

Page 1
GPs
User manUal
ENGLISH
FRANÇAIS
ESPAÑOL
DEUTSCH
ITALIANO
User manual
Manuel d’utilisation
Manual de usuario
Benutzerhandbuch
Manuale per l’utente
. . . . . . . . . . . . . . . . . . . . . . . . . . . . . . . . . . . . . . . . . . . . . . . . . 1
. . . . . . . . . . . . . . . . . . . . . . . . . . . . . . . . . . . . . . . . . . . 53
. . . . . . . . . . . . . . . . . . . . . . . . . . . . . . . . . . . . . . . . 27
. . . . . . . . . . . . . . . . . . . . . . . . . . . . . . . . . . . . . . . . . . 79
. . . . . . . . . . . . . . . . . . . . . . . . . . . . . . . . . . . . . . . 105
Entertainment way
*
Page 2

USER MANUAL - version 4
!
▲
GPs
The TMC (Trafc Message Channel) function is only available if you have pur-
chased the bundled version (the version which includes an ARCHOS player & a GPS
in-car holder). If you have purchased the GPS in-car holder as an accessory, this
function is not available. All other functions are identical
Table Of COnTenTs
IMPORTanT safeTY nOTes fOR PROPeR UsaGe ����������������������������������������������������������������3
1� InTROdUCTIOn ��������������������������������������������������������������������������������������������������������������������������������������� 4
1.1. REGISTER YOUR PRODUCT! . . . . . . . . . . . . . . . . . . . . . . . . . . . . . . . . . . . . . . . . . . . . . . . . .4
1.2. AN INTRODUCTORY NOTE FROM ARCHOS... . . . . . . . . . . . . . . . . . . . . . . . . . . . . . . . . . . . .4
1.3. WHERE TO FIND THE INFORMATION YOU MAY NEED . . . . . . . . . . . . . . . . . . . . . . . . . . . . . 4
1.4. ARCHOS GPS KIT . . . . . . . . . . . . . . . . . . . . . . . . . . . . . . . . . . . . . . . . . . . . . . . . . . . . . . . . .5
1.5. DESCRIPTION OF THE IN-CAR HOLDER . . . . . . . . . . . . . . . . . . . . . . . . . . . . . . . . . . . . . . . .5
2� InsTallaTIOn ���������������������������������������������������������������������������������������������������������������������������������������7
2.1. THE INSTALLATION DVD . . . . . . . . . . . . . . . . . . . . . . . . . . . . . . . . . . . . . . . . . . . . . . . . . . . 7
2.2. SETTING UP THE GPS IN YOUR CAR . . . . . . . . . . . . . . . . . . . . . . . . . . . . . . . . . . . . . . . . . . . 7
3� GeTTInG sTaRTed �����������������������������������������������������������������������������������������������������������������������������9
3.1. ENTERING THE GPS APPLICATION . . . . . . . . . . . . . . . . . . . . . . . . . . . . . . . . . . . . . . . . . . . . 9
3.2. FIRST TIME SETUP . . . . . . . . . . . . . . . . . . . . . . . . . . . . . . . . . . . . . . . . . . . . . . . . . . . . . . . . 9
3.3. THE MAIN NAVIGATION SCREEN . . . . . . . . . . . . . . . . . . . . . . . . . . . . . . . . . . . . . . . . . . . . 10
3.4. USING THE BUTTONS . . . . . . . . . . . . . . . . . . . . . . . . . . . . . . . . . . . . . . . . . . . . . . . . . . . . . 11
3.5. LEAVING THE “GPS” APPLICATION . . . . . . . . . . . . . . . . . . . . . . . . . . . . . . . . . . . . . . . . . . 11
4� MOsT COMMOn Uses ����������������������������������������������������������������������������������������������������������������������12
4.1. HOW DO I GO TO A SPECIFIC ADDRESS? . . . . . . . . . . . . . . . . . . . . . . . . . . . . . . . . . . . . . .12
4.2. HOW DO I MEMORIZE A FAVORITE DESTINATION? . . . . . . . . . . . . . . . . . . . . . . . . . . . . . . 13
4.3. HOW DO I MEMORIZE MY HOME ADDRESS? . . . . . . . . . . . . . . . . . . . . . . . . . . . . . . . . . . . 14
4.4. HOW DO I GO TO A MEMORIZED DESTINATION? . . . . . . . . . . . . . . . . . . . . . . . . . . . . . . . .15
4.5. HOW DO I GO TO A POINT OF INTEREST (POI)? . . . . . . . . . . . . . . . . . . . . . . . . . . . . . . . . . 16
4.6. HOW DO I CHANGE THE VIEW MODES? . . . . . . . . . . . . . . . . . . . . . . . . . . . . . . . . . . . . . . .17
4.7. HOW DO I SET HIGHWAY/TOLL ROAD PREFERENCES? . . . . . . . . . . . . . . . . . . . . . . . . . . .18
4.8. HOW DO I RECOMPUTE A ROUTE (ROADBLOCK/TRAFFIC)? . . . . . . . . . . . . . . . . . . . . . . . 19
5� desCRIPTIOn Of The MenUs ����������������������������������������������������������������������������������������������������20
5.1. QUICK MENU . . . . . . . . . . . . . . . . . . . . . . . . . . . . . . . . . . . . . . . . . . . . . . . . . . . . . . . . . . . 20
5.2. MAIN MENU . . . . . . . . . . . . . . . . . . . . . . . . . . . . . . . . . . . . . . . . . . . . . . . . . . . . . . . . . . . .20
6� OTheR fUnCTIOns ��������������������������������������������������������������������������������������������������������������������������25
6.1. TRAFFIC MESSAGE CHANNEL (TMC) . . . . . . . . . . . . . . . . . . . . . . . . . . . . . . . . . . . . . . . . . 25
6.2. ADDITIONAL OPTIONS . . . . . . . . . . . . . . . . . . . . . . . . . . . . . . . . . . . . . . . . . . . . . . . . . . . .25
leGal InfORMaTIOn ���������������������������������������������������������������������������������������������������������������������������26
2
Page 3
GPs
USER MANUAL - version 4
IMPORTanT safeTY nOTes
fOR PROPeR UsaGe
To protect against the risk of accidents for you or other drivers, do not operate the
GPS device while you are driving.
!
▲
!
▲
!
▲
!
▲
!
▲
!
▲
Only look at the screen if the current driving conditions allow you do to so in
complete safety. Do not watch it while driving if using the ARCH
multimedia or video mode. Playing media les while mounted to your windshield
or within view of the driver may be illegal. Inform yourself about local “driver distraction” laws and obey them.
Circulation signs and indicators on the roadway have absolute priority over GPS
navigational instructions.
Only mount the GPS in such a way that is does not impede your ability to control
your vehicle as normal. Note that humidity, temperature, and time play a role in the
adhesive properties of the suction cup. The mounting area should be at least 15°
centigrade (60° Fahrenheit) for a secure mount. Security also includes placing or
running cables in a safe manner and which will not get entangled in the steering
wheel or other movable controls. Do no mount the device such that it could cause
personal harm even in the case of an accident (in front of an airbag for example).
Because the GPS cannot know all road changes, do not rely solely on GPS information, for example, the speed limit of the current road.
Do not rely solely on the voice commands to guide you along your route. The
timing of the voice commands such as “Turn right” or “Turn left” will be made in
varying distances in advance of the calculated route’s turns. This voice command
could coincidentally be made while there is another street directly available to
you. Or, the voice command may come later than that which allows you to safely
manoeuvre your vehicle to make the turn. Immediately obeying such a command
could require you to make a brisk and dangerous manoeuvre which could cause
harm to yourself or other drivers.
OS in the regular
!
▲
Unplug the power cable from your cigarette lighter when the car is parked. Your
GPS will continue to consume energy and could discharge your car battery if left
for an extended period.
3
Page 4
GPs
USER MANUAL - version 4
1� InTROdUCTIOn
1�1� ReGIsTeR YOUR PROdUCT!
Once you unpack your ARCHOS product, go to www.archos.com/register and register it. This will allow you
to get access to technical support as well as FREE AND PURCHASABLE options and FREE software updates
for your GPS.
1�2� an InTROdUCTORY nOTe fROM aRChOs���
Dear Customer,
This manual explains how to install and use the GPS with your ARCHOS multimedia player. If you wish to
learn about your ARCHOS player’s other functions, you can read the printed Quick Start Guide that came
with it or the full manual (www.archos.com/manuals).
Wishing you the best multimedia experience,
The ARCHOS Team.
All the information contained in this manual was correct at the time of publication. However, as we are often updating
and improving our products, your device’s software may have a slightly different appearance or modied functionality
presented in this manual.
than
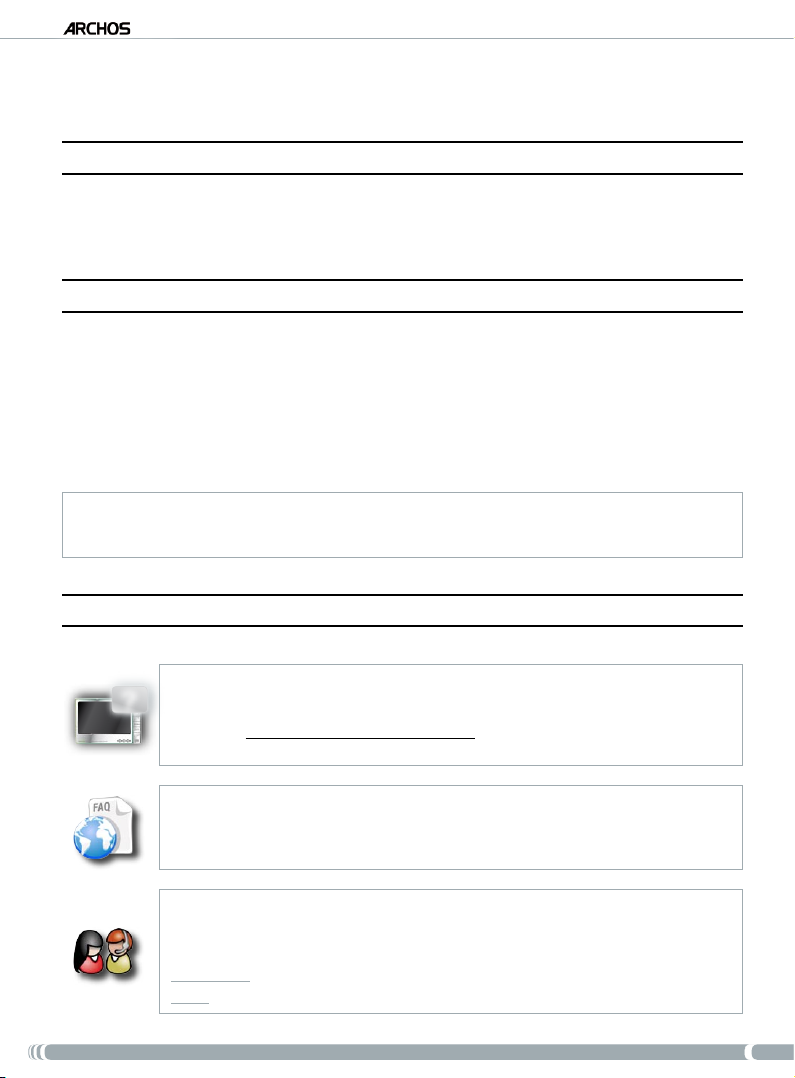
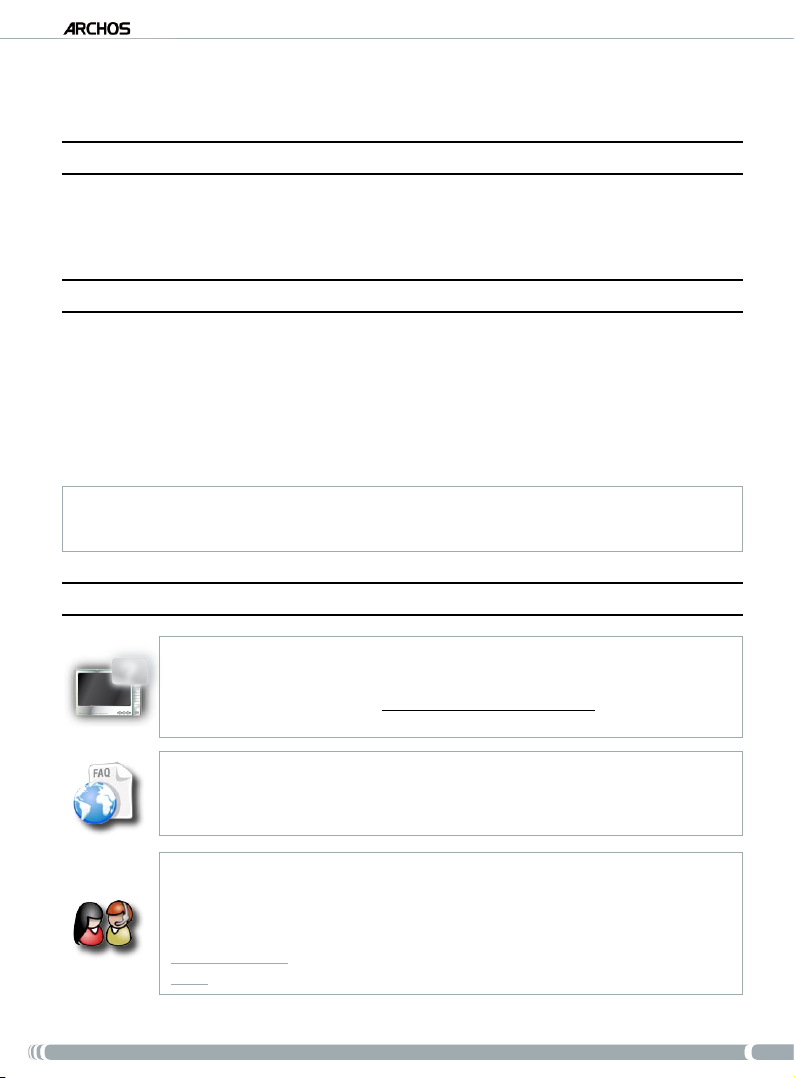
1�3� WheRe TO fInd The InfORMaTIOn YOU MaY need
Your ARCHOS player’s other functions (non-GPS)?
?
To learn about your ARCHOS player’s other functions, you can read the printed Quick
Start Guide that came with your ARCHOS player, or visit www.archos.com/manuals to nd
the most recent version the full manual.
Troubleshooting
See the Frequently Asked Questions section at www.archos.com/faq
Technical Support
Visit www.archos.com/support for e-mail support (e-mails in English, French and German).
U.S. & Canada: Call 877-300-8879 (toll free)
Europe: please register your product before contacting Technical Support (www.archos.com/register).
4
Page 5
GPs
1�4� aRChOs GPs kIT
List of GPS components included in the package:
The installation DVD: before setting up the GPS in your car, you need to run this DVD which will
guide you through the installation of the maps and latest software onto your ARCHOS player.
The in-car holder: it contains a GPS receiver which will send the GPS signal to your ARCHOS
player. Therefore, your player MUST be mounted on the in-car holder, so that it can locate
your position and help you get to your destination.
4 pairs of rubber spacers: to adapt best to your ARCHOS player, so that it is held tight by the
in-car holder. See section 2.2.
The car power adapter: in order for the GPS to function, the power adapter MUST be con-
nected to the in-car holder and to the cigarette lighter.
2 ARCHOS connection cables (one for the ARCHOS 605 and one for next generation devices): in order for the
GPS to function, this cable MUST be connected to the in-car holder and to the ARCHOS player.
The TMC (Trafc Message Channel) antenna: in order to use the trafc information functionality
on your ARCHOS GPS. See chapter 6. Other Functions. If you have purchased the GPS in-car
holder as an accessory, this function is not available.
USER MANUAL - version 4
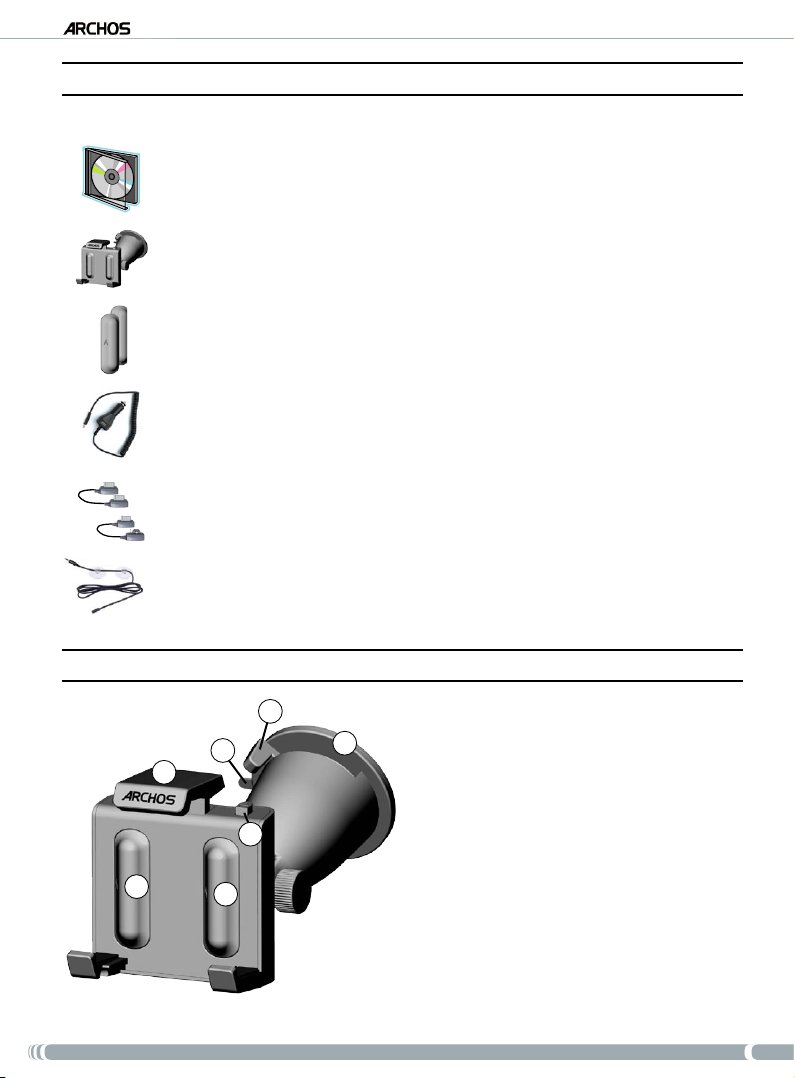
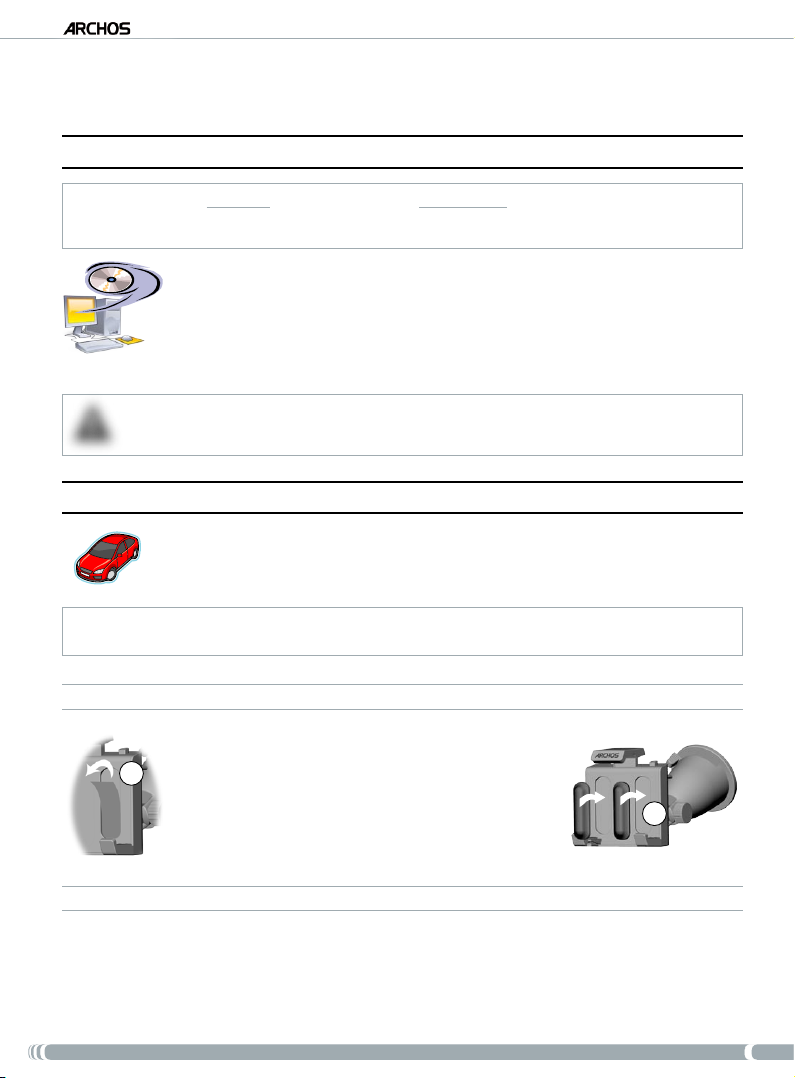
1�5� desCRIPTIOn Of The In-CaR hOldeR
5
6
2
3
1
1
4
Location for the rubber spacers
1.
Adjustable top grip (to hold ARCHOS player
2.
tight)
Gr
ip release (to release ARCHOS player)
3.
Suction cup (to adhere to the windshield)
4.
Locking lever (to lock the suction cup)
5.
Suction release tab (to release in-car holder)
6.
5
Page 6

GPs
8
7
Bottom of the in-car holder
USER MANUAL - version 4
ARCHOS
7.
8.
9
10
9.
10.
connector (to connect ARCHOS player)
TMC antenna connector (for trafc information)
A
udio output (to connect to your auto radio’s
audio input, with optional cable)
Power connector (to connect the car power
adapter)
11
12
13
Back of the in-car holder
Futur
11.
Speaker
12.
Positioning
13.
e use connector
adjustments
6
Page 7
GPs
USER MANUAL - version 4
2� InsTallaTIOn
2�1� The InsTallaTIOn dvd
This DVD installation is not needed if you have purchased the bundled version (the version which includes an ARCHOS
player & a GPS in-car holder). In this case, the software and maps have already been installed and activated on the
device. However, the DVD can be used later for reinstallation.
Before even setting up the GPS in your car, you need to run the installation DVD on
•
your computer (internet connection required).
This DVD will guide you through the installation and activation of the maps as well as
•
the installation of the latest software(s). If the installer does not launch automatically
after inserting the DVD, explore the DVD and launch it manually.
Follow the on-screen instructions.
•
The MAP CODE (written on the sleeve of the DVD) will be needed during installation (and reinstallation).
!
▲
DO NOT LOSE IT!
2�2� seTTInG UP The GPs In YOUR CaR
After having completed the software setup as explained in the previous section, you are
now ready to install the GPS in your vehicle. Please refer to the legal and safety sections
of this manual.
GPS signal reception is highly dependent upon optimal in-car holder placement, vehicle features such as heat reective
windshields, and the surrounding environment such as mountains and high buildings.
INSTALLING THE RUBBER ADAPTERS
For the ARCHOS 605 30Gb and 4Gb, use the spacers labeled
A. For other 605 models, use the B spacers. The C and D spacers will be used for next generation ARCHOS players.
1
Use your ngernail or a sharp object to peal off the two
1.
protective lms to expose the sticky surfaces.
Press the appropriate spacers rmly onto these areas of
2.
the car holder.
WHERE TO PLACE YOUR GPS?
Find a clean, safe mounting area on your windshield. As the GPS reception antenna is located under
•
the suction cup, placing the holder on a surface other than the windshield will yield poor reception.
If you have difculties with reception, check your car manual to see if you have a heat reective
•
windshield
erty and also allow the safe mounting of the in-car holder.
which may interfere with GPS reception. There may be areas that do not have this prop-
2
7
Page 8

GPs
TO ENSURE YOUR SAFETY, it is ESSENTIAL that you place the GPS in-car holder as suggested below:
!
•
▲
IT SHOULD NOT OBSCURE THE VIEW OF THE ROAD OR TRAFFIC
•
IT SHOULD NOT COVER YOUR VEHICLE’S INSTRUMENT PANELS
INSTALLING THE IN-CAR HOLDER
USER MANUAL - version 4
2
4
1
3
CONNECTING THE ARCHOS PLAYER
7
5
8
*
*
To disconnect your ARCHOS player from the in-car holder, just follow this procedure in reverse order.
for ARCHOS 605 for next generation ARCHOS players
6
8
Page 9
GPs
3� GeTTInG sTaRTed
3�1� enTeRInG The GPs aPPlICaTIOn
When you connect the ARCHOS player to the powered in-car holder:
•
the ARCHOS player turns on automatically.
•
on the ARCHOS 605, the “
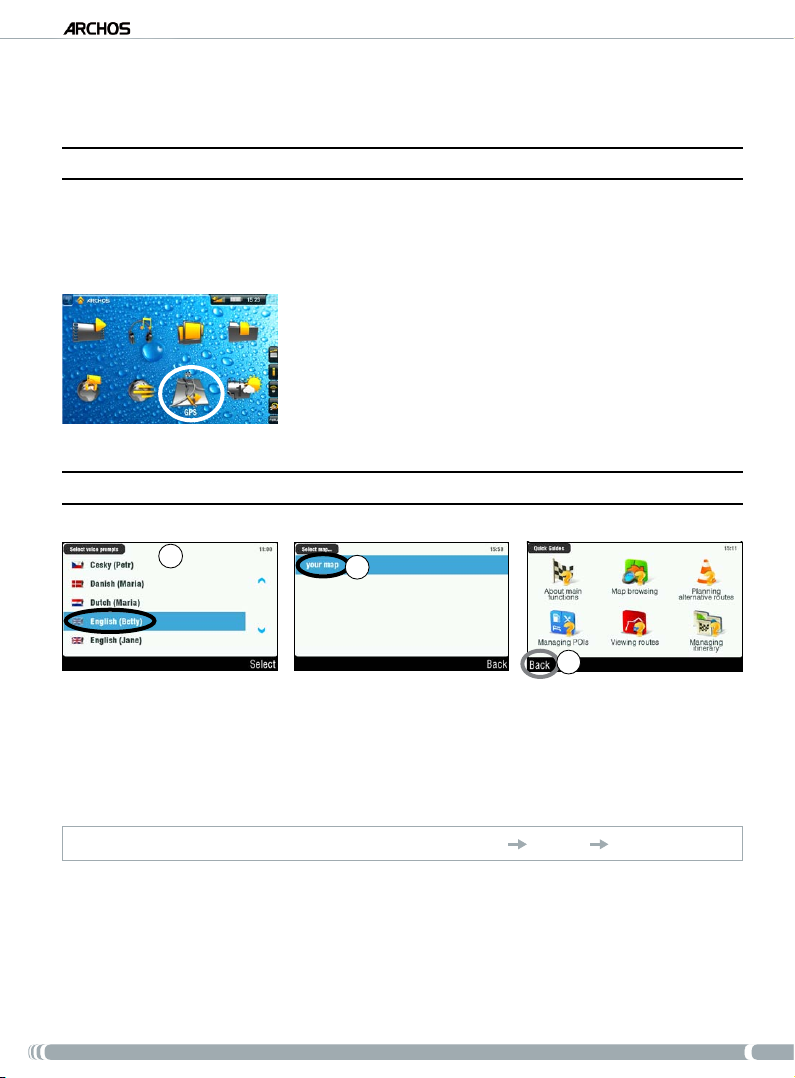
3�2� fIRsT TIMe seTUP
1
Recorder” icon on the home screen becomes the “GPS” icon.
1.
Tap on the “GPS” icon to enter the application. The start screen
appears.
2.
After a few seconds, a red screen appears. Read the legal message
carefully, and tap on ‘
3.
The rst time the GPS is used, you will have to enter a few basic
pr
eferences (see next section).
2
I agree’.
USER MANUAL - version 4
3
1.
This initial installation will help you congure several settings such as the voice language and distance units (km or miles).
2.
Select your map by tapping on it. Wait while the map is loading.
3.
A choice of little help guides will be displayed*. Tap on one to read it, or tap on ‘
Back’ to go to the
main navigation screen.
* If you want to read the help guides later, you can always go to
‘
Main menu’
‘Settings’
‘
Quick Guides’
.
9
Page 10
GPs
USER MANUAL - version 4
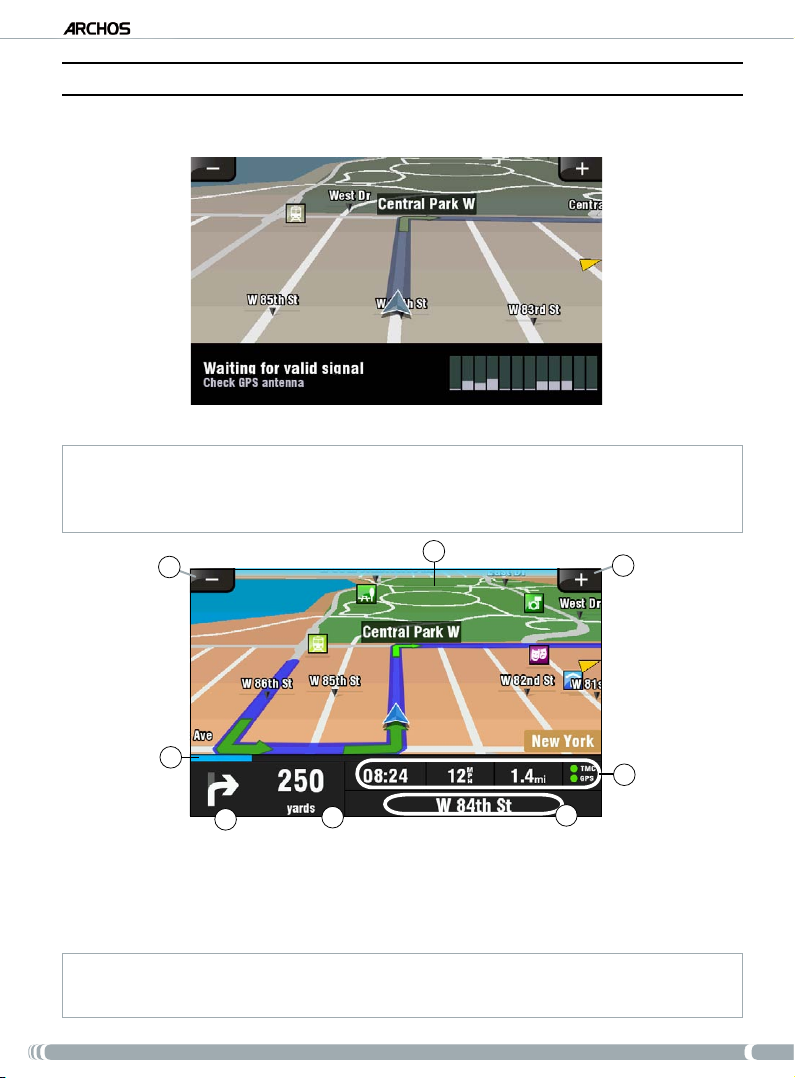
3�3� The MaIn navIGaTIOn sCReen
When you launch the GPS application, it will search for a valid GPS signal and you will rst see the
•
following screen. The strength of the signal appears in the bottom right corner.
•
As soon as the GPS nds a valid signal (it can take up to several minutes), the following screen will appear.
If your GPS remains on the rst screen, check that you have correctly installed the GPS in your car.
See section 2.2.
Setting up the GPS in your car.
GPS signal reception is highly dependent upon optimal in-car holder placement, vehicle features such as heat reective
windshields, and the surrounding environment such as mountains and high buildings.
1
4
5
Zoom out
1.
Direction of your destination*
2.
Zoom in
3.
Your route’s progression bar*
4.
2
6
N
ext turning point* (tap to hear instruction again)
5.
Distance to next turning point* (tap to hear instruction again)
6.
Curr
ent position
7.
Arrival time** / Current speed / Distance left** / TMC*** &
8.
3
8
7
GPS indicators
* This information only appears if you have computed a route.
** This information can be congured in the settings.
*** TMC = Trafc Message Channel,
see chapter 6: Other Functions
.
10
Page 11
GPs
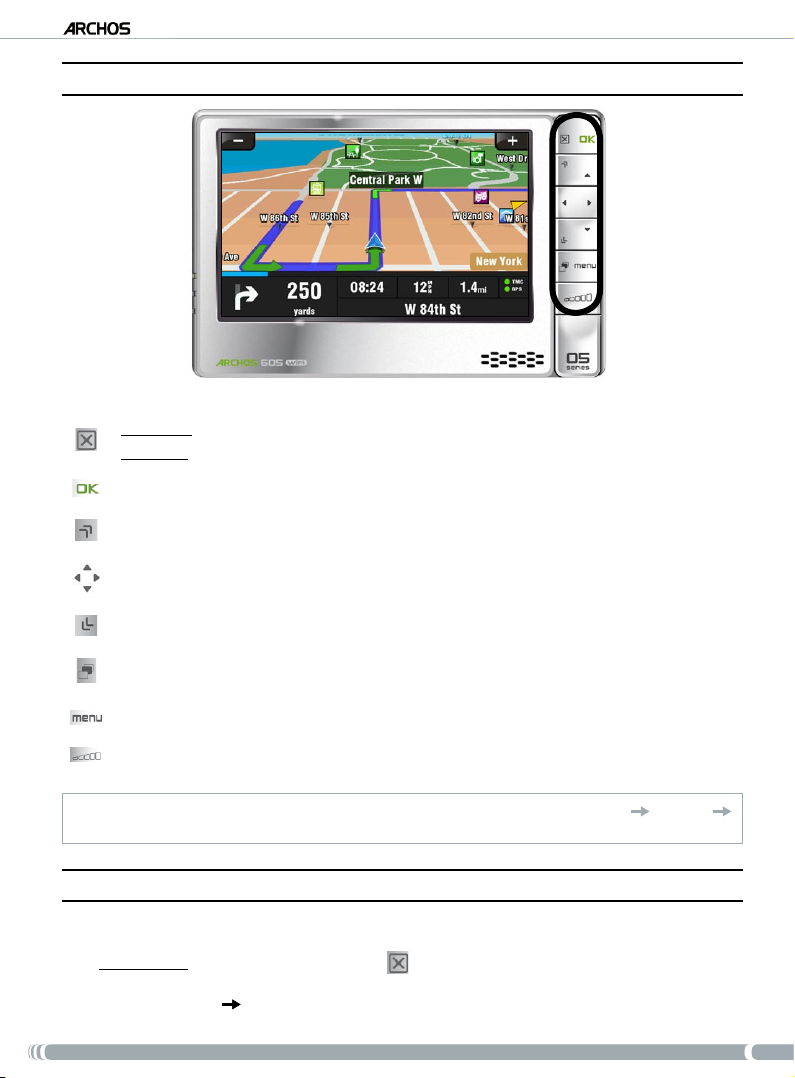
3�4� UsInG The bUTTOns
ARCHOS 605
Short press: go back
Long press: exit the GPS application (a conrmation screen will appear)
Enter / Validate
Zoom in
Move from an item to another (menus) / Browse the map
USER MANUAL - version 4
Zoom out
Switch between 2D and 3D view modes
Enter main menu
increase/decrease volume*
* Note: this volume control is independent of the volume controls that you can set in
Volume settings’
‘
.
‘
Main menu
’ ‘
3�5� leavInG The “GPs” aPPlICaTIOn
There are two ways to exit the “GPS” application and go back to the ARCHOS home screen:
ARCHOS 605: press and hold the Exit button
•
appears. Tap on ‘Exit’ to conrm.
Go to ‘
•
Main menu’ ‘Exit’. A conrmation message will appear. Tap on ‘Exit’ to conrm.
on your ARCHOS player until a conrmation screen
Settings’
11
Page 12
GPs
4� MOsT COMMOn Uses
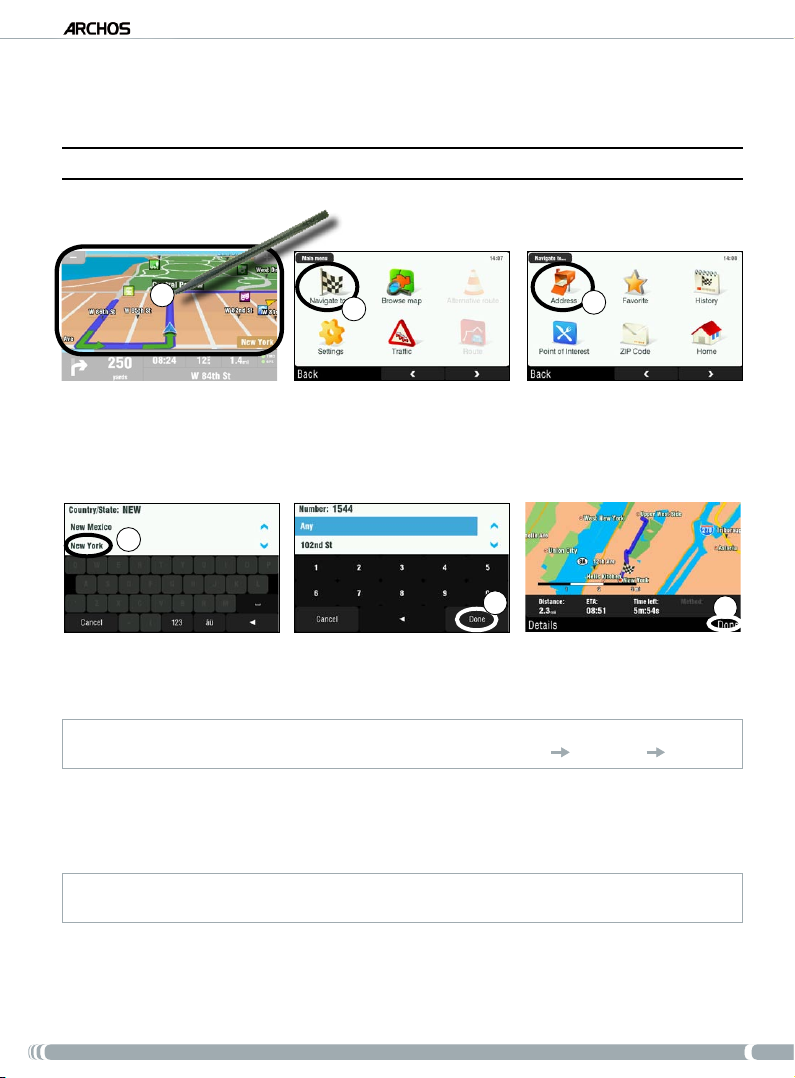
4�1� hOW dO I GO TO a sPeCIfIC addRess?
1
From the navigation screen, tap anywhere on the map area to access the main menu.
1.
Tap on ‘
2.
3.
Select ‘
4
Navigate to’.
Address’.
2
5
USER MANUAL - version 4
3
6
4.
Tap on the rst letters of the country/state using the keyboard. When the country/state appears in
the top list, tap on it. Similarly, select the city and the street.
For compound city and street names, for example “Saint John”, only enter “John”, as “Saint” would give too many results. If
you do not nd your city, you can try to enter the address using a ZIP code (
5.
Enter the street number, using the keyboard, then tap on ‘Done’.
6.
Wait while the ARCHOS computes a route. You will then see your route on the map*. Tap on ‘
‘
Main menu’
‘Navigate to’
‘
ZIP Code’)
Done’
to go back to the navigation screen and start following the instructions.
* You can tap on ‘
roads, unpaved roads, etc.
Details
’ to see the types of roads you are going to use. You can then choose to avoid highways, toll
.
12
Page 13
GPs
USER MANUAL - version 4
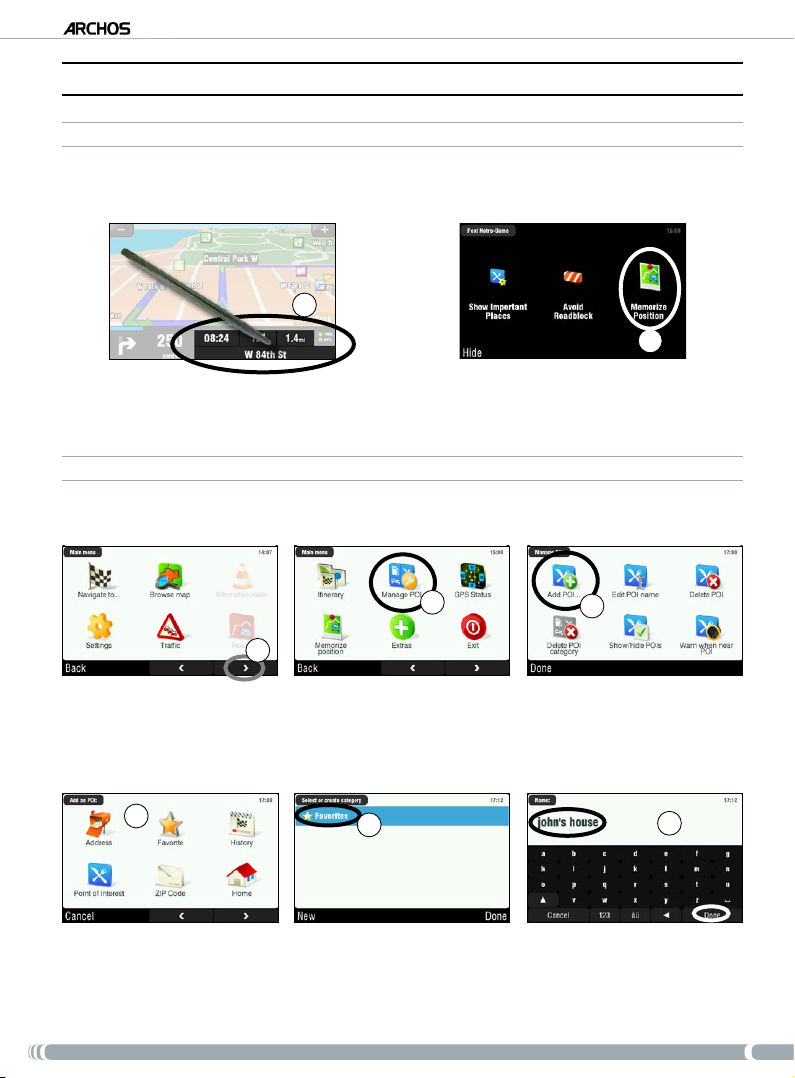
4�2� hOW dO I MeMORIze a favORITe desTInaTIOn?
USING THE HISTORY (QUICKEST WAY)
Every time a route is computed, the destination is automatically stored into the history. Furthermore, you
can add your current position to the history:
1
2
Tap on the bottom right of the navigation screen to access the quick menu.
1.
Then tap on ‘
2.
CREATING A FAVORITE
In order to create a favorite, you will need to add a new point of interest, and then put it under the ‘Favorites’
category.
Memorize Position’. Your current position is automatically stored into the history.
2
3
1
1.
From the navigation screen, tap anywhere in the map area to access the main menu. Then tap on the
bottom right arrow to access the second screen of the main menu.
2.
Tap on ‘
Manage POI’.
3.
Tap on ‘
Add POI’.
4
4.
Choose a method to enter your favorite location (address, city center, point on map, etc.), then
5
6
enter/select the address.
5.
Tap on ‘
Favorites’. This will put the destination into the favorites.
6.
Enter a name for the memorized destination, then tap on ‘
Done’.
13
Page 14
GPs
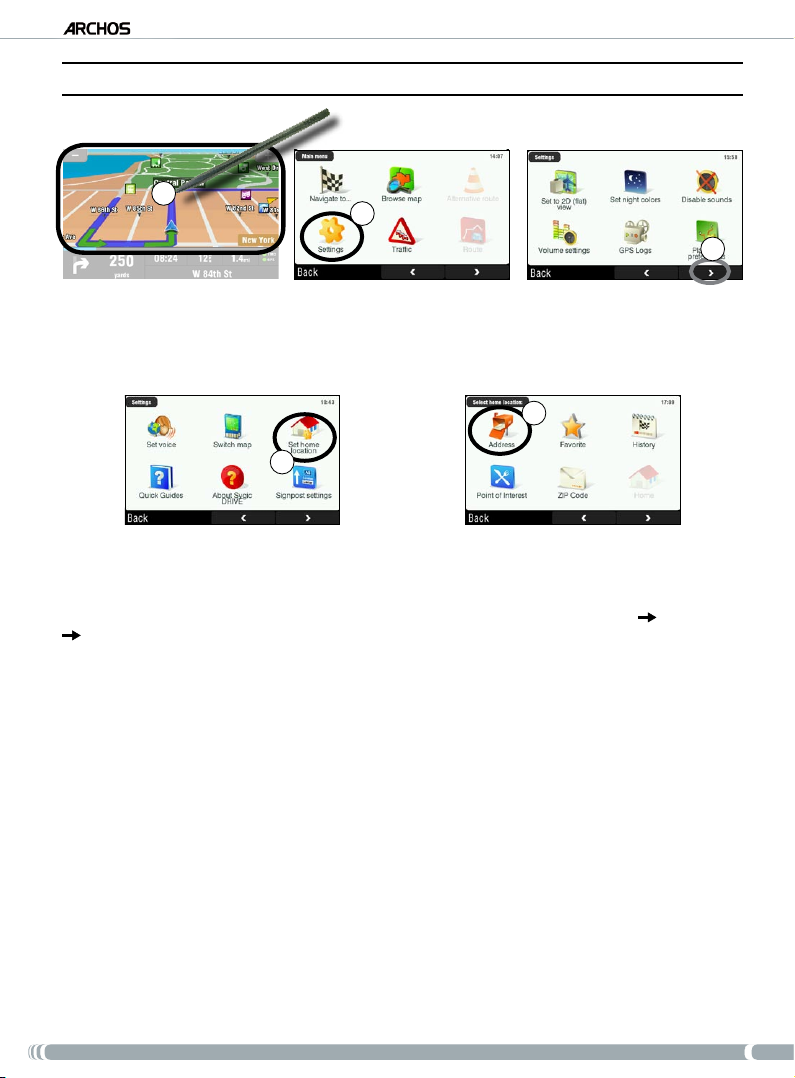
4�3� hOW dO I MeMORIze MY hOMe addRess?
1
From the navigation screen, tap anywhere in the map area to access the main menu.
1.
Then tap on ‘
2.
Tap twice on the bottom right arrow to access the third screen of the main menu.
3.
4.
Tap on ‘Set home location’.
5.
Tap on ‘
Settings’.
4
Address’, then enter your home address (as explained in section 4.1).
2
5
USER MANUAL - version 4
3
Your home address is now memorized. To select it as your destination, go to ‘
‘Home’.
Main menu’ ‘Navigate to’
14
Page 15
GPs
USER MANUAL - version 4
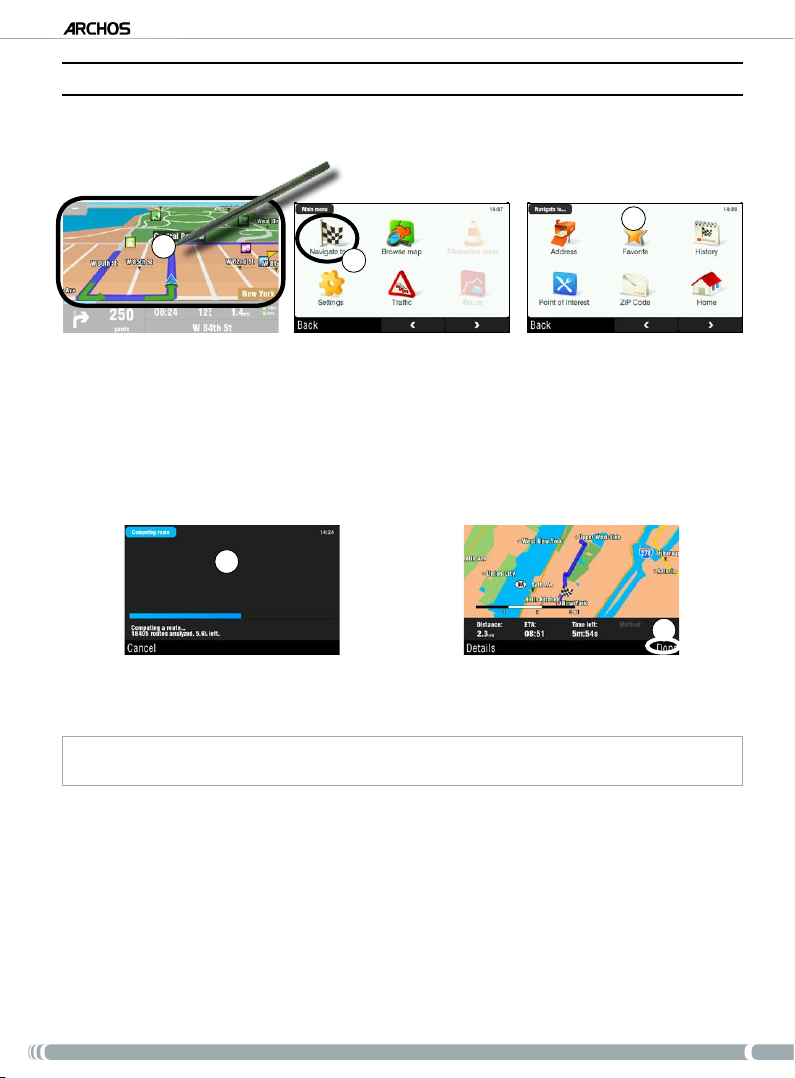
4�4� hOW dO I GO TO a MeMORIzed desTInaTIOn?
See the two previous sections to learn how to memorize a destination (history, favorite, or home). Explained
below are the procedures for going to a memorized destination.
3
1
From the navigation screen, tap anywhere on the map area to access the main menu.
1.
Tap on ‘
2.
3.
Navigate to’.
Here you can either:
•
choose ‘
History’, and select one of your previous destinations.
•
select ‘
Favorite’, and choose one of your favorites as your destination.
•
tap on ‘
Home’ to go to your home address
4
2
4.
Wait while the ARCHOS computes a route.
5.
You will then see your route on the map*. Tap on ‘
* You can tap on ‘
roads, unpaved roads, etc.
Details
’ to see the types of roads you are going to use. You can then choose to avoid highways, toll
5
Done’ to go back to the navigation screen.
15
Page 16
GPs
USER MANUAL - version 4
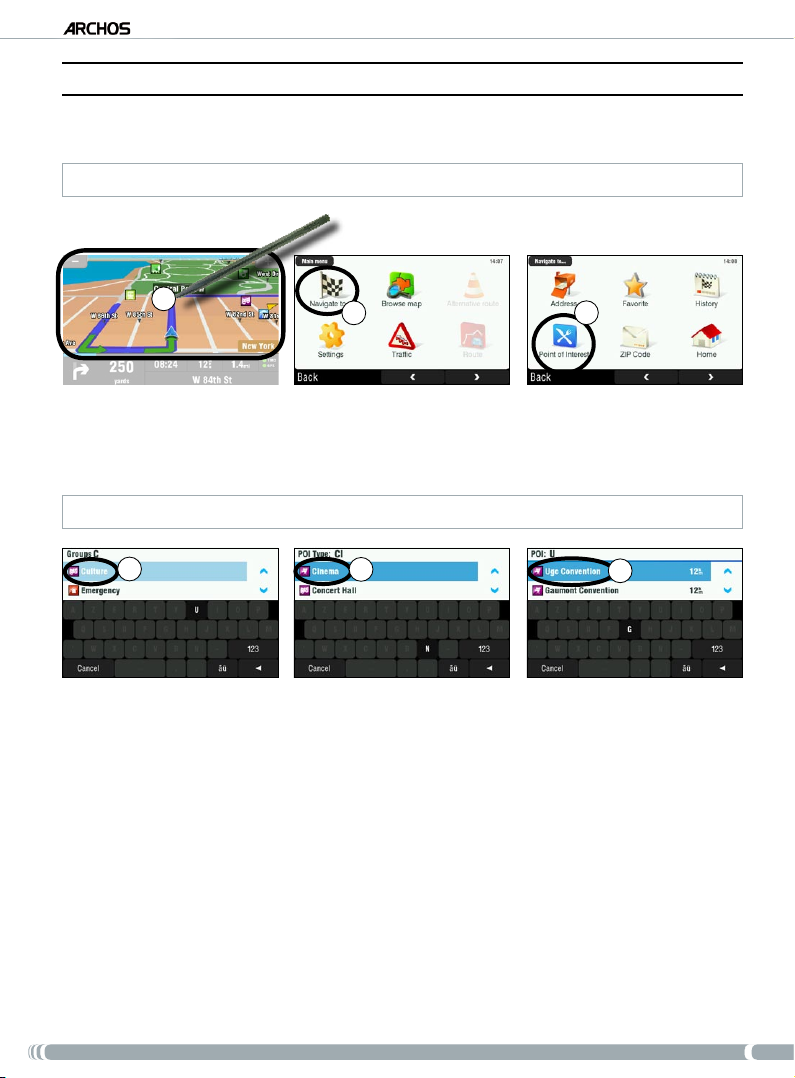
4�5� hOW dO I GO TO a POInT Of InTeResT (POI)?
Points of interest (POI) are, for example, restaurants, hotels, or gas stations. They appear as symbols on the
map during your route. The GPS can create a route to a specic point of interest.
Additional POIs are available in your ARCHOS personal account (www.archos.com/register), under the GPS section.
1
From the navigation screen, tap anywhere on the map area to access the main menu.
1.
Tap on ‘
2.
3.
Navigate to’.
Tap on ‘
Point of Interest’ to see the closest POIs and select the one you want to go to.
2
3
You can also choose to go to a POI in a specic city. Go to the second screen of ‘
4
4.
Use the arrows to scroll down to the group that you are interested in, and tap on it. For example:
5
Navigate to
’ and select ‘
6
‘Culture’.
5.
Similarly, nd the POI type you’re interested in, and tap on it. For example: ‘Cinema’.
6.
All
corresponding POIs will be displayed from closest to furthest. Just select the one you want to go
to.
7.
Wait while the ARCHOS computes the route. You will then see your route on the map. Tap on ‘
to go back to the navigation screen.
POI in City
Done’
’.
16
Page 17
GPs
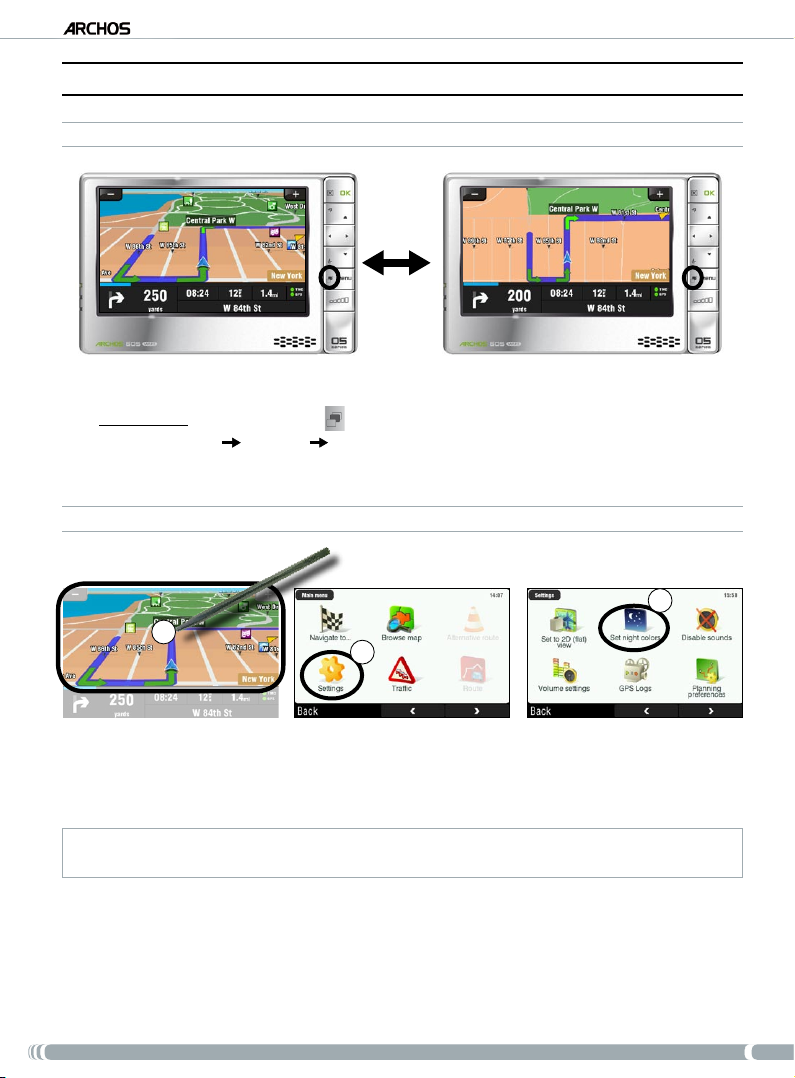
4�6� hOW dO I ChanGe The vIeW MOdes?
2D/3D VIEW MODES
There are two ways to switch between 2D and 3D view modes:
USER MANUAL - version 4
•
ARCHOS 605: press the Tab button
Go to ‘
•
Main menu’ ‘Settings’ ‘Set to 2D (at) view’ / ‘Set 3D view’.
on your ARCHOS player.
DAY / NIGHT COLOR MODES
3
1
1.
From the navigation screen, tap anywhere on the map area to access the main menu.
2.
Tap on ‘
Settings’.
3.
Then tap on ‘
Note: when set to ‘Automatic colors’, the device switches automatically between day/night color modes, depending
on the time of the day.
Set night colors / Set automatic colors / Set daylight colors’.
2
17
Page 18
GPs
USER MANUAL - version 4
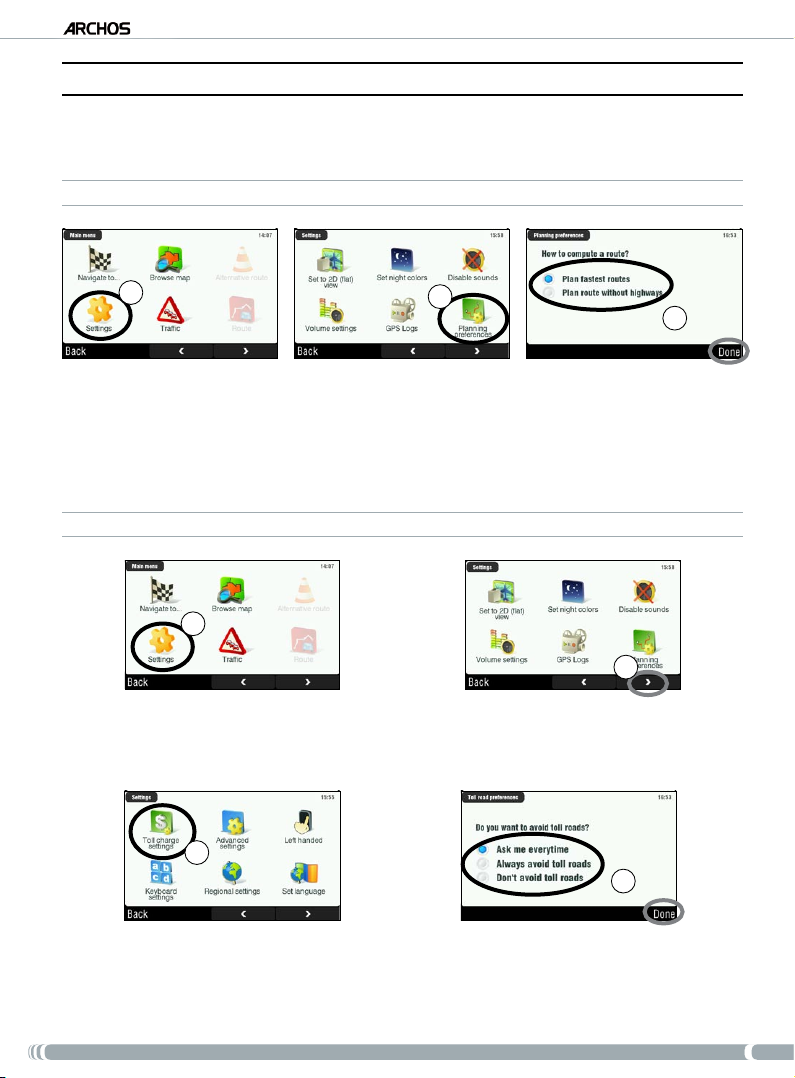
4�7� hOW dO I seT hIGhWaY/TOll ROad PRefeRenCes?
The GPS allows you to dene planning preferences that will be used every time you compute a route. You
can choose to always plan fastest routes, avoid highways or avoid toll roads.
PLANNING PREFERENCES
1
From the navigation screen, tap anywhere in the map area to access the main menu. Then tap on
1.
‘Settings’.
Tap on ‘
2.
3.
TOLL CHARGE SETTINGS
Planning preferences’.
Choose the option that will be used every time you compute a route: ‘
route without highways
’. Tap on an option to select it, then tap on ‘Done’.
2
Plan fastest routes’ or ‘Plan
3
1
2
1.
From the navigation screen, tap anywhere in the map area to access the main menu. Then tap on
‘Settings’.
2.
Tap on the bottom right arrow to go to the second ‘
3
3.
Tap on ‘Toll charge settings’.
4.
Dene how you want to manage toll roads each time you compute a route: ‘Ask me every time’,
Settings’ screen.
4
‘Always avoid toll roads’ or ‘Don’t avoid toll roads’. Tap on an option to select it, then tap on ‘Done’.
18
Page 19
GPs
USER MANUAL - version 4
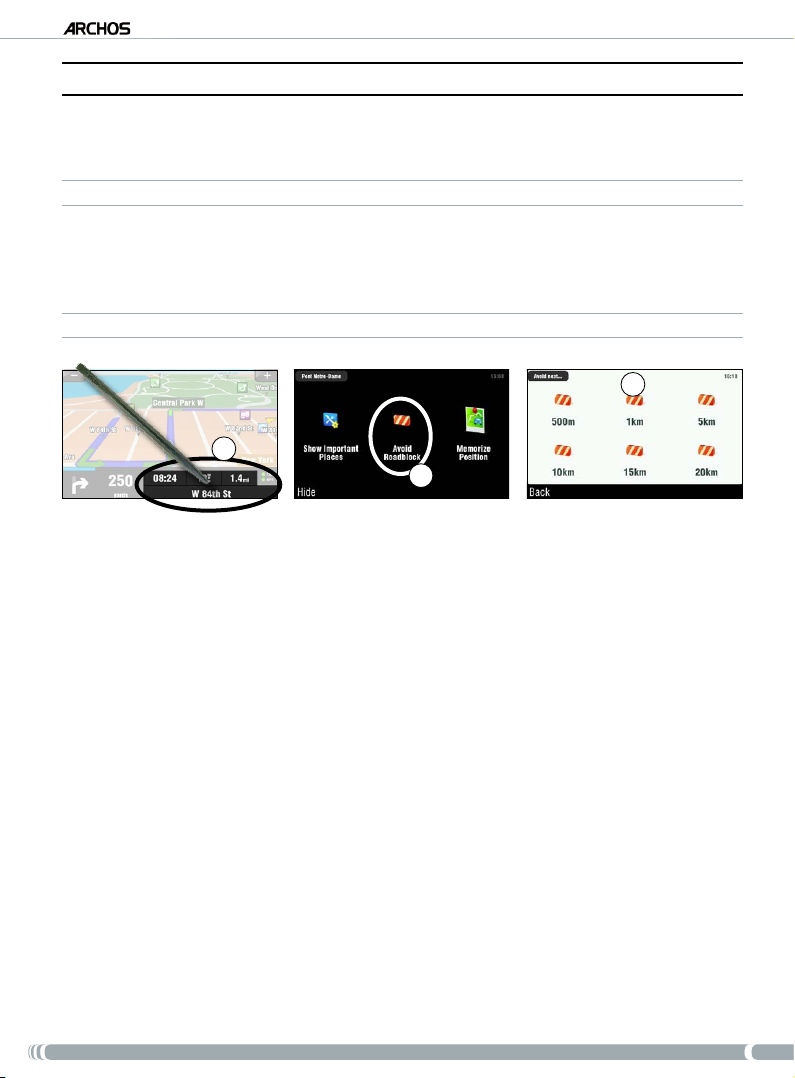
4�8� hOW dO I ReCOMPUTe a ROUTe (ROadblOCk/TRaffIC)?
Every time you leave the advised route, the GPS will automatically compute a new route based on your cur-
rent position. The ARCHOS also allows you to avoid trafc and road blocks.
AVOIDING TRAFFIC
For this to work, TMC (Trafc Message Channel) needs to be enabled (see chapter 6: Other Functions).
•
By default, if the ARCHOS receives information concerning trafc problems on your current route, it
•
will automatically compute a new route that will avoid the trafc.
AVOIDING ROAD BLOCKS
3
1
2
Tap on the bottom right of the navigation screen to access the quick menu.
1.
Tap on ‘
2.
3.
Avoid Roadblock’.
Then select how far the roadblock is. The GPS will automatically recompute a route that will avoid
this road block.
19
Page 20
GPs
USER MANUAL - version 4
5� desCRIPTIOn Of The MenUs
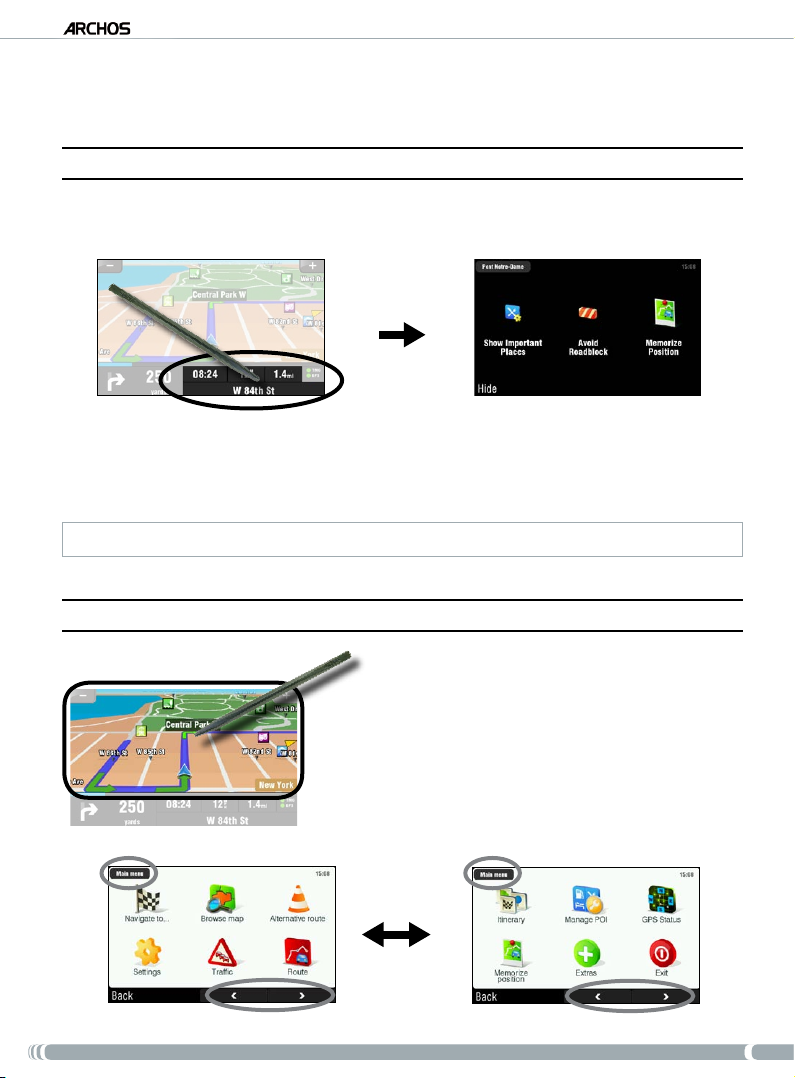
5�1� qUICk MenU
Tap on the bottom right of the navigation screen to access the quick menu. You will then see 3 main options:
‘Show Important Places’ *: displays the two closest points of interest on your route.
•
‘
•
Avoid Roadblock’ *: allows you to dene a road block. The ARCHOS will automatically recompute a
route that will avoid this road block .
•
‘
Memorize Position’: stores your current position into the history.
* only if you have computed a route.
5�2� MaIn MenU
From the navigation screen, tap anywhere on the map
•
area to access the main menu.
Use the bottom arrows to jump back and forth between
•
the 2 screens of the main menu.
The box in the top left corner tells you where you are in
•
the menu system.
20
Page 21
GPs
USER MANUAL - version 4
NAVIGATE TO...
This menu allows you to select your destination. You can choose between several options:
•
‘Address’: enter an address (country, city, street, number)
•
‘
Favorite’: select a destination from your favorites
•
‘
History’: select a destination from the history
•
‘
Point of Interest’: choose a point of interest as the destination
•
‘
ZIP Code’: enter the destination address using a ZIP code
•
‘
Home’: choose your home as the destination
•
‘
Point on Map’: select your destination by selecting it on the map
•
‘
Enter GPS position’: enter the GPS coordinates (longitude, latitude)
•
‘
City Center’: brings you to the center of a city
•
‘
POI in City’: allows you to go to a point of interest in a specic city
BROWSE MAP
This function allows you to look for a location in the map. You can drag the map using the touchscreen. You
can zoom in and out with the ARCHOS player’s accelerator buttons
zoom bar (on the right of the screen).
If you select ‘
•
•
•
•
•
Options’, you will see the following items:
Find...’: show a specic address on the map
‘
‘
Show current position’: show your current position on the map
‘
Show entire route’: show your computed route on the map
‘
Show city’: show a specic city on the map
‘
Show/Hide POIs...’: select what POI you want to be displayed on the map
(ARCHOS 605), or using the
Tapping on the cursor (bottom center of the screen) allows you to select an alternate method to get to your destination.
ALTERNATIVE ROUTE
This menu allows you to compute an alternative route in case you encounter something unexpected during
your trip (trafc, road block, etc.). It is available only if you have computed a route.
•
Compute alternative’: generates a new route using different roads
‘
•
‘
Avoid next…’: allows you to dene a road block. The ARCHOS automatically recomputes a route
that will avoid this road block
•
‘
Travel via…’: allows you to travel via a specic location (city, address, etc.)
•
‘
Reset to original’: cancels all the changes made in this menu
21
Page 22
GPs
USER MANUAL - version 4
SETTINGS
‘Set to 2D (at) view / Set 3D view’: switches between 2D and 3D view modes
•
‘
Set night colors / Set automatic colors / Set daylight colors’: select your preferred color mode
•
‘
•
Disable sounds / Enable sounds’: enables/disables all sounds (voice, warnings, etc.)
•
‘
Volume settings’: allows you to set a different volume for low speed and high speed
•
‘
GPS Logs’: to record your trip in order to replay it later
•
‘
Planning preferences’: to dene how your route will be computed: fastest route or avoid highways
•
‘
Toll charge settings’: choose if you want to avoid toll roads or not
•
‘
Advanced settings’: allows you to set several parameters (enable/disable autozoom, avoid U-turns,
etc.). You can also choose what type of distance/time indicators are displayed on the navigation
screen.
•
‘
Left handed’ / ‘Right handed’: switches between left and right handed display modes
•
‘
Keyboard settings’: allows you to select your preferred keyboard layout (Abcd, Qwerty or Azerty)
•
‘
Regional settings’: to select the distance units (Km or miles) and coordinate units.
•
‘
Set language’: select the language that will be used on the screen
•
‘
Set voice’: select the voice language
•
‘
Set home location’: allows you to dene your home address
•
‘
Quick Guides’: several quick guides briey describe the main functions of the GPS
•
‘
About ARCHOS GPS’: information about the GPS software
•
‘
Signpost settings’: dene how you want the direction signs to appear on the navigation screen
TRAFFIC
This menu allows you to set the trafc information function. The TMC (Trafc Message Channel) antenna
needs to be connected to your in-car holder. To learn more about this, see chapter 6: Other Functions.
•
Show all incidents’: displays all trafc incidents on the map
‘
•
‘
Incidents on route’: displays all the trafc incidents located on your route
•
‘
Optimize route’: the ARCHOS will generate a new route that will avoid trafc incidents
•
‘Options’: allow you to change several parameters (automatic route recomputing, automatic update, etc.)
ROUTE
This menu allows you to show various information about your computed route. It is available only if you
have computed a route.
•
Show route instructions’: displays your route as a list of turns
‘
•
‘
Show route as images’: displays your route as a manual slide show
•
‘
Show route summary’: displays your route on a map with trip information
22
Page 23
GPs
‘Show route demo’: allows you to watch a video of your trip
•
‘
•
Show on map’: displays your route on a zoomable map
•
‘
Cancel route’: cancels your computed route
USER MANUAL - version 4
ITINERARY
This menu allows you to follow an already created itinerary or dene an itinerary with multiple stopping
points.
•
Select your current route, a previously created itinerary, or create a new itinerary using the ‘New’
button.
•
You can start adding new points to your itinerary using the ‘
Add’ button. The ‘Options’ button allows
you to optimize your itinerary, save it or delete it.
•
Each time you add a point to your trip, it will appear in the list. You can tap on one of the lines of the
list to access several options: ‘
Set as unvisited’, ‘Set as start’, ‘Add nearby POI’, ‘Delete’, ‘Move up’,
‘Move down’.
•
Tap on ‘
Done’ when you have nished creating your itinerary. Tap on ‘Yes’ to compute the route.
MANAGE POI
Points of interest (POI) are, for example, restaurants, hotels or gas stations. They appear as symbols on the
map during your trip. This menu allows you to manage the points of interest: you can add new ones, select
the ones you want to be displayed, etc.
•
Add POI...’: allows you to add a new point of interest (for example a friend’s house)
‘
•
‘
Edit POI name’: allows you to edit the name of a POI
•
‘
Delete POI’: allows you delete a POI
•
‘
Delete POI category’: allows you delete a POI category
•
‘
Show/hide POIs’: allows you select which POIs to be displayed on the map
•
‘
Warn when near POI’: allows you to set an audible warning when you are at a certain distance from
a specic POI (for example when you are approaching a restaurant)
GPS STATUS
This menu allows you to see the number of satellites from which the ARCHOS receives a signal, as well as
the strength of their signal. A minimum of 3 green (valid) signals is required for the ARCHOS to be able to
locate your position and compute a route.
MEMORIZE POSITION
When you tap on this icon, your current position is stored into the history.
23
Page 24

GPs
USER MANUAL - version 4
EXTRAS
In this menu, you will nd several tools such as a world clock, a calculator, a unit converter and roadway
information in specic countries.
EXIT
Tap on this icon if you want to leave the GPS application and return to the ARCHOS home screen.
24
Page 25
GPs
USER MANUAL - version 4
6� OTheR fUnCTIOns
6�1� TRaffIC MessaGe Channel (TMC)
If you have purchased the GPS in-car holder as an accessory, this function is not available.
WHAT IS TMC?
•
Your ARCHOS GPS includes a TMC receiver. This is a system that allows your GPS device to be
informed of current trafc conditions. Depending on your country and your location, there are FM
radio stations that transmit trafc information along with the regular programming. Some trafc
information is free of charge while other trafc information services, which typically offer a wider
range of trafc info, must be purchased.
•
Using the included TMC antenna, your ARCHOS GPS will receive the free trafc conditions if this is
o
ffered in your country or area. Check the ARCHOS website to see what other purchasable TMC options are available. TMC is not an ARCHOS service and the reliability of information is the responsibility of the provider of these services.
•
Once the antenna is installed, and you are traveling through an area that has TMC broadcasts, the green
TMC indicator will display
tured the TMC signal and is incorporating it into the planned route. See the settings section to decide
how you want the device to manage TMC information. By default, if the ARCHOS GPS nds trafc
problems on your current route, it will automatically compute a new route that will avoid trafc.
Note: In certain cases, the best route may be the original one.
(on the main navigation screen) indicating that the device has cap-
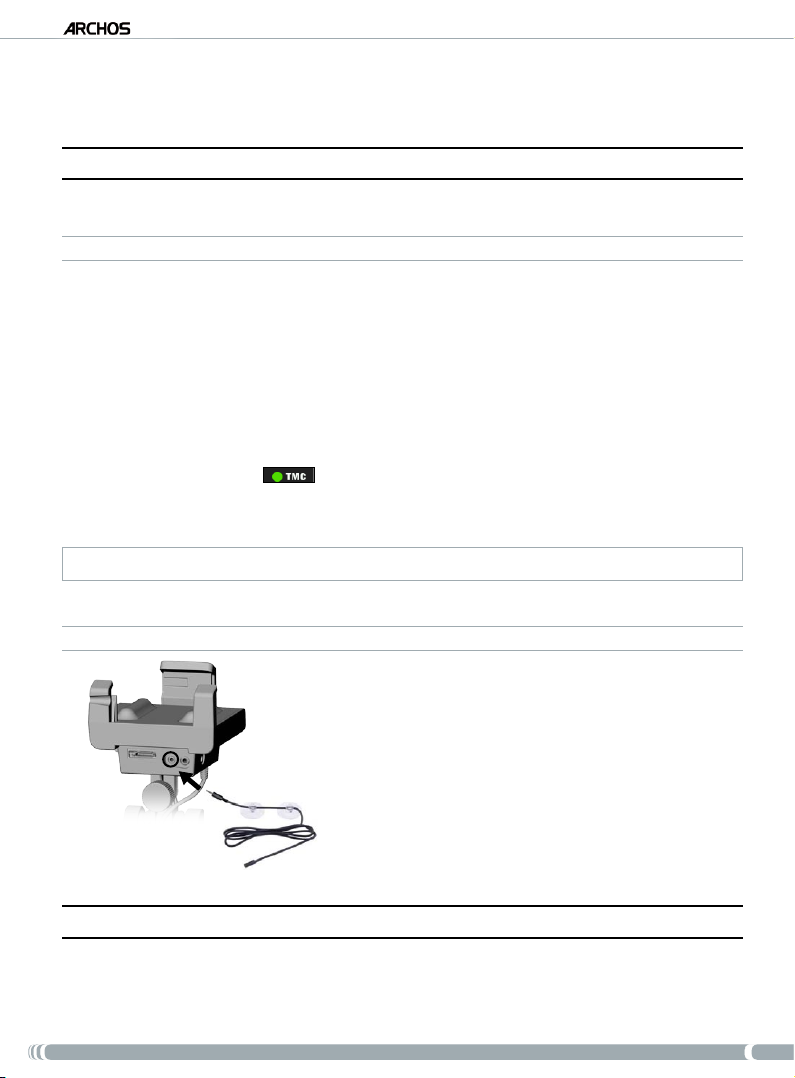
HOW TO INSTALL THE TMC ANTENNA
•
Connect the TMC antenna to the TMC connector, at
the bottom of the in-car holder.
•
Then place the cable in such a way that it does not
impede your vision or your ability to drive safely.
•
Heat reective windshields could impede reception.
Chec
k your car manual to see if your windshield has
areas that do not have this property.
6�2� addITIOnal OPTIOns
Check in your ARCHOS personal account on-line ( you create this when you register your product:
www.archos.com/register) for additional free and purchasable options such as extended Points of Interests,
updated maps, etc.
25
Page 26

GPs
USER MANUAL - version 4
leGal InfORMaTIOn
1) Warranty and Limited Liability
This product is sold with a limited warranty and specic remedies are available to the original purchaser in the event the product fails to conform
to
the limited warranty. Manufacturer’s liability may be further limited in accordance with its sales contract.
In general, and in a non-limited manner, the manufacturer shall not be responsible for product damages caused by natural disasters, re, static
disc
harge, misuse, abuse, neglect, improper handling or installation, unauthorized repair, alteration or accident. In no event shall the manufacturer
be liable for loss of data stored on disk media.
MANUFACTURER SHALL NOT BE LIABLE FOR ANY SPECIAL, INCIDENTAL OR CONSEQUENTIAL DAMAGES. EVEN IF INFORMED OF THE
POSSIBILITY THEREOF IN ADVANCE.
ARCHOS licensor(s) makes no warranties, express or implied, including, without limitation, the implied warranties of merchantability and tness for a particular purpose, regarding the licensed materials. ARCHOS’ licensor(s) does not warrant, guarantee or make any representations regarding the use or the results of
the use of the licensed materials in terms of its correctness, accuracy, reliability, or otherwise. The entire risk as to the results and performance of the licensed
materials is assumed by you. The exclusion of implied warranties is not permitted by some jurisdictions. The above exclusion may not apply to you.
In no event will ARCHOS’ licensor(s), and their directors, ofcers, employees or agents (collectively ARCHOS’ licensor) be liable to you for any consequential, incidental or indirect damages (including damages for loss of business prots, business interruption, loss of business information, and the like) arising
out of the use of inability to use the licensed materials even if ARCHOS’ licensor has been advised of the possibility of such damages. Because some
jurisdictions do not allow the exclusion or limitation of liability for consequential or incidental damages, the above limitations may not apply to you.
Please see your sales contract for a complete statement of warranty rights, remedies and limitation of liability. Furthermore, warranty does not
apply to:
1. Damages or problems resulting from misuse, abuse, accident, alteration or incorrect electrical current or voltage.
2. Any product tampered-with or damaged warranty seal or serial number label.
3. Any product without a warranty or serial number label.
4. Batteries and any consumable items delivered with or in the equipment.
The end user is required to use this product only in conformity with its original purpose and is strictly forbidden to make any technical modications that could potentially impinge on the rights of third parties. Any modication to the hardware, software, or physical enclosure of the product must be approved in writing by ARCHOS. Non approved modied products are subject to the withdrawal of any or all guarantee clauses.
2) Global Positioning System
The
Global Positioning System is satellite based system that is operated and controlled by the government of the United States of America. Its
accuracy and reliability are their responsibility. Any changes in the signal system or in environmental conditions may have an impact on the
operation of your ARCHOS GPS device. ARCHOS cannot accept any liability for the accuracy or reliability of the GPS signaling system.
3) Windshield Mounting Restriction Laws
countries and states in the United States of America have laws concerning the mounting of devices onto the windshield or other windowed
Some
areas of a vehicle. Check your country or state laws concerning this. California Vehicle Code Section 26708 (a) (1) states that “No persons shall
drive any motor vehicle with an object or material placed, displayed, installed, afxed, or applied upon the windshield or side or rear windows.”
D
rivers in California should not use the suction receiver/mount on their windshield, side or rear windows. ARCHOS declines all responsibility
for any nes, penalties or damage that may be incurred by disregarding this notice. Note: this section of the California Vehicle Code applies to
licensed drivers from other states/countries who drive in California.
4) Intellectual Property Rights.
I
ncluded software is proprietary to ARCHOS or its suppliers and are subject to copyright and other intellectual property laws. Client’s only rights with
respect to any ARCHOS software included with the Products shall be provided, under the terms of ARCHOS’ software license. Title to all ARCHOS
Software remains with ARCHOS. Client agrees that ARCHOS retains ownership of all rights, title, and interest in all intellectual property, works of
authorship, trade secrets and like’s in all aspects of the Product(s). Client and its afliates and subcontractors agree not to reverse engineer any aspect
o
f the Software and/or Products supplied under this agreement and further agree to pay assessed damages should such action take place.
5) GPS Software Copyright and Copies
The
GPS Software (including any copy thereof) is owned by ARCHOS or its suppliers and is protected by United States, Canada, European,
Brazilian and Australian copyright and patent laws and international treaty provisions. The Software copy is licensed to you the client, not sold
to you, and you (the client) are not an owner of any copy thereof. You may make one copy of the software for backup or archival purposes. You
may not otherwise copy the software, except as authorized by applicable law, nor the written materials accompanying the Software. ARCHOS
hereby reserves all rights not explicitly granted in the license agreement.
The complete and most up to date copyright and EULA (End User License Agreement) information is available on the ARCHOS web site (www.archos.com).
6) Copyright Notices
© 2008 ARCHOS SA, France
All trademarks are the property of their respective owners.
Data Source © 2008 Tele Atlas N.V. Based upon:
Topograsche ondergrond Copyright © dienst voor het kadaster en de openbare registers, Apeldoorn 2004.
©
Ordnance Survey of Northern Ireland.
© IGN France.
© Swisstopo.
© BEV, GZ 1368/2003.
© Geonext/DeAgostini.
© Norwegian Mapping Authority, Public Roads Administration / © Mapsolutions
© DAV
This product includes mapping data licensed from Ordnance Survey with the permission of the Controller of Her Majesty’s Stationery Ofce. ©
Crown copyright and/or database right 2008. All rights reserved. License number 100026920.
Data Source © 1984 – 2008 Tele Atlas North America. Inc. All rights reserved.
26
Page 27

GPs
Canadian data © DMTI Spatial. Portions of Canadian map data are reproduced under license from Her Majesty the Queen in Right of Canada
with permission from Natural Resource Canada. Point of Interest data by Info USA. Copyright 2006.
Data Source © Whereis® 2006 UBD® and Sensis® are trademarks of Telstra® Corporation Limited, used under license.
© 2008 Tele Atlas North America, Inc. / Geographic Data Technology, Inc. All rights reserved. This material is proprietary and the subject of copyright
protection and other intellectual property rights owned by or licensed to Tele Atlas North America, Inc. / Geographic Data Technology, Inc. The use of
this material is subject to the terms of a license agreement. You will be held liable for any unauthorized copying or disclosure of this material.
© InfoUSA All rights reserved
7) EULA (End User License Agreement)
a)
The user license is exclusively for the End User’s own internal business or personal use and not for resale, sublicense or commercial use.
b) The licensed Products are the condential information of Tele Atlas (TA) and other parties and it is expressly prohibited to disclose this information
to third parties.
c) It is expressly prohibited to make unauthorized copies of the licensed software or data.
d) It is expressly prohibited to remove or obscure any copyright, trademark notice, or restrictive legend.
e) The covenants and obligations undertaken by the End User herein are intended for the direct benet of Tele Atlas and ARCHOS and may be
enforced by any or all of these entities against the End User.
f) NEITHER TELE ATLAS (TA) NOR ITS SUPPLIERS SHALL BE LIABLE TO THE UNDERSIGNED FOR ANY INCIDENTAL, CONSEQUENTIAL, SPECIAL,
INDIRECT OR EXEMPLARY DAMAGES ARISING OUT OF THIS AGREEMENT, INCLUDING LOST PROFITS OR COSTS OF COVER, LOSS OF USE
OR BUSINESS INTERRUPTION OR THE LIKE, REGARDLESS OF WHETHER THE PARTY WAS ADVISED OF THE POSSIBILITY OF SUCH DAMAGES.
NOTWITHSTANDING ANYTHING TO THE CONTRARY CONTAINED HEREIN, TA SHALL HAVE NO MONETARY LIABILITY TO THE UNDERSIGNED
FOR ANY CAUSE (REGARDLESS OF THE FORM OF ACTION) UNDER OR RELATING TO THIS AGREEMENT.
g) THE LICENSED PRODUCTS ARE PROVIDED ON AN “AS IS” AND “WITH ALL FAULTS BASIS” AND TA AND ITS SUPPLIERS EXPRESSLY DISCLAIM ALL
WARRANTIES, EXPRESS OR IMPLIED, INCLUDING BUT NOT LIMITED TO, THE IMPLIED WARRANTIES OF NON-INFRINGEMENT, MERCHANTABILITY,
SATISFACTORY QUALITY, ACCURACY, TITLE AND FITNESS FOR A PARTICULAR PURPOSE. NO ORAL OR WRITTEN ADVICE OR INFORMATION
PROVIDED BY TA OR ANY OF ITS AGENTS, EMPLOYEES OR THIRD PARTY PROVIDERS SHALL CREATE A WARRANTY, AND LICENSEE IS NOT ENTITLED
TO RELY ON ANY SUCH ADVICE OR INFORMATION. THIS DISCLAIMER OF WARRANTIES IS AN ESSENTIAL CONDITION OF THE AGREEMENT.
h) End Users acknowledge that the use of the Licensed Products with a non-TA map may result in increased variance between the location
displayed on the map and ground truth location.
i) End Users shall not provide display or allow access to the actual numerical latitude and longitude coordinates.
j) U.S. Government Users
If
the End User is an agency, department, or other entity of the United States Government, or funded in whole or in part by the United States
Government, then use, duplication, reproduction, release, modication, disclosure or transfer of this commercial product and accompanying
documentation, is
(DOD commercial computer software denition), DFARS 227.7202-1 (DOD policy on commercial computer software), FAR 52.227-19 (JUN
1987) (commercial computer software clause for civilian agencies), DFARS 252.227-7015 (NOV 1995) (DOD technical data – commercial items
clause); FAR 52.227-14 Alternates I, II, and III (JUN 1987) (civilian agency technical data and non-commercial computer software clause); and/or
FAR 12.211 and FAR 12.212 (commercial item acquisitions), as applicable. In case of conict between any of the FAR and DFARS provisions listed
herein and this License, the construction that provides greater limitations on the Government’s rights shall control. Contractor/manufacturer is
Tele Atlas North America, Inc., 11 Lafayette Street, Lebanon, NH 03766-1445. Phone: 603.643. 0330. The Licensed Products are ©1984-2008
by Tele Atlas North America, Inc. ALL RIGHTS RESERVED. For purpose of any public disclosure provision under any federal, state or local law, it is
agreed that the Licensed Products are a trade secret and a proprietary commercial product and not subject to disclosure.
If End User is an agency, department, or other entity of any State government, the United States Government or any other public entity or funded
in whole or in part by the United States Government, then End User hereby agrees to protect the Licensed Products from public disclosure and
to consider the Licensed Products exempt from any statute, law, regulation, or code, including any Sunshine Act, Public Records Act, Freedom of
Information Act, or equivalent, which permits public access and/or reproduction or use of the Licensed Products. In the event that such exemption is
challenged under any such laws, this EULA shall be considered breached and any and all right to retain any copies or to use of the Licensed Products
shall be terminated and considered immediately null and void. Any copies of the Licensed Products held by Licensee shall immediately be destroyed.
If any court of competent jurisdiction considers this clause void and unenforceable, in whole or in part, for any reason, this EULA shall be considered
terminated and null and void, in its entirety, and any and all copies of the Licensed Products shall immediately be destroyed.
8) Cautions and Warnings
To prevent risks of electric shock, this unit must only be opened by qualied service personnel.
Disconnect the power supply cable before opening the unit. To prevent re or shock hazard, do not expose the unit to rain or moisture.
9) Driver Safety
For
driving safety, the driver should not operate the device when the car is in motion. Laws governing the usage of electronic devices by the driver
may be applicable in your jurisdiction and/or country.
10) Environmental Considerations
The Product: The crossed-out garbage can symbol on your product signies that it falls into the category of electric /electronic equipment.
roducts of this type contain substances that are potentially dangerous to the environment and to human health. Therefore, you should not
P
dispose of the ARCHOS electronic device in a regular trash. As such, the current European directives ask that this device be collected:
- At places of distribution in the case of a purchase of a similar electronic product.
- At locally created disposal areas (waste disposal centers, sorted trash system, etc.)
By doing this, you are actively participating in the reuse and recycling of disposed electronic and electric equipment that could have potential
effects on the environment and human health.
11) FCC Compliance Statement
U
SA & Canada: This device complies with Part 15 of the FCC Rules. Operation is subject to the following two conditions:
(1) this device may not cause harmful interference, and
(2) this device must accept any interference received, including interference that may cause undesired operation.
restricted in accordance with the LIMITED or RESTRICTED rights as described in DFARS 252.227-7014(a)(1) (JUN 1995)
Protection of the environment is an important concern to ARCHOS. In order to put this concern into tangible actions, ARCHOS
has consciously included a set of methods that favors a respect for the environment into the entire cycle of its products; from
fabrication to consumer usage, to nal disposal.
Batteries: If your product contains a detachable battery pack, you should only dispose of it in a designated collection point
for used batteries.
USER MANUAL - version 4
27
Page 28

MANUEL D’UTILISATION - version 4
!
▲
GPs
La fonction d’information trac (TMC : Trafc Message Channel) n’est disponible que
si vous avez acheté l’offre groupée (pack comprenant un lecteur ARCHOS ainsi qu’un
support GPS de voiture). Si vous avez acheté le support GPS de voiture comme accessoire, cette fonction n’est pas disponible. Toutes les autres fonctions sont identiques.
Table des MaTIèRes
COnsIGnes IMPORTanTes de sÉCURITÉ ��������������������������������������������������������������������������������29
1� InTROdUCTIOn ������������������������������������������������������������������������������������������������������������������������������������ 30
1.1. ENREGISTREZ VOTRE PRODUIT ! . . . . . . . . . . . . . . . . . . . . . . . . . . . . . . . . . . . . . . . . . . . . 30
1.2. AVANT-PROPOS . . . . . . . . . . . . . . . . . . . . . . . . . . . . . . . . . . . . . . . . . . . . . . . . . . . . . . . . . 30
1.3. OÙ TROUVER LES INFORMATIONS DONT VOUS AVEZ BESOIN ? . . . . . . . . . . . . . . . . . . . .30
1.4. KIT GPS ARCHOS . . . . . . . . . . . . . . . . . . . . . . . . . . . . . . . . . . . . . . . . . . . . . . . . . . . . . . . .31
1.5. DESCRIPTION DU SUPPORT VOITURE . . . . . . . . . . . . . . . . . . . . . . . . . . . . . . . . . . . . . . . . 31
2� InsTallaTIOn ������������������������������������������������������������������������������������������������������������������������������������33
2.1. LE DVD D’INSTALLATION . . . . . . . . . . . . . . . . . . . . . . . . . . . . . . . . . . . . . . . . . . . . . . . . . .33
2.2. INSTALLATION DU GPS DANS VOTRE VOITURE . . . . . . . . . . . . . . . . . . . . . . . . . . . . . . . . .33
3� PReMIèRe UTIlIsaTIOn �����������������������������������������������������������������������������������������������������������������35
3.1. OUVERTURE DE L’APPLICATION GPS . . . . . . . . . . . . . . . . . . . . . . . . . . . . . . . . . . . . . . . . .35
3.2. PREMIERS RÉGLAGES . . . . . . . . . . . . . . . . . . . . . . . . . . . . . . . . . . . . . . . . . . . . . . . . . . . .35
3.3. L’ÉCRAN PRINCIPAL DE NAVIGATION . . . . . . . . . . . . . . . . . . . . . . . . . . . . . . . . . . . . . . . .36
3.4. UTILISATION DES BOUTONS . . . . . . . . . . . . . . . . . . . . . . . . . . . . . . . . . . . . . . . . . . . . . . . 37
3.5. QUITTER L’APPLICATION GPS . . . . . . . . . . . . . . . . . . . . . . . . . . . . . . . . . . . . . . . . . . . . . .37
4� fOnCTIOns les PlUs UTIlIsÉes �������������������������������������������������������������������������������������������� 38
4.1. COMMENT ME RENDRE À UNE ADRESSE DONNÉE ? . . . . . . . . . . . . . . . . . . . . . . . . . . . . .38
4.2. COMMENT MÉMORISER UNE DESTINATION FAVORITE ? . . . . . . . . . . . . . . . . . . . . . . . . .39
4.3. COMMENT MÉMORISER L’ADRESSE DE MON DOMICILE ? . . . . . . . . . . . . . . . . . . . . . . . . 40
4.4. COMMENT ME RENDRE À UNE DESTINATION FAVORITE ? . . . . . . . . . . . . . . . . . . . . . . . .41
4.5. COMMENT ME RENDRE À UN POINT D’INTÉRÊT (POI) ? . . . . . . . . . . . . . . . . . . . . . . . . . .42
4.6. COMMENT CHANGER LE MODE D’AFFICHAGE ? . . . . . . . . . . . . . . . . . . . . . . . . . . . . . . . .43
4.7. COMMENT DÉFINIR LES OPTIONS D’ITINÉRAIRE (AUTOROUTES/PÉAGES) ? . . . . . . . . . .44
4.8. COMMENT RECALCULER UN ITINÉRAIRE (ROUTE BARRÉE/EMBOUTEILLAGE) ? . . . . . . .45
5� desCRIPTIOn des MenUs �����������������������������������������������������������������������������������������������������������46
5.1. MENU RAPIDE . . . . . . . . . . . . . . . . . . . . . . . . . . . . . . . . . . . . . . . . . . . . . . . . . . . . . . . . . .46
5.2. MENU PRINCIPAL . . . . . . . . . . . . . . . . . . . . . . . . . . . . . . . . . . . . . . . . . . . . . . . . . . . . . . . .46
6� aUTRes fOnCTIOns ������������������������������������������������������������������������������������������������������������������������51
6.1. INFORMATION TRAFIC EN TEMPS RÉEL (TMC) . . . . . . . . . . . . . . . . . . . . . . . . . . . . . . . . . 51
6.2. OPTIONS SUPPLÉMENTAIRES . . . . . . . . . . . . . . . . . . . . . . . . . . . . . . . . . . . . . . . . . . . . . .51
InfORMaTIOns lÉGales ������������������������������������������������������������������������������������������������������������������52
28
Page 29
GPs
MANUEL D’UTILISATION - version 4
COnsIGnes IMPORTanTes de
sÉCURITÉ
An d’éviter tout risque d’accident, pour vous-même ou d’autres conducteurs, ne
manipulez pas le dispositif GPS lorsque vous conduisez.
!
▲
Ne regardez l’écran que lorsque les conditions de conduite vous permettent
de le faire en toute sécurité. Ne regardez pas l’écran lorsque vous conduisez si
!
▲
!
▲
!
▲
vous utilisez le lecteur ARCH
est possible que la lecture de chiers multimédias soit interdite lorsque l’appareil
est xé sur votre pare-brise ou lorsqu’il est dans le champ de vision du conducteur.
Informez-vous et respectez la législation locale sur la vigilance au volant
et sur les éléments susceptibles de distraire l’attention du conducteur.
Vous devez accorder une priorité absolue au respect des panneaux de signalisa-
tion routière par rapport aux instructions de navigation GPS.
Fixez le GPS de manière à ce qu’il n’entrave pas votre aptitude à garder le
contrôle normal de votre véhicule. Le degré d’humidité, la température et la durée ont un impact important sur les propriétés d’adhérence de la ventouse de
xation. An de garantir la abilité de la xation, la zone choisie doit présenter
une température d’au moins 15° centigrades. Veillez également à disposer et
acheminer les câbles de manière sécurisée, en vous assurant qu’ils ne puissent
se prendre dans le volant ou toute autre commande mobile. Ne xez pas l’appa-
reil à un emplacement où il risquerait de causer des blessures aux personnes,
même en cas d’accident (devant un airbag par exemple).
OS dans son mode multimédia ou vidéo classique. Il
!
▲
!
▲
!
▲
Dans la mesure où le GPS ne peut intégrer toutes les modications routières,
ne vous ez pas uniquement à ses indications (limitations de vitesse sur la route
actuelle, par exemple).
Ne vous ez pas uniquement aux instructions vocales pour vous indiquer votre
itinéraire. Les instructions vocales (par exemple « tournez à droite » ou « tournez à gauche ») vous sont données à des distances variables en amont des
changements de direction de la route calculée. Il est donc possible qu’une telle
instruction soit donnée au moment même où vous approchez d’une autre rue.
Ou encore, que l’instruction vocale soit donnée trop tard pour vous permettre
d’effectuer ce changement de direction en toute sécurité. Le fait de suivre cette
instruction dans de telles conditions peut vous amener à effectuer une manœu-
vre brusque, mettant en danger votre sécurité et celle des autres conducteurs.
Débranchez le câble d’alimentation de votre allume-cigare lorsque votre véhicule est à l’arrêt. Dans le cas contraire, votre GPS continuerait à consommer de
l’énergie et pourrait décharger la batterie de votre véhicule s’il restait branché
pour une durée prolongée.
29
Page 30
GPs
MANUEL D’UTILISATION - version 4
1� InTROdUCTIOn
1�1� enReGIsTRez vOTRe PROdUIT !
Après avoir déballé votre produit ARCHOS, rendez-vous sur www.archos.com/register et enregistrez-le.
Cela vous donnera accès à l’assistance technique, ainsi qu’à des options GRATUITES ET PAYANTES et aux
mises à jour logicielles GRATUITES pour votre GPS.
1�2� avanT-PROPOs
Cher client,
Ce manuel explique comment installer et utiliser le GPS avec votre lecteur multimédia ARCHOS. Si vous
souhaitez en savoir plus sur les autres fonctions de votre lecteur ARCHOS, consultez le Guide de Démarrage
Rapide imprimé (livré avec votre produit) ou le manuel complet (www.archos.com/manuals).
Nous vous souhaitons une excellente expérience multimédia.
L’équipe ARCHOS.
Toutes les informations contenues dans ce manuel étaient correctes au moment de sa publication. Toutefois, dans la
mesure où nous améliorons et mettons fréquemment à jour nos produits, le logiciel de votre appareil peut présenter
des différences mineures d’apparence ou de fonctionnalités par rapport aux indications gurant dans ce manuel.
1�3� Où TROUveR les InfORMaTIOns dOnT vOUs avez besOIn ?
Les autres fonctions (autres que GPS) de votre lecteur ARCHOS ?
?
Pour en savoir plus sur les autres fonctions de votre lecteur ARCHOS, consultez le Guide
de Démarrage Rapide imprimé (livré avec votre lecteur ARCHOS) ou rendez-vous sur
www.archos.com/manuals pour rechercher la version la plus récente du manuel complet.
Dépannage
Consultez la Foire Aux Questions sur www.archos.com/faq
Assistance technique
Rendez-vous sur www.archos.com/support pour obtenir une assistance par email (en anglais, français et allemand).
États-Unis et Canada : appelez le 877-300-8879 (appel gratuit)
Europe : enregistrez votre produit avant de contacter l’Assistance technique (www.archos.com/register).
30
Page 31

GPs
1�4� kIT GPs aRChOs
Liste des éléments GPS inclus dans la boîte :
DVD d’installation : avant d’installer le GPS dans votre voiture, vous devez insérer ce DVD dans votre
ordinateur an d’installer les cartes et la dernière version du logiciel sur votre lecteur ARCHOS.
Support voiture : il contient un récepteur GPS qui transmet le signal GPS à votre lecteur
ARCHOS. Votre lecteur DOIT donc être xé sur le support voiture an de pouvoir localiser
votre position et vous aider à atteindre votre destination.
4 paires de cales en caoutchouc : elles permettent de s’adapter parfaitement à votre lecteur
ARCHOS et de le maintenir fermement sur le support voiture. Voir la section 2.2.
Chargeur de voiture : pour que votre GPS fonctionne, le chargeur DOIT être branché sur le
support voiture et sur l’allume-cigare.
2 câbles de connexion ARCHOS (l’un destiné à l’ARCHOS 605 et l’autre aux appareils de la génération
: pour que votre GPS fonctionne, ce câble DOIT être branché sur le support voiture
suivante)
et sur le lecteur ARCHOS.
Antenne TMC (Trafc Message Channel) : elle permet d’utiliser la fonction d’information trac
sur votre GPS ARCHOS. Reportez-vous au chapitre 6. Autres fonctions. Si vous avez acheté le
support GPS de voiture comme accessoire, cette fonction n’est pas disponible.
MANUEL D’UTILISATION - version 4
1�5� desCRIPTIOn dU sUPPORT vOITURe
5
1.
6
4
2
3
1
1
Emplacement des cales en caoutchouc
2.
Pince supérieure réglable (servant à maintenir
fermement le lecteur ARCHOS)
3.
Bouton de libération de la pince (permettant de
libérer le lecteur ARCHOS)
4.
Ventouse (assurant l’adhérence sur le pare-brise)
5.
Levier de verrouillage (permettant de verrouiller
la ventouse)
6.
Languette de libération de la ventouse
permettant de désolidariser le support voiture
(
du pare-brise)
31
Page 32

GPs
8
9
7
Dessous du support voiture
MANUEL D’UTILISATION - version 4
C
onnecteur ARCHOS (pour connecter le lecteur
7.
ARCHOS)
onnecteur de l’antenne TMC (pour l’information
C
8.
trac)
Sor
tie audio (à connecter à l’entrée audio de votre
10
11
9.
autoradio, avec câble optionnel)
Connecteur d’alimentation (pour connecter le
10.
chargeur de voiture)
12
13
Arrière du support voiture
C
onnecteur destiné à une utilisa-
11.
tion
future
Haut-parleur
12.
Molettes
13.
de réglage de la position
32
Page 33

GPs
MANUEL D’UTILISATION - version 4
2� InsTallaTIOn
2�1� le dvd d’InsTallaTIOn
Ce DVD d’installation n’est pas nécessaire si vous avez acheté le pack GPS (offre groupée) incluant le lecteur ARCHOS
et le support GPS de voiture. Dans ce cas, le logiciel et les cartes sont déjà installés et activés sur l’appareil. Toutefois, le
DVD peut être utilisé ultérieurement pour réinstaller ces éléments.
Avant d’installer le GPS dans votre voiture, vous devez insérer le DVD d’installation
•
dans votre ordinateur (une connexion Internet est nécessaire).
Ce DVD vous guidera à travers les différentes étapes d’installation/activation des cartes,
•
et d’installation des derniers logiciels. Si le programme d’installation ne se lance pas autom
atiquement après l’insertion du DVD, parcourez le DVD et lancez-le manuellement.
Suivez les instructions qui apparaissent à l’écran.
•
Le CODE DE LA CARTE (inscrit sur la pochette du DVD) est indispensable pour l’installation (et la réinstalla-
!
▲
tion). NE LE PERDEZ PAS !
2�2� InsTallaTIOn dU GPs dans vOTRe vOITURe
Lorsque vous avez terminé l’installation du logiciel (section précédente), vous êtes prêt à installer le GPS dans votre véhicule. Veuillez consulter, dans ce manuel, les sections contenant les
informations légales et les consignes de sécurité.
La réception du signal GPS dépend très fortement du positionnement optimal du support voiture, de la présence d’équipements tels qu’un pare-brise athermique et des caractéristiques de l’environnement (montagnes et bâtiments élevés).
INSTALLATION DES CALES EN CAOUTCHOUC
Pour l’ARCHOS 605 30 Go et 4 Go, utilisez les cales A. Pour
les autres modèles de 605, utilisez les cales B. Les cales C et D
sont destinées à la génération suivante de lecteurs ARCHOS.
1
En utilisant votre ongle ou un objet pointu, retirez les deux
1.
lms protecteurs collés sur les emplacements des cales.
Placez ensuite les cales appropriées sur les zones collantes,
2.
et appuyez fermement pour garantir une bonne adhésion.
OÙ PLACER VOTRE GPS ?
Localisez une zone de xation propre et sûre sur votre pare-brise. Dans la mesure où l’antenne de
•
réception GPS est située sous la ventouse, le fait de placer le support sur une surface autre que le
pare-brise entraînerait une mauvaise réception.
Si vous rencontrez des problèmes de réception, consultez le manuel de votre voiture et vériez si elle
•
est
équipée d’un pare-brise athermique, qui est susceptible de perturber la réception GPS. Votre pare-
brise dispose peut-être de zones qui n’ont pas cette propriété et permettent également une xation
sûre du support voiture.
2
33
Page 34

GPs
POUR VOTRE SÉCURITÉ, il est ESSENTIEL que vous placiez le support GPS de voiture comme indiqué ci-dessous :
!
•
▲
IL NE DOIT PAS OBSTRUER LA VUE SUR LA ROUTE OU LA CIRCULATION ;
•
IL NE DOIT PAS COUVRIR LE TABLEAU DE BORD DE VOTRE VÉHICULE.
INSTALLATION DU SUPPORT VOITURE
4
MANUEL D’UTILISATION - version 4
2
1
3
CONNEXION DU LECTEUR ARCHOS
7
5
8
6
*
*
Pour déconnecter votre lecteur ARCHOS du support voiture, suivez cette même procédure en inversant l’ordre des étapes.
ARCHOS 605 lecteurs ARCHOS de la génération suivante
34
Page 35

GPs
MANUEL D’UTILISATION - version 4
3� PReMIèRe UTIlIsaTIOn
3�1� OUveRTURe de l’aPPlICaTIOn GPs
Lorsque vous connectez le lecteur ARCHOS sur le support voiture alimenté :
•
le lecteur ARCHOS s’allume automatiquement ;
•
sur l’ARCHOS 605, l’icône
3�2� PReMIeRs RÉGlaGes
Recorder [Enregistrement] sur l’écran d’accueil se transforme en icône GPS.
1.
Sélectionnez l’icône GPS pour ouvrir l’application. L’écran de
démarrage s’afche.
2.
Après quelques secondes, un écran rouge apparaît. Lisez attentivement
le message d’informations légales et sélectionnez la mention
I agree [J’accepte].
3.
La première fois que vous utilisez votre GPS, vous devrez indiquer
quelques préférences de base (reportez-vous à la section suivante).
1
2
3
1.
Cette première installation va vous permettre d’effectuer différents réglages tels que la langue de la
voix et l’unité utilisée pour les distances (km ou miles)
2.
Sélectionnez votre carte en appuyant dessus. Patientez pendant le chargement de la carte.
3.
Une liste de petits guides d’aide s’afche*. Sélectionnez le guide de votre choix pour le lire ou sélec-
Back [Retour] pour afcher l’écran principal de navigation.
tionnez
* Vous pouvez consulter les guide d’aide à tout moment, en sélectionnant
[Réglages]
Quick Guides [Guides rapides]
.
Main menu [Menu principal]
Settings
35
Page 36

GPs
MANUEL D’UTILISATION - version 4
3�3� l’ÉCRan PRInCIPal de navIGaTIOn
Lorsque vous lancez l’application GPS, elle va commencer à rechercher un signal GPS valide et, dans un
•
premier temps, vous verrez l’écran suivant. La puissance du signal s’afche dans l’angle inférieur droit.
Dès que le GPS localise un signal valide (cela peut prendre plusieurs minutes), l’écran suivant s’afche.
•
Si votre GPS reste bloqué sur le premier écran, vériez que vous l’avez correctement installé dans votre voiture.
Reportez-vous à la section
La réception du signal GPS dépend très fortement du positionnement optimal du support voiture, de la présence d’équipements tels qu’un pare-brise athermique et des caractéristiques de l’environnement (montagnes et bâtiments élevés).
2.2. Installation du GPS dans votre voiture.
1
2
4
5
Zoom arrière
1.
Direction de votre destination*
2.
Zoom avant
3.
Barre de progression
4.
de votre itinéraire*
* Cette information apparaît uniquement si vous avez calculé un itinéraire.
** Cette information peut être congurée dans les réglages.
***
TMC = Trafc Message Channel, reportez-vous au chapitre
6
P
rochain changement de direction* (appuyez pour écouter à
5.
nouveau l’instruction)
Distance avant le prochain changement de direction* (ap-
6.
puyez pour écouter à nouveau l’instruction)
Position
7.
8.
actuelle
Heure d’arrivée** / Vitesse actuelle / Distance restant à
parcourir** / Indicateurs TMC*** et GPS
6 : Autres fonctions
3
8
7
.
36
Page 37

GPs
3�4� UTIlIsaTIOn des bOUTOns
ARCHOS 605
Appui court : retour
Appui long : quitter l’application GPS (un écran de conrmation s’afche)
Entrée/Valider
Zoom avant
Se déplacer d’un élément à un autre (menus) / Parcourir la carte
MANUEL D’UTILISATION - version 4
Zoom arrière
Alterner entre le mode d’afchage 2D et 3D
Ouvrir le menu principal
Augmenter/diminuer le volume*
* Remarque : ce réglage de volume est indépendant des réglages de volume que vous pouvez dénir dans
[Menu principal]
Settings [Réglages] Volume settings [Volume]
.
Main menu
3�5� qUITTeR l’aPPlICaTIOn GPs
Vous disposez de deux possibilités pour quitter l’application GPS et retourner sur l’écran d’accueil ARCHOS :
ARCHOS 605 : maintenez enfoncé le bouton
•
conrmation s’afche. Sélectionnez Exit [Sortir] pour conrmer.
Sélectionnez
•
Main menu [Menu principal] Exit [Sortir]. Un message de conrmation s’afche.
Sélectionnez Exit [Sortir] pour conrmer.
de votre lecteur ARCHOS jusqu’à ce qu’un écran de
37
Page 38

GPs
MANUEL D’UTILISATION - version 4
4� fOnCTIOns les PlUs UTIlIsÉes
4�1� COMMenT Me RendRe à Une adResse dOnnÉe ?
1
Sur l’écran de navigation, appuyez n’importe où sur la carte pour accéder au menu principal.
1.
Sélectionnez
2.
3.
Sélectionnez
Navigate to [Aller à...].
Address [Adresse].
2
3
4
5
4.
Tapez les premières lettres du pays à l’aide du clavier. Lorsque le pays apparaît dans la liste en haut
de l’écran, sélectionnez-le. Procédez de même pour la ville et la rue.
Pour les noms de villes et de rue composés, par exemple « Saint-Malo », entrez seulement « Malo » car « Saint » générerait trop de résultats. Si vous ne trouvez pas votre ville, essayez d’entrer l’adresse en utilisant le code postal (
[Menu principal]
5.
Entrez le numéro de la rue à l’aide du clavier, puis sélectionnez Done [Terminé].
6.
Patientez pendant que le l’ARCHOS calcule l’itinéraire. Celui-ci apparaît ensuite sur la carte*.
Sélectionnez
instructions.
Navigate to [Aller à...]
Done [Terminé] pour retourner sur l’écran de navigation et commencer à suivre les
ZIP Code [Code postal])
.
Main menu
6
* Vous pouvez sélectionner
choisir d’éviter les autoroutes, les routes à péage, les chemins de terre, etc.
Details [Détails]
pour voir le type de routes que vous allez emprunter. Vous pouvez alors
38
Page 39

GPs
MANUEL D’UTILISATION - version 4
4�2� COMMenT MÉMORIseR Une desTInaTIOn favORITe ?
UTILISATION DE L’HISTORIQUE (MÉTHODE LA PLUS RAPIDE)
Chaque fois qu’un itinéraire est calculé, la destination est automatiquement enregistrée dans l’historique.
Vous pouvez également ajouter votre position actuelle à l’historique :
1
2
1.
Appuyez dans la zone en bas à droite de l’écran de navigation pour accéder au menu rapide.
2.
Puis sélectionnez
quement enregistrée dans l’historique.
CRÉER UN FAVORI
Pour créer un favori, vous devez ajouter un nouveau point d’intérêt (POI), puis l’insérer dans la catégorie
Favorites [Favoris].
Memorize Position [Mémoriser la position]. Votre position actuelle est automati-
2
3
1
Sur l’écran de navigation, appuyez n’importe où sur la carte pour accéder au menu principal. Puis
1.
appuyez sur la èche pointant vers la droite, en bas de l’écran, pour accéder au deuxième écran du
men
u principal.
Sélectionnez
2.
Sélectionnez
3.
Choisissez une méthode pour entrer votre destination favorite (adresse, centre-ville, position sur la
4.
carte, etc.), puis entrez/sélectionnez l’adresse.
Sélectionnez
5.
6.
Entrez le nom que vous souhaitez attribuer à la destination mémorisée, puis sélectionnez
Manage POI [Gestion des POI].
Add POI [Ajouter un POI...].
4
Favorites [Favoris]. La destination est alors insérée dans les favoris.
5
6
Done [Terminé].
39
Page 40

GPs
MANUEL D’UTILISATION - version 4
4�3� COMMenT MÉMORIseR l’adResse de MOn dOMICIle ?
1
2
Sur l’écran de navigation, appuyez n’importe où sur la carte pour accéder au menu principal.
1.
Puis sélectionnez
2.
Appuyez deux fois sur la èche pointant vers la droite, en bas de l’écran, pour accéder au troisième
3.
écr
an du menu principal.
4.
Sélectionnez Set home location [Dénir Domicile].
5.
Sélectionnez
données dans la section 4.1).
Settings [Réglages].
5
4
Address [Adresse], puis entrez l’adresse de votre domicile (suivez les explications
3
L’adresse de votre domicile est alors mémorisée. Pour la sélectionner comme destination, choisissez
menu [Menu principal]
Navigate to [Aller à...] Home [Domicile].
Main
40
Page 41

GPs
MANUEL D’UTILISATION - version 4
4�4� COMMenT Me RendRe à Une desTInaTIOn favORITe ?
Reportez-vous aux deux sections précédentes pour découvrir comment mémoriser une destination (historique, favori ou domicile). Vous trouverez ci-dessous les procédures à suivre pour vous rendre à une destination
mémorisée.
3
1
1.
Sur l’écran de navigation, appuyez n’importe où sur la carte pour accéder au menu principal.
2.
Sélectionnez
3.
À partir d’ici, vous pouvez :
•
choisir
•
sélectionner
•
sélectionner
Navigate to [Aller à...].
History [Historique] et sélectionner l’une de vos précédentes destinations ;
Favorite [Favoris] et choisir l’un de vos favoris comme destination ;
Home [Domicile] pour vous rendre à l’adresse de votre domicile.
2
4
4.
Patientez pendant que l’ARCHOS calcule l’itinéraire.
5.
Celui-ci apparaît ensuite sur la carte*. Sélectionnez Done [Terminé] pour retourner sur l’écran de
navigation.
* Vous pouvez sélectionner
choisir d’éviter les autoroutes, les routes à péage, les chemins de terre, etc.
Details [Détails]
pour voir le type de routes que vous allez emprunter. Vous pouvez alors
5
41
Page 42

GPs
MANUEL D’UTILISATION - version 4
4�5� COMMenT Me RendRe à Un POInT d’InTÉRêT (POI) ?
Les points d’intérêt (POI) sont, par exemple, des restaurants, des hôtels ou des stations essence. Ils sont
représentés sous forme de symboles sur la carte le long de votre itinéraire. Le GPS peut créer un itinéraire
vers un point d’intérêt spécique.
Des POI supplémentaires sont disponibles sur votre compte personnel ARCHOS (www.archos.com/register),
dans la section GPS.
1
Sur l’écran de navigation, appuyez n’importe où sur la carte pour accéder au menu principal.
1.
Sélectionnez
2.
Sélectionnez
3.
celui où vous souhaitez vous rendre.
Vous pouvez aussi choisir de vous rendre à un POI situé dans une ville donnée. Afchez le deuxième écran du menu
Navigate to [Aller à...]
Navigate to [Aller à...].
Point of Interest [Points d’intérêt] pour afcher les POI les plus proches et sélectionner
et sélectionnez
4
4.
Utilisez les èches pour faire déler les différents groupes de POI et sélectionnez celui qui vous
intéresse. Par exemple : ‘Culture’.
5.
Procédez de même pour trouver le type de POI qui vous intéresse et sélectionnez-le. Par exemple :
‘Cinema’ [Cinéma].
6.
Tous les POI correspondants sont afchés, du plus proche au plus distant. Sélectionnez celui auquel
ous souhaitez vous rendre.
v
7.
Patientez pendant que l’ARCHOS calcule l’itinéraire. Celui-ci apparaît ensuite sur la carte.
Sélectionnez
Done [Terminé] pour retourner sur l’écran de navigation.
2
POI in City [POI en ville]
5
.
3
6
42
Page 43

GPs
MANUEL D’UTILISATION - version 4
4�6� COMMenT ChanGeR le MOde d’affIChaGe ?
MODE D’AFFICHAGE 2D/3D
Deux méthodes vous permettent de passer du mode 2D au mode 3D, et inversement :
•
ARCHOS 605 : appuyez sur le bouton
sélectionnez
•
aérienne]
MODES DE COULEUR DIURNE/NOCTURNE
Main menu [Menu principal] Settings [Réglages] Set to 2D (at) view [Vue
/Set 3D view [Vue 3D].
de votre lecteur ARCHOS ;
3
1
2
1.
Sur l’écran de navigation, appuyez n’importe où sur la carte pour accéder au menu principal.
2.
Sélectionnez
3.
Puis sélectionnez
Set daylight colors [Mode jour]
Remarque : lorsque vous sélectionnez Automatic colors [Couleurs automatiques], l’appareil bascule automatiquement
entre le mode jour et le mode nuit en fonction de l’heure.
Settings [Réglages].
Set night colors [Mode nuit] / Set automatic colors [Couleurs automatiques] /
.
43
Page 44

GPs
MANUEL D’UTILISATION - version 4
4�7� COMMenT dÉfInIR les OPTIOns d’ITInÉRaIRe (aUTOROUTes/PÉaGes) ?
Votre GPS vous permet de dénir des options d’itinéraire qui seront appliquées chaque fois que
vous calculez un itinéraire. Vous pouvez choisir de calculer systématiquement la route la plus rapide,
d’éviter les autoroutes ou d’éviter les routes à péage.
OPTIONS DE CALCUL D’ITINÉRAIRE
1
Sur l’écran de navigation, appuyez n’importe où sur la carte pour accéder au menu principal. Puis
1.
sélectionnez Settings [Réglages].
Sélectionnez
2.
3.
Choisissez l’option qui sera appliquée à chaque fois que vous calculez un itinéraire :
route [Itinéraire le plus rapide]
Appuyez sur une option pour la sélectionner, puis sélectionnez Done [Terminé].
PÉAGES
Planning preferences [Options de calcul].
ou Plan route without highways [Itinéraire sans autoroute].
2
Plan fastest
1
2
1.
Sur l’écran de navigation, appuyez n’importe où sur la carte pour accéder au menu principal. Puis
sélectionnez Settings [Réglages].
2.
Sélectionnez la èche pointant vers la droite, en bas de l’écran, pour accéder au deuxième écran
Settings [Réglages].
3
4
3
3.
Sélectionnez Toll charge settings [Péages].
4.
Dénissez la manière dont vous souhaitez traiter les routes à péage à chaque fois que vous calculez
un
itinéraire : Ask me every time [Toujours me demander], Always avoid toll roads [Toujours
éviter les routes à péage]
sur une option pour la sélectionner, puis sélectionnez Done [Terminé].
ou Don’t avoid toll roads [Ne jamais éviter les routes à péage]. Appuyez
44
Page 45

GPs
MANUEL D’UTILISATION - version 4
4�8� COMMenT ReCalCUleR Un ITInÉRaIRe (ROUTe baRRÉe/
eMbOUTeIllaGe) ?
Chaque fois que vous quittez la route conseillée, le GPS calcule automatiquement un nouvel itinéraire basé sur
votre position actuelle. L’ARCHOS vous permet également d’éviter les embouteillages et les routes barrées.
ÉVITER LES PROBLÈMES DE CIRCULATION
•
Pour bénécier de cette possibilité, vous devez activer la fonction TMC ou Trafc Message Channel
(reportez-vous au chapitre 6 : Autres fonctions).
•
Par défaut, si l’ARCHOS reçoit des informations concernant des problèmes de circulation sur votre itinér
aire actuel, il calcule automatiquement un nouvel itinéraire permettant de contourner ce problème.
ÉVITER LES ROUTES BARRÉES
3
1
2
1.
Appuyez dans la zone en bas à droite de l’écran de navigation pour accéder au menu rapide.
2.
Sélectionnez
3.
Puis sélectionnez la distance à laquelle vous vous trouvez de la route barrée. Le GPS calcule automatiquement
Avoid Roadblock [Eviter une route barrée].
un nouvel itinéraire permettant la contourner.
45
Page 46

GPs
MANUEL D’UTILISATION - version 4
5� desCRIPTIOn des MenUs
5�1� MenU RaPIde
Appuyez dans la zone en bas à droite de l’écran de navigation pour accéder au menu rapide. Trois options
principales s’afchent :
Show Important Places [Afcher les POI importants]* : afche les deux points d’intérêt les plus
•
proches gurant sur votre itinéraire.
•
Avoid Roadblock [Eviter une route barrée]* : vous permet de dénir une route barrée. Votre
ARCHOS calcule automatiquement un nouvel itinéraire permettant la contourner.
•
Memorize Position [Enregistrer la position] : enregistre votre position actuelle dans l’historique.
* uniquement si vous avez calculé un itinéraire.
5�2� MenU PRInCIPal
Sur l’écran de navigation, appuyez n’importe où sur la
•
carte pour accéder au menu principal.
Utilisez les èches en bas de l’écran pour passer du
•
pr
emier au deuxième écran du menu principal.
La case située dans l’angle supérieur gauche indique
•
votre position dans le système de menus.
46
Page 47

GPs
MANUEL D’UTILISATION - version 4
NAVIGATE TO [ALLER À...]
Ce menu vous permet de sélectionner votre destination. Vous avez le choix entre plusieurs options :
Address [Adresse] : entrez une adresse (pays, ville, rue, numéro)
•
Favorite [Favoris] : sélectionnez une destination à partir de vos favoris
•
History [Historique] : sélectionnez une destination à partir de l’historique
•
Point of Interest [Points d’intérêt] : choisissez un point d’intérêt comme destination
•
ZIP Code [Code postal] : entrez l’adresse de destination en utilisant son code postal
•
Home [Domicile] : choisissez votre domicile comme destination
•
Point on Map [Position sur la carte] : choisissez votre destination en la sélectionnant sur la carte
•
Enter GPS position [Entrer position GPS] : entrez les coordonnées GPS (longitude, latitude)
•
City Center [Centre-ville] : vous conduit au centre d’une ville
•
POI in City [POI en ville] : vous permet de vous rendre à un point d’intérêt situé dans une ville donnée
•
BROWSE MAP [MODE CARTE]
Cette fonction vous permet de rechercher un emplacement sur la carte. Vous pouvez faire glisser la carte en
utilisant l’écran tactile. Vous pouvez effectuer un zoom avant ou arrière grâce aux boutons d’accélération du
lecteur ARCHOS
Si vous sélectionnez
Find... [Chercher...] : situe une adresse spécique sur la carte
•
Show current position [Afcher la position actuelle] : situe votre position actuelle sur la carte
•
Show entire route [Afcher l’itinéraire complet] : afche l’itinéraire calculé sur la carte
•
Show city [Afcher la ville] : situe une ville spécique sur la carte
•
Show/Hide POIs... [Afcher/Masquer les POI...] : permet de sélectionner les POI que vous souhaitez
•
(ARCHOS 605) ou en utilisant la barre de zoom (à droite de l’écran).
Options, les éléments suivants apparaissent :
afcher sur la carte
Le curseur (en bas au centre de l’écran) vous permet de sélectionner une autre méthode pour vous rendre à votre
destination.
ALTERNATIVE ROUTE [ITINÉRAIRE BIS]
Ce menu vous permet de calculer un itinéraire bis lorsque vous rencontrez un problème inattendu au cours de votre
déplacement (route barrée, embouteillage, etc.). Il est disponible uniquement si vous avez calculé un itinéraire.
Compute alternative [Calculer un itinéraire bis] : génère un nouvel itinéraire utilisant des routes
•
différentes
Avoid next... [Eviter le(s) prochain(s)...] : vous permet de dénir une route barrée. Votre ARCHOS
•
calcule automatiquement un nouvel itinéraire permettant la contourner.
Travel via... [Passer par...] : vous permet de passer par un emplacement spécique (ville, adresse, etc.)
•
Reset to original [Itinéraire original] : annule toutes les modications effectuées dans ce menu
•
47
Page 48

GPs
MANUEL D’UTILISATION - version 4
SETTINGS [RÉGLAGES]
Set to 2D (at) view [Vue aérienne] / Set 3D view [Vue 3D] : bascule entre les modes d’afchage 2D
•
et 3D
•
Set night colors [Mode nuit] / Set automatic colors [Couleurs automatiques] / Set daylight colors
[Mode jour]
•
Disable sounds [Sons off] / Enable sounds [Sons on] : active/désactive tous les sons (voix, avertis-
: vous permet de sélectionner le mode de couleur qui vous convient le mieux
sements, etc.)
•
Volume settings [Volume] : vous permet de dénir deux niveaux de volumes différents pour les
vitesses peu élevées et les vitesses élevées
•
GPS Logs [Fichiers log GPS] : pour enregistrer vos itinéraires an de pouvoir les visionner ultérieu-
rement
•
Planning preferences [Options de calcul] : permet de dénir la manière dont votre itinéraire doit
être calculé : itinéraire le plus rapide ou éviter les autoroutes
•
Toll charge settings [Péages] : permet de choisir si vous souhaitez éviter les routes à péage ou non
•
Advanced settings [Paramètres avancés] : vous permet de dénir différents paramètres (activer/
désactiver l’autozoom, éviter les demi-tours, etc.). Vous pouvez également choisir les types d’indica-
teurs de distance/horaires à afcher sur l’écran de navigation.
•
Left handed [Mode gaucher] / Right handed [Mode droitier] : bascule entre les modes d’afchage
gaucher et droitier
•
Keyboard settings [Clavier] : vous permet de sélectionner la disposition du clavier qui vous convient
le mieux (Abcd, Qwerty ou Azerty)
•
Regional settings [Unités] : pour sélectionner les unités de distance (km ou miles) et de coordonnées.
•
Set language [Langues] : permet de sélectionner la langue qui sera utilisée à l’écran
•
Set voice [Prompts vocaux] : permet de sélectionner la langue dans laquelle sont exprimés les
indications vocales
•
Set home location [Dénir Domicile] : vous permet de dénir l’adresse de votre domicile
•
Quick Guides [Guides rapides] : plusieurs mini-guides décrivant brièvement les principales fonc-
tions du GPS
•
About ARCHOS GPS [À propos d’ARCHOS GPS] : informations concernant le logiciel de naviga-
tion GPS
•
Signpost settings [Panneaux indicateurs] : vous permet de dénir la manière dont les panneaux
indicateurs apparaissent sur l’écran de navigation
TRAFFIC [TRAFIC]
Ce menu vous permet de congurer la fonction d’information trac. L’antenne TMC (Trafc Message Channel)
doit être connectée au support voiture. Pour en savoir plus sur cette fonction, reportez-vous au chapitre 6 :
Autres Fonctions.
•
Show all incidents [Afcher tous les incidents] : afche tous les incidents de circulation sur la carte
•
Incidents on route [Incidents sur l’itinéraire] : afche tous les incidents de circulation survenant sur
votre itinéraire
48
Page 49

GPs
Optimize route [Optimiser l’itinéraire] : votre ARCHOS génère un nouvel itinéraire contournant les
•
MANUEL D’UTILISATION - version 4
incidents de circulation
•
Options : vous permet de modier différents paramètres (recalcul automatique de l’itinéraire, mise à
jour automatique, etc.)
ROUTE [ITINÉRAIRE]
Ce menu vous permet d’afcher différentes informations concernant l’itinéraire calculé. Il est disponible
uniquement si vous avez calculé un itinéraire.
•
Show route instructions [Feuille de route] : afche votre itinéraire sous la forme d’une liste de
changements de direction
•
Show route as images [Diaporama] : afche votre itinéraire sous la forme d’un diaporama manuel
•
Show route summary [Résumé] : afche votre itinéraire sur la carte avec les informations concer-
nant votre trajet
•
Show route demo [Simulation] : vous permet de voir une vidéo de votre trajet
•
Show on map [Afcher sur la carte] : afche votre itinéraire sur une carte zoomable
Cancel route [Annuler l’itinéraire] : annule l’itinéraire calculé
•
ITINERARY [ITINÉRAIRE AVANCÉ]
Ce menu vous permet de suivre un itinéraire déjà créé ou de dénir un itinéraire comportant plusieurs points
d’arrêt.
•
Sélectionnez votre itinéraire actuel, un itinéraire précédemment créé ou créez un nouvel itinéraire en
utilisant le bouton
Vous pouvez commencer à insérer de nouveaux points le long de votre itinéraire à l’aide du bouton
•
Add [Ajouter]. Le bouton Options vous permet d’optimiser votre itinéraire, de l’enregistrer ou de le
New [Nouveau].
supprimer.
•
Chaque fois que vous ajoutez un point le long de votre trajet, il apparaît dans la liste. Lorsque vous
appuyez sur une ligne de la liste, vous pouvez accéder à différentes options :
[Dénir comme non visité]
[Ajouter un POI voisin]
•
Sélectionnez
Done [Terminé] lorsque vous avez ni de créer votre itinéraire. Sélectionnez Yes [Oui]
, Set as start [Dénir comme point de départ], Add nearby POI
, Delete [Effacer], Move up [Monter], Move down [Descendre].
Set as unvisited
pour calculer l’itinéraire.
MANAGE POI [GESTION DES POI]
Les points d’intérêt (POI) sont, par exemple, des restaurants, des hôtels ou des stations essence. Ils sont
représentés sous forme de symboles sur la carte le long de votre trajet. Ce menu vous permet de gérer les
points d’intérêt : vous pouvez en ajouter de nouveaux, sélectionner ceux que vous voulez afcher, etc.
Add POI... [Ajouter un POI...] : permet d’ajouter un nouveau point d’intérêt (comme le domicile
•
d’un ami)
•
Edit POI name [Renommer] : permet de modier le nom d’un POI
49
Page 50

GPs
Delete POI [Effacer] : permet de supprimer un POI
•
Delete POI category [Effacer la catégorie] : permet de supprimer une catégorie de POI
•
Show/hide POIs [Afcher/Masquer les POI] : permet de sélectionner les POI que vous souhaitez
•
MANUEL D’UTILISATION - version 4
afcher sur la carte
Warn when near POI [Alerter à proximité d’un POI] : permet de programmer une alerte sonore
•
lorsque vous arrivez à une certaine distance d’un type spécique de POI (lorsque vous approchez
d’un restaurant, par exemple)
GPS STATUS [STATUT GPS]
Ce menu vous permet d’afcher le nombre de satellites dont l’ARCHOS reçoit le signal, ainsi que la puissance
de ce signal. Pour que l’ARCHOS soit en mesure de localiser votre position et de calculer un itinéraire, il doit
recevoir au minimum 3 signaux valides (verts).
MEMORIZE POSITION [ENREGISTRER LA POSITION]
Lorsque vous sélectionnez cette icône, votre position actuelle est enregistrée dans l’historique.
EXTRAS
Dans ce menu, vous trouverez plusieurs outils tels qu’une horloge universelle, une calculatrice, un convertisseur d’unités et des informations routières relatives à différents pays.
EXIT [SORTIR]
Sélectionnez cette icône si vous souhaitez quitter l’application GPS et retourner sur l’écran d’accueil
ARCHOS.
50
Page 51

GPs
MANUEL D’UTILISATION - version 4
6� aUTRes fOnCTIOns
6�1� InfORMaTIOn TRafIC en TeMPs RÉel (TMC)
Si vous avez acheté le support GPS de voiture comme accessoire, cette fonction n’est pas disponible.
QU’EST-CE QUE LA TMC ?
Votre GPS ARCHOS intègre un récepteur TMC. Il s’agit d’un système qui permet à votre appareil GPS
•
de recevoir des informations relatives aux conditions de circulation actuelles. En fonction de votre
pays et de votre position géographique, vous pouvez capter des stations de radio FM qui diffusent
des informations concernant le trac en plus de leurs programmes habituels. Certains services d’information trac sont gratuits, tandis que d’autres, qui offrent généralement une gamme plus étendue
d’informations, sont payants.
Grâce à son antenne TMC, votre GPS ARCHOS peut recevoir l’information trac gratuite si elle est
•
proposée dans votre pays ou dans votre zone géographique. Consultez le site web ARCHOS pour
connaître les options TMC payantes disponibles. TMC n’est pas un service ARCHOS et la abilité des
informations relève de la responsabilité du fournisseur de ces services.
•
Une fois que l’antenne est installée et que vous traversez une zone qui bénécie d’un service de
fusion TMC, le témoin TMC de couleur verte s’afche (sur l’écran principal de naviga-
dif
tion) signalant que l’appareil capte le signal TMC et le prend en compte dans le calcul de l’itinéraire.
Reportez-vous à la section relative aux réglages pour déterminer la manière dont l’appareil doit gérer
l’information TMC. Par défaut, si l’ARCHOS reçoit des informations concernant des problèmes de
circulation sur votre itinéraire actuel, il calcule automatiquement un nouvel itinéraire permettant de
contourner ce problème.
Remarque : dans certains cas, il est possible que le meilleur itinéraire soit l’itinéraire d’origine.
COMMENT INSTALLER L’ANTENNE TMC
Connectez l’antenne TMC au connecteur TMC situé
•
sous le support voiture.
Disposez le câble de telle sorte qu’il n’entrave pas
•
votre vision ou votre aptitude à conduire en toute
sécurité.
Les pare-brise athermiques peuvent empêcher la
•
réception. Consultez le manuel de votre voiture pour
vérier si votre pare-brise dispose de zones non
rééchissantes.
6�2� OPTIOns sUPPlÉMenTaIRes
Consultez votre compte personnel ARCHOS en ligne (créé au moment où vous enregistrez votre produit sur
www.archos.com/register) pour connaître les options supplémentaires disponibles (gratuites et payantes) :
points d’intérêt additionnels, mises à jour de cartes, etc.
51
Page 52

GPs
MANUEL D’UTILISATION - version 4
InfORMaTIOns lÉGales
1) Garantie et responsabilité limitée
Ce produit est vendu assorti d’une garantie limitée et prévoit des recours spéciques pour l’acheteur initial au cas où le produit ne serait pas
conforme aux dispositions de la garantie limitée. La responsabilité du fabricant peut être limitée en outre par les termes du contrat de vente.
De manière générale et non limitative, le fabricant ne saurait être tenu responsable des dommages causés aux produits par toutes catastrophe
naturelle, incendie, décharge électrostatique, utilisation incorrecte ou abusive, négligence, manipulation ou installation inadéquates, réparation non
autorisée, altération ou accident. Le fabricant ne pourra en aucun cas être tenu responsable de la perte de données enregistrées sur le disque.
LE FABRICANT NE SAURAIT ÊTRE TENU RESPONSABLE DE TOUT DOMMAGE SPÉCIFIQUE, ACCESSOIRE OU CONSÉCUTIF,
Y COMPRIS LE CAS OÙ IL AURAIT ÉTÉ INFORMÉ AU PRÉALABLE D’UNE TELLE ÉVENTUALITÉ.
Le c
édant (la société ARCHOS) n’offre aucune garantie, qu’elle soit explicite ou implicite, y compris notamment les garanties implicites de qualité
marchande et d’adéquation à une n donnée des matériels sous licence. Le cédant ARCHOS n’offre aucune garantie ni représentation concernant
l’utilisation ou les résultats de l’utilisation des matériels sous licence en termes de conformité, exactitude, abilité ou autre. La totalité des risques liés
a
ux résultats et aux performances des matériels sous licence relève de votre seule responsabilité. Certaines juridictions n’autorisent pas l’exclusion
des garanties implicites. Il est donc possible que l’exclusion mentionnée ci-dessus ne s’applique pas dans votre cas.
Le cédant ARCHOS, ses directeurs, cadres, employés ou agents (désignés collectivement sous le terme « cédant ARCHOS ») ne sauraient en aucun cas
être tenus responsables des dommages consécutifs, accessoires ou indirects (notamment les dommages résultant de la perte de bénéces commerciaux, de l’interruption d’une activité professionnelle, de la perte de données professionnelles et autres dommages apparentés) induits par l’utilisation
ou l’incapacité à utiliser les matériels sous licence, y compris dans le cas où le cédant ARCHOS aurait été informé de l’éventualité de tels dommages.
Dans la mesure où certaines juridictions interdisent l’exclusion ou la limitation de la responsabilité vis-à-vis des dommages consécutifs ou accessoires,
il est possible que les limitations mentionnées ci-dessus ne s’appliquent pas dans votre cas.
Veuillez consulter votre contrat de vente pour obtenir un énoncé complet de vos droits en termes de garantie, recours et limitation de responsabilité. En outre, la garantie ne s’applique pas aux :
1. dommages ou problèmes résultants d’une utilisation impropre ou abusive, d’accident, d’une altération, de l’utilisation d’un courant ou d’une
tension électriques inappropriés ;
2. produits ayant subi une altération ou présentant un sceau de garantie ou une étiquette de numéro de série endommagés ;
3. produits dépourvus de l’étiquette de garantie ou de l’étiquette portant le numéro de série ;
4. batteries et autres articles consommables livrés avec ou intégrés à l’équipement.
L’utilisateur nal doit utiliser ce produit conformément à sa destination d’origine ; il est en particulier formellement interdit de procéder à des modications
techniques susceptibles de porter atteinte aux droits de tiers. Toute modication du matériel, des logiciels ou du boîtier physique du produit est soumise à
une autorisation écrite de la part d’ARCHOS. Toute modication non autorisée du produit pourra entraîner l’exclusion partielle ou totale de la garantie.
2) Géo-Positionnement par Satellite (GPS, Global Positioning System)
Le GPS est un système reposant sur la transmission par satellite exploité et contrôlé par le gouvernement des États-Unis d’Amérique. Son exactitude et sa
abilité relèvent de sa responsabilité. Tout changement intervenant dans le signal ou dans les conditions environnementales peut avoir un impact sur le
fonctionnement de votre appareil GPS ARCHOS. ARCHOS ne saurait être tenu responsable de l’exactitude de la abilité des signaux du système GPS.
3) Lois restrictives relatives à la xation sur le pare-brise
Certains pays et certains états des États-Unis d’Amérique disposent de loi concernant la xation d’appareils sur le pare-brise et autres parties
vitrées d’un véhicule. Vériez la législation applicable sur ce point dans votre pays ou dans votre état. La loi californienne (Vehicle Code Section
26708 (a) (1)) stipule qu’il est interdit de conduire un véhicule à moteur équipé d’un objet ou d’un matériel positionné, afché, installé, apposé ou
appliqué contre le pare-brise, les vitres latérales ou la lunette arrière. En Californie, les conducteurs ne doivent pas utiliser le récepteur/support à
ventouse sur leur pare-brise, leurs vitres latérales ou leur lunette arrière. ARCHOS décline toute responsabilité concernant les amendes, sanctions
ou dommages qui pourraient résulter du non-respect de cet avis. Remarque : cette réglementation de la loi californienne (Vehicle Code) s’applique aux conducteurs titulaires d’un permis de conduire résidant dans d’autres états/pays dès lors qu’ils conduisent en Californie.
4) Droits de propriété intellectuelle
Les logiciels intégrés sont la propriété d’ARCHOS ou de ses fournisseurs ; ils sont protégés par les lois sur les droits d’auteur et autres lois sur la propriété
intellectuelle. Les seuls droits consentis au client concernant les logiciels ARCHOS intégrés dans les produits sont ceux octroyés par les termes de l’accord
de licence des logiciels ARCHOS. ARCHOS est seul à détenir le droit de propriété sur tous les logiciels ARCHOS. Le client reconnaît qu’ARCHOS conserve la
propriété de tout droit, titre et intérêt relatifs à la propriété intellectuelle, aux œuvres d’auteur, au secret industriel et autres droits apparentés pour tous les
aspects des Produits. Le client, ses afliés et ses sous-traitants s’interdisent de décompiler ou de désassembler une quelconque partie du logiciel et/ou des
Produits fournis dans le cadre de cet accord et acceptent de payer les dommages estimés au cas où ils procéderaient à de tels actes de rétro-ingénierie.
5) Droit d’auteur du logiciel GPS et copies
Le logiciel GPS (ainsi que toute copie de celui-ci) est la propriété d’ARCHOS ou de ses fournisseurs ; il est protégé par les lois sur les droits d’auteur et les brevets
en vigueur aux États-Unis, au Canada, en Europe, au Brésil et en Australie, ainsi que par les traités internationaux en la matière. Seule une licence d’utilisation
d’un exemplaire du logiciel vous est concédée ; elle ne vous est pas vendue et vous (le client) n’êtes propriétaire d’aucune copie du logiciel. Vous pouvez créer
une copie du logiciel à des ns de sauvegarde ou d’archive. Toute autre copie du logiciel et des supports écrits l’accompagnant est interdite, sauf telle qu’autorisée par la loi applicable. Par la présente, ARCHOS se réserve tous les droits qui ne sont pas explicitement octroyés à l’utilisateur par l’accord de licence.
Les informations les plus complètes et les plus récentes relatives aux droits d’auteur et à l’accord de licence de l’utilisateur final sont disponibles sur
le site web d’ARCHOS (www.archos.com).
6) Droits d’auteur
©
2008 ARCHOS SA, France
Toutes les marques sont la propriété de leurs détenteurs respectifs
Source de données © 2008 Tele Atlas N.V. Sur la base de :
Topograsche ondergrond Copyright © dienst voor het kadaster en de openbare registers, Apeldoorn 2004.
© Ordnance Survey d’Irlande du Nord.
© IGN France.
© Swisstopo.
© BEV, GZ 1368/2003.
© Geonext/DeAgostini.
© Autorité de cartographie de Norvège, Administration des voies publiques / © Mapsolutions
© DAV
Ce produit intègre des données cartographiques sous licence Ordnance Survey, avec la permission du Controller of Her Majesty’s Stationery
Ofce. © Copyright et/ou droits sur la base de données 2008, Couronne du Royaume-Uni. Tous droits réservés. Numéro de licence 100026920.
Source de données © 1984 – 2008 Tele Atlas North America. Inc. Tous droits réservés.
52
Page 53

GPs
Données canadiennes © DMTI Spatial. Certaines données cartographiques canadiennes sont reproduites sous licence de Sa Majesté la Reine agissant au nom du Canada, avec la permission de Ressources naturelles Canada. Données Points d’intérêt provenant d’Info USA. Copyright 2006.
Source de données © Whereis® 2006 UBD® et Sensis® sont des marques commerciales de Telstra® Corporation Limited, utilisées sous licence.
© 2008 Tele Atlas North America, Inc. / Geographic Data Technology, Inc. Tous droits réservés. Ce matériel est propriétaire et est protégé par les droits
d’auteur et de propriété intellectuelle de (ou sous licence accordée à) Tele Atlas North America, Inc. / Geographic Data Technology, Inc. L’utilisation de
ce matériel est soumise aux termes d’un accord de licence. Vous serez tenu responsable de toute copie ou divulgation non autorisée de ce matériel.
© InfoUSA Tous droits réservés
7) Accord de licence de l’utilisateur nal
a) La licence utilisateur est exclusivement réservée à l’usage personnel de l’utilisateur nal ou à un usage limité au cadre de son entreprise
per
sonnelle ; elle n’autorise pas la revente, l’accord de sous-licences ni une utilisation commerciale.
b) Les Produits sous licence constituent des informations condentielles de Tele Atlas (TA) et d’autres parties ; il est expressément interdit de
divulguer ces informations à des tiers.
c) Il est expressément interdit de créer des copies non autorisées des logiciels ou des données sous licence.
d) Il est expressément interdit de supprimer ou d’occulter toute mention de droit d’auteur, avis de marque de commerce ou mention propriétaire.
e) Les clauses restrictives et les obligations contractées par l’utilisateur nal par le présent accord de licence ont pour objet de protéger les
intérêts de Tele Atlas et ARCHOS ; elles pourront être opposées par l’une ou toutes ces parties à l’utilisateur nal.
f) NI TELE ATLAS (TA) NI SES FOURNISSEURS NE SAURAIENT ËTRE TENUS RESPONSABLES VIS-À-VIS DU SOUSSIGNÉ DE TOUT DOMMAGE
ACCESSOIRE, CONSÉCUTIF, SPÉCIFIQUE, INDIRECT OU EXEMPLAIRE RÉSULTANT DE CET ACCORD, Y COMPRIS LA PERTE DE BÉNÉFICES OU
LES FRAIS ENGAGÉS, LA PERTE DE L’USAGE OU L’INTERRUPTION D’ACTIVITÉ OU TOUT DOMMAGE APPARENTÉ, QUE LA PARTIE CONCERNÉE
AIT ÉTÉ AVERTIE OU NON DE L’ÉVENTUALITÉ DE TELS DOMMAGES. NONOBSTANT TOUTE CLAUSE CONTRAIRE INCLUSE DANS LE PRÉSENT
ACCORD, LA RESPONSABILITÉ FINANCIÈRE DE TA NE SAURAIT ÊTRE ENGAGÉE ENVERS LE SOUSSIGNÉ POUR QUELQUE CAUSE QUE CE SOIT
(ET QUELLE QUE SOIT LA FORME DE L’ACTION ENTREPRISE) DANS LE CADRE DU PRÉSENT ACCORD OU EN RELATION AVEC AVEC CELUI-CI.
g) LES PRODUITS SOUS LICENCE SONT FOURNIS « EN L’ÉTAT » ET « AVEC TOUS LEURS DÉFAUTS ÉVENTUELS » ; TA ET SES FOURNISSEUR DÉCLINENT
EXPLICITEMENT TOUTE GARANTIE, EXPLICITE OU IMPLICITE, Y COMPRIS, SANS Y ÊTRE LIMITÉ, LES GARANTIES IMPLICITES D’ABSENCE DE CONTREFAÇON, DE
QUALITÉ LOYALE ET MARCHANDE, D’EXACTITUDE, DE PROPRIÉTÉ ET D’ADÉQUATION À UNE FIN DONNÉE. AUCUN CONSEIL OU RENSEIGNEMENT, ORAL OU
ÉCRIT, FOURNI PAR TA OU L’UN DE SES AGENTS, EMPLOYÉ OU TIERS FOURNISSEUR, NE SAURAIT CONSTITUER UNE GARANTIE ET LE LICENCIÉ NE SAURAIT SE
PRÉVALOIR D’UN TEL CONSEIL OU RENSEIGNEMENT. CETTE EXONÉRATION DE GARANTIES EST UNE CONDITION ESSENTIELLE DE CET ACCORD.
h) Les utilisateurs naux admettent que l’utilisation des Produits sous licence avec une carte autre que celles de TA est susceptible d’induire une
variance accrue de la position géographique afchée sur la carte et la position géographique réelle.
i) Les utilisateurs naux ne doivent pas fournir l’afchage ou permettre l’accès aux coordonnées numériques de latitudes et de longitude.
j) Utilisateurs membres du gouvernement des États-Unis
Si l’utilisateur nal est une agence, un service ou tout autre entité de gouvernement des États-Unis, ou entité nancée partiellement ou totalement par
le gouvernement des États-Unis, alors l’utilisation, la duplication, la reproduction, la cession, la modication, la divulgation ou le transfert de ce produit
commercial et de la documentation associée sont régis conformément aux droits LIMITÉS ou RESTREINTS tel que décrit par les dispositions DFARS
252.227-7014(a)(1) (JUIN 1995) (logiciel commercial tel que déni par le DOD), DFARS 227.7202-1 (politique du DOD vis-à-vis des logiciels commerciaux), FAR 52.227-19 (JUIN 1987) (clause relative aux logiciels commerciaux applicable aux agences civiles), DFARS 252.227-7015 (NOV 1995)
(données techniques du DOD – clause relative aux produits commerciaux) ; FAR 52.227-14 Alternates I, II, et III (JUIN 1987) (données techniques des
agences civiles et clause relative aux logiciels non commerciaux) ; et/ou FAR 12.211 et FAR 12.212 (acquisitions de produits commerciaux), là où elles
s’appliquent. En cas de conit entre l’une des dispositions FAR ou DFARS répertoriées ici et la présente licence, la disposition imposant les limitations
les plus importantes sur les droits du Gouvernement devra prévaloir. L’entrepreneur/fabricant est Tele Atlas North America, Inc., 11 Lafayette Street,
Liban, NH 03766-1445. Téléphone : 603.643. 0330. Les Produits sous licence sont la propriété intellectuelle ©1984-2008 de Tele Atlas North America,
Inc. TOUS DROITS RÉSERVÉS. Au regard de toute provision d’une loi fédérale, étatique ou locale concernant la divulgation publique, il est admis que les
produits sous licence sont des secrets industriels et des produits commerciaux propriétaires qui ne peuvent faire l’objet d’une divulgation.
Si l’utilisateur nal est une agence, un service ou tout autre entité gouvernementale de l’un des états ou du Gouvernement fédéral des États-Unis,
ou une entité nancée partiellement ou totalement par le Gouvernement fédéral des États-Unis, alors l’utilisateur nal accepte par le présent
accord de protéger les produits sous licence de toute divulgation publique et de les considérer comme n’étant pas soumis à une quelconque loi,
réglementation ou code, y compris les lois suivantes : Sunshine Act, Public Records Act, Freedom of Information Act, ou toute loi équivalente
autorisant l’accès public et/ou la reproduction ou l’utilisation des produits sous licence. Dans l’éventualité où une telle exemption venait à être
contestée par de telles lois, cet accord de licence de l’utilisateur nal serait considéré comme rompu et le droit de conserver une copie ou d’utiliser les produits sous licence serait annulé et immédiatement considéré comme nul et non avenu. Toute copie des produits sous licence détenue
par le licencié devrait alors être détruite sans délai. Si cette clause devait être jugée par le tribunal d’une juridiction compétente comme nulle et
non applicable, en totalité ou en partie et pour quelque motif que ce soit, cet accord de licence de l’utilisateur nal serait annulé et considéré
comme nul et non avenu, dans sa totalité, et toute copie des produits sous licence devrait alors être détruite sans délai.
8) Mises en garde et avertissements
An de prévenir tout risque d’électrocution, cette unité doit être ouverte exclusivement par un agent de maintenance qualié. Débranchez le câble
d’alimentation avant d’ouvrir l’unité. An de prévenir tout risque d’incendie ou d’électrocution, n’exposez jamais l’unité à la pluie ou à l’humidité.
9) Sécurité du conducteur
Pour
sa sécurité, le conducteur ne doit pas manipuler l’appareil lorsque la voiture est en mouvement. Il est possible que l’utilisation d’appareils
électroniques par le conducteur soit réglementée dans votre juridiction et/ou votre pays.
10) Considérations environnementales
Produit : le symbole représentant une poubelle barrée qui gure sur votre produit signie que celui-ci entre dans la catégorie des équipements électriques/électroniques. Les produits de ce type contient des substances potentiellement dangereuses pour l’environnement et pour la santé des personnes. C’est pourquoi
vous ne devez pas jeter cet appareil électronique ARCHOS dans une poubelle classique. Les directives européennes imposent que cet appareil soit collecté :
- aux points de distribution dans le cas de l’acquisition d’un produit électronique similaire ;
- en des points de collecte mis en place localement (centre de traitement des ordures, systèmes de tri des ordures, etc.).
En respectant ces consignes, vous participez activement à la réutilisation et au recyclage des équipements électroniques et électriques usagés
qui pourraient avoir un impact sur l’environnement et la santé des personnes.
11) Déclaration de conformité FCC
U
(1) Cet appareil ne doit pas provoquer d’interférences gênantes,
(2) Cet appareil doit tolérer les interférences reçues, y compris celles susceptibles d’en perturber le fonctionnement.
La protection de l’environnement est une préoccupation importante pour ARCHOS. An de convertir cette préoccupation en
actions concrètes, ARCHOS a volontairement mis en place un ensemble de méthodes qui favorisent le respect de l’environnement
tout au long du cycle de ses produits, incluant leur fabrication, leur utilisation par le client et leur élimination nale.
Batteries : si votre produit contiennent une batterie amovible, lorsqu’elle est usagée, jetez-la exclusivement dans les points de
collecte spéciquement prévus à cet effet.
SA & Canada: Section 15 de la réglementation FCC - utilisation soumise aux deux conditions suivantes :
MANUEL D’UTILISATION - version 4
53
Page 54

MANUAL DE USUARIO - versión 4
!
▲
GPs
La función TMC (Trafc Message Channel) es activa únicamente si compro el paquete (la versión que incluye un reproductor ARCHOS y un adaptador GPS de coche). Si
compró el aparato y el adaptador por separado, esta función está desactivada. Las
demas funciones no son afectadas.
ÍndICe
COnsIGnas de seGURIdad �������������������������������������������������������������������������������������������������������������55
1� InTROdUCCIón ������������������������������������������������������������������������������������������������������������������������������������56
1.1. ¡REGISTRE SU PRODUCTO! . . . . . . . . . . . . . . . . . . . . . . . . . . . . . . . . . . . . . . . . . . . . . . . .56
1.2. NOTA INTRODUCTORIA DE ARCHOS... . . . . . . . . . . . . . . . . . . . . . . . . . . . . . . . . . . . . . . . .56
1.3. DÓNDE ENCONTRAR LA INFORMACIÓN NECESARIA . . . . . . . . . . . . . . . . . . . . . . . . . . . . .56
1.4. KIT ARCHOS GPS . . . . . . . . . . . . . . . . . . . . . . . . . . . . . . . . . . . . . . . . . . . . . . . . . . . . . . . .57
1.5. DESCRIPCIÓN DEL SOPORTE PARA COCHE . . . . . . . . . . . . . . . . . . . . . . . . . . . . . . . . . . . .57
2� InsTalaCIón ��������������������������������������������������������������������������������������������������������������������������������������59
2.1. EL DVD DE INSTALACIÓN . . . . . . . . . . . . . . . . . . . . . . . . . . . . . . . . . . . . . . . . . . . . . . . . . . 59
2.2. INSTALACIÓN DEL GPS EN SU COCHE . . . . . . . . . . . . . . . . . . . . . . . . . . . . . . . . . . . . . . . . 59
3� UTIlIzaCIón POR PRIMeRa vez �����������������������������������������������������������������������������������������������61
3.1. PRESENTACIÓN DE LA APLICACIÓN GPS . . . . . . . . . . . . . . . . . . . . . . . . . . . . . . . . . . . . . .61
3.2. CONFIGURACIÓN POR PRIMERA VEZ . . . . . . . . . . . . . . . . . . . . . . . . . . . . . . . . . . . . . . . . .61
3.3. LA PANTALLA DE NAVEGACIÓN PRINCIPAL . . . . . . . . . . . . . . . . . . . . . . . . . . . . . . . . . . . .62
3.4. UTILIZACIÓN DE LOS BOTONES . . . . . . . . . . . . . . . . . . . . . . . . . . . . . . . . . . . . . . . . . . . . . 63
3.5. SALIR DE LA APLICACIÓN GPS . . . . . . . . . . . . . . . . . . . . . . . . . . . . . . . . . . . . . . . . . . . . . 63
4� UsOs Más COMUnes ���������������������������������������������������������������������������������������������������������������������64
4.1. ¿CÓMO LLEGAR A UNA DIRECCIÓN ESPECÍFICA? . . . . . . . . . . . . . . . . . . . . . . . . . . . . . . .64
4.2. ¿CÓMO MEMORIZAR MIS DESTINOS FAVORITOS? . . . . . . . . . . . . . . . . . . . . . . . . . . . . . .65
4.3. ¿CÓMO MEMORIZAR MI DOMICILIO? . . . . . . . . . . . . . . . . . . . . . . . . . . . . . . . . . . . . . . . . 66
4.4. ¿CÓMO LLEGAR A UN DESTINO MEMORIZADO? . . . . . . . . . . . . . . . . . . . . . . . . . . . . . . . . 67
4.5. ¿CÓMO LLEGAR A UN PUNTO DE INTERÉS (PDI)? . . . . . . . . . . . . . . . . . . . . . . . . . . . . . . .68
4.6. ¿CÓMO CAMBIAR EL MODO DE VISUALIZACIÓN? . . . . . . . . . . . . . . . . . . . . . . . . . . . . . . .69
4.7. ¿CÓMO ESPECIFICAR SI PREFIERO AUTOPISTAS O CARRETERAS DE PEAJE? . . . . . . . . .70
4.8. ¿CÓMO RECALCULAR UNA RUTA (OBSTÁCULOS/TRÁFICO)? . . . . . . . . . . . . . . . . . . . . . . 71
5� desCRIPCIón de lOs Menús ����������������������������������������������������������������������������������������������������72
5.1. MENÚ RÁPIDO . . . . . . . . . . . . . . . . . . . . . . . . . . . . . . . . . . . . . . . . . . . . . . . . . . . . . . . . . . 72
5.2. MENÚ PRINCIPAL . . . . . . . . . . . . . . . . . . . . . . . . . . . . . . . . . . . . . . . . . . . . . . . . . . . . . . . .72
6� OTRas fUnCIOnes ��������������������������������������������������������������������������������������������������������������������������77
6.1. CANAL DE MENSAJES DE TRÁFICO (TMC) . . . . . . . . . . . . . . . . . . . . . . . . . . . . . . . . . . . .77
6.2. OPCIONES ADICIONALES . . . . . . . . . . . . . . . . . . . . . . . . . . . . . . . . . . . . . . . . . . . . . . . . . .77
InfORMaCIón leGal ���������������������������������������������������������������������������������������������������������������������������78
54
Page 55

GPs
MANUAL DE USUARIO - versión 4
COnsIGnas de seGURIdad
Para minimizar el riesgo de accidentes para usted u otros conductores,
no maneje el dispositivo GPS mientras conduce.
!
▲
!
▲
!
▲
!
▲
!
▲
!
▲
Mire a la pantalla sólo si las actuales condiciones de conducción le permiten hacerlo
de forma totalmente segura. No la mire mientras conduce si utiliza el A
modo multimedia o vídeo estándar. La reproducción de archivos multimedia con
el dispositivo instalado en el parabrisas o a la vista del conductor podría ser ilegal.
mpla la normativa local aplicable en materia de "distracciones al volante".
Cu
Las señales de circulación y los indicadores de la carretera tienen prioridad
absoluta sobre las instrucciones de navegación del GPS.
Coloque el GPS de tal forma que no interera con su capacidad para controlar
el vehículo normalmente. Tenga en cuenta que la humedad, la temperatura y
el tiempo pueden inuir en las propiedades adhesivas de la ventosa. Para un
agarre seguro, el lugar de colocación deberá estar, al menos, a 15º centígrados
(60º Fahrenheit). La seguridad también implica colocar o disponer los cables
correctamente, de forma que no queden enredados en el volante o en otros
controles movibles. No coloque el dispositivo de tal manera que pueda causarle
lesiones, aun en caso de accidente (p. ej. frente a un airbag).
Dado que el GPS no puede estar siempre al corriente de todos los cambios viales, no confíe exclusivamente en los datos del GPS, por ejemplo en lo referente
al límite de velocidad de la carretera actual.
No se guíe únicamente por las instrucciones de voz a la hora de seguir una
ruta. Las instrucciones de voz, como “Girar a derecha” o “Girar a izquierda”, se
darán un determinado tiempo (variable) antes de llegar al giro de ruta calculado.
Dichas instrucciones vocales podrían coincidir con la presencia de otras calles
alternativas disponibles. O puede que la instrucción de voz no llegue a tiempo
para permitirle girar el vehículo de forma segura. Obedecer tal instrucción de
forma inmediata requeriría la realización de maniobras bruscas y peligrosas que
podrían ocasionarle daños a usted o a otros conductores.
RCHOS en
!
▲
Desenchufe el cable de alimentación del encendedor cuando el coche esté aparcado. De lo contrario, el GPS seguiría consumiendo energía y podría llegar a descargar
la batería de su automóvil.
55
Page 56

GPs
MANUAL DE USUARIO - versión 4
1� InTROdUCCIón
1�1� ¡ReGIsTRe sU PROdUCTO!
Una vez desempaquetado su producto ARCHOS, entre en www.archos.com/register para registrarlo.
Esto le permitirá acceder a la asistencia técnica, así como a las opciones GRATUITAS Y DE PAGO y a las
actualizaciones de software GRATIS para su GPS.
1�2� nOTa InTROdUCTORIa de aRChOs���
Estimado Cliente:
Este manual le explica cómo instalar y utilizar el GPS con su reproductor multimedia ARCHOS. Para obtener
más información sobre las restantes funciones de su reproductor ARCHOS, consulte la Guía Rápida impresa
suministrada o el manual completo (www.archos.com/manuals).
Relájese y disfrute de la mejor experiencia multimedia.
El Equipo ARCHOS.
Toda la información incluida en este manual es correcta en el momento de su publicación. Ahora bien, al estar actualizando y mejorando constantemente nuestros productos, la apariencia o el software de su dispositivo pueden variar
ligeramente con respecto a lo descrito en este manual.
1�3� dónde enCOnTRaR la InfORMaCIón neCesaRIa
Otras funciones (no GPS) de su reproductor ARCHOS:
?
Para saber más sobre otras funciones de su reproductor ARCHOS, puede leer la
Guía Rápida incluida con el aparato ARCHOS, o visitar www.archos.com/manuals,
donde encontrará la versión más reciente del manual completo.
Resolución de problemas
Consulte la sección de preguntas más frecuentes en www.archos.com/faq
Asistencia técnica
Visite www.archos.com/support para la asistencia por e-mail (e-mails en inglés, francés
y alemán).
EE.UU. y Canadá: 877-300-8879 (llamada de teléfono gratuita).
Europa: por favor, registre su producto antes de ponerse en contacto con la asistencia técnica
.archos.com/register).
(www
56
Page 57

GPs
1�4� kIT aRChOs GPs
Lista de componentes GPS incluidos en el paquete:
DVD de instalación: antes de instalar el GPS en su coche, deberá ejecutar este DVD que le guiará a
través de la instalación de los mapas y del software más reciente en su reproductor ARCHOS.
Soporte para coche: alberga un receptor GPS encargado de enviar la señal GPS al reproductor
ARCHOS. Por tanto, el reproductor DEBERÁ estar acoplado al soporte para coche, de forma
que pueda localizar su posición y ayudarle a llegar a su destino.
4 pares de separadores de goma: sirven para acoplar rmemente el reproductor ARCHOS al
soporte para coche. Consulte la sección 2.2.
Adaptador de alimentación para coche: para que el GPS funcione, el adaptador de alimentación
DEBE estar conectado al soporte para coche y al encendedor.
MANUAL DE USUARIO - versión 4
2 cables de conexión ARCHOS (uno para el ARCHOS 605 y otro p ara los dispositivos de próxima
generación)
y al reproductor ARCHOS.
Antena TMC (Canal de Mensajes de Tráco): sirve para utilizar la funcionalidad de información
de tráco del ARCHOS GPS. Véase el capítulo 6. Otras funciones. Si compró el aparato y el
adaptador por separado, esta función está desactivada.
: para que el GPS funcione, este cable DEBE estar conectado al soporte para coche
1�5� desCRIPCIón del sOPORTe PaRa COChe
5
6
2
3
1
1
4
1.
Ubicación de los separadores de goma
2.
Agarre superior ajustable
(
para mantener sujeto el reproductor ARCHOS)
3.
Botón de liberación
(
para soltar el reproductor ARCHOS)
4.
Ventosa (para adherirse al parabrisas)
5.
Palanca de bloqueo (para bloquear la ventosa)
6.
Pestaña de liberación de ventosa (para soltar el
soporte)
57
Page 58

GPs
8
9
7
Parte inferior del soporte para coche
11
10
MANUAL DE USUARIO - versión 4
C
7.
onector ARCHOS
para conectar el reproductor ARCHOS)
(
8.
Conector de antena TMC
(para la información de tráco)
9.
Salida
de audio (para conectar a la entrada
de
audio de su autorradio, con cable opcional)
10.
Conector de alimentación (para conectar el adaptador
de alimentación para coche)
12
13
Parte posterior del soporte para coche
C
onector para usos futuros
11.
Altavoz
12.
R
egulador de posición
13.
58
Page 59

GPs
MANUAL DE USUARIO - versión 4
2� InsTalaCIón
2�1� el dvd de InsTalaCIón
Este DVD de instalación no es necesario si ha comprado el paquete combinado (la versión que incluye un reproductor
ARCHOS y un soporte GPS para coche). En dicho caso, el software y los mapas ya vienen instalados y activados
el dispositivo. Aunque podrá utilizar el DVD más adelante, en caso de reinstalación.
en
Antes de proceder a la instalación del GPS en su coche, deberá ejecutar el DVD
•
de instalación en un ordenador con conexión a Internet.
Este DVD le guiará a través de la instalación y activación de los mapas y del software
•
más reciente. Si el instalador no se lanzara automáticamente tras haber insertado el
DVD, localice el DVD en el disco duro y ejecútelo manualmente.
Siga las instrucciones en pantalla.
•
El CÓDIGO DE MAPAS (en la carátula del DVD) le será pedido durante la instalación (y reinstalación).
!
▲
¡NO LO PIERDA!
2�2� InsTalaCIón del GPs en sU COChe
Tras haber realizado la instalación del software como se explica en la sección
anterior, ya está preparado para instalar el GPS en su vehículo. Consulte las secciones
de información legal y seguridad de este manual.
La recepción de señales GPS depende, en gran medida, de la colocación óptima del soporte para coche, de características
del vehículo como los parabrisas termorreectantes, y de condiciones ambientales como montañas o edicios altos.
COLOCACIÓN DE LOS ADAPTADORES DE GOMA
Para el ARCHOS 605 30Gb y 4Gb, use los separadores etiquetados como A. Para otros modelos 605, use los separadores B.
Los separadores C y D se usarán con la próxima generación
1
de reproductores ARCHOS.
Use su uña o un objeto puntiagudo para quitar las dos
1.
películas de protección y descubrir la supercie pegajosa.
Apriete rmemente las cuñas adecuadas sobre estas áreas.
2.
¿DÓNDE COLOCAR SU GPS?
Busque un lugar limpio y seguro en el parabrisas. Como la antena de recepción GPS está ubicada bajo la
•
ventosa, si coloca el soporte sobre una supercie que no sea el parabrisas obtendrá una recepción mediocre.
Si experimenta dicultades con la recepción, consulte la documentación de su coche para ver si tiene
•
un parabrisas termorreectante que pueda interferir con la recepción GPS. Puede que haya zonas que
no dispongan de esta propiedad y además permitan la instalación segura del soporte.
2
59
Page 60

GPs
PARA GARANTIZAR SU SEGURIDAD, es FUNDAMENTAL que coloque el soporte GPS para coche tal y como
se indica seguidamente:
!
▲
•
NO DEBERÁ OBSTACULIZAR LA VISIÓN DE LA CARRETERA O EL TRÁFICO
•
NO DEBERÁ CUBRIR LOS PANELES DE INSTRUMENTACIÓN DE SU VEHÍCULO
INSTALACIÓN DEL SOPORTE PARA COCHE
4
MANUAL DE USUARIO - versión 4
2
1
3
CONEXIÓN DEL REPRODUCTOR ARCHOS
7
5
8
*
*
Para desconectar el reproductor ARCHOS del soporte, siga este mismo procedimiento en sentido inverso.
para el ARCHOS 605
para la próxima generación de reproductores
ARCHOS
6
60
Page 61

GPs
MANUAL DE USUARIO - versión 4
3� UTIlIzaCIón POR PRIMeRa vez
3�1� PResenTaCIón de la aPlICaCIón GPs
Al acoplar el reproductor ARCHOS al soporte para coche alimentado:
•
el reproductor ARCHOS se enciende automáticamente.
•
en el ARCHOS 605, el icono
3�2� COnfIGURaCIón POR PRIMeRa vez
Recorder [Grabación] de la pantalla principal se convierte en el icono GPS.
1.
Pinche en el icono GPS para abrir la aplicación. Aparecerá la
pantalla de inicio.
2.
Al cabo de unos segundos, aparecerá una pantalla roja. Lea detenidamente
el aviso legal y pinche en I agree [Acepto].
3.
La primera vez que utilice el GPS, deberá introducir unas cuantas
preferencias básicas (véase la siguiente sección).
1
2
3
1.
Esta instalación inicial le ayudará a congurar varios parámetros, como el idioma hablado y
las unidades de distancia (km o millas).
2.
Seleccione su mapa pinchando en él. Espere mientras el mapa se carga.
3.
Se mostrará una serie de pequeñas guías de ayuda*. Pinche en una para leerla, o pinche en
[Atrás] para ir a la pantalla de navegación principal.
* Siempre podrá volver a leer las guías de ayuda más adelante, para ello seleccione
Settings
[Ajustes]
Quick Guides
[Guía rápida]
.
Main menu
Back
[Menú principal]
61
Page 62

GPs
MANUAL DE USUARIO - versión 4
3�3� la PanTalla de naveGaCIón PRInCIPal
Al ejecutar la aplicación GPS, ésta buscará una señal GPS válida y aparecerá en principio la siguiente
•
pantalla. La intensidad de la señal se muestra en la esquina inferior derecha.
•
Tan pronto como el GPS localice una señal válida (puede llevarle varios minutos), se mostrará la
siguiente pantalla.
Si el GPS permanece en la primera pantalla, compruebe si ha instalado correctamente el GPS en su coche.
sección 2.2. Instalación del GPS en su coche.
La recepción de señales GPS depende, en gran medida, de la colocación óptima del soporte para coche, de características
del vehículo como los parabrisas termorreectantes, y de condiciones ambientales como montañas o edicios altos.
1
2
Consulte la
3
4
5
1.
Alejar
2.
Dirección de su destino*
3.
Acercar
arra de progresión de su ruta*
4.
B
* Esta información sólo aparecerá si ya ha calculado una ruta.
** Esta información puede congurarse en los ajustes.
*** TMC = Canal de Mensajes de Tráco,
6
5.
óxima desviación*
Pr
D
istancia hasta la próxima desviación* (pinche para oír de
6.
nuevo las instrucciones)
Posición
7.
Hora de llegada** / Velocidad actual / Distancia restante** /
8.
TMC*** e indicadores GPS
véase el capítulo 6: Otras funciones
8
7
(pinche para oír de nuevo las instrucciones)
actual
.
62
Page 63

GPs
3�4� UTIlIzaCIón de lOs bOTOnes
ARCHOS 605
Pulsación corta: retroceder
Pulsación larga: salir de la aplicación GPS (aparecerá una pantalla de conrmación)
Enter / Conrmar
Acercar
Para pasar de un ítem a otro (menús) / Navegar por el mapa
MANUAL DE USUARIO - versión 4
Alejar
Cambiar entre los modos de visualización en 2D y 3D
Entrar en el menú principal
aumentar/disminuir el volumen*
* Nota: este control de volumen es independiente de los controles de volumen jados en
Settings [Ajustes]
Volume settings [Ajustes de volumen]
.
Main menu
3�5� salIR de la aPlICaCIón GPs
Existen dos formas de salir de la aplicación GPS y volver a la pantalla principal de ARCHOS:
ARCHOS 605: mantenga pulsado el botón Exit
•
una pantalla de conrmación. Pinche en Exit [Salir] para conrmar.
Seleccione
•
Main menu [Menú principal] Exit [Salir]. Aparecerá un mensaje de conrmación.
Pinche en Exit [Salir] para conrmar.
en el reproductor ARCHOS hasta que aparezca
[Menú principal]
63
Page 64

GPs
MANUAL DE USUARIO - versión 4
4� UsOs Más COMUnes
4�1� ¿CóMO lleGaR a Una dIReCCIón esPeCÍfICa?
1
En la pantalla de navegación, pinche en cualquier lugar del mapa para entrar en el menú principal.
1.
Pinche en
2.
3.
Seleccione
Navigate to [Dirigirse a].
Address [Dirección].
2
3
4
5
4.
Con el teclado, introduzca las primeras letras del país. Cuando el país aparezca al principio de la lista,
pinche en él. Seleccione la ciudad y la calle de forma similar.
Para nombres compuestos de calles o ciudades, p. ej. “San Francisco”, introduzca sólo “Francisco”, ya que “San” arrojaría
demasiados resultados. Si no encuentra su ciudad, pruebe a introducir la dirección utilizando el código postal (
[Menú principal]
5.
6.
Navigate to
Introduzca el número de calle con el teclado y luego pinche en Done [Hecho].
Espere a que ARCHOS calcule una ruta. Su ruta aparecerá luego en el mapa*. Pinche en
[Hecho] para volver a la pantalla de navegación y empezar a seguir las instrucciones.
[Dirigirse a]
ZIP Code
[Código postal
])
.
Done
6
Main menu
* Pinche en
pistas, las carreteras de peaje, las carreteras en mal estado, etc.
Details
[Detalles] si quiere ver los tipos de carreteras por los que va a circular. Puede elegir evitar las auto-
64
Page 65

GPs
MANUAL DE USUARIO - versión 4
4�2� ¿CóMO MeMORIzaR MIs desTInOs favORITOs?
USANDO EL HISTORIAL (FORMA MÁS RÁPIDA)
Cada vez que se calcula una ruta, el destino se guarda automáticamente en el historial. Por otro lado,
también puede añadir su posición actual al historial:
1
2
1.
Pinche en la esquina inferior derecha de la pantalla de navegación para acceder al menú rápido.
2.
Luego, pinche en
camente en el historial.
CREACIÓN DE UN FAVORITO
Para crear un favorito, deberá añadir un nuevo punto de interés, y luego guardarlo en la categoría
de Favorites [favoritos].
Memorize Position [Memorizar posición]. Su posición actual se guardará automáti-
2
3
1
1.
En la pantalla de navegación, pinche en cualquier lugar del mapa para entrar en el menú principal. Luego,
pinche en la echa de la esquina inferior derecha para entrar en la segunda pantalla del menú principal.
2.
Pinche en
3.
Pinche en
4.
Escoja un método para introducir su ubicación favorita (dirección, centro urbano, punto en el mapa,
etc.) y luego introduzca/seleccione la dirección.
5.
Pinche en
6.
Introduzca un nombre para el destino memorizado y pinche en
Manage POI [Administrar PDIs].
Add POI [Añadir PDI].
4
Favorites [Favoritos]. De esta forma, llevará el destino a sus favoritos.
5
Done [Hecho].
6
65
Page 66
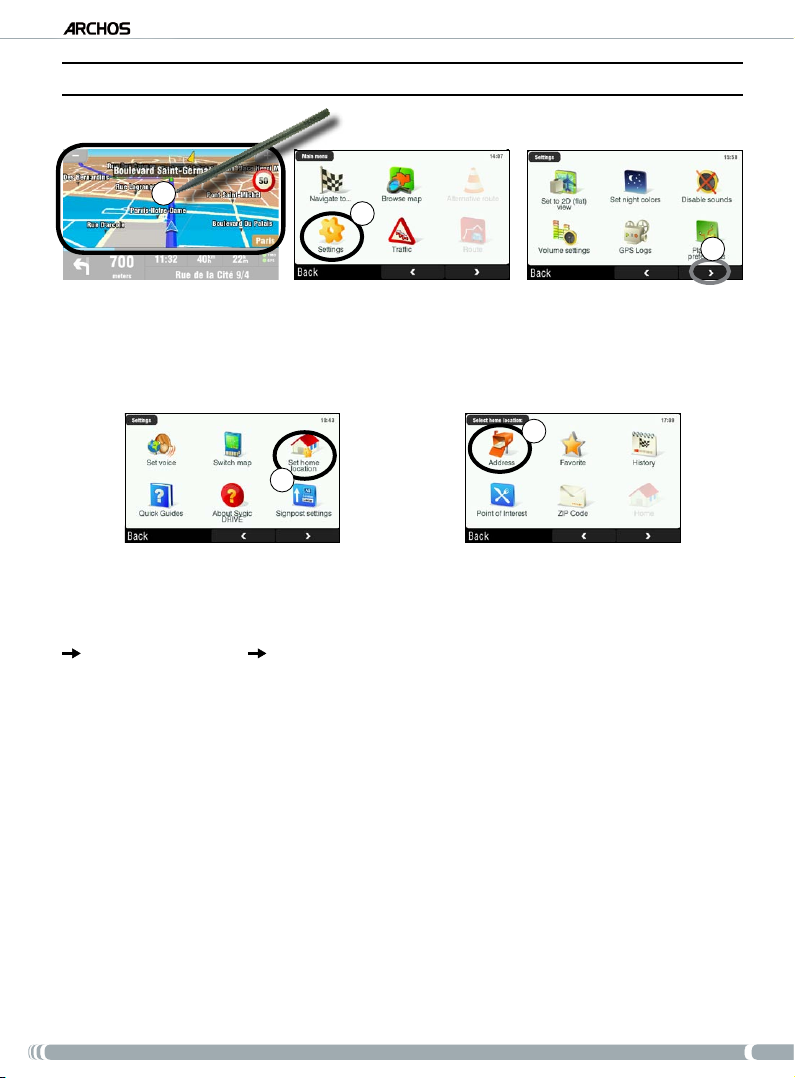
GPs
MANUAL DE USUARIO - versión 4
4�3� ¿CóMO MeMORIzaR MI dOMICIlIO?
1
2
En la pantalla de navegación, pinche en cualquier lugar del mapa para entrar en el menú principal.
1.
Luego, pinche en
2.
Pinche dos veces en la echa de la esquina inferior derecha para entrar en la tercera pantalla del
3.
men
ú principal.
Settings [Ajustes].
5
4
4.
Pinche en Set home location [Especicar domicilio].
5.
Pinche en
Address [Dirección] e introduzca la dirección de su casa (como se explica en la sección 4.1).
3
Ya ha memorizado su domicilio. Para seleccionarlo como destino, vaya a
Navigate to [Dirigirse a] Home [Domicilio].
Main menu [Menú principal]
66
Page 67

GPs
MANUAL DE USUARIO - versión 4
4�4� ¿CóMO lleGaR a Un desTInO MeMORIzadO?
Consulte las dos secciones anteriores para saber cómo memorizar un destino (historial, favorito o domicilio).
Seguidamente, se explica el procedimiento para ir a un destino memorizado.
3
1
En la pantalla de navegación, pinche en cualquier lugar del mapa para entrar en el menú principal.
1.
Pinche en
2.
3.
Podrá hacer alguna de estas acciones:
•
•
•
Navigate to [Dirigirse a].
escoger
History [Historial] y seleccionar uno de sus destinos anteriores.
seleccionar
pinchar en
Favorite [Favorito] y escoger como destino uno de sus favoritos.
Home [Domicilio] para volver a su casa
2
4
4.
Espere a que ARCHOS calcule una ruta.
5.
Su ruta aparecerá luego en el mapa*. Pinche en
* Pinche en
pistas, las carreteras de peaje, las carreteras en mal estado, etc.
Details
[Detalles] si quiere ver los tipos de carreteras por los que va a circular. Puede elegir evitar las auto-
Done [Hecho] para volver a la pantalla de navegación.
5
67
Page 68

GPs
MANUAL DE USUARIO - versión 4
4�5� ¿CóMO lleGaR a Un PUnTO de InTeRÉs (PdI)?
Puntos de interés (PDI) son, por ejemplo, restaurantes, hoteles o gasolineras. Aparecen como símbolos en el
mapa a lo largo de una ruta. El GPS puede crear una ruta a un punto de interés determinado.
Encontrará PDIs adicionales en su cuenta personal ARCHOS (www.archos.com/register), dentro de la sección GPS.
1
En la pantalla de navegación, pinche en cualquier lugar del mapa para entrar en el menú principal.
1.
Pinche en
2.
Pinche en
3.
que desea ir.
También puede escoger ir a un PDI en una ciudad determinada. Vaya a la segunda pantalla de
y seleccione
Navigate to [Dirigirse a].
Point of Interest [Punto De Interés] para ver los PDIs más cercanos y seleccionar el PDI al
POI in City
[PDI en la ciudad].
4
4.
Use las echas para desplazarse hasta el grupo en el que esté interesado y pinche en él. Por ejemplo:
“Culture” [Cultura].
5.
De forma similar, busque el tipo de PDI en el que esté interesado y pinche en él. Por ejemplo: “Cinema” [Cine].
6.
Se mostrarán todos los PDIs correspondientes, del más cercano al más lejano. Sólo le queda seleccionar el PDI al que quiere dirigirse.
7.
Espere a que ARCHOS calcule la ruta. Su ruta aparecerá luego en el mapa. Pinche en
para volver a la pantalla de navegación.
2
5
3
Navigate to
[Dirigirse a]
6
Done [Hecho]
68
Page 69

GPs
MANUAL DE USUARIO - versión 4
4�6� ¿CóMO CaMbIaR el MOdO de vIsUalIzaCIón?
MODOS DE VISUALIZACIÓN EN 2D/3D
Existen dos formas de cambiar entre los modos de visualización en 2D y 3D:
ARCHOS 605: pulse el botón Tab en su reproductor ARCHOS.
•
Vaya a
•
MODOS DE COLOR DIURNO / NOCTURNO
Main menu [Menú principal] Settings [Ajustes] Set to 2D (at) view [Activar vista
desde arriba] / Set 3D view [Activar vista en 3D].
3
1
2
1.
En la pantalla de navegación, pinche en cualquier lugar del mapa para entrar en el menú principal.
2.
Pinche en
3.
Luego, pinche en
Colores automáticos / Colores diurnos].
Nota: si elige Automatic colors [Colores automáticos], el dispositivo cambiará automáticamente entre los modos de
color diurno y nocturno, dependiendo de la hora que sea.
Settings [Ajustes].
Set night colors / Set automatic colors / Set daylight colors [Colores nocturnos /
69
Page 70

GPs
MANUAL DE USUARIO - versión 4
4�7� ¿CóMO esPeCIfICaR sI PRefIeRO aUTOPIsTas O CaRReTeRas de Peaje?
El GPS le permite jar sus propias preferencias de ruta, que serán utilizadas cada vez que calcule una ruta.
Puede escoger circular siempre por el camino más rápido, evitar autopistas o evitar carreteras de peaje.
PREFERENCIAS DE RUTA
1
2
3
En la pantalla de navegación, pinche en cualquier lugar del mapa para entrar en el menú principal.
1.
Luego, pinche en Settings [Ajustes].
Pinche en
2.
3.
Escoja la opción que desee utilizar cada vez que calcule una ruta:
rápido] o Plan route without highways [Ruta sin autopistas]. Pinche en una opción para seleccionarla y luego pinche en Done [Hecho].
AJUSTES DE PEAJES
Planning preferences [Preferencias de ruta].
Plan fastest routes [El camino más
1
2
1.
En la pantalla de navegación, pinche en cualquier lugar del mapa para entrar en el menú principal.
Luego, pinche en Settings [Ajustes].
2.
Pinche en la echa de la esquina inferior derecha para ir a la segunda pantalla de
Settings [Ajustes].
3
4
3.
Pinche en Toll charge settings [Ajustes de peajes].
4.
Establezca qué desea hacer con los peajes cada vez que calcule una ruta: Ask me every time
[Preguntarme siempre], Always avoid toll roads [Evitar los peajes siempre] o Don’t avoid toll roads
[No evitar nunca los peajes]. Pinche en una opción para seleccionarla y luego pinche en Done [Hecho].
70
Page 71

GPs
MANUAL DE USUARIO - versión 4
4�8� ¿CóMO ReCalCUlaR Una RUTa (ObsTáCUlOs/TRáfICO)?
Cada vez que se desvíe de la ruta aconsejada, el GPS calculará automáticamente una nueva ruta en base
a su posición actual. ARCHOS también le permite evitar el tráco y los obstáculos en el camino.
EVITAR EL TRÁFICO
•
Para ello, antes deberá habilitar el TMC (Canal de Mensajes de Tráco) (véase el capítulo 6: Otras funciones).
•
Por defecto, si el ARCHOS recibe información sobre incidentes de tráco en su ruta actual,
calculará automáticamente una nueva ruta que evite dichos problemas.
EVITAR LOS OBSTÁCULOS DEL CAMINO
3
1
2
1.
Pinche en la esquina inferior derecha de la pantalla de navegación para acceder al menú rápido.
2.
Pinche en
3.
Luego, indique a qué distancia se encuentra el obstáculo. El GPS recalculará automáticamente
una
Avoid Roadblock [Evitar obstáculos] .
ruta para evitar dicho obstáculo.
71
Page 72

GPs
MANUAL DE USUARIO - versión 4
5� desCRIPCIón de lOs Menús
5�1� Menú RáPIdO
Pinche en la esquina inferior derecha de la pantalla de navegación para acceder al menú rápido.
Aparecerán 3 opciones principales:
Show Important Places [Mostrar PDIs] *: muestra los dos puntos de interés de su ruta más cercanos.
•
Avoid Roadblock [Evitar obstáculos] *: permite especicar un obstáculo. El ARCHOS recalculará
•
automáticamente la ruta para evitar dicho obstáculo.
•
Memorize Position [Memorizar posición]: guarda su posición actual en el historial.
* sólo si ya ha calculado una ruta.
5�2� Menú PRInCIPal
En la pantalla de navegación, pinche en cualquier lugar
•
del mapa para entrar en el menú principal.
Use las echas para pasar de una pantalla a otra del
•
men
ú principal.
La casilla en la esquina superior izquierda indica el lugar
•
donde se encuentra dentro del sistema de menús.
72
Page 73

GPs
MANUAL DE USUARIO - versión 4
NAVIGATE TO... [DIRIGIRSE A...]
En este menú podrá seleccionar su destino. Puede escoger entre varias opciones:
Address [Dirección]: introduzca una dirección (país, ciudad, calle, número)
•
Favorite [Favorito]: seleccione un destino de entre sus favoritos
•
History [Historial]: seleccione un destino de los guardados en el historial
•
Point of Interest [Punto de interés]: escoja un punto de interés como destino
•
ZIP Code [Código postal]: introduzca la dirección de destino utilizando un código postal
•
Home [Domicilio]: escoja su domicilio como destino
•
Point on Map [Punto en el mapa]: elija su destino seleccionándolo en el mapa
•
Enter GPS position [Introducir posición GPS]: introduzca las coordenadas GPS (longitud, latitud)
•
City Center [Centro urbano]: le lleva al centro de una ciudad
•
POI in City [PDI en la ciudad]: para ir a un punto de interés de una determinada ciudad
•
BROWSE MAP [EXPLORAR MAPA]
Esta función permite buscar un determinado lugar en el mapa. Puede ir arrastrando el mapa mediante la
pantalla táctil. Para acercar o alejar la imagen, utilice los botones de aceleración del reproductor ARCHOS
(ARCHOS 605), o la barra de aumento (a la derecha de la pantalla).
Si selecciona
•
•
•
•
•
Options [Opciones], verá los siguientes ítems:
Find... [Encontrar...]: muestra una dirección determinada en el mapa
Show current position [Mostrar posición actual]: muestra su posición actual en el mapa
Show entire route [Mostrar ruta completa]: muestra su ruta calculada en el mapa
Show city [Mostrar ciudad]: muestra una ciudad determinada en el mapa
Show/Hide POIs... [Mostrar/Ocultar PDIs...]: indique los PDIs que desea mostrar en el mapa
Si pincha en el cursor (parte inferior central de la pantalla) podrá seleccionar un método alternativo para llegar a
su destino.
ALTERNATIVE ROUTE [RUTA ALTERNATIVA]
En este menú podrá calcular una ruta alternativa para el caso de que encuentre algún incidente inesperado
durante el trayecto (tráco, obstáculos, etc.). Sólo estará disponible si ya ha calculado una ruta.
Compute alternative [Calcular alternativa]: genera una ruta nueva utilizando diferentes caminos
•
Avoid next… [Evitar próximos...]: permite especicar un obstáculo. El ARCHOS recalculará automáti-
•
camente la ruta para evitar dicho obstáculo.
Travel via… [Pasar por este punto]: si desea que su ruta pase por un determinado lugar (ciudad,
•
dirección, etc.)
Reset to original [Recuperar original]: anula todos los cambios realizados en este menú
•
73
Page 74

GPs
MANUAL DE USUARIO - versión 4
SETTINGS [AJUSTES]
Set to 2D (at) view / Set 3D view [Activar vista desde arriba / Activar vista en 3D]: cambia entre los
•
modos de visualización en 2D y 3D
•
Set night colors / Set automatic colors / Set daylight colors [Colores nocturnos / Colores automá-
ticos / Colores diurnos]: seleccione su modo de color preferido
•
Disable sounds / Enable sounds [Desactivar sonidos / Activar sonidos]: activa y desactiva todos
los sonidos (voz, advertencias, etc.)
•
Volume settings [Ajustes de volumen]: permite indicar un volumen distinto a velocidad baja y alta
•
GPS Logs [Registros GPS]: graba su trayecto para poder reproducirlo más adelante
•
Planning preferences [Preferencias de ruta]: sirve para especicar los criterios de cálculo de ruta:
el camino más rápido o evitar las autopistas
•
Toll charge settings [Ajustes de peajes]: elija si quiere evitar o no las carreteras con peaje
•
Advanced settings [Opciones avanzadas]: le permiten ajustar varios parámetros (permitir o no
autozoom, evitar cambios de sentido, etc.). También puede escoger el tipo de indicadores de distancia
y hora que se muestran en la pantalla de navegación.
•
Left handed / Right handed [Zurdo / Diestro]: cambia entre los modos de visualización para zurdos
y diestros
•
Keyboard settings [Ajustes de teclado]: le permite escoger la disposición de teclado más cómoda
para usted (Abcd, Qwerty o Azerty)
•
Regional settings [Ajustes regionales]: para seleccionar las unidades de distancia (km o millas)
y coordenadas
•
Set language [Establecer idioma]: seleccione el idioma que se usará en la pantalla
•
Set voice [Elegir voz]: seleccione el idioma de las instrucciones vocales
•
Set home location [Especicar domicilio]: le permite especicar la dirección de su casa
•
Quick Guides [Guía rápida]: varias guías rápidas que describen brevemente las funciones principales
del GPS
•
About ARCHOS GPS [Acerca de ARCHOS GPS]: información sobre el programa GPS
•
Signpost settings [Ajuste de señalización]: sirve para indicar cómo quiere que aparezcan las señales
de dirección en la pantalla de navegación
TRAFFIC [TRÁFICO]
En este menú podrá establecer la función de información de tráco. La antena TMC (Canal de Mensajes
de Tráco) deberá estar conectada al soporte para coche. Para obtener más información, consulte el capítulo
6: Otras funciones.
•
Show all incidents [Mostrar todos los incidentes]: muestra todos los incidentes de tráco en el mapa
•
Incidents on route [Incidentes en la ruta]: muestra todos los incidentes de tráco a lo largo de su ruta
•
Optimize route [Optimizar ruta]: el ARCHOS generará una nueva ruta para evitar los incidentes de tráco.
Options [Opciones]: permite cambiar diversos parámetros (recálculo automático de ruta, actualiza-
•
ción automática, etc.)
74
Page 75
GPs
MANUAL DE USUARIO - versión 4
ROUTE [RUTA]
En este menú podrá ver diversa información sobre la ruta calculada. Sólo estará disponible si ya ha calculado
una ruta.
Show route instructions [Mostrar instrucciones]: muestra los distintos giros que incluye su ruta
•
Show route as images [Mostrar como imagen]: muestra su ruta en forma de presentación de imáge-
•
nes manual
•
Show route summary [Mostrar resumen ruta]: muestra su ruta en un mapa con información del trayecto
Show route demo [Reproducir demostración]: muestra un vídeo de su trayecto
•
Show on map [Mostrar en el mapa]: muestra su ruta en un mapa ampliable
•
Cancel route [Cancelar ruta]: anula la ruta calculada
•
ITINERARY [ITINERARIO]
En este menú podrá seguir un itinerario ya creado o establecer un itinerario con varios puntos de parada.
•
Seleccione la ruta actual, un itinerario creado previamente, o cree un itinerario nuevo pulsando
botón New [Nuevo].
el
Puede empezar a añadir nuevos puntos a su itinerario con el botón
•
Add [Añadir]. El botón Options
[Opciones] le permite optimizar su itinerario, guardarlo o borrarlo.
•
Todo punto añadido al trayecto quedará reejado en el listado. Al pinchar en cualquiera de las líneas
del
listado, aparecerán las siguientes opciones: Set as unvisited [Marcar como no visitado],
Set as start [Establecer punto partida], Add nearby POI [Añadir PDI cercano], Delete [Borrar],
Move up [Mover hacia arriba], Move down [Mover hacia abajo].
•
Pinche en
Done [Hecho] cuando haya terminado de crear su itinerario. Pinche en Yes [Sí] para
calcular la ruta.
MANAGE POI [ADMINISTRAR PDIS]
Puntos de interés (PDI) son, por ejemplo, restaurantes, hoteles o gasolineras. Aparecen como símbolos en
el mapa a lo largo de un trayecto. Con este menú podrá administrar los puntos de interés: añadir puntos
nuevos, escoger los que quiera mostrar, etc.
Add POI... [Añadir PDI]: para añadir un nuevo punto de interés (por ejemplo, la casa de un amigo)
•
Edit POI name [Editar nombre de PDI]: permite modicar el nombre de un PDI
•
Delete POI [Borrar PDI]: permite borrar un PDI
•
Delete POI category [Borrar categoría]: sirve para borrar una categoría de PDIs
•
Show/hide POIs [Mostrar/Ocultar PDIs]: permite seleccionar los PDIs que desea mostrar en el mapa
•
Warn when near POI [Alertar al acercarse]: permite activar una advertencia sonora cuando se acerca
•
a una determinada distancia de un PDI especíco (por ejemplo, al aproximarse a un restaurante)
75
Page 76

GPs
MANUAL DE USUARIO - versión 4
GPS STATUS [ESTADO DEL GPS]
En este menú podrá ver el número de satélites de los que el ARCHOS recibe señal, así como la intensidad
de dichas señales. Se requiere un mínimo de 3 señales verdes (válidas) para que el ARCHOS pueda localizar
su posición y calcular una ruta.
MEMORIZE POSITION [MEMORIZAR POSICIÓN]
Pinche en este icono para guardar su posición actual en el historial.
EXTRAS
En este menú encontrará varias herramientas, como un reloj mundial, una calculadora, un conversor
de unidades e información viaria de determinados países.
EXIT [SALIR]
Pinche en este icono si desea salir de la aplicación GPS y volver a la pantalla principal del ARCHOS.
76
Page 77
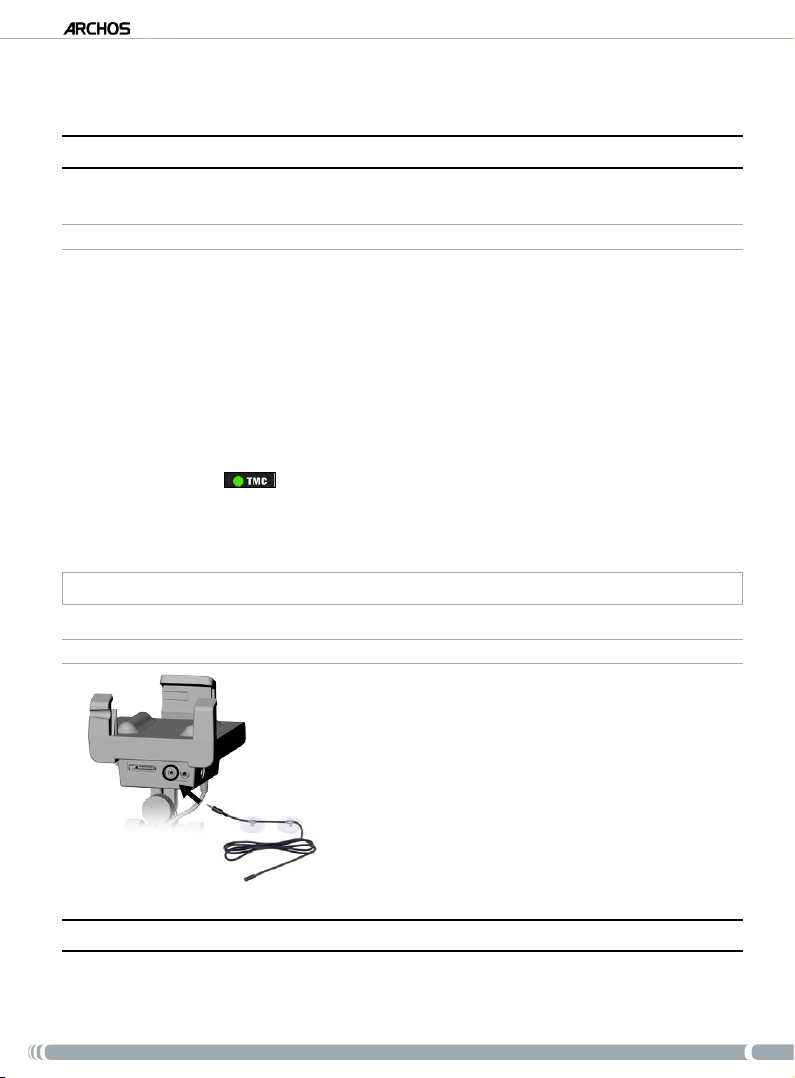
GPs
MANUAL DE USUARIO - versión 4
6� OTRas fUnCIOnes
6�1� Canal de Mensajes de TRáfICO (TMC)
Si compró el aparato y el adaptador por separado, esta función está desactivada.
¿QUÉ ES EL TMC?
•
Su ARCHOS GPS incluye un receptor TMC. Se trata de un sistema que permite al dispositivo GPS
mantenerse al tanto de las condiciones de tráco actuales. Dependiendo del país y el lugar donde
se encuentre, podrá sintonizar emisoras de radio FM que además de su programación habitual
transmitan información de tráco. Alguna información de tráco se ofrece gratuitamente, mientras
que otros servicios de información, que suelen ofrecer una información de tráco más amplia,
deben ser abonados.
•
Con la antena TMC incluida, su ARCHOS GPS recibirá los datos de tráco gratuitos que se ofrezcan
en
su país o región. Consulte el sitio web de ARCHOS para ver qué otras opciones TMC de pago
están disponibles. TMC no es un servicio de ARCHOS, por lo que la abilidad de la información
proporcionada es responsabilidad del proveedor de dichos servicios.
•
Una vez instalada la antena, y si circula por una zona con transmisiones TMC, el indicador TMC
verde aparecerá así
captado la señal TMC y está incorporándola a la ruta planicada. Consulte la sección de ajustes para
decidir la forma en que el dispositivo gestionará la información TMC. Por defecto, si el ARCHOS GPS
localiza problemas de tráco en su ruta actual, calculará automáticamente una nueva ruta que evite
dichos problemas.
Nota: En determinados casos, la mejor ruta puede ser la que había sido propuesta la primera vez.
(en la pantalla de navegación principal), indicando que el dispositivo ha
INSTALACIÓN DE LA ANTENA TMC
•
Acople la antena TMC al conector TMC, en la parte
inferior del soporte para coche.
•
Luego, coloque el cable de tal forma que no interera
c
on su visión o capacidad para conducir con seguridad.
•
Los parabrisas termorreectantes podrían obstaculizar
la
recepción. Consulte la documentación del coche
para saber si su parabrisas dispone de zonas sin dicha
propiedad térmica.
6�2� OPCIOnes adICIOnales
En su cuenta personal en línea ARCHOS (se crea al registrar el producto: www.archos.com/register) encontrará
opciones extra gratis y de pago, como una mayor variedad de puntos de interés, mapas actualizados, etc.
77
Page 78

GPs
MANUAL DE USUARIO - versión 4
InfORMaCIón leGal
1) Garantía y responsabilidad limitadas
Este producto incluye una garantía limitada y ofrece al comprador original el recurso a vías especícas en el caso de que dicho producto no se
ajuste
a la garantía limitada. La responsabilidad del fabricante puede verse limitada si así lo estipula el contrato de compraventa.
En general, y a título indicativo, el fabricante no se hará responsable de los daños en el producto provocados por desastres naturales, fuego,
descarga estática, utilización o uso incorrectos, negligencia, manejo o instalación inadecuados, reparación no autorizada, alteración o accidente.
En ningún caso, el fabricante se hará responsable de la pérdida de datos almacenados en un soporte de disco.
EL FABRICANTE NO SE HARÁ RESPONSABLE DE LOS DAÑOS EXTRAORDINARIOS, FORTUITOS O INDIRECTOS, AUN HABIENDO SIDO
INFORMADO PREVIAMENTE DE DICHA POSIBILIDAD.
El o l
os cedentes de la licencia ARCHOS excluyen toda garantía, expresa o implícita, en la que se incluya, sin ninguna restricción, las garantías implícitas
de aprovechamiento y adecuación a un n especíco del producto bajo licencia. El o los cedentes de la licencia ARCHOS no justican, garantizan ni
f
ormulan observación alguna con respecto a la utilización o al resultado de la utilización del producto bajo licencia, en cuanto a su corrección, exactitud,
abilidad u otras circunstancias. El consumidor asumirá todo el riesgo que se derive del rendimiento del producto bajo licencia. Algunas jurisdicciones no
permiten la exclusión de las garantías implícitas. En dicho caso, las exclusiones anteriormente mencionadas no serían de aplicación.
Bajo ningún concepto, el o los cedentes de la licencia ARCHOS, y sus directores, ejecutivos, empleados o agentes (llamados cedentes de la licen-
cia ARCHOS) se harán responsables de los daños indirectos, imprevistos o fortuitos (entre los que se incluye la pérdida de benecios, la interrupción
de negocio, le pérdida de información y similares) consecuencia de la utilización o de la incapacidad de utilizar los productos bajo licencia,
aun cuando el cedente de la licencia ARCHOS reconozca la posibilidad de tales perjuicios. Las restricciones anteriores no serán de aplicación en
el caso de que la jurisdicción local no autorice la exclusión o limitación de los daños indirectos o imprevistos.
Consulte su contrato de compraventa para una relación completa de los derechos de garantía, recursos y limitación de responsabilidad. Además,
la garantía no cubrirá lo siguiente:
1. Daños o problemas que resulten del uso inapropiado, abuso, accidente, alteración o corriente eléctrica o voltaje incorrectos.
2. Cualquier producto cuyo sello de garantía o etiqueta con el número de serie hayan sido alterados o dañados.
3. Cualquier producto sin garantía o etiqueta de número de serie.
4. Pilas y otros artículos fungibles suministrados con el dispositivo o en el interior del mismo.
El usuario nal se compromete a usar en todo momento este producto conforme a su utilidad original, quedando terminantemente prohibido realizar cualquier
modicación técnica que pudiera vulnerar los derechos de terceros. Cualquier modicación en el hardware, software o carcasa del producto deberá ser aprobada por escrito por ARCHOS. Se considerarán sin efecto las cláusulas de garantía de cualesquiera productos que hayan sido modicados sin autorización.
2) Sistema de Posicionamiento Global
El Sistema de Posicionamiento Global es un sistema de navegación por satélite dirigido y controlado por el gobierno de Estados Unidos, que es
el responsable de su precisión y abilidad. Cualquier cambio en el sistema de señales o en las condiciones medioambientales podría inuir en el
funcionamiento del dispositivo ARCHOS GPS. ARCHOS no se hará responsable de la precisión o abilidad del sistema de señalización GPS.
3) Restricciones legales a su instalación en parabrisas
Algunos estados de Estados Unidos y otros países disponen de leyes relativas a la instalación de dispositivos en el parabrisas u otras supercies acristaladas
de un vehículo. Consulte la legislación de su estado o país en esta materia. El Código de circulación de California, sección 26708 (a) (1) declara que “Ninguna
persona deberá conducir un vehículo a motor con un objeto o material colocado, expuesto, instalado, pegado o acoplado en el parabrisas o retrovisores laterales o trasero.” Los conductores en California no podrán utilizar el soporte/receptor de ventosa en su parabrisas o retrovisores laterales o trasero. ARCHOS
declina toda responsabilidad por cualesquiera multas, penas o daños que pudieran derivarse del incumplimiento de esta norma. Nota: esta sección del Código
de circulación de California también se aplica a los conductores que hayan obtenido su permiso en otros estados/países y conduzcan en California.
4) Derechos de propiedad intelectual
El software incluido es propiedad de ARCHOS o de sus suministradores y está amparado por las leyes en materia de copyright y propiedad intelect
ual. Los únicos derechos del cliente con respecto a cualquier software ARCHOS incluido con los Productos serán los estipulados en las condiciones
de licencia del software de ARCHOS. La titularidad de cualquier software ARCHOS recaerá en ARCHOS. El Cliente reconoce que ARCHOS mantiene
la titularidad de todos los derechos de propiedad y propiedad intelectual, trabajos de autoría, secretos comerciales y similares en todos los aspectos
del Producto. El Cliente y sus aliados y subcontratistas se comprometen a no utilizar técnicas de ingeniería inversa en ninguna faceta del Software y/
o los Productos suministrados en virtud de este contrato, comprometiéndose a abonar los daños correspondientes si tales acciones tuvieran lugar.
5) Copias y copyright del Software GPS
El Software GPS (incluida cualquier copia del mismo) es propiedad de ARCHOS o de sus suministradores y está protegido por la normativa en materia de patentes y propiedad intelectual de Estados Unidos, Canadá, Europa, Brasil y Australia, así como por lo dispuesto en los tratados internacionales. El cliente tiene licencia
para utilizar una copia del Software, pero no es el propietario de dicha copia. El cliente podrá hacer una copia de seguridad del software o una copia para su
archivo personal. Fuera de estos supuestos, queda prohibida la copia del software, excepto que así lo autorice la normativa aplicable, así como también la de los
materiales escritos que acompañan al Software. Por la presente, ARCHOS se reserva todos los derechos no atribuidos explícitamente en el contrato de licencia.
Para ver la información completa y actualizada sobre el copyright y el contrato de licencia para el usuario final (EULA), visite el sitio web de ARCHOS
(www.archos.com).
6) Avisos de copyright
©
2008 ARCHOS SA, Francia
Todas las marcas comerciales son propiedad de sus respectivos titulares.
Data Source © 2008 Tele Atlas N.V. Basado en:
Topograsche ondergrond Copyright © dienst voor het kadaster en de openbare registers, Apeldoorn 2004.
©
Ordnance Survey of Northern Ireland.
© IGN France.
© Swisstopo.
© BEV, GZ 1368/2003.
© Geonext/DeAgostini.
© Norwegian Mapping Authority, Public Roads Administration / © Mapsolutions
© DAV
Este producto incluye datos cartográcos con licencia de Ordnance Survey y la autorización del interventor de la Editorial y Papelería de Su
Majestad. © Copyright de la Corona y/o derecho de base de datos 2008. Reservados todos los derechos. Número de licencia 100026920.
Data Source © 1984 – 2008 Tele Atlas North America. Inc. Reservados todos los derechos.
78
Page 79

GPs
Canadian data © DMTI Spatial. Los datos de secciones del mapa canadiense han sido reproducidos bajo licencia de Su Majestad la Reina,
Soberana de Canadá, con la autorización de Natural Resource Canada. Datos sobre Puntos de Interés de Info USA. Copyright 2006.
Data Source © Whereis® 2006 UBD® y Sensis® son marcas registradas de Telstra® Corporation Limited, usadas bajo licencia.
© 2008 Tele Atlas North America, Inc. / Geographic Data Technology, Inc. Reservados todos los derechos. Este material ha sido registrado y está
supeditado a las leyes de protección del copyright y a otros derechos de propiedad intelectual, siendo propiedad o licencia concedida a Tele Atlas
North America, Inc. / Geographic Data Technology, Inc. El uso de este material está supeditado a las condiciones estipuladas en el contrato de
licencia. Usted será responsable de cualquier copia o divulgación no autorizada de este material.
© InfoUSA Todos los derechos reservados
7) EULA (Contrato de licencia para el usuario nal)
a)
La licencia de usuario se concede exclusivamente para un uso personal u operaciones internas del Usuario Final y no para su reventa, sublicencia
o uso comercial.
b) Los productos bajo licencia incluyen información condencial de Tele Atlas (TA) y otros asociados, quedando terminantemente prohibido
revelar dicha información a terceras partes.
c) Queda terminantemente prohibido realizar copias no autorizadas del software o datos bajo licencia.
d) Queda terminantemente prohibido quitar u ocultar cualquier aviso de marca registrada, copyright o leyenda restrictiva.
e) Los compromisos y obligaciones reconocidos por el Usuario Final por la presente están destinados al benecio directo de Tele Atlas y ARCHOS,
y podrán imponerse por cualesquiera de estas entidades contra el Usuario Final.
f) NI TELE ATLAS (TA) NI SUS SUMINISTRADORES PODRÁN HACERSE RESPONSABLES FRENTE AL ABAJO FIRMANTE POR CUALESQUIERA
DAÑOS FORTUITOS, EMERGENTES, ESPECIALES, INDIRECTOS O EJEMPLARES DERIVADOS DE ESTE CONTRATO, INCLUYENDO LA PÉRDIDA DE
BENEFICIOS O LOS COSTES DE COBERTURA, LA PÉRDIDA FUNCIONAL O LA INTERRUPCIÓN DE NEGOCIO O SIMILARES, AUN HABIENDO
SIDO NOTIFICADO DE LA POSIBILIDAD DE TALES DAÑOS. SIN PERJUICIO DE LO ESPECIFICADO EN LA PRESENTE, TA NO ASUMIRÁ NINGUNA
RESPONSABILIDAD MONETARIA FRENTE AL ABAJO FIRMANTE POR NINGUNA CAUSA (INDEPENDIENTEMENTE DE LA FORMA DE ACCIÓN)
DERIVADA O RELACIONADA CON ESTE CONTRATO.
g) LOS PRODUCTOS BAJO LICENCIA SE PROPORCIONAN EN EL ESTADO ACTUAL Y CON TODOS SUS DEFECTOS, Y TA Y SUS SUMINISTRADORES
EXCLUYEN EXPRESAMENTE TODA CLASE DE GARANTÍAS, EXPRESAS O IMPLÍCITAS, INCLUYENDO, A TÍTULO ENUNCIATIVO, LAS GARANTÍAS
IMPLÍCITAS DE NO VULNERACIÓN DE DERECHOS DE TERCEROS, COMERCIABILIDAD, CALIDAD SATISFACTORIA, EXACTITUD, TÍTULO E
IDONEIDAD PARA UN FIN DETERMINADO. LOS CONSEJOS ORALES O ESCRITOS O LA INFORMACIÓN PROPORCIONADA POR TA O
CUALQUIERA DE SUS AGENTES, EMPLEADOS O PROVEEDORES TERCEROS NO TENDRÁ CARÁCTER DE GARANTÍA, Y EL LICENCIATARIO
NO PODRÁ DEPENDER DE TALES CONSEJOS O INFORMACIONES. ESTA EXCLUSIÓN DE GARANTÍAS ES UNA CONDICIÓN ESENCIAL DEL
CONTRATO.
H) El Usuario Final reconoce que el uso de los Productos bajo licencia con mapas de terceros distintos a TA puede provocar variaciones entre el
lugar mostrado en el mapa y la localización real del usuario.
i) El Usuario Final se compromete a no mostrar o permitir el acceso a las coordenadas de latitud y longitud reales.
j) Usuarios del gobierno de EE.UU.
Si el Usuario Final es una agencia, departamento u otra entidad del gobierno de Estados Unidos, o está nanciado total o parcialmente por el
gobierno de Estados Unidos, quedará restringido el uso, la reproducción, la publicación, la modicación, la divulgación o la transferencia de este pro-
d
ucto comercial y de la documentación adjunta, de conformidad con los derechos LIMITADOS o RESTRINGIDOS tal y como se describen en DFARS
252.227-7014(a)(1) (JUN 1995) (DOD denición de programa informático comercial), DFARS 227.7202-1 (DOD política sobre programas informáticos comerciales), FAR 52.227-19 (JUN 1987) (cláusula sobre programas informáticos comerciales para agencias civiles), DFARS 252.227-7015
(NOV 1995) (DOD cláusula sobre artículos comerciales y datos técnicos); FAR 52.227-14 Alterna I, II y III ( JUN 1987) (cláusula sobre programas
informáticos no comerciales y datos técnicos para agencias civiles); y/o FAR 12.211 y FAR 12.212 (adquisiciones de artículos comerciales), en su
caso. En caso de conicto entre cualquiera de las disposiciones FAR y DFARS citadas más arriba y esta Licencia, prevalecerán aquéllas que ofrezcan
mayores restricciones a los derechos del gobierno. El contratante/fabricante es Tele Atlas North America, Inc., 11 Lafayette Street, Lebanon, NH
03766-1445. Teléfono: 603.643. 0330. Los productos bajo licencia están protegidos por ©1984-2008 por Tele Atlas North America, Inc. TODOS LOS
DERECHOS RESERVADOS. A los nes de cualquier disposición de divulgación pública bajo la legislación federal, estatal o local, queda acordado que
el producto bajo licencia constituye un secreto comercial y un producto comercial registrado no sujeto a divulgación alguna.
Si el Usuario Final es una agencia, departamento u otra entidad del gobierno de cualquier Estado, del gobierno de Estados Unidos o de cualquier otra
entidad pública o nanciada total o parcialmente por el gobierno de Estados Unidos, el Usuario Final se compromete por la presente a proteger los
Productos bajo licencia de su divulgación pública y a calicar los Productos bajo licencia exentos de cualquier estatuto, ley, reglamento o código,
i
ncluyendo la Sunshine Act, Public Records Act, Freedom of Information Act, o equivalentes, que permita el acceso público y/o la reproducción o uso
de los Productos bajo licencia. En el caso de que tal exoneración contravenga cualquiera de dichas disposiciones legales, este EULA se considerará
incumplido y se rescindirán cualesquiera derechos de posesión de copias o de utilización de los Productos bajo licencia, considerándose el contrato
nulo y sin efecto. Toda copia de los Productos bajo licencia en posesión del licenciatario deberá ser destruida inmediatamente. Si un tribunal de una
jurisdicción competente considera esta disposición nula e inaplicable, total o parcialmente, por cualquier razón, este contrato EULA se considerará
rescindido, nulo y sin efecto, en su totalidad, y cualesquiera copias de los Productos bajo licencia deberán ser destruidas de forma inmediata.
8) Precauciones y advertencias
Para prevenir cualquier riesgo de choque eléctrico, sólo un técnico cualicado podrá abrir este dispositivo. Antes de abrir el dispositivo, deberá
desconectar
el cable de alimentación. Protéjalo del fuego y de sacudidas eléctricas, guardándolo en un lugar seco y sin humedad.
9) Seguridad del conductor
Par
a una conducción segura, el conductor no podrá utilizar el dispositivo con el coche en movimiento. Obedezca la legislación vigente en su país
o jurisdicción que regule la utilización de dispositivos electrónicos por el conductor de un automóvil.
10) Consideraciones medioambientales
La protección del medio ambiente es una preocupación básica de ARCHOS. Para traducir esto en acciones concretas, ARCHOS
ha querido introducir una serie de métodos tendentes a favorecer el respeto al medio ambiente en la totalidad del ciclo de
sus productos, de la fabricación al uso, pasando por su eliminación nal.
Baterías: Si su producto contiene un paquete de baterías extraíble, recíclelo en un punto de recogida especíco para baterías usadas.
El Producto: El símbolo de un contenedor con una cruz signica que este producto entra en la categoría de equipamiento eléctrico/electrónico. Los produc-
t
electrónico ARCHOS en un contenedor de basura normal. Asimismo, las actuales directivas europeas estipulan que este dispositivo debe ser recogido:
- En los lugares de distribución en caso de compra de un producto electrónico similar.
- En las zonas de eliminación de residuos locales (centros de eliminación y tratamiento de residuos, sistema de separación de basura, etc.)
Al hacer esto, estará participando activamente en la reutilización y el reciclado de aparatos electrónicos y eléctricos usados que, de otro modo,
podrían perjudicar el medio ambiente y la salud humana.
os de este tipo contienen sustancias potencialmente peligrosas para el medio ambiente y la salud humana. Por tanto, no deberá desechar el dispositivo
MANUAL DE USUARIO - versión 4
79
Page 80

BENUTZERHANDBUCH - VERSION 4
!
▲
GPs
Die TMC (Trafc Message Channel) Funktion ist nur verfügbar, wenn Sie eine Bundle
(ein ARCHOS Player und der GPS Carholder) erworben haben. Wenn Sie nur den
GPS Carholder als Zubehör erworben haben, ist diese Funktion nicht verfügbar. Alle
anderen Funktionen sind identisch.
InhalTsveRzeIChnIs
WIChTIGe sICheRheITshInWeIse beI vORsChRIfTsMÄssIGeM GebRaUCh �������81
1� eInfühRUnG ����������������������������������������������������������������������������������������������������������������������������������������82
1.1. REGISTRIEREN SIE IHR PRODUKT! . . . . . . . . . . . . . . . . . . . . . . . . . . . . . . . . . . . . . . . . . . 82
1.2. EINFÜHRENDE ANMERKUNG VON ARCHOS... . . . . . . . . . . . . . . . . . . . . . . . . . . . . . . . . . . 82
1.3. REFERENZEN AUF NOTWENDIGE INFORMATIONEN . . . . . . . . . . . . . . . . . . . . . . . . . . . . . . 82
1.4. ARCHOS GPS-ZUBEHÖR . . . . . . . . . . . . . . . . . . . . . . . . . . . . . . . . . . . . . . . . . . . . . . . . . . .83
1.5. BESCHREIBUNG DER KFZ-HALTERUNG . . . . . . . . . . . . . . . . . . . . . . . . . . . . . . . . . . . . . . .83
2� InsTallaTIOn ������������������������������������������������������������������������������������������������������������������������������������85
2.1. INSTALLATIONS-DVD . . . . . . . . . . . . . . . . . . . . . . . . . . . . . . . . . . . . . . . . . . . . . . . . . . . . .85
2.2. ANBRINGUNG DES GPS-GERÄTS IM FAHRZEUG . . . . . . . . . . . . . . . . . . . . . . . . . . . . . . . .85
3� eRsTe sChRITTe ������������������������������������������������������������������������������������������������������������������������������87
3.1. AUFRUFEN DER GPS-ANWENDUNG . . . . . . . . . . . . . . . . . . . . . . . . . . . . . . . . . . . . . . . . . .87
3.2. ERSTE EINRICHTUNG . . . . . . . . . . . . . . . . . . . . . . . . . . . . . . . . . . . . . . . . . . . . . . . . . . . . .87
3.3. HAUPTNAVIGATIONSFENSTER . . . . . . . . . . . . . . . . . . . . . . . . . . . . . . . . . . . . . . . . . . . . . .88
3.4. TASTENFUNKTIONEN . . . . . . . . . . . . . . . . . . . . . . . . . . . . . . . . . . . . . . . . . . . . . . . . . . . . .89
3.5. BEENDEN DER GPS-ANWENDUNG . . . . . . . . . . . . . . . . . . . . . . . . . . . . . . . . . . . . . . . . . . . 89
4� hÄUfIGsTe anWendUnGsfÄlle �������������������������������������������������������������������������������������������90
4.1. WIE GELANGE ICH ZU EINER BESTIMMTEN ADRESSE? . . . . . . . . . . . . . . . . . . . . . . . . . .90
4.2. WIE SPEICHERE ICH EINE ZIELADRESSE ALS FAVORITENEINTRAG? . . . . . . . . . . . . . . . . 91
4.3. WIE SPEICHERE ICH MEINE HEIMATADRESSE? . . . . . . . . . . . . . . . . . . . . . . . . . . . . . . . . . 92
4.4. WIE GELANGE ICH ZU EINER GESPEICHERTEN ZIELADRESSE? . . . . . . . . . . . . . . . . . . . . . 93
4.5. WIE GELANGE ICH ZU EINEM POINT OF INTEREST (POI)? . . . . . . . . . . . . . . . . . . . . . . . . . 94
4.6. WIE ÄNDERE ICH DEN ANZEIGEMODUS? . . . . . . . . . . . . . . . . . . . . . . . . . . . . . . . . . . . . . .95
4.7. WIE RICHTE ICH VORGABEN FÜR AUTOBAHNEN/MAUTPFLICHTIGE STRASSEN EIN? . . . 96
4.8. WIE BERECHNE ICH EINE STRECKE NEU (HINDERNISSE/VERKEHR)? . . . . . . . . . . . . . . . . 97
5� besChReIbUnG deR Menüs ������������������������������������������������������������������������������������������������������98
5.1. KURZMENÜ . . . . . . . . . . . . . . . . . . . . . . . . . . . . . . . . . . . . . . . . . . . . . . . . . . . . . . . . . . . . . 98
5.2. HAUPTMENÜ . . . . . . . . . . . . . . . . . . . . . . . . . . . . . . . . . . . . . . . . . . . . . . . . . . . . . . . . . . .98
6� WeITeRe fUnkTIOnen ����������������������������������������������������������������������������������������������������������������103
6.1. TRAFFIC MESSAGE CHANNEL (TMC) . . . . . . . . . . . . . . . . . . . . . . . . . . . . . . . . . . . . . . . . 103
6.2. ZUSÄTZLICHE OPTIONEN . . . . . . . . . . . . . . . . . . . . . . . . . . . . . . . . . . . . . . . . . . . . . . . . . 103
ReChTlIChe hInWeIse ���������������������������������������������������������������������������������������������������������������������104
80
Page 81

GPs
BENUTZERHANDBUCH - VERSION 4
WIChTIGe sICheRheITshInWeIse
beI vORsChRIfTsMÄssIGeM
GebRaUCh
Bedienen Sie das GPS-Gerät nicht während des Fahrens, um sich selbst und
andere Personen keinem Unfallrisiko auszusetzen.
!
▲
Schauen Sie nur dann auf das Display, wenn die aktuelle Fahrsituation dies ohne
Sicherheitsrisiko zulässt. Verfolgen Sie die Displaydarstellung beim Fahren nicht,
!
▲
!
▲
!
▲
wenn Sie AR
Abspielen von Mediendateien auf einem an der Windschutzscheibe befestigten oder
n Sichtweite des Fahrers bendlichen Gerätes widerspricht u. U. geltenden Gesetzen.
i
Informieren Sie sich über die in Ihrem Bundesland/Kanton geltenden Gesetze.
Verkehrs- und Hinweiszeichen auf den Straßen sind gegenüber den GPSNavigationsanweisungen absolut vorrangig.
Beachten Sie bei der Montage des GPS-Gerätes, dass dadurch die Steuerung
des Fahrzeugs nicht beeinträchtigt werden darf. Die Haftfähigkeit des Saugfußes
wird durch Feuchtigkeit, Temperatur und Zeitdauer beeinusst. Die Oberäche
sollte
sen. Zu den Sicherheitsaspekten zählen auch eine geeignete Platzierung und
eine sichere Kabelführung, sodass sich Kabel nicht im Lenkrad oder anderen
beweglichen Steuerelementen verfangen. Achten Sie bei der Montage darauf,
dass niemand auch nicht bei einem Unfall (Montage vor einem Airbag) durch das
Gerät Schaden nehmen kann.
CHOS GPS im regulären Multimedia- oder Videomodus betreiben. Das
für eine sichere Befestigung mindestens 15 °C (60 °Fahrenheit) aufwei-
!
▲
!
▲
!
▲
Das GPS-Gerät wird in keinem Fall alle aktuellen Änderungen umfassen. Deshalb
sollten Sie sich niemals ausschließlich auf die GPS-Informationen, beispielsweise
bezüglich der Geschwindigkeitsbegrenzung auf bestimmten Straßen, verlassen.
Vertrauen Sie nicht ausschließlich auf die gesprochenen Anweisungen zum
Streckenverlauf. Die Sprachanweisungen „Biegen Sie rechts ab.“ oder „Biegen
Sie links ab.“ werden in unterschiedlichen Entfernungen vor der berechneten
Straßeneinmündung oder Kreuzung gegeben. Sie erhalten die Anweisung
U. zufälligerweise kurz vor einer anderen Straßeneinmündung und damit zu
u.
spät, um ein sicheres Abbiegemanöver zu gewährleisten. Wenn Sie einer sol-
Anweisung spontan Folge leisten, sind Sie u. U. zu einem abrupten und
chen
gefahrvollen Fahrmanöver gezwungen, mit dem Sie sich selbst und andere
Verkehrsteilnehmer gefährden.
Ziehen Sie das Netzkabel aus dem Zigarettenanzünder, wenn Sie das Fahrzeug
parken. Das GPS-Gerät verbraucht auch im parkenden Fahrzeug Energie und
könnte die Autobatterien über einen längeren Zeitraum entladen.
81
Page 82

GPs
BENUTZERHANDBUCH - VERSION 4
1� eInfühRUnG
1�1� ReGIsTRIeRen sIe IhR PROdUkT!
Gehen Sie, sobald Sie Ihr ARCHOS-Produkt der Verpackung entnommen haben, auf www.archos.com/register
und registrieren Sie es. Dadurch erhalten Sie die Zugangsberechtigung für den technischen Support und für
FREI VERFÜGBARE UND KÄUFLICH ERWERBLICHE Optionen und KOSTENLOSE Software-Updates für Ihr
GPS-Gerät.
1�2� eInfühRende anMeRkUnG vOn aRChOs���
Sehr geehrte Kundin, sehr geehrter Kunde,
in diesem Handbuch werden die Installation und der Gebrauch des GPS-Geräts mit Ihrem ARCHOS-
Multimediaplayer erklärt. Weitere Informationen zu den übrigen Funktionen Ihres ARCHOS-Players nden Sie
n der mitgelieferten Kurzbedienungsanleitung oder im vollständigen Handbuch (www.archos.com/manuals).
i
Ein stets ungetrübtes Multimedia-Erlebnis wünscht Ihnen
das ARCHOS-Team.
Alle in diesem Handbuch enthaltenen Informationen sind zum Zeitpunkt der Veröffentlichung aktuell. Aufgrund der
regelmäßig vorgenommenen Aktualisierungen und Produktverbesserungen kann die Software auf Ihrem Gerät bezüglich
des Erscheinungsbildes oder der Funktionalität geringfügig von den Beschreibungen in diesem Handbuch abweichen.
1�3� RefeRenzen aUf nOTWendIGe InfORMaTIOnen
Weitere Funktionen (außer GPS) Ihres ARCHOS Players
Um mehr über weitere Funktionen Ihres ARCHOS Players zu erfahren, lesen Sie bitte
?
die gedruckte Kurzanleitung, die Sie zusammen mit Ihrem ARCHOS Players bekommen
haben, oder schauen Sie auf www.archos.com/manuals nach der neuesten Version des
vollständigen Handbuchs.
Fehlerbehebung
Konsultieren Sie dazu den Abschnitt „Häug gestellte Fragen“ (FAQ) unter
www.archos.com/faq
Technischer Support
Besuchen Sie www.archos.com/support, um Ihre Fragen per E-Mail an unser Support-Team
zu richten (E-Mails in Englisch, Französisch und Deutsch).
USA und Kanada: gebührenfreie Hotline 877-300-8879
Europa: Registrieren Sie bitte das Produkt, bevor Sie sich an den technischen Support
.archos.com/register) wenden.
(www
82
Page 83

GPs
1�4� aRChOs GPs-zUbehöR
In der Verpackung enthaltene GPS-Komponenten:
Installations-DVD: Vor der Anbringung des GPS-Gerätes im Auto müssen Sie die DVD einlegen,
die Sie durch den Installationsprozess führt und die Karten und die aktuelle Software auf dem
ARCHOS-Player installiert.
KFZ-Halterung: Enthält einen GPS-Empfänger, der das GPS-Signal an den ARCHOS-Player
weiterleitet. Der Player MUSS daher in die KFZ-Halterung eingesteckt werden, sodass Ihre
Position und die Navigation zum Ziel ermittelt werden kann.
4 Paar Gummi-Adapter: Passen sich dem ARCHOS-Player optimal an, sodass er fest in der
Halterung steckt. Siehe Abschnitt 2.2.
KFZ-Netzadapter: Damit das GPS-Gerät funktioniert, MUSS der Netzadapter mit der
Fahrzeughalterung und dem Zigarettenanzünder verbunden sein.
2 ARCHOS-Verbindungskabel (eines für ARCHOS 605 und eines für Geräte der nächsten Generation):
Damit das GPS-Gerät funktioniert, MUSS dieses Kabel mit der KFZ-Halterung und dem
ARCHOS-Player verbunden sein.
TMC (Trafc Message Channel)-Antenne: um mit Ihrem ARCHOS-GPS die Verkehrsinformationen
empfangen zu können. Siehe Kapitel 6. Weitere Funktionen. Wenn Sie nur den GPS Carholder
als Zubehör erworben haben, ist diese Funktion nicht verfügbar.
BENUTZERHANDBUCH - VERSION 4
1�5� besChReIbUnG deR kfz-halTeRUnG
5
6
2
3
1
1
4
Position der Gummi-Adapter
1.
Einstellbarer oberer Klemmbügel
2.
(zur
festen Einspannung des ARCHOS-Players)
Klemmbügelfreigabe (zur Entnahme des
3.
ARCHOS-Players)
Saugfuß (Befestigung an der Windschutzscheibe)
4.
Arretierhebel (zur Arretierung des Saugfußes)
5.
Entriegelung (zum Lösen der KFZ-Halterung)
6.
83
Page 84

GPs
BENUTZERHANDBUCH - VERSION 4
8
9
7
Unterseite der KFZ-Halterung
12
ARCHOS-Ansc
7.
ARCHOS-Players)
TMC-Antennenanschluss (für Verkehrsinformationen)
8.
Audio-Ausgang (zum Anschluss an den Audio-
10
11
9.
Ausgang des Autoradios über ein optionales Kabel)
Netzanschluss (zum Anschluss des KFZ-
10.
Netzadapters)
hluss (zum Anschließen des
E
rweiterungsanschluss
11.
Lautsprecher
12.
Positionseinstellung
13.
13
Rückseite der KFZ-Halterung
84
Page 85

GPs
BENUTZERHANDBUCH - VERSION 4
2� InsTallaTIOn
2�1� InsTallaTIOns-dvd
Die Installation von DVD ist nicht notwendig, wenn Sie die Paketversion (Version mit ARCHOS-Player und einer KFZHalterung für GPS) gekauft haben. In diesem Fall wurden Software und Karten bereits auf dem Gerät installiert und
aktiviert. Die DVD kann jedoch für eine spätere Neuinstallation verwendet werden.
Bevor Sie das GPS-Gerät im Auto anbringen, müssen Sie die Installations-DVD in das ent-
•
sprechende Laufwerk Ihres Computers (mit hergestellter Internetverbindung) einlegen.
Die DVD führt Sie durch den Installationsvorgang und die Aktivierung der Karten und
•
installiert die aktuelle Software. Wird die Installationsroutine nach Einlegen der DVD
nicht automatisch gestartet, erweitern Sie den DVD-Knoten im Dateisystem, und
starten Sie die Installationsroutine manuell.
Befolgen Sie die Anweisungen auf dem Display.
•
Der KARTENCODE (auf der DVD-Hülle) wird bei der Installation (und Neuinstallation) benötigt. BEWAHREN
!
▲
SIE DIESEN SORGFÄLTIG AUF!
2�2� anbRInGUnG des GPs-GeRÄTs IM fahRzeUG
Nachdem Sie die Software gemäß der Beschreibung im vorangegangenen Abschnitt eingerichtet haben, können Sie das GPS-Gerät nun in Ihrem Fahrzeug montieren. Beachten Sie dabei die
rechtlichen und Sicherheitshinweise in diesem Handbuch.
Der Empfang des GPS-Signals hängt in hohem Maße von einer optimalen Anbringung im Fahrzeug, von den
Fahrzeugeigenschaften, wie wärmereektierend beschichteten Windschutzscheiben, und der Beschaffenheit der
mgebung, wie Berge und hohe Gebäude, ab.
U
INSTALLATION DER GUMMI-ADAPTER
Verwenden Sie für ARCHOS 605 30 GB und 4 GB die GummiAdapter mit der Aufschrift A, für andere 605er Modelle die GummiAdapter mit der Aufschrift B. Die Gummi-Adapter C und D werden für
ARCHOS-Player der nächsten Generation verwendet.
1
Benutzen Sie Ihren Fingernagel oder einen schar-
1.
fen Gegenstand, um die Schutzlme von den zwei
Klebeoberächen zu entfernen.
Drücken Sie die für Ihren Player geeigneten Abstandshalter
2.
fest auf diese Stellen Ihrer KFZ-Halterung.
WO BEFESTIGE ICH DAS GPS?
•
Dazu eignet sich ein sauberer und sicherer Platz auf der Windschutzscheibe. Da sich die GPS-
Empfangsantenne unter dem Saugfuß bendet, sollte die Halterung ausschließlich an der Windschutzscheibe
a
ngebracht werden, anderenfalls können nur stark abgeschwächte Signale empfangen werden.
Wenn Sie Empfangsstörungen beobachten, sehen Sie in Ihrem Autohandbuch nach, ob die
•
Windschutzscheibe mit einer wärmereektierenden Beschichtung versehen ist, die den GPS-Empfang
beeinträchtigt. Möglicherweise sind einige Teilächen nicht beschichtet und gestatten ebenso eine
sic
here Anbringung der KFZ-Halterung.
2
85
Page 86
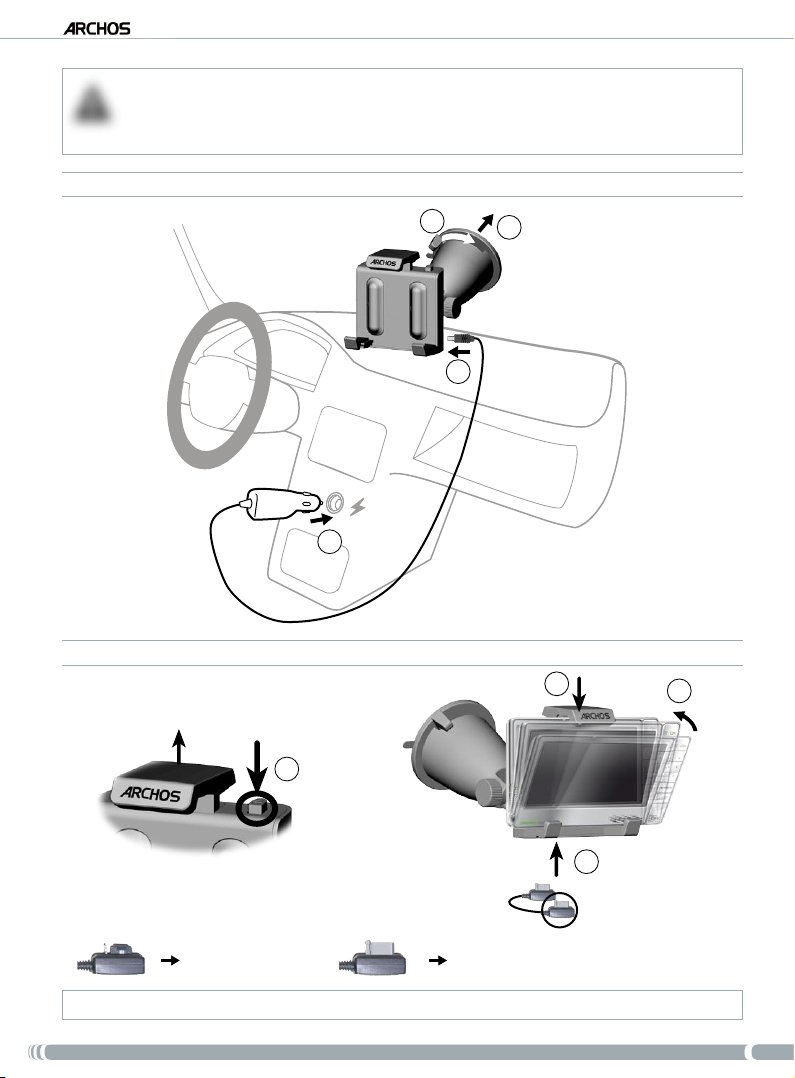
GPs
ZU IHRER SICHERHEIT ist es UNERLÄSSLICH, dass Sie die KFZ-Halterung für GPS entsprechend der unten
gezeigten Darstellung anbringen:
!
▲
•
SIE DARF NICHT DIE FREIE SICHT AUF DIE STRASSE ODER DEN VERKEHR BEHINDERN
•
SIE DARF NICHT DAS ARMATURENBRETT UND DIE MITTELKONSOLE DES FAHRZEUGS VERDECKEN
INSTALLATION DER KFZ-HALTERUNG
BENUTZERHANDBUCH - VERSION 4
2
1
3
4
EINSTECKEN DES ARCHOS-PLAYERS
7
5
8
6
*
*
Um den ARCHOS-Player aus der Halterung herauszuziehen, führen Sie den Vorgang in umgekehrter Reihenfolge aus.
für ARCHOS 605 für ARCHOS-Player der nächsten Generation
86
Page 87

GPs
BENUTZERHANDBUCH - VERSION 4
3� eRsTe sChRITTe
3�1� aUfRUfen deR GPs-anWendUnG
Beim Einstecken des ARCHOS-Players in die angeschlossene KFZ-Halterung:
•
schaltet sich der ARCHOS-Player automatisch ein.
•
wandelt sich im Hauptfenster des ARCHOS 605 das Symbol
Symbol.
1.
Tippen Sie auf das GPS-Symbol, um die Anwendung aufzurufen.
Daraufhin wird das Hauptfenster angezeigt.
2.
Nach einigen Sekunden blendet sich ein rotes Fenster ein. Lesen Sie
die darin enthaltenen rechtlichen Hinweise aufmerksam, und tippen
Sie auf
I agree [Zustimmen].
3.
Bei der ersten Verwendung der GPS-Anwendung müssen Sie einige
grundlegende Voreinstellungen festlegen (siehe nächster Abschnitt).
3�2� eRsTe eInRIChTUnG
Recorder [Aufnahme] in ein GPS-
1
2
3
1.
Bei der Neuinstallation werden mehrere Einstellungen, wie Sprache und Längeneinheiten (km oder
Meilen), konguriert.
2.
Wählen Sie mit einem Fingertipp die gewünschte Karte aus. Der Ladevorgang dauert einige Zeit.
3.
Ein Hilfe-Menü wird angezeigt*. Tippen Sie auf die Option, zu der Sie Informationen benötigen,
tippen Sie auf Back [Zurück], um zum Hauptnavigationsfenster zurückzukehren.
oder
* Wenn Sie die Hilfethemen zu einem späteren Zeitpunkt lesen möchten, können Sie sie über
Settings [Einstellungen]
Quick Guides [Hilfe] aufrufen
.
Main menu [Hauptmenü]
87
Page 88

GPs
BENUTZERHANDBUCH - VERSION 4
3�3� haUPTnavIGaTIOnsfensTeR
Beim Start der GPS-Anwendung wird nach einem verwertbaren GPS-Signal gesucht, und Sie sehen
•
das folgende Fenster. Die Signalstärke wird in der unteren rechten Ecke angezeigt.
Sobald ein GPS-Signal empfangen wird (kann einige Minuten dauern), wird folgende Ansicht angezeigt.
•
Wenn die erste Ansicht weiterhin angezeigt wird, überprüfen Sie, ob Sie das GPS-Gerät ordnungsgemäß im Auto installiert haben.
Der GPS-Signalempfang ist in hohem Maße abhängig von einer optimalen Position der KFZ-Halterung, von
Fahrzeugeigenschaften, wie wärmereektierend beschichteten Windschutzscheiben, und den Umgebungsbedingungen,
wie
Siehe Abschnitt 2.2. „Anbringung des GPS-Geräts im Fahrzeug“.
Berge und hohe Gebäude.
1
2
3
4
5
Zoom Out
1.
Richtung zum Zielpunkt*
2.
Zoom In
3.
Reisefortschrittsleiste*
4.
* Diese Informationen werden nur angezeigt, wenn bereits eine Strecke berechnet wurde.
** Diese Informationen können in den Einstellungen konguriert werden.
*** TMC = Trafc Message Channel [Verkehrsfunk],
6
5.
ächste Abzweigung* (tippen, um Anweisung noch einmal zu hören)
N
ntfernung bis zur nächsten Abzweigung* (tippen, um Anweisung
6.
E
noch einmal zu hören)
Aktuelle
7.
8.
Position
Ankunftszeit**/Aktuelle Geschwindigkeit/Verbleibende Distanz**/
TMC-*** und GPS-Anzeige
siehe Kapitel 6: Weitere Funktionen
8
7
.
88
Page 89

GPs
BENUTZERHANDBUCH - VERSION 4
3�4� TasTenfUnkTIOnen
ARCHOS 605
Einmal kurz drücken: Zurück
Lange Drücken: Beendet die GPS-Anwendung (Bestätigungsfenster wird angezeigt)
Eingabe/Bestätigung
Zoom In
Zu einem anderen Element (Menü) wechseln/Durch Karte navigieren
Zoom Out
Zwischen 2D- und 3D-Ansichtsmodus wechseln
Hauptmenü aufrufen
Lautstärke erhöhen/reduzieren*
* Hinweis: Diese Lautstärkeregelung ist unabhängig von den Einstellungen, die Sie unter
Settings [Einstellungen]
Volume settings [Einstellung Lautstärke
] vornehmen.
Main menu [Hauptmenü]
3�5� beenden deR GPs-anWendUnG
Sie können die GPS-Anwendung auf zweierlei Wegen beenden und zurück zum ARCHOS-Hauptmenü gelangen:
ARCHOS 605: Halten Sie die Exit [Programmende]-Taste auf dem ARCHOS-Player solange gedrückt,
•
bis ein Bestätigungsfenster angezeigt wird. Tippen Sie auf Exit [Beenden], um den Vorgang zu bestätigen.
Rufen Sie im Main menu [Hauptmenü] die Option Exit [Programmende] auf. Daraufhin wird
•
eine Bestätigungsmeldung angezeigt. Tippen Sie auf Exit [Beenden], um den Vorgang zu bestätigen.
89
Page 90

GPs
BENUTZERHANDBUCH - VERSION 4
4� hÄUfIGsTe anWendUnGsfÄlle
4�1� WIe GelanGe ICh zU eIneR besTIMMTen adResse?
1
Tippen Sie im Navigationsfenster auf einen beliebigen Kartenabschnitt, um das Hauptmenü aufzurufen.
1.
Tippen Sie auf
2.
3.
Wählen Sie
Navigate to [Fahre zu].
Address [Adresse].
2
3
4
5
4.
Tippen Sie auf der Tastatur die ersten Buchstaben der Landesbezeichnung ein. Wenn der Ländername
in der oberen Liste angezeigt wird, tippen Sie darauf. Wählen Sie entsprechend den Stadt- und
Straßennamen aus.
Geben Sie bei zusammengesetzten Städte- und Straßennamen, z. B. „St. Marien“, nur „Marien“ ein, da Sie mit dem
Eintrag „Sankt“ zu viele Ergebnisse erhalten würden. Wenn Ihre Stadt nicht angezeigt wird, können Sie die Adresse über
eine Postleitzahl eingeben (
5.
Geben Sie auf der Tastatur die Hausnummer ein, und tippen Sie abschließend auf Done [Fertig].
6.
Warten Sie, bis ARCHOS eine Strecke berechnet hat. Der Streckenvorschlag wird auf der Karte
angezeigt*. Tippen Sie auf
Anweisungen zu folgen.
Main menu [Hauptmenü]
Done [Fertig], um zurück zum Navigationsfenster zu gelangen und den
Navigate to [Fahre zu]
ZIP Code [PLZ])
.
6
* Mit einem Tipp auf
entscheiden, Autobahnen, mautpichtige Straßen, unbefestigte Straßen usw. zu vermeiden.
Details
werden Detailinformationen zu den Straßen des Streckenverlaufs angezeigt. Sie können
90
Page 91

GPs
BENUTZERHANDBUCH - VERSION 4
4�2� WIe sPeICheRe ICh eIne zIeladResse als favORITeneInTRaG?
ANHAND DER LETZTEN ZIELEINGABEN (SCHNELLSTE METHODE)
Bei jeder Berechnung eines Streckenverlaufs wird das Ziel automatisch unter History [Letzte Zieleingaben]
gespeichert. Des Weiteren können Sie Ihre aktuelle Position dort speichern:
1
2
Tippen Sie im Navigationsfenster unten rechts, um das Kurzmenü aufzurufen.
1.
Tippen Sie dann auf
2.
tisch in der Chronik der letzten Zieleingaben gespeichert.
ERSTELLEN EINES FAVORITENEINTRAGS
Um einen Favoriteneintrag anzulegen, müssen Sie einen neuen Point of Interest (POI) hinzufügen und diesen
unter der Kategorie Favorites [Vorgaben] ablegen.
Memorize Position [Position speichern]. Ihre aktuelle Position wird automa-
2
3
1
1.
Tippen Sie im Navigationsfenster auf einen beliebigen Kartenabschnitt, um das Hauptmenü aufzurufen. Tippen Sie anschließend auf den nach rechts zeigenden Pfeil am unteren Fensterrand, um die
zweite Ansicht des Hauptmenüs aufzurufen.
2.
Tippen Sie auf
3.
Tippen Sie auf
4
4.
Wählen Sie eine Methode zur Favoriteneingabe (Adresse, Stadtzentrum, Wegepunkt usw.), und wählen Sie die Adresse aus oder geben Sie eine ein.
5.
Tippen Sie auf
6.
Geben Sie für das gespeicherte Ziel einen Namen ein, und tippen Sie abschließend auf
Manage POI [POI modizieren].
Add POI [POI hinzufügen].
5
Favorites [Vorgaben]. Damit wird das Ziel als Vorgabe gespeichert.
6
Done [Fertig].
91
Page 92

GPs
BENUTZERHANDBUCH - VERSION 4
4�3� WIe sPeICheRe ICh MeIne heIMaTadResse?
1
2
Tippen Sie im Navigationsfenster auf einen beliebigen Kartenabschnitt, um das Hauptmenü aufzurufen.
1.
Tippen Sie dann auf
2.
Tippen Sie anschließend zweimal auf den nach rechts zeigenden Pfeil am unteren Fensterrand,
3.
um
die dritte Ansicht des Hauptmenüs aufzurufen.
Settings [Einstellungen].
5
4
4.
Tippen Sie auf Set home location [Heimposition].
5.
Tippen Sie auf
beschrieben) ein.
Address [Adresse], und geben Sie dann Ihre Heimadresse (wie in Abschnitt 4.1
3
Ihre Heimadresse ist damit gespeichert. Um diese als Zieladresse festzulegen, wählen Sie
[Hauptmenü]
Navigate to [Fahre zu] Home [Nach Hause].
Main menu
92
Page 93
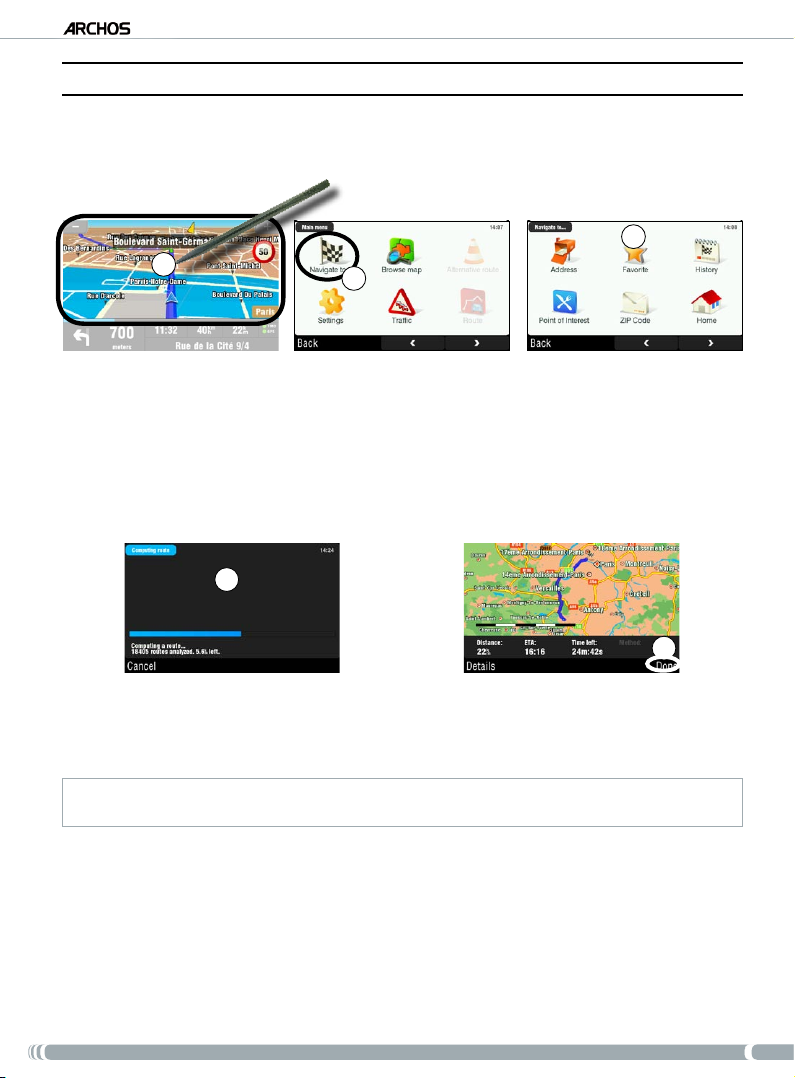
GPs
BENUTZERHANDBUCH - VERSION 4
4�4� WIe GelanGe ICh zU eIneR GesPeICheRTen zIeladResse?
Lesen Sie in den beiden vorangegangenen Abschnitten nach, wie Sie eine Zieladresse speichern (Zielvorgabe,
Favoriteneintrag oder Heimadresse). Im Folgenden wird das Vorgehen beschrieben, anhand dessen Sie zu
einer gespeicherten Zieladresse gelangen.
3
1
Tippen Sie im Navigationsfenster auf einen beliebigen Kartenabschnitt, um das Hauptmenü aufzurufen.
1.
Tippen Sie auf
2.
3.
An diesem Punkt haben Sie die folgende Auswahlmöglichkeiten:
•
wählen Sie
•
wählen Sie
•
tippen Sie auf
Navigate to [Fahre zu].
History [Letzte Zieleingaben], und wählen Sie eines der zuvor angesteuerten Ziele aus.
Favorite [Favorit], und wählen Sie eines Ihrer als Favoriten gespeicherten Ziele aus.
Home [Nach Hause], um die Heimatadresse festzulegen.
2
4
4.
Warten Sie, bis ARCHOS eine Strecke berechnet hat.
5.
Der Streckenvorschlag wird auf der Karte angezeigt*. Tippen Sie auf
Navigationsfenster zu gelangen.
* Mit einem Tipp auf
entscheiden, Autobahnen, mautpichtige Straßen, unbefestigte Straßen usw. zu vermeiden.
Details
werden Detailinformationen zu den Straßen des Streckenverlaufs angezeigt. Sie können
Done [Fertig], um zurück zum
5
93
Page 94

GPs
BENUTZERHANDBUCH - VERSION 4
4�5� WIe GelanGe ICh zU eIneM POInT Of InTeResT (POI)?
Points Of Interest (POI) sind Punkte öffentlichen Interesses, wie beispielsweise Restaurants, Hotels oder
Tankstellen. Sie werden auf dem Streckenverlauf als Symbole auf der Karte angezeigt. Das GPS-Gerät kann
eine Strecke zu einem bestimmten POI erstellen.
Zusätzliche POIs sind in Ihrem persönlichen ARCHOS-Kundenkonto (www.archos.com/register) unter dem GPSAbschnitt verfügbar.
1
1.
Tippen Sie im Navigationsfenster auf einen beliebigen Kartenabschnitt, um das Hauptmenü aufzurufen.
2.
Tippen Sie auf
3.
Tippen Sie auf
gewünschten POI aus.
Sie haben auch die Möglichkeit, einen POI in einer bestimmten Stadt auszuwählen. Wechseln Sie zur zweiten Ansicht
des Menüs
Navigate to [Fahre zu].
Point of Interest, um die nächstliegenden POIs anzuzeigen, und wählen Sie den
Navigate to [Fahre zu]
, und wählen Sie die Option
4
4.
Blättern Sie anhand der Pfeile zu der gewünschten Gruppe, und tippen Sie auf diese. Beispiel:
„Culture“ [Kultur].
5.
Suchen Sie in analoger Weise den gewünschten POI-Typ, und tippen Sie darauf. Beispiel: „Cinema“ [Kino].
6.
Alle zugehörigen POIs werden angezeigt, vom nächstgelegenen bis zum weitest entfernten. Wählen
Sie einfach den POI, zu dem Sie fahren möchten.
7.
fWarten Sie, bis ARCHOS die Strecke berechnet hat. Der Streckenvorschlag wird auf der Karte angez
eigt. Tippen Sie auf Done [Fertig], um zurück zum Navigationsfenster zu gelangen.
2
POI in City [POI in der Stadt]
5
3
aus.
6
94
Page 95
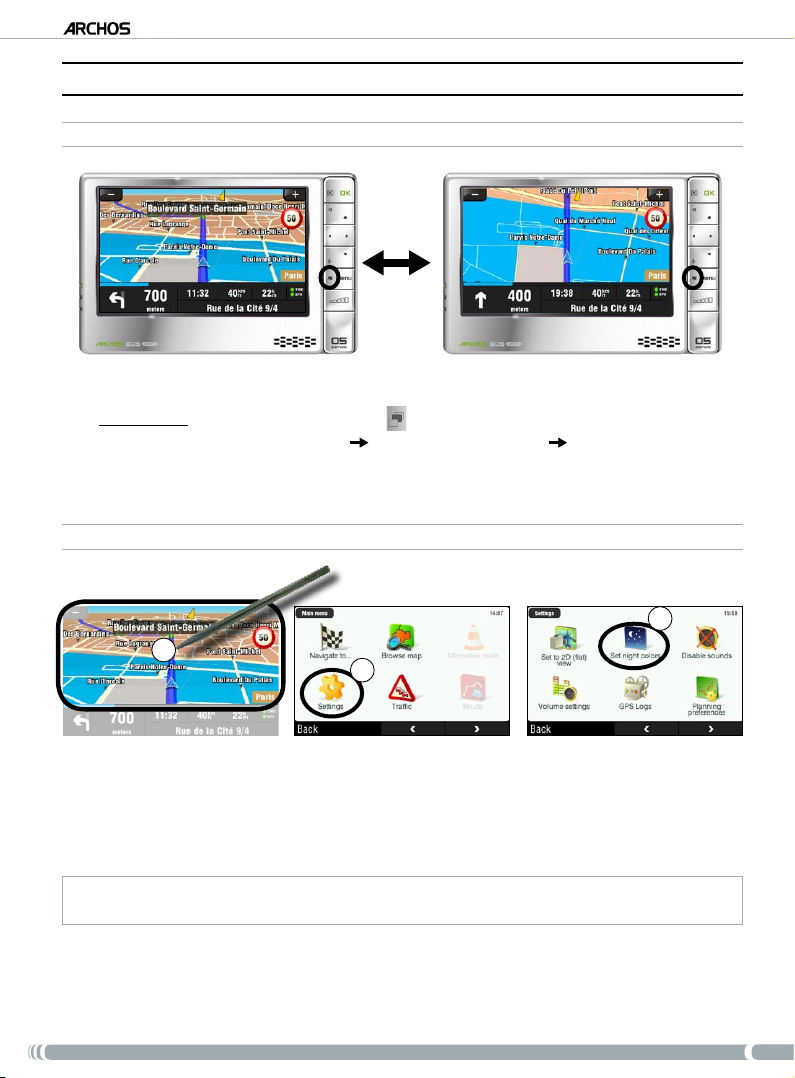
GPs
BENUTZERHANDBUCH - VERSION 4
4�6� WIe ÄndeRe ICh den anzeIGeMOdUs?
2D/3D-ANZEIGEMODUS
Zum Umschalten zwischen dem 2D- und dem 3D-Anzeigemodus sind zwei Methoden möglich:
ARCHOS 605: drücken Sie die Tabulatortaste auf dem ARCHOS-Player.
•
Wählen Sie
•
[Vogelperspektive]
TAG-/NACHTFARBMODUS
Main menu [Hauptmenü] Settings [Einstellungen] Set to 2D (at) view
/Set 3D view [3D-Anzeige].
3
1
2
1.
Tippen Sie im Navigationsfenster auf einen beliebigen Kartenabschnitt, um das Hauptmenü aufzurufen.
2.
Tippen Sie auf
3.
Tippen Sie dann auf
Farbgestaltung]/Set daylight colors [Tagesfarben]
Hinweis: Bei der Einstellung Automatic colors [Automatische Farbgebung] wird entsprechend der Uhrzeit automatisch
zwischen Tages- und Nachtfarben umgeschaltet.
Settings [Einstellungen].
Set night colors [Nachtfarben]/ Set automatic colors [Automatische
.
95
Page 96

GPs
BENUTZERHANDBUCH - VERSION 4
4�7� WIe RIChTe ICh vORGaben füR aUTObahnen/MaUTPflIChTIGe sTRassen eIn?
Mit dem GPS können Sie Planungsvorgaben festlegen, die bei jeder Streckenberechnung verwendet werden.
So können Sie z. B. immer die kürzeste Strecke nehmen, Autobahnen oder mautpichtige Straßen vermeiden.
ROUTENPLANUNG MIT VORGABEN
1
2
3
Tippen Sie im Navigationsfenster auf einen beliebigen Kartenabschnitt, um das Hauptmenü aufzuru-
1.
fen. Tippen Sie auf Settings [Einstellungen].
Tippen Sie auf
2.
3.
Wählen Sie die Option, die Sie bei jeder Streckenplanung verwenden möchten:
[Schnellste Route]
Auswahl auf eine Option, und tippen Sie dann auf Done [Fertig].
EINSTELLUNGEN MAUTSTRASSEN
Planing preferences [Routenplanung mit Vorgaben].
Plan fastest routes
oder Plan route without highways [Route ohne Autobahnen]. Tippen Sie zur
1
2
1.
Tippen Sie im Navigationsfenster auf einen beliebigen Kartenabschnitt, um das Hauptmenü aufzurufen. Tippen Sie auf Settings [Einstellungen].
2.
Tippen Sie auf den nach rechts zeigenden Pfeil am unteren Fensterrand, um die zweite
[Einstellungen]
-Ansicht aufzurufen.
Settings
3
4
3.
Tippen Sie auf Toll charge settings [Einstellungen Mautstraßen].
4.
Legen Sie fest, wie bei der Streckenberechnung mautpichtige Straßen behandelt werden sollen:
Ask me every time [Immer fragen], Always avoid toll roads [Immer ausweichen] oder Don’t avoid toll
roads [Nie ausweichen]
. Tippen Sie zur Auswahl auf eine Option, und tippen Sie dann auf Done [Fertig].
96
Page 97

GPs
BENUTZERHANDBUCH - VERSION 4
4�8� WIe beReChne ICh eIne sTReCke neU (hIndeRnIsse/veRkehR)?
Wenn Sie vom vorgesehenen Streckenverlauf abweichen, berechnet das GPS, ausgehend von der aktuellen Position, automatisch eine neue Route. Mit ARCHOS GPS ist es auch möglich, Strecken mit hohem
Verkehrsaufkommen und Straßensperrungen auszuweichen.
HOHEM VERKEHRSAUFKOMMEN AUSWEICHEN
Zu diesem Zweck muss die Funktion TMC (Trafc Message Channel; Verkehrsfunk) aktiviert
•
werden(siehe Kapitel 6: Weitere Funktionen).
Wenn Verkehrsmeldungen eingehen, die den aktuellen Streckenverlauf betreffen, berechnet ARCHOS
•
GPS standardmäßig eine neue Route unter Umgehung des hohen Verkehrsaufkommens.
HINDERNISSEN AUSWEICHEN
3
1
2
Tippen Sie im Navigationsfenster unten rechts, um das Kurzmenü aufzurufen.
1.
Tippen Sie auf
2.
Wählen Sie dann die Länge des behinderten Straßenabschnitts aus. Vom GPS wird automatisch eine
3.
andere Strecke berechnet, bei der das Hindernis umfahren wird.
Avoid Roadblock [Hindernissen ausweichen].
97
Page 98
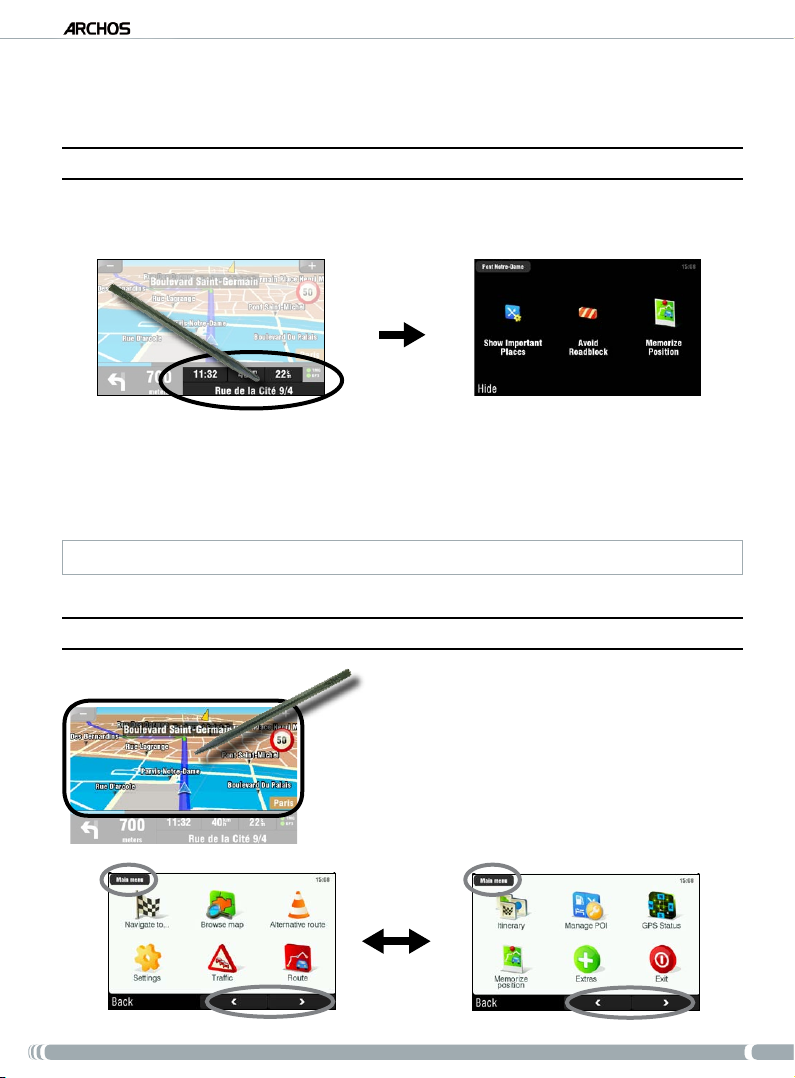
GPs
BENUTZERHANDBUCH - VERSION 4
5� besChReIbUnG deR Menüs
5�1� kURzMenü
Tippen Sie im Navigationsfenster unten rechts, um das Kurzmenü aufzurufen. Dort haben Sie drei
Hauptoptionen:
Show Important Places [Anzeige von wichtigen POI]*: Zeigt die zwei nächstgelegenen POIs auf
•
Ihrer Strecke an.
•
Avoid Roadblock [Hindernissen ausweichen]*: Über diese Option können Sie ein Hindernis denie-
ren. ARCHOS GPS berechnet automatisch eine andere Strecke, bei der das Hindernis umfahren wird.
•
Memorize Position [Position speichern]: Speichert die aktuelle Position unter den letzten Zieleingaben.
* nur wenn bereits eine Strecke berechnet wurde
5�2� haUPTMenü
•
Tippen Sie im Navigationsfenster auf einen beliebigen
Kartenabschnitt, um das Hauptmenü aufzurufen.
•
Wechseln Sie mit den Pfeile am unteren Fensterrand
zwischen den beiden Ansichten des Hauptmenü hin und
her.
•
Im
Feld in der oberen linken Ecke sehen Sie, an welcher
Stelle des Menüsystems Sie sich gerade benden.
98
Page 99

GPs
BENUTZERHANDBUCH - VERSION 4
NAVIGATE TO... [FAHRE ZU...]
In diesem Menü können Sie Ihr Ziel auswählen. Dazu stehen mehrere Optionen zur Auswahl:
Address [Adresse]: Geben Sie eine Adresse ein (Land, Stadt, Straße, Hausnummer).
•
Favorite [Favorit]: Wählen Sie unter den Favoriten ein Ziel aus.
•
History [Letzte Zieleingaben]: Wählen Sie aus den Zieleingaben ein Ziel aus.
•
Point of Interest [Point of Interest]: Wählen Sie als Ziel einen POI aus.
•
ZIP Code [PLZ]: Geben Sie eine Zieladresse mithilfe einer Postleitzahl ein.
•
Home [Nach Hause]: Wählen Sie als Ziel Ihre Heimatadresse.
•
Point on Map [Punkt auf Karte]: Wählen Sie Ihr Ziel direkt auf der Karte aus.
•
Enter GPS position [GPS-Position angeben]: Geben Sie die GPS-Koordinaten (Längen- und
•
Breitengrad) an.
City Center [Stadtmitte]: Führt Sie zum Stadtzentrum.
•
POI in City [POI in der Stadt]: Damit können Sie einen POI in einer bestimmten Stadt ansteuern.
•
BROWSE MAP [KARTENÜBERSICHT]
Anhand dieser Funktion können Sie auf der Karte nach einem Ort suchen. Mithilfe des Touchscreen können Sie den
dargestellten Kartenausschnitt verschieben. Anhand der Schnelltasten
605) oder der Zoomleiste (am rechten Fensterrand) können Sie die Darstellung vergrößern oder verkleinern.
des ARCHOS-Players (ARCHOS
Bei Wahl von Options [Optionen] werden folgende Elemente angezeigt:
Find... [Finde...]: Zeigt eine bestimmte Adresse auf der Karte.
•
Show current position [Zeige aktuelle Position]: Zeigt Ihre aktuelle Position auf der Karte.
•
Show entire route [Zeige gesamte Route]: Zeigt Ihre berechnete Strecke auf der Karte.
•
Show City [Zeige Stadt]: Zeigt eine bestimmte Stadt auf der Karte.
•
Show/Hide POIs [POI zeigen/ausblenden]: Wählen Sie hier aus, welche POIs auf der Karte angezeigt
•
werden sollen.
Durch Tippen auf den Cursor (untere Mitte der Ansicht) können Sie eine alternative Methode auswählen, wie Sie an
Ihr Ziel gelangen.
ALTERNATIVE ROUTE [ALTERNATIVROUTE]
In diesem Menü können Sie, für den Fall, dass unterwegs unvorhergesehene Ereignisse (Stau, Hindernisse
usw.) eintreten, eine Alternativroute berechnen lassen. Diese Funktion ist nur verfügbar, wenn bereits eine
Strecke berechnet wurde.
Compute alternative [Berechnen einer Alternative]: Erstellt eine neue Route über andere Straßen.
•
Avoid next... [Hindernis ausweichen]: Über diese Option können Sie ein Hindernis denieren.
•
ARCHOS GPS berechnet automatisch eine andere Strecke, bei der das Hindernis umfahren wird.
Travel via… [Fahre über...]: Diese Funktion ermöglicht eine Streckenplanung über einen bestimmten
•
Ort (Stadt, Adresse usw.).
99
Page 100

GPs
Reset to original [Standardeinstellungen]: Alle in diesem Menü vorgenommenen Änderungen
•
BENUTZERHANDBUCH - VERSION 4
werden hiermit verworfen.
SETTINGS [EINSTELLUNGEN]
Set to 2D (at) view / Set 3D view [Vogelperspektive/3D-Anzeige]: Schaltet zwischen dem 2D- und
•
dem 3D-Ansichtsmodus hin und her.
•
Set night colors [Nachtfarben]/ Set automatic colors [Automatische Farbgestaltung]/Set daylight
colors [Tagesfarben]
•
Disable sounds [Ton aus]/Enable sounds [Ton an]: Aktiviert/deaktiviert den Ton (Sprachmeldungen,
: Zur Auswahl der bevorzugten Farbgestaltung
Warnungen usw.).
•
Volume settings [Einstellung Lautstärke]: Mit dieser Option können Sie für niedrige und hohe
Geschwindigkeiten unterschiedliche Lautstärken einstellen.
•
GPS Logs [GPS-Aufzeichnung]: Mit dieser Option können Sie die Tour aufzeichnen, um sie später
erneut zu nutzen.
•
Planning preferences [Routenplanung mit Vorgaben]: Über diese Option denieren Sie, wie die
Strecke berechnet werden soll: die schnellste Strecke oder unter Vermeidung von Autobahnen.
•
Toll charge settings [Einstellungen Mautstraßen]: Legen Sie hier fest, ob Sie Mautstraßen umfahren
möchten.
•
Advanced settings [Erweiterte Einstellungen]: Hierüber können Sie verschiedene Parameter einstel-
len (Autozoom aktivieren/deaktivieren, keine U-Turns usw.). Außerdem können Sie festlegen, welche
Art von Entfernungs-/Zeitmarken im Navigationsfenster angezeigt werden sollen.
•
Left handed [Linkshänder] / Right handed [Rechtshänder]: Schaltet zwischen dem auf Linkshänder
und Rechtshänder ausgerichteten Anzeigemodus hin und her.
•
Keyboard settings [Einstellung Tastatur]: Hierüber lässt sich das präferierte Tastaturlayout einstel-
len (Abcd, Qwerty oder Azerty).
•
Regional settings [Regionale Einstellungen]: Mit dieser Option stellen Sie die Längeneinheiten (km
oder engl. Meilen) und die Koordinateneinheiten ein.
•
Set language [Sprachwahl]: Wählen Sie hier die Sprache, die auf dem Display verwendet werden soll.
•
Set voice [Einstellung Stimme]: Legen Sie hier die Sprache für Sprachmeldungen fest.
•
Set home location [Heimposition]: Über diese Option legen Sie Ihre Heimatadresse fest.
•
Quick Guides [Hilfe]: Mehrere Hilfethemen geben eine kurze Beschreibung zu den Hauptfunktionen
des GPS-Gerätes.
•
About ARCHOS GPS [Über ARCHOS GPS]: Informationen zur GPS-Software
•
Signpost settings [Einstellung Beschilderung]: Hierüber stellen Sie ein, wie im Navigationsfenster
die Richtungshinweise angezeigt werden sollen.
TRAFFIC [VERKEHR]
In diesem Menü können Sie die Verkehrsinformationsfunktion einrichten. Die TMC (Trafc Message Channel)Antenne muss mit der KFZ-Halterung verbunden werden. Weitere Informationen dazu nden Sie im Kapitel
6: Weitere Funktionen.
•
Show all incidents [Anzeigen aller Verkehrsinfos]: Zeigt alle verkehrsbedingten Ereignisse auf der
Karte an.
100
 Loading...