

Page 1

ENGLISH
www
Thank you for choosing this ARNOVA product. We hope that you will enjoy using it and that it will give you satisfaction for many
years to come. Once you unpack your ARNOVA product, we recommend that you take a few minutes to register it
(http://arnovatech.com/register). This will allow you to get access to ARNOVA technical support (http://arnovatech.com/support).
?
UserGuide_Arnova_7G2_109860_book.indd 1 01/06/2011 16:47:36
REGISTER YOUR PRODUCT!
ÄOn the web at http://arnovatech.com/register
NEED HELP?
On our Website: See the Frequently Asked Questions section on http://arnovatech.com/faq
Contact our Technical Support Team: Visit http://arnovatech.com/support for e-mail support.
Please register your product before contacting Technical Support (see
As we are often updating and improving our products, your device’s software may have
a slightly different appearance or modified functionality than presented in this Quick Start Guide.
Register your Product
).
P/N: 109860
1
Page 2
???
ENGLISH
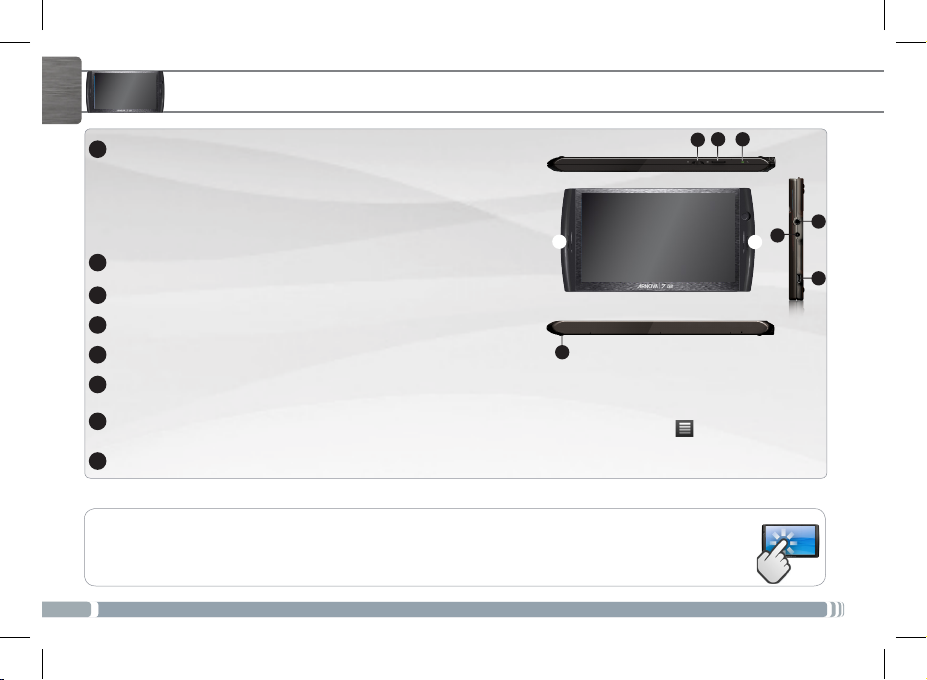
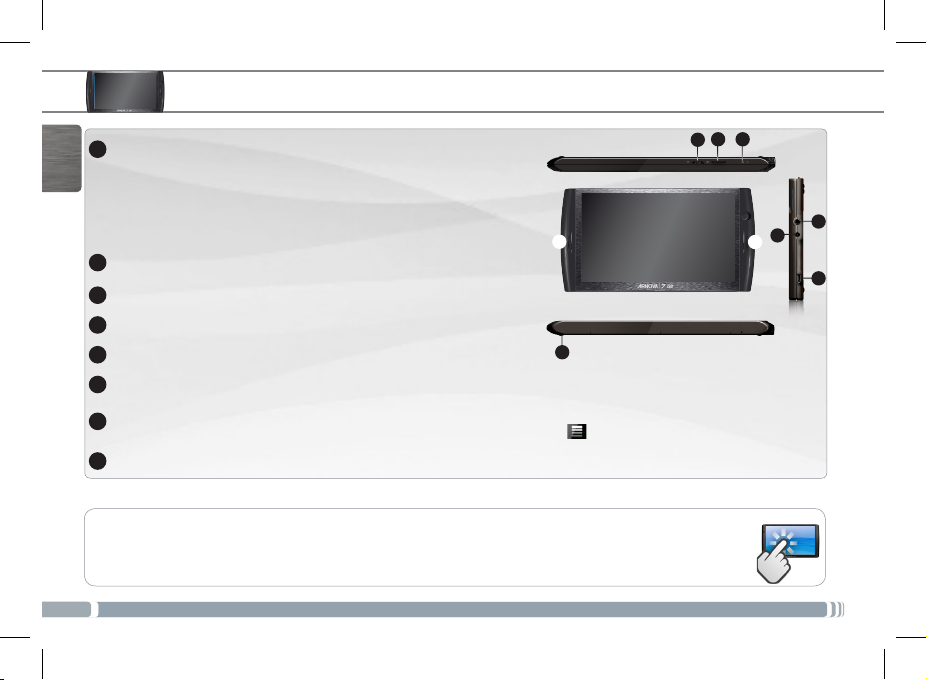
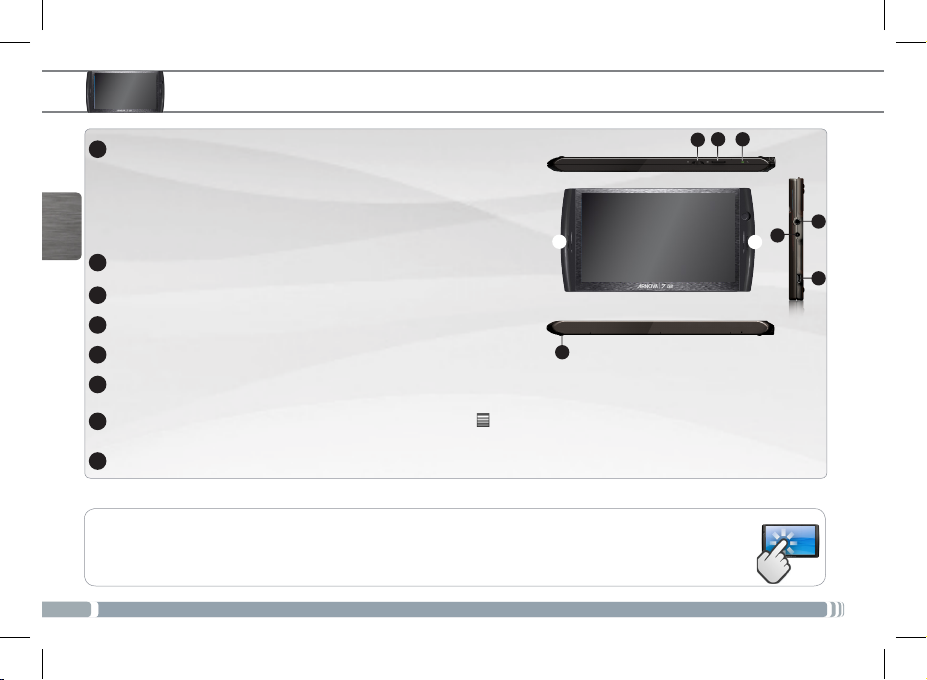
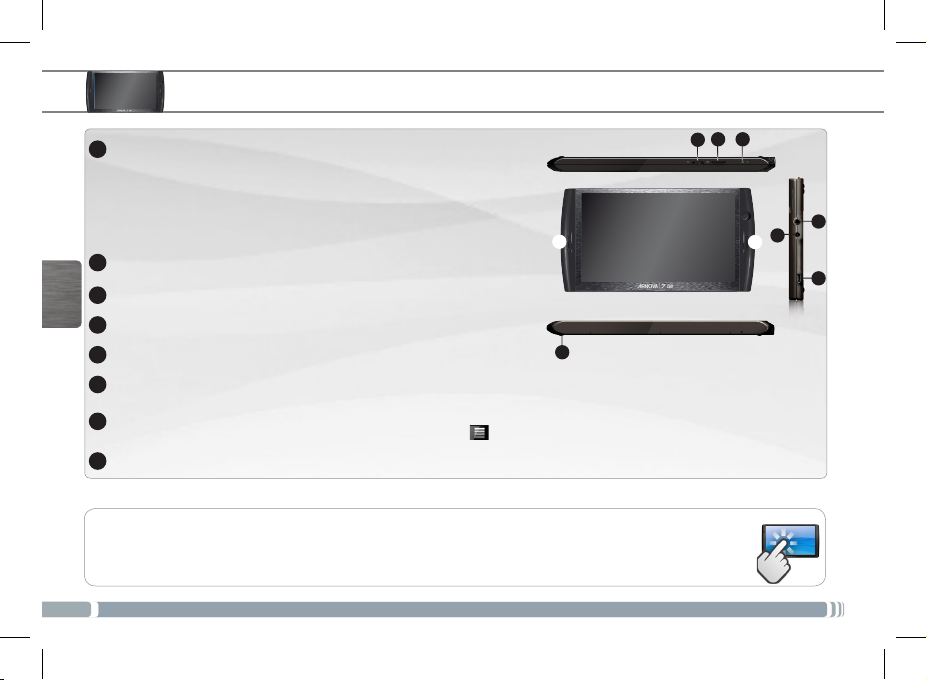
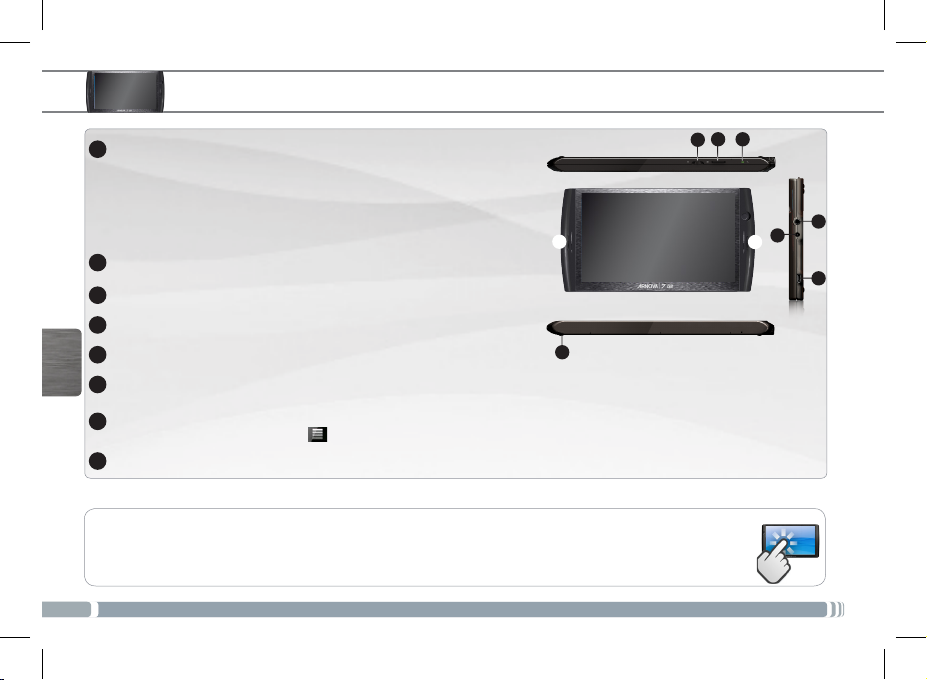
Power/Lock: slide left and hold to switch on/off. Slide right to lock the device’s
1
touchscreen.
When you slide left and hold, a window appears with a list of options (when the product is on). Tap
on “Power Off” to fully shut down your ARNOVA. Tap on “Suspend” to put the device in standby
(and allow a quick start up when you next tap the screen). While the device is in suspend mode, slide
right to lock the device with its screen off. This can be useful if your ARNOVA is in your backpack, for
example, and you do not want to wake it up by touching the screen by accident.
2
Micro-SD card reader
Charging indicator: Red light: battery charging / Yellow: battery charged.
3
Loudspeakers
4
Headphone jack
5
Power connector: to connect the supplied power cable.
6
Micro-USB port: to connect your ARNOVA to your computer, using the included USB cable (to transfer files). You can also con-
7
nect a keyboard, a mouse or a mass storage USB device. Go on the Home screen, tap on the Menu icon , then select Settings/
USB Mode select.
8
Leg stand: pull it out, and it will allow your ARNOVA to stand by itself on a flat, stable surface.
DESCRIPTION OF THE DEVICE
2 3
1
4
8
If the Host port is off, tap on the Host port line to turn it on. Important: turn off the Host port after use.
5
6
4
7
IMPORTANT:
Your device is frozen.You can turn it off. Slide and hold to the left the ON/OFF button for 10 seconds or press the reset
button.
2
UserGuide_Arnova_7G2_109860_book.indd 2 01/06/2011 16:47:40
Page 3

1
2
2
1
STARTING UP
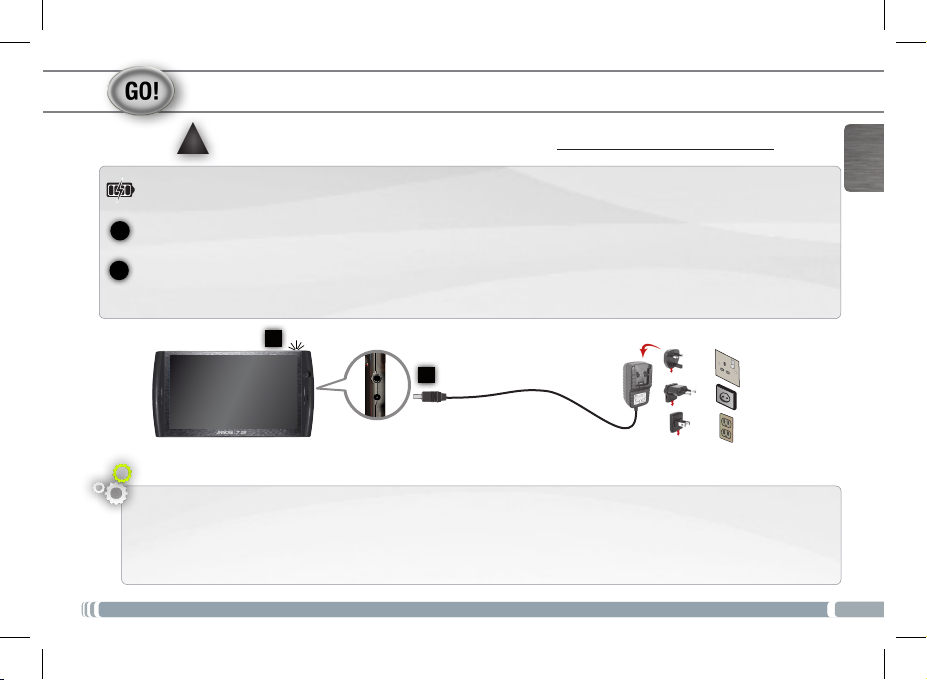
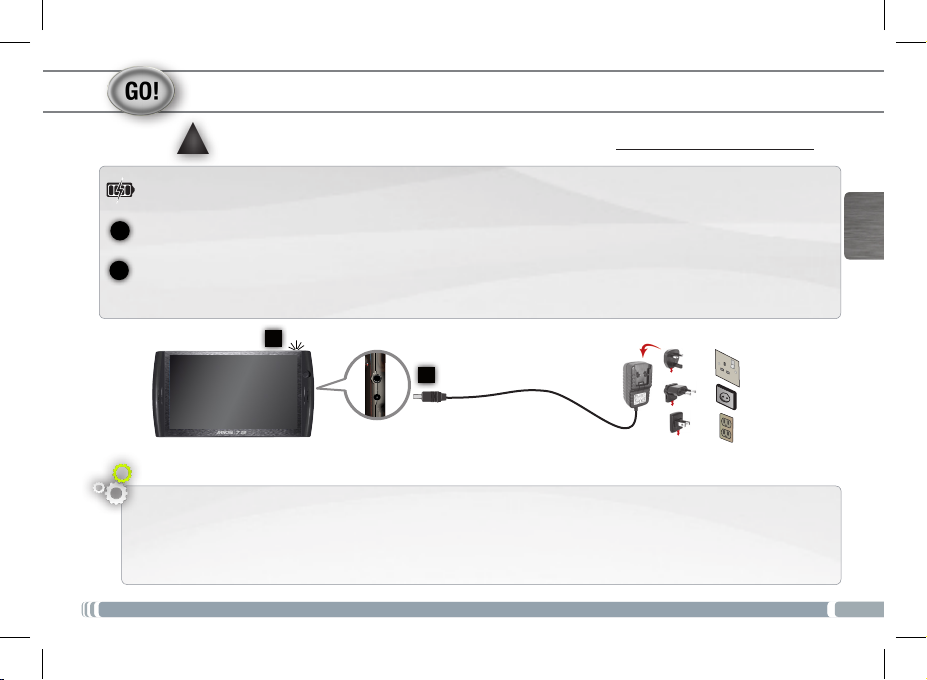
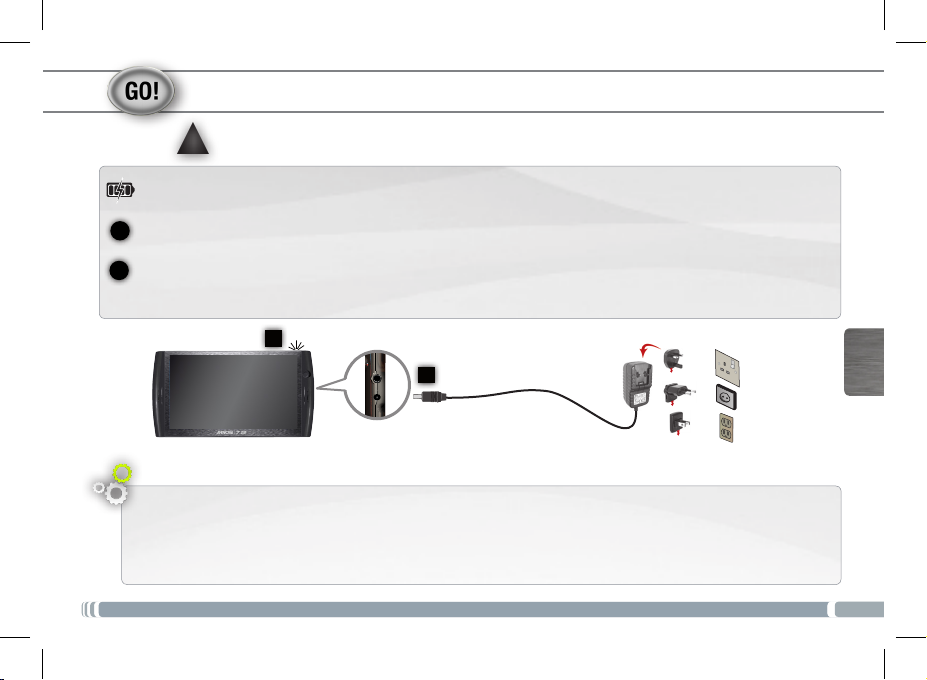
Before using your ARNOVA for the rst time, completely charge the battery!
!
▲
Charging the Battery
Connect the supplied power cable to the ARNOVA Power connector and to a wall outlet.
ENGLISH
UserGuide_Arnova_7G2_109860_book.indd 3 01/06/2011 16:47:42
The ARNOVA device will turn on and start charging. The Power indicator light is red while the battery is charging. It will turn
yellow when the battery is fully charged.
UK
Installation Wizard
The first time you start up your ARNOVA, the installation wizard will bring you through a few screens to help you set up
the principal settings: Language, country, time, etc.
EUR
US
3
Page 4

1
2
3
4
ENGLISH
www
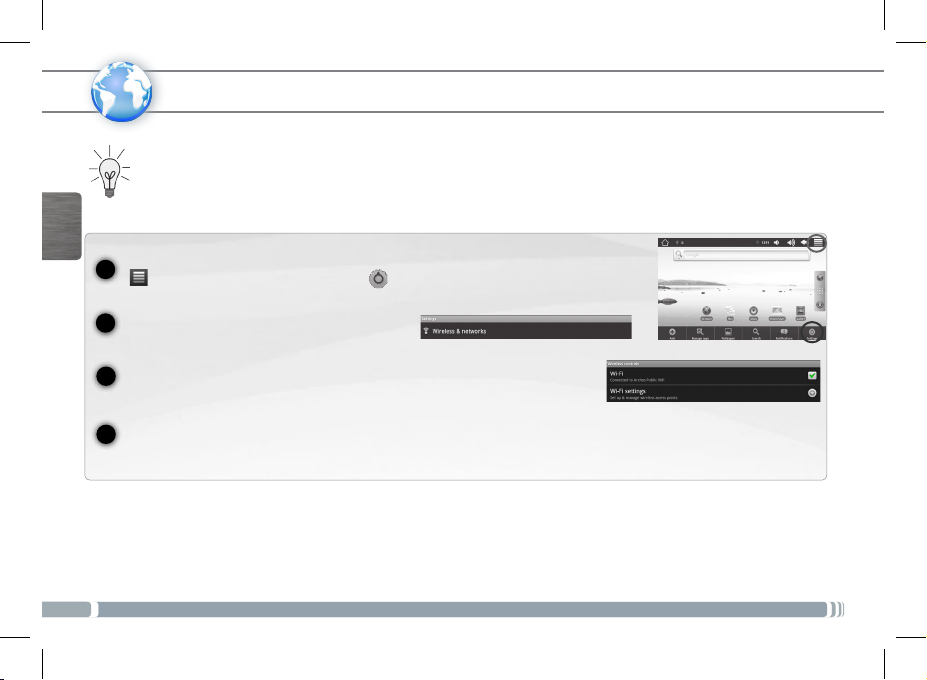
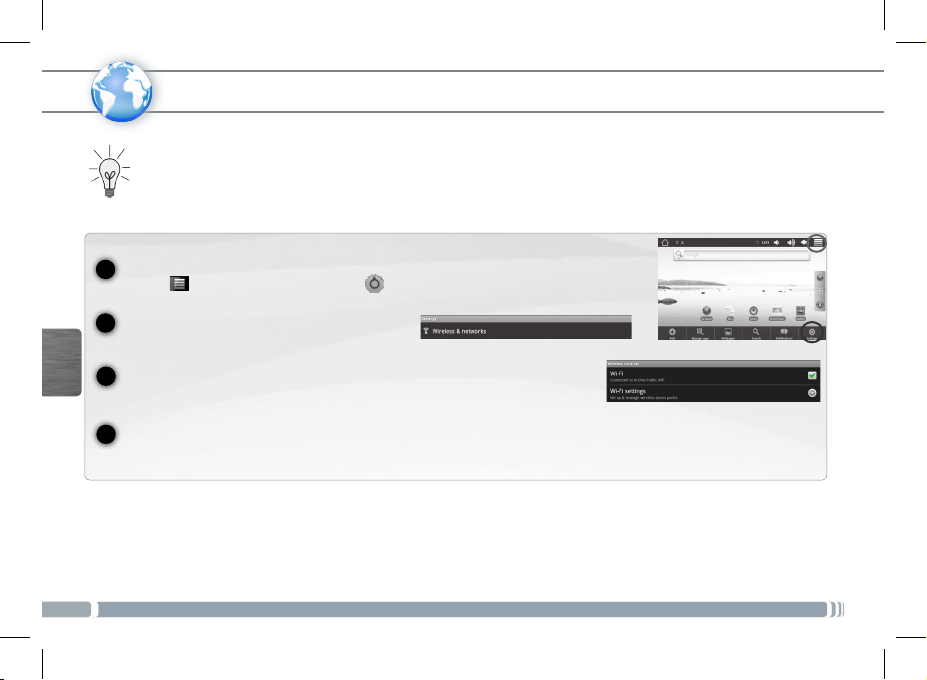
CONNECTING TO THE WIFI NETWORK
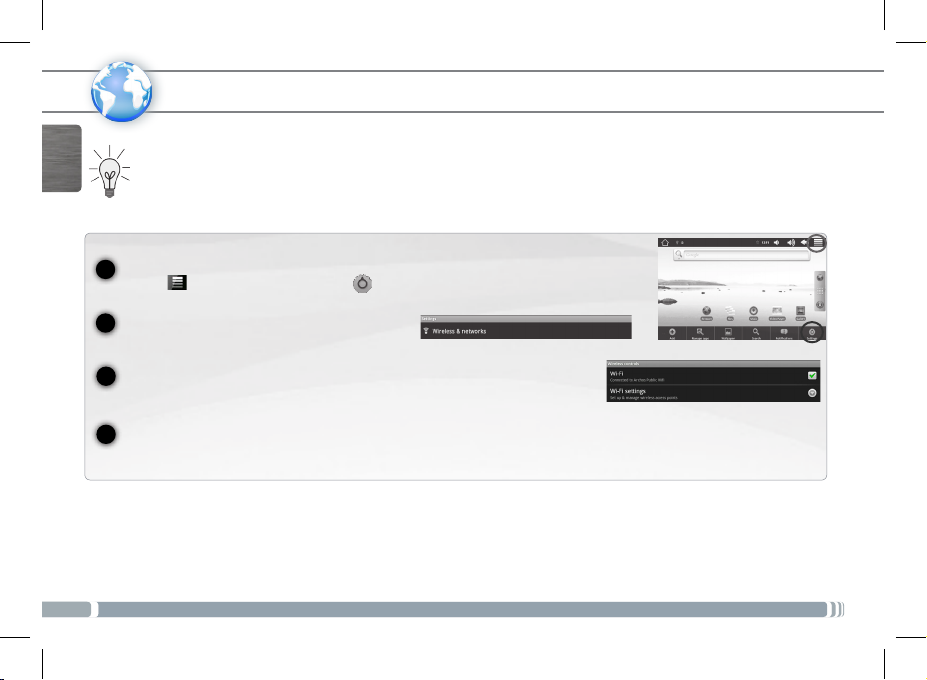
For this procedure to work, you need to be in a WiFi zone that will allow you to connect to it. Every time the ARNOVA is
in range of a network that you have already configured once, it will attempt to make a connection.
To configure a new WiFi network, go on the Home screen, tap on the Menu icon , then
select Settings .
In the Settings screen, select Wireless & networks.
4
UserGuide_Arnova_7G2_109860_book.indd 4 01/06/2011 16:47:44
If the WiFi is off, tap on the Wi-Fi line to turn it on. Then select Wi-Fi settings. The ARNOVA
will scan for available WiFi networks and display them at the bottom of the screen.
Tap on the network you want to connect to, enter the required network information* and then tap on Connect. Your
ARNOVA will now attempt to establish a connection to that WiFi hot spot with the network parameters you entered.
* For free access WiFi points, there is no need to enter any special information. For secured networks, you will need either a key (a series of numbers and/or letters)
of the type WEP, WPA, or WPA2. To obtain the exact connection p arameters required, contact the Internet service provider.
Page 5

▼
▼▼
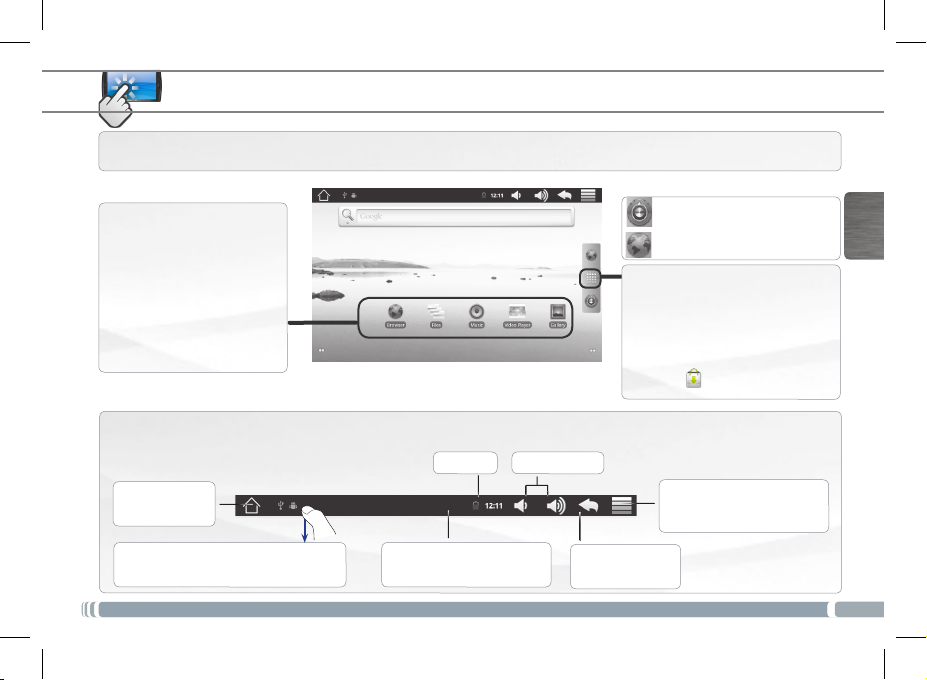
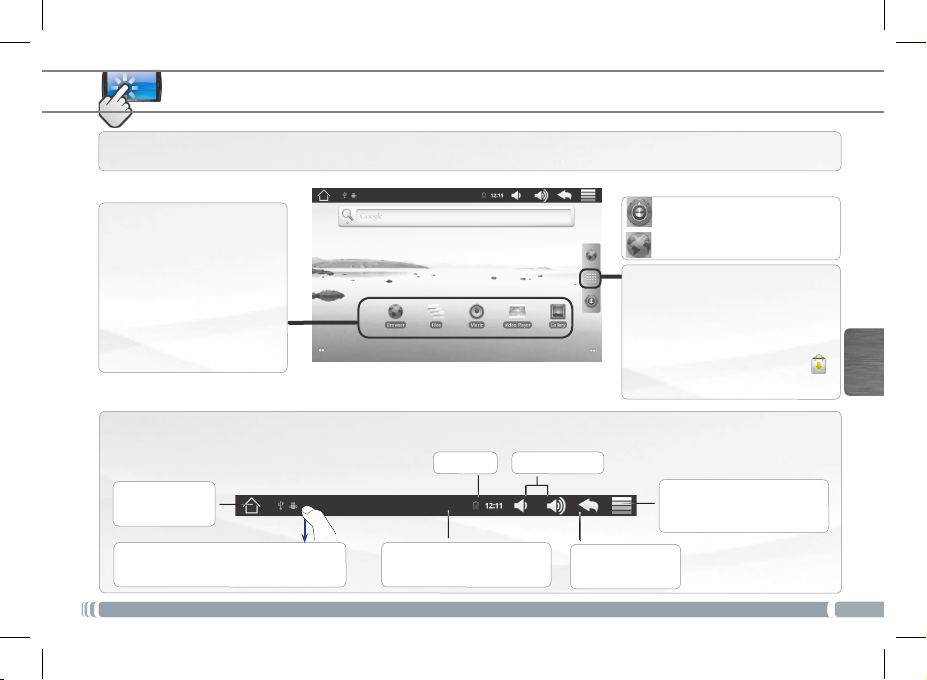
THE ARNOVA INTERFACE
Your ARNOVA device is equipped with a capacitive touchscreen. Use your finger pulp to navigate.
ENGLISH
Home Screen
These are the default
Android™ shortcuts (Web
Browser, EMail, etc.). Tap on an
icon to open the corresponding application. You can
customize the Home screen
by adding/removing shortcuts
and widgets, changing the
wallpaper, etc. See next page.
Settings shortcut
Web browser shortcut
Application button
Tap on this icon to reveal all the Android™ applications installed on your
ARNOVA (games, various tools, etc.).
You can copy them onto the Home
screen. You can get more Android™
applications from AppsLib .
Top bar of the Interface (varies according to the screen you are in)
Time Volume -/+
Return to the
Home screen
Notification icons: drag the top bar downwards
to reveal the notification messages (if any).
UserGuide_Arnova_7G2_109860_book.indd 5 01/06/2011 16:47:45
▼
Status icons: (WiFi connection
status, battery level, etc.)
▼
Return to the
previous screen
Menu: gives menu options ac-
▼
cording to the current screen.
5
Page 6

ENGLISH
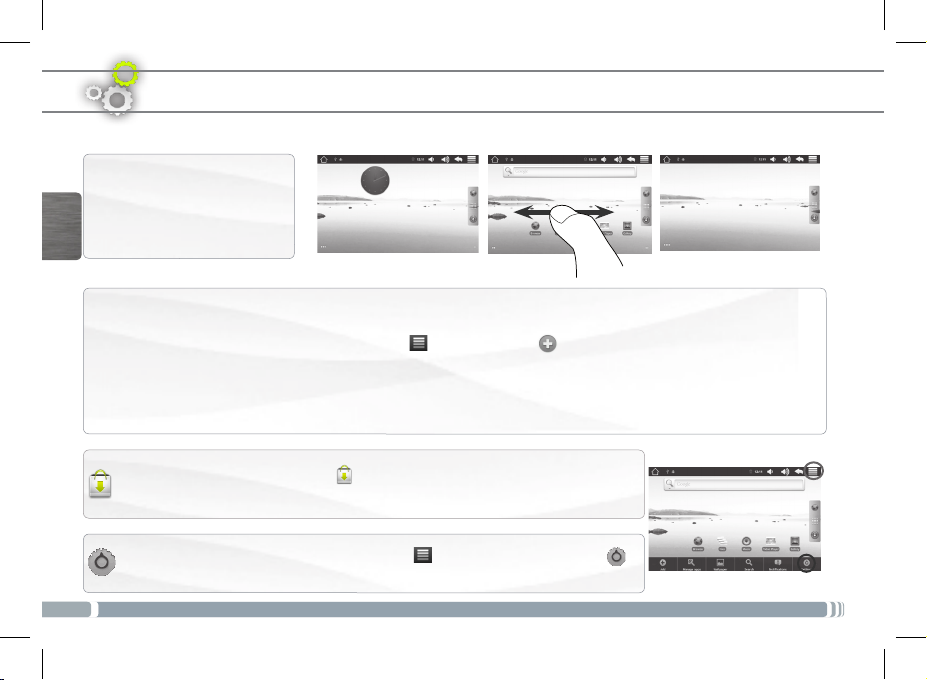
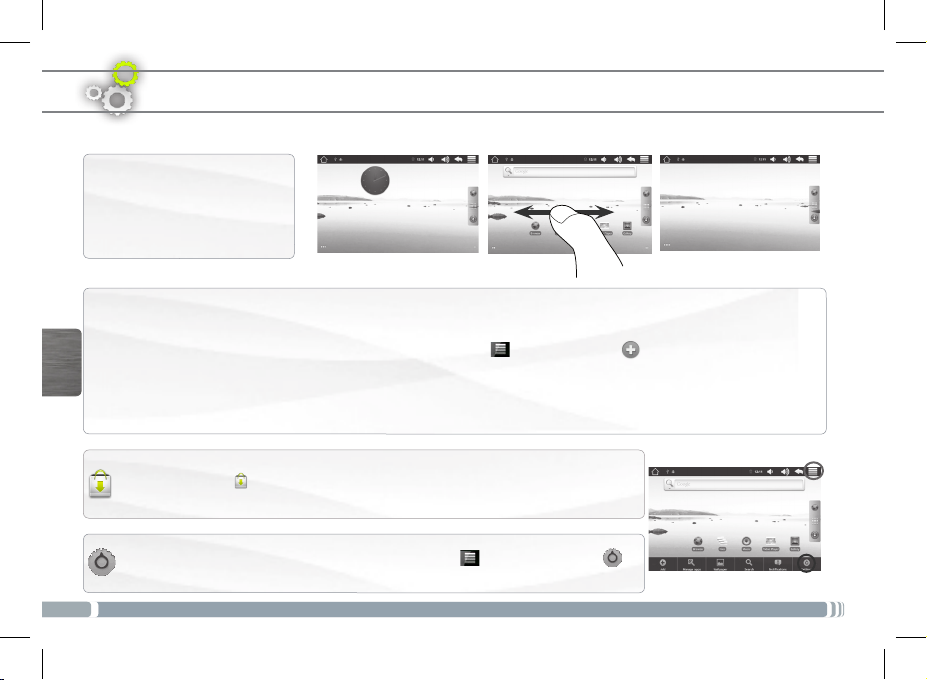
CUSTOMIZING YOUR PRODUCT
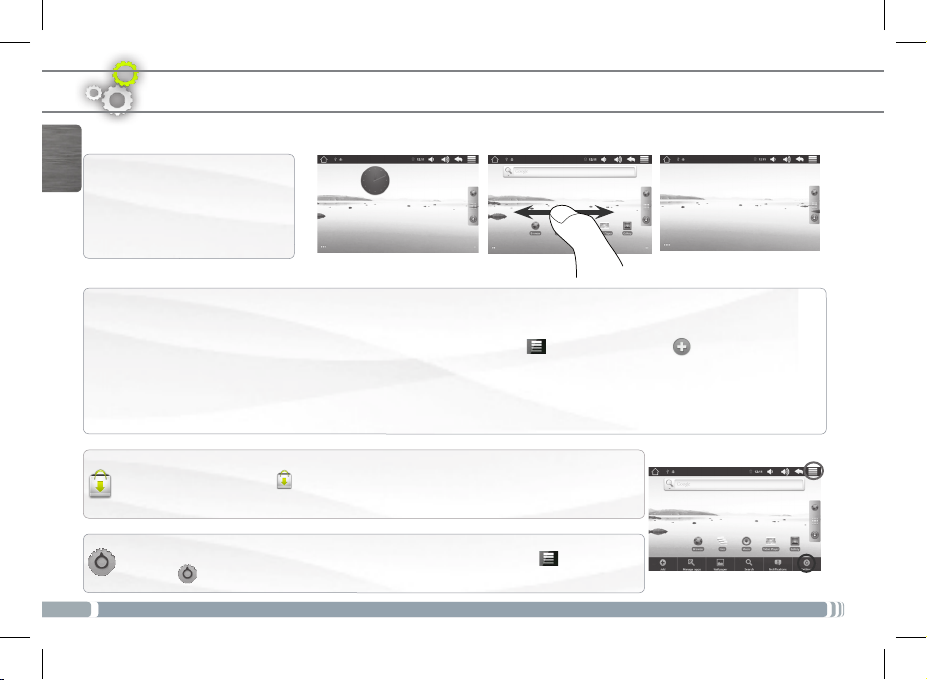
The extended Home screen
Slide your finger horizontally on
the screen to go to the left or right
side of the extended Home screen.
Customizing the Home screen items
- To add a Home screen item (shortcuts, widgets, etc.), hold your finger on the screen at an empty location, then choose from
the list. You can also tap on the Menu icon and select Add , at the bottom of the screen.
- To move a Home screen item, hold your finger onto it until it gets larger, then drag it to the desired location, and release
your finger.
- To remove a Home screen item, hold your finger onto it, drag it onto the recycle bin (while you’re holding an item, the
Applications tab, on the right side of the screen, turns into a recycle bin) and release your finger.
Adding more applications with APPSLIB : With the ARNOVA connected to the Internet, tap on
the AppsLib icon . This online library of free and purchasable applications has thousands of
fun games and useful applications to download and use.
Changing the Settings: From the Home screen, tap on the Menu icon , tap on Settings
and choose a category: Wireless controls, Sound & display, Date & time, etc.
6
UserGuide_Arnova_7G2_109860_book.indd 6 01/06/2011 16:47:46
Page 7
1
2
3
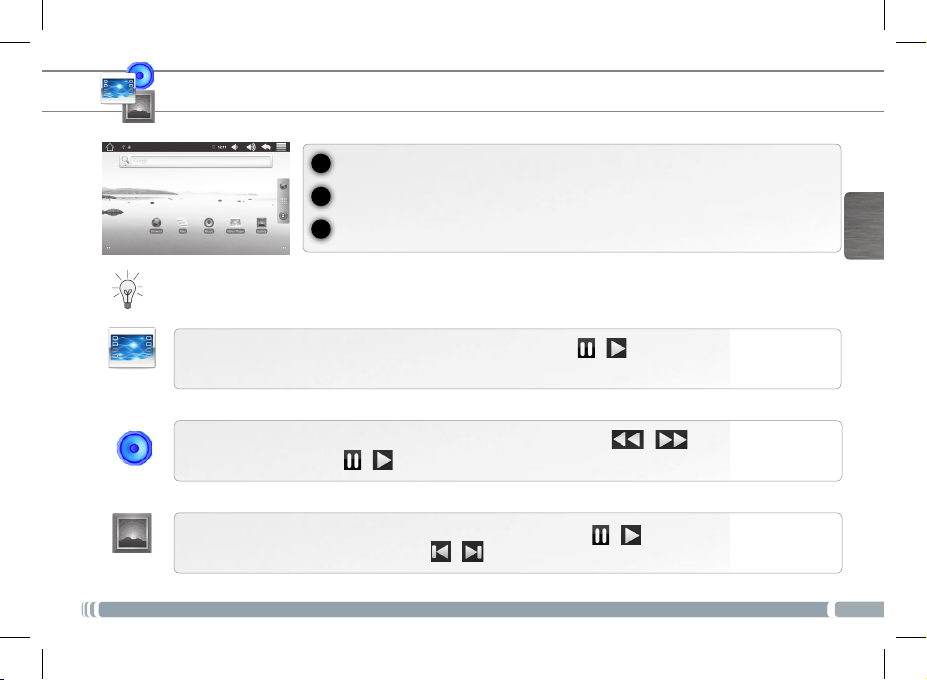
PLAYING MULTIMEDIA FILES
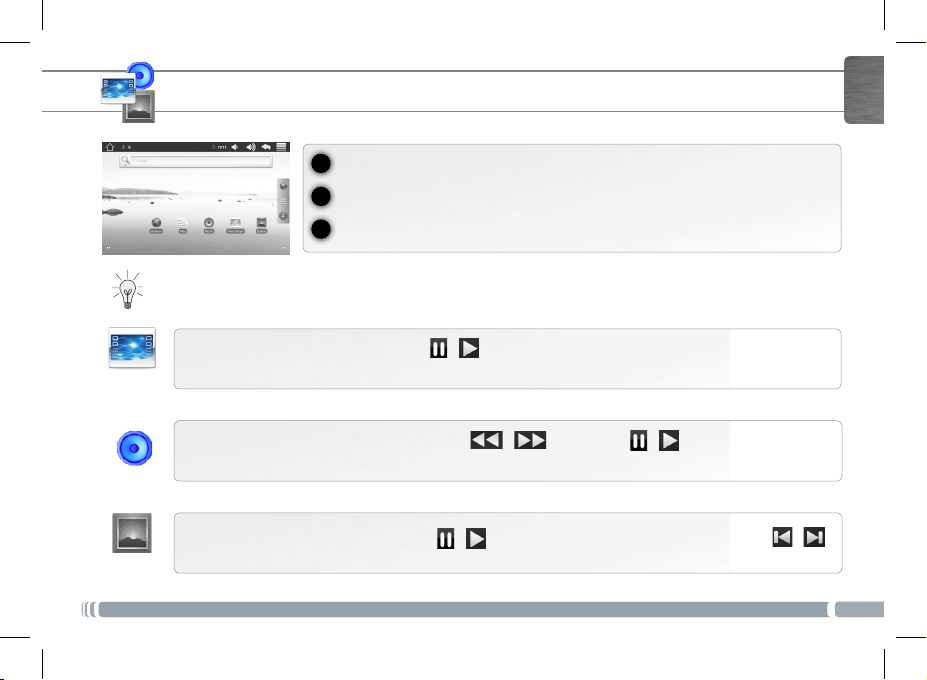
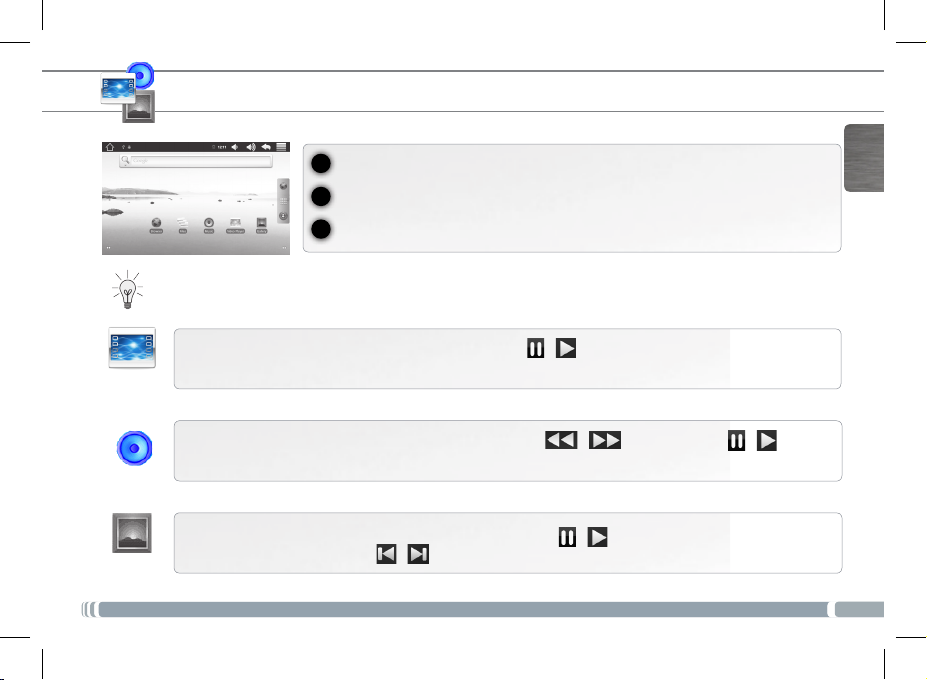
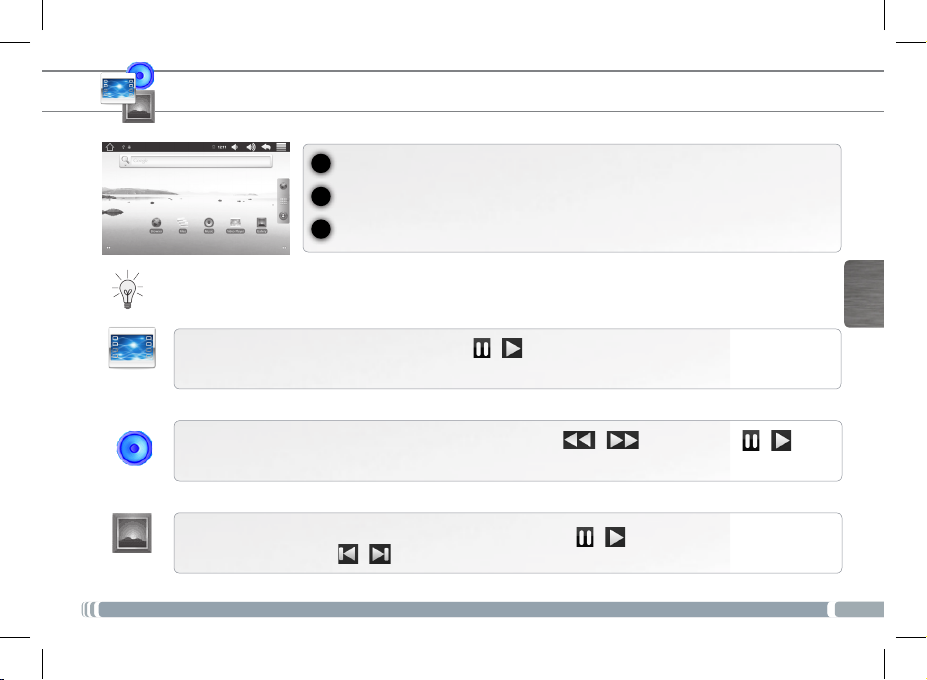
From the Home screen, tap on the video, audio or photo icon.
Only in Video and Photo modes: to display/hide the on-screen controls, tap anywhere on the screen.
To pause or resume a video, tap on the icon / (bottom of screen). To go to any particular point in the video,
slide the progression bar to the desired point.
Video
To play the next or previous song, tap on the icons / . Use the icons / and the progression bar as
in the video player screen (see above).
Music
The ARNOVA will display a list of les or folders corresponding to the selected category.
Tap on an item to start playing it.
ENGLISH
To start or pause a slide show, tap on the icon
Photo
UserGuide_Arnova_7G2_109860_book.indd 7 01/06/2011 16:47:48
/
. To view the next or previous photo, tap on the icons / .
7
Page 8
USB
1
32
ENGLISH
COMPUTER
TURNED ON
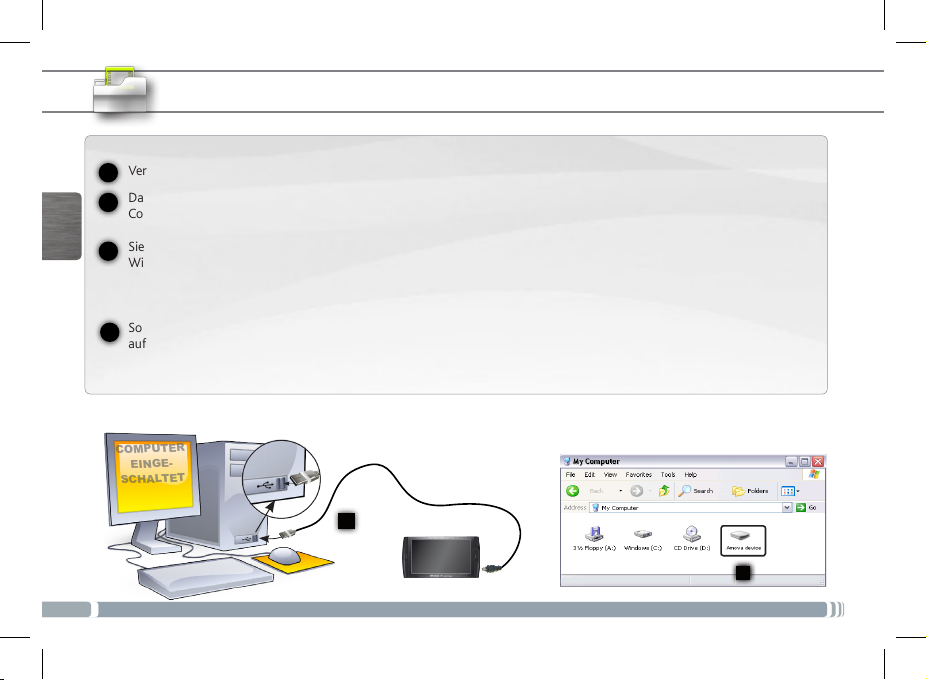
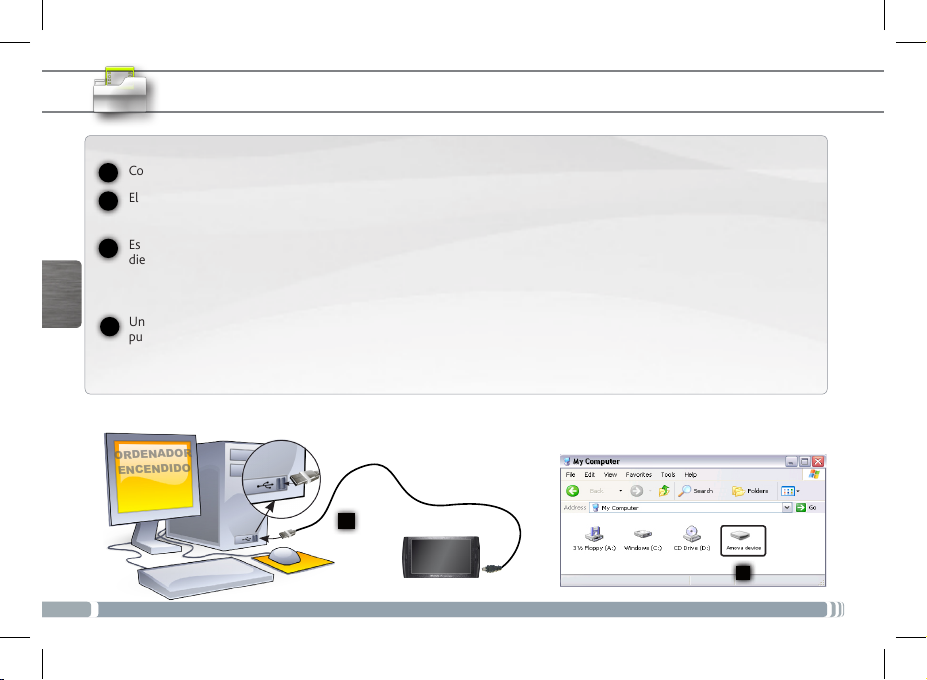
TRANSFERRING MEDIA TO YOUR ARNOVA
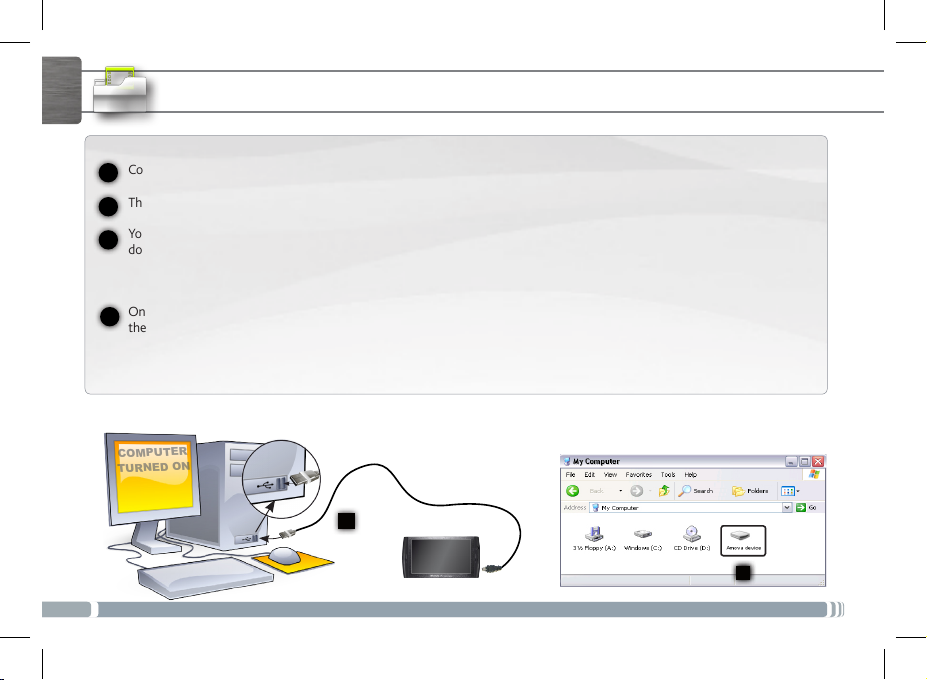
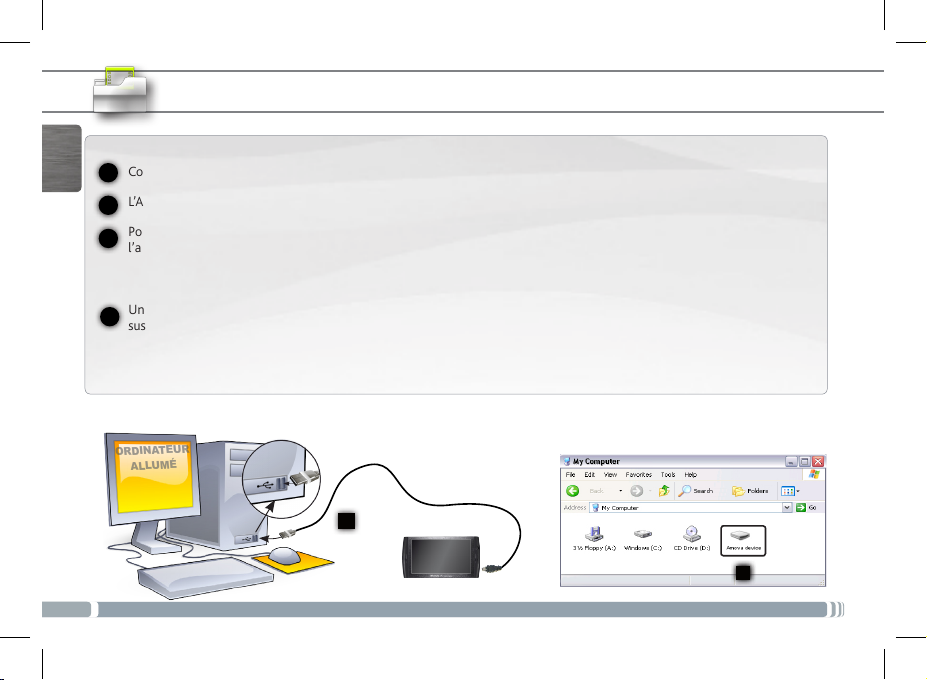
Connect the supplied USB cable to the ARNOVA and to a running computer.
1
The ARNOVA will turn on. Within a few seconds the ARNOVA will appear as an icon on your computer.
2
You can transfer your media files to the ARNOVA either by copy/pasting them into the respective folders using Win-
3
dows® Explorer (or the Finder on a Mac®), or by using Windows Media® Player. Open Windows Media Player® and then
use the Sync tab to synchronize your music, videos, and photos onto your ARNOVA. See Windows Media Player®’s Help
to learn more about this.
Once all your file transfers are finished, close Windows® Explorer and any other program that may have read or written to
4
the ARNOVA . Click on the ‘safely remove’ icon in the system tray, next to the clock. You can now unplug the USB cable.
8
UserGuide_Arnova_7G2_109860_book.indd 8 01/06/2011 16:47:50
Page 9
www
Merci d’avoir choisi ce produit ARNOVA. Nous espérons que vous aurez plaisir à l’utiliser et qu’il vous donnera satisfaction pendant de
nombreuses années. Après avoir déballé votre produit ARNOVA, nous vous conseillons de prendre quelques minutes pour l’enregistrer
(http://arnovatech.com/register). Cela vous permettra d’avoir accès au support technique ARNOVA (http://arnovatech.com/support).
ENREGISTREZ VOTRE PRODUIT !
ÄSur Internet : http://arnovatech.com/register
FRANÇAIS
?
UserGuide_Arnova_7G2_109860_book.indd 9 01/06/2011 16:47:51
BESOIN D’AIDE ?
Sur notre site Web: Consultez la Foire Aux Questions (FAQ) sur http://arnovatech.com/faq
Contactez notre équipe d’assistance technique: Allez sur http://arnovatech.com/support pour une assistance par e-mail.
Veuillez enregistrer votre produit avant de contacter notre équipe d’assistance technique (voir
Comme nous mettons à jour et améliorons régulièrement nos produits, le logiciel de votre appareil peut présenter une
interface ou des fonctionnalités légèrement différentes de celles décrites dans ce guide.
Enregistrez votre Produit
).
9
Page 10
???
DESCRIPTION DE L’APPAREIL
2 3
Marche/Arrêt/Verrouillage : Faites glisser vers la gauche et maintenez pour allu-
1
mer/éteindre. Faites glisser vers la droite pour verrouiller l’écran tactile.
Lorsque vous faites glisser ce bouton vers la gauche et le maintenez, une fenêtre apparaît avec une liste d’op -
FRANÇAIS
tions (lorsque le produit est en marche). Appuyez sur “Eteindre” pour éteindre votre ARNOVA complètement.
Appuyez sur “Mettre en veille” (Suspend) pour mettre l’appareil en veille (et permettre un redémarrage plus
rapide en touchant l’écran). Lorsque l’appareil est en veille, faites glisser le bouton vers la droite pour verrouiller
l’appareil avec l’écran éteint. Cela peut s’avérer utile si votre ARNOVA se trouve dans votre sac à dos, par
exemple, et que vous ne voulez pas le réveiller en touchant l’écran par accident.
2
Lecteur de cartes Micro-SD
Témoin de charge - rouge : batterie en charge / jaune : batterie chargée
3
Haut-parleurs
4
Prise casque
5
Connecteur d’alimentation : pour connecter le câble d’alimentation fourni.
6
Port micro-USB : permet de connecter votre ARNOVA à un ordinateur, à l’aide du câble USB fourni
7
appareil USB de stockage de masse.
select. Si le Host port est désactivé, appuyez sur la ligne Host port pour l’activer.Important: désactiver le Host port après utilisation.
8
Béquille : sortez-la, et elle vous permettra de faire tenir votre ARNOVA sur une surface plane et stable.
Sur l’écran d’accueil, appuyez sur l’icône de Menu , puis sélectionnez Paramètres/USB Mode
4
8
IMPORTANT:
Votre produit ne réagit plus. Vous pouvez l’arrêter en actionnant pendant 10 secondes le bouton ON/OFF ou en utilisant
le bouton de réinitialisation (reset).
10
UserGuide_Arnova_7G2_109860_book.indd 10 01/06/2011 16:47:54
1
6
4
. Vous pouvez aussi connecter un
5
7
Page 11
1
2
2
1
PREMIÈRE UTILISATION
Avant d’utiliser votre ARNOVA pour la première fois, chargez complètement sa batterie !
!
▲
Charger la batterie
Branchez le câble d’alimentation fourni sur le connecteur d’alimentation de l’ARNOVA et sur une prise secteur.
UserGuide_Arnova_7G2_109860_book.indd 11 01/06/2011 16:47:55
Votre ARNOVA s’allume et commence à se charger. Le témoin de charge est rouge lorsque que la batterie est en charge. Il
est jaune lorsque la batterie est complètement chargée.
UK
Assistant d’installation
La première fois que vous allumez l’ARNOVA, l’assistant d’installation vous aide à configurer les principaux réglages de
l’appareil : la langue, le pays, l’heure, etc.
EUR
US
FRANÇAIS
11
Page 12
1
2
3
4
www
FRANÇAIS
* Pour vous connecter à un réseau WiFi ouvert, il n’est p as nécessaire de saisir les informations réseau. Pour un réseau protégé, vous devrez soit entrer une clé
(une suite de chiffres et/ou de lettres) du type WEP, WPA ou WPA2. Pour obtenir les paramètres de connexion exacts, contacter le fournisseur d’accès à Internet.
12
UserGuide_Arnova_7G2_109860_book.indd 12 01/06/2011 16:47:56
SE CONNECTER À UN RÉSEAU WIFI
Pour suivre cette procédure, vous devez vous situer dans une zone WiFi vous permettant de vous connecter. Chaque fois
que l’ARNOVA détectera un réseau que vous avez déjà configuré, il tentera de s’y connecter.
Pour configurer un nouveau réseau WiFi, allez sur l’écran d’accueil, appuyez sur l’icône de
Menu , puis sélectionnez Paramètres .
Dans l’écran des Paramètres, sélectionnez
Connexions sans fil & Réseaux.
Si le WiFi est désactivé, appuyez sur la ligne Wi-Fi pour l’activer. Puis, sélectionnez
Paramètres Wi-Fi. L’ARNOVA recherche les réseaux WiFi disponibles et les affiche au
bas de l’écran.
Appuyez sur l’un des réseaux disponibles proposés, saisissez les informations réseau demandées* et appuyez ensuite sur Se conec-
ter. Votre ARNOVA essaie alors de se connecter à ce point d’accès WiFi d’après les paramètres réseau saisis précédemment.
Page 13

▼
▼▼
L’INTERFACE DE L’ARNOVA
Votre ARNOVA est équipé d’un écran tactile capacitif. Utiliser la pulpe de votre doigt pour naviguer.
Ecran d’accueil
Voici les raccourcis Android™
par défaut (Navigateur Web,
E-mail, etc.). Appuyez sur une
icône pour ouvrir l’application
correspondante. Vous pouvez
personnaliser l’écran d’accueil
en ajoutant/supprimant des
raccourcis et des widgets, en
changeant le fond d’écran, etc .
Voir page suivante.
Partie supérieure de l’interface (varie selon votre position dans l’interface)
Heure Volume -/+
Retour à l’écran
d’Accueil
Icônes de Notification : faites glisser la barre
supérieure de l’écran vers le bas pour afficher
les messages de notification (le cas échéant).
UserGuide_Arnova_7G2_109860_book.indd 13 01/06/2011 16:47:57
▼
Icônes de Statut : (état de la
connexion WiFi, niveau de
batterie, etc.)
▼
Retour à l’écran
précédent
Raccourci Paramètres
Raccourci Navigateur Web
Bouton applications
Appuyez sur cette icône pour afficher
toutes les applications Android™
installées sur votre ARNOVA (jeux,
différents outils, etc.). Il est possible
de les copier sur l’écran d’accueil. Vous
pouvez obtenir d’autres applications
Android™ depuis AppsLib .
Menu : vous donne accès aux
▼
options de menu disponibles.
FRANÇAIS
13
Page 14
PERSONNALISATION DE L’APPAREIL
L’écran d’accueil étendu
FRANÇAIS
Faites glisser votre doigt horizontalement sur l’écran pour aller sur
le côté gauche ou droit de l’écran
d’accueil étendu.
Personnalisation des éléments de l’écran d’accueil
- Pour ajouter un élément (raccourci, widget, etc.), maintenez votre doigt appuyé sur un emplacement vide de l’écran, puis choi-
sissez parmi la liste d’options. Vous pouvez aussi appuyer sur l’icône de Menu et sélectionner Ajouter , en bas de l’écran.
- Pour déplacer un élément, maintenez votre doigt appuyé dessus jusqu’à ce qu’il s’agrandisse, faites-le glisser vers l’emplace-
ment souhaité, et relâchez votre doigt.
- Pour supprimer un élément de l’écran d’accueil, maintenez votre doigt appuyé dessus, faites-le glisser vers la corbeille (l’on-
glet Applications, sur la droite, se transforme en corbeille lorsque vous maintenez un élément appuyé) et relâchez votre doigt.
Ajouter d’autres d’applications avec APPSLIB : Connectez votre ARNOVA à Internet, puis
appuyez sur l’icône AppsLib . Ce portail de téléchargement vous propose des milliers
d’applications gratuites et payantes, telles que des jeux amusants ou des outils pratiques.
Choisissez une application et téléchargez-la. C’est aussi simple que cela !
Modification des paramètres : Sur l’écran d’accueil, appuyez sur l’icône de Menu , appuyez sur
Paramètres et choisissez une catégorie : Connexions sans fil, Sons et affichage, Date et heure, etc .
14
UserGuide_Arnova_7G2_109860_book.indd 14 01/06/2011 16:47:58
Page 15
1
2
3
LECTURE DE FICHIERS MULTIMÉDIA
Sur l’écran d’accueil, appuyez sur l’icône vidéo, audio ou photo.
Uniquement dans les modes Vidéo et Photo : pour afficher/masquer les options disponibles, appuyez n’importe où sur l’écran.
Pour mettre en pause/relancer une vidéo, appuyez sur l’icône / (en bas de l’écran). Pour naviguer dans la
vidéo, utilisez la barre de progression (en bas de l’écran) et faites-la glisser jusqu’à la zone désirée.
Vidéo
Pour lire la chanson précédente/suivante, appuyez sur les icônes / . Utilisez les icônes / et la
barre de progression de la même façon que dans le lecteur vidéo (voir ci-dessus).
Musique
L’ARNOVA afche la liste de chiers/dossiers correspondant à la catégorie sélectionnée.
Appuyez sur un élément pour l’ouvrir.
FRANÇAIS
Pour démarrer/mettre en pause un diaporama, appuyez sur l’icône /
Photo
UserGuide_Arnova_7G2_109860_book.indd 15 01/06/2011 16:47:58
précédente, appuyez sur les icônes / .
. Pour afcher la photo suivante ou
15
Page 16
USB
1
32
FRANÇAIS
ORDINATEUR
ALLUMÉ
TRANSFERT DE FICHIERS MULTIMÉDIA
Connectez le câble USB fourni à votre ARNOVA et à un ordinateur allumé.
1
L’ARNOVA s’allume. Après quelques secondes, l’ARNOVA apparaît sous la forme d’une icône sur votre ordinateur.
2
Pour transférer vos fichiers sur l’ARNOVA, vous pouvez les copier/coller directement dans les dossiers respectifs de
3
l’appareil (avec Windows® Explorer ou le Finder sur Mac®), ou vous pouvez également utiliser Windows Media® Player.
Lancez Windows Media Player®, puis utilisez l’onglet Synchroniser pour synchroniser vos chansons, vidéos et photos avec
votre ARNOVA. Consultez l’aide de Windows Media Player® pour en savoir plus à ce sujet.
Une fois que tous les transferts de fichiers sont terminés, fermez Windows Media® Player ou tout autre programme
4
susceptible d’utiliser l’ARNOVA. Cliquez ensuite sur l’icône de retrait du périphérique en toute sécurité dans la barre des
tâches, à côté de l’horloge. Vous pouvez à présent débrancher le câble USB.
16
UserGuide_Arnova_7G2_109860_book.indd 16 01/06/2011 16:48:00
Page 17
www
Vielen Dank, dass Sie sich für dieses Produkt von ARNOVA entschieden haben. Wir hoffen, Sie werden viel Freude daran haben und
dass es Ihnen für viele Jahre zuverlässige Dienste leisten wird. Nachdem Sie Ihr ARNOVA-Produkt ausgepackt haben, empfehlen wir
Ihnen, sich ein paar Minuten Zeit zu nehmen, und es zu registrieren (http://arnovatech.com/register). Dadurch erhalten Sie Zugriff auf
den technischen Support von ARNOVA (http://arnovatech.com/support).
REGISTRIEREN SIE IHR PRODUKT!
ÄIm Internet unter http://arnovatech.com/register
DEUTSCH
?
Da unsere Produkte kontinuierlich aktualisiert und weiterentwickelt werden, kann die Software Ihres Geräts in Erscheinung und Funktionalität geringfügige
UserGuide_Arnova_7G2_109860_book.indd 17 01/06/2011 16:48:01
SIE BENÖTIGEN HILFE?
Auf unserer Website: Für häug gestellte Fragen (FAQ) siehe http://arnovatech.com/faq
Kontaktieren Sie unseren technischen Kundendienst: Sie erhalten unter http://arnovatech.com/support Hilfe per E-Mail.
Bitte registrieren Sie Ihr Produkt, bevor Sie Kontakt mit dem technischen Support aufnehmen (siehe
Abweichungen zu den Darstellungen in dieser Kurzbedienungsanleitung aufweisen.
Registrieren Sie Ihr Produkt
).
17
Page 18
???
BESCHREIBUNG DES ARNOVA
2 3
Ein-/Ausschalten/Sperren: nach links schieben und halten, um ein- bzw. auszu-
1
schalten. Nach rechts schieben, um den Touchscreen des Gerätes zu sperren.
Wenn Sie den Schalter nach links schieben und festhalten, erscheint ein Auswahlfenster mit Optionen
(falls das Produkt eingeschaltet ist). Drücken Sie “Pow er Off” [Ausschalten], um Ihren ARNOVA vollständig auszuschalten. Wählen Sie “Suspend” [Ruhezustand], um das Gerät in den Bereitschaftsmodus
zu versetzen (dies ermöglicht einen schnellen Start, wenn Sie den Bildschirm berühren). Während
sich das Gerät im Bereitschaftsmodus befindet, schieben sie den Schalter nach rechts, um das Gerät
zu sperren. Dies kann nützlich sein, falls sich Ihr ARNOVA z .B. in Ihrer Tasche befindet und Sie nicht
wünschen, daß das Gerät aus Ver sehen eingeschaltet wird.
DEUTSCH
2
Micro-SD Karten Leser
Ladeanzeige - rote Anzeige: Akku wird geladen / gelbe Anzeige: Akku geladen.
3
Lautsprecher
4
Kopfhöreranschluss
5
Strom anschluss: zum Anschluss des mitgelieferten Stromkabels.
6
Micro USB Port: Um Ihren ARNOVA mit Ihrem Computer zu verbinden, verwenden Sie das mitgelieferte USB Kabel. Auch zur Verwen-
7
dung ein USB-Stick. Tippen Sie auf dem Desktop auf das Menü Icon und wählen anschließend Einstellungen/USB Mode select.
Wenn das Host port ausgeschaltet ist, tippen Sie auf die Host port Zeile um es einzuschalten. Wichtig: Schalten Sie den Host Port nach
Gebrauch aus.
8
Standfuß: Klappen Sie ihn heraus und stellen Sie Ihren ARNOVA auf einer flachen, stabilen Oberfläche ab.
4
8
WICHTIG:
Ihr Gerät ist abgestürzt, bitte schalten Sie es aus. Drücken und halten Sie den Ein-/Aus-Schalter für 10 Sekunden
oder drücken Sie den Reset-Schalter.
18
UserGuide_Arnova_7G2_109860_book.indd 18 01/06/2011 16:48:04
1
5
6
4
7
Page 19
1
2
2
1
STARTEN
Vor der erstmaligen Verwendung des ARNOVA sollte der Akku vollständig aufgeladen werden!
!
▲
Auaden des Akkus
Verbinden Sie das mitgelieferte Stromkabel mit dem ARNOVA-Stromanschluss und mit einer Steckdose.
UserGuide_Arnova_7G2_109860_book.indd 19 01/06/2011 16:48:06
Daraufhin schaltet sich der ARNOVA-Player ein und startet den Ladevorgang. Während der Akku aufgeladen wird, leuchtet
die Leistungsanzeige rot. Diese wechselt zu Gelb, sobald der Akku vollständig geladen ist.
UK
Installationsassistent
Wenn Sie Ihren ARNOVA das erste Mal in Betrieb nehmen, leitet Sie der Installationsassistent durch einige Bildschirme, um
Ihnen dabei zu helfen, die grundlegenden Einstellungen vorzunehmen. Sprache, Land, Uhrzeit usw.
EUR
US
DEUTSCH
19
Page 20
1
2
3
4
www
WIFI-NETZWERKVERBINDUNG
Dazu müssen Sie sich in Reichweite eines WiFi befinden. Der ARNOVA wir dann jedesmal eine Verbindung mit einem der
bereits konfigurierten Netzwerke herstellen.
DEUTSCH
20
UserGuide_Arnova_7G2_109860_book.indd 20 01/06/2011 16:48:06
Um ein neues WiFi Netzwerk einzurichten, tippen Sie auf dem Desktop auf das Menü Icon
und wählen anschließend Einstellungen .
Unter Einstellungen wählen Sie Drahtlos & Netzwerke.
Wenn das WiFi ausgeschaltet ist, tippen Sie auf die WLAN Zeile um es einzuschalten.
Dann wählen Sie WLAN-Einstellungen aus. Der ARNOVA wird die verfügbaren WiFiNetze suchen und sie auf dem Display anzeigen.
Tippen Sie auf das Netzwerk, mit dem Sie verbinden möchten, geben Sie die erforderlichen Netzwerkinformationen ein*
und tippen Sie dann auf Verbinden. Ihr ARNOVA wird nun versuchen, eine Verbindung mit diesem WiFi-Hot Spot aufzunehemen, mit den von Ihnen eingegebenen Netzwerkparametern.
* Für kostenlose WiFi-Access Points besteht kein Bedarf für das Eingeben spezieller Informationen. Für abgesicherte Netzwerke benötigen Sie entweder einen
Schlüssel (eine Serie von Zahlen und/oder Buchstaben) des Typs WEP, WPA oder WPA2. Um die exakten Verbindungsparameter zu erhalten, kontaktieren Sie
den Internetprovider.
Page 21
▼
▼▼
DIE ARNOVA SCHNITTSTELLE
Ihr ARNOVA-Gerät ist mit einem Kapazitiven Touchscreen ausgerüstet. Benutzen die Fingerbeere.
Hauptfenster
Dies sind Desktop-Verküpfungen
von Android™ (Web-Browser,
E-Mail, usw.). Tippen Sie auf ein
Icon, um die entsprechende Anwendung zu öffnen. Sie können
den Home-Screen nach Ihren
Wünschen anpassen, indem Sie
Shortcuts und Widgets hinzufügen oder entfernen oder das
Design des Hintergundes ändern.
Siehe auch folgende Seite.
Web-Browser Shortcut
Einstellungen Shortcut
Applikationen Taste
Tippen Sie auf dieses Icon, um alle installierten Android™- Anwendungen zu
sehen (Spiele, verschiedene Tools, usw.).
Bei Bedarf können Sie diese Anwendungen auf Ihren Desktop kopieren. Sie
finden weitere Android™-Anwendungen
in AppsLib .
Obere Leiste der Schnittstelle (variiert, je nachdem, in welchem Bildschirm Sie sich befinden)
Uhrzeit Lautstärke -/+
Zurück zur
Startseite
Mitteilungs-Icons: Um die Mitteilung zu sehen,
ziehen Sie die top bar einfach nach unten.
UserGuide_Arnova_7G2_109860_book.indd 21 01/06/2011 16:48:07
▼
Status-Icons: (WiFi Verbindungsstatus, Ladezustand der Batterie usw.)
▼
Zurück zum vorherigen Bildschirm
Menü: bietet Menüoptionen
▼
entsprechend des aktuellen
Bildschirms.
DEUTSCH
21
Page 22
ANPASSEN IHRES PRODUKTES
Der erweiterte Desktop
Bewegen Sie Ihren Finger horizontal auf dem Touchscreen, um
auf die linke oder rechte Seite des
Desktops zu gelangen. Insgesamt
gibt es 3 Desktops.
DEUTSCH
Passen Sie die Elemente auf dem Desktop an
- Um ein Element (Shortcuts, Widgets, usw.) auf Ihren Home-Screen hinzuzufügen, wählen Sie eine leere Position, um dann aus der Liste eine
Anwendung auszuwählen. Sie können auch auf das Menü Icon tippen und Hinzufügen wählen (zu finden im unteren Bereich des Displays).
- Um ein Element auf Ihrem Desktop zu verschieben, halten Sie Ihren Finger darauf bis es größer wird, dann ziehen Sie es zur
gewünschten Stelle und lassen Sie anschließend los.
- Zum Löschen eines Objektes auf Ihrem Desktop gehen Sie auf das entsprechende Objekt und ziehen es einfach auf den
Mülleimer (dieser erscheint auf der rechten Seite des Displays) anstatt des Applikations-Tab.
Applikationen hinzufügen - APPSLIB: Wenn Sie Ihren ARNOVA mit dem Internet verbunden
haben, tippen Sie auf das AppsLib Ikon . Diese Onlinebibliothek bietet Ihnen tausende zum
Teil kostenlose Apps wie Unterhaltung, Spiele und weitere nützliche Anwendungen zum herunterladen und verwenden.
Einstellungen ändern: Tippen Sie auf das Menü Icon anschließend auf Einstellungen
und wählen Sie aus einer der Kategorien: Wireless, Sound und Display, Datum und Uhrzeit, usw.
22
UserGuide_Arnova_7G2_109860_book.indd 22 01/06/2011 16:48:08
Page 23
1
2
3
ABSPIELEN VON MULTIMEDIADATEIEN
Tippen Sie auf der Startseite auf Video icon, Audio icon oder Foto icon.
Nur in den Modi Video und Foto: Um Bildschirmsteuerungen ein - oder auszublenden, tippen Sie auf eine beliebige Stelle im
Bildschirm.
Um ein Video anzuhalten oder fortzusetzen, tippen Sie auf das Symbol / (unten auf dem Bildschirm). Um zu
einem bestimmten Punkt im Video zu springen, schieben Sie die Fortschrittsleiste zum gewünschten Punkt.
Video
Um zum nächsten oder letzten Titel zu gelangen, tippen Sie auf die Symbole / .
Verwenden Sie die Symbole / und die Fortschrittsleiste, wie in dem Video-Player-Bildschirm (siehe oben).
Musik
Der ARNOVA zeigt nun eine Liste von Dateien oder Ordern an, je nach gewählter Kategorie.
Tippen Sie auf eine Datei, um diese abzuspielen.
DEUTSCH
Um eine Diashow zu starten oder anzuhalten, tippen Sie auf das Symbol / .
vorherigen Fotos tippen Sie auf die Symbole / .
Foto
UserGuide_Arnova_7G2_109860_book.indd 23 01/06/2011 16:48:09
Für die Anzeige des nächsten oder
23
Page 24
USB
1
32
DEUTSCH
COMPUTER
EINGE
-
SCHALTET
ÜBERTRAGEN VON MEDIADATEIEN
Verbinden Sie Ihren ARNOVA mit dem Computer, mit Hilfe des mitgeliefertem USB-Kabels.
1
Daraufhin schaltet sich der ARNOVA ein. Innerhalb weniger Sekunden erscheint der ARNOVA als Symbol auf Ihrem
2
Computer.
Sie können Ihre Media-Dateien durch Kopieren/Einfügen in die jeweiligen Ordner auf Ihren ARNOVA entweder mit dem
3
Windows® Explorer (oder mit dem Finder auf einem Mac®) übertragen oder indem Sie den Windows Media® Player
verwenden. Verwenden Sie den Windows Media Player® (Tab Sync [Synchronisieren]), um Musik, Videos und Fotos Ihrer Wahl
auf Ihrem ARNOVA zu synchronisieren. Weitere Informationen entnehmen Sie bitte der Windows Media Player®-Hilfe.
Sobald die Dateiübertragung beendet ist, schließen Sie den Windows® Explorer und alle anderen Programme. Klicken Sie
4
auf das ‘Sicher entfernen’ Icon in der Ablageleiste neben der Uhr. Sie können das USB-Kabel jetzt entfernen.
24
UserGuide_Arnova_7G2_109860_book.indd 24 01/06/2011 16:48:10
Page 25
www
Gracias por haber elegido este producto ARNOVA. Esperamos que sea de su total agrado y lo pueda disfrutar durante muchos años.
Una vez desempaquetado su producto ARNOVA, dedique unos pocos minutos de su tiempo para registrarlo (http://arnovatech.com/
register). De esta forma, podrá acceder al servicio de asistencia técnica de ARNOVA (http://arnovatech.com/support).
¡REGISTRE SU PRODUCTO!
ÄEn Internet en http://arnovatech.com/
register
ESPAÑOL
?
UserGuide_Arnova_7G2_109860_book.indd 25 01/06/2011 16:48:11
¿NECESITA AYUDA?
En nuestro sitio web: Consulte la sección de preguntas más frecuentes en http://arnovatech.com/faq
Póngase en contacto con nuestro equipo de Asistencia Técnica: Visite http://arnovatech.com/support para la asistencia
por e-mail.
Producto
Por favor, registre su producto antes de ponerse en contacto con la asistencia técnica (consulte
).
Tenga en cuenta que como estamos actualizando y mejorando constantemente nuestros productos, el software de su dispositivo
puede variar ligeramente con respecto a lo descrito en esta Guía Rápida.
Registre su
25
Page 26
???
DESCRIPCIÓN DEL ARNOVA
On / Off / Bloqueo: Arrastre hasta la izquierda y mantenga pulsado para encender
1
/ apagar. Arrastre hasta la derecha para bloquear la pantalla táctil.
Cuando arrastra el botón a la izquierda y lo mantenga, aparece una ventana con una lista de
opciones (cuando el producto se está ejecutando). Pulse “Apagar” para apagar tu ARNOVA
completamente. Pulse “Suspend” (Modo de espera /suspende) para poner en modo de espera (y
permitir un rápido reinicio del sistema la próxima vez que toque la pantalla). Mientras el dispositivo está en modo de suspensión, arrastre derecho para bloquear el dispositivo con la pantalla
apagada. Esto puede ser útil si su ARNOVA está en su mochila, por ejemplo, y no quiere abrirlo
tocando la pantalla por accidente).
2
Lector de tarjetas Micro-SD
Indicador de carga - Rojo: batería cargando / Amarillo: batería cargada.
3
ESPAÑOL
Altavoces
4
Toma de auriculares
5
Conector de alimentación: para conectar el cable de alimentación suministrado.
6
Puerto micro-USB: para conectar el ARNOVA a un ordenador. Para conectar un dispositivo de almacenamiento masivo USB.
7
Sitúese en la pantalla de inicio, dé un toque en el icono de menú y, a continuación, seleccione
Host port está desactivado, dé un toque en la línea Host port para activarlo. Importante: apagar el Host port después de su uso
8
Soporte de pie: sáquelo; permitirá que el ARNOVA se aguante por sí mismo en una superficie plana y estable.
4
8
Ajustes/USB Mode select.
2 3
1
5
6
4
7
Si el
.
IMPORTANTE:
Si su producto no responde. Puede apretar el botón ON / OFF durante 10 segundos o utilisar el botón de reinicio (reset).
26
UserGuide_Arnova_7G2_109860_book.indd 26 01/06/2011 16:48:13
Page 27
1
2
2
1
ANTES DE EMPEZAR
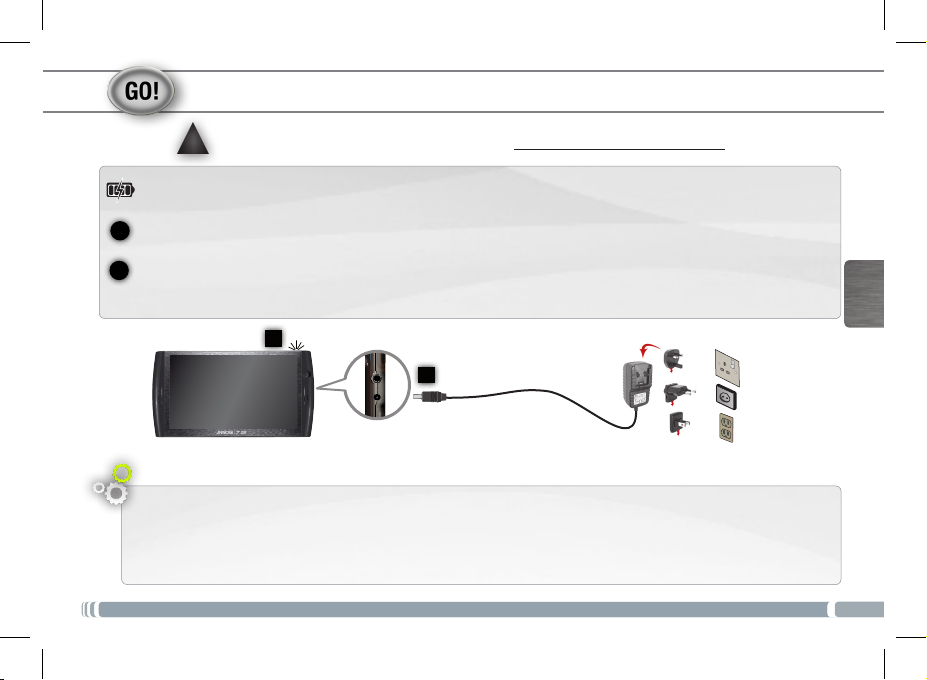
Antes de utilizar su ARNOVA por primera vez, cargue completamente la batería.
!
▲
Cargado de la batería
Conecte el cable de alimentación suministrado al conector de alimentación del ARNOVA y a una toma eléctrica de pared.
UserGuide_Arnova_7G2_109860_book.indd 27 01/06/2011 16:48:14
El ARNOVA se encenderá y empezará a cargarse. El indicador de carga es de color rojo cuando la batería se está cargando. Es
de color amarillo cuando la batería está completamente cargada.
UK
Asistente para la instalación
La primera vez que encienda el ARNOVA, el asistente para la instalación le guiará a través de una serie de pantallas que le
ayudarán a configurar los parámetros principales: idioma, país, hora, etc.
EUR
US
27
ESPAÑOL
Page 28
1
2
3
4
www
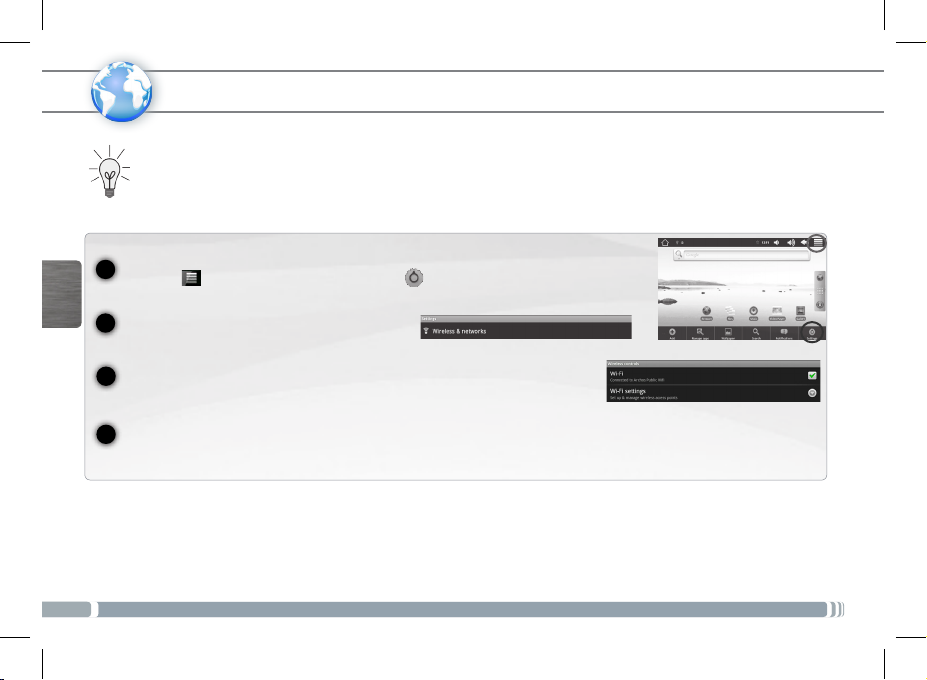
CONEXIÓN A UNA RED WIFI
Para que este procedimiento funcione, debe encontrarse en una zona WiFi que le permita conectarse. Cuando el ARNOVA
se encuentre dentro del alcance de una red que ya haya configurado una vez, intentará realizar una conexión.
Para configurar una red WiFi nueva, sitúese en la pantalla de inicio, dé un toque en el icono
de menú y, a continuación, seleccione
Ajustes
.
ESPAÑOL
28
UserGuide_Arnova_7G2_109860_book.indd 28 01/06/2011 16:48:15
En la pantalla
inalámbricas
Si el WiFi está desactivado, dé un toque en la línea Wi-Fi para activarlo. Después,
seleccione Configuración de Wi-Fi. El ARNOVA realizará una exploración para ver si
hay redes WiFi disponibles y las mostrará en la parte inferior de la pantalla.
Pinche en la red a la que desee conectarse, introduzca la información de red requerida* y luego pinche en Establecer co-
nexión. Así, el ARNOVA intentará establecer una conexión al punto de acceso WiFi con los parámetros de red introducidos.
* Con respecto a los puntos de acceso WiFi gratuitos, no es necesario introducir ninguna información especial. En las redes protegidas, necesitará o bien una clave
(serie de caracteres alfanuméricos) de tipo WEP, WPA o WPA2. Solicite los parámetros de conexión exactos requeridos a la servicio que gestione la red WiFi.
.
Ajustes
, seleccione
Conexiones
Page 29
▼
▼▼
LA INTERFAZ DEL ARNOVA
El dispositivo ARNOVA está equipado con una pantalla táctil capacitiva. Utilizar la pulpa de los dedos.
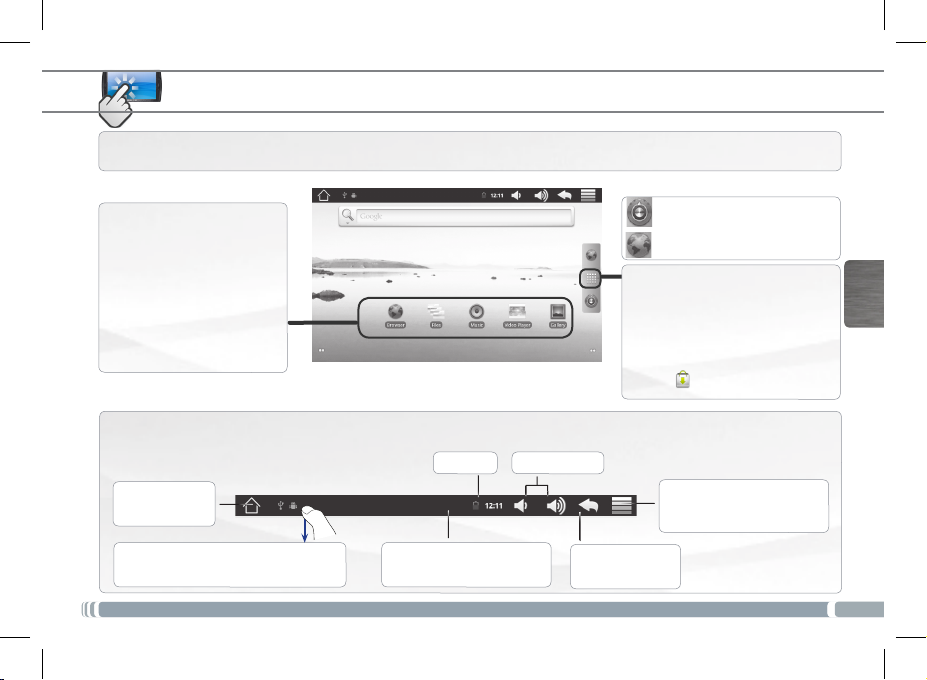
Pantalla principal
Estos son los accesos directos
Android™ predeterminados (Na-
vegador web, EMail, etc.). Dé un
toque en un icono para abrir la
aplicación correspondiente. Puede personalizar la pantalla de
inicio añadiendo o eliminando
accesos directos y widgets, cambiando el fondo, etc. Consulte la
página siguiente.
Barra superior de la interfaz (varía según la pantalla en la que se encuentre)
Hora Volumen -/+
Volver a la pantalla principal
Iconos de
perior hacia abajo para mostrar los mensajes
de notificación (si hay alguno).
UserGuide_Arnova_7G2_109860_book.indd 29 01/06/2011 16:48:16
Notificación
▼
: arrastre la barra su-
Iconos de Estado: (estado de
la conexión WiFi, nivel de la
batería, etc.)
▼
Volver a la pantalla anterior
Icono Ajustes
Icono Navegador web
Aplicaciones botón
Dé un toque en este icono para mostrar
todas las aplicaciones Android™ instaladas en el ARNOVA ( juegos, distintas
herramientas, etc.). Puede copiarlas a la
pantalla de inicio. Usted puede obtener
otras aplicaciones Android™ desde
AppsLib .
Menú: ofrece distintas opciones
de menú en función de la pantalla
▼
en la que se encuentre.
29
ESPAÑOL
Page 30
PERSONALIZACIÓN DEL PRODUCTO
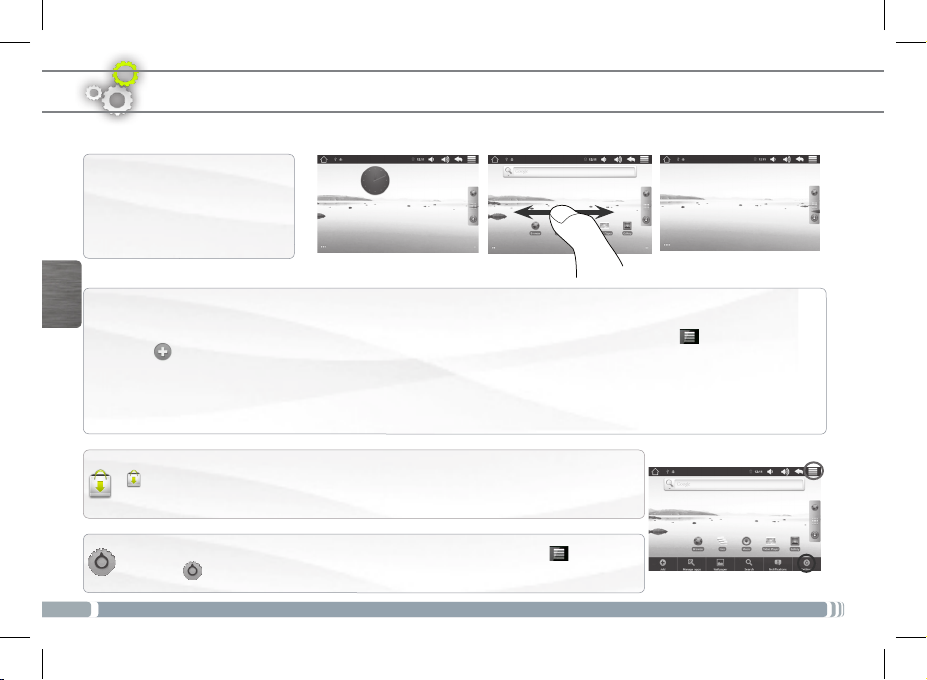
La pantalla de inicio ampliada
Deslice el dedo horizontalmente en la pantalla para ir al lado
izquierdo o derecho de la pantalla
de inicio ampliada.
Personalización de los elementos de la pantalla de inicio
ESPAÑOL
- Para añadir un elemento a la pantalla de inicio (accesos directos, widgets, etc.), mantenga el dedo en la pantalla en un lugar
vacío y, a continuación, elija el elemento en la lista. También puede dar un toque en el icono de menú y seleccionar
Añadir , en la parte inferior de la pantalla.
- Para desplazar un elemento de la pantalla de inicio, mantenga el dedo sobre él hasta que aumente de tamaño; a continua-
ción, arrástrelo hasta el lugar que desee y suelte el dedo.
- Para eliminar un elemento de la pantalla de inicio, mantenga el dedo sobre él, arrástrelo hasta la papelera de reciclaje (mientras mantiene el
dedo sobre un elemento, la pestaña de Aplicaciones del lado derecho de la pantalla se convierte en una papelera de reciclaje) y suelte el dedo.
Agregar más aplicaciones - APPSLIB
de AppsLib. Esta biblioteca en línea de aplicaciones gratis y adquiribles, tiene miles de juegos y
aplicaciones útiles para descargar y utilizar.
Cambio de los ajustes: En la pantalla de inicio, dé un toque en el icono de menú , dé un toque
en Ajustes y elija una categoría: Conexiones inalámbricas, Sonido y pantalla, Fecha y hora, etc.
30
UserGuide_Arnova_7G2_109860_book.indd 30 01/06/2011 16:48:17
: Conecte el ARNOVA Internet, a continuación, pulse el icono
Page 31
1
2
3
REPRODUCCIÓN DE ARCHIVOS MULTIMEDIA
En la pantalla principal, pulse el icono de vídeo, audio o fotos.
Sólo en los modos Foto y V ídeo: para mostrar/ocultar los controles en pantalla, pinche en cualquier lugar de la pantalla.
Para pausar o reanudar un vídeo, pinche en el icono / (esquina inferior de la pantalla). Para ir a un
determinado punto en el vídeo, deslice la barra de progresión hasta el punto deseado.
Vídeo
Para reproducir la canción siguiente o anterior, pinche en los iconos / . Utilice los iconos / y la
barra de progresión de igual forma que para la reproducción de vídeo.
Música
El ARNOVA mostrará una lista de archivos o carpetas correspondientes a la categoría
seleccionada.
Pinche en un elemento para empezar a reproducirlo.
ESPAÑOL
Para empezar o pausar una presentación de imágenes, pinche en el icono /
Foto
UserGuide_Arnova_7G2_109860_book.indd 31 01/06/2011 16:48:18
anterior presa en las iconos / .
. Para mostrar la foto siguiente o la
31
Page 32
USB
1
32
ESPAÑOL
ORDENADOR
ENCENDIDO
TRANSFERENCIA DE ARCHIVOS MULTIMEDIA
Conecte el cable USB suministrado al ARNOVA y a un ordenador encendido.
1
El ARNOVA se encenderá. En unos segundos, aparecerá el icono del ARNOVA en su ordenador.
2
Es posible transferir archivos multimedia al dispositivo ARNOVA copiándolos y pegándolos en las carpetas correspon-
3
dientes mediante el Explorador de Windows® (o la función Finder en un Mac®), o bien utilizando Windows Media®
Player. Utilice Windows Media Player® (pestaña Sincronizar) para sincronizar la música, los vídeos y las fotos que elija en
su ARNOVA. Para saber más sobre esta función, consulte la ayuda de Windows Media Player®.
Una vez finalizadas todas las transferencias de archivos, cierre el Explorador de Windows® y cualquier otro programa que
4
pueda haber leído o escrito en el ARNOVA. Haga clic en el icono “Quitar hardware con seguridad” de la bandeja del sistema, junto al reloj. Ahora ya puede desenchufar el cable USB.
32
UserGuide_Arnova_7G2_109860_book.indd 32 01/06/2011 16:48:19
Page 33
www
Grazie per aver scelto questo prodotto ARNOVA. ARNOVA vi augura di poter sfruttare al massimo le possibilità offerte dal prodotto per
molti anni. Dopo aver aperto il vostro prodotto ARNOVA, vi suggeriamo di registrarlo; ci vorranno solo pochi minuti
(http://arnovatech.com/register). Una volta registrato, potrete accedere al servizio di assistenza tecnica di ARNOVA (http://arnovatech.
com/support).
REGISTRAZIONE DEL PRODOTTO
Ä Su Internet all'indirizzo http://arnovatech.com/
register
?
UserGuide_Arnova_7G2_109860_book.indd 33 01/06/2011 16:48:20
SERVE AIUTO?
Sul nostro sito Web: Consultare la sezione FAQ (Frequently Asked Questions) all'indirizzo http://arnovatech.com/faq
Contattare il nostro servizio di assistenza tecnica: Visitare il sito Web http://arnovatech.com/support per ricevere assistenza
mediante posta elettronica.
(consultare
Poiché i nostri prodotti vengono continuamente aggiornati e migliorati, è possibile che il software del dispositivo si presenti in modo
Registrazione del Prodotto
leggermente diverso o con funzioni modificate rispetto a quanto presentato nella presente Guida rapida.
Registrare il prodotto prima di contattare il servizio di assistenza tecnica
).
33
ITALIANO
Page 34
???
DESCRIZIONE
2 3
1
Accendere/spegnere/bloccare: fate scorrere verso la sinistra e mantenere questa posizione per
accendere/spegnere. Fate scorrere verso la destra per bloccare lo schermo tattile.
Quando fate scorrere questo bottone verso la sinistra e mantenete questa posizione, apparirà una finestra con
una lista di opzioni (quando il prodotto è acceso). Premete su “Spegni” per spegnere completamente il vostro
ARNOVA. Premete su “Suspend” (Mettere in pausa) per mettere l’app arecchio in pausa (e permettere un riavvio
più rapido quando ancora toccate lo schermo). Quando l’apparecchio è in standby, muovete il bottone a destra
per bloccare l’apparecchio con lo schermo spento. questo vi sara utile quando il vostro ARNOVA si trova, per
esempio, nel vostro zaino, e non volete accenderlo toccando lo schermo per sbaglio.
Card reader Micro SD
2
3
Indicatore della ricarica: Rosso: batteria in carica / giallo: batteria caricata.
4
Altoparlanti
5
Spinotto cuffie
6
ITALIANO
Connettore di alimentazione: per collegare il cavo di alimentazione fornito.
Porta micro USB: per collegare ARNOVA al vostro PC, utilizzare il cavo USB. Per connettere una tastiera. Andare allo schermo
7
principale, sfiorare sul Menu l’icona quindi selezionare Impostazioni/USB Mode select. Se Host port è spento, toccare la linea
Host port per portarla sullo stato attivo. Importante: spegnere la Host port dopo l’uso
8
Staffe: per posizionare il ARNOVA su una superficie piatta e stabile.
4
8
IMPORTANTE:
Il vostro prodotto non reagisce più. Potete spegnerlo azionandolo durante 10 secondi il bottone ON/OFF o utilizzando il
bottone di re-inizalizzazione(reset).
34
UserGuide_Arnova_7G2_109860_book.indd 34 01/06/2011 16:48:22
1
5
6
4
7
Page 35
1
2
2
1
AVVIO
Prima di utilizzare il dispositivo ARNOVA per la prima volta, caricare completamente la batteria.
!
▲
Caricamento della batteria
Collegare il cavo di alimentazione fornito al connettore di alimentazione del dispositivo ARNOVA e a una presa a muro.
UserGuide_Arnova_7G2_109860_book.indd 35 01/06/2011 16:48:24
Il dispositivo ARNOVA si accende e viene avviata la ricarica. L’indicatore della carica è rosso quando la batteria è in ricarica.
Diventa giallo quando la batteria è completamente ricaricata.
UK
Installazione guidata
Al primo avvio del dispositivo ARNOVA, l'installazione guidata consentirà di impostare facilmente le impostazioni principali: lingua, paese, ora ecc.
EUR
US
35
ITALIANO
Page 36
1
2
3
4
www
ITALIANO
* Per i punti WiFi ad accesso libero, non è necessario immettere informazioni specifiche. Per le reti protette, è necessario immettere una chiave (una serie di numeri e/o lettere) di tipo WEP, WPA o WPA2. Contattare il Internet Service Provider per ottenere i parametri di connessione appropriati.
36
UserGuide_Arnova_7G2_109860_book.indd 36 01/06/2011 16:48:25
CONNESSIONE A UNA RETE WIRELESS
Per procedere è necessario trovarsi in una zona WIFI che permetta la connessione. Ogni qualvolta ARNOVA si trova in un
raggio di rete che avete già configurato una volta, cercherà una connessione.
Per configurare una nuova rete WIFI, andare allo schermo principale, sfiorare sul Menu
l’icona quindi selezionare Impostazioni .
Nello schermo Impostazioni selezionare
Controlli wireless.
Se WIFI è spento, toccare la linea Wi-Fi per portarla sullo stato attivo. Quindi
selezionare Impostazioni Wi-Fi. Il ARNOVA inzierà la ricerca delle reti WIFI disponibili
mostrandole nella parte superiore dello schermo.
Toccare la rete a cui connettersi, immettere le informazioni di rete necessarie*, quindi toccare Connetti. A questo punto,
verrà eseguito un tentativo di connessione all'hot spot WiFi con i parametri di rete immessi.
Page 37
▼
▼▼
INTERFACCIA
Il dispositivo ARNOVA è dotato di uno capacitivo schermo a sfioramento. Utilizzando la polpa delle dita.
Schermata Home [Pagina iniziale]
Queste sono le scorciatoie
Android™
(Web Browser,
EMail
,
ecc.) - sfiorare un’icona per
aprire l’applicazione corrispondente. E’ possibile personalizzare lo schermo aggiungendo
/rimuovendo scorciatoie e
congegni, cambiando sfondo
ecc.. - vedi pagina successiva
Barra superiore dell'interfaccia (varia in base alla schermata selezionata)
Ora Volume -/+
Consente di
tornare alla Pagina
iniziale
Icone di Notifica: trascinare la barra degli strumenti verso il basso per mostrare i messaggi
di notifica (se attivi)
UserGuide_Arnova_7G2_109860_book.indd 37 01/06/2011 16:48:25
▼
Icone delle Stato: collegamento wifi, livello batteria ecc..
▼
Consente di tornare
alla schermata
precedente
Icona Impostazioni
Icona Web Browser
Applicazioni pulsante
Sfiorare questa icona per mostrare le
applicazioni Android™ installate sul vostro ARNOVA (giochi, tools vari ecc..).
E’ possibile copiarli direttamente sul
vostro schermo. Potete ottenere altre
applicazioni Android™ da Appslib .
Menu: consente di accedere alle
opzioni del menu in base alla
▼
schermata corrente.
37
ITALIANO
Page 38
PERSONALIZZA IL PRODOTTO
Schermo intero
Fare scivolare il dito in senso
orizzontale sullo schermo per
posizionarsi sulla parte sinistra o
destra dello schermo.
Personalizza le voci dello schermo
- Per aggiungere scorciatoie, congegni e altro al vostro schermo, tenere premuto il dito in una parte libera dello schermo, quindi sceglie-
re dall’elenco. E’ anche possibile premere leggermente l’icona del menu , selezionare Aggiungi sulla parte alta dello schermo.
- Per spostare una voce dello schermo mantenere il dito sull stessa voce finchè non emette una vibrazione, quindi trascinarla
ITALIANO
UserGuide_Arnova_7G2_109860_book.indd 38 01/06/2011 16:48:26
nello spazio desiderato e rilasciare il dito.
- Per rimuovere la voce dallo schemo, tenere il dito premuto sulla stessa voce, trascinarla nel cestino (sempre tenendo il dito
premuto, la barra delle applicazioni, sulla parte destra dello schermo, si trasforma in un cestino) quindi rilasciare il dito.
Aggiungere altre applicazioni - APPSLIB: connettete il vostro ARNOVA a Internet, poi premete
cull’icona AppsLib . Questo portale vi propone di scaricare, gratuitamente e a pagamento,
diverse migliaia di applicazioni, come quelle relative a giochi divertenti o a servizi più pratici.
Scegliete un’applicazione e scaricatela.
Cambio Impostazioni: Dallo schermo sfiorare l’icona menu , toccare Impostazioni e
scegliere una categoria: Controlli wireless, Audio e display, Data e ora, ecc..
38
Page 39
1
2
3
LETTURA DEI FILES MULTIMEDIA
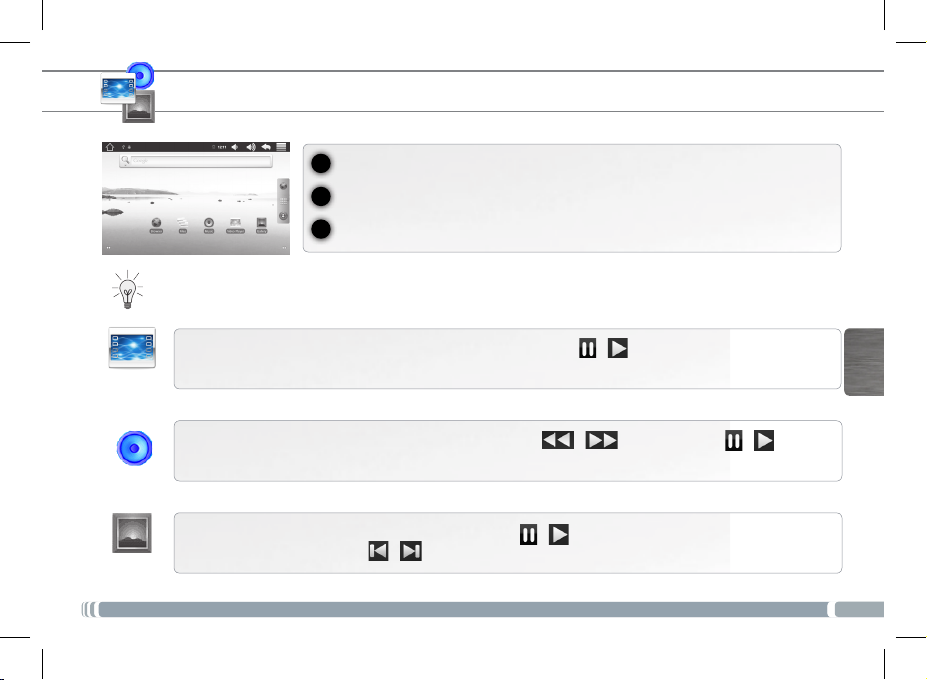
Sulllo schermo tattile, premete sull’icona video, audio o foto.
Solo nelle modalità Video e Photo [Foto]: per visualizzare/nascondere i comandi sullo schermo, toccare un’area qualsiasi dello
schermo.
Per sospendere o riprendere la riproduzione di un video, toccare l'icona / (parte inferiore dello schermo). Per
selezionare un punto specifico nel video, fare scorrere la barra di avanzamento al punto desiderato.
Video
Per riprodurre il brano successivo o precedente, toccare le icone / . Utilizzare le icone / e la barra
di avanzamento come nella schermata del lettore video (vedere sopra).
Musica
Per avviare o sospendere una presentazione, toccare l'icona / . Per visualizzare la fotografia seguente o
precedente, premete sulle icone / .
Foto
UserGuide_Arnova_7G2_109860_book.indd 39 01/06/2011 16:48:27
Verrà visualizzato un elenco di fi le o cartelle corrispondenti alla categoria selezionata.
Toccare un elemento per riprodurlo.
39
ITALIANO
Page 40
USB
1
32
ITALIANO
COMPUTER
ACCESO
TRASFERIMENTO DI CONTENUTI MULTIMEDIALI
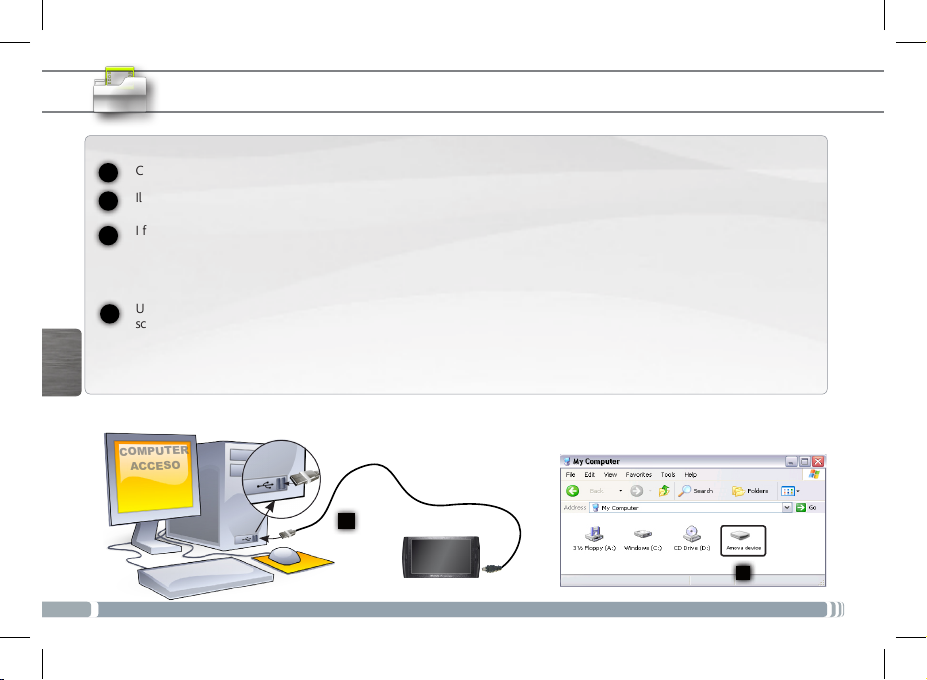
Collegare il cavo USB in dotazione ad il ARNOVA e ad un computer funzionante.
1
Il dispositivo ARNOVA si accende. Dopo qualche secondo, verrà visualizzata l'icona ARNOVA sul computer.
2
I file multimediali possono essere trasferiti nel dispositivo ARNOVA copiandoli/incollandoli nelle rispettive cartelle usando
3
Windows® Explorer (o Finder su Mac®), oppure usando Windows Media® Player. Utilizzare Windows Media Player® (scheda Sync [Sincronizzazione]) per sincronizzare la musica, le foto e i video desiderati nel dispositivo ARNOVA. Per ulteriori
informazioni, consultare la Guida di Windows Media Player®.
Una volta terminati tutti i trasferimenti dei file, chiudere Windows® Explorer e tutti gli altri programmi che possano aver letto o
4
scritto sull’ARNOVA. Fare clic sull’icona “Rimozione sicura dell’hardware” nella barra di sistema, accanto all’orologio. Potete adesso
disconnettere il cavo USB.
40
UserGuide_Arnova_7G2_109860_book.indd 40 01/06/2011 16:48:29
Page 41
www
Dank u voor het kiezen van dit ARNOVA-product. Wij hopen dat u er nog jarenlang plezier aan zult mogen beleven. Wij raden u aan
om uw ARNOVA-product te registreren zodra u het uit de verpakking hebt gehaald (http://arnovatech.com/register). Na registratie
krijgt u toegang tot de technische ondersteuning van ARNOVA (http://arnovatech.com/support).
UW PRODUCT REGISTREREN
Ä Op het internet op http://arnovatech.com/register
?
UserGuide_Arnova_7G2_109860_book.indd 41 01/06/2011 16:48:29
HULP NODIG?
Op onze website:
Neem contact op met onze Technisch ondersteuning:
via e-mail.
registreren
Omdat we onze producten voortdurend aanpassen en verbeteren, kan de software van uw apparaat er een beetje anders
Raadpleeg het onderdeel Frequently Asked Questions op http://arnovatech.com/faq
Registreer uw product alvorens contact op te nemen met onze Technische ondersteuning (zie
).
uitzien of een licht gewijzigde functionaliteit hebben dan voorgesteld in deze Snelstartgids.
Surf naar http://arnovatech.com/support voor ondersteuning
Uw product
LANDS
41
NEDER-
Page 42
???
BESCHRIJVING ARNOVA
2 3
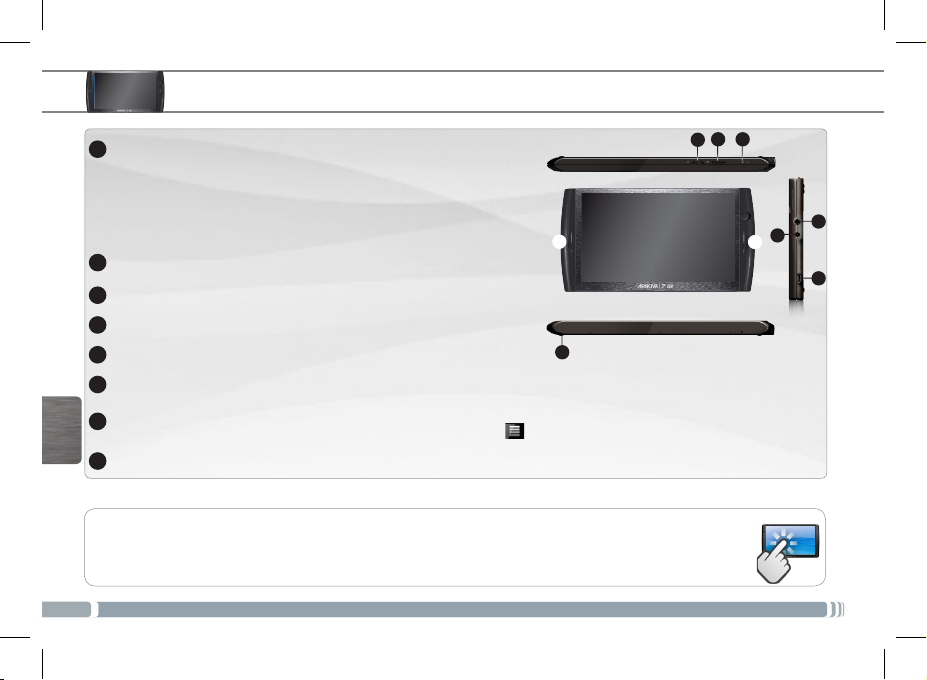
Power/Lock [Aan/uit/Vergrendelen]: schuif naar links en blijf vasthouden om het toestel in of uit
1
te schakelen. Schuif naar rechts om het aanraakscherm van het toestel te vergrendelen.
Wanneer u de schakelaar naar links verschuift en blijft vasthouden, verschijnt er een venster met een
optielijst (wanneer het toestel ingeschakeld is). Tik Power Off [Uitschakelen] aan om uw ARNOVA volledig
af te sluiten. Tik ‘ Suspend’ [Stand-by] aan om uw toestel in stand-by te zetten (en snel opstarten mogelijk te
maken bij eerstvolgende aanraking). Schuif het toestel naar rechts terwijl het scherm afstaat om te vergrendelen terwijl het in standby staat. Dit kan nuttig zijn wanneer je ARNOVA bijvoorbeeld in je rugzak zit, en het
niet uit slaapstand wil halen door per ongeluk het scherm aan te raken.
Micro-SD-kaartlezer
2
Laadindicator - Rood: batterij wordt geladen / Geel: batterij is opgeladen.
3
Luidsprekers
4
Hoofdtelefoonaansluiting
5
Stroomaansluiting: voor aansluiting van het meegeleverde netsnoer.
6
Micro-USB-poort: met de bijgesloten USB-kabel kunt u uw
7
senbord. Gaat u naar het beginscherm, drukt u op het Menu-pictogram en selecteert u Instellingen/USB Mode select.
port uit staat, druk dan op de Host port-regel om het aan te zetten.
LANDS
NEDER-
Voet: trek hem uit en uw toestel ARNOVA kan zelfstandig staan op een vlak en stabiel oppervlak.
8
ARNOVA
met uw computer verbinden.
Belangrijk: het uitschakelen van de Host port na gebruik
4
8
BELANGRIJKE
Uw product niet reageren. U kunt stoppen door op de ON / OFF-knop gedurende 10 seconden of met behulp van de
reset-knop (reset).
42
UserGuide_Arnova_7G2_109860_book.indd 42 01/06/2011 16:48:32
1
6
4
Voor het aansluiten van een toet-
Als Host
5
7
Page 43
1
2
2
1
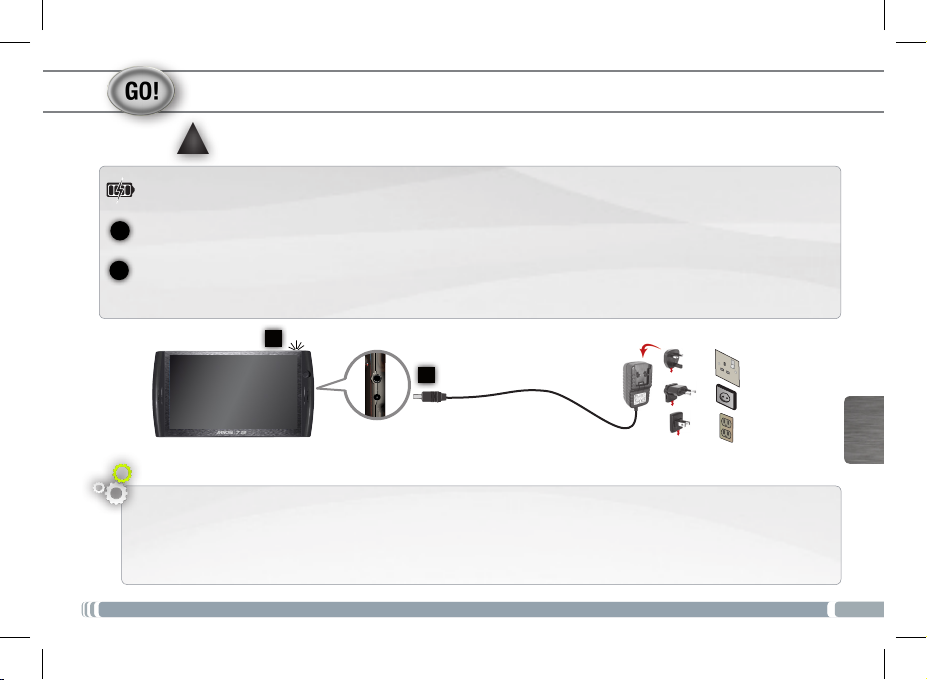
OPSTARTEN
Laad de batterij volledig op alvorens de ARNOVA voor de eerste maal te gebruiken.
!
▲
De batteren laden
Sluit het meegeleverde netsnoer aan op de stroomaansluiting van de ARNOVA en op een stopcontact.
UserGuide_Arnova_7G2_109860_book.indd 43 01/06/2011 16:48:33
Uw ARNOVA zal worden ingeschakeld en starten met laden. Het aan/uit-lampje brandt rood wanneeer de batterij aan het
opladen is. Het wordt geel zodra de batterij volledig is opgeladen.
UK
Installatiewizard
De eerste keer dat u uw ARNOVA opstart, zal de installatiewizard u door een paar schermen leiden om u te helpen met de
voornaamste instellingen: taal, land, tijd, enz.
EUR
US
43
NEDER-
LANDS
Page 44
1
2
3
4
www
WIFI-NETWERKVERBINDING
Hiervoor dient u zich in een WiFi-zone te bevinden, zodat u verbinding kunt maken. Telkens dat uw ARNOVA zich in een
zone bevindt met een netwerk dat u al geconfigureerd hebt, zal het proberen om hier verbinding mee te maken.
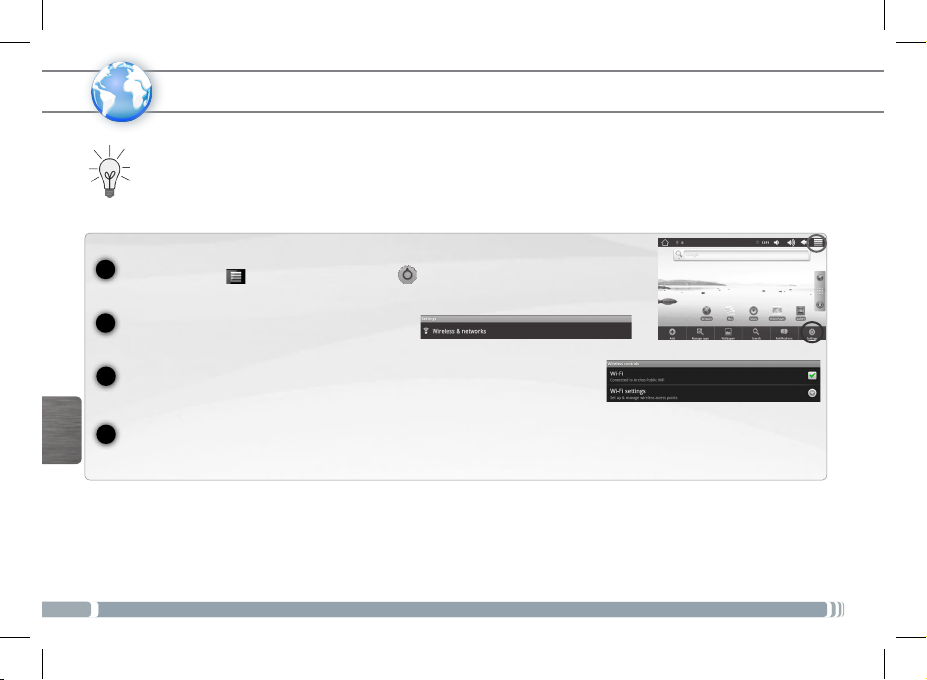
Om een nieuw WiFi-netwerk te configureren, gaat u naar het beginscherm, drukt u op het
Menu-pictogram en selecteert u Instellingen .
LANDS
NEDER-
44
UserGuide_Arnova_7G2_109860_book.indd 44 01/06/2011 16:48:34
In het Instellingen-scherm, selecteert u
Draadloze bedieningselementen.
Als WiFi uit staat, druk dan op de Wi-Fi-regel om het aan te zetten. Selecteer vervolgens
Wi-Fi
Instellingen
zal de gevonden netwerken aan de onderkant van het scherm afbeelden.
Tik het netwerk aan waarmee u wilt verbinden, voer de vereiste netwerkgegevens* in en tik vervolgens Verbinden aan. Uw
ARNOVA zal nu proberen een verbinding tot stand te brengen met die WiFi-hotspot aan de hand van de netwerkparameters
die u hebt ingevoerd.
* Voor WiFi-punten met vrije toegang hoeven geen speciale gegevens te worden ingevoerd. Voor beveiligde netwerken moet u ofwel een sleutel (een reeks cijfers
en/of letters) van het WEP, WPA of WPA2. Vraag om de Internet service provider om de juiste vereiste verbindingsparameters te verkrijgen.
. Uw ARNOVA zal nu gaan zoeken naar beschikbare WiFi-netwerken en
Page 45
▼
▼▼
DE ARNOVA-INTERFACE
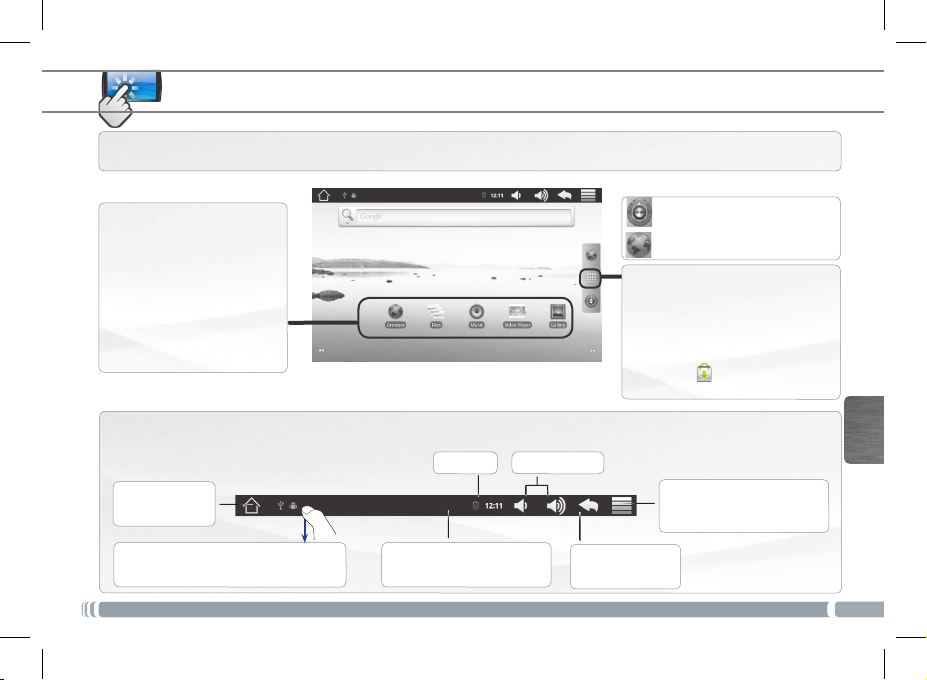
Uw ARNOVA-apparaat is uitgerust met een capacitieve aanraakscherm. Gebruik de vinger pulp.
Startscherm
Dit zijn de standaard Android™snelkoppelingen (Web Browser,
EMail, enz.). Druk op een
pictogram om de betreffende
applicatie te openen. U kunt de
beginpagina personaliseren door
snelkoppelingen en widgets
toe te voegen/ te verwijderen,
het wallpaper (achtergrond) te
veranderen, enz. Zie hiervoor de
volgende pagina.
Bovenbalk van de interface (varieert in functie van het actieve scherm)
Tijd Volume -/+
Terug naar het
scherm Home
Berichtgevingspictogrammen: sleep de bovenste werkbalk naar beneden om eventuele
berichten te zien.
UserGuide_Arnova_7G2_109860_book.indd 45 01/06/2011 16:48:35
▼
Statuspictogrammen: (status
WiFi-verbinding, batterijniveau, enz.)
▼
Terugkeren naar het
vorige scherm
Snelkoppeling Instellingen
Snelkoppeling Web Browser
Applicaties knop
Druk op dit pictogram om al de op uw
ARNOVA geïnstalleerde Android™applicaties te zien (games, verschillende instrumenten, enz.). U kunt deze
op uw beginpagina plakken. U kunt
meer Android™-toepassingen ophalen
van AppsLib .
Menu: geeft menuopties in
▼
functie van het actieve scherm.
45
NEDER-
LANDS
Page 46
PERSONALISEER UW PRODUCT
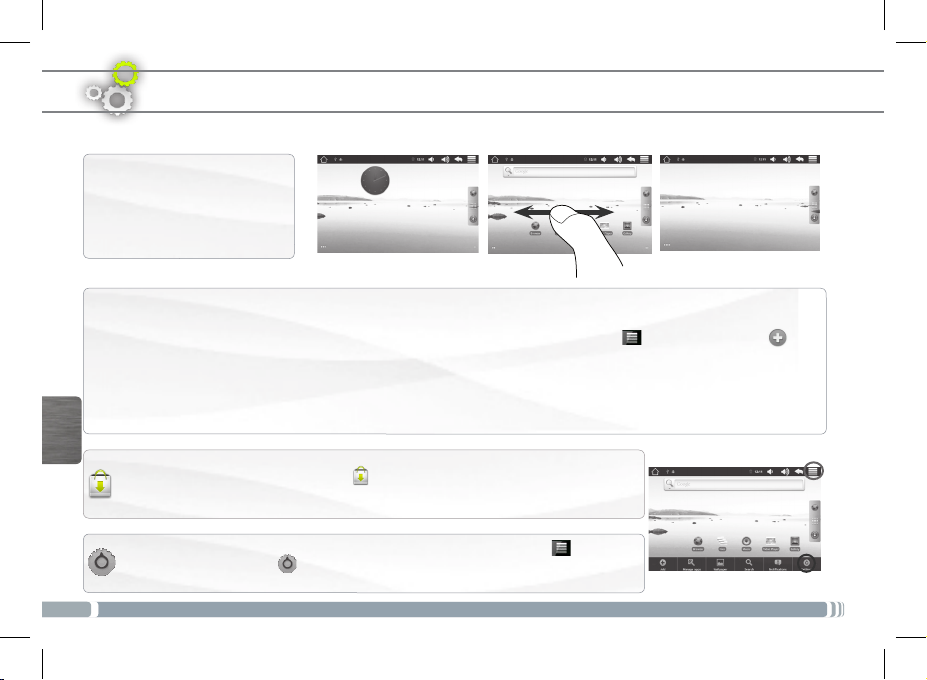
Het uitgebreide beginscherm
Schuif met uw vinger horizontaal
over het scherm om naar de
linker- of de rechterkant van uw
uitgebreide beginscherm te gaan.
De items op het beginscherm personaliseren
- Om een item toe te voegen aan het beginscherm (snelkoppelingen, widgets, enz.) houdt u uw vinger op een lege plek op
het scherm en kiest u vervolgens een item uit de lijst. U kunt ook op het menu-pictogram drukken en Toevoegen
selecteren aan de onderkant van het scherm.
- Om een item op het beginscherm te verplaatsen, houdt u uw vinger erop totdat het item groter wordt en sleept u het
vervolgens naar de gewenste locatie. Tot slot haalt u uw vinger weer van het item af.
- Om een item van het beginscherm te verwijderen, houdt u uw vinger op het item, sleept u het naar de prullenbak (terwijl u uw vinger op
een item houdt verandert het tabblad Applicaties, aan de rechterkant van het scherm, in een prullenbak) en laat u het item tot slot los.
LANDS
NEDER-
46
UserGuide_Arnova_7G2_109860_book.indd 46 01/06/2011 16:48:35
Het toevoegen van meer toepassingen - APPSLIB: Met de ARNOVA verbonden met het
internet, druk op het pictogram AppsLib . Deze online bibliotheek van gratis en betaalde
toepassingen heeft duizenden leuke spelletjes en nuttige toepassingen om te downloaden en
te gebruiken.
De instellingen wijzigen: Druk op het beginscherm op het menu-pictogram , druk
vervolgens op Instellingen en kies een categorie: Draadloze bedieningselementen, Geluid en
weergave, Datum en tijd, enz.
Page 47
1
2
3
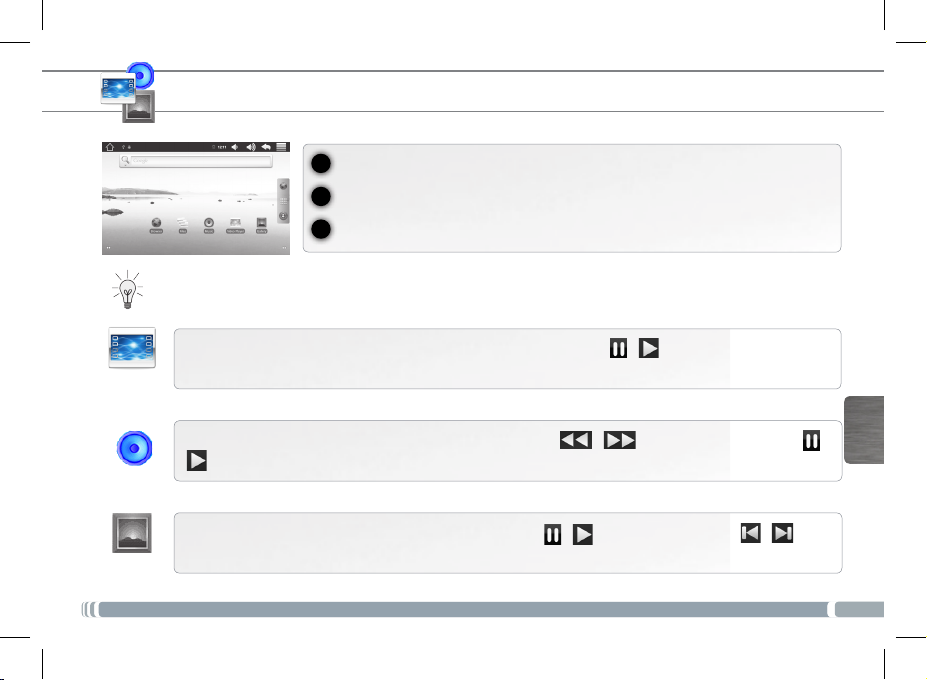
MULTIMEDIABESTANDEN
Tik in het Beginscherm de video-, audio- of fotopictogram aan.
De ARNOVA zal een lijst van bestanden of mappen weergeven die overeenstemmen met
Alleen in de modus Video en Foto: tik om het even w elke plek op het scherm aan om de bedieningsknoppen op het scherm
weer te geven of te verbergen.
Om een video te pauzeren of het afspelen te hervatten, tikt u het pictogram / aan (onderaan op het
scherm). Om naar een speciek punt in de video te gaan, verschuift u de voortgangsbalk naar het gewenste punt.
Video
Om het volgende of vorige nummer te spelen, tikt u het pictogram / . aan. Gebruik de pictogrammen /
en de voortgangsbalk zoals in het scherm van de videospeler (zie hierboven).
Music
de geselecteerde categorie.
Tik een item aan om het af te spelen.
NEDER-
LANDS
Om een diashow te starten of te pauzeren, tikt u het pictogram / aan
om de volgende of vorige foto weer te geven.
Photo
UserGuide_Arnova_7G2_109860_book.indd 47 01/06/2011 16:48:36
. Tik de pictogrammen / aan
47
Page 48
USB
1
32
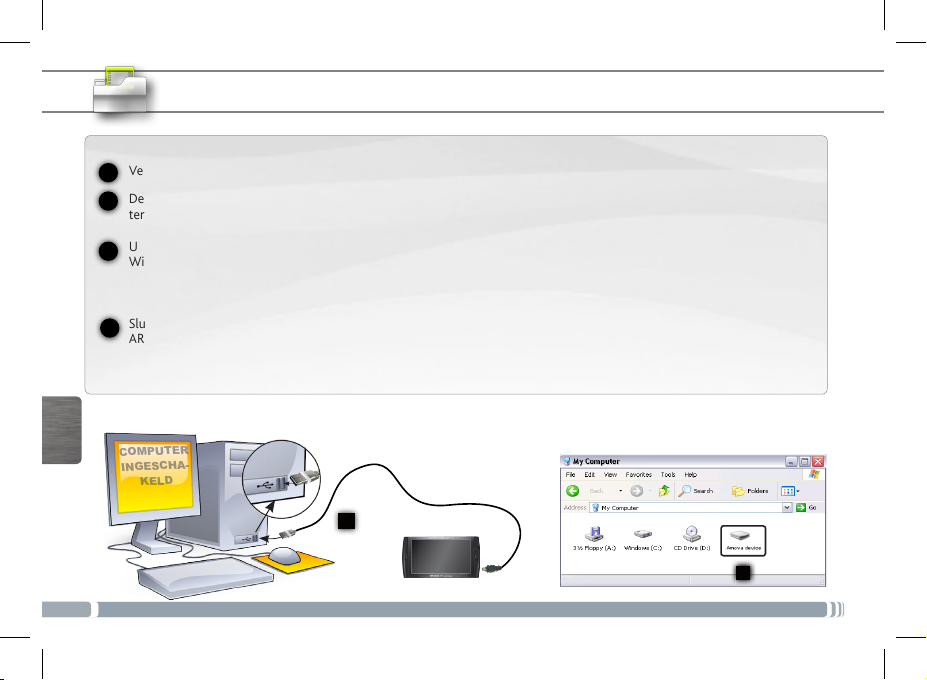
MEDIA OVERZETTEN NAAR UW ARNOVA
COMPUTER
INGESCHA
-
KELD
National restrictions
This device is intended for home and ofce use in all EU countries (and other countries following the EU directive 1999/5/EC) without
any limitation except for the countries mentioned below:
Country Restriction Reason/remark
Bulgaria None General authorization required for outdoor
France Outdoor use lim-
Italy None If used outside of own premises, general
Luxembourg None General authorization required for network
Norway Implemented This subsection does not apply for the geo-
Russian Federation None Only for indoor applications
Note: Please don’t use the product outdoors in France.
Consult the declaration of conformity on http://www.arnovatech.com/products/declaration_conformity.html
Verbind de meegeleverde USB-kabel met de ARNOVA en met een computer die aan staat.
1
De ARNOVA zal worden ingeschakeld. Binnen enkele seconden verschijnt de ARNOVA als een pictogram op uw compu-
2
ter.
U kunt uw mediabestanden op de ARNOVA plaatsen door ze ofwel in de betreffende map te kopiëren/met behulp van
3
Windows® Verkenner (of met Zoeken op een Mac®) ofwel met behulp van Windows Media® Player. Gebruik Windows Media Player® (tabblad 'Sync') om de muziek, de video's en de foto's van uw keuze te synchroniseren. Zie Help van Windows
Media Player® voor meer informatie.
Sluit, zodra alle bestanden overgeplaatst zijn, Windows® Verkenner en eventuele andere toepassingen die bestanden op de
4
ARNOVA hebben gelezen of bestanden op uw ARNOVA hebben geplaatst. Klik op het ‘VEILIG VERWIJDEREN’-pictogram in
het systeemvak, naast de klok. U kunt de USB-kabel nu loskoppelen.
LANDS
NEDER-
48
UserGuide_Arnova_7G2_109860_book.indd 48 01/06/2011 16:48:38
Page 49
National restrictions
This device is intended for home and ofce use in all EU countries (and other countries following the EU directive 1999/5/EC) without
any limitation except for the countries mentioned below:
Country Restriction Reason/remark
Bulgaria None General authorization required for outdoor
France Outdoor use lim-
ited to 10 mW e.i.r.p.
within the band
2454-2483.5 MHz
Italy None If used outside of own premises, general
Luxembourg None General authorization required for network
Norway Implemented This subsection does not apply for the geo-
Russian Federation None Only for indoor applications
Note: Please don’t use the product outdoors in France.
Consult the declaration of conformity on http://www.arnovatech.com/products/declaration_conformity.html
UserGuide_Arnova_7G2_109860_book.indd 49 01/06/2011 16:48:38
use and public service
Military Radiolocation use. Refarming of the
2.4 GHz band has been ongoing in recent
years to allow current relaxed regulation. Full
implementation planned 2012
authorization is required.
and service supply (not for spectrum)
graphical aera within a radius of 20 km from
the centre of Ny-Alesund
49
 Loading...