

Page 1

User Manual
(User Manual ARCHOS TV+ V0.9)
ARCHOS TV+ (model54205) WIFI
Annex No.5
Page 1 of 81
Page 2
ENGLISH
TV+
ENGLISH USER MANUAL
Please visit www.archos.com/manuals to download the latest version of this manual.
Dear Customer,
Thank you for choosing this ARCHOS product. We hope that you will enjoy
using it and that it will give you satisfaction for many years to come.
Please do register your product on our website (www.archos.com/register) to
ensure that you get access to our help line and to be informed of free software
updates for your product.
Version 0.9
Wishing you the best multimedia experience,
The ARCHOS Team.
All the information contained in this manual was correct at the time of
publication. However, as we are often updating and improving our products, your device’s software may have a slightly different appearance or
modified functionality than presented in this manual.
Entertainment
way
Page 3

TV+
MANUAL
V0.9
TABLE OF CONTENTS > P. 2
TABLE OF CONTENTS
INTRODUCTION ........................................................................................4
ARCHOS DESCRIPTION ......................................4
CONNECTING THE ARCHOS TO YOUR TV .........................7
TURNING THE ARCHOS ON/OFF ................................8
USING THE ARCHOS INTERFACE ...............................9
CHANGING THE LANGUAGE ..................................10
PRODUCT CARE ...........................................11
1. PLAYING VIDEO .................................................................................12
1.1 BROWSING THROUGH YOUR VIDEOS ........................12
1.2 VIDEO PLAYBACK .......................................13
1.3 VIDEO PLAYER SETTINGS .................................15
1.4 PUTTING VIDEOS ONTO YOUR ARCHOS ......................16
1.5 RECORDING VIDEO ......................................17
1.6 PLAYING YOUR PC’S SHARED VIDEOS .......................18
2. PLAYING MUSIC ............................................................................... 19
2.1 BROWSING THROUGH YOUR MUSIC FILES ....................19
2.2 MUSIC PLAYBACK ......................................20
2.3 MUSIC PLAYER SETTINGS ................................22
2.4 PLAYLISTS ............................................24
2.5 PUTTING MUSIC ONTO YOUR ARCHOS .......................26
2.6 RECORDING ANALOGUE AUDIO ............................28
2.7 PLAYING YOUR PC’S SHARED MUSIC .......................28
3. VIEWING PHOTOS ..........................................................................29
3.1 BROWSING THROUGH YOUR PHOTOS ........................29
3.2 PHOTO VIEWER .........................................30
3.3 PHOTO VIEWER SETTINGS ................................32
3.4 PLAYING A SLIDESHOW ..................................32
3.5 VIEWING PHOTOS WHILE LISTENING TO MUSIC ...............33
3.6 PUTTING PHOTOS ONTO YOUR ARCHOS ......................33
3.7 PLAYING YOUR PC’S SHARED PHOTOS ......................34
4. USING THE FILE BROWSER ......................................................35
4.1 NAVIGATION ...........................................35
4.3 USING THE FILE BROWSER WHILE LISTENING TO MUSIC ........37
4.4 BROWSING OTHER COMPUTERS ON THE NETWORK ............37
4.5 USING THE PDF READER .................................38
TABLE OF CONTENTS CONTINUED ON NEXT PAGE...
Page 4

TV+
MANUAL
V0.9
TABLE OF CONTENTS > P. 3
5. USING THE INTERNET FEATURES ...................................... 40
5.1 BROWSING THE WEB ....................................40
5.2 PLAYING YOUR PC’S SHARED MEDIA FILES ..................42
5.3 THE ARCHOS CONTENT PORTAL. . . . . . . . . . . . . . . . . . . . . . . . . . . . 44
6. TRANSFERRING FILES ................................................................ 46
6.1 CONNECTING THE ARCHOS TO A COMPUTER .................46
6.2 USB HOST CONNECTION .................................49
7. MAIN SETTINGS ..............................................................................50
7.1 “SOUND” SETTINGS .....................................50
7.2 “TV SETTINGS” .........................................51
7.3 “APPEARANCE” SETTINGS ................................52
7.4 “NETWORK” SETTINGS ..................................53
7.5 “LANGUAGE AND REGION” SETTINGS .......................57
7.6 “TV CONTROL” SETTINGS ................................57
7.7 “CLOCK” SETTINGS .....................................58
7.8 “POWER” SETTINGS .....................................59
7.9 “FIRMWARE AND PLUG-INS” SETTINGS .....................59
7.10 UPDATING THE FIRMWARE ..............................60
7.11 “SYSTEM” SETTINGS ...................................61
8. SCHEDULING A TV RECORDING .............................................63
8.1 HARDWARE SETUP ......................................63
8.2 SCHEDULING TV RECORDINGS ............................65
8.3 TRANSFERRING THE PROGRAM DATA TO THE ARCHOS .........66
9. OTHER RECORDING FUNCTIONS ............................................72
9.1 RECORDING AUDIO MANUALLY ............................72
9.2 RECORDING VIDEO MANUALLY ............................73
9.3 EDITING YOUR RECORDINGS ..............................74
TROUBLESHOOTING ..........................................................................76
RESETTING YOUR ARCHOS ..................................76
SYSTEM RECOVERY ........................................76
REPAIR AND FORMATTING TOOLS .............................77
TECHNICAL SPECIFICATIONS ........................................................78
TECHNICAL SUPPORT INFORMATION ..........................................................................80
Page 5
TV+
MANUAL
V0.9
INTRODUCTION
ARCHOS DESCRIPTION
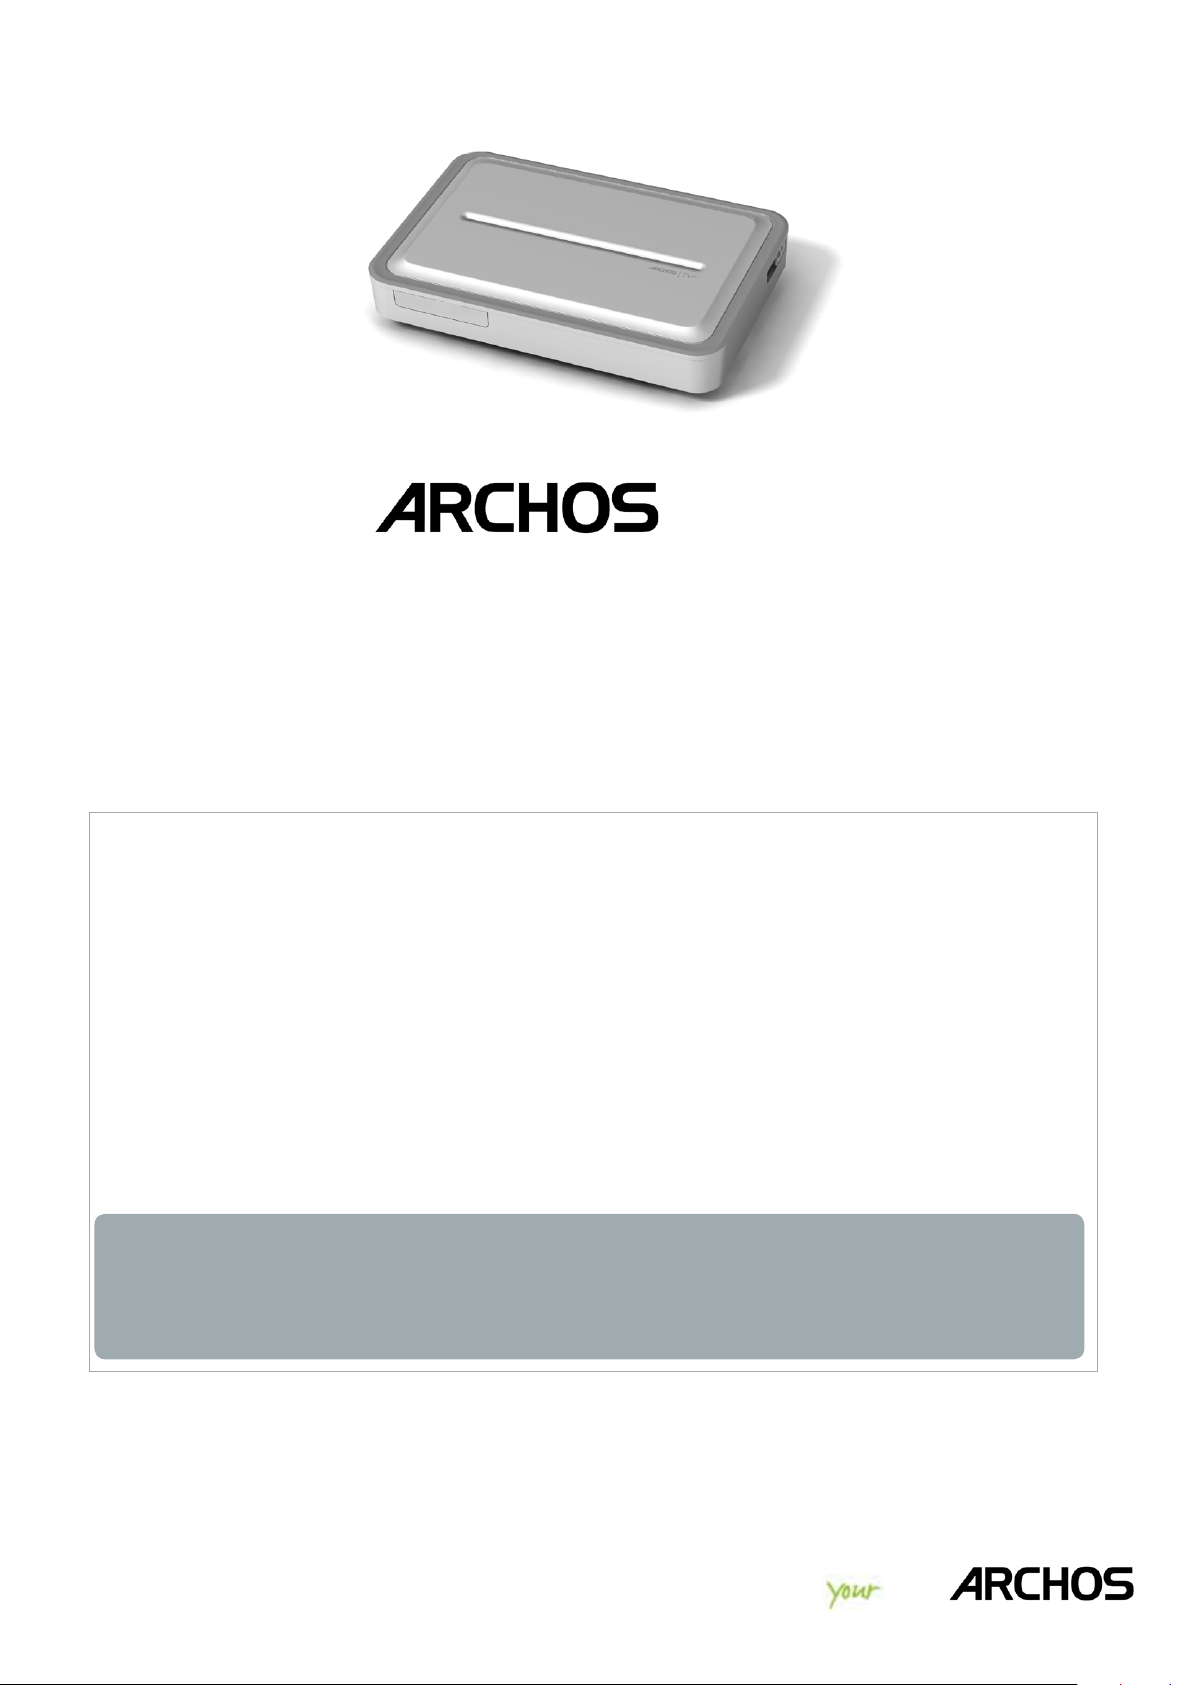
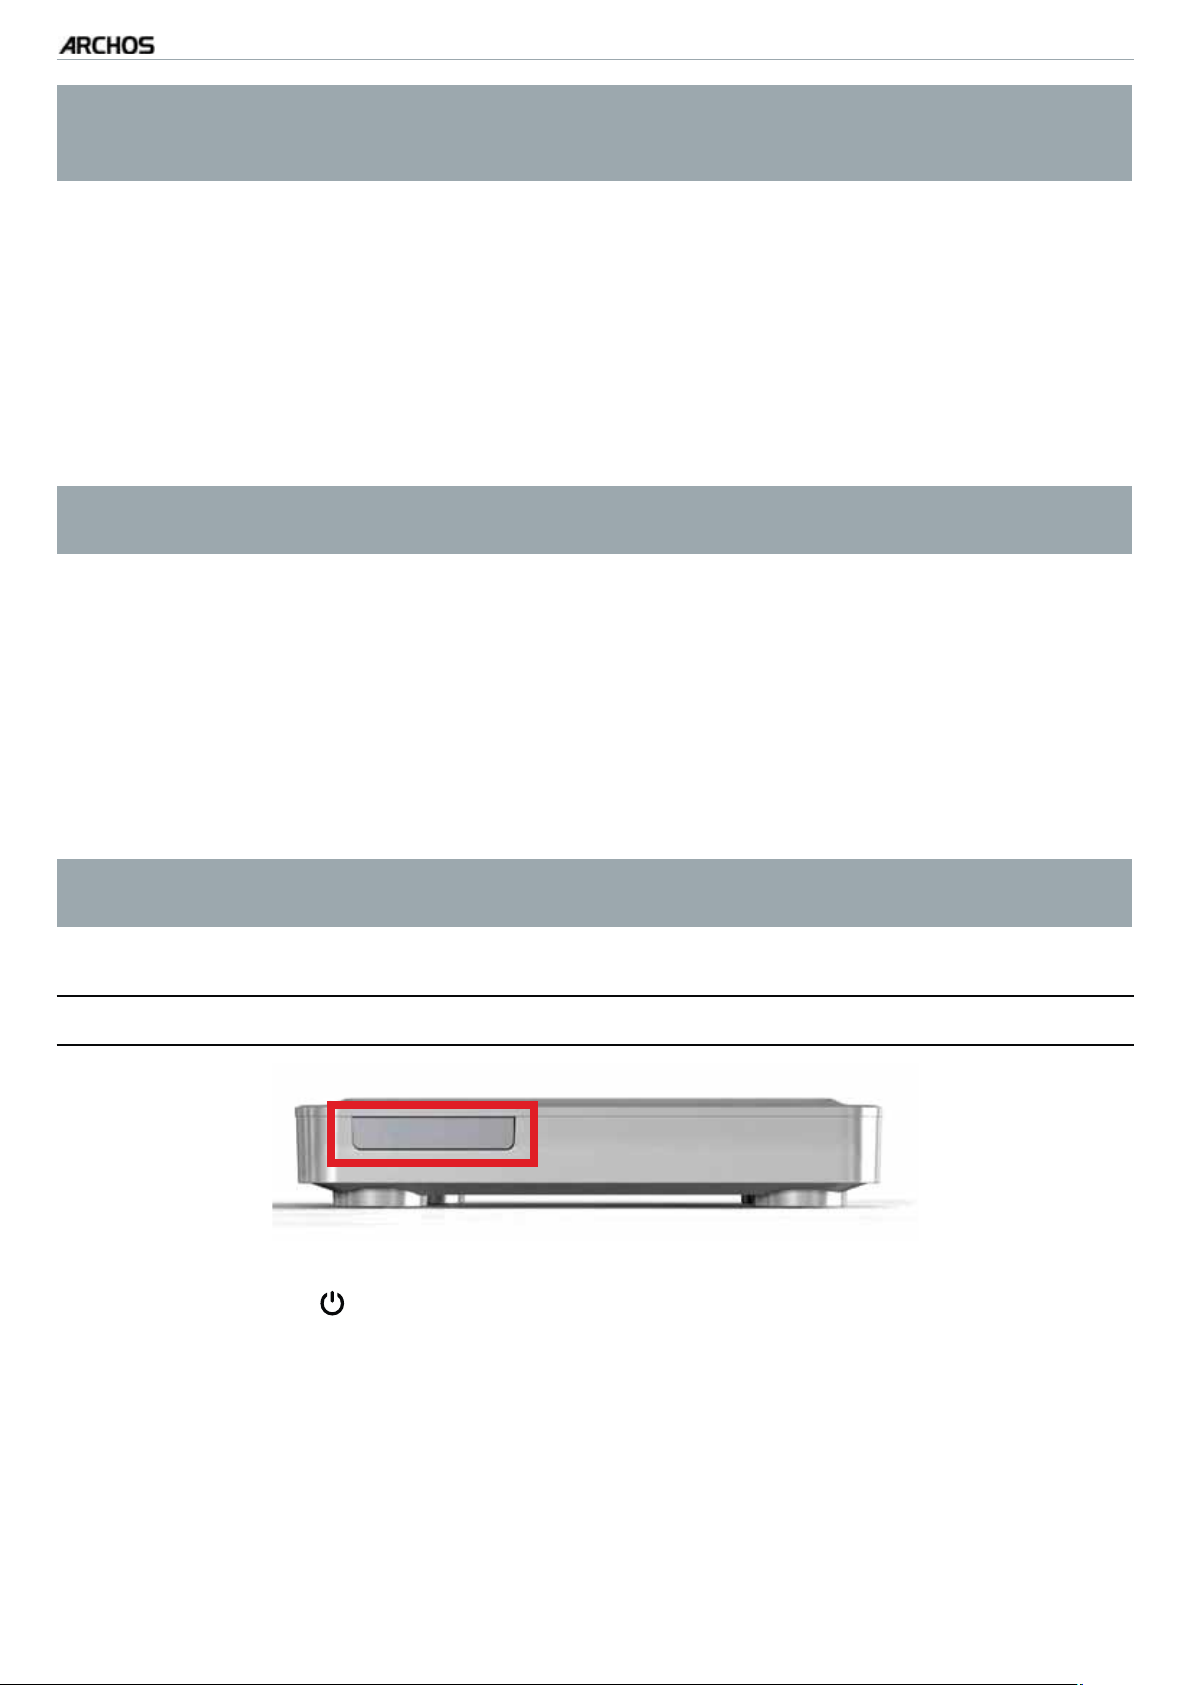
LED INDICATORS
INTRODUCTION > P. 4
On the front of the device, on the left side:
Red light:
light on: the ARCHOS is in standby mode.
•
flashing: the ARCHOS is rebooting.
•
Green light:
•
light on: the ARCHOS is on.
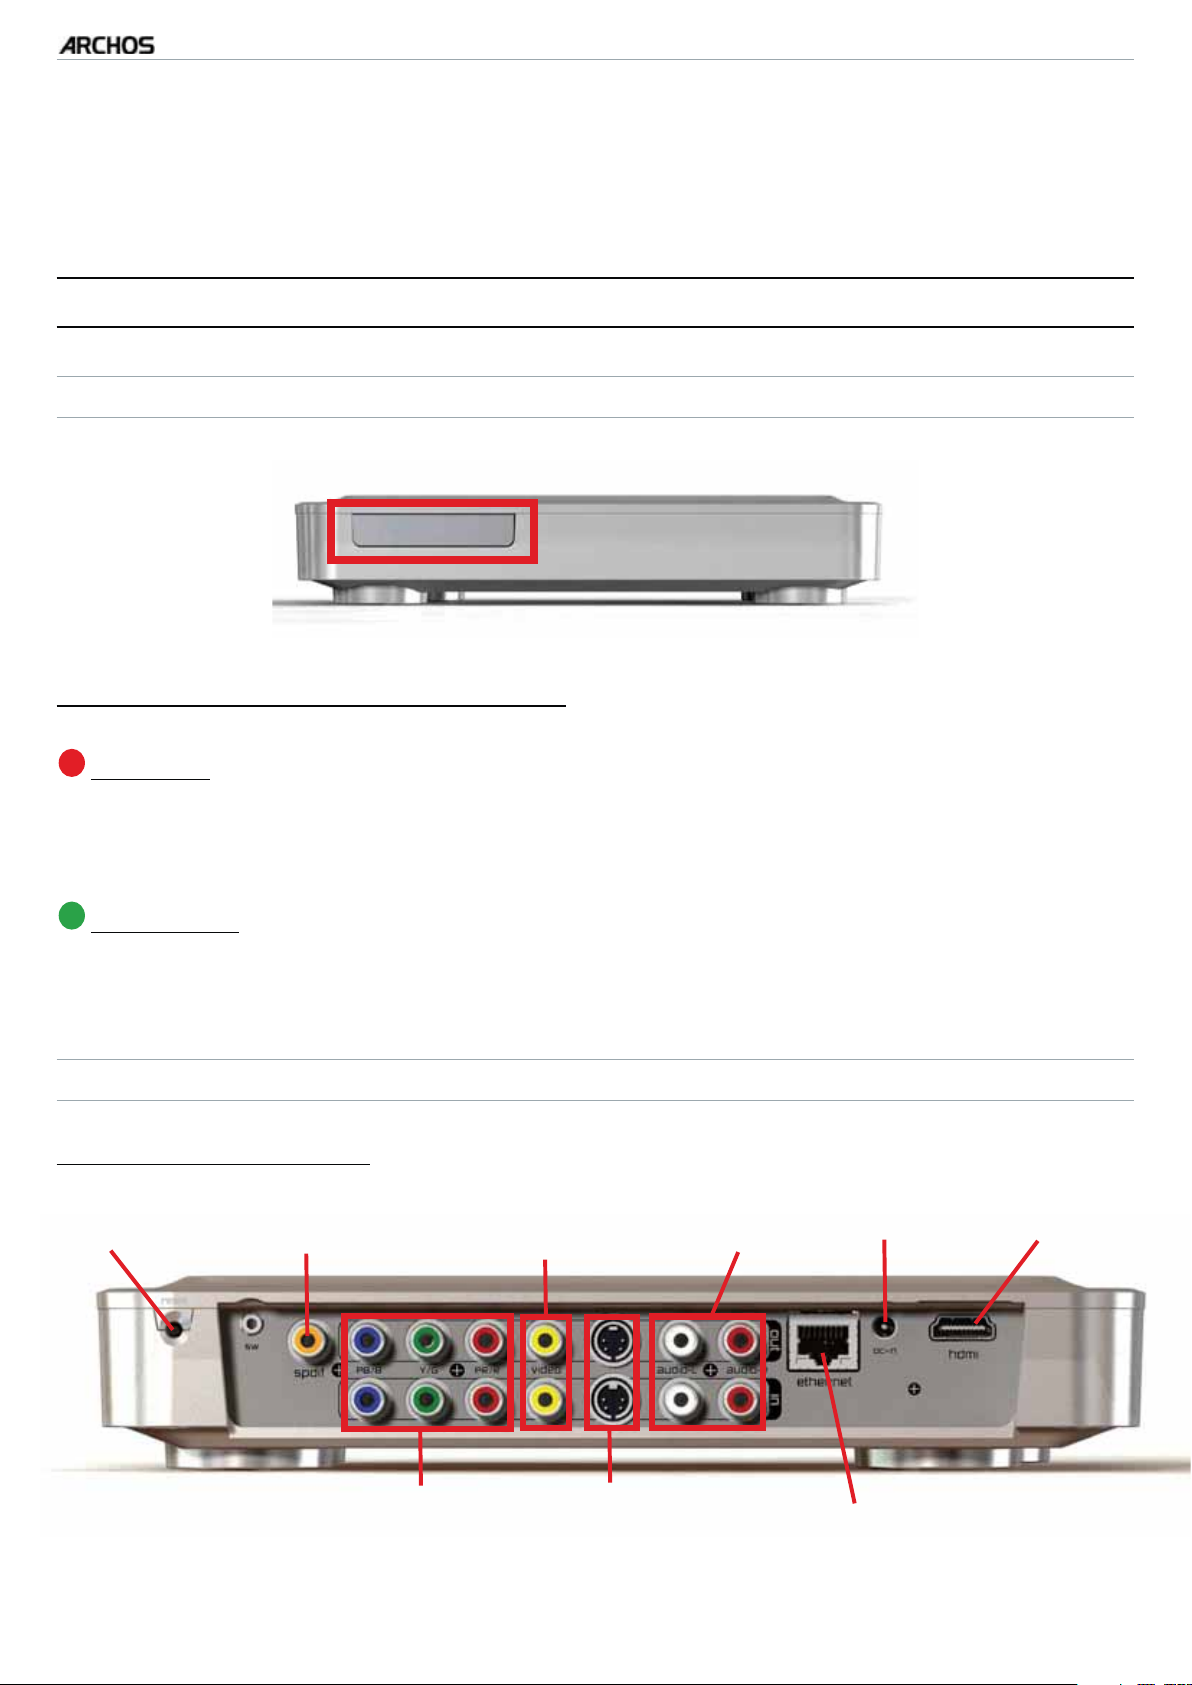
CONNECTORS
On the back of the device:
Composite Video
In & Out
Reset button
SPDIF Out
Audio L&R
In & Out
DC in
HDMI Out
RGB or YPbPr
video In & Out
S-Video
In & Out
Ethernet connector
Page 6
TV+
MANUAL
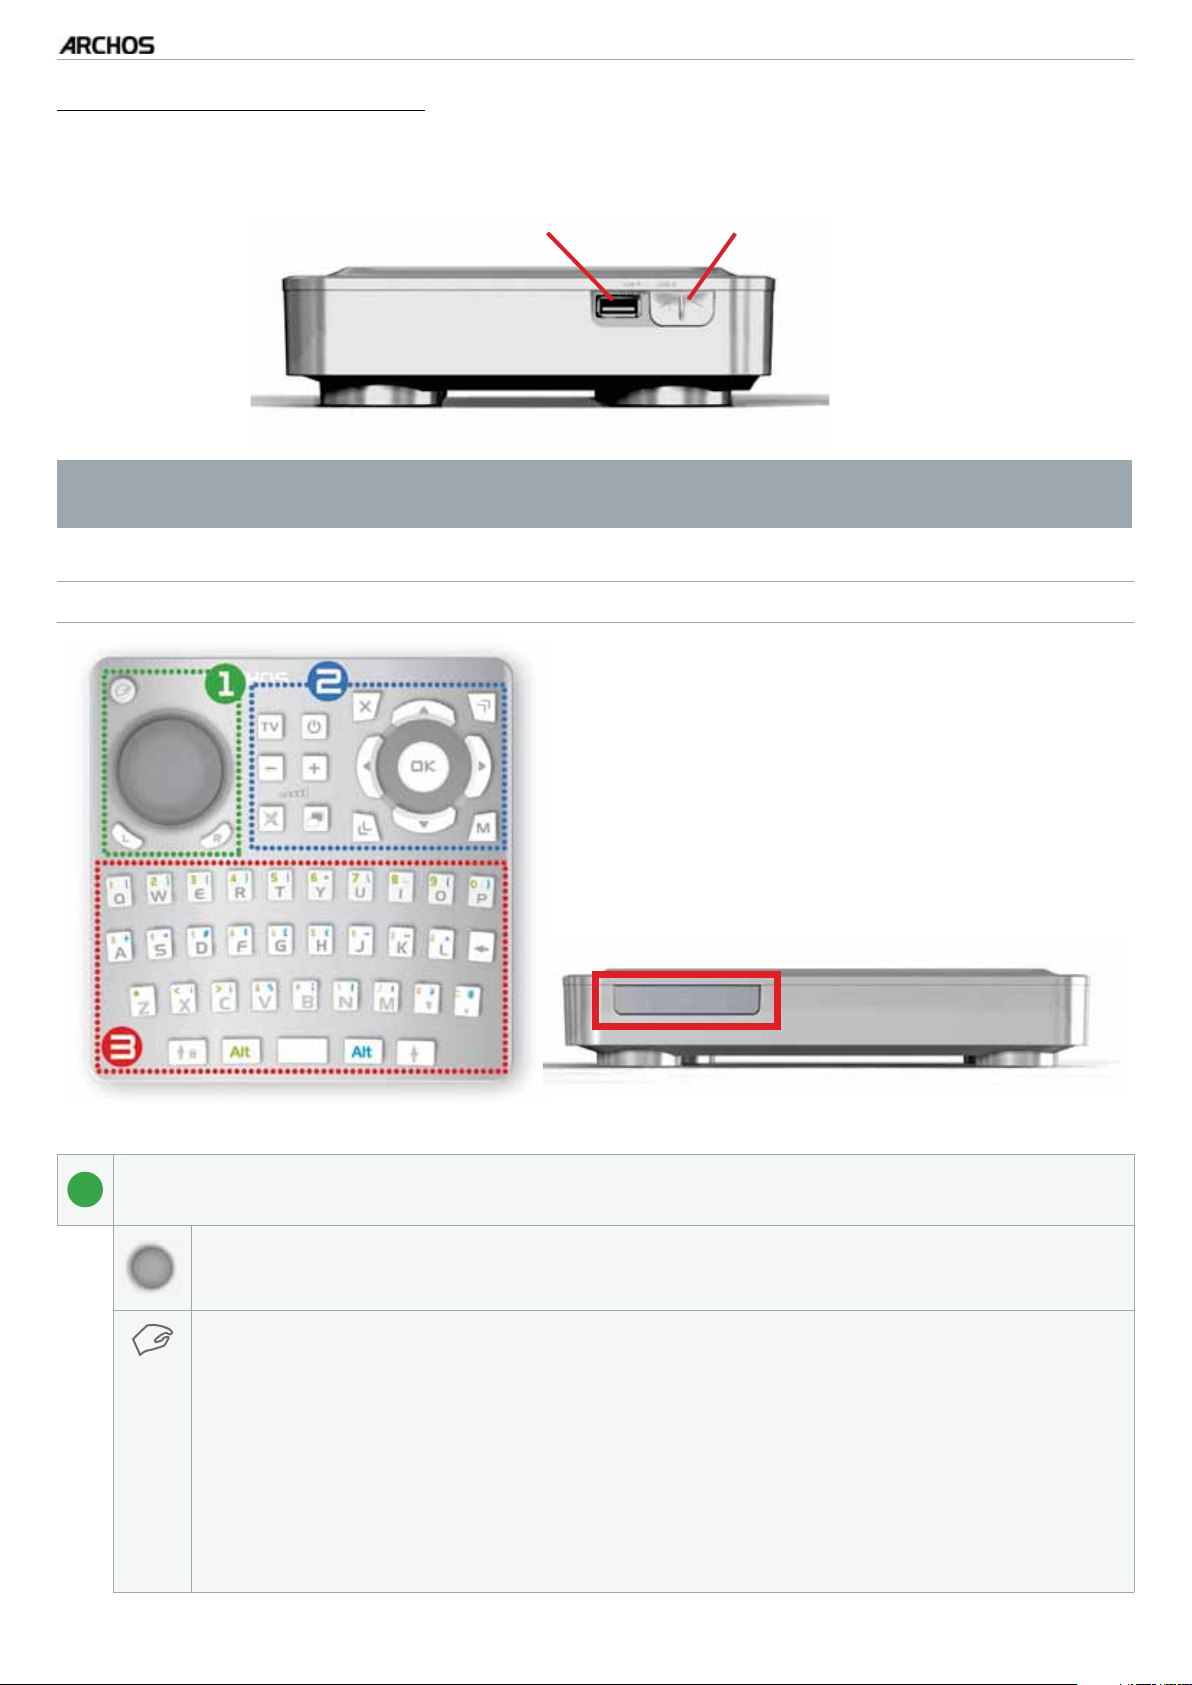
On the right side of the device:
V0.9
INTRODUCTION > P. 5
USB A Connector
(for USB Host)
See Transferring Files to learn how to connect the ARCHOS to a computer or to
a USB external device.
USING THE REMOTE CONTROLREMOTE CONTROL
You will need the remote control in order
•
USB B Connector (for
computer connection)
to control your ARCHOS device.
Your ARCHOS device has an infrared re-
•
ceiver located on the front of the device,
on the left side (next to the LED indicators). Point the supplied remote control
towards the infrared receiver.
1
This part of the remote control is used for the Web Browser and the Widgets.
Use the direction pad to move the cursor that appears on the screen.
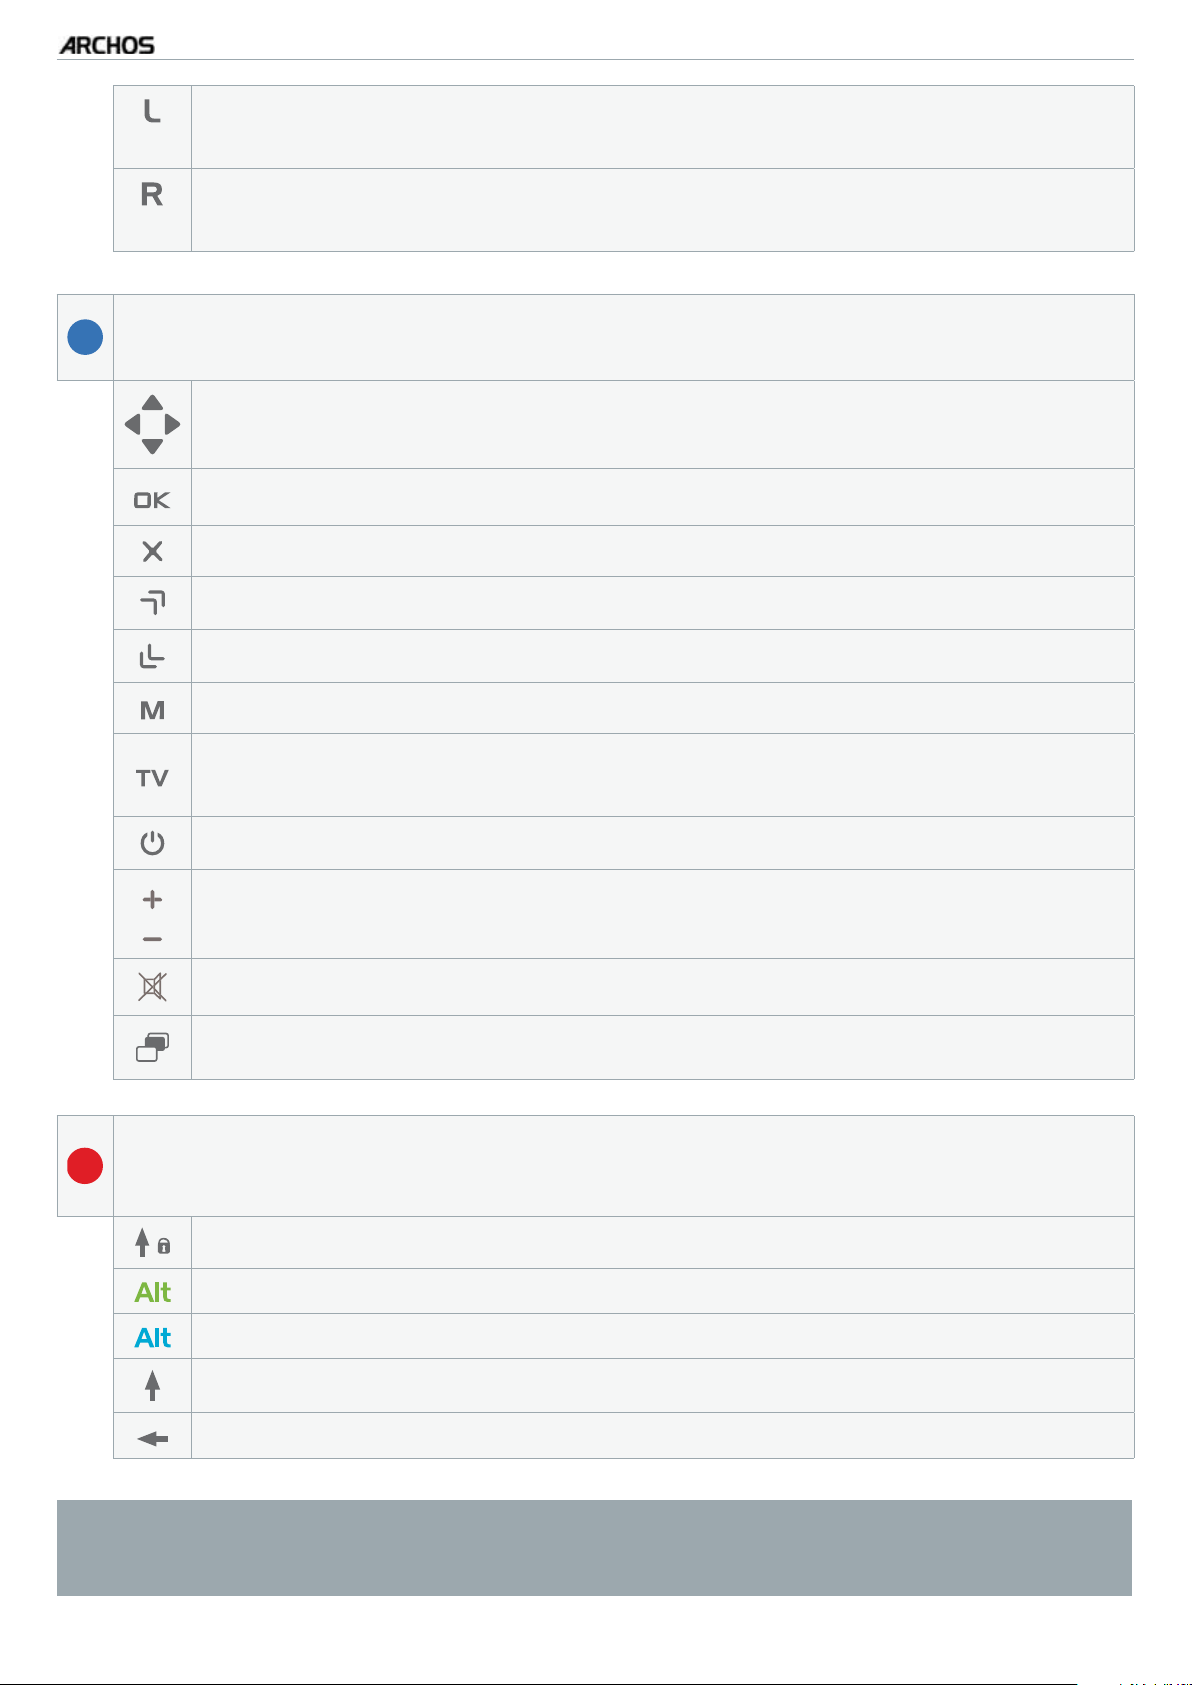
Pressing this button will activate 2 modes at the same time:
the “left button lock” mode: the direction pad will act as if you moved
-
a mouse while holding its left button at the same time. It will allow
you, for example, to use sliders or other dragging controls.
-
the navigation buttons, at the top right, will allow you to move from
one link/field to another (normally they scroll the page up/down).
Press again to disable these 2 modes.
Page 7
TV+
MANUAL
This button is like a mouse’s left button. Depending on where you are in
the interface, it will allow you to open a link, execute a function, etc.
This button is like a mouse’s right button. Depending on where you are in
the interface, pressing this button will display a contextual menu.
2
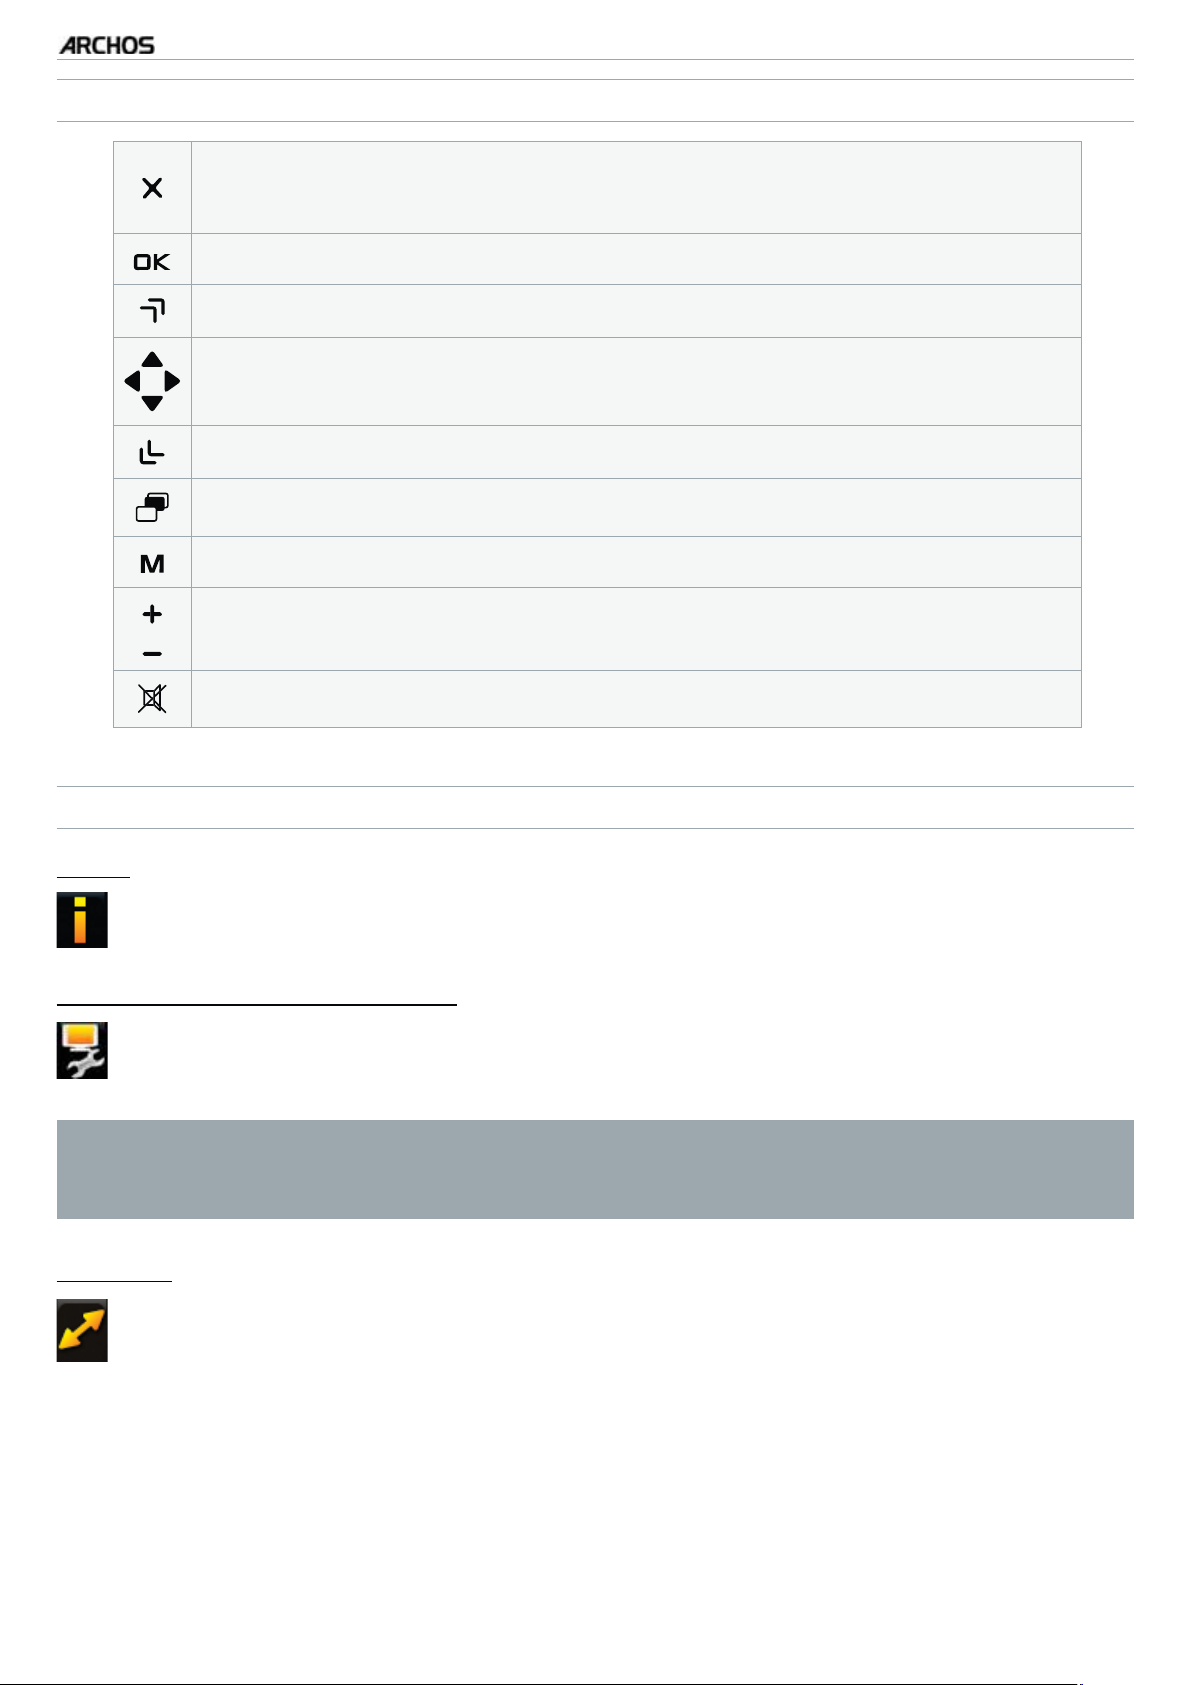
These are the main buttons:
Navigation buttons: move from one item to another
Enter/Accept or Play/Pause/Resume
Exit button: Escape/Back/Stop
Up Accelerator button: High-speed fast forward, list scrolling or zoom in
V0.9
INTRODUCTION > P. 6
Down Accelerator button: High-speed fast rewind, list scrolling or zoom out
Menu button: Display a text description of the available menu icons
Switch the display of the image between the ARCHOS and a tuner (if you have connected one to the ARCHOS’ output connectors: See Using the Recording Function).
Power button: Turn on the ARCHOS / put it into standby mode
Volume buttons: Increase/decrease volume
Mute sound
Tab button: Tab between available screens
The keyboard can be used, for example, to enter a Web address, write an e-
3
mail, name/rename a folder, etc:
Caps Lock key
Green Alt key: enable the keys’ green secondary functions
Blue Alt key: enable the keys’ blue secondary functions
Shift key
delete character before cursor
In order to type one of the green/blue secondary characters in capital letters
(é, è, ç, etc.), press Caps Lock, then Alt green/blue, and press the corresponding key.
Page 8
TV+
MANUAL
V0.9
INTRODUCTION > P. 7
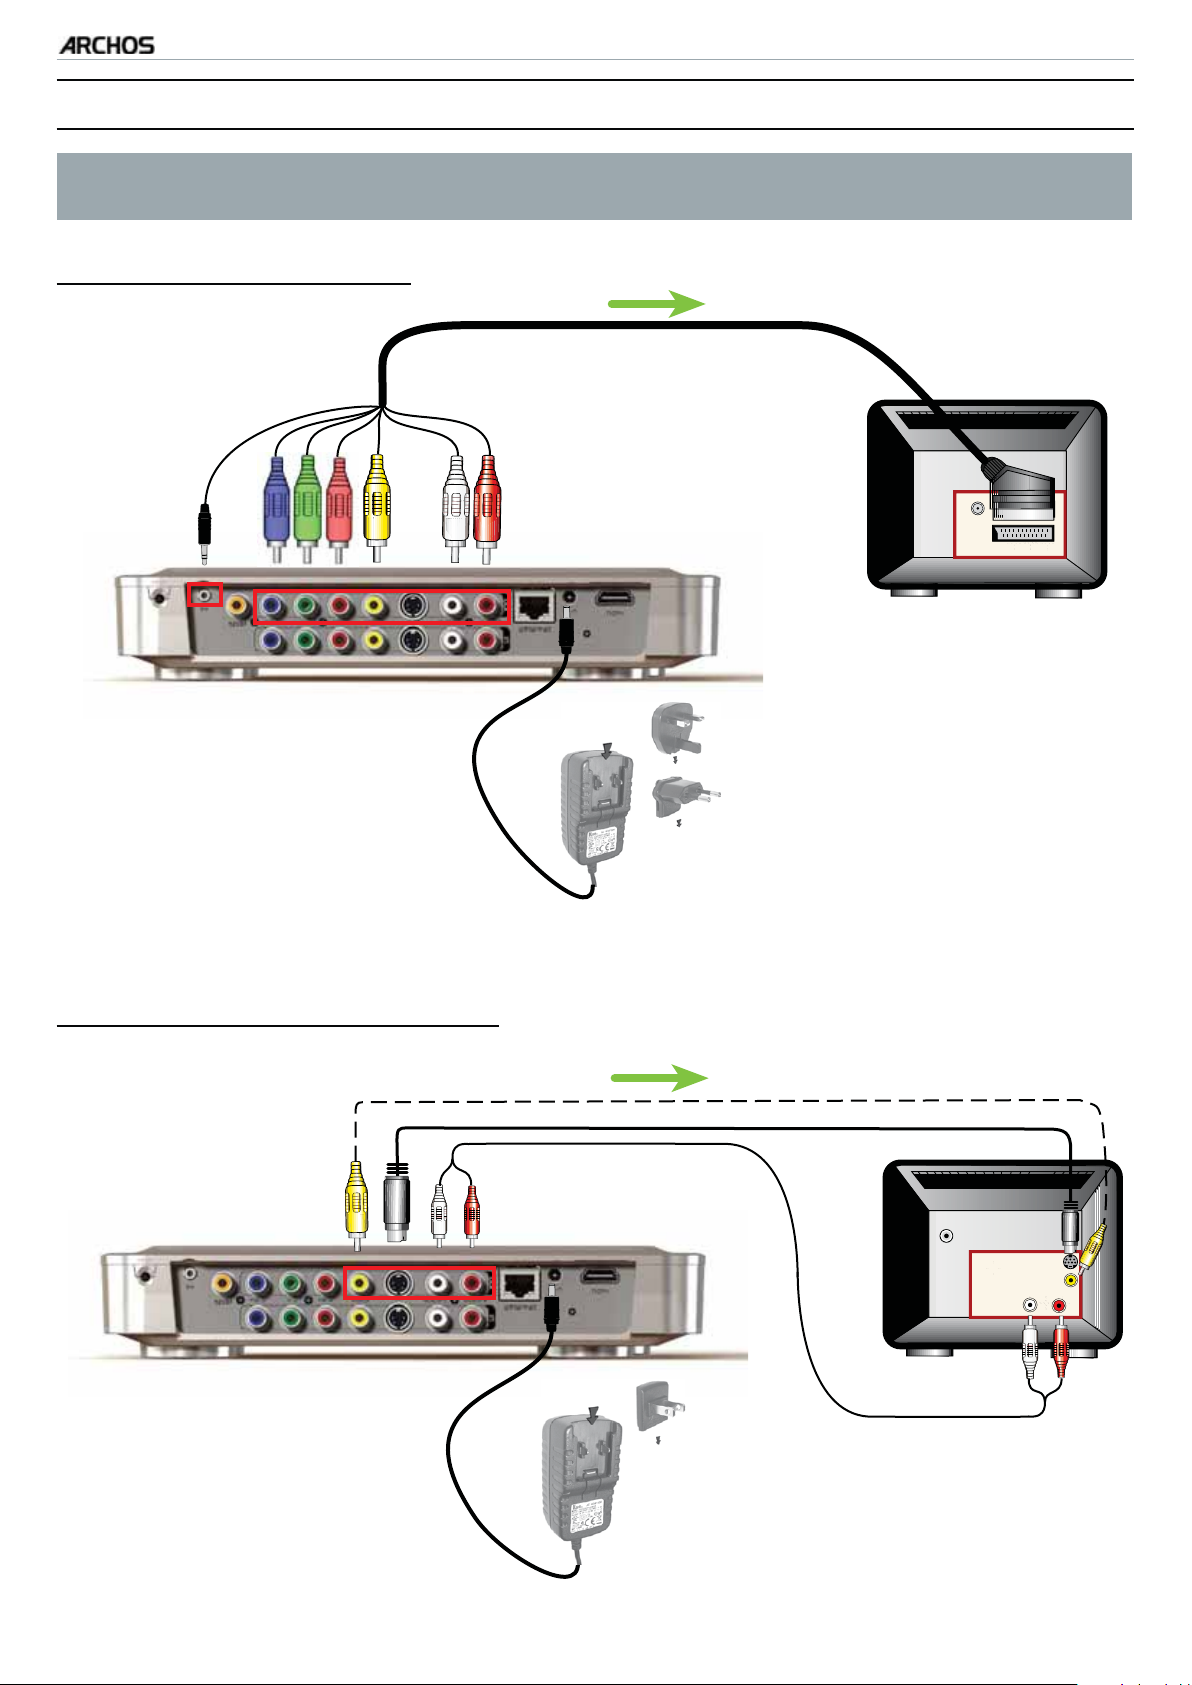
CONNECTING THE ARCHOS TO YOUR TV
See Scheduling TV Recordings to learn how to connect a tuner to the ARCHOS
in order to schedule a TV recording (manually or via the TV Program Guide).
Connection Diagram for Europe:
Wjefp!Pvuqvu!dbcmf
Ufmfwjtjpo
Connection Diagram for North America:
*
Dmjdl"
VL
FV
Bvejp!'!Wjefp!Pvu
Ufmfwjtjpo
Boufoob
t.wjefp!jo
wjefp!jo
Bvejp!!M S
Page 9
TV+
* North America: If either your tuner or TV does not have S-video connections,
use a standard RCA video cable (- - - - ) instead of the S-video cable. In this
case, set the TV Connection to “Composite”. See “TV Settings”.
1.
Connect the included charger/adapter to the jack labeled DC-IN on the back of
MANUAL
V0.9
INTRODUCTION > P. 8
the ARCHOS.
2.
Then plug the other end of the charger/adapter into an available wall socket.
If you have correctly connected the charger/adapter, the red LED indicator (on
the front of the device, on the left side) will start blinking while the device is
booting. When the ARCHOS is on, the green LED will light up.
Use only the supplied ARCHOS charger/adapter as other adapters may damage this device (even if they give the same voltage rating).
3.
Connect the ARCHOS’ outputs to your TV’s inputs. See the Connection Diagrams
for Europe and North Armerica (previous page).
4.
Make sure that your TV is switched to the AV input that is used to connect the
ARCHOS.
5.
When the image of the ARCHOS appears on your TV, follow the instructions on
screen (installation wizard) to finish installing the ARCHOS.
Make sure that you set the ARCHOS “TV Settings” based on how you have
connected the ARCHOS to your TV. See “TV Settings”.
TURNING THE ARCHOS ON/OFF
•
Press and hold the button, on the remote control, to turn on your ARCHOS or put
it into standby mode.
•
The green LED indicator, on the front of the device, lights up when the device is
on. The red LED indicator lights up when the device is in standby mode.
Page 10
TV+
MANUAL
V0.9
USING THE ARCHOS INTERFACE
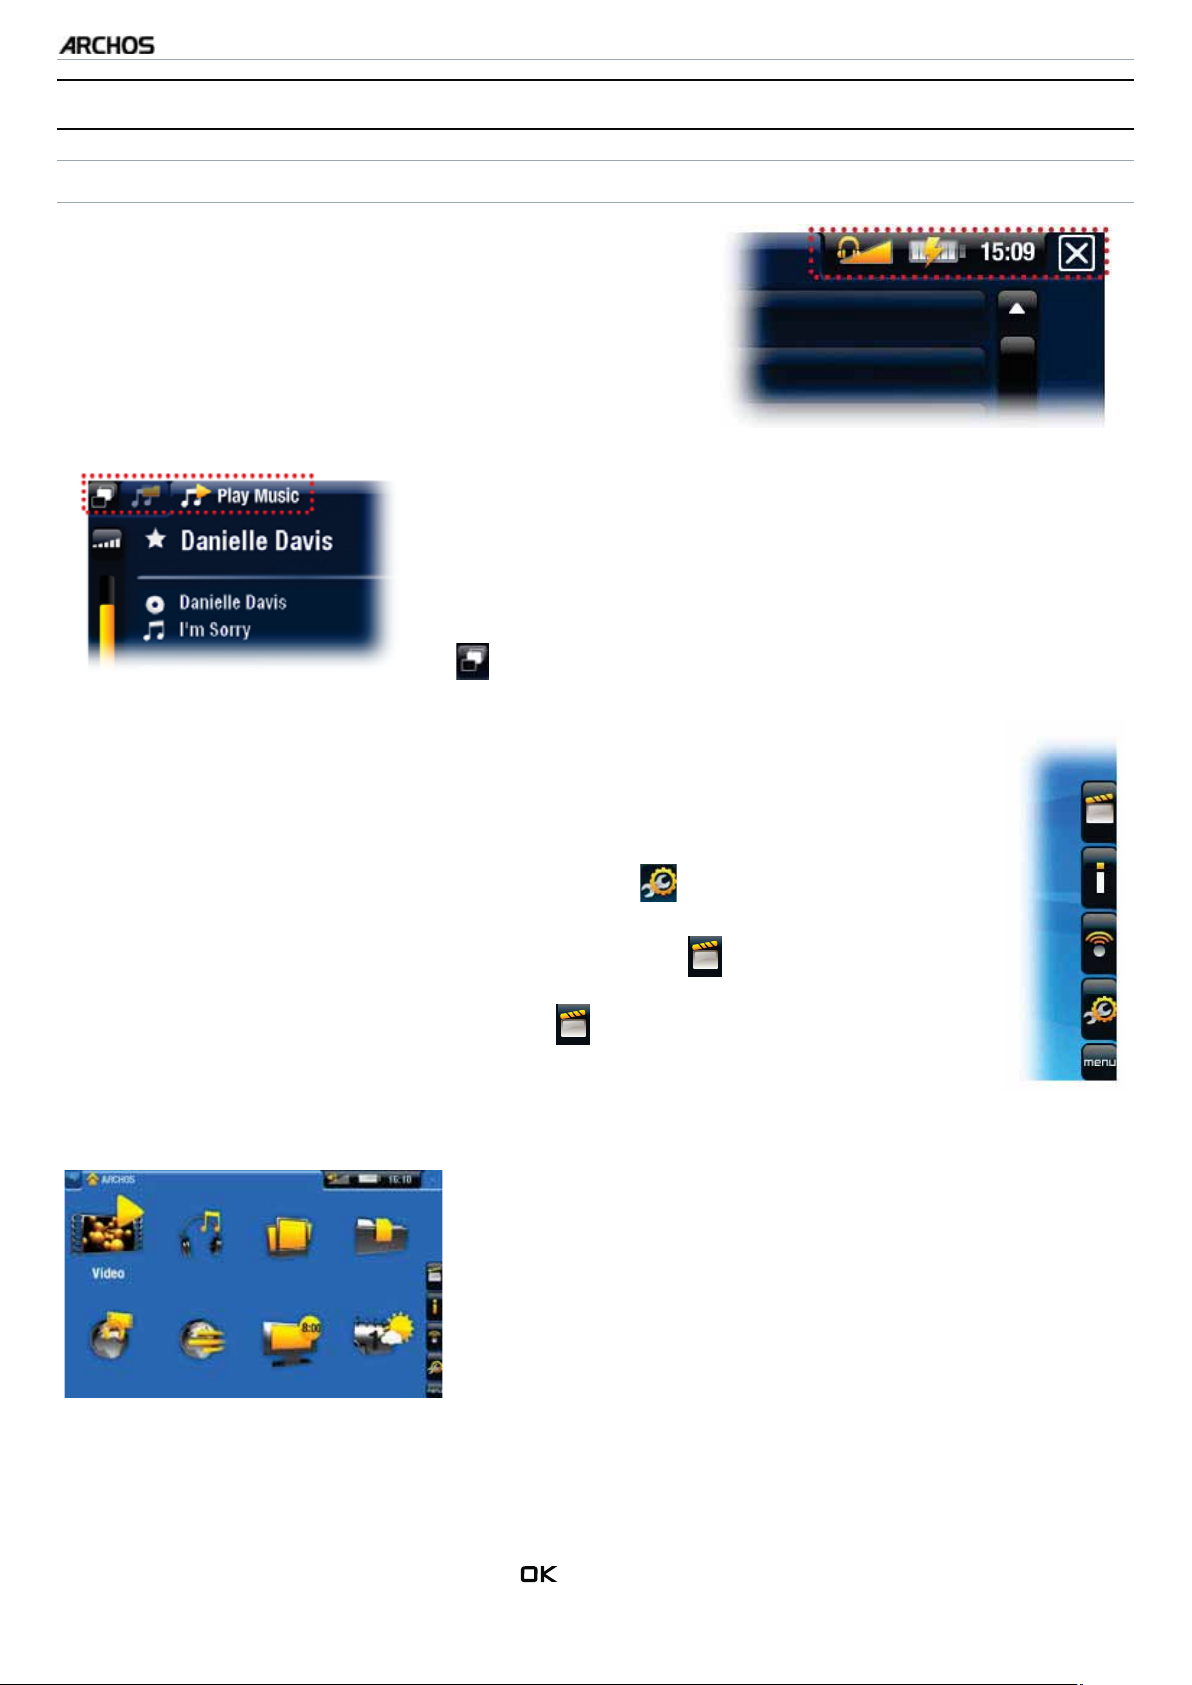
INTERFACE DESCRIPTION
Status Bar
In the top right corner of the screen, the status
•
bar indicates the ‘network connection’ status
(WiFi or Ethernet), the volume level and the current time of your device.
Tabs
In the top left corner of the screen, the tabs area
•
shows other available applications and screens. They
vary, depending on where you are in the interface.
INTRODUCTION > P. 9
When there is only one tab available, the Tab icon
•
in the top left corner is grayed out.
Contextual Menu
In the lower right corner of the screen, the contextual menu area
•
shows the menu icons. The available options will vary, depending on
where you are in the interface.
In the Home screen, choose the “
•
Settings” menu item to access
the main settings of your ARCHOS.
In the Home screen, the “
•
Resume” menu item allows you to re-
sume the last-played music or video file, if it was interrupted before
the end. If the “
Resume” menu icon does not appear, it means that
no music or video file playback can be resumed.
Home Screen
This is the main screen of your ARCHOS, showing
•
its main functions.
Main Button Actions:
To open an application/screen via its icon or item, use the Navigation buttons to
•
highlight the icon/item and press
.
Page 11
TV+
In the different applications, you can go back one level in the hierarchy by press-
•
MANUAL
V0.9
INTRODUCTION > P. 10
ing the Exit button once. Wherever you are in the hierarchy, you can go back
directly to the Home screen by holding the Exit button.
•
When several tabs are available, you can switch between them by pressing the
Tab button .
To execute a menu icon’s function, press the Menu button
•
, select a menu item
with the navigation buttons, and press .
While playing a video, song or photo slideshow, you can pause/resume it by
•
pressing
.
Other Button Actions
When watching a video or listening to music, you can hold the left/right
•
Navigation buttons to move the cursor in the progression bar to another
location in the video or song.
To increase/decrease volume, use the Volume buttons (
•
In the different browsers (File, Music, Video, Photo), you can hold the up/
•
/ ).
down Navigation buttons to scroll the file list up and down. You can also
scroll faster by using the Accelerator buttons.
In the Web browser and the PDF viewer, you can scroll up and down by
•
holding the up/down Navigation buttons.
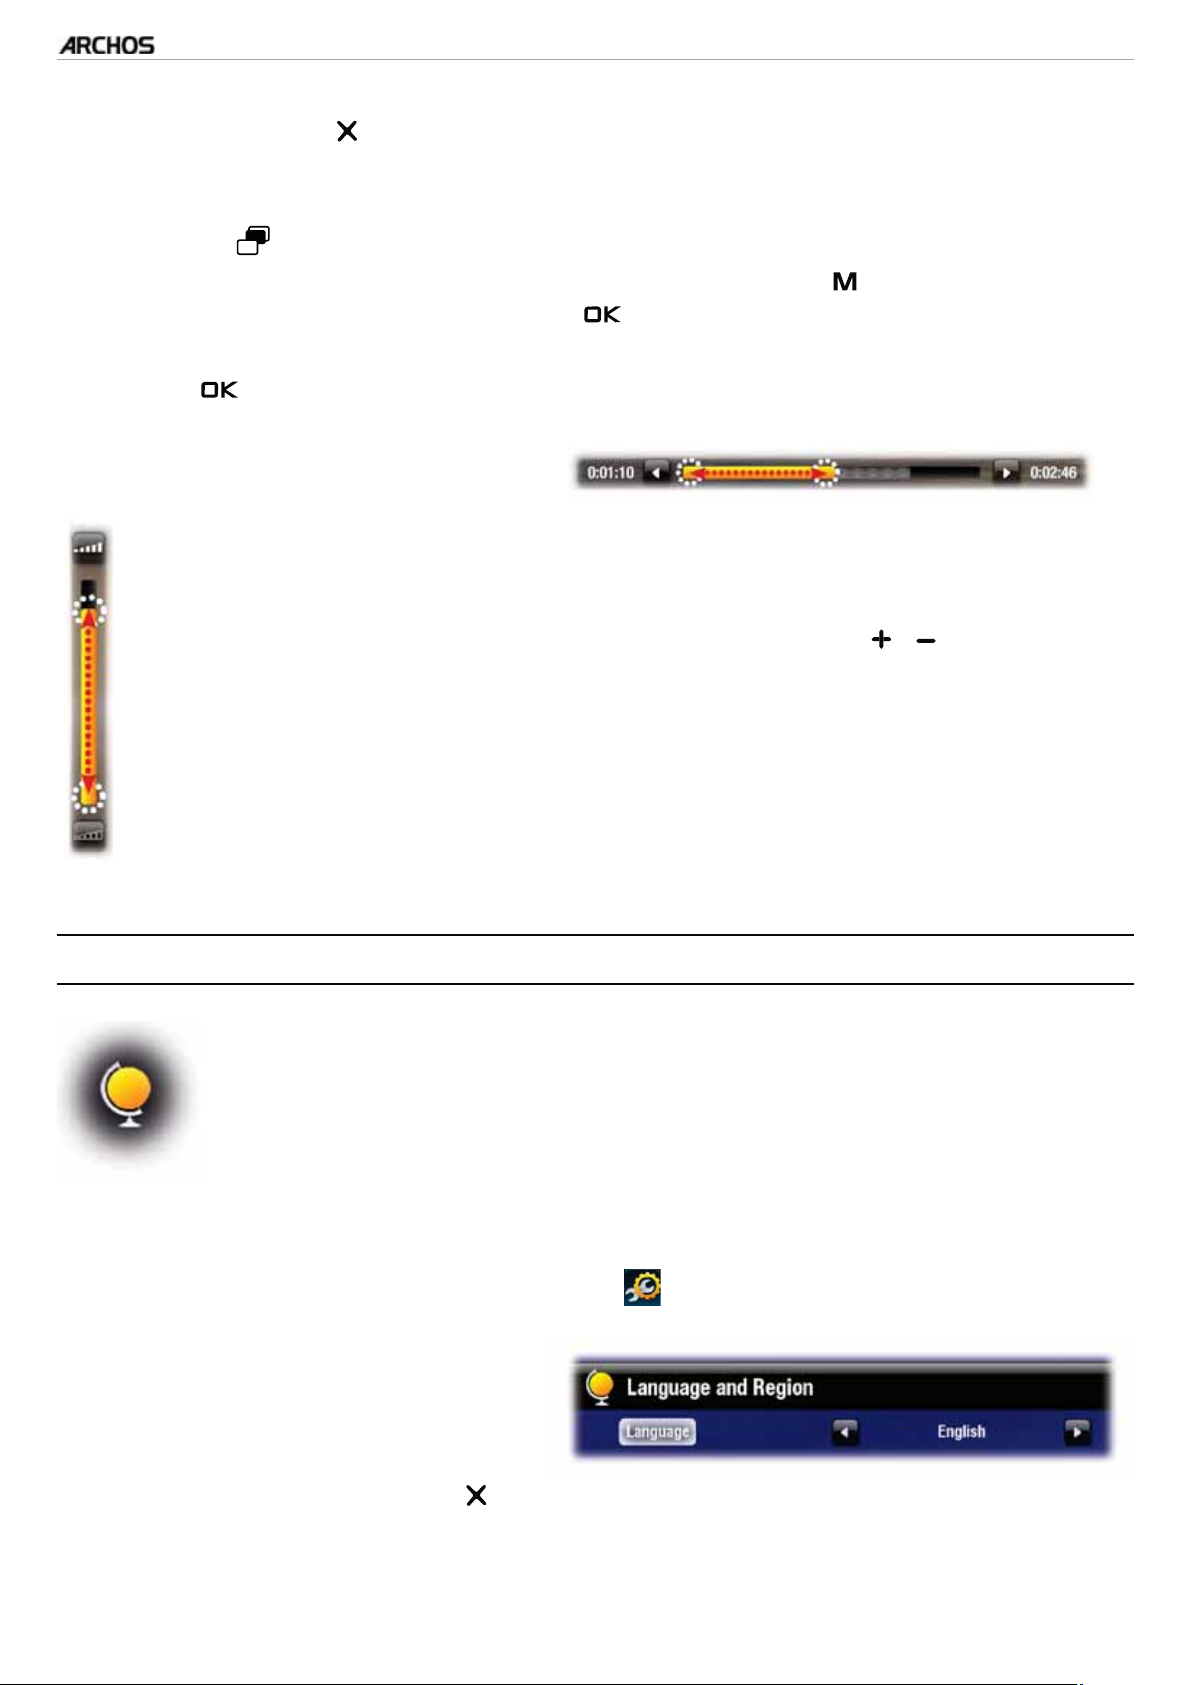
CHANGING THE LANGUAGE
The interface of your ARCHOS is available in various languages.
•
If your language is not available, go to the ARCHOS website
•
(www.archos.com/firmware) and download and install the latest version of the firmware. New languages are included in the firmware as
they become available. See
To change the system’s language:
In the Home screen, select the “Settings” menu item, and choose “Language
1.
and Region
Select a different language using
2.
”.
the left/right arrows (your settings
are saved instantly).
Close the screen (Exit button ) to exit and go back to the Home screen.
3.
Updating the Firmware
.
Page 12

TV+
MANUAL
V0.9
INTRODUCTION > P. 11
PRODUCT CARE
Your ARCHOS is an electronic product that needs to be treated with care:
•
Do not subject it to unnecessary shock or vibration.
Do not subject it to heat, keep it ventilated (especially when connected to a computer).
•
Keep it away from water and excessively humid areas.
•
Keep it away from high electromagnetic fields.
•
Do not open it up. There are no user-serviceable parts inside. Opening will void
•
your warranty.
Page 13
TV+
MANUAL
V0.9
PLAYING VIDEO > P. 12
1. PLAYING VIDEO
In the Home screen, select the “Video” icon to enter the Video mode.
1.1 BROWSING THROUGH YOUR VIDEOS
The “Video” browser allows you to navigate through the Video folder of the
•
ARCHOS’ hard drive.
You can go back one level in the hierarchy by closing the current screen (Exit but-
•
ton
screen by pressing and holding down on the Exit button.
). Wherever you are in the hierarchy, you can go back directly to the Home
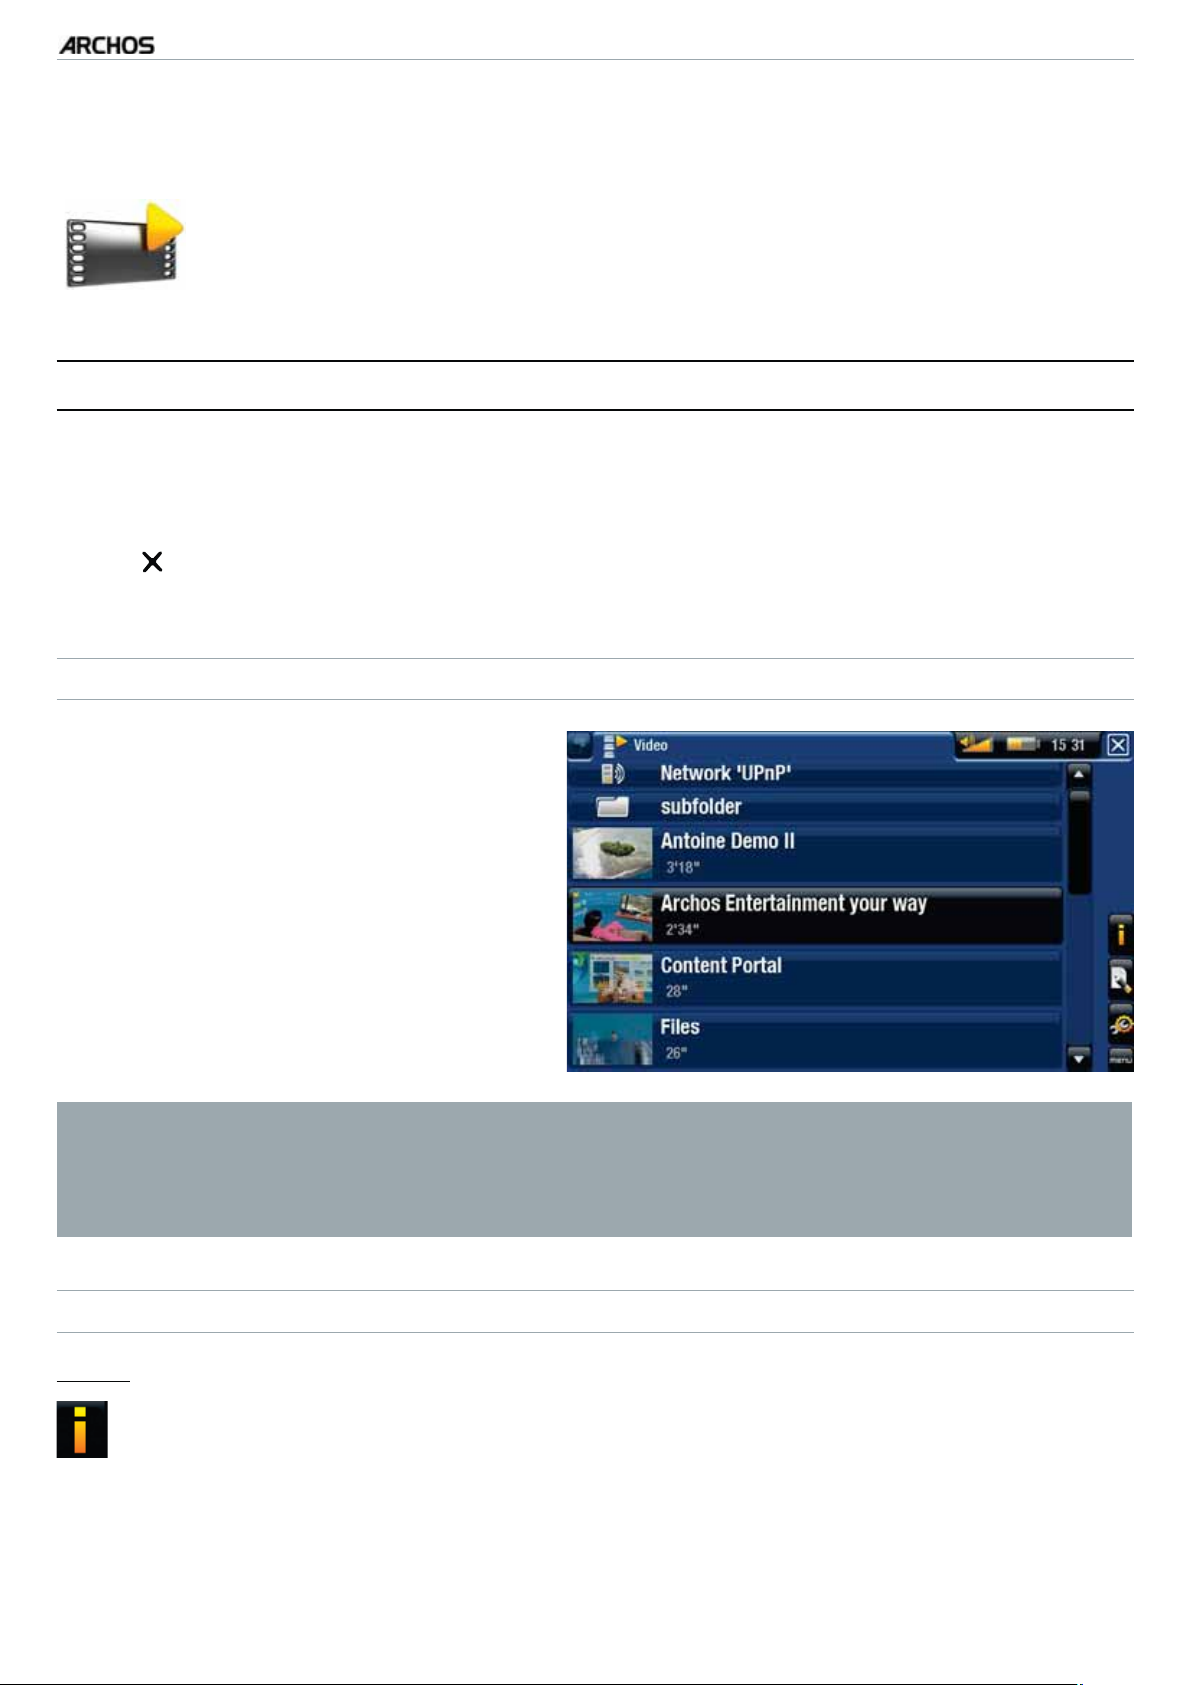
THE VIDEO BROWSER
•
The first screen of the Video mode
shows you all the videos and subfolders located in the Video folder.
•
To play a video, highlight it, then
open it.
•
If a video is in a subfolder of the
Video folder, open the subfolder, and
you will see your video.
In the “Video” browser, each video file appears with a thumbnail, displayed
•
on the left of the file’s name.
To define a new thumbnail for a video file, open the video, select the “Set”
•
menu item, and choose “Thumbnail” (see: Video Playback Menu Items).
VIDEO BROWSER MENU ITEMS
“Info”
displays a message box with information about the highlighted video file.-
Page 14
TV+
MANUAL
V0.9
PLAYING VIDEO > P. 13
“File Management”
“Rename”: allows you to change the name of the highlighted video file using
-
the keyboard. See:
“
Delete”: allows you to delete the highlighted video file. A confirmation
-
The Remote Control
.
screen will pop up.
“Bookmark”
-
“Resume”: will resume playing the highlighted video from the bookmark.
Clear”: will remove the bookmark from the highlighted video file.
-
“
“Bookmark” only appears in the menu when a bookmarked video file is highlighted.
“Settings”
you can choose to display the Video Player settings screen (see:
-
Settings
) or the “Sound” settings screen (see:
“Sound” Settings
Video Player
).
1.2 VIDEO PLAYBACK
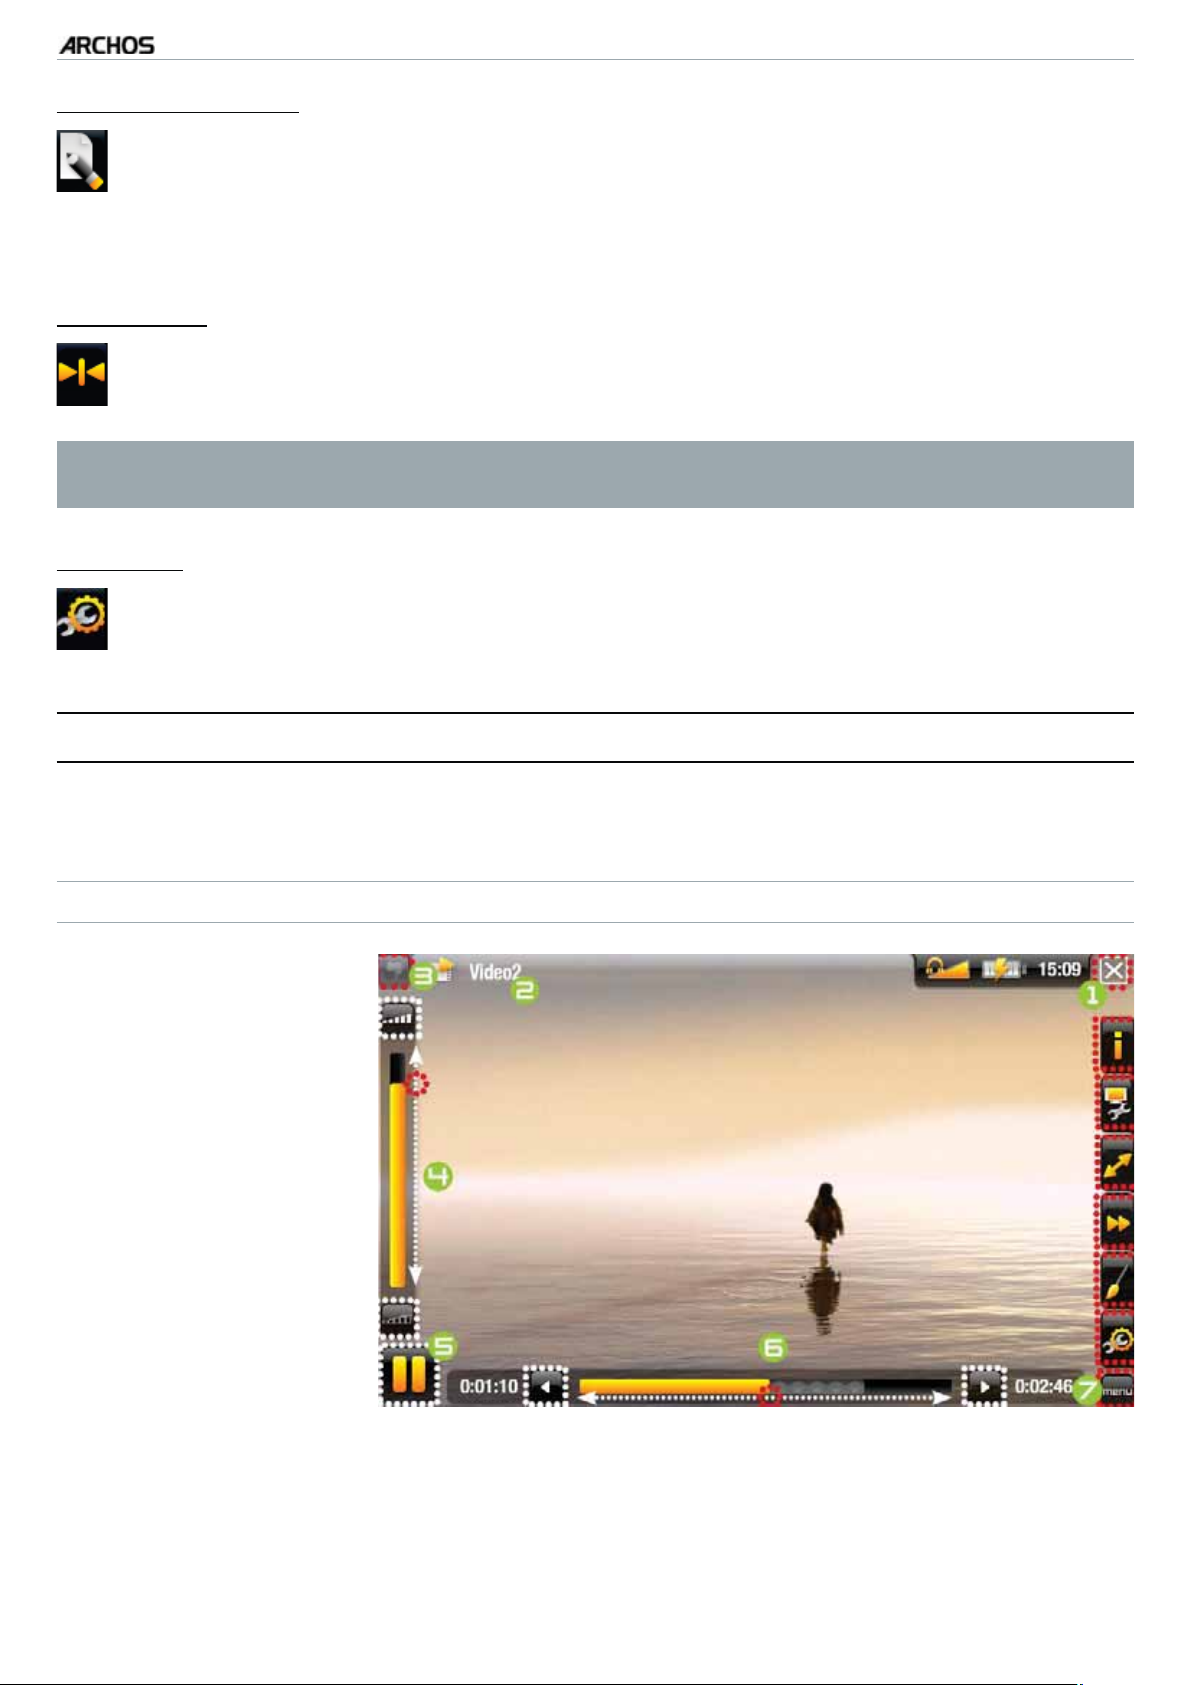
To play a video, highlight the file and open it. The menu overlay will disappear automatically after a few seconds.
VIDEO PLAYBACK SCREEN
1.
Exit icon
2.
video file name
3.
Tab icon
4.
volume level
5.
play / pause icon
6.
video progression bar
7.
menu items
Page 15
TV+
VIDEO PLAYBACK BUTTON CONTROLS
press once: stop the video and go back to the “Video” browser
-
hold: exit the Video mode and go back directly to the Home screen.
-
MANUAL
V0.9
pause/resume the video
accelerated fast forward
left/right: fast rewind/forward
accelerated fast rewind
display/hide the menu overlay
display available menu items
PLAYING VIDEO > P. 14
increase/decrease volume
Mute sound
VIDEO PLAYBACK MENU ITEMS
“Info”
displays a message box with information about the current video file.-
“Soundtrack” and/or “Subtitles”
allows you to select a different audio track*.
-
allows you to choose subtitles**.
-
* Only if the video file contains several audio tracks.
** Only if the subtitles are in a separate file. The supported file types are: .srt,
.ssa, .sub (text based) and .smi.
“Format”
allows you to change the way the image is displayed.
-
“
-
Auto”: adjusts the video size to best adapt to the TV.
-
Full Screen”: enlarges the picture to fill the screen. In order to fit the
“
ARCHOS’ screen, your device might need to cut small parts of the image,
most likely at the top and bottom.
-
“
Maximized”: enlarges the picture to fill the screen, considering the image is
encoded in 2.35 format with black bands at the top and bottom.
-
“
Original”: displays the entire picture in its original format.
Page 16
“Speed”
will play the current video in slow motion or high speed.
-
while paused in slow motion, you can advance frame by frame, using the right
-
arrow.
“Set”
-
TV+
MANUAL
V0.9
PLAYING VIDEO > P. 15
“Bookmark”: sets a bookmark at the current spot in the video. Only one
bookmark per file is allowed. You can bookmark up to 32 files. Bookmarked
videos will appear, in the “Video” browser, with a bookmark symbol and a
progression bar.
to resume playing a video from a bookmark, go to the “
-
Video” browser and
highlight the bookmarked video file. Select the “Bookmark” menu item, then
choose “Resume” (“Clear” will remove the bookmark from the video).
Thumbnail”: saves the current image as a new thumbnail for this file. In the
“
-
“Video” browser, the video’s thumbnail will be replaced by the new one.
“
Wallpaper”: the current image will be defined as your device’s background
-
image.
“Settings”
you can choose to display the Video Player settings screen (see:
-
Settings
) or the “Sound” settings screen (see:
“Sound” Settings
Video Player
).
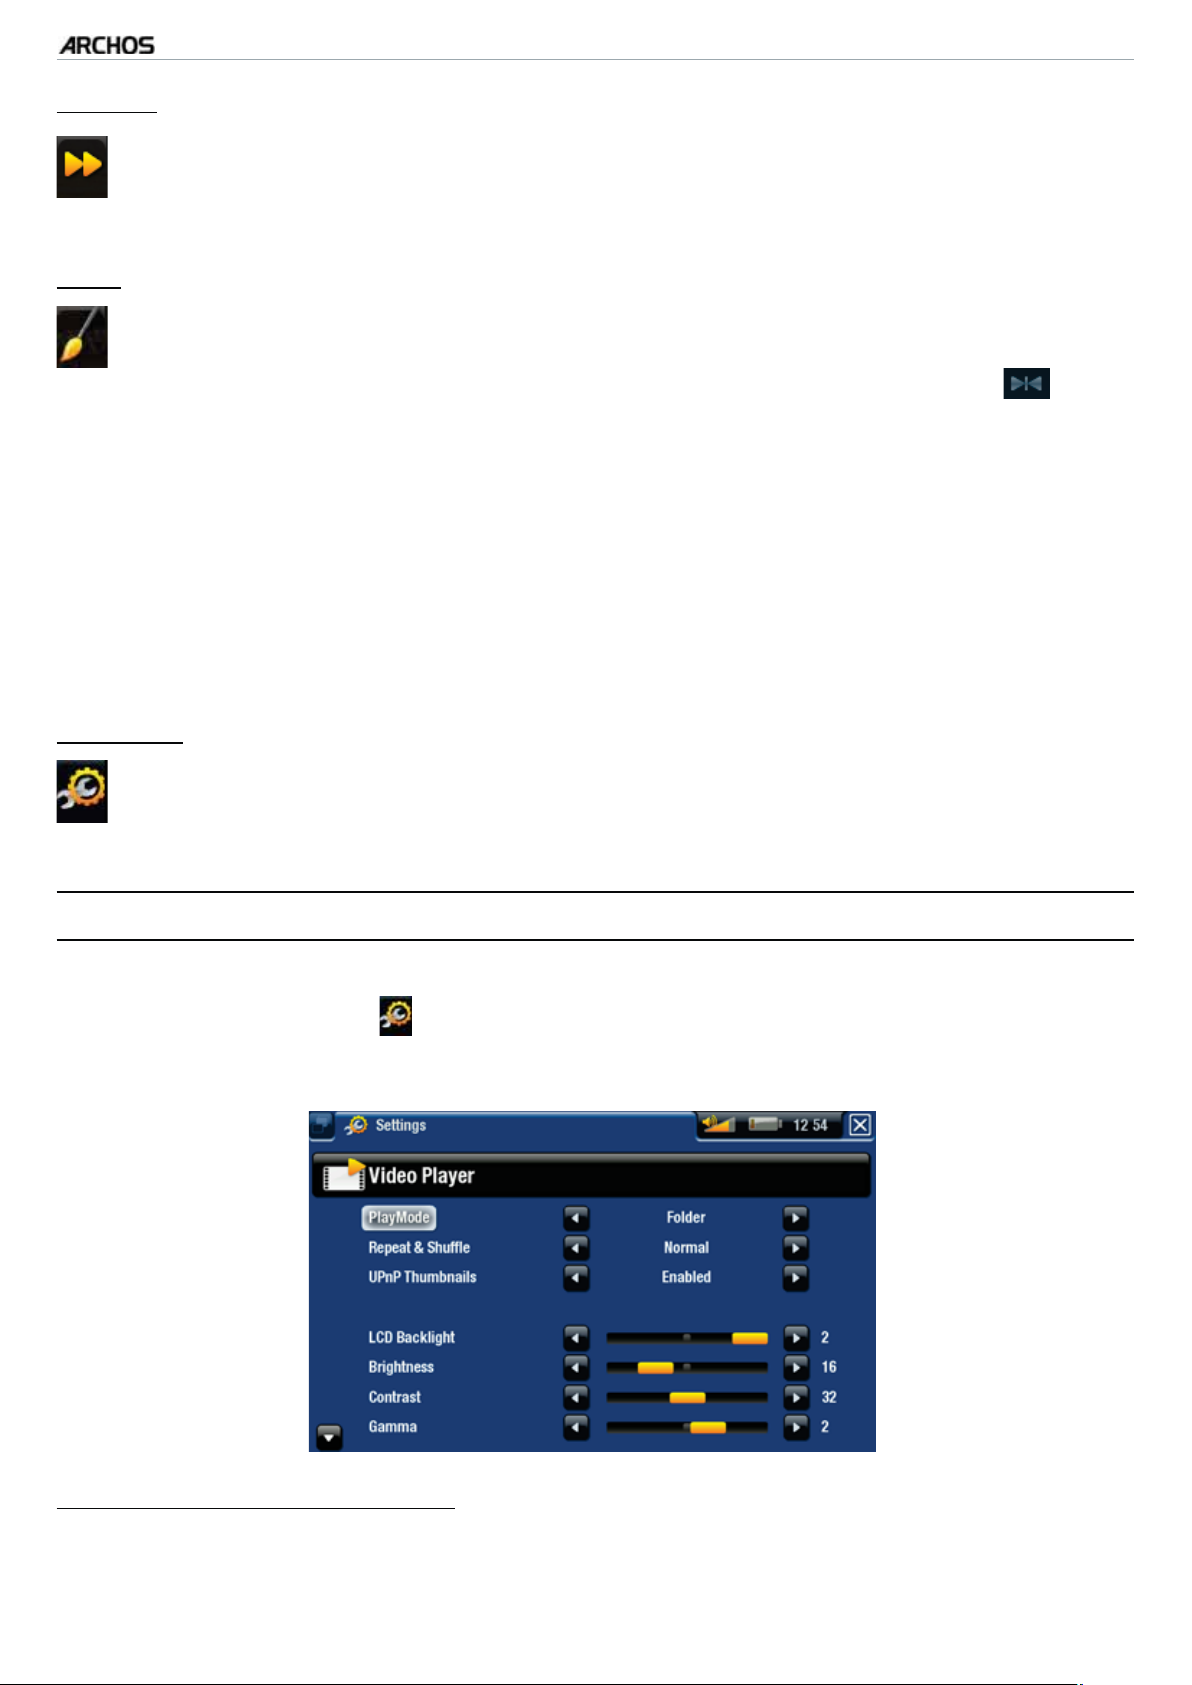
1.3 VIDEO PLAYER SETTINGS
•
In the Video mode, you can access the Video Player settings screen by using the
“Settings” menu item .
•
Use the left/right arrows to select a different setting for a parameter.
“PlayMode”, “Repeat & Shuffle”
the following table explains how the video player will work according to the set-
-
tings you chose in “
PlayMode” AND “Repeat & Shuffle”.
Page 17

TV+
MANUAL
V0.9
PLAYING VIDEO > P. 16
“PlayMode”
“Single”“Normal”
“Folder”
“UPnP Thumbnails”
“Repeat &
Shuffle”
“Repeat”
“Normal”
“Repeat”
“Shuffle”
What the video player does...
plays the current video file and stops.-
plays the current video file repeatedly.-
plays all the video files of the current folder
-
one after the other, and then stops.
plays all the video files of the current folder
-
one after the other. This will be repeated indefinitely.
plays all the videos of the current folder ran-
-
domly.
here you can enable/disable the video thumbnails while browsing through your
-
PC’s shared videos (see:
Playing your PC’s Shared Media Files
). If you choose
“Disabled”, you will be able to browse through your PC’s shared videos faster.
1.4 PUTTING VIDEOS ONTO YOUR ARCHOS
On the ARCHOS Content Portal, you have the possibility to purchase videos
directly from your ARCHOS, without using a computer. See: The ARCHOS
Content Portal.
There are three main methods to transfer the videos stored on your computer onto
the ARCHOS:
1.
Windows Media® Player: copy your videos using Windows Media® Player 10 or
higher*:
Use Windows Media® Player 10 or higher* (Sync tab) to synchronize
-
your computer’s video files with the ARCHOS.
See
-
* For best performance, we recommend that users update to Windows Media®
Player 11 or higher.
Putting Files onto the ARCHOS
to learn more about how to transfer
your computer’s video files with Windows Media
®
Player.
Page 18

TV+
Windows® Explorer: Copy and paste your video files from your computer into the
2.
Video folder of your ARCHOS.
MANUAL
V0.9
PLAYING VIDEO > P. 17
To learn how to connect/disconnect the ARCHOS from your computer, see the
Transferring Files
You can also use the following methods to transfer videos onto your ARCHOS:
Connect a USB external device to your ARCHOS’ USB host port. See: USB
•
Host Connection.
Copy files from your PC, via a WiFi / Ethernet connection. See: Browsing
•
Other Computers on the Network.
CREATING COMPATIBLE VIDEO FILES WITH YOUR COMPUTER
section.
If some of your videos don’t play on your ARCHOS, you may need to convert them to
a compatible format:
The easiest way to do this is by using Windows Media® Player 10 or higher to
•
transfer videos to your ARCHOS. Windows Media® Player will automatically convert most formats to the WMV format that your device can play.
See your Windows Media® Player help instructions for more information.
•
If you don’t want to use Windows Media® Player, a search on the Internet should
allow you to find suitable utility programs to do this job.
•
If you would like to simply copy and paste unprotected DVD video files from
your PC onto your ARCHOS without converting them to WMV format, you can
purchase the Cinema plug-in from the ARCHOS website (www.archos.com). The
same is also true for video podcasts in the H.264 format. In this case, purchase
the Video Podcast plug-in.
1.5 RECORDING VIDEO
Your ARCHOS gives you the possibility to record video from most
•
any standard video source.
See:
•
•
Recording Audio/Video Manually
You will also have the possibility to schedule TV recordings easily,
.
via the TV Program Guide (EPG).
Scheduling TV Recordings.
See:
•
Page 19
TV+
MANUAL
V0.9
PLAYING VIDEO > P. 18
1.6 PLAYING YOUR PC’S SHARED VIDEOS
Using a WiFi or Ethernet connection, your ARCHOS gives you the
•
possibility to watch, directly on your device, shared videos stored in
your PC’s Windows Media® Library.
For this to work, you will need a WiFi or Ethernet connection and
•
Windows Media® Player 11 or higher* installed on your PC.
The ARCHOS uses the UPnP (Universal Plug-and-play) standard to
•
stream shared videos from your PC’s Windows Media® Library.
•
See:
Playing your PC’s Shared Media Files
* There are other products on the market that also can share media files using
the UPnP standard.
.
Page 20
TV+
MANUAL
V0.9
PLAYING MUSIC > P. 19
2. PLAYING MUSIC
In the Home screen, select the “Music” icon to enter the Music mode.
2.1 BROWSING THROUGH YOUR MUSIC FILES
There are two types of views for you to browse through your songs: the Music
•
Library and the Music Browser.
In both views, you can go back one level in the hierarchy by closing the current
•
screen (Exit button
ly to the Home screen by pressing and holding down on the Exit button.
). Wherever you are in the hierarchy, you can go back direct-
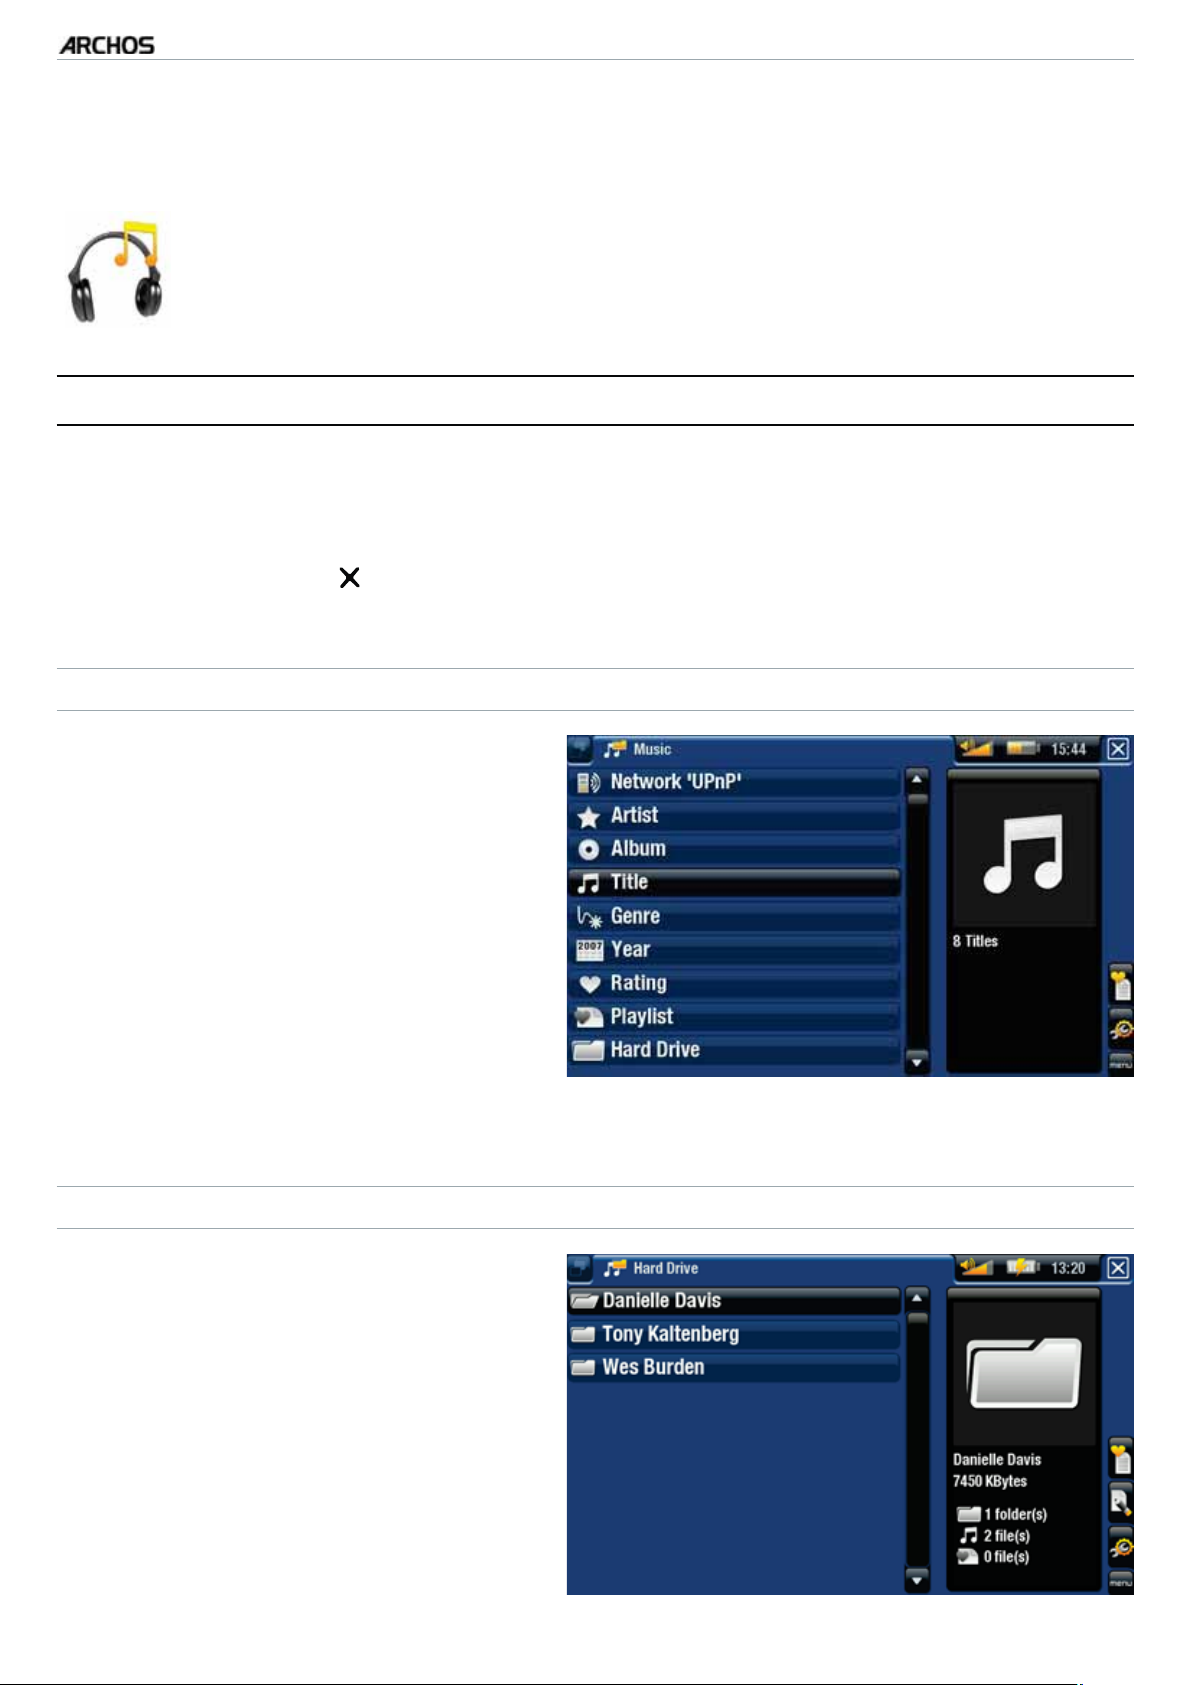
THE MUSIC LIBRARY
•
The Music Library (default view)
shows your music sorted by categories (Artist, Album, Genre, etc.) if
your music files contain these song
information tags.
•
When new music is copied to the
ARCHOS, the Music Library will be
updated automatically.
•
If some of your music files do not
contain information tags, they will
be classified as
(Unknown) in the
Music Library.
THE MUSIC BROWSER
The music browser allows you to
•
navigate through the Music folder
of your device’s hard drive.
To use it, select “
•
Hard Drive” (or
“Internal Memory”) in the initial
Music Library view.
Page 21
TV+
MUSIC LIBRARY AND MUSIC BROWSER MENU ITEMS*
MANUAL
V0.9
“Info”
displays a message box with information about the highlighted music file.-
“Show playlist”
PLAYING MUSIC > P. 20
opens a playlist edition window on the right (see:
Playlists
).-
“Bookmark”
-
“Resume”: will resume playing the highlighted song from the bookmark.
Clear”: will remove the bookmark from the highlighted music file.
-
“
“Bookmark” only appears in the menu when a bookmarked music file is highlighted.
“File Management”
-
“Rename”: allows you to change the name of the highlighted music file using
the keyboard. See:
“
Delete”: allows you to delete the highlighted music file. A confirmation
-
The Remote Control
.
screen will pop up.
“Settings”
you can choose to display the Music Player settings screen (see:
-
Settings
* The available menu items will vary depending on the mode you chose (Music
Library or Music Browser).
) or the “Sound” settings screen (see:
“Sound” Settings
Music Player
).
2.2 MUSIC PLAYBACK
Use the scroll bar to browse through the list of audio tracks.
•
To play a song, highlight the corresponding file and open it.
•
Page 22
TV+
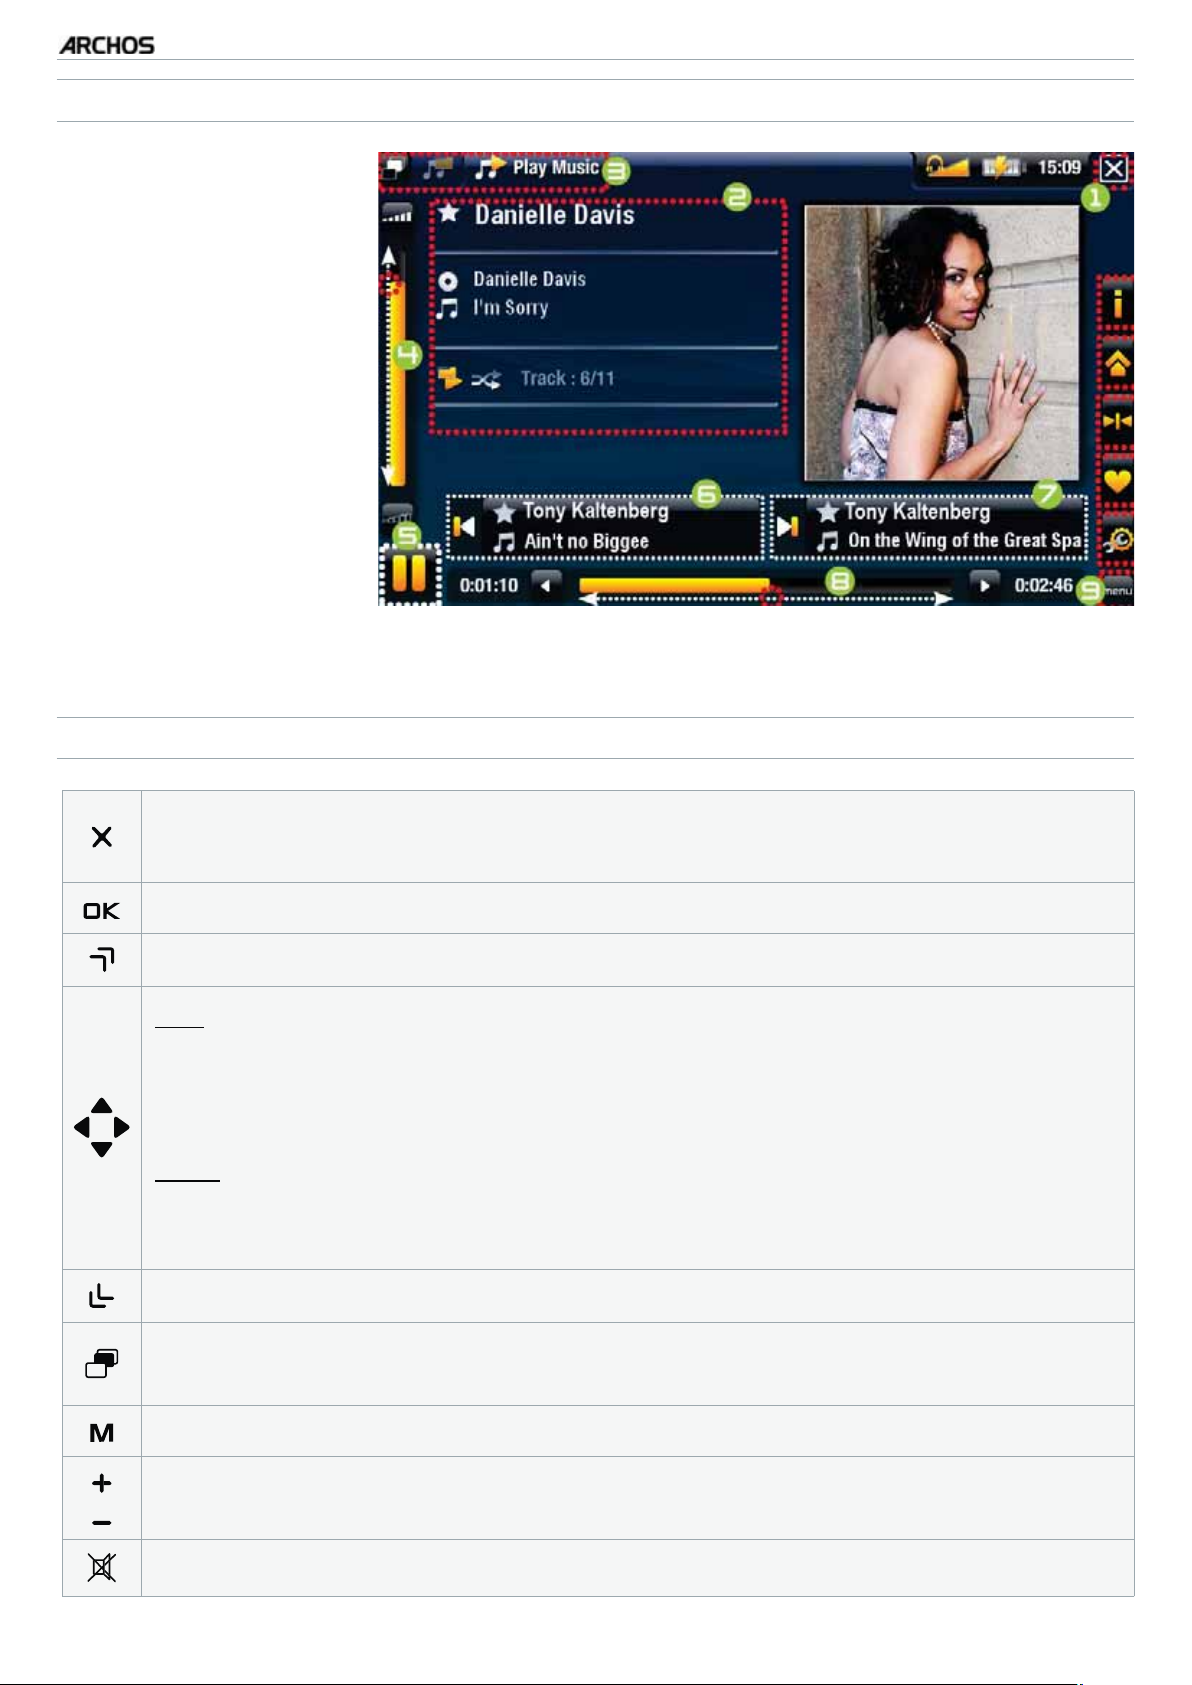
MUSIC PLAYBACK SCREEN
1.
Exit icon
2.
artist name, album
title, song title, playback status icon(s)
and track number
3.
available tabs
4.
volume level
5.
play / pause icon
6.
previous track
7.
next track
8.
progression bar
9.
menu items
MANUAL
V0.9
PLAYING MUSIC > P. 21
MUSIC PLAYBACK BUTTON CONTROLS
press once: stop the song
-
hold: exit the Music mode and go back directly to the Home screen.
-
and go back to the
pause/resume the song
accelerated fast forward
left:
press once: back to the beginning of the song, or previous song (in the
-
first 10 seconds of a track)
hold: fast rewind
-
right:
press once: next song
-
hold: fast forward
-
accelerated fast rewind
“Music”
Library or browser
tabs back to the Music Library or Music browser (depending on which mode
you launched the song from)
display available menu items
increase/decrease volume
Mute sound
Page 23
TV+
MUSIC PLAYBACK MENU ITEMS
MANUAL
“Info”
displays a message box with information about the current music file.-
“ARCHOS home screen”
allows you to go back to the Home screen, and browse your hard drive or
-
view your photos while listening to music.
“Set bookmark”
sets a bookmark at the current spot in the song. Only one bookmark per file is
-
allowed. You can bookmark up to 32 files.
-
to resume playing a song from a bookmark, go to the Music Library or the Music
Browser, highlight the bookmarked music file. Select the “Bookmark” menu
item, then choose “Resume” (“Clear” will remove the bookmark from the song).
V0.9
PLAYING MUSIC > P. 22
“Set rating”
allows you to give a rating to the current song (1-5) or to remove the rating
-
(none).
“Settings”
you can choose to display the Music Player settings screen (see next section)
-
or the “Sound” settings screen (see:
“Sound” Settings
).
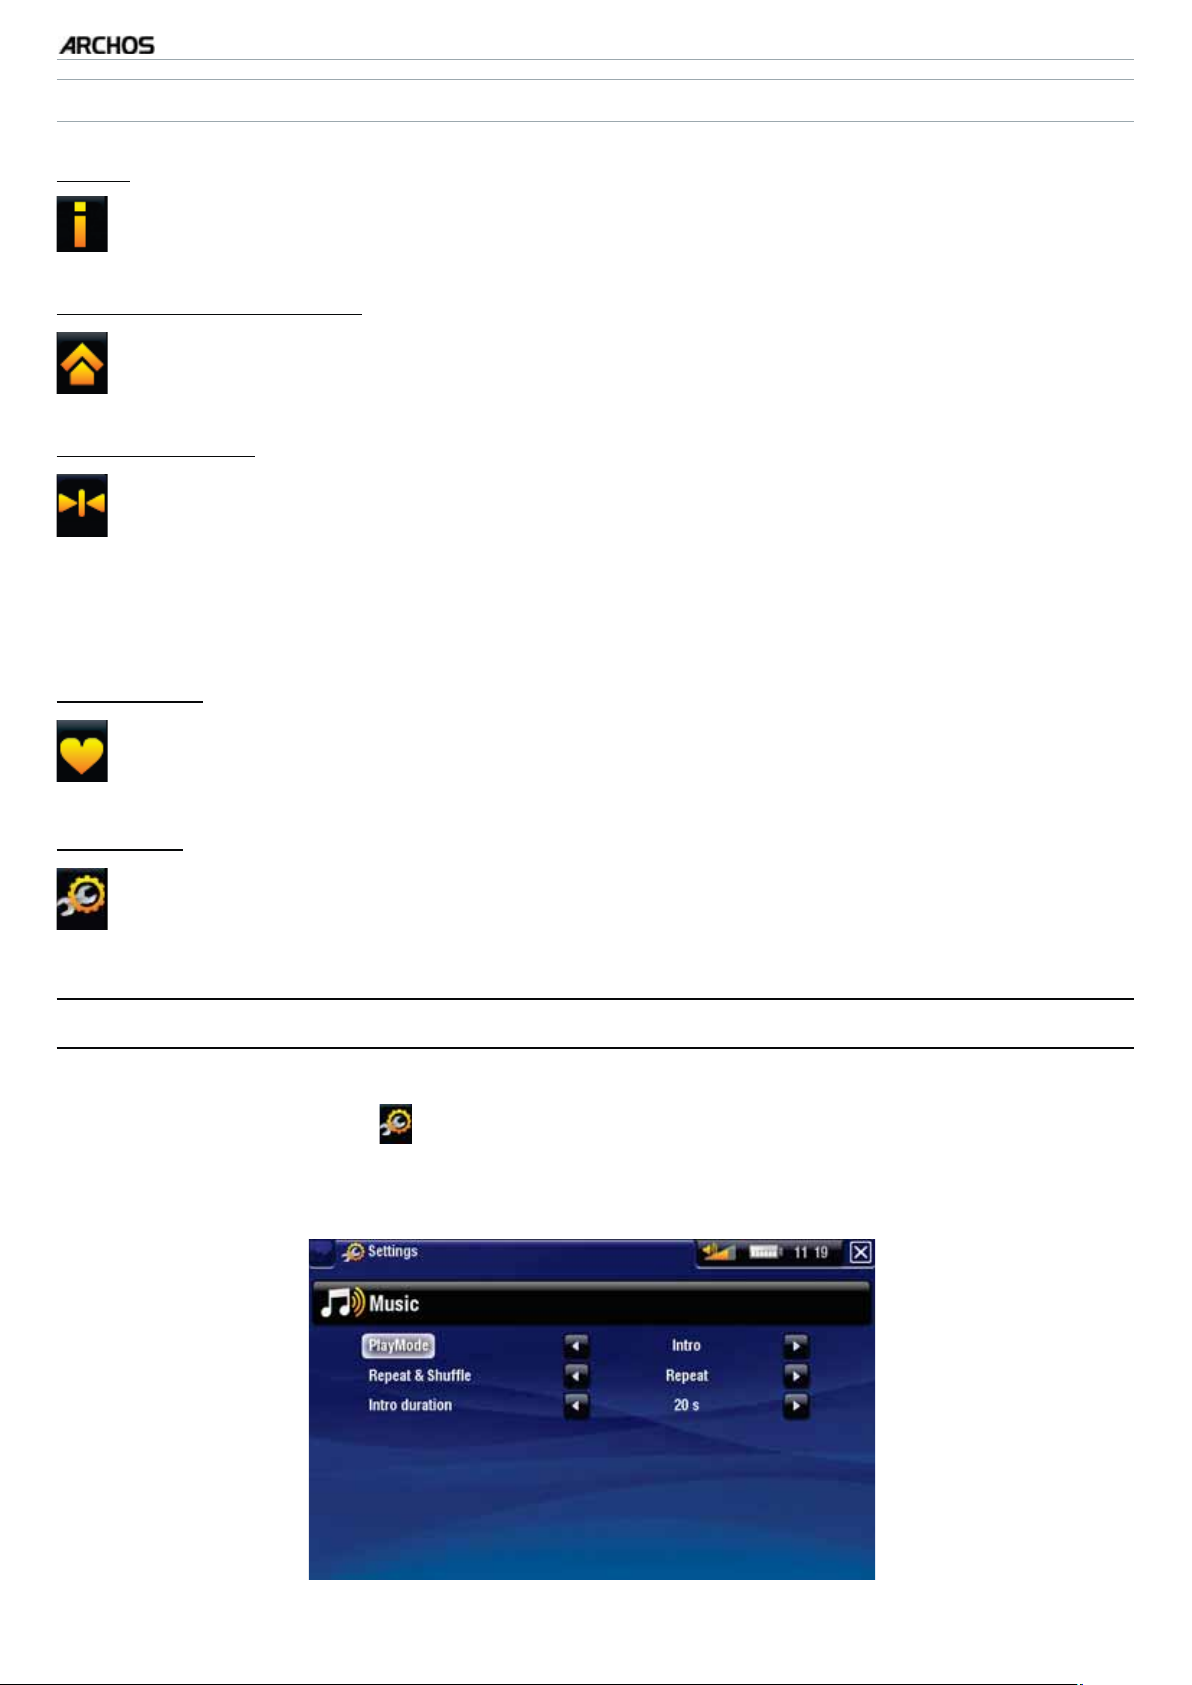
2.3 MUSIC PLAYER SETTINGS
In the Music mode, you can access the Music Player settings screen by using the
•
“Settings” menu item .
•
Use the left/right arrows to select a different setting for a parameter.
Page 24
TV+
MANUAL
V0.9
PLAYING MUSIC > P. 23
“PlayMode”, “Repeat & Shuffle”
the following table explains how the audio player will work according to the set-
-
tings you chose in “
An icon shows the current modes in the Music playback screen.
-
PlayMode” AND “Repeat & Shuffle”.
“PlayMode”
“Single”
“Folder”
“Repeat &
Shuffle”
“Normal”
“Repeat”
“Normal”
“Repeat”
“Shuffle”
What the video player does...
plays the current song and stop.-
plays the current song repeatedly.-
plays all the songs of the current folder one
-
after the other, and then stops.
plays all the songs of the current folder one af-
-
ter the other. This will be repeated indefinitely.
plays the songs of the current folder ran-
-
domly.
“All”
“Queue”
plays all the songs of your ARCHOS one
“Normal”
-
after the other, and then stops.
plays all the songs of your ARCHOS one
“Repeat”
-
after the other. This will be repeated indefinitely.
plays all the songs of your ARCHOS ran-
“Shuffle”
allows you to select a track to be played after the current one
-
-
domly.
is finished.
while a track is playing, switch to the browser window, select
-
a track to highlight it, then open it. This is your queued track,
which will be played after the current track.
you can only queue one track at a time, and you need to se-
-
lect the song to queue before the end of the current track.
“Intro”
plays the first few seconds of each track. You can define the
-
length to play in “Intro duration”. Press OK during the intro
period to let the whole song play.
Page 25
TV+
“Intro duration”
MANUAL
V0.9
PLAYING MUSIC > P. 24
-
defines for how long each track will be played when “
PlayMode” is set to “Intro”.
2.4 PLAYLISTS
•
A playlist is a list of audio tracks that the music player will automatically
play one after the other.
•
On your ARCHOS, you can play, create and edit as many playlists as you want.
In the ARCHOS Browser, playlists are the files with the icon.
•
Note: when you delete a playlist, you are only deleting the list and not the music itself.
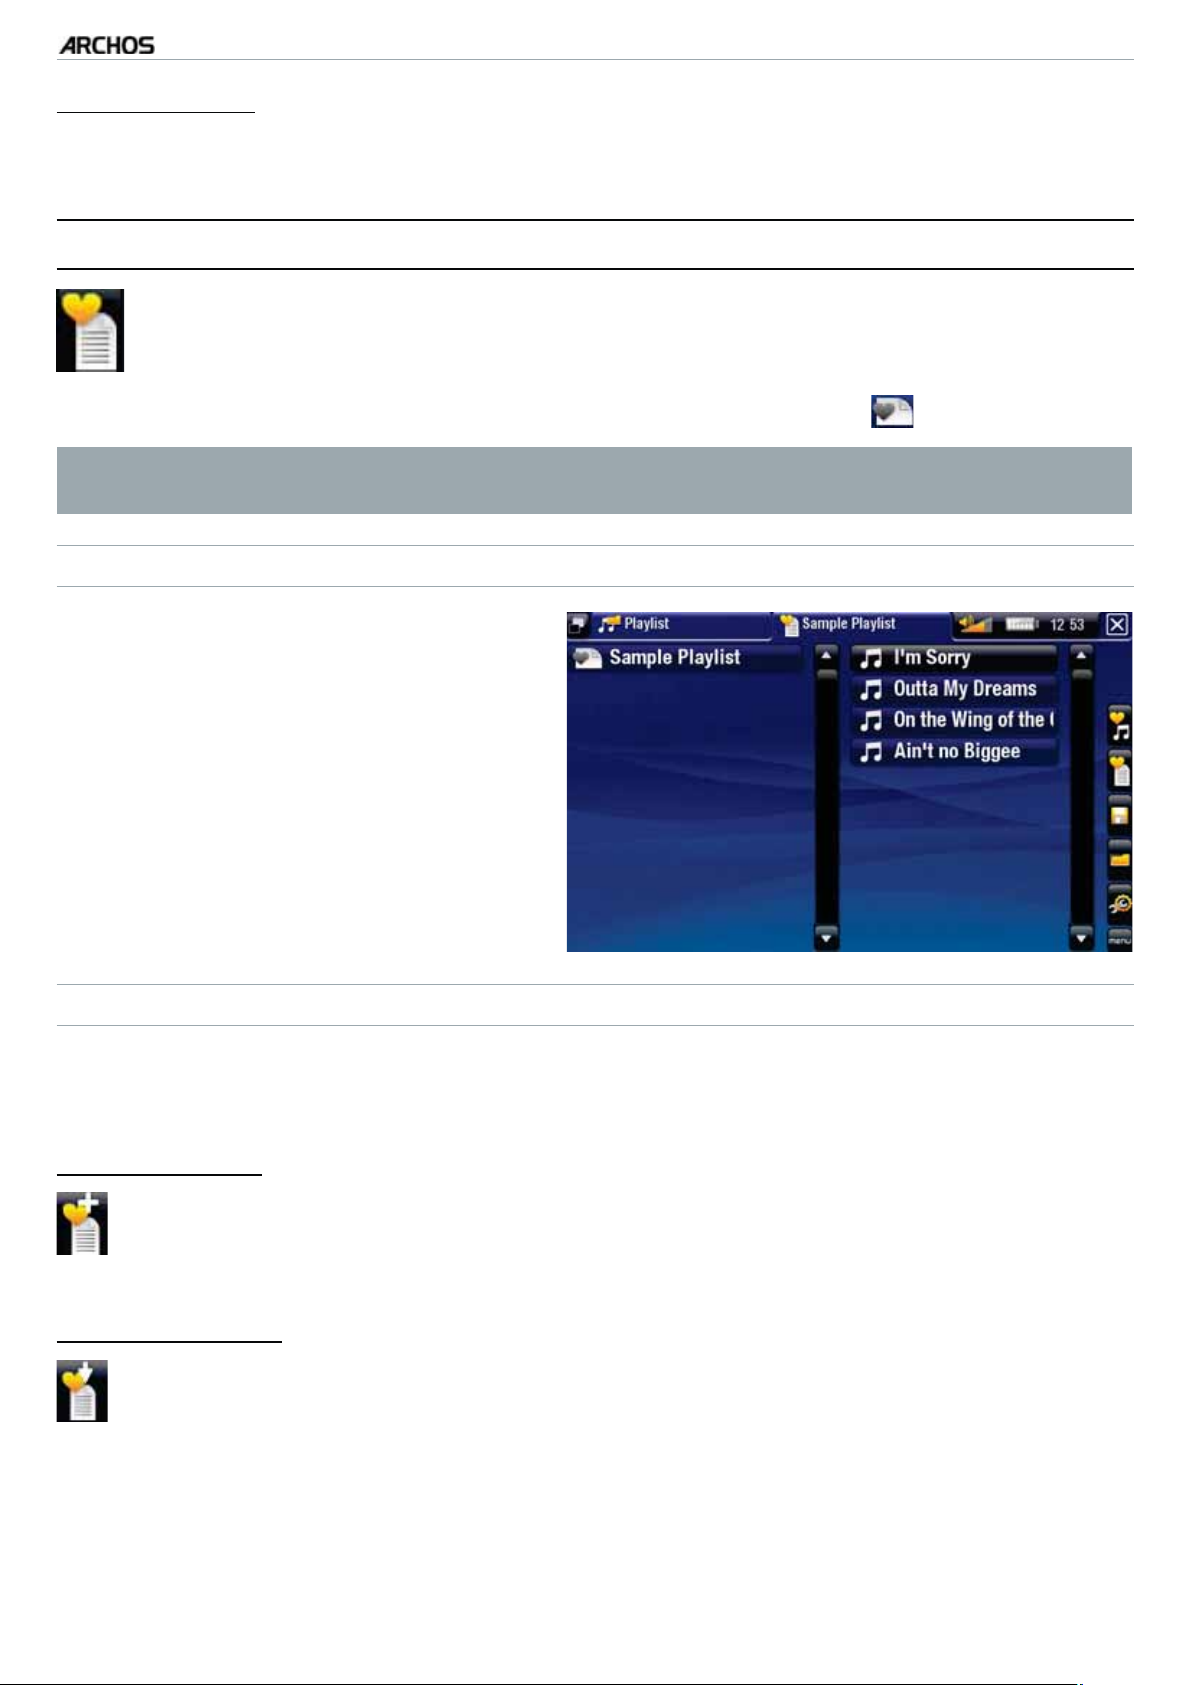
PLAYING A PLAYLIST
In the Music Library, highlight the
•
“Playlist” line and open it.
Highlight a playlist and open it. A
•
panel showing the contents of the
playlist will open on the right.
Open the first item in the playlist to
•
start playing from the first track.
PLAYLIST MENU ITEMS
These menu items appear when a music file is highlighted on the left panel:
“Add to playlist”
-
“Selected file”: will add the highlighted track at the end of the current playlist.
All files”: will add all the tracks (from the left panel) at the end of the current
-
“
playlist.
“Insert in playlist”
-
“Selected file”: will insert the highlighted track before the selected item in
the current playlist.
All files”: will add all the tracks (from the left panel) before the selected
-
“
item the current playlist.
Page 26

TV+
MANUAL
V0.9
PLAYING MUSIC > P. 25
These menu items appear when the focus is on the right panel (playlist editor):
“Track”
-
“Remove track”: deletes the highlighted track from the playlist.
Move”: allows you to change the position of the highlighted track within the
-
“
playlist. Highlight the track you want to move, select the “Track” menu item,
then choose “Move”. Now highlight the position to which you want to move
the track and validate.
“Playlist”
-
“Clear”: clears the current playlist.
Shuffle”: randomly shuffles the order of the songs in the current playlist.
-
“
“Save playlist”
“Save”: saves the current playlist to the Playlists folder.
-
“
Save As”: same as “Save”, but it also allows you to give a personalized name
-
to the playlist. See:
The Remote Control
.
“Hide playlist”
closes the playlist editor.-
“Settings”
you can choose to display the Music Player settings screen (see
-
Settings
CREATING A NEW PLAYLIST
While you are in the Music browser, select the “Show playlist” menu item. A
1.
) or the “Sound” settings screen (see:
“Sound” Settings
Music Player
).
playlist panel will open on the right. By default, the new playlist contains the
same songs as the last opened playlist. You can now start modifying the playlist.
In the left panel, locate the songs you would like to add to your playlist. Highlight
2.
a song and open it to add it to the playlist. Repeat this operation with all the
tracks you want.
To add all the songs of a folder to a playlist: open the folder in the left panel
and highlight the first song. Then use the “Add to playlist” or “Insert in playlist” menu item and choose “All files”.
When you are satisfied with your new playlist, select the “Save playlist” menu
3.
item, and then choose “
Save as”.
Page 27

TV+
MANUAL
V0.9
PLAYING MUSIC > P. 26
Enter the name of your new playlist with the keyboard (see:
4.
The Remote Control
and select “OK”.
Use the tabs to jump back and forth between the left and right panels.
EDITING A PLAYLIST
To edit an existing playlist:
In the Music Library, highlight the “
1.
Highlight the playlist you want to modify and open it. A panel showing the con-
2.
Playlist” line and open it.
tents of the playlist will open on the right.
You can now add, shuffle, move or remove tracks within the playlist, using the
3.
appropriate menu items. The available menu items will vary according to which
panel you selected (see:
After you have made the changes you want, select the “
4.
Playlist Menu Items
).
Save playlist” menu item
and choose “Save” to save the playlist. If you wish to give it a different name,
choose “Save As”.
)
ADDING SONGS TO A PLAYLIST WHILE LISTENING TO MUSIC
While playing a song, use the tab button/icon to go back to the Music Library or
1.
Music Browser, and select the “Show playlist” menu item.
Your window will then have two panels: the music files on the left and the last-
2.
opened playlist on the right.
While listening to your song, you can edit the last-opened playlist.
3.
Close the playlist editor (Exit button
4.
Please note: this can only be done if you have entered the “Music” folder via
the “Music” icon in the Home screen and not via the “Files” icon.
) to return to the playback screen.
2.5 PUTTING MUSIC ONTO YOUR ARCHOS
There are two main methods to transfer the music stored on your computer onto the
ARCHOS:
Windows Media® Player: copy your music using Windows Media
1.
higher*:
®
Player 10 or
Page 28

TV+
-
Use Windows Media® Player 10 or higher* (Sync tab) to synchronize
MANUAL
V0.9
PLAYING MUSIC > P. 27
your computer’s music files with the ARCHOS.
See
-
Putting Files onto the ARCHOS
your computer’s music files with Windows Media
* For best performance, we recommend that users update to Windows Media®
Player 11 or higher.
Windows® Explorer: Copy and paste your music files from your computer into the
2.
Video folder of your ARCHOS.
to learn more about how to transfer
®
Player.
To learn how to connect/disconnect the ARCHOS from your computer, see the
Transferring Files
You can also use the following methods to transfer music onto your ARCHOS:
section.
Connect a USB external device to your ARCHOS’ USB host port. See: USB
•
Host Connection.
Copy files from your PC, via a WiFi / Ethernet connection. See: Browsing
•
Other Computers on the Network.
TRANSFERRING YOUR CD COLLECTION TO YOUR ARCHOS
You can easily create audio content with your computer by using Windows Media®
Player 10 or higher to convert your own CDs to MP3 or WMA format:
Place a music CD in your computer, and
1.
Windows® will ask you what action you would
like to perform.
Choose
2.
Rip music from CD, and Windows
Media® Player will start ripping the CD. The
songs will be automatically extracted from the
CD and encoded into the MP3 or WMA format, according to what you chose in Windows
Media® Player’s ripping options. The default
format is WMA.
Once this is done, the album will become part
3.
of your Music Library.
See
4.
Transferring Files
to learn how to transfer
the ripped music files onto the ARCHOS.
See your Windows Media® Player help instructions
for more information.
Page 29

TV+
Check the laws and regulations in your country or jurisdiction to know if pri-
•
vate copying of your CDs for your own use is authorized.
Some music CDs have a special copy protection system that will not allow
•
Windows Media
MANUAL
®
Player to make music files from them.
V0.9
PLAYING MUSIC > P. 28
2.6 RECORDING ANALOGUE AUDIO
Your ARCHOS Gives you the possibility to record audio from most
•
any standard line level analogue audio source.
See:
•
Recording Audio/Video Manually
.
2.7 PLAYING YOUR PC’S SHARED MUSIC
Using a WiFi or Ethernet connection, your ARCHOS gives you the
•
possibility to play, directly on your device, shared music stored in
your PC’s Windows Media® Library.
For this to work, you will need a WiFi or Ethernet connection and
•
Windows Media® Player 11 or higher* installed on your PC.
The ARCHOS uses the UPnP (Universal Plug-and-play) standard to
•
stream shared music from your PC’s Windows Media® Library.
See:
•
* There are other products on the market that also can share media files using
the UPnP standard.
Playing your PC’s Shared Media Files
.
Page 30

TV+
MANUAL
V0.9
VIEWING PHOTOS > P. 29
3. VIEWING PHOTOS
In the Home screen, select the “Photo” icon to enter the Photo viewer.
3.1 BROWSING THROUGH YOUR PHOTOS
The “Photo” browser allows you to navigate through the Pictures folder of the
•
ARCHOS’ hard drive.
You can go back one level in the hierarchy by closing the current screen (Exit but-
•
ton
screen by pressing and holding down on the Exit button.
). Wherever you are in the hierarchy, you can go back directly to the Home
THE PHOTO BROWSER
The first screen of the Photo mode
•
shows all the photos and subfolders
located in the Pictures folder.
To view a photo, highlight its
•
thumbnail, then open it. If a photo is
in a subfolder of the
Pictures folder,
open the subfolder, and you will see
your photo.
The Photo Browser also allows you
•
to view your pictures, sorted by
date.
In the “Photo” browser each photo is displayed with a thumbnail.
PHOTO BROWSER MENU ITEMS*
“Info”
displays a message box with information about the highlighted picture.-
“Delete”
allows you to delete the highlighted picture. A confirmation screen will pop
-
up.
Page 31

TV+
“Start slideshow”
starts a slideshow from the highlighted image.
-
“Pause slideshow” menu item will appear, allowing you to pause the
the
-
slideshow.
“Settings”
MANUAL
V0.9
VIEWING PHOTOS > P. 30
will display the Photo viewer settings screen (see
* The available menu items will vary depending on where you are in the
“Photo” Browser.
Photo Viewer Settings
).-
3.2 PHOTO VIEWER
To view a picture, highlight the corresponding thumbnail and open it. The menu overlay will disappear automatically after a few seconds.
PHOTO VIEWER SCREEN
PHOTO VIEWER BUTTON CONTROLS
press once: close the photo viewer and go back to the “Photo” browser
-
-
hold: exit the Music mode and go back directly to the Home screen.
start/pause a slideshow
zoom in
left/right: previous/next picture
down/up: rotate 90° clockwise/counterclockwise
Page 32

TV+
MANUAL
zoom out
display/hide the menu overlay
display available menu items
increase/decrease volume
Mute sound
PHOTO VIEWER MENU ITEMS
“Info”
displays a message box with information about the current picture.-
V0.9
VIEWING PHOTOS > P. 31
“Rotate”
choose “Left” to rotate the picture 90° counterclockwise.
-
choose “
-
Right” to rotate the picture 90° clockwise.
“Start slideshow”
starts a slideshow from the current image.
-
the
“Pause slideshow” menu item will appear, allowing you to pause the
-
slideshow.
“Set as wallpaper”
defines the current picture as your ARCHOS’ background image.-
“Settings”
will display the Photo viewer settings screen (see next section).-
“Zoom”
use the slider to magnify/demagnify the current picture.-
Page 33

TV+
MANUAL
V0.9
VIEWING PHOTOS > P. 32
3.3 PHOTO VIEWER SETTINGS
In the Photo mode, you can access
•
the Photo viewer settings screen via
the “Settings” menu item .
Use the left/right arrows to select a
•
different setting for a parameter.
“Picture Pause”
defines the time that each picture will be displayed during a slideshow.
-
“Transition”
defines the transition effect to be used between two pictures. There are several
-
cool effects that you can choose from.
“Sequence”
allows you to enable/disable the shuffle mode. If this parameter is set to
-
“
Shuffle”, your pictures will be displayed randomly. To disable the shuffle mode,
select “Normal”.
“Format”
allows you to change the way the picture is displayed.
-
“
Original”: displays the entire picture in its original format.
-
“
Full Screen”: enlarges the picture to fill the screen. In order to fit the ARCHOS’
-
screen, your device might need to cut small parts of the image, most likely at the
top and bottom.
3.4 PLAYING A SLIDESHOW
To view a slideshow, highlight a picture file in the “Photo” browser or while view-
•
ing a photo, and choose the “Start slideshow” menu item.
While a slideshow is playing, you can pause it at any time by selecting the “Pause
•
slideshow
You can define the time that each picture is displayed and the transition effects in
•
the “Photo” settings (see:
” menu item.
“Photo” Settings
).
Page 34

TV+
MANUAL
V0.9
VIEWING PHOTOS > P. 33
3.5 VIEWING PHOTOS WHILE LISTENING TO MUSIC
You can view photos and play slideshows while listening to music:
•
Choose the “
In the Home screen, select the “
•
•
Browse through your photos (see:
show as normal (see:
To go back to the Music playback screen, go to the Home screen and select the
•
ARCHOS home screen” menu item while playing a song.
Photo” icon to enter the Photo mode.
Browsing Through your Photos
Playing a Slideshow
).
) or start a slide-
“Music” icon.
3.6 PUTTING PHOTOS ONTO YOUR ARCHOS
There are two main methods to transfer the pictures stored on your computer onto
the ARCHOS:
Windows Media® Player: copy your pictures using Windows Media® Player 10 or
1.
higher*:
Use Windows Media® Player 10 or higher* (Sync tab) to synchronize
-
your computer’s pictures with the ARCHOS.
See
-
Putting Files onto the ARCHOS
to learn more about how to transfer
your computer’s pictures with Windows Media® Player.
* For best performance, we recommend that users update to Windows Media®
Player 11 or higher.
2.
Windows® Explorer: Copy and paste your pictures from your computer into the
Video folder of your ARCHOS.
To learn how to connect/disconnect the ARCHOS from your computer, see the
Transferring Files
You can also use the following methods to transfer photos onto your ARCHOS:
Connect a USB external device to your ARCHOS’ USB host port. See: USB
•
Host Connection.
Copy files from your PC, via a WiFi / Ethernet connection. See: Browsing
•
Other Computers on the Network.
section.
Page 35

TV+
MANUAL
V0.9
VIEWING PHOTOS > P. 34
3.7 PLAYING YOUR PC’S SHARED PHOTOS
•
Using a WiFi or Ethernet connection, your ARCHOS gives you the
possibility to view, directly on your device, shared photos stored in
your PC’s Windows Media® Library.
•
For this to work, you will need a WiFi or Ethernet connection and
Windows Media® Player 11 or higher* installed on your PC.
•
The ARCHOS uses the UPnP (Universal Plug-and-play) standard to
stream shared photos from your PC’s Windows Media® Library.
•
See:
Playing your PC’s Shared Media Files
* There are other products on the market that also can share media files using
the UPnP standard.
.
Page 36

TV+
MANUAL
V0.9
USING THE FILE BROWSER > P. 35
4. USING THE FILE BROWSER
The ARCHOS File Browser gives you the possibility to navigate the file
system of your ARCHOS’ hard drive. In the Home screen, select the
“Files” icon to enter the File Browser.
You will see two panels:
The one on the left is the panel that
•
you usually use to navigate through
your device’s hard drive.
The panel on the right is the one
•
you will use when you want to
copy or move files and folders
(see:
Folders
Copying and Moving Files and
).
About your ARCHOS’ hard drive:
DO NOT delete or rename the original folders: “Music”, “Pictures”, “Video”,
Playlists, etc. The icons on the Home screen (“Video, “Music”, “Photo”...) lead
directly to these folders and they may no longer work correctly if the folders
are deleted or renamed.
4.1 NAVIGATION
BUTTON CONTROLS
press once: go back one level in the hierarchy
-
hold: exit the
-
open a file or folder
scroll up the file list faster
File Browser
and go back directly to the Home screen.
left: go back up one level in the folder hierarchy
up/down: scroll the file list up and down
scroll down the file list faster
jump between the left and right panels.
Page 37

TV+
MANUAL
V0.9
USING THE FILE BROWSER > P. 36
display available menu items
increase/decrease volume
Mute sound
BROWSER MENU ITEMS
Note that some of the above menu items may not appear if they are not available for the highlighted file or folder.
“Info”
displays a message box with information about the highlighted file.-
“Create folder”
creates a folder at the current location.
-
you will have to enter the folder’s name with the keyboard (see:
-
Control
).
“File Management”
“Rename”: allows you to change the name of the highlighted file or folder us-
-
ing the keyboard. See:
“
Delete”: allows you to delete the highlighted file or folder (and all its con-
-
tents). A confirmation screen will pop up.
“Copy”
“Copy”: allows you to copy the highlighted file or folder to the location de-
-
fined in the other browser panel.
Copy all files”: allows you to copy all the files of the current folder to the
“
-
location defined in the other browser panel.
The Remote Control
The Remote
.
Move”: allows you to move the highlighted file or folder to the location de-
-
“
fined in the other browser panel.
COPYING AND MOVING FILES AND FOLDERS
•
In the left panel, highlight the file/folder that you want to copy or move.
•
In the right panel, navigate to the location where you wish to copy the file/folder to.
•
Go back to the left panel, select the “Copy” menu item and then choose “Copy”,
“
Copy all files” or “Move”, depending on the action that you want to carry out.
Page 38

TV+
MANUAL
V0.9
USING THE FILE BROWSER > P. 37
4.3 USING THE FILE BROWSER WHILE LISTENING TO MUSIC
You can browse your files while listening to music:
Choose the “ARCHOS home screen” menu item while playing a song.
•
In the Home screen, select the “
•
Files” icon to enter the File Browser and start
browsing through your files.
•
To go back to the Music playback screen, go to the Home screen and select the
“
Music” icon.
4.4 BROWSING OTHER COMPUTERS ON THE NETWORKBROWSING OTHER COMPUTERS ON THE NETWORK
•
When you are connected to a Windows® network, you can browse* the shared
folders of other computers in the network, using the ARCHOS File Browser.
•
From the Home screen, select the “
Files” icon. In the left panel of the browser,
select the first line in the list (“Network”). Your device will connect to your WiFi /
Ethernet access point and then search for other computers in the Windows® network. You can then choose a computer and start browsing its shared folders.
* If the computer with the shared folders normally has a Windows® username
and password, you will be asked to enter these before you can access the
folder contents.
Using the ARCHOS double browser, you will be able to play media files or transfer any
file from a networked computer onto your device. You can also transfer files from your
device onto a computer’s write-enabled shared folder (see
and Folders
If the WiFi / Ethernet is not enabled or if you are not connected to a network,
the device will scan for available networks and connect to a known network or
display the list of available networks so that you can connect to one of them.
).
Copying and Moving Files
Page 39

TV+
MANUAL
V0.9
USING THE FILE BROWSER > P. 38
4.5 USING THE PDF READER
•
Your ARCHOS features a PDF reader with hyperlink support.
•
In the Browser, PDF files are displayed with the
To view a PDF document, highlight the PDF document in the File Browser and
•
icon.
open it.
ATTENTION: The ARCHOS PDF reader may not implement all PDF features.
For example, you will not be able to open password protected PDF files.
PDF BUTTON CONTROLS
1st press: fit to width (if zoomed)
-
nd
2
press: exit PDF reader
-
follow a highlighted link
previous page
navigate within the current page
next page
-
display available menu items
-
-
FOLLOWING HYPERLINKS
Some PDF documents have hyperlinks (for instance, a table of contents, links to
•
an external website, etc.).
Links are surrounded by a blue outline. A highlighted link (active link) is surround-
•
ed by a red outline.
If you want to go back to the previous page (where you ‘clicked’ the link), select
•
Link back” menu item.
the “
Note that hyperlinks referring to an external document or to a URL may not
work.
Page 40

TV+
PDF READER MENU ITEMS
MANUAL
V0.9
USING THE FILE BROWSER > P. 39
“Hide text overlay”
will hide all overlaid graphics (status bar, menu items, etc.) to only show the PDF
-
document.
“Zoom”
allows you to adjust the zoom level.-
“Previous page”
goes to the previous page in the document.-
“Next Page”
goes to the next page in the document.-
“Link back”
will take you back to the page that you came from.
-
only appears when you have previously followed a link.
-
“Go to page...”
-
allows you to select a specific page.
-
use the left/right buttons to select a page number.
-
Select “
Ok” to go to this page.
Page 41

TV+
MANUAL
V0.9
USING THE INTERNET FEATURES > P. 40
5. USING THE INTERNET FEATURES
When connected to a WiFi or Ethernet network, your ARCHOS gives you
the possibility to:
rent or purchase on-line videos/music via the ARCHOS Content
•
Portal. See:
browse the web with the optional Web Browser plug-in, available at
•
www.archos.com. See next section.
play shared media files stored on other computers in your network.
•
See:
Playing your PC’s Shared Media Files
•
The first time you turned on your ARCHOS, the installation wizard helped
you configure the WiFi and Ethernet connection.
The ARCHOS Content Portal
.
.
•
Every time you restart/reboot your ARCHOS, your device will automatically
connect to the last configured network.
•
If you want to change your Network configuration, select the “Settings”
menu item from the Home screen, and choose “Network”. See “Network”
Settings.
5.1 BROWSING THE WEB
In order to browse the web, you will need the Web Browser plug-in, available at www.archos.com. With this Internet browser, specially designed
for your ARCHOS, you will have the possibility to browse websites*, use
web-based e-mailing, download content, etc.
*supports Flash™ content and Javascript. Java virtual machine not supported.
LAUNCHING THE WEB BROWSER
From the Home screen, select the “Web” icon.
If you are already connected to a network, the Web browser will simply open and
•
you can start browsing the Web.
If WiFi / Ethernet is not enabled or if you are not connected to a network, the
•
device will scan for available networks and connect to a known network or display
the list of available networks so that you can connect to one of them.
Please note: not all wireless / Ethernet networks offer access to the Internet.
•
Some WiFi or Ethernet networks only link several computers together, without
any Internet connection.
Page 42

TV+
If the time and date are not correctly set, you might not be able to access certain web pages (See: “Clock” settings). If you choose to set the clock automatically when the ARCHOS connects to a WiFi / Ethernet network, you will need
to select your Country and City/Zone (see: “Language and Region” Settings).
USING THE WEB BROWSER
•
You can use the Web browser to read your Web-based e-mail, view Web sites, and
MANUAL
V0.9
USING THE INTERNET FEATURES > P. 41
download documents from the Internet.
•
The menu overlay will disappear after a few seconds.
The Web browser features ‘tabbed browsing’. You can have several pages opened
•
at the same time. They will appear in the tabs area, in the upper left corner of the
screen. When several pages are open, simply select a tab to access the page that
you want. See next section.
WEB BROWSER BUTTON CONTROLS
See:
The Remote Control
BROWSER MENU ITEMS
.
“Reload” / “Stop”
will stop loading the web page, if it is currently loading.
-
will refresh the current web page, if it has stopped loading.
-
“Navigation”
Forward”: will go to the next page that you browsed.
“
-
“
Back”: will go back to the previous page that you browsed.
-
“Zoom”
changes the way the web page is displayed. Select a zoom mode.
-
Page 43

TV+
MANUAL
V0.9
USING THE INTERNET FEATURES > P. 42
“Go to”
“
-
Enter URL...”: allows you to enter the address of a Web site you’d like to visit.
Enter the address with the keyboard (see:
open the website in the current window, or select “
The Remote Control
Open in new tab” to open it in
). Select “OK” to
a new window.
-
“
Search...”: allows you to search an address in one of the configured search en-
gines. Enter the key words using the keyboard (see:
The Remote Control
). Select
“OK” to open the results in the current window, or select “Open in new tab” to
open them in a new window.
“Favorites”
-
will open the “
them. Select a favorite and use the “
Favorites” manager. Here you can add favorites, rename or delete
Open in new tab” menu item to open the
corresponding web page in a new window.
“Settings”
-
will open the “
Web Browser” settings screen. Here you can decide whether to
accept/ignore popup windows, enable/disable flash content, delete your Internet
history and cookies, etc.
Please note that some Web features requiring special plug-in software or
Active X controls may not work in this special version of the Web Browser.
5.2 PLAYING YOUR PC’S SHARED MEDIA FILES
Streaming one of your PC’s shared videos and displaying it on your TV
When connected to your home WiFi / Ehternet network, your ARCHOS gives you
•
the possibility to watch, directly on your device, shared media files (videos, music
or photos) stored in your PC’s Windows Media® Library.
Page 44

TV+
For this to work, you will need a WiFi /Ethernet connection and Windows Media®
•
MANUAL
V0.9
USING THE INTERNET FEATURES > P. 43
Player 11 or higher installed on your PC*.
This is especially useful when you have a large library of music and video and you
•
cannot fit it all onto the internal hard drive of the ARCHOS.
The ARCHOS uses the UPnP (Universal Plug-and-play) standard to stream shared
•
media files from your PC’s Windows Media® Library.
* If you cannot install Windows Media® Player 11 or higher, it is possible to access and stream your PC’s files from the ARCHOS File Browser. See Browsing
Other Computers on the Network.
SETTING WINDOWS MEDIA
Connect the ARCHOS to your WiFi / Ethernet net-
1.
work. See
Connect your PC to the same WiFi / Ethernet net-
2.
“Network” Settings
®
PLAYER’S SHARING OPTIONS
.
work and start Windows Media® Player, version 11
or higher.
Click on the
3.
ing...
Check the box Share my media to, and click on
4.
OK. The ARCHOS’ icon should appear in the win-
Library tab, and select Media shar-
dow, with a warning symbol next to it*.
* ATTENTION: the first time you set your sharing options, it might take a couple of minutes
for your PC to display the ARCHOS’ icon.
5.
Select the ARCHOS’ icon and click on the Allow button.
6.
To modify your sharing settings, click on
Settings. You can, for example, enter a
name for your shared media files. You will then see this name on your ARCHOS.
Click on
7.
Click on OK to close the Media Sharing window.
8.
You can now close Windows Media® Player, and start viewing your PC’s shared
OK to save the modifications.
media files directly on your ARCHOS (see next section).
Page 45

TV+
PLAYING YOUR SHARED MEDIA FILES ON THE ARCHOS
MANUAL
V0.9
USING THE INTERNET FEATURES > P. 44
Your PC needs to be connected to the same WiFi / Ethernet network as the one the
ARCHOS will connect to. You also need to have configured Windows Media® Player’s
sharing options (see the previous section).
1.
On your ARCHOS, enter the Video, Music or Photo mode.
2.
You will notice that the first item in the list is the shared media files: “
‘UPnP’
”. Open this item to start scanning for devices and computers sharing
Network
their media files on the WiFi / Ethernet network.
3.
If you entered a name for your shared media files in Windows Media® Player, it
should appear. Open it, and you will see all your shared videos, songs or photos.
If you are in the Video mode,
•
you will then have access to all
the videos stored in your PC’s
Windows Media® Library.
In the same way, the Music and
•
Photo modes will allow you
to access all the music/photos
stored in your PC’s Windows
Media® Library.
Note: You may have some video files of very high quality and these require
that the WiFi / Ethernet connection transfers data at a high speed. If your
ARCHOS is far away from your WiFi box, it may happen that the connection
speed is reduced thus not allowing some video files to stream from your PC to
the ARCHOS and the television.
5.3 THE ARCHOS CONTENT PORTAL
The ARCHOS Content Portal is an on-line store that offers several
•
video and music partners. This portal gives you access to video and
music content that is either free, for rent, or for purchase. No need
for your computer, the media streams directly off the Internet into
your ARCHOS.
Page 46

TV+
In order to activate the ARCHOS
1.
MANUAL
V0.9
USING THE INTERNET FEATURES > P. 45
Content portal, you will need to register your ARCHOS product on-line on
the ARCHOS web site (www.archos.
com/register).
Make sure you have configured your
2.
ARCHOS on a WiFi / Ethernet network (see:
Select the ARCHOS “Content Portal” icon to view available on-line media stores
3.
“Network” Settings
).
and purchase videos or songs.
You can also visit the ARCHOS on-line store to purchase accessories.
4.
Depending on your connection speed, you will have the possibility to start
playing the video/song you purchased or rented while it’s being downloaded.
The videos/songs you get from the ARCHOS Content Portal are saved in the
“Video”/“Music” folders.
Page 47

TV+
MANUAL
V0.9
TRANSFERRING FILES > P. 46
6. TRANSFERRING FILES
6.1 CONNECTING THE ARCHOS TO A COMPUTER
You can also copy files from your PC, via a WiFi / Ethernet connection. See:
Browsing Other Computers on the Network.
CONNECTION STEPS
Plug a USB cable (not supplied) into the ARCHOS (USB B port).
1.
Plug the other end of the ARCHOS USB cable into your running computer.
2.
USB B
The ARCHOS’ icon will appear on your computer*. You can now start transferring
4.
files to it.
* If you do not have Windows Media® Player 10 or higher installed on your
computer, the ARCHOS will ask you if you want to charge its battery or connect it as a mass storage device (Hard Drive). Choose to connect it.
Page 48

TV+
PUTTING FILES ONTO THE ARCHOS
MANUAL
V0.9
TRANSFERRING FILES > P. 47
There are two main methods to transfer your computer’s files onto the ARCHOS:
1.
Copy your media files (videos, music, photos) with Windows Media® Player 10 or
higher*:
* For best performance, we recommend that users update to Windows Media®
Player 11 or higher.
The Synchronize button in Windows Media® Player is a one way ‘sync’ button. It will add
video, music and photo files to your ARCHOS. If will give you the possibility to have the same
digital media on your ARCHOS as you have in your Windows Media® Player media library.
Connect your ARCHOS to the computer. See
1.
to a Computer
2.
On your computer, start Windows Media® Player.
3.
Select the Sync tab.
4.
Choose the media files you want to transfer.
5.
Click on the
6.
The selected videos, songs or photos will be copied directly into the
corresponding
.
Start Sync button.
Video, Music or Pictures folder of the ARCHOS.
Connecting the ARCHOS
See your Windows Media® Player help instructions for more information.
The second method is to use Windows® Explorer to copy and paste your files
2.
from your computer to the
You cannot copy files larger that 2 GB to the ARCHOS due to the FAT32 file
system constraints. For advanced users: in “PC Hard Drive” connection
modes (mode 2 and 3), the maximum size is 2 GB for .AVI files and 4 GB for
any other type of file. See: “System” Settings.
Video, Music or Pictures folder of your ARCHOS.
DISCONNECTING
When you disconnect the ARCHOS from a computer, your device automatically updates the ARCLibrary, so that the media files you just copied appear in
the Music and Photo Libraries.
Windows® XP or higher & WMP10 or higher
Verify that no data are being transferred between your ARCHOS and your com-
•
puter (the HDD indicator on your ARCHOS is not flickering).
Now unplug the USB cable from your ARCHOS and/or computer.
•
Page 49

TV+
MANUAL
V0.9
TRANSFERRING FILES > P. 48
Windows® 2000 or Me
DO NOT SIMPLY PULL OUT THE CABLE AT ANY TIME! You must remove/unmount the
ARCHOS from the computer before disconnecting the USB cable to avoid loss of data
or freezing.
Once all your transfers are finished, click on the ‘safely
•
remove’ icon in the system tray, next to the clock.
Click on the ‘safely remove’
•
message.
A message will pop up, telling you that it is
•
now safe to disconnect the device*. You can
now safely unplug the USB cable from your
ARCHOS and/or computer.
* If you get a message saying that the device cannot be removed, close any
computer program that may still be using data on your device, such as media
players or Windows® Explorer.
Mac® OS X
DO NOT SIMPLY PULL OUT THE CABLE AT ANY TIME!
You must remove/unmount the ARCHOS from the
computer before disconnecting the USB cable to avoid
loss of data or freezing.
On your desktop, drag the ARCHOS’ icon towards
•
the trashcan, which will turn into a big eject symbol.
Drop the icon onto this eject symbol: the ARCHOS’
•
hard drive will disappear from the desktop.
You can now safely unplug the USB cable from
•
your ARCHOS and/or computer.
Linux
DO NOT SIMPLY PULL OUT THE CABLE AT
ANY TIME!
You must remove/unmount the ARCHOS from
the computer before disconnecting the USB
cable to avoid loss of data or freezing.
On your computer, right-click on the ARCHOS icon and select Safely Remove.
•
Wait until the ARCHOS icon disappears, and safely unplug the USB cable from
•
your ARCHOS and/or computer.
Page 50

TV+
MANUAL
V0.9
TRANSFERRING FILES > P. 49
6.2 USB HOST CONNECTION
•
The ARCHOS allows you to connect a USB external device, so that you can
transfer files or play content directly on the ARCHOS.
•
These devices can be Mass Storage Class (MSC) or PTP devices.
•
Check your manufacturer’s information to find out whether your device is
an MSC or PTP device. Non Mass Storage Class devices such as printers,
Ethernet adapters, mice, keyboards, etc. are not supported.
Once the ARCHOS is on, connect the external USB device (with a standard USB
1.
cable if needed) into the USB A port.
Turn on the external USB device if needed (check the documentation of your ex-
2.
ternal USB device).
A double browser window will appear on the ARCHOS: the external USB device
3.
will appear in the left panel, and your ARCHOS device’s hard drive in the right
panel.
You can then play files directly on the ARCHOS or transfer them onto it.
4.
USB A
TO DISCONNECT
1.
Make sure that no transfer is being made.
2.
From the File Browser, select the “
3.
You can now pull out the USB cable on either end.
Note: you may not always be able to copy files to your external USB device
from your ARCHOS.
Remove safely” menu item.
Page 51

TV+
MANUAL
V0.9
MAIN SETTINGS > P. 50
7. MAIN SETTINGS
In the Home screen, select the “Settings” menu item and choose a setting.
USING THE BUTTONS
•
To open a settings screen, press the Menu button , use the navigation buttons to
highlight the “Settings” menu item, and press OK.
•
Once you are in a settings screen:
-
use the up/down navigation buttons to highlight a parameter.
-
use the left/right navigation buttons to select a different setting.
-
when you have finished adjusting your settings, press the Exit button
save them and go back to the Home screen.
When it is possible, use the up/down navigation buttons to scroll the screen
-
up and down.
7.1 “SOUND” SETTINGS
This screen allows you to adjust the
sound settings of your ARCHOS to
your personal taste.
to
“Audio Output”
defines whether the audio signal is sent out via the “
-
Analog Line-Out”, “HDMI” or
“SPDIF” interface depending on how you have connected the ARCHOS to your TV.
“Bass Boost Level”
adjusts the bass boosting level.
-
“Preset”
allows you to quickly select a sound profile.
-
“Set Equalizer”
allows you to use a custom sound profile. Select this option to enter the equalizer
-
screen (see next section).
Page 52

TV+
MANUAL
V0.9
MAIN SETTINGS > P. 51
“Balance”
allows you to balance the sound between the left and right stereo channels.
-
“Reset”
resets the sound parameters to the default values.
-
“EQUALIZER” SCREEN
Your ARCHOS features a 5-band
•
equalizer.
Select a band (Bass, Mid. bass, Mid.
•
range, Mid. treble or Treble), then
use the up/down arrows to change
the gain level for these frequency
ranges.
It is advised that you change these
settings while listening to music, in
order to be able to appreciate the
sound changes.
7.2 “TV SETTINGS”
“TV Connection”
select the type of video output (“
-
Composite”, “S-Video”, “Component”, “RGB” or
“HDMI”), based on how you have connected the ARCHOS to your TV.
“TV Standard”
choose between the “
-
NTSC (USA)” and “PAL (Europe)” systems (select the one
that is compatible with your country’s television system).
Page 53

TV+
MANUAL
V0.9
MAIN SETTINGS > P. 52
“TV Format”
4:3” or “16:9” - the format used by your television set to display images.
“
-
the option “
-
parameter to
Wide screen” becomes available when you set the “TV standard”
“PAL (Europe)”.
“Audio Output”
defines whether the audio signal is sent out via the “
-
Analog Line-Out”, “HDMI” or
“SPDIF” interface depending on how you have connected the ARCHOS to your TV.
“Set”
use this button when you have finished adjusting your settings. They will be auto-
-
matically applied and saved.
7.3 “APPEARANCE” SETTINGS
“Picture name”
allows you to select a picture to use as a wallpaper image. Select “
-
None” if you do
not want any background image.
you can choose between all default backgrounds or the images that you have
-
previously set as wallpapers.
you can also set a picture as wallpaper from the Photo and Video modes.
-
“Theme color”
defines the theme color for your icons (and for the background, if you have dis-
-
abled the use of a wallpaper).
“Cancel”
use this button to discard any changes you may have made since entering this
-
screen.
Page 54

TV+
MANUAL
V0.9
MAIN SETTINGS > P. 53
7.4 “NETWORK” SETTINGS“NETWORK” SETTINGS
•
The first time you turned on your ARCHOS, the installation wizard helped
you configure the WiFi and Ethernet connection.
•
Every time you restart/reboot your ARCHOS, it will automatically connect to
the last configured network.
•
This section explains how to change your Network configuration, for example if you want to connect to a different network.
This screen displays your connection status.
•
Select the “
•
work the ARCHOS is currently connected to: IP, security details, etc.
•
You have the possibility to connect to the internet via the WiFi or via an Ethernet
cable.
Network Details” button to view the information concerning the net-
WIFI CONNECTION
When you select the WiFi Connection button, the ARCHOS will scan for available networks. The list of available networks will be displayed.
Once you are connected to a WiFi network, the status bar icon (WiFi not
connected) will become
when WiFi is not enabled.
(WiFi connected). There is no status bar icon at all
The List of Available Networks
The list of available networks shows
•
all the wireless networks in range of
your device.
The list is constantly refreshed au-
•
tomatically.
In the list of available networks, for
•
each network you will see the following information:
Page 55

TV+
MANUAL
V0.9
MAIN SETTINGS > P. 54
Configuration status:
1.
2.
The name of the network (SSID), if it is broadcasted
configured network
(if the SSID is not broad-
unconfigured network
casted, you will be prompted to enter it in the next configuration screen).
3.
The strength of the signal.
4.
The type of encryption key that is required:
Open network (no key) WEP key WPA key WPA2 key
5.
The channel used by the network.
6.
The type of network (Infrastructure or Ad-Hoc).
Ad-Hoc networks are not sup-
ported at this time.
Select the network that you want to connect to (your home wireless network or
•
a free hotspot).
You will be taken to the configuration screen for this network, where you will
•
have to enter some information to set up your access to this network.
WiFi Network Configuration
In order to connect to a wireless network, the ARCHOS will need some specific information about the network. Your device will automatically pick up certain pieces
of information that it needs from the WiFi hot spot. You can enter the rest of the information manually in the network’s configuration screen, as shown in the following
sections.
Note that your device will remember the network connection information that
you enter, in order to re-use it and connect automatically to the network when
it is in range.
Page 56

TV+
MANUAL
Open Networks
Open networks do not require an
•
authentication key.
If the network has automatic con-
•
figuration turned on (DHCP), simply select the “
Connect” button,
and your ARCHOS will connect to
this network, provided the signal is
strong enough.
If the network needs to be config-
•
ured manually, use the left/right arrows to select the “
Manual” setting
on the “Configuration” parameter.
V0.9
MAIN SETTINGS > P. 55
Other parameters will appear: the
•
required information can be obtained from the person who manages the network.
When you have finished entering all the information, select the “Connect” button,
and your ARCHOS will connect to this network, provided the signal is strong enough.
Protected Networks (WEP, WPA or WPA2 KEY
Protected networks require an en-
•
)
cryption key to connect.
The type of key (WEP, WPA or
•
WPA2) will be detected automatically by your device.
The rest of the required information
•
can be obtained from the person
who manages the network.
You will have to specify the following settings:
“Key length” (for WEP networks only)
the authentication key can be 10 characters long (64bit) or 26 characters long
-
(128bit).
Page 57

TV+
MANUAL
V0.9
MAIN SETTINGS > P. 56
“Key format” (for WEP networks only)
in some cases you may need to change the key format in order to enter a pass-
-
phrase/password.
See the documentation that came with your WiFi router or
modem.
“Key” (WEP or WPA)
-
type in the authentication key.
-
you will be taken to a keyboard (see:
-
type in the key and select “
OK” when you have finished.
The Remote Control
).
“Authentication” (for WEP networks only)
-
the network’s authentication method can be based on an “
fault)
” or a “Shared Key”.
Open System (de-
“Configuration”
-
it can be “
-
if it is “
Automatic (DHCP)” or “Manual”.
Automatic (DHCP)”, then you do not have to enter any more information.
Simply use the “Connect” button, and your ARCHOS will connect to this network,
provided the signal is strong enough.
-
if you must configure the network manually, select the “
Manual” setting. Other
parameters will appear: the required information can be obtained from the person
who manages the network.
When you have finished entering all the information, use the “Connect” button, and
your ARCHOS will connect to this network, provided the signal is strong enough.
Filtered networks: If your network manager allows only specific devices to
connect to the network (known as MAC address filtering), you can supply the
network manager with the MAC address of your ARCHOS. To find out what
your MAC address is, select the “Settings” menu item from the Home screen,
then choose “System”. See: “System” Settings.
ETHERNET CONNECTION
•
When you select the Ethernet Connection button (on the “Network Settings” first
screen), the ARCHOS will scan for available networks. The list of available networks will be displayed.
•
The procedure is the same as for a WiFi open network. See WiFi Connection.
Page 58

TV+
MANUAL
V0.9
MAIN SETTINGS > P. 57
7.5 “LANGUAGE AND REGION” SETTINGS
“Language”
choose a language.
-
visit www.archos.com to check the availability of other languages. New lan-
-
guages are included in the firmware as they become available. See
Firmware
.
Updating the
“Select location”
if your clock is set to “Automatic” (see
-
“Clock” Settings
), select your “Country”,
and “City/Zone”.
“WiFi Region”
this is configured automatically according to how you set your location.
-
7.6 “TV CONTROL” SETTINGS
This is where you can set the ARCHOS’ IR emitter to communicate with your tun-
•
er. This will allow you to schedule recordings easily via the ARCHOS TV Program
Guide (EPG).
See
•
Scheduling TV Recordings.
Page 59

TV+
MANUAL
V0.9
MAIN SETTINGS > P. 58
7.7 “CLOCK” SETTINGS
If you use the ARCHOS to schedule video recordings on your TV system,
make sure that the time and date are set correctly!
“Time Format”
-
choose between 12h or 24h mode.
“Time setting”
Automatic”: select this parameter if you want to set the clock automatically
-
“
when your ARCHOS is connected to a WiFi / Ethernet network. You will need
to select your location in the “Language and Region” settings screen (see:
“Language and Region” Settings
“
-
Manual”: select this parameter to set the current date & time manually. The fol-
).
lowing parameters will appear: “Hour”, “Minute”, “Year”, “Month” and “Day”.
“Synchronize now”
-
if the “Time setting” parameter is set to “Automatic”, use this button to set the
clock automatically via a WiFi / Ethernet network.
-
for this to work, the ARCHOS needs to be connected to a WiFi / Ethernet network.
ATTENTION: If the time & date are not correctly set, you might not be able to
access certain web pages.
“Hour”, “Minute”, “Year”, “Month”, “Day”
these parameters allow you to set the current time and date manually.
-
Page 60

TV+
MANUAL
V0.9
MAIN SETTINGS > P. 59
7.8 “POWER” SETTINGS
Your ARCHOS will consume more power as these parameters are set to higher
values.
“Standby”
the amount of time of user inactivity before the ARCHOS goes into Standby mode.
-
the system will not go into Standby mode during a slideshow, audio/video play-
-
back, audio/video recording, or USB connection.
“Web Browser”
“
-
Normal Stanby”: while browsing the web, the ARCHOS will go into Standby
mode according to the setting selected for the “Standby” parameter.
-
Prevents Standby”: while browsing the web, the system will never go into
“
Standby mode.
7.9 “FIRMWARE AND PLUG-INS” SETTINGS
“Firmware Ver.”
-
displays the current version of the firmware and Digital Rights Management
(DRM) system.
Page 61

TV+
MANUAL
V0.9
MAIN SETTINGS > P. 60
“Plug-ins”
-
displays the current plug-ins installed on your device.
“Product Key”
-
each ARCHOS has a unique number.
you will need this number to register your product online (www.archos.com/register).
-
“Firmware Update”
use this button to update the firmware manually (see:
-
Updating the Firmware)
“Online Firmware Update”
use this button to search for an online update via a WiFi / Ethernet network. If there
-
is one available, it will be installed automatically. See
Updating the Firmware
to learn
more.
7.10 UPDATING THE FIRMWARE
The firmware is the operating system (OS) of your ARCHOS. It is periodically updated
to bring new features, improvements and bug fixes. There are two main ways to update your product’s firmware:
Directly on your ARCHOS via a WiFi / Ethernet network.
•
Using a computer connected to the internet
•
(
UPDATE DIRECTLY ON THE ARCHOS
WIFI / ETHERNET CONNECTION NEEDED
This is the easiest way to update the firmware. For this to work, you only need an access to a WiFi / Ethernet network. See
From to the Home screen, select the “
1.
“Network” Settings
Settings” menu item, and choose
.
“Firmware and Plug-ins”.
Use the “
2.
The ARCHOS will search on-line for a new firmware. If there is one available, it will
3.
Online Firmware Update” button.
start downloading, and it will be installed automatically.
UPDATE USING A COMPUTER
(
INTERNET CONNECTION NEEDED
)
If you cannot connect your ARCHOS to a WiFi / Ethernet network, you can also update the firmware using a computer connected to the internet.
See Transferring Files to learn how to copy the new firmware to your ARCHOS.
)
On your PC, go to www.archos.com/firmware.
1.
Page 62

TV+
Search for the latest firmware available for your ARCHOS.
2.
Compare the latest on-line version with the one installed on your ARCHOS: your
3.
ARCHOS’ firmware version number appears in the “
tings screen (see:
If the on-line version is more recent than yours, follow the instructions to down-
4.
MANUAL
V0.9
“Firmware and Plug-ins” Settings
MAIN SETTINGS > P. 61
Firmware and Plug-ins” set-
).
load and install the new firmware.
Your Internet browser may warn you that the contents of the firmware file
could harm your computer. ARCHOS has taken precautions to insure that this
file will not harm your computer.
7.11 “SYSTEM” SETTINGS“SYSTEM” SETTINGS
“Free Storage Space”
displays the amount of free space on the hard drive.
-
Note: reported number of megabytes is binary-based counting (1Kb=1024
bytes). Thus each reported Mb represents approximately 1.05 megabytes
(decimal), and each reported Gb represents approximately 1.07 gigabytes.
Formatting also takes up space.
“USB preference” (for advanced users)
Your preferred connection mode will be used every time you connect the
-
ARCHOS to a computer. The connection mode determines how your device interacts with your computer:
Mode 1: “
-
Windows Media Device”: Recommended for users of
Player (WMP) version 10 or higher
. When set to this mode, the ARCHOS uses the
Windows Media®
Media Transfer Protocol (MTP). It allows you to charge your ARCHOS and transfer
files onto it at the same time.
in Windows® Explorer.
You will be able to synchronize your media library auto-
Your ARCHOS will be locked only when it is opened
matically every time you connect your ARCHOS to your computer. When your
file transfer is finished, simply unplug the cable from the ARCHOS, and your device will update the ARCLibrary (Music/Photo libraries).
Page 63

TV+
Mode 2: “PC Hard Drive”: Recommended for users of Windows® XP with Windows
-
MANUAL
V0.9
MAIN SETTINGS > P. 62
Media® Player 9, Windows® 2000, Me, Mac® OS X or Linux. When connected to
your computer, your ARCHOS will be locked. Disconnection: when the file transfer
is over, safely unmount the ARCHOS (See:
Disconnecting
) and your device will do a
quick ARCLibrary update (Music/Photo libraries). May not index all files.
Mode 3: “PC Hard Drive (auto-ARCLib)”: Same as mode 2, but with a full
-
ARCLibrary update (Music/Photo libraries) at disconnection.
“Update ARCLibrary”
Available only when “
-
This USB mode only does a quick ARCLibrary update (Music/Photo libraries). Use
-
Update ARCLibrary” button if you want to do a full ARCLibrary update.
the “
USB Preference” is set to “PC Hard Drive” (mode 2).
“Product Key”
each ARCHOS has a unique number.
-
you will need this number to register your product online (www.archos.com/register).
-
“MAC addresses”
some WiFi / Ethernet networks filter MAC addresses. You might need to commu-
-
nicate this address to the person who manages the network.
“Repair and Formatting Tools”
use this button to access the “
-
Repair and Formatting Tools” settings screen. This
screen allows you to do the following actions:
Clear temporary system files and cache” (does not erase any data)
“
-
“Reset Settings” (resets all user settings)
-
“Format Hard Drive / Internal memory” (erase all data, media files, and licenses)
-
“
Full Reinitialization” (erase all data, media files, licenses and settings)
-
In the event that your ARCHOS freezes or does not respond anymore, try to
reset it (see: Troubleshooting).
If this does not work or if you cannot access the Repair and Formatting Tools,
you can try a system recovery (see: Troubleshooting).
Page 64

TV+
MANUAL
V0.9
SCHEDULING A TV RECORDING > P. 63
8. SCHEDULING A TV RECORDING
When connected to your home tuner (cable box, satellite receiver, digital tuner, DSL box or VCR), you will be able to schedule recordings easily
via the ARCHOS TV Program Guide (EPG).
8.1 HARDWARE SETUP
CONNECTION PRINCIPLES
The ARCHOS is a ‘pass-through’ device. This means that when it is off or when
•
you press the TV button, it simply passes the audio and video signals (DVD,
Television, etc.) through the ARCHOS to your television.
What this means is that you will place the ARCHOS ‘between’ your television
•
reception device (Cable box, satellite receiver, Digital TV receiver, etc.) and your
television. See
When connecting cables between devices, always remember that the
•
Diagram B on the Connection Guide.
OUT con-
nectors of one device must be connected by cables to the IN connectors of the
next device. You can think of it as the signals traveling out of one device into the
next device. Finally, make sure that you always match the color of the connector
with the color of the jack it is being plugged into.
CONNECTING A TUNER TO YOUR ARCHOS
This shows the basic connection setup of a television source (tuner), the ARCHOS, and
your TV.
Your tuner needs to be connected to your home antenna/satellite/cable.
1.
Connect your tuner’s TV outputs to the ARCHOS’ inputs.
2.
Connect the ARCHOS’ outputs to your TV’s inputs.
3.
You can also connect your DVD player (output) either to your TV (if it has secondary input connector) or to your tuner (if it has an input connector).
If you can still watch TV when the ARCHOS is off, it means that you have cor-
rectly connected the ARCHOS as a pass-through device.
If you cannot watch TV anymore, this means that there is an incorrect connec-
tion. Check the previous connections steps carefully.
Page 65

TV+
ARCHOS PASS-THROUGH TABLE
MANUAL
V0.9
SCHEDULING A TV RECORDING > P. 64
The ARCHOS will pass through the following video signals when it is iff, or when your
press the TV button on the remote control.
Video input Video Output Pass-through
Composite
yellow connector or supplied scart
(Europe)
Composite
yellow connector or supplied scart
(Europe)
Composite
yellow connector or supplied scart
(Europe)
S-Video
or S-Video on supplied scart
(Europe)
S-Video
or S-Video on supplied scart
(Europe)
Composite
Yes
yellow connector
No
S-Video
will only show black & white image
RGB
No
(PR/R, PB/B, Y/G)
S-Video Yes
Composite
yellow connector
No
will only show black & white image
S-Video
or S-Video on supplied scart
(Europe)
Note: you can use the ARCHOSs RGB output connectors in order to get the
best image quality from the ARCHOS to the television, but it will not pass
through any input video source signal.
RGB
No
(PR/R, PB/B, Y/G)
Notes for North America:
Although your ARCHOS has connectors for composite video (yellow), you can also
use S-Video cables (not supplied) in order that you get the best possible quality video
recording.
Notes for Europe:
To get the best recording quality from your TV or other tuner devices, ARCHOS recommends that you record from an S-Video signal. You may be able to do this by setting
the scart connector on the back of your tuner (satellite receiver, Digital TV Adapter, VCR,
etc.) to send out an S-Video signal. Check the manual of the device to see if this can be
set. If the device can be set to exit an S-Video signal through the scart connection, then
you should set your television as well to expect an S-Video signal (sometimes called
‘Y/C’) from its scart connector. See your television’s manual on how to do this. Make
Page 66

TV+
MANUAL
V0.9
SCHEDULING A TV RECORDING > P. 65
sure to set your ARCHOS to send out an S-Video signal as well (“Menu” > “Settings” >
“Display” > “TV Connection” > “S-Video”).
8.2 SCHEDULING TV RECORDINGS
With the ARCHOS TV Program Guide (EPG), you will be able to schedule
recordings easily. You have a one year free subscription to the TV Program
Guide.
WHAT’S REQUIRED TO USE THIS FUNCTION?
•
In order to use this functionality, you will need to connect the powered ARCHOS
to a tuner, which can be either:
-
a satellite receiver
-
a Digital TV receiver
-
a cable/DSL box
-
a VCR
-
a DVD Recorder
•
See
Diagram
B on the Connection Guide, and the
Hardware Setup
section of this
manual.
You tuner will need to be connected to your home antenna/satellite/cable.
ACTIVATING THE TV PROGRAM GUIDE ONLINE
After having set the ARCHOS to your home television system, you will need to activate the TV Program Guide (EPG) online. This is a one-time operation.
Go to www.archos.com/register
1.
Access your ARCHOS account (or create one if you don’t have one yet) and regis-
2.
ter your ARCHOS. If you have already registered your ARCHOS, find the line that
Page 67

TV+
MANUAL
V0.9
SCHEDULING A TV RECORDING > P. 66
matches your product and click on More... (on the right).
Follow the instructions on screen to activate the TV Program Guide.
3.
8.3 TRANSFERRING THE PROGRAM DATA TO THE ARCHOS
Once you have activated the TV Program Guide online, you now need to transfer its
data onto your ARCHOS. In order to do that, your ARCHOS needs to be connected to
the internet.
First time Procedure
1.
Turn on your ARCHOS device.
2.
From the Home screen, select the “
Select the “
3.
Settings” menu item, and choose how many days of TV programs you
Recorder” icon.
want (“Number of Days” parameter).
Select the “
4.
Update” menu item. Your ARCHOS will automatically connect to a
configured network.
If your ARCHOS finds a configured WiFi network and if you have correctly acti-
vated the TV Program Guide online, the TV Program data will start updating automatically. This operation can take several minutes, according to the number of
days of Program Guide information that you chose.
Do not try to operate the device while it is downloading TV Program information.
Updating the TV Program Guide periodically
Every time you transfer the TV Program Guide information to the ARCHOS, your
•
device will memorize all the TV Programs within a certain period of time.
Remember to update the data periodically, according to how you configured the
•
TV Program Guide update (“
You also have the possibility to let the ARCHOS automatically update the TV
•
Settings” menu item).
Program Guide information at night:
Select the “
-
Night
If your ARCHOS finds a configured WiFi / Ethernet network, the data will
” or “Every three Nights”.
Settings” menu item and set the “Update” parameter to “Every
be updated automatically during the night. Thus you must leave your WiFi /
Ethernet connection powered throughout the night.
Page 68

TV+
CONFIGURING THE TV CONTROL SETTINGS
From the ARCHOS Home Screen,
•
MANUAL
V0.9
select the “Settings” menu item,
and choose “TV Control” to display
the “TV Control” settings screen.
This settings screen allows you to
•
set the ARCHOS’ IR emitter as well
as configure the channel list.
Verifying the Channel List
SCHEDULING A TV RECORDING > P. 67
1.
From the “TV Control” screen, select “Set TV Channel List”.
2.
Verify that the channel list on the ARCHOS is the same as on your tuner.
3.
Here you can deselect/select a channel or change the number of a channel.
Setting the IR Emitter
•
The ARCHOS has a high-powered infrared LED, located on the front of the device,
at the same place as the infrared receiver (see:
It allows your ARCHOS device to communicate with your tuner (VCR, cable
•
Using the Remote Control
).
box, satellite receiver or Digital TV receiver), so that it can turn it on and off, and
change channels on it.
This is a one time step to set your ARCHOS device to send the correct infrared
•
codes to control your tuner. If you do not plan on making scheduled recordings,
then you do not need to set the infrared emitter code.
1st Test: turning your tuner off
From the “
1.
TV Control” screen, select “Set Infrared Emitter”. This first screen al-
lows you to correctly set the codes and parameters so that the ARCHOS can turn
your tuner on/off automatically (for a scheduled recording).
Page 69

TV+
“TV Receiver”: select the type of tuner that you want to control with the IR
2.
MANUAL
V0.9
SCHEDULING A TV RECORDING > P. 68
Emitter (“VCR”, “Cable/DSL box”, “Satellite Receiver”, “DVD Recorder” or
“Digital TV”).
“
3.
Receiver brand”: choose the brand of your tuner. You can use the buttons
on the remote control to scroll the list faster.
4.
Select the “
Test power Off code” button. Make sure that your tuner is on. Your
ARCHOS device will then try to turn your tuner off. After a few seconds, your
ARCHOS will ask you if the device responded correctly:
If your tuner turned off, select “
If your tuner did not turn off, select “
Yes”, and move on to the next section.
No, try next code”. Your device will try turn-
ing the tuner off again, using a different code. Repeat this operation until the
ARCHOS manages to turn the tuner off.
If none of the codes work, check that the ARCHOS is positioned in a way that
allows the infrared signal to reach your tuner’s receiver. Note: In some rare
cases the ON/OFF functionality may not work.
2nd Test: changing channels on your tuner
After you select “Yes” at the end of the 1st test, the following screen appears. It allows
you to correctly set the parameters so that the ARCHOS can change channels on your
tuner (for a scheduled recording).
Page 70

TV+
For the “Channel” parameter, select the highest channel that is currently memo-
1.
MANUAL
V0.9
SCHEDULING A TV RECORDING > P. 69
rized on your tuner.
Select the “
2.
Test channel select” button. Make sure that your tuner is on. Your
ARCHOS device will then attempt to switch your tuner to the selected channel.
After a few seconds, your ARCHOS will ask you if the device responded correctly:
If this worked, select “
If this did not work, select “
Yes”.
No, try next option”. Your device will try again to
switch your tuner to the selected channel, using a different option*. Repeat this
operation until it works.
*Here is a description of the different parameters automatically set by the ARCHOS:
-
“Key Delay”:
Long
“
-
“Key: Enter”:
mote control after you enter the channel number. Example: If you normally press 1, 3, “
to access channel 13, then this parameter is set to “
-
“Key: -/--”:
control before entering a channel with several digit numbers (that is to say a channel greater than 9). This key is often represented with this symbol: “-/--”.
”).
delay between the emission of each digit of a channel (“
Set to “On” if normally, you have to press an “OK” button on your turner’s re-
On
”.
Set to “On” if normally, you need to press a special key on your tuner’s remote
Short
”, “
Normal
”,
OK
”
“Switches on with”:
-
“Time until video”:
-
After you selected “Yes” at the end of the 2nd step, the following screen appears.
3.
see below.
see below.
You will have to set these two parameters:
“Switches on with”: this depends on what key you normally press, on your
-
tuner’s remote control, to turn it on. If you normally press the “Power” key,
select “Power”. If you can press any channel key, then select “Any channel”. If
you can press any key, select “Any key”.
“
-
Time until video”: select the amount of time it normally takes between the
moment you turn on your tuner, and the moment the image appears on your
TV (“0...10 seconds”, “10...30 seconds”, “>30 seconds”).
Page 71

TV+
4.
When you have finished, select “Done”, and a confirmation message will appear.
MANUAL
V0.9
SCHEDULING A TV RECORDING > P. 70
Select “OK”.
SCHEDULING YOUR RECORDING
In the Home screen, select the “Recorder” icon to display the ARCHOS TV
1.
Program Guide.
This screen’s menu items will allow you to choose a different day, update the
2.
Program Guide data, or change various settings (program guide update and channel list configuration).
Navigate through the different TV programs, and simply select the one you wish
3.
to record.
A new window will appear with a description of the TV program. Select “
4.
You will go back to the TV Program Guide and a ‘
5.
REC’ icon will now appear next
Record”.
to the TV Program you selected.
THE MANUAL “TV SCHEDULER”
From the ARCHOS Home Screen,
•
select the “
Recorder” icon, and
switch to the “TV Scheduler” tab
button).
(
This screen allows you to view and
•
edit your scheduled recordings. It
also allows you to schedule recordings manually, if you are not using
the TV Program Guide.
Here you can schedule a new recording or edit an existing one: you can remove it,
•
edit its title, change the time, date, channel, etc. You also have the possibility to
Page 72

TV+
MANUAL
V0.9
SCHEDULING A TV RECORDING > P. 71
add a safety margin to the beginning/end of the scheduled recording. To set this
parameter, use the “Settings” menu item.
NOTES ABOUT THE SCHEDULER
The scheduler automatically reorganizes the recording events chronologically.
•
In order for a scheduled recording to start, you must leave the ARCHOS device on
•
the home menu screen or leave it in stand-by mode. If you are listening to music,
watching a video or looking at photos with the device, it will not interrupt you to
make the scheduled recording.
Once the scheduled recording has been made, or the date of a recording has been
•
passed without the recording having been made, the schedule entry will be erased
from the scheduler.
Page 73

TV+
MANUAL
V0.9
OTHER RECORDING FUNCTIONS > P. 72
9. OTHER RECORDING FUNCTIONS
9.1 RECORDING AUDIO MANUALLY
With the ARCHOS, you have the possibility to record audio from most
any standard audio source (hi-fi, turntable, boombox, etc).
RECORDING PROCEDURE
Connect your audio source’s outputs to the ARCHOS’ inputs.
1.
In the Home screen, select the “
2.
Recorder” icon and use the tabs ( button) to
access the “Video Recorder” mode. Then select the “Audio Recorder” menu
item.
3.
This screen will allow you to adjust the recording sound gain (left/right arrows) as
well as configure other recording parameters
You can now tell the ARCHOS to start recording from the audio source (“
4.
Recording
” menu item, or OK button). You can pause and resume your recording
(see next section)
.
Start
at any time.
Close the screen
5.
* All audio recordings made by your ARCHOS device are saved in the Music/
(Rec) folder. If you wish to keep them in a different location, you can use the
“Move” function of the ARCHOS file browser after recording.
“AUDIO RECORDER” SETTINGS
to stop and save the recording*.
To access the “Audio Recorder” settings screen, select the “Settings” menu item:
“Set Title”:
-
“Format”:
-
WAV format.
-
“Sampling”:
quality but a larger file).
Be careful that the audio source is supplying a line-level and not an amplified signal (turning down the volume of the player will work if you are using
the headphone out signal of your audio device). A signal that is amplified too
much will result in a terribly distorted recording.
allows you to give a personalized title to the recording, using the keyboard.
you can choose between “
choose the sample rate for your recording (a higher rate gives higher sound
PCM
” (uncompressed) and “
ADPCM
” (compressed)
Page 74

TV+
MANUAL
V0.9
OTHER RECORDING FUNCTIONS > P. 73
9.2 RECORDING VIDEO MANUALLY
With the ARCHOS, you will be able to record video from most any standard video source.
RECORDING PROCEDURE
Connect your video source’s outputs to the ARCHOS’ inputs.
1.
In the Home screen, select the “
2.
Recorder” icon and use the tabs ( button) to
access the “Video Recorder” mode.
This screen will allow you to adjust the recording sound gain (left/right arrows) as
3.
well as configure other recording parameters
You can now tell the ARCHOS to start recording from the video source (“
4.
Recording
” menu item, or OK button). You can pause and resume your recording
(see next section)
.
Start
at any time.
Close the screen
5.
* All video recordings made by your ARCHOS device are saved in the Video/
(Rec) folder. If you wish to keep them in a different location, you can use the
“Move” function of the ARCHOS file browser after recording.
“VIDEO RECORDER” SETTINGS
to stop and save the recording*.
To access the “Video recorder” settings screen, select the “Settings” menu item:
“Auto Stop Rec”:
-
cording. If you disable this function, the recording will continue until you press
entire hard drive fills up.
“Rename”:
-
board.
“Source”:
-
“
you can set it to “
video.
“Format”:
-
ARCHOS device will record. You can set this manually, but in most cases you can just leave it
on “
“Widescreen”:
-
video signal in widescreen, you can force the ARCHOS to recognize this signal. This should be
set to “
can just leave it on “
Component
Auto
On
allows you to define the filename before the recording begins, using the key-
you can choose which video input (“
”/“
“
Auto
”.
” if recordings show people that look unusually tall and thin. But in most cases you
the duration of time after which the ARCHOS will automatically stop re-
or until the
Auto
”/“
Composite
RGB
”) you want the ARCHOS to use. Normally, with a good video signal,
Auto
” and your ARCHOS will scan its inputs to see which one is receiving
”/“
4:3
”/“
5:3
”/“
16:9
”/“
2.35
”. This is the aspect ratio of the screen that the
“
Auto
”/“On”/“
Auto
Off
”. If your tuner (cable box, satellite receiver, etc.) outputs a
”.
”/“
S-Video
”/“
Scart
”/
Page 75

TV+
MANUAL
V0.9
OTHER RECORDING FUNCTIONS > P. 74
“Bitrate”:
-
quality. The higher the encoding rate, the higher the image quality but also more hard drive
space will be used.
-
“Sampling”:
quality sound but will take up more space on the hard drive.
-
“Brightness”:
-
“Contrast”:
-
“Saturation”:
-
“Hue”:
-
“Reset”:
COPY PROTECTION
•
The ARCHOS recording system is designed to respect the Macrovision™ copyright
500kb/s, 1000kb/s, 1500kb/s, 2000kb/s, 2500kb/s
32kHz, 48kHz
adjusts the recorded image brightness.
adjusts the recorded image contrast.
use this to de-emphasize or saturate the colors in the recorded image.
changes the color spectrum in the recorded image.
changes the above settings to the default values.
. This is the sound sampling rate. The higher value gives a higher
. Use this to set the encoding
protection system. If the source of your video is copy-protected, the device will
record in protected mode. You will see a ‘P’ icon on the recording screen (not during playback), indicating that the file will be a protected file.
•
Protected files can only be played back on the ARCHOS that created them, and not
on a computer. The playback of protected files is also limited to the HDMI video
output. It cannot be displayed on a television using any other video output type.
9.3 EDITING YOUR RECORDINGS
•
Video files recorded with the ARCHOS can be edited by deleting the sections you
do not wish included. The editing you can do is either cropping or cutting of particular segments of the video file.
•
You will mark a segment of your video file, and then you will tell the ARCHOS to
delete everything except the marked segment or to delete the marked segment
from the video file. These operations can be done multiple times on the same
video file.
•
Once finished, you will have the option to save the edit marks with the video or
to write a new video file. If you save your file with edit marks, you can always go
back and change your edits at another time. The actual video information is not
deleted. On the other hand, you can write a new file which will only include the
video parts that you specified in the edit session. This file will be smaller but you
can never un-edit it.
EXAMPLE 1
You have recorded a music video program and would like to keep one single music
presentation. But you do not want to keep the rest of the television recording.
Page 76

TV+
MANUAL
V0.9
OTHER RECORDING FUNCTIONS > P. 75
Beginning of recording Video section to keep
Open the video file you want to edit and pause it.
1.
In the progression bar, go to the beginning of the desired section (a), select the
2.
“
Insert a mark” menu item, and choose “Start Mark”.
3.
Forward to the end of the desired section (b), select the “
Insert a mark” menu
End of recording
item, and choose “End Mark”.
4.
Select the “Edit Selection” menu item and choose “Crop”, which will delete
everything except the designated section.
EXAMPLE 2
You have recorded a television program but would like to remove certain sections
before the program started, parts during the program, and the program afterwards
because you had recorded a little extra.
1.
Open the video file you want to edit and pause it.
2.
In the progression bar, go to the beginning of the first undesired section (a), select
the “
Insert a mark” menu item, and choose “Start Mark”. Forward to the end
of the first undesired section (b), select the “
choose “
End Mark”. Select the “Edit Selection” menu item and choose “Cut”,
Insert a mark” menu item, and
which will cut out this part of the recording.
3.
Go to the beginning of the second undesired section (c), select the “
mark
” menu item, and choose “Start Mark”. Forward to the end of the second
Insert a
undesired section (d), select the “Insert a mark” menu item, and choose “End
Mark
”. Select the “Edit Selection” menu item and choose “Cut”, which will cut
out this section.
4.
Do the same for the other section(s) that you want to cut out.
•
If you want to keep the edit points and be able to re-edit another time, select
the “Save edit” menu item, and choose “Save”.
•
If you want to save the edited file as a new individual file, select the “Save
edit”
will pop up.
menu item, and choose “Write to new File”. A confirmation screen
•
If you want to cancel the edit points and restart editing, choose the “Cancel
changes and restart edit”
menu item.
Page 77

TV+
MANUAL
V0.9
TROUBLESHOOTING > P. 76
TROUBLESHOOTING
RESETTING YOUR ARCHOS
In the event that your ARCHOS freezes or does not respond anymore, try to reset it:
press the reset button on the back of the device and your ARCHOS will reboot.
Note: Resetting your ARCHOS will not erase any data from your device.
However some settings will be reset to their factory defaults.
SYSTEM RECOVERY
If your ARCHOS does not respond correctly, or does not show certain songs or
•
videos that you have copied to it, try using the “Repair and Formatting Tools”
(see:
If using the “
•
try a system recovery. It allows you to repair the hard drive, format it, etc.
Reboot your device (reset button).
1.
Immediately press and hold the
2.
Recovery mode starts (white screen).
System Settings
Repair and Formatting Tools” did not solve your problem, you can
).
TV button on the remote control until the
The system recovery mode gives you several options:
“No”
cancels the system recovery.
-
“Repair Disk”
attempts to repair the file structure on the hard drive.
-
does not erase any data.
-
Page 78

TV+
MANUAL
V0.9
TROUBLESHOOTING > P. 77
“Format Disk”
-
formats the hard drive.
-
all data (music, photos, videos, etc.), licenses and settings are erased.
REPAIR AND FORMATTING TOOLS
-
to access the “
Repair and Formatting Tools” settings screen: from the Home
screen, select the “Settings” menu item, choose “System”, then use the “Repair
and Formatting Tools
-
“
Clear temporary system files and cache” (does not erase any data)
-
“Reset Settings” (resets all user settings)
-
“Format Hard Drive / Internal memory” (erase all data, media files, and licenses)
-
“Full Reinitialization” (erase all data, media files, licenses and settings)
In the event that your ARCHOS freezes or does not respond anymore, try to
reset it (see: Resetting your ARCHOS).
If this does not work or if you cannot access the Repair and Formatting Tools,
you can try a system recovery (see: System Recovery).
” button. This screen allows you to do the following actions:
Page 79

TV+
MANUAL
V0.9
TECHNICAL SPECIFICATIONS > P. 78
TECHNICAL SPECIFICATIONS
CAPACITY
•
See packaging
VIDEO PLAYBACK**
MPEG-4
•
WMV (MP@ML, up to DVD resolution)
•
With optional software plug-ins (available on www.archos.com):
•
Podcast plug-in: H.264 up to DVD resolution and AAC sound.
-
Cinema Plug-in: MPEG-2 MP@ML up to 10 Mbps (up to DVD resolution) and
-
(4)
AC3 stereo sound.
.
(ASP@L5 AVI, up to DVD resolution)
AUDIO PLAYBACK**
Stereo MP3 decoding @ 30-320 Kbits/s CBR & VBR, WMA, Protected WMA, WAV
•
(PCM/ADPCM).
With optional software plug-ins (available on www.archos.com):
•
(5)
AAC
-
AC3 stereo audio files
-
PHOTO VIEWER***
JPEG, BMP, PNG
•
PDF VIEWER
Reads PDF documents (may not implement all PDF features)
•
VIDEO RECORDING
Records NTSC/PAL/SECAM to MPEG-4 SP files with ADPCM stereo sound, VGA
•
stereo audio files
(6)
resolution (640 x 480)@ 30 or 25 f/s, in AVI format.
AUDIO RECORDING
In WAV (IMA ADPCM or PCM) format.
•
INTERFACES
USB 2.0 High-Speed Device (compatible USB 1.1): Mass Storage Class (MSC) and
•
Media Transport Protocol (MTP).
USB 2.0 Host : Mass Storage Class (MSC) and Picture Transfer Protocol (PTP)
•
Page 80

TV+
CONNECTIONS
WiFi (802.11g) connection. Optional Web Browser plug-ins for web browsing
•
MANUAL
V0.9
TECHNICAL SPECIFICATIONS > P. 79
(available on www.archos.com)
INPUTS :
•
Audio: stereo analog
-
Video: composite, S-video, RGB, YPbPr (component)
-
Miscellaneous: Ethernet, USB slave (USB B), USB host ( USB A), infrared receptor
-
for remote control, and DC-in
OUTPUTS:
•
Audio: stereo analog, SPDIF (RCA type)
-
Video: composite, S-video, RGB, YPbPr, and HDMI
-
Miscellaneous: infrared emitter, AV Switch
-
POWER SOURCE
External: Power supply
•
SCALABILITY
Device automatically downloads latest firmware updates
•
PACKAGE INCLUDES
For North America: remote control, power supply (US plug), 2 audio RCA/RCA
•
cables, 2 x S-Video cables, User guide, Connection sheet, Legal and safety notice,
warranty sheet
For Europe: remote control, power supply (EU/UK plugs), 6 RCA/SCART Out cable,
•
6 RCA + jack/SCART In cable, User guide, Connection sheet, Legal and safety no-
tice, warranty sheet
* Certain bitrates, resolutions, and/or file variations may not be compatible.
** Certain resolutions and file sizes may not be compatible.
(4)
MPEG-4 ASP@L5 AVI (MPEG-4: ISO standard by Moving Picture Experts Group; AVI:
audio/video file container by Microsoft) without GMC and Quarter Pixel and WMV (including protected WMV).
(5)
Does not read AAC protected files.
(6)
Macrovision®-protected files can only be played back on the ARCHOS that created
them, and not on a computer. The playback of protected files is also limited to the HDMI
video output. It cannot be displayed on a television using any other video output type.
Page 81

TV+
MANUAL
V0.9
TECHNICAL SUPPORT INFORMATION > P. 80
TECHNICAL SUPPORT INFORMATION
Need Help? You can find the information you need:
On our Website: see the frequently asked questions section on
•
www.archos.com/faq
By asking our technical support team: visit www.archos.com/support for e-mail
•
support.
•
U.S. & Canada: Call 877-300-8879 (toll free).
All brands and product names are registered trademarks and the property of their respective owners. Windows Media® and Windows® are trademarks or registered trademarks
of Microsoft Corporation in the United States and/or other countries. Specifications
are subject to change without notice. Errors or omissions excepted. Images and illustrations may not always match contents. All the information contained in this guide
was correct at the time of publication.
COPYRIGHT ARCHOS © 2007. All rights reserved.
 Loading...