

Page 1

1
English
Table of contents
For more information, please consult the FAQs on www.archos.com.
Make sure to read them before considering any product return. As we
are often updating and improving our products, your device’s software
may have a slightly dierent appearance or modied functionality than
presented in this Quick Start Guide.
2
3
6
10
12
14
16
Consult the declaration of conformity on http://www.archos.com/gb-en/
support/support_tech/downloads.html
Package contents..........................................................................................................
Description of the phone...........................................................................................
Getting started...............................................................................................................
Mobile data & WiFi connection.................................................................................
Google account & Contacts........................................................................................
Hints & tips with AndroidTM........................................................................................
Troubleshooting.............................................................................................................
ARCHOS 50E Helium book.indd 1 26/08/2015 14:29:32
Page 2

2
Package Contents
Check your product box for the following items:
- ARCHOS 50E Helium
- Battery
- Headset
- USB cable
- Charger
- Quick start guide
- Warranty Legal & Safety notices
The items supplied with your device and available accessories may vary
depending on your region or service provider.
The supplied items are designed only for your device and may not be
compatible with other devices.
Unapproved accessories may cause your device to malfunction.
ARCHOS 50E Helium book.indd 2 26/08/2015 14:29:32
Page 3
9
3
3
5
4
1 2
86
7
English
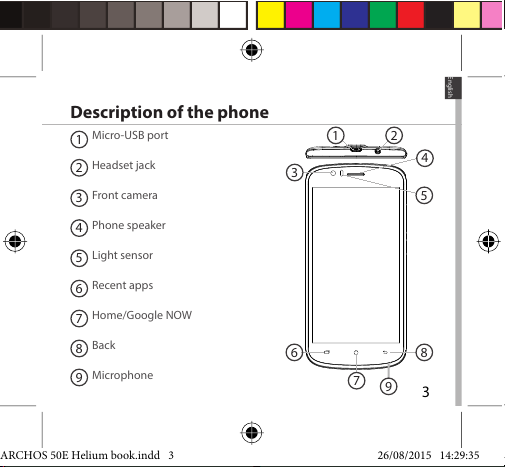
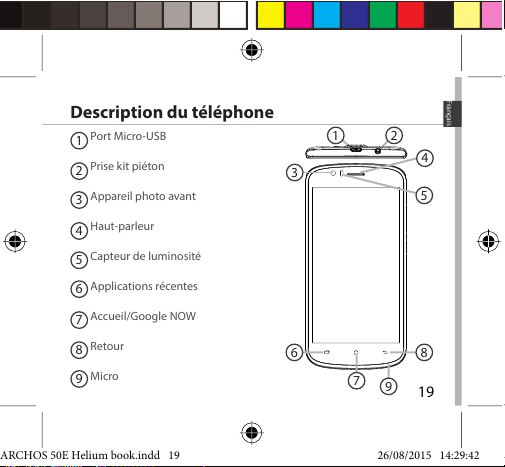
1
Micro-USB port
Headset jack
Front camera
Phone speaker
Light sensor
Recent apps
Home/Google NOW
Back
Microphone
2
3
4
Description of the phone
5
6
7
8
9
ARCHOS 50E Helium book.indd 3 26/08/2015 14:29:35
Page 4
4
14
10
11
12
13
Description of the phone
11
10
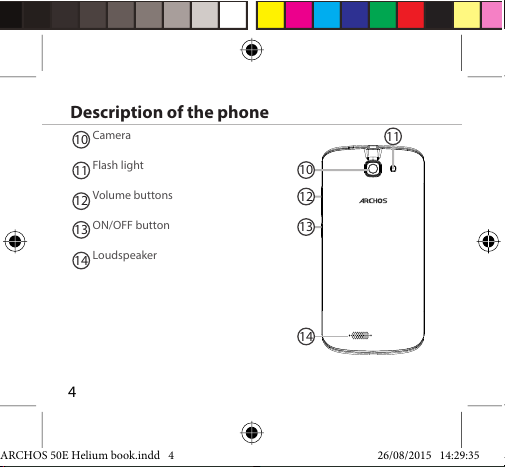
Camera
Flash light
Volume buttons
ON/OFF button
Loudspeaker
12
14
13
ARCHOS 50E Helium book.indd 4 26/08/2015 14:29:35
Page 5
5
English
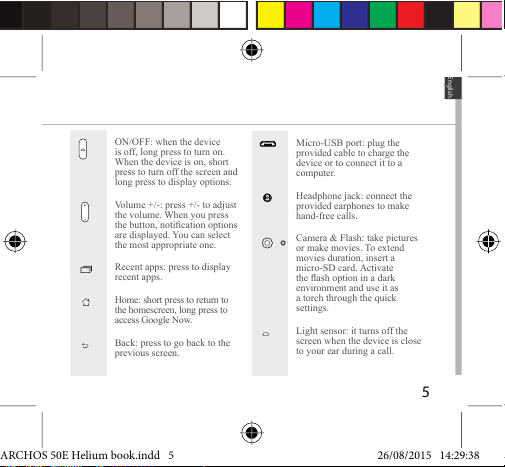
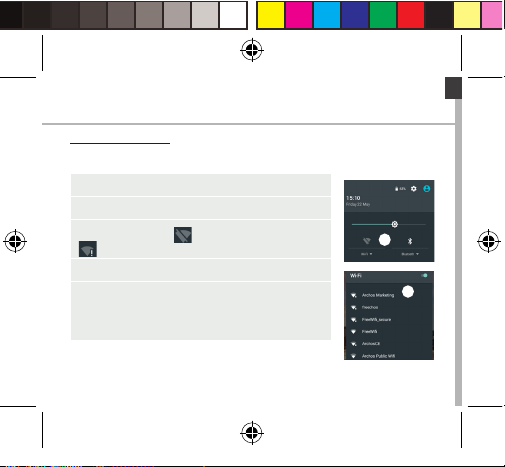
ON/OFF: when the device
is off, long press to turn on.
When the device is on, short
press to turn off the screen and
long press to display options.
Volume +/-: press +/- to adjust
the volume. When you press
the button, notication options
are displayed. You can select
the most appropriate one.
Recent apps: press to display
recent apps.
Home: short press to return to
the homescreen, long press to
access Google Now.
Back: press to go back to the
previous screen.
Micro-USB port: plug the
provided cable to charge the
device or to connect it to a
computer.
Headphone jack: connect the
provided earphones to make
hand-free calls.
Camera & Flash: take pictures
or make movies. To extend
movies duration, insert a
micro-SD card. Activate
the ash option in a dark
environment and use it as
a torch through the quick
settings.
Light sensor: it turns off the
screen when the device is close
to your ear during a call.
ARCHOS 50E Helium book.indd 5 26/08/2015 14:29:38
Page 6

6
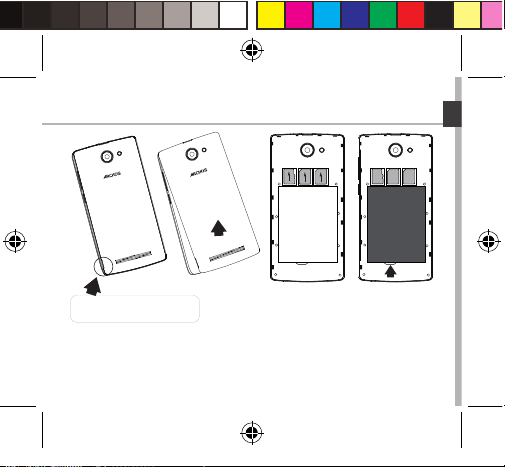
Assembling
After you have unpacked your mobile phone box:
1. Remove the device’s back cover using the notch.
2. Insert your SIM card or Memory card in the corresponding slot.
3. Insert the device’s battery.
4. Replace the back cover.
Getting started
4G/3G/2G slot 1 When inserting your SIM card or micro-SD card,
make sure to follow the illustration, otherwise you
may damage the slot or the card.
2G slot 2
Micro-SD card slot 3
ARCHOS 50E Helium book.indd 6 26/08/2015 14:29:39
Page 7

7
123
English
Lift the back cover
using the notch
ARCHOS 50E Helium book.indd 7 26/08/2015 14:29:39
Page 8

8
Turning on
1. Plug the charging cable in the Micro-USB port and connect it to its
charger.
Before using your device for the rst time, charge its battery completely.
2. Press and hold th e ON/OFF bu tton to tur n on the de vice.
The rst time you start up your ARCHOS, the installation wizard will help
you set up your device.
3. Fol low th e ins truct ions.
If you have inserted a SIM card, you may need to enter a PIN code.
Beware of typing a wrong PIN code.
Tip:
Your device goes in standby mode when you do not use it for a
specific period of time. To wake up your device, press the ON/OFF
button. To set the duration, go to Settings > Display > Sleep.
Getting started
ARCHOS 50E Helium book.indd 8 26/08/2015 14:29:39
Page 9
9
5
4
1
2
3
English
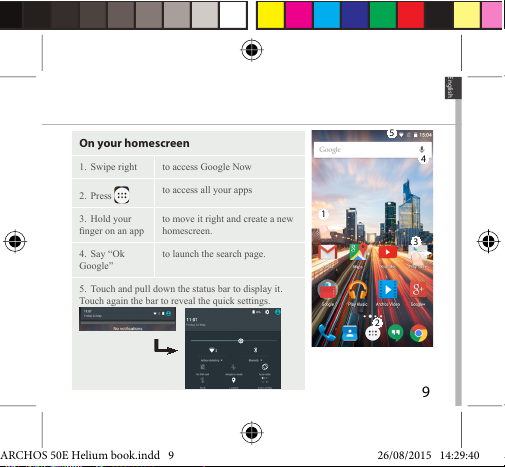
On your homescreen
1. Swipe right to access Google Now
2. Press
to access all your apps
3. Hold your
nger on an app
to move it right and create a new
homescreen.
4. Say “Ok
Google”
to launch the search page.
5. Touch and pull down the status bar to display it.
Touch again the bar to reveal the quick settings.
ARCHOS 50E Helium book.indd 9 26/08/2015 14:29:40
Page 10

10
3
4
5
Mobile data connection
If your mobile phone subscription includes a mobile data option, you
should be connected to the Internet without any further setup. The
ARCHOS will only have signal if you are in an area covered by your
provider’s 4G or 3G network.
Activating/Deactivating the mobile data
Mobile Data & WiFi connection
1. Touch and pull down the status bar to display it.
2. Touch again the bar to reveal the quick settings.
3. Select the Settings icon.
4. In Wireless & networks, select Data usage, then the
SIM card tab.
5. Slide the Mobile data switch to turn on/off.
ARCHOS 50E Helium book.indd 10 26/08/2015 14:29:40
Page 11
11
3
5
English
WiFi connection
WARNING: Make sure that you are in a WiFi zone. You can access the WiFi
settings quickly from the status bar.
1. Touch and pull down the status bar to display it.
2. Touch again the bar to reveal the quick settings.
3. Select the WiFi icon to activate the WiFi connection
.
4. Select “WiFi” below the WiFi icon.
5. Touch the name of network you want to connect to.
Private networks are shown with a lock icon and will require
you to enter your password.
ARCHOS 50E Helium book.indd 11 26/08/2015 14:29:41
Page 12

12
Adding a Google account
A Google account lets you take full advantage of any Google apps and
services that you may want to use.
1. Go to “Settings” > “Accounts” > “Add account”.
2. Select the account type “Google” to add.
3. Fol low th e ons creen instr ucti ons to ente r info rmati on ab out th e acc ount.
Once the account is created, you can access Play Store, Gmail, Hangouts,
Maps and many other apps.
Synchronizing info
Information must be sync to be saved. Your data is backed up on Google
servers.
1. Go to “Settings” > “Accounts” > “Google”.
2. Select your account.
The list of information that can be sync are displayed.
Automatic sync should be activated. To launch the sync, press the Menu
button , then Sync now. You can get them back in case of loss of your
device or SIM card. When your Google account is added to a new device,
all your saved information is transferred.
Google & Contacts
ARCHOS 50E Helium book.indd 12 26/08/2015 14:29:41
Page 13
13
English
Saving your contacts
When your contacts are saved, they are always available on the web
and can be synced to any Android phone that’s set up with your Google
account.
1. Install the SIM card with your contacts in your phone.
2. From the Ho me scr een or the Al l Apps screen , selec t the Contac ts app .
3. To uc h t he M e nu b ut t on > “Import/Export”.
4. In Import/export contacts, select “Import from SIM card”.
5. Select your Google account.
6. Check contacts to be imported and validate.
7. Once the contacts are imported in the Google account, go to “Settings” >
“Ac co un ts ” > “Go o gl e”.
8. Select you Google account.
9. Select the Menu button , then “Sync now”.
You r c on t ac t s a re sa ve d t o y o ur G o o gl e a cc o un t .
ARCHOS 50E Helium book.indd 13 26/08/2015 14:29:41
Page 14

14
Moving a home screen item:
Touch and hold your nger onto it, then slide it to the desired location,
and release your nger.
Removing a home screen item:
Touch and hold it, slide your nger towards the top of the screen and
drop it over the "Remove" icon.
Uninstalling an item:
From the "All apps" screens, touch and hold it, slide your nger towards
the top of the screen and drop it over "Uninstall" bin.
Creating application folders:
Drop one app icon over another on a home screen and the two icons will
be combined.
Hints & tips for Android
TM
ARCHOS 50E Helium book.indd 14 26/08/2015 14:29:41
Page 15

15
English
Widgets:
Hold your nger on a homescreen at an empty location. Touch “Widgets”.
Changing your wallpaper:
Hold your nger on a home screen at an empty location.
Touch “ Wallpapers”.
Locking the touchscreen:
Select the “Settings” app, then scroll down and touch “Security”. Touch
“Screen lock”. Touch the type of lock you would like to use. After you
set a lock, a lock screen is displayed whenever your screen wakes up,
requesting the pattern, pin or other specied key.
ARCHOS 50E Helium book.indd 15 26/08/2015 14:29:41
Page 16
16
Troubleshooting
My phone is frozen or cannot switch on
1. Remove and replace the battery.
2. Charge your device.
My phone cannot connect to a network or “No service” is displayed
Try connecting in another location. Verify the network coverage with your
operator.
Unable to make outgoing calls
Make sure your phone is connected to a network, and the network is not
overloaded or unavailable.
Unable to receive incoming calls
Make sure your phone is switched on and connected to a network (check
for overloaded or unavailable network).
SIM card PIN locked
Contact your network operator to obtain the PUK code (Personal
Unblocking Key).
To configure a new 4G network:
On your device, tap Settings.
1. Select Wireless & networks > More... > Mobile networks.
2. In Mobile network settings, select your operator in Network operators.
3. In Mobile network settings, select Access point names, then select
to add new parameters and enter the exact connection parameters
provided by your 4G provider.
ARCHOS 50E Helium book.indd 16 26/08/2015 14:29:41
Page 17

17
Français
Pour plus d’informations, consultez-les FAQs sur www.archos.com.
Consultez-les avant d’envisager un éventuel retour du produit. Le
problème que vous rencontrez peut être résolu facilement. Comme nous
mettons à jour et améliorons régulièrement nos produits, le logiciel
de votre appareil peut présenter une interface ou des fonctionnalités
légèrement diérentes de celles décrites dans ce guide.
Contenu de la boîte.....................................................................................................
Description du téléphone.........................................................................................
Prise en main..................................................................................................................
Données mobiles & WiFi.............................................................................................
Compte Google & Contacts......................................................................................
Trucs & Astuces avec AndroidTM................................................................................
Dépannage.....................................................................................................................
18
19
22
26
28
30
32
Table des matières
Consultez la déclaration de conformité sur http://www.archos.com/fr-fr/
support/support_tech/downloads.html
ARCHOS 50E Helium book.indd 17 26/08/2015 14:29:41
Page 18

18
Contenu de la boîte
Vériez que les éléments ci-dessous sont présents dans la boîte :
- ARCHOS 50E Helium
- Batterie
- Kit piéton
- Câble USB
- Chargeur
- Guide d’utilisation rapide
- Guide des garanties et des mentions légales
Il se peut que les éléments fournis, de même que les accessoires, varient
en fonction de votre localité ou de votre opérateur.
Les éléments fournis sont conçus uniquement pour votre appareil et ils
pourraient ne pas être compatibles avec d’autres appareils.
Des accessoires non conformes peuvent être la source d’un mauvais
fonctionnement.
ARCHOS 50E Helium book.indd 18 26/08/2015 14:29:41
Page 19
19
3
5
4
1 2
86
7
9
Français
Description du téléphone
1
2
3
4
Port Micro-USB
Prise kit piéton
Appareil photo avant
Haut-parleur
Capteur de luminosité
Applications récentes
Accueil/Google NOW
Retour
Micro
5
6
7
8
9
ARCHOS 50E Helium book.indd 19 26/08/2015 14:29:42
Page 20

20
14
10
11
12
13
Description du téléphone
11
10
Appareil photo arrière
Flash
Boutons de volume
Bouton ON/OFF
Haut-parleur
13
12
14
ARCHOS 50E Helium book.indd 20 26/08/2015 14:29:42
Page 21

21
ON/OFF : Lorsque l’appareil
est éteint, faites un appui
long pour l’allumer. Lorsque
l’appareil est allumé, faites
un appui court pour éteindre
l’écran et un appui long pour
afcher des options.
Volume+/- : Appuyez sur +/- pour
ajuster le son. Lorsque vous
appuyez sur le bouton, des options
de notications s’afchent.
Sélectionnez la notication
souhaitée.
Applications récentes :
appuyez pour afcher les
applications récentes.
Accueil : Faites un appui
court pour retourner à l’écran
d’accueil et un appui long pour
accéder à Google Now.
Retour : Appuyez pour
retourner à l’écran précédent.
Port Micro-USB : branchez
le câble fourni pour charger
l’appareil ou le connecter à un
ordinateur.
Port jack : connectez les
écouteurs fournis pour passer des
appels en kit mains libres
Appareil photo & Flash :
prenez des photos ou lmez.
Pour des lms plus longs,
insérez une carte micro-SD.
Activez le ash dans
l’obscurité et utilisez le comme
torche en l’activant à partir des
réglages rapides
Capteur de proximité : lorsque
l’appareil est à proximité de
l’oreille au cours d’un appel, il
permet d’éteindre l’écran.
Français
ARCHOS 50E Helium book.indd 21 26/08/2015 14:29:44
Page 22

22
Prise en main
Assemblage
Après avoir déballé le téléphone :
1. Enlevez la coque arrière en utilisant l’encoche.
2. Insérez votre carte SIM ou carte mémoire dans l’emplacement
correspondant.
3. Insérez la batterie dans le téléphone.
4. Remettez en place la coque arrière.
4G/3G/2G emplacement 1 Lorsque vous insérez une carte SIM ou
une carte micro-SD, conformez-vous au
schéma pour ne pas endommager la carte ou
l’emplacement.
2G emplacement 2
Carte micro-SD emplacement 3
ARCHOS 50E Helium book.indd 22 26/08/2015 14:29:44
Page 23
23
123
Français
Utilisez l’encoche pour
enlever la coque arrière
ARCHOS 50E Helium book.indd 23 26/08/2015 14:29:44
Page 24
24
Allumer l’appareil
1. Branchez le câble de chargement dans le port micro-USB et connectez-le
à son chargeur.
Avant la première utilisation, chargez complètement la batterie.
2. Maintenez le bouton ON/OFF pour allumer l’appareil.
La première fois que vous allumez votre téléphone, l’assistant de
démarrage vous permet de le paramétrer.
3. Suivez les instructions à l’écran.
Si vous avez inséré une carte SIM dans votre téléphone, il se peut que
vous ayez besoin d’entrer un code PIN. Assurez-vous de saisir le bon
code PIN.
ASTUCE :
L’écran tactile s’éteint après une certaine période d’inactivité. Pour
rallumer l’écran, faites un appui court sur le bouton ON/OFF. Pour
définir la mise en veille, allez sur Paramètres>Affichage>Veille.
Prise en main
ARCHOS 50E Helium book.indd 24 26/08/2015 14:29:44
Page 25
25
5
4
1
2
3
Français
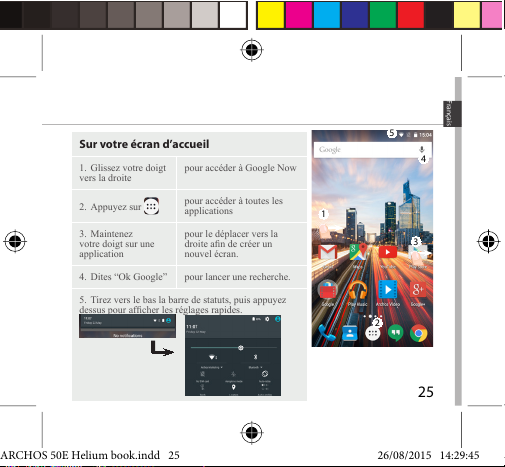
Sur votre écran d’accueil
1. Glissez votre doigt
vers la droite
pour accéder à Google Now
2. Appuyez sur
pour accéder à toutes les
applications
3. Maintenez
votre doigt sur une
application
pour le déplacer vers la
droite an de créer un
nouvel écran.
4. Dites “Ok Google” pour lancer une recherche.
5. Tirez vers le bas la barre de statuts, puis appuyez
dessus pour afcher les réglages rapides.
ARCHOS 50E Helium book.indd 25 26/08/2015 14:29:45
Page 26
26
3
4
5
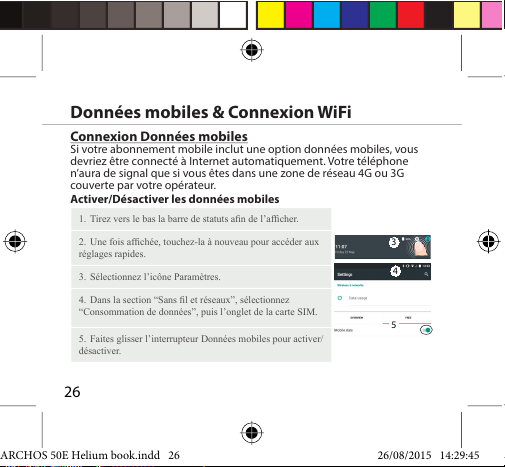
Connexion Données mobiles
Si votre abonnement mobile inclut une option données mobiles, vous
devriez être connecté à Internet automatiquement. Votre téléphone
n’aura de signal que si vous êtes dans une zone de réseau 4G ou 3G
couverte par votre opérateur.
Activer/Désactiver les données mobiles
Données mobiles & Connexion WiFi
1. Tirez vers le bas la barre de statuts an de l’afcher.
2. Une fois afchée, touchez-la à nouveau pour accéder aux
réglages rapides.
3. Sélectionnez l’icône Paramètres.
4. Dans la section “Sans l et réseaux”, sélectionnez
“Consommation de données”, puis l’onglet de la carte SIM.
5. Faites glisser l’interrupteur Données mobiles pour activer/
désactiver.
ARCHOS 50E Helium book.indd 26 26/08/2015 14:29:45
Page 27
27
3
5
Français
Connexion WiFi
ATTENTION : assurez-vous d’être dans une zone couverte par un réseau
WiFi. Vous pouvez accéder rapidement aux paramètres WiFi à partir de la
barre de statuts.
1. Tirez vers le bas la barre de statuts an de l’afcher.
2. Une fois afchée, touchez-la à nouveau pour accéder aux
réglages rapides.
3. Sélectionnez l’icône WiFi pour activer la connexion .
4. Sélectionnez “WiFi” en bas de l’icône WiFi.
5. Sélectionnez le nom du réseau auquel vous voulez vous
connecter. Les réseaux privés sont afchés avec un cadenas.
Ils nécessitent un mot de passe.
ARCHOS 50E Helium book.indd 27 26/08/2015 14:29:45
Page 28
28
Ajouter un compte Google
Un compte Google vous permet de proter au maximum des
applications et des services Google que vous pourriez utiliser.
1. Sélectionnez “Paramètres” > “Comptes” > “Ajouter compte”.
2. Sélectionnez “Google” pour le type de compte à ajouter.
3. Suivez les instructions à l’écran pour saisir les informations demandées.
Une fois que le compte est créé, accédez aux applications Play Store,
Gmail, Hangouts, Maps et beaucoup d’autres.
Synchroniser des informations
Vos informations doivent être synchronisées an d’être sauvegardées.
Vos données sont enregistrées sur les serveurs Google.
1. Sélectionnez “Paramètres” > “Comptes” > “Google”.
2. Sélectionnez votre compte.
La liste des informations qu’on peut synchroniser est achée.
La synchronisation automatique est activée. Si vous voulez lancer la
synchronisation, appuyez sur le bouton de Menu , puis sur Synchroniser
maintenant. Vous pouvez les récupérer en cas de perte de votre
téléphone ou de votre carte SIM. Lorsque vous ajoutez votre compte
Google à un nouvel appareil, toutes les informations sauvegardées sont
collectées.
Compte Google & Contacts
ARCHOS 50E Helium book.indd 28 26/08/2015 14:29:46
Page 29

29
Français
Sauvegarder vos contacts
Tous vos contacts sont disponibles sur le Web et peuvent être
synchronisés sur n’importe quel téléphone Android paramétré avec votre
compte Google.
1. Insérer votre carte SIM incluant vos contacts dans votre téléphone.
2. A partir de l’écran d’accueil ou de l’écran Toutes les applications,
sélectionnez l’application Contacts .
3. Appuyez sur le bouton de M enu puis sélec tionnez “Impor ter/Exporter”.
4. Dans “Importer/exporter contacts”, sélectionnez “Importer à partir de la
carte SIM”.
5. Sélectionnez votre compte Google.
6. Sélectionnez les contacts à importer puis validez.
7. Une fois les contacts importés sur votre compte Google, sélectionnez
“Paramètres” > “Comptes” > “Google”.
8. Sélectionnez votre compte Google.
9. Appuyez sur le bouton de M enu , puis sélectionnez “Synchroniser
maintenant”. Vos contacts sont sauvegardés sur votre compte Google.
ARCHOS 50E Helium book.indd 29 26/08/2015 14:29:46
Page 30
30
Déplacer une icône de l’écran d’accueil :
Maintenez votre doigt appuyé sur l’icône jusqu’à ce que s’achent
les lignes de positionnement, puis faites-la glisser vers l’emplacement
souhaité, et relâchez.
Supprimer une icône de l’écran d’accueil :
Maintenez votre doigt appuyé sur l’icône, puis faites-la glisser vers le
haut de l’écran, et déposez-la sur l’icône Supprimer.
Désinstaller une application :
A partir de l’écran Toutes les applications, maintenez votre doigt appuyé
sur l’icône, puis faites-la glisser vers le haut de l’écran et déposez-la sur
l’icône Désinstaller.
Créer des dossiers d’applications :
A partir d’un écran d’accueil, déposez une icône sur une autre pour les
rassembler.
Tru cs & As tu ce s po ur An dr oi d
TM
ARCHOS 50E Helium book.indd 30 26/08/2015 14:29:46
Page 31

31
Français
Widgets :
Maintenez votre doigt appuyé sur un emplacement vide de l’écran
d’accueil. Sélectionnez Widgets.
Changer le fond d’écran :
Maintenez votre doigt appuyé sur un emplacement vide de l’écran
d’accueil. Sélectionnez fonds d’écran.
Verrouiller votre téléphone :
A partir du panneau des réglages rapides dans la barre de statuts,
sélectionnez Paramètres. Faites déler l’écran vers le bas, puis
sélectionnez Sécurité. Sélectionnez Verrouillage de l’écran. Sélectionnez
le type de verrouillage que vous voulez utiliser. Une fois que vous avez
sélectionné une option, un écran de verrouillage s’ache chaque fois
que votre écran est réactivé. Vous êtes alors invité à saisir le schéma, le
code PIN ou tout autre code spécié.
ARCHOS 50E Helium book.indd 31 26/08/2015 14:29:46
Page 32

32
Dépannage
Mon téléphone ne répond pas ou ne s’allume pas
1. Enlevez la batterie, puis remettez-la en place.
2. Chargez votre appareil.
Mon téléphone ne se connecte pas au réseau ou affiche “Pas de service”
Tentez de vous connecter à partir d’un autre endroit. Vérifiez la couverture réseau
avec votre opérateur.
Impossible de passer des appels
Assurez-vous que votre téléphone est connecté au réseau et que le réseau n’est
ni saturé, ni indisponible.
Impossible de recevoir des appels
Assurez-vous que le téléphone est allumé et connecté au réseau.
Carte SIM bloquée (mauvais code PIN)
Contactez votre opérateur réseau afin d’obtenir le code PUK.
Configurer votre connexion 4G
Sur votre appareil, sélectionnez Paramètres :
1. Sélectionnez “Sans l et réseaux > Plus > Réseaux mobiles”.
2. Dans Paramètres des réseaux mobiles, sélectionnez “Opérateurs de réseau”
puis le réseau adapté.
3. Dans Paramètres des réseaux mobiles, sélectionnez “Noms des points
d’accès”, puis sélectionnez pour ajouter de nouveaux paramètres et entrez les
paramètres de connexion exacts fournis par votre opérateur 4G.
ARCHOS 50E Helium book.indd 32 26/08/2015 14:29:46
Page 33

33
Deutsch
Inhaltsverzeichnis
Verpackungsinhalt........................................................................................................
Beschreibung des Geräts............................................................................................
Erste Schritte....................................................................................................................
Mobildaten & WLAN-Verbindung.............................................................................
Google-Konten & Kontakte.........................................................................................
AndroidTM kennenlernen .............................................................................................
Fehlerbehebung.............................................................................................................
34
35
38
42
44
46
48
Weitere Informationen nden Sie unter den FAQs auf www.archos.com.
Diese unbedingt durchlesen, bevor Sie eine Rückgabe des Produkts in
Erwägung ziehen. Es könnte ein geringfügiges Problem vorliegen. Da
unsere Produkte kontinuierlich aktualisiert und weiterentwickelt werden,
kann die Software Ihres Gerätes in Erscheinung und Funktionalität
geringfügige Abweichungen zu den Darstellungen in dieser
Schnellstartanleitung aufweisen.
Konsultieren Sie die Konformitätserklärung auf http://www.archos.com/
de-de/support/support_tech/downloads.html
ARCHOS 50E Helium book.indd 33 26/08/2015 14:29:46
Page 34

34
Verpackungsinhalt
In der Verpackung müssen folgende Elemente enthalten sein:
- ARCHOS 50E Helium
- Batterie
- Headset
- USB-Kabel
- Ladegerät
- Benutzerhandbuch
- Garantie, Impressum und Sicherheitshinweise
Die mit Ihrem Gerät mitgelieferten Elemente und das verfügbare
Zubehör können je nach Region oder Dienstleister abweichen.
Die mitgelieferten Elemente wurden ausschließlich für Ihr Gerät
entwickelt und sind mit anderen Geräten nicht kompatibel.
Nicht genehmigtes Zubehör kann zu einer Fehlfunktion Ihres Geräts
führen.
ARCHOS 50E Helium book.indd 34 26/08/2015 14:29:47
Page 35

35
3
5
4
1 2
86
7
9
Deutsch
Beschreibung des Geräts
1
2
3
4
Micro-USB-Anschluss
Kopfhöreranschluss
Frontkamera
Lautsprecher
Lichtsensor
Letzte Apps
Home/Google NOW
Zurück
Mikrofon
5
6
7
8
9
ARCHOS 50E Helium book.indd 35 26/08/2015 14:29:48
Page 36

36
14
10
11
12
13
Beschreibung des Geräts
11
10
Kamera
Bliztlicht
Lautstärketasten
EIN/AUS-Taste
Lautsprecher
13
12
14
ARCHOS 50E Helium book.indd 36 26/08/2015 14:29:48
Page 37

37
EIN/AUS-Taste: bei
ausgeschaltetem Gerät: lang
drücken, um einzuschalten. Bei
eingeschaltetem Gerät: kurz
drücken, um den Bildschirm
auszuschalten, lang drücken, um
die Optionen anzuzeigen.
Lautstärketasten: drücken Sie
auf +/-, um die Lautstärke
einzustellen. Sobald Sie die
Tas te dr üc ke n, w er den d ie
Benachrichtigungsoptionen
angezeigt. Wählen Sie die
entsprechende Option aus.
Zurück: drücken, um die zuletzt
verwendeten Apps anzuzeigen.
Home: kurz drücken, um zum
Startbildschirm zurückzukehren,
lang drücken, um auf Google Now
zuzugreifen.
Letzte Apps: drücken, um
zum vorherigen Bildschirm
zurückzukehren.
Micro-USB-Anschluss: das
mitgelieferte Kabel einstecken,
um das Gerät zu laden oder
um es mit einem Computer zu
verbinden.
Kopfhöreranschluss:
Anschluss des mitgelieferten
Kopfhörers für Anrufe mit
Freisprechfunktion.
Kamera & Bliztlicht: Aufnahme
von Bildern oder Filmen. Für
längere Filmaufnahmen eine
micro-SD-Karte einstecken.
Aktivieren Sie in einer dunklen
Umgebung die Blitzoption und
verwenden Sie das Gerät über
die Schnelleinstellungen als
Tas che nl amp e.
Der Lichtsensor schaltet den
Bildschirm ab, sobald sich das
Gerät während eines Anrufs an
Ihrem Ohr bendet.
Deutsch
ARCHOS 50E Helium book.indd 37 26/08/2015 14:29:49
Page 38

38
Montage
Nach dem Auspacken des Mobiltelefons:
1. Heben Sie die Rückabdeckung des Geräts mithilfe der Einkerbung an.
2. Stecken Sie eine SIM-Karte oder micro-SD-Karte in den entsprechenden
Steckplatz ein.
3. Legen Sie den Akk u des Geräts ein.
4. Bringen Sie die Rückabdeckung wieder an.
4G/3G/2G 1 Beachten Sie beim Einführen der SIM-Karte oder
micro-SD-Karte unbedingt die Illustration, der
Steckplatz oder die Karte könnten sonst beschädigt
werden.
2G 2
micro-SD-Karte 3
Erste Schritte
ARCHOS 50E Helium book.indd 38 26/08/2015 14:29:49
Page 39

39
123
Deutsch
Heben Sie die Rückabdeckung
mithilfe der Einkerbung an
ARCHOS 50E Helium book.indd 39 26/08/2015 14:29:50
Page 40

40
Tipp:
Wird der Touchscreen über einen bestimmten Zeitraum hinweg nicht
benutzt, wird dieser vom Gerät abgeschaltet. Um den Bildschirm wieder
einzuschalten, drücken Sie die EIN/AUS-Taste. Für die Einstellung der
Dauer gehen Sie zu Einstellungen > Anzeige > Display-Timeout.
Erste Schritte
Einschalten
1. Stecken Sie das Ladekabel in den Micro-USB-Anschluss und verbinden Sie
es mit dem Ladegerät.
Vor der erstmaligen Benutzung des Geräts sollte der Akku vollständig
aufgeladen werden.
2. Drücken und halten Sie die EIN/AUS-Taste, um das Gerät einzuschalten.
Beim ersten Einschalten des ARCHOS wird Sie der Installationsassistent
bei der Konguration Ihres Geräts unterstützen.
3. Fol gen Si e den Anwei sunge n.
Haben Sie eine SIM-Karte eingesteckt, muss unter Umständen ein PINCode eingegeben werden.
Geben Sie unbedingt die richtige PIN-Nummer ein.
ARCHOS 50E Helium book.indd 40 26/08/2015 14:29:50
Page 41

41
5
4
1
2
3
Deutsch
Auf Ihrem Startbildschirm
1. Nach recht wischen für den Zugriff auf Google
Now
2. drücken
für den Zugriff auf Ihre Apps
3. Halten Sie Ihren
Finger auf einer App
um sie nach rechts zu
verschieben und um einen
neuen Startbildschirm zu
erstellen.
4. "Ok Google" sagen um die Suchseite zu öffnen.
5. Die Statusleiste nach unten ziehen, dann drücken,
um die Schnelleinstellungen anzuzeigen.
ARCHOS 50E Helium book.indd 41 26/08/2015 14:29:51
Page 42

42
3
4
5
Mobildatenverbindung
Beinhaltet Ihr Mobilfunkvertrag eine Mobildatenoption, sollte ohne
weitere Einrichtung eine Verbindung zum Internet hergestellt werden.
Beachten Sie, dass der ARCHOS nur dann ein Signal erhält, wenn Sie sich
im Bereich des 4G- oder 3G-Netzwerks Ihres Anbieters benden.
Aktivierung/Deaktivierung der Mobildaten
Mobildaten & WLAN-Verbindung
1. Die Statusleiste berühren und nach unten ziehen, um
diese anzuzeigen.
2. Die Leiste erneut berühren, um die Schnelleinstellungen
anzuzeigen.
3. Wählen Sie das Symbol "Einstellungen".
4. Unter "WLAN & Netzwerke" wählen Sie "Datennutzung"
und dann die Registerkarte "SIM-Karte".
5. Schieben Sie den Schalter "Mobilfunkdaten" auf Ein/Aus.
ARCHOS 50E Helium book.indd 42 26/08/2015 14:29:51
Page 43

43
3
5
Deutsch
WLAN-Verbindung
ACHTUNG: Überprüfen Sie, ob Sie sich in einer WLAN-Zone benden.
Über die Statusleiste kann schnell auf die WLAN-Einstellungen
zugegrien werden.
1. Die Statusleiste berühren und nach unten ziehen, um
diese anzuzeigen.
2. Die Leiste erneut berühren, um die Schnelleinstellungen
anzuzeigen.
3. Wählen Sie das WLAN-Symbol zur Aktivierung der
WLAN-Verbindung .
4. Wählen Sie "WLAN" unter dem WLAN-Symbol.
5. Tippen Sie auf den Namen des Netzwerks, mit dem eine
Verbindung hergestellt werden soll.
Private Netzwerke werden mit einem Schlosssymbol
angezeigt und hier muss das Passwort eingegeben werden.
ARCHOS 50E Helium book.indd 43 26/08/2015 14:29:51
Page 44

44
Google-Konten & Kontakte
Google-Konto hinzufügen
Mit einem Google-Konto können Sie Ihre Google-Apps und Dienste in
vollem Umfang nutzen.
1. Gehen Sie zu "Settings" > "Accounts" > "Add account" ("Einstellungen" >
"Konten & Synchronisierung" > "Konto hinzufügen").
2. Wählen Sie für das hinzuzufügende Konto den Typ "Google".
3. Folgen Sie den Anweisungen auf dem Bildschirm und geben Sie die
Informationen für das Konto ein.
Nachdem das Konto erstellt wurde, können Sie auf Play Store, Gmail,
Hangouts, Maps und viele andere Apps zugreifen.
Synchronisierungsinformationen
Die Informationen müssen synchron sein, um gespeichert werden zu
können. Ihre Daten werden auf Google-Servern gesichert.
1. Gehen Sie zu "Einstellungen" > "Konten" > "Google".
2. Wählen Sie Ihr Konto aus.
Die Liste der synchronisierbaren Informationen wird angezeigt.
Im Falle eines Geräte- oder SIM-Kartenverlusts können diese
wiederhergestellt werden.
Wird Ihr Google-Konto einem neuen Gerät hinzugefügt, werden Ihre
gespeicherten Informationen erfasst.
ARCHOS 50E Helium book.indd 44 26/08/2015 14:29:51
Page 45

45
Deutsch
Speicherung Ihrer Kontakte
Alle Ihre Kontakte sind im Web immer verfügbar und können mit jedem
Android-Telefon synchronisiert werden, das mit dem gleichen GoogleKonto eingerichtet ist.
1. Legen Sie die SIM-Karte mit Ihren Kontakten in Ihr Telefon ein.
2. Wählen Sie vom Bildschirm „Home“ oder „All Apps (Alle
Anwendungen)“ aus die App „Contacts (Kontakte)“ .
3. Tippen Sie auf die Menü-Taste > “Import/Export” (Importieren/
Exportieren).
4. Unter “Import/export contacts” (Kontakte importieren/exportieren)
wählen Sie Import from SIM card (Von SIM-Karte importieren).
5. Wählen Sie Ihr Google-Konto aus.
6. Markieren Sie die zu importierenden Kontakte und bestätigen Sie.
7. Nachdem die Kontakte in Ihr Google-Konto importiert wurden, gehen Sie
zu „Einstellungen > Konten > Google“.
8. Wählen Sie Ihr Google-Konto aus.
9. Drücken Sie die Menü-Taste und dann “Jetzt synchronisieren“.
Ihre Kontakte werden in Ihrem Google-Konto gespeichert.
ARCHOS 50E Helium book.indd 45 26/08/2015 14:29:52
Page 46

46
Android
TM
kennenlernen
Ein Element vom Startbildschirm verschieben:
Zum Verschieben eines Elements vom Startbildschirm den Finger
darauf legen und so lange halten, bis die Rasterlinien zur Positionierung
erscheinen. Dann an die gewünschte Stelle schieben und loslassen.
Ein Element vom Startbildschirm entfernen:
Den Finger auf das Element legen und halten. Den Finger auf dem
Bildschirm nach oben bewegen und über dem «Entfernen»-Symbol
loslassen.
Ein Element deinstallieren:
Auf den «Alle Apps»-Bildschirmen das betreende Element berühren
und halten. Den Finger im Bildschirm nach oben bewegen und über
dem «Deinstallieren»-Papierkorb loslassen.
Anwendungsordner erstellen:
Ziehen Sie auf einem Startbildschirm ein Anwendungssymbol über ein
anderes. Die beiden Symbole werden kombiniert.
ARCHOS 50E Helium book.indd 46 26/08/2015 14:29:52
Page 47

47
Deutsch
Widgets:
Halten Sie Ihren Finger im Startbildschirm an einer beliebigen leeren
Stelle. Tippen Sie auf “Widgets”.
Hintergrundbild ändern:
Halten Sie Ihren Finger im Startbildschirm an einer beliebigen leeren
Stelle. Berühren Sie „Hintergrundbilder“.
Touchscreen sperren:
Berühren Sie Einstellungen auf dem Schnelleinstellungen-Dashboard in
der Statusleiste. Scrollen Sie nach unten und berühren Sie “Sicherheit ”.
Berühren Sie Bildschirmsperrung. Berühren Sie die gewünschte Art der
Sperrung. Nach erfolgter Sperrung wird ein Sperrbildschirm angezeigt,
sobald der Bildschirm aktiviert wird. Auf diesem ist ein Muster, eine PIN
oder ein anderer festgelegter Schlüssel einzugeben.
ARCHOS 50E Helium book.indd 47 26/08/2015 14:29:52
Page 48

48
Fehlerbehebung
Mein Telefon ist abgestürzt oder es kann nicht eingeschaltet werden
1. Entfernen Sie die Batterie und legen Sie sie wieder ein.
2.Laden Sie das Gerät auf.
Mein Telefon kann nicht mit einem Netzwerk verbinden oder es wird „Kein Dienst“
angezeigt
Testen Sie das Gerät an einem anderen Standort. Überprüfen Sie die Netzwerkabdeckung bei
Ihrem Anbieter.
Keine ausgehenden Anrufe möglich
Überprüfen Sie die Verbindung Telefon - Netzwerk und ob das Netzwerk überlastet oder nicht
verfügbar ist.
Eingehende Anrufe können nicht empfangen werden
Überprüfen Sie, ob das Telefon eingeschaltet und mit einem Netzwerk verbunden und ob das
Netzwerk überlastet oder nicht verfügbar ist.
PIN der SIM-Karte gesperrt
Wenden Sie sich an Ihren Netzwerkbetreiber, um den PUK-Code zu erhalten.
Konfiguration eines neuen 4G-Netzwerks:
Tippen Sie auf Ihrem Gerät auf „Einstellungen“.
1. Wählen Sie Wireless & networks > More... > Mobilnetzwerke.
2. Wählen Sie in den „M obilnetzwerk“-Einstellungen aus den Netzwerkanbietern Ihren
Anbieter aus.
3. Wählen Sie in den „M obilnetzwerk“-Einstellungen den Namen des Access Points.
Wählen Sie , um neue Parameter hinzuzufügen, und geben Sie die exakten
Verbindungsparameter ein, die Sie von Ihrem 4G-Anbieter erhalten haben.
ARCHOS 50E Helium book.indd 48 26/08/2015 14:29:52
Page 49

Español
49
Índice
Contenido de la caja.....................................................................................................
Descripción del dispositivo........................................................................................
Primeros pasos ..............................................................................................................
Datos móviles y conexión WiFi..................................................................................
Cuenta de Google/ Contactos...................................................................................
Para familiarizarse con AndroidTM............................................................................
Resolución de problemas...........................................................................................
50
51
54
58
60
62
64
Para más información, consulte la sección de preguntas y respuestas en
www.archos.com. Examínela detenidamente antes de pensar en realizar
cualquier devolución. Puede que su problema tenga una fácil solución.
Al estar actualizando y mejorando constantemente nuestros productos,
el aspecto o el software de su dispositivo pueden variar ligeramente con
respecto a lo descrito en esta guía de inicio rápido.
Consulte la declaración de conformidad en http://www.archos.com/
es-es/support/support_tech/downloads.html
ARCHOS 50E Helium book.indd 49 26/08/2015 14:29:52
Page 50

50
Contenido de la caja
Compruebe que la caja del producto incluya los elementos siguientes:
- ARCHOS 50E Helium
- Batería
- Headset
- USB cable
- Cargador
- Guía de usuario
- Avisos de garantía, legales y de seguridad
Los elementos suministrados con su dispositivo y los accesorios
disponibles pueden variar según la zona geográfica o proveedor de
servicio utilizado. Los elementos suministrados han sido desarrollados
en exclusiva para este dispositivo y pueden no ser compatibles con
otros dispositivos. La utilización de accesorios no homologados podría
ocasionar un funcionamiento defectuoso del producto.
ARCHOS 50E Helium book.indd 50 26/08/2015 14:29:52
Page 51

51
3
5
4
1 2
86
7
9
Español
Descripción del dispositivo
Puerto micro USB
Conector de headset
Cámara frontal
Altavoz
Lichtsensor
Apps recientes
Inicio/Google NOW
Atrás
Micrófono
1
2
3
4
5
6
7
8
9
ARCHOS 50E Helium book.indd 51 26/08/2015 14:29:53
Page 52

52
14
10
11
12
13
Descripción del dispositivo
10
11
Camera
Flash
Botones de volumen
Botón ON/OFF
Altavoz
12
13
14
ARCHOS 50E Helium book.indd 52 26/08/2015 14:29:53
Page 53

53
Botón ON/OFF: con el
dispositivo apagado: mantenga
pulsado para encenderlo. Con
el dispositivo encendido: pulse
brevemente para desactivar la
pantalla, mantenga pulsado para
mostrar las opciones.
Botones de volumen: pulse +/-
para ajustar el volumen. Pulse el
botón para mostrar las opciones
de noticación. Seleccione la
más apropiada.
Apps recientes: pulse para
mostrar las aplicaciones
recientes.
Inicio: pulsación corta para
volver a la pantalla principal,
pulsación larga para entrar en
Google Now.
Atrás: pulse para volver a la
pantalla anterior.
Puerto micro USB: enchufe el
cable suministrado para cargar
el dispositivo o conectarlo a un
ordenador.
Conector de headset: conecte los
auriculares suministrados para
hacer llamadas con manos libres.
Camera & Flash: para hacer
fotos o vídeos. Inserte una
tarjeta micro SD para aumentar
la duración de los vídeos. Active
la opción ash en entornos
con poca luz o utilícela como
linterna a través de los ajustes
rápidos.
El sensor de luz desactiva
la pantalla cuando acerca el
dispositivo a la oreja durante
una llamada.
Español
ARCHOS 50E Helium book.indd 53 26/08/2015 14:29:54
Page 54

54
Montaje
Una vez el teléfono móvil fuera de su caja:
1. Retire la cubierta posterior del dispositivo utilizando la muesca.
2. Inserte su tarjeta SIM o micro SD en la ranura correspondiente.
3. Inserte la batería del dispositivo.
4. Vuelv a a coloca r la cubie rta post erior.
Primeros pasos
4G/3G/2G 1 Al insertar una tarjeta SIM o una tarjeta micro SD,
asegúrese de hacerlo conforme a la ilustración, de
lo contrario podría dañar la ranura o la tarjeta.
2G 2
Tarjeta micro SD 3
ARCHOS 50E Helium book.indd 54 26/08/2015 14:29:54
Page 55

55
123
Español
Levante la cubierta
posterior utilizando la muesca
ARCHOS 50E Helium book.indd 55 26/08/2015 14:29:55
Page 56

56
Consejos:
El dispositivo desactiva la pantalla táctil tras un determinado periodo
sin utilizar. Para volver a activar la pantalla, pulse el botón ON/OFF.Para
escoger una duración, vaya a Ajustes>Pantalla>Tiempo espera pantalla.
Encendido
1. Enchufe el cable de carga al puerto micro USB y conéctelo al cargador.
Antes de utilizar el dispositivo por primera vez, cargue completamente
la batería.
2. Mantenga pulsado el botón ON/OFF para encender el dispositivo.
La primera vez que encienda el ARCHOS, el asistente de instalación le
ayudará a congurar su dispositivo.
3. Siga las instrucciones.
Si ha introducido una tarjeta SIM, deberá teclear el código PIN.
Tenga cuidado de no introducir un código PIN incorrecto.
Primeros pasos
ARCHOS 50E Helium book.indd 56 26/08/2015 14:29:55
Page 57

57
5
4
1
2
3
Español
En la pantalla principal
1. Deslice el dedo
hacia la derecha.
para acceder a Google Now
2. Pulse
para acceder a todas las
aplicaciones
3. Pulse y
mantenga el dedo
en una aplicación
para moverla a la derecha
y crear una nueva pantalla
principal.
4. Diga "Ok
Google"
para lanzar la página de
búsqueda.
5. Arrastre hacia abajo la barra de estado y luego pulse
para mostrar los ajustes rápidos.
ARCHOS 50E Helium book.indd 57 26/08/2015 14:29:55
Page 58

58
3
4
5
Datos móviles y conexión WiFi
1. Toque y arrastre hacia abajo la barra de estado para
mostrarla.
2. Vuelva a tocar la barra para mostrar los ajustes rápidos.
3. Seleccione el icono de Ajustes.
4. En Conexiones inalámbricas y redes, seleccione Uso de
datos, y luego la pestaña de la tarjeta SIM.
5. Deslice el interruptor de Datos móviles para activarlo o
desactivarlo.
Conexión de datos móviles
Si su contrato de telefonía móvil incluye la opción de datos móviles,
debería poder conectarse a Internet sin ninguna otra conguración
adicional. El ARCHOS sólo recibirá la señal si se encuentra en un área
cubierta por su proveedor de telefonía 4G o 3G.
Activación y desactivación de los datos móviles
ARCHOS 50E Helium book.indd 58 26/08/2015 14:29:56
Page 59

59
3
5
Español
Conexión WiFi
ADVERTENCIA: Asegúrese de que se encuentra en una zona con
cobertura WiFi. Puede acceder rápidamente a los ajustes WiFi desde la
barra de estado.
1. Toque y arrastre hacia abajo la barra de estado para
mostrarla.
2. Vuelva a tocar la barra para mostrar los ajustes rápidos.
3. Seleccione el icono WiFi para activar la conexión
WiFi .
4. Seleccione “WiFi” bajo el icono WiFi.
5. Toque el nombre de la red a la que se desee conectar.
Las redes privadas aparecen con un icono de candado, lo que
signica que deberá introducir una contraseña.
ARCHOS 50E Helium book.indd 59 26/08/2015 14:29:57
Page 60

60
Cuenta de Google & Contactos
Añadir una cuenta de Google
La cuenta de Google le permite aprovechar al máximo cualquier
aplicación o servicio de Google que desee utilizar.
1.
Vaya a “Settings” [Ajustes] > “Accounts” [Cuentas] > “Add account” [Añadir
cuenta].
2.
En tipo de cuenta, seleccione “Google”.
3.
Siga las instrucciones en pantalla para introducir los datos de la cuenta.
Una vez creada su cuenta, podrá acceder a Play Store, Gmail, Hangouts,
Maps y muchas otras aplicaciones.
Información sobre sincronización
Para poder ser guardada, la información debe estar sincronizada. Sus
datos se guardan en servidores de Google.
1.
Vaya a "Se tting s" [A juste s] > "Accoun ts" [ Cuenta s] > "Goo gle".
2.
Seleccione su cuenta.
Aparecerá la lista de información que puede sincronizarse.
La sincronización automática debe estar activada.
Para lanzar la sincronización, pulse el botón Menú
, y luego Sincronizar
ahora. De esta forma, podrá recuperar sus datos en caso de pérdida del
dispositivo o de la tarjeta SIM. Al añadir su cuenta de Google a un nuevo
dispositivo, se recogerá toda la información guardada.
ARCHOS 50E Helium book.indd 60 26/08/2015 14:29:57
Page 61

61
Español
Guardar sus contactos
Todos sus contactos están disponibles en todo momento en la web y
pueden sincronizarse con cualquier teléfono Android congurado con la
misma cuenta de Google.
1. Inserte la tarjeta SIM con sus contactos.
2. Desde la pantalla de Inicio o Todas las aplicaciones, seleccione la
aplicación Contactos .
3. Pulse el botón Me nú > "Import/Expor t" [Importar/exportar].
4. En Importar/exportar contactos, seleccione "Import from SIM card"
[Importar de USIM].
5. Seleccione su cuenta de Google.
6. Marque los contactos que desee importar y conrme.
7. Una vez los contactos importados en la cuenta de Google, vaya a “Ajustes”
> “Cuentas” > “Google”.
8. Seleccione su cuenta de Google.
9. Seleccione el botón Menú y luego “Sync now” [Sincronizar] para guardar
sus contactos en su cuenta de Google.
Sus contactos se guardarán a través de su cuenta de Google.
ARCHOS 50E Helium book.indd 61 26/08/2015 14:29:57
Page 62

62
Desplazamiento de un elemento de la pantalla de inicio:
Mantenga el dedo sobre él hasta que aparezcan líneas de cuadrícula de
posición; a continuación, deslícelo hasta la ubicación deseada y suelte
el dedo.
Eliminación de un elemento de la pantalla de inicio:
Mantenga el dedo sobre él, deslice el dedo hacia la parte superior de la
pantalla y déjelo caer sobre el icono Eliminar.
Desinstalación de un elemento:
En las pantallas Todas las aplicaciones, mantenga el dedo sobre él,
deslice el dedo hacia la parte superior de la pantalla y déjelo caer sobre
la papelera Desinstalar.
Creación de carpetas de aplicaciones:
Deje caer un icono de aplicación sobre otro en una pantalla de inicio y
los dos iconos se combinarán.
Para familiarizarse con Android
TM
ARCHOS 50E Helium book.indd 62 26/08/2015 14:29:57
Page 63

63
Español
Widgets:
Mantenga el dedo pulsado en una ubicación libre de una de las pantallas
principales. Toque “Widgets”.
Cambiar el fondo:
Mantenga el dedo pulsado en una ubicación libre de una de las pantallas
principales. Pulse “Fondos”.
Bloqueo de la pantalla táctil:
En el escritorio digital de ajustes rápidos de la barra de estado, toque
ajustes. Desplácese hacia abajo y toque Seguridad > Bloqueo de la
pantalla. Toque el tipo de bloqueo que desee utilizar. Tras denir aquí
un bloqueo, aparecerá una pantalla de bloqueo cuando se active la
pantalla, solicitando el patrón, PIN u otra clave especicada.
ARCHOS 50E Helium book.indd 63 26/08/2015 14:29:57
Page 64

64
Mi teléfono está bloqueado o no lo puedo encender
1. Retire la batería y vuelva a colocarlo en su lugar.
2. Cargue el dispositivo.
Mi teléfono no puede conectarse a la red o aparece un mensaje de “Sin
servicio”
Pruebe a conectarse desde otro lugar. Compruebe la cobertura de red de su
operador.
No consigo hacer llamadas
Asegúrese de que el teléfono esté conectado a una red y de que la red no esté
sobrecargada o indisponible.
No consigo recibir llamadas
Compruebe que su teléfono esté encendido y conectado a una red (verifique que
la red no esté sobrecargada o indisponible).
El PIN de mi tarjeta SIM está bloqueado
Póngase en contacto con su operador de telefonía para obtener el código PUK
(Clave de Desbloqueo Personal).
Para configurar una nueva red 4G:
En su dispositivo, pulse Ajustes.
1. Seleccione Conexiones inalámbricas y redes > Más... > Redes móviles.
2. En la conguración de red móvil, seleccione su operador en Operadores de red.
3. En la conguración de red móvil, seleccione Nombres de punto de acceso.
4. Seleccione para añadir nuevos parámetros e introducir los parámetros de
conexión exactos proporcionados por su proveedor 4G.
Resolución de problemas
ARCHOS 50E Helium book.indd 64 26/08/2015 14:29:57
Page 65

65
Italiano
Sommario
Contenuto della confezione......................................................................................
Descrizione del dispositivo........................................................................................
Introduzione...................................................................................................................
Connessione dati e Wi-Fi.............................................................................................
Account Google e contatti.........................................................................................
Conoscere AndroidTM...................................................................................................
Risoluzione dei problemi...........................................................................................
Per ulteriori informazioni, consultare le FAQ e il manuale utente del
vostro prodotto su www.archos.com. Accertarsi di aver letto questo
materiale prima di considerare l’eventuale restituzione del prodotto. Il
problema riscontrato potrebbe non essere davvero un problema!
Consultare la dichiarazione di conformità su http://www.archos.com/
it-it/support/support_tech/downloads.html
66
67
70
74
76
78
80
ARCHOS 50E Helium book.indd 65 26/08/2015 14:29:57
Page 66

66
Contenuto della confezione
Assicurarsi della presenza dei seguenti articoli nella confezione:
- ARCHOS 50E Helium
- Batteria
- Cua
- Cavo USB
- Caricatore
- Guida dell’utente
- Garanzia, note legali e sulla sicurezza
Gli articoli forniti con il dispositivo e gli accessori disponibili possono
variare in base al Paese o al gestore telefonico.
Gli articoli in dotazione sono progettati esclusivamente per il dispositivo
in questione e potrebbero non essere compatibili con altri dispositivi.
Accessori non approvati possono causare il malfunzionamento del
dispositivo.
ARCHOS 50E Helium book.indd 66 26/08/2015 14:29:57
Page 67

67
3
5
4
1 2
86
7
9
Italiano
Porta micro-USB
Jack per auricolare
Fotocamera anteriore
Altoparlanti
Sensore di luce
App recenti
Home/Google Now
Indietro
Microfono
Descrizione del dispositivo
1
2
3
4
5
6
7
8
9
ARCHOS 50E Helium book.indd 67 26/08/2015 14:29:58
Page 68

68
14
10
11
12
13
Descrizione del dispositivo
10
11
Fotocamera
Flash
Pulsante per il volume
Pulsanti ON/OFF
Altoparlanti
12
13
14
ARCHOS 50E Helium book.indd 68 26/08/2015 14:29:59
Page 69

69
Pulsanti ON/OFF: quando il
dispositivo è spento, premere a
lungo per accenderlo. Quando
il dispositivo è acceso, premere
brevemente per spegnere lo
schermo o premere a lungo per
visualizzare le opzioni.
Pulsante per il volume: premere
+/- per regolare il volume.
Premendo il pulsante, verranno
visualizzate le opzioni di notica.
È possibile selezionare quella più
appropriata.
App recenti: premere per
visualizzare le app usate di
recente.
Home: premere brevemente per
tornare alla schermata iniziale,
premere a lungo per accedere a
Google Now.
Indietro: premere per tornare alla
schermata precedente.
Porta micro-USB: collegare il
cavo in dotazione per caricare il
dispositivo o per connetterlo al
computer.
Jack per auricolare: collegare
gli auricolari in dotazione per
effettuare chiamate in viva voce.
Fotocamera & Flash: scattare foto
o registrare video. Per aumentare
la durata dei video, inserire una
scheda micro-SD. Attivare il ash
in ambienti bui e utilizzarlo come
torcia tramite le impostazioni
rapide.
Il sensore di luce oscura lo
schermo quando il dispositivo si
trova vicino all’orecchio durante
una chiamata.
Italiano
ARCHOS 50E Helium book.indd 69 26/08/2015 14:30:00
Page 70

70
Assemblaggio
Dopo aver estratto dalla confezione il telefono cellulare:
1. Rimuovere la copertura posteriore del dispositivo utilizzando il foro.
2. Inserire la scheda SIM o scheda micro-SD nello slot corrispondente.
3. Inserire la batteria del dispositivo.
4. Riposizionare la copertura posteriore.
Introduzione
4G/3G/2G 1 Quando si inserisce la scheda SIM o la scheda
micro-SD, assicurarsi di seguire quanto illustrato
per evitare di danneggiare lo slot o la scheda.
2G 2
Scheda micro-SD 3
ARCHOS 50E Helium book.indd 70 26/08/2015 14:30:00
Page 71

71
123
Italiano
Sollevare la copertura
posteriore facendo leva sulla tacca
ARCHOS 50E Helium book.indd 71 26/08/2015 14:30:01
Page 72

72
Suggerimenti:
Il dispositivo disattiva il touch screen quando non lo si utilizza per un
periodo determinato. Per attivare lo schermo, premere il pulsante
ON/OFF. Per impostare la durata, andare su Settings (Impostazioni)>
Display> Sleep (Sospensione).
Accensione
1. Inserire il cavo di ricarica nella porta micro-USB e collegarlo al
caricabatterie.
Prima di utilizzare il dispositivo per la prima volta, caricare
completamente la batteria.
2. Te ne re p r em ut o i l pu l sa nt e O N/ OF F p er a c ce nd er e i l di s po si t iv o.
Alla prima accensione di ARCHOS, l'installazione guidata supporterà
l'utente nella congurazione del dispositivo.
3. Seguire le istruzioni.
Se l'utente ha inserito una scheda SIM, potrebbe essere richiesto un
codice PIN.
Inserire con attenzione il codice PIN.
Introduzione
ARCHOS 50E Helium book.indd 72 26/08/2015 14:30:01
Page 73

73
5
4
1
2
3
Italiano
Schermata iniziale
1. Far scorrere il
dito verso destra
per accedere a Google Now.
2. Premere
per accedere a tutte le
applicazioni.
3. Toccare a lungo
un'app
per spostarla e creare una
nuova schermata iniziale.
4. Pronunciare
"Ok Google"
per avviare la pagina di ricerca.
5. Trascinare verso il basso la barra di stato e premere
per visualizzare le impostazioni rapide.
ARCHOS 50E Helium book.indd 73 26/08/2015 14:30:02
Page 74

74
3
4
5
Connessione dati
Se il piano tariario del telefono cellulare include l'opzione della
connessione dati, è possibile connettersi a Internet senza ulteriori
congurazioni. Il dispositivo ARCHOS mostrerà il segnale solo se l'utente
si trova in un'area coperta dalla rete 4G o 3G dell'operatore telefonico.
Attivazione/Disattivazione della connessione dati
Connessione dati e Wi-Fi
1. Toccare e tirare verso il basso la barra di stato per
visualizzarla.
2. Toccare di nuovo la barra per visualizzare le impostazioni
rapide.
3. Selezionare l'icona "Settings" [Impostazioni].
4. In "Wireless & networks" [Wireless e reti], selezionare
"Data usage" [Uso dati], quindi la scheda della SIM card.
5. Scorrere il dito per attivare/disattivare l'opzione "Mobile
data" [Connessione dati].
ARCHOS 50E Helium book.indd 74 26/08/2015 14:30:02
Page 75

75
3
5
IT
Italiano
Connessione Wi-Fi
AVVERTENZA: assicurarsi di essere in una zona Wi-Fi. È possibile accedere
rapidamente alle impostazioni Wi-Fi dalla barra di stato.
1. Toccare e tirare verso il basso la barra di stato per
visualizzarla.
2. Toccare di nuovo la barra per visualizzare le impostazioni
rapide.
3. Selezionare l'icona del Wi-Fi per attivare la
connessione Wi-Fi .
4. Selezionare "Wi-Fi" sotto l'icona del Wi-Fi.
5. Toccare il nome della rete a cui l'utente desidera
connettersi.
Le reti private vengono mostrate con un'icona di blocco e
richiedono l'inserimento della password.
ARCHOS 50E Helium book.indd 75 26/08/2015 14:30:02
Page 76

76
Account Google e contatti
Aggiunta di un account Google
Un account Google consente di sfruttare al meglio tutte le applicazioni e i
servizi di Google che è possibile utilizzare.
1. Andare a "Impostazion i" > "Account"> "Aggiungi account".
2. Selezionare il tipo di account "Google" da aggiungere.
3. Seguire le istruzioni a schermo per inserire le informazioni relative
all'account.
Una volta che l'account è stato creato, è possibile accedere a Play Store,
Gmail, Hangouts, Maps e molte altre applicazioni.
Sincronizzazione di informazioni
Le informazioni devono essere sincronizzate per essere salvate. I tuoi dati
vengono salvati sui server di Google.
1. Andare a "Impostazion i"> "Account"> "Google".
2. Selezionare il proprio account.
Viene visualizzato l’elenco di informazioni che si possono sincronizzare.
La sincronizzazione automatica dev’essere attivata.
Se si desidera avviare la sincronizzazione, premere il pulsante Menu ,
quindi Sincronizza ora. È possibile recuperare i dati in caso di smarrimento
del dispositivo o della scheda SIM. Quando l’utente aggiunge il proprio
account Google a un nuovo dispositivo, tutte le informazioni salvate
vengono raccolte.
ARCHOS 50E Helium book.indd 76 26/08/2015 14:30:02
Page 77

77
Italiano
Salvataggio dei contatti
Tutti i propri contatti sono sempre disponibili sul web e possono essere
sincronizzati con qualsiasi telefono Android che è impostato con lo
stesso account Google.
1. Installare la scheda SIM con i contatti presenti nel telefono.
2. Da una schermata Home o Tutte le Applicazioni, selezionare l'applicazione
Contatti .
3. To cc ar e i l pu l sa nt e M en u > Impor ta/Esporta.
4. In Importa/Esporta contatti, selezionare Importa da scheda SIM.
5. Seleziona il tuo account Google.
6. Controll a i contatti da im portare e confer mali.
7. Una volta che i contatti vengono importati nell’account Google, vai su
“Settings” (Impostazioni) > “Account”> “Google”.
8. Scegliere il proprio account Google.
9. Selezionare il pulsante Menu , quindi "Sincronizza ora". I contatti sono
salvati sul proprio account Google.
ARCHOS 50E Helium book.indd 77 26/08/2015 14:30:03
Page 78

78
Spostare una voce della schermata iniziale:
Selezionare e tenere il dito su di essa no a quando si visualizzano le
linee della griglia di posizionamento, quindi scorrere nella posizione
desiderata e togliere il dito.
Rimuovere una voce della schermata iniziale:
Selezionare e tenerla, scorrere il dito verso la parte superiore dello
schermo e lasciare sull’icona Rimuovi.
Disinstallare una voce:
Dalle schermate Tutte le applicazioni, selezionare e tenere, scorrere il dito
verso la parte superiore dello schermo e lasciare su Cestino disinstalla.
Creare cartelle di applicazioni:
Lasciare un’icona di applicazione su un’altra icona della schermata
iniziale e le due icone si combineranno.
Conoscere Android
TM
ARCHOS 50E Helium book.indd 78 26/08/2015 14:30:03
Page 79

79
Italiano
Widget:
Tenere premuto con il dito un punto vuoto della schermata iniziale.
Toccare “Widget”.
Modicare lo sfondo:
Tenere premuto con il dito un punto vuoto della schermata iniziale.
Toccare “Wallpapers” [Sfondi].
Blocco del touchscreen:
Dal pannello delle impostazioni rapide nella barra di stato, selezionare
impostazioni. Scorrere e selezionare protezione. Bloccare il touchscreen.
Selezionare il tipo di blocco che si desidera usare. Dopo aver impostato
un blocco, un lucchetto viene visualizzato ogni volta che lo schermo si
apre, richiedendo sequenza, PIN o altra chiave specicata.
ARCHOS 50E Helium book.indd 79 26/08/2015 14:30:03
Page 80

80
Il telefono è bloccato o non si accende
1. Rimuovere la batteria e reinstallarlo nuovamente.
2. Caricare il dispositivo.
Il mio telefono non riesce a connettersi a una rete o visualizza il messaggio
“No service”
Provare a connettersi in un altro luogo. Verificare la copertura di rete con
l’operatore.
Impossibile effettuare chiamate in uscita
Assicurarsi che il telefono sia connesso a una rete, e che la rete non sia sovraccarica
o non disponibile.
Impossibile ricevere chiamate in arrivo
Assicurarsi che il telefono sia acceso e collegato ad una rete (controllare che la rete
non sia sovraccarica o non disponibile).
PIN della scheda SIM bloccato
Contattare l’operatore di rete per ottenere il codice PUK (Personal Unblocking Key).
Per configurare una nuova rete 4G:
Sul dispositivo, toccare “Settings” [Impostazioni].
1. Selezionare “Wireless & networks” [Wireless e reti] > “More...” [Altro...] > “Mobile
networks” [Reti di telefonia mobile].
2. Nelle impostazioni delle reti di telefonia mobile, selezionare il proprio operatore
in “Network operators” [Operatori telefonici].
3. Nelle impostazioni delle reti di telefonia mobile, selezionare “Access point names”
[Nome del punto di accesso].
4. Selezionare per aggiungere nuovi parametri e inserire i parametri di
connessione esatti forniti dall’operatore 4G.
Risoluzione dei problemi
ARCHOS 50E Helium book.indd 80 26/08/2015 14:30:03
Page 81

81
Nederlands
Inhoudsopgave
Inhoud van de verpakking.........................................................................................
Beschrijving van het apparaat..................................................................................
Aan de slag......................................................................................................................
Mobiele data & WiFi-verbinding..............................................................................
Scherm Google account & Contacten...................................................................
Vertrouwd raken met Android
TM
..............................................................................
Probleemoplossing.......................................................................................................
82
83
86
90
92
94
96
Raadpleeg voor meer informatie de veelgestelde vragen (FAQ's) op
www.archos.com. Lees eerst de antwoorden op deze vragen voordat u
het product terugstuurt. Uw probleem is dan mogelijk snel opgelost.
Aangezien wij onze producten regelmatig updaten en verbeteren,
kunnen de vormgeving en/of de functies van uw apparaatsoftware
afwijken van de software in deze Verkorte handleiding.
Raadpleeg de verklaring van overeenstemming op http://www.archos.
com/nl-nl/support/support_tech/downloads.html
ARCHOS 50E Helium book.indd 81 26/08/2015 14:30:03
Page 82

82
Inhoud van de verpakking
Controleer of de volgende onderdelen in de verpakking zitten:
- ARCHOS 50E Helium
- Batterij
- Headset
- USB-kabel
- Lader
- Gebruikershandleiding
- Garantie, wettelijke mededelingen en veiligheidsvoorschriftem
De onderdelen die bij het apparaat zijn meegeleverd en de accessoires
die verkrijgbaar zijn, verschillen per land en per service provider.
De meegeleverde onderdelen zijn uitsluitend bestemd voor uw
apparaat en zijn mogelijk niet compatibel met andere apparaten.
Niet goedgekeurde accessoires kunnen tot storingen van het apparaat
leiden.
ARCHOS 50E Helium book.indd 82 26/08/2015 14:30:03
Page 83

83
3
5
4
1 2
86
7
9
Nederlands
Beschrijving van het apparaat
Micro-USB-poort
Aansluiting voor headset
Camera aan de voorkant
Luidspreker
Lichtsensor
Recente apps
Home/Google Now
Vorige
Microfoon
1
2
3
4
5
6
7
8
9
ARCHOS 50E Helium book.indd 83 26/08/2015 14:30:04
Page 84

84
14
10
11
12
13
Beschrijving van het apparaat
10
11
Camera
Flash
Volumeknoppen
AAN/UIT-knop
Luidspreker
12
13
14
ARCHOS 50E Helium book.indd 84 26/08/2015 14:30:05
Page 85

85
AAN/UIT-knop: Wanneer
het apparaat is uitgeschakeld:
ingedrukt houden om in te
schakelen. Wanneer het apparaat
is ingeschakeld: kort indrukken
om het scherm uit te schakelen,
ingedrukt houden om de opties
weer te geven.
Volumeknoppen: druk op
+/- om het volume te regelen.
Wanneer u op de knop drukt
worden de waarschuwingsopties
weergegeven. U kunt de meest
geschikte opties kiezen.
Recente apps: drukken om
recente apps weer te geven.
Home: kort drukken om terug
te keren naar het beginscherm,
ingedrukt houden om Google
Now te openen.
Vorige: drukken om terug te gaan
naar het vorige scherm.
Micro-USB-poort: sluit de
meegeleverde kabel aan om het
apparaat op te laden of om het
aan te sluiten op een computer.
Aansluiting voor headset: sluit
de meegeleverde oortjes aan om
handsfree te bellen.
Camera & Flash: maak foto’s of
lmpjes. Om langere lmpjes
op te nemen, kunt u een micro-
SD-kaart plaatsen. Schakel in
donkere omgevingen de itsoptie
in en gebruik de its als zaklamp
via de snelinstellingen.
De lichtsensor schakelt het
scherm uit wanneer het apparaat
zich dicht bij uw oor bevindt
tijdens een telefoongesprek
Nederlands
ARCHOS 50E Helium book.indd 85 26/08/2015 14:30:06
Page 86

86
Montage
Na het uitpakken van de mobiele telefoon:
1. Ver wijd er de acht erkl ep va n het appa raat via d e ink eping .
2. Plaats de SIM -kaart of micro-SD-ka art in de betreende sleuf.
3. Plaats de batter ij van het apparaat.
4. Plaats de achter klep terug.
Aan de slag
4G/3G/2G 1 Kijk tijdens het plaatsen van een SIM-kaart of micro-
SD-kaart goed naar de afbeelding. Anders beschadigt u
mogelijk de sleuf of de kaart.
2G 2
Micro-SD-kaart 3
ARCHOS 50E Helium book.indd 86 26/08/2015 14:30:06
Page 87

87
123
Nederlands
breng de achterklep voorzichtig
omhoog via de inkeping.
ARCHOS 50E Helium book.indd 87 26/08/2015 14:30:06
Page 88

88
Tip:
Als u het apparaat gedurende een ingestelde tijdsduur niet gebruikt,
wordt het scherm uitgeschakeld. Om het scherm weer in te schakelen,
drukt u op de AAN/UIT-knop. Om de duur in te stellen, gaat u naar
Settings > Display > Sleep [Instellingen > Display > Stand-by].
Inschakelen
1. Sluit de oplaadkabel aan op de Micro-SB-poort en sluit de kabel aan op
de oplader.
Voordat u het apparaat gaat gebruiken, moet u eerst de batterij
helemaal opladen.
2. Houd de AAN/UIT-knop ingedrukt om het apparaat in te schakelen.
De eerste keer dat u uw ARCHOS opstart, helpt de installatiewizard u bij
het instellen van uw apparaat.
3. Vol g de aanwi jzing en.
Wanneer u een SIM-kaart heeft geplaatst, moet u mogelijk een PIN-code
invoeren.
Voorkom de invoer van een onjuiste pincode.
Aan de slag
ARCHOS 50E Helium book.indd 88 26/08/2015 14:30:06
Page 89

89
5
4
1
2
3
Nederlands
Op het beginscherm
1. Veeg naar
rechts
om Google Now te openen
2. Druk op
voor toegang tot alle apps
3. Houd uw
vinger op
een app
om deze naar rechts te
verplaatsen en een nieuw
beginscherm te maken.
4. Zeg "Ok
Google"
om een zoekpagina te openen.
5. Sleep de statusbalk naar beneden en druk dan op de
statusbalk om de snelinstellingen weer te geven.
ARCHOS 50E Helium book.indd 89 26/08/2015 14:30:07
Page 90

90
3
4
5
Mobiele dataverbinding
Wanneer uw mobiele telefoonabonnement een optie voor mobiele data
bevat, dan heeft u, als het goed is, meteen internetverbinding, zonder
verdere installatie. De ARCHOS heeft alleen signaal in een gebied met
dekking door uw 4G- of 3G-netwerkaanbieder.
Mobiele data inschakelen/uitschakelen
Mobiele data & WiFi-verbinding
1. Trek de statusbalk omlaag om deze weer te geven.
2. Raak de balk nogmaals aan om de snelinstellingen weer
te geven.
3. Selecteer het pictogram Settings [Instellingen].
4. Bij Wireless & networks [Draadloos & Netwerken]
kiest u Data usage [Datagebruik] en dan de tab SIM card
[Sim-kaart].
5. Verschuif de schakelaar voor mobiele data om in en uit
te schakelen.
ARCHOS 50E Helium book.indd 90 26/08/2015 14:30:07
Page 91

91
3
5
NL
Nederlands
WiFi-verbinding
WAARSCHUWING: Controleer of u zich in een WiFi-zone bevindt. Vis de
statusbalk heeft u snel toegang tot de WiFi-instellingen.
1. Trek de statusbalk omlaag om deze weer te geven.
2. Raak de balk nogmaals aan om de snelinstellingen weer
te geven.
3. Kies het WiFi-pictogram om de WiFi-verbinding in
te schakelen .
4. Kies "WiFi" onder het WiFi-pictogram.
5. Tik op de naam van het netwerk waarmee u verbinding
wilt maken.
Privé-netwerken worden weergegeven met een slot-
pictogram en vereisen de invoer van een wachtwoord.
ARCHOS 50E Helium book.indd 91 26/08/2015 14:30:07
Page 92

92
Google account & Contacten
Een Google account toevoegen
Met een Google account kunt u het meeste uit uw Google apps en
voorzieningen halen.
1. Ga naar“Settings” [Instellingen] > “Accounts” > “Add account” [Account
toevoegen].
2. Kies het accounttype "Google" om toe te voegen.
3. Vol g de aanwi jzing en op het scher m om de a ccoun tgege vens i n te voere n.
Nadat u een account heeft aangemaakt, heeft u toegang tot Play Store,
Gmail, Hangouts, Maps en diverse andere apps.
Gegevens synchroniseren
Gegevens die u wilt opslaan, moet u eerst synchroniseren. Van uw
gegevens wordt een back-up gemaakt op Google-servers.
1. Ga naar“Settings” [Instellingen] > “Accounts” > “Google”.
2. Kies uw account.
De lijst met informatie die kan worden gesynchroniseerd, wordt
weergegeven. Automatisch synchroniseren moet ingeschakeld zijn.
Als u wilt synchroniseren, drukt u op de Menu-knop en vervolgens
op Sync now [Nu synchroniseren]. Uw gegevens blijven bewaard bij
verlies van uw apparaat of SIM-kaart. Wanneer uw Google account wordt
toegevoegd aan een nieuw apparaat, worden alle opgeslagen gegevens
verzameld.
ARCHOS 50E Helium book.indd 92 26/08/2015 14:30:08
Page 93

93
Nederlands
Contacten opslaan
Uw contacten zijn altijd beschikbaar op internet en kunnen worden
gesynchroniseerd met alle Android-telefoons die via hetzelfde Googleaccount zijn gecongureerd.
1. Plaats de SIM -kaarten met uw contacten in uw telefoon.
2. In het beginscherm of in het scherm "Alle Apps" kiest u de app
"Contacten" .
3. Tik op de menuknop > "Import/Export" [Impor teren/Exporteren].
4. Bij "Import/export contacts" [Contacten importeren/exporteren] kiest u
"Import from SIM card" [Importeren van SIM-kaart].
5. Kies uw Google-account.
6. Controle er de contacten d ie u wilt impor teren en bevestig deze.
7. Na het importeren van de contacten in de Google account gaat u naar
“Settings” > “Accounts” > “Google” [Instellingen > Accounts > Google].
8. Kies uw Google-account.
9. Tik op de menuknop en dan “Sync now” [Nu synchroniseren].
10. Uw contacten worden opgeslagen op uw Google-account.
ARCHOS 50E Helium book.indd 93 26/08/2015 14:30:08
Page 94

94
Het verplaatsen van een item op het startscherm:
Tik en houd uw vinger op zijn plaats tot de positioneringsrasterlijnen
verschijnen, dan schuift u deze naar de gewenste locatie en laat uw
vinger vervolgens weer los.
Het verwijderen van een item op het startscherm:
Tik en houd uw vinger op het item en schuif dit vervolgens naar de
bovenkant van het scherm en zet het op het pictogram Verwijderen.
Verwijderen van een item:
Tik in de schermen Alle apps op het item en houd uw vinger daar, schuif
vervolgens uw vinger in de richting van de bovenkant van het scherm
en plaats het item op de prullenbak Verwijderen.
Het aanmaken van applicatiemappen:
Plaats op een startscherm het ene app-pictogram op het andere, en de
twee pictogrammen worden gecombineerd.
Vertrouwd raken met Android
TM
ARCHOS 50E Helium book.indd 94 26/08/2015 14:30:08
Page 95

95
Nederlands
Widgets:
Houd uw vinger op een lege plek van een beginscherm. Tik op “ Widgets”.
Achtergrond wijzigen:
Houd uw vinger op een lege plek van een beginscherm.
Tik op “Wallpapers” [Achtergrond].
Het vergrendelen van het aanraakscherm:
Tik vanuit het snelinstellingen-dashboard op instellingen. Scroll naar
beneden en tik op veiligheid. Tik op Scherm vergrendelen. Tik op het
type slot dat u wilt gebruiken. Nadat u hier een slot hebt ingesteld,
wordt er een vergrendelscherm weergegeven wanneer uw scherm
‘wakker’ wordt, dat om het patroon, de PIN of een andere specieke
toets vraagt.
ARCHOS 50E Helium book.indd 95 26/08/2015 14:30:08
Page 96

96
Probleemoplossing
Mijn telefoon doet niets meer of kan niet worden ingeschakeld
1. Verwijder de batterij en opnieuw installeren.
2. Laad uw apparaat op.
Mijn telefoon kan geen verbinding maken met een netwerk of “Geen service” wordt
weergegeven
Probeer op een andere locatie verbinding te maken. Informeer bij uw beheerder naar uw
netwerkdekking.
Ik kan geen uitgaande gesprekken voeren
Controleer of uw telefoon is verbonden met een netwerk en of het netwerk overbelast of
niet beschikbaar is.
Ik kan geen inkomende gesprekken ontvangen
Controleer of uw telefoon is ingeschakeld en is verbonden met een netwerk (controleer of
het netwerk overbelast of niet beschikbaar is).
PIN-code van SIM-kaart geblokkeerd
Neem contact op met uw netwerkbeheerder voor de PUK-code (Personal Unblocking Key).
Een 4G-netwerk configureren:
Tik op Settings [Instellingen] op het apparaat.
1. Kies Wireless & Networks [Draadloos en netwerken] > More [Meer] > Mobile networks
[Mobiele netwerken].
2. Bij Mobile network settings [Mobiele netwerkinstellingen] kiest u uw beheerder bij
Network operators [Netwerkbeheerders].
3. Bij Mobile network settings [Mobiele netwerkinstellingen] kiest u Access point names
[Toegangspunten].
4. Kies om nieuwe parameters toe te voegen en voer de exacte verbindingsparameters
in die u heeft gekregen van uw 4G-aanbieder.
ARCHOS 50E Helium book.indd 96 26/08/2015 14:30:08
Page 97

97
Português
Índice
Conteúdo da embalagem........................................................................................
Descrição do dispositivo..........................................................................................
Introdução.....................................................................................................................
Dados móveis e ligação Wi-Fi..................................................................................
Ecrã da conta Google e contactos.........................................................................
Familiarizar-se com AndroidTM................................................................................
Resolução de problemas..........................................................................................
98
99
102
106
108
110
112
Para mais informações, consulte as perguntas frequentes (FAQs) em
www.archos.com. Certique-se de que as lê antes de devolver qualquer
produto. O seu problema ter uma resolução muito simples. Como
atualizamos e melhoramos frequentemente os nossos produtos, o
software do seu dispositivo pode ter uma aparência ou funcionalidade
ligeiramente diferente daquela que é apresentada neste Guia de
Referência Rápida.
Consulte a declaração de conformidade em http://www.archos.com/
pt-en/support/support_tech/downloads.html
ARCHOS 50E Helium book.indd 97 26/08/2015 14:30:08
Page 98

98
Conteúdo da embalagem
Verique se tem os seguintes itens na embalagem do seu produto:
- ARCHOS 50E Helium
- Bateria
- Headset
- Cabo USB
- Carregador
- Guia do usuário
- Garantia, avisos legais e de segurança
Os itens fornecidos com o seu dispositivo e os acessórios disponíveis
podem variar entre regiões e fornecedores de serviços.
Os itens fornecidos foram concebidos exclusivamente para o seu
dispositivo e podem ser incompatíveis com outros dispositivos.
O uso de acessórios não aprovados pode resultar em mau
funcionamento do seu dispositivo.
ARCHOS 50E Helium book.indd 98 26/08/2015 14:30:08
Page 99

99
3
5
4
1 2
86
7
9
Português
Descrição do dispositivo
Porta Micro-USB
Entrada do auricular
Câmara dianteira
Coluna
Sensor de luz
Aplicações recentes
Início/Google NOW
Voltar
Microfone
1
2
3
4
5
6
7
8
9
ARCHOS 50E Helium book.indd 99 26/08/2015 14:30:09
Page 100

100
14
10
11
12
13
Descrição do dispositivo
11
10
Câmara
Flashlight
Botões de volume
Ligar/desligar
Coluna
13
12
14
ARCHOS 50E Helium book.indd 100 26/08/2015 14:30:09
 Loading...