

Page 1

1
1105
05
MP3 & WMA Digital Music Player
•
Photo Viewer
•
Video Player
•
ENGLISH USER MANUAL Version 1.1
Please visit www.archos.com/manuals to download the latest version of this manual.
Entertainment
way
1
2
An introductory note from ARCHOS
Dear Customer,
Thank you for choosing this ARCHOS product. We hope that you will enjoy using it and that it will give you
satisfaction for many years to come.
Please do register your product on our website (www.archos.com/register) to ensure that you get access to our
help line and to be informed of free software updates for your product.
Wishing you the best Multimedia experience,
The ARCHOS T eam.
__________
All the information contained in this manual was correct at the time of publication. However, as we are often
updating and improving our products, your device’s software may have a slightly different appearance or modifi ed
functionality than presented in this manual.
2
Page 2

3
TTable of Contents
able of Contents
1 Ports, Buttons, and Connections 5
2 First Time Usage 6
2.1 Charging the Battery 6
2.2 Turning the ARCHOS 105 ON and OFF 6
2.3 Changing the Interface language 6
2.4 Caring for the ARCHOS 105 7
3 Playing Music 8
3.1 Playing a Music File 8
3.2 Play Screen and Button Control 9
3.3 Playback Menu Items 11
3.4 ARCLibrary Specifi cs 11
3.5 ARCLibrary Updating 12
3.6 Setting a Bookmark 12
3.7 The Resume Function 12
3.8 Locking the ARCHOS 105 Buttons 13
4 Putting Music onto your ARCHOS 105 14
4.1 Synchronizing Music from Windows Media® Player (WMP) to the ARCHOS 105 14
4.2 Comparison of Windows Media Player 10 and 11 to Windows Media Player 9 15
4.3 Transferring your CD collection to the ARCHOS 105 15
4.4 Installing Windows Media
4.5 Installing Windows Media
5 Playlists 17
5.1 Creating a new Playlist 17
5.2 Loading a Playlist 18
5.3 Playing a Playlist 18
5.4 Playlist Menu Options 18
6 Settings 20
6.1 Changing the Sound Settings 20
6.2 Changing the PlayMode Settings 22
6.3 Changing the time & date settings 23
6.4 Changing the Display Settings 24
®
Player (WMP) 9 16
®
Player (WMP) 10 or 11 16
4
6.5 Changing the Power Settings 25
6.6 Changing the System Settings 26
7 Using the Browser 27
7.1 Inside the MUSIC Folder 27
7.2 Navigating the Directory Structure 28
7.3 File and Folder Operations in Browser Mode 29
7.4 Using the Virtual Keyboard 30
8 Viewing Photos with your ARCHOS 105 32
8.1 Using the Photo Browser 32
8.2 Photo Browser Contextual Menu 33
8.3 Transferring Photos to your ARCHOS 105 34
9 Playing videos with your ARCHOS 105 35
9.1 Playing video 35
9.2 Putting Videos onto your ARCHOS 105 35
10 Connecting the ARCHOS 105 to a Stereo system 37
11 Connecting the ARCHOS 105 to your Computer 38
11.1 USB Connection Type (‘Hard Drive’ or ‘Windows Device’) 38
11.2 Connecting the ARCHOS 105 38
11.3 Disconnecting the ARCHOS 105 from your Computer 39
12 Updating the ARCHOS 105 Firmware 42
12.1 Download the fi rmware_a105.AOS fi le 42
12.2 Copy to ARCHOS 105 root and Update 42
12.3 ‘Hard Drive’ or ‘Windows Device’? 43
12.4 Activate the Update 43
13 Technical Specifi cations 44
14 Technical Support 45
7.3.1 Contextual Menu on a File 29
7.3.2 Contextual Menu on a Folder 29
7.3.3 Contextual Menu while in the Double Browser 30
8.3.1 Transferring Photos in Hard Drive Mode 34
8.3.2 Transferring Photos in Windows Device Mode 34
3
4
Page 3
5
1
Ports, Buttons, and Connections
2
First Time Usage
2.1 Charging the Battery
2.2 Turning the ARCHOS 105 ON and OFF
2.3 Changing the Interface language
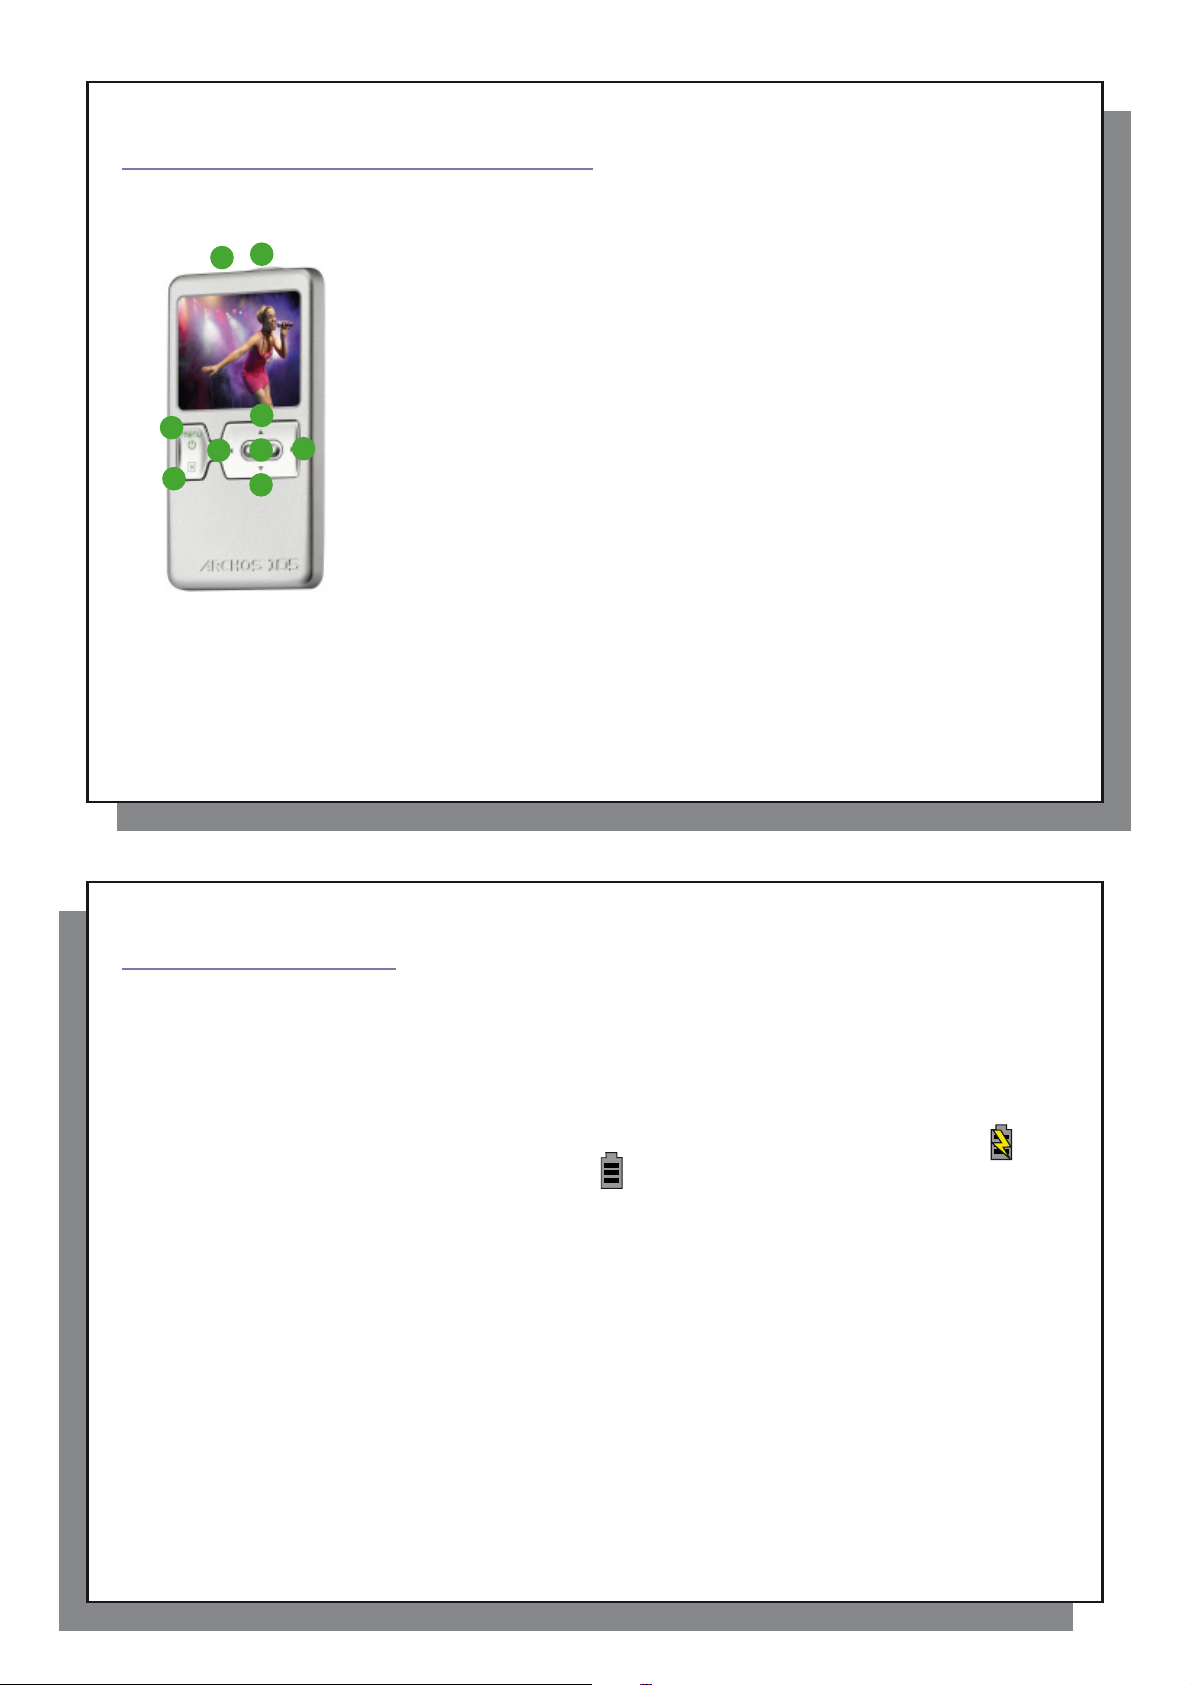
Ports, Buttons, and Connections
1
A
B
C
D
E
H
I
G
F
A Headphone Jack
B USB 2.0 port – To connect your ARCHOS device to a computer, to transfer fi les
and/or charge the battery.
C On button (hold 3 seconds) & Menu options
D Off button (hold 3 seconds) & Stop/Escape*
Navigation pad
E Move Up & increase volume
F Move Down & decrease volume
G Move Left (decrease value) or audio/video rewind
H Move Right (increase value) or audio/video fast forward
I Play/Pause/Resume/Enter
* Hardware reset: in the event that the ARCHOS 105 freezes operation, you can reset your device by holding down on the
STOP/ESC button for 15 seconds.
6
First Time Usage
2
2.1 Charging the Battery
Before using your ARCHOS 105 for the fi rst time, completely charge the battery.
• The ARCHOS 105 is charged through its USB connector. Connect the included USB cable to a running
computer and plug the other end into the ARCHOS 105 while it is off. This will charge its internal battery.
• A lightning bolt symbol will fl ash over the battery icon in the status bar while the battery is charging:
• It will stop fl ashing when the battery is fully charged:
2.2 Turning the ARCHOS 105 ON and OFF
5
.
.
• Press and hold the ON/Menu button until the screen comes on.
• The ARCHOS 105 will automatically shut off after a given amount of time if no buttons are pressed. T o conserve
battery energy, the backlight will automatically shut of f. You can change these parameters in Setup > Power .
• Press and hold the Stop/of f button until the ARCHOS 105 shuts off.
2.3 Changing the Interface language
• English is selected as the default language for your ARCHOS 105 user interface. You can choose another
language by going to Setup > Display .
6
Page 4
7
2.4 Caring for the ARCHOS 105
3
Playing Music
3.1 Playing a Music File
2.4 Caring for the ARCHOS 105
The ARCHOS 105 is an electronic product that needs to be treated with care.
• Do not subject it to unnecessary shock or vibration.
• Do not subject it to heat. Keep it ventilated (especially when connected to a computer).
• Keep the ARCHOS 105 away from water and excessively humid areas.
• Keep the ARCHOS 105 away from high electromagnetic fi elds.
8
Playing Music
3
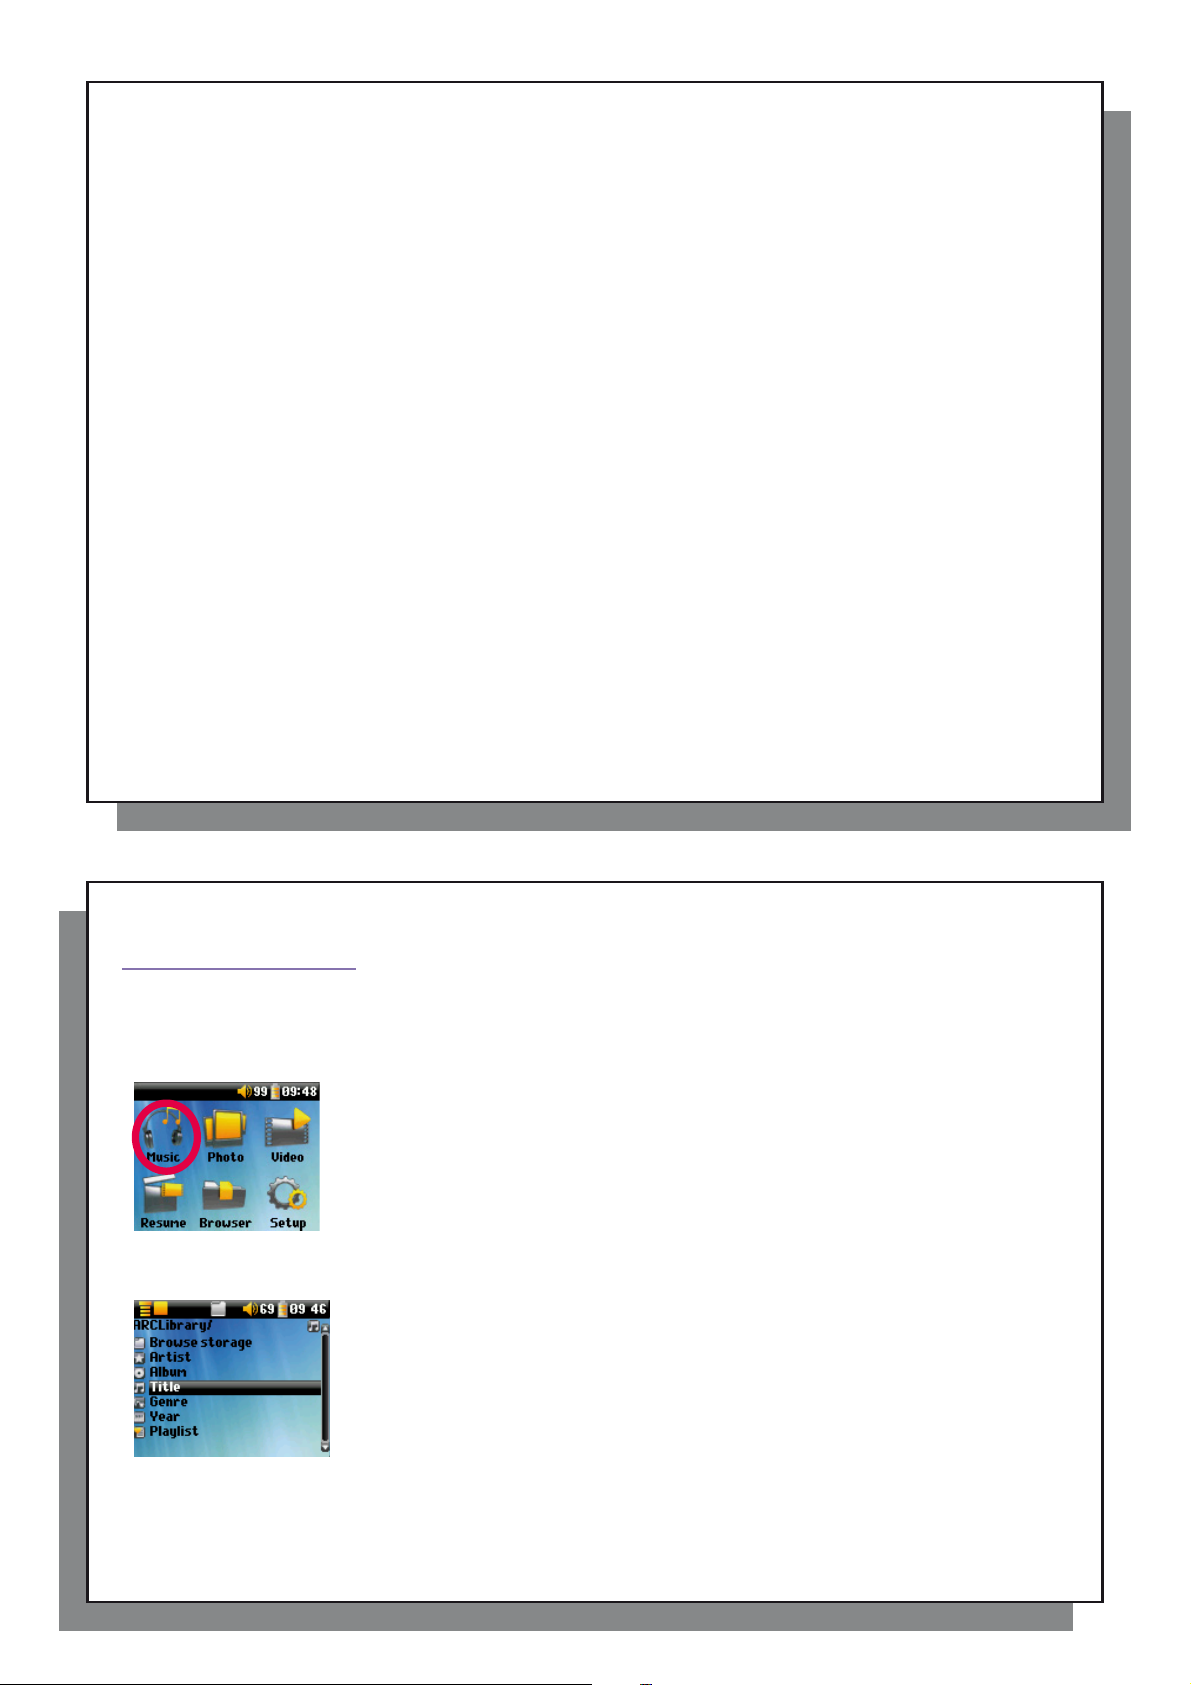
Once the ARCHOS 105 has been turned on, the following screen is displayed. Y ou can select the major functions
from this main menu.
• Music : Browse through the folder Music or use the ARCLibrary music selection system.
• Photo : Browse through and view all the pictures on your ARCHOS 105.
• Video : Navigate through the Video folder and watch your videos.
• Resume : Resume playing from the last place you stopped.
• Browser : Browse through and manage all of the other fi les on your ARCHOS 105.
• Setup: Set the parameters of your ARCHOS 105 to your personal taste.
3.1 Playing a Music File
To select a music fi le, use the navigation controls UP and DOWN to move upwards or downwards and ENTER
to enter a highlighted subfolder or tag category. Click ENTER to play the highlighted song. Use LEFT to leave a
folder and go back to the previous level.
8
7
By clicking on the Music icon in the main menu screen, you will enter into a ‘music only’
mode. File types other than WMA, WAV, and MP3 that may be in those folders will be
fi ltered from view.
There are two ways to access your music, by selecting Browse storage (Internal
Memory) or by searching the songs’ tag information, Artist, Album, Title, etc . In the
case of Browse storage (Internal Memory), you will be sent directly to the Music folder
of your ARCHOS 105. Here you can look at all your music fi les and the folders of your
ARCHOS 105 as if you were browsing fi les with a computer. The other way is to browse
your music by tag information, artist, album, song name, year, or genre. The Unknown
category indicates that the fi le has no tag data.
Page 5
9
3.2 Play Screen and Button Control
Play Status Play Order
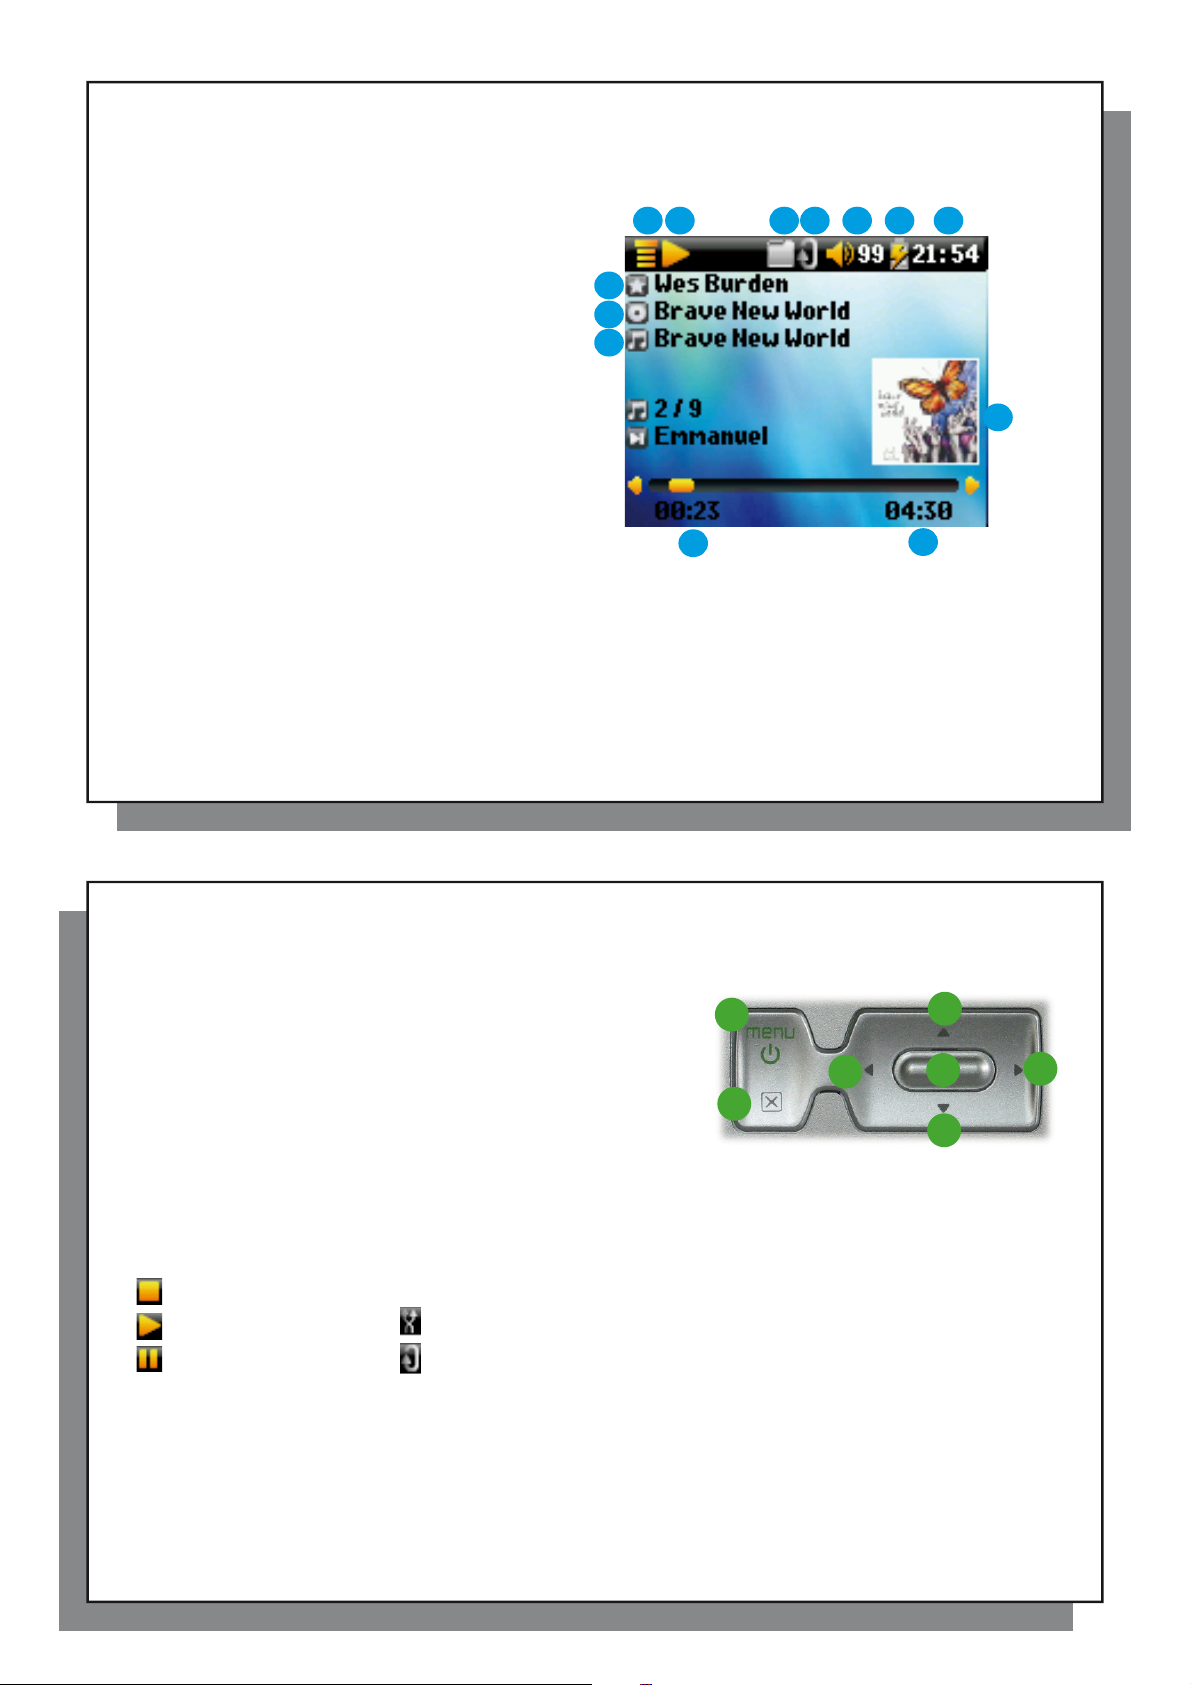
3.2 Play Screen and Button Control
(1) Menu available
(2) Artist* or parent folder
(3) Album* or current folder
(4) Song title* or fi le name
(5) Status: playing
(6) Play Mode: Folder
(7) Play Order: Repeat
(8) Volume (0-99)
(9) Battery level
(10) Clock
(1 1) Song elapsed time
(12) Song remaining time
(13) Album cover (if it is available)
*If the fi le contains these tag data
1
5 6 7 8 9
2
3
4
11
10
13
12
10
A Play/pause/resume song
B Increase the volume
C Click once: Play the next song in the folder or playlist.
Hold: Fast forward through the song.
D Decrease the Volume
E Click once: Play the previous song in the folder or playlist
(during fi rst 10 seconds of song) otherwise go to the beginning
of the song.
Hold: Fast reverse through the song.
F Stop Song
G Hold for 3 seconds to lock/unlock the buttons.
Play Status Play Order
Stopped (no icon) Play once
Playing a track Shuffl e (Random) track selection
Current track is paused Repeat playing
The top status bar indicates the status and play settings that you have given. See the Settings chapter for a
description of the Playmode options.
G
F
E
B
A
D
9
C
10
Page 6
11
3.3 Playback Menu Items
3.4 ARCLibrary Specifi cs
3.5 ARCLibrary Updating
3.6 Setting a Bookmark
3.7 The Resume Function
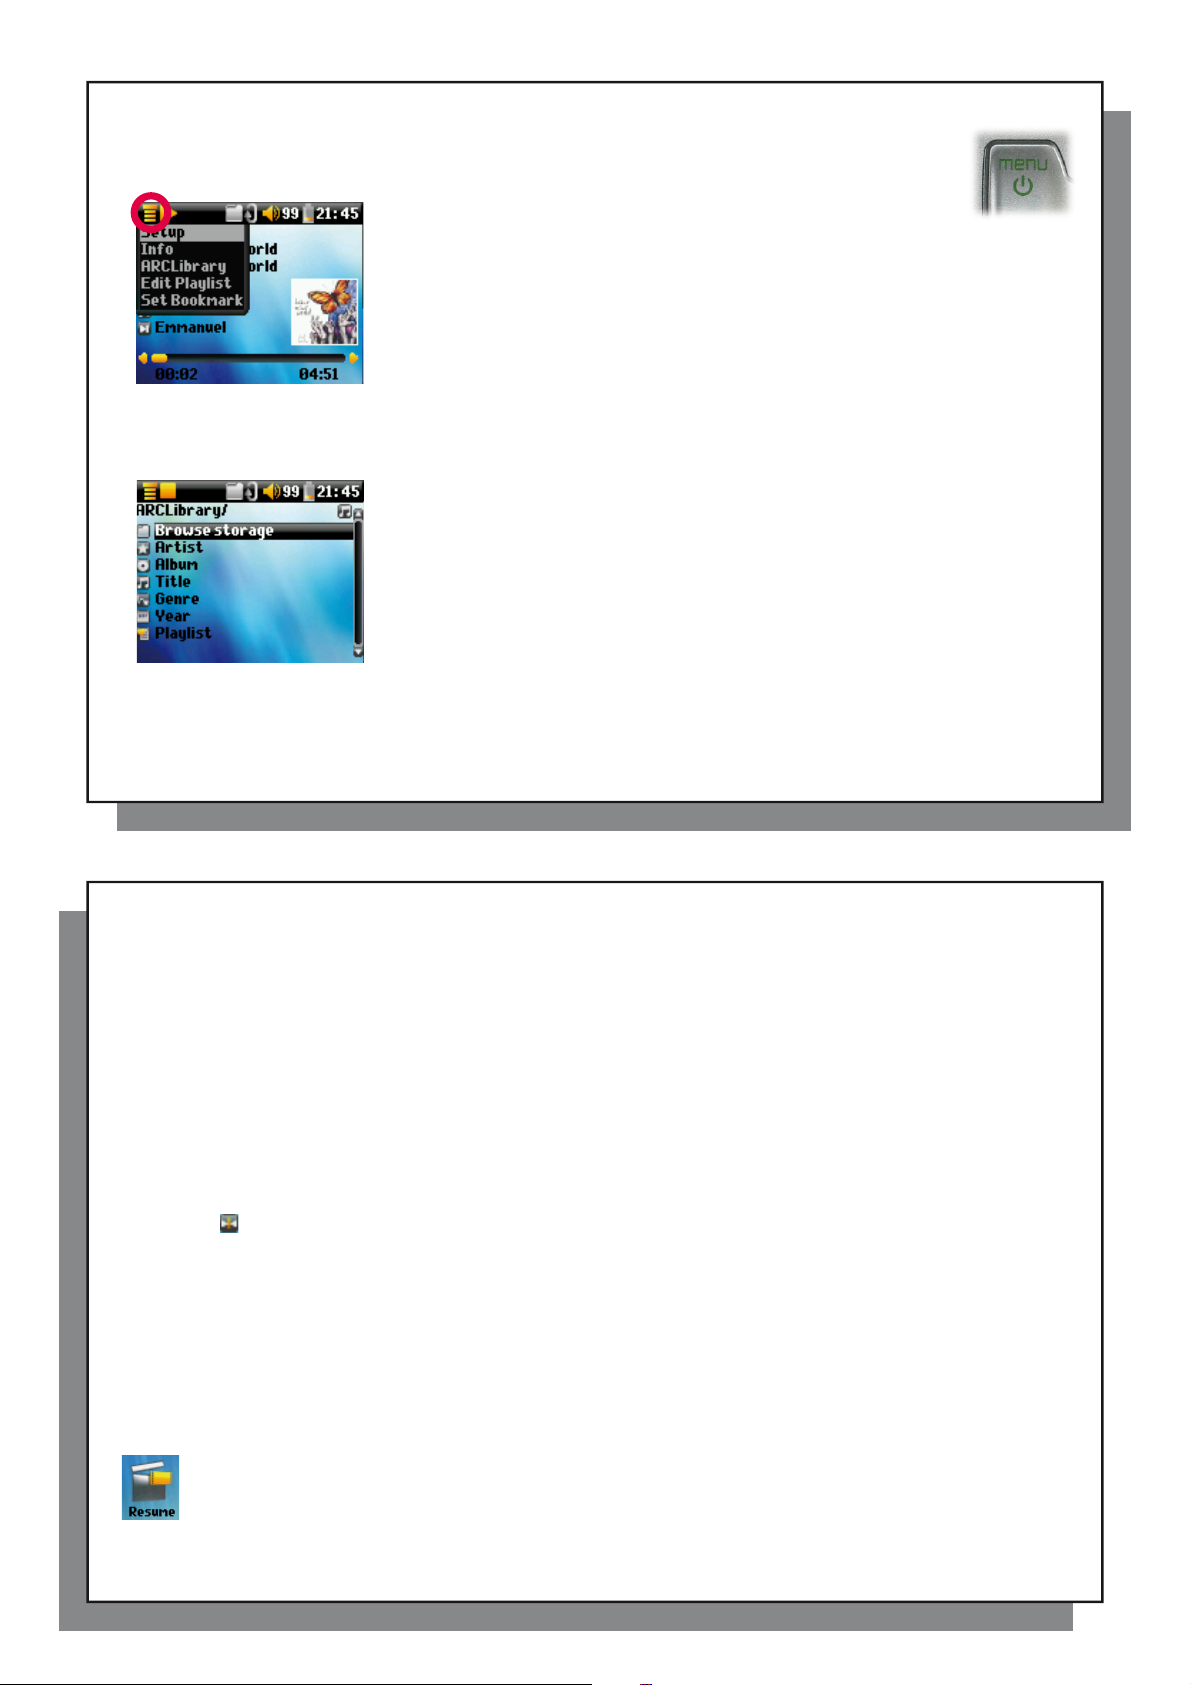
3.3 Playback Menu Items
When the menu icon appears, you have certain options. During song playback, press the MENU
button for the following options.
• Setup: Enters the Setup screen (same as selecting the Setup icon
in the main menu) which allows you access to parameters such as
bass and treble.
• Info: Show fi le information such as the fi le name, fi le size, date created, fi le
format, etc.
• ARCLibrary: Allows you to browse through your ARCLibrary while listening to the
current song.
• Edit Playlist: Enters the playlist editor (see below how to use Playlists).
• Set Bookmark: Set a bookmark at the current position within the audio fi le. See
the Bookmark section below.
3.4 ARCLibrary Specifi cs
The ARCLibrary is a system for choosing your music by its characteristics. It can be
turned On or Off in the settings from Setup > Playmode . As shown in this screen
capture here, you can select your music by Artist, Album, Song Title, Genre, or
Year. MP3 and WMA music fi les have internal data tags to hold information about
the song. For MP3 fi les, these are known as ID3 tags. Not all MP3 fi les have all
this information fi lled in. If you purchase a song from a music download service,
the song will have this information. If you have an MP3 or WMA fi le without this tag
information, then you can add or change it by going to the properties of the fi le in
Windows® Explorer. The ARCLibrary indexes all the music and playlists that it fi nds
in the folders Music and Playlists by using the tag information in each song. Thus,
you should never delete the folders Music or Playlists . If a song does not have
tags, it will be put into the category <unknown> .
12
3.5 ARCLibrary Updating
If you paste audio fi les from your computer to the ARCHOS 105, they go directly in the ARCHOS 105’s internal
memory without the ARCLibrary knowing about the new song. This is why the ARCLibrary is updated when
you disconnect your ARCHOS 105 from the computer. Alternatively, you can set up the ARCLibrary to update
only when you choose to, by setting it to On, not automatic. You can fi nd the information on how to do this
in the section Playmode in the Settings chapter. You will then have to go to the Setup > Playmode screen,
highlight [Update ARCLibrary] and press ENTER. A message screen will appear indicating that it is updating
the ARCLibrary contents.
3.6 Setting a Bookmark
If you are listening to a song, or perhaps a long recording, and would like to place a bookmark in it in order to
pick up from this point at another time, you can use the Bookmark function. While listening to the audio recording,
simply click on the MENU button, then choose Set Bookmark . This will set a bookmark in the audio fi le at the
current position. You can only set one bookmark per fi le. In your browser, bookmarked music fi les appear with
this icon: . You can have a maximum of 16 fi les bookmarked. Setting more bookmarks will erase existing
bookmarks, starting with the oldest. The next time you play the audio fi le, you will be presented with three
options:
Resume: Start playing from the bookmarked position.
Ignore: Keep the bookmark but start playing from the very beginning.
Clear: Clear the bookmark from this fi le and start playing from the very beginning .
11
3.7 The Resume Function
When you turn on your ARCHOS 105 you will sometimes notice that the icon which is highlighted on
the main screen is not the Browser but rather the Resume icon. This icon is highlighted when the
12
ARCHOS 105 can resume the last played audio fi le.
Page 7
13
3.8 Locking the ARCHOS 105 Buttons
4
Putting Music onto your ARCHOS 105
4.1 Synchronizing Music from Windows Media
®
Player (WMP) to the ARCHOS 105
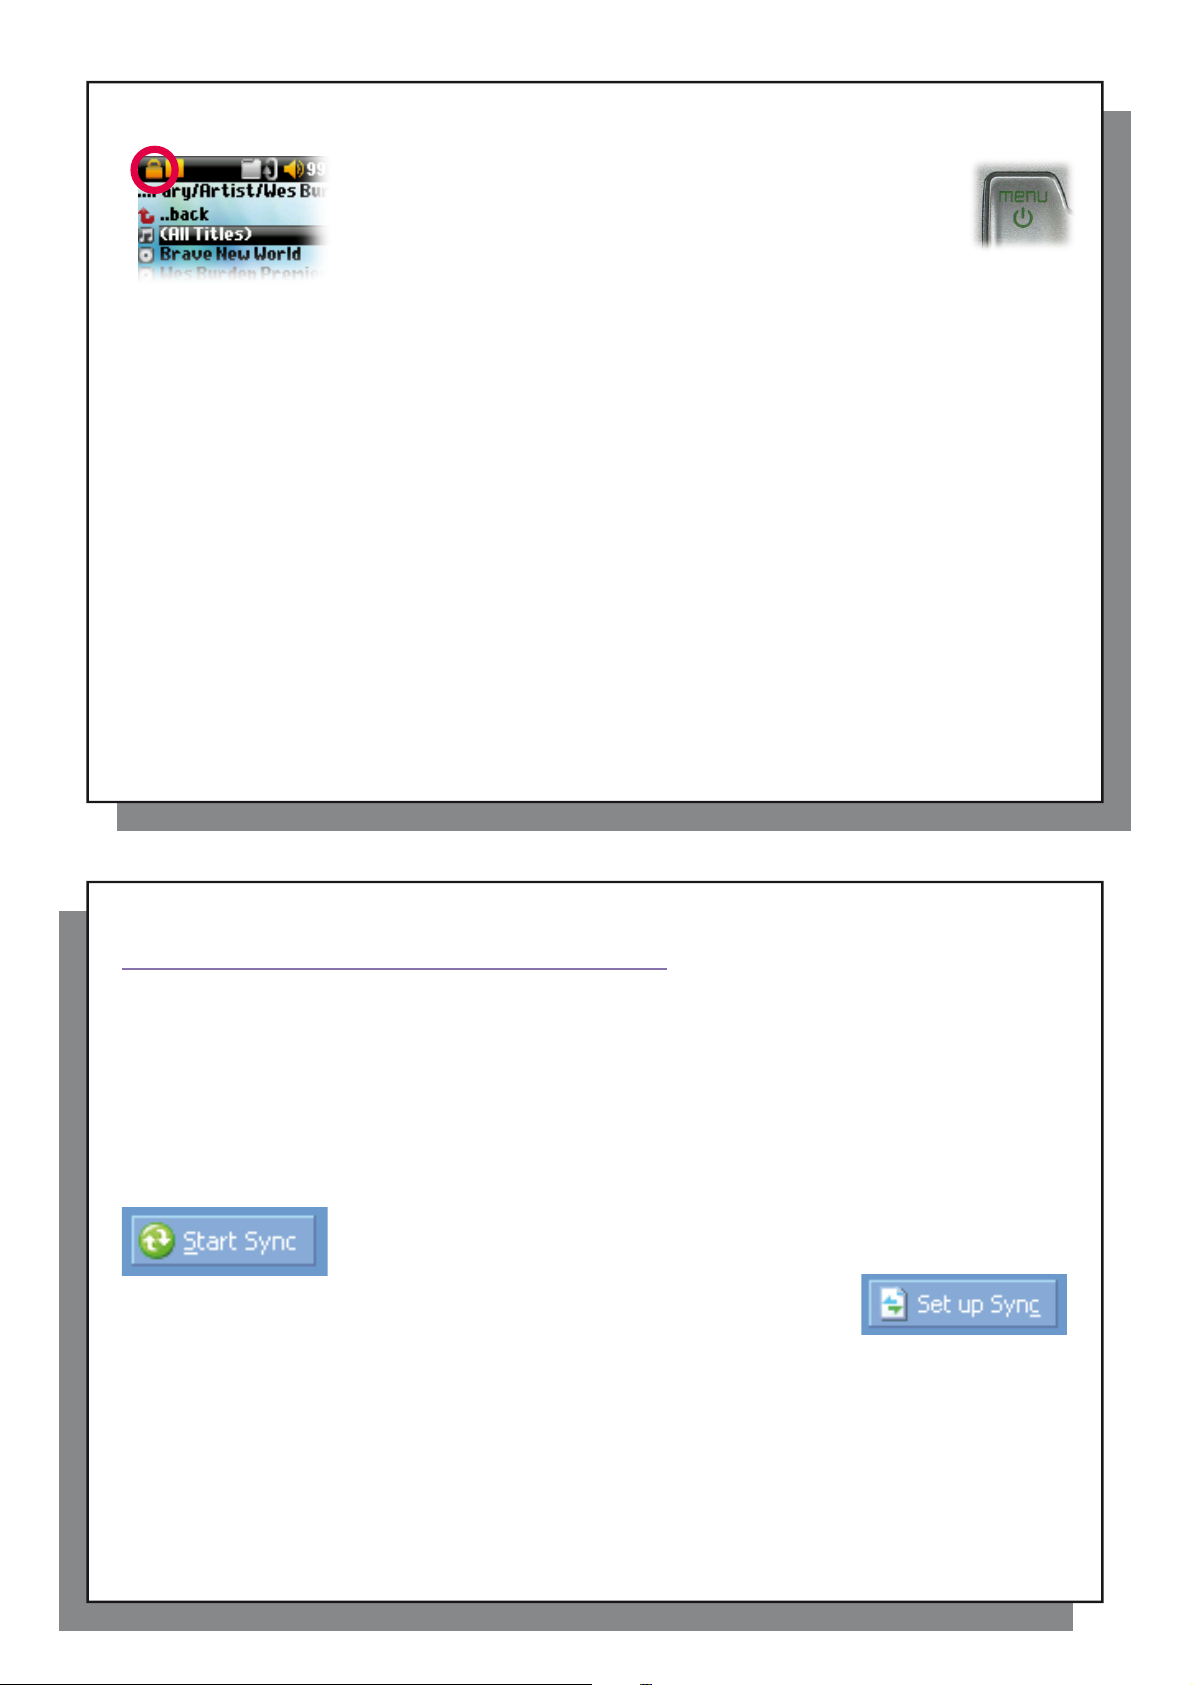
3.8 Locking the ARCHOS 105 Buttons
Y ou can prevent the ARCHOS 105 from executing unintended functions
by locking the buttons. To lock the buttons, hold down on the MENU
button until the “lock” icon appears in the top-left corner of the screen.
Now the buttons are disabled, but you can still use the UP and DOWN
controls on the navigation pad to change the volume. To unlock the
buttons hold down again on the Menu button until the “lock” icon
disappears.
14
Putting Music onto your ARCHOS 105
4
The ARCHOS 105 is designed to work seamlessly with Windows Media
11. The Windows Media
computer and organize it. You will also use it to synchronize (copy) the contents of your Windows Media
media library to your ARCHOS device. See the comparison chart below for an explanation of the different features
available when running Windows Media
4.1 Synchronizing Music from Windows Media
On WMP10/11, you can click the button Set up Sync in the Sync tab and then check
the box labeled Synchronize Device Automatically. This is the auto-sync advantage of
WMP10/11. If this box is checked, then each time you connect your ARCHOS 105 to
your PC, Windows Media
or videos in your media library, and if so, will then copy them
Windows Media® Player 9, you have to tell it what you want to sync, WMP9 cannot synchronize automatically
when you connect your ARCHOS 105 to your computer.
Note for WMP10/11 users: Files added to your ARCHOS 105 from another computer cannot be added to the
Windows Media
added, will however, be listed in the device’s ARCLibrary.
®
Player Library when you connect your ARCHOS 105 to the computer. Songs which have been
®
Player software is used to download digital media content from the Internet to your
®
The Synchronize button in Windows Media
That is, it will add music, photo and video fi les to your ARCHOS 105 so that you have
the same digital media on your ARCHOS 105 as you have in your Windows Media
Player media library. Of course, you can choose to sync only
certain songs, photos or videos, or sync your entire library.
®
Player will automatically start up and check to see if there is any new music, photos
®
Player (WMP) versions 9, 10 and
Player 9 and 10/11.
®
Player (WMP) to the ARCHOS 105
®
Player (WMP) is a one way ‘sync’ button.
to your ARCHOS 105. On the other hand, with
®
Player
13
®
14
Page 8

15
4.2 Comparison of Windows Media Player 10 and 11 to Windows Media Player 9
4.3 Transferring your CD collection to the ARCHOS 105
4.4 Installing Windows Media
®
Player (WMP) 9
4.5 Installing Windows Media
®
Player (WMP) 10 or 11
4.2 Comparison of Windows Media Player 10 and 11 to Windows Media Player 9
Windows® Media Player 10 /11 is only available for Windows
It is worth your while to upgrade to Windows
shows the advantages.
Functionality WMP9 WMP10 and 11
Auto-synchronize the WMP library
to ARCHOS 105 on connecting to PC
Can synchronize subscription music
(‘to go’ services) to your ARCHOS 105
Carefree USB disconnection
(no special green arrow unmount procedure)
* Must use WMP9 manual sync function to copy purchased music to the ARCHOS 105.
®
XP or higher and to Windows
4.3 Transferring your CD collection to the ARCHOS 105
The process of transferring music from a CD into fi les for your ARCHOS 105 is known
as ‘ripping’. It is actually a transcoding process, taking the CDA (CD Audio) format and
converting it to WMA or MP3 format which the ARCHOS 105 can read. There are many
music ripping programs on the market, but the easiest thing to do is to use Windows Media
Player to do it. In fact, when you place a music CD in your computer, Windows® will ask you
if you would like to rip it. Depending on the power of your computer, to rip a 60 minute CD, it
will take anywhere from 10 minutes to 60 minutes. Once this is done, the album will become
part of your music library. Connect your ARCHOS 105 to your computer with the supplied
USB cable. Now, you go to the Sync tab and tell Windows Media
that album to your ARCHOS 105. It will then transfer that album to your ARCHOS 105.
Note: Some music CDs have a special copy protection system that will not allow Windows Media® Player to
make music fi les from them.
®
XP (service Pack 1) and newer operating systems.
®
Media Player 10/11. The list below
no* yes
no yes
no yes
®
Player to synchronize
®
16
4.4 Installing Windows Media
If you have Windows
4.5 Installing Windows Media
Y ou must be running Windows
install this software is to visit the Microsoft
®
ME or 2000, you should use Windows Media
®
Player (WMP) 9
®
Player (WMP) 10 or 11
®
XP or higher in order to install Windows Media
®
Website and download the very latest version.
®
Player 9.
®
Player 10/11. The easiest way to
15
16
Page 9

17
5
Playlists
5.1 Creating a new Playlist
5.2 Loading a Playlist
5.3 Playing a Playlist
5.4 Playlist Menu Options
Playlists
5
A Playlist is a list of songs that the ARCHOS 105 will automatically play one after the other. The ARCHOS 105
can handle one Playlist at a time. You can create new Playlists, add or delete songs from a Playlist, or Save a
Playlist as a fi le (fi le type.m3u) to be used another time. There is no limit to the number of Playlists you can save
on the ARCHOS 105. A Playlist can have a maximum of 1000 songs in it.
5.1 Creating a new Playlist
To create a Playlist, press the RIGHT button while you are in the Music browser. A
second panel is opened on the right side to display the Playlist contents (shown empty
in the picture). You can now start adding songs to the current Playlist.
Note: If tracks are displayed in the right panel, this means a Playlist is already open.
To create a new Playlist, close the current list fi rst (see the Playlist Menu options) and
click RIGHT again.
In the left panel, search for the songs you would like to add to your Playlist. Once the
song is highlighted, click on the ENTER button to add it to the Playlist. The song will
indicate that it is now in the Playlist. You can also add all the music fi les of a complete folder in one operation
by highlighting the desired folder and choosing Add to playlist or Insert in playlist on the menu. Be careful
about which panel you are in since the left panel menu has different options than the right panel menu. Continue
searching and adding songs in this manner until you are satisfi ed. Y ou can jump back and forth anytime between
the two panels by clicking LEFT/RIGHT on the navigation pad.
We recommend that you save your Playlists (see Playlists Menu Options below) to use them again later. After
saving a new Playlist, use the menu of the left panel to update the ARCLibrary in order for it to appear in your
Playlists folder. The menu also offers you the option Insert in playlist : The track will be added before the track
which is highlighted in the Playlist.
be added to the Playlist and a small mark is placed next to the music note icon to
18
5.2 Loading a Playlist
5.3 Playing a Playlist
After loading a Playlist, press the RIGHT control on the navigation pad to go into
the Playlist edition panel. Then use the UP and DOWN controls to select a song.
Click on ENTER, and your Playlist will start playing from that song according to
the current PlayMode settings.
5.4 Playlist Menu Options
17
You can load a previously saved Playlist or add the fi les it contains to the current
Playlist. Use the music browser to select the Playlist of your choice (Playlists are
indicated by a special list icon) and then press OK. If there were already some items
in the ARCHOS 105 Playlist, then the songs of the loaded Playlist will be added to the
end of it. You can then check or modify the Playlist as usual in the Playlist panel.
While in the Playlist screen (right side) you have the following options.
• Save: Saves the current Playlist onto the ARCHOS 105 so that it can be reloaded
later. It will be saved into the directory Playlists .
• Close: Closing the list enables you to create a new Playlist by using the RIGHT
control of the navigation pad while in the Music folder or any of its sub-folders.
• Rename: Changes the name of the current Playlist using the Virtual Keyboard.
• Shuffl e: Randomly changes the order of the items in the loaded Playlist.
• Delete all: Removes ALL tracks from the loaded Playlist.
18
Page 10

19
6
Settings
6.1 Changing the Sound Settings
• Move: Allows you to change the order of songs in the Playlist by moving them up
or down using the UP/DOWN buttons of the navigation pad.
• Delete: Removes the highlighted track from the playlist.
Note: To delete a Playlist, navigate to Browser > Playlists . Highlight the Playlist, press the menu button,
highlight Delete and press ENTER.
(Moving a music track)
Important: Once you save a Playlist it is important that you do not move the actual fi les as the Playlist searches in the
original fi le location. If you need to move your fi les to a different folder, you’ll have to recreate your Playlists.
19
20
Settings
6
6.1 Changing the Sound Settings
If you would like to customize the sound quality , go to [ Setup > Sound ].
There are a number of parameters you can set on the ARCHOS 105 to make it
operate according to your particular needs. Start by clicking on Setup .
Within the menus, you will fi nd different parameters. In order to modify a parameter ,
click LEFT or RIGHT on the navigation pad.
20
Page 11

21
Parameter Description
6.2 Changing the PlayMode Settings
Parameter Description
Parameter Description
Volume Range: 0 to 99 Controls the current volume.
Balance Range: -10 to +10 (left to right)
Sound effect Custom, Flat, Rock, Techno, Jazz, Classic or Live
Change this parameter to select an equalizer setting to the style of music you are listening to.
Select Custom to set your own equalizer levels.
[Set Equalizer] T o customize the equalizer. See below .
[Reset] Sets all your sound parameters with default or fl at values.
Customizing the equalizer
To set the equalizer, highlight the [ Set equalizer ] line and then click on ENTER. You will now be able to adjust
the ARCHOS 105’s fi ve band equalizer. Use the LEFT/RIGHT buttons to select a specifi c frequency range (Bass,
Medium-Base, Medium, Medium-Treble, Treble) and then use the UP/DOWN buttons to increase or decrease
the response for the given frequency range. Modifying these settings changes the sound in real time. Thus it is
best to change these values while listening to a song.
1. 2. 3. Change values 4. Exit screen.
22
6.2 Changing the PlayMode Settings
If you would like the ARCHOS 105 to play through an entire folder of songs, play songs at random (shuffl e), or any
of the other playing options, you can set these parameters in the Playmode settings. Go to Setup > Playmode .
Parameter Description
Folder Play all tracks in the current directory
All Play all tracks on the ARCHOS 105
Single Play a single track then stop
Queue User can queue the next track to be played †
Scan ARCHOS 105 plays fi rst 15 seconds of each track ††
21
Repeat and shuffl e This parameter allows you to choose the order of play of your songs
Repeat: the music sequence is played in a loop
Shuffl e: the music sequence is played randomly
22
(no icon) Normal: the music sequence is played once
Page 12

23
6.3 Changing the time & date settings
6.4 Changing the Display Settings
Parameter Description
ARCLibrary Off, On. Automatic (default)
The ARCLibrary feature enables you to see your music organised by Artist, Album, Title, Genre and Year. Select
ARCLibrary Update Scans through all music and playlists in the folders Music and Playlists and indexes these into the ARCLibrary . You
†Queue Mode: While the current song is playing, simply click on the menu button and select Browser or ARCLibrary (depending on the
current folder), fi nd the next song you want to play, then click ENTER. This is your queued song. The lower arrow of the Queue icon will
turn black. You can only queue one song at a time. See the Playlist section to prepare multiple songs to play. Once the current track has
fi nished playing, your queued track will be played. If you do not queue another track at this time, the ARCHOS 105 will play the next song in
the original directory.
††Scan Mode: Each track in the directory is played for 15 seconds. This allows a quick sample of each song. If you want to play the whole
song, click on the Play button during those fi rst 15 seconds. The ARCHOS 105 will then revert to single directory mode and play the rest of
the songs in the directory without scanning.
6.3 Changing the time & date settings
In order to set the time and date or to change the time format, go to Setup > Clock .
Off to disable the feature or On to enable it. On Automatic, the library will update itself when disconnected from the
computer.
need to do this only when you have copied new music to your ARCHOS 105.
24
The Time format can be set to a 12 hour clock (0:00 to 12:59) or 24 hour clock (0:00 to 23:59).
The Time is expressed in Hours , Minutes and Seconds , although seconds are not displayed. The date is
expressed as Day , Month and Year .
Having modifi ed all necessary parameters, be sure to set them. To do this, highlight the [Set] line and then
click ENTER. Wait a moment for the ARCHOS 105 to save the new values before clicking the STOP/ESCAPE
button.
6.4 Changing the Display Settings
In order to change the operating language, the brightness of the display or the appearance of the ARCHOS 105,
go to Setup > Display .
23
Parameter Description
Language Use this option to set the operating language of the ARCHOS 105.
Brightness Adjusts the brightness of the screen. Be aware that a high level of brightness can affect battery life.
Wallpaper Choose the background image that will appear on your ARCHOS 105.
Appearance Choose the color of your ARCHOS 105’s icons.
24
Page 13

25
6.5 Changing the Power Settings
Parameter Description
6.6 Changing the System Settings
Parameter Description
6.5 Changing the Power Settings
To help you get the most battery life out of your ARCHOS 105 before having to recharge it, you can adjust the
power settings. Go to Setup > Power.
Parameter Description
Power Off Range: 1 to 9 minutes or Never .
Number of minutes of user inactivity before the ARCHOS 105 automatically shuts off. The ARCHOS 105 will not
Backlight Backlight shut down time: 10 to 90 seconds, Never.
The time of user inactivity (no buttons pressed) before the ARCHOS 105 turns off the backlight. Never indicates that
shut off during the playback of music fi les. Never (on External power operation) indicates that the ARCHOS 105
will not do an automatic shut down.
the backlight will always stay on. Keeping the backlight on will reduce the battery time.
26
6.6 Changing the System Settings
To change the system parameters or get information about the system, go to Setup > System .
Parameter Description
Show all fi les If “Off” is selected, fi les are fi ltered so that only music fi les are shown. The “On” setting lets you see other fi le types
USB Port Windows Device, Hard Drive.
When set to Windows Device, your ARCHOS 105 will use the MTP (Media Transport Protocol) whenever it
When set to Hard Drive, your ARCHOS 105 will act as an external hard drive (mass storage device) when connected
OS Version Displays the current version of the Operating System (OS).
Prod key Display the product key of your ARCHOS 105. Every ARCHOS 105 has a unique product key number.
Internal Storage Displays the amount of free and used space in the ARCHOS 105’s internal memory . Reported number of megabytes
[Update Firmware] Used to update the ARCHOS 105 to a new version of the Operating System. See the chapter
26
as well as music fi les.
is connected to a PC with Windows Media
Device in Windows® Explorer. W ARNING: This will not work for earlier Windows® operating systems or Macintosh®
computers.
to a computer. Use this mode for all non-Windows
is binary based counting (1kb=1024 bytes). Thus each reported MB represents approximately 1.05 megabytes
(decimal). Formatting also takes up space.
Updating the ARCHOS 105 Firmware.
®
Player 10 or higher installed. It will be seen as the ARCHOS 105
®
XP (or higher) operating systems.
25
Page 14

27
7
Using the Browser
7.1 Inside the MUSIC Folder
7.2 Navigating the Directory Structure
Button Controls
Button Action
Using the Browser
7
The browser is used to navigate the fi le system on the ARCHOS 105. The fi le
system is the same type of fi le system that is found on Windows
This way, transferring fi les from your computer to your ARCHOS 105 is as easy as
‘drag and drop’. The fi le system is a hierarchical system which includes folders and
subfolders. Because you will be putting hundreds of fi les onto your ARCHOS 105, it
is STRONGLY ADVISED that you keep a neat and orderly fi le structure. We suggest
that you keep the predefi ned folders: Data (to carry miscellaneous data fi les with
you), Manuals, Music (all of your music fi les), Pictures (all of your photos), Playlists
(to hold all your music Playlists) and Video (all your video fi les).
7.1 Inside the MUSIC Folder
The top level of your ARCHOS 105 includes the folder Music . Most people who create neat fi le structures for
their ARCHOS players make the following hierarchy within the Music folder.
Level 1 – Artist (Dire Straits, Madonna, Stravinsky, etc.)
Level 2 – Album (Brothers in Arms, American life, etc.)
Level 3 – Song (Money for Nothing, etc.)
The folders Music, Pictures and Video are special folders in that the Music , Photo and Video icons on the main
screen lead to these folders directly. They should not be deleted or renamed.
®
based computers.
28
7.2 Navigating the Directory Structure
Button Controls
Button Action
Up Highlights the previous fi le or folder in the current directory
Down Highlights the next fi le or folder in the current directory
Right Open double-browser or gives the focus to the right panel.
Left Goes to parent directory if single panel view. Gives the focus to the left panel when in double-browser mode.
ENTER Folder highlighted: enters this folder.
File highlighted: Plays the fi le.
Off/Escape Exit Browser mode.
Menu Displays the contextual menu.
Just below the top status bar, the fi le path is displayed.
T o navigate the directory structure you will use the UP/
DOWN controls of the navigation pad
to move through the fi les in a directory.
Press ENTER to enter a highlighted
folder. To go back up one level in the
directory structure, click on the LEFT
button. The contextual MENU button
allows you to create new folders, delete
folders, rename a fi le or folder, or display information
about a fi le.
27
28
Page 15

29
7.3 File and Folder Operations in Browser Mode
7.4 Using the Virtual Keyboard
7.3 File and Folder Operations in Browser Mode
While browsing the directory structure, you will have the option to manipulate fi les and folders. When you use the
Browser mode, you will be browsing through the ARCHOS 105’s internal memory as if browsing via a computer.
In Browser mode, you can create folders, delete fi les or folders, rename fi les or folders, and copy or move fi les
from one place to another.
7.3.1 Contextual Menu on a File
Info: Show fi le information such as song length, fi le size, date fi le was created, etc.
Rename: Allows you to change the name of the highlighted fi le. You cannot change
the fi le extension type for fi le types that are playable by the ARCHOS 105. You will
be sent to the virtual keyboard (see the next section) to enter the new fi le name.
Delete: Delete the fi le permanently from the ARCHOS 105. (Before it is deleted, the
ARCHOS 105 will ask for confi rmation: “Delete fi le? - Yes/No”). Press ENTER to
confi rm or STOP/ESCAPE to cancel.
Create Folder: Create a new folder in the current level of the directory. You will be
sent to the Virtual Keyboard to enter the new folder name. There is a limit of 1000
fi les per folder.
7.3.2 Contextual Menu on a Folder
Info:
Show folder information such as size, date created, number of fi les and folders
the folder contains etc.
Rename: Allows you to change the name of the highlighted folder. You will be sent to
the virtual keyboard (see the next section) to enter the new folder name.
Delete: Delete the fi le permanently from the ARCHOS 105. (Before it is deleted, the
ARCHOS 105 will ask for confi rmation: “Delete folder X? - Yes/No.” Press ENTER to
confi rm or STOP/ESCAPE to cancel.
Create Folder: Create a new folder in the current level of the directory. You will be
sent to the Virtual Keyboard to enter the new folder name. There is a limit of 1000
fi les per folder.
29
30
7.3.3 Contextual Menu while in the Double Browser
By using the unique ARCHOS double browser system, you can copy or move fi les from one location in the fi le
structure to another (caution: there is a limit of 1000 fi les per folder). While in the Browser mode, you simply click
Source Destination
7.4 Using the Virtual Keyboard
If you want to create folders and rename fi les or folders, it is recommended to do so from your computer when it
is connected to the ARCHOS 105. The computer keyboard is easier to use. At times, however, you are not near
your computer and you would like to enter the text directly with the ARCHOS 105. For this, you will use the Virtual
Keyboard. You will be taken to this screen when you rename a fi le or folder or create a new folder. You will use
the LEFT , RIGHT, UP, and DOWN controls to move around the keyboard. Click on ENTER to enter the character
that is highlighted. Once your text is entered, select Enter on the bottom right.
the RIGHT control and a second browser panel will open. Y ou can jump between the
two panels using the LEFT/RIGHT buttons. When the title of the folder is highlighted,
this is the active folder. The fi le highlighted within this active folder will be copied, that
is to say, it is the source for the copy. The other panel will be the destination folder.
Once you have decided on the destination folder, move to the source browser panel,
highlight the fi le to copy, and then click on the MENU button. You can now choose
Copy to copy the highlighted fi le, Copy All to copy all the fi les in that folder to the
destination folder, or Move to move it to the destination folder. Other options such as
Info, Delete, Rename and Create Folder are addressed above .
30
Page 16

31
8
Viewing Photos with your ARCHOS 105
8.1 Using the Photo Browser
2
1
3
4
5 6 7
1 Contextual Menu
2 Text being typed
3 Cursor
4 Upper/Lower case*
5 Delete character*
6 Clear entire line*
7 Enter *
* These items can also be found in the contextual menu
Tip: use the STOP/ESCAPE button to cancel any changes you made and exit the virtual
keyboard.
32
Viewing Photos with your ARCHOS 105
8
8.1 Using the Photo Browser
With your ARCHOS 105, you can view pictures in the JPEG format* on the built-in
LCD screen. They will be automatically resized by the ARCHOS 105 to fi t on its
screen.
By clicking on the Photo icon in the main menu screen, you will enter into the
Photo browser. File types other than JPG that may be in the ‘Pictures’ folder and its
subfolders will not be displayed.
* please note that the progressive JPEG format is not supported.
31
32
T o select a picture for viewing, use the navigation controls UP and DOWN to move
upwards or downwards and ENTER to view the highlighted picture or open the
highlighted folder.
When the picture is displayed on the screen, you can use the navigation controls
LEFT (or UP) to view the previous picture and RIGHT (or DOWN) to view the next
picture.
Page 17

33
8.2 Photo Browser Contextual Menu
8.3 Transferring Photos to your ARCHOS 105
8.2 Photo Browser Contextual Menu
Just like in the browser mode, you can rename fi les and folders
and delete them if needed, and you can create folders to sort
your picture fi les. You simply need to press the MENU button to
display the contextual menu. See the instructions given in chapter
7 on using the browser.
Info
Another feature of the photo browser is the possibility
to view picture information such as the size of the
picture fi le, the date and time it was created, and
the image’s resolution. If a photo contains EXIF
information, it will also be displayed. You will then
see information such as the brand and model of the
digital camera that took the digital photograph, the
exposure time and aperture, whether the fl ash was
used or not, etc.
Save as Wallpaper
You also have the possibility to save one of your own pictures as the wallpaper for your ARCHOS 105. Simply
select Save as wallpaper in the contextual menu while viewing a picture or when the picture fi le is highlighted.
34
8.3 Transferring Photos to your ARCHOS 105
There are three different ways of transferring photos to your ARCHOS 105 from your computer. The most suitable
method for you will depend on your ARCHOS 105’s USB port setting (see section 6.6 of this manual): Hard Drive
or Windows Device.
8.3.1 Transferring Photos in Hard Drive Mode
If your ARCHOS 105 operates in Hard Drive mode, you can simply copy your pictures onto it:
connect your ARCHOS 105 to your computer (see chapter 11 of this manual).
•
on your computer, locate the pictures you want to transfer, select them and copy them (right click > copy).
•
•
open ‘My Computer’ and double click on the ARCHOS 105.
•
open the Pictures folder of your ARCHOS 105 and paste your pictures there (right click > paste). Note that your photos must go in the
Pictures folder if you want to be able to view them directly on your ARCHOS 105.
Standard Info screen
Info screen with EXIF data
33
8.3.2 Transferring Photos in Windows Device Mode
If your ARCHOS 105 operates in Windows Device mode, choose one of the following methods.
Copy Photos to the Media/Pictures folder
•
connect your ARCHOS 105 to your computer (see chapter 1 1 of this manual). If an ‘MTP Media Player‘ window pops up asking what you
want to do, select ‘take no action’ and click on OK.
•
on your computer, locate the pictures you want to transfer, select them and copy them (right click > copy).
•
open ‘My Computer’ and double click on the ARCHOS 105 device.
•
open the device, and then the Pictures folder of your ARCHOS 105 and paste your pictures there (right click > paste). Note that your
photos must go in the Pictures folder if you want to be able to view them directly on your ARCHOS 105.
Sync with Windows Media® Player 10 or 11
If you use the Windows Media® Player library to manage your photos, you can synchronize your ARCHOS 105 device to your computer’s
library. (see section 4.1 of this manual and the Windows Media® Player instructions to learn how to use it to synchronize your pictures, videos
and music automatically).
34
Page 18

35
9
Playing videos with your ARCHOS 105
9.1 Playing video
9.2 Putting Videos onto your ARCHOS 105
Playing videos with your ARCHOS 105
9
9.1 Playing video
In the main menu screen, select the Video icon. The video browser will show you all the available video fi les in
the Video folder . Select one of the video fi les and then press the ENTER button. Use the ENTER button to Pause
and Resume playback. To stop the video, press the STOP/ESCAPE button. Use the MENU button to see the
available menu options for video playback.
9.2 Putting Videos onto your ARCHOS 105
The ARCHOS 105 is capable of playing WMV9 video fi les at a reduced resolution size (160x120 pixels). Since
video fi les come in many different sizes and formats, you may need to use Windows Media Player 11 to convert
them to play on your ARCHOS 105. Follow these steps to convert the video fi le that you would like to store and
view on your ARCHOS 105.
1. Start Windows Media Player 11.
2. Add the desired video fi le to the Windows Media Player Library, if it is not already there (File > Add to
Library).
36
3. Connect the ARCHOS to your computer with the USB cable. Your ARCHOS must be set to the USB mode
Windows Media Device (Setup > System > USB Port). See chapter 11 of this manual.
4. Verify that Windows Media Player recognizes your device.
5. Add the desired video to the Sync List: right click on the video and select Add to ‘Sync List’.
6. Click on the button Start Sync in Windows Media Player. Your PC will then recognize whether or not the video
needs to be resized and/or converted to WMV9 format in order to play on your ARCHOS. If so, it will show a
‘converting’ message before it synchronizes the video to your ARCHOS.
35
7. Once the video fi le is converted (if needed) and synchronized to your ARCHOS, disconnect the USB cable.
Y ou can now play the video on your ARCHOS by selecting it from the Video browser.
36
Page 19

37
1
0
Connecting the ARCHOS 105 to a Stereo system
1
1
Connecting the ARCHOS 105 to your Computer
11.1 USB Connection Type (‘Hard Drive’ or ‘Windows Device’)
11.2 Connecting the ARCHOS 105
Connecting the ARCHOS 105 to a Stereo system
1
0
Connecting your ARCHOS 105 to a stereo system allows you to listen to your ARCHOS 105’s music on it without
a headset. You will need a standard (mini headphone to RCA) audio cable for this which is not supplied with the
ARCHOS 105. The diagram below illustrates the setup. Plug the audio cable into the headphone jack and into
the auxiliary jacks on your stereo. Note that this is only a schematic representation of a stereo. If in doubt, the
manual of your stereo will enable you to identify the auxiliary inputs.
38
1
11.1 USB Connection Type (‘Hard Drive’ or ‘Windows Device’)
Y our device comes confi gured as a Windows
have Windows Media
sure what version you have, or if you are using a Macintosh
Serial Bus) Port setting on the ARCHOS 105. You will do this by going to System and USB Port and change it
to Hard Drive.
11.2 Connecting the ARCHOS 105
Connection order: See the sections below for your particular computer’s operating system.
1) Turn on the ARCHOS 105.
2) With your computer running, plug the USB cable into your computer.
3) Plug in the other end of the USB cable to the ARCHOS 105 USB Device port (if your computer asks to install
a new driver for the new hardware, then you must unplug it and change the USB Port to Hard Drive.)
Windows
If you have Windows Media
of connecting the ARCHOS as a Windows Device. Connect it to your PC as shown above and you can then
see the ARCHOS 105 in Windows® Explorer. Without Windows Media
Windows® recognized Device and will have to follow the instructions for Windows
Windows
Attention: Before connecting the ARCHOS 105 to your computer with the USB cable, go to Setup>System>USB
Port and change it to ‘Hard Drive’.
Connecting the ARCHOS 105 to your Computer
1
®
Device and will be immediately recognized by your computer if you
®
XP and higher
™
ME and 2000
®
Player 10 or higher. If you have another version of Windows Media
®
Player 10 or 11 (WMP10/11) installed on your computer, you can take advantage
®
®
, then you will need to change the USB (Universal
®
Player 10/11, you cannot use it as a
®
ME & 2000 below.
Player, if you are not
37
38
Page 20

39
11.3 Disconnecting the ARCHOS 105 from your Computer
When connected to your computer, the ARCHOS 105 will be recognized as an
external Hard Drive and display automatically within a few seconds of being
connected. You will see a new drive letter, such as E: in My Computer. You can
now use the hard drive called ARCHOS 105 like any other external hard drive.
Simply access it using Windows
ARCHOS 105.
™
Explorer to drag and drop fi les to and from the
Macintosh
If you have OS X, you must update to version 10.3.9 or newer.
You must also change the ARCHOS 105’s USB Port setting to
‘Hard Drive’. From the main menu, go to Setup > System > USB Port and change it to ‘Hard
Drive’.
You will now simply plug the ARCHOS 105 into your Macintosh
within a few seconds, the ARCHOS 105 will be recognized as a mass storage device (Hard
Drive) and mount on the desktop. You can now use the hard drive called ARCHOS 105 like
any other external hard drive.
™
OS X
®
as enumerated above, and
11.3 Disconnecting the ARCHOS 105 from your Computer
Windows Device Mode
If the ARCHOS 105 is connected to your computer as a Windows Device, verify that no data is being transferred
between your ARCHOS 105 and your computer. Y ou can now safely unplug the USB cable from your ARCHOS 105
and/or computer.
Hard Drive Mode
If the ARCHOS 105 is connected to your computer as a hard drive, DO NOT SIMPLY PULL OUT THE USB
CABLE AT ANY TIME! WARNING: You must properly remove (unmount) your ARCHOS 105 from the computer
before disconnecting the USB cable to avoid loss of data or freezing the computer and/or the ARCHOS 105.
40
39
Hard Drive Mode & Windows™
To safely disconnect the ARCHOS 105 hard drive, click on the system tray remove icon (green arrow as shown
below) and follow the instructions. Wait until you get a message saying that you can safely unplug the device
before disconnecting the USB cable.
Attention: The operating system will not allow you to safely disconnect the ARCHOS 105 if you have an open
fi le from it in a running application. You will have to close all open ARCHOS 105 fi les in any running application.
Sometimes, even when fi les are closed in an application, you will have to shut down the application. Using the
green disconnect arrow in the system tray will then allow you to safely disconnect the ARCHOS 105.
1. The safe remove icon is in the system tray near the system clock.
®
Windows
2. Click on the icon to Eject (unmount) the ARCHOS 105 from your computer and then select the ‘Safely remove’
message.
3. There will be a message indicating that it is now safe to disconnect the ARCHOS 105. You can now go ahead
and unplug the USB cable from the ARCHOS 105.
XP Windows® 2000 & Windows® ME
40
Page 21

41
1 12
Updating the ARCHOS 105 Firmware
12.1 Download the fi rmware_a105.AOS fi le
12.2 Copy to ARCHOS 105 root and Update
Hard Drive Mode & Macintosh
First, close all programs that are using fi les from your ARCHOS 105. Drag the
ARCHOS 105 hard drive icon towards the trash can, and the trash can will become a
big arrow as shown in the screen image. Drop the hard drive icon onto the arrow. The
hard drive icon will disappear from the desktop. You can now safely unplug the USB
cable from your ARCHOS 105 and/or your computer.
™
42
ARCHOS periodically updates the fi rmware or Operating System (OS) and makes it available for free download
on the ARCHOS website (www.archos.com). Updates to the Operating System include new features, feature
improvements, and bug fi xes. You should check to make sure that you are running the most recent version of
the OS. To see the current version of the software your device is running, go to Setup > System and look at the
line OS Version . You will fi nd the most recent version of the OS and its version number at the ARCHOS website
(www.archos.com/fi rmware).
12.1 Download the fi rmware_a105.AOS fi le
Updating the ARCHOS 105 Firmware
2
When you click on the link to download the new OS fi le (the fi le name is fi rmware_a105.AOS),
your browser may warn you that the contents of the download may harm your computer.
This is because the Windows
ARCHOS has made every effort to ensure that the fi le does not contain viruses. Click on the
option Save to download this fi le to a convenient place, such as My Documents , in order to
later copy this fi le to your ARCHOS 105. If your ARCHOS 105 is connected to your PC, you
can even save it directly to the ARCHOS 105.
You will also fi nd next to the fi rmware download, a text fi le which details the list of
changes from the previous version of the OS.
®
system does not know what an .AOS fi le is. Be assured that
41
12.2 Copy to ARCHOS 105 root and Update
Connect your ARCHOS 105 to your computer (See the chapter on connecting
to the computer for help), and then copy the fi rmware_a105.AOS fi le to the
current fi le. Click on Yes. Once this fi le is copied, safely disconnect ARCHOS 105 from the computer. Refer to the
disconnection procedure in the connection chapter if you are unsure of how to do this.
42
root directory of the ARCHOS 105. The root directory is the top most level of
the directory hierarchy. Just drag this .AOS fi le onto the ARCHOS 105 Hard
drive in your fi le manager and it will place it in the top most directory (outside
any folder). If there is already an older version of the fi rmware_a105.AOS
fi le on your ARCHOS 105, Windows® will ask if you want to overwrite the
Page 22

43
12.3 ‘Hard Drive’ or ‘Windows Device’?
12.4
Activate the Update
1
3
Technical Specifi cations
12.3 ‘Hard Drive’ or ‘Windows Device’?
If your ARCHOS 105 is seen as a hard drive, then you simply need to drag the fi rmware_a105.AOS fi le
onto this icon, and Windows
should not be placed inside any folder within your ARCHOS 105. Once this fi le is copied, safely disconnect
(refer to the chapter on Connecting/Disconnecting) the ARCHOS 105 from the computer.
®
will place the fi le into the top most directory (root) of the ARCHOS 105. It
If your ARCHOS 105 is seen as a Windows
in Windows
version of the fi rmware_a105.AOS fi le on your ARCHOS 105, Windows® will ask if you want to overwrite
the current fi le. Click on Yes. Disconnect the ARCHOS 105 from your computer.
12.4
Activate the Update
On your ARCHOS 105, go to Setup > System and select the [ Update Firmware ] line. Click ENTER. You will be
prompted to power the ARCHOS 105 with the USB cable connected to a turned-on computer. The ARCHOS 105
will now locate the update fi le and install it. A message will appear asking you to unplug the USB cable and then
click on any button to restart the device. You can go to Setup > System to verify that the new OS has been
installed by looking at the version number there.
Warning!
Never unplug the USB cable while the update is in progress. This can cause permanent damage to the unit.
®
Explorer and drop the fi rmware_a105.AOS into the ARCHOS 105. If there is already an older
®
Device, then you will have to open the ARCHOS 105 Device
44
43
1
ARCHOS 105
Capacity See packaging.
Display 1.8’’ OLED color screen, 160 x 128, 262 000 colors.
Video Playback WMV9 - 160 x 128 @25fps.
Music Playback Stereo MP3 decoding @ 30-320 kb/s CBR & VBR, WMA, Protected WMA and W AV (PCM) – ID tag 3 compatible.
Photo Viewer* JPEG (not progressive JPEG).
Interfaces High-speed USB 2.0, compatible USB 1.1 (at a lower speed), PC & Mac .
Audio Connection s Stereo earphones / 3.5mm jack.
Battery life ** Up to 18 hours
Scalability Download fi rmware updates from www.archos.com or from the ARCHOSLINK software available for free on
Power Source Internal: Li-Ion Battery. External: Charges via USB .
Package includes ARCHOS 105, USB 2.0 cable, headphones, quick start guide (full manual in PDF format on device).
* Certain resolutions and fi le sizes may not be compatible.
** Rechargeable batteries have a limited number of charge cycles and may eventually need to be replaced. Battery life and number of charge
cycles vary by use and settings.
Technical Specifi cations
3
www.archos.com
44
Page 23

45
1 14
Technical Support
Technical Support
4
Need Help? You can fi nd the information you need:
• on our Website: see the frequently asked questions section on www.archos.com/faq
• by asking our technical support team: visit www.archos.com/support for e-mail support.
• U.S. & Canada: Call 877-300-8879 (toll free).
All brands and product names are registered trademarks and the property of their respective owners. Windows Media® and Windows® are trademarks or
registered trademarks of Microsoft Corporation in the United States and/or other countries. Specifi cations are subject to change without notice. Errors
or omissions excepted. Images and illustrations may not always match contents. All the information contained in this guide was correct at the time of
publication. COPYRIGHT ARCHOS © 2007. All rights r eserved.
45
 Loading...