

Page 1
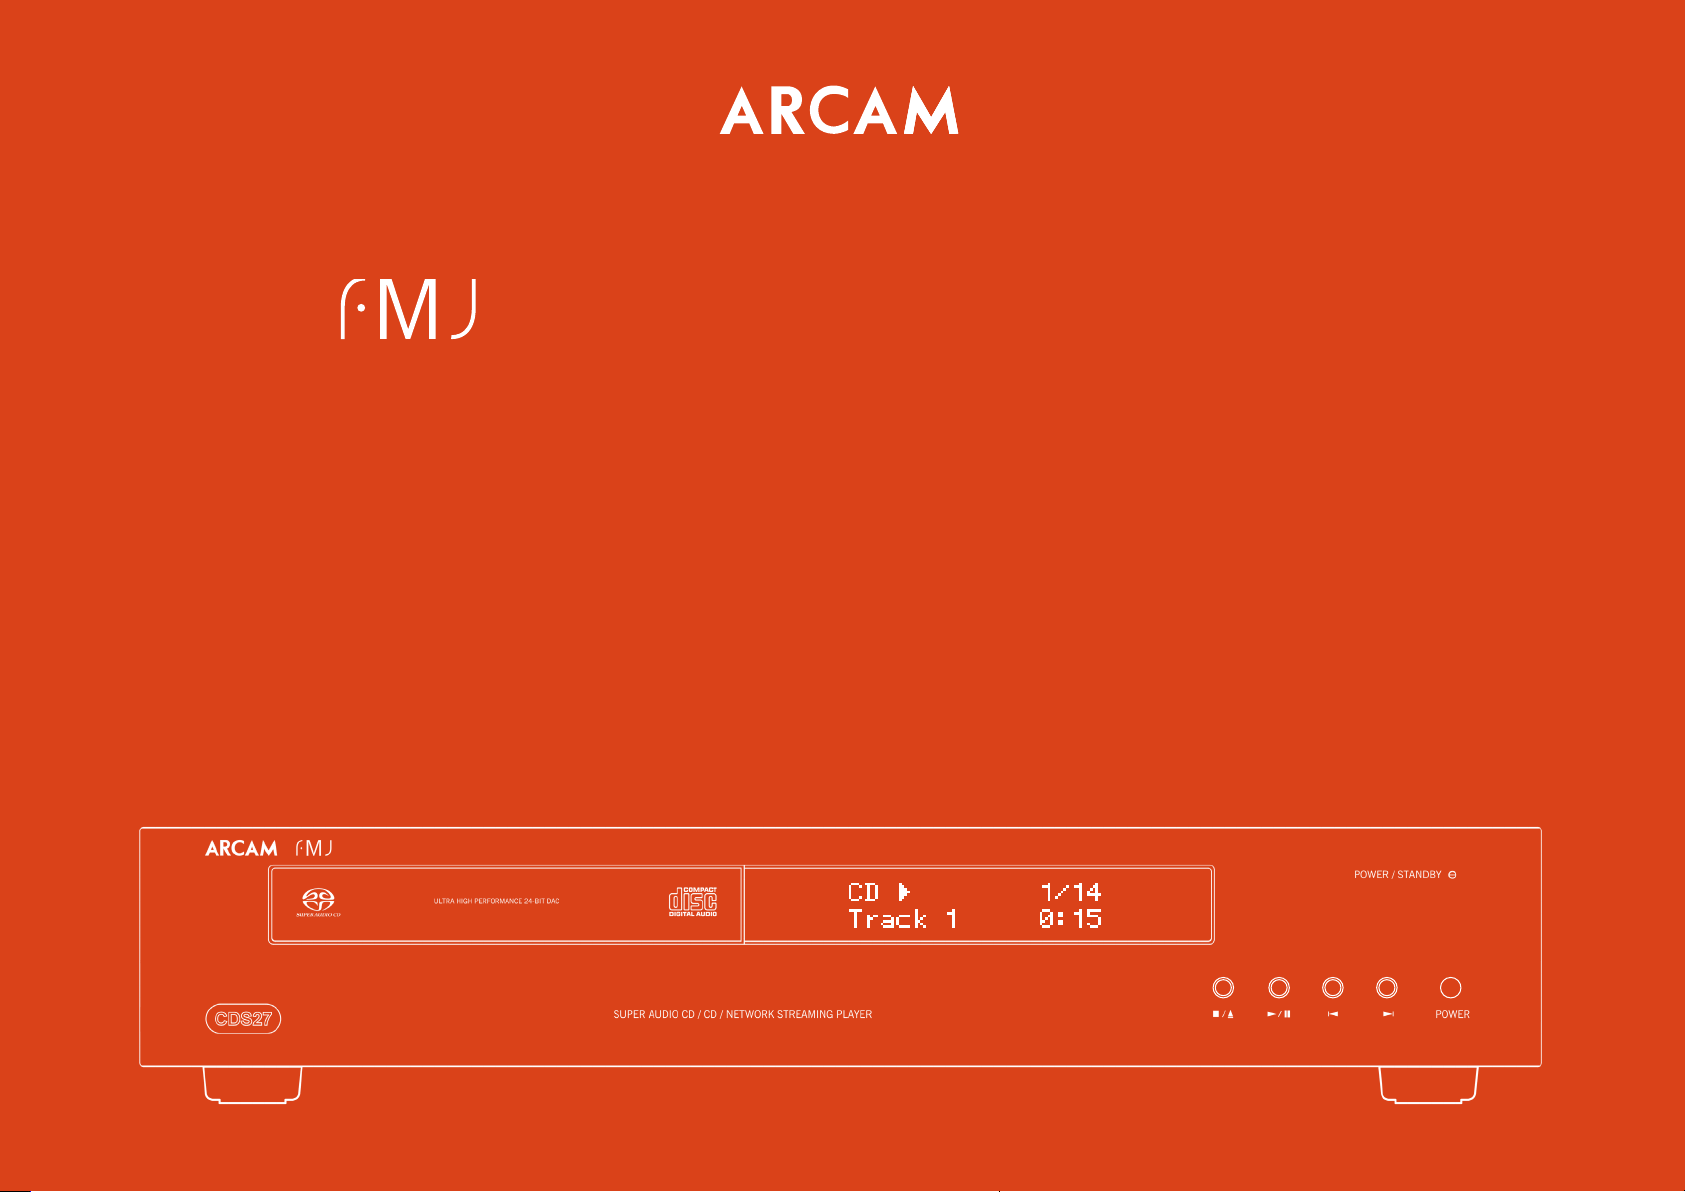
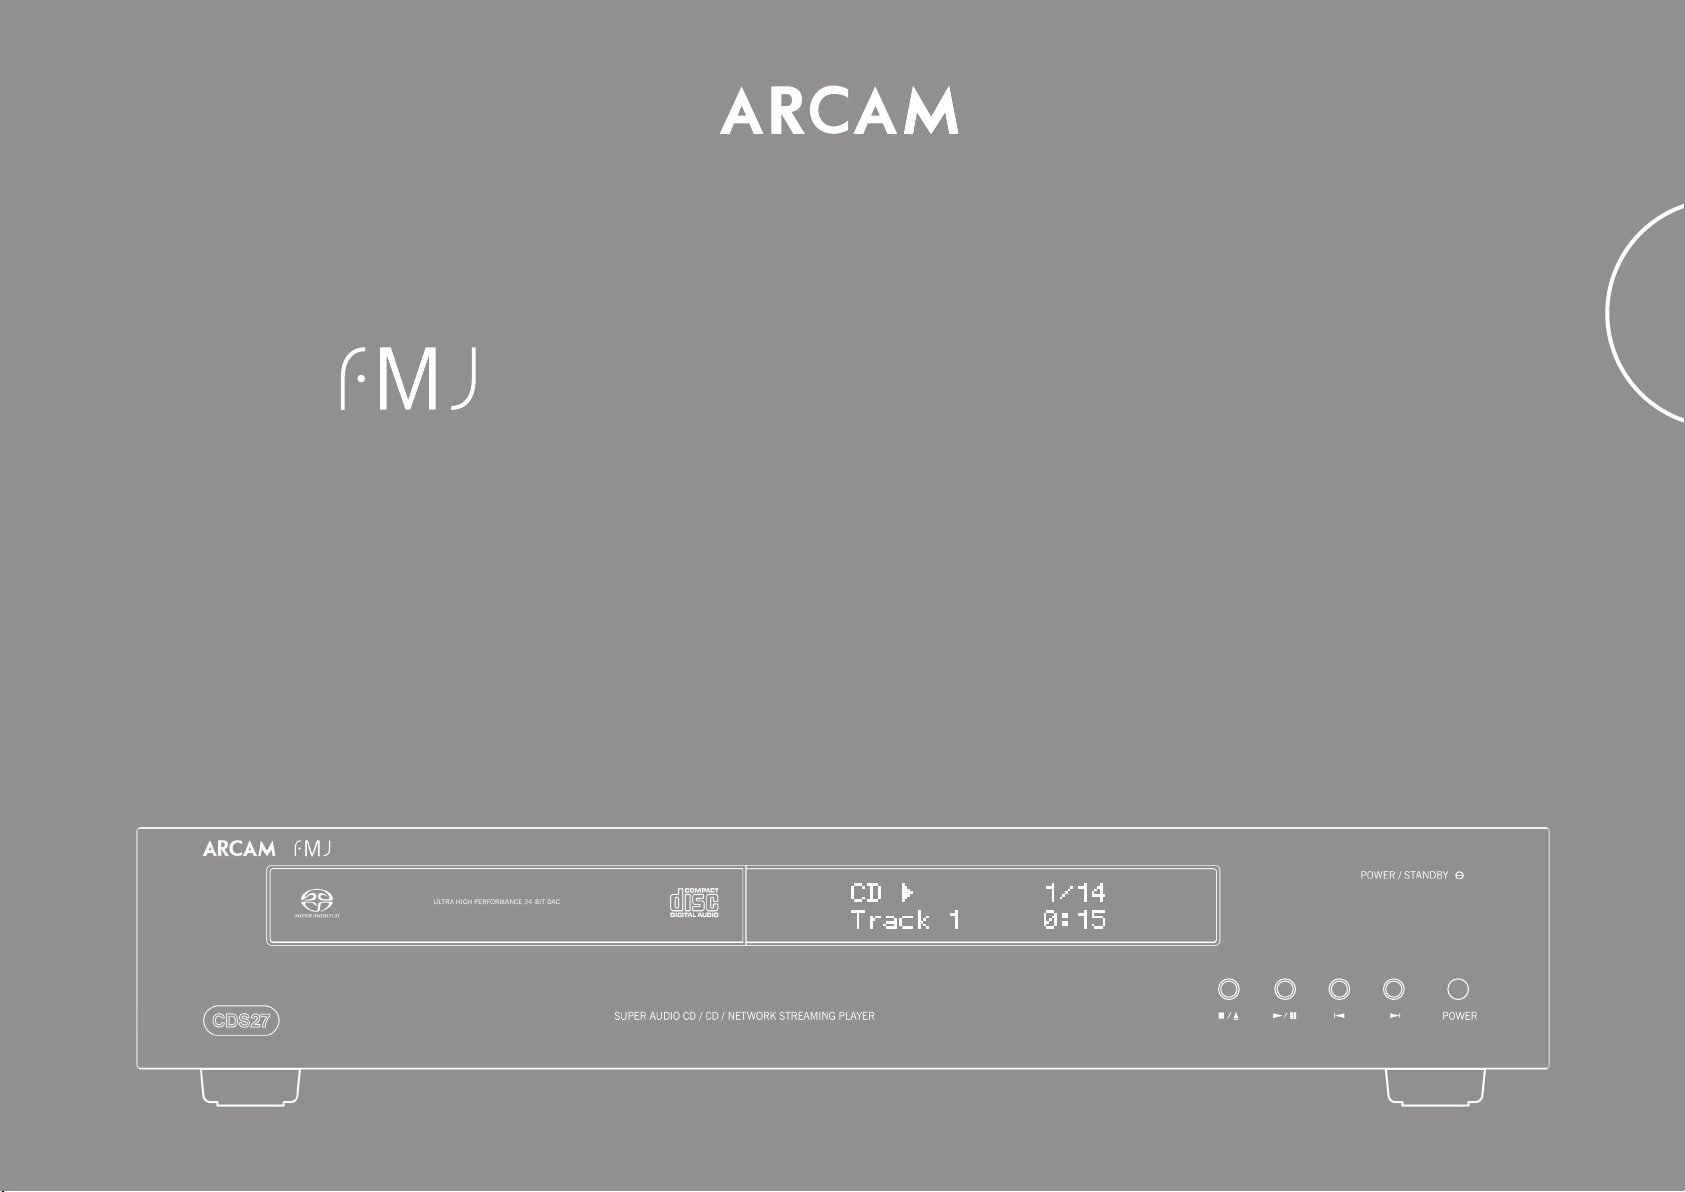
CDS27
HANDBOOK Super Audio CD/CD/Network Streaming Player
MANUEL Lecteur Super Audio CD/CD/Diusion via réseau
HANDBUCH Super-Player für Audio-für CD/CD/Netzwerk-Streaming
HANDLEIDING Reproductor de Super Audio CD/CD/Streaming de red
MANUAL Super Audio CD/CD/Netwerk Streaming Speler
РУ КОВОДСТВО Сетевой проигрыватель потокового аудио/Super Audio CD/CD
MANUALE Lettore streaming audio CD/CD/di rete di qualità superiore
手册 Super Audio CD/CD/网络流媒体播放器
Page 2

Page 3
CDS27
HANDBOOK Super Audio CD/CD/Network Streaming Player
English
Page 4
safety
guidelines
Important safety instructions
1. Read these instructions.
2. Keep these instructions.
3. Heed all warnings.
4. Follow all instructions.
5. Do not use this apparatus near water.
6. Clean only with dry cloth.
7. Do not block any ventilation openings. Install in
accordance with the manufacturer’s instructions.
8. Do not install near any heat sources such
as radiators, heat registers, stoves, or other
apparatus (including ampliers) that produce
heat.
9. Do not defeat the safety purpose of the polarized
or grounding-type plug.
A polarized plug has two blades with one wider
than the other. A grounding type plug has two
blades and a third grounding prong. e wide blade
or the third prong are provided for your safety. If the
provided plug does not t into your outlet, consult
an electrician for replacement of the obsolete outlet.
10. Protect the power cord from being walked on
or pinched particularly at plugs, convenience
receptacles, and the point where they exit from
the apparatus.
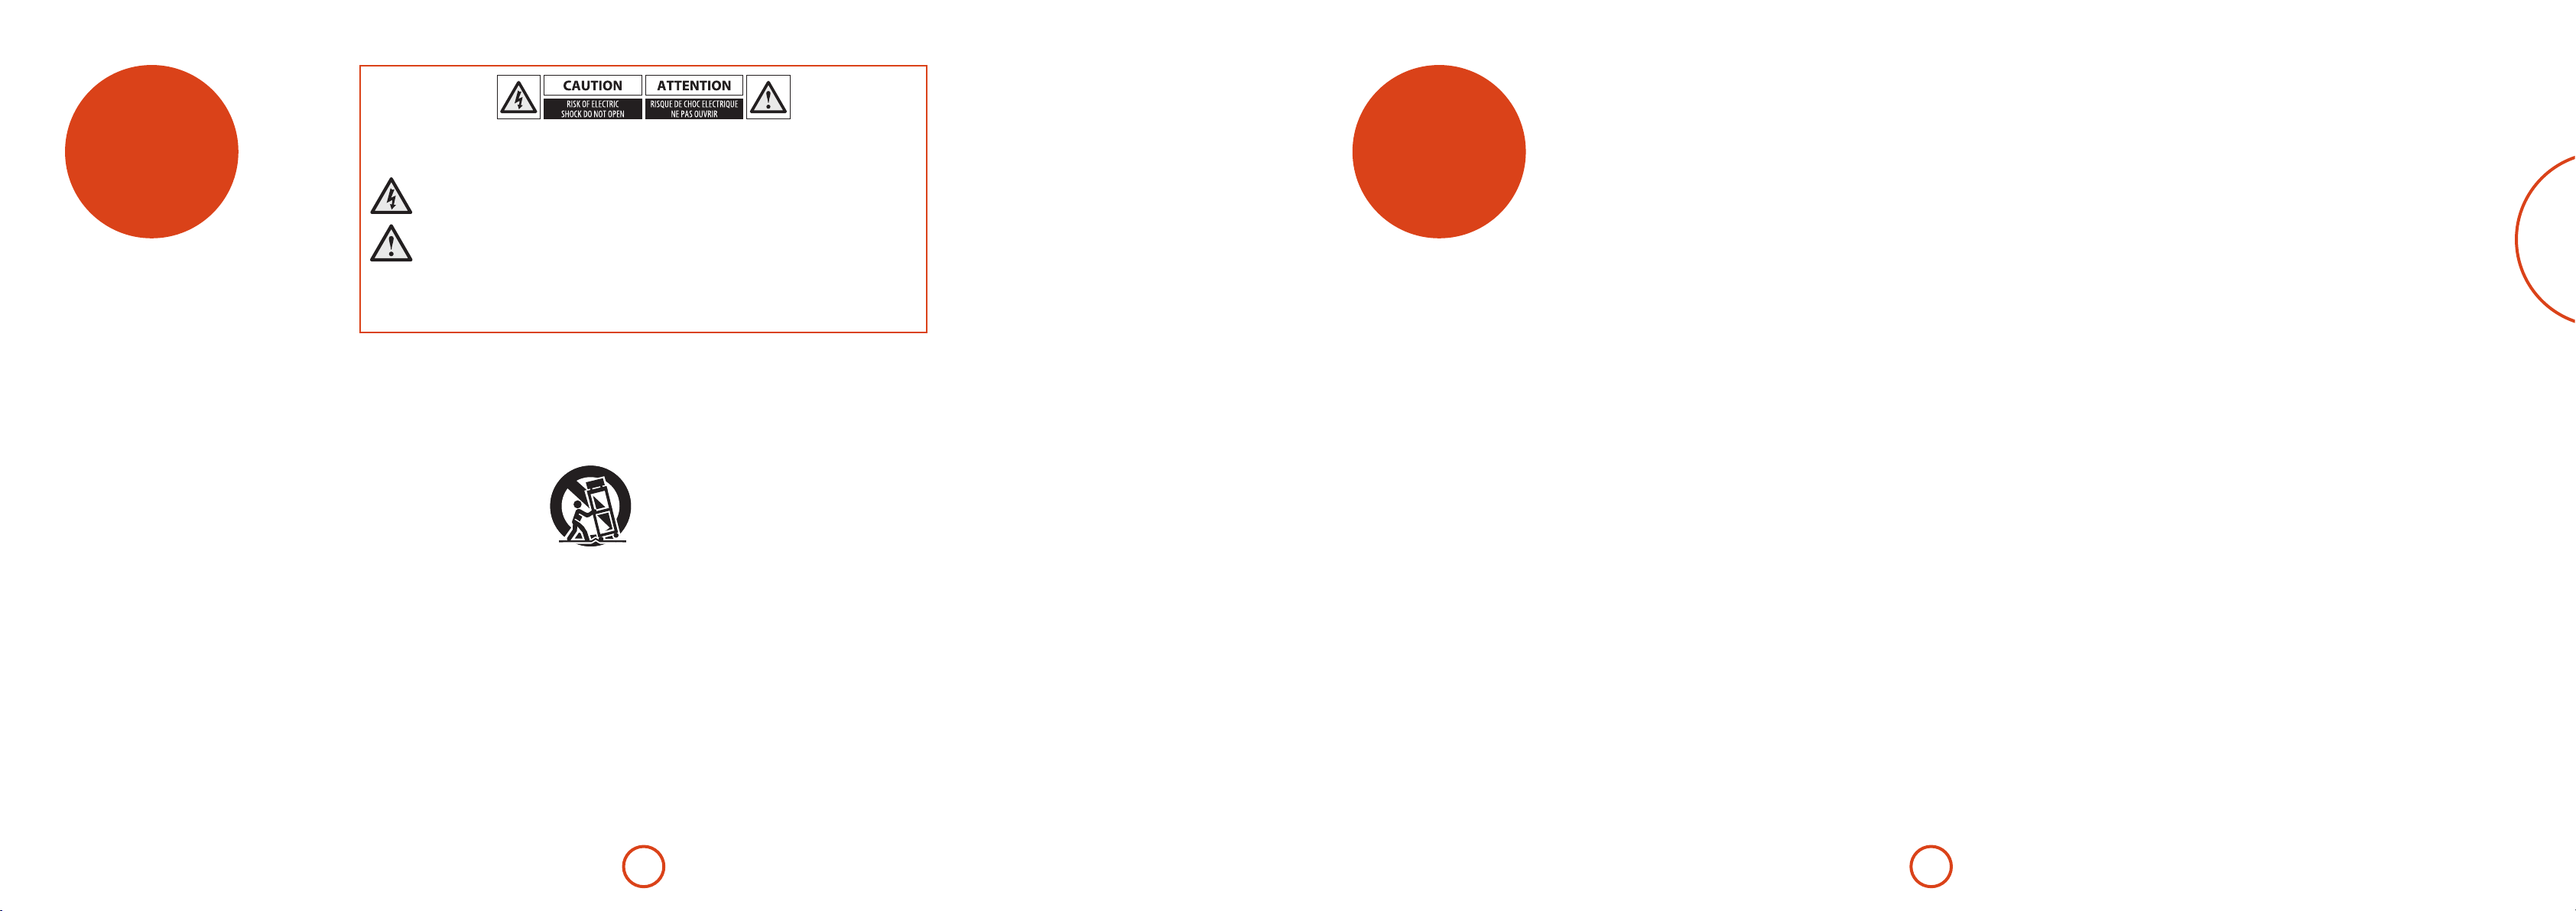
CAUTION: To reduce the risk of electric shock, do not remove cover (or back). No user serviceable parts inside. Refer
servicing to qualied service personnel.
WARNING: To reduce the risk of re or electric shock, do not expose this apparatus to rain or moisture.
e lightning ash with an arrowhead symbol within an equilateral triangle is intended to alert the user to the
presence of uninsulated ‘dangerous voltage’ within the product’s enclosure that may be of sucient magnitude to
constitute a risk of electric shock to persons.
e exclamation point within an equilateral triangle is intended to alert the user to the presence of important
operating and maintenance (servicing) instructions in the literature accompanying the product.
CAUTION: In Canada and the USA, to prevent electric shock, match the wide blade of the plug to the wide slot in the socket
and insert the plug fully into the socket.
CAUTION: Use of any controls, adjustments or procedures other than those specied herein may result in hazardous
radiation exposure.
11. Only use attachments/accessories specied by the
manufacturer.
12. Use only with the cart, stand, tripod, bracket, or
table specied by the manufacturer, or sold with
the apparatus.
When a cart is used, use caution
when moving the cart/apparatus
combination to avoid injury from
tip-over.
13. Unplug this apparatus during lightning storms or
when unused for long periods of time.
14. Refer all servicing to qualied service personnel.
Servicing is required when the apparatus has been
damaged in any way, such as power-supply cord or
plug is damaged, liquid has been spilled or objects
have fallen into the apparatus, the apparatus has
been exposed to rain or moisture, does not operate
normally, or has been dropped.
15. Object or liquid entry
WARNING – Take care that objects do not fall and
liquids are not spilled into the enclosure through
any openings. e equipment shall not be exposed
to dripping or splashing. Liquid-lled objects such
as vases should not be placed on the equipment.
16. Climate
e equipment has been designed for use in
moderate climates and in domestic situations.
17. Cleaning
Unplug the unit from the mains supply before
cleaning.
e case should normally only require a wipe with
a so, lint-free cloth. Do not use chemical solvents
for cleaning.
We do not advise the use of furniture cleaning
sprays or polishes as they can cause permanent
white marks.
18. Power sources
Only connect the equipment to a power supply of
the type described in the operating instructions or
as marked on the equipment.
e primary method of isolating the equipment
from the mains supply is to remove the mains plug.
e equipment must be installed in a manner that
makes disconnection possible.
19. Abnormal smell
If an abnormal smell or smoke is detected from the
equipment, turn the power o immediately and
unplug the equipment from the wall outlet. Contact
your dealer and do not reconnect the equipment.
20. Damage requiring service
e equipment should be serviced by qualied
service personnel when:
A. the power-supply cord or the plug has been
damaged, or
B. objects have fallen, or liquid has spilled into the
equipment, or
C. the equipment has been exposed to rain, or
D. the equipment does not appear to operate
normally or exhibits a marked change in
performance, or
E. the equipment has been dropped or the enclosure
damaged.
WARNING - e mains plug is used as a disconnect
device, the disconnect device shall remain readily
operable.
WARNING - e batteries shall not be exposed to
excessive heat, such as sunshine or re.
CAUTION - Danger of explosion if batteries are
incorrectly replaced. Replace only with the same or
equivalent type.
Safety compliance
is equipment has been designed to meet the IEC/EN
60065 international electrical safety standard.
is device complies with Part 15 of the FCC Rules.
Operation is subject to the following two conditions:
(1) is device may not cause harmful interference, and
(2) this device must accept any interference received,
including interference that may cause undesired
operation.
welcome
English
ank you and congratulations for purchasing your Arcam FMJ CDS27 player.
e CDS27 provides class-leading sound quality from CD, SACD, USB and network based
audio. High performance state-of-the-art Delta-Sigma DACs (Digital-to-Analogue Converters)
provide audiophile sound quality to truly bring your music to life.
Arcam has been producing specialist hi- and home cinema products of remarkable quality for
over three decades and the CDS27 is the latest in a long line of award winning equipment. e
design of the FMJ range draws upon all of Arcam’s experience as one of the UK’s most respected
audio companies and is built to give you years of trouble-free listening enjoyment.
is handbook has been designed to give you all the information you need to install, connect
and use your new purchase. e remote control handset supplied with this equipment is also
described. Use the contents list shown on the next page to guide you to the section of interest.
We hope that your player will give you years of enjoyment. In the unlikely event of any fault,
or if you simply require further information about Arcam products, our network of dealers
will be happy to help you. Further information can also be found on the Arcam website at
www.arcam.co.uk.
e FMJ development team
E-3E-2
Page 5
Contents
safety guidelines ����������������������������������������������������������������������������������������������������������������������������������������E-2
Important safety instructions ����������������������������������������������������������������������������������������������������������������������������������������������������� E-2
Safety compliance ��������������������������������������������������������������������������������������������������������������������������������������������������������������������������� E-2
welcome �������������������������������������������������������������������������������������������������������������������������������������������������������E-3
installation ���������������������������������������������������������������������������������������������������������������������������������������������������E-5
Placing the unit �������������������������������������������������������������������������������������������������������������������������������������������������������������������������������� E-5
Power ��������������������������������������������������������������������������������������������������������������������������������������������������������������������������������������������������� E-5
The remote control and trigger inputs ������������������������������������������������������������������������������������������������������������������������������������ E-5
Interconnect cables ������������������������������������������������������������������������������������������������������������������������������������������������������������������������ E-5
CDS27 connections ������������������������������������������������������������������������������������������������������������������������������������E-6
Network connection ���������������������������������������������������������������������������������������������������������������������������������������������������������������������� E-7
USB connection ������������������������������������������������������������������������������������������������������������������������������������������������������������������������������� E-7
Making audio connections ���������������������������������������������������������������������������������������������������������������������������������������������������������� E-7
Playable discs ������������������������������������������������������������������������������������������������������������������������������������������������������������������������������������ E-7
Supported Media ���������������������������������������������������������������������������������������������������������������������������������������������������������������������������� E-7
basic operation �������������������������������������������������������������������������������������������������������������������������������������������E-8
remote control ��������������������������������������������������������������������������������������������������������������������������������������������E-9
settings menus ���������������������������������������������������������������������������������������������������������������������������������������� E-11
Navigating the menus �����������������������������������������������������������������������������������������������������������������������������������������������������������������E-11
troubleshooting �������������������������������������������������������������������������������������������������������������������������������������� E-12
specications ������������������������������������������������������������������������������������������������������������������������������������������� E-13
Radio interference�������������������������������������������������������������������������������������������������������������������������������������������������������������������������E-13
Laser radiation ��������������������������������������������������������������������������������������������������������������������������������������������������������������������������������E-13
software licencing ����������������������������������������������������������������������������������������������������������������������������������� E-14
product guarantee ���������������������������������������������������������������������������������������������������������������������������������� E-16
Worldwide Guarantee������������������������������������������������������������������������������������������������������������������������������������������������������������������E-16
Claims under guarantee �������������������������������������������������������������������������������������������������������������������������������������������������������������E-16
Problems? �����������������������������������������������������������������������������������������������������������������������������������������������������������������������������������������E-16
On-line registration ����������������������������������������������������������������������������������������������������������������������������������������������������������������������E-16
installation
Placing the unit
< Place the CD player on a level, rm surface,
avoiding direct sunlight and sources of heat or
damp.
< Do not place the CD player on top of an
amplier or other source of heat.
< Do not place the CD player in an enclosed space
such as a bookcase or closed cabinet unless
there is good provision for ventilation. e CD
player is designed to run warm during normal
operation.
< Do not place any other component or item on
top of the CD player as this may obstruct airow
around the unit, causing the CD player to run
hot.
< Make sure the remote-control receiver (next to
the display on the front panel) is unobstructed,
or remote control will be impaired.
< Do not place your record deck on top of this
unit. Record decks are very sensitive to the noise
generated by mains power supplies which will be
heard as a background ‘hum’ if the record deck
is too close.
Power
e CD player is supplied with a moulded mains plug
already tted to the lead. Check that the plug supplied
ts your supply – should you require a new mains lead,
please contact your Arcam dealer.
If your mains supply voltage or mains plug is dierent,
please contact your Arcam dealer immediately
Push the IEC plug end of the power cable into the
socket on the back of the CD player, making sure that it
is pushed in rmly. Plug the other end of the cable into
your mains socket and, if necessary, switch the socket
on.
The remote control and trigger
inputs
e REMOTE IN input can be used to pass RC5 codes
to the CDS27 if it is installed in a position or system,
where infrared cannot be used. If this is required, please
contact your dealer for further information.
NOTE
< e remote control input requires a mono
3.5mm jack, with the tip active and the
sleeve grounded.
< e remote control signals must be in
modulated RC5 format (at 36kHz), with a
voltage level of between 5V and 12V.
English
e 12V TRIGGER IN input can be used to switch the
CDS27 into and out of standby. Connecting the trigger
output of your Arcam amplier (or other compatible
device), will cause the CDS27 to come out of standby
automatically when the amplier is switched on,
returning to standby when the amplier is switched
o. Please see your amplier handbook for further
information.
In normal use there is no need to make any connections
to these inputs.
e RS232 input is for optional connection to a home
automation system or computer. Various third-party
systems are available providing sophisticated control
over all your entertainment devices using touch screens
etc. Contact your dealer or installer for further details.
e technical details of the remote control protocol
are available from Arcam on request (email support@
arcam.co.uk).
Interconnect cables
We recommend the use of high-quality screened cables
that are designed for the particular application. Other
cables will have dierent impedance characteristics
that will degrade the performance of your system (for
example, do not use cabling intended for video use to
carry audio signals). All cables should be kept as short
as is practically possible.
It is good practice when connecting your equipment to
make sure that the mains power-supply cabling is kept
as far away as possible from your audio cables. Failure
to do so may result in unwanted noise in the audio
signals.
E-5E-4
Page 6

CDS27
connections
Coaxial digital output
Use this socket if you are using a high quality
audiophile DAC with a coaxial digital input. Connect
to the digital input using a suitable 75Ω screened cable.
CAUTION: Never connect the digital output socket
to a conventional audio input.
Phono audio output
Connect these to your amplier’s CD (or other line-
level) input using suitable high quality interconnect
cables. Ensure that the le and right audio outputs
from the CD player are connected to the same le and
right inputs on your amplier.
Network connection
An ethernet cable can be used to connect the CDS27
to a router or switch on your home network, enabling
playback of audio stored on your computer or NAS
device.
Wireless connection is also available, and may be
congured through the settings menu.
Router
English
Power inlet
Connect the correct
mains cable here.
Connect the supplied Wi-Fi antenna if a wireless
network connection is required. A network
connection enables Network audio playback (for
Network connection
Connect this socket to a port on your
network router using an Ethernet patch
cable (see page 7). A network connection
enables network audio playback (for setup
details see page 11).
Optical digital output
Use this socket if you are using an AV receiver
with an optical digital audio input.
Wireless network connection
setup details see page 11).
Insert USB ash memory devices here. e
CDS27 can play certain digital les stored
on USB memory drives (see ‘Supported
Connect these to your amplier’s CD (or other balanced)
input using suitable high quality interconnect cables. Ensure
that the le and right audio outputs from the CD player are
connected to the same le and right inputs on your amplier.
USB connection
Media’ on page 7).
12V trigger input
is socket allows the CDS27 to be switched in and out
of standby mode by an amplier (or another item of AV
equipment) with a 12V TRIG OUT function. See page 5.
Balanced audio output
Remote in
is allows remote-control signals to be
received by the CDS27 if the remote sensor
on the front panel is covered (or otherwise
not ‘visible’ to the remote-control).
See page 5 for more information.
RS232
is connection allows for remote control
from a third-party home automation
system or computer.
See page 5 for more information.
USB connection
A USB type A socket, used to connect up your ash
drives or external hard drives containing audio.
May also be used for soware upgrade.
Internet
Making audio connections
e CDS27 oers a number of alternatives for connecting audio, the connection type to use depends on the rest of
your system; chose the type most appropriate to your amplier.
For the best stereo sound quality we recommend connecting the stereo analogue audio outputs to the CD input on
your amplier, allowing the CDS27’s audiophile digital-to-analogue circuitry to be utilised.
Analogue
Using a pair of stereo phono cables of suitable length, connect the outputs labelled
“Phono” to the le and right CD/SACD inputs on your amplier.
Alternatively, connect the le/right balanced outputs to a balanced input on your
amplier.
Digital
Connect one of the Digital Audio outputs (Optical or Coaxial) to the ‘CD/SACD’
digital input of your receiver, these digital outputs provide PCM stereo only.
LAN
Playable discs
e player supports the following disc types:
CD-Audio
CD-R
CD-RW
Super Audio CD
USB Flash Drive
Supported Media
Playback of the followning le formats in supported,
over Disc, USB and network.
< FLAC, up to 24 bit, 192 KHz
< WAV, up 24bit, 192 KHz
< AAC, up to 24bit, 96 KHz
< AIFF, up to 24bit, 192 KHz
< OGG, up to 24bit, 192 KHz
< MP3, up to 320kbps, 48 KHz
< WMA, up to 192 kbps, 48KHz
E-7E-6
Page 7

basic
AUDIO
SACD
MENU
FM MONO P/TUNE
STORE
INFO
BD
CR902
RTN
remote
operation
Introduction
‘Basic operation’ explains how to play audio discs,
network content and audio les stored on USB media.
Note that it may be necessary to congure your player
correctly for your system before optimum – or any–
playback can be achieved. Player conguration is
described beginning on page 11.
Switching on
Switch the unit on by pressing the POWER button. e
status LED glows green when the unit is powered up
and red when in standby mode. Standby mode may be
entered using the standby button on the remote control
and exited using either the same button, or the </
key on the front panel. If the POWER button is pressed
(or power is removed) whilst in standby, the unit will
enter standby mode when power is re-applied.
Note that the remote control sensor is located to the
right-hand side of the display window. Do not obstruct
this or the remote control will not work.
1
Playing a disc
Press </1 on the front panel (or 1 on the handset)
and place the disc on the tray, with the playback side
facing down (some discs are double sided, in which
case the side labelled ‘side A’ should face up to play
sideA).
Press </1 on the front panel to close the tray. e disc
loads aer a pause of a few seconds.
A disc may take some time to load once the tray is
closed. When the ‘Disc Autoplay’ setting is set to On
(the default setting), playback starts automatically. (For
details, refer to ‘Disc Auto Playback’ on page 11).
For discs that do not play automatically, press 4/; on
the front panel or press 4 on the remote control.
Playing from the network
Ensure the CDS27 is connected to your local network.
Select ‘Media Browser’ from the home screen, the user
will be presented with a list of devices available for
browsing. Navigate the available libraries using the
',
Network music playback may also ne controlled from
your computer, phone or mobile device using your
favourite UPnP control point application.
keys on the remote.
<>
Pressing OK or 4 on a highlighted audio le will access
the le for playback. Playback will continue through all
subsequent tracks in the playback directory.
Playing from USB
Connect your USB device to the USB socket to the rear
of the CDS27. Aer the device has been recognised
select ‘Media Browser’ from the home screen, then
choose the ‘USB’ option from the media list.
Navigate directions using the
the remote and begin playback of a highlighted audio
le by pressing OK, 4or >. Playback will continue
through all subsequent tracks in the playback directory.
',
<>
keys on
During playback
Scan
Press 8 or 7 on the front-panel or remote control
to scan forwards or backwards, at x4 normal playback
speed. To resume normal playback, press PLAY .
Skipping chapters/tracks
To skip tracks, press /or 0.
When skipping back, the rst button press takes you to
the beginning of the current track. Pressing the button
again takes you to the start of the previous track.
Pausing playback
Press 4/; on the front panel or ; on the remote
control to pause playback. To resume playback, press
on the front panel or 4 on the handset.
4/;
Stopping playback
Press the </1 button on the front panel or < on the
remote control to stop playback.
control
e CDS27 is supplied with the CR902 remote control.
Using the remote control
Please keep in mind the following when using the
remote control:
< Ensure there are no obstacles between the
remote control and the remote sensor on the
front panel. e remote has a range of about
7metres. (If the remote sensor is obscured, the
IR in remote control input jack on the rear panel
is available. Please consult your dealer for further
information.)
< Remote operation may become unreliable if
strong sunlight or uorescent light is shining on
the remote sensor of the unit.
< Replace the batteries when you notice a
reduction in the operating range of the remote
control.
Inserting batteries into the remote control
1. Open the battery compartment on the back of
the handset.
2. Insert two ‘AAA’ batteries according to the
diagram on the battery cover casing.
3. Slide the battery cover casing back into position
and lock it closed with a click.
NOTE
< Incorrect use of batteries can result in hazards
such as leakage and bursting.
< Do not mix old and new batteries together.
< Do not use non-identical batteries together
– although they may look similar, dierent
batteries may have dierent voltages.
< Ensure the plus (+) and minus (–) ends of
each battery match the indications in the
battery compartment.
< Remove batteries from equipment that is not
going to be used for a month or more.
< When disposing of used batteries, please
comply with governmental or local
regulations that apply in your country or area.
English
The CR902 remote complies with Part 15
of the FCC rules
is equipment has been tested and found to comply
with the limits for a class B digital device, pursuant
to part 15 of the FCC Rules. ese limits are
designed to provide a reasonable protection against
harmful interference in a residential installation.
is equipment generates, uses, and can radiated
radio frequency energy and if not installed and
used in accordance with the instructions, may cause
harmful interference to radio communications.
However, there is no guarantee that interference
will not occur in a particular installation. If this
equipment does cause harmful interference to radio
or television reception, which can be determined
by turning the equipment o and on, the user is
encouraged to try to correct the interference by one
or more of the following measures:
Reorient or relocate the receiving antenna.
Increase the separation between the equipment and
receiver.
Connect the equipment into an outlet or a circuit
dierent from that to which the receiver is
connected.
Consult the dealer or an experienced audio
technician for help.
E-9E-8
Page 8
AMP Device Mode
e A Device Mode button congures the CR902 to
control your Arcam amplier. Pressing this button does
not aect the currently selected input on the amplier.
Toggles power between standby and on
P
Cycles through the front panel display’s
DISP
brightness options
Cycles through the display modes on the
MODE
front panel
Displays the amplier setup menu on the
MENU
front panel
Navigate menus
conrms a selection
O
Toggles the mute function of the amplier
@
Vol +/– adjusts the volume of an Arcam
amplier up or down.
Vol-
Press the MUTE button once to mute an
Vol+
Arcam amplier. Press again (or use Vol +/–)
to un- mute.
SP1
Toggles Speaker 1 output
SP2
Toggles Speaker 2 output
Adjusts the balance between the le and
BAL
right audio channel
NOTE
e CR902 is a multi-device remote, therefore key
functions will dier according to the last input
button pressed.
Please ensure “CD” button is selected prior to
controlling the CDS27.
TUN Device Mode
e T Device Mode button congures the CR902 to
control the tuner functions of Arcam tuners.
Toggles power between standby and on
P
0…9
' ,
e numeric keys are used to store and
recall presets
Cycles through the front panel display’s
DISP
brightness options
Cycle through dierent information
INFO
display modes
Rewind iPod
)
Fast forward iPod
(
Preset down/Sirius category down/iPod
]
track back
Preset up/Sirius category up/iPod track
[
forward
Stop iPod
#
Play/pause iPod
$
Play/pause iPod
&
Displays the tuner setup menu on the front
MENU
panel
Preset up/down, iPod track back/forward
Decrement/increment tuning frequency
< >
Conrm a selection
O
Toggle FM mode between mono and
FM MONO
stereo reception
P/TUNE
Enter/Exit Preset recall mode
STORE
Enter/Exit Preset store mode
BAND
Cycles through available tuner bands
CD Device Mode
e c Device Mode button congures the CR902 to
control the CD functions of Arcam CD players.
Toggles power between standby and on
P
Open/close disc tray
!
e numeric keys allow direct access to
individual tracks on a disc. To select a track
0…9
press the corresponding keypad button.
For tracks greater than 9, enter the digits
in sequence. For example, to play track 15,
press 1, then press 5.
Cycles through the front panel display’s
DISP
brightness options
Changes the available display modes on the
MODE
CD player
Fast rewind
)
Fast forward
(
Skip back to the start of the current/
]
previous track
Skip forwards to the start of the next track
[
Stop playback
#
Play
$
Toggles pause of playback
&
Navigates track listings if supported by the
player
selects the currently highlighted track if
O
supported by the player
SHUFF
Toggles random (‘shue’) play on and o
Repeat track will cause the current track
to be played once the end of that track has
been reached.
Repeat all will repeat the current section
RPT
of tracks once the end of the nal track has
been removed.
To repeat a particular track, select that
track and press RPT twice. To cancel, press
RPT a third time
BD Device Mode
e � Device Mode button congures the CR902 to
control the BD functions of Arcam BD players.
Toggles power between standby and on
P
Open/close disc tray
!
e numeric keys allow direct access to
individual tracks on a disc. To select a track
0…9
press the corresponding keypad button.
For tracks greater than 9, enter the digits
in sequence. For example, to play track 15,
press 1, then press 5.
Cycles through the front panel display’s
DISP
brightness options
Changes the available display modes on the
MODE
BD player
Fast rewind
)
Fast forward
(
Skip back to the start of the current/
]
previous track
Skip forwards to the start of the next track
[
Stop playback
#
Play
$
Toggles pause of playback
&
Changes audio decode format (Dolby
AUDIO
Digital, DTS, etc.).
MENU
Activates BD player menu.
Navigates track listings if supported by the
player
selects the currently highlighted track if
O
supported by the player
Returns navigation to the top level of the
.
menu (‘Home’).
When navigating a menu, press this key to
RTN
return to the previous screen or selection
SHUFF
Toggles random (‘shue’) play on and o
Repeat playback of the disc or preprogrammed selection of tracks. To repeat a
RPT
particular track, select that track and press
RPT twice. To cancel, press RPT a third time.
settings
menus
e Settings menu allows you to congure all aspects
of your CDS27. is section will go through the menu
items and explain their function.
e only way to view the Settings menu is on the
CDS27 display screen.
Entering the settings menu
If the home menu is not currently displayed, press
MENU on the remote control to display it.
Press C until the SETTINGS MENU item is displayed
and and press OK to enter.
Navigating the menus
e CDS27 menus can be navigated by using the cursor
(arrow) keys on the remote control.
1. Use the B and C keys to navigate up and
down the current menu.
2. With the main section you require displayed,
press OK to select it.
3. Use the B and C keys to navigate up and
down the options.
4. Pressing E selects a setting: use the B and C
keys to change the setting.
5. Press OK to conrm the setting. Go back to step 4
to adjust any other settings in the current section.
6. Press < to return to the previous screen if you
want to select another section to adjust.
Network Standby – is item determines whether
network features are available when the CDS27 is in
standby.
Selecting “ACTIVE” will maintain the network
connection (required for IP control).
Selecting “STANDBY” willl allow the network
hardware to be powered down in order to reduce power
consumption.
Network Setup– is item allows the user to congure
the unit to join an existing network, required for
network audio playback and over the internet soware
updates.
Auto Standby – Allows user to speciy the period of
inactivity aer which the unit will automatically enter
standby. e options are: 5/10/15/20/25/30 Minutes.
Disc Auto Playback – controls whether an optical disc
(e.g. CD) will play automatically aer it is inserted.
< On: Optical discs will play automatically.
< O: play must be pressed to play a disc.
English
Firmware Update – You can check for an upgrade to
your player’s rmware by selecting this menu item and
pressing OK to highlight ‘Network’, then press OK again.
A message appears if no new rmware is available,
otherwise follow the on-screen instructions.
Load Defaults – Press OK with this item highlighted to
reset all settings to factory defaults.
You are asked to conrm that you want to load the
factory default settings. Select “cancel” to exit or ' to
highlight the “yes” option and OK to conrm.
System Information – Use the '/, cursor keys to
browses through options.
e System Information panel shows information
about your player, such as the IP address and rmware
version.
Network Audio - Allows the user to enable or disable
the UPNP rendering capability of the player. Setting
this option to ‘o ’ will disable network audio.
Digital Output - Allows the user to limit the sample rate
of the coax/optical digital output.
E-11E-10
Page 9
troubleshooting
If a fault occurs, check this troubleshooting table before
taking your unit for repair.
If the fault persists, attempt to solve it by switching the
unit o and on again.
If this fails to resolve the situation, consult your dealer.
Under no circumstances should you repair the unit
yourself as this will invalidate the guarantee!
Problem Possible cause Remedy
No power < e AC input cord is disconnected.
< Poor connection at AC wall outlet or the outlet is inactive.
No disc playback < e disc is loaded upside down.
< e disc is not playable.
< e disc is dirty.
< e recorded disc is not correctly nalized.
No Disc/Bad Disc < e disc is scratched, dirty, poorly recorded or unplayable. < Press the POWER switch to switch the power o, press the
No sound < e audio cords are disconnected. < Connect the cords correctly.
Noisy or distorted sound < e disc is dirty.
< Poor connections.
Remote control unit
does not operate.
< Batteries are not loaded or exhausted.
< e remote sensor is obstructed.
< Connect cord securely.
< Check the outlet using a lamp or another appliance.
< Reload the disc with the printed side up.
< Use a playable disc.
< Clean the disc.
< Load a disc that is correctly nalized.
POWER switch again and then unload the disc.
< Clean the disc.
< Check the connections and connect all cords securely.
< Replace the batteries.
< Remove the obstacle.
specications
Analogue Audio Output
Digital to Analogue conversion 24-bit 192kHz Delta-Sigma DAC
Signal to noise ratio 110dB CCIR
Harmonic distortion (1kHz) 0.002%
Frequency response (±0.5dB) 10Hz-20kHz
Output level (0dB) 2.2Vrms
Output impedance 47 Ω
Minimum recommended load 5k Ω
Digital interfaces
Audio outputs 75 Ω co-axial/optical TOSLINK
USB USB 2.0 High Speed (480 Mbit/s)
Ethernet 10/100 10/100
Wireless b/g/n
Physical
Dimensions (W x D x H) 433 x 276 x 75
Weight 5.2kg/7.5kg packed
Power consumption 20W maximum
Supplied accessories
Mains lead, CR902 remote control, 2 x AAA batteries, Wi-Fi antenna
E&OE
NOTE: All specication values are typical unless otherwise stated
Radio interference
e CDS27 player is a digital device which has been
designed to very high standards of electromagnetic
compatibility.
All CD players generate, and can radiate RF (radio
frequency) energy. In some cases this can cause
interference with FM and AM radio reception. If this is
the case, keep the player and its connecting cables as far
from the tuner and its aerials as possible. Connecting
the player and the tuner to dierent mains sockets can
also help to reduce interference.
EC COUNTRIES – is products have been designed
to comply with EMC Directive 2004/108/EC.
USA – ese products comply with FCC Part 15 Class B.
Laser radiation
CLASS II
LASER PRODUCT
If the CDS27 player is operated
whilst the outer casing is
removed, invisible laser
radiation could cause eye
damage.
English
Continual improvement policy
Arcam has a policy of continual improvement for its
products. is means that designs and specications
are subject to change without notice.
E-13E-12
Page 10

software
licencing
MPEG Layer-3 audio coding technology licensed from
Fraunhofer IIS and omson.
Windows Media and the Windows logo are trademarks or
registered trademarks of Microso Corporation in the United
States and/or other countries.
is product uses some soware programs which are listributed
under the GPL license. Accordingly, the following GPL soware
source codes that have been used in this product can be
provided aer asking at http://www.sherwoodamerica.com.
GNU GENERAL PUBLIC LICENSE
Version 2, June 1991
Copyright (C) 1989, 1991 Free Soware Foundation, Inc.
51 Franklin Street, Fih Floor, Boston, MA 02110-1301, USA
Everyone is permitted to copy and distribute verbatim copies of
this license document, but changing it is not allowed.
Preamble
e licenses for most soware are designed to take away your
freedom to share and change it. By contrast, the GNU General
Public License is intended to guarantee your freedom to share
and change free soware--to make sure the soware is free for
all its users. is General Public License applies to most of the
Free Soware Foundation’s soware and to any other program
whose authors commit to using it. (Some other Free Soware
Foundation soware is covered by the GNU Lesser General
Public License instead.) You can apply it to your programs, too.
When we speak of free soware, we are referring to freedom,
not price. Our General Public Licenses are designed to make
sure that you have the freedom to distribute copies of free
soware (and charge for this service if you wish), that you
receive source code or can get it if you want it, that you can
change the soware or use pieces of it in new free programs;
and that you know you can do these things.
To protect your rights, we need to make restrictions that forbid
anyone to deny you these rights or to ask you to surrender the
rights. ese restrictions translate to certain responsibilities for
you if you distribute copies of the soware, or if you modify
it. For example, if you distribute copies of such a program,
whether gratis or for a fee, you must give the recipients all the
rights that you have. You must make sure that they, too, receive
or can get the source code. And you must show them these
terms so they know their rights.
We protect your rights with two steps: (1) copyright the
soware, and (2) oer you this license which gives you legal
permission to copy, distribute and/or modify the soware.
Also, for each author’s protection and ours, we want to make
certain that everyone understands that there is no warranty for
this free soware. If the soware is modied by someone else
and passed on, we want its recipients to know that what they
have is not the original, so that any problems introduced by
others will not reect on the original authors’ reputations.
Finally, any free program is threatened constantly by soware
patents. We wish to avoid the danger that redistributors of a
free program will individually obtain patent licenses, in eect
making the program proprietary. To prevent this, we have made
it clear that any patent must be licensed for everyone’s free use
or not licensed at all.
e precise terms and conditions for copying, distribution and
modication follow.
TERMS AND CONDITIONS FOR COPYING,
DISTRIBUTION AND MODIFICATION
is License applies to any program or other work which
contains a notice placed by the copyright holder saying it may
be distributed under the terms of this General Public License.
e ‘Program’, below, refers to any such program or work, and
a ‘work based on the Program’ means either the Program or
any derivative work under copyright law: that is to say, a work
containing the Program or a portion of it, either verbatim or
with modications and/or translated into another language.
(Hereinaer, translation is included without limitation in the
term ‘modication’.) Each licensee is addressed as ‘you’.
Activities other than copying, distribution and modication are
not covered by this License; they are outside its scope. e act
of running the Program is not restricted, and the output from
the Program is covered only if its contents constitute a work
based on the Program (independent of having been made by
running the Program). Whether that is true depends on what
the Program does.
ENGLISH
1. You may copy and distribute verbatim copies of the Program’s
source code as you receive it, in any medium, provided that
you conspicuously and appropriately publish on each copy
an appropriate copyright notice and disclaimer of warranty;
keep intact all the notices that refer to this License and to
the absence of any warranty; and give any other recipients
of the Program a copy of this License along with the
Program.
You may charge a fee for the physical act of transferring a
copy, and you may at your option oer warranty protection
in exchange for a fee.
2. You may modify your copy or copies of the Program or any
portion of it, thus forming a work based on the Program,
and copy and distribute such modications or work under
the terms of Section 1 above, provided that you also meet
all of these conditions:
a). You must cause the modied les to carry prominent
notices stating that you changed the les and the date of
any change.
b). You must cause any work that you distribute or publish,
that in whole or in part contains or is derived from the
Program or any part thereof, to be licensed as a whole at no
charge to all third parties under the terms of this License.
c). If the modied program normally reads commands
interactively when run, you must cause it, when started
running for such interactive use in the most ordinary
way, to print or display an announcement including an
appropriate copyright notice and a notice that there is
no warranty (or else, saying that you provide a warranty)
and that users may redistribute the program under these
conditions, and telling the user how to view a copy of this
License. (Exception: if the Program itself is interactive
but does not normally print such an announcement, your
work based on the Program is not required to print an
announcement.)
ese requirements apply to the modied work as a whole.
If identiable sections of that work are not derived from the
Program, and can be reasonably considered independent
and separate works in themselves, then this License, and its
terms, do not apply to those sections when you distribute
them as separate works. But when you distribute the same
sections as part of a whole which is a work based on the
Program, the distribution of the whole must be on the
terms of this License, whose permissions for other licensees
extend to the entire whole, and thus to each and every part
regardless of who wrote it.
us, it is not the intent of this section to claim rights or
contest your rights to work written entirely by you; rather,
the intent is to exercise the right to control the distribution
of derivative or collective works based on the Program.
In addition, mere aggregation of another work not based
on the Program with the Program (or with a work based
on the Program) on a volume of a storage or distribution
medium does not bring the other work under the scope of
this License.
3. You may copy and distribute the Program (or a work based on
it, under Section 2) in object code or executable form under
the terms of Sections 1 and 2 above provided that you also
do one of the following:
a). Accompany it with the complete corresponding machine-
readable source code, which must be distributed under the
terms of Sections 1 and 2 above on a medium customarily
used for soware interchange; or,
b). Accompany it with a written oer, valid for at least three
years, to give any third party, for a charge no more than
your cost of physically performing source distribution,
a complete machine-readable copy of the corresponding
source code, to be distributed under the terms of Sections
1 and 2 above on a medium customarily used for soware
interchange; or,
c). Accompany it with the information you received as to
the oer to distribute corresponding source code. (is
alternative is allowed only for noncommercial distribution
and only if you received the program in object code
or executable form with such an oer, in accord with
Subsection b above.)
e source code for a work means the preferred form of
the work for making modications to it. For an executable
work, complete source code means all the source code
for all modules it contains, plus any associated interface
denition les, plus the scripts used to control compilation
and installation of the executable. However, as a special
exception, the source code distributed need not include
anything that is normally distributed (in either source
or binary form) with the major components (compiler,
kernel, and so on) of the operating system on which the
executable runs, unless that component itself accompanies
the executable.
If distribution of executable or object code is made by
oering access to copy from a designated place, then
oering equivalent access to copy the source code from the
same place counts as distribution of the source code, even
though third parties are not compelled to copy the source
along with the object code.
4. You may not copy, modify, sublicense, or distribute the
Program except as expressly provided under this License.
Anyattempt otherwise to copy, modify, sublicense or
distribute the Program is void, and will automatically
terminate your rights under this License. However, parties
who have received copies, or rights, from you under this
License will not have their licenses terminated so long as
such parties remain in full compliance.
5. You are not required to accept this License, since you have not
signed it. However, nothing else grants you permission to
modify or distribute the Program or its derivative works.
ese actions are prohibited by law if you do not accept
this License. erefore, by modifying or distributing the
Program (or any work based on the Program), you indicate
your acceptance of this License to do so, and all its terms
and conditions for copying, distributing or modifying the
Program or works based on it.
6. Each time you redistribute the Program (or any work based
on the Program), the recipient automatically receives a
license from the original licensor to copy, distribute or
modify the Program subject to these terms and conditions.
You may not impose any further restrictions on the
recipients’ exercise of the rights granted herein. You are not
responsible for enforcing compliance by third parties to
this License.
7. If, as a consequence of a court judgment or allegation of patent
infringement or for any other reason (not limited to
patent issues), conditions are imposed on you (whether by
court order, agreement or otherwise) that contradict the
conditions of this License, they do not excuse you from the
conditions of this License. If you cannot distribute so as to
satisfy simultaneously your obligations under this License
and any other pertinent obligations, then as a consequence
you may not distribute the Program at all. For example, if a
patent license would not permit royalty-free redistribution
of the Program by all those who receive copies directly or
indirectly through you, then the only way you could satisfy
both it and this License would be to refrain entirely from
distribution of the Program. If any portion of this section
is held invalid or unenforceable under any particular
circumstance, the balance of the section is intended to
apply and the section as a whole is intended to apply in
other circumstances. It is not the purpose of this section to
induce you to infringe any patents or other property right
claims or to contest validity of any such claims; this section
has the sole purpose of protecting the integrity of the free
soware distribution system, which is implemented by
public license practices. Many people have made generous
contributions to the wide range of soware distributed
through that system in reliance on consistent application
of that system; it is up to the author/donor to decide if
he or she is willing to distribute soware through any
other system and a licensee cannot impose that choice.
is section is intended to make thoroughly clear what is
believed to be a consequence of the rest of this License.
8. If the distribution and/or use of the Program is restricted
in certain countries either by patents or by copyrighted
interfaces, the original copyright holder who places
the Program under this License may add an explicit
geographical distribution limitation excluding those
countries, so that distribution is permitted only in or
among countries not thus excluded. In such case, this
License incorporates the limitation as if written in the body
of this License.
9. e Free Soware Foundation may publish revised and/or new
versions of the General Public License from time to time.
Such new versions will be similar in spirit to the present
version, but may dier in detail to address new problems
or concerns. Each version is given a distinguishing version
number. If the Program species a version number of this
License which applies to it and ‘any later version’, you have
the option of following the terms and conditions either of
that version or of any later version published by the Free
Soware Foundation. If the Program does not specify
a version number of this License, you may choose any
version ever published by the Free Soware Foundation.
10. If you wish to incorporate parts of the Program into other
free programs whose distribution conditions are dierent,
write to the author to ask for permission. For soware
which is copyrighted by the Free Soware Foundation,
write to the Free Soware Foundation; we sometimes make
exceptions for this. Our decision will be guided by the two
goals of preserving the free status of all derivatives of our
free soware and of promoting the sharing and reuse of
soware generally.
NO WARRANTY
11. BECAUSE THE PROGRAM IS LICENSED FREE OF
CHARGE, THERE IS NO WARRANTY FOR THE
PROGRAM, TO THE EXTENT PERMITTED BY
APPLICABLE LAW. EXCEPT WHEN OTHERWISE
STATED IN WRITING THE COPYRIGHT HOLDERS
AND/OR OTHER PARTIES PROVIDE THE PROGRAM
‘AS IS’ WITHOUT WARRANTY OF ANY KIND,
EITHER EXPRESSED OR IMPLIED, INCLUDING, BUT
NOT LIMITED TO, THE IMPLIED WARRANTIES
OF MERCHANTABILITY AND FITNESS FOR A
PARTICULAR PURPOSE. THE ENTIRE RISK AS
TO THE QUALITY AND PERFORMANCE OF THE
PROGRAM IS WITH YOU. SHOULD THE PROGRAM
PROVE DEFECTIVE, YOU ASSUME THE COST OF ALL
NECESSARY SERVICING, REPAIR OR CORRECTION.
12. IN NO EVENT UNLESS REQUIRED BY APPLICABLE LAW
OR AGREED TO IN WRITING WILL ANY COPYRIGHT
HOLDER, OR ANY OTHER PARTY WHO MAY
MODIFY AND/OR REDISTRIBUTE THE PROGRAM
AS PERMITTED ABOVE, BE LIABLE TO YOU FOR
DAMAGES, INCLUDING ANY GENERAL, SPECIAL,
INCIDENTAL OR CONSEQUENTIAL DAMAGES
ARISING OUT OF THE USE OR INABILITY TO USE
THE PROGRAM (INCLUDING BUT NOT LIMITED
TO LOSS OF DATA OR DATA BEING RENDERED
INACCURATE OR LOSSES SUSTAINED BY YOU OR
THIRD PARTIES OR A FAILURE OF THE PROGRAM
TO OPERATE WITH ANY OTHER PROGRAMS), EVEN
IF SUCH HOLDER OR OTHER PARTY HAS BEEN
ADVISED OF THE POSSIBILITY OF SUCH DAMAGES.
END OF TERMS AND CONDITIONS
How to Apply ese Terms to Your New Programs
If you develop a new program, and you want it to be of the
greatest possible use to the public, the best way to achieve this
is to make it free soware which everyone can redistribute and
change under these terms.
To do so, attach the following notices to the program. It is safest
to attach them to the start of each source le to most eectively
convey the exclusion of warranty; and each le should have at
least the ‘copyright’ line and a pointer to where the full notice
is found.
One line to give the program’s name and a brief idea of what
it does.
Copyright (C) <year><name of author>
is program is free soware; you can redistribute it and/or
modify it under the terms of the GNU General Public License
as published by the Free Soware Foundation; either version 2
of the License, or (at your option) any later version.
is program is distributed in the hope that it will be useful,
but WITHOUT ANY WARRANTY; without even the implied
warranty of MERCHANTABILITY or FITNESS FOR A
PARTICULAR PURPOSE. See the GNU General Public
License for more details.
You should have received a copy of the GNU General Public
License along with this program; if not, write to the Free
Soware Foundation, Inc., 59 Temple Place, Suite 330, Boston,
MA 02111-1307 USA
Also add information on how to contact you by electronic and
paper mail.
If the program is interactive, make it output a short notice like
this when it starts in an interactive mode:
Gnomovision version 69, Copyright (C) year name of author
Gnomovision comes with ABSOLUTELY NO WARRANTY; for
details type ‘show w’. is is free soware, and you are welcome
to redistribute it under certain conditions; type ‘show c’ for
details.
e hypothetical commands ‘show w’ and ‘show c’ should show
the appropriate parts of the General Public License. Of course,
the commands you use may be called something other than
‘show w’ and ‘show c’; they could even be mouse-clicks or menu
items--whatever suits your program.
You should also get your employer (if you work as a
programmer) or your school, if any, to sign a ‘copyright
disclaimer’ for the program, if necessary. Here is a sample; alter
the names:
Yoyodyne, Inc., hereby disclaims all copyright interest in the
program ‘Gnomovision’ (which makes passes at compilers)
written by James Hacker.
signature of Ty Coon, 1 April 1989
Ty Coon, President of Vice
is General Public License does not permit incorporating
you program into proprietary programs. If your program is
subroutine library, you may consider it more useful to permit
linking proprietary applications with the library. If this is what
you want to do,
use the GNU Library General Public License instead of this
License.
English
E-15E-14
Page 11

product
guarantee
Worldwide Guarantee
is entitles you to have the unit repaired free of charge, during the rst two years aer
purchase, provided that it was originally purchased from an authorised Arcam dealer.
e Arcam dealer is responsible for all aer-sales service. e manufacturer can take no
responsibility for defects arising from accident, misuse, abuse, wear and tear, neglect or
through unauthorised adjustment and/or repair, neither can they accept responsibility
for damage or loss occurring during transit to or from the person claiming under the
guarantee.
The warranty covers:
Parts and labour costs for two years from the purchase date. Aer two years you must
pay for both parts and labour costs. e warranty does not cover transportation costs
at any time.
Claims under guarantee
is equipment should be packed in the original packing and returned to the dealer
from whom it was purchased. It should be sent carriage prepaid by a reputable carrier –
not by post. No responsibility can be accepted for the unit whilst in transit to the dealer
or distributor and customers are therefore advised to insure the unit against loss or
damage whilst in transit.
For further details contact Arcam at:
Arcam Customer Support Department, Unit 15, Pembroke Avenue, Waterbeach,
CAMBRIDGE, CB25 9QP, England
or via www.arcam.co.uk.
Problems?
If your Arcam dealer is unable to answer any query regarding this or any other Arcam
product please contact Arcam Customer Support at the above address and we will do our
best to help you.
On-line registration
You can register your product on-line at www.arcam.co.uk.
E-16
Correct disposal of this product
is marking indicates that this
product should not be disposed with
other household waste throughout
the EU.
To prevent possible harm to the
environment or human health from
uncontrolled waste disposal and to
conserve material resources, this
product should be recycled responsibly.
To dispose of your product, please use your local
return and collection systems or contact the retailer
where the product was purchased.
Page 12
CDS27
MANUEL Lecteur Super Audio CD/CD/Diusion via réseau
Français
Page 13
conseils de
sécurité
Instructions importantes de
sécurité
1. Lisez ces instructions.
2. Conservez ces instructions.
3. Respectez toutes les mises en garde.
4. Suivez l'ensemble des instructions.
5. N'utilisez pas cet appareil près d'une source d'eau.
6. Nettoyez uniquement avec un chion sec.
7. Ne bloquez pas les ouvertures d'aération.
Procédez à l'installation conformément aux
recommandations du fabricant.
8. N'installez pas l'appareil près de sources de
chaleur, comme des radiateurs, des grilles de
chauage, des fours ou autres appareils (y compris
des amplicateurs) produisant de la chaleur.
9. Ne détournez pas la protection de la prise
polarisée ou de terre.
Une prise polarisée dispose de deux lames, dont
l'une plus large que l'autre. Une prise de terre
dispose de deux lames et d'une troisième broche de
mise à la terre. La lame la plus large ou la troisième
broche correspond à un dispositif de protection.
Si la che fournie ne correspond pas à votre
installation électrique, veuillez-vous adresser à un
électricien pour faire remplacer la prise obsolète.
10. Installez le câble électrique de telle sorte qu'il ne
puisse pas être piétiné ou écrasé, notamment au
niveau des ches, des prises et des points de sortie
de l'appareil.
ATTENTION : Pour réduire le risque d'électrocution, ne retirez pas le couvercle (ou l'arrière). L'appareil ne contient aucune
pièce pouvant être réparée par l'utilisateur. Conez toute réparation à du personnel d'entretien qualié.
MISE EN GARDE: Pour réduire le risque d'incendie ou d'électrocution, protégez cet appareil de la pluie ou de l'humidité.
L'éclair avec une èche dans un triangle équilatéral permet d'avertir l'utilisateur de la présence de tensions
dangereuses non isolées à l'intérieur de l'appareil, d'une ampleur susante pour constituer un risque d'électrocution
sur les personnes.
Le point d'exclamation dans un triangle équilatéral permet d'avertir l'utilisateur de la présence de consignes
importantes sur le fonctionnement et l'entretien (réparations) dans la documentation livrée avec l'appareil.
ATTENTION : Au Canada et aux Etats-Unis, pour éviter tout risque d'électrocution, faites correspondre la lame la plus
large de la che à la fente la plus large de la prise et insérez la che entièrement dans la prise.
ATTENTION : L'utilisation de commandes, réglages ou procédures autres que ce qui est indiqué dans ce document peut
entrainer un risque d'exposition à des radiations dangereuses.
11. Utilisez uniquement des câbles/accessoires
conformes aux recommandations du fabricant.
12. Utilisez uniquement un meuble à roulettes, un
support, un trépied, des xations ou une table
recommandé(e) par le fabricant ou livré(e) avec
l'appareil.
En cas d'utilisation d'un meuble
à roulettes, déplacez le meuble/
appareil avec précaution pour
éviter de le renverser, ce qui
pourrait entraîner des blessures.
13. Débranchez l'appareil en cas d'orage ou lorsque
vous ne l'utiliserez pas sur une période prolongée.
14. Conez les réparations à un technicien qualié.
Il est nécessaire de faire réparer l'appareil s'il a été
endommagé d'une manière ou d'une autre, par
exemple si le l électrique ou la prise est abimé(e),
si du liquide a été renversé ou des objets ont pénétré
dans l'appareil, si l'appareil a été exposé à la pluie ou
à l'humidité, s'il ne fonctionne pas normalement, ou
s'il est tombé.
15. Pénétration d'objet ou de liquide
MISE EN GARDE – Veillez à ce qu'aucun objet ou
liquide ne puisse pénétrer à l'intérieur de l'appareil
par les ouvertures d'aération. Cet appareil doit être
protégé des gouttes ou des éclaboussures. Il ne faut
pas poser d'objet rempli de liquide, tel qu'un vase,
sur l'appareil.
16. Climat
Cet appareil est conçu pour une utilisation en climat
tempéré et dans un cadre domestique.
17. Nettoyage
Débranchez l'appareil du circuit électrique avant de
procéder au nettoyage.
Pour nettoyer les parois de l'appareil, un chion
non-pelucheux et doux devrait sure. N'utilisez pas
de produits de nettoyage chimiques.
Nous déconseillons l'utilisation d'aérosols de
nettoyage pour bois ou de la cire car ceux-ci peuvent
laisser des marques blanches irréversibles.
18. Sources d'alimentation
Branchez cet appareil uniquement sur une source
d'alimentation du type décrit dans le mode d'emploi
ou comme indiqué sur l'appareil.
La principale méthode d'isolation de l'appareil du
circuit électrique consiste à débrancher la prise.
Il faut installer l'appareil de manière à pouvoir le
débrancher facilement.
19. Odeur inhabituelle
En cas d'odeur inhabituelle provenant de l'appareil,
éteignez immédiatement l'appareil et débranchez-le
du circuit électrique. Contactez votre revendeur et
ne rebranchez pas l'appareil.
20. Dommages nécessitant une réparation
Il est nécessaire de faire réparer l'appareil par un
technicien qualié lorsque:
A. le cordon d'alimentation ou la prise est
endommagé(e), ou
B. des objets sont tombés dans l'appareil ou un
liquide a été renversé sur l'appareil, ou
C. l'appareil a été exposé à la pluie, ou
D. le fonctionnement de l'appareil semble anormal
ou s'il ne marche pas de la même manière
qu'avant, ou
E. si l'appareil est tombé ou si le boitier est abimé.
AVERTISSEMENT – La prise secteur est utilisée
comme dispositif de débranchement de l'appareil, elle
doit rester facilement accessible.
AVERTISSEMENT – La batterie ne doit pas être
exposée à une chaleur excessive telle que rayons du
soleil, feu etc.
ATTENTION – Il y a un danger d'explosion si le
remplacement des piles est incorrect. Remplacez
toujours avec des piles du même type ou de type
équivalent.
Conformité relative à la sécurité
Cet appareil est conforme aux normes de sécurité
électrique internationale IEC/EN 60065.
Cet appareil est conforme à la Section 15 des règles
de la FCC. Son fonctionnement est soumis aux deux
conditions suivantes:
(1) Cet appareil ne doit pas provoquer d'interférences
nuisibles, et
(2) cet appareil doit accepter toute interférence reçue,
y compris des interférences pouvant provoquer un
fonctionnement indésirable.
bienvenue
Nous vous remercions et nous vous félicitons pour l'achat de ce lecteur Arcam FMJ CDS27.
Le CDS27 ore une qualité sonore de première classe, que ce soit à partir de CD, SACD, USB
ou audio via réseau. Des convertisseurs numérique-analogique Delta-Sigma haute performance
à la pointe de la technologie orant une qualité sonore audiophile d’apporter réellement vie à
votre musique.
Depuis plus de trois décades, Arcam s'est spécialisée dans les produits audio de grande qualité
et le CDS27 est le dernier d'une longue ligne d'équipements HiFi récompensés. La gamme FMJ
capitalise sur l'expérience considérable d'Arcam, l'un des plus grands spécialistes britanniques
de produits audio, conçus pour vous assurer des années de plaisir audiophile sans le moindre
problème.
Ce manuel a été conçu pour vous donner toutes les informations dont vous avez besoin pour
installer, connecter et utiliser votre nouvel achat. La description de la télécommande fournie
avec cet équipement est également détaillée. Utilisez la liste des contenus de la page suivante
pour vous aider à retrouver les sections qui vous intéressent.
Nous souhaitons que ce lecteur vous donne satisfaction pendant plusieurs années. Dans
l'éventualité, peu probable, où une panne surviendrait, ou si vous recherchez simplement des
informations supplémentaires sur les produits Arcam, les représentants de notre réseau de
revendeurs se feront un plaisir de vous aider. D'autres informations sont disponibles sur notre
site web d'Arcam à l'adresse www.arcam.co.uk.
L'équipe de développement FMJ
Français
F-3F-2
Page 14
Table des matières
conseils de sécurité ������������������������������������������������������������������������������������������������������������������������������������F-2
Instructions importantes de sécurité ����������������������������������������������������������������������������������������������������������������������������������������F-2
Conformité relative à la sécurité �������������������������������������������������������������������������������������������������������������������������������������������������F-2
bienvenue ����������������������������������������������������������������������������������������������������������������������������������������������������F-3
Installation���������������������������������������������������������������������������������������������������������������������������������������������������F-5
Mise en place de l'appareil������������������������������������������������������������������������������������������������������������������������������������������������������������F-5
Alimentation ��������������������������������������������������������������������������������������������������������������������������������������������������������������������������������������F-5
Entrées télécommande et déclenchement ����������������������������������������������������������������������������������������������������������������������������F-5
Câbles de branchement �����������������������������������������������������������������������������������������������������������������������������������������������������������������F-5
connexions duCDS27 �������������������������������������������������������������������������������������������������������������������������������F-6
Connexion réseau ����������������������������������������������������������������������������������������������������������������������������������������������������������������������������F-7
Connexion USB ���������������������������������������������������������������������������������������������������������������������������������������������������������������������������������F-7
Branchements audio �����������������������������������������������������������������������������������������������������������������������������������������������������������������������F-7
Disques compatibles �����������������������������������������������������������������������������������������������������������������������������������������������������������������������F-7
Supports compatibles ��������������������������������������������������������������������������������������������������������������������������������������������������������������������F-7
fonctionnement de base ��������������������������������������������������������������������������������������������������������������������������F-8
télécommande ��������������������������������������������������������������������������������������������������������������������������������������������F-9
menus de conguration ������������������������������������������������������������������������������������������������������������������������� F-11
Parcourir les menus ����������������������������������������������������������������������������������������������������������������������������������������������������������������������F-11
dépannage ����������������������������������������������������������������������������������������������������������������������������������������������� F-12
spécications ������������������������������������������������������������������������������������������������������������������������������������������� F-13
Interférences radio ������������������������������������������������������������������������������������������������������������������������������������������������������������������������ F-13
Radiation laser �������������������������������������������������������������������������������������������������������������������������������������������������������������������������������� F-13
garantie du produit �������������������������������������������������������������������������������������������������������������������������������� F-14
Garantie internationale ���������������������������������������������������������������������������������������������������������������������������������������������������������������F-14
Réclamations sous garantie ������������������������������������������������������������������������������������������������������������������������������������������������������� F-14
Des problèmes ? ���������������������������������������������������������������������������������������������������������������������������������������������������������������������������� F-14
Enregistrement en ligne �������������������������������������������������������������������������������������������������������������������������������������������������������������F-14
Installation
Mise en place de l'appareil
< Posez le lecteur BD sur une surface plane et
ferme, en évitant de l'exposer directement aux
rayons du soleil ou à une source de chaleur ou
d'humidité.
< Ne posez pas le lecteur BD au-dessus d'un
amplicateur ou de toute autre source de chaleur.
< N'installez pas le lecteur BD dans un endroit
conné, tel qu'une bibliothèque ou un placard
fermé, sauf si la ventilation est susante. Lorsque
le lecteur CD est en marche, sa température
augmente, ce qui est normal.
< Ne posez pas un autre appareil ou objet au-dessus
du lecteur CD car cela pourrait bloquer le
ux de ventilation autour de l'appareil, ce qui
entraînerait une surchaue de l'appareil.
< Veillez à ce que le capteur de la télécommande
(situé près de l'écran sur la façace de l'appareil) ne
soit pas bloqué, ce qui gênerait le fonctionnement
de la télécommande.
< Ne posez pas votre platine-disque sur cet
appareil. Les platines sont des appareils très
sensibles aux bruits générés par l'alimentation
secteur. Ces derniers peuvent s'entendre en bruit
de fond si la platine est trop proche de l'appareil.
Alimentation
Le lecteur CD est livré avec une prise de courant
moulée intégrée au câble. Vériez que la prise livrée
correspond bien à votre circuit électrique. S'il vous faut
un autre câble d'alimentation, veuillez vous adresser à
votre revendeur Arcam.
Si la tension ou les prises de votre circuit électrique sont
diérentes, contactez immédiatement votre revendeur
Arcam
Insérez la prise IEC du câble d'alimentation dans
la che située au dos du lecteur BD, en poussant
fermement pour assurer un branchement correct.
Branchez l'autre extrémité du câble sur votre prise
secteur, et, si nécessaire, allumez celle-ci.
Entrées télécommande et
déclenchement
L'entrée REMOTE IN peut être utilisée pour la
transmission de codes RC5 (indiqués sur la page ) vers
le CDS27 si ce dernier est installé dans une position ou
sur un système empêchant l'utilisation de l'infrarouge.
Si cela est nécessaire, veuillez contacter votre revendeur
pour obtenir de plus amples informations.
REMARQUE
< L'entrée télécommande nécessite une prise
jack mono 3,5mm, avec pointe active et
manchon mis à la masse.
< Les signaux de la télécommande doivent être
émis au format RC5 modulé (à 36kHz), avec
un niveau de tension compris entre 5 et 12V.
Français
L'entrée 12V TRIGGER IN peut être utilisée pour sortir
le CDS27 de l'état de veille ou le mettre sur veille. Si
vous branchez le CDS27 sur le sortie de déclenchement
de votre amplicateur Arcam (ou tout autre appareil
compatible), le CDS27 sortira automatiquement de
l'état de veille à la mise en marche de l'amplicateur,
et se remettra sur veille à la mise hors tension de
l'amplicateur. Pour en savoir plus, veuillez consulter le
mode d'emploi de votre amplicateur.
Dans le cadre d'une utilisation normale, il n'est pas
nécessaire d'eectuer de branchement sur ces entrées.
L'entrée RS232 est destinée à la connexion facultative
sur un système d'automatisation domestique ou sur un
ordinateur. Vous pouvez trouver divers systèmes tiers
permettant de commander l'ensemble de vos dispositifs
de divertissement à l'aide d'écrans tactiles, etc. Pour
en savoir plus, veuillez contacter votre revendeur ou
installateur. Les détails techniques du protocole de
télécommande sont disponibles sur demande auprès
d'Arcam (envoyez un email à support@arcam.co.uk).
Câbles de branchement
Il est recommandé d'utiliser des câbles blindés de haute
qualité, conçus pour ce genre d'application. L'utilisation
d'autres câbles, dont les caractéristiques d'impédance
dièrent, risque d'aecter les performances de votre
système. (Par exemple, n'utilisez pas de câble conçu
pour un usage vidéo pour le transport des signaux
audio). Les câbles doivent être aussi courts que possible.
Lors de la connexion du matériel, il convient de vérier
que les câbles d'alimentation secteur sont positionnés
le plus loin possible de vos câbles audio. Vous éviterez
ainsi les bruits indésirables dans les signaux audio.
F-5F-4
Page 15

connexions
duCDS27
Entrée
d'alimentation
Branchez le câble
d'alimentation secteur
qui convient ici.
Sortie numérique coaxiale
Utilisez cette sortie si vous utilisez un convertisseur
numérique-analogique audiophile de haute qualité
avec une entrée numérique coaxiale. Utilisez un câble
blindé 75Ω adéquat pour eectuer le branchement sur
l'entrée numérique.
ATTENTION : Ne reliez jamais une prise de sortie
numérique sur une entrée audio classique.
Connexion à un réseau sans l
Connectez l'antenne Wi-Fi fournie avec l'appareil si une
connexion à un réseau sans est requise. Une connexion
réseau permet la lecture audio via réseau (pour plus
d'informations sur la conguration, voir page 11).
Sortie audio phono
Branchez ces sorties sur l'entrée CD de votre ampli (ou
toute autre entrée à niveau de ligne) en utilisant des
câbles d'interconnexion haute qualité adéquats. Veillez
à ce que les sorties audio gauche et droite du lecteur
CD soient branchées sur les entrées gauche et droite
correspondantes sur votre ampli.
Entrée déclenchement 12 V
Cette prise permet de mettre le CDS27 en marche ou sur
veille à partir d'un ampli (ou de tout autre appareil AV)
grâce à la fonction 12V TRIG OUT. voir page5.
Connexion réseau
Un câble Ethernet peut être utilisé pour connecter
le CDS27 à un routeur ou un commutateur de votre
réseau local, permettant la lecture de chiers audio
stockés sur votre ordinateur ou périphérique NAS.
Une connexion sans l est également disponible, et peut
être congurée via le menu réglages.
Connexion USB
Port USB de type A, utilisé pour connecter vos lecteurs
ash ou disques durs externes contenant des chiers
l'audio.
Peut également être utilisé pour la mise à jour du
logiciel.
Routeur
LAN
Français
Internet
Lecteur USB
Connexion réseau
Branchez cette prise sur un port de votre
routeur réseau à l'aide d'un câble patch
Ethernet (voir page 7). Une connexion
réseau permet la lecture audio via
réseau (pour plus d'informations sur la
conguration, voir page 11).
Sortie numérique optique
Utilisez cette prise si vous disposez d'un récepteur
AV avec entrée audionumérique optique.
Connexion USB
Insérez vos supports mémoire USB ici.
Le CDS27 peut lire certains chiers
numériques stockés sur des clés USB (voir
«Supports compatibles» à page 7).
Connectez les sorties audio aux entrées de l'ampli de votre
lecteur CD (ou autres entrées symétriques) à l'aide de câbles
de haute qualité. Veillez à ce que les sorties audio gauche et
droite du lecteur CD soient branchées sur les entrées gauche et
droite correspondantes sur votre ampli.
Sorties audio symétriques
Entrée télécommande
Cela permet aux signaux de la
télécommande d'être reçus par le CDS27 si
le capteur de la télécommande du panneau
avant n'est pas couvert (ou autrement non
«visible» par la télécommande).
Reportez-vous à la page 5 pour plus
d'informations.
RS232
Cette prise permet l'utilisation
d'une télécommande d'un système
d'automatisation domestique ou d'un
ordinateur.
Reportez-vous à la page 5 pour plus
d'informations.
Branchements audio
Le CDS27 propose plusieurs possibilités de branchement audio, le type de connexion est à choisir en fonction du
reste de votre système: choisissez le type le mieux adapté à votre ampli.
Pour avoir la meilleure qualité audio stéréo, nous vous recommandons de connecter les sorties audio stéréo
analogiques à l'entrée CD de votre ampli, cela permet au circuit numérique-analogique audiophile du CDS27 d'être
utilisé.
Analogique
En utilisant des câbles phono stéréo d'une longueur appropriée, connectez les
sorties marquées «Phono» aux entrées gauche et droite CD/SACD de votre ampli.
Vous pouvez également connecter les sorties symétriques gauche/droite à une
entrée symétrique de votre ampli.
Numérique
Connectez l'une des sorties audio numérique (optique ou coaxiale) à l'entrée
numérique «CD/SACD»de votre récepteur, ces sorties numériques fournissent une
uniquement stéréo PCM.
Disques compatibles
Ce lecteur accepte les types de disque suivants:
CD-Audio
CD-R
CD-RW
Super Audio CD
F-7F-6
Supports compatibles
Les formats de chiers suivants sont pris en charge en
lecture sur disque, USB et réseau.
< FLAC, jusqu'à 24bit, 192KHz
< WAV, jusqu'à 24bit, 192KHz
< AAC, jusqu'à 24bit, 96KHz
< AIFF, jusqu'à 24bit, 192KHz
< OGG, jusqu'à 24bit, 192KHz
< MP3, jusqu'à 320kbps, 48KHz
< WMA, jusqu'à 192kbps, 48KHz
Page 16
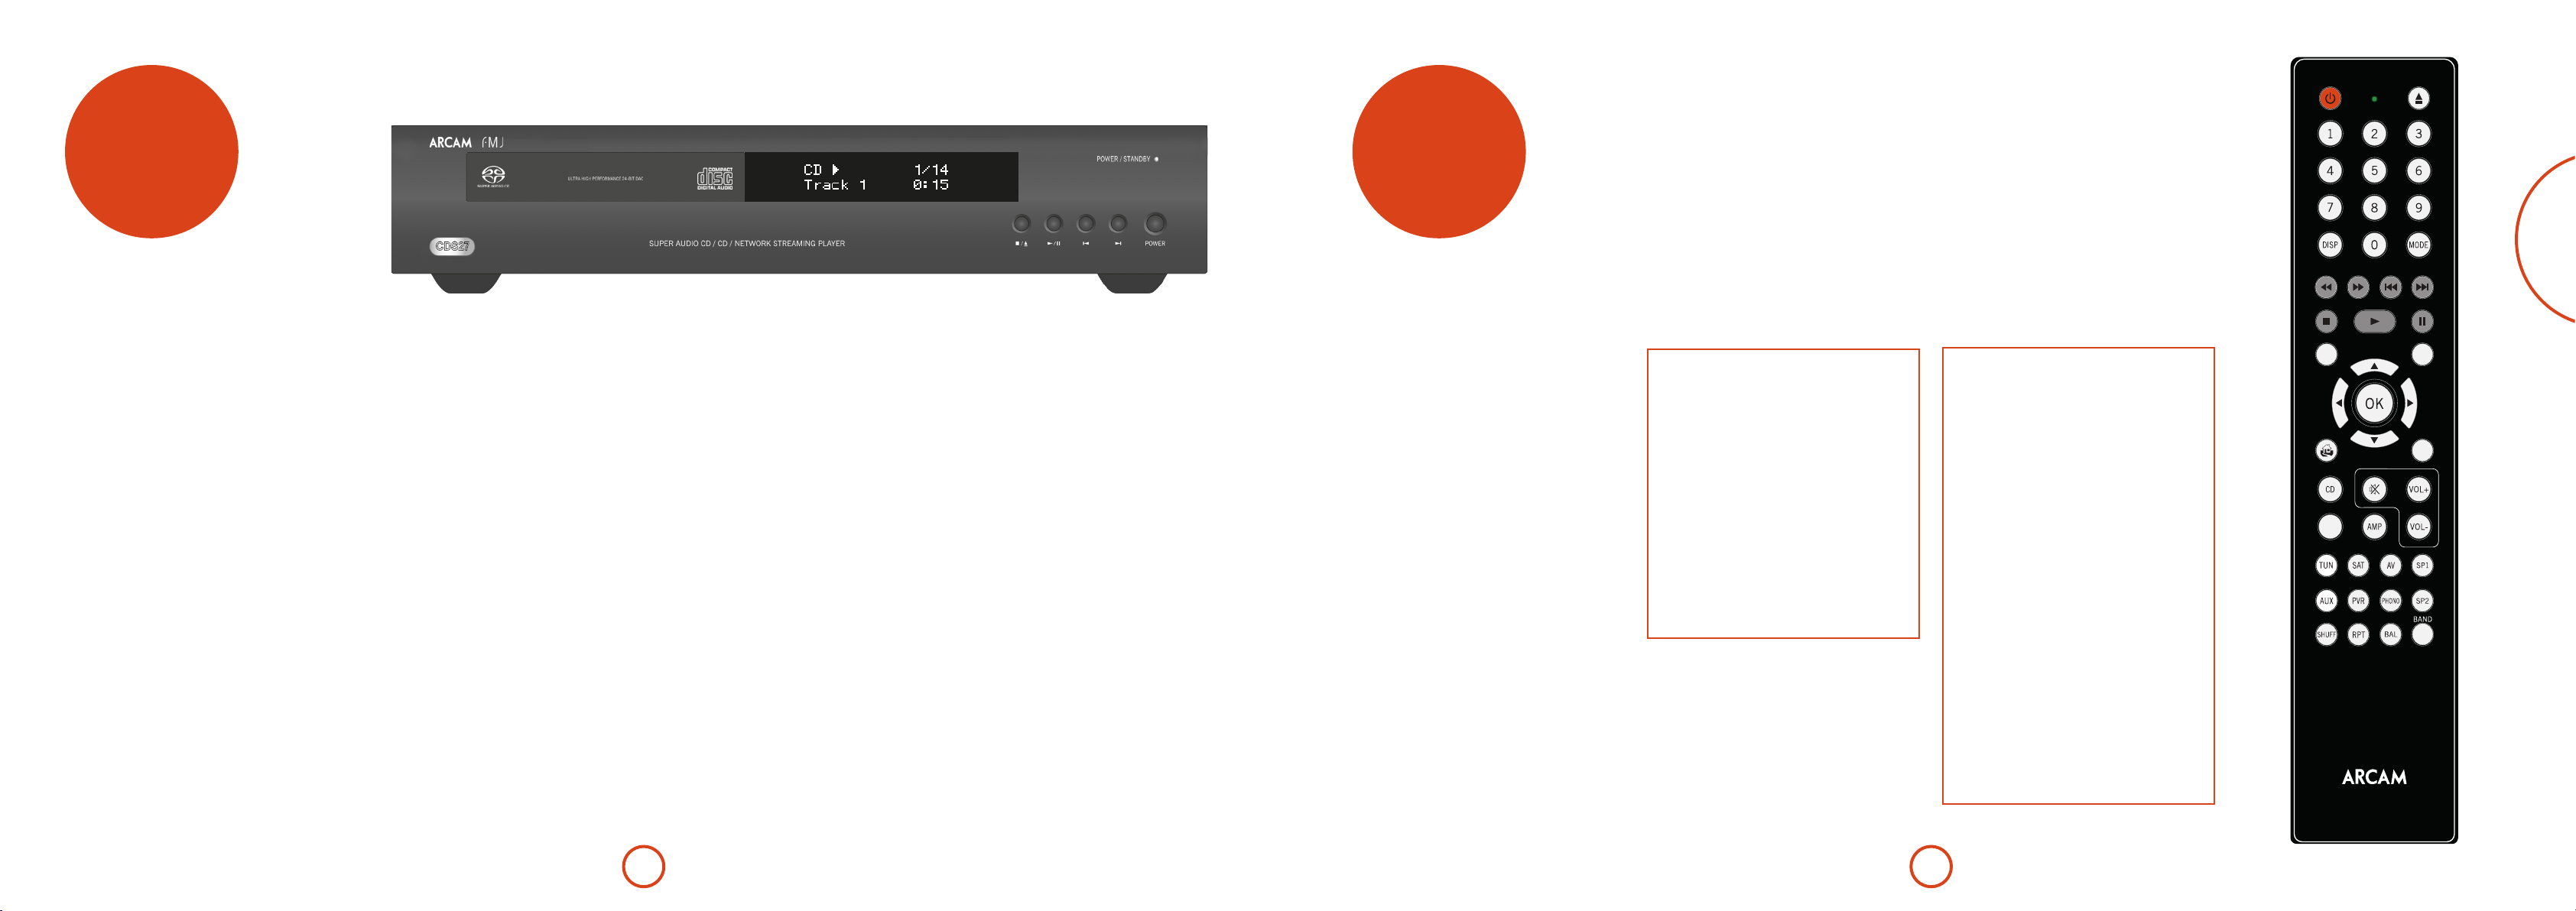
fonctionnement
AUDIO
SACD
MENU
FM MONO P/TUNE
STORE
INFO
BD
CR902
RTN
de base
télécommande
Français
Inleiding
«Fonctionnement de base», explique la façon de lire
des disques audio, des contenus réseau et les chiers
audio stockés sur un support USB. Il peut s'avérer
nécessaire de congurer votre lecteur en fonction de
votre système avant de pouvoir obtenir un résultat de
lecture optimal. La conguration du lecteur est décrite à
partir de la page 11.
Mise en marche
Appuyez sur la touche d'alimentation POWER pour
allumer l'appareil. Le voyant devient vert lorsque
l'appareil est sous tension et rouge lorsqu'il est en mode
veille. Pour passer en mode veille vous pouvez utiliser
la touche veille de la télécommande et pour quitter ce
mode utilisez la même touche, ou la touche </1 du
panneau avant. Si vous appuyez sur la touche POWER
(ou si vous débranchez l'appareil) lorsque l'appareil est
sur veille, ce dernier se remettra en mode veille à la
prochaine mise sous tension.
Il faut remarquer que le capteur de télécommande est
situé à droite de la fenêtre d'achage. Ne l'obstruez pas
pour que la télécommande puisse fonctionner.
Lecture d'un disque
Appuyez sur </1 sur la façade (ou sur 1 sur la
télécommande) et posez le disque sur le plateau, face de
lecture vers le bas (certains disques sont à double face.
Dans ce cas, la face A doit être vers le haut pour une
lecture de cette face).
Appuyez sur </1 sur la façade pour refermer le
plateau. Au bout de quelques secondes, le chargement
du disque est lancé.
Le chargement d'un disque peut prendre un certain
temps à partir du moment ou le plateau se referme.
La lecture commence automatiquement si l'option
«Lecture automatique de disque» est activée (option
par défaut). (Pour plus d'informations, reportez-vous à
«Lecture automatique de disque» à page 11).
Pour les disques qui ne sont pas lus automatiquement,
appuyez sur 4/; du panneau avant ou sur 4 de la
télécommande.
Lecture à partir du réseau
Assurez-vous que le CDS27 est connecté à votre réseau
local. Sélectionnez «Explorateur de supports» à partir
de l'écran d'accueil, une liste de supports disponibles
sera présentée pour l'exploration. Utilisez les touches
',
bibliothèques disponibles.
La lecture audio via réseau peut également être
contrôlée à partir de votre ordinateur, téléphone ou
appareil portable à l'aide de votre application UPnP.
de la télécommande pour explorer les
<>
Appuyez sur OK ou 4 au niveau d'un chier audio
sélectionné (en surbrillance) pour le lire. La lecture
se poursuit à travers tous les chiers suivants dans le
répertoire de lecture.
Lecture à partir d'USB
Connectez votre appareil USB au port USB à l'arrière
du CDS27. Une fois l'appareil reconnu, sélectionnez
«Explorateur de supports» à partir de l'écran d'accueil,
puis choisissez l'option «USB» dans la liste des
supports.
Naviguez en utilisant les touches de direction de la
télécommande
chier audio en surbrillance en appuyant sur OK, 4
ou >. La lecture se poursuit à travers tous les chiers
suivants dans le répertoire de lecture.
',
et lancez la lecture d'un
<>
Pendant la lecture
Recherche
Appuyez sur 8 ou 7 du panneau avant ou de la
télécommande pour rechercher vers l'avant ou vers
l'arrière, à la vitesse de lecture 4x la normale. Pour
reprendre la lecture normale, appuyez sur LECTURE.
Saut de chapitres/pistes
Pour sauter des chiers, appuyez sur / ou 0.
Lors de saut de chiers vers l'arrière, la première
pression sur la touche vous emmène au début du chier
en cours. En appuyant à nouveau sur la touche vous
allez au début du chier précédent.
Pause de la lecture
Appuyez sur la touche 4/; sur la façade ou sur ; sur
la télécommande pour mettre la lecture sur pause. Pour
reprendre la lecture, appuyez sur 4/; sur la façade ou
sur 4 sur la télécommande.
Arrêt de la lecture
Appuyez sur la touche </1 sur la façade ou sur < sur
la télécommande pour arrêter la lecture.
Le CDS27 est fourni avec la télécommande CR902.
Utilisation de la télécommande
Veuillez garder à l'esprit les règles suivantes lorsque
vous utilisez la télécommande.
< Veillez à ce qu'aucun obstacle ne se trouve
entre la télécommande et le capteur de la
télécommande sur la façade. La portée de
la télécommande est d'environ 7 mètres. (Si
le capteur de la télécommande est obstrué,
vous pouvez utiliser la prise d'entrée de la
télécommande IF in au dos de l'appareil. Veuillez
vous adresser à votre revendeur pour obtenir de
plus amples informations.)
< La télécommande peut devenir capricieuse si
le capteur de la télécommande sur l'appareil est
exposé à une puissante luminosité solaire ou
articielle.
< Remplacez les piles si vous remarquez une
réduction de la portée de la télécommande.
Insertion des piles dans la télécommande
1. Ouvrez le compartiment à piles situé au dos de
l'appareil.
2. Insérez deux piles «AAA» selon le schéma sur le
couvercle du compartiment à piles.
3. Faites glisser le couvercle du compartiment à
piles dans sa position de fermeture tout en le
verrouillant avec un déclic.
REMARQUE
< Une mauvaise utilisation des piles peut
entrainer un risque de fuite ou d'explosion.
< Ne mélangez pas piles usagées et piles neuves.
< Ne mélangez pas des piles de types diérents–
elles peuvent paraître identiques, mais des
piles diérentes peuvent avoir une tension
diérente.
< Veillez à ce que les signes plus (+) et moins
(–) de chaque pile correspondent bien aux
indications dans le compartiment à piles.
< Sortez les piles de l'appareil si vous n'avez pas
l'intention de l'utiliser pendant plus d'un mois.
< Lorsque vous devez jeter des piles
usagées, veuillez respecter les consignes
gouvernementales ou locales en vigueur dans
votre pays ou votre région.
La télécommande CR902 est conforme à
la section 15 de la réglementation du FCC
Cet équipement a fait l'objet de tests et a été jugé
conforme aux limitations d'un appareil numérique
de classe B, conformément à la Section 15 des règles
de la FCC. Ces limites sont imposées pour assurer
une protection susante contre les interférences
produites dans une installation résidentielle. Cet
appareil génère, utilise et peut émettre de l'énergie
de fréquence radio et, s'il n'est pas installé et utilisé
conformément aux instructions, peut produire des
interférences nuisibles aux communications radio. Il
n'est cependant pas garanti qu'aucune interférence
ne se produira dans une installation particulière.
Si cet appareil provoque des interférences nuisibles
aectant la réception de programmes radio ou
télévisés, ce qui peut être déterminé en éteignant
puis rallumant l'appareil, l'utilisateur peut tenter
de remédier à ces interférences en adoptant une ou
plusieurs des mesures suivantes:
Réorientez ou déplacez l'antenne de réception.
Augmentez la distance entre l'appareil et le
récepteur.
Branchez l'appareil sur une prise située sur un
circuit diérent de celui sur lequel est branché le
récepteur.
Consultez le revendeur ou un technicien audio
expérimenté pour obtenir de l'aide.
F-9F-8
Page 17
Mode périphérique AMP
La touche mode Appareil A congure la CR902 pour
contrôler votre amplicateur Arcam. Le fait d'appuyer
sur cette touche n'a aucune incidence sur l'entrée
sélectionnée sur l'amplicateur.
Pour mettre en veille ou en marche
P
Parcourt les options de luminosité de
DISP
l'achage en façade
Parcourt les modes d'achage sur le
MODE
panneau avant
Ache le menu de conguration de
MENU
l'amplicateur sur le panneau avant
Navigation dans les menus
conrme une sélection
O
Pour activer ou désactiver la fonction
@
silence de l'amplicateur
Les touches Vol +/– permettent de régler le
volume d'un ampli Arcam.
Vol-
Appuyez sur la touche MUTE pour couper
Vol+
le son d'un ampli Arcam. Appuyez de
nouveau (ou utilisez Vol +/–) pour rétablir
le son.
Pour activer ou désactiver la sortie de
SP1
l'enceinte 1
Pour activer ou désactiver la sortie de
SP2
l'enceinte 2
Permet de régler la balance entre le canal
BAL
audio gauche et droit
REMARQUE
La CR902 est une télécommande multi- appareil,
c'est pour cela que les fonctions des touches dièrent
selon la dernière touche appuyée.
Assurez-vous que la touche «CD» est sélectionnée
avant de contrôler le CDS27.
Mode appareil TUNER
La touche mode Appareil T congure la CR902 pour
contrôler les fonctions de tuner des tuners Arcam.
Pour mettre en veille ou en marche
P
0…9
' ,
Les touches numériques sont utilisées pour
stocker et rappeler les préréglages
Parcourt les options de luminosité de
DISP
l'achage en façade
Parcourt les diérents modes d'achage de
INFO
l'information
Retour rapide iPod
)
Avance rapide iPod
(
Présélection vers le bas/Catégorie Sirius
]
vers le bas/Lecture arrière iPod
Présélection vers le haut/Catégorie Sirius
[
vers le haut/Lecture avant iPod
Éteindre l'iPod
#
Lecture/pause de l'iPod
$
Lecture/pause de l'iPod
&
Ache le menu de conguration du tuner
MENU
sur le panneau avant
Présélection vers le haut/vers le bas, lecture
arrière iPod/lecture avant
Diminution/augmentation de la fréquence
< >
de syntonisation
Pour conrmer une sélection
O
Pour faire basculer le mode FM entre
FM MONO
réception mono et stéréo
Pour entrer/sortir en mode rappel de
P/TUNE
préréglage
Pour entrer/sortir en mode enregistrement
STORE
de la présélection
Permet de parcourir les bandes disponibles
BAND
du tuner
Mode périphérique CD
La touche c de mode périphérique congure la CR902
pour contrôler les fonctions CD des lecteurs CD Arcam.
Pour mettre en veille ou en marche
P
Ouverture/fermeture du plateau de disque.
!
Les touches numériques permettent un accès
direct aux pistes individuelles sur un disque.
Pour sélectionner une plage, appuyez sur la
0…9
touche du clavier correspondante. Pour les
pistes supérieures à 9, saisir les chires dans
l'ordre. Par exemple, pour lire la piste 15,
appuyez sur 1, puis sur 5.
Parcourt les options de luminosité de
DISP
l'achage en façade
Permet de modier les modes d'achage
MODE
disponibles sur le lecteur de CD
Retour rapide
)
Avance rapide
(
Pour revenir directement au début de la piste
]
actuelle/précédente
Pour aller directement au début de la piste
[
suivante
Arrêt de la lecture
#
Lecture
$
Pour activer ou désactiver la pause de lecture
&
Pour naviguer dans la liste des morceaux si
pris en charge par le lecteur
pour sélectionner la piste en surbrillance
O
si pris en charge par le lecteur
Active ou désactive la lecture aléatoire
SHUFF
(«shue »)
La répétition d'un morceau permet la lecture
de nouveau du morceau en cours une fois la
n de celui-ci est atteinte.
Répéter tout va répéter la sélection courante
de morceaux, une fois la n du dernière
RPT
morceau est atteinte.
Pour répéter une piste particulière,
sélectionnez cette piste et appuyez deux fois
sur RPT. Pour annuler, appuyez sur RPT une
troisième fois.
Mode périphérique BD
La touche Mode � permet de congurer la CR902
pour contrôler les fonctions BD des lecteurs Arcam BD.
Pour mettre en veille ou en marche
P
Ouverture/fermeture du plateau de disque.
!
Les touches numériques permettent un accès
direct aux pistes individuelles sur un disque.
Pour sélectionner une plage, appuyez sur la
touche du clavier correspondante. Pour les
0…9
pistes supérieures à 9, saisir les chires dans
l'ordre. Par exemple, pour lire la piste 15,
appuyez sur 1, puis sur 5.
Parcourt les options de luminosité de
DISP
l'achage en façade
Change les modes d'achage disponibles sur
MODE
le lecteur BD
Retour rapide
)
Avance rapide
(
Pour revenir directement au début de la piste
]
actuelle/précédente
Pour aller directement au début de la piste
[
suivante
Arrêt de la lecture
#
Lecture
$
Pour activer ou désactiver la pause de lecture
&
Change le format de décodage audio (Dolby
AUDIO
Digital, DTS, etc.).
MENU
Active le menu du lecteur BD.
Pour naviguer dans la liste des morceaux si
pris en charge par le lecteur
pour sélectionner la piste en surbrillance
O
si pris en charge par le lecteur
Retour de la navigation au niveau supérieur
.
du menu (« Accueil »).
Lors de la navigation dans un menu, appuyez
RTN
sur cette touche pour revenir à l'écran ou à la
sélection précédente
Active ou désactive la lecture aléatoire
SHUFF
(«shue »)
Pour répéter la lecture du disque ou la
sélection de pistes préprogrammée. Pour
RPT
répéter une piste particulière, sélectionnez
cette piste et appuyez deux fois sur RPT. Pour
annuler, appuyez sur RPT une troisième fois.
menus de
conguration
Le menu Réglages permet de congurer tous les aspects
de votre CDS27. Cette section passe en revue les
éléments du menu tout en expliquant leurs fonctions.
La seule façon pour acher le menu Réglages est sur
l'écran d'achage du CDS27.
Accès au menu de conguration
Si le menu d'accueil n'est pas aché, appuyez sur
MENU de la télécommande pour l'acher.
Appuyez sur C jusqu'à ce que l'élément de
MENU REGLAGES soit aché et appuyez sur OK pour
accéder.
Parcourir les menus
Les menus du CDS27 peuvent être parcourus en
utilisant les touches de direction (èches) de la
télécommande.
1. Utilisez les touches B et C pour naviguer vers
le haut et vers le bas dans les menus.
2. Pour acher la section, appuyez sur OK pour la
sélectionner.
3. Utilisez les touches B et C pour parcourir les
options.
4. Pour sélectionner un paramètre, appuyez sur la
touche E: utilisez les touches B et C pour
modier le réglage.
5. Appuyez sur OK pour conrmer le réglage.
Retournez à l'étape 4 pour eectuer d'autres
réglages sur la section sélectionnée.
6. Appuyez sur < pour retourne à l'écran
précédent si vous voulez choisir une autre section
à régler.
Veille réseau – Cette option détermine si les fonctions
réseau sont disponibles lorsque le CDS27 est en mode
veille.
Sélectionnez «ACTIVE» pour maintenir la connexion
réseau activée (nécessaire pour le contrôle IP).
Sélectionnez «VEILLE» pour que le matériel réseau
soit désactivé an de réduire la consommation
d'énergie.
Conguration réseau – Cette option permet de
congurer l'unité pour se connecter à un réseau
existant, nécessaire pour la lecture audio réseau et les
mises à jour du logiciel via Internet.
Veille automatique – Permet de spécier la période
d'inactivité au bout de laquelle l'appareil se met
automatiquement en veille. Les options sont:
5/10/15/20/25/30 Minutes.
Lecture automatique de disque – contrôle si la lecture
d'un disque optique (ex. CD) se fait automatiquement
après son insertion.
< Activé : La lecture des disques optiques démarre
automatiquement.
< Désactivé: il faut appuyer sur play pour démarrer
la lecture d'un disque.
Mise à jour du logiciel – Vous pouvez vérier si des
mises à jour du logiciel de votre lecteur sont disponibles
en sélectionnant cette option et en appuyant sur OK
pour mettre «Réseau» en surbrillance, et en appuyant
une nouvelle fois sur OK.
Un message s'ache si aucune mise à jour n'est
disponible. Sinon, suivez les instructions à l'écran.
Réinitialisation des paramètres – Appuyez sur OK
lorsque cette option est en surbrillance pour rétablir
l'ensemble des paramètres d'usine (à l'exception des
contrôles parentaux).
Il vous sera demandé de conrmer que vous voulez
rétablir les paramètres par défaut. Sélectionnez
«Annuler» pour quitter ou sur ' pour sélectionner
l'option «oui» et sur OK pour conrmer.
Informations système – Utilisez les touches '/
,
pour parcourir les options.
L'écran Informations système donne des informations
sur votre lecteur, telles que l'adresse IP et la version du
micrologiciel.
Audio réseau – Permet d'activer ou de désactiver la
capacité de rendu UPNP du lecteur. Mettre cette option
sur «désactivé» désactive l'audio réseau.
Sortie numérique – Permet de limiter le taux
d'échantillonnage de la sortie numérique coaxiale/
optique.
Français
F-11F-10
Page 18

dépannage
En cas de problème, consultez ce tableau avant
d'emmener votre appareil à réparer.
Si le problème persiste, esssayez de le résoudre en
éteignant et en rallumant l'appareil.
Si cela ne résoud toujours pas la situation, veuillez
vous adresser à votre revendeur. N'essayez jamais de
réparer l'appareil par vous-même car cela annulerait la
garantie!
Problème Cause possible Solution
Pas d'alimentation < Le câble d'alimentation électrique est débranché.
< Mauvais branchement sur la prise murale ou prise murale hors d'état de
marche.
Lecture de disque
impossible
Pas de disque/disque
erroné
Aucun son < Les câbles audio sont débranchés. < Branchez les câbles comme il convient.
Interférences ou son
déformé
La télécommande ne
marche pas.
< Le disque a peut-être été inséré dans le mauvais sens.
< Le disque ne peut pas être lu.
< Le disque est sale.
< Le disque enregistré n'a pas été correctement nalisé.
< Le disque est rayé, sale, mal enregistré ou incompatible. < Appuyez sur la touche POWER pour éteindre l'appareil.
< Le disque est sale.
< Les branchements sont mal eectués.
< Les piles n'ont pas été installées ou sont usagées.
< Le capteur de la télécommande est masqué.
< Enfoncez fermement le câble d'alimentation.
< Vériez si la prise fonctionne en utilisant une lampe ou un
autre appareil.
< Réinsérez le disque, face imprimée vers le haut.
< Utilisez un disque compatible.
< Nettoyez le disque.
< Insérez un disque bien nalisé.
Appuyez de nouveau sur cette touche et retirez le disque.
< Nettoyez le disque.
< Vériez les branchements et insérez fermement l'ensemble
des câbles sur les prises.
< Remplacez les piles.
< Enlevez l'obstacle.
spécications
Sortie audio analogique
Conversion numérique-analogique DAC Delta-Sigma 24-bit 192 kHz
Rapport signal/bruit 110dB CCIR
Distorsion harmonique (1 kHz) 0,002%
Fréquence en réponse (±0,5 dB) 10Hz-20kHz
Niveau de sortie (0dB) 2,2 Vrms
Impédance de sortie 47Ω
Charge minimum conseillée 5kΩ
Interfaces numériques
Sorties audio 75Ω coaxial/optique TOSLINK
USB USB 2.0 High Speed (480 Mbit/s)
Ethernet 10/100 10/100
Sans l b/g/n
Caractéristiques physiques
Dimensions (L x P x H) 433 x 276 x 75
Poids 5,2kg/7,5kg emballage inclus
Consommation électrique 20W maximum
Accessoires fournis
Câble d'alimentation, Télécommande CR902, 2 piles AAA, Antenne Wi-Fi
E&OE
Remarque: toutes les valeurs techniques sont typiques sauf mention contraire
Interférences radio
Le lecteur de CDS27 est un appareil numérique qui
a été conçu pour fonctionner selon des normes très
strictes de compatibilité électromagnétique.
Tous les lecteurs CD génèrent et peuvent émettre de
l'énergie de radiofréquence (RF). Cela peut parfois
entrainer des interférences sur la réception radio FM
et AM. Dans ce cas, éloignez le plus possible le lecteur
et ses câbles de connexion du tuner et de ses antennes.
Branchez le lecteur et le tuner sur des prises de courant
diérentes peut également contribuer à réduire les
interférences.
PAYS DE LA CE – La conception de ces appareils est
conforme à la directive EMC 2004/108/EC.
ETATS-UNIS – Ces appareils sont conformes à la Class
B, section 15 de la FCC.
Radiation laser
CLASSE II
PRODUIT LASER
Si le lecteur CDS27 est utilisé
alors que le boîtier externe est
enlevé, un rayonnement laser
invisible pourrait provoquer des
lésions oculaires.
Français
Politique d'amélioration continue
Arcam améliore continuellement ses produits. Les
conceptions et les spécications peuvent donc faire
l'objet de modications sans préavis.
F-13F-12
Page 19

garantie du
produit
Garantie internationale
Cette garantie vous donne droit à des réparations gratuites de l'appareil, durant les
deux ans à compter de la date d'achat, si l'achat a été fait auprès d'un revendeur Arcam
agréé. Le revendeur Arcam est responsable de l'ensemble du service après-ventes. Le
fabricant ne peut être tenu responsable de défauts provoqués par un accident, une
mauvaise utilisation, une utilisation abusive, une usure normale, de la négligence ou
des réglages et/ou réparations non autorisés, et n'accepte pas non plus la responsabilité
des dommages et pertes encourus durant le transport vers ou à partir de la personne
réclamant les réparations sous garantie.
Cette garantie couvre:
Les frais de pièces et main d'œuvre pendant deux ans à compter de la date d'achat. Au
bout de deux ans, il vous faut payer les frais de pièces et de main d'œuvre. La garantie ne
couvre en aucun cas les frais de transport.
Réclamations sous garantie
Cet équipement doit être renvoyé dans son emballage d'origine au revendeur auprès
duquel il avait été acheté. Il doit être expédié par l'intermédiaire d'un transporteur
réputé – pas par la poste. Aucune responsabilité ne peut être acceptée durant le transit de
l'appareil vers le revendeur ou le distributeur et il est donc conseillé aux clients d'assurer
l'appareil contre toute perte ou dommage durant le transport.
Pour en savoir plus, veuillez contacter Arcam au:
Arcam Customer Support Department, Unit 15, Pembroke Avenue, Waterbeach,
CAMBRIDGE, CB25 9QP, Angleterre
ou sur le site www.arcam.co.uk.
Des problèmes ?
Si votre revendeur Arcam n'est pas en mesure de répondre à vos questions sur cet
appareil ou tout autre appareil Arcam, veuillez vous adresser au service après-vente
d'Arcam à l'adresse ci-dessus. Nous ferons de notre mieux pour vous aider.
Enregistrement en ligne
Vous pouvez enregistrer votre produit en ligne à www.arcam.co.uk.
F-14
Mise au rebus adéquate de cet appareil
Les plaques signalétiques indiquent
que cet appareil ne doit pas être jeté
avec le reste des déchets ménagers,
et ce dans toute l'Union Européenne.
Pour protéger l'environnement
et la santé en évitant une mise au
rebus des déchets non contrôlée et
pour conserver les ressources de
matériaux, cet appareil doit être recyclé de manière
responsable.
Si vous devez jeter votre appareil, veuillez le faire
conformément aux systèmes de renvoi et de collecte
locaux, ou contactez le revendeur ayant vendu cet
appareil.
Page 20
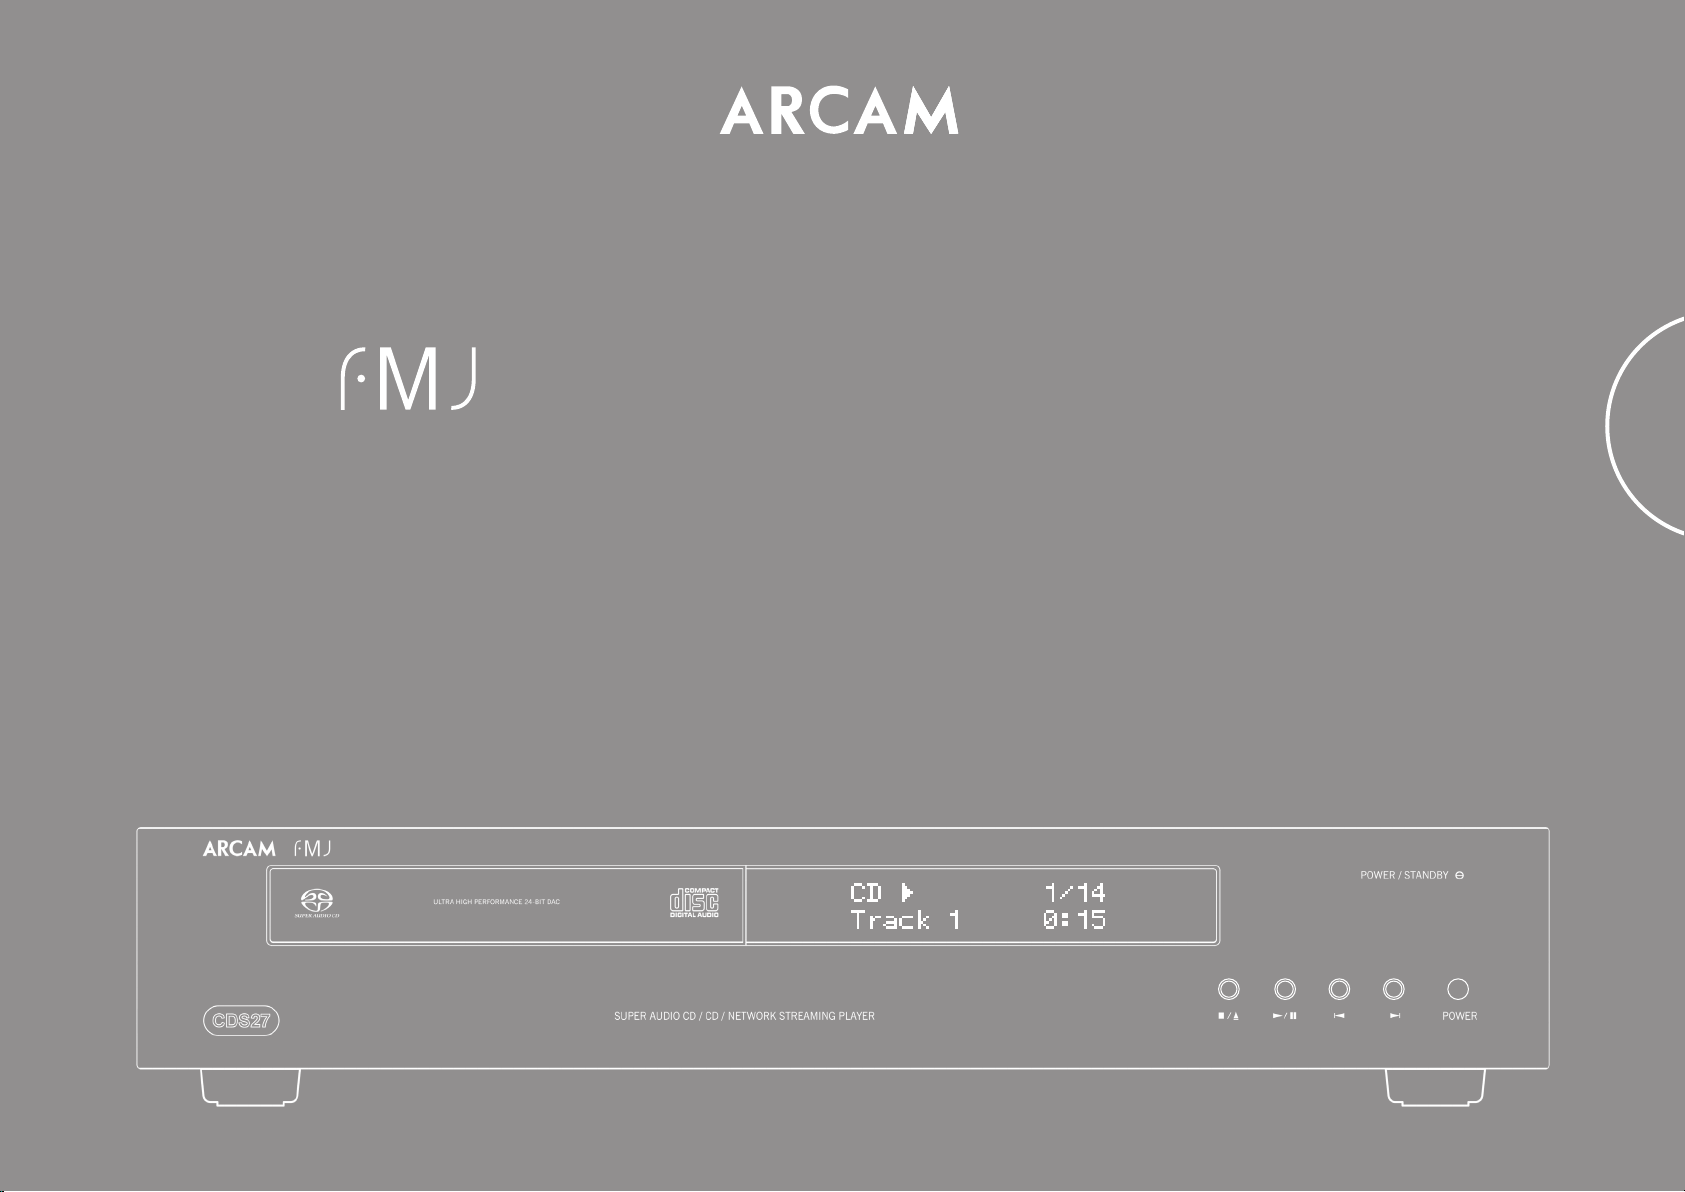
CDS27
HANDBUCH Super-Player für Audio-für CD/CD/Netzwerk-Streaming
Deutsch
Page 21
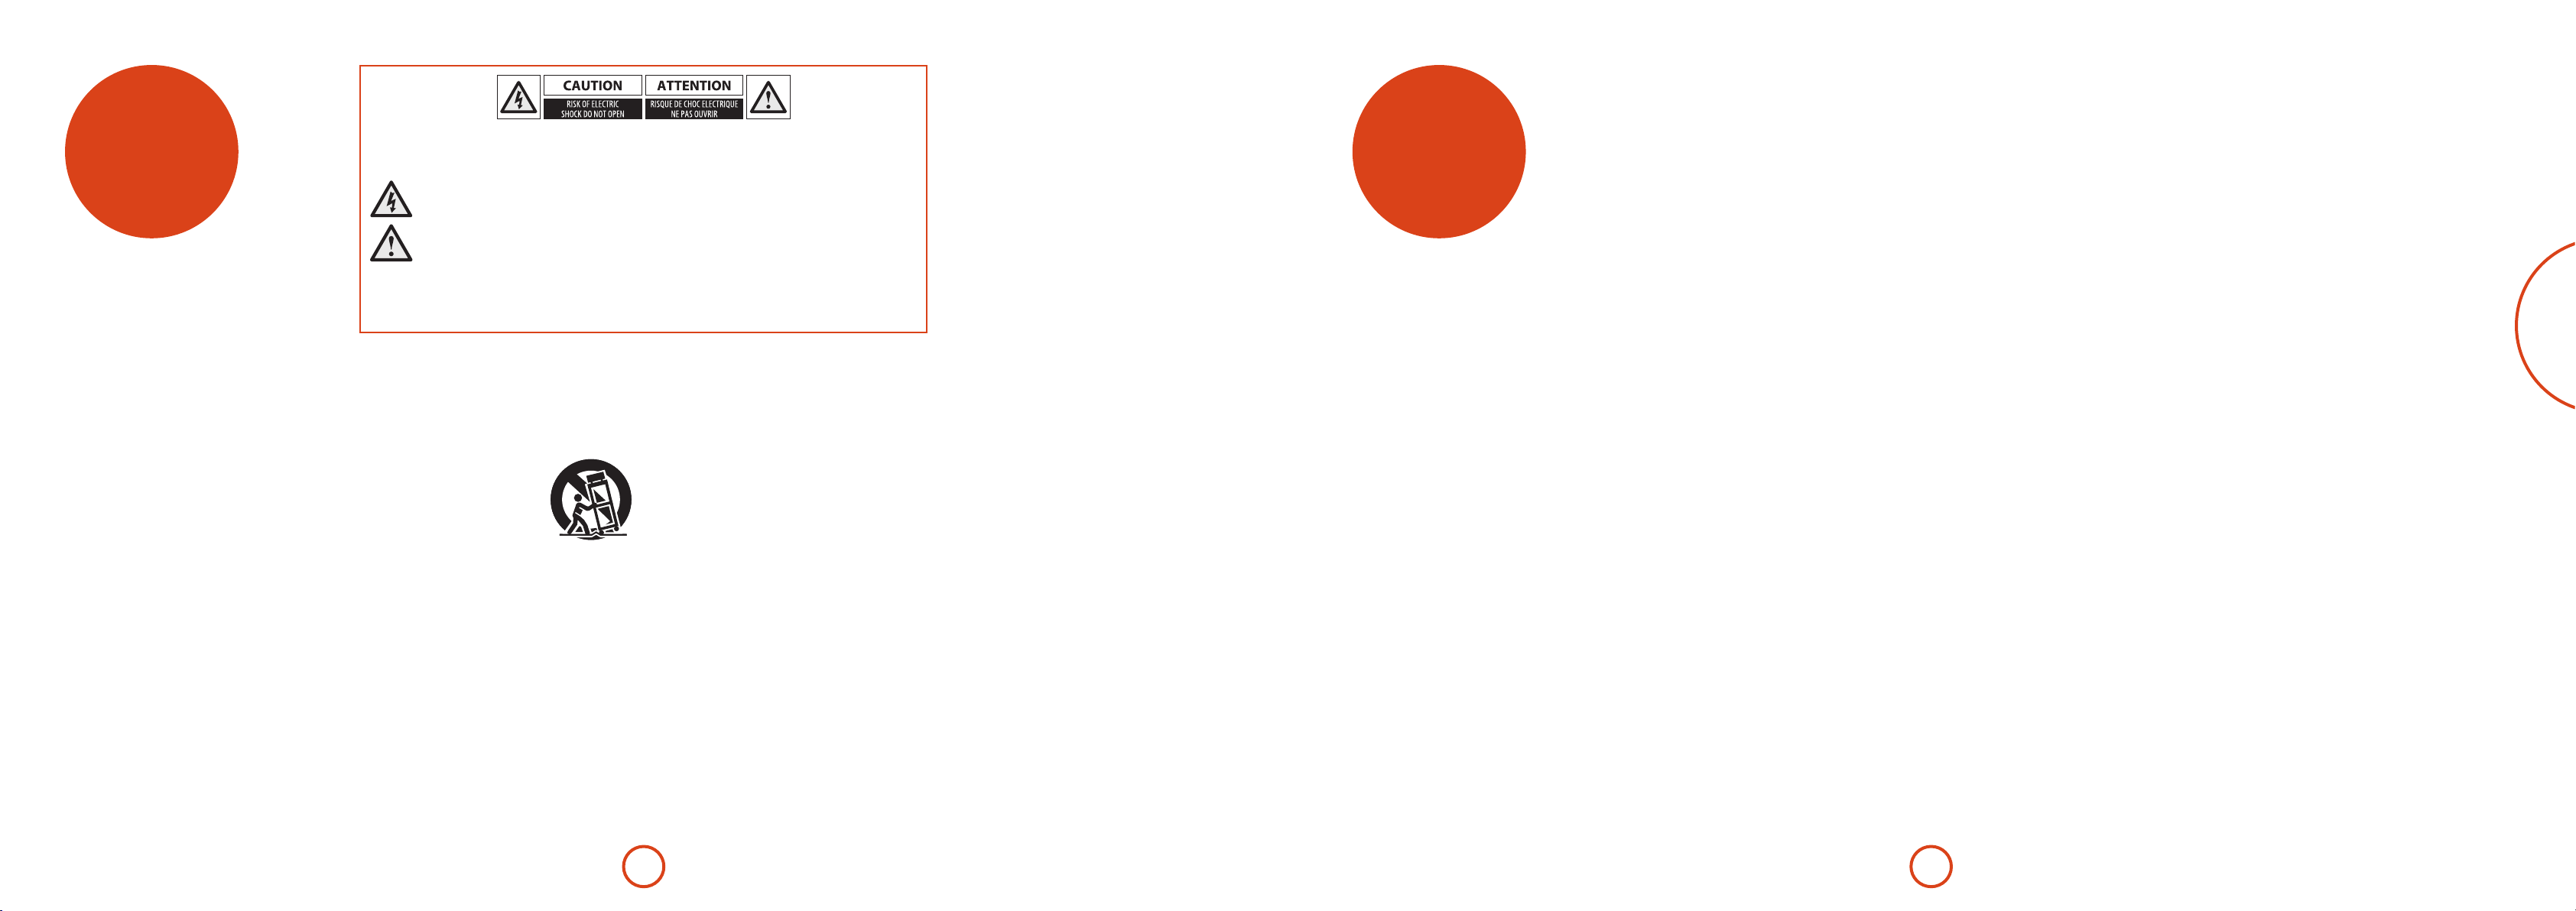
sicherheits-
richtlinien
Wichtige Sicherheitsanweisungen
1. Diese Anweisungen lesen.
2. Die Anweisungen auewahren.
3. Alle Warnungen beachten.
4. Alle Anweisungen befolgen.
5. Dieses Gerät nicht in der Nähe von Wasser
verwenden.
6. Nur mit einem trockenen Tuch reinigen.
7. Keine Belüungsönungen abdecken. In
Übereinstimmung mit den Anweisungen des
Herstellers installieren.
8. Das Gerät muss fern von Wärmequellen wie
Radiatoren, Heizkörpern, Öfen und anderen
wärmeerzeugenden Geräten (einschließlich
Verstärkern) aufgestellt werden.
9. Nicht die Sicherheiten des polarisierten oder
geerdeten Steckers außer Kra setzen.
Ein polarisierter Stecker hat zwei Stie, wobei der
eine breiter ist als der andere. Ein geerdeter Stecker
hat zwei Stie und einen dritten Erdungssti. Der
breitere Sti oder der dritte Erdungssti sind für
Ihre Sicherheit gedacht. Wenn der mitgelieferter
Stecker nicht in Ihre Steckdose passt, bitten
Sie einen Elektriker die veraltete Steckdose
auszuwechseln.
10. Schützen Sie das Netzkabel, dass möglichst
nicht darauf getreten und dass es nicht
eingeklemmt wird. Besondere Vorsicht sollte
man bei Netzsteckern, Steckdosen und an der
Ausgangsstelle im Gerät walten lassen.
VORSICHT: Um das Risiko eines Elektroschocks zu minimieren, sollten Sie die Abdeckung (Rückseite) nicht entfernen. Im
Geräteinneren benden sich keine zu wartenden Teile. Überlassen Sie die Wartung des Geräts einem Fachmann.
WARNUNG: Um das Risiko von Brand oder Elektroschock zu reduzieren, das Gerät weder Regen noch Feuchtigkeit
VORSICHT: In Kanada und den USA muss zur Vorbeugung gegen elektrische Schläge der breite Teil des Steckers in die
breite Önung der Steckdose vorsichtig eingesteckt werden.
VORSICHT: Steuerungen oder Einstellungen anders als in dieser Bedienungsanleitung beschrieben, können zur
Freisetzung gefährlicher Strahlung führen.
11. Nur Befestigungs- und Zubehörteile verwenden,
12. Stets nur auf einen vom Hersteller empfohlenen
13. Ziehen Sie während eines
14. Wenden Sie sich mit allen Wartungsarbeiten stets
15. Eindringen von Fremdkörpern oder Flüssigkeiten
16. Klima
aussetzen.
Das Blitzsymbol im gleichschenkligen Dreieck weist den Benutzer auf eine nicht isolierte „gefährliche Spannung“ im
Gehäuse des Geräts hin, die stark genug sein kann, um einen Stromschlag auszulösen.
Das Ausrufezeichen im gleichschenkligen Dreieck weist den Benutzer auf wichtige Anweisungen zum Betrieb und
zur Instandhaltung (Wartung) in der Dokumentation hin.
die vom Hersteller empfohlen werden.
oder zusammen mit dem Gerät verkauen
Wagen, Ständer, Dreifuß, Gestell oder Tisch
benutzen.
Bei Verwendung eines Wagens,
die Geräte/Wagen-Kombination
vorsichtig bewegen, um
Verletzungen durch Umstürzen zu
vermeiden.
Gewitters und bei längerer Nichtbenutzung den
Netzstecker des Geräts.
an einen autorisierten Kundendienst-Mitarbeiter.
Reparaturen sind erforderlich, wenn das Gerät
in irgendeiner Weise beschädigt wurde, z.B. das
Netzkabel oder der Stecker, wenn Flüssigkeiten oder
Gegenstände in das Gerät eingedrungen sind, das
Gerät Regen oder Feuchtigkeit ausgesetzt wurde,
es nicht richtig funktioniert oder fallen gelassen
wurde.
ACHTUNG – Achten Sie darauf, dass keine
Flüssigkeiten oder Fremdkörper in das Geräteinnere
gelangen. Das Gerät vor tropfenden oder
spritzenden Flüssigkeiten schützen. Sie sollten
keine mit Flüssigkeit gefüllten Behälter, wie z.B.
Blumenvasen, auf dem Gerät abstellen.
Das Gerät wurde für den Betrieb innerhalb
von Gebäuden und in gemäßigten Klimazonen
ausgelegt.
17. Reinigung
Ziehen Sie vor dem Reinigen des Geräts den
Netzstecker.
In den meisten Fällen reicht es aus, wenn Sie das
Gehäuse mit einem weichen, usenfreien und
angefeuchteten Tuch abwischen. Verwenden Sie
keine chemischen Lösungsmittel zur Reinigung.
Von der Verwendung von Polituren oder
Möbelsprays wird abgeraten, da diese Substanzen
weiße Spuren hinterlassen können, die nicht mehr
entfernt werden können.
18. Stromversorgung
Das Gerät nur an Stromquellen anschließen, die in
der Betriebsanleitung genannt werden oder auf dem
Gerät angegeben sind.
Zum Trennen des Geräts von der
Netzstromversorgung muss der Netzstecker gezogen
werden. Das Gerät muss so aufgestellt werden, dass
eine Trennung des Geräts von der Stromversorgung
möglich ist.
19. Ungewöhnlicher Geruch
Sollten Sie einen ungewöhnlichen Geruch
bemerken oder Rauch am Gerät entdecken, schalten
Sie es aus und ziehen Sie den Netzstecker. Wenden
Sie sich unverzüglich an Ihren Fachhändler und
schließen Sie das Gerät nicht erneut an.
20. Zu behebende Schäden
Das Gerät muss von einem Fachmann gewartet
werden, wenn:
A. das Netzkabel oder der Netzstecker beschädigt
wurde, oder
B. Gegenstände in das Gerät gefallen oder
Flüssigkeiten eingedrungen sind, oder
C. das Gerät Regen ausgesetzt war, oder
D. das Gerät nicht ordnungsgemäß funktioniert
oder einen erheblichen Leistungsabfall aufweist,
oder
E. das Gerät zu Boden gefallen oder das Gehäuse
beschädigt ist.
ACHTUNG - Der Netzstecker dient zur Unterbrechung
der Stromversorgung und sollte daher immer
betriebsbereit sein.
ACHTUNG - Batterien dürfen nicht hohen
Temperaturen ausgesetzt werden, wie
Sonneneinwirkung oder Feuer.
VORSICHT - Falsch eingesetzte Batterien können
explodieren. Nur mit dem gleichen oder ähnlichen
Batterietyp austauschen.
Einhaltung von
Sicherheitsbestimmungen
Dieses Gerät entspricht der internationalen
Sicherheitsnorm für Elektrogeräte IEC/EN 60065.
Dieses Gerät erfüllt Teil 15 der FCC-Bestimmungen.
Der Betrieb unterliegt folgenden zwei Bedingungen:
(1) Dieses Gerät darf keine schädlichen Störungen
erzeugen, und
(2) dieses Gerät muss Störungen von außen
akzeptieren, dazu gehören solche Störungen, die einen
unerwünschten Betrieb verursachen.
willkommen
Wir bedanken uns und beglückwünschen Sie zu Ihrem Kauf des Players FMJ CDS27 von
Arcam.
Der CDS27 bietet die beste Klangqualität seiner Klasse bei der Wiedergabe von CD, SACD,
USB und Netzwerk-Audiomaterial. Leistungsstarke, zeitgemäße Delta-Sigma DACs (Digital-/
Analogkonverter) liefern audiophile Klangqualität, Ihre Musik wirklich zum Leben zu
erwecken.
Arcam stellt seit mehr als drei Jahrzehnten hochwertige Audio- und Heimkinokomponenten her.
Der CDS27 ist das neueste Modell in einer langen Reihe preisgekrönter HiFi-Geräte. Das Design
der FMJ-Produktreihe vereint alle von Arcam in seiner Position als renommiertestes AudioUnternehmen Großbritanniens gesammelte Erfahrungen und ist entsprechend konzipiert, um
Ihnen jahrelangen, störungsfreien Klanggenuss bieten zu können.
Dieses Handbuch wurde zusammengestellt, um Sie mit allen notwendigen Informationen
über Installation, Anschluss und Verwendung Ihre neue Kauf zu versorgen. Die mit diesem
Gerät mitgelieferte Fernbedienung wird ebenfalls detailliert beschrieben. Verwenden Sie die
Inhaltsangabe auf der nächsten Seite zur Aundung des Abschnitts, der für Sie von besonderem
Interesse ist.
Wir hoen, dass Ihr Player Ihnen jahrelang störungsfreie Dienste erweist. Im
unwahrscheinlichen Fall eines Produktfehlers bzw. wenn Sie Interesse an zusätzlichen
Informationen über Arcam Produkte haben, steht Ihnen unser Händlernetz gerne zur
Verfügung. Weitere Informationen nden Sie auch auf der Website von Arcam unter
www.arcam.co.uk.
Das FMJ-Entwicklungsteam
Deutsch
D-3D-2
Page 22

Inhalt
sicherheits-richtlinien ������������������������������������������������������������������������������������������������������������������������������D-2
Wichtige Sicherheitsanweisungen �������������������������������������������������������������������������������������������������������������������������������������������D-2
Einhaltung von Sicherheitsbestimmungen ���������������������������������������������������������������������������������������������������������������������������D-2
willkommen �����������������������������������������������������������������������������������������������������������������������������������������������D-3
installation ��������������������������������������������������������������������������������������������������������������������������������������������������D-5
Aufstellen des Geräts ���������������������������������������������������������������������������������������������������������������������������������������������������������������������D-5
Netzanschluss �����������������������������������������������������������������������������������������������������������������������������������������������������������������������������������D-5
Eingänge für Fernbedienung und Trigger �����������������������������������������������������������������������������������������������������������������������������D-5
Verbindungskabel ���������������������������������������������������������������������������������������������������������������������������������������������������������������������������D-5
CDS27 Anschlüsse �������������������������������������������������������������������������������������������������������������������������������������D-6
Netzwerkverbindung ���������������������������������������������������������������������������������������������������������������������������������������������������������������������D-7
USB-Port ���������������������������������������������������������������������������������������������������������������������������������������������������������������������������������������������D-7
Audioanschlüsse herstellen ���������������������������������������������������������������������������������������������������������������������������������������������������������D-7
Abspielbare Disks ����������������������������������������������������������������������������������������������������������������������������������������������������������������������������D-7
Unterstützte Medien ����������������������������������������������������������������������������������������������������������������������������������������������������������������������D-7
grundlegende Bedienung �����������������������������������������������������������������������������������������������������������������������D-8
fernbedienung �������������������������������������������������������������������������������������������������������������������������������������������D-9
einstellungs-menüs ��������������������������������������������������������������������������������������������������������������������������������D-11
Navigieren in den Menüs ����������������������������������������������������������������������������������������������������������������������������������������������������������D-11
fehlerbehebung ��������������������������������������������������������������������������������������������������������������������������������������D-12
technische Daten ������������������������������������������������������������������������������������������������������������������������������������D-13
Funkinterferenzen ������������������������������������������������������������������������������������������������������������������������������������������������������������������������D-13
Laserstrahlung ������������������������������������������������������������������������������������������������������������������������������������������������������������������������������� D-13
produkt-garantie �������������������������������������������������������������������������������������������������������������������������������������D-14
Weltweite Garantie ����������������������������������������������������������������������������������������������������������������������������������������������������������������������D-14
Inanspruchnahme der Garantie ���������������������������������������������������������������������������������������������������������������������������������������������� D-14
Probleme? ���������������������������������������������������������������������������������������������������������������������������������������������������������������������������������������D-14
Online-Registrierung ������������������������������������������������������������������������������������������������������������������������������������������������������������������ D-14
installation
Aufstellen des Geräts
< Stellen Sie den CD-Player auf einem ebenen
festen Untergrund auf und vermeiden Sie
direkte Sonneneinstrahlung, sowie Hitze- und
Feuchtigkeitsquellen.
< Stellen Sie den CD-Player nicht auf einen
Leistungsverstärker oder eine andere
Wärmequelle.
< Stellen Sie CD-Player nicht in ein geschlossenes
Bücherregal oder einen Schrank, es sei denn,
es ist für ausreichende Belüung gesorgt. Der
CD-Player wird bei Normalbetrieb warm.
< Stellen Sie kein anderes Gerät oder Objekt auf
den CD-Player, da dadurch die Lüungsschlitze
verdeckt werden können, was zu einer
Überhitzung des CD-Players sowie eventuell zur
Überhitzung des anderen Geräts führen kann.
< Stellen Sie sicher, dass der
Fernbedienungsempfänger (in der Nähe des
Displays auf der Frontplatte) frei zugänglich ist,
da die Fernbedienungsfunktion sonst gestört
werden kann.
< Stellen Sie keinen Plattenspieler auf dieses Gerät.
Plattenspieler reagieren sehr empndlich auf
das von Netzteilen erzeugte Rauschen, das als
Hintergrundbrummen zu hören ist, wenn sich
der Plattenspieler zu dicht am Gerät bendet.
Netzanschluss
Der CD-Player wird mit einem bereits mit dem Kabel
verbundenen Netzstecker geliefert. Überprüfen Sie,
dass das mitgelieferte Kabel mit Ihrem Anschluss
kompatibel ist – falls Sie ein neues Netzkabel benötigen,
wenden Sie sich bitte an Ihren Arcam-Händler.
Falls Ihre Netzanschlussspannung oder das Netzkabel
nicht übereinstimmen, wenden Sie sich bitte sofort an
Ihren Arcam-Händler.
Verbinden Sie das IEC-Steckerende des Netzkabels
mit der Buchse auf der Rückseite des CD-Players
und stellen dabei sicher, dass er fest eingesteckt ist.
Schließen Sie das andere Ende des Kabels an eine
Steckdose an und schalten Sie diese, falls nötig, ein.
Eingänge für Fernbedienung und
Trigger
Der Eingang REMOTE INkönnen Sie RC5-Codes in den
CDS27 einspeisen, einspeisen, wenn das Gerät an
einem Standort oder in einem System installiert ist, an/
in dem kein Infrarotsignal verwendet werden kann.
Sollten Sie diese Option benötigen, wenden Sie sich
bitte an Ihren Händler für weitere Informationen.
HINWEIS
< Der Eingang für die Fernbedienung erfordert
eine 3,5-mm-Monobuchse (Spitze aktiv; Masse
geerdet).
< Die Fernbedienungssignale müssen in
moduliertem RC5-Format (bei 36 kHz)
mit einer Spannung zwischen 5 und 12 V
vorliegen.
Der 12 V-Eingang TRIGGER INkann zum Aktivieren
bzw. Deaktivieren des Standby-Modus des CDS27
genutzt werden.. Wenn Sie den Trigger-Ausgang des
Arcam-Verstärkers bzw. eines anderen kompatiblen
Geräts anschließen, wird der Standby-Modus des
CDS27 automatisch deaktiviert, wenn der Verstärker
eingeschaltet wird. Beim Ausschalten des Verstärkers
wird der Standby-Modus wieder aktiviert. Weitere
Informationen nden Sie im Handbuch zum Verstärker
Im normalen Betrieb benötigen Sie diese Anschlüsse
nicht.
Der RS232-Eingang ist für eine optionale Verbindung
zu einem Hausautomationssystem oder zu einem
Computer gedacht. Verschiedene DrittanbieterSysteme bieten ein ranierte Steuerung all Ihrer
Unterhaltungsgeräte mittels Touch-Screens usw.
Wenden Sie sich an Ihren Händler oder Installateur für
weitere Informationen. Die technischen Einzelheiten
des Fernbedienungsprotokolls sind von Arcam auf
Anfrage (E-Mail support@arcam.co.uk) erhältlich.
Verbindungskabel
Wir empfehlen den Einsatz hochwertiger abgeschirmter
Kabel, die für diese spezielle Anwendung entwickelt
wurden. Andere Kabel verfügen über eine andere
Impedanzen, die die Leistung Ihres Systems verringern
(verwenden Sie z.B. keine für Video vorgesehenem
Kabel zur Übertragung von Audiosignalen). Alle Kabel
sollten so kurz wie möglich gehalten werden.
Bei der Verkabelung der Geräte sollten Sie darauf
achten, dass das Netzkabel so weit wie möglich von
den Audiokabeln entfernt ist. Andernfalls kann es
zu unerwünschtem Rauschen in den Audiosignalen
kommen.
Deutsch
D-5D-4
Page 23

CDS27
Anschlüsse
Netzeingang
Schließen Sie hier
das entsprechende
Netzkabel an.
Koaxialer digitaler Ausgang
Verwenden Sie diesen Anschluss zur Verwendung
eines hochqualitativen audiophilen DAC mit einem
koaxialen Digitaleingang. Schließen Sie den digitalen
Eingang unter Verwendung eines entsprechenden mit
75 Ω abgeschirmten Kabels an.
VORSICHT: Den digitalen Ausgang nie an einen
herkömmlichen Audioeingang anschließen.
Drahtlose Netzwerkverbindung
Wenn eine drahtlose Netzwerkverbindung benötigt
wird, schließen Sie die mitgelieferte WLAN-Antenne
an. Über eine Netzverbindung ist die Wiedergabe
von Audiodateien über das Netzwerk möglich (für
Setupdetails siehe Seite 11).
Phono-Audioausgang
Schließen Sie diesen Anschluss unter Verwendung
eines entsprechenden hochqualitativen
Verbindungskabels an den CD-Eingang (oder anderen
Line-Pegeleingang) Ihres Verstärkers an. Stellen Sie
sicher, dass der linke und rechte Audioausgang des
CD-Players mit dem entsprechenden linken und
rechten Eingang Ihres Verstärkers verbunden ist.
12 V Trigger-Eingang
Diese Buchse erlaubt das ferngesteuerte Ein-/Ausschalten des
CDS27 in den Standby-Modus durch einen Verstärker (oder
ein anderes Gerät der AV-Ausrüstung) mit einer 12V TRIG OUT
Funktion geschaltet werden. Siehe Seite 5.
Netzwerkverbindung
Der CDS27 kann mit einem Ethernet-Kabel an
einen Router oder Switch in Ihrem Heimnetzwerk
angeschlossen werden. So kann er Audiodateien auf
Ihrem Computer oder NAS-Gerät wiedergeben.
Eine drahtlose Verbindung ist auch verfügbar und sie
kann über das Einstellungsmenü konguriert werden.
USB-Port
An den USB-Port Typ A kann Ihr Flashlaufwerk
oder eine externe Festplatten mit Audiodateien
angeschlossen werden.
Er kann auch zum Aktualisieren der Firmware
verwendet werden.
Router
LAN
Internet
Deutsch
USB-Flashlaufwerk
Netzwerkverbindung
Verbinden Sie diese Buchse mittels eines
Ethernet-Patchkabels mit einem Port Ihres
Netzwerk-Routers (siehe Seite 7). Über
eine Netzverbindung ist die Wiedergabe
von Audiodateien über das Netzwerk
möglich (für Setupdetails siehe Seite 11).
Optischer digitaler Ausgang
Verwenden Sie diesen Anschluss zum
Gebrauch eines AV-Receiver mit optischem,
digitalen Eingang.
USB-Port
Stecken Sie hier ein USB-
Flashspeichergerät ein. Der CDS27
kann auch bestimmte digitale
Dateien wiedergeben, die auf USB-
Speicherlaufwerken gespeichert wurden
(siehe „Unterstützte Medien“ auf Seite 7).
Symmetrische Audioausgänge
Verbinden Sie diese mit dem CD- (oder einen anderen
symmetrischen) Eingang Ihres Verstärkers unter Verwendung
eines entsprechenden hochqualitativen Verbindungskabels.
Stellen Sie sicher, dass der linke und rechte Audioausgang
des CD-Players mit dem entsprechenden linken und rechten
Eingang Ihres Verstärkers verbunden ist.
Remote in
(Fernbedienungseingang)
Erlaubt den Empfang von ferngesteuerten
Signalen durch den CDS27, wenn der
Fernbedienungssensor auf der Frontblende
verdeckt (oder anderweitig für die
Fernbedienung „nicht sichtbar“ ist).
Weitere Informationen nden Sie auf Seite 5.
RS232
Mit diesem Anschluss ist die
Fernsteuerung mittels eines
Hausautomationssystems von einem
Drittanbieter oder Computer möglich.
Weitere Informationen nden Sie auf
Seite 5.
Audioanschlüsse herstellen
Der CDS27 bietet eine Reihe von Alternativen für den Audioanschluss. Die verwendete Anschlussart hängt von
Ihrem restlichen System ab. Wählen die am besten geeignete Anschlussart für Ihren Verstärker.
Für die beste Stereo-Klangqualität empfehlen wir den Anschluss der analogen Stereo-Audioausgänge an den
CD-Eingang an Ihrem Verstärker, damit der audiophile Digital/Analog-Schaltkreis des CDS27 verwendet wird.
Analog
Schließen Sie die mit „Phono“ beschrieten Ausgänge mit einem Stereo-Cinch-Kabel
mit geeigneter Länge an den linken und rechten CD/SACD-Eingängen an Ihrem
Verstärker an.
Alternativ können Sie die linken/rechten symmetrischen Ausgänge an einen
symmetrischen Eingang an Ihrem Verstärker anschließen.
Digital
Schließen Sie einen der digitalen Audioausgänge (optisch oder koaxial) an den
digitalen ‚CD/SACD‘-Eingang Ihres Empfängers an. Diese digitalen Ausgänge
liefern nur PCM-Stereo.
Abspielbare Disks
Der Player unterstützt folgende Diskarten:
CD-Audio
CD-R
CD-RW
Super Audio CD
D-7D-6
Unterstützte Medien
Bei der Wiedergabe über Disk, USB und Netzwerk
werden folgende Dateiformate unterstützt.
< FLAC, bis 24 Bit, 192 KHz
< WAV, bis 24 Bit, 192 KHz
< AAC, bis 24 Bit, 96 KHz
< AIFF, bis 24 Bit, 192 KHz
< OGG, bis 24 Bit, 192 KHz
< MP3, bis 320 Kbps, 48 KHz
< WMA, bis 192 Kbps, 48 KHz
Page 24

grundlegende
AUDIO
SACD
MENU
FM MONO P/TUNE
STORE
INFO
BD
CR902
RTN
Bedienung
fernbedienung
Einführung
Unter „gundlegende Bedienung“ wird erklärt, wie
Audiodisk, Netzwerkinhalte und Audiodateien auf
USB-Medien wiedergegeben werden. Beachten Sie,
dass möglicherweise der Player für Ihr System richtig
konguriert werden muss, bevor eine optimale
Wiedergabe erzielt wird. Die Konguration des Players
wird ab Seite 11 beschrieben.
Einschalten
Schalten Sie das Gerät mit der Taste POWER ein.
Die Status-LED leuchtet grün auf, wenn das Gerät
eingeschaltet wurde und leuchtet rot, wenn es sich im
Standby-Modus bendet. Der Standby-Modus wird
mit der Standby-Taste auf der Fernbedienung oder der
Tast e </1 auf der Frontblende aufgerufen und mit
der gleichen Taste wieder verlassen. Wenn die Taste
POWER im Standby-Modus gedrückt wird (oder die
Stromversorgung unterbrochen wird), bendet sich das
Gerät im Standby-Modus, wenn die Stromversorgung
wiederhergestellt wird.
Beachten Sie, dass sich der Fernbedienungssensor
auf der rechten Seite des Displays bendet. Decken
Sie diesen nicht ab, da die Fernbedienung dann nicht
funktioniert.
Wiedergabe einer Disk
Drücken Sie </1 auf der Frontblende (oder 1 auf
der Fernbedienung) und legen Sie eine Disk mit der
Wiedergabeseite nach unten auf die CD-Schublade
(Einige Disks haben zwei Seiten, in diesem Fall legen
Sie die Seite nach oben ein, die mit „Seite A“ beschriet
ist, um Seite A abzuspielen).
Drücken Sie </1 auf der Frontblende, um die
CD-Schublade zu schließen. Die CD wird nach einer
Pause von ein paar Sekunden geladen.
Sobald die Schublade geschlossen wurde, kann
das Laden einer Disk einige Zeit dauern. Wenn
die Einstellung „Autom. Wiedergabe einer Disk“
eingeschaltet wurde (Standardeinstellung), wird
die Wiedergabe automatisch gestartet. (Weitere
Informationen nden Sie unter „Autom. Wiedergabe
einer Disk“ auf Seite 11).
Bei Disks, die nicht automatisch wiedergegeben
werden, drücken Sie die Taste 4/; auf der Frontblende
oder drücken Sie 4 auf der Fernbedienung.
Wiedergabe über Netzwerk
Achten Sie darauf, dass der CDS27 mit Ihrem
lokalen Netzwerk verbunden ist. Wählen Sie auf
dem Startbildschirm die Option „Medienbrowser“
(Medienbrowser) aus. Eine Liste der verfügbaren
Geräte wird angezeigt. Navigieren Sie mit den
Tasten
',
verfügbaren Bibliotheken.
auf der Fernbedienung zu den
<>
Die Netzwerk-Musikwiedergabe kann auch über Ihre
favorisierte UPnP-Control Point-Anwendung von
Ihrem Computer, Smartphone oder mobilen Gerät
gesteuert werden.
Geben Sie durch Drücken von OK oder 4 auf einer
hervorgehobenen Audiodatei diese wieder. Es werden
alle nachfolgenden Tracks im Wiedergabeverzeichnis
abgespielt.
Wiedergabe von USB
Schließen Sie das USB-Gerät am USB-Port auf der
Rückseite des CDS27 an. Nachdem das Gerät erkannt
wurde‚ wählen Sie auf dem Startbildschirm die Option
„Medienbrowser“ aus. Anschließend wählen die Option
„USB“ in der Medienliste aus.
Navigieren Sie mit den Pfeiltasten
der Fernbedienung und starten Sie die Wiedergabe
einer hervorgehobenen Audiodatei mit OK, 4
oder >. Es werden alle nachfolgenden Tracks im
Wiedergabeverzeichnis abgespielt.
',
<>
auf
Während der Wiedergabe
Suchlauf
Um einen Track schnell vor- oder rückwärts mit
4-facher Wiedergabegeschwindigkeit zu durchsuchen,
drücken Sie 8 oder 7 auf der Frontblende
oder auf der Fernbedienung. Um zur normalen
Wiedergabegeschwindigkeit zurückzukehren, drücken
Sie die Taste Wiedergabe.
Kapitel/Tracks überspringen
Drücken Sie zum Überspringen von Tracks die Taste /
oder 0.
Beim Rückwärtsspringen kehrt der erste Tastendruck
zum Anfang des aktuellen Tracks zurück. Durch
erneutes Drücken der Taste gelangen Sie zum Anfang
des vorigen Tracks.
Wiedergabe vorübergehend unterbrechen
Drücken Sie 4/; auf der Frontblende oder ; auf der
Fernbedienung, um die Wiedergabe vorübergehend zu
unterbrechen. Drücken Sie 4/; auf der Frontblende
oder 4 auf der Fernbedienung, um die Wiedergabe
fortzusetzen.
Wiedergabe anhalten
Drücken Sie die Taste </1 auf dem vorderen
Bedienfeld oder < auf der Fernbedienung, um die
Wiedergabe anzuhalten.
Der CDS27 wird mit der CR902 Fernbedienung
geliefert.
Gebrauch der Fernbedienung
Bitte beachten Sie bei der Benutzung der
Fernbedienung die folgenden Hinweise:
< Achten Sie darauf, dass sich keine
Hindernisse zwischen Fernbedienung und
Fernbedienungssensor auf der Frontblende
benden. Die Fernbedienung hat einen
Arbeitsbereich von etwa 7 Metern. (Falls der
Fernbedienungssensor abgedeckt ist, steht die
Fernbedienungseingangsbuchse IR auf der
Rückseite zur Verfügung. Bitte wenden Sie sich
für weitere Informationen an Ihren Händler).
< Die Funktion der Fernbedienung kann
gestört werden, wenn starkes Sonnenoder Leuchtstoröhrenlicht auf den
Fernbedienungssensor des Geräts fällt.
< Wechsel Sie die Batterien, wenn Sie eine
Verringerung der Reichweite der Fernbedienung
bemerken.
Einlegen von Batterien in die Fernbedienung
1. Önen Sie das Batteriefach auf der Rückseite der
Fernbedienung.
2. Legen Sie zwei „AAA“-Batterien entsprechend
zur Abbildung auf dem Batteriefachdeckel ein.
3. Schieben Sie den Deckel des Batteriefachs wieder
an seinen Platz und schließen Sie ihn, indem Sie
ihn mit einem „Klick“ einrasten lassen.
HINWEIS
< Falsche Handhabung von Batterien kann zu
Gefährdungen wie Auslaufen oder Bersten
führen.
< Alte und neue Batterien nicht mischen.
< Nutzen Sie keine unterschiedlichen Batterien
zusammen – auch wenn diese identisch
aussehen, können sie unterschiedliche
Spannungen besitzen.
< Versichern Sie sich, dass die Batterien richtig
herum wie im Batteriefach markiert mit plus
(+) und minus (-) eingesetzt sind.
< Entfernen Sie Batterien aus Geräten die länger
als einen Monat nicht genutzt werden.
< Bitte beachten Sie bei der Entsorgung von
Batterien die in Ihrem Land oder Ihrer Region
üblichen Entsorgungsbestimmungen.
Die CR902-Fernbedienung erfüllt Teil 15
der FCC-Bestimmungen.
Diese Fernbedienung wurde getestet und
entspricht den Grenzwerten eines Digitalgeräts
der Klasse B, gemäß Teil 15 der FCCBestimmungen. Diese Grenzwerte sind so
ausgelegt, dass sie annehmbaren Schutz gegen
störende Interferenzen im Heimbereich bieten.
Diese Fernbedienung verursacht und verwendet
Energie im Radiofrequenzbereich und kann auf
solchen Frequenzen ausstrahlen. Falls es nicht
entsprechend den Anweisungen installiert und
verwendet wird, so kann es störende Interferenzen
bei Funkkommunikation hervorrufen. Allerdings
gibt es keine Garantie, dass bei einer bestimmten
Installation keine Interferenzen aureten werden.
Falls dieses Gerät abträgliche Interferenzen beim
Funk- oder Fernsehempfang verursacht, was
ermittelt werden kann, indem man das Gerät
ein- und ausschaltet, so sollte der Benutzer die
Interferenz auf eine oder mehrere der folgenden
Arten beheben:
Die Empfangsantenne neu ausrichten/aufstellen.
Den Abstand zwischen dem Gerät und dem
Empfänger vergrößern.
Das Gerät mit einer Steckdose verbinden, die Teil
eines anderen Schaltkreises ist als der Empfänger.
Fragen Sie den Händler oder einen erfahrenen
Radio- und Fernsehtechniker um Rat.
Deutsch
D-9D-8
Page 25

AMP-Gerätemodus
Die Gerätemodustaste A konguriert die CR902 zur
Steuerung Ihres Arcam-Verstärkers. Das Drücken
dieser Taste beeinusst nicht den aktuell gewählten
Eingang am Verstärker.
Umschalten zwischen Standby- und Normal-
P
Modus.
Geht zyklisch durch die Helligkeitsoptionen
DISP
des Displays auf der Frontblende.
Geht zyklisch durch die Anzeigemodi des
MODE
Displays auf der Frontblende.
Zeigt das Verstärker-Einstellungsmenü auf
MENU
dem Display auf der Frontblende an.
Navigieren in Menüs.
bestätigt eine Einstellung.
O
Aktiviert und deaktiviert die
@
Stummschaltfunktion des Verstärkers.
Vol + /– erhöht oder verringert die Lautstärke
eines Arcam-Verstärkers.
Drücken Sie einmal die Taste
Vol-
Stummschaltung, um einen Arcam-
Vol+
Verstärker stumm zu schalten. Erneut
drücken (oder Vol +/– verwenden), um die
Stummschaltung aufzuheben.
SP1
Schaltet den Ausgang von Lautsprecher 1 um
SP2
Schaltet den Ausgang von Lautsprecher 2 um
Stellt die Balance zwischen dem linken und
BAL
dem rechten Audiokanal ein.
HINWEIS
Die CR902 ist eine Mehrgeräte-Fernbedienung.
Daher unterscheiden sich die Tastenfunktionen
gemäß der zuletzt gedrückten Eingangstaste.
Vergewissern Sie sich vor dem Bedienen des CDS27,
dass die Taste „CD“ gedrückt wurde.
TUN-Gerätemodus
Die Gerätemodustaste T konguriert die CR902 zur
Steuerung der Tunerfunktionen von Arcam-Tunern.
Umschalten zwischen Standby- und Normal-
P
Modus.
0…9
' ,
Die Zierntasten dienen zum Speichern und
Abrufen von Voreinstellungen.
Geht zyklisch durch die Helligkeitsoptionen
DISP
des Displays auf der Frontblende.
Geht zyklisch durch verschiedene
INFO
Informationsanzeigemodi.
iPod Schnellrücklauf.
)
iPod Schnellvorlauf.
(
Voreinstellung abwärts/Sirius-Kategorie
]
abwärts/iPod-Track zurück.
Voreinstellung aufwärts/Sirius-Kategorie
[
aufwärts/iPod-Track weiter.
iPod anhalten.
#
iPod-Wiedergabe starten/pausieren.
$
iPod-Wiedergabe starten/pausieren.
&
Zeigt das Tuner-Einstellungsmenü auf dem
MENU
Frontdisplay an.
Voreinstellung aufwärts/abwärts, iPod-Track
zurück/weiter.
Abstimmfrequenz verringern/erhöhen.
< >
Bestätigt eine Auswahl.
O
UKW-Modus zwischen Mono- und
FM MONO
Stereoempfang umschalten.
Voreinstellung-Abrufmodus aufrufen/
P/TUNE
verlassen.
Voreinstellung-Speichermodus aufrufen/
STORE
verlassen.
Geht zyklisch durch die verfügbaren
BAND
Frequenzbänder.
CD-Gerätemodus
Die Gerätemodustaste c konguriert die CR902 zur
Steuerung der CD-Funktionen von Arcam-CD-Playern.
Umschalten zwischen Standby- und Normal-
P
Modus.
Disk-Schublade auf/zu.
!
Die numerischen Tasten ermöglichen den
direkten Zugri auf die einzelnen Titel auf der
Disk. Drücken Sie zur Auswahl eines Titels die
0…9
entsprechende Taste auf der Tastatur. Geben
Sie für Tracknummern größer als 9 die Zahlen
nacheinander ein. Um zum Beispiel Titel 15
abzuspielen, drücken Sie 1 gefolgt von 5.
Geht zyklisch durch die Helligkeitsoptionen
DISP
des Displays auf der Frontblende
Ändert den Anzeige-Modus von Arcam-CD-
MODE
Playern
Schneller Rücklauf.
)
Schneller Vorlauf.
(
Zurück an den Anfang des aktuellen bzw.
]
vorigen Tracks.
Springt zum Anfang des nächsten Tracks.
[
Wiedergabe beenden.
#
Wiedergeben.
$
Schaltet die Wiedergabe zwischen Pause und
&
Abspielen um.
Navigiert durch Tracklisten, wenn dies vom
Player unterstützt wird.
wählt den momentan hervorgehobenen
O
Track, falls dies von dem Player unterstützt
wird.
Schaltet die Zufallswiedergabe („shue“) ein
SHUFF
oder aus.
„Track wiederholen“ gibt den aktuellen Track
bis zum Ende wieder.
„Alle wiederholen“ wiederholt den aktuellen
Trackabschnitt bis zum Ende des letzten
Tracks.
RPT
Um einen bestimmten Track zu wiederholen,
wählen Sie den Track aus und drücken Sie
dann zweimal RPT. Um die WiederholFunktion abzubrechen, drücken Sie RPT ein
drittes Mal.
BD-Gerätemodus
Die Gerätemodustaste � konguriert die CR902 zur
Steuerung der BD-Funktionen von Arcam-BD-Playern.
Umschalten zwischen Standby- und Normal-
P
Modus.
Disk-Schublade auf/zu.
!
Die numerischen Tasten ermöglichen den
direkten Zugri auf die einzelnen Titel auf der
Disk. Drücken Sie zur Auswahl eines Titels die
0…9
entsprechende Taste auf der Tastatur. Geben
Sie für Tracknummern größer als 9 die Zahlen
nacheinander ein. Um zum Beispiel Titel 15
abzuspielen, drücken Sie 1 gefolgt von 5.
Geht zyklisch durch die Helligkeitsoptionen
DISP
des Displays auf der Frontblende
Ändert den Display-Modus von Arcam-BD-
MODE
Playern.
Schneller Rücklauf.
)
Schneller Vorlauf.
(
Zurück an den Anfang des aktuellen bzw.
]
vorigen Tracks.
Springt zum Anfang des nächsten Tracks.
[
Wiedergabe beenden.
#
Wiedergeben.
$
Schaltet die Wiedergabe zwischen Pause und
&
Abspielen um.
Wechselt zwischen den Audio-
AUDIO
Decodierungsformaten (Dolby Digital, DTS
usw.).
MENU
Aktiviert das Menü des BD-Players.
Navigiert durch Tracklisten, wenn dies vom
Player unterstützt wird.
wählt den momentan hervorgehobenen
O
Track, falls dies von dem Player unterstützt
wird.
Kehrt zur obersten Ebene des Menüs („Start“)
.
zurück.
Drücken Sie beim Navigieren in den Menüs
RTN
diese Taste, um zum vorherigen Bildschirm
oder Auswahl zurückzukehren.
Schaltet die Zufallswiedergabe („shue“) ein
SHUFF
oder aus.
Wiederholt die Wiedergabe der Disk oder
eine vorprogrammierte Auswahl von Tracks.
Um einen bestimmten Track zu wiederholen,
RPT
wählen Sie den Track aus und drücken Sie
dann zweimal RPT. Um die WiederholFunktion abzubrechen, drücken Sie RPT ein
drittes Mal.
einstellungs-
menüs
Mit den Einstellungsmenüs können Sie alle
Einstellungen Ihres CDS27 kongurieren. Dieser
Abschnitt geht durch die Menüpunkte und erklärt ihre
Funktion.
Die einzige Möglichkeit zur Anzeige des
Einstellungsmenüs ist der CDS27-Bildschirm.
Aufrufen des Einstellungsmenüs
Wenn das Startmenü momentan nicht angezeigt wird,
zeigen Sie es mit der Taste MENU auf der Fernbedienung
ein.
Drücken Sie C, bis die Option Einstellungsmenü
angezeigt wird und rufen Sie es mit OK auf.
Navigieren in den Menüs
Sie können sich mit den Cursor (Pfeil)-Tasten auf der
Fernbedienung in den Menüs des CDS27 bewegen.
1. Bewegen Sie sich mit den Tasten B und C im
aktuellen Menü nach oben oder unten.
2. Wenn der gewünschte Hauptabschnitt angezeigt
wird, drücken Sie zur Auswahl OK.
3. Bewegen Sie sich mit den Tasten B und C in
den Optionen nach oben oder unten.
4. Wählen Sie mit E eine Einstellung aus: Ändern
Sie mit den Tasten B und C die Einstellung.
5. Bestätigen Sie die Einstellung mit OK. Gehen
Sie zu Schritt 4 zurück, um die anderen
Einstellungen in dem aktuellen Bereich
anzupassen.
6. Drücken Sie <, um zum vorigen Bildschirm
zurückzukehren, wenn Sie einen anderen Bereich
zum Einstellen auswählen möchten.
Netzwerk-Standby – Dieser Punkt legt fest, ob die
Netzwerkfunktionen zur Verfügung stehen, wenn der
CDS27 sich im Standby-Modus bendet.
Die Auswahl vom „ACTIVE“ aktiviert die
Netzverbindung (für die IP Steuerung erforderlich).
Die Auswahl von „STANDBY“ ermöglicht das
Abschalten der Netzwerkhardware, um die
Energieaufnahme zu verringern.
Netzwerk-Setup – Diese Option ermöglicht die
Konguration des Geräts, um einem existierenden
Netzwerk beizutreten. Für die NetzwerkAudiowiedergabe und für Firmware-Aktualisierungen
über das Internet erforderlich.
Autom. Standby – Ermöglicht die Eingabe einer
Inaktivitätsdauer, nach der das Gerät automatisch
den Standby-Modus aufru. Die Optionen sind:
5/10/15/20/25/30 Minuten.
Disk Autom. Wiedergabe – Steuert, ob eine optische
Disk (z.B. CD) automatisch wiedergegeben wird,
nachdem sie eingelegt wurde.
< Ein: Optische Disks werden automatisch
wiedergegeben.
< Aus: Zur Wiedergabe einer Disk muss PLAY
gedrückt werden.
Firmware-Aktualisierung – Sie können überprüfen, ob
einen Aktualisierung der Firmware für Ihren Players
vorhanden ist, indem diese Menüoption wählen und OK
drücken, um „Netzwerk“ hervorzuheben. Anschließend
drücken Sie erneut OK.
Wenn keine neue Firmware zur Verfügung steht, wird
eine Meldung angezeigt, ansonsten folgen Sie den
Anweisungen auf dem Bildschirm.
Standardeinstellungen laden – Wenn dieser
Punkt hervorgehoben ist, drücken Sie OK, um
alle Einstellungen auf die Werkseinstellungen
zurückzusetzen.
Sie werden gebeten zu bestätigen, dass Sie die
Standardeinstellungen laden möchten. Wählen Sie zum
Verlassen die Option „Abbrechen“ oder ' aus, um
die Option „Ja“ hervorzuheben und bestätigen Sie mit
OK.
Systeminformationen – Blättern Sie mit den
Cursortasten '/, durch die Optionen.
Das Systeminformationsfeld zeigt Informationen über
Ihren Player an, wie zum Beispiel die IP-Adresse und
die Firmwareversion.
Netzwerkaudio - Aktiviert oder deaktiviert die
Renderingfunktion des Players. Einstellen dieser
Option schaltet auf „Aus“ deaktiviert Netzwerkaudio.
Digitaler Ausgang - Begrenzt die Samplerate des
koaxialen/digitalen optischen Ausgangs.
Deutsch
D-11D-10
Page 26
fehlerbehebung
Sollte sich mit dem System ein Problem ergeben,
dann überprüfen Sie zunächst mit dieser
Fehlerbehebungstabelle, bevor Sie sich an den
Kundendienst wenden.
Wenn die Störung weiterhin besteht, versuchen Sie
das Problem durch erneutes Aus- und Einschalten des
Gerätes zu lösen.
Wenn es Ihnen nicht gelingt, das Problem zu lösen,
wenden Sie sich an Ihren Händler. Sie dürfen unter
keinen Umständen versuchen, das Gerät selbst
reparieren, da dies die Garantie erlöschen lässt!
Problem Mögliche Ursache Abhilfe
Keine Stromversorgung < Das Netzkabel ist nicht angeschlossen.
< Schlechter Kontakt an der Steckdose oder die Steckdose wurde
ausgeschaltet.
Keine Diskwiedergabe < Die Disk wurde verkehrt herum eingelegt.
< Die Disk ist nicht abspielbar.
< Die Disk ist verschmutzt.
< Die aufgenommene Disk wurde nicht richtig abgeschlossen.
Keine Disk/Defekte Disk < Die Disk ist verkratzt, verschmutzt, wurde schlecht aufgenommen oder
nicht abspielbar.
Kein Ton < Die Audiokabel wurden abgesteckt. < Schließen Sie die Kabel richtig an.
Rauschen oder
verzerrter Tone.
Die Fernbedienung
funktioniert nicht.
< Die Disk ist verschmutzt.
< Schlechte Verbindungen.
< Die Batterien sind nicht eingelegt oder sind erschöp.
< Der Fernbedienungssensor wurde abgedeckt.
< Schließen Sie das Netzkabel gut an.
< Prüfen Sie die Steckdose mit einer Lampe oder einem
anderen Gerät.
< Legen Sie die Disk mit der bedruckten Seite nach oben ein.
< Verwenden Sie eine abspielbare Disk.
< Reinigen Sie die Disk.
< Legen Sie eine Disk ein, die richtig abgeschlossen wurde.
< Drücken Sie POWER, um das Gerät auszuschalten,
drücken Sie erneut POWER und entfernen Sie
anschließend die Disk.
< Reinigen Sie die Disk.
< Überprüfen Sie die Verbindungen und schließen Sie alle
Kabel gut an.
< Ersetzen Sie die Batterien.
< Entfernen Sie das Hindernis.
technische
Daten
Analoge Audioausgänge
Digital-/Analogwandler 24 Bit, 192 kHz Delta-Sigma DAC
Signal-/Rauschabstand 110 dB CCIR
Harmonische Verzerrung (1 kHz) 0,002 %
Frequenzgang (±0,5 dB) 10 Hz-20 kHz
Ausgangspegel (0 dB) 2,2 V Ue
Ausgangsimpedanz 47 Ω
Minimale empfohlene Last 5 kΩ
Digitale Schnittstellen
Audioausgänge 75 Ω koaxialer/optischer TOSLINK
USB USB 2.0 Hochgeschwindigkeit (480 Mbit/s)
Ethernet 10/100 10/100
Drahtlos b/g/n
Äußere
Abmessungen (B x T x H) 433 x 276 x 75
Gewicht 5,2 kg/7,5 kg verpackt
Leistungsaufnahme maximal 20 W
Mitgeliefertes Zubehör
Netzkabel, CR902 Fernbedienung, 2 x AAA Batterien, WLAN-Antenne
Fehler und Auslassungen vorbehalten
HINWEIS: Alle Spezikationen sind typische Werte falls nicht abweichend angegeben.
Funkinterferenzen
Der CDS27 Player ist ein digitales Gerät, das
den höchsten Anforderungen hinsichtlich seiner
elektromagnetischen Verträglichkeit entspricht.
Alle CD-Player erzeugen jedoch RF (Funkfrequenzen)
und können diese abstrahlen. Dies kann u.U. Störungen
beim UKW- und MW-Empfang verursachen.
Platzieren Sie in einem solchen Fall den Player und
die Verbindungskabel so weit wie möglich entfernt
vom Tuner und der Antenne. Das Anschließen des
Players bzw. des Empfängers/Verstärkers an getrennte
Stromquellen kann ebenfalls zur Verringerung von
Interferenzen beitragen.
Hinweis für Länder der EU – Dieses Gerät erfüllt die
Bestimmung EMV-Richtlinie 2004/108/EC.
USA – Diese Geräte entsprechen Teil 15 der FCCBestimmungen Klasse B.
Laserstrahlung
KLASSE II
LASERPRODUKT
Bei Betrieb des CDS27-Players
ohne Gehäuse kann es durch
unsichtbare Laserstrahlen zu
Augenschäden kommen.
Deutsch
Ständige Verbesserungen
Arcam bemüht sich um ständige
Produktverbesserung. Das Design und die
technischen Daten können sich deshalb ohne weitere
Ankündigung ändern.
D-13D-12
Page 27

produkt-
garantie
Weltweite Garantie
Sie sind berechtigt, das Gerät während der ersten zwei Jahre nach Kaufdatum bei
einem autorisierten Arcam-Fachhändler kostenlos reparieren zu lassen, unter der
Voraussetzung, dass es ursprünglich bei einem Arcam-Händler erworben wurde.
Der Arcam-Fachhändler führt den Kundenservice nach Vertragsschluss durch. Der
Hersteller übernimmt keine Verantwortung für Schäden, die durch Unfall, Missbrauch,
Verschleiß, Vernachlässigung oder unzulässige Veränderungen bzw. Reparaturen
entstehen. Außerdem wird keinerlei Verantwortung für Schäden oder Verlust des
Gerätes während des Transports zum oder vom Garantienehmer übernommen.
Die Garantie umfasst Folgendes:
Teile- und Arbeitsstundenkosten bis zu zwei Jahre nach dem Kaufdatum. Nach Ablauf
von zwei Jahren müssen Sie die vollen Kosten für Ersatzteile und Arbeitsstunden tragen.
Versandkosten werden nicht übernommen.
Inanspruchnahme der Garantie
Das Gerät sollte in der Originalverpackung an den Händler zurückgegeben werden,
bei dem es erworben wurde. Der Versand muss frei Haus durch einen angesehenen
Kurier erfolgen – nicht mit der Post. Da keine Verantwortung für Schäden oder Verlust
während des Transports zum Händler oder Distributor übernommen wird, sollten Sie
das Gerät entsprechend versichern.
Weitere Informationen erhalten Sie vom Arcam-Kundendienst:
Arcam Customer Support Department, Unit 15, Pembroke Avenue, Waterbeach,
CAMBRIDGE, CB25 9QP, England
oder unter www.arcam.co.uk.
Probleme?
Kann Ihr Arcam-Händler Fragen zu diesem oder einem anderen Arcam-Produkt nicht
beantworten, wenden Sie sich an den Arcam-Kundendienst, und wir versuchen uns
Möglichstes, Ihnen zu helfen.
Online-Registrierung
Sie können Ihr Produkt online auf www.arcam.co.uk registrieren.
D-14
Sachgemäße Entsorgung des Produkts
Diese Kennzeichnung zeigt an, dass
das Produkt in der gesamten EU
nicht mit anderem Haushaltsmüll
entsorgt werden darf.
Zur Vermeidung möglicher
Umwelt- oder Gesundheitsschäden
durch unkontrollierte Entsorgung
und zur Materialerhaltung sollte dieses Produkt
verantwortungsvoll entsorgt werden.
Zur Entsorgung Ihres Produkts verwenden Sie
bitte Ihre örtlichen Entsorgungssysteme oder
kontaktieren Sie den Händler, bei dem Sie das
Produkt erstanden haben.
Page 28

CDS27
MANUAL Reproductor de Super Audio CD/CD/Streaming de red
Español
Page 29
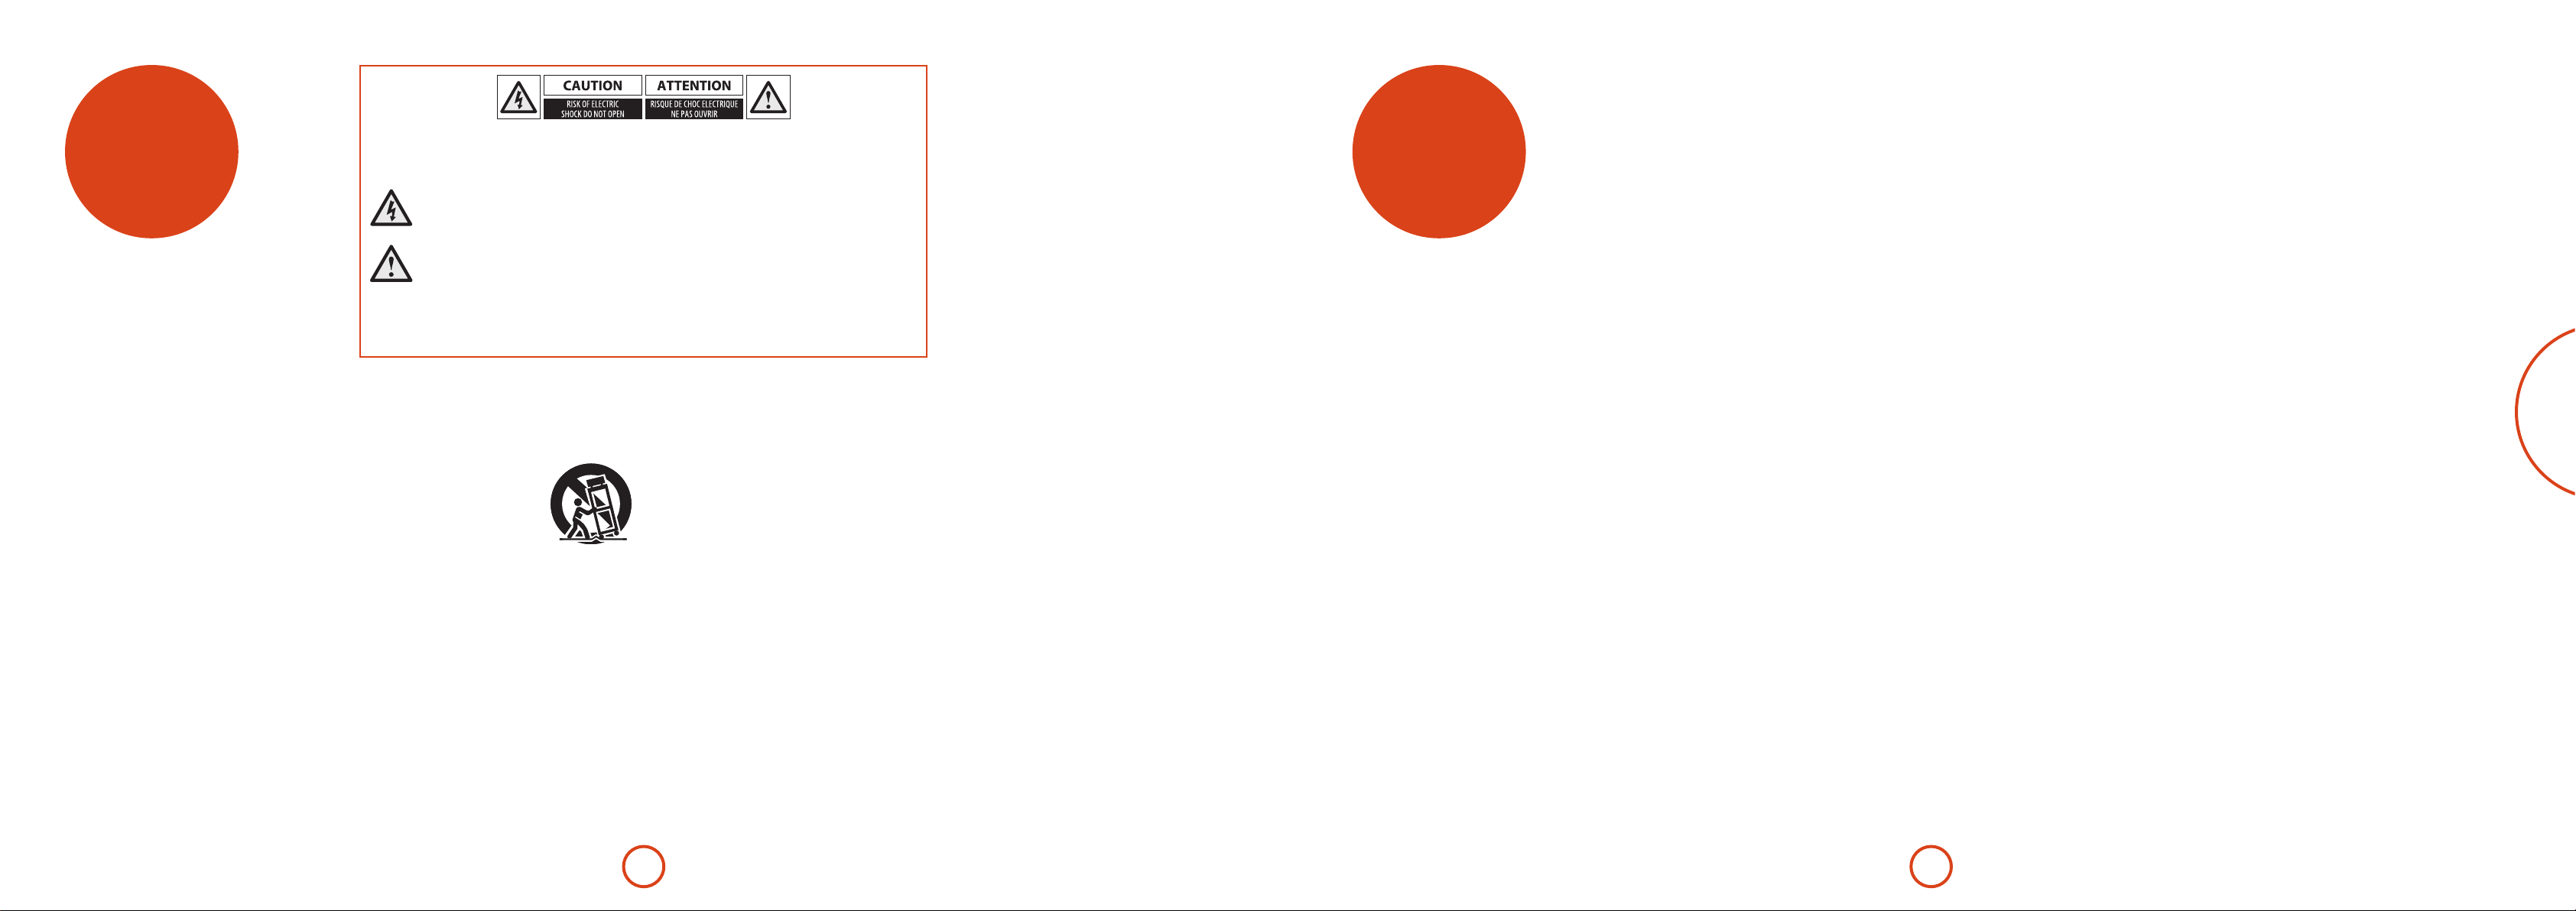
pautas de
seguridad
Instrucciones importantes de
seguridad
1. Lea estas instrucciones.
2. Conserve estas instrucciones.
3. Preste atención a todas las advertencias.
4. Siga todas las instrucciones.
5. No utilice este aparato cerca del agua.
6. Límpielo sólo con un paño seco.
7. No obstruya ninguna abertura de ventilación.
Instálelo de acuerdo con las instrucciones del
fabricante.
8. Coloque la unidad lejos de fuentes de calor
tales como radiadores, rejillas de salida de
calefacción, estufas y otros aparatos (incluyendo
amplicadores) que produzcan calor.
9. No anule las medidas de seguridad del enchufe
con toma de tierra o polarizado.
Un enchufe polarizado tiene dos clavijas, una más
ancha que la otra. Un enchufe con toma de tierra
tiene dos clavijas y una tercera para la conexión
a tierra. La hoja ancha o la tercera clavija tienen
por objeto mantener su seguridad. Si el enchufe
suministrado no encaja en su toma de corriente,
consulte a un electricista para realizar la sustitución
de la toma de corriente por una adecuada.
10. Proteja el cable de alimentación para que no se le
pise ni dañe, principalmente en los enchufes, en
las tomas de corriente, y en los puntos de salida
del equipo.
PRECAUCIÓN: Para reducir el riesgo de descargas eléctricas, no retire la tapa (ni la parte trasera). Dentro no hay piezas
que requieran reparación por parte del usuario. Para asistencia técnica consulte al personal cualicado.
ADVERTENCIA: Para reducir el riesgo de incendios o de descargas eléctricas, no exponga este aparato a la lluvia ni a la
humedad.
El símbolo de un rayo con una punta de echa dentro de un triángulo equilátero, tiene por nalidad alertar al
usuario de la presencia de “voltaje peligroso” sin aislar en el interior de la envolvente del producto, cuya magnitud
puede ser suciente para constituir un riesgo de descarga eléctrica para las personas.
El signo de exclamación dentro de un triángulo equilátero, tiene por nalidad alertar al usuario de la presencia de
instrucciones importantes de funcionamiento y mantenimiento (servicio técnico) en la literatura que acompaña al
aparato.
PRECAUCIÓN: En Canadá y en los Estados Unidos, para evitar descargas eléctricas, haga coincidir la hoja ancha del
enchufe con la ranura ancha del tomacorriente e inserte completamente el enchufe en el tomacorriente.
PRECAUCIÓN: El uso de cualesquiera controles, ajustes o procedimientos que no sean los especicados aquí, pueden dar
como resultado una exposición a radiaciones peligrosas.
11. Utilice sólo los accesorios y conexiones
especicados por el fabricante.
12. Colóquelo sólo sobre los carritos, plataformas,
trípodes, soportes o mesas, especicados por el
fabricante, o vendidos con el aparato.
Cuando se utilice un carrito, tenga
cuidado al mover el conjunto
de carrito y aparato para evitar
lesiones en caso de vuelco.
13. Desconecte el equipo durante las
tormentas eléctricas o cuando
vaya a estar mucho tiempo sin utilizarse.
14. Para todo tipo de mantenimiento consulte al
personal de servicio técnico cualicado.
El servicio técnico es necesario cuando el equipo
haya sido dañado de cualquier forma, como por
ejemplo: cuando se dañe el cable de alimentación,
se derrame líquido o caigan objetos sobre el equipo,
éste se haya expuesto a la lluvia o la humedad, no
funcione con normalidad, o se haya caído.
15. Entrada de objetos o líquidos
ADVERTENCIA – Tenga cuidado de que no
caigan objetos ni se derramen líquidos en el envase
por medio de las aberturas. El aparato no se debe
exponer al goteo ni a las salpicaduras. Sobre el
equipo no deben colocarse objetos llenos de líquido,
tales como jarrones.
16. Ambiente
El equipo ha sido diseñado para utilizarse en
ambientes moderados y en entornos domésticos.
17. Limpieza
Desenchufe la unidad del tomacorriente antes de
limpiarla.
Normalmente la cubierta sólo necesita limpiarse con
un paño suave y sin pelusa. No utilice disolventes
químicos para su limpieza.
No recomendamos el empleo de atomizadores ni
abrillantadores para limpieza de muebles, ya que
pueden dejar marcas blancas permanentes.
18. Fuentes de alimentación
Conecte el equipo sólo a la fuente de alimentación
descrita en las instrucciones de funcionamiento, o
como viene indicado en el equipo.
El principal método para aislar el equipo de la
alimentación principal es desconectar el enchufe
principal. El equipo debe estar instalado de tal
forma que sea posible su desconexión.
19. Olor anormal
Si se detecta un olor anormal o humo saliendo del
equipo, apáguelo inmediatamente y desenchufe
el equipo del tomacorriente. Contacte con su
distribuidor y no vuelva a conectar el equipo.
20. Daños que requieren de servicio
El equipo debe recibir servicio por parte de personal
calicado cuando:
A. se hayan dañado el cable o el enchufe de
alimentación, o
B. hayan caído objetos o se haya derramado
líquido dentro del equipo, o
C. el equipo haya estado sometido a la lluvia, o
D. el equipo no parezca operar normalmente
o exhiba un cambio marcado en su
comportamiento, o
E. el equipo se haya caído o la envolvente esté
dañada.
ADVERTENCIA – El enchufe de alimentación se usa
como un dispositivo de desconexión, el dispositivo de
desconexión deberá ser fácil de manipular.
ADVERTENCIA – Las baterías no deberán ser
expuestas a calor excesivo, tal como luz del sol o fuego.
PRECAUCIÓN – Peligro de explosión si las baterías se
sustituyen incorrectamente. Sustitúyalas con el mismo
tipo o equivalente.
Conformidad con la seguridad
Este equipo se ha diseñado para cumplir con la norma
internacional de seguridad eléctrica IEC/EN 60065.
Este dispositivo cumple la Parte 15 de la Normativa
FCC. El funcionamiento está sujeto a las siguientes dos
condiciones:
(1) Este dispositivo no debe ocasionar interferencias
perjudiciales, y
(2) este dispositivo debe aceptar cualquier interferencia
que se reciba, incluyendo las interferencias que pudiera
causar el funcionamiento indeseado.
bienvenido
Gracias y felicitaciones por comprar su reproductor Arcam FMJ CDS27.
El CDS27 ofrece calidad de sonido líder en su clase de CD, SACD, USB y audio basado en la
red. Los DAC (Convertidores digitales/analógicos) Delta-Sigma de última generación y alto
desempeño ofrecen calidad de sonido para audiólos traer verdaderamente vida a su música.
Arcam ha estado produciendo productos especializados de alta delidad y cine en casa de
calidad extraordinaria a lo largo de tres décadas y el CDS27 es el más reciente de una larga
la de equipo de alta delidad galardonado. El diseño del alcance del FMI descansa en toda la
experiencia de Arcam como una de las empresas de audio más respetada del Reino Unido y está
construido para brindarle años de disfrute libres de problemas.
Este manual ha sido diseñado para ofrecerle toda la información que necesita para instalar,
conectar y usar su nueva adquisición. También se describe la unidad de mando a distancia
suministrada con este equipo. Use el índice que se muestra en la página siguiente para guiarle a
la sección de interés.
Esperamos que su reproductor le proporcione años de esparcimiento. En el caso poco probable
de darse algún fallo, o simplemente si requiere más información sobre los productos Arcam,
nuestra red de distribuidores estará encantada de ayudarle. También se puede encontrar
información adicional en el sitio Web de Arcam ww.arcam.co.uk.
El equipo de desarrollo de FMJ
ES-3ES-2
Español
Page 30

Contenidos
pautas de seguridad ������������������������������������������������������������������������������������������������������������������������������� ES-2
Instrucciones importantes de seguridad ������������������������������������������������������������������������������������������������������������������������������ ES-2
Conformidad con la seguridad �������������������������������������������������������������������������������������������������������������������������������������������������ES-2
bienvenido ����������������������������������������������������������������������������������������������������������������������������������������������� ES-3
instalación ������������������������������������������������������������������������������������������������������������������������������������������������ ES-5
Colocación de la unidad ������������������������������������������������������������������������������������������������������������������������������������������������������������� ES-5
Alimentación ����������������������������������������������������������������������������������������������������������������������������������������������������������������������������������� ES-5
El mando a distancia y las entradas de activación ������������������������������������������������������������������������������������������������������������ ES-5
Interconexión de cables �������������������������������������������������������������������������������������������������������������������������������������������������������������� ES-5
conexiones del CDS27 ���������������������������������������������������������������������������������������������������������������������������� ES-6
Conexión de red ����������������������������������������������������������������������������������������������������������������������������������������������������������������������������ES-7
Conexión USB ��������������������������������������������������������������������������������������������������������������������������������������������������������������������������������� ES-7
Cómo hacer las conexiones de audio ������������������������������������������������������������������������������������������������������������������������������������ES-7
Discos que se pueden reproducir��������������������������������������������������������������������������������������������������������������������������������������������ES-7
Medios soportados ����������������������������������������������������������������������������������������������������������������������������������������������������������������������� ES-7
operación básica ������������������������������������������������������������������������������������������������������������������������������������� ES-8
mando a distancia ����������������������������������������������������������������������������������������������������������������������������������� ES-9
menús de conguración ���������������������������������������������������������������������������������������������������������������������� ES-11
Navegación por los menús ������������������������������������������������������������������������������������������������������������������������������������������������������ES-11
solución de problemas ������������������������������������������������������������������������������������������������������������������������� ES-12
especicaciones ������������������������������������������������������������������������������������������������������������������������������������ES-13
Interferencia de radio ����������������������������������������������������������������������������������������������������������������������������������������������������������������ES-13
Radiación láser �����������������������������������������������������������������������������������������������������������������������������������������������������������������������������ES-13
garantía del producto ��������������������������������������������������������������������������������������������������������������������������ES-14
Garantía Mundial �������������������������������������������������������������������������������������������������������������������������������������������������������������������������ES-14
Reclamaciones bajo la garantía ���������������������������������������������������������������������������������������������������������������������������������������������ES-14
¿Problemas? ����������������������������������������������������������������������������������������������������������������������������������������������������������������������������������ES-14
Registro en línea ��������������������������������������������������������������������������������������������������������������������������������������������������������������������������ES-14
instalación
Colocación de la unidad
< Coloque el reproductor de CD sobre una
supercie nivelada y rme, lejos de la luz del sol
directa y fuentes de calor o humedad.
< No coloque el reproductor de CD encima de un
amplicador u otra fuente de calor.
< No coloque el reproductor de CD en un espacio
cerrado como un librero o armario cerrado, a
menos que permita una buena ventilación. El
reproductor de CD está diseñado para calentarse
durante la operación normal.
< No coloque ningún otro componente o artículo
encima del reproductor de CD ya que pueden
obstruir el ujo de aire alrededor de la unidad,
provocando que el reproductor de CD se caliente.
< Asegúrese de que el receptor del mando a
distancia (que está junto a la pantalla del panel
frontal) no esté obstruido, o el mando a distancia
no funcionará.
< No coloque su tocadiscos sobre la unidad. Los
tocadiscos son muy sensibles al ruido que genera
la alimentación principal, y se puede oír como
un “zumbido” de fondo si el tocadiscos está
demasiado cerca.
Alimentación
El reproductor de CD se suministra con un enchufe
de alimentación moldeado con cable incluido.
Compruebe que el conector que se incluye encaje con
su tomacorriente; si necesitase un nuevo conector de
alimentación, por favor, contacte con su distribuidor
de Arcam.
Si su voltaje de alimentación o enchufe de alimentación
es diferente, por favor contacte inmediatamente con su
distribuidor de Arcam.
Empuje el extremo del enchufe IEC del cable de
alimentación dentro de la toma en la parte posterior
del reproductor de CD, asegurándose de empujarlo
rmemente. Conecte el otro extremo del cable en el
tomacorriente y, si fuera necesario, alimente la toma.
El mando a distancia y las
entradas de activación
La entrada REMOTE IN puede utilizarse para pasar
códigos RC5 al CDS27 si está instalado en una posición,
o a un sistema donde no se puedan utilizar infrarrojos.
Si esto es necesario, contacte con su distribuidor para
obtener más información.
NOTA
< La entrada del mando a distancia requiere de
un conector mono de 3,5 mm, con la punta
activa y el manguito a tierra.
< Las señales del mando a distancia deben estar
moduladas en formato RC5 (a 36 KHz), con
un nivel de voltaje de entre 5V y 12V.
La entrada 12V TRIGGER IN puede usarse para alternar
el CDS27 entre los estados de encendido y espera. La
conexión de la salida de activación de su amplicador
Arcam (u otro dispositivo compatible) causará que el
CDS27 salga automáticamente del estado de espera
cuando se encienda el amplicador, regresando a la
espera cuando se apague el amplicador. Consulte
el manual de su amplicador para obtener más
información.
En el uso normal no hay necesidad de hacer ninguna
conexión a estas entradas.
La entrada RS232 es para la conexión opcional a
un sistema de automatización doméstica o a una
computadora. Están disponibles varios sistemas de
terceras partes que proporcionan control sosticado
sobre todos sus dispositivos de entretenimiento
utilizando pantallas táctiles, etc. Contacte con su
distribuidor o instalador para conocer más detalles. Los
detalles técnicos del protocolo del mando a distancia
están disponibles previa solicitud (correo electrónico
support@arcam.co.uk).
Interconexión de cables
Recomendamos que utilice cables apantallados de
alta calidad que hayan sido diseñados para esta
aplicación en particular. Otros cables tendrán diferentes
características de impedancia, lo que rebajará el
rendimiento de su sistema (por ejemplo, no utilice
cableado diseñado para video, para transmitir señales
de audio). Todos los cables deben mantenerse lo más
cortos como sea posible en la práctica.
Es recomendable, cuando conecte su equipo, asegurarse
de que el cableado de alimentación se mantenga lo más
alejado posible de los cables de audio. No hacerlo puede
causar ruidos indeseados en las señales de audio.
Español
ES-5ES-4
Page 31
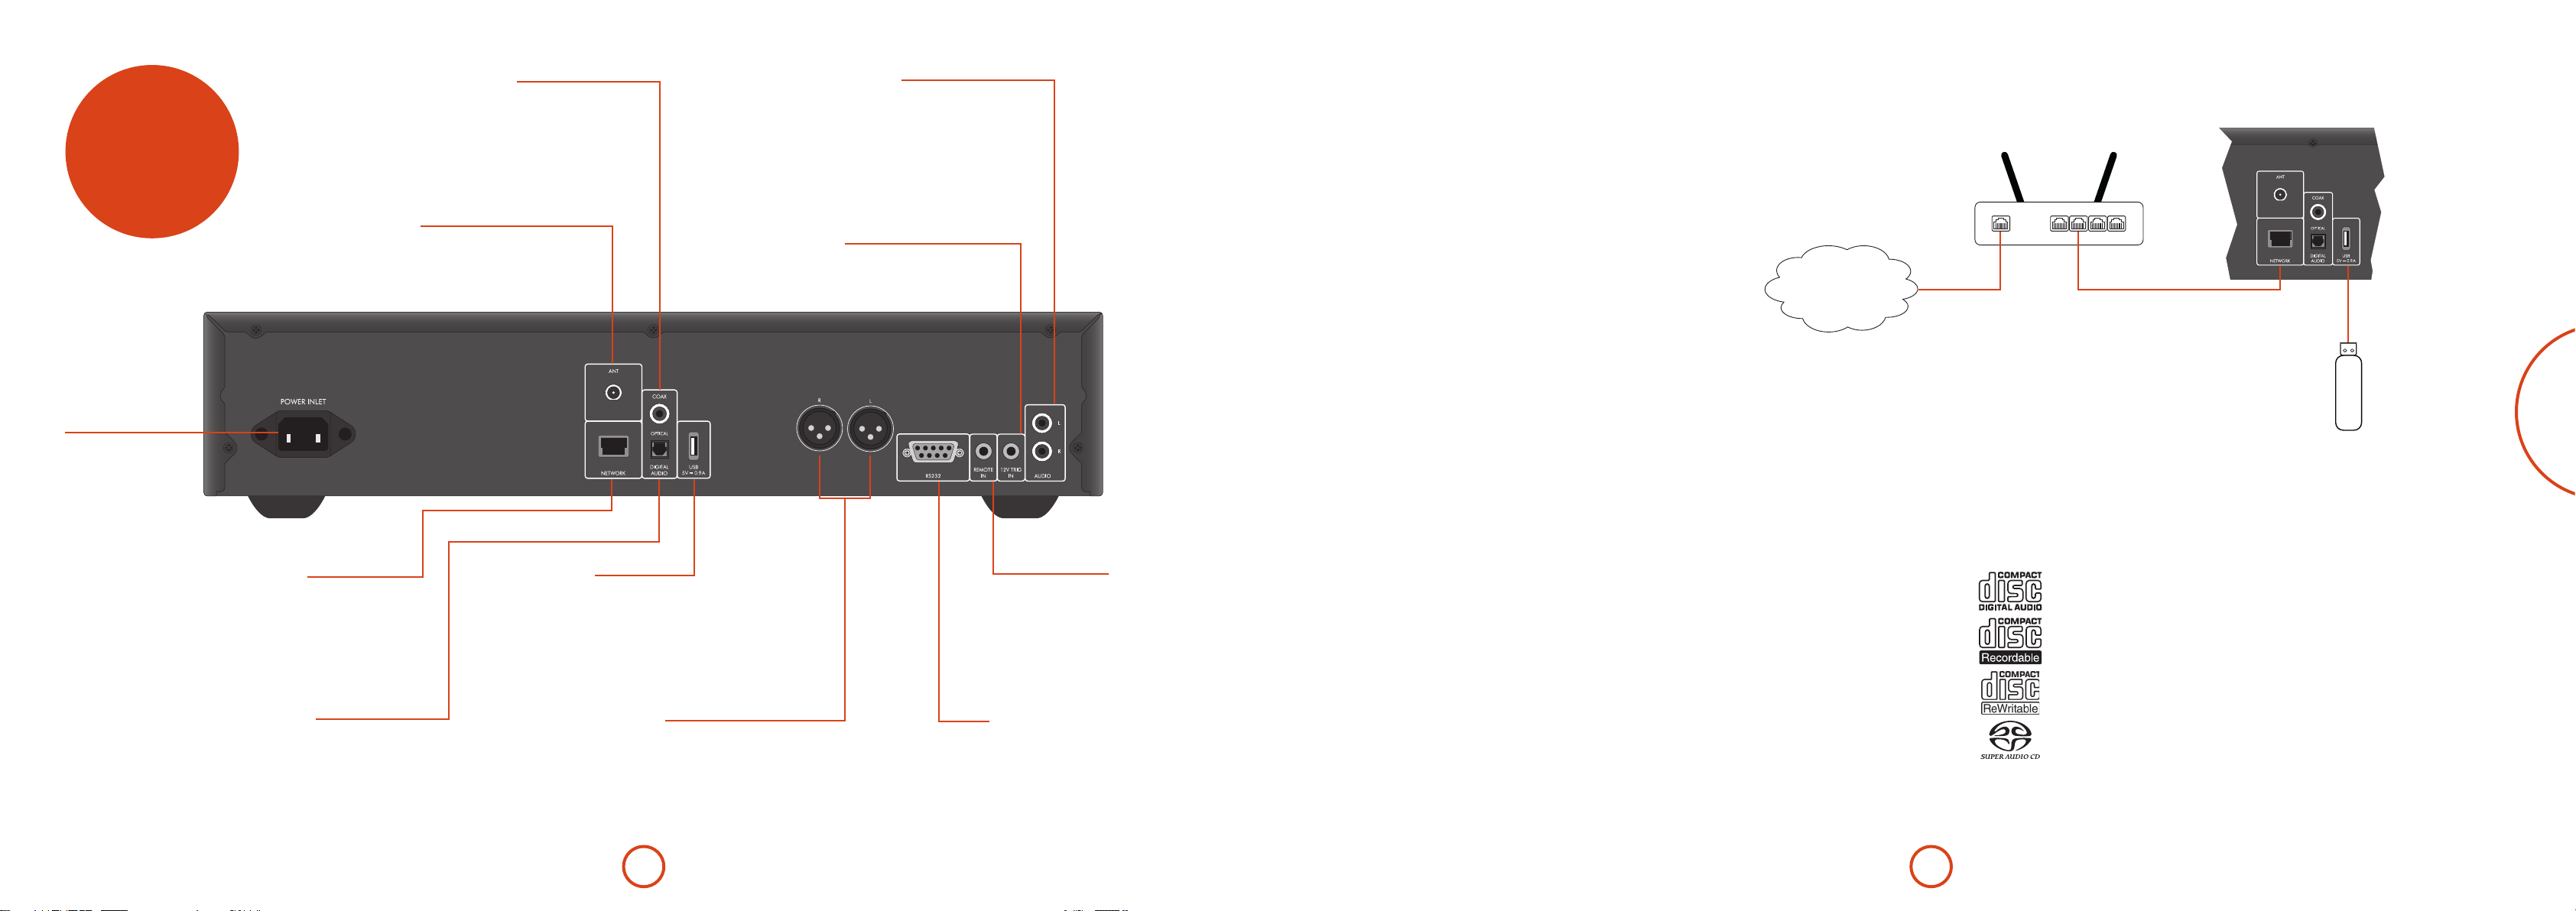
conexiones
del CDS27
Entrada de
alimentación
Conecte aquí el
cable correcto de
alimentación.
Salida digital coaxial
Use este conector si está usando un DAC audiólo de
alta calidad con una entrada digital coaxial. Conéctelo
a la entrada digital usando un cable apantallado
adecuado de 75Ω.
PRECAUCIÓN: Nunca conecte la salida digital a una
entrada convencional de audio.
Conexión de red inalámbrica
Conecte la antena Wi-Fi suministrada si necesita
utilizar la conexión de red inalámbrica. Una
conexión de red posibilita la reproducción de audio
de Red (para detalles de conguración véase la
página11).
Salida de audio Phono
Conéctela a la entrada de CD de su amplicador
(o a otra de nivel de línea) utilizando cables de
interconexión adecuados de alta calidad. Asegúrese
de que las salidas de audio izquierda y derecha del
reproductor de CD estén conectadas a las mismas
entradas izquierda y derecha de su amplicador.
Entrada de activación 12V
Este conector permite que el CDS27 se encienda o se
ponga en el modo de espera por un amplicador (u
otro artículo de equipo de AV) con una función de
12V TRIG OUT. Véase la página5
Conexión de red
Se puede usar un cable Ethernet para conectar el
CDS27 a un enrutador o conmutador en su red
doméstica, lo que posibilita la reproducción de audio
almacenado en su computadora o dispositivo NAS.
También está disponible la conexión inalámbrica,
y puede ser congurada a través del menú de
conguración.
Conexión USB
Una entrada USB tipo A, usada para conectar sus
unidades ash o unidades de disco duro externas que
contienen audio.
También puede ser usada para actualizar soware.
Internet
Router
LAN
Unidad Flash USB
Español
Conexión de red
Conecte este conector a un puerto de
su router de red utilizando un cable de
conexión Ethernet (Véase la página7).
Una conexión de red posibilita la
reproducción de audio de Red (para
detalles de conguración véase la
página11).
Salida digital óptica
Use este conector si está utilizando un
receptor de AV con una entrada de audio
óptico digital.
Conexión USB
Inserte aquí los dispositivos de memoria
ash USB. El CDS27 también puede
reproducir ciertos archivos digitales
almacenados en unidades de memoria USB
(Véase ‘Medios soportados’ en la página7)
Salida de audio balanceada
Conéctelas a la entrada de CD (u otra balanceada) de su
amplicador usando cables de interconexión adecuados de
alta calidad. Asegúrese de que las salidas de audio izquierda y
derecha del reproductor de CD estén conectadas a las mismas
entradas izquierda y derecha de su amplicador.
Entrada Remote
Esto permite que el CDS27 reciba señales
de mando a distancia si el sensor remoto en
el panel frontal está cubierta (o de alguna
manera no es ‘visible’ para el mando a
distancia).
Vea la página 5 para más información.
RS232
Esta conexión permite el control remoto
desde un sistema de automatización
doméstico de terceros o una computadora.
Vea la página 5 para más información.
Cómo hacer las conexiones de audio
El CDS27 ofrece varias alternativas para la conexión del audio, el tipo de conexión a utilizar depende del resto de su
sistema; seleccione el tipo más apropiado para su amplicador.
Para obtener la mejor calidad de sonido estéreo recomendamos conectar las salidas de audio analógico estéreo a
la entrada de CD en su amplicador, lo que permite que se utilicen los circuitos digitales/analógicos audiólos del
CDS27.
Analógico
Usando un par de cables fonográcos estéreo de longitud adecuada, conecte las
salidas etiquetadas “Phono” a las entradas izquierda y derecha CD/SACD en su
amplicador.
Alternativamente, conecte las salidas balanceadas izquierda/derecha a la entrada
balanceada en su amplicador.
Digital
Conecte una de las salidas Digital Audio (Optical o Coaxial) a la entrada digital
‘CD/SACD’ de su receptor, estas salidas digitales ofrecen exclusivamente PCM
estéreo.
Discos que se pueden reproducir
El reproductor soporta los siguientes tipos de discos:
CD-Audio
CD-R
CD-RW
CD Super Audio
ES-7ES-6
Medios soportados
La reproducción de los siguientes formatos de archivo
es soportada, en Disc, USB y red.
< FLAC, hasta 24 bit, 192KHz
< WAV, hasta 24bit, 192KHz
< AAC, hasta 24bit, 96KHz
< AIFF, hasta 24bit, 192KHz
< OGG, hasta 24bit, 192KHz
< MP3, hasta 320kbps, 48KHz
< WMA, hasta 192kbps, 48KHz
Page 32

operación
AUDIO
SACD
MENU
FM MONO P/TUNE
STORE
INFO
BD
CR902
RTN
mando a
básica
Introducción
‘Operación básica’ explica cómo reproducir discos
de audio, contenido de red y archivos de audio
almacenados en medios USB. Note que puede ser
necesario congurar su reproductor correctamente
para su sistema antes de poder obtener la reproducción
óptima, o de cualquier tipo. La conguración del
reproductor se describe al comienzo de la página11.
Encendido
Encendido de la unidad al pulsar el botón POWER. El
LED de estado se ilumina en verde cuando la unidad se
enciende y en rojo cuando está en el modo de espera. Se
puede ingresar al modo de espera usando el botón de
espera en el mando a distancia y salir usando el mismo
botón, o la tecla </1 en el panel frontal. Si el botón
POWER se pulsa (o se retira la alimentación) estando
en espera, la unidad entrará de nuevo en el estado de
espera al restituir la alimentación.
Tenga presente que el sensor del mando a distancia
está ubicado en el lado derecho de la ventana del
visualizador. No lo obstruya o el mando a distancia no
trabajará.
Reproducción de un disco
Pulse </1 en el panel frontal (o 1 en el mando a
distancia) y coloque el disco en la bandeja, con el lado
de reproducción orientado hacia abajo (algunos discos
son de doble cara, en cuyo caso el lado marcado como
“lado A” debe estar hacia arriba para reproducir el
ladoA).
Pulse </1 en el panel frontal para cerrar la bandeja.
El disco se carga después de una pausa de unos pocos
segundos.
Un disco puede demorarse algún tiempo en cargarse
una vez que está cerrada la bandeja. Si la conguración
‘Reproducción automática de disco’ está puesta en
Encendido (la conguración predeterminada), la
reproducción inicia automáticamente. (Para detalles,
consulte la sección ‘Reproducción automática de discos’
en la página11).
Para discos que no se reproduzcan automáticamente,
pulse 4/; en el panel frontal o pulse 4 en el mando a
distancia.
Reproducción desde la red
Asegúrese de que el CDS27 esté conectado a su
red local. Seleccione ‘Buscador de medios’ desde la
pantalla de inicio, se le presentará al usuario una lista
de dispositivos disponibles para la búsqueda. Navegue
por las bibliotecas disponibles usando las teclas
',
La reproducción de música en la red también puede
ser controlada desde su computadora, teléfono o
dispositivo móvil usando su aplicación de punto de
control UPnP favorita.
en el mando a distancia.
<>
Al pulsar OK o 4 en el archivo de audio resaltado
accederá al archivo para reproducción. La reproducción
continuará a través de todas las pistas subsecuentes en
el directorio de reproducción.
Reproducción desde USB
Conecte su dispositivo USB a la entrada USB en la parte
posterior del CDS27. Después de que el dispositivo
haya sido reconocido seleccione ‘Buscador de medios’
desde la pantalla de inicio, luego elija la opción ‘USB’ de
la lista de medios.
Navegue por las direcciones usando las teclas
',
reproducción de un archivo de audio resaltado al
pulsar OK, 4o >. La reproducción continuará a través
de todas las pistas subsecuentes en el directorio de
reproducción.
en el mando a distancia e inicie la
<>
Durante la reproducción
Exploración
Pulse 8 o 7 en el panel frontal o el mando a distancia
para explorar hacia adelante o atrás a x4 la velocidad de
reproducción normal. Para reanudar la reproducción
normal, pulse REPRODUCIR.
Saltos de capítulos/pistas�
Para saltar pistas, pulse /o 0.
Si salta hacia atrás, al pulsar el botón por primera vez
le lleva al inicio de la pista actual. Al pulsar el botón de
nuevo le lleva al inicio de la pista anterior.
Pausas en la reproducción
Pulse 4/; en el panel frontal o ; en el mando a
distancia para introducir una pausa en la reproducción.
Para reanudar la reproducción, presione 4/; en el
panel frontal o 4 en el mando.
Para detener la reproducción
Pulse el botón </1 en el panel frontal o < en el
mando a distancia para detener la reproducción.
distancia
El CDS27 se suministra con el mando a distancia
CR902.
Utilización del mando a distancia
Por favor tenga presente lo siguiente, cuando utilice el
mando a distancia:
< Asegúrese de que no haya obstáculos entre
el mando a distancia y su sensor en el panel
frontal. El mando tiene un alcance aproximado
de 7 metros. (Si el sensor del mando a distancia
está obstruido, está disponible el conector de
entrada IR para el mando a distancia en el panel
posterior. Por favor, consulte con su distribuidor
para más información).
< El funcionamiento del mando a distancia puede
no ser able si una luz solar o uorescente intensa
incide sobre el sensor del mando a distancia de
la unidad.
< Sustituya las pilas cuando note una reducción
en el alcance del funcionamiento del mando a
distancia.
Colocación de las pilas en el mando a
distancia
1. Abra el compartimiento de las pilas en la parte
posterior del mando a distancia.
2. Inserte dos pilas ‘AAA’ de acuerdo al diagrama en
tapa de la cubierta de las pilas.
3. Deslice la tapa de la cubierta de las pilas de nuevo
a su posición y ciérrela hasta escuchar un clic.
NOTA
< El uso incorrecto de las pilas puede producir
riesgos tales como fugas o roturas.
< No mezcle pilas nuevas y usadas.
< No mezcle pilas que no sean idénticas entre
sí; aunque puedan parecer iguales, las pilas
distintas pueden tener distintos voltajes.
< Asegúrese de que los extremos más (+) y
menos (-) de cada pila, concuerden con las
indicaciones del compartimiento de las pilas.
< Retire las pilas de los equipos que no vayan a
ser utilizados durante un mes o más.
< Cuando se deshaga de las pilas usadas, por
favor siga la normativa local o del gobierno
que sean de aplicación en su país o zona.
El mando a distancia CR902 cumple con la
Parte 15 de la normativa FCC
Este equipo ha sido probado y se ha comprobado
que cumple con los límites para los dispositivos
digitales de Clase B, con arreglo a la Parte 15 de la
normativa FCC. Estos límites tienen por nalidad
proporcionar una protección razonable frente
a interferencias perjudiciales en instalaciones
residenciales. Este equipo genera, utiliza y puede
irradiar energía de radiofrecuencias, y si no se
instala y utiliza de acuerdo a las instrucciones,
puede causar interferencias perjudiciales a las
comunicaciones por radio. Sin embargo, no se
garantiza que esta interferencia no pueda ocurrir
en una instalación en particular. Si este producto
causa interferencias perjudiciales en la recepción de
radio o televisión, lo cual que puede determinarse
encendiendo y apagando el equipo, se recomienda
al usuario que intente corregir la interferencia por
medio de una o más de las siguientes medidas:
Reoriente o cambie de ubicación la antena de
recepción.
Aumente la separación entre el equipo y el receptor.
Conecte el equipo a un tomacorriente o a un
circuito diferente del que esté conectado el receptor.
Pida asesoría al distribuidor o a un técnico en audio
experimentado.
Español
ES-9ES-8
Page 33

Modo de Dispositivo AMP
El botón de Modo de Dispositivo A congure
el CR902 para controlar su amplicador Arcam.
Pulsar este botón no afecta la entrada seleccionada
actualmente en el amplicador.
Alterna entre la Espera y el encendido
P
Alterna entre las opciones de brillo del
DISP
visualizador del panel delantero
Se desplaza por los modos de visualización en
MODE
el panel frontal
Muestra el menú de conguración del
MENU
amplicador en el panel frontal
Menús de navegación
conrma una selección
O
Alterna la función de silencio del amplicador
@
Vol +/– sube o baja el volumen del
amplicador Arcam.
Vol-
Pulse el botón SILENCIO para silenciar el
Vol+
amplicador Arcam. Pulse de nuevo (o use
Vol +/–) para salir de silenciar.
SP1
Alterna la salida del Altavoz 1
SP2
Alterna la salida del Altavoz 2
Ajusta el balance entre el canal de audio
BAL
izquierdo y derecho
NOTA
El CR902 es un mando a distancia para varios
dispositivos, por lo que las funciones de las teclas
pueden diferir dependiendo de cuál fue el último
botón de entrada que se pulsó.
Asegúrese de que el botón “CD” esté seleccionado
antes de controlar el CDS27.
Modo de Dispositivo TUN
El botón Modo de Dispositivo T congure el CR902
para controlar las funciones del sintonizador de los
sintonizadores Arcam.
Alterna entre la Espera y el encendido
P
0…9
' ,
Las teclas numéricas se usan para almacenar y
recuperar los preajustes
Alterna entre las opciones de brillo del
DISP
visualizador del panel delantero
Se desplaza a través de diferentes modos de
INFO
visualización de la información
Rebobinar iPod
)
Avance rápido iPod
(
Preajuste abajo/Categoría Sirius abajo/Pista
]
iPod atrás
Preajuste arriba/Categoría Sirius arriba/Pista
[
iPod adelante
Detener iPod
#
Reproducir/Pausa iPod
$
Reproducir/Pausa iPod
&
Muestra el menú de conguración del
MENU
sintonizador en el panel frontal
Preajuste arriba/abajo, pista iPod atrás/
adelante
Disminución/aumento frecuencia
< >
sintonización
Conrma una selección
O
Alterna el modo FM entre recepción mono
FM MONO
y estéreo
P/TUNE
Entrar/Salir modo recuperación Preajuste
STORE
Entrar/Salir modo almacenar Preajuste
Se desplaza a través de las bandas del
BAND
sintonizador disponibles
Modo de Dispositivo CD
El botón de Modo de Dispositivo c congure el
CR902 para controlar las funciones de CD de los
reproductores de CD Arcam.
Alterna entre la Espera y el encendido
P
Abre/cierra la bandeja de discos
!
Las teclas numéricas permiten el acceso
directo a pistas individuales de un disco.
Para seleccionar una pista pulse el botón
0…9
correspondiente del teclado. Para pistas
mayores que el 9, introduzca los dígitos en
secuencia. Por ejemplo, para reproducir la pista
15, pulse 1 y a continuación pulse el 5.
Alterna entre las opciones de brillo del
DISP
visualizador del panel delantero
Cambia los modos de visualización disponibles
MODE
en el reproductor de CD
Retroceso rápido
)
Avance rápido
(
Salta de nuevo hacia el inicia de la pista actual/
]
anterior
Salta hacia delante al inicio de la pista siguiente
[
Detiene la reproducción
#
Reproducir
$
Alterna la pausa de la reproducción
&
Navega por los listados de pistas si lo soporta
el reproductor
selecciona la pista actualmente resaltada si
O
lo soporta el reproductor
Alterna la activación y la desactivación de la
SHUFF
reproducción aleatoria (“shue”)
Repetir pista hará que la pista actual sea
reproducida una vez que se haya llegado al
nal de esa pista.
Repetir todo repetirá la sección de pistas actual
RPT
una vez que se haya retirado el nal de la pista
nal.
Para repetir una pista en particular, seleccione
esa pista y pulse dos veces RPT. Para cancelar,
pulse RPT por tercera vez.
Modo de Dispositivo BD
El botón de Modo de Dispositivo � congura el
CR902 para controlar las funciones de BD de los
reproductores BD Arcam.
Alterna entre la Espera y el encendido
P
Abre/cierra la bandeja de discos
!
Las teclas numéricas permiten el acceso
directo a pistas individuales de un disco.
Para seleccionar una pista pulse el botón
0…9
correspondiente del teclado. Para pistas mayores
que el 9, introduzca los dígitos en secuencia. Por
ejemplo, para reproducir la pista 15, pulse 1 y
a continuación pulse el 5.
Alterna entre las opciones de brillo del
DISP
visualizador del panel delantero
Cambia los modos de visualización disponibles
MODE
en el reproductor BD
Retroceso rápido
)
Avance rápido
(
Salta de nuevo hacia el inicia de la pista actual/
]
anterior
Salta hacia delante al inicio de la pista siguiente
[
Detiene la reproducción
#
Reproducir
$
Alterna la pausa de la reproducción
&
Cambia el formato de decodicación de audio
AUDIO
(Dolby Digital, DTS, etc.).
MENU
Activa el menú del reproductor BD.
Navega por los listados de pistas si lo soporta el
reproductor
selecciona la pista actualmente resaltada si
O
lo soporta el reproductor
Vuelve la navegación al nivel superior del menú
.
(“Inicio”).
Cuando se navega por un menú, pulse esta tecla
RTN
para regresar a la pantalla o selección anterior
Alterna la activación y la desactivación de la
SHUFF
reproducción aleatoria (“shue”)
Repite la reproducción del disco o de la
selección preprogramada de pistas. Para repetir
RPT
una pista en particular, seleccione esa pista y
pulse dos veces RPT. Para cancelar, pulse RPT por
tercera vez.
menús de
conguración
El menú de Conguración le permite congurar todos
los aspectos de su CDS27. Esta sección examinará las
opciones del menú y explicará su función.
La única manera de visualizar el menú de
Conguración es en la pantalla del CDS27.
Entrada en el menú de conguración
Si por el momento no se muestra el menú de inicio,
pulse MENU en el mando a distancia para mostrarlo.
Pulse C hasta que la opción MENÚ DE CONFIGURACIÓN
se muestre y pulse OK para ingresar.
Navegación por los menús
Se puede navegar por los menús del CDS27 mediante
el uso de las teclas de cursor (echa) en el mando a
distancia.
1. Use las teclas B y C para navegar hacia arriba
y abajo en el menú actual.
2. Una vez que la sección principal que requiera se
muestre, pulse OK para seleccionarla.
3. Use las teclas B y C para navegar hacia arriba
y abajo por las opciones.
4. Al pulsar E se selecciona un ajuste: use las teclas
y C para cambiar el ajuste.
B
5. Pulse OK para conrmar el ajuste. Regrese al paso
4 para ajustar cualquier otra conguración en la
sección actual.
6. Pulse < regresar a la pantalla anterior si desea
seleccionar otra sección para ajustar.
Red en espera – Esta opción determina si las
características de la red están disponibles cuando el
CDS27 está en espera.
Al seleccionar “ACTIVA” se mantendrá la conexión de
red (requerida para el mando IP).
Al seleccionar “ESPERA” permitirá que el hardware
de la red sea apagado a n de reducir el consumo de
energía.
Conguración de red– Esta opción permite al usuario
congurar la unidad para unirse a una red existente,
requerida para la reproducción de audio de red y las
actualizaciones de soware a través de internet.
Espera automática – Permite al usuario especicar
el periodo de inactividad después del cual la unidad
entrará automáticamente en espera. Las opciones son:
5/10/15/20/25/30 minutos.
Reproducción automática de discos – controla
si un disco óptico (p. ej., CD) se reproducirá
automáticamente después de ser insertado.
< On (Activado): Los discos ópticos se
reproducirán automáticamente.
< O (Desactivado): Debe pulsarse play para
reproducir un disco.
Actualización de Firmware – Puede comprobar si hay
actualizaciones para el rmware de su reproductor
seleccionando esta opción de menú y pulsando OK para
resaltar “Red”, a continuación pulse de nuevo OK.
Si no hay disponible un nuevo rmware aparece un
mensaje, de lo contrario, siga las instrucciones que
aparezcan en pantalla.
Cargar predeterminados – Pulse OK con esta opción
resaltada para reiniciar todas las conguraciones a los
valores predeterminados de fábrica.
Se le solicitará que conrme que desea cargar las
conguraciones predeterminadas. Seleccione “cancelar”
para salir o ' para resaltar la opción “sí” y OK para
conrmar.
Información del sistema – Use las teclas de cursor
'/,
para buscar entre las opciones.
El panel de Información del sistema muestra
información sobre su reproductor, tal como la dirección
IP y la versión de rmware.
Audio de red - Permite al usuario habilitar o
deshabilitar la capacidad de conversión UPNP del
reproductor. Si se ajusta esta opción en ‘apagado’ se
deshabilitará el audio de red.
Salida digital - Permite al usuario limitar la velocidad
de muestreo de la salida digital coaxial/óptica.
Español
ES-11ES-10
Page 34

solución de
problemas
Si ocurre una falla, revise esta tabla de solución de
problemas antes de enviar su equipo para que lo
reparen.
Si la falla persiste, intente resolverla apagando la unidad
y encendiéndola de nuevo.
Si con esto no se resuelve la situación, consulte con
su distribuidor. ¡Bajo ninguna circunstancia debe
reparar usted mismo la unidad, ya que esto invalidará
la garantía!
Problema Causa Posible Solución
No hay Alimentación < El cable de entrada de CA está desconectado.
< Mala conexión en la toma de corriente de CA o la toma de corriente no
está alimentada.
Disco no se reproduce < El disco está colocado con las caras invertidas.
< El disco no es reproducible.
< El disco está sucio.
< El disco no se nalizó correctamente.
Sin disco/disco
defectuoso
No hay sonido < Los cables de audio están desconectados. < Conecte correctamente los cables.
Sonido ruidoso o
distorsionado
El mando a distancia no
funciona.
< El disco está arañado, sucio, mal grabado o no es reproducible. < Pulse el interruptor de ALIMENTACIÓN para apagar el
< El disco está sucio.
< Malas conexiones.
< Las baterías no están cargadas o están agotadas.
< El sensor del mando a distancia está obstruido.
< Conecte bien el cable.
< Compruebe la toma de corriente utilizando una lámpara u
otro equipo.
< Cargue de Nuevo el disco con la cara impresa hacia arriba.
< Use un disco que se pueda reproducir.
< Limpie el disco.
< Cargue un disco que esté correctamente nalizado.
equipo; púlselo de nuevo y entonces extraiga el disco.
< Limpie el disco.
< Verique las conexiones y conecte los cables en la forma
correcta.
< Sustituya las baterías.
< Elimine el obstáculo.
especicaciones
Salida de Audio Analógico
Conversión Digital a Analógica DAC 24-bit 192kHz Delta-Sigma
Relación señal a ruido 110dB CCIR
Distorsión armónica (1kHz) 0,002%
Respuesta de frecuencia (±0,5dB) 10Hz-20kHz
Nivel de salida (0dB) 2,2 Vrms
Impedancia de salida 47Ω
Carga mínima recomendada 5kΩ
Interfaces digitales
Salidas de audio 75Ω TOSLINK coaxial/óptico
USB USB 2.0 Alta Velocidad (480 Mbit/s)
Ethernet 10/100 10/100
Inalámbrica b/g/n
Física
Dimensiones (Ancho x
Profundidad x Alto)
Peso 5,2kg/7,5kg embalado
Consumo de potencia 20W máximo
Accesorios incluidos
E&OE
NOTA: Todos los valores especicados son típicos a menos que se indique otra cosa.
433 x 276 x 75
Cable de alimentación, Mando a distancia CR902, 2 pilas AAA, Antena
Wi-Fi
Interferencia de radio
El reproductor CDS27 es un dispositivo digital que ha
sido diseñado para cumplir con normas muy altas de
compatibilidad electromagnética.
Todos los reproductores de CD generan, y pueden
irradiar energía de RF (radiofrecuencia). En algunos
casos esto puede causar interferencias con la recepción
de radio FM y AM. En este caso, mantenga el
reproductor y sus cables de conexión tan lejos como
sea posible del sintonizador y de sus antenas. La
conexión del reproductor y el sintonizador en diferentes
tomas de corriente también puede ayudar a reducir la
interferencia.
PAÍSES DE LA CE – Este producto ha sido diseñado
para cumplir con la Directiva EMC 2004/108/EC.
EE.UU. – Estos productos cumplen con FCC Parte 15
Clase B
Radiación láser
PRODUCTO
LÁSER
CLASE II
Si el reproductor CDS27 se
opera sin la cubierta externa
en su lugar, la radiación láser
invisible podría provocar
lesiones en los ojos.
Español
Política de mejora continua
Arcam tiene una política de mejora continua de
sus productos. Esto signica que los diseños y
especicaciones están sujetos a cambios sin previo
aviso.
ES-13ES-12
Page 35

garantía del
producto
Garantía Mundial
Esto le asegura la reparación de su unidad de forma gratuita, durante los dos primeros
años tras la compra, siempre y cuando haya sido comprada a un distribuidor Arcam
autorizado. El distribuidor de Arcam es responsable de todo el servicio post-venta. El
fabricante no se hace responsable de los defectos derivados de ningún accidente, uso
inadecuado, abuso, desgaste, ajuste y/o reparación negligente o no autorizado, ni puede
aceptar la responsabilidad por daños o pérdidas durante el transporte hasta o desde la
persona reclamante bajo la garantía.
La garantía cubre:
Costos de piezas y mano de obra durante dos años a partir de la fecha de compra.
Transcurridos los dos años usted correrá con los costos de piezas y de mano de obra. La
garantía no cubre los costos de transporte en ningún momento.
Reclamaciones bajo la garantía
Este equipo deberá estar empaquetado en su embalaje original y ser devuelto al
distribuidor al cual fue comprado. Debe ser enviado en un transporte ya pagado, por un
transportista reconocido – no por correo. No se acepta responsabilidad sobre la unidad
mientras se está transportando al distribuidor o clientes y por eso aconsejamos asegurar
la unidad contra pérdida o daños durante el transporte.
Para más detalles contacte con Arcam en:
Departamento de Atención al Cliente de Arcam, Unidad 15, Pembroke Avenue,
Waterbeach, CAMBRIDGE, CB25 9QP, Inglaterra
o a través de www.arcam.co.uk.
¿Problemas?
Si su distribuidor de Arcam es incapaz de responderle a alguna duda respecto a este o
a otro producto Arcam, por favor contacte con el Servicio de Atención al Cliente de
Arcam, en la dirección anterior y haremos todo lo posible por ayudarle.
Registro en línea
Puede registrar su producto en línea en www.arcam.co.uk.
ES-14
Forma correcta de deshacerse de este producto
Esta marca indica que este producto
no debe disponerse con otros
desperdicios domésticos en ningún
lugar de los EE.UU.
Para evitar posibles daños al medio
ambiente o a la salud humana
proveniente de la eliminación no
controlada de desechos y para
conservar los recursos materiales, este producto
debe reciclarse de manera responsable.
Para eliminar su producto, utilice sus sistemas
locales de devolución y recolección o contacte con el
distribuidor al que le compró el producto.
Page 36
CDS27
HANDLEIDING Super Audio CD/CD/Netwerk Streaming Speler
Nederlands
Page 37

veiligheids-
richtlijnen
Belangrijke veiligheidsinstructies
1. Lees deze instructies.
2. Bewaar deze instructies.
3. Besteed aandacht aan alle waarschuwingen.
4. Volg alle instructies op.
5. Gebruik dit toestel niet in de buurt van water.
6. Reinig het apparaat alleen met een droge doek.
7. Blokkeer geen ventilatieopeningen. Installeer
volgens de instructies van de fabrikant.
8. Installeer niet in de buurt van warmtebronnen
zoals radiatoren, kachels, ovens of andere
apparaten (inclusief versterkers) die warmte
produceren.
9. Omzeil nooit de veiligheidsvoorziening van de
gepolariseerde of geaarde stekker.
Een gepolariseerde stekker hee twee bladen,
waarvan er een breder is dan de andere. Een geaarde
stekker hee twee bladen en een derde pen voor de
aarding. Het brede blad of de derde pen is bedoeld
voor uw veiligheid. Mocht de geleverde stekker
niet in uw stopcontact passen, raadpleeg dan een
elektricien voor het vervangen van het verouderde
stopcontact.
10. Bescherm het netsnoer zodat er niet over gelopen
kan worden of bekneld kan raken, vooral bij
stekkers, stopcontacten en het punt waar ze het
apparaat verlaten.
11. Gebruik alleen aansluitstukken/accessoires
aanbevolen door de fabrikant.
OPGELET: Om het risico voor elektrische schokken te verminderen, verwijder niet de afdekking (of de achterkant). Er
zijn geen door de gebruiker herstelbare onderdelen binnenin aanwezig. Verwijs onderhoud door naar gekwaliceerd
onderhoudspersoneel.
WAARSCHUWING: Om het risico van brand of elektrische schokken te verkleinen, stel dit toestel niet bloot aan regen of
vocht.
De bliksemschicht met pijlpunt binnenin een gelijkzijdige driehoek is bedoeld om u te attenderen op de
aanwezigheid van ongeïsoleerde “gevaarlijke voltage” binnenin de behuizing van het product dat van voldoende
omvang is om voor personen een risico op elektrische schokken te vormen.
Het uitroepteken binnen een gelijkzijdige driehoek is bedoeld om de gebruiker te waarschuwen op de aanwezigheid
van belangrijke bediening- en onderhoudsinstructies in de documentatie die met het apparaat meekomen.
OPGELET: In Canada en de Verenigde Staten, om elektrische schokken te voorkomen, steek de brede pin van de stekker in
de brede sleuf van het stopcontact en steek de stekker volledig in het stopcontact.
OPGELET: Het gebruik van bedieningselementen, aanpassingen of procedures anders dan hierin vermeld, kan leiden tot
gevaarlijke blootstelling aan straling.
12. Gebruik uitsluitend een wagentje, standaard,
statief, beugel of tafel door de fabrikant
aanbevolen of bij het apparaat verkocht.
Wanneer u een wagentje gebruikt,
wees dan voorzichtig bij het
verplaatsen van de combinatie
wagen/toestel en voorkom letsel
door omvallen.
13. Haal de stekker van dit toestel uit
het stopcontact tijdens bliksem of wanneer het
toestel gedurende lange perioden niet gebruikt
wordt.
14. Laat al het onderhoud uitvoeren door
gekwaliceerd onderhoudspersoneel.
Onderhoud is nodig wanneer het apparaat op enige
wijze beschadigd is, zoals het netsnoer of de stekker
is beschadigd, er vloeistof in het apparaat is gemorst
of voorwerpen in zijn terechtgekomen, het apparaat
aan regen of vocht is blootgesteld, niet normaal
werkt of is gevallen.
15. Binnendringen van voorwerpen of vloeistoen
WAARSCHUWING – Er moet worden opgelet,
dat voorwerpen en gemorste vloeistoen niet via
de openingen in de behuizing terechtkomen. De
apparatuur mag niet aan druppels of spatten worden
blootgesteld. Met vloeistof gevulde voorwerpen
zoals vazen mogen niet op de apparatuur worden
geplaatst.
16. Klimaat
De apparatuur is ontworpen voor gebruik in een
gematigd klimaat en in huishoudelijke situaties.
17. Reiniging
Haal vóór het schoonmaken de stekker van het
toestel uit het stopcontact.
De behuizing hoe normaal gesproken alleen
met een zachte, pluisvrije doek schoongeveegd te
worden. Gebruik geen chemische oplosmiddelen
voor het reinigen.
Wij raden het gebruik van reinigingssprays of
poetsmiddelen voor meubilair af, omdat het tot
blijvende witte vlekken kan leiden.
18. Voedingsbronnen
Sluit de apparatuur alleen aan op een
stroomvoorziening van het type zoals omschreven
in de gebruiksaanwijzing of zoals aangegeven op het
toestel.
De belangrijkste methode om de apparatuur van
het lichtnet te ontkoppelen, is het verwijderen van
de stekker uit het stopcontact. De apparatuur moet
op een zodanige wijze worden geïnstalleerd zodat
ontkoppeling mogelijk wordt gemaakt.
19. Vreemde geur
Indien een vreemde geur of rook van het
toestel wordt waargenomen, schakel de stroom
onmiddellijk uit en trek de stekker van de
apparatuur uit het stopcontact. Neem contact op
met uw dealer en sluit de apparatuur niet opnieuw
aan.
20. Schade die gerepareerd moet worden
De apparatuur moet door gekwaliceerd personeel
worden gerepareerd wanneer:
A. het netsnoer of de stekker beschadigd is, of
B. als er in het apparaat voorwerpen zijn gevallen of
vloeistof erin is gemorst, of
C. de apparatuur is blootgesteld aan regen, of
D. de apparatuur niet normaal lijkt te werken, of
het vertoont een duidelijke verandering in de
prestaties, of
E. het apparaat is gevallen of de behuizing
beschadigd.
WAARSCHUWING – De netstekker wordt gebruikt
om de stroom tot het apparaat volledig te onderbroken
en moet dus bereikbaar en gereed worden gehouden.
WAARSCHUWING – Stel de batterijen niet bloot aan
teveel hitte, zoals zonlicht of vuur.
OPGLET – Gevaar op ontplong als batterijen
verkeerd worden geïnstalleerd. Uitsluitend vervangen
door hetzelfde of een gelijksoortig type.
Naleving van de veiligheid
Deze apparatuur is ontworpen om aan de IEC/EN
60065 internationale elektrische veiligheidsrichtlijnen
te voldoen.
Dit product voldoet aan deel 15 van de FCC-regels.
Gebruik is onderworpen aan de volgende twee
voorwaarden:
(1) dit toestel mag geen schadelijke interferentie
veroorzaken, en
(2) dit toestel moet elke ontvangen interferentie
accepteren, inclusief interferentie die ongewenste
werking kan veroorzaken.
welkom
Wij danken u hartelijk en feliciteren u met de aanschaf van uw Arcam CDS27-speler.
De CDS27 verstrekt een geluidskwaliteit van de hoogste klasse van CD, SACD, USB en
netwerkgebaseerde audio. De ultramoderne Delta-Sigma DAC’s (Digitaal-naar-Analoog
Omzetters) bieden audiophile geluidskwaliteit om uw muziek echt tot leven brengen.
Arcam produceert al langer dan drie decennia gespecialiseerde hi- en thuisbioscoopproductien
van uitzonderlijke kwaliteit en de CDS27 is de nieuwste aanvulling op ons breed aanbod aan
prijswinnende apparatuur. Het ontwerp van de FMJ-serie is gebaseerd op de brede ervaring van
Arcam, één van de meest gewaardeerde audiorma’s in de UK, en is gemaakt om u jarenlang
zorgeloos luisterplezier te kunnen bieden.
Deze handleiding is ontworpen om u alle informatie te geven die u nodig hebt om uw nieuwe
aankoop te installeren, aan te sluiten en te gebruiken. De afstandsbediening met dit apparaat
meegeleverd, wordt hierin ook beschreven. Gebruik de inhoudsopgave op de volgende pagina
om de gewenste sectie te vinden.
Wij hopen dat u jarenlang plezier zult beleven aan uw. In het onwaarschijnlijke geval dat het
systeem defect raakt of indien u meer informatie wilt ontvangen over producten van Arcam,
dan zijn de dealers van ons netwerk u graag van dienst. U kunt ook meer informatie vinden op
de Arcam website www.arcam.co.uk.
Het FMJ-ontwikkelingsteam
Nederlands
N-3N-2
Page 38
Inhoudsopgave
veiligheidsrichtlijnen ��������������������������������������������������������������������������������������������������������������������������������N-2
Belangrijke veiligheidsinstructies ���������������������������������������������������������������������������������������������������������������������������������������������N-2
Naleving van de veiligheid ����������������������������������������������������������������������������������������������������������������������������������������������������������N-2
welkom ��������������������������������������������������������������������������������������������������������������������������������������������������������N-3
installatie ����������������������������������������������������������������������������������������������������������������������������������������������������N-5
Het plaatsen van het toestel �������������������������������������������������������������������������������������������������������������������������������������������������������N-5
Voeding �����������������������������������������������������������������������������������������������������������������������������������������������������������������������������������������������N-5
De afstandsbediening en trigger-ingangen ��������������������������������������������������������������������������������������������������������������������������N-5
Verbindingskabels ��������������������������������������������������������������������������������������������������������������������������������������������������������������������������N-5
CDS27 aansluitingen �������������������������������������������������������������������������������������������������������������������������������� N-6
Netwerkaansluiting ������������������������������������������������������������������������������������������������������������������������������������������������������������������������N-7
USB-aansluiting ��������������������������������������������������������������������������������������������������������������������������������������������������������������������������������N-7
Audio-aansluitingen maken ��������������������������������������������������������������������������������������������������������������������������������������������������������N-7
Afspeelbare schijven ����������������������������������������������������������������������������������������������������������������������������������������������������������������������N-7
Ondersteunde Media ���������������������������������������������������������������������������������������������������������������������������������������������������������������������N-7
basisbediening ������������������������������������������������������������������������������������������������������������������������������������������ N-8
afstandsbediening ������������������������������������������������������������������������������������������������������������������������������������ N-9
Instellingenmenu’s ����������������������������������������������������������������������������������������������������������������������������������N-11
Door de menu’s navigeren �������������������������������������������������������������������������������������������������������������������������������������������������������� N-11
problemen oplossen�������������������������������������������������������������������������������������������������������������������������������N-12
specicaties ����������������������������������������������������������������������������������������������������������������������������������������������N-13
Radiostoring ����������������������������������������������������������������������������������������������������������������������������������������������������������������������������������� N-13
Laserstraling ����������������������������������������������������������������������������������������������������������������������������������������������������������������������������������� N-13
productgarantie ��������������������������������������������������������������������������������������������������������������������������������������N-14
Wereldwijde Garantie ����������������������������������������������������������������������������������������������������������������������������������������������������������������� N-14
Claims onder garantie ���������������������������������������������������������������������������������������������������������������������������������������������������������������� N-14
Problemen? ������������������������������������������������������������������������������������������������������������������������������������������������������������������������������������ N-14
Online registratie �������������������������������������������������������������������������������������������������������������������������������������������������������������������������� N-14
installatie
Het plaatsen van het toestel
< Plaats de CD-speler op een vlakke, stevige
ondergrond, vermijd direct zonlicht en vocht- en
warmtebronnen.
< Plaats de CD-speler niet bovenop een versterker
of andere warmtebron.
< Plaats de CD-speler niet in een gesloten ruimte
zoals een boekenkast of een afgesloten kast,
tenzij er een goede ventilatie is. De CD-speler is
zo ontworpen, dat hij bij normaal gebruik warm
wordt.
< Plaats geen andere component of voorwerp
op de CD-speler, omdat dit de luchtcirculatie
rondom het apparaat kan verstoren, waardoor de
CD-speler oververhit kan raken.
< Zorg ervoor dat de ontvanger voor de
afstandsbediening (naast de display op het
voorpaneel) niet geblokkeerd wordt, anders zal
de afstandsbediening niet functioneren.
< Plaats geen platenspeler op het toestel.
Platenspelers zijn zeer gevoelig voor het geluid
dat wordt geproduceerd door apparaten die op
het lichtnet zijn aangesloten en dit vertaalt zich in
achtergrondgeruis als de platenspeler te dichtbij
staat.
Voeding
De CD-speler is uitgerust met een gegoten netstekker.
Controleer of de stekker in uw stopcontact past –
indien u een andere stekker nodig hebt, dient u met uw
Arcam-dealer contact op te nemen.
Neem onmiddellijk contact op met uw Arcam-dealer
als de voedingsspanning of netstekker bij u afwijkt
Steek het IEC-stekkereinde van het netsnoer in de
opening aan de achterkant van de CD-speler en
controleer of deze stevig vast zit. Steek het andere
uiteinde van de kabel in uw stopcontact en schakel zo
nodig het stopcontact in.
De afstandsbediening en triggeringangen
De REMOTE IN-ingang kan worden gebruikt om
RC5-codes aan de CDS27 door te geven als deze in
een positie of in een systeem is geplaatst waar geen
infrarood kan worden gebruikt. Indien nodig kunt
u contact opnemen met uw dealer voor aanvullende
informatie.
OPMERKING
< Voor de afstandsbediening is een 3,5 mm
mono jackplug nodig met actieve punt en
geaarde mof.
< De signalen van de afstandsbediening moeten
in een RC5-formaat (bij 36 kHz) gemoduleerd
zijn, met een spanningsniveau tussen de 5 V
en 12 V.
De 12 V TRIGGER IN ingang kan worden gebruikt om
de CDS27 in en uit op stand-by te schakelen. Door
de trigger-ingang van uw Arcam versterker (of ieder
ander compatibel apparaat) aan te sluiten, zal de CDS27
automatisch uit de stand-by-modus komen zodra de
versterker aan wordt gezet en naar stand-by terugkeren
zodra de versterker weer wordt uitgeschakeld. Voor
meer informatie dient u de handleiding van uw
versterker te raadplegen.
Bij normaal gebruik hoe u deze uitgangen nergens op
aan te sluiten.
De RS232-ingang is bedoeld voor optionele aansluiting
op een domoticasysteem of een computer. Er zijn
verschillende systemen van derden verkrijgbaar die u
met behulp van aanraakschermen enz. een uitgebreide
controle over al uw entertainment-apparatuur
bieden. Neem voor nadere informatie contact op
met uw dealer of installateur. De technische details
van de afstandsbediening zijn bij Arcam op aanvraag
verkrijgbaar (e-mail support@arcam.co.uk).
Verbindingskabels
Wij raden u aan om afgeschermde kabels van hoge
kwaliteit te gebruiken die speciaal voor dit doel
ontwikkeld zijn. Andere kabels hebben andere
impedantie-eigenschappen die de prestaties van uw
systeem zullen verminderen (gebruik bijvoorbeeld geen
videokabels om audiosignalen door te geven). Alle
kabels moeten zo kort mogelijk gehouden worden.
Het is een goede gewoonte om ervoor te zorgen dat u
bij het installeren van uw apparatuur het netsnoer zo
ver mogelijk van uw audiokabels verwijderd houdt. Dit
kan namelijk ongewenst geruis in de audiosignalen tot
gevolg hebben.
Nederlands
N-5N-4
Page 39

CDS27 aan-
sluitingen
Coaxiale digitale uitgang
Gebruik deze aansluiting als u een audiophile DAC
van hoge kwaliteit gebruikt met een coaxiale digitale
ingang. Sluit op de digitale ingang aan met behulp van
een geschikte 75 Ω afgeschermde kabel.
OPGELET: Sluit de digitale uitgangsaansluiting
nooit aan op een conventionele audio-ingang.
Phono audio-uitgang
Sluit deze op de CD-ingang (of een ander lijnniveau)
van uw versterker aan met behulp van geschikte,
hoogwaardige verbindingskabels. Zorg ervoor dat de
linker en de rechter audio-uitgang van de CD-speler
op dezelfde linker en rechter ingangen van uw
versterker aangesloten zijn.
Netwerkaansluiting
U kunt een ethernetkabel gebruiken om de CDS27
aan te sluiten op een router of schakelaar in uw
thuisnetwerk, zodat u audiobestanden kunt afspelen die
op een computer of NAS-apparaat zijn opgeslagen.
U kunt ook een draadloze verbinding tot stand brengen
door deze in het instellingsmenu te congureren.
Router
Voedingaansluiting
Sluit hier het correcte
netsnoer op aan.
Sluit de meegeleverde WiFi-antenne aan als een
draadloze netwerkverbinding is vereist. U kunt via
deze netwerkverbinding audiobestanden afspelen
via een Netwerk (zie pagina 11 voor meer informatie
Netwerkaansluiting
Sluit deze aansluiting met behulp van
een Ethernet-verlengkabel aan op een
poort van uw netwerk-router. (Zie pagina
7). U kunt via deze netwerkverbinding
audiobestanden afspelen via een Netwerk
(zie pagina 11 voor meer informatie over
instellingen).
Optische digitale uitgang
Gebruik deze aansluiting als u een
AV-ontvanger met een optische, digitale
audio-ingang gebruikt.
Draadloze netwerkverbinding
over instellingen).
USB-aansluiting
Steek hier uw USB ash
geheugenapparatuur in. De CDS27 kan
bepaalde digitale bestanden afspelen die
zijn opgeslagen op USB-geheugendrives
(zie “Ondersteunde Media” op pagina 7).
Sluit deze aan op de CD-ingang (of andere gebalanceerde
ingang) van uw versterker d.m.v. aansluitkabels van hoge
kwaliteit. Zorg ervoor dat de linker en de rechter audio-
uitgang van de CD-speler op dezelfde linker en rechter
Dankzij deze aansluiting kan de CDS27 met behulp
van een versterker (of een ander AV-apparaat) met
een 12V TRIG OUT-functie, in en uit de stand-by-modus
Gebalanceerde audio-uitgang
ingangen van uw versterker aangesloten zijn.
12V trigger-ingang
geschakeld worden. zie pagina 5.
RS232
Dankzij deze aansluiting kunt u de
afstandsbediening van een ander Home
Automation Systeem of van een andere
computer gebruiken.
Zie pagina 5 voor meer informatie.
Remote in
De CDS27 kan hiermee
afstandsbedieningsignalen
ontvangen, vooropgesteld dat de
afstandsbedieningsensor op het voorpaneel
is afgedekt (of anders niet ‘zichtbaar’ is
voor de afstandsbediening).
Zie pagina 5 voor meer informatie.
USB-aansluiting
Een type A USB-poort, gebruikt om uw ashdrives of
externe harddrives met audiobestanden aan te sluiten.
Ook bruikbaar voor soware-upgrades.
Internet
Audio-aansluitingen maken
De CDS27 biedt een aantal alternatieven manieren om audio aan te sluiten, de te gebruiken type aansluiting is
aankelijk van de rest van uw systeem; kies het type dat het meest geschikt is voor uw versterker.
Voor stereo geluid van de beste kwaliteit, raden wij u aan de stereo analoge audio-uitgangen aan te sluiten op de
CD-ingang op uw versterker, zodat het audiophile digitaal-naar-analoog schakelsysteem van uw CDS27 kan worden
gebruikt.
Analoog
Gebruik een paar stereo phono-kabels van een geschikte lengte om de uitgangen
gemarkeerd “Phono” aan te sluiten op de linker en rechter CD/SACD-ingangen op
uw versterker.
U kunt ook de linker/rechter gebalanceerde uitgangen aansluiten op een
gebalanceerde ingang op uw versterker.
Digitaal
Sluit een van de Digitale Audio-uitgangen (Optisch of Coaxiaal) aan op de digitale
‘CD/SACD’ ingang van uw ontvanger, deze digitale uitgangen reproduceren alleen
PCM stereo.
LAN
Afspeelbare schijven
Deze speler ondersteunt de volgende schijypes:
CD-Audio
CD-R
CD-RW
Super Audio-CD
USB ash-drive
Ondersteunde Media
De volgende bestandsformaten kunnen worden
afgespeeld via Disk, USB en netwerk.
< FLAC, tot op 24bit, 192 KHz
< WAV, tot op 24bit, 192 KHz
< AAC, tot op 24bit, 96 KHz
< AIFF, tot op 24bit, 192 KHz
< OGG, tot op 24bit, 192 KHz
< MP3, tot op 320kbps, 48 KHz
< WMA, tot op 192 kbps, 48 KHz
Nederlands
N-7N-6
Page 40

basisbedie-
AUDIO
SACD
MENU
FM MONO P/TUNE
STORE
INFO
BD
CR902
RTN
afstandsbe-
ning
Inleiding
‘Basisbediening’ legt uit hoe u audiodisks,
netwerkbestanden en audiobestanden opgeslagen op
USB-media afspeelt. Let erop dat het misschien nodig is
om uw speler correct te congureren voor uw systeem,
voordat er optimaal - of zelfs ook maar iets - afgespeeld
kan worden. De conguratie van de speler staat
beschreven aan het begin van pagina 11.
Inschakelen
Druk op de toets AAN/UIT om het apparaat in te
schakelen. De status-LED is groen verlicht als het
apparaat aan staat en rood in de stand-by-modus. U
kunt de stand-by modus inschakelen en uitschakelen
door op de toets Stand-by op de afstandsbediening te
drukken of op de toets </1 op het voorpaneel. Als de
POWER-toets wordt ingedrukt (of als de stroom uitvalt)
terwijl het apparaat in de stand-by-modus staat, zal het
opnieuw in de stand-by-modus schakelen wanneer er
weer stroom is.
Vergeet niet dat de afstandsbedieningsensor rechts van
het weergavevenster is geplaatst. Blokkeer de sensor
niet, want dan zal de afstandsbediening niet werken.
Een schijf afspelen
Druk op </1 op het frontpaneel (of 1 op de
afstandsbediening) en plaats de schijf in de schijade,
met de af te spelen kant naar beneden (sommige
schijven zijn dubbelzijdig, in dat geval moet de kant
waar “A” op staat naar boven wijzen om de A-kant af te
spelen).
Druk op </1 op het voorpaneel om de schijade
te sluiten. De schijf zal na een pauze van een paar
seconden geladen worden.
Als de lade eenmaal gesloten is, kan het nog even
duren voordat de schijf wordt geladen. Wanneer u de
instelling ‘Disk Automatisch Afspelen’ op Aan instelt
(standaard instelling), wordt het afspelen automatisch
afgespeeld. (Lees voor meer informatie ‘Disl
Automatisch Afspelen’ op pagina 11).
Als een disk niet automatisch wordt afgespeeld,
kunt u op 4/; op het voorpaneel of op 4 op de
afstandsbediening drukken.
Netwerkbestanden afspelen
Zorg ervoor dat de CDS27 is verbonden met uw lokale
netwerk. Selecteer ‘Media Browser’ op het homescherm
om een browserlijst te openen met beschikbare
apparaten. Navigeer de beschikbare bibliotheken met de
toetsen
',
Het afspelen van muziek van uw netwerk kan ook
worden bediend via uw computer, telefoon of mobiel
apparaat door gebruik van de gewenste UpnP
bedieningsapplicatie.
op de afstandsbediening.
<>
Druk op OK of 4 op een gemarkeerd audiobestand om
het af te spelen bestand te openen. Alle daaropvolgende
tracks in de afspeelfolder zullen vervolgens
achtereenvolgens worden afgespeeld.
Afspelen van USB
Sluit uw USB-apparaat aan op de USB-ingang op
de achterzijde van uw CDS27. Nadat het apparaat is
geïdenticeerd, selecteert u ‘Media Browser’ op het
homescherm en kiest u vervolgens de optie ‘USB’ in de
medialijst.
Gebruik de toetsen
afstandsbediening om te navigeren en begin het
afspelen van een gemarkeerd audiobestand door op
OK, 4of > te drukken. Alle daaropvolgende tracks
in de afspeelfolder zullen vervolgens achtereenvolgens
worden afgespeeld.
',
<>
op de
Tijdens het afspelen
Spoelen
Druk op 8 of 7 op het voorpaneel of op de
afstandsbediening om op 4x normale afspeelsnelheid
vooruit of terug te spoelen. Druk op START om de
normale afspeelmodus te hervatten.
Hoofdstukken/nummers overslaan
Druk op /of 0 om tracks over te slaan.
Wanneer u een vorige track wilt selecteren, gaat u naar
het begin van de huidige track wanneer u de eerste
keer op de toets drukt. Door normaals op de toets te
drukken, gaat u naar het begin van de vorige track.
Afspelen op pauze zetten
Druk op 4/; op het voorpaneel of op ; op de
afstandsbediening om het afspelen op pauze te zetten.
Om verder te gaan met het afspelen drukt u op 4/; op
het voorpaneel of op 4 op de afstandsbediening.
Afspelen stopzetten
Druk op de </1 -toets op het voorpaneel of < op de
afstandsbediening om het afspelen te stoppen.
diening
De CDS27 wordt geleverd met de CR902
afstandsbediening.
De afstandsbediening gebruiken
Houd met het volgende rekening als u de
afstandsbediening gebruikt:
< Zorg ervoor dat er zich geen obstakels bevinden
tussen de afstandsbediening en de sensor op
het voorpaneel. De afstandsbediening hee
een bereik van ongeveer 7 meter. Als de sensor
verborgen is, is de IR in-aansluiting voor
de afstandsbediening op het achterpaneel
beschikbaar. Raadpleeg uw dealer voor nadere
informatie.)
< Bediening op afstand kan onbetrouwbaar worden
als sterk zonlicht of TL-licht op de sensor van de
afstandsbediening van de eenheid schijnt.
< Vervang de batterijen wanneer u een
vermindering van het werkbereik van de
afstandsbediening opmerkt.
De batterijen in de afstandsbediening
plaatsen
1. Open de batteriijhouder op de achterzijde van de
afstandsbediening.
2. Installeer twee type ‘AAA’ batterijen volgens de
markeringen op het klepje van de batterijhouder.
3. Schuif het klepje terug op de batterijhouder
totdat deze vast klikt.
OPMERKING
< Onjuist gebruik van batterijen kan tot risico’s
zoals lekkage en barsten leiden.
< Gebruik geen oude en nieuwe batterijen door
elkaar.
< Gebruik alleen identieke batterijen met elkaar
– zelfs als hetzelfde eruit zien, verschillende
batterijen kunnen verschillende voltages
hebben.
< Zorg ervoor dat de plus (+) en min (–) einden
van elke batterij overeenkomen met de
aanduidingen in het batterijvak.
< Verwijder de batterijen uit apparaten die u
langer dan een maand niet gaat gebruiken.
< Raadpleeg voordat u uw gebruikte batterijen
weggooit de lokale regelgeving of de
overheidsvoorschien die in uw regio van
kracht zijn.
De CR902 afstandsbediening voldoet aan
Deel 15 van de FCC-richtlijnen
Deze apparatuur is getest en voldoet aan de eisen
die gesteld worden aan een klasse B digitaal toestel,
volgens lid 15 van de FCC-regels. Deze normen zijn
bedoeld om een redelijke bescherming te bieden
tegen schadelijke storing in een huiselijke installatie.
Deze apparatuur genereert en gebruikt energie
voor radiofrequentie en kan deze ook uitstralen,
en indien dit toestel niet volgens de instructies
wordt geïnstalleerd, kan er storing optreden die
schadelijk is voor radiocommunicaties. Dit is echter
geen garantie dat in een bijzondere situatie geen
storing op zal treden. Als deze apparatuur inderdaad
schadelijke storing voor de ontvangst van radio of
televisie veroorzaakt- wat vastgesteld kan worden
door de apparatuur aan en uit te schakelen - dan
wordt het de gebruiker aangeraden om één of meer
van de volgende maatregelen te nemen:
Richt de ontvangstantenne opnieuw of verplaats het.
Vergroot de afstand tussen de apparatuur en de
ontvanger.
Sluit de apparatuur aan op een ander stopcontact
of andere groep dan dat waarop de ontvanger is
aangesloten.
Vraag uw dealer of een ervaren radiotechnicien om
hulp.
Nederlands
N-9N-8
Page 41

AMP toestelmodus
De toets A Apparaatmodus congureert de CR902
om uw Arcam-versterker te bedienen. Deze toets
indrukken hee geen invloed op de momenteel
geselecteerde ingang op de versterker.
Schakelt om tussen stand-by en aan
P
Loopt langs de helderheidinstellingen van
DISP
de display
Doorloopt de weergavemodi op het
MODE
voorpaneel
Toont het instellingsmenu van de
MENU
versterker op het voorpaneel
Menunavigatie
bevestigt een selectie
O
Wisselt de dempfunctie van de versterker
@
Vol +/– verhoogt of verlaagt het volume van
een Arcam versterker.
Vol-
Druk eenmaal op de toets DEMP om
Vol+
een Arcam versterker te dempen. Druk
nogmaals in (of gebruik Vol +/–) om het
geluid te herstellen.
SP1
Wisselt Luidspreker 1 uitgang
SP2
Wisselt Luidspreker 2 uitgang
Past de balans aan tussen het linker en
BAL
rechter audiokanaal
OPMERKING
De CR902 is een afstandsbediening voor meerdere
apparaten, daarom zullen de toetsfuncties
verschillen volgens de laatst ingedrukte ingangtoets.
Zorg ervoor de toets “CD” te selecteren voordat u de
CDS27 wilt bedienen.
TUN Apparaatmodus
De toets T Apparaatmodus congureert de CR902 om
de tunerfuncties van Arcam-tuners te bedienen.
Schakelt om tussen stand-by en aan
P
De cijfertoetsen worden gebruikt om
0…9
' ,
geheugennummers op te slaan en te
herroepen
Loopt langs de helderheidinstellingen van
DISP
de display
Doorloopt verschillende modi voor
INFO
informatieweergave
iPod terugspoelen
)
iPod vooruitspoelen
(
Geheugen omlaag/Sirius-categorie omlaag/
]
iPod vorige track
Geheugen omhoog/Sirius-categorie
[
omhoog/iPod volgende track
iPod stoppen
#
iPod starten/pauzeren
$
iPod starten/pauzeren
&
Toont het instellingsmenu van de tuner op
MENU
het voorpaneel
Geheugen omhoog/omlaag, iPod vorige/
volgende track
Tunerfrequentie verlagen/verhogen
< >
Een selectie bevestigen
O
De FM-modus wisselen tussen mono en
FM MONO
stereo ontvangst
De herroepmodus van geheugennummers
P/TUNE
openen/verlaten
De opslagmodus van geheugennummers
STORE
openen/verlaten
BAND
Doorloopt de beschikbare tunerbanden
CD-apparaatmodus
De toets c Apparaatmodus congureert de CR902
om de CD-functies van de CD-spelers van Arcam te
bedienen.
Schakelt om tussen stand-by en aan
P
Diskhouder openen/sluiten
!
U kunt de cijfertoetsen gebruiken om
individuele tracks op een disk direct te
openen. Druk op de corresponderende
0…9
toets op het toetsenpaneel om een track te
selecteren. Voor tracks hoger dan 9, voer
de cijfers op volgorde in. Om bijvoorbeeld
track 15 te selecteren, druk op 1 en
vervolgens op 5.
Loopt langs de helderheidinstellingen van
DISP
de display
Verandert de beschikbare weergavemodi
MODE
op de CD-speler
Terugspoelen
)
Vooruitspoelen
(
Terug overslaan naar het begin van de
]
huidige track/vorige track
Vooruit overslaan naar het begin van de
[
volgende track
Stop afspelen
#
Afspelen
$
Wisselt tussen pauzeren en afspelen
&
Navigeert tracklijsten indien ondersteund
door de speler
selecteert de momenteel gemarkeerde
O
track indien ondersteund door de speler
Schakelt de willekeurige (‘shue’)
SHUFF
afspeelmodus in en uit
Door ‘herhaal track’ te selecteren, wordt de
huidige track nogmaals afgespeeld nadat
het einde van deze track eenmaal is bereikt.
Door ‘herhaal alles’ te selecteren, zal de
huidige tracksectie nogmaals worden
RPT
afgespeeld nadat het einde van de laatste
track eenmaal is bereikt.
U kunt een bepaalde track herhalen door
deze track te selecteren en tweemaal op RPT
te drukken. Annuleer deze functie door
een derde keer op RPT te drukken
BD-apparaatmodus
De toets � Apparaatmodus congureert de CR902
om de BD-functies te bedienen van de BD-spelers van
Arcam.
Schakelt om tussen stand-by en aan
P
Diskhouder openen/sluiten
!
U kunt de cijfertoetsen gebruiken om
individuele tracks op een disk direct te
openen. Druk op de corresponderende
0…9
toets op het toetsenpaneel om een track te
selecteren. Voor tracks hoger dan 9, voer
de cijfers op volgorde in. Om bijvoorbeeld
track 15 te selecteren, druk op 1 en
vervolgens op 5.
Loopt langs de helderheidinstellingen van
DISP
de display
Verandert de beschikbare weergavemodi op
MODE
de BD-speler
Terugspoelen
)
Vooruitspoelen
(
Terug overslaan naar het begin van de
]
huidige track/vorige track
Vooruit overslaan naar het begin van de
[
volgende track
Stop afspelen
#
Afspelen
$
Wisselt tussen pauzeren en afspelen
&
Wijzigt het audio decoderingsformaat
AUDIO
(Dolby Digital, DTS, enz.).
MENU
Activeert het BD-spelermenu.
Navigeert tracklijsten indien ondersteund
door de speler
selecteert de momenteel gemarkeerde
O
track indien ondersteund door de speler
De navigatie keert terug naar het hoogste
.
niveau van het menu (‘uis’).
Druk tijdens menunavigatie op deze toets
RTN
om terug te keren naar het vorige scherm of
een vorige selectie
Schakelt de willekeurige (‘shue’)
SHUFF
afspeelmodus in en uit
Herhalende afspeelmodus van de disk of
een geprogrammeerde trackselectie. U kunt
een bepaalde track herhalen door deze track
RPT
te selecteren en tweemaal op RPT te drukken.
Annuleer deze functie door een derde keer
op RPT te drukken.
Instellingen-
menu’s
Gebruik het Instellingenmenu om alle functies van
uw CDS27 te congureren. De volgende paragraaf
beschrij alle menuonderwerpen en hun functies.
U kunt het Instellingenmenu uitsluitend op het scherm
van de CDS27 weergeven.
Toegang tot de instellingenmenu’s
Als het hoofdmenu momenteel niet wordt weergegeven,
dient u eerst op MENU op de afstandsbediening te
drukken om dit menu te openen.
Druk op C totdat de optie INSTELLINGENMENU wordt
weergegeven en druk op OK om te openen.
Door de menu’s navigeren
Gebruik de navigatietoetsen (pijltjes) op de
afstandsbediening om de CDS27 menu’s te navigeren.
1. Gebruik de toetsen B en C om het huidige
menu omhoog en omlaag te navigeren.
2. Wanneer de gewenste hoofdsectie wordt
weergegeven, kunt u op OK drukken om deze te
openen.
3. Gebruik de toetsen B en C om de opties
omhoog en omlaag te navigeren.
4. Druk op E om een instelling te selecteren:
gebruik de B en C toets om de instelling te
wijzigen.
5. Druk op OK om de selectie te bevestigen. Ga terug
naar stap 4 om andere instellingen in het huidige
onderdeel te wijzigen.
6. Druk op < om terug te keren naar het vorige
scherm als u een andere sectie wilt kiezen om aan
te passen.
Netwerk Stand-by – Bepaal met deze optie of
netwerkfuncties beschikbaar moeten zijn wanneer de
CDS27 op stand-by is geschakeld.
Selecteer “ACTIEF” om de netwerkverbinding in stand
te blijven houden (vereist voor IP-bediening).
Selecteer “STAND-BY” om de netwerkhardware uit te
laten schakelen en stroomverbruik te besparen.
Netwerkinstelling– Gebruik deze optie om het
apparaat in te stellen deel te nemen aan een bestaand
netwerk, nodig voor het afspelen van netwerkaudio en
voor soware-updates via het internet.
Auto Stand-by – Stel hier een tijdsduur van inactiviteit
in, waarna het apparaat automatisch op stand-by zal
schakelen. De opties zijn: 5/10/15/20/25/30 Minuten.
Disk Automatisch Afspelen – Bepaal hier of een
optische disk (bijv. CD) automatisch moet worden
afgespeeld nadat deze is geladen.
< Aan: Optische schijven zullen automatisch
afgespeeld worden.
< Uit: Om een schijf af te spelen moet u op afspelen
drukken.
Firmware-update – U kunt voor een upgrade van de
rmware van uw speler controleren door dit menuitem te selecteren en op OK te drukken om “Netwerk” te
markeren, druk dan nogmaals op OK.
Een bericht wordt weergegeven als geen nieuwe
rmware beschikbaar is, volg anders de instructies op
het scherm.
Laad standard instellingen – Druk op OK wanneer
deze optie gemarkeerd is, om alle instellingen naar de
fabrieksinstellingen terug te zetten.
U wordt gevraagd om het laden van de
standaardinstellingen te bevestigen. Selecteer
“annuleren” om te verlaten of ' om de optie “ja” te
markeren en druk vervolgens ter bevestiging op OK.
Systeeminformatie – Gebruik de navigatietoetsen
'/,
om de opties te doorlopen.
Het paneel met systeeminformatie over uw speler toont
informatie zoals het IP-adres en de rmwareversie.
Netwerkaudio - U kunt hiermee de UPNP-functie van
de speler in- of uitschakelen. Stel deze optie in op ‘uit’
om netwerkaudio te deactiveren.
Digitale Uitgang - U kunt hiermee een limiet toewijzen
aan de samplesnelheid van de coaxiale/optische digitale
uitgang.
Nederlands
N-11N-10
Page 42

problemen
oplossen
Als er een storing optreedt, raadpleeg dan eerst
deze probleemoplossingstabel voordat u uw toestel
wegbrengt voor reparatie.
Als de storing voortduurt, probeer deze dan te
verhelpen door het apparaat aan- en uit te schakelen.
Als dit geen resultaat hee, neem dan contact op met
uw dealer. Onder geen enkele omstandigheid moet u
proberen de speler zelf te repareren, omdat hierdoor de
garantie vervalt!
Probleem Mogelijke oorzaak Oplossing
Geen elektriciteit < De AC netstroomkabel is niet aangesloten.
< Slechte aansluiting bij het AC stopcontact of de aansluiting is niet actief.
Schijven spelen niet af < De schijf ligt ondersteboven in de schijade.
< De schijf is niet afspeelbaar.
< De schijf is vuil.
< De opgenomen schijf is niet correct afgewerkt.
Geen Schijf/Slechte
Schijf
Geen geluid < De audiokabels zijn niet aangesloten. < Sluit de kabels goed aan.
Verwrongen of luid
geluid
De afstandsbediening
werkt niet.
< Er zitten krassen op de schijf, hij is vuil, slecht opgenomen of niet
afspeelbaar.
< De schijf is vuil.
< Slechte aansluitingen.
< Er zitten geen batterijen in of deze zijn leeg.
< De sensor van de afstandsbediening is bedekt.
< Sluit het snoer goed aan.
< Controleer de aansluiting met behulp van een lamp of een
ander apparaat.
< Laad de schijf opnieuw met de bedrukte zijde boven.
< Gebruik een afspeelbare schijf.
< Maak de schijf schoon.
< Laad een schijf die correct is afgewerkt.
< Druk op de AAN/UIT knop om de stroom af te zetten,
druk dan opnieuw op de AAN/UIT knop en haal dan de
schijf uit de lade.
< Maak de schijf schoon.
< Controleer de aansluitingen en sluit alle kabels stevig aan.
< Vervang de batterijen.
< Verwijder het obstakel.
specicaties
Analoge Audio-uitgang
Digitale naar analoge conversie 24-bit 192kHz Delta-Sigma DAC
Signaal-ruisverhouding 110dB CCIR
Harmonische vervorming (1 kHz) 0,002%
Frequentierespons (±0,5dB) 10Hz–20kHz
Uitgangniveau (0 dB) 2,2 Vrms
Uitgangsimpedantie 47Ω
Aanbevolen minimale belasting 5kΩ
Digitale interfaces
Audio-uitgangen 75Ω coaxiale/optische TOSLINK
USB USB 2.0 High Speed (480 Mbit/s)
Ethernet 10/100 10/100
Draadloos b/g/n
Fysiek
Afmetingen (B x D x H) 433 x 276 x 75
Gewicht 5,2kg/7,5kg verpakt
Stroomverbruik 20W maximaal
Meegeleverde accessoires
Voedingskabel, CR902 afstandsbediening, 2 x AAA batterijen, WiFi-antenne
E&OE
Opmerking: De waarden van alle specicaties zijn kenmerkend, tenzij anders vermeld
Radiostoring
De CDS27 speler is een digitaal apparaat dat
ontworpen is volgens zeer hoge standaards voor
elektromagnetische compatibiliteit.
Alle CD-spelers genereren RF (radiofrequentie) energie
en kunnen deze ook uitstralen. In sommige gevallen
kan dit interferentie veroorzaken met FM en AM radioontvangst. Als dit het geval is, houd de speler en de
aangesloten kabels zo ver van de radio en de antennes
vandaan als enigszins mogelijk is. Het kan ook helpen
om de speler en de radio aan te sluiten op verschillende
stopcontacten.
EG LANDEN – Deze producten zijn ontwikkeld om te
voldoen aan de EMC Richtlijn 2004/108/EC.
USA – Deze producten voldoen aan de FCC-norm Lidt
15 Classe B.
Laserstraling
KLASSE II
LASERPRODUCT
Als de CDS27-speler
gebruikt wordt terwijl het
buitenbehuizing van de speler
is verwijderd, is het mogelijk
dat onzichtbare laserstralen
oogletsel kunnen veroorzaken.
Nederlands
Beleid van constante verbetering
Het beleid van Arcam is gericht op constante
verbetering van de producten. Dit betekent dat
ontwerpen en specicaties onderhevig zijn aan
veranderingen zonder voorafgaande kennisgeving.
N-13N-12
Page 43

productga-
rantie
Wereldwijde Garantie
Dit gee u het recht om de eenheid kosteloos te laten herstellen, tijdens de eerste twee
jaar na aankoop, onder voorbehoud dat het oorspronkelijk bij een ociële Arcamdealer is gekocht. De Arcam-dealer is verantwoordelijk voor alle service na verkoop.
De fabrikant kan geen verantwoordelijkheid aanvaarden voor gebreken als gevolg van
ongeval, verkeerd gebruik, misbruik, slijtage, verwaarlozing of door ongeoorloofde
aanpassing en/of reparatie, noch kan zij verantwoordelijkheid aanvaarden voor schade
of verlies ontstaan tijdens het transport van of naar de persoon die krachtens de garantie
claimt.
De garantie dekt:
Onderdelen en arbeidskosten voor twee jaar vanaf de aankoopdatum. Na twee jaar
moet u voor zowel de onderdelen als de arbeidskosten betalen. De garantie dekt geen
transportkosten op elk moment.
Claims onder garantie
Deze apparatuur moet worden verpakt in de originele verpakking en naar de dealer
worden geretourneerd van wie het werd gekocht. Het moet franco vervoer via een
gerenommeerde vervoerder worden toegezonden – niet per post. Er kan tijdens
transport naar de dealer of distributeur geen verantwoordelijkheid voor de eenheid
worden aanvaard en klanten worden daarom geadviseerd om de eenheid te verzekeren
tegen verlies of beschadiging tijdens transport.
Neem contact op met Arcam voor nadere details:
Arcam Klantenservice, Unit 15, Pembroke Avenue, Waterbeach, CAMBRIDGE, CB25
9QP, Engeland
of via www.arcam.co.uk.
Problemen?
Als uw Arcam-dealer geen enkele vraag met betrekking tot dit of enig ander Arcamproduct kan beantwoorden, neem contact op met Arcam Customer Support op het
hierboven vermelde adres en we zullen ons best doen om u te helpen.
Online registratie
Online registratie U kunt uw product online registreren op www.arcam.co.uk.
N-14
Een juiste verwijdering van dit product
Deze markering gee aan dat dit
product nergens in de Europese
Unie met ander huishoudelijk afval
mag worden afgevoerd.
Om mogelijke schade aan het
milieu of gezondheid door
ongecontroleerde afvalverwijdering
te voorkomen en grondstoen te
beschermen, dient dit product op verantwoorde
wijze gerecycled te worden.
Om uw toestel te verwijderen, maak gebruik van u
plaatselijke inlever- en inzamelsystemen of neem
contact op met de winkelier waar het product werd
gekocht.
Page 44

CDS27
РУКОВОДСТВО Сетевой проигрыватель потокового аудио/Super Audio CD/CD
Русский
Page 45
правила
техники
безопасности
Важные правила техники
безопасности
1. Прочтите данные инструкции.
2. Сохраните эти инструкции.
3. Внимательно отнеситесь ко всем
предупреждениям.
4. Следуйте всем инструкциям.
5. Не используйте устройство вблизи воды.
6. Протирайте только сухой тканью.
7. Не закрывайте никакие вентиляционные
отверстия. Проводите установку в
соответствии с инструкциями производителя.
8. Не устанавливайте вблизи какие-либо
источники тепла, такие как радиаторы,
обогреватели, печи или другие приборы,
выделяющие тепло (включая усилители
звука).
9. Не удаляйте функциональные элементы
безопасности поляризованной или
заземленной электровилки.
Поляризованная вилка имеет два контакта,
один из которых шире другого. Вилка с
заземлением имеет два контакта и третий
заземляющий контакт. Широкий контакт или
контакт заземления предназначены для вашей
безопасности. Если комплектная вилка не
подходит к вашей розетке, проконсультируйтесь
с электриком для ее замены.
10. Защитите шнур питания таким образом,
чтобы на него нельзя было наступить или
передавить, особенно в местах рядом с вилкой,
розеткой и местом его выхода из устройства.
ОСТОРОЖНО: Чтобы снизить риск поражения электрическим током не снимайте крышку ресивера (или заднюю
панель). Внутри нет элементов, которые пользователь может самостоятельно ремонтировать. Для проведения
ремонта обращайтесь к квалифицированному персоналу.
ВНИМАНИЕ: Чтобы снизить риск возгорания или поражения электрическим током, не подвергайте ресивер
воздействию дождя или влаги.
ОСТОРОЖНО: В Канаде и США во избежание поражения электрическим током при подключении необходимо
вставлять электрическую вилку в розетку до конца. При этом широкий штырь вилки должен совпадать с широким
гнездом розетки.
ОСТОРОЖНО: Использование каких-либо элементов управления, настроек и процедур, отличных от указанных в
данном документе, могут привести к опасному облучению.
11. Используйте только приспособления/
12. Пользуйтесь только тележками, стойками,
13. Отключайте ресивер от сети во время грозы
14. Для проведения любого ремонта обращайтесь
15. Падение предметов и попадание жидкостей
Значок молнии со стрелкой в равностороннем треугольнике предназначен для предупреждения
пользователя о наличии неизолированного опасного напряжения внутри корпуса продукта, которое имеет
достаточную величину, чтобы представлять для человека угрозу поражения электрическим током.
Восклицательный знак внутри равностороннего треугольника предназначен для предупреждения
пользователя о наличии важных инструкций по эксплуатации и техническому обслуживанию (ремонту) в
сопроводительной документации к продукту.
аксессуары, указанные производителем.
штативами, креплениями или подставками,
рекомендованными
изготовителем или
входящими в комплект
устройства.
При использовании тележки
соблюдайте осторожность
при совместном перемещении
тележки с ресивером
во-избежание повреждений при возможном
опрокидывании.
или когда долго им не пользуетесь.
к квалифицированному персоналу.
Ремонт необходим, если устройство было
повреждено каким-либо образом, например,
был испорчен шнур питания или вилка, на
устройство была пролита жидкость или
падали предметы, устройство подвергалось
воздействию дождя или влаги, оно некорректно
функционирует или его роняли.
ПРЕДУПРЕЖДЕНИЕ: Обратите внимание,
чтобы не падали предметы, а также не
проливалась жидкость внутрь корпуса через
какие-либо отверстия. Следует предохранять
оборудование от попадания капель и брызг.
На ресивер не следует ставить наполненные
жидкостью сосуды, например, вазы.
16. Климатические условия
Ресивер разработан для использования в
умеренном климате в домашних условиях.
17. Чистка
Перед очисткой отключите ресивер от сети
электропитания.
Корпус, как правило, достаточно протереть
мягкой безворсовой тканью. Не используйте для
чистки химические растворители.
Мы не рекомендуем использовать спреи или
полироли для очистки мебели, так как они могут
привести к появлению стойких белых пятен.
18. Источники электропитания
Просто подключите ресивер к источнику
электропитания, тип которого описывается
в инструкции по эксплуатации, либо в
соответствии с отметками на оборудовании.
Основным методом изоляции оборудования
от сети электропитания является извлечение
сетевой вилки из розетки. Оборудование
следует устанавливать таким образом, чтобы его
можно было отключить.
19. Необычный запах
Если вами был замечен дым или необычный
запах от оборудования, немедленно выключите
ресивер и отключите оборудование от
розетки электропитания. Свяжитесь с вашим
поставщиком и не пытайтесь подключить
оборудование снова.
20. Повреждения, требующие ремонта
Ремонт оборудования квалифицированным
персоналом необходим в следующих случаях:
A. шнур питания или розетка были повреждены;
B. на оборудование падали предметы, была
пролита жидкость;
C. оборудование подверглось воздействию
дождя;
D. оборудование, судя по всему, работает не
нормально или проявляет существенные
изменения в работоспособности;
E. оборудование роняли или у него поврежден
корпус.
ВНИМАНИЕ! Сетевая розетка служит для
отключения устройства от сети, поэтому она
должна всегда быть в технически исправном
состоянии.
ВНИМАНИЕ! Не подвергайте батарейки
воздействию интенсивных источников теплоты,
таких как солнечные лучи и огонь.
ВНИМАНИЕ! При неправильной замене батареек
устройство может взорваться. Заменяйте батарейки
новыми того же или аналогичного типа.
Соответствие требованиям
безопасности
Данное оборудование разработано в соответствии
с международным стандартом электротехнической
безопасности IEC/EN 60065.
Данное устройство соответствует Разделу 15
Правил FCC. Эксплуатация прибора должна
подчиняться следующим двум условиям:
(1) данный ресивер не должен создавать вредных
помех,
(2) данный ресивер должен выдерживать любые
помехи, включая помехи, которые могут вызывать
сбои в работе.
приветствие
Спасибо за покупку, поздравляем вас с приобретением проигрывателя Arcam FMJ
CDS27.
CDS27 обеспечивает высочайшее в своем классе качество воспроизведение
аудиозаписей из сети, а также с CD, SACD, USB-устройств. Высокопроизводительные
и ультрасовременные цифро-аналоговые конвертеры Delta-Sigma DAC не оставят
равнодушным самого требовательного меломана, по-настоящему принести свою
музыку к жизни.
Компания Arcam уже более тридцати лет занимается выпуском профессионального
оборудования класса hi- и продуктов для домашних кинотеатров высочайшего
качества. Проигрыватель CDS27 является новейшей разработкой в длинном перечне
удостоившегося награды оборудования. Дизайн линейки FMJ опирается на опыт
компании Arcam, как одной из наиболее уважаемых компаний-производителей аудиотоваров в Великобритании, и создан для того, чтобы долгие годы доставлять Вам
удовольствие при прослушивании.
Настоящее руководство пользователя составлено с учетом всех необходимых
сведений по установке, подключению и эксплуатации проигрывателя Ваш новый
покупку. В настоящем руководство также приведены инструкции по эксплуатации
комплектного пульта ДУ. Чтобы перейти к интересующему вас разделу,
воспользуйтесь предметным указателем, приведенным на следующей странице
руководства.
Мы надеемся, что проигрыватель будет дарить вам удовольствие долгие годы. В
случае непредвиденных обстоятельств, сбоев или при необходимости получения
информации о продуктах Arcam, наша сеть дилеров будет рада помочь вам.
Более подробную информацию вы можете найти на нашем Интернет-сайте
www.arcam.co.uk.
Команда разработчиков FMJ
R-3R-2
Русский
Page 46
Содержание
правила техники безопасности........................................................................................................... R-2
Важные правила техники безопасности ����������������������������������������������������������������������������������������������������������������������������� R-2
Соответствие требованиям безопасности ������������������������������������������������������������������������������������������������������������������������ R-2
приветствие .............................................................................................................................................. R-3
установка ................................................................................................................................................... R-5
Установка ресивера ��������������������������������������������������������������������������������������������������������������������������������������������������������������������� R-5
Питание ���������������������������������������������������������������������������������������������������������������������������������������������������������������������������������������������� R-5
Пульт дистанционного управления и триггерные входы ������������������������������������������������������������������������������������������� R-5
Соединительные кабели ������������������������������������������������������������������������������������������������������������������������������������������������������������ R-5
cоединения CDS27 .................................................................................................................................. R-6
Сетевое подключение ����������������������������������������������������������������������������������������������������������������������������������������������������������������� R-7
USB-подключение ������������������������������������������������������������������������������������������������������������������������������������������������������������������������� R-7
Подключение аудио ��������������������������������������������������������������������������������������������������������������������������������������������������������������������� R-7
Воспроизводимые диски ����������������������������������������������������������������������������������������������������������������������������������������������������������� R-7
Поддерживаемые медиаформаты����������������������������������������������������������������������������������������������������������������������������������������� R-7
oсновные функции .................................................................................................................................. R-8
пульт дистанционного управления ................................................................................................... R-9
меню настроек ....................................................................................................................................... R-11
Навигация по меню ��������������������������������������������������������������������������������������������������������������������������������������������������������������������R-11
поиск неисправностей .........................................................................................................................R-12
cпецификации ........................................................................................................................................ R-13
Радиопомехи ���������������������������������������������������������������������������������������������������������������������������������������������������������������������������������R-13
Лазерная радиация ��������������������������������������������������������������������������������������������������������������������������������������������������������������������R-13
гарантия изделия .................................................................................................................................. R-14
Гарантия по всему миру �����������������������������������������������������������������������������������������������������������������������������������������������������������R-14
Претензии по гарантии ������������������������������������������������������������������������������������������������������������������������������������������������������������R-14
Проблемы? �������������������������������������������������������������������������������������������������������������������������������������������������������������������������������������R-14
Регистрация онлайн �������������������������������������������������������������������������������������������������������������������������������������������������������������������R-14
установка
Установка ресивера
< Установите CD-проигрыватель на ровной,
твердой поверхности, вдали от прямых
солнечных лучей и источников тепла и влаги.
< Не устанавливайте CD-проигрыватель сверху
на усилитель или другой источник тепла.
< Не устанавливайте CD-проигрыватель
в закрытом пространстве, таком как
книжный шкаф или закрытая стойка, если
там не обеспечена хорошая вентиляция.
CD-проигрыватель сконструирован таким
образом, что нагревается в процессе
нормальной работы.
< Не располагайте никаких других компонентов
или предметов сверху на CD-проигрывателе,
так как это может затруднять вентиляцию
устройства, что приведет к чрезмерному
нагреву проигрывателя.
< Убедитесь, что приемник дистанционного
управления (рядом с дисплеем на передней
панели) ничем не закрыт – в противном
случае, дистанционное управление работать
не будет.
< Не устанавливайте электропроигрыватель
сверху на ресивер. Электропроигрыватели
очень чувствительны к производимым
источниками электропитания помехам, что
может быть слышно как фоновый «гул», если
электропроигрыватель расположен слишком
близко.
Питание
CD-проигрыватель поставляется с литой
электровилкой, уже установленной на шнур
питания. Убедитесь, что комплектная вилка
подходит к вашей розетке сети электропитания.
Если вам нужен другой кабель электропитания,
обратитесь к дилеру компании Arcam.
Если напряжение вашей сети питания или
необходимый тип вилки отличаются, немедленно
свяжитесь с дилером Arcam
Подключите конец кабеля с IEC-штепселем к
разъему на задней панели CD-проигрывателя и
убедитесь, что он вставлен плотно. Подключите
другой конец кабеля к розетке электропитания и,
если необходимо, включите розетку.
Пульт дистанционного
управления и триггерные входы
Вход REMOTE IN может использоваться для передачи
RC5-кодов на проигрыватель CDS27, если он
установлен в такое положение или систему,
где применение инфракрасного управления
невозможно. При необходимости данной функции,
свяжитесь с дилером для получения более
подробной информации.
ПРИМЕЧАНИЕ
< Для входя дистанционного управления
требуется одиночный штекер 3,5 мм с
активным наконечником и заземленной
контактной муфтой.
< Сигналы ДУ должны иметь
модулированный формат RC5 (36 кГц) и
напряжение 5~12 В.
Вход 12V TRIGGER IN может использоваться для
перевода CDS27 в режим ожидания и обратно.
При подключении триггерного выхода усилителя
Arcam (или другого совместимого устройства) к
этому входу, проигрыватель CDS27 автоматически
выходит из режима ожидания при включении
усилителя и обратно переходит в этот режим
при выключении усилителя. Дополнительную
информацию см. в руководстве пользователя к
усилителю.
При обычной эксплуатации к этим разъемам
ничего не подключается.
Вход RS232 предназначен для дополнительного
подключения к домашней системе автоматизации
или компьютеру. Существуют различные
системы от сторонних производителей, которые
обеспечивают расширенное управление всей
домашней мультимедийной электроникой при
помощи сенсорных экранов и т. п. За более
подробной информацией обращайтесь к своему
дилеру. Подробные технические данные протокола
дистанционного управления доступны по запросу в
Arcam (электронная почта: support@arcam.co.uk).
Русский
Соединительные кабели
Мы рекомендуем использовать
высококачественные экранированные кабели,
предназначенные для конкретного применения.
Другие кабели будут иметь отличающиеся
характеристики сопротивления, что приведет
к ухудшению работы системы (например,
не используйте видеокабель для передачи
аудиосигнала). Все кабели должны быть как можно
более короткими.
При подключении оборудования рекомендуется,
чтобы кабель электропитания располагался
как можно дальше от аудио-и видеокабелей.
Несоблюдение этого требования может привести к
появлению нежелательных шумов.
R-5R-4
Page 47

cоединения
CDS27
Разъем
электропитания
Для подключения
соответствующего
шнура питания.
Цифровой коаксиальный выход
Воспользуйтесь этим разъемом, если вы
пользуетесь высокоточным цифро-аналоговым
конвертором DAC с коаксиальным цифровым
вводом. Выполните подключение при помощи
соответствующего экранированного кабеля 75 Ом.
ОСТОРОЖНО: Никогда не подключайте разъем
цифрового выхода к обычному аудиовходу.
Беспроводное сетевое соединение
Если необходимо создать беспроводное подключение,
воспользуйтесь входящей в комплект поставки Wi-Fi
антенной. Сетевое подключение позволяет проигрывать
аудио из сети (для получения более подробной
информации смотрите на странице 11).
Аудиовыход предусилителя
Подключите аудиовыход предусилителя
к CD-входу (или другому линейному
входу) усилителя с помощью подходящего
высококачественного соединительного
кабеля. Убедитесь, что левый и правый каналы
аудиовыхода на CD-проигрывателе подключены
к соответствующим левому и правому каналам на
усилителе.
Триггерный вход 12 В
Данный разъем делает возможным включение/
выключение CDS27 из режима ожидания через
усилитель (или другой элемент AV-оборудования) с
помощью функции 12V TRIG OUT. Cмотрите на странице 5
Сетевое подключение
Для подключения CDS27 к маршрутизатору или
домашней сети можно использовать ethernetкабель, который позволяет воспроизводить
аудиозаписи, сохраненные на вашем компьютере
или NAS-устройстве.
Проигрыватель также можно подключить
беспроводным способом; подключение
настраивается через меню параметров настройки.
USB-подключение
USB-разъем «А» служит для подключения флешнакопителей или внешних жестких дисков с
аудиозаписями.
Может также использоваться для обновления
программного обеспечения.
Маршрутизатор
LAN
Интернет
Флэш-диск USB
Сетевое подключение
Подключите данный разъем к порту на сетевом
маршрутизаторе при помощи соединительного
Ethernet-кабеля. (Cмотрите на странице 7). Сетевое
подключение позволяет проигрывать аудио из сети
(для получения более подробной информации см. на
странице 11).
Цифровой оптический выход
Используйте данное гнездо при
подключении AV-ресивера с цифровым
оптическим аудиовходом.
USB-подключение
Используется для подключения
USB-устройств флэш-памяти. Кроме
этого, CDS27 может воспроизводить
некоторые цифровые файлы,
хранящиеся на USB-дисках. Cмотрите.
«Поддерживаемые медиаформаты» на
странице 7.
Подключите балансный аудиовыход к CD-входу (или
другому балансному входу) с помощью подходящего
высококачественного соединительного кабеля.
Убедитесь, что левый и правый каналы аудиовыхода на
CD-проигрывателе подключены к соответствующим
левому и правому каналам на усилителе.
Балансный аудиовыход
Вход ДУ
Это позволяет передавать
проигрывателю CDS27 сигналы с пульта
ДУ, если сенсорный датчик ПДУ-сигнала
на передней панели устройства закрыт
посторонними объектами (или по иным
причинам «невидим» для ПДУ).
Дополнительную информации см. на
странице 5.
RS232
Эта связь дает возможность
дистанционного управления от
домашней системы автоматизации или
компьютера других производителей.
Дополнительную информации см. на
странице5.
Подключение аудио
CDS27 предлагает несколько альтернативных способов подключения аудио, тип используемого соединения
зависит от остальных компонентов вашей системы. Выберите тип, наиболее подходящий для вашего
усилителя.
Для обеспечения наилучшего качества стереозвучания аудиозаписей мы рекомендуем подключать
стереофонические аналоговые аудиовыходы к CD-входам вашего усилителя, что позволит задействовать
цифро-аналоговый конвертер CDS27 плейера.
Аналоговое соединение
С помощью двух стереофонических кабелей подходящей длины, подключите
выходы «Phono» к левому и правому CD/SACD входам усилителя.
Или подключите левый/правый дифференциальные выходы к
дифференциальным входам вашего усилителя.
Цифровое соединение
Подключите один из цифровых аудиовыходов (оптический или
коаксиальный) к цифровым входам CD/SACD вашего ресивера, эти
цифровые выходы обеспечивают только кодово-импульсную модуляцию
стерео.
Воспроизводимые диски
Проигрыватель поддерживает следующие типы
дисков:
CD-Audio
CD-R
CD-RW
Компакт-диски Super
Audio CD
R-7R-6
Поддерживаемые
медиаформаты
Воспроизведение и поддержка следующих
файловых форматов с диска, USB и из сети.
< FLAC, до 24 бит, 192 кГц
< WAV, до 24 бит, 192 кГц
< AAC, до 24 бит, 96 кГц
< AIFF, до 24 бит, 192 кГц
< OGG, до 24 бит, 192 кГц
< MP3, до 320 кбит/с, 48 кГц
< WMA, до 192 кбит/с, 48KHz
Русский
Page 48

oсновные
AUDIO
SACD
MENU
FM MONO P/TUNE
STORE
INFO
BD
CR902
RTN
функции
пульт
дистанционного
управления
Введение
В разделе «Основные аспекты эксплуатации
устройства» объяснено, как проигрывать
аудиодиски, контент из сети и аудиофайлы,
сохраненные на USB-флеш-накопителях.
Обращаем ваше внимание, что может возникнуть
необходимость в выполнении правильных
системных настройках плейера до оптимального
или другого желаемого уровней проигрывания
аудио. Настройка проигрывателя описывается
начиная со на странице 11.
Включение
Включите устройство, нажав кнопку POWER.
Светодиодный индикатор состояния светится
зеленым, когда устройство включено, и красным,
если устройство находится в режиме ожидания.
Для перехода в режим ожидания необходимо
воспользоваться соответствующей кнопкой,
для выхода из режима ожидания необходимо
воспользоваться той же кнопкой или кнопкой
</1
нажата (или было отключено от электросети) в
режиме ожидания, то устройство снова вернется в
режим ожидания при появлении питания.
Обращаем ваше внимание, что сенсора пульта ДУ
располагается справа от окна панели индикации.
Не закрывайте его, иначе пульт ДУ не будет
работать.
на передней панели. Если кнопка POWER была
Воспроизведение диска
Нажмите кнопку </1 на передней панели
(или 1 на пульте) и поместите диск на лоток
проигрываемой стороной вниз (некоторые
диски имеют две стороны, и в этом случае для
проигрывания стороны «А» нужно ставить диск
меткой «А» вверх).
Нажмите кнопку </1 на передней панели, чтобы
закрыть лоток. Через несколько секунд диск
загрузится.
После закрытия лотка диску может потребоваться
некоторое время для загрузки. При включении
функции «Автовоспр. компакт-дисков» (включена
по умолчанию) компакт-диск проигрывается
автоматически. (Для получения более подробной
информации изучите раздел «Автоматическое
проигрывание компакт-дисков» на странице 11).
Для дисков, которые не воспроизводятся
автоматически, нажмите кнопку 4/; на передней
панели или кнопку 4 на пульте ДУ.
Проигрывание из сети
Убедитесь, что CDS27 подключен к локальной сети.
Выбор опции «Медиабраузер» на домашнем экране,
позволит пользователю просмотреть список
доступных устройств. Перемещение по доступным
библиотекам с помощью кнопок
пульте дистанционного управления.
Управлять воспроизведением аудио из сети
можно также с помощью вашего компьютера,
телефона или мобильного устройства,
',
<>
на
посредством знаменитой функции универсальной
автоматической настройки подключаемых
устройств UPnP.
Нажав OK или 4, можно получить доступ и
проиграть выделенный аудиофайл. Проигрыватель
будет последовательно воспроизводить
аудиозаписи, находящиеся в списке
воспроизведения.
Воспроизведение аудиозаписей с USB
Поместите USB-устройство в USB-разъем,
расположенный сзади CDS27. После того, как
устройство опознано, выберите «Медиабраузер» на
домашнем экране, затем из медиасписка - опцию
«USB».
Для перемещения по списку воспроизведения
воспользуйтесь кнопками
ДУ, для воспроизведения выделенного аудиофайла
нажмите «OK», 4 или >. Проигрыватель будет
последовательно воспроизводить аудиозаписи,
находящиеся в списке воспроизведения.
',
<>
на пульте
Во время воспроизведения аудиозаписей
Быстрая прокрутка
Нажмите 8 или 7 на передней панели или
пульте дистанционного управления для быстрой
прокрутки аудиозаписи вперед-назад со скоростью
в 4 раза превышающую нормальную скорость
воспроизведения аудиозаписи. Для возобновления
воспроизведения аудиозаписи в нормальном
режиме нажмите ВОСПРОИЗВЕСТИ.
Пропуск разделов/дорожек
Для пропуска трека нажмите / или 0.
Однократное нажатие кнопки возврата к
предыдущему треку вернет вас в начало текущего
трека. Нажав кнопку повторно можно перейти к
началу предыдущего трека.
Приостановка воспроизведения
Нажмите кнопку 4/; на передней панели или ;
на пульте ДУ для приостановки воспроизведения
(паузы). Чтобы возобновить воспроизведение,
нажмите кнопку 4/; на передней панели или 4 на
пульте ДУ.
Остановка воспроизведения
Нажмите кнопку </1 на передней панели или <
на пульте ДУ, чтобы остановить воспроизведение.
CDS27 поставляется с пультом дистанционного
управления CR902.
Использование пульта дистанционного
управления
При использовании пульта дистанционного
управления помните о следующем:
< Убедитесь в отсутствии препятствий между
пультом и датчиком ДУ на передней панели.
Радиус действия пульта дистанционного
управления составляет около 7 метров.
(Если датчик ДУ по каким-то причинам
закрыт, то имеется возможность подключить
ИК-датчик к входу ДУ на задней панели.
Проконсультируйтесь со своим дилером для
получения более подробной информации.)
< Работа пульта может быть ненадежной, если
на датчик ДУ падает яркий солнечный или
флуоресцентный свет.
< Если вы заметили уменьшение радиуса
действия пульта дистанционного управления,
замените в нем батареи.
Установка батарей в пульт
дистанционного управления
1. Откройте крышку батарейного отсека на
задней панели телефона.
2. Установите две батарейки «AAA» согласно
схеме на крышке батарейного отсека.
3. Поместите крышку батарейного отсека на
штатное место и защелкните ее, толкнув
крышку пальцем до характерного щелчка.
ПРИМЕЧАНИЕ
< Неправильное использование батарей
может привести к опасной ситуации,
например, протечке или взрыву.
< Не используйте вместе старые и новые
батареи.
< Не используйте вместе неодинаковые
батареи. Хотя они могут выглядеть
одинаково, различные батареи могут
иметь разное напряжение.
< Убедитесь, что положительный (+) и
отрицательный (-) концы каждой батареи
совпадают с таким же отметками в
батарейном отсеке.
< Извлекайте батареи из оборудования, если
его не планируется использовать в течение
месяца и более.
< При утилизации использованных батарей
следуйте государственным и местным
нормам, применяемым в вашей стране или
регионе.
Пульт ДУ CR902 отвечает требованиям
Части 15 Правил Федерального
агентства по связи
Данное оборудование прошло испытания
и было признано как соответствующее
ограничениям для цифровых устройств класса
«В» согласно части 15 правил FCC. Данные
ограничения разработаны для обеспечения
достаточной защиты от неблагоприятных
воздействий при установке устройств в жилых
помещениях. Данное оборудование генерирует,
использует и может излучать радиочастотную
энергию, и, если оно установлено и используется
не в соответствии с инструкциями, может
создавать вредные помехи для радиосвязи. Тем
не менее, нет никакой гарантии, что помехи
не возникнут в каком-то конкретном случае
установки. Если вредные помехи для приема
радио-и телесигналов вызваны именно данным
оборудованием, что можно определить путем
его включения и выключения, то пользователю
рекомендуется попытаться устранить помехи
с помощью одного или нескольких следующих
способов:
Изменить ориентацию или местоположение
приемной антенны.
Увеличить расстояние между оборудованием и
приемником.
Подключить оборудование и приемник к
розеткам, имеющим отдельные контуры сети
электропитания.
Обратитесь за помощью к дилеру или опытному
специалисту по ремонту аудиоустройств.
R-9R-8
Русский
Page 49
Режим устройства AMP
Кнопка режима устройства A позволяет
настроить CR902 для управления усилителем
Arcam. Нажатие данной кнопки не влияет на
выбранный на усилителе вход.
Переключение между рабочим режимом и
P
режимом ожидания
Циклически выбирает опции яркости
DISP
дисплея на передней панели
Циклическое переключение режимов
MODE
отображения на передней панели
Отображение меню настройки усилителя
MENU
на передней панели
Меню навигации
– подтверждение выбора
O
Переключение функции отключения звука
@
усилителя
Vol +/– служит для увеличения или
уменьшения громкости звука усилителя
Arcam.
Vol-
Нажмите кнопку ОТКЛЮЧЕНИЕ ЗВУКА
Vol+
для отключения звука усилителя
Arcam. Нажмите кнопку повторно (или
используйте Vol +/–) для включения звука
усилителя.
SP1
Переключение выхода динамика 1
SP2
Переключение выхода динамика 2
Настройка баланса между левым и правым
BAL
аудиоканалами
ПРИМЕЧАНИЕ
CR902 – пульт ДУ, который позволяет
одновременно управлять различными
устройствами, поэтому ключевые функции
будут определяться последней нажатой кнопкой
ввода.
Прежде чем приступить к управлению
проигрывателем CDS27, необходимо убедиться,
что выбрана кнопка «CD».
Режим устройства TUN
Кнопка режим устройства T позволяет настроить
CR902 для управления функциями тюнера на
тюнерах Arcam.
Переключение между рабочим режимом и
P
режимом ожидания
Числовые кнопки используются для
0…9
' ,
хранения и извлечения настроенных
каналов
Циклически выбирает опции яркости
DISP
дисплея на передней панели
Циклическое переключение различных
INFO
режимов отображения информации
Перемотка на iPod назад
)
Быстрая перемотка на iPod вперед
(
На предыдущий настроенный канал/
На предыдущую категорию Sirius/На
]
предыдущую дорожку iPod
На следующий настроенный канал/
На следующую категорию Sirius/На
[
следующую дорожку iPod
Остановка iPod
#
Воспроизведение/пауза iPod
$
Воспроизведение/пауза iPod
&
Отображает меню настройки тюнера на
MENU
передней панели
На следующий/предыдущий настроенный
канал, на следующую/предыдущую
дорожку iPod
Уменьшение/повышение частоты
< >
настройки
Подтверждение выбора
O
FM MONO
Переключение моно- и стереорежима FM
Вход/выход из режима вызова настроенных
P/TUNE
каналов
Вход/выход из режима сохранения
STORE
настроенных каналов
Переход по доступным диапазонам
BAND
настройки частот
Режим проигрывателя
компакт-дисков
Кнопка режима устройства c позволяет настроить
CR902 для управления функциями компакт-диска на
проигрывателях компакт-дисков Arcam.
Переключение между рабочим режимом и
P
режимом ожидания
Открытие/закрытие лотка диска
!
Числовые кнопки предоставляют
непосредственный доступ к отдельным
дорожкам на диске. Для выбора дорожки
0…9
нажмите соответствующую кнопку. Для
выбора номера дорожки больше 9 вводите
цифры последовательно. Например, для
воспроизведения дорожки 15 нажмите 1,
затем нажмите 5.
Циклически выбирает опции яркости
DISP
дисплея на передней панели
Изменение доступных режимов
MODE
отображения на проигрывателе компактдисков
Быстрая перемотка назад
)
Быстрая перемотка вперед
(
Переход на начало текущей/предыдущей
]
дорожки
Перемотка вперед на начало следующей
[
дорожки
Остановка воспроизведения
#
Воспроизведение
$
Включение паузы воспроизведения
&
Навигация по спискам дорожек (если
поддерживается проигрывателем)
позволяет выбрать выделенную
O
дорожку, если поддерживается
проигрывателем
Включение и отключение режима
SHUFF
произвольного воспроизведения
«Повторить воспроизведение трека» -
текущий трек будет воспроизведен заново
после завершения его воспроизведения.
«Повторить все» - повторное
воспроизведение всего списка треков после
RPT
завершения проигрывания последнего
трека их списка.
Для повтора определенной дорожки
выберите ее и дважды нажмите RPT. Для
отмены нажмите RPT еще раз.
Режим устройства BD
Кнопка режима устройства � позволяет
настроить CR902 для управления функциями BD на
проигрывателях BD Arcam.
Переключение между рабочим режимом и
P
режимом ожидания
Открытие/закрытие лотка диска
!
Числовые кнопки предоставляют
непосредственный доступ к отдельным
дорожкам на диске. Для выбора дорожки
0…9
нажмите соответствующую кнопку. Для
выбора номера дорожки больше 9 вводите
цифры последовательно. Например, для
воспроизведения дорожки 15 нажмите 1,
затем нажмите 5.
Циклически выбирает опции яркости
DISP
дисплея на передней панели
Изменение доступных режимов
MODE
отображения на проигрывателе BD
Быстрая перемотка назад
)
Быстрая перемотка вперед
(
Переход на начало текущей/предыдущей
]
дорожки
Перемотка вперед на начало следующей
[
дорожки
Остановка воспроизведения
#
Воспроизведение
$
Включение паузы воспроизведения
&
Изменение формата декодирования звука
AUDIO
(Dolby Digital, DTS и т.д.).
MENU
Активация меню проигрывателя BD.
Навигация по спискам дорожек (если
поддерживается проигрывателем)
позволяет выбрать выделенную дорожку,
O
если поддерживается проигрывателем
Возвращает навигацию на верхнее меню
.
(«Главная»).
При навигации по меню нажмите эту
RTN
кнопку для возврата на предыдущий экран
или элемент выбора
Включение и отключение режима
SHUFF
произвольного воспроизведения
Повтор воспроизведения диска или
предварительно запрограммированных
RPT
дорожек. Для повтора определенной
дорожки выберите ее и дважды нажмите RPT.
Для отмены нажмите RPT еще раз.
меню
настроек
Меню параметров настройки позволяет
вам выполнить настройку всех параметров
функционирования CDS27. В этом разделе
приведено описание элементов меню и их функции.
Меню параметров настройки выводится только на
дисплее CDS27 проигрывателя.
Вход в меню настроек
Если на дисплее не отображается главное меню,
нажмите MENU на пульте ДУ для вывода его на
дисплей.
Нажмите и удерживайте C, пока на дисплее не
отобразится МЕНЮ ПАРАМЕТРОВ НАСТРОЙКИ, а затем
нажмите OK, чтобы войти в него.
Навигация по меню
По меню проигрывателя CDS27 можно
перемещаться с помощью курсора (стрелочки) на
пульте ДУ.
1. Воспользуйтесь кнопками B и C для
перемещения вверх-вниз по текущему меню.
2. Выведя на дисплей нужный раздел, нажмите
OK, чтобы выбрать его.
3. Воспользуйтесь кнопками B и C для
перемещения вверх-вниз по текущим опциям.
4. Для выбора настройки нажмите кнопку
: используйте кнопки B и C для и
E
изменения настройки.
5. Нажмите OK для подтверждения выбора. Для
управления другими настройками в этой
секции, см. пункт 4.
6. Нажмите < для возврата к предыдущему
экрану, если вы желаете выбрать другой
раздел для настройки.
Режим ожидания сети – данная опция определяет
доступные функции сетевых служб, когда
проигрыватель CDS27 находится в режиме
ожидания.
Выбор опции «АКТИВНЫЙ» позволит
поддерживать сетевое подключение (необходимое
для управления IP).
Выбор опции «РЕЖИМ ОЖИДАНИЯ» позволяет
отключить сетевое оборудование для сокращения
потребления электроэнергии.
Настройка сети– опция, которая позволяет
пользователю настроить устройство для
подключения его к существующей сети для
проигрывания аудио из сети, а также для
обновления Интернет-приложений.
Авторежим ожидания позволяет задать
время бездействия, через которое устройство
автоматически перейдет в режим ожидания.
Имеются следующие опции: 5/10/15/20/25/30
минут.
Автопроигрывание компакт-диска – управлении
функцией автоматического воспроизведения
оптических компакт-дисков (например CD) сразу
после их установки в дисковод.
< Вкл.: Оптические диски будут проигрываться
автоматически.
< Выкл.: Для проигрывания диска необходимо
нажать Воспроизведение.
обновление прошивки – Вы можете проверить
обновление прошивки для вашего проигрывателя,
выбрав данный пункт меню и нажав OK для
выделения «Сеть», после чего нажав OK еще раз.
При отсутствии новых прошивок появится
сообщение, в противном случае, следуйте
инструкциям на экране.
загрузить настройки по умолчанию – Нажмите
OK на выделенном данном пункте, чтобы сбросить
все настройки на заводские по умолчанию
(включая родительский контроль).
Будет запрошено подтверждение на загрузку
настроек по умолчанию. Выберите «отменить» для
выхода или ' выбора «да» и нажмите ОK для
подтверждения.
Информация о системе – воспользуйтесь
клавишами курсора '/, для выбора нужной
опции.
На панель информации о системе выводятся
сведения о вашем плейере, такие как IP-адрес и
версия аппаратного обеспечения.
Сетевое аудио - позволяет пользователю
включать или выключать функцию автоматическая
настройки подключаемых устройств плейера
UPNP. Перевод опции в положение «выключено»
позволяет выключить функцию воспроизведения
аудио из сети.
Цифровой выход - позволяет пользователю
ограничить шаг дискретизации коаксиальных/
оптических цифровых выводов.
Русский
R-11R-10
Page 50

поиск
неисправностей
При возникновении ошибки, проверьте таблицу
устранения неисправностей прежде чем отправить
устройство в ремонт.
Если проблема не решена, попробуйте выключить и
включить устройство снова.
Если проблема не устранена, обращайтесь к
вашему поставщику. Ни при каких обстоятельствах
не следует производить ремонт устройства
самостоятельно, так как это может привести к
аннулированию гарантии!
Проблема Возможная причина Способ устранения
Отсутствует питание < Отключен шнур питания переменного тока.
< Плохой контакт в розетке переменного тока, или розетка не
работает.
Диск не проигрывается < Диск вставлен вверх ногами.
< Диск не является воспроизводимым.
< Диск загрязнен.
< Диск был некорректно финализирован при записи.
Диск отсутствует/
испорченный диск
Отсутствует звук < Отключены аудиокабели. < Правильно подключите кабели.
Шумы или
искаженный звук
Не работает пульт
дистанционного
управления.
< Диск поцарапан, загрязнен, плохо записан или не является
воспроизводимым.
< Диск загрязнен.
< Плохие соединения.
< Батареи отсутствуют или разряжены.
< Закрыт датчик дистанционного управления.
< Надежно подключите кабель.
< Проверьте розетку с помощью лампы или другого
прибора.
< Загрузите диск печатной стороной вверх.
< Используйте воспроизводимый диск.
< Очистите диск.
< Загрузите диск с корректной финализацией записи.
< Нажмите выключатель POWER для отключения, снова
нажмите POWER для повторного включения, после
чего выгрузите диск.
< Очистите диск.
< Проверьте подключения и правильно подключите все
кабели.
< Замените батареи.
< Устраните помеху.
cпецификации
Аналоговый аудиовыход
Преобразование цифрового в
аналоговое
Соотношение шум/сигнал 110Дб CCIR
Гармоническое искажение (1 кГц) 0,002%
Частотная характеристика (±0,5 Дб) 10 Гц-20 кГц
Уровень выхода (0 Дб) 2,2 Vrms
Импеданс выхода 47 Ом
Минимальная рекомендуемая
нагрузка
Цифровые интерфейсы
Аудиовыходы 75 Ом коаксиальный/оптический выход TOSLINK
USB USB 2.0 высокоскоростной (480 Мбит/с)
Сеть Ethernet 10/100 10/100
Беспроводной b/g/n
Физический
Габаритные размеры (Ш x Д x В) 433 x 276 x 75
Вес Коробка 5,2 кг/7,5 кг
Энергопотребление 20 Вт макс.
Аксессуары в комплекте
E&OE
Примечание: Все значения спецификации типичны если не указано иное
24-разрядный DAC Delta_Sigma на 192 кГц
5 кОм
Кабель электропитания, пульт ДУ CR902, 2 батарейки AAA,
антенна Wi-Fi
Радиопомехи
Проигрыватель CDS27 – цифровое
устройство, разработанное в соответствии с
высочайшими требованиями стандартов по
электросовместимости.
Все CD-проигрыватели генерируют и могут
излучать энергию электромагнитного излучения.
В некоторых случаях это может создавать помехи
в получении FM и AM радиосигналов. В таком
случае, храните плеер и его соединительные
кабели как можно дальше от тюнера и его антенн.
Подключение плеера и тюнера к различным
розеткам электросети также поможет уменьшить
помехи.
СТРАНЫ EC – Это продукты были разработаны,
чтобы соответствовать EMC Директиве 2004/108/
EC.
USA – Эти продукты соответствуют Части 15 FCC.
Класс Б.
Лазерная радиация
ИЗДЕЛИЕ КЛАССА II
ЛАЗЕРНОЙ
ОПАСНОСТИ
При эксплуатации
проигрывателя CDS27
со снятой внешней
крышкой, невидимое
лазерное излучение может
повредить органы зрения.
Русский
Политика непрерывного
совершенствования
Arcam ведет политику непрерывного
совершенствования для всех своих продуктов.
Это означает, что дизайн и спецификации могут
меняться без какого либо уведомления.
R-13R-12
Page 51

гарантия
изделия
Гарантия по всему миру
Это дает вам право отремонтировать аппарат бесплатно в течение первых
двух лет после покупки, при условии, что он был первоначально приобретен
у официального дилера Arcam. Дилер Arcam несет ответственность за все
послепродажное обслуживание устройства. Производитель не несет никакой
ответственности за дефекты, возникшие вследствие несчастного случая,
неправильного обращения, износа, или вследствие несанкционированных
настроек и / или ремонта, не несет ответственность за ущерб или убытки,
происходящие во время транспортировки к или от лица, проходящего по
гарантии.
Гарантия покрывает:
Затраты на запчасти и трудовые затраты на протяжении двух лет с даты покупки.
По окончании двух лет, вы оплачиваете стоимость запчастей и трудовые затраты
самостоятельно. Гарантия не покрывает затраты на транспортировку товара.
Претензии по гарантии
Оборудования должно быть упаковано в оригинальную коробку и возвращено
дилеру, у которого было заказано. Должно быть отправлено курьерской почтой
с оплатой доставки – не почтой. Компания не несет ответственности за состояние
оборудования на пути к дилеру или дистрибьютору, и рекомендует застраховать
устройство от потери и повреждения на время пребывания в пути.
За дополнительной информацией обращайтесь к компании Arcam по адресу:
Arcam Customer Support Department, Unit 15, Pembroke Avenue, Waterbeach,
CAMBRIDGE, CB25 9QP, England
или через вебсайт www.arcam.co.uk.
Проблемы?
Если дилер компании Arcam не может ответить на любой запрос относительно
этого или любого другого продукта Arcam пожалуйста, свяжитесь с нашей
службой поддержки Arcam, по указанному выше адресу, и мы сделаем все
возможное, чтобы помочь вам.
Регистрация онлайн
Вы можете зарегистрировать ваш продукт онлайн на сайте www.arcam.co.uk.
Утилизация этого устройства
Эта маркировка означает,
что изделие не должно быть
утилизировано вместе с
бытовыми отходами по всей
территории ЕС.
Для предотвращения возможного
ущерба для окружающей среды
или здоровья человека вследствие
неконтролируемой утилизации отходов и
сохранения материальных ресурсов, данный
ресивер должен быть соответствующим образом
утилизирован.
Для утилизации вашего устройства, пожалуйста,
используйте локальные системы сбора и
возврата или обратитесь к поставщику
устройства.
R-14
Page 52

CDS27
MANUALE Lettore streaming audio CD/CD/di rete di qualità superiore
Italiano
Page 53

linee guida
per la
sicurezza
Importanti istruzioni di sicurezza
1. Leggere queste istruzioni.
2. Conservare queste istruzioni.
3. Osservare tutte le avvertenze.
4. Seguire tutte le istruzioni.
5. Non utilizzare questo apparecchio vicino
all'acqua.
6. Pulire solo con un panno asciutto.
7. Non ostruire le aperture di ventilazione. Installare
secondo le istruzioni del produttore.
8. Non installare vicino a fonti di calore come
radiatori, caloriferi, stufe o altri apparecchi
(compresi amplicatori) che producono calore.
9. Non annullare gli scopi di sicurezza della spina
polarizzata o con messa a terra.
Una spina polarizzata presenta due lame, una più
grande dell'altra. Una spina con messa a terra ha
due lame e un terzo polo di terra. La lama larga o
il terzo polo sono presenti per la vostra sicurezza.
Se la spina fornita non è adatta alla propria presa,
consultate un elettricista per la sostituzione della
presa obsoleta.
10. Evitare che il cavo di alimentazione venga
calpestato o tirato, in particolare presso le spine,
le prese e al punto di uscita dall'apparecchio.
11. Usare solo dispositivi opzionali/accessori
specicati dal produttore.
CAUTELA: Per ridurre il rischio di scosse elettriche, non rimuovere il coperchio (o il retro). All'interno non sono presenti
parti riparabili dall'utente. Per l'assistenza tecnica rivolgersi a personale qualicato.
AVVERTENZA: Per ridurre il rischio di incendi o scosse elettriche, non esporre questo apparecchio alla pioggia o
all'umidità.
Il simbolo del lampo con punta di freccia, all'interno di un triangolo equilatero, avverte l'utente della presenza di
‘voltaggio pericoloso' non isolato all'interno del prodotto che può essere di entità tale da costituire un rischio di
shock elettrico per le persone.
Il punto esclamativo all'interno di un triangolo equilatero avverte l'utente della presenza di istruzioni importanti di
manutenzione (assistenza) nella documentazione che accompagna il prodotto.
CAUTELA: In Canada e USA, per evitare scosse elettriche, far corrispondere il polo largo del connettore all'ampia fessura
nella presa e inserire completamente la spina nella presa.
CAUTELA: L'uso di comandi, impostazioni o procedure diverse da quelle specicate nel presente manuale può provocare
l'esposizione a radiazioni pericolose.
12. Usare solo con carrello, supporto, cavalletto,
sostegno o tavola specicati dal produttore o
venduti con l'apparecchio.
Se si usa un carrello, prestare
attenzione muovendo la
combinazione di carrello/
apparecchio per evitare lesioni
dovute a ribaltamento.
13. Scollegare questo apparecchio durante temporali
o se resta inutilizzato per lunghi periodi di tempo.
14. Per l'assistenza tecnica rivolgersi a personale
qualicato.
L'assistenza si rende necessaria quando
l'apparecchio è stato danneggiato in qualsiasi modo,
per esempio se il cavo di alimentazione o la spina
sono danneggiati, è stato versato del liquido o degli
oggetti sono caduti sul dispositivo, o ancora se
l'apparecchio è stato esposto a pioggia o umidità,
non funziona normalmente, o è caduto.
15. Ingresso di oggetti o liquidi
ATTENZIONE - Fare attenzione che non
cadano oggetti e non si versino liquidi nel
corpo dell'apparecchio attraverso le aperture.
L'apparecchio non deve essere esposto a schizzi o
liquidi. Nessun oggetto contenente liquidi, come
vasi, deve essere collocato sull'apparecchio.
16. Clima
L'apparecchiatura è stata progettata per l'utilizzo
in condizioni climatiche temperate e in situazioni
interne.
17. Pulizia
Staccare l'unità dalla presa di corrente prima di
pulirla.
La custodia dovrebbe di norma richiedere solo di
essere stronata con un panno morbido, privo di
lanugine. Non usare solventi chimici per la pulizia.
Sconsigliamo l'uso di spray per la pulizia di mobili
o lucidanti in quanto possono causare macchie
bianche permanenti.
18. Fonti di alimentazione
Collegare l'apparecchiatura ad una presa di
alimentazione del tipo descritto nelle istruzioni
d'uso o segnalato sull'apparecchio.
Il metodo principale per isolare l'apparecchiatura
dalla rete di alimentazione è quello di rimuovere la
spina di rete. L'apparecchio deve essere installato in
modo che sia sempre possibile scollegarlo.
19. Odori anormali
Se notate odori anormali o fumo dall'apparecchio,
spegnerlo immediatamente e scollegare
l'apparecchio dalla presa a muro. Contattare il
rivenditore e non ricollegare l'apparecchiatura.
20. Danni che necessitano di riparazione qualicata
L'apparecchio deve essere riparato da personale
qualicato se:
A. il cavo di alimentazione o la spina sono
danneggiati;
B. sono caduti oggetti sull'apparecchio o è
penetrato del liquido al suo interno;
C. l'apparecchio è stato esposto alla pioggia;
D. l'apparecchio sembra non funzionare
normalmente o mostra alterazioni notevoli nelle
prestazioni;
E. l'apparecchio è caduto o il telaio ha subito dei
danni.
ATTENZIONE - La spina del cavo di alimentazione è
utilizzata come mezzo di scollegamento, pertanto deve
rimanere sempre facilmente utilizzabile.
ATTENZIONE - Le batterie non devono essere esposte
a calore eccessivo, quale i raggi solari o il fuoco.
CAUTELA - Pericolo di esplosione in caso di batterie
sostituire in modo erroneo. Sostituire soltanto con
batterie uguali o dello stesso tipo.
Conformità alle norme di
sicurezza
Questo apparecchio è stato progettato nel rispetto dello
standard internazionale per la sicurezza elettrica IEC/
EN 60065.
Questo prodotto è conforme alla Parte 15 delle Norme
FCC. Il funzionamento è soggetto alle seguenti due
condizioni:
(1) Questo dispositivo non deve causare interferenze
pericolose, e
(2) Questo dispositivo deve accettare qualsiasi
interferenza ricevuta, incluse le interferenze che
potrebbero comprometterne il funzionamento.
benvenuto
Grazie per aver acquistato il lettore Arcam FMJ CDS27.
Il lettore CDS27 è in grado di riprodurre suono di qualità eccellente da audio presente su CD,
SACD, USB e in rete. I CDA (convertitori digitale analogico) Delta-Sigma secondo la tecnologia
nota ad alte prestazioni è in grado di riprodurre una qualità sonora da intenditori per portare
veramente la vostra musica per la vita.
Arcam è una società specializzata nella realizzazione di prodotti hi- e per home cinema di
qualità notevole da oltre trent'anni e il lettore CDS27 è l'apparecchiatura più recente di una
lunga serie di successo. La serie FMJ è stata progettata sfruttando tutta l'esperienza di Arcam,
una delle aziende di prodotti audio più apprezzate del Regno Unito ed è stata ideata per orire
anni di piacevole ascolto senza problemi.
Questo manuale è stato ideato per fornire tutte le informazioni necessarie per montare,
collegare e usare il lettore il vostro nuovo acquisto. Nel manuale è descritto anche il telecomando
fornito in dotazione con l'unità. Tramite l'indice dei contenuti riportato sulla pagina seguente è
possibile accedere alla propria sezione di interesse.
Vi auguriamo di poter usufruire della qualità del lettore per lungo tempo a venire. Nel caso
improbabile di un guasto, o se semplicemente desiderate ulteriori informazioni sui prodotti
Arcam, la nostra rete di rivenditori sarà lieta di aiutarvi. Ulteriori informazioni si possono
trovare anche sul sito Arcam www.arcam.co.uk.
Il team di sviluppo FMJ
Italiano
IT-3IT-2
Page 54

Indice
linee guida per la sicurezza ���������������������������������������������������������������������������������������������������������������������IT-2
Importanti istruzioni di sicurezza ����������������������������������������������������������������������������������������������������������������������������������������������IT-2
Conformità alle norme di sicurezza ������������������������������������������������������������������������������������������������������������������������������������������IT-2
benvenuto ��������������������������������������������������������������������������������������������������������������������������������������������������IT-3
installazione �����������������������������������������������������������������������������������������������������������������������������������������������IT-5
Posizionamento dell'unità �����������������������������������������������������������������������������������������������������������������������������������������������������������IT-5
Alimentazione ����������������������������������������������������������������������������������������������������������������������������������������������������������������������������������IT-5
Il telecomando e gli ingressi di attivazione ���������������������������������������������������������������������������������������������������������������������������IT-5
Cavi di interconnessione ��������������������������������������������������������������������������������������������������������������������������������������������������������������IT-5
collegamenti CDS27 ���������������������������������������������������������������������������������������������������������������������������������IT-6
Connessione di rete ������������������������������������������������������������������������������������������������������������������������������������������������������������������������IT-7
Connessione USB ����������������������������������������������������������������������������������������������������������������������������������������������������������������������������IT-7
Collegamenti audio ������������������������������������������������������������������������������������������������������������������������������������������������������������������������IT-7
Dischi riproducibili ��������������������������������������������������������������������������������������������������������������������������������������������������������������������������IT-7
Mezzi supportati ������������������������������������������������������������������������������������������������������������������������������������������������������������������������������IT-7
funzionamento base ���������������������������������������������������������������������������������������������������������������������������������IT-8
telecomando ����������������������������������������������������������������������������������������������������������������������������������������������IT-9
menu di impostazioni ��������������������������������������������������������������������������������������������������������������������������� IT-11
Navigazione all'interno dei menu ������������������������������������������������������������������������������������������������������������������������������������������ IT-11
risoluzione dei problemi ����������������������������������������������������������������������������������������������������������������������� IT-12
speciche ������������������������������������������������������������������������������������������������������������������������������������������������� IT-13
Interferenze radio ������������������������������������������������������������������������������������������������������������������������������������������������������������������������� IT-13
Radiazione laser ���������������������������������������������������������������������������������������������������������������������������������������������������������������������������� IT-13
garanzia sul prodotto ���������������������������������������������������������������������������������������������������������������������������� IT-14
Garanzia in tutto il mondo �������������������������������������������������������������������������������������������������������������������������������������������������������� IT-14
Richieste in garanzia ������������������������������������������������������������������������������������������������������������������������������������������������������������������� IT-14
Problemi? ����������������������������������������������������������������������������������������������������������������������������������������������������������������������������������������IT-14
Registrazione on-line ������������������������������������������������������������������������������������������������������������������������������������������������������������������ IT-14
installazione
Posizionamento dell'unità
< Posizionare il lettore CD su una supercie piana
e stabile, evitando l'esposizione alla luce solare
diretta e a fonti di calore o umidità.
< Non sistemare il lettore CD sopra un
amplicatore di potenza o altre fonti di calore.
< Non posizionare il lettore CD in uno spazio
ristretto, come una libreria o un armadietto
chiuso a meno che non ci sia abbastanza spazio
per una buona ventilazione. È normale che il
lettore CD si scaldi durante il funzionamento.
< Non collocate qualsiasi altro componente o
elemento sopra il lettore CD in quanto ciò
potrebbe ostruire il usso d'aria attorno all'unità,
provocando il surriscaldamento del lettore CD.
< Assicuratevi che il sensore di ricezione del
segnale del telecomando (vicino al display sul
pannello anteriore) non sia ostruito, perché
questo potrebbe impedire il funzionamento del
telecomando.
< Non posizionate il giradischi sulla parte superiore
di questa unità. I giradischi sono molto sensibili
al rumore generato dagli alimentatori di rete,
che sarà ascoltato come 'ronzio' di fondo se il
giradischi è troppo vicino.
Alimentazione
Il lettore CD è dotato di una spina di alimentazione
stampata, montata sul cavo integrato. Vericate che
la spina in dotazione si adatti al vostro alimentatore.
Se avete bisogno di un nuovo cavo di alimentazione,
contattate il rivenditore Arcam.
Se il vostro alimentatore di rete o la spina sono diversi,
siete pregati di contattare immediatamente il vostro
rivenditore Arcam
Spingere l'estremità della spina IEC del cavo di
alimentazione nella presa sul retro del lettore CD,
facendo in modo che essa sia inserita saldamente.
Inserite l'altra estremità del cavo nella presa di corrente
e, se necessario, accendete la presa.
Il telecomando e gli ingressi di
attivazione
L'ingresso REMOTE IN può essere utilizzato per
trasmettere codici RC5 all'CDS27 se installato in una
posizione o sistema in cui non è possibile utilizzare
gli infrarossi. In tal caso, contattate il rivenditore per
ulteriori informazioni.
NOTA
< L'ingresso del telecomando richiede una presa
jack da 3,5mm, mono, con punta attiva e
manicotto di scarica a terra.
< I segnali del tekecomando devono essere in
formato RC5 modulato (a 36 kHz), con un
livello di tensione compreso tra 5V e 12V.
L'ingresso 12V TRIGGER IN può essere utilizzato per
attivare o disattivare il lettore CDS27 dalla modalità
standby. Collegando l'uscita trigger dell'amplicatore
Arcam (o di altro dispositivo compatibile), l'unità
CDS27 esce automaticamente dalla modalità standby
all'accensione dell'amplicatore e ritorna in tale
modalità quando lo si spegne. Consultate il manuale
dell'amplicatore per ulteriori informazioni.
Durante l'uso normale non è necessario eettuare il
collegamento a questo tipo di ingressi.
L'ingresso RS232 serve per eettuare dei collegamenti
opzionali a un impianto di domotica o a un computer.
Sono disponibili vari sistemi di parti terze in grado
di fornire un sistema di controllo sosticato su tutti i
dispositivi di intrattenimento tramite touch-screen.
Contattate il vostro rivenditore o installatore per
ricevere ulteriori informazioni. I dettagli tecnici sul
protocollo del telecomando possono essere richiesti ad
Arcam (e-mail support@arcam.co.uk).
Cavi di interconnessione
Si consiglia l'utilizzo di cavi schermati di alta qualità,
che sono stati progettati per questa particolare
applicazione. Altri cavi avranno caratteristiche di
impedenza diverse che peggioreranno le prestazioni del
sistema (ad esempio, non utilizzate cavi progettati per
i segnali video per trasportare i segnali audio). Tutti i
cavi devono essere tenuti il più possibile corti.
È buona norma, quando si collega l'apparecchiatura,
vericare che il cablaggio di alimentazione di rete
venga mantenuto il più lontano possibile dai cavi
audio. In caso contrario si potrebbe generare rumore
indesiderato nei segnali audio.
Italiano
IT-5IT-4
Page 55

collegamenti
CDS27
Uscita digitale coassiale
Utilizzate questa presa se è in uso un CDA di qualità
elevata con un ingresso digitale coassiale. Collegare
l'ingresso digitale utilizzando un idoneo cavo
schermato da 75Ω.
CAUTELA: Non collegare la presa dell'uscita digitale
a un ingresso audio convenzionale.
Uscita audio phono
Collegare all'ingresso del CD dell'amplicatore (o
ad altra linea dedicata all'ingresso) utilizzando cavi
di collegamento di alta qualità. Controllare che le
uscite audio di sinistra e destra dal lettore CD siano
collegate ai corrispondenti ingressi di sinistra e destra
sull'amplicatore.
Connessione di rete
Si può utilizzare un cavo Ethernet per collegare il
lettore CDS27 a un router o a un commutatore sulla
rete di casa, consentendo la riproduzione di audio
memorizzato su computer o dispositivo NAS.
Si può utilizzare inoltre la connessione wireless che può
essere congurata tramite menu di impostazione.
Router
Ingresso di
alimentazione
Collegare qui il cavo di
rete corretto.
Collegate a un'antenna Wi-Fi in dotazione se è
richiesta una connessione di rete wireless. Una
connessione di rete consente la riproduzione
dell'audio di rete (per dettagli di congurazione
Connessione di rete
Collegare questa presa a una porta
sul router di rete utilizzando un cavo
patch Ethernet (vedere pagina 7).
Una connessione di rete consente la
riproduzione dell'audio di rete (per
dettagli di congurazione vedere pagina
11).
Uscita digitale ottica
Utilizzate questa presa in caso di ricevitore
AV con ingresso audio digitale.
Connessione rete wireless
vedere pagina 11).
Connessione USB
Qui si possono inserire i dispositive di
memoria ash USB. Il lettore CDS27 è
in grado di riprodurre le digitali salvati
su unità di memoria USB (vedere "Mezzi
supportati" su pagina 7).
dell'amplicatore (o altro ingresso bilanciato) utilizzando
cavi di collegamento di alta qualità. Controllare che le uscite
audio di sinistra e destra dal lettore CD siano collegate ai
corrispondenti ingressi di sinistra e destra sull'amplicatore.
Questa presa consente di attivare o disattivare il lettore
CDS27 dalla modalità standby, tramite amplicatore (o
tramite altra apparecchiatura AV) dotato di funzione
Uscita audio bilanciata
Collegare questo tipo di uscita all'ingresso CD
Ingresso trigger da 12V
12V TRIG OUT. vedere pagina 5.
RS232
Questa connessione consente di utilizzare
il telecomando di un sistema di domotica
o di un computer di altri produttori.
Vedere pagina 5 per ulteriori informazioni.
Ingresso remoto
Consente la ricezione dei segnali del
telecomando da parte del lettore CDS27
se il sensore remoto sul pannello anteriore
è coperto (o altrimenti non ‘visibile' dal
telecomando).
Vedere pagina 5 per ulteriori informazioni.
Connessione USB
Una presa USB tipo A, utilizzata per collegare le unità
ash o i dischi rigidi esterni contenenti audio.
Utilizzabile anche per aggiornamento soware.
Internet
Collegamenti audio
L'CDS27 ore una serie di alternative per la connessione audio, il tipo di connessione da usare dipende dal resto del
sistema; scegliere il tipo più adatto per il proprio amplicatore.
Per ottenere la migliore qualità di suono stereo si consiglia di collegare le uscite audio analogiche dello stereo
all'ingresso CD sull'amplicatore, consentendo in tal modo l'uso del circuito digitale analogico da intenditori del
lettore CDS27.
Analogico
Utilizzando un paio di cavi fono stereo di lunghezza idonea, collegate le uscite
etichettate con "Phono" agli ingressi CD/SACD a sinistra e a destra sull'amplicatore.
In alternativa collegare le uscite bilanciate di sinistra/destra a un ingresso bilanciato
sull'amplicatore.
Digitale
Collegart una delle uscite Audio Digitale (ottica o coassiale) all'ingresso digitale
'CD/SACD' del ricevitore; queste uscite digitali forniscono soltanto stereo PCM.
LAN
Dischi riproducibili
Il lettore supporta i seguenti tipi di dischi:
CD-Audio
CD-R
CD-RW
Super Audio CD
Unità di memoria Flash USB
Mezzi supportati
È supportata la riproduzione dei seguenti formati di le
su disco, USB e rete.
< FLAC, no a 24bit, 192 KHz
< WAV, no a 24bit, 192 KHz
< AAC, no a 24bit, 96 KHz
< AIFF, no a 24bit, 192 KHz
< OGG, no a 24bit, 192 KHz
< MP3, no a 320kbps, 48 KHz
< WMA, no a 192kbps, 48 KHz
Italiano
IT-7IT-6
Page 56

funzionamento
AUDIO
SACD
MENU
FM MONO P/TUNE
STORE
INFO
BD
CR902
RTN
base
telecomando
Introduzione
Il ‘Funzionamento base' spiega come riprodurre i dischi
audio, il contenuto di rete e i le audio salvati sui mezzi
USB. Si noti che potrebbe essere necessario congurare
il lettore correttamente prima di poter ottenere la
riproduzione ottimale o comunque qualsiasi tipo di
riproduzione. La congurazione del lettore è descritta a
partire da pagina 11.
Accensione
Accendete l'unità premendo il pulsante POWER.
All'accensione dell'unità il LED di stato diventa verde
mentre in modalità standby ritorna rosso. Si può
entrare in modalità standby utilizzando il pulsante
di standby sul telecomando e si può uscire da tale
modalità o utilizzando lo stesso pulsante oppure il
tasto </1 sul pannello anteriore. Se si preme il
pulsante POWER (o si disattiva l'alimentazione) durante
la modalità standby, l'unità ritorna in tale modalità
quando si attiva nuovamente l'alimentazione.
Si noti che il sensore del telecomando si trova sul lato
destro della nestra di visualizzazione. Non ostruite
il sensore, altrimenti il telecomando non potrà
funzionare.
Riproduzione di un disco
Premete </1 sul pannello anteriore (oppure 1 sul
telecomando) e posizionare il disco nel supporto, con il
lato di riproduzione verso il basso (alcuni dischi sono
riproducibili su due lati; in tal caso porre verso l'alto il
lato etichettato con 'A' per la riproduzione del lato A).
Premete </1 sul pannello anteriore per chiudere il
supporto. Dopo una pausa di alcuni secondi inizia la
lettura del disco.
Per la lettura del disco è necessario un breve lasso di
tempo dopo la chiusura del supporto. Se l'impostazione
‘Riproduzione automatica disco' è impostata su On
(l'impostazione predenita) la riproduzione parte
automaticamente. (Per dettagli, vedere ‘Riproduzione
automatica disco' su pagina 11).
Per i dischi la cui riproduzione non parte
automaticamente, premete 4/; sul pannello anteriore
o premete 4 sul telecomando.
Riproduzione dalla rete
Controllate che l'unità CDS27 sia collegata alla rete
locale. Selezionando ‘Browser mezzi multimediali"
dalla schermata principale, l'utente potrà accedere a un
elenco di dispositivi disponibili da sfogliare. Navigate
alle librerie disponibili utilizzando i tasti
sul telecomando.
La riproduzione di musica di rete può anche essere
controllata dal computer, dal telefono o dal dispositivo
mobile utilizzando l'applicazione del punto di controllo
UPnP preferito.
',
<>
Premendo OK o 4 su un le audio evidenziato si
può accedere al le per riprodurlo. La riproduzione
continuerà per tutti i brani successivi nella directory di
riproduzione.
Riproduzione da USB
Collegare il dispositivo USB alla presa USB sul retro
del CDS27. Dopo il riconoscimento del dispositivo
selezionare ‘Browser mezzi multimediali' dalla
schermata principale, quindi scegliere l'opzione ‘USB'
dall'elenco dei mezzi.
Spostarsi utilizzando i tasti
telecomando e iniziare la riproduzione di un le audio
evidenziato premendo OK, 4o >. La riproduzione
continuerà per tutti i brani successivi nella directory di
riproduzione.
',
<>
sul
Durante la riproduzione
Scansione
Premete 8 o 7 sul pannello anteriore o sul
telecomando per eettuare la scansione in avanti o
indietro alla velocità normale di riproduzione x4.
Per riprendere la normale riproduzione premere
RIPRODURRE.
Salto di capitoli/brani
Per saltare i brani, premete /o 0.
Se si saltano i brani indietreggiando, quando si preme
per la prima volta il pulsante si torna all'inizio del
brano corrente. Premendo di nuovo il pulsante si torna
all'inizio del brano precedente.
Pausa di riproduzione
Premete 4/; sul pannello anteriore oppure ; sul
telecomando per interrompere la riproduzione. Per
riprendere la riproduzione, premete 4/; sul pannello
anteriore o 4 sul telecomando.
Arresto della riproduzione
Premete il pulsante </1 sul pannello anteriore oppure
sul telecomando per arrestare la riproduzione.
<
Il CDS27 è fornito con telecomando CR902 in
dotazione.
Uso del telecomando
Si prega di tenere presente quanto segue quando si
utilizza il telecomando:
< Controllate l'assenza di ostacoli tra il
telecomando e il relativo sensore sul pannello
anteriore. Il telecomando ha un raggio di
circa 7metri. (Se il sensore del telecomando
è oscurato, sono disponibili gli IR nel jack di
ingresso del telecomando sul pannello posteriore.
Si prega di rivolgersi al proprio rivenditore per
ulteriori informazioni.)
< Il telecomando può non funzionare
correttamente in presenza di luce solare molto
intensa o di luce uorescente in direzione del
sensore del telecomando sull'unità.
< Sostituire le batterie quando si nota una
riduzione del raggio di funzionamento del
telecomando.
Inserimento delle batterie nel telecomando
1. Aprite il vano batteria sul retro del telecomando.
2. Inserite 2 batterie 'AAA' rispettando lo schema
sul coperchio del vano batteria.
3. Fate scorrere il coperchio del vano batteria in
posizione e chiuderlo facendolo scattare.
NOTA
< L'uso improprio delle batterie può causare
danni, ad esempio la perdita di liquido ed
esplosioni.
< Non mischiare batterie vecchie e nuove.
< Non utilizzare insieme batterie non identiche
– anche se possono sembrare simili, batterie
diverse possono avere tensioni diverse.
< Controllate che il polo positivo (+) e negativo
(–) di ciascuna batteria corrisponda alle
indicazioni riportate nel vano batteria.
< Rimuovere le batterie dall'apparecchio se non
sarà utilizzato per un mese o più.
< Per lo smaltimento delle batterie usate, vi
preghiamo di rispettare le norme governative
o locali in vigore nel proprio paese o regione.
Il telecomando CR902 è conforme con la
Parte 15 delle norme FCC
Questo apparecchio è stato testato ed è risultato
conforme ai limiti previsti per i dispositivi
digitali di Classe B, ai sensi della Parte 15 delle
Norme FCC. Questi limiti sono progettati per
fornire una ragionevole protezione contro
interferenze dannose in una installazione
residenziale. Questa apparecchiatura genera,
utilizza e può emettere energia a radiofrequenza
e, se non installata e utilizzata in conformità alle
istruzioni, può causare interferenze dannose alle
comunicazioni radio. Tuttavia, non vi è alcuna
garanzia che non si verichino interferenze in una
particolare installazione. Se questo apparecchio
causa interferenze dannose alla ricezione radio
o televisiva, che possono essere determinate
spegnendo e accendendo l'apparecchio, l'utente è
incoraggiato a cercare di rimuovere l'interferenza
con uno o più dei seguenti metodi:
Riorientare o riposizionare l'antenna di ricezione.
Aumentare la distanza tra l'apparecchio e il
ricevitore.
Collegare l'apparecchio a una presa o a un circuito
diverso da quello a cui è collegato il ricevitore.
Contattate il rivenditore o un tecnico audio esperto
per ricevere assistenza.
Italiano
IT-9IT-8
Page 57
Modalità dispositivo AMP
Il pulsante modalità dispositivo A congura il
CR902 per controllare il vostro amplicatore Arcam.
Premendo questo pulsante non modicherà l'ingresso
selezionato sull'amplicatore.
Passa da standby ad acceso e viceversa
P
Scorre fra le opzioni di luminosità del
DISP
display del pannello anteriore
Scorre fra le modalità del display sul
MODE
pannello anteriore
Mostra il menu di impostazione sul
MENU
pannello anteriore
Navigazione nei menu
conferma la selezione
O
Attiva e disattiva la funzione mute
@
dell'amplicatore
Vol +/– serve per aumentare o diminuire il
volume di un amplicatore Arcam.
Premete il pulsante MUTE una volta per
Vol-
disattivare temporaneamente l'audio
Vol+
dell'amplicatore Arcam. Premete di nuovo
(o usare Vol +/–) per attivare/disattivare il
suono.
SP1
Passa all'uscita sui diusori 1
SP2
Passa all'uscita sui diusori 2
Regolare il bilanciamento tra il canale
BAL
audio sinistro e destro
NOTA
Il CR902 è un telecomando per vari dispositivi, per
cui le funzioni dei tasti sono dierenti a seconda
dell'ultimo pulsante di immissione premuto.
Controllate di aver selezionato il pulsante "CD"
prima di tentare di controllare il lettore CDS27.
Modalità dispositivo TUN
Il pulsante modalità dispositivo T congura il CR902
per controllare le funzioni dei sintonizzatori Arcam.
Passa da standby ad acceso e viceversa
P
0…9
' ,
I tasti numerici servono a registrare e
richiamare le memorie
Scorre fra le opzioni di luminosità del
DISP
display del pannello anteriore
Scorre fra le diverse modalità di
INFO
visualizzazione delle informazioni
Riavvolgimento rapido iPod
)
Avanzamento rapido iPod
(
Memoria precedente/Categoria Sirius
]
precedente/Traccia iPod precedente
Memoria successiva/Categoria Sirius
[
successiva/Traccia iPod successiva
Stop iPod
#
Play/pausa iPod
$
Play/pausa iPod
&
Mostra il menu di impostazione del
MENU
sintonizzatore sul pannello anteriore
Memoria successiva/precedente, traccia
iPod precedente/successiva
Diminuzione/aumento frequenza
< >
sintonizzatore
Conferma la selezione
O
Cambia la modalità di ricezione FM fra
FM MONO
mono e stereo
P/TUNE
Entra/esci da modalità richiamo memoria
Entra/esci da modalità registrazione
STORE
memoria
Scorrete ciclicamente attraverso le bande
BAND
del sintonizzatore disponibili
Modalità dispositivo CD
Il pulsante modalità dispositivo c congura il CR902
per controllare le funzioni dei lettori CD Arcam.
Passa da standby ad acceso e viceversa
P
Aprire/chiudere il vassoio del disco
!
I tasti numerici consentono di accedere
direttamente alle singole tracce di un disco.
Per selezionare una traccia, premete il
0…9
pulsante corrispondente sul tastierino. Per le
tracce sopra il 9, inserite le cifre in sequenza.
Ad esempio, per riprodurre la traccia 15,
premete 1 e poi 5.
Scorre fra le opzioni di luminosità del
DISP
display del pannello anteriore
Cambia le modalità di visualizzazione
MODE
disponibili sul lettore CD
Riavvolgimento rapido
)
Avanzamento rapido
(
Torna all'inizio della traccia corrente/
]
precedente
Passa all'inizio della traccia successiva
[
Interrompe la riproduzione
#
Play
$
Mette la riproduzione in pausa
&
Naviga fra gli elenchi delle tracce, se
supportato dal lettore
seleziona la traccia evidenziata, se
O
supportato dal lettore
Attiva e disattiva la riproduzione casuale
SHUFF
('shue')
Ripeti brano eettua la riproduzione del
brano corrente dopo aver raggiunto la ne
di detto brano.
Ripeti tutto ripete la sezione corrente dei
RPT
brani dopo aver raggiunto la ne del brano
nale.
Per ripetere una traccia specica,
selezionatela e premete due volte RPT. Per
annullare, premete RPT una terza volta.
Modalità dispositivo BD
Il pulsante modalità dispositivo � congura il CR902
per controllare le funzioni dei lettori BD Arcam.
Passa da standby ad acceso e viceversa
P
Aprire/chiudere il vassoio del disco
!
I tasti numerici consentono di accedere
direttamente alle singole tracce di un
disco. Per selezionare una traccia, premete
0…9
il pulsante corrispondente sul tastierino.
Per le tracce sopra il 9, inserite le cifre in
sequenza. Ad esempio, per riprodurre la
traccia 15, premete 1 e poi 5.
Scorre fra le opzioni di luminosità del
DISP
display del pannello anteriore
Cambia le modalità di visualizzazione
MODE
disponibili sul lettore BD
Riavvolgimento rapido
)
Avanzamento rapido
(
Torna all'inizio della traccia corrente/
]
precedente
Passa all'inizio della traccia successiva
[
Interrompe la riproduzione
#
Play
$
Mette la riproduzione in pausa
&
Modica il formato di decodica audio
AUDIO
(Dolby Digital, DTS, ecc.).
MENU
Attiva il menu del lettore BD.
Naviga fra gli elenchi delle tracce, se
supportato dal lettore
seleziona la traccia evidenziata, se
O
supportato dal lettore
Torna al livello superiore del menu
.
('Home').
Quando navigate in un menu, premete
RTN
questo tasto per tornare alla schermata o
alla selezione precedente
Attiva e disattiva la riproduzione casuale
SHUFF
('shue')
Ripete la riproduzione del disco o di una
selezione di tracce. Per ripetere una traccia
RPT
specica, selezionatela e premete due volte
RPT. Per annullare, premete RPT una terza
volta.
menu di
impostazioni
Il menu Impostazioni consente di congurare tutti gli
aspetti del lettore CDS27. Questa sezione analizza le
voci del menu e ne spiega il funzionamento.
Il solo modo di visualizzare il menu Impostazioni è
sullo schermo del display del lettore CDS27.
Accesso ai menu di impostazioni
Se il menu principale non è attualmente visualizzato,
premete MENU sul telecomando per visualizzarlo.
PremeteC nché la voce MENU IMPOSTAZIONI non è
visualizzata è premere OK per accedere.
Navigazione all'interno dei menu
Potete navigare all'interno dei menu CDS27 utilizzando
i tasti cursore (freccia) sul telecomando.
1. Utilizzate i tasti B e C per navigare in alto e
in basso nel menu corrente.
2. Con la sezione principale richiesta, visualizzata
premete OK per selezionarla.
3. Utilizzate i tasti B e C per navigare in alto e
in basso tra le opzioni.
4. Premendo E selezionate una impostazione: usate
i tasti B e C per cambiare l'impostazione.
5. Premete OK per confermare l'impostazione.
Tornate indietro al passo 4 per regolare le altre
impostazioni nella sezione corrente.
6. Premete < per tornare alla schermata
precedente se si desidera scegliere un'altra
sezione da congurare.
Standby di rete – Questa voce stabilisce quali sono
le caratteristiche di rete disponibili quando il lettore
CDS27 si trova in standby.
Selezionando "ATTIVO" verrà mantenuta la
connessione di rete (richiesta per comando IP).
Selezionando "STANDBY" consentirà all'hardware di
rete di essere disattivato in modo da ridurre il consumo
di corrente.
Congurazione di rete– Questa voce consente
all'utente di congurare l'unità per unirsi a una rete
esistente; richiesto per la riproduzione audio di rete e
attraverso gli aggiornamenti soware di Internet.
Standby automatico – Consente all'utente di
specicare il periodo di inattività trascorso il quale
l'unità entra automaticamente in standby. Le opzioni
sono: 5/10/15/20/25/30 minuti.
Riproduzione automatica disco – controlla se un disco
ottico (per es. CD) viene riprodotto automaticamente
dopo essere stato inserito.
< Acceso: I dischi ottici verranno riprodotti
automaticamente.
< Spento: per riprodurre un disco premere play.
Aggiornamento del rmware – Potete controllare la
disponibilità di un aggiornamento rmware del lettore
selezionando questa voce di menu e premendo OK per
evidenziare 'Rete', quindi premete OK di nuovo.
Appare un messaggio se non è disponibile un nuovo
rmware, altrimenti seguite le istruzioni che compaiono
sullo schermo.
Carica predeniti – Premere OK quando è evidenziata
questa voce per ripristinare tutte le impostazioni a
quelle predenite in fabbrica.
Vi verrà richiesto di confermare il ripristino delle
impostazioni predenite di fabbrica. Selezionate
"Annulla" per uscire oppure ' per evidenziare
l'opzione "Sì" e OK per confermare.
Informazioni di sistema – Usate i tasti cursore
'/,
per navigare tra le opzioni.
Il pannello delle Informazioni di sistema mostra
informazioni sul lettore, quali l'indirizzo IP e la
versione rmware.
Audio di rete - Consente all'utente di attivare o
disattivare la capacità di resa UPNP del lettore.
Impostando questa opzione su ‘spenti' si disattiverà
l'audio di rete.
Uscita digitale - Consente all'utente di limitare la
velocità di campionatura dell'uscita digitale coassiale/
ottica.
Italiano
IT-11IT-10
Page 58

risoluzione dei
problemi
In caso di anomalia, controllate la tabella per la
risoluzione dei problemi prima di far riparare l'unità.
Se l'anomalia persiste, tentate di risolverla spegnendo e
accendendo di nuovo l'unità.
Se in tal modo non riuscite a risolvere la situazione,
contattare il proprio rivenditore. Non tentate di riparare
in alcun modo l'unità da soli, altrimenti si annulla la
validità della garanzia!
Problema Possibile causa Soluzione
Assenza di
alimentazione
Nessuna riproduzione
del disco
Nessun Disco/Disco
errato
Assenza di suono < I cavi audio sono scollegati. < Collegate i cavi correttamente.
Suono disturbato o
distorto
L'unità del telecomando
non funziona.
< Il cavo di ingresso CA è scollegato.
< Connessione eseguita male alla presa a muro di CA oppure la presa non
funziona.
< Il disco è caricato sottosopra.
< Il disco non è riproducibile.
< Il disco è sporco.
< Il disco registrato non è stato nalizzato correttamente.
< Il disco è graato, sporco, registrato male o non riproducibile. < Premete l'interruttore POWER per disattivare
< Il disco è sporco.
< Collegamenti eettuati male.
< Le batterie non sono state caricate o sono esaurite.
< Il sensore del telecomando è ostruito.
< Collegate il cavo correttamente.
< Controllate la presa utilizzando una lampada o un altro
elettrodomestico.
< Ricaricate il disco con il lato stampato verso l'alto.
< Utilizzate un disco riproducibile.
< Pulite il disco.
< Caricate un disco nalizzato correttamente.
l'alimentazione, premete l'interruttore POWER di nuovo e
togliete il disco.
< Pulite il disco.
< Controllare i collegamenti e ssare i cavi strettamente.
< Sostituite le batterie.
< Eliminate l'ostacolo.
speciche
Uscita audio analogico
Conversione digitale - analogico 24-bit 192kHz Delta-Sigma DAC
Rapporto segnale - disturbo 110dB CCIR
Distorsione armonica (1kHz) 0,002%
Risposta di frequenza (±0,5dB) 10Hz–20kHz
Livello di uscita (0dB) 2,2Vrms
Impedenza in uscita 47Ω
Carico minimo consigliato 5kΩ
Interfacce digitali
Uscite audio 75Ω TOSLINK co-assiale/ottico
USB USB 2.0 High Speed (480 Mbit/s)
Ethernet 10/100 10/100
Wireless b/g/n
Caratteristiche Fisiche
Dimensioni (L x P x A) 433 x 276 x 75
Peso 5,2kg/7,5kg confezionato
Consumo di corrente 20W massimo
Accessori in dotazione
Cavo di alimentazione CR902 telecomando 2 x batterie AAA, Antenna
WI-FI
E&OE
NOTA: Tutti i valori delle speciche sono tipici se non diversamente indicato
Interferenze radio
Il lettore CDS27 è un dispositivo digitale che è
stato progettato secondo standard di compatibilità
elettromagnetica molto elevati.
Tutti i lettori CD generano e possono irradiare
energia RF (radio frequenza). In alcuni casi questa
può provocare interferenza con la ricezione radio
FM e AM. In tal caso, allontanare il lettore e i cavi di
collegamento dal sintonizzatore e dalle relative antenne.
Il collegamento del lettore e del sintonizzatore a una
presa di alimentazione diversa può contribuire a ridurre
l'interferenza.
PAESI CE -Questo prodotto è stato progettato per
essere conforme alla direttiva EMC 2004/108/CE.
USA – Questi prodotti sono conformi con la normativa
FCC Parte 15 Classe B.
Radiazione laser
CLASSE II
PRODOTTO
LASER
Se il lettore CDS27 funziona
con la custodia esterna
smontata, la radiazione laser
invisibile potrebbe danneggiare
gli occhi.
Italiano
Politica di miglioramento continuo
Arcam ha una politica di continuo miglioramento
dei propri prodotti. Ciò signica che i progetti
e le speciche sono soggette a modiche senza
preavviso.
IT-13IT-12
Page 59

garanzia sul
prodotto
Garanzia in tutto il mondo
Questa garanzia dà diritto a far riparare l'apparecchio gratuitamente, nei primi due
anni dalla data di acquisto, a condizione che esso sia stato originariamente acquistato
presso un rivenditore autorizzato Arcam. Il concessionario Arcam è responsabile di
tutti i servizi postvendita. Il produttore non si assume alcuna responsabilità per difetti
derivanti da incidenti, uso improprio, abuso, usura, negligenza o da modiche e/o
riparazioni non autorizzate. Inoltre, il produttore non accetta alcuna responsabilità per
danni o perdite che si verichino durante il trasporto da o verso la persona che invoca la
garanzia.
La garanzia copre:
Parti e costo del lavoro per due anni dalla data di acquisto. Dopo due anni devono essere
pagate sia le parti che il costo del lavoro. La garanzia non copre mai i costi di trasporto.
Richieste in garanzia
Questo apparecchio deve essere imballato nella confezione originale e restituito
al rivenditore presso il quale è stato acquistato. Dovrebbe essere inviato tramite
spedizione prepagata con un vettore adabile e non per posta. Nessuna responsabilità
può essere accettata per l'unità mentre è in transito verso il rivenditore o il distributore
e i clienti sono pertanto invitati ad assicurare l'unità contro perdita o danno durante il
trasporto.
Per ulteriori dettagli contattare Arcam presso:
Arcam Customer Support Department, Unit 15, Pembroke Avenue, Waterbeach,
CAMBRIDGE, CB25 9QP, Inghilterra
o tramite www.arcam.co.uk.
Problemi?
Se il rivenditore Arcam non è in grado di rispondere a una domanda per quanto
riguarda questo o qualsiasi altro prodotto Arcam, si prega di contattare il supporto
clienti all'indirizzo Arcam di cui sopra e noi faremo del nostro meglio per aiutarvi.
Registrazione on-line
È possibile registrare il prodotto on-line all'indirizzo www.arcam.co.uk.
IT-14
Smaltimento corretto di questo prodotto
Questo marchio indica che il
prodotto non dovrebbe essere
smaltito con altri riuti domestici
all'interno dell'UE.
Per evitare eventuali danni
all'ambiente o alla salute umana
causati da smaltimento errato dei
riuti e per risparmiare le risorse
materiali, il prodotto deve essere riciclato in modo
responsabile.
Per smaltire il prodotto, si prega di utilizzare i
sistemi locali di restituzione e raccolta o contattare
il rivenditore presso il quale il prodotto è stato
acquistato.
Page 60
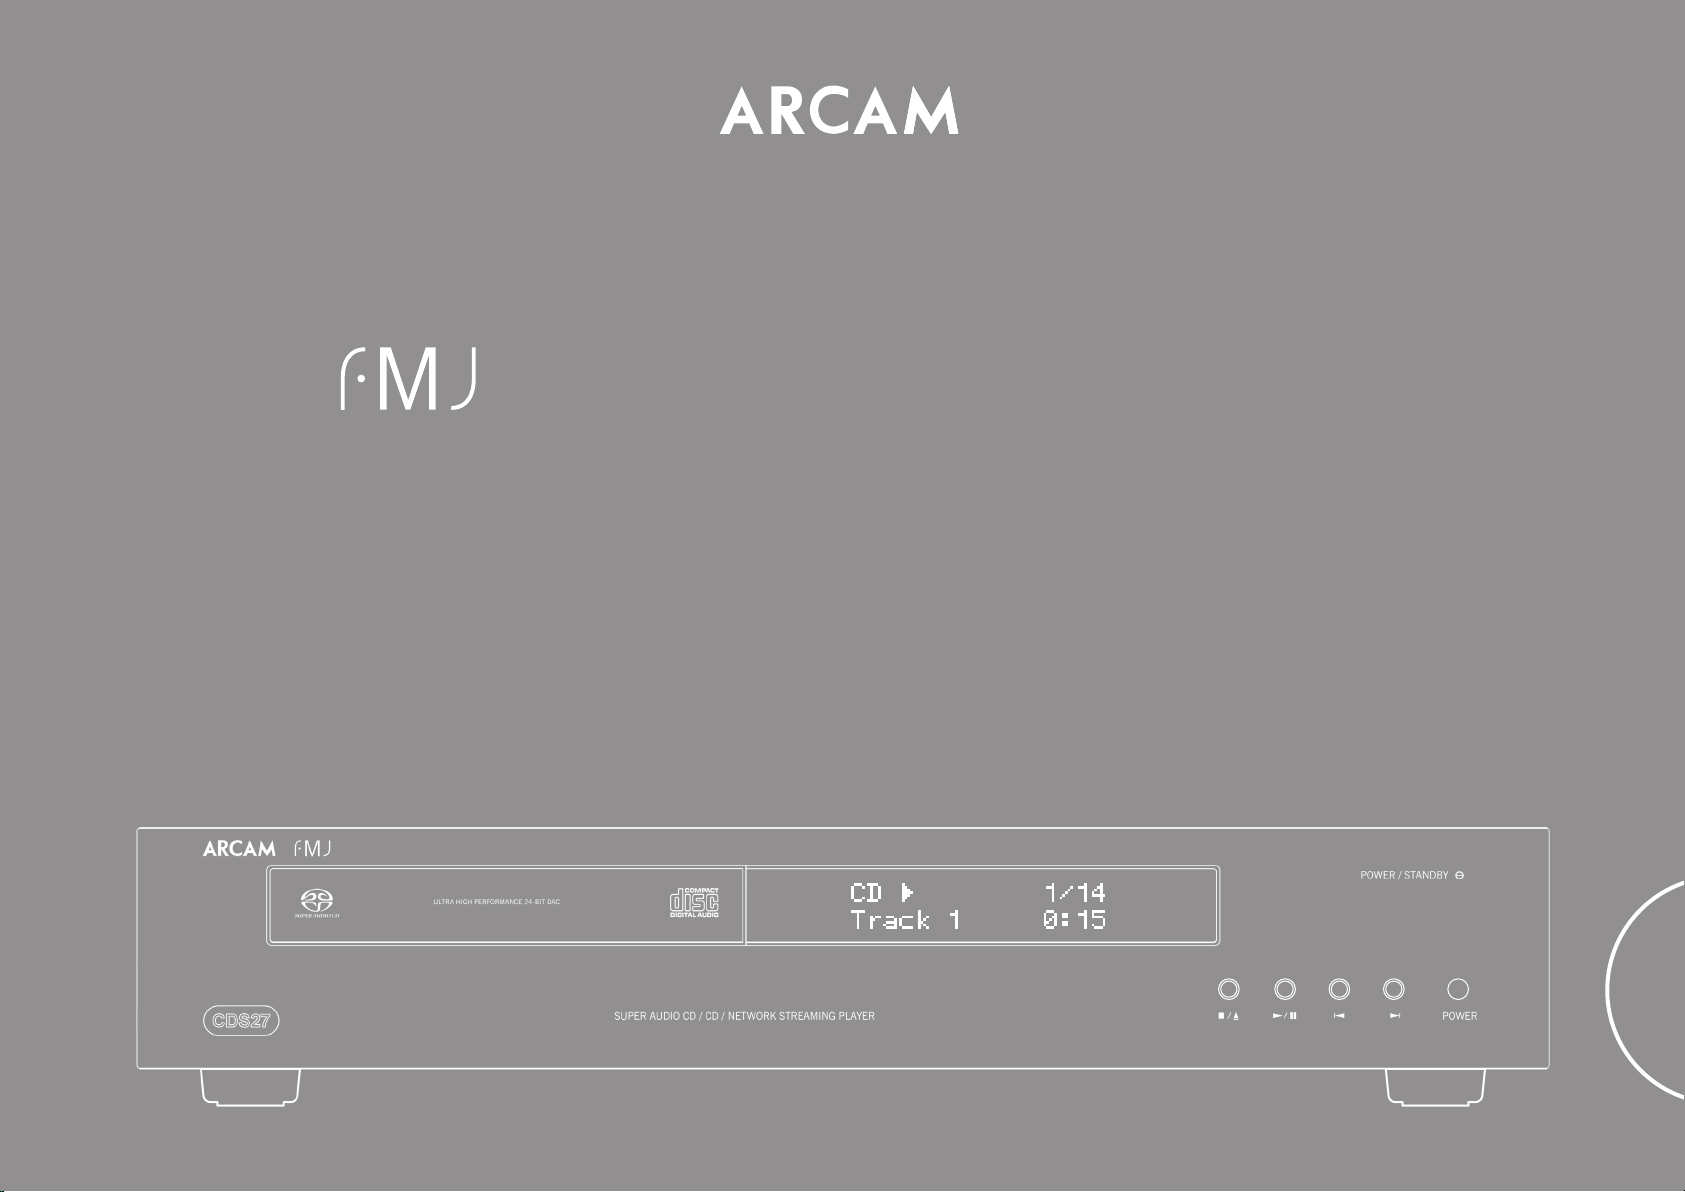
CDS27
手册 Super Audio CD/CD/网络流媒体播放器
简体中文
Page 61
安全指示
注意:为避免触电的危险,请勿拆下盖板(或者背板)。设备内部没有用户可维修部件。只能由合格的维修人员进行
维修。
警告:为避免火灾或触电的危险,请勿将本电器曝露在雨水或湿气环境中。
等边三角形包围的带箭头闪电符号旨在提醒用户,产品机箱内部存在未绝缘的“危险电压”,其能量足以
构成触电的危险。
等边三角形包围的惊叹号旨在提醒用户,设备随附的文档中提供了重要的操作与维护(维修)说明。
欢迎
重要安全指示
1. 阅读这些指示。
2. 保留这些指示。
3. 留意所有警告。
4. 遵照所有指示。
5. 请勿在水边使用本设备。
6. 只能使用干抹布进行清洁。
7. 请勿阻塞任何通风孔。请按照制造商的说明进
行安装。
8. 请勿将本设备安装在靠近热源(例如电热炉、
暖气机、火炉)或其他发热仪器(包括放大
器)的位置。
9. 请勿破坏定极插头或接地型插头的安全设计。
定极插头的一个插片宽,一个插片窄。接地型
插头包括两个插片,附加一个接地插片。定极
插头的较宽插片或者接地型插头的插片就是一
种安全设计。如果提供的插头不适合您的插
座,请联系电工来更换插座。
10. 防止电源线遭到踩踏或者缠绕,在插头、插座
和设备的电源线出口位置尤其要注意。
11. 只能使用制造商指定的附件/配件。
13. 雷电天气或长时间不用时,请拔
注意:在加拿大和美国,为避免触电,请将插头的较宽插片插入插座的较宽插孔,并将插头完全插入插座。
注意:执行非本文指定的任何控制、调整或程序可能会导致危险的辐射暴露。
12. 只能结合制造商指定的或者随本设备一起销售
的推车、支座、三脚架、托架或工作台使用本
设备。
若将设备安装于移动推车上使
用,移动推车时请务必小心,以
免翻倒造成人身伤害。
下设备的电源。
14. 当有维修需要时,请咨询合格的维修人员。
当电器出现任何形式的损坏,例如电源线或插
头受损、液体溅入电器、物件掉入电器、雨水
或湿气渗入电器、电器无法正常工作或者电器
已摔坏,则需要予以维修。
15. 物体或液体的进入
警告——小心不要让任何物体或者液体通过开
孔掉入(溅入)机箱内部。本设备应远离滴水
或溅水。不得在本设备上放置任何装有液体的
物件,例如花瓶。
16. 气候条件
本设备只能在气候适宜的条件下于家庭环境中
使用。
17. 清洁
在清洁之前,请从主电源上拔下本设备。
要清洁设备,只需使用柔软的不脱毛抹布擦
拭。请勿使用化学溶剂进行清洁。
不建议使用家具清洁喷剂或抛光剂,因为这些
物质会导致永久性的白斑。
18. 电源
只能将本设备连接到操作说明书中所述的或设
备上标示的电源类型。
断开设备主电源的主要方法就是拔下电源插
头。安装后的设备必须能够方便地拔下电源。
19. 异味
如果发现设备发出异味或烟雾,请立即关闭电
源,并从墙上插座中拔下电源装置。然后联系
您的经销商,并且不要再次连接设备。
20. 需要维修的损坏
发生以下情况时,设备应由合规的维修人员进
行维修:
A. 电源线或插头受损;
B. 物件掉入设备或液体溅入设备;
C. 设备被雨水淋湿;
D. 设备无法正常工作或性能发生变化;
E. 设备被摔坏或机箱受损。
警告——主插头用作断开装置时,应保持随时可
用。
警告——电池不应暴露在过热热源之下,例如阳光
或火源。
警告——如果电池更换不当,会有爆炸危险。只能
以相同或等同类型的电池进行更换。
安全合规性
本设备设计为可以满足 IEC/EN 60065 国际电气安全
标准。
本产品符合 FCC 规则第 15 部分。此规则要求设备
的工作符合下列两个条件:
(1)本设备不能产生有害干扰;
(2)本设备不受任何干扰(包括可能导致工作异常的
干扰)的影响。
感谢并祝贺您购买了 Arcam FMJ CDS27 播放器。
CDS27 在播放 CD、SACD、USB 和网络音频时都可实现领先的音质效果。最先进的
高性能 Delta-Sigma 数模转换器 (DAC) 可提供音响发烧友级的音质,要真正把你的音
乐生活。
Arcam 30 多年来一直制造高质量的专业级高保真和家庭影院产品,CDS27 正是众多
获奖的设备中的最新力作。FMJ系列凝聚了英国口碑最好的音频产品制造公司之一 —
Arcam 的丰富经验,可以为您带来长久畅然无忧的聆听享受。
本手册旨在为您提供安装、连接和使用 您新购买 播放器所需的全部信息。该设备附
带的遥控器也在本手册中进行了说明。请参考下一页显示的目录列表转到您想要了解
的章节。
我们希望 播放器能给您带来长久的聆听享受。如果您的产品发生故障(这种情况很
罕见),或者您只是想要了解有关 Arcam 产品的其他信息,我们的经销商网点将很乐
意为您效劳。您也可以从 Arcam 网站 www.arcam.co.uk 了解更多信息。
FMJ 开发团队
简体中文
SC-3SC-2
Page 62

目录
安全指示 ................................................................................................................................................... SC-2
重要安全指示.................................................................................................................................................................................SC-2
安全合规性 .....................................................................................................................................................................................SC-2
欢迎 ............................................................................................................................................................ SC-3
安装 ............................................................................................................................................................ SC-5
放置设备 ..........................................................................................................................................................................................SC-5
电源 ....................................................................................................................................................................................................SC-5
遥控和触发输入 ............................................................................................................................................................................SC-5
连接线缆 ..........................................................................................................................................................................................SC-5
CDS27 连接 ............................................................................................................................................... SC-6
网络连接 ..........................................................................................................................................................................................SC-7
USB 连接 ...........................................................................................................................................................................................SC-7
进行音频连接.................................................................................................................................................................................SC-7
可播放的光盘.................................................................................................................................................................................SC-7
支持的媒体类型 ............................................................................................................................................................................SC-7
基本操作 ................................................................................................................................................... SC-8
遥控器........................................................................................................................................................ SC-9
设置菜单 .................................................................................................................................................SC-11
导航菜单 ....................................................................................................................................................................................... SC-11
故障排除 .................................................................................................................................................SC-12
规格 ..........................................................................................................................................................SC-13
无线电干扰 .................................................................................................................................................................................. SC-13
激光辐射 ....................................................................................................................................................................................... SC-13
产品保修 .................................................................................................................................................SC-14
全球联保 ....................................................................................................................................................................................... SC-14
保修免责声明.............................................................................................................................................................................. SC-14
问题解决 ....................................................................................................................................................................................... SC-14
在线注册 ....................................................................................................................................................................................... SC-14
安装
放置设备
请将 CD 播放器放置在水平坚固的表面之上,
<
避开日光的直接照射以及热源或潮湿环境。
请不要将 CD 播放器放置在放大器或其他热源
<
之上。
除非提供良好的通风,否则请不要将 CD 播放
<
器置于封闭空间(例如书柜或封闭的柜子)
内。CD 播放器在正常工作过程中会变热。
不要将任何其他组件或物品放置在 CD 播放
<
器之上,因为这可能会阻挡播放器附近的气
流,导致 CD 播放器发烫。
确保遥控接收器(位于前端面板上的显示屏
<
旁)未受阻挡,否则遥控功能会受影响。
请勿在本设备的顶部放置录音机。录音机对
<
主电源产生的噪声非常敏感,如果录音机与
主电源靠得太近,会录下背景“哼声”。
电源
CD 播放器配备已安装在导线之上的模制主插头。
请检查随附的插头是否与您的电源规格相符——如
需新购电源导线,请联系您的 Arcam 经销商。
如果主电源的电压与电源插头上规定的电压不同,
请立即联系您的 Arcam 经销商
将电源线的 IEC 插头端推入 CD 播放器背面的插
槽,确保插入到位。将电源线的另一端插入主电源
插座,必要时打开插座的电源。
遥控和触发输入
如果将 CDS27 安装在无法使用红外功能的位置或
系统中,可以使用 REMOTE IN 输入来向 CDS27 传送
RC5 代码。如果需要使用,请联系您的经销商,以
便获取更多信息。
注
遥控输入需要尖端有源、套管接地的单声
<
道 3.5mm 插孔。
遥控信号必须为调制 RC5 格式(频率
<
36kHz),电压电平介于 5V 和 12V 之间。
12V TRIGGER IN 输入可使 CDS27 进入和退出待机模
式。连接您的 Arcam 放大器(或其他兼容设备)的
触发输出,将导致 CDS27 在放大器打开时自动退出
待机模式,在放大器关闭时回到待机模式。请参阅
您的放大器手册,以便获取更多信息。
正常使用中不需要连接这些输入。
RS232 输入是适用于家庭自动化系统或计算机的可
选连接。有各种第三方系统可使用触控屏幕等对
您的所有娱乐设备进行精密控制。请联系您的经
销商或安装人员,以便获取更多详细信息。Arcam
可按需提供遥控协议的技术详细信息(电子邮箱
support@arcam.co.uk)。
连接线缆
建议使用针对特定应用设计的优质屏蔽线缆。其他
线缆的电阻特征不同,会降低系统的性能(例如,
请勿使用视频专用线缆来传输音频信号)。尽量使
用短线缆,其长度只要够用即可。
在连接设备时,最好让主电源线尽量远离音频线。
否则,音频信号中可能会出现令人讨厌的噪声。
简体中文
SC-5SC-4
Page 63
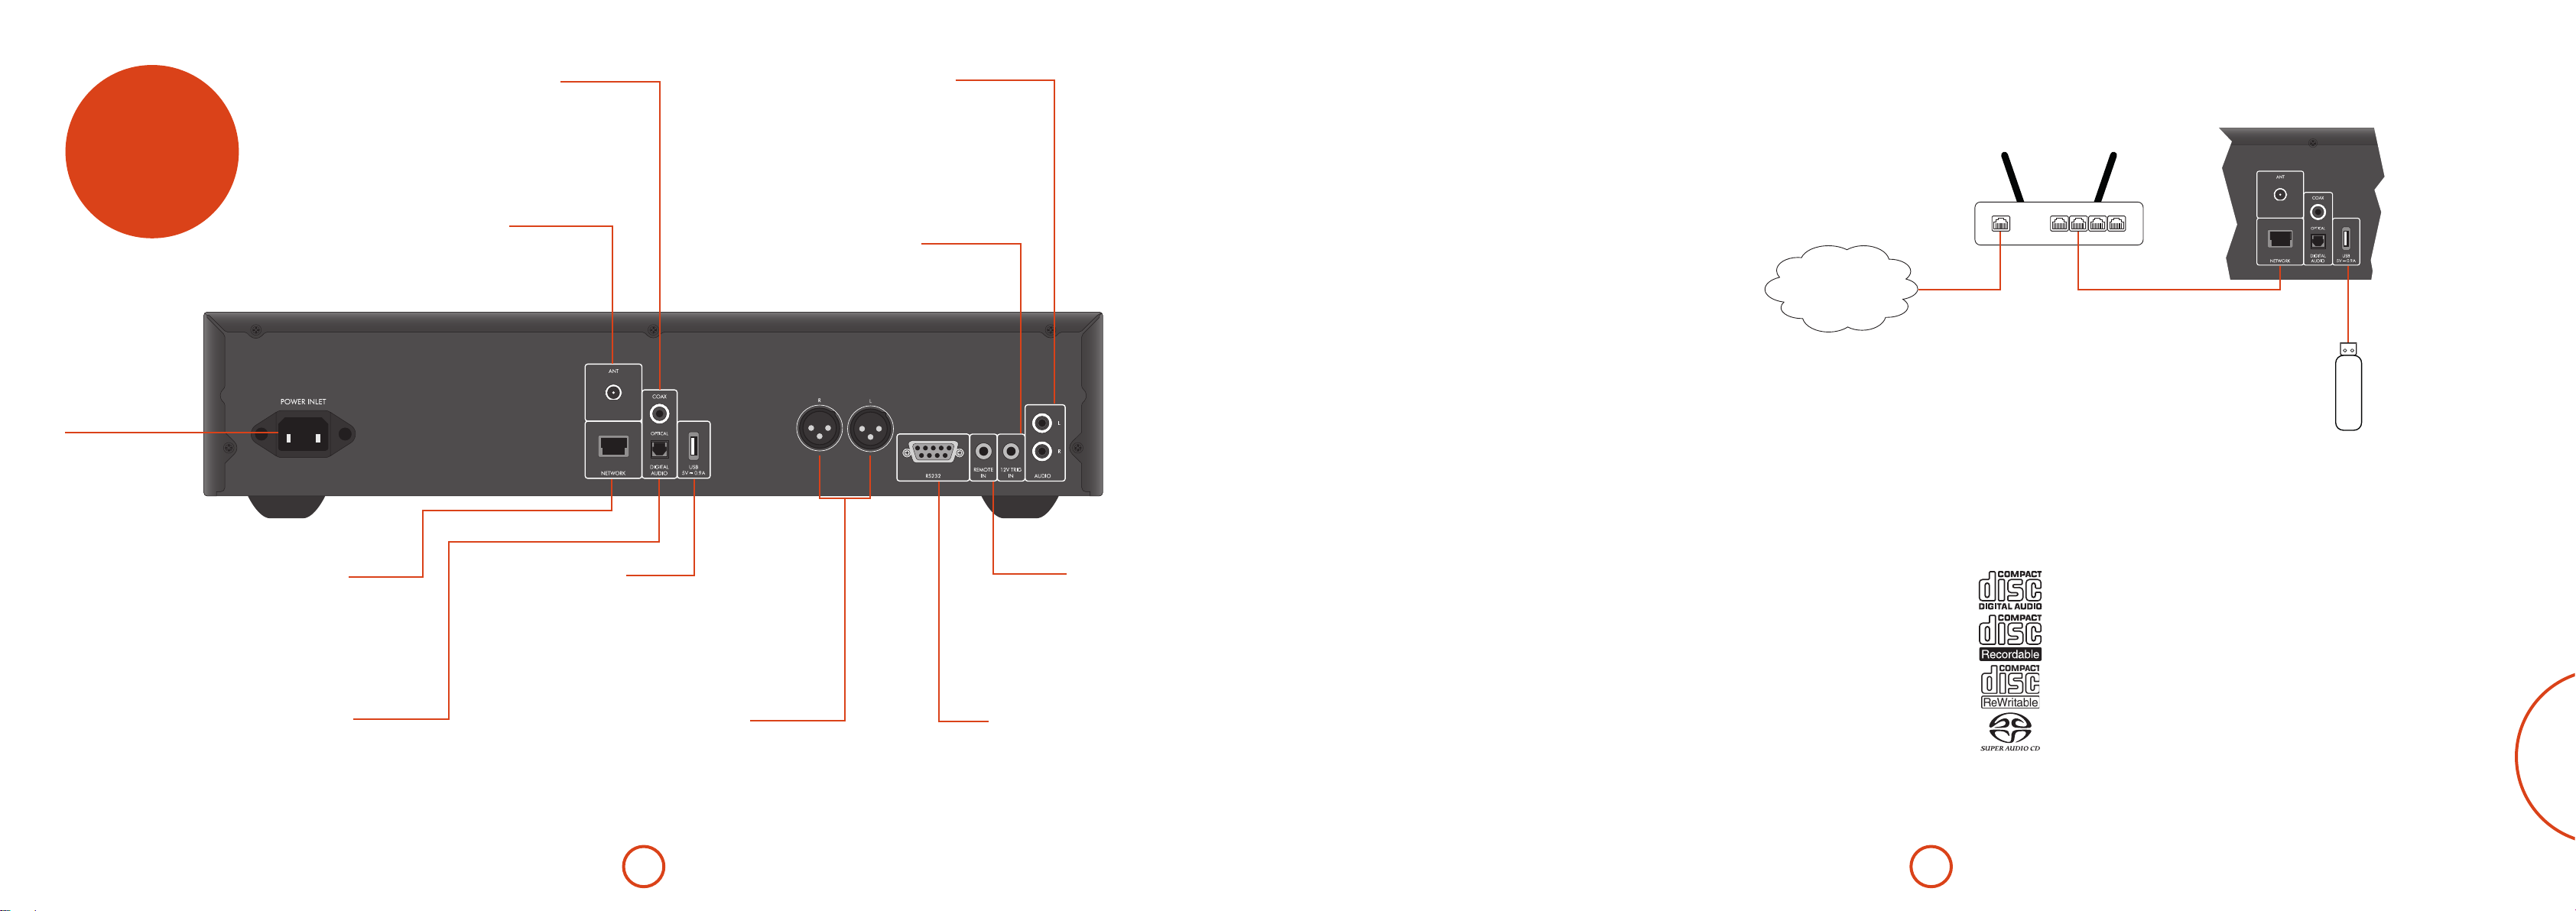
CDS27 连接
同轴数字输出
如果您使用的是具有同轴数字输入的高质量音响发烧
友级 DAC,应使用这个插槽。使用合适的 75Ω 屏蔽
线缆连接至数字输入。
注意:切勿将数字输出插槽连接至传统的音频输入。
唱机音频输出
请使用适用的高品质互连线缆将这些输出连接至
您放大器的 CD(或其他线路电平)输入。请确保
将 CD 播放器的左、右音频输出连接至您放大器上
的相同左、右输入。
网络连接
可使用以太网线缆将 CDS27 连接到家庭网络中的路
由器或交换机,以播放储存在电脑或 NAS 设备上的
音频。
另外,还提供无线连接,您可通过设置菜单进行配
置。
路由器
电源输入
在此处连接正确的
电源线。
如果需要无线网络连接,可以连接附带的 Wi-Fi
天线。网络连接可实现网络音频播放(具体设置
网络连接
使用以太网跳接线将此插槽连接至您网络路
由器上的端口(请参阅第 7 页的内容)。网
络连接可实现网络音频播放(具体设置方法
请参阅第 11 页的内容)。
光纤数字输出
如果您正使用带光纤数字音频输入的 AV
接收器,请使用该插槽。
无线网络连接
方法请参阅第 11 页的内容)。
在此处插入 USB 闪存设备。CDS27 也可
以播放存储在 USB 存储设备上的特定数
字文件(请参阅第 7 页的“支持的媒体
使用适用的高品质互连线缆将这些连接至您放大器的 CD
(或其他平衡)输入。请确保将 CD 播放器的左、右音频
该插槽使得可以通过带 12V TRIG OUT 功能的放大器
(或其他 AV 设备),让 CDS27 进入和退出待机模
USB 连接
类型”)。
平衡音频输出
输出连接至您放大器上的相同左、右输入。
12V 触发输入
式。参阅第 5 页的内容。
RS232
该连接支持第三方家庭自动化系统或计算机
的遥控器。
请参阅第5页的内容,以便了解更多信息。
遥控输入
如果覆盖了前面板上的遥控传感器,
这使得 CDS27 可以接收遥控信号,
(否则对于遥控器“不可见”)。
请参阅第5页的内容,以便了解更多
信息。
USB 连接
1 个 USB type A 插槽,用来连接存有音频的闪存盘
或移动硬盘。
也可用来进行软件升级。
互联网
进行音频连接
CDS27 提供多种音频连接方式,连接类型的选用取决于系统的其他部分;应选择最适合您放大器的连接类
型。
如果想获得最佳的立体声音质,我们建议您将立体声模拟音频输出连接到放大器上的 CD 输入端,以使用
CDS27 的发烧友级数模转换电路。
模拟
使用一对长度合适的立体声唱机线缆将标记为 "Phono" 的输出连接到放大器的
左、右 CD/SACD 输入。
或者,将左/右平衡输出连接到放大器的平衡输入。
数字
将 1 个数字音频输出(光纤或同轴)连接到接收机的 "CD/SACD" 数字输入,
这些数字输出只提供 PCM 立体声。
LAN
可播放的光盘
播放器支持以下的光盘类型:
CD-Audio
CD-R
CD-RW
超级音频 CD
USB 闪存驱动器
支持的媒体类型
可通过光盘、USB 和网络播放以下文件格式。
FLAC,最大24位,192KHz
<
WAV ,最大24位,192KHz
<
AAC,最大24位,96KHz
<
AIFF,最大24位,192KHz
<
OGG,最大24位,192KHz
<
MP3,最大320kbps,48KHz
<
WMA,最大192kbps,48KHz
<
简体中文
SC-7SC-6
Page 64

基本操作
AUDIO
SACD
MENU
FM MONO P/TUNE
STORE
INFO
BD
CR902
RTN
遥控器
简介
“基本操作”介绍如何播放音频光盘、网络内容和
存储在 USB 介质上的音频文件。注意需针对系统正
确配置您的播放器,才能正常播放或者获得最佳播
放效果。播放器配置从第 11 页开始描述。
开机
按 POWER 按钮打开本设备。本设备加电时,状态
LED 指示灯呈绿色,处于待机模式时,指示灯呈红
色。使用遥控器上的待机按钮进入待机模式;使用
该按钮或前端面板上的 </1 按键退出待机模式。
如果在本设备处于待机模式时按下 POWER 按钮(或
者移除电源),重新加电时,本设备将会进入待机
模式。
请注意,遥控传感器处于显示窗口的右侧。不要阻
挡此传感器,否则遥控器将无法工作。
播放光盘
按前端面板上的 </1(或者遥控器上的 1),将
光盘放置在托盘之上,播放面朝下(某些光盘为双
面光盘,此时要播放 A 面,则标有“A 面”的一侧
应朝上)。
按前端面板上的 </1 以便关闭托盘。光盘将在暂
停数秒后加载。
一旦托盘关闭,可能需要花费一些时间来加载光
盘。若“光盘自动播放”设置为开启(默认设
置),会自动播放光盘。(具体内容请参阅第 11
页的“光盘自动播放”)。
如果光盘没有自动播放,请使用前端面板上的 4/;
或遥控器上的 4。
网络播放
确保将 CDS27 连接到本地网络。选择主屏幕上的
“媒介浏览器”,用户会看到可供选择的设备列
表。使用遥控器的
备库中进行选择。
可在电脑、手机或移动设备上利用您最喜欢的
UPnP 控制点应用来控制网络音乐的播放。
',<>
按键在所提供的设
在突出显示的音频文件上点 OK 或 4,对该文件进
行访问播放。播放器会继续播放目录中该曲目后面
的所有曲目。
USB 播放
将您的 USB 设备插到 CDS27 后面的 USB 插槽中。
待播放器识别 USB 设备后,选择主屏幕中的“媒介
浏览器”,然后从媒介列表中选择 "USB"。
使用遥控器上的
并点击 OK、4或 > 播放突出显示的音频文件。播
放器会继续播放目录中该曲目后面的所有曲目。
',<>
按键导航音频文件,
播放过程中
快进和快退
可以按前端面板或遥控器上的 8 或 7 以 4 倍的正
常播放速度快进或快退。如要恢复正常播放速度,
可以按 播放。
跳过章节/曲目
如要跳过曲目,可以按 /或 0。
后跳时,第一次按下按钮将使您进入当前曲目的起
始位置。再次按下按钮将使您进入上一曲目的起始
位置。
暂停播放
按前端面板上的 4/; 或遥控器上的 ;,以便暂停
播放。如要继续播放,按前端面板上的 4/; 或遥
控器上的 4。
停止播放
按前端面板上的 </1 按钮或遥控器上的 <,以便
停止播放。
CDS27 配备 CR902 遥控器。
使用遥控器
使用遥控器时请注意以下事项:
确保遥控器和前端面板上的遥控传感器之间
<
没有障碍物。遥控范围大约为7米。(如果遥
控传感器受到阻挡,可以使用后端面板上的
IR 输入遥控输入插孔。有关其他信息,请咨
询您的经销商)。
如果有强烈的日光或荧光照射在本设备的遥
<
控传感器之上,遥控操作可能会变得不稳
定。
当您发觉遥控器的工作范围缩短时,请更换
<
电池。
将电池插入遥控器
1. 打开遥控器背面的电池室。
2. 按照电池盖上的图示插入两节‘AAA’电
池。
3. 滑动电池盖使其重新就位并锁闭(发出卡嗒
声)。
注
不当地使用电池可能会导致漏液和爆炸等
<
危险。
请勿混用新旧电池。
<
不要混用类型不同的电池——尽管它们看
<
上去类似,但不同的电池可能具有不同的
电压。
确保每节电池的正 (+) 负 (–) 端与电池室中
<
的指示相符。
如果有一个月或更长时间不使用遥控器,
<
请取出电池。
请根据您所在国家/地区适用的政府或当地
<
法规处置废旧电池。
CR902 遥控器符合 FCC 规则的第 15 部分
本设备经测试,符合 FCC 规则第 15 部分 B 类数
码设备的限制。规定这些限制是为了合理地防止
在居民区产生有害干扰。本设备会产生、使用并
可能发射无线射频,如果不按照说明书进行安装
和使用,可能会给无线电通信造成有害干扰。但
是,我们无法保证本设备在特定安装项目中不会
产生干扰。如果本设备确实给无线电或电视接收
造成有害干扰(可以通过关闭再打开本设备进行
检测),则建议用户尝试使用下列一种或多种措
施来解决干扰:
重新摆正或重新定位接收天线。
增大本设备与接收器之间的分隔距离。
将设备连接到电路中的插座内,该插座不是接收
器所连接到的插座。
向经销商或有经验的音频技术人员寻求帮助。
简体中文
SC-9SC-8
Page 65

AMP设备模式
可以使用设备模式按钮 A 来配置 CR902,以便控
制您的 Arcam 放大器。按下此按钮不会影响放大器
上当前选择的输入。
将电源切换为待机或打开
P
DISP
切换前面板显示屏的亮度选项
MODE
切换前端面板显示模式
MENU
在前端面板上显示放大器设置菜单
导航菜单
确认选择
O
切换放大器的静音功能
@
Vol +/– 可以提高或降低 Arcam 放大器的
音量。
Vol-
按 静音 按钮一次可使 Arcam 放大器静
Vol+
音。再按一次(或使用 Vol +/–)可以取
消静音。
SP1
切换扬声器1输出
SP2
切换扬声器2输出
BAL
调节左右音频通道的平衡
注
CR902 遥控器可用于多款设备,因此按键功能会
根据最后按动的输入按钮不同而有所不同。
请在控制 CDS27 之前,确保 "CD" 按钮已被选
中。
TUN设备模式
可以使用设备模式按钮 T 来配置 CR902,以便控
制 Arcam 调谐器的调谐器功能。
将电源切换为待机或打开
P
0…9
' ,
< >
FM MONO
可以使用这些数值按键存储和调用预
设曲目
DISP
切换前面板显示屏的亮度选项
INFO
切换不同的信息显示模式
使 iPod 快退
)
使 iPod 快进
(
上一预设曲目/Sirius 产品进入上一类
]
别/使 iPod 播放上一曲目
下一预设曲目/Sirius 产品进入下一类
[
别/使 iPod 播放下一曲目
使 iPod 停止
#
使 iPod 播放/暂停
$
使 iPod 播放/暂停
&
MENU
在前端面板上显示调谐器设置菜单
上一预设曲目/下一预设曲目,使iPod
播放上一曲目/下一曲目
提高/降低调谐频率
确认选择
O
在单声道和立体声接收之间切换FM模
式
P/TUNE
进入/退出预设曲目调用模式
STORE
进入/退出预设曲目存储模式
BAND
切换可用的调谐器频段
CD 设备模式
可以使用设备模式按钮 c 来配置 CR902,以便控
制 Arcam CD 播放器的 CD 功能。
将电源切换为待机或打开
P
打开/关闭光盘托架
!
通过数字按键可以直接访问 CD 光盘
上的个人曲目。如要选择某个曲目,
0…9
按对应的数字键即可。对于编号大于
9 的曲目,按顺序输入曲目编号数字
即可。例如,如要播放 15 号曲目,按
,然后按 5 即可。
1
DISP
切换前面板显示屏的亮度选项
MODE
更改 CD 播放器上的可用显示模式
快退
)
快进
(
快退至当前/上一曲目的起始位置
]
快进至下一曲目的起始位置
[
停止播放
#
播放
$
切换播放的暂停状态
&
在播放器支持的情况下,可以浏览曲
目列表
在播放器支持的情况下,O可以选择当
前突出显示的曲目
SHUFF
打开或关闭随机播放
重复曲目是指当前曲目播放完毕后重
新播放该曲目。
重复所有是指当前曲目列表播放完毕
RPT
后重新播放该列表。
如要重复播放特定曲目,可以选择该
曲目,然后按 2 次 RPT。如要取消重
复,再按一次 RPT 即可。
BD设备模式
可以使用设备模式按钮 � 来配置 CR902,以便控
制 Arcam BD 播放器的 BD 功能。
将电源切换为待机或打开
P
打开/关闭光盘托架
!
通过数字按键可以直接访问 CD 光盘
上的个人曲目。如要选择某个曲目,
0…9
按对应的数字键即可。对于编号大于
9 的曲目,按顺序输入曲目编号数字
即可。例如,如要播放 15 号曲目,按
,然后按 5 即可。
1
DISP
切换前面板显示屏的亮度选项
MODE
更改 BD 播放器上的可用显示模式
快退
)
快进
(
快退至当前/上一曲目的起始位置
]
快进至下一曲目的起始位置
[
停止播放
#
播放
$
切换播放的暂停状态
&
更改音频解码格式(Dolby Digital、
AUDIO
DTS 等)。
MENU
激活 BD 播放器菜单。
在播放器支持的情况下,可以浏览曲
目列表
在播放器支持的情况下,O可以选择
当前突出显示的曲目
导航回到菜单的顶层,即“主页”。
.
对菜单进行导航操作时,按此键可以
RTN
返回上一屏幕或选择
SHUFF
打开或关闭随机播放
重复播放 CD 光盘或预先编程选定的曲
目。如要重复播放特定曲目,可以选
RPT
择该曲目,然后按 2 次 RPT。如要取消
重复,再按一次 RPT 即可。
设置菜单
您可以利用设置菜单配置 CDS27 的所有内容。这个
章节将介绍各个菜单项和它们的功能。
只能在 CDS27 的显示屏幕上查看设置菜单。
进入设置菜单
如果主菜单目前未显示,按遥控器上的 MENU 可以
显示该菜单。
持续按 C,直到显示 设置菜单为止,然后按 OK 进
入。
导航菜单
使用遥控器上的箭头键可以浏览 CDS27 菜单。
1. 使用 B 和 C 按键向上和向下浏览当前菜
单。
2. 如果显示出您所需的主选项,按 OK 选择进
入。
3. 使用 B 和 C 按键向上和向下浏览选项。
4. 按 E 可以选择设置:使用 B 和 C 按键可
以更改设置。
5. 按 OK 可以确认设置。回到步骤 4 可以调整当
前部分中的任意其他设置。
6. 如果您想要选择需要调整的另一选项,按 <
可以返回上一屏幕。
网络待机
——该选项决定当 CDS27 处于待机状态
时,网络功能是否可用。
若选择“活动”,将保持网络连接(IP 控制需选择
该项)。
若选择“待机”,将使网络硬件的电源休眠,以降
低功耗。
网络设置
——用户可利用该选项对设备进行配置并
加入已有网络,以实现网络音频播放和因特网软件
升级。
自动待机
——用户可利用该选项指定设备在未使
用多长时间后自动进入待机模式。可用选项有:
5/10/15/20/25/30 分钟。
光盘自动播放
——控制光盘(例如 CD)插入后是
否自动播放。
开启:光盘将会自动播放。
<
关闭:必须按播放才能播放光盘。
<
固件更新
——通过选择该菜单项,然后按 OK 使
‘网络’ 突出显示,最后再次按 OK,可以检查是
否有适用于播放器固件的升级。
如果没有新的可用固件,将会显示一条提示信息,
否则请遵循屏幕指令进行操作。
恢复默认设置
——在该选项突出显示时,按 OK,可
以将所有设置重置为出厂默认值。
您将会收到一条提示信息,以确认是否要恢复出厂
默认设置。选择“取消”退出,或者选择 ' 突出
显示“是”选项,并选择 OK 确认。
系统信息
——使用'/, 键切换选项。
系统信息面板显示有关播放器的信息,例如 IP 地址
和固件版本。
网络音频
——用户可利用该选项开启或关闭播放器
的 UPNP 渲染功能。将该选项设置为“关闭”,将
关闭网络音频功能。
数字输出
——用户可利用该选项限制同轴/光纤数
字输出的采样率。
简体中文
SC-11SC-10
Page 66

故障排除
如果发生故障,在将您的设备送修之前检查该故障
排除表。
如果故障仍然存在,通过将本设备关闭,然后再打
开来尝试排除故障。
如果未能排除故障,请咨询您的经销商。在任何情
况下,您都不得自行维修本设备,因为这样做会使
保修失效!
问题 可能的原因 补救措施
无电源
无光盘播放
无光盘/坏光盘
没有声音
声音失真或存在噪声
遥控器不工作。
AC 输入线已断开。
<
AC 墙上插座接触不良或插座未通电。
<
光盘正反颠倒。
<
光盘不可播放。
<
光盘脏污。
<
光盘录制未正确完成。
<
光盘已擦伤、脏污、录制不良或无法播放。
<
音频线已断开。
<
光盘脏污。
<
接触不良。
<
未安装电池或电池电量已耗尽。
<
遥控传感器受到阻挡。
<
牢固连接电源线。
<
使用灯具或其他设备检查插座。
<
打印面朝上重新加载光盘。
<
使用可播放的光盘。
<
清洁光盘。
<
加载录制正确完成的光盘。
<
按电源开关关闭电源,再次按电源开关,然后卸载光盘。
<
正确连接线缆。
<
清洁光盘。
<
检查连接,并牢固连接所有线缆。
<
更换电池。
<
移除障碍物。
<
规格
模拟音频输出接口
数字至模拟转换 24 位 192kHz 增量累加 DAC
信噪比 110dB CCIR
谐波失真 (1kHz) 0.002%
频率响应 (±0.5dB) 10Hz-20kHz
输出电平 (0dB) 2.2Vrms
输出阻抗 47Ω
最小推荐负载 5kΩ
数字接口
音频输出 75Ω 同轴/光纤 TOSLINK
USB USB 2.0 高速 (480 Mb/s)
以太网 10/100 10/100
无线 b/g/n
物理
尺寸(宽×深×高) 433 x 276 x 75
重量 5.2kg/7.5kg包装后
功耗 最大 20W
随附件
电源线,CR902 遥控器,2 节 AAA 电池,Wi-Fi 天线
E&OE
注:除非另有说明,否则所有规格值均为典型值。
无线电干扰
CDS27 光盘播放器是一款设计为符合极高电磁兼容
性标准的数字设备。
所有 CD 播放器都会产生和辐射 RF(射频频率)能
量。在某些情况下,这可能会导致 FM 和 AM 射频
接收干扰。如果出现这种情况,使播放器及其连接
线缆尽可能地远离调谐器及其天线。将播放器和调
谐器连接至不同的主插槽还可以帮助减少干扰。
欧盟国家/地区——本产品的设计符合 EMC 指令
2004/108/EC。
美国——这些产品符合 FCC 规则第 15 部分 B 类的
要求。
激光辐射
II 类
激光产品
如果 CDS27 光盘播放器在拆
除外壳的情况下工作,不可
见的激光辐射可能会导致眼
部受伤。
持续改进政策
Arcam 针对其产品推行持续改进政策。这意味着
我们可能随时更改设计和规格,恕不另行通知。
简体中文
SC-13SC-12
Page 67

产品保修
全球联保
在购买本设备后的 2 年内,您享有免费保修权,但前提是您的设备是从授权的
Arcam 经销商那里原装购买的。Arcam 经销商负责提供所有的售后服务。对于由
于意外、误用、滥用、磨损、疏忽、未经授权的调校和/或维修而导致的缺陷,制
造商可以不承担任何责任,此外,对于在运输期间发生的损坏或丢失,制造商可
以不履行保修义务。
保修范围:
2 年期(从购买日期开始算起)部件与人工费用。2 年后,您必须支付部件和人工
费用。无论何时,保修都不包括运输费用。
保修免责声明
应该使用原有包装将本设备退回到销售本设备的经销商。应该在预付运费的情况
下通过快递公司发货——请勿邮寄。如果设备在发往经销商或分销商的途中出现
问题,我们不承担责任;因此,客户需确保设备在运输途中不会发生丢失或损
坏。
有关更多详细信息,请联系 Arcam,
Arcam Customer Support Department,Unit 15, Pembroke Avenue, Waterbeach,
CAMBRIDGE, CB25 9QP, England
或者通过 www.arcam.co.uk 进行联系。
问题解决
如果您的 Arcam 经销商无法解答有关本设备或其他任何 Arcam 产品的咨询,请通
过上述地址联系 Arcam 客户支持部,我们将尽力为您提供帮助。
在线注册
您可以通过 www.arcam.co.uk 在线注册您的产品。
请正确处置本产品
此标记指示在整个欧盟范围内,
不应该将本产品当作普通的家庭
废弃物进行处置。
为防止非受控的废弃物处置方式
对环境或人类健康造成危害以及
为了节省物料资源,应该以负责
任的态度回收本产品。
要处置您的产品,请利用当地的回收系统,或者
与销售本产品的经销商联系。
SC-14
Page 68

Page 69

SH269 Issue 2
WATERBEACH, CAMBRIDGE, CB25 9PB, ENGLAND
 Loading...