

Page 1
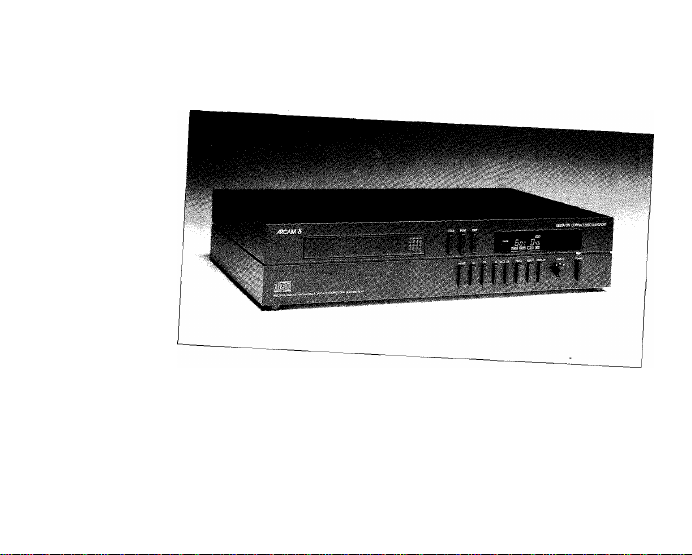
Audiophile products
from A&R Cambridge
Delta 170 CD transport handbook
Delta 70.2 CD player and
Page 2

Introduction
The Arcam Delta Compact Disc playing systems have been
designed to provide the best possible sound quality from Compact Disc.
Combine the Delta 70.2 CD player or Delta 170 CD transport
with an Arcam Delta range amplifier, tuner and digital to analogue
converter, plus a pair of Arcam loudspeakers to complete a formidable,
British made hi-fi system.
The Delta 70.2 CD player is a direct development of the
widely acclaimed Delta 70 and offers the excellent sound quality and
comprehensive range of features expected of a machine with such a
pedigree. Mew features include twin transformer power supplies, an
improved display (which can be switched off or dimmed) plus a remote
control handset which includes volume and direct track access facilities.
The Delta 170 CD transport is a top quality CD player
without the D/A converters and analogue output stages. It is perhaps
analogous to a top quality turntable motor unit to which an arm and
cartridge of the user's choice are added. It is simply designed to provide
a digital output signal of the highest quality and integrity. The Delta 170
must be used with an outboard D/A converter or with DAC equipped
amplifiers or pre-amplifiers.
With the exception of the remote control volume facility, the
Delta 170 includes all the features found on the Delta 70.2. To obtain
the very best performance the Delta 170 also includes a CDM1 Mk 2 die
cast transport and twin digital outputs (one optical and one co-axial), fed
from their own transformers and power supplies. To ensure the best
possible isolation from external vibration the Delta 170 comes complete
with a set of AudioQuest sorbothane feet.
Please study this manual carefully to ensure you get the best
results from your CD machine. Remember that your dealer is there to
help you. He has a full knowledge of all Arcam products and
considerable experience of their use in a variety of systems. If, however,
he is unable to answer your query then please do not hesitate to contact
us at the factory.
Important Notice
1 Prior to installation it is essential to remove the two large
metal transit screws which protrude from the base of your machine.
These can be safely stored in the holes provided on the back panel of
both the Delta 70.2 and the Delta 170.
DO NOT transport either machine without re-fitting and
tightening up the transit screws.
2 Please retain the carton and all packing materials (including
the transit screws) provided with your player so that it may be re-packed
correctly if it ever becomes necessary to transport the unit or to return it
for service.
3 If servicing is required then the equipment should be fitted
with its transit screws, properly packed and returned to the dealer from
whom it was purchased. It is essential to include a covering letter, giving
your name and address and a brief but thorough description of the fault.
Installing and using your
Delta 70.2/Delta 170
Mains Supply
The Arcam Delta 70.2/Delta 170 may be supplied to work on
any of the following a.c. voltages; 240\/, 220V, 120V, 11OV, 1OOV.
Check that your local mains supply voltage agrees with the voltage
setting indicated on the back panel of the player. If not, please contact
the factory or your national distributor for details of how to proceed
further.
A detachable mains lead is supplied with the player. The
cores of this lead are coloured in accordance with the following code;
Green and Yellow - Earth
Blue - Neutral
Brown - Live
Note: Export units for certain markets have moulded mains
plugs fitted as standard.
As the colours in the mains lead may not correspond with the
coloured markings identifying the terminals in your plug proceed as
follows;
The wire which Is coloured GREEN AND YELLOW must be
connected to the terminal in the plug which is marked by the letter E or
to the safety earth symbol or coloured GREEN or GREEN AND YELLOW.
Page 3

The wire which is coloured BLUE must be connected to the terminal
which is marked by the letter N or coloured BLACK or BLUE. The wire
which is coloured BROWN must be connected to the terminal which I:
marked by the letter L or coloured RED or BROWN.
Fuses
If the mains plug is fused fit a 3 amp fuse. All versions of the
Delta 70-2 and Delta 170 are fitted with an anti-surge mains fuse, rated
at 3 f 5mA for 220/240V players and 630mA for i 00/ II0/120V players.
Should a mains fuse fail, SWITCH OFF THE PLAYER AND
DISCONNECT IT AT THE WALL SOCKET. The fuse always remains live
when the machine is plugged into the mains. Remove the top plate from
the player by unscrewing the two screws at the top of the rear panel
using a No 1 ‘Posidriv’ screwdriver. Lift the top plate vertically and pull it
backwards slightly to release it. Fit a new fuse of the same type and
value in the fuse holder close to the mains inlet.
You should find a spare mains fuse in the spares kit provided
with the player or, alternatively, fitted inside the machine dose to the
mains inlet.
If the new fuse fails we recommend that you return the
player to your dealer for investigation and possible repair.
Interaction with other equipment
Although the transformers used in the Delta CD machines
have a low and well controlled level of magnetic field radiation it is
possible that they may occasionally interfere with nearby sensitive
equipment, such as the cartridge inputs of an amplifier or the replay
circuitry of a cassette recorder. This interference normally manifests itself
as a low level background hum, present when using the appropriate
equipment, but which disappears when the CD machine is turned off. If
this situation occurs and is annoying it can be eliminated by changing
the relative position of the interacting items or, in extreme cases,
switching off the CD player when other items are in use. (It may be
useful to know that the transformers in the Delta 70.2 and Delta 170 are
located to the right of the unit).
A CD player may also radiate some r.f. (radio frequency)
signals, derived from its digital circuitry. Although within statutory limits
this can cause interference with nearby tuners and radios, especially on
the AM (Medium and Long) wavebands. To solve this problem move the
aerial of the tuner or radio away from the CD player, or re-orient it for
minimum interference pickup. In extreme cases switch off the CD player
when using your tuner or radio.
Disc Maintenance
Treat your CDs with care. If you always pick up a disc by its
edge and put it back in its case after use, cleaning should not be
necessary. Should fingerprints, dust or dirt appear, you can rerrrove them
with a soft, lint free cloth, wiping the disc in a straight line from centre to
edge. Breathe on the disc lightly if necessary but do not use detergent,
abrasive cleaning agents or solutions designed for use on records.
Never write on the disc label; this can cause irreparable
damage as corrosive components present in inks can etch their way
through and destroy the information layer of the disc.
Player Maintenance
Clean the cabinet, when necessary, with a soft, damp cloth.
Do not use cleaning agents containing alcohol, spirits, ammonia or
abrasives. (For stubborn stains or fingermarks we have found the careful
application of ‘Windolene' to be particularly effective). Keep the disc tray
free of dust. With the exception of changing a fuse, do not attempt to
adjust or modify anything inside the player - this will void your
warranty.
In Case of Difficulty
Although the Arcam Delta CD machines have been
manufactured to the highest standards, the possibility remains that a
fault could appear. However the cause of a problem will not always be
the player - apparent faults can arise because you are not yet fully
familiar with a complex new product, or simply from faulty discs.
There follows a list of possible faults and their causes (see
pages 10-11). If you are unable to solve a problem after following our
guidelines, stop your investigation, disconnect your machine from the
mains and contact your dealer.
Page 4
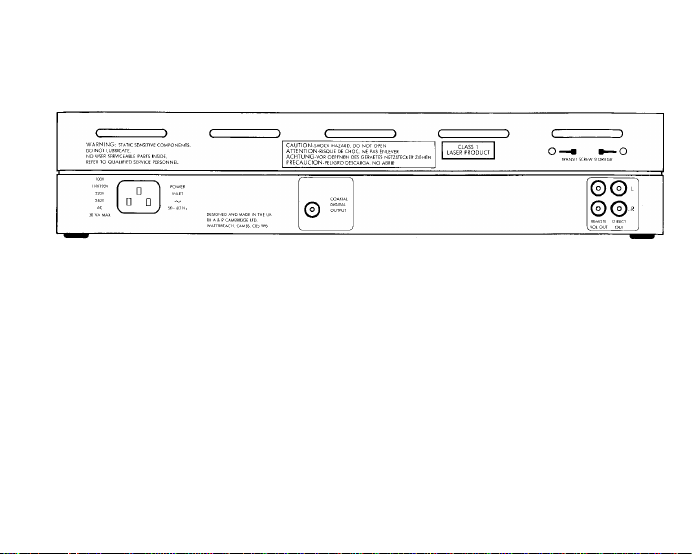
Delta 70.2 Rear Panel Connections
Audio Outputs
Two pairs of audio outputs to your amplifier are available via
standard RCA type phono sockets, marked left and right. A pair of phono
to phono leads should be used to connect the player to your amplifier. A
basic cable of reasonable sound quality has been provided with the Delta
70.2 to "get you going' (but see notes on connecting cables below).
The average output level of both audio outputs is SOOmV (2V
RMS peak). You should connect the Delta 70.2 output to the CD or AUX
input of your amplifier.
The direct outputs on the Delta 70.2 offer the most direct
path from the internal D/A converter circuitry and hence give the best
sound quality.
The variable outputs, by offering a remote control volume
facility, give convenient armchair command over a useful but limited
range of 2 i dB with only a slight loss in audio quality.
Note: A set volume level will be lost when the power to the
player is switched off. When the player is switched on again the volume
will be set at normal full output level. Any other required listening level
will therefore need to be reset using the remote handset.
Digital Output
This single phono socket allows the Delta 70.2 user to reap
the sonic benefits achieved by using the player with an outboard D/A
converter, for example the Delta Black Box, or perhaps with a digital
pre-amplifier or amplifier equipped with its own internal DACs.
DO NOT connect the digital output of the Delta 70.2 to the
conventional inputs of any audio amplifier.
Connecting Cables
With high quality CD sources, such as the Delta 70.2 and
Delta 170, the quality of the cables which carry the analogue signals
between the player and the amplifier becomes of paramount
importance. Remember a hi-fi system is only as good as the weakest
link in the chain!
We strongly recommend that only first class interconnect
cables be used with your hi-fi system. (Of course the same
importance should also be attached to loudspeaker cables).
We have found interconnect and loudspeaker cables from
the AudioQuest LiveWire range to be particularly suitable.
We suggest that you discuss the question of cables with
your dealer. As a rule of thumb you might budget to spend between
5% and 20% of the price of your system on cable. This can be one of
the most effective upgrades you can carry out on your system.
Page 5
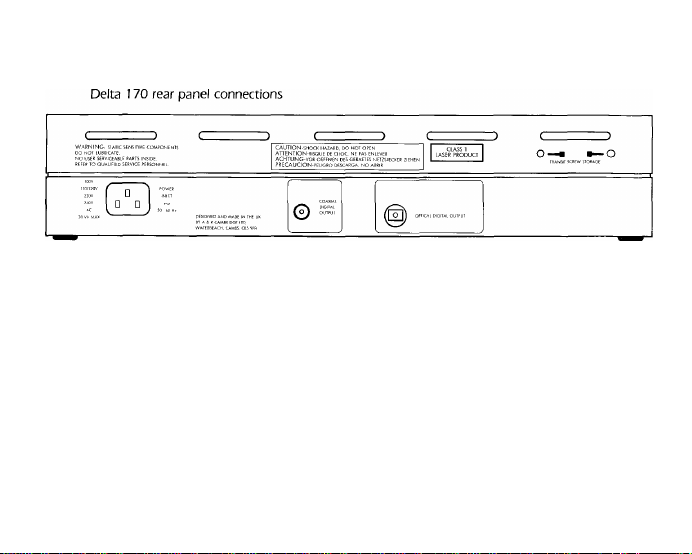
Digital Outputs
The Delta 170 is a transport only CD machine which must be
used in conjunaion with an outboard D/A converter or with DAC
equipped amplifiers or pre-amplifiers.
Since the Delta 170 contains no D/A conversion stages of its
own both outputs are digital.
One is a standard phono co-axial digital output, suitable for
connection to the phono digital input of a D/A converter or DAC
equipped amplifier/pre-amplifier.
A 0.75m, 75 ohm phono co-axial lead is supplied as standard
with the Delta 170 for this purpose.
The second digital output is an optical output which allows
the Delta 170 to be used with equipment possessing the TOSLINK
optical connector. A fibre optic cable terminated with TOSLINK
connectors should be used for optically connecting the Delta 170 to a
D/A converter or DAC equipped amplifier/pre-amplifier. (A suitable cable
is supplied with the Delta Black Box 2, or can be supplied on application
to your dealer, distributor or the factory).
The Delta 170 has been designed primarily for use with the
Arcam Delta Black Box D/A converter. Optimum results can be achieved
by coupling the Delta 170 with the optically compatible Black Box 2.
Positioning your Delta CD player
Your CD machine should be placed horizontally on a flat,
firm surface, not on a soft mat or similar which may limit ventilation.
A Delta CD machine can be stacked but should preferably be placed
either at the bottom or the top of the stack. (If you are using
sorbothane feet under your CD machine and wish to place the player
at the bottom of the stack bear in mind the weight capacity of the
feet). Do not stand the player or sorbothane feet on any equipment
(e.g. a power amplifier) which emits substantial amounts of heat.
Dedicated tables or other specialist supports are
encouraged as they can improve the performance of your player by
isolating it from external vibration. AudioQuest sorbothane CD feet
are a particularly cost effective way of improving the performance of
your player.
If siting the player in a cupboard or wall unit allow a
minimum of 1" (25mmJ above the machine to aid cooling.
Page 6
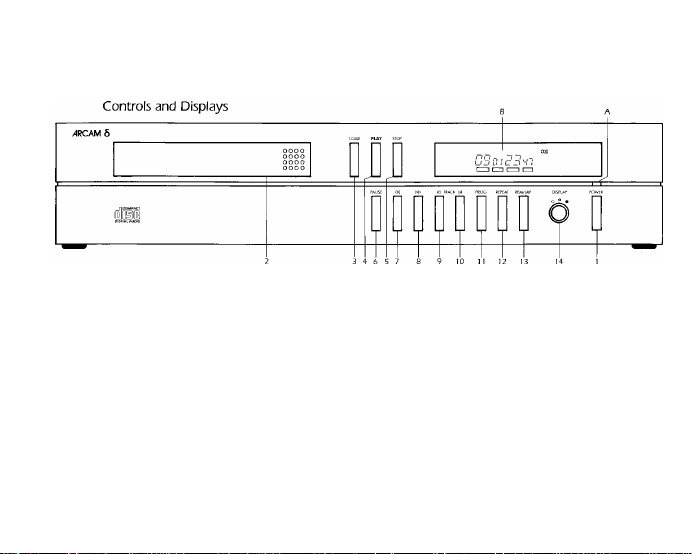
Delta 70.2/Delta 170 Front Panel
Your compact dise player should now be wired up and ready
for use. Before attempting to operate it, we recommend that you
familiarise yourself with the functions of the controls and the display as
described below.
Function controls
1 POWER switch
Switches the unit on and off.
2 Disc loading drawer
When open, accepts a compact disc (label side up) for
playing. Pushing in the open drawer approx. 1/4" (6mm) will activate ii
motorised closing function and load the disc. Note that the drawer is
suitable for both 80 mm and 120mm discs.
3 LOAD button
Opens and closes the disc loading drawer.
4 PLAYbUtton
Plays a disc from the beginning (after first automatically
1 open disc drawer). If a particular track or full program has
been loaded into the player, the disc will start at the first chosen place. If
PLAY is pressed while a disc is actually playing, the track in progress will
be replayed from the start.
5 STOP button
If playing a disc, your machine can be stopped by pressing
this button once. Any material programmed into the memory will remain.
By pressing the STOP button once again the memory can be cleared.
6 PAUSE button
This button interrupts and mutes the program whilst
continuing to track the disc at the point of interruption. Pressing PAUSE
again will resume play.
7 SEARCH (Reverse) button
Moves the laser tracking head towards the beginning of the
8 SEARCH (Forward) button
Moves the laser tracking head towards the end of the
Page 7

9 PREVIOUS TRACK button
This button selects the track number by counting down the
displayed digits.
fO NEXT TRACK button
This button selects the track number by counting up the
displayed digits.
In general the TRACK buttons are used to find the track
number you want to start with and for selecting track numbers when
compiling a program. They can also be used for returning to a previous
track number or for moving on to a later one while the disc is playing.
11 PROGRAM button
This button stores the track numbers of a program (up to 20
tracks in any order may be stored) and also produces a sequential display
(review) of the stored program.
12 REPEAT button
This button repeats a whole disc or selected program.
13 REM/LAP button
This button switches between displays indicating the
remaining (REM) time of a disc and the elapsed (LAP) time of the track
playing.
14 DISPLAY Control
This control adjusts the brightness of the display.
The switch has three positions;
Fully clockwise - Normal
Centre - Dimmed
Fully anti-dockwise - Off
It has been observed that a better sound can be achieved
when the display is either dimmed or is completely off.
Visual Displays
(A) Power on LED
Glows green when mains power is applied and the player is
(B) Main Dispiay
This comprehensive display indicates all the information
necessary for the operation of your machine. The basic display indicates
track numbers, index numbers and all timing details in minutes and
seconds.
The display also indicates in detail which of the machine's
various functions are in operation. Headers denoting REPEAT, PAUSE,
REVIEW. PROGRAM, REM/tAP time. DISC and ERROR appear around
the basic display when a particular function is being used.
Operating the Player
Mains power
The player is turned on by depressing the POWER switch (I|.
The adjacent power LED (A) will glow green. The display (B) will light up,
assuming the display control knob is in the on or dimmed position.
If there is no disc in the machine at switch on, the DISC
header on the display will flash for a few seconds, the ERROR header will
light up (signifying that there is no disc to play) and the dispiay will
indicate a series of noughts.
If there is a disc in the machine the DISC header will flash for
a few seconds before the display indicates the total number of tracks on
and total playing time of the disc.
Loading and Unloading
Push the LOAD button (3) once to open the disc loading
drawer. Ensure the drawer is not obstructed.
Holding the disc horizontally by the edge place it, label side
up, in the drawer - make sure the disc is properly in place or else it may
be damaged when the drawer is closed. Push the LOAD button (3) once
again or, if preferred, push in the drawer mechanism approx. 1/4" (6mm)
to activate the drawer motor.
Once the disc is in the player the DISC header will glow for a
few seconds and then the dispiay will indicate the number of tracks on
and the total playing time of the disc.
To unload the disc press the LOAD button (3) and when the
tray is fully out remove the disc.
Page 8

Playing a complete disc
The complete disc may be played in one of the following
ways:
(a) If the disc is not loaded: open the drawer, load the disc
and press the PLAY button (4).
(b) If the LOAD button (3) is pressed instead of the PLAY
button |4); then the disc information (number of tracks + total time) may
be read before pressing the PLAY button (4).
|c| If the disc is already loaded in the machine; simply press
the PLAY button (4).
The disc may be stopped at any time by pressing the STOP
button (5). If this is done then the player will revert to playing the disc
from the beginning again when the PLAY button (4) is next pressed.
Playing from a specific track
Load the disc and then select the desired track number by
pressing the TRACK buttons (9) and (10) to decrement or increment the
TRACK display (B), until the desired track number is shown. (These
buttons may either be pressed repeatedly or held down for a steady
count, as desired).
You can simplify this operation by using the 0-9 direct entry
keypad on the CRIO remote control handset (see below).
Replay
To restart a track which is already playing, simply press the
PLAY button (4). This will replay the track from the beginning.
Holding Play/Interrupting Play
Pressing the PAUSE button (6) while playing will interrupt
play and mute the output. The laser head will continue to track the disc
at the precise point of interruption until the PAUSE button (6) is pressed
again, when the program will start from exactly the same point.
Whenever the player Is in the pause mode the PAUSE header
on the left of the display will be illuminated.
Cueing and Searching
In order to cue the laser head silently to an exact (known)
point on the disc, load the disc, press the PLAY button (4) and the press
the PAUSE button (6) as soon as the first track is ready to play (indicated
by TRACK-01 on the display). Select the track required by using the
TRACK controls (9) and (10). Then use the SEARCH buttons (7) and (8) to
arrive at the exact timing point required. Press the PAUSE button (6)
when you are ready to start playing.
The above process allows you silently to access a known
place on a disc (track and elapsed time on that track) to an accuracy of
one second. The same process can be carried out with audible cueing by
omitting to use the PAUSE function.
Note that the SEARCH process has three operational speeds
dependent on how long the SEARCH buttons (7) and (8) are kept
depressed.
Programming
The Arcam Delta CD machines can be programmed to play
up to 20 pre-selected tracks from a disc in any order. Each track can be
anywhere in the range 1-99. (NOTE - although tracks in the range
1-99 can be programmed, only those in the range 1-26 give a time
indication on the display).
Programming must be carried out with the disc loaded, so
that the player first knows the actual number of tracks recorded on the
disc. It is not possible to program index points, although they do remain
accessible from the remote control handset during the play of a program,
except when you have programmed only one track number.
To store the track numbers you want to include in a program,
refer to the disc holder and bring up each track number in turn using the
TRACK buttons (9) and (10) to move up or down through the track
numbers, whichever is quickest. It is of course even quicker to use the
0-9 direct entry key pad on the CR10 handset (see below). The TRACK
display header below the track number will flash on and off. You can
then store a track by pressing the PROGRAM button (11). When a track
has been stored the TRACK header will stop flashing and the PROGRAM
Page 9

header will light up. The time indicator will also show how much
cumulative time has been programmed.
In the programming mode, when TRACK is not flashing, the
TRACK display shows the number (quantity) of tracks you have
programmed. When TRACK is flashing, the TRACK display shows the
track number (position) currently selected by the PREVIOUS and NEXT
TRACK buttons (9) and (
pressing the TRACK buttons (9) and (10) to select a track and pressing
the PROGRAM button (II). After this time the TRACK header will stop
flashing and the microprocessor in the player will assume that you have
changed your mind; the track can then no longer be stored. The display
will revert to detailing the number of tracks and total time of the disc. To
program any 'missed' track simply repeat the process described above.
by pressing the STOP button (5) once. If the machine is playing a disc
then STOP must be pressed twice - once to stop the disc and once again
to erase the program. A program can also be erased if the drawer is
opened by pressing the LOAD button (3).
the memory by pressing the PROGRAM button (II). All the stored track
numbers will then cycle through the track number display. In your own
chosen order of play at the rate of about one per second. The REVIEW
display header will light up while a review is in progress.
except those associated with locating a specific track or index number.
Here you are limited to playing only the tracks you chose to program
and when you push the TRACK buttons (9) and (10), the player will only
access these chosen tracks, in the order in which you programmed them.
Trying to go outside the limits of the program is not possible and will
cause the ERROR header on the display to light up.
space between the beginning and the end of the track being played -
10).
Do not allow more than six seconds to elapse between
A program can be erased if the machine is not playing a disc
Reviewing the stored program
During or after programming you can check the contents of
Playing a program
To play a complete program press the PLAY button (4).
During a programmed play, all functions operate as normal
The SEARCH buttons (7) and (8) will only operate in the
you cannot move the laser head outside these limits. Arrival at either limit
is indicated by the ERROR header lighting up, whereupon the laser head
will stop until you release the SEARCH button.
At any time during play it is possible to review the part of the
stored program that remains to be played by pressing the PROGRAM
button (11). The display will cycle through a list of the remaining tracks
before reverting to indicating track number, index number and the
remaining or elapsed time of the program.
When all the tracks have been played the disc stops.
However the program will remain in the memory until you press the
STOP button (5), open the drawer or turn off the player - it is then
erased.
Remote Control Handset Type CRIO
This unit duplicates all the functions of the player with the
exception of LOAD, POWER (on/off) and the display brightness control.
It also offers some useful extra features.
1 Volume Control (Delta 70.2 only)
By using the VOLUME buttons marked + and — it is
possible to increase or decrease the listening level according to taste over
a range of 21dB. (This facility is available on the variable outputs of the
Delta 70.2 only).
2 Playing from index points
Index points are a method (occasionally) used by disc
manufacturers to allow you td access defined points within a track. Think
of them as tracks within a track.
By using the INDEX buttons it is possible to count up or
down through the index numbers on a disc (assuming the disc is
encoded with them - and very few are). When the required number is
reached the disc can be played from that point by pressing the PLAY
button.
3 Direct Dialling to a track
By using the numbered buttons on the handset it is possible
to access a particular track directly, without using the track controls to
work up or down through the track numbers. Simply enter the track
number required and then press PLAY to play the track.
Page 10

This facility makes programming via the remote control
handset a very straightforward process. Simply use the 0-9 keypad to
select the desired track numbers and press PROGRAM to store each
track in the required sequence.
You should always point the handset directly at the front of
the player for best results.
The CR10 uses three AAA type cells for power. These should
be removed if the unit is not be be used for a long period of time.
Faults and their likely causes
(1 ] Pressing the POWER switch does not light up the
display.
The POWER switch (1) was not pushed in far enough.
The I.E.C. mains socket on the mains lead is not pushed firmly
home into the player's chassis mounted plug.
The mains plug is not properly plugged into the socket or its
fuse is loose or defective.
There is no supply present at the mains socket.
The mains fuse in the player is defective.
The display switch is off.
(2) Pressing the LOAD button does not open the disc
drawer.
The player is not switched on. Check the power LED (A) is on.
The transit screws have not been removed.
The microprocessor has not received the command properly.
Check by pushing the STOP button (5) and then the LOAD button (3)
again. If this does not work, try switching the player off and then on
again 5 seconds later to see If this cures the problem.
|3) Pressing the LOAD or PLAY buttons will not close
the disc drawer.
The player is not switched on or the mains supply has been
interrupted. Check the power LED (A) is on.
The microprocessor has not received the command correctly.
See section 2 above.
The drawer is jammed by a foreign object around the
periphery of its slot, or the disc is not placed properly on its cradle.
(4) After closing the drawer, the ERROR header
lights up or the disc information is not displayed.
The disc is loaded label side down or there is no disc in the
tray.
The disc is dirty or badly scratched. The disc is defective.
The transit screws have not been removed.
There is a foreign object in the disc drawer (e.g. a piece of
paper or a remnant of packaging.)
(5) The disc Is playing but there is no sound.
The connection between the player and amplifier (or D/A
converter) is broken.
The amplifier (or D/A converter) is not switched on or the
volume control of the amplifier is at zero. The speakers are not
connected.
The selector switch on the amplifier is set to the wrong
source. Check the tape monitor switching too!
The amplifier (or D/A converter) input to which the player is
connected is defective.
The amplifier (or D/A converter) or the speakers are defective.
Switch to another sound source on your amplifier (e.g. vinyl disc, tuner or
tape) to check this.
(6) Programming Is not working.
The disc is dirty or badly scratched.
The microprocessor has not processed the commands
properly. Erase the programme by pressing the STOP button (5) twice
and store it again: restart play and check if the fault has cleared.
All 20 memory places are already occupied and you have
missed the flashing ERROR header sign that indicates this.
Page 11

(7) Playback does not begin with the first track
number on the disc or of the program, but with another.
Playback stops before the end of the disc or the program.
The microprocessor has not processed the command
correctly. Check if switching the player off and on again, then restarting,
clears the fault.
The disc is dirty or badly scratched. The disc is defective.
There is an unwanted object in the disc tray.
(8) The sound is poor or distorted, or skipping
tracks.
The transit screws have not been removed.
There is an unwanted object in the disc tray.
The disc is dirty or badly scratched.
The player or your D/A converter is connected to the
PHONO (pick up cartridge) input of the amplifier instead of the CD,
AUX, TUNER or TAPE input.
The amplifier (or D/A converter) or speakers are faulty.
The interconnecting leads are defective or the RCA plugs are
either dirty or not fully plugged home at the player or amplifier (or D/A
converter).
(9) The sound can be heard through one channel
only.
One interconnecting lead is defective, or the RCA piugs are
either dirty or not fully plugged home at the player or amplifier (or D/A
converter).
One channel of the amplifier (or D/A converter) or speakers i:
faulty. Check with another sound source.
You have used one direct and one variable output from the
CD player.
Specifications
Playback system
16 bit Compact Disc Digital Audio,
Optical read-out system
Laser type semiconductor Al Ga As
Numerical Aperture 0.45
Wavelength 800 nm
Typical Audio Performance (Delta 70.2 only) 20Hz -
20kHz unless otherwise stated)
Frequency response
Channel balance
Channel phase balance
T.H.D.
Signal to noise ratio
Dynamic Range
Channel Separation
Wow and flutter
Outputs (Delta 70.2 only)
1. Direct Output
Output level
Output Impedance 22ohms
Minimum load impedance 5k ohm
2. Variable Output
Output level
Range
Channel balance
Output impedance
Minimum load impedance 5k ohm
Power Supply
Normally set to 240V AC 50 to 60Hz, with service solution
for 110, 120 and 220V. lOOV version available to special order.
Maximurn power consumption 25VA.
Meets lEC 65 electrical safety requirements as standard.
+/-0.1dB lOHz-lOkHz,
-0-5 dB at 20kHz
+/-0.1dB
+/-0.5 deg.
0.007% at 1 kHz, OdB
101 dB unweighted
105dB CCIR/ARM weighted
96dB
1 OOdB at 1 kHz
95dB at 20kHz
Quartz precision control
2V rms at MSB (OdB)
2V rms maximum at MSB (OdB)
-21dB nominal
+/-0.5dB
200ohm maximum
Page 12

General
Width 430mm
Height 90mm
Depth 272mm (drawer closed and excluding rear panel
connectors), 410 mm (drawer open and excluding rear panel connectors)
Delta 70.2 Weight 5.25kg Net Delta 170 - 5.25kg Net
Weight 6.3kg Packed - 6.5kg Packed
Guarantee for UK sales
This equipment has been fully tested and a full record of
these tests made before despatch from the factory. Both the
workmanship and the performance of this equipment are (except as set
out below) guaranteed against defects for a period of two years from the
date of purchase provided that it was originally purchased from an
authorised UK dealer under a consumer sale agreement. (The words
'consumer sale' shall be construed in accordance with Section 15 of the
Supply of Goods (Implied Terms) Act 1973).
The manufacturers can accept no responsibility for defects
arising from accident, misuse, wear and tear, neglect or through
unauthorised adjustment and or repair, neither can they accept
responsibility for damage or loss occurring during transit to or from the
person claiming under this guarantee.
This guarantee covers both labour and parts and it is transferable to
subsequent purchasers but the liability of the manufacturers is limited to
the cost of repair or replacement (at the discretion of the manufacturers)
of the defective parts and under no circumstances extends to
consequential loss or damage.
Claims under this guarantee
This equipment should be packed in the original packing and
returned to the dealer from whom it was purchased or, failing this, any
other authorised Arcam dealer. If it is not possible to return the
equipment by hand, then It should be sent carriage prepaid by a
reputable carrier.
(inc. sorbothane feet)
Should the original packing not be available, replacement
packing can be purchased from the manufacturers. The equipment should
not be sent by post.
Do NOT CONSIGN THE EQUIPMENT TO A8R CAMBRIDGE UNLESS YOU HAVE
FIRST BEEN SPECIFICAaV REQUESTED TO DO SO BY THE MANUFACTURER'S TECHNICAL SERVICE
DEPARTMENT. Do NOT UNDER ANY CIRCUMSTANCES ATTEMPT TO DISASSEMBLE THE
EQUIPMENT BEFORE DESPATCH.
If you have any difficulty complying with these requirements
please contact the manufacturers at the following address.
A&R Cambridge Limited,
Pembroke Avenue,
Denny Industrial Centre,
Waterbeach,
Cambridge CB5 9PB, England.
Telephone: (0223) 440964
Fax (0223) 863384
In either case you should state clearly your name and
address, the date and place of purchase together with a brief description
of the fault experienced.
In the event of equipment being returned which on test is
found to comply with the published specification the manufacturers
reserve the right to charge a reasonable fee for testing the equipment
and for return carriage.
Enquiries
The manufacturers are happy to answer any queries you may
have regarding the use of this equipment on the condition that this
enquiry is by letter and a stamped addressed envelope is provided. You
should state clearly the serial number of the unit, the dealer from whom
it was purchased and the date of purchase.
This guarantee in no way varies or removes a purchaser s
STATUTORY RIGHTS.
PART NO. SH026A E&OE APRIL 1989
 Loading...