

Page 1
CO
■, r:r-- -I -i!
■'. .'■ *
Q
ARCAM
Alpha 7SE • 8SE • 9
CD Players
Page 2

Thank you for choosing ARCAM
USING THIS HANDBOOK
This handbook has been designed to make the instaiiation and use
of your CD piayer straightforward. Howeven we appreciate that
some of our customers require further technicai information.
When extra technical information is available you will see the
following, at the end of the section: [Want more info? See Technical
notes on page 5]
SAFETY
There are 19 safety items, set out on the back cover of this
handbook. For your own safety, and to ensure that your CD player
works properly, we strongly recommend that you read them.
Installation
SEVERAL MODELS
This handbook covers three CD players:
Alpha 7SE
Alpha 8SE
Alpha 9
Many features are common to more than one of these CD players.
[Want more info? See no. I in Technical notes on page 5]
There is a remote control handset supplied.
CONNECTING TO A POWER SUPPLY
WRONG PLUG I
If the plug supplied with the CD player does not fit your power
supply, see no, 3 in Technical notes on page 5.
Check that your mains supply voltage agrees with the voltage
setting indicated above the POWER INLET on the rear panel of
the CD player
If your mains supply voltage is different, consult your Arcam dealer
or Arcam Customer Support on +44 (0) 1223 203203.
PLUGGING IN
Push the plug (lEC line socket) of the cable supplied with the CD
player; into the socket (POWER INLET) in the back of the CD
player Make sure it is pushed in firmly.
[Want more info? See no. 2 in Technical notes on page 5]
Push the plug on other end of the cable into your power
supply socket.
CONNECTING TO OTHER EQUIPMENT
AUDIO OUTPUTS
Connect to your amplifier’s CD or AUX inputs using suitable high
quality interconnect cables. Insert the phono plug which is red [or
marked ‘R’, or with a red ring] into the socket labelled ‘R’ and the
other plug into the socket labelled 'L'.
ALPHA 8SE & 9 ONLY The second set of sockets can be used to
connect to a second amplifier set up for multi room use.
COAXIAL DIGITAL OUTPUT
Use this socket if you are using a separate digital to analogue
converter (DAC) or digital recorder Connect to the DAC or
recorder’s digital input using a suitable 75 ohm screened cable.
Never connect the digital output socket to a conventional audio
input
OPTICAL DIGITAL OUTPUT
Use this socket if you are using a separate digital to analogue
(DAC) or digital recorder with an optical connection.
Connect using a suitable optical cable.
The CD Player is double insulated and does not require an earth.
This is why there is no centre(earth) pin in the socket (POWER
INLET).
Note
Interconnecting cables are not supplied with this CD Player
We recommend high quality cables as inferior quality cables
will degrade the sound quality of your system. Please contact
your Arcam dealer or Arcam Customer Support for details of
suitable cables.
TWIN AUDIO OUTPUTS
(ALPHA 8SE & 9 ONL
COAXIAL DIGITAL OUTPUT
POWER INLET
I EC LINE SOCKET
SINGLE AUDIO OUTPUT
(ALPHA 7SL ONLY)
OPTICAL
DIGITAL
OUTPUT
TYPICAL
PHONO
PLUGS
Page 3
Using your CD player - getting started
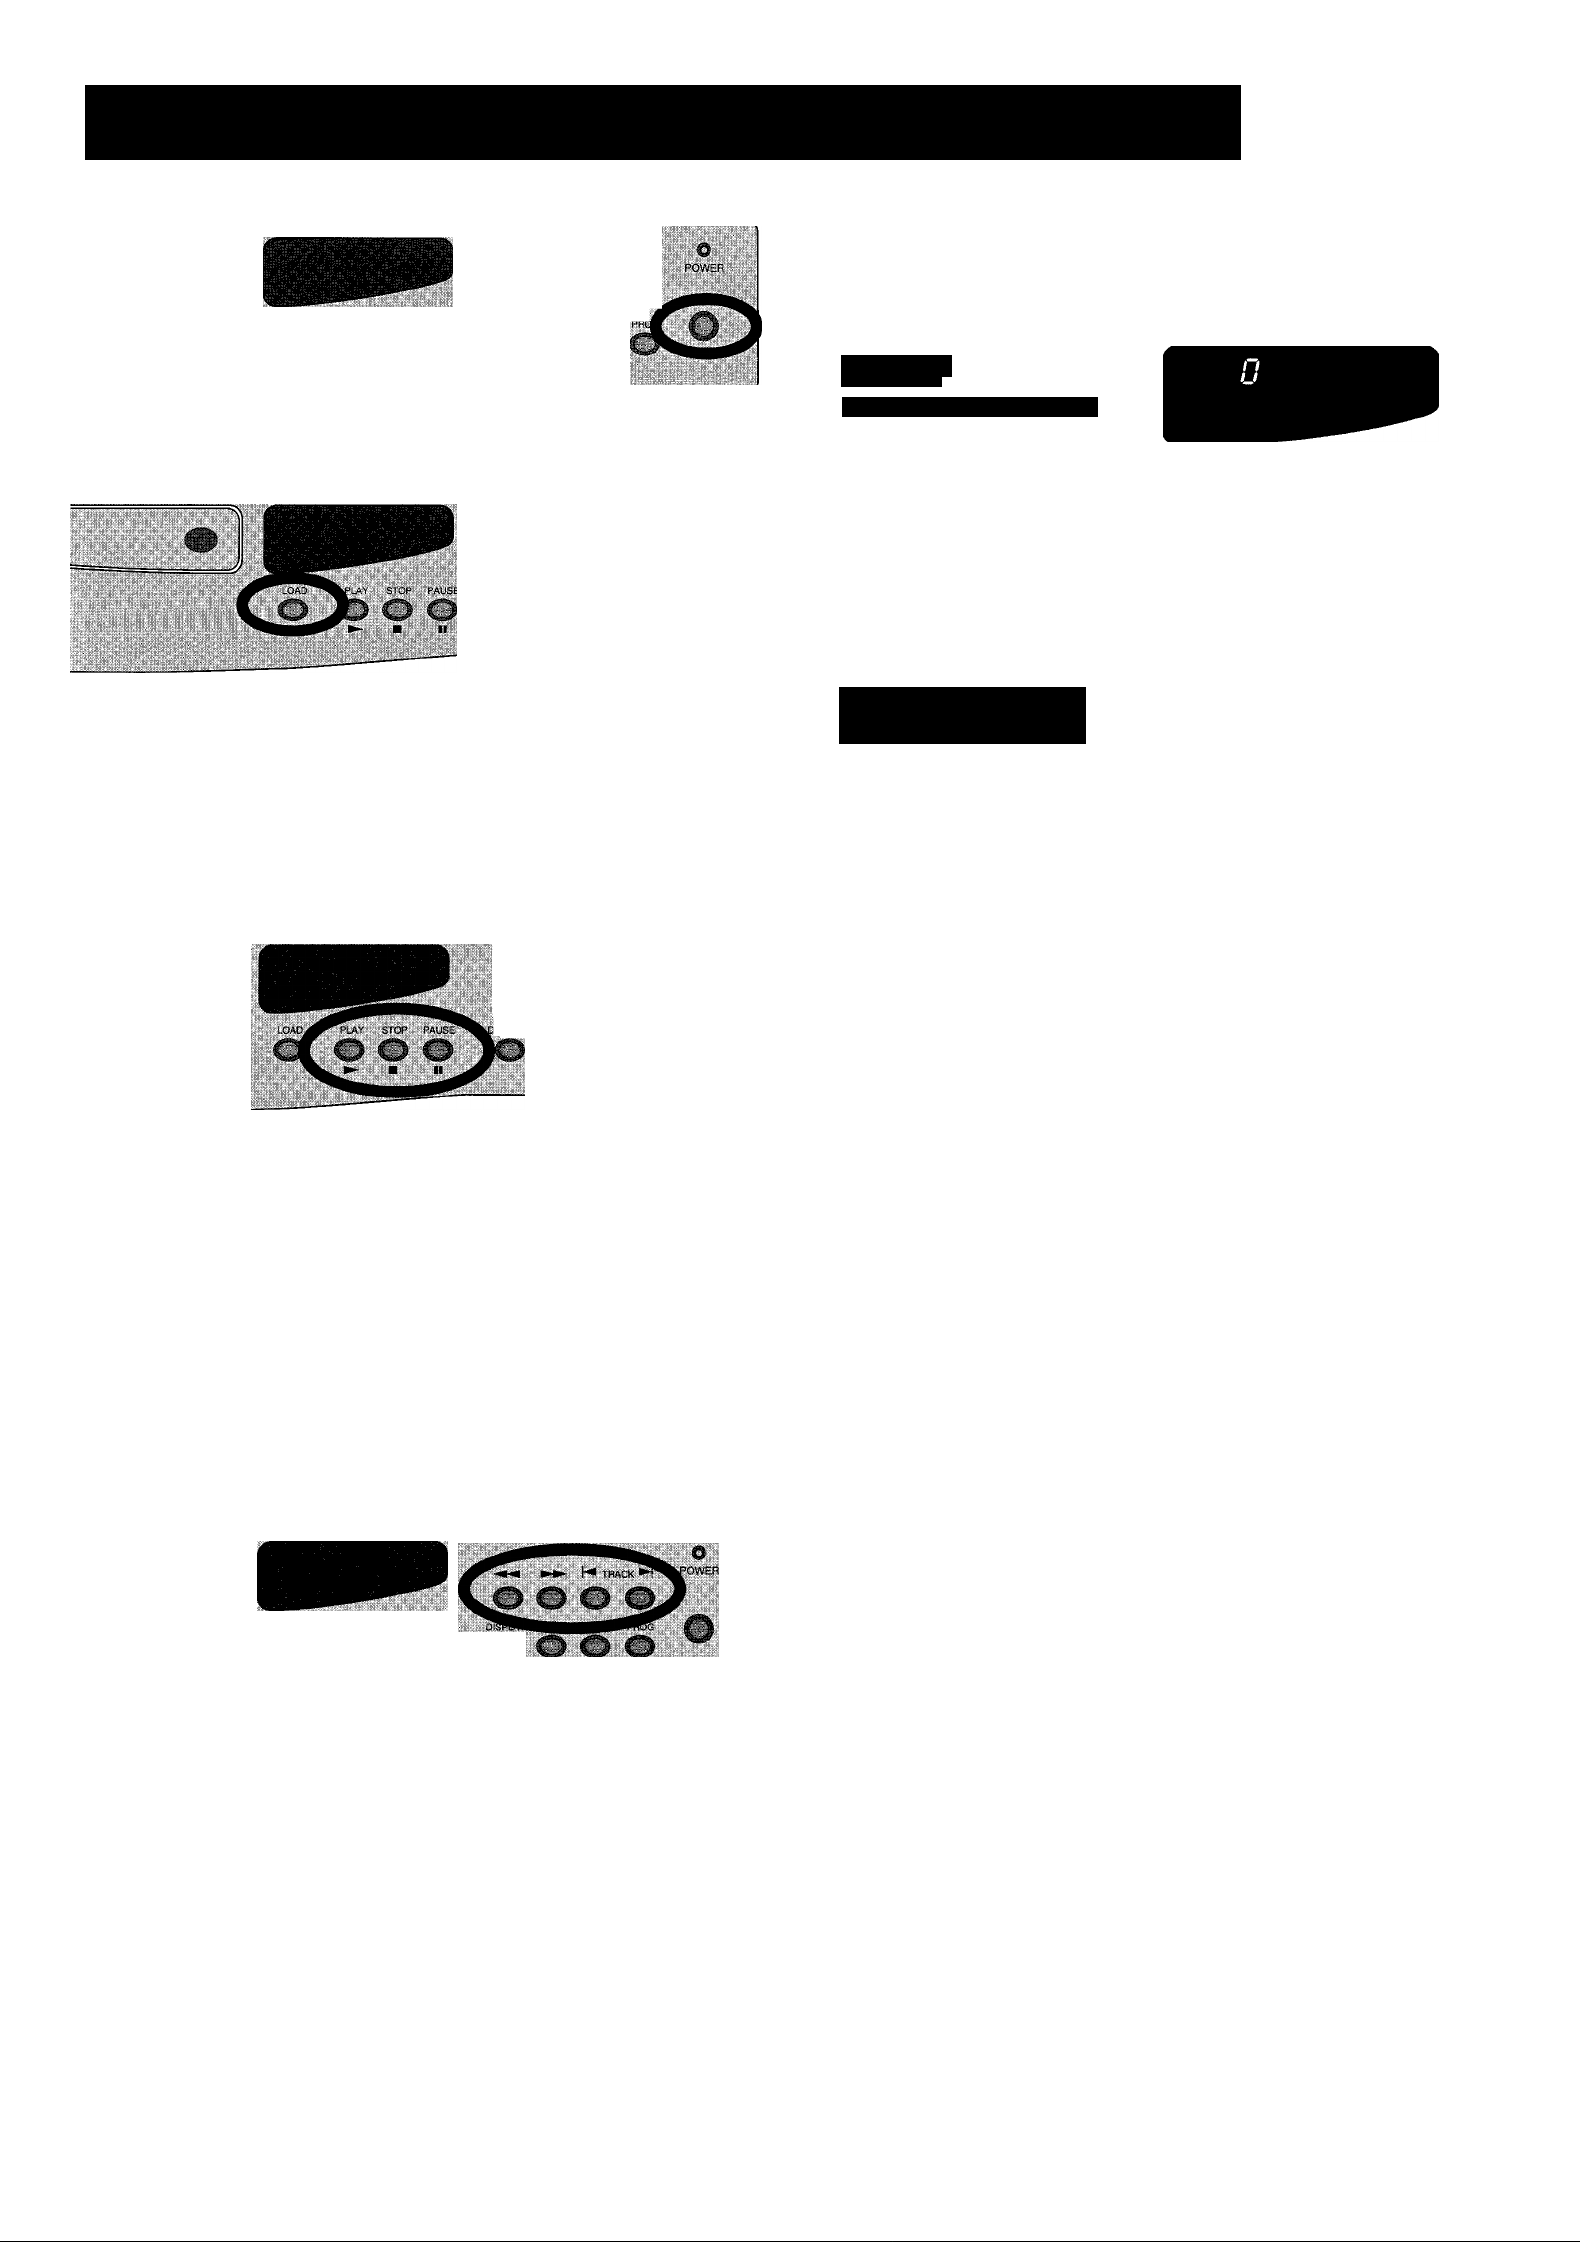
POWER
Press this button to switch the CD player on and off.
When first powered up with no CD installed you will see...
...first this ...then this
DISC D
11
1 2 3 4 5 6 7 8 9 10 11 12 13 14 15 16
LOAD (called OPEN on remote control)
To install a CD, press 'LOAD'. The CD tray opens, it accepts both
8 cm and 12 cm discs. Place the CD in the tray with the label side
uppermost. Press ‘LOAD’ again [or press ‘PLAY’, or gently push the
tray in 5mm], the tray closes. You will see 'DISC, along with the
total number of tracks and total disc time, eg.
Ö o Ö o Ö
t > o o.
Ö Ö
REPEAT CHECK
O CO O O
■OWER
-r'.
M»- H TRACK H POWER
o o o o
ISPLAY REPEAT CHECK PROG : C
o o o
DISC lU -It-. ID
123456789 10
If the disc has more than 16 tracks then the word 'OVER' is also
shown on the display. The display returns to ‘0’ after a few
seconds. It is now ready to play.
in CD 70
PLAY ►
Press to play the CD. To restart the disc from track I, press ‘STOP’
and then ‘PLAY’.
Note:
Make sure your amplifier (input source selector) is set to CD.
HDCD encoded CDs will be recognised automatically by the
Alpha 8SE and 9CD players.To indicate this, a red LED (Light
Emitting Diode) will illuminate behind the Arcam badge in the top
left hand corner of the front panel whenever an HDCD disc is
playing.
LOAD PLAY STOF
o o o o
STOP ■
Press to stop the CD playing.
The display will show an ‘0’ and the number of tracks.
PAUSE ■■
Press to pause the disc (interrupt play).
Press ‘PAUSE’ again to resume play from the same point.
SEARCH ►►
Press MM to search back or ►►to search forward, for a particular
passage during play. If the player is in ‘PAUSE’ mode the search will
be at high speed and the sound will be muted (you will hear
nothing).
TRACK - PREVIOUS or NEXT H H
To start the CD with a track other than the first one, press H
or to locate your desired track, then press ‘PLAY’.
To select another track during play, press H or H to locate the
track. The player will automatically ‘PLAY’ after you have selected
the track. Pressing [◄ once will restart the track currently playing.
To select the previous track, press twice. To go back two
tracks, press !◄ three times, and so on.
Page 4

Using your CD player - getting started
DISPLAY
Dims or turns the display off and on. Turning the display off will
generally give a slight improvement in sound quality. Pressing
‘DISPLAY’ once turns the display off. To dim the display press the
‘DISPLAY’ button twice. To restore the display to full brightness
press ‘DISPLAY’ a third time.
REPEAT
To repeat the entire CD or a pre-programmed selection of tracks
IlcV
press ‘REPEAT’ once. ‘REPEAT will illuminate on the display.
To repeat one particular track go to the track you wish to repeat
by using the H or H buttons (or the 0-9 keypad on the
remote control) and press ‘PLAY’. Then press the REPEAT button
twice so that ‘REPEAT I ’ is illuminated on the display.
If you now select a different track, that one will be repeated
instead. To cancel the repeat function press ‘REPEAT a third time.
continued
PROG
To programme a selection of up to 24 tracks from a disc in any
order To program your choice of tracks press Track !◄ or H ,
or use the remote’s 0-9 keypad orTrack !◄ and H buttons, to
locate the desired track.
Press ‘PROG’to program the track into memory (RMS is illuminated
on the display to indicate that you have begun a programmed
sequence). Repeat these steps to program all the desired tracks
into the player The display will show the track numbers that have
been programmed, the total length of the programmed sequence
and how many tracks have been programmed by use of the
number above the word ‘STEP’.
If you press [◄ Of H or use the 0-9 keypad to direct dial to a
track the number above the ‘STEP’ will change by one and start to
flash until you press ‘PROG’. After pressing ‘PROG’ the number
will stop flashing. If you fail to press ‘PROG’ within about 5
seconds the display will also stop flashing and you will have to
reselect the track you want to program.
Press ‘PLAY’ to start playback of the programmed tracks.
The existing program may be replayed by pressing ‘PLAY’.
To clear the programmed sequence of tracks press STOP twice.
CHECK
To confirm your programmed sequence, press ‘CHECK’.
The first programmed track number and track time will be
displayed. Subsequent pressing of the ‘CHECK’ button will display
the next track details and total time of the sequence so far.
After checking the last selection ‘END’ is displayed for a few
seconds. The display then reverts to showing the track details of
the last programmed track.
Page 5

Using the remote control
The buttons shown in white have
the same functions as those on the
front of the CD player.
Don’t forget to fit'the batteries and ensure they
are inserted correctly into the back of the
remote control before using it.
The remote control sends a message to an infra
red receiver which is located behind the ARCAM
badge on the front of the CD player
;.i c ..i
Do not place anything in front of the badge or
the remote control may not work.
SPACE
This button automatically Inserts a 4 second space between tracks in either normal or
programmed play (see PROG). This enables the music search system of certain cassette
decks to operate correctly when making recordings. The ‘SPACE’ indicator on the display
is illuminated. Press the SPACE button a second tihne to cancel this function. The 4
second space is ignored when you use any of the search keys. NOTE:The 4 second time
between tracks is added to the remaining and total time display for the disc e.g. an I I
track disc will have 40 seconds added to its total track time when using the 'SPACE'
function. When the CD is between tracks the displayed time will count from -0.04 to 0.00
in one second increments and the ’SPACE’ legend will flash,before the track begins to play.
CLEAR
If you make a mistake whilst programming
you can delete the last track you
programmed in by pressing the ‘CLEAR’
button. To delete a track from the middle
of a programmed selection press ‘CHECK’
until you get to the track you wish to
delete. Then press ‘CLEAR’. To delete all
the programmed tracks press the ‘STOP’
key twice or continually press ‘CLEAR’ until
‘0’ is displayed.
0-9 KEYPAD
Allows direct access to individual tracks on
the disc.
To select a track, press the corresponding
keypad button then press ‘PLAY’. For tracks
greater than 9 just enter the appropriate
numbers, ie for track 15 press I, then 5,
then ‘PLAY’.
REMAIN
Press once to display the remaining time of
the track. Press a second time to display
the remaining time of the disc. Press
‘REMAIN’ a third time and the display will
revert to its original setting showing the
elapsed time of the track. If you press
‘REMAIN’ when the disc is not playing the
total number of tracks and total playing
time is displayed.
A-B
This’button enables you to repeat any
section of music within one track. Whilst
the disc is playing press the ‘A-B’ button at
the start of the section that you wish to
repeat 'REPEAT is illuminated on the
display and the ‘A -’ letter flashes. Press the
A-B button a second time when you reach
the end of the section you wish to repeat
The ‘A-B’ letters stop flashing and remain lit
The selected section of track will play
repeatedly until you press the ‘STOP’ or H
or H ■ The backward -«w and forward
►► search buttons can move back or for
ward within the selected section.
SHUFFLE
Press ‘SHUFFLE’ and then ‘PLAY’ to play all
the tracks on the disc in random order
Press ‘SHUFFLE’ during play and shuffle play
will begin from the current selection.
‘SHUFFLE’ will illuminate in the display.
While the player is deciding which track to
play the track indicator on the display will
perform a scrolling routine, in ‘SHUFFLE’
mode the H button will only replay the
current track, and not select the previous
track, To stop the shuffle function press
‘SHUFFLE’ a second time.
MUTE
Stops sound to the speaker outputs of
certain Arcam amplifiers.
Please note:The ‘VOLUME’ control and
‘MUTE’ buttons have no effect on the audio
output level of the Alpha CD players.
VOLUME + -
Adjusts the volume level on Arcam remote
controllable amplifiers.
Please note:The ‘VOLUME’ control and
‘MUTE’ buttons have no effect on the audio
output level of the Alpha CD players.
SCAN
Press to play the first 10 seconds of each
track in sequence, The track number will be
indicated on the display while ‘SCAN’ is
selected. To continue listening to a ‘scanned’
track, press‘PLAY’. The player will leave the
‘SCAN’ mode once ‘PLAY’ has been
pressed.
Page 6

Technical notes
1
Alpha 7SE, 8SE & 9 CD Players
These all use the same basic chassis and mechanics and the
controls are identical. They differ in the system of digital to analogue
(D/A) conversion used in each player Lower specification Arcam
CD players can be upgraded by your dealer to higher performance
models by installing the appropriate Arcam D/A upgrade kit.
Alpha 7SE CD Player
This has Delta-Sigma D/A conversion with 24 bit filtering.
Alpha 8SE CD Player
The DAC module of the 8SE utilises the Pacific microsonics PMD
100 filter and HDCD® (High Definition Compatible Digital)
decoder; coupled to the high quality PWM (Pulse width
modulated) bitstream DAC (digital to analogue convertor) used in
the Alpha 8CD player The benefits of this improved sound quality
on all conventional CDs plus the ability to reproduce the full
dynamic range of the ever increasing number of HDCD encoded
CDs now available.
Alpha 9 CD Player
The Alpha 9 CD incorporates the unique dCS Ring DAC ’ which
delivers state-of-the-art performance from its revolutionary 24 bit
technology.
This new DAC is the result of a three year partnership between
two British companies - Arcam and dCS (Data Conversion Systems
Ltd), the world's leading supplier of professional audio ADCs and
DACs. Ring DAC technology exhibits exceptionally linear response
when decoding digital audio data, with the ability to resolve the
finest acoustic details recorded on a compact disc.
In the Alpha 9 CD player; 24 bit digital filtering is provided by the
Pacific Microsonics PMD 100 chipset, which also performs HDCD
(High Definition Compatible Digital) decoding of suitably encoded
CDs.The sonic performance of the Alpha 9 makes it one of the
very best CD players currently available, regardless of price.
2
For optimum sonic performance, the analogue power supply of the
Alpha CD players is kept powered up all the time the unit is
connected to the mains supply. The front panel power switch
powers down all other circuitry.
This means that even though the power switch is off, it may be
possible to hear a slight residual hum coming from the mains
transformer inside the CD player This is perfectly normal. If the
unit is to be left unused for an extended period, we recommend
that it is disconnected from the mains supply by switching it off at
the wall socket.
3
This appliance is normally supplied with a moulded mains plug
already fitted to the lead. If for any reason the plug needs to be
removed, it must be disposed of immediately and securely, as it is a
potential shock hazard when inserted into the mains socket The
unit is double insulated and does not require an earth.
If the plug is removed then the remaining lead must be rewired as
follows:
The blue wire
must be connected
to the terminal
which is coloured
blue or marked
with the letter N.
connected to the terminal
which is coloured brown or
^ marked with the letter L.
4
For convenience and ease of use. Alpha CD players are supplied
with an infra-red remote control handset. The handset transmits
Philips RC-5 type codes.
The green and yellow
wire must be connected
to the terminal which
is coloured green and
yellow, or marked with
the letter E or the
safety earth symbol.
wire must be
POSITIONING
Always place the CD player or transport on a level, firm
surface. Placing your player on a set of dedicated sorbothane
isolation feet will isolate the unit from its surroundings as well as
absorbing the vibrations created within the player itself. You will
generally hear some sonic improvements, which makes this an
extremely cost-effective upgrade.
RADIO INTERFERENCE
The Alpha 7SE/8SE/9 CD players are digital audio devices which
have been designed to very high standards of electromagnetic
compatibility.
Both CD players and digital to analogue converters (DACs)
generate, and can radiate RF (radio frequency) energy. In some
cases, this can cause interference with FM and AM radio reception.
If this is the case, keep the CD player and its connecting cables as
far from the tuner and its aerials as possible. Connecting the CD
player and the tuner to different mains sockets can also help to
reduce interference.
EC COUNTRIES -These products have been designed to comply
with directive 89/336/EEC.
USA - These products comply with FCC requirements.
LASER RADIATION
If an Arcam Alpha CD player is operated whilst the outer casing is
removed, invisible laser radiation could cause eye damage.
CLASS I
LASER PRODUCT
I
For more details about HDCD and HDCD recordings please visit
the Pacific Microsonics Website www.hdcd.com or contact them at
Pacific Microsonics Inc. 2560 Ninth Street, Suite 219. Berkeley,
CA 94710, USA
Page 7

Technical specification
Alpha 7SE
Alpha 8SE
Alpha 9
Laser pick-up 3 beam
Laser wavelength
Numerical Aperture
Dynamic Range l06dB
Signal to noise ratio (CCIR) >IOOdB
Harmonic distortion (Odb, 1 kHz) <0.005%
Frequency response (-O.SdB) 20Hz-20kHz Supplied accessories Mains lead
Output level (Odb) 2.3Vrms Remote control
Output ifinpedance
Minimum recommended load
Digital output connection 75Q co-axia
24 bit multi-level D^lta-Sigma digital to analogue conversion.
bit PWM DAC plus HDCD
High resolution proprietary multi-bit current output digital to analogue conversion.
24 bit dCS Ring DAC plus HDCD
Power consumption(max)
780nm Dimensions W/D/H mm.
0.45
50Q (I50Q on Alpha 7SE) 2xAAA batteries
5l<n
E&OE
Optical toslink
Weight Alpha 7SE
Alpha 8SE
Alpha 9 4.1 kg nett/ 5.6kg packed
430x290x85
25VA max
3.6kg nett/ 5.1 kg packed
4.1 kg nett/ 5.6kg packed
Guarantee
WORLDWIDE GUARANTEE
This entitles you to have the unit repaired free of charge, during
the first two years after purchase, at any authorised Arcam
distributor provided that it was originally purchased from an
authorised ARCAM dealer or distributor The manufacturer can
accept no responsibility for defects arising from accident, misuse,
abuse, wear and tear; neglect or through unauthorised adjustment
and/or repair, neither can they accept responsibility for damage or
loss occurring during transit to or from the person claiming under
the guarantee.
The warranty covers:
Parts and labour costs for two years from the purchase date.
After two years you must pay for both parts and labour costs.
The warranty does not cover transportation costs at any time.
CLAIMS UNDER GUARANTEE
This equipment should be packed in the original packing and
returned to the dealer from whom it was purchased, or failing this,
directly to the Arcam distributor in the country of residence.
It should be sent carriage prepaid by a reputable carrier - NOT by
post. No responsibility can be accepted for the unit whilst in
transit to the dealer or distributor and customers are therefore
advised to insure the unit against loss or damage whilst in transit.
For further details contact Arcam at:
ARCAM Customer Support Department, Pembroke Avenue,
Denny Industrial Centre, Waterbeach,
Cambridge, CB5 9PB, England.
Telephone: (01223) 203203 Fax: (01223) 863384
e-mail:
support@arcam.co.uk
PROBLEMS!
If your dealer is unable to answer any query regarding this or any
other Arcam product please contact Arcam Customer Support on
+44 (0) 1223 203203 or write to us at the above address and we
will do our best to help you.
Page 8

SAFETY GUIDELINES
SAFETY STANDARD
This product has been designed to meet the EN60065
international electrical safety standard.
SAFETY INSTRUCTIONS
This product was designed and manufactured to meet strict quality
and safety standards. There are, however some installation and
operation precautions of which you should be particularly aware:
1. Read Instructions All the safety and operating
instructions should be read before the appliance is operated.
2. Retain Instructions The safety and operating
instructions should be retained for future reference.
3. Heed Warnings All warnings on the appliance and in this
handbook should be adhered to.
4. Follow Instructions All operating and use instructions
should be followed.
5. Water and Moisture The appliance should not be used
near water - for example near a bathtub, washbowl, kitchen
sink, laundry tub, in a wet basement or near a swimming pool, etc.
6. Racks and Stands The appliance should be used only
with a rack or stand that is recommended for use with audio
equipment. If the equipment is on a portable rack it should be
moved with care. Quick stops, excessive force, and uneven
surfaces may cause the combination to overturn.
7. Ventilation The appliance should be situated so that its
location or position does not interfere with its proper
ventilation. For example, the appliance should not be situated
on a bed, sofa, rug or similar surface that may block the
ventilation openings or placed in a built-in installation, such as a
bookcase or cabinet that may impede the flow of air through
the ventilation openings. We recommend a minimum distance
of 50mm (2 inches) around the sides and top of the apparatus
to provide adequate ventilation.
8. Heat The appliance should be situated away from naked
flames and equipment, heat such as radiators, stoves or other
appliances (including other amplifiers) that produce heat.
12. Cleaning Unplug the unit from the mains supply before
cleaning. The appliance should normally only require a wipe
over with a clean, dry, lint-free cloth. If it is heavily soiled then a
cloth slightly dampened with a water/washing up liquid solution
may be used. Dry the unit afterwards with a dry cloth.
We do not advise the use of furniture type cleaning sprays/
polishes as this can cause white marks, which are very difficult
to remove, if the unit is then wiped over with water
I 3. Power Lines An outdoor antenna/ aerial should be
located away from power lines.
14. Non-use Periods If the unit has has a standby function,
a small amount of current will continue to flow into the
equipment in this mode.The power cord of the appliance
should be unplugged from the outlet when left unused for a
long period of time.
15. Object and Liquid Entry Care should be taken so
that objects do not fall and liquids are not spilled into the
enclosure through any openings. Objects filled with liquids, such
as vases, should not be placed on the equipment.
16. Abnormal Smell If an abnormal smell or smoke is
detected from the appliance, immediately turn the power off
and unplug the unit from the wall outlet.
Contact your dealer immediately.
I Z.Damage Requiring Service The appliance should be
serviced by qualified service personnel when:
A. The power-supply cord or the plug has been damaged or:
B. Objects have fallen, or liquid has spilled into the appliance or:
C. The appliance has been exposed to rain or:
D. The appliance does not appear to operate normally or exhibits
a marked change in performance or:
9. Power Sources The appliance should be connected to a
power supply only of the type described in the operating
instructions or as marked on the appliance.
10. Grounding Precautions should be taken so that the
grounding means of the appliance is not defeated.
I I. Power-Cord Protection Power supply cords should
be routed so that they are not likely to be walked on or
pinched by items placed upon or against them, paying particular
attention to cords and plugs, and the point where they exit
from the appliance.
ARCAM
Pembroke Avenue, Waterbeach, Cambridge, CBS 9PB, England
Telephone: +44 (0) 1223 203203
E. The appliance has been dropped or the enclosure damaged.
18. Servicing You should not attempt to service the appliance
beyond that described in this handbook. All other servicing
should be referred to qualified service personnel.
19. Climate The appliance has been designed for use in
moderate climates.
Issue 6/99
Fax:+44 (0) 1223 863384
e-mail:
support@arcam.co.uk
www.arcam.co.uk
SH076E
 Loading...