

Page 1
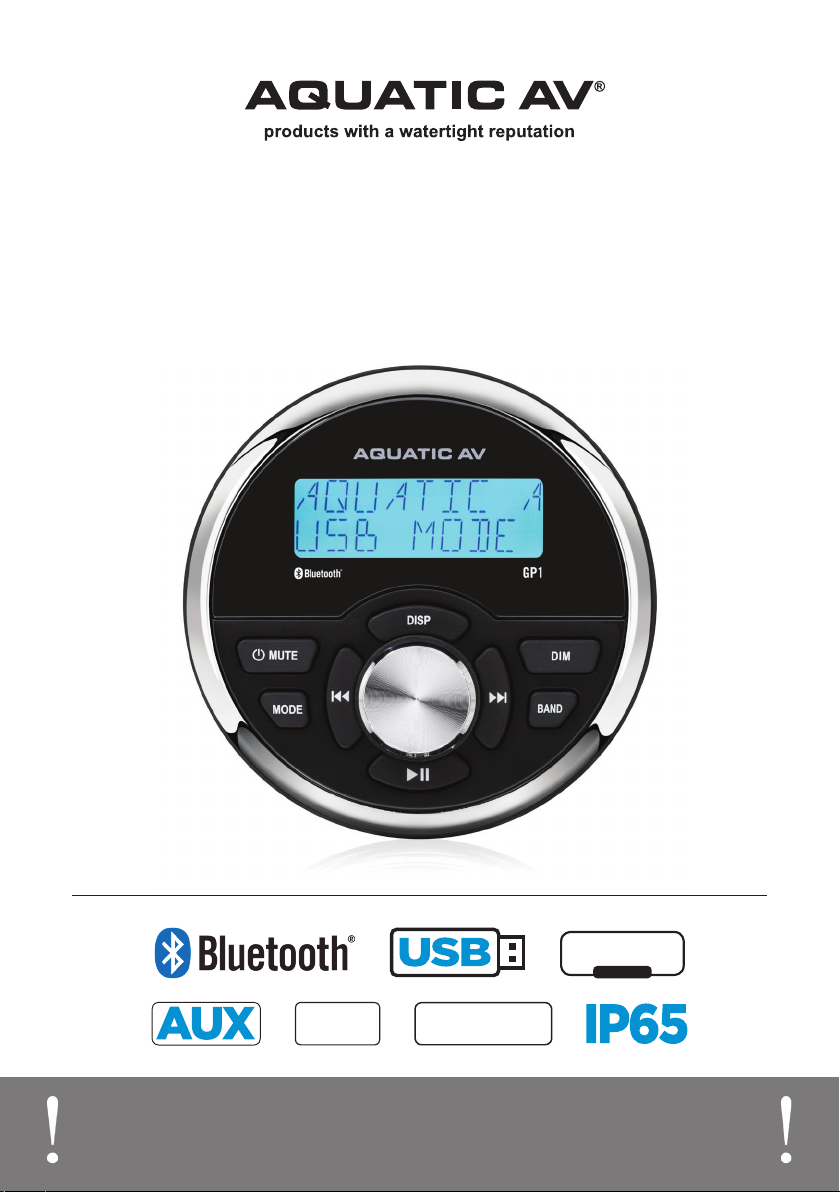
GP1 - WATERPROOF STEREO
RADIO
AM/FM
288W
POWER
DSP EQ
DSP EQ
USER / INSTALLATION MANUAL
PLEASE READ THIS INSTRUCTION MANUAL BEFORE
INSTALLATION AND OPERATION
Page 2

Table of Contents GP1 WATERPROOF STEREO
1 Getting Started...............................................................................................................................................
1.1 Contents..................................................................................................................................................
1.2 Connections.............................................................................................................................................
1.3 Connections Diagram...............................................................................................................................
1.4 Installation.............................................................................................................................................
1.5 Power On.................................................................................................................................................
2 Controlling the Stereo.....................................................................................................................................
2.1 Location of Controls.................................................................................................................................
2.2 Control Functions.....................................................................................................................................
3 Listening via Bluetooth...................................................................................................................................
3.1 Listening via Bluetooth............................................................................................................................
3.2 Pair with Bluetooth Audio Device.............................................................................................................
3.3 Listening via Bluetooth Audio Device.......................................................................................................
3.4 Bluetooth Multi-Link................................................................................................................................
4 Listening via USB...........................................................................................................................................
4.1 Listening via USB....................................................................................................................................
4.2 Direct Search by Track Number.................................................................................................................
4.3 Random Playback.....................................................................................................................................
4.4 Repeat Playback.......................................................................................................................................
4.5 Device Charging.......................................................................................................................................
5 Listening to AM/FM Radio...............................................................................................................................
5.1 Listening to AM/FM Radio.........................................................................................................................
5.2 Manually Save AM/FM Radio Stations to Memory......................................................................................
5.3 Automatically Save AM/FM Radio Stations to Memory...............................................................................
5.4 Listening to Saved Radio Memory.............................................................................................................
6 Audio & Settings Menus..................................................................................................................................
6.1 Audio Menu..............................................................................................................................................
6.1.1 EQ.....................................................................................................................................................
6.1.2 Loudness...........................................................................................................................................
6.2 Settings Menu.........................................................................................................................................
6.2.1 Beep Tone..........................................................................................................................................
6.2.2 Info/Clock..........................................................................................................................................
6.2.3 Power On Volume (P-VOL)..................................................................................................................
6.2.4 Area USA/Euro...................................................................................................................................
6.2.5 Local On/Off......................................................................................................................................
6.2.6 Stereo/Mono......................................................................................................................................
7 Additional Features........................................................................................................................................
7.1 Listening to Auxiliary Devices..................................................................................................................
7.2 Dimmer High/Low....................................................................................................................................
8 Specifications & Dimensions..........................................................................................................................
8.1 Specifications..........................................................................................................................................
8.2 Dimensions..............................................................................................................................................
9 Warranty Information......................................................................................................................................
3
3
3
4
5
5
6
6
7
8
8
8
8
8
9
9
9
9
9
9
10
10
10
10
10
11
11
11
11
11
11
11
12
12
12
12
12
12
12
13
13
13
14
2www.aquaticav.com
Page 3

Getting Started GP1 WATERPROOF STEREO
1.1 Contents
• GP1 Gauge Size Waterproof Stereo
• User/Installation Manual
• Wiring Harness (AQ-UNH-2)
• Mounting Bracket
• Two (2) Stainless Steel screws
• Two (2) Stainless Steel nuts
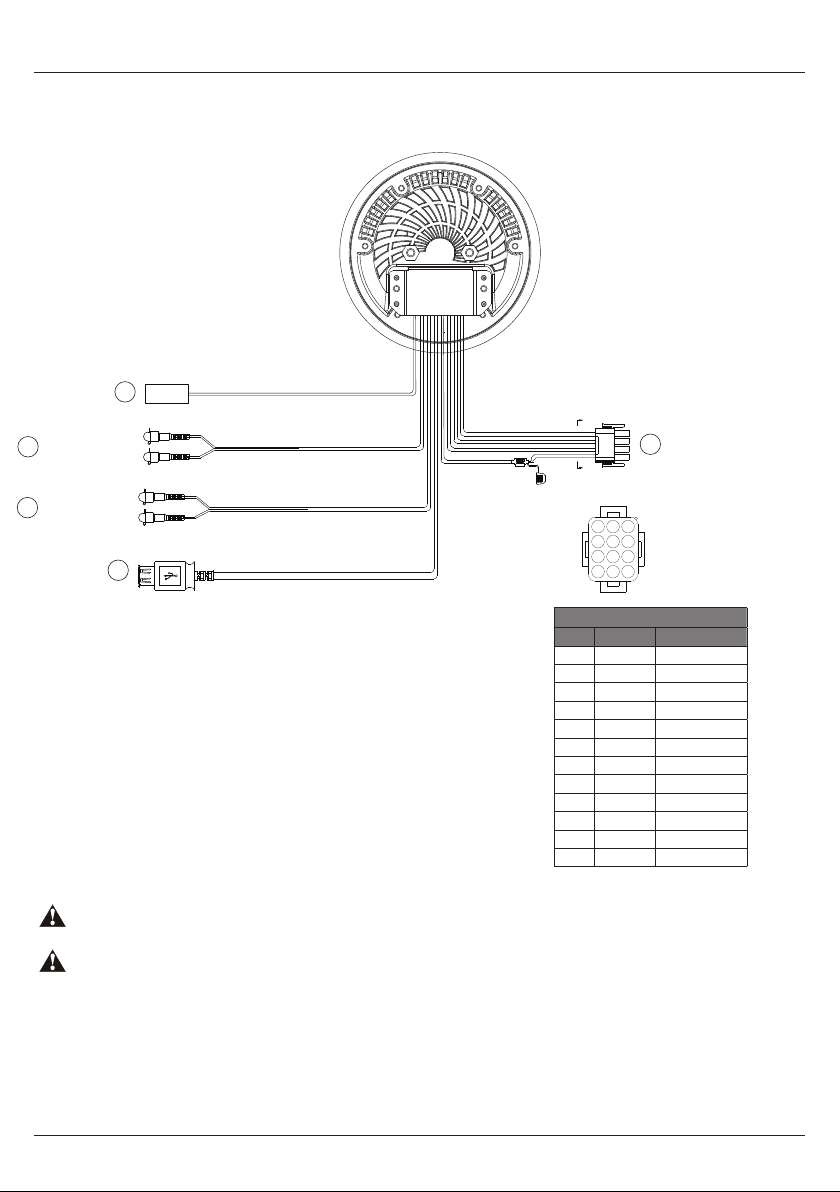
1.2 Connections (see Wiring Diagram 1.3)
1. 12-pin Watertight Harness
The 12-pin harness supplies power and ground connections to the stereo and four (4)
speaker channel output connections from the stereo.
Do not cut or modify the 12-pin harness on the stereo side or warranty will be void.
2. AM/FM Radio Antenna Jack
Allows connection of AM/FM radio antenna. For best AM/FM performance make sure the
antenna is extended to the highest achievable position.
3. Auxiliary Outputs
Allows external amplifiers to be connected to power additional speakers.
4. Auxiliary Inputs
Allows an additional RCA input, from a standalone unit or another stereo source.
5. USB Input
Play USB thumb drives with supported audio media and charge devices when connected.
3www.aquaticav.com
Page 4
Getting Started GP1 WATERPROOF STEREO
1.3 Connections Diagram
AM/FM Radio Antenna Jack
RCA Auxiliary Inputs (Black)
RCA Auxiliary Outputs (Gray)
USB Input (Black)
Fuse 15A
A
1
A
A-A
1
3
2
4
5
6
7
8
9
10
11
12
Right Channel (Red)
4
Left Channel (White)
Right Channel (Red)
3
Left Channel (White)
2
5
12-pin Watertight Harness*
Pin No. Wire Color Description
1 Green LR Speaker (+)
2 Green/Black LR Speaker (-)
3 Red Acc (+12V)
4 White LF Speaker (+)
5 White/Black LF Speaker (-)
6 Yellow Battery (+12V)
7 Gray RF Speaker (+)
8 Gray/Black RF Speaker (-)
9 Blue Power AMP Remote
10 Violet RR Speaker (+)
11 Violet/Black RR Speaker (-)
12 Black Ground
No lower than a 2 Ohm speaker load should be used or damage may occur to the stereo. Make sure the polarity of
speakers is connected correctly.
All open wire connections should be soldered and protected against water and dust for best long-term performance.
12-pin Watertight Harness
4www.aquaticav.com
Page 5
Getting Started GP1 WATERPROOF STEREO
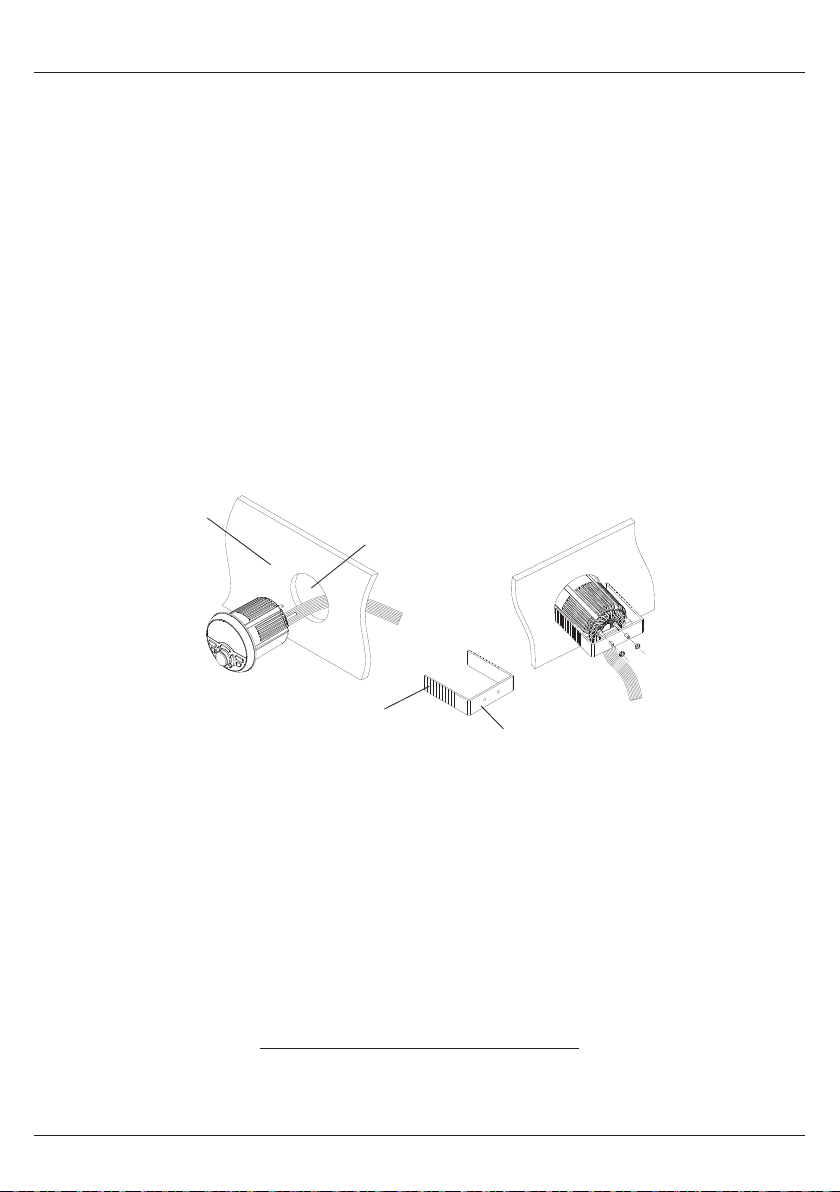
1.4 Installation
PLEASE READ THIS INSTRUCTION MANUAL BEFORE INSTALLATION AND OPERATION.
Aquatic AV recommends installation of this stereo by a professional technician.
Aquatic AV recommends using the ‘measure twice, cut once’ method!
1. Check clearances on both sides of a planned installation area before drilling any holes.
2. Drill a pilot hole at the center point and then use a circular saw to drill a hole with a 3”
(76.2mm) diameter.
3. Slide the GP1 stereo through the mounting hole and secure the stereo using the mounting
bracket, screws and washers. If the bracket needs to be shortened this can be done by
removing the appropriate number of breakaway segments using a pair of pliars.
4. Once complete make sure the outside surface is clean and clear of debris to ensure
a proper water/dust seal. The GP1 stereo has an external water/dust proof gasket which
requires a clean and flat surface for long-term environmental protection performance.
Dashboard
Mounting hole size
3” (76.2mm)
Break Lines
Mounting
Bracket
1.5 Power On
In a spa application the red and yellow wires should be jumped together and then connected to
the +12VDC output of the power source. In this set up the GP1 will always be on, with a very low
current draw when idle.
In a boat, ATV or other application requiring power from a battery, the yellow wire (constant
power) should be connected to the battery, and the red wire should be connected to the ignition
or a switch.
For detailed instructions you can check out our online video:
‘How to wire your Aquatic AV stereo system’
http://www.aquaticav.com/support/videos
Once all connections are made press the POWER/MUTE button and the stereo will turn ON. Press
and hold the POWER/MUTE button to turn the unit OFF.
5www.aquaticav.com
Page 6

Controlling the Stereo GP1 WATERPROOF STEREO
2.1 Location of Controls
1 2 3
MUTE
MODE
10 9 8 7 6 5
1. Power/Mute
2. LCD Display
3. Display
4. Dimmer
5. Band / File Search
4
DISP
DIM
BAND
6. Next / Fast Forward
7. Preset / Play/Pause
8. Rotary Selector
9. Previous / Fast Rewind
10. Mode
6www.aquaticav.com
Page 7

Controlling the Stereo GP1 WATERPROOF STEREO
2.2 Control Functions
Button Action AM/FM USB AUX BLUETOOTH
Power ON
Mute ON/OFF
Press and Hold for 5 sec
to reset unit
BAS / TRE / BAL / FAD /
BEEP / CLOCK / P-VOL /
AREA / LOCAL / ST
EQ / LOUD
No function
BAS / TRE / BAL / FAD /
EQ / LOUD
BEEP / CLOCK / P-VOL /
AREA / LOCAL / ST
Power/Mute
Dimmer
Mode
Band /
File Search
Display
Preset /
Play/Pause
Next /
Fast Forward
Previous /
Fast Rewind
Rotary Selector
Short Press
Long Press Power OFF
Short Press Dimmer High/Low
Long Press No function Repeat Playback No function No function
Short Press Change source
Long Press Bluetooth off/link
Short Press Change Band File search No function No function
Long Press Auto Store Random Playback No function No function
Short Press Info/Clock
Long Press Clock setting
Short Press
Long Press Manual Save Station No function No function No function
Short Press Seek Up Next File No function Next File
Long Press Turn Up Fast Forward
Short Press Seek Down Previous File No function Previous File
Long Press Turn Down Fast Rewind Show Version No function
Rotate Volume Up/Down Volume Up/Down Volume Up/Down Volume Up/Down
Short Press
Long Press
Show CH1. Rotate to
select CH1-CH6
BAS / TRE / BAL / FAD
/ EQ / LOUD
BEEP / CLOCK / P-VOL
/ AREA / LOCAL / ST
Play/Pause No function Play/Pause
BAS / TRE / BAL / FAD /
EQ / LOUD
BEEP / CLOCK / P-VOL /
AREA / LOCAL / ST
If your music player is connected via the Auxiliary input you will not be able to control track or receive track
information.
Navigating past the last Settings Menu item (Restore) will automatically exit the Settings Menu and enter the Audio
Menu. Press and hold Audio/Menu button to enter the Settings Menu again.
7www.aquaticav.com
Page 8

Listening via Bluetooth GP1 WATERPROOF STEREO
3.1 Listening via Bluetooth
The Bluetooth Audio menu is accessible by pressing the MODE button and is used to connect a
Bluetooth Audio device or disconnect a Bluetooth Audio device that has already been paired.
3.2 Pair with Bluetooth Audio Device
1. Enable Bluetooth Audio mode by pressing MODE and selecting Bluetooth.
2. Switch on your Bluetooth Audio device.
3. Select ‘AQUATIC AV GP1’ from the list of available devices to pair. No password should be
required however if prompted for a password use ‘0000’.
4. A Bluetooth logo will illuminate on the stereo’s LCD to verify Bluetooth is connected.
3.3 Listening via Bluetooth Audio Device
1. Bluetooth Audio mode will be activated once a Bluetooth Audio device is paired in any
mode. Use MODE to change to Bluetooth Audio mode to listen to music from your device.
2. Play the song from device and the sound will play through the stereo.
3. Press PLAY/PAUSE to play or pause the song.
4. Press FAST REWIND / FAST FORWARD buttons to play previous/next song file.
5. Previous/next track and volume up/down can also be controlled directly from your
Bluetooth Audio device.
Bluetooth functions are device specific and not all devices will allow Fast Forward/Rewind or Next/Previous to work.
3.4 Bluetooth Multi-link
A second Bluetooth Audio device can pair to the stereo even when music is playing from the first
Bluetooth Audio device.
1. Long press MODE to unlink first device.
2. Pair second device by selecting ‘Aquatic AV GP1’ in the device’s Bluetooth menu.
3. Once paired, playing music from device 2 will override device 1 and the stereo should begin
playing from device 2.
4. Should you wish to play music from the first device again, repeat steps 1, 2 & 3.
8www.aquaticav.com
Page 9

Listening via USB GP1 WATERPROOF STEREO
4.1 Listening via USB
1. Attach your USB thumb drive to the female USB connector and the music files on the
USB will play automatically.
2. If your USB device is readable then USB source mode will be automatically selected and
your compatible content will begin to play.
3. Press PLAY/PAUSE to play or pause the music.
4. Press FAST REWIND / FAST FORWARD once play previous / next song file.
5. Press and hold FAST REWIND / FAST FORWARD to fast forward / fast rewind the song file.
Playback and navigation of music files via USB includes MP3 and WMA files.
4.2 Direct Search by Track number
1. Press BAND button and the display will show ‘NUM ****’
2. Turn the Rotary Selector to select numeric value.
3. Press FAST REWIND / FAST FORWARD to move to the next number in the sequence.
4. Once the desired file number is selected press the Rotary Selector or allow the timer to
auto select the track number being displayed.
4.3 Random Playback
Press and hold the BAND button to toggle RDM ON or RDM OFF (default).
4.4 Repeat Playback
Press and hold the DIM button to toggle RPT ONE, RPT FOLD, RPT ALL (default).
4.5 Device Charging
When specified USB devices such as Smartphones or MP3 players are connected with a standard
male-to-female USB cable the device’s battery will charge automatically. The USB connection will
deliver up to 2.1A of current to charge a device battery.
9www.aquaticav.com
Page 10

Listening to AM/FM Radio GP1 WATERPROOF STEREO
5.1 Listening to AM/FM Radio
1. Enter radio mode by pressing MODE and selecting FM1, FM2, FM3, AM1 or AM2.
2. Press BAND button to select the radio band.
3. Navigate the available stations using the FAST REWIND / FAST FORWARD buttons.
4. Press FAST REWIND / FAST FORWARD to seek another station.
5. Press and hold FAST REWIND / FAST FORWARD for manual tuning. (Manual tuning will
time out after 5 seconds of no action then will revert back to Seek/Auto).
5.2 Manually Save AM/FM Radio Stations to Memory
1. Tune to the station you would like to be saved as a preset.
2. Press and hold the PLAY/PAUSE button and the stereo will display ‘SAVE CH1’.
3. Turn the Rotary Selector to select the desired preset slot you would like to save the current
station to.
4. Press the Rotary Selector to save the preset.
5. Upon successfully saving a preset the preset number that was chosen will be shown in the
right corner.
Presets are only for the current band you are on. Each band FM1, FM2, FM3, AM1 and AM2 has six presets for a
total of 30 (18x FM & 12x AM).
5.3 Automatically Save AM/FM Radio Stations to Memory
Press and hold the BAND button for 2 seconds to auto store stations to preset locations 1-6 of
bands FM1-FM3 when in FM or AM1-AM2 when in AM.
5.4 Listening to Saved Radio Memory
1. Press the PLAY/PAUSE button and the stereo will display CH ‘X’.
2. Turn the Rotary Selector to the desired preset channel.
3. Press the Rotary Selector to start listening to the preset selected.
10www.aquaticav.com
Page 11

Audio & Settings Menus GP1 WATERPROOF STEREO
6.1 Audio Menu
1. Press the Rotary Selector to enter the Audio menu. The available Audio options are:
BASS - TREBLE - BALANCE - FADER - EQ - LOUD
2. Press the Rotary Selector to navigate the menu options.
3. Turn the Rotary Selector to adjust the desired Audio option.
4. Press the Rotary Selector to confirm your change and continue in the Audio menu or wait
5 seconds for the unit to time out to close the Audio menu.
Any changes made in the Audio menu are system wide and will affect all modes.
6.1.1 EQ
The GP1 stereo is equipped with an audio DSP (Digital Signal Processor) to provide preset
listening experiences for different music types. If you have chosen a preset equalizer setting
(Classic, Rock, Pop, Flat, Off (default)) the previous Bass & Treble settings will be overridden.
6.1.2 Loudness
Increases the sound output level by 15dB.
6.2 Settings Menu
1. Press and hold the Rotary Selector to enter the Settings menu. The available Settings
options are:
BEEP - CLOCK - P-VOLUME - AREA - LOCAL - STEREO/MONO
2. Press the Rotary Selector to navigate the menu options.
3. Turn the Rotary Selector to adjust the desired Setting option.
4. Press the Rotary Selector to confirm your change and continue with your selections in the
Settings Menu or allow 5 seconds for the menu to time out.
Any changes made in the Settings menu are system wide and will affect all modes.
6.2.1 Beep Tone
The Beep tone plays when any button is pressed. This can be switched ON or OFF in the Settings
Menu.
6.2.2 Info/Clock
Short press the DISP button to display either Clock or Information, or change the time as below.
1. Press and hold the DISP button for 2 seconds. The hours ‘00’ will display flashing.
2. Turn the Rotary Selector to change the hour and then press to confirm.
3. The minutes ‘00’ will display flashing. Turn the Rotary Selector to change the minutes and
press to confirm.
11www.aquaticav.com
Page 12

Settings Operation GP1 WATERPROOF STEREO
6.2.3 Power On Volume (P-VOLUME)
Sets the maximum volume the stereo will be set when powering the unit on. If the stereo is
switched off with a lower volume than the P-Vol setting then the lower volume setting will be
used.
Normal volume control and operation is resumed once the Rotary Selector is turned after
switching the stereo on.
6.2.4 Area USA/Euro
Select USA or European AM/FM radio frequencies.
USA mode will increase and decrease the FM frequency in steps of 0.1 MHz, e.g. 88.5, 88.6,88.7 MHz. EURO mode
will increase and decrease the FM frequency in steps of 0.05 MHz, e.g. 88.25, 88.30, 88.35 MHz.
6.2.5 Local On/Off
When Local is turned on the stereo seeks to only the radio channels with strong signal strength.
When Local is turned off the stereo will seek to all radio channels it receives signal from.
When Local setting is turned on the word ‘Local’ will appear in the upper right hand corner of the stereo’s display.
6.2.6 Stereo/Mono
Change the output mode between stereo and mono.
Additional Features
7.1 Listening to Auxiliary Devices
1. Connect your audio device to the rear RCA connectors using a stereo RCA cable.
2. Press MODE on the stereo to select ‘AUX IN’ mode.
3. Play the song from your auxiliary audio device and the sound will play through the stereo.
4. Volume level will be determined by the auxiliary device’s audio output level.
Always ensure you connect and disconnect the stereo with dry hands!
7.2 Dimmer High/Low
Adjust the display brightness from 100% for normal operation to 30% brightness to reduce
screen glare during night time operation.
12www.aquaticav.com
Page 13

Specifications & Dimensions GP1 WATERPROOF STEREO
8.1 Specifications
Media
Supported Media...............................Bluetooth Audio / USB / MP3 / AM/FM / AUX
Device Charging.................................via rear USB cable (2.1A)
Display
Display Type..................................... Monochrome TFT with blue backlight
Clock Display.................................... Yes
Variable Screen Brightness.................100% and 30% settings
Inputs
Bluetooth..........................................Bluetooth Audio
USB.................................................1x USB
Auxiliary............................................1x stereo pair RCA
Outputs
Pre-Out.............................................1x stereo pair RCA (2V)
Radio
AM/FM Tuner.....................................18x FM pre-set & 12x AM pre-set memory. US/Euro frequencies
Power
Power (max)......................................4x 45W (4 Ohms), 4x 72W (2 Ohms)
Amplifier Type...................................Class A/B (2 Ohm stable)
Output Voltage.................................. 10.5V - 14.4V DC
Current Draw.....................................7A (max) / <3mA (standby)
Multi-Environment Certifications
Waterproof / Dustproof....................... Yes - IP65
Conformal PCB Coating......................Yes
UV Protection....................................500hrs stable, ASTM D4329 compliant
Salt/Fog Protection............................ 500hrs stable, ASTM B117 compliant
Certifications.....................................CE, RoHS, WEE, FCC
Stainless Steel Mountings.................. Yes
8.2 Dimensions
Ø 92mm
MUTE
MODE
12.7mm
DISP
DIM
BAND
77.7mm
Ø 76mm
82.7mm
13www.aquaticav.com
Page 14

Warranty Information GP1 WATERPROOF STEREO
Aquatic AV offers a limited warranty of our products on the following terms:
Length of warranty
2 years on audio systems, electronics, speakers, and accessories (receipt required).
Coverage
This warranty covers only the original purchaser of an Aquatic AV product purchased from an
authorized Aquatic AV dealer. In order to receive service, the purchaser must provide Aquatic AV
with a copy of the receipt stating the customer name, dealer name, product purchased and date
of purchase.
Defective products
Products found to be defective during the warranty period will be repaired or replaced (with a
product deemed to be equivalent) at Aquatic AV’s discretion.
What is not covered
Damage caused by accident, abuse, improper operations or theft. Any cost or expense related to
the removal or reinstallation of product. Service performed by anyone other than an authorized
Aquatic AV service center. Any product with the serial number or tamper labels defaced, altered,
or removed. Subsequent damage to other components. Any product not purchased from an
authorized Aquatic AV dealer.
Limit on implied warranties
Any implied warranties including warranties of fitness for use and merchantability are limited
in duration to the period of the express warranty set forth above. Some states do not allow
limitations on the length of an implied warranty, so this limitation may not apply. No person is
authorized to assume for Aquatic AV any other liability in connection with the sale of the product.
How to obtain service
You must obtain a return material authorization number (RMA) to return any product to Aquatic
AV. You are responsible for shipping charges of returned products to Aquatic AV.
Priority Customer Support & Free Extended Warranty
In order to receive the best customer support from Aquatic AV we recommend you register your
product for a free extended warranty.
Register your product for extended warranty and priority support at www.aquaticav.com/register
Please record the model and serial number[s] of your equipment in the space provided below as
your permanent record and will assist us with your factory warranty coverage. These numbers can
be found on the chassis label found on the rear of the stereo on the wire harness.
Model number[s]: Serial number[s]:
14www.aquaticav.com
Page 15

FCC Statement GP1 WATERPROOF STEREO
FCC ID:
MADE IN CHINA
FCC Statement to the User
This equipment has been tested and found to comply with the limits for a Class B digital
device, pursuant to Part 15 of the FCC Rules. These limits are designed to provide
reasonable protection against harmful interference in a residential installation. This
equipment generates, uses and can radiate radio frequency energy and, if not installed
and used in accordance with the instructions, may cause harmful interference to radio
communications. However, there is no guarantee that interference will not occur in a
particular installation. If this equipment does cause harmful interference to radio or
television reception, which can be determined by turning the equipment off and on, the
user is encouraged to try to correct the interference by one of the following measures:
1. Reorient or relocate the receiving antenna.
2. Connect the equipment into an outlet on a circuit different from that to which the
receiver is connected.
3. Increase the separation between the equipment and receiver.
4. Consult the dealer or an experienced radio/TV technician for help.
FCC Caution:
Any changes or modifications not expressly approved by the party responsible for
compliance could void the user’s authority to operate this equipment.
This device complies with Part 15 of the FCC Rules. Operation is subject to the following
two conditions: (1) This device may not cause harmful interference, and (2) this device
must accept any interference received, including interference that may cause undesired
operation
Product design and specification subject to change without notice. E&OE.
Doc V1.1
15www.aquaticav.com
Page 16

Aquatic AV
282 Kinney Drive
San Jose, CA 95112, USA
E-mail: info@aquaticav.com
US & Canada: 1 877 579 2782
International: +1 408 559 1668
Fax: +1 408 559 0125
www.aquaticav.com
 Loading...