

Page 1

Warranty
AquaCraft
™
will warrant this kit for 90 days after the date of purchase from defects in materials or
workmanship. AquaCraft will either repair or replace, at no charge, the incorrectly made part.
Make sure you save the receipt or invoice you were given when you bought your model! It is your
proof of purchase and we must see it before we can honor the warranty.
To return your Pro Fisherman Bass Boat for repairs covered under warranty you should send your
boat to:
Hobby Services
3002 N. Apollo Drive, Suite 1
Champaign, Illinois 61822
Attn: Service Department
Phone: (217) 398-0007 9:00 am – 5:00 pm Central Time M-F
E-mail: hobb
yservices@hobbico.com
HCAZ3024 for HCAB11**Entire Contents © Copyright 2004
ASSEMBLY AND OPERATION MANUAL
™
™
Page 2

INTRODUCTION ..............................................................2
SAFETY PRECAUTIONS......................................................2
REPAIR SERVICE ................................................................2
SPECIFICATION & DESCRIPTION CHANGES ..................2
ITEMS REQUIRED FOR COMPLETION..............................3
USEFUL TOOLBOX ITEMS ................................................3
BOAT TERMINOLOGY ......................................................3
FINAL ASSEMBLY ..............................................................3
KEEP ON BASSIN’ ..............................................................5
ORDERING REPLACEMENT PARTS....................................5
EXPLODED VIEWS ............................................................7
Thank you for purchasing the Pro Fisherman™! We at
AquaCraft know how exciting a new R/C boat purchase can
be and we know you’re anxious to get started, but please take
time to read these instructions carefully and completely
before attempting to operate your model. This manual
contains the instructions you need to safely operate and
maintain your boat. As with any hobby, there is the possibility
of injury. Arming yourself with knowledge is the best way to
avoid injury.
If for any reason you think that this model is not for you,
return it to your local dealer immediately. PLEASE NOTE:
Your hobby dealer cannot accept a return on any model
after the final assembly sequence has begun.
• Adult supervision is strongly recommended! Children
should be warned about the dangers of playing in close
proximity to water.
• Do not attempt to charge battery packs in the immediate
vicinity of swimming pools, lakes, rivers, oceans, inland
seas, etc. Above all, NEVER ATTEMPT TO OPERATE A
CHARGER IF YOU, THE CHARGER, OR THE BATTERY
PACK ARE WET.
• Always remove the battery pack from the boat
before re-charging.
• This boat is controlled by radio signals, which are
susceptible to possible interference from other R/C
transmitters, paging systems, or other electrical noise.
Before turning your radio transmitter and receiver on,
make sure no one else in the area is operating a radio on
the same frequency (channel).
• Do not touch the propeller anytime the electronics are
turned “ON.” Pay close attention to items such as loose
clothing, shirt sleeves, ties, scarves, long hair or any
loose objects that may come in contact with the spinning
propeller. If your fingers, hands, etc. come in contact
with the spinning propeller, you may be severely injured.
• The speed and mass of this boat can inflict property
damage and severe personal injury if a collision occurs.
Never run this boat in the presence of swimmers or where
the possibility of collision with people or property exists.
• Electric motors can generate considerable heat. Do not
touch any part of your motor until it has cooled.
Touching the motor immediately after running the boat
may result in a serious burn.
If the buyer is not prepared to accept the liability associated
with the use of this product, the buyer is advised to return
this kit immediately in new and unused condition to the
place of purchase.
Repair service is available anytime.
After the 90-day warranty, you can still have your boat
repaired for a small charge by the experts at AquaCraft’s
authorized repair facility, Hobby Services, at the address
listed on the front page of this manual.
To speed up the repair process, please follow the
instructions below.
1. Under all circumstances return the ENTIRE system; boat
and radio.
2. Make sure the electronics are turned off and all batteries
are removed.
3. Send written instructions which include a list of all items
returned, a THOROUGH explanation of the problem,
the service needed and your phone number during the
day. If you expect the repair to be covered under
warranty, be sure to include a proof-of-purchase date
(your store receipt or purchase invoice).
4. Also be sure to send your full return address.
All pictures, descriptions, and specifications found in this
instruction manual are subject to change without notice.
AquaCraft maintains no responsibility for inadvertent errors in
this manual.
SPECIFICATION & DESCRIPTION CHANGES
REPAIR SERVICE
SAFETY PRECAUTIONS
INTRODUCTION
TABLE OF CONTENTS
2
Page 3
❏ DTXC2100 – DuraTrax
®
7.2 volt 1500mAh NiCd battery
pack (1 required)
❏ DTXP4000 – AC/DC Piranha
™
Peak Power charger
❏ FUGP7300 – Four (4) “AA” batteries. Eight (8) “AA”
batteries are required for the transmitter.
As with any hobby, it is a good idea to assemble a useful
collection of tools to bring along anytime you head out to the
pond. Here are some items you may wish to keep handy.
❏ #2 Phillips screwdriver (HCAR1024)
❏ 1.5mm Hex driver (HCAR1150)
❏ 4mm Socket or wrench
❏ Paper towels
❏ Spray-on glass cleaner
❏ Hook & Loop material (GPMQ4480)
❏ Hobby knife (HCAR0109)
BOW: The front of the boat
STERN: The back of the boat
PORT: This is the left side of the boat when aboard and facing
the front (bow). An easy way to remember this is that port and
left both contain four letters.
STARBOARD: This is the right side of the boat when aboard
and facing the front (bow).
HULL: The body of the boat.
DECK: The top of the boat
Decals have been provided for your Pro Fisherman. Simply
cut them out, peel, and stick! See the box for recommended
decal placement.
After the decals are applied, press-fit the boat’s steering
wheel into place as shown. The package containing the
steering wheel is located inside the hatch compartment of
the hull.
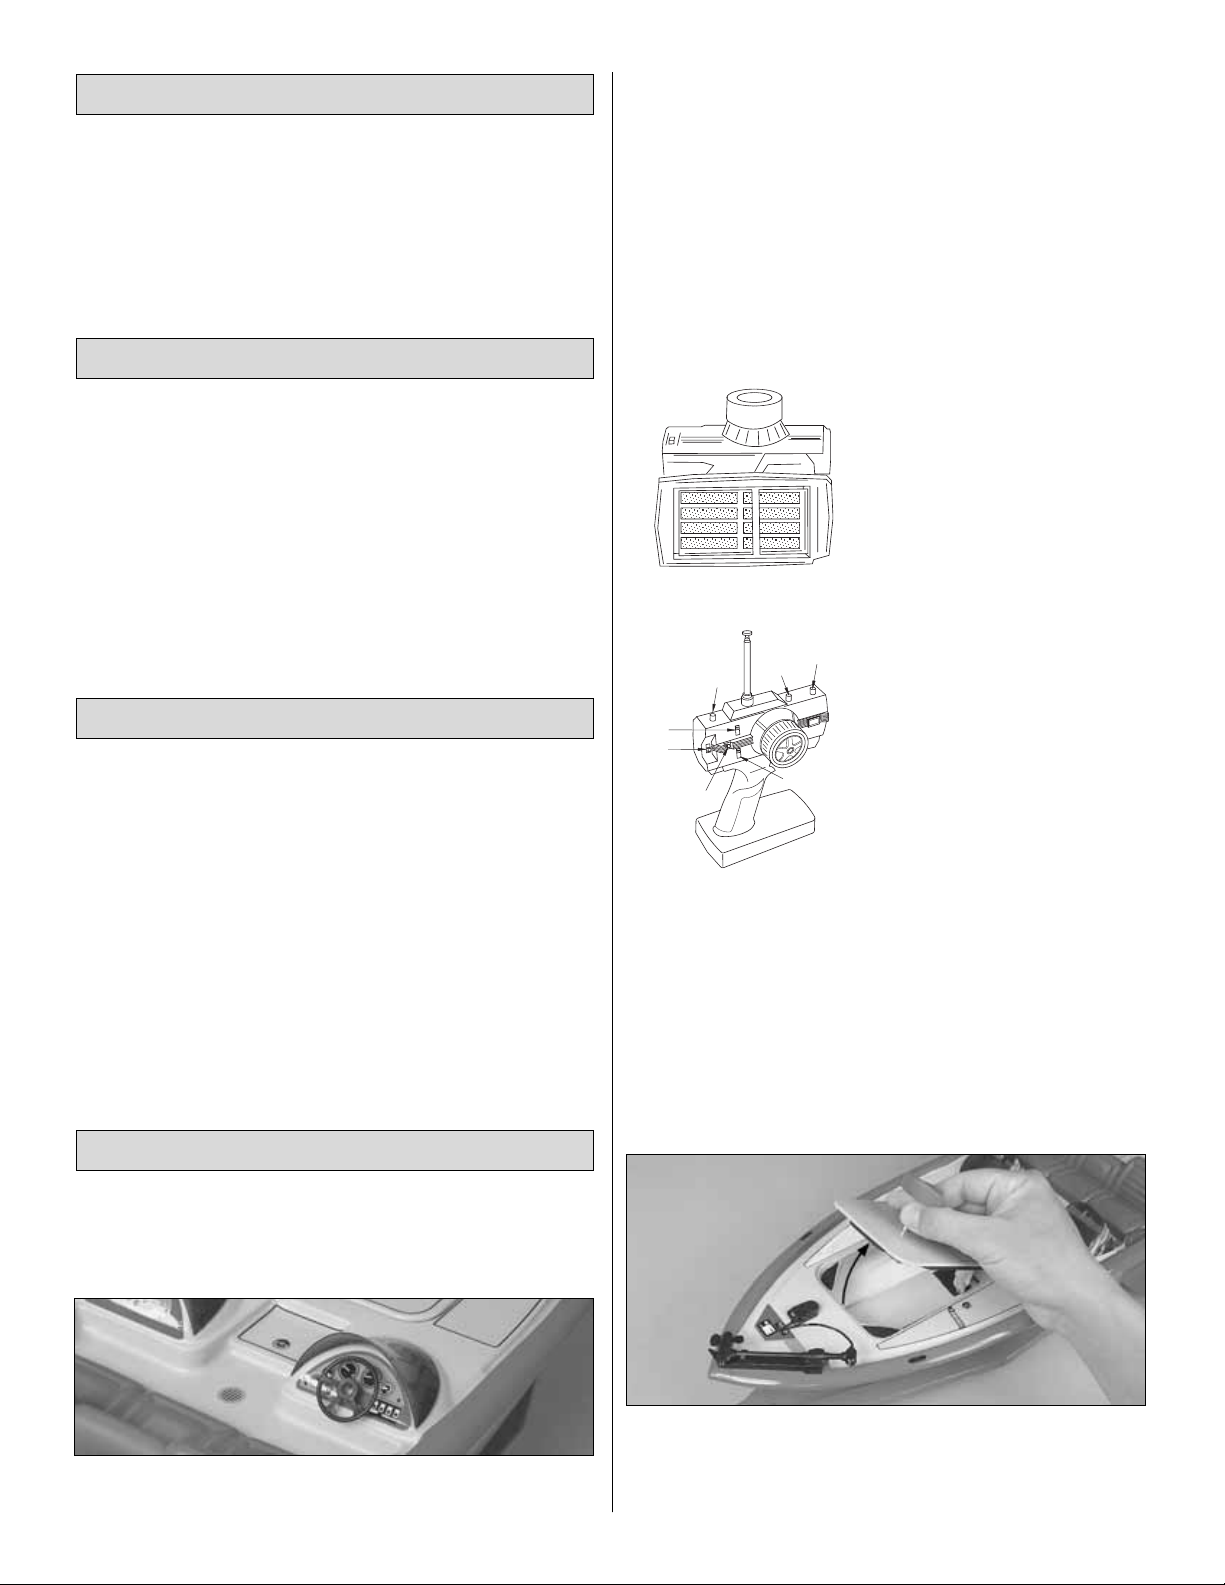
Transmitter Assembly
Important Note: The transmitter is not water resistant and
should never come in contact with water.
❏ 1. Remove the transmitter antenna from the parts bag and
thread it into the top of the transmitter. To ensure that the
antenna is attached, lightly pull on the base of the antenna. If
it slides out, it is not installed properly.
❏ 2. Slide off the battery door
on the bottom of the transmitter.
Install 8 new “AA” batteries into
the bottom of the transmitter in
the configuration molded into
the battery holder. Re-install the
battery door onto the bottom of
the transmitter.
❏ 3. Turn the transmitter “ON”
using the switch on the front. The
red LED light next to the on/off
switch should light up. If the LED
does not light up, turn the
transmitter off and check to
make sure that the batteries are
installed properly. If you see a
flashing LED, the batteries are
low and need to be replaced.
Battery Pack Installation
IMPORTANT! Never leave a charger and battery pack
unattended while charging. Use only the recommended
battery pack and an appropriate charger. Do not attempt to
charge the battery while it is installed in the Pro Fisherman.
Refer to the instructions included with your charger for
proper battery charging procedure.
❏ 1. Remove the forward hatch by grasping the fishing seat
and gently lifting as shown to reveal the battery compartment.
Peel the backing off of the supplied hook & loop material and
apply the “loop” side to your 6-cell battery pack.
FINAL ASSEMBLY
BOAT TERMINOLOGY
USEFUL TOOLBOX ITEMS
ITEMS REQUIRED FOR COMPLETION
3
Install (8) new "AA" batteries
THROTTLE
TRIM
RATE
STEERING
TRIM
THROTTLE SERVO
REVERSE
STEERING
SERVO
REVERSE
ON / OFF
ADJUSTABLE
STEERING
POWER
LIGHT
Page 4

❏ 2. With the forward hatch removed from the deck, place a fully
charged battery pack onto the battery tray as shown.
❏ 3. Plug the battery pack into the boat’s ESC (Electronic
Speed Control) battery connector. Do not force them
together; they are designed to fit together only one way.
❏ 4. Put the forward hatch back into place (note direction).
Make sure that the hook & loop material connects properly.
Check the Radio System
❏ 1. Turn the power “ON” to the transmitter and Pro
Fisherman (in that order).
❏ 2. If the boat’s propeller begins to spin once power is
turned “ON,” make sure your transmitter is “ON” and simply
rotate the throttle trim knob located atop the transmitter until
it stops.
❏ 3. Standing behind the boat with the radio system turned
“ON,” rotate the steering wheel of your transmitter to the left.
The outboard unit should move towards the left. Rotate the
steering wheel of your transmitter to the right. The back of the
outboard unit should move towards the right. If this is not the
case, simply move the transmitter’s steering servo reverse
switch to the other position.
❏ 4. Squeeze the trigger on the transmitter; this should
activate the propeller in a counterclockwise motion. If this is
not the case, try moving the throttle servo reversing switch to
the other position. Pushing the trigger forward will activate
the propeller in a clockwise rotation; this is the “REVERSE”
feature and it can be used to either back out of precarious
water or slow the boat down quickly.
❏ 5. The D/R knob located atop the transmitter is the steering
rate adjustment. Turning the knob to the right increases the
total movement of the outboard unit while turning it to the left
decreases the movement.
❏ 6. Turn the power “OFF” to your boat and then your
transmitter (always, in that order).
PLEASE READ BEFORE Running the Pro Fisherman:
• NEVER attempt to swim after a stalled or capsized boat!
Wait patiently for the wind currents to return the boat to
shore or use a tennis ball attached to the end of a fishing
rod to retrieve a stalled or capsized boat.
• It is dangerous to operate any R/C vehicle at any time that
there is not sufficient light.
• R/C models produce vibrations which will cause screws,
nuts, bolts, etc, on your model to become loose over
time. It is important to make sure that all hardware is
secure before operating your model.
• The edges of the propeller are very sharp and can cut
your fingers if you are not careful. At no time should you
ever attempt to stop the prop with your hand. In the event
that weeds become entangled in the propeller, turn the
Pro Fisherman’s power “OFF” before attempting to
remove them.
• CAUTION: Your Pro Fisherman may take on small
amounts of water, especially when running in rough
water due to high winds or when making tight turns.
Keep a roll of paper towels handy and dry out the hull
interior after every run.
• Total run time of the Pro Fisherman is approximately
6-10 minutes (assuming you begin with a fully charged
battery pack). When you notice a decrease in power or
sluggish steering response, it means the battery pack is
nearly drained and it’s time to head for shore. As soon as
the boat reaches shore, turn off the power to the boat’s
receiver and transmitter (in that order).
• CAUTION: The motor and battery may be hot! Allow them
to cool for a few minutes before attempting to remove the
battery pack.
• After running, store your Pro Fisherman with both
hatches opened to allow the interior to dry out
completely. If you fail to do this, it may result in corrosion
of the electronic components.
4
Page 5

• IMPORTANT: If, for whatever reason, your boat takes on
a large amount of water causing the radio equipment to
get wet, you must do the following immediately: Remove
the battery pack and radio equipment from the boat.
Allow the components to air dry completely before
reassembling. Reinstall the components and check for
proper operation before running the boat in water.
Launch Procedure
1 Turn the power “ON” to the transmitter and receiver (in
that order).
2. Gently place the boat in water that is at least 8" deep and free
of obstacles (weeds, rocks, sticks, ducks, muskrats, etc.).
3. Slowly advance the throttle to full speed and note if the
boat has a tendency to turn right or left. Adjust the
steering trim knob on your transmitter until the boat runs
in a straight line when the steering wheel is at neutral.
4. When finished running, be sure to turn the power “OFF”
to your boat and transmitter (in that order).
The Waiting Game
If your Pro Fisherman should happen to stall, wind and/or
water currents will slowly carry it to shore. The bad news is
that the boat could be carried to the opposite shore. When
surveying areas to run your boat, keep variables in mind such
as wind direction, size of the lake, strength of river currents,
etc. Above all, NEVER attempt to swim after a stalled boat.
Helpful Tip
Use a fishing rod with at least 12lb. line and a tennis ball tied
to the end to retrieve a stalled boat.
Regular Maintenance
After every 10-12 hours of leisurely run time or after a day of
competition, it is a good idea to disassemble and re-lubricate
the gears, shafts, and bearings of the outboard unit with fairly
heavy-duty grease (not oil). Be sure to wipe away any old
grease but DO NOT use any de-greasing agents. Refer to the
exploded view on page 7 for assembly diagram.
Getting More Out Of Your Pro Fisherman
The AquaCraft Pro Fisherman comes equipped with the EP1
Outboard Motor unit. You can increase or decrease the
performance of the Pro Fisherman by adjusting the ride height
or the thrust angle of the EP1. Making slight adjustments can
make major differences, so it is a good idea to keep a record
of any adjustments you make and how it affects performance.
In addition to these adjustments, performance may also be
affected by the weight distribution of your onboard radio gear,
speed control, battery pack(s), etc…
Basic Maintenance
When you are through operating your boat for the day, be sure to
perform these basic maintenance procedures. This will prolong
the life of the Pro Fisherman and help to ensure trouble-free
running. Be sure to turn the power “OFF” to your boat and
transmitter before performing any maintenance.
• Remove the hatches.
• Remove the battery pack.
• Flip your boat over and shake any excess water from the
outboard motor.
• Soak up any excess water with a paper towel.
• Locate and remove the “endcap” at the base of the
outboard unit by turning it counterclockwise. This will
allow you to release any water trapped in the gear
housing. The “bullet” at the front of the outboard unit is
also removed by counterclockwise rotation. This allows
access to the front shaft bearing.
• Make sure the propeller and drive dog are free of moss
and other debris.
• Wipe down the entire boat with spray-on glass cleaner
and a paper towel.
GOOD LUCK AND GREAT BOATING!
To order replacement parts for the AquaCraft Pro Fisherman,
use the order numbers in the Replacement Parts List that
follows. Replacement parts are available only as listed and
can be purchased from hobby shops or mail order/Internet
order firms. Hardware items (screws, nuts, bolts) are also
available from these outlets. If you need assistance locating a
dealer to purchase parts, visit www.hobbico.com and click on
"Where to buy". If this kit is missing parts, contact Hobbico
Product Support.
Replacement Parts List
Order # Item Description
HCAB6311 Decal Sheet All the decals for each hull are
on one sheet
HCAB7007 Front Hatch Includes one front hatch with
fishing seat
HCAB7006 Rear Hatch Includes one rear hatch with
fishing seat
HCAB8800 Plastic Pieces Includes trolling motor, foot pedal,
windshields, steering wheel
HCAB7101 Boat Stand Trailer Includes one trailer, unpainted.
ORDERING REPLACEMENT PARTS
KEEP ON BASSIN’
5
Page 6

Replacement Parts List EP1 Outboard Motor
Order # Item Key Number
HCAB7861 Outboard Motor Unit *This is the part number
for the entire outboard unit
HCAB6457 Outboard Upper Cover #1
HCAB7857 Outboard Lower Unit #2
HCAB7750 Propeller Set #16, 17, 18, 19 x2
HCAB7856 Ball Bearings #G x4
HCAB3479 Motor #3
HCAB7858 Motor Coupler & Gasket #6, A, #7
HCAB8100 Transom Mount #22, C x2, D x2
HCAB7801
Linkage Ball Studs & Linkages
#23 x2, E x2, F x2
HCAZ3023 Instruction Manual
Hardware Listing
A. 3 x 3mm Set Screw
B. 3 x 8mm Hex Head Screw
C. 3 x 16mm Hex Head Screw
D. 3mm Nylon Insert Locknut
E. 2mm Nut
F. 2 x 8mm Screw
G. 5 x 10mm Ball Bearing
More easy ways to ride the waves from Aquacraft!
Nitro Hammer™RTR (HCAB26**)
More interested in action than assembly? The Nitro Hammer
hits the nail on the head for convenience and ease. Virtually
everything is included and factory-installed. That goes for the
provided, Futaba®-made radio system as well as the recoilstarted AquaCraft marine .15 engine and tuned pipe. Plus, the
fuelproofed fiberglass hull and deck are prejoined, finished in
one of six trim schemes and gel-coated for protection.
DuraTrax®Piranha™6- and 7-cell NiCd Battery Packs
Piranha NiCd batteries are so affordable, you can keep several
on hand and charged for nonstop racing. The 1900mAh styles
weigh almost the same as the 1500mAh packs, but offer 25%
more run-time capacity.
DTXC2100 Piranha 1500mAh SCX 6-Cell Flat Standard
DTXC2110 Piranha 1500mAh SCX 7-Cell Flat Standard
DTXC2020 Piranha 1900mAh 6-Cell Flat Standard
DTXC2021 Piranha 1900mAh 7-Cell Flat Standard
DuraTrax®Piranha Chargers
CX-10 for 6-7 cell NiCd’s is a fast, timed AC/DC charger. CX-
15 adds a meter for monitoring and discharge circuitry for
cycling. Peak 6-7 cell NiCd and NiMH packs economically
with the DC Peak Charger. Enjoy AC/DC flexibility with the
Piranha Peak Power Charger for 6-7 cell NiCds. Digital Peak
Charger offers easy programming and peak charging for 1-8
cell NiCd and NiMH batteries.
DTXC4000 Piranha AC/DC Peak Power Charger
DTXC4002 Piranha DC Peak Charger
DTXC4005 Piranha AC/DC Digital Peak Charger
DTXC4011 Piranha CX-10 AC/DC Fast Charger
DTXC4020 Piranha CX-15 AC/DC Fast Charger with Meter
Bristol Bay RTR (HCAB60**)
From bow to stern, the Bristol Bay boasts factory-installed,
attention-getting detail like that usually found on elaborate
display ships: horns, life preservers, lifeboat...even a spotlight
and six running lights controlled by their own on/off switch.
But assembly takes only minutes – and as authentic as this
electric R/C fishing boat looks, it’s also just as seaworthy! The
supplied 550-size motor turns an efficient direct-drive system.
You can navigate smoothly at any pace, in forward and
reverse, by sending commands to the electronic speed control
from the 2-channel AquaCraft radio made by Futaba. Static
cloth sails capture the look of a real fishing boat – and the
Bristol Bay is fully rigged out of the box!
6
Piranha DC Peak Charger
Page 7

7
EXPLODED VIEWS
Page 8

NOTES
Date
Date
 Loading...