

Page 1

Warranty
AquaCraft
™
will warrant this kit for 90 days after the date of purchase from defects in materials or
workmanship. AquaCraft will either repair or replace, at no charge, the incorrectly made part.
Make sure you save the receipt or invoice you were given when you bought your model! It is your
proof of purchase and we must see it before we can honor the warranty.
To return your Bristol Bay Fishing Boat for repairs covered under warranty you should send your boat to:
Hobby Services
3002 N. Apollo Drive, Suite 1
Champaign, Illinois 61822
Attn: Service Department
Phone: (217) 398-0007 9:00 am – 5:00 pm Central Time M-F
E-mail: hobb
yservices@hobbico.com
HCAZ3120 for HCAB60**Entire Contents © Copyright 2004
ASSEMBLY AND OPERATION MANUAL
™
™
Page 2

INTRODUCTION ..............................................................2
USEFUL TOOLBOX ITEMS ................................................2
SAFETY PRECAUTIONS......................................................2
REPAIR SERVICE ................................................................2
SPECIFICATION & DESCRIPTION CHANGES ..................3
ITEMS REQUIRED FOR COMPLETION..............................3
BOAT TERMINOLOGY ......................................................3
FINAL ASSEMBLY ..............................................................3
ORDERING REPLACEMENT PARTS....................................6
Thank you for purchasing the Bristol Bay Fishing Boat! We at
AquaCraft Models know how exciting a new R/C boat
purchase can be and we know you’re anxious to get started,
but please take time to read these instructions carefully and
completely before attempting to operate your model. This
manual contains the instructions you need to safely operate
and maintain your boat. As with any hobby, there is the
possibility of injury. Arming yourself with knowledge is the
best way to avoid injury.
If for any reason you think that this model is not for you,
return it to your local dealer immediately. PLEASE NOTE:
Your hobby dealer cannot accept a return on any model
after the final assembly sequence has begun.
As with any hobby, it is a good idea to assemble a useful
collection of tools to bring along anytime you head out to the
pond. Here are some items you may wish to keep handy.
❏ #2 Phillips screwdriver (HCAR1024)
❏ 1.5mm Hex driver (HCAR1150)
❏ 4mm Socket or wrench
❏ Paper towels
• Do not attempt to charge battery packs in the immediate
vicinity of swimming pools, lakes, rivers, oceans, inland
seas, etc. Above all, NEVER ATTEMPT TO OPERATE A
CHARGER IF YOU, THE CHARGER, OR THE BATTERY
PACK ARE WET.
• Always remove the battery pack from the boat before
recharging.
• This boat is controlled by radio signals, which are
susceptible to possible interference from other R/C
transmitters, paging systems, or other electrical noise.
Before turning your radio transmitter and receiver on,
make sure no one else in the area is operating a radio on
the same frequency (channel).
• Do not touch the propeller anytime the electronics are
turned “ON.” Pay close attention to items such as loose
clothing, shirt sleeves, ties, scarves, long hair or any
loose objects that may come in contact with the spinning
propeller. If your fingers, hands, etc. come in contact
with the spinning propeller, you may be severely injured.
• The speed and mass of this boat can inflict property damage
and severe personal injury if a collision occurs. Never run
this boat in the presence of swimmers or where the
possibility of collision with people or property exists.
• Electric motors can generate considerable heat. Do not
touch any part of your motor until it has cooled.
Touching the motor immediately after running the Bristol
Bay Fishing Boat may possibly result in a serious burn.
If the buyer is not prepared to accept the liability associated
with the use of this product, the buyer is advised to return
this kit immediately in new and unused condition to the
place of purchase.
Repair service is available anytime.
After the 90-day warranty, you can still have your Bristol Bay
Fishing Boat repaired for a small charge by the experts at
AquaCraft’s authorized repair facility, Hobby Services, at the
address listed on the front page of this manual.
To speed up the repair process, please follow the instructions
as listed below.
1. Under all circumstances return the ENTIRE system; boat
and radio.
2. Make sure the electronics are turned off and all batteries
are removed.
3. Send written instructions which include a list of all items
returned, a THOROUGH explanation of the problem,
the service needed and your phone number during the
day. If you expect the repair to be covered under
warranty, be sure to include a proof-of-purchase date
(your store receipt or purchase invoice).
4. Also be sure to send your full return address.
REPAIR SERVICE
SAFETY PRECAUTIONS
USEFUL TOOLBOX ITEMS
INTRODUCTION
TABLE OF CONTENTS
2
Page 3
All pictures, descriptions, and specifications found in this
instruction manual are subject to change without notice.
AquaCraft maintains no responsibility for inadvertent errors in
this manual.
❏ DTXC2100 DuraTrax
®
7.2 volt 1500mAh NiCd battery
pack (1 required)
❏ DTXP4000 AC/DC Piranha
™
Peak Power charger
❏ FUGP7300 “AA” batteries. Ten (10) “AA” batteries are
required (8 for the transmitter, 2 for the lighting system)
BOW: The front of the boat.
STERN: The back of the boat.
PORT: This is the left side of the boat when aboard and facing
the front (bow). An easy way to remember this is that port and
left both contain four letters.
STARBOARD: This is the right side of the boat when aboard
and facing the front (bow).
HULL: The body of the boat.
DECK: The top of the boat.
Transmitter Assembly
Important Note: The transmitter is not water resistant and
should never come in contact with water.
❏ 1. Remove the transmitter antenna from the parts bag and
screw it into the top of the transmitter. To ensure that the
antenna is attached, lightly pull on the base of the antenna. If
it slides out, it is not installed properly.
❏ 2. Slide off the battery door
on the bottom of the transmitter.
Install eight (8) new “AA”
batteries into the bottom of the
transmitter in the configuration
molded into the battery holder.
Re-install the battery door onto
the bottom of the transmitter.
❏ 3. Turn the transmitter “ON”
using the switch on the front. The
red LED light next to the on/off
switch should light up. If the LED
does not light up, turn the
transmitter off and check to
make sure that the batteries are
installed properly. If you see a
flashing LED, the batteries are
low and need to be replaced.
Hull
❏ 1. Carefully remove the Bristol Bay and boat stand from
their packaging.
❏ 2. Carefully remove the strips of tape that hold the deck
ornaments in place.
Mast & Sail Installation
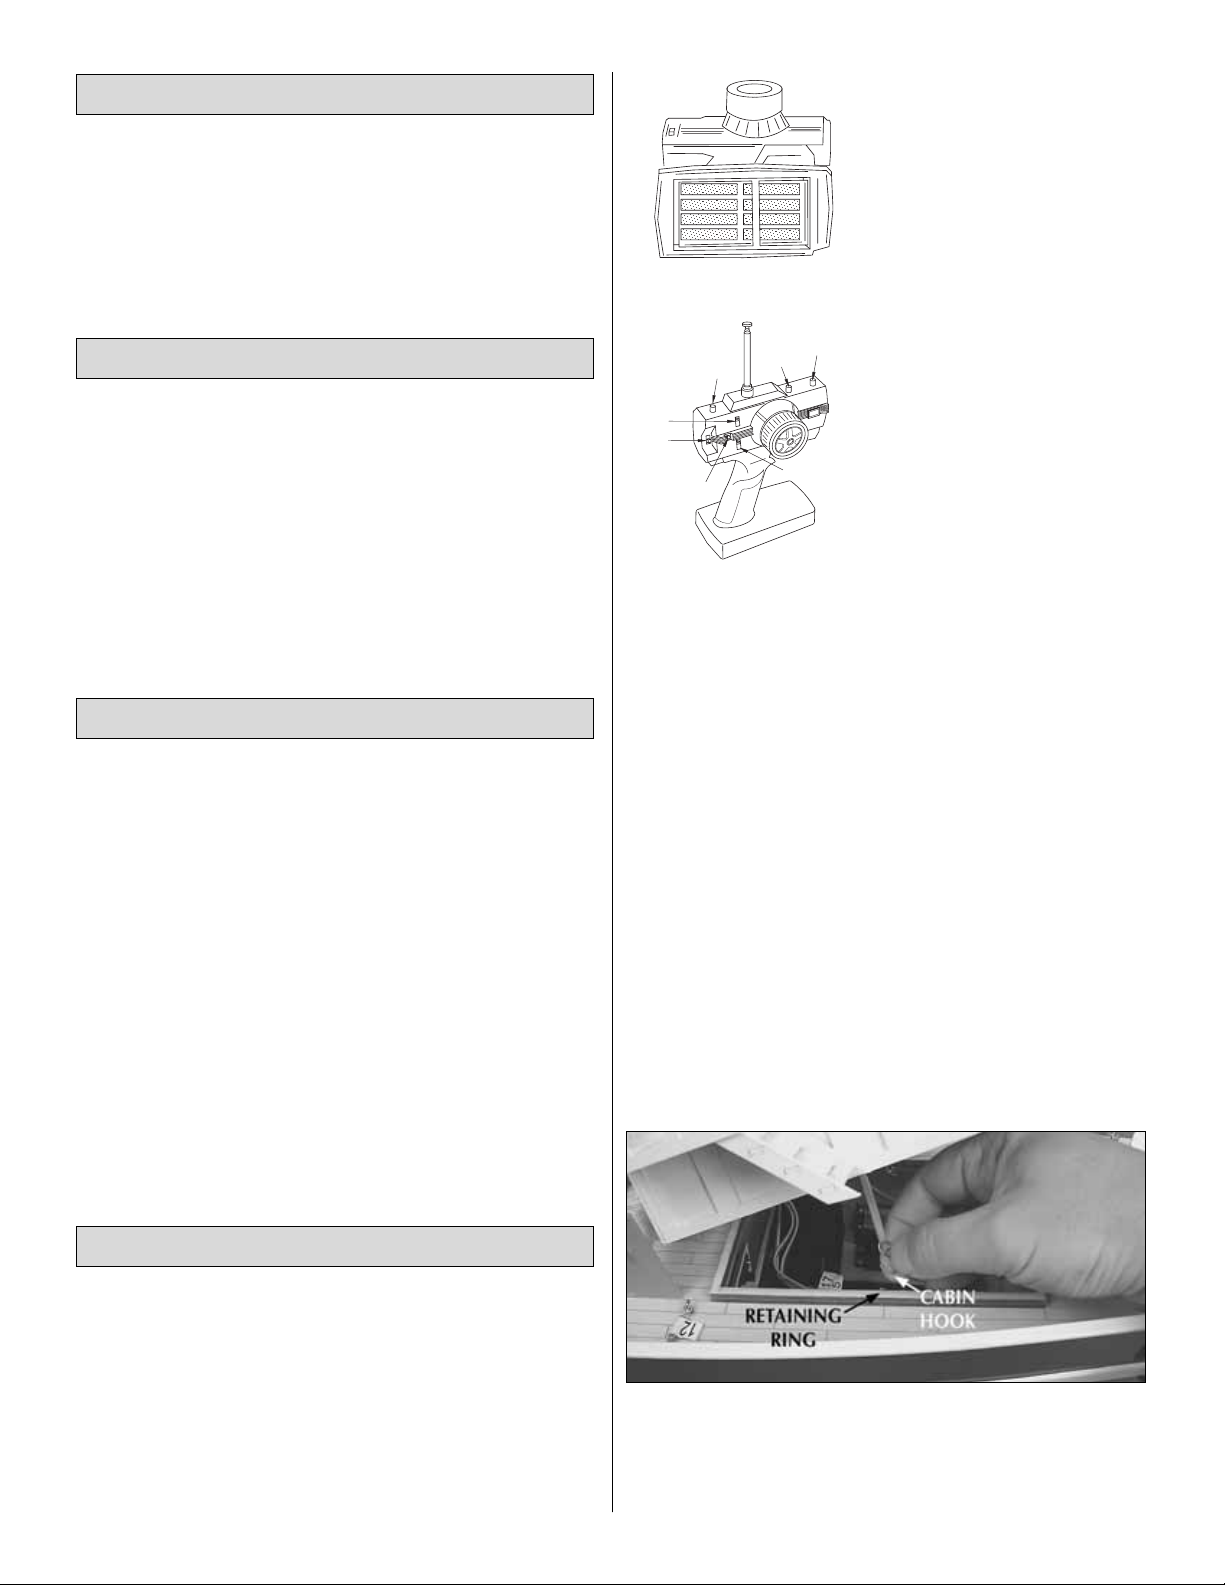
❏ 1. Lift the cabin gently and release the port (left) and starboard
(right) cabin hooks from their retaining rings as shown.
❏ 2. Carefully remove the mast and sails from their packaging.
Be careful of the electrical wiring for the mast lighting.
FINAL ASSEMBLY
BOAT TERMINOLOGY
ITEMS REQUIRED FOR COMPLETION
SPECIFICATION & DESCRIPTION CHANGES
3
Install (8) new "AA" batteries
STEERING
SERVO
REVERSE
ON / OFF
ADJUSTABLE
STEERING
RATE
POWER
LIGHT
STEERING
TRIM
THROTTLE SERVO
THROTTLE
TRIM
REVERSE
Page 4

❏ 3. Insert the front mast into the round opening in front of
the radio compartment. Gently twist it so that the lights are
facing toward the front of the boat.
❏ 4. Insert the rear mast into the round opening at the rear of
the radio compartment opening. Gently twist the mast so that
the running light is toward the port (left) side as shown. Note:
Be sure that the receiver antenna is inserted into the rear mast
before inserting the mast into the opening.
❏ 5. Each rigging line and coupler has been numbered.
Gently screw together the rigging couplers as shown in
numerical sequence (i.e. #1 line connects to #1 rigging
coupler, the #2 line connects to the #2 coupler etc...). Note:
The numerical sequence in the photos may not match those
of your model.
❏ 6. Each lighting plug and battery connector has been
numbered. Plug them into their respective battery connectors.
Note: The connectors only fit together one way and the
numerical sequence in the photos may not match that of
your model.
Lighting System Battery Installation
❏ 1. Install two (2) new “AA” batteries into the lighting
system battery holder as shown. Be sure to follow the positive
(+) and negative (-) pattern molded into the battery holder.
4
Page 5

❏ 2. The lighting system has its own dedicated power switch.
Turn the power “ON” to illuminate the running lights. If the
lights appear to be dim or do not illuminate at all, this is an
indication that the batteries need to be replaced.
Battery Pack Installation
IMPORTANT! Never leave a charger and battery pack
unattended while charging. Use only the recommended
battery pack and an appropriate charger. Do not attempt to
charge the battery while it is installed in the Bristol Bay.
❏ 1. Peel the backing off of the supplied hook & loop
material and apply the “loop” side to your 6-cell battery pack.
With the cabin removed from the deck, place a fully charged
battery pack onto the battery tray as shown.
❏ 2. Plug the battery pack into the boat’s ESC (Electronic
Speed Control) battery connector. Do not force them
together; they are designed to fit together only one way.
Check the Radio System
Note: Make sure that the receiver antenna and antenna tube
are inserted into the rear mast for optimum range.
❏ 1. Turn the power “ON” to the transmitter and receiver (in
that order). Attach the port (left) and starboard (right) cabin
hooks to their retaining rings and carefully set the cabin in
place as shown.
❏ 2. If the boat’s propeller begins to spin once power is
turned “ON,” make sure your transmitter is “ON” and simply
rotate the throttle trim knob located atop the transmitter until
it stops.
❏ 3. Standing behind the boat with the radio system turned
“ON,” rotate the steering wheel of your transmitter to the left.
The back of the rudder should move towards the left. Rotate
the steering wheel of your transmitter to the right. The back of
the rudder should move towards the right. If this is not the
case, simply move the transmitter’s steering servo reverse
switch to the other position.
❏ 4. Squeeze the trigger on the transmitter; this should
activate the propeller in a counter-clockwise motion. If this is
not the case, try moving the throttle servo reversing switch to
the other position. Pushing the trigger forward will activate
the propeller in a clockwise rotation; this is the “REVERSE”
feature and it can be used to either back out of precarious
water or slow the boat down quickly.
❏ 5. The D/R knob located atop the transmitter is the steering
rate adjustment. Turning the knob to the right increases the
total movement of the rudder while turning it to the left
decreases the rudder movement.
5
Page 6

❏ 6. Turn the power “OFF” to your boat and then your
transmitter (always, in that order).
PLEASE READ BEFORE RUNNING THE BRISTOL BAY
FISHING BOAT
• NEVER attempt to swim after a stalled or capsized boat!
Wait patiently for the wind currents to return the boat to
shore or use a tennis ball attached to the end of a fishing
rod to retrieve a stalled or capsized boat.
• It is dangerous to operate any R/C vehicle at any time that
there is not sufficient light.
• R/C models produce vibrations which will cause screws,
nuts, bolts, etc., on your model to become loose over
time. It is important to make sure that all hardware is
secure before operating your model.
• The edges of the propeller are very sharp and can cut your
fingers if you are not careful. At no time should you ever
attempt to stop the prop with your hand. In the event that
weeds become entangled in the propeller, turn the Bristol
Bay’s power “OFF” before attempting to remove them.
• CAUTION: Your Bristol Bay Fishing Boat may take on
small amounts of water, especially when running in
rough water due to high winds or when making tight
turns. Keep a roll of paper towels handy and dry out the
hull interior after every run.
• Total run time of the Bristol Bay Fishing Boat is
approximately 10–15 minutes (assuming you begin with a
fully charged battery pack). When you notice a decrease in
power or sluggish steering response, it means the battery
pack is nearly drained and it’s time to head for shore. As
soon as the boat reaches shore, turn off the power to the
boat’s receiver and transmitter (in that order).
• CAUTION: The motor may be hot! Allow it to cool for a
few minutes before attempting to remove the battery pack.
• After running, store your Bristol Bay Fishing Boat with the
hatches opened to allow the interior to dry out
completely. If you fail to do this, it may result in corrosion
of the electronic components.
• IMPORTANT: If, for whatever reason your, boat takes on
a large amount of water causing the radio equipment to
get wet, you must do the following immediately: Remove
the battery pack and radio equipment from the boat.
Allow the components to air dry completely before
reassembling. Reinstall the components and check for
proper operation before running the boat in water.
Launch Procedure
❏ 1. Turn the power “ON” to the transmitter and receiver (in
that order).
❏ 2. Gently place the boat in water that is at least 8" deep and
free of obstacles (weeds, rocks, sticks, ducks, muskrats, etc.).
❏ 3. Slowly advance the throttle to full speed and note if the
boat has a tendency to turn right or left. Adjust the steering
trim knob on your transmitter until the boat runs in a straight
line when the steering wheel is at neutral.
❏ 4. When finished running, be sure to turn the power “OFF”
to your boat and transmitter (in that order).
The Waiting Game
If your Bristol Bay Fishing Boat should happen to stall, wind
and/or water currents will slowly carry it to shore. The bad news
is that the boat could be carried to the opposite shore. When
surveying areas to run your boat, keep variables in mind such as
wind direction, size of the lake, strength of river currents, etc.
Above all, NEVER attempt to swim after a stalled boat.
Helpful Tip
Use a fishing rod with at least 12lb. line and a tennis ball tied
to the end to retrieve a stalled boat.
GOOD LUCK AND GREAT BOATING!
To order replacement parts for the AquaCraft Bristol Bay
Fishing Boat, use the order numbers in the Replacement Parts
List that follows. Replacement parts are available only as
listed and can be purchased from hobby shops or mail order/
Internet order firms. Hardware items (screws, nuts, bolts) are
also available from these outlets. If you need assistance
locating a dealer to purchase parts, visit www.hobbico.com
and click on “Where to buy”. If this kit is missing parts,
contact Hobbico Product Support.
Replacement Parts List
Order # Description
HCAB7760 3-Blade propeller (1 propeller with 1 lock-nut)
HCAB8703 Rudder & parts (rudder, rudder control arm,
rudder metal standoff, screw to secure arm)
HCAB7860 Drive system (stuffing tube and drive shaft,
prop coupler-drivedog)
HCAM7037 ESC forward/reverse (ESC includes exact wiring as
the ESC included with fishing boat–motor wire
with plugs, battery wire with plug, receiver wire
plug and switch)
HCAG1060 550 Electric motor (includes motor wire with plugs
and capacitors installed)
HCAB9200 Cloth sails (3) (includes bow, midship and aft sails
with sail rigging lines attached)
HCAB9205 Rigging coupler set (12) (12 male/female rigging
couplers)
HCAB9210 Rigging line (16' [5m] roll)
ORDERING REPLACEMENT PARTS
6
Page 7

7
CHECK OUT THESE OTHER SENSATIONAL AQUACRAFT BOATS!
AquaCraft Models Air Force™RTR (Ready-to-Run) and ARR (Almost Ready-to-Run)
• The new “force in R/C boating!
• Features a FIBERGLASS hull and deck!
The Air Force can be action-ready in minutes! The
fiberglass hull is durable, lightweight and resistant
to the damaging effects of fuel residue. The prejoined deck and hull reduce final assembly, and
stainless steel hardware is supplied. Choose the
white, gel-coated “ARR” (almost ready-to-run)
version and use your own engine and radio...or get
the “RTR” (ready-to-run) model in one of six
brilliant, gel-coated colors, along with an
AquaCraft Pro 46 engine, 2-channel AquaCraft
radio made by Futaba®, and prop.
Air Force Ready-to-Run HCAB27**
RTR Version Includes: AquaCraft pro 46 engine, AquaCraft
2-channel radio w/2 standard servos, propeller, engine video
Air Force Ready-to-Run HCAB27**
ARR Version Requires: .40 to .46-size engine, 2-channel
radio, propeller
AquaCraft Models Nitro Hammer GP RTR HCAB26**
• Fully assembled - with fiberglass deck and hull!
• FREE engine video with tips for tuning and maintenance!
Strike hard, strike fast, with ready-to-run ease and
tuned pipe power! The Nitro Hammer is factorybuilt of first-class materials, including a fuelproof
fiberglass hull (factory-finished in one of six
custom colors) and stainless steel hardware.
On-board gear for the included AquaCraft
2-channel pistol radio is installed, and the recoilstarted AquaCraft Marine .15 ABC engine (also
installed!) comes with a power-boosting tuned
pipe! A flip-top fuel tank with primer button makes
sure you won’t waste fuel – a free start-up video
makes sure you won’t waste a minute of the Nitro
Hammer’s performance! Just 24" long.
Includes: Recoil started AquaCraft .15 Marine engine w/tuned pipe, AquaCraft 2-channel pistol radio system, engine break-in
video and stand. Requires: 20% Glow fuel, glow starter and 12 “AA” batteries
Length: 24 in
Beam: 8.8 in
Overall Length: 36 in
Hull Length: 30.5 in
Beam: 13.5 in
Page 8

AquaCraft Models Reef Racer™RTR HCAB12**
• Includes genuine Futaba® pistol radio!
• Hobby quality – affordable price!
Just 15" long, this compact electric is ideal for
small ponds, lakes and boaters looking for
immediate off-shore excitement. It comes out of
the box factory-painted, already assembled and
completely equipped with a Futaba-made
Aquacraft 2-channel radio, motor, forward-only
ESC, NiMH battery and a 2-hour AC wall charger.
Bury the throttle, and let the direct-drive system
send you screaming across the water. Go for a
turn, and you’ll enjoy rapid-fire response and “turn
on a dime handling,” even at top speed. Flip or roll
coming out of one, and the self-righting hull puts
you back in the action in a heartbeat. Includes
prebuilt stand for display and maintenance.
Includes: 2-channel AquaCraft radio w/1 servo, 6-cell 1000mAh NiMH battery pack, AC wall charger, boat stand. Requires: 8
“AA” batteries
Length: 15 in
Beam: 6 in
 Loading...