

Page 1
•
g
hard
h
en
™
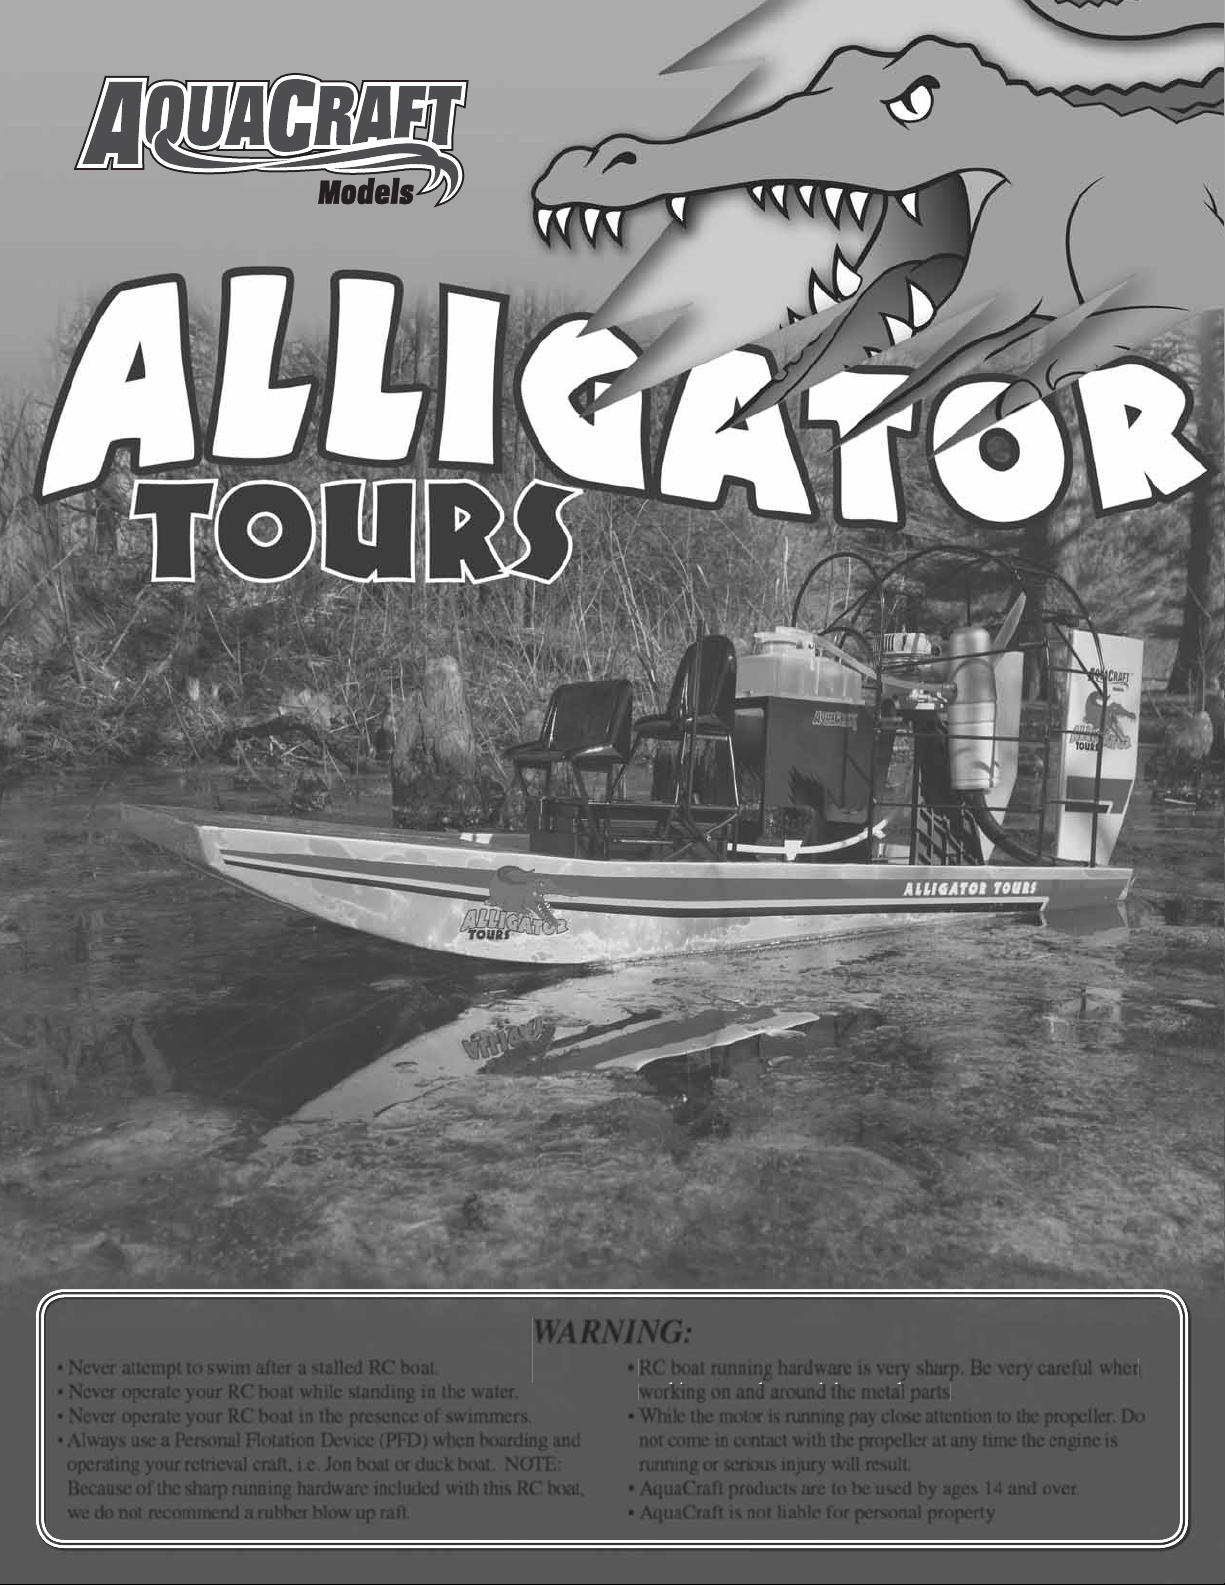
• Never attempt to swim after a stalled RC boat.
• Never operate your RC boat while standing in the water.
• Never operate your RC boat in the presence of swimmers.
• Always use a Personal Flotation Device (PFD) when boarding and
operating your retrieval craft, i.e. Jon boat or duck boat. NOTE:
Because of the sharp running hardware included with this RC boat,
we do not recommend a rubber blow up raft.
WARNING:
• RC boat running hardware is very sharp. Be very careful when
RC boat runnin
working on and around the metal parts.
• While the motor is running pay close attention to the propeller. Do
not come in contact with the propeller at any time the engine is
running or serious injury will result.
• AquaCraft products are to be used by ages 14 and over.
• AquaCraft is not liable for personal property
ware is very sharp. Be very careful w
Page 2

Introduction
Specifi cations
Thank you for purchasing the AquaCraft Alligator Tours
Airboat! We want the time you spend with your new RC boat
to be fun and successful, so please fully read the manual.
If for any reason you think this R/C model is not for you,
return it to your local hobby dealer immediately. NOTE: Your
hobby dealer cannot accept returns on any model after fi nal
assembly or after your boat has been operated.
Safety Precautions
• Never ever attempt to swim after a stalled RC boat. DO
NOT get in the water for any reason to retrieve your
boat. To aid you in retrieving a stalled RC boat you can
use a fi shing reel with a tennis ball tied to the end of
the line. Or better yet, get yourself a small Jon boat
so you can row out and pick up your boat. Remember
to use a PFD (personal fl otation device) any time you
enter your retrieval craft.
BOAT SPECIFICATIONS:
Over all Length: 30” (770mm)
Width: 11 ¼” (285mm)
Height: 14” (355mm)
BOAT FEATURES:
Air cooled .34 SuperTigre
Tough fi berglass hull construction
Twin Air Rudders
Injection molded water resistant radio box
Steel welded propeller cage
9x6 Fiber-fi lled pusher prop
Easy Fill Fuel Tank
Flotation installed inside the hull
RADIO SYSTEM:
Tactic™ 2 Channel Pistol Grip Transmitter
Tactic 2 Channel RX
Tactic TSX 200 Standard servos (2)
®
Glow Engine
• AquaCraft products are to be used by ages 14 and over.
• Do not touch the propeller anytime the motor is running.
Pay equally close attention to items such as loose clothing,
shirtsleeves, ties, scarves, long hair or anything that may
become entangled in the spinning prop. If your fi ngers,
hands, etc. come in contact with the spinning propeller, you
may be severely injured.
• The speed and mass of this boat can infl ict property
damage and severe personal injury if a collision occurs.
Never run this boat in the presence of swimmers or where
the possibility of collision with people or property exists.
• Glow engines produce heat. Do not touch any part of your
engine until it has cooled.
• This boat is controlled by radio signals, which are susceptible
to possible interference from other R/C transmitters, paging
systems, or other electrical noise. Before turning your radio
transmitter and receiver on, make sure no one else in the
area is operating a radio on the same frequency (channel).
• If your Alligator Tours Airboat should happen to stall, water
currents will slowly carry it to shore. The bad news is that
the boat could be carried to the opposite shore. When
surveying areas to run your model, keep variables in
mind such as wind direction, size of the lake, etc. It is not
advisable to run R/C boats on any free-fl owing bodies of
water such as creeks or rivers.
Manual Specifi cations &
Description Changes
All pictures, descriptions, and specifi cations found in this
instruction manual are subject to change without notice.
AquaCraft maintains no responsibility for inadvertent errors
in this manual.
Warranty Service
AquaCraft will warrant your Alligator Tours Airboat for 90 days
after the purchase from defects in materials or workmanship
of original manufacture. AquaCraft, at their option, will
repair or replace at no charge the incorrectly made part.
This warranty does not cover damage caused by crash,
abuse, misuse, alteration or accident. To return your boat for
repairs you need to provide proof of purchase. Your store
receipt or product invoice will suffi ce. IN NO EVENT SHALL
THE PURCHASER BE ENTITLED TO ANY INCIDENTAL,
SPECIAL, INDIRECT OR CONSEQUENTIAL DAMAGES,
WHETHER RESULTING FROM THE USE, MISUSE OR
INABILITY TO USE THE PRODUCT OR FROM DEFECTS
IN THE PRODUCT. This warranty gives you specifi c legal
rights and you may also have other rights, which vary from
state to state.
2
Page 3
Outside USA and Canada, contact local importer for warranty
information.
Hobby Services
3002 N. Apollo Drive, Suite 1
Champaign, Illinois 61822
Attn: Service Department
Phone: (217) 398-0007 9:00 am - 5:00 pm CST M-F
E-mail: hobbyservices@hobbico.com
Standard Repair Service
After the 90-day warranty has run out you can still have
your Alligator Tours Airboat repaired for a service fee by
the experts at AquaCraft™. To speed up the repair process,
please follow these four simple steps:
IMPORTANT NOTE:
For standard repair service you must specify whether you
wish the charges to be billed COD or if you wish to be notifi ed
of the charges so you can send a check.
1. It is best (recommended) to return the ENTIRE system,
boat and radio.
2. Make sure batteries are removed from the transmitter and
radio box of the boat.
3. Send written instructions which include a list of all items
returned, and a THOROUGH explanation of the problem or
problems requiring service. Be sure to include your return
address and daytime phone number. If you have access to
e-mail, please provide us with your e-mail address to help
speed communication.
4. Send to Hobby Services at the address above.
Optional Accessories
As with any hobby, it is a good idea to assemble a useful collection
of tools and accessories to bring along when you head to the
pond. Here are some items you will want to keep handy:
❏ Extra “AA” Batteries
❏ Extra Glow Plugs
❏ Glow Plug Wrench
❏ Extra prop
❏ Small standard screwdriver
❏ Pliers (HCAR0625)
❏ Hobby Knife (HCAR0109)
❏ Metric Hex L-Wrench Set (HCAR0521)
❏ DuraTrax 6V NiMH Receiver Battery (DTXM2011)
❏ DuraTrax A/C NiMH Charger (DTXP4085)
❏ Hobbico Switch Harness (HCAM2400)
OTHER USEFUL ITEMS TO HAVE ON HAND:
❏ Waders or rubber boots
❏ Paper Towels
❏ Spray-On Cleaner
❏ Sunglasses
❏ Sun block
❏ Folding table
❏ Lawn chair
❏ First-Aid kit
❏ Cooler with plenty of ice
and soda
❏ Canopy or shelter
Required Accessories
Small personal retrieval system: This might be as simple as a
tennis ball tied to the end of a fi shing reel, or a fully equipped
AquaCraft Hammer™ EP RTR (AQUB10**) towing an empty
pop bottle behind a 10 foot line. Better yet, a small Jon boat
and personal fl otation device (PFD) are “preferred” so you
can row out and properly retrieve your boat.
YOU WILL ALSO NEED:
❏ 12 AA batteries
❏ 10 to 15% nitro aircraft glow fuel (Do not use “boat fuel”
in this product)
❏ Hobbico
❏ Hobbico TorqMaster 12V Battery (HCAP0800)
❏ Hobbico HotShot
❏ DuraTrax
❏ Hobbico
®
TorqMaster™ 12V Starter (HCAP3200)
™
®
Kwik Pit™ 500cc Fuel Bottle (DTXP0150)
®
After Run Engine Oil (HCAP3000)
2 Glow Igniter (HCAP2520)
Boat Terminology
BOW: The front of the boat.
STERN: The back of the boat.
PORT: This is the left side of the boat when aboard and
facing the front (bow). An easy way to remember this is that
port and left both contain four letters.
STARBOARD: This is the right side of the boat when aboard
and facing the front (bow).
HULL: The body of the boat.
DECK: The top of the boat.
TRANSOM: The back of the boat.
KEEL: The center of the bottom of the boat.
RUDDER: The hinged vertical plate/s mounted at the
transom that controls steering
3
Page 4
Assembly
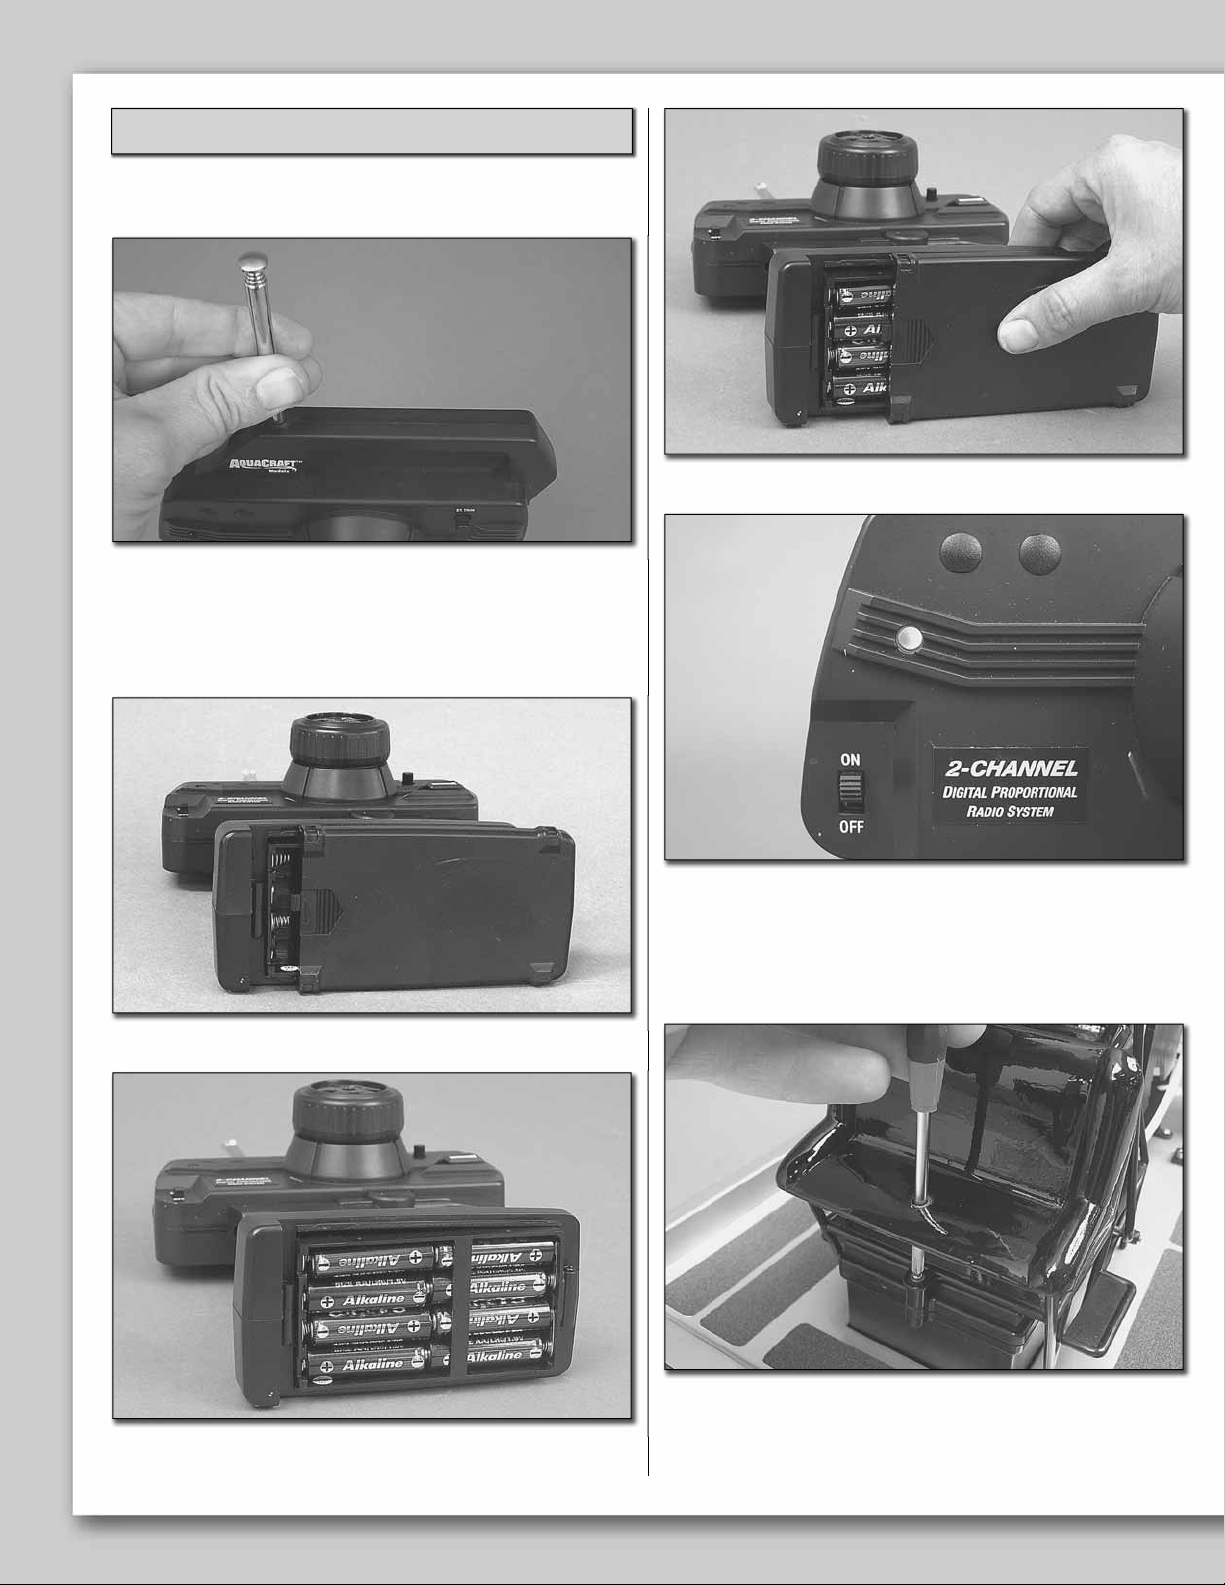
HAND HELD TRANSMITTER
❏ 1. After removing the transmitter and transmitter antenna
from the box, line up the antenna to the hole in the top of the
transmitter. Slip the antenna in and lightly screw the antenna
into the transmitter. Do not over tighten. Give the antenna a
light tug to make sure it is properly installed.
❏ 4. Reinstall the battery door onto the bottom of the transmitter.
❏ 2. Slide off the battery door from the bottom of the transmitter.
❏ 3. Install 8 “AA” batteries into the transmitter in the
confi guration molded into the battery fl oor.
❏ 5. Turn the transmitter “ON” using the switch on the
transmitter’s left side. The battery level indicator light (LED)
should glow green. If the light is fl ashing the batteries are low
and need to be replaced.
RECEIVER BATTERIES
❏ 1. Using a #1 Phillips screwdriver (small), remove the two
(2) Phillips head screws from the top of the radio box. One is
located under the front seat of the boat and the other behind
the back seat.
4
Page 5

❏ 2. Remove the seat assembly as well as the top of the
radio box and lay them to the side.
❏ 3. Install 4 “AA” batteries into the battery holder following
the diagram in molded in the bottom of the holder.
❏ 5. Place the radio box cover as well as the seat assembly in
place and reinstall the screws. Be careful to not overtighten.
❏ 4. Slide the battery box back in the radio box, carefully
tucking the wires in the box.
At this time you can install the decals on the boat. You can
use the pictures on the box to help you place the decals. Your
Alligator Tours Airboat is now ready for operation.
5
Page 6

The SuperTigre .34
C
B
Your carburetor has been set from the factory but differences
in altitude, temperature and type of fuel can have an effect
on the factory setting. The factory carburetor settings for your
SuperTigre .34 are:
D
• HSN (#2): 1-1/2 Turns out
• LSN (#3): 5 Turns out
• Spray bar (#4): Fuel nipple aligned with lowest cooling fi n
on the engine (20° counterclockwise)
E
A
Parts of the engine:
A. Crankcase D. Muffl er
B. Cylinder Head E. Carburetor
C. Glow Plug
7
4
2
The above setting should get you going but should be
considered a starting point and might not be the over all best
setting for your motor. If you are having troubles starting your
motor you might want to revert back to the factory settings
and start over.
UNDERSTANDING & ADJUSTING YOUR CARBURETOR:
The SuperTigre carburetor has two main adjustments and
one sub adjustment. The two main adjustments are the HSN
(High Speed Needle) and the LSN (Low Speed Needle). The
sub-adjustment is the Spray Bar.
Turning or what we call “tuning” your HSN adjusts the amount
of fuel entering the motor during high speed operation (the
mixture). The LSN adjusts the fuel mixture during idle and
the spray bar adjusts the mixture during the transition from
idle to full speed operation. The more you turn in (lean out)
1
either the HSN or the LSN, the less fuel there is entering the
engine. This in turn makes the most power but can cause
a condition called “a lean run”. A lean run can damage
6
your engine so always adjust your engine on the rich side.
When properly adjusted, the Spay Bar allow the engine to
accelerate with very little hesitation.
3
5
Parts of the carburetor:
1. Body 5. Throttle arm
2. HSN (Needle) 6. Fuel Nipple
3. LSN (Idle Needle) 7. Idle speed adjustment screw
4. Spray bar
The idle speed adjustment screw is located on the top of the
carburetor body. Turning this clockwise allows a faster idle
setting; turning it counter clockwise lowers the idle speed.
LISTEN TO YOUR MOTOR:
As you adjust your engine you are going to want to listen for
what we call the 4-cycle/2-cycle break. The 4-cycle/2-cycle
break is a point when your engine goes from a slower speed
crackling sound to a smooth running, high pitch sound. It’s
not hard to hear this and you will know when you have found
it: your motor will start making a lot of power.
OPTIMUM ENGINE SETTINGS:
HSN: Your engine will last the longest and make the best
power if you tune and operate your engine to just over the
point of the 4-cycle/2-cycle break. You need to make sure
you have it rich enough so you do not have a lean run and
risk damaging the motor. If you’re in doubt as you start your
new engine, err on the rich side.
6
Page 7

LSN: You want your LSN set so that when the motor is idling
it will run for a few minutes without quitting. One way to
determine this is to pinch the fuel line with fi ngers about 1"
[25mm] from the carburetor as the engine is running at idle.
If the motor stops instantly as you pinch the line, your LSN
is set too lean. Turn the needle out 1/2-turn and try again. If
your engine slowly picks up speed and after 10 seconds or
so quits, you are likely just a tad rich. It’s a good idea to let
the engine run for a minute or two between pinch tests. This
way you can be certain the new setting has taken effect.
Spray Bar: Adjusting the spray can only be done after the
engine is fully broken in. What you want to achieve is a
smooth transition from idle to full throttle. Loosening the two
screws located on the side of the carburetor that hold the
spray bar will allow you to rotate the spray bar to optimize
the mid range. Moving the spray bar even a tiny amount (a
few degrees) can have a large effect on the way the engine
runs. It will not only affect the midrange but the top end and
the idle as well, so only move it a small amount at a time.
Turning the spray bar clockwise will richen the mixture and
counter clockwise will lean it, but only to a point. When the
spray bar is turned clockwise further than 20° it will start to
go lean again. Too far counterclockwise (a full 40°) and the
engine just will not run well at all.
Operating your Alligator Tours Airboat
POWER UP AND POWER DOWN SEQUENCE
It is important to follow the below sequence each time you
operate your boat.
Power up before a run:
1. Fill the fuel tank.
2. Turn on the transmitter.
3. Turn on the Receiver (switch located on the top of the
boat’s radio box)
4. Attach the glow igniter to the top of the glow plug.
5. Start the engine using an electric starter.
6. Remove the glow igniter and let the motor warm up.
Power down after a run:
1. Retrieve the boat. Do not touch the engine or muffl er!
2. Turn the receiver switch off.
3. Turn off the transmitter.
BREAKING IN YOUR ENGINE
Your SuperTigre .34 engine uses ABC construction. ABC
stands for:
Aluminum piston operating in a
Brass material,
Chrome plated sleeve.
You don’t want to run the motor too rich during break in
(running in). Operating the motor too rich will not allow the
internal parts to warm up correctly. In doing so the piston and
liner might not get properly seated. Lean it until it is running
just on the edge of what is known as the 4 cycle - 2 cycle
break, and then gradually work leaner with each run (just a
click or two). You should also use a fuel that contains castor
oil in the lubrication mix. Castor oil helps the engine run
better and is a better overall lubricant for our ABC engines.
Full-synthetic fuels have been known to cause diffi culties in
the operation of ABC model engines. Once properly broken
in, your ABC-type engine will serve you well and deliver
reliable performance for years to come.
7
Page 8

We recommend “running in” the engine at full speed for at least
6-8 full tanks of fuel before you adjust it for top performance.
LAUNCHING & DRIVING YOUR AIRBOAT
After starting the engine use extreme care handling the boat.
Make sure you grab the boat by the handle at the front of the
prop cage. Carefully walk to the water line and place the boat
in the water. Here is the part where we usually say launch
the boat in water that is free of weeds and small debris.
However, this time we are not going to say that. As a matter
of fact, we recommend just the opposite…
Enjoy Driving your Alligator Tours Airboat!
(Typical run times are in the 10 to 12-minute range.)
If Your Airboat Flips
If you should happen to fl ip your Alligator Tours Airboat you are
going to need to remove any water that might have entered
the motor. We recommend removing the glow plug, hold the
boat upside down and turn the motor over a few times by
hand to remove the water. After most of the water has been
removed leave the glow plug out and turn the motor over with
the electric starter expelling the rest of the water. Make sure
you hold a rag over the glow plug hole to avoid spraying water
all over the place. NOTE: Be careful to keep that rag and
fi ngers away from the spinning prop. Re-install the glow plug
and start the engine. It is best to start the engine after you
have fl ipped the boat to make sure ALL THE WATER IS OUT
OF THE ENGINE. It is also a good idea to open the radio box
to make sure no water entered the radio compartment.
Ordering Replacement Parts
To order replacement parts for the AquaCraft Alligator Tours
Airboat, use the order numbers in the replacement parts list that
follows. Replacement parts can be purchased from your local
hobby shop or by mail order. If you need assistance locating
a dealer to purchase parts, visit www.aquacraftmodels.com
and click on “Where to buy”. If you are missing parts, contact
Hobbico Product Support at:
Phone: 217.398.8970
Fax: 217.398.7721
E-mail: boatsupport@greatplanes.com
Part Number Description
AQUB8727 Rudders (2)
AQUB8728 Rudder Brackets
AQUB6275 Airboat Prop Cage
AQUB7751 Prop Hub G34
AQUB7804 Linkage Set
AQUB6909 Fuel Tank Mount
AQUB6276 Airboat Seats
AQUB6301 Decal Sheet
AQUB8607 Radio Box w/Lid
AQUB6500 Engine Mounts with Screws
AQUB9508 Flip Top Fuel Tank
SUPG0105 SuperTiger G34
AQUG6002 Exhaust Extension
APCQ0096 APC 9x6 Pusher Prop
Maintenance
After you’re done boating for the day you are going to want
to add some after run oil to the engine to protect the internal
parts. We recommend removing the glow plug, opening the
carburetor all the way to full throttle and placing 10 to 12
drops of after run oil down the barrel of the carburetor. Place
a rag over the glow plug hole and turn the engine over with
the electric starter. Repeat this step a least one more time to
make sure the inside of the engine is fully coated. Replace
the plug and wipe the boat down with cleaner. It is also a
good idea to open the radio box and unplug the AA battery
holder from the switch harness. Leave the lid off the radio box
over night to make sure any water that might have entered
can evaporate.
88
Page 9

SuperTigre G34 Engine
# Part # Description
1 SUPG3741 Cylinder Head
2 SUPG4196 Cylinder Liner
3 SUPG5209 Piston
4 SUPG5300 Piston Ring
5 SUPG6630 Wrist Pin
6 SUPG5170 Wrist Pin Retainer
7 SUPG2598 Connecting Rod
8 SUPG2955 Crankcase
9 SUPG4410 Front Bearing
10 SUPG5475 Rear Bearing
11 SUPG3316 Crankshaft
12 SUPG6424 Crankshaft Spacer
13 SUPG4730 Lock Cone
14 SUPG6375 Drive Washer
15 SUPG6405 Prop Washer
# Part # Description
16 SUPG5445 Prop Nut
17 SUPG1826 Carburetor
18 SUPG4866 High Speed Needle
19 SUPG5080 Carburetor Body O-Ring
20 SUPG2375 Carburetor Retainer
21 SUPG2085 Backplate
22 SUPG4485 Engine Gasket Set
23 SUPG5685 Engine Set Screw Set
24 SUPG1574 Exhaust Stack
25 SUPG1560 Silent Muffler/Stack
26 SUPG5806 Muffler Screw Set
27 SUPG2355 Carburetor Retainer Nut
28 SUPG4475 Fuel Nipple/Pressure Fitting
29 SUPG4660 Exhaust Stack Gasket (5)
Carburetor Parts List
# Part# Description
A SUPG4866 Needle
B SUPG5080 Carburetor Body O-Ring
C SUPG2356 Needle Ratchet Spring Nut
D SUPG5975 Spray Bar
E SUPG2200 Throttle Barrel Guide Screw
F SUPG2445 Throttle Barrel Spring
G SUPG4203 Throttle Barrel
H SUPG6060 Throttle Arm
J SUPG4880 Idle Needle
K SUPG6206 Carburetor Body
L SUPG4475 Fuel Nipple
M SUPG5695 Screw Set
N SUPG4885 Needle Valve Assembly
P SUPG2375 Carb Retainer
Q SUPG5093 Idle Needle O-Ring
R SUPG2025 Throttle Barrel Dust Shield
S SUPG2456 Ratchet Spring
T SUPG4717 Throttle Barrel Stop Screw Spring
9
Page 10

Receiver NiCd Upgrade
These three items will be needed to upgrade your receiver
battery to rechargable NiCd’s.
Accessories to Get You Running
DuraTrax® 6V 1400mAh NiMH Receiver Hump Pack
DuraTrax technology makes this pack a great value for nitro
boat modelers. The high discharge cells meet the increased
power demands of today’s digital servos — and 1400mAh of
capacity means more run-time and less charging. Each pack
includes a universal connector. DTXM2011
DuraTrax® AC Wall Charger
Designed for easy, convenient battery charging from a 120V
household wall outlet, this compact unit offers 7.2V, 600mAh
output and includes a female Futaba J plug. DTXP4085
Hobbico® TorqMaster™ LC 12V/7Ah Battery
Compare it to other field batteries on capacity, convenience
or cost, and the TorqMaster LC looks like a clear winner. It
comes out of the box ready for use and recharges overnight
with an inexpensive AC Charger (HCAP0200). Sealed and
maintenance-free, it never needs electrolyte and can be
mounted at almost any angle. At just 5.9” x 3.75” x 2.5” (150
x 91 x 64 mm), it’s an easy fit for almost any field box — and
with a full 7Ah of current capacity, it’s the ideal choice for
supplying power to starters, chargers, fuel pumps, power
panels and more. Weight: 5.25 lb (2.38 kg) HCAP0800
Hobbico® Switch Harness with Charge Plug
For use with Futaba radios that have J-style connectors, this
switch harness connects your receiver battery to the receiver
through an on/off switch. It also enables you to charge the
receiver battery without removing it from your model.
Included are one switch harness with J connectors and a
charge cord. HCAM2400
Hobbico® TorqMaster™ 90 Deluxe 12V Starter
The TorqMaster 90 Deluxe 12V starts engines up to .90 cu.
in. and includes an aluminum starter cone with grooved
silicone insert; soldered copper contacts; thick carbon
brushes; easy press switch; 5’ DC input cord; and factorysoldered battery clips. HCAP3200
10
Page 11

Hobbico Super Hot-Shot™ 2 Glo-Starter
The Super Hot-Shot 2 combines a locking glow plug clip for
standard or 4-stroke plugs with a high-capacity Sanyo®
rechargeable NiCd. It delivers 4000mA -- enough for an
entire day of modeling. Features include a Twist-and-Lock
Connector and heavy-duty wall outlet adapter with LED
indicator for recharging. HCAP2520
Hobbico After Run Engine Oil
After each time you run your engine, just
take a few seconds to put After-Run Engine
Oil into its carburetor -- that’s a quick, easy
way to prevent varnish or gum build-up,
and to protect bearings and internal parts
from rust and corrosion. After-Run Engine
Oil works wonders to keep 2- and 4-stroke
engines performing in peak condition.
Available in a handy, 2-ounce bottle.
HCAP3000
®
DuraTrax
Kwik-Pit™ 500cc Fuel Bottle
The 5” long, angled, anodized aluminum
neck of the Kwik-Pit Fuel Bottle reaches
easily into your tank to prevent fuel spills.
The clear plastic body — marked with
capacity measuring lines in 10 cc increments
— keeps you aware of fuel levels. At 500 cc
(17.6 oz.) capacity, it holds more than enough
glow fuel to top off your tank. A black rubber
tip cap prevents spills during transport.
DTXP0150
AquaCraft™ Hammer EP RTR
Sure, there are several clever methods for retrieving stalled
boats. But the Hammer EP turns the task into another way
to enjoy R/C water fun...driving the hottest little electric deep
vee ever to cut through the current! Batteries are all you
need to buy and install. Everything else is already covered:
assembly, finishing, a display stand and more. On-board
gear for the AquaCraft 2-channel radio is in place, as is a
water-cooled 550 motor and ESC with reverse. This 24” long
(610mm) model is a blast for all skill levels and available in
six exciting colors. Requires a 6- or 7-cell battery, charger
and 8 “AA” cells. AQUB10**
11
Page 12

www.aquacraftmodels.com
Copyright © 2008 AQUB29**Mnl1.0
 Loading...