

Page 1

User Manual
Руководство пользователя
Smart Smoke Detector
Умный датчик дыма
Please read this manual carefully and keep it
Внимательно изучите и храните руководство на
протяжении всего срока использования продукта
Page 2
English
Product Introduction
Aqara Smart Smoke Detector is a self-contained photoelectric smoke
detection alarm that detects fire by sensing smoke.
In case the concentration of smoke is detected to reach the configured
threshold value, the detector will immediately release a sound and
light alarm signal and send a notice to the mobile phone app via the
hub. You shall be on the alert and take immediate and effective
measures to troubleshoot the danger, avoiding serious fire accidents.
*An Aqara Zigbee 3.0 hub is required.
*To work with Apple HomeKit,a compatible Aqara hub is required. Please see
www.aqara.com/support for more information.
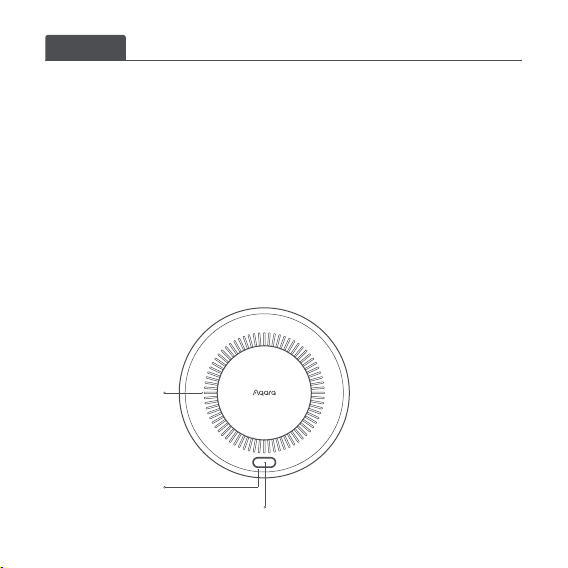
Buzzer Sound
Output
Indicator
(Red/Yellow/Green)
Silence/Self-Test Button
Silence/Self-Test Button
Reset: Press quickly for
three times
Silence: Press once (in case
of alarm)
Self-Test: Press and hold for
over 3 seconds
Communication Distance
Test: Press once
Page 3
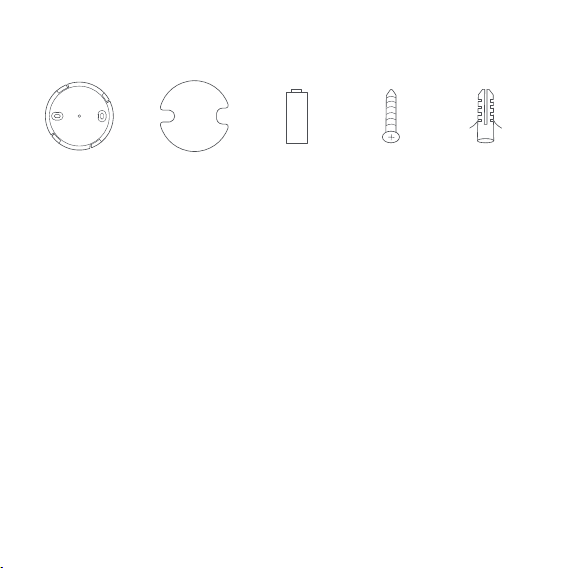
What's In The Box
Mounting
Plate × 1
Adhesive
Sticker × 1
Battery × 1 Self-Tapping
Screw × 2
Expansion
Tube × 2
Quick Setup
Add Device
1. Before activating the accessory, please make sure you have the
Aqara Home app downloaded and an Aqara Zigbee 3.0 hub installed.
2.Remove the battery protective film and properly install the battery
into the battery compartment.
3. Please open the app, tap “Home” and then tap “+” in the top right
corner to enter the “Add Device (Accessory)” page. Select “Smart
Smoke Detector” and add it according to instructions in the Aqara
Home app.
4. Please seewww.aqara.com/supportfor additional information.
*If adding fails, please move the product closer to thehub and try again.
Page 4

Installation and Usage
Please confirm that communication between the Smart Smoke
Detector and the Aqara Zigbee 3.0 hub works normally, and then install
and fix it in position.
Installation Instructions
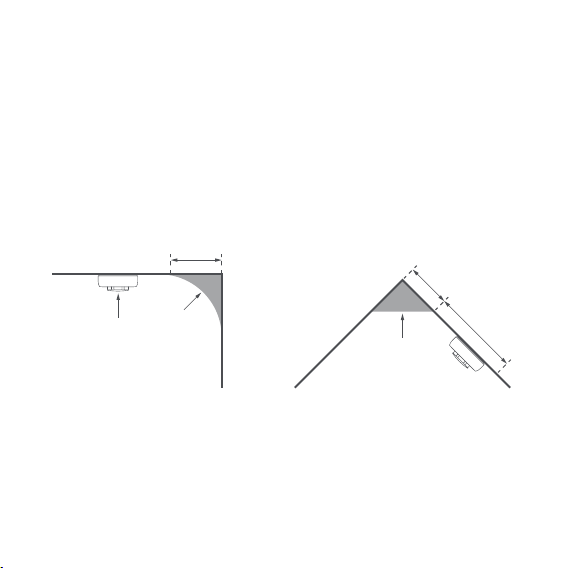
1.At least one detector should be installed in each independent room.
2. The detector should be installed in the middle of the roof, with at
least 0.5 meters away from any wall.
3. The detector should not be installed in the kitchen or near the water
heater with combustible smoke particles.
4. The detector should not be installed in places with massive moisture
or large amount of water vapor, such as bathrooms.
5. The detector should not be installed in places with too much dust.
6. The detector should not be installed near the fans, air conditioners,
fresh air entrances and exits where the wind speed is too fast.
7. The detector should not be installed at the corner of the wall or at
the top of the spire room with poor air flow.
8. The detector should not be installed near fluorescent lamps with
electromagnetic interference.
Page 5
9. The detector should not be installed in places with temperature
below 0°C or above 40°C.
10. The detector should be installed horizontally. In case slanting
installation is inevitable, the dip angle should not be greater than 45
degrees.
11. Do not install the detector in new buildings until renovations and
other processes that may generate dust are completed.
Ceiling
The best
position
50cm
Wrong
position
Ceiling installation position
50cm
Wrong
position
Any position
in area
Wrong
position
Slanting installation position
1m
Page 6

Installation
Please first place the detector in the target position for installation,
load the batteries, and press the silence/self-test button to verify the
communication distance. You should make sure that the device
communicates properly with the hub before installing and fixing it in
position.
Installation with screws
1.Aer loading the battery, hold down the silence/self-test button for
more than 3 seconds to confirm that the indicator flashes red, yellow
and green in turn, with three beeps of the buzzer, which indicates
that the self-test is normal.
2. Choose a suitable position in the middle of the roof and use an
impact drill to punch holes in accordance with the holes on the
mounting plate.
3. Install the expansion tube at the punch position.
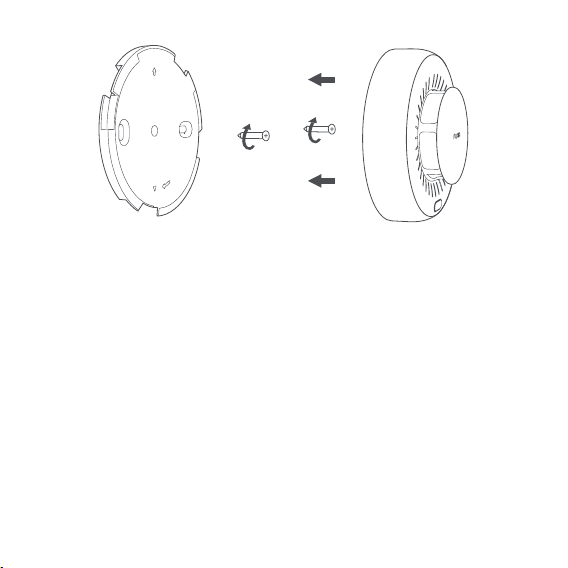
4. Secure the mounting plate with self-tapping screws.
5. Align the "△" mark on the back of the detector with the same mark
on the mounting plate, and rotate clockwise to fix it.
6. Use screws first to ensure a more secure installation.
Page 7
Installation with adhesive
1.Aer loading the battery, hold down the silence/self-test button for
more than 3 seconds to confirm that the indicator flashes red, yellow
and green in turn, with three beeps of the buzzer, which indicates
that the self-test is normal.
2. Remove the protective film on one side of the adhesive sticker, and
stick the adhesive sticker on the back of the mounting plate.
3. Choose a suitable position in the middle of the roof and make sure
the surface is smooth, clean and dry. Please do not stick the
mounting plate on the surface of the wall paint and other coatings,
otherwise the sticking position is prone to peeling aer a period of
time, resulting in falling off of the detector.
Page 8
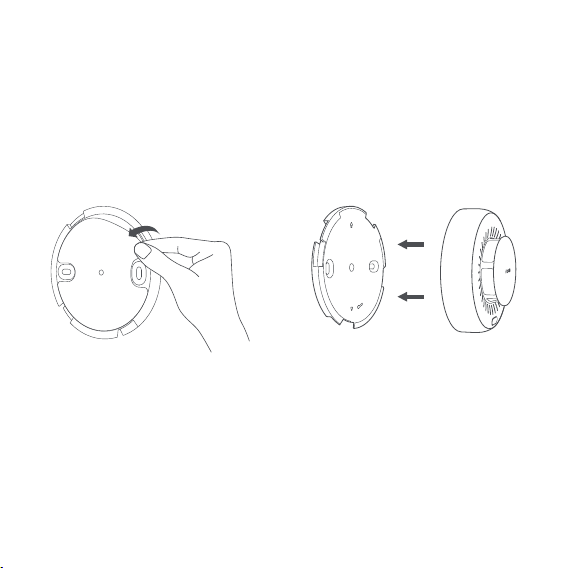
4. Remove the protective film on the other side of the adhesive sticker,
stick the mounting plate, and press with uniform force for 30
seconds to make it firm (it is recommended to leave it still for 24
hours before installing the detector).
5. Align the "△" mark on the back of the detector with the same mark
on the mounting plate, and rotate clockwise to fix it.
Status signal of the detector
The detector is equipped with a wireless networking interface, which
can output the following status signals.
Page 9

Status Indicator Buzzer
Normal
monitoring
Self-test Self-test
Fire alarm Fire alarm
Linkage
alarm
Fault Fault
Low battery Low battery
Power off (green light
flashes once every 56
seconds aer the power
indicator is turned on)
The red, yellow and
green colors flash in turn,
with duration of each
flash one second and a
pause every three flashes
Red light flashes
once per second
Red light flashes once
every 4 seconds
Yellow light flashes
three times every
48 seconds
Yellow light flashes
once every 48 seconds
No sound
One beep per second,
with a pause every
three beeps
One beep per second,
with a pause every
three beeps
One beep per second,
with a pause every
three beeps
Three beeps every
48 seconds
One beep every
48 seconds
App
Monitoring
normal
Linkage
alarm
Page 10

Self-test
1.In the normal working status of the detector, hold down the
silence/self-test button for more than 3 seconds to confirm that the
indicator flashes red, yellow and green in turn, with three beeps of
the buzzer, which indicates that the self-test is normal.
2.Press and hold the button until the indicator and buzzer repeat the
above sound and light signals with a pause every three seconds, and
then release.
3. A monthly self-test on the detector is recommended. Contact the
aer-sales service immediately in case of any faults.
Fire alarm
1.Smoke detected
When the detector works normally and detects that the smoke
concentration is at or above the configured threshold value, the
indicator keeps flashing red once per second, and the buzzer sounds
loudly, with one beep per second and a pause every three beeps.
2. In case of a fire
Please take immediate and effective measures, such as using fire
extinguishing facilities, calling the fire alarm.
Page 11

3. In case of the fire hazard eliminated
Aer pressing the silence/self-test button, the buzzer will be silenced
for 10 minutes, with no sound prompt during this period until the end
of the silence status. During the silence, if you hold down the silence/-
self-test button for more than 3 seconds, the alarm sound prompt
function will be restored. In case the smoke concentration is below the
configured threshold value, the detector will automatically return to
the normal working status.
4. False alarm of the detector may be triggered as a result of the
following conditions
a. Cooking fumes or steam.
b. Wet weather causes condensation on the detector.
c. The application of incense or electric mosquito incense.
d. Spraying paint, air freshener or pesticide.
e. Massive dust accumulation inside the detector.
Page 12

Fault
1.In case the detector fails, the yellow indicator flashes three times
continuously every 48 seconds, with continuous three beeps of the
buzzer, which means that the detector is unable to detect the smoke
normally. Please contact the aer-sales service with the least delay
possible.
2. In case the detector fails, aer pressing the silence/self-test button,
the buzzer will be silenced for 8 hours, with no sound prompt during
this period until the end of the silence status. During the silence, if
you hold down the silence/self-test button for more than 3 seconds,
the fault sound prompt function will be restored.
Low battery
1.In case of low battery of the detector, the yellow indicator flashes
once every 48 seconds, with one beep of the buzzer. Replace the
battery with the least delay possible.
2. Replace the battery within 7 days to ensure the normal operation of
the detector.
Page 13
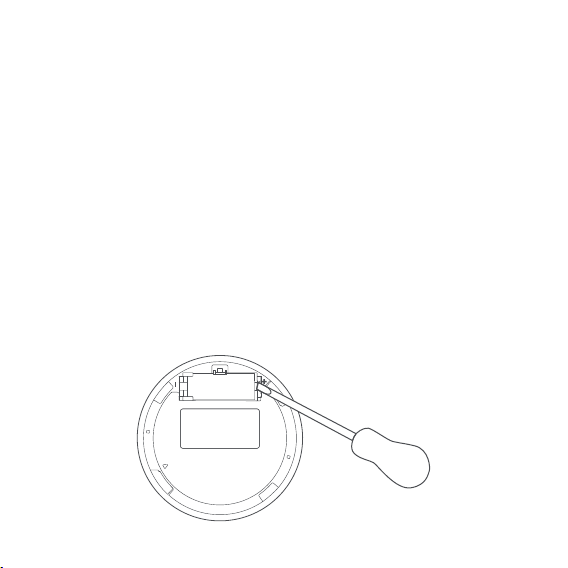
Battery replacement
1.Hold the detector and remove it from the mounting plate by rotating
it counterclockwise.
2. Remove the old battery with a screwdriver.
3. Load a new CR17450 battery in the battery compartment. Do not
reverse the positive and negative electrodes of the battery.
4. Aer replacing the battery, hold down the silence/self-test button for
more than 3 seconds to confirm that the indicator flashes red, yellow
and green in turn, with three beeps of the buzzer, which indicates
that the self-test is normal.
5. Align the "△" mark on the back of the detector with the same mark
on the mounting plate, and rotate clockwise to fix it.
Page 14

Product Specifications
Smart Smoke Detector
Model:JY-GZ-03AQ
Battery: DC 3V(CR17450)
WirelessProtocol:Zigbee
Dimensions:⌀104.6× 42mm
Operating Temperature:0°C~ 40°C
Operating Humidity:0~95%RH, no condensation
What is in the Box: Detector × 1, Mounting Plate × 1, Battery × 1,
Adhesive Sticker × 1
Manufacturer:LumiUnited Technology Co., Ltd.
Address: Room 801-804, Building 1, Chongwen Park, NanshaniPark, No.
3370, Liuxian Avenue, Fuguang Community, Taoyuan Residential
District, Nanshan District, Shenzhen, China.
Online Customer Service:www.aqara.com/support
Made in China
Page 15

Faults Fault diagnosis Solutions
Indicator remains off
Buzzer failure
Yellow indicator
flashes once every 48
seconds, with one
beep of the buzzer
Yellow indicator flashes
three times every 48
seconds, with three
beeps of the buzzer
Battery is not well
loaded; indicator is
damaged; other reasons
Buzzer is damaged
Detector failure
Recheck loading of
the battery. contact
aer-sales service
Contact aer-sales
service
Replace the batteryLow battery
Contact aer-sales
service
Page 16

Precautions
1.If you need to carry out construction, renovation and other activities
that generate a lot of dust, it is recommended that it be dismantled
first to stop dust from entering the interior of the detector, resulting
in massive dust accumulation, which causes continuous false alarm
in the absence of fire.
2. Please do not disassemble the cover or repair the detector by yourself.
3. A monthly cleaning of the detector cover is recommended to remove
dust or dirt. Use a brush or dry lint cloth for cleaning.
4. This product has the function of reporting or notifying "fire alarm"
via wireless network, which is affected by the installation environ-
ment of the device, the network environment and maintenance
conditions of the device and the hub connected to the device, the
network environment and conditions of the mobile phone used by
the user, and the authorization scope and conditions of the app used
by the user. The manufacturer or producer makes no warranties or
promises as to the reliability and timeliness of this function.
Page 17

5. The product application is at the user's own risk. In no event shall the
manufacturer or producer be liable for any risk, loss, damage,
compensation, liability or expense arising from or suffered as a result
of any alleged malfunction of the product (including but not limited
to failure to deliver push messages, failure of automated execution,
etc.) and failure to achieve its efficacy or purpose.
6. This product has the function of "silencing" the sound emitted by the
device via the wireless network. When users adopt this function in
various scenarios (including but not limited to mobile phone App
operation, automation settings), please make sure to check the
installation site of the device first to eliminate the hazard or danger
of fire at the site, ensuring that it will not lead to fire, explosion and
other accidents (such as false alarm of the device) due to "silencing"
before operating.
CAUTION
1. Risk of explosion if the battery is replaced by an incorrect type.
2. Dispose of used batteries according to the instructions.
3. Do not ingest battery, Chemical Burn Hazard.
Page 18

4. If the battery compartment does not close securely, stop using the
product and keep it away from children.
5. If you think batteries might have been swallowed or placed inside
any part of the body, seek immediate medical attention.
6. Disposal of a battery into fire or a hot oven, or mechanically crushing
or cutting of a battery, that can result in an explosion.
7. Leaving a battery in an extremely high temperature surrounding
environment that can result in an explosion or the leakage of
flammable liquid or gas.
8. A battery subjected to extremely low air pressure that may result in
an explosion or the leakage of flammable liquid or gas.
9.For smoke alarms incorporating replaceable batteries, information
shall be given on the action to be taken if a battery fault warning is
emitted.
Scan to get the Zigbee 3.0 Install Code on the last page of the manual.
*Please read this manual carefully and keep it in a safe place.
*If necessary, the contents of this manual will be modified or adjusted without
special notice.
 Loading...