

①
18
②
⑤
⑥
⑦
⑧
⑨
⑩
11
④
③
14
13
12
17
16
15
24
19
20
21
22
23
25
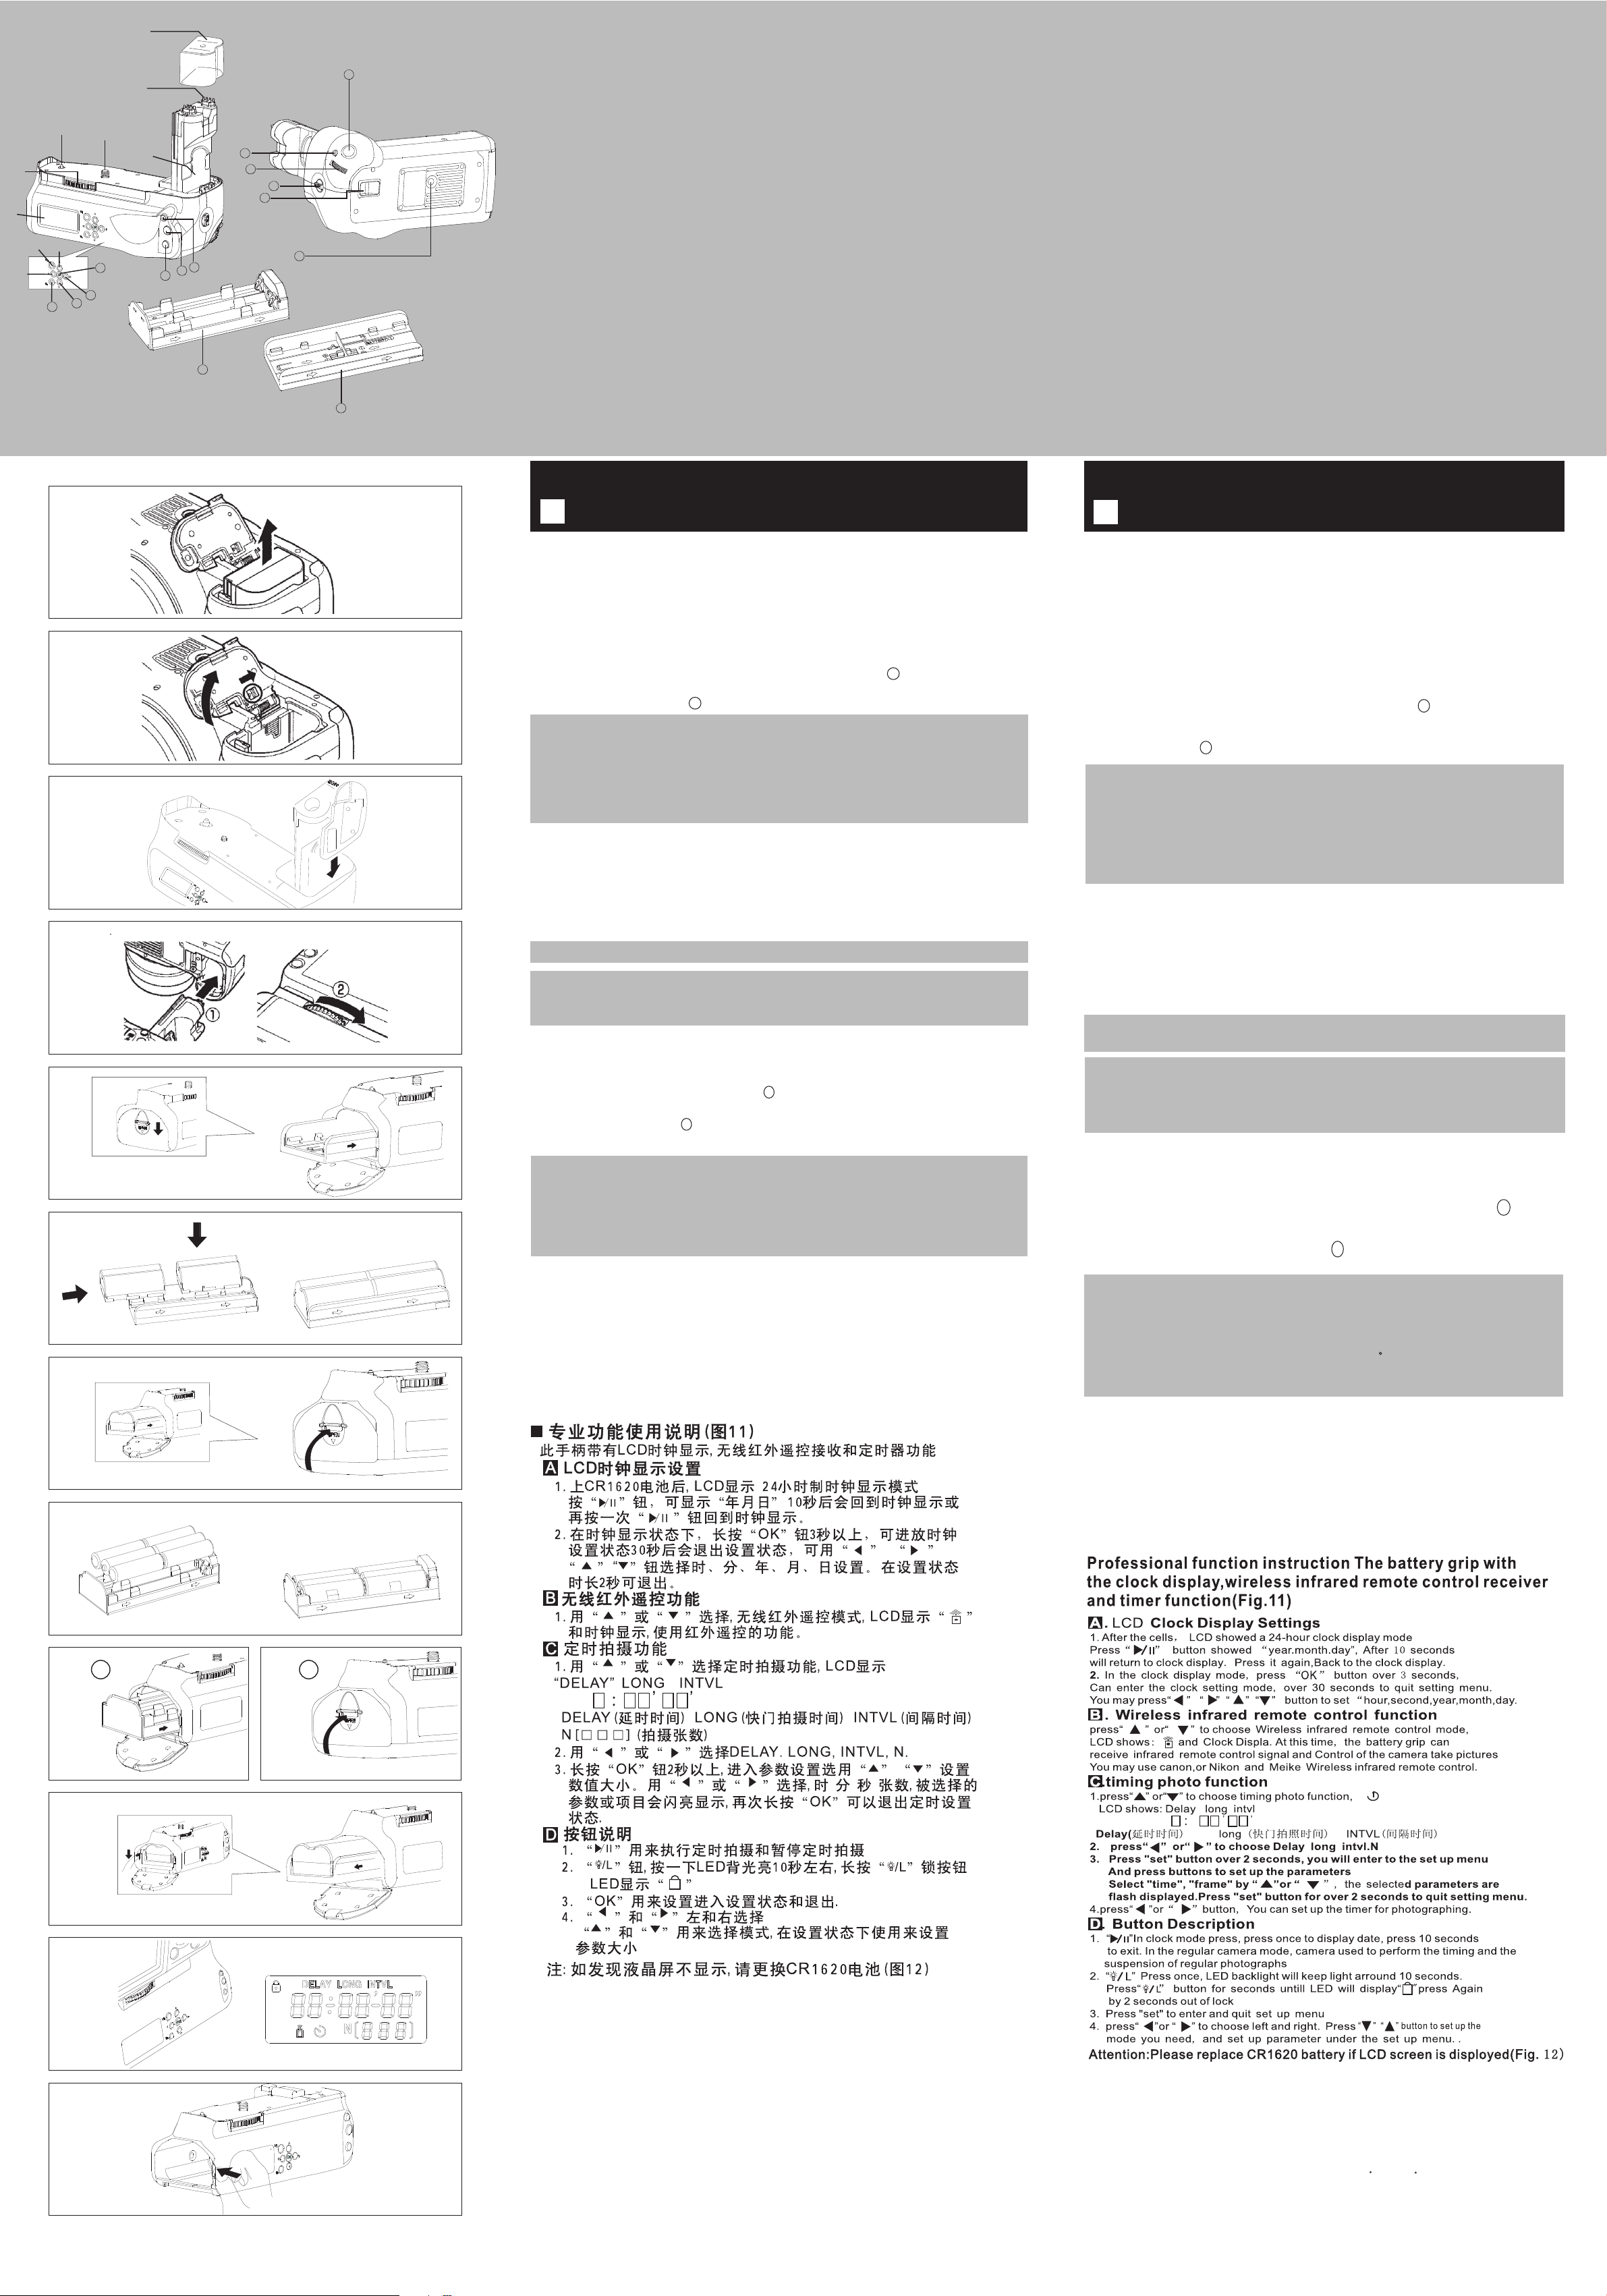
1
○
保护盖
2
○
电接点
3
○
照相机电池舱 顶 盖 槽
4
固定螺钉
○
5
定位销
○
6
○
装卸旋钮
7
显示屏
○
8
执行/暂停
○
9
-减少(下)
○
10
左
○
11
○
LCD背光启动 键/锁
12
○
+增加(上)
13
○
右
14
○
设定
15
AF框选择/放大按 钮
○
16
AE锁定/缩略图/缩小 按 钮
○
17
○
自动对焦启动 按 钮
18
○
快门按钮
19
○
多功能按钮
20
主拨盘
○
21
纵向位置操作 开 关
○
22
手提带固定部
○
23
三角架用螺纹 孔
○
24
电池夹BGM- E 6
○
25
干电池仓
○
26
锂电池仓
○
各部 分名 称
Part Names
1
○
Protective cover
2
○
Electrical contacts
3
○
Camera battery compartment cover slot
4
○
Attachment screw
5
○
Guide pin
6
○
Attach/detach knob
7
LCD Monitor
○
8
○
Perform/ Pause
9
○
- decrease(down)
10
○
Left
11
○
LED backlight start button / Locked
12
○
+ Increase(up)
13
right
○
14
○
Setting
15
○
AF point selection/Magnify button
16
AE lock/Index/Reduce button
○
17
AF start button
○
18
○
Shutter button
19
○
Muitl-function button
20
○
Main Dial
21
○
Vertical-grip operation switch
22
○
Hand strap mount
23
○
Tripod socket
24
○
Battery Magazine BGM-E6
25
AA battery magazine
○
26
Lithium battery magazine
○
1
2
3
4
5
6
7
8
电池盒兼手柄 7DL
使用说明书C
7DL是一个可以装 入 两 个 电池LP-E6或6个AA/ LR 尺寸电池的电 池 盒
兼手柄。本电 池 手 柄还配有纵向位置 快 门 按 钮、主拨盘等, 使 得 纵
向拍摄与横向 拍 摄 一样轻松。
■安装到相机
1.取下相机的 电 池 (图1)
2.卸下相机的 电 池 仓盖(图2)
3.将卸下的电 池 仓 盖插入存放区,以 免 丢 失 (图3)
4.卸下保护盖 , 然 后将电接点部插入 电 池 仓 (图4-1)
5.将固定螺钉 对 准 相机三角架用螺纹 孔 , 然 后转动装卸旋钮 牢 固 地
固定在相机上 ( 图4 -2)
·在插入电池 之 前 ,请务必先将电池 手 柄 安 装到相机上,如 果 您 将
已装入电池的 电 池 手柄安装到相机上 , 则 相 机可能无法正确 地 显
示电池电量检 测 结 果。
·将电池盒兼 手 柄 从相机上卸下之前 , 请 务 必先将相机的电 源 开 关
转到〈OFF〉位置并 取 出 电池。取出电池后 , 请 为电接点安装保护
盖。
■安装电池
1.按下电池门 扣 如 箭头方向所示,打开电 池 门 并 按下电池仓
扣,弹出电池仓( 图5)
2.在电池仓(LP- E6用)中装入单个 或 两 个 电池LP-E6(图6)
3.关闭电池门(图7)
如果不将电池 门 关 闭,则相机不会工作
·单独存放电 池 盒 时,请务必安装随机提 供 的 保 护盖以防止发生 短 路 。
·如果只使用 单 个 电池,可将其装在右侧 或 左 侧
如果安装了两 个 电 池,则两个电池同时供 电,可 装 入 两个
电量不同的电 池 并 且使用起来不会有 任 何 问 题。
■装入AA/LR6尺寸电池
1.将电池装入 电 池 门 (图8)
按照图所示,确保 电 池 的正负触点朝向正 确
2.将电池仓装 入 电 池手柄(如图9- 1 )
安装完毕后,检查 电 池 仓是否已牢固地安 装 到 电 池手柄。
3.关闭电池门(如 图9-2)
如果不将电池 门 关 闭,则相机不会工作。
·使用AA/LR6尺 寸 电池时,能够拍 摄 的 图 像张数较少。另 外 , 根 据
电池品牌和存 储 条 件的不同,能够拍 摄 的 图 像可能会更少, 因 此 ,
建议您只在急 需 时 才使用AA/LR6尺 寸 电 池 。
·利用非充电AA/LR6尺寸电池时, 请 在2 0℃ 以上的温度下使 用6个 相
同品牌的新电 池 。 在低温条件下或当 新 旧 电 池混合使用时, 相 机 可
能不工作。
■卸下电池方法
·打开电池门,按 下 电 池仓扣并如箭头方 向 操 作,然 后电池仓将自
动弹出(图10)
■电池盒兼手柄的使用方法
·将纵向位置 操 作 开关转动到<ON>位置可 以 使 电 池盒兼手柄上
的按钮和拨盘 与 相 机上的按钮和拨盘 功 能 相 同。
·在进行横向 拍 摄 时,请将纵向位置 操 作 开 关转动到〈OFF〉位置 , 以
免您不经意时 使 用 电池盒兼手柄上的 按 钮 或 拨盘。
6
Battery Grip 7DL
InstructionsE
The 7DL is a battery grip that can hold two Battery packs LP-E6
or six size-AA/LR6 batteries.It is also equipped with a vertical-grip
shutter button.Main Dial,etc,to enable vertical shooting with the
same ease as horizontal shooting.
■Attaching to the Camera
1.Remove the battery from the camera(Fig.1)
2.Detach the camera’s battery compartment cover(Fig.2)
3.Insert the detached cover into its storage slot to ensure that it
will not be lost(Fig.3)
4.Remove the protective cover,and then insert the electrical
contacts into the battery compartment(Fig.4-1)
5.Align the attachment screw with the camera’s tripod socket,
and then turn the attach/detach knob to tighten securely to the
camera(Fig.4-2)
·Be sure to attach the battery grip to the camera before inserting
the batteries.The results of the battery check may not be
displayed properly if you attach the battery grip to the camera
with the batteries already inside.
·Before removing the battery grip from the camera,be sure to
turn the camera’s power switch to <OFF>,and take out the
batteries.After removing the batteries,attach the protective
cover to the electrical contacts.
■Inserting the Battery Packs
1.Press the battery door as shown in the direction of the arrow to
open the battery door and press the battery storage Button,pop up battery storage(Fig.5)
2.In the battery position(LP-E6 use) in single or two batteries
into pools LP-E6(Fig.6)
3.Close the battery door(Fig.7)
If you do not the battery door closed,then the camera will not work
·If storing battery magazine separately,be sure to attach the
provided protective cover to prevent shorting.
·If only one battery pack is used,it may be inserted in
either the right or left sides.
·If two battery packs are inserted,power is supplied simultaneou sly by both battery packs.Two battery packs with different
charging levels can be inserted and used without any problems.
■Inserting Size-AA/LR6 Batteries
1.Insert the batteries into the Battery Magazine (Fig.8)
Make sure the +and- battery contacts are properly oriented as
shown in the illustration.
2.Attach the battery magazine into the battery grip.(Fig.9-1)
After attaching,check that the battery magazine is securely
attched to the battery grip.
3.Close the release handel.(Fig.9-2)
The camera will not work unless the handle is closed.
·Fewer images can be shot when using size-AA/LR6 batteries.
Also,fewer images can be shot depending on the battery brand
and storage conditions,and so usage of size-AA/LR6 batteries
is recommended only for emergencies.
·With size-AA/LR6 batteries.use six new batteries of the same
brand at temperatures above 20℃/ 6 8 F,The camera may not
function when used in low temperatures or when old and new
batteries are used together.
■Instrction of Remove battery
·Open battery house,press battery-chamber Latch(Fig.10)
battery magazine will be push out by itself.
■Using the Battery Grip
·Turning the vertical-grip operation switch to <ON>makes
the battery grip buttons and dial function in the same way as those
on the camera.
·When shooting horizontally,turn the vertical-grip operation switch
to <OFF>so that you do not accidentally use the button or dial
on the battery grip.
9-1
10
11
12
9-2
■规格
使用电源: (1 )一 个 或两个电池LP-E6
(2) AA/LR6碱 性 电池子X6
(3)交流电适 配 器 套 装ACK-E6
电源开关: 与相机 电 源 开关连动
可拍摄数量: 参阅 相 机 的使用说明书
工作温度范围: 0℃- + 40℃
工作湿度范围: 85%或 更 小
尺寸: 148.7(长) X 68.3(宽) X 117.8(高)毫米
重量: 约296克(不含电源或 电 池 夹 的重量)
■Specifications
Power sources: (1) One or two Battery Packs LP-E6
(2) AA alkaline/LR6 batteries x6
(3)AC Adapter Kit ACK-E6
Power switch: Camera’s power switch
Possible shots: Refer to your camera’s Instruction Manual.
Working tempeature range:
0℃-+40℃/ 32F-104F
Working humidity: 85% or less
Dimensions: 148.7( W)X68.3(D) X 117.8( H)mm
Weight: Approx:296g(not including the power supply
or battery magazine)

Namen van onderdelen
①
18
②
⑤
⑥
⑦
⑧
⑨
⑩
11
④
③
14
13
12
17
16
15
24
19
20
21
22
23
25
1
○
Beschermkapje
2
○
Elektrische contactpunten
3
○
Sleufje voor kapje batterijcompartiment camera
4
Bevestigingsschroef
○
5
Geleidingspen
○
6
○
Bevestigings-/verwijderingsknop
7
LCD-Display
○
8
Einfühung/Pause
○
9
- Reduzieren
○
10
Links
○
11
○
LED starten/ LED Schloss
12
○
+ Plus
13
○
Rechts
14
○
Bestätigen
15
AF-puntselectie/inzoomknop
○
16
AE-vergrendeling/index/uitzoomknop
○
17
○
AF-startknop
18
○
Ontspanknop
19
○
Multifunctieknop
20
Hoodfinstelwiel
○
21
Verticaalschakelaar
○
22
Handriembevestiging
○
23
Bevestigingspunt voor statief
○
24
Batterijmagazijn BGM-E6
○
25
Trockenlagerung
○
26
Cang Li-lonen-Akku
○
1
2
3
Batterijgreep 7DL
InstructiesD
De 7DL is een batterijgreep waarin twee LP-E6 batterijen of
zes AA/LR6-batterijen passen.Ook in deze voorzien van een
ontspanknop,een hoofdinstelwiel enzovoort op de verticale greep.
zodat u even eenvoudig verticaal als horizontaal foto’s kunt maken.
■Aan de camera bevestigen
1.Haal de batterij uit de camera(afbeelding.1)
2.Verwijder het kapje van het batterijcompartiment van de camera
(afbeelding.2)
3.Schuif het verwijderde kapje in de bewaarsleuf,zodat u dit niet
kwijt raakt(afbeelding.3)
4.Verwijder het beschermkapje en schuif de elektrische
contactpunten in het batterijcompartiment(afbeelding.4-1)
5.Leg de bevestigingsschroef gelijk met de statiebevestiging
van de camera en draai vervolgens aan de bevestigings /verwijderingsknop om de greep stevig vast te zetten aan de
camera(afbeelding.4-2)
·Bevestig de batterijgreep op de camera vóórdat u de batterijen
plaatst,De resultaten van de batterijcontrole worden mogelijk
niet doed weergegeven als u de batterijgreep aan de camera
bevestigt als de batterijen al in de batterijgreep zitten.
·Zet de aan-/uitschakelaar van de camera op<OFF> vóórdat
u de batterijgreep van de camera verwijdert en haal de
batterijen eruit.Bevestig na verwijdering van de batterijen het
beschermkapje op de elektrische contactpunten.
Hinweis:Der LCD-Bildschirm ist nicht angezeigt.wenn gefunden,
ersetzen Sie bitte die Cr1620 Batterien(afbeelding.12)
■Specificaties
voedingsbronnen: (1)Een of twee batterijen LP-E6
(2)AA/LR6-alkalinebatterijen x6
(3)AC-adapterset ACK-E6
Aan/uit-schakelaar: Aan/uit-schakelaar camera
Max.opnamen: Raadpleeg de instructies bij de camera.
Bedrijfstemperatuur: 0℃- + 4 0℃
Luchtvochtigheld tijdens gebruik
85% of lager
Afmetingen: 148.7( W)X68.3(T) X 117.8( B)mm
Gewicht: ca.296g(ohne Stromversorgung und
Batteriemagazin)
4
5
6
7
8
9-1
9-2
■Plaatsing van de batterijen
1.Drücken Sie die Batterieabdeckung drücken,da in Richtung des Pfeils
angezeigt,um die Batterie Tür zu öffnen und drücken Sie die Batterie Langerung Button,Pop-up-Batterie -Lagerung(afbeelding.5)
2.In der Position Akku(LP-E6 Nutzung) im Einzel-oder zwei Batterien in
Pools LP-E6(afbeelding.6)
3.Schließen Sie die Batterieabdeckung(afbeelding.7)Wenn Sie den Akku
nicht geschlossener Tür,dann die Kamera funktioniert nicht
Wanneer u het batterijmagazijn los bewaart,bavestig dan het
bijeleverde beschermdeksel om kortsluiting to voorkomen.
·Wanneer u slechts één batterij gebruikt,kunt u deze zowel
aan de rechterkant als aan de linkerkant naar binnen
schuiven.
·Wanneer u twee batterijen gebruikt,leveren de twee
batterijen teglijkertijd stroom,Er kunnen zonder
problemen twee batterijen worden geplaatst en gebrulkt
met een verschilledn laadriveau.
■Installeren van AA/LR6-batterijen
1.Plaats de batterijen in het batterijmagazijn(afbeelding.8)
Zorg dat de polen + en - van de batterij in de juiste richtingzijn
geplaatst,zoals op de afbeelding aangegeven.
2.Bevestig het batterijnagazing in de batterijgreep(afbeelding9-1)
Controleer na bevestiging of het batterijmagazijn stevig op de
batterijgreep is aangesloten.
3.Sluit de ontgrendelingshendel(afbeelding 9-2)
De camera werkt alleen als de ontgrendelingshendel is gesloten.
·U kunt mider foto’s maken wanneer u AA/LR6-batterijen
gebruikt.Afhanklijk van het merk batterijen en de opslag kunt
u ook minder foto’s maken,Daarom wordt het gebruik van
AA/LR6-batterijen alleen in noodsituaties aanbevolen.
·Gebruik als u AA/LR6-batterijen gebruikt,zes nieuwe batterijen
van hetzelfde merk op een temperatuur hoger dan 20℃
De camera functioneert mogelijk niet wanneer deze bij lage
temperaturen wordt gebruikt of wanneer oude en nieuwe
batterijen door elkaar worden gebruikt.
■Entfernen Sie die Batterie-Methode(afbeelding.10)
·Öffnen Sie das Batteriefach,drücken Sie die Batterie-Lagerung und
Betrieb,wie die Richtung des Pfeils,und dann den Akku automatisch
Pop-up-store.
■Gebruik van de batterijgreep
·Als u de verticaalschakelaar op de greep op <ON> zet
werken de knoppen en het hoofdinstewiel op
dezelfde manier als die op de cmaera.
·Als u horizontaal fotografeert,wordt het aanbevolen de
verticaalschakelaar op de greep op <OFF> te zetten,zodat u niet
per ongeluk de knoppen of het hoofdinstelwiel op de batterijgreep
gebruikt.
10
11
12
Professionell Funktionen Benutzerhandbuch(afbeelding.11)
 Loading...