

Page 1
Mac mini Model A1283 Teardown
Mac mini Model A1283 Teardown
Tools used in this guide
1.5" Thin Putty Knife
Phillips #0 Screwdriver
Step 1 -
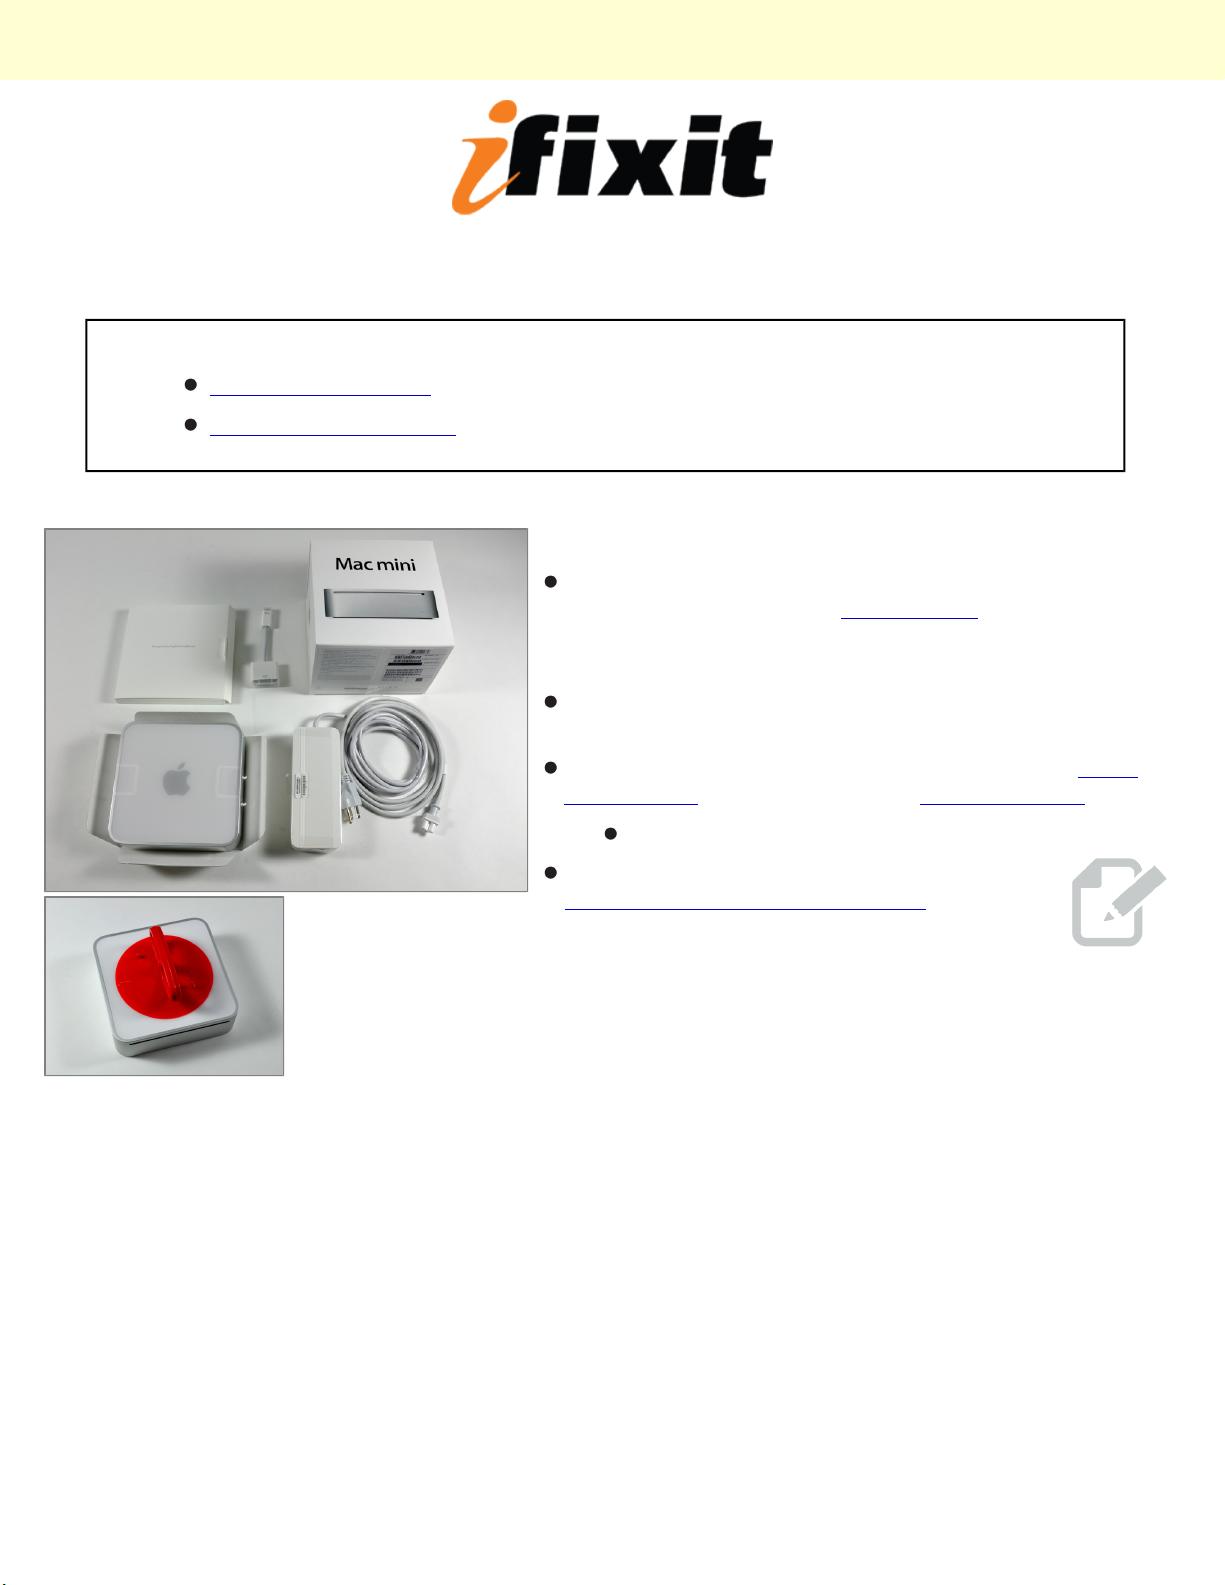
The Mac mini for this First Look was graciously
provided by our friends at macminicolo, a Mac mini
colocation service. They allow your Mac mini to be
used as a surprisingly powerful and inexpensive server.
Ladies and gentlemen, without further ado, allow us to
introduce the new and improved Mac mini!
We immediately tried to open the mini using our iMac
opening tool, used in yesterday's iMac First Look.
We also posted a guide for installing a
second hard drive in the Mac Mini.
It did not work.
© 2010 iFixit — CC BY-NC-SA www.iFixit.com Page 1 of 10
Page 2
Mac mini Model A1283 Teardown
Step 2
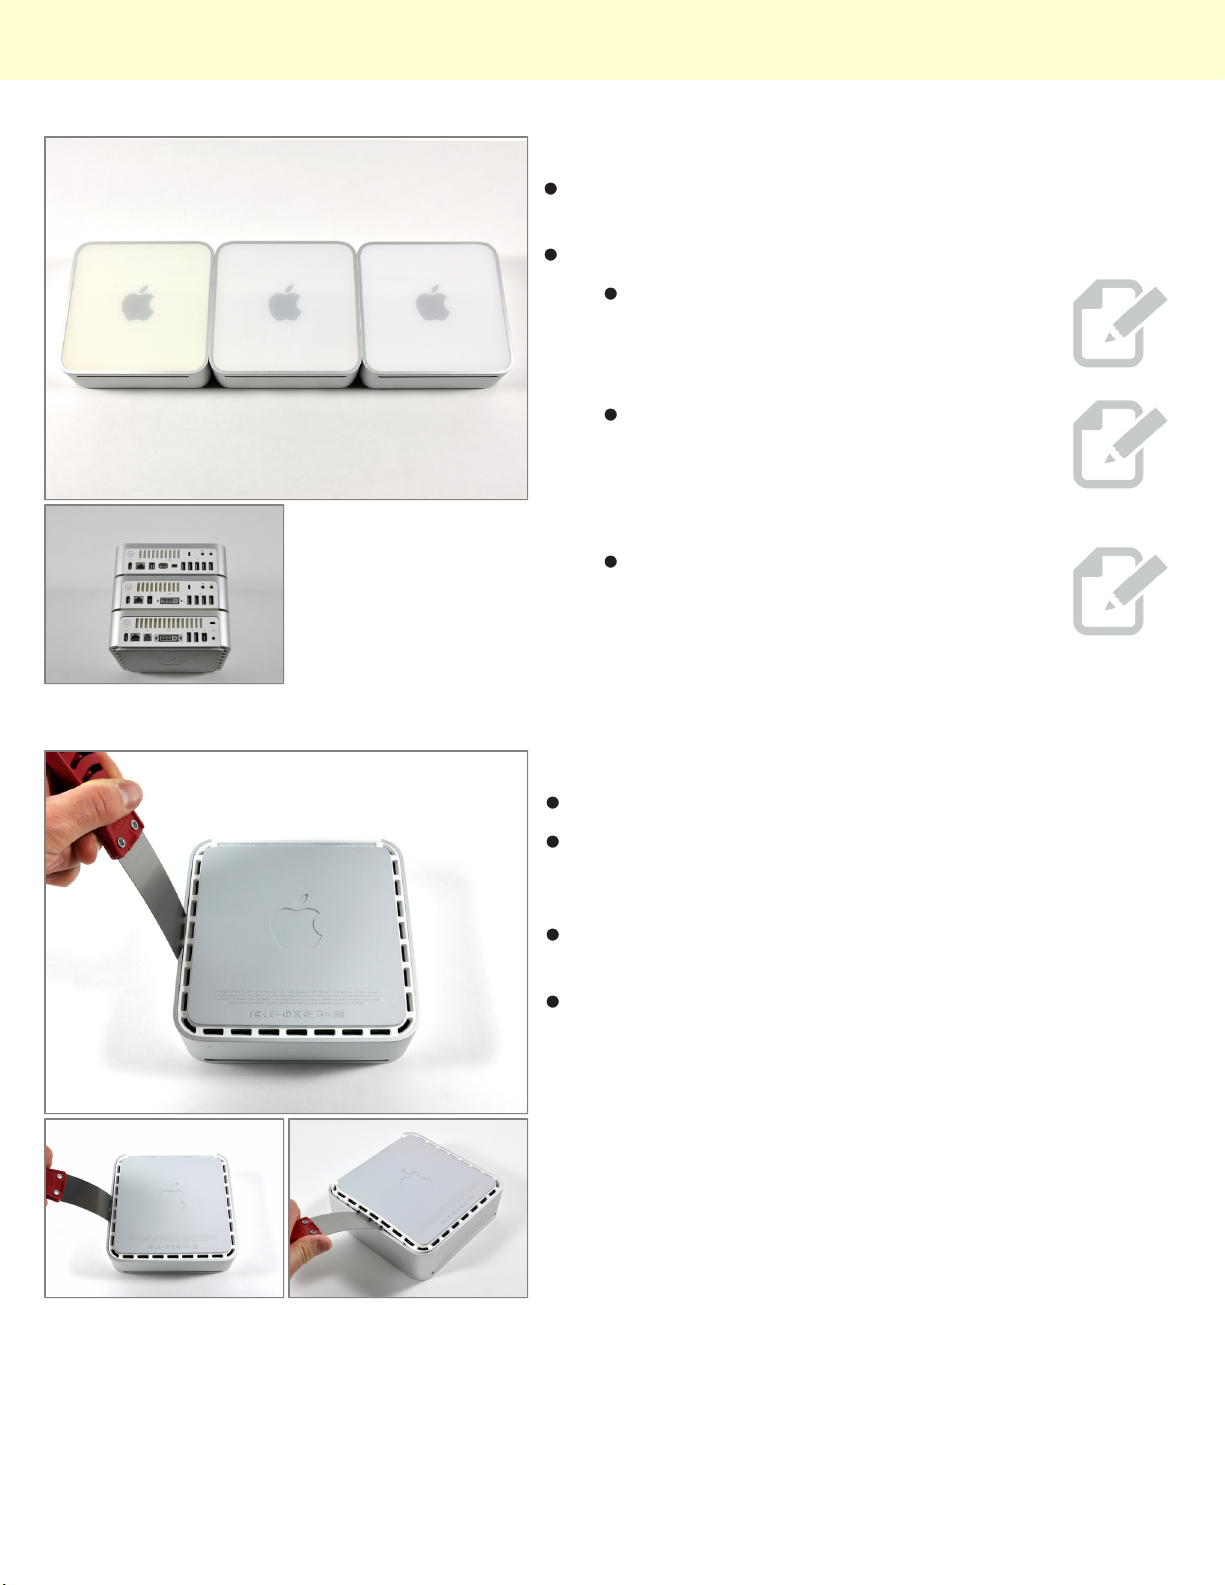
The beauty of evolution at its finest. From left to right:
Power PC, Intel Core Duo, Intel Core 2 Duo.
Notable differences in the latest model:
An additional USB port brings the total
to five, one more than the previous
model (and three more than the Power
PC!).
A Mini DisplayPort and mini-DVI port -which allow for Dual-Monitor support
for the first time in a Mac mini -replace the DVI display port of the
previous generation.
A Firewire 800 port replaced the old
FireWire 400 port, much to the chagrin
of Mac users.
Step 3
Let's rock this thing!
Carefully insert a putty knife into the crevice in between
the top cover and bottom housing. Start on the left side
first.
Gently enlarge the existing crevice by twisting the putty
knife downward and away from the mini.
Repeat the prying motion until a portion of the bottom
housing has been nudged upward.
© 2010 iFixit — CC BY-NC-SA www.iFixit.com Page 2 of 10
Page 3
Mac mini Model A1283 Teardown
Step 4
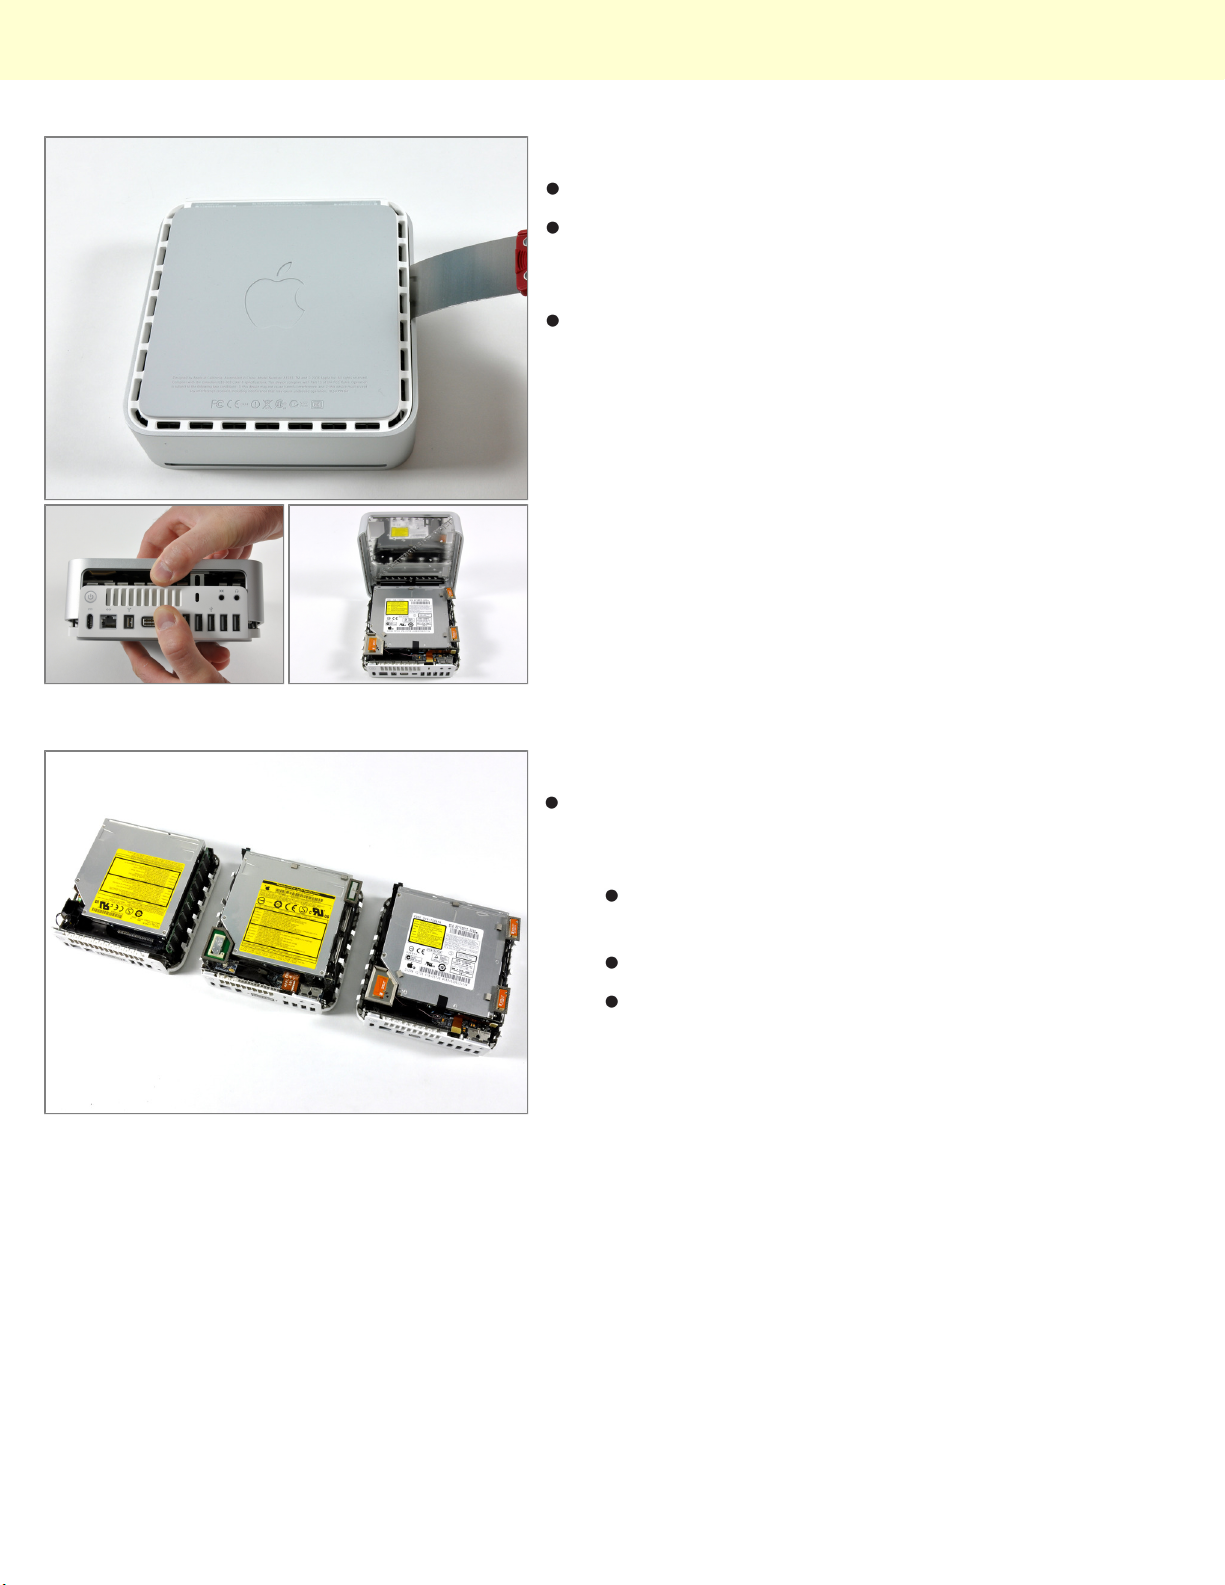
Repeat the same prying procedure on the right side.
The top cover should now be marginally separated from
the bottom housing. Use your fingers to completely
separate the two, starting with the I/O side of the mini.
The top cover does not have any cables attaching it to
the bottom housing; it should now be completely
detached from the bottom.
Step 5
A quick comparison photo of the three Mac mini
generations (oldest on left) showcases their
technological progression:
No antennas --> One antenna --> Two antennas
(Airport card)
Desktop RAM --> laptop RAM
PATA --> SATA drives
© 2010 iFixit — CC BY-NC-SA www.iFixit.com Page 3 of 10
Page 4
Mac mini Model A1283 Teardown
Step 6
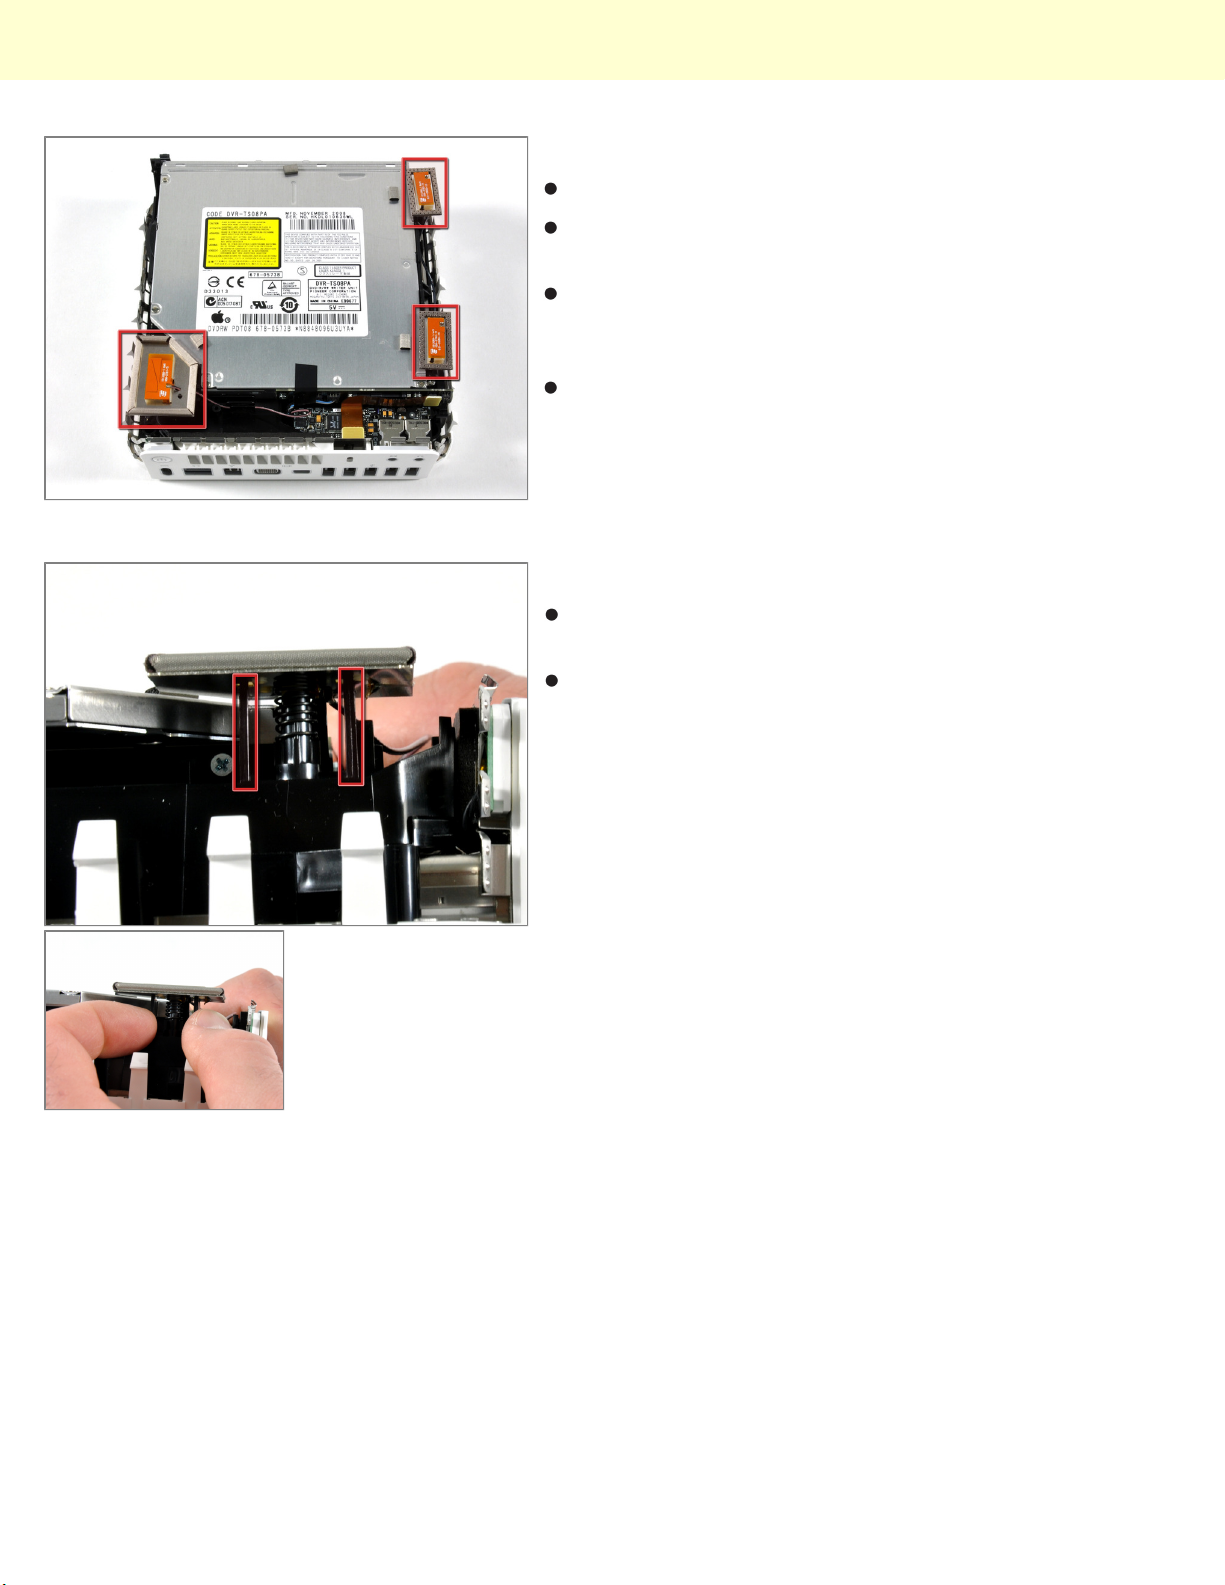
Can you hear me now? Excellent.
The wireless board contains a Broadcom
BCM4312KFBGH WiFi transceiver on it.
The new mini houses three wireless communications
antennas, one for use with the built-in Bluetooth and
two for the Airport Extreme wireless 802.11n card.
All three antennas need to be removed before
accessing the hardware underneath.
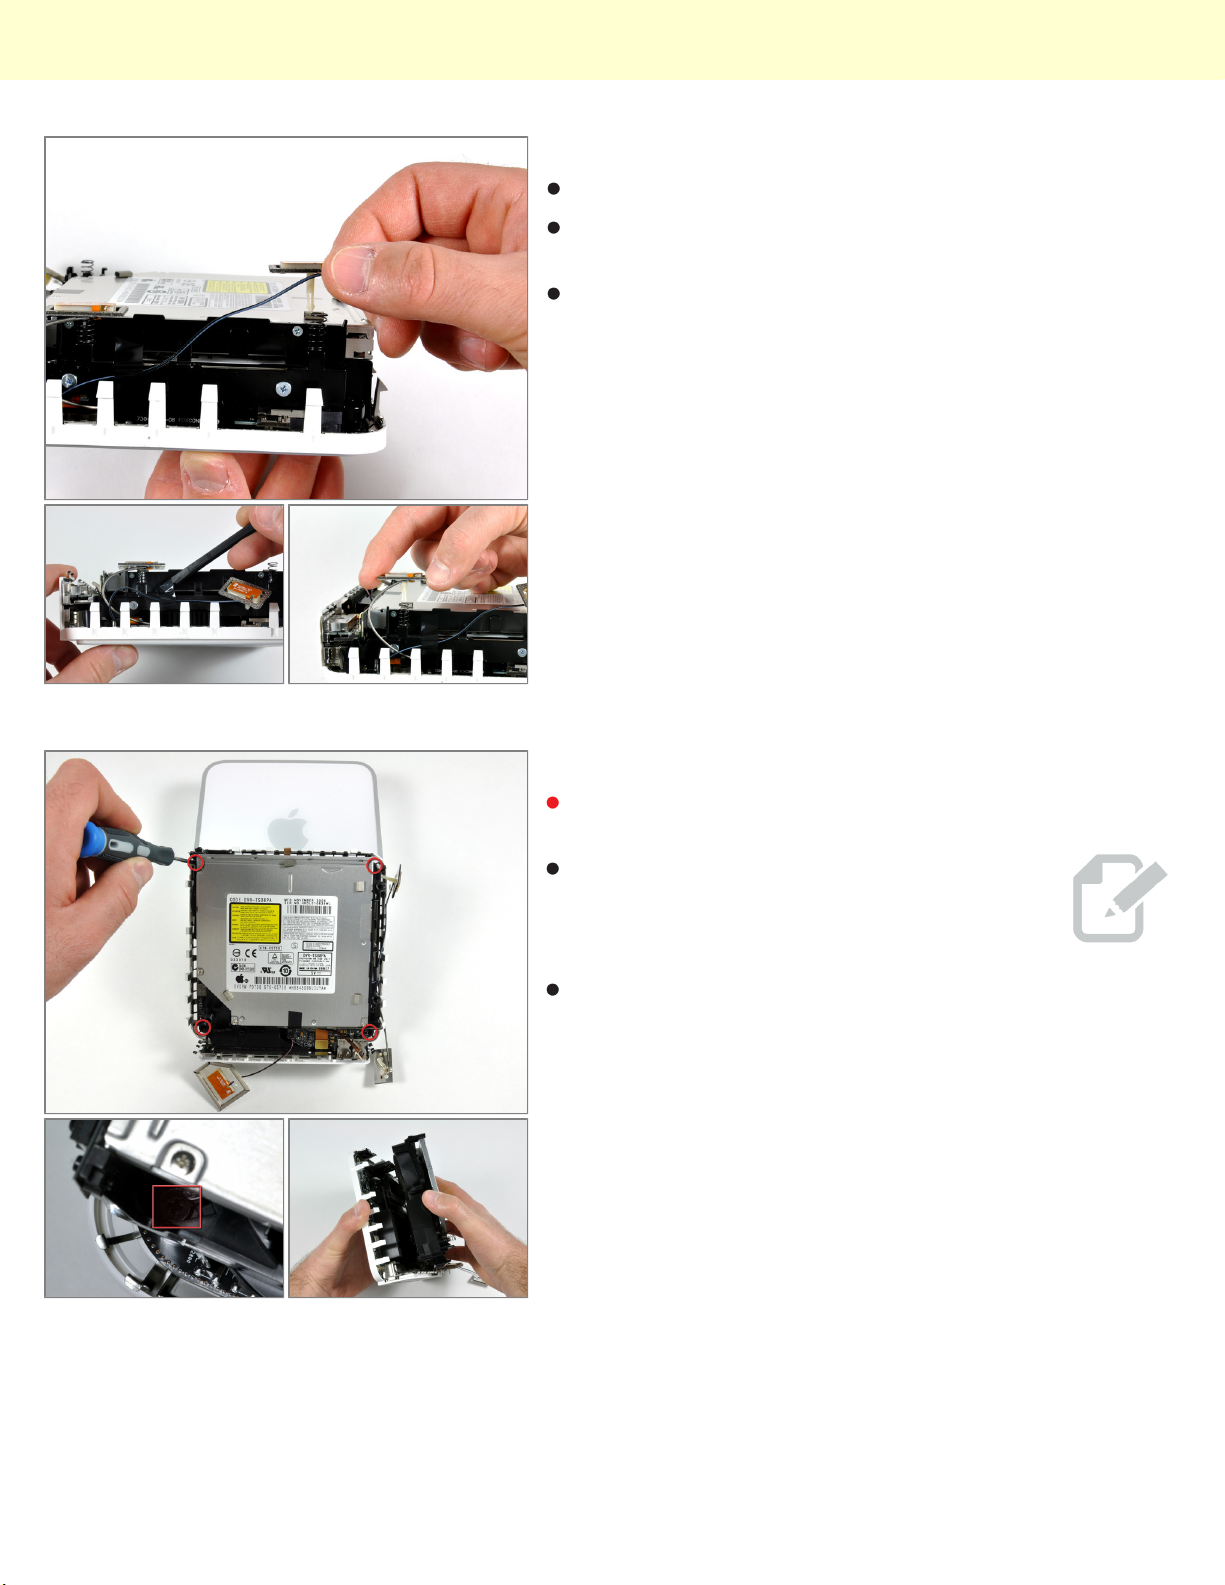
Step 7
There are two black posts securing the Airport antenna
board to the internal frame.
Squeeze both black posts together and gently lift the
antenna board from the post.
© 2010 iFixit — CC BY-NC-SA www.iFixit.com Page 4 of 10
Page 5
Mac mini Model A1283 Teardown
Step 8
Rotate the mini 180 degrees.
Use a spudger to peel back the black tape and release
the antenna cable.
Carefully lift the remaining two antennas from the right
side of the mini.
Step 9
Remove the four black Phillips screws holding the
internal frame to the bottom housing.
We spent a lot of time searching for these
screws. Is this an Apple conspiracy to
prevent consumers from disassembling their
products? Put on your tinfoil hats!
After the screws were removed, we separated the
internal framework from the bottom housing.
© 2010 iFixit — CC BY-NC-SA www.iFixit.com Page 5 of 10
Page 6
Mac mini Model A1283 Teardown
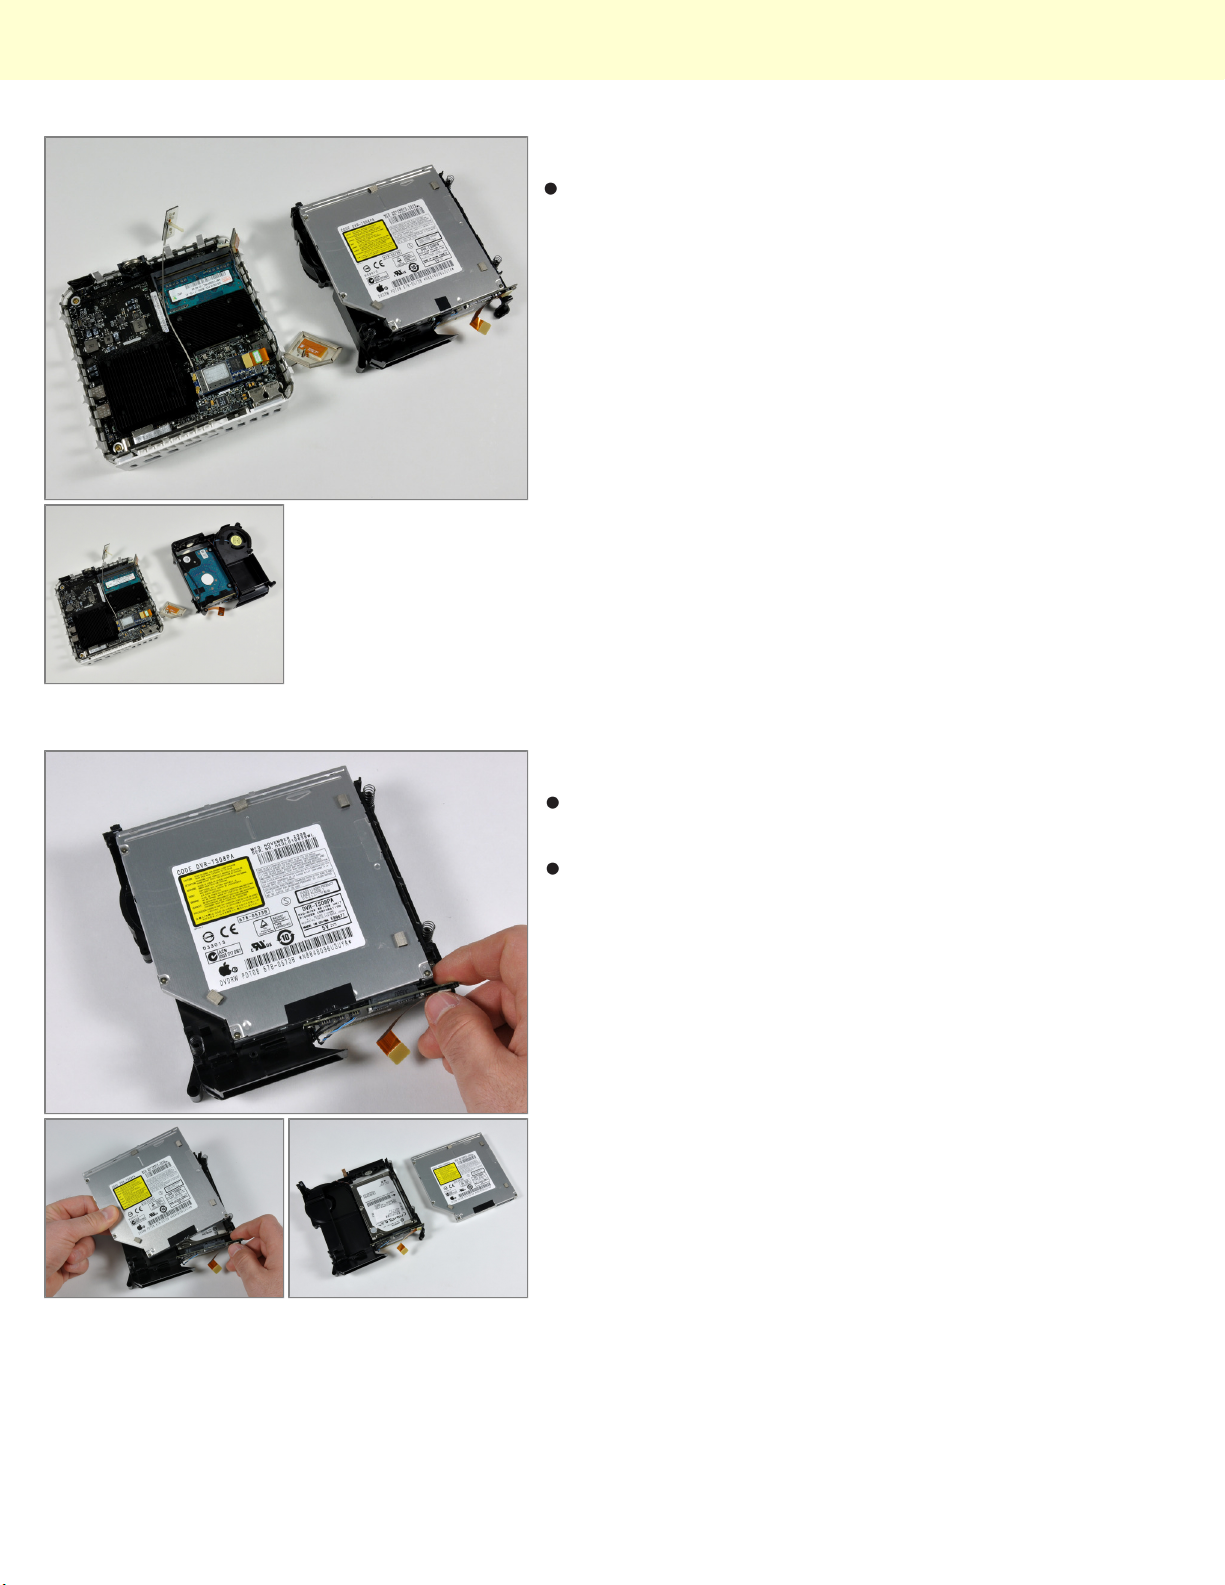
Step 10
On the left we have the bottom housing, which includes
the logic board, CPU, and RAM. On the right is the
internal framework, which contains the SuperDrive, fan,
and hard drive.
Step 11
Remove the six Philips screws from the left, right, and
back sides of the SuperDrive.
Unplug the drive from the interconnect board to
completely remove it from the framework.
© 2010 iFixit — CC BY-NC-SA www.iFixit.com Page 6 of 10
Page 7
Mac mini Model A1283 Teardown
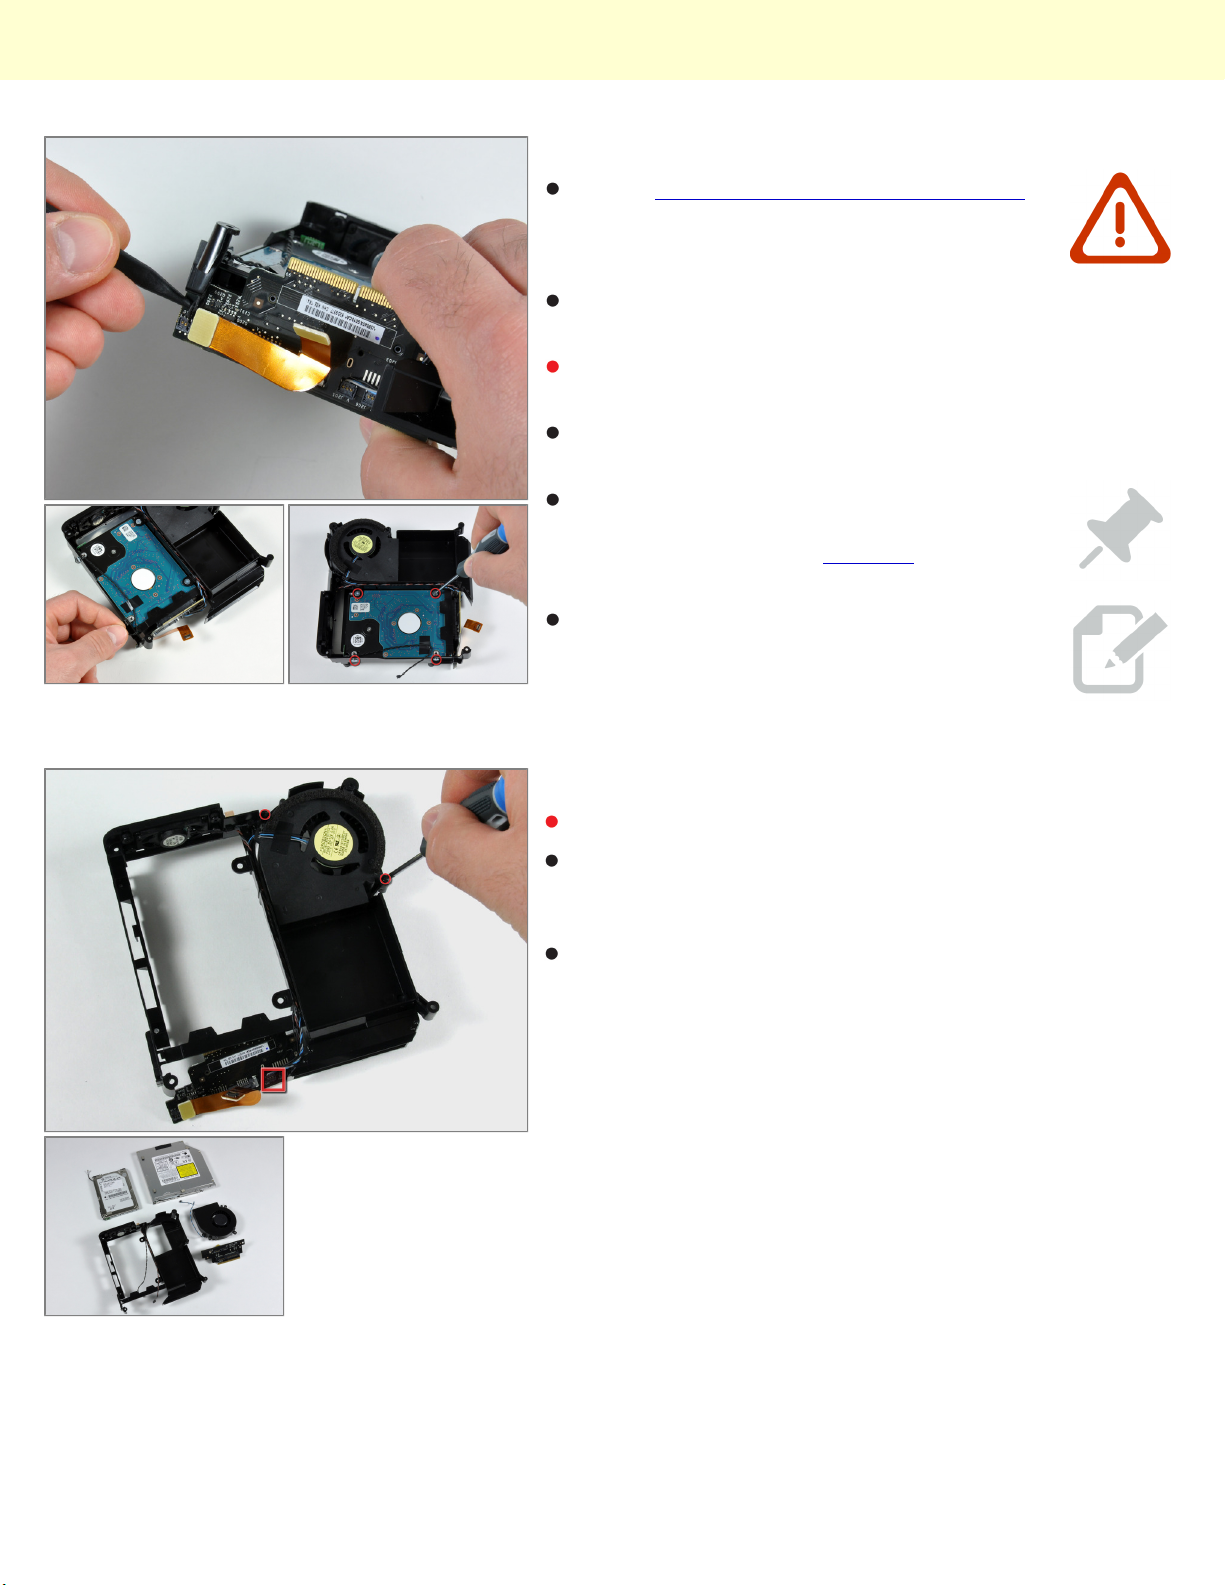
Step 12
Use the Mac mini Terabyte Upgrade Guide
instead of this First Look to make any
modifications to your mini.
Next, disconnect the small black two-wire connector
from the interconnect board and move it out of the way.
Remove the four Phillips screws securing the hard drive
to the internal frame.
The hard drive easily slides out once it is detached from
the interconnect board.
The hard drive is a paltry 120 GB. If you'd
like to hold more than six photographs on
your computer, you can upgrade to a 500
GB drive for just $130 and a little time.
Apple only allows you to customize the mini
with a 320 GB drive, and they want a
whopping $175!
Step 13
Remove the two screws holding the fan in place.
Disconnect the fan's blue/gray cable from the
interconnect board. This should allow the fan to be
removed from the framework.
The top half of the Mac mini is now completely
disassembled!
© 2010 iFixit — CC BY-NC-SA www.iFixit.com Page 7 of 10
Page 8
Mac mini Model A1283 Teardown
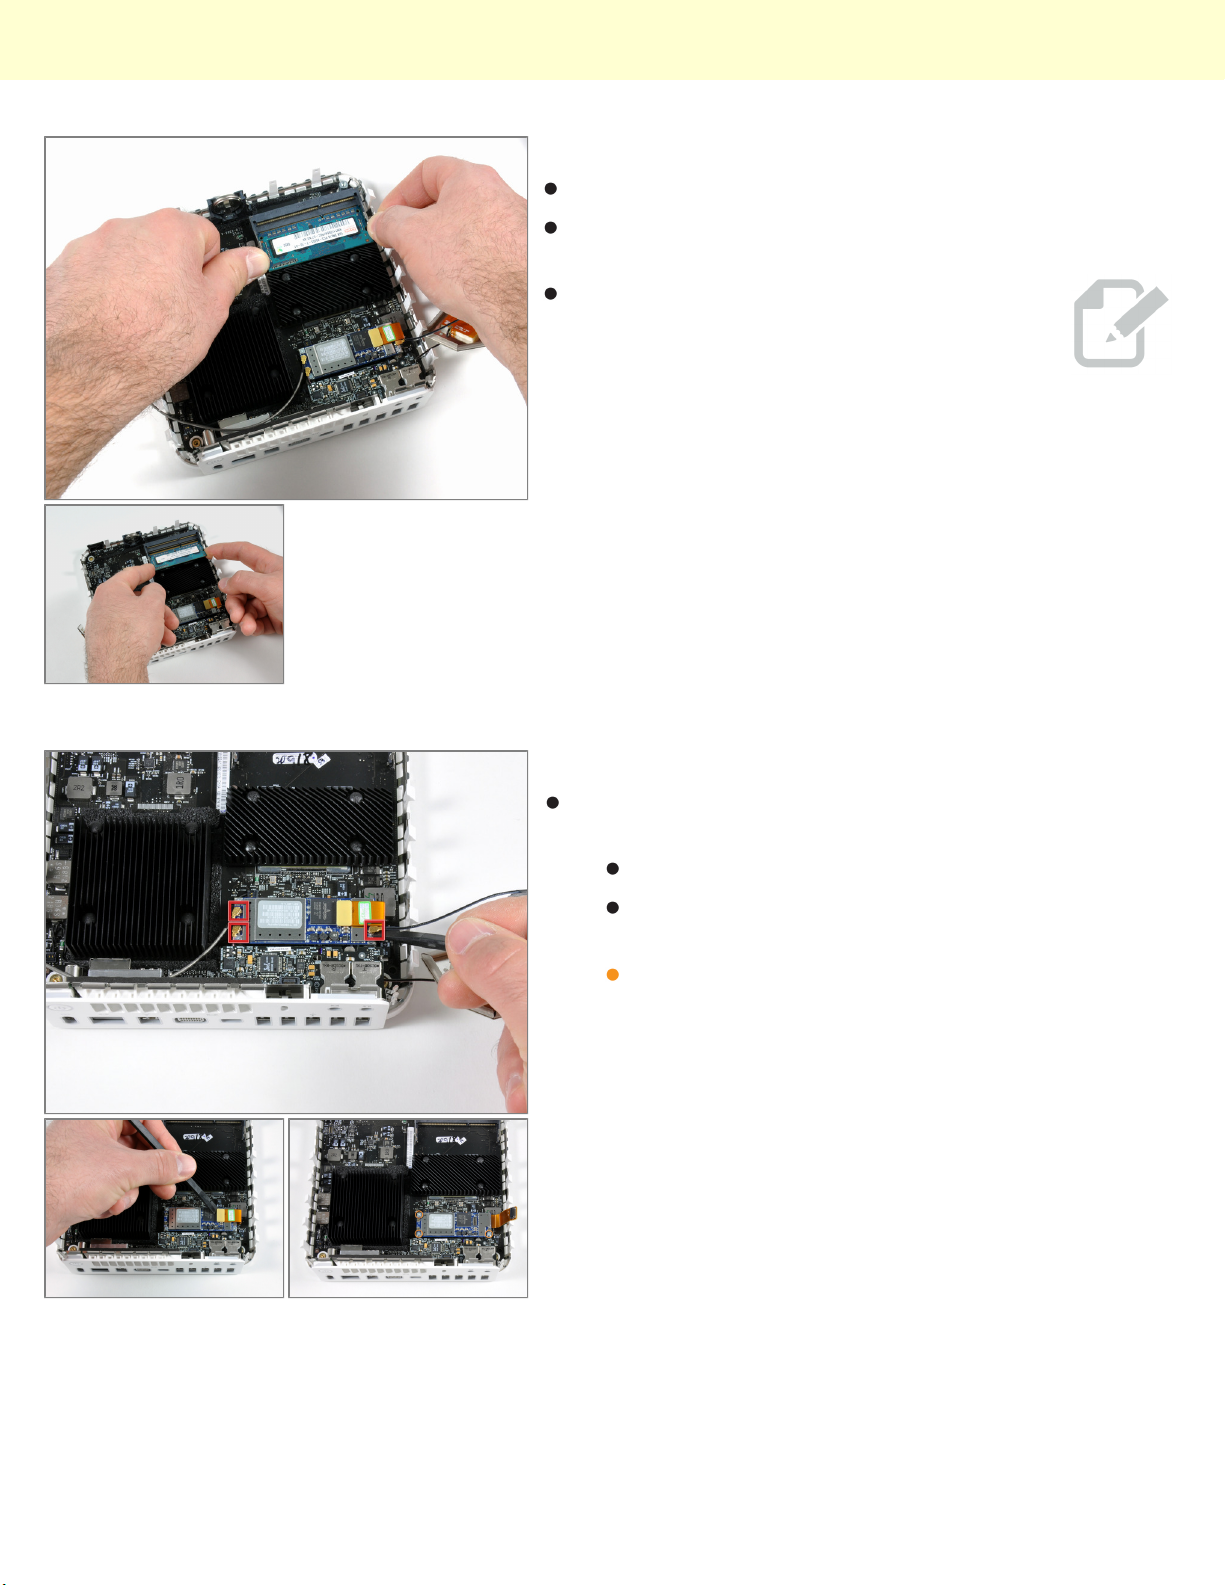
Step 14
Now for the lower half...
The standard quick pry with the fingers (and
subsequent pull) frees the RAM from the logic board.
Our $599 Mini shipped with only a single 1
GB PC3-8500 chip. In this configuration, the
NVIDIA 9400M graphics processor allocated
128 MB of this memory as VRAM. When we
installed a second chip in this machine, for a
total of 2 GB, the 9400M automatically
allocated 256 MB VRAM instead.
Step 15
On to the AirPort/Bluetooth board removal. A couple of
steps are needed to remove the board:
Disconnect the three antennas (marked in red).
Disconnect the AirPort/Bluetooth communication
cable (second photo).
Remove three Phillips screws (third photo) and
then completely remove the AirPort/Bluetooth
board.
© 2010 iFixit — CC BY-NC-SA www.iFixit.com Page 8 of 10
Page 9
Mac mini Model A1283 Teardown
Step 16
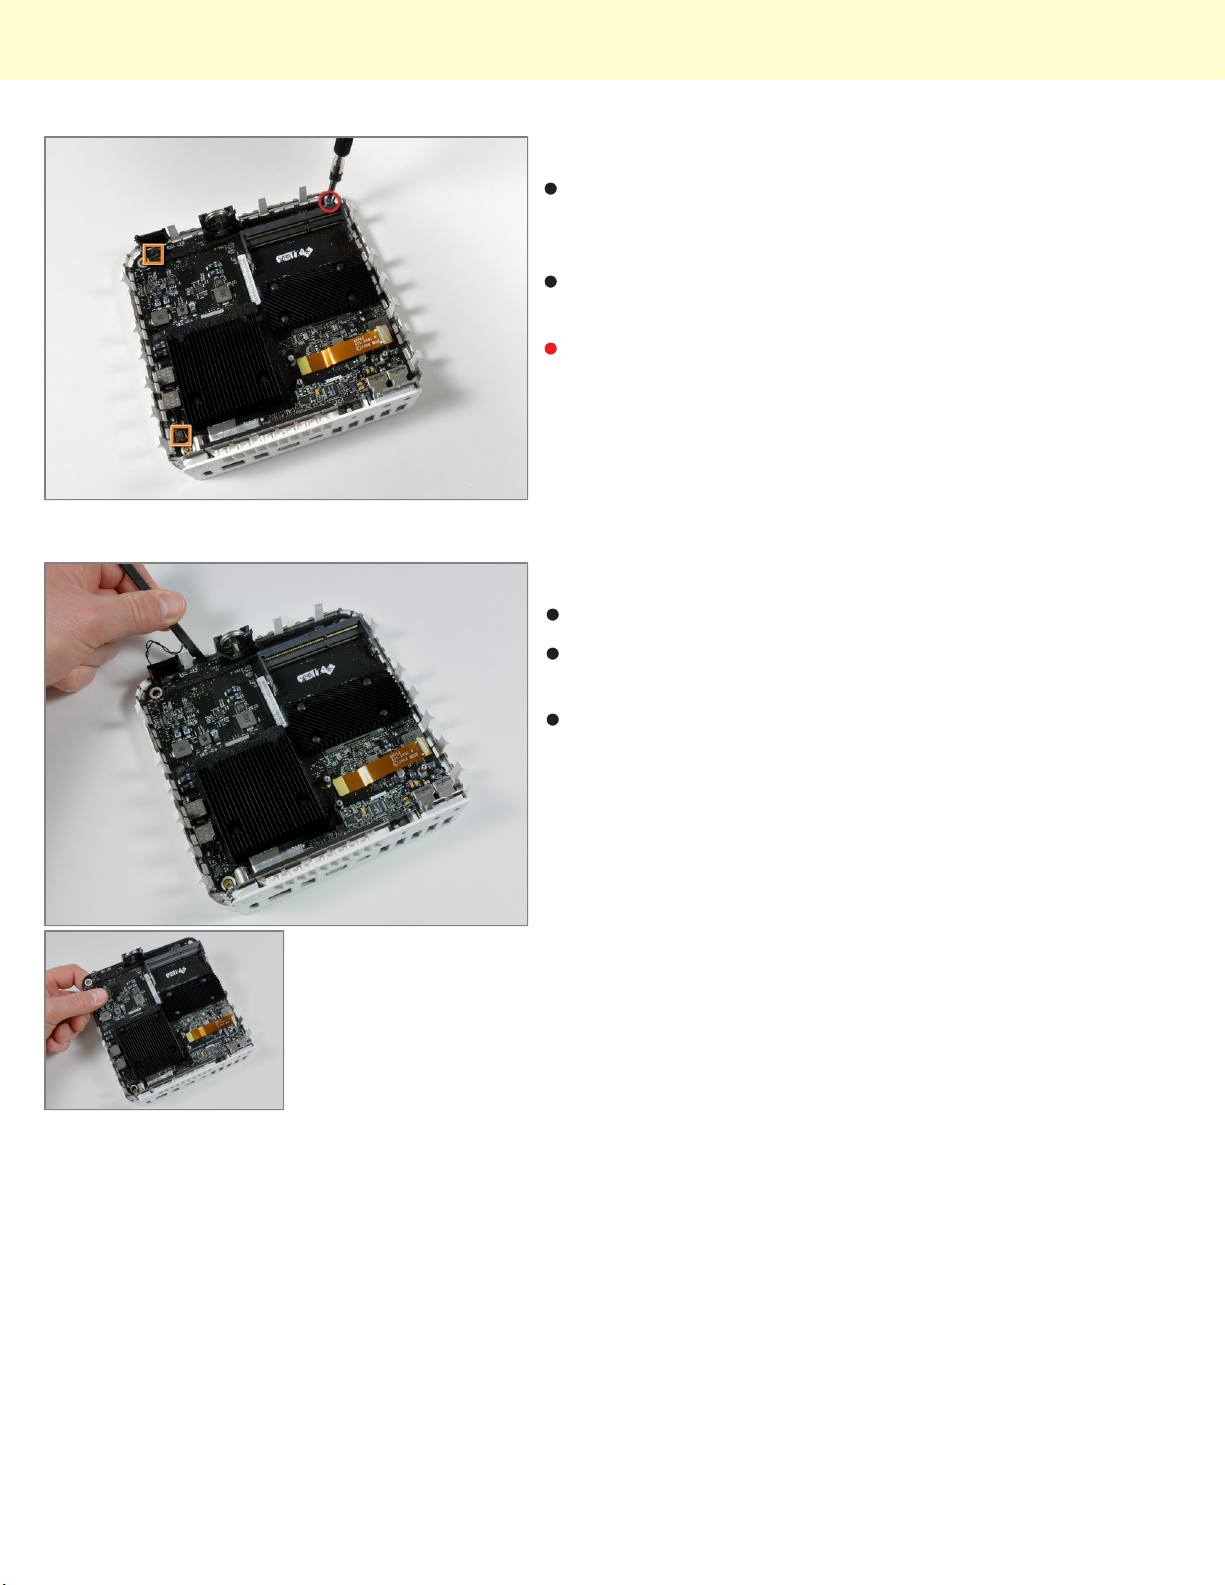
Once we had removed the AirPort/Bluetooth board, the
only thing preventing us from taking out the logic board
was two connectors and a T10 Torx screw.
Disconnect the power button cable and the power-on
LED.
Use a T10 Torx screwdriver to remove the standoff
screw.
Step 17
Use a spudger to gently pry up the logic board.
Grasp the logic board with your hand and pull it away
from the I/O ports.
Voila! The logic board is free.
© 2010 iFixit — CC BY-NC-SA www.iFixit.com Page 9 of 10
Page 10
Mac mini Model A1283 Teardown
Step 18
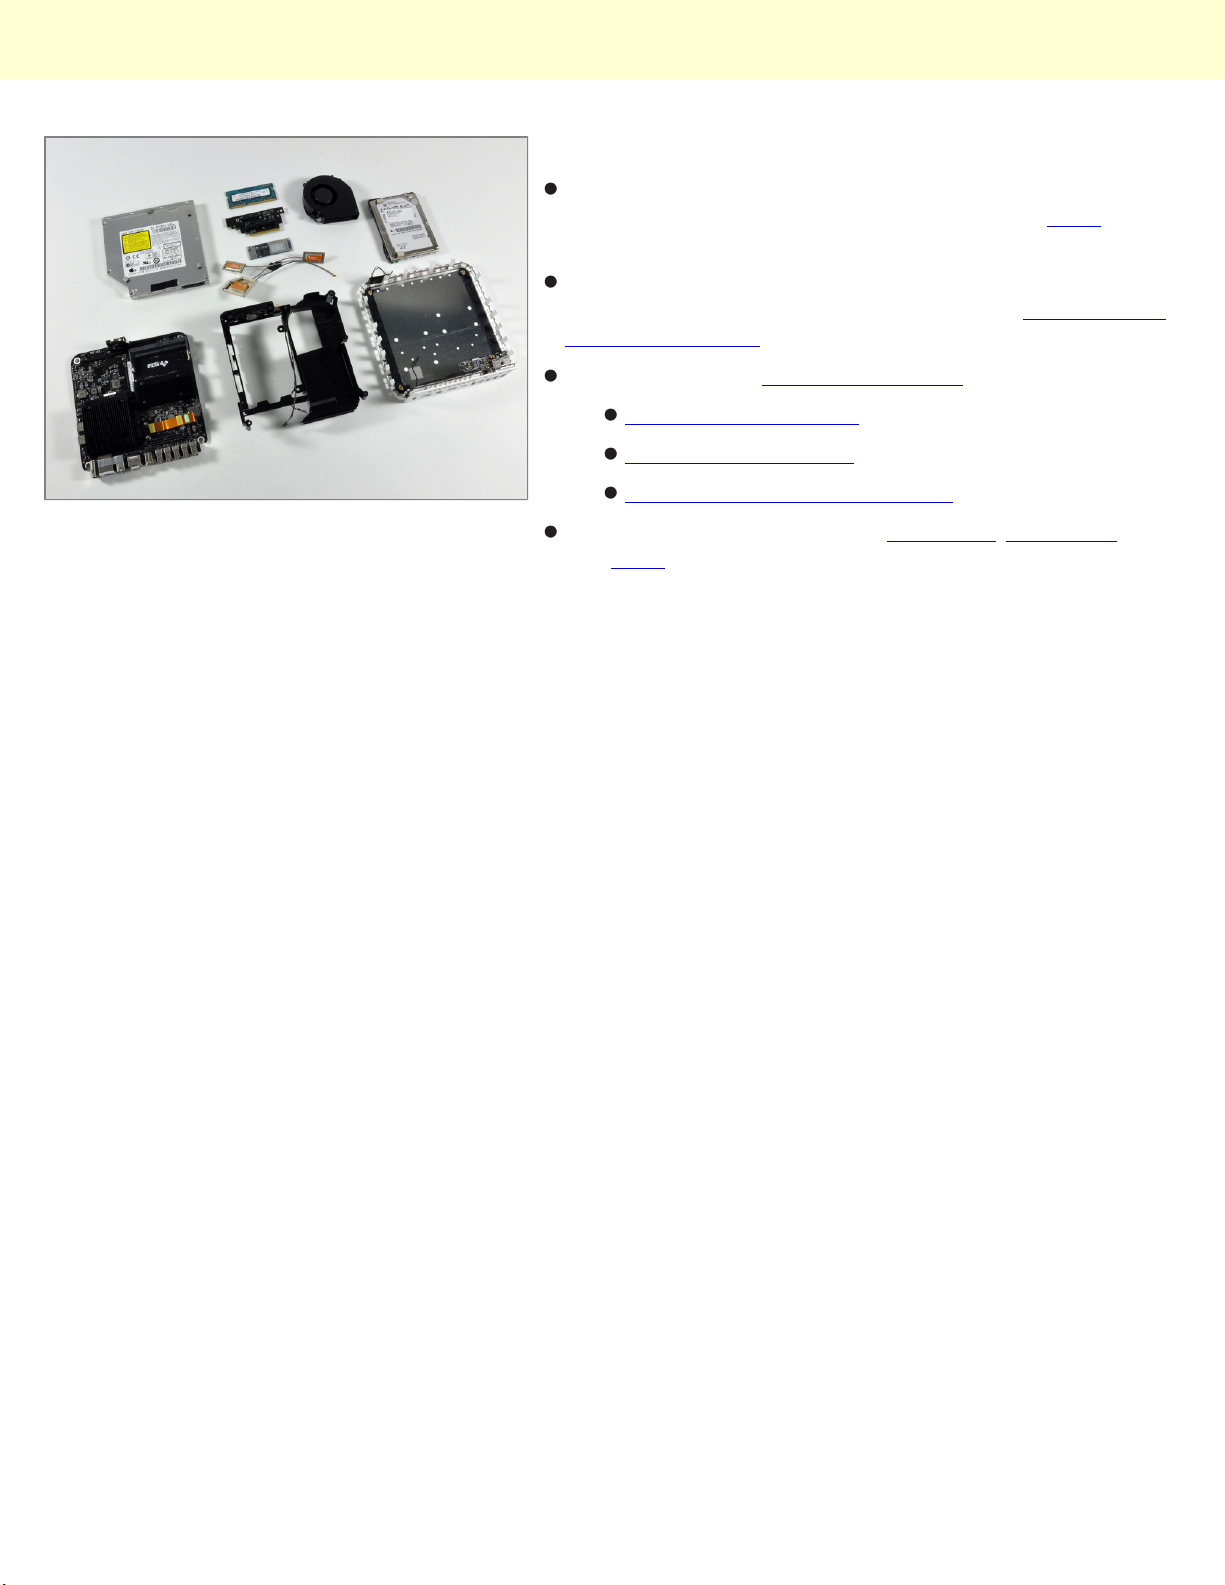
All the goodies of the disassembly in one place. Taking
apart the Mac mini was a lot simpler than the iMac we
took apart yesterday.
Putting the mini back together was easy too, it's running
great. In fact, we've figured out how to add one terabyte
of internal storage to our mini.
We also did these product teardowns recently:
Shameless plug: We sell both Mac parts, iPod parts,
and tools.
iMac 20" disassembly
Kindle 2 disassembly
MacBook Pro 17" disassembly
© 2010 iFixit — CC BY-NC-SA www.iFixit.com Page 10 of 10
 Loading...