

Page 1

MacBook Air Models A1237 and A1304 Teardown
MacBook Air Models A1237 and A1304 Teardown
We disassembled this laptop on February 1, 2008.
© 2010 iFixit — CC BY-NC-SA www.iFixit.com Page 1 of 11
Page 2
MacBook Air Models A1237 and A1304 Teardown
Step 1 -
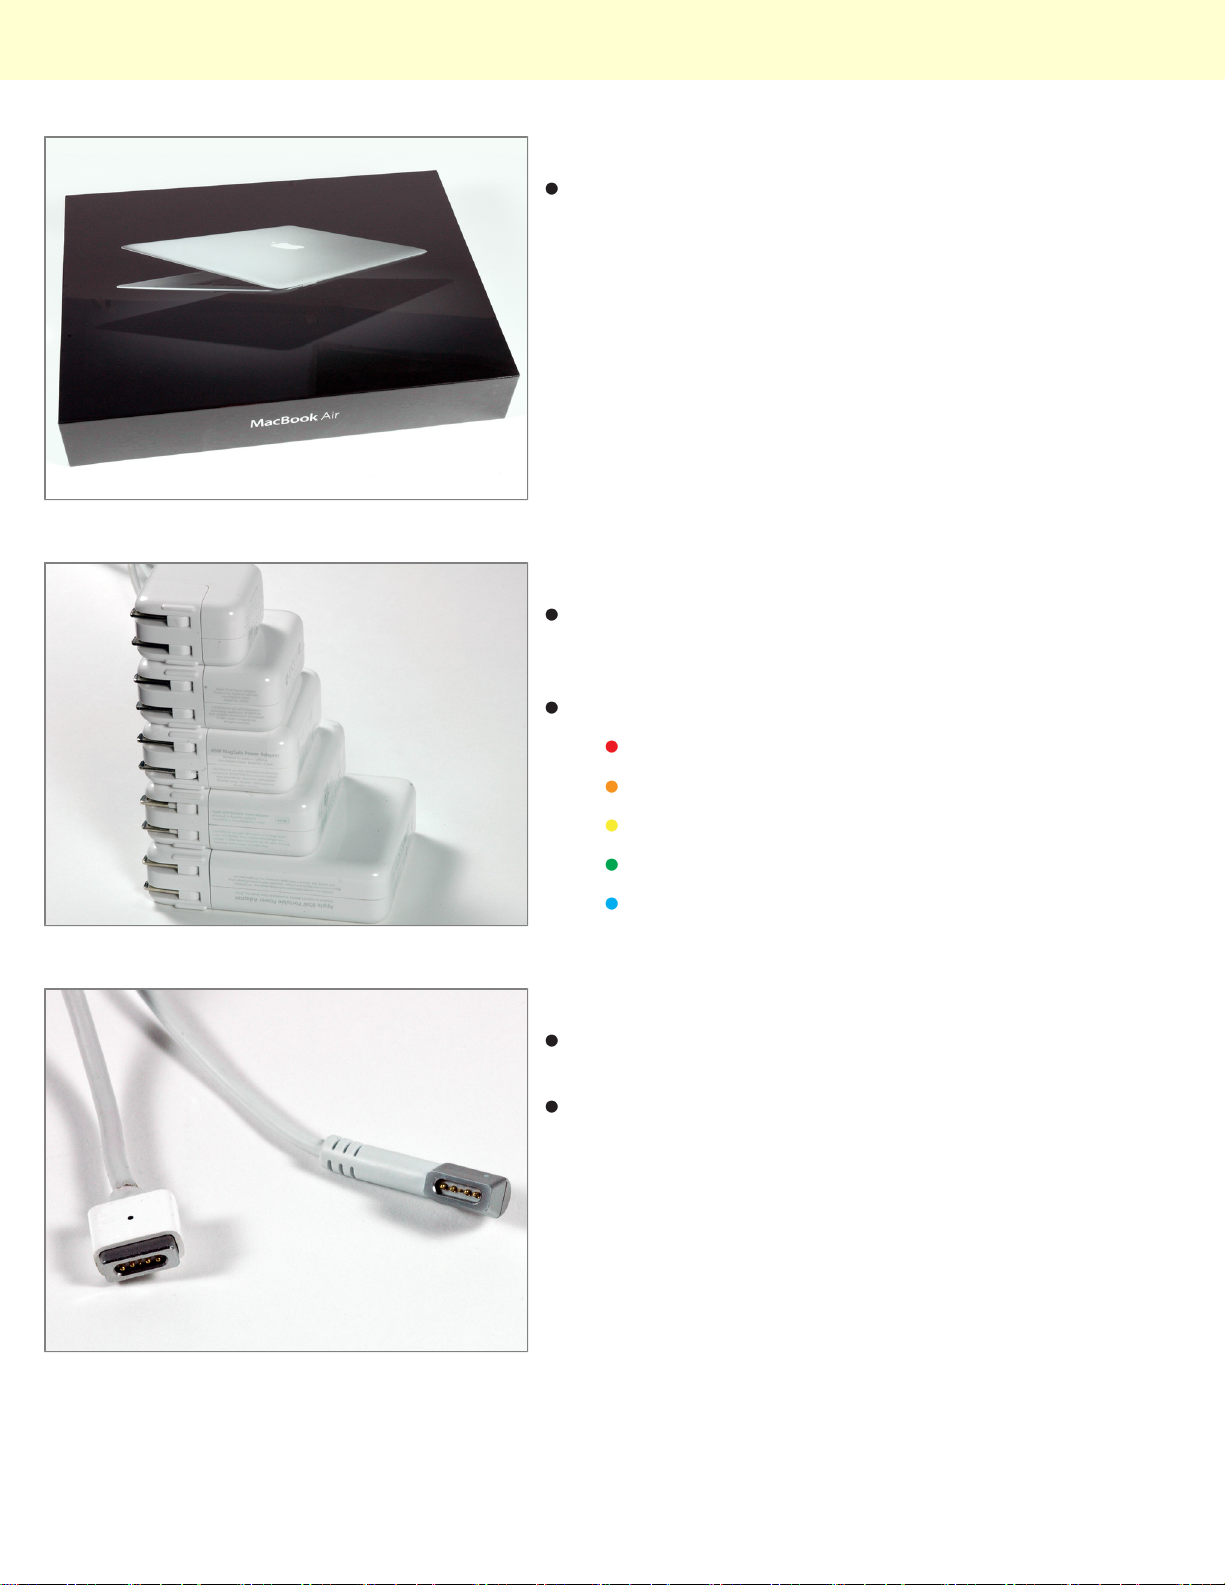
We were relieved to discover the MacBook Air ships in
more than just a manila envelope.
Step 2
The MacBook Air adds yet another power adapter to
Apple's impressively-varied lineup, and is the first
Mactel to run on 45 watts.
A comparison, from top to bottom:
iPhone (5-watt)
iPod (8-watt)
MacBook Air (45-watt)
MacBook (60-watt)
MacBook Pro (85-watt)
Step 3
The new MagSafe power adapter has been rotated 90
degrees to handle the Air's extreme thinness.
The earlier MacBook power adapter works, but won't fit
when the Air is placed on a flat surface.
© 2010 iFixit — CC BY-NC-SA www.iFixit.com Page 2 of 11
Page 3
MacBook Air Models A1237 and A1304 Teardown
Step 4
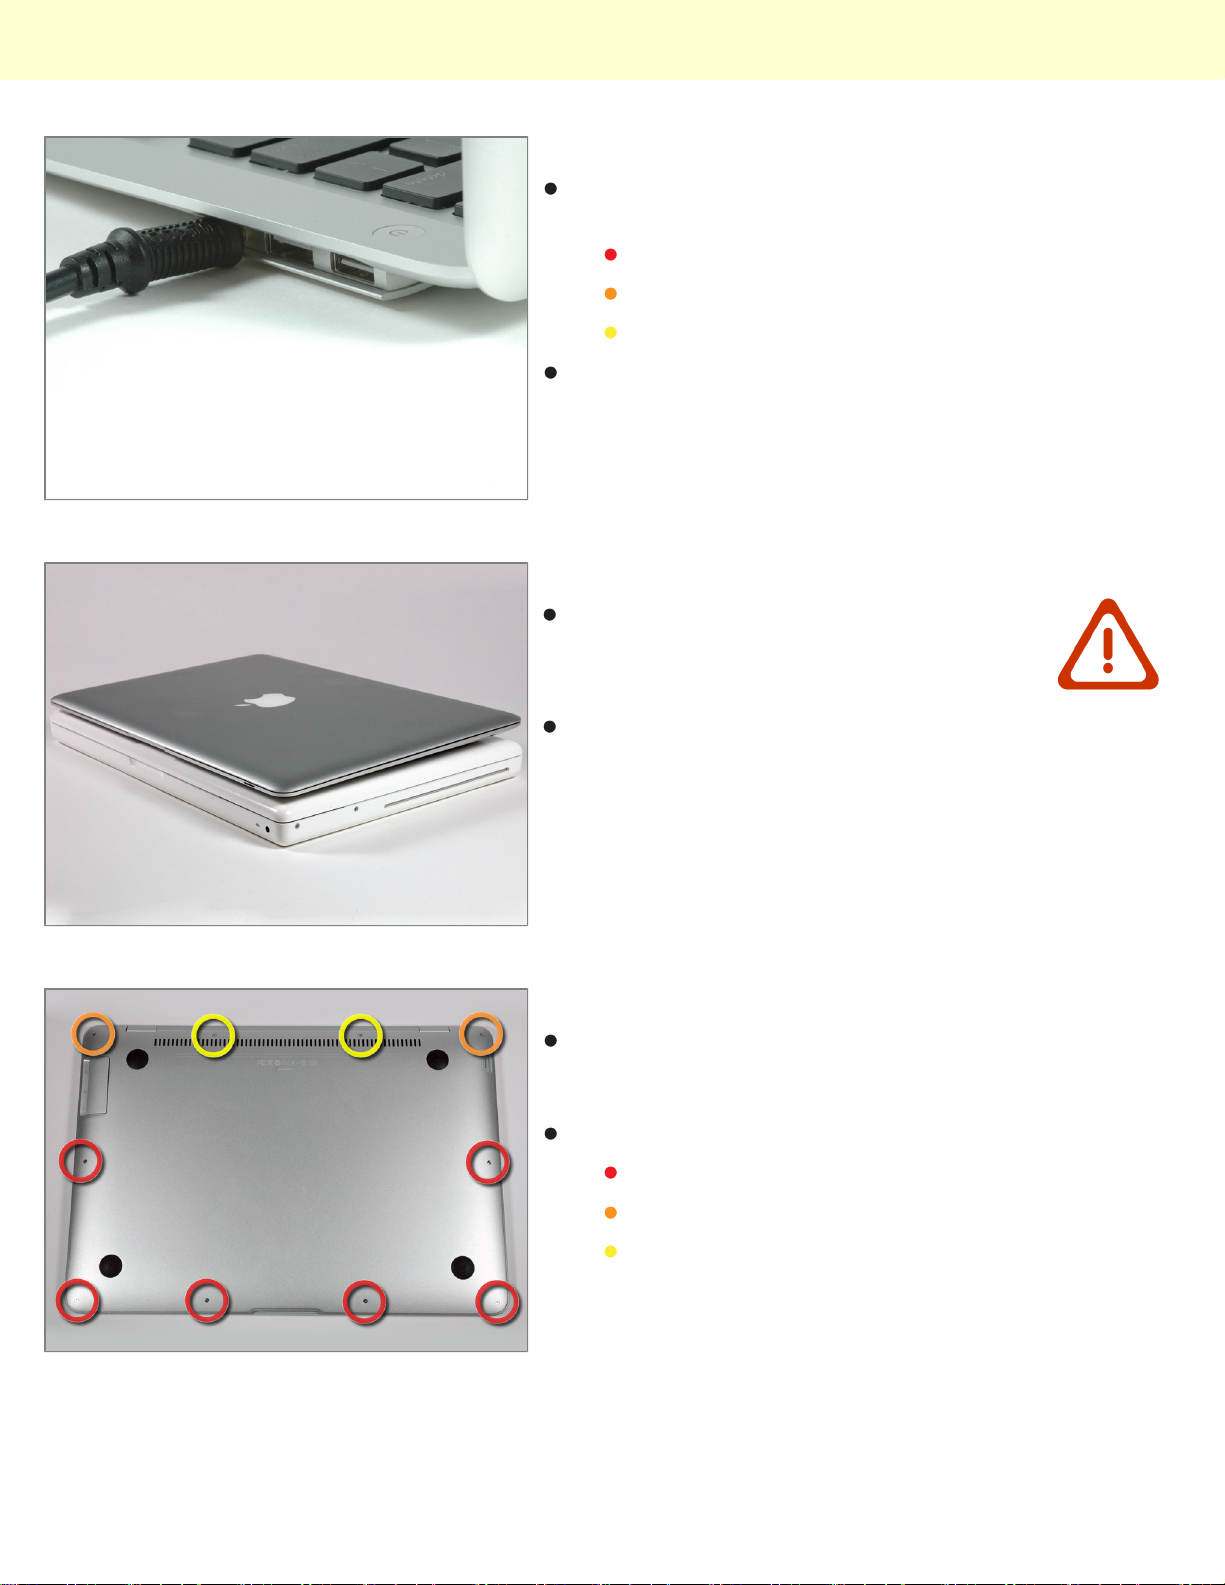
The more traditional ports are hidden in a bay that
drops down to reveal:
The placement of the ports means that the Air doesn't
play nicely with bulky connectors. To get your Air to sit
flat on the desktop, you'll need either a dongle or slim
connectors.
Step 5
Laptop on laptop action.
The Air makes the MacBook look like the new iBook.
One USB port.
One headphone jack.
And one micro-DVI port.
Step 6
As you'd expect with a computer so devoted to
aesthetics, getting to the "user-installable" parts is
going to be a bit more challenging than usual.
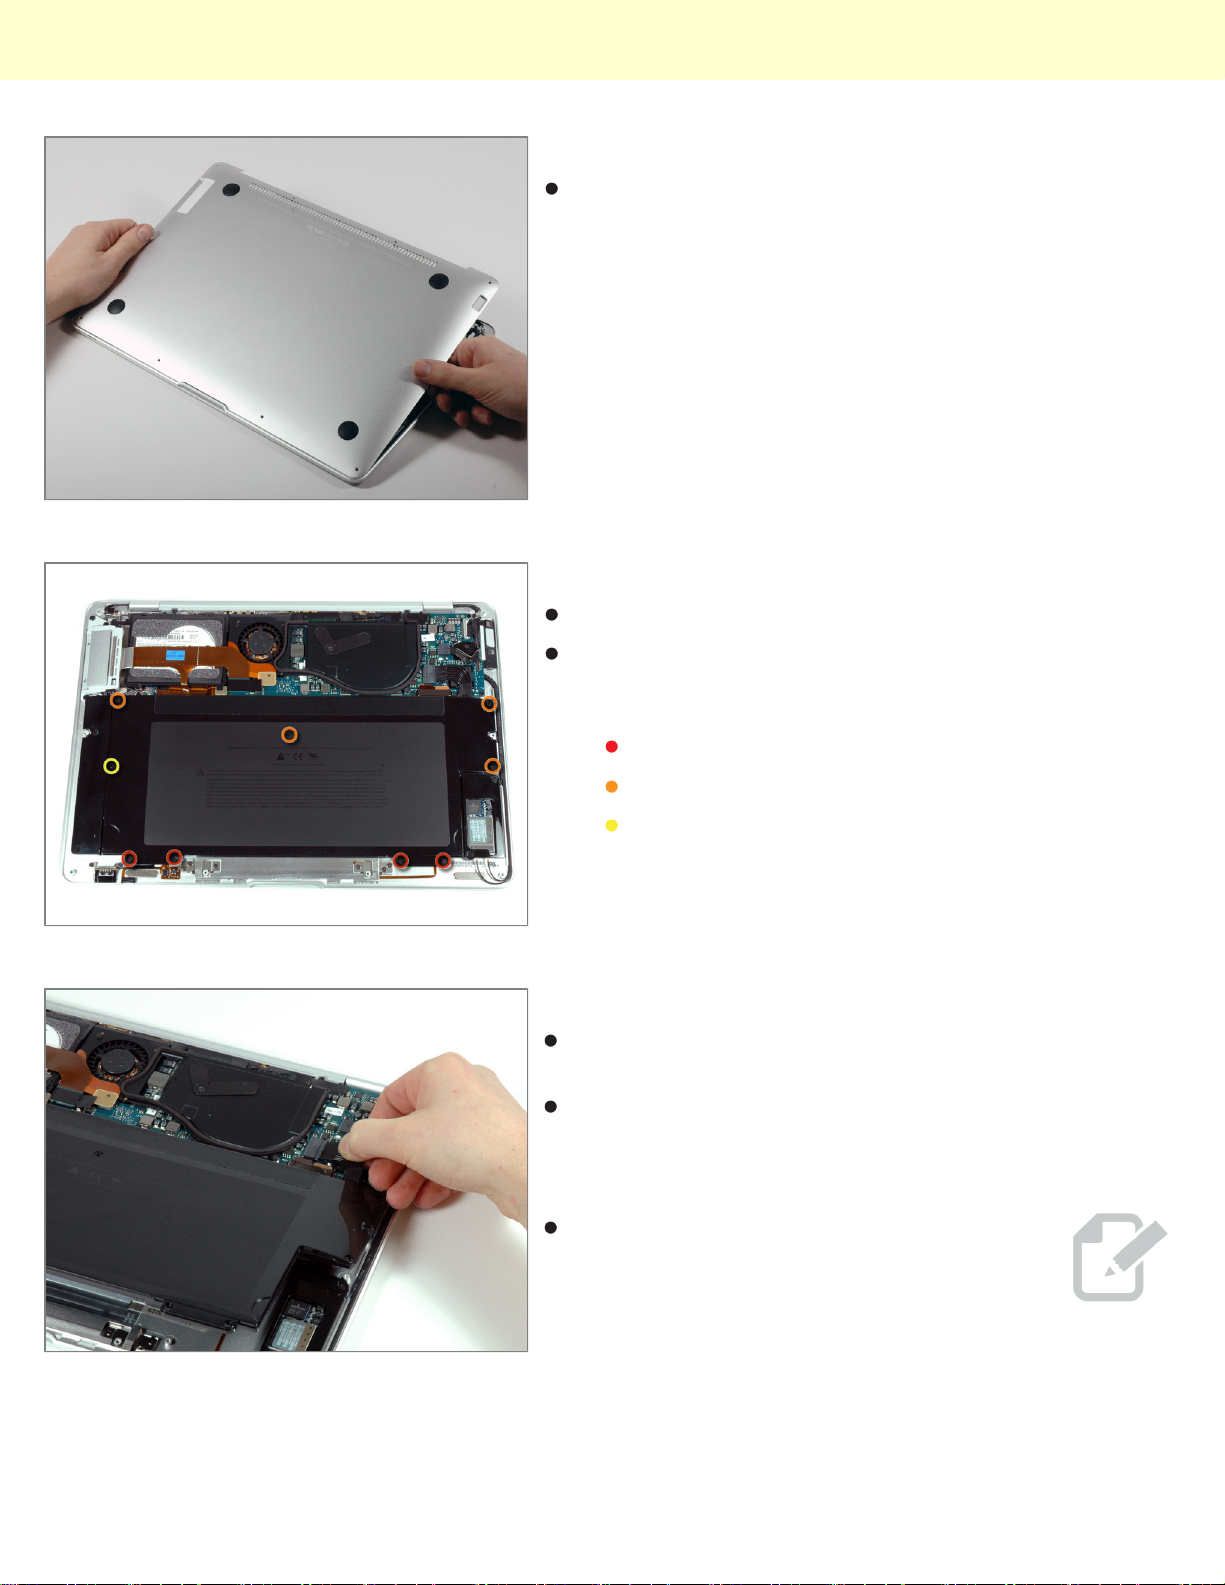
The bottom case is held down by 10 screws:
© 2010 iFixit — CC BY-NC-SA www.iFixit.com Page 3 of 11
Six 3mm #00 Phillips.
Two 5.4mm #00 Phillips.
Two 7.9mm #00 Phillips.
Page 4
MacBook Air Models A1237 and A1304 Teardown
Step 7
Removing the lower case proved a surprisingly
pleasant task. Thanks Apple.
Step 8
Look! We found the battery.
Unfortunately, it's no longer considered a userinstallable part by Apple and is attached to the case by
9 screws:
Four 3mm #00 Phillips.
Four 3.8mm #00 Phillips.
One 7.3mm #00 Phillips.
Step 9
But things aren't so bad. Once the screws are out, you
can just unplug it.
If you weren't counting, that's 19 screws to remove the
battery. Replacing the battery is straightforward, but not
something you'll be doing when your battery dies midflight.
It won't be long before we, along with the
rest of the Mac market, will be selling
replacement batteries for this machine.
© 2010 iFixit — CC BY-NC-SA www.iFixit.com Page 4 of 11
Page 5
MacBook Air Models A1237 and A1304 Teardown
Step 10
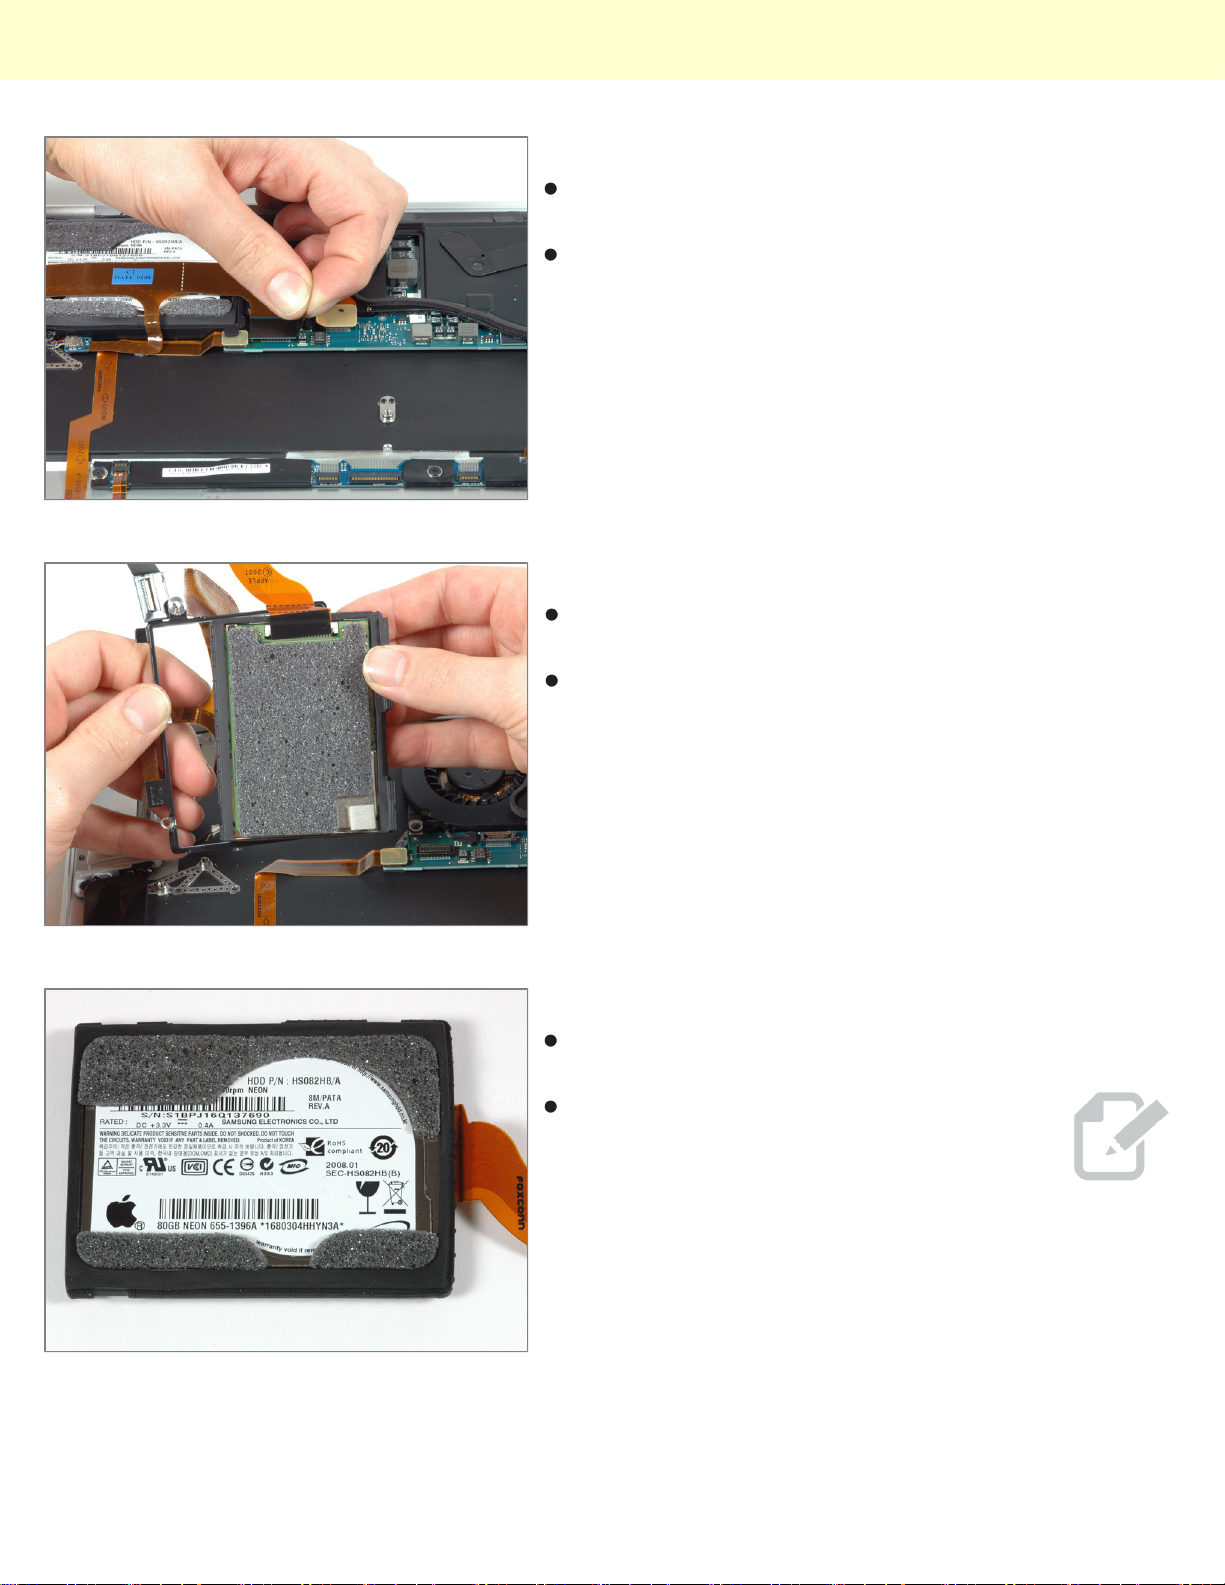
The hard drive sits beneath the USB, micro-DVI, and
audio ribbon cables.
Borrowing from the iPod design, the hard drive sports
both foam padding and rubber bumpers. For those of
us too stingy to spring for the shock-resistant SSD,
hopefully this will give the hard drive a little extra
protection.
Step 11
With the cables unplugged, you can lift the hard drive
out of its frame.
A hard drive swap is definitely possible, but it's no
longer a trivial procedure like in the MacBook.
Step 12
The MacBook Air comes standard with an 80 GB 4200
RPM Parallel ATA hard disk drive.
Just like the 80 GB iPod Classic, the hard
drive is 1.8" wide and 5mm tall.
Unfortunately, 80 GB is the largest drive in
this form factor currently available. If you're
a data pack rat, the Air probably isn't for you.
© 2010 iFixit — CC BY-NC-SA www.iFixit.com Page 5 of 11
Page 6
MacBook Air Models A1237 and A1304 Teardown
Step 13
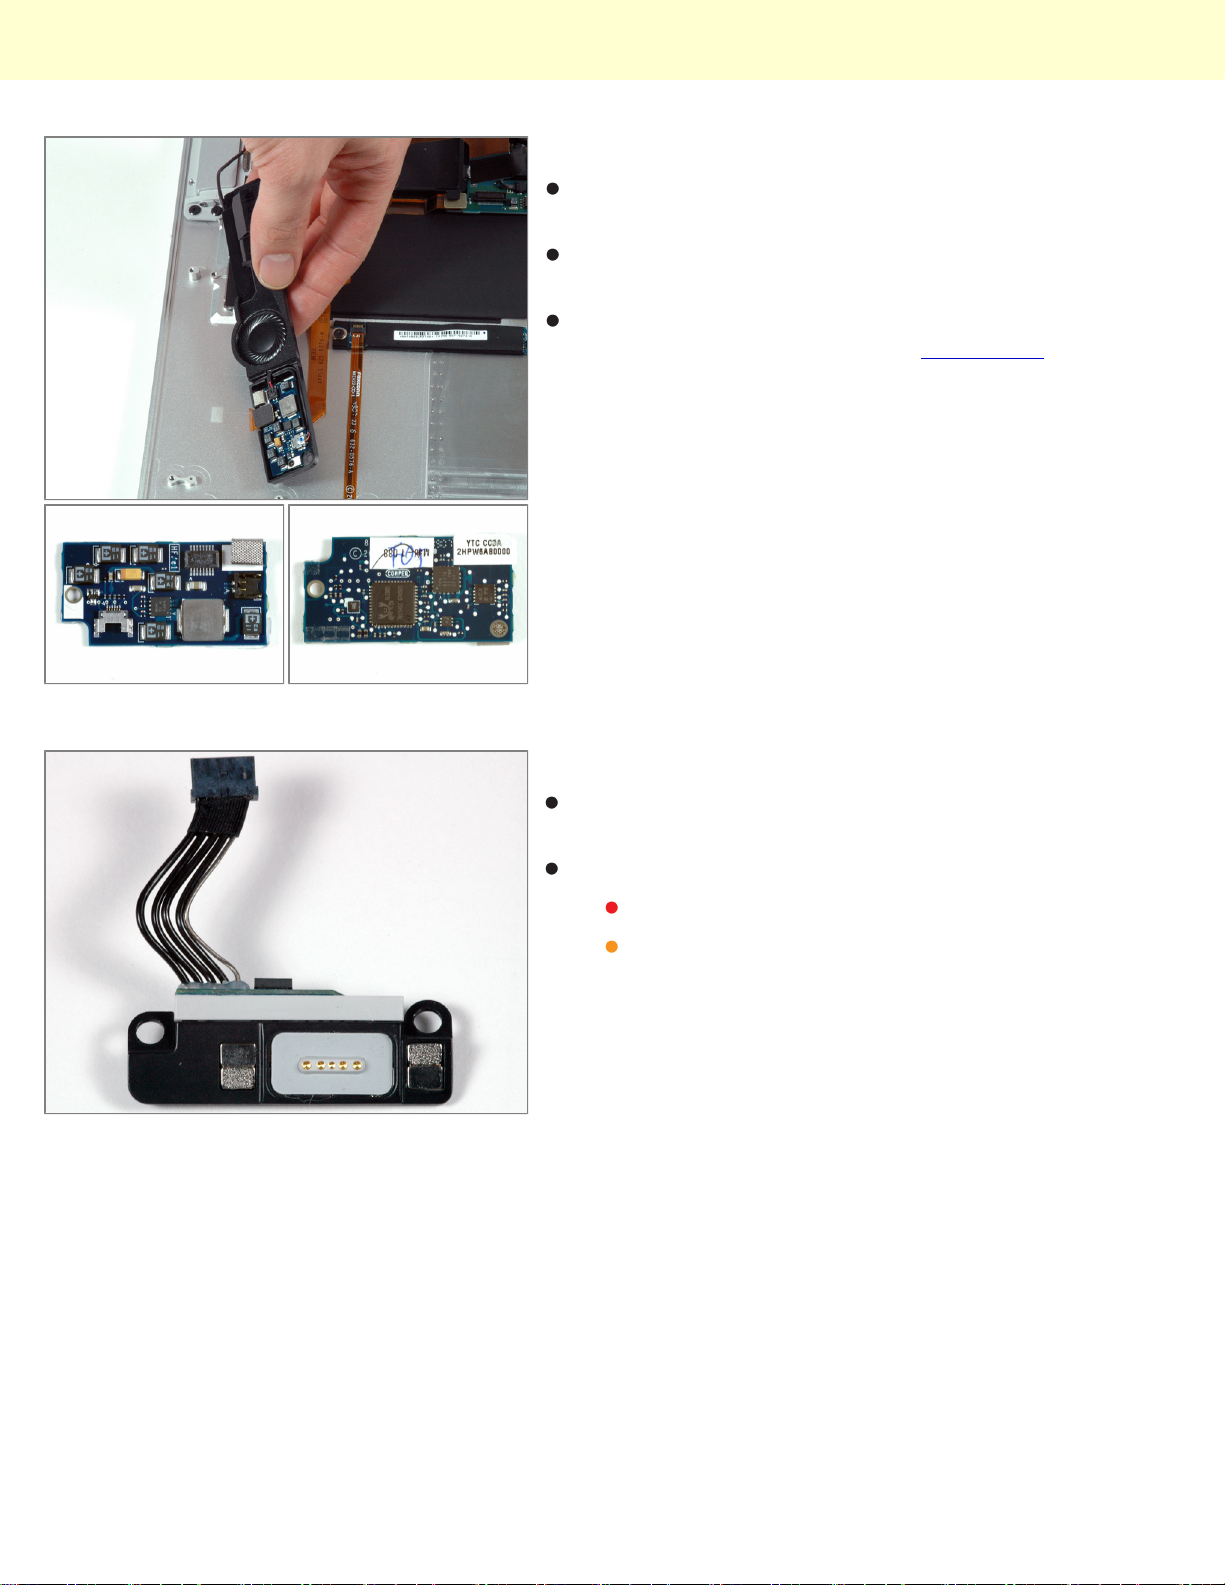
The speaker board is located beneath the arrow keys
on the keyboard.
It outputs to both the 20mm speaker and the 3.5mm
audio jack hidden in the drop down bay.
We found a Realtek ALC885 audio codec chip on the
back of the board along with a TI TPS 62110.
Step 14
The power interface connects the MagSafe power
adapter to the motherboard.
The MagSafe connection is guided by several magnets:
Four directly behind the MagSafe port.
And two on either side.
© 2010 iFixit — CC BY-NC-SA www.iFixit.com Page 6 of 11
Page 7
MacBook Air Models A1237 and A1304 Teardown
Step 15
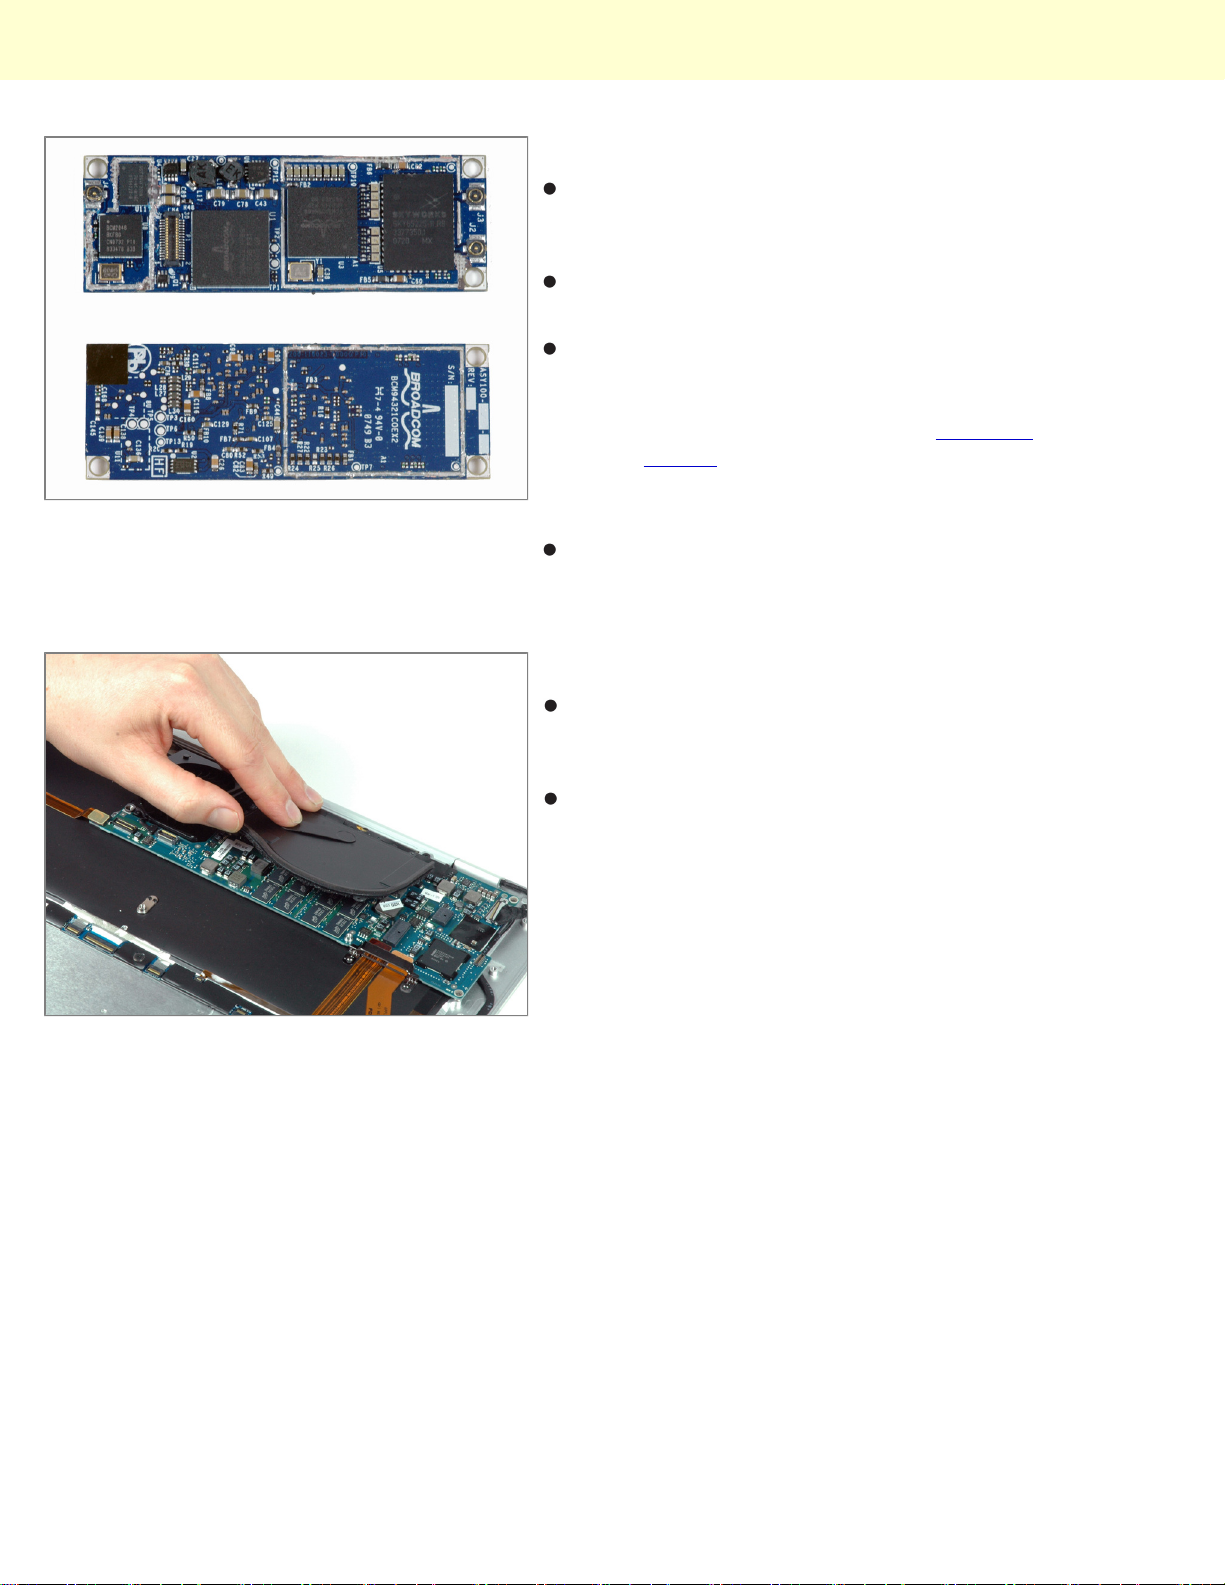
The RF module, in all its blue glory. We spliced
together two photos, so this image shows the front and
back of the PCB.
The Broadcom 802.11 chip had the markings
BCM4321KFBG.
We removed the EMI shield covering the RF chips. We
uncovered a Skyworks SKY652225-11 R8, a Broadcom
BCM2G55KF86, a Broadcom BCM2046, and an SST
39VF200A. We also found eight of Anaren's 1mm
square baluns interfaced between the Broadcom and
Skyworks chips, presumably running at 2.4GHz and
5GHz.
And the backside had another chip marked with
BCM94321COEX2.
Step 16
The heat sink is made of very thin aluminum and looks
totally different from anything we've seen in a Mac
before.
The L-shaped aluminum bracket on the heat sink rests
tightly against the lower case, providing thermal
conductivity without making an electrical connection to
the chassis. The inside of the lower case has a patch of
non-conducting material to aid this thermal dissipation.
© 2010 iFixit — CC BY-NC-SA www.iFixit.com Page 7 of 11
Page 8
MacBook Air Models A1237 and A1304 Teardown
Step 17
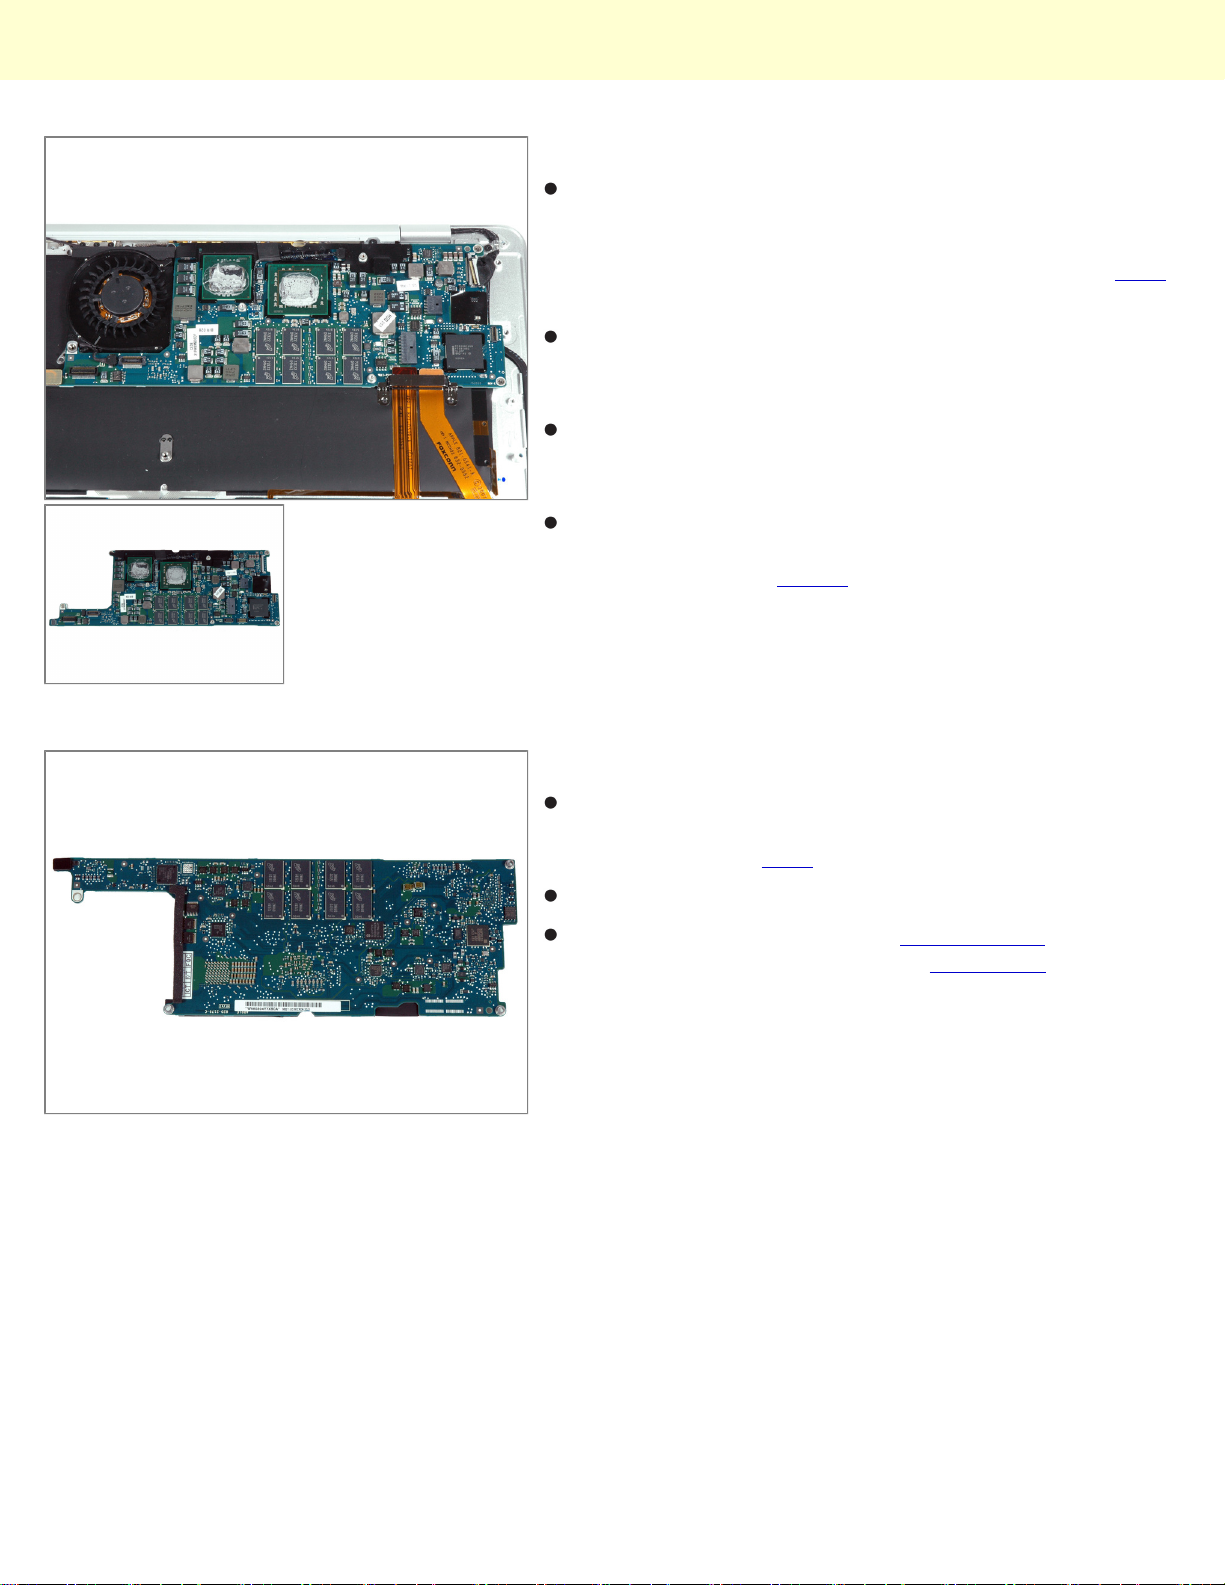
We found Intel's new Core 2 Duo chip right beneath the
heat sink (no surprises there). A temperature sensor
sits on an external board glued between the CPU and
graphics chips. A high-resolution image is available here
.
There are 16 RAM chips (eight one-gigabit chips on
each side of the logic board) for a total of 2 GB 667MHz
DDR2 SDRAM.
The large microchip in the center of the picture is a low
power Intel North Bridge GS965 integrated graphics
chip with the markings LE82GS965.
Three chips adjacent to the North Bridge/graphics
controller have a semi-transparent blue epoxy covering
them, as part of the HDCP hardware requirement for
digital video signals.
Step 18
The reverse side of the logic board. Many of these
chips are for power management. A high-resolution
image is available here.
You can see the second half of the Micron RAM chips.
We identified the Silicon Image SIL1392CNU HDMI
video chip and Texas Instruments TPS51120 dual
current mode synchronous step-down controller (power
management).
© 2010 iFixit — CC BY-NC-SA www.iFixit.com Page 8 of 11
Page 9
MacBook Air Models A1237 and A1304 Teardown
Step 19
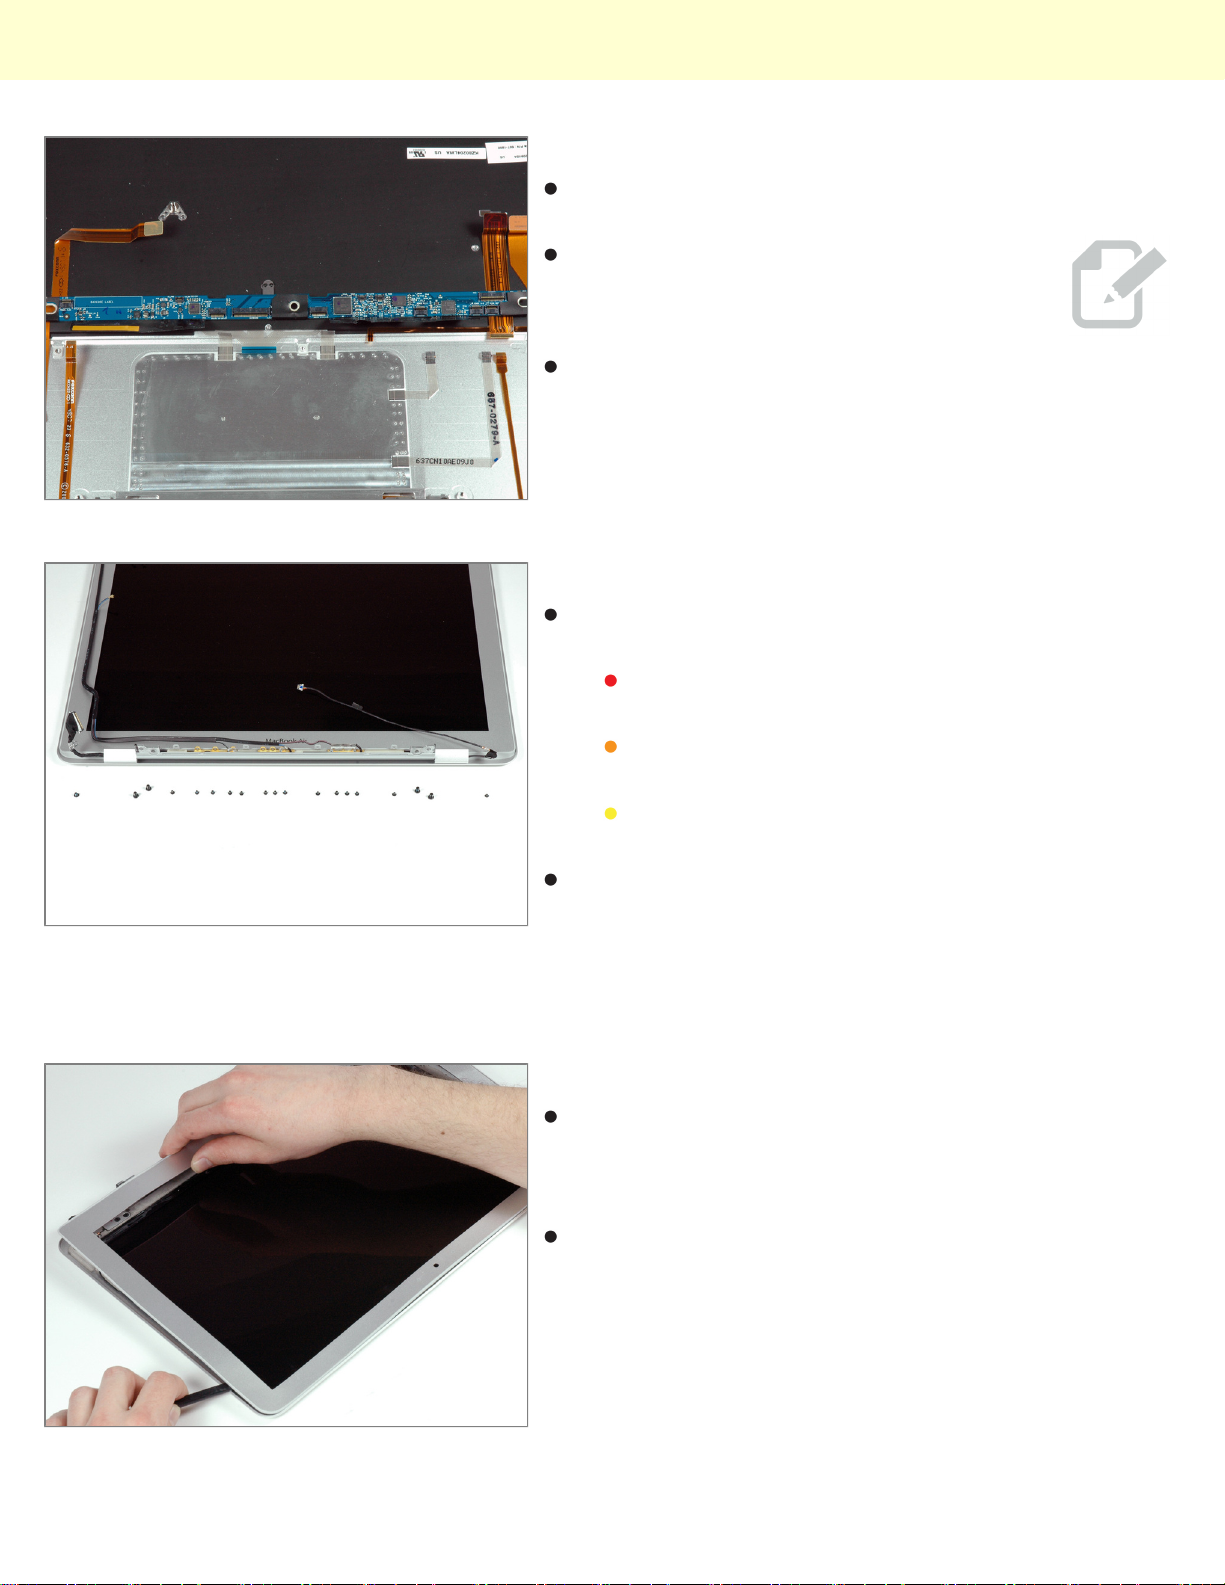
We found a Broadcom BCM5974 touch screen
controller chip on the interconnect board.
This is the same chip you'll find in the
iPhone and iPod Touch.
This board also contains an SST 25VF020 Serial Flash
chip, likely containing machine code for a nearby chip.
There are a few CYPRUS chips nearby, one of which
we identified as the CY7C638 low-speed USB
peripheral controller.
Step 20
The display assembly is attached to the case with 19
small screws:
Four (relatively) large Torx which screw into the
hinges.
Thirteen #00 Phillips which hold down the clutch
cover.
And two #00 Phillips which screw into cable
ground loops.
Apple made no compromises on the Air's display.
Amazingly, the entire display assembly weighs only 465
g (slightly more than a pound), 34 percent less than the
functionally-equivalent display assembly on the
MacBook.
Step 21
Unfortunately, getting into the display assembly isn't as
easy as cracking open the lower case. There are no
screws holding the front bezel to the display, only (very,
very sticky) double-sided tape.
We bent the bezel a bit getting it off. Things aren't as
bad as they were with the Titanium, but it's no cakewalk.
© 2010 iFixit — CC BY-NC-SA www.iFixit.com Page 9 of 11
Page 10
MacBook Air Models A1237 and A1304 Teardown
Step 22
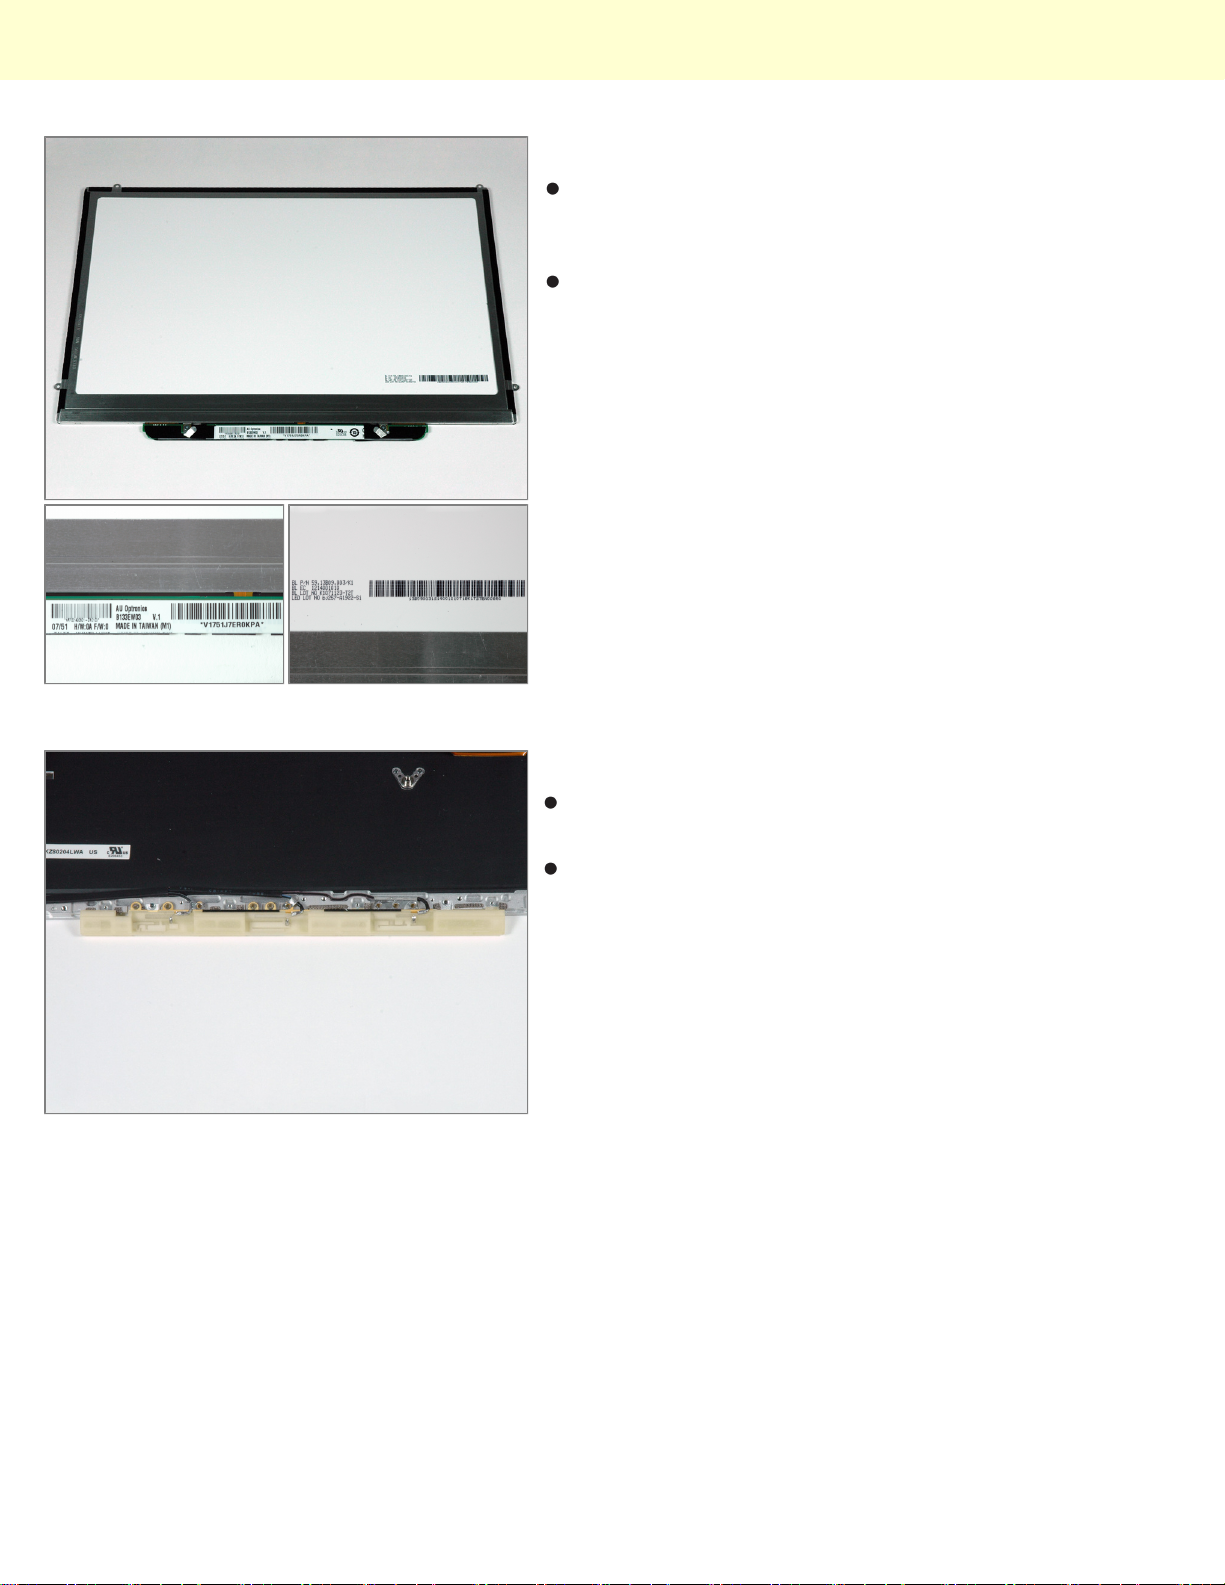
The LED display. The display is manufactured by AU
Optronics and is model #B133EW03. The actual panel
is less than 3mm thick.
Thanks to the LED display technology, there is no
inverter board. A single cable provides the data and
power to the display.
Step 23
The antennas, perhaps the most under-valued
components of a modern laptop.
Apple obviously expects everyone to be using wireless
on the Air, so a substantial engineering effort went into
designing robust antennas.
© 2010 iFixit — CC BY-NC-SA www.iFixit.com Page 10 of 11
Page 11
MacBook Air Models A1237 and A1304 Teardown
Step 24
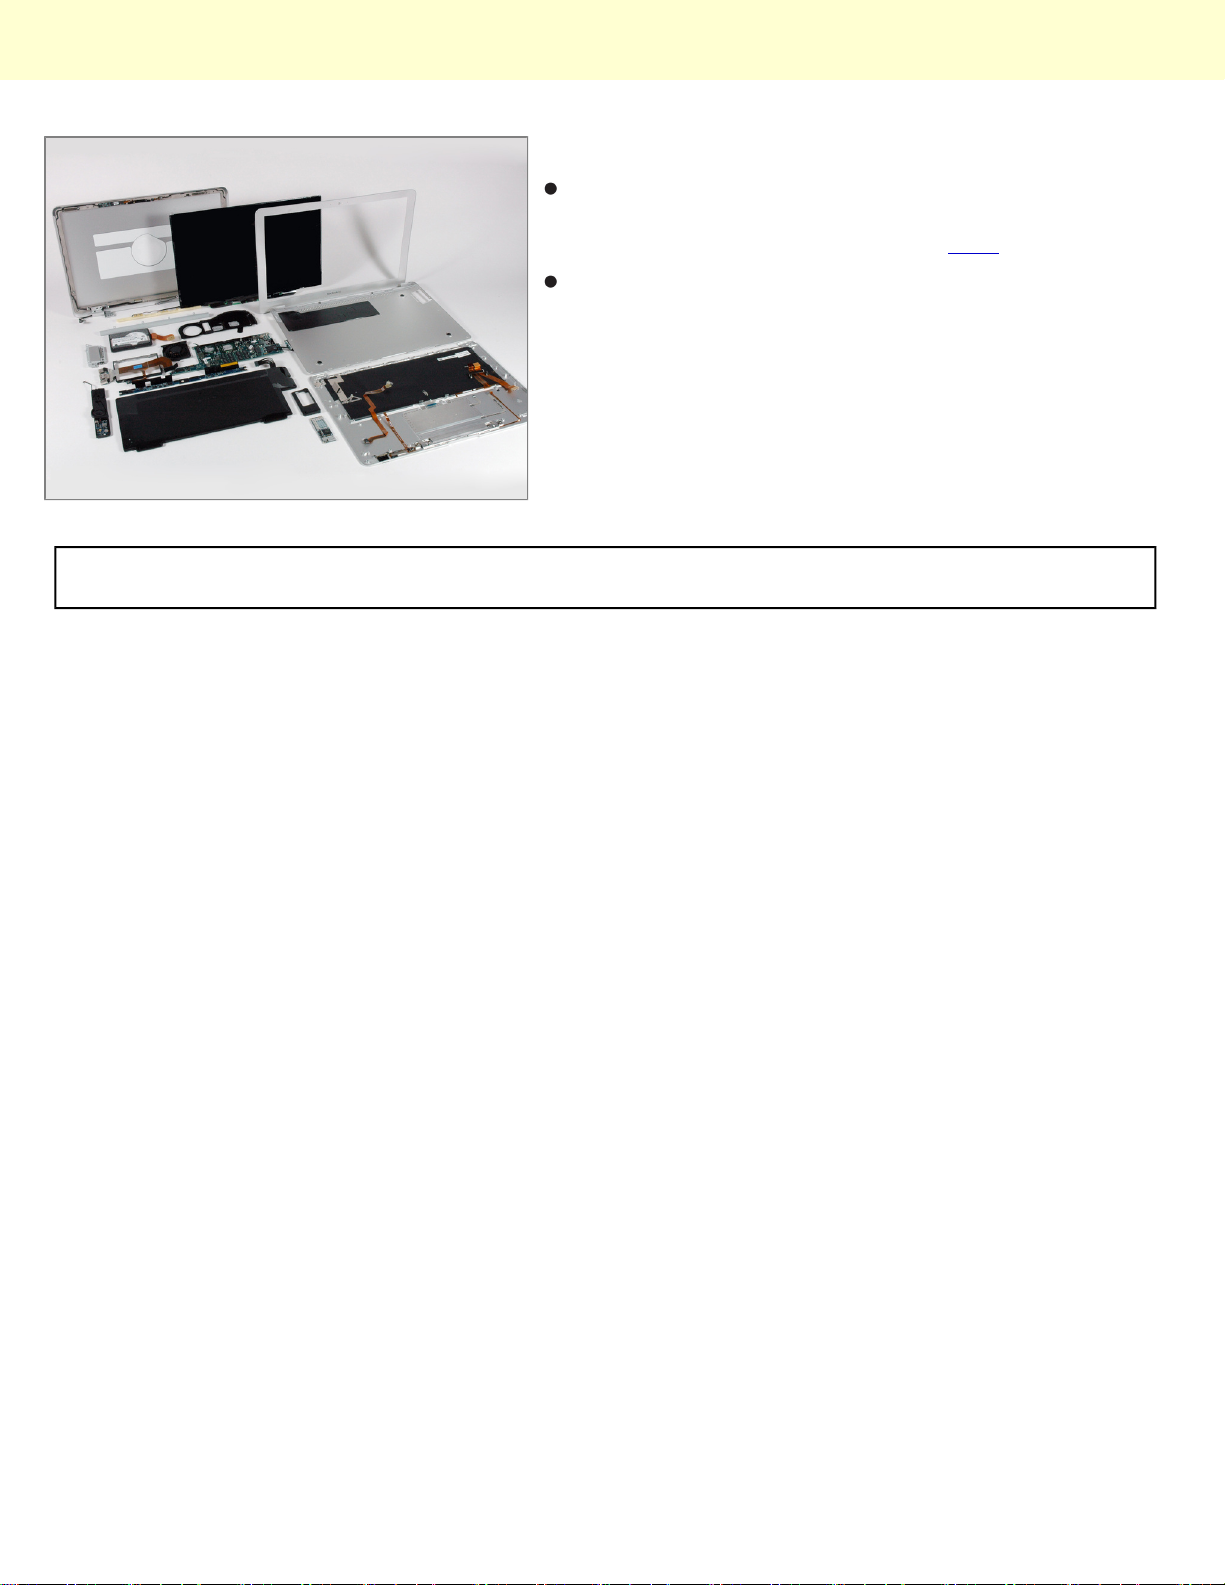
We're left with 88 screws and lots of parts. It's hard to
believe everything here weighs in at only three pounds.
A high-resolution image is available here.
If you have any additional information about
components in the MacBook Air, or interesting
information about its construction, please drop us a
note. We're happy to post additional information.
To reassemble your device, follow these instructions in reverse order.
This document was last generated on Dec 14, 2010.
© 2010 iFixit — CC BY-NC-SA www.iFixit.com Page 11 of 11
 Loading...