

Page 1
K
Service Source
Safety
Page 2
Page 3

Safety General Safety Procedures - 1
General Safety Procedures
For your safety and the safety of others, review and follow
all electrostatic discharge precautions, cathode-ray tube
(CRT) procedures, and battery handling precautions
presented in this manual.
Page 4
Safety ESD Damage Prevention - 2
ESD Damage Prevention
Follow the guidelines in this section to reduce the risk of
electrostatic discharge (ESD) damage to equipment.
ESD Prevention Rules
Leads
Handle all ICs by the body. Do not touch the leads. Also, do not
touch the edge connectors, exposed circuitry, or printed
circuits on boards or cards. Handle ICs, boards, and cards by
the edges, or use extractors.
Page 5
Safety ESD Damage Prevention - 3
Grounds
Before working on any device containing a printed circuit,
ground yourself and your equipment to an earth or building
ground. Use a grounded conductive workbench mat and
grounding wriststrap, and ground your equipment to the
mat.
±
Warning:
• You work on plugged-in equipment
• You discharge a cathode ray tube (CRT)
• You work on an unplugged CRT that has not yet been
discharged
• You are performing live adjustments
Make sure you are
not
grounded when
Metals
Never place components on any metal surface. Use antistatic,
conductive, or foam rubber mats.
Page 6
Safety ESD Damage Prevention - 4
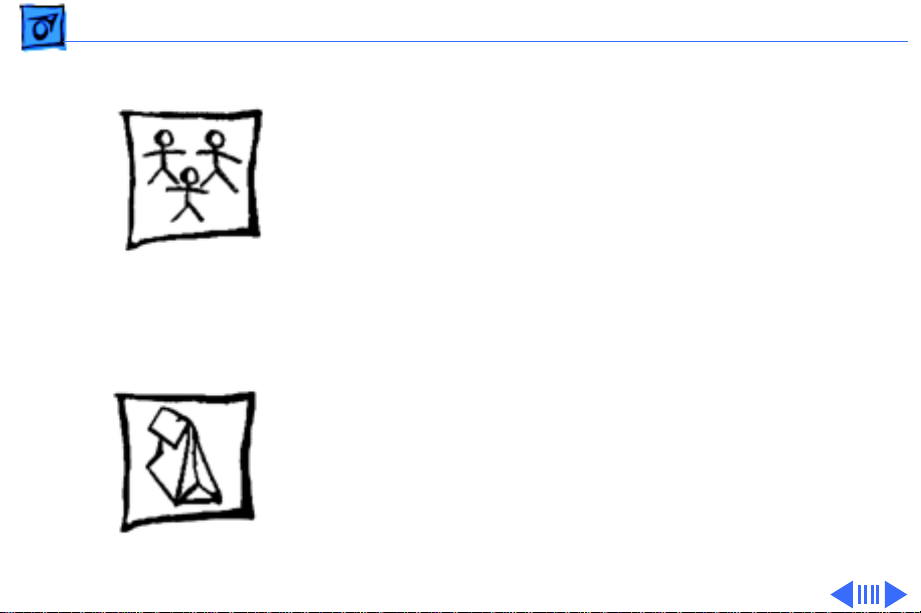
Bodies
Don’t touch anybody who is working on integrated circuits.
If that person is properly grounded, your “zap” may not
cause any damage, but just to be on the safe side, do not touch
or brush against other technicians.
Bags
Use static-shielding bags during storage, transportation,
and handling of boards and chips. When you are ready to
leave your bench and take a board to a storage place, put the
board in a static-shielding bag. Leave all Apple replacement
modules in their ESD-safe packaging until you need them.
Page 7
Safety ESD Damage Prevention - 5
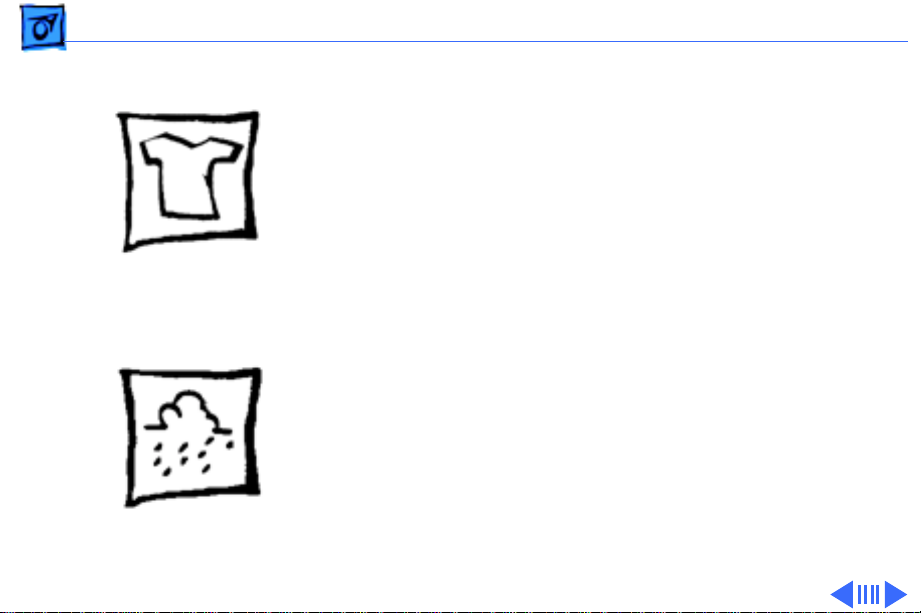
Synthetics
Do not wear polyester clothing or bring plastic, vinyl, or
styrofoam into the work environment. The electrostatic field
around these nonconductors cannot be removed.
Atmosphere
If possible, keep the humidity in the service area between
70% and 90%, and use an ion generator. Charge levels are
reduced (but not eliminated) in high-humidity
environments and in areas where an ion generator is
routinely used.
Page 8

Safety ESD Damage Prevention - 6
Setting Up an ESD-Safe Workstation
Follow the guidelines in this section to set up an ESD-safe
workstation.
To prevent electrical shock, you will need to make an
exception to these guidelines when performing certain tasks
on a CRT. When there is a risk of contacting high voltage,
such as when you discharge a CRT or work with a poweredon CRT, do
and do
not
wear a grounding wriststrap or heelstrap,
not
work on a grounded pad.
Page 9
Safety ESD Damage Prevention - 7
Materials Required
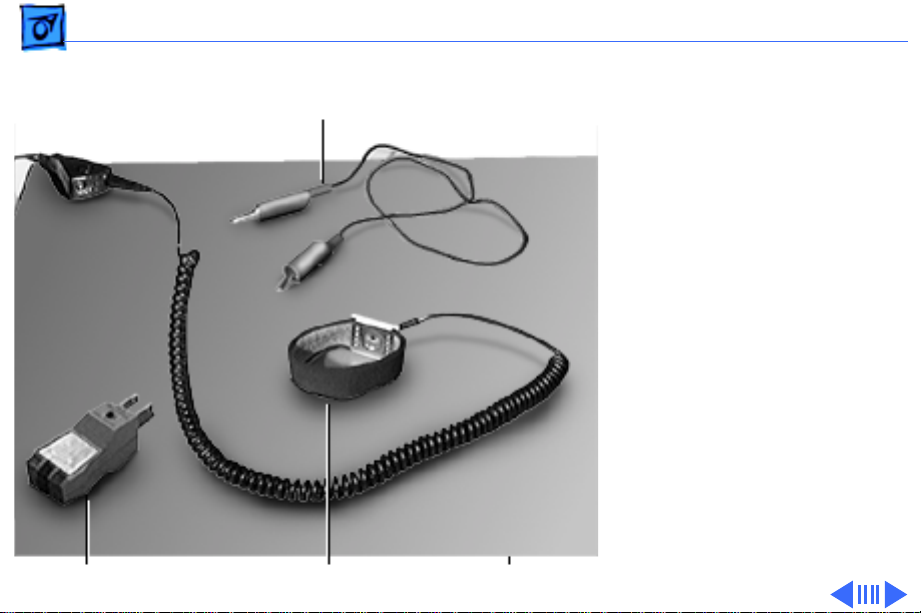
Wire Lead with Alligator Clips
You will need the following
materials to set up an ESDsafe workstation:
• Conductive workbench
mat
• Wriststrap, with 1
megohm resistor and
ground cord
• Wire lead with alligator
clips
• Ground/polarity tester
Ground/Polarity Tester
Wriststrap
Mat
Page 10

Safety ESD Damage Prevention - 8
Setup Procedure
Follow these steps to set up an ESD-safe workstation:
1 Remove all ESD hazards from the area including the
following nonconductive materials:
• Syrofoam
• Common plastics
• Synthetic clothing
• Vinyl
Since these nonconductive materials cannot be grounded
and can retain a charge for hours and even days, the
static field surrounding them, when discharged, can
easily damage sensitive components.
2 Use a ground/polarity meter to verify proper grounding
of the power outlet. Though ground/polarity testers vary
slightly in design, all are very easy to use. To use a
tester, simply insert the three prongs of the tester into
Page 11

Safety ESD Damage Prevention - 9
the three-pronged outlet. Most testers will display a
light pattern that, when matched to the code on the
tester, indicates whether the outlet has proper
grounding. Connect the grounding cord of the workbench
mat to ground.
3 Connect the end of the ground cord that contains the
solderless terminal to ground.
4 Attach the snap fastener of the grounding cord to the snap
on the workbench mat. Then, slip the wriststrap onto
your wrist, allowing the metal part of the wriststrap to
touch your skin.
All objects in the service area should be grounded to the
same potential. Touching the chassis of a machine will
bring you to the same potential as the machine. However,
since the act of shifting your weight from one foot to the
other can generate static charge, momentary “touch
grounding” is not enough. You need the continuous
Page 12
Safety ESD Damage Prevention - 10
grounding provided by a
grounding wriststrap.
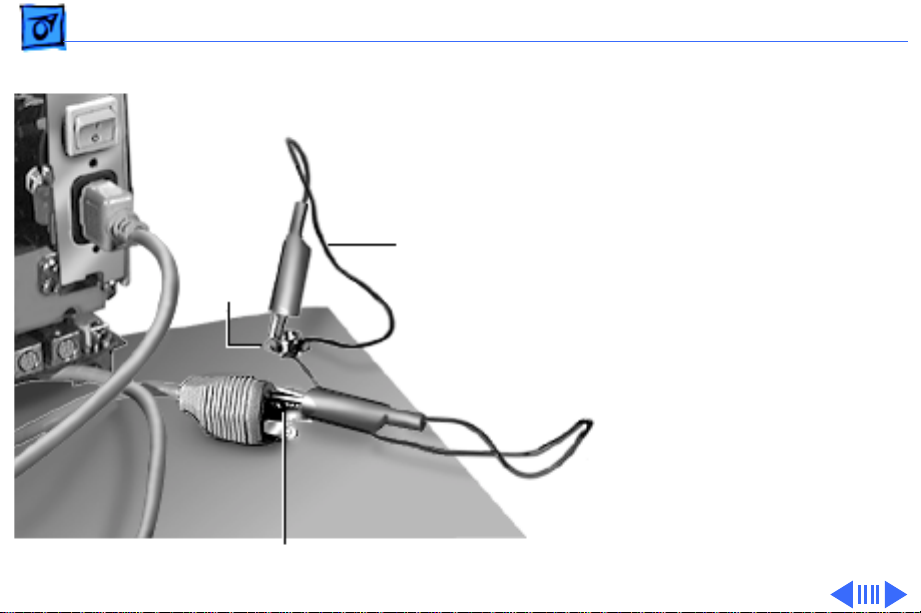
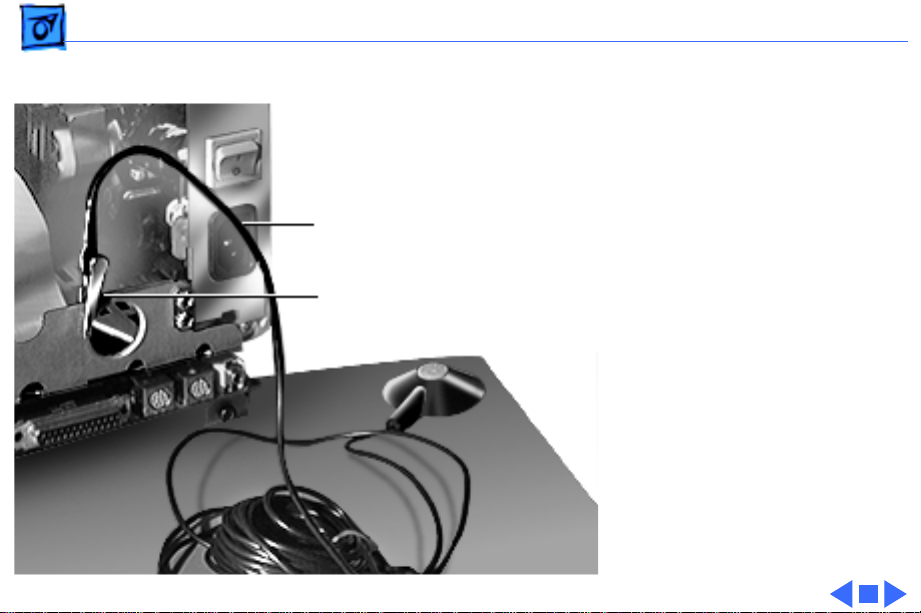
5 Ground the equipment
you are working on.
Note:
The product
Wire Lead
Snap
should
not
be plugged
into the wall outlet.
If you are working on a
product that has a threepronged power cord, you
can attach the ground pin
to the conductive
workbench mat using a
wire lead with alligator
clips. Put one clip on the
snap of the mat and the
Clip on Ground Pin
other on the ground pin.
Page 13
Safety ESD Damage Prevention - 11
Or, if you have a
grounding cord with
alligator clips, attach
the clip to any metal
part of the device you
Grounding Cord
Alligator Clip
are working on.
Page 14

Safety CRT Safety - 12
CRT Safety
A cathode-ray tube (CRT) provides the video display for the
Macintosh or Performa compact computers, modular
monitors, and Apple II computers. The CRT is a picture tube
that operates at very high voltages and contains a high
vacuum. If cracked or broken, the CRT can implode (collapse
into itself) and scatter fragments of glass. When working on
or near a CRT, follow all safety rules and take every
precaution against breaking the tube, especially at the neck
where the tube is thinnest.
The following precautions must be taken to ensure your
safety, especially when you are making adjustments on a
live CRT.
Page 15
Safety CRT Safety - 13
CRT Safe Electrical Setup Precautions
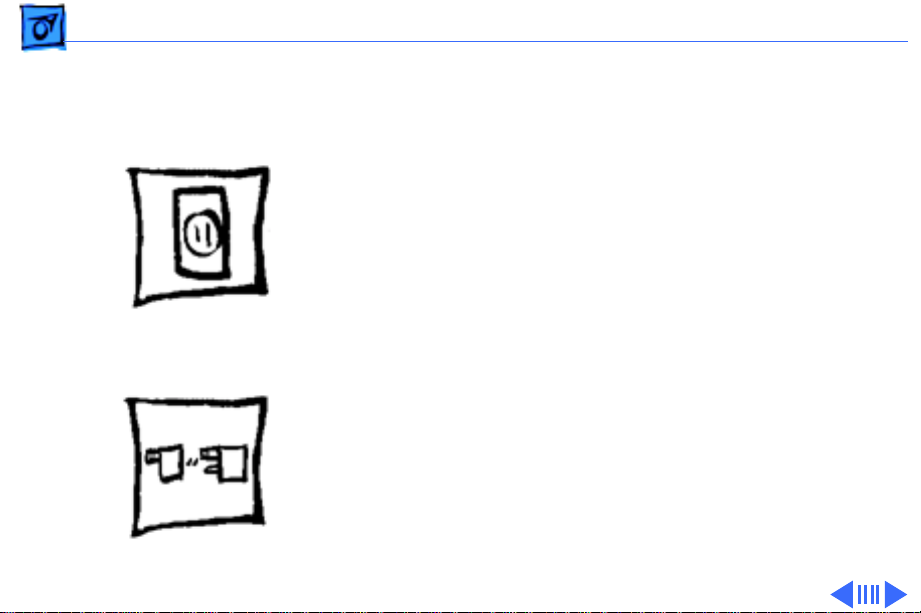
Electric Outlet
Be sure your outlet is correctly wired and properly
grounded. Polarity and ground testers are available from
most electronics stores. Test all outlets in your service shop
before working on any electrical equipment. If you have any
doubts about the wiring in your building, consult a qualified
electrician.
Adapter Plug
Never use an adapter plug to connect a monitor’s threepronged power plug to a two-pronged wall outlet. Adapters
defeat the ground pin, which is a safety feature.
Page 16
Safety CRT Safety - 14
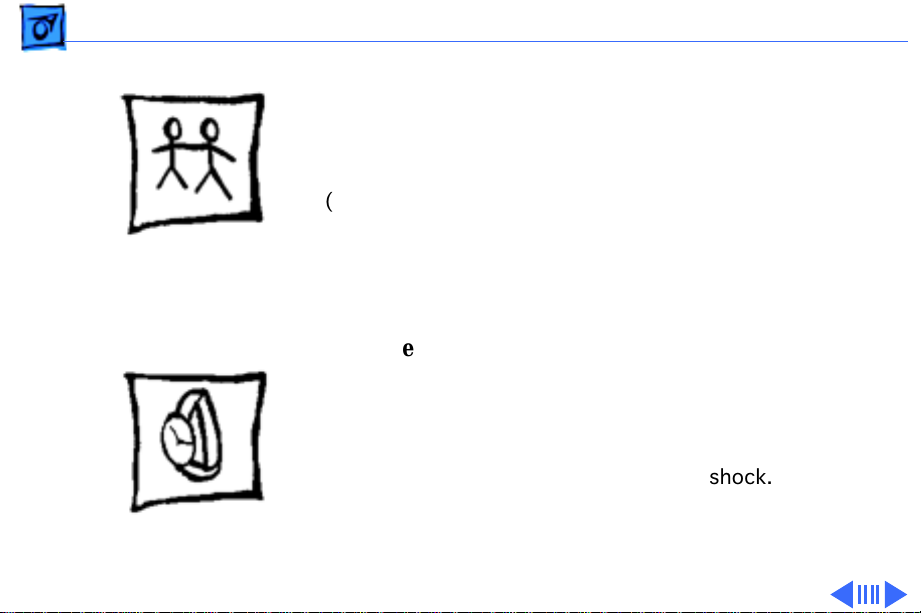
Buddies
Do
not
work on a CRT alone. If there is an accident, having
someone else nearby could save your life. Apple recommends
that your staff be trained in cardiopulmonary resuscitation
(CPR).
Metal Jewelry
Remove rings, wristwatches, hanging necklaces, and other
jewelry before performing repairs on a CRT. Metal jewelry
is an excellent conductor of electricity. Removing jewelry
will reduce the possibility of electrical shock.
Page 17
Safety CRT Safety - 15
Grounding Devices
Never use a grounding wriststrap or heelstrap or work on a
grounded workbench mat when discharging a CRT or when
performing live adjustments. Even though the straps and
mats contain one-megohm resistors and conduct only small
electrical charges, Apple recommends that straps and mats
be used only when working on “dead” (uncharged)
equipment.
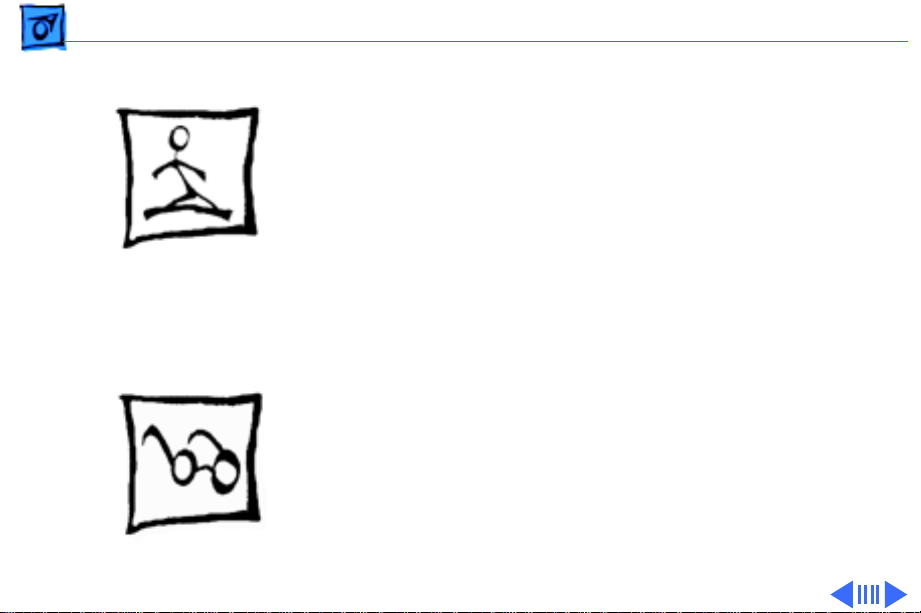
Safety Goggles
Wear safety goggles when working with a CRT. The CRT
contains a high vacuum. If cracked or broken, the CRT can
implode (collapse into itself) and scatter fragments of glass.
Page 18
Safety CRT Safety - 16
Power
Before working inside a monitor or a Macintosh containing a
CRT, turn off the power and disconnect the AC power cord.
Certain parts of a monitor or Macintosh chassis are hot
(electrified) when the unit is under power. Except when you
must have the power on (for example, when making live
adjustments), never work on a plugged-in monitor or
Macintosh with video.
One Hand
Keep one hand in your pocket or behind your back when
working on a live monitor or Macintosh with video. Working
with only one hand reduces the risk of current passing
through your heart, should you accidentally contact high
voltage.
Page 19
Safety CRT Safety - 17
Anode
Discharge the anode before working inside the unit. See
“Discharging the Cathode Ray Tube (CRT)” in this manual.
Some monitors and some Macintosh computers containing
CRTs have a bleeder resistor on the anode that drains the
charge when the power is turned off. Nevertheless, in case
the resistor fails and leaves the anode fully charged, you
must perform the discharge procedure.
Page 20
Safety CRT Safety - 18
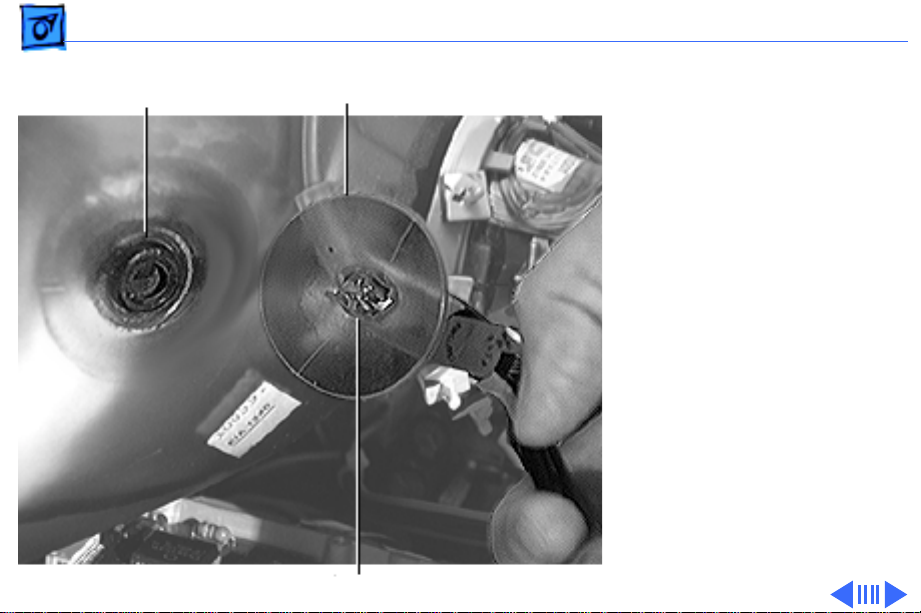
Anode Aperture
Anode Cap
Anode Connector
Anode Connector and Aperture
±
Warning:
anode connector or the anode
aperture. Normally, the
anode aperture has a
connector plugged into it.
When a CRT is replaced, the
anode connector is removed,
exposing the anode
aperture. If the bleeder
resistor fails, the anode can
retain a charge of several
thousand volts (even when
power is off) and can regain
some charge even after it
has been discharged.
Never touch the
Page 21
Safety CRT Safety - 19
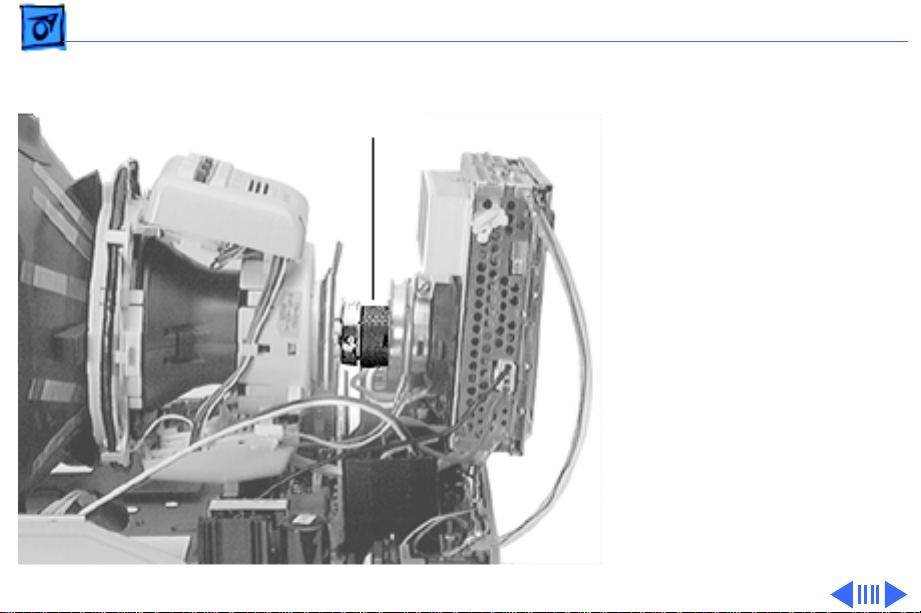
CRT Neck
Neck of CRT
±
Warning:
or handle a CRT by its neck,
where the tube is the
thinnest. To prevent an
implosion, take every
precaution against breaking
the CRT.
Do not pick up
Page 22
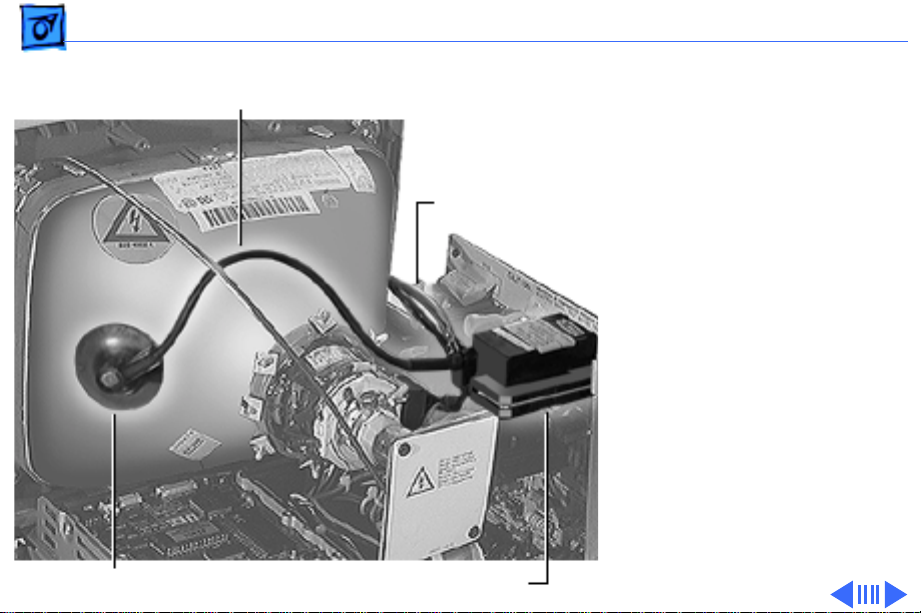
Safety CRT Safety - 20
Anode Cap
High Voltage Cable
Yoke Cable/
Connector
Flyback Transformer
CRT Live Adjustment Rules
Plastic Adjustment T ool
When performing live
adjustments, use a plastic
adjustment tool or insulated
screwdriver only.
Live Components
When adjusting a live
monitor, never touch the
components shown here
(the actual location of these
components will vary by
product).
Page 23
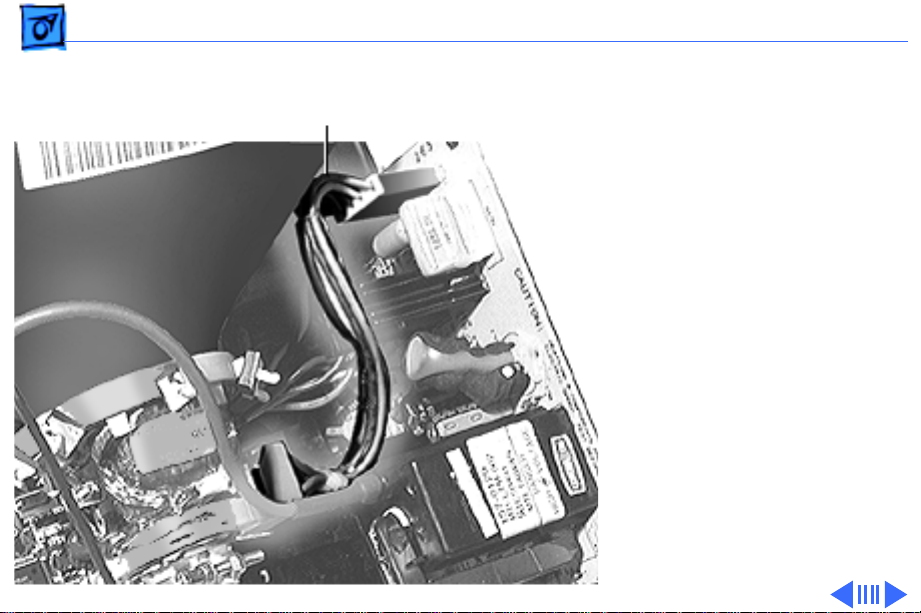
Safety CRT Safety - 21
±
Yoke Cable/Connector
Warning:
could result if you touch any
of these components with the
power on:
• High Voltage Cable
• Anode Cap
• Yoke Cable/Connector
• Flyback Transformer
In general, also avoid
touching any soldered
connections or exposed
uninsulated wires.
Serious injury
Page 24

Safety CRT Safety - 22
Discharging the Cathode Ray Tube (CRT)
In the following steps, you will discharge the high voltage
from a cathode-ray tube (CRT). Discharging the tube before
working on it lessens the chance of an electric shock.
Most later Macintosh video monitors are equipped with a
bleeder resistor that automatically drains the charge from
the CRT when the power is shut off. However, if the resistor
fails, the anode may retain a charge. Thus, to ensure your
safety, perform the following discharge procedure.
Materials Required
• Safety goggles
• Ungrounded foam pad
• Needlenose pliers
• Alligator lead with clips at both ends
• CRT discharge tool
Page 25

Safety CRT Safety - 23
CRT Discharge Tools
There are three types of discharge tools:
• Apple CRT Discharge Tool
• Older Apple CRT Discharge Tool
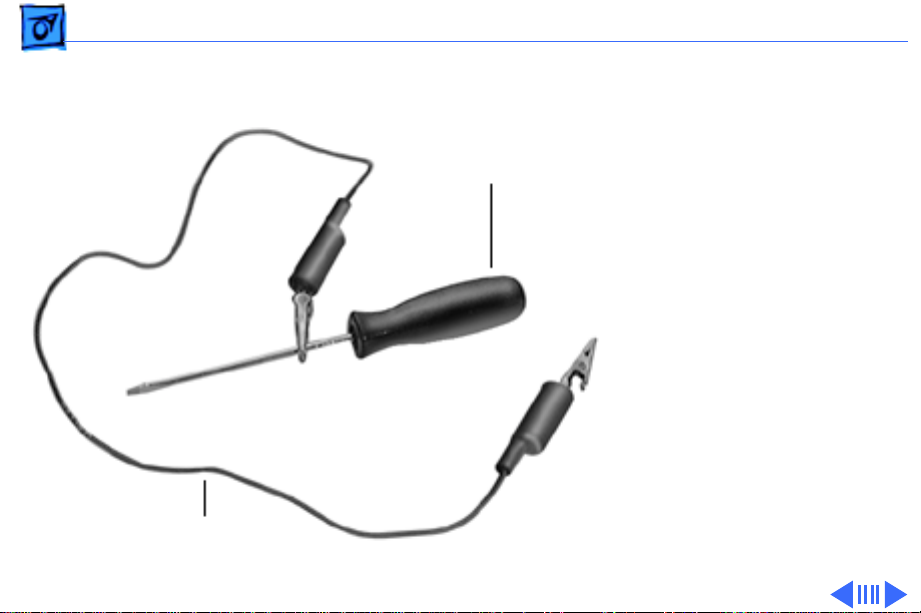
• Screwdriver and wire lead
Caution:
screwdriver with wire lead on a Macintosh or Macintosh
Plus. If you use the newer Apple CRT Discharge Tool on a
Macintosh or Macintosh Plus, you
ground lug to avoid destroying the logic board!
Use the older Apple CRT Discharge Tool or
must
discharge to the
Page 26
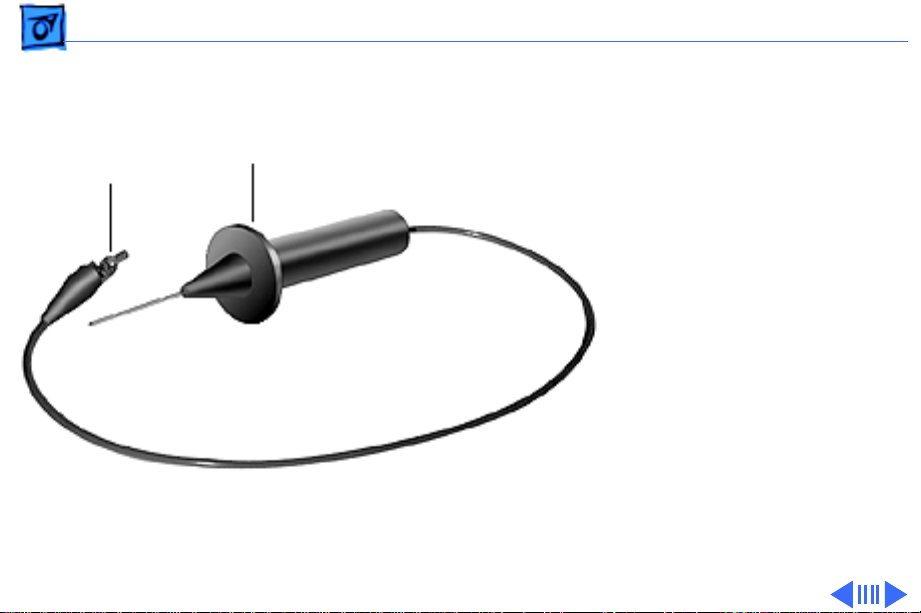
Safety CRT Safety - 24
Apple CRT Discharge Tool
Stainless
Steel Clip
Hand Guard
Apple recommends the version
of the Apple CRT Discharge
Tool (Part No. 076-0381)
shown here
. This version
features a stainless steel
alligator clip, thicker
insulation, and a hand
guard. No internal resistor
is installed, so the tool gives
auditory feedback (the
electrostatic “crack”) to
assure the technician, when
discharging any monitor
without a bleeder resistor,
that the CRT is indeed
discharged.
Page 27
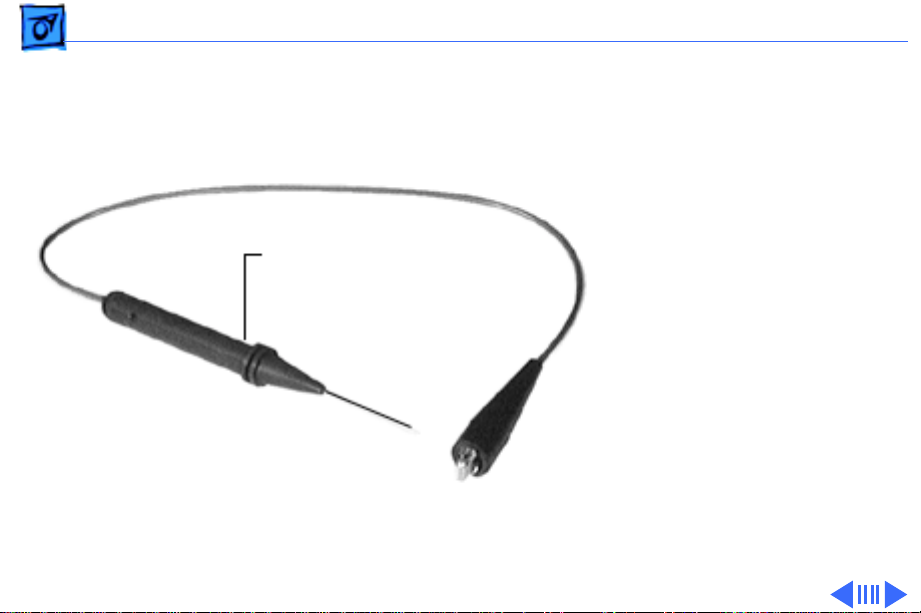
Safety CRT Safety - 25
Older Apple CRT Discharge
Tool
The older version of the Apple
CRT Discharge Tool (Part No.
Older Discharge Tool
076-0243)
alligator clip but no hand
has a copper
guard. It has a built-in
100-megohm resistor,
which means you will
not
hear an electrostatic crack
when the CRT discharges,
even if the monitor has no
bleeder resistor. This older
tool was designed for the
original Macintosh or
Macintosh Plus logic board.
A resistor was installed to
Page 28

Safety CRT Safety - 26
diminish the impact of the electrostatic discharge if a
technician accidentally discharged the CRT to the metal
chassis instead of to the ground lug. (The Macintosh logic
board circuitry is grounded to the chassis.) This older tool
is safer for use on the Macintosh or Macintosh Plus CRT.
Page 29
Safety CRT Safety - 27
Screwdriver and Wire Lead
If you do not have a discharge
Insulated Screwdriver
tool, you can use an
insulated screwdriver
attached to a wire lead with
alligator clips on both ends
as shown here. You should
also use this discharge
method as a follow-up after
using the older Apple CRT
discharge tool to ensure that
the CRT is discharged.
Wire Lead with Alligator Clips
Page 30

Safety CRT Safety - 28
CRT Discharge Procedure Overview
These are the major steps for discharging a CRT:
1 Set up a CRT-safe electrical area.
2 Remove the housing.
3 Attach the discharge tool to the ground lug on a built-in
monitor. Attach the discharge tool to the metal chassis on
a stand-alone monitor.
4 Touch the discharge tool probe to the anode aperture.
Detailed steps for the CRT discharge procedure follow.
Page 31

Safety CRT Safety - 29
Set Up CRT-Safe Electrical Area
1 Read the “CRT Safe Electrical Setup Precautions”
section in this manual before you proceed!
2 Turn off the power and disconnect the AC power cord.
±
Warning:
yoke assembly, yoke cable/connector, high voltage cable,
anode connector, flyback transformer, the inside of the AC
power switch, the primary fuse, any soldered connections,
or exposed uninsulated wires. If you have questions as to the
location of these parts in the monitor or computer on which
you are working, refer to the manual for that product.
3 Remove any metal jewelry and grounding wriststrap.
4 Disconnect the snap fastener on the grounded workbench
mat.
5 Put on safety goggles.
To prevent serious injury, do not touch the
Page 32

Safety CRT Safety - 30
Remove Housing
1 Remove the cover and any internal shielding (refer to
the Take Apart chapter for the monitor or Macintosh
computer on which you are working).
2 Set the monitor or Macintosh upright on the ungrounded
foam pad, with the back facing you.
Page 33
Safety CRT Safety - 31
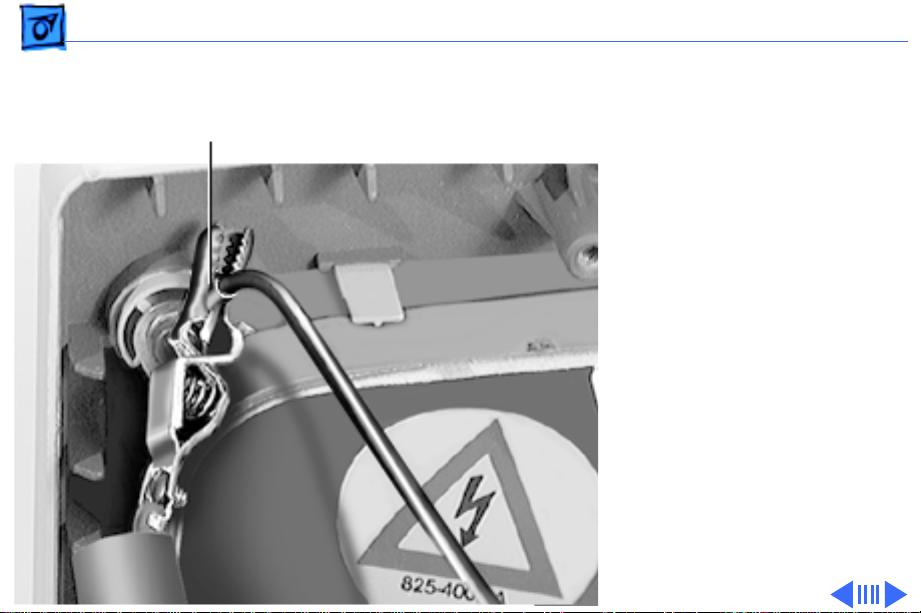
Attach Discharge Tool to
Ground Lug
Ground
Ground for Computer with
Built-in Monitor
Caution: If you are working
on a compact Macintosh that
contains a CRT and
incorrectly discharge the
CRT to the metal chassis,
you may destroy the logic
board. You must discharge
to the ground lug!
Attach the clip of the CRT
discharge tool to the ground
lug of the computer.
Page 34
Safety CRT Safety - 32
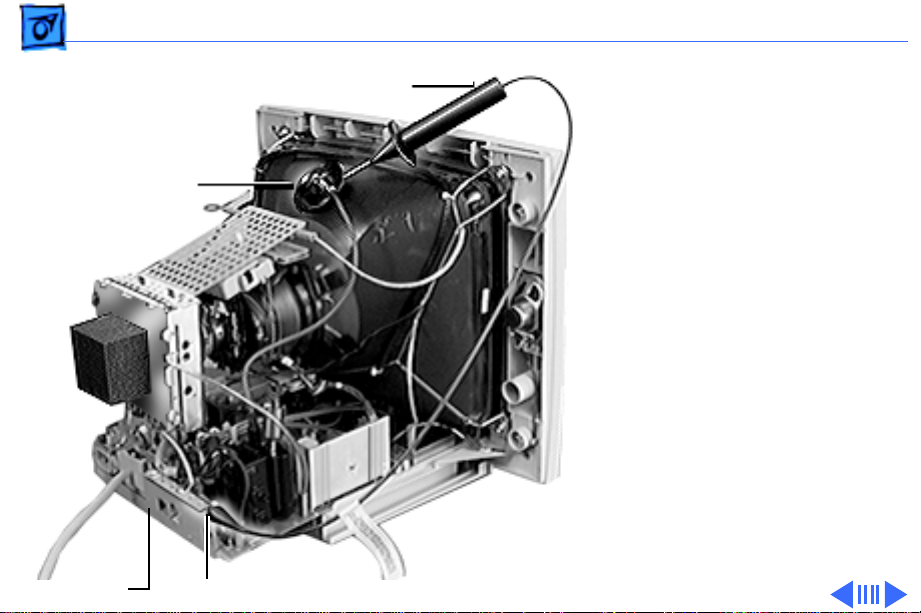
Anode Cap
Chassis
Discharge Tool
Alligator Clip
Ground for Stand-Alone
Monitor
If you are working on a
stand-alone monitor, attach
the clip of the CRT discharge
tool to the monitor’s metal
chassis.
Page 35
Safety CRT Safety - 33
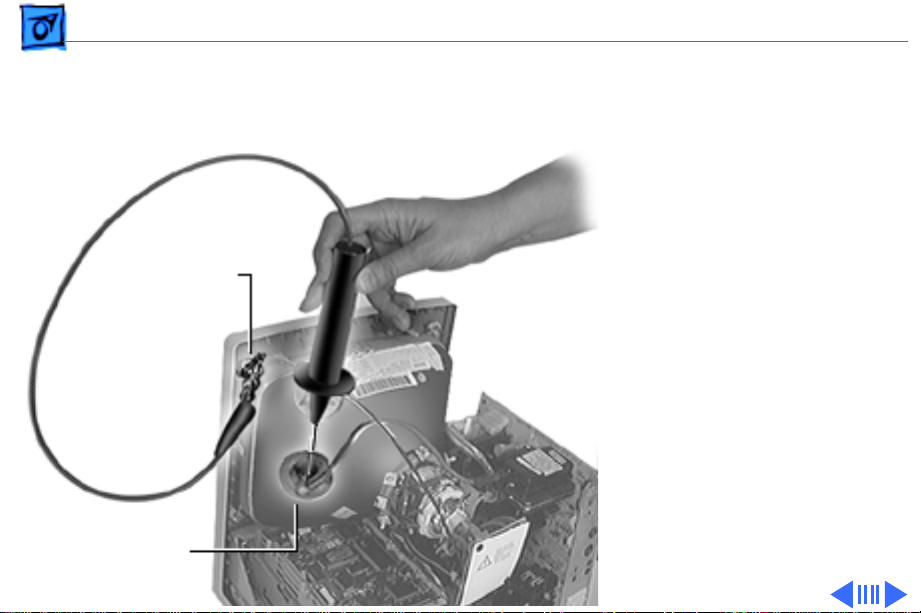
Touch Probe to Anode Aperture
1 Put one hand behind your
back, and grasp the
handle of the discharge
tool with your other
Ground Lug
Anode Cap
hand.
2 Hold the CRT discharge
tool to the tube surface,
and slide the tool probe
under the anode cap until
the probe touches the
anode aperture.
3 Remove the probe of the
CRT discharge tool from
under the anode cap.
Page 36

Safety CRT Safety - 34
4 Detach the discharge tool’s alligator clip from the metal
chassis or Macintosh ground lug.
±Warning: If you performed this procedure using the
5
older version of the discharge tool (and thus did not hear
the electrostatic crack that confirms that the monitor
discharged), ensure that the CRT is discharged by
repeating the preceding four steps using the insulated
flatblade screwdriver and alligator lead. Attach one
alligator clip to ground, and the other clip to the blade of
the screwdriver.
Page 37

Safety CRT Safety - 35
Remove the CRT/Video Board
Perform this procedure only if you are replacing the CRT/
video board or removing the CRT.
±Warning: Be sure to discharge the CRT before attempting
to remove the CRT/video board.
Caution: Twisting, bending, or applying force to the CRT/
video board could damage the neck of the CRT.
Page 38
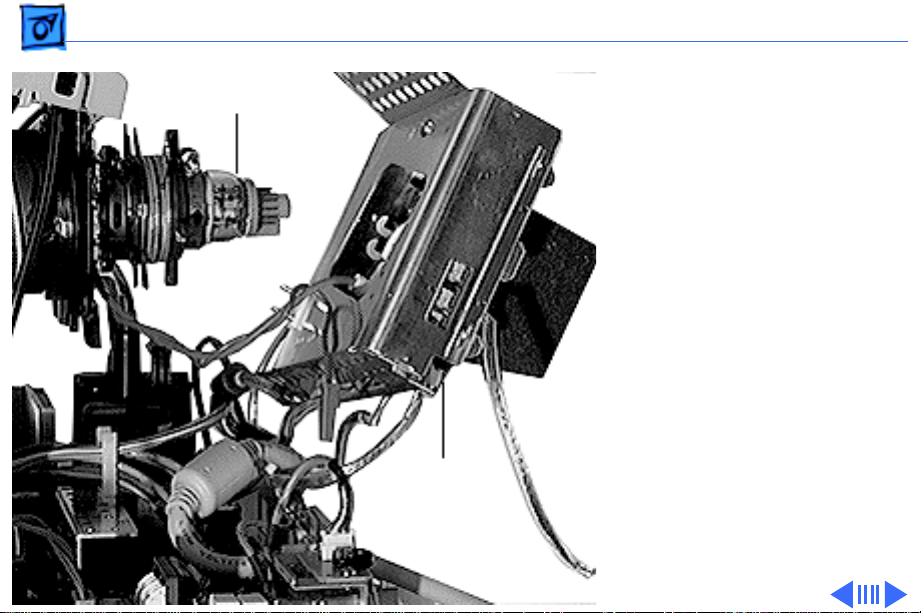
Safety CRT Safety - 36
Neck
Remove the CRT/video
board assembly from the
neck of the CRT. Refer to the
Take Apart chapter of the
monitor or computer manual
for steps to remove the CRT/
video board.
CRT/Video
Board
Page 39

Safety CRT Safety - 37
Establish an Ongoing Lead to Ground
A discharged CRT can build up a charge. If a discharged CRT
must remain exposed for any length of time, you must
establish an ongoing lead to ground.
±Warning: Be sure to discharge the CRT before attempting
to establish an ongoing lead to ground.
Page 40
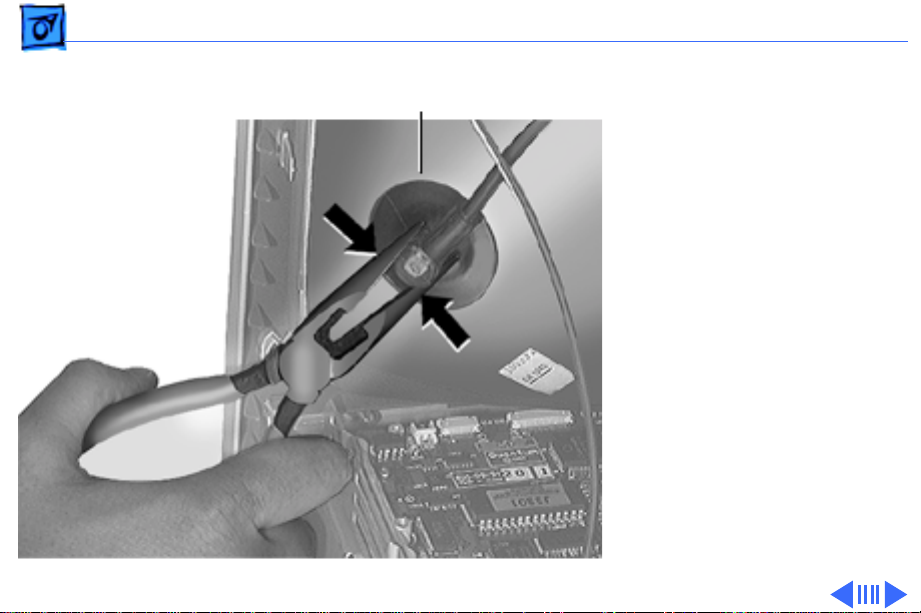
Safety CRT Safety - 38
Anode Cap
1 Using needlenose pliers,
compress the anode cap
to free it from the anode
aperture.
Page 41
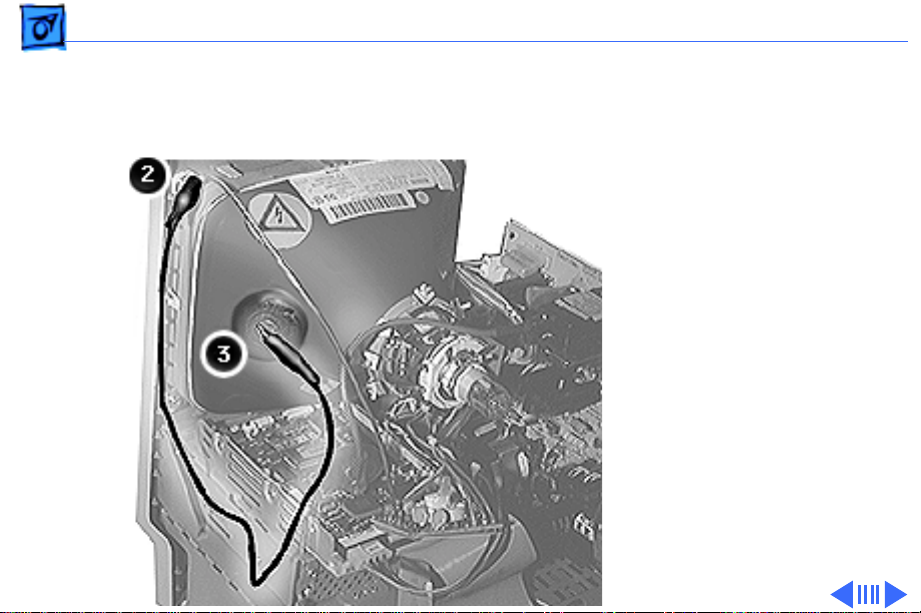
Safety CRT Safety - 39
2 Connect one end of an
alligator lead to ground.
3 Connect the other end of
the alligator lead to the
anode aperture.
Page 42
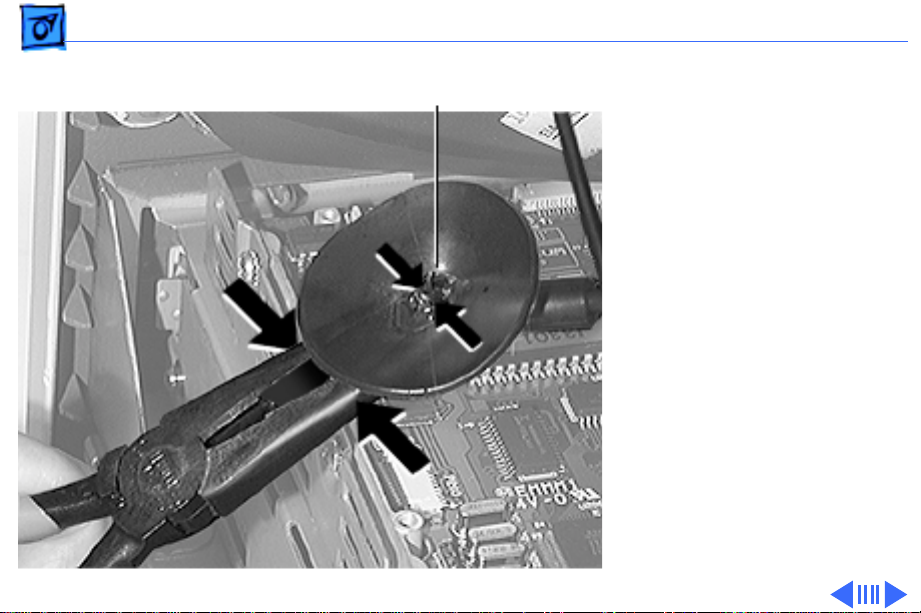
Safety CRT Safety - 40
Anode Connector
Replacement Note: To
replace the anode cap, use
needlenose pliers to press
together the plastic cup
outside of the anode
connector so that you can
insert it into the anode
aperture. After inserting the
connector, tug on the high
voltage cable to make sure it
is firmly seated. Then press
down around the edges of the
rubber anode cap to ensure a
firm seal.
Page 43

Safety CRT Safety - 41
Return Defective Color Cathode Ray Tubes (CRTs)
See Service Information, Service Programs/Repairing—
Packing and Shipping for information about returning
defective color CRTs.
Page 44

Safety CRT Safety - 42
Properly Dispose of Black and White CRTs
±Warning: You must devacuum a defective black and white
CRT before throwing it in a trash receptacle. Discarded
black and white CRTs that have not been devacuumed may
become cracked and implode, injuring anyone who happens
to be near. Instructions for disposing of black and white
CRTs follow.
Materials Required
• Thick cardboard box large enough to contain the CRT
• Safety goggles
• Gardening gloves
• Needlenose pliers
• Large sharp diagonal cutters
• Duct tape
• 12-in. x 12-in. piece of cloth or heavy paper
Page 45
Safety CRT Safety - 43
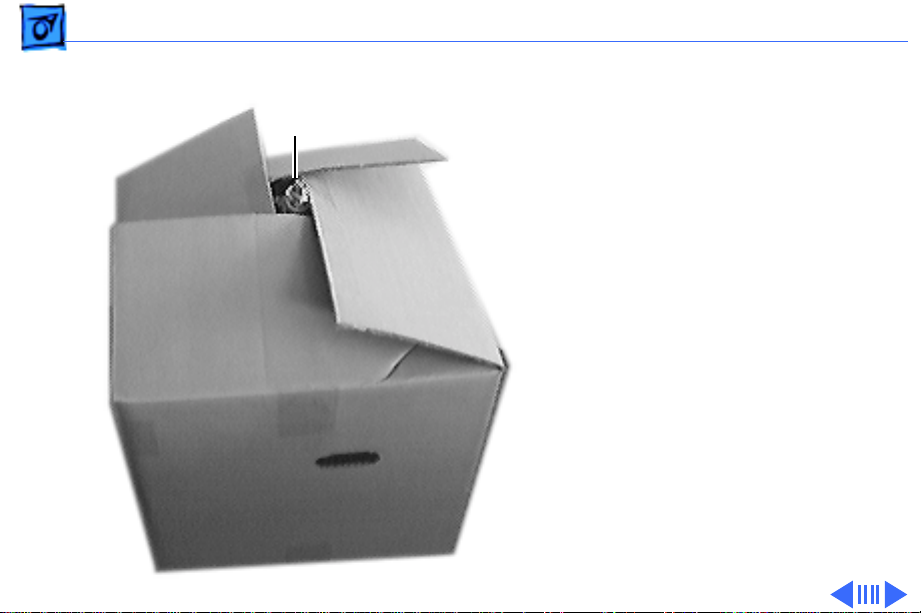
Disposal Procedure
Neck Tip
Follow these steps when
disposing of a black and
white CRT:
1 Put on safety goggles.
2 Place the black and white
CRT inside a box with the
CRT neck pointing up.
Fold down the box flaps
so just the tip of the CRT
neck protrudes through
the box opening.
3 Put on gloves.
Page 46
Safety CRT Safety - 44
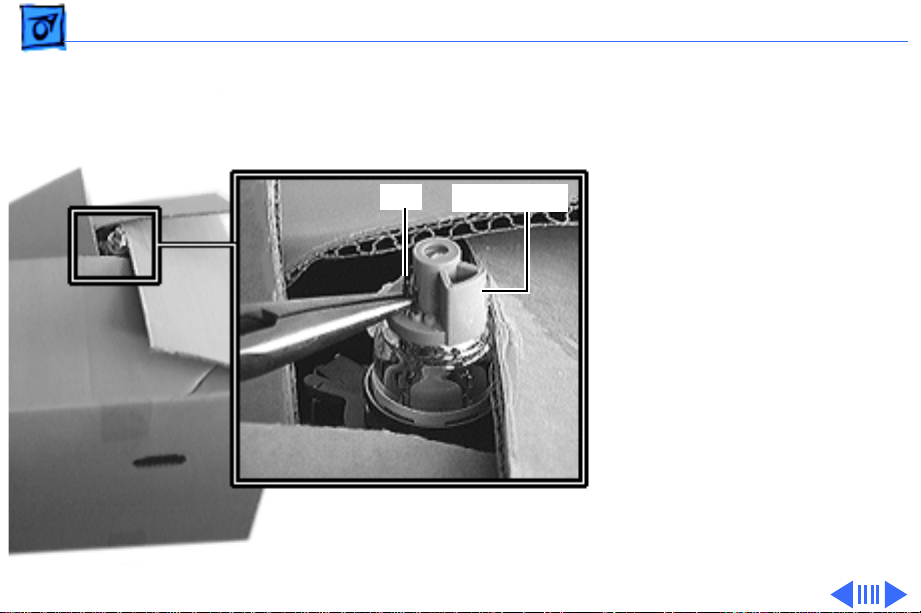
4 If the tip of the neck has
a plastic key, go to the
next step; otherwise, go
to step 9.
Pin
Plastic Key
5 Using needlenose pliers,
grasp one of the
connector pins on the end
of the CRT neck.
6 Firmly pull the
connector pin until you
hear a hissing sound (the
devacuum noise) emit
from the CRT. If no
hissing sound is heard,
keep pulling pins until
you hear the sound.
Page 47
Safety CRT Safety - 45
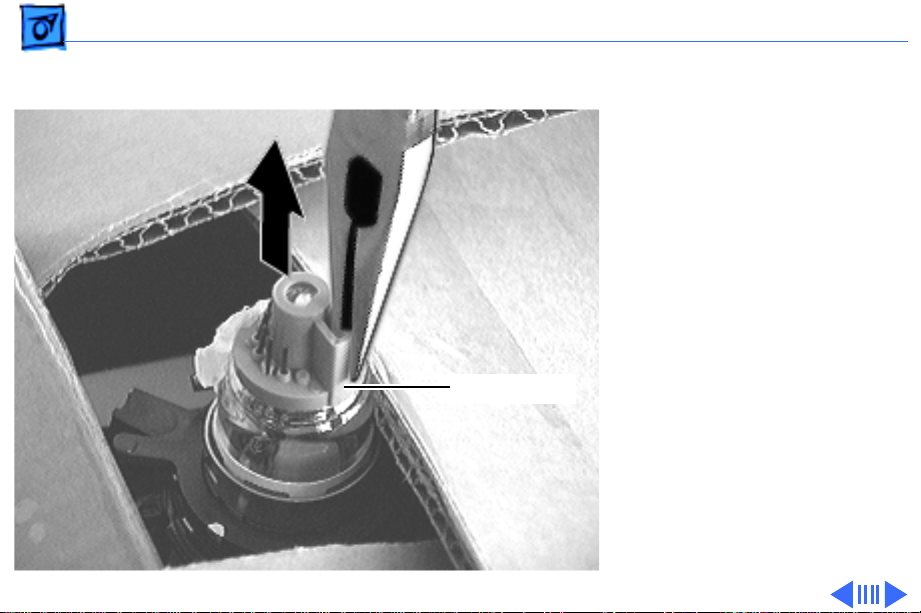
7 If pulling connector
pins does not work, you
can remove the plastic
key by grasping it with
needlenose pliers and
pulling it straight off the
CRT neck.
8 Tape the box shut.
Plastic Key
Page 48
Safety CRT Safety - 46
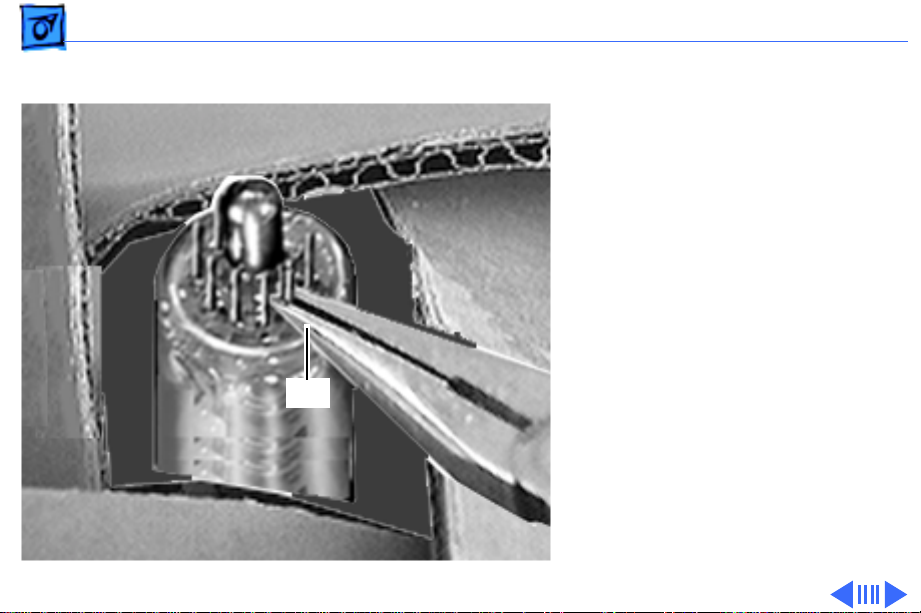
9 For a CRT without a
plastic key, use
needlenose pliers to
grasp one of the
connector pins on the end
of the CRT neck.
10 Firmly pull the
connector pin until you
hear a hissing sound
emit from the CRT. If no
hissing sound is heard,
Pin
keep pulling pins until
you hear the sound.
11 If pulling connector
pins does not work, go to
the next step.
Page 49
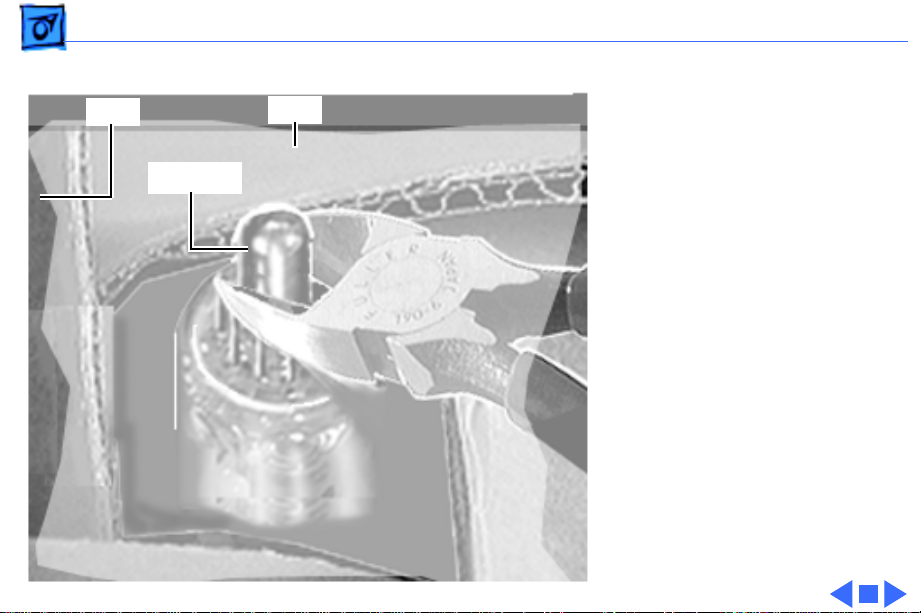
Safety CRT Safety - 47
12 Tape a piece of cloth or
Tape Veil
paper onto the box so
that it forms a veil over
Neck Tip
the opening while still
allowing access to the tip
of the CRT neck.
13 Position the diagonal
cutters under the veil
and at the tip of the CRT.
14 ±Warning: Because of
the possibility of flying
bits of glass, ensure no
one is nearby. Avert
your eyes, and clip off
the tip of the CRT.
15 Tape the box shut.
Page 50

Safety Battery Handling - 48
Battery Handling
Lithium thionyl chloride batteries, the type used for backup
batteries in most modular Macintosh models, have some
potential for explosion if improperly handled.
±Warning: Lithium batteries should be stored in a
designated, well-marked area with limited access.
Apple’s lithium batteries are sealed in individual zip-locked
wrappers. Upon receipt, inspect the integrity of the
wrappers, and store the batteries in the same packaging in
which they were received.
Page 51

Safety Battery Handling - 49
Battery Disposal
Lithium backup batteries cannot be reused and, therefore,
require disposal when exhausted. In addition to its explosive
potential, lithium is water-reactive and must be disposed of
as hazardous waste. Apple recommends the following course
of action.
After removing an exhausted battery from the board, clip off
the lead wires (necessary for soldered batteries) and place
the battery into the zip-locked wrapper and packaging used
for the replacement battery. Mark the battery DEAD and
return it to Apple, where it will be disposed of following EPA
guidelines. See Service Programs/Repairing—Packing and
Shipping for additional shipping instructions.
 Loading...