

Page 1

Macintosh
PhotoFlash
User’s Guide
Page 2

K Apple Computer, Inc.
© 1994 Apple Computer, Inc. and Storm Software, Inc. All rights reserved.
Under the copyright laws, this manual may not be copied, in whole or in part, without the
written consent of Apple. Your rights to the software are governed by the accompanying
software license agreement.
The Apple logo is a trademark of Apple Computer, Inc., registered in the U.S. and other
countries. Use of the “keyboard” Apple logo (Option-Shift-K) for commercial purposes without
the prior written consent of Apple may constitute trademark infringement and unfair
competition in violation of federal and state laws.
Every effort has been made to ensure that the information in this manual is accurate. Apple and
Storm Software are not responsible for printing or clerical errors.
Apple Computer, Inc. Storm Software
1 Infinite Loop 1861 Landings Drive
Cupertino, CA 95014-6299 Mountain View, CA 94043
(408) 996-1010 (415) 691-6600
StuffIt InstallerMaker software is Copyright © 1993 by Aladdin Systems, Inc. and
Raymond Lau.
Apple, the Apple logo, EtherTalk, LaserWriter, LocalTalk, and Macintosh are trademarks of
Apple Computer, Inc., registered in the U.S.A. and other countries.
AppleScript, Finder, PhotoFlash, QuickTake, and QuickTime are trademarks of Apple
Computer, Inc.
Adobe, Adobe Illustrator, Adobe Photoshop, and PostScript are trademarks of Adobe Systems
Incorporated, which may be registered in certain jurisdictions.
Cinepak and SuperMac are trademarks of SuperMac Technology.
DayStar Digital is a trademark of DayStar Digital.
ExposurePro is a registered trademark of Baseline Publishing, Inc.
FileMaker is a registered trademark of Claris Corporation.
Helvetica and Times are registered trademarks of Linotype-Hell AG and/or its subsidiaries.
Kodak and Photo CD are trademarks of Eastman Kodak Company.
Microsoft and MS-DOS are registered trademarks of Microsoft Corporation.
PageMaker, Persuasion, and SuperPaint are registered trademarks of Aldus Corporation.
PicturePress and Storm Software are registered trademarks of Storm Software.
PowerPC is a trademark of International Business Machines Corporation, used under license
therefrom.
QuicKeys is a trademark of CE Software, Inc.
QMS is a registered trademark of QMS, Inc.
QuarkXPress is a registered trademark of Quark, Inc.
UNIX is a registered trademark of UNIX System Laboratories, Inc.
UserTalk is a trademark of UserLand Software.
Simultaneously published in the United States and Canada.
Mention of third-party products is for informational purposes only and constitutes neither an
endorsement nor a recommendation. Apple assumes no responsibility with regard to the
performance or use of these products.
Page 3

Contents
Preface ix
What you need to know ix
How to use this book x
1 Using Catalogs 1
Creating a catalog 2
Creating a catalog from within PhotoFlash 2
Creating a catalog from the desktop 2
Saving a catalog 4
Opening and closing a catalog 5
Opening a catalog from within PhotoFlash 5
Opening a catalog from the desktop 6
Closing a catalog 6
Duplicating a catalog 6
Adding image files to a catalog 6
Dragging image file icons from the desktop to an open catalog 7
Using the Add to Catalog command 7
Resizing catalog windows 9
iii
Page 4

Working with thumbnails 10
Selecting thumbnails 10
Moving and copying thumbnails 12
Sorting thumbnails 13
Removing thumbnails from a catalog 14
Opening image files from a catalog 14
Getting information about image files 14
Printing a catalog 15
Searching for images 16
Searching for images by caption text 16
Searching for images by filename 18
Searching for images that resemble a sketch 19
Searching for similar images 20
2 Working With Image Files 23
Macintosh image files 23
File formats recognized by PhotoFlash 24
Opening image files (non-Photo CD) 25
Opening a Photo CD image file 26
Acquiring images 28
Creating a new image 29
Viewing images 30
Moving an image within its window 30
Magnifying or reducing an image 31
Arranging windows 33
Adding or editing a caption 33
iv
Contents
Page 5

Saving an image 34
Saving an image as a new file 34
Saving changes to an existing image file 36
Reverting to the previously saved version 37
Printing images 37
Exporting images 38
3 Working With Selections 41
The PhotoFlash Tool palette 41
Selecting a rectangle 43
Selecting a rectangle visually 43
Selecting a rectangle of a specific size 44
Selecting an irregular area 45
Selecting an area in the shape of a polygon 46
Selecting an area of similar colors (Magic Wand) 47
Changing the area of a selection 48
Adding to a selection 48
Subtracting from a selection 49
Selecting an entire image 50
Deselecting an area 51
Inverting a selection 51
Moving a selection 52
4 Manipulating Images 53
Duplicating an image 53
Cropping an image 54
Resizing an image 55
Resizing part of an image 56
Resizing the entire image 58
Straightening an image 65
Contents
v
Page 6

Rotating an image 67
Rotating part of an image 68
Rotating an entire image 69
Flipping an image 71
Changing the number of colors used by an image 72
Using the Number of Colors command 72
Deciding how many colors to use 74
5 Enhancing Images 75
Using the Enhance commands 76
Adjusting colors 77
Balancing the exposure 79
Adjusting brightness and contrast 80
Blurring an image 82
Using the Blur command 82
Using the Blur tool 83
Sharpening an image 84
Using the Sharpen command 84
Using the Sharpen tool 85
Removing dust 86
Using the Remove Dust command 87
Using the DeDust tool 88
Removing scratches 89
Using the Remove Scratch command 90
Using the DeScratch tool 91
Repeating enhancements 92
vi
Contents
Page 7

6 Converting and Compressing Files 93
Converting image file formats 94
Choosing a file format 95
PICT 95
TIFF 97
JPEG 98
EPS 99
DCS 102
Number of colors or grays supported by standard file formats 103
Using JPEG compression 104
Applying JPEG compression to the entire file 105
Applying different levels of JPEG compression within an image 106
7 Automating Your Work 109
The Script palette and Script menu 110
Scripting with PhotoFlash 111
Recording and saving a script 113
Running a script 115
Launching application programs from PhotoFlash 116
Choosing a different scripting language 116
Editing a script 117
Appendix A Setting PhotoFlash Preferences 121
Virtual memory preferences 122
Thumbnail preferences 124
Display preferences 126
Processing/Filing preferences 127
Units preferences 129
Contents
vii
Page 8

Appendix B Using Photoshop-Compatible Plug-In Modules 133
Installing and storing plug-in modules 134
Using plug-in modules 134
Scripting plug-in modules 135
Appendix C PhotoFlash Acceleration 137
PhotoFlash tasks that can be accelerated 138
Using accelerator cards 138
Glossary 139
Index 141
viii
Contents
Page 9

Preface
PhotoFlash allows you to organize photographs and other digitized images,
enhance them, and place them in a document created with another
application program. To start using PhotoFlash, follow the instructions in
PhotoFlash Getting Started. That guide describes how to install the PhotoFlash
software and start using it within just a few minutes.
This guide is a reference to everything you need to know about using
PhotoFlash. After you’ve read PhotoFlash Getting Started, you should be able
to start using PhotoFlash with your own images right away. If you have
questions about any of PhotoFlash’s capabilities while you’re working, you
can look up the task you want to learn about in this guide.
What you need to know
This guide assumes that you have installed the PhotoFlash software according
to the directions in PhotoFlash Getting Started and that you understand how to
perform the other tasks described in that guide. It also assumes that you’re
familiar with the basics of using Macintosh System 7: how to work with disks,
programs, folders, and files and how to use menus and dialog boxes. For more
information on Macintosh basics, see the Macintosh User’s Guide provided
with your computer.
ix
Page 10

How to use this book
This guide is organized according to tasks. Use the Contents or the Index to
locate instructions for specific tasks.
Descriptions of tasks in this guide often include numbered steps. Each step
consists of a short instruction in boldface type followed (usually) by further
explanation in plain type. Depending on your level of expertise with
PhotoFlash and other Macintosh programs, you may find that you can speed
through some or all of the instructions by reading just the boldface steps and
looking at the pictures:
1 The boldface steps like this tell you what to do.
The text like this gives you extra help.
2Pictures like this show you what to look for on your computer screen:
This guide contains the following chapters and appendixes:
m Chapter 1, “Using Catalogs,” describes how to create and use PhotoFlash
catalogs—collections of thumbnails that represent image files stored
anywhere on your hard disk or on other volumes, including other volumes
on a network.
m Chapter 2, “Working With Image Files,” describes how to open, view, and
save image files with PhotoFlash. This chapter also describes the standard
image file formats that PhotoFlash supports.
m Chapter 3, “Working With Selections,” describes how to use the Selection
tools in the PhotoFlash Tool palette to select part of an image. After you’ve
selected an area, you can use the Action tools to manipulate or enhance it
as described in Chapters 4 and 5.
m Chapter 4, “Manipulating Images,” describes how to use commands in the
Image menu to crop, resize, straighten, rotate, flip, and change the number
of colors used by an image. It also describes how to manipulate selections
by using the Crop, Resize, and Rotate tools in the PhotoFlash Tool palette.
x
Preface
Page 11

m Chapter 5, “Enhancing Images,” describes how to use commands in the
Enhance menu to adjust an image’s red, green, and blue (RGB) values,
balance an image’s exposure, blur or sharpen an image, and remove dust
and scratches. It also describes how to enhance selections by using the
Blur, Sharpen, DeDust, and DeScratch tools in the PhotoFlash Tool palette.
m Chapter 6, “Converting and Compressing Files,” describes how to convert
image files from one format to another. It also discusses the five standard
file formats supported by PhotoFlash and describes how to use JPEG
compression, which is a standard format for image compression that can be
used with most file formats.
m Chapter 7, “Automating Your Work,” describes how to record and run
scripts that perform repetitive tasks in PhotoFlash and other programs.
m Appendix A, “Setting PhotoFlash Preferences,” describes how to use
controls and settings in the Preferences dialog box (available from the Edit
menu) to control various aspects of the way PhotoFlash works.
m Appendix B, “Using Photoshop-Compatible Plug-In Modules,” describes
how to use PhotoFlash with third-party plug-in modules designed for use
with Photoshop.
m Appendix C, “PhotoFlash Acceleration,” describes PhotoFlash’s support for
program-specific accelerator cards designed to work with application
™
programs such as PhotoFlash, Adobe
Photoshop (versions 2.0.1, 2.5, or
higher), and PicturePress.
You can find definitions of unfamiliar terms in the Glossary. Use the Index to
find instructions for specific tasks or information about specialized topics and
commands.
Preface
xi
Page 12

1
Using Catalogs
PhotoFlash allows you to create collections of images called
use catalogs to organize images that you want to group together. For example,
you could create a catalog that represents all the images you want to use in
one issue of a newsletter, or all your photos from a vacation, or all the images
for a chapter of a book. You can also manipulate multiple images at the same
time from within a catalog.
A catalog is a PhotoFlash document that you can save and open like other
documents. When you open a catalog, you see a series of
reproductions of the images that it represents. You can arrange a catalog’s
thumbnails in any order you like; add to or remove them; or search for
specific images by name, by caption text, or by their resemblance to other
images or a rough sketch.
A catalog doesn’t contain the actual image files that correspond to each
thumbnail. Instead, it contains a small copy (the thumbnail) of each file
and keeps track of the file’s location. The arrangement of thumbnails in a
catalog is completely independent of the arrangement of the image files on
your hard disk.
catalogs.
thumbnails,
You can
or small
1
Page 13
Creating a catalog
You can create a new catalog from within PhotoFlash or from the desktop.
Creating a catalog from within PhotoFlash
To create a new catalog from within PhotoFlash, follow these steps:
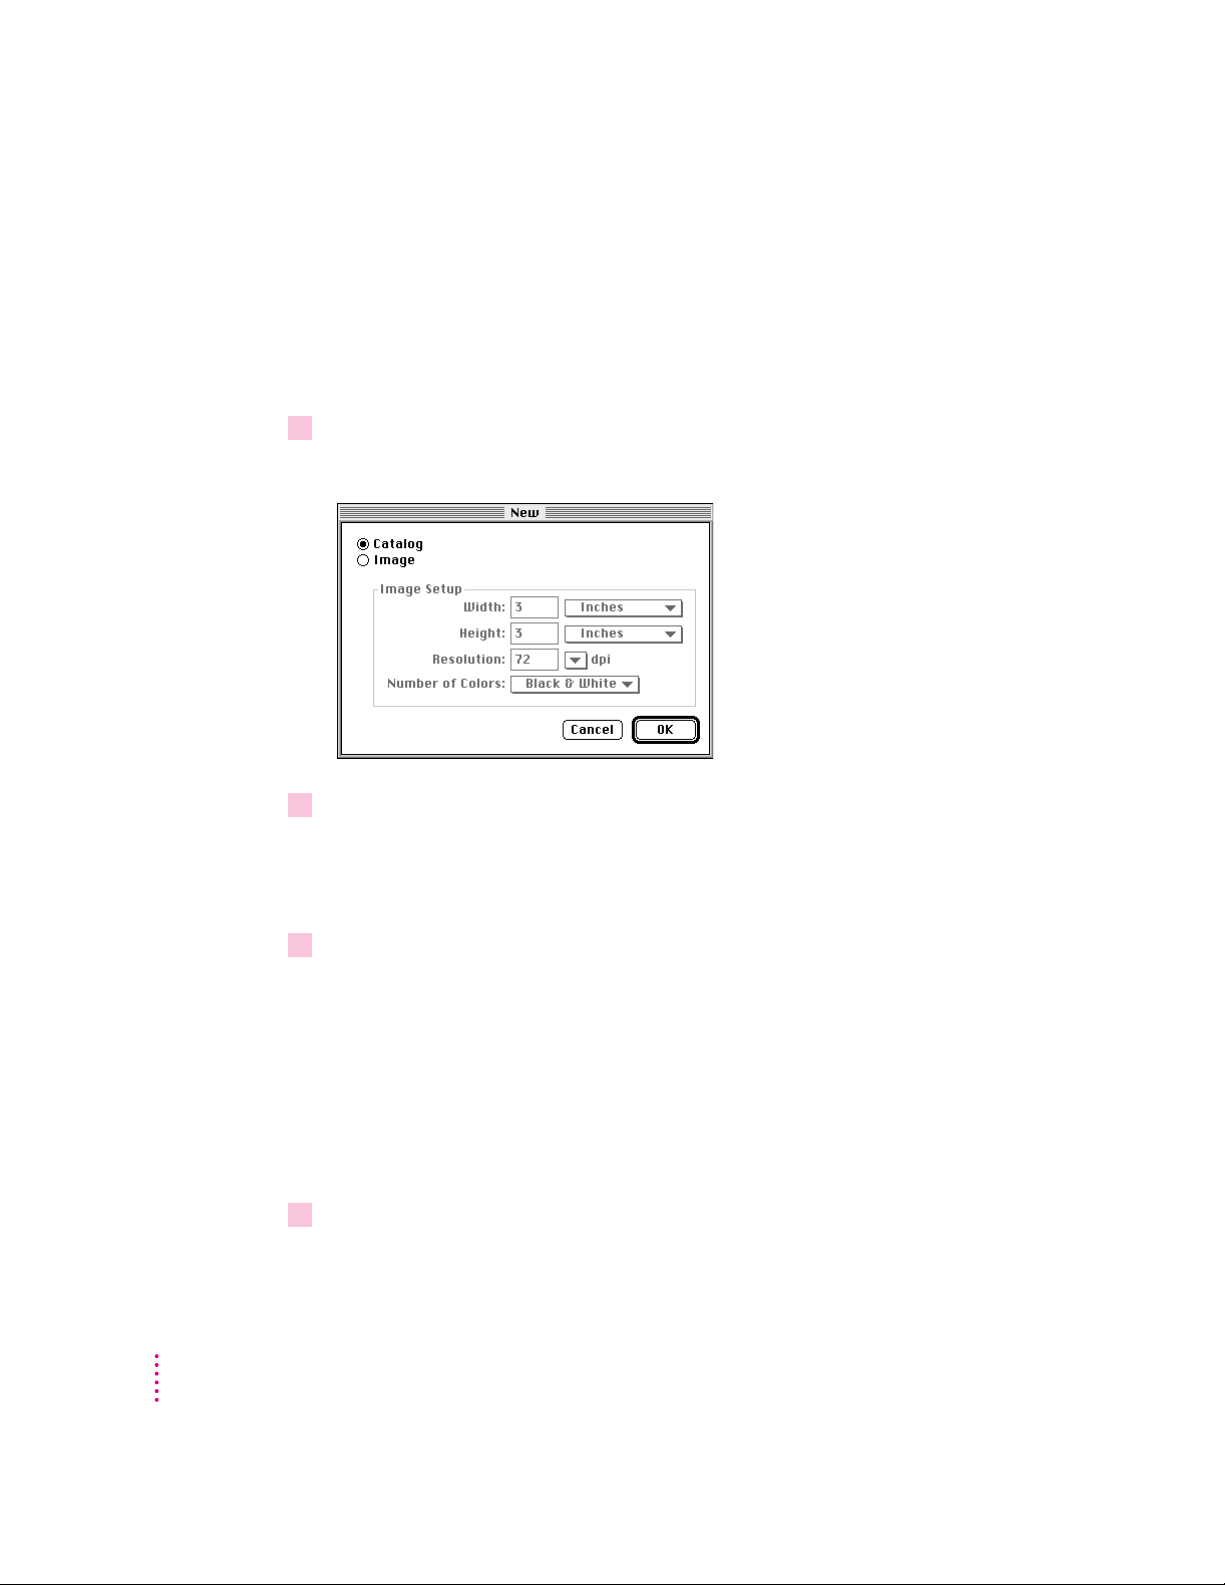
1Choose New from the File menu.
The New dialog box appears.
2If it’s not already selected, click Catalog to indicate that you want to create a new
catalog.
2
When the Catalog button is selected, the Image Setup information in the
dialog box is dimmed.
3 Click OK.
A new, empty catalog document appears. To add images to your new catalog,
follow the directions in “Adding Image Files to a Catalog” later in this
chapter.
Creating a catalog from the desktop
If some of the image files you want to include in a catalog are located within
a folder on the desktop, follow these steps:
1 Locate the PhotoFlash program’s icon on the desktop.
Chapter 1
Page 14
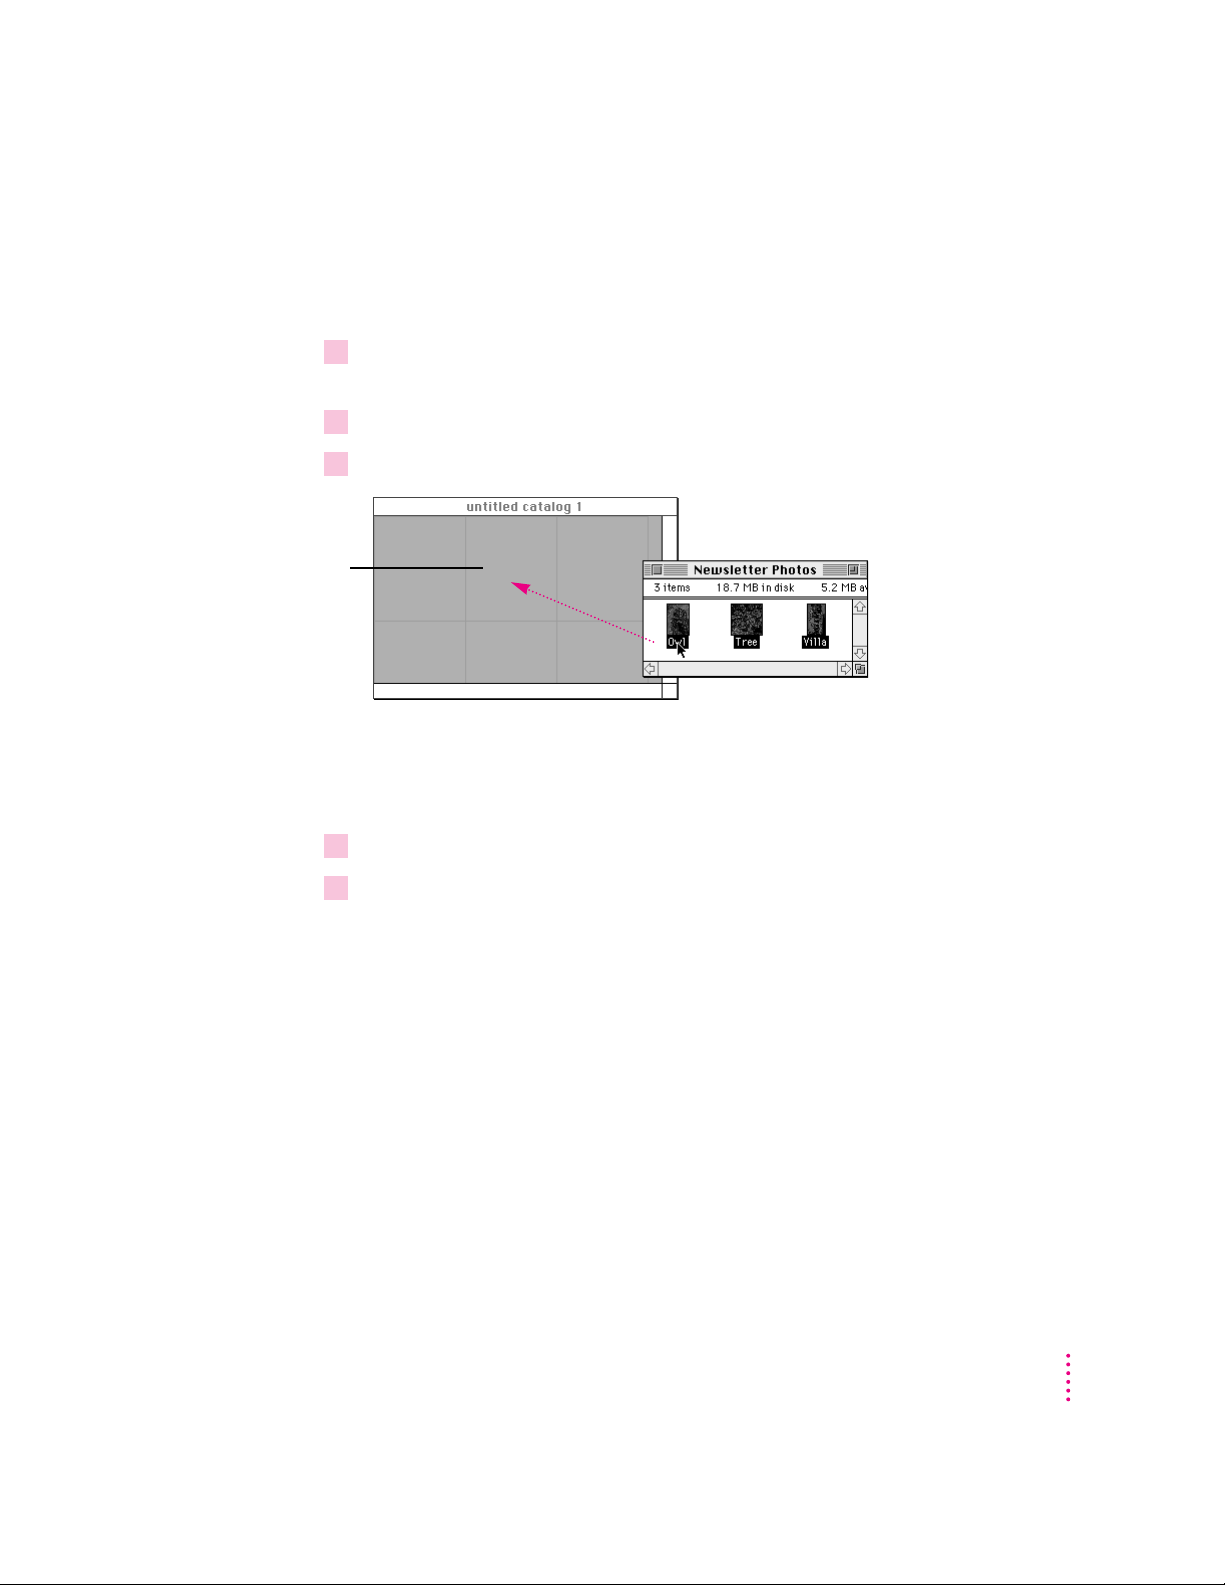
Unless you have moved it since installing PhotoFlash, the PhotoFlash
program should be located in the PhotoFlash folder.
2 Locate the folder that contains the images you want to include in a new catalog.
3 Drag the folder icon over the PhotoFlash icon and release the mouse button.
When the folder you are dragging is directly over the PhotoFlash icon, the
icon becomes highlighted. (If it doesn’t become highlighted, you may need to
rebuild your desktop. To do so, hold down the
x and Option keys and restart
your computer.)
After you release the mouse button, PhotoFlash opens a new catalog and
creates thumbnails in the catalog for all the image files in the folder. Like
most new Macintosh documents, the new catalog isn’t saved on your hard disk
until you choose Save As from the File menu and choose a name and location
for the catalog file.
If you drag several folder icons over the PhotoFlash icon at once, the catalog
will include all the images in all the folders. If you drag individual images
over the PhotoFlash icon, PhotoFlash opens the images instead of creating a
catalog for them.
Using Catalogs
3
Page 15
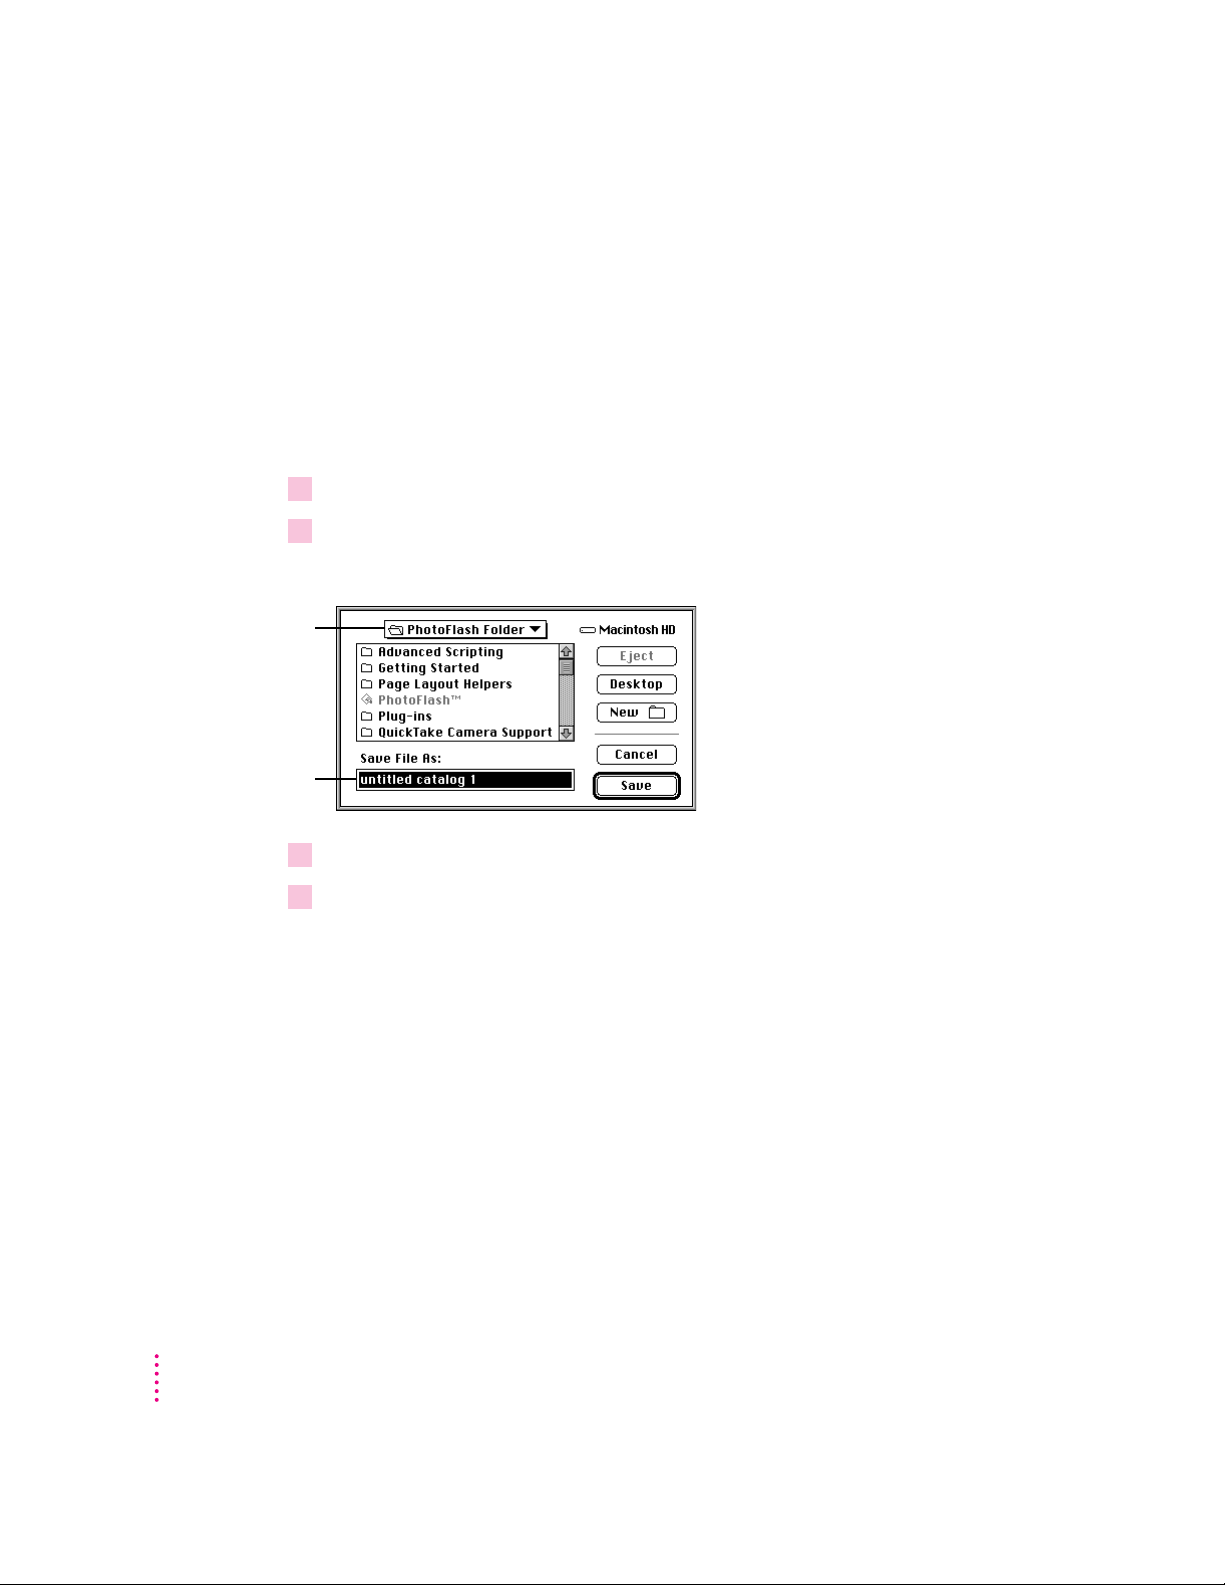
Saving a catalog
1Make sure the catalog you want to save is in the frontmost window.
2Choose Save As from the File menu.
Folder where the
catalog file will be
stored
Catalog name
PhotoFlash creates a new catalog each time you drag icons for folders or disks
that contain image files over its icon. If you want to add images to a catalog
that already exists, follow the directions in “Adding Image Files to a Catalog”
later in this chapter.
To save a new catalog, follow these steps:
The Save As dialog box appears.
4
3 Use the dialog box to give the catalog file a name and select a location for it.
4Click Save.
As with most other Macintosh documents, after you’ve saved a catalog for the
first time you can continue working on it and save it again at any time by
choosing Save from the File menu.
Chapter 1
Page 16
Opening and closing a catalog
You can open a previously saved catalog from within PhotoFlash or from
the desktop.
Opening a catalog from within PhotoFlash
To open a catalog file from within PhotoFlash, follow these steps:
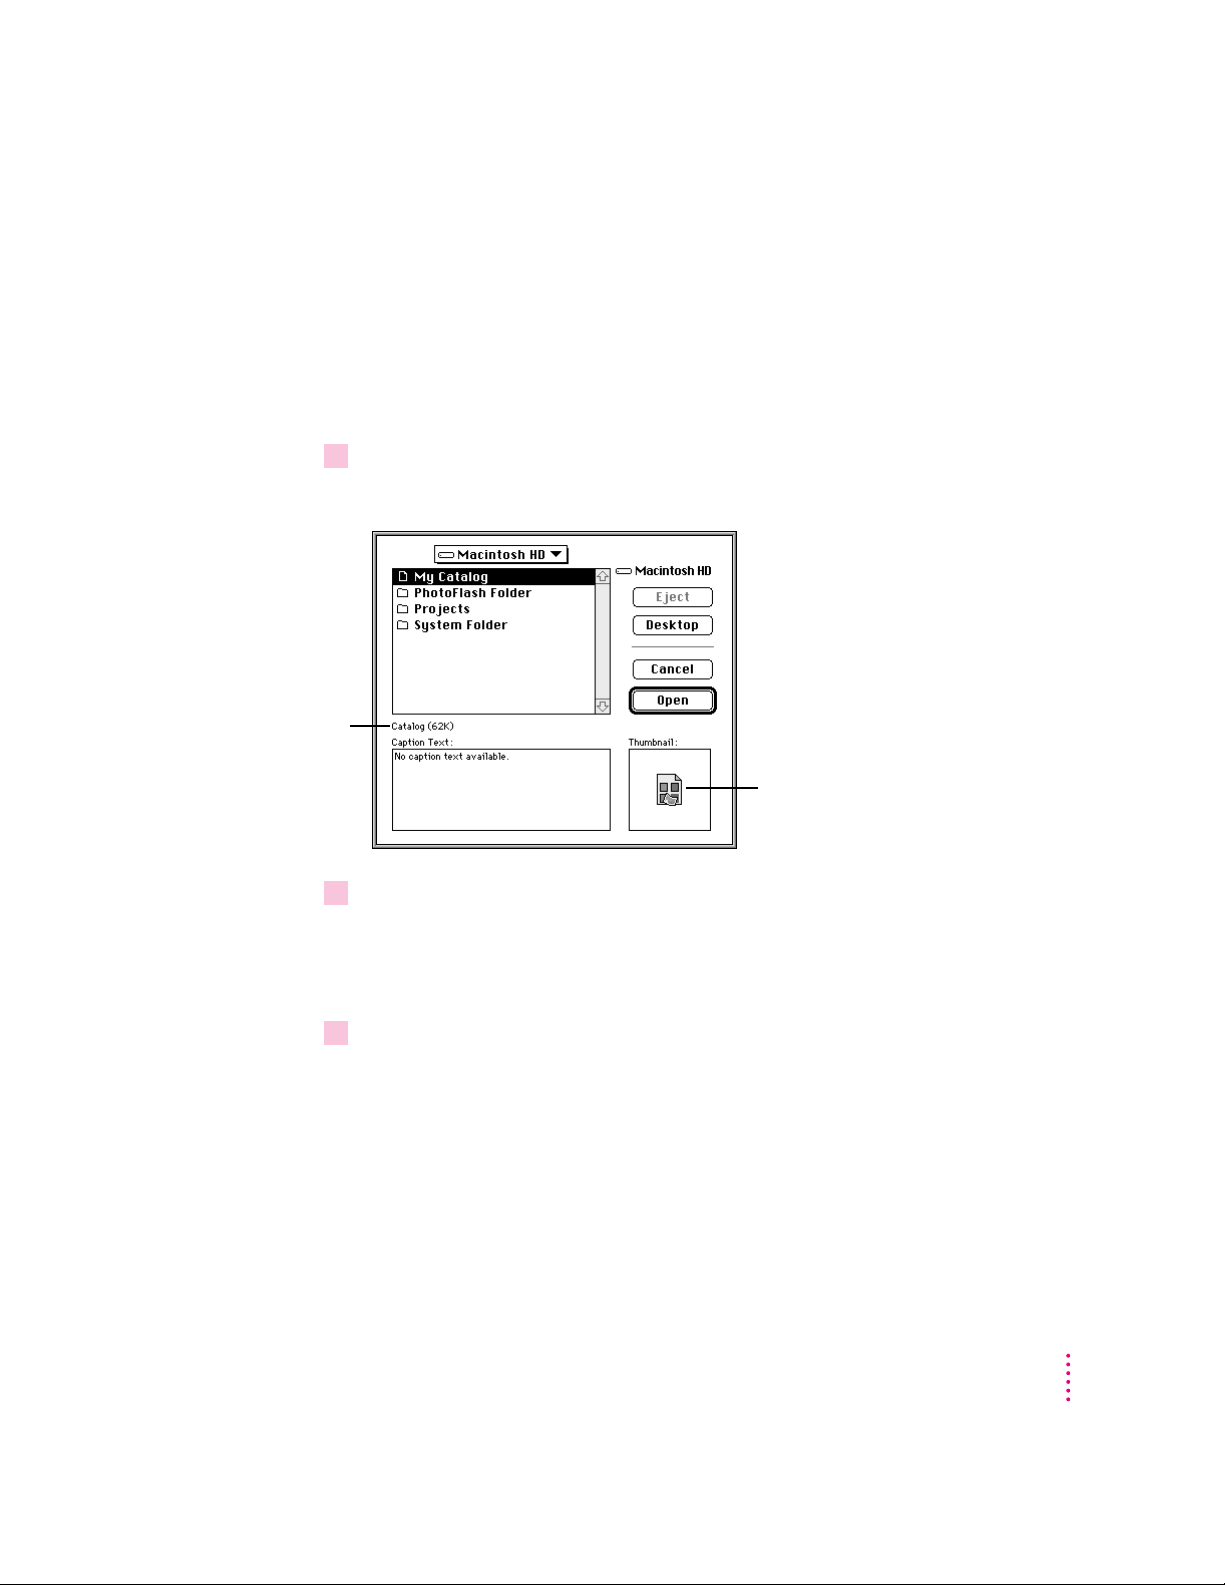
1Choose Open from the File menu.
The Open dialog box appears.
This shows the
amount of disk
space used to
store the selected
catalog file.
This icon indicates that
the selected file is a
catalog.
2 Use the Open dialog box to locate the catalog file you want to open.
When you select a catalog file, the catalog icon appears in the lower-right
corner of the dialog box, as shown in the figure. When you select an image
file, the image’s thumbnail (if one is available) appears instead.
3 Click Open.
PhotoFlash opens the catalog and, if necessary, updates its thumbnails.
Using Catalogs
5
Page 17

Opening a catalog from the desktop
To open a catalog file from the desktop, double-click its icon.
Closing a catalog
To close a catalog, click its close box (in the upper-left corner of its window)
or choose Close from the file menu while the catalog’s window is the
frontmost window. If you haven’t saved the catalog or if you’ve changed it
since the last time you saved, a dialog box appears asking whether you want
to save your changes.
If the catalog you are closing includes thumbnails for images that are
currently open in PhotoFlash, and if any of those images or their captions
have been changed and haven’t yet been saved, PhotoFlash displays a dialog
box asking whether you want to save the images before closing the catalog.
Duplicating a catalog
To duplicate a catalog, make sure it’s in the frontmost window and choose
Duplicate Catalog from the File menu.
An exact duplicate of the catalog appears in a new untitled window.
Adding image files to a catalog
To add one or more image files to a catalog, you can drag their icons from the
Finder desktop into a catalog window or use the Add to Catalog command.
This section describes both methods.
If one open catalog includes thumbnails for the image files you want to add to
another open catalog, you can copy and paste the thumbnails or drag them
between the catalog windows. See “Moving and Copying Thumbnails” later
in this chapter for details.
6
Chapter 1
Page 18
1Make sure both the catalog window and the icons for the files you want to add are
2Select the icons for the image files or folders.
3 Drag the selected icons from the desktop into the the catalog window.
Drag icons into the
catalog window to
add the images they
represent.
Dragging image file icons from the desktop to an open catalog
To drag icons for image files or folders that contain image files from the
desktop to an open catalog, follow these steps:
visible.
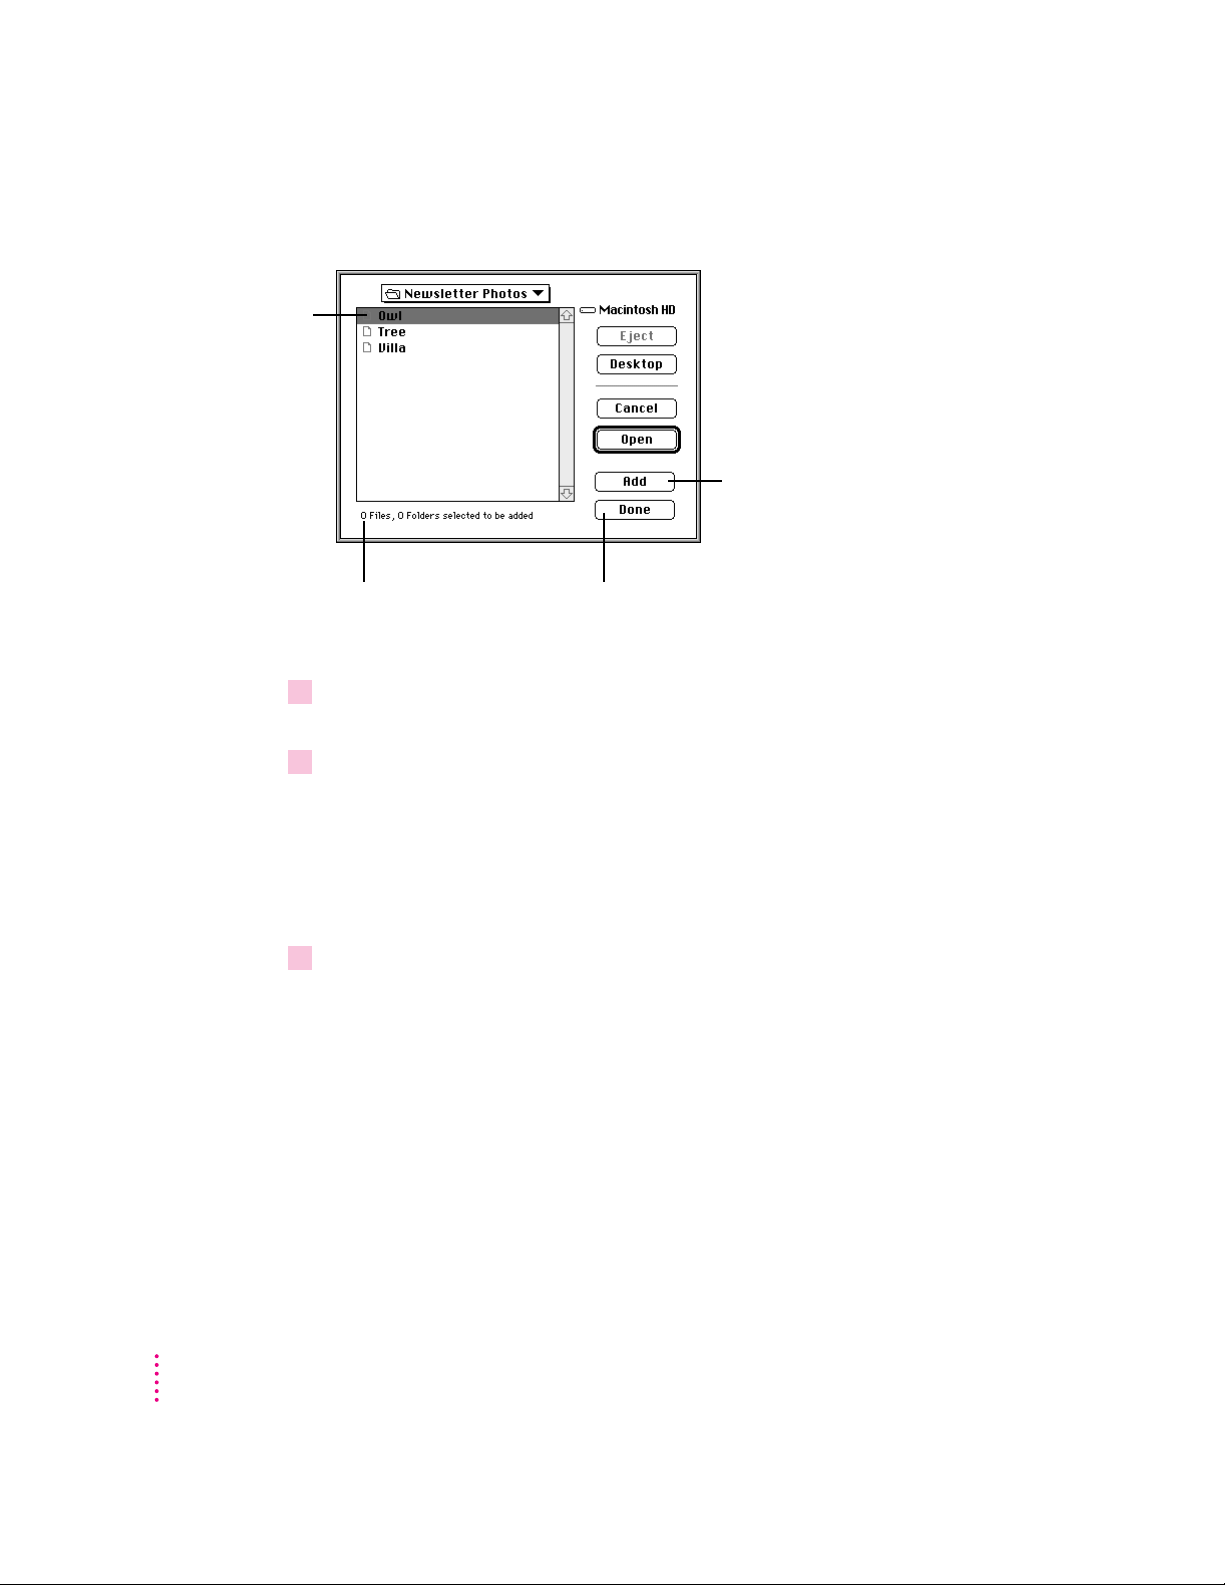
Using the Add to Catalog command
To add image files to a catalog from within PhotoFlash, follow these steps:
1Make sure the catalog to which you want to add images is the frontmost window.
2Choose Add to Catalog from the File menu.
Using Catalogs
7
Page 19
When you click
Add, PhotoFlash
removes the
selected file or
folder from this list
and then adds it to
the catalog when
you click Done.
The Add to Catalog dialog box appears.
Click here to include the
selection in the list of files
or folders to be added to
the catalog.
This shows how many files
and folders you’ve selected to
be added to the catalog.
Click here
when you’ve
finished
selecting files.
3 Use the Add to Catalog dialog box to locate and select the first image file or folder of
image files that you want to add.
4 Click Add.
The selected file disappears from the list of files and folders. The text at
the bottom of the dialog box indicates how many folders and files you have
selected so far. If you wish, you can add other image files or folders. Only
image files (whether selected individually or within a folder) will show up in
the catalog.
5When you have finished adding image files to the catalog, click Done.
After a few moments, thumbnails for the image file or files you selected
appear in the catalog. If you change your mind about including any of the
images, select the ones you don’t want and press the Backspace or Delete key.
8
Chapter 1
Page 20

Resizing catalog windows
You can resize a catalog window the same way you resize any Macintosh
window, by dragging the resize box in its lower-right corner. When you do so,
the overall ordering of the thumbnails from the beginning to the end of the
catalog remains the same, but PhotoFlash rearranges them so the width of
each row fits in the window.
You can also use a catalog window’s Zoom box to toggle between window
sizes.
To toggle a window’s size between its current dimensions and the maximum
dimensions required to show as many thumbnails as possible, follow these
steps:
1Click the catalog window’s Zoom box (in its upper-right corner).
The window’s width increases as much as necessary to accommodate its
thumbnails, and its height changes so that either all the thumbnails are
visible or, if all the thumbnails won’t fit on the screen, until the window fills
the screen.
2 To return the catalog window to its original size, click the Zoom box again.
To toggle a window’s size between its current height and the maximum height
required to show as many thumbnails as possible, without changing the
number of thumbnails in a row, follow these steps:
1Hold down the Option key and click the catalog window’s Zoom box (in the window’s
upper-right corner).
If any blank space is visible toward the right side of the window, the window’s
width decreases to eliminate the space, and the window’s height increases
until either all the thumbnails are visible or, if all the thumbnails won’t fit in
the window, until the height of the window matches the height of the screen.
2 To return the catalog window to its original size, click the Zoom box again.
Using Catalogs
9
Page 21
Working with thumbnails
You can arrange thumbnails in a catalog however you wish. This section
describes how to select thumbnails, how to move them within or between
catalogs, how to sort them within a single catalog, and how to open the
images they represent.
You can manipulate one or more images from within a catalog by selecting
their thumbnails and choosing commands in the Image, Enhance, or Script
menus. For information about applying specific commands to thumbnails, see
Chapter 4, “Manipulating Images,” Chapter 5, “Enhancing Images,” and
Chapter 7, “Automating Your Work.”
If you change an image represented by a thumbnail in an open catalog, the
label “Changed” appears across the thumbnail to indicate that the catalog
thumbnail hasn’t yet been updated. PhotoFlash updates the thumbnail the
next time you open the catalog.
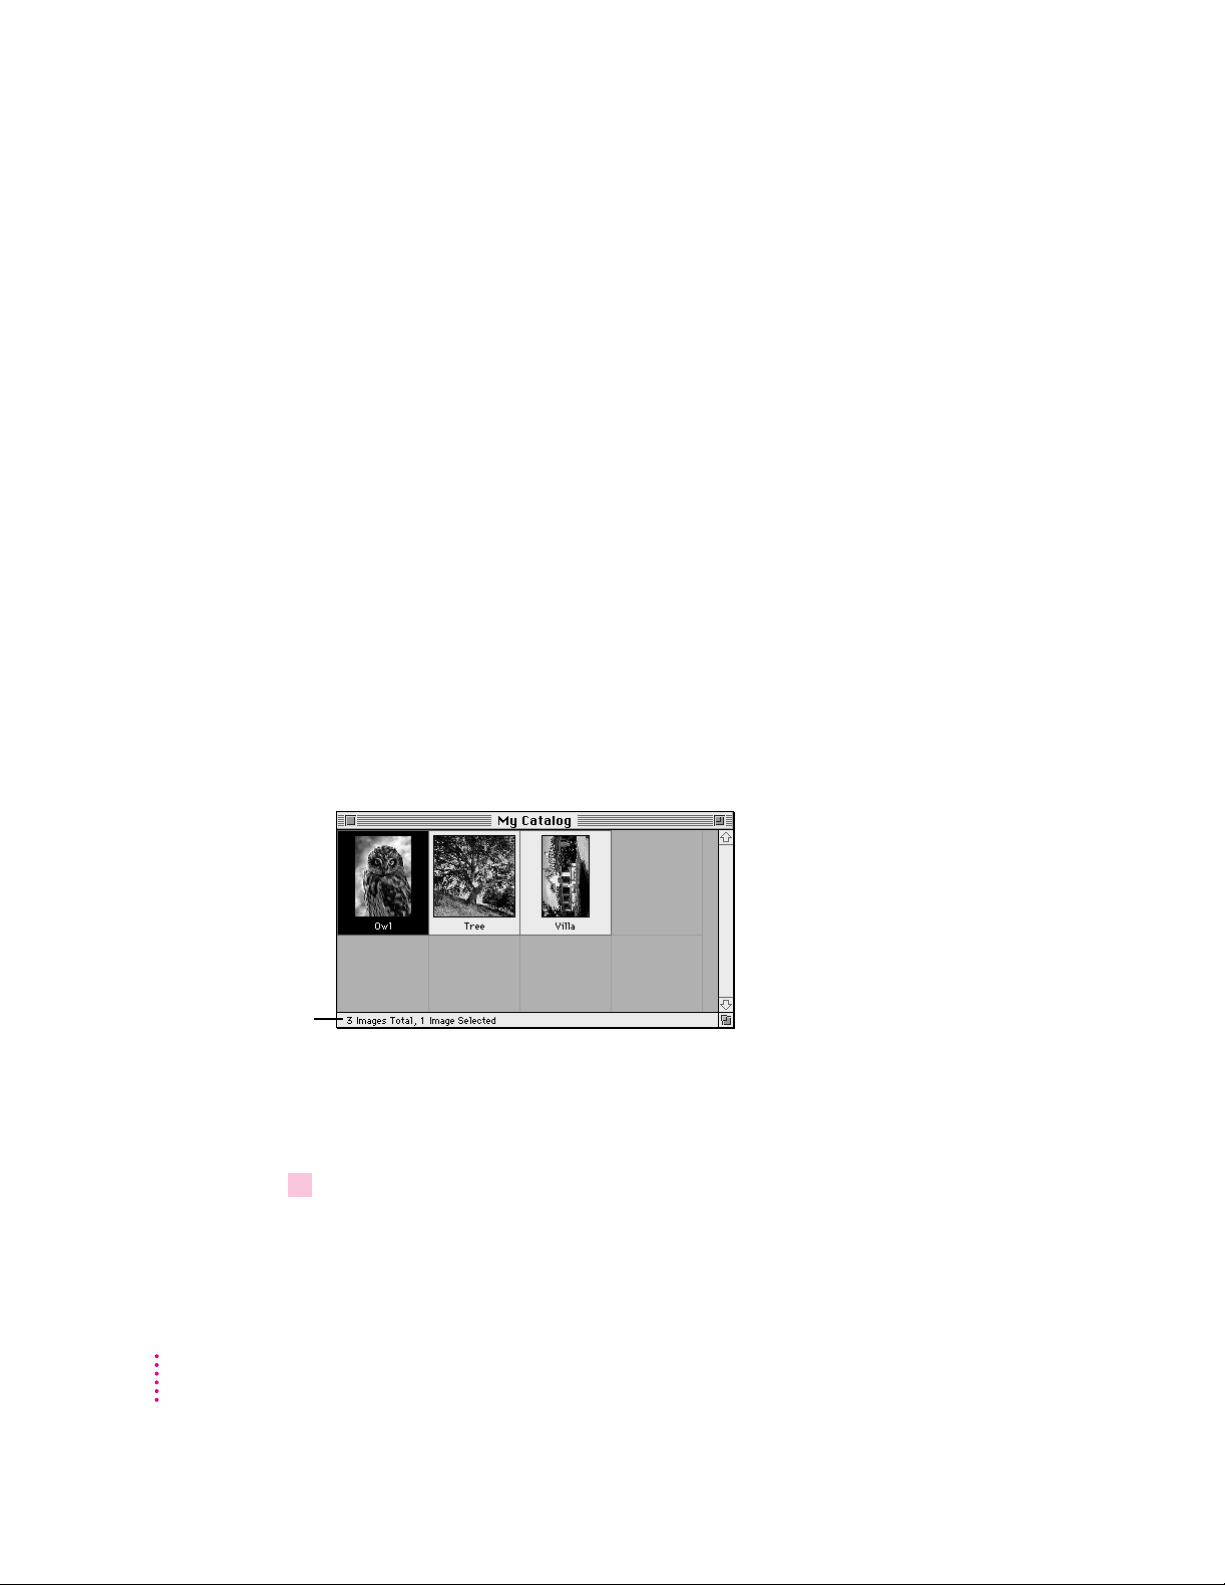
Selecting thumbnails
To select a single thumbnail, just click it. The area around the thumbnail’s
image becomes highlighted when the thumbnail is selected.
Total number of
images in catalog and
total number selected
10
Chapter 1
Selecting separate thumbnails
To select several thumbnails in different parts of the catalog, follow
these steps:
1 Click the first thumbnail you want to select.
Page 22
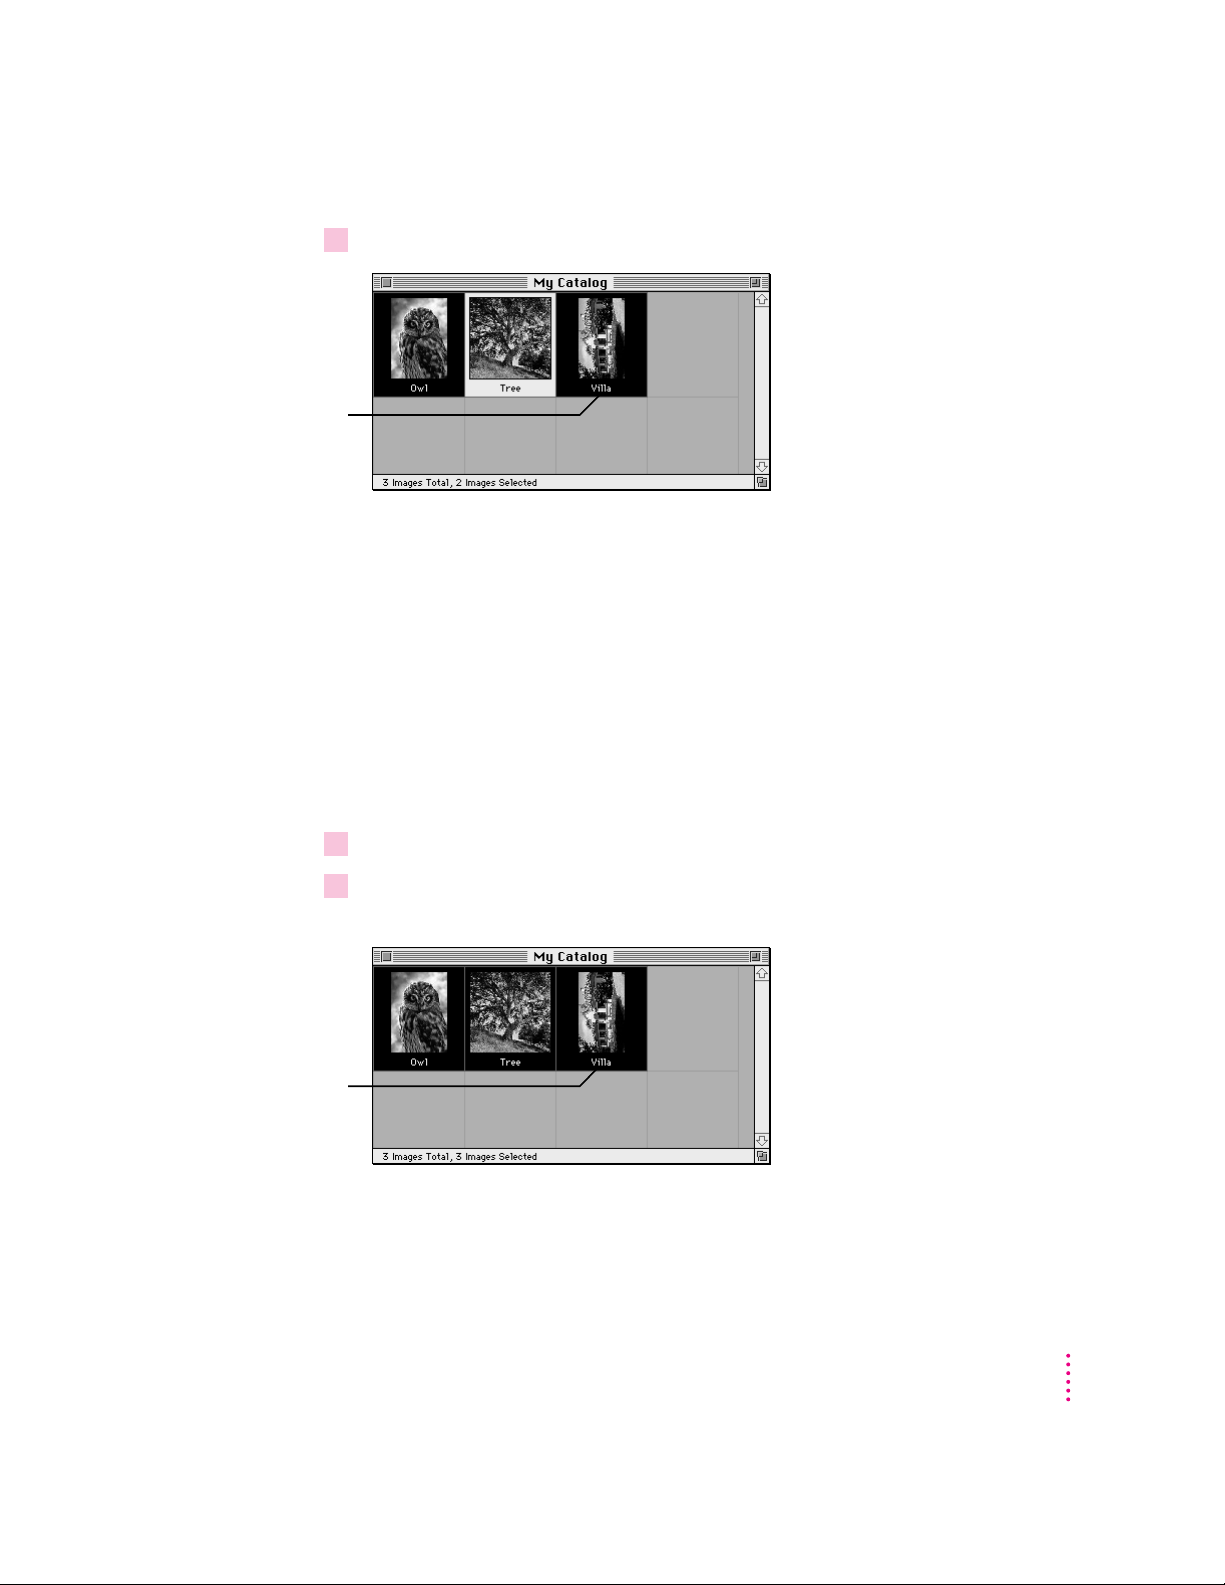
2Hold down the Shift key (or the x key) and click the other thumbnails you want to select.
Shift-click
additional
thumbnails to
select them.
While you’re holding down the Shift key, each unselected new thumbnail
you click becomes selected, and previously selected thumbnails remain
selected. (Each selected thumbnail you click becomes unselected.) Only
thumbnails you click are added to the selection, even if they are separated by
other thumbnails.
Holding down the x key has the same effect as holding down the Shift key
when you’re selecting thumbnails.
Selecting a range of thumbnails
To select a continuous range of thumbnails, follow these steps:
1 Click the thumbnail at one end of the range of thumbnails you want to select.
2Hold down the Option key and click the thumbnail at the other end of the range you want
Option-click a
second thumbnail
to select a range.
to select.
Using Catalogs
11
Page 23

After you’ve selected one or more thumbnails, you can move them to any
location in the same catalog or in a different catalog. The next two sections
describe how.
Moving and copying thumbnails
You can move thumbnails within a catalog by selecting and dragging them.
When you drag thumbnails between catalogs, PhotoFlash inserts copies of the
thumbnails in the second catalog.
You can also move thumbnails between catalogs by cutting and pasting them.
Moving or copying thumbnails by dragging
You can drag selected thumbnails either within the same catalog or to a
different catalog. If you are copying thumbnails between catalogs, make sure
both catalog windows are open and visible on your screen.
To move or copy thumbnails by dragging them, first select the thumbnails
(see “Selecting Thumbnails” earlier in this chapter if you need instructions).
Then follow these steps:
1Position the pointer over one of the selected thumbnails.
2 Drag the selected thumbnails to the location to which you want to move or copy them.
12
When you drag the pointer between two thumbnails, the vertical line between
them changes to red to indicate where the selected thumbnails will be
inserted if you release the mouse button.
If you drag the pointer slowly toward the right or bottom edge of a window
with active scroll bars, the window scrolls in the same direction.
3When the pointer is over the location to which you want to move the selected
thumbnails, release the mouse button.
If the new location is in the same catalog, PhotoFlash moves the thumbnails
to their new location in the order you selected them and rearranges the other
thumbnails in the catalog as necessary. If the new location is in a different
catalog, PhotoFlash copies the thumbnails in the order you selected them and
rearranges the other thumbnails in the second catalog as necessary. The
thumbnails remain selected after you move them.
Chapter 1
Page 24

Note: A catalog can contain only one thumbnail for each of its images. If you
attempt to drag several thumbnails to another catalog that already contains
some of the dragged thumbnails, PhotoFlash copies only those that are new.
Copying, cutting, and pasting thumbnails
When you copy or cut thumbnails and then paste them into a catalog,
PhotoFlash pastes them after any thumbnails that are currently in the catalog.
Therefore, pasting thumbnails within the same catalog isn’t useful unless you
want to move them to the end.
To move thumbnails between catalogs by cutting and pasting, first select the
thumbnails you want to move as described in “Selecting Thumbnails” earlier
in this chapter. Then follow these steps:
1Choose Copy or Cut from the Edit menu.
2 Open the catalog you are moving the thumbnails to or activate its window.
3Choose Paste from the Edit menu.
The thumbnails you copied appear, selected and in the order you selected
them, after the last thumbnail in the catalog.
Note: A catalog can contain only one thumbnail for each of its images. If you
attempt to paste thumbnails into a catalog that already contains some of the
same thumbnails, PhotoFlash pastes only those that are new
Sorting thumbnails
You can sort thumbnails in a catalog by filename or by date. Sorting occurs
only when you choose a PhotoFlash sort command from the Search menu.
You can change the thumbnail order any time you want by moving thumbnails
around as described in the previous section.
To sort a catalog’s thumbnails, follow these steps:
1Make sure the catalog whose thumbnails you want to sort is in the frontmost window.
2Choose Sort by Filename or Sort by Date from the Search menu.
PhotoFlash rearranges the catalog’s thumbnails by filename or by the date on
which each file was last modified. After sorting a catalog’s thumbnails, you
can rearrange them in any way you choose.
Using Catalogs
13
Page 25

Removing thumbnails from a catalog
To remove one or more thumbnails from a catalog, follow these steps:
1 Select the thumbnail or thumbnails you want to remove.
For detailed instructions, see “Selecting Thumbnails” earlier in this chapter.
2Press the Backspace or Delete key or choose Clear from the Edit menu.
Or press the Clear key if your keyboard has one.
The thumbnails you selected disappear, and PhotoFlash rearranges the
remaining thumbnails as necessary.
Opening image files from a catalog
To open an image file from within a catalog that includes the image, just
double-click the image’s thumbnail.
To open several images from within a catalog, follow these steps:
1 Select the thumbnails for the images you want to open as described in “Selecting
Thumbnails” earlier in this chapter.
2Double-click any of the selected thumbnails.
PhotoFlash opens the image files for all the selected thumbnails. If any of the
image files represented by selected thumbnails are on a disk or other volume
that isn’t visible on your desktop, PhotoFlash asks you to mount the volume.
Getting information about image files
You can view information about an image in a catalog, including its caption,
by opening its Get Info window.
To open the Get Info windows for one or more images from within a catalog,
follow these steps:
1Select the thumbnail or thumbnails for which you want to view information.
For instructions, see “Selecting Thumbnails” earlier in this chapter.
14
Chapter 1
Page 26
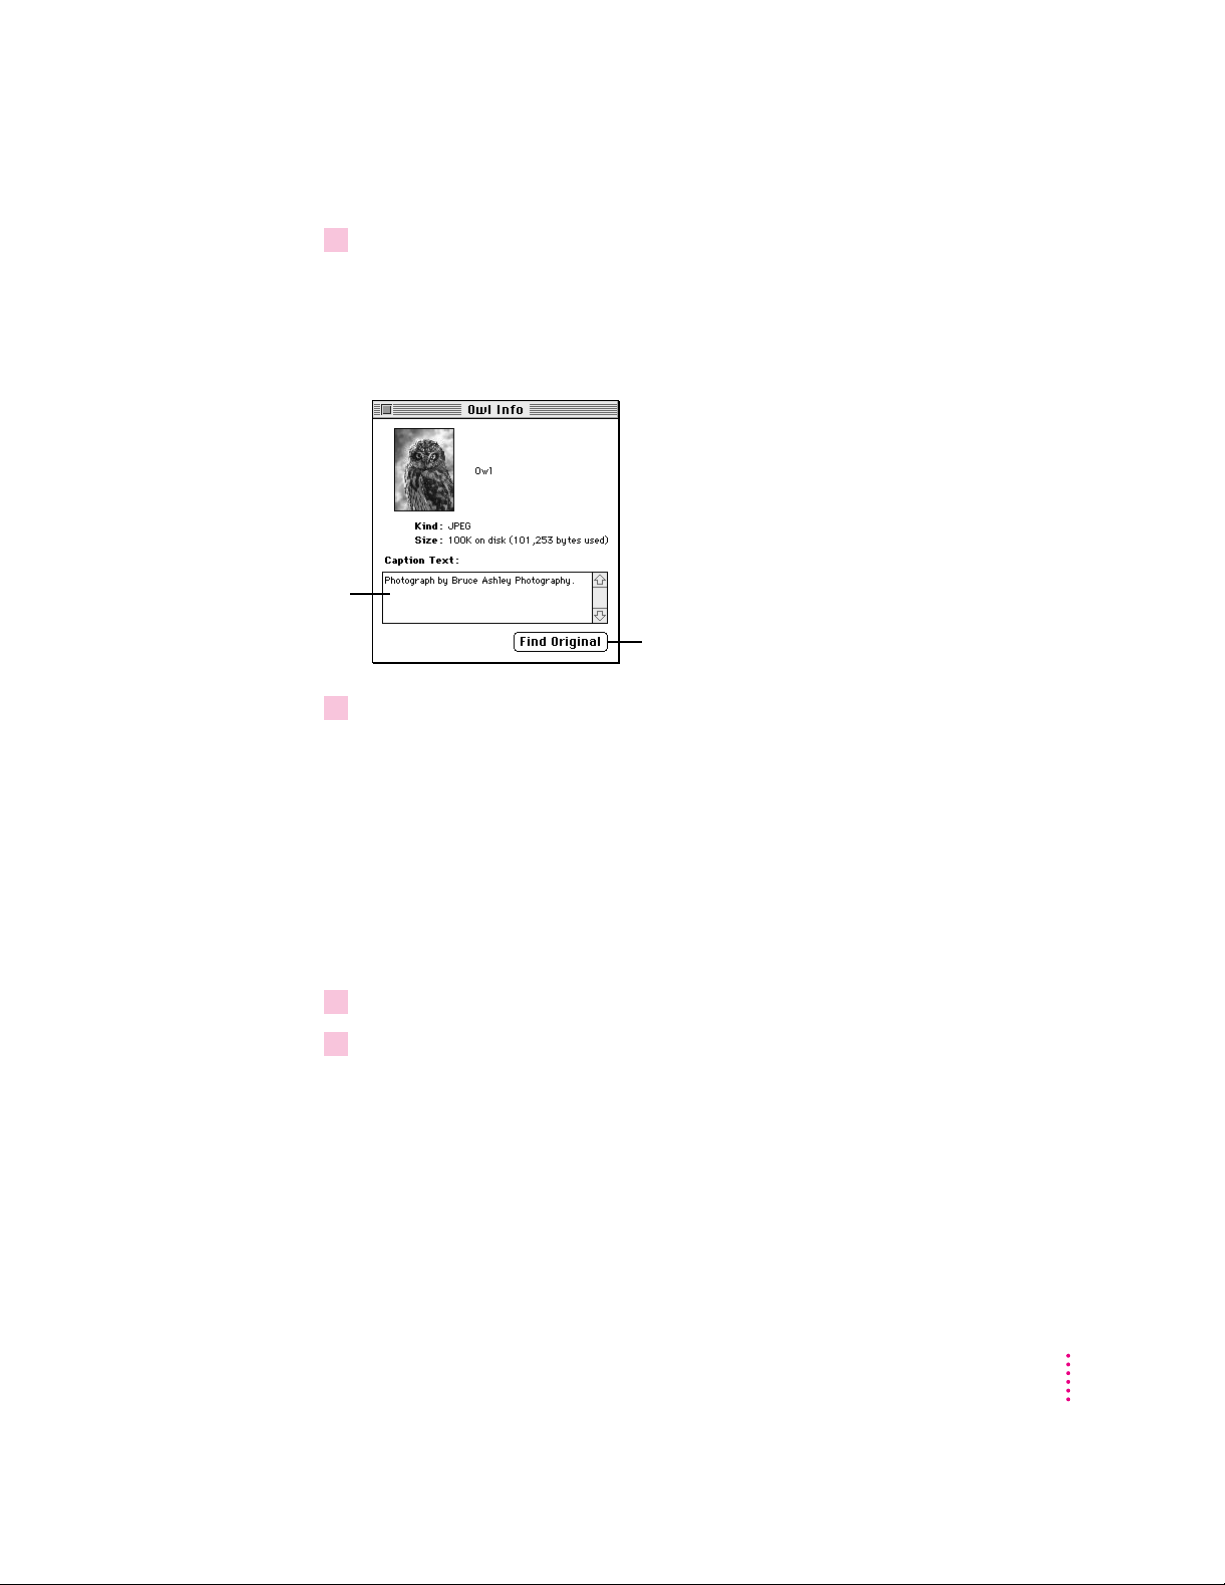
2Choose Get Info from the File menu.
Type or edit
caption text here.
3When you’re finished, click the Get Info window’s close box to close the window.
The Get Info window for the thumbnail you selected appears. If you selected
several thumbnails, a Get Info window appears for each of them. You can add
or edit caption text in this window. To locate the image file’s icon on the
desktop, click the Find Original button.
Click here to locate the image
file’s icon on the desktop.
You can also open the Get Info window for an image file that is currently
open in PhotoFlash. To do so, make sure the the image’s window is active and
choose Get Info from the file menu.
Printing a catalog
1Make sure the catalog you want to print is in the frontmost window.
2Choose Print from the File menu.
To print the thumbnails in a catalog in a form similar to a contact sheet for a
roll of film, follow these steps:
Using Catalogs
15
Page 27
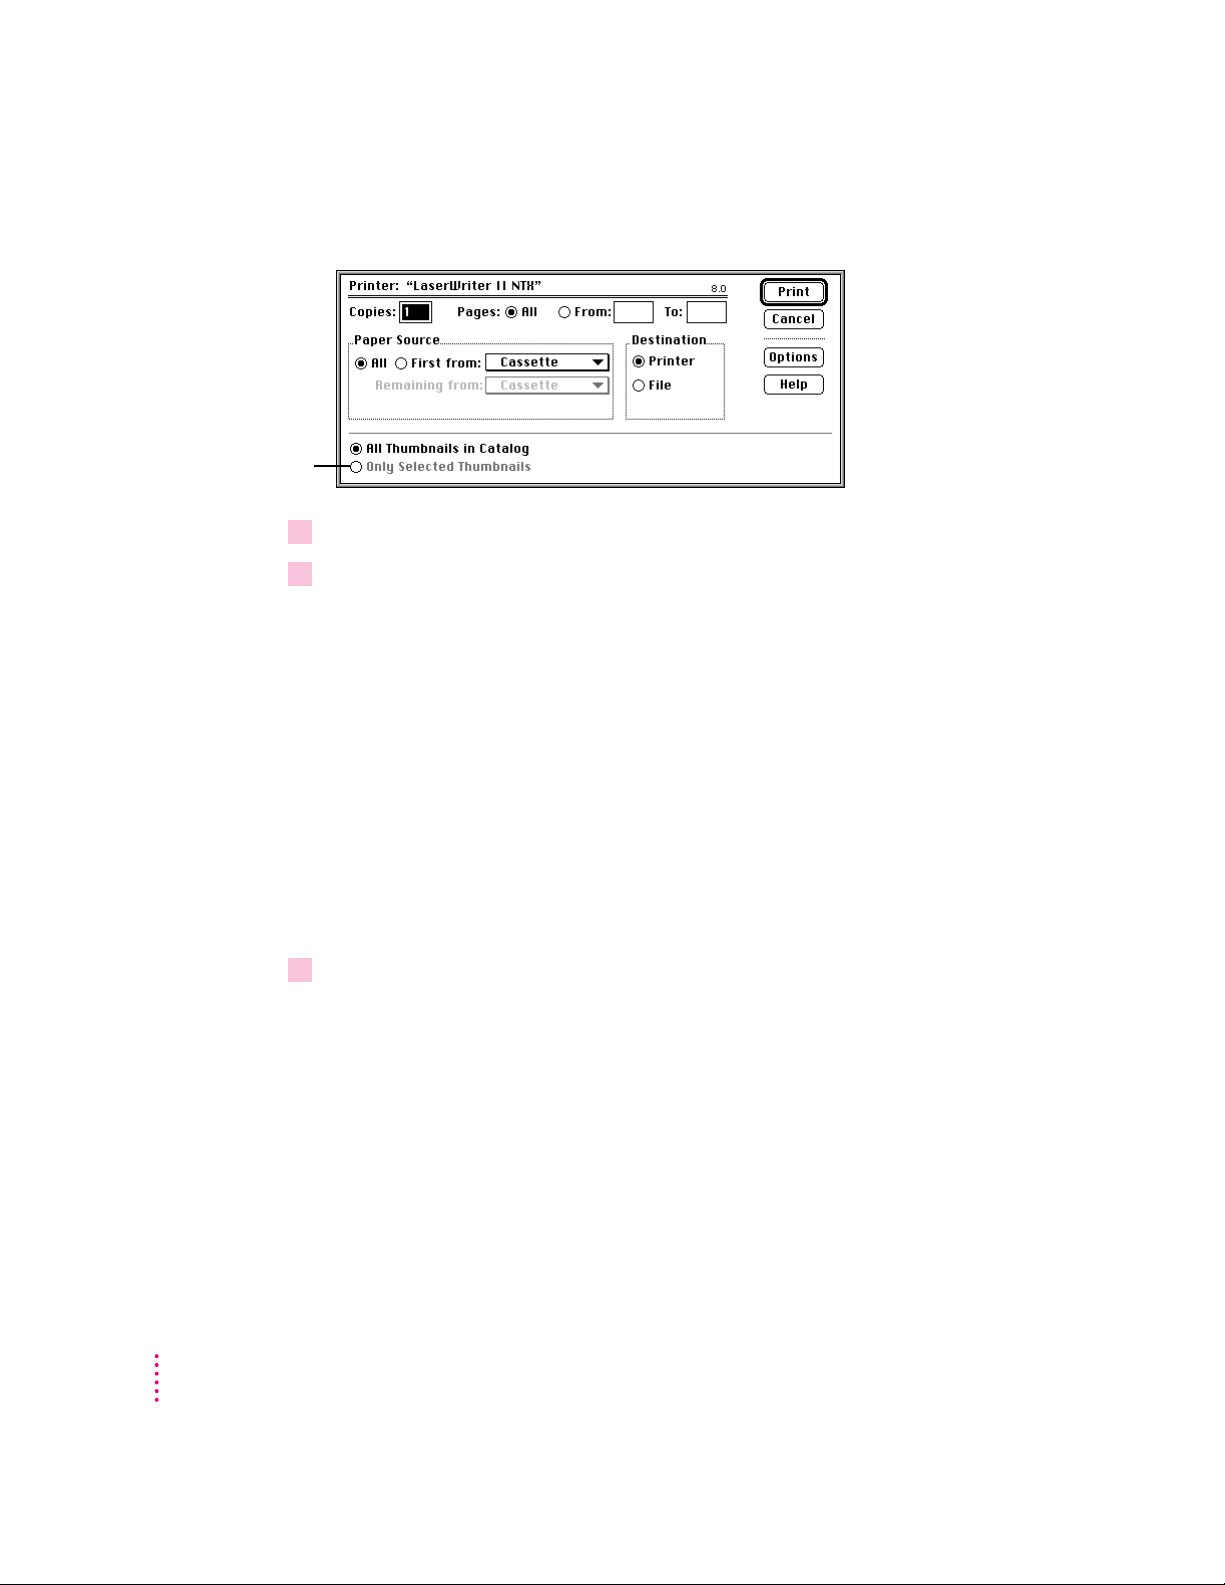
The Print dialog box appears.
Click here to print
only the selected
thumbnails.
3Adjust the settings in the Print dialog box.
4 Click OK.
PhotoFlash prints the catalog as you specified.
Searching for images
You can use commands in the Search menu to search for images in one
catalog or in all of your open catalogs by name, by caption text, or by
resemblance to other images or a rough sketch.
16
Searching for images by caption text
To search for images by caption text, make sure the catalogs you want to
search are open, then follow these steps:
1Choose Caption Text from the Search menu.
Chapter 1
Page 28
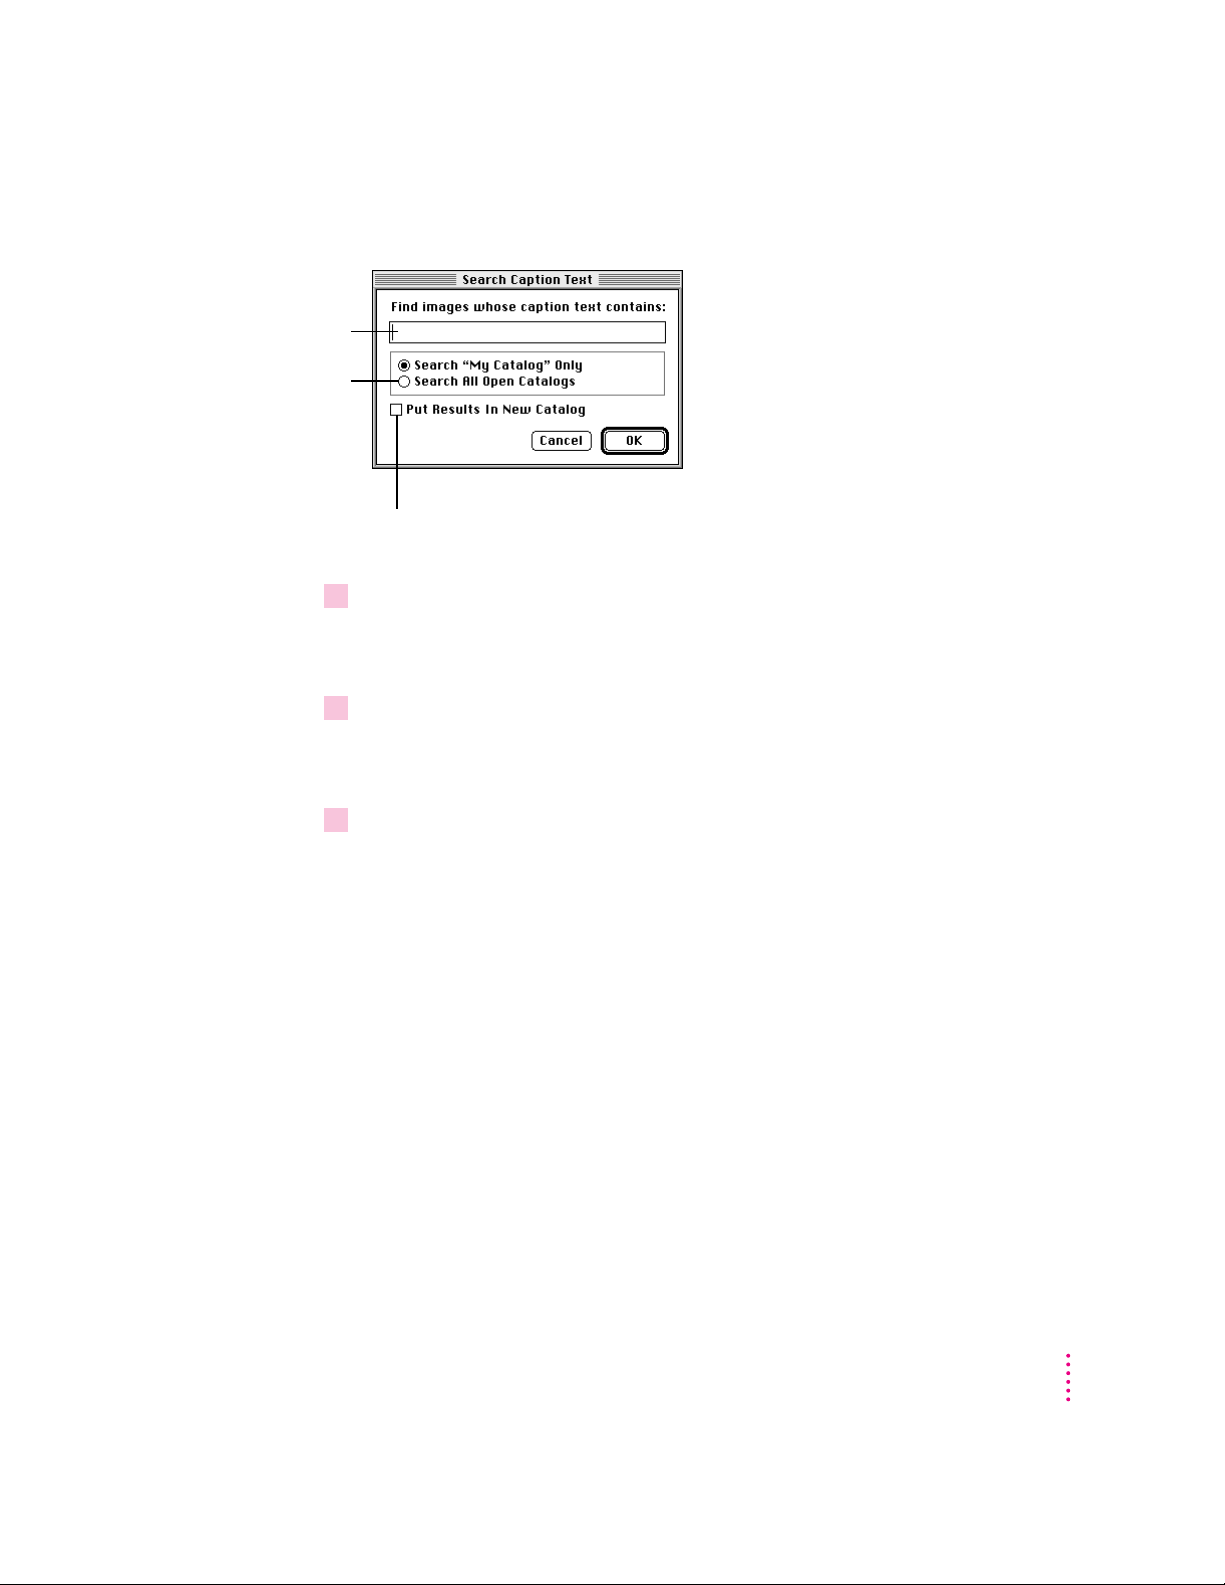
Type the text you
want to find here.
Click here to
request a search
of all open
catalogs.
2 Type the text you want to find.
3Select the search options you want.
The Search Caption Text dialog box appears.
Click here to request a new
catalog that contains copies of
the matching thumbnails.
Capitalization and diacritical marks don’t matter. PhotoFlash looks for images
with captions that include the text you specify.
The default settings cause PhotoFlash to search only one catalog and to
highlight the selected images in that catalog.
4Click OK or press Return.
When the search is complete, PhotoFlash selects the matching thumbnails in
their original catalogs or, if you selected the Put Results in New Catalog
checkbox, creates a new untitled catalog containing copies of all matching
thumbnails.
Using Catalogs
17
Page 29

1Choose Filenames from the Search menu.
Type the filename
you want to find here.
Click here to request
a search of all open
catalogs.
2Type the filename or a portion of the filename you want to find.
Searching for images by filename
To search for images by filename, make sure the catalogs you want to search
are open, then follow these steps:
The Search Filenames dialog box appears.
Click here to request a new
catalog that contains copies of
the matching thumbnails.
Capitalization and diacritical marks don’t matter. PhotoFlash looks for images
with filenames that include the text you specify.
18
3Select the search options you want.
The default settings cause PhotoFlash to search only one catalog and to
highlight the selected images in that catalog.
4Click OK or press Return.
When the search is complete, PhotoFlash selects the matching thumbnails
in their original catalogs or, if you selected the Put Results in New Catalog
checkbox, creates a new untitled catalog containing copies of all matching
thumbnails.
Chapter 1
Page 30
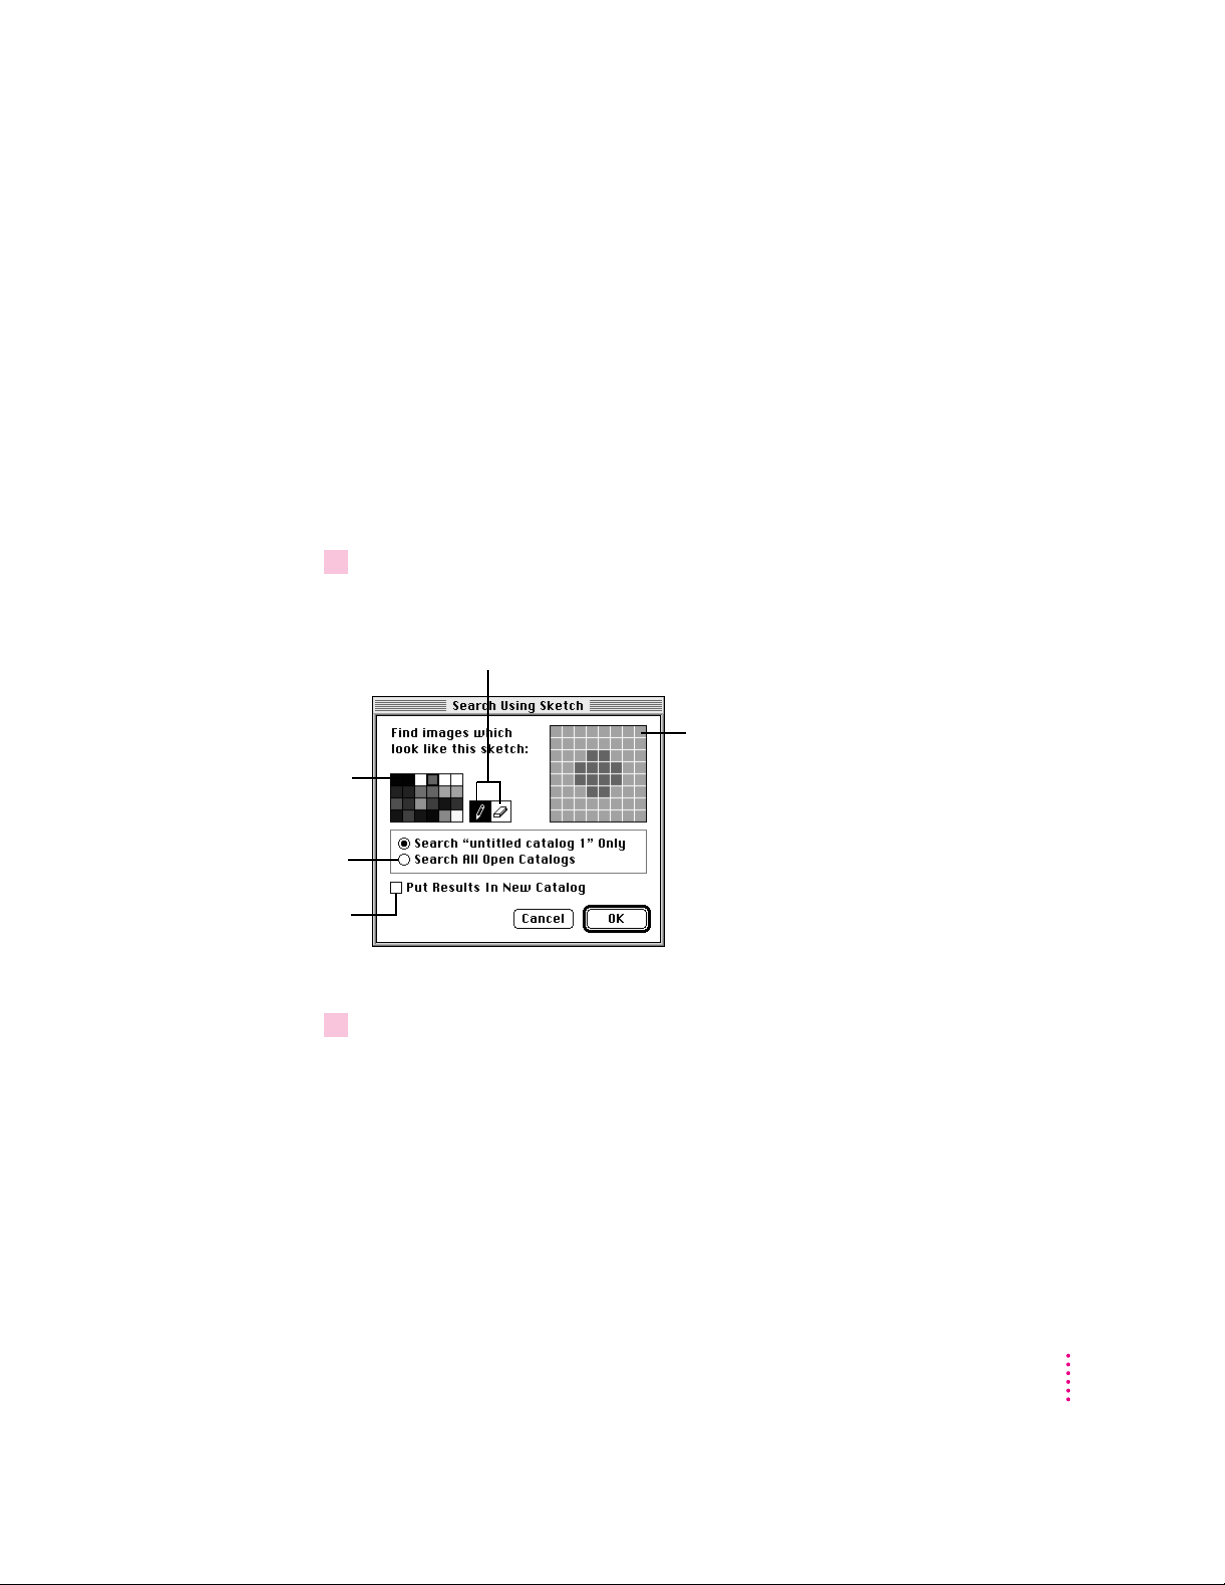
1Choose Using Sketch from the Search menu.
Click here to
select a color.
Click here to request
a search of all open
catalogs.
Searching for images that resemble a sketch
You can use the Using Sketch command in the Search menu to draw a rough
sketch of an image and search for catalog images that resemble the sketch.
The Using Sketch command can identify general similarities based on color
and (to a lesser extent) shape, but may not always be able to locate an
individual image. However, it’s worth trying if you don’t know anything about
the image’s caption or filename. It’s also useful if you want to identify several
images with similar colors or compositions.
To search for images by their similarity to a sketch, make sure the catalogs
you want to search are open, then follow these steps:
The Search Using Sketch dialog box appears.
Click here to select the
Pencil or Eraser tool.
Draw a rough
sketch of the
image you want
to find here.
Click here to request a
new catalog that
contains copies of the
matching thumbnails.
2 Use the color palette and the Pencil and Eraser tools to create a sketch that resembles
the image you want to find.
If you click on any thumbnail while this dialog box is open, a sketch based on
that thumbnail appears in the sketch area. You can then use the Pencil tool to
add to the sketch and the Eraser tool to erase. To erase the whole sketch and
start over, double-click the Eraser tool.
Using Catalogs
19
Page 31

3Select the search options you want.
The default settings cause PhotoFlash to search only one catalog and to
highlight the selected images in that catalog. It’s usually a good idea to select
the Put Results in New Catalog option, because PhotoFlash sorts the
thumbnails in the new catalog in order of their similarity to the sketch.
4Click OK or press Return.
When the search is complete, PhotoFlash selects the matching thumbnails in
their original catalogs or, if you selected the Put Results in New Catalog
checkbox, creates a new untitled catalog containing copies of all the matching
thumbnails, starting with those that most closely resemble the sketch on
which the search was based.
20
Searching for similar images
You can use the Similar Images command in the Search menu to search for
catalog images that resemble a specific image. The Similar Images command
can identify general similarities based on color, but may not always be able to
locate an individual image. However, it’s worth trying if you don’t know
anything about the image’s caption or filename. It’s also useful if you want to
identify several images with similar colors or compositions.
Chapter 1
Page 32

1Select the thumbnail for an image that resembles the image you want to find.
2Choose For Similar Images from the Search menu.
Click here to request
a search of all open
catalogs.
For example, if you use the Similar Images command to look for pictures
similar to a picture of a beach, PhotoFlash will probably identify pictures of
beaches that contain similar colors. However, if you look for pictures similar
to a picture of a cat, PhotoFlash probably won’t identify other pictures of cats,
because the colors in pictures of cats vary a lot more than the colors in
pictures of beaches.
To search for images by their similarity to another image in a catalog, make
sure the catalogs you want to search are open, then follow these steps:
You can’t search for similar images unless you have a single thumbnail
selected.
The Search for Similar Images dialog box appears.
Click here to request a
new catalog that
contains copies of the
matching thumbnails.
3Select the search options you want.
The default settings cause PhotoFlash to search only one catalog and to
highlight the selected images in that catalog. It’s usually a good idea to select
the Put Results in New Catalog option, because PhotoFlash sorts the
thumbnails in the new catalog in order of their similarity to the sketch.
Using Catalogs
21
Page 33

4Click OK or press Return.
When the search is complete, PhotoFlash selects the matching thumbnails or,
if you selected the Put Results in New Catalog checkbox, creates a new
untitled catalog containing copies of all the matching thumbnails, starting
with those that most closely resemble the image on which the search was
based. In the example shown here, the images that include blue sky or sea are
listed first.
22
Chapter 1
Page 34

2
Working With Image Files
PhotoFlash allows you to work with image files in a variety of formats. This
chapter describes those formats and explains how to open, view, save, and
print image files.
Macintosh image files
Images are stored as files, just like other Macintosh documents. You can get
images from a variety of sources, including Photo CDs, digital cameras such
as Apple’s QuickTake camera, video frame-grabbing programs, scanners, and
online services and bulletin boards. They may be in black and white, shades
of gray, or color.
Image files come in several formats. PhotoFlash can interpret the most
commonly used formats, which means it can open most kinds of image files
you’re likely to run across. You can also use PhotoFlash to convert image files
from one format to another.
When a color image is stored as a Macintosh file, the file includes
information about the number of colors that appear in the image. In general,
the more colors an image file can use, the better the image looks on the
screen; but image files that use a lot of colors take up more room on disk than
files that are restricted to fewer colors. For more information about the use of
color in image files, see “Changing the Number of Colors Used by an Image”
in Chapter 4, “Manipulating Images.”
23
Page 35

Image files often include a caption and a thumbnail, which is a miniature
reproduction of the image. Thumbnails appear in catalog windows, in the
Open dialog box when you select an image file, and in the Get Info window
for an image.
File formats recognized by PhotoFlash
PhotoFlash can open image files saved in any of the following file formats:
PICT
m
m
m
is the standard Macintosh format for image files. PICT files can also
be opened in the Windows environment if QuickTime is installed in the
Windows system.
TIFF
(Tagged Image File Format) is a commonly used file format for both
Macintosh and MS-DOS system software. You can use a Macintosh
program to open a file saved in the TIFF format from an MS-DOS
program, and vice versa.
EPS
(Encapsulated PostScript™) is a format used primarily to export image
files for use with page layout programs. EPS files may include line art as
well as images. PhotoFlash can open EPS files that contain bitmapped
images like those created by Adobe Photoshop, but it can’t open EPS files
that contain nonbitmapped images, like those created in Illustrator, which
consist of mathematically defined shapes.
24
Chapter 2
JPEG
m
(Joint Photographic Experts Group) is a standard method of
compressing image files. You can apply JPEG compression to files saved in
most of the formats that PhotoFlash supports, and you can save files in the
JPEG file format.
DCS
m
(Desktop Color Separation, version 1.0) is a variation of the EPS file
format used by page layout programs. It is also one form of CMYK file. An
CMYK
image stored in the
format used by DCS 1.0 is split into five separate
image files. Four of these files represent the color components of the
image: Cyan, Magenta, Yellow, and Black. The fifth is the Master file,
which shows how the whole image looks and can be viewed from within a
page layout program or from within PhotoFlash.
Page 36

m
Photo CD
is the file format used to save photographs on Kodak Photo CDs.
PhotoFlash can open Photo CD or Photo CD Pro files but can’t save files in
this format. For more information about this format, see “Opening a Photo
CD Image File” later in this chapter.
Photoshop
m
format is used by Adobe Photoshop. PhotoFlash can read data
from files saved with Adobe Photoshop 2.0 or 2.5, but can’t save files in this
format.
m Additional formats are supported by Photoshop-compatible plug-in
modules that you can obtain from other companies. Once installed,
these modules allow you to open, save, acquire, export, or apply
specialized enhancements to image files in a variety of formats from
within PhotoFlash. For more information about third-party plug-in
modules for PhotoFlash, see Appendix B.
For more information about the PICT, TIFF, EPS, JPEG, and DCS file
formats, see Chapter 6, “Converting and Compressing Files.”
Opening image files (non–Photo CD)
You can open one or more images that are part of a catalog at the same time
by selecting their thumbnails and then double-clicking one of the selected
thumbnails. For more information about working with thumbnails, see
Chapter 1, “Using Catalogs.”
You can also open any image file, whether it’s part of a catalog or not, by
using the Open command in the File menu. This section describes how to use
the Open command to open an image file in any format recognized by
PhotoFlash except for the Kodak Photo CD format. The next section
describes how to open Photo CD images.
To open an image file in any format other than Photo CD, follow these steps:
1Choose Open from the File menu.
Working With Image Files
25
Page 37

Only files saved in
formats PhotoFlash
recognizes, including
plug-in formats and
Photo CD, show up.
This shows the
amount of disk space
used to store the
selected image.
2 Use the directory dialog box to locate and select the image file you want to open.
3Click Open or press Return.
The Open directory dialog box appears.
This box shows a preview
of the selected image (if
one is available).
This box describes the contents of the
selected image. It may be empty.
PhotoFlash opens the file in a new window.
Opening a Photo CD image file
If you have a CD-ROM drive and a Photo CD disk, you can open the images
on the disc in PhotoFlash. Follow these steps:
1Make sure your CD-ROM drive is turned on.
2Choose Open from the File menu.
The Open dialog box appears (see figure in preceding section).
3Insert the Photo CD disc.
The names of the folders on the Photo CD disc should appear in the directory
dialog box, including a folder named PHOTO_CD. If you can’t see this folder,
use the directory dialog box to locate and open the CD icon.
26
Chapter 2
Page 38

4 Open the folder named PHOTO_CD, then open the folder inside it named IMAGES.
5Double-click the name of the image you want to open.
Uncompressed
size of the image
at the current
Resolution setting
The Photo CD Options dialog box appears.
Dimensions (in
pixels) of the
image displayed
on your screen
Note: If you have the Apple Photo Access extension installed, you will see a
Photos folder as well as the PHOTO_CD folder. The subfolders of each of
these folders contain the same images, although they are organized differently.
The Photo CD Options dialog box appears only when you choose images
from the Images folder inside the PHOTO_CD folder. It is usually preferable
to use these images, because PhotoFlash opens them more quickly and the
Photo CD Options dialog box allows you to size, rotate, and preview the
images before you open them.
6Choose a set of dimensions from the Resolution pop-up menu.
The dimensions in the Resolution pop-up menu give the image’s width and
height in pixels. In addition to setting the image’s size on screen, these
dimensions determine how much room the file occupies in your computer’s
random-access memory (RAM) after you open it. An additional set of
dimensions appears in the menu if the CD supports Photo CD Pro.
7Notice the orientation of the image preview in the Photo CD Options dialog box. If the
image is turned on its side and you want to open it right way up, click Rotate 90° Right to
rotate the image clockwise or Rotate 90° Left to rotate it counterclockwise.
The preview shows you the new orientation.
Working With Image Files
27
Page 39

8 Click Open.
Acquiring images
The Photo CD image opens in PhotoFlash with the dimensions and
orientation you selected.
Note: PhotoFlash doesn’t read caption text for Photo CD files.
You can use PhotoFlash to read image data from an external device such as a
digital camera or scanner. To do so, you must have a plug-in module for the
device you are using. A
plug-in module
is a special file that conforms to Adobe
Photoshop’s standard plug-in specifications. Some Photoshop plug-in modules
that use other specifications may not work with PhotoFlash. (Note that you
don’t need a plug-in module to use a CD-ROM drive.)
PhotoFlash can use several kinds of plug-in modules. The names of the
Acquire plug-in modules installed in the Plug-ins folder of the PhotoFlash
folder appear in the Acquire submenu of PhotoFlash’s File menu. If your
digital camera, scanner, or other external devices came with a Photoshop
plug-in module, you can install it by dragging the file into the Plug-ins folder.
You must quit PhotoFlash, then launch it again before PhotoFlash can
recognize a newly installed module.
28
Chapter 2
To use the Acquire command, make sure the external device you want to use
is turned on, then follow these steps:
1Choose the Acquire command from the File menu, but don’t release the mouse button.
The Acquire submenu appears.
IMPORTANT
If the Acquire command is dimmed, PhotoFlash has no Acquire
plug-in modules installed. You must have an appropriate plug-in module
installed for the external device you want to use before you can use the
Acquire command.
2 Drag the pointer to the right to choose the plug-in module you want to use from the
Acquire submenu.
Page 40

A dialog box appears showing the options for the plug-in module. For
instructions on using the plug-in module, see the documentation that came
with the external device.
For more information about plug-in modules, see Appendix B.
Note: Plug-in modules may or may not be scriptable. For more information,
consult the documentation that comes with each module.
Creating a new image
To create a new, empty image, follow these steps:
1Choose New from the File menu.
The New dialog box appears.
Type the image’s
width and
height here.
Type the image’s
resolution here, or
drag to choose it
from the dpi menu.
Drag here to choose a different
unit of measurement.
Drag here to choose the number
of colors used by the image.
2If it’s not already selected, click Image to indicate that you want to create a new image.
3Select the Image Setup options you want.
4 Click OK.
A new, empty image document appears. The background color for the new
document corresponds to the background color selected in the Preferences
dialog box (see Appendix A for information about PhotoFlash preferences).
You can copy material from other images or other programs and paste it into
this document.
Working With Image Files
29
Page 41

Viewing images
You can use two tools in the PhotoFlash Tool palette to change your view of
an image within its window. If the Tool palette isn’t visible on your screen,
choose Show Tool Palette from the Window menu to make it appear. The
Hand tool and the Zoom tool, at the top of the palette, allow you to move an
image around within its window and enlarge or reduce it.
The Hand tool moves
an image around
within a window.
1Click the Hand tool (the tool in the upper-left corner of the Tool palette).
2Move the pointer over the image you want to move within its window.
The Zoom tool
enlarges or
reduces an image.
The sections that follow describe how to use the Hand and Zoom tools and
how to use the Arrange and Zoom commands in the Window menu. For
information about using the other tools in the Tool palette, see Chapter 3,
“Working With Selections.”
Moving an image within its window
When you’re looking at an image that’s too large to fit in the window, you can
use the Hand tool to move the image around inside the window so you can
see different parts of it. Follow these steps:
The pointer changes to the Hand icon.
30
3Hold down the mouse button and drag the image around.
The image moves around within the window, allowing you to examine any
part of it.
Chapter 2
Page 42

Magnifying or reducing an image
You can use either the Zoom tool (in the Tool palette) or the Zoom command
(in the window menu) to magnify or reduce an image.
Using the Zoom tool
To magnify or reduce an image by using the Zoom tool, follow these steps:
1Click the Zoom tool (in the top right corner of the Tool palette) to select it.
If you can’t see the Tool palette, choose Show Tool Palette from the
Window menu.
2Move the pointer over the image you want to magnify or reduce.
The pointer changes to the Zoom icon with a plus (+) sign inside it.
3 To magnify the image, click within the image window while the Zoom icon contains a
plus sign (+).
PhotoFlash enlarges the image, centering the enlargement on the place
you clicked.
4 To reduce the image, hold down the Option key and click in the image window.
PhotoFlash reduces the image, centering the reduced area on the place
you clicked.
When you hold down the Option key, the plus (+) sign inside the Zoom tool
pointer changes to a minus (–) sign, and clicking on an image reduces it
instead of enlarging it.
Each click of the Zoom tool enlarges or reduces the image by a factor of 2.
The maximum enlargement is 6400%, and the maximum reduction is 1.6%.
5 To return the image to its original size, move the pointer over the Tool palette and
double-click the Zoom tool.
Working With Image Files
31
Page 43

Using the Zoom command
To magnify or reduce an image by using the Zoom command, make sure the
image is open and follow these steps:
1Choose the Zoom command from the Window menu, but don’t release the mouse button.
The Zoom submenu appears. The current enlargement or reduction has a
checkmark beside it in the submenu.
32
2 Drag the pointer to the right and down to choose the percentage enlargement or
reduction you want.
Fitting an image to the screen
To reduce an image to fit within the window, follow these steps:
1Choose Zoom from the Window menu, but don’t release the mouse button.
The Zoom submenu appears.
2 Drag to the right and choose Fit to Window from the Zoom submenu.
If the window is too small for the image, PhotoFlash reduces the image to fit
within the window.
Chapter 2
Page 44

Arranging windows
If you have multiple image windows open at the same time, you can arrange
them automatically by choosing a command from the Arrange menu. Follow
these steps:
1Choose the Arrange command from the WIndow menu, but don’t release the
mouse button.
The Arrange submenu appears.
2 Drag the pointer to the right and down to choose the window arrangement you want.
PhotoFlash arranges the image windows as you specified.
If a Get Info or catalog window is frontmost when you choose an Arrange
command, PhotoFlash arranges only the Get Info windows or the catalog
windows.
Adding or editing a caption
You can view information about an image and edit its caption by opening its
Get Info window.
To open the Get Info window for an image in the frontmost window, follow
these steps:
1Choose Get Info from the File menu.
Working With Image Files
33
Page 45

Type or edit
caption text here.
2When you’re finished, click the Get Info window’s close box to close the window.
Saving an image
The Get Info window for the image appears. You can add or edit caption text
in this window. To locate the image file’s icon on the desktop, click the Find
Original button.
Click here to locate the image
file’s icon on the desktop.
You can also open the Get Info window for an image by selecting its
thumbnail in a catalog and choosing Get Info from the File menu.
34
You can save any image as a new file, or you can save changes to an existing
image file.
Saving an image as a new file
To save a PhotoFlash image as a new file, follow these steps:
1Choose Save As from the File menu, but don’t release the mouse button.
Chapter 2
Page 46

2 Drag to the right to choose the file format you want to use from the Save As submenu.
A dialog box appears showing the format options for the file format
you selected.
Note: If the image you’re saving uses fewer than millions of colors or fewer
than 256 grays, you can choose only the PICT or TIFF items in the Save As
submenu; the others are dimmed. You can’t increase the actual number of
colors used by an image, but you can change its setting to a higher number of
colors if you want to save it in one of the dimmed formats. For details, see
“Changing the Number of Colors Used by an Image” in Chapter 4,
“Manipulating Images.”
3Adjust the settings in the dialog box.
For more information about each file format and its Save As dialog box, see
Chapter 6, “Converting and Compressing Files.”
4Click Save.
Working With Image Files
35
Page 47

The Save dialog box appears.
5 Use the dialog box to select a name and location for the file.
PhotoFlash appends a suffix to the default name of the file that reflects the
file format you selected (for example, “/TIFF” for a TIFF file). You can
change the name if you want to.
6Click Save.
PhotoFlash saves the file in the format you selected with the settings you
selected in step 3.
Saving changes to an existing image file
36
PhotoFlash allows you to open many kinds of image files and modify them in
various ways. If the original image file is in an image format that PhotoFlash
can save—PICT, TIFF, JPEG, EPS, DCS (for CMYK images only), or formats
supported by Adobe Photoshop plug-in modules installed in PhotoFlash’s
Plug-ins folder—you can save the modified image by choosing Save from the
File menu.
PhotoFlash displays a dialog box before saving the image in the following
cases:
m If the image was pasted onto a new, untitled work area created by choosing
the New command from the File menu.
m If the original image file is in a format that PhotoFlash can open but can’t
save, such as Adobe Photoshop 2.0 or 2.5 or Kodak Photo CD.
m If the original image file is in a format that a PhotoFlash plug-in module
reads but doesn’t write.
Chapter 2
Page 48

m If the numbers of colors in the original image file have been changed in a
manner that makes it impossible for PhotoFlash to save the image in its
original format (for example, if you have converted a JPEG image with
millions of colors to be displayed using only 256 colors).
If a dialog box appears, it will be a Save As dialog box for the file format
currently specified in PhotoFlash preferences; or, if the preferences specify
Ask instead of a specific file type, a dialog box asking the user to choose a
file format. (For information about setting preferences, see Appendix A,
“Setting PhotoFlash Preferences.”)
If a dialog box appears when you choose Save from the File menu, follow
these steps to save the image as a separate file:
1Select the settings you want to use in the Save As dialog box.
For more information about the Save As dialog box for each file format, see
Chapter 6, “Converting and Compressing Files.”
2Click Save.
The Save dialog box appears.
3If you want to change the file’s name, type the new name in the text box.
4 Use the dialog box to locate the disk or folder where you want to save the image.
5Click Save.
Reverting to the previously saved version
If you accidentally damage an image, you can easily return the image to the
condition it was in the last time you saved it. To restore the saved version,
choose Revert from the File menu.
Printing images
1Make sure the image you want to print is the frontmost window.
2Choose Print from the File menu.
Working With Image Files
37
Page 49

Click here if you want
to print the caption
with the image.
Drag here to choose
the caption font size.
The Print dialog box appears.
These settings are
dimmed until you click the
Print Caption checkbox.
3Adjust the settings in the Print dialog box as necessary.
4 Click OK.
Exporting images
Drag here to choose
the caption font.
Click one of these buttons to specify the
caption’s position in relation to the image.
PhotoFlash prints the image as you specified.
You can use PhotoFlash to export image data to a specialized external device
such as a high-quality printer. To do so, you must have a plug-in module for
the device you are using. A plug-in module is a special file that conforms to
Adobe Photoshop’s standard plug-in specifications. Some Photoshop plug-in
modules that use other specifications may not work with PhotoFlash.
PhotoFlash can use several kinds of plug-in modules. The names of the
Export plug-in modules installed in the Plug-ins folder of the PhotoFlash
folder appear in the Export submenu of PhotoFlash’s File menu. You can
install an Export plug-in module by dragging the file into the Plug-ins folder.
You must quit PhotoFlash, then launch it again before PhotoFlash can
recognize a newly installed module.
38
Chapter 2
Page 50

To use the Export command, make sure the external device you want to use is
turned on, then follow these steps:
1Choose the Export command from the File menu, but don’t release the mouse button.
The Export submenu appears.
IMPORTANT
If the Export command is dimmed, PhotoFlash has no Export
plug-in modules installed. You must have an appropriate plug-in module
installed for the external device you want to use before you can use the
Export command.
2 Drag the pointer to the right to choose the plug-in module you want to use from the
Export submenu.
A dialog box appears showing the options for the plug-in module. For
instructions on using the plug-in module, see the documentation that came
with the external device.
For more information about plug-in modules, see Appendix B.
Working With Image Files
39
Page 51

3
Working With Selections
This chapter describes how to use the Selection tools in the PhotoFlash Tool
palette to select part of an image. After you’ve selected an area, you can use
the Action tools to manipulate or enhance it.
The PhotoFlash Tool palette
You use tools in the PhotoFlash Tool palette to select and modify part of an
image. If the Tool palette isn’t visible on your screen, choose Show Tool
Palette from the Window menu to make it appear.
Use the View tools to move, enlarge, or
reduce an image in its window.
Use the Selection tools to
select part of an image.
Use the Action tools to perform
actions on the part of the image you
selected with the Selection tools.
41
Page 52

You can drag the Tool palette by its top to any convenient location on the
screen. To hide it, click the close box in its upper-right corner or choose Hide
Tool Palette from the Window menu. To select a tool, click it.
The Tool palette contains three groups of tools: the View Tools, the Selection
To ols, and the Action tools. Chapter 2, “Working With Image Files,” describes
how to use the View tools.
IMPORTANT
As shown on the previous page, one of the Selection tools can be
selected at the same time as one of the Action tools. The Selection and Action
tools work together. First you select part of the image with one of the
Selection tools, then you use one of the Action tools to manipulate or enhance
the selection.
This figure summarizes how to use each of the Selection tools:
Drag the Marquee tool to select
a rectangle.
Drag the Polygon tool to indicate each
side of a polygonal selection; doubleclick to complete the selection.
Drag the Lasso tool to select
an irregular area.
Click an image with the Magic
Wand to select an area of
similar colors.
After you select an area, you can perform any of these actions with one of the
Action tools:
Drag a selection with the Move tool to
move it.
Drag a corner of a selection with the
Resize tool to resize it; hold down the
Shift key to maintain proportions.
Click a selection with the Crop
tool to trim away all of the
image except the selection.
Drag a selection with the
Rotate tool to rotate it.
42
Chapter 3
Click a selection with the Blur tool to
blur it.
Click a selection with the DeDust tool
to remove dust.
Click a selection with the
Sharpen tool to sharpen it.
Click a selection with the
DeScratch tool to remove
a scratch.
Page 53

This chapter describes how to use the Selection tools: the Marquee tool, the
Lasso tool, the Polygon tool, and the Magic Wand.
The easiest way to learn how to use the Action tools is to experiment with
them. Duplicate an image to work with, select part of the image, choose an
Action tool, and click or drag in the selection to see what happens.
For more detailed information about the actions the Action tools can perform,
see Chapter 4, “Manipulating Images,” and Chapter 5, “Enhancing Images.”
Selecting a rectangle
To select a rectangle, use the Marquee tool. You can either drag diagonally
across the image to make your selection visually, or you can set a specific size
for the selection first and then click the image to set the selection.
Selecting a rectangle visually
To select a rectangular area, follow these steps:
1Click the Marquee tool to select it.
The Marquee tool becomes highlighted, and the pointer changes to a
crosshair when it’s over the image.
2 Move the crosshair pointer to one corner of the area you want to select.
3 Drag diagonally to the opposite corner of the area.
A moving dashed line surrounds the selected area. If the area you selected
isn’t exactly what you want, click outside it (or type
x-D) to deselect it and try
again. Alternatively, follow these steps to adjust the selection:
1Move the pointer over a corner of the selection until the pointer changes to four arrows.
Working With Selections
43
Page 54

2 Drag to adjust the selection.
The current dimensions of the selection appear at the bottom of the Tool
palette as you drag.
Selecting a rectangle of a specific size
To specify the size of a rectangular selection before you select it, follow
these steps:
1Double-click the Marquee tool.
The Rectangle Options dialog box appears.
Click here.
Type the
measurements
you want here.
2Click the Fixed Size button to activate the Width and Height controls.
3Type the width and height of the rectangle you want to select in the Width and
4Click OK to close the dialog box and confirm your settings.
5Move the pointer over the image window, press the mouse button, and don’t release it.
6 Drag the selection rectangle until it is positioned correctly, then release the
Drag here to select a different
unit of measurement.
If necessary, use the pop-up menus to select different units of measurement.
Height boxes.
A selection rectangle of the size you specified appears. Its upper-left corner is
located where you clicked. You can drag any corner to position the selection.
mouse button.
44
Chapter 3
Page 55

IMPORTANT
dialog box, PhotoFlash uses this setting whenever you choose the Marquee
tool. To switch back so you can drag to select a rectangle, double-click
the Marquee tool again, click Normal in the Rectangle Options box, and
click OK.
Selecting an irregular area
To select an irregular area, follow these steps:
1Click the Lasso tool to select it.
The Lasso tool becomes highlighted, and the pointer changes to a lasso when
it’s over the image.
2 Drag the lasso around the area you want to select.
After you select the Fixed Size setting in the Rectangle Options
The line trailing
from the tip of the
Lasso determines
what you select.
You don’t need to drag completely around the area you want to select.
PhotoFlash will complete the selection by drawing a straight line between the
point where you start dragging and the point where you stop. (But if you stop
too soon, you might miss part of what you want to select.)
Working With Selections
45
Page 56

Selecting an area in the shape of a polygon
To select an area in the shape of a polygon whose sides aren’t necessarily the
same length, follow these steps:
1Click the Polygon tool to select it.
The Polygon tool becomes highlighted, and the pointer changes to a crosshair
when it’s over the image.
2Click at the point where you want to begin the first side of the selection.
3Without holding down the mouse button, move the crosshair pointer to create one side
of the selection.
4When the side of the selection is the length you want it, click to fix its length.
5 Repeat steps 3 and 4 for each additional side.
1 Click here to start.
2 Click here.
3 Click here.
7
Double-click here to
finish the selection.
46
4 Click here.
Chapter 3
6
Click here.
5
Click here.
6 To finish selecting the area, double-click the starting point.
If you don’t click the starting point exactly, PhotoFlash completes the
selection by drawing a straight line between the point where you started and
the point where you double-clicked.
Page 57

Selecting an area of similar colors (Magic Wand)
To select an area of similar colors by using the Magic Wand tool, you must be
working with an image with 256 grays or thousands or millions of colors or
with a CMYK image. Follow these steps:
1Click the Magic Wand tool to select it.
The Magic Wand tool becomes highlighted, and the pointer changes to a
magic wand when it’s over the image.
2Click the area of similar colors (or grays) you want to select.
A moving dashed line surrounds the selected area.
You can adjust the sensitivity of the Magic Wand tool so that it selects a lesser
or greater range of colors or grays. The greater the range, the larger the
selection is likely to be.
To set the range of colors selected by the Magic Wand tool, follow these steps:
1Double-click the Magic Wand tool.
Working With Selections
47
Page 58

The Magic Wand Options dialog box appears.
Drag the slider to the right
to increase the size of the
selection.
2 Drag the Sensitivity slider control to adjust the range of colors to be selected.
The default setting is 15, which selects a relatively narrow range of colors. You
can select any setting from 0 to 255. The lower the number, the fewer the
colors selected by the Magic Wand tool, and the smaller the selection is likely
to be.
At a setting of 0, the Magic Wand selects only colors that are exactly the same
as the color you click.
At a setting of 255, the Magic Wand selects all the colors in the image.
Note: A setting of 0 is good for selecting a completely white background. For
example, if you want to remove a white border from an image, set Sensitivity
to 0; click within the white border with the Magic Wand; choose Invert
Selection from the Edit menu; then click in the colored part of the image with
the Crop tool.
3Click OK to close the dialog box and confirm your setting.
Changing the area of a selection
After you’ve selected part of an image, you can change the selection by
adding to it or by subtracting from its area.
Adding to a selection
After you’ve selected an area, you can use the Shift key to select additional
separate or overlapping areas. This can be useful if you want to enhance
several odd-shaped areas in the same way, such as by blurring.
48
Chapter 3
Page 59

To select several areas of an image and keep them all selected, follow
these steps:
1Select one area of the image.
2Hold down the Shift key and select the next area.
You can choose a different Selection tool if you wish. The second selection
may overlap the first selection.
Area selected with
the Marquee tool
Area selected with
the Lasso tool
3 Repeat step 2 as many times as you need to.
A moving dashed line surrounds the currently selected areas. If you use
an Action tool anywhere within a selected area, the action affects all the
selected areas.
Subtracting from a selection
After you’ve selected an area, you can use the x key to subtract from the
selection. Follow these steps:
1 Select one part of the image.
2Hold down the xkey and select another area that overlaps your first selection.
Working With Selections
49
Page 60

You can choose a different Selection tool if you wish.
When you release the mouse button and x key, PhotoFlash subtracts from the
overall selection the area of the second selection that overlaps the first.
50
3 Repeat step 2 as many times as you need to.
A moving dashed line surrounds the currently selected area. If you use
an Action tool anywhere within the selected area, the action affects the
whole selection.
Selecting an entire image
To select an entire image, choose Select All from the Edit menu or press x-A.
When the entire image is selected, moving dashed lines surround it.
Chapter 3
Page 61

Deselecting an area
To deselect the current selection so that no part of the image remains
selected, choose Deselect from the Edit menu or press x-D. If you’re not
using the Magic Wand or the Polygon tool, you can also click outside of the
selected area or in the gray area around the image, if any, to deselect the
current selection.
After you’ve deselected an area, the moving dashed lines around it disappear.
Inverting a selection
When you invert the current selection, everything that was selected becomes
deselected, and everything that was not selected becomes selected.
To invert a selection, choose Invert Selection from the Edit menu. After you
invert a selection, the original selection remains surrounded by moving
dashed lines, but moving dashed lines also surround the entire image.
Selected area
The area originally
selected is now the
only area that’s not
selected.
Inverting a selection can be useful if you want to emphasize one part of an
image by using the Blur tool or some of the other Action tools to make the
rest of the image appear to recede into the background. You can select the
part you want to emphasize, invert the selection so that the part you want to
emphasize becomes deselected and the background becomes selected, then
use the Blur tool or one of the other Action tools to change the selected
background.
Working With Selections
51
Page 62

Moving a selection
You can use the Move tool to move or copy a selection. Follow these steps:
1Select the area you want to move.
2Click the Move tool to select it.
3Position the pointer over the selected area.
4 Drag the selection to reposition it.
If you want to drag a copy of the selection rather than dragging the original,
hold down the Option key while you drag. This causes the area you originally
selected to remain intact after you move the selection.
After you’ve moved the selected area, it remains selected, and you can
perform other operations on it.
5When you’re satisfied with the appearance of the selected area in its new location, click
outside the area to deselect it.
52
After you deselect it, the moved area replaces any part of the image that’s
underneath it. If you want to undo a move, you have to choose Undo or press
x-Z before you deselect the area.
Chapter 3
Page 63

4
Manipulating Images
You can use commands in the Image menu to crop, resize, straighten, rotate,
or flip an image or to change the number of colors it uses. If part of the image
is currently selected, you can use commands in the Image menu or the
equivalent tools in the PhotoFlash Tool palette to crop the image to the
selection or to resize, rotate, or flip just the selection.
For a quick summary of the way the tools in the Tool palette work, see the
beginning of Chapter 3, “Working With Selections.”
This chapter describes in detail how to manipulate images by using
commands in the Image menu and how to manipulate selections by using the
Crop, Resize, and Rotate tools in the PhotoFlash tool palette. For information
about using commands in the Enhance menu and the other Action tools in the
PhotoFlash Tool palette, see Chapter 5, “Enhancing Images.”
Duplicating an image
Before you begin to experiment on an image with PhotoFlash commands and
tools, it’s usually a good idea to make a copy and make your changes to the
copy. That way you can try out anything you like without danger of losing the
original image. When you’ve finished adjusting the copy to make it look the
way you want, you can save it like any other image file.
53
Page 64

To duplicate the image in the frontmost PhotoFlash image window, just
choose Duplicate from the File menu. An exact duplicate of the image
appears in a new untitled window.
Cropping an image
If you wish to remove some portion of an image, you can select the area you
want to retain and crop (trim away) the rest.
1Select the part of the image you want to keep.
For information on using the Selection tools, see Chapter 3, “Working With
Selections.”
54
2Choose Crop from the Image menu.
Or click the Crop tool in the Tool palette and then click inside the selected
area to crop the image.
Chapter 4
Page 65

The area you selected appears in the center of the window. The rest of the
image disappears. If you’re not happy with the crop, choose Undo Crop from
the Edit menu and try again.
Area no longer part
of image (gray)
Total area of new image
3 Use the Save or Save As command from the File menu to save the cropped image file on
your hard disk.
IMPORTANT
original image on your hard disk. You won’t see a dialog box asking you to
confirm the changes to the original file..
Resizing an image
You can resize part of an image by using the Resize tool or the entire image
by using the Resize command in the Image menu. The Resize tool changes
the dimensions of a selected area without changing the image’s resolution
when printed or its size on disk. The Resize command in the Image menu
allows you to change the whole image’s dimensions in the same way, and also
allows you to change the image’s resolution and its size on disk.
If you use the Save command, the cropped image replaces the
Manipulating Images
55
Page 66

IMPORTANT
Resizing an image may cause its quality to deteriorate.
Note that the Resize tool and the Resize command work differently from the
Zoom tool or the Zoom command. The Resize tool and the Resize command
change the information stored on disk when you save the file, whereas the
Zoom tool and the Zoom command only magnify or reduce the image on
screen without changing its actual dimensions, resolution, or size on disk.
Resizing part of an image
To reduce or enlarge part of an image, follow these steps:
1Select the area you want to resize.
For detailed instructions on using the Selection tools, see Chapter 3,
“Working With Selections.”
2Click the Resize tool in the Tool palette to select it.
The Resize tool becomes highlighted.
56
3Position the pointer over the selected area.
The pointer changes to the Resize tool icon.
4 Drag any corner or side of the selection in the direction you want to resize it.
To keep the proportions of the selected area the same while you resize it, hold
down the Shift key right after you first press the mouse button, and keep
holding it down while you drag. If you don’t hold down the Shift key, you are
likely to distort the selected area.
Chapter 4
Page 67

Drag from a
corner to resize
the selected area.
5 Release the mouse button.
As you resize the selection, its new dimensions appear at the bottom of the
Tool palette.
If you want to resize a copy of the selection, so that the original selected area
underneath it remains intact, hold down the Option key while you drag.
The selected area changes size. If you’re not happy with the results, choose
Undo Resize Selection from the Edit menu and try again.
You can use the Resize tool the same way to resize an entire image: Start by
choosing Select All from the Edit menu, then perform steps 2 through 5.
To change an image file’s uncompressed size on disk or its resolution when
printed, use the Resize command as described in the next section.
Manipulating Images
57
Page 68

Resizing the entire image
To resize an entire image, use the Resize command in the Image menu. This
command displays a dialog box in which you can indicate the new dimensions
you want for the image by typing a percentage or typing a new width and a
new height. The Resize dialog box also allows you to resize the work area in
which the image appears and to change the image’s resolution and its size.
The dimensions of an image, its resolution when printed, and its size on disk
pixels,
are interrelated. An image consists of a grid of
per square inch, the higher the resolution and overall quality of the image,
and the more room it occupies in memory and on disk (before compression
is applied).
Most monitors display images at a fixed resolution of about 72 dots per inch
(dpi). For this reason, the size of an image displayed on screen may differ
from its size when printed. For example, an image that measures 5 by 3.5
inches on a 72-dpi monitor measures about 2.5 by 1.75 inches when printed
at 150 dpi.
The sections that follow describe how to use the Resize dialog box to change
an image’s dimensions, the dimensions of an image’s work area, or an image’s
resolution. You can choose Undo Resize from the Edit menu after any of these
operations if you’re not happy with the results.
or dots. The more dots
58
Changing an image’s dimensions
You can use the Resize command to change the dimensions of a single image
or of multiple images represented by selected catalog thumbnails. This
section describes how to resize a single image.
To change an image’s dimensions, make sure the window you want the Resize
command to affect is the frontmost window, then follow these steps:
1Choose Resize from the Image menu.
The Resize dialog box appears.
Chapter 4
Page 69

2If it’s not already selected, click the Image button.
Type a percentage
reduction or
enlargement
here . . .
. . . or type a new width
and height here.
New uncompressed
size of the image file
3Click the Preserve Proportions checkbox to select or deselect it.
Image button
selected
This information describes the
image before it is resized.
Select this checkbox to preserve
the original image’s proportions.
Drag here to choose a
different unit of measurement.
Select this checkbox to
preserve the uncompressed
size of the image.
If the Preserve Proportions checkbox is selected, the image’s width and height
stay in proportion—if you change one, the other changes automatically by the
same proportion.
If the Preserve Proportions checkbox isn’t selected, you can distort the image
by changing only one dimension or by changing each dimension by a
different proportion.
Manipulating Images
59
Page 70

4Click the Preserve Size checkbox to select or deselect it.
If the Preserve Size checkbox is selected, the uncompressed size of the image
(labeled New Size in the dialog box) won’t change, no matter how much
larger or smaller you make its dimensions. Changing the image’s dimensions
changes its resolution only.
If the Preserve Size checkbox isn’t selected, the uncompressed size of the
image (labeled New Size in the dialog box) changes when you change the
image’s dimensions.
5 Define the new dimensions you want for the image by typing a percentage in the Percent
box or typing new dimensions in the Width and Height boxes.
The Percent box is always set to 100 when you first open the dialog box.
When you type a new number, the Width and Height boxes also change to
show the size of the image at that percentage.
Alternatively, you can type the new dimensions you want in the Width and
Height boxes. If the Preserve Proportions checkbox is selected, changing one
automatically changes the other.
When you define the image’s new dimensions, either the Resolution number
(if the Preserve Size checkbox is selected) or the New Size number (if the
Preserve Size checkbox isn’t selected) also changes automatically.
60
Chapter 4
IMPORTANT
If Preserve Size isn’t selected and you increase the image’s
dimensions, it will use more disk space when you save it. Make sure you have
enough space available.
6Click OK to close the Resize dialog box and initiate the resizing.
PhotoFlash resizes the image, ignoring any selection the image contains.
If you’re resizing multiple images whose thumbnails are selected in a catalog,
PhotoFlash opens the images (if they’re not already open) and resizes each
one.
Page 71

To confirm that the new dimensions of an image have been set as you
intended, follow these steps:
1Position the pointer over the number in the lower-left corner of the image window.
2Press the mouse button.
Changing the dimensions of an image’s work area
An image file can include an extra space around the image itself called the
work area.
The work area is actually part of the image; the only difference is
that its pixels are a uniform color determined by a setting in the Preferences
dialog box (white by default). You can use the Resize command to change the
dimensions of the work area. For example, if you want to include two pictures
in one image file, you might want to enlarge the work area to make room for
the second picture.
If you make the work area larger, white pixels are added around the
boundaries of the image. If you make the work area smaller than the image
itself, the image is cropped accordingly. Changing the dimensions of an
image’s work area always changes the uncompressed size of the image file.
You can only change the work area of a single image; you can’t change the
work area of images represented by selected catalog thumbnails.
To resize a single image’s work area, make sure the window you want the
command to affect is the frontmost window, then follow these steps:
1Choose Resize from the Image menu.
The Resize dialog box appears.
Manipulating Images
61
Page 72

2If it’s not already selected, click the Work Area button.
Type a percentage
reduction or
enlargement
here . . .
. . . or type a new width
and height here.
New uncompressed
size of the image file
3Click the Preserve Proportions checkbox to select or deselect it.
Work area button
selected
This information describes the image
before the work area is resized.
Select this checkbox to preserve
the original image’s proportions.
Click one of these squares
to specify where to place the
image in the work area.
Drag here to choose a
different unit of measurement.
If the Preserve Proportions checkbox is selected, the width and height must
stay in proportion—if you change one, the other changes automatically by the
same proportion.
If the Preserve Proportions checkbox isn’t selected, you can change the work
area’s vertical and horizontal dimensions in any way you like.
62
Chapter 4
4 Define the new dimensions you want for the work area by typing a percentage in the
Percent box or typing new dimensions in the Width and Height boxes
.
The Percent box is always set to 100 when you first open the dialog box.
When you type a new number, the Width and Height boxes also change to
show the size of the work area at that percentage.
Alternatively, you can type the new dimensions you want in the Width and
Height boxes. If the Preserve Proportions checkbox is selected, changing one
automatically changes the other.
Page 73

When you define the work area’s new dimensions, the New Size figure (which
indicates what the image’s uncompressed size will be after you save it) also
changes automatically.
IMPORTANT
If you increase the work area’s dimensions, it will use more disk
space when you save it. Make sure you have enough space available.
5If you’re enlarging the image’s work area, click one of the squares in the upper-right
corner of the dialog box to indicate approximately where you want the image located
within the new work area.
6Click OK to close the Resize dialog box and initiate work area resizing.
PhotoFlash resizes the work area.
Changing an image’s resolution
You can use the Resize command to change the resolution of a single image or
of multiple images represented by selected catalog thumbnails. Resolution is
usually expressed in dots per inch (dpi)—that is, the number of pixels in a 1inch-high column of pixels. An image’s resolution may differ from the
resolution at which it is displayed. For this reason, the size of an image
displayed on screen may differ from its size when printed. For example, an
image that measures 5 by 3.5 inches on a 72-dpi monitor measures about 2.5
by 1.75 inches when printed at 150 dpi.
Some printers and other devices produce better results if the images they
print are set to a specific resolution. For best results, follow the directions
regarding resolution in the documentation that comes with the printer or other
output device. The general rule of thumb is that the image resolution should
be no more than half of the printer’s resolution, as suggested by this table.
For the best results in: Set the image file resolution to:
Displaying images on computer screen, like desktop presentations 72 dpi
Printing images on most laser printers (300 dpi) 150 dpi
Printing images on higher-end laser printers (600 dpi) 300 dpi
Creating image output for film production 600 dpi
Printing on very high end print production printers 2400 dpi
Manipulating Images
63
Page 74

1Choose Resize from the Image menu.
2If it’s not already selected, click the Image button.
Image button
selected
Type a new
resolution here . . .
. . . or drag here to
choose a new
resolution.
To change the resolution of a single image, make sure the window you
want the Resize command to affect is the frontmost window, then follow
these steps:
The Resize dialog box appears.
Select this checkbox to
preserve the uncompressed
size of the image.
New uncompressed size
of the image file
64
3Click the Preserve Size checkbox to select or deselect it.
If the Preserve Size checkbox is selected, the uncompressed size of the image
(labeled New Size in the dialog box) won’t change, no matter how you change
its resolution. Changing the image’s resolution changes its dimensions only.
If the Preserve Size checkbox isn’t selected, the uncompressed size of the
image (labeled New Size in the dialog box) changes when you change the
image’s resolution.
4 Define the new resolution you want for the image by typing a number in the Resolution
box or choosing a resolution from the Resolution pop-up menu.
When you define a new resolution for a single image, either the Width and
Height boxes change to show the image’s new dimensions (if the Preserve
Size checkbox is selected) or the New Size number changes to indicate the
uncompressed size of the image (if the Preserve Size checkbox isn’t selected).
Chapter 4
Page 75

IMPORTANT
resolution, it will use more disk space when you save it. Make sure you have
enough space available.
5Click OK to close the Resize dialog box and initiate the resolution change.
PhotoFlash changes the image’s resolution, ignoring any selection the image
may contain.
If you’re resizing multiple images whose thumbnails are selected in a catalog,
PhotoFlash opens the images (if they’re not already open) and changes the
resolution of each one.
Straightening an image
If an image wasn’t exactly straight straight on the scanner when it was
scanned, or if the camera used to take a picture wasn’t level, or if for any
reason you want to straighten an entire image within its window, you can use
the Straighten command to do so. Follow these steps:
1Make sure the window for the image you want to straighten is the frontmost window.
2Choose Straighten from the Image menu.
If Preserve Size isn’t selected and you increase the image’s
A cross with a circle in its center appears over the image. If you’ve previously
selected any part of the image, the selection disappears. (It will reappear in
the corresponding part of the straightened image.).
If you change your mind and decide you don’t want to straighten the image
after all, choose Cancel Straighten from the Image window, press the Escape
(Esc) key, or press
x-period.
Manipulating Images
65
Page 76

3 Drag the circle in the center of the cross to define the axis around which you want to
Horizontal crossbar
rotate the image.
Vertical crossbar
Pointer
A convenient point for the axis of rotation in this picture is the bottom of the
big tree’s trunk, as shown above.
4 Release the mouse button.
5Move the pointer along any of the crossbar’s arms.
The pointer changes to a small curve with arrows at both ends.
The pointer becomes
a curve with arrows.
66
Chapter 4
Page 77

6Hold the mouse button down and drag until the crossbars align with elements in the
Align one of the
crossbars with
elements that you
want to be vertical
or horizontal.
7Move the pointer over any part of the image that’s away from the crossbars and click.
image that you want to be vertical or horizontal.
When the pointer looks like this,
you can click to rotate the image.
In this example, the horizontal crossbar has been aligned with the hillside and
the vertical crossbar has been aligned with the tree, so that the tree will look
like it’s growing straight up out of flat ground after the image is straightened.
After a moment, PhotoFlash rotates the image around the point you specified
in step 3. If necessary, the work area enlarges to accommodate the entire
straightened image.
Rotating an image
You can rotate part of an image by using the Rotate tool, or you can rotate the
entire image by using the Rotate command in the Image menu. You can also
use the Straighten command to rotate an entire image as described in the
previous section. Use the Straighten command when you want to align the
image horizontally or vertically, and the Rotate command when you want to
rotate the image a specific number of degrees.
Manipulating Images
67
Page 78

Rotating part of an image
To rotate part of an image, follow these steps:
1 Select the part of the image you want to rotate.
For instructions on using the Selection tools, see Chapter 3, “Working With
Selections.”
2Click the Rotate tool in the Tools palette to select it.
The Rotate tool becomes highlighted.
3Position the pointer over the selected area.
The pointer changes to a tightly curved arrow.
4 Drag any corner of the selection in the direction you want to rotate it.
68
Drag to rotate the
selected area.
As you rotate the selection, the angle measurement at the bottom of the Tool
palette changes.
If you want to rotate a copy of the selection, so that the original area
underneath it remains intact, hold down the Option key while you drag.
5 Release the mouse button when you’ve rotated the selection to the desired angle.
Chapter 4
Page 79

Rotating an entire image
You can rotate an image in 90° increments: 90° left, 90° right, or a full 180°.
You can also specify an arbitrary number of degrees that you want the image
to be rotated.
You can use the Rotate command on a single image that’s open in PhotoFlash
or on one or more thumbnails selected in a catalog window. If you want to
use the Rotate command on thumbnails in a catalog, make sure the catalog is
the frontmost window and that the thumbnails whose images you want to
rotate are selected before you follow the steps presented here.
To rotate images in 90° increments, follow these steps:
1Choose Rotate from the Image menu, but don’t release the mouse button.
2 Drag to the right to choose one of the three preset Rotate commands.
After you release the mouse button, Photoflash rotates the image or images as
you specified. (If the images represented by selected catalog thumbnails aren’t
open, PhotoFlash opens them first.)
Manipulating Images
69
Page 80

To rotate images an arbitrary number of degrees, follow these steps:
1Choose Rotate from the Image menu, but don’t release the mouse button.
2 Drag to the right to choose the Arbitrary command.
After you release the mouse button, the Rotate dialog box appears.
3Type the number of degrees you want to rotate the image and click Right or Left to
indicate the direction of rotation.
70
4 Click OK to rotate the image.
If necessary, the work area enlarges to accommodate the entire rotated image.
If the frontmost window contains a single image and part of the image is
selected, the Rotate command rotates only the selected area. If the frontmost
window contains a catalog with several thumbnails selected, the Rotate
command ignores any selections the images contain.
Chapter 4
Page 81

Flipping an image
1If you want to flip just part of an image, first select the part.
2Choose Flip from the Image menu, but don’t release the mouse button.
3 Drag to the right to choose Horizontally or Vertically.
You can flip part of an image or the whole image by using the Flip command
in the Image menu. This can be useful, for example, if you want to place a
picture on a page with the person in it facing left, but the person faces right in
the original image.
To flip part or all of an image, follow these steps:
If you want to flip the whole image, skip this step. For detailed instructions on
using the Selection tools, see Chapter 3, “Working With Selections.”
After you release the mouse button, Photoflash flips the image or, if part of
the image is selected, the selection.
To flip multiple images at a time from within a catalog, select their
thumbnails and repeat steps 2 and 3. If image files for the selected thumbnails
aren’t already open, PhotoFlash opens and flips them. If image files for the
selected thumbnails are already open, PhotoFlash flips them. In both cases
PhotoFlash ignores any selections the images contain.
Manipulating Images
71
Page 82

Changing the number of colors used by an image
A digitized image consists of a grid of pixels, or dots. You can use the
Number of Colors command in the Image menu to control how many
different colors each pixel is capable of representing. This number directly
affects the fidelity of the image, especially in the case of photographic or
other continuous-tone images.
If a single pixel can represent only black or white, it occupies very little space
on disk, but it can give only a rough approximation of any grays or colors in
the original image. At the other extreme, if a single pixel can represent one of
millions of colors, it occupies much more space on disk, but it is likely to give
a very good approximation of any colors or grays in the original.
IMPORTANT
The number of colors used by an image may differ from the
number of colors you can actually see on screen, which depends on the kind
of monitor you have and the current setting for that monitor in the Monitors
control panel. For example, on a black-and-white monitor an image that uses
millions of colors displays only white or black pixels, because that’s all
the monitor can display. The Number of Colors command controls only
the number of colors used internally to represent an image’s pixels, not the
number of colors used by your monitor.
The next section describes how to use the Number of Colors command.
“Deciding How Many Colors to Use,” later in this chapter, describes some of
the issues you should consider if you’re not sure how many colors to use for a
particular image.
Using the Number of Colors command
Before you change the number of colors used by an image, it’s a good idea
to use the Duplicate command in the File menu to create a copy of the image
in a new window. This ensures that you can retrieve the original version of
the image no matter what you do to the copy. Otherwise, if you reduce the
number of colors used by the original image and use the Save command
to save the new version, the original information about the image’s colors is
gone forever.
72
Chapter 4
Page 83

To change the number of colors used by an image, follow these steps:
1Choose Number of Colors from the Image menu.
The Number of Colors dialog box appears.
Current size of
uncompressed
image
View of
current image
Use these tools to
move, enlarge, or
reduce the view of
the image.
2 Select the number of colors you want the image to use.
View of image after
changing number of colors
New size of uncompressed image
Click here to turn
dithering on or off.
Click one of the buttons in this box
to choose the number of grays or
colors you want the image to use.
If you click anywhere in an image while this dialog box is open, the part of
the image you click appears in the Before and After boxes.
IMPORTANT
You can’t increase the actual number of colors used by an image,
but you can increase the setting for this number in the Number of Colors
dialog box. This can be useful when you’re converting image files between
different formats. Note that increasing the number of colors always increases
the image’s size on disk, even though the actual number of colors used by each
pixel doesn’t change.
Manipulating Images
73
Page 84

For help deciding which setting to use for a specific image, see the next
section, “Deciding How Many Colors to Use.”
3If you want the image to be dithered, make sure the Dithered checkbox is selected.
You can select the Dithered checkbox only if you are reducing the number of
colors used by the image. A dithered image is displayed using a technique that
changes the colors of some adjacent pixels to create the illusion of more
colors. For example, dithering can give the effect of shades of gray in a blackand-white image or of additional colors in a color image.
You may want to experiment with the Dithered option and see how it affects
the view labeled After in the dialog box. In many cases (but not all), dithering
improves an image’s appearance.
4 Click Change.
The image information changes as you specified. If you don’t like the change,
choose Undo Depth Change from the Edit menu and try again.
Deciding how many colors to use
If you’re not sure how many colors (or shades of gray) to use for a particular
image, keep these general guidelines in mind:
74
m Reducing the number of colors used by an image decreases its size when
saved to disk, but it may also reduce the image’s quality when displayed on
screen or printed.
m Reducing the number of colors used by an image may mean that it prints
more quickly, but (depending on the printer you’re using) it doesn’t
necessarily reduce the print quality.
Some file formats limit the number of colors (or shades of gray) that images
saved in those formats can use. The section “Number of Colors or Grays
Supported by Standard File Formats” in Chapter 6 lists the number of colors
or grays you can specify for the standard file formats supported by
PhotoFlash.
Chapter 4
Page 85

5
Enhancing Images
You can use commands in the Enhance menu to adjust the color balance,
exposure, brightness, and contrast of an image; to blur or sharpen it; and to
remove dust or scratches. You can also use most of the Enhance commands
on selected thumbnails in a catalog.
If you are using any Enhance command on a single image and part of the
image is currently selected, the command affects only the selection. In some
cases you can use an equivalent tool in the PhotoFlash Tool palette as an
alternative to using an Enhance command. For a quick summary of the way
the tools in the Tool palette work, see the beginning of Chapter 3, “Working
With Selections.”
This chapter describes in detail how to enhance images by using the standard
Enhance commands and how to enhance selections by using the Blur,
Sharpen, DeDust, and DeScratch tools. If you have installed any Photoshopcompatible plug-in modules in the PhotoFlash Plug-ins folder, additional
commands that aren’t described here may show up in the Enhance menu.
Such commands work much like the standard Enhance commands. See the
documentation that came with the plug-in modules for more information.
75
Page 86

Using the Enhance commands
This section summarizes how the standard Enhance menu commands work.
The sections that follow describe in more detail the actions you can perform
with each command and, where appropriate, how to use the equivalent tool in
the PhotoFlash Tool palette.
To enhance a single image or a group of images represented by selected
catalog thumbnails, make sure the window you want the command to affect is
frontmost and then follow these steps:
1Choose the command you want to use from the Enhance menu.
The Enhance dialog box for the command appears. This is what it looks like
for the Brightness/Contrast command:
View of image before
enhancement
Use these tools to
move, enlarge, or
reduce the view of
the image.
Click here to restore
the default settings.
View of image after
enhancement
Drag here to choose a
different enhancement.
Use the slider controls to
adjust the enhancement.
If you are working with a single image, the dialog box includes Before and
After views of the image. If you click on the image itself while this dialog box
is open, the place you click appears in the Before and After boxes.
If you are working with more than one thumbnail in a catalog, the dialog box
doesn’t include Before and After images.
76
Chapter 5
Page 87

2Adjust the sliders as necessary to achieve the kind of enhancement you want.
If you are working with a single image, you can try out new settings and view
their effects, and you can use the Hand and Zoom tools to move, enlarge, or
reduce the view of the image.
3If you can’t achieve the look you want, try experimenting with other commands in the
Enhancement pop-up menu.
The commands in the Enhancement pop-up menu are the same as the
standard commands in the Enhance menu. (Enhance commands provided by
plug-in modules may not show up in the pop-up menu.) When you choose a
different command, the Enhance dialog box displays the controls for that
command.
If you change your mind about the enhancement, click Cancel.
4Click Enhance when you’re ready to apply the current enhancement settings.
PhotoFlash applies the current enhancement settings to the current selection,
if any, or to the entire image in the frontmost window, or to the images
represented by selected thumbnails in the frontmost window. If any of the
images represented by selected thumbnails are currently open, PhotoFlash
applies the enhancement to each image as a whole and ignores any selections
the images contain.
Adjusting colors
If you’re not happy with the results, choose Undo from the Edit menu and
try again.
Most image files contain information about each pixel’s color in the form of
numbers that represent the proportions of red, green, and blue that combine
to make a specific color. You can use the Adjust Colors command in the
Enhance menu to increase or decrease the proportion of red, green, or blue
for all the pixels in a selection, in an image, or in a group of images identified
by selected catalog thumbnails.
The Adjust Colors command works only for images with millions of colors.
Enhancing Images
77
Page 88

Make sure the window you want the Adjust Colors command to affect is
frontmost, then follow these steps:
1Choose Adjust Colors from the Enhance menu.
The Enhance dialog box appears.
View of current
image
2Adjust the Red, Green, and Blue sliders as necessary to adjust the image’s colors to
3When you’re ready to apply the color adjustments, click Enhance.
View of image after new colors
settings are applied
Drag these sliders to
increase or decrease the
proportions of red, green,
and blue.
If you click on the image itself while this dialog box is open, the place you
click appears in the Before and After boxes.
your satisfaction.
PhotoFlash applies the color adjustment settings you specified to the
frontmost window. If the window contains an image that includes a selection,
PhotoFlash applies the new settings to the selection only. If the window
contains a catalog with selected thumbnails, it applies the new settings to the
images they represent and ignores any selections the images contain.
78
Chapter 5
Page 89

Balancing the exposure
You can use the Balance Exposure command in the Enhance menu to bring
out details in an image that are otherwise faint or even invisible. In general,
it’s preferable to balance the exposure of a whole image rather than a selected
area of an image. This command may improve severely overexposed or
underexposed images that can’t be fixed with the Brightness/Contrast
command.
Make sure the window you want the Balance Exposure command to affect is
frontmost, then follow these steps:
1Choose Balance Exposure from the Enhance menu.
The Enhance dialog box appears.
View of current
image
2Adjust the Sensitivity and Blending sliders as necessary to achieve the exposure
3When you’re ready to apply the exposure settings, click Enhance.
View of image after exposure
settings are applied
Drag this slider to increase or
decrease sensitivity to details.
Drag this slider to increase or
decrease the effect of the
enhancement.
If you click on the image itself while this dialog box is open, the place you
click appears in the Before and After boxes.
you want.
Enhancing Images
79
Page 90

PhotoFlash applies the exposure settings you specified to the frontmost
window. If the window contains an image that includes a selection,
PhotoFlash applies the new settings to the selection only. If the window
contains a catalog with selected thumbnails, PhotoFlash applies the
new settings to the images they represent and ignores any selections the
images contain.
Adjusting brightness and contrast
You can use the Brightness/Contrast command in the Enhance menu to adjust
the brightness and contrast of a selected area, a single image, or multiple
images represented by selected catalog thumbnails.
Make sure the window you want the command to affect is frontmost, then
follow these steps:
1Choose Brightness/Contrast from the Enhance menu.
The Enhance dialog box appears.
View of current image
Drag this slider to
increase or decrease
contrast between
light and dark areas.
80
Chapter 5
View of image after
brightness and contrast
have been adjusted
Drag this slider to make the
image lighter or darker.
If you click on the image itself while this dialog box is open, the place you
click appears in the Before and After boxes.
2Adjust the Brightness and Contrast slider as necessary to achieve the look you want.
Page 91

Some general guidelines for adjusting brightness and contrast follow step 3.
After you adjust the Brightness slider, click different areas of the image to
examine the changes in the brightest and darkest areas. If you move the slider
too far to the right, very light areas change to pure white and lose all detail. If
you move the slider too far to the left, very dark areas change to pure black
and lose all detail.
It’s also a good idea to examine the light and dark areas of the preview image
after you adjust the Contrast slider. If you increase contrast, lighter areas
become brighter and darker areas become darker. If you decrease contrast,
lighter areas become darker and darker areas become lighter.
3When you’re ready to apply the new settings, click Enhance.
PhotoFlash applies the brightness and contrast settings you specified to the
frontmost window. If the window contains an image that includes a selection,
PhotoFlash applies the new settings to the selection only. If the window
contains a catalog with selected thumbnails, PhotoFlash applies the new
settings to the images they represent and ignores any selections the images
contain.
Every image you attempt to adjust with the Brightness/Contrast command is
likely to require slightly different settings for optimal quality. Finding the
right settings is usually a matter of trial and error, but keep these guidelines in
mind as a starting point for your adjustments:
If the image appears to be
too dark,
m
increase the brightness and then experiment with changing
the contrast.
m
too light,
decrease the brightness and then experiment with changing
the contrast.
m
too gray
, increase the contrast and then experiment with changing
the brightness.
m
too high contrast
, decrease the contrast and then experiment with changing
the brightness.
If you can’t improve an image by adjusting its brightness and contrast, try the
Balance Exposure command.
Enhancing Images
81
Page 92

Blurring an image
1Choose Blur from the Enhance menu.
You can use either the Blur command or the Blur tool to blur or soften part of
an image or an entire image, making it appear to be less in focus. The Blur
command is more convenient if you’re blurring the whole image, and it gives
you a preview of the change before you apply it. You can also use the Blur
command to blur multiple images represented by selected catalog thumbnails.
The Blur tool is sometimes convenient if you’re blurring just part of an image.
PhotoFlash blurs images by blending the colors of neighboring pixels. Both
the Blur command and the Blur tool allow you to adjust the amount of
blurring applied at one time. If you select the minimum amount, PhotoFlash
blends only immediately adjacent pixels, producing a subtle softening of the
image. As you increase the amount of blurring, PhotoFlash blends more and
more pixels until the image becomes unrecognizable.
Using the Blur command
To use the Blur command on part of an image, an entire image, or multiple
images represented by selected catalog thumbnails, make sure the window
you want the command to affect is frontmost, then follow these steps:
82
View of current
Chapter 5
image
The Enhance dialog box appears.
View of image after Blur
setting is applied
Drag this slider to increase or
decrease the Blur command’s effect.
Page 93

If you click on the image itself while this dialog box is open, the place you
click appears in the Before and After boxes.
2Adjust the slider as necessary to achieve the look you want.
3When you’re ready to apply the new setting, click Enhance.
PhotoFlash applies the Blur setting you specified to the frontmost window. If
the window contains an image that includes a selection, PhotoFlash blurs the
selection only. If the window contains a catalog with selected thumbnails,
PhotoFlash blurs the images they represent and ignores any selections the
images may contain.
Using the Blur tool
To blur part of an image using the Blur tool, follow these steps:
1 Select the part of the image you want to blur.
For instructions on using the Selection tools, see Chapter 3, “Working With
Selections.” To select the entire image, choose Select All from the Edit menu.
2If you want to adjust how much the Blur tool blurs, double-click it; otherwise, skip to
step 4.
Double-click the Blur
tool in the Tool palette
to adjust its settings.
3Adjust the Blur Options setting as necessary, then click OK .
4If it’s not already selected, click the Blur tool in the Tools palette to select it.
The Blur Options dialog box appears.
Drag this slider to increase or
decrease the Blur tool’s effect.
The Blur tool becomes highlighted when it’s selected.
Enhancing Images
83
Page 94

5Position the pointer over the part of the image you selected.
The pointer changes to the Blur icon.
6Click anywhere in the selected area.
PhotoFlash blurs the selected area.
Sharpening an image
You can use either the Sharpen command or the Sharpen tool to sharpen an
image. The Shar pen command is usually more convenient if you’re
sharpening the whole image, and it gives you a preview of the change before
you apply it. You can also use the Sharpen command to sharpen multiple
images represented by selected catalog thumbnails. The Sharpen tool is
sometimes convenient if you’re sharpening just part of an image.
Because many printers tend to blur images slightly, shar pening an image
slightly before printing can yield better results. Note, however, that some
printers sharpen images automatically.
Sharpening an image doesn’t add any detail to it. Instead, PhotoFlash
analyzes the contents of the area to be sharpened and emphasizes the
differences between the colors of adjacent pixels. Both the Sharpen command
and the Sharpen tool allow you to adjust the degree of sharpening. You
should keep this adjustment as low as possible. Sharpening may produce
unwanted effects if you apply it at too high a setting.
84
Using the Sharpen command
To sharpen part of an image, an entire image, or multiple images represented
by selected catalog thumbnails, follow these steps:
1Choose Sharpen from the Enhance menu.
Chapter 5
Page 95

The Enhance dialog box appears.
View of current
image
2Adjust the slider as necessary to achieve the look you want.
3When you’re ready to apply the new setting, click Enhance.
View of image after Sharpen
setting is applied
Drag this slider to increase or
decrease the Sharpen
command’s effect.
If you click on the image itself while this dialog box is open, the place you
click appears in the Before and After boxes.
For best results, keep the setting as low as possible.
PhotoFlash applies the Sharpen setting you specified to the frontmost
window. If the window contains an image that includes a selection,
PhotoFlash sharpens the selection only. If the window contains a catalog with
selected thumbnails, PhotoFlash sharpens the images they represent and
ignores any selections the images may contain.
Using the Sharpen tool
To sharpen part of an image by using the Sharpen tool, follow these steps:
1 Select the part of the image you want to sharpen.
For instructions on using the Selection tools, see Chapter 3, “Working With
Selections.” To select the entire image, choose Select All from the Edit menu.
Enhancing Images
85
Page 96

2If you want to adjust how much the Sharpen tool sharpens, double-click it; otherwise,
skip to step 4.
Double-click the Sharpen tool in the
Tool palette to adjust its settings.
The Sharpen Options dialog box appears.
Drag this slider to increase or
decrease the Sharpen tool’s
effect.
3Adjust the Sharpen setting as necessary, then click OK.
For best results, keep the setting as low as possible.
4If it’s not already selected, click the Sharpen tool in the Tools palette to select it.
The Sharpen tool becomes highlighted when it’s selected.
5Position the pointer over the part of the image you selected.
Removing dust
86
Chapter 5
The pointer changes to the Sharpen icon.
6Click anywhere in the selected area.
PhotoFlash sharpens the selected area.
You can use either the Remove Dust command or the DeDust tool to remove
dust from a selected area or an entire image. Both methods work best if you
carefully select the part of the image from which you want to remove dust.
Otherwise, PhotoFlash may interpret part of the image itself as dust and
remove details you don’t want removed.
Page 97

The Remove Dust command allows you to preview its changes before you
make them, which can be helpful when you’re trying to find the right settings
to remove dust that blends in with the background. It’s not a good idea to use
the Remove Dust command to remove dust from multiple images represented
by selected thumbnails, because the command ignores selections and instead
acts on the whole image.
Using the Remove Dust command
The Remove Dust command, like the DeDust tool, works best if you first
carefully select the part of the image from which you want to remove dust.
Follow these steps:
1Select the part of the image from which you want to remove dust.
For instructions on using the Selection tools, see Chapter 3, “Working With
Selections.”
2Choose Remove Dust from the Enhance menu.
The Enhance dialog box appears.
View of current
image
Drag this slider to
increase or decrease
the sensitivity of the
Remove Dust
command.
3Adjust the sliders as necessary to remove the dust.
View of image after Remove
Dust settings are applied
Drag this slider to increase or
decrease the size of the spots that
PhotoFlash interprets as dust.
Enhancing Images
87
Page 98

Try fairly low settings first, and check the Before and After views to see their
effect. The lower the Size setting, the smaller the specks that PhotoFlash
recognizes as dust. The lower the Sensitivity setting, the more different a
speck’s color must be from surrounding colors for PhotoFlash to recognize it
as dust. Lower sensitivity also tends to reduce the number of image elements
that PhotoFlash recognizes as dust.
4When you’re ready to try removing the dust, click Enhance.
PhotoFlash attempts to remove the dust as you specified. Because PhotoFlash
can’t always distinguish between dust and part of the original image, it may
not always be able to remove dust successfully without altering the image
itself.
Using the DeDust tool
To remove dust from part of an image by using the DeDust tool, follow
these steps:
1Select the part of the image from which you want to remove dust.
For instructions on using the Selection tools, see Chapter 3, “Working
With Selections.”
Double-click the
DeDust tool in the
Tool palette to adjust
Drag this slider to
increase or decrease
the sensitivity of the
DeDust tool.
88
Chapter 5
2If you want to adjust the dust size and sensitivity settings for the DeDust tool, double-
click it; otherwise, skip to step 4.
its settings.
The Remove Dust Options dialog box appears.
Drag this slider to increase or
decrease the size of the spots
that PhotoFlash interprets as dust.
Page 99

3Adjust the Size and Sensitivity settings as necessary, then click OK.
Try fairly low settings first, increasing them only if the dust doesn’t disappear
when you click the selection. To see the effects different settings have, use the
Remove Dust command as described in the previous section.
4If it’s not already selected, click the DeDust tool in the Tool palette to select it.
The DeDust tool becomes highlighted when it’s selected.
5Position the pointer over the part of the image you selected.
The pointer changes to the DeDust icon.
6Click anywhere in the selected area.
PhotoFlash attempts to remove dust from the selected area. If you have
trouble removing dust with the DeDust tool, you may find it easier to use the
Remove Dust command as described in the previous section. The Remove
Dust command allows you to preview part of an image while you adjust the
Remove Dust Options dialog box.
Removing scratches
You can use either the Remove Scratch command or the DeScratch tool to
remove scratches from a selected area or an entire image. Both methods work
best if you carefully select the scratch you want to remove, including as little
of the rest of the image as possible. Otherwise, PhotoFlash may interpret part
of the image itself as a scratch and remove details you don’t want removed. If
you find you don’t get good results after selecting a scratch with the Marquee
tool, try the Lasso tool.
The Remove Scratch command allows you to preview its changes before you
make them, which can be helpful when you’re trying to find the right settings
to remove a scratch that blends in with the background. It’s not a good idea to
use the Remove Scratch command to remove scratches from multiple images
represented by selected thumbnails, because the command ignores selections
and instead acts on the whole image.
Enhancing Images
89
Page 100

Using the Remove Scratch command
The Remove Scratch command, like the DeScratch tool, works best if you
first carefully select the part of the image from which you want to remove a
scratch. Follow these steps:
1Select the part of the image from which you want to remove a scratch.
For instructions on using the Selection tools, see Chapter 3, “Working
With Selections.”
2Choose Remove Scratch from the Enhance menu.
The Enhance dialog box appears.
View of current
image
Drag this slider to
increase or decrease
the sensitivity of the
Remove Scratch
command.
3Adjust the sliders as necessary to remove the scratch.
View of image after Remove
Scratch settings are applied
Drag this slider to increase or
decrease the width of the marks that
PhotoFlash interprets as scratches.
Try fairly low settings first. Check the Before and After views to see the effect
of changing the settings. The higher the Width setting, the wider a scratch can
be for PhotoFlash to recognize it as a scratch. The higher the Sensitivity
setting, the more image elements PhotoFlash interprets as scratches.
If you raise either of these settings too high, PhotoFlash may interpret valid
elements of the image such as trees, poles, or wallpaper patterns as scratches.
Always use the lowest settings that remove the scratches on your image.
90
Chapter 5
 Loading...