

Page 1

Memory DIMMs
Replacement Instructions
Mac Pro
First Steps
Shut down computer.1
Wait 10 minutes.
2
Warning: Parts inside
computer can be very
hot. Allow computer
to cool down before
continuing.
Unplug all external 3
cables except power
cord.
Touch metal PCI cover 4
on back of computer.
Unplug power cord.5
Note: Follow these instructions carefully. Failure to do so could damage your equipment and
void its warranty.
Opening the
Computer
Hold side access 1
panel and lift latch on
back of computer.
Warning: Edges of
access panel and
enclosure can be
sharp. Be careful
when handling.
Remove access panel 2
and place it on at
surface covered by
soft, clean cloth.
© 2009 Apple Inc. All rights reserved.
073-1246 Rev. B 1
Page 2
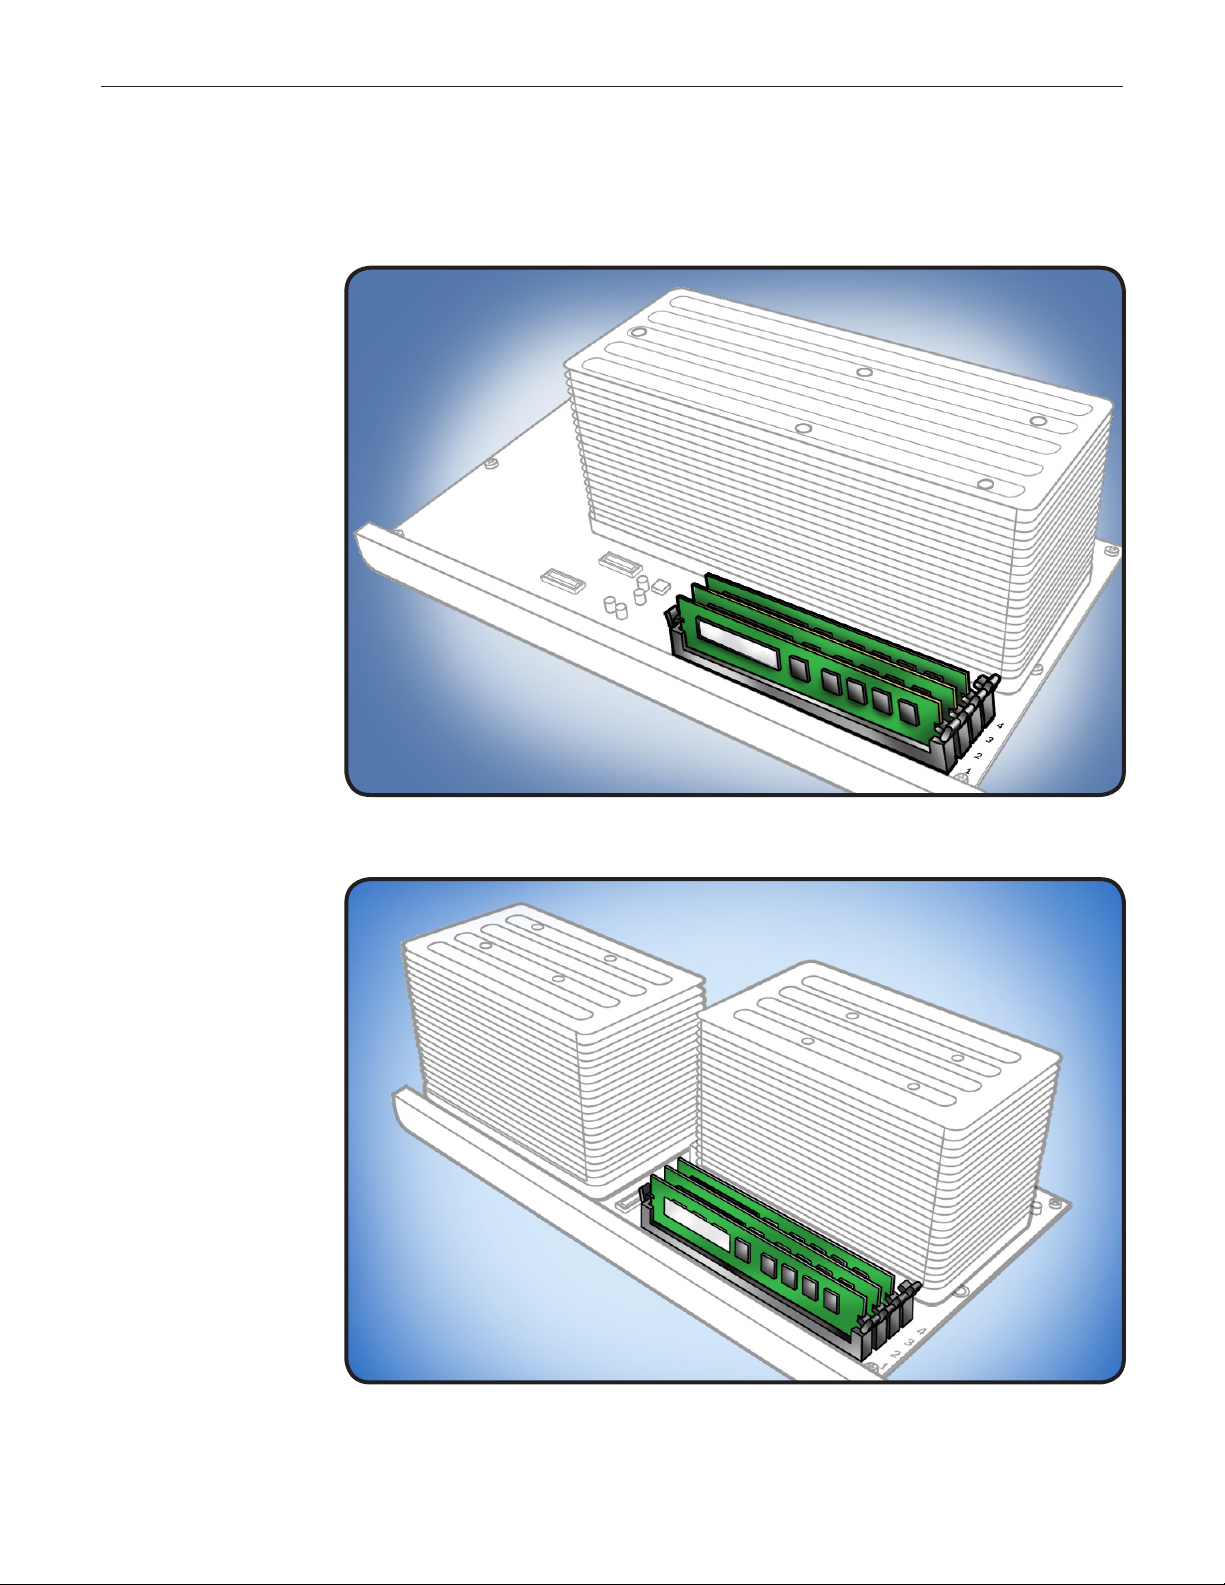
Memory
Conguration
DIMMs reside on the
computer’s processor
board, which is laid out
in two congurations.
Check the illustrations on
this page to determine if
you have a quad-core or
8-core conguration.
Specications
DIMMs for your
computer must t these
specications:
PC3-8500,1066 •
MHz, DDR3 SDRAM
UDIMMs
72-bit wide, 240-pin •
modules
18 memory ICs •
maximum per UDIMM
Error-correcting code •
(ECC)
Quad-Core Conguration
8-Core Conguration
Note: Memory from older
Apple computers is not
compatible with your
computer.
© 2009 Apple Inc. All rights reserved.
073-1246 Rev. B 2
Page 3
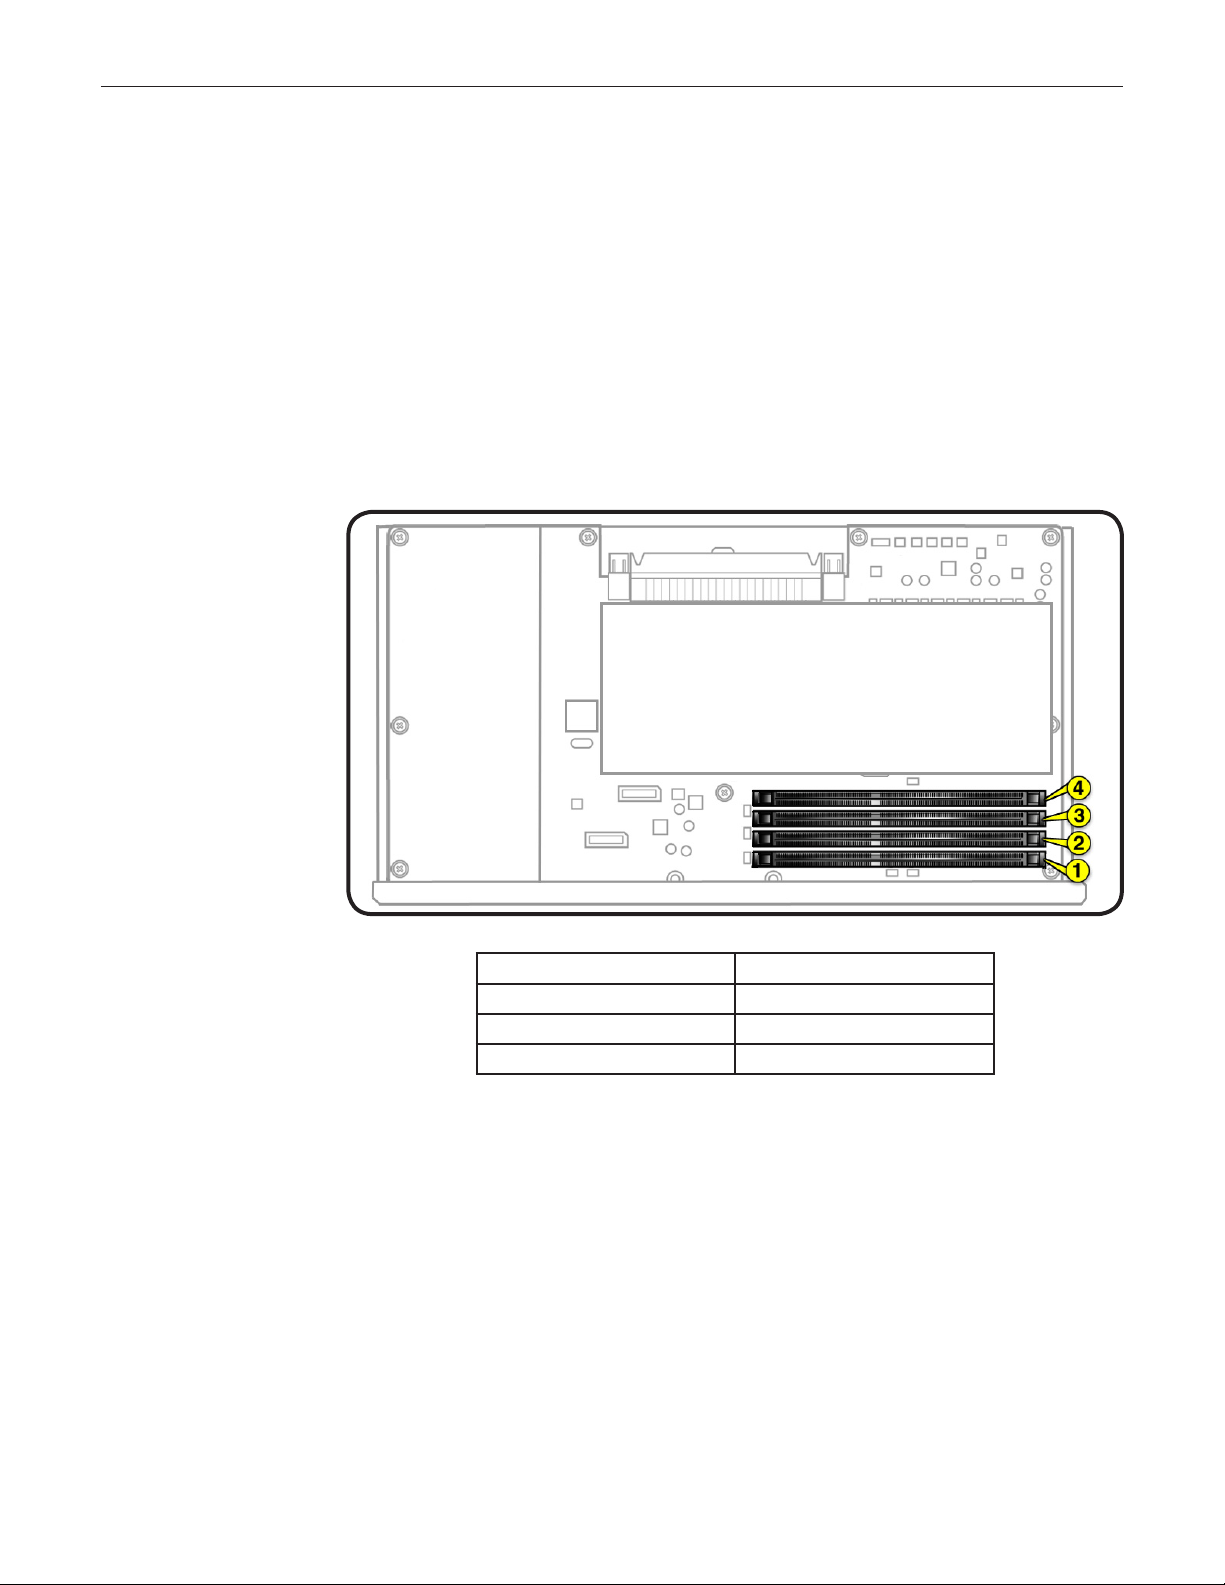
Filling Slots
If you are installing DIMMs
that are of the same size,
follow the order in the
tables on pages 3 and 4.
If you are installing
dierent-size DIMMs, also
refer to “Memory Slot
Utility” on page 4.
Quad-Core Memory
Quad-core computers
have four memory slots.
You can install 1 GB or
2 GB DIMMs for a total of
up to 8 GB of memory.
The processor’s memory
controller has three
memory channels. DIMM
slots 1 and 2 have their
own channels; slots 3 and
4 share a channel.
For optimal memory
bandwidth, all three
memory channels should
be used, and memory
should be balanced across
the three channels.
Note: Populating slot 4
slightly drops maximum
memory bandwidth,
but depending on the
applications used, overall
system performance may
benet from the larger
amount of memory.
© 2009 Apple Inc. All rights reserved.
If you have Fill these slots
Two DIMMs 1 and 2
Three DIMMs 1, 2, and 3
Four DIMMs 1, 2, 3, and 4
073-1246 Rev. B 3
Page 4

8-Core Memory
Eight-core computers
have eight memory slots,
four per processor. You
can install 1 GB, 2 GB, or 4
GB DIMMs for a total of up
to 32 GB of memory.
Each processor’s memory
controller has three
memory channels. DIMM
slots 1, 2, 5, and 6 have
their own channels; slots
3 and 4 share a channel
and slots 7 and 8 share a
channel.
For optimal memory
bandwidth, all six memory
channels should be used,
and memory should be
balanced across the six
channels.
If you have Fill in these slots
Two DIMMs 1 and 2
Three DIMMs 1, 2, and 3
Four DIMMs 1, 2, and 5, 6
Six DIMMs 1, 2, 3 and 5, 6, 7
Eight DIMMs 1, 2, 3, 4 and 5, 6, 7, 8
Note: Populating slot 4 or
8 slightly drops maximum
memory bandwidth,
but depending on the
applications used, overall
system performance may
benet from the larger
amount of memory.
Memory Slot Utility
If you install dierent-size DIMMs in your computer, follow the order in the tables above. If the
DIMM conguration you install doesn’t provide optimized performance, the Memory Slot Utility
will appear on screen and recommend an improved conguration. To use the Memory Slot
Utility again, go to /System/Library/Core Services.
© 2009 Apple Inc. All rights reserved.
073-1246 Rev. B 4
Page 5

Removing the
Installed DIMM
Because memory DIMMs
are installed on the
computer’s processor
board, before you can
remove a DIMM, you must
remove the processor tray.
Locate processor tray.1
2
Press down and
release 2 latches on
front of processor tray.
© 2009 Apple Inc. All rights reserved.
073-1246 Rev. B 5
Page 6

3 Holding tray by
latches, lift it out of
computer.
Place tray DIMM side 4
up on soft, clean
cloth.
Important: When
removing or installing
DIMM, be careful of
nearby heatsink ns, as
they can be sharp. Always
handle DIMM only by
the edges. Do not touch
its connectors or any
components.
5 Open ejectors on
DIMM slot by pushing
them out to the sides.
Holding DIMM by 6
edges, remove it from
processor board.
© 2009 Apple Inc. All rights reserved.
073-1246 Rev. B 6
Page 7

Installing the
Replacement
DIMM
Align DIMM in slot on
1
processor board.
Push both ends of 2
DIMM down until
ejectors snap back up
into place.
Note: If a black sticker
covers barcode label on
DIMM you are replacing,
remove sticker before
returning DIMM to Apple.
(Service DIMMs do not
include black sticker.)
3 Holding processor
tray by latches, lower
it back into computer.
Make sure latches are 4
closed ush with front
of processor tray.
© 2009 Apple Inc. All rights reserved.
073-1246 Rev. B 7
Page 8

Closing the
Computer
Replace access panel.
1
Note: Make sure
latch is up before you
replace panel. If latch
is down, panel will
not seat correctly.
Push latch down 2
to close and secure
access panel.
Warning: Never turn
on computer unless
all its internal and
external parts are in
place and it is closed.
Operating computer
when open or missing
parts can cause
damage or injury.
3
Verify DIMM
installation using
“Memory Diagnostic
LEDs” information on
next page.
© 2009 Apple Inc. All rights reserved.
073-1246 Rev. B 8
Page 9

Memory
Diagnostic LEDs
Important: The quad-
core and 8-core processor
boards include a set of
diagnostic memory LEDs.
After re-installing or
replacing a DIMM, always
use the LEDs to verify the
DIMM is correctly seated.
To verify your DIMM
installation, do this:
Start up the 1
computer.
Remove the side 2
access panel.
Check the bank of 3
memory LEDs.
Quad-Core LEDs
8-Core LEDs
An illuminated, red
LED indicates its
associated DIMM may
be poorly seated or
failed.
If you see a red 4
LED, refer to “How
to Troubleshoot
Memory LEDs” on the
next page.
Note: Apple System
Proler does not report
unseated or failed
memory. You must use the
memory LEDs to locate
DIMM issues.
© 2009 Apple Inc. All rights reserved.
073-1246 Rev. B 9
Page 10

How to
Troubleshoot
Memory LEDs
Follow this procedure when troubleshooting each DIMM identied by a red LED:
Remove and reseat DIMM.1.
Restart computer. If associated LED is no longer illuminated, issue is resolved. 2.
If associated LED remains illuminated, replace DIMM with new DIMM.3.
Restart computer and verify LED is no longer illuminated.4.
There is one exception. If two LEDs illuminate at the same time for the 3 DIMM and 4 DIMM
slots or for the 7 DIMM and 8 DIMM slots, check both DIMMs using this process:
Check Result Action
Remove both DIMMs identied by 1.
illuminated LEDs. Set DIMM 4 (or
Yes Replace DIMM 3 (or DIMM 7) with
new DIMM. Go to step 2.
DIMM 8) aside, and reseat DIMM 3 (or
DIMM 7). Restart computer. Is DIMM 3
(or DIMM 7) LED illuminated?
Reinstall DIMM 4 (or DIMM 8). Restart 2.
computer. Is one or both LEDs
No Go to step 2.
Yes Replace DIMM 4 (or DIMM 8) with
new DIMM.
illuminated?
No Issue resolved.
Apple Inc.
© 2009 Apple Inc. All rights reserved.
This document is protected under U.S. Copyright Law and International Treaties, and no part of this
document may be reproduced in any form without written permission from Apple.
Apple is not responsible for typographical, printing, or inadvertent errors.
Apple Inc.
1 Innite Loop
Cupertino, CA 95014-2084 USA
+ 1 408 996 1010
www.apple.com
Apple, the Apple logo, and Mac are trademarks of Apple Inc., registered in the U.S. and other countries.
© 2009 Apple Inc. All rights reserved.
073-1246 Rev. B 10
 Loading...