

Page 1

iPhone OS
Enterprise Deployment
Guide
Second Edition, for Version 3.2 or later
Page 2

K
Apple Inc.
© 2010 Apple Inc. All rights reserved.
This manual may not be copied, in whole or in part,
without the written consent of Apple.
The Apple logo is a trademark of Apple Inc., registered
in the U.S. and other countries. Use of the “keyboard”
Apple logo (Option-Shift-K) for commercial purposes
without the prior written consent of Apple may
constitute trademark infringement and unfair
competition in violation of federal and state laws.
Every effort has been made to ensure that the
information in this manual is accurate. Apple is not
responsible for printing or clerical errors.
Apple
1 Infinite Loop
Cupertino, CA 95014
408-996-1010
www.apple.com
Apple, the Apple logo, Bonjour, iPhone, iPod, iPod touch,
iTunes, Keychain, Leopard, Mac, Macintosh, the Mac
logo, Mac OS, QuickTime, and Safari are trademarks of
Apple Inc., registered in the U.S. and other countries.
iPad is a trademark of Apple Inc.
iTunes Store and App Store are service marks of Apple
Inc., registered in the U.S. and other countries. MobileMe
is a service mark of Apple Inc.
Other company and product names mentioned herein
are trademarks of their respective companies. Mention
of third-party products is for informational purposes
only and constitutes neither an endorsement nor a
recommendation. Apple assumes no responsibility with
regard to the performance or use of these products.
Simultaneously published in the United States and
Canada.
019-1835/2010-04
Page 3

3
Contents
Preface 6 iPhone in the Enterprise
6
What’s New for the Enterprise in iPhone OS 3.0 and Later
7
System Requirements
8
Microsoft Exchange ActiveSync
10
VPN
11
Network Security
11
Certificates and Identities
12
Email Accounts
12
LDAP Servers
12
CalDAV Servers
13
Additional Resources
Chapter 1 14 Deploying iPhone and iPod touch
15
Activating Devices
16
Preparing Access to Network Services and Enterprise Data
20
Determining Device Passcode Policies
21
Configuring Devices
22
Over-the-Air Enrollment and Configuration
27
Other Resources
Chapter 2 28 Creating and Deploying Configuration Profiles
29
About iPhone Configuration Utility
30
Creating Configuration Profiles
39
Editing Configuration Profiles
40
Installing Provisioning Profiles and Applications
40
Installing Configuration Profiles
43
Removing and Updating Configuration Profiles
Chapter 3 44 Manually Configuring Devices
44
VPN Settings
48
Wi-Fi Settings
49
Exchange Settings
54
Installing Identities and Root Certificates
55
Additional Mail Accounts
3
Page 4

55
Updating and Removing Profiles
55
Other Resources
Chapter 4 57 Deploying iTunes
57
Installing iTunes
59
Quickly Activating Devices with iTunes
60
Setting iTunes Restrictions
62
Backing Up a Device with iTunes
Chapter 5 63 Deploying Applications
63
Registering for Application Development
64
Signing Applications
64
Creating the Distribution Provisioning Profile
64
Installing Provisioning Profiles Using iTunes
65
Installing Provisioning Profiles Using iPhone Configuration Utility
65
Installing Applications Using iTunes
66
Installing Applications Using iPhone Configuration Utility
66
Using Enterprise Applications
66
Disabling an Enterprise Application
66
Other Resources
Appendix A 67 Cisco VPN Server Configuration
67
Supported Cisco Platforms
67
Authentication Methods
68
Authentication Groups
68
Certificates
69
IPSec Settings
69
Other Supported Features
Appendix B 70 Configuration Profile Format
70
Root Level
71
Payload Content
72
Profile Removal Password Payload
72
Passcode Policy Payload
73
Email Payload
75
Web Clip Payload
75
Restrictions Payload
76
LDAP Payload
76
CalDAV Payload
77
Calendar Subscription Payload
77
SCEP Payload
78
APN Payload
79
Exchange Payload
79
VPN Payload
4
Contents
Page 5

81
Wi-Fi Payload
84
Sample Configuration Profiles
Appendix C 88 Sample Scripts
Contents
5
Page 6

iPhone in the Enterprise
Learn how to integrate iPhone, iPod touch, and iPad with
your enterprise systems.
This guide is for system administrators. It provides information about deploying and
supporting iPhone, iPod touch, and iPad in enterprise environments.
What’s New for the Enterprise in iPhone OS 3.0 and Later
iPhone OS 3.x includes numerous enhancements, including the following items of
special interest to enterprise users:
Â
CalDAV calendar wireless syncing is supported.
Â
LDAP server support for contact look-up in mail, address book, and SMS.
Â
Configuration profiles can be encrypted and locked to a device so that their removal
requires an administrative password.
Â
iPhone Configuration Utility allows you to add and remove encrypted configuration
profiles directly onto devices that are connected to your computer by USB.
Â
Online Certificate Status Protocol (OCSP) is supported for certificate revocation.
Â
On-demand certificate-based VPN connections are now supported.
Â
VPN proxy configuration via a configuration profile and VPN servers is supported.
Â
Microsoft Exchange users can invite others to meetings. Microsoft Exchange 2007
users can also view reply status.
Â
Exchange ActiveSync client certificate-based authentication is supported.
Â
Additional EAS policies are supported, along with EAS protocol 12.1.
Â
Additional device restrictions are available, including the ability to specify the length
of time that a device can be left unlocked, disable the camera, and prevent users
from taking a screenshot of the device’s display.
Â
Local mail messages and calendar events can be searched. For IMAP, MobileMe,
and Exchange 2007, mail that resides on the server can also be searched.
Â
Additional mail folders can be designated for push email delivery.
Â
APN proxy settings can be made specified using a configuration profile.
Preface
6
Page 7

Â
Web clips can be installed using a configuration profile.
Â
802.1x EAP-SIM is now supported.
Â
Devices can be authenticated and enrolled over-the-air using a Simple Certificate
Enrollment Protocol (SCEP) server.
Â
iTunes can store device backups in encrypted format.
Â
iPhone Configuration Utility supports profile creation via scripting.
Â
iPhone Configuration Utility 2.2 supports iPad, iPhone, and iPod touch. Mac OS X
v10.6 Snow Leopard is required. Windows 7 is also supported.
System Requirements
Read this section for an overview of the system requirements and the various
components available for integrating iPhone, iPod touch, and iPad with your enterprise
systems.
iPhone and iPod touch
iPhone and iPod touch devices you use with your enterprise network must be updated
to iPhone OS 3.1.x.
iPad
iPad must be updated to iPhone OS 3.2.x.
iTunes
iTunes 9.1 or later is required in order to set up a device. iTunes is also required in order
to install software updates for iPhone, iPod touch, and iPad. You also use iTunes to
install applications, and sync music, video, notes, or other data with a Mac or PC.
To use iTunes, you need a Mac or PC that has a USB 2.0 port and meets the minimum
requirements listed on the iTunes website. See www.apple.com/itunes/download/.
iPhone Configuration Utility
iPhone Configuration Utility lets you create, encrypt, and install configuration profiles,
track and install provisioning profiles and authorized applications, and capture device
information such as console logs.
iPhone Configuration Utility requires one of the following:
 Mac OS X v10.5 Snow Leopard
 Windows XP Service Pack 3 with .NET Framework 3.5 Service Pack 1
 Windows Vista Service Pack 1 with .NET Framework 3.5 Service Pack 1
 Windows 7 with .NET Framework 3.5 Service Pack 1
iPhone Configuration Utility operates in 32-bit mode on 64-bit versions of Windows.
Preface
iPhone in the Enterprise
7
Page 8

You can download the .Net Framework 3.5 Service Pack 1 installer at:
http://www.microsoft.com/downloads/details.aspx?familyid=ab99342f-5d1a-413d-831981da479ab0d7
The utility allows you to create an Outlook message with a configuration profile as an
attachment. Additionally, you can assign users’ names and email addresses from your
desktop address book to devices that you’ve connected to the utility. Both of these
features require Outlook and are not compatible with Outlook Express. To use these
features on Windows XP computers, you may need to install 2007 Microsoft Office
System Update: Redistributable Primary Interop Assemblies. This is necessary if Outlook
was installed before .NET Framework 3.5 Service Pack 1.
The Primary Interop Assemblies installer is available at:
http://www.microsoft.com/downloads/details.aspx?FamilyID=59daebaa-bed4-4282a28c-b864d8bfa513
Microsoft Exchange ActiveSync
iPhone, iPod touch, and iPad support the following versions of Microsoft Exchange:
 Exchange ActiveSync for Exchange Server (EAS) 2003 Service Pack 2
 Exchange ActiveSync for Exchange Server (EAS) 2007
For support of Exchange 2007 policies and features, Service Pack 1 is required.
Supported Exchange ActiveSync Policies
The following Exchange policies are supported:
 Enforce password on device
 Minimum password length
 Maximum failed password attempts
 Require both numbers and letters
 Inactivity time in minutes
The following Exchange 2007 policies are also supported:
 Allow or prohibit simple password
 Password expiration
 Password history
 Policy refresh interval
 Minimum number of complex characters in password
 Require manual syncing while roaming
 Allow camera
 Require device encryption
For a description of each policy, refer to your Exchange ActiveSync documentation.
8 Preface iPhone in the Enterprise
Page 9

The Exchange policy to require device encryption (RequireDeviceEncryption) is
supported on iPhone 3GS, on iPod touch (Fall 2009 models with 32 GB or more)
and on iPad. iPhone, iPhone 3G, and other iPod touch models don’t support device
encryption and won’t connect to an Exchange Server that requires it.
If you enable the policy “Require Both Numbers and Letters” on Exchange 2003, or
the policy “Require Alphanumeric Password” on Exchange 2007, the user must enter
a device passcode that contains at least one complex character.
The value specified by the inactivity time policy (MaxInactivityTimeDeviceLock or
AEFrequencyValue) is used to set the maximum value that users can select in both
Settings > General > Auto-Lock and Settings > General > Passcode Lock > Require
Passcode.
Remote Wipe
You can remotely wipe the contents of an iPhone, iPod touch, or iPad. Wiping removes
all data and configuration information from the device. The device is securely erased
and restored to original, factory settings.
Important: On iPhone and iPhone 3G, wiping overwrites the data on the device, which
can take approximately one hour for each 8 GB of device capacity. Connect the device
to a power supply before wiping. If the device turns off due to low power, the wiping
process resumes when the device is connected to power. On iPhone 3GS and iPad,
wiping removes the encryption key to the data (which is encrypted using 256-bit AES
encryption) which occurs instantaneously.
With Exchange Server 2007, you can initiate a remote wipe using the Exchange
Management Console, Outlook Web Access, or the Exchange ActiveSync Mobile
Administration Web Tool.
With Exchange Server 2003, you can initiate a remote wipe using the Exchange
ActiveSync Mobile Administration Web Tool.
Users can also wipe a device in their possession by choosing “Erase All Content and
Settings” from the Reset menu in General settings. Devices can also be configured to
automatically initiate a wipe after several failed passcode attempts.
If you recover a device that was wiped because it was lost, use iTunes to restore it using
the device’s latest backup.
Microsoft Direct Push
The Exchange server automatically delivers email, contacts, and calendar events to
iPhone and iPad Wi-Fi + 3G if a cellular or Wi-Fi data connection is available. iPod touch
and iPad Wi-Fi don’t have a cellular connection, so they receive push notifications only
when they’re active and connected to a Wi-Fi network.
Preface iPhone in the Enterprise 9
Page 10

Microsoft Exchange Autodiscovery
The Autodiscover service of Exchange Server 2007 is supported. When you
manually configure a device, Autodiscover uses your email address and password
to automatically determine the correct Exchange server information. For information
about enabling the Autodiscover service, see http://technet.microsoft.com/en-us/
library/cc539114.aspx.
Microsoft Exchange Global Address List
iPhone, iPod touch, and iPad retrieve contact information from your company’s
Exchange server corporate directory. You can access the directory when searching
in Contacts, and it’s automatically accessed for completing email addresses as you
enter them.
Additional Supported Exchange ActiveSync Features
In addition to the features and capabilities already described, iPhone OS supports:
 Creating calendar invitations. With Microsoft Exchange 2007, you can also view the
status of replies to your invitations.
 Setting Free, Busy, Tentative, or Out of Office status for your calendar events.
 Searching mail messages on the server. Requires Microsoft Exchange 2007.
 Exchange ActiveSync client certificate-based authentication.
Unsupported Exchange ActiveSync Features
Not all Exchange features are supported, including, for example:
 Folder management
 Opening links in email to documents stored on SharePoint servers
 Task synchronization
 Setting an “out of office” autoreply message
 Flagging messages for follow-up
VPN
iPhone OS works with VPN servers that support the following protocols and
authentication methods:
 L2TP/IPSec with user authentication by MS-CHAPV2 Password, RSA SecurID and
CryptoCard, and machine authentication by shared secret.
 PPTP with user authentication by MS-CHAPV2 Password, RSA SecurID, and
CryptoCard.
 Cisco IPSec with user authentication by Password, RSA SecurID, or CryptoCard,
and machine authentication by shared secret and certificates. See Appendix A for
compatible Cisco VPN servers and recommendations about configurations.
10 Preface iPhone in the Enterprise
Page 11

Cisco IPSec with certificate-based authentication supports VPN on demand for domains
you specify during configuration. See “VPN Settings” on page 35 for details.
Network Security
iPhone OS supports the following 802.11i wireless networking security standards as
defined by the Wi-Fi Alliance:
 WEP
 WPA Personal
 WPA Enterprise
 WPA2 Personal
 WPA2 Enterprise
Additionally, iPhone OS supports the following 802.1X authentication methods for WPA
Enterprise and WPA2 Enterprise networks:
 EAP-TLS
 EAP -TTLS
 EAP-FAST
 EAP-SIM
 PEAP v0, PEAP v1
 LEAP
Certificates and Identities
iPhone, iPod touch, and iPad can use X.509 certificates with RSA keys. The file
extensions .cer, .crt, and .der are recognized. Certificate chain evaluations are
performed by Safari, Mail, VPN, and other applications.
Use P12 (PKCS #12 standard) files that contain exactly one identity. The file extensions
.p12 and .pfx are recognized. When an identity is installed, the user is prompted for the
passphrase that protects it.
Certificates necessary for establishing the certificate chain to a trusted root certificate
can be installed manually or by using configuration profiles. You don’t need to add root
certificates that are included on the device by Apple. To view a list of the preinstalled
system roots, see the Apple Support article at http://support.apple.com/kb/HT3580.
Certificates can be securely installed over the air via SCEP. See “Overview of the
Authenticated Enrollment and Configuration Process” on page 22 for more information.
Preface iPhone in the Enterprise 11
Page 12

Email Accounts
iPhone, iPod touch, and iPad support industry-standard IMAP4- and POP3-enabled
mail solutions on a range of server platforms including Windows, UNIX, Linux, and
Mac OS X. You can also use IMAP to access email from Exchange accounts in addition
to the Exchange account you use with direct push.
When a user searches their mail, they have the option of continuing the search on
the mail server. This works with Microsoft Exchange Server 2007 as well as most
IMAP-based accounts.
The user’s email account information, including Exchange user ID and password,
are securely stored on the device.
LDAP Servers
iPhone, iPod touch, and iPad retrieve contact information from your company’s LDAPv3
server corporate directories.You can access directories when searching in Contacts, and
and they are automatically accessed for completing email addresses as you enter them.
CalDAV Servers
iPhone, iPod touch, and iPad synchronize calendar data with your company’s CalDAV
server. Changes to the calendar are periodically updated between the device and
server.
You can also subscribe to read-only published calendars, such as holiday calendars or
those of a colleague’s schedule.
Creating and sending new calendar invitations from a device isn’t supported for CalDAV
accounts.
12 Preface iPhone in the Enterprise
Page 13

Additional Resources
In addition to this guide, the following publications and websites provide useful
information:
 iPhone in Enterprise webpage at www.apple.com/iphone/enterprise/
 iPad in Business webpage at: www.apple.com/ipad/business/
 Exchange Product Overview at http://technet.microsoft.com/en-us/library/
bb124558.aspx
 Deploying Exchange ActiveSync at http://technet.microsoft.com/en-us/library/
aa995962.aspx
 Exchange 2003 Technical Documentation Library at http://technet.microsoft.com/
en-us/library/bb123872(EXCHG.65).aspx
 Managing Exchange ActiveSync Security at http://technet.microsoft.com/en-us/
library/bb232020(EXCHG.80).aspx
 Wi-Fi for Enterprise webpage at www.wi-fi.org/enterprise.php
 iPhone VPN Connectivity to Cisco Adaptive Security Appliances (ASA) at
www.cisco.com/en/US/docs/security/vpn_client/cisco_vpn_client/iPhone/2.0/
connectivity/guide/iphone.html
 iPhone User Guide, available for download at www.apple.com/support/iphone/;
view the guide on iPhone, tap the iPhone User Guide bookmark in Safari or go to
http://help.apple.com/iphone/
 iPhone Guided Tour at www.apple.com/iphone/guidedtour/
 iPod touch User Guide, available for download at www.apple.com/support/ipodtouch;
view the guide on iPod touch, tap the iPod touch User Guide in Safari or go to
http://help.apple.com/ipodtouch/
 iPod touch Guided Tour at www.apple.com/ipodtouch/guidedtour/
 iPad User Guide, available for download at www.apple.com/support/ipad; view the
guide on iPad, tap the iPad User Guide in Safari or go to http://help.apple.com/ipad/
 iPad Guided Tour at www.apple.com/ipad/guided-tour/
Preface iPhone in the Enterprise 13
Page 14

1 Deploying iPhone and iPod touch
1
This chapter provides an overview of how to deploy iPhone,
iPod touch, and iPad in your enterprise.
iPhone, iPod touch, and iPad are designed to easily integrate with your enterprise
systems, including Microsoft Exchange 2003 and 2007, 802.1X-based secure wireless
networks, and Cisco IPSec virtual private networks. As with any enterprise solution,
good planning and an understanding of your deployment options make deployment
easier and more efficient for you and your users.
When planning your deployment of iPhone, iPod touch, and iPad, consider the
following:
 How will your company’s iPhones and iPad (Wi-Fi + 3G models) be activated for
wireless cellular service?
 Which enterprise network services, applications, and data will your users need to
access?
 What policies do you want to set on the devices to protect sensitive company data?
 Do you want to manually configure devices individually, or use a streamlined process
for configuring a large fleet?
14
The specifics of your enterprise environment, IT policies, wireless carrier, and your
computing and communication requirements affect how you tailor your deployment
strategy.
Page 15

Activating Devices
Each iPhone must be activated with your wireless carrier before it can be used to make
and receive calls, send text messages, or connect to the cellular data network. Contact
your carrier for voice and data tariffs and activation instructions for consumer and
business customers.
You or your user need to install a SIM card in the iPhone. After the SIM card is installed,
iPhone must be connected to a computer with iTunes to complete the activation
process. If the SIM card is already active, iPhone is ready for immediate use; otherwise,
iTunes walks you through the process of activating a new line of service.
iPad must be connected to a computer with iTunes to activate the device. For
iPad Wi-Fi + 3G in the U.S., you sign up and manage (or cancel) an AT&T data plan
using iPad. Go to Settings > Cellular Data > View Account. iPad is unlocked, so
you can use your preferred carrier. Contact your carrier to set up an account and
obtain a compatible micro SIM card. In the U.S., micro SIM cards compatible with
AT&T are included with iPad Wi-Fi + 3G.
Although there is no cellular service or SIM card for iPod touch and iPad Wi-Fi, they
must also be connected to a computer with iTunes for activation.
Because iTunes is required in order to complete the activation process, you must
decide whether you want to install iTunes on each user’s Mac or PC, or whether
you’ll complete activation for each device with your own iTunes installation.
After activation, iTunes isn’t required in order to use the device with your enterprise
systems, but it’s required for synchronizing music, video, and web browser bookmarks
with a computer. It’s also required for downloading and installing software updates
for devices and installing your enterprise applications.
For more information about activating devices and using iTunes, see Chapter 4.
Chapter 1 Deploying iPhone and iPod touch 15
Page 16

Preparing Access to Network Services and Enterprise Data
iPhone OS 3.x software enables secure push email, push contacts, and push calendar
with your existing Microsoft Exchange Server 2003 or 2007 solution, as well as Global
Address Lookup, Remote Wipe, and device passcode policy enforcement. It also
allows users to securely connect to company resources via WPA Enterprise and WPA2
Enterprise wireless networks using 802.1X wireless authentication and/or via VPN
using PPTP, LT2P over IPSec, or Cisco IPSec protocols.
If your company doesn’t use Microsoft Exchange, your users can still use iPhone or
iPod touch to wirelessly sync email with most standard POP or IMAP-based servers
and services. And they can use iTunes to sync calendar events and contacts from
Mac OS X iCal and Address Book or Microsoft Outlook on a Windows PC. For wireless
access to calendars and directories, CalDAV and LDAP are supported.
As you determine which network services you want users to access, refer to the
information in the following sections.
Microsoft Exchange
iPhone communicates directly with your Microsoft Exchange Server via Microsoft
Exchange ActiveSync (EAS). Exchange ActiveSync maintains a connection between
the Exchange Server and iPhone or iPad Wi-Fi + 3G, so that when a new email
message or meeting invitation arrives, the device is instantly updated. iPod touch
and iPad Wi-Fi don’t have a cellular connection, so they receive push notifications
only when they’re active and connected to a Wi-Fi network.
If your company currently supports Exchange ActiveSync on Exchange Server 2003 or
Exchange Server 2007, you already have the necessary services in place. For Exchange
Server 2007, make sure the Client Access Role is installed. For Exchange Server 2003,
make sure you’ve enabled Outlook Mobile Access (OMA).
If you have an Exchange Server but your company is new to Exchange ActiveSync,
review the information in the following sections.
Network Configuration
 Make sure port 443 is open on the firewall. If your company uses Outlook Web
Access, port 443 is most likely already open.
 Verify that a server certificate is installed on the front-end Exchange server and turn
on basic authentication only, in the Authentication Method properties, to require an
SSL connection to the Microsoft Server ActiveSync directory of your IIS.
 If you’re using a Microsoft Internet Security and Acceleration (ISA) Server, verify that a
server certificate is installed and update the public DNS to properly resolve incoming
connections.
16 Chapter 1 Deploying iPhone and iPod touch
Page 17

 Make sure the DNS for your network returns a single, externally-routable address to
the Exchange ActiveSync server for both intranet and Internet clients. This is required
so the device can use the same IP address for communicating with the server when
both types of connections are active.
 If you’re using a Microsoft ISA Server, create a web listener as well as an Exchange
web client access publishing rule. See Microsoft’s documentation for details.
 For all firewalls and network appliances, set the idle session timeout to 30 minutes.
For information about heartbeat and timeout intervals, refer to the Microsoft
Exchange documentation at
Exchange Account Setup
 Enable Exchange ActiveSync for specific users or groups using the Active Directory
service. These are enabled by default for all mobile devices at the organizational level
in Exchange Server 2003 and Exchange Server 2007. For Exchange Server 2007, see
Recipient Configuration in the Exchange Management Console.
 Configure mobile features, policies, and device security settings using the Exchange
System Manager. For Exchange Server 2007, this is done in the Exchange
Management Console.
 Download and install the Microsoft Exchange ActiveSync Mobile Administration Web
Tool, which is necessary to initiate a remote wipe. For Exchange Server 2007, remote
wipe can also be initiated using Outlook Web Access or the Exchange Management
Console.
http://technet.microsoft.com/en-us/library/cc182270.aspx.
WPA/WPA2 Enterprise Wi-Fi Networks
Support for WPA Enterprise and WPA2 Enterprise ensures that corporate wireless
networks are securely accessed on iPhone, iPod touch and iPad. WPA/WPA2 Enterprise
uses AES 128-bit encryption, a proven block-based encryption method that provides a
high level of assurance that corporate data remains protected.
With support for 802.1X authentication, iPhone OS devices can be integrated into a
broad range of RADIUS server environments. 802.1X wireless authentication methods
are supported, including EAP-TLS, EAP-TTLS, EAP-FAST, PEAPv0, PEAPv1, and LEAP.
WPA/WPA2 Enterprise Network Configuration
 Verify network appliances for compatibility and select an authentication type (EAP
type) supported by iPhone, iPod touch, and iPad. Make sure that 802.1X is enabled
on the authentication server, and if necessary, install a server certificate and assign
network access permissions to users and groups.
 Configure wireless access points for 802.1X authentication and enter the
corresponding RADIUS server information.
 Test your 802.1X deployment with a Mac or a PC to make sure RADIUS authentication
is properly configured.
Chapter 1 Deploying iPhone and iPod touch 17
Page 18

 If you plan to use certificate-based authentication, make sure you have your public
key infrastructure configured to support device and user-based certificates with the
corresponding key distribution process.
 Verify the compatibility of your certificate formats with the device and your
authentication server. For information about certificates see “Certificates and
Identities” on page 11.
Virtual Private Networks
Secure access to private networks is supported on iPhone, iPod touch, and iPad using
Cisco IPSec, L2TP over IPSec, and PPTP virtual private network protocols. If your
organization supports one of these protocols, no additional network configuration or
third-party applications are required in order to use your devices with your VPN
infrastructure.
Cisco IPSec deployments can take advantage of certificate-based authentication via
industry-standard X.509 certificates. Additionally, certificate-based authentication
allows you to take advantage of VPN On Demand, which provides seamless, secure
wireless access to your enterprise network.
For two-factor token-based authentication, iPhone OS supports RSA SecurID and
CryptoCard. Users enter their PIN and token-generated, one-time password directly on
their device when establishing a VPN connection. For compatible Cisco VPN servers and
recommendations about configurations, see Appendix A.
iPhone, iPod touch and iPad also support shared secret authentication for Cisco IPSec
and L2TP/IPSec deployments, and MS-CHAPv2 for basic user name and password
authentication.
VPN Proxy auto-config (PAC and WPAD) is also supported, which allows you specify
proxy server settings for accessing specific URLs.
VPN Setup Guidelines
 iPhone OS integrates with most existing VPN networks, so minimal configuration is
necessary to enable devices to access to your network. The best way to prepare for
deployment is to check if your company’s existing VPN protocols and authentication
methods are supported by iPhone.
 Ensure compatibility with standards by your VPN concentrators. It’s also a good idea
to review the authentication path to your RADIUS or authentication server, to make
sure standards supported by iPhone OS are enabled within your implementation.
 Check with your solutions providers to confirm that your software and equipment
are up-to-date with the latest security patches and firmware.
18 Chapter 1 Deploying iPhone and iPod touch
Page 19

 If you want to configure URL-specific proxy settings, place a PAC file on a web server
that’s accessible with the basic VPN settings, and ensure that it’s served with a MIME
type of application/x-ns-proxy-autoconfig. Alternatively, configure your DNS or DHCP
to provide the location of a WPAD file on a server that is similarly accessible.
IMAP Email
If you don’t use Microsoft Exchange, you can still implement a secure, standards-based
email solution using any email server that supports IMAP and is configured to require
user authentication and SSL. For example, you can access Lotus Notes/Domino or
Novell GroupWise email using this technique. The mail servers can be located within
a DMZ subnetwork, behind a corporate firewall, or both.
With SSL, iPhone OS supports 128-bit encryption and X.509 certificates issued by the
major certificate authorities. It also supports strong authentication methods including
industry-standard MD5 Challenge-Response and NTLMv2.
IMAP Network Setup Guidelines
 For additional security protection, install a digital certificate on the server from
a trusted certificate authority (CA). Installing a certificate from a CA is an important
step in ensuring that your proxy server is a trusted entity within your corporate
infrastructure. See “Credentials Settings” on page 38 for information about installing
certificates on iPhone.
 To let iPhone OS devices retrieve email from your server, open port 993 in the firewall
and make sure that the proxy server is set to IMAP over SSL.
 To let devices send email, port 587, 465, or 25 must be open. Port 587 is used first,
and is the best choice.
LDAP Directories
iPhone OS lets you access standards-based LDAP directory servers and provide
a global address directory or other information similar to the Global Address List in
Microsoft Exchange.
When an LDAP account is configured on the device, the device searches for the
attribute namingContexts at the server’s root level to identify the default search base.
The search scope is set to subtree by default.
CalDAV Calendars
CalDAV support in iPhone OS provides global calendars and scheduling for
organizations that don’t use Microsoft Exchange. iPhone OS works with calendar
servers that support the CalDAV standard.
Chapter 1 Deploying iPhone and iPod touch 19
Page 20

Subscribed Calendars
If you want to publish read-only calendars of corporate events, such as holidays or
special event schedules, iPhone OS devices can subscribe to calendars and display the
information alongside Microsoft Exchange and CalDAV calendars. iPhone OS works
with calendar files in the standard iCalendar (.ics) format.
An easy way to distribute subscribed calendars to your users is to send the fully
qualified URL in SMS or email. When the user taps the link, the device offers to
subscribe to the specified calendar.
Enterprise Applications
To deploy enterprise iPhone OS applications, you install the applications on your
devices using iPhone Configuration Utility or iTunes. Once you deploy an application to
users’ devices, updating those applications will be easier if each user has iTunes
installed on their Mac or PC.
Online Certificate Status Protocol
When you provide digital certificates for iPhone OS devices, consider issuing them so
they’re OCSP-enabled. This allows the device to ask your OCSP server if the certificate
has been revoked before using it.
Determining Device Passcode Policies
Once you decide which network services and data your users will access, you should
determine which device passcode policies you want to implement.
Requiring passcodes to be set on your devices is recommended for companies whose
networks, systems, or applications don’t require a password or an authentication token.
If you’re using certificate-based authentication for an 802.1X network or Cisco IPSec
VPN, or your enterprise application saves your login credentials, you should require
users to set a device passcode with a short timeout period so a lost or stolen device
cannot be used without knowing the device passcode.
Policies can be set on iPhone, iPod touch, and iPad in either of two ways. If the device is
configured to access a Microsoft Exchange account, the Exchange ActiveSync policies
are wirelessly pushed to the device. This allows you to enforce and update the policies
without any user action. For information about EAS policies, see “Supported Exchange
ActiveSync Policies” on page 8.
If you don’t use Microsoft Exchange, you can set similar policies on your devices by
creating configuration profiles. If you want to change a policy, you must post or send
an updated profile to users or install the profile using iPhone Configuration Utility. For
information about the device passcode policies, see “Passcode Settings” on page 32.
20 Chapter 1 Deploying iPhone and iPod touch
Page 21

If you use Microsoft Exchange, you can also supplement your EAS policies by using
configuration policies. This can provide access to policies that aren’t available in
Microsoft Exchange 2003, for example, or allow you to define policies specifically for
iPhone OS devices.
Configuring Devices
You need to decide how you’ll configure each iPhone, iPod touch, or iPad. This is
influenced in part by how many devices you plan on deploying and managing over
time. If the number is small, you may find that it’s simpler for you or your users to
manually configure each device. This involves using the device to enter the settings
for each mail account, Wi-Fi settings, and VPN configuration information. See Chapter 3
for details about manual configuration.
If you deploy a large number of devices, or you have a large collection of email
settings, network settings, and certificates to install, then you may want to configure
the devices by creating and distributing configuration profiles. Configuration profiles
quickly load settings and authorization information onto a device. Some VPN and Wi-Fi
settings can only be set using a configuration profile, and if you’re not using Microsoft
Exchange, you’ll need to use a configuration profile to set device passcode policies.
Configuration profiles can be encrypted and signed, which allows you to restrict their
use to a specific device, and prevents anyone from changing the settings that a profile
contains. You can also mark a profile as being locked to the device, so once installed it
cannot be removed without wiping the device of all data, or optionally, with an
administrative passcode.
Whether or not you’re configuring devices manually or using configuration profiles,
you also need to decide if you’ll configure the devices or if you will delegate this task to
your users. Which you choose depends on your users’ locations, company policy
regarding users’ ability to manage their own IT equipment, and the complexity of the
device configuration you intend to deploy. Configuration profiles work well for a large
enterprise, for remote employees, or for users that are unable to set up their own devices.
If you want users to activate their device themselves or if they need to install or update
enterprise applications, iTunes must be installed on each user’s Mac or PC. iTunes is also
required for iPhone OS software updates, so keep that in mind if you decide to not
distribute iTunes to your users. For information about deploying iTunes, see Chapter 4.
Chapter 1 Deploying iPhone and iPod touch 21
Page 22

Over-the-Air Enrollment and Configuration
Enrollment is the process of authenticating a device and user so that you can automate
the process of distributing certificates. Digital certificates provide many benefits to
users. They can be used to authenticate access to key enterprise services, such as
Microsoft Exchange ActiveSync, WPA2 Enterprise wireless networks, and corporate VPN
connections. Certificate-based authentication also permits the use of VPN On Demand
for seamless access to corporate networks.
In addition to using the over-the-air enrollment capabilities to issue certificates for your
company’s public key infrastructure (PKI), you can also deploy device configuration
profiles. This ensures that only trusted users are accessing corporate services and that
their devices are configured according to your IT policies. And because configuration
profiles can be both encrypted and locked, the settings cannot be removed, altered,
or shared with others. These capabilities are available to you in the over-the-air process
described below, and also by using iPhone Configuration Utility to configure devices
while they’re attached to your administrative computer. See Chapter 2 to learn about
using iPhone Configuration Utility.
Implementing over-the-air enrollment and configuration requires development and
integration of authentication, directory, and certificate services. The process can be
deployed using standard web services, and once it’s in place, it permits your users to
set up their devices in a secure, authenticated fashion.
Overview of the Authenticated Enrollment and Configuration Process
To implement this process, you need to create your own profile distribution service
that accepts HTTP connections, authenticates users, creates mobileconfig profiles,
and manages the overall process described in this section.
You also need a CA (certificate authority) to issue the device credentials using
Simple Certificate Enrollment Protocol (SCEP). For links to PKI, SCEP, and related topics
see “Other Resources” on page 27.
The following diagram shows the enrollment and configuration process that iPhone
supports.
22 Chapter 1 Deploying iPhone and iPod touch
Page 23
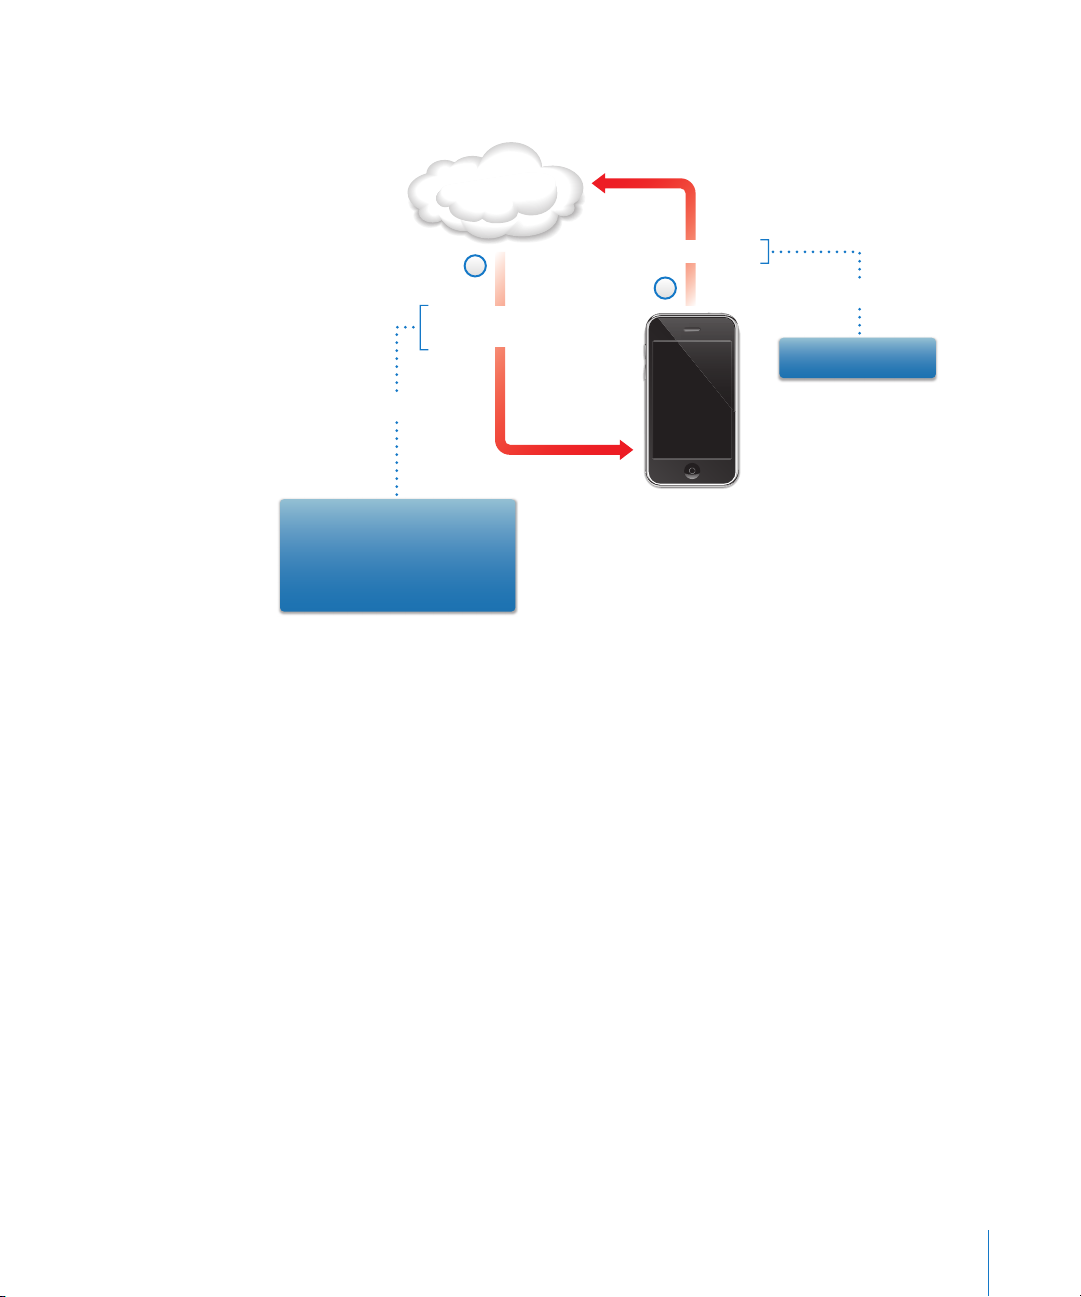
Phase 1 - Begin Enrollment
Profile service
2
Device information
request
sample
Attributes required: UDID,
OS version, IMEI
Challenge token: AnneJohnson1
URL for response:
https://profiles.example.com
Enrollment request
1
sample
User: Anne Johnson
Phase 1 – Begin Enrollment: Enrollment begins with the user using Safari to access
the URL of the profile distribution service you’ve created. You can distribute this URL via
SMS or email. The enrollment request, represented as step 1 in the diagram, should
authenticate the user’s identify. Authentication can be as simple as basic auth, or you
can tie into your existing directory services.
In step 2, your service sends a configuration profile (.mobileconfig) in response. This
response specifies a list of attributes that the device must provide in the next reply and
a pre-shared key (challenge) that can carry the identity of the user forward during this
process so you can customize the configuration process for each user. The device
attributes that the service can request are iPhone OS version, device ID (MAC Address),
product type (iPhone 3GS returns iPhone2,1), phone ID (IMEI), and SIM information (ICCID).
For a sample configuration profile for this phase, see “Sample Phase 1 Server Response”
on page 84.
Chapter 1 Deploying iPhone and iPod touch 23
Page 24

Phase 2 - Device Authentication
Profile service
Signed response via POST
sample
Attributes: UDID,
OS Version, IMEI
Challenge token:
AnneJohnson1
Phase 2 – Device Authentication: After the user accepts the installation of the
profile received in phase 1, the device looks up the requested attributes, adds the
challenge response (if provided), signs the response using the device’s built-in
identity (Apple-issued certificate), and sends it back to the profile distribution
service using HTTP Post.
For a sample configuration profile for this phase, see “Sample Phase 2 Device
Response” on page 85.
24 Chapter 1 Deploying iPhone and iPod touch
Page 25
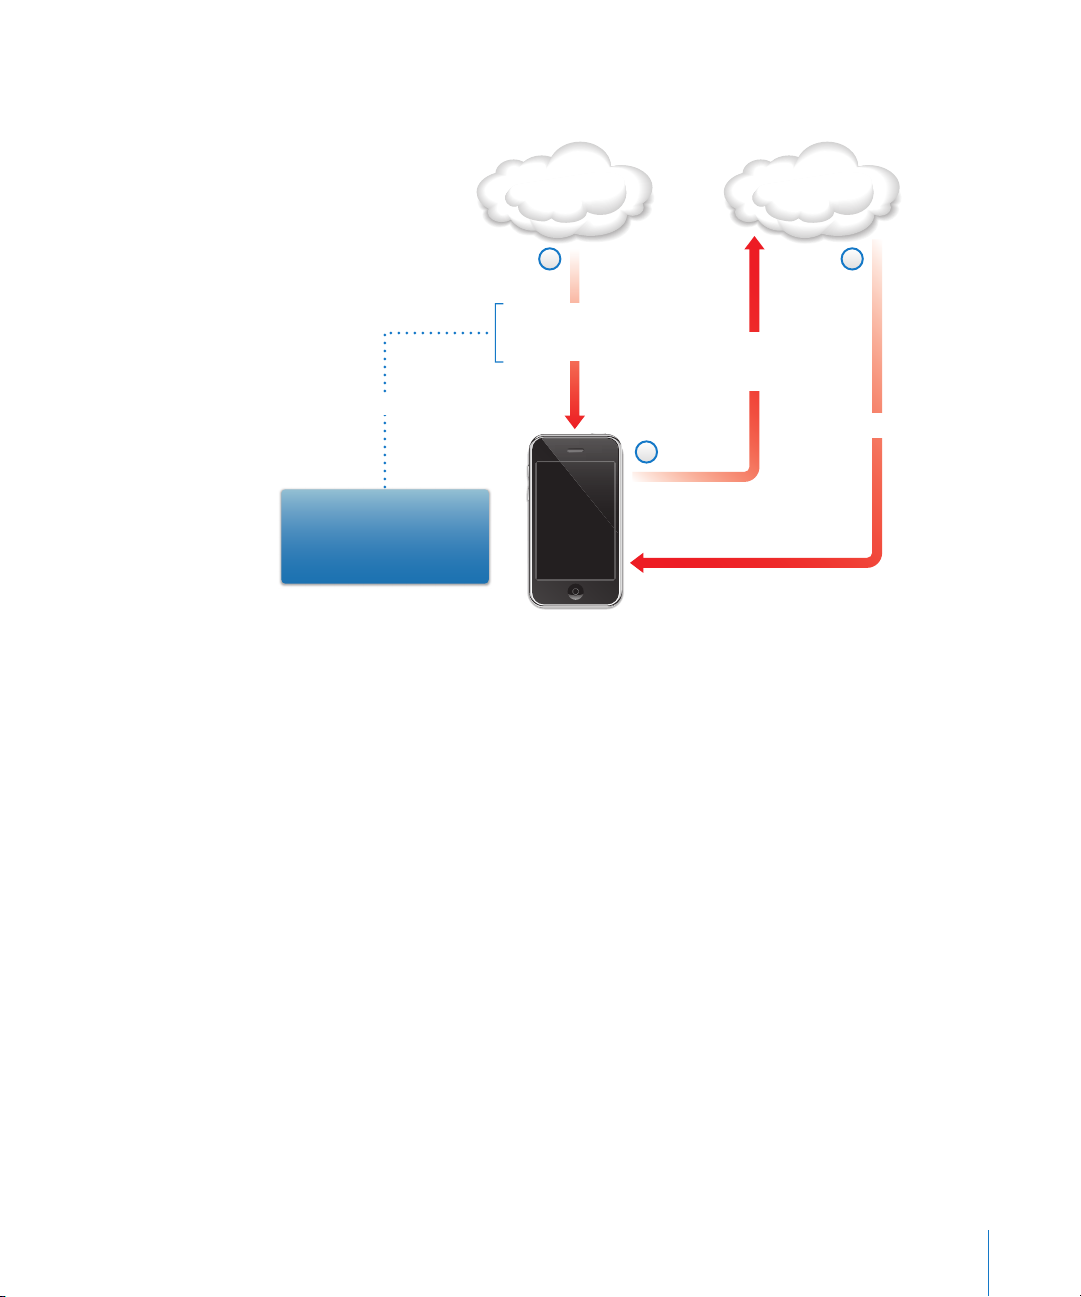
Phase 3 - Device Certificate Installation
Certificate
issuing service
3
Device certificate
sample
RSA: 1024
Challenge: AnneJohnson1
URL:http://ca.example.com/
getkey.exe
Profile service
1
Challenge
Key generation specs
URL for response
Challenge
Certificate Signing Request
Public key
2
Phase 3 – Certificate Installation: In step 1, the profile distribution service responds
with specifications that the device uses to generate a key (RSA 1024) and where to
return it for certification using SCEP (Simple Certificate Enrollment Protocol).
In step 2, the SCEP request must be handled in automatic mode, using the challenge
from the SCEP packet to authenticate the request.
In step 3, the CA responds with an encryption certificate for the device.
For a sample configuration profile for this phase, see “Sample Phase 3 Server Response
With SCEP Specifications” on page 85.
Chapter 1 Deploying iPhone and iPod touch 25
Page 26

Phase 4 - Device Configuration
2
Profile service
A .mobileconfig file
encrypted for device
and signed by profile service
Device attributes
signed with
device certificate
sample
sample
1
UDID, OS version,
IMEI, MAC address
Exchange policies, VPN
settings, additional
SCEP payloads,
mail accounts, etc.
Phase 4 – Device Configuration: In step 1, the device replies with the list of attributes,
signed using the encryption certificate provided by the CA in the previous phase.
In step 2, the profile service responds with an encrypted .mobileconfig file that’s
automatically installed. The profile service should sign the .mobileconfig file. Its SSL
certificate can be used for this purpose, for example.
In addition to general settings, this configuration profile should also define enterprise
policies that you want to enforce and it should be a locked profile so the user cannot
remove it from the device. The configuration profile can contain additional requests for
enrollment of identities using SCEP, which are executed as the profile is installed.
Similarly, when a certificate installed using SCEP expires or is otherwise invalidated,
the device asks the user to update the profile. When the user authorizes the request,
the device repeats the above process to obtain a new certificate and profile.
For a sample configuration profile for this phase, see “Sample Phase 4 Device
Response” on page 87.
26 Chapter 1 Deploying iPhone and iPod touch
Page 27

Other Resources
 Digital Certificates PKI for IPSec VPNs at https://cisco.hosted.jivesoftware.com/docs/
DOC-3592
 Public key infrastructure at http://en.wikipedia.org/wiki/Public_key_infrastructure
 IETF SCEP protocol specification at http://www.ietf.org/internet-drafts/draft-nourse-
scep-18.txt
Additional information and resources for iPhone, iPod touch and iPad in the enterprise
are available at www.apple.com/iphone/enterprise/ and www.apple.com/ipad/
business/.
Chapter 1 Deploying iPhone and iPod touch 27
Page 28

2 Creating and Deploying
Configuration Profiles
2
Configuration profiles define how iPhone, iPad and
iPod touch work with your enterprise systems.
Configuration profiles are XML files that contain device security policies and
restrictions, VPN configuration information, Wi-Fi settings, email and calendar
accounts, and authentication credentials that permit iPhone, iPod touch, and
iPad to work with your enterprise systems.
You can install configuration profiles on devices connected to a computer via USB
using iPhone Configuration Utility, or you can distribute configuration profiles by
email or using a webpage. When users open the email attachment or download
the profile using Safari on their device, they are prompted to begin the installation
process.
If you prefer not to create and distribute configuration profiles, you can configure
devices manually. See Chapter 3 for information.
28
Page 29

About iPhone Configuration Utility
iPhone Configuration Utility lets you easily create, encrypt and install configuration
profiles, track and install provisioning profiles and authorized applications, and capture
device information including console logs. When you run the iPhone Configuration
Utility installer, the utility is installed in /Applications/Utilities/ on Mac OS X, or in
Programs\iPhone Configuration Utility\ on Windows.
When you open iPhone Configuration Utility, a window similar to the one shown
below appears.
The content of the main section of the window changes as you select items in the sidebar.
The sidebar displays the Library, which contains the following categories:
 Devices shows a list of iPhone and iPod touch devices that have been connected to
your computer.
 Applications lists your applications that are available to install on devices attached
to your computer. A provisioning profile might be needed for an application to run
on a device.
 Provisioning Profiles lists profiles that permit the use of the device for iPhone OS
development, as authorized by Apple Developer Connection. For information,
see Chapter 5. Provisioning profiles also allow devices to run enterprise applications
that are not distributed using the iTunes Store.
 Configuration Profiles lists the configuration profiles you’ve previously created, and
lets you edit the information you entered, or create a new configuration that you can
send to a user or install on a connected device.
Chapter 2 Creating and Deploying Configuration Profiles 29
Page 30

The sidebar also displays Connected Devices, which shows information about the
iPhone OS devices currently connected to your computer’s USB port. Information
about a connected device is automatically added to the Devices list, so you can view
it again without having to reconnect the device. After a device has been connected,
you can also encrypt profiles for use on only that device.
When a device is connected, you can use iPhone Configuration Utility to install
configuration profiles and applications on the device. See “Installing Configuration
Profiles Using iPhone Configuration Utility” on page 40,“Installing Applications Using
iPhone Configuration Utility” on page 66 and “Installing Provisioning Profiles Using
iPhone Configuration Utility” on page 65 for details.
When a device is connected, you can also view console logs and any available crash
logs. These are the same device logs that are available for viewing within the Xcode
development environment on Mac OS X.
Creating Configuration Profiles
This document uses the terms configuration profile and payload. A configuration profile
is the whole file that configures certain (single or multiple) settings for iPhone,
iPod touch, or iPad. A payload is an individual collection of a certain type of settings,
such as VPN settings, within the configuration profile.
Although you can create a single configuration profile that contains all of the payloads
you need for your organization, consider creating one profile for certificates and
another one (or more) for other settings so you can update and distribute each type of
information separately. This also allows users to retain the certificates they’ve already
installed when installing a new profile that contains VPN or account settings.
Many of the payloads allow you to specify user names and passwords. If you omit this
information, the profile can be used by multiple users, but the user will be asked to
enter the missing information when the profile is installed. If you do personalize the
profile for each user, and include passwords, you should distribute the profile in
encrypted format to protect its contents. For more information see “Installing
Configuration Profiles” on page 40.
To create a new configuration profile, click the New button in the toolbar of iPhone
Configuration Utility. You add payloads to the profile using the payloads list. Then, you
edit the payloads by entering and selecting options that appear in the editing pane.
Required fields are marked with a red arrow. For some settings such as W-Fi, you can
click the Add (+) button to add configurations. To remove a configuration, click the
Delete (–) button in the editing pane.
To edit a payload, select the appropriate item in the payloads list, then click the
Configure button, and fill in the information as described below.
30 Chapter 2 Creating and Deploying Configuration Profiles
Page 31

Automating Configuration Profile Creation
You can also automate the creation of configuration files using AppleScript on a Mac,
or C# Script on Windows. To see the supported methods and their syntax, do the
following:
 Mac OS X: Use Script Editor to open the AppleScript Dictionary for iPhone
Configuration Utility.
 Windows: Use Visual Studio to view the method calls provided by iPCUScripting.dll.
To execute a script, on Mac, use the AppleScript Tell command. On Windows, pass the
script name to iPhone Configuration Utility as a command line parameter.
For examples, see Appendix C, “Sample Scripts.”
General Settings
This is where you provide the name and identifier of this profile, and specify if users are
allowed to remove the profile after it is installed.
The name you specify appears in the profiles list and is displayed on the device after
the configuration profile is installed. The name doesn’t have to be unique, but you
should use a descriptive name that identifies the profile.
The profile identifier must uniquely identify this profile and must use the format
com.companyname.identifier, where identifier describes the profile. (For example,
com.mycompany.homeoffice.)
Chapter 2 Creating and Deploying Configuration Profiles 31
Page 32

The identifier is important because when a profile is installed, the value is compared
with profiles that are already on the device. If the identifier is unique, information in
the profile is added to the device. If the identifier matches a profile already installed,
information in the profile replaces the settings already on the device, except in the case
of Exchange settings. To alter an Exchange account, the profile must first be manually
removed so that the data associated with the account can be purged.
To prevent a user from deleting a profile installed on a device, choose an option from
the Security pop-up menu. The With Authorization option allows you to specify an
authorization password that permits the removal of the profile on the device. If you
select the Never option, the profile can be updated with a new version, but it cannot
be removed.
Passcode Settings
Use this payload to set device policies if you aren’t using Exchange passcode policies.
You can specify whether a passcode is required in order to use the device, as well as
specify characteristics of the passcode and how often it must be changed. When the
configuration profile is loaded, the user is immediately required to enter a passcode
that meets the policies you select or the profile won’t be installed.
If you’re using device policies and Exchange passcode policies, the two sets of policies
are merged and the strictest of the settings is enforced. For information about supported
Exchange ActiveSync policies
, see “Microsoft Exchange ActiveSync” on page 8.
The following policies are available:
 Require passcode on device: Requires users to enter a passcode before using
the device. Otherwise, anyone who has the device can access all of its functions
and data.
 Allow simple value: Permits users to use sequential or repeated characters in their
passcodes. For example, this would allow the passcodes “3333” or “DEFG.”
 Require alphanumeric value: Requires that the passcode contain at least one letter
character.
 Minimum passcode length: Specifies the smallest number of characters a passcode
can contain.
 Minimum number of complex characters: The number of non-alphanumeric characters
(such as $, &, and !) that the passcode must contain.
 Maximum passcode age (in days): Requires users to change their passcode at the
interval you specify.
 Auto-Lock (in minutes): If the device isn’t used for this period of time, it automatically
locks. Entering the passcode unlocks it.
 Passcode history: A new passcode won’t be accepted if it matches a previously used
passcode. You can specify how many previous passcodes are remembered for this
comparison.
32 Chapter 2 Creating and Deploying Configuration Profiles
Page 33

 Grace period for device lock: Specifies how soon the device can be unlocked again
after use, without re-prompting for the passcode.
 Maximum number of failed attempts: Determines how many failed passcode attempts
can be made before the device is wiped. If you don’t change this setting, after six
failed passcode attempts, the device imposes a time delay before a passcode can be
entered again. The time delay increases with each failed attempt. After the eleventh
failed attempt, all data and settings are securely erased from the device. The
passcode time delays always begin after the sixth attempt, so if you set this value to
6 or lower, no time delays are imposed and the device is erased when the attempt
value is exceeded.
Restrictions Settings
Use this payload to specify which device features the user is allowed to use.
 Allow explicit content: When this is turned off, explicit music or video content
purchased from the iTunes Store is hidden. Explicit content is marked as such by
content providers, such as record labels, when sold through the iTunes Store.
 Allow use of Safari: When this option is turned off, the Safari web browser application
is disabled and its icon removed from the Home screen. This also prevents users from
opening web clips.
 Allow use of YouTube: When this option is turned off, the YouTube application is
disabled and its icon is removed from the Home screen.
 Allow use of iTunes Music Store: When this option is turned off, the iTunes Music Store
is disabled and its icon is removed from the Home screen. Users cannot preview,
purchase, or download content.
 Allow installing apps: When this option is turned off, the App Store is disabled and its
icon is removed from the Home screen. Users are unable to install or update their
applications.
 Allow use of camera: When this option is turned off, the camera is completely
disabled and its icon is removed from the Home screen. Users are unable to take
photographs.
 Allow screen capture: When this option is turned off, users are unable to save a
screenshot of the display.
Chapter 2 Creating and Deploying Configuration Profiles 33
Page 34

Wi-Fi Settings
Use this payload to set how the device connects to your wireless network. You can add
multiple network configurations by clicking the Add (+) button in the editing pane.
These settings must be specified, and must match the requirements of your network,
in order for the user to initiate a connection.
 Service Set Identifier: Enter the SSID of the wireless network to connect to.
 Hidden Network: Specifies whether the network is broadcasting its identity.
 Security Type: Select an authentication method for the network. The following
choices are available for both Personal and Enterprise networks.
 None: The network doesn’t use authentication.
 WEP: The network uses WEP authentication only.
 WPA/WPA 2: The network uses WPA authentication only.
 Any: The device uses either WEP or WPA authentication when connecting to the
network, but won’t connect to non-authenticated networks.
 Password: Enter the password for joining the wireless network. If you leave this
blank, the user will be asked to enter it.
Enterprise Settings
In this section you specify settings for connecting to enterprise networks.
These settings appear when you choose an Enterprise setting in the Security Type
pop-up menu.
In the Protocols tab, you specify which EAP methods to use for authentication and
configure the EAP-FAST Protected Access Credential settings.
In the Authentication tab, you specify sign-in settings such as user name and
authentication protocols. If you’ve installed an identity using the Credentials section,
you can choose it using the Identity Certificate pop-up menu.
In the Trust tab, you specify which certificates should be regarded as trusted for the
purpose of validating the authentication server for the Wi-Fi connection. The Trusted
Certificates list displays certificates that have been added using the Credentials tab,
and lets you select which certificates should be regarded as trusted. Add the names of
the authentication servers to be trusted to the Trusted Server Certificates Names list.
You can specify a particular server, such as server.mycompany.com or a partial name
such as *.mycompany.com.
The Allow Trust Exceptions option lets users decide to trust a server when the chain of
trust can’t be established. To avoid these prompts, and to permit connections only to
trusted services, turn off this option and embed all necessary certificates in a profile.
34 Chapter 2 Creating and Deploying Configuration Profiles
Page 35

VPN Settings
Use this payload to enter the VPN settings for connecting to your network. You can add
multiple sets of VPN connections by clicking the Add (+) button.
For information about supported VPN protocols and authentication methods, see
“VPN” on page 10. The options available vary by the protocol and authentication
method you select.
VPN On Demand
For certificate-based IPSec configurations, you can turn on VPN On Demand so that a
VPN connection is automatically established when accessing certain domains.
The VPN On Demand options are:
Setting Description
Always Initiates a VPN connection for any address that matches the
specified domain.
Never Does not initiate a VPN connection for addresses that match the
specified domain, but if VPN is already active, it may be used.
Establish if needed Initiates a VPN connection for addresses that match the specified
domain only after a failed DNS look-up has occurred.
The action applies to all matching addresses. Addresses are compared using simple
string matching, starting from the end and working backwards. The address
“.example.org” matches “support.example.org” and “sales.example.org” but doesn’t
match “www.private-example.org”. However, if you specify the match domain as
“example.com”—notice there is not a period at the start—it matches “www.privateexample.com” and all the others.
Note that LDAP connections won’t initiate a VPN connection; if the VPN hasn’t already
been established by another application, such as Safari, the LDAP lookup fails.
VPN Proxy
iPhone supports manual VPN proxy, and automatic proxy configuration using PAC or
WPAD. To specify a VPN proxy, select an option from the Proxy Setup pop-up menu.
Chapter 2 Creating and Deploying Configuration Profiles 35
Page 36

For PAC-based auto-proxy configurations, select Automatic from the pop-up menu and
then enter the URL of a PAC file. For information about PACS capabilities and the file
format, see “Other Resources” on page 55.
For Web Proxy Autodiscovery (WPAD) configurations, select Automatic from the pop-up
menu. Leave the Proxy Server URL field empty, iPhone will request the WPAD file using
DHCP and DNS. For information about WPAD see “Other Resources” on page 55.
Email Settings
Use this payload to configure POP or IMAP mail accounts for the user. If you’re adding
an Exchange account, see Exchange Settings below.
Users can modify some of the mail settings you provide in a profile, such as the
account name, password, and alternative SMTP servers. If you omit any of this
information from the profile, users are asked to enter it when they access the account.
You can add multiple mail accounts by clicking the Add (+) button.
Exchange Settings
Use this payload to enter the user’s settings for your Exchange server. You can create
a profile for a specific user by specifying the user name, host name, and email address,
or you can provide just the host name—the users are prompted to fill in the other
values when they install the profile.
If you specify the user name, host name, and SSL setting in the profile, the user can’t
change these settings on the device.
You can configure only one Exchange account per device. Other email accounts,
including any Exchange via IMAP accounts, aren’t affected when you add an Exchange
account. Exchange accounts that are added using a profile are deleted when the profile
is removed, and can’t be otherwise deleted.
By default, Exchange syncs contacts, calendar, and email. The user can change these
settings on the device, including how many days worth of data to sync, in Settings >
Accounts.
If you select the Use SSL option, be sure to add the certificates necessary to
authenticate the connection using the Credentials pane.
To provide a certificate that identifies the user to the Exchange ActiveSync Server,
click the Add (+) button and then select an identity certificate from the Mac OS X
Keychain or Windows Certificate Store. After adding a certificate, you can specify the
Authentication Credential Name, if necessary for your ActiveSync configuration. You
can also embed the certificate’s passphrase in the configuration profile. If you don’t
provide the passphrase, the user is asked to enter it when the profile is installed.
36 Chapter 2 Creating and Deploying Configuration Profiles
Page 37

LDAP Settings
Use this payload to enter settings for connecting to an LDAPv3 directory. You can
specify multiple search bases for each directory, and you can configure multiple
directory connections by clicking the Add (+) button.
If you select the Use SSL option, be sure to add the certificates necessary to
authenticate the connection using the Credentials pane.
CalDAV Settings
Use this payload to provide accounts settings for connecting to a CalDAV-compliant
calendar server. These accounts will be added to the device, and as with Exchange
accounts, users need to manually enter information you omit from the profile, such as
their account password, when the profile is installed.
If you select the Use SSL option, be sure to add the certificates necessary to
authenticate the connection using the Credentials pane.
You can configure multiple accounts by clicking the Add (+) button.
Subscribed Calendars Settings
Use this payload to add read-only calendar subscriptions to the device’s Calendar
application. You can configure multiple subscriptions by clicking the Add (+) button.
A list of public calendars you can subscribe to is available at
www.apple.com/downloads/macosx/calendars/.
If you select the Use SSL option, be sure to add the certificates necessary to
authenticate the connection using the Credentials pane.
Web Clip Settings
Use this payload to add web clips to the Home screen of the user’s device. Web clips
provide fast access to favorite web pages.
Make sure the URL you enter includes the prefix http:// or https://—this is required
for the web clip to function correctly. For example, to add the online version of
the iPhone User Guide to the Home screen, specify the web clip URL:
http://help.apple.com/iphone/
To add a custom icon, select a graphic file in gif, jpeg, or png format, 59 x 60 pixels in
size. The image is automatically scaled and cropped to fit, and converted to png format
if necessary.
Chapter 2 Creating and Deploying Configuration Profiles 37
Page 38

Credentials Settings
Use this payload to add certificates and identities to the device. For information about
supported formats, see “Certificates and Identities” on page 11.
When installing credentials, also install the intermediate certificates that are necessary
to establish a chain to a trusted certificate that’s on the device. To view a list of the
preinstalled roots, see the Apple Support article at http://support.apple.com/kb/HT2185.
If you’re adding an identify for use with Microsoft Exchange, use the Exchange payload
instead. See “Exchange Settings” on page 36.
Adding credentials on Mac OS X:
1 Click the Add (+) button.
2 In the file dialog that appears, select a PKCS1 or PKSC12 file, then click Open.
If the certificate or identity that you want to install in your Keychain, use Keychain
Access to export it in .p12 format. Keychain Access is located in /Applications/Utilities.
For help see Keychain Access Help, available in the Help menu when Keychain Access
is open.
To add multiple credentials to the configuration profile, click the Add (+) button again.
Adding credentials on Windows:
1 Click the Add (+) button.
2 Select the credential that you want to install from the Windows Certificate Store.
If the credential isn’t available in your personal certificate store, you must add it, and
the private key must be marked as exportable, which is one of the steps offered by the
certificate import wizard. Note that adding root certificates requires administrative
access to the computer, and the certificate must be added to the personal store.
If you’re using multiple configuration profiles, make sure certificates aren’t duplicated.
You cannot install multiple copies of the same certificate.
Instead of installing certificates using a configuration profile, you can let users use
Safari to download the certificates directly to their device from a webpage. Or, you can
email certificates to users. See “Installing Identities and Root Certificates” on page 54
for more information. You can also use the SCEP Settings, below, to specify how the
device obtains certificates over-the-air when the profile is installed.
38 Chapter 2 Creating and Deploying Configuration Profiles
Page 39

SCEP Settings
The SCEP payload lets you specify settings that allow the device to obtain certificates
from a CA using Simple Certificate Enrollment Protocol (SCEP).
Setting Description
URL This is the address of the SCEP server.
Name This can be any string that will be understood by the certificate
authority, it can be used to distinguish between instances, for
example.
Subject The representation of a X.500 name represented as an array of OID
and value. For example, /C=US/O=Apple Inc./CN=foo/1.2.5.3=bar,
which would translate to:
[ [ [“C”, “US”] ], [ [“O”, “Apple Inc.”] ], ..., [ [ “1.2.5.3”, “bar” ] ] ]
Challenge A pre-shared secret the SCEP server can use to identify the request
or user.
Key Size and Usage Select a key size, and—using the checkboxes below this field—the
acceptable use of the key.
Fingerprint If your Certificate Authority uses HTTP, use this field to provide the
fingerprint of the CA’s certificate which the device will use to
confirm authenticity of the CA’s response. during the enrollment
process. You can enter a SHA1 or MD5 fingerprint, or select a
certificate to import its signature.
For more information about how the iPhone obtains certificates wirelessly,
see “Over-the-Air Enrollment and Configuration” on page 22.
Advanced Settings
The Advanced payload lets you change the device’s Access Point Name (APN) and cell
network proxy settings. These settings define how the device connects to the carrier’s
network. Change these settings only when specifically directed to do so by a carrier
network expert. If these settings are incorrect, the device can’t access data using the
cellular network. To undo an inadvertent change to these settings, delete the profile
from the device. Apple recommends that you define APN settings in a configuration
profile separate from other enterprise settings, because profiles that specify APN
information must be signed by your cell service provider.
iPhone OS supports APN user names of up to 20 characters, and passwords of up to
32 characters.
Editing Configuration Profiles
In iPhone Configuration Utility, select a profile in the Configuration Profiles list, and
then use the payload list and editing panes to make changes. You can also import a
profile by choosing File > Add to Library and then selecting a .mobileconfig file. If the
settings panes aren’t visible, choose View > Show Detail.
Chapter 2 Creating and Deploying Configuration Profiles 39
Page 40

The Identifier field in the General payload is used by the device to determine whether a
profile is new, or an update to an existing profile. If you want the updated profile to
replace one that users have already installed, don’t change the Identifier.
Installing Provisioning Profiles and Applications
iPhone Configuration Utility can install applications and distribution provisioning
profiles on devices attached to the computer. For details, see Chapter 5, “Deploying
Applications,” on page 63.
Installing Configuration Profiles
After you’ve created a profile, you can connect a device and install the profile using
iPhone Configuration Utility.
Alternatively, you can distribute the profile to users by email, or by posting it to a
website. When users use their device to open an email message or download the
profile from the web, they’re prompted to start the installation process.
Installing Configuration Profiles Using iPhone Configuration Utility
You can install configuration profiles directly on a device that has been updated to
iPhone OS 3.0 or later and is attached to your computer. You can also use iPhone
Configuration Utility to remove previously installed profiles.
To install a configuration profile:
1 Connect the device to your computer using a USB cable.
After a moment, the device appears in the Devices list in iPhone Configuration Utility.
2 Select the device, and then click the Configuration Profiles tab.
3 Select a configuration profile from the list, and then click Install.
4 On the device, tap Install to install the profile.
When you install directly onto a device using USB, the configuration profile is
automatically signed and encrypted before being transferred to the device.
Distributing Configuration Profiles by Email
You can distribute configuration profiles using email. Users install the profile by
receiving the message on their device, then tapping the attachment to install it.
To email a configuration profile:
1 Click the Share button in the iPhone Configuration Utility toolbar.
In the dialog that appears, select a security option:
a None: A plain text .mobileconfig file is created. It can be installed on any device.
Some content in the file is obfuscated to prevent casual snooping if the file is examined.
40 Chapter 2 Creating and Deploying Configuration Profiles
Page 41

b Sign Configuration Profile: The .mobileconfig file is signed and won’t be installed by
a device if it’s altered. Some fields are obfuscated to prevent casual snooping if the
file is examined. Once installed, the profile can only be updated by a profile that has
the same identifier and is signed by the same copy of iPhone Configuration Utility.
c Sign and Encrypt Profile: Signs the profile so it cannot be altered, and encrypts all
of the contents so the profile cannot be examined and can only be installed on
a specific device. If the profile contains passwords, this option is recommended.
Separate .mobileconfig files will be created for each of the devices you select from
the Devices list. If a device does not appear in the list, it either hasn’t been previously
connected to the computer so that the encryption key can be obtained, or it hasn’t
been upgraded to iPhone OS 3.0 or later.
2 Click Share, and new Mail (Mac OS X) or Outlook (Windows) message opens with the
profiles added as uncompressed attachments. The files must be uncompressed for the
device to recognize and install the profile.
Distributing Configuration Profiles on the Web
You can distribute configuration profiles using a website. Users install the profile by
downloading it using Safari on their device. To easily distribute the URL to your users,
send it via SMS.
To export a configuration profile:
1 Click the Export button in the iPhone Configuration Utility toolbar.
In the dialog that appears, select a security option:
a None: A plain text .mobileconfig file is created. It can be installed on any device.
Some content in the file is obfuscated to prevent casual snooping if the file is
examined, but you should make sure that when you put the file on your website it’s
accessible only by authorized users.
b Sign Configuration Profile: The .mobileconfig file is signed and won’t be installed by
a device if it’s altered. Once installed, the profile can only be updated by a profile that
has the same identifier and is signed by the same copy of iPhone Configuration
Utility. Some of the information in the profile is obfuscated to prevent casual
snooping if the file is examined, but you should make sure that when you put the file
on your website, it’s accessible only by authorized users.
c Sign and Encrypt Profile: Signs the profile so it cannot be altered, and encrypts all
of the contents so the profile cannot be examined and can only be installed on
a specific device. Separate .mobileconfig files will be created for each of the devices
you select from the Devices list.
2 Click Export, then select a location to save the .mobileconfig files.
The files are ready for posting on your website. Don’t compress the .mobileconfig file or
change its extension, or the device won’t recognize or install the profile.
Chapter 2 Creating and Deploying Configuration Profiles 41
Page 42

User Installation of Downloaded Configuration Profiles
Provide your users with the URL where they can download the profiles onto their
devices, or send the profiles to an email account your users can access using the device
before it’s set up with your enterprise-specific information.
When a user downloads the profile from the web, or opens the attachment using Mail,
the device recognizes the .mobileconfig extension as a profile and begins installation
when the user taps Install.
During installation, the user is asked to enter any necessary information, such as
passwords that were not specified in the profile, and other information as required by
the settings you specified.
The device also retrieves the Exchange ActiveSync policies from the server, and will
refresh the policies, if they’ve changed, with every subsequent connection. If the device
or Exchange ActiveSync policies enforce a passcode setting, the user must enter a
passcode that complies with the policy in order to complete the installation.
Additionally, the user is asked to enter any passwords necessary to use certificates
included in the profile.
If the installation isn’t completed successfully—perhaps because the Exchange server
was unreachable or the user cancelled the process—none of the information entered
by the user is retained.
Users may want to change how many days worth of messages are synced to the device
and which mail folders other than the inbox are synced. The defaults are three days and
all folders. Users can change these by going to Settings > Mail, Contacts, Calendars >
Exchange account name.
42 Chapter 2 Creating and Deploying Configuration Profiles
Page 43

Removing and Updating Configuration Profiles
Configuration profile updates aren’t pushed to users. Distribute the updated profiles to
your users for them to install. As long as the profile identifier matches, and if signed, it
has been signed by the same copy of iPhone Configuration Utility, the new profile
replaces the profile on the device.
Settings enforced by a configuration profile cannot be changed on the device.
To change a setting, you must install an updated profile. If the profile was signed, it
can be replaced only by a profile signed by the same copy of iPhone Configuration
Utility. The identifier in both profiles must match in order for the updated profile
to be recognized as a replacement. For more information about the identifier, see
“General Settings” on page 31.
Important: Removing a configuration profile removes policies and all of the Exchange
account’s data stored on the device, as well as VPN settings, certificates, and other
information, including mail messages, associated with the profile.
If the General Settings payload of the profile specifies that it cannot be removed by
the user, the Remove button won’t appear. If the settings allows removal using an
authorization password, the user will be asked to enter the password after tapping
Remove. For more information about profile security settings, see “General Settings” on
page 31.
Chapter 2 Creating and Deploying Configuration Profiles 43
Page 44

3 Manually Configuring Devices
This chapter describes how to manually configure iPhone,
iPod touch, and iPad.
If you don’t provide automatic configuration profiles, users can configure their
devices manually. Some settings, such as passcode policies, can only be set by using
a configuration profile.
VPN Settings
To change VPN settings, go to Settings > General > Network > VPN.
When you configure VPN settings, the device asks you to enter information based on
responses it receives from your VPN server. For example, you’ll be asked for an RSA
SecurID token if the server requires one.
3
44
You cannot configure a certificate-based VPN connection unless the appropriate
certificates are installed on the device. See “Installing Identities and Root Certificates”
on page 54 for more information.
VPN On Demand cannot be configured on the device, you set this up using a
configuration profile. See “VPN On Demand” on page 35.
VPN Proxy Settings
For all configurations you can also specify a VPN proxy. To configure a single proxy for
all connections, tap Manual and provide the address, port, and authentication if
necessary. To provide the device with an auto-proxy configuration file, tap Auto and
specify the URL of the PACS file. To specify auto-proxy configuration using WPAD, tap
Auto. The device will query DHCP and DNS for the WPAD settings. See Other Resources
at the end of this chapter for PACS file samples and resources.
Page 45

Cisco IPSec Settings
When you manually configure the device for Cisco IPSec VPN, a screen similar to the
following appears:
Use this chart to identify the settings and information you enter:
Field Description
Description A descriptive title that identifies this group of settings.
Server The DNS name or IP address of the VPN server to connect to.
Account The user name of the user’s VPN login account. Don’t enter the
group name in this field.
Password The passphrase of the user’s VPN login account. Leave blank for
RSA SecurID and CryptoCard authentication, or if you want the user
to enter their password manually with every connection attempt.
Use Certificate This will be available only if you’ve installed a .p12 or .pfx identity
that contains a certificate provisioned for remote access and the
private key for the certificate. When Use Certificate is on, the Group
Name and Shared Secret fields are replaced with an Identify field
that lets you pick from a list of installed VPN-compatible identities.
Group Name The name of the group that the user belongs to as defined on the
VPN server.
Secret The group’s shared secret. This is the same for every member of the
user’s assigned group. It’s not the user’s password and must be
specified to initiate a connection.
Chapter 3 Manually Configuring Devices 45
Page 46

PPTP Settings
When you manually configure the device for PPTP VPN, a screen similar to the
following appears:
Use this chart to identify the settings and information you enter:
Field Description
Description A descriptive title that identifies this group of settings.
Server The DNS name or IP address of the VPN server to connect to.
Account The user name of the user’s VPN login account.
RSA SecurID If you’re using an RSA SecurID token, turn on this option, so the
Password field is hidden.
Password The passphrase of the user’s VPN login account.
Encryption Level The default is Auto, which selects the highest encryption level that
is available, starting with 128-bit, then 40-bit, then None. Maximum
is 128-bit only. None turns off encryption.
Send All Traffic The default is On. Sends all network traffic over the VPN link. Turn
off to enable split-tunneling, which routes only traffic destined for
servers inside the VPN through the server. Other traffic is routed
directly to the Internet.
46 Chapter 3 Manually Configuring Devices
Page 47

L2TP Settings
When you manually configure the device for L2TP VPN, a screen similar to the
following appears:
Use this chart to identify the settings and information you enter:
Field Description
Description A descriptive title that identifies this group of settings.
Server The DNS name or IP address of the VPN server to connect to.
Account The user name of the user’s VPN login account.
Password The password of the user’s VPN login account.
Secret The shared secret (pre-shared key) for the L2TP account. This is the
same for all LT2P users.
Send All Traffic The default is On. Sends all network traffic over the VPN link. Turn
off to enable split-tunneling, which routes only traffic destined for
servers inside the VPN through the server. Other traffic is routed
directly to the Internet.
Chapter 3 Manually Configuring Devices 47
Page 48

Wi-Fi Settings
To change Wi-Fi settings, go to Settings > General > Network > Wi-Fi. If the network
you’re adding is within range, select it from the list of available networks. Otherwise,
tap Other.
Make sure that your network infrastructure uses authentication and encryption
supported by iPhone and iPod touch. For specifications, see “Network Security” on
page 11. For information about installing certificates for authentication, see “Installing
Identities and Root Certificates” on page 54.
48 Chapter 3 Manually Configuring Devices
Page 49

Exchange Settings
You can configure only one Exchange account per device. To add an Exchange account,
go to Settings > Mail, Contacts, Calendars, and then tap Add Account. On the Add
Account screen, tap Microsoft Exchange.
When you manually configure the device for Exchange, use this chart to identify the
settings and information you enter:
Field Description
Email The user’s complete email address.
Domain The domain of the user’s Exchange account.
Username The user name of the user’s Exchange account.
Password The password of the user’s Exchange account.
Description A descriptive title that identifies this account.
iPhone, iPod touch, and iPad support Microsoft’s Autodiscover service, which uses your
user name and password to determine the address of the front-end Exchange server. If
the server’s address can’t be determined, you’ll be asked to enter it.
If your Exchange server listens for connections on a port other than 443, specify the
port number in the Server field using the format exchange.example.com:portnumber.
Chapter 3 Manually Configuring Devices 49
Page 50

After the Exchange account is successfully configured, the server’s passcode policies are
enforced. If the user’s current passcode doesn’t comply with the Exchange ActiveSync
policies, the user is prompted to change or set the passcode. The device won’t
communicate with the Exchange server until the user sets a compliant passcode.
Next, the device offers to immediately sync with the Exchange server. If you choose not
to sync at this time, you can turn on calendar and contact syncing later in Settings >
Mail, Contacts, Calendars. By default, Exchange ActiveSync pushes new data to your
device as it arrives on the server. If you prefer to fetch new data on a schedule or to
only pull new data manually, use Settings > Mail, Contacts, Calendars > Fetch New Data
to change the settings.
To change how many days’ worth of mail messages are synced to your device, go to
Settings > Mail, Contacts, Calendars, and then select the Exchange account. You can
also select which folders, in addition to the inbox, are included in push email delivery.
To change the setting for calendar data go to Settings > Mail, Contacts, Calendars >
Sync.
50 Chapter 3 Manually Configuring Devices
Page 51

LDAP Settings
iPhone, iPod touch, and iPad can look up contact information on LDAP directory
servers. To add an LDAP server, go to Settings > Mail, Contacts, Calendars > Add
Account > Other. Then tap Add LDAP Account.
Enter the LDAP server address, and user name and password if required, then tap Next.
If the server is reachable and supplies default search settings to the device, the settings
will be used.
Chapter 3 Manually Configuring Devices 51
Page 52

The following Search Scope settings are supported:
Search Scope setting Description
Base Searches the base object only.
One Level Searches objects one level below the base object, but not the base
object itself.
Subtree Searches the base object and the entire tree of all objects
descended from it.
You can define multiple sets of search settings for each server.
CalDAV Settings
iPhone, iPod touch, and iPad work with CalDAV calendar servers that provide group
calendars and scheduling. To add a CalDAV server, go to Settings > Mail, Contacts,
Calendars > Add Account > Other. Then tap Add CalDAV Account.
Enter the CalDAV server address, and user name and password if necessary, then tap Next.
After the server is contacted, additional fields appear that allow you to set more options.
52 Chapter 3 Manually Configuring Devices
Page 53

Calendar Subscription Settings
You can add read-only calendars, such as project schedules or holidays. To add a
calendar, go to Settings > Mail, Contacts, Calendars > Add Account > Other and then
tap Add Subscribed Calendar.
Enter the URL for an iCalendar (.ics) file, and the user name and password if necessary,
then tap Save. You can also specify whether alarms that are set in the calendar should
be removed when the calendar is added to the device.
In addition to adding calendar subscriptions manually, you can send users a webcal://
URL (or an http:// link to a .ics file) and, after the user taps the link, the device will offer
to add it as a subscribed calendar.
Chapter 3 Manually Configuring Devices 53
Page 54

Installing Identities and Root Certificates
If you don’t distribute certificates using profiles, your users can install them manually by
using the device to download them from a website, or by opening an attachment in an
email message. The device recognizes certificates with the following MIME types and
file extensions:
 application/x-pkcs12, .p12, .pfx
 application/x-x509-ca-cert, .cer, .crt, .der
See “Certificates and Identities” on page 11 for more information about supported
formats and other requirements.
When a certificate or identity is downloaded to the device, the Install Profile screen
appears. The description indicates the type: identity or certificate authority. To install
the certificate, tap Install. If it’s an identity certificate, you’ll be asked to enter the
certificate’s password.
To view or remove an installed certificate, go to Settings > General > Profile. If you
remove a certificate that’s required for accessing an account or network, your device
cannot connect to those services.
54 Chapter 3 Manually Configuring Devices
Page 55

Additional Mail Accounts
You can configure only one Exchange account, but you can add multiple POP and
IMAP accounts. This can be used, for example, to access mail on a Lotus Notes or
Novell Groupwise mail server. Go to Settings > Accounts > Mail, Contacts, Calendars >
Add Account > Other. For more about adding an IMAP account, see the
iPhone User Guide, iPod touch User Guide, or iPad User Guide.
Updating and Removing Profiles
For information about how a user updates or removes configuration profiles, see
“Removing and Updating Configuration Profiles” on page 43.
For information about installing distribution provisioning profiles, see “Deploying
Applications” on page 63.
Other Resources
For information about the format and function of auto-proxy configuration files,
used by the VPN proxy settings, see the following:
 Proxy auto-config (PAC) at http://en.wikipedia.org/wiki/Proxy_auto-config
 Web Proxy Autodiscovery Protocol at http://en.wikipedia.org/wiki/Wpad
 Microsoft TechNet “Using Automatic Configuration, Automatic Proxy, and Automatic
Detection” at http://technet.microsoft.com/en-us/library/dd361918.aspx
Apple has several video tutorials, viewable in a standard web browser, that show your
users how to set up and use the features of iPhone, iPod touch, and iPad:
 iPhone Guided Tour at www.apple.com/iphone/guidedtour/
 iPod touch Guided Tour at www.apple.com/ipodtouch/guidedtour/
 iPad Guided Tour at www.apple.com/ipad/guided-tours/
 iPhone Support webpage at www.apple.com/support/iphone/
 iPod touch Support webpage at www.apple.com/support/ipodtouch/
 iPad Support webpage at www.apple.com/support/ipad/
There is also a user guide for each device, in PDF, that provides additional tips and
usage details:
 iPhone User Guide: http://manuals.info.apple.com/en/iPhone_User_Guide.pdf
 iPod touch User Guide: http://manuals.info.apple.com/en/iPod_touch_User_Guide.pdf
 iPad User Guide: http://manuals.info.apple.com/en/iPad_User_Guide.pdf
Chapter 3 Manually Configuring Devices 55
Page 56

56 Chapter 3 Manually Configuring Devices
Page 57

4 Deploying iTunes
4
You use iTunes to sync music and video, install applications,
and more.
This chapter describes how to deploy iTunes and enterprise applications, and defines
the settings and restrictions you can specify.
iPhone, iPod touch, and iPad can sync each type of data (music, media, etc) to only one
computer at a time. For example, you can sync music with a desktop computer and
bookmarks with a portable computer, by setting iTunes sync options appropriately
on both computers. See iTunes Help, available in the Help menu when iTunes is open,
for more information about sync options.
Installing iTunes
iTunes uses standard Macintosh and Windows installers. The latest version and a list of
system requirements is available for downloading at www.itunes.com.
57
For information about licensing requirements for distributing iTunes, see:
http://developer.apple.com/softwarelicensing/agreements/itunes.html
Installing iTunes on Windows Computers
When you install iTunes on Windows computers, by default you also install the latest
version of QuickTime, Bonjour, and Apple Software Update. You can omit these
components by passing parameters to the iTunes installer, or by pushing only the
components you want to install on your users’ computers.
Page 58

Installing on Windows using iTunesSetup.exe
If you plan to use the regular iTunes installation process but omit some components,
you can pass properties to iTunesSetup.exe using the command line.
Property Meaning
NO_AMDS=1 Don’t install Apple Mobile Device Services. This component is
required for iTunes to sync and manage mobile devices.
NO_ASUW=1 Don’t install Apple Software Update for Windows. This application
alerts users to new versions of Apple software.
NO_BONJOUR=1 Don’t install Bonjour. Bonjour provides zero-configuration network
discovery of printers, shared iTunes libraries, and other services.
NO_QUICKTIME=1 Don’t install QuickTime. This component is required to use iTunes.
Don’t omit QuickTime unless you’re sure the client computer
already has the latest version installed.
Silently Installing on Windows
To silently install iTunes, extract the individual .msi files from iTunesSetup.exe, then push
the files to client computers.
To extract .msi files from iTunesSetup.exe:
1 Run iTunesSetup.exe.
2 Open %temp% and find a folder named IXPnnn.TMP, where %temp% is your temporary
directory and nnn is a 3-digit random number. On Windows XP, the temporary directory
is typically bootdrive:\Documents and Settings\user\Local Settings\temp\. On Windows
Vista, the temporary directory is typically \Users\user\AppData\Local\Temp\.
3 Copy the .msi files from the folder to another location.
4 Quit the installer opened by iTunesSetup.exe.
Then use Group Policy Object Editor, in the Microsoft Management Console, to add the
.msi files to a Computer Configuration policy. Make sure to add the configuration to the
Computer Configuration policy, not the User Configuration policy.
Important: iTunes requires QuickTime and Apple Application Support. Apple
Application Support must be installed before installing iTunes. Apple Mobile Device
Services (AMDS) is necessary to use an iPhone, iPad, or iPod touch with iTunes.
Before pushing the .msi files, you need to select which localized versions of iTunes you
want to install. To do so, open the .msi in the ORCA tool, which is installed by the
Windows SDK as Orca.msi, in bin\. Then edit the summary information stream and
remove the languages that you don’t want to install. (Locale ID1033 is English.)
Alternatively, use the Group Policy Object Editor to change the deployment properties
of the .msi files to Ignore Language.
58 Chapter 4 Deploying iTunes
Page 59

Installing iTunes on Macintosh Computers
Mac computers come with iTunes installed. The latest version of iTunes is available
at www.itunes.com. To push iTunes to Mac clients, you can use Workgroup Manager,
an administrative tool included with Mac OS X Server.
Quickly Activating Devices with iTunes
Before a new iPhone, iPod touch, or iPad can be used, it must be activated by
connecting it to a computer that is running iTunes. Normally, after activating a device,
iTunes offers to sync the device with the computer. To avoid this when you’re setting
up a device for someone else, turn on activation-only mode. This causes iTunes to
automatically eject a device after it’s activated. The device is then ready to configure,
but doesn’t have any media or data.
To turn on activation-only mode on Mac OS X:
1 Make sure iTunes isn’t running, and then open Terminal.
2 In Terminal, enter a command:
 To turn activation-only mode on:
defaults write com.apple.iTunes StoreActivationMode -integer 1
 To turn activation-only mode off:
defaults delete com.apple.iTunes StoreActivationMode
To activate a device, see “Using Activation-only Mode,” below.
To turn on activation-only mode on Windows:
1 Make sure iTunes isn’t running, and then open a Command Prompt window.
2 Enter a command:
 To turn activation-only mode on:
"C:\Program Files\iTunes\iTunes.exe" /setPrefInt StoreActivationMode 1
 To turn activation-only mode off:
"C:\Program Files\iTunes\iTunes.exe" /setPrefInt StoreActivationMode 0
You can also create a shortcut, or edit the iTunes shortcut you already have, to include
these commands so you can quickly toggle activation-only mode.
To verify that iTunes is in activation-only mode, choose iTunes > About iTunes and look
for the text “Activation-only mode” under the iTunes version and build identifier.
Chapter 4 Deploying iTunes 59
Page 60

Using Activation-Only Mode
Make sure that you’ve turned on activation-only mode as described above, and then
follow these steps.
1 If you’re activating an iPhone, insert an activated SIM card. Use the SIM eject tool, or a
straightened paper clip, to eject the SIM tray. See the iPhone User Guide for details.
2 Connect iPhone, iPod touch, or iPad to the computer. The computer must be
connected to the Internet to activate the device.
iTunes opens, if necessary, and activates the device. A message appears when the
device is successfully activated.
3 Disconnect the device.
You can immediately connect and activate additional devices. iTunes won’t sync with
any device while activation-only mode is on, so don’t forget to turn activation-only
mode off if you plan on using iTunes to sync devices.
Setting iTunes Restrictions
You can restrict your users from using certain iTunes features. This is sometimes
referred to as parental controls. The following features can be restricted:
 Automatic and user-initiated checking for new versions of iTunes and device
software updates
 Displaying Genius suggestions while browsing or playing media
 Automatically syncing when devices are connected
 Downloading album artwork
 Using Visualizer plug-ins
 Entering a URL of streaming media
 Automatically discovering Apple TV systems
 Registering new devices with Apple
 Subscribing to podcasts
 Playing Internet radio
 Accessing the iTunes Store
 Library sharing with local network computers also running iTunes
 Playing iTunes media content that is marked as explicit
 Playing movies
 Playing TV shows
60 Chapter 4 Deploying iTunes
Page 61

Setting iTunes Restrictions for Mac OS X
On Mac OS X, you control access by using keys in a plist file. On Mac OS X the key
values shown above can be specified for each user by editing ~/Library/Preferences/
com.apple.iTunes.plist using Workgroup Manager, an administrative tool included with
Mac OS X Server.
For instructions, see the Apple Support article at http://docs.info.apple.com/
article.html?artnum=303099.
Setting iTunes Restrictions for Windows
On Windows, you control access by setting registry values inside one of the following
registry keys:
On Windows XP and 32-bit Windows Vista:
 HKEY_LOCAL_MACHINE\Software\Apple Computer, Inc.\iTunes\[SID]\Parental
Controls\
 HKEY_CURRENT_USER\Software\Apple Computer, Inc.\iTunes\Parental Controls
On 64-bit Windows Vista:
 HKEY_LOCAL_MACHINE\Software\Wow6432Node\Apple Computer,
Inc.\iTunes\[SID]\Parental Controls\
 HKEY_CURRENT_USER\Software\Wow6432Node\Apple Computer,
Inc.\iTunes\Parental Controls
For information about the iTunes registry values, see the Apple Support article at
http://support.apple.com/kb/HT2102.
For general information about editing the Windows registry, see the Microsoft Help and
Support article at http://support.microsoft.com/kb/136393.
Updating iTunes and iPhone OS Manually
If you turn off automated and user-initiated software update checking in iTunes,
you’ll need to distribute software updates to users for manual installation.
To update iTunes, see the installation and deployment steps described earlier in this
document. It’s the same process you followed for distributing iTunes to your users.
Chapter 4 Deploying iTunes 61
Page 62

To update iPhone OS, follow these steps:
1 On a computer that doesn’t have iTunes software updating turned off, use iTunes to
download the software update. To do so, select an attached device in iTunes, click the
Summary tab, and then click the “Check for Update” button.
2 After downloading, copy the updater file (.ipsw) found in the following location:
 On Mac OS X: ~/Library/iTunes/iPhone Software Updates/
 On Windows XP: bootdrive:\Documents and Settings\user\Application Data\
Apple Computer\iTunes\iPhone Software Updates\
3 Distribute the .ipsw file to your users, or place it on the network where they can
access it.
4 Tell your users to back up their device with iTunes before applying the update. During
manual updates, iTunes doesn’t automatically back up the device before installation.
To create a new backup, right-click (Windows) or Control-click (Mac) the device in the
iTunes sidebar. Then choose Back Up from the contextual menu that appears.
5 Your users install the update by connecting their device to iTunes, then selecting the
Summary tab for their device. Next, they hold down the Option (Mac) or Shift
(Windows) key and click the “Check for Update” button.
6 A file selector dialog appears. Users should select the .ipsw file and then click Open to
begin the update process.
Backing Up a Device with iTunes
When iPhone, iPod touch, or iPad is synced with iTunes, device settings are
automatically backed up to the computer. Applications purchased from the App Store
are copied to the iTunes Library.
Applications you’ve developed yourself, and distributed to your users with enterprise
distribution profiles, won’t be backed up or transferred to the user’s computer. But the
device backup will include any data files your application creates.
Device backups can be stored in encrypted format by selecting the Encrypt Backup
option for the device in the summary pane of iTunes. Files are encrypted using AES256.
The key is stored securely in the iPhone OS keychain.
Important: If the device being backed up has any encrypted profiles installed, iTunes
requires the user to enable backup encryption.
62 Chapter 4 Deploying iTunes
Page 63

5 Deploying Applications
5
You can distribute iPhone, iPod touch, and iPad applications
to your users.
If you want to install iPhone OS applications that you’ve developed, you distribute the
application to your users, who install the applications using iTunes.
Applications from the online App Store work on iPhone, iPod touch, and iPad without
any additional steps. If you develop an application that you want to distribute yourself,
it must be digitally signed with a certificate issued by Apple. You must also provide
your users with a distribution provisioning profile that allows their device to use the
application.
The process for deploying your own applications is:
 Register for enterprise development with Apple.
 Sign your applications using your certificate.
 Create an enterprise distribution provisioning profile that authorizes devices to use
applications you’ve signed.
 Deploy the application and the enterprise distribution provisioning profile to your
users’ computers.
 Instruct users to install the application and profile using iTunes.
63
See below for more about each of these steps.
Registering for Application Development
To develop and deploy custom applications for iPhone OS, first register for the iPhone
Enterprise Developer Program at http://developer.apple.com/.
Once you complete the registration process, you’ll receive instructions for enabling
your applications to work on devices.
Page 64

Signing Applications
Applications you distribute to users must be signed with your distribution certificate.
For instructions about obtaining and using a certificate, see the iPhone Developer
Center at http://developer.apple.com/iphone.
Creating the Distribution Provisioning Profile
Distribution provisioning profiles let you create applications that your users can use on
their device. You create an enterprise distribution provisioning profile for a specific
application, or multiple applications, by specifying the AppID that is authorized by the
profile. If a user has an application, but doesn’t have a profile that authorizes its use, the
user isn’t able to use the application.
The designated Team Agent for your enterprise can create distribution provisioning
profiles at the Enterprise Program Portal at http://developer.apple.com/iphone.
See the website for instructions.
Once you create the enterprise distribution provisioning profile, download the
.mobileprovision file, and then securely distribute it and your application.
Installing Provisioning Profiles Using iTunes
The user’s installed copy of iTunes automatically installs provisioning profiles that are
located in the following folders defined in this section. If the folders don’t exist, create
them using the names shown.
Mac OS X
 ~/Library/MobileDevice/Provisioning Profiles/
 /Library/MobileDevice/Provisioning Profiles/
 the path specified by the ProvisioningProfilesPath key in ~/Library/Preferences/
com.apple.itunes
Windows XP
 bootdrive:\Documents and Settings\username\Application Data\Apple Computer\
MobileDevice\Provisioning Profiles
 bootdrive:\Documents and Settings\All Users\Application Data\Apple Computer\
MobileDevice\Provisioning Profiles
 the path specified in the HKCU or HKLM by the ProvisioningProfilesPath registry key
SOFTWARE\Apple Computer, Inc\iTunes
64 Chapter 5 Deploying Applications
Page 65

Windows Vista
 bootdrive:\Users\username\AppData\Roaming\Apple Computer\MobileDevice\
Provisioning Profiles
 bootdrive:\ProgramData\Apple Computer\MobileDevice\Provisioning Profiles
 the path specified in the HKCU or HKLM by the ProvisioningProfilesPath registry key
SOFTWARE\Apple Computer, Inc\iTunes
iTunes automatically installs provisioning profiles found in the locations above onto
devices it syncs with. Once installed, the provisioning profiles can be viewed on the
device in Settings > General > Profiles.
You can also distribute the .mobileprovision file to your users and have them drag
it to the iTunes application icon. iTunes will copy the file to the correct location as
defined above.
Installing Provisioning Profiles Using iPhone Configuration Utility
You can use iPhone Configuration Utility to install provisioning profiles on connected
devices. Follow these steps:
1 In iPhone Configuration Utility, choose File > Add to Library, and then select the
provisioning profile that you want to install.
The profile is added to iPhone Configuration Utility and can be viewed by selecting the
Provisioning Profiles category in the Library.
2 Select a device in the Connected Devices list.
3 Click the Provisioning Profiles tab.
4 Select the provisioning profile in the list, and then click its Install button.
Installing Applications Using iTunes
Your users use iTunes to install applications on their devices. Securely distribute the
application to your users and then have them follow these steps:
1 In iTunes, choose File > Add to Library and select the application (.app) you provided.
You can also drag the .app file to the iTunes application icon.
2 Connect a device to the computer, and then select it in the Devices list in iTunes.
3 Click the Applications tab, and then select the application in the list.
4 Click Apply to install the application and all distribution provisioning profiles that are
located in the designated folders discussed in “Installing Provisioning Profiles Using
iTunes” on page 64.
Chapter 5 Deploying Applications 65
Page 66

Installing Applications Using iPhone Configuration Utility
You can use iPhone Configuration Utility to install applications on connected devices.
Follow these steps:
1 In iPhone Configuration Utility, choose File > Add to Library, and then select the
application that you want to install.
The application is added to iPhone Configuration Utility and can be viewed by
selecting the Applications category in the Library.
2 Select a device in the Connected Devices list.
3 Click the Applications tab.
4 Select the application in the list, and then click its Install button.
Using Enterprise Applications
When a user runs an application that isn’t signed by Apple, the device looks for a
distribution provisioning profile that authorizes its use. If a profile isn’t found, the
application won’t open.
Disabling an Enterprise Application
If you need to disable an in-house application, you can do so by revoking the identity
used to sign the distribution provisioning profile. The application will no longer be able
to be installed, and if it’s already installed, it will no longer open.
Other Resources
For more information about creating applications and provisioning profiles, see:
 iPhone Developer Center at http://developer.apple.com/iphone/
66 Chapter 5 Deploying Applications
Page 67

A Cisco VPN Server Configuration
Use these guidelines to configure your Cisco VPN server for
use with iPhone, iPod touch and iPad.
Supported Cisco Platforms
iPhone OS supports Cisco ASA 5500 Security Appliances and PIX Firewalls configured
with 7.2.x software or later. The latest 8.0.x software release (or later) is recommended.
iPhone OS also supports Cisco IOS VPN routers with IOS version 12.4(15)T or later. VPN
3000 Series Concentrators don’t support iPhone VPN capabilities.
Authentication Methods
iPhone OS supports the following authentication methods:
 Pre-shared key IPSec authentication with user authentication via xauth
 Client and server certificates for IPSec authentication with optional user
authentication via xauth
 Hybrid authentication where the server provides a certificate and the client provides
a pre-shared key for IPSec authentication; user authentication is required via xauth.
 User authentication is provided via xauth and includes the following authentication
methods:
 User name with password
 RSA SecurID
 CryptoCard
Appendix A Cisco VPN Server Configuration 67
Page 68

Authentication Groups
The Cisco Unity protocol uses authentication groups to group users together based on
a common set of authentication and other parameters. You should create an
authentication group for iPhone OS device users. For pre-shared key and hybrid
authentication, the group name must be configured on the device with the group’s
shared secret (pre-shared key) as the group password.
When using certificate authentication, no shared secret is used and the user’s group is
determined based on fields in the certificate. The Cisco server settings can be used to
map fields in a certificate to user groups.
Certificates
When setting up and installing certificates, make sure of the following:
 The server identity certificate must contain the server’s DNS name and/or IP address
in the subject alternate name (SubjectAltName) field. The device uses this
information to verify that the certificate belongs to the server. You can specify the
SubjectAltName using wildcard characters for per-segment matching, such as
vpn.*.mycompany.com, for more flexibility. The DNS name can be put in the common
name field, if no SubjectAltName is specified.
 The certificate of the CA that signed the server’s certificate should be installed on the
device. If it isn’t a root certificate, install the rest of the trust chain so that the
certificate is trusted.
 If client certificates are used, make sure that the trusted CA certificate that signed the
client’s certificate is installed on the VPN server.
 The certificates and certificate authorities must be valid (not expired, for example.).
 Sending of certificate chains by the server isn’t supported and should be turned off.
 When using certificate-based authentication, make sure that the server is set up to
identify the user’s group based on fields in the client certificate. See “Authentication
Groups” on page 68.
68 Appendix A Cisco VPN Server Configuration
Page 69

IPSec Settings
Use the following IPSec settings:
 Mode: Tunnel Mode
 IKE Exchange Modes: Aggressive Mode for pre-shared key and hybrid authentication,
Main Mode for certificate authentication.
 Encryption Algorithms: 3DES, AES-128, AES-256
 Authentication Algorithms: HMAC-MD5, HMAC-SHA1
 Diffie Hellman Groups: Group 2 is required for pre-shared key and hybrid.
authentication. For certificate authentication, use Group 2 with 3DES and AES-128.
Use Group 2 or 5 with AES-256.
 PFS (Perfect Forward Secrecy): For IKE phase 2, if PFS is used the Diffie-Hellman group
must be the same as was used for IKE phase 1.
 Mode Configuration: Must be enabled.
 Dead Peer Detection: Recommended.
 Standard NAT Transversal: Supported and can be enabled if desired. (IPSec over TCP
isn’t supported).
 Load Balancing: Supported and can be enabled if desired.
 Re-keying of Phase 1: Not currently supported. Recommend that re-keying times on
the server be set to approximately one hour.
 ASA Address Mask: Make sure that all device address pool masks are either not set,
or are set to 255.255.255.255. For example:
asa(config-webvpn)# ip local pool vpn_users 10.0.0.1-10.0.0.254 mask
255.255.255.255.
When using the recommended address mask, some routes assumed by the VPN
configuration might be ignored. To avoid this, make sure that your routing table
contains all necessary routes and verify that the subnet addresses are accessible
before deployment.
Other Supported Features
iPhone, iPod touch, and iPad support the following features:
 Application Version: The client software version is sent to the server, allowing the
server to accept or reject connections based on the device’s software version.
 Banner: The banner, if configured on the server, is displayed on the device and the
user must accept it or disconnect.
 Split Tunnel: Split tunneling is supported.
 Split DNS: Split DNS is supported.
 Default Domain: Default domain is supported.
Appendix A Cisco VPN Server Configuration 69
Page 70

B Configuration Profile Format
B
This appendix specifies the format of mobileconfig files for
those who want to create their own tools.
This document assumes that you’re familiar with the Apple XML DTD and the general
property list format. A general description of the Apple plist format is available at
www.apple.com/DTDs/PropertyList-1.0.dtd. To get started, use iPhone Configuration
Utility to create a skeleton file that you can modify using the information in this
appendix.
This document uses the terms payload and profile. A profile is the whole file that
configures certain (single or multiple) settings on iPhone, iPod touch, or iPad. A
payload is an individual component of the profile file.
Root Level
At the root level, the configuration file is a dictionary with the following key/value pairs:
Appendix
70
Key Value
PayloadVersion Number, mandatory. The version of the whole configuration
profile file. This version number designates the format of the
whole profile, not the individual payloads.
PayloadUUID String, mandatory. This is usually a synthetically generated
unique identifier string. The exact content of this string is
irrelevant; however, it must be globally unique. On Mac OS X,
you can generate UUIDs with /usr/bin/uuidgen.
PayloadType String, mandatory. Currently, only “Configuration” is a valid value
for this key.
PayloadOrganization String, optional. This value describes the issuing organization of
the profile, as displayed to the user.
Page 71

Key Value
PayloadIdentifier String, mandatory. This value is by convention a dot-delimited
string uniquely describing the profile, such as
“com.myCorp.iPhone.mailSettings” or
“edu.myCollege.students.vpn”. This is the string by which profiles
are differentiated—if a profile is installed which matches the
identifier of another profile, it overrides it (instead of being
added).
PayloadDisplayName String, mandatory. This value determines a very short string to
be displayed to the user describing the profile, such as “VPN
Settings”. It does not have to be unique.
PayloadDescription String, optional. This value determines what descriptive, free-
form text will be shown to the user on the Detail screen for the
entire profile. This string should clearly identify the profile so the
user can decide whether to install it.
PayloadContent Array, optional. This value is the actual content of the profile.
If it is omitted, the whole profile has no functional meaning.
PayloadRemovalDisallowed Boolean, optional. Default is No. If set, the user won’t be able to
delete the profile. A profile with this set can be updated via USB
or web/email only if the profile identifier matches and is signed
by the same authority. If a removal password is provided, the
profile can be deleted by specifying the password.
With signed and encrypted profiles, having this locking bit in
plain view is without consequence because the profile can’t be
altered and this setting is also shown on the device.
Payload Content
The PayloadContent array is an array of dictionaries, where each dictionary describes an
individual payload of the profile. Each functional profile has at least one or more entries
in this array. Each dictionary in this array has a few common properties, regardless of
the payload type. Others are specialized and unique to each payload type.
Key Value
PayloadVersion Number, mandatory. The version of the individual payload.
Each profile can consist of payloads with different version numbers.
For instance, the VPN version number can be incremented at a
point in the future while the Mail version number would not.
PayloadUUID String, mandatory. This is usually a synthetically generated unique
identifier string. The exact content of this string is irrelevant;
however, it must be globally unique.
PayloadType String, mandatory. This key/value pair determines the type of the
individual payload within the profile.
PayloadOrganization String, optional. This value describes the issuing organization of the
profile, as it will be shown to the user. It can be, but doesn’t have to
be, the same as the root level PayloadOrganization.
Appendix B Configuration Profile Format 71
Page 72

Key Value
PayloadIdentifier String, mandatory. This value is by convention a dot-delimited
string uniquely describing the payload. It’s usually the root
PayloadIdentifier with an appended subidentifier, describing the
particular payload.
PayloadDisplayName String, mandatory. This value is a very short string displayed to the
user which describes the profile, such as “VPN Settings”. It does not
have to be unique.
PayloadDescription String, optional. This value determines what descriptive, free-form
text is displayed on the Detail screen for this particular payload.
Profile Removal Password Payload
The Removal Password payload is designated by the
com.apple.profileRemovalPassword value of PayloadType. It’s purpose is to encode the
password that allows users to remove a configuration profile from the device. If this
payload is present, and has a password value set, the device will ask for the password
when the user taps a profile’s Remove button. This payload is encrypted with the rest of
the profile.
Key Value
RemovalPassword String, optional. Specifies the removal password for the profile.
Passcode Policy Payload
The Passcode Policy payload is designated by the
com.apple.mobiledevice.passwordpolicy PayloadType value. The presence of this
payload type prompts device to present the user with an alphanumeric passcode entry
mechanism, which allows the entry of arbitrarily long and complex passcodes.
In addition to the settings common to all payloads, this payload defines the following:
Key Value
allowSimple Boolean, optional. Default YES. Determines whether a simple
passcode is allowed. A simple passcode is defined as containing
repeated characters, or increasing/decreasing characters (such
as 123 or CBA). Setting this value to “NO” is synonymous to
setting minComplexChars to “1”.
forcePIN Boolean, optional. Default NO. Determines whether the user is
forced to set a PIN. Simply setting this value (and not others)
forces the user to enter a passcode, without imposing a length
or quality.
72 Appendix B Configuration Profile Format
Page 73

Key Value
maxFailedAttempts Number, optional. Default 11. Allowed range [2...11]. Specifies the
number of allowed failed attempts to enter the passcode at the
device’s lock screen. Once this number is exceeded, the device is
locked and must be connected to its designated iTunes in order
to be unlocked.
maxInactivity Number, optional. Default Infinity. Specifies the number of
minutes for which the device can be idle (without being
unlocked by the user) before it’s locked by the system. Once this
limit is reached, the device is locked and the passcode must be
entered.
maxPINAgeInDays Number, optional. Default Infinity. Specifies the number of days
for which the passcode can remain unchanged. After this
number of days, the user is forced to change the passcode
before the device is unlocked.
minComplexChars Number, optional. Default 0. Specifies the minimum number of
complex characters that a passcode must contain. A “complex”
character is a character other than a number or a letter, such as
&%$#.
minLength Number, optional. Default 0. Specifies the minimum overall
length of the passcode. This parameter is independent of the
also optional minComplexChars argument.
requireAlphanumeric Boolean, optional. Default NO. Specifies whether the user must
enter alphabetic characters (“abcd”), or if numbers are sufficient.
pinHistory Number, optional. When the user changes the passcode, it has
to be unique within the last N entries in the history. Minimum
value is 1, maximum value is 50.
manualFetchingWhenRoaming Boolean, optional. If set, all push operations will be disabled
when roaming. The user has to manually fetch new data.
maxGracePeriod Number, optional. The maximum grace period, in minutes, to
unlock the phone without entering a passcode. Default is 0,
that is no grace period, which requires a passcode immediately.
Email Payload
The email payload is designated by the com.apple.mail.managed PayloadType value.
This payload creates an email account on the device. In addition to the settings
common to all payloads, this payload defines the following:
Key Value
EmailAccountDescription String, optional. A user-visible description of the email account,
shown in the Mail and Settings applications.
EmailAccountName String, optional. The full user name for the account. This is the
user name in sent messages, etc.
Appendix B Configuration Profile Format 73
Page 74

Key Value
EmailAccountType String, mandatory. Allowed values are EmailTypePOP and
EmailTypeIMAP. Defines the protocol to be used for that
account.
EmailAddress String, mandatory. Designates the full email address for the
account. If not present in the payload, the device prompts for
this string during profile installation.
IncomingMailServerAuthentication String, mandatory. Designates the authentication scheme for
incoming mail. Allowed values are EmailAuthPassword and
EmailAuthNone.
IncomingMailServerHostName String, mandatory. Designates the incoming mail server host
name (or IP address).
IncomingMailServerPortNumber Number, optional. Designates the incoming mail server port
number. If no port number is specified, the default port for a
given protocol is used.
IncomingMailServerUseSSL Boolean, optional. Default Yes. Designates whether the incoming
mail server uses SSL for authentication.
IncomingMailServerUsername String, mandatory. Designates the user name for the email
account, usually the same as the email address up to the @
character. If not present in the payload, and the account is set
up to require authentication for incoming email, the device will
prompt for this string during profile installation.
IncomingPassword String, optional. Password for the Incoming Mail Server. Use only
with encrypted profiles.
OutgoingPassword String, optional. Password for the Outgoing Mail Server. Use only
with encrypted profiles.
OutgoingPasswwordSameAsIncomi
ngPassword
OutgoingMailServerAuthentication String, mandatory. Designates the authentication scheme for
OutgoingMailServerHostName String, mandatory. Designates the outgoing mail server host
OutgoingMailServerPortNumber Number, optional. Designates the outgoing mail server port
OutgoingMailServerUseSSL Boolean, optional. Default Yes. Designates whether the outgoing
OutgoingMailServerUsername String, mandatory. Designates the user name for the email
Boolean, optional. If set, the user will be prompted for the
password only once and it will be used for both outgoing and
incoming mail.
outgoing mail. Allowed values are EmailAuthPassword and
EmailAuthNone.
name (or IP address).
number. If no port number is specified, ports 25, 587 and 465
are used, in this order.
mail server uses SSL for authentication.
account, usually the same as the email address up to the @
character. If not present in the payload, and the account is set
up to require authentication for outgoing email, the device
prompts for this string during profile installation.
74 Appendix B Configuration Profile Format
Page 75

Web Clip Payload
The Web Clip payload is designated by the com.apple.webClip.managed PayloadType
value. In addition to the settings common to all payloads, this payload defines the
following:
Key Value
URL String, mandatory. The URL that the Web Clip should open when
clicked. The URL must begin with HTTP or HTTPS or it won’t work.
Label String, mandatory. The name of the Web Clip as displayed on the
Home screen.
Icon Data, optional. A PNG icon to be shown on the Home screen.
Should be 59 x 60 pixels in size. If not specified, a white square will
be shown.
IsRemovable Boolean, optional. If No, the user cannot remove the Web Clip,
but it will be removed if the profile is deleted.
Restrictions Payload
The Restrictions payload is designated by the com.apple.applicationaccess PayloadType
value. In addition to the settings common to all payloads, this payload defines the
following:
Key Value
allowAppInstallation Boolean, optional. When false, the App Store is disabled and its
icon is removed from the Home screen. Users are unable to install
or update their applications.
allowCamera Boolean, optional. When false, the camera is completely disabled
and its icon is removed from the Home screen. Users are unable to
take photographs.
allowExplicitContent Boolean, optional. When false, explicit music or video content
purchased from the iTunes Store is hidden. Explicit content is
marked as such by content providers, such as record labels, when
sold through the iTunes Store.
allowScreenShot Boolean, optional. When false, users are unable to save a
screenshot of the display.
allowYouTube Boolean, optional. When false, the YouTube application is disabled
and its icon is removed from the Home screen.
allowiTunes Boolean, optional. When false, the iTunes Music Store is disabled
and its icon is removed from the Home screen. Users cannot
preview, purchase, or download content.
allowSafari Boolean, optional. When false, the Safari web browser application is
disabled and its icon removed from the Home screen. This also
prevents users from opening web clips.
Appendix B Configuration Profile Format 75
Page 76

LDAP Payload
The LDAP payload is designated by the com.apple.ldap.account PayloadType value.
There’s a one-to-many relationship from LDAP Account to LDAPSearchSettings. Think of
LDAP as a tree. Each SearchSettings object represents a node in the tree to start the
search at, and what scope to search for (node, node+1 level of children, node + all
levels of children). In addition to the settings common to all payloads, this payload
defines the following:
Key Value
LDAPAccountDescription String, optional. Description of the account.
LDAPAccountHostName String, mandatory. The host.
LDAPAccountUseSSL Boolean, mandatory. Whether or not to use SSL.
LDAPAccountUserName String, optional. The username.
LDAPAccountPassword String, optional. Use only with encrypted profiles.
LDAPSearchSettings Top level container object. Can have many of these for one
account. Should have at least one for the account to be useful.
LDAPSearchSettingDescription String, optional. Description of this search setting.
LDAPSearchSettingSearchBase String, required. Conceptually, the path to the node to start a
search at “ou=people,o=example corp”
LDAPSearchSettingScope String, required. Defines what recursion to use in the search.
Can be one of the following 3 values:
LDAPSearchSettingScopeBase: Just the immediate node pointed to
by SearchBase
LDAPSearchSettingScopeOneLevel: The node plus its immediate
children.
LDAPSearchSettingScopeSubtree: The node plus all children,
regardless of depth.
CalDAV Payload
The CalDAV payload is designated by the com.apple.caldav.account PayloadType value.
In addition to the settings common to all payloads, this payload defines the following:
Key Value
CalDAVAccountDescription String, optional. Description of the account.
CalDAVHostName String, mandatory. The server address
CalDAVUsername String, mandatory. The user’s login name.
CalDAVPassword String, optional. The user’s password
CalDAVUseSSL Boolean, mandatory. Whether or not to use SSL.
CalDAVPort Number, optional. The port on which to connect to the server.
CalDAVPrincipalURL String, optional. The base URL to the user’s calendar.
76 Appendix B Configuration Profile Format
Page 77

Calendar Subscription Payload
The CalSub payload is designated by the com.apple.subscribedcalendar.account
PayloadType value. In addition to the settings common to all payloads, this payload
defines the following:
Key Value
SubCalAccountDescription String, optional. Description of the account.
SubCalAccountHostName String, mandatory. The server address.
SubCalAccountUsername String, optional. The user’s login name
SubCalAccountPassword String, optional. The user’s password.
SubCalAccountUseSSL Boolean, mandatory. Whether or not to use SSL.
SCEP Payload
The SCEP (Simple Certificate Enrollment Protocol) payload is designated by the
com.apple.encrypted-profile-service PayloadType value. In addition to the settings
common to all payloads, this payload defines the following:
Key Value
URL String, mandatory.
Name String, optional. any string which is understood by the SCEP
server. For example, it could be a domain name like
example.org. If a certificate authority has multiple CA certificates
this field can be used to distinguish which is required.
Subject Array, optional. The representation of a X.500 name represented
as an array of OID and value. For example, /C=US/O=Apple Inc./
CN=foo/1.2.5.3=bar, which would translate to:
[ [ [“C”, “US”] ], [ [“O”, “Apple Inc.”] ], ..., [ [ “1.2.5.3”, “bar” ] ] ]
OIDs can be represented as dotted numbers, with shortcuts for
C, L, ST, O, OU, CN (country, locality, state, organization,
organizational unit, common name).
Challenge String, optional. A pre-shared secret.
Keysize Number, optional. The keysize in bits, either 1024 or 2048.
Key Type String, optional. Currently always “RSA”.
Key Usage Number, optional. A bitmask indicating the use of the key. 1 is
signing, 4 is encryption, 5 is both signing and encryption. Some
CAs, such as Windows CA, support only encryption or signing,
but not both at the same time.
Appendix B Configuration Profile Format 77
Page 78

SubjectAltName Dictionary Keys
The SCEP payload can specify an optional SubjectAltName dictionary that provides
values required by the CA for issuing a certificate. You can specify a single string or an
array of strings for each key. The values you specify depend on the CA you’re using, but
might include DNS name, URL, or email values. For an example, see “Sample Phase 3
Server Response With SCEP Specifications” on page 85.
GetCACaps Dictionary Keys
If you add a dictionary with the key GetCACaps, the device uses the strings you provide
as the authoritative source of information about the capabilities of your CA. Otherwise,
the device queries the CA for GetCACaps and uses the answer it gets in response. If the
CA doesn’t respond, the device defaults to GET 3DES and SHA-1 requests.
APN Payload
The APN (Access Point Name) payload is designated by the com.apple.apn.managed
PayloadType value. In addition to the settings common to all payloads, this payload
defines the following:
Key Value
DefaultsData Dictionary, mandatory. This dictionary contains two key/value
pairs.
DefaultsDomainName String, mandatory. The only allowed value is
com.apple.managedCarrier.
apns Array, mandatory. This array contains an arbitrary number of
dictionaries, each describing an APN configuration, with the
key/value pairs below.
apn String, mandatory. This string specifies the Access Point Name.
username String, mandatory. This string specifies the user name for this
APN. If it’s missing, the device prompts for it during profile
installation.
password Data, optional. This data represents the password for the user for
this APN. For obfuscation purposes, it’s encoded. If it’s missing
from the payload, the device prompts for it during profile
installation.
proxy String, optional. The IP address or URL of the APN proxy.
proxyPort Number, optional. The port number of the APN proxy.
78 Appendix B Configuration Profile Format
Page 79

Exchange Payload
The Exchange payload is designated by the com.apple.eas.account PayloadType value.
This payload creates a Microsoft Exchange account on the device. In addition to the
settings common to all payloads, this payload defines the following:
Key Value
EmailAddress String, mandatory. If not present in the payload, the device
prompts for this string during profile installation. Specifies the
full email address for the account.
Host String, mandatory. Specifies the Exchange server host name
(or IP address).
SSL Boolean, optional. Default YES. Specifies whether the Exchange
server uses SSL for authentication.
UserName String, mandatory. This string specifies the user name for this
Exchange account. If missing, the devices prompts for it during
profile installation.
Password String, optional. The password of the account. Use only with
encrypted profiles.
Certificate Optional. For accounts that allow authentication via certificate,
a .p12 identity certificate in NSData blob format.
CertificateName String, Optional. Specifies the name or description of the
certificate.
CertificatePassword Optional. The password necessary for the p12 identity certificate.
Use only with encrypted profiles.
VPN Payload
The VPN payload is designated by the com.apple.vpn.managed PayloadType value.
In addition to the settings common to all payload types, the VPN payload defines the
following keys.
Key Value
UserDefinedName String. Description of the VPN connection displayed on the
device.
OverridePrimary Boolean. Specifies whether to send all traffic through the VPN
interface. If true, all network traffic is sent over VPN.
VPNType String. Determines the settings available in the payload for this
type of VPN connection. It can have three possible
values: “L2TP”, “PPTP”, or “IPSec”, representing L2TP, PPTP and
Cisco IPSec respectively.
There are two possible dictionaries present at the top level, under the keys “PPP” and
“IPSec”. The keys inside these two dictionaries are described below, along with the
VPNType value under which the keys are used.
Appendix B Configuration Profile Format 79
Page 80

PPP Dictionary Keys
The following elements are for VPN payloads of type PPP.
Key Value
AuthName String. The VPN account user name. Used for L2TP and PPTP.
AuthPassword String, optional. Only visible if TokenCard is false. Used for L2TP
and PPTP.
TokenCard Boolean. Whether to use a token card such as an RSA SecurID
card for connecting. Used for L2TP.
CommRemoteAddress String. IP address or host name of VPN server. Used for L2TP and
PPTP.
AuthEAPPlugins Array. Only present if RSA SecurID is being used, in which case
it has one entry, a string with value “EAP-RSA”. Used for L2TP
and PPTP.
AuthProtocol Array. Only present if RSA SecurID is being used, in which case it
has one entry, a string with value “EAP”. Used for L2TP and PPTP.
CCPMPPE40Enabled Boolean. See discussion under CCPEnabled. Used for PPTP.
CCPMPPE128Enabled Boolean. See discussion under CCPEnabled. Used for PPTP.
CCPEnabled Boolean. Enables encryption on the connection. If this key and
CCPMPPE40Enabled are true, represents automatic encryption
level; if this key and CCPMPPE128Enabled are true, represents
maximum encryption level. If no encryption is used, then none
of the CCP keys are true. Used for PPTP.
IPSec Dictionary Keys
The following elements are for VPN payloads of type IPSec.
Key Value
RemoteAddress String. IP address or host name of the VPN server. Used for Cisco
IPSec.
AuthenticationMethod String. Either “SharedSecret” or “Certificate”. Used for L2TP and
Cisco IPSec.
XAuthName String. User name for VPN account. Used for Cisco IPSec.
XAuthEnabled Integer. 1 if XAUTH is ON, 0 if it’s OFF. Used for Cisco IPSec.
LocalIdentifier String. Present only if AuthenticationMethod = SharedSecret.
The name of the group to use. If Hybrid Authentication is used,
the string must end with “[hybrid]”. Used for Cisco IPSec.
LocalIdentifierType String. Present only if AuthenticationMethod = SharedSecret.
The value is “KeyID”. Used for L2TP and Cisco IPSec.
SharedSecret Data. The shared secret for this VPN account. Only present if
AuthenticationMethod = SharedSecret. Used for L2TP and Cisco
IPSec.
80 Appendix B Configuration Profile Format
Page 81

Key Value
PayloadCertificateUUID String. The UUID of the certificate to use for the account
credentials. Only present if AuthenticationMethod = Certificate.
Used for Cisco IPSec.
PromptForVPNPIN Boolean. Whether to prompt for a PIN when connecting.
Used for Cisco IPSec.
Wi-Fi Payload
The Wi-Fi payload is designated by the com.apple.wifi.managed PayloadType value.
This describes version 0 of the PayloadVersion value. In addition to the settings
common to all payload types, the payload defines the following keys.
Key Value
SSID_STR String. SSID of the Wi-Fi network to be used.
HIDDEN_NETWORK Boolean. Besides SSID, the device uses information such as
broadcast type and encryption type to differentiate a network.
By default, it’s assumed that all configured networks are open or
broadcast. To specify a hidden network, you need to include a
boolean for the key “HIDDEN_NETWORK”.
EncryptionType String. The possible values for “EncryptionType” are “WEP”, “WPA”,
or “Any”. “WPA” corresponds to WPA and WPA2 and applies to
both encryption types. Make sure that these values exactly
match the capabilities of the network access point. If you’re
unsure about the encryption type, or would prefer that it applies
to all encryption types, use the value “Any”.
Password String, optional. The absence of a password doesn’t prevent the
network from being added to the list of known networks. The
user is eventually prompted to provide the password when
connecting to that network.
For 802.1X enterprise networks, the EAP Client Configuration Dictionary must be
provided.
Appendix B Configuration Profile Format 81
Page 82

EAPClientConfiguration Dictionary
In addition to the standard encryption types, it’s possible to specify an enterprise
profile for a given network via the “EAPClientConfiguration” key. If present, its value is a
dictionary with the following keys.
Key Value
UserName String, optional. Unless you know the exact user name, this
property won’t appear in an imported configuration. Users can
enter this information when they authenticate.
AcceptEAPTypes Array of integer values. These EAP types are accepted:
13 = TLS
17 = LEAP
21 = TTLS
25 = PEAP
43 = EAP-FAST
PayloadCertificateAnchorUUID Array of strings, optional. Identifies the certificates to be trusted
for this authentication. Each entry must contain the UUID of a
certificate payload. Use this key to prevent the device from
asking the user if the listed certificates are trusted.
Dynamic trust (the certificate dialogue) is disabled if this
property is specified, unless TLSAllowTrustExceptions is also
specified with the value true.
TLSTrustedServerNames Array of string values, optional. This is the list of server certificate
common names that will be accepted. You can use wildcards to
specify the name, such as wpa.*.example.com. If a server
presents a certificate that isn’t in this list, it won’t be trusted.
Used alone or in combination with TLSTrustedCertificates, the
property allows someone to carefully craft which certificates to
trust for the given network, and avoid dynamically trusted
certificates.
Dynamic trust (the certificate dialogue) is disabled if this
property is specified, unless TLSAllowTrustExceptions is also
specified with the value true.
TLSAllowTrustExceptions Boolean, optional. Allows/disallows a dynamic trust decision by
the user. The dynamic trust is the certificate dialogue that
appears when a certificate isn’t trusted. If this is false, the
authentication fails if the certificate isn’t already trusted. See
PayloadCertificateAnchorUUID and TLSTrustedNames above.
The default value of this property is true unless either
PayloadCertificateAnchorUUID or TLSTrustedServerNames is
supplied, in which case the default value is false.
82 Appendix B Configuration Profile Format
Page 83

Key Value
TTLSInnerAuthentication String, optional. This is the inner authentication used by the
TTLS module. The default value is “MSCHAPv2”.
Possible values are “PAP”, “CHAP”, “MSCHAP”, and “MSCHAPv2”.
OuterIdentity String, optional. This key is only relevant to TTLS, PEAP, and EAP-
FAST.
This allows the user to hide his or her identity. The user’s actual
name appears only inside the encrypted tunnel. For example,
it could be set to “anonymous” or “anon”, or
“anon@mycompany.net”.
It can increase security because an attacker can’t see the
authenticating user’s name in the clear.
EAP-Fast Support
The EAP-FAST module uses the following properties in the EAPClientConfiguration
dictionary.
Key Value
EAPFASTUsePAC Boolean, optional.
EAPFASTProvisionPAC Boolean, optional.
EAPFASTProvisionPACAnonymously Boolean, optional.
These keys are hierarchical in nature: if EAPFASTUsePAC is false, the other two
properties aren’t consulted. Similarly, if EAPFASTProvisionPAC is false,
EAPFASTProvisionPACAnonymously isn’t consulted.
If EAPFASTUsePAC is false, authentication proceeds much like PEAP or TTLS: the server
proves its identity using a certificate each time.
If EAPFASTUsePAC is true, then an existing PAC is used if it’s present. The only way to
get a PAC on the device currently is to allow PAC provisioning. So, you need to enable
EAPFASTProvisionPAC, and if desired, EAPFASTProvisionPACAnonymously.
EAPFASTProvisionPACAnonymously has a security weakness: it doesn’t authenticate the
server so connections are vulnerable to a man-in-the-middle attack.
Certificates
As with VPN configurations, it’s possible to associate a certificate identity configuration
with a Wi-Fi configuration. This is useful when defining credentials for a secure
enterprise network. To associate an identity, specify its payload UUID via the
“PayloadCertificateUUID” key.
Key Value
PayloadCertificateUUID String. UUID of the certificate payload to use for the identity
credential.
Appendix B Configuration Profile Format 83
Page 84

Sample Configuration Profiles
This section includes sample profiles that illustrate the over-the-air enrollment and
configuration phases. These are excerpts and your requirements will vary from the
examples. For syntax assistance, see the details provided earlier in this appendix. For a
description of each phase, see “Over-the-Air Enrollment and Configuration” on page 22.
Sample Phase 1 Server Response
<?xml version="1.0" encoding="UTF-8"?>
<!DOCTYPE plist PUBLIC "-//Apple Inc//DTD PLIST 1.0//EN" "http://
www.apple.com/DTDs/PropertyList-1.0.dtd">
<plist version="1.0">
<dict>
<key>PayloadContent</key>
<dict>
<key>URL</key>
<string>https://profileserver.example.com/iphone</string>
<key>DeviceAttributes</key>
<array>
<string>UDID</string>
<string>IMEI</string>
<string>ICCID</string>
<string>VERSION</string>
<string>PRODUCT</string>
</array>
<key>Challenge</key>
<string>optional challenge</string>
or
<data>base64-encoded</data>
</dict>
<key>PayloadOrganization</key>
<string>Example Inc.</string>
<key>PayloadDisplayName</key>
<string>Profile Service</string>
<key>PayloadVersion</key>
<integer>1</integer>
<key>PayloadUUID</key>
<string>fdb376e5-b5bb-4d8c-829e-e90865f990c9</string>
<key>PayloadIdentifier</key>
<string>com.example.mobileconfig.profile-service</string>
<key>PayloadDescription</key>
<string>Enter device into the Example Inc encrypted profile service</
string>
<key>PayloadType</key>
<string>Profile Service</string>
</dict>
</plist>
84 Appendix B Configuration Profile Format
Page 85

Sample Phase 2 Device Response
<?xml version="1.0" encoding="UTF-8"?>
<!DOCTYPE plist PUBLIC "-//Apple//DTD PLIST 1.0//EN" "http://www.apple.com/
DTDs/PropertyList-1.0.dtd">
<plist version="1.0">
<dict>
<key>UDID</key>
<string></string>
<key>VERSION</key>
<string>7A182</string>
<key>MAC_ADDRESS_EN0</key>
<string>00:00:00:00:00:00</string>
<key>CHALLENGE</key>
either:
<string>String</string>
or:
<data>"base64 encoded data"</data>
</dict>
</plist>
Sample Phase 3 Server Response With SCEP Specifications
<?xml version="1.0" encoding="UTF-8"?>
<!DOCTYPE plist PUBLIC "-//Apple Inc//DTD PLIST 1.0//EN" "http://
www.apple.com/DTDs/PropertyList-1.0.dtd">
<plist version="1.0">
<dict>
<key>PayloadVersion</key>
<integer>1</integer>
<key>PayloadUUID</key>
<string>Ignored</string>
<key>PayloadType</key>
<string>Configuration</string>
<key>PayloadIdentifier</key>
<string>Ignored</string>
<key>PayloadContent</key>
<array>
<dict>
<key>PayloadContent</key>
<dict>
<key>URL</key>
<string>https://scep.example.com/scep</string>
<key>Name</key>
<string>EnrollmentCAInstance</string>
<key>Subject</key>
<array>
<array>
Appendix B Configuration Profile Format 85
Page 86

<array>
<string>O</string>
<string>Example, Inc.</string>
</array>
</array>
<array>
<array>
<string>CN</string>
<string>User Device Cert</string>
</array>
</array>
</array>
<key>Challenge</key>
<string>...</string>
<key>Keysize</key>
<integer>1024</integer>
<key>Key Type</key>
<string>RSA</string>
<key>Key Usage</key>
<integer>5</integer>
</dict>
<key>PayloadDescription</key>
<string>Provides device encryption identity</string>
<key>PayloadUUID</key>
<string>fd8a6b9e-0fed-406f-9571-8ec98722b713</string>
<key>PayloadType</key>
<string>com.apple.security.scep</string>
<key>PayloadDisplayName</key>
<string>Encryption Identity</string>
<key>PayloadVersion</key>
<integer>1</integer>
<key>PayloadOrganization</key>
<string>Example, Inc.</string>
<key>PayloadIdentifier</key>
<string>com.example.profileservice.scep</string>
</dict>
</array>
</dict>
</plist>
86 Appendix B Configuration Profile Format
Page 87

Sample Phase 4 Device Response
<?xml version="1.0" encoding="UTF-8"?>
<!DOCTYPE plist PUBLIC "-//Apple//DTD PLIST 1.0//EN" "http://www.apple.com/
DTDs/PropertyList-1.0.dtd">
<plist version="1.0">
<dict>
<key>UDID</key>
<string></string>
<key>VERSION</key>
<string>7A182</string>
<key>MAC_ADDRESS_EN0</key>
<string>00:00:00:00:00:00</string>
</dict>
</plist>
Appendix B Configuration Profile Format 87
Page 88

C Sample Scripts
C
This appendix provides sample scripts for iPhone OS
deployment tasks.
The scripts in this section should be modified to fit your needs and configurations.
Sample C# Script for iPhone Configuration Utility
This sample script demonstrates creating configuration files using iPhone Configuration
Utility for Windows.
using System;
using Com.Apple.iPCUScripting;
public class TestScript : IScript
{
private IApplication _host;
public TestScript()
{
}
Appendix
88
public void main(IApplication inHost)
{
_host = inHost;
string msg = string.Format("# of config profiles : {0}",
_host.ConfigurationProfiles.Count);
Console.WriteLine(msg);
IConfigurationProfile profile = _host.AddConfigurationProfile();
profile.Name = "Profile Via Script";
profile.Identifier = "com.example.configviascript";
profile.Organization = "Example Org";
profile.Description = "This is a configuration profile created via the
new scripting feature in iPCU";
// passcode
IPasscodePayload passcodePayload = profile.AddPasscodePayload();
passcodePayload.PasscodeRequired = true;
Page 89

passcodePayload.AllowSimple = true;
// restrictions
IRestrictionsPayload restrictionsPayload =
profile.AddRestrictionsPayload();
restrictionsPayload.AllowYouTube = false;
// wi-fi
IWiFiPayload wifiPayload = profile.AddWiFiPayload();
wifiPayload.ServiceSetIdentifier = "Example Wi-Fi";
wifiPayload.EncryptionType = WirelessEncryptionType.WPA;
wifiPayload.Password = "password";
wifiPayload = profile.AddWiFiPayload();
profile.RemoveWiFiPayload(wifiPayload);
// vpn
IVPNPayload vpnPayload = profile.AddVPNPayload();
vpnPayload.ConnectionName = "Example VPN Connection";
vpnPayload = profile.AddVPNPayload();
profile.RemoveVPNPayload(vpnPayload);
// email
IEmailPayload emailPayload = profile.AddEmailPayload();
emailPayload.AccountDescription = "Email Account 1 Via Scripting";
emailPayload = profile.AddEmailPayload();
emailPayload.AccountDescription = "Email Account 2 Via Scripting";
// exchange
IExchangePayload exchangePayload = profile.AddExchangePayload();
exchangePayload.AccountName = "ExchangePayloadAccount";
// ldap
ILDAPPayload ldapPayload = profile.AddLDAPPayload();
ldapPayload.Description = "LDAP Account 1 Via Scripting";
ldapPayload = profile.AddLDAPPayload();
ldapPayload.Description = "LDAP Account 2 Via Scripting";
// webclip
IWebClipPayload wcPayload = profile.AddWebClipPayload();
wcPayload.Label = "Web Clip 1 Via Scripting";
wcPayload = profile.AddWebClipPayload();
wcPayload.Label = "Web Clip 2 Via Scripting";
}
}
Appendix C Sample Scripts 89
Page 90

Sample AppleScript for iPhone Configuration Utility
This sample script demonstrates creating configuration files using iPhone Configuration
Utility for Mac OS X.
tell application "iPhone Configuration Utility"
log (count of every configuration profile)
set theProfile to make new configuration profile with properties
{displayed name:"Profile Via Script", profile
identifier:"com.example.configviascript", organization:"Example Org.",
account description:"This is a configuration profile created via
AppleScript"}
tell theProfile
make new passcode payload with properties {passcode required:true,
simple value allowed:true}
make new restrictions payload with properties {YouTube allowed:false}
make new WiFi payload with properties {service set identifier:"Example
Wi-Fi", security type:WPA, password:"password"}
set theWiFiPayload to make new WiFi payload
delete theWiFiPayload
make new VPN payload with properties {connection name:"Example VPN
Connection"}
set theVPNPayload to make new VPN payload
delete theVPNPayload
make new email payload with properties {account description:"Email
Account 1 Via Scripting"}
make new email payload with properties {account description:"Email
Account 2 Via Scripting"}
make new Exchange ActiveSync payload with properties {account
name:"ExchangePayloadAccount"}
make new LDAP payload with properties {account description:"LDAP
Account 1 Via Scripting"}
make new LDAP payload with properties {account description:"LDAP
Account 2 Via Scripting"}
make new web clip payload with properties {label:"Web Clip Account 1
Via Scripting"}
make new web clip payload with properties {label:"Web Clip Account 2
Via Scripting"}
end tell
end tell
90 Appendix C Sample Scripts
 Loading...