

Page 1

iPhone
User’s Guide
Page 2

Contents
1
Chapter 1 4 Activating and Setting Up iPhone
4
What You Need
4
Activating iPhone
5
Syncing iPhone with Your Computer
9
Disconnecting iPhone from Your Computer
Chapter 2 10 Basics
10
iPhone at a Glance
14
iPhone Buttons and Touchscreen
20
Using the Stereo Headset
21
Connecting to the Internet
22
Using iPhone on an Airplane
22
Charging the Battery
23
Cleaning iPhone
Chapter 3 24 Phone
24
29
32
34
36
37
41
Chapter 4 43 Mail
43
45
46
49
Chapter 5 52 Safari
52
56
57
2
Calling and Answering
Visual Voicemail
Adding Contact Information to iPhone
Phone Settings
Ringtones
Using iPhone with a Bluetooth Headset or Car Kit
Calling to and from Other Countries
Setting Up Email Accounts
Sending Email
Checking and Reading Email
Mail Settings
Surfing the Web
Using Bookmarks
Safari Settings
Page 3

Chapter 6 58 iPod
58
Syncing iPod Content from your iTunes Library
59
Playing Music and Video
65
iPod Settings
Chapter 7 67 Applications
67
Tex t
70
Calendar
73
Photos and Camera
78
YouTube
81
Stocks
82
Maps
87
Weather
89
Clock
91
Calculator
92
Notes
Chapter 8 93 Settings
94
Airplane Mode
94
Wi-Fi
95
Carrier
95
Usage
96
Sounds and the Ring/Silent Switch
97
Brightness
97
Wallpaper
97
General
10 0
Restoring or Transferring Your iPhone Settings
Appendix A 101 Safety and Handling
101
Important Safety Information
10 7
Important Handling Information
Appendix B 109 Tips and Troubleshooting
10 9
General Suggestions
113
Removing the SIM Card
11 4
Updating and Restoring iPhone Software
11 4
Using iPhone Accessibility Features
Appendix C 116 Learning More, Service, and Support
117 Regulatory Compliance Information
117 Apple and the Environment
Index 11 8
Contents
3
Page 4

Activating and Setting Up iPhone
1
1
What You Need
To use iPhone, you need:
Â
A new two-year wireless service plan with AT&T
Â
A Mac or a PC with a USB 2.0 port and one of the following operating systems:
Â
Mac OS X version10.4.10 or later
Â
Windows XP Home or Professional with Service Pack 2 or later
Â
Windows Vista Home Premium, Business, Enterprise, or Ultimate edition
Â
iTunes 7.3 or later, available at www.itunes.com
Â
An iTunes Store account
Â
An Internet connection
You must be at least 18 years old to open a new AT&T wireless account. You will need a
major credit card to open a new iTunes Store account.
Activating iPhone
Before you can use any of iPhone’s features, you must activate iPhone by signing up for
an AT&T service plan and registering iPhone with the network. If you already have an
AT&T (Cingular) wireless account, you can choose to upgrade your account to work
with iPhone, or you can keep using your old phone and add a new line for iPhone.
(Some accounts may not be upgradable.) You can transfer your current phone number
to iPhone, or get a new one.
For more information about iPhone, including videos about how to activate and use
iPhone, go to:
www.apple.com/iphone
4
Page 5
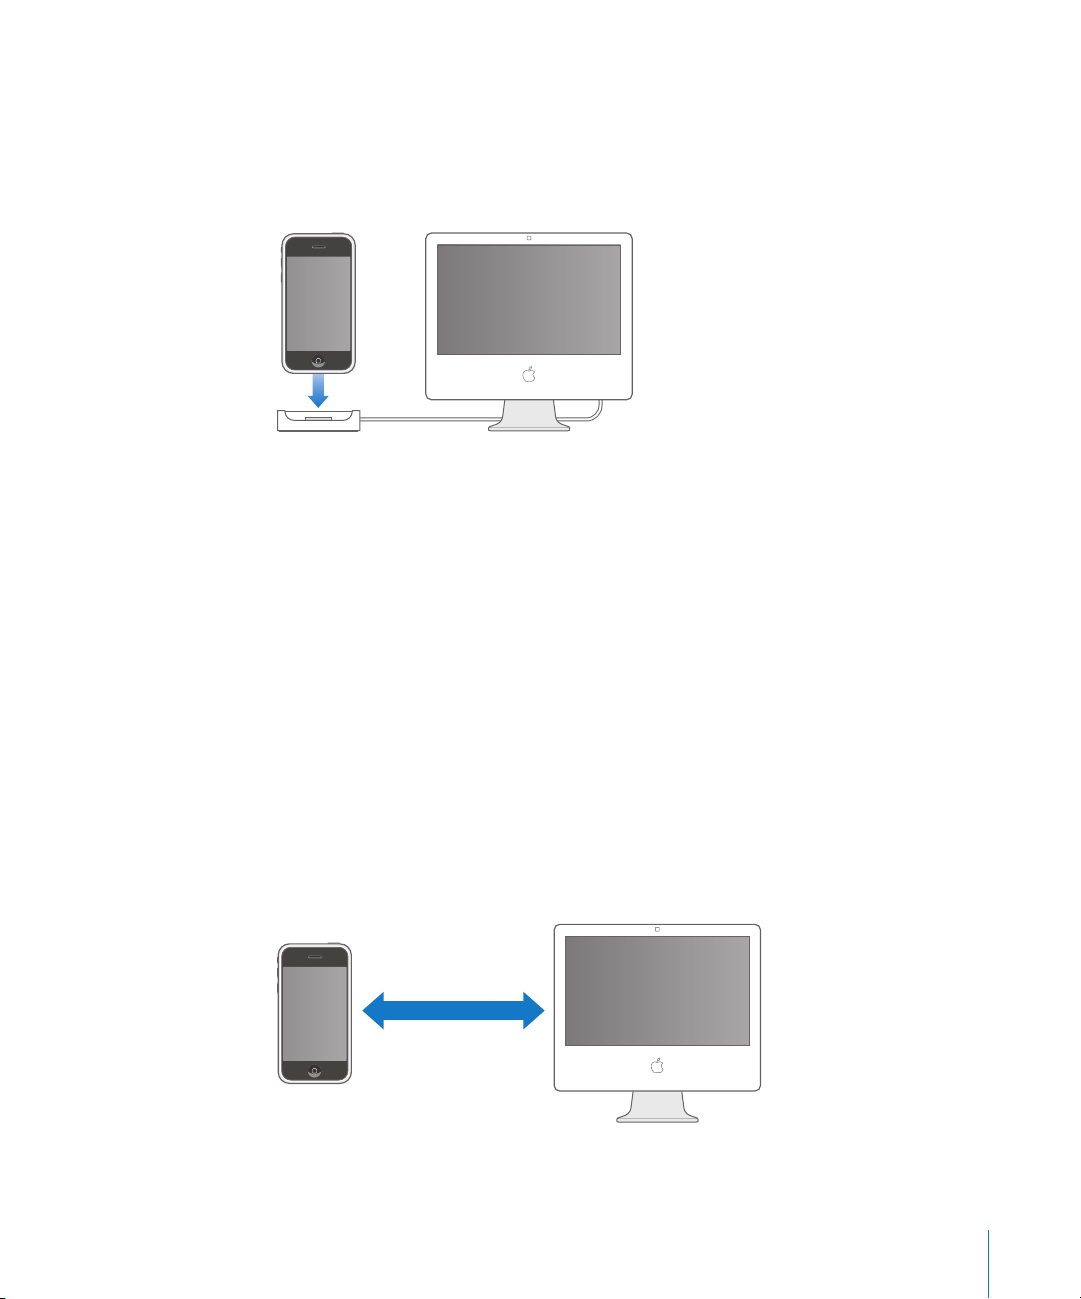
To activate iPhone:
1
Download and install iTunes 7.3 (or later) from www.itunes.com.
2
Connect iPhone to a USB 2.0 port on your Mac or PC using the dock and cable that
came with iPhone. (Don’t connect iPhone to the USB port on your keyboard—it does
not have enough power.) iTunes opens automatically.
3
Follow the onscreen instructions in iTunes to activate iPhone and sync iPhone with
your contacts, calendars, email accounts, and bookmarks on your computer.
A single checkmark in “Set Up Your iPhone” syncs all these items automatically. Or you
can use iTunes to customize the information you sync, and to sync your music, photos,
podcasts, TV shows, and movies to iPhone. See the following section.
Important:
AT&T will send you a welcome text message a few minutes after activation
is complete, letting you know that you can receive calls. If you are migrating your
current phone number to iPhone, activation is usually completed in less than 20
minutes, but may take several hours depending on your previous carrier. In the
meantime, you can make calls and use iPhone’s other features.
Syncing iPhone with Your Computer
When you connect iPhone to your computer, iTunes syncs iPhone with the information
and media on your computer, according to your iPhone settings in iTunes. By default,
iTunes does this automatically.
Chapter 1
Activating and Setting Up iPhone
5
Page 6

You can set iTunes to sync any or all of the following:
Â
Contacts—names, phone numbers, addresses, email addresses, and so on
Â
Calendars—appointments and events
Â
Email account settings
Â
Webpage bookmarks
Â
Music and audiobooks
Â
Movies
Â
TV shows
Â
Podcasts
Â
Photos
Because music, movies, TV shows, podcasts, and photos are managed on your
computer, these items are synced one-way, from your computer to iPhone. Email
account settings also are only synced from your computer to iPhone. This allows you to
customize your email account on iPhone without affecting the email account settings
on your computer. Contacts and calendars are synced both ways between your
computer and iPhone. New entries or changes you make on iPhone get synced to your
computer, and vice versa.
If you like, you can set iPhone to sync with only a portion of what’s on your computer.
For example, you might want to sync only a group of contacts from your address book,
or only unwatched movies. You can adjust sync settings whenever iPhone is connected
to your computer.
Important:
PC, you should be logged in to your own user account on the computer before
connecting iPhone. If you connect more than one iPhone to the same user account,
use the same sync settings for each.
Setting Up Syncing
You use iTunes on your computer to set up which items are synced with iPhone.
Set up syncing
1
Connect iPhone to your computer, and open iTunes (if it doesn’t open automatically).
2
Select iPhone in the iTunes Source pane.
3
Configure the sync settings in each of the panes.
4
Click Apply in the lower-right corner of the screen.
6 Chapter 1
You can connect and sync only with one iPhone at a time. If you’re using a
Activating and Setting Up iPhone
Page 7
The following sections provide an overview of each of the iPhone configuration panes
in iTunes. For more information, see iTunes Help (in iTunes, choose Help > iTunes Help).
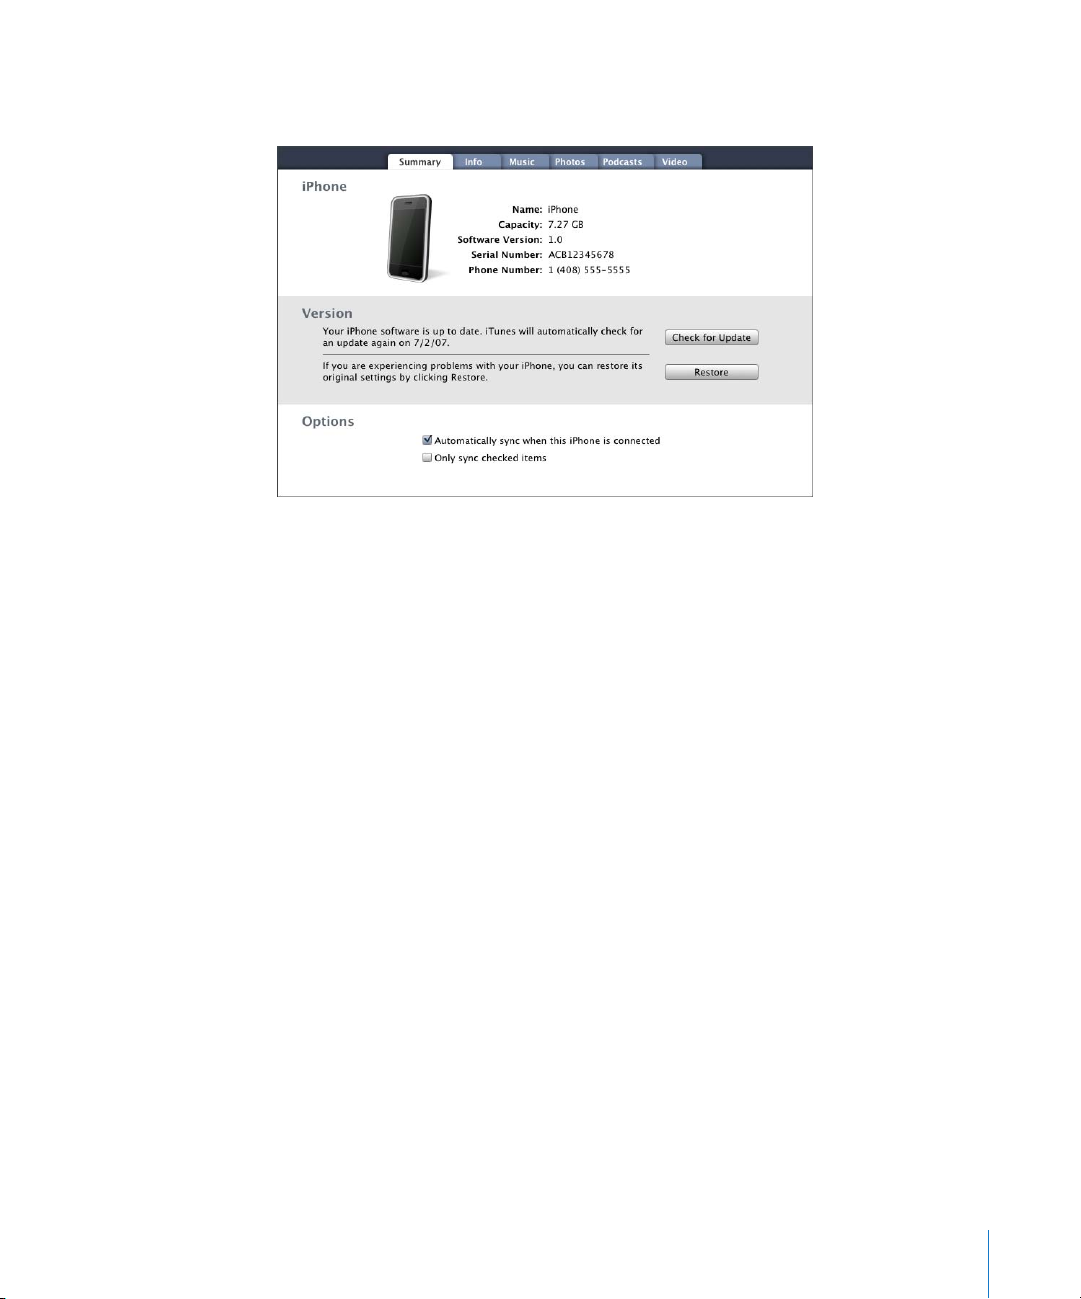
Summary Pane
Select “Automatically sync when this iPhone is connected” to have iTunes sync iPhone
automatically whenever you connect iPhone to your computer. Deselect this option if
you want to sync only by clicking the Sync button in iTunes. For more information
about preventing automatic syncing, see page 9.
Select “Only sync checked items” if you want to sync only checked items in your iTunes
library.
Info Pane
The Info pane lets you configure the sync settings for your contacts, calendars, email
accounts, and web browser.
Contacts
You can sync contacts from Mac OS X Address Book and Yahoo! Address Book on a
Mac, or from Yahoo! Address Book, Windows Address Book (Outlook Express), or
Microsoft Outlook on a PC. On a Mac, any other address books you’ve set to sync with
Address Book, such as Microsoft Entourage, will also be synced with iPhone. If you sync
with Yahoo! Address Book, you only need to click Configure when you change your
Yahoo! ID or password after you’ve set up syncing. Click Configure and enter your new
login information.
Note:
Syncing won’t delete any contact in Yahoo! Address Book that contains a
Messenger ID, even if you’ve deleted the contact from your address book on iPhone or
your computer. To delete a contact with a Messenger ID, log in to your online Yahoo!
account and delete the contact using Yahoo! Address Book.
Chapter 1
Activating and Setting Up iPhone
7
Page 8

Calendars
You can sync calendars from iCal on a Mac, or from Microsoft Outlook on a PC.
On a Mac, when you sync iCal calendars with iPhone, any other calendars you’ve set to
sync with iCal, such as your events and tasks in Microsoft Entourage, will also be synced
with iPhone.
Mail Accounts
You can sync email account settings from Mail on a Mac, or Microsoft Outlook or
Outlook Express on a PC. Account settings are only transferred from your computer to
iPhone. Changes you make to an email account on iPhone do not affect the account on
your computer.
Note:
The password for your Yahoo! email account is not saved on your computer.
So if you sync a Yahoo! email account, you must enter the password on iPhone.
From the Home screen choose Settings > Mail, choose your Yahoo! account, then enter
your password in the password field.
Web Browser
You can sync bookmarks from Safari on a Mac, or Safari or Internet Explorer on a PC.
Advanced
These options let you replace the information on iPhone with the information on your
computer during the next sync.
Music, Podcasts, and Video Panes
Use these panes to specify the media you want to sync. You can sync all music,
podcasts, and videos, or select the playlists and specific podcasts and videos you want
on iPhone. Audiobooks and music videos are synced along with music.
Photos Pane
You can sync iPhone with photos in iPhoto 4.0.3 or later on a Mac, or with Adobe
Photoshop Album 2.0 or later or Adobe Photoshop Elements 3.0 or later on a PC.
Or you can sync with any folder on your computer that contains images.
8 Chapter 1
Activating and Setting Up iPhone
Page 9

Preventing iPhone from Syncing Automatically
You may want to prevent iPhone from syncing automatically if you prefer to add items
to iPhone manually or when you connect iPhone to some other computer than the
main computer you sync iPhone with.
Set iTunes not to sync automatically when you connect iPhone
m Connect iPhone to your computer and in iTunes click the Summary tab. Then deselect
“Automatically sync when this iPhone is connected.” This also prevents iTunes from
opening automatically when you connect iPhone. You can still start a sync manually.
Set iTunes to prevent automatic syncing for all iPhones
m In iTunes choose iTunes > Preferences (on a Mac) or Edit > Preferences (on a PC),
then deselect “Disable automatic syncing for all iPhones.”
If this checkbox is selected, iPhone won’t sync automatically, even if “Automatically
sync” is selected in the Summary pane.
Prevent iPhone from syncing automatically one time, without changing
any settings
m Open iTunes. Then as you connect iPhone to your computer, press and hold Command-
Option (if you’re using a Mac) or Shift-Control (if you’re using a PC) until you see iPhone
in the iTunes Source pane.
Start a sync manually
m Click the Summary tab, then click Sync in the lower-right corner of the window.
Or, if you’ve changed any sync settings, click Apply.
Disconnecting iPhone from Your Computer
Unless iPhone is syncing with your computer, you can disconnect iPhone from your
computer at any time.
When iPhone is syncing with your computer, iPhone shows “Sync in progress.” If you
disconnect iPhone before it’s done syncing, some data may not have been transferred.
When iPhone is done syncing, iTunes shows “iPhone sync is complete.”
To cancel a sync so you can disconnect iPhone, drag the slider on iPhone. If you get a
call during a sync, the sync is canceled automatically and you can unplug iPhone to
answer the call. Connect iPhone after the call to finish syncing.
Chapter 1
Activating and Setting Up iPhone
9
Page 10
2 Basics
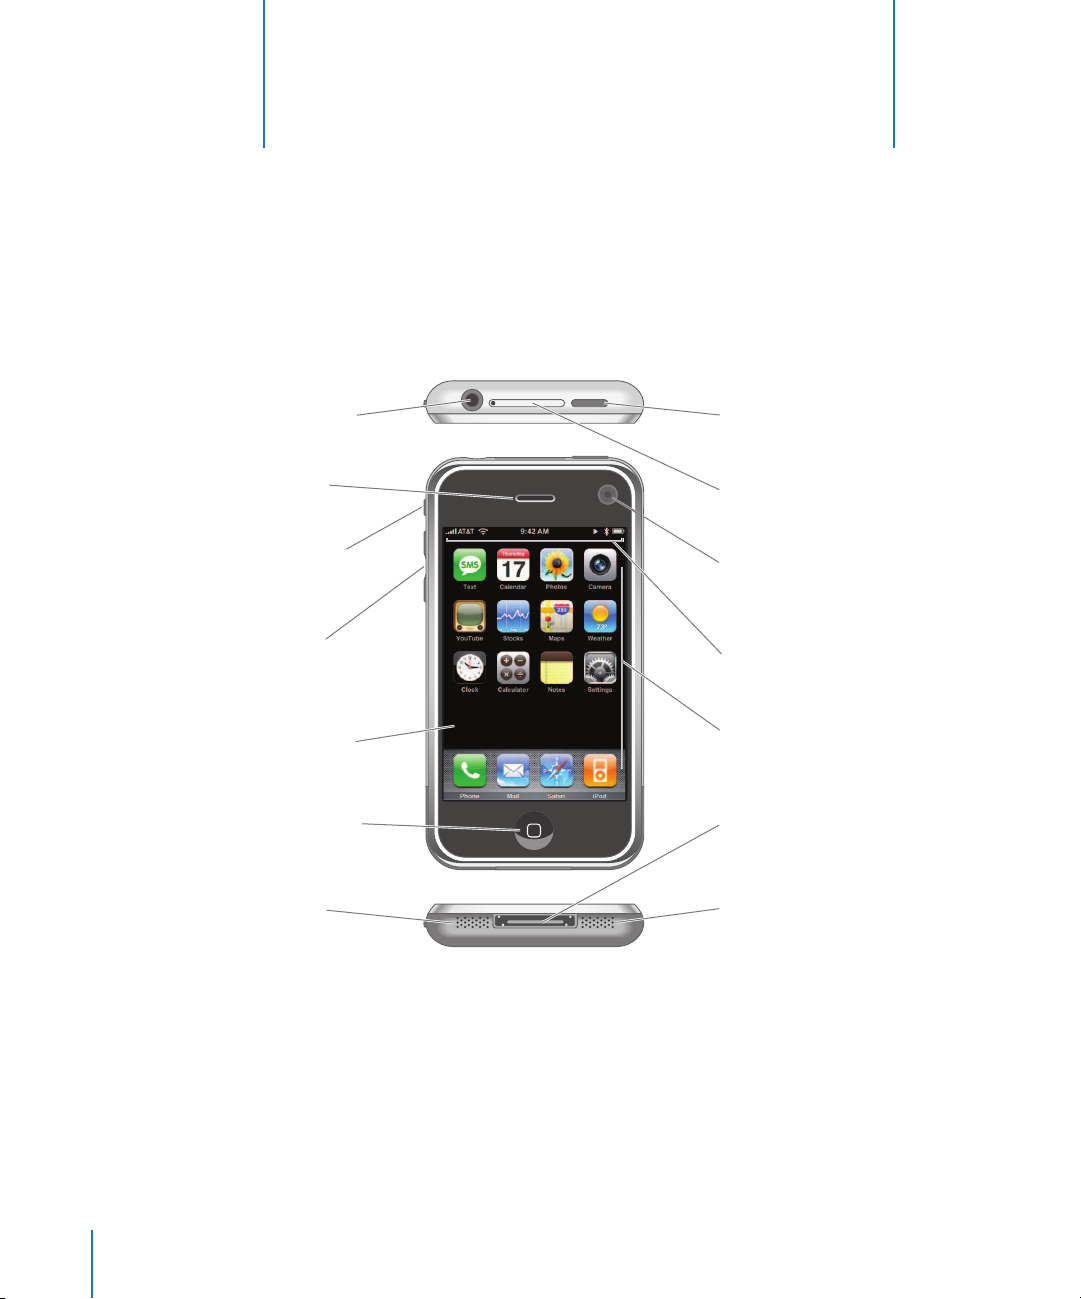
iPhone at a Glance
2
Headset jack
Receiver
Ring/Silent
switch
Volume
buttons
Touchscreen
Home button
Speaker
Sleep/Wake
button
SIM card tray
Camera
(on back)
Status bar
Application
buttons
Dock connector
Microphone
10
Page 11
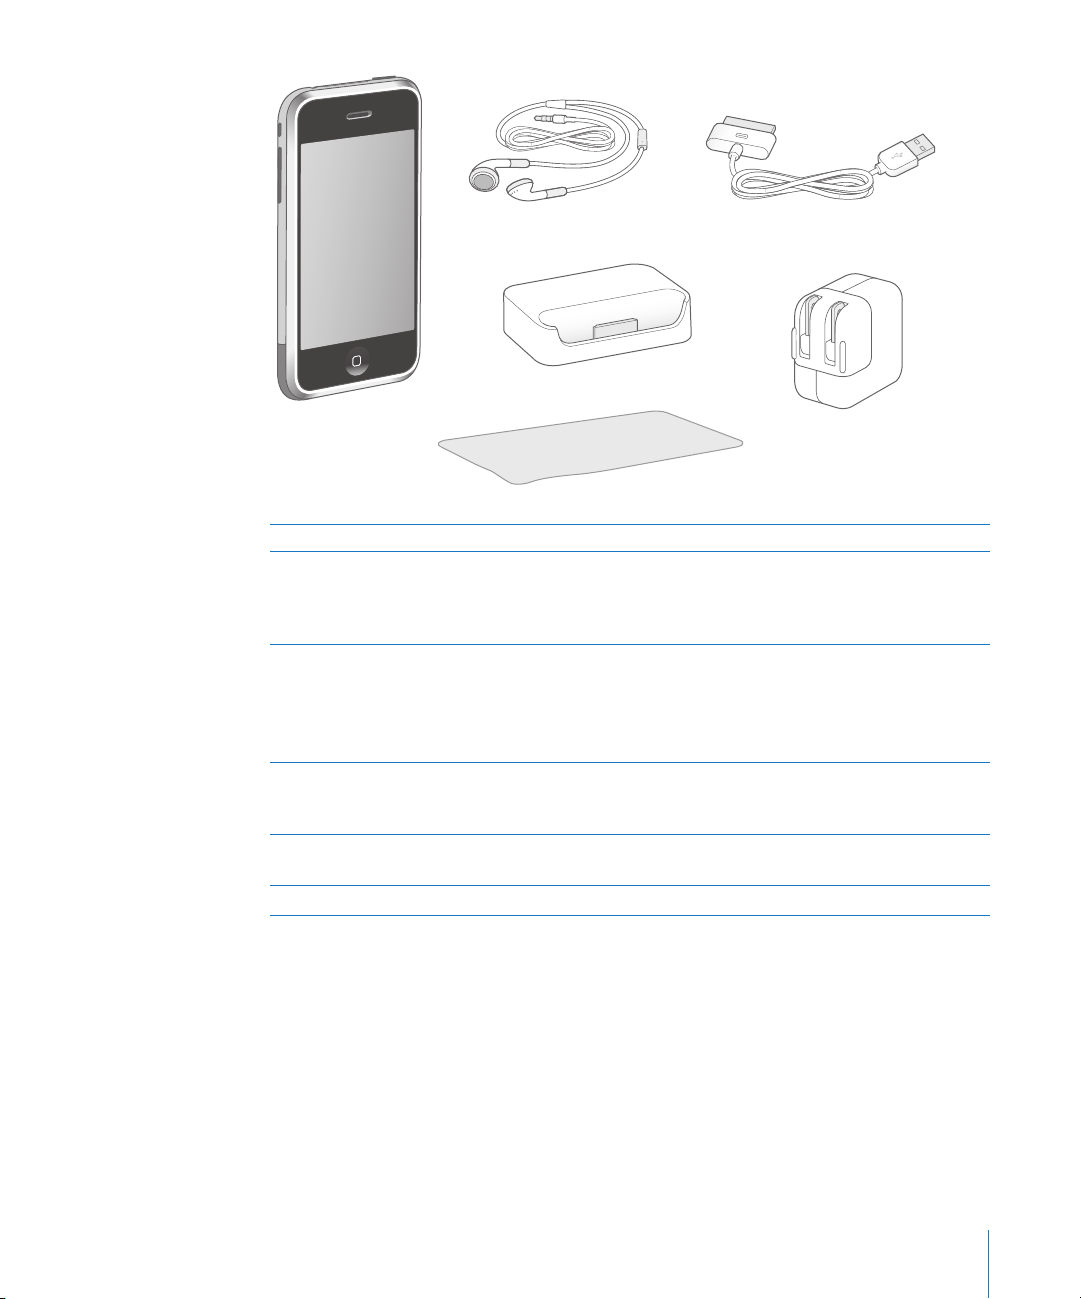
Stereo headset
Dock
Cleaning cloth
Dock connector to USB cable
iPhone
USB power adapter
Item What you can do with it
Stereo headset Listen to music, videos, and phone calls. Use the built-in microphone to talk.
Click the mic button to answer or end a call. When listening to iPod, click
the button once to play or pause a song, or click twice quickly to skip to the
next track.
Dock Connect the dock to your computer or to the power adapter using the
included cable, then set iPhone in the dock so it stands upright as it charges
or syncs.
Connect external speakers to the line out port on the back of the dock
using an audio cable that has a standard 3.5 millimeter stereo miniplug.
Dock connector to USB
cable
Use the cable to connect iPhone to your computer to sync and charge,
or to the power adapter to charge. The cable can be used with the dock or
plugged directly into iPhone.
USB power adapter Connect the power adapter to iPhone using the included cable, then plug it
into a standard power outlet to charge iPhone.
Cleaning cloth Wipe the iPhone screen.
Chapter 2 Basics 11
Page 12
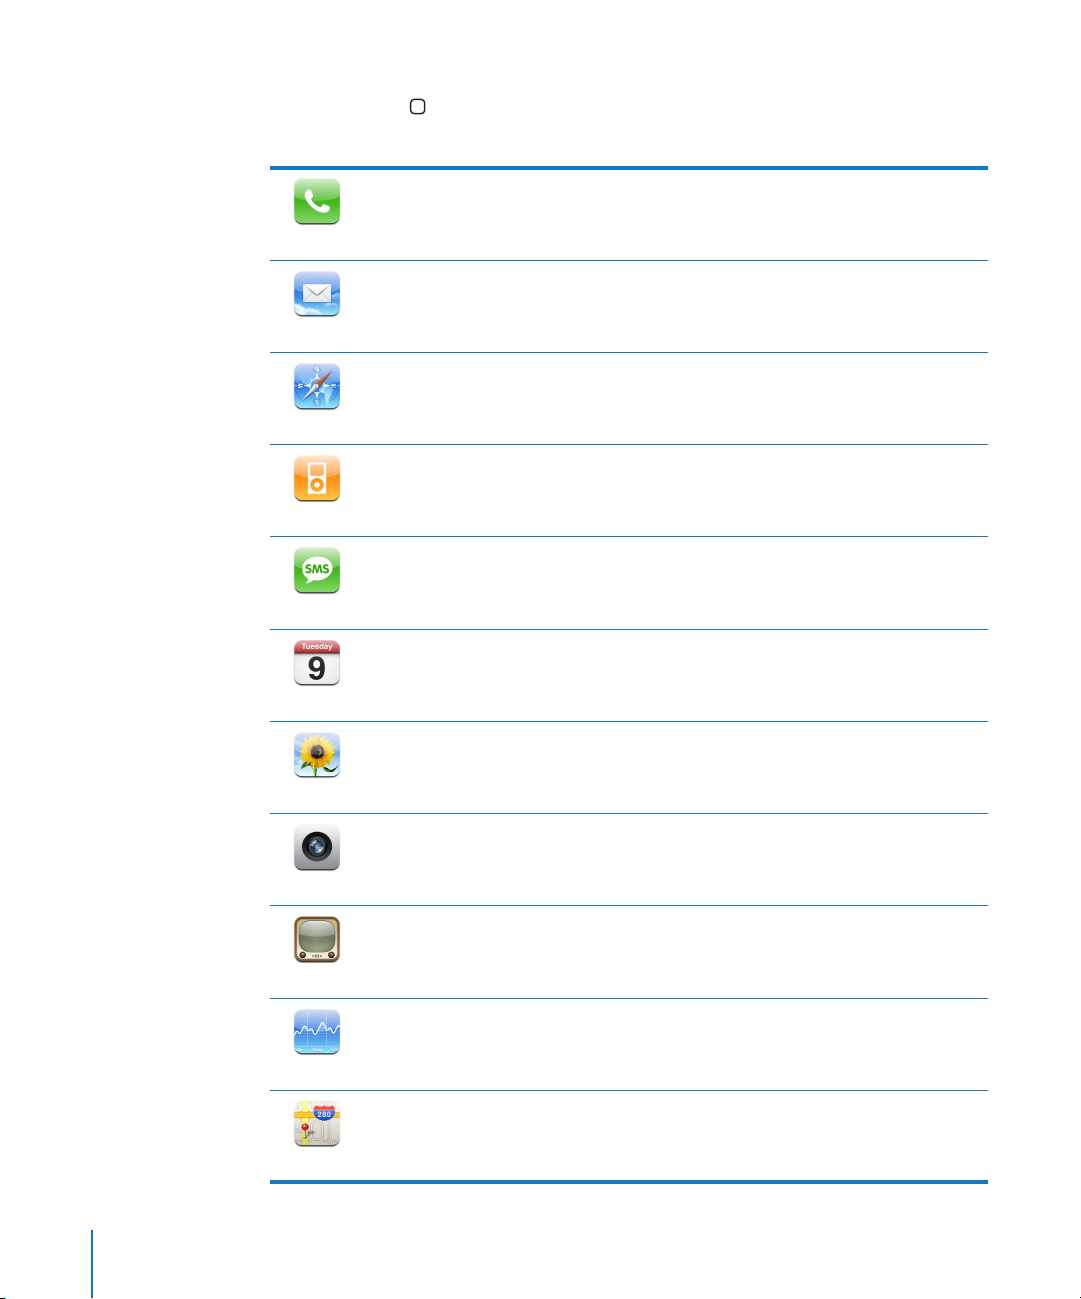
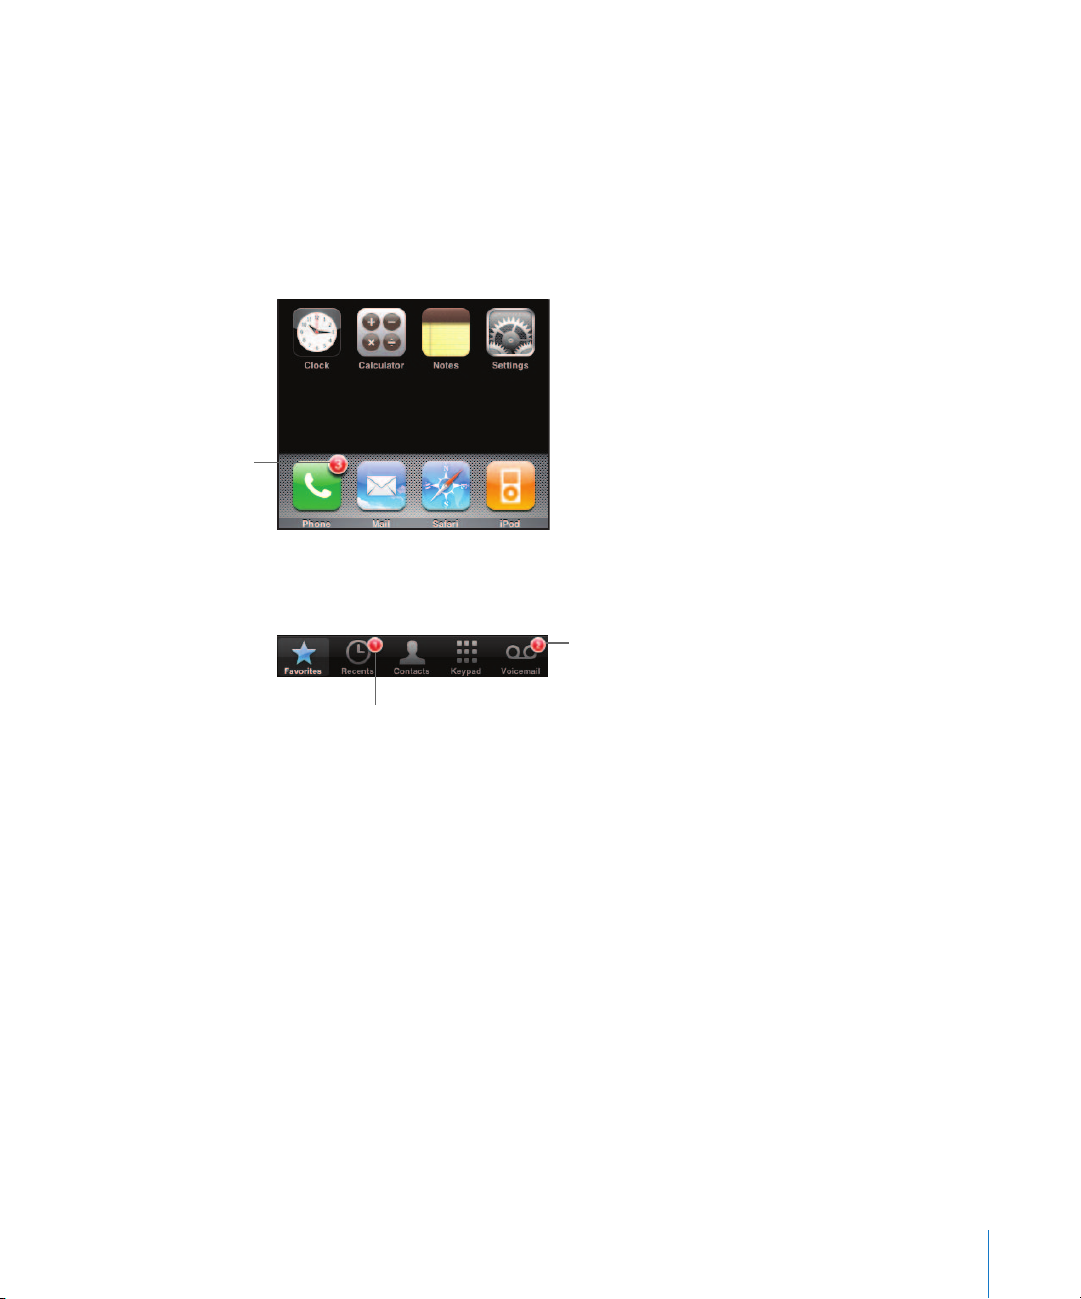
iPhone Applications
Press the Home button at any time to see the iPhone applications. Tap any
application button to get started:
Make calls, with quick access to recent callers, favorites, and all your contacts. Visual
voicemail presents a list of your voicemail messages. Just tap to listen to any message
Phone
Mail
Safari
iPod
Tex t
you want, in any order you want.
Send and receive email using your existing email accounts. iPhone works with the
most popular email systems—including Yahoo! Mail, Gmail, AOL, and .Mac Mail—as
well as most industry-standard POP3 and IMAP email systems.
Browse any website over the EDGE data network or over Wi-Fi. Rotate iPhone sideways
for widescreen viewing. Double-tap to zoom in or out—Safari automatically fits
sections to the iPhone screen for easy reading.
Listen to your songs, audiobooks, and podcasts. Watch TV shows, movies, and video
podcasts in widescreen.
Send and receive SMS text messages with anyone who has an SMS-capable phone.
Conversations are saved in an iChat-like presentation, so you can see a history of
messages you’ve sent to and received from each person.
Calendar
Photos
Camera
YouTube
Stocks
Maps
View your iCal, Microsoft Entourage, or Microsoft Outlook calendar synced from
your computer. Enter events on iPhone and they get synced back to your computer.
Set alerts to remind you of events, appointments, and deadlines.
View photos transferred from your computer or taken with iPhone. View them in
portrait or landscape mode. Zoom in on any photo for a closer look. Watch a
slideshow. Email photos, assign them to contacts, and use them as wallpaper.
Take clear, crisp photos at two megapixels and view them on iPhone, email them,
or upload them to your computer. Take a friend’s picture and set iPhone to display it
when that person calls you.
Play videos from YouTube’s online collection. Search for any video, or browse featured,
most viewed, most recently updated, and top-rated videos.
Watch your favorite stocks, updated automatically from the Internet.
See a street map or a photographic satellite view of locations around the world.
Zoom in for a closer look. Get detailed directions and see current traffic conditions.
Find businesses in the area and call with a single tap.
12 Chapter 2 Basics
Page 13
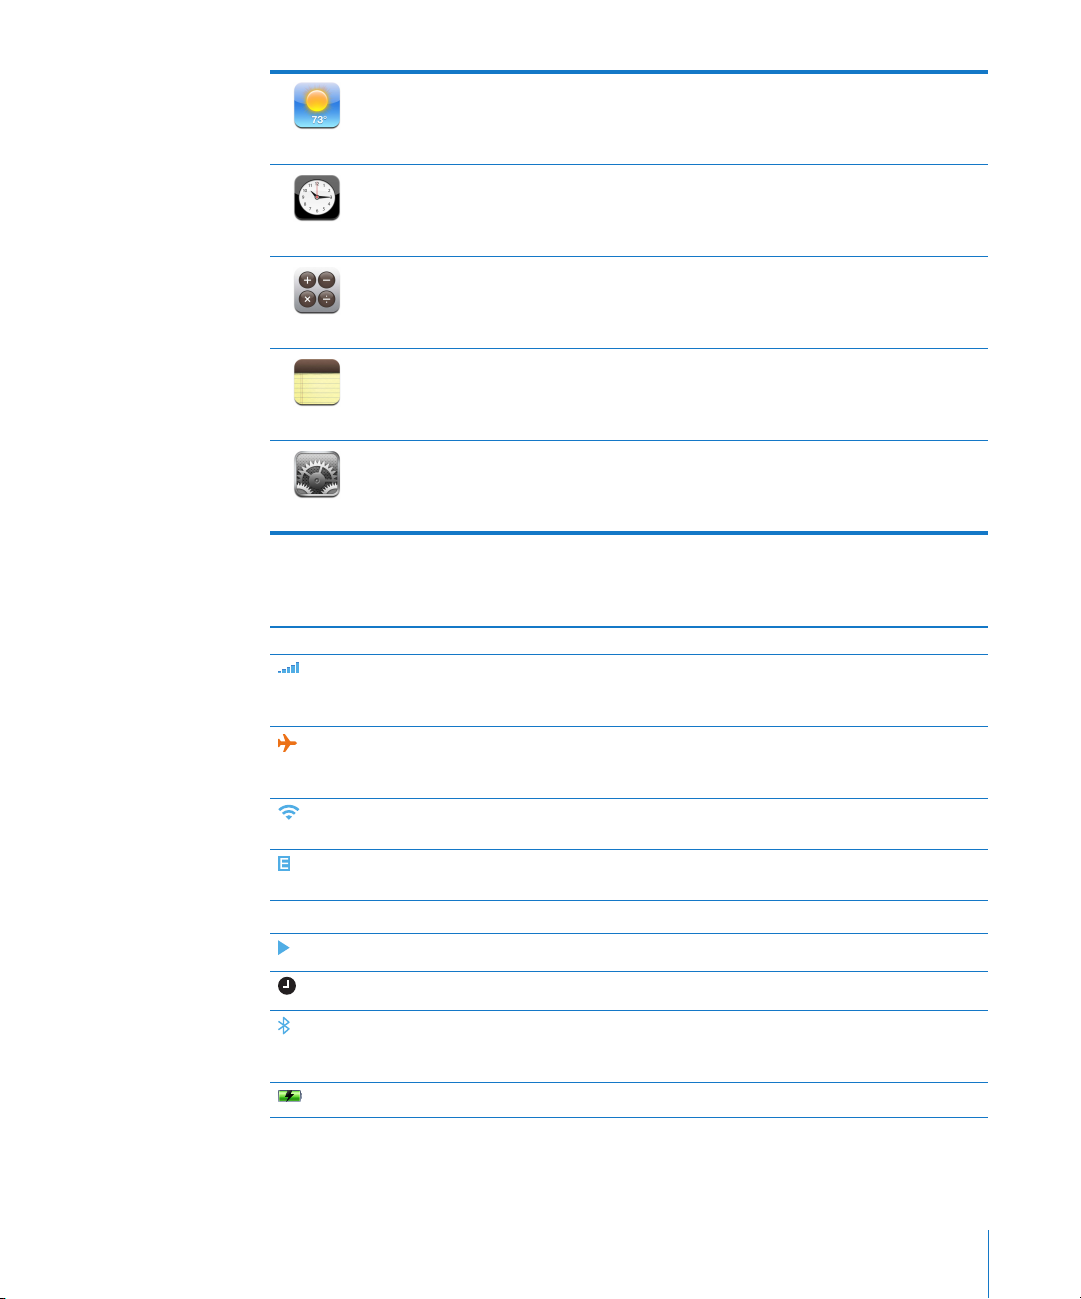
Get current weather conditions and a six-day forecast. Store your favorite cities for a
quick weather report anytime.
Weather
View the time in cities around the world—create clocks for your favorites. Set one or
more alarms. Time yourself using the stopwatch, or set a countdown timer.
Clock
Add, subtract, multiply, and divide.
Calculator
Jot notes on the go—reminders, grocery lists, brilliant ideas. Send them in email.
Notes
Adjust all iPhone settings in one convenient place. Set your ringtone, wallpaper,
screen brightness, and settings for network, phone, mail, web, music, video, photos,
Settings
and more. Set auto-lock and a passcode for security.
Status Icons
The icons in the status bar at the top of the screen give information about iPhone:
Status icon What it means
Cell signal Shows whether you’re in range of the cell network and can make
and receive calls. The more bars, the stronger the signal. If there’s
no signal, the bars are replaced with “No service.”
Airplane Mode Shows that airplane mode is on—you cannot use the phone,
access the Internet, or use Bluetooth® devices. Non-wireless
features are available. See page 94.
Wi-Fi Shows that iPhone is connected to the Internet over a Wi-Fi
network. The more bars, the stronger the connection. See page 21.
EDGE Shows that AT&T’s EDGE network is available, and iPhone can
connect to the Internet over EDGE. See page 21.
Lock Shows that iPhone is locked. See page 14.
¥
Play Shows that a song is playing. See page 60.
Alarm Shows that an alarm is set. See page 89.
Bluetooth Blue or white icon: Bluetooth is on and a device, such as a headset
or car kit, is connected. Gray icon: Bluetooth is on, but no device is
connected. No icon: Bluetooth is turned off. See page 37.
Battery Shows battery level or charging status. See page 22.
Chapter 2 Basics 13
Page 14
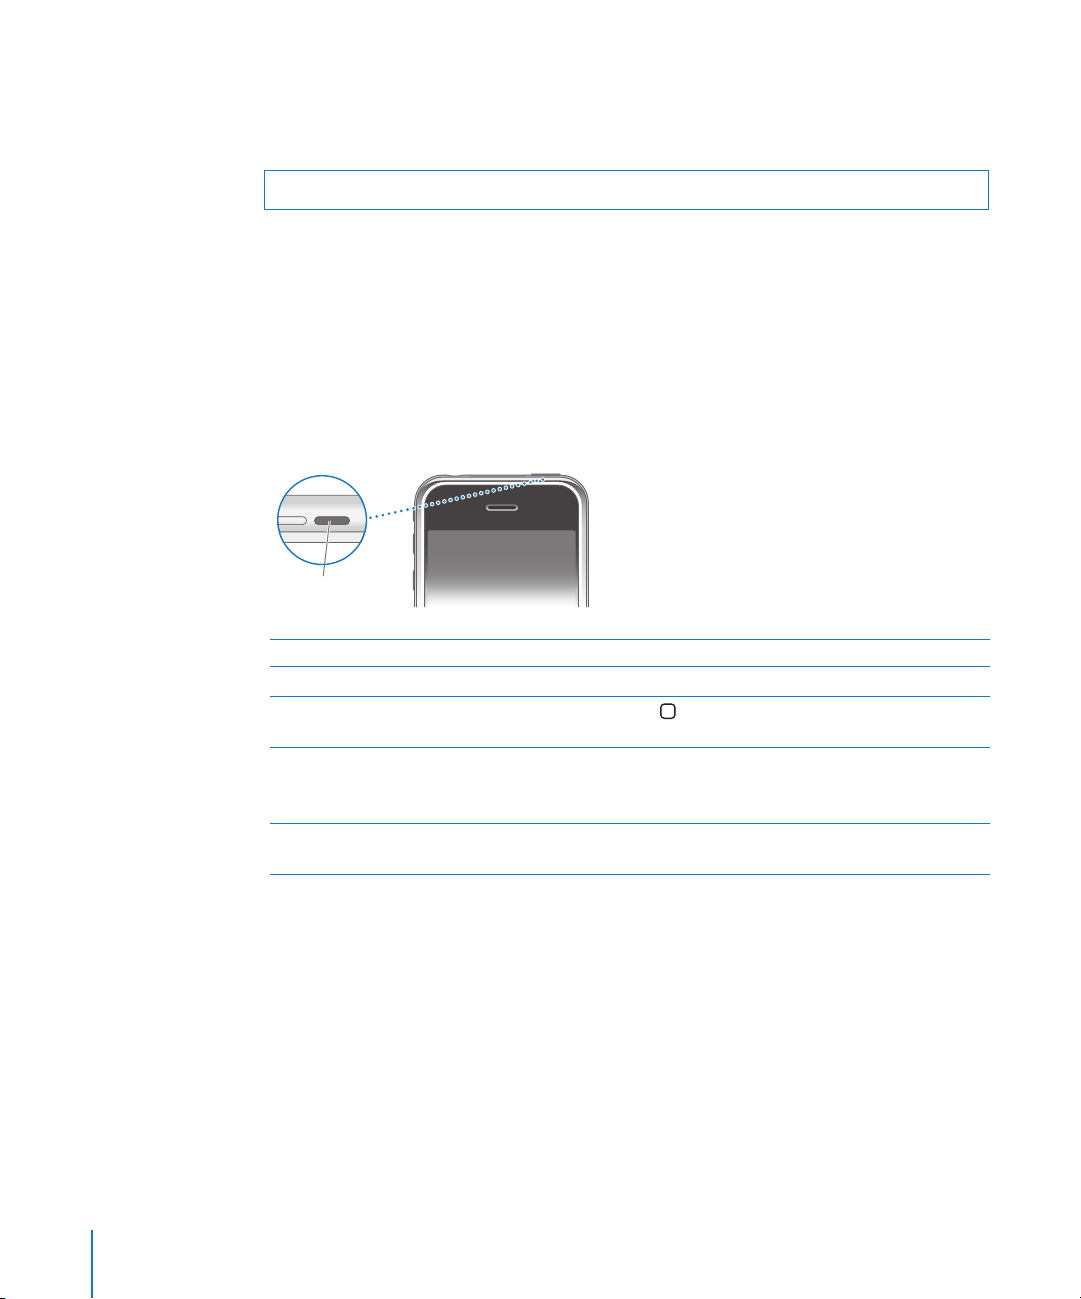
iPhone Buttons and Touchscreen
A few simple buttons and a high-resolution touchscreen make it easy to learn and use
iPhone.
WARNING: For important information about driving safety, see page 103.
Locking iPhone and Turning It On or Off
When you’re not using iPhone but you still want to receive calls and text messages,
you can lock it.
When iPhone is locked, nothing happens if you touch the screen. You can still listen to
music and adjust the volume, and use the button on the included stereo headset to
play or pause a song, or answer or end a call.
By default, if you don’t touch the screen for a minute, iPhone locks automatically.
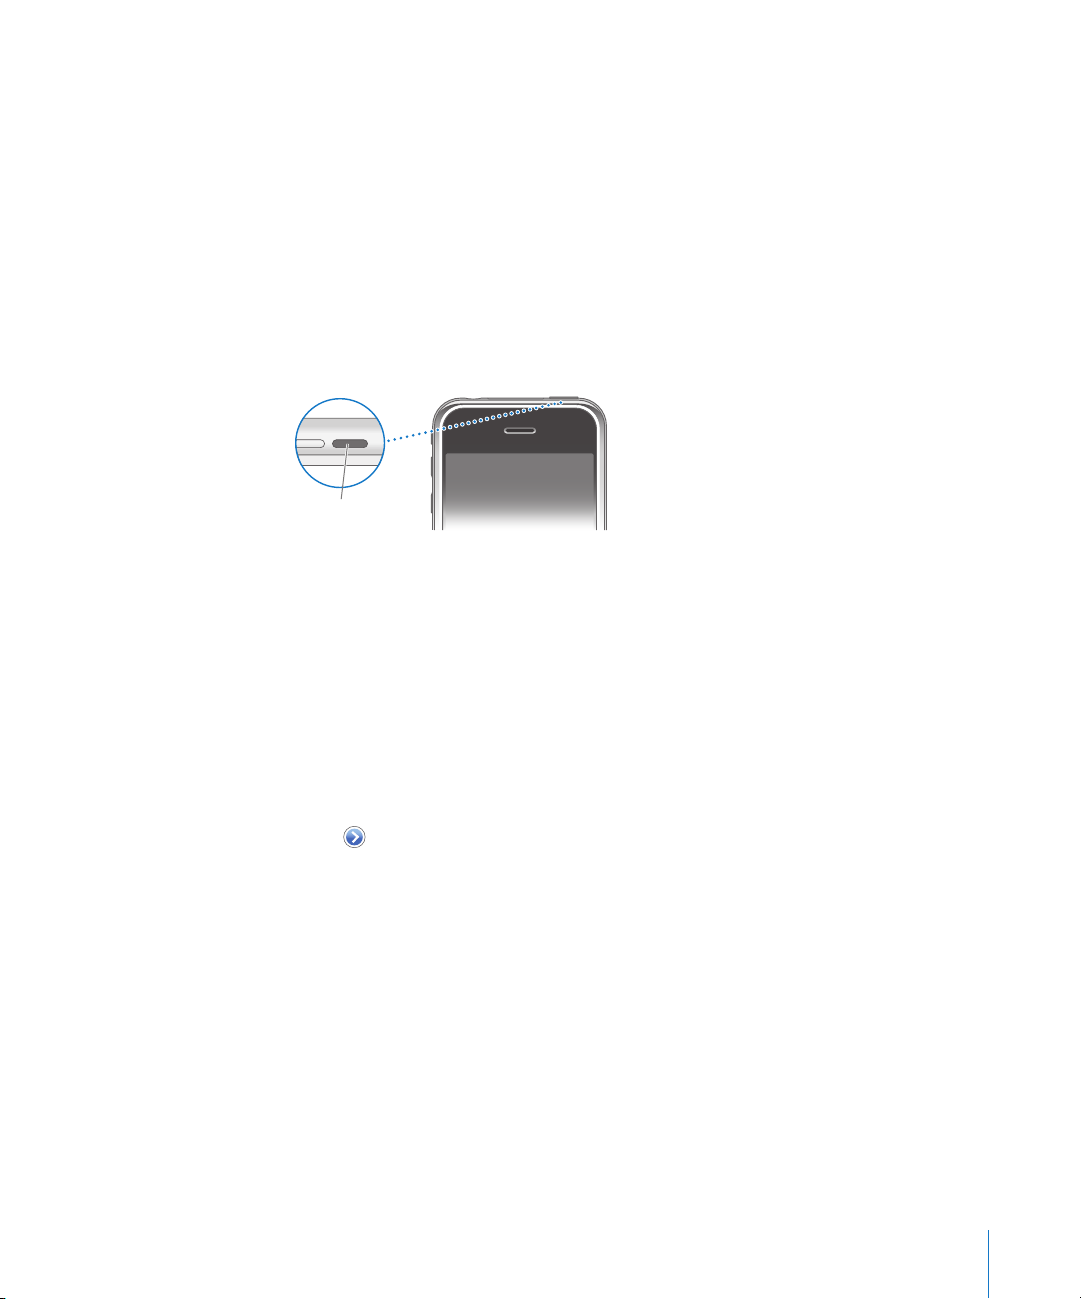
Sleep/Wake
button
To Do this
Lock iPhone Press the Sleep/Wake button.
Unlock iPhone Press the Home button or the Sleep/Wake button, then
drag the slider.
Turn iPhone completely off Press and hold the Sleep/Wake button for a few seconds until
the red slider appears, then drag the slider.
When iPhone is off, incoming calls go straight to voicemail.
Turn iPhone on Press and hold the Sleep/Wake button until the Apple logo
appears.
For information about setting iPhone to require a passcode to unlock it, see “Passcode
Lock” on page 98.
14 Chapter 2 Basics
Page 15
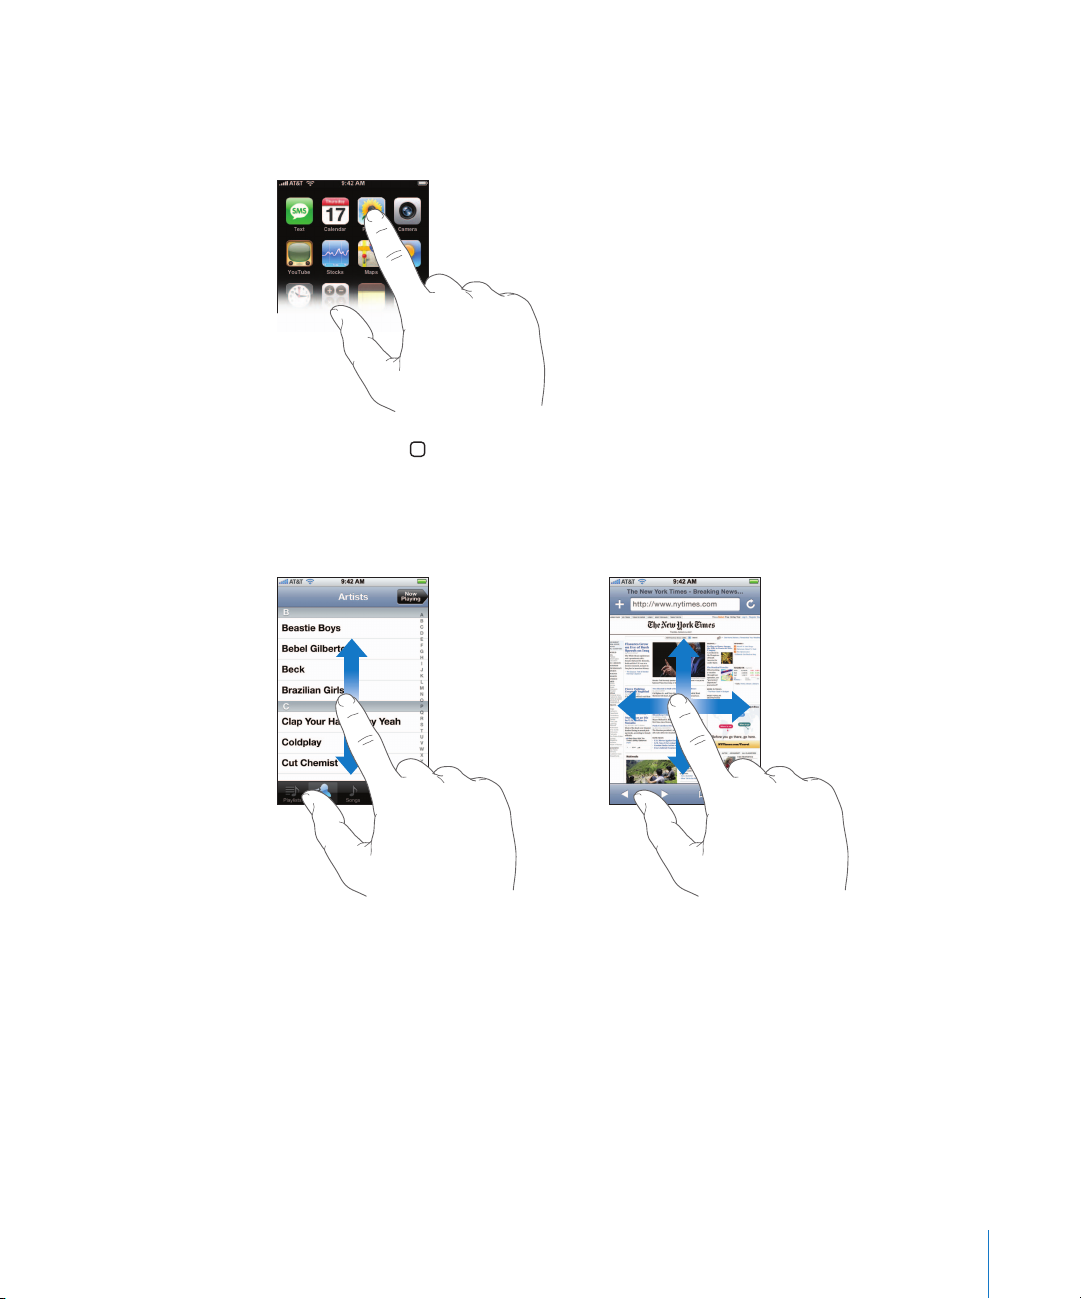
Using the Touchscreen
The controls on the iPhone touchscreen change dynamically to suit the task at hand.
m Tap any application to open it.
m Press the Home button below the display at any time to return to the Home screen
and see all the applications.
m Flick or drag up or down to scroll. On some screens such as webpages, you can also
scroll side to side.
Flicking or dragging your finger to scroll won’t choose or activate anything on the
screen.
Chapter 2 Basics 15
Page 16
m Flick to scroll quickly.
You can wait for the scrolling to come to a stop, or tap or touch anywhere on the
screen to stop it immediately. Tapping or touching to stop scrolling doesn’t choose or
activate anything on the screen.
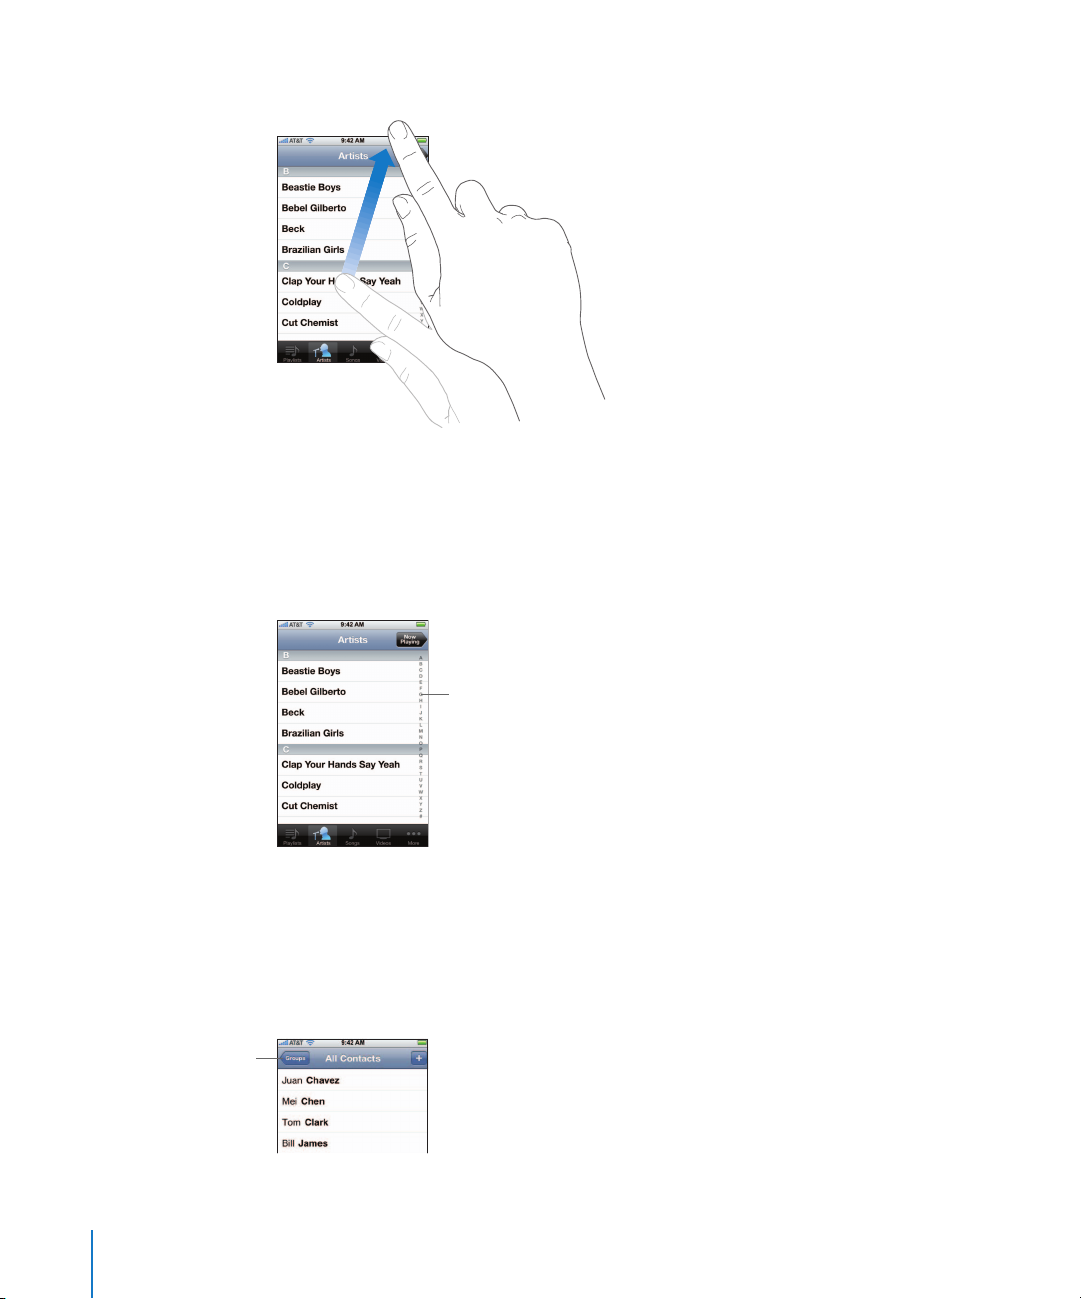
m Some lists have an index along the right side. Tap a letter to jump to items starting with
that letter. Drag your finger along the index to quickly scroll through the list.
m Tap an item in the list to choose it. Depending on the list, tapping an item can do
different things—for example, it may open a new list, play a song, open an email,
or show someone’s contact information so you can call that person.
m The back button in the upper-left corner shows the name of the previous list. Tap it to
go back.
Back button
16 Chapter 2 Basics
Index
Page 17

m When viewing photos, web pages, email, or maps, you can zoom in and out. You can
double-tap (tap quickly twice) to zoom in, then double-tap again to zoom out. Or just
pinch to zoom in or out.
Entering Text
You can use the onscreen keyboard to enter text messages, contact information, notes,
and more. The intelligent keyboard on iPhone automatically suggests corrections as
you type, to help prevent mistyped words. Start by typing with just your index finger.
As you get more proficient, you can type more quickly by using two thumbs.
1 Tap a text field, such as in a note or new contact, to bring up the keyboard.
2 Tap keys on the keyboard.
As you type, each letter appears above your thumb or finger.
Chapter 2 Basics 17
Page 18
Suggested correction
Suggested corrections appear just above or below the word you’re typing.
 To use the suggested correction, type a space, punctuation mark, or return character.
 To reject the correction, finish typing the word as you want it, then tap the word
before continuing to type anything else. (The second time you type the same word
and reject the correction this way, iPhone adds the word to its dictionary.)
To Do this
Type uppercase Tap the Shift key before tapping a letter.
Turn caps lock on Enable Caps Lock (see page 99), then double-tap the
Shift key. The Shift key turns blue, and all letters you type
are uppercase. Tap the Shift key again to turn caps lock off.
Shows numbers, punctuation, or
symbols
Tap the Number key. Tap the Symbol key to see
additional punctuation and symbols.
3 To edit text, touch and hold to see a magnified view, then position the cursor.
18 Chapter 2 Basics
Page 19
You can use this magnified view whenever you’re typing text. For example, you can use
it when composing email, or when typing in a text field while surfing the web.
Adjusting the Volume
When you’re on the phone or listening to songs, movies, or other media, the buttons
on the side of iPhone adjust the audio volume. Otherwise, the buttons control the
volume for the ringer, alerts, and other sound effects.
m To adjust the volume, use the buttons on the side of iPhone.
Volume
up
Volume
down
WARNING: For important information about avoiding hearing loss, see page 102.
m Flip the Ring/Silent switch to change between ring and silent modes.
Ring
Silent
When set to ring mode, iPhone plays all sounds. When set to silent mode, iPhone
doesn’t ring or sound any alerts or sound effects (alarms set using Clock do sound).
By default, when you get a call, iPhone vibrates whether it’s set to ring or silent mode.
If iPhone is set to ring mode, you can silence a call by pressing the Sleep/Wake button
or one of the volume buttons once. Press a second time to send the call to voicemail.
For information about changing sound and vibrate settings, see page 96.
Chapter 2 Basics 19
Page 20

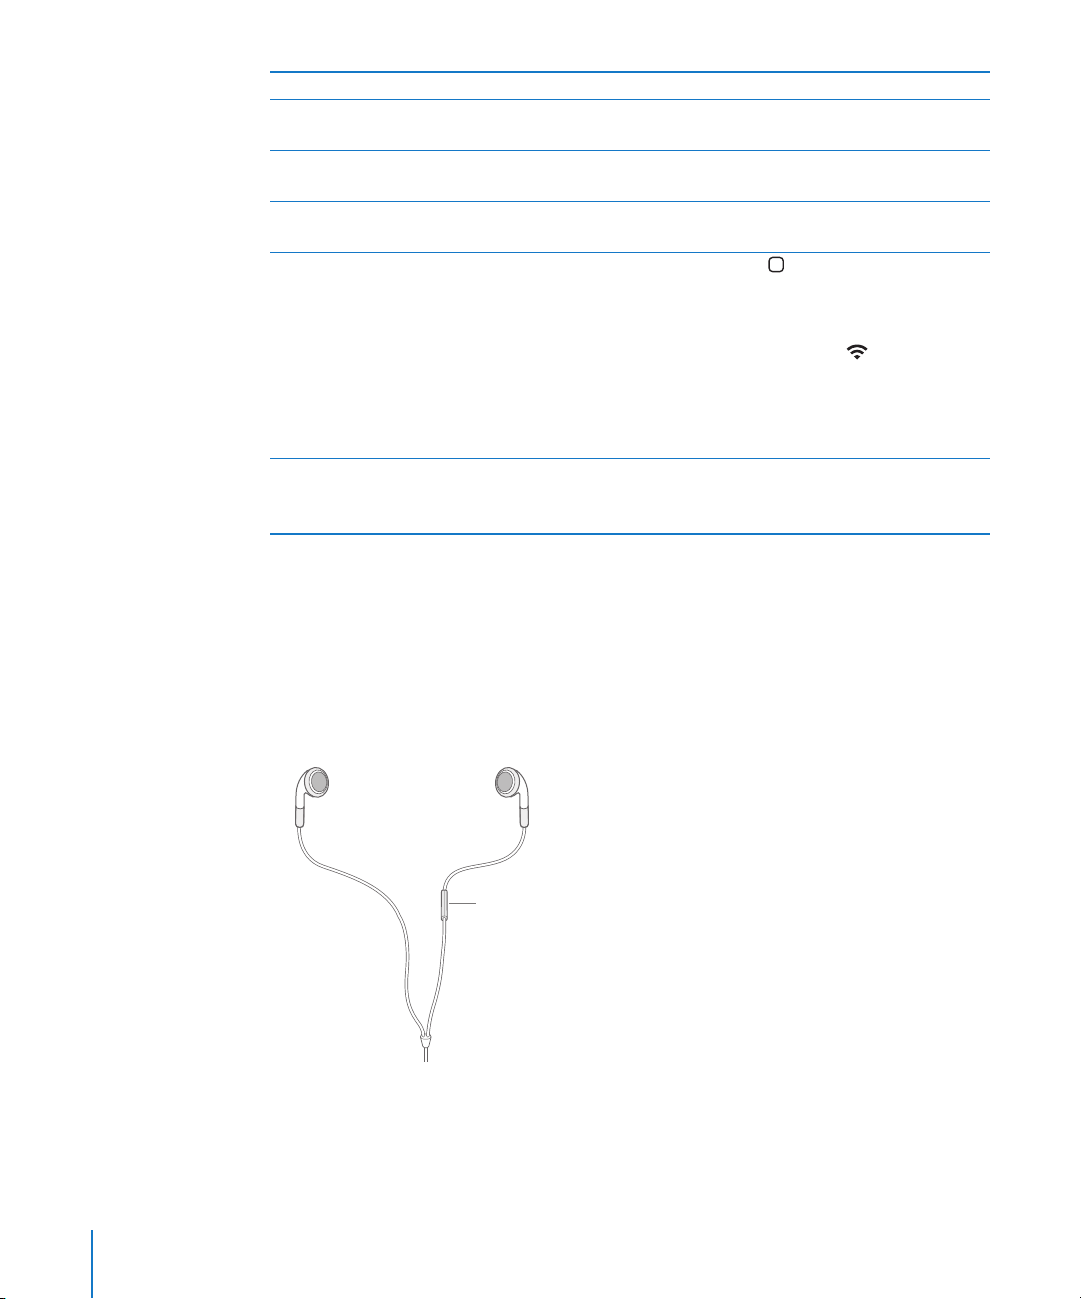
Using the Stereo Headset
The headset included with iPhone features a microphone and an integrated button
that allows you to answer and end calls easily, and control audio and video playback.
Plug in the headset to listen to music or a phone call. Callers hear you through the
headset microphone. Click the mic button to control music playback and answer or
end calls, even when iPhone is locked.
Mic button
To Do this
Pause a song or video Click the mic button once. Click again to resume playback.
Skip to the next song Click twice quickly.
Answer an incoming call Click once.
End the current call Click once.
Decline an incoming call Press and hold for about two seconds, then let go. When you
let go, two low beeps confirm you declined the call.
Switch to an incoming or on-hold
call and put the current call on hold
Switch to an incoming or on-hold
call and end the current call
Click once. Click again to switch back to the first call.
Press and hold for about two seconds, then let go. When you
let go, two low beeps confirm you ended the first call.
If you get a call while the headset is plugged in, you can hear the ringtone through
both the iPhone speaker and the headset.
20 Chapter 2 Basics
Page 21

Connecting to the Internet
iPhone connects to the Internet automatically whenever you use Mail, Safari, YouTube,
Stocks, Maps, or Weather. iPhone does the following, in order, until connected:
 Connects over the last Wi-Fi network you used that’s available.
 If no previously used Wi-Fi networks are available, iPhone shows a list of Wi-Fi
networks in range. Tap a network and, if necessary, enter the password to join.
Networks that require a password show ¥ next to them.
 If no Wi-Fi networks are available or you choose not to join any, iPhone connects to
the Internet over EDGE .
If no Wi-Fi networks are available and EDGE is not available, iPhone cannot connect to
the Internet. Turning on airplane mode disables both Wi-Fi and EDGE.
Note: Because iPhone uses EDGE for the phone, you cannot use the Internet over EDGE
when you’re on a call. To talk on the phone and use Internet applications at the same
time, connect over a Wi-Fi network.
Wi-Fi
iPhone can join AirPort and other Wi-Fi networks at home, at work, or at Wi-Fi hot spots
around the world.
When iPhone is connected to a Wi-Fi network, the Wi-Fi icon in the status bar at the
top of the screen shows connection strength. The more bars you see, the stronger the
connection.
m To see all the Wi-Fi networks in range, from the Home screen choose Settings > Wi-Fi.
Tap a network to join it.
Many Wi-Fi networks can be used free of charge, and some require a fee. To join a
Wi-Fi network at a hot spot where charges apply, in most cases you can open Safari to
see a webpage that allows you to sign up for service.
For information about configuring Wi-Fi settings, see “Wi-Fi” on page 94.
EDGE
EDGE allows Internet connectivity over the cellular network, available through AT&T’s
wireless service. Check AT&T’s network coverage in your area for availability.
You can tell iPhone is connected to the Internet over EDGE if you see in the status
bar at the top of the screen.
If you’re outside AT&T’s network, you may be able to use EDGE from another carrier.
Roaming charges may apply.
Note: While iPhone is actively transferring data over EDGE—downloading a webpage,
for example—you may not be able to receive calls. Incoming calls may go to voicemail.
Chapter 2 Basics 21
Page 22

Using iPhone on an Airplane
Airplane mode disables the wireless features of iPhone to avoid interfering with aircraft
operation and other electrical equipment.
m From the Home screen choose Settings, then turn airplane mode on.
When you turn on airplane mode, appears in the status bar at the top of the screen.
No cell phone, radio, Wi-Fi, or Bluetooth signals are emitted from iPhone. You cannot:
 Make phone calls
 Send or receive email
 Browse the Internet
 Send or receive text messages
 Stream YouTube videos
 Get stock quotes
 Get maps locations
 Get weather reports
If allowed by the aircraft operator and applicable laws and regulations, you can
continue to use iPhone to:
 Listen to music and watch video
 Listen to visual voicemail
 Check your calendar
 Take or view pictures
 Hear alarms
 Use the stopwatch or timer
 Use the calculator
 Take notes
 Read text messages and email messages stored on iPhone
Charging the Battery
iPhone has an internal rechargeable battery.
Charge the battery
m Connect iPhone to a power outlet using the included cable and power adapter.
22 Chapter 2 Basics
Page 23
Charge the battery and sync iPhone
m Connect iPhone to your computer (not your keyboard) using the included cable
and dock.
Note: If iPhone is connected to a computer that’s turned off or is in sleep or standby
mode, the iPhone battery may drain.
An icon in the upper-right corner of the screen shows battery charging status.
Charging Charged
If you charge the battery while syncing or using iPhone, it may take longer to charge.
Important: If iPhone is very low on power, it shows a message saying “Please Connect
to Power” or “Charging... Please Wait” and needs to charge for up to ten minutes before
you can use it. If iPhone is extremely low on power, the display may be blank for up to
two minutes before showing the low-power message.
Rechargeable batteries have a limited number of charge cycles and may eventually
need to be replaced. The iPhone battery is not user replaceable; it can only be replaced
by an authorized service provider. For more information, go to:
www.apple.com/batteries
WARNING: For important safety information about charging iPhone, see page 102.
Cleaning iPhone
Use the cloth that came with iPhone to gently wipe the glass screen and the case.
You can also use a soft, slightly damp, lint-free cloth. Unplug and turn off iPhone (press
and hold the Sleep/Wake button, then drag the onscreen red slider). Avoid getting
moisture in openings. Don’t use window cleaners, household cleaners, aerosol sprays,
solvents, alcohol, ammonia, or abrasives to clean iPhone.
Chapter 2 Basics 23
Page 24
3 Phone
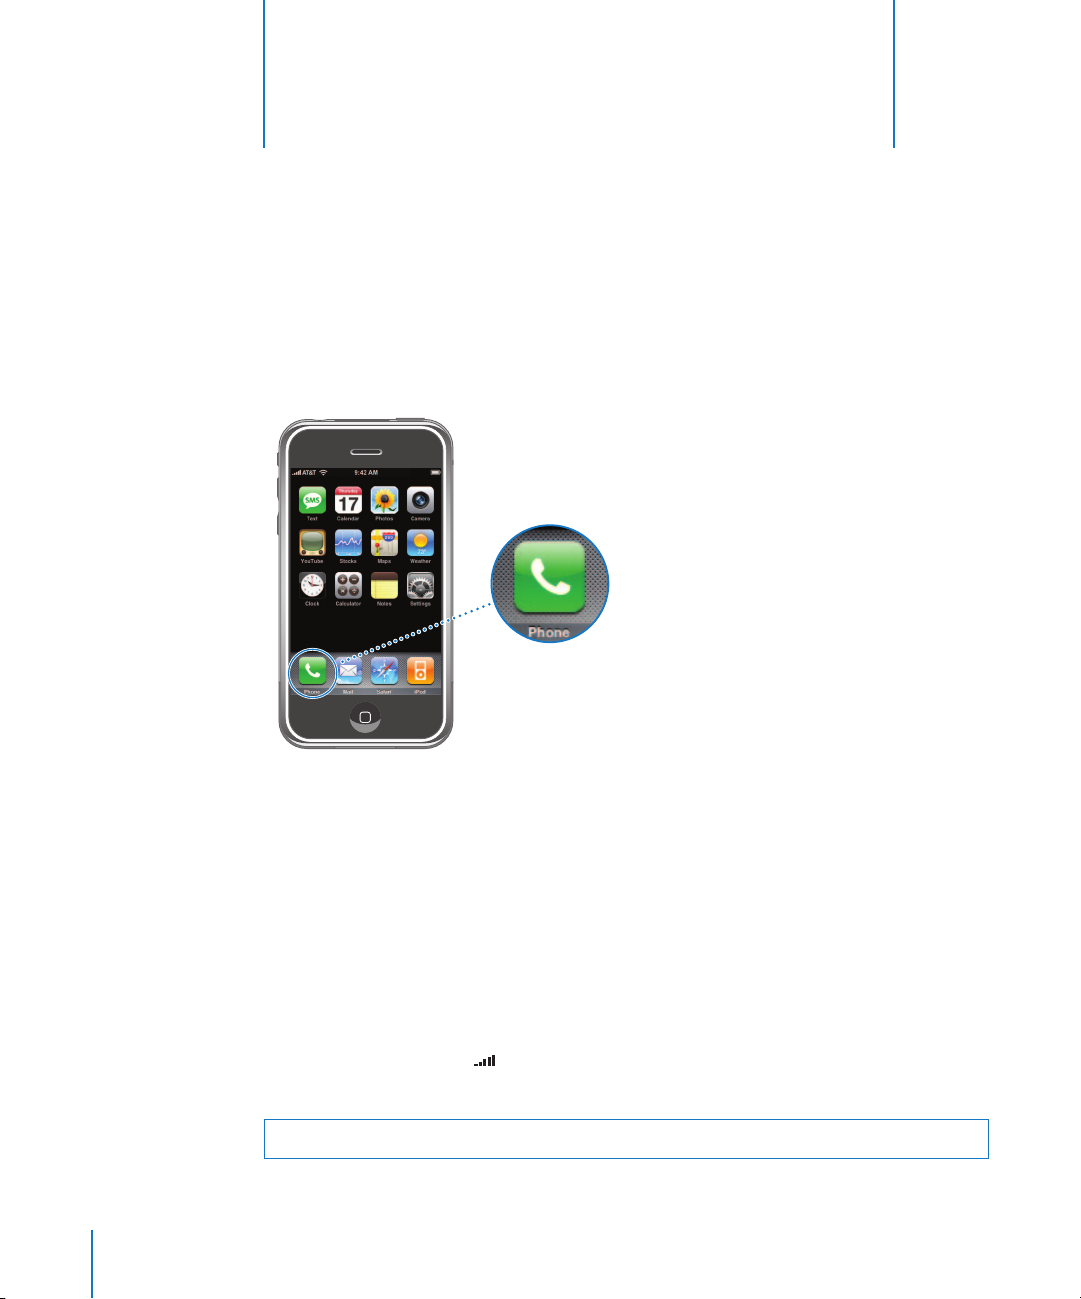
Tap Phone to make calls, view and add contacts, and
check voicemail.
3
24
Making a call on iPhone is as simple as tapping a name or number in your contacts list
or tapping someone in your favorites list. Or tap the name of a recent caller to return
the call. Your contacts are automatically synced with the address book on your
computer each time you connect iPhone.
Visual voicemail displays a list of your voicemail messages so you can listen to them in
whatever order you chose. Or tap to get more information, such as the time and
duration of the call.
Calling and Answering
The cell signal indicator at the top of the screen shows whether you’re in range of
the cell network and can make and receive calls. The more bars, the stronger the signal.
WARNING: For important information about driving safety, see page 103.
Page 25
Making a Call
Making a call is easy—simply tap an entry in your list of contacts, favorites, or recent
calls on iPhone. Or you can make a call the “old-fashioned” way, by entering a number
on the keypad.
Call someone in your contacts list
m Tap Contacts and choose a contact, then tap the phone number you want to call.
Call someone in your favorites list
m Tap Favorites and choose a contact.
For information about adding people to your favorites list, see page 34.
Call someone you’ve recently called or who has recently called you
m Tap Recents and choose a person or number. Calls you’ve missed are shown in red.
Tap Missed to see only missed calls.
You can also tap Keypad and then tap Call, to bring up the number of the last person
you called.
Dial a call
m Tap Keypad and enter the number, then tap Call. Tap if you make a mistake.
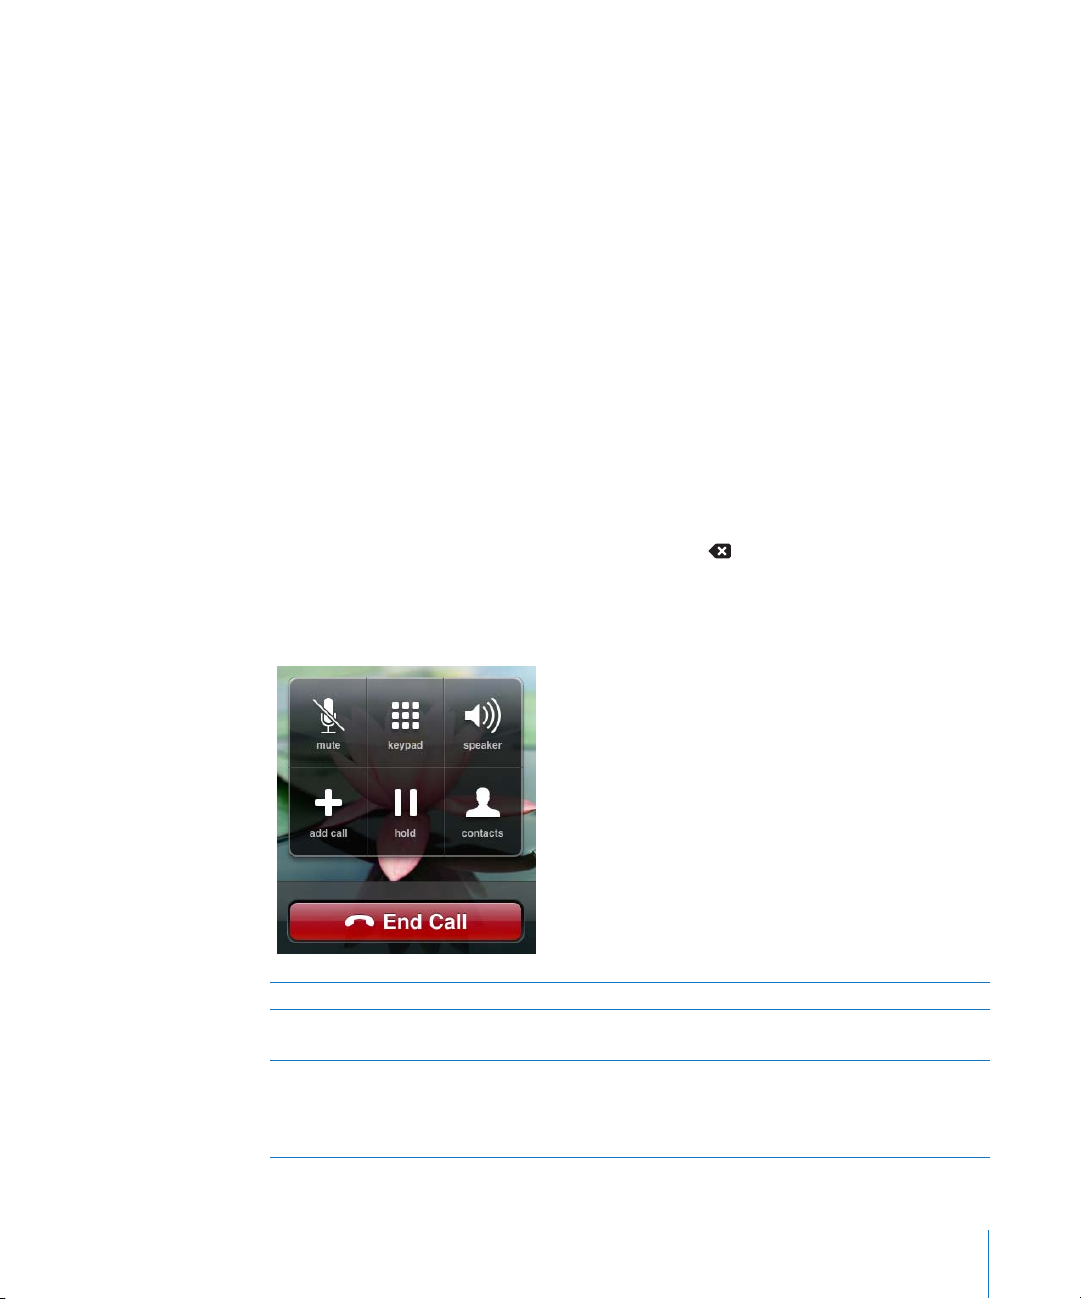
While You’re On a Call
When you’re on a call, the screen shows call options.
Call options
To Do this
Mute the microphone Tap Mute. The caller can’t hear you, but you can still hear the
caller. Tap Mute again for the caller to hear you.
Use the keypad to enter
information
Chapter 3 Phone 25
Tap Keypad.
You can use the keypad to enter information requested by
automated voice systems, such as when calling airlines
reservations. Tap Hide Keypad to see call options again.
Page 26
To Do this
Use the speakerphone, so you can
talk and listen hands-free
Make a conference call Tap Add Call. For information about conference calling, see
Put a call on hold Tap Hold. The caller can’t hear you and you can’t hear the caller.
Use iPhone applications while
you’re on a call
End a call Tap End Call.
Tap Speaker anytime you’re on a call.
page 28.
Tap Hold again to talk again.
While on a call, press the Home button to go to the Home
screen and use other applications. Or tap Contacts to browse
contacts.
So for example, you can check your calendar or takes notes
while on a call. If you’re connected to Wi-Fi , you can also
browse the web and use other Internet applications such as
Maps—to find the location of a restaurant, perhaps.
To return to the call screen from another application, tap the
green bar at the top of the screen.
If you’re listening through the included stereo headset, you can
also click the mic button to end a call.
Answering a Call
When someone calls you, iPhone rings and displays the caller’s information.
Answer a call
m When you receive a call, do one of the following:
 Tap Answer. Or, if iPhone is locked, drag the slider.
 If you’re listening through the stereo headset, you can click the mic button to answer.
Mic button
26 Chapter 3 Phone
Page 27
Silencing or Declining a Call
When a call comes in, you may not want to answer it, or you may need to stop iPhone
from ringing or vibrating. You can silence or decline an incoming call. When you silence
a call, you still have a chance to answer it, until the call goes to voicemail. When you
decline a call, the call is silenced and sent directly to voicemail.
Silence a call
m Press the Sleep/Wake button once, or either of the volume buttons.
Decline a call
m Do one of the following:
 Press the Sleep/Wake button twice quickly.
Sleep/Wake
button
 Press and hold the mic button on the headset for about two seconds, then let go.
When you let go, two low beeps confirm that the call was declined.
 Tap Decline. Decline appears only when you’re using iPhone.
Checking Recent and Missed Calls
iPhone keeps a list of the most recent calls you made or received.
See a list of recently made, received, and missed calls
m Tap Recents.
Missed calls appear in red. To list only your missed calls, tap Missed.
Tap the next to an entry to see more information about the call, such as whether
the call was incoming or outgoing. If the call was to or from someone in your contacts,
all of the contact information is shown and the phone number used for the call
appears in blue. A star indicates that the number is also in your favorites list.
Making or Answering a Second Call During a Call
You can make or receive another call while you’re already on the phone. If you receive a
second call, iPhone beeps and shows the caller’s information and a list of options.
Put a caller on hold and make a second call
m Tap Add Call and make a second call.
Respond to an incoming call
m Do one of the following:
Chapter 3 Phone 27
Page 28

 To ignore the call and send it to voicemail, tap Ignore.
 To hold the first call and answer the new call, tap Hold Call + Answer.
 To end the first call and answer the new one, tap Hold Call + Answer.
To Do this
Switch back to the first call and put
the second call on hold
Merge the two calls, so all three of
you can talk
Tap the first call at the top of the screen, or tap Swap.
Tap Merge Calls.
Conference Calling
Conference calling lets you talk to more than one person at a time. You can merge up
to five calls for a phone conference.
Start a conference call
1 Make a call.
2 Tap Add Call and make another call. The first call is put on hold. If you want, you can
talk on the second line privately before merging the calls.
3 Tap Merge Calls. The calls are merged onto one line and everyone can hear each other.
4 Repeat steps two and three to add more calls to the conference.
To Do this
Drop one call from a conference Tap Conference and tap next to a call. Then tap End Call.
Talk privately with a call in a
conference
Add an incoming call to a
conference
Tap Conference and tap Private next to a call. Tap Merge Calls
to return the call to the conference.
Tap Hold Call + Answer, then tap Merge Calls.
iPhone always has two lines available, one of which can be a conference call.
Emergency Dialing
Even if your iPhone isn’t activated or doesn’t have a SIM card, you can still use it to call
emergency services, for example by dialing 911.
Call for help in an emergency
m Tap Keypad and dial the number, then tap Call. Or if iPhone is locked with a passcode
(see page 98), tap Emergency Call, then dial the number.
You should not rely on wireless devices for essential communications, such as medical
emergencies. Use of any cellular phone to call emergency services, for example by
dialing 911, may not work in all locations. Emergency numbers and services vary by
region, and sometimes an emergency call cannot be placed due to network availability
or environmental interference.
28 Chapter 3 Phone
Page 29
Number of missed
calls and unheard
voicemail messages
Visual Voicemail
When you decline or don’t answer a call, the caller hears a recorded greeting and can
leave a voicemail message. On iPhone, visual voicemail lets you see a list of your
messages and choose which ones to listen to or delete, without having to listen to
prior messages or voice instructions.
The Phone button on the Home screen shows the total number of missed calls and
unheard voicemail messages you have.
When you tap Phone, the Voicemail button shows the number of unheard voicemail
messages and the Recents button shows the number of missed calls.
Number of unheard
voicemail messages
Number of missed calls
Setting Up Voicemail
Set up voicemail and create a password
m Tap Voicemail. The first time you tap Voicemail, iPhone prompts you to create a
voicemail password and record your voicemail greeting.
Record a new voicemail greeting
1 Tap Voicemail and tap Greeting. Then tap Custom.
2 Tap Record and say your greeting.
3 When you finish, tap Stop. To listen to your greeting, tap Play.
4 When you’re satisfied, tap Save.
Set iPhone to play a default voicemail greeting
m Tap Voicemail and tap Greeting. Then tap Default. When someone calls, they’ll hear a
standard message that includes your phone number.
Chapter 3 Phone 29
Page 30
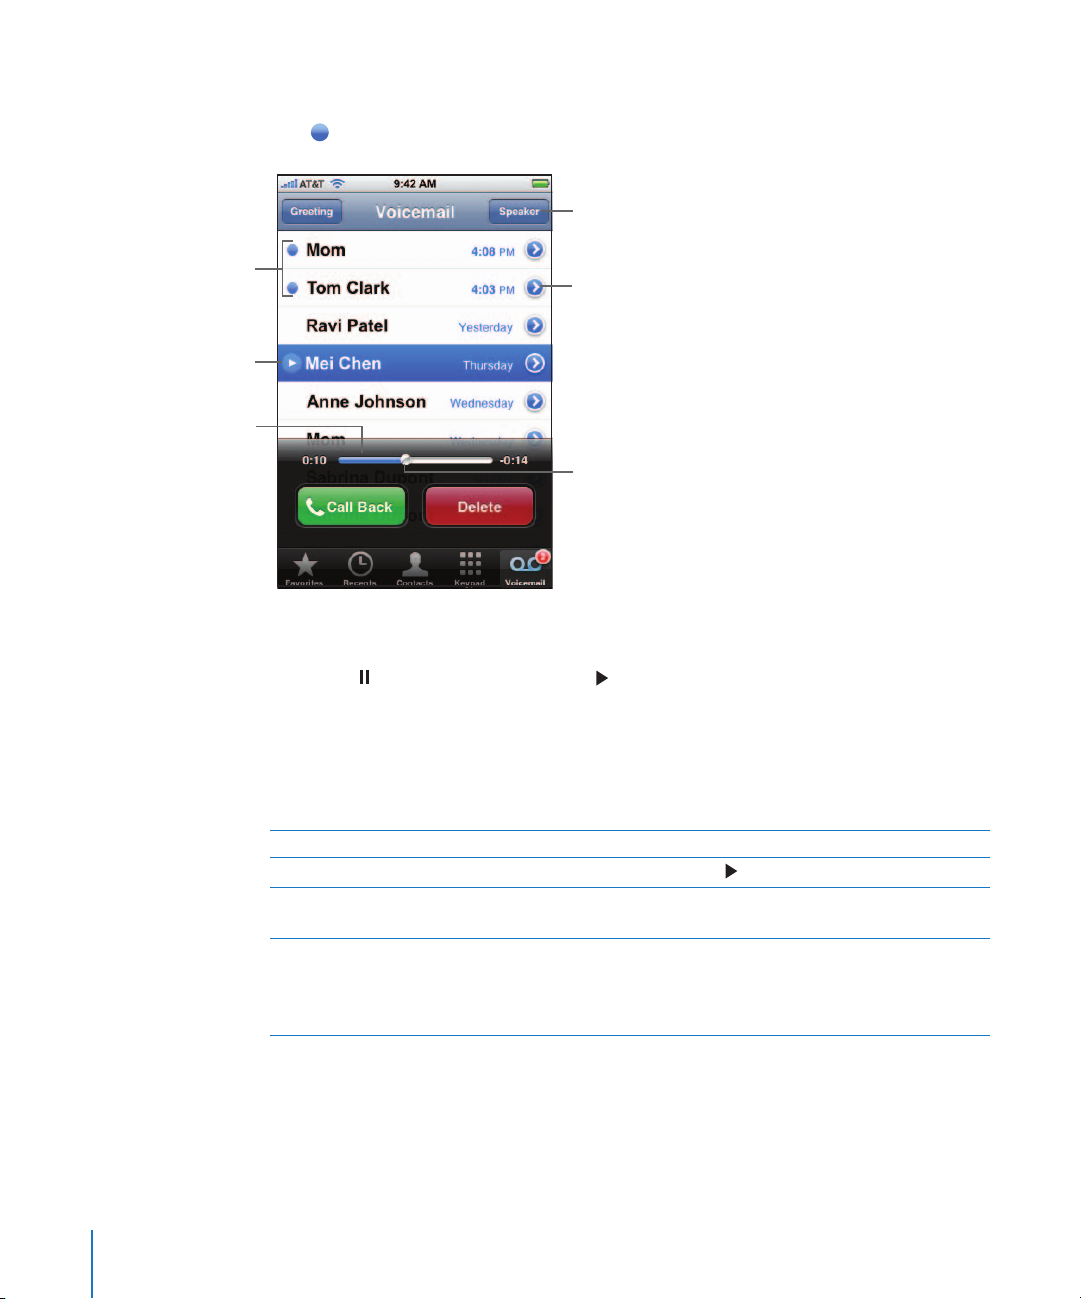
Checking Voicemail
The Voicemail screen shows your voicemail messages. Unheard messages have a blue
dot next to them.
Voicemail
Unheard messages
Play/Pause
Scrubber bar
Speakerphone
Contact info
Playhead
Listen to a new voicemail message
m Tap Voicemail, then tap the new message. The message downloads to iPhone and
plays. Tap to pause the message. Tap to resume playback.
You can skip to any point in a message by dragging the playhead on the scrubber bar.
This is useful if you want to review part of a message—to hear a phone number again,
for example.
Once you listen to a message, it is saved for 30 days from the time you listened to it.
To Do this
Listen to a message again Tap the message and tap .
Listen to a deleted message Tap Deleted Messages (at the end of your voicemail messages),
Listen over the speakerphone Tap Speaker.
30 Chapter 3 Phone
then tap the message you want to hear.
If iPhone is connected to a Bluetooth headset or car kit, tap
Audio and choose Speaker Phone. To switch back to the
headset or car kit, tap Audio again, then choose the device.
Page 31

Check voicemail from another phone
m Call your own phone number. As your greeting plays, enter *, enter your voicemail
password followed by #, then follow the voice instructions.
To set up a password for voicemail, see “Change the voicemail password” on page 36.
Returning a Call
It’s simple to return a call from voicemail.
m Tap a message, then tap Call Back.
Deleting Messages
Deleted messages are saved on iPhone for a time, then they are automatically and
permanently erased. Before messages are erased permanently, you can still view and
listen to them, and even undelete them.
Delete a message
m Tap a message, then tap Delete.
Undelete a message
m Tap Deleted Messages (at the end of your voicemail messages), then tap a message
and tap Undelete. The message returns to your messages list.
Getting Contact Information
Voicemail saves more than just recorded messages. The date and time of the call,
the length of the message, and any available contact information are all included.
If the caller is already in your contacts, that information is a tap away. If the message is
from someone not in your contacts, you can easily add them. You can also add a caller
to your favorites list from Voicemail.
To Do this
See a caller’s contact information Tap next to a message. Tap a number or email address to
contact the caller. Tap Text Message to text the caller.
Add a caller’s number to your
contacts list
Add a caller to your favorites list Tap next to a message, then tap “Add to Favorites.”
Tap next to a message. Then tap Create New Contact,
or tap “Add to Existing Contact” and choose a contact.
Setting an Alert Sound for Voicemail
You can set an alert to sound whenever you receive a new voicemail. The alert sounds
only once.
Set an alert sound for new voicemail
m From the Home screen choose Settings > Sounds, then turn New Voicemail on or off.
If the Ring/Silent switch is off, iPhone won’t make alert sounds even if they’re turned on
in Settings.
Chapter 3 Phone 31
Page 32

Recording your Voicemail Greeting
The voicemail greeting, or outgoing message, is what a caller hears when you don’t
answer or decline the call, and the call is sent to voicemail. A default greeting is
provided by AT&T. You can record a custom greeting to use instead.
Record a voicemail greeting
1 In Voicemail, tap Greeting in the upper-left corner of the screen.
2 Tap Custom.
3 Tap Record when you’re ready to record your greeting.
4 Tap Stop when you finish.
To review the greeting, Tap Play. If you’re not satisfied, repeat steps 2 through 4 to rerecord the greeting.
5 Tap Save.
Adding Contact Information to iPhone
With iPhone Contacts, it’s easy to have all your contact information with you. You can
sync the contact information from your computer to iPhone, and you can enter new
contacts and make changes directly on iPhone.
Syncing Contact Information from your Computer
If you’ve set up iTunes to sync contacts, iTunes automatically keeps your contacts upto-date—whether you make changes on your computer or on iPhone. iTunes supports
syncing with the following applications on your computer.
 On a Mac: Mac OS X Address Book, Microsoft Entourage, and Yahoo! Address Book
 On a PC: Yahoo! Address Book, Windows Address Book (Outlook Express), and
Microsoft Outlook
For information about syncing iPhone with your address books and other information
on your computer, see “Syncing iPhone with Your Computer” on page 5.
Adding and Editing Contacts Directly on iPhone
Your contacts are always quickly available on iPhone, whenever you need them.
iPhone lets you view and add contact information directly from Phone, Mail, and Text
applications. If someone calls, emails, or sends you a text message, you can add them
to your contacts, right where you are. If you’re entering a new contact from scratch,
however, you do that in Phone.
Add a contact to iPhone
m Choose Contacts and tap , then enter the contact information.
32 Chapter 3 Phone
Page 33

Add a contact from a number entered using the keypad
1 Tap Keypad and enter a number, then tap .
2 Tap Create New Contact and enter the caller’s information, or tap “Add to Existing
Contact” and choose a contact.
Edit a contact’s phone number, address, and other information
m Tap Contacts and choose a contact, then tap Edit.
 To add an item—such as a web address or mobile phone number, tap next to the
item.
 To delete an item, tap next to it.
 To delete the contact from your contacts list, scroll down and tap Delete Contact.
Enter a pause in a number
m Tap , then tap Pause.
Pauses are sometimes required by phone systems—before an extension or password,
for example. Each pause lasts 2 seconds. You may need to enter more than one.
Add a recent caller’s information to your contacts
m Tap Recents and tap next to the number. Then tap Create New Contact and enter
the caller’s information, or tap “Add to Existing Contact” and choose a contact.
Assign a photo to a contact or change a contact’s photo
1 Tap Contacts and choose a contact.
2 Tap Edit and tap Add Photo, or tap the existing photo.
3 Tap Take Photo to use the camera to take a picture. Or tap Choose Existing Photo and
choose a photo.
4 Move and scale the photo the way you want it. Pinch or double-tap to zoom in or out.
Drag the photo up, down, or sideways.
5 Click Set Photo.
Using the Information on the Contact Page
You can do a lot more than make a call from the Info page for a contact. For example,
with a single tap, create a new email message addressed to your contact, go to their
website, or locate their home or business in Maps.
Chapter 3 Phone 33
Page 34

See a map and get
m Tap contacts and choose a contact. Then tap an item.
Contact info
Call
Send an email
Visit the website
directions
Send a text message
Add a phone number
to your favorites list
Adding Entries to Your Favorites List for Quick Access
Add a contact’s number to your favorites list
m Tap Contacts and choose a contact. Then tap “Add to Favorites” and choose the number
you want to add.
Add a recent caller’s number to your favorites list
m Tap Recents and tap next to a caller, then tap “Add to Favorites.”
To Do this
Call a contact from your favorites
list
Delete a number from your
favorites list
Reorder your favorites list Tap Favorites and tap Edit. Then drag next to a contact to a
Tap Favorites and choose a contact.
Tap Favorites and tap Edit. Then tap next to a contact or
number and tap Remove.
new place in the list.
Seeing Your Own Phone Number
See your own number
m Tap Contacts and scroll to the top of the list.
Phone Settings
Phone settings let you determine how your contacts are sorted, forward incoming calls,
turn call waiting on or off, change your password, and other things.
34 Chapter 3 Phone
Page 35

Setting How Contacts Are Displayed
Set how contacts are sorted and displayed
m From the Home screen choose Settings > Phone, then do one of the following:
 To sort alphabetically by first or last name, tap Sort Order.
 To display first name first or last name first, tap Display Order.
Call Forwarding
You can set iPhone to forward incoming calls to another number. You may, for example,
be on vacation and want all calls to go somewhere else. If you’re going to an area with
no cell coverage, you may want to forward calls to a place where you can be reached.
Set iPhone to forward your calls
1 From the Home screen choose Settings > Phone > Call Forwarding and turn Call
Forwarding on.
2 Tap Forwarding To and enter the phone number you want calls forwarded to.
You must be in range of the cell network when you set iPhone to forward calls, or calls
won’t be forwarded.
Call Waiting
Activate or deactivate call waiting
m From the Home screen choose Settings > Phone > Call Waiting, then turn Call Waiting
on or off. If you turn call waiting off and someone calls you when you’re already on the
phone, the call goes to voicemail.
Show My Caller ID
Show or hide your caller ID
m From the Home screen choose Settings > Phone > Show My Caller ID, then turn Show
My Caller ID on or off.
If Show My Caller ID is off, people you call can’t see your name or phone number on
their phone.
Using iPhone with a Teletype (TTY) Machine
Teletype (TTY) machines are used by the hearing impaired to communicate by typing
and reading text. If you have the iPhone TTY Adapter cable, available at
www.apple.com/store, you can use iPhone with a TTY machine.
Connect iPhone to a TTY machine
m From the Home screen choose Settings > Phone, then turn TTY on. Then connect
iPhone to your TTY machine using the adapter cable.
For information about using the TTY machine, see the documentation that came with
the machine.
Chapter 3 Phone 35
Page 36

For more information about other accessibility features of iPhone, go to:
www.apple.com/accessibility
Changing Your Voicemail Password
A voicemail password helps prevent others from access your voicemail. You only need
to enter the password when you’re calling in to get your messages from another
phone. You won’t need to enter the password when using Voicemail on iPhone.
Change the voicemail password
m From the Home screen choose Settings > Phone > Change Voicemail Password.
Locking Your SIM Card
You can assign a PIN number to your SIM card, so it can’t be used in other phones
without the number. You must enter the number each time you turn iPhone off and
turn it back on again.
Assign a PIN number to your SIM card
m From the Home screen choose Settings > Phone > SIM PIN.
Accessing AT&T Services
You can access some AT&T services directly from iPhone. You can do things like check
your bill balance, call directory assistance, and view how many minutes you have left.
Access AT&T Services
m From the Home screen choose Settings > Phone > AT&T Services.
When you request information such as your bill balance using AT&T Services,
AT&T sends you a text message with the information. There is no charge for these
text messages; they do not count against the number of messages allowed in your
calling plan.
Ringtones
iPhone comes with a number of ringtones that you can use for incoming calls.
A dedicated switch on the side of iPhone lets you quickly turn ringing on or off,
and you can set iPhone to vibrate or not.
Setting Ringtones
In addition to the default ringtone, you can assign individual ringtones to people in
your contacts so that you can tell when a particular person calls.
Set the default ringtone
m From the Home screen choose Settings > Sounds > Ringtone, then choose a ringtone.
36 Chapter 3 Phone
Page 37

Assign a ringtone to a contact
m From Phone, Tap Contacts and choose a contact, then tap Edit. Tap Assign Ringtone
and choose a ringtone. When that person calls, you hear that ringtone.
Setting the Ring Mode
You can switch between ring and silent mode. You can set iPhone to vibrate in
either mode or both.
Switch between ring mode and silent mode
m Flip the Ring/Silent switch on the side of iPhone.
Ring
Silent
You can tell by feel if iPhone is set to ring or be silent. The Ring/Silent switch is aligned
with the volume buttons when it is set to ring. In silent mode, the button is offset.
Setting iPhone to Vibrate
You can have iPhone vibrate when you receive a call. Separate controls let you sent
iPhone to vibrate in ring mode, silent mode, or both.
Set whether iPhone vibrates
m From the Home screen choose Settings > Sounds. To set whether iPhone vibrates in
silent mode, turn Vibrate under Silent on or off. To set whether iPhone vibrates in
ring mode, turn Vibrate under Ring on or off.
For more information about changing sound and vibrate settings, see page 96.
Using iPhone with a Bluetooth Headset or Car Kit
You can talk on iPhone hands-free using the optional iPhone Bluetooth Headset.
You can also use iPhone with other Bluetooth headsets. If your car has a Bluetooth car
kit, you can talk in your car hands-free without using a headset.
WARNING: For important information about avoiding hearing loss and driving safety,
see page 102 and page 103.
Chapter 3 Phone 37
Page 38

Using the iPhone Bluetooth Headset
The iPhone Bluetooth Headset, available separately, is unlike any other Bluetooth
headset you’ve used before. It features autopairing and simple operation. You can pair
iPhone with the headset simply by placing iPhone and the headset in the iPhone Dual
Dock, which comes with the headset. Pairing sets iPhone to work with only one
headset, preventing connections with other headsets.
Pair iPhone with the iPhone Bluetooth Headset
m Connect the iPhone Dual Dock to your computer, then place iPhone and the headset in
the dock.
Dock
The first time you connect the headset, let it charge for about an hour until the status
light on the headset turns from amber to green. When iPhone and the headset are
both in the dock, iPhone displays the battery level for the headset.
Connect the iPhone Bluetooth Headset with iPhone
Before you can answer or make calls with the headset, the headset must be wirelessly
connected to iPhone.
m Press the button on the headset.
When the headset is connected, the blue ( ) or white ( ) Bluetooth icon appears in
the iPhone status bar at the top of the screen. (The color of the icon depends on the
color of the current status bar.)
Make or answer a call
1 Place the headset in either ear with the microphone pointed towards your mouth.
Microphone
38 Chapter 3 Phone
Page 39

2 Make a call on iPhone, or press the button on top of the headset to answer an
incoming call.
Button
Status light
3 When you finish, press the button to end the call.
Adjust the volume
m Use the volume buttons on the side of iPhone.
Using a Third-Party Headset or Car Kit
Other Bluetooth headsets and car kits can be used with iPhone as well. You must first
pair a Bluetooth device with iPhone before you can use it for your phone calls.
Pairing a Bluetooth Headset or Car Kit
Pairing sets iPhone to work with only one headset. This prevents iPhone from sending
your calls to some other headset.
Pair iPhone with a Bluetooth headset or car kit
1 Follow the instructions that came with the headset or car kit to make it discoverable or
to set it to search for other Bluetooth devices. This may involve entering a passkey or
PIN number.
2 From the Home screen, choose Settings > General > Bluetooth and turn Bluetooth on.
iPhone searches for nearby Bluetooth devices.
3 Choose the headset or device on iPhone and enter a passkey or PIN number.
The instructions that came with the headset or car kit should tell you how to get
the passkey.
Routing Calls Through a Bluetooth Headset, Car Kit, or iPhone
After you’ve paired a Bluetooth device to work with iPhone, you must make a
connection to have iPhone use the device for your calls.
When iPhone is connected to a Bluetooth device, all outgoing calls are routed through
the device by default. Incoming calls are routed through the device if you answer using
the device, and through iPhone if you answer using iPhone. In some cases, your
contacts list transfers to the car kit and you can start a call by looking up a contact on
the car kit’s display.
iPhone can be connected with only one Bluetooth device at a time.
Chapter 3 Phone 39
Page 40

Route calls through a Bluetooth headset or car kit
m Make a connection between iPhone and the headset or car kit.
To connect with a third-party Bluetooth headset, see the documentation that came
with the headset.
Once you have paired iPhone with a Bluetooth car kit, iPhone connects to the car kit
automatically when you start the car (if you have iPhone with you and Bluetooth is
turned on).
Bluetooth Status
You can see whether Bluetooth is on or off, and whether a Bluetooth device is
connected to iPhone, by looking at the Bluetooth icon ◊ in the iPhone status bar at the
top of the screen:
 or (white): Bluetooth is on and a device is connected to iPhone.
 (gray): Bluetooth is on but no device is connected. If you’ve paired a device with
iPhone, it may be out of range or turned off.
 No Bluetooth icon in status bar: Bluetooth is turned off.
Stop Using a Headset or Car Kit
There are a few ways to stop using a headset or car kit and go back to hearing calls
through iPhone.
Route calls through iPhone
m Answer a call by tapping the iPhone touchscreen.
m During a call, tap Audio on iPhone. Choose iPhone to hear calls through iPhone, choose
Speaker Phone to hear calls through the speakerphone, or choose a connected
Bluetooth device.
m Turn off Bluetooth. From the Home screen choose Settings > General > Bluetooth and
drag the switch to Off.
m Turn off the headset or car kit, or move out of range. You must be within about 30 feet
of a Bluetooth device for it to be connected to iPhone.
To turn off the iPhone Bluetooth Headset, press and hold the button until you hear the
falling tones.
40 Chapter 3 Phone
Page 41

Unpairing a Device from iPhone
If you’ve paired iPhone with a device and want to use another device instead, you must
unpair the first device.
Unpair a device from iPhone
1 From the Home screen choose Settings > General > Bluetooth. If Bluetooth isn’t on,
turn it on.
2 Choose a device and tap Unpair.
Until you pair the device with iPhone again, iPhone doesn’t route calls through it.
Turning Bluetooth on iPhone On or Off
m From the Home screen choose Settings > General > Bluetooth, then turn Bluetooth on
or off.
Calling to and from Other Countries
iPhone is a quad-band GSM phone. It supports the most common frequencies in the
U.S., Europe, and Asia (850, 900, 1800, and 1900 MHz), ensuring broad international
coverage.
Calling Abroad from the U.S.
AT&T calling plans allow you to make international calls from U.S., Canada, and many
Caribbean countries. International long-distance rates may apply when you make a call
to another country from the U.S.
Make a call to another country
m Canada, Puerto Rico, the U.S. Virgin Islands, and other Caribbean countries: Dial 1 followed
by the area code and the number.
m Any other country: Dial 011 + Country Code + City/Area Code (if required) + Local
Number.
Instead of dialing 011, you can dial the plus sign (+). Press and hold 0 to dial +.
For more information about making international calls, including international calling
rates, go to:
www.wireless.att.com/learn/international/long-distance
Chapter 3 Phone 41
Page 42

International Roaming
You can use iPhone to make calls in many countries around the world. You must first
enable iPhone for international roaming. International roaming is not required when
calling from the U.S., Canada, Puerto Rico, or the U.S. Virgin Islands. International
roaming charges may apply depending on your rate plan.
So that you can still make calls by tapping entries in contacts or favorites, you can set
iPhone to add the correct prefix automatically to U.S. phones numbers when you call.
When you’re traveling abroad, you may be able to choose which carrier network you
want to use.
For information about international coverage and how to enable roaming, go to:
www.wireless.att.com/learn/international
Make a call from outside the U.S., Canada, Puerto Rico, or U.S. Virgin Islands
m Enable your iPhone for international roaming.
You don’t need to enable international roaming to use iPhone in Canada, Puerto Rico,
and the U.S. Virgin Islands.
Set iPhone to add the correct prefix to U.S. numbers when dialing from abroad
m From the Home screen choose Settings > Phone, then turn International Assist on or
off. By default, International Assist is on.
Set the carrier network to use
m In Settings, tap Carrier, then select the carrier network you prefer. You can only make
calls on carriers that have roaming agreements with AT&T. Any roaming charges will be
billed from the selected network. See “Carrier” on page 95 for more information.
42 Chapter 3 Phone
Page 43

4 Mail
Tap Mail to send and check email.
4
Mail is a rich HTML email client that retrieves your email in the background while you
do other things on iPhone. iPhone works with the most popular email systems—
including Yahoo! Mail, Gmail, AOL, and .Mac Mail—as well as most industry-standard
POP3 and IMAP email systems. Mail lets you send and receive photos and graphics,
which are displayed in your message along with the text. You can also get PDFs and
other attachments and view them on iPhone.
Setting Up Email Accounts
You must have an email address—which looks like “yourname@example.com”—to use
iPhone for email. If you have Internet access, you most likely got an email address from
your Internet service provider.
If you chose automatic syncing during setup, your existing email accounts should be
already set up and ready to go. Otherwise, you can set iTunes to sync your email
accounts, or configure email accounts directly on iPhone.
43
Page 44

Syncing Email Accounts to iPhone
You use iTunes to sync your email accounts to iPhone. iTunes supports Mail and
Microsoft Entourage on a Mac, and Microsoft Outlook and Outlook Express on a PC.
See “Setting Up Syncing” on page 6.
Note: Syncing an email account to iPhone copies the email account setup, not the
messages themselves. Whether the messages in your inbox appear on both iPhone and
your computer depends on the type of email account you have and how it’s
configured.
If You Don’t Have an Email Account
Email accounts are available from most Internet service providers. If you use a Mac, you
can get an email address, along with other services, at www.mac.com. Fees may apply.
Free accounts are also available online:
 www.mail.yahoo.com
Yahoo! provides free “push” email accounts. With a push email account, email is
transferred to iPhone as soon as it is received by the mail server.
 www.google.com/mail
 www.aol.com
Setting Up an Email Account on iPhone
You can set up and make changes to an email account directly on iPhone. Your email
service provider can provide the account settings you need to enter.
Changes you make on iPhone to a email account synced from your computer are not
copied to your computer.
Enter account settings directly on iPhone
1 If this is the first account you’re setting up on iPhone, tap Mail. Otherwise, from the
Home screen choose Settings > Mail > Accounts > Add Account.
2 Choose your email account type: Y! Mail (for Yahoo!), Gmail, .Mac, AOL, or Other.
3 Enter your account information:
If you’re setting up a Yahoo!, Gmail, .Mac, or AOL account, enter your name, email
address, and password. After that, you’re done.
Otherwise, click Other, select a server type—IMAP, POP, or Exchange—and enter your
account information.
 Your email address
 The email server type (IMAP, POP, or Exchange)
 The Internet host name for your incoming mail server (which may look like
“mail.example.com”)
44 Chapter 4 Mail
Page 45

 The Internet host name for your outgoing mail server (which may look like
“smtp.example.com”)
 Your user name and password for incoming and outgoing servers (you may not need
to enter a user name and password for an outgoing server)
Note: Exchange email accounts must be configured for IMAP in order to work with
iPhone. Contact your IT organization for more information.
Sending Email
You can send an email message to anyone who has an email address. You can send it
to one person or a group of people.
Compose and send a message
1 Tap .
2 Type one or more names or email addresses in the To or Cc (carbon copy) fields, or tap
and choose a contact to add the contact’s email address.
As you type an email address, comparable email addresses from your contacts list
appear below. Tap one to add it.
3 Type a subject if you like, then type a message.
4 Tap Send.
Send a photo in a message
m From the Home screen choose Photos, then choose a photo. Then tap and tap
Email Photo.
If you have more than one email account on iPhone, the photo is sent using the default
account (see page 51).
Save a message as a draft so you can work on it later
m Start composing the message and tap Cancel. Then tap Save. You can find the message
in the Drafts mailbox, add to it or change it, and then send it.
Reply to a message
m Open a message and tap . Tap Reply to reply to just the person who sent the
message. Tap Reply All to reply to the sender and the other recipients. Then add a
message of your own if you like, and tap Send.
When you reply to a message, files or images attached to the initial message are not
sent back.
Forward a message
m Open a message and tap , then tap Forward. Add one or more email addresses and
a message of your own if you like, then tap Send.
Chapter 4 Mail 45
Page 46

When you forward a message, you can include the files or images attached to the
original message.
Send a message to a recipient of a message you received
m Open the message and tap the recipient’s name or email address, then tap Email.
Checking and Reading Email
The Mail button shows the total number of unread messages in your all of your
inboxes. You may have other unread messages in other mailboxes.
Number of
unread emails
On each account screen, you can see the number of unread messages next to each
mailbox.
Tap to see all
your email accounts
Number of
unread messages
46 Chapter 4 Mail
Page 47

Tap a mailbox to see the messages inside. Unread messages have a blue dot next
to them.
Unread messages
Read a message
m Tap a mailbox, then tap a message. Within a message, tap or to see the next or
previous message.
Delete a message
m Open the message and tap .
You can also delete a message directly from the mailbox message list by swiping left or
right over the message title and then tapping Delete.
To show the Delete button, swipe
left or right over the message.
Or you can tap Edit and tap next to a message.
Check for new messages
m Choose a mailbox, or tap at any time.
Open an attached file
You can view or read some types of files and images attached to messages you receive.
For example, if someone sends you a PDF, Microsoft Word, or Microsoft Excel
document, you’ll be able to read it on iPhone.
Chapter 4 Mail 47
Page 48

m Tap the attachment. It downloads to iPhone and then opens.
Tap attachment
to download
Downloading
If an attached file isn’t supported by iPhone, you can see the name of the file but you
can’t open it. iPhone supports the following email attachment file formats:
 .c, .cpp, .diff, .doc, .docx, .h, .hpp, .htm, .html, .m, .mm, .patch, .pdf, .txt, .xls, .xlsx
See all the recipients of a message
m Open the message and tap Details.
Tap a name or email address to see the recipient’s contact information. Then tap a
phone number, email address, or Text Message to contact the person. Tap Hide to hide
the recipients.
Add an email recipient to your contacts list
m Tap the message and, if necessary, tap Details to see the recipients. Then tap a name or
email address and tap Create New Contact or “Add to Existing Contact.”
Mark a message as unread
m Open the message and tap “Mark as Unread.”
A blue dot appears next to the message in the mailbox list until you open it again.
Move a message to another mailbox
m Open the message and tap , then choose a mailbox.
Zoom in to a part of a message
m Double-tap the part you want to zoom in on. Double-tap again to zoom out.
Resize any column of text to fit the screen
m Double-tap the text.
Resize a message manually
m Pinch to zoom in or out.
48 Chapter 4 Mail
Page 49

Follow a link
m Tap the link.
Text links are typically underlined in blue. Many images also have links. A link can take
you to a webpage, open a map, dial a phone number, or open a new preaddressed
email message.
Web, phone, and map links open Safari, Phone, or Maps on iPhone. To return to your
email, press the Home button and tap Mail.
Mail Settings
Mail settings let you customize your email account for iPhone. Changes you make to
accounts settings are not synced to your computer, allowing you to configure email to
work with iPhone without affecting email on your computer.
Account Settings
The specific accounts settings that appear on iPhone depend on the type of account
you have—POP or IMAP.
Note: Exchange email accounts must be configured for IMAP to work with iPhone.
Stop using an account
m From the Home screen choose Settings > Mail, choose an account, then turn
Account off.
If an account is off, iPhone doesn’t display the account, or send or check email from
that account, until you turn it back on.
Adjust advanced settings
m From the Home screen choose Settings > Mail > Accounts, choose an account, then do
one of the following:
 To set whether drafts, sent messages, and deleted messages are stored on iPhone or
remotely on your email server (IMAP accounts only), tap Advanced and choose Drafts
Mailbox, Sent Mailbox, or Deleted Mailbox.
If you store messages on iPhone, you can see them even when iPhone isn’t
connected to the Internet.
 To set when deleted messages are removed permanently from iPhone, tap Advanced and
tap Remove, then choose a time: Never, or after one day, one week, or one month.
 To adjust email server settings, tap Host Name, User Name, or Password under
Incoming Mail Server or Outgoing Mail Server. Ask your network administrator or
Internet service provider for the correct settings.
 To adjust SSL and password settings, tap Advanced. Ask your network administrator or
Internet service provider for the correct settings.
Chapter 4 Mail 49
Page 50

Delete an email account from iPhone
m From the Home screen choose Settings > Mail, tap an account, then scroll down and
tap Delete Account.
Deleting an email account from iPhone doesn’t delete it from your computer.
Settings for Checking and Viewing Email
iPhone checks for and retrieves new email in your accounts whenever your open Mail.
You can also set Mail to regularly check for email and download your messages even
when you don’t have Mail open.
Set whether iPhone checks for new messages automatically
m From the Home screen choose Settings > Mail > Auto-Check, then tap Manual, “Every
15 minutes,” “Every 30 minutes,” or “Every hour.”
If you have a Yahoo! email account, email is instantly transferred to iPhone as it arrives
at the Yahoo! server.
Set whether iPhone plays an alert sound when you have new email
m From the Home screen choose Settings > Sound, then turn New Mail on or off.
Set the number of messages shown on iPhone
m From the Home screen choose Settings > Mail > Show, then choose a setting. You can
choose to see the most recent 25, 50, 75,100, or 200 messages. To download additional
messages when you’re in Mail, scroll to the bottom of your inbox and tap
“Download . . . more.”
Set how many lines of each message are previewed in the message list
m From the Home screen choose Settings > Mail > Preview, then choose a setting. You
can choose to see anywhere from zero to five lines of each message. That way, you can
scan a list of messages in a mailbox and get an idea of what each message is about.
Set a minimum font size for messages
m From the Home screen choose Settings > Mail > Minimum Font Size, then choose
Small, Medium, Large, Extra Large, or Giant.
Setting whether iPhone shows To and Cc labels in message lists
m From the Home screen choose Settings > Mail, then turn Show To/Cc Label on or off.
If Show To/Cc Label is on, or next to each message in a list indicates whether
the message was sent directly to you or you were Cc’ed.
Setting iPhone to confirm that you want to delete a message
m From the Home screen, choose Settings > Mail and turn Ask Before Deleting on or off.
If Ask Before Deleting is on, to delete a message you must tap , then confirm by
tapping Delete.
50 Chapter 4 Mail
Cc
To
Page 51

Settings for Sending Email
Set an alert to sound when you successfully send a message
m From the Home screen choose Settings > Sound, then turn Sent Mail on or off.
Set whether iPhone sends you a copy of every message you send
m From the Home screen choose Settings > Mail, then turn Always Cc Myself on or off.
Add a signature to your messages
You can set iPhone to add a signature—your favorite quote, or your name, title, and
phone number, for example—that appears in every message you send.
m From the Home screen choose Settings > Mail > Signature, then type a signature.
Set the default email account
When you initiate sending a message from another iPhone application, such as
sending a photo from Photos or tapping a business’ email address in Maps, the
message is sent from your default email account.
m From the Home screen choose Settings > Mail > Default Account, then choose an
account.
Chapter 4 Mail 51
Page 52

5 Safari
Tap Safari to explore the World Wide Web.
5
m Tap the address field at the top of the screen, type the web address—apple.com or
52
Surfing the Web
Safari lets you see web pages just as they were designed to be seen in computer-based
browsers. A simple tap lets you zoom in; rotate iPhone sideways for a wider view.
Search using Google or Yahoo!—both are built-in.
Opening and Navigating Webpages
Open a new webpage
www.google.com, for example—and tap Go. If you don’t see the address field, tap the
status bar at the top of the screen.
As you type, any web address in your bookmarks or history list that contains those
letters appears below. Tap a web address to go to its webpage.
If you don’t see the address field, tap the status bar or scroll to the top of the page.
Page 53

Erase all the text in the address field
m Tap the address field, then tap .
Follow a link on a webpage
m Tap the link.
Text links are typically underlined in blue. Many images also have links. A link can take
you to another place on the web, open a map, call a phone number, or open a new
preaddressed email.
Email, phone, and map links open Mail, Phone, or Maps on iPhone. To return to Safari,
press the Home button and tap Safari.
If a link leads to a sound or movie file supported by iPhone, Safari plays the sound or
movie. For supported file types, see page 111.
To Do this
See a link’s destination address Touch and hold the link. The address pops up next to your
finger. You can touch and hold an image to check whether it
has a link.
Stop a page from loading if you
change your mind
Reload a webpage Tap .
Return to the previous or next
webpage
Return to any of the last several
webpages you’ve visited
Send a webpage address over email Tap the address field and tap Share. You must have an email
Tap .
Tap or in the navigation bar at the bottom of the screen.
Tap and tap History. To clear the history list, tap Clear.
account set up on iPhone (see page 43).
Chapter 5 Safari 53
Page 54

Zooming In to See a Page More Easily
View a webpage in widescreen orientation
m Rotate iPhone sideways. Safari automatically reorients and expands the page.
Resize any column to fit the screen
m Double-tap the column. The column expands, so you can read it more easily.
Double-tap again to zoom back out.
Zoom in on part of a webpage
m Double-tap the part of the page you want to zoom in on. Double-tap again to
zoom out.
Zoom in or out manually
m Pinch to zoom in or out.
Pan and scroll around the page
m Drag up, down, or sideways. When scrolling or panning, you can touch and drag
anywhere on the page without activating any links. If you tap a link, you follow the link,
but if you touch a link and drag, the page scrolls or pans.
54 Chapter 5 Safari
Page 55

Searching the Web
By default, Safari searches using Google. You can set it to search using Yahoo!, instead.
Search for anything on the web
1 Tap the address field, then tap the Google search field.
2 Type a word or phrase that describes what you’re looking for, then tap Google.
3 Tap a link in the list of search results to open a webpage.
Set Safari to search using Yahoo!
m From the Home screen choose Settings > Safari > Search Engine, then choose Yahoo!.
Opening Multiple Pages at Once
You can have more than one webpage open at a time. Some links automatically open a
new page instead of replacing the current one.
The number inside the pages icon at the bottom of the screen shows how many
pages are open. If there’s no number inside, just one page is open.
For example:
= one page is open
= three pages are open
Open a new page
m Tap and tap New Page.
See all open pages and go to another page that’s open
m Tap and flick left or right. When you get to the page you want, tap it.
Close a page
m Tap and tap . You can’t close a page if it’s the only one that’s open.
Chapter 5 Safari 55
Page 56

Typing in Text Fields
Some webpages have forms or text fields you can enter information in.
Bring up the keyboard
m Tap inside a text field.
Move to other text fields on the page
m Tap another text field. Or tap the Next or Previous button.
Submit the form
m Once you finish filling out the text fields on the page, tap Go or Search. Most pages
also have a link you can tap to submit the form.
Dismiss the keyboard without submitting the form
m Tap Done.
Using Bookmarks
You can bookmark webpages, so you can quickly return to them at any time without
having to type the address.
Bookmark a webpage
m Open the page and tap . Then tap Save.
Before you save a bookmark you can edit its title or choose where to save it. By default,
the bookmark is saved in the top level Bookmarks folder. Tap Bookmarks to choose
another folder.
Open a bookmarked webpage
m Tap , then choose a bookmark or tap a folder to see the bookmarks inside.
Edit a bookmark or bookmark folder
m Tap , choose the folder that has the bookmark or folder you want to edit, and tap
Edit. Then do one of the following:
 To make a new folder, tap New Folder.
 To delete a bookmark or folder, tap next to the bookmark or folder.
 To reposition a bookmark or folder, drag next to the item you want to move.
 To edit a bookmark’s or folder’s name or address, or to put it in a different folder, tap the
bookmark or folder.
Syncing Bookmarks
If you use Safari on the Mac, or Safari or Internet Explorer on the PC, you can sync
bookmarks on iPhone with bookmarks on your computer.
56 Chapter 5 Safari
Page 57

Sync bookmarks between iPhone and your computer
m Connect iPhone to your computer. If bookmarks are set to be synced (see page 6),
the sync begins.
Safari Settings
Blocking Pop-Ups
Many websites have pop-ups—new pages that appear when you didn’t intend for
them to. Many pop-ups are advertisements.
Block or allow pop-ups
m From the Home screen choose Settings > Safari, then turn Block Pop-ups on or off.
Blocking pop-ups stops only pop-ups that appear when you close a page or open a
page by typing its address. It doesn’t block pop-ups that open when you click a link.
Security Settings
By default, Safari is set to show some of the features of the web, like some movies,
animation, and web applications. You may wish to turn off some of these features to
help protect your privacy and iPhone from possible security risks on the Internet.
Change security settings
m From the Home screen choose Settings > Safari, then do one of the following:
 To enable or disable JavaScript, turn JavaScript on or off.
JavaScript lets web programmers control elements of the page—for example, a page
that uses JavaScript might display the current date and time or cause a linked page
to appear in a new pop-up page.
 To enable or disable plug-ins, turn Plug-ins on or off. Plug-ins allow Safari to display
some kinds of video.
 To set whether Safari accepts cookies, tap Accept Cookies and choose Never, “From
visited,” or Always.
A cookie is a piece of data that a website puts on iPhone so the website can
remember you when you visit again. That way, webpages can be customized for you
based on information you may have provided.
Some pages won’t work correctly unless iPhone is set to accept cookies.
 To clear all cookies from Safari, tap Clear Cookies.
 To clear the browser cache, tap Clear Cache.
The browser cache stores the content of pages so the pages open faster the next
time you visit them. If a page you open isn’t showing new content, clearing the
cache may help.
Chapter 5 Safari 57
Page 58

6 iPod
Tap iPod to listen to songs, audiobooks, and podcasts,
and watch TV shows, movies, and other video.
6
58
iPod on iPhone works . . . just like an iPod! iPhone syncs with iTunes on your computer
to get the songs, movies, TV shows, and other content you’ve collected in your iTunes
library.
Syncing iPod Content from your iTunes Library
If you’ve turned on syncing, iTunes automatically syncs content from iTunes library to
iPhone each time you connect it to your computer. iTunes lets you sync all of your
media, or selected songs, movies, videos, and podcasts.
For information about syncing iPhone with your iTunes library, see “Syncing iPhone
with Your Computer” on page 5.
For information about using iTunes to get music and other media onto your computer,
open iTunes and choose Help > iTunes Help.
Page 59

Syncing Music, Podcasts, and Video
Only songs and videos encoded in formats that iPhone supports are transferred to
iPhone. For information about which formats iPhone supports, see page 111.
If there are more songs in your iTunes library than can fit on your iPhone, iTunes asks if
you want to create a special playlist and set it to sync with iPhone. Then iTunes
randomly fills the playlist. You can add or delete songs from the playlist and sync again.
When you sync podcasts or audiobooks on iPhone with those on your computer, both
iTunes and iPhone remember where you last left off and start playing from that
position.
Transferring Purchased Content from iPhone to Another Computer
Music, video, and podcasts sync from your iTunes library to iPhone, but not from
iPhone to your iTunes library. However, you can transfer content purchased from the
iTunes store from iPhone to an iTunes library on another computer.
m Connect iPhone to the other computer. iTunes asks if you want to transfer purchased
content. You can also connect iPhone and, in iTunes, choose File > Transfer Purchases.
To play the content, the computer must be authorized to play content from your iTunes
account.
Converting Videos for iPhone
You can add videos other than those purchased from iTunes to iPhone, such as videos
you create in iMovie on a Macintosh or videos you download from the Internet.
If you try to add a video from iTunes to iPhone and a message says the video can’t play
on iPhone, you can convert the video.
Convert a video to work with iPhone
m Select the video in your iTunes library and choose Advanced > “Convert Selection for
iPod.” Then add the converted video to iPhone.
Playing Music and Video
The high resolution display makes listening to songs on iPhone as much a visual
experience as a musical one. You can scroll through your playlists, or use Cover Flow to
browse through your album art. Videos play in landscape orientation to take full
advantage of the widescreen display.
WARNING: For important information about avoiding hearing loss, see page 102.
Chapter 6 iPod 59
Page 60

Playing Songs, Audiobooks, and Podcasts
Browse your collection
m Tap Playlists, Artists, or Songs. Tap More to browse Albums, Audiobooks, Compilations,
Composers, Genres, or Podcasts.
Play a song
m Tap the song.
Controlling Song Playback
When you play a song, the Now Playing screen appears:
Back
Now Playing screen
Previous/rewind
Track list
Play/Pause
Next/Fast-forward
Volume
To Do this
Pause a song Tap or press the mic button on the iPhone headset.
Resume playback Tap or press the mic button on the iPhone headset.
Raise or lower the volume Drag the volume slider or use the buttons on the side of
iPhone.
Restart a song or a chapter in an
audiobook or podcast
Skip to the next or previous song or
chapter in an audiobook or podcast
Rewind or fast-forward Touch and hold or .
Return to the iPod browse lists Tap . Or swipe to the right over the album cover.
Tap .
Tap twice to skip to the previous song. Tap to skip to
the next song, or press the mic button on the iPhone headset
twice quickly.
60 Chapter 6 iPod
Page 61

To Do this
Return to the Now Playing screen Tap Now Playing .
See the tracks in your collection
from the current album
Tap . Tap any track to play it.
Additional Controls
m From the Now Playing screen tap the album cover.
The repeat and shuffle controls and the scrubber bar playhead appear. You can see
time elapsed, time remaining, and the song number.
Playhead
Repeat
Shuffle
Scrubber bar
To Do this
Set iPhone to repeat songs Tap . Tap again to set iPhone to repeat one song.
= iPhone is set to repeat all songs in the currently playing
album or list.
= iPhone is set to repeat the current song over and over.
= iPhone is not set to repeat songs.
Skip to any point in a song Drag the playhead along the scrubber bar.
Set iPhone to shuffle songs Tap . Tap again to set iPhone to play songs in order.
= iPhone is set to shuffle songs.
= iPhone is set to play songs in order.
Shuffle the tracks in any playlist,
album, or other list of songs
Tap Shuffle at the top of the list. For example, to shuffle all the
songs on iPhone, choose Songs > Shuffle.
Whether or not iPhone is set to shuffle, if you tap Shuffle at the
top of a list of songs, iPhone plays the songs from that list in
random order.
Chapter 6 iPod 61
Page 62

Browsing Album Covers in Cover Flow
Whenever you’re using iPod—except for when you’re browsing or watching videos—
you can rotate iPhone sideways to see your iPod content in Cover Flow. Cover Flow lets
you browse your music library by album artwork.
To Do this
See Cover Flow Rotate iPhone sideways.
Browse album covers Drag or flick left or right.
See the tracks on an album Tap a cover or .
To Do this
Play any track Tap the track. Drag up or down to scroll through the tracks.
Return to the cover Tap the title bar. Or tap again.
Play or pause the current song Tap or . Or, if you’re using the included stereo headset,
62 Chapter 6 iPod
click the mic button.
Page 63

Viewing All Tracks on an Album
See all the tracks on the album that the current song is on
m From the Now Playing screen tap . Tap a track to play it. Tap the album cover
thumbnail to return to the Now Playing screen.
Track List view
Rating bar
Back to Now
Playing screen
Album tracks
In track list view, you can assign ratings to songs. You can use ratings to create
smart playlists in iTunes that dynamically update to show, for example, your highest
rated songs.
Rate a song
m Drag your thumb across the ratings bar to give the song zero to five stars.
Making Playlists Directly on iPhone
Make an on-the-go playlist
1 Tap Playlists and Tap On-The-Go.
2 Browse for songs using the buttons at the bottom of the screen. Tap any song or video
to add it to the playlist. Tap Add All at the top of any list of songs to add all the songs in
the list.
3 When you finish, tap Done.
When you make an on-the-go playlist and then sync iPhone to your computer, the
playlist is saved on iPhone and in your iTunes library. The first is saved as “On-The-Go 1,”
the second as “On-The-Go 2,” and so on. The playlists remain until you delete them
from iTunes. To delete a playlist from iTunes, select it and press Delete on your
keyboard.
Edit an on-the-go playlist
m Tap Playlists, tap On-The-Go, tap Edit, then do one of the following:
 To move a song higher or lower in the list, drag next to the song.
 To delete a song from the playlist, tap next to a song and tap Delete. Deleting a
song from the on-the-go playlist doesn’t delete it from iPhone.
 To clear the entire playlist, tap Clear Playlist.
 To add more songs, tap .
Chapter 6 iPod 63
Page 64

Playing TV Shows, Movies, Music Videos, and Video Podcasts
Play a video
m Tap Videos and tap the video.
Controlling Video Playback
Video plays in widescreen mode, with no visible controls.
m Tap the screen to show the controls. Tap again to make them disappear.
Playhead
Video controls
Scale
Play/Pause
Restart/Rewind
Fast-forward
Volume
To Do this
Play or pause a video Tap or .
Raise or lower the volume Drag the volume slider.
Start a video over Tap .
Rewind or fast-forward Touch and hold or .
Skip to any point in a video Drag the playhead along the scrubber bar.
Stop watching a video before it
finishes playing
Scale a video to fill the screen or fit
to the screen
Play the sound from a music video
or video podcast without showing
the video
Scrubber bar
Tap Done . Or press the Home button.
Tap to make the video fill the screen. Tap to make it
fit to the screen.
You can also double-tap the video to toggle between fitting
and filling the screen.
When you scale a video to fill the screen, the sides or top may
be cropped from view. When you scale it to fit the screen, you
may see black bars on the sides or above and below the video.
Browse for the music video or podcast through lists other than
the Videos list. To play the video for a music video or podcast,
you must browse for it through the Videos list.
Deleting Videos
You can delete videos directly from iPhone, to save space.
64 Chapter 6 iPod
Page 65

Delete a video
m In the videos list, swipe left or right over a video, then tap Delete.
To show the Delete button, swipe
left or right over the video title.
Also, when you finish watching a movie, video podcast, or TV show, iPhone asks if you
want to delete it to save space.
When you delete a video from iPhone, it isn’t deleted from your iTunes library. You can
sync the video back to iPhone later. If you don’t want to sync the video back to iPhone,
set iTunes not to sync the video (see page 59).
iPod Settings
Set iTunes to play songs at the same sound level
iTunes can automatically adjust the volume of songs, so they play at the same relative
volume level. You can set iPhone to use the iTunes volume settings:
m In iTunes, choose iTunes > Preferences if you’re using a Mac, or Edit > Preferences if
you’re using a PC, then click Playback and select Sound Check.
Set iPhone to use the iTunes volume settings
m From the Home screen choose Settings > iPod, then turn Sound Check on.
Set audiobook play speed
You can set audiobooks to play faster than normal so you can hear them more quickly,
or slower so you can hear them more clearly.
m From the Home screen choose Settings > iPod > Audiobook Speed, then choose
Slower, Normal, or Faster.
Use the equalizer to change the sound on iPhone to suit a particular sound or style
m From the Home screen choose Settings > iPod > EQ, then choose a setting.
Set a volume limit for music and videos
m From the Home screen choose Settings > iPod > Volume Limit, then drag the slider to
adjust the maximum volume. Tap Lock Volume Limit to assign a combination to
prevent the setting from being changed.
Setting a volume limit only limits the volume of music and videos, and only when a
headset, headphones, or speakers are connected to the headset jack on iPhone.
WARNING: For important information about avoiding hearing loss, see page 102.
Chapter 6 iPod 65
Page 66

Setting a Sleep Timer
You can set iPhone to stop playing music or video after a period of time.
m From the Home screen choose Clock > Timer, then flick to set the number of hours and
minutes. Tap When Timer Ends and choose Sleep iPod, then tap Start to start the timer.
When the time runs out, iPhone stops playing music or video.
Changing the Browse Buttons at the Bottom of the Screen
You can replace the Playlists, Artist, Songs, or Videos browse buttons at the bottom of
the screen with ones you use more. For example, if you listen to podcasts a lot and
don’t watch many videos, you can replace the Videos button with Podcasts.
m Tap More and tap Edit, then drag a button to the bottom of the screen, over the button
you want to replace.
If you like, drag the buttons at the bottom of the screen left or right to rearrange them.
When you finish, tap Done.
Tap More at any time to access the browse buttons you replaced.
66 Chapter 6 iPod
Page 67

7 Applications
Text
7
Sending and Receiving Text Messages
You can send and receive text messages anytime you’re in range of the cell network.
If you can make a call, you can send a text message. All iPhone plans include a certain
number of free text messages. Depending on your phone plan, you may be charged for
additional message you send or receive.
You can send text messages to anyone with an SMS-capable phone. The recipient is
notified of the message and can read it and reply at any time.
WARNING: For important information about driving safety, see page 103.
Send a new text message
m Tap , then enter a phone number or name, or tap and choose a contact from
your contacts list. Type a message and tap Send.
67
Page 68

unread messages
Text messages from
the other person
The Text button on the Home screen shows the total number of unread text messages
you have.
Number of
As you text back and forth with a person over time, your conversation is saved in the
Text Messages list. Conversations that contain unread messages have a blue dot
next to them. Tap a name in the list to see or add to that conversation.
Text messages
you sent
Reply to a text message or send one to someone you’ve texted before
m Tap a name or phone number in the Text Messages list, then type a message and
tap Send.
Delete a conversation from the Text Messages list
m Tap Edit, then tap next to a conversation and tap Delete.
You can also delete a conversation by swiping left or right over a conversation and
tapping Delete.
Send a text message to someone in your favorites list or to a recent caller
m From the Home screen tap Phone, then tap Favorites or Recents. Tap next to a
name or number and tap Text Message.
68 Chapter 7 Applications
To show the Delete button, swipe
left or right over the message.
Page 69

Call or email someone you’ve texted
m Tap a message in the Text Messages list. Scroll to the top of the conversation and tap
Call to call the person. Tap Contact Info, then tap an email address to send an email.
The person’s email address must already be in your contacts list.
Follow a link in a message
m Tap the link.
Tap a web address to open a webpage in Safari, a phone number to make a call, an
email address to open a preaddressed email in Mail, or a street address to see a map in
Maps. To return to your text messages, press the Home button and tap Text.
Add information in a link to a contact, or see the contact information of the person
associated with the link
m Tap next to the message.
Add someone you’ve texted to your contacts list
m Tap a name or phone number in the Text Messages list, then tap “Add to Contacts.”
Set whether iPhone makes an alert sound when you get a text message
m From the Home screen choose Settings > Sounds, then turn New Text Message on
or off.
If the Ring/Silent switch is off, iPhone won’t make alert sounds even if they’re turned on
in Settings.
Chapter 7 Applications 69
Page 70

Calendar
Adding Calendar Events to iPhone
You can enter appointments and events on your computer and sync them with iPhone,
and you can enter appointments and events directly on iPhone.
Entering Calendar Events on Your Computer
You can enter appointments and events in iCal or Microsoft Entourage on a Mac,
or in Microsoft Outlook on a PC.
Syncing Calendars
Sync calendars between iPhone and your computer
m Connect iPhone to your computer. If iPhone is set to sync calendars (see page 6),
the update begins.
Adding and Editing Calendar Events Directly on iPhone
Add an event
m Tap and enter event information. Then tap Done.
You can enter any of the following:
 Title
 Location
 Starting and ending times (or turn on All-day if it’s an all-day event)
 Repeat times—none, or every day, week, two weeks, month, or year
 Alert time—from five minutes to two days before the event
If you set an alert time, iPhone gives you the option to set a second alert time,
in case you miss the first one. When the alert goes off, iPhone plays a sound (if the
Ring/Silent switch is set to ring) and displays a reminder message.
 Notes
70 Chapter 7 Applications
Page 71

Set iPhone to make a sound when you get a calendar alert
m From the Home screen choose Settings > Sounds, then turn Calendar Alerts on.
If Calendar Alerts is off, iPhone displays a message but makes no sound when you get a
calendar alert.
Edit an event
m Tap the event and tap Edit.
Delete an event
m Tap the event, tap Edit, then scroll down and tap Delete Event.
Viewing Your Calendar
Switch views
m Tap List, Day, or Month.
 List view: All your appointments and events appear in an easy-to-scan list. Scroll up
or down to see previous or upcoming days.
 Day view: Scroll up or down to see hours earlier or later in the day. Tap or to
see the previous or next day.
 Month view: Days with events show a dot below the date. Tap a day to see its events
in a list below the calendar. Tap or to see the previous or next month.
Go to today
Month view
Events for selected day
Switch views
Add an event
Days with dots have
scheduled events
Jump to today
m Tap Today.
Chapter 7 Applications 71
Page 72

See the details of an event
m Tap the event.
Set iPhone to adjust event times for a selected time zone
m From the Home screen tap Settings > General > Date & Time, then turn Time Zone
Support on. Then tap Time Zone and search for a major city in the time zone you want.
When Time Zone Support is on, Calendar displays event dates and times in the time
zone set for your calendars. When Time Zone Support is off, Calendar displays events in
the time zone of your current location.
72 Chapter 7 Applications
Page 73

Photos and Camera
iPhone lets you carry your photos with you, so you can share them with your family,
friends, and associates on iPhone’s high-resolution display. You can sync photos from
your computer to iPhone, and take photos with the built-in 2-megapixel camera.
Syncing Photos from your Computer
If you’ve turn on syncing, iTunes automatically copies or updates your photo library
(or selected albums) from your computer to iPhone whenever you connect iPhone to
your computer. iTunes can sync your photos from the following applications:
 On a Mac: iPhoto 4.0.3 or later
 On a PC: Adobe Photoshop Album 2.0 or later or Adobe Photoshop Elements 3.0
or later
For information about syncing iPhone with photos and other information on your
computer, see “Syncing iPhone with Your Computer” on page 5
Taking Pictures
To take a picture, just point and tap. The camera is on the back of iPhone so you can
see the image you want on the display.
You can email pictures that you’ve taken, use them as wallpaper, assign them to
contacts, and upload them to your computer.
Take a picture
m Tap Camera, then aim iPhone and tap .
If you take a picture with iPhone rotated sideways, it is automatically saved in
landscape orientation.
Chapter 7 Applications 73
Page 74

Import photos from iPhone to your computer
m Connect iPhone to your computer. Then:
 On a Mac: In iPhoto, click Import. iPhoto should open automatically.
 On a PC: Follow the instructions that came with your camera or photo application.
Viewing Photos
You can view the roll of pictures you’ve taken with the built-in camera in either Camera
or Photos. Photos synced from your computer can be viewed in Photos.
See the pictures you’ve taken
m Tap Camera, then tap . Or from the Home screen choose Photos > Camera Roll.
Delete a picture
m Tap a picture in the Camera Roll album, then tap .
View photos from your computer
m From the Home screen choose Photos.
 Tap Photo Library to see all your photos.
 Tap any photo album, or Camera Roll to see pictures you’ve taken with iPhone.
See a photo at full screen
m Tap a thumbnail photo to see it at full screen. Tap the full screen photo to hide
the controls.
Tap the screen again to show the controls.
74 Chapter 7 Applications
Page 75

See the next or previous photo
m Flick left or right. Or tap the screen to show the controls, then tap or .
Changing the Size or Orientation
See a photo in landscape orientation
m Rotate iPhone sideways. The photo automatically reorients and, if it’s in landscape
format, expands to fit the screen.
Zoom in on part of a photo
m Double-tap the part you want to zoom in on. Double-tap again to zoom out.
Chapter 7 Applications 75
Page 76

Zoom in or out
m Pinch to zoom in or out.
Pan and scroll around a photo
m Drag the photo.
Viewing Slideshows
View photos in a slideshow
m Choose an album and tap a photo, then tap . If you don’t see , tap the photo to
show the controls.
Set slideshow settings
1 From the Home screen choose Settings > Photos.
2 To set:
 The length of time each slide is shown, tap Play Each Slide For and choose a time.
 Transition effects when moving from photo to photo, tap Transition and choose a
transition type.
 Whether slideshows repeat, turn Repeat on or off.
 Whether photos are shown in random order, turn Shuffle on or off.
Play music during a slideshow
m From the Home screen choose iPod, and play a song. Then choose Photos from the
Home screen and start a slideshow.
76 Chapter 7 Applications
Page 77

Using a Photo as Wallpaper
You see a wallpaper background picture as you unlock iPhone or when you’re on a call
with someone you don’t have a high-resolution photo for.
Set a photo as wallpaper
1 Choose any photo and tap , then tap Use As Wallpaper.
2 Drag the photo to pan, or pinch the photo to zoom in or out, until it looks the way
you want.
3 Tap Set Wallpaper.
You can also choose from several wallpaper pictures included with iPhone by choosing
Settings > Wallpaper > Wallpaper from the Home screen.
Emailing a Photo
Email a photo
m Choose any photo and tap , then tap Email Photo.
iPhone must be set up for email (see “Setting Up Email Accounts” on page 43).
Assigning a Photo to a Contact
You can assign a photo to a contact. When that person calls you, iPhone displays the
photo you assigned.
Assign a photo to a contact
1 Choose Camera from the Home screen and take someone’s picture. Or choose any
photo already on iPhone and tap .
2 Tap Assign to Contact and choose a contact.
3 Drag the photo to pan, or pinch the photo to zoom in or out, until it looks the way
you want.
4 Tap Set Photo.
You can also assign a photo to a contact in Contacts by tapping edit and then tapping
the picture icon.
Chapter 7 Applications 77
Page 78

YouTube
Finding and Viewing Videos
YouTube features short videos submitted by people from around the world.
Browse videos
m Tap Featured, Most Viewed, or Bookmarks. Or tap More to browse by Most Recent,
Top Rated, or History.
 Featured: Videos reviewed and featured by YouTube staff.
 Most Viewed: Videos most seen by YouTube viewers. Tap All for all-time most viewed
videos, or Today or This Week for most-viewed videos of the day or week.
 Bookmarks: Videos you’ve bookmarked.
 Most Recent: Videos most recently submitted to YouTube.
 Top Rated: Videos most highly rated by YouTube viewers. To rate videos, go to
www.youtube.com.
 History: Videos you’ve viewed most recently.
Search for a video
1 Tap Search, then tap the YouTube search field.
2 Type a word or phrase that describes what you’re looking for, then tap Search. YouTube
shows results based on video titles, descriptions, tags, and user names.
Play a video
m Tap the video. The video begins to download to iPhone and a progress bar shows
progress. When enough of the video has downloaded, it begins to play. You can also
tap to start the video.
78 Chapter 7 Applications
Page 79

Controlling Video Playback
When a video starts playing, the controls disappear so they don’t obscure the video.
m Tap the screen to show or hide the controls.
Playback controls
Bookmark
Previous/rewind
Playhead
Download progress
Volume
Scale
Play/Pause
Email
Next/Fast-forward
Scrubber bar
To Do this
Play or pause a video Tap or .
Raise or lower the volume Drag the volume slider. Or use the volume buttons on the side
of iPhone.
Start a video over Tap .
Skip to the next or previous video Tap twice to skip to the previous video. Tap to skip to
the next video.
Rewind or fast-forward Touch and hold or .
Skip to any point in a video Drag the playhead along the scrubber bar.
Stop watching a video before it
Tap Done . Or press the Home button.
finishes playing
Toggle between scaling a video to
fill the screen or fit to the screen.
Double-tap the video. You can also tap to make the video
fill the screen, or tap to make it fit to the screen.
Bookmark a video Tap next to a video and tap Bookmark. Or start playing a
video and tap . Tap Bookmarks to see your bookmarked
videos.
Email a link to the video Tap next to a video and tap Share. Or start playing a video
and tap .
See details about a video and
browse related videos
Play the whole video, tap Done while a video is playing, or tap
next to any video in a list.
iPhone shows the video’s rating, description, date added, and
other information. You also see a list of related videos that you
can tap to view.
Chapter 7 Applications 79
Page 80

Changing the Browse Buttons at the Bottom of the Screen
You can replace the Featured, Most Viewed, Bookmarks, and Search buttons at the
bottom of the screen with ones you use more. For example, if you watch top rated
videos a lot and don’t watch many featured videos, you could replace the Featured
button with Top Rated.
m Tap More and tap Edit, then drag a button to the bottom of the screen, over the button
you want to replace.
If you like, drag the buttons at the bottom of the screen left or right to rearrange them.
When you finish, tap Done.
Tap More at any time to access the browse buttons you replaced.
Add Your Own Videos to YouTube
For information about adding your own videos to YouTube, go to www.youtube.com
and tap Help.
80 Chapter 7 Applications
Page 81

Stocks
Viewing Stock Quotes
When you tap Stocks from the Home screen, the stock reader shows updated quotes
for all your stocks. Quotes are updated every time you open Stocks, while connected to
the Internet. Quotes may be delayed by up to 20 minutes.
Add a stock, index, or fund to the stock reader
1 Tap , then tap .
2 Enter a symbol, company name, index, or fund name, then tap Search.
3 Choose an item in the search list.
Delete a stock
m Tap and tap next to a stock, then tap Delete.
Switch between showing percentage change and dollar change
m Tap the number showing the change. Tap it again to switch back.
You can also tap and tap % or Numbers.
Show a stock’s progress over a longer or shorter time period
m Tap a stock symbol, then tap 1d, 1w, 1m, 3m, 6m, 1y, or 2y. The chart adjusts to show
progress over one day, one week, one month, three months, six months, one year, or
two years.
See information about a stock at Yahoo.com
m Tap .
You can see news, information, websites related to the stock, and more.
Chapter 7 Applications 81
Page 82

Maps
Finding and Viewing Locations
Find a location and see a map
m Tap the search field to bring up the keyboard, then type an address, intersection,
general area, name of a landmark, bookmark name, name of someone in your contacts
list, or zip code. Then tap Search.
For example, you can type things like:
 1 w 53rd st, new york, ny
 sunset and vine, hollywood, ca
 Boston, MA
 Golden Gate bridge
 02144
A pushpin drops down to show the location. Tap the pushpin to see the name or
description of the location.
82 Chapter 7 Applications
Tap to get information about
the location, get directions, or add
the location to your bookmarks or
contacts list
Page 83

Zoom in to a part of a map
m Pinch the map with two fingers. Or double-tap the part you want to zoom in on.
Double-tap again to zoom in even closer.
Zoom out
m Pinch the map. Or tap the map with two fingers. Tap with two fingers again to zoom
out further.
Pan or scroll to another part of the map
m Drag up, down, left, or right.
See a satellite view
m Tap Satellite.
Tap Map to return to map view.
See the location of someone in your contacts list
m Tap in the search field, then tap Contacts and choose a contact.
To see a contact’s location, you must already have their address stored on iPhone. You
can also find their location by tapping an address in Contacts.
Bookmark a location
m Find a location, tap the pushpin that points to it, tap next to the name or
description, then tap “Add to Bookmarks.”
See a bookmarked location or recently viewed location
m Tap in the search field, then tap Bookmarks or Recents.
Add a location to your contacts list
m Find a location, tap the pushpin that points to it, tap next to the name or
description, then tap Create New Contact or “Add to Existing Contact.”
You can see the contact by choosing Phone from the Home screen and tapping
Contacts.
Chapter 7 Applications 83
Page 84

Getting Directions
Get directions
1 Tap .
2 Enter starting and ending locations in the Start and End fields. Or tap in either
field and choose a location in Bookmarks, Recents, or Contacts.
For example, if a friend’s address is in your contacts list, you can tap Contacts and tap
your friend’s name instead of having to type the address.
3 Tap Route, then do one of the following:
 To view directions one step at a time, tap Start, then tap to see the next leg of the
trip. Tap to go back.
 To view all directions in a list, tap List. Tap any item in the list to see a map of that leg
of the trip.
You can also get directions by finding a location on the map, tapping the pushpin that
points to it, tapping next to the name, then tapping Directions To Here or
Directions From Here.
See traffic conditions
In some regions, you can check traffic conditions.
m Tap .
When you tap , the approximate driving time at the top of the screen adjusts
according to traffic conditions.
Highways are color-coded according to the flow of traffic:
84 Chapter 7 Applications
Traffic
Green = more than 50 miles per hour
Yellow = 25–50 miles per hour
Red = less than 25 miles per hour
Gray = No data currently available
Page 85

If you tap and don’t see color-coded highways, you may need to zoom out to a level
where you can see major roads, or traffic conditions may not be available for that area.
Zooming in or out automatically updates the traffic display.
Switch start and end points, for reverse directions
m Tap .
If you don’t see , tap List, then tap Edit.
See recently viewed directions
m Tap in the search field, then tap Recents.
WARNING: For important information about driving safety, see page 103.
Finding and Contacting Businesses
Find businesses in an area
1 Find a location—for example, a city and state, or a street address.
2 Type the kind of business in the text field and tap Search.
Pushpins drop down and point to matching locations. For example, if you locate “san
francisco, ca” and then type “gas” and tap Search, pushpins point to gas stations in the
San Francisco area.
Tap the pushpin that points to a business to see its name or description.
Tap to show
contact info
Find businesses without typing the location first
m Type things like:
 gas san francisco ca
 pizza in billings montana
 movies near palo alto, ca
 hospital 95355
 apple store new york
Contact a business or get directions
m Tap the pushpin that points to a business, then tap next to the name.
Call
Visit website
Get directions
Chapter 7 Applications 85
Page 86

From there, you can do the following:
 Depending on what information is stored for that business, you can tap a phone
number to call, email address to email, or web address to go to a website.
 For directions, tap Directions To Here or Directions From Here.
 To add the business to your contacts list, scroll down and tap Create New Contact or
“Add to Existing Contact.”
See a list of the businesses found in the search
From the Map screen, tap List. Tap a business to see its location on the map. Or tap
next to a business to see its information.
86 Chapter 7 Applications
Page 87

Weather
Viewing Weather Summaries
Tap Weather from the Home screen to see the current temperature and a six-day
forecast for a city of your choice. You can store multiple cities, for quick access.
Weather screen
Today’s high and low
Current conditions
Current temperature
Six-day forecast
Add and delete cities
Number of cities stored
If the weather board is light blue, it’s daytime in that city—between 6:00 a.m. and
6:00 p.m. If the board is dark purple, it’s nighttime—between 6:00 p.m. and 6:00 a.m.
Switch to another city
m Flick left or right. The number of dots below the weather board shows how many cities
are stored.
Chapter 7 Applications 87
Page 88

Add a city
1 Tap , then tap .
2 Enter a city name or zip code, then tap Search.
3 Choose a city in the search list.
Delete a city
m Tap and tap next to a city, then tap Delete.
Set whether iPhone shows the temperature in Fahrenheit or Celsius
m Tap , then tap ºF or ºC.
See information about a city at Yahoo.com
m Tap .
You can see a more detailed weather report, news and websites related to the city,
and more.
88 Chapter 7 Applications
Page 89

Clock
Adding and Viewing Clocks for Locations Around the World
You can add multiple clocks to show the time in major cities and time zones around
the world.
View all clocks
m Tap World Clock.
If the clock face is white, it’s daytime in that city. If it’s black, it’s nighttime. If you have
more than four clocks, scroll to see them all.
Add a clock
m Tap World Clock, then tap and type the name of a city. Cities matching what you’ve
typed appear below. Tap a city to add a clock for that city.
If you don’t see the city you’re looking for, try a major city that’s in the same time zone.
Delete a clock
m Tap World Clock and tap Edit. Then tap next to a clock and tap Delete.
Move a clock
m Tap World Clock and tap Edit. Then drag next to a clock to a new place in the list.
Setting Alarm Clocks
You can set multiple alarms. You can set each alarm to repeat on days you specify,
or set it to sound only once.
Set an alarm
m Tap Alarm and tap , then adjust any of the following settings:
 To set the alarm to repeat on certain days, tap Repeat and choose the days.
Chapter 7 Applications 89
Page 90

 To choose the ringtone that sounds when the alarm goes off, tap Sound.
 To set whether the alarm gives you the option to hit snooze, turn Snooze on or off.
If Snooze is on and you tap Snooze when the alarm sounds, the alarm stops and then
sounds again in ten minutes.
 To give the alarm a description, tap Label. iPhone displays the label when the alarm
sounds.
If at least one alarm is set and turned on, appears in the iPhone status bar at the top
of the screen.
Turn an alarm on or off
m Tap Alarm and turn any alarm on or off. If an alarm is turned off, it won ‘t sound again
unless you turn it back on.
If an alarm is set to sound only once, it turns off automatically after it sounds. You can
turn that alarm on again to reenable it.
Change settings for an alarm
m Tap Alarm and tap Edit, then tap next to the alarm you want to change.
Delete an alarm
m Tap Alarm and tap Edit, then tap next to an alarm and tap Delete.
Using the Stopwatch
Use the stopwatch to measure time
m Tap Stopwatch. Tap Start to start the stopwatch. To record lap times, tap Lap after each
lap. Tap Stop to pause the stopwatch. Then tap Start to resume, or tap Reset to reset
the stopwatch to zero.
If you start the stopwatch and go to another iPhone application, the stopwatch
continues running in the background.
Setting the Timer
Set the timer
m Tap Timer, then flick to set the number of hours and minutes. Tap When Timer Ends to
choose the sound iPhone makes when the timer ends. Tap Start to start the timer.
Set a sleep timer
m Set the timer, then tap When Timer Ends and choose Sleep iPod.
When you set a sleep timer, iPhone stops playing music or video when the time runs
out.
If you start the timer and go to another iPhone application, the timer continues
running in the background.
90 Chapter 7 Applications
Page 91

Calculator
Use the calculator
m Add, subtract, multiply, and divide, as with a standard calculator.
When you tap the add, subtract, multiply, or divide button, a white ring appears around
the button to let you know the operation to be carried out.
Use the memory functions
m C: Tap to clear the displayed number.
m M+: Tap to add the displayed number to the number in memory. If no number is in
memory, tap to store the displayed number in memory.
m M–: Tap to subtract the displayed number from the number in memory.
m MR/MC: Tap once to replace the displayed number with the number in memory.
Tap twice to clear the memory. If the MR/MC button has a white ring around it, there is
a number stored in memory.
Chapter 7 Applications 91
Page 92

Notes
Writing, Reading, and Emailing Notes
Notes are listed by date added, with the most recent note at the top. You can see the
first few words of each note in the list.
Add a note
m Tap , then type your note and tap Done.
Read or edit a note
m Tap the note. Tap anywhere on the page to bring up the keyboard and edit the note.
Tap or to see the next or previous note.
Delete a note
m Tap the note, then tap .
Email a note
m Tap the note, then tap .
To email a note, iPhone must be set up for email (see “Setting Up Email Accounts” on
page 43).
92 Chapter 7 Applications
Page 93

8 Settings
Tap Settings to adjust iPhone settings.
8
Settings allows you to customize iPhone applications, set the date and time, configure
your network connection, and enter other preferences for iPhone.
Phone, Mail, Safari, iPod, and Photos Settings
Settings for some of the iPhone applications are covered elsewhere in this guide.
For information about:
 Phone settings, see page 34.
 Mail settings, see page 49.
 Safari settings, see page 57.
 iPod settings, see page 65.
 Photos settings, see page 76.
93
Page 94

Airplane Mode
Airplane mode disables the wireless features of iPhone to avoid interfering with aircraft
operation and other electrical equipment.
Turn on airplane mode
m Tap Settings and turn airplane mode on.
When airplane mode is on, appears in the status bar at the top of the screen, and
no cell phone, radio, Wi-Fi, or Bluetooth signals are emitted from iPhone. You can’t
make calls, send or receive text messages, stream YouTube videos, or get stock quotes,
map locations, or weather reports.
If allowed by the aircraft operator and applicable laws and regulations, you can
continue to use iPhone to:
 Listen to music and watch video
 Listen to visual voicemail
 Check your calendar
 Take or view pictures
 Hear alarms
 Use the stopwatch and timer
 Use the calculator
 Take notes
 Read text messages and email messages stored on iPhone
Wi-Fi
Wi-Fi settings determine when iPhone uses local Wi-Fi networks to connect to the
Internet. If no Wi-Fi networks are available, or you’ve turned Wi-Fi off, then iPhone
connects to the Internet via EDGE.
Turn Wi-Fi on or off
m Choose General > Network and turn Wi-Fi on or off.
Set iPhone to ask if you want to join a new network
When you are trying to access the internet, by using Safari or Mail for example, and you
are not in range of a Wi-Fi network you have previously used, this option tells iPhone to
look for another network. iPhone displays a list of all available Wi-Fi networks that you
can choose from. (Networks that require a password appear with a lock icon.) If “Ask to
Join New Networks” is turned off, you must manually join a network to connect to the
Internet when neither a previously used network nor EDGE is available.
m Choose Wi-Fi and turn “Ask to Join Networks” on or off. If you turn “Ask to Join
Networks” off, you must join new networks manually.
94 Chapter 8 Settings
Page 95

Join a Wi-Fi network manually
m Choose Wi-Fi, wait a moment as iPhone detects networks in range, then choose a
network. If necessary, enter a password and tap Join. (Networks that require a password
appear with a lock icon.)
Make iPhone forget a network, so iPhone doesn’t join it automatically
m Choose Wi-Fi and tap next to a network you’ve joined before. Then tap “Forget this
Network.”
Connect to a closed Wi-Fi network (an available Wi-Fi network that isn’t shown in the
list of scanned networks)
m Choose Wi-Fi > Other and enter the network name. If the network requires a password,
choose Security, tap the type of security the network uses, and enter the password.
You must already know the network name, password, and security type to connect to a
closed network.
Some Wi-Fi networks may require you to enter or adjust additional settings, such as a
client ID or static IP address. Ask the network administrator which settings to use.
Adjust settings to connect to a Wi-Fi network
m Choose Wi-Fi, then tap next to a network.
Carrier
When you’re in another country, you can choose which local carrier network to use for
your phone calls and EDGE Internet connections if more than one network is available.
You can only make calls on carriers that have roaming agreements with AT&T.
Additional fees may apply. Any international roaming charges will be billed by the
carrier of the selected network through AT&T.
For information about international coverage and how to enable roaming, go to:
www.wireless.att.com/learn/international
Select a carrier for phone calls
m Choose Carrier and select the network you want to use.
Once you select a network, iPhone will only use that network. If the network is
unavailable, “No service” will appear on the iPhone screen and you won’t be able to
make or receive calls, or connect to the Internet via EDGE. Set Network Settings to
Automatic to have iPhone select a network for you.
Usage
See your usage statistics
m Choose Usage. There, you can see:
Chapter 8 Settings 95
Page 96

 Amount of time iPhone has been unlocked and in use since the last full charge
 Amount of time iPhone has been in standby mode—locked but turned on—since
the last full charge
 Current period and lifetime call time
 Amount of data sent and received over the EDGE network
Reset your usage statistics
m Tap Usage and tap Reset Statistics to clear the data and cumulative time statistics. The
statistics for the amount of time iPhone has been unlocked and in standby mode are
not reset.
Sounds and the Ring/Silent Switch
Set the ringtone
m Choose Sounds > Ringtone.
Set alert and effects sounds
m Choose Sounds and turn items on or off under Ring . When the Ring/Silent switch is
set to ring, iPhone plays sounds for alerts and effects that are turned on.
You can set iPhone to play a sound whenever you:
 Get a call
 Get a voicemail message
 Get a text message
 Get an email message
 Send an email message
 Have an appointment that you’ve set up to alert you
 Lock iPhone
 Type using the keyboard
Switch between ring and silent mode
m Flip the Ring/Silent switch on the side of iPhone.
When set to silent, iPhone doesn’t play any ring, alert, or effects sounds. It does,
however, play alarms set using Clock.
Set whether iPhone vibrates when you get a call
m Choose Sounds. To set whether iPhone vibrates in silent mode, turn Vibrate under
Silent on or off. To set whether iPhone vibrates in ring mode, turn Vibrate under
Ring on or off.
Adjust the ringer and alerts volume
m Choose Sounds and drag the slider. Or, if no song or video is playing and you aren’t on
a call, use the volume buttons on the side of iPhone.
96 Chapter 8 Settings
Page 97

Brightness
Screen brightness affects battery life. Dim the screen to extend the time before you
need to recharge iPhone. Or use Auto-Brightness, which is designed to conserve
battery life.
Adjust the screen brightness
m Choose Brightness and drag the slider.
Set whether iPhone adjusts screen brightness automatically
m Choose Brightness and turn Auto-Brightness on or off. If Auto-Brightness is on, iPhone
adjusts the screen brightness for current light conditions.
Wallpaper
You see a wallpaper background picture when you unlock iPhone or when you’re on a
call with someone you don’t have a photo for.
m Choose Wallpaper and choose a picture.
General
The General settings include date and time, security, network, and other settings that
affect more than one application. This is also where you can find information about
your iPhone, and reset iPhone to its original state.
Seeing Information About Your iPhone
See information about your iPhone
m Choose General > About. There, you can see:
 Name of your phone network
 Number of songs, videos, and photos
 Total storage capacity
 Space available
 Software version
 Serial and model numbers
 Wi-Fi and Bluetooth addresses
 IMEI (International Mobile Equipment Identity) and ICCID (Integrated Circuit Card
Identifier, or Smart Card) numbers
 Modem firmware version of the cellular transmitter
 Legal information
Date and Time
These settings apply to the time shown in the status bar at the top of the screen, world
clocks, and calendar.
Chapter 8 Settings 97
Page 98

Set whether iPhone shows 24-hour time or 12-hour time
m Choose General > Date & Time and turn 24-Hour Time on or off.
Set whether iPhone sets the date and time automatically
m Choose General > Date & Time and turn Set Automatically on or off.
If iPhone is set to update the time automatically, it gets the correct time over the cell
network, and updates it for the time zone you’re in.
Set the time manually
m Choose General > Date & Time and turn Set Automatically off. Then enter a time zone,
date, and time.
Turn on Calendar time zone support
m Choose General > Date & Time and turn Time Zone Support on. When Time Zone
Support is on, Calendar displays event dates and times in the time zone set for your
calendars. When Time Zone Support is off, Calendar displays events in the time zone of
your current location.
Auto-Lock
Locking iPhone turns off the display. Nothing happens if you touch the screen. You can
still receive calls and text messages, and you can adjust the volume and use the mic
button on the iPhone Stereo headset when listening to music or on a call.
Set the amount of time before iPhone locks
m Choose General > Auto-Lock and choose a time.
Passcode Lock
By default, iPhone doesn’t require you to enter a passcode to unlock it.
Set a passcode
m Choose General > Passcode Lock and enter a 4-digit passcode. iPhone then requires
you to enter the passcode to unlock it.
Turn passcode lock off or change the passcode
m Choose General > Passcode Lock and tap Turn Passcode Off or Change Passcode,
then enter the current passcode.
If you forget your passcode, you must restore the iPhone software. See page 114.
VPN
VPNs (virtual private networks) are often used within organizations to allow you to
communicate private information securely over a non-private network. Your may need
to configure VPN, for example, to access your work email on iPhone.
iPhone can connect to VPNs that use the L2TP or PPTP protocol. VPN works over both
Wi-Fi and EDGE network connections.
98 Chapter 8 Settings
Page 99

Configure VPN
m Choose General > Network > VPN and tap Settings. Ask your network administrator
which settings to use. In most cases, if you’ve set up VPN on your computer, you can
use the same VPN settings for iPhone.
Turn VPN on or off
Once you’ve entered VPN settings, a VPN switch appears at the top level of the
Settings list.
m Tap Settings and turn VPN on or off.
Bluetooth
iPhone can connect wirelessly to Bluetooth headsets and car kits for hands-free talking.
See “Using iPhone with a Bluetooth Headset or Car Kit” on page 37 for more
information.
Turn Bluetooth on or off
m Choose General > Network and turn Bluetooth on or off.
Keyboard
Turn Auto-Capitalization on or off
By default, iPhone automatically capitalizes words after you type sentence-ending
punctuation or a return character.
m Choose General > Keyboard and turn Auto-Capitalization on or off.
Set whether Caps Lock is enabled
If Caps Lock is enabled and you double-tap the Shift key on the keyboard, all letters
you type are uppercase. The Shift key turns blue when Caps Lock is on.
m Choose General > Keyboard and turn Enable Caps Lock on or off.
Resetting iPhone Settings
Reset all settings
m Choose General > Reset and tap Reset All Settings.
All your preferences and settings are reset. Data—such as your contacts list—and
media—such as your songs and videos—are not deleted.
Erase All Content and Settings
m Choose General > Reset and tap “Erase All Content and Settings.”
All your data and media are deleted. You must sync iPhone with your computer to
restore contacts, songs, videos, and other data and media.
Reset the keyboard dictionary
m Choose General > Reset and tap Reset Keyboard Dictionary.
Chapter 8 Settings 99
Page 100

You add words to the keyboard dictionary by rejecting words iPhone suggests as you
type. Tap a suggested word to reject it and add your word to the keyboard dictionary.
Resetting the keyboard dictionary erases all words you’ve added.
Reset Network Settings
m Choose General > Reset and tap Reset Network Settings.
Restoring or Transferring Your iPhone Settings
When you connect iPhone to your computer, settings on iPhone are automatically
backed up to your computer. You can restore this information if you need to—if you
get a new iPhone, for example, and want to transfer your previous settings to it. You
may also want to reset the data on iPhone if you’re having trouble connecting to a WiFi network.
Automatically backed-up information includes text messages, notes, call history,
contact favorites, sound settings, widget settings, certain network settings, and other
preferences.
Restore or transfer settings
Do one of the following:
m Connect a new iPhone to the same computer you used with your other iPhone,
open iTunes, and follow the onscreen instructions.
m Reset the data on iPhone. From the Home screen choose Settings > General > Reset,
then choose Reset All Settings, “Erase All Content and Settings,” or “Reset Network
Settings.” Then connect iPhone to your computer, open iTunes, and follow the
onscreen instructions.
When you reset network settings, the follow information is deleted:
 All custom network sets from SystemConfig
 Any VPN service configuration from SystemConfig
 ~/L/P/com.apple.mobilevpn.plist
 List of known networks
 Custom settings dictionary
In addition, Wi-Fi is turned off and then back on, which disconnects you from any
network you’re on. Wi-Fi is left turned on.
Delete a set of backed-up settings
m Open iTunes and choose iTunes > Preferences (on a Mac) or Edit > Preferences (on a
PC). Then select an iPhone and click “Remove iPhone.”
iPhone doesn’t need to be connected to your computer.
Note: If you use a Bluetooth headset or car kit with iPhone and you restore settings,
you must pair the Bluetooth device with iPhone again to use it.
100 Chapter 8 Settings
 Loading...