

Page 1
Apple Technician Guide
iMac (21.5-inch, Late 2009)
Updated: 2010-11-18
Page 2

Apple Inc.
© 2010 Apple Inc. All rights reserved.
Under the copyright laws, this document may not be copied, in whole or in part, without the
written consent of Apple.
Every eort has been made to ensure that the information in this document is accurate. Apple
is not responsible for printing or clerical errors.
Apple
1 Innite Loop
Cupertino, CA 95014-2084
USA
+ 1 408 996 1010
www.apple.com
Apple, the Apple logo, Mac, and Macintosh are trademarks of Apple Inc., registered in the U.S.
and other countries.
Page 3

iMac (21.5-inch, Late 2009)
Contents
About This Guide
Updates 9
Updated 18 November 2010 9
Updated 5 March 2010 10
Updated 8 January 2010 10
Updated 24 November 2009 10
Updated 28 October 2009 11
Introduced 20 October 2009 11
Feedback 11
Basics
Overview 13
Identifying Features 13
Product Congurations 14
Wireless Troubleshooting 14
Safety 15
Serial Number Location 16
Troubleshooting
General Troubleshooting 18
Wireless Troubleshooting 18
Update System Software & Firmware 18
Troubleshooting Theory 18
Hardware vs. Software 18
Common Reset Procedures 19
Power On Self Test (POST) 19
Resetting the System Management Controller (SMC) 19
Resetting Parameter RAM (PRAM) 20
Starting Up in Safe Mode 20
Diagnostics 21
Diagnostic LEDs 23
LED Functions 24
Page 4

LED Startup Sequence 25
Logic Board Test Points 26
Sensor and Fan Connector Locations 27
Block Diagram 28
Symptom Charts 29
Startup and Power 29
No Power, Dead Unit 29
Won’t Start Up 31
Intermittent Shutdown 33
Kernel Panic, System Crashes 35
No Video 37
Corrupted Video 39
Burnt Smell/Odor 41
Uncategorized Symptoms 42
Display 43
Backlight Issue/No Backlight 43
Noise / Unstable Flickering 45
LCD Image Issues 47
Incorrect/Missing Colors 48
Distorted/Blurred Image 49
Pixel Anomalies 51
Vertical/Horizontal Lines 52
Non-Uniform Brightness 54
Cosmetic Defects 55
Uncategorized Symptoms 55
Mass Storage 56
Hard Drive Not Recognized 56
Hard Drive Read/Write Errors 58
Hard Drive Noisy 59
Optical Drive Not Recognized 61
Optical Drive Won’t Accept/Eject Media 62
Optical Drive Read/Write Error 63
Optical Drive Not Performing to Specications 65
Optical Drive Noisy 66
SD Card Will Not Insert Into Slot 67
SD Card Not Recognized 68
Uncategorized Symptoms 69
Communications 70
AirPort/Bluetooth Issues 70
AirPort Card Kernel Panic 72
Ethernet Port/Device Issue 73
Wireless Input Device Doesn’t Pair 74
Wireless Input Device Loses Connection 76
Uncategorized Symptoms 78
Page 5

Input/Output Devices 79
Apple Remote Inoperable 79
Audio: Microphone 81
Audio: Built-in Speakers Have Distorted Sound 82
Audio: Built-in Speakers Have No Audio 83
Camera Issues 85
FireWire Device Not Recognized 86
USB Device Not Recognized 88
Wired Keyboard Does Not Function Properly 90
Keyboard: Specic Keys Do Not Respond 92
Wired Keyboard/Mouse Not Recognized 92
Uncategorized Symptoms 94
Mechanical 95
Noise/Hum/Vibration 95
Fan Failures / Thermal Issues 98
Stand/Hinge Issues 99
Physical Damage 100
Uncategorized Symptoms 100
Take Apart
General Information 102
Opening the Unit 102
Required Tools 102
Required Special Tools for Glass Panel 103
Cleaning Tools Starter Kit 103
Cleaning & Handling the Glass Panel 104
Do’s and Don’ts 104
Handling a Broken Glass Panel 104
How to Remove a Broken Glass Panel 105
Safety 109
Logic Board Handling 110
Note About Images in This Guide 110
Access Door 111
Memory 113
Glass Panel 115
Removal 116
Reassembly 117
Camera 120
LCD Panel 123
Handling LCD Panel 127
Page 6

Vertical Sync Cable 129
LCD Temp Sensor Cable 130
LVDS Cable 131
Bluetooth Antenna 132
Bluetooth Board 134
AirPort Antenna 136
AirPort Card 138
AirPort Cable 140
AirPort Carrier Board 142
LED Backlight Board 144
Power Supply 146
Backlight Pressure Wall 148
Power Supply Pressure Wall 150
Hard Drive 152
Hard Drive Sensor Cable 155
Bluetooth Cable 157
Camera Cable 160
Optical Drive 163
Optical Drive Sensor Cable 166
Optical Drive Fan 168
SD Card Reader 170
SD Cable 172
Audio Cable 174
IR Board & Cable 176
Logic Board 178
Video Card 185
Battery 187
Page 7

Hard Drive Data Cable 189
Optical Drive Data Cable 191
Cable, AC/DC Power/Backlight/SATA 193
CPU Fan 194
Ambient Temp Sensor 197
Left Speaker 199
Right Speaker 201
Hard Drive Fan 203
Mechanism Cover 205
Stand 207
Mechanism 209
Optical Drive Pressure Wall 211
Microphone Cable 213
Rear Housing 214
Views
Exploded Views 217
iMac (21.5-inch, Late 2009), Part 1 217
iMac (21.5-inch, Late 2009), Part 2 218
iMac (21.5-inch, Late 2009), Part 3 219
Screw Chart 220
External Views 222
Front View 222
Rear View 223
I/O Ports 224
Internal Views 225
Photo of Components below LCD 225
Photo of Components below Logic Board 226
Logic Board, Front Side 227
Logic Board, Back Side 227
Page 8

Apple Technician Guide
About This Guide
iMac (21.5-inch, Late 2009)
© 2010 Apple Inc. All rights reserved.
Page 9

Updates
Updated 18 November 2010
SD Board renamed SD Card Reader throughout document.
Troubleshooting
• General Information: Wireless Troubleshooting: added more kBase links.
• General Information: Common Reset Procedures: rewrote SMC section.
Take Apart
• General Information:
• Required Tools: added Thermal paste syringe (Apple part #922-9625) for camera;
• removed commercial screen cleaning products.
• Memory: Removal Step 2: added “For better grip, attach double-stick tape to ends of tabs.”
• Glass Panel:
• rewrote Removal Step 1;
• changed cleaning procedures to indicate microber cloth should only be dampened
with water (rather than isopropyl alcohol or commerical screen cleaning products).
• Camera: added reassembly instructions to transfer or add thermal paste between camera
and rear housing.
• LCD Panel:
• added reassembly note not to overtighten LCD screws, which could cause light
leakage after reassembly;
• added new section “Handling LCD Panel”.
• Hard Drive:
• added image of screw pins; corrected screwdriver size to T8 for 922-9136 and 922-7001
• corrected image of Western Digital temp sensor cable placement.
• Hard Drive Sensor Cable:
• corrected image of Western Digital temp sensor cable placement.
• Audio Cable: added reassembly note that plugging in earbuds can help keep cable aligned
while tightening screws.
• Logic Board:
• added note that logic board is much easier to reinstall if memory is removed;
• added replacement foil strip part #922-8378;
• added reassembly notes to help align logic board: push up gently with your thumb on
lower edge of video card heatsink (if present), and plug in USB, Ethernet, and/or Mini
DisplayPort cables while tightening screws.
• Optical Drive Pressure Wall: added chapter.
• Rear Housing: added reassembly instructions to transfer or add thermal paste between
camera and rear housing.
2010-11-18
iMac (21.5-inch, Late 2009) — Updates 9
Page 10

Updated 5 March 2010
Take Apart
• Camera: Added screw part number 922-9239.
• LCD Panel:
• Step 2: added caution: “Tilt display out no more than 4 inches (10 cm). Pulling display
too far could damage cables or connectors.”
• Step 3: added reassembly note: “Verify that all cables are rmly seated into connectors.”
• Vertical Sync Cable: Added reassembly note: “Insert cable securely into connector and
replace all mylar tape.”
Updated 8 January 2010
Troubleshooting
• General: Reworded “Update System Software & Firmware” section to indicate that using the
wrong version of Mac OS X can cause certain symptoms, and added link to:
kBase #TS3101: iMac (Late 2009): Using the correct Mac OS X system software
• General: Updated Apple Service Diagnostic and Apple Hardware Test version numbers,
updated Apple Hardware Test error code table.
• Startup Power:
• Updated “No Video” symptom code ow to include a check of the LVDS cable
connection to back of LCD panel.
• Updated “Corrupted Video” symptom code ow to include a check for the correct Mac
OS X build version.
• Display: Updated “Noise/Unstable Flickering” symptom code ow to include a check of the
Vertical sync cable connections.
2010-11-18
Views
• Exploded Views: Added note that Video Card is “only for MXM models; not present with
integrated graphics”.
Updated 24 November 2009
Troubleshooting
• General: Updated close-up image of diagnostic LEDs.
• Mechanical: Fan noise issues: updated two topics, “Noise/Hum/Vibration” and “Fan Failures/
Thermal Issues” with the following information:
• Check: Verify if any tape, gasket, cable label, or cable is touching the fan blades and
causing a ticking noise.
• Actions: Secure the material so it doesn’t touch fan blades. If tape adhesive has lost its
stickiness, replace that section of tape.
Take Apart
• General Information: Added images to section “How to Remove a Broken Glass Panel.”
• Hard Drive and Hard Drive Sensor Cable: Added information about connecting sensor cables
to Western Digital drives: Orient the drive with its circuit board facing up and connect the
sensor cable to the hard drive pins, leaving the 2 left pins unconnected (exposed).
iMac (21.5-inch, Late 2009) — Updates 10
Page 11

• Logic Board: Added note that logic board may be easier to remove if RAM is removed rst.
Views
• Exploded Views: Added part numbers for Power Supply Pressure Wall (922-9281), Backlight
Pressure Wall (922-9282), Bluetooth Antenna (922-9283), and AirPort Antenna (922-9284).
Updated 28 October 2009
• Basics: Added another kBase link to Wireless Troubleshooting section.
• Troubleshooting: General: Added another kBase link to Wireless Troubleshooting section.
• Take Apart: General: Added section “How to Remove a Broken Glass Panel.”
Introduced 20 October 2009
Feedback
We want your feedback to help improve this and future Technician Guides!
Please email any comments to: [email protected]
2010-11-18
iMac (21.5-inch, Late 2009) — Feedback 11
Page 12

Apple Technician Guide
Basics
iMac (21.5-inch, Late 2009)
© 2010 Apple Inc. All rights reserved.
Page 13
Overview
2010-11-18
Identifying Features
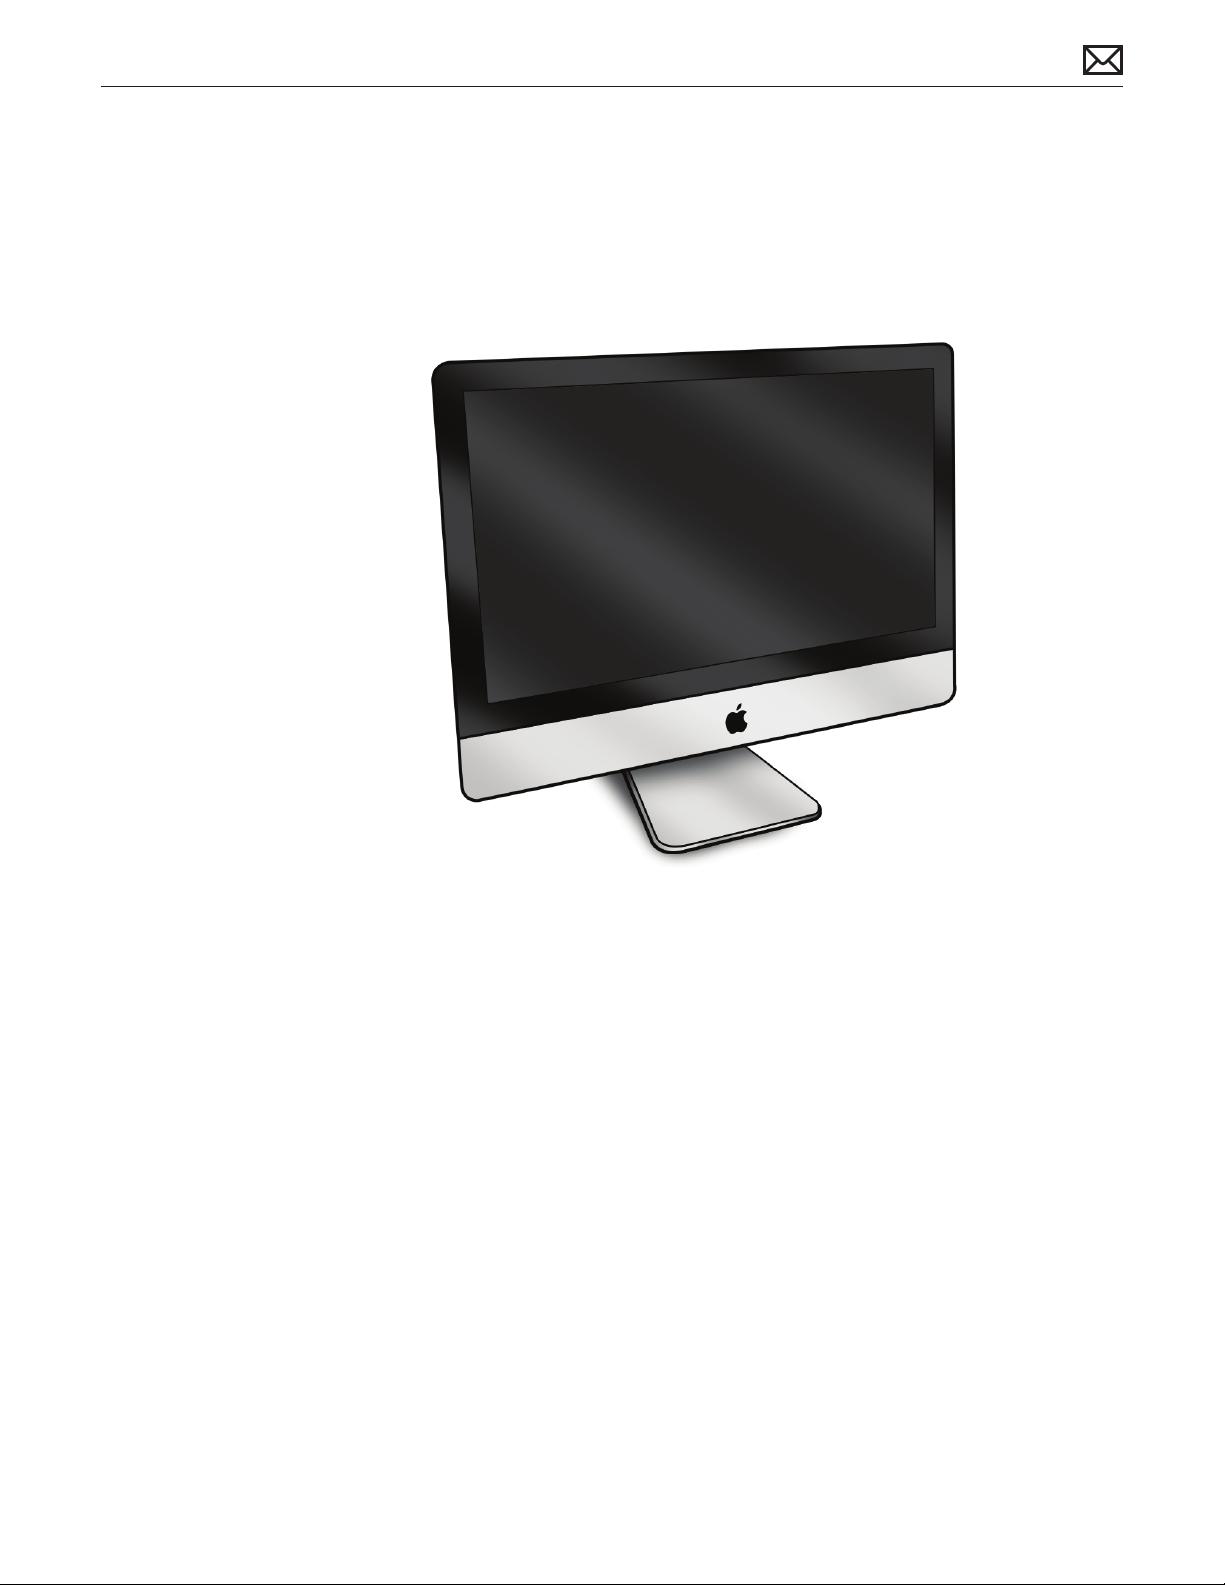
The iMac (21.5-inch, Late 2009) has an all-aluminum enclosure with a glass front. It can be
distinguished from the previous model by the glass extending all the way to the top, left and
right edges, rather than having an aluminum bezel that borders the glass. Also, the rear of the
computer is aluminum rather than black plastic.
This model’s other new features include:
• Larger and LED-backlit 21.5-inch 16:9 display with 1920x1080 native HD resolution
• Increased processor speeds: 3.06 GHz or 3.33 GHz Intel Core 2 Duo
• Integrated NVIDIA GeForce 9400M or ATI Radeon HD 4670 graphics
• Four RAM memory slots: two slots are lled with at least 2GB each, for a total of 4GB;
maximum RAM is 16GB
• Larger hard drive options: 500GB, 1TB, 2TB (CTO only)
• SD card reader
• New Apple Wireless Keyboard and wireless Magic Mouse, standard with all congurations
• Ships with and requires at least Mac OS 10.6.1 (Snow Leopard)
iMac (21.5-inch, Late 2009) Basics — Overview 13
Page 14

Product Congurations
For product congurations, refer to AppleCare Tech Specs: http://support.apple.com/specs/
Wireless Troubleshooting
If you’re having issues with Bluetooth and wireless connectivity issues, refer to the following
Apple Knowledge Base articles:
kBase #TS3048: Desktop computers: Troubleshooting wireless mouse and keyboard issues
kBase #HT1365: AirPort and Bluetooth: Potential sources of interference for wireless
devices and networks
kBase #HT3903: Apple Wireless Keyboard, Mouse, and Trackpad: How to install batteries
2010-11-18
iMac (21.5-inch, Late 2009) Basics — Overview 14
Page 15
Safety
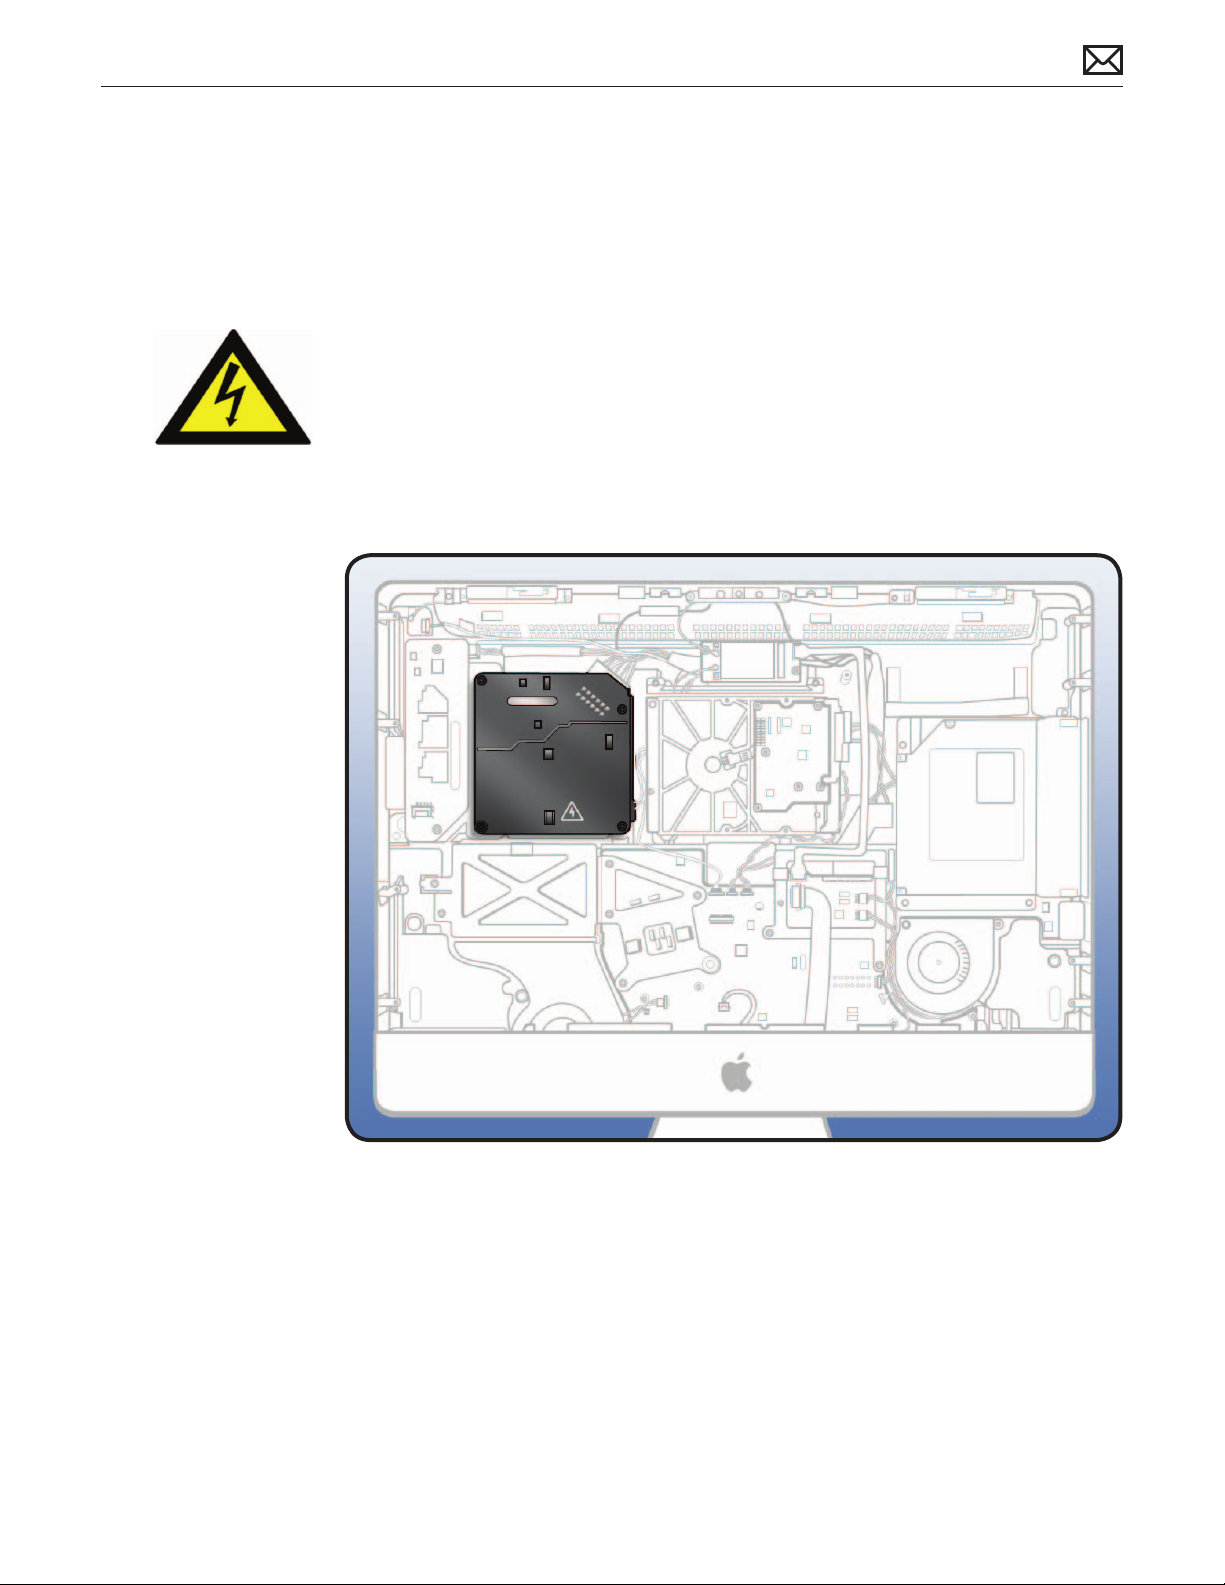
Warning: HIGH VOLTAGE: The AC/DC power supply PCB remains powered up whenever
system is plugged in, whether or not system has been turned on. Use extreme caution
when troubleshooting system with glass panel removed.
Important: If computer is shut down by removing power cord, allow power supply a good 2-3
minutes to discharge capacitors before handling it. However, if you select “Shut Down” via the
Apple menu, the computer will discharge power supply capacitor almost immediately.
2010-11-18
iMac (21.5-inch, Late 2009) Basics — Safety 15
Page 16
Serial Number Location
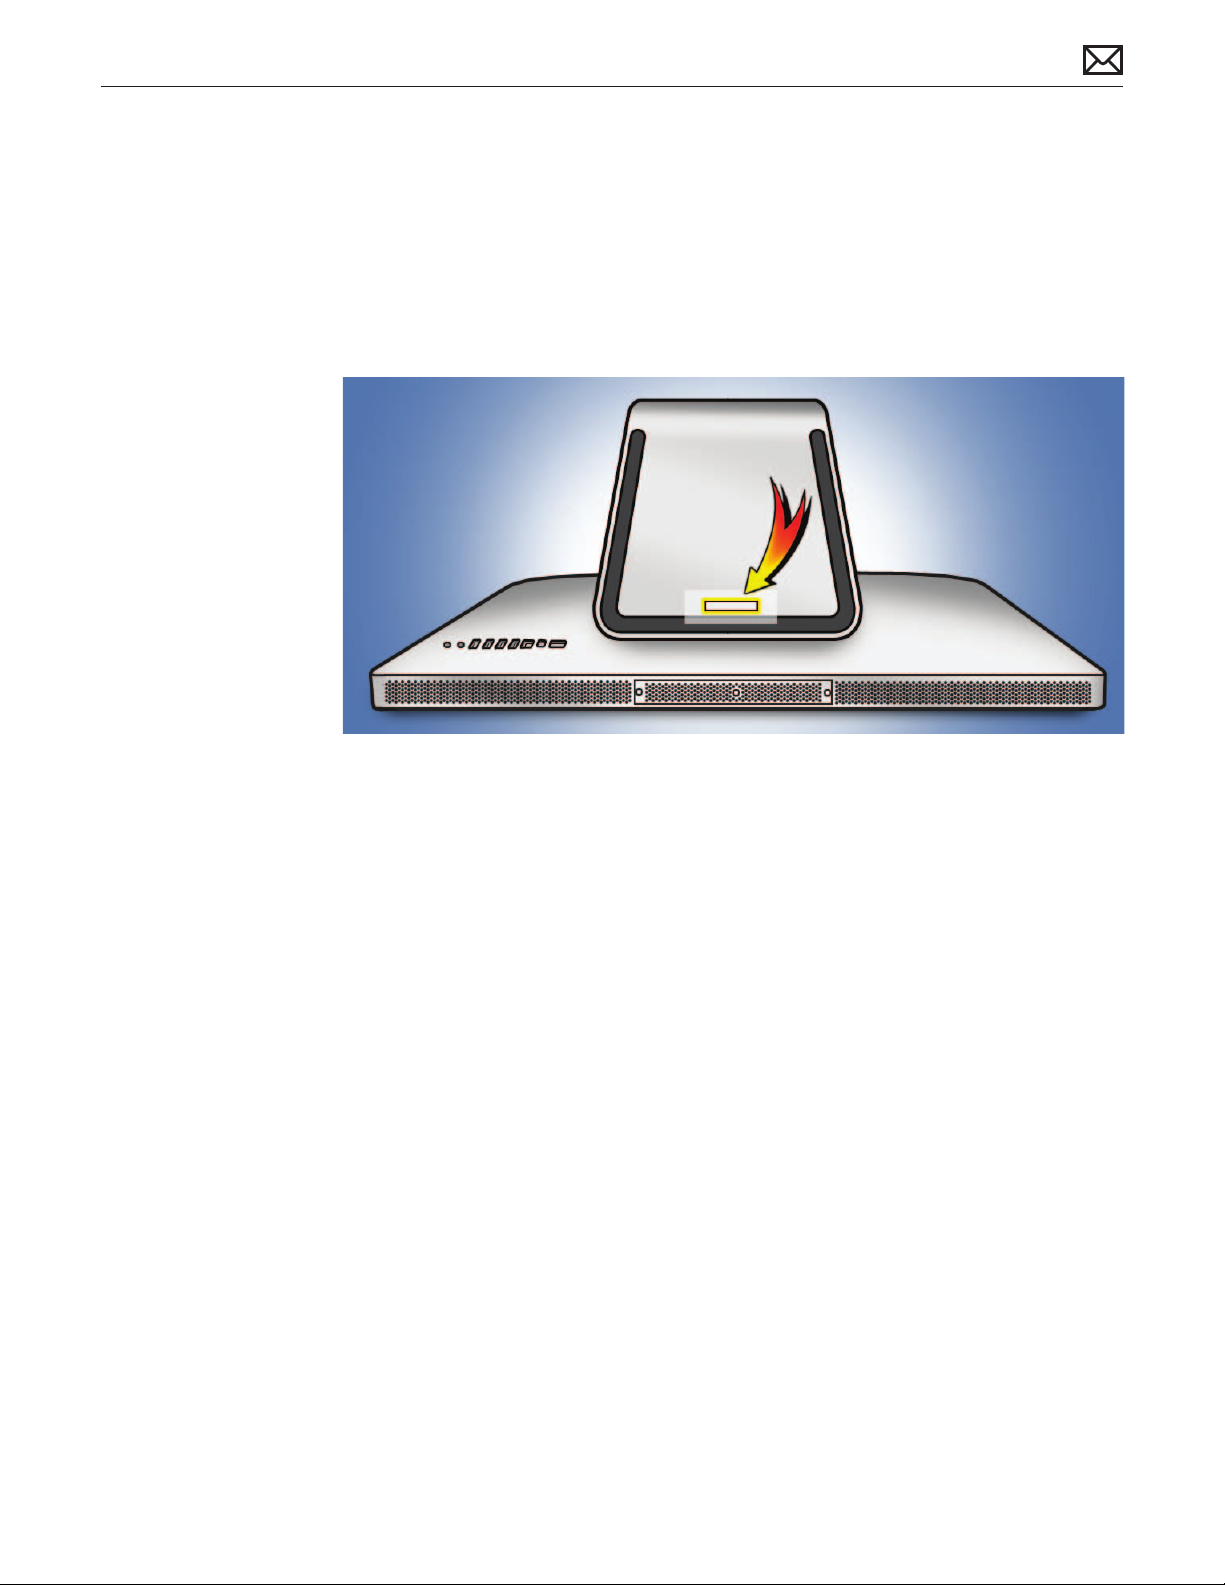
The iMac (21.5-inch, Late 2009)’s serial number is located on the bottom of the stand. When
replacing a stand, transfer the serial number to the new stand.
2010-11-18
iMac (21.5-inch, Late 2009) Basics — Serial Number Location 16
Page 17

Apple Technician Guide
Troubleshooting
iMac (21.5-inch, Late 2009)
© 2010 Apple Inc. All rights reserved.
Page 18

General Troubleshooting
Wireless Troubleshooting
If you’re having issues with Bluetooth and wireless connectivity issues, refer to:
• Bluetooth Service Diagnostic (BSD) self-paced training
• Bluetooth Troubleshooting Course
• kBase #TS3048: Troubleshooting wireless mouse and keyboard issues
• kBase #HT3887: Wireless input devices: Bluetooth frequently asked questions
• kBase #HT1365: AirPort and Bluetooth: Potential source of interference for wireless
devices and networks
• kBase #HT3903: Apple Wireless Keyboard, Mouse, Trackpad: How to install batteries
Update System Software & Firmware
Important: Ensure the correct version Mac OS X and latest software and rmware updates have
been applied before you begin troubleshooting. Computers sometimes exhibit symptoms that
indicate the wrong Mac OS X system software is installed. Refer to:
kBase #TS3101: iMac (Late 2009): Using the correct Mac OS X system software
Firmware is the name given to software that is written into memory circuits such as ash
memory, that will hold the software code indenitely, even when power is removed from
the hardware. Firmware on Intel Mac computers is designed to be updated if necessary by
running the Mac OS X Software Update check (available in the Apple menu) while computer is
connected to the Internet. For more information about rmware updates, refer to:
kBase # HT1557: About rmware updates for Intel-based Macs
Troubleshooting Theory
For general information on troubleshooting theory, go to GSX and nd the Service Training
course menu link. From there you can access the Troubleshooting Theory self-paced course.
Hardware vs. Software
For information on how to isolate a hardware issue from a software issue, refer to:
kBase #TS1388: Isolating issues in Mac OS X
For information on how to troubleshoot a software issue, refer to:
kBase #HT1199: Mac OS X: How to troubleshoot a software issue
kBase #TS1394: Mac OS X: Troubleshooting installation and software updates
kBase #HT2956: Troubleshooting Mac OS X installation from CD or DVD
2010-11-18
iMac (21.5-inch, Late 2009) — General Troubleshooting 18
Page 19

Common Reset Procedures
Power On Self Test (POST)
Intel-based Mac computers such as the iMac rely on a combination of tones to indicate Power
On Self Test (POST) error codes.
• If the computer detects out-of-specication or no SDRAM, the screen will remain black
but the computer will beep. This error condition may be due to physically damaged RAM,
installing incorrect type of RAM, or not having RAM installed.
• Some RAM may appear to pass the Power-On-Self-Test (POST) but still cannot be used by
the operating system. In this case, the computer will display a gray screen, sound three
tones and repeat tones until computer is turned o.
• The solution to both of these situations is to rst re-seat memory and test computer again.
If memory fails POST again, remove all installed memory and test by installing one by one
each memory module that has been veried to work correctly on another system (i.e.,
“known-good”) or order new memory.
• A sequence of tones heard at startup or a no video symptom may also be xed by
temporarily removing/replacing the backup battery.
For more information, refer to:
kBase #HT2538: iMac (Mid 2007) and later models: About new startup tones
Resetting the System Management Controller (SMC)
The System Management Controller (SMC) is a chip on logic board that controls all power
functions. If computer is experiencing any power issue, such as not starting up, not displaying
video, sleep issues, or fan noise issues, resetting SMC may resolve it. To reset SMC on an iMac:
1. From Apple menu, choose Shut Down (or if the computer is not responding, hold power
button for approximately ten seconds until it powers o).
2. Unplug all cables from computer, including power cord.
3. Press and hold the power button for 5 seconds.
4. Release the power button.
5. Attach the computer’s power cable, making sure power button is not being pressed.
Note: If you press the power button while inserting the power cord, the iMac will enter a
mode in which the fans run at full speed. For more information, refer to:
kBase #TS1433: iMac: Fans run at full speed after computer turns on
6. Press the power button to turn on the computer.
For more information, refer to:
kBase #HT3964: Intel-based iMacs: Resetting the System Management Controller (SMC)
2010-11-18
iMac (21.5-inch, Late 2009) — General Troubleshooting 19
Page 20

Resetting Parameter RAM (PRAM)
PRAM stores certain system and device settings in a location that Mac OS X can access quickly.
Exactly which settings are stored in the computer’s PRAM varies depending on the type of
computer as well as the types of devices and drives connected. To reset PRAM:
1. Shut down the computer.
2. Locate the following keys on keyboard: Command, Option, P, and R. You will need to hold
these keys down simultaneously in Step 4.
Note: If the keyboard does not have an Option key, use the Alt key instead.
3. Press power button.
4. Immediately press and hold Command-Option-P-R keys.
Important: You must press this key combination before the gray screen appears.
5. Hold down keys until the computer restarts, and you hear the startup chime a second time.
6. Release keys.
For more information, refer to:
kBase #HT1242: Mac OS X: What’s stored in PRAM
kBase #HT1379: Resetting your Mac’s PRAM and NVRAM
Starting Up in Safe Mode
Starting up into Safe Mode does several things that can help resolve software or directory
issues that may exist on the startup volume. To start up in Safe Mode:
1. Shut down the computer.
2. Press power button.
3. Immediately after you hear startup tone, press and hold Shift key.
Note: The Shift key should be held as soon as possible after startup tone but not before.
4. Release Shift key when you see the screen with a gray Apple and progress indicator (looks
like a spinning gear). Note that booting into Safe Mode will take longer than a normal
startup. During startup, the words ”Safe Boot” will appear on Mac OS X startup screen.
5. To leave Safe Mode, restart computer normally, without holding down any keys during
startup.
For more information, refer to:
kBase #HT1564: Mac OS X: What is Safe Boot, Safe Mode?
kBase #TS1884: Safe Boot takes longer than normal startup
2010-11-18
iMac (21.5-inch, Late 2009) — General Troubleshooting 20
Page 21
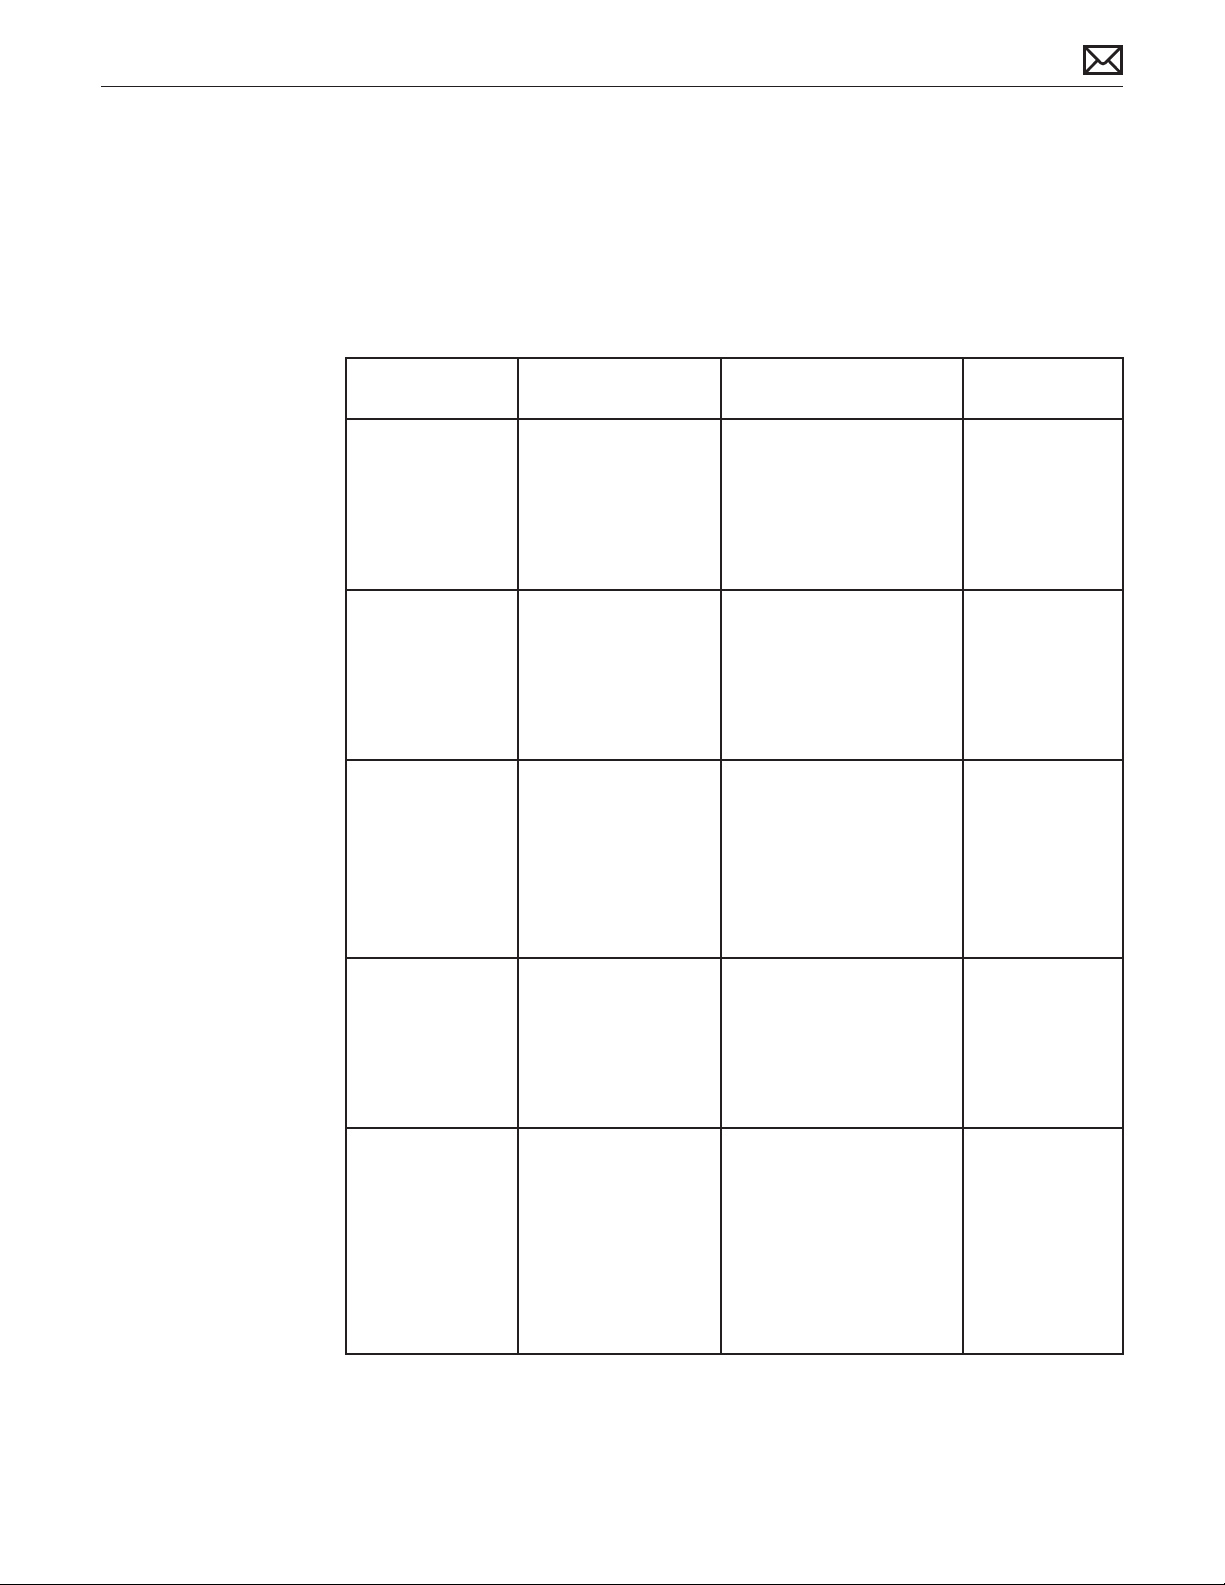
Diagnostics
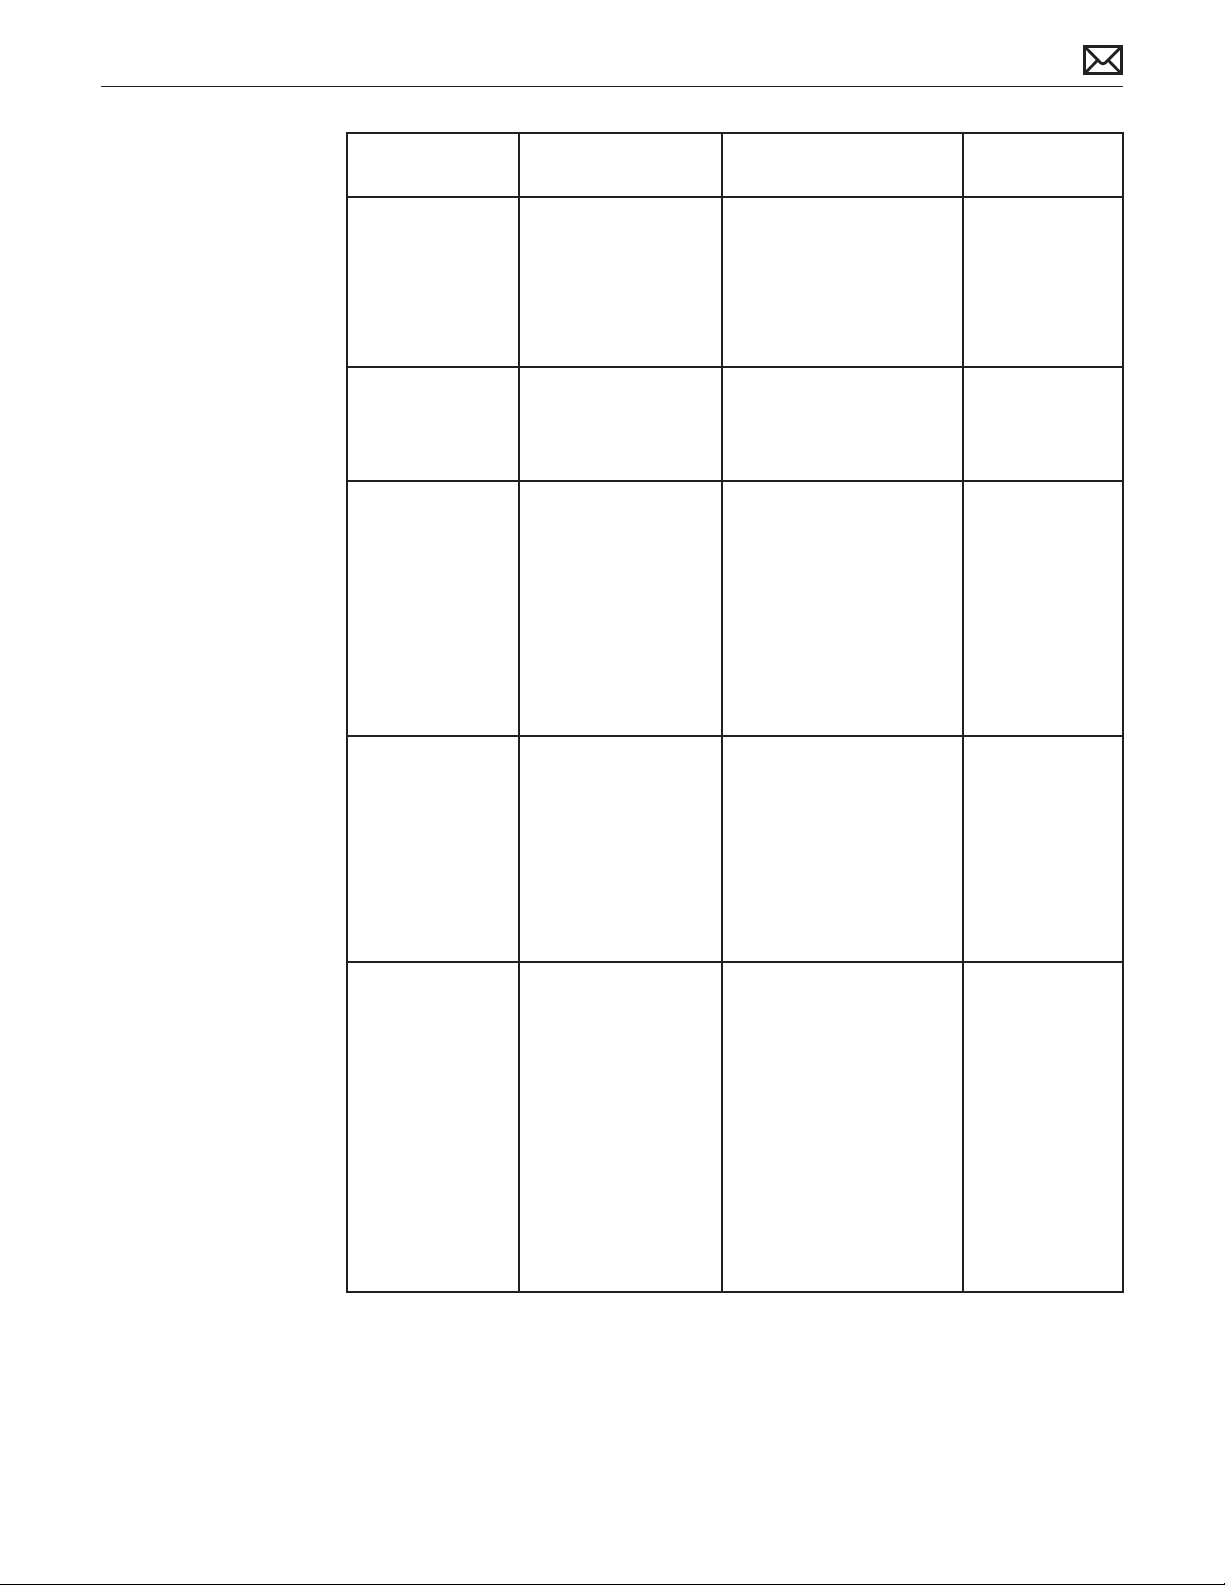
Run Apple Service Diagnostic version 3S135 to determine if any thermal sensors or blowers
are malfunctioning. If ASD is not available, run Apple Hardware Test version 3A189 by holding
down the D key during startup. When a test reports an error, reseat appropriate connections.
If issue persists, replace the corresponding part (sensor, blower, logic board, video card, or
power supply). See Apple Hardware Error code chart below for correlation between error code,
aected sensor, sensor location, and additional checks to perform.
AHT Error code Suspected part and
Location
4SNS/1/C0000008:
TA0P - xxx
4SNS/1/C0000008:
T00p-xxx
4SNS/1/C0000008:
TH00--xxx
4SNS/1/C0000008:
TL0p
4SNS/1/C0000008:
TS2P-xxx
Ambient temp
sensor damaged or
disconnected from
logic board.
ODD temp sensor
damaged or
disconnected from
logic board.
HDD temp sensor
damaged or
disconnected from
logic board. Use the
correct sensor cable,
each drive vendor has
a unique sensor cable.
LCD temp sensor on
LCD is damaged or
disconnected from top
of logic board
Skin temp sensor
(Quad-core models
only) is damaged or
disconnected from top
of logic board.
Suggested Action Notes
Verify sensor cable is
securely connected to the
top edge of the logic board
and attached to the left
speaker housing. Replace
sensor cable if damaged.
Verify sensor cable is
securely connected to the
logic board and the sensor
is properly attached to the
ODD mechanism. Replace
sensor cable if damaged.
Verify sensor cable is
securely connected to top
left side of logic board and
is connected to hard drive.
Check for damaged cable
on logic board.
Verify that the LCD sensor
cable is securely connected
to the logic board and the
sensor is attached to the
LCD. Replace the sensor
cable if damaged
Verify that the skin temp
sensor cable is securely
connected to the top
of the logic board and
sensor is attached to rear
housing (near the camera).
Replace the sensor cable if
damaged.
All fans ramp
at full speed
if sensor is
disconnected.
The ODD fan
will run at full
speed if sensor is
disconnected.
The HD fan may
run at full speed
if the sensor is
disconnected.
The CPU fan will
run at full speed
if the sensor is
disconnected.
2010-11-18
iMac (21.5-inch, Late 2009) — General Troubleshooting 21
Page 22
AHT Error code Suspected part and
Location
Suggested Action Notes
4SNS/1/40000000:
TC0H
4SNS/1/40000000:
TG0H
4MOT/4/40000002:
ODD-xxx
4MOT/4/40000002:
HDD-xxx
4MOT/4/40000002:
CPU-xxx
CPU temp sensor
(located on back side
of logic board). Note:
this sensor is not
Check CPU sensor cable
connection to logic board.
It requires removal of the
logic board.
available as a separate
service part
GPU temp sensor
(located on back side
of logic board)
Check GPU sensor cable
connection to logic board.
It requires removal of the
logic board.
Optical fan/blower Verify that the ODD
blower/fan cable is securely
connected to the right side
of the logic board and that
there are no obstructions
that would prevent the
blower/fan from rotating.
Replace fan if the error
continues.
Hard drive fan/blower,
located below logic
board, near hard drive
Verify that the HDD
blower/fan cable is securely
connected to the top of the
logic board and that there
are no obstructions that
would prevent the blower/
fan from rotating. Replace
fan if the error continues.
CPU fan/blower,
located next to left
speaker (logic board
has to be removed to
replace CPU blower)
Verify that the CPUblower/
fan cable is securely
connected to the left side
of the logic board and that
there are no obstructions
that would prevent the
blower/fan from rotating.
Replace fan if the error
continues.
If the sensor is
disconnected, the
CPU fan will run
at full speed.
If sensor is
disconnected the
CPU fan will run
at full speed.
Normal fan
operation, except
the ODD blower.
Normal fan
operation, except
the HDD blower.
Normal fan
operation, except
the CPU blower.
Note: Make sure
black mylar tape
along the bottom
of LCD panel is
not obstructing
fan blades, if so,
cut tape and restick to LCD.
2010-11-18
iMac (21.5-inch, Late 2009) — General Troubleshooting 22
Page 23
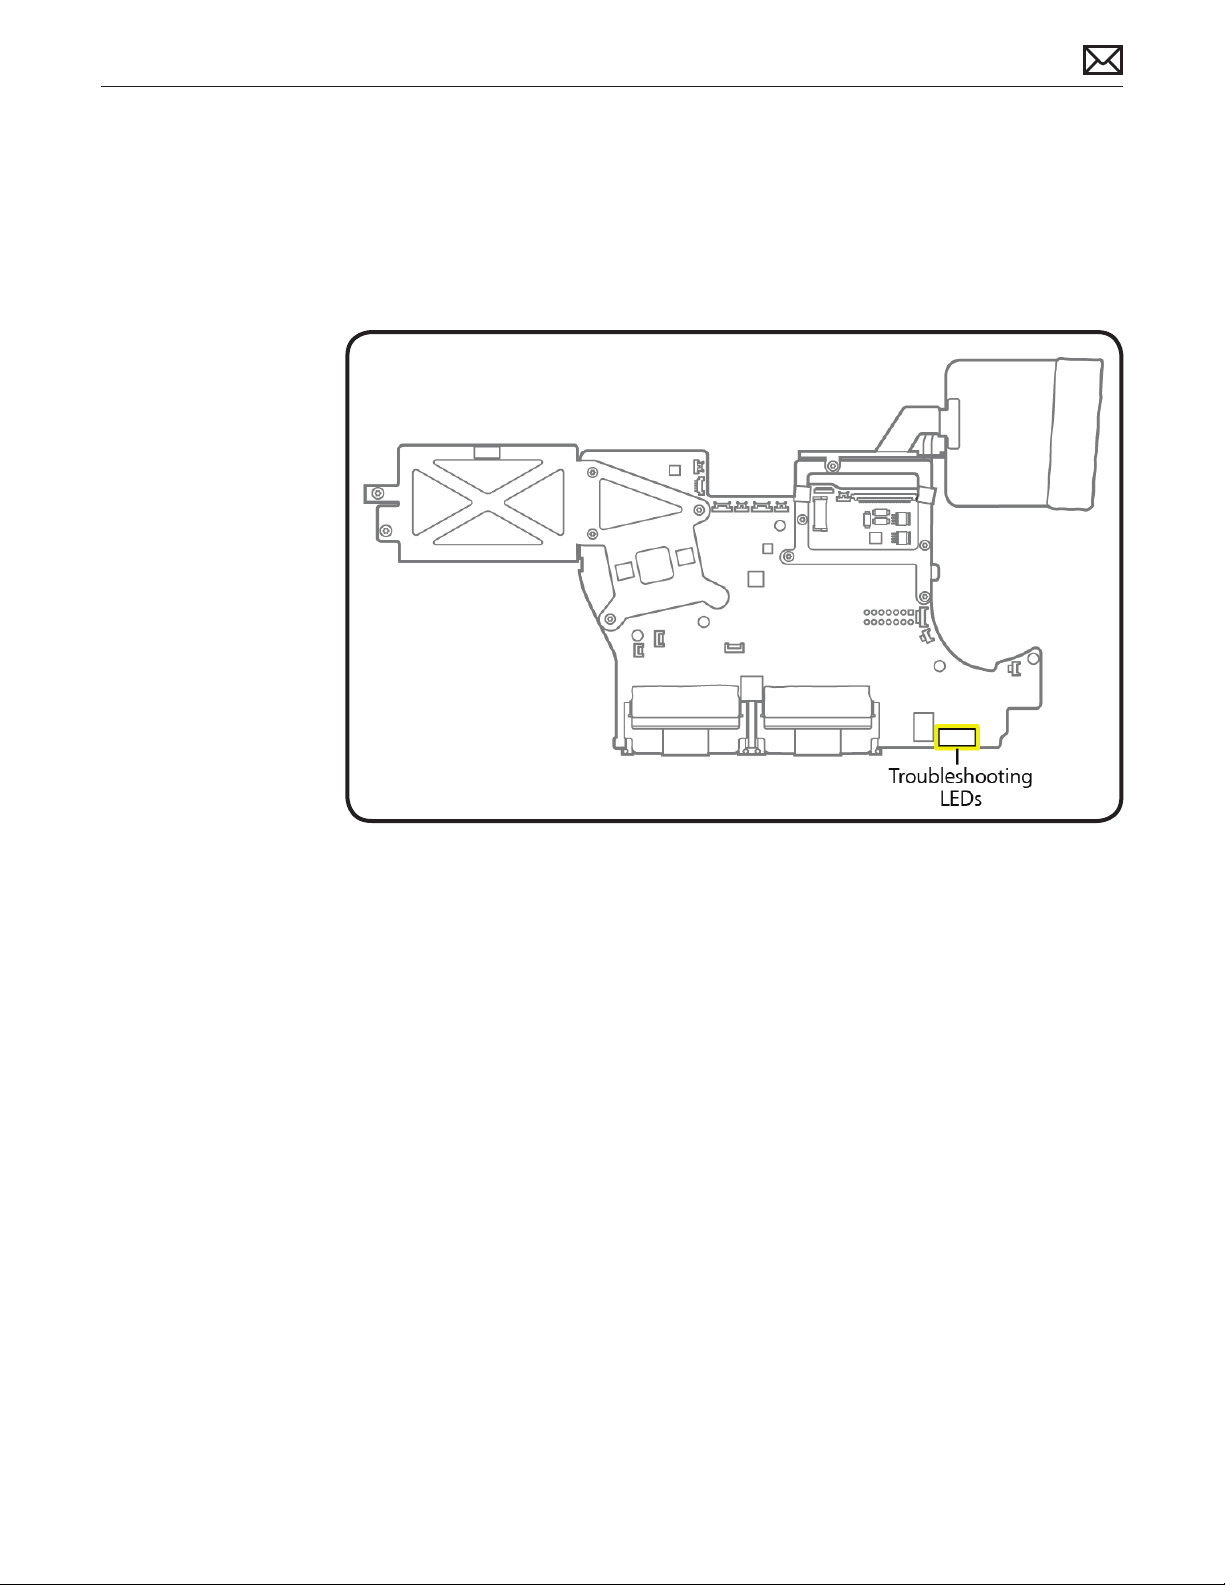
Diagnostic LEDs
Depending on iMac model, there are either three or four built-in diagnostic LEDs on the logic
board that can help troubleshoot the computer. LEDs are located on bottom right edge of logic
board (under a piece of black mylar tape) and can only be seen when looking through lower
vents of rear housing.
2010-11-18
iMac (21.5-inch, Late 2009) — General Troubleshooting 23
Page 24
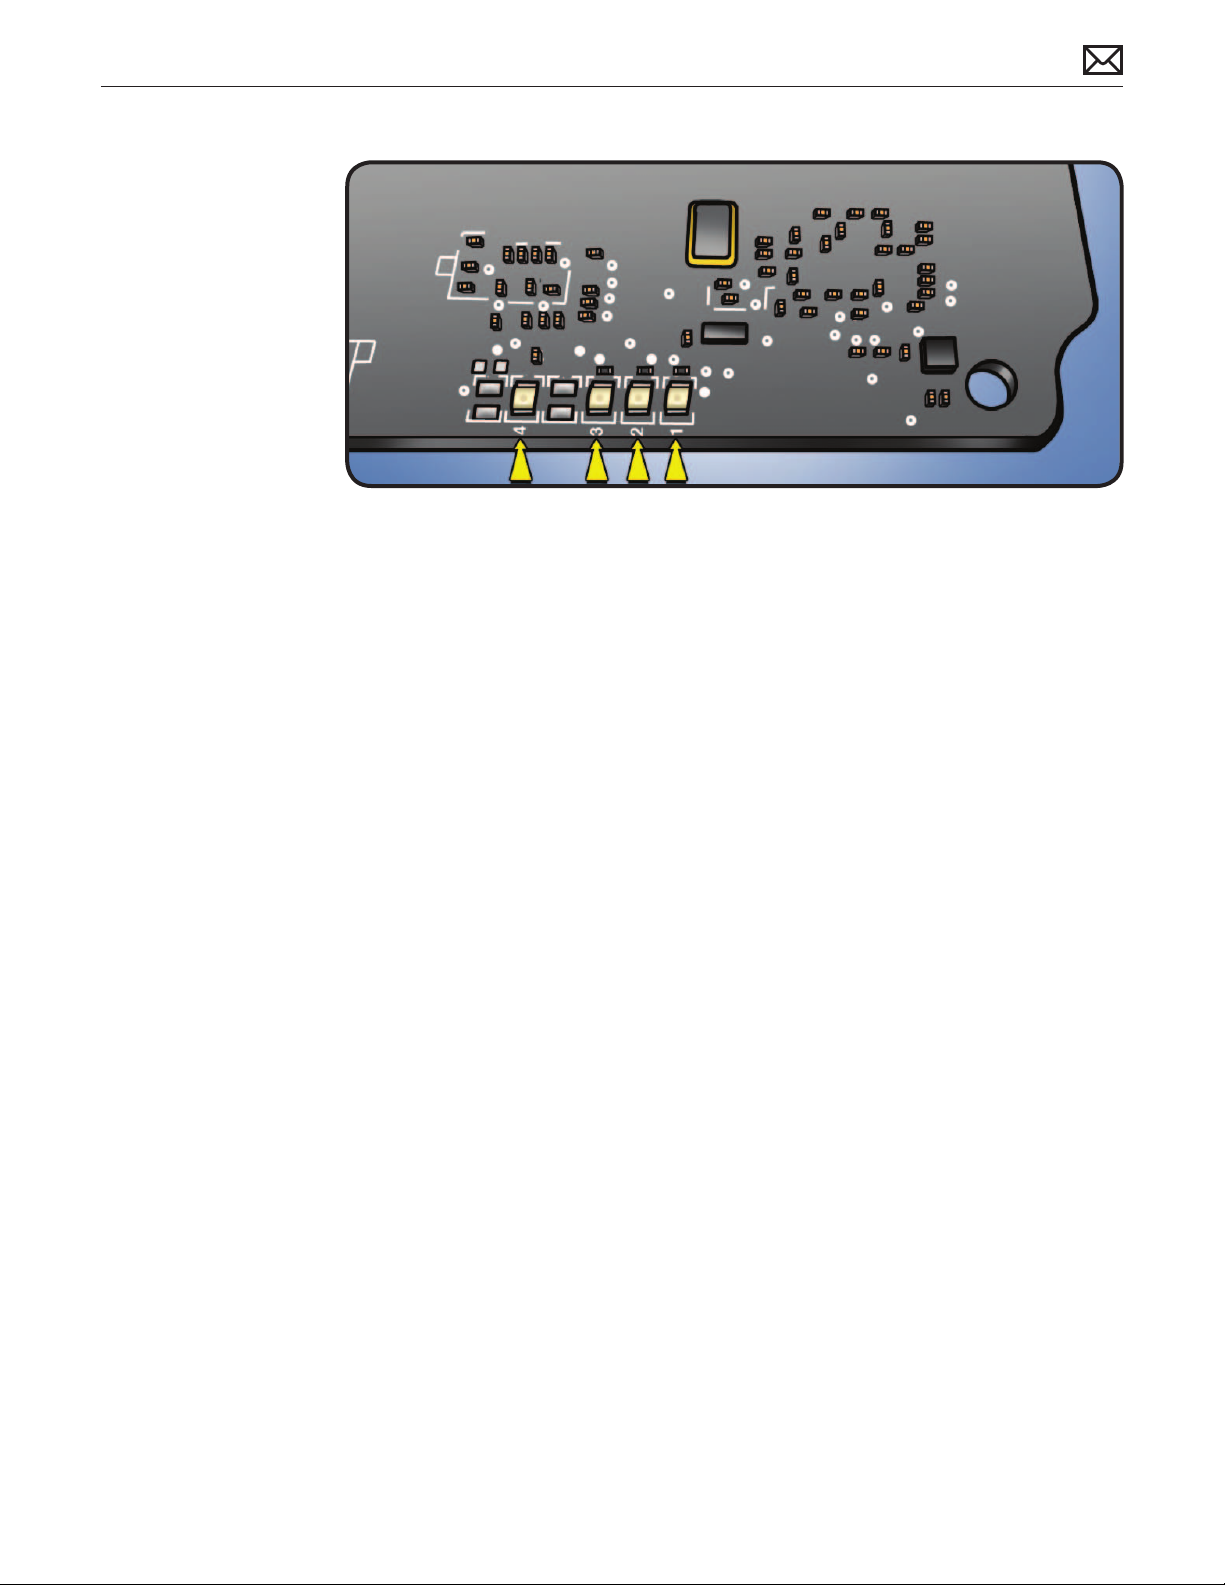
LED Functions
LED #1
• Indicates that trickle voltage from power supply has been detected by logic board. This LED
will remain ON whenever the iMac is connected to a working AC power source. The LED will
remain on even when computer has been shut down or put to sleep. The LED will turn o
only if AC power source is disconnected or power supply is faulty.
LED #2
• Indicates that logic board has detected power from power supply when computer is
turned on. This LED will be ON when computer is turned on and power supply and voltage
regulators are working correctly.
LED #3
• Indicates that computer and video card are communicating. This LED will be ON when
computer is communicating properly with video card. If LEDs 1 and 2 are ON and you heard
the startup sound, but LED 3 is OFF, then video card might be installed incorrectly or need
replacement. Note: LED #3 is not present on models with integrated graphics.
LED #4
• Indicates that computer and LCD panel are communicating. This LED will be ON when
computer is turned on and video signal is being generated. If LED 4 is ON and there is
no image on display, then LCD panel, LED backlight board, or cables between might be
installed incorrectly or need replacement.
2010-11-18
iMac (21.5-inch, Late 2009) — General Troubleshooting 24
Page 25

LED Startup Sequence
LED #1 = Power available.
If no LED is visible:
• Verify AC source
• Verify known-good AC cable is connected
• Verify cable connection between AC inlet and power supply
• Verify cable connection between power supply and logic board
• Verify power supply
LED #1 + LED #2 = Power available, and system is powered on.
If second LED is not visible when power button is pressed:
• Verify power button connection to logic board
• Verify power button functionality
• Verify cable connection between power supply and logic board
• Verify power supply
• Verify logic board
LED #1 + LED #2 + LED #3 = Power available, system is powered on, and video card found.
If third LED is not visible after power on:
• Verify that MXM video card is seated properly
• Verify logic board
LED #1 + LED #2 + LED #3 + LED #4 = Power available, system is powered on, video card
found, and internal LCD found.
If fourth LED is not visible after power on:
• Verify cable connections between LCD panel and logic board
• Inspect LCD display cables for cable damage
• Verify external video functionality, and according to result check the following items:
-If external display works then verify/replace LED backlight board
-If external display works then verify/replace LCD panel
-If external display does not work verify/replace logic board
2010-11-18
iMac (21.5-inch, Late 2009) — General Troubleshooting 25
Page 26
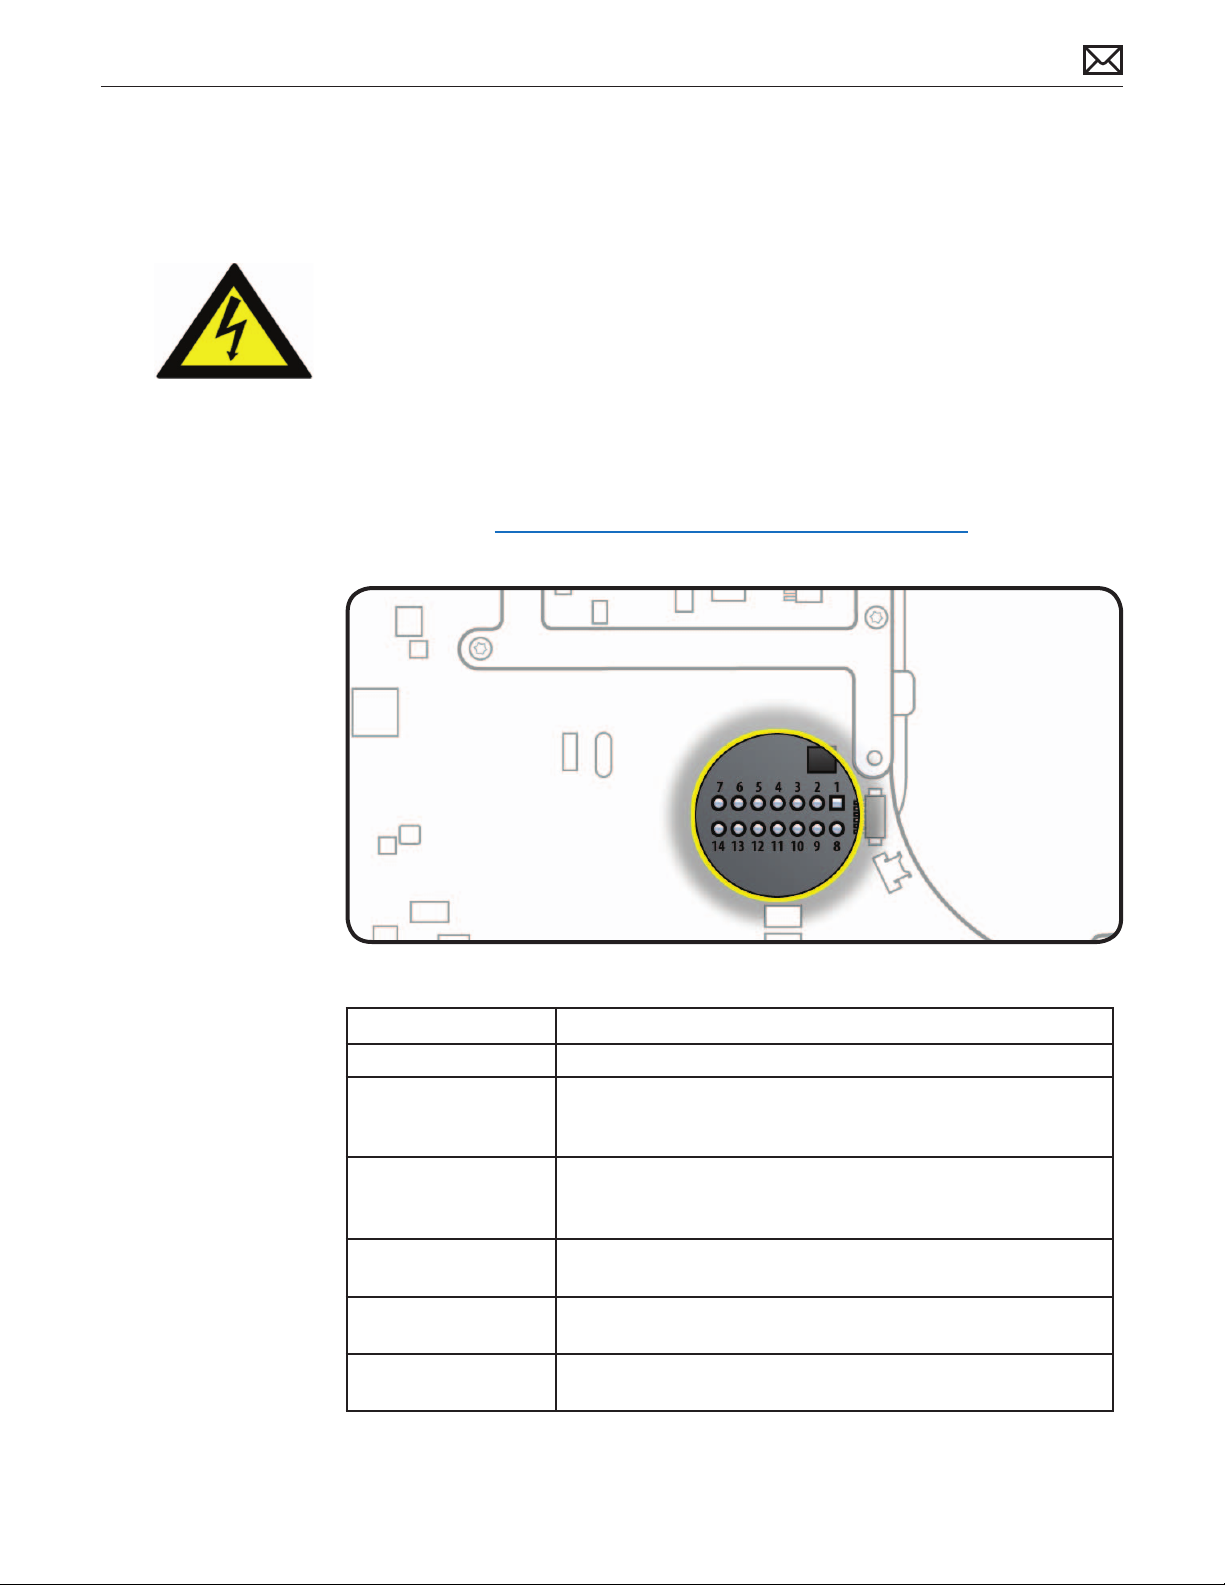
Logic Board Test Points
Test points, which can be used to verify proper power ow, are accessible on logic board when
LCD panel is removed. All voltages given in Troubleshooting Symptom Charts assume that
computer is plugged into a known-good power outlet with a known-good AC cable. Some
guidelines for using test points:
• Warning: HIGH VOLTAGE: Use extreme caution when live testing!
• Do NOT lean over or touch the power supply area during live testing.
• Keep your ngers behind nger guards on test probes when measuring.
• Turn dial of voltmeter/multimeter to measure DC (direct current, usually indicated by a solid
horizontal line over dashes). If your voltmeter requires a set voltage range, choose a DC
range that includes the voltage you are measuring.
• Connect black probe to ground. Connect red probe to test point and verify voltage.
For more info, see kBase #HT3250: Diagnostics: Using a digital multimeter
2010-11-18
Logic Board Test Point Function
Pin 1 Ground
Pin 4 Standby 12V power (permanent power coming from power supply
and present as long as AC cable is connected, even if computer is
o); corresponds to LED #1
Pin 6 Backlight Control pulse width modulated signal (from logic board
to LED backlight board, to adjust the backlight level setting
according to user setup)
Pin 11 12V Run-Mode power to logic board (coming from power supply,
present as long as system is on or asleep); corresponds to LED #2
Pin 12 Power On Request signal (from logic board to power supply when
power button is pressed)
Pin 13 Backlight Enable (signal from logic board to Backlight Controller
board, to enable backlight
iMac (21.5-inch, Late 2009) — General Troubleshooting 26
Page 27
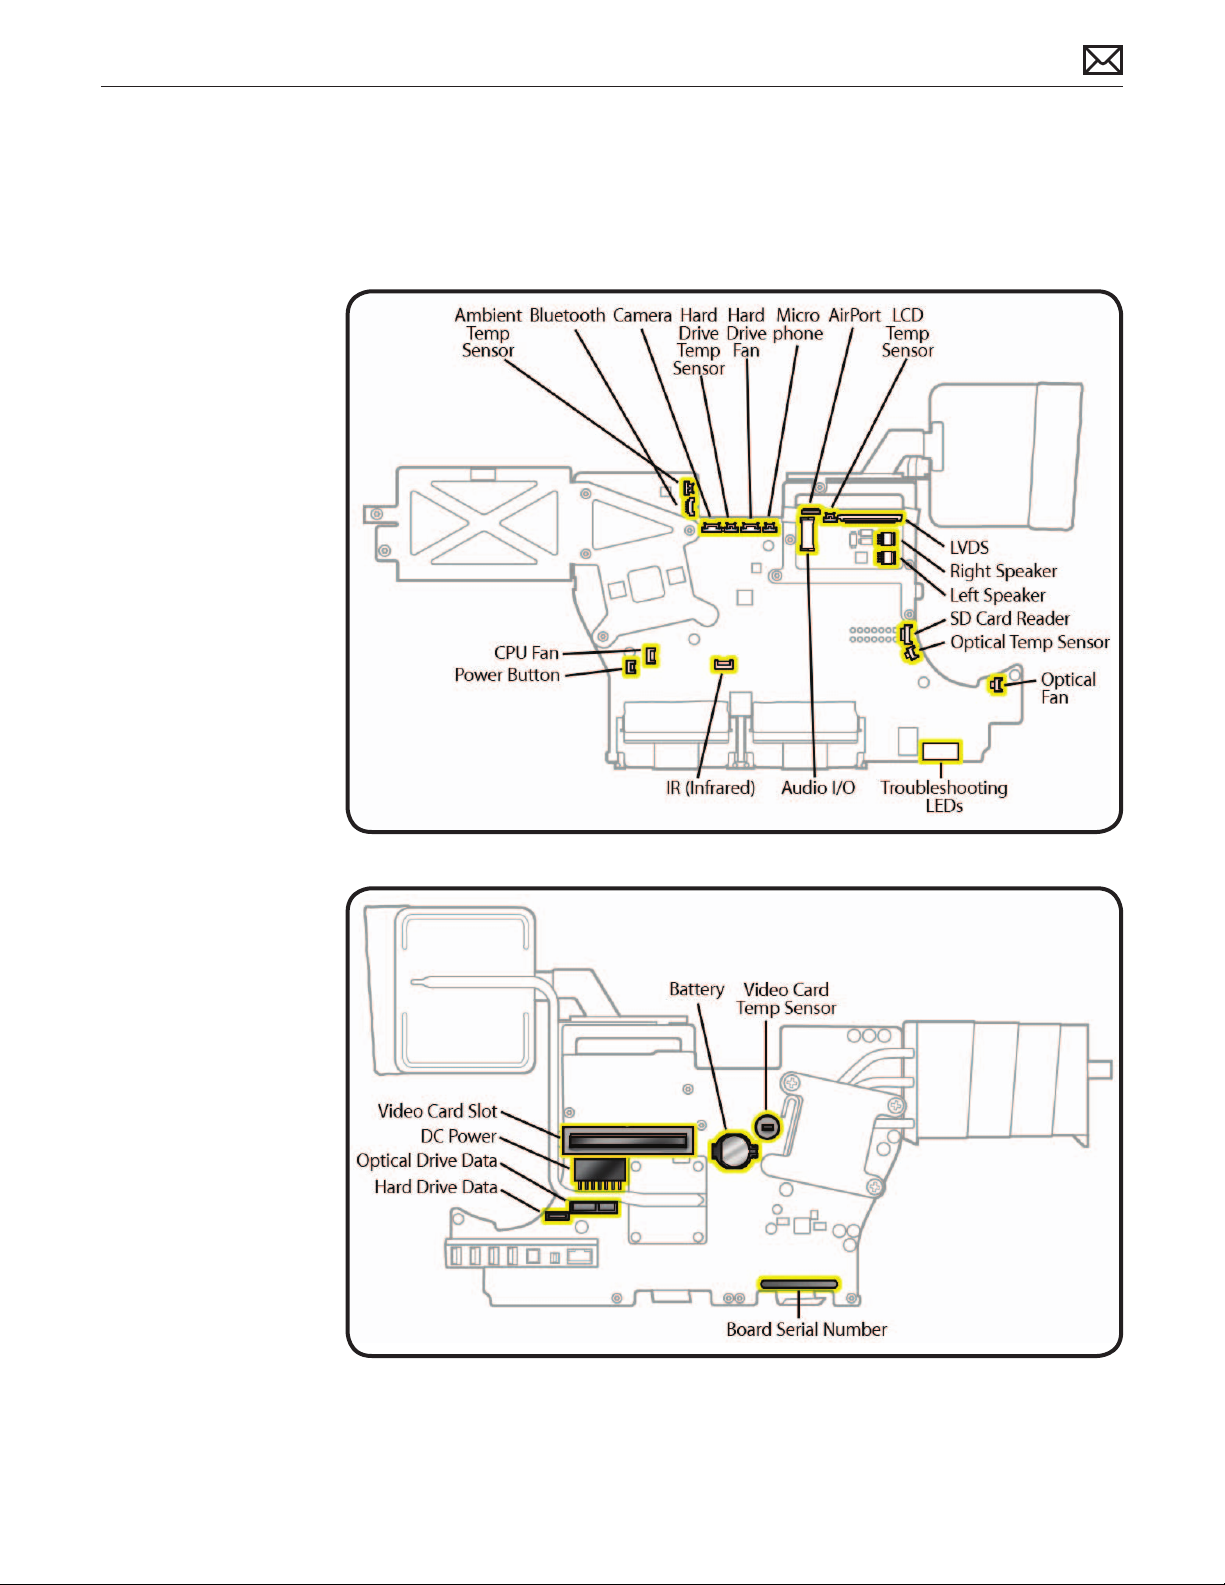
Sensor and Fan Connector Locations
Ambient temp sensors and fans connectors locations are shown below. Ensure cables are
correctly routed and the sensors and fans are properly connected. If a sensor or fan is faulty or
not connected, Apple Hardware Test and Apple Service Diagnostic will generate an error code.
2010-11-18
iMac (21.5-inch, Late 2009) — General Troubleshooting 27
Page 28
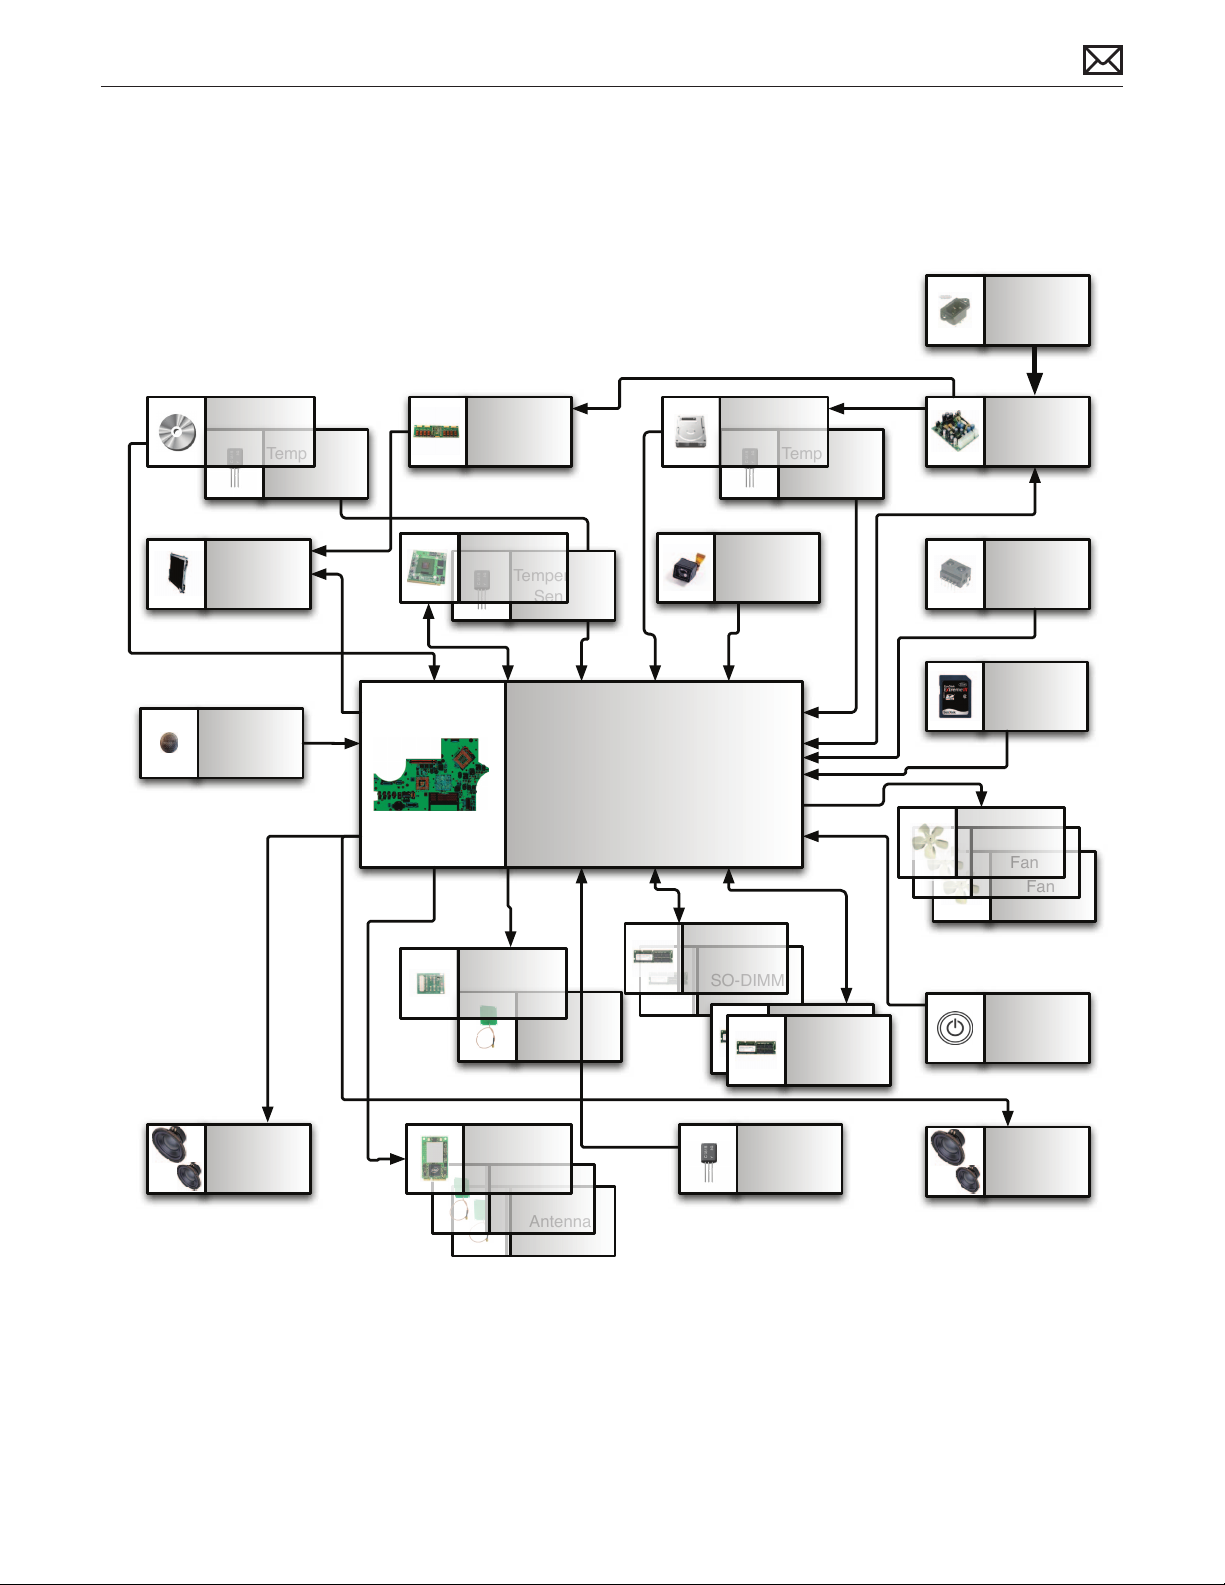
Block Diagram
Refer to this diagram to see how modules are interrelated.
AC Inlet
Temperature
Display
Microphone
Sensor
Backlight
Controller
MXM
Temperature
Bluetooth
Sensor
MLB
Hard DriveOptical Drive
Camera
SO-DIMM
SO-DIMM
AC/DC
Temperature
Sensor
IR Sensor
SD Card
Reader
Fan
Fan
Fan
2010-11-18
Speakers
802.11n
Antenna
Antenna
Antenna
Power
SO-DIMM
SO-DIMM
Ambient
Temperature
Sensor
Button
Speakers
iMac (21.5-inch, Late 2009) — General Troubleshooting 28
Page 29
Symptom Charts
Follow steps in the order indicated below. If an action resolves the issue, retest system to verify.
Note: A compilation of Quick Check tables is available at:
http://service.info.apple.com/QRS/en/quickreference.pdf
Startup and Power
No Power, Dead Unit
Unlikely cause: speakers
Quick Check
Symptoms Quick Check
No Power, Dead Unit
• No power
• No fan spin
• No startup chime
• No image on external display
• No hard drive or optical drive
activity
1. Verify power source.
2. Verify power cable.
3. Listen closely for signs of activity from system
including: rotating fans, hard drive or optical drive
activity, startup chime, etc.
Deep Dive
Check Result Action Code
1. Power ON system. Verify if
there is any indication that the
system has powered up (fan
rotation, hard drive or optical
drive noise, backlight turns on).
2. Locate diagnostic LEDs in
bottom case vents. Plug AC
cord into system. Verify if
diagnostic LED #1 turns ON.
You may alternately check for
presence of a 12V DC signal
between pin 4 and pin 1 of
logic board.
Yes
No Go to step 2.
Yes Standby power voltage being
No Replace power supply.
The symptom is powering
up. Go to Won’t Start Up
symptom ow.
supplied by power supply.
Go to step 3.
2010-11-18
iMac (21.5-inch, Late 2009) Symptom Charts — Startup and Power 29
Page 30

3. Press power button while
monitoring diagnostic LEDs.
Verify if LED #2 turns ON and
remain ON after pressing
the power button. You may
alternately check for a power
request signal between pin 12
and pin 1 of logic board.
Yes Power supply functioning and
logic board detects supply
voltages. Go to Won’t Start
Up symptom ow.
No Go to step 4.
4. Disconnect AC cable then
remove power supply and
carefully inspect connectors
between AC inlet and power
supply, then DC connectors and
cables between power supply
and logic board, for damage or
poor connections.
5. Inspect power button and
verify if it is properly connected
to the logic board.
6. Disconnect power button from
logic board. Inspect cable and
connector for damage. Verify
continuity between the two
pins of power button when it is
pressed.
7. Press power button and Verify
if system turns ON. You may
alternately check for presence
of a 12V DC signal between
pin 11 and pin 1 of logic board
when power button is pressed.
Yes Replace damaged part. P16
No Go to step 5.
Yes Go to step 6.
No Reconnect power button.
Yes Power button is functioning
correctly. Reconnect power
button to logic board and
go to step 7.
No Power button faulty. Replace
X14
rear housing (which includes
power button).
Yes
Power supply functioning. If
system still won’t boot, go
to Won’t Start Up symptom
ow.
No Replace DC power cable.
X03
Go to step 8.
2010-11-18
8. Press power button and verify if
system turns ON.
Yes Issue solved with replaced DC
power cable.
No Replace power supply.
P01
Go to step 9.
9. Press power button and verify if
system turns ON.
Yes Issue solved with replaced
power supply.
No Reinstall power supply and
M01
replace logic board.
Note: If No Power symptom persists after all steps have been followed use minimum
conguration troubleshooting to proceed. Try disconnecting hard drive, optical drive, AirPort,
Bluetooth, and SD card modules to determine if one of them is preventing the power supply
from functioning.
iMac (21.5-inch, Late 2009) Symptom Charts — Startup and Power 30
Page 31
Won’t Start Up
Quick Check
Symptoms Quick Check
Won’t Start Up
• No startup chime.
• Error tones during startup.
• Grey screen with fan noise, or
other noise.
• Will not progress beyond
Apple logo or spinning gear.
1. Isolate OS by starting up from original install
media for this computer, from a same-model
computer in Target Disk Mode, or from a
compatible known-good OS on an external drive.
Both AirPort and Bluetooth services are available
when booted from the Install disc.
2. Reset SMC and PRAM to clear any stored,
corrupted information.
3. Start up in Safe Mode by holding shift key down
during startup to load only required kernel
extensions and disable all startup and login
items. See kBase #HT1564: Mac OS X: What is
Safe Boot, Safe Mode?
4. If system generates error tones there may be an
issue with the SDRAM. See kBase #HT2341: Intel-
based Mac: Power On Self Test RAM error codes
5. Identifying when in the startup process the
computer hangs can help isolate the issue.
See kBase #HT2674: Intel-based Mac: Startup
sequence and error codes, symbols for
information on the Macintosh startup sequence,
and error codes and symbols used.
2010-11-18
Deep Dive
Check Result Action Code
1. Boot computer to Apple
Hardware Test on the internal
hard drive or an inserted Install
DVD by holding down the D
key at startup. Verify if system
boots up from any of these
volumes.
2. Remove installed SDRAM, and
test with known-good SDRAM.
Verify if computer starts up
properly now.
iMac (21.5-inch, Late 2009) Symptom Charts — Startup and Power 31
Yes Run the extended tests
and proceed with results. If
AHT passes or boots with a
memory error, go to step 2.
No Go to step 2.
Yes SDRAM issue. Reinstall one
of user’s SDRAM modules
and retest. Proceed one by
one to nd the faulty SDRAM
module, and replace it.
No Go to step 3.
X02
Page 32
3. Wait 15 seconds after computer
was powered down and
disconnect AirPort cable from
logic board. Verify if computer
starts up properly now.
Yes Go to AirPort Card Kernel
Panic symptom ow.
No Go to step 4.
4. Disconnect hard drive SATA
cable and startup from Install
DVD in the optical drive, or
from an external bootable
volume. Verify if computer
starts up properly now.
5. Reconnect hard drive,
disconnect optical drive cable
and retest. Verify if computer
starts up properly now.
6. Remove coin battery on back
of logic board (you will need to
completely remove logic board
to do this), and leave out for
approximately 1 minute. Then
reinstall battery. This will reset
logic board. Verify if computer
starts up properly now.
Yes Go to Hard Drive Not
Recognized symptom ow.
No Go to step 5.
Yes Go to Optical Drive Not
Recognized symptom ow.
No Go to step 6.
Yes Issue resolved by logic board
reset. Measure DC voltage on
battery touching battery with
red probe, and grounding
with black probe. If voltage is
2.7v or less, replace battery.
For multimeter help, see
kBase #HT3250: Diagnostics:
Using a digital multimeter.
No Replace logic board. M02
2010-11-18
iMac (21.5-inch, Late 2009) Symptom Charts — Startup and Power 32
Page 33
Intermittent Shutdown
Quick Check
Symptoms Quick Check
Intermittent Shutdown
• Powers o during startup.
• Powers o during desktop use.
• Computer restarts
spontaneously.
• Powers o when waking from
sleep.
1. Make sure that power cord is securely attached
to the back of computer, and is not hindered by a
desk or other furniture.
2. Plug computer directly into an AC outlet to test if
a surge protector or UPS is causing issue.
3. Open System Preferences > Energy Saver >
Schedule and make sure that a “Shut Down”
event is not scheduled.
4. Isolate OS by starting up from original install
media for this computer, from a same-model
computer in Target Disk Mode, or from a
compatible known-good OS on an external drive.
Both AirPort and Bluetooth services are available
when booted from the Install disc.
5. Reset SMC and PRAM to clear any stored,
corrupted information.
6. Start up in Safe Mode by holding shift key down
during startup to load only required kernel
extensions and disable all startup and login
items. See kBase #HT1564: Mac OS X: What is
Safe Boot, Safe Mode?
2010-11-18
Deep Dive
Check Result Action Code
1. Verify improper shutdown
by opening the system.log
located in /var/log. Filter log
for “shutdown cause”. Entries
of value “0” or a negative
value indicate an improper
shutdown. Verify if you nd
recent entries of an improper
shutdown in log le.
iMac (21.5-inch, Late 2009) Symptom Charts — Startup and Power 33
Yes Determine if user caused
improper shutdown. Use
known-good AC power cord
and AC outlet. Go to step 2.
No Revisit Quick Check examples
for possible software issues.
Check if user is running
other automating software
that may be shutting down
system. Verify issue and jump
to appropriate symptom
ow. No repair needed under
current symptom ow.
Page 34

2. With known-good AC power
cord and AC outlet, Verify if
system continues to restart or
shutdown
Yes Go to step 3.
No AC power cord / outlet issue.
Issue resolved.
X03
3. Disconnect hard drive power
cable from hard drive and
startup the computer from
other bootable media (like
Install DVD, a same model
computer in Target Disk Mode,
or a compatible known-good
OS on an external drive). Verify
if system continues to restart or
shutdown.
4. Inspect and reseat AC inlet
connection to power supply
(the smaller of the 2 cables
connected to power supply),
and DC power cable from
power supply to logic board.
Verify if damage is observed on
the cables or connectors.
5. Install known-good power
supply. Verify if system
continues to restart or
shutdown.
Yes Go to step 4.
No
Possible bad software or hard
drive. Go to Hard Drive Not
Recognized symptom ow.
Yes Replace damaged cable.
Retest. Return to step 1 if
problem continues.
No Go to step 5.
Yes Reinstall original power
supply. Go to step 6.
No Issue resolved with power
supply replacement.
X03
P02
6. Replace DC power cable,
which supplies power to
logic board, hard drive, and
LED backlight board. Verify if
system continues to restart or
shutdown.
7. Replace logic board. Verify if
system continues to restart or
shutdown.
Yes Go to step 7.
No Issue resolved with DC power
cable replacement.
Yes Use Minimum Conguration
troubleshooting to isolate
failed module.
No Issue resolved with logic
board replacement.
X03
M08
2010-11-18
iMac (21.5-inch, Late 2009) Symptom Charts — Startup and Power 34
Page 35
Kernel Panic, System Crashes
Quick Check
Symptoms Quick Check
Kernel Panic, System Crashes
• Kernel Panic on startup or
desktop use.
• System freeze during use.
• System freeze upon wake from
sleep.
1. Isolate OS by starting up from original install
media for this computer, from a same model
computer in Target Disk Mode, or from a
compatible known-good OS on an external drive.
Both AirPort and Bluetooth services are available
when booted from the Install disc.
2. Ensure that all software and rmware updates for
this model have been installed to take advantage
of any available bug xes.
3. Reset SMC and PRAM to clear any stored,
corrupted information.
4. Start up in Safe Mode by holding shift key down
during startup to load only required kernel
extensions and disable all startup and login
items. See kBase #HT1564: Mac OS X: What is
Safe Boot, Safe Mode?
5. Check the panic.log, located /Library/Logs/
Panicreporter, for information in the back trace
that may give clues about the kernel panic.
6. For more information, see kBase #HT1392:
About “You need to restart your computer”
(kernel panic) messages.
2010-11-18
Deep Dive
Check Result Action Code
1. Boot the computer to Apple
Hardware Test on internal hard
drive or an inserted Install DVD
by holding down the D key at
startup. Verify if system boots
up from any of these volumes.
2. Remove all peripheral devices
including keyboard and mouse.
Verify if system starts without
kernel panic.
iMac (21.5-inch, Late 2009) Symptom Charts — Startup and Power 35
Yes Run extended tests and
proceed with results. If AHT
passes or boots with a kernel
panic, go to step 2.
No Go to step 2.
Yes Add peripheral devices one
at a time until kernel panic
repeats. Replace device
causing issue.
No Go to step 3.
Page 36
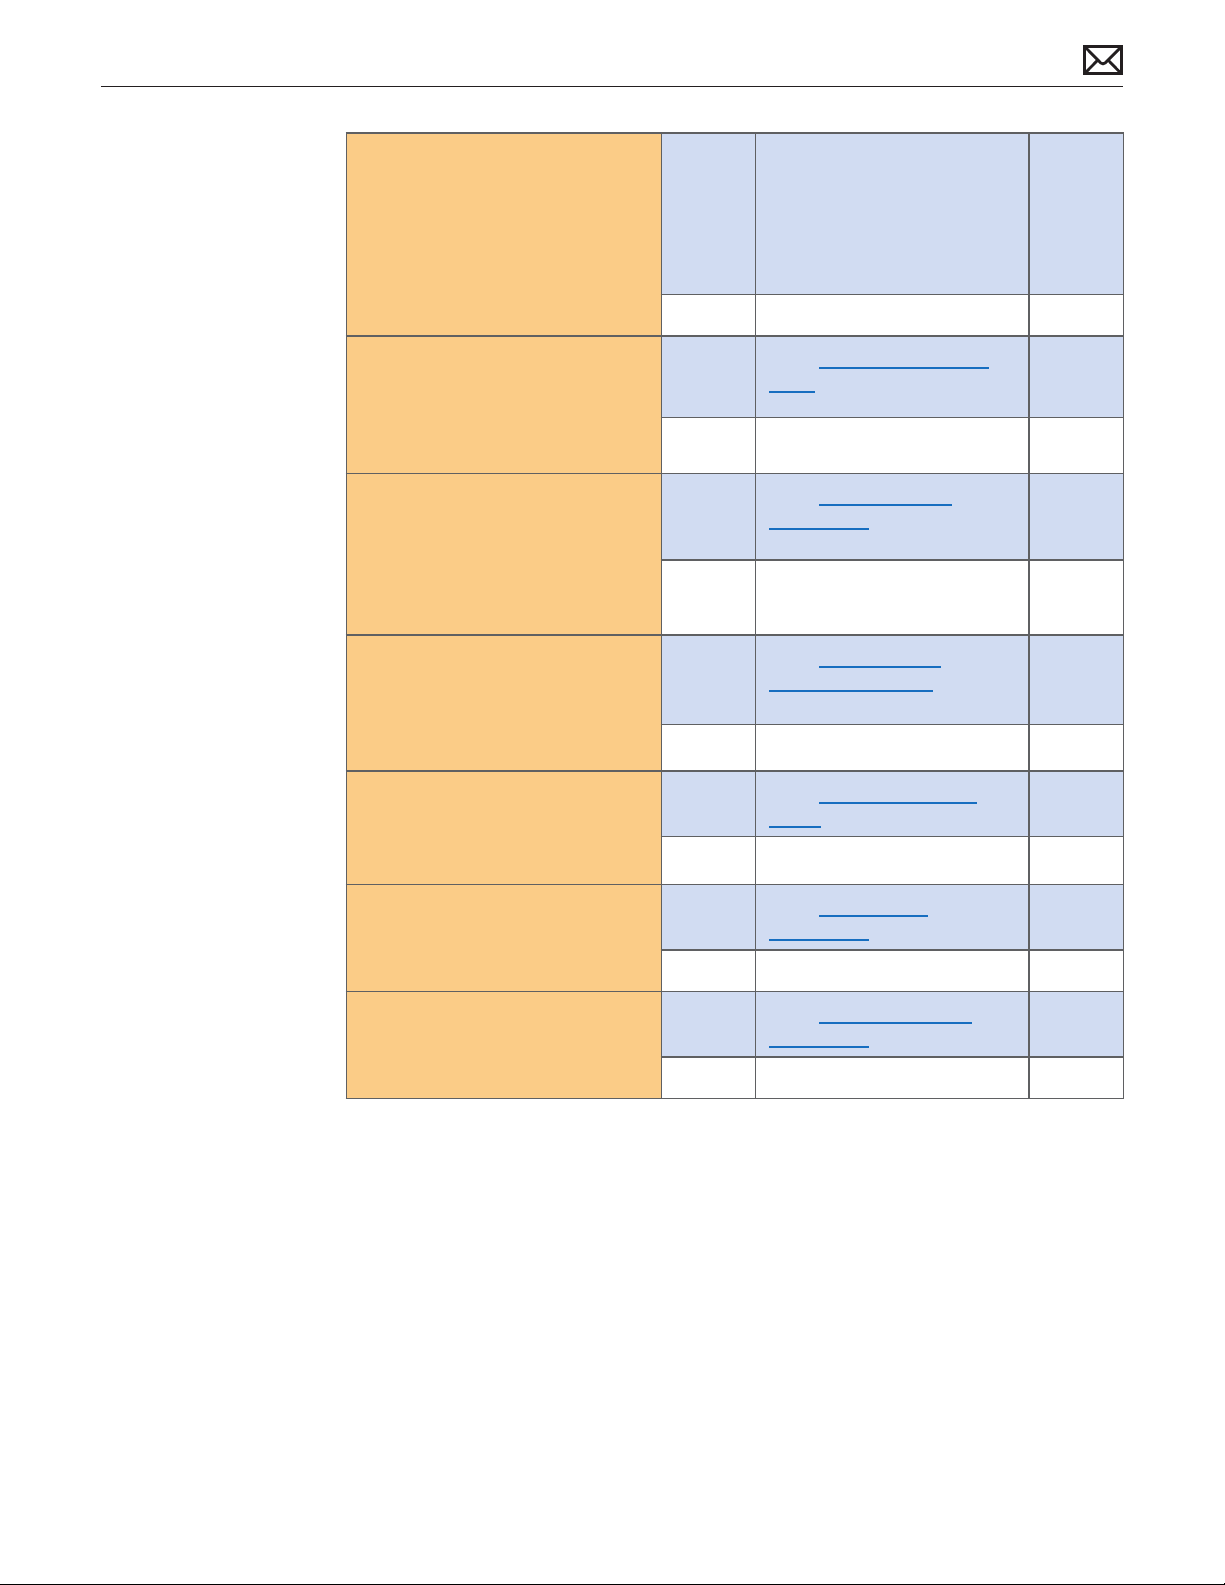
3. Use known-good SDRAM in the
system. Verify if system start
without kernel panic now.
Yes Install user’s SDRAM one by
one and test. If kernel panic
repeats, replace aected
SDRAM. Verify if correct
SDRAM specication is being
used.
No Go to step 4.
X01
4. Wait for 20 seconds after
shutdown and disconnect
AirPort cable on logic board.
Verify if system starts without
kernel panic now.
5. Disconnect SATA cable from
hard drive and startup to the
Install DVD in the optical drive
or from an external volume.
Verify if system starts without
kernel panic now.
6. Disconnect camera and
microphone cables from logic
board. Verify if system starts
without kernel panic now.
7. Disconnect Bluetooth cable
on logic board. Verify if system
starts without kernel panic
now.
8. Disconnect SD board on logic
board. Verify if system starts
without kernel panic now.
Yes Go to AirPort Card Kernel
Panic symptom ow.
No Go to step 5.
Yes Go to Hard Drive Not
Recognized symptom ow.
No Go to step 6.
Yes Go to Camera Issues or
Audio: Microphone symptom
ow as appropriate.
No Go to step 7.
Yes
Go to AirPort/Bluetooth
Issues symptom ow.
No Go to step 8.
Yes Go to SD Card Not
Recognized symptom ow.
No Go to step 9.
X99
2010-11-18
9. Disconnect optical drive and
test. Verify if system starts
without kernel panic now.
iMac (21.5-inch, Late 2009) Symptom Charts — Startup and Power 36
Yes
Go to Optical Drive Not
Recognized symptom ow.
No Replace logic board.
Page 37
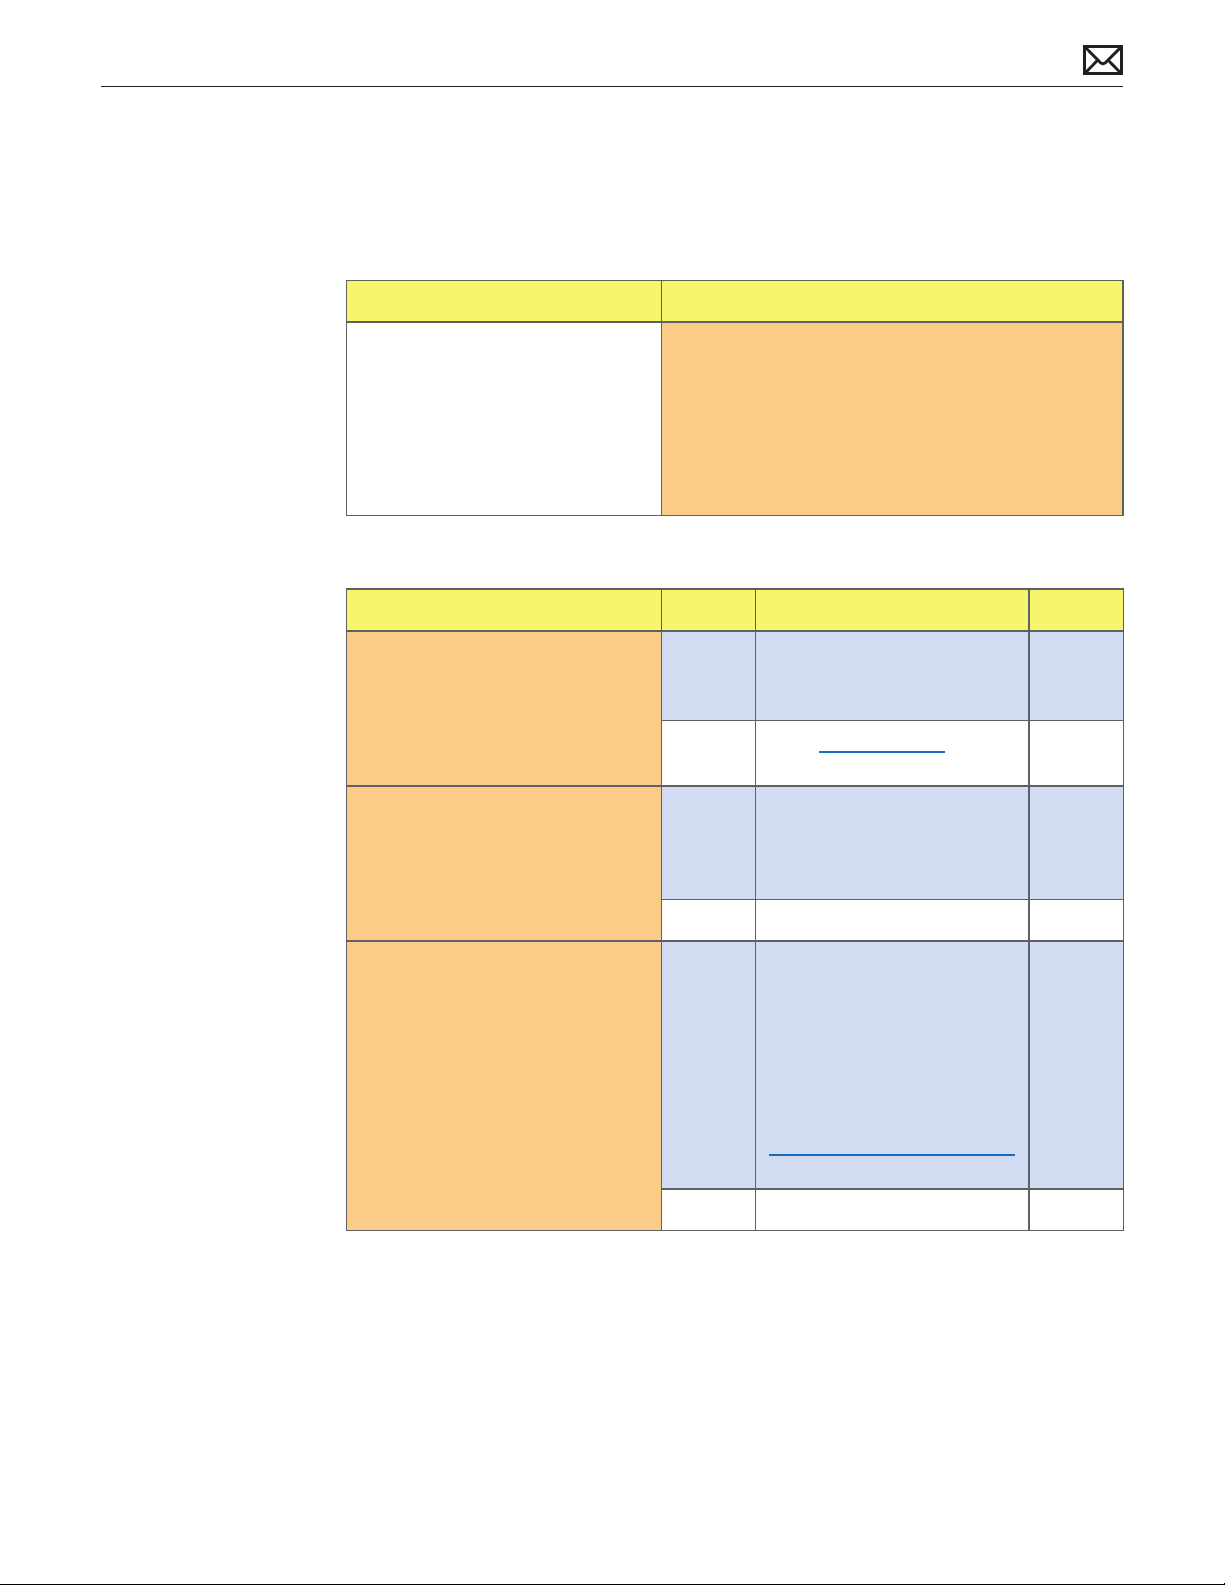
No Video
Unlikely cause: hard drive, optical drive, speakers, camera, microphone
Quick Check
Symptoms Quick Check
No Video
• No image.
• Backlight failure.
1. Check brightness setting.
2. For no-video issues, connect an external display
to Verify if iMac video circuitry is functioning.
If image appears on external display go to
Backlight Issue/No Backlight symptom ow.
3. Reset SMC.
Deep Dive
Check Result Action Code
1. Verify boot chime present and
fans running when system
powered ON. (Reset SMC and
clear PRAM if necessary for
proper boot up.)
2. Verify if image is visible on
built-in LCD panel.
Yes Power ON self test OK. Boot
sequence started.
Go to step 2.
No Go to Won’t Start Up
symptom ow.
Yes Video present. Verify system
functionality and return to
user or jump to appropriate
troubleshooting ow.
No Go to step 3.
2010-11-18
3. Connect supported external
display. Verify if image appears
on external display when
system is booted.
iMac (21.5-inch, Late 2009) Symptom Charts — Startup and Power 37
Yes External display detected by
system. Video circuitry on
logic board functional.
Inspect LVDS cable
connection to back of LCD
panel. Reseat and test
again. If issue persists, go to
Backlight Issue/No Backlight
symptom ow.
No Go to step 4.
Page 38
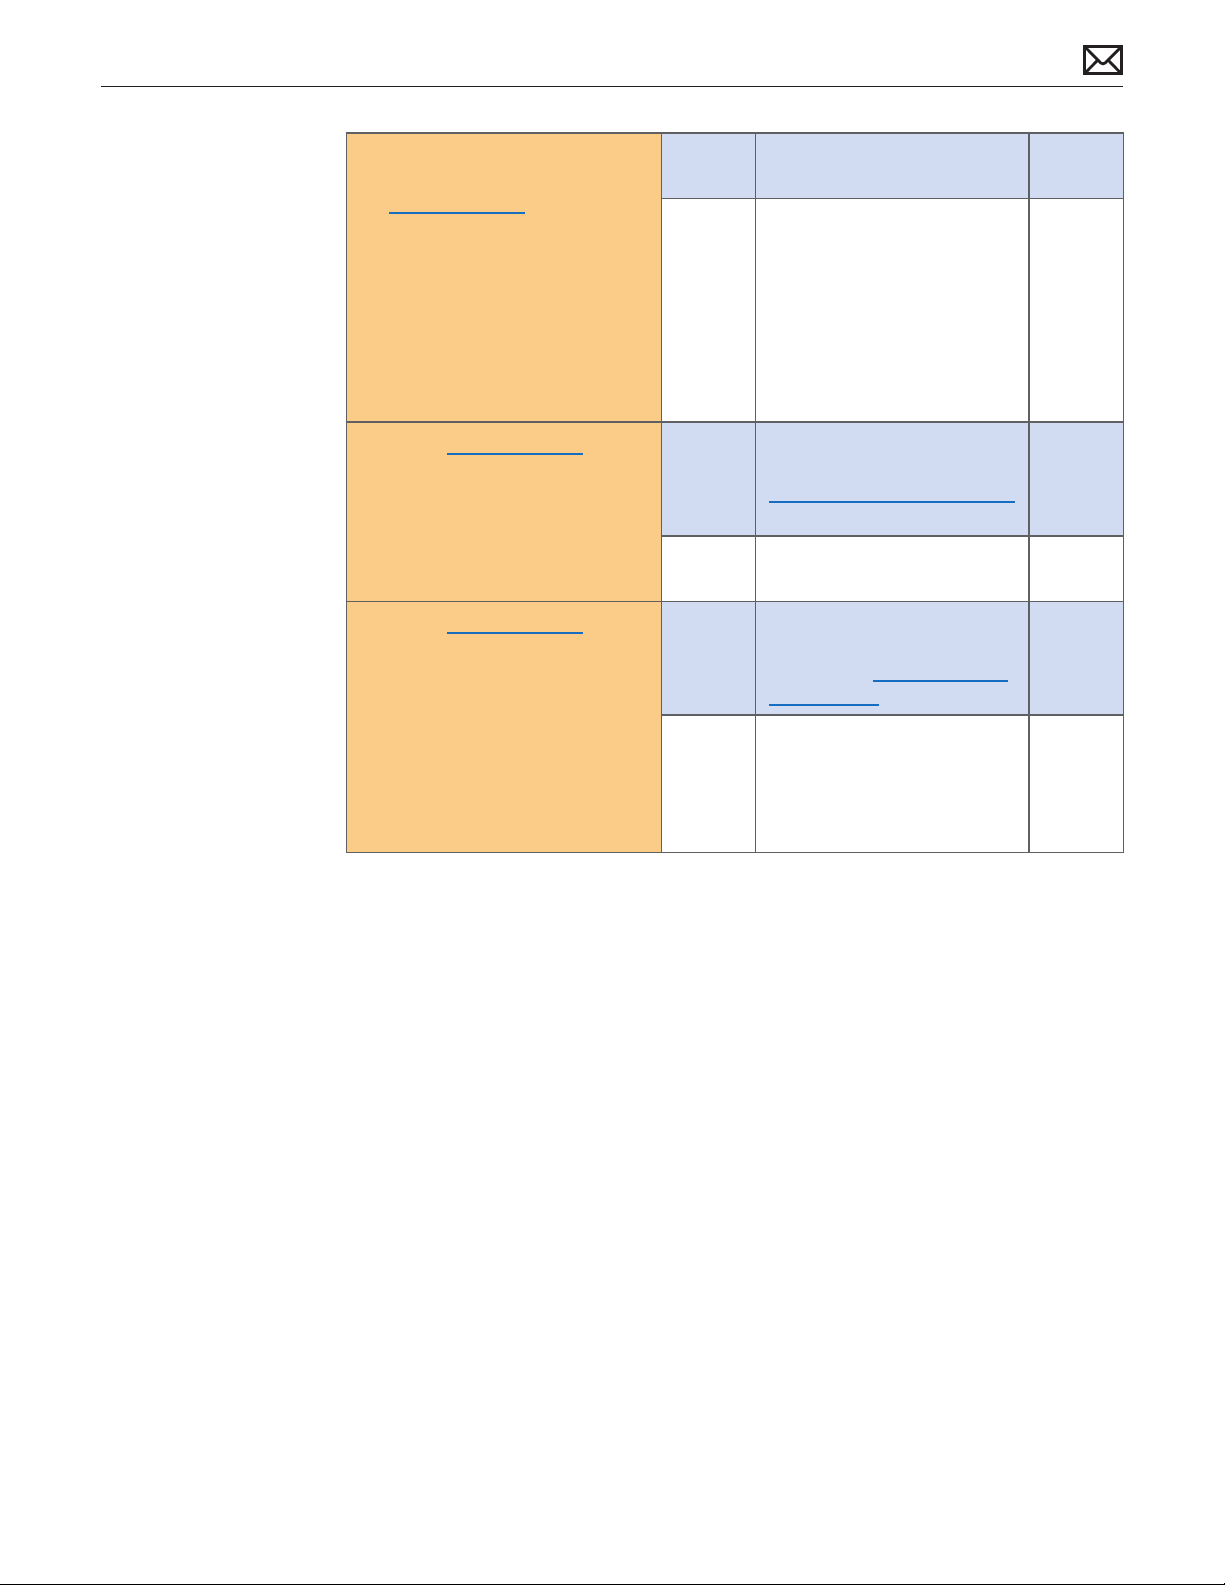
4. Pivot enclosure to access
lower intake vent, and locate
diagnostic LEDs on edge of
logic board. Verify if LED #3
turns on shortly after system
powers on.
Yes Logic board communicating
with video card. Go to step 5.
No If LED #3 does not turn ON
-If system has a separate
video card, reseat video card
and retest, then replace video
card and repeat step 4. If issue
persists, replace logic board.
-For a system without video
card, replace logic board.
M03
5. Locate diagnostic LEDs on
logic board. Verify if LED #4
turns on shortly after system
powers on.
6. Locate diagnostic LEDs on
the logic board. Verify if LED #4
turns on shortly after system
powers on.
Yes Logic board communicating
with LCD panel. Go to
Backlight Issue/No Backlight
symptom ow.
No Replace LVDS cable.
Go to step 6.
Yes Video controller functional
and communicating with LCD
panel. Go to Backlight Issue/
No Backlight symptom ow.
No Video controller unable to
communicate with LCD panel.
Reseat cables rst. If issue
persists, replace LCD panel.
Retest.
M03
2010-11-18
iMac (21.5-inch, Late 2009) Symptom Charts — Startup and Power 38
Page 39
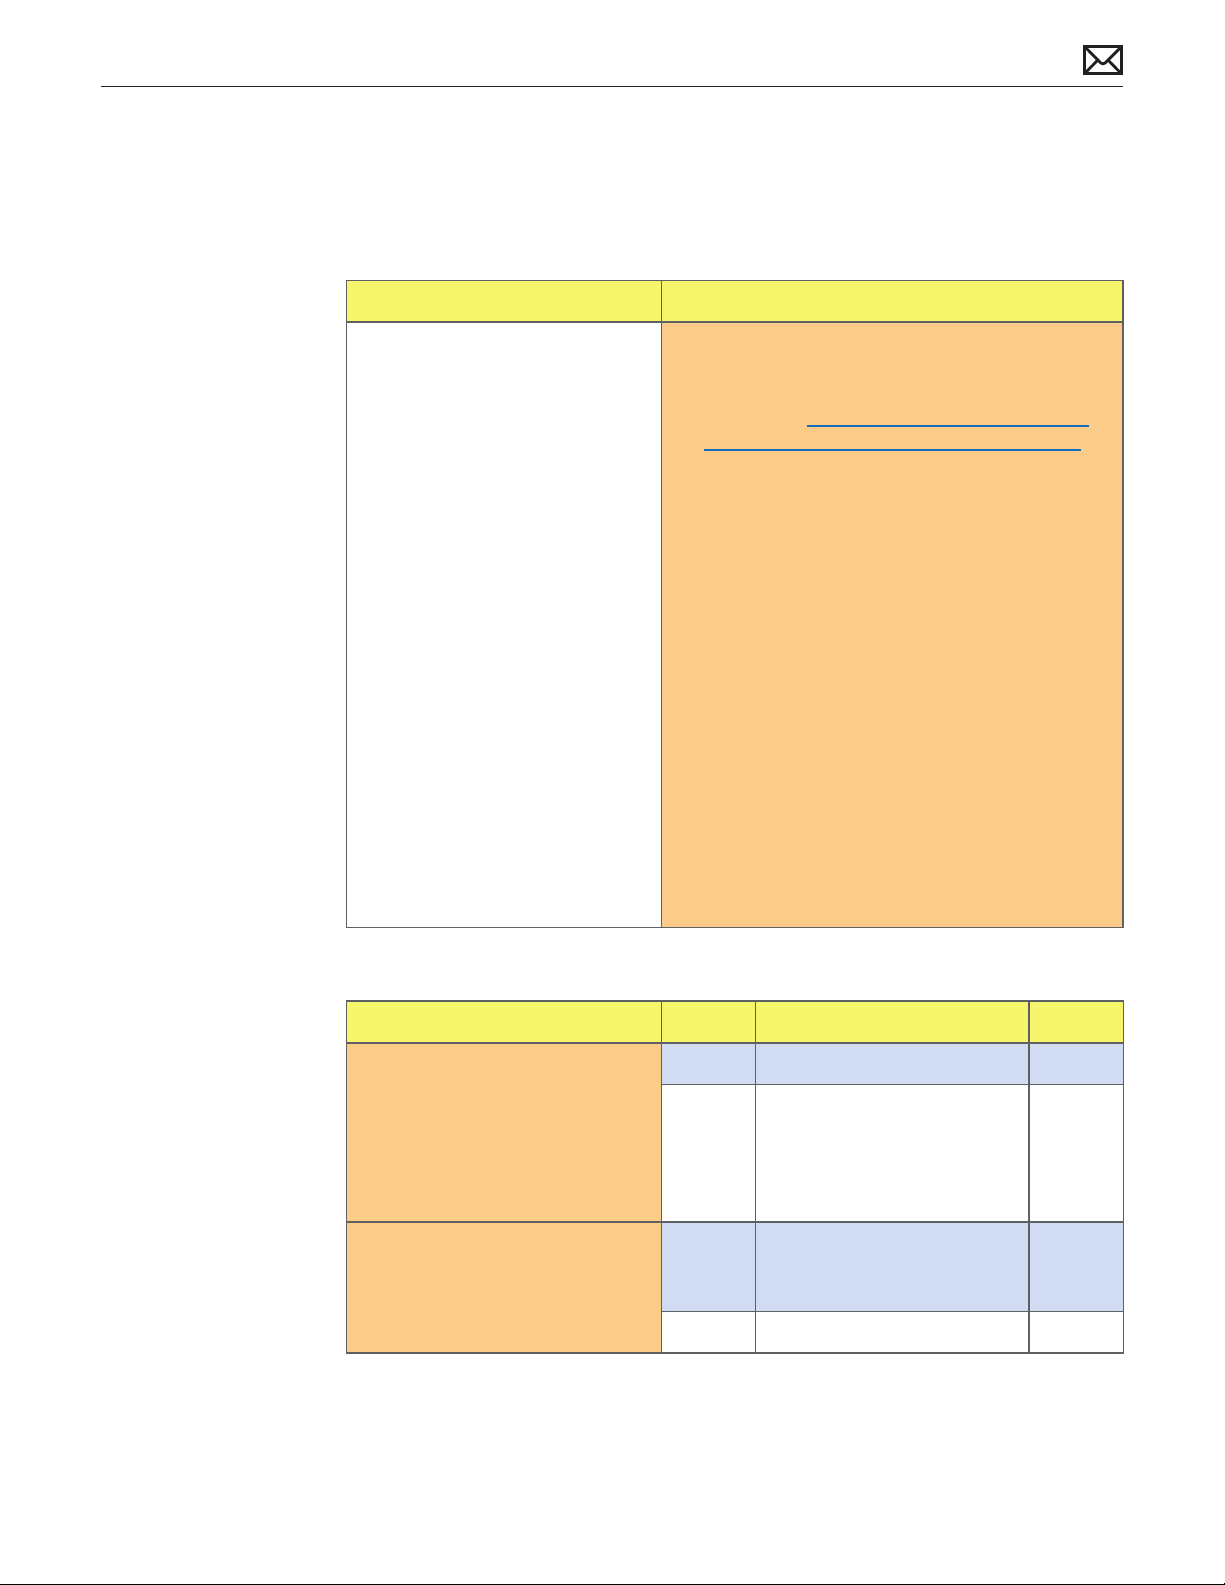
Corrupted Video
Unlikely cause: power supply, hard drive, optical drive, fans, speakers, camera, microphone
Quick Check
Symptoms Quick Check
Corrupted Video
• Text and graphics appear fuzzy
• Image corrupted
1. Verify Mac OS X version installed is the build
number supported on the hardware. Make sure
customer didn’t migrate over their old version of
Mac OS. See kBase #TS3101: iMac (Late 2009):
Using the correct Mac OS X system software.
2. Set System Preferences > Displays to native
resolution of LCD. Non-native resolutions are
unable to produce optimal clarity.
3. Clean outside surface of glass panel.
4. Make sure all relevant software updates have
been applied. Graphics driver updates may be
included with software updates.
5. Boot from install DVD or another known-good
volume to determine whether a potential
software/driver issue exists.
6. When issue occurs, take a screenshot of the
display (Command-Shift-3). View screenshot le
on a known-good computer. If image corruption
can be seen in the screenshot then issue is with
the video drivers, software, or video/logic board. If
issue cannot be seen in the screenshot then LCD
panel and LVDS cable should be tested further.
2010-11-18
Deep Dive
Check Result Action Code
1. Boot from Install DVD and
Verify if issue is still visible.
2. Verify if issue is visible on an
external display.
iMac (21.5-inch, Late 2009) Symptom Charts — Startup and Power 39
Yes Go to step 2.
No Issue likely caused by
software or driver issue.
Troubleshoot for software
issues. Make sure all software
updates have been installed.
Yes Issue is NOT caused by
internal LCD display.
Go to step 3.
No Go to step 6.
Page 40
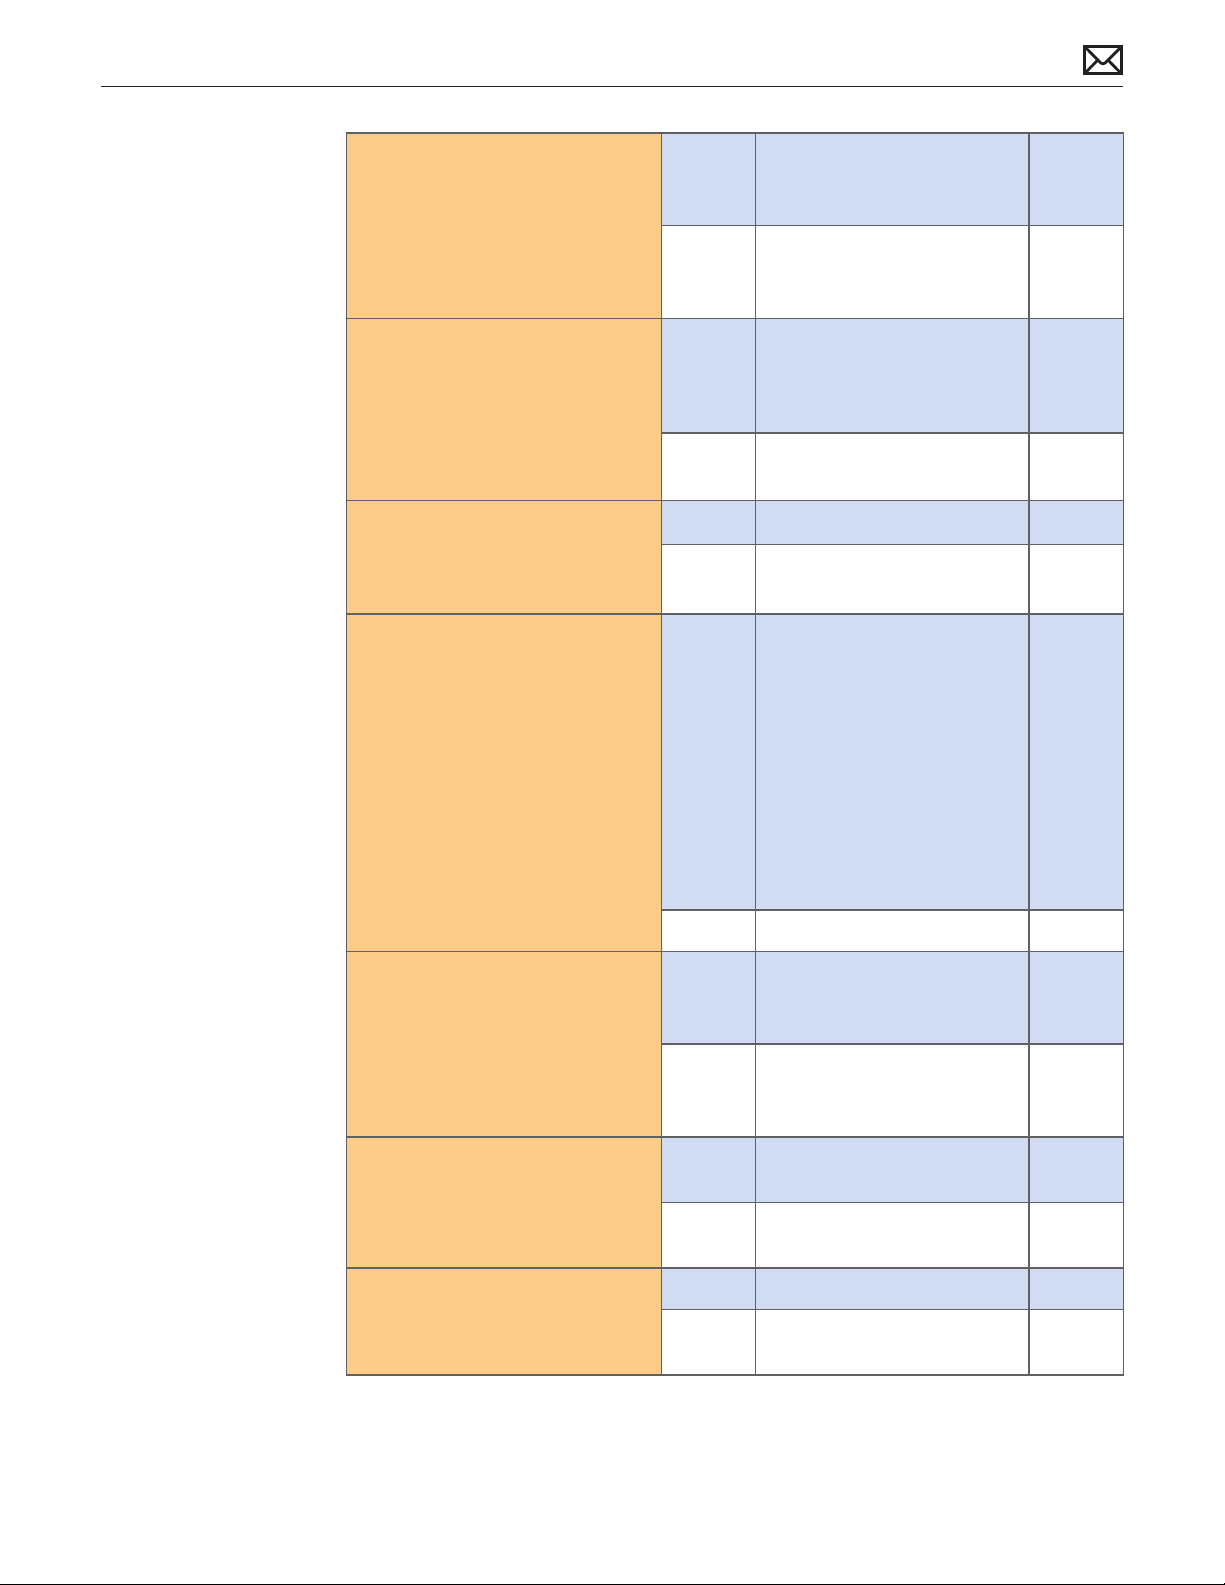
3. For systems without a separate
video card, go to step 4. If a
video card is present, remove
video card, inspect connector
for damage or corrosion.
Reinstall video card and retest.
Verify if issue still occurs.
Yes Replace video card.
Go to step 4.
No Issue resolved by reseating
video card.
M04
4. Verify if video corruption issue
is still present.
5. Verify if video corruption issue
is still present with replacement
logic board installed.
6. Inspect glass panel. Verify if
issue is caused by condensation
or contaminants on inside/
outside surface of glass panel,
or on surface of LCD panel.
Yes Replace logic board. If a video
M04
card was replaced, reinstall
the user’s original video card.
Go to step 5.
No Issue resolved with
replacement video card.
Yes Return to step 1 and retest. X04
No Issue resolved with
M04
replacement logic board.
Yes Clean glass and/or LCD using
procedures in Glass Panel
take-apart chapter.
Identify possible sources
of contamination (nearby
cigarette/cooking smoke,
heavy airborne dust, etc.)
to prevent recurrence.
Condensation should
dissipate after computer has
been running a few hours.
2010-11-18
7. Disconnect LVDS cable
between LCD display and logic
board, and verify if there is
damage to cable or connectors.
Repeat with vertical sync cable
connected between LCD panel
and LED backlight board.
8. Verify if issue is still visible after
reinstalling/replacing LVDS
cable and vertical sync cable.
9. Verify if issue is still present
with replacement LCD panel
installed.
iMac (21.5-inch, Late 2009) Symptom Charts — Startup and Power 40
No Go to step 7.
Yes Replace LVDS cable or any
other damaged part/module.
No Reinstall LVDS cable and
vertical sync cable.
Go to step 8.
Yes Replace LVDS cable and LCD
panel. Go to step 9.
No Issue resolved with reseating
cables.
Yes Return to step 1 and retest.
No Issue resolved with
replacement of LCD panel.
X03
L04
L04
Page 41
Burnt Smell/Odor
Unlikely cause: speakers, microphone, rear housing
Quick Check
Symptoms Quick Check
Burnt Smell/Odor
• Burning smell
• Unusual odor
1. Verify that computer is the source of the odor.
2. If system is new, see kBase #TA22044: New
Equipment: Odors May Be Present Short-Term.
3. Disconnect all third-party devices and check to
see if any external device is the source of odor.
4. Inspect air intake and air outlets for obstructions.
To prevent overheating make sure there
is sucient clearance to allow air to ow
unobstructed into and out of the system.
5. Verify if system is functional.
Deep Dive
Check Result Action Code
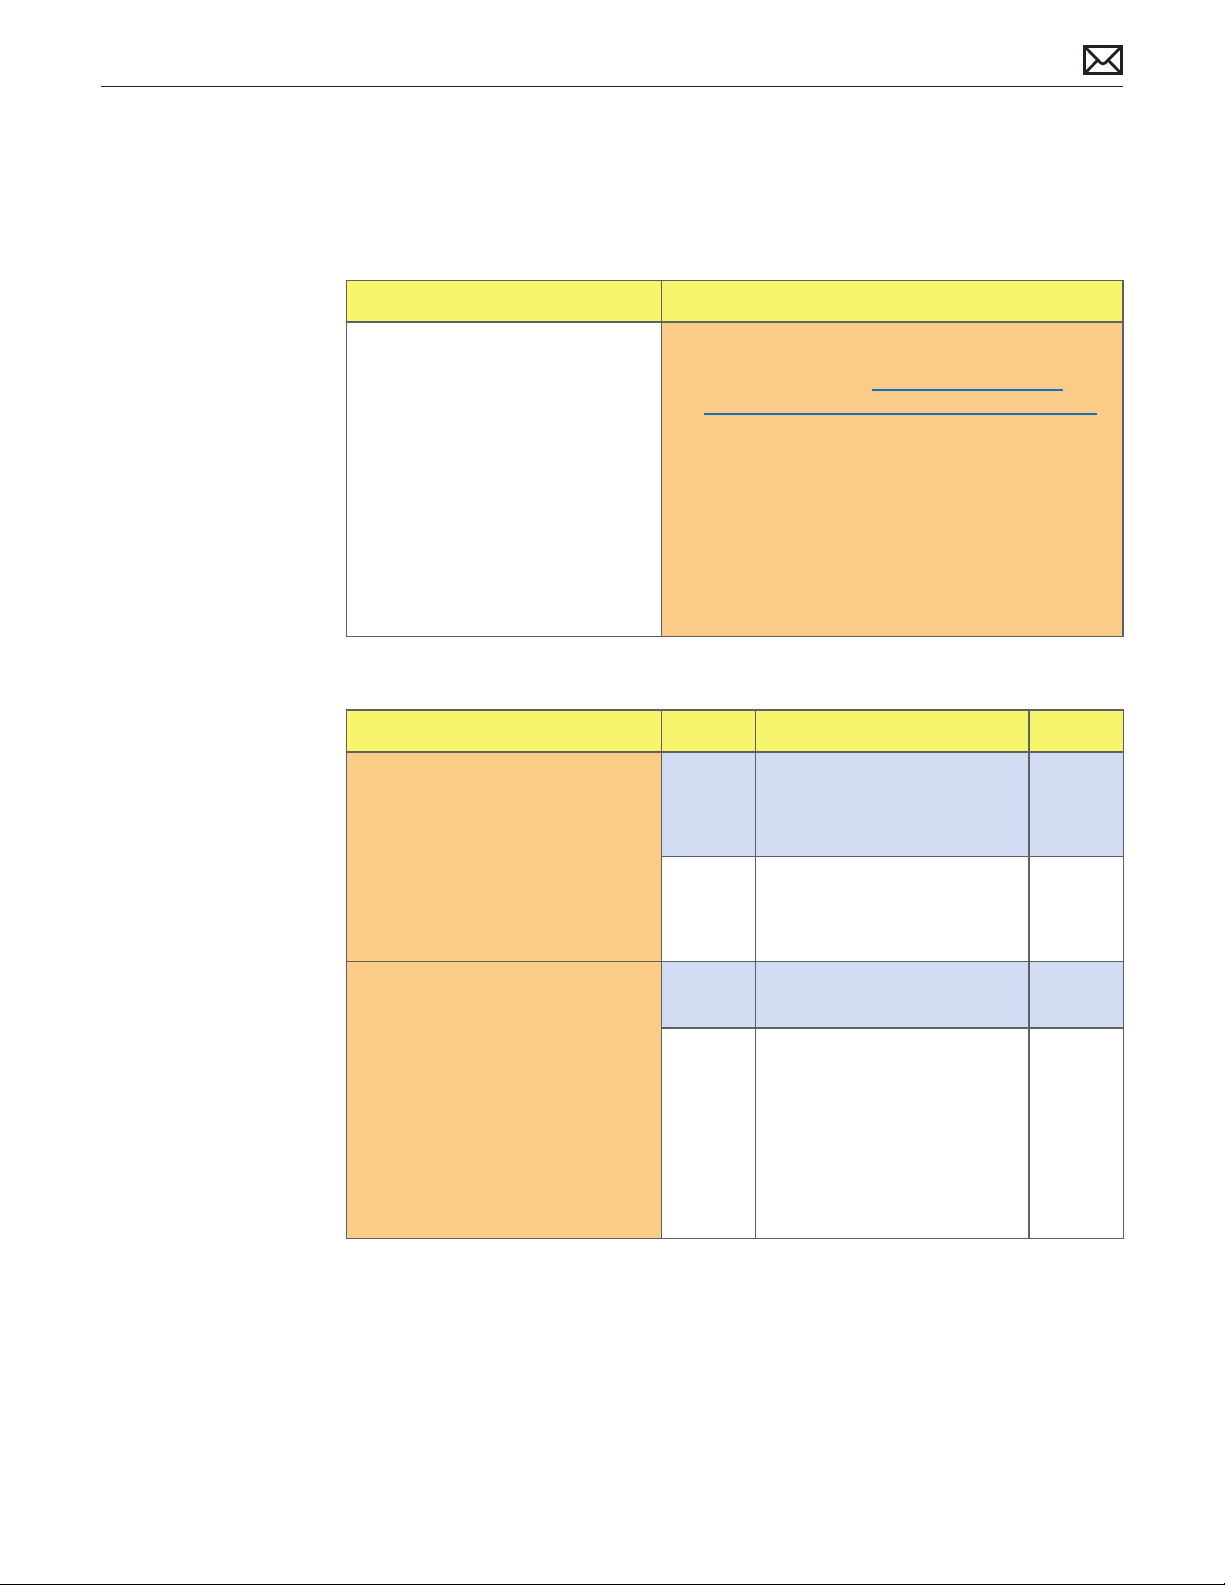
1. Verify if source of the odor
can be identied by visually
inspecting each module
and its associated cables for
signs of burned or damaged
components, smoke residue,
burned traces, or melted or
damaged wiring,
Yes Replace aected module(s).
Go to step 2
No Unable to locate source of
odor. Go to step 3.
P08
2010-11-18
2. Disconnect all third-party
devices and cables. Power ON
system and verify if smoke or
strong odor returns.
Yes Power down system
immediately. Go to step 3.
No System functions correctly.
Verify system functionality
with third-party devices and
cables and return system
to user if problem has been
resolved. Consult third-party
companies as needed for
issues with those products.
iMac (21.5-inch, Late 2009) Symptom Charts — Startup and Power 41
Page 42
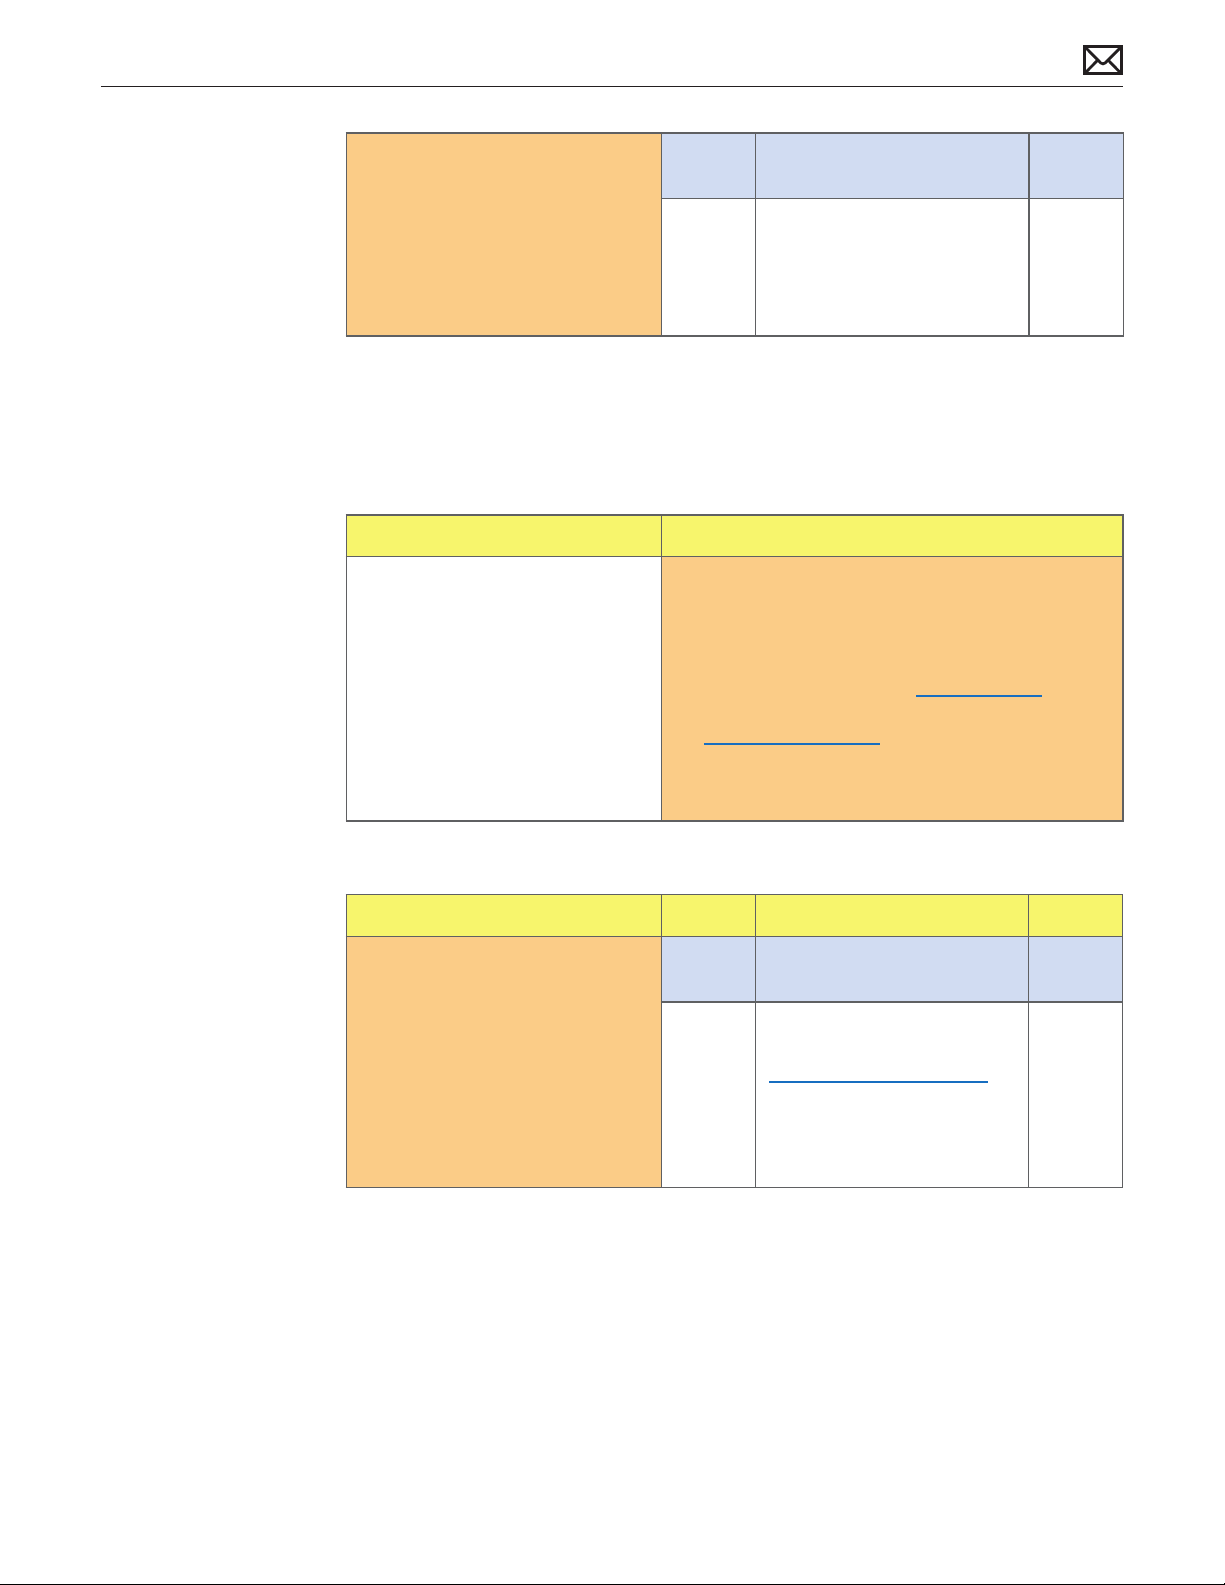
3. Verify if source of odor can be
located using your nose.
Yes Replace aected module(s)
No Contact Apple for assistance
Uncategorized Symptoms
Quick Check
Symptoms Quick Check
P08
and retest system.
if you feel that there is a
possible safety issue with
computer that has not been
resolved in previous steps.
Uncategorized Symptoms
• Unable to locate appropriate
symptom code.
1. Make sure system is plugged into a known-good
outlet.
2. Listen for boot chime, fan, optical drive, or hard
drive noise which indicates system is powering
up. If noise is heard, go to Won’t Start Up
symptom ow. If no noise is heard go to
No Power, Dead Unit symptom ow.
3. Attempt to boot from Install DVD to isolate
possible software issues.
Deep Dive
Check Result Action Code
1. Verify if existing symptom code
applies to issue reported by
user.
Yes Jump to appropriate
symptom code ow.
No
Document reported failure
and send feedback to
stating that a suitable
symptom code wasn’t found.
Provide as much detail as
possible.
N99
2010-11-18
iMac (21.5-inch, Late 2009) Symptom Charts — Startup and Power 42
Page 43
Display
Backlight Issue/No Backlight
Unlikely cause: hard drive, optical drive, speakers, camera, microphone
Quick Check
Symptoms Quick Check
Backlight Issue/No Backlight
• No image
• Partial backlight failure
• Backlight ickers
• Display dim
1. Check for Software Update.
2. Verify that System Preferences > Displays >
Brightness control setting is above minimum.
3. If no image on built-in display, connect external
display to verify if iMac video circuitry is
functioning. If no image visible on external
display, go to No Video symptom ow.
Deep Dive
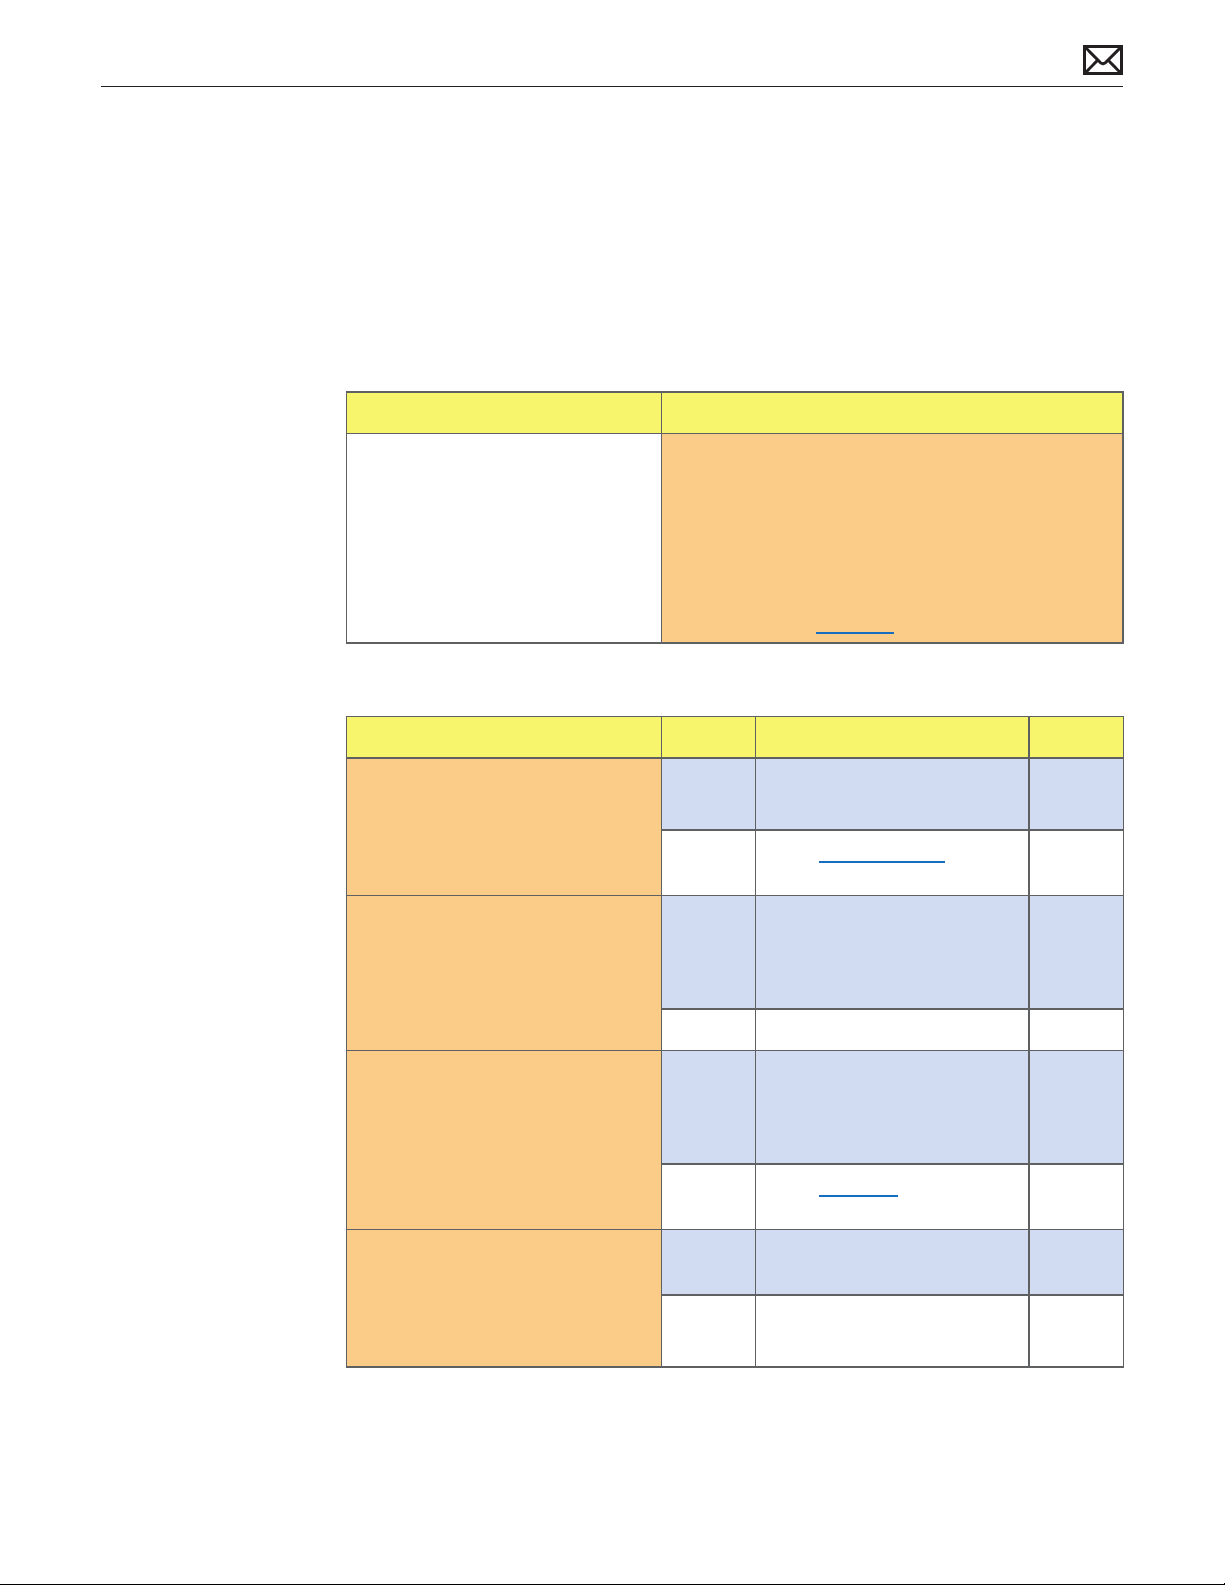
Check Result Action Code
1. Verify boot chime present and
fans running when computer
powered ON. (Reset SMC and
clear PRAM if necessary for
proper boot up.)
2. Verify if image is visible on
built-in LCD panel, with
adjustable backlight level.
Yes Power on self test OK.
Go to step 2.
No Go to Won’t Start Up
symptom ow.
Yes Video present. Verify system
functionality and return to
user or go to appropriate
troubleshooting ow.
No Go to step 3.
2010-11-18
3. Connect supported external
display. Verify if image appears
on external display when
system is booted.
4. Verify if LCD backlight is ON
by looking for faint glow
from display when viewed in
darkened room with brightness
set at maximum.
Yes External display detected by
system. Video circuitry on
logic board functional.
Go to step 4.
No Go to No Video symptom
ow.
Yes LED backlight is functioning.
Go to step 7.
No Go to step 5.
iMac (21.5-inch, Late 2009) Symptom Charts — Display 43
Page 44
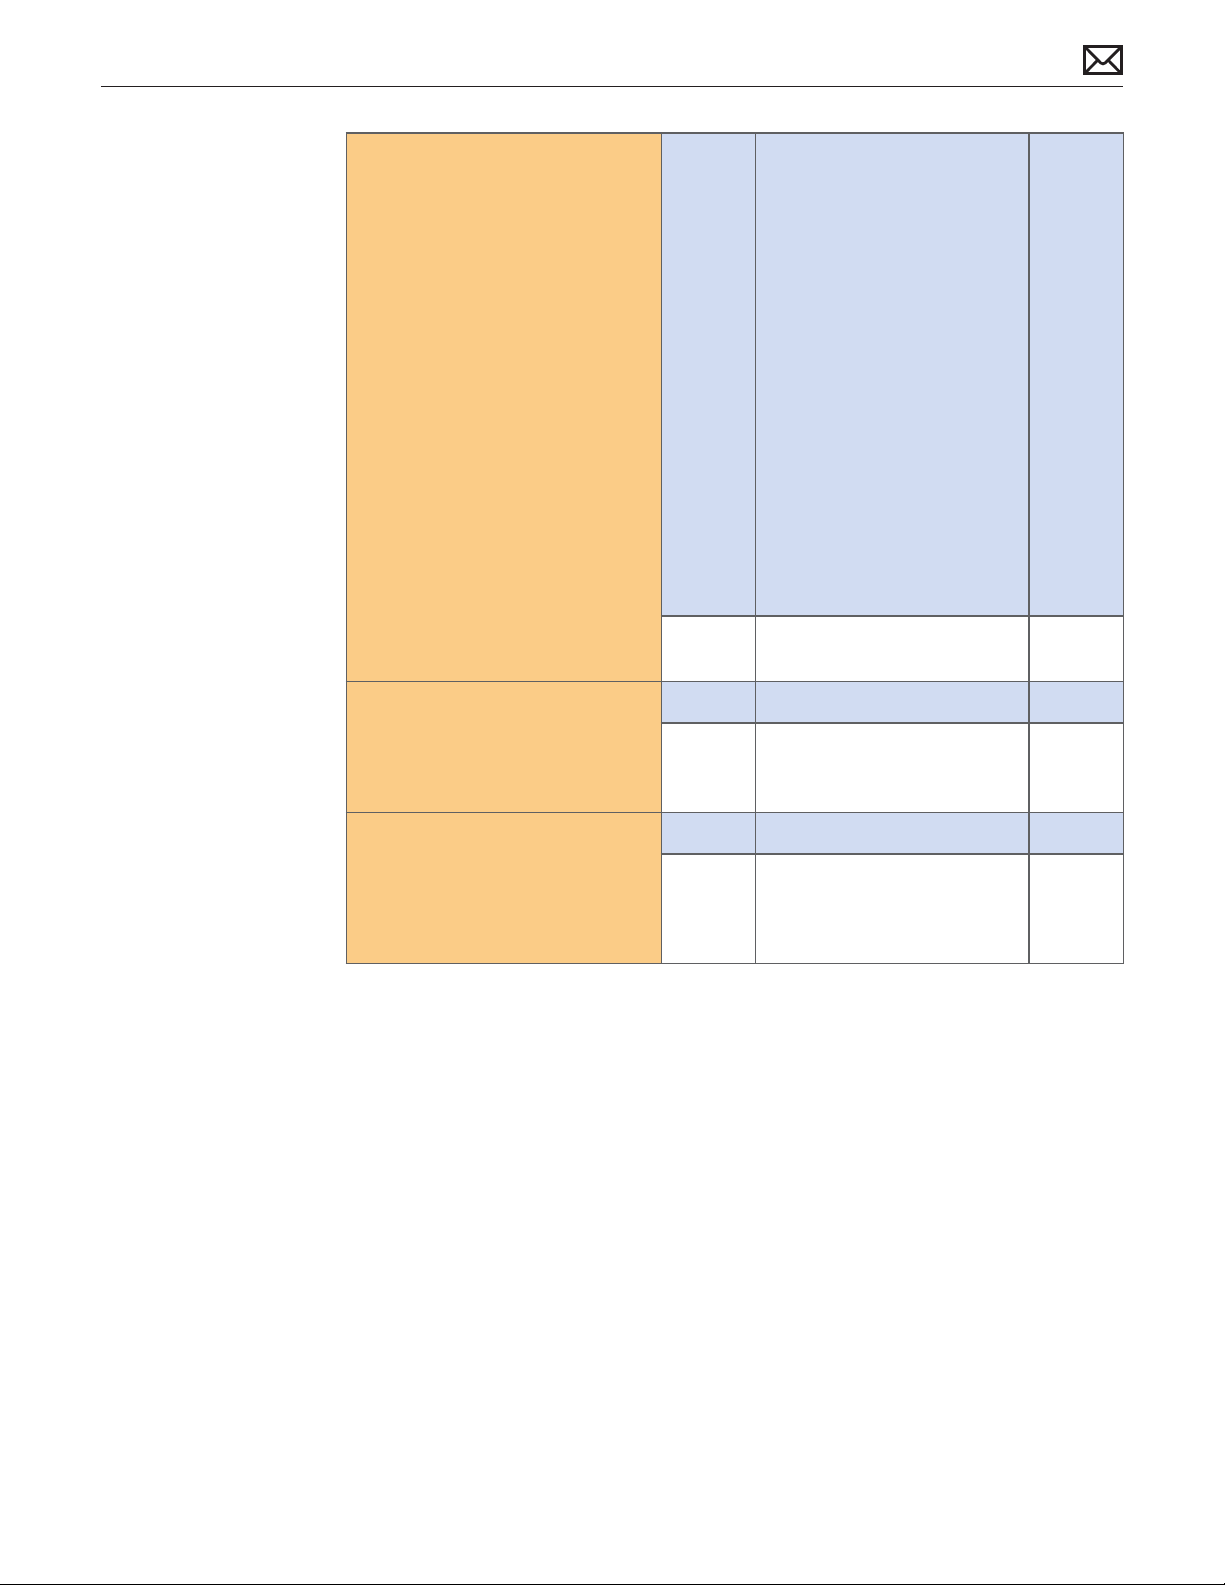
5. Shine bright (low heat)
ashlight onto front of LCD.
With computer powered ON
verify if a faint image is visible.
Yes LCD panel functional but
backlight is missing or
dim. Remove LCD panel
and inspect and reseat the
following cable connections:
-Output cable between lower
end of LED backlight board
and lower end of LCD panel.
-Vertical sync cable between
upper end of LED backlight
board and LCD panel.
-DC power cable between
upper right of LED backlight
board and power supply.
Replace any damaged cable.
Reinstall LCD panel and go to
step 6.
No No image or backlight.
Go to step 7.
X03
6. Power ON system. Verify if
image is now visible on LCD
panel with correct backlight
level.
7. Inspect and reseat LVDS cable
between LCD panel and logic
board. Power ON system. Verify
if image is visible on built-in
LCD display.
Yes Issue resolved.
No Replace LED backlight board.
Retest. If issue persists, go to
step 7.
Yes Issue resolved.
No Replace LVDS cable.
If issue persists, replace LCD
panel. Retest.
M04
X03
L03
2010-11-18
iMac (21.5-inch, Late 2009) Symptom Charts — Display 44
Page 45
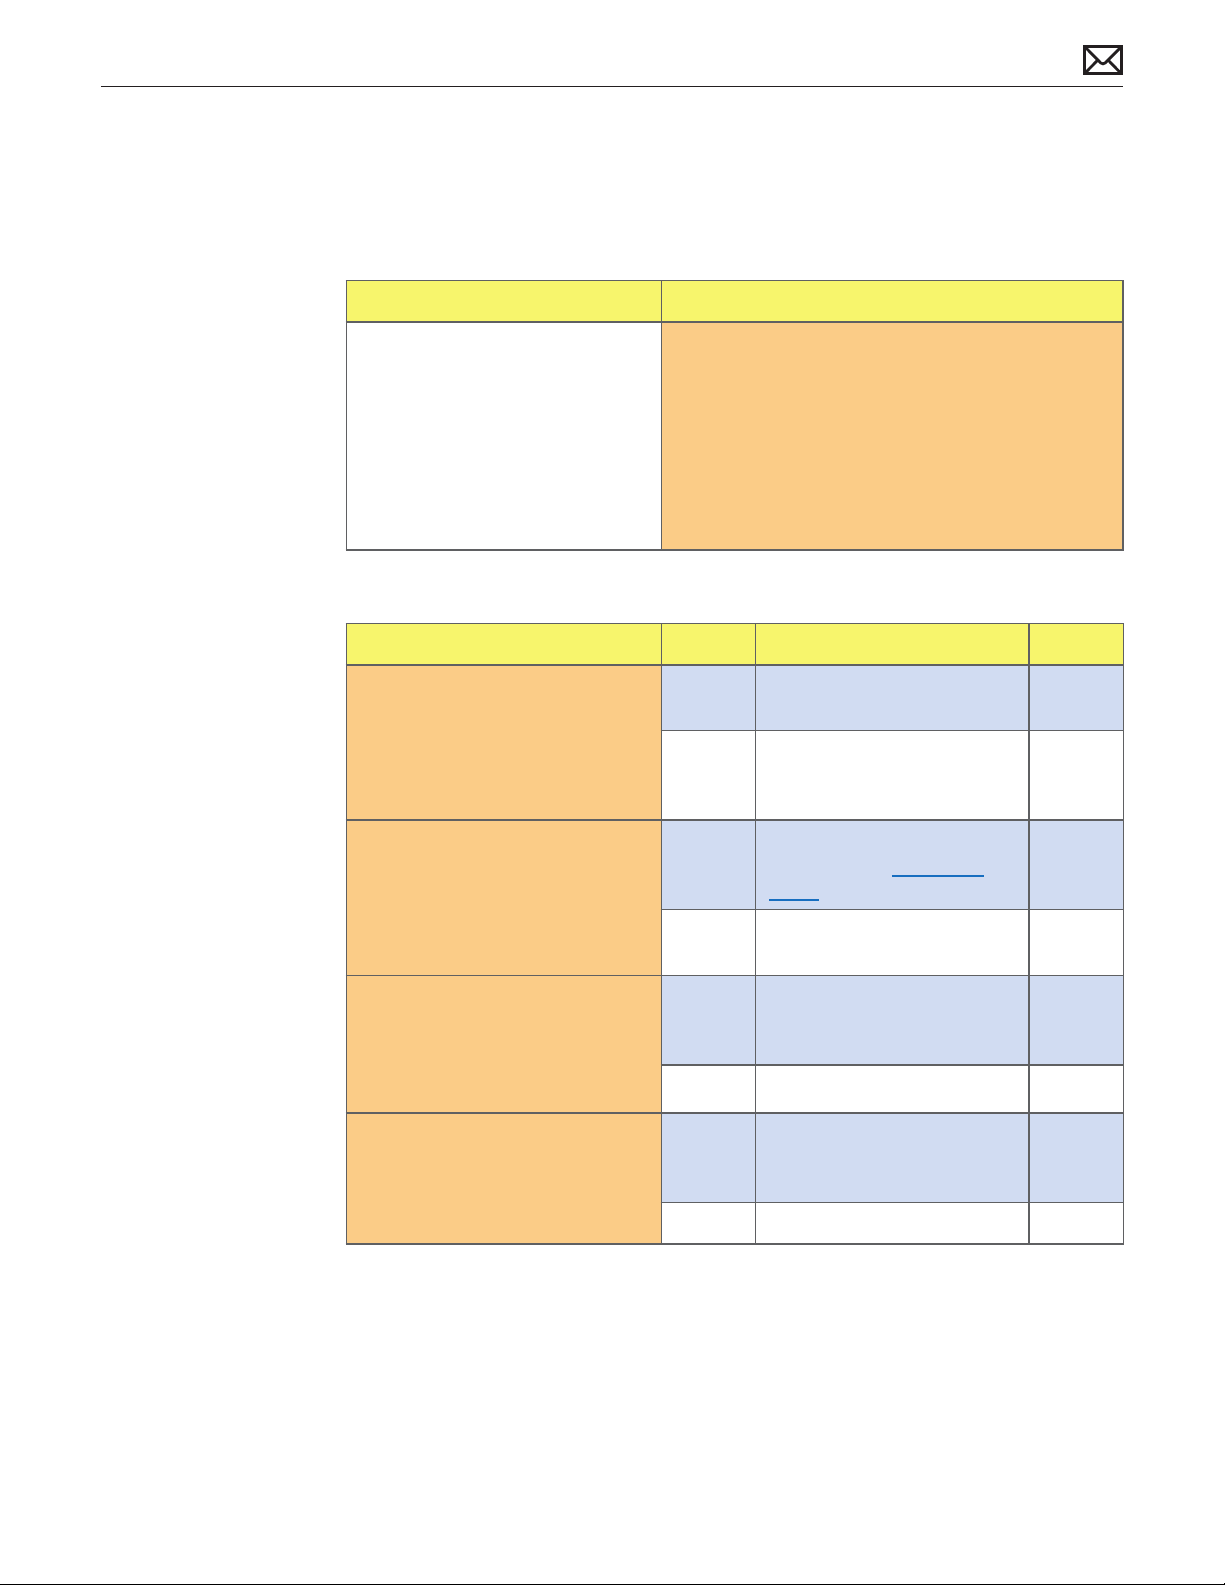
Noise / Unstable Flickering
Unlikely cause: camera, microphone
Quick Check
Symptoms Quick Check
Noise / Unstable Flickering
• Unstable image
• Flickering image
• Humming noise from display
• High frequency noise from
display
1. Verify that intake vent on bottom of computer is
not obstructed.
2. Inspect system for third party software that is
being used to set fan speeds to a higher than
normal RPM. Some users may install this software
to monitor and control internal temperatures,
potentially causing higher fan speeds to generate
higher than expected noise levels.
Deep Dive
Check Result Action Code
1. Verify if user issue is due to
ickering, or to an unstable
video image on the LCD.
2. Connect a supported external
display to the mini DisplayPort
on rear of computer. Verify
if issue occurs with external
display.
Yes Suspected ickering issue, go
to step 2
No For audible noise issues go to
step 8. All other issues go to
appropriate symptom ow.
Yes Suspect issue with video
circuitry. Go to Corrupted
Video symptom ow.
No Video circuitry OK.
Go to step 3.
2010-11-18
3. Disconnect and carefully
inspect all four cables on
back of LCD panel for signs of
damage, corrosion, or pinched
wires.
4. Power ON computer and verify
if issue still occurs.
Yes Replace damaged cable(s)
where needed, otherwise
reattach connectors. Retest.
No Go to step 4.
Yes If connections are secure and
display is still ickering, go to
step 5.
No Issue resolved.
iMac (21.5-inch, Late 2009) Symptom Charts — Display 45
X03
Page 46
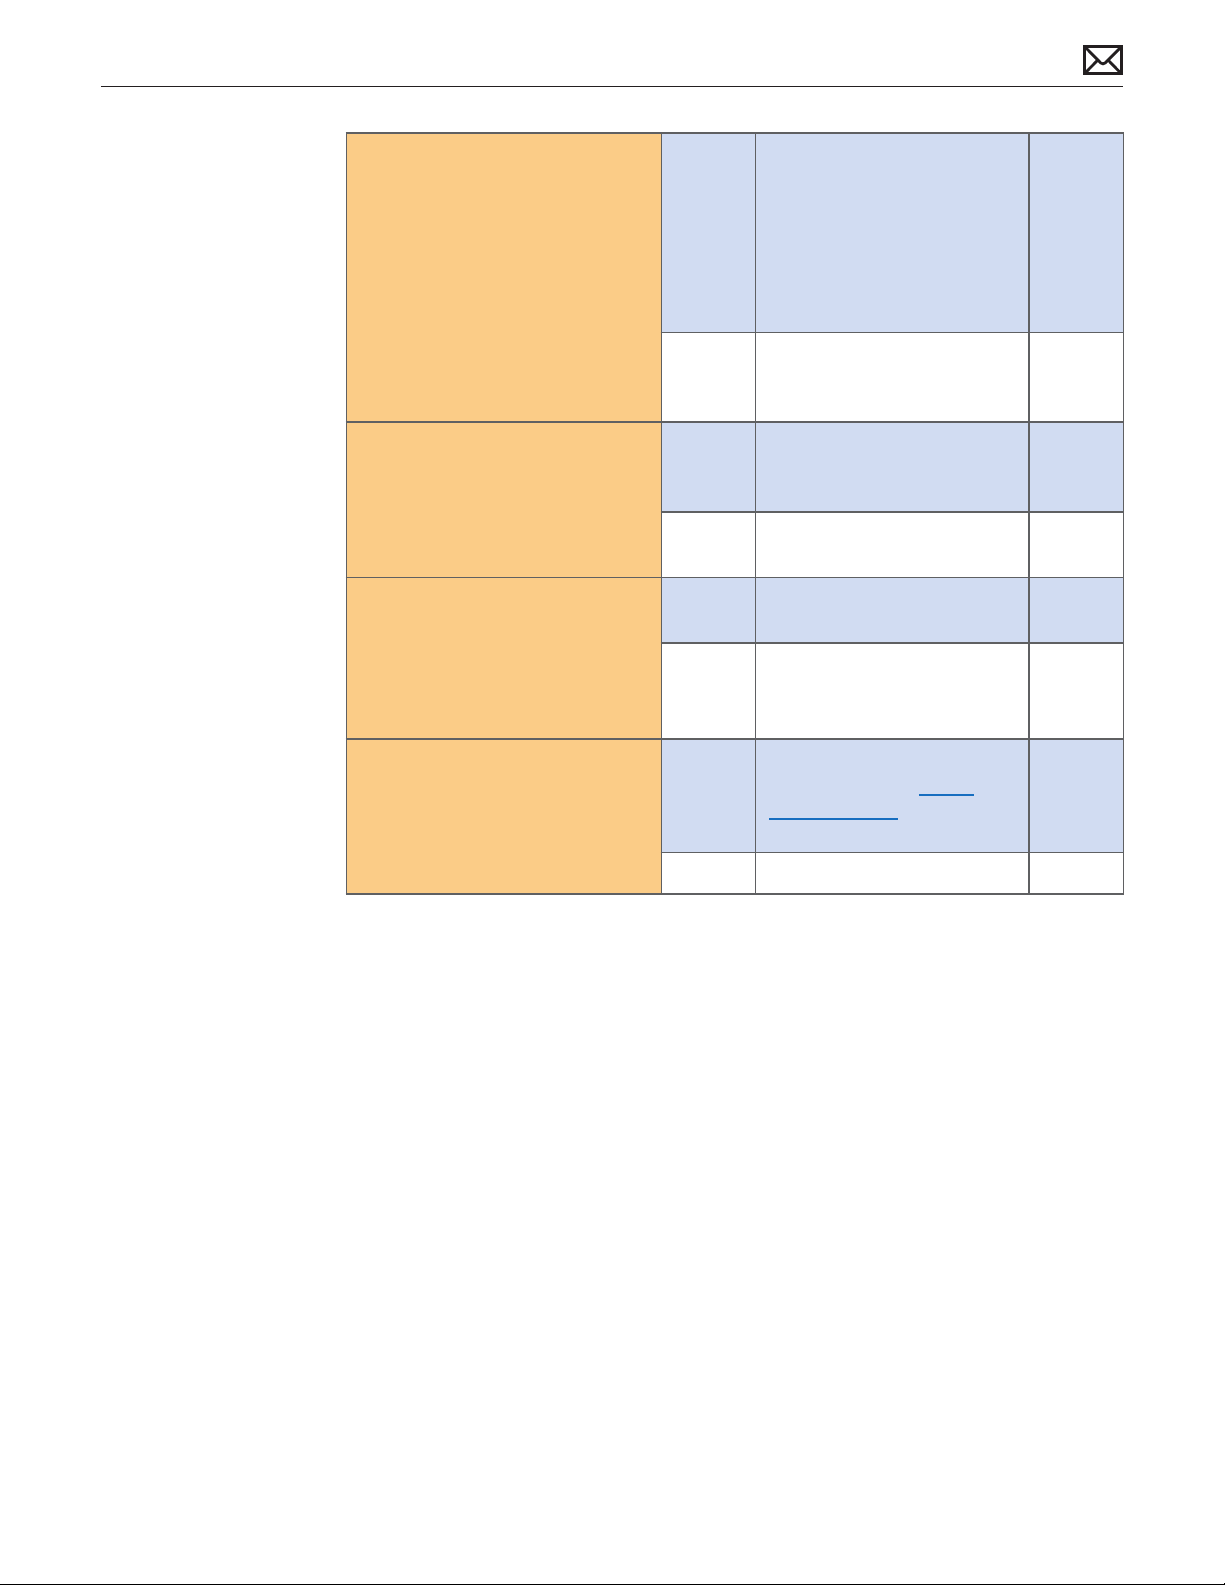
5. Shine bright (low heat)
ashlight into front of LCD.
Verify if an image is being
displayed when ickering issue
is occurring.
Yes Image present but backlight
is ickering. Replace vertical
sync cable (between LCD
panel and upper end of LED
backlight board) and retest.
X03
If issue persists, replace LED
backlight board.
No Replace LVDS cable between
LCD panel and logic board,
and retest.
6. Verify if noise varies when
adjusting brightness level up
and down.
Yes Noise seems to be generated
by vertical sync cable. Inspect
and replace.
No Noise is from another source.
Go to step 7.
7. Verify if noise can be heard
when computer is set up with
Yes Replace LED backlight board.
Go to step 8.
user seated in normal user
position. Adjusting brightness
level up and down may be
necessary to recreate issue.
No Noises that are not audible
from the normal user position
are considered acceptable.
8. Verify if noise is still present. Yes Replace LCD panel. If noise
still present, go to Noise/
Hum/Vibration symptom
ow.
M04
X03
M04
L06
No Issue resolved.
2010-11-18
iMac (21.5-inch, Late 2009) Symptom Charts — Display 46
Page 47
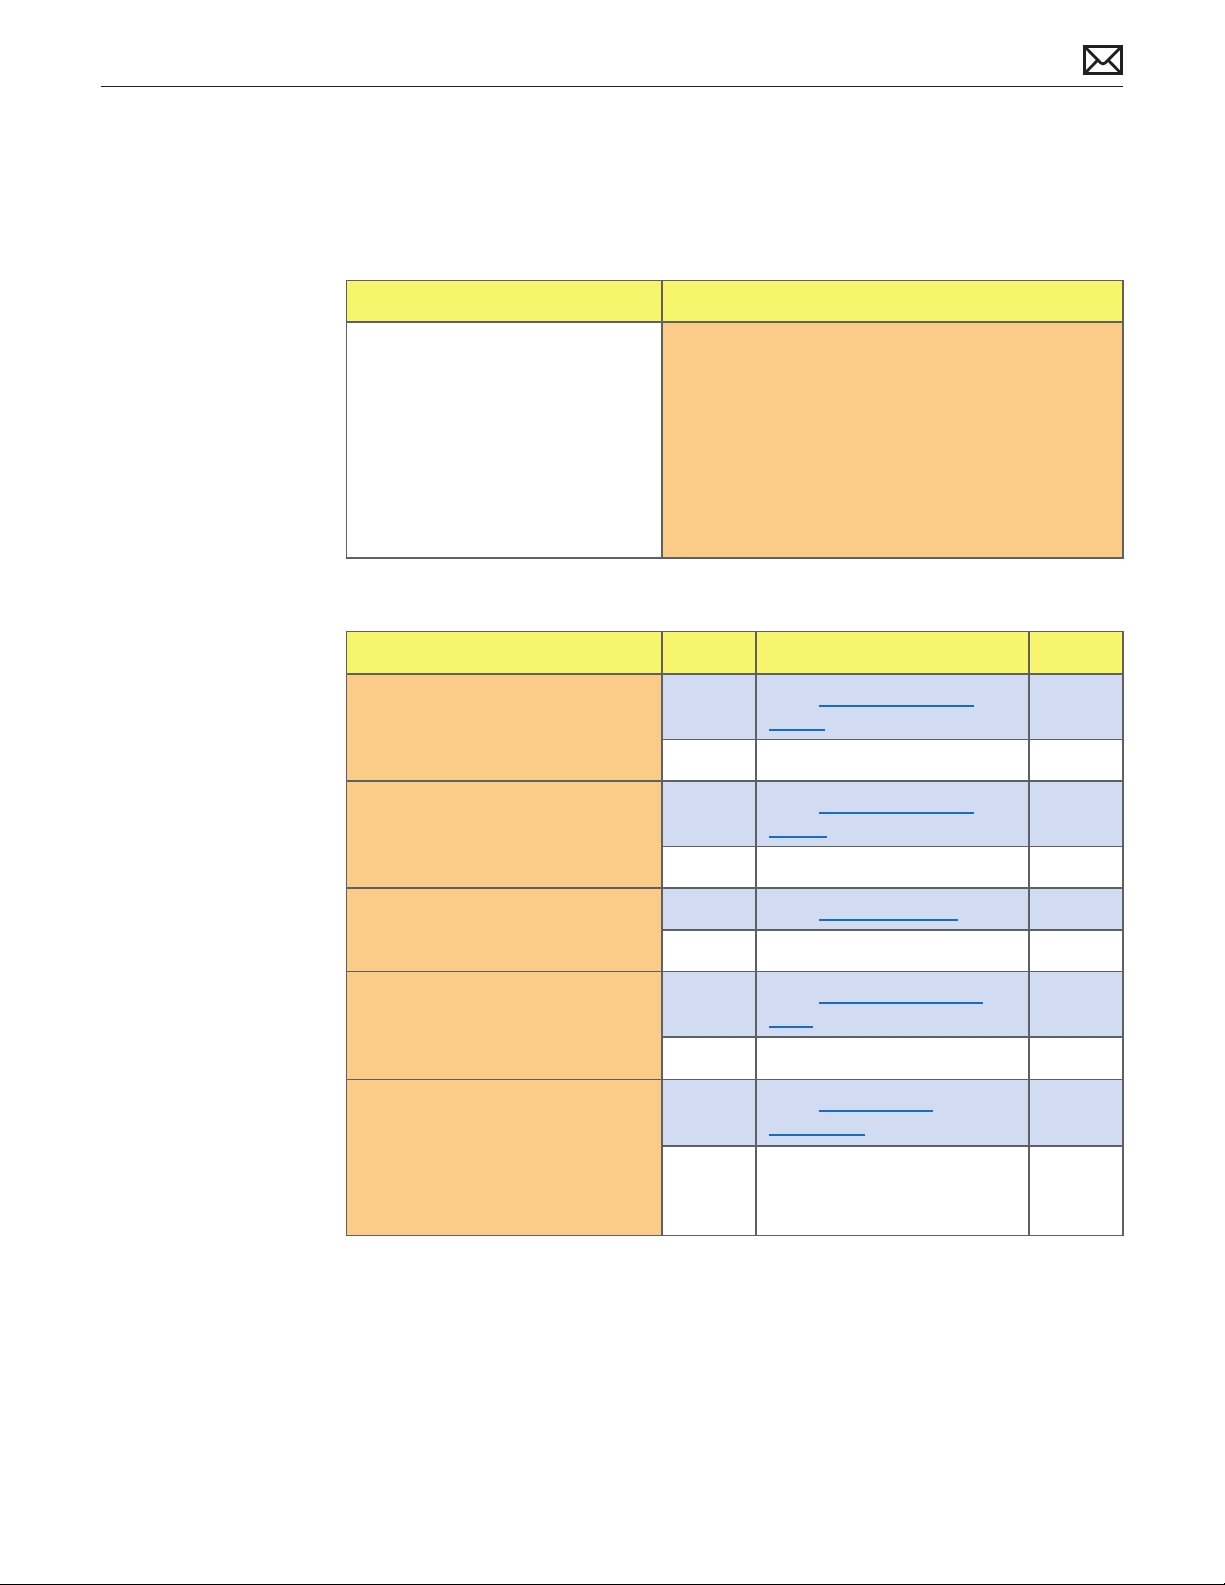
LCD Image Issues
Unlikely cause: power supply, hard drive, optical drive, fans, speakers, camera, microphone
Quick Check
Symptom Quick Check
LCD Issues
• Incorrect/missing colors
• Distorted/blurred image
• Pixel anomalies
• Vertical/horizontal lines
• Non-uniform brightness
1. Allow display to reach normal operating
temperature for about 15 minutes before
evaluating front-of-screen performance.
2. Check display preferences for use of custom
display prole.
3. Check brightness setting.
4. Clean glass panel while checking for dust/debris.
Deep Dive: General
Check Result Action Code
1. Verify if issue is incorrect/
missing colors.
2. Verify if issue is distorted/
blurred image.
3. Verify if issue is bright or dark
pixel anomalies.
Yes
No Go to step 2.
Yes Go to distorted/blurred
No Go to step 3.
Yes Go to pixel anomalies.
No Go to step 4.
Go to incorrect/missing
colors.
image.
2010-11-18
4. Verify if issue is vertical or
horizontal lines.
5. Verify if issue is non-uniform
brightness.
Yes Go to vertical/horizontal
lines.
No Go to step 5.
Yes
No LCD functioning OK. Return to
iMac (21.5-inch, Late 2009) Symptom Charts — Display 47
Go to non-uniform
brightness.
appropriate symptom ow if
user issue is still present.
Page 48
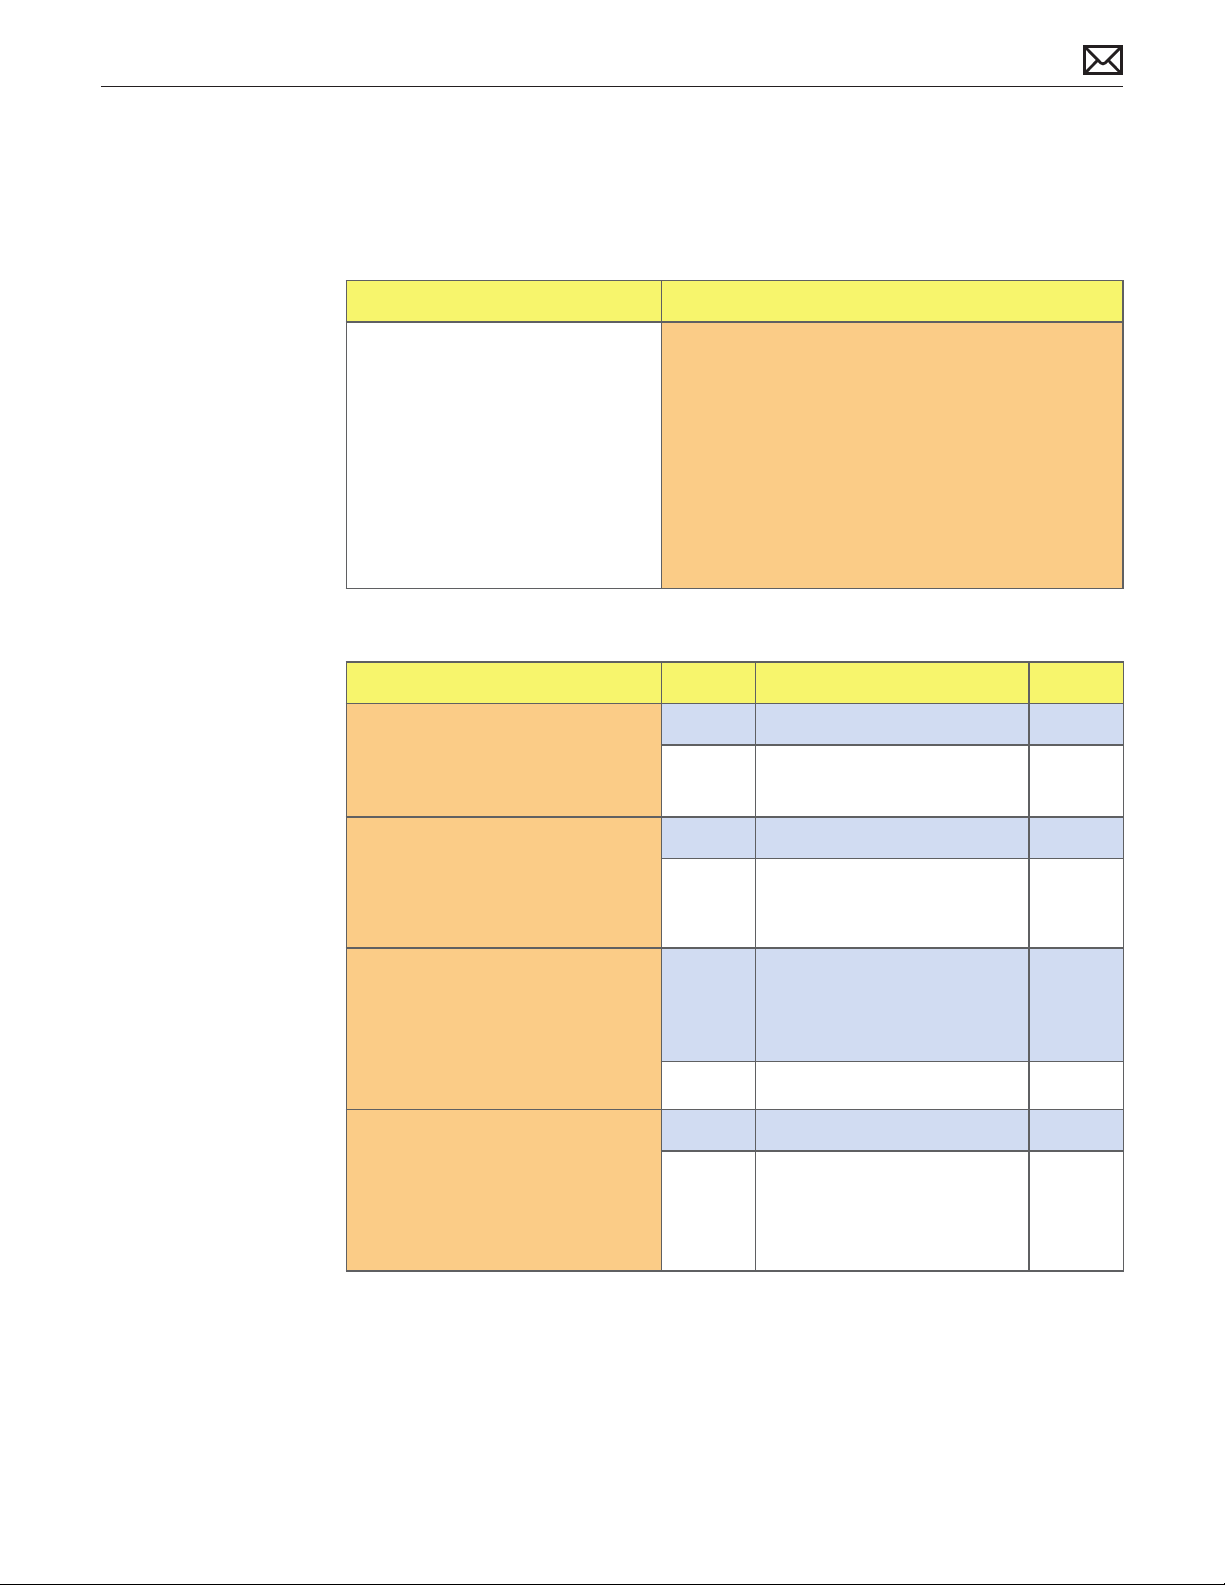
Incorrect/Missing Colors
Unlikely cause: power supply, hard drive, optical drive, fans, speakers, camera, microphone
Quick Check
Symptoms Quick Check
Incorrect/Missing Colors
• Wrong color display
• Color/contrast issues
1. Allow display to reach normal operating
temperature for about 15 minutes before
evaluating front-of-screen performance.
2. Verify if System Preferences > Display settings are
congured to use default display prole.
3. Verify System Preferences > Universal Access >
Display “Enhance contrast”, “Use grayscale”, and
“Black on White/White on Black” settings are set
to defaults.
Deep Dive
Check Result Action Code
1. Verify computer has been
warmed up for about 15
minutes to stabilize backlight
before continuing.
2. Verify if all four cables on back
of LCD panel are secure at both
ends.
Yes Go to step 2.
No Warm up computer for about
15 minutes. Go to step 2.
Yes Go to step 3.
No Reseat connections, replace
damaged cable(s) if needed.
Retest.
L14
2010-11-18
3. Go to System Preferences >
Desktop & Screen Saver >
Desktop and set color to Solid
Gray Light. Verify if incorrect/
missing color issue aects
entire display.
4. Set up computer side-by-side
with a known-good, samemodel computer showing
same image. Verify if issue is
noticeably worse on display
being tested.
Yes Suspect poor video
connection. Replace LVDS
cable between LCD panel and
logic board.
No Go to step 4.
Yes Replace LCD panel. L02
No Small variations in color
uniformity across display are
normal and do not warrant
replacement of LCD.
iMac (21.5-inch, Late 2009) Symptom Charts — Display 48
L14
Page 49
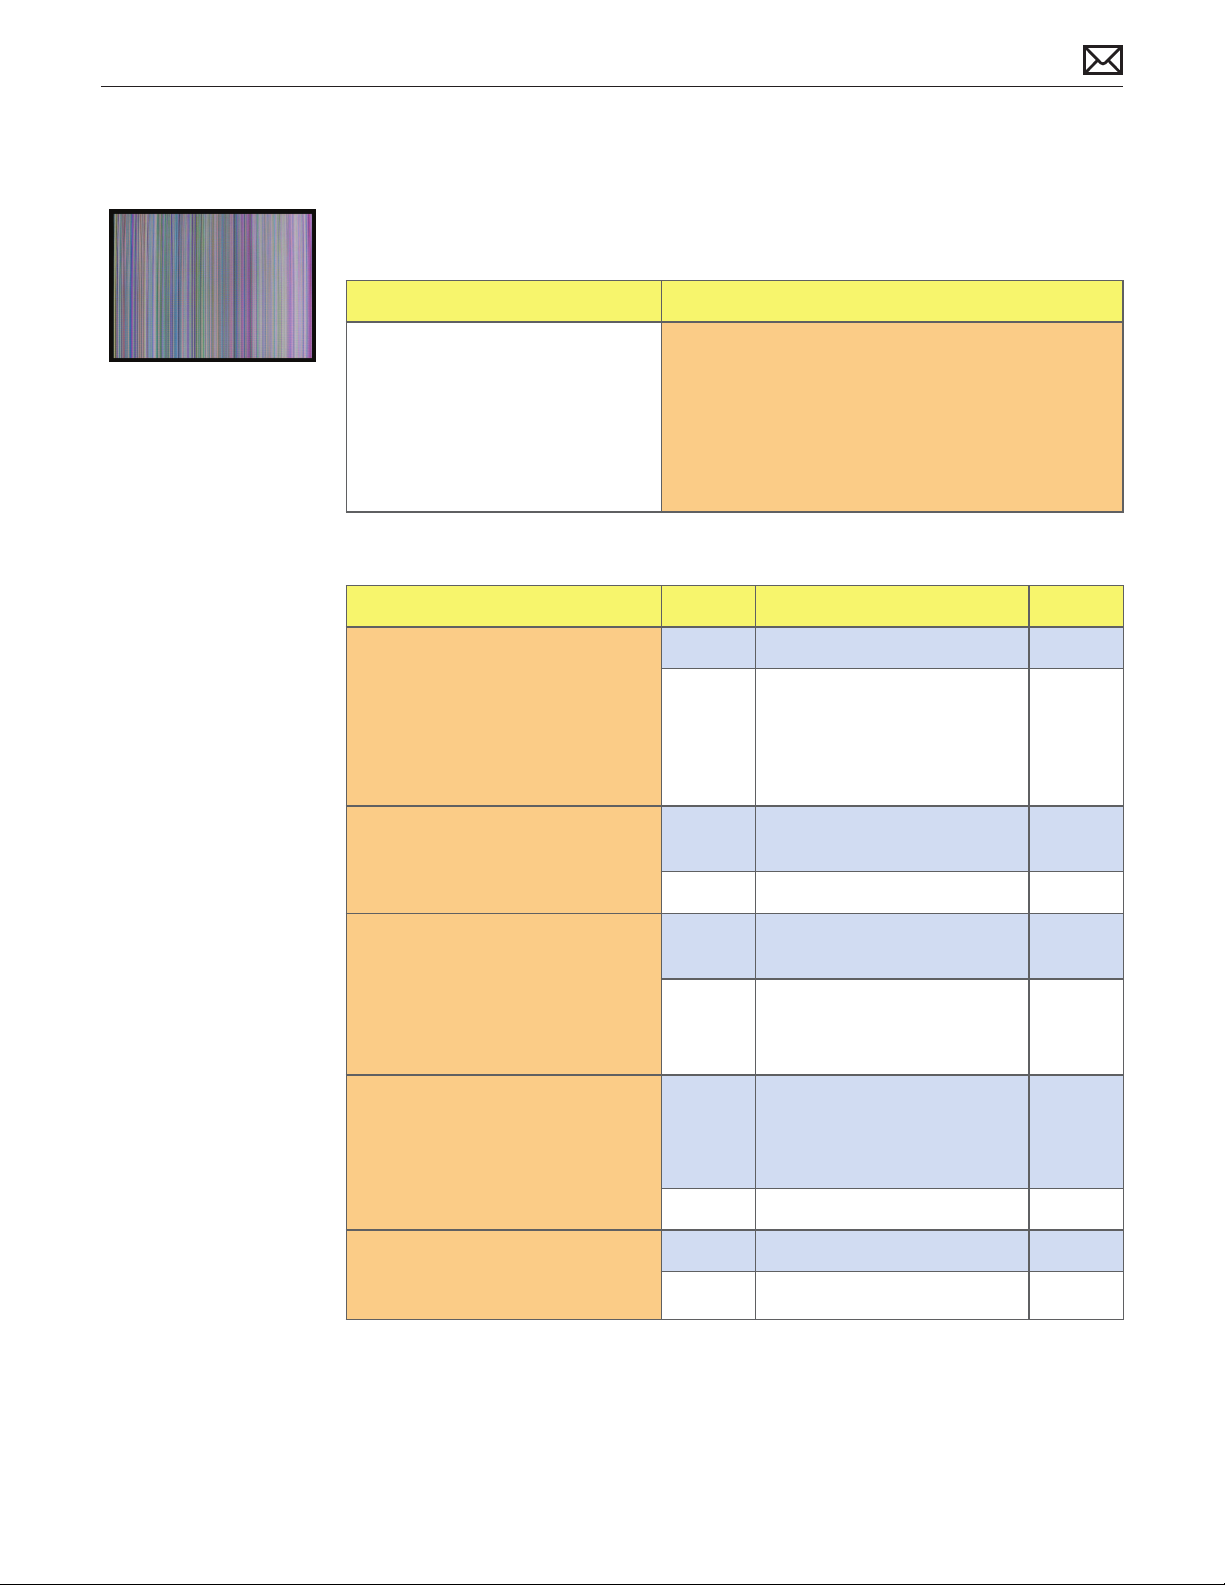
Distorted/Blurred Image
Unlikely cause: power supply, hard drive, optical drive, fans, speakers, camera, microphone
Quick Check
Symptoms Quick Check
Distorted/Blurred Image
• Text and graphics appear fuzzy
• Image corrupted
1. Set System Preferences > Displays to native
resolution of LCD. Non-native resolutions are
unable to produce optimal clarity.
2. Clean outside of glass panel.
3. Boot from install DVD to determine if a potential
software issue exists.
Deep Dive
Check Result Action Code
1. Boot from Install DVD and
verify if issue is still visible.
2. Verify if issue is visible on an
external display attached to
mini DisplayPort.
Yes Go to step 2.
No Issue likely caused by
software or driver issue.
Troubleshoot for software
issues. Make sure all software
updates have been installed.
Yes Issue NOT caused by internal
LCD panel. Go to step 3.
No Go to step 6.
2010-11-18
3. For systems without video card,
go to step 4. If a video card is
present, remove video card,
inspect connector for damage
or corrosion then reinstall.
Verify if issue still occurs.
4. Verify if distorted/blurred
image issue is still present.
5. Verify if issue is still present
with replacement logic board
installed.
Yes Replace video card.
Go to step 4.
No Issue likely caused by poor
video card connection.
Yes Replace logic board. For
systems with a video card,
reinstall the user’s original
video card. Go to step 5.
No Issue resolved.
Yes Return to step 1 and retest.
No Issue resolved.
iMac (21.5-inch, Late 2009) Symptom Charts — Display 49
M24
M04
Page 50

6. Inspect glass panel. Verify if
issue is caused by condensation
or contaminants on inside
surface of glass panel.
Yes Clean glass and/or LCD using
procedures in Glass Panel
take-apart chapter.
Identify possible sources
of contamination (nearby
cigarette/cooking smoke,
heavy airborne dust, etc.)
to prevent recurrence.
Condensation should
dissipate after computer has
been running a few hours.
No Go to step 7.
7. Remove LVDS cable between
LCD panel and logic board,
and verify if there is damage to
cable or connectors.
8. Verify if issue is still visible after
reinstalling LVDS cable.
9. Verify if issue is still present
with replacement LCD panel
installed.
Yes Replace LVDS cable. X03
No Reinstall LVDS cable.
Go to step 8.
Yes Replace LCD panel.
L04
Go to step 9.
No Issue resolved.
Yes Return to step 1 and retest.
No Issue resolved.
2010-11-18
iMac (21.5-inch, Late 2009) Symptom Charts — Display 50
Page 51
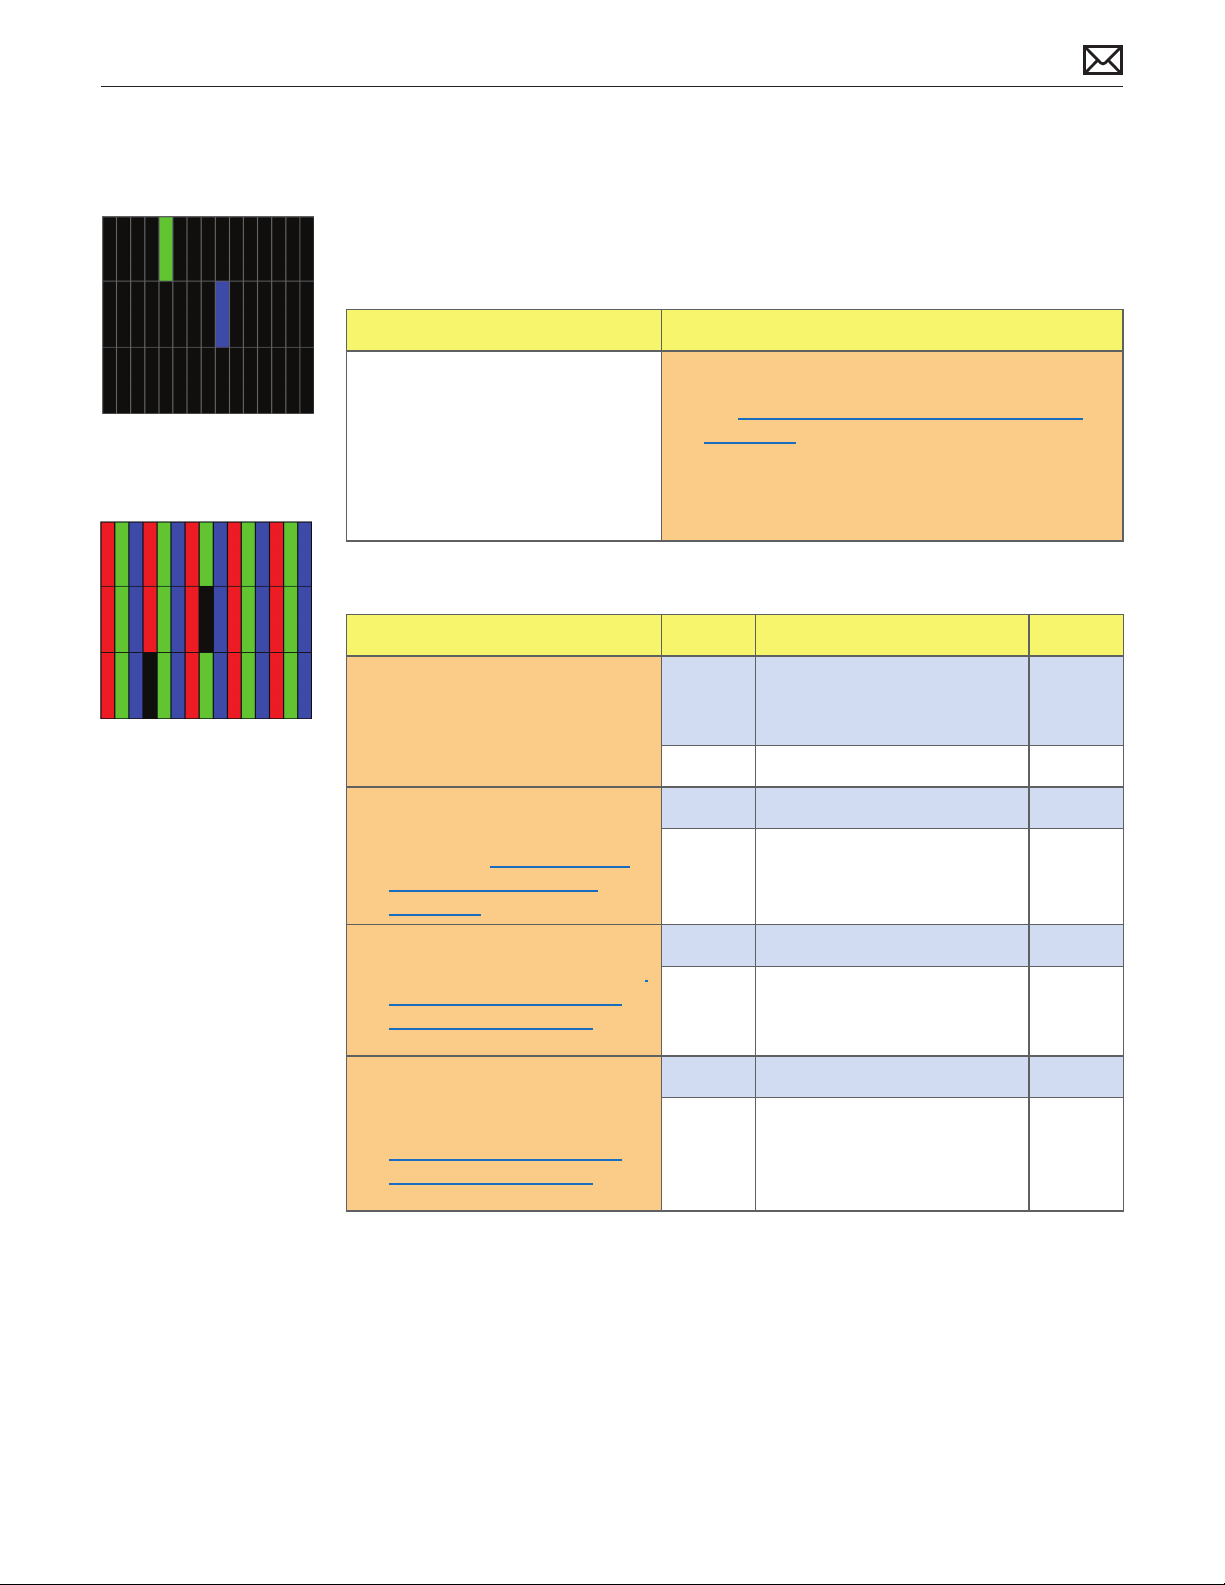
Pixel Anomalies
Unlikely cause: logic board, power supply, hard drive, optical drive, fans, speakers, camera,
microphone
Quick Check
Symptoms Quick Check
Pixel Anomalies
• Dark dot anomalies
• Bright dot anomalies
• Debris on inside surface of
glass panel
• Debris on surface of LCD panel
1. Clean outside surface of glass panel.
2. See kBase #HT1721: About LCD display pixel
anomalies.
Deep Dive
Check Result Action Code
1. Determine if “defects” are dust/
debris on surface of glass panel
or LCD.
2. Determine if bright pixel
defects exceed acceptable
number. See kBase #HT1721:
About LCD display pixel
anomalies.
3. Determine if dark pixel defects
exceed acceptable number. See
kBase #HT1721: About LCD
display pixel anomalies.
Yes Clean glass and/or LCD using
procedures in Glass Panel
take-apart chapter.
No Go to step 2.
Yes Replace LCD panel. L08
No LCD panel meets bright pixel
defect specications.
Go to step 3.
Yes Replace LCD panel. L08
No LCD panel meets dark pixel
defect specications.
Go to step 4.
2010-11-18
4. Determine if combination
of bright/dark pixel defects
exceed acceptable number. See
kBase #HT1721: About LCD
display pixel anomalies.
Yes Replace LCD panel. L08
No Explain to user that LCD
panel is operating within
specications for pixel defects.
Do NOT replace LCD panel.
iMac (21.5-inch, Late 2009) Symptom Charts — Display 51
Page 52
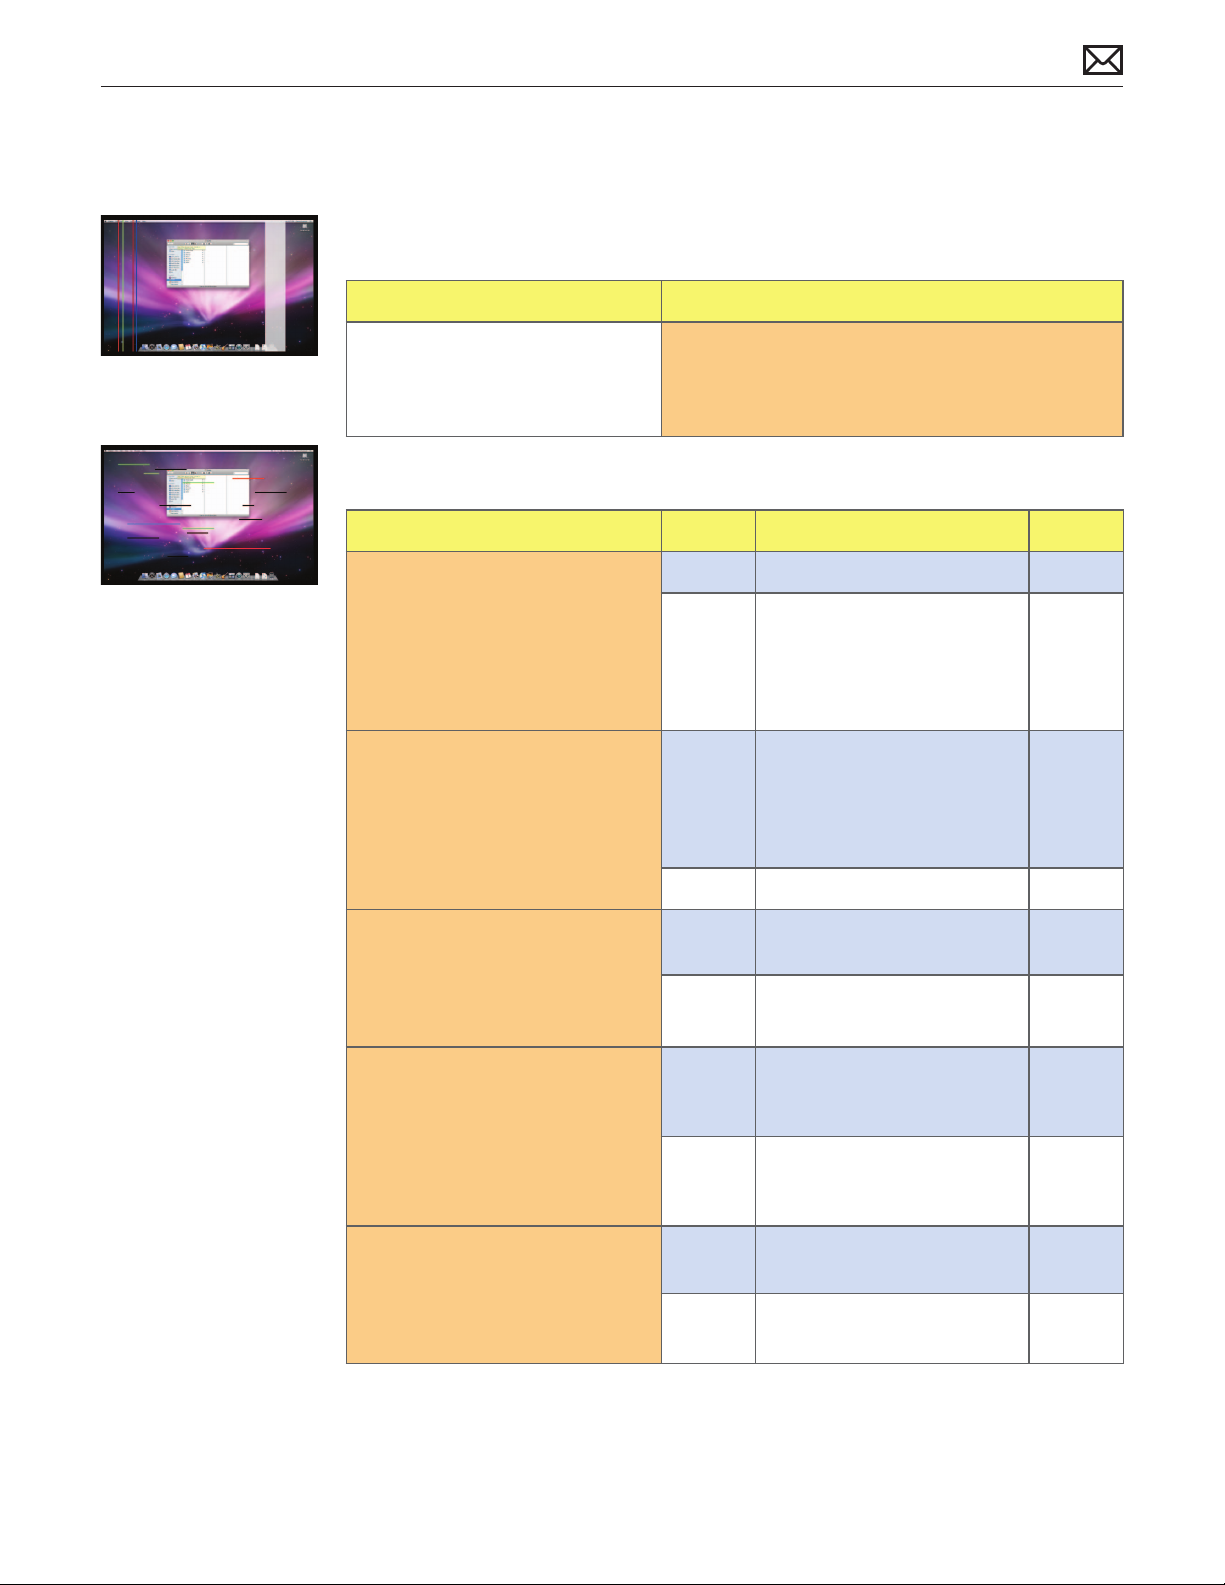
Vertical/Horizontal Lines
Unlikely cause: power supply, hard drive, optical drive, fans, speakers, camera, microphone
Quick Check
Symptoms Quick Check
Vertical/Horizontal Lines
• Vertical lines
• Horizontal lines
1. Boot from install DVD to determine if potential
software issue exists.
2. Verify if issue is visible on an external display.
Deep Dive
Check Result Action Code
1. Boot from Install DVD and
verify if issue is still visible.
2. Verify if issue is visible on an
external display attached to
mini DisplayPort.
Yes Go to step 2.
No Issue likely caused by
software or driver issue.
Troubleshoot for software
issues. Make sure all software
updates have been installed.
Yes Issue NOT caused by internal
LCD. For systems with a video
card, go to step 3. For systems
without a video card, go to
step 4.
No Go to step 6.
2010-11-18
3. If a video card is present,
remove video card and inspect
connector for damage or
corrosion then reinstall. Verify if
issue still occurs.
4. For systems without video card,
horizontal lines may be related
to a failing RAM module. Verify
if video issue only happens
AFTER Apple logo and spinning
wheel appear.
5. Start with shift key down
(safe mode) to disable system
extensions. Verify if issue still
happens when booting in safe
mode.
Yes Replace video card.
Go to step 8.
No Issue likely caused by poor
video card connection.
Yes Issue only happens AFTER
Apple logo and spinning
wheel appear. Go to step 5.
No Issue present before Apple
logo and spinning wheel
appear. Go to step 8.
Yes Go to step 8.
No No video issue when booting
in safe mode. Go to step 6.
iMac (21.5-inch, Late 2009) Symptom Charts — Display 52
M24
Page 53

6. Isolate with only one memory
module installed, then with the
other one. Test with knowngood memory. Verify if issue
only happens with specic
RAM module(s).
Yes Replace aected RAM
module.
No Go to step 7.
X02
7. Isolate with one known-good
memory module installed in
one memory slot. Repeat by
testing in other memory slots
Verify if issue only happens
with specic memory slot of
logic board.
8. Remove LVDS cable between
LCD panel and logic board and
verify if there is damage to
cable or connectors.
9. Verify if issue is still present
after reinstalling LVDS cable.
10. Verify if issue is still present
with replacement logic board
installed.
11. Reinstall original logic board
and verify if issue is still present
with original logic board
reinstalled.
Yes Replace logic board and
M07
retest.
No Go to step 8.
Yes Replace LVDS cable.
X04
Go to step 9.
No Reinstall LVDS cable.
Go to step 9.
Yes Replace logic board. If video
M04
card was present, reinstall
original video card.
Go to step 10.
No Issue resolved.
Yes Go to step 11.
No Issue resolved.
Yes Replace LCD panel. L04
No Issue resolved. If a video card
was present, reinstall original
video card.
2010-11-18
iMac (21.5-inch, Late 2009) Symptom Charts — Display 53
Page 54
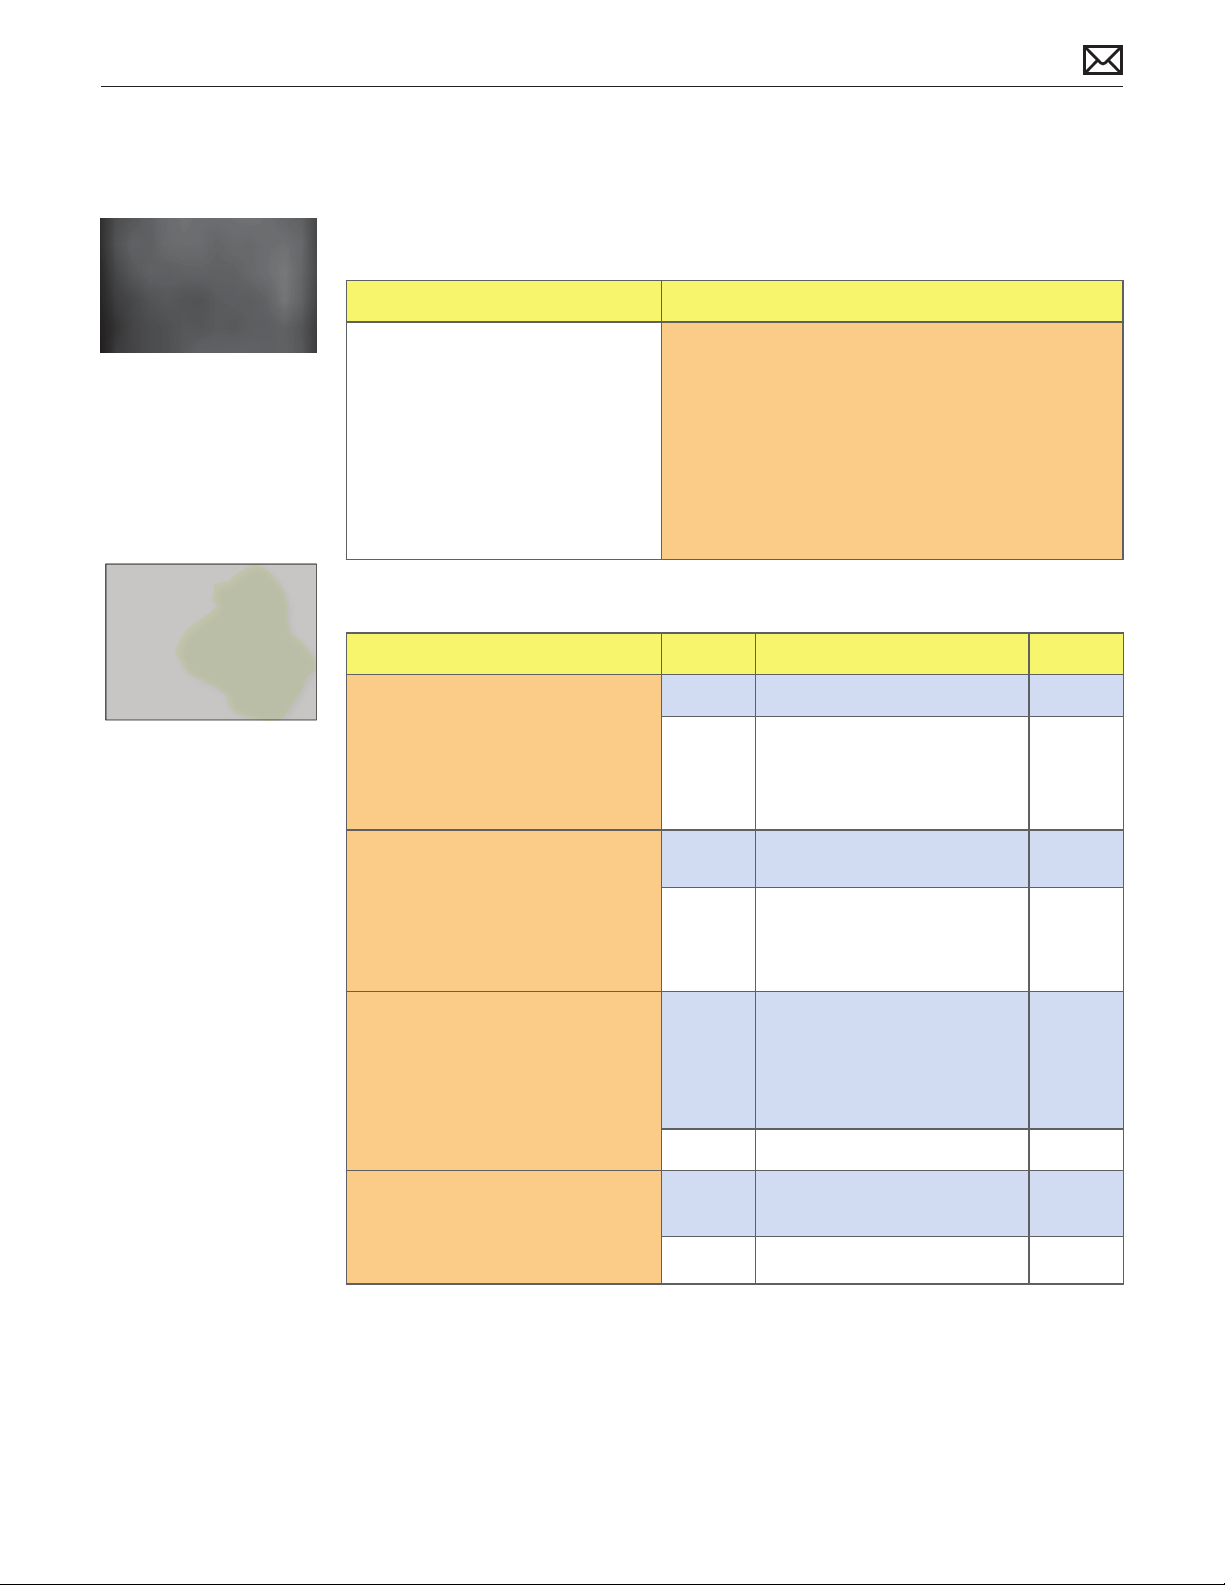
Non-Uniform Brightness
Unlikely cause: power supply, hard drive, optical drive, fans, speakers, camera, microphone
Quick Check
Symptoms Quick Check
Non-Uniform Brightness
• Brightness not uniform
• Color not-uniform
1. Verify System Preferences > Displays > Brightness
slider is set above minimum.
2. Allow 15 minutes for backlight to reach normal
operating temperature and output before
evaluating display.
3. Visually inspect glass panel for presence of dust,
cigarette smoke, or other contaminants. Clean
glass panel if needed.
Deep Dive
Check Result Action Code
1. Determine if brightness
uniformity issue is visible after
display has warmed up for
about 15 minutes.
2. Look at user-provided
examples showing brightness
uniformity issue. Determine if
variation in uniformity appears
excessive when compared to
another same-model computer.
Yes Go to step 2.
No Display backlight can take
several minutes to stabilize.
Retest. If issue still not visible
return computer to user.
Yes Go to step 3.
No Demonstrate to user that LCD
performs similarly to another
computer of the same model.
2010-11-18
3. Remove glass panel and
loosen screws securing LCD
panel. Determine if brightness
uniformity improves.
4. Remove LCD panel, then
inspect and reseat backlight
cables. Determine if brightness
uniformity improves.
Yes Inspect for mechanical
interference with screws
or cables making contact
with back of LCD. Reseat
components & cables, retest.
No Go to step 4.
Yes One or more backlight cables
were loose.
No Replace LCD panel. L07
iMac (21.5-inch, Late 2009) Symptom Charts — Display 54
Page 55
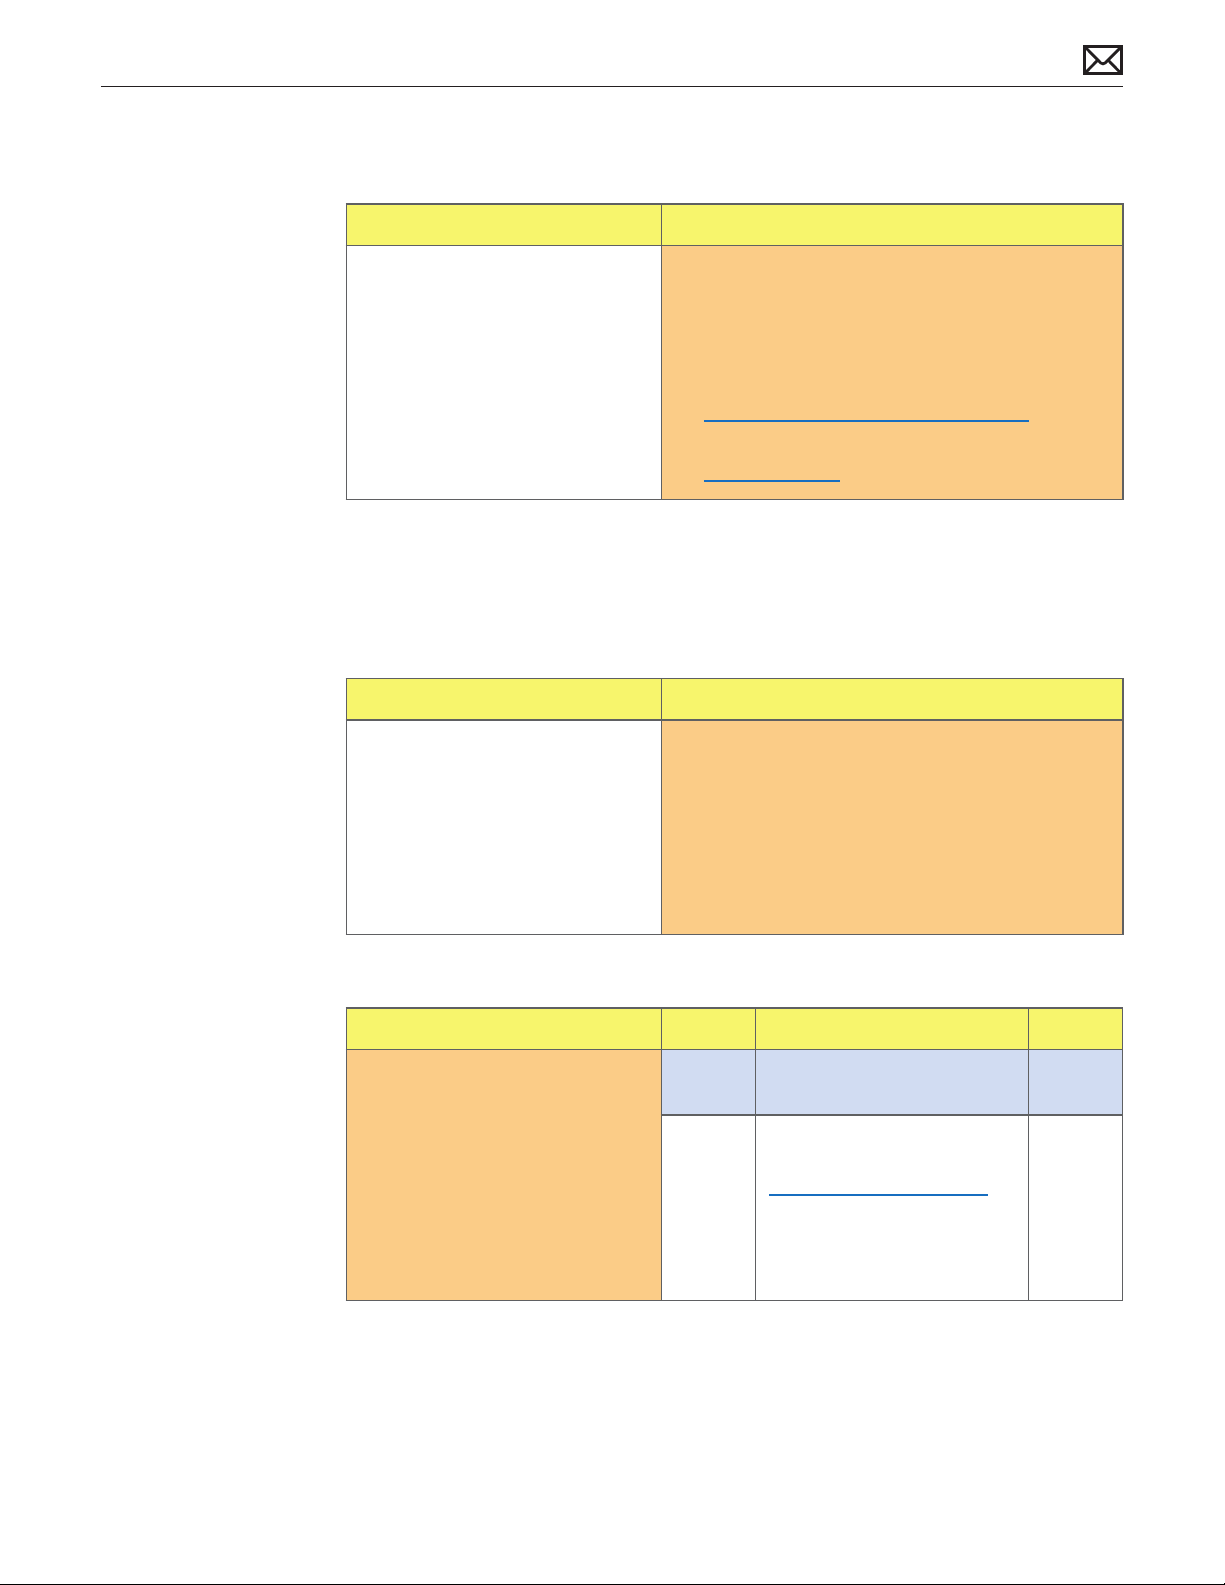
Cosmetic Defects
Symptoms Quick Check
Cosmetic Defects to LCD
• Cracked LCD
• Scratched LCD polarizer
• Scorched or melted LCD
• LCD impact damage
• Foreign material on LCD or
back side of glass panel.
1. Determine if damage was caused by user
environment, accidental damage, or abuse. If
applicable, inform user that Apple does not
warrant damage caused by accident, abuse,
misuse, ood, re, earthquake, or other external
causes. For more information, refer to:
http://www.apple.com/legal/warranty
2. For dark and bright pixel anomalies see
Pixel Anomalies symptom ow.
Uncategorized Symptoms
Quick Check
Symptoms Quick Check
Uncategorized Symptoms
• Unable to locate appropriate
symptom code.
1. Make sure brightness level is set above minimum.
2. Clean glass panel to make sure external
contaminants are removed prior to evaluating
display performance.
3. Allow LCD display to warm up approximately
15 minutes before evaluating display color and
brightness uniformity performance.
Deep Dive
Check Result Action Code
1. Verify if existing symptom code
applies to issue reported by
user.
Yes Jump to appropriate
symptom code ow.
No Document reported failure
and send feedback to
stating that a suitable
symptom code wasn’t found.
Provide as much detail as
possible.
N99
2010-11-18
iMac (21.5-inch, Late 2009) Symptom Charts — Display 55
Page 56
Mass Storage
Hard Drive Not Recognized
Unlikely cause: LCD panel, power supply, fans, speakers, camera, microphone
Quick Check
Symptoms Quick Check
Drive Not Recognized
Drive No Boot
• Flashing Question Mark
• Boots to Grey Screen
• Boots to Blue Screen
• Boots to Prohibitory Symbol
(Review kBase #HT2674: Intel-
based Mac: Startup sequence
and error codes, symbols)
1. Use a known-good mouse. A stuck mouse button
will not allow boot.
2. Boot from Install DVD. Use Disk Utility to verify
S.M.A.R.T. status of hard drive.
3. Use Disk Utility to repair disk.
4. Verify that user’s data is backed up and that user
authorizes erasing disk and reinstalling software.
5. Use Target Disk Mode to mount user’s hard drive
on a known-good computer. Use Disk Utility on
host computer for Quick Checks 2 through 4.
Deep Dive
Check Result Action Code
1. Boot from Install DVD and run
Disk Utility. Verify if user’s hard
drive is available for Disk Utility
to repair.
2. Run Disk Utility’s “Repair
Disk” function and verify if it
completes successfully.
Yes Go to step 2.
No Go to step 5.
Yes Go to step 3.
No Go to step 4.
2010-11-18
3. Reboot computer. Verify if
system boots successfully and
that Disk Utility “Verify” function
reports no errors.
4. With user’s permission, erase
hard drive and reinstall Mac
OS. Verify if installation process
completes.
5. Inspect hard drive SATA and
power cables and connectors
for bent pins, or other damage
to the cable.
Yes Data error. Issue resolved. H07
No Go to step 4.
Yes Go to step 8.
No Go to step 5.
Yes Replace damaged SATA cable
or DC power cable.
Go to step 8.
No Go to step 6.
iMac (21.5-inch, Late 2009) Symptom Charts — Mass Storage 56
X03
Page 57
6. Reseat hard drive SATA cable
at logic board and hard drive
connections, and verify if
computer starts up.
Yes Go to step 8.
No Replace SATA cable.
Go to step 8.
X03
7. Test with known-good
bootable hard drive. Verify if
system boots successfully and
that Disk Utility “Verify” function
reports no errors.
8. Reboot computer. Verify if
system boots successfully and
that Disk Utility “Verify” function
reports no errors.
9. Reboot computer. Verify if
system boots successfully and
that Disk Utility “Verify” function
reports no errors.
10. Replace hard drive. Boot from
system-specic Install DVD
and reinstall Mac OS X with
drive format option. Verify if
drive is formatted correctly
(GUID partition table) and that
software restore was successful.
Yes Install user’s hard drive.
Go to step 9.
No SATA cable veried or
replaced and known-good
hard drive installed. Replace
logic board. Go to step 1.
Yes Issue resolved. Return system
to user.
No Go to step 7.
Yes Issue resolved.
No User’s hard drive appears to
be defective. Go to step 10.
Yes Issue resolved by replacing
hard drive.
No SATA cable veried/replaced
and new hard drive installed,
Check with known-good
restore DVD. If restore failure
still happens, go to step 11.
H01
11. If restore is unsuccessful,
startup a known-good system
in Target Disk Mode and
connect it to the user’s system
with a FireWire cable. Once
set up, insert the iMac Install
Disc in its optical drive. Startup
user’s system while holding
Option key, select and boot
from the Install Disc DVD
and restore system software.
Verify if software restore was
successful.
Yes Restore failure seems to be
due to internal optical drive
or media issue. Go to Optical
Drive Read/Write Error
symptom ow.
No Restore failure seems to be
due to internal SATA bus
issue. Replace logic board.
M19
2010-11-18
iMac (21.5-inch, Late 2009) Symptom Charts — Mass Storage 57
Page 58
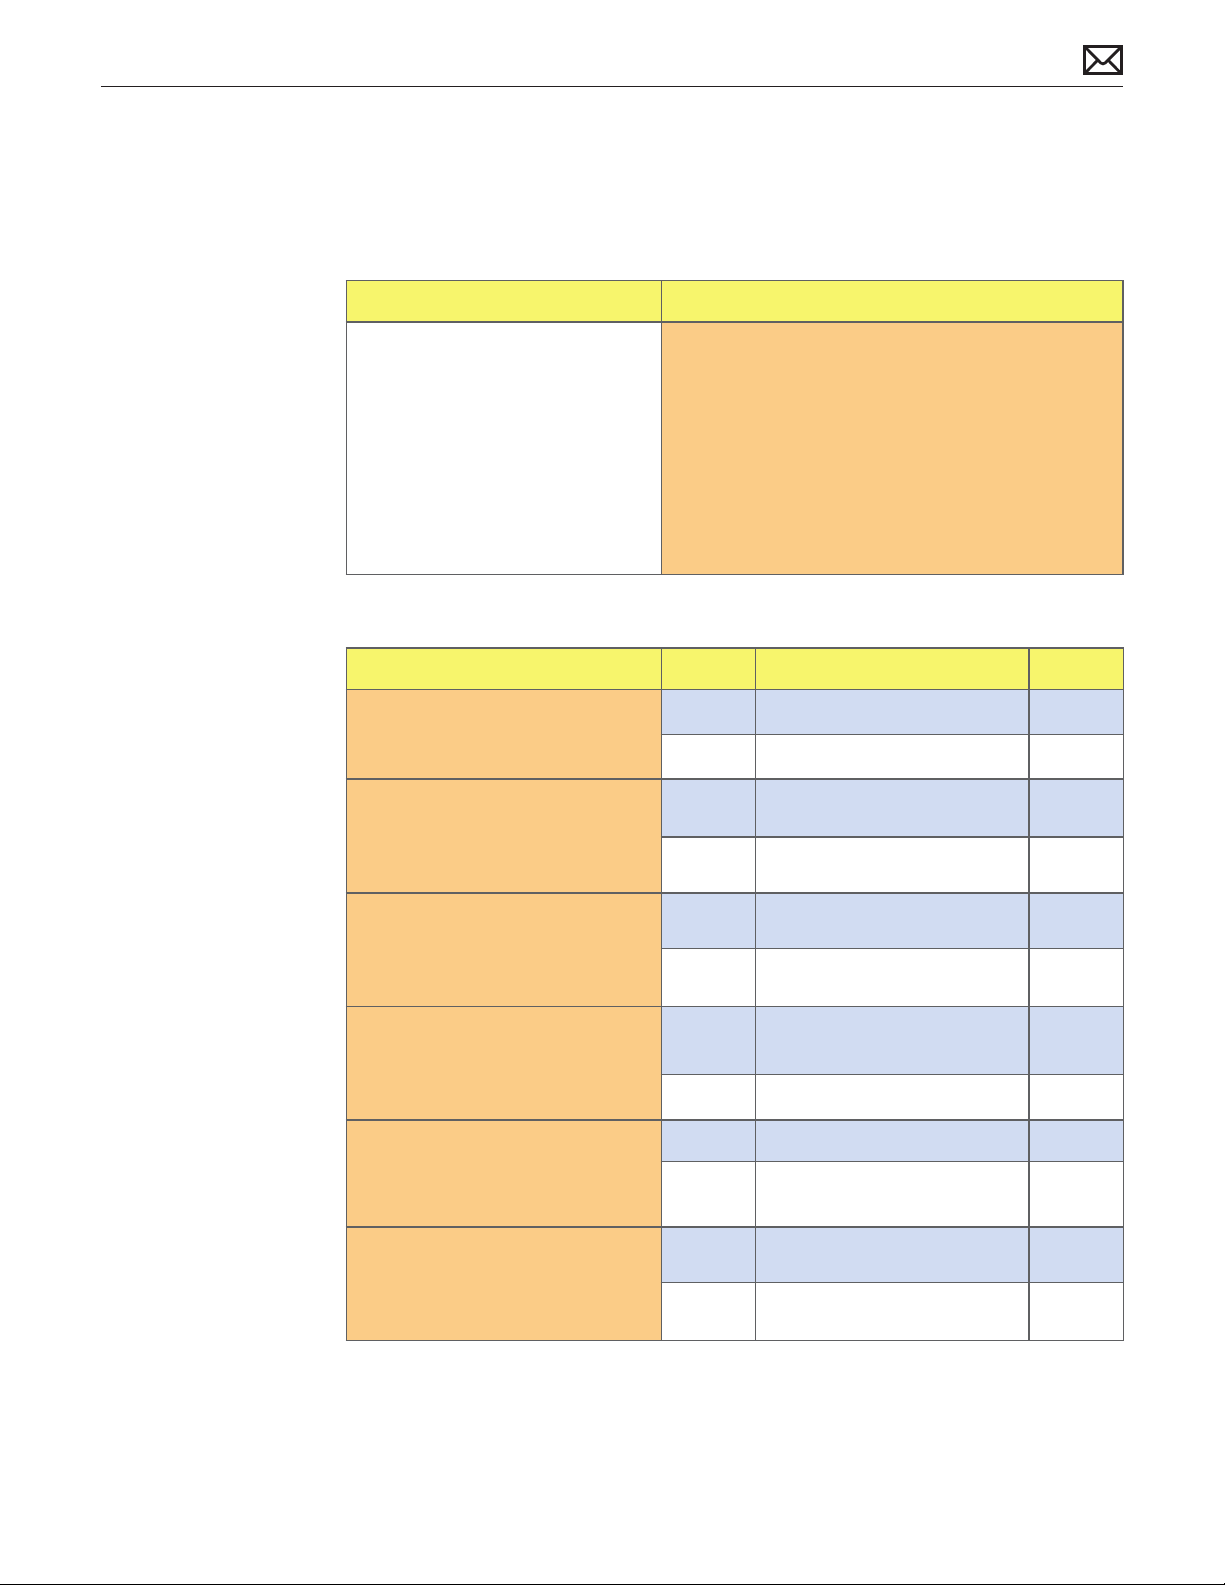
Hard Drive Read/Write Errors
Unlikely cause: LCD panel, power supply, fans, speakers, camera, microphone
Quick Check
Symptoms Quick Check
Drive Read/Write Error
Drive Bad Sector/Defective
Drive Formatting Issues
• Cannot save documents
• Read/write error message
• Hang when accessing or saving
data
1. Boot from Install DVD. Use Disk Utility to verify
S.M.A.R.T. status of hard drive.
2. Use Disk Utility to repair disk.
3. Verify that user’s data is backed up and that user
authorizes erasing disk and reinstalling software.
4. Use Target Disk Mode to mount user’s hard drive
on a known-good computer. Use Disk Utility on
host computer for Quick Checks 2 through 3.
Deep Dive
Check Result Action Code
1. Run Disk Utility ‘Repair Disk’
function and verify if it
completes successfully.
2. Reboot computer. Verify if
system boots successfully and
that Disk Utility “Verify” function
reports no errors.
3. With user’s permission, erase
hard drive and reinstall Mac
OS. Verify if installation process
completes.
Yes Go to step 2.
No Go to step 3.
Yes Data error. Issue resolved. H07
No Go to step 3.
Yes Go to step 6.
No Go to step 4.
2010-11-18
4. Inspect hard drive SATA, power
cables and connectors for bent
pins, or other damage to the
cable.
5. Reseat SATA cable on hard
drive and logic board. Verify if
computer starts up.
6. Reboot computer. Verify if
system boots successfully and
Disk Utility “Verify” function
reports no errors.
Yes Replace damaged cable.
Go to step 6.
No Go to step 5.
Yes Go to step 6.
No Replace hard drive data cable.
Go to step 6.
Yes Issue resolved.
No Go to step 7.
iMac (21.5-inch, Late 2009) Symptom Charts — Mass Storage 58
H04
H04
Page 59
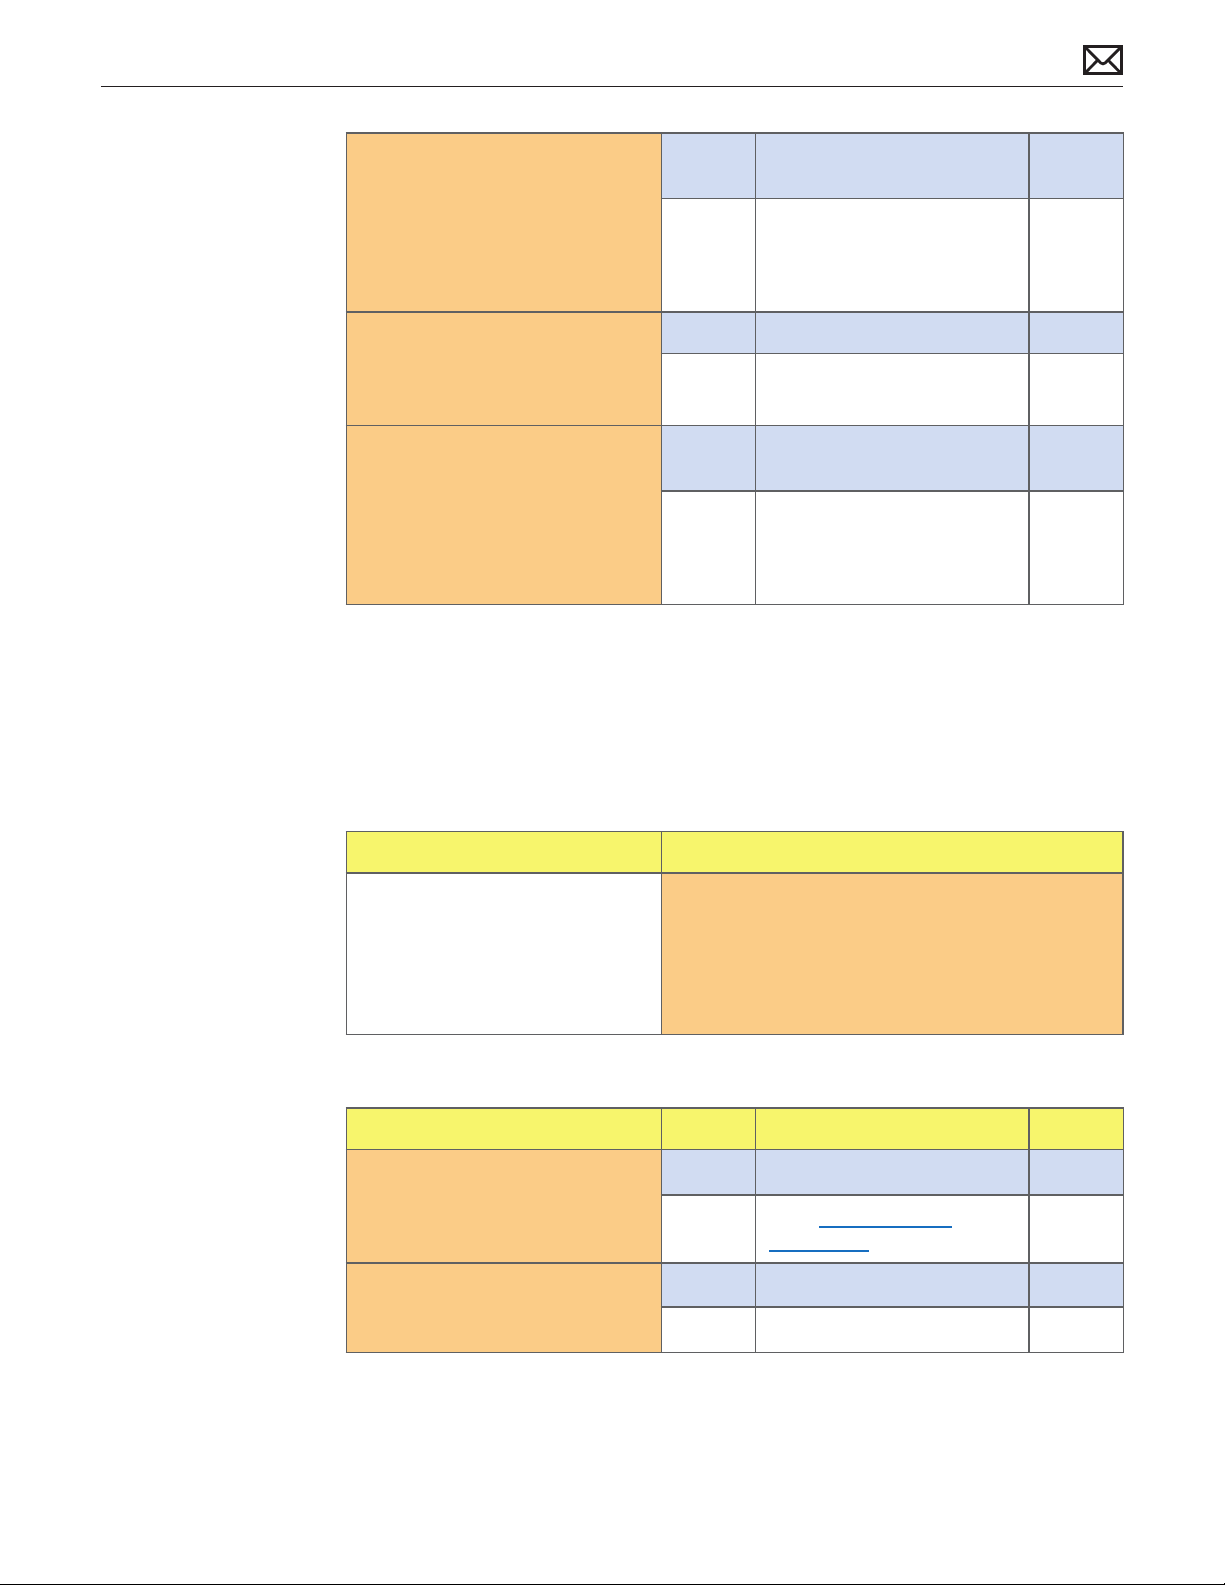
7. Test with known-good hard
drive. Verify if system boots
successfully and Disk Utility
“Verify” function reports no
errors.
Yes Reinstall user’s hard drive, go
to step 8.
No SATA cable veried or
replaced and known-good
hard drive installed. Replace
logic board.
8. Reboot computer. Verify if
system boots successfully and
that Disk Utility “Verify” function
reports no errors.
9. Replace user’s hard drive. Verify
if drive formats correctly with a
GUID partition map and installs
Mac OS without errors.
Yes Issue resolved.
No User’s hard drive appears to
be defective. Go to step 9.
Yes Issue resolved by replacing
user’s hard drive.
No SATA cable veried or
replaced and new hard drive
did not resolve issue. Replace
logic board.
Hard Drive Noisy
Unlikely cause: LCD panel, logic board, power supply, speakers, camera, microphone
Quick Check
Symptoms Quick Check
Hard Drive Noisy
• Noise during start up
• Noise during operation
• Noise when drive is copying or
saving data
1. Boot from Install DVD. Use Disk Utility to verify
S.M.A.R.T. status of hard drive.
2. Use Disk Utility to repair disk.
3. Determine if noise is comparable to another
machine of the same model.
H03
M19
2010-11-18
Deep Dive
Check Result Action Code
1. Boot from the Install DVD and
run Disk Utility. Verify if user
hard drive is available for Disk
Utility to repair.
2. Run Disk Utility ‘Repair Disk’
function and verify if it
completes successfully.
Yes Go to step 2.
No
Yes Go to step 3.
No Go to step 4.
iMac (21.5-inch, Late 2009) Symptom Charts — Mass Storage 59
Go to Hard Drive Not
Recognized symptom ow.
Page 60
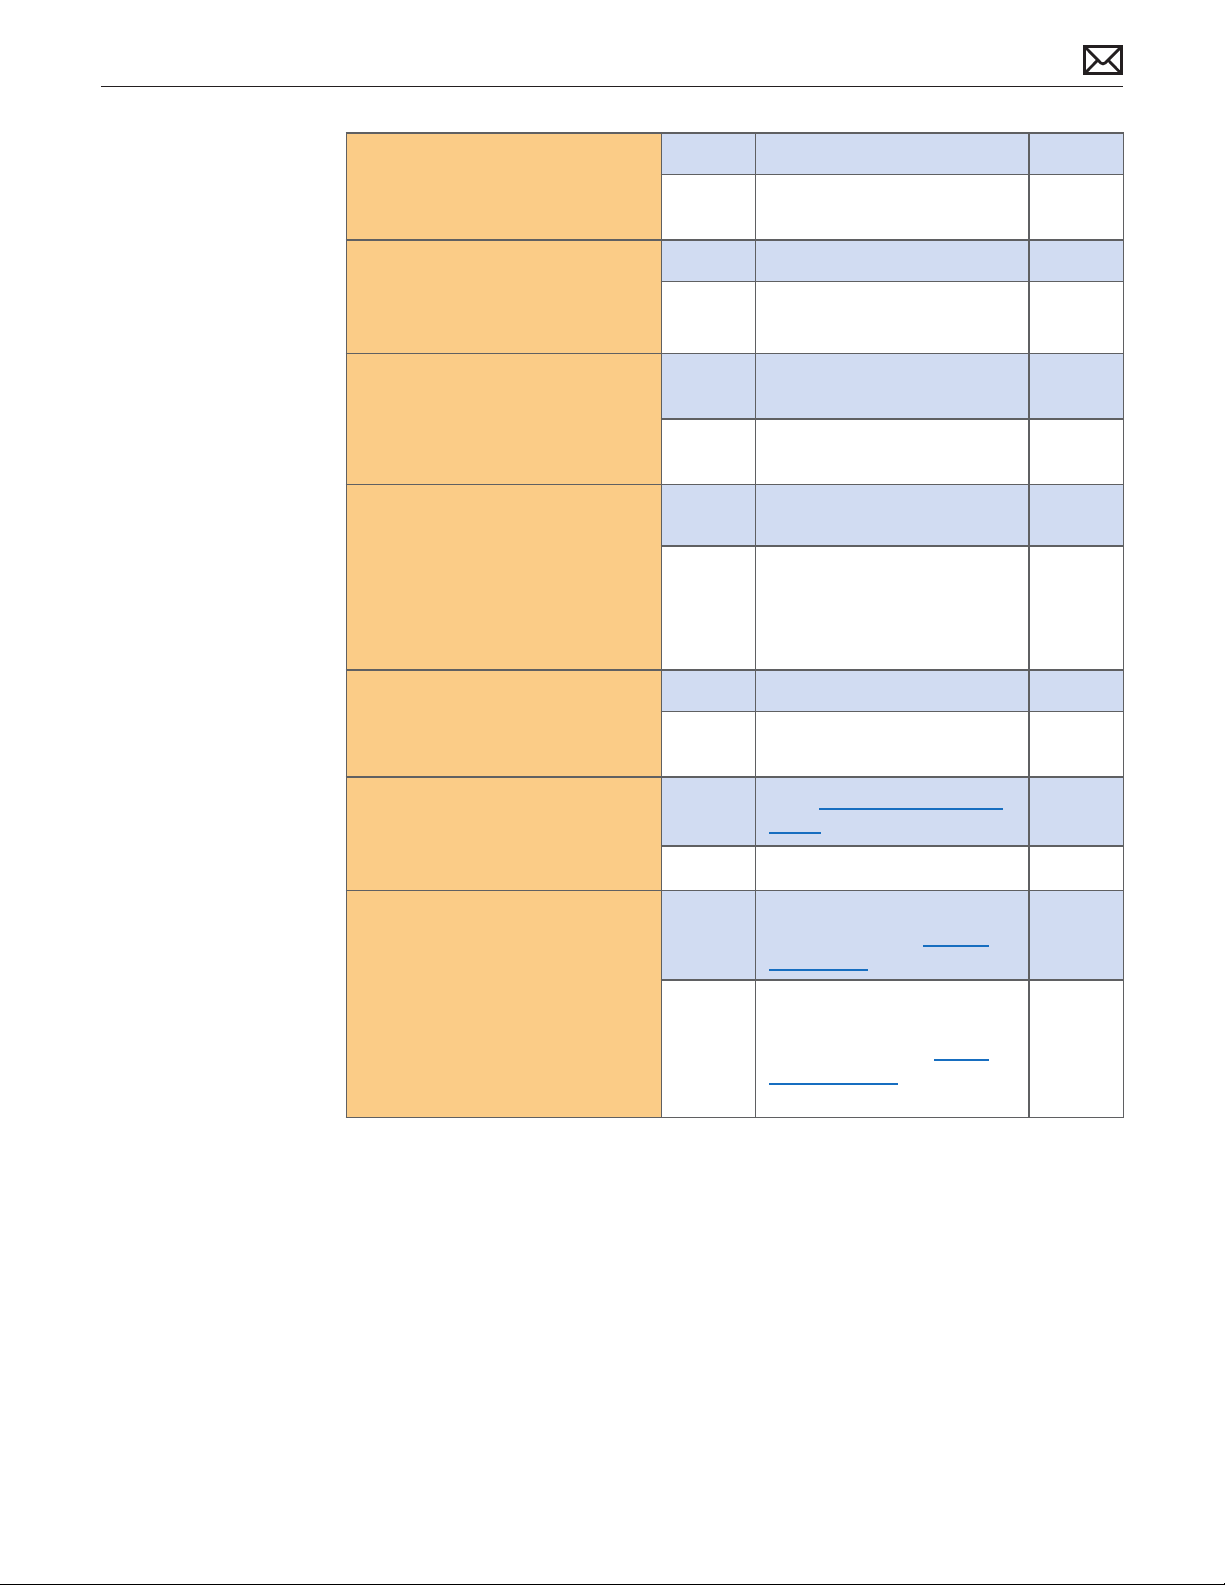
3. Restart the computer. Verify if
the noise is still present.
Yes Go to step 4.
No Issue resolved. Return system
to user.
H06
4. With user’s permission, erase
hard drive and reinstall Mac
OS. Verify if installation process
completes.
5. With replacement hard drive
installed, reboot computer.
Verify if noise is still present.
6. With hard drive removed verify
if rubber vibration isolation
grommets are properly
installed in hard drive bracket
(attached to hard drive) and
to mechanism in rear housing
(where hard drive pins insert).
7. Reboot computer. Verify if noise
is still present.
8. Disconnect hard drive SATA and
power connections then boot
from the Install DVD. Verify if
noise is caused by fans.
Yes Go to step 3.
No Replace hard drive.
Go to step 5.
Yes Replacement hard drive did
not resolve issue. Go to step 6.
No Issue resolved by replacing
hard drive.
Yes Go to step 8.
No If grommets are missing or
damaged, replace hard drive
bracket or mechanism as
appropriate. Go to step 7.
Yes Go to step 8.
No Issue resolved. Return
computer to user.
Yes Go to Fan Failures/Thermal
Issues symptom ow.
No Go to step 9.
H06
H06
2010-11-18
9. Disconnect hard drive and
optical drive then boot from an
external volume. Verify if noise
disappears when optical drive
has been disconnected.
Yes Possible optical drive or
media issue. Go to Optical
Drive Noisy symptom ow.
No
Noise issue still present, but
does not appear to be caused
by hard drive. Go to Noise/
Hum/Vibration symptom
ow.
iMac (21.5-inch, Late 2009) Symptom Charts — Mass Storage 60
Page 61
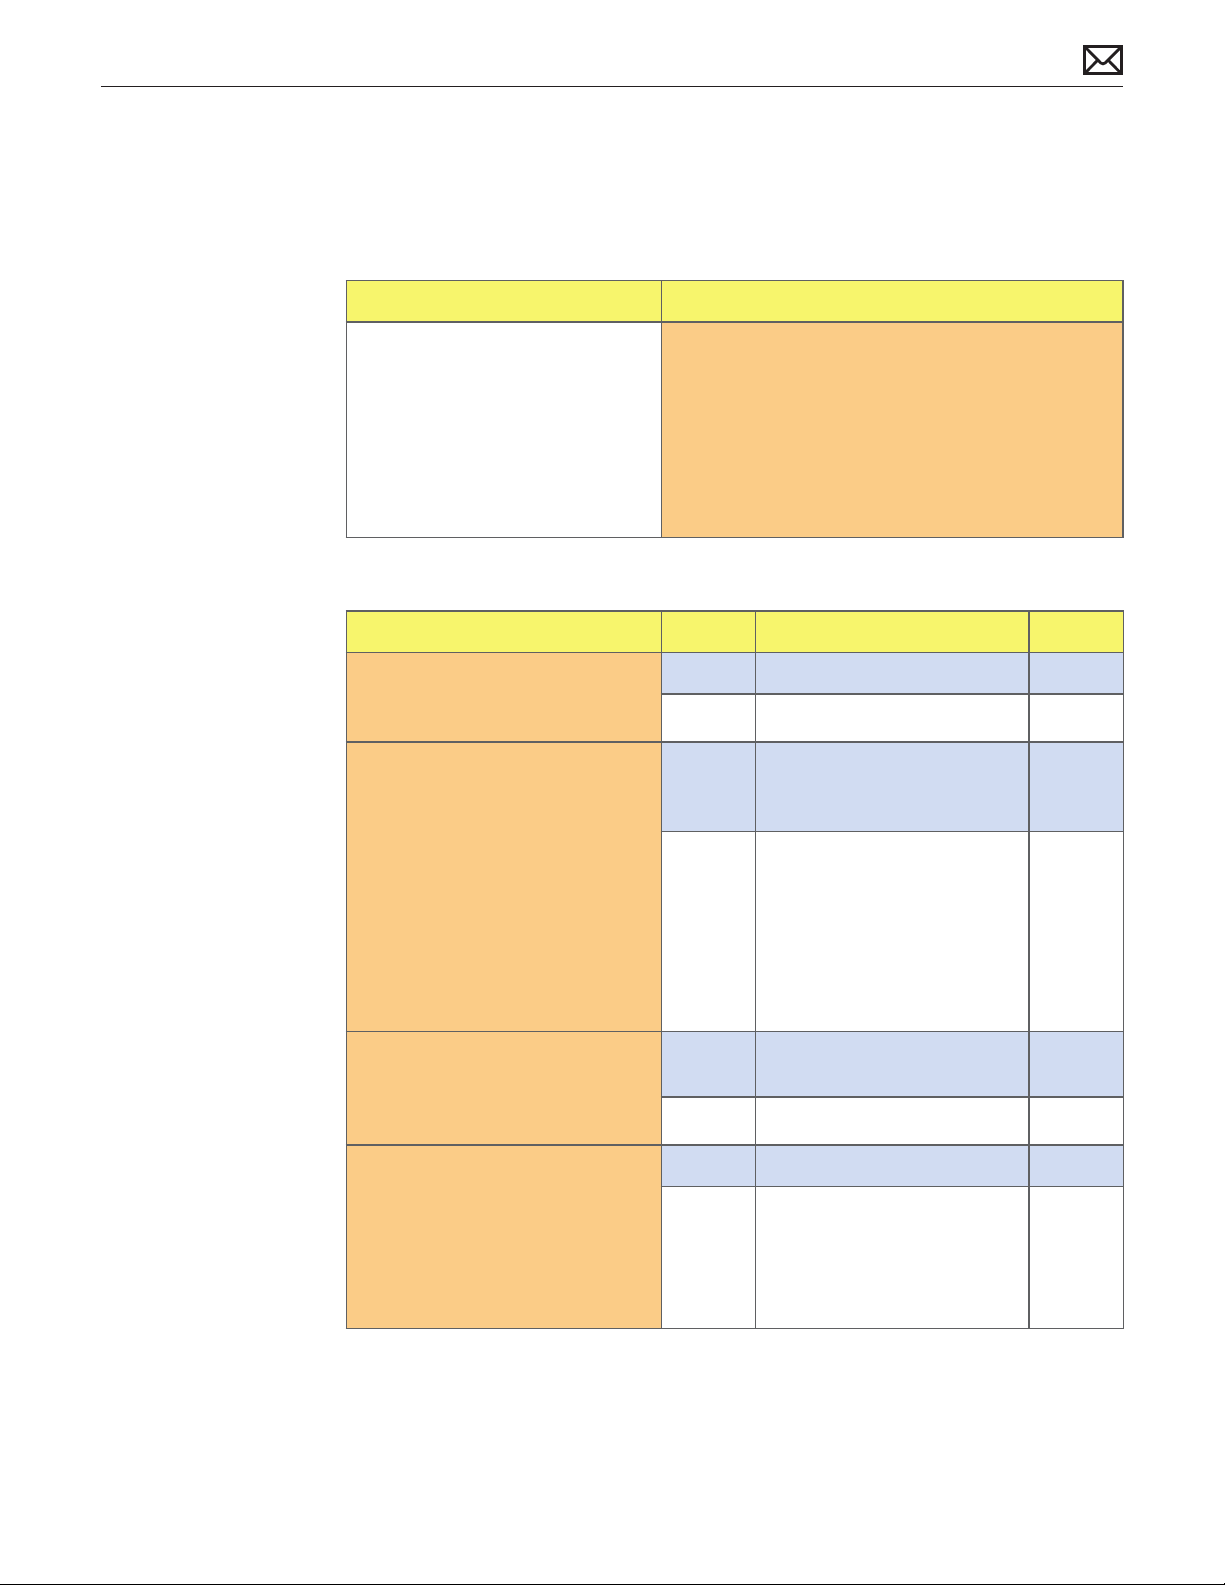
Optical Drive Not Recognized
Unlikely cause: LCD panel, power supply, fans, speakers, camera, microphone
Quick Check
Symptoms Quick Check
Drive Not Recognized/Mount
• Discs inject and eject, but do
not appear in Finder
1. Use System Proler Serial-ATA section to see if
optical drive appears.
2. System Proler Serial-ATA section will show any
media inserted.
3. Check Finder Preferences and make sure “CD’s,
DVD’s and iPods” is checked under “Show these
items on the desktop” in the General section.
Deep Dive
Check Result Action Code
1. Verify if optical drive is listed
in Serial-ATA section of System
Proler.
2. Test both CD and DVD media.
Verify if optical drive can read
both CD and DVD media.
Yes Go to step 2.
No Go to step 3.
Yes No issue, or possible
intermittent issue. Gather
more information from user.
No If both types of media fail,
check that Finder Preferences
are set to “show CD’s and
DVD’s”, then go to step 3.
J03
2010-11-18
3. Connect known-good optical
drive to SATA cable. Verify if
both CD and DVD media are
read reliably.
4. Reseat SATA cable connections
at optical drive and logic board
(cable connects to back of logic
board). Verify if both CD and
DVD media are read reliably.
If only one type of media fails,
drive has a laser pickup issue.
Replace optical drive.
Yes SATA cable and port on logic
board good. Go to step 5.
No Go to step 4.
Yes Go to step 6.
No Replace SATA cable and test.
If issue persists, replace logic
board.
Go to step 6.
iMac (21.5-inch, Late 2009) Symptom Charts — Mass Storage 61
X03
M19
Page 62
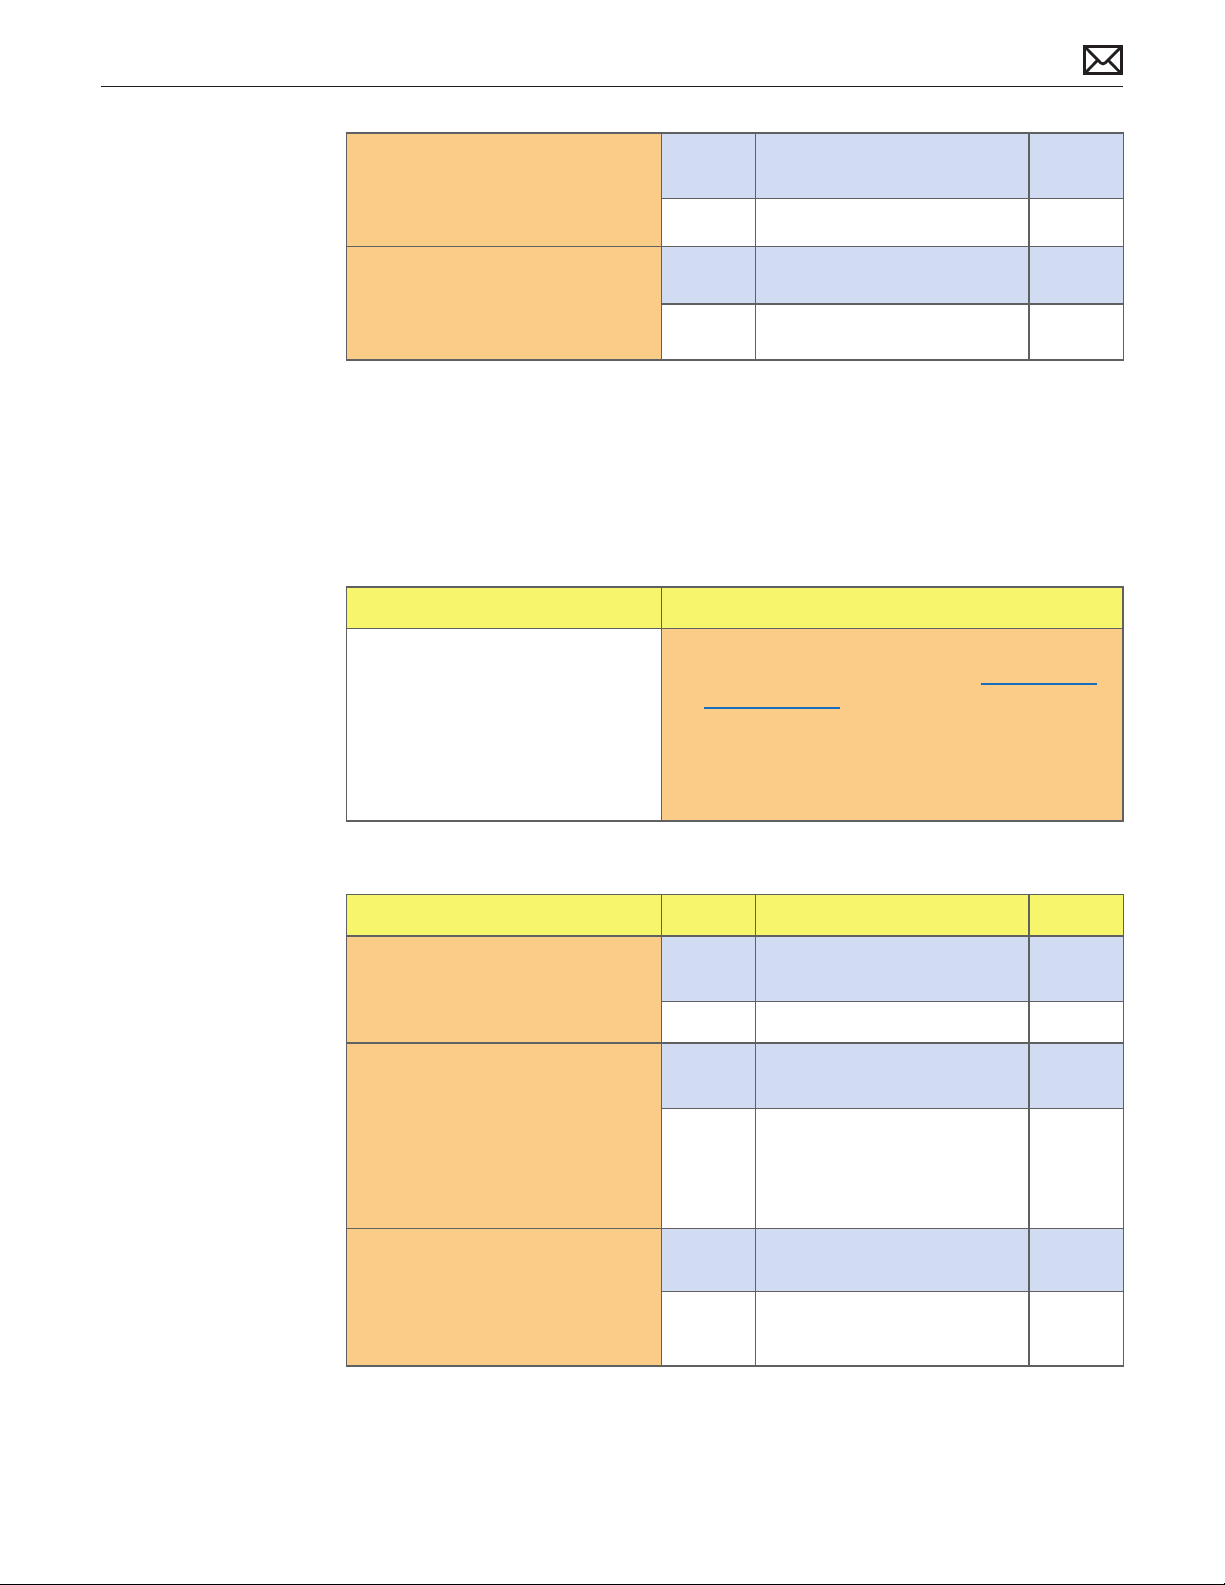
5. Connect original optical drive
to known-good SATA cable.
Verify if both CD and DVD
media are read reliably.
Yes SATA cable issue. Replace
SATA cable. Go to step 6.
No Replace optical drive. J03
X03
6. Test read compatible known-
good CD and DVD media
(Install DVD). Verify if media is
recognized and reads reliably.
Yes Issue resolved.
No Replace optical drive. J03
Optical Drive Won’t Accept/Eject Media
Unlikely cause: LCD panel, power supply, fans, speakers, camera, microphone
Quick Check
Symptoms Quick Check
Drive Won’t Accept Media
Drive Won’t Eject Media
• Cannot insert a disc into drive
• Cannot eject a disc from drive
1. Use System Proler Serial-ATA section to see if
optical drive appears. If not, go to Optical Drive
Not Recognized symptom ow.
2. Restart computer and hold down mouse button
or keyboard eject key to cycle optical drive.
3. Inspect optical drive slot for obstructions
Deep Dive
Check Result Action Code
1. Verify if optical drive is listed in
System Proler device tree for
Serial-ATA devices.
2. Verify SATA cable connections
between optical drive and logic
board. Visually inspect cables
and connectors for any debris,
damage or bent pins. Verify if
optical drive is listed in System
Proler device tree.
3. Connect known-good optical
drive to SATA cable. Verify if
known-good optical drive is
listed in the System Proler
device tree.
Yes Optical drive communicating
with logic board. Go to step 5.
No Go to step 2.
Yes Optical drive communicating
with logic board. Go to step 5.
No Replace damaged cables
and retest. If connections are
good and no visible cable
damage, go to step 3.
Yes Go to step 4.
No Suspect bad SATA cable.
Go to step 7.
X03
2010-11-18
iMac (21.5-inch, Late 2009) Symptom Charts — Mass Storage 62
Page 63
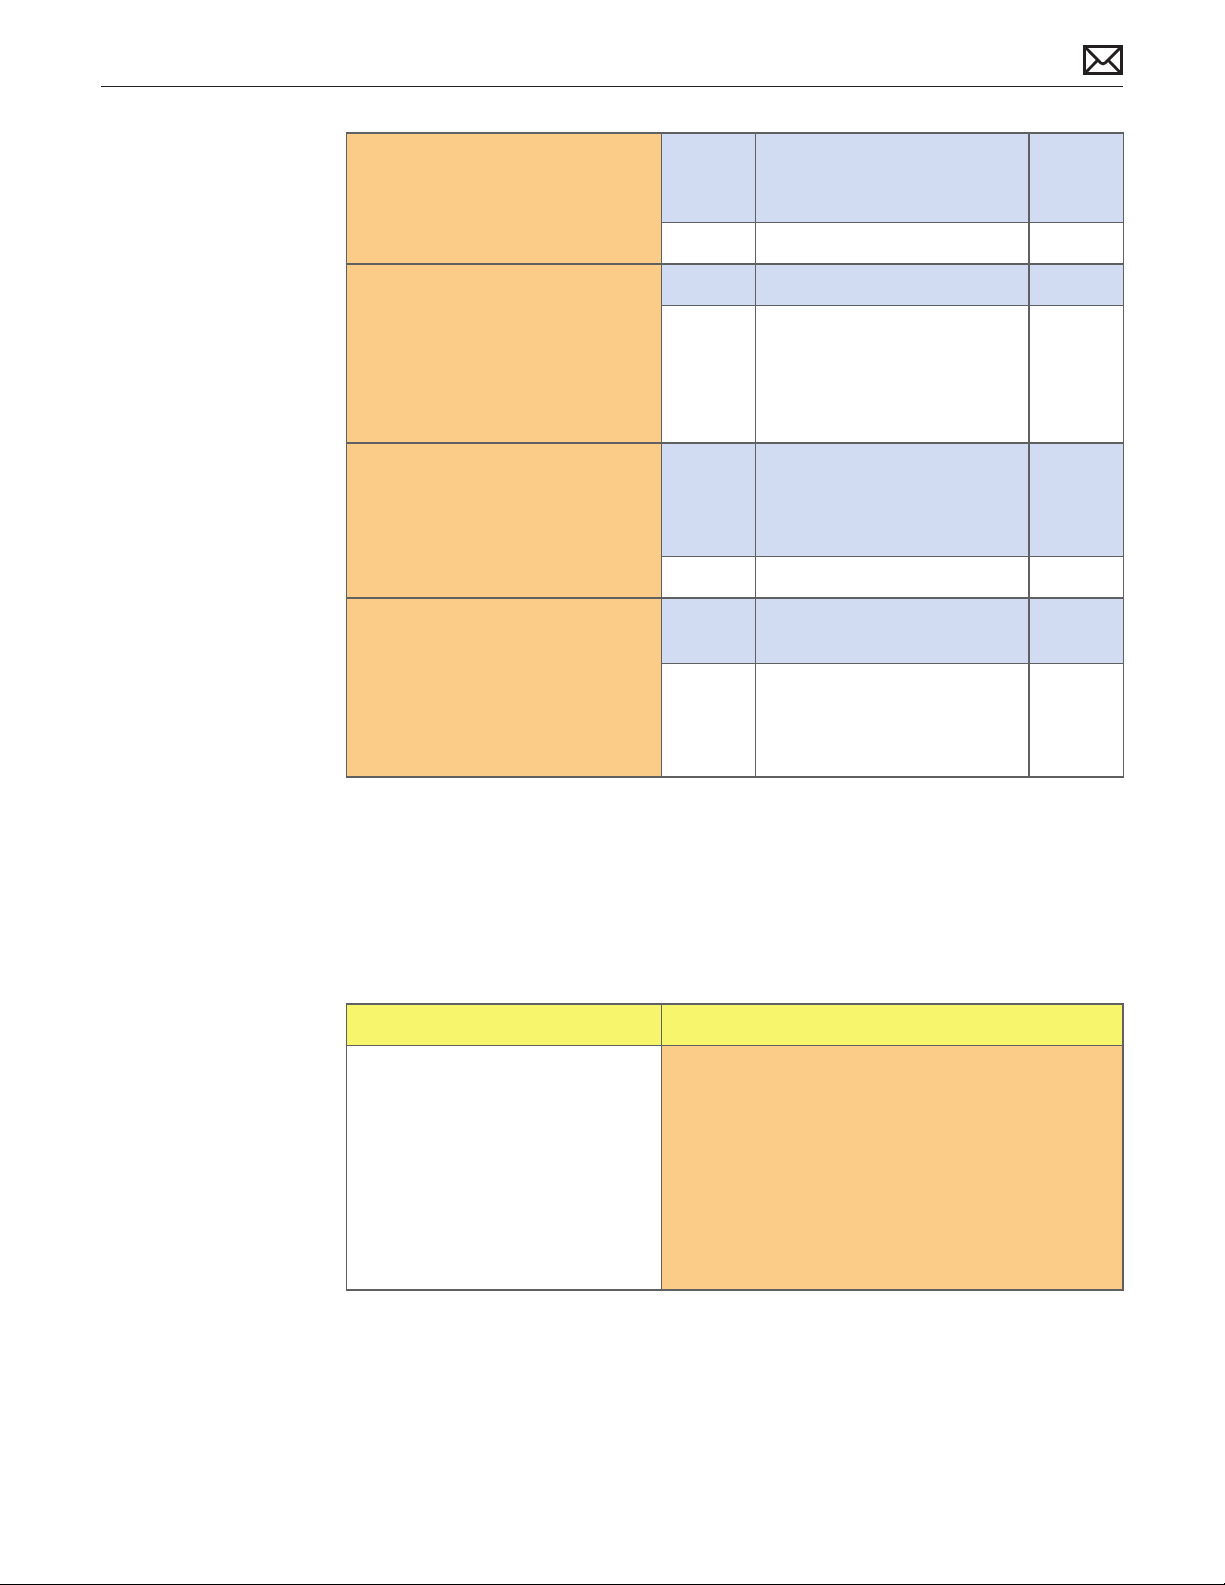
4. With known-good optical drive
installed, test for media inject/
eject. Verify if drive accepts and
ejects known-good media.
Yes Known-good optical drive
resolved inject/eject issue.
Replace optical drive.
No Go to step 7.
J03
5. Inspect optical drive slot during
disc insert/eject. Verify if discs
can be inserted easily.
6. With known-good optical
media (Install DVD), test for
media inject/eject. Verify
if drive accepts and ejects
known-good media.
7. Replace SATA cable then test
for media inject/eject. Verify if
drive injects and ejects knowngood media.
Yes Go to step 6.
No Verify correct optical drive
bezel alignment with
enclosure. Reseat optical drive
then retest. If issue persists,
replace optical drive.
Yes Media issue. No repair
necessary. Suggest user
investigate use of dierent
media.
No Go to step 3.
Yes SATA cable resolved issue.
Return system to user.
No SATA cable veried or
replaced, and optical drive
veried or replaced. Replace
logic board and retest.
J03
X03
M19
Optical Drive Read/Write Error
Unlikely cause: LCD panel, power supply, fans, speakers, camera, microphone
Quick Check
Symptoms Quick Check
Drive Read/Write Data Error
• Errors when writing optical
media.
• Errors when reading optical
media.
• Hang when accessing or
preparing to write data.
1. Test optical media in a known-good optical drive
in the same type of computer to rule out media
issue.
2. Check with known-good discs like the Install DVD
that came with the computer.
3. For write issues, check with known-good media
that performs well in a known-good optical drive
in the same type of computer.
2010-11-18
iMac (21.5-inch, Late 2009) Symptom Charts — Mass Storage 63
Page 64
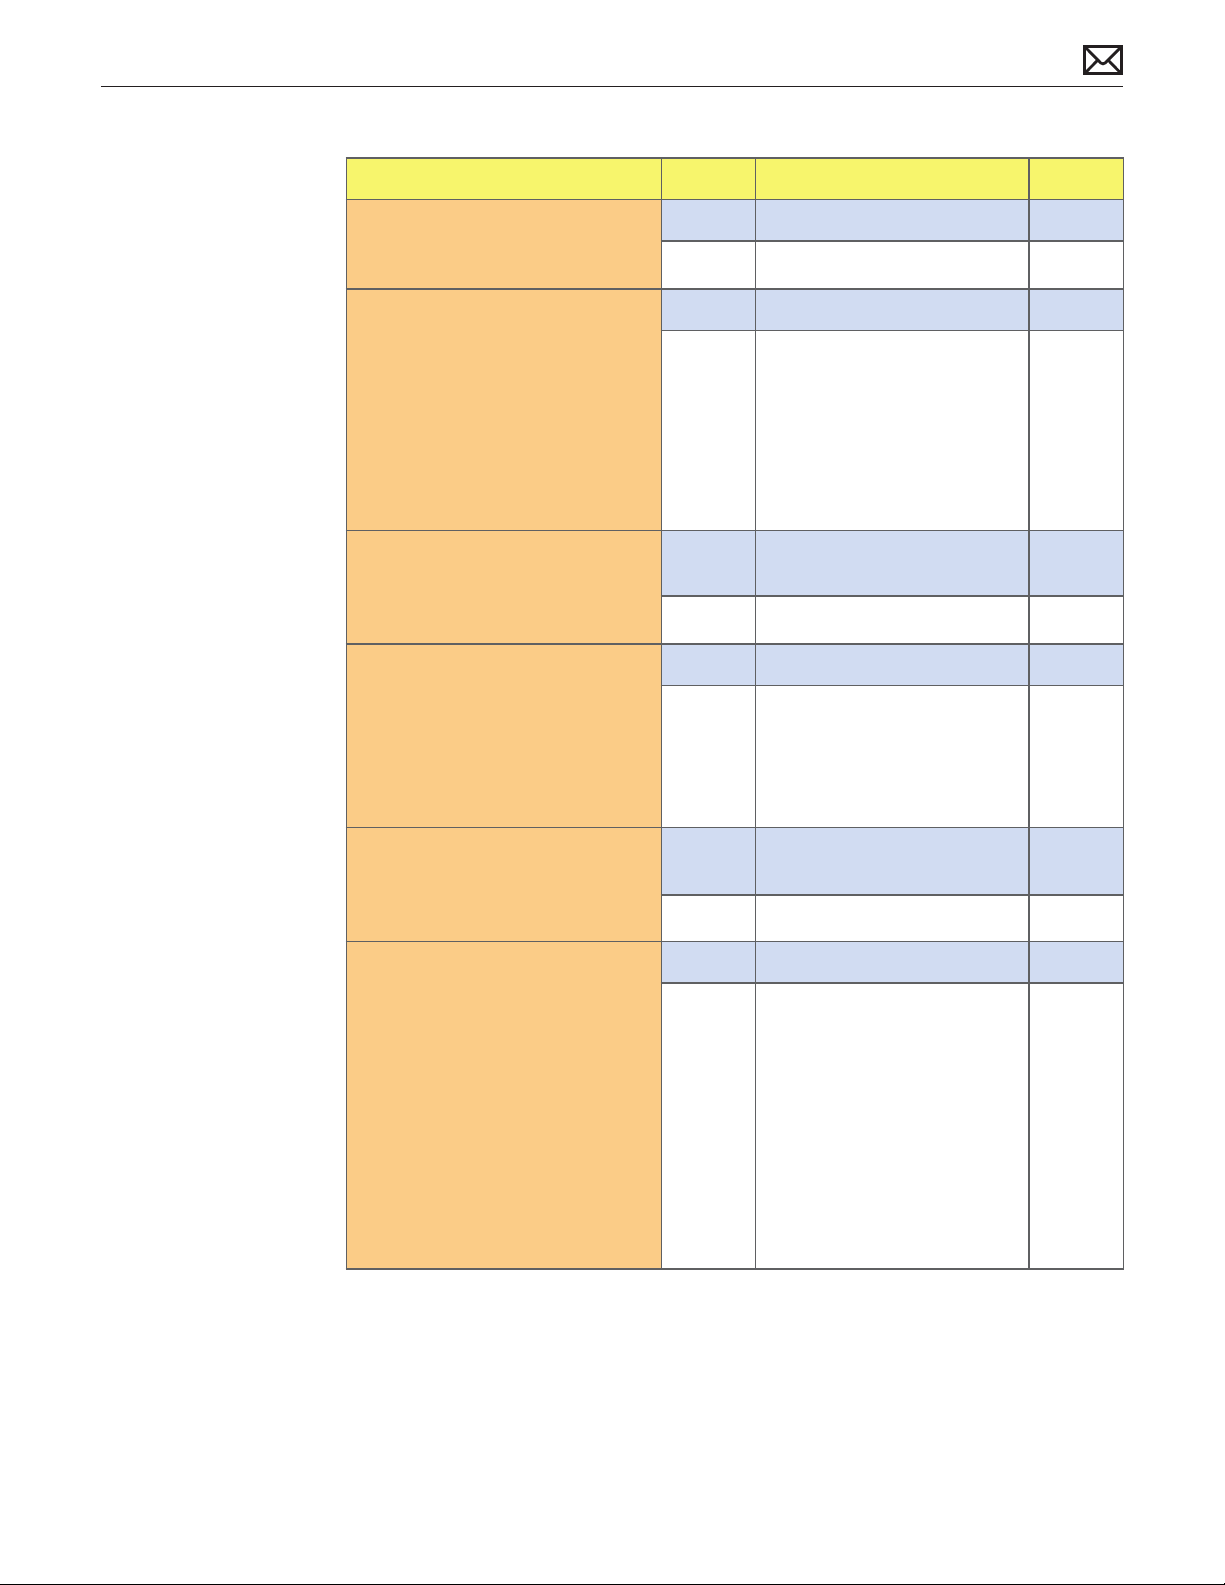
Deep Dive
Check Result Action Code
1. Verify if media is free to spin
without optical drive scraping
edge or surface of media.
2. Test both CD and DVD media.
Verify if drive can read both CD
and DVD media.
3. Connect known-good optical
drive to SATA cable. Verify if
both CD and DVD media are
read reliably.
4. Reseat SATA cable connections
at optical drive and logic board
(cable connects to back of logic
board). Verify if both CD and
DVD media are read reliably.
Yes Go to step 2.
No Replace optical drive. J05
Yes Go to step 6.
No If both types of media fail,
check that Finder Preferences
are set to “show CD’s and
DVD’s”, then go to step 3.
If only one type of media fails,
drive has a laser pickup issue.
Replace optical drive.
Yes SATA cable and port on logic
board good. Go to step 5.
No Go to step 4.
Yes Go to step 6.
No Replace SATA cable and test.
If issue persists, replace logic
board.
J03
X03
M19
5. Connect original optical drive
to known-good SATA cable.
Verify if both CD and DVD
media are read reliably.
6. Test write data to compatible
CD and DVD media. Verify if
burned media is recognized
and read reliably.
Go to step 6.
Yes SATA cable issue. Replace
SATA cable. Go to step 6.
No Replace optical drive. J03
Yes Issue resolved.
No Run ODD sensor and ODD fan
tests in ASD:
If errors found check
ODD sensor and ODD fan
connections to logic board
(read/write errors may be due
to drive being too hot).
If no errors are found while
running diagnostics, replace
optical drive.
X03
J03
2010-11-18
iMac (21.5-inch, Late 2009) Symptom Charts — Mass Storage 64
Page 65
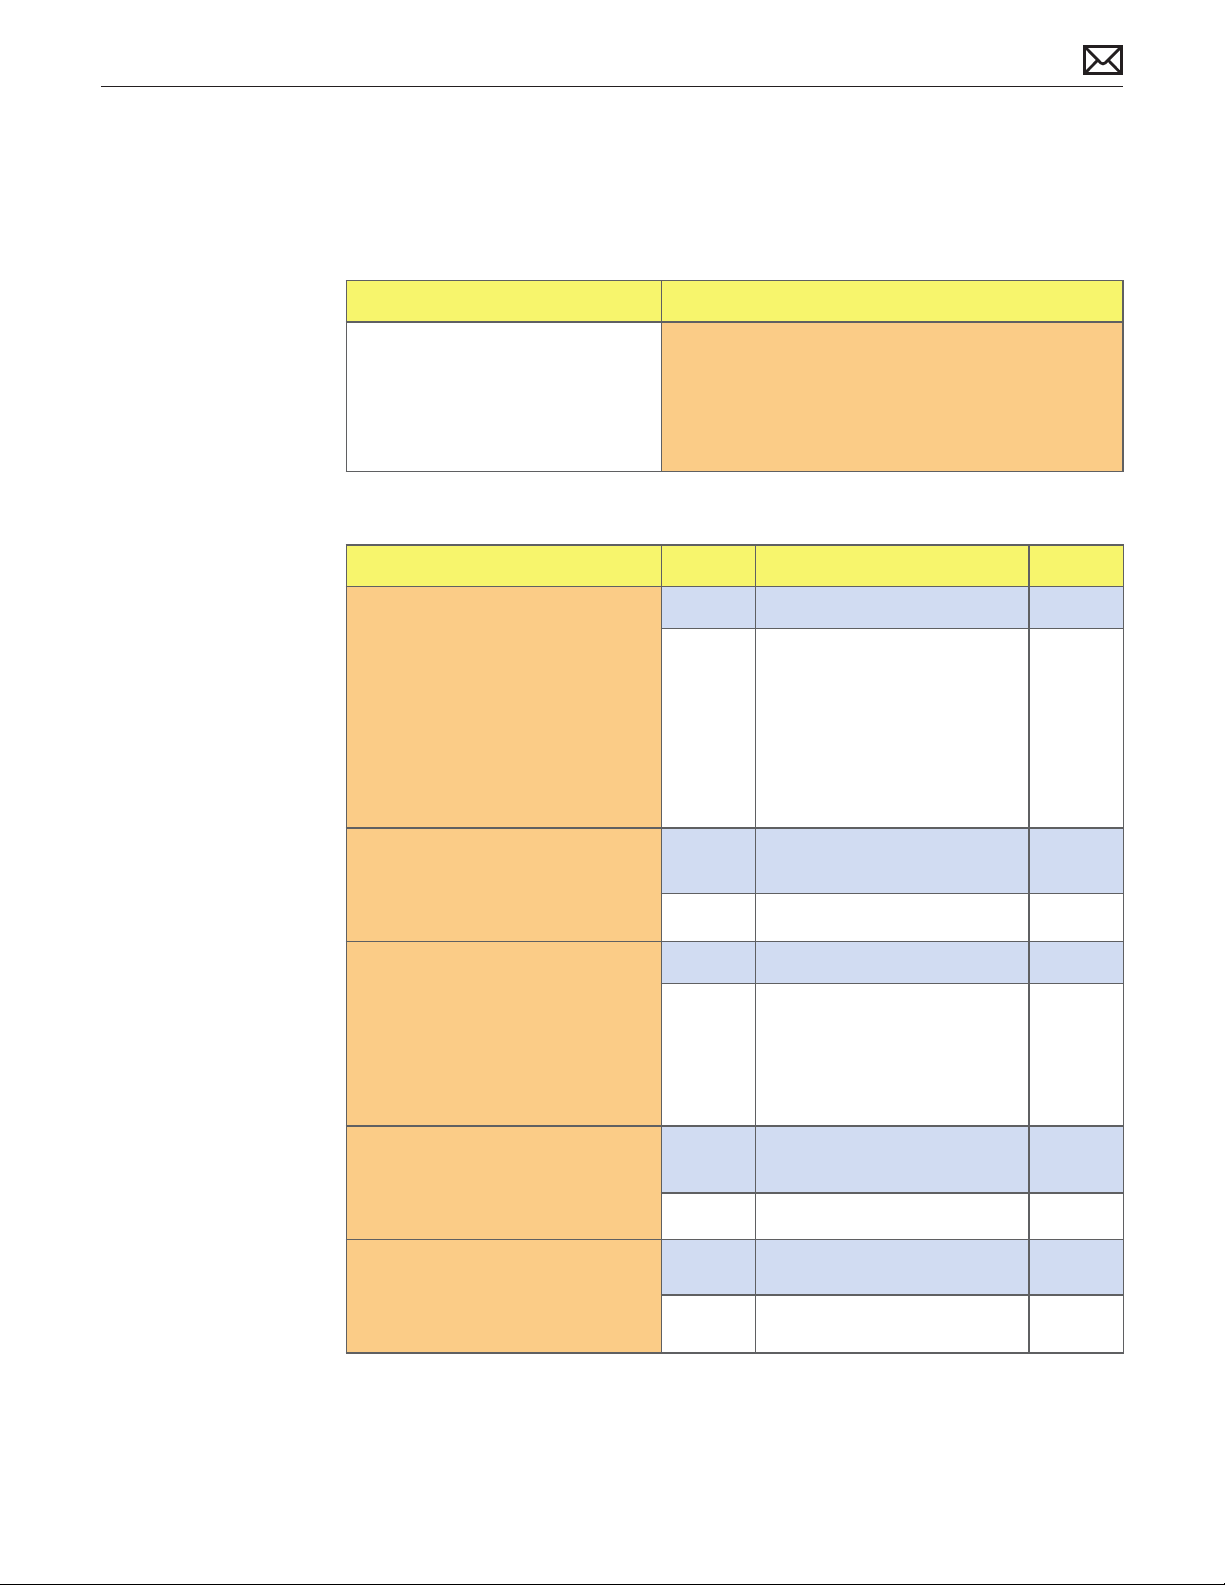
Optical Drive Not Performing to Specications
Unlikely cause: LCD panel, power supply, fans, speakers, camera, microphone
Quick Check
Symptoms Quick Check
Optical Drive Not Performing to
Specications
• Read or write speeds slower
than expected
1. Test optical media in another computer of the
same type to rule out media issue.
2. For write issues, check with known-good media
that performs well in another computer and drive
of the same type.
Deep Dive
Check Result Action Code
1. Test both CD and DVD media.
Verify if optical drive can read
both CD and DVD media.
2. Connect known-good optical
drive to SATA cable. Verify if
both CD and DVD media are
read reliably.
Yes Go to step 5.
No If both types of media fail,
check that Finder Preferences
are set to “show CD’s and
DVD’s”, then go to step 2.
If only one type of media fails,
drive has a laser pickup issue.
Replace optical drive.
Yes SATA cable and port on logic
board good. Go to step 4.
No Go to step 3.
J03
2010-11-18
3. Reseat SATA cable connections
at optical drive and logic board
(cable connects to back of logic
board). Verify if both CD and
DVD media are read reliably.
4. Connect original optical drive
to known-good SATA cable.
Verify if both CD and DVD
media are read reliably.
5. Test write data to compatible
CD and DVD media. Verify if
burned media is recognized
and read reliably.
Yes Go to step 5.
No Replace SATA cable and test.
If issue persists, replace logic
board.
Go to step 5.
Yes SATA cable issue. Replace
SATA cable. Go to step 5.
No Replace optical drive. J03
Yes Issue resolved.
No Go to step 6.
iMac (21.5-inch, Late 2009) Symptom Charts — Mass Storage 65
X03
M19
X03
Page 66
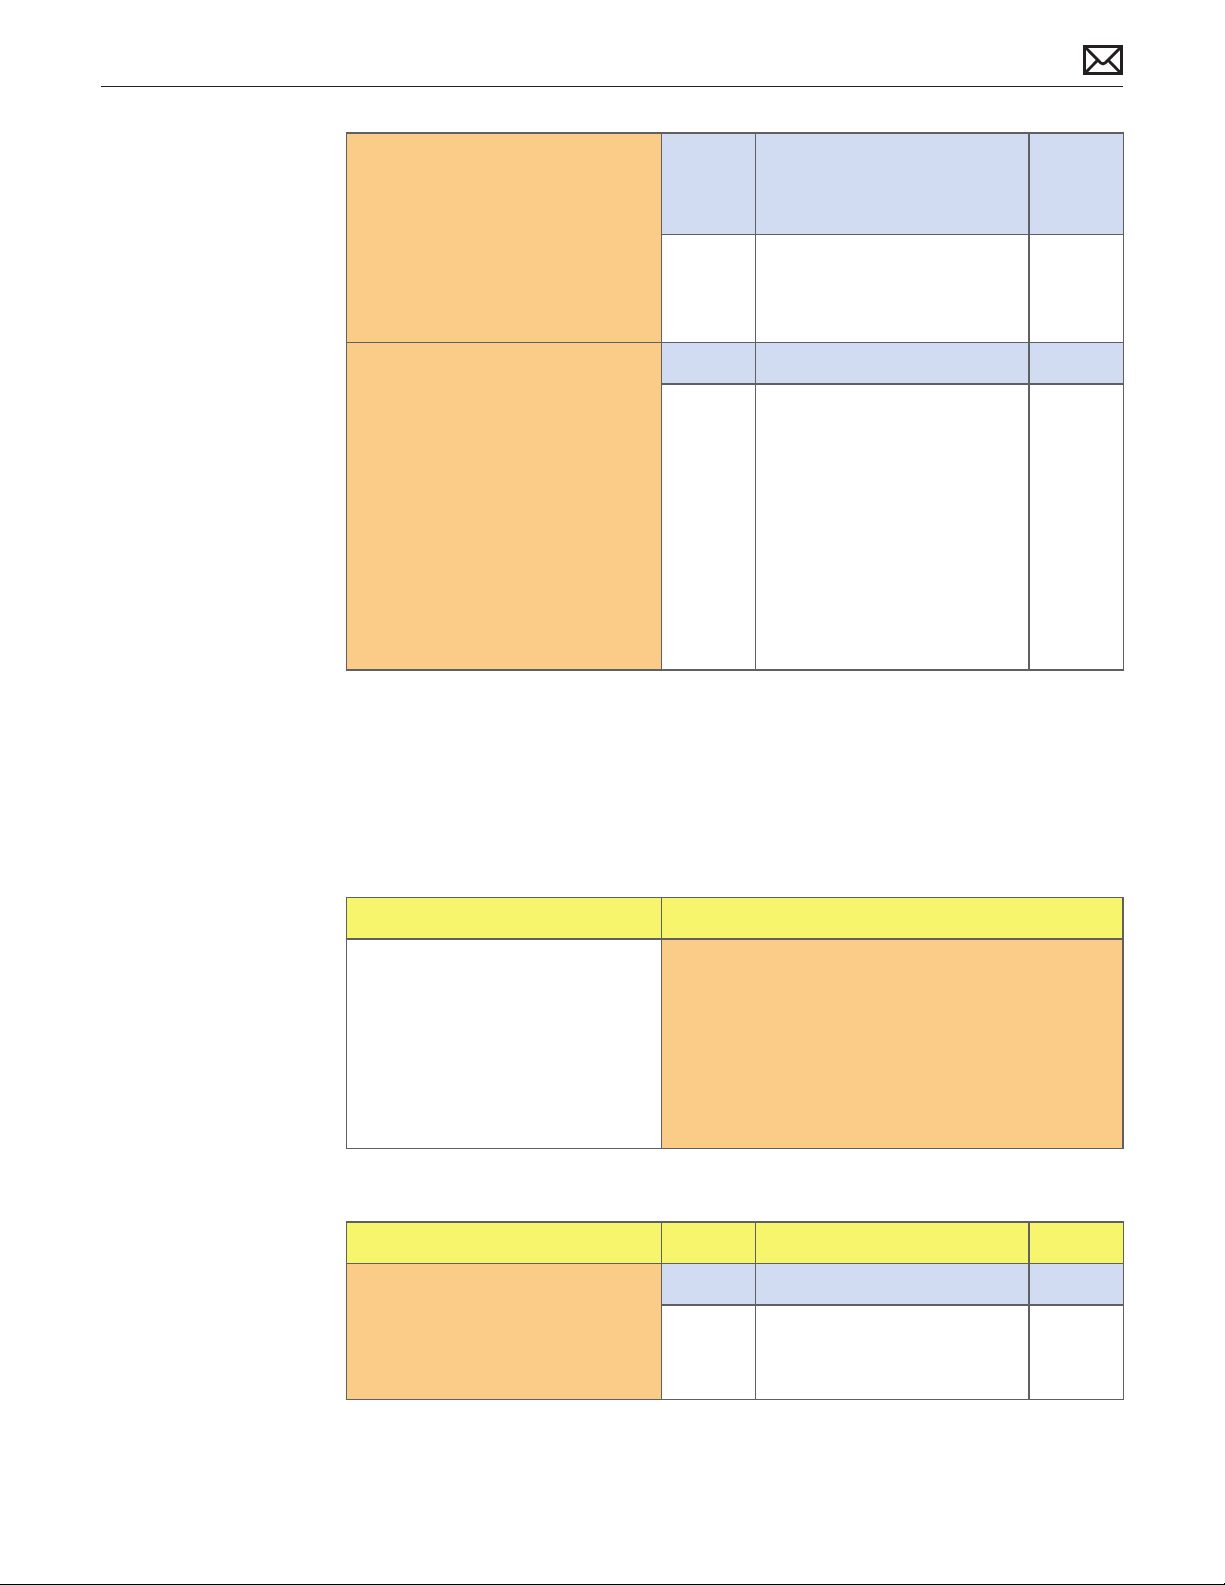
6. Media that is out of balance
may not perform well at higher
speeds even though higher
speeds may be supported
by the optical drive. Verify if
slowing requested burn speed
allows discs to be written
reliably.
Yes Media issue. No repair
necessary.
No Go to step 7.
7. Test write data to compatible
CD and DVD media. Verify
burned media is recognized
and reads reliably.
Yes Issue resolved.
No Run ODD sensor and ODD fan
tests in ASD:
If errors found check
ODD sensor and ODD fan
connections to logic board
(read/write errors may be due
to drive being too hot).
If no errors are found while
running diagnostics, replace
optical drive.
Optical Drive Noisy
Unlikely cause: LCD panel, power supply, fans, speakers, camera, microphone
Quick Check
Symptoms Quick Check
J03
2010-11-18
Optical Drive Noisy (J04)
• Noise during boot
• Noise during operation
• Noise when drive is copying or
writing data
1. Test optical media in another computer of the
same type to rule out media issue.
2. Check with known-good discs like the Install DVD
that came with the computer.
3. Verify if noise occurs without media in optical
drive. If so, verify if noise made by hard drive or
fans.
Deep Dive
Check Result Action Code
1. Test optical drive with dierent
source of media. Does the noise
issue remain?
Yes Go to step 2.
No Issue due to unbalanced
media. Recommend using
dierent media.
iMac (21.5-inch, Late 2009) Symptom Charts — Mass Storage 66
Page 67
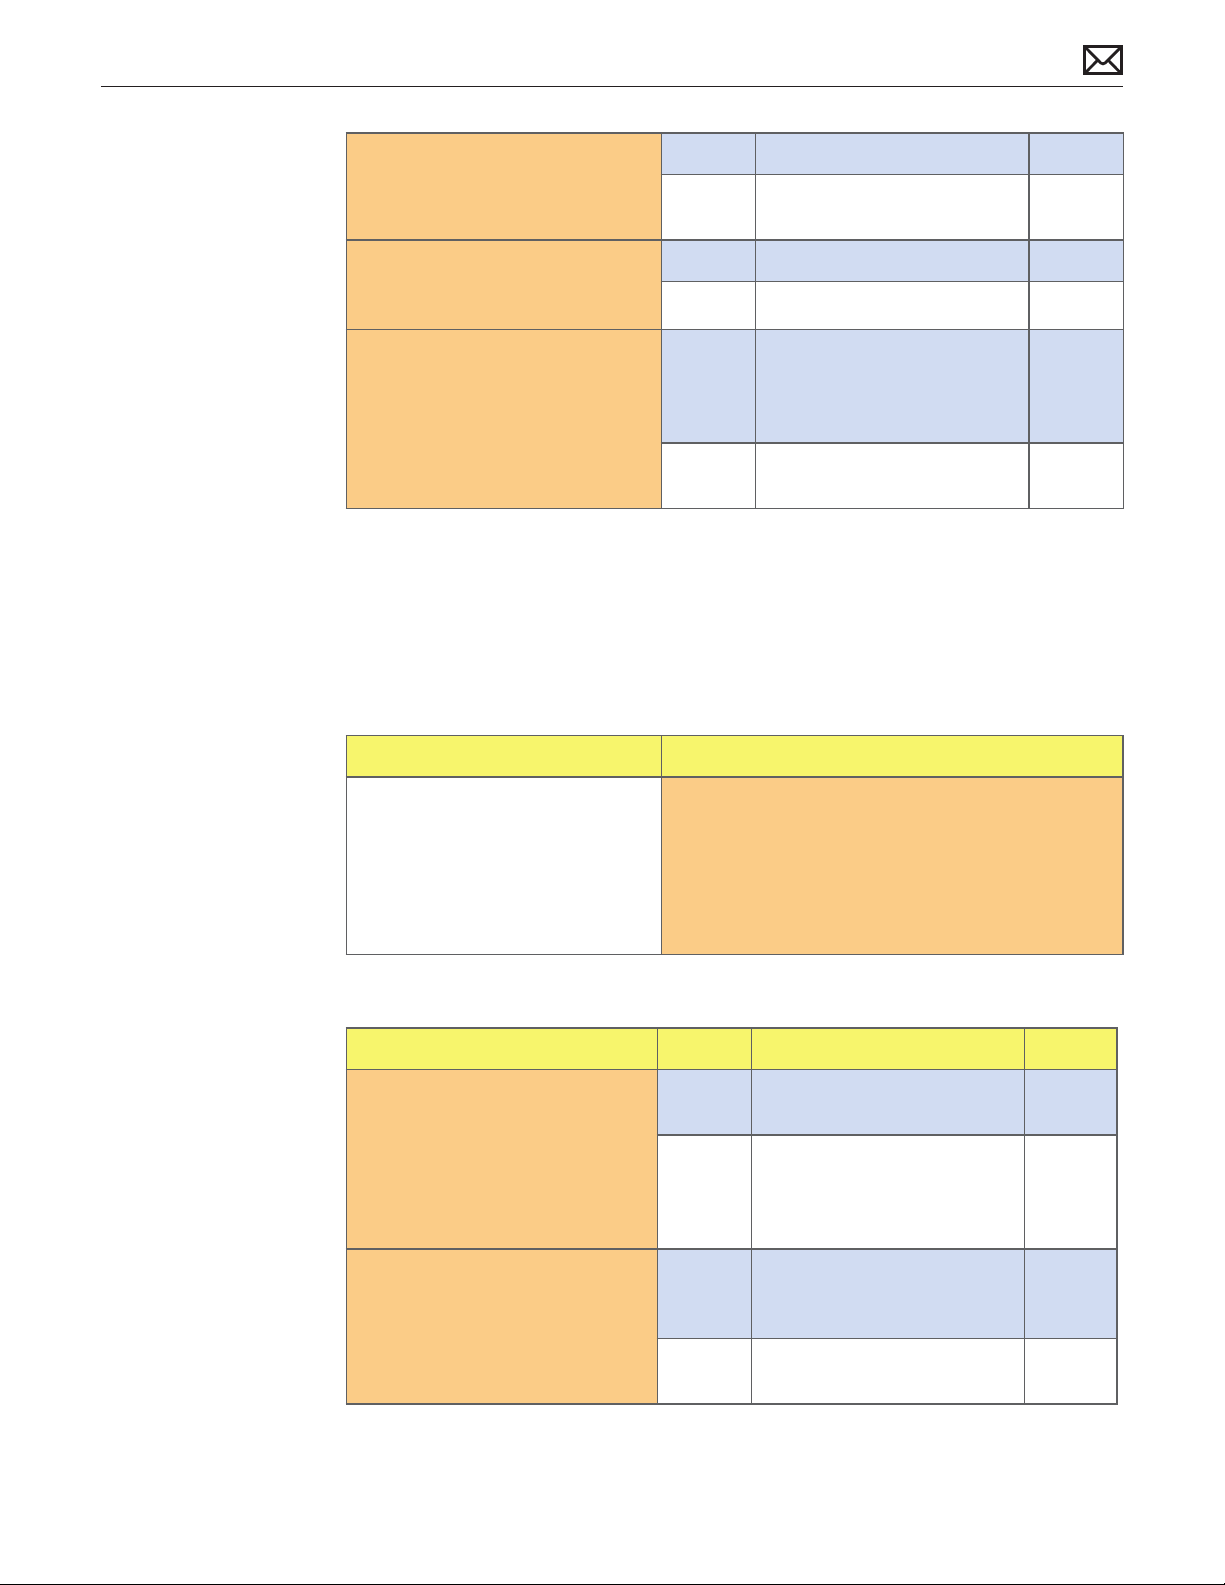
2. Reseat optical drive in
enclosure. Does noise issue
remain?
Yes Go to step 3.
No Issue resolved by reseating
drive in enclosure.
3. Install known-good optical
drive in enclosure. Does noise
issue remain?
4. Compare system with similar
model for optical drive noise in
operation and verify that noise
level is similar.
Yes Go to step 4.
No Replace optical drive. J04
Yes Noise level of optical
drive appears to be within
specication. Return system
to user.
No Check for other causes of
noise in the system.
SD Card Will Not Insert Into Slot
Unlikely cause: LCD panel, logic board, optical drive, hard drive
Quick Check
Symptom Quick Check
SD Card will not insert into slot
• SD Memory Card does not fully
seat into slot
• Card slot does not align with
enclosure.
1. The SD card must be a 32 mm by 24 mm by 2.1
mm. You can also use thinner cards, such as Multi
Media Cards (MMC).
2. Clear any obstruction in SD card slot.
2010-11-18
Deep Dive
Check Result Action Code
1. Verify if known-good SD card
ts in slot.
2. Verify if known-good SD card
now ts in slot.
Yes Ask user to replace defective
or out-of-spec SD card.
No Loosen the SD card reader
screws, then insert knowngood SD card again. Go to
step 2.
Yes Tighten SD card reader
screws.
Go to step 3.
No Replace SD card reader and
retest.
iMac (21.5-inch, Late 2009) Symptom Charts — Mass Storage 67
M17
Page 68
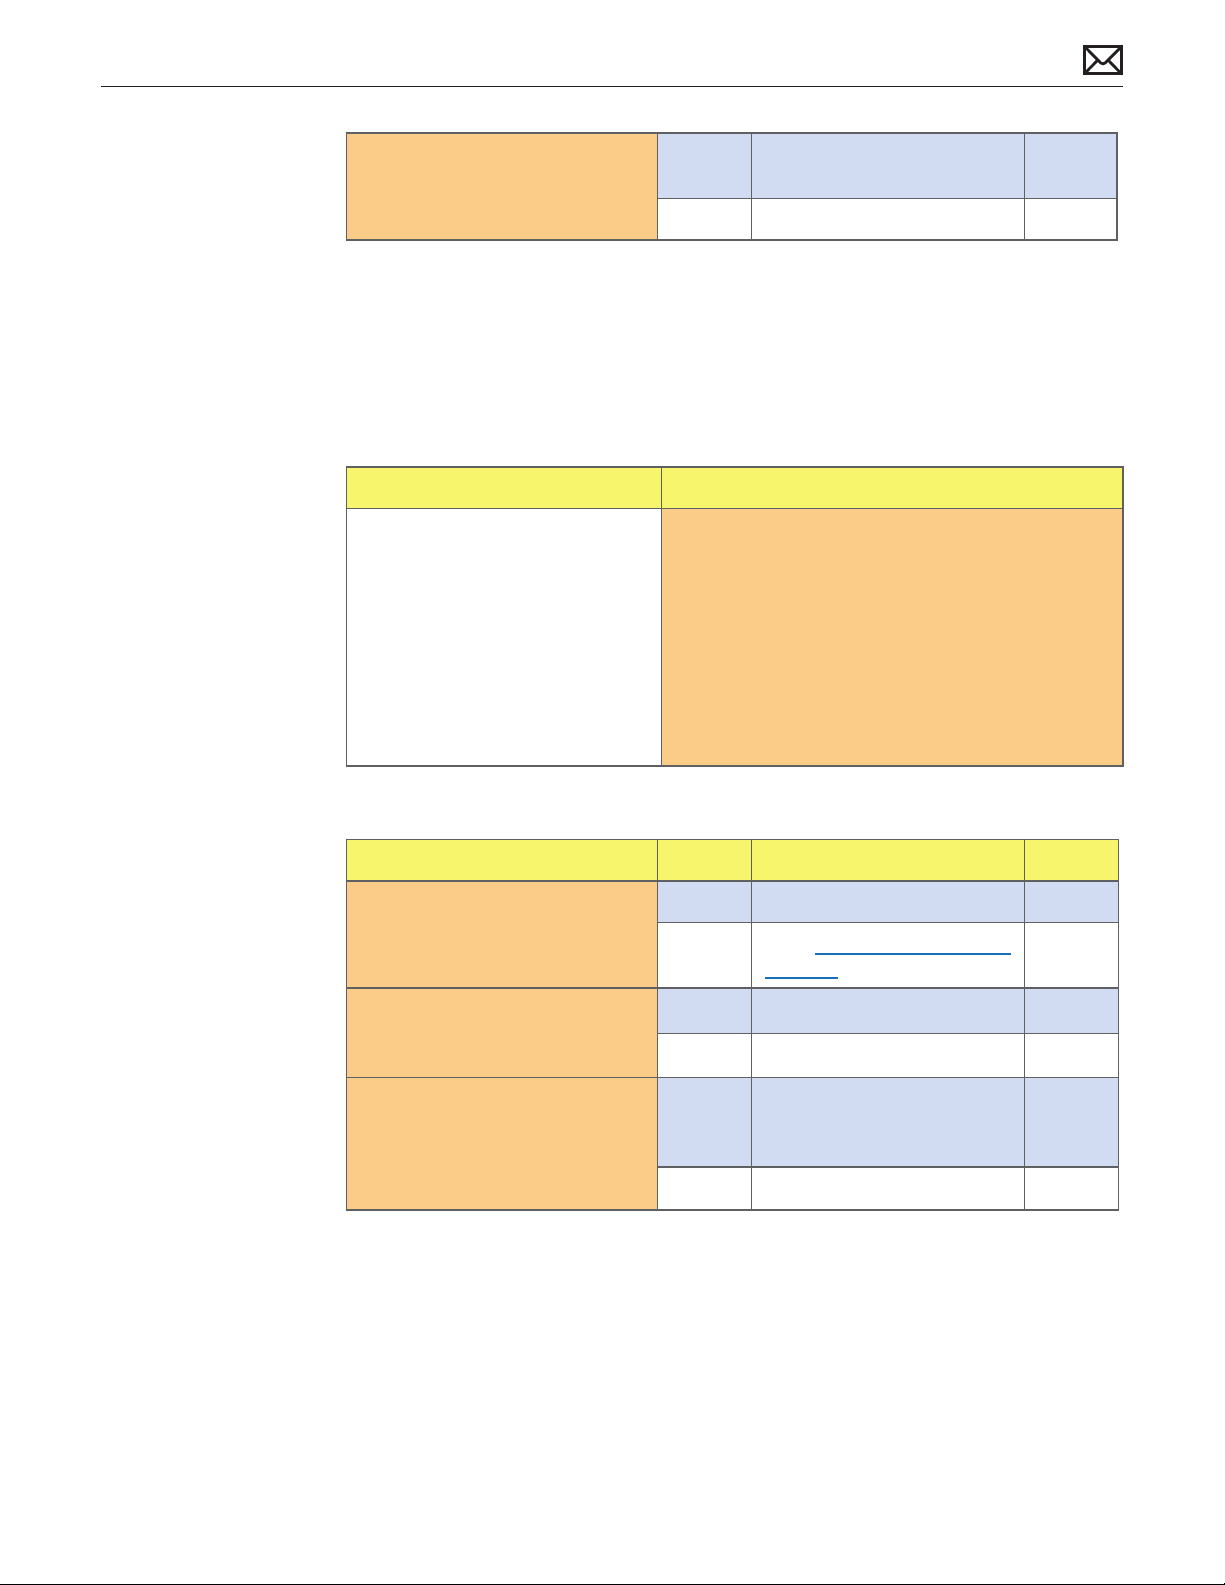
3. Verify if SD card now ejects
and inserts without issue.
Yes Issue resolved by SD card
reader alignment.
No Replace SD card reader. M17
SD Card Not Recognized
Unlikely cause: LCD panel, logic board, optical drive, hard drive
Quick Check
Symptom Quick Check
SD Card Not Recognized
• Card does not show up on
desktop or in System Proler
1. Insert user’s SD card into a known-good system
and verify that it functions properly. If card
cannot be read, contact card manufacturer for
support options.
2. Verify SD card slot with known-good SD card.
3. Check correct drivers are installed for user’s SD
card type. Standard SD cards are supported by
Mac OS X, but others may require specic driver
software to be used.
Deep Dive
Check Result Action Code
1. Verify if SD card inserts
correctly in SD slot.
2. Unlock and insert user’s SD
card and verify it shows up on
desktop or in System Proler.
3. Insert a known-good unlocked
SD card and verify if read/write
capabilities are working.
Yes Go to step 2.
No Go to SD Card Will Not Insert
Into Slot symptom ow.
Yes Go to step 6.
No Go to step 3.
Yes User’s SD card not functioning
properly. Contact card
manufacturer for support.
2010-11-18
No Go to step 4.
iMac (21.5-inch, Late 2009) Symptom Charts — Mass Storage 68
Page 69
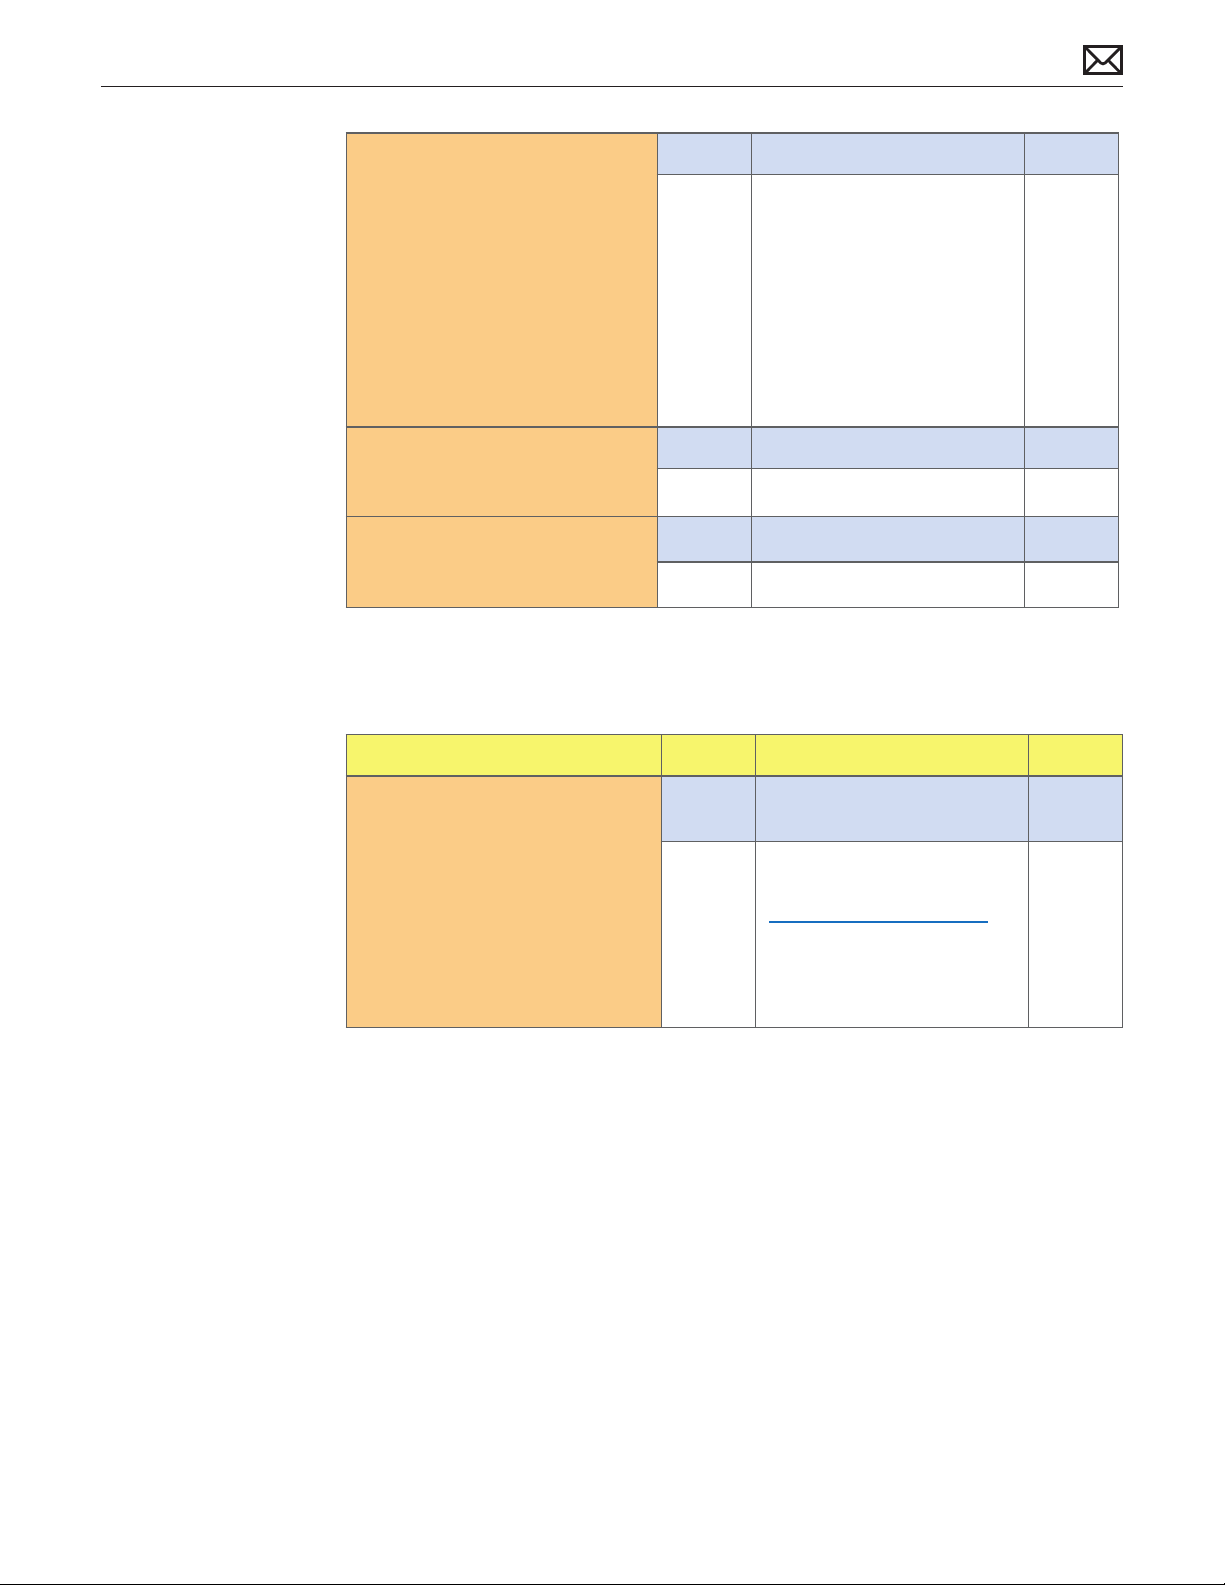
4. Run System Proler and verify
if SD card reader is now listed
in USB devices.
Yes Go to step 5.
No Reseat SD cable at SD card
reader and logic board
If issue persists, replace
SD cable.
If issue persists, replace
SD card reader.
If issue persists, replace
logic board.
M17
M17
M17
5. Verify if a known-good
unlocked SD card can now be
correctly read and written.
6. Lock the user’s SD card and
verify if it can’t be written.
Yes Go to step 6.
No Replace SD card reader. M17
Yes Issue resolved.
No Replace SD card reader. M17
Uncategorized Symptoms
Check Result Action Code
1. Verify if existing symptom code
applies to issue reported by
user.
Yes Jump to appropriate
symptom code ow.
No Document reported failure
and send feedback to
stating that a suitable
symptom code wasn’t found.
Provide as much detail as
possible.
N99
2010-11-18
iMac (21.5-inch, Late 2009) Symptom Charts — Mass Storage 69
Page 70
Communications
AirPort/Bluetooth Issues
Quick Check
Symptoms Quick Check
AirPort/Bluetooth Issues
• Unable to join networks or pair
devices
• AirPort card not available
• Intermittent device or
connection dropouts
• Limited wireless range
1. Verify that AirPort or Bluetooth is turned ON, and
for AirPort issues make sure that a network is
selected.
2. For AirPort, check if the wireless access point
requires special connection and encryption
protocols.
3. Check for nearby sources of interference such as
microwave ovens or cordless phones.
See kBase #HT1365: AirPort and Bluetooth:
Potential source of interference for wireless
devices and networks.
4. Check the number of users trying to use AirPort
in the area for possible network congestion
(available bandwidth).
5. Isolate potential OS issues by starting up
from original Install media for the computer, a
same-model computer in Target Disk Mode, or
compatible known-good OS on an external drive.
Both AirPort and Bluetooth services are available
when booted from Install disc.
2010-11-18
Deep Dive
Check Result Action Code
1. Open System Proler. AirPort
is listed under Network, while
Bluetooth is listed under USB.
Verify if both AirPort and
Bluetooth cards are recognized.
2. Reseat both AirPort cable
connection on logic board and
on AirPort card carrier ends.
Verify if AirPort card is now
listed in System Proler.
iMac (21.5-inch, Late 2009) Symptom Charts — Communications 70
Yes Install all software updates
for AirPort/Bluetooth and
re-test. If issue persists after
software update, go to step 4
for AirPort, or go to step 6 for
Bluetooth.
No Go to step 2 for AirPort.
Go to step 6 for Bluetooth.
Yes Issue resolved by reaseating
AirPort cable.
No Replace AirPort cable and re-
test. Go to step 3.
M11
Page 71
3. After cable has been replaced,
verify if AirPort card is now
listed in System Proler.
Yes Issue resolved by replacing
AirPort cable.
No Replace AirPort card carrier
board and re-test. If issue
persists (card not seen on
bus), replace AirPort card.
X03
M11
4. Enable AirPort and verify if
known local AirPort networks
are available, or create a
computer-to-computer
network with another
Macintosh computer using
AirPort. See http://docs.
info.apple.com/article.
html?path=AirPort/5.0/en/
ap2110.html. Verify if you
connect successfully.
5. Check and reseat the two
antennas to the AirPort card.
Verify if you can connect to
known AirPort network.
6. Verify that computer and
Bluetooth device are both in
discoverable mode. Verify if
you can now successfully and
reliably pair the device.
Yes Issue resolved.
No Go to step 5.
Yes Issue resolved.
No Replace AirPort card. If issue
persists, replace AirPort
antenna(s). If damaged
antenna is the one embedded
in rear housing behind Apple
logo, replace rear housing.
Yes Issue resolved.
No Replace Bluetooth antenna.
Go to step 7.
N04
M11
2010-11-18
7. Re-test with new Bluetooth
antenna and verify if Bluetooth
issues are resolved.
Yes Issue resolved.
No Replace Bluetooth card. M11
iMac (21.5-inch, Late 2009) Symptom Charts — Communications 71
Page 72
AirPort Card Kernel Panic
Quick Check
Symptoms Quick Check
AirPort Card Kernel Panic
• Kernel Panic on startup
• Kernel Panic or freezing while
attempting to connect to WiFi
networks
• Kernel Panic while transferring
data on WiFi networks
1. Isolate OS by starting up from original Install
media for this computer, a same-model computer
in Target Disk Mode, or compatible known-good
OS on an external drive. AirPort and Bluetooth
services are available when booted from the
Install disk.
2. Ensure that all software and rmware updates for
the computer and AirPort been installed.
Deep Dive
Check Result Action Code
1. Disconnect AirPort card cable
end from logic board. Verify if
computer starts now without
kernel panic.
Yes Reseat AirPort card cable and
retest. If problem continues
replace cable. Go to step 2.
No Kernel panic not related
to AirPort. Restart from
Install DVD or known-good
bootable external drive and
check Panic.Log le on user’s
hard drive to nd out which
is the crashing I/O interface.
Also troubleshoot installed
Mac OS X software..
2010-11-18
2. With replacement AirPort
card cable installed, verify if
computer starts now without
kernel panic.
3. With replacement AirPort
carrier or card installed, verify
if computer starts now without
kernel panic.
Yes AirPort cable issue. Issue
resolved.
No Replace AirPort card carrier
board and re-test. If issue
remains, replace AirPort card.
Go to step 3.
Yes AirPort carrier or card issue.
Issue resolved.
No Replace logic board. M11
iMac (21.5-inch, Late 2009) Symptom Charts — Communications 72
N13
N13
Page 73
Ethernet Port/Device Issue
Unlikely cause: LCD display, power supply, hard drive, optical drive, fans
Quick Check
Symptoms Quick Check
Ethernet Port/Device Issue
• No Ethernet device present
• Unable to access network
resources
• Ethernet device shows no
connection
• Ethernet device unable to an IP
address
• Slow network performance
1. Verify if Ethernet cable is inserted into port
correctly. Check Ethernet cable for damage. Try
a known good Ethernet cable – CAT5 or better
recommended for 100Mbps+ connections.
2. Check Ethernet ports on the computer and wall/
switch for dust, debris, damage or bent pins.
3. Ensure distance from networking infrastructure is
less than 300 feet/ 105 meters.
4. Verify port, cable and network hardware with a
known good system. Isolate rewall, MAC address
ltering or hardware access control devices.
5. Isolate OS by starting up from original Install
media for this computer, a same-model computer
in Target Disk Mode, or compatible known-good
OS on an external drive.
Deep Dive
Check Result Action Code
1. Visually inspect Ethernet port
of computer and ensure that all
pins will make physical contact
with the Ethernet cable.
Yes Go to step 2.
No Pins are damaged, bent at or
missing. Replace logic board.
M24
2010-11-18
2. Boot from original Install media.
Verify Network Link status is
active by using Network Utility
under the “Info” tab. Verify if the
Link Status is “Active”.
3. Connect computer to another
Mac using CAT5 Ethernet
cable. See article http://
docs.info.apple.com/article.
html?path=Mac/10.5/en/8429.
html. Verify if you connect
successfully.
iMac (21.5-inch, Late 2009) Symptom Charts — Communications 73
Yes Go to step 3.
No If same Ethernet cable gives
an “Active” link status on a
known-good, same-model
computer, replace logic board.
Yes Ethernet communication
good. Go to step 4.
No If same Ethernet cable and
computer connects to a
known-good, same-model
computer, replace logic board.
M10
M10
Page 74
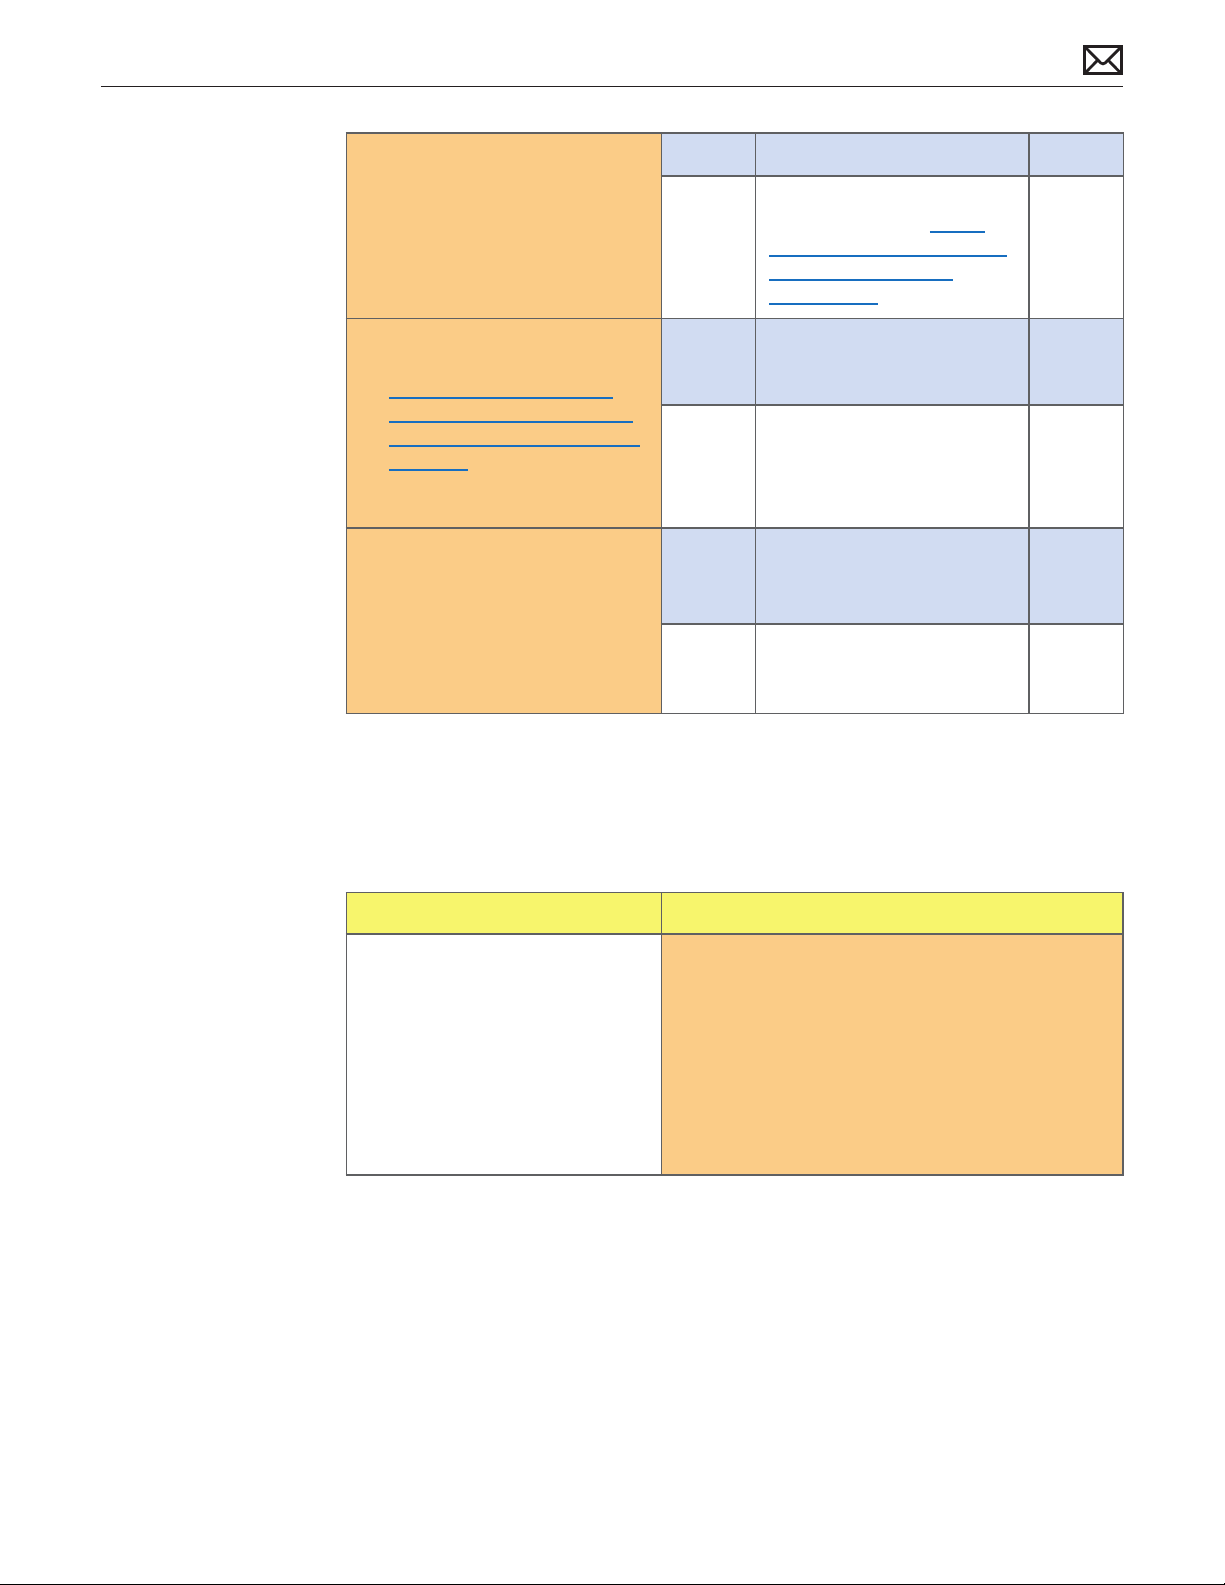
4. Check for speed and duplex
issues on network. Open
System Preference > Network;
click the Advanced button,
then the Ethernet tab. Verify if
the speed and duplex reported
are what is expected.
Yes Go to step 5.
No
Change speed and duplex
settings. See article http://
docs.info.apple.com/article.
html?path=Mac/10.5/
en/8711.html. Go to step 6.
5. Check for MTU (Maximum
Transmission Unit) issues. See
kBase #HT2532: Mac OS X
10.4 or later: How to change
the MTU for troubleshooting
purposes. Verify if changing
MTU settings on computer
resolves issue.
6. If changing speed, duplex
or MTU settings allows
connectivity, check with a
known-good, same-model
computer. Verify if known-good
computer produces the same
results.
Yes Go to step 6.
No Ethernet controller damaged.
Yes Check with ISP or Network
No Verify with known good OS.
Wireless Input Device Doesn’t Pair
Quick Check
Symptoms Quick Check
M10
Replace logic board.
Administrator concerning
speed, duplex & MTU settings.
M10
If issue persists, replace logic
board.
2010-11-18
Wireless Input Device Doesn’t
Pair
• Can’t get system to recognize
Bluetooth keyboard or mouse
iMac (21.5-inch, Late 2009) Symptom Charts — Communications 74
1. Remove and reinstall batteries for device.
2. Check that device is powering on.
3. Use known-good batteries with device.
4. Ensure that device is being used within 30-foot
range for Bluetooth devices.
5. Ensure that the latest Software Updates have
been applied.
Page 75
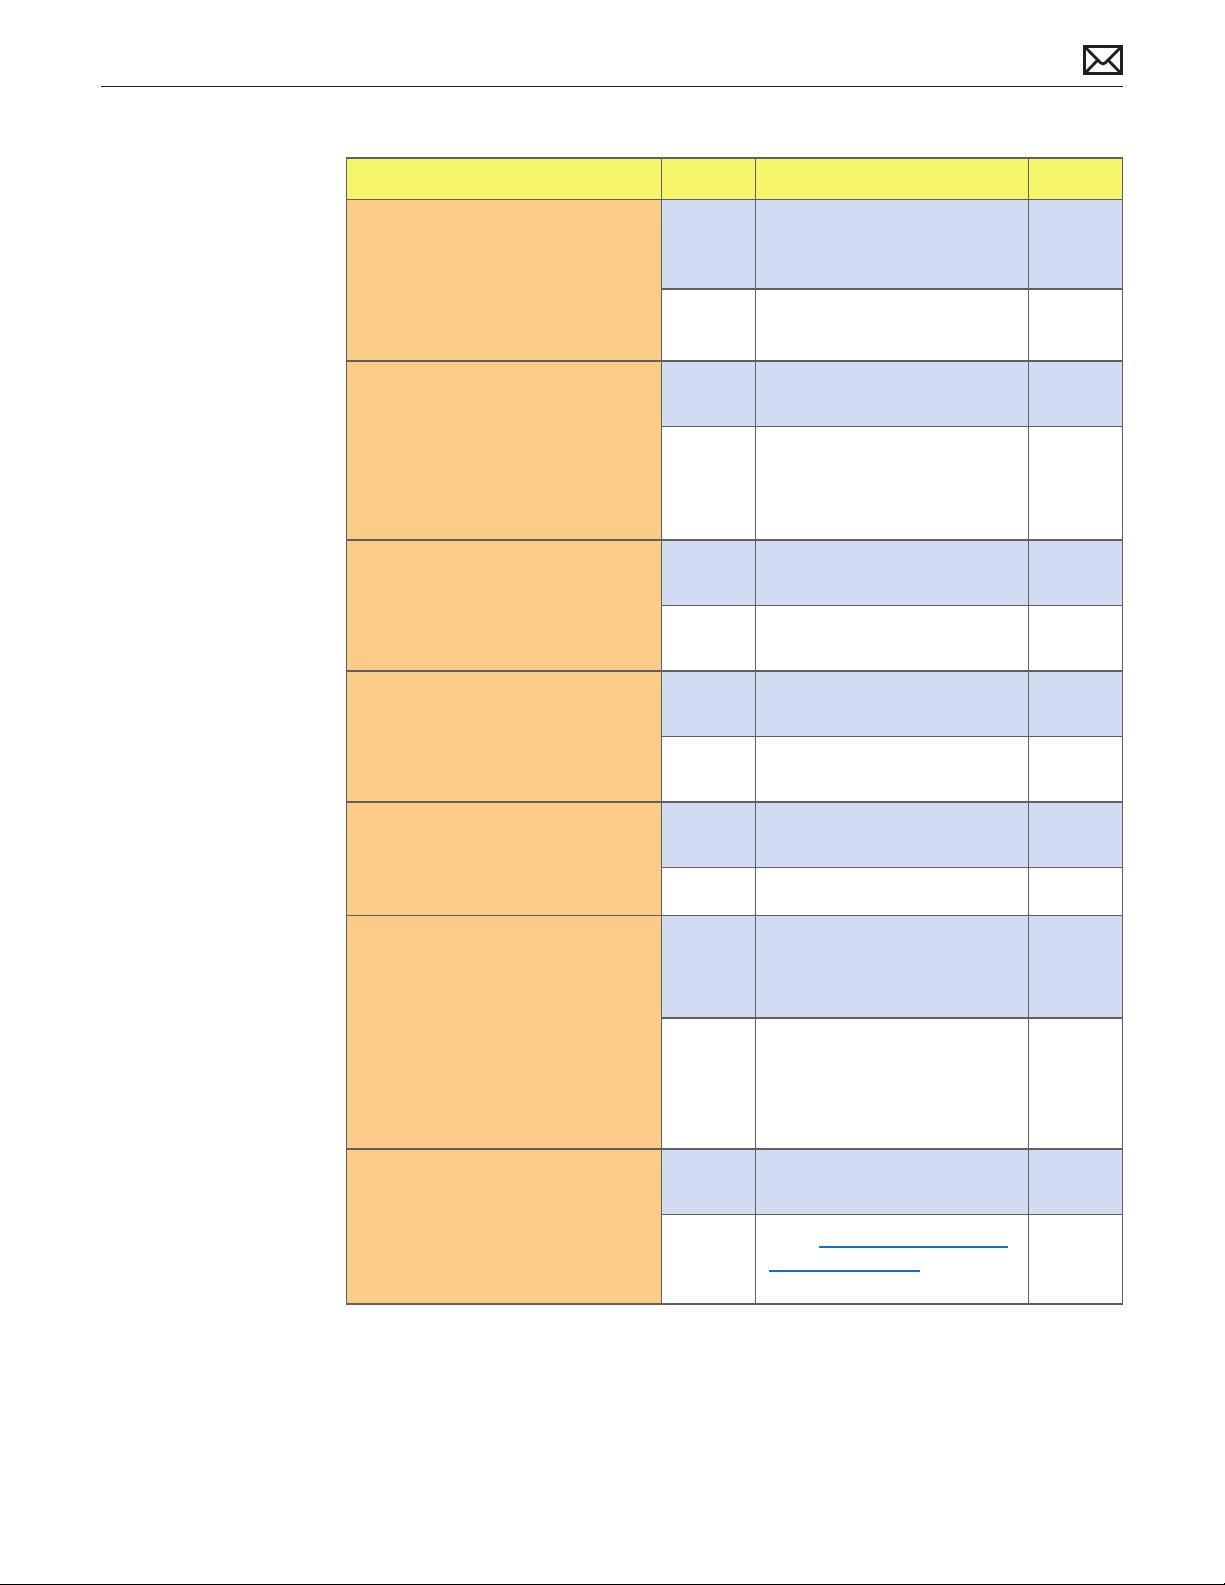
Deep Dive
Check Result Action Code
1. Without any wired input
devices connected, and with a
wireless mouse in discoverable
mode, startup computer. Verify
if computer shows Bluetooth
Mouse Setup Assistant.
2. Connect a wired mouse and
run System Proler. Verify if
Bluetooth interface is listed
under USB in System Proler.
3. Use an external monitor.
Run System Proler. Verify if
Bluetooth interface is listed
under USB in System Proler.
4. Run System Proler. Verify if
Bluetooth interface is listed
under USB in System Proler.
Yes Bluetooth hardware is active.
Go to step 6.
No Go to step 2.
Yes Bluetooth hardware is
present. Go to step 6.
No Remove glass and LCD panel,
reseat both ends of cable
between Bluetooth board and
logic board. Go to step 3.
Yes Bluetooth hardware is now
present. Go to step 6.
No Replace Bluetooth cable.
Go to step 4.
Yes Bluetooth hardware is now
present. Go to step 6.
No Replace Bluetooth board.
Go to step 5.
X03
M11
5. Run System Proler. Verify if
Bluetooth interface is listed
under USB in System Proler.
6. Run Software Update and
apply any available Bluetooth
updates. Activate Bluetooth
in System Preferences (or
Apple menu icon) then select
“Congure a new Bluetooth
device” (or run Bluetooth
Mouse Setup Assistant). Verify if
Bluetooth mouse is seen.
7. With a wireless mouse on, and
in discoverable mode, verify
if you can successfully pair
mouse with the assistant.
Yes Bluetooth hardware is now
present. Go to step 6.
No Replace logic board. M11
Yes Bluetooth discovery is now
active. Go to step 7.
No Replace Bluetooth antenna. X03
Yes Check for stability.
Go to step 8.
No
Go to Wireless Input Device
Loses Connection symptom
ow.
2010-11-18
iMac (21.5-inch, Late 2009) Symptom Charts — Communications 75
Page 76
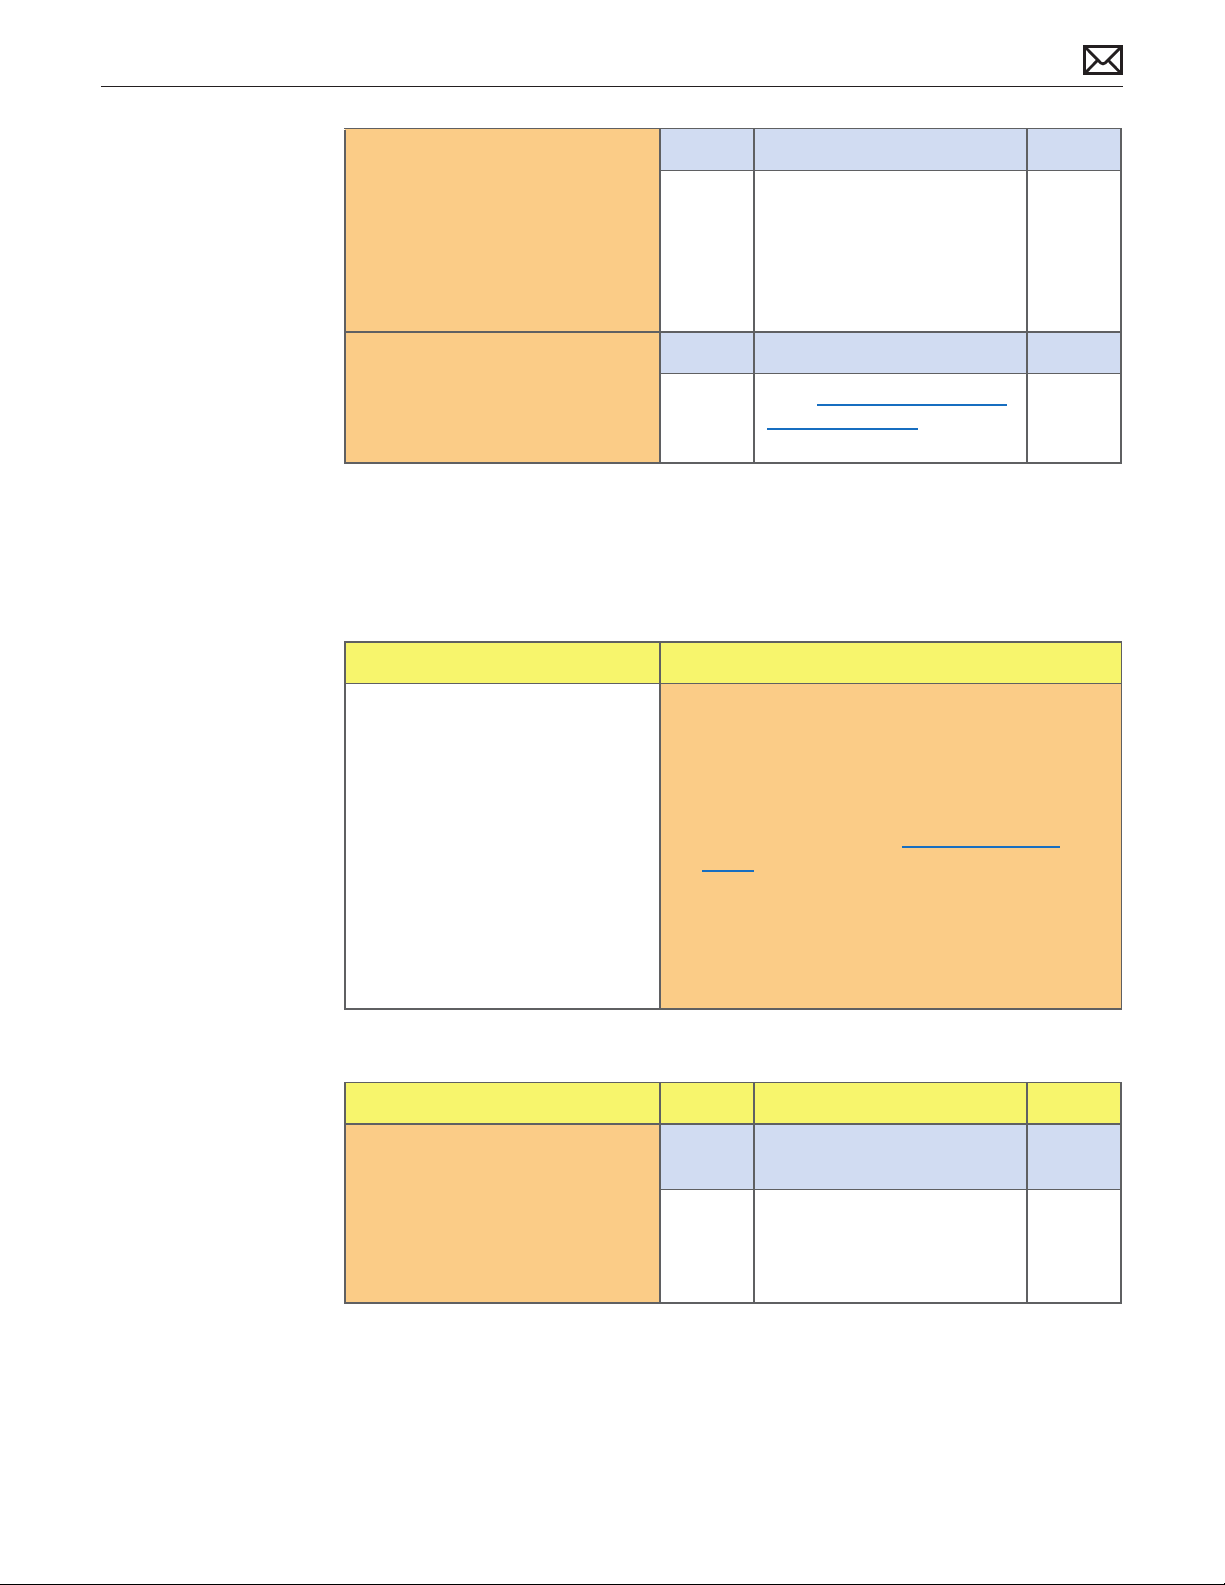
8. With wireless mouse paired,
verify if mouse stays connected.
Yes Issue resolved.
No Inspect and reseat Bluetooth
antenna cable. Replace a
damaged antenna cable, or
Bluetooth board if its antenna
connector is damaged.
Go to step 9.
9. With wireless mouse paired,
verify if mouse stays connected.
Yes Antenna issue. Issue resolved.
No
Go to Wireless Input Device
Loses Connection symptom
ow.
Wireless Input Device Loses Connection
Quick Check
Symptoms Quick Check
Wireless Input Device Loses
Connection
• Wireless keyboard, mouse, or
other wireless input device
loses connection.
1. Remove and reinstall batteries for device.
2. Check that device is powering on.
3. Use known-good batteries with device.
4. Ensure other devices pair and keep connection
without issue. If not, see AirPort/Bluetooth
Issues symptom ow.
5. Ensure that device is being used within 30-foot
range for Bluetooth devices.
2010-11-18
6. Ensure that the latest Software Updates have
been applied.
Deep Dive
Check Result Action Code
1. Open System Preferences >
Bluetooth. Paired items and
their connection status are
shown. Verify if device is listed.
iMac (21.5-inch, Late 2009) Symptom Charts — Communications 76
Yes Device has been paired.
Go to step 2.
No Device is not paired. Make
device discoverable and open
Bluetooth Setup Assistant.
Go to step 3.
Page 77
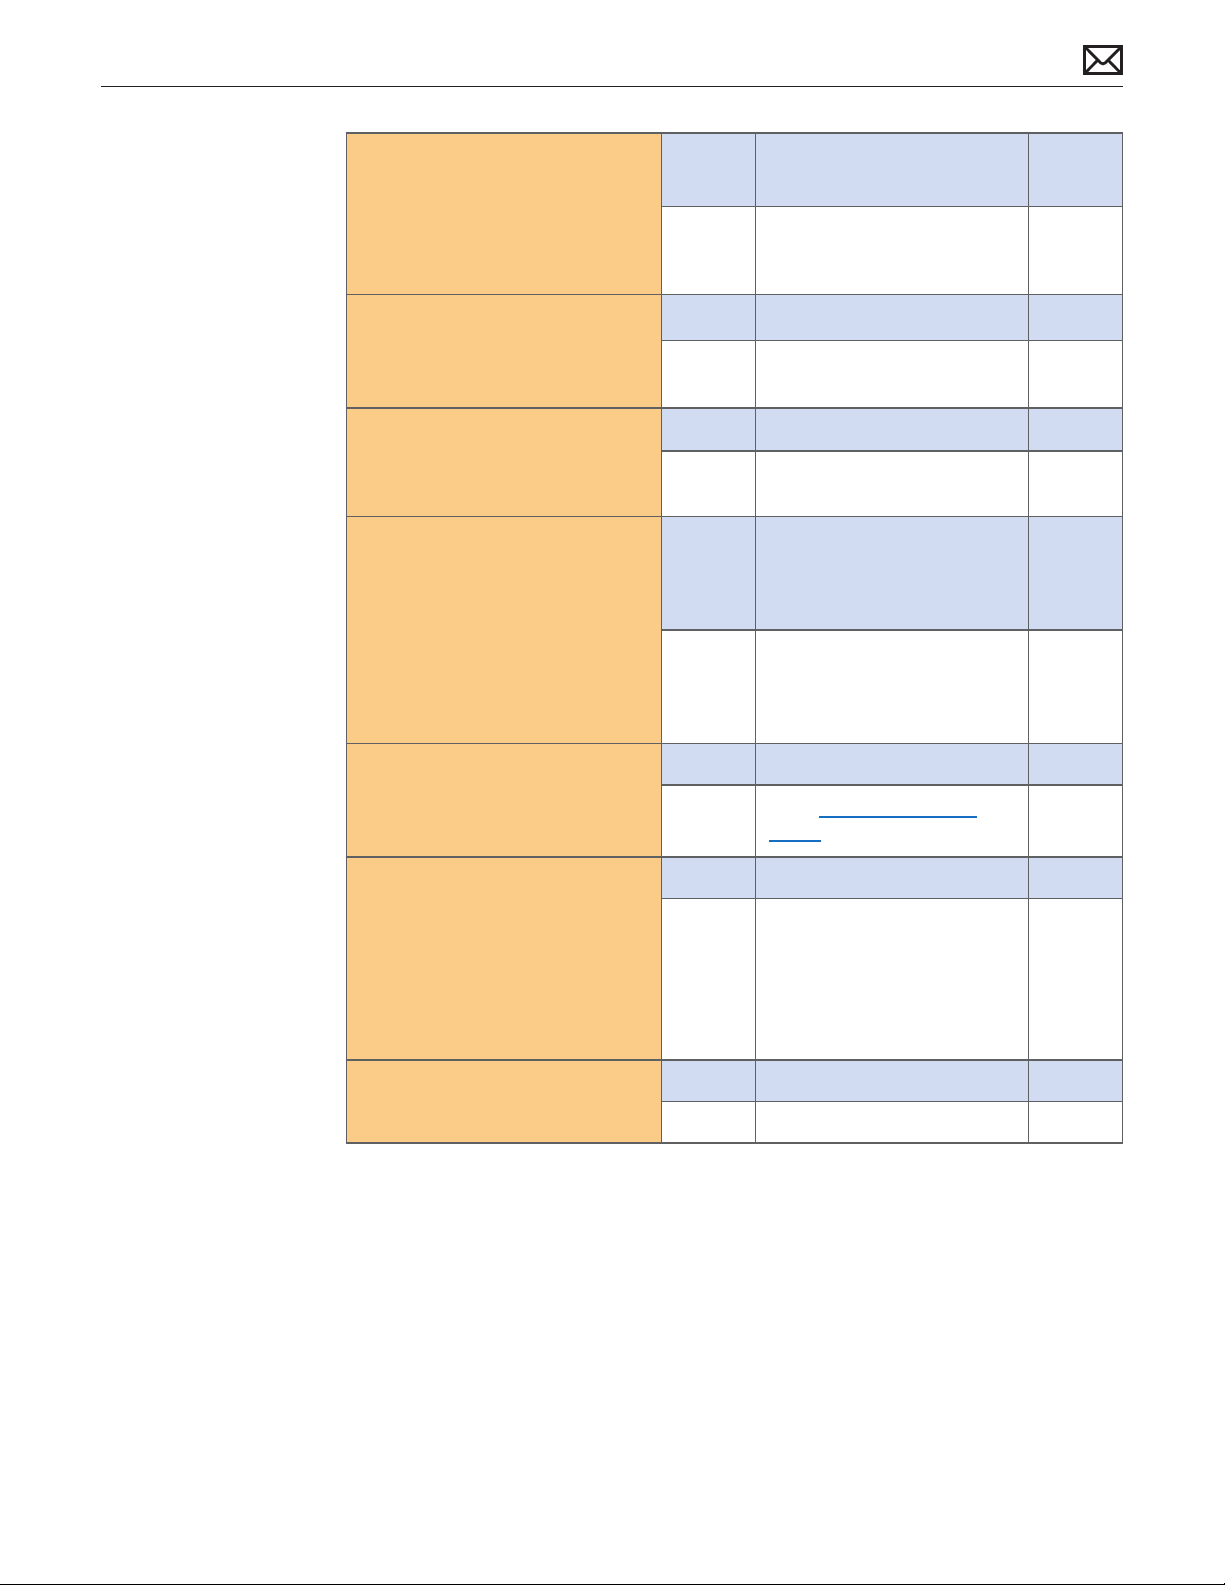
2. Make sure device is on.
In System Preferences >
Bluetooth, select device and
from the Action menu (gear)
choose “Connect”. Verify if
device connects successfully.
Yes Go to step 7.
No Delete pairing in System
Preferences. Go to step 3.
3. With the device on, run
Bluetooth Setup Assistant.
Verify if you can successfully
pair the device.
4. With device on, run Bluetooth
Setup Assistant. Verify if you
can successfully pair device.
5. Log into new Admin User
account. With device on, run
Bluetooth Setup Assistant.
Verify if you can successfully
pair device with new user
account.
6. Restart computer, With device
on, run Bluetooth Setup
Assistant. Verify if you can
successfully pair device.
7. With device paired and
connected, verify if device
connection is stable if used
normally.
Yes Go to step 7.
No Restart computer.
Go to step 4.
Yes Go to step 7.
No Create a new Admin User.
Go to step 5.
Yes User account issue.
Troubleshoot software on
User account. No hardware
repair needed.
No Remove the following le: /
Library/Preferences/com.
apple.Bluetooth.plist
Go to step 6.
Yes Go to step 7.
No
Go to AirPort/Bluetooth
Issues symptom ow.
Yes Issue resolved.
No Check wireless device manual
to verify if device is being
used in accordance with
manufacturer’s specications
(range, OS support, battery
types). Go to step 8.
2010-11-18
8. Verify if device is performing to
stated specications.
iMac (21.5-inch, Late 2009) Symptom Charts — Communications 77
Yes Educate user. Issue resolved.
No Replace wireless device.
Page 78
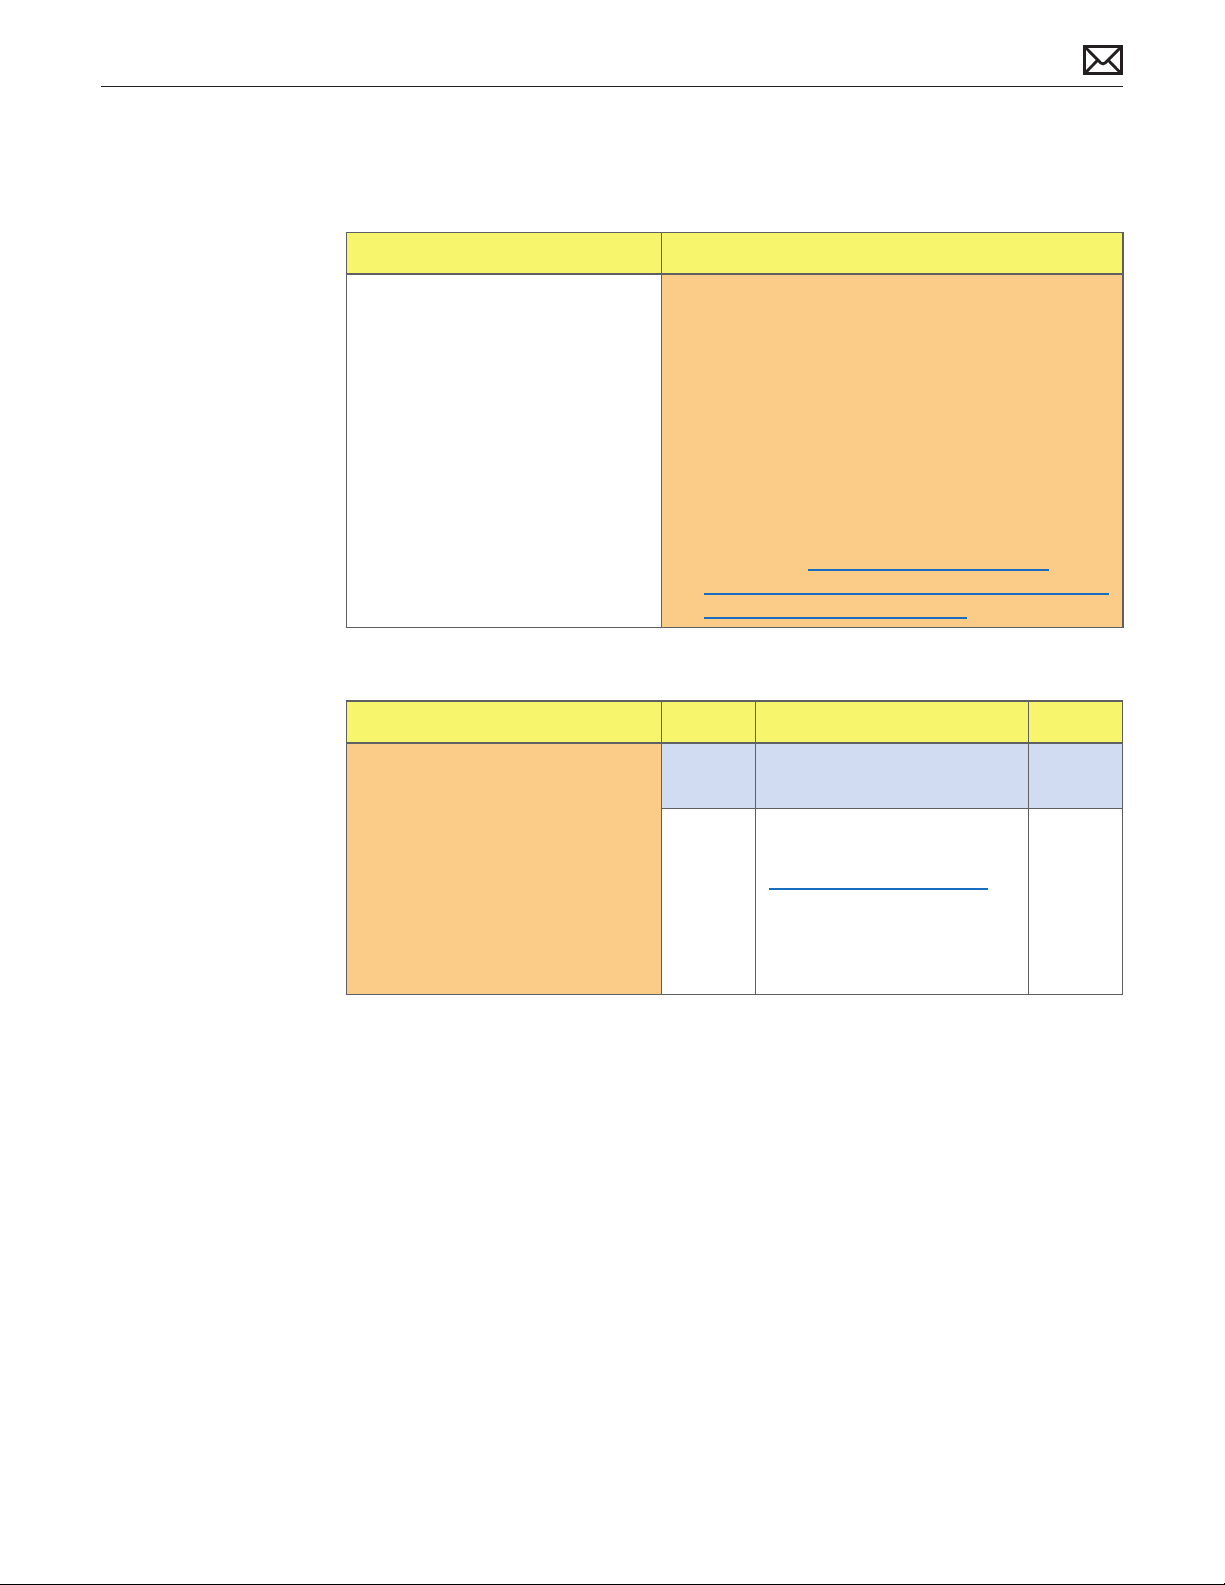
Uncategorized Symptoms
Quick Check
Symptoms Quick Check
Uncategorized Symptoms
• Unable to locate appropriate
symptom code.
1. Verify System Preferences/Network settings
are congured appropriately to support
communication method.
2. For Ethernet connection issues verify that cable
being used functions when used with another
known-good system.
3. For wireless connection issues review user
environment to determine whether possible
interference from other 2.4GHz or 5GHz
communications devices might be contributing
to issue. See kBase #HT1365: AirPort and
Bluetooth: Potential sources of interference for
wireless devices and networks.
Deep Dive
Check Result Action Code
1. Verify if existing symptom code
applies to issue reported by
user.
Yes Jump to appropriate
symptom code ow.
No
Document reported failure
and send feedback to
stating that a suitable
symptom code wasn’t found.
Provide as much detail as
possible.
N99
2010-11-18
iMac (21.5-inch, Late 2009) Symptom Charts — Communications 78
Page 79
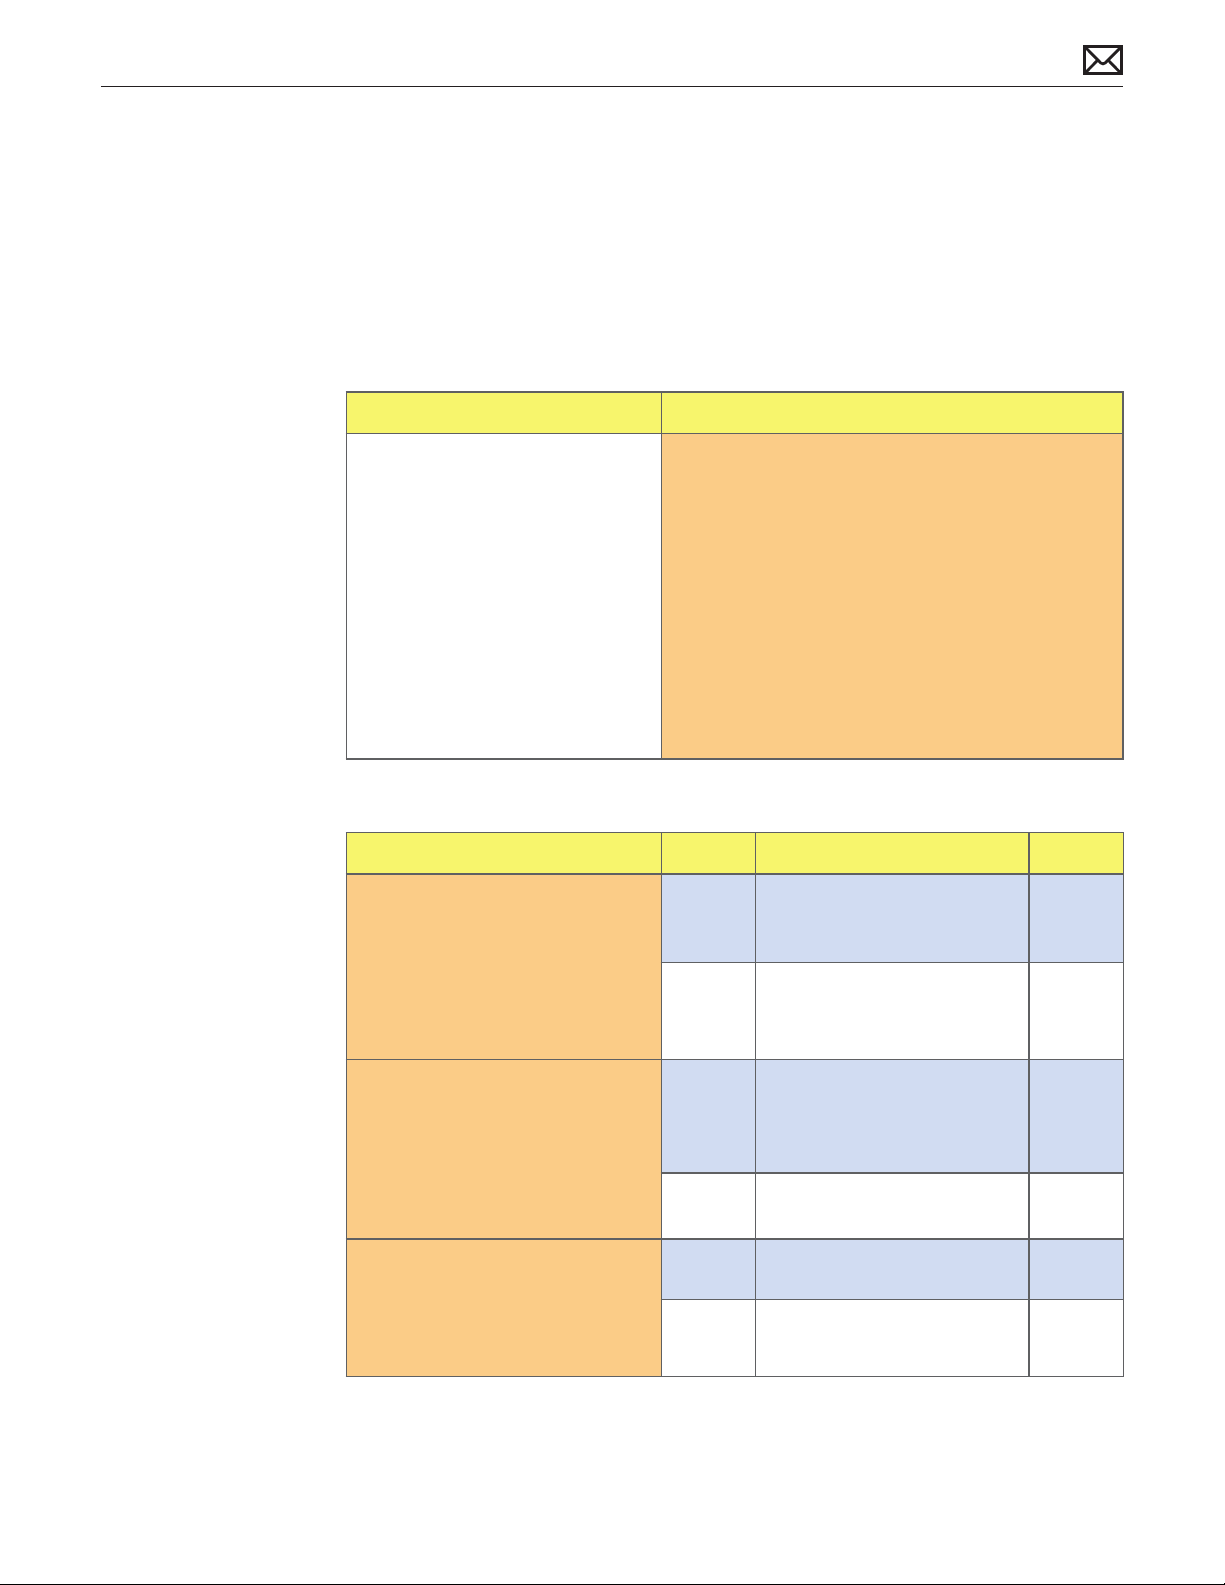
Input/Output Devices
Apple Remote Inoperable
Unlikely cause: LCD display, power supply, hard drive, optical drive, fans
Quick Check
Symptoms Quick Check
Apple Remote Inoperable
• Apple Remote doesn’t bring up
Front Row
• Apple Remote doesn’t control
iTunes
• Apple Remote doesn’t control
computer volume
1. Make sure Apple Remote is within 30 ft. of
computer, and has an unobstructed line-of-sight
to computer.
2. Make sure lens end of Apple Remote is pointing
directly at front of computer.
3. Make sure “Disable remote control infrared
receiver” checkbox in System Preferences >
Security is not checked.
4. Ensure that all software and rmware updates for
this model have been installed to take advantage
of any available bug xes.
Deep Dive
Check Result Action Code
1. Open Photo Booth or iChat’s
video preview window. Point
Apple Remote at built-in
camera and press any button
on Apple Remote. Verify if a
white, ashing light is visible in
video preview.
Yes Apple Remote is functioning.
Go to step 2.
No Replace Apple Remote
battery.
Go to step 3.
2010-11-18
2. Open System Preferences
> Security. Verify if “Unpair”
setting is available in this
preference panel.
3. With replacement battery,
verify if white ashing light
is visible coming from Apple
Remote in video preview
window.
iMac (21.5-inch, Late 2009) Symptom Charts — Input/Output Devices 79
Yes Click “Unpair” button to
disable possible pairing with
another Apple Remote.
Go to step 4.
No Possible IR board issue.
Go to step 5.
Yes Battery issue. Issue resolved. X05
No Apple Remote defective.
Replace Apple Remote.
X04
Page 80

4. After clicking “Unpair”, verify if
the computer now responds to
the Apple Remote.
Yes Pairing issue. Issue resolved.
No Possible IR board issue.
Go to step 5.
5. Open System Proler. Verify if
“IR Receiver” is listed in USB list
of devices.
6. Check that IR board is correctly
tted and aligned with Apple
window and that lens is not
blocked by any foreign material
and re-test. Verify if computer
responds to Apple Remote.
7. After reseating or replacing
IR board, verify if “IR Receiver”
is listed under USB in System
Proler, and that computer now
responds to Apple Remote.
8. After replacing IR cable, verify
if “IR Receiver” is listed under
USB in System Proler, and that
computer now responds to
Apple Remote.
Yes IR board reporting on USB
bus. Check for lens block.
Go to step 6.
No Inspect and reseat IR cable
connection to logic board.
Go to step 7.
Yes Lens blocked or sensor not
aligned with window. Issue
resolved.
No Lens damaged or inoperable.
Replace IR board. Go to step 7.
Yes IR module reseated/replaced.
Issue resolved.
No If IR board was only reseated,
replace IR cable. Go to step 8.
Yes IR cable replaced. Issue
resolved.
No Replace IR board. Go to step 9.
X03
X03
X03
2010-11-18
9. After replacing IR board, verify
if “IR Receiver” is listed under
USB in System Proler, and that
computer now responds to
Apple Remote.
iMac (21.5-inch, Late 2009) Symptom Charts — Input/Output Devices 80
Yes IR board replaced. Issue
X03
resolved.
No Replace logic board. M23
Page 81
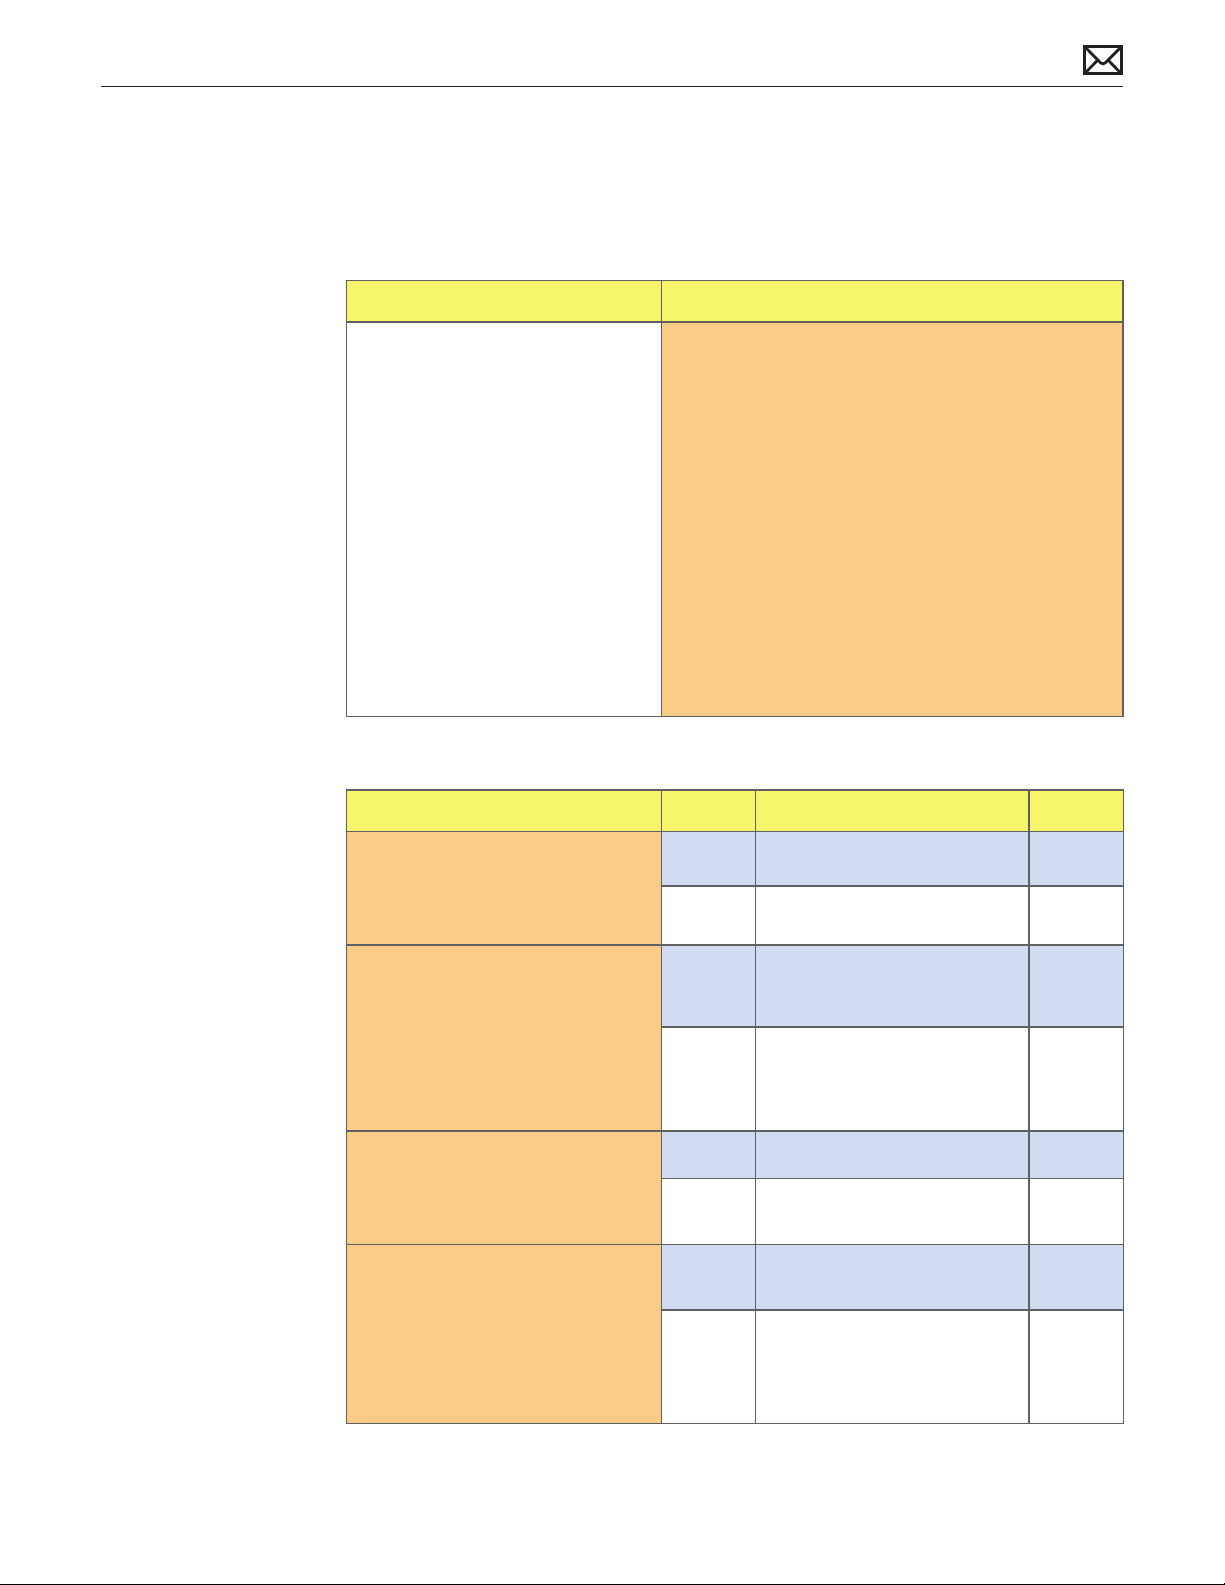
Audio: Microphone
Unlikely cause: LCD display, power supply, hard drive, optical drive, fans
Quick Check
Symptoms Quick Check
Audio: Microphone
• Microphone not working
• Microphone audio garbled
• No sound
1. Verify that no tape, sticky notes, or other objects
are blocking microphone located on top of
computer near camera. Microscopic perforations
on top of computer must be free of obstructions
in order for microphone to function.
2. Go to System Preferences > Sound > Input.
Verify that sound input device is set to internal
microphone.
3. Go to System Preferences > Sound > Input.
Verify that “Input volume” setting is set above
minimum level.
4. Go to System Preferences > Sound > Input.
Verify that “Input level” indicator moves when
speaking into microphone.
Deep Dive
Check Result Action Code
1. Verify if boot chime is present
when system is powered
ON. Make sure audio output
preferences are not set to mute.
Yes Go to step 2.
No Reset PRAM and retest.
2010-11-18
2. Make sure no cables are
connected to external sound
input/output ports. Go to
System Preferences > Sound >
Input and verify that “Internal
microphone” is an available
option.
3. Go to System Preferences >
Sound > Input and verify if
“Input volume” is set above
minimum sensitivity.
4. Go to System Preferences
> Sound > Input and verify
if “Input level” indicator
moves when speaking into
microphone.
iMac (21.5-inch, Late 2009) Symptom Charts — Input/Output Devices 81
Yes Go to step 3.
No Replace audio cable. M09
Yes Go to step 4.
No Set “Input volume” slider to
middle position. Retest.
Yes Microphone and audio input
functioning. Go to step 6.
No Suspect bad microphone
connection. Reseat
microphone connector on
logic board. Go to step 5.
Page 82
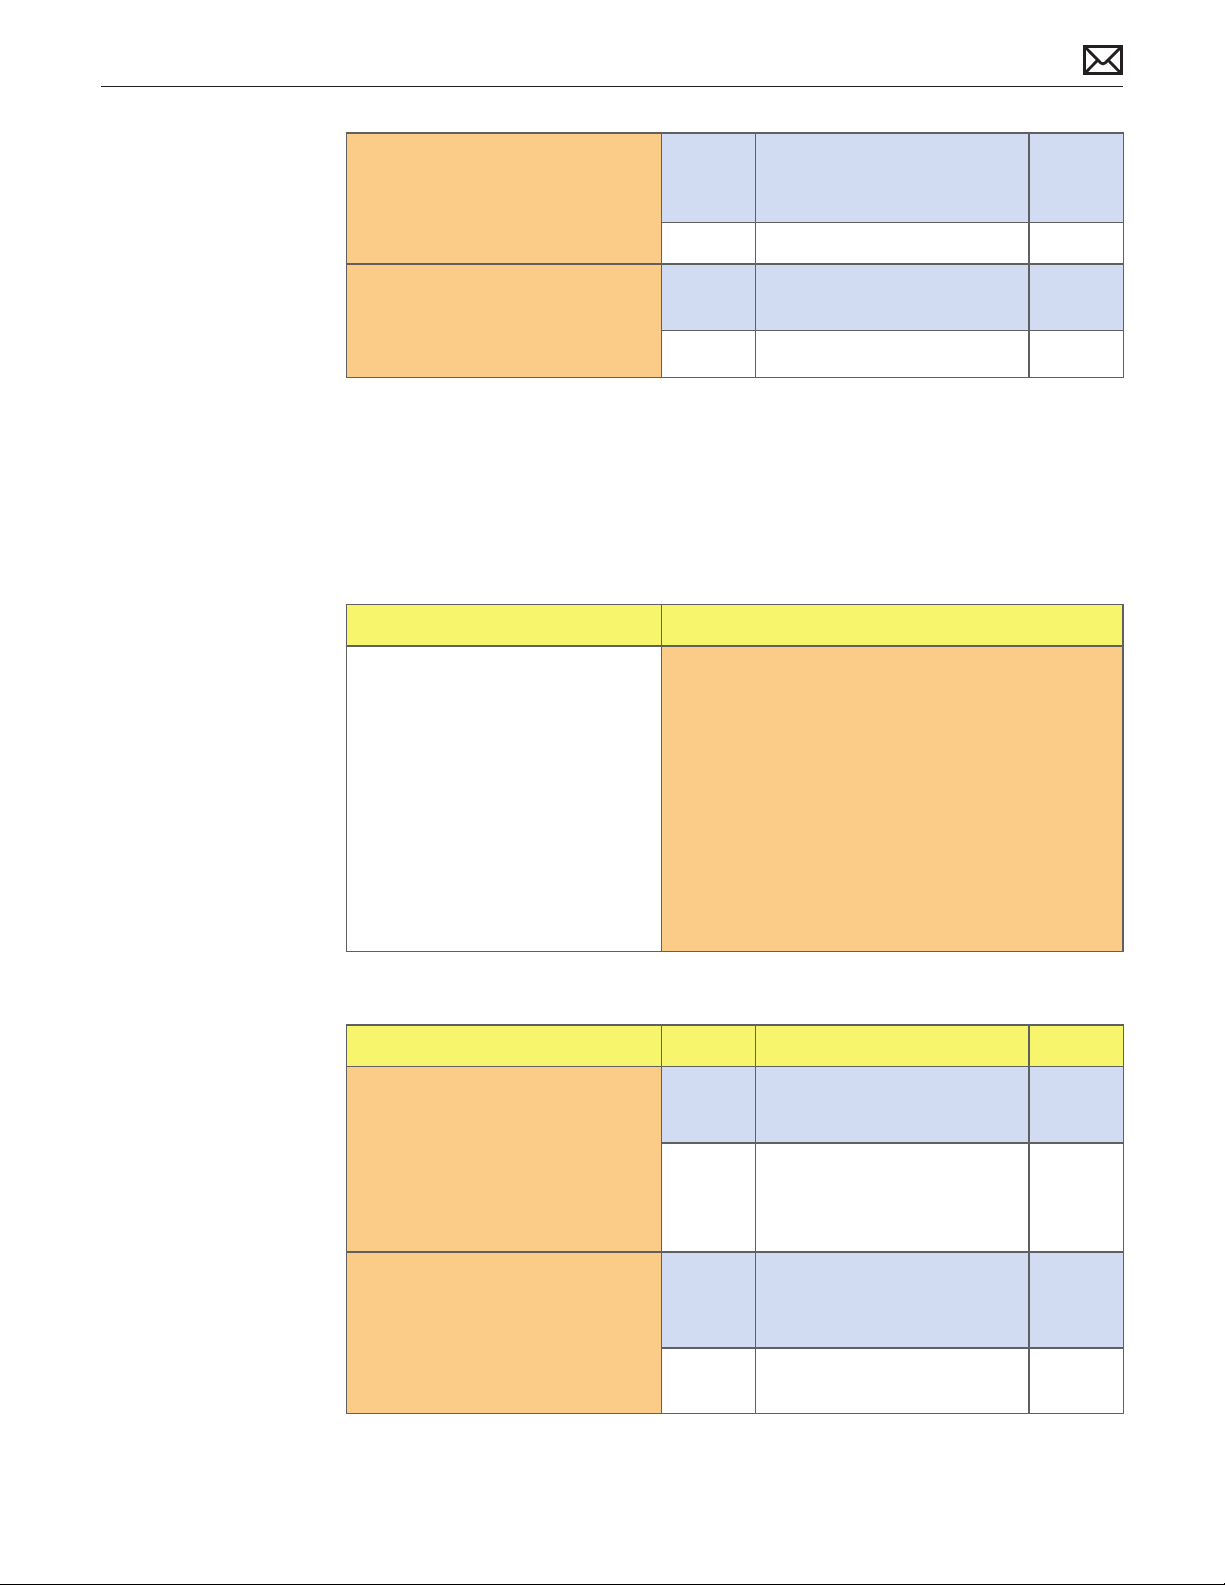
5. Inspect microphone cable
routing and verify if cable is
pinched or damaged.
Yes Replace rear housing
(microphone cable not
available separately).
No Go to step 6.
L14
6. Record sound sample using
GarageBand or iMovie. Verify if
sound quality of sound sample
is normal during playback.
Yes Microphone circuitry OK.
Return system to user.
No Replace logic board. M09
Audio: Built-in Speakers Have Distorted Sound
Unlikely cause: LCD display, power supply, hard drive, optical drive, fans
Quick Check
Symptoms Quick Check
Audio: Built-in Speakers Have
Distorted Sound
• No audio from one or both
speakers.
• Audio from speakers distorted
1. Go to System Preferences > Sound > Output.
Verify that sound output device is set to internal
speakers and that balance control is set to the
center position.
2. Obtain known-good high-quality sound le or
use iTunes Store sound samples to evaluate
sound quality. Verify suspect sound les on
another system to determine if distortion is
caused by computer or sound le.
2010-11-18
3. Set volume control to mid-range. Overdriving
built-in speakers can cause distortion.
Deep Dive
Check Result Action Code
1. Go to System Preferences >
Sound > Output. Set speaker
balance 100% to LEFT speaker
and play a known-good sound
le. Verify if sound is generated
by LEFT speaker and that sound
quality is acceptable.
2. Set speaker balance 100%
to RIGHT speaker and play a
known-good sound le. Verify
if sound is generated by RIGHT
speaker and that sound quality
is acceptable.
iMac (21.5-inch, Late 2009) Symptom Charts — Input/Output Devices 82
Yes LEFT speaker and amplier
circuitry OK. Go to step 2.
No Distortion detected in LEFT
speaker. Set Balance slider to
middle position. Go to step 3.
Yes RIGHT speaker and amplier
circuitry OK. Set Balance slider
to middle. Go to step 3.
No Distortion detected in RIGHT
speaker. Go to step 4.
Page 83
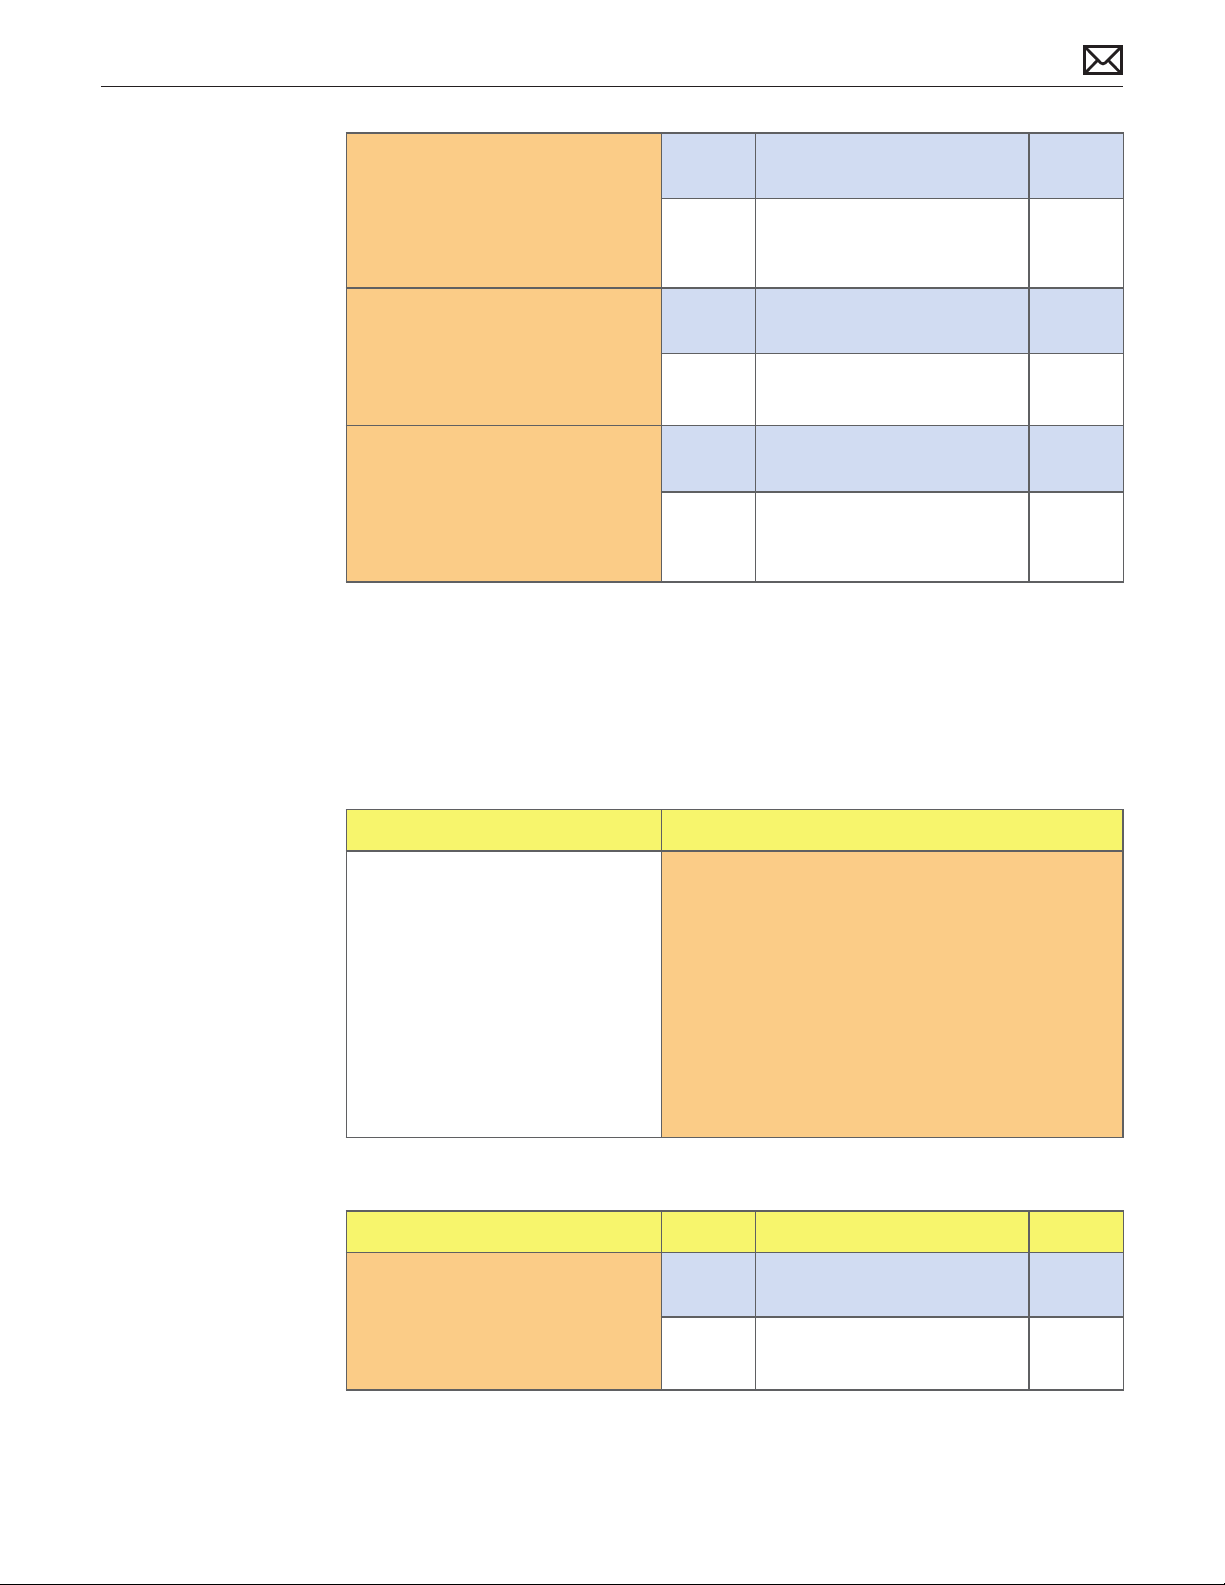
3. Connect external speakers or
headphones to audio-out port
and play a known-good sound
le. Verify if sound quality is
acceptable.
Yes Suspect bad speaker.
Go to step 4.
No Audio CODEC or amplier
issue suspected. Replace logic
board and retest.
M09
4. Inspect LEFT and RIGHT
speaker cones and speaker
connection cable for damage.
Verify if speakers have visible
damage.
5. Install known-good speaker
into location where distorted
sound was heard. Verify if
sound quality improves.
Yes Replace damaged speaker.
Retest.
No Go to step 5.
Yes Replace speaker. L11
No Speaker amplier issue
suspected. Replace logic
board.
Audio: Built-in Speakers Have No Audio
Unlikely cause: LCD display, power supply, hard drive, optical drive, fans
Quick Check
Symptoms Quick Check
Audio: Built-in Speakers Have No
Audio
• No audio from one or both
speakers.
• Audio from speakers distorted
1. Go to System Preferences > Sound > Output.
Verify that sound output device is set to internal
speakers.
2. Go to System Preferences > Sound > Output.
Verify that “Output volume” setting is set above
the minimum level and that “Mute” checkbox is
not selected.
L11
M09
2010-11-18
3. Go to System Preferences > Sound > Output.
Verify that “Balance” slider is set to middle
position so left and right speakers are both used.
Deep Dive
Check Result Action Code
1. Verify if boot chime is present
when system is powered
ON. Make sure audio output
preferences are not set to mute
and volume is set to mid-range.
iMac (21.5-inch, Late 2009) Symptom Charts — Input/Output Devices 83
Yes Go to step 2.
No Reset PRAM and retest.
Page 84
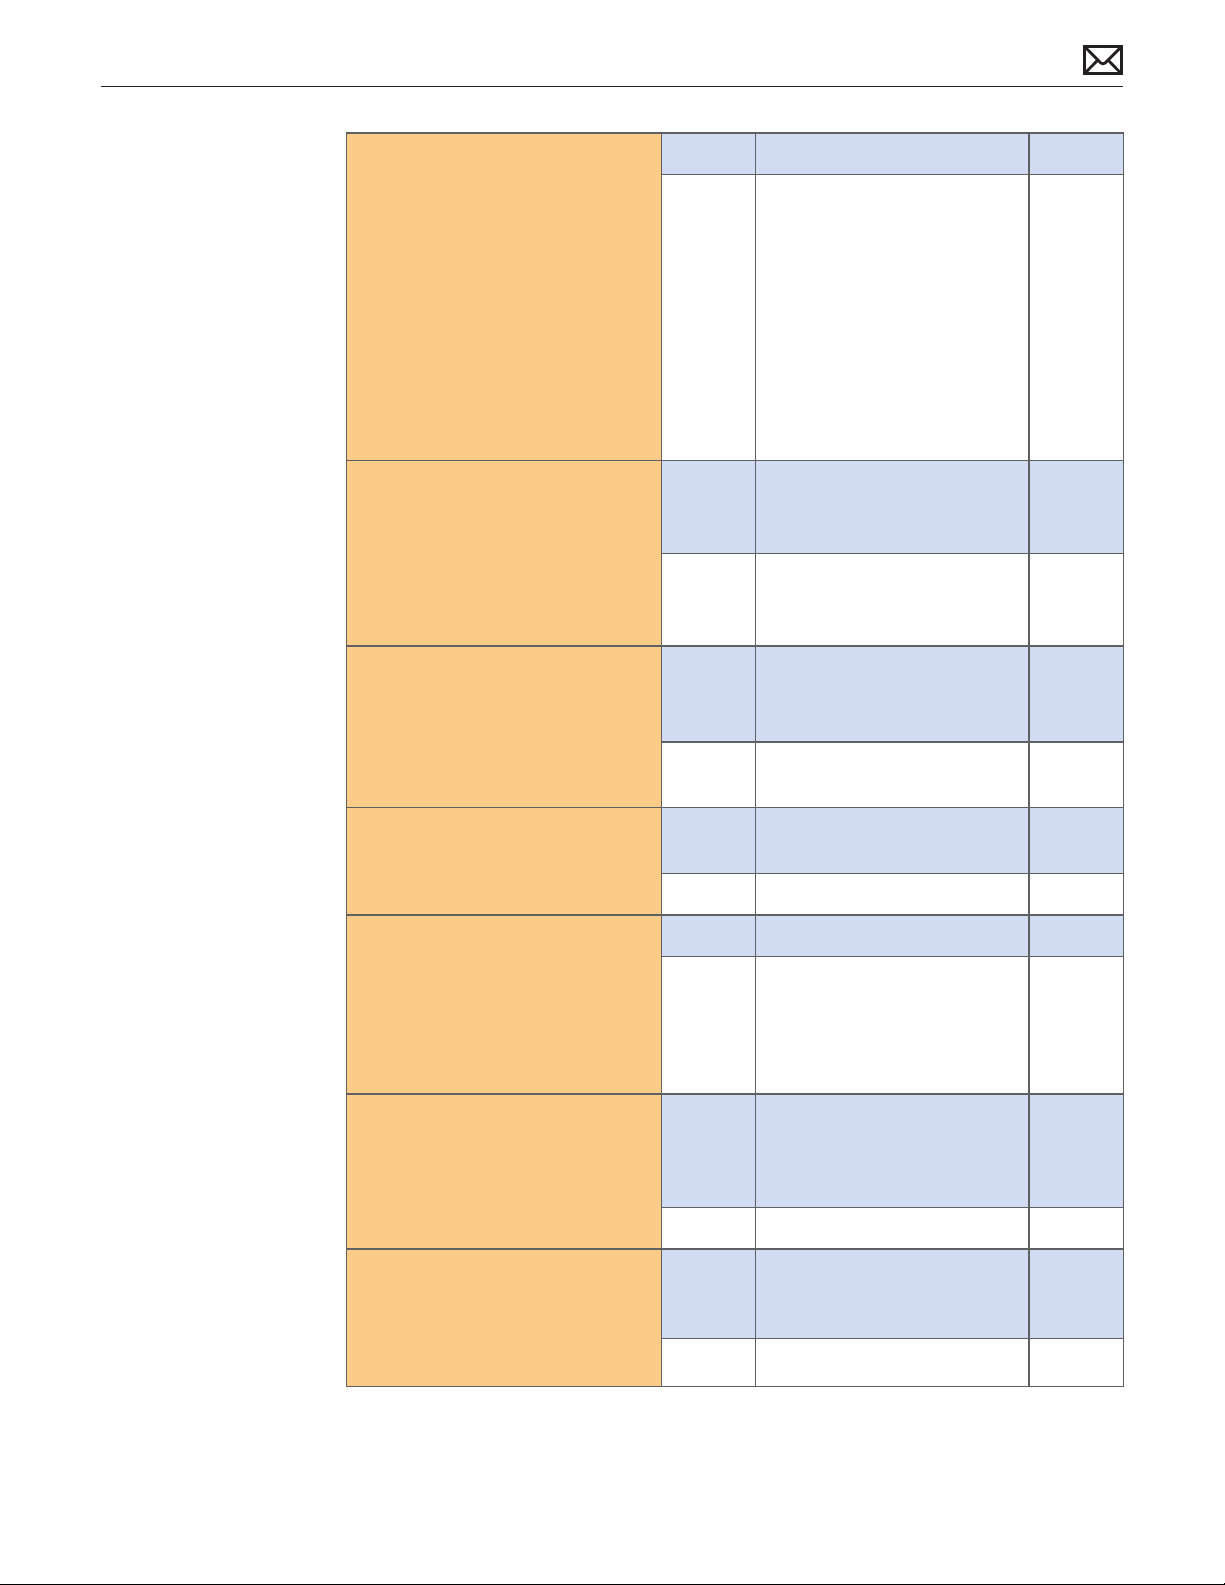
2. Make sure no cables are
connected to external sound
input/output ports. Go to
System Preferences > Sound >
Output and verify that “Internal
speakers” is an available option.
Yes Go to step 3.
No If “Headphones” is the only
available sound output
device, replace audio cable.
If “Digital output” is the
only available sound output
device, reseat audio cable to
logic board. If issue persists,
replace audio cable.
If issue persists, replace logic
board.
L11
L11
M09
3. Go to System Preferences >
Sound > Output. Set speaker
balance 100% to LEFT speaker
and play a known-good sound
le. Verify if sound is generated
by LEFT speaker and that sound
quality is acceptable.
4. Set speaker balance 100%
to RIGHT speaker and play a
known-good sound le. Verify
if sound is generated by RIGHT
speaker and that sound quality
is acceptable.
5. Verify if user-reported audio
issue has been resolved.
6. Boot system from Install
DVD or another known-good
bootable volume. Verify if issue
still occurs.
Yes LEFT speaker and amplier
circuitry OK. Go to step 4.
No No audio in LEFT speaker.
Go to step 7.
Yes RIGHT speaker and amplier
circuitry OK. Set Balance slider
to middle. Go to step 5.
No No audio in RIGHT speaker.
Go to step 7.
Yes Issue no longer present.
Return system to user.
No Go to step 6.
Yes Go to step 7.
No Known-good boot volume
works OK. Troubleshoot for
software issue. Isolate if issue
is application-specic or a
possible OS conict.
2010-11-18
7. Connect external speakers or
headphones to audio-out port
and play a known-good sound
le. Verify if sound quality is
acceptable.
8. Disconnect and carefully
inspect audio cable and
connection to logic board for
damage such as bent pins or
pinched/cut wires.
iMac (21.5-inch, Late 2009) Symptom Charts — Input/Output Devices 84
Yes Logic board, internal
speakers, and audio-out port
functioning correctly. Return
system to user.
No Go to step 8.
Yes Replace damaged audio
L14
cable. If issue persists, verify if
symptom has changed.
No Replace logic board. M09
Page 85
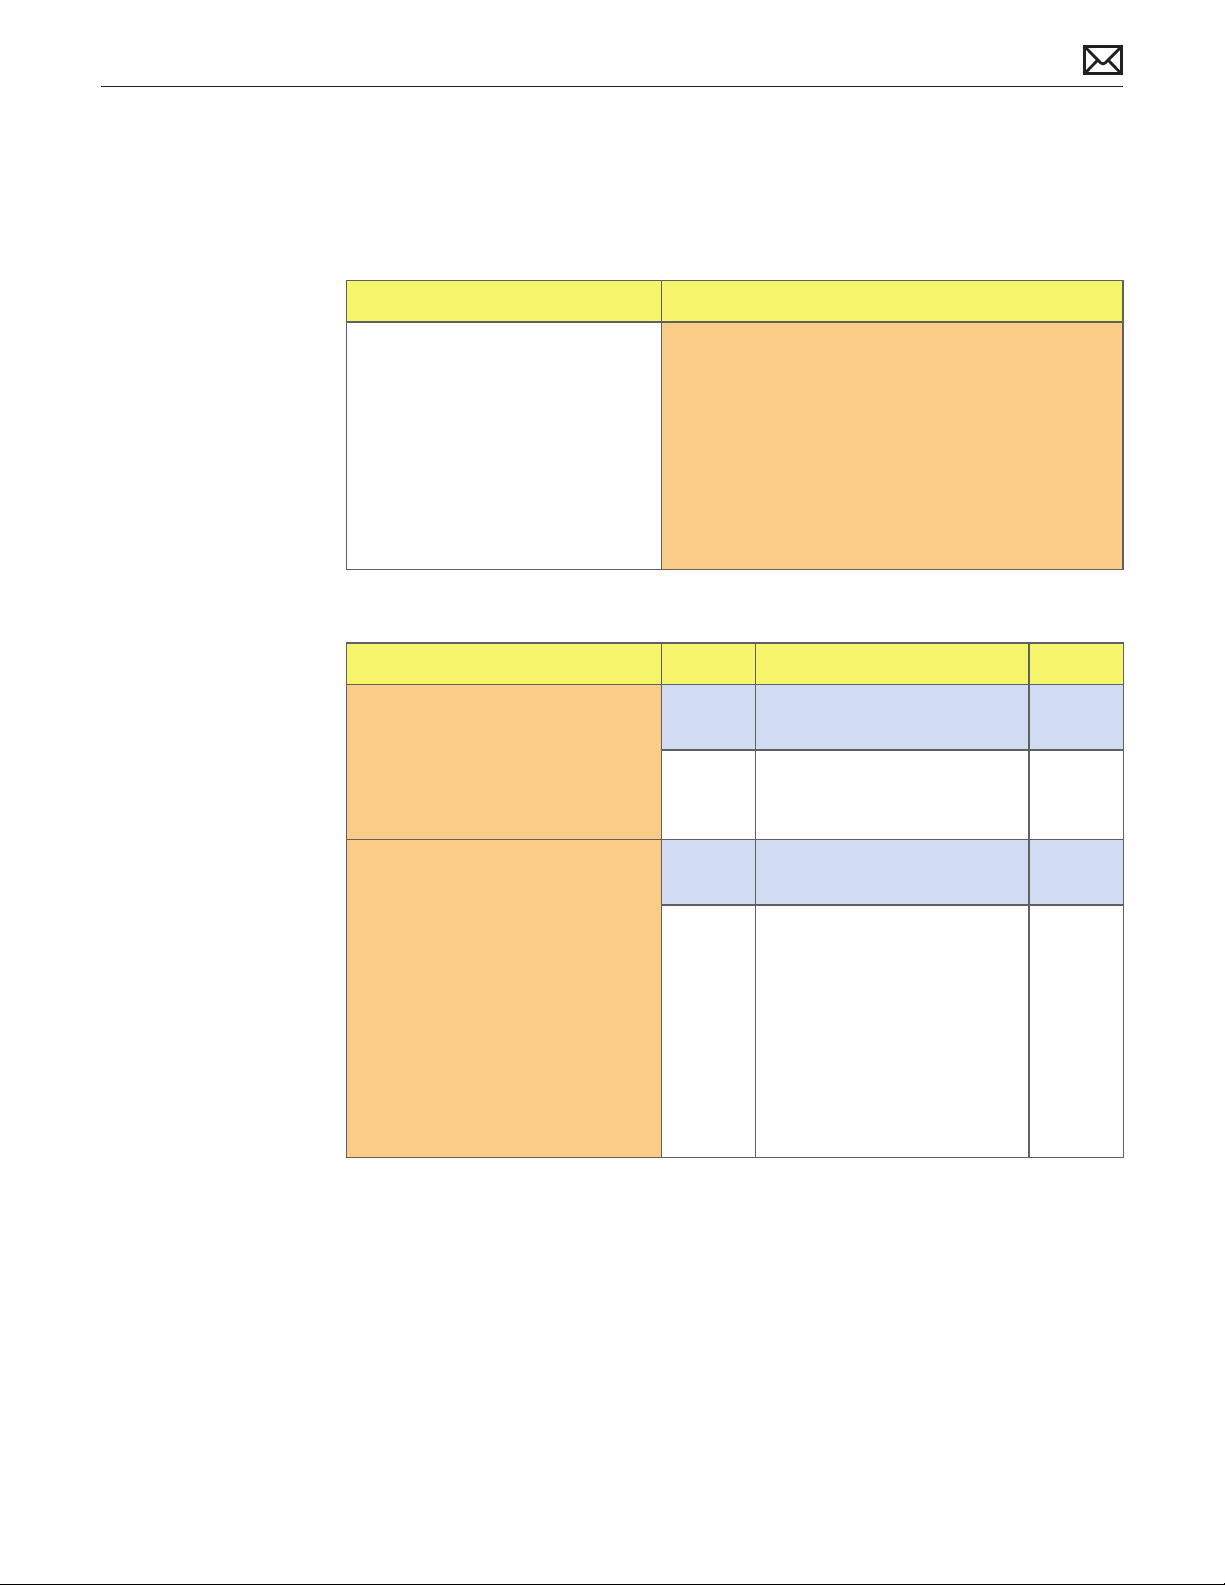
Camera Issues
Unlikely cause: LCD display, power supply, hard drive, optical drive, fans, speakers, microphone
Quick Check
Symptoms Quick Check
Camera Issues
• Camera not detected
• No green LED for camera
• Excessive blooming
• Poor White Balance
• Poor Focus
• Green image
• Image distortion
1. Launch System Proler and conrm that system’s
USB hub and built-in camera are visible.
2. Verify camera lens and glass panel are clean and
free of contaminants. Clean glass panel if needed.
3. Launch Photo Booth to verify that green indicator
LED near camera lens turns on and image quality
is acceptable.
Deep Dive
Check Result Action Code
1. Launch System Proler and
verify built-in camera is visible
in USB list of devices.
2. Launch Photo Booth. Verify if
green LED near camera lens
turns ON and image appears
normal.
Yes Camera recognized.
Go to step 2
No Inspect and reseat camera
cable connection on logic
board. Go to step 2.
Yes Camera functioning. Return
system to user.
No Remove glass and clean both
sides. Clean camera lens.
If issue persists, replace
camera cable.
If issue persists, replace
camera.
If issue persists, replace logic
board.
X07
X07
M13
2010-11-18
iMac (21.5-inch, Late 2009) Symptom Charts — Input/Output Devices 85
Page 86
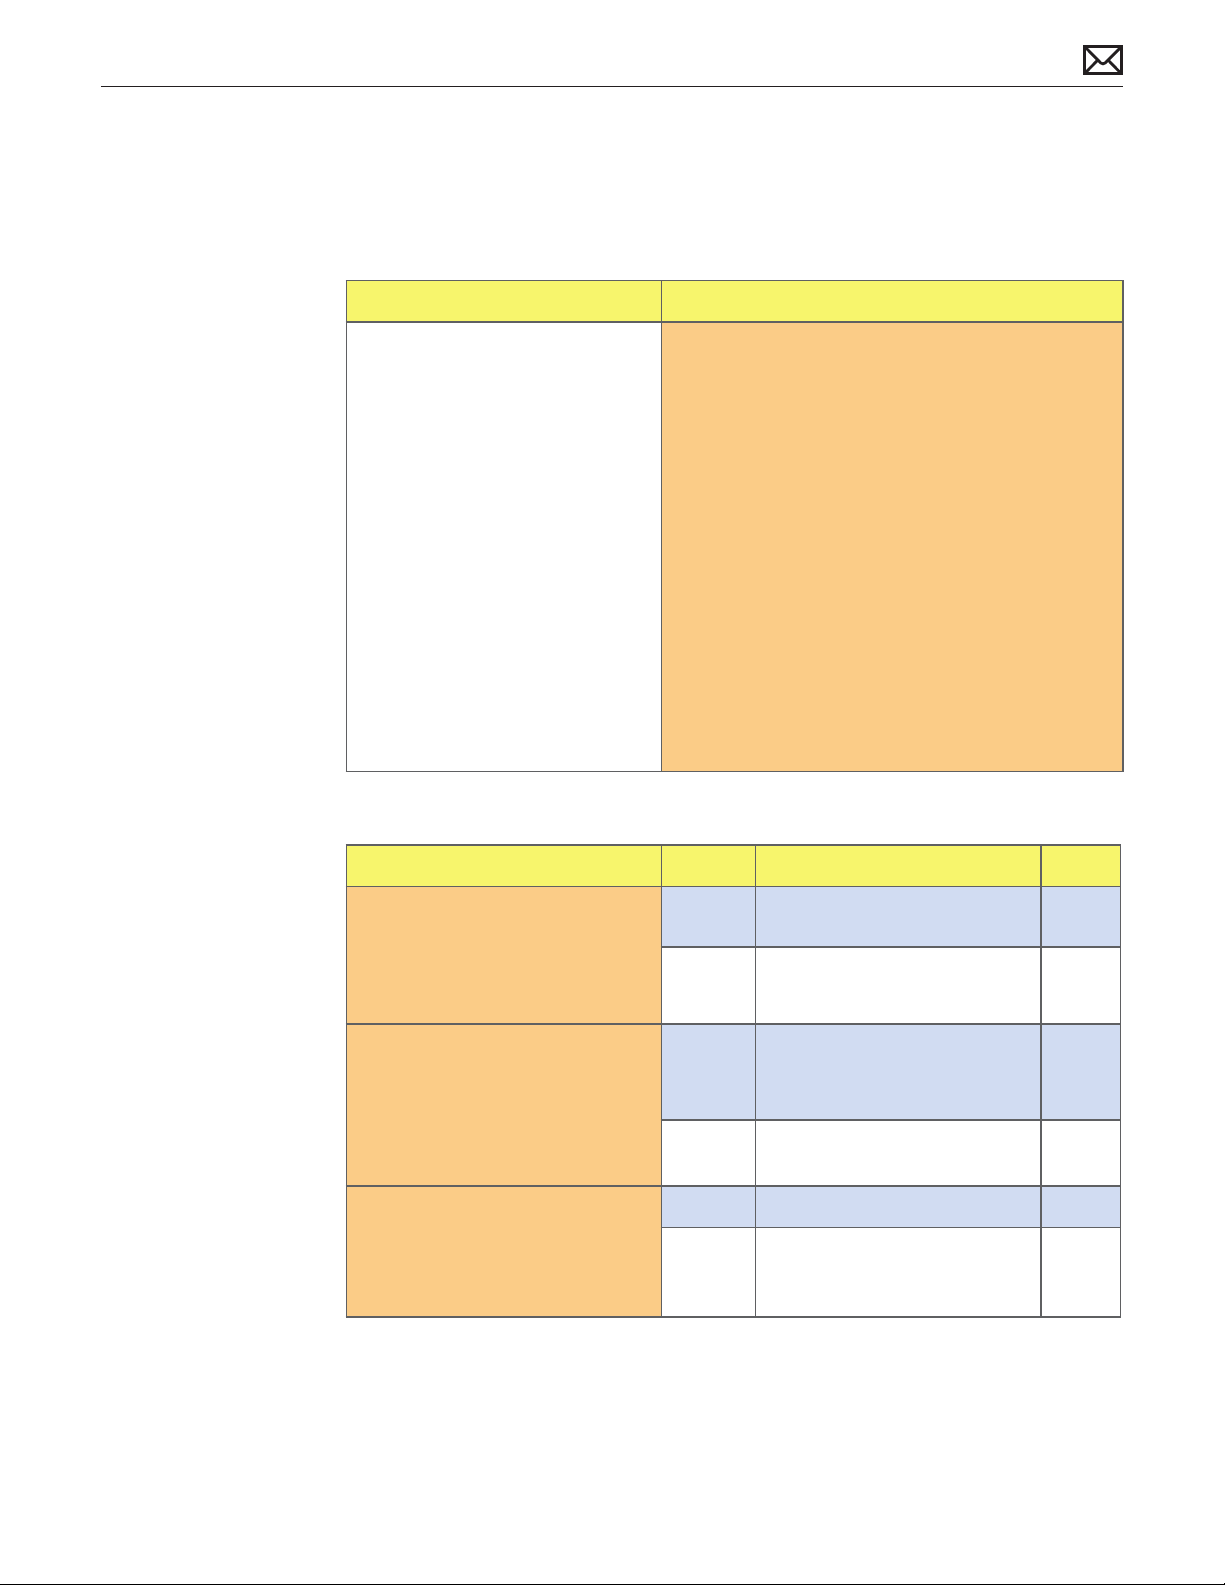
FireWire Device Not Recognized
Unlikely cause: LCD display, power supply, hard drive, optical drive, fans
Quick Check
Symptoms Quick Check
FireWire Device Not Recognized
• FireWire hard drive not
recognized
• FireWire optical drive not
recognized
• FireWire camera not recognized
• FireWire printer not recognized
1. For external FireWire drives, make sure any
external power source is plugged in and
operating to isolate a power issue with the
device.
2. Test a known-good FireWire device to isolate a
failed peripheral issue.
3. Test a known-good FireWire cable to isolate a
FireWire cable issue.
4. Ensure that all software and rmware updates for
this model have been installed to take advantage
of any available bug xes.
5. Launch System Proler and verify if the aected
FireWire device is visible on FireWire bus. If yes,
then FireWire port and cable are functioning
properly. Contact FireWire device manufacturer to
verify that device is supported.
Deep Dive
Check Result Action Code
1. Unplug all FireWire devices
from computer. Reset PRAM.
Reconnect FireWire device
in question. Verify if FireWire
device is recognized.
Yes Issue resolved.
No Possible logic board failure.
Go to step 2.
2010-11-18
2. Use a known-good FireWire
cable with a known-good
FireWire device (such as
another Mac in Target Disk
Mode). Verify if FireWire device
is recognized.
3. Verify if FireWire device is
recognized on a known-good
same model computer.
iMac (21.5-inch, Late 2009) Symptom Charts — Input/Output Devices 86
Yes Try FireWire device in question
with a known-good computer
of same model. Go to step 3.
No FireWire not recognized.
Replace logic board.
Yes Go to step 4.
No Device may need additional
power. Use a powered FireWire
hub. Go to step 5.
M12
Page 87

4. Verify if FireWire device is
recognized with a knowngood FireWire cable on user’s
computer.
Yes FireWire cable issue. Issue
resolved.
No FireWire device may need
additional power. Go to step 5.
5. Using a powered FireWire
hub, and having installed any
software or rmware updates
for the device, verify if FireWire
device is now recognized.
6. Create a new user in System
Preferences > Accounts and
log out current user. Log in
on new user account and
verify if FireWire device is now
recognized.
Yes Device recognized. Required
additional power from hub or
update. Issue resolved.
No Device may require additional
software, or there may be a
conict in the Mac OS. Go to
step 6.
Yes Software Issue. Troubleshoot
software on User account. Issue
resolved.
No Apply all Mac OS and FireWire
specic updates. If issue
persists, contact device
manufacturer for support.
FireWire port and cable have
been veried.
2010-11-18
iMac (21.5-inch, Late 2009) Symptom Charts — Input/Output Devices 87
Page 88
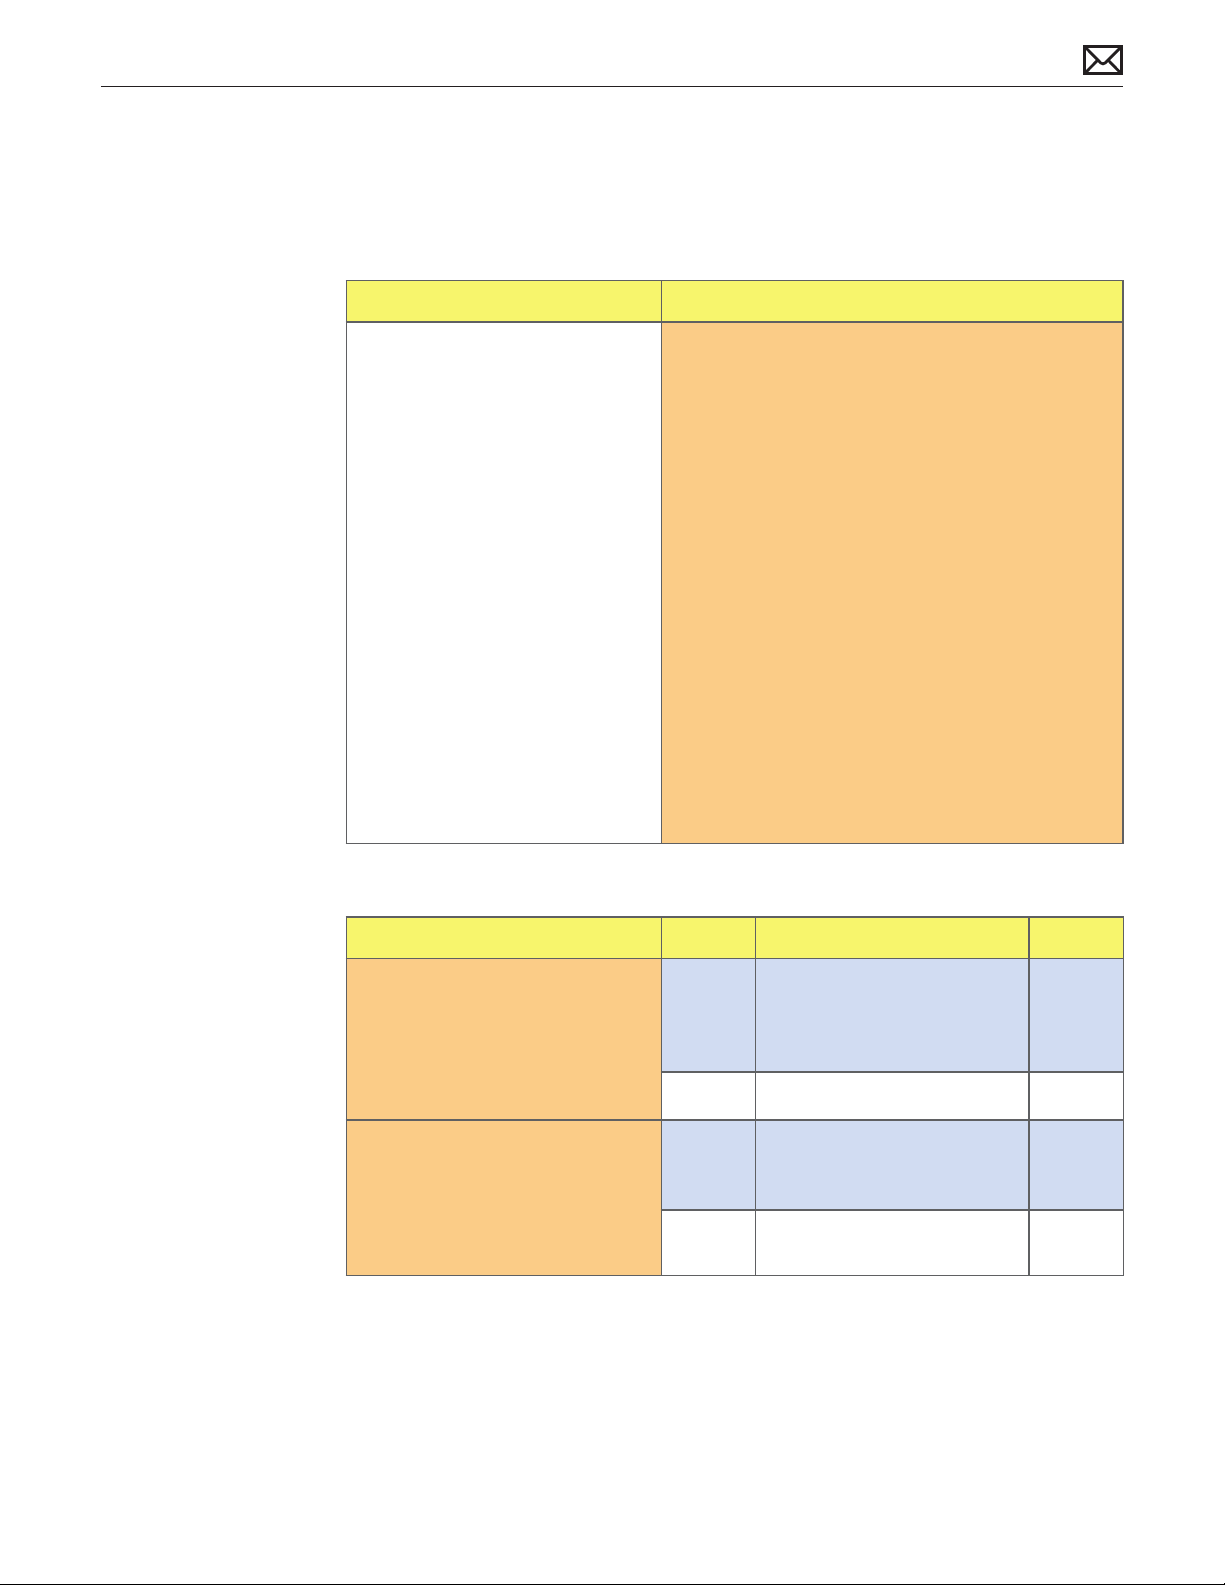
USB Device Not Recognized
Unlikely cause: LCD display, power supply, hard drive, optical drive, fans
Quick Check
Symptoms Quick Check
USB Device Not Recognized
• USB wired keyboard/mouse not
recognized
• USB external drive not
recognized
• USB camera not recognized
• USB printer not recognized
Deep Dive
1. Reset SMC.
2. For printers and external USB drives, make sure
any external power source is plugged in and
operating to isolate a power issue with device.
3. The iMac has 4 USB ports on rear of computer. Try
each port to isolate a particular port malfunction.
4. Test with a known-good wired keyboard or
mouse to isolate a failed peripheral issue.
5. Test with a known-good USB cable when dealing
with a printer or external USB drive, to isolate a
USB cable issue.
6. Ensure that all software and rmware updates for
this model have been installed to take advantage
of any available bug xes.
7. Launch System Proler and verify if device is
visible on USB bus. If yes, then the USB port and
cable are functioning properly. Contact device
manufacturer to verify that device is supported.
2010-11-18
Check Result Action Code
1. Unplug all USB devices from
the computer except for USB
keyboard and mouse. Start
computer and reset PRAM.
Verify if USB keyboard and
mouse are recognized.
2. Verify if Bluetooth Mouse Setup
assistant launches after startup.
iMac (21.5-inch, Late 2009) Symptom Charts — Input/Output Devices 88
Yes Test with all USB ports to
ensure all USB ports working
as expected. Replace logic
board for any port failures.
No Reset SMC. Go to step 2.
Yes Bluetooth detected, but
external USB devices not
recognized. Go to step 3.
No Disconnect USB keyboard and
mouse. Go to step 4.
Page 89

3. Verify if a known-good USB
keyboard and mouse are
recognized.
Yes Test original USB mouse and
keyboard. Replace if still not
recognized. Go to step 5.
4. With no USB devices
connected, restart computer.
Verify if Bluetooth Mouse Setup
assistant launches after startup.
5. With known-good USB
keyboard and mouse working,
test USB peripheral in question
(USB hard drive or printer, etc.)
Verify if device is recognized in
System Proler under USB.
6. Verify if using a powered USB
hub resolves the issue.
No External USB ports not
functioning. Replace logic
board.
Yes Bluetooth detected.
Go to step 3.
No Bluetooth not recognized.
Internal and external USB not
functioning. Replace logic
board.
Yes Device recognized. Test in all
USB ports to ensure all USB
ports working as expected.
Replace logic board for any
port failures.
No Device may require more
power than supplied by USB
ports. Test with a powered
USB hub. Go to step 6.
Yes Test device on same USB port
of a same-model computer.
If other computer does not
require a powered USB hub
to allow functionality, replace
logic board.
M15
M15
M15
M15
2010-11-18
No Ensure all software and
rmware updates have
been applied for computer
and device. If issue persists,
contact device manufacturer
for support. The computer’s
USB ports and cable have
been veried.
iMac (21.5-inch, Late 2009) Symptom Charts — Input/Output Devices 89
Page 90
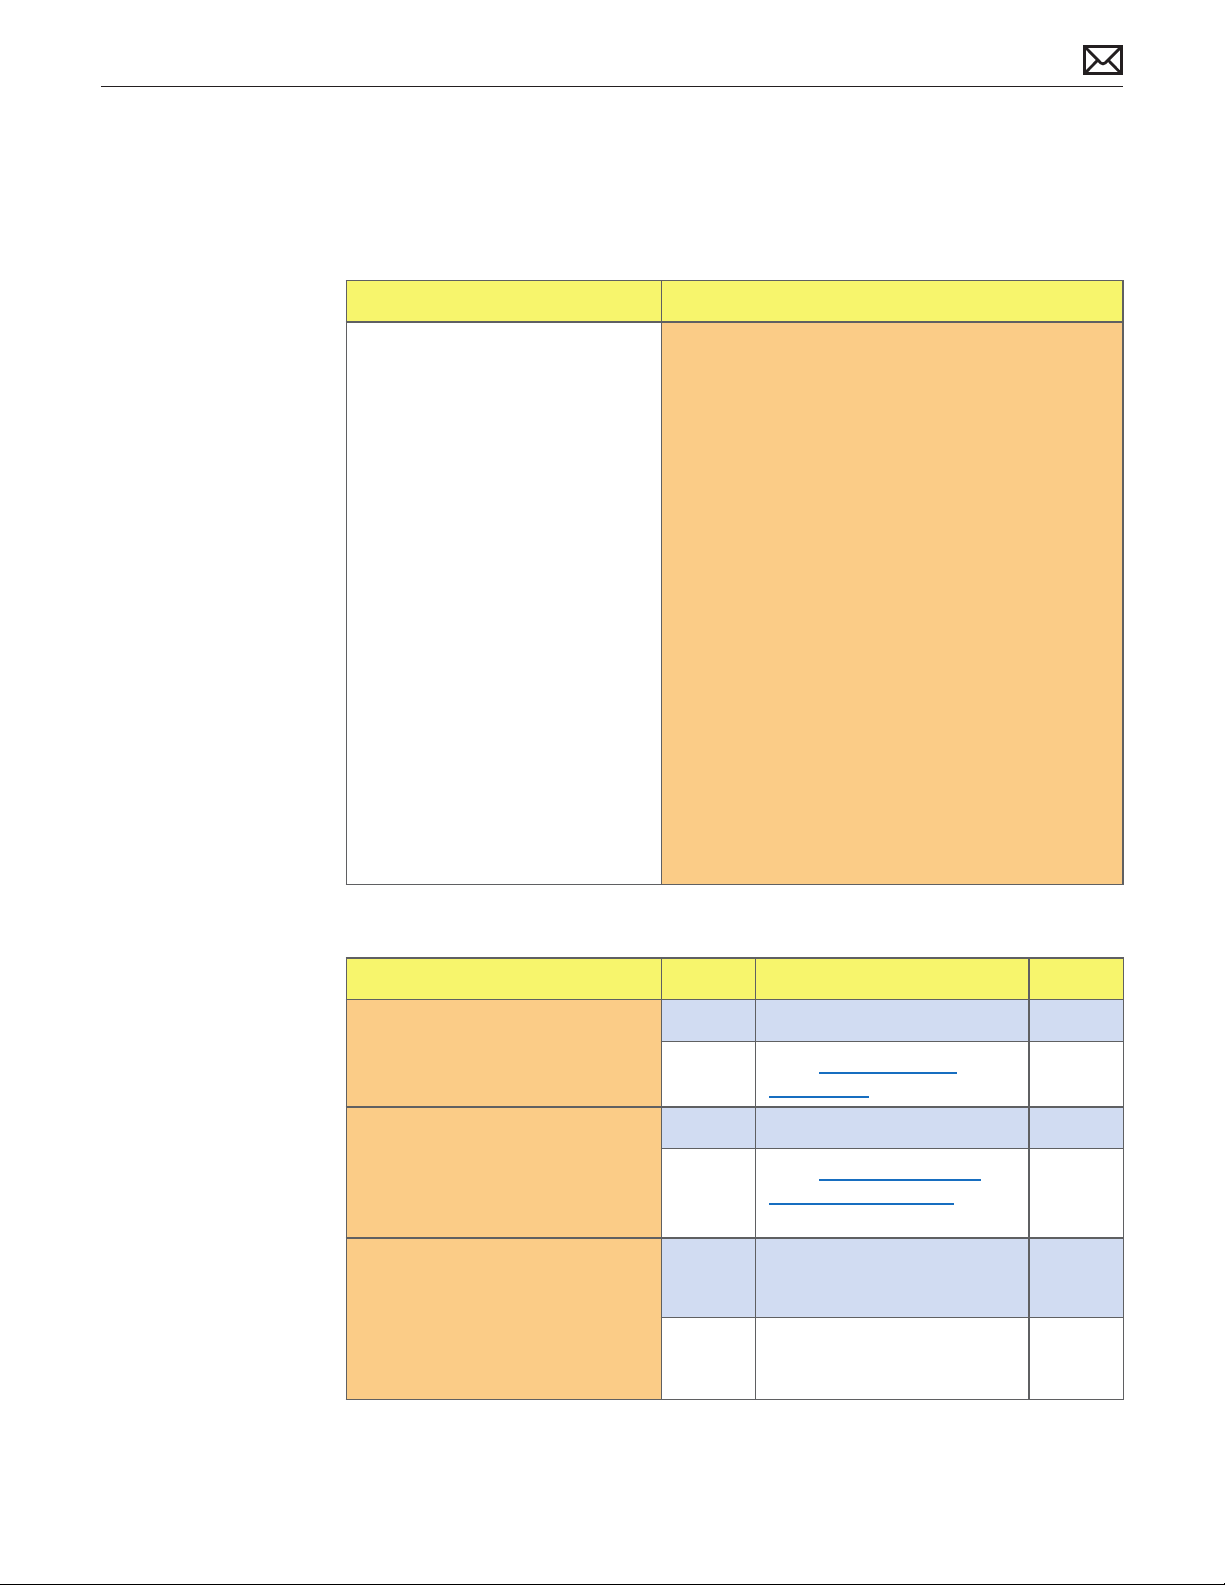
Wired Keyboard Does Not Function Properly
Unlikely cause: LCD display, power supply, hard drive, optical drive, fans
Quick Check
Symptoms Quick Check
Wired Keyboard Does Not
Function Properly
• Some or all keys on the
keyboard don’t work
• Eject key or Caps Lock key
doesn’t seem to work
• Some keys don’t work as
expected
1. Reset SMC
2. Open System Preferences > Universal Access >
Mouse & Trackpad and verify that Mouse Keys
is turned OFF. When enabled, Mouse Keys can
disable functionality of some or most keys,
depending on keyboard used.
3. The iMac has 4 USB ports on rear of computer.
Make sure to try each port to isolate a particular
port malfunction.
4. Test with a known-good wired keyboard to
isolate a failed peripheral issue.
5. Test wired keyboard on a known-good, samemodel computer. If it works on the other
computer, this may indicate a bad USB port if
keyboard doesn’t work at all on user’s computer,
or a software issue if keyboard is working but not
as expected on user’s computer.
6. Ensure that all software and rmware updates for
this model have been installed to take advantage
of any available bug xes.
2010-11-18
Deep Dive
Check Result Action Code
1. Verify if all keys on keyboard
work.
2. Verify if Caps Lock is working as
expected.
3. Verify if media Eject key is
working as expected. Note that
to prevent accidentally ejecting
media, Mac OS X adds a slight
delay to the media Eject key
before it takes eect.
iMac (21.5-inch, Late 2009) Symptom Charts — Input/Output Devices 90
Yes Go to step 2.
No Go to USB Device Not
Recognized symptom ow.
Yes Go to step 3.
No Go to Keyboard: Specic
Keys Do Not Respond
symptom ow
Yes Go to step 4.
No Go to step 5.
Page 91
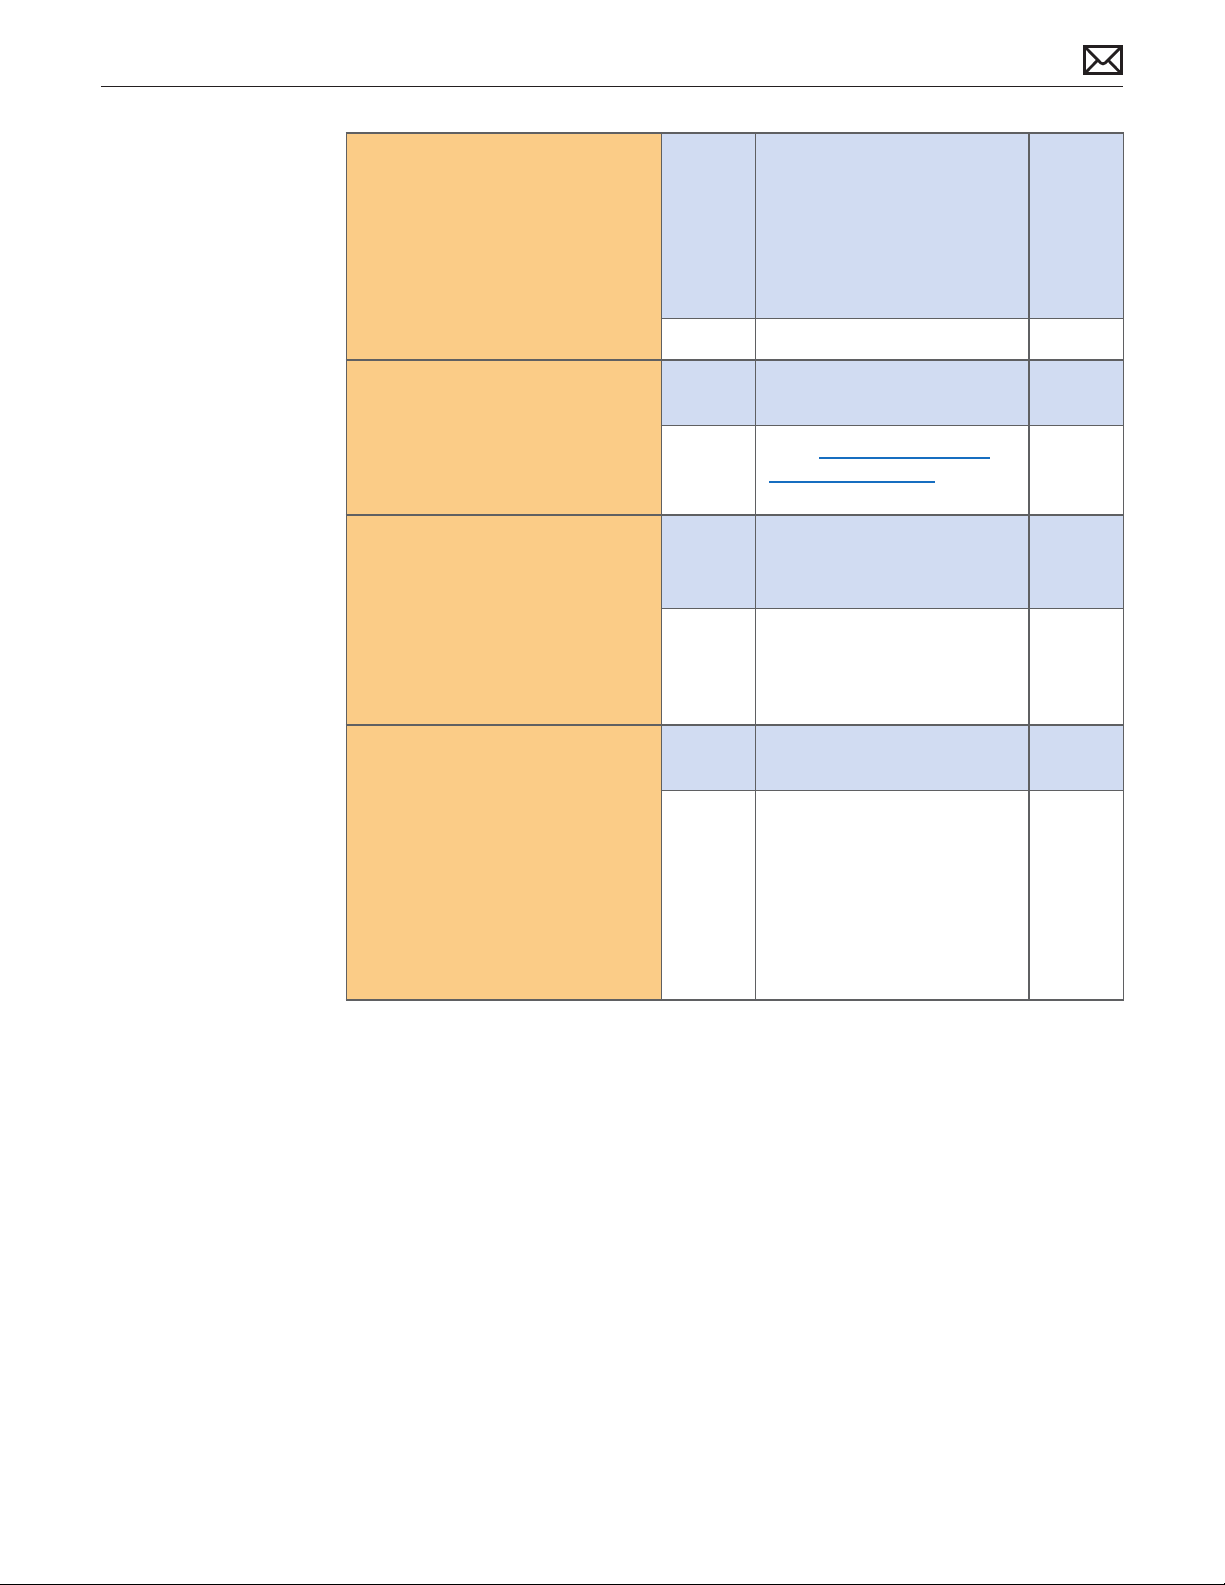
4. Open System Preferences >
Speech. Verify if the “Speak
selected text when the key is
pressed” checkbox is selected.
Yes The key combination to speak
text cannot be used for any
other purpose. Either disable,
or change to a more rare
key combination (including
Shift, Command, Option and
Control).
No Go to step 6. M15
5. With optical media in the drive,
hold the media Eject key. Verify
if the eject symbol appears on
screen and that optical media
is ejected if present.
6. Open System Preferences >
Language and Text > Input
Menu. Check “Keyboard Viewer”.
From the Input Menu (ag) in
the Menu Bar, choose “Show
Keyboard Viewer”. Verify if keys
pressed appear in Keyboard
Viewer.
7. Open TextEdit or another text
application and try typing
something using the nonresponding keys. Verify if
they are typed in this other
application.
Yes Normal media eject key delay.
No repair necessary.
No Go to Optical Drive Won’t
Accept/Eject Media
symptom ow.
Yes Keys recognized.
Go to step 9.
No Keys not recognized.
Replace keyboard.
Yes Application-specic issue.
Troubleshoot application.
No Create a new user account
in System Preferences >
Accounts, log out from
current user and log in with
new user to isolate a User
account related issue. If issue
persists, reinstall Mac OS X
from Install DVD.
K01
2010-11-18
iMac (21.5-inch, Late 2009) Symptom Charts — Input/Output Devices 91
Page 92
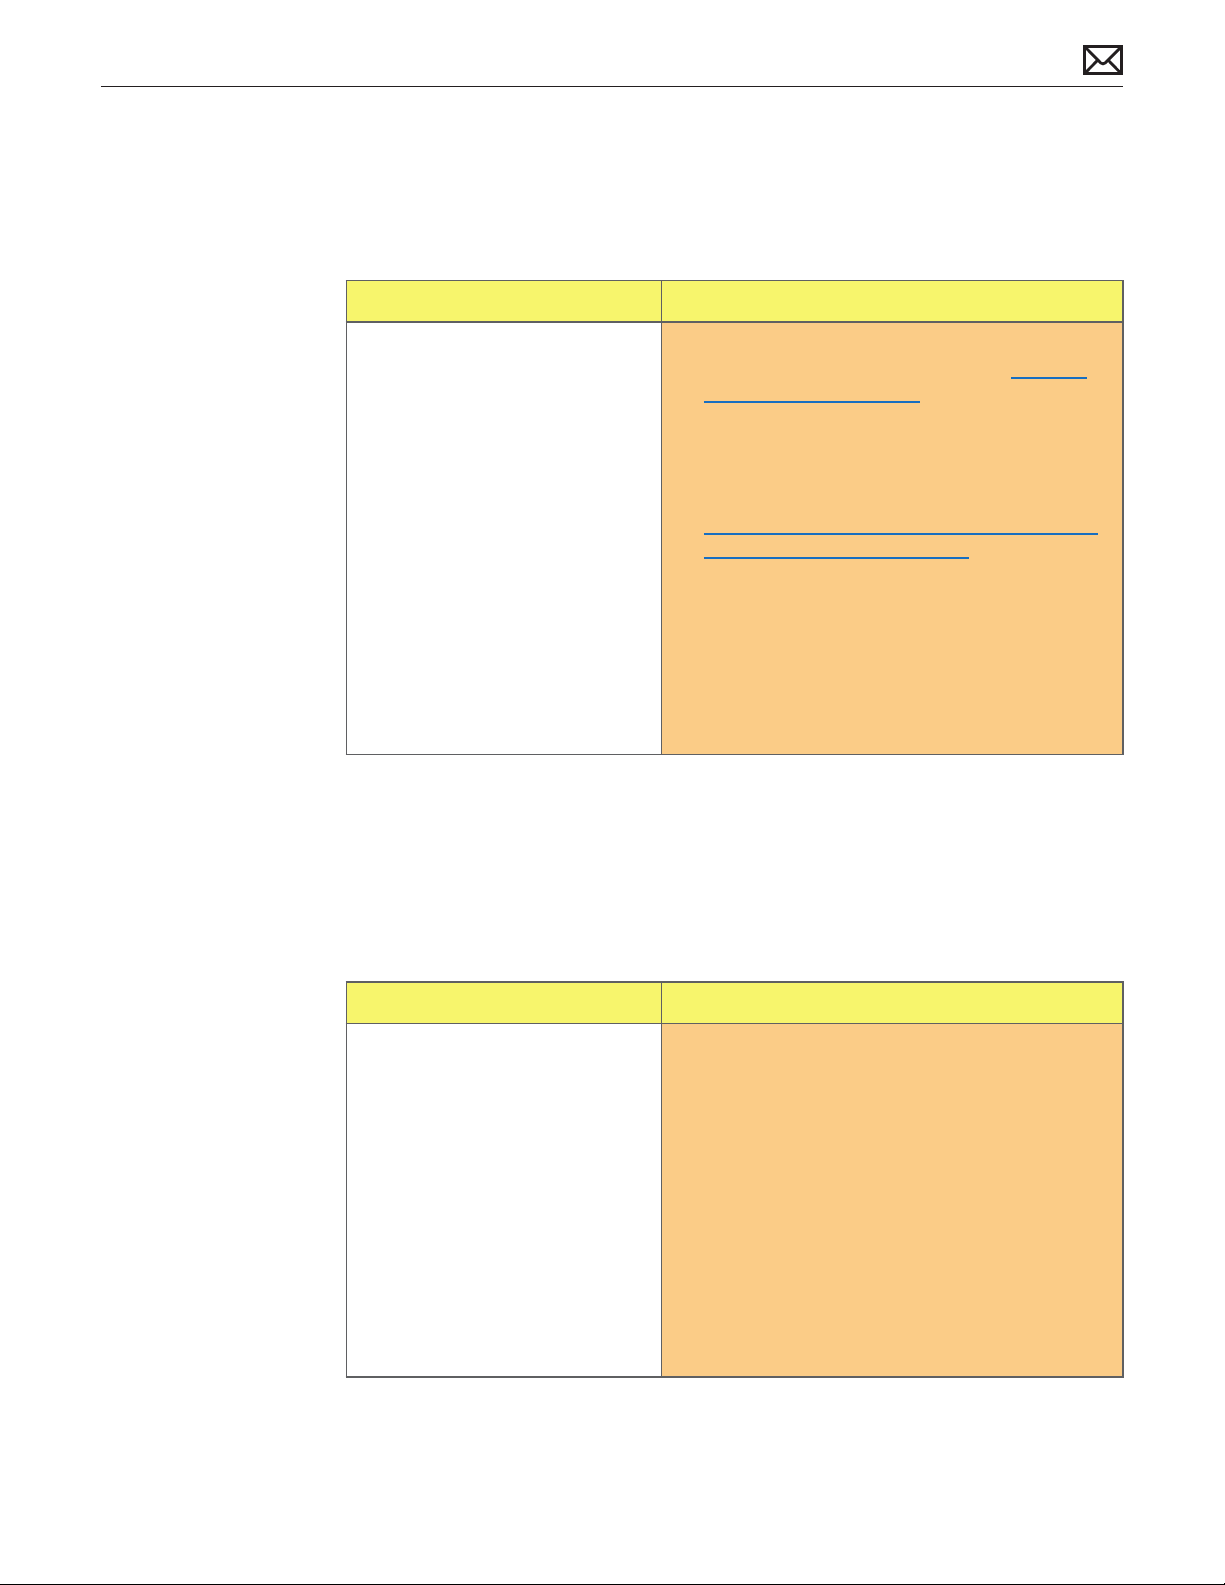
Keyboard: Specic Keys Do Not Respond
Unlikely cause: LCD display, power supply, hard drive, optical drive, fans
Quick Check
Symptoms Quick Check
Keyboard: Specic Keys Do Not
Respond
• One or more keys do not
respond when pressed
• Key sticks
• Keycap missing
1. If wireless keyboard is being used verify that it is
properly paired with computer. Go to Wireless
Input Device Doesn’t Pair symptom ow to
resolve pairing issues.
2. The caps lock key has a built-in delay to reduce
accidental activation and must be held for
approximately ½ second for it to be activated. See
kBase #TS1578: Keyboard Caps Lock modied
to reduce accidental activation.
3. Inspect keyboard for signs of liquid spills or other
contamination. Apple’s warranty does not cover
accidental damage.
4. If keycap is loose attempt to reattach it.
5. For other keyboard issues jump to appropriate
symptom ow.
Wired Keyboard/Mouse Not Recognized
Unlikely cause: LCD display, power supply, hard drive, optical drive, fans
2010-11-18
Quick Check
Symptoms Quick Check
Wired Keyboard/Mouse Not
Recognized
• USB wired keyboard/mouse not
recognized when plugged in.
• Mouse scroll ball not working
or not working as expected.
• Mouse buttons not working or
not working as expected.
iMac (21.5-inch, Late 2009) Symptom Charts — Input/Output Devices 92
1. Reset SMC.
2. The iMac has 4 USB ports on rear of computer.
Make sure to try each port to isolate a particular
port malfunction.
3. Test with a known-good wired keyboard or
mouse to isolate a failed peripheral issue.
4. Test a mouse when connected directly to ports
on the back of iMac to isolate a keyboard USB
port issue.
5. Ensure that all software and rmware updates for
this model have been installed to take advantage
of any available bug xes.
Page 93
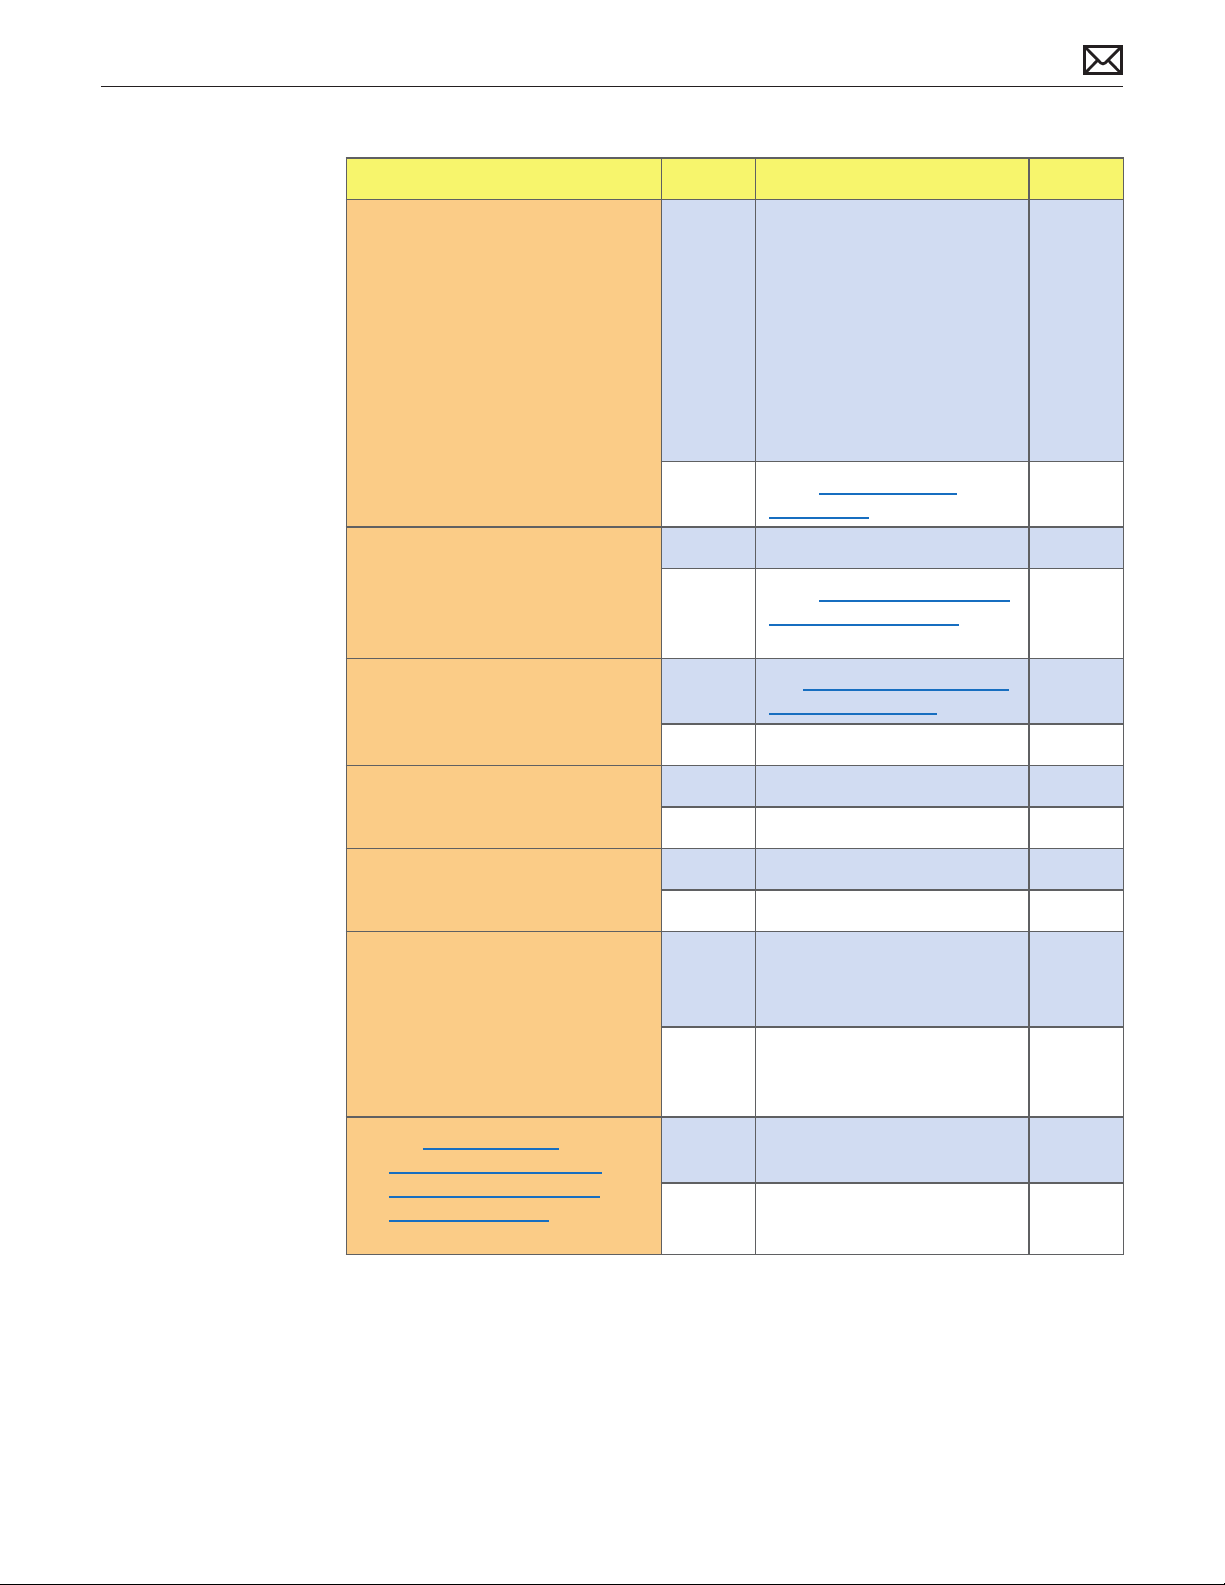
Deep Dive
Check Result Action Code
1. Verify if computer recognizes
keyboard or mouse when
plugged into rear USB ports on
back of iMac.
2. Verify if keyboard is working as
expected.
3. Verify if mouse has an issue
with scroll ball.
4. Verify if mouse has an issue
with buttons.
Yes Test device in all USB ports to
ensure all other USB ports are
working as expected.
Replace logic board if any
USB port on rear fails.
Replace keyboard if any USB
port on keyboard fails.
Go to step 2.
No
Yes Go to step 3.
No Go to Wired Keyboard Does
Yes See kBase #HT3226: How to
No Go to step 4.
Yes Go to step 7.
No Go to step 5.
Go to USB Device Not
Recognized symptom ow.
Not Function Properly
symptom ow.
clean Mac products.
M15
K11
5. Verify if mouse has an issue
with tracking.
6. Try using mouse on another
surface. Non-reective, opaque
surfaces without repetitive
patterns work best. The surface
should be clean but not shiny.
Verify if mouse tracks correctly
when used on another surface.
7. See kBase #HT1581:
Troubleshooting Mighty
Mouse and determining
expected behavior. Verify if
this article resolves issue.
Yes Go to step 6.
No Go to step 7.
Yes Surface issue. Issue resolved.
No Go to step 7
Yes Issue resolved.
No Replace wired mouse. K99
2010-11-18
iMac (21.5-inch, Late 2009) Symptom Charts — Input/Output Devices 93
Page 94
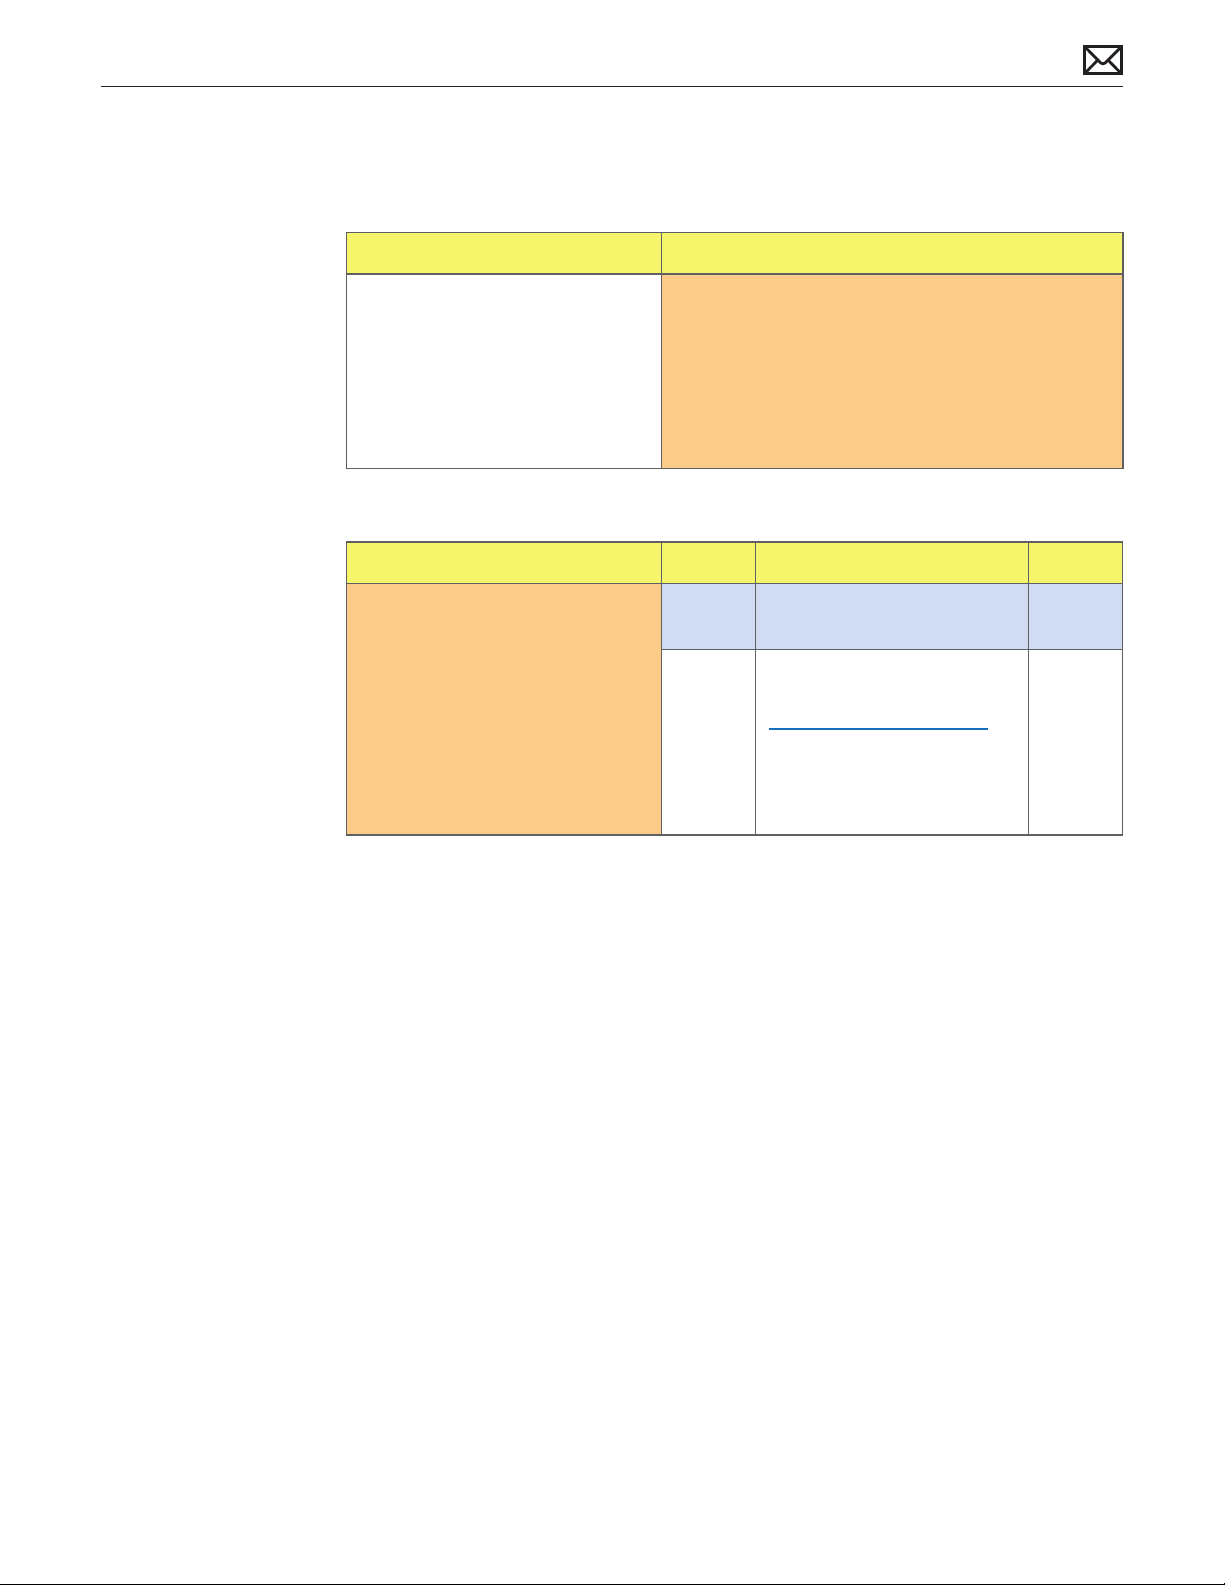
Uncategorized Symptoms
Quick Check
Symptoms Quick Check
Uncategorized Symptoms
• Unable to locate appropriate
symptom code.
1. Reset SMC.
2. Verify that external I/O device (where applicable)
works on a known-good, same-model computer.
3. For third party I/O devices, make sure necessary
software is installed and up-to-date, and that
device is supported with user’s system.
Deep Dive
Check Result Action Code
1. Verify if existing symptom code
applies to issue reported by
user.
Yes Jump to appropriate
symptom code ow.
No Document reported failure
and send feedback to
stating that a suitable
symptom code wasn’t found.
Provide as much detail as
possible.
N99
2010-11-18
iMac (21.5-inch, Late 2009) Symptom Charts — Input/Output Devices 94
Page 95
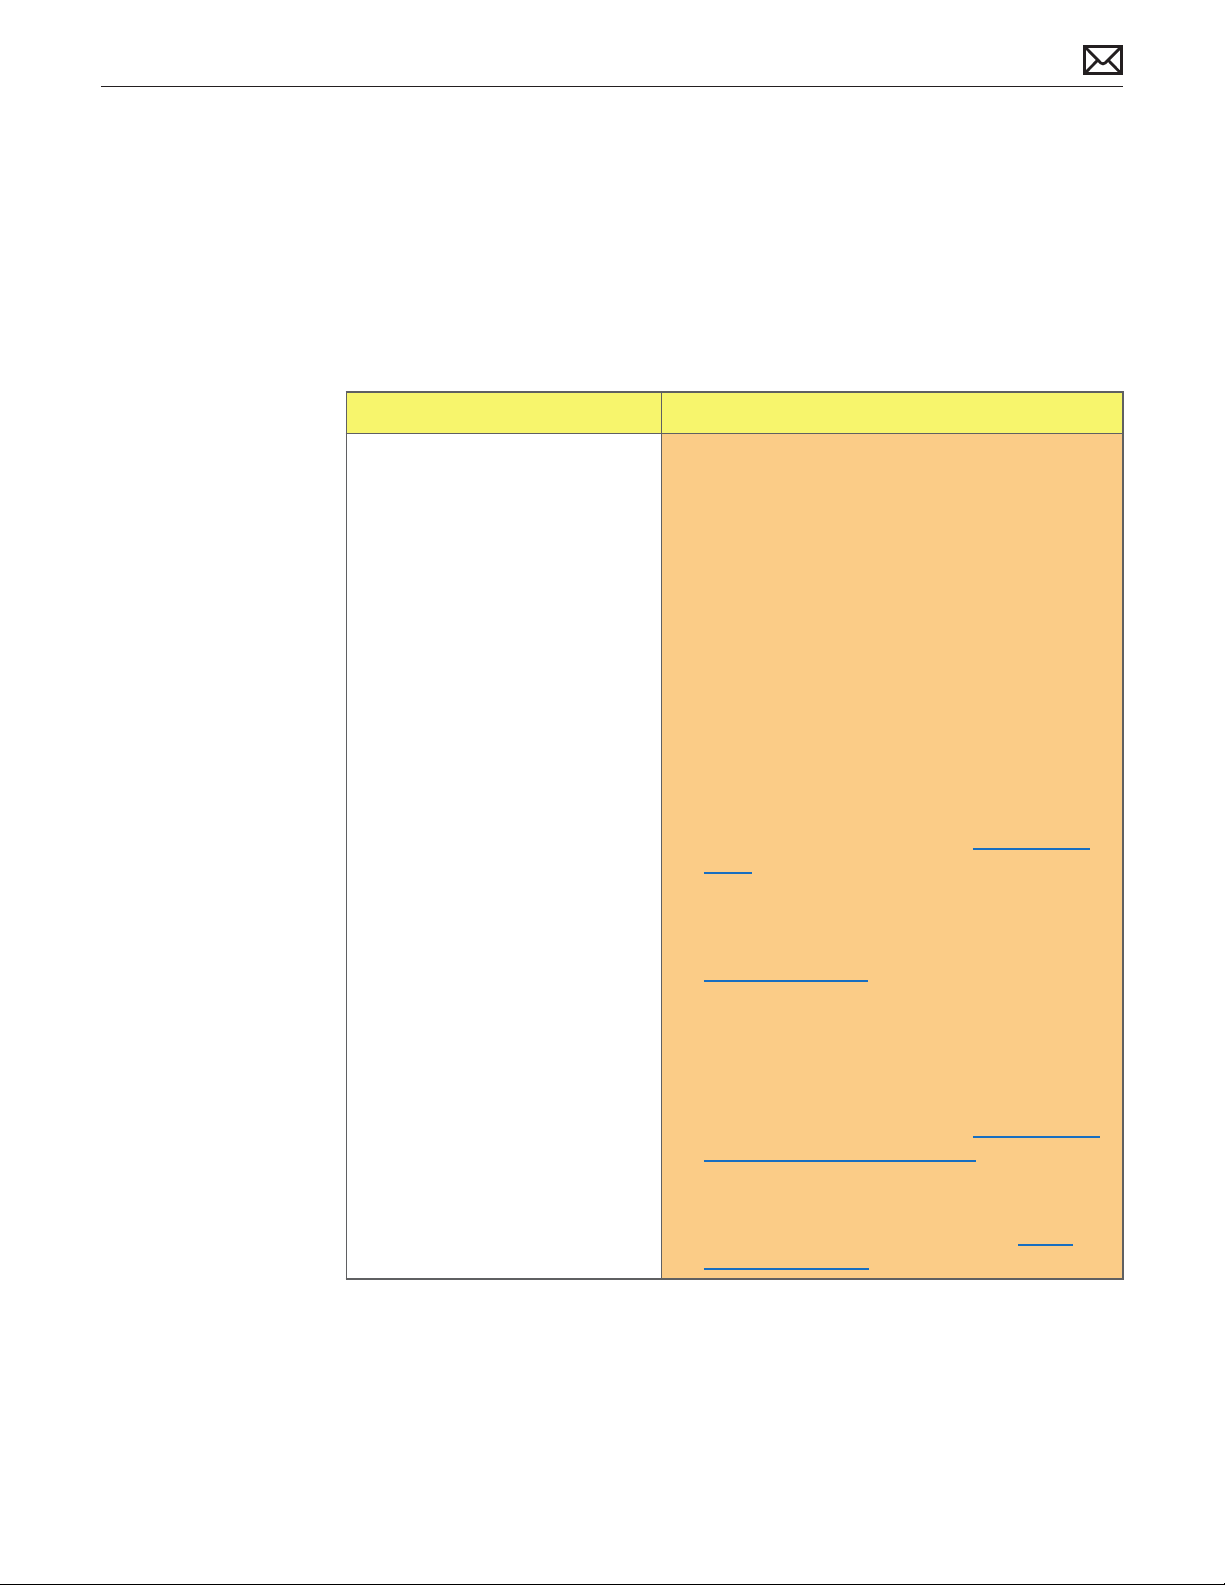
Mechanical
Noise/Hum/Vibration
Unlikely cause: LCD panel, glass panel, enclosure, cables
Quick Check
Symptoms Quick Check
Noise/Hum/Vibration
• Buzzing noise
• Rattling noise
• Ticking noise
• Squeaking noise
1. Verify that the vents on the bottom and
back of the system are free of dust and other
obstructions that might inhibit proper airow
through the system.
2. Launch Applications/Utilities/Activity Monitor.
Determine whether an application or process is
consuming a high percentage of CPU bandwidth.
CPU-intensive applications can cause the fans
to run fast in order to maintain the proper
internal system temperatures. If needed, quit the
application or restart the system to resolve the
issue.
3. Eject optical media from optical drive. Out-ofbalance optical media can generate audible
noise. To resolve try a dierent brand of media.
For additional information, go to Optical Drive
Noisy symptom ow.
4. Tilt display to hinge limits to determine if
mechanical noise is generated by the hinge
mechanism. For additional information, go to
Stand/Hinge Issues symptom ow.
5. Play sound sample at loud and soft volume
levels to determine if the noise is caused by the
left/right speakers or the amplier circuit. Plug
external headphones to identify whether the
noise comes from audio out or from other source.
For additional information, go to Audio: Built-in
Speakers Have Distorted Sound symptom ow.
2010-11-18
6. Adjust the display brightness to determine
whether the noise is related to the brightness
level. For additional information, go to Noise/
Unstable Flickering symptom ow.
iMac (21.5-inch, Late 2009) Symptom Charts — Mechanical 95
Page 96
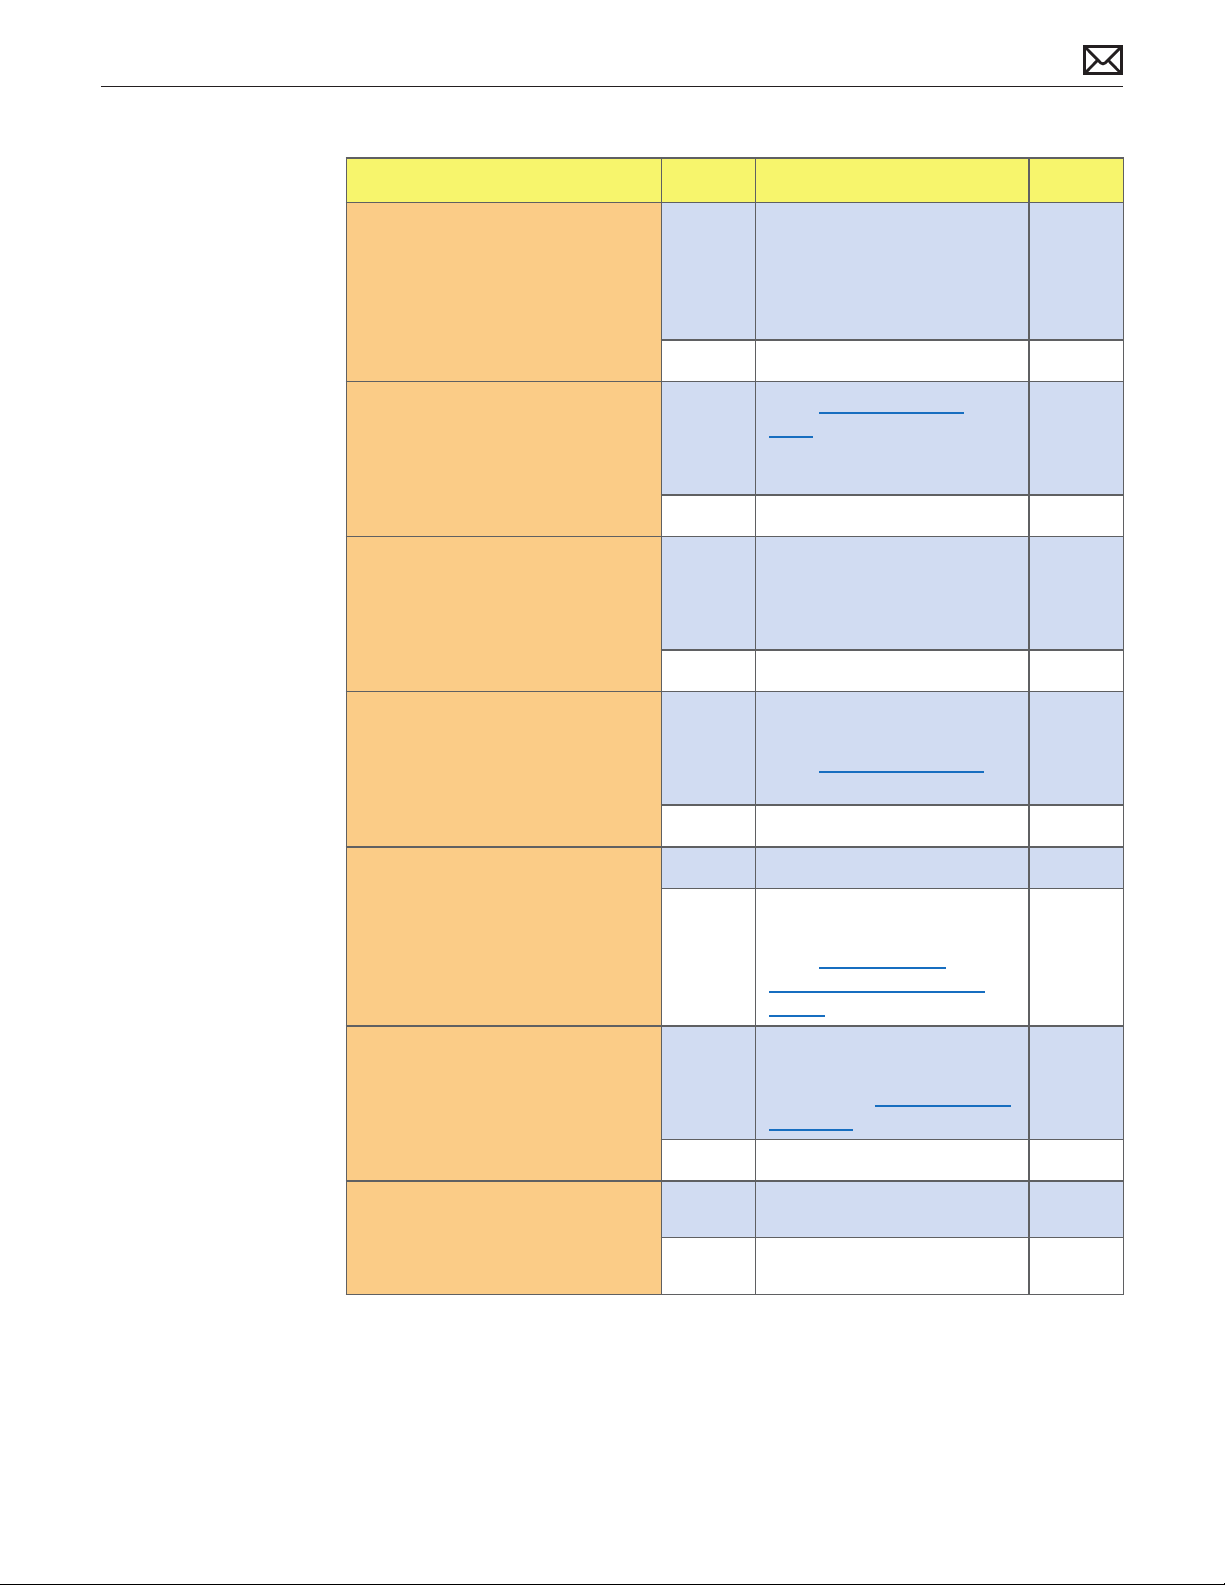
Deep Dive
Check Result Action Code
1. Verify if any tape, gasket, cable
label, or cable is touching
the fan blades and causing a
ticking noise.
2. Run Apple System Diagnostic.
Verify if running ASD generates
one or more errors.
3. Verify if noise sounds like one
or more fans are spinning faster
than expected.
4. Verify if noise changes when
optical drive is being accessed
or media is inserted or ejected.
Yes Secure the material so it
doesn’t touch fan blades. If
tape adhesive has lost its
stickiness, replace that section
of tape.
No Go to step 2.
Yes
No Go to step 3.
Yes Reset SMC by disconnecting
No Go to step 6.
Yes Suspect issue with optical
Go to ASD Error Codes
table to decode error. Follow
instructions in table for
resolving error, then retest.
power cord for ~15 seconds
then retest. If issue continues
go to step 3.
drive or media used.
Go to Optical Drive Noisy
symptom ow.
5. Mute the system volume. Verify
if issue still occurs.
6. Adjust brightness on display
between maximum and
minimum settings. Verify if
issue changes depending on
brightness level.
7. Remove fans and rotate
blades. Verify if fan blades spin
smoothly without interference
from fan housing.
No Go to step 5.
Yes Go to step 6.
No Suspect issue with speakers
or audio amplier circuitry.
Go to Audio: Built-in
Speakers Have Distorted
Sound symptom ow.
Yes Suspect issue with LCD
display or backlight controller
board. Go to Noise/Unstable
Flickering symptom ow.
No Go to step 7.
Yes Go to step 8.
No Replace aected fan. P04
2010-11-18
iMac (21.5-inch, Late 2009) Symptom Charts — Mechanical 96
Page 97

8. Reinstall fans while carefully
ensuring that there are no
cables routed under or near
fan assembly that might cause
interference with fan blades.
After reassembling system
verify if noise issue is resolved.
Yes Noise issue resolved. Suspect
issue caused by interference
from wiring or possible
distortion or fan housing
when installed in system.
No Go to step 9.
P04
9. Temporarily remove LCD
display then power ON system.
Verify if source of noise can be
located. Caution: The exposed
power supply poses a serious
shock hazard. Take proper
precautions when working
around an energized system.
10. Disconnect these major
modules/parts (hard drive,
optical drive, fans, LCD display)
one at a time then power ON
the system. Determine if noise
issue goes away when one of
the modules is disconnected.
Caution: The exposed power
supply poses a serious shock
hazard. Take proper precautions
when working around an
energized system.
Yes Identify, inspect, and if
necessary replace part that
caused noise issue.
No Go to step 10.
Yes Identify, inspect, and if
necessary replace part that
caused noise to disappear
when it was disconnected
from the system.
No All parts veried. Verify that
correct symptom ow is
being used.
P04
P04
2010-11-18
iMac (21.5-inch, Late 2009) Symptom Charts — Mechanical 97
Page 98
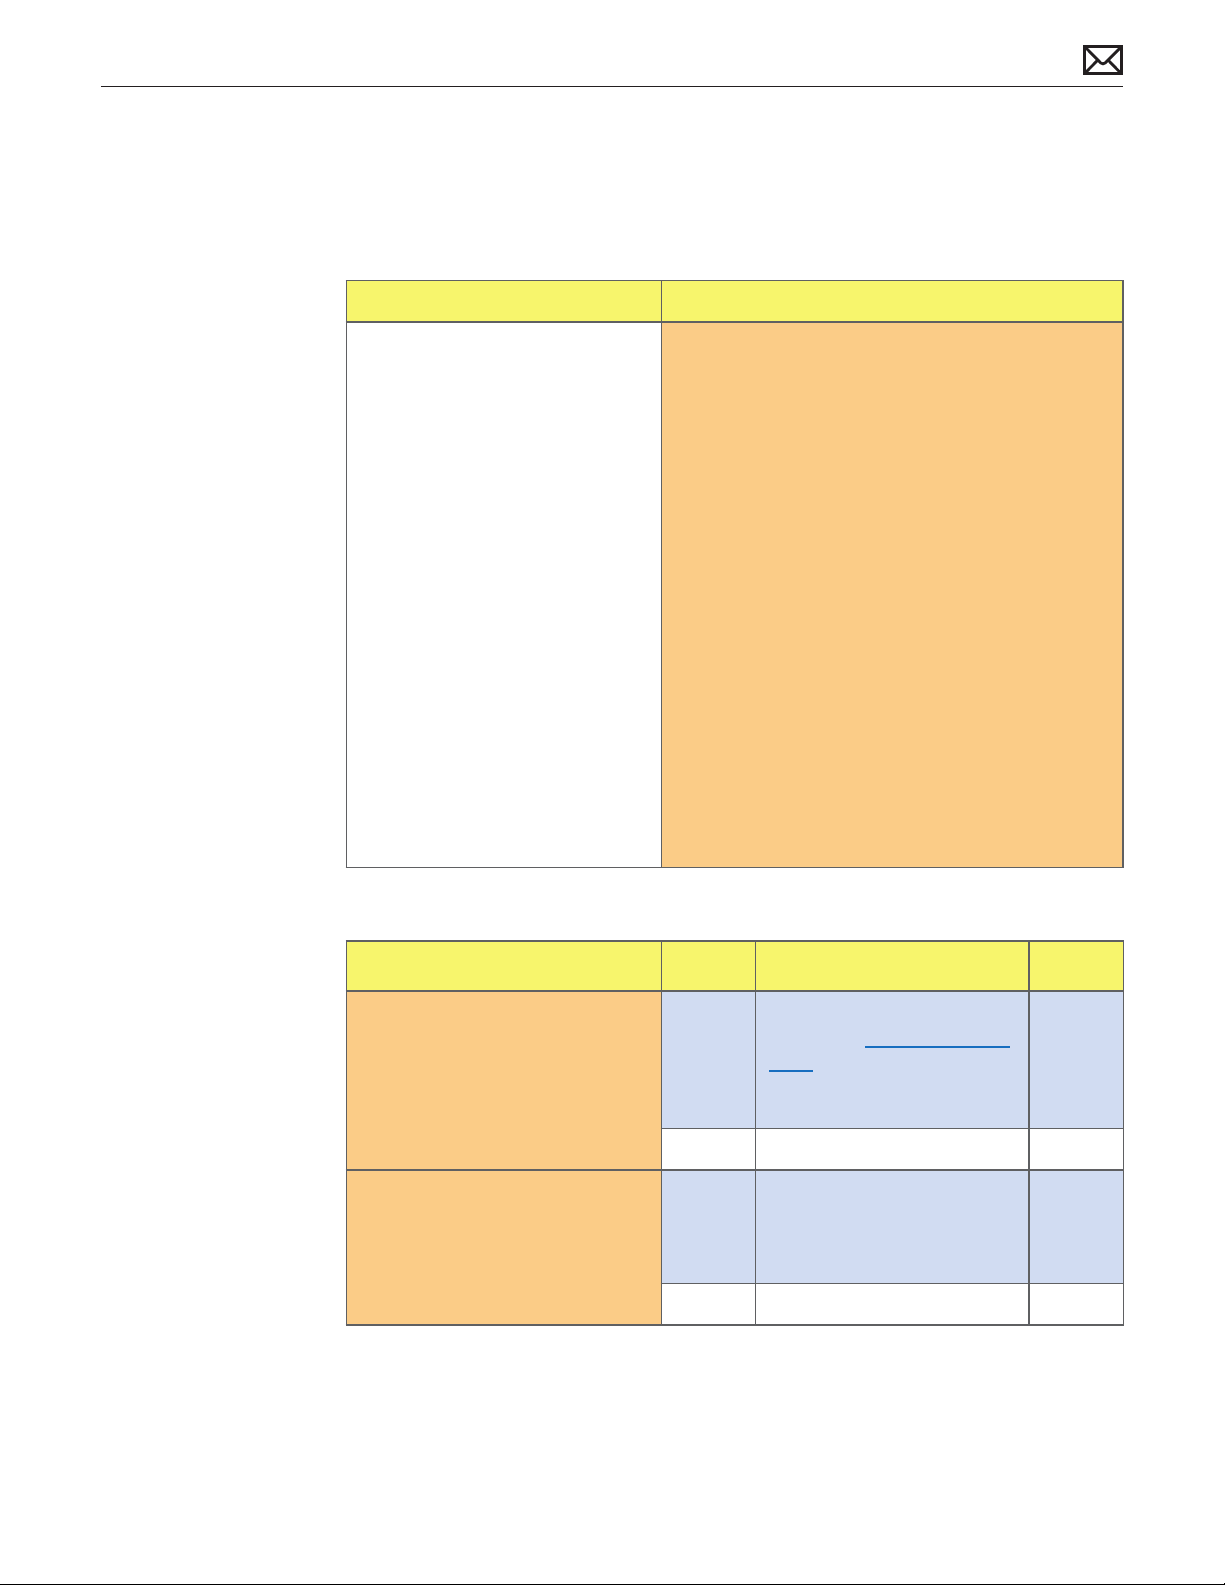
Fan Failures / Thermal Issues
Unlikely cause: speakers
Quick Check
Symptoms Quick Check
Fan Failures / Thermal Issues
• System feels very hot
• Fan(s) not operating
• Fan(s) running fast
• System is noisy
1. Verify that vents on bottom and back of system
are free of dust and other obstructions that might
inhibit proper airow through the system.
2. Verify that computer is not exposed to direct
sunlight which may heat up enclosure, making it
feel hot to the touch.
3. Verify computer is not running hotter than
expected for normal operation. If possible,
compare to a similarly congured system. Note:
Power supply is located in upper left corner
where highest temperatures can usually be felt.
4. Launch Applications/Utilities/Activity Monitor.
Verify if an application or process is consuming
a high percentage of CPU bandwidth. CPUintensive applications can cause fans to run
fast in order to maintain proper internal system
temperatures. If needed, quit the application or
restart the system to resolve issue.
5. Reset SMC by unplugging power cord for ~15
seconds.
2010-11-18
Deep Dive
Check Result Action Code
1. Run Apple System Diagnostic.
Verify if ASD generates one or
more errors.
2. Verify if noise sounds like one
or more fans running faster
than expected.
Yes
No Go to step 2.
Yes Fans running fast. Reset SMC
No Go to step 3.
iMac (21.5-inch, Late 2009) Symptom Charts — Mechanical 98
Suspect possible fan or sensor
error. Go to ASD Error Codes
table to decode error. Follow
instructions in table for
resolving error, then retest.
by disconnecting power cord
for ~15 seconds then retest. If
issue continues go to step 3.
Page 99
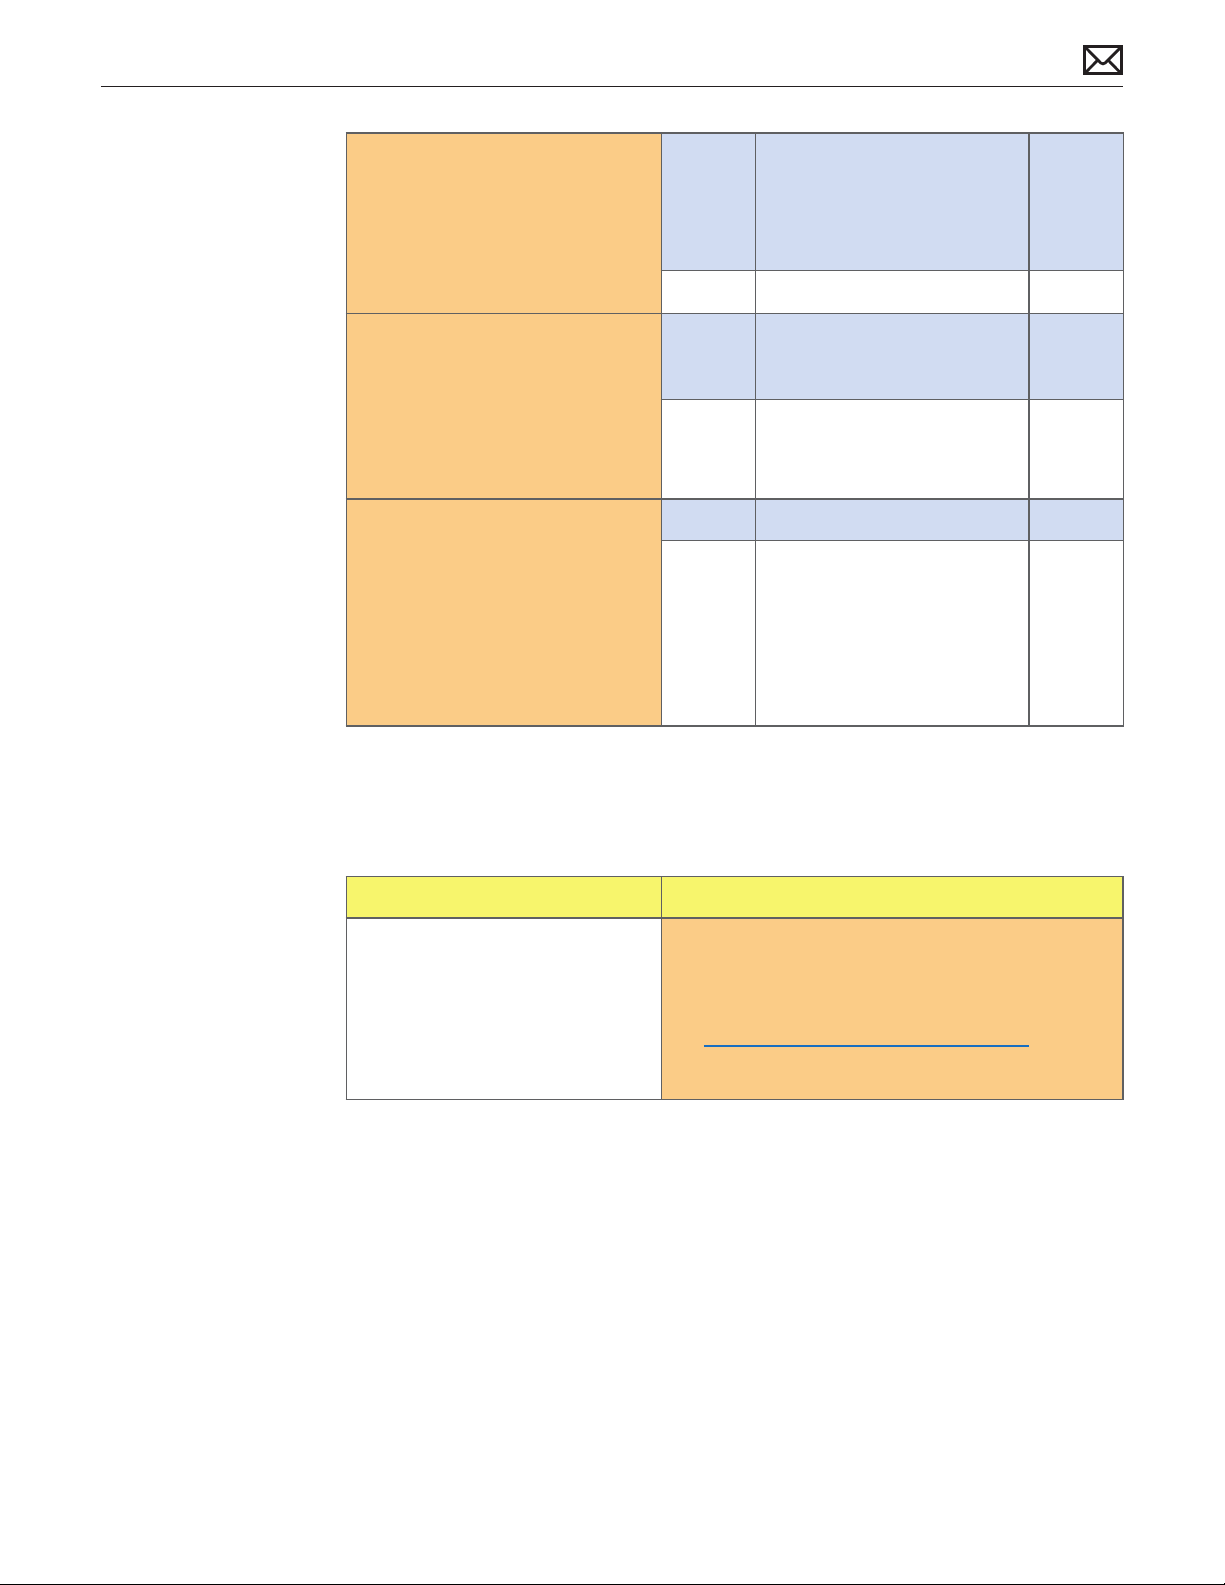
3. Verify if any tape, gasket, cable
label, or cable is touching
the fan blades and causing a
ticking noise.
Yes Secure the material so it
doesn’t touch fan blades. If
tape adhesive has lost its
stickiness, replace that section
of tape.
No Go to step 4.
4. Remove fans and rotate blades.
Check for any dust that could
be clogging the fans. Verify
if fan blades spin smoothly
without interference from fan
housing and fan blades are all
intact.
5. Run Apple Service Diagnostics
stand-alone tests in looping
mode, and verify if all sensor or
fans related tests pass.
Yes Go to step 5.
No Replace aected fan(s). P06
Yes Noise issue resolved.
No Check for correct sensors/fans
Stand/Hinge Issues
Symptoms Quick Check
P06
connections on logic board.
Check for pinched cables.
Compare with known-good
similar system, and check
for unlisted sensors. Replace
aected sensor/fan.
2010-11-18
Stand/Hinge Issues
• Bent stand
• Broken hinge
• Stripped screw/head
• Stripped screw boss
1. Determine if damage caused by user /technician
environment, accidental damage, or abuse. If
so, inform user/technician the failures are not
covered by Apple warranties. Refer to
http://www.apple.com/legal/warranty
2. For hinge noise issues replace hinge mechanism.
iMac (21.5-inch, Late 2009) Symptom Charts — Mechanical 99
Page 100
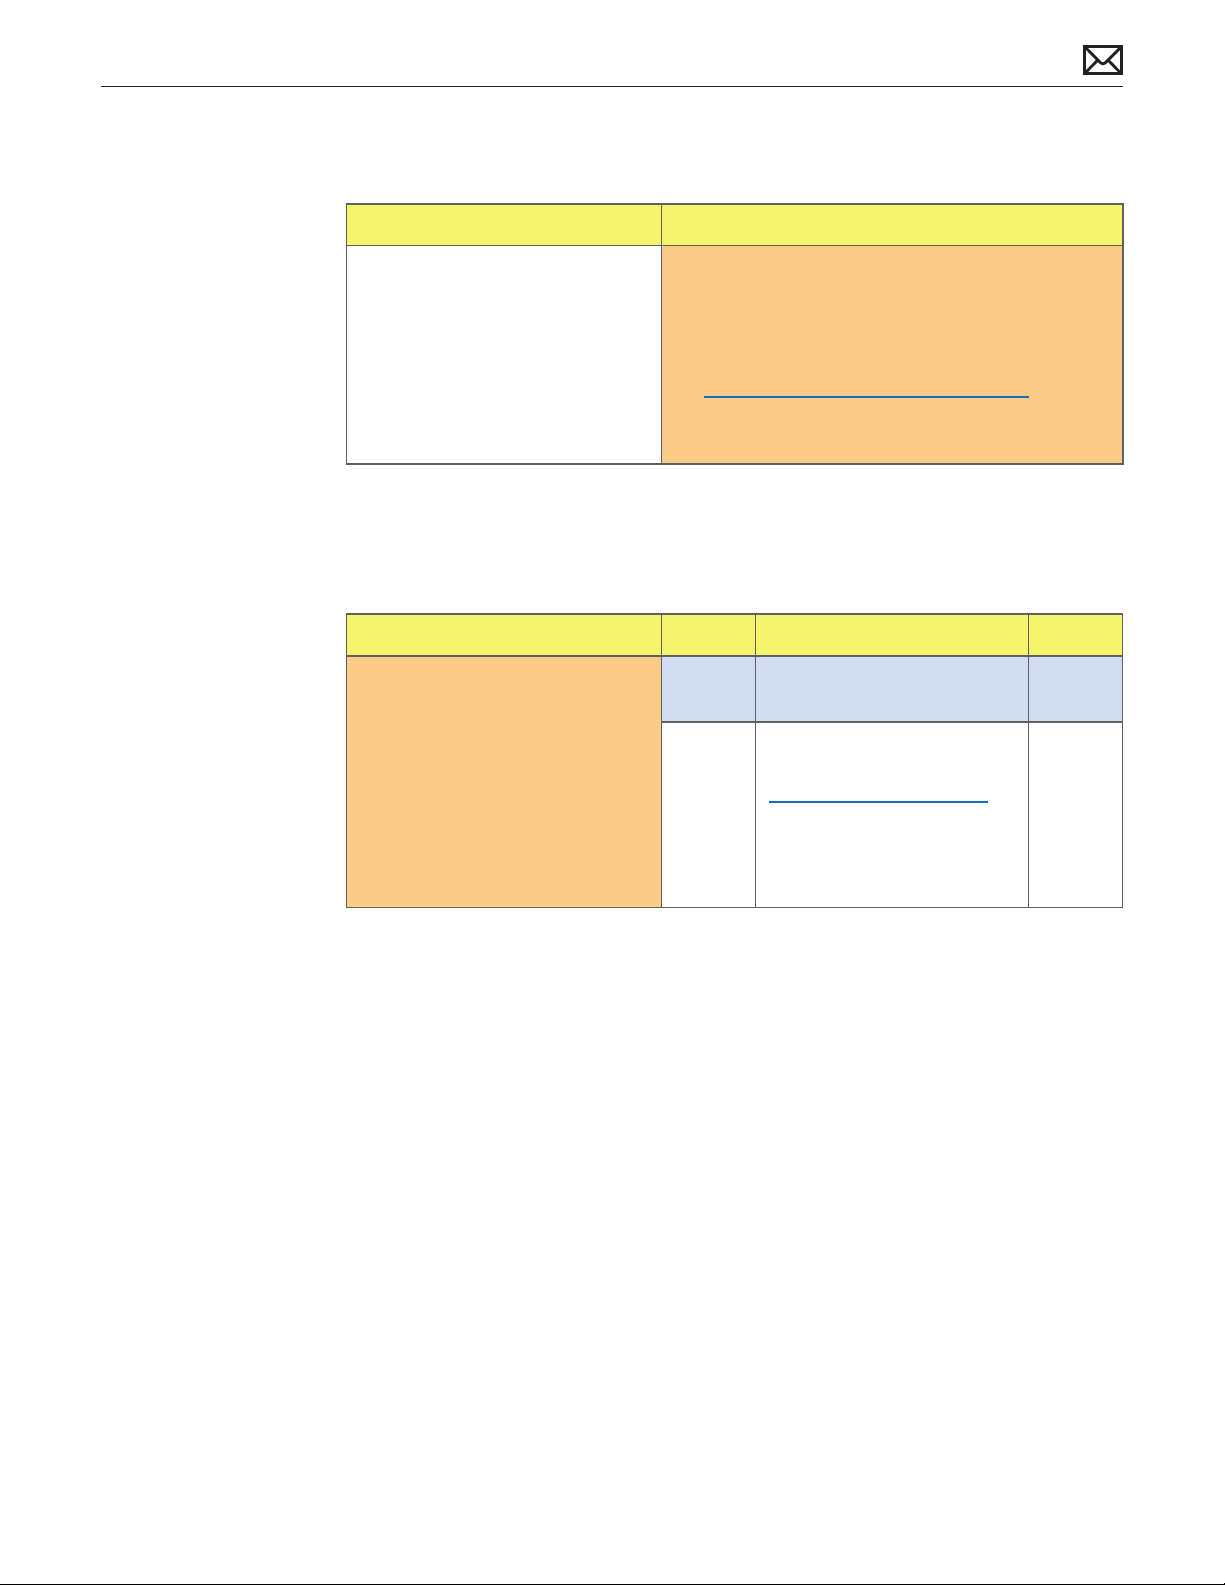
Physical Damage
Symptoms Quick Check
Physical Damage
• Broken glass
• Bent stand
• Broken hinge
• Stripped screw/head
• Stripped screw boss
• Dent or scratch to chassis
1. Verify if damage caused by user environment,
accidental damage, or abuse. If applicable inform
the user that Apple does not warrant damage
caused by accident, abuse, misuse, ood, re,
earthquake, or other external causes. Refer to:
http://www.apple.com/legal/warranty
Uncategorized Symptoms
Check Result Action Code
1. Verify if existing symptom code
applies to issue reported by
user.
Yes Jump to appropriate
symptom code ow.
No
Document reported failure
and send feedback to
stating that a suitable
symptom code wasn’t found.
Provide as much detail as
possible.
N99
2010-11-18
iMac (21.5-inch, Late 2009) Symptom Charts — Mechanical 100
 Loading...