

Page 1

iBook (Dual USB)
Keyboard
Replacement Instructions
Be sure to follow the instructions in this sheet carefully. Failure to follow these instructions
could result in damage to your equipment and may void your warranty.
Note:
Written and video instructions covering customer-installable parts are available at
http://www.info.apple.com/installparts/.
Tools Required
• coin
• #0 Phillips screwdriver
• 2.4 millimeter (mm) or 3/32-inch slotted (flat-blade) screwdriver
(if keyboard is locked)
• small soft cloth (if an optional AirPort Card is installed)
Opening the Computer
1. Place your computer on a clean, flat surface.
2. Shut down your computer.
Warning: Always turn off your computer before opening its case to avoid
damaging its internal components.
3. Disconnect the power cord and any other cables connected to the computer.
4. Close the computer, turn it over, and locate the battery latch.
Warning: Removing the battery before shutting down your computer may
result in data loss.
Use a coin to turn the battery latch 1/4 turn clockwise to unlock the battery. Gently
remove the battery.
(Figure 1)
Removing the battery will prevent you from accidentally turning on the computer.
5. Turn over the computer.
073-0614 Rev. B
Page 2

6. Raise the display so you can access the keyboard.
Warning: The internal components of your iBook may be hot. If you have been
using your iBook, wait 30 minutes after shutting it down to let the internal
components cool before continuing.
7. Make sure the keyboard locking screw, located in the small plastic tab to the left of the
Num Lock key
keyboard unlocked, so unless you or someone else locked the keyboard, you can skip
this step.
To unlock the keyboard, turn the screw 1/2 turn.
8. Release the keyboard by pulling down on the keyboard release tabs (located to the left
of the F1 and F12 keys)
and toward the display.
(Figure 2)
, is not in the locked position. Your iBook comes with the
(Figure 3)
, then lift the top portion of the keyboard up slightly,
9. Flip the keyboard over and lay it on the palm rests and trackpad.
10. Touch a metal surface on the inside of the computer to discharge any static electricity,
as shown.
Important:
touching the computer’s framework before you touch any parts or install any
components inside the computer. To avoid static electricity building back up in your
body, do not walk around the room until you have completed your installation and
closed the computer.
11. If your computer has the optional AirPort Card installed, unlatch the flexible wire
holder that secures the card.
Use the pull-tab on the card to remove it from the slot. (You do not need to
disconnect the antenna.)
To avoid scratching the computer’s case, place a soft cloth between the AirPort Card
and the surface of your iBook.
12. If an AirPort Card is not installed, unlatch the flexible wire holder to release the AirPort
Card antenna cable.
13. Remove the screws that secure the RAM shield.
(Figure 5)
To avoid electrostatic discharge damage, always ground yourself by
(Figure 6)
(Figure 7)
(Figure 4)
14. Lift the RAM shield out of the computer. Carefully pulling up on the wire holder may
help to remove the shield.
(Figure 8)
iBook (USB) Keyboard -
2
Page 3

Removing the Keyboard
1. Locate the keyboard cable connector.
2. Pull up on the connector, from side to side if needed, to disconnect it from the
computer.
3. Remove the keyboard.
(Figure 9)
Installing the Keyboard
1. Lay the replacement keyboard in the correct orientation over the keyboard opening,
then flip it toward you and lay it face down on the palm rests and trackpad to expose its
connector cable.
2. Firmly insert the keyboard cable connector into its connector on the computer.
Closing the Computer
1. Insert the RAM shield.
Verify that the end of the wire of the wire holder (where it is attached to the RAM
shield, on the keyboard side) does not catch on the side of the compartment. The
screw holes on the shield and computer should align and the shield should lay
uniformly flat.
(Figure 10)
Verify that the AirPort antenna cable routes through the notch in the RAM shield
without pinching.
2. Replace the screws.
3. If you do not have an AirPort Card, flip down the wire holder over the AirPort Card
antenna cable and secure it by inserting the prongs of the holder into the slots in the
RAM shield.
4. If you have an AirPort Card, gently slide it (with the AirPort ID number and bar code
facing up) under the wire bracket and securely into the AirPort Card slot.
5. Use the wire holder to secure the AirPort Card in place by inserting its prongs into the
slots in the RAM shield.
6. Flip the keyboard back toward the keyboard opening in the case.
7. Hold the keyboard at a
tabs on the bottom edge of the keyboard into the slot under the edge of the opening.
(Figure 13)
Important:
flush against the edge of the opening
8. Lay the keyboard flat into the keyboard opening.
(Figure 11)
(Figure 12)
45-degree angle
Make sure that all the
above the keyboard opening, and insert the
tabs are seated
.
and that the
keyboard rests
iBook (USB) Keyboard -
3
Page 4

9. Pull down on the keyboard release tabs and then press down on the top portion of the
keyboard.
10. Let go of the keyboard release tabs to secure the keyboard in place.
11. Close the display and turn the iBook over.
12. Replace the battery into the battery compartment. Hold the battery flush and use a
coin to turn the latch counterclockwise 1/4 turn to lock the battery into place.
(Figure 14)
13. Turn your iBook over and open the display.
14. Reconnect the power cord and any other cables that were connected and restart your
computer.
Note:
panel).
Warning: Never turn on your computer until it is fully reassembled. Operating
your computer with missing or unsecured parts can damage the computer or
cause injury.
(Figure 3)
You may need to reset the date and time (using the Date & Time control
Apple Computer, Inc.
© 2001 Apple Computer, Inc. All rights reserved.
Under the copyright laws, this document may not be copied, in whole or in part, without the
written consent of Apple.
The Apple logo is a trademark of Apple Computer, Inc., registered in the U.S. and other
countries. Use of the “keyboard” Apple logo (Option-Shift-K) for commercial purposes
without the prior written consent of Apple may constitute trademark infringement and
unfair competition in violation of federal and state laws.
Every effort has been made to ensure that the information in this document is accurate.
Apple is not responsible for printing or clerical errors.
Apple Computer, Inc.
1 Infinite Loop
Cupertino, CA 95014-2084
USA
+ 1 408 996 1010
http://www.apple.com
Apple, the Apple logo, and iBook are trademarks of Apple Computer, Inc., registered in the
U.S. and other countries.
iBook (USB) Keyboard -
4
Page 5
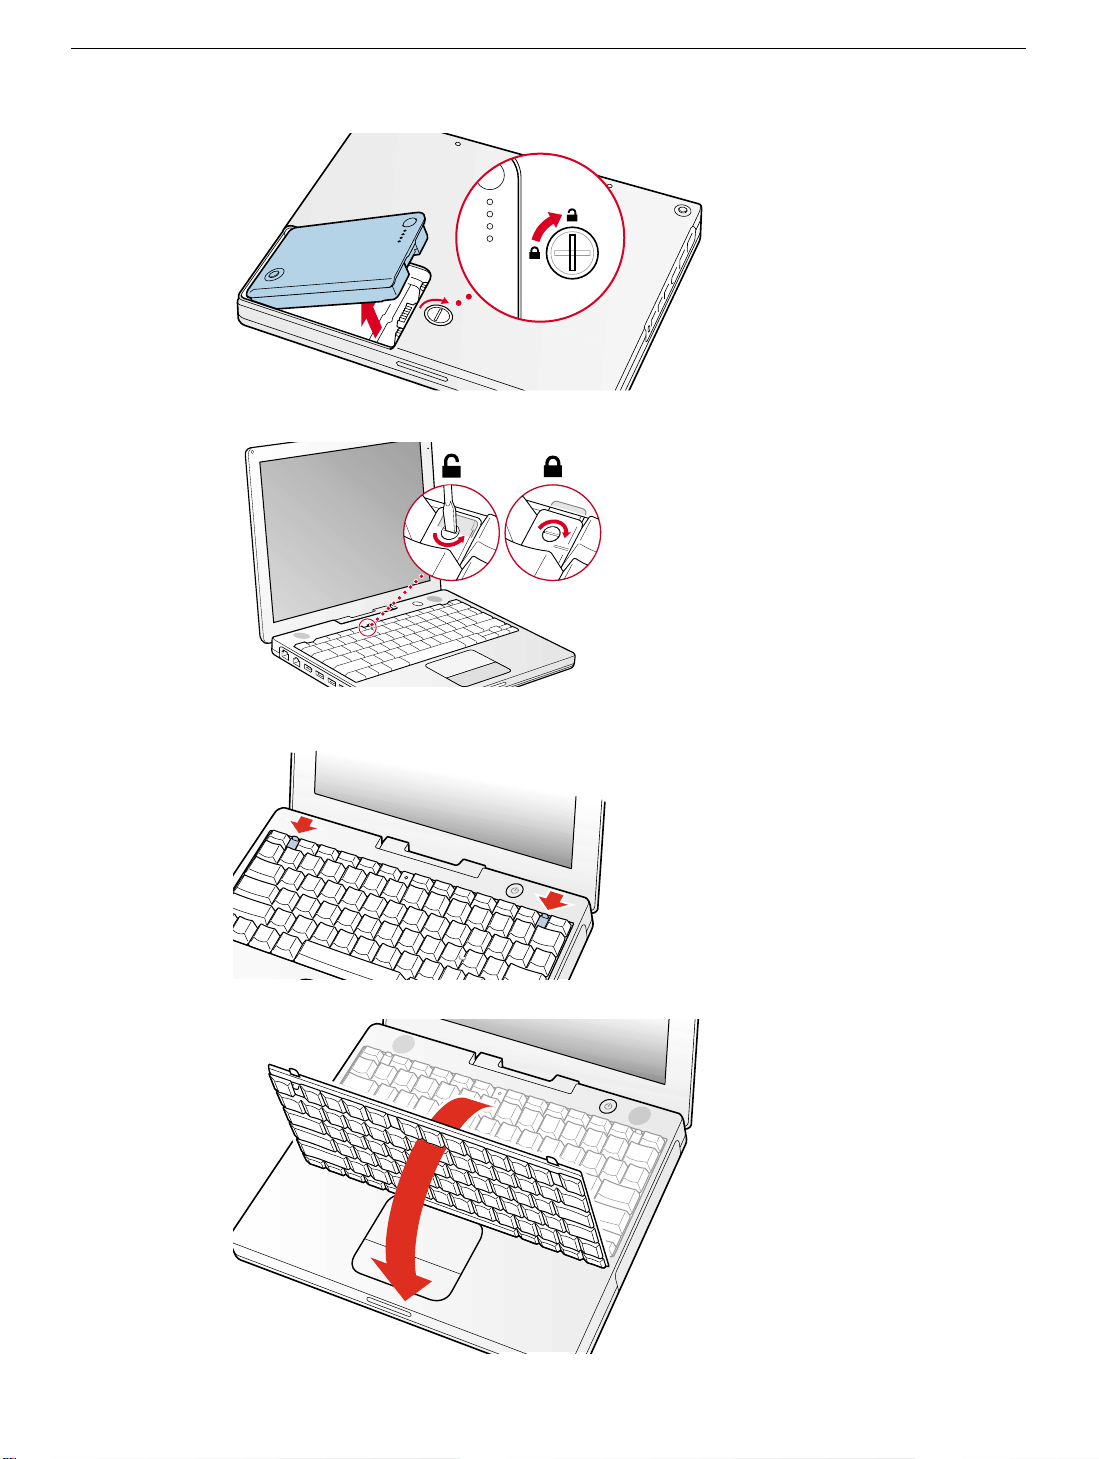
Figure 1
Figure 2
Figure 3
Figure 4
iBook (USB) Keyboard -
5
Page 6
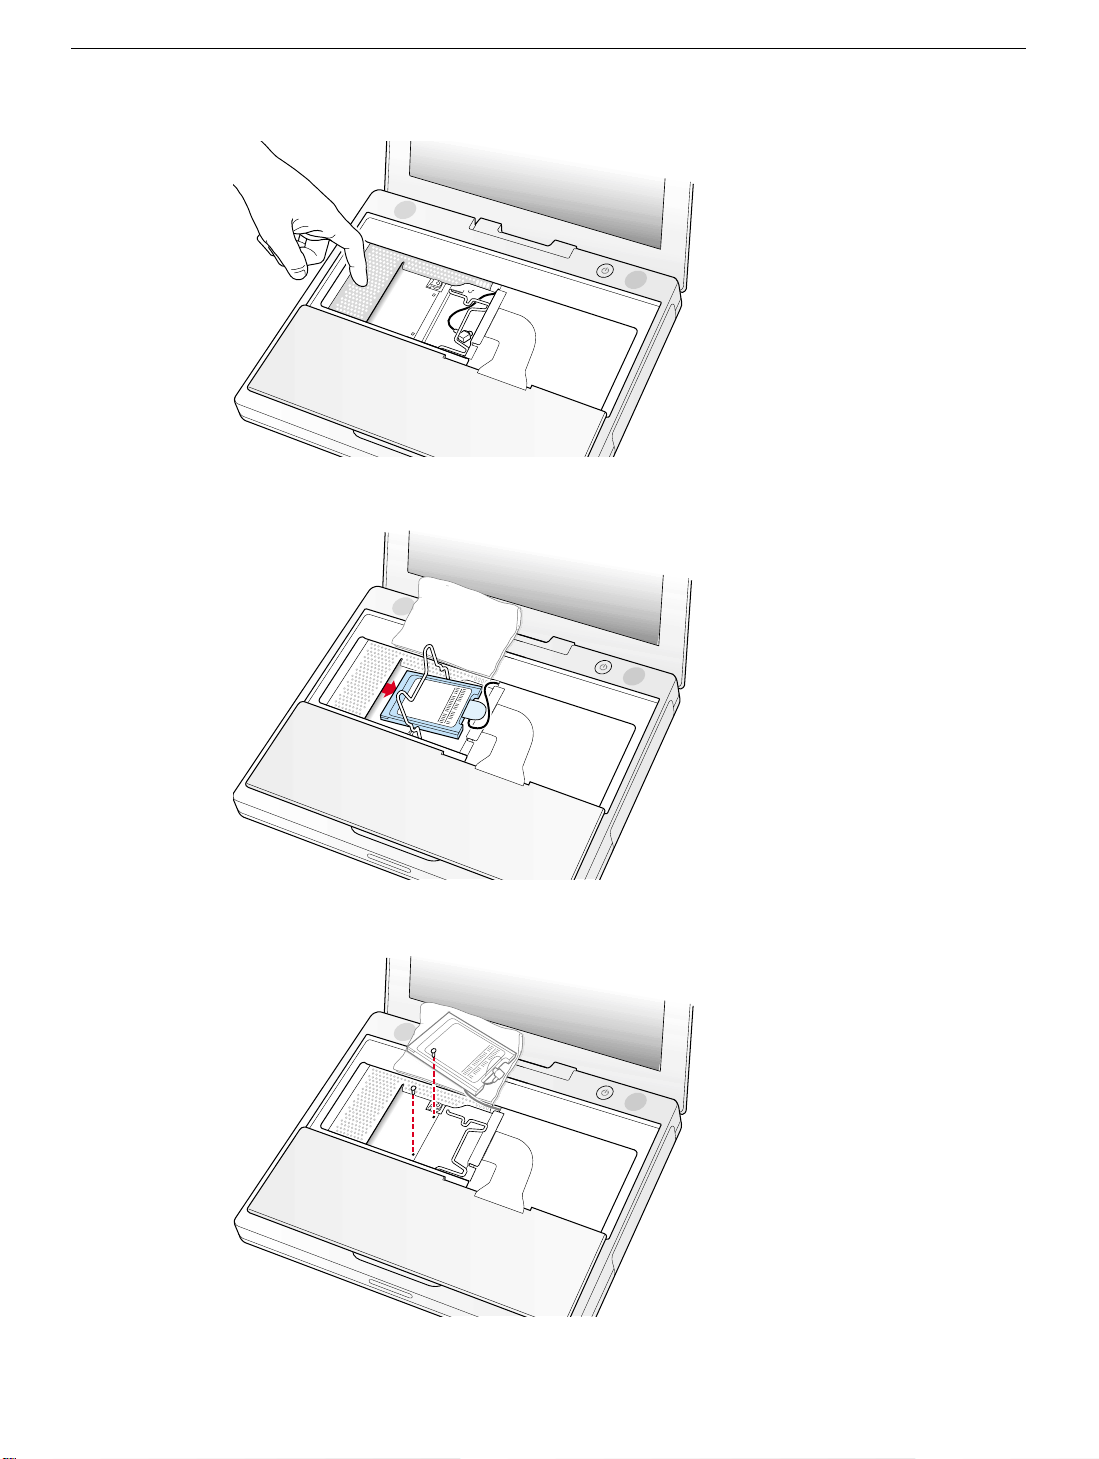
Figure 5
Figure 6
Figure 7
iBook (USB) Keyboard -
6
Page 7
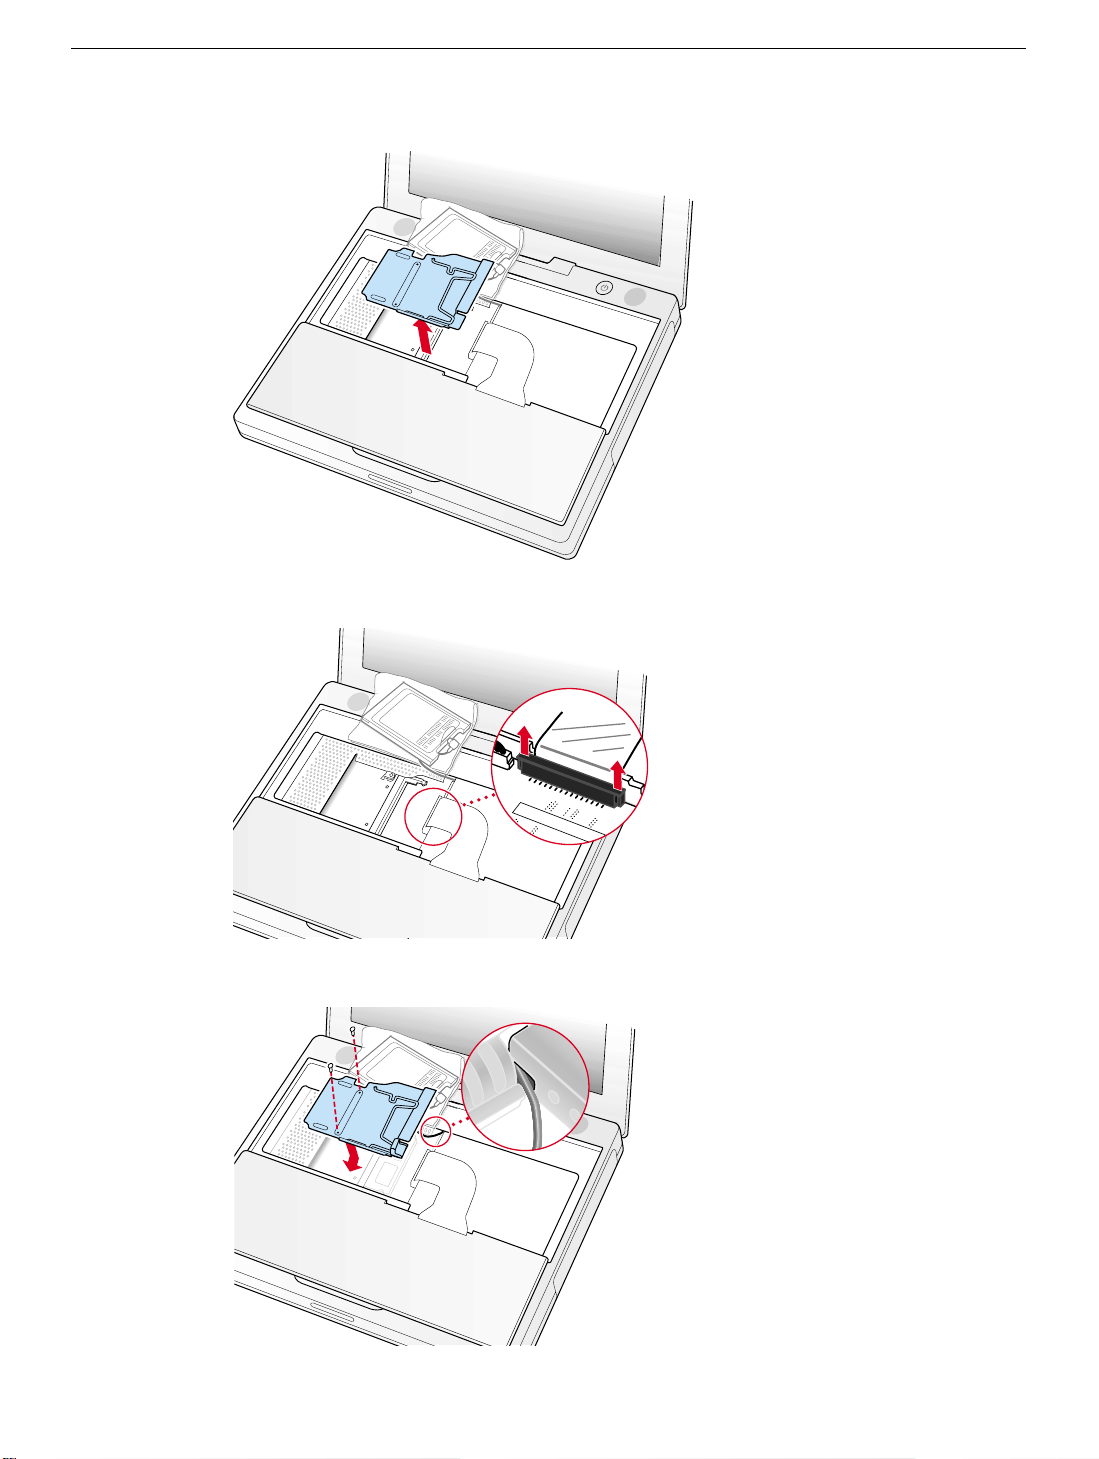
Figure 8
Figure
9
Figure 10
iBook (USB) Keyboard -
7
Page 8
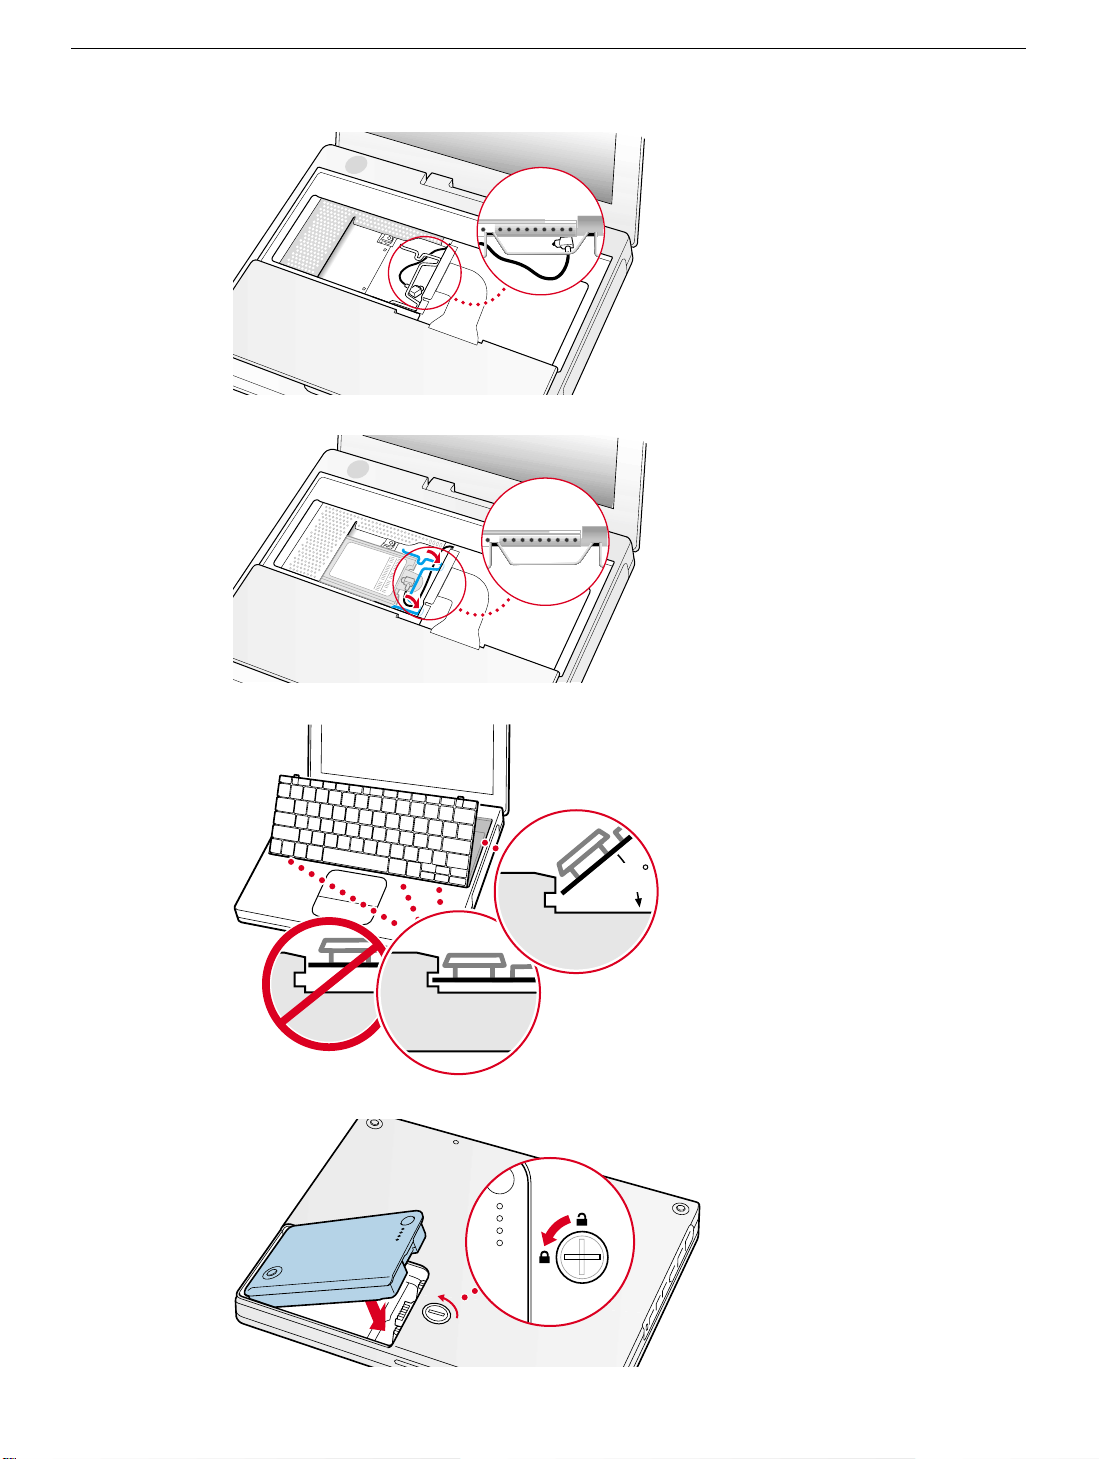
Figure 11
45
Figure 12
Figure 13
Figure 14
iBook (USB) Keyboard -
8
Page 9

iBook (Dual USB)
AirPort Card
Replacement Instructions
Be sure to follow the instructions in this sheet carefully. Failure to follow these instructions
could result in damage to your equipment and may void your warranty.
If you are adding an AirPort Card rather than replacing one, skip the section “Removing
the AirPort Card.”
Note:
Written and video instructions covering customer-installable parts are available at
http://www.info.apple.com/installparts/.
Tools Required
• coin
• 2.4 millimeter (mm) or 3/32-inch slotted (flat-blade) screwdriver
(if keyboard is locked)
Opening the Computer
1. Place your computer on a clean, flat surface.
2. Shut down your computer.
Warning: Always turn off your computer before opening its case to avoid
damaging its internal components.
3. Disconnect the power cord and any other cables connected to the computer.
4. Close the computer, turn it over, and locate the battery latch.
Warning: Removing the battery before shutting down your computer may
result in data loss.
Use a coin to turn the battery latch 1/4 turn clockwise to unlock the battery. Gently
remove the battery.
(Figure 1)
Removing the battery will prevent you from accidentally turning on the computer.
5. Turn over the computer.
Page 10

6. Raise the display so you can access the keyboard.
Warning: The internal components of your iBook may be hot. If you have been
using your iBook, wait 30 minutes after shutting it down to let the internal
components cool before continuing.
7. Make sure the keyboard locking screw, located in the small plastic tab to the left of the
Num Lock key
keyboard unlocked, so unless you or someone else locked the keyboard, you can skip
this step.
To unlock the keyboard, turn the screw 1/2 turn.
8. Release the keyboard by pulling down on the keyboard release tabs (located to the left
of the F1 and F12 keys)
and toward the display.
(Figure 2)
, is not in the locked position. Your iBook comes with the
(Figure 3)
, then lift the top portion of the keyboard up slightly,
9. Flip the keyboard over and lay it on the palm rests and trackpad.
10. Touch a metal surface on the inside of the computer to discharge any static electricity,
as shown.
Important:
touching the computer’s framework before you touch any parts or install any
components inside the computer. To avoid static electricity building back up in your
body, do not walk around the room until you have completed the installation and
closed the computer.
(Figure 5)
To avoid electrostatic discharge damage, always ground yourself by
(Figure 4)
Removing the AirPort Card
1. Unlatch the flexible wire holder that secures the card.
2. Use the pull-tab on the card to remove it from the slot.
3. Disconnect the antenna cable from the AirPort Card by pulling straight back on its
connector.
(Figure 6)
Installing the AirPort Card
1. If the AirPort Card came with the AirPort adapter
and pull the AirPort Card (B) from the adapter (C). The adapter and metal clip are not
used with your iBook.
(Figure 7)
, remove the metal clip (A)
2. Locate the AirPort antenna cable connector and plug it into the port (located just
below the pull-tab) on the end of the AirPort Card. Make sure the connector is straight
before inserting it into the card.
3. To install the AirPort Card, gently slide it (with the AirPort ID number and bar code
facing up) under the wire bracket and securely into the AirPort Card slot.
4. Use the wire holder to secure the AirPort Card in place by inserting its prongs into the
slots in the RAM shield.
(Figure 9)
(Figure 8)
iBook (Dual USB) AirPort Card -
2
Page 11

Closing the Computer
1. Flip the keyboard back toward the keyboard opening in the case.
2. Hold the keyboard at a
tabs on the bottom edge of the keyboard into the slot under the edge of the opening.
(Figure 10)
Important:
flush against the edge of the opening
3. Lay the keyboard flat into the keyboard opening.
4. Pull down on the keyboard release tabs and then press down on the top portion of the
keyboard.
5. Let go of the keyboard release tabs to secure the keyboard in place.
6. Close the display and turn the iBook over.
7. Replace the battery into the battery compartment. Hold the battery flush and use a
coin to turn the latch counterclockwise 1/4 turn to lock the battery into place.
(Figure 11)
8. Turn your iBook over and open the display.
9. Reconnect the power cord and any other cables that were connected and restart your
computer.
Note:
panel).
Make sure that all the
(Figure 3)
You may need to reset the date and time (using the Date & Time control
45-degree angle
tabs are seated
above the keyboard opening, and insert the
and that the
.
keyboard rests
Warning: Never turn on your computer until it is fully reassembled. Operating
your computer with missing or unsecured parts can damage the computer or
cause injury.
iBook (Dual USB) AirPort Card -
3
Page 12

Apple Computer, Inc.
© 2001 Apple Computer, Inc. All rights reserved.
Under the copyright laws, this document may not be copied, in whole or in part, without the
written consent of Apple.
The Apple logo is a trademark of Apple Computer, Inc., registered in the U.S. and other
countries. Use of the “keyboard” Apple logo (Option-Shift-K) for commercial purposes
without the prior written consent of Apple may constitute trademark infringement and
unfair competition in violation of federal and state laws.
Every effort has been made to ensure that the information in this document is accurate.
Apple is not responsible for printing or clerical errors.
Apple Computer, Inc.
1 Infinite Loop
Cupertino, CA 95014-2084
USA
+ 1 408 996 1010
http://www.apple.com
Apple, the Apple logo, and iBook are trademarks of Apple Computer, Inc., registered in the
U.S. and other countries.
AirPort is a trademark of Apple Computer, Inc.
iBook (Dual USB) AirPort Card -
4
Page 13
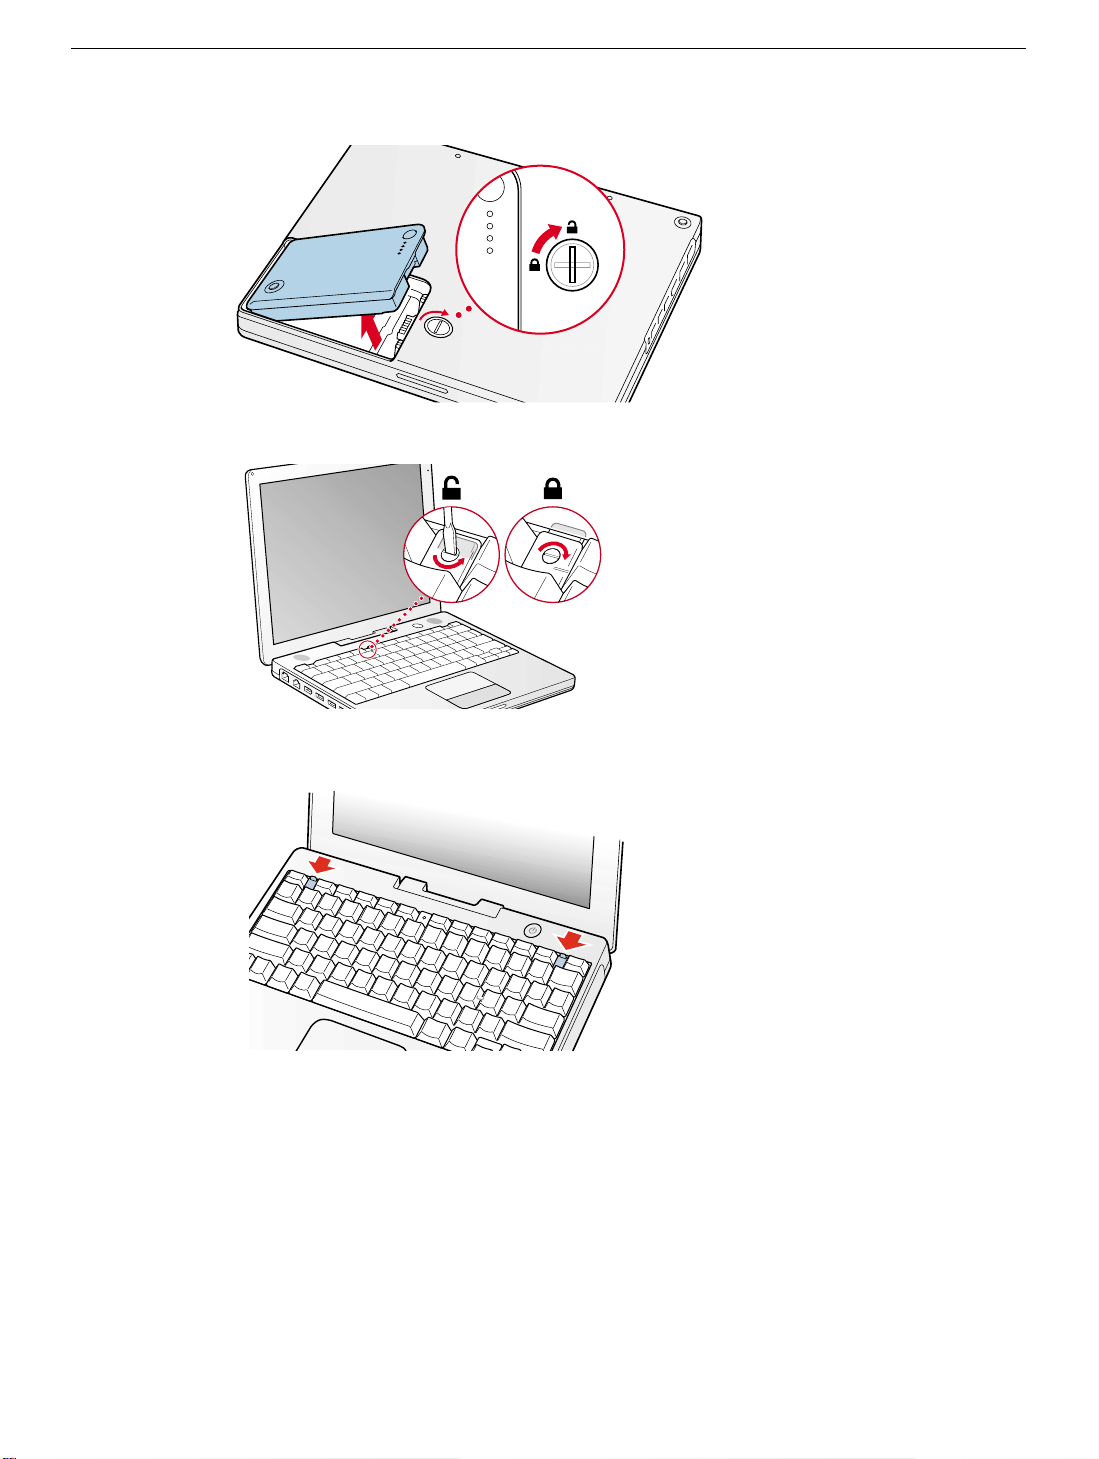
Figure 1
Figure 2
Figure 3
iBook (Dual USB) AirPort Card -
5
Page 14
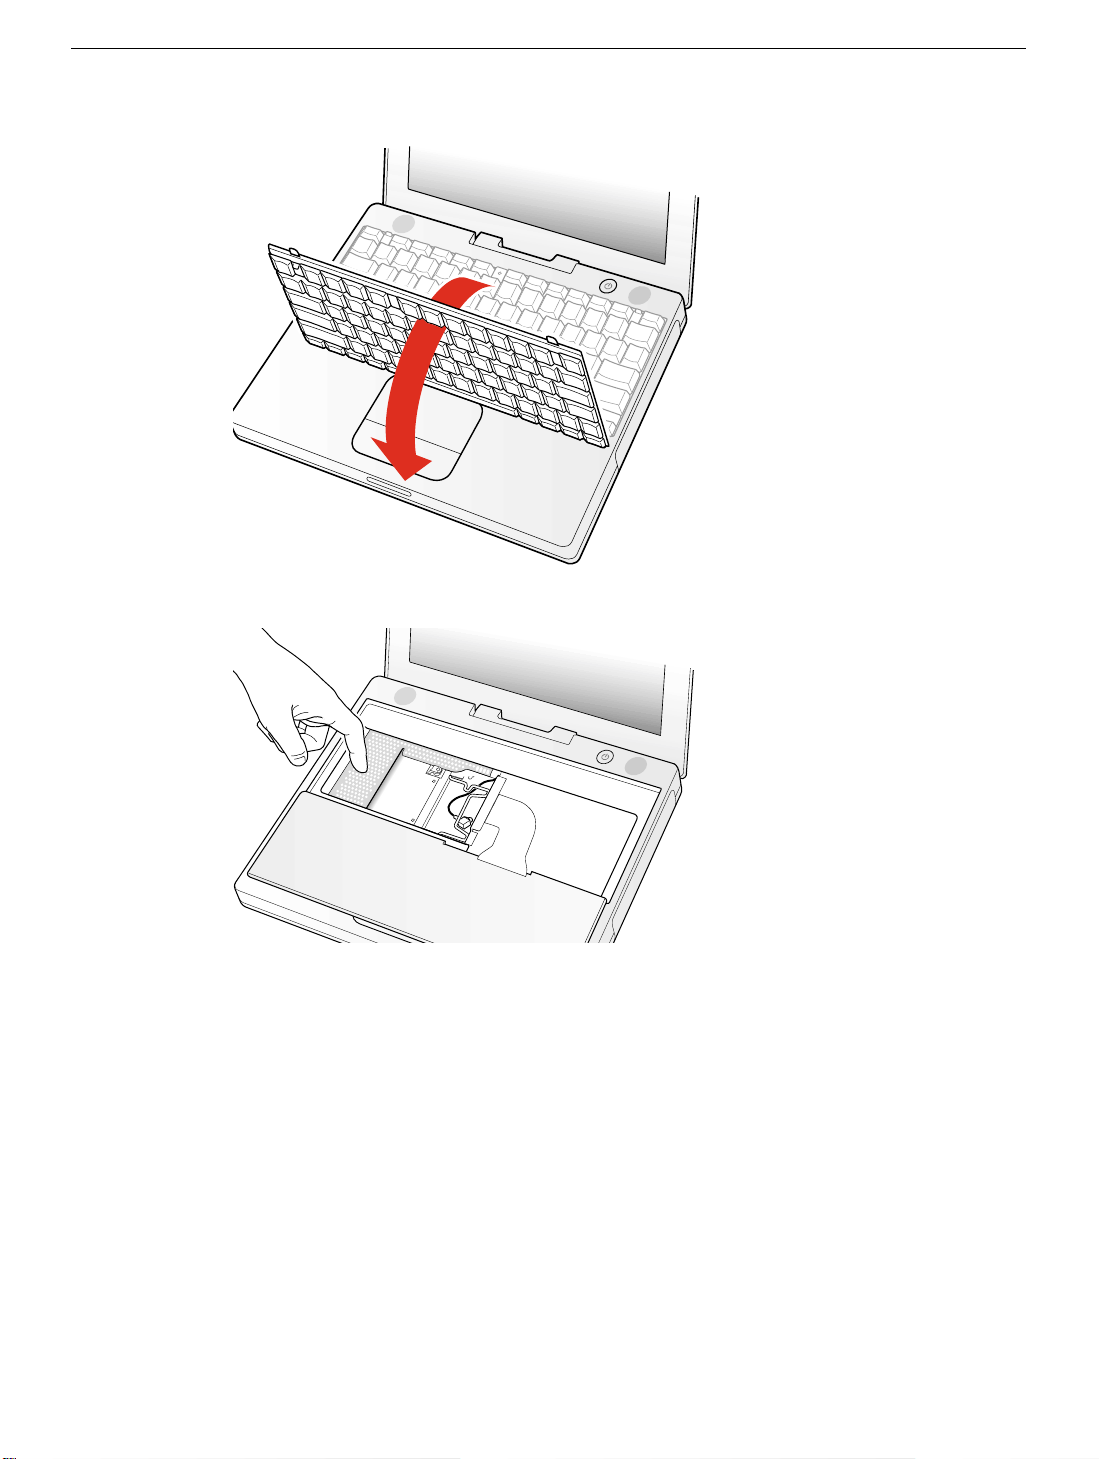
Figure 4
Figure 5
iBook (Dual USB) AirPort Card -
6
Page 15
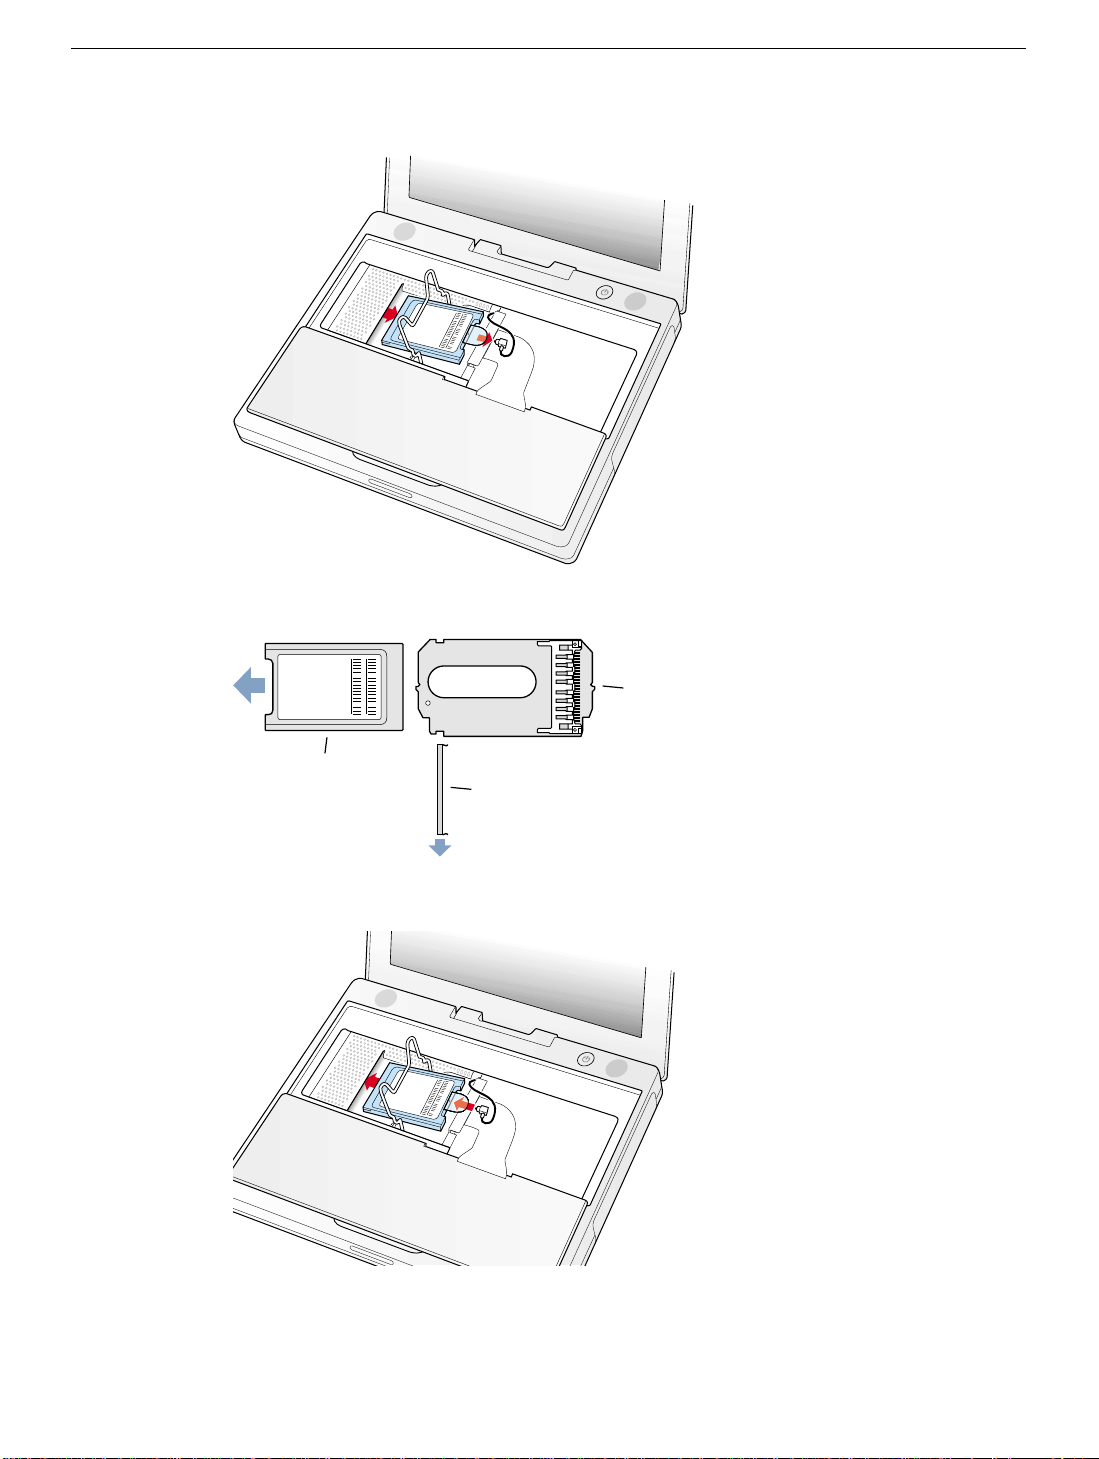
Figure 6
Figure
7
Figure 8
C
B
A
iBook (Dual USB) AirPort Card -
7
Page 16
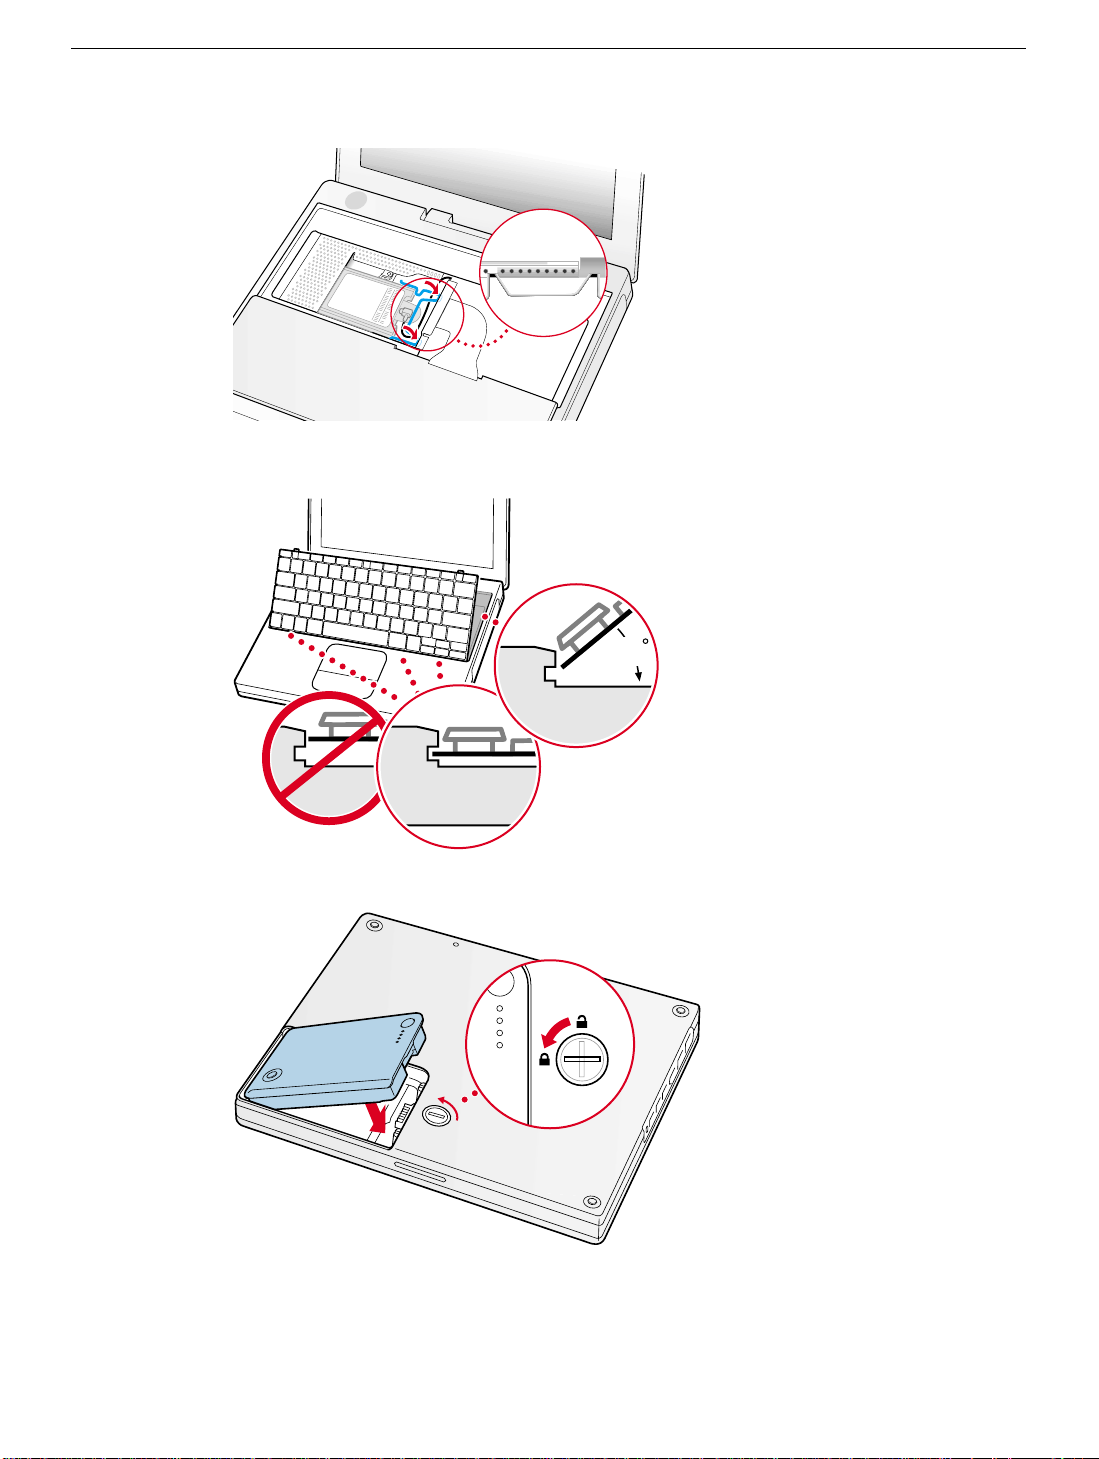
Figure 9
45
Figure 10
Figure 11
iBook (Dual USB) AirPort Card -
8
Page 17

iBook (Dual USB)
Memory (RAM)
Replacement Instructions
Be sure to follow the instructions in this sheet carefully. Failure to follow these instructions
could result in damage to your equipment and may void your warranty.
If you are adding memory rather than replacing it, skip the section “Removing the Memory
Card.”
Warning: When removing or installing a memory card, do not touch its gold
connectors. Handle the card only by the edges.
Note:
Written and video instructions covering customer-installable parts are available at
http://www.info.apple.com/installparts/.
Tools Required
• coin
• #0 Phillips screwdriver
• 2.4 millimeter (mm) or 3/32-inch slotted (flat-blade) screwdriver
(if keyboard is locked)
• small soft cloth (if an optional AirPort Card is installed)
Opening the Computer
1. Place your computer on a clean, flat surface.
2. Shut down your computer.
Warning: Always turn off your computer before opening its case to avoid
damaging its internal components.
3. Disconnect the power cord and other cables connected to the computer.
4. Close the computer, turn it over, and locate the battery latch.
(Figure 1)
Warning: Removing the battery before shutting down your computer may
result in data loss.
Use a coin to turn the battery latch 1/4 turn clockwise to unlock the battery. Gently
remove the battery.
Removing the battery will prevent you from accidentally turning on the computer.
Page 18

5. Turn over the computer.
6. Raise the display so you can access the keyboard.
Warning: The internal components of your iBook may be hot. If you have been
using your iBook, wait 30 minutes after shutting it down to let the internal
components cool before continuing.
7. Make sure the keyboard locking screw, located in the small plastic tab to the left of the
Num Lock key
keyboard unlocked, so unless you or someone else locked the keyboard, you can skip
this step.
To unlock the keyboard, turn the screw 1/2 turn.
8. Release the keyboard by pulling down on the keyboard release tabs (located to the left
of the F1 and F12 keys)
and toward the display.
(Figure 2)
, is not in the locked position. Your iBook comes with the
(Figure 3)
, then lift the top portion of the keyboard up slightly,
9. Flip the keyboard over and lay it on the palm rests and trackpad.
10. Touch a metal surface on the inside of the computer to discharge any static electricity,
as shown.
Important:
touching the computer’s framework before you touch any parts or install any
components inside the computer. To avoid static electricity building back up in your
body, do not walk around the room until you have completed your installation and
closed the computer.
11. If your computer has the optional AirPort Card installed, unlatch the flexible wire
holder that secures the card.
Use the pull-tab on the card to remove it from the slot. (You do not need to
disconnect the antenna.)
To avoid scratching the computer’s case, place a soft cloth between the AirPort Card
and the surface of your iBook.
12. If an AirPort Card is not installed, unlatch the flexible wire holder to release the AirPort
Card antenna cable.
13. Remove the screws that secure the RAM shield.
(Figure 5)
To avoid electrostatic discharge damage, always ground yourself by
(Figure 6)
(Figure 7)
(Figure 4)
14. Lift the RAM shield out of the computer. Carefully pulling up on the wire holder may
help to remove the shield.
(Figure 8)
Removing the Memory Card
1. Touch a metal surface on the inside of the computer to discharge any static electricity
built up on your body.
2. Locate the RAM expansion slot.
(Figure 5)
iBook (USB) Memory -
2
Page 19

3. Remove the existing memory card.
Locate the brackets that secure the memory card on both sides. Carefully spread the
brackets apart until the card releases on each side. Pull the card up and out.
(Figure 9)
Installing the Memory Card
1. Touch a metal surface on the inside of the computer to discharge any static electricity
built up on your body.
2. To install a memory card, line up the notch in the card with the small tab in the
memory slot. Hold the card at a
it is firmly seated.
Note:
If you feel resistance when inserting the card, try pushing one side at a time.
3. Gently push the top of the card down until the brackets snap onto both sides of the
memory card to lock it into place.
(Figure 5)
(Figure 10)
30-degree angle
(Figure 11)
, then push the card into the slot until
Closing the Computer
1. Insert the RAM shield.
Verify that the end of the wire of the wire holder (where it is attached to the RAM
shield, on the keyboard side) does not catch on the side of the compartment. The
screw holes on the shield and computer should align and the shield should lay
uniformly flat.
Verify that the AirPort antenna cable routes through the notch in the RAM shield
without pinching.
2. Replace the screws.
3. If you do not have an AirPort Card, flip down the wire holder over the AirPort Card
antenna cable and secure it by inserting the prongs of the holder into the slots in the
RAM shield.
4. If you have an AirPort Card, gently slide it (with the AirPort ID number and bar code
facing up) under the wire bracket and securely into the AirPort Card slot.
5. Use the wire holder to secure the AirPort Card in place by inserting its prongs into the
slots in the RAM shield.
6. Flip the keyboard back toward the keyboard opening in the case.
7. Hold the keyboard at a
tabs on the bottom edge of the keyboard into the slot under the edge of the opening.
(Figure 13)
(Figure 12)
(Figure 14)
45-degree angle
above the keyboard opening, and insert the
Important:
flush against the edge of the opening. (Figure 15)
8. Lay the keyboard flat into the keyboard opening.
Make sure that all the
tabs are seated
and that the
iBook (USB) Memory -
keyboard rests
3
Page 20

9. Pull down on the keyboard release tabs and then press down on the top portion of the
keyboard.
10. Let go of the keyboard release tabs to secure the keyboard in place.
11. Close the display and turn the iBook over.
12. Replace the battery into the battery compartment. Hold the battery flush and use a
coin to turn the latch counterclockwise 1/4 turn to lock the battery into place.
(Figure 16)
13. Turn your iBook over and open the display.
14. Reconnect the power cord and any other cables that were connected and restart your
computer.
Note:
panel).
Warning: Never turn on your computer until it is fully reassembled. Operating
your computer with missing or unsecured parts can damage the computer or
cause injury.
(Figure 3)
You may need to reset the date and time (using the Date & Time control
Apple Computer, Inc.
© 2001 Apple Computer, Inc. All rights reserved.
Under the copyright laws, this document may not be copied, in whole or in part, without the
written consent of Apple.
The Apple logo is a trademark of Apple Computer, Inc., registered in the U.S. and other
countries. Use of the “keyboard” Apple logo (Option-Shift-K) for commercial purposes
without the prior written consent of Apple may constitute trademark infringement and
unfair competition in violation of federal and state laws.
Every effort has been made to ensure that the information in this document is accurate.
Apple is not responsible for printing or clerical errors.
Apple Computer, Inc.
1 Infinite Loop
Cupertino, CA 95014-2084
USA
+ 1 408 996 1010
http://www.apple.com
Apple, the Apple logo, and iBook are trademarks of Apple Computer, Inc., registered in the
U.S. and other countries.
iBook (USB) Memory -
4
Page 21
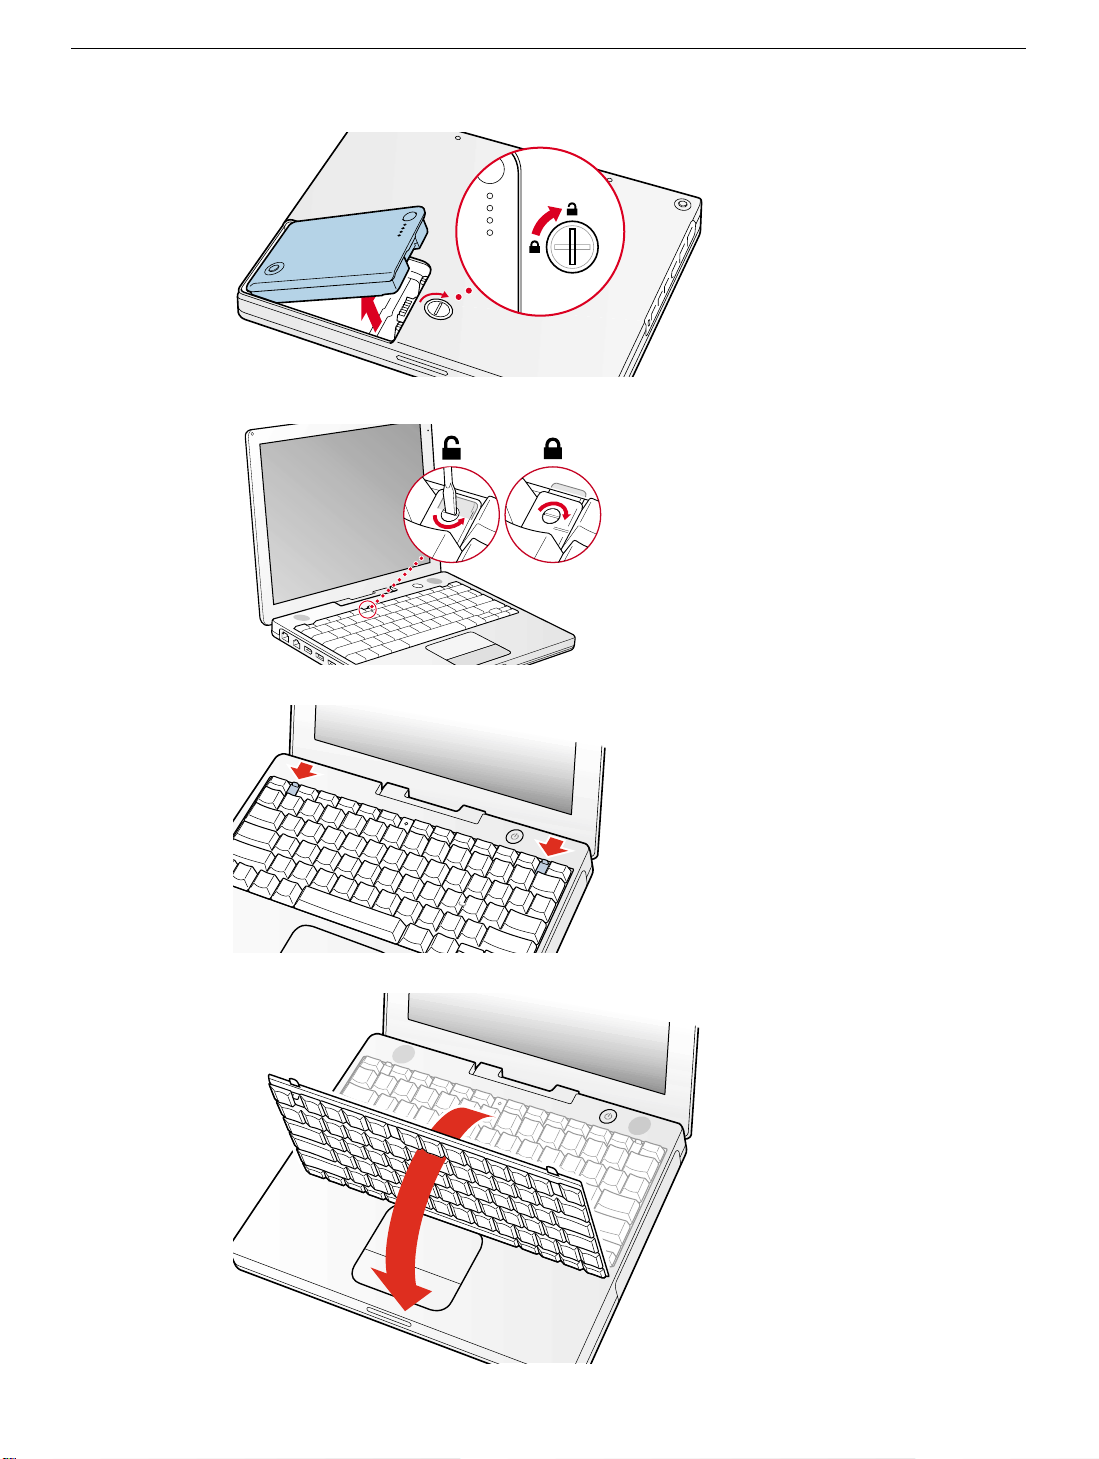
Figure 1
Figure 2
Figure 3
Figure 4
iBook (USB) Memory -
5
Page 22
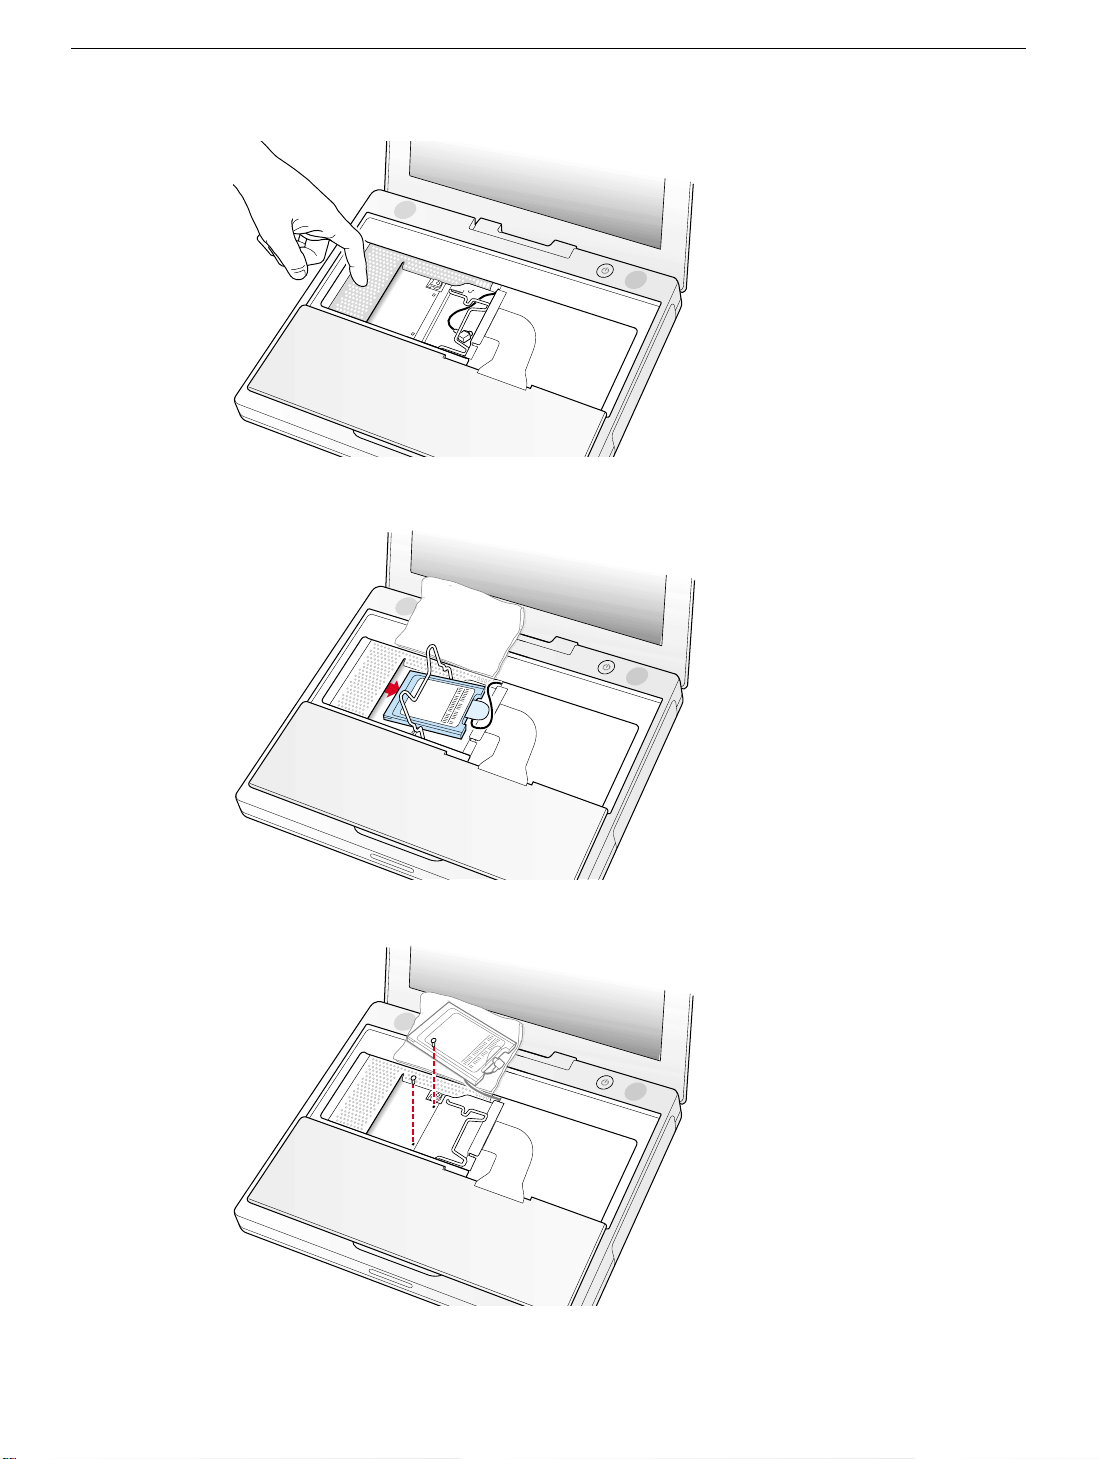
Figure 5
Figure 6
Figure 7
iBook (USB) Memory -
6
Page 23
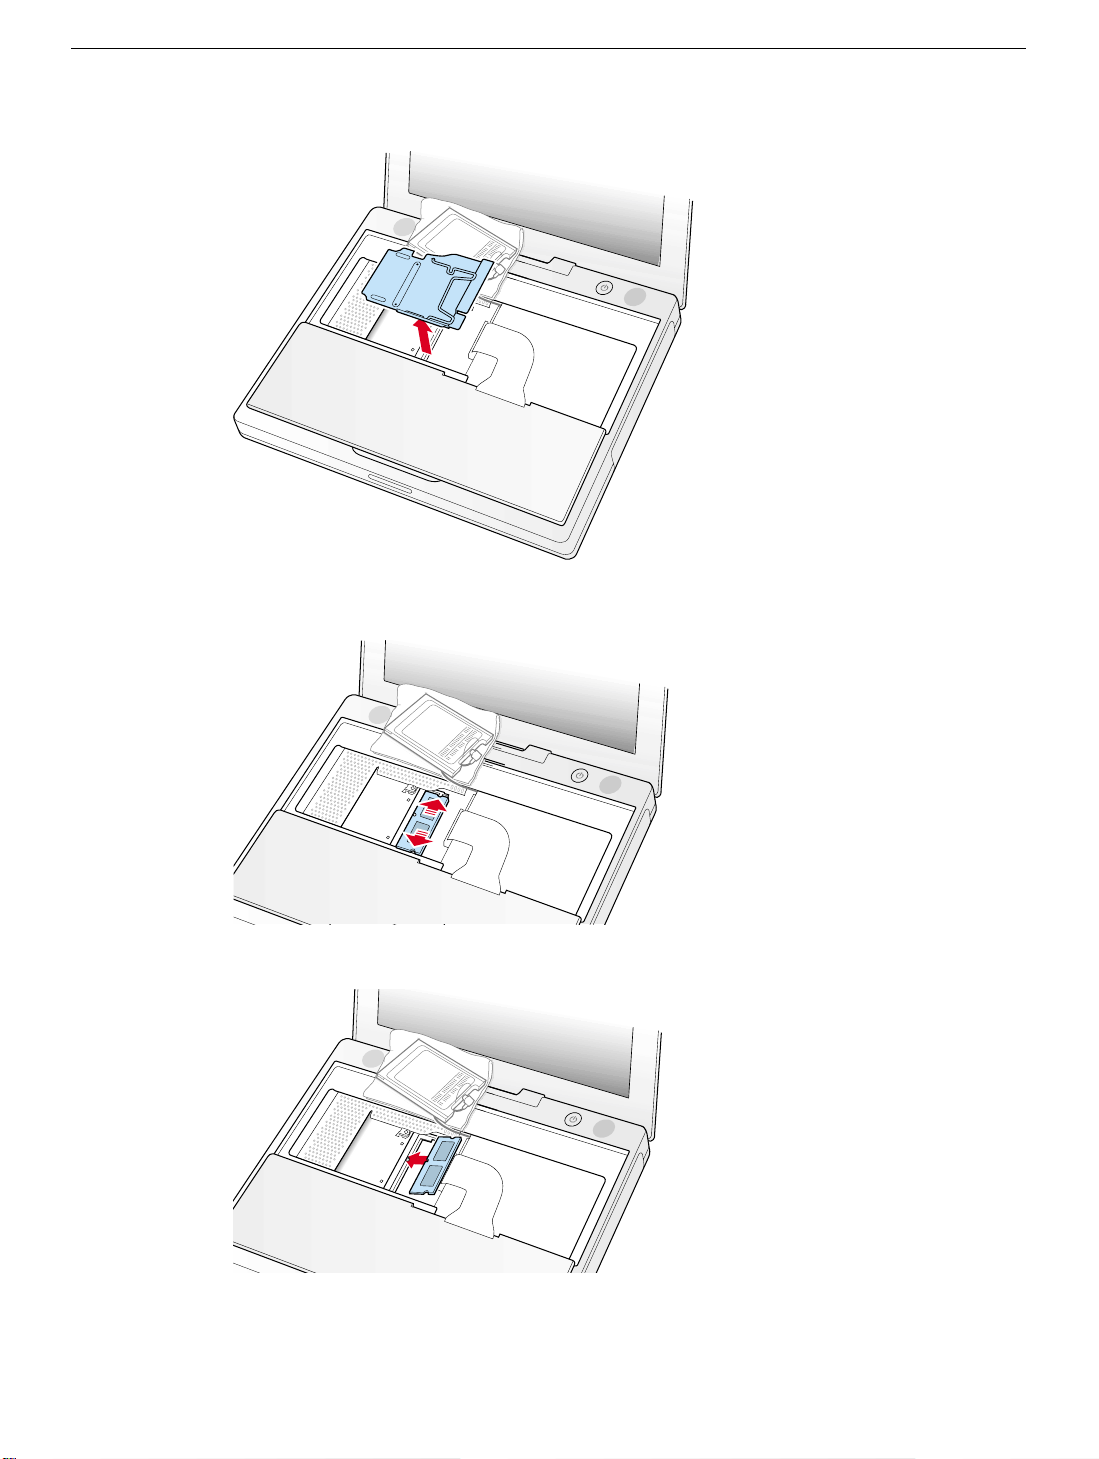
Figure 8
Figure 9
Figure 10
iBook (USB) Memory -
7
Page 24
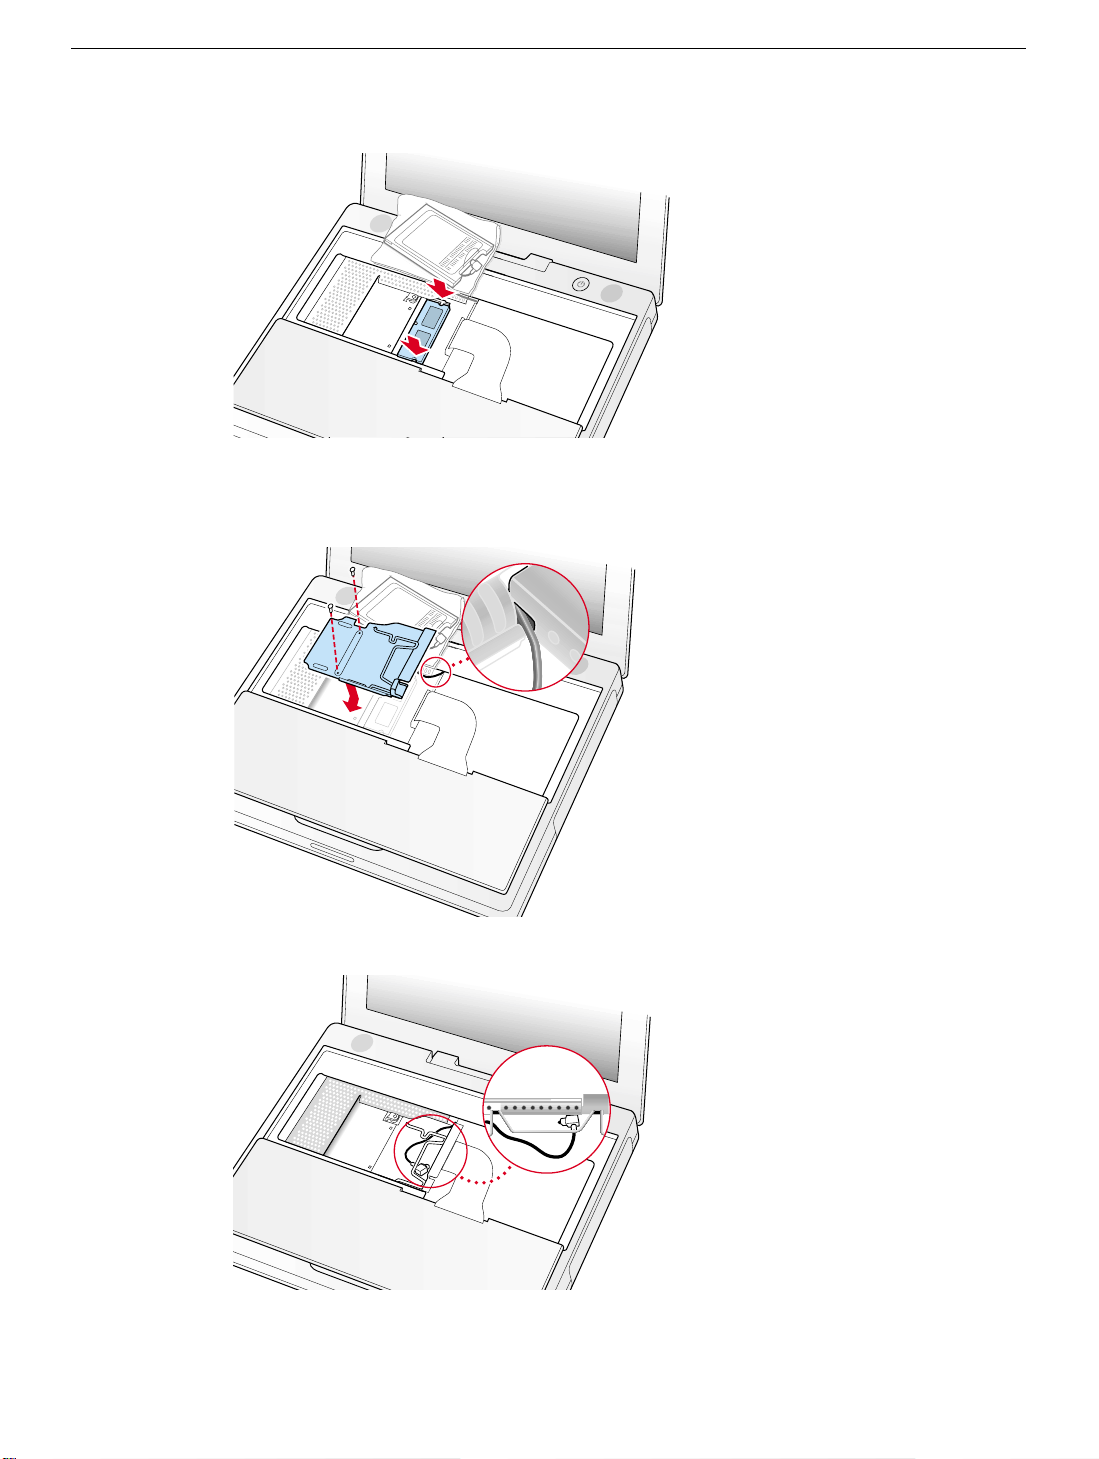
Figure 11
Figure 12
Figure 13
iBook (USB) Memory -
8
Page 25
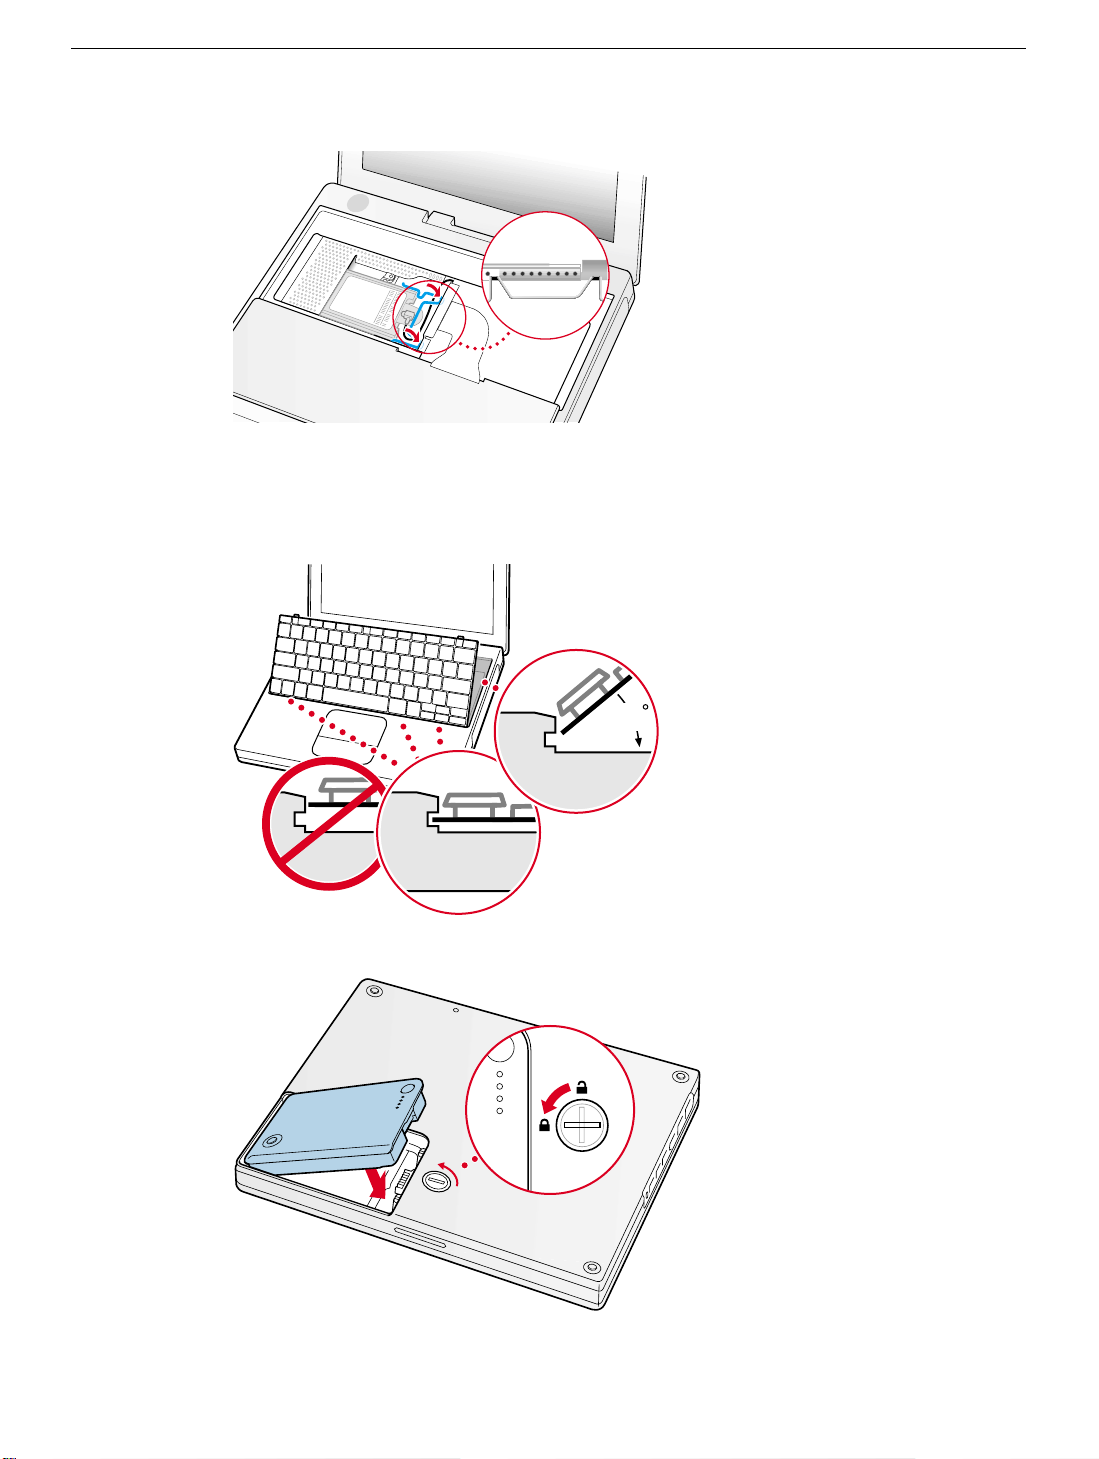
Figure 14
45
Figure 15
Figure 16
iBook (USB) Memory -
9
Page 26

iBook (Dual USB)
Bottom Case
Replacement Instructions
The following instructions explain ho w to replace the bottom case on the iBook (Dual USB)
computer.
Tools
This procedure requires the following tools:
• Soft cloth
• Torx T8 screwdriver
• Black stick (or other nonconductive nylon or plastic tool)
• #0 Phillips screwdriver
Preliminary Steps
Before you begin, remove the battery.
Procedure
1. Place the computer upside down on a soft cloth.
Updated: 2001-07-06
Page 27
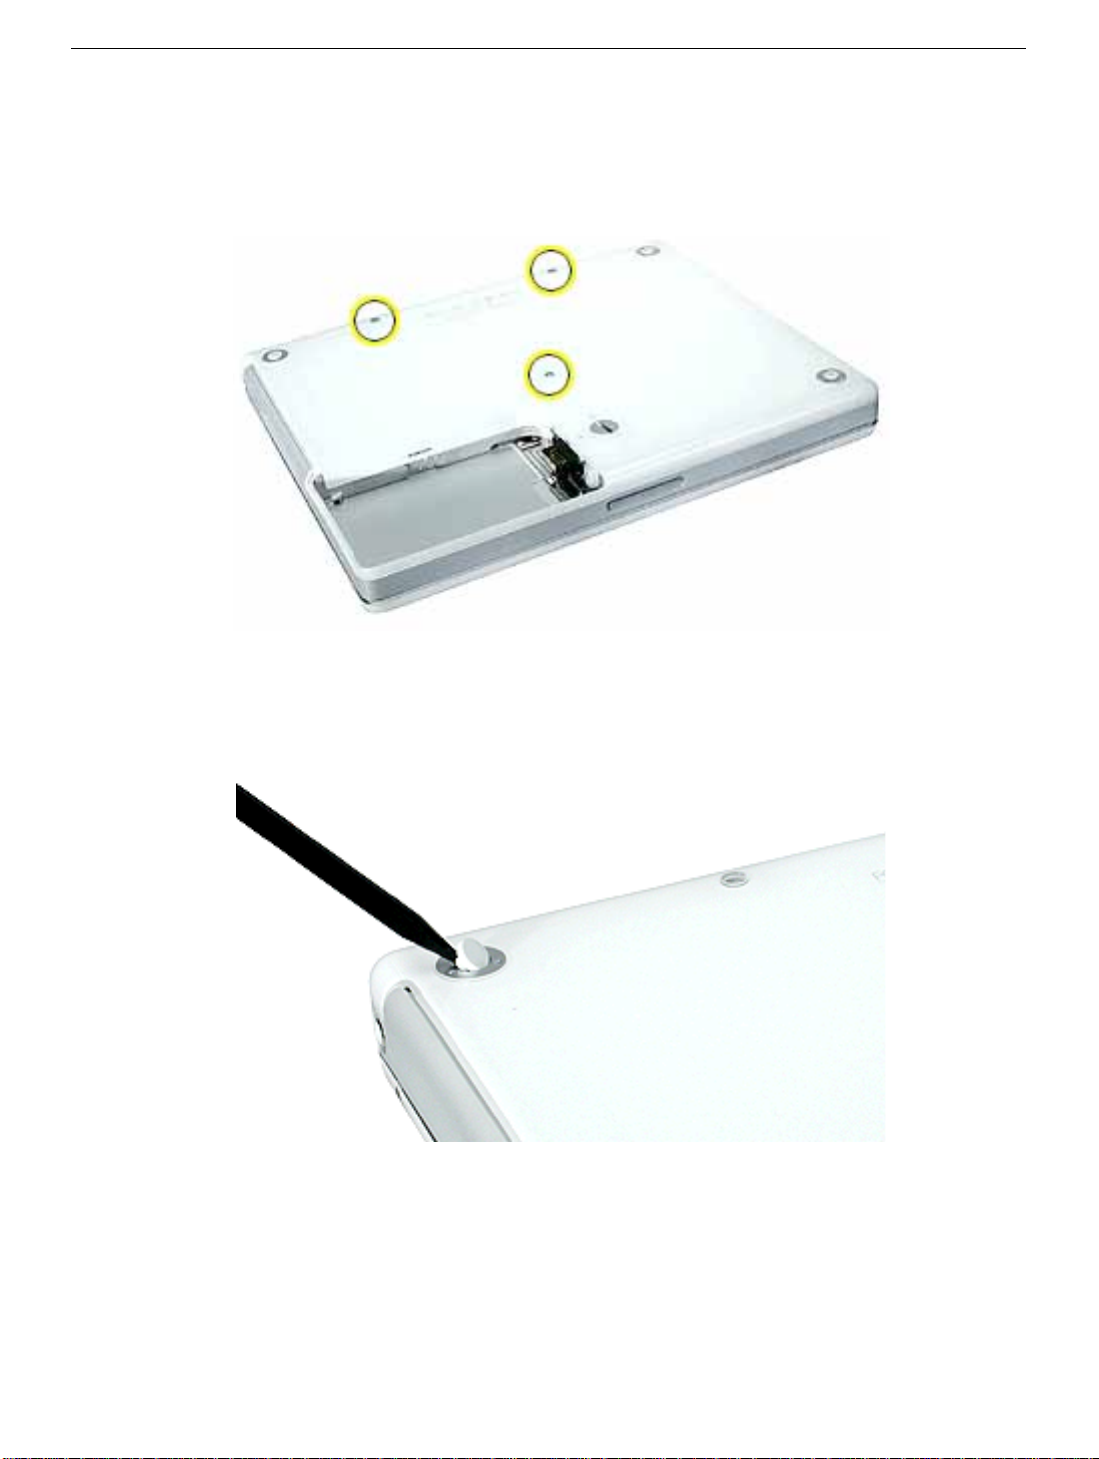
2.
Important:
slip out of the screw head during removal.
Remove the three screws.
3. Using a black stick, peel up the three rubber feet from the metal sockets.
To avoid damaging the case, be careful that the screwdriver tip does not
Note: When reassembling the computer, do not reuse the feet. Install three new
rubber feet.
iBook (Dual USB) Bottom Case -
2
Page 28
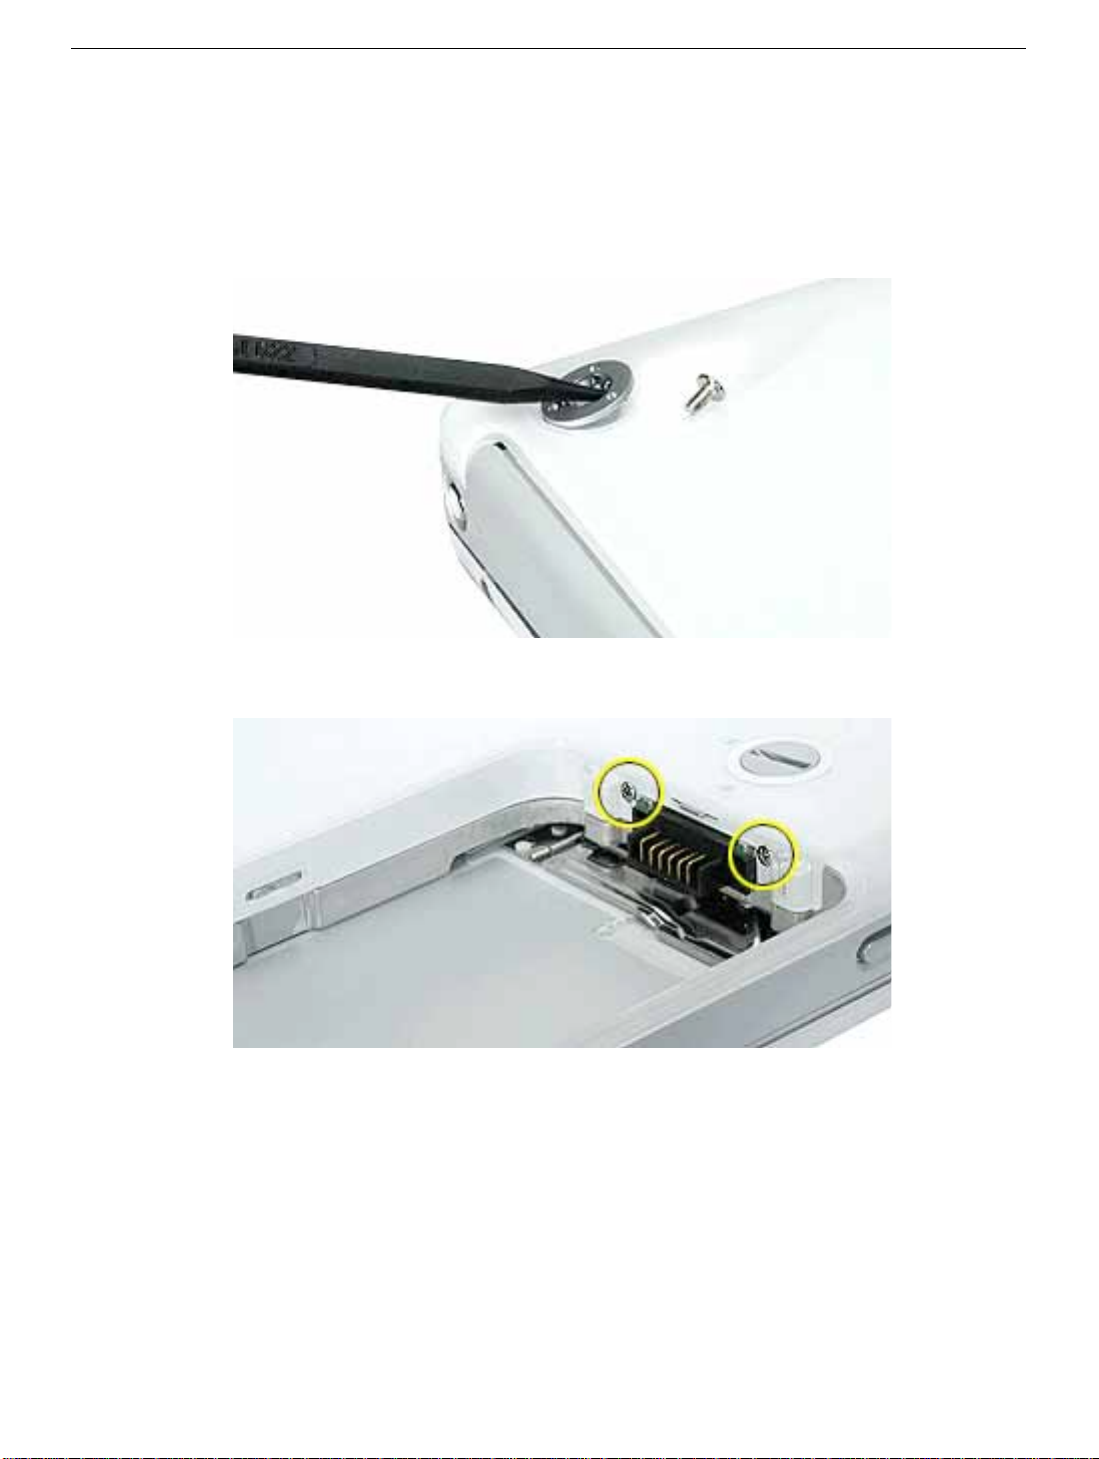
4. Remove the three Phillips screws from the metal sockets.
5. Use a black stick to lift out the metal sockets.
Note: When reassembling the computer, note that the metal sockets are keyed.
Rotate them until they sit flat against the bottom case.
6. Remove the two Phillips screws next to the battery connector.
iBook (Dual USB) Bottom Case -
3
Page 29
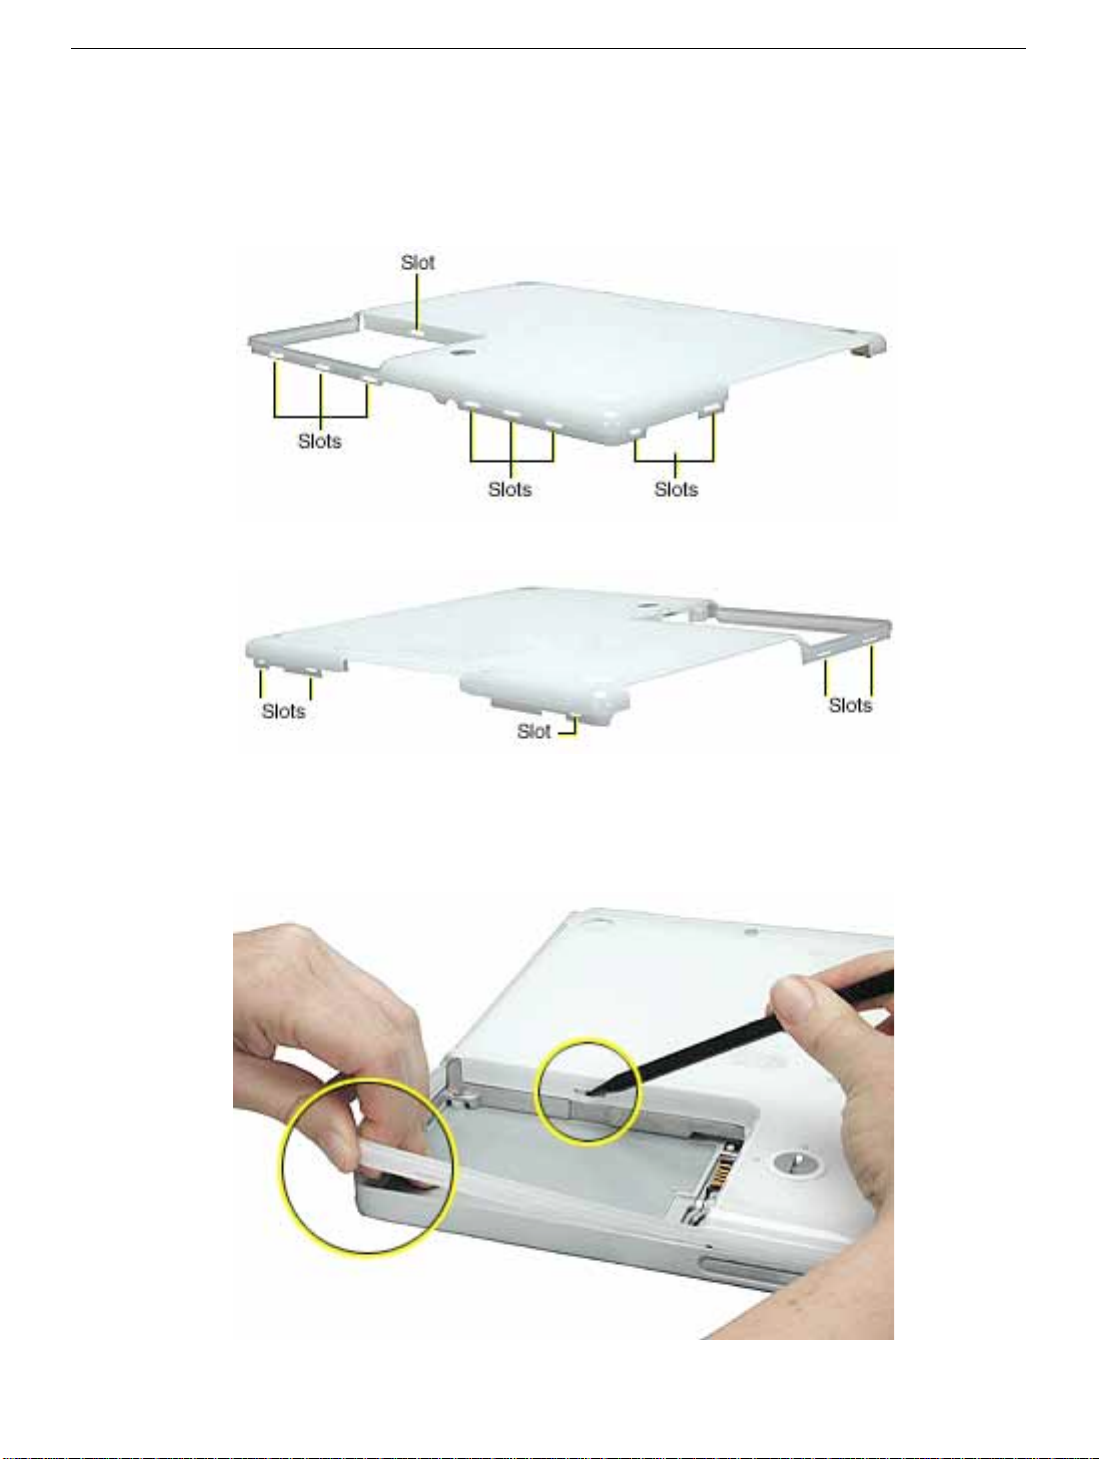
7. Note the locations of the slots on the bottom case. The computer frame has tabs that
fit into slots within the bottom case (six tabs in front; two on each side; three in back).
When using a black stick to pry off the bottom case, it helps to know where the slots
are as you free the tabs from the slots.
8. In the battery compartment, lift up the corner of the bottom case, and use a black stick
to gently pry up the slot from the inner tabs on the frame.
iBook (Dual USB) Bottom Case -
4
Page 30
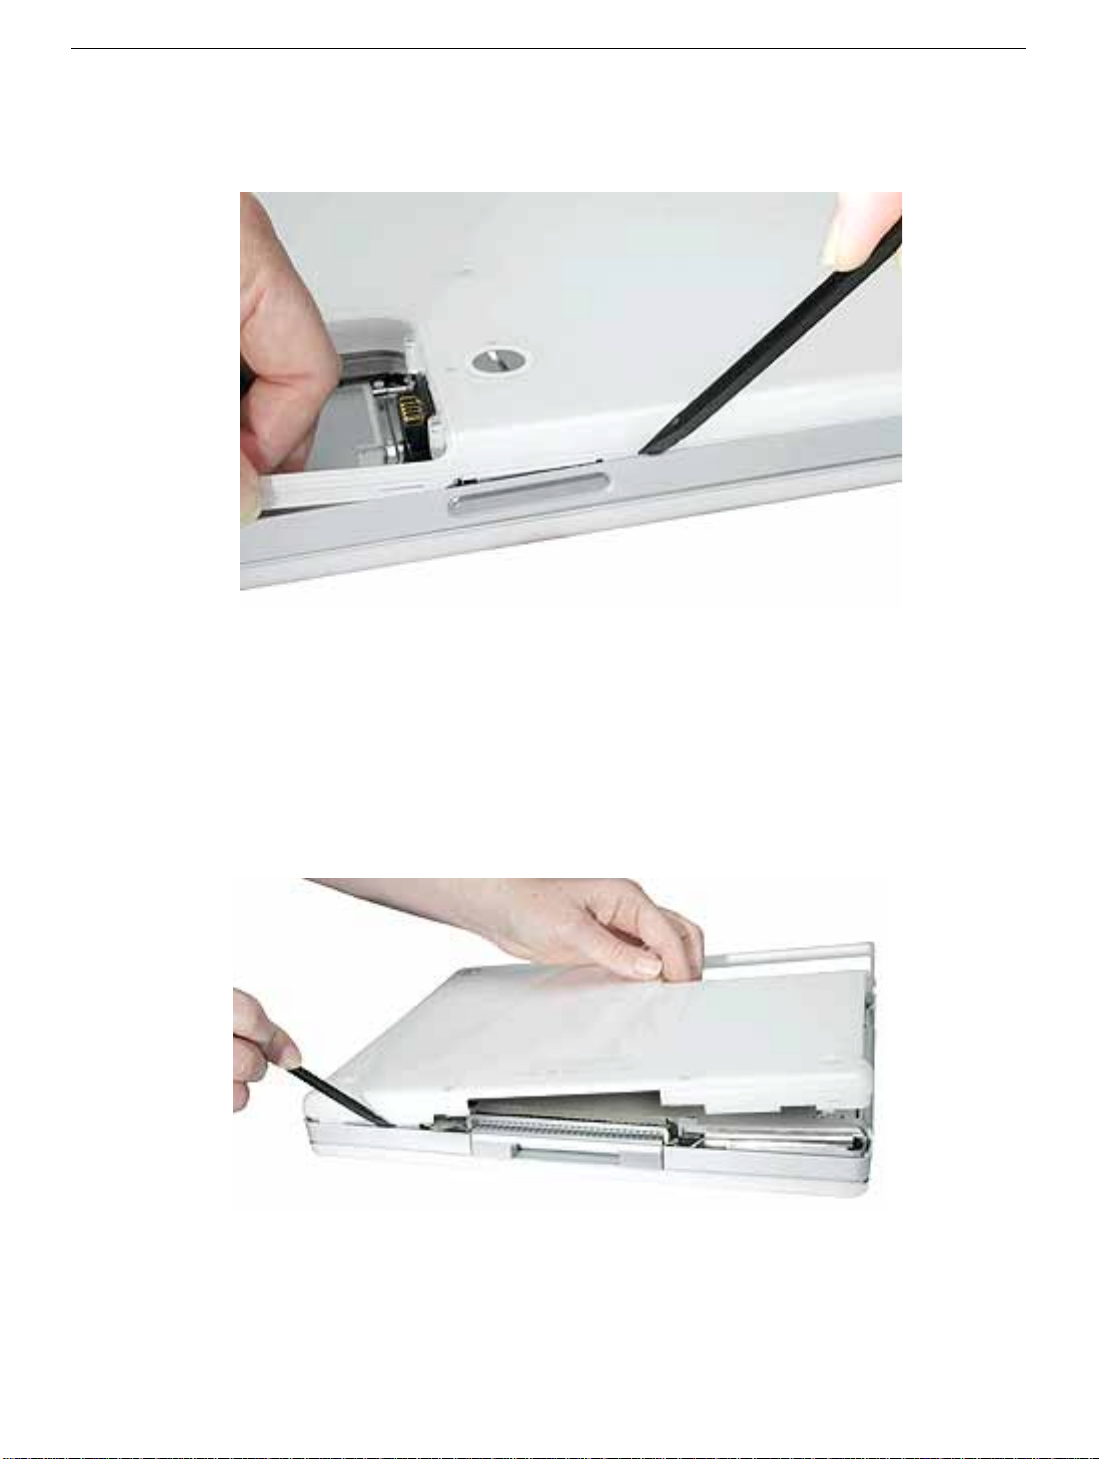
9. Starting at the battery compartment, use a black stick to carefully pry up the bottom
case from the computer.
10. The bottom case fits snugly. Use moderate force to remove the remaining tabs from
the slots.
11. When all tabs have been freed from the slots, lift up the bottom case.
Note:
When reassembling the computer, be careful not to pinch any cables as
you press the bottom case back onto the computer. Check that the bottom case
shows no raised surfaces and is fully snapped into place before installing the
remaining screws, sockets, and feet.
iBook (Dual USB) Bottom Case -
5
Page 31
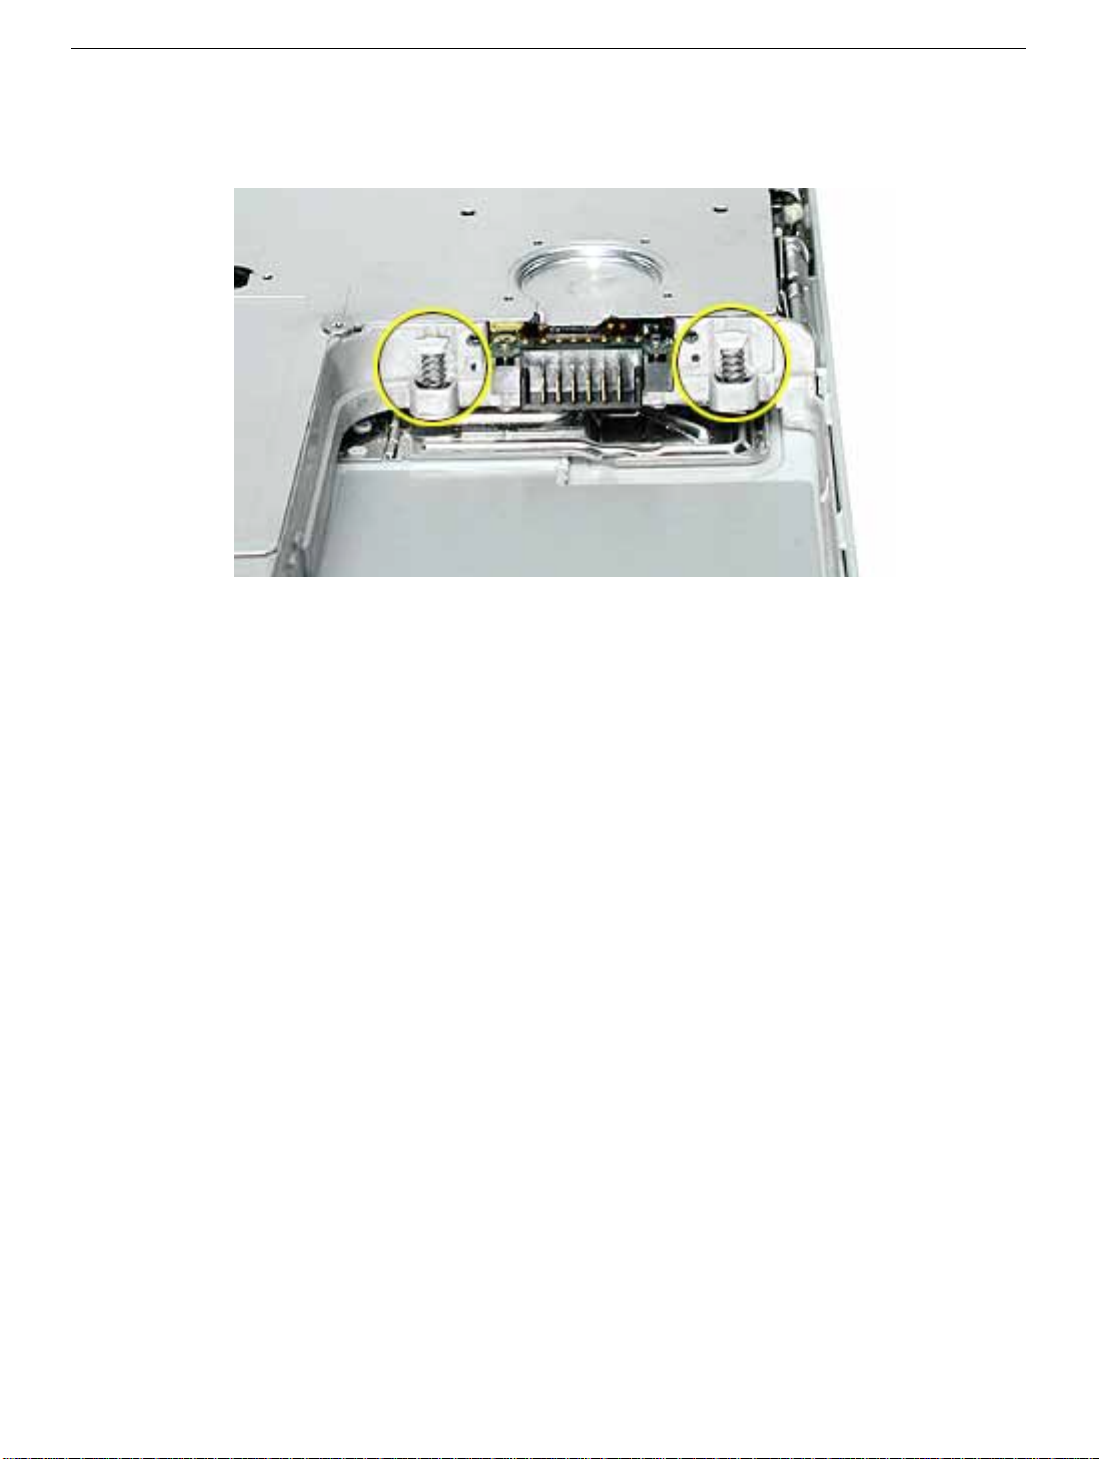
12. If you are replacing any additional parts at this time, remove the two springs from the
battery compartment so they do not fall out and get lost.
Note:
When reassembling the computer, make sure that the two springs in
the battery connector are in place before installing the bottom case. Each
spring has a plastic cap on one end. The cap should fit securely on the spring,
and the curved side of the cap should be positioned against the inner frame.
13. Install the replacement bottom case, and reassemble and test the computer.
iBook (Dual USB) Bottom Case -
6
Page 32

iBook (Dual USB)
Bottom Shield
Replacement Instructions
The following instructions explain how to replace the bottom shield in the iBook (Dual
USB) computer.
Tools
• Soft cloth
• #0 Phillips screwdriver
• Black stick (or other nonconductive nylon or plastic tool)
Note:
To organize the screws you remove from the computer, use a tray with divided
compartments (such as a plastic ice cube tray).
Preliminary Steps
Before you begin, remove the following:
• Battery
• Bottom case
Updated: 2001-07-06
Page 33
Procedure
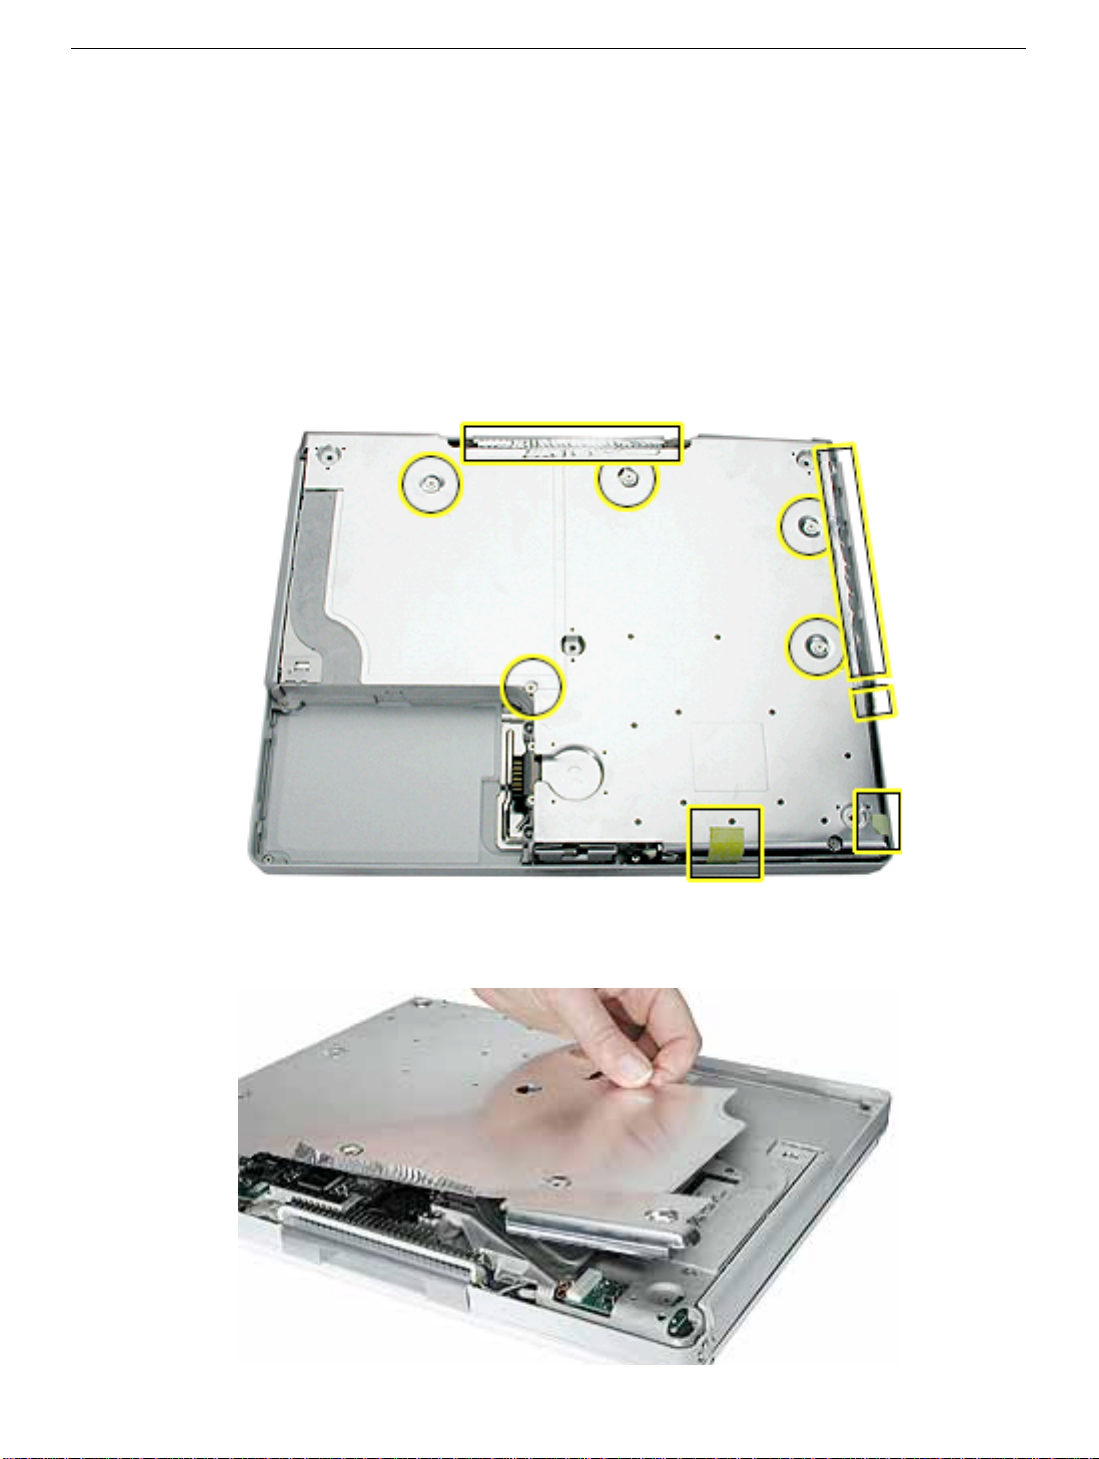
1. With the computer on a soft cloth, remove the five identical Phillips screws from the
bottom case.
2. Peel up, but do not remove, the three pieces of yellow tape.
Note:
When reassembling the computer, reuse the tape to secure the
replacement bottom shield.
3. Using a black stick, peel up—but do not remove—the two strips of foil tape from the
bottom shield.
4.
Warning: Do not bend the bottom shield.
being careful where it might catch on the tape.
Lift the bottom shield off the computer,
iBook (Dual USB) Bottom Shield -
2
Page 34
5.
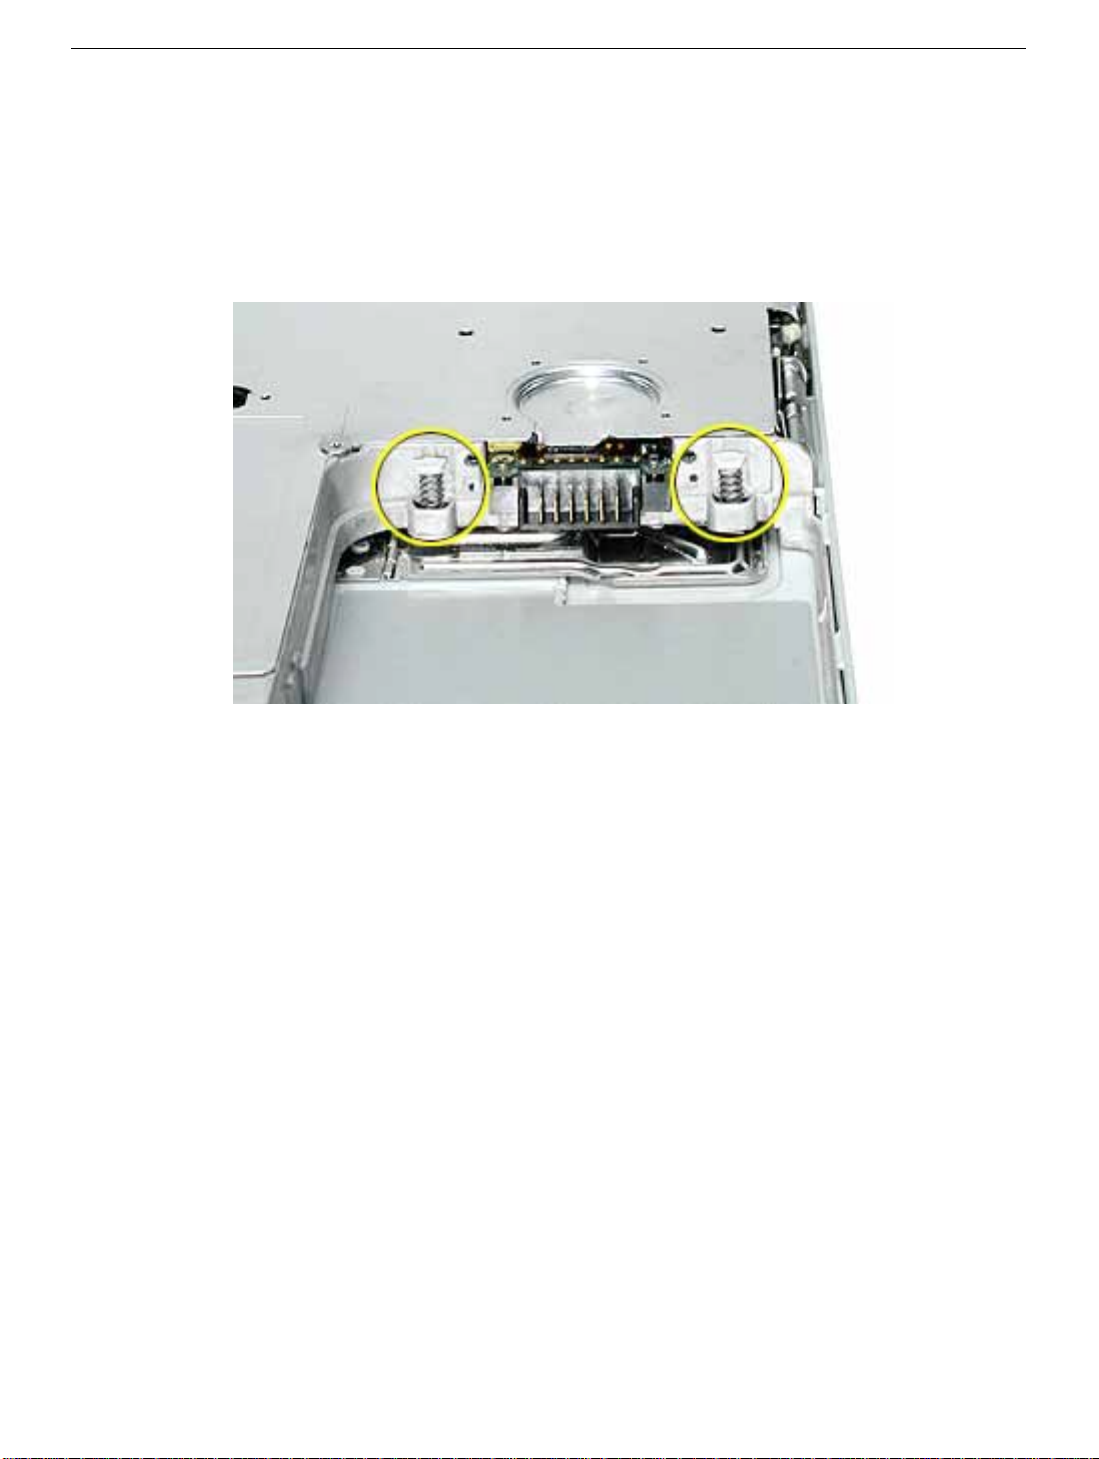
Note:
The two springs in the battery connector can become loose. When
reassembling the computer, make sure that the two springs in the battery connector
are in place before installing the bottom case. Each spring might have grease on the
coils, and each has a plastic cap on one end. Make sure the cap fits securely on the
spring, and the curved side of the cap is positioned against the inner frame.
6. Install the replacement bottom shield, and reassemble and test the computer.
iBook (Dual USB) Bottom Shield -
3
Page 35
iBook (Dual USB)
Fan
Replacement Instructions
The following instructions explain how to replace the fan in the iBook (Dual USB)
computer.
Tools
• Soft cloth
• #0 Phillips screwdriver
• Black stick (or other nonconductive nylon or plastic tool)
Preliminary Steps
Before you begin, remove the following:
• Battery
• Bottom case
• Bottom shield
Procedure
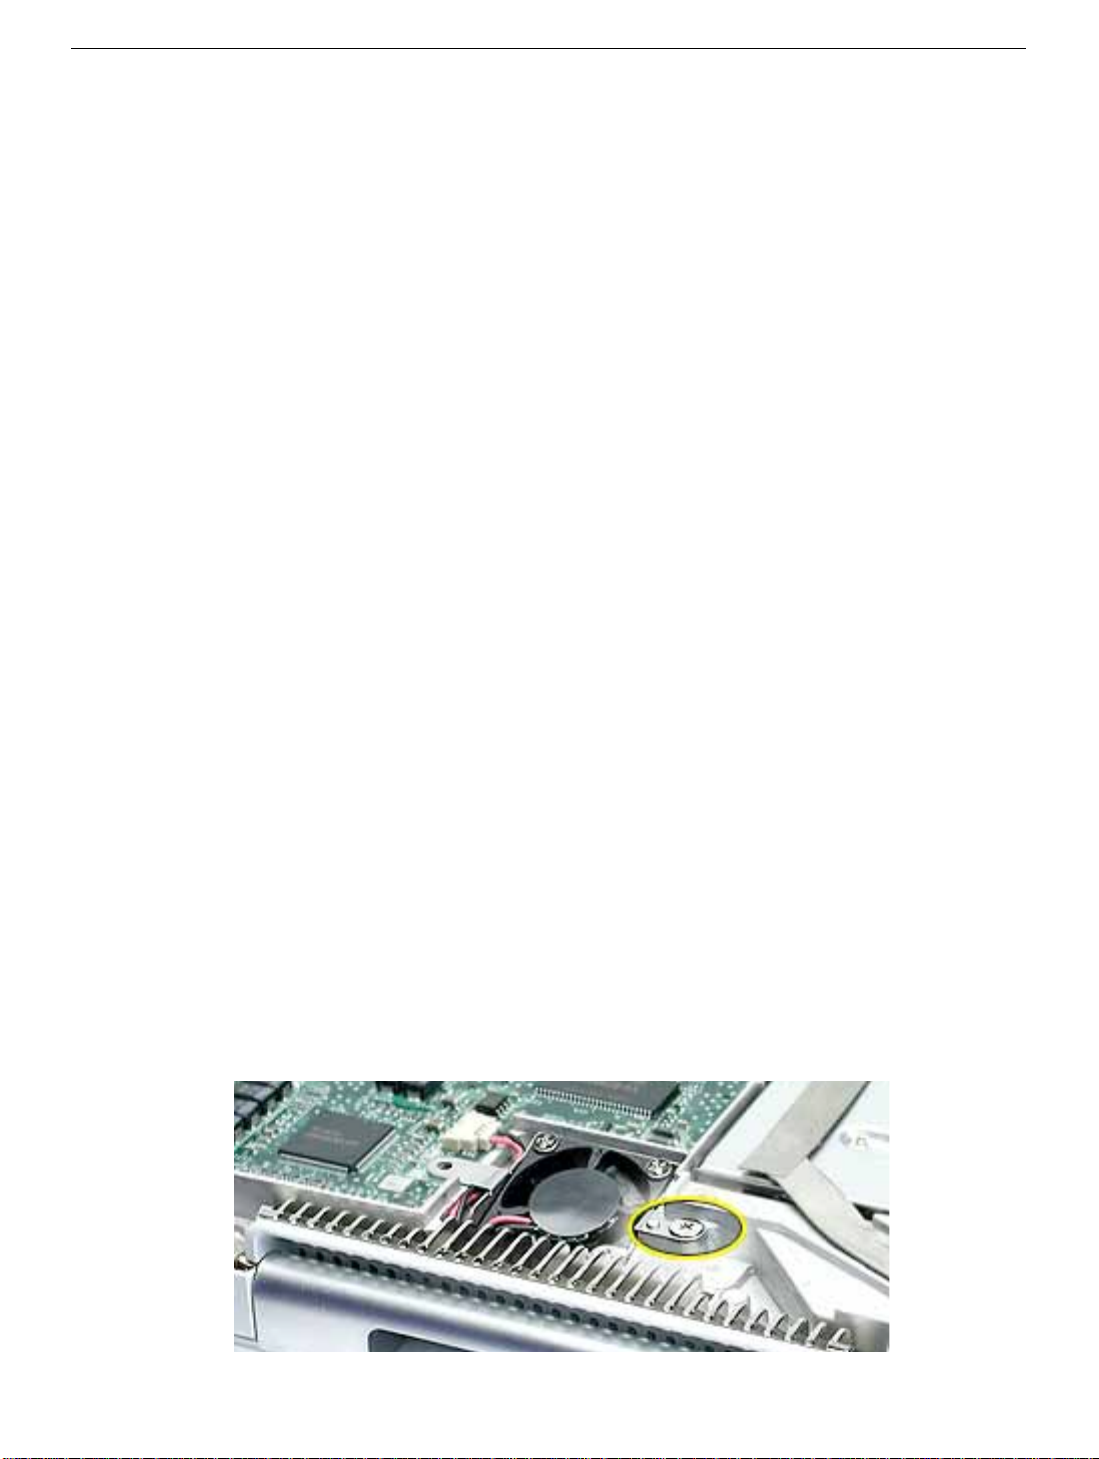
1. With the computer on a soft cloth, remove the single screw from the fan bracket.
Note:
Reserve the screw for the replacement fan.
Updated: 2001-07-06
Page 36
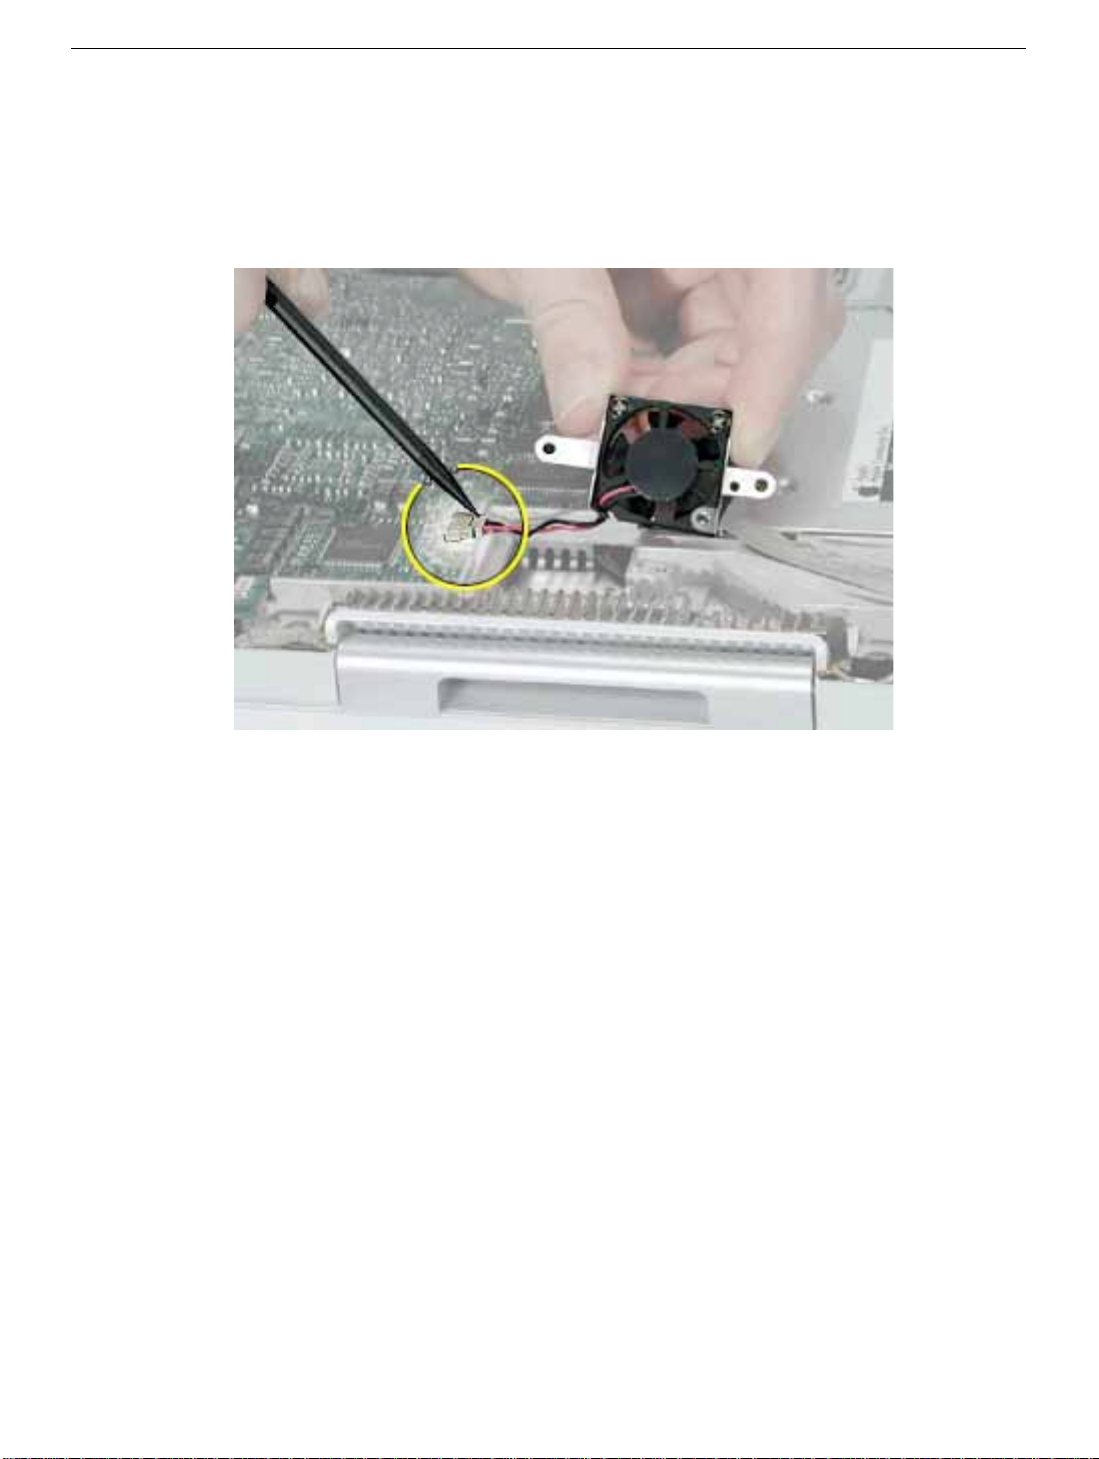
2. Lift the fan and bracket from the computer, and use a black stick to disconnect the
connector from the logic board.
Note:
When reassembling the computer, tuck in the cable underneath the
replacement fan bracket.
3. Install the replacement fan, and reassemble and test the computer.
iBook (Dual USB) Fan -
2
Page 37

iBook (Dual USB)
Top Case
Replacement Instructions
The following instructions explain how to replace the top case on the iBook (Dual USB)
computer.
Tools
This procedure requires the following tools:
• Soft cloth
• Black stick (or other nonconductive nylon or plastic tool)
• #0 Phillips screwdriver
• Metal paper clip
Note:
To organize the screws you remove from the computer, use a tray with divided
compartments (such as a plastic ice cube tray).
Preliminary Steps
Before you begin, remove the following:
• Battery
• Keyboard
• AirPort Card
• Bottom case
Updated: 2001-07-06
Page 38
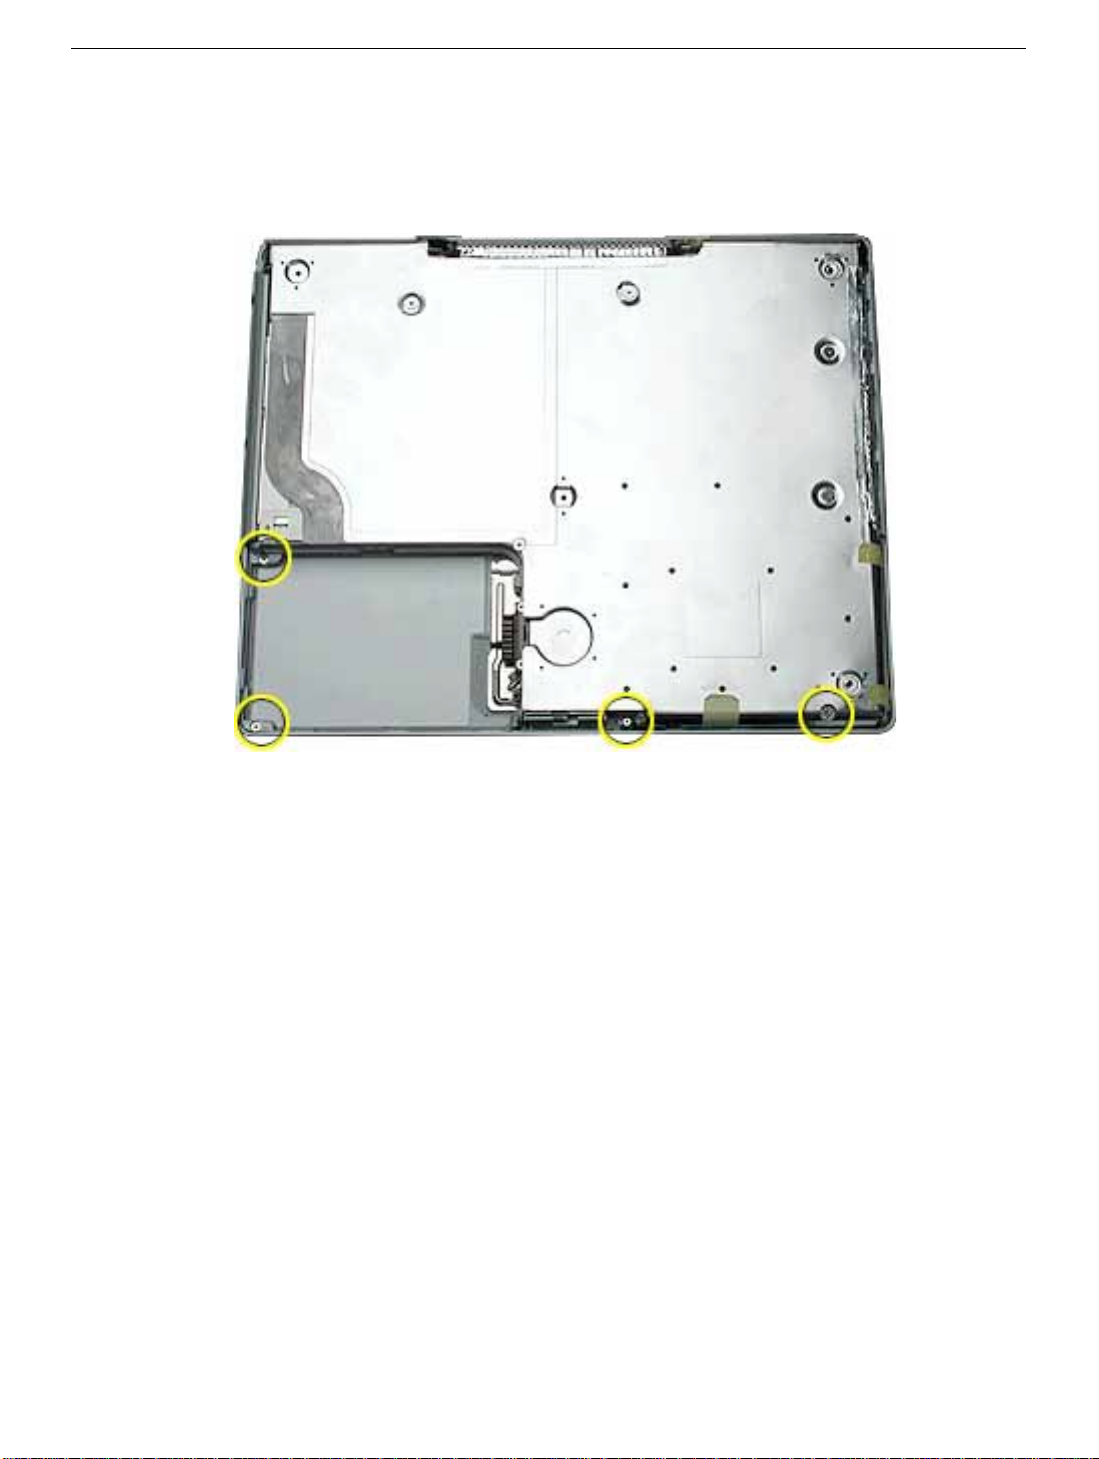
Procedure
1. With the computer on a soft cloth and the bottom shield facing up, remo ve f our scre ws,
as shown.
iBook (Dual USB) Top Case -
2
Page 39
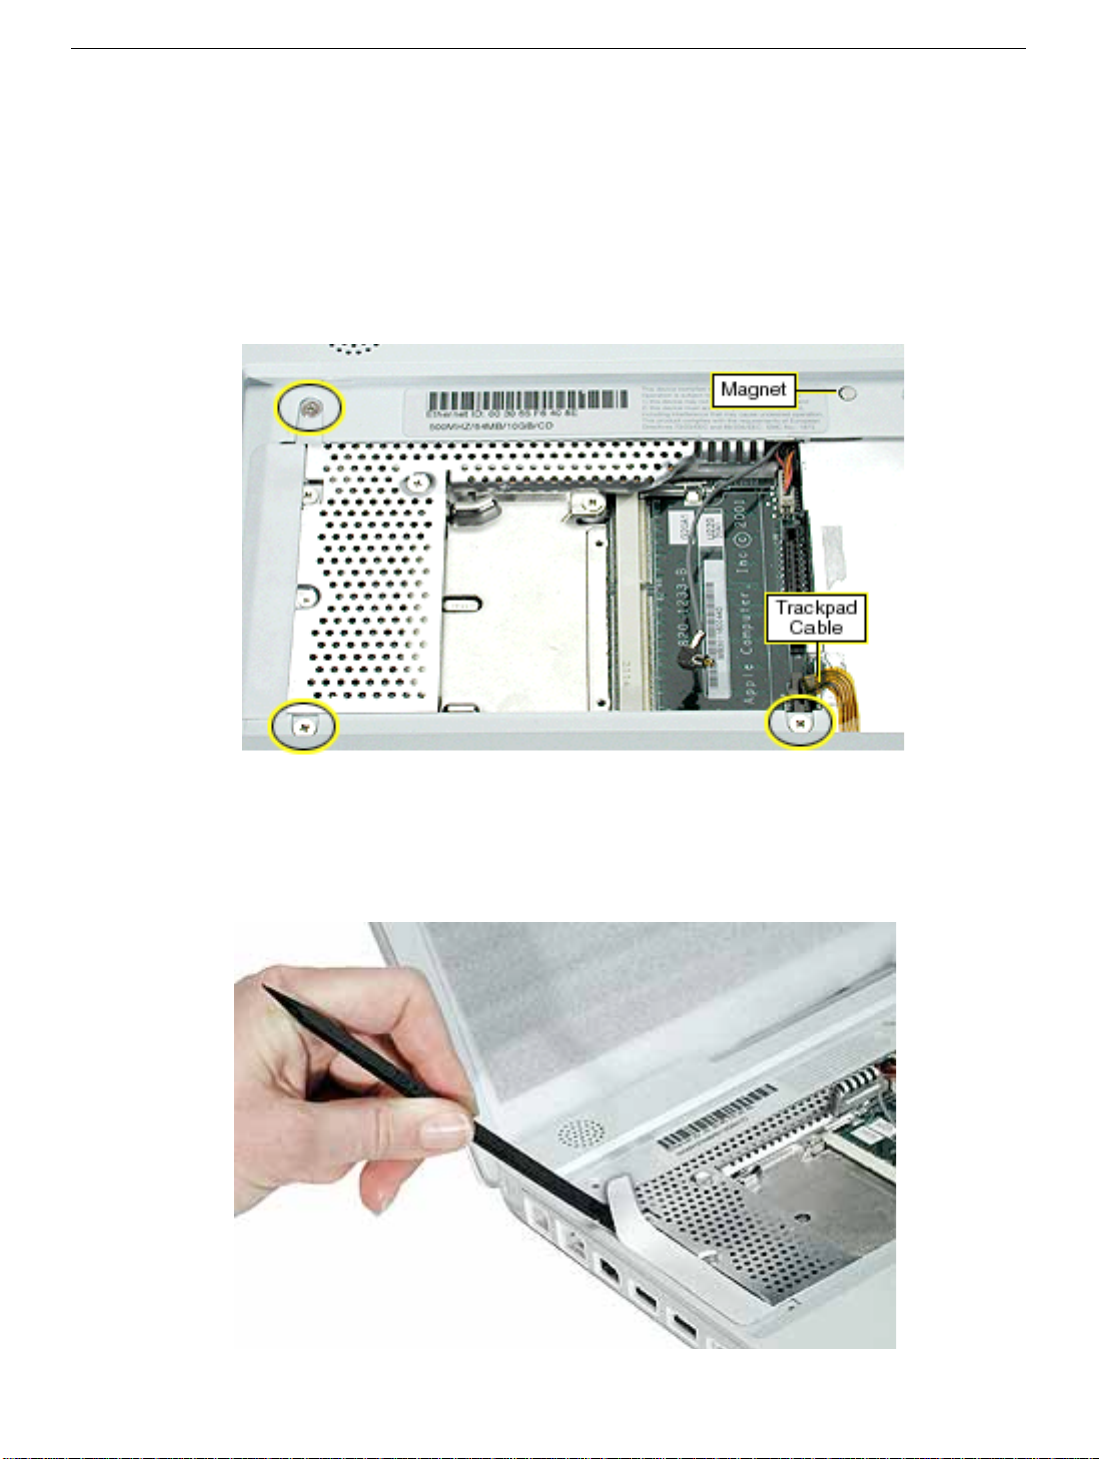
2. Turn over the computer. Using a black stick, pry up the sides of the trackpad cable
connector to release the trackpad cable.
3. Remove the three identical screws from the keyboard well.
4. Using a black stick, pry up the magnet. Then remove the screw beneath it.
Note: When reassembling the computer, note that the screw beneath the magnet is
smaller than the other three screws. Be sure to install the magnet over the screw.
5. Peel up the speak er wire tape, b ut make sure that the speak er wire beneath it remains
in place. Set aside the speaker wire tape.
Note: When reassembling the computer, reuse the speaker wire tape.
iBook (Dual USB) Top Case -
3
Page 40
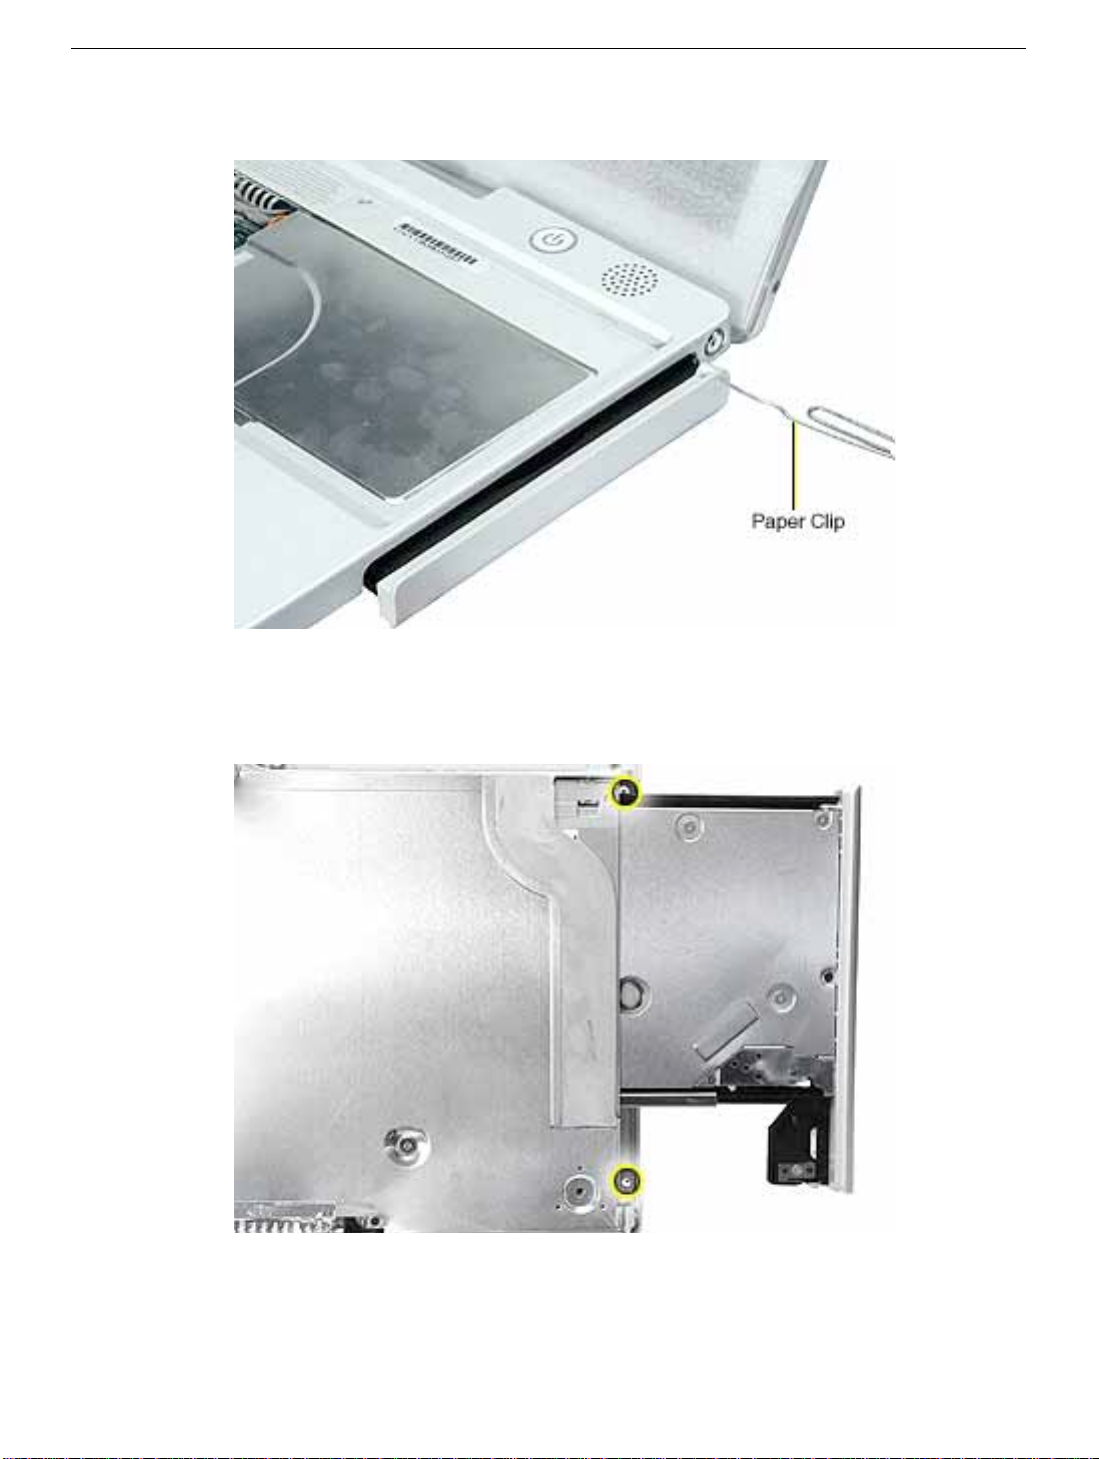
6. Using a straightened paper clip, open the optical drive.
7. Turn over the computer, and remove the small screw near the DC connector.
8. Completely slide out the optical drive tray, and then slide in the side rail until you can
access the small screw above the drive. Remove the screw.
iBook (Dual USB) Top Case -
4
Page 41
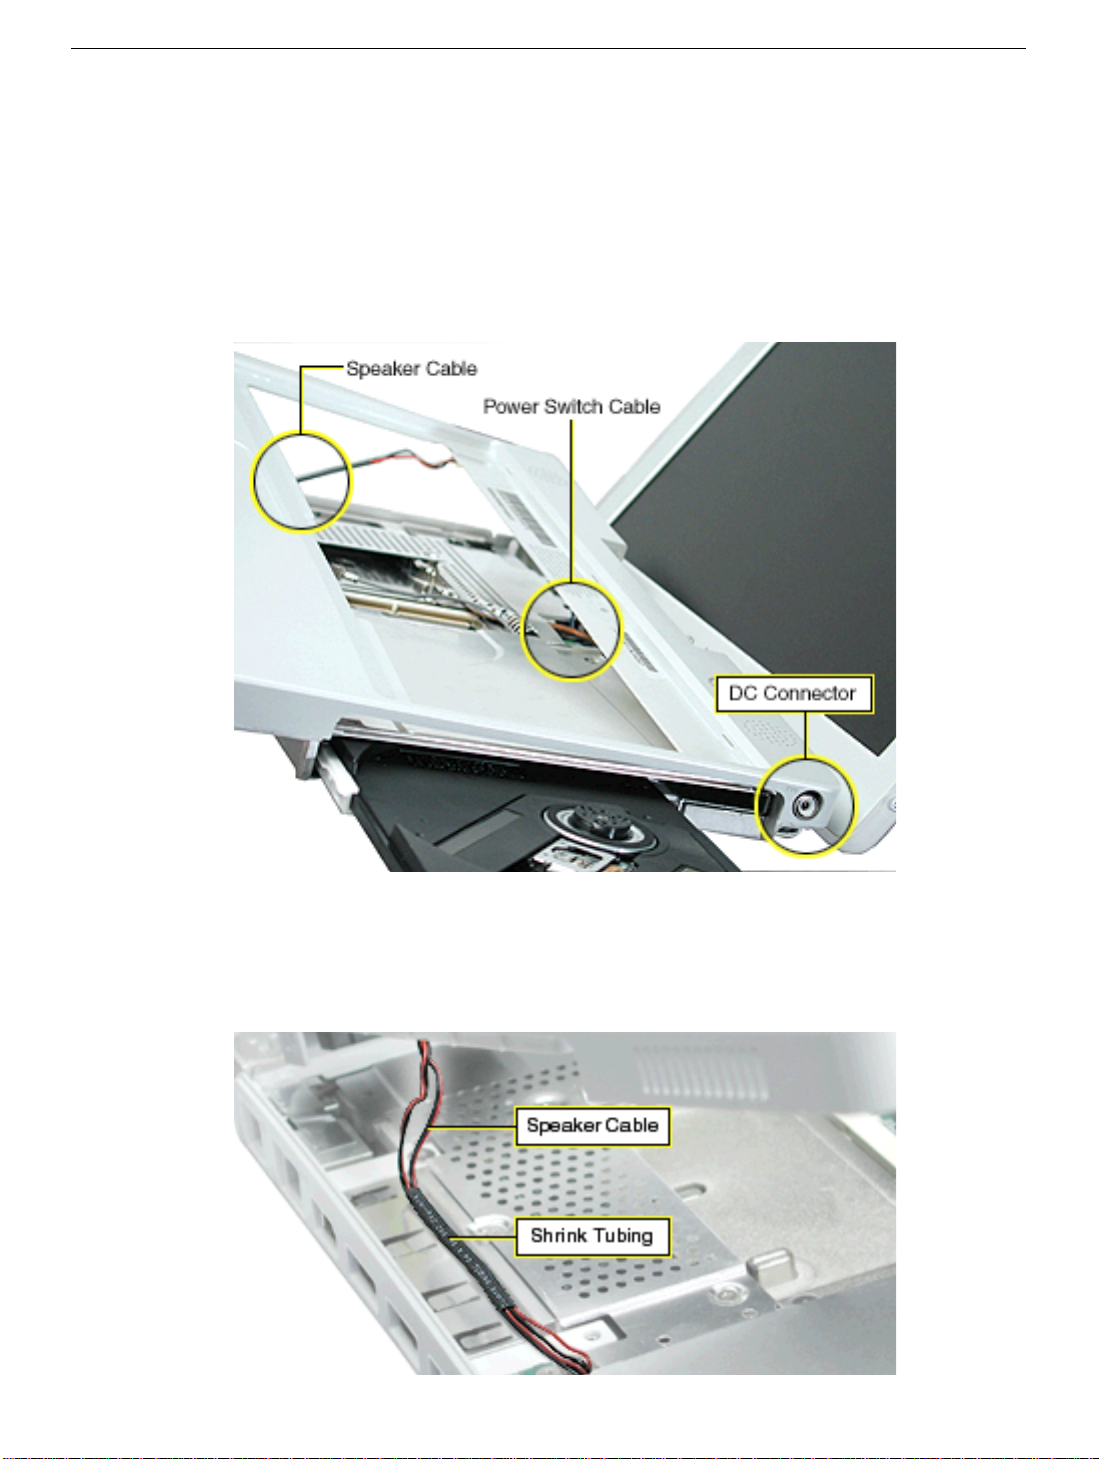
9.
Warning: When performing this step, make sure the speaker cable and power
switch cable are not strained.
Starting near the speaker end of the top case, lift up the top case near the
keyboard well. Tilt the top case so that it clears the DC connector.
Tilt the top case up away from the computer latch, and use a black stick to separate
the top case from the battery compartment.
10. With the top case loosened, note how the speaker cable is routed.
Note:
When reassembling the computer, ensure that the shrink tubing section of the
speaker cable sticks to the top shield and is routed as shown.
iBook (Dual USB) Top Case -
5
Page 42
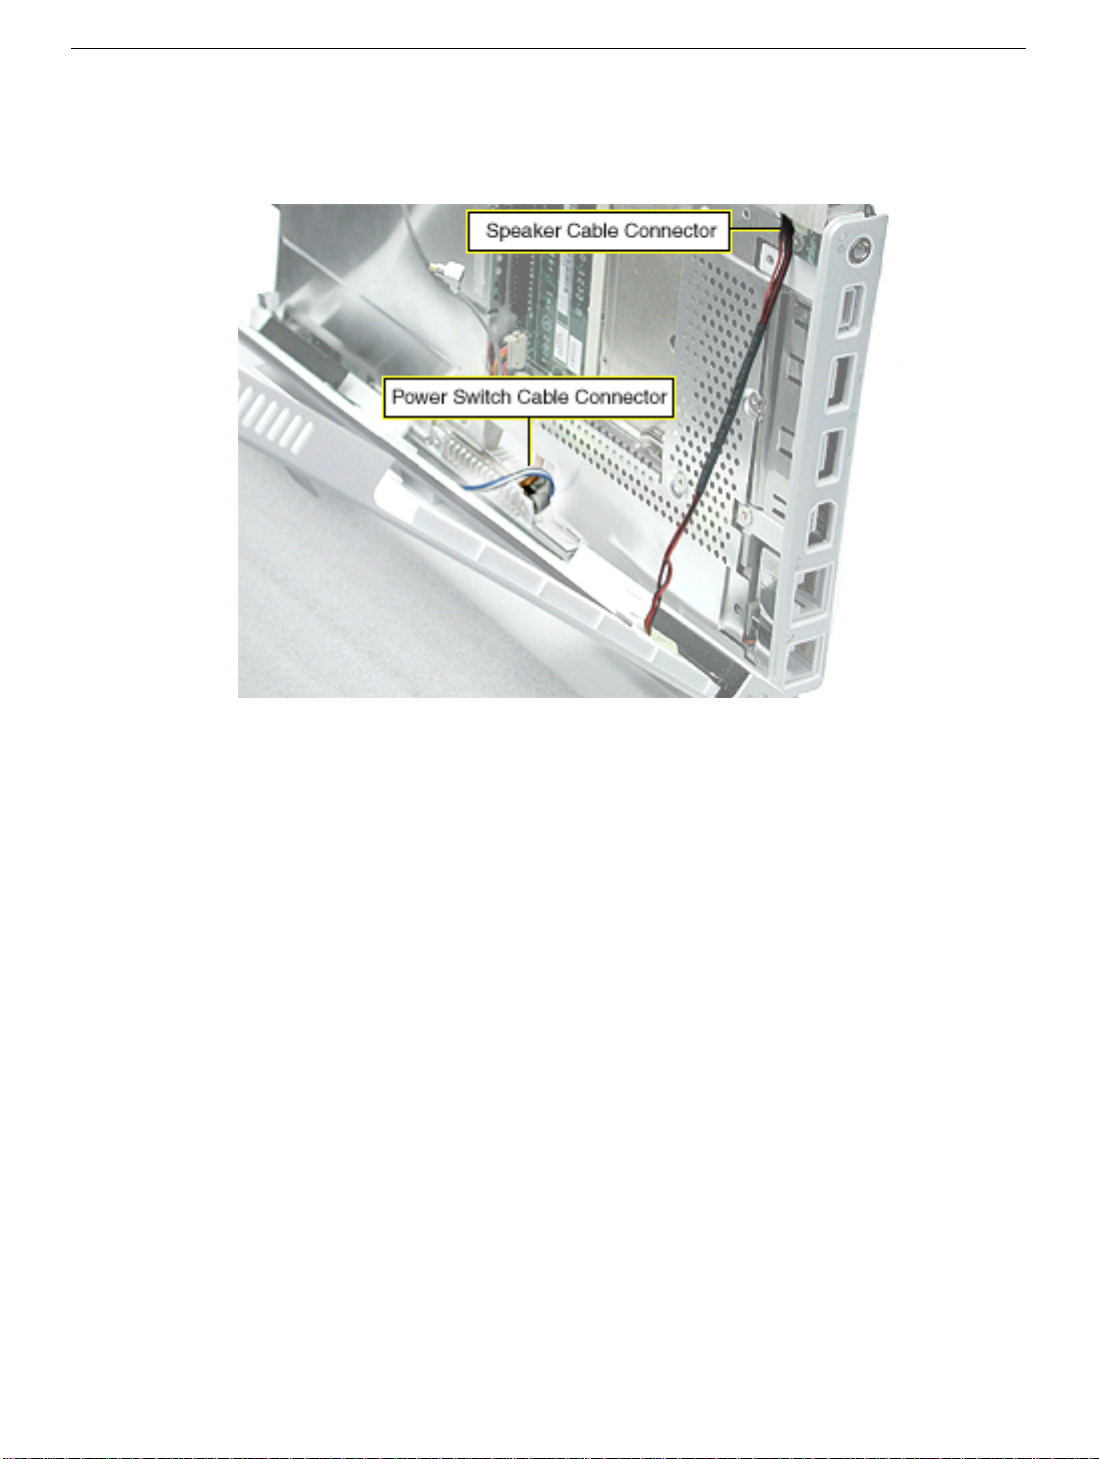
11. Disconnect the power switch cable connector from the logic board.
12. Disconnect the speaker cable connector from the logic board.
13. Remove the top case from the computer.
Note:
When installing the replacement top case, make sure you attach the
case over the DC connector first. Then connect the power switch cable
connector followed by the speaker cable connector. Do not strain the cables.
14. Install the replacement top case, and reassemble and test the computer.
Warning: When reassembling the computer, be careful not to pinch any cables
as you press the top case back onto the computer. Check that the top case
shows no raised surfaces and is fully snapped into place before installing the
remaining screws.
iBook (Dual USB) Top Case -
6
Page 43

iBook (Dual USB)
Top Shield
Replacement Instructions
The following instructions explain how to replace the top shield in the iBook (Dual USB)
computer.
Tools
• Soft cloth
• #0 Phillips screwdriver
• Black stick (or other nonconductive nylon or plastic tool)
Note:
To organize the screws you remove from the computer, use a tray with divided
compartments (such as a plastic ice cube tray).
Preliminary Steps
Before you begin, remove the following:
• Battery
• Bottom case
• Keyboard
• Airport Card
• Top case
Updated: 2001-07-06
Page 44
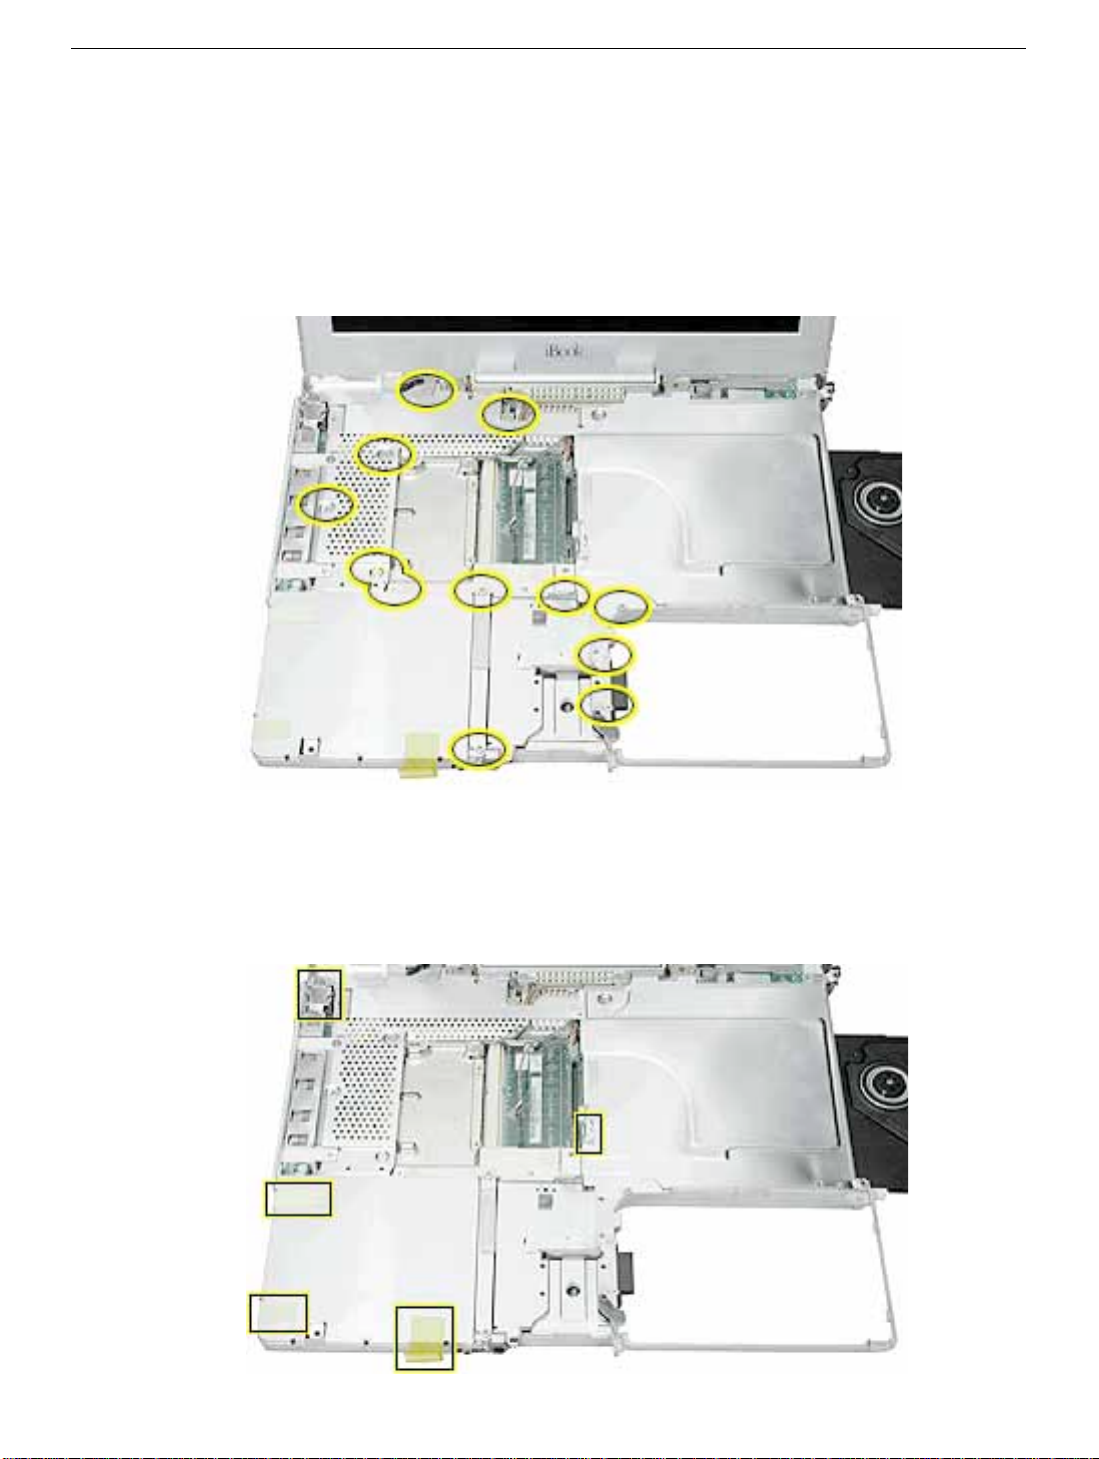
Procedure
1. With the computer on a soft cloth, remove the 12 Phillips screws:
• five large identical screws
• one medium-sized screw
• five small identical screws
• one tiny screw
2. Using a black stick, carefully peel up, but do not remove, the two foil strips and three
pieces of tape.
Note: When reassembling the computer, reuse the foil and tape to secure the
replacement top shield.
iBook (Dual USB) Top Shield -
2
Page 45
3.
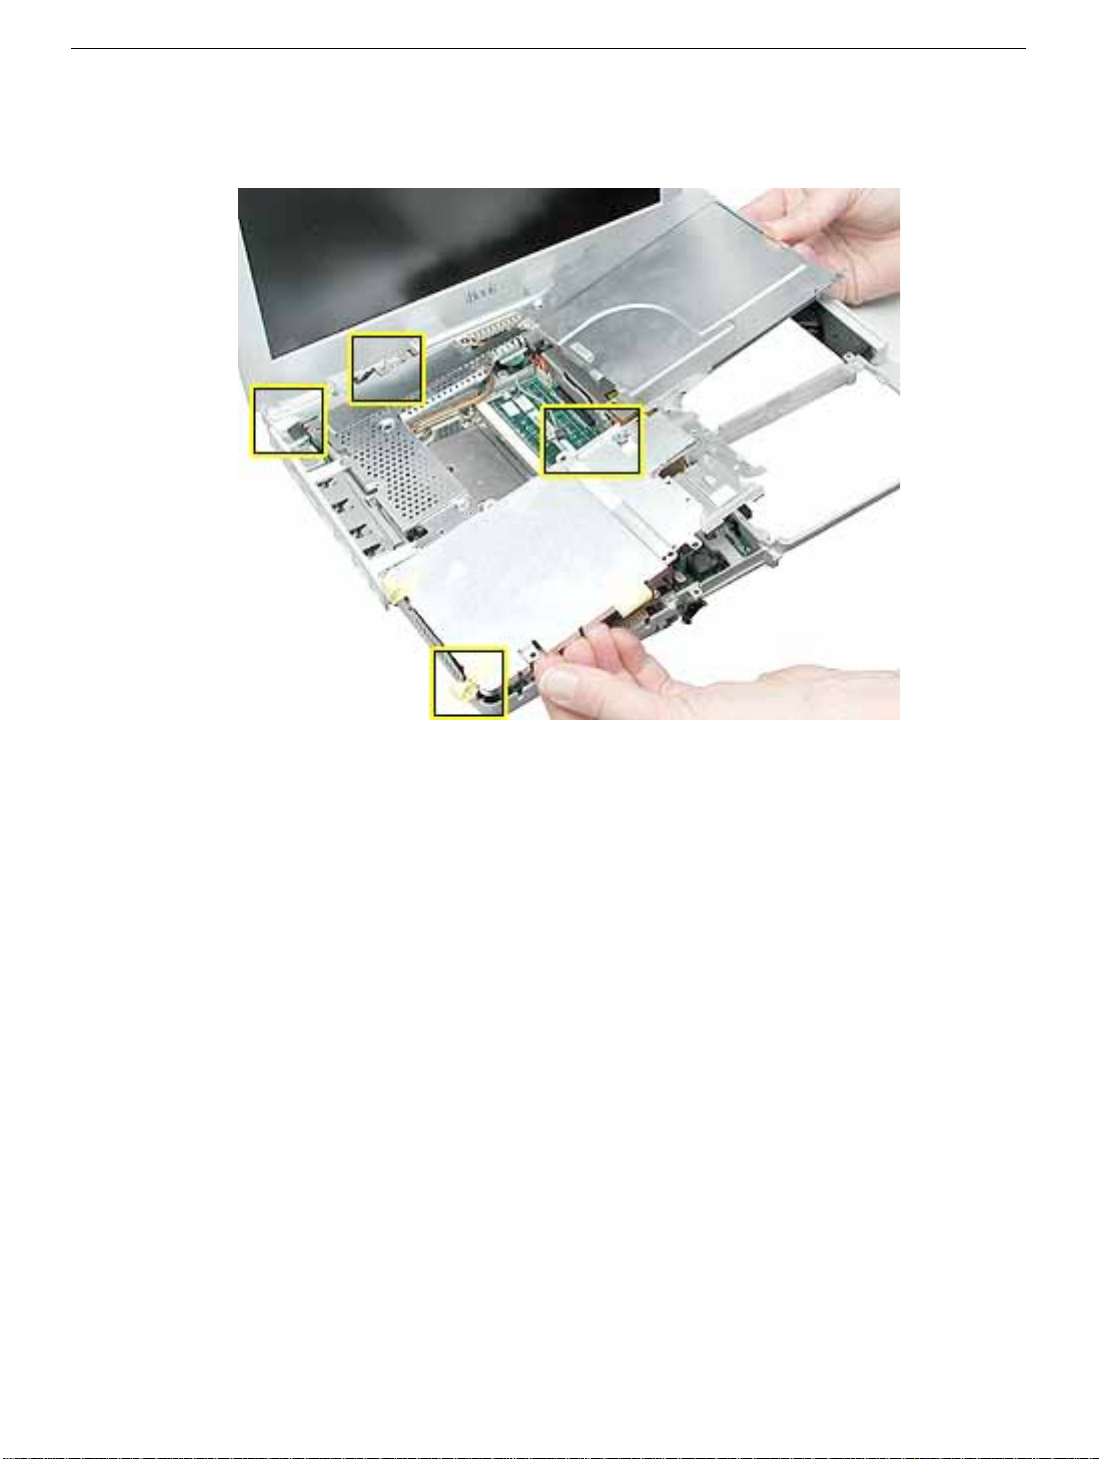
Warning: Do not bend the top shield.
careful where it might catch on the highlighted areas shown.
Lift the top shield off the computer, being
4. Install the replacement top shield, and reassemble and test the computer.
iBook (Dual USB) Top Shield -
3
Page 46

iBook (Dual USB)
I/O Bezel
Replacement Instructions
The following instructions explain how to replace the I/O bezel in the iBook (Dual USB)
computer.
Tools
• Soft cloth
• #0 Phillips screwdriver
• Black stick (or other nonconductive nylon or plastic tool)
Preliminary Steps
Before you begin, remove the following:
• Battery
• Bottom case
• Bottom shield
• Keyboard
• Airport Card
• Top case
Updated: 2001-07-06
Page 47
Procedure
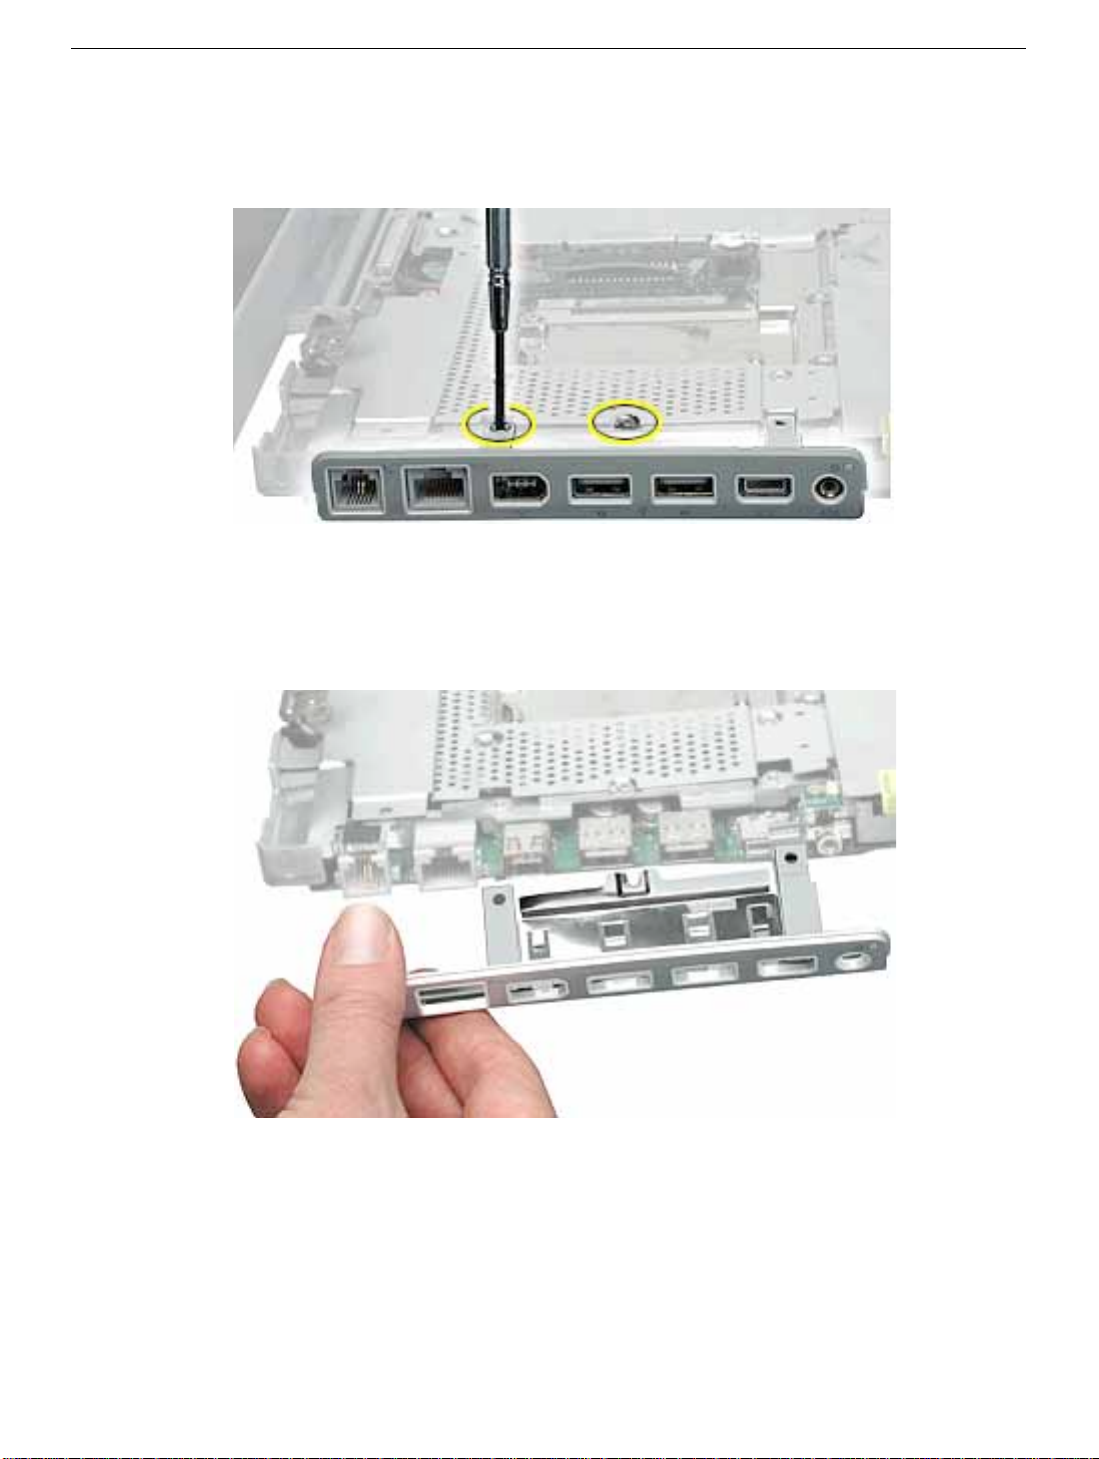
1. With the computer on a soft cloth, remove the two screws from the I/O bezel.
2. Tilt down the I/O bezel and remove it from the computer frame.
Note:
When reassembling the computer, make sure that the
and fits over all ports.
I/O bezel
is level
iBook (Dual USB) I/O Bezel -
2
Page 48
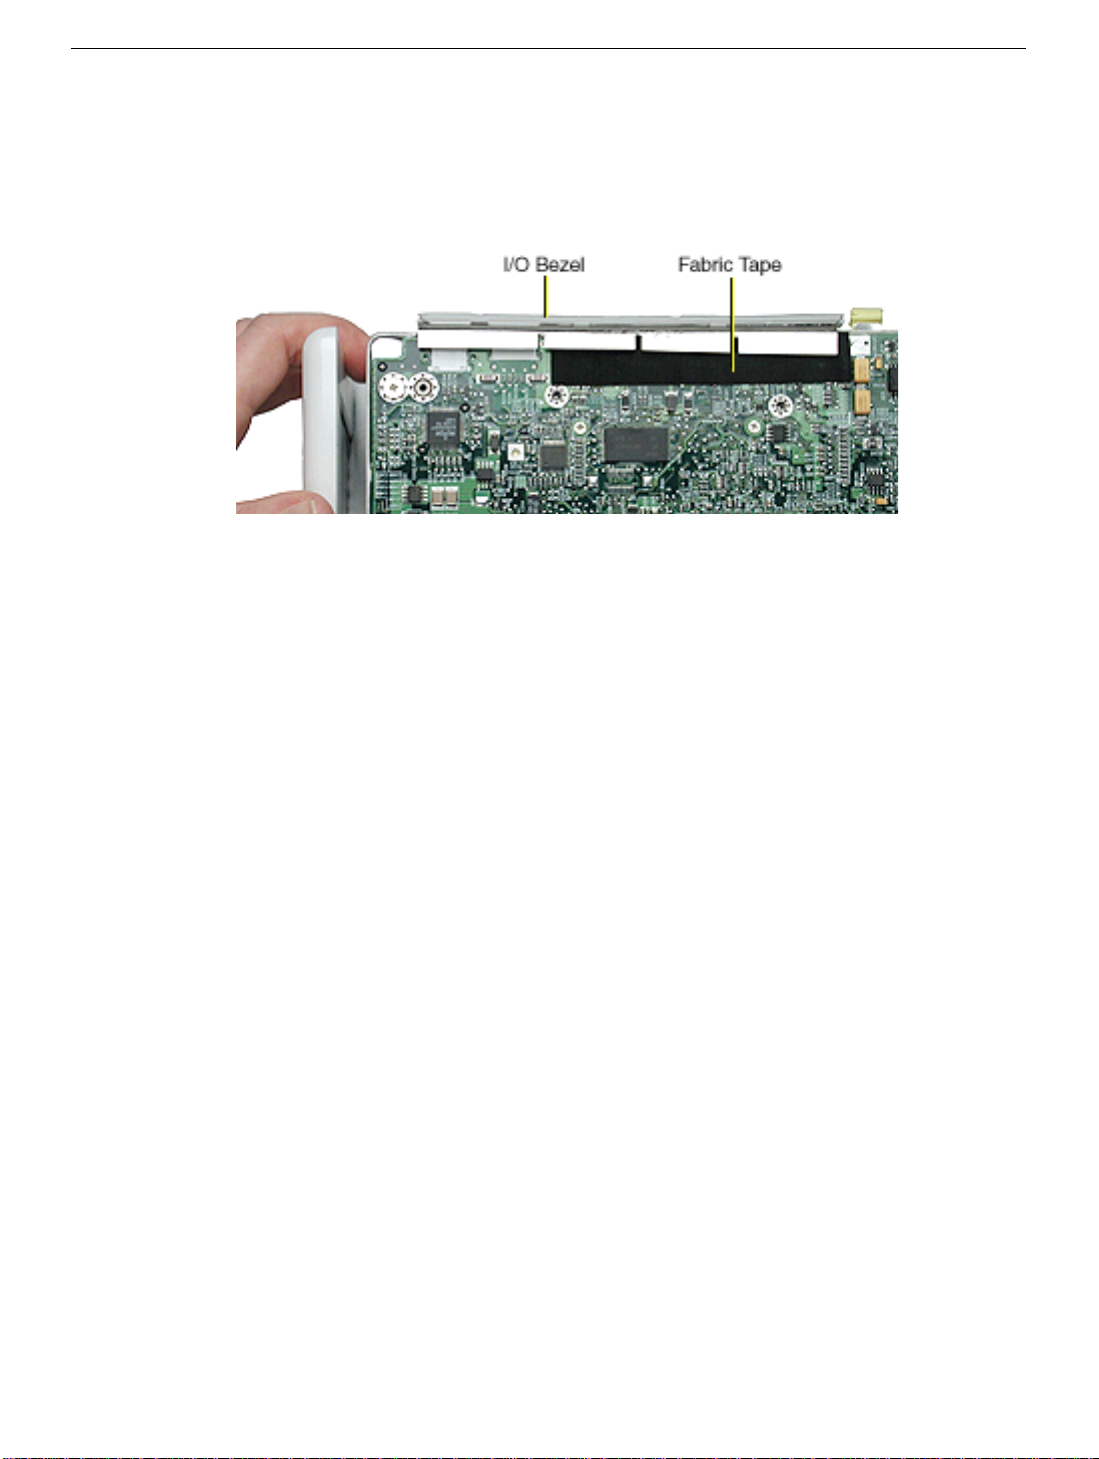
3. Install the replacement I/O bezel, and reassemble and test the computer.
Note:
When installing the replacement I/O bezel, make sure the bezel shield
fits over the fabric tape on the underside of the logic board, as shown below.
iBook (Dual USB) I/O Bezel -
3
Page 49

iBook (Dual USB)
Hard Drive
Replacement Instructions
The following instructions explain how to replace the hard drive in the iBook (Dual USB)
computer.
Tools
• Soft cloth
• Black stick (or other nonconductive nylon or plastic tool)
• Torx T8 screwdriver
Note:
To organize the screws you remove from the computer, use a tray with divided
compartments (such as a plastic ice cube tray).
Preliminary Steps
Before you begin, remove the following:
• Battery
• Bottom case
• Keyboard
• Airport Card
• Top case
• Top shield
Updated: 2001-07-06
Page 50
Procedure
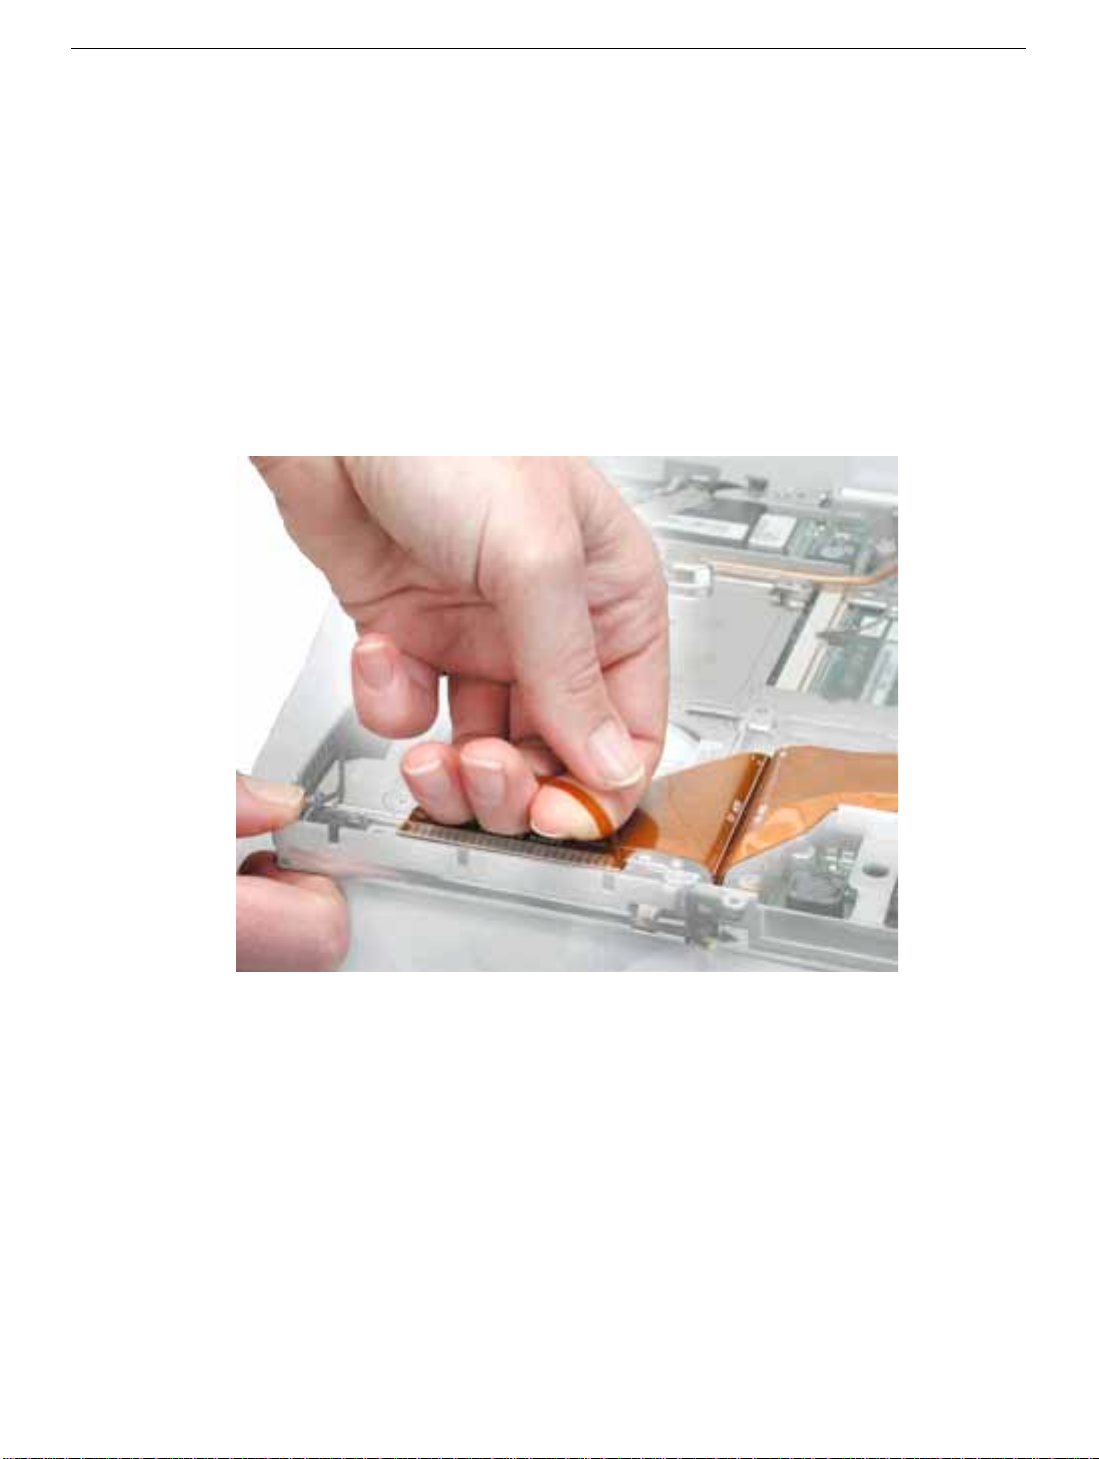
1. With the computer on a soft cloth, note the location of the hard drive and how the
ribbon cable is routed.
2. Warning: If the ribbon cable connector is pulled up unevenly, some connector
pins could become bent and damaged.
Using even force, pull the looped handle straight up to disconnect the ribbon
cable from the connector at the side of the hard drive.
Note:
When installing the ribbon cable at the side of the replacement drive,
this connector is labeled "TO MAIN BOARD" on the ribbon cable.
iBook (Dual USB) Hard Drive -
2
Page 51
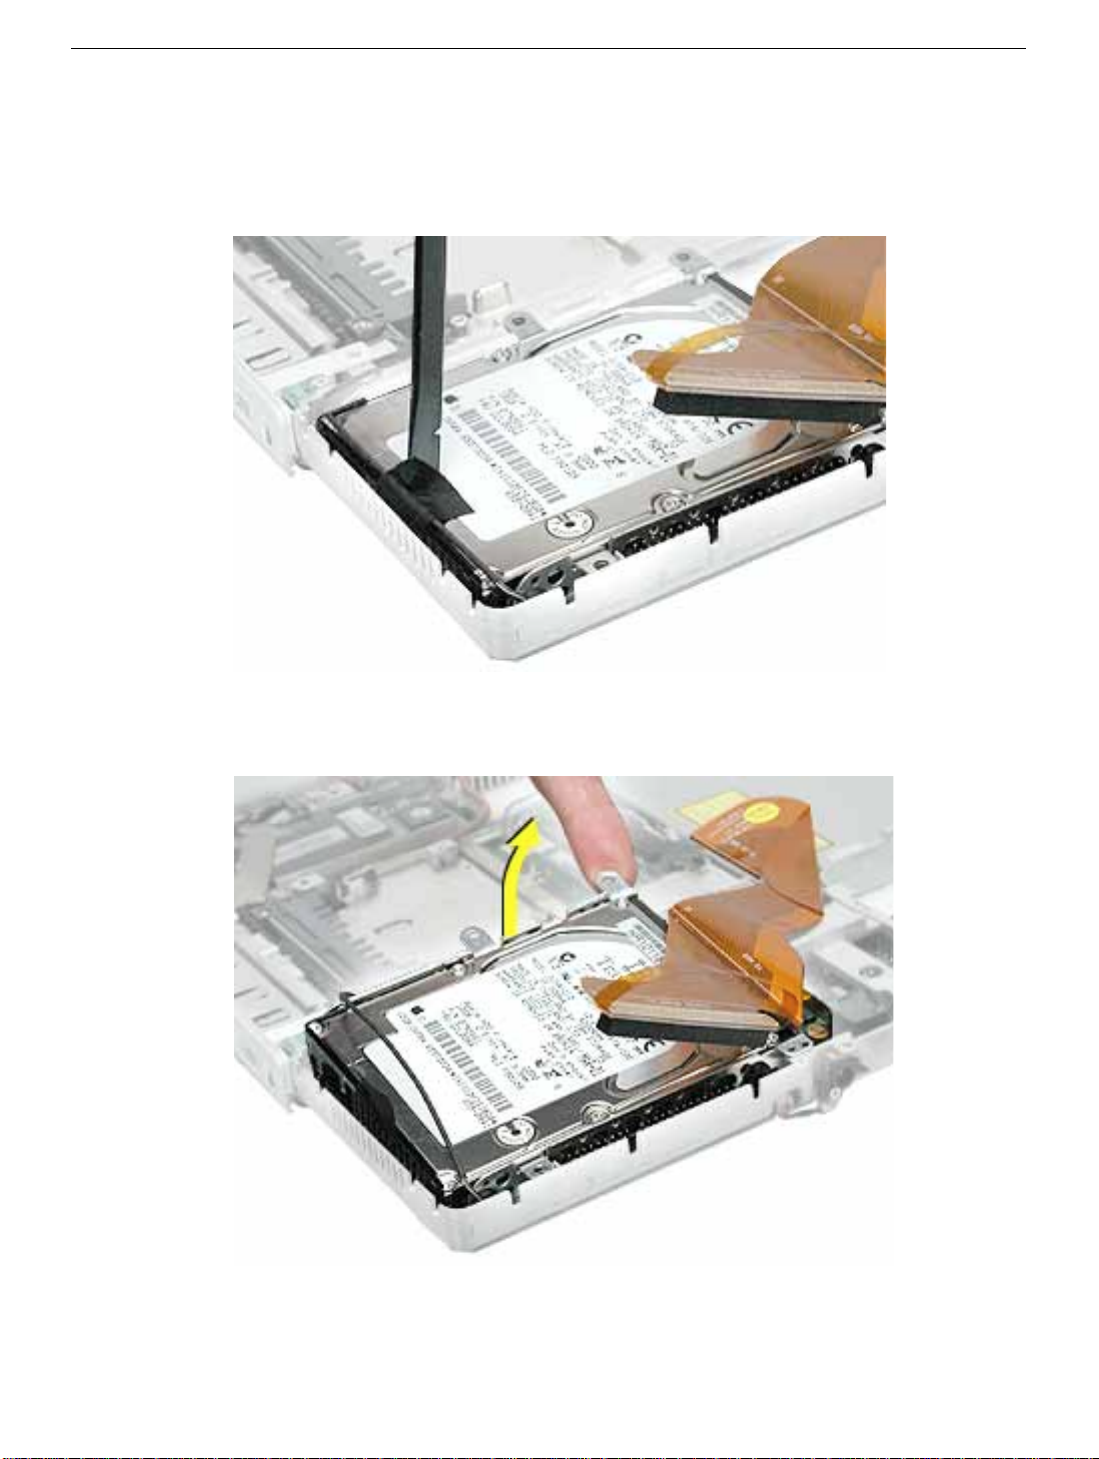
3. Lift up the fabric tape to release the microphone cable.
Note: When reassembling the computer, reuse the tape to secure the microphone
cable to the replacement drive.
4. From the corner bracket, tilt up the hard drive, and slide it out from under the
microphone cable.
iBook (Dual USB) Hard Drive -
3
Page 52
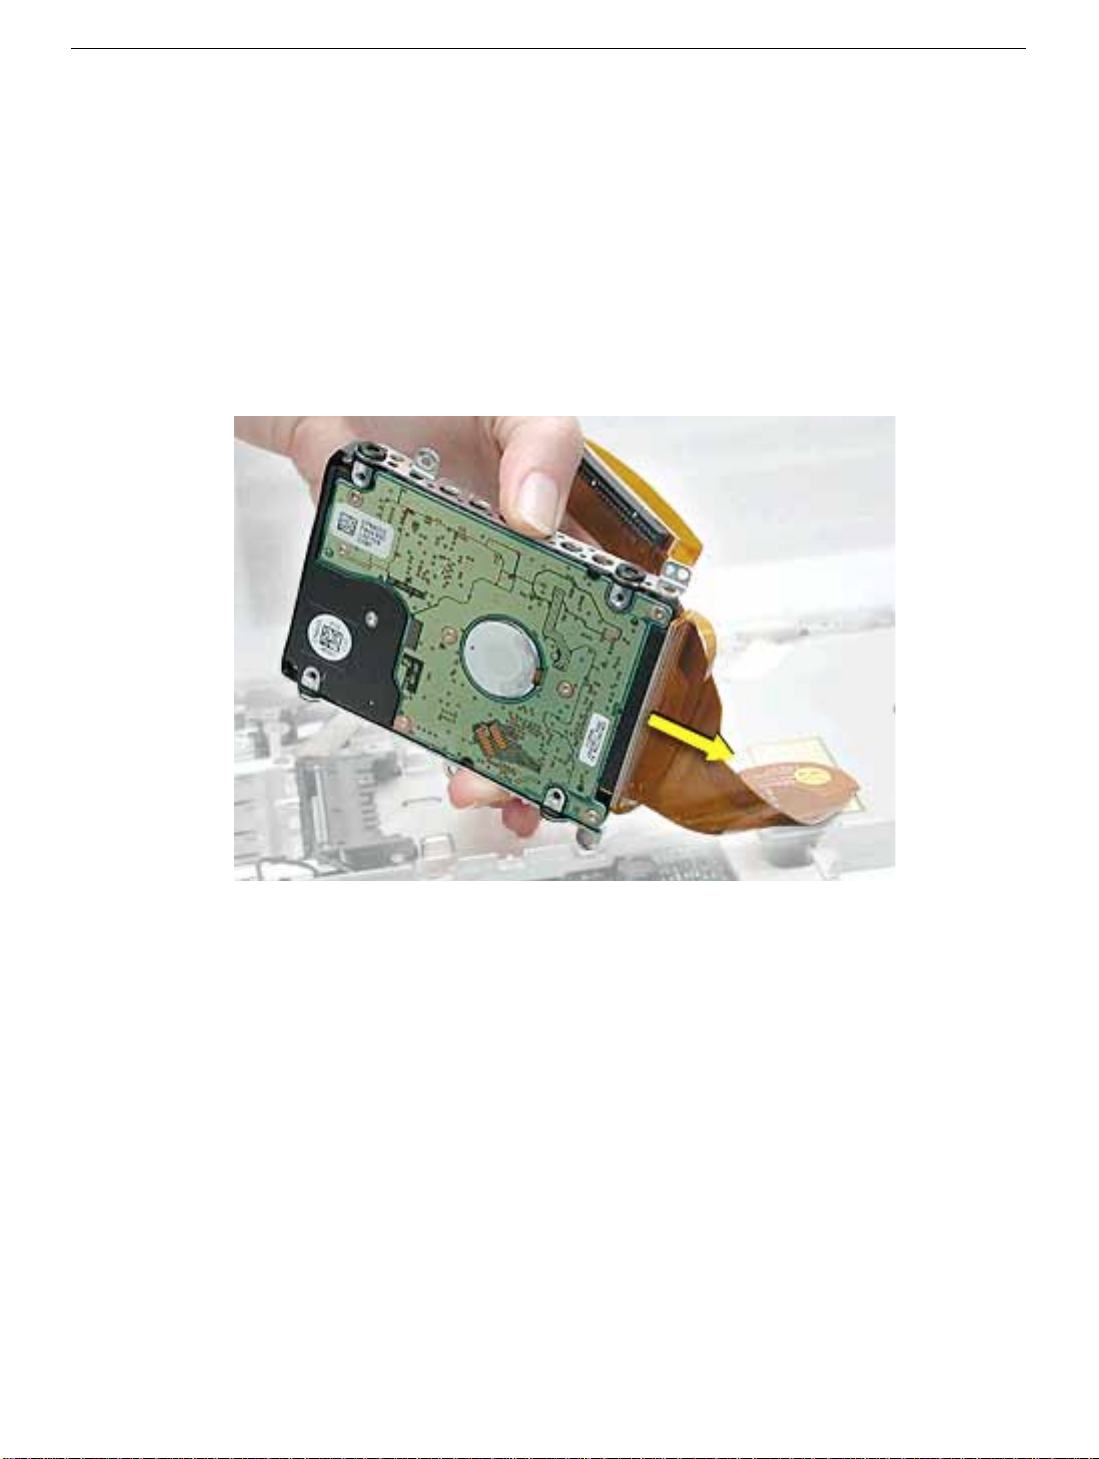
5. Warning: Handle the hard drive at the sides only. Do not touch or press
anywhere else on the drive.
Warning: If the ribbon cable connector is pulled out unevenly, some connector
pins could become bent and damaged.
Using even force,
connector on the end of the hard drive.
Note:
When installing the ribbon cable to the end of the replacement drive,
this connector is labeled "TO HDD" on the ribbon cable.
pull the looped handle to disconnect the ribbon cable from the
iBook (Dual USB) Hard Drive -
4
Page 53
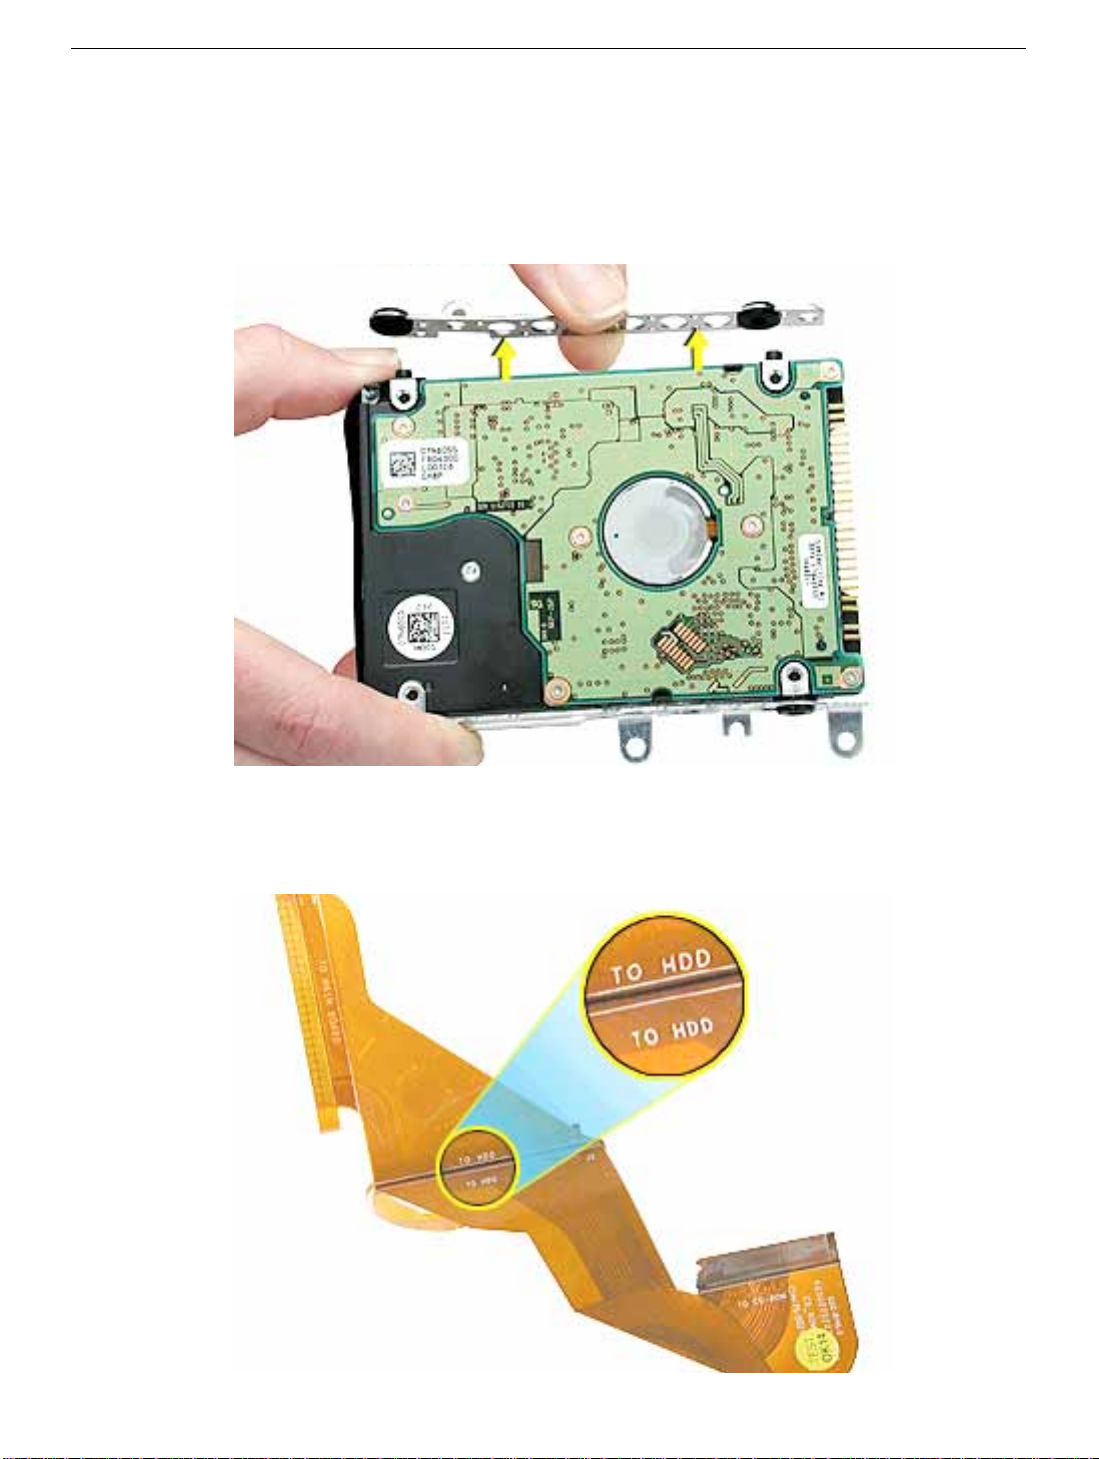
6. Holding the drive by the corners as shown, pull off the side rails (with grommets
attached).
Note: When reassembling the computer, transfer the side brackets (including the
grommets) to the replacement hard drive so the grommets fit over the screw heads.
7. Install the replacement hard drive, and reassemble and test the computer.
Note:
Each connector on the ribbon cable is labeled for reinstallation.
iBook (Dual USB) Hard Drive -
5
Page 54

iBook (Dual USB)
Modem
Replacement Instructions
The following instructions explain how to replace the modem in the iBook (Dual USB)
computer.
Tools
• Soft cloth
• #0 Phillips screwdriver
• Black stick (or other nonconductive nylon or plastic tool)
Preliminary Steps
Before you begin, remove the following:
• Battery
• Bottom case
• Keyboard
• Airport Card
• Top case
• Top shield
Updated: 2001-07-06
Page 55
Procedure
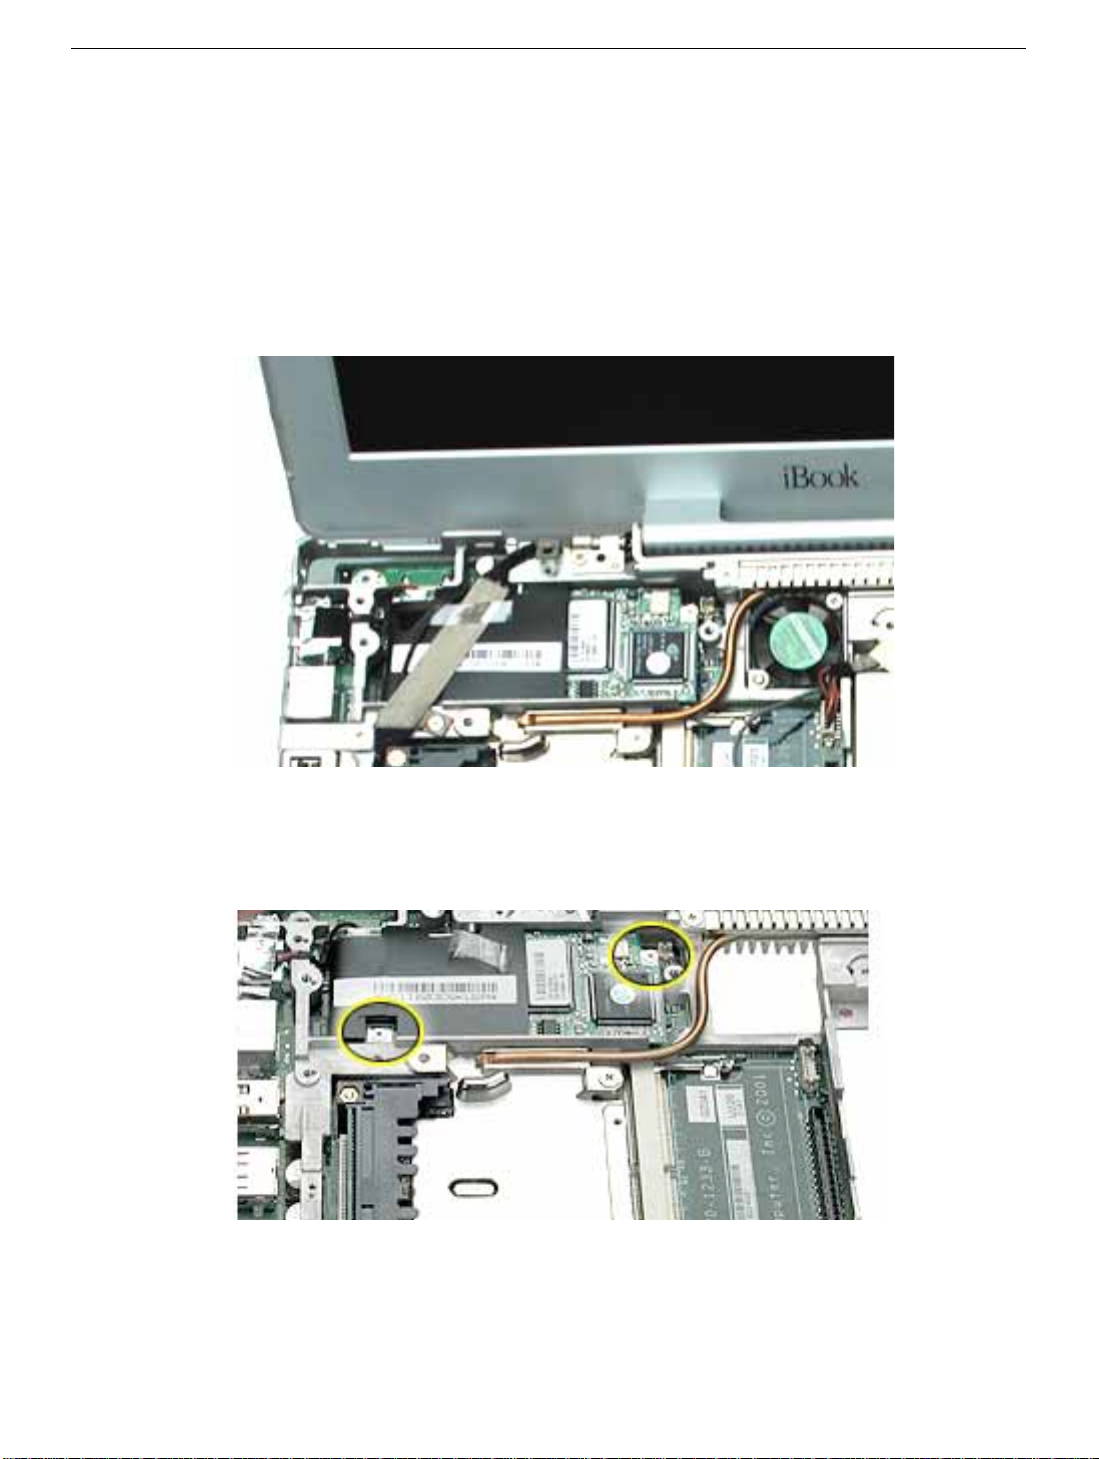
1. Warning: When removing the modem, be careful not to strain the cable.
With the computer on a soft cloth, note the routing of the LVDS (low voltage data
signal) cable that is taped to the modem sleeve.
Without straining the LVDS cable, peel off the clear tape and carefully move the
cable aside.
2.
Important:
strain or remove the cable.
With the computer on a soft cloth, remove the two screws from the modem.
Although the image below shows the LVDS cable removed, do not
iBook (Dual USB) Modem -
2
Page 56
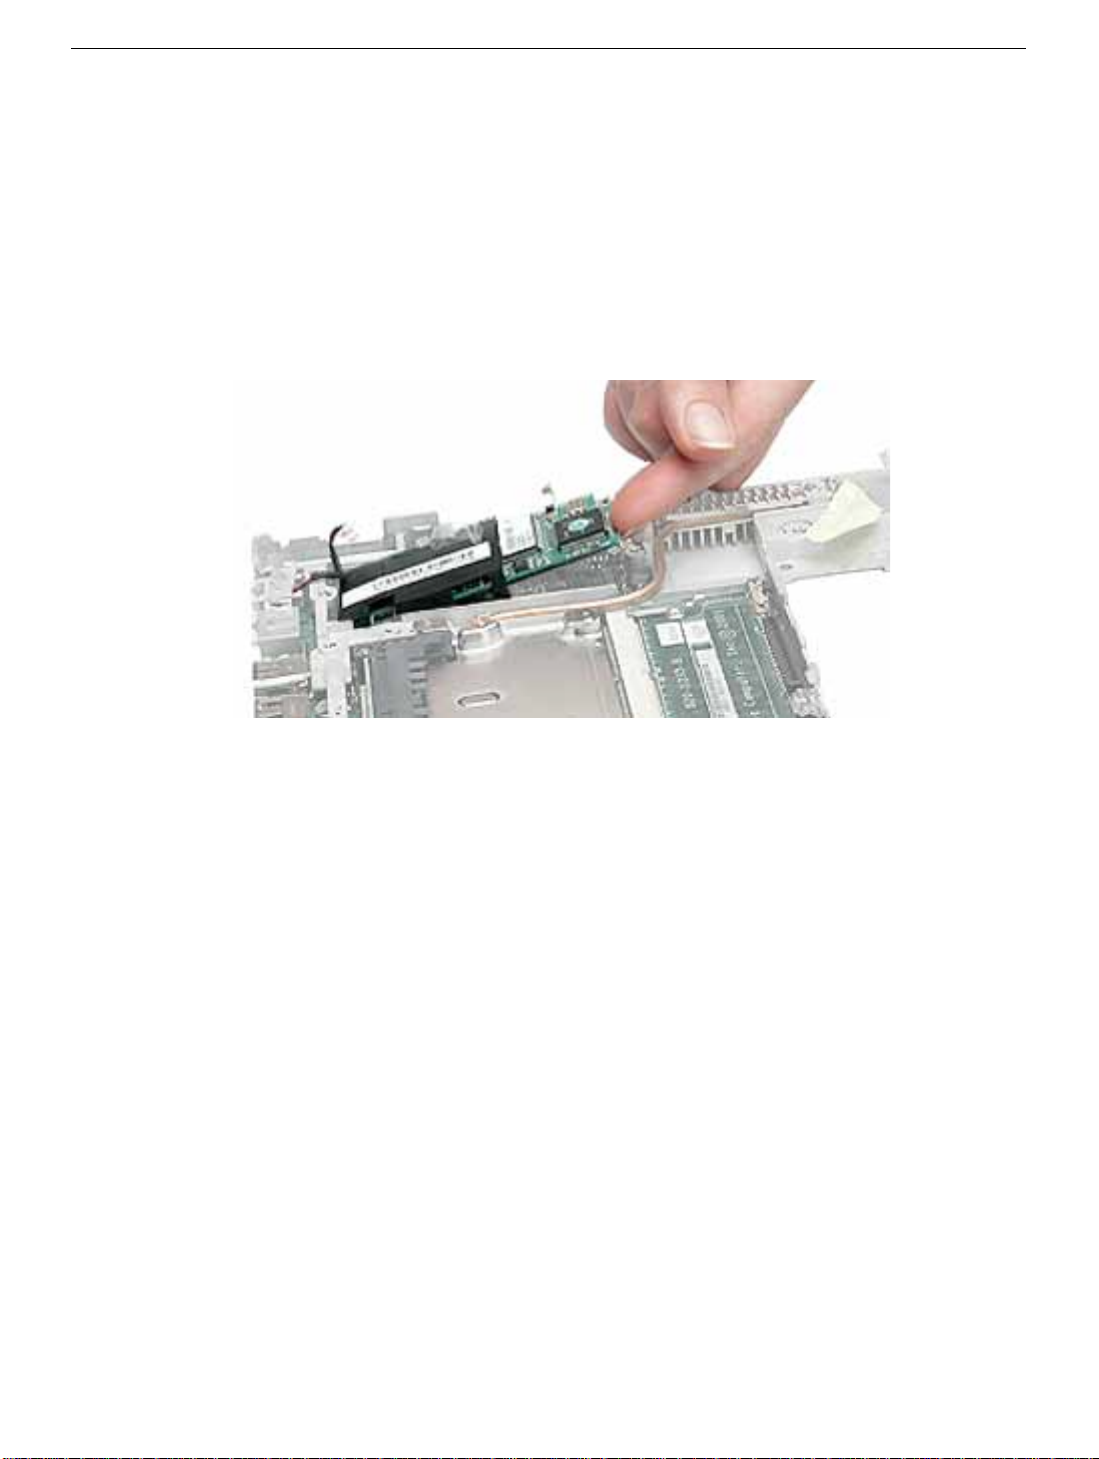
3.
Important:
strain or remove the cable.
Tilt up the end of the modem to disconnect it from the logic board.
4. Disconnect the 2-pin connector cable from the modem, and remove the modem from
the computer.
Note:
cable to the modem sleeve. (Refer to the Display Module procedure.)
Although the image below shows the LVDS cable removed, do not
When reassembling the computer, reuse the tape that secures the flat LVDS
5. Install the replacement modem, and reassemble and test the computer.
iBook (Dual USB) Modem -
3
Page 57

iBook (Dual USB)
Display Module
Replacement Instructions
The following instructions explain how to replace the display module in the iBook (Dual
USB) computer.
Tools
• Soft cloth
• #0 Phillips screwdriver
• Black stick (or other nonconductive nylon or plastic tool)
Note:
To organize the screws you remove from the computer, use a tray with divided
compartments (such as a plastic ice cube tray).
Preliminary Steps
Before you begin, remove the following:
• Battery
• Bottom case
• Keyboard
• Airport Card
• Top case
• Top shield
Updated: 2001-07-06
Page 58
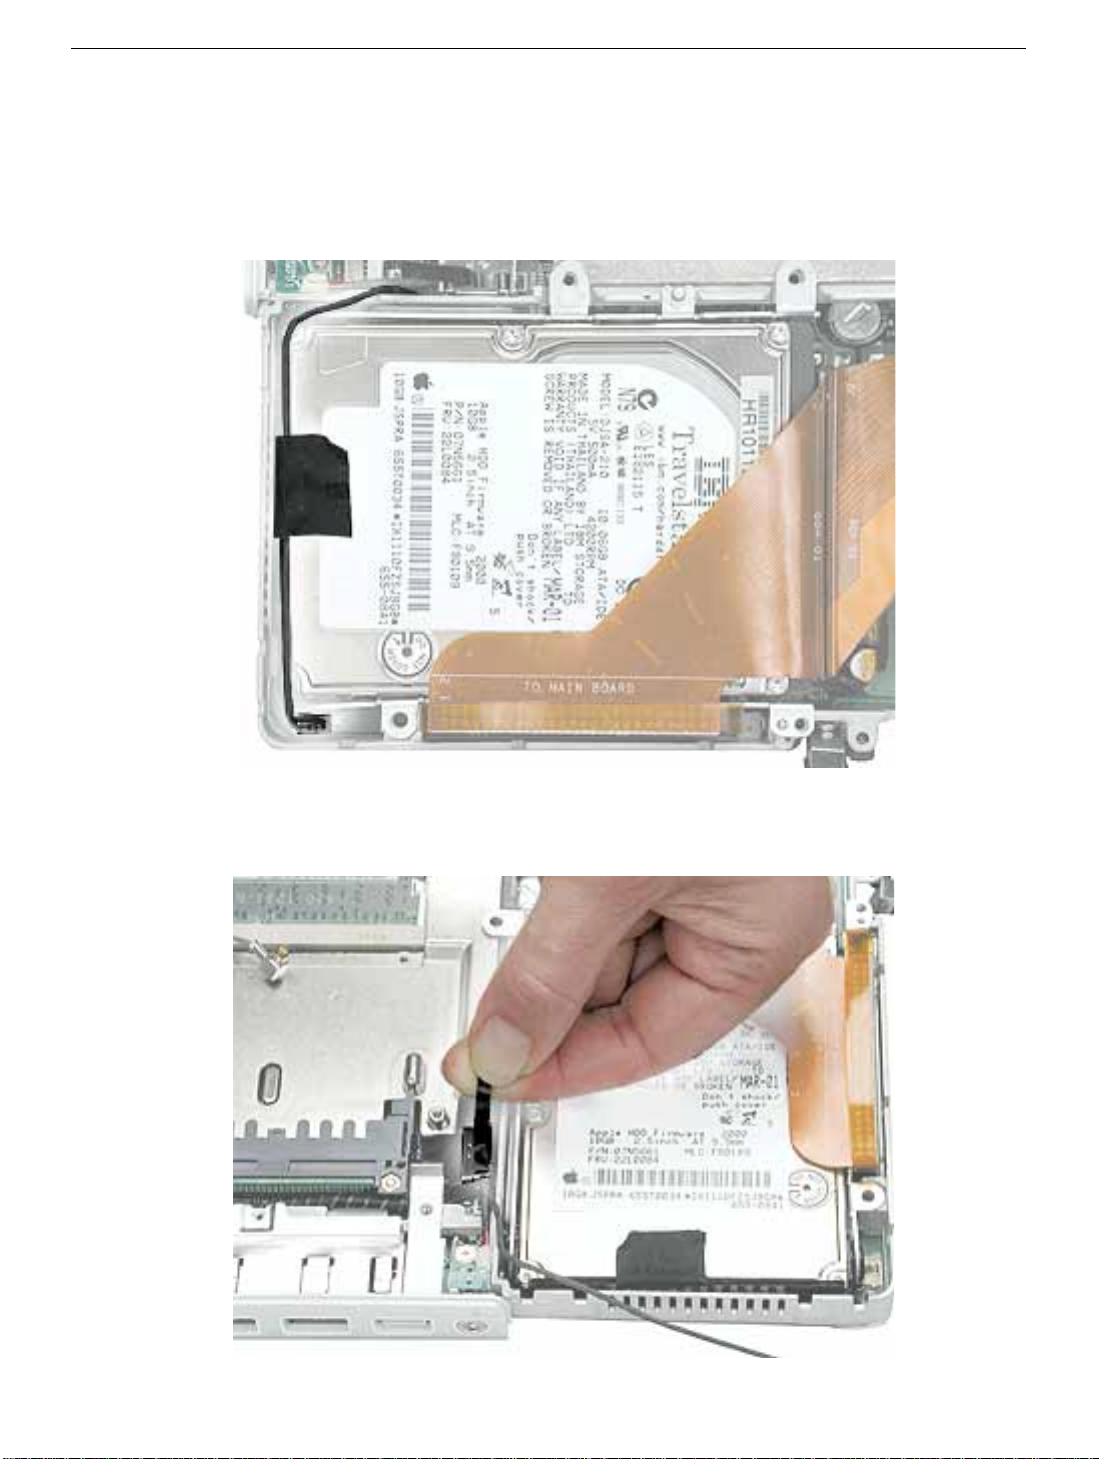
Procedure
1. With the computer on a soft cloth, note the routing of the black microphone cable.
Disconnect the microphone cable from the logic board and release the cable from the
black fabric tape on the hard drive.
2. Pull up the flexible tab to disconnect the LVDS (lo w v oltage data signal) cab le from the
logic board.
iBook (Dual USB) Display Module -
2
Page 59
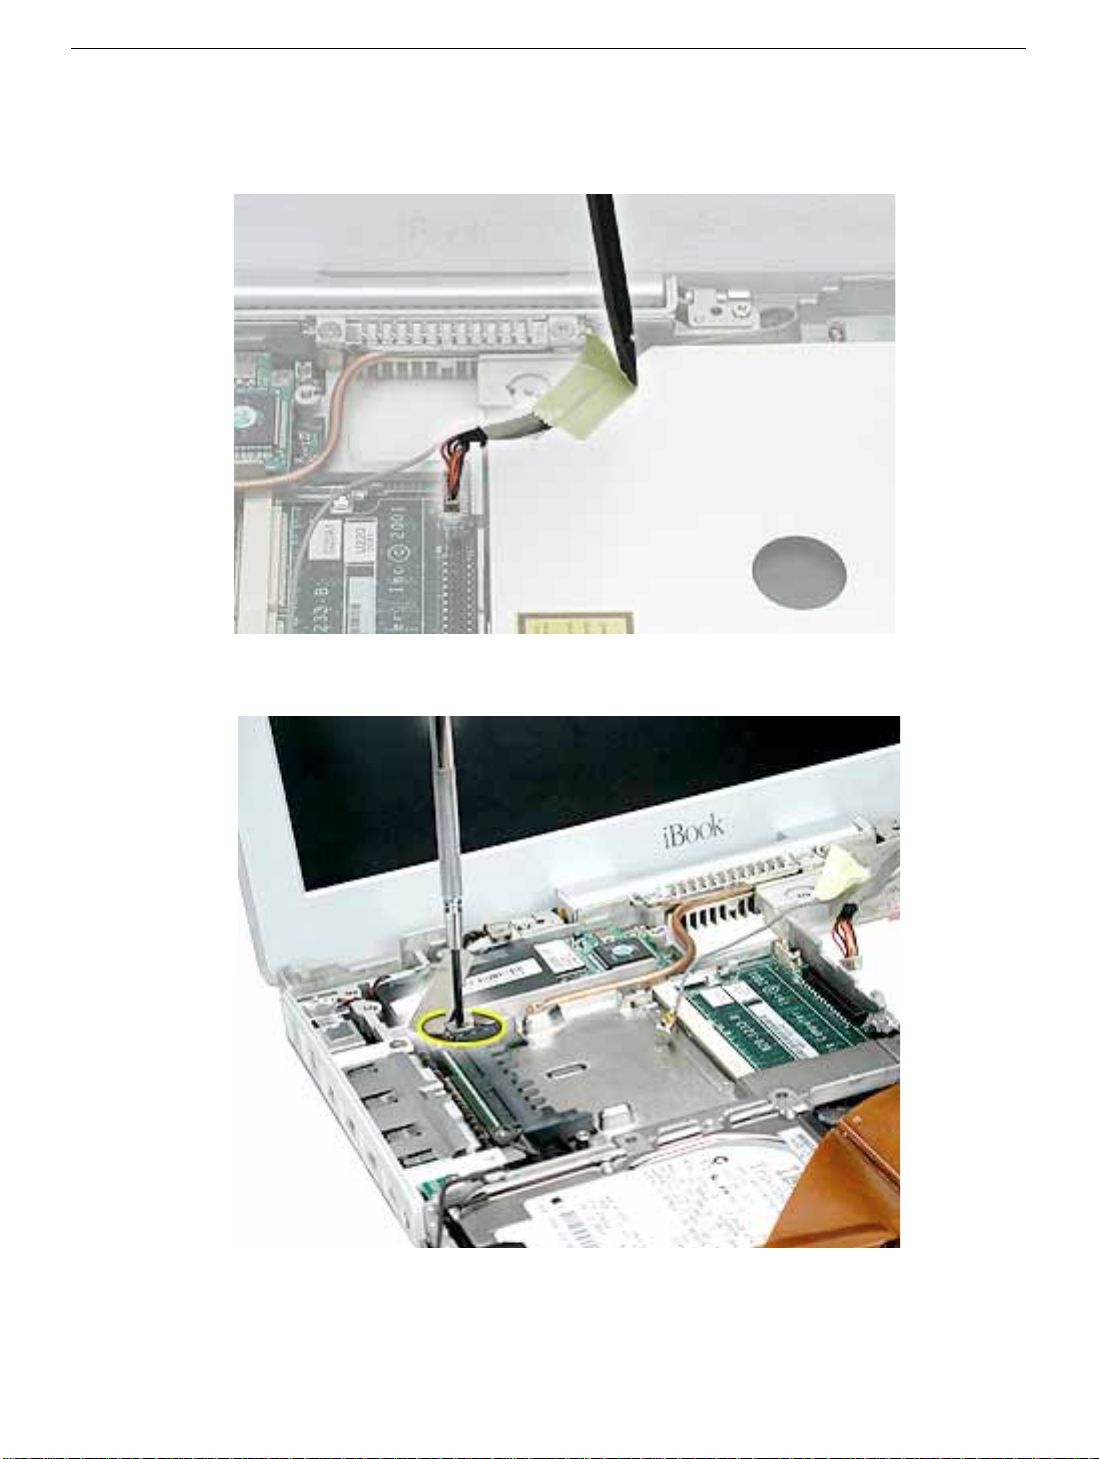
3. Peel the tape off of the optical drive, and disconnect the flat backlight cable from the
logic board.
4. Remove the screw securing the flat section of the LVDS cable.
iBook (Dual USB) Display Module -
3
Page 60
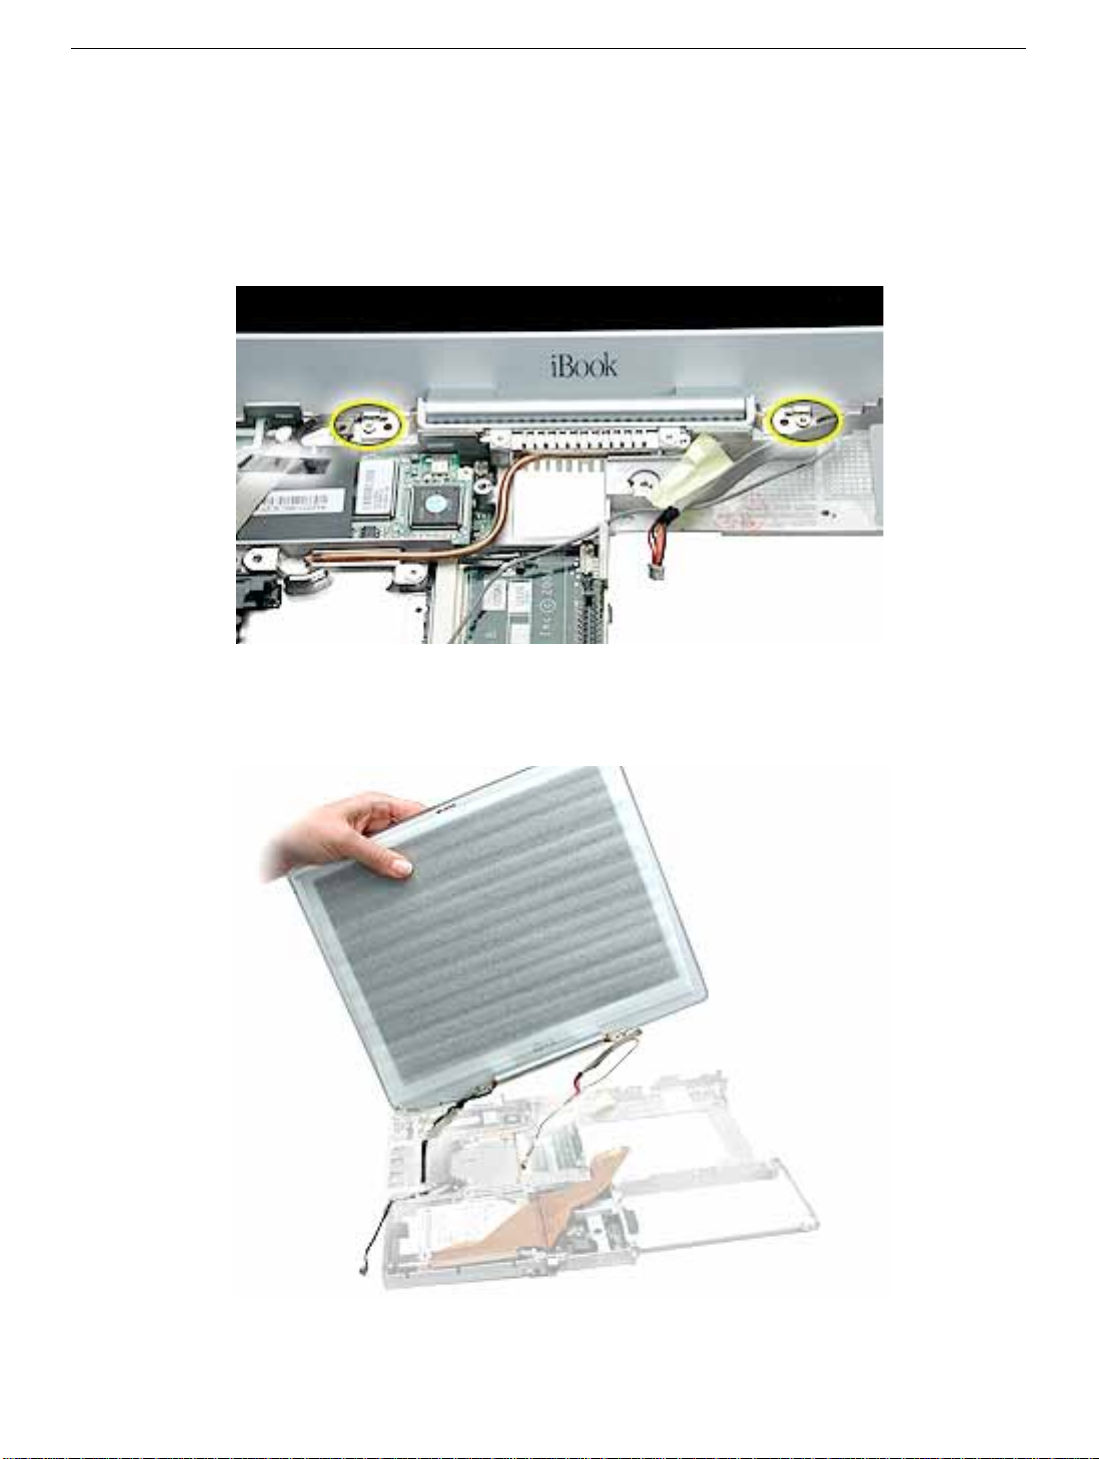
5. Warning: To prevent damage, support the back of the display while performing
this step.
Remove the tape that secures the LVDS cable to the modem sleeve.
Remove the screw at each display hinge.
6. Warning: When lifting the display, be careful not to strain the cables.
Tilt the display up off the computer.
iBook (Dual USB) Display Module -
4
Page 61
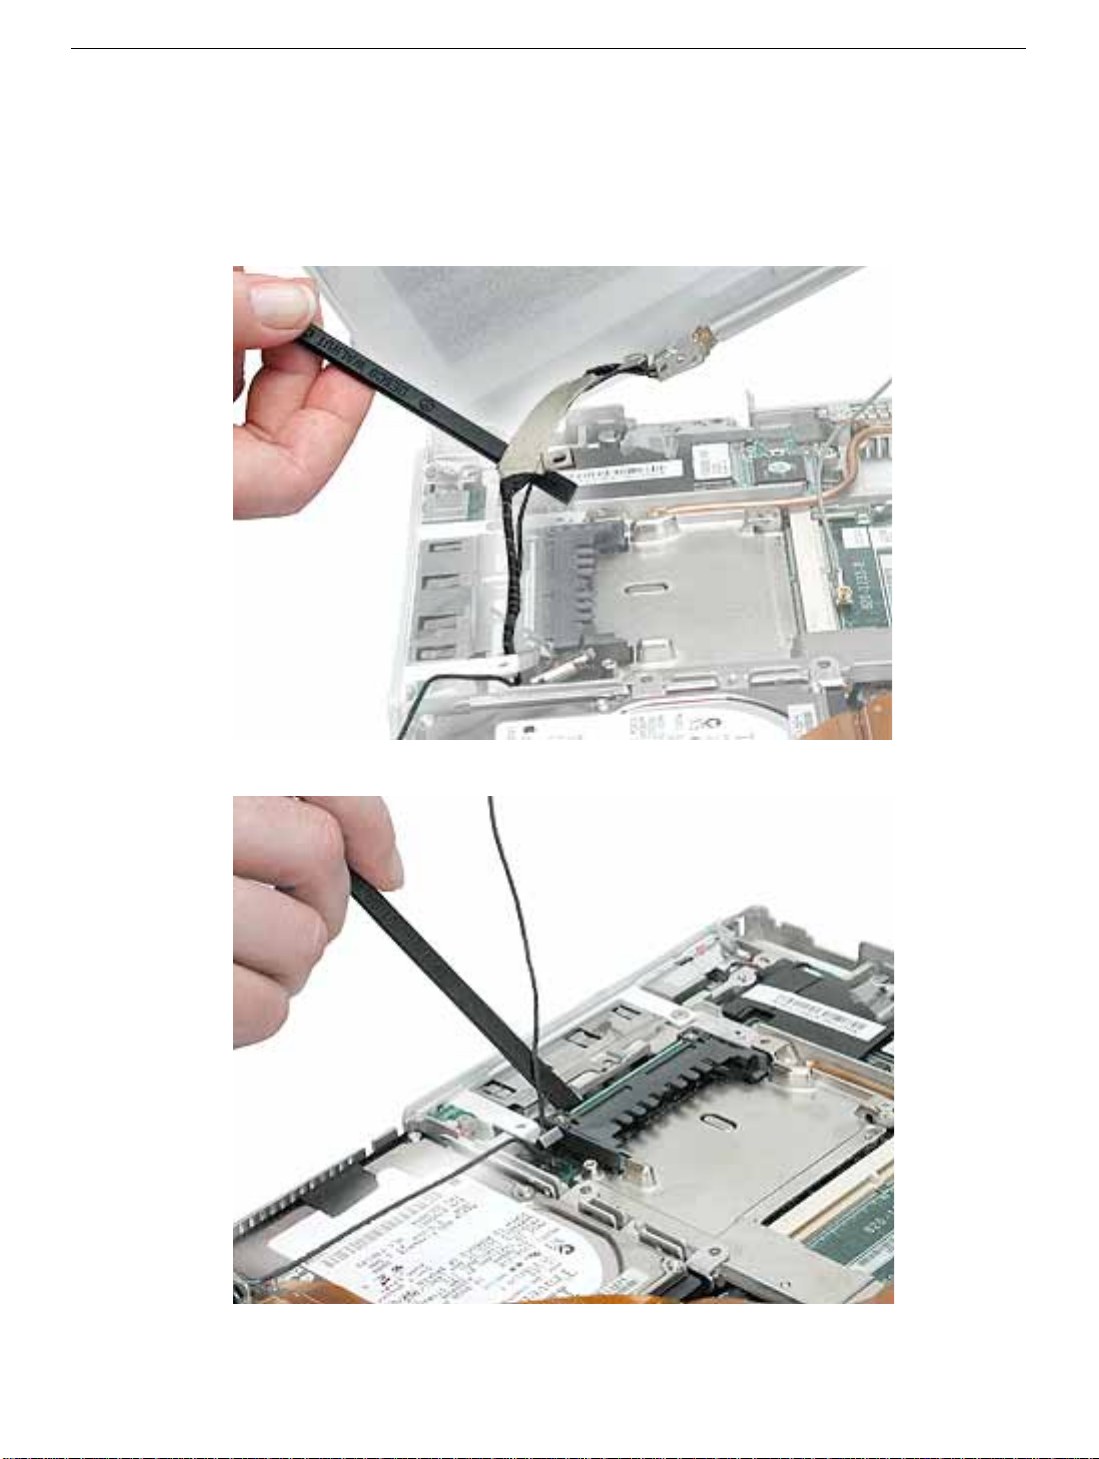
7. Warning: Do not tug on the remaining cables. Make sure the cable insulation is
not torn or damaged.
Using a black stick, carefully release the remaining length of the LVDS cable and the
microphone cable from the computer.
iBook (Dual USB) Display Module -
5
Page 62
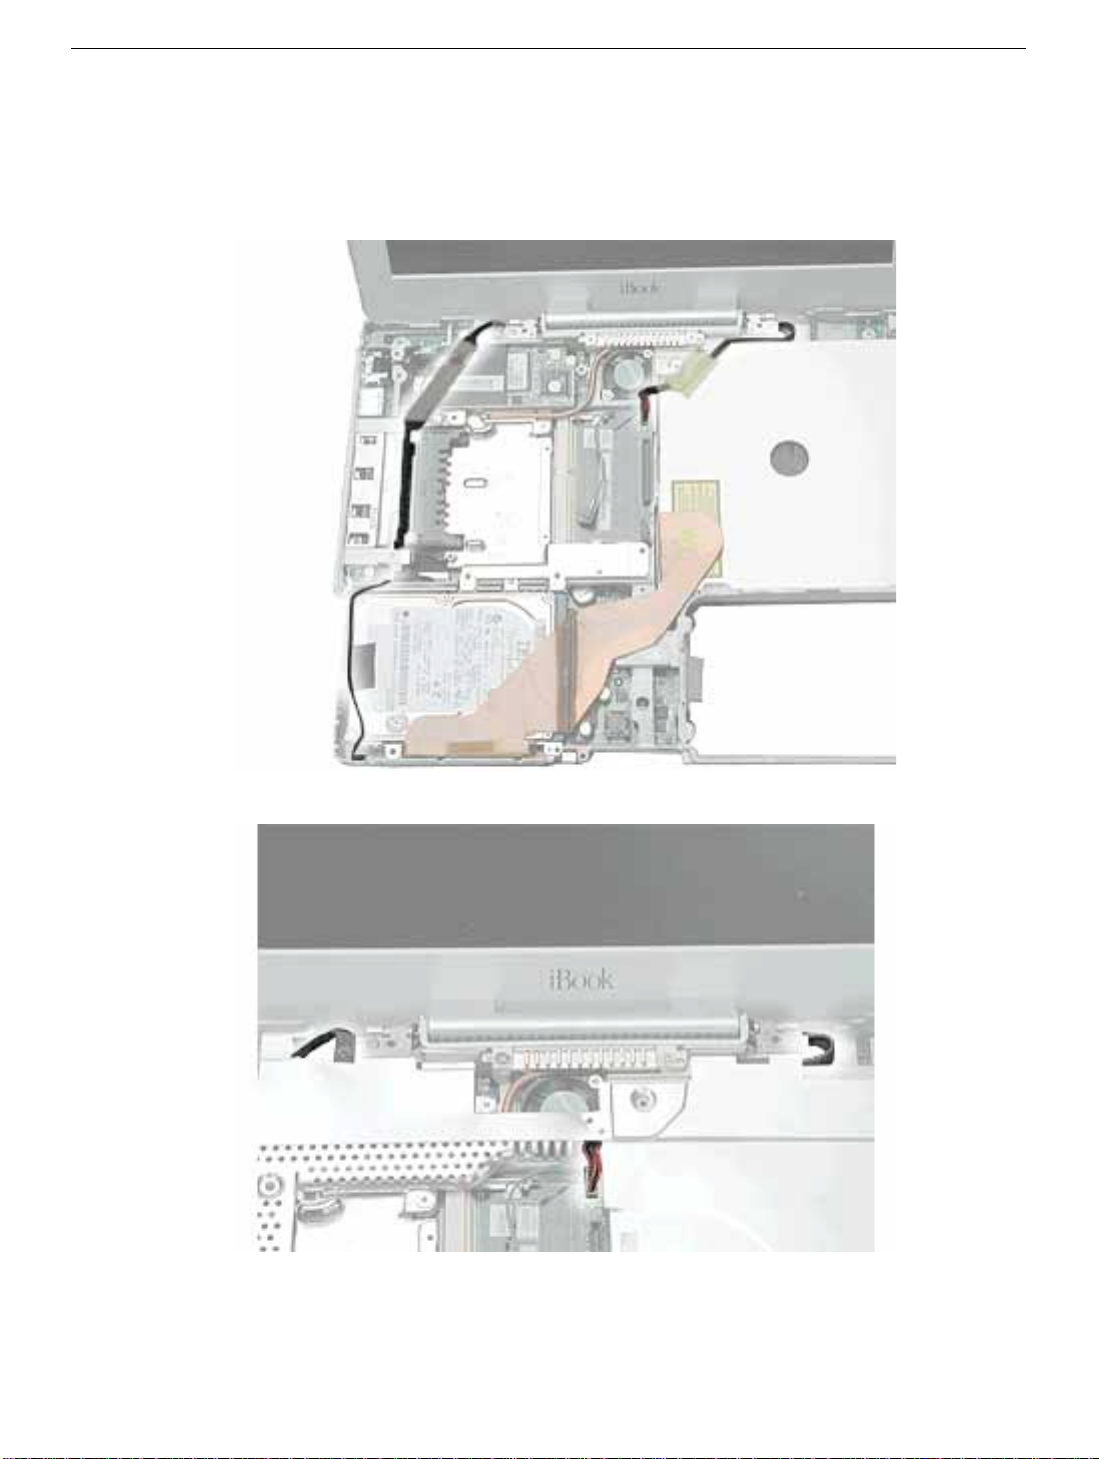
8. Install the replacement display module, and reassemble and test the computer.
Note:
When guiding the display cables into place, make sure that they are
routed as shown below.
iBook (Dual USB) Display Module -
6
Page 63

iBook (Dual USB)
Optical Drive
Replacement Instructions
The following instructions explain ho w to replace the optical driv e in the iBook (Dual USB)
computer.
Note:
Depending on the configuration of a customer’s computer, the optical drive can be
a CD-ROM drive, a CD-R W drive , a DVD-ROM drive, or a combination CD-RW/DVD-R OM
drive. The replacement instructions are the same no matter which optical drive is installed.
Tools
• Soft cloth
• #0 Phillips screwdriver
• Black stick (or other nonconductive nylon or plastic tool)
Note:
To organize the screws you remove from the computer, use a tray with divided
compartments (such as a plastic ice cube tray).
Preliminary Steps
Before you begin, remove the following:
• Battery
• Bottom case
• Bottom shield
• Keyboard
• Airport Card
• Top case
• Top shield
Updated: 2001-08-14
Page 64
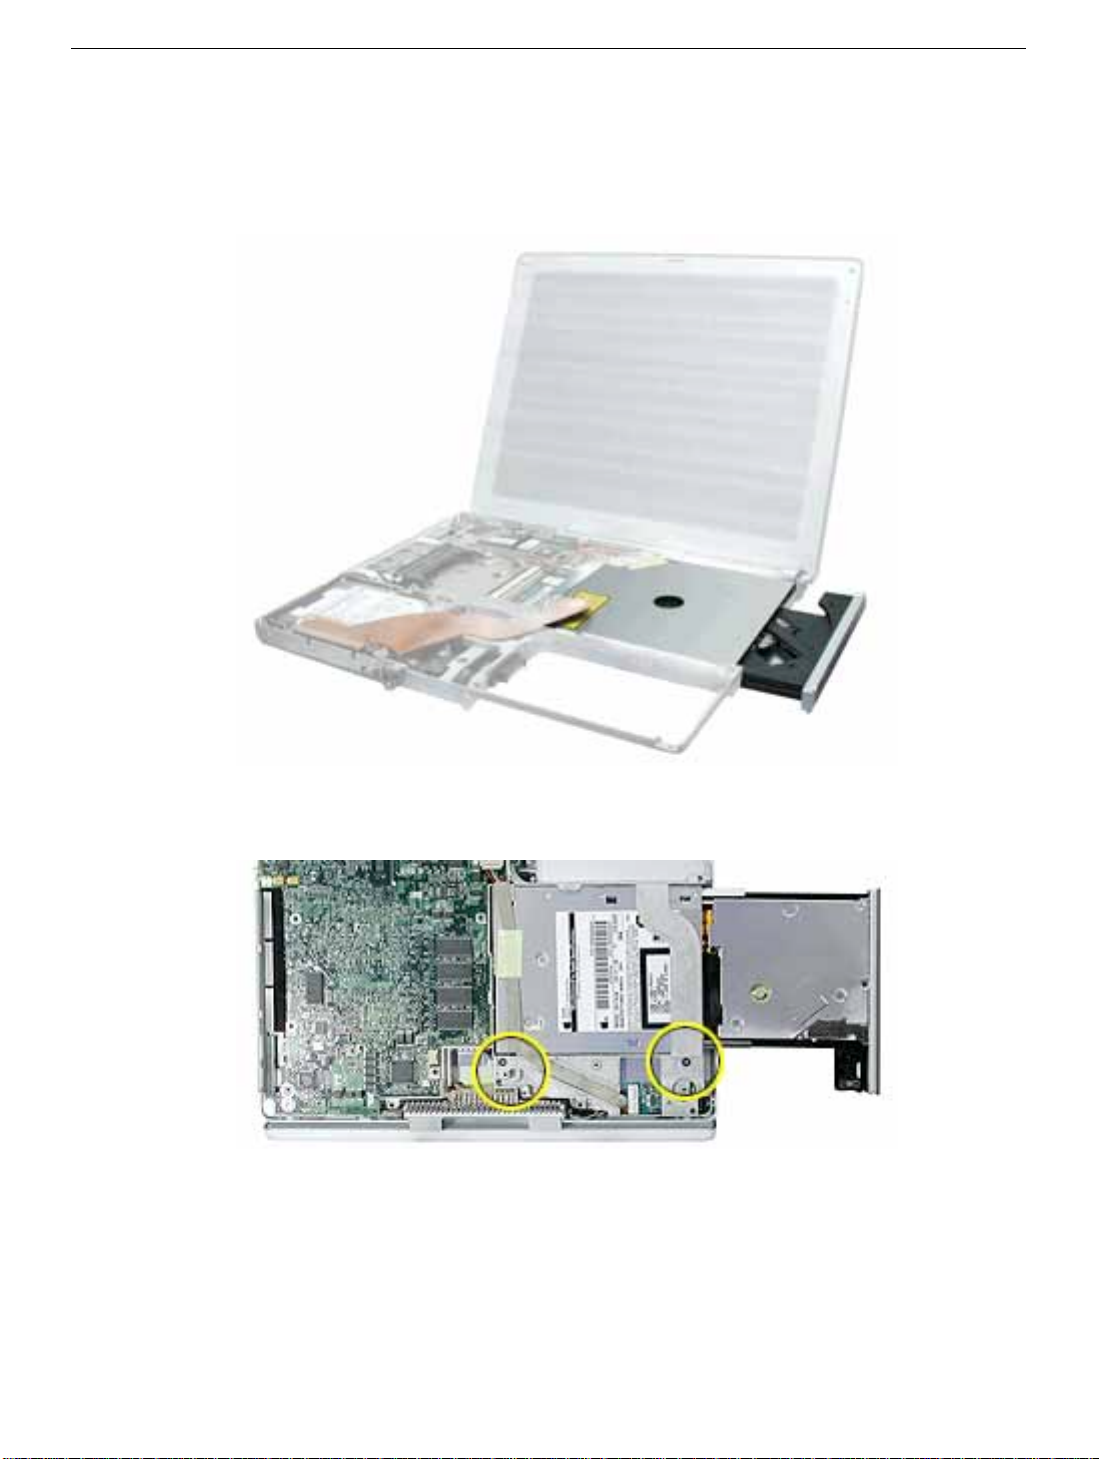
Procedure
1. With the computer on a soft cloth, note the location of the optical drive and the routing
of the ribbon cable.
2. Tilt up the computer, and remove the two screws beneath the optical drive.
iBook (Dual USB) Optical Drive -
2
Page 65
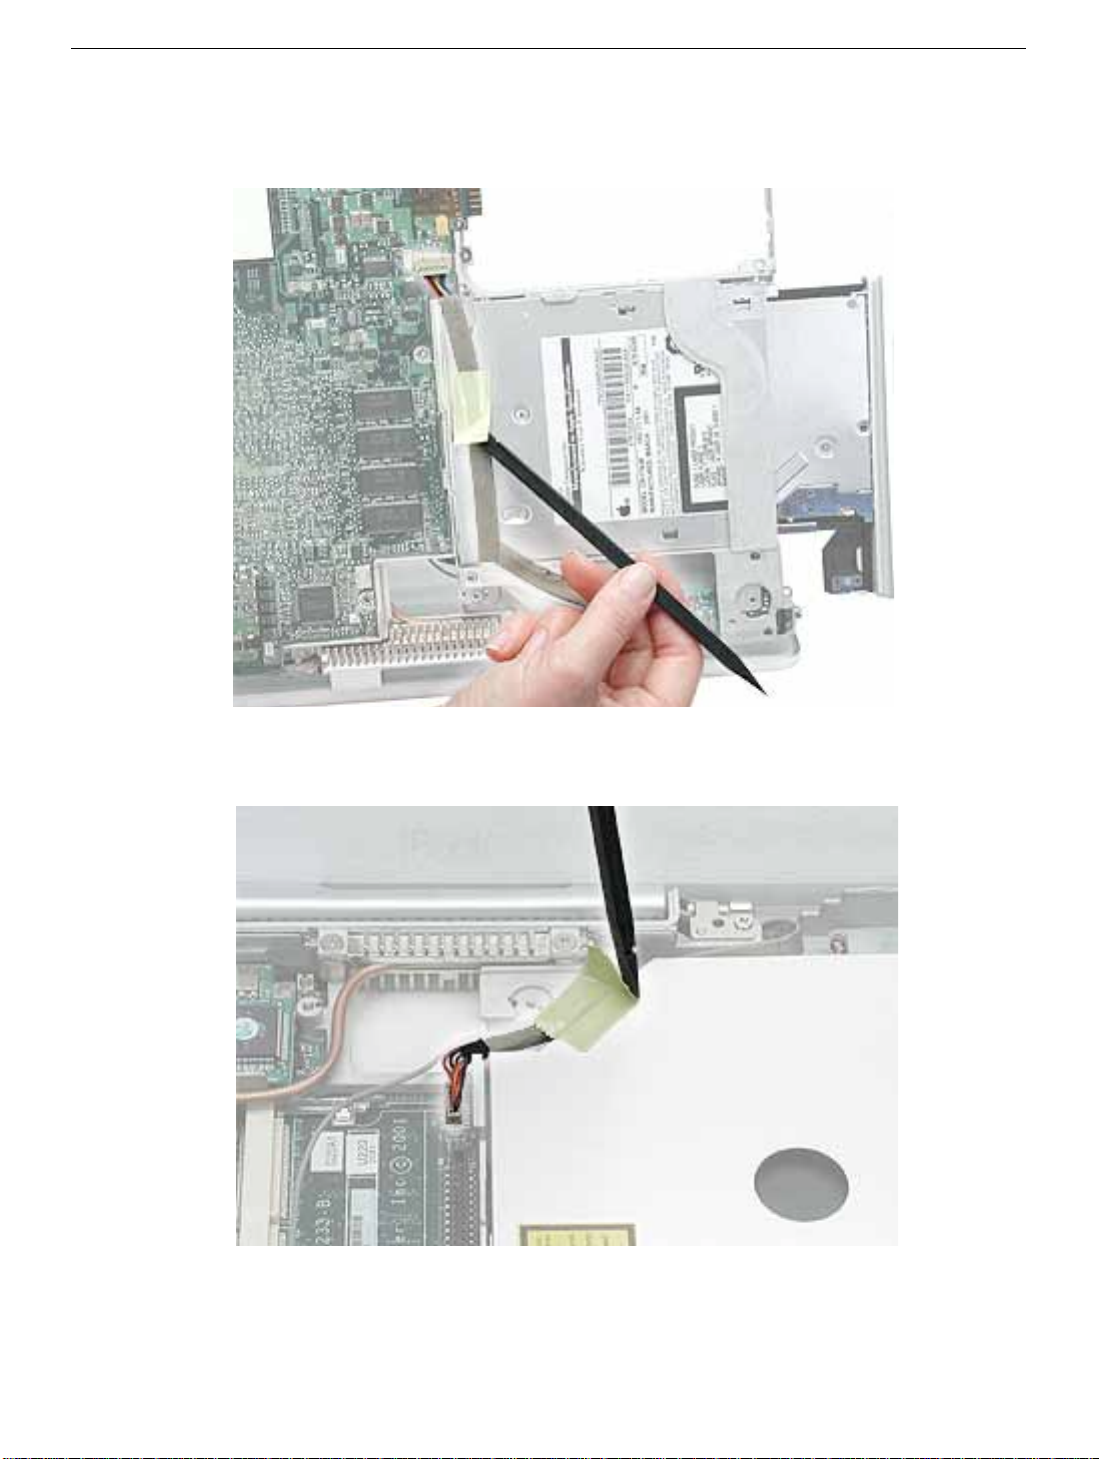
3. Note the routing of the flat power cable across the underside of the optical drive .Lift up
the tape from the flat power cable.
4. Tilt back the computer, and on the other side of the optical drive, loosen the tape
holding the backlight cable to the optical drive. Do not disconnect the backlight cable.
iBook (Dual USB) Optical Drive -
3
Page 66
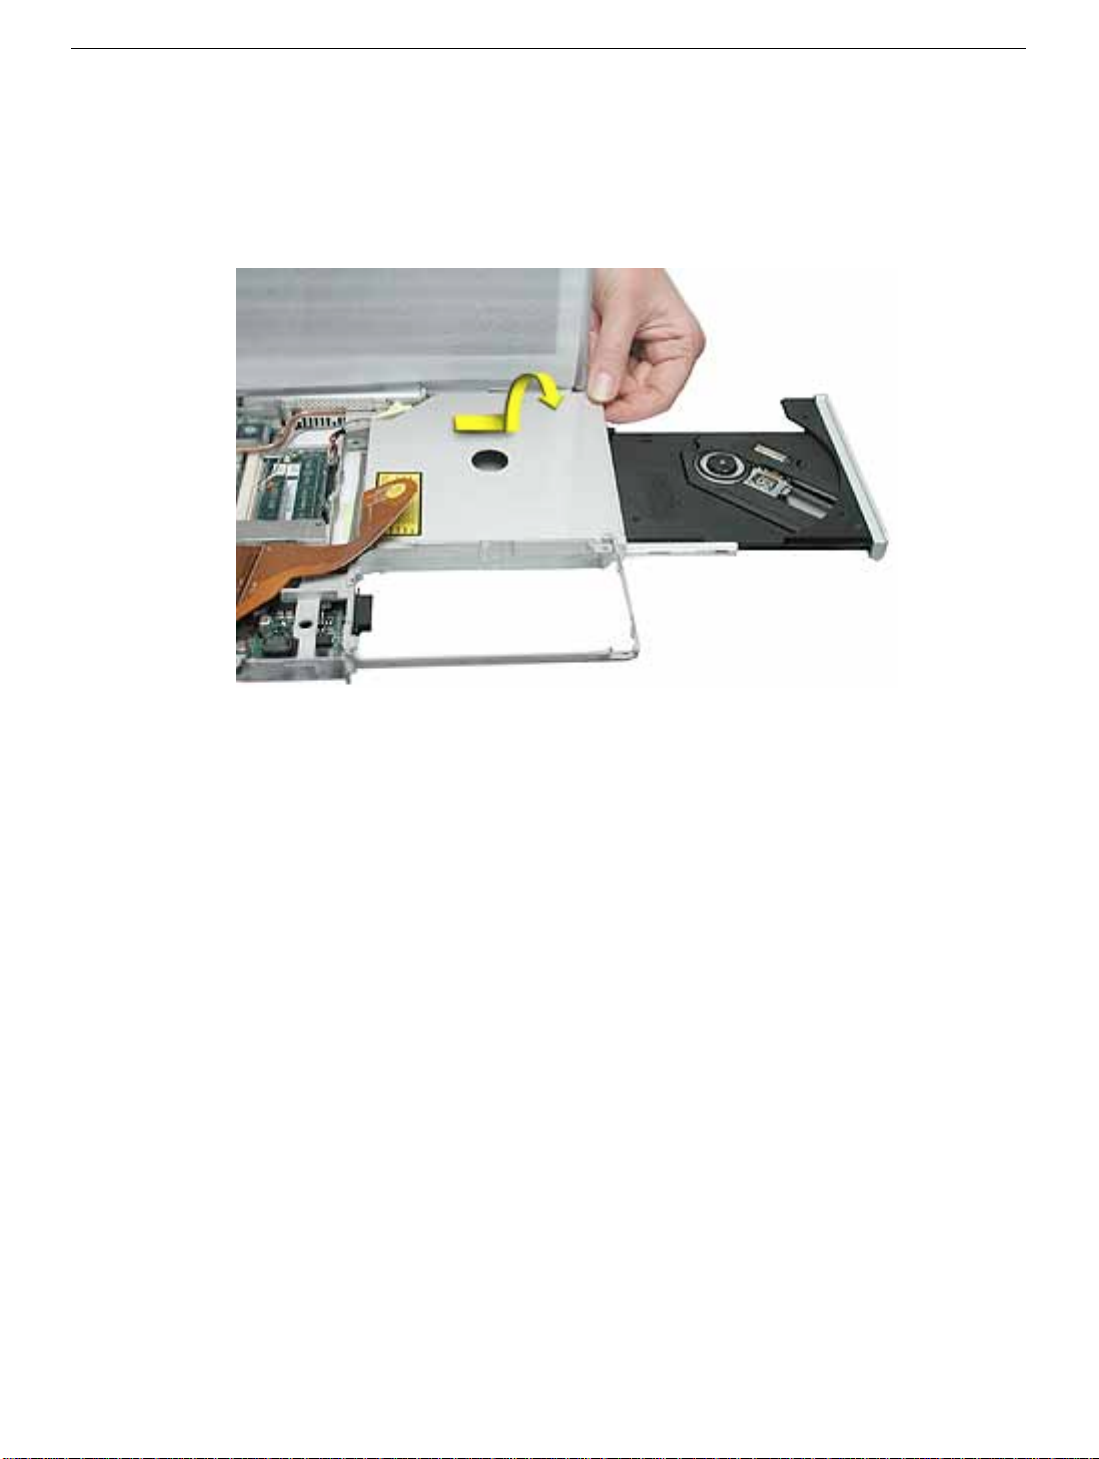
5. Warning: Handle the optical drive at the sides only. Do not touch or press
anywhere else on the drive.
Without straining the ribbon cable, slide out the optical drive part way and tilt it up and
away from the computer.
iBook (Dual USB) Optical Drive -
4
Page 67
6.
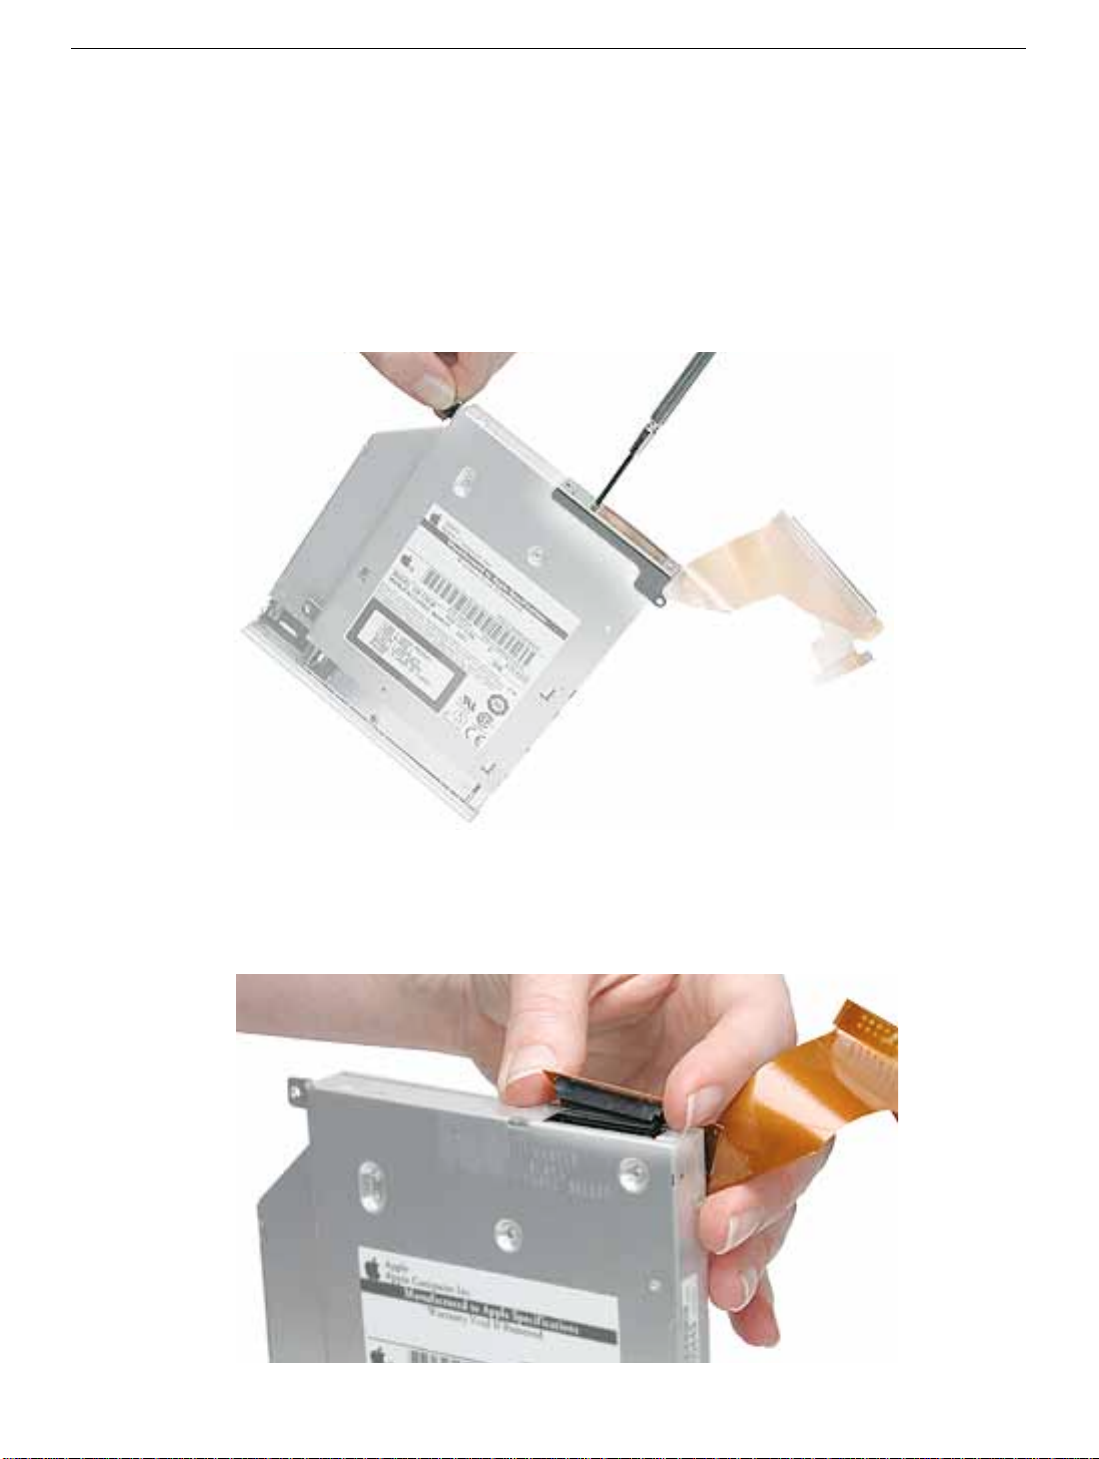
Important:
disconnect the ribbon cable from the hard drive.
Remove the two screws holding the cable bracket to the optical drive.
7. Remove the cable bracket.
Note:
replacement drive.
Contrary to the images shown on this page, it is not necessary to
When reassembling the computer, transfer the cable bracket to the
8. Disconnect the ribbon cable.
Note:
When reassembling the computer, transfer the ribbon cable to the
replacement drive. The connector is labeled "TO CD-ROM" on the ribbon cable.
iBook (Dual USB) Optical Drive -
5
Page 68
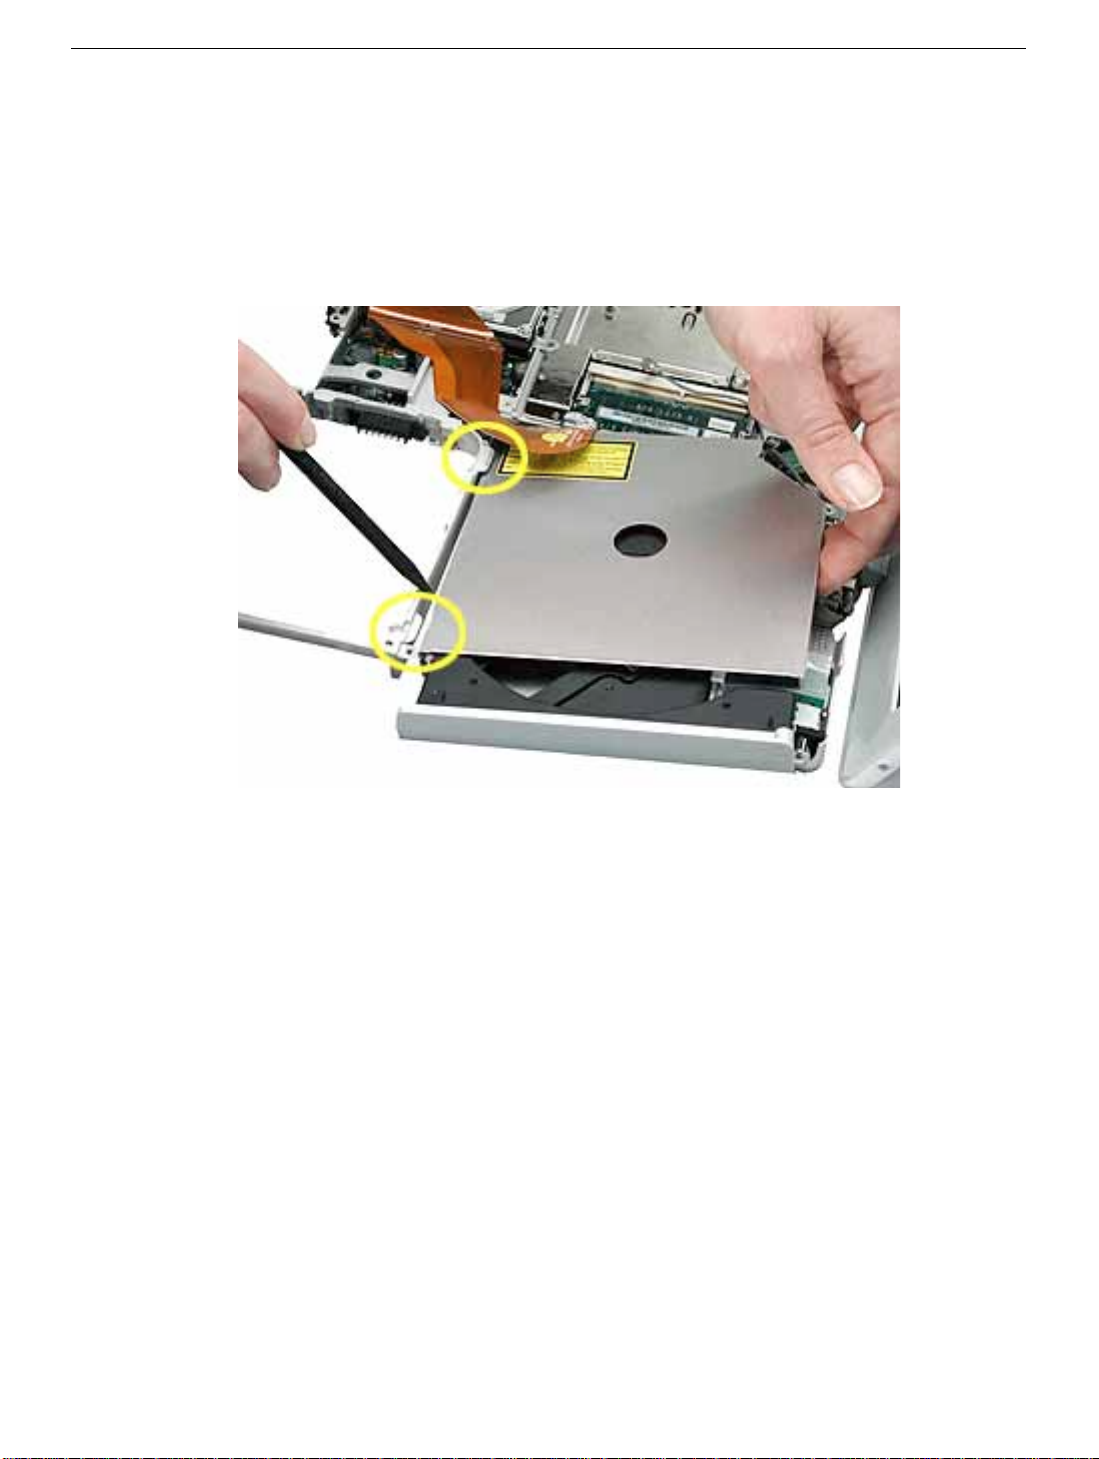
9. Remove the drive door and install it on the replacement optical drive, as described in
the next section.
10. Install the replacement optical drive, and reassemble and test the computer.
Note:
When installing the replacement optical drive, slide it in under the two
side tabs, as shown below.
iBook (Dual USB) Optical Drive -
6
Page 69
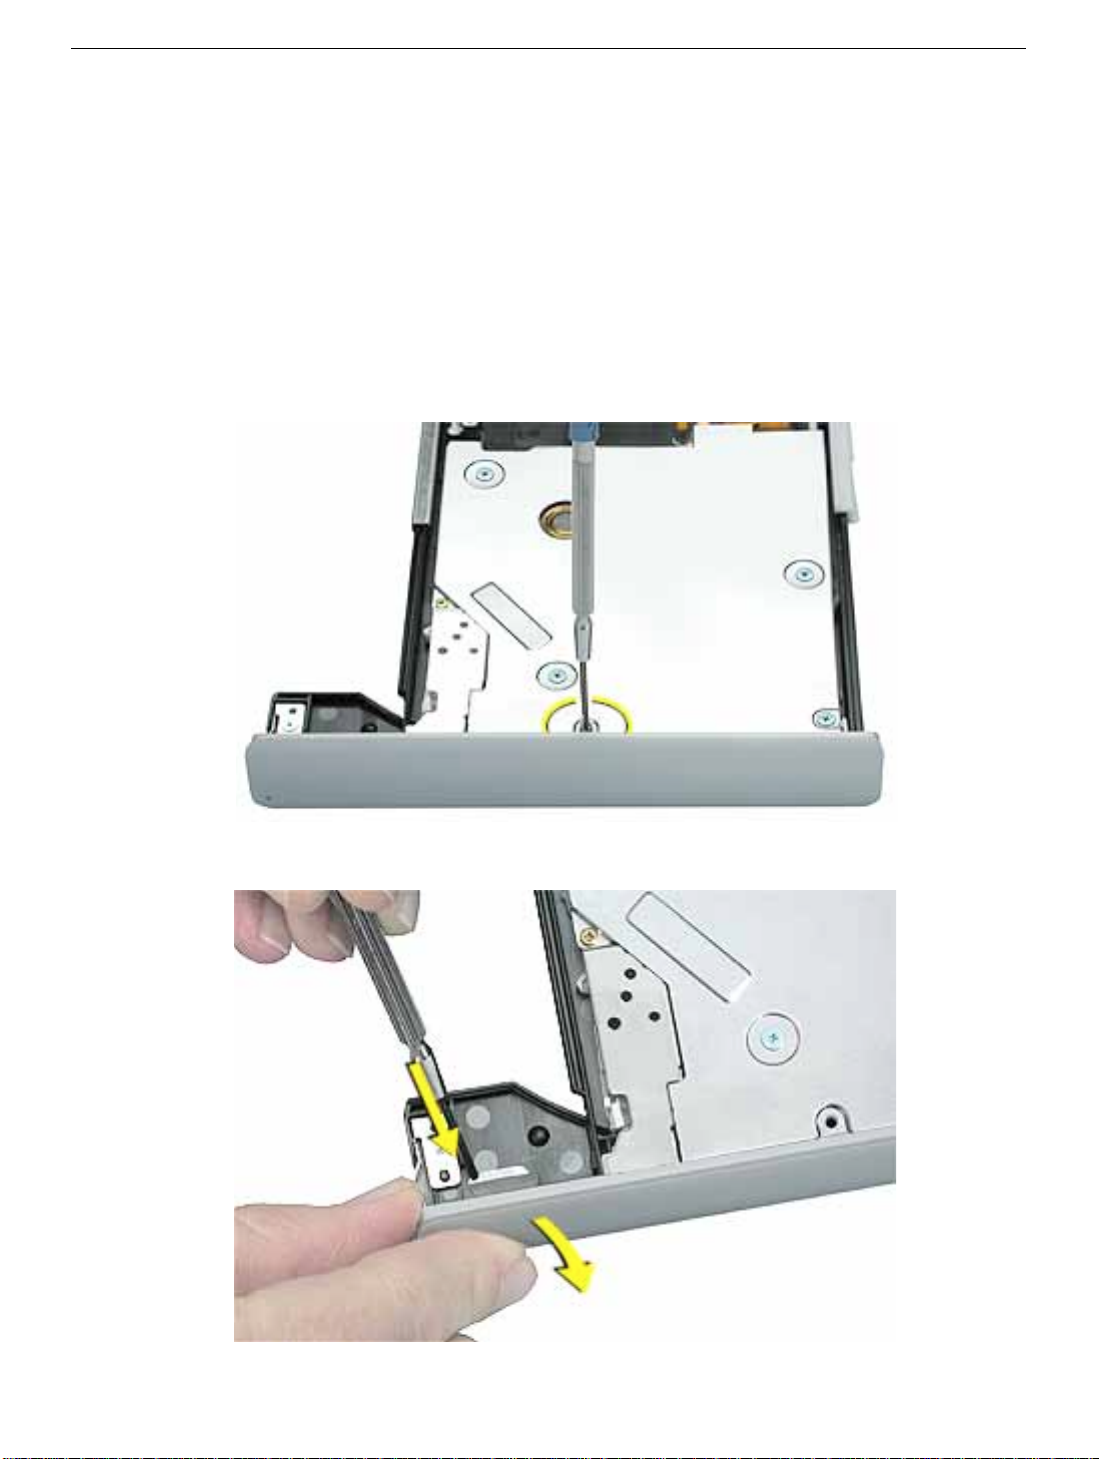
Transferring the Drive Door
This section shows how to remove the drive door from the optical drive so you can attach
it to the replacement optical drive. The drive door is attached differently on each type of
optical drive. Refer to the optical drive description that matches the configuration of the
customer’s computer.
CD-ROM Drive Door
1. On the underside of the drive, remove the single black #0 Phillips screw from the CD
drive door.
2. Press on the wide tab, and pull that end of the door away from the drive.
iBook (Dual USB) Optical Drive -
7
Page 70
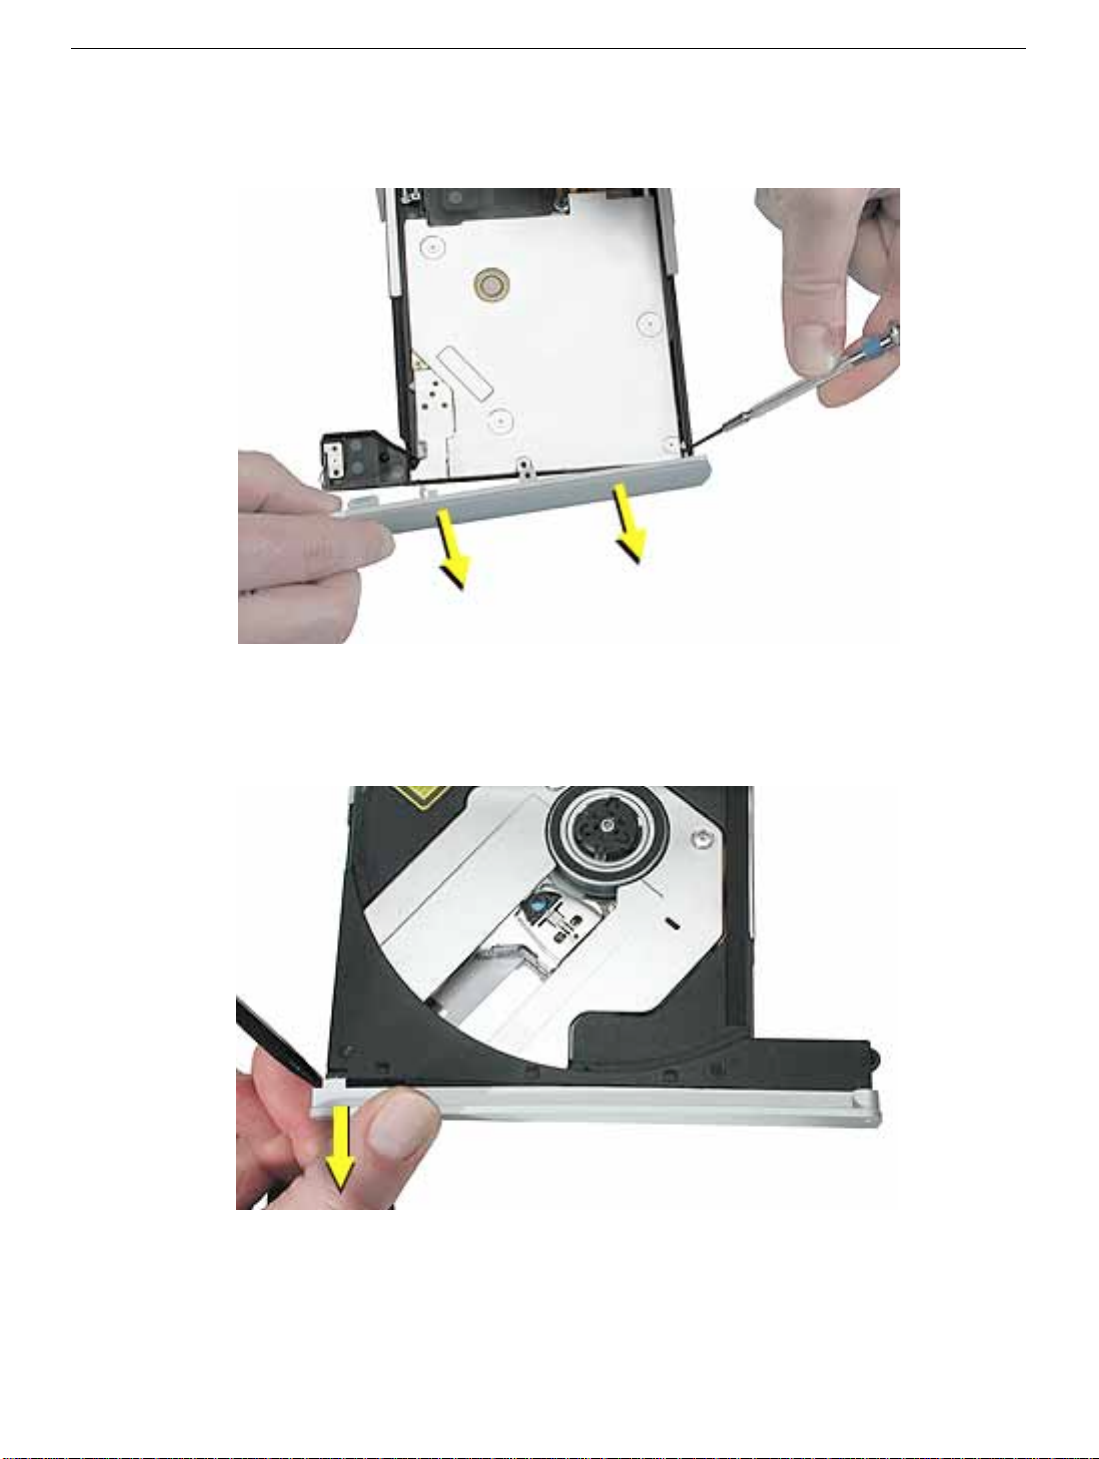
3. Release the tab at the other end of the door, and pull the door straight up to free it
from the drive.
CD-RW Drive Door
1. Using the pointed tip of a black stick, lift up the tab to loosen one end of the door.
iBook (Dual USB) Optical Drive -
8
Page 71
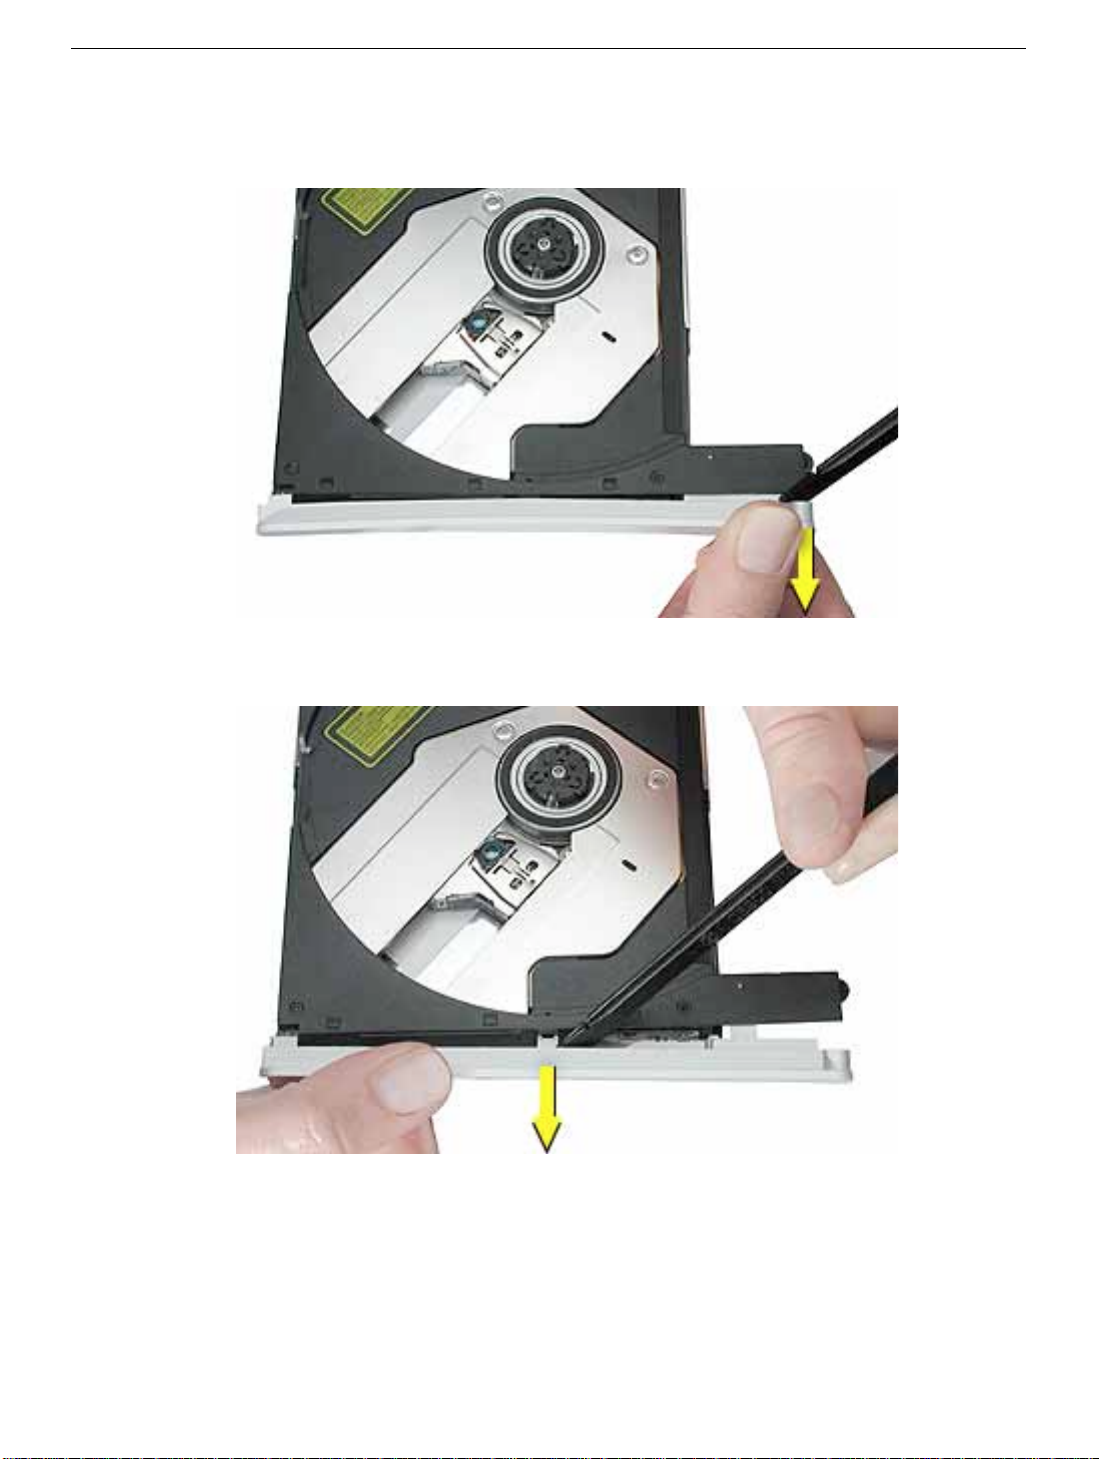
2. At the other end of the door, use the flat end of the black stick to pry off the other end
of the door.
3. Use the flat end of the black stick to detach the middle tab and remove the door.
iBook (Dual USB) Optical Drive -
9
Page 72
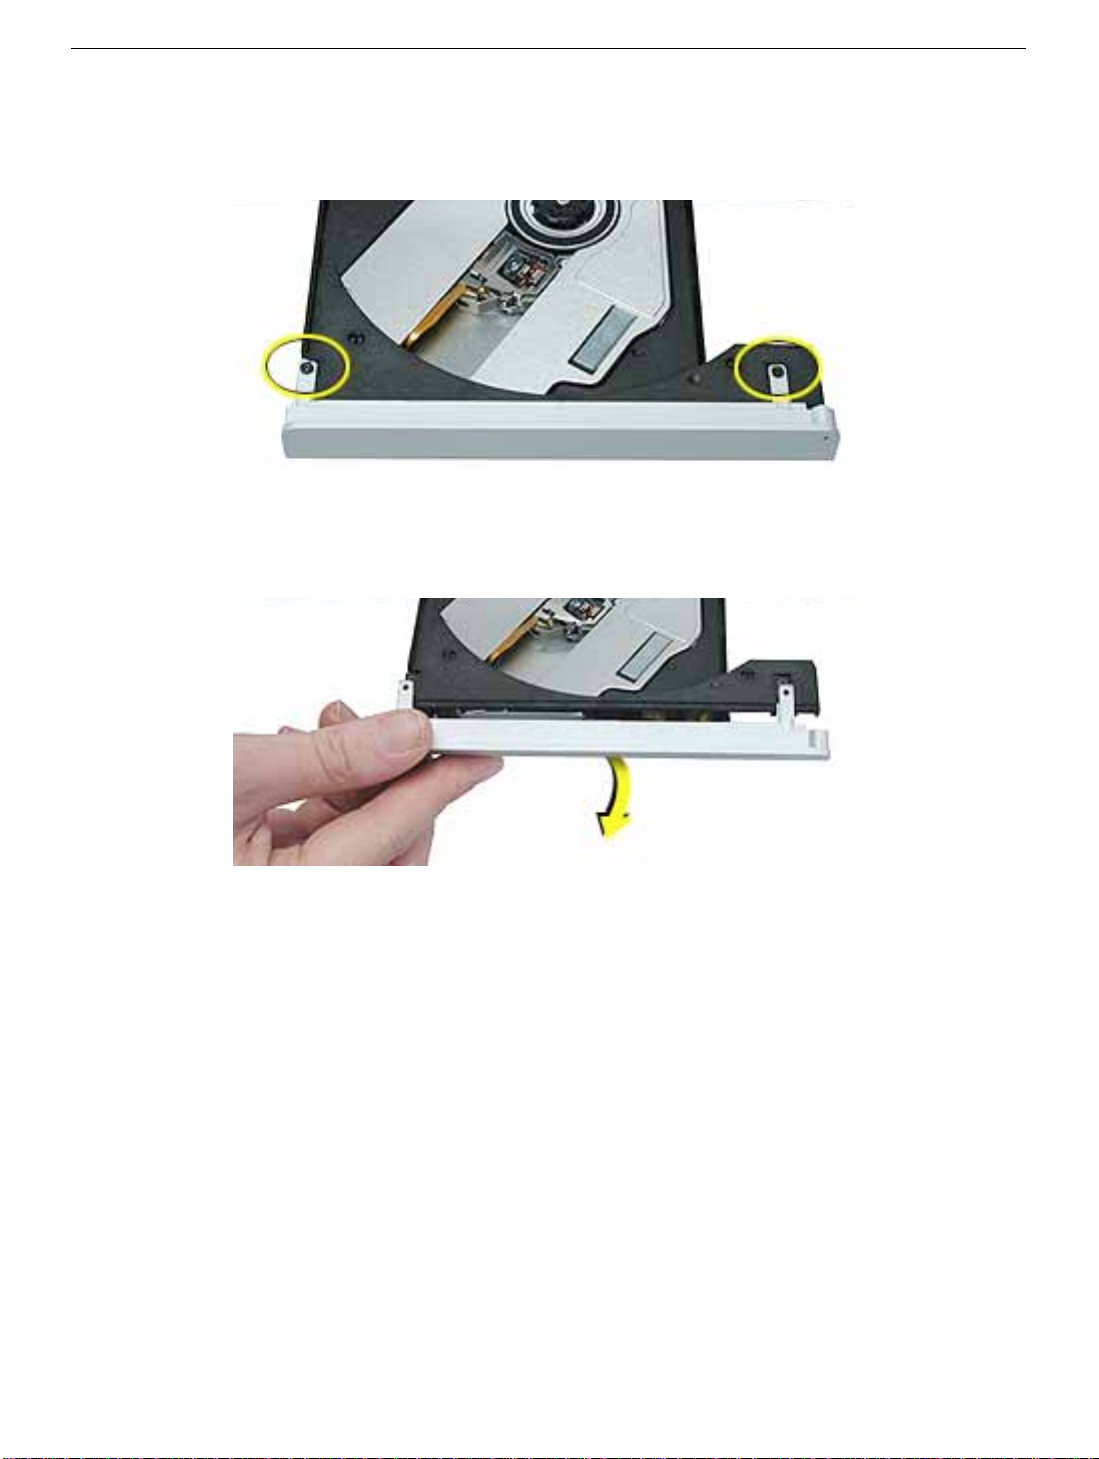
DVD-ROM Drive Door
1. Remove the two black #0 Phillips screws from the DVD drive door.
2. Gently tilt the door away from the screw holes to release the hooks underneath that
hold the door in place.
iBook (Dual USB) Optical Drive -
10
Page 73
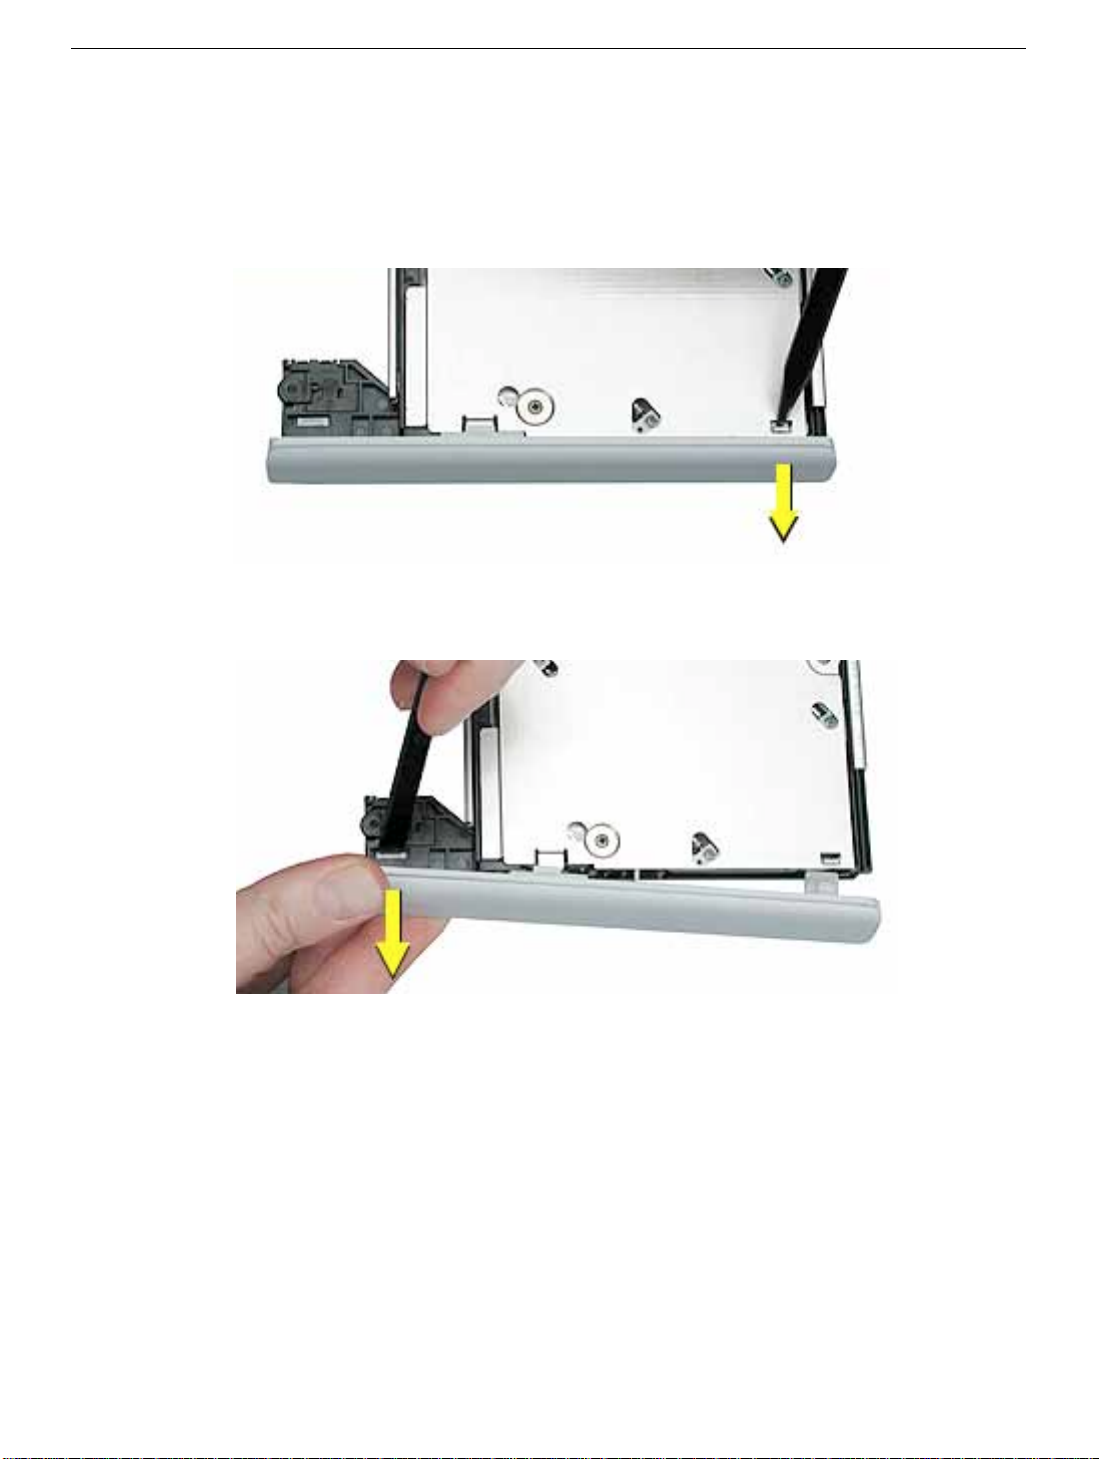
Combination CD-RW/DVD-ROM Drive Door
1. On the underside of the drive, notice the tabs near each end of the drive door.
2. Using the pointed end of a black stick, press the recessed middle of the smaller tab,
and loosen that end of the door.
3. Press the wider tab, and pull the door off of the drive.
iBook (Dual USB) Optical Drive -
11
Page 74

iBook (Dual USB)
DC Board
Replacement Instructions
The following instructions explain how to replace the DC board in the iBook (Dual USB)
computer.
Tools
• Soft cloth
• #0 Phillips screwdriver
Preliminary Steps
Before you begin, remove the following:
• Battery
• Bottom case
• Bottom shield
• Keyboard
• Airport Card
• Top case
• Top shield
• Optical drive
Updated: 2001-07-06
Page 75
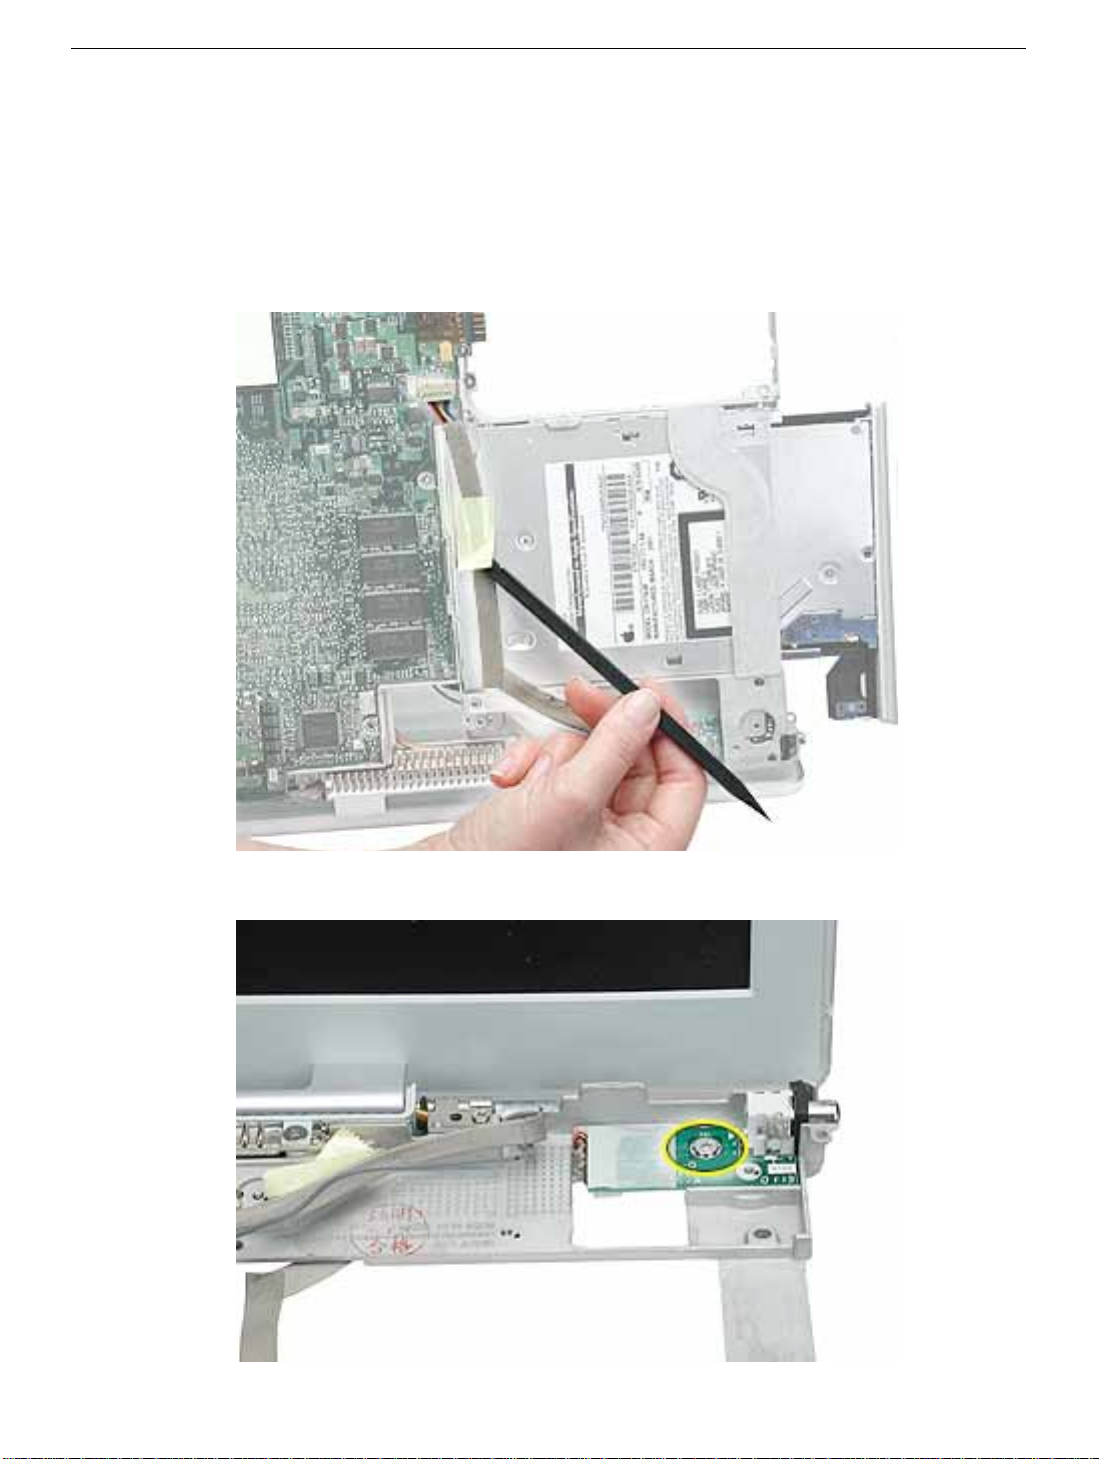
Procedure
1. With the computer on a soft cloth, disconnect the flat power cable from the underside
of the logic board.
Note:
When reassembling the computer, make sure the flat power cable is
taped to the underside of the optical drive, as shown below.
2. Remove the single screw from the DC board.
iBook (Dual USB) DC Board -
2
Page 76
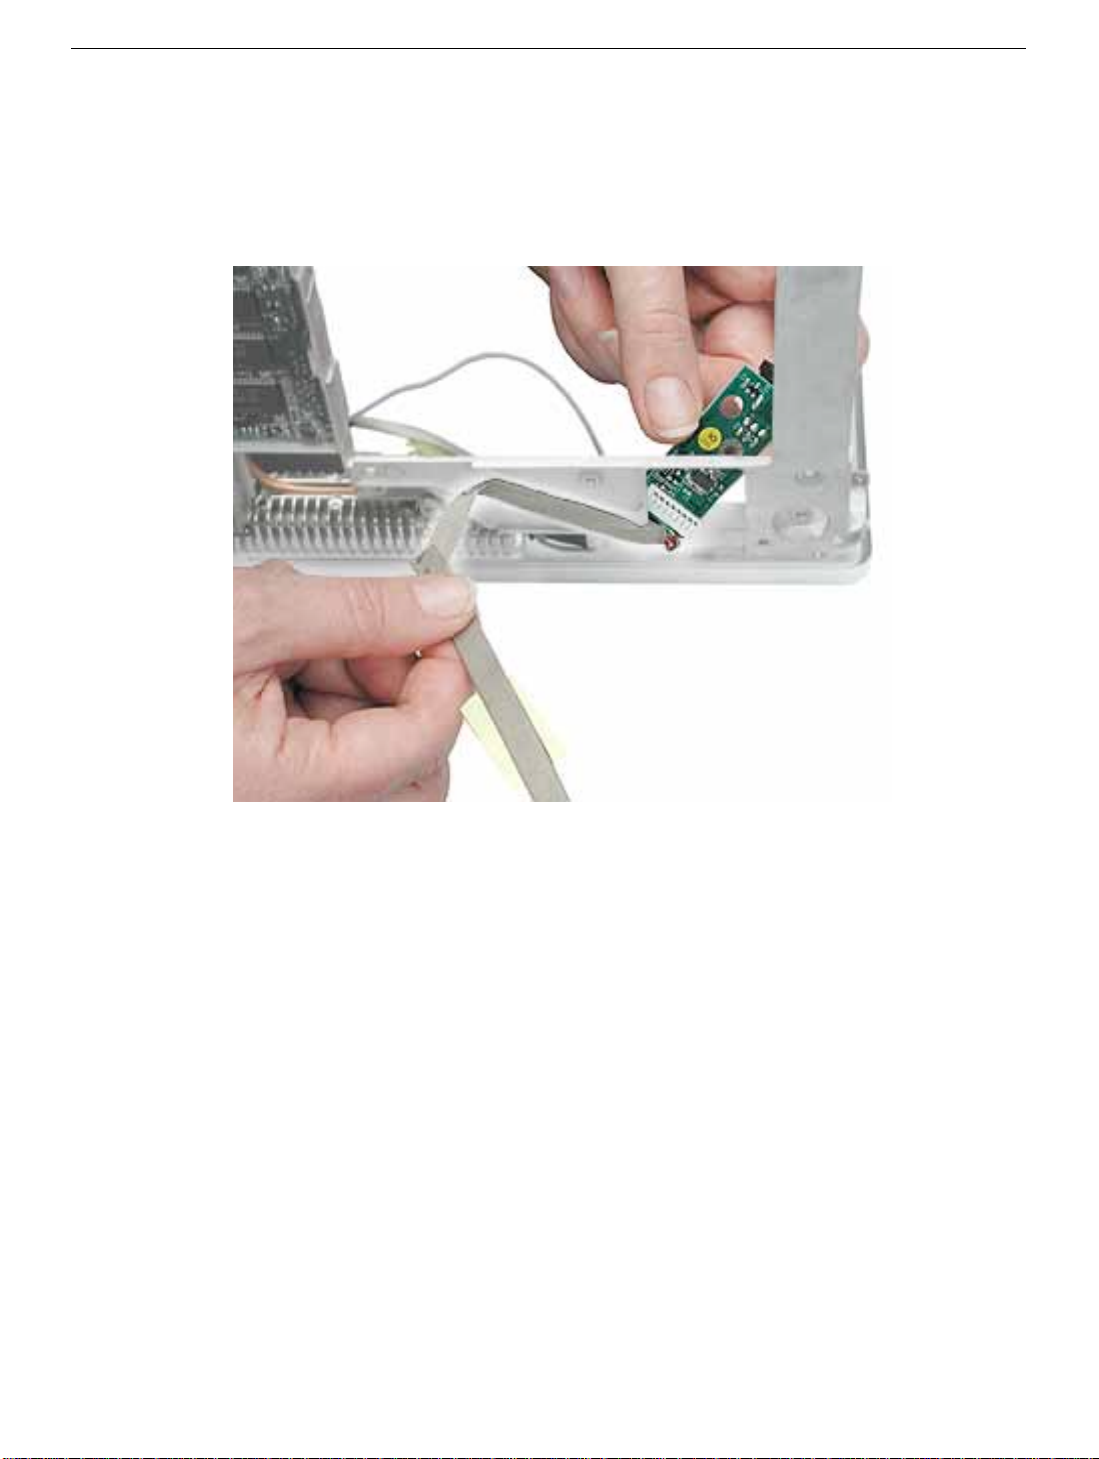
3. Tilt up the computer and note the routing of the flat power cable across the underside
of the inner frame.
Note:
When reassembling the computer, make sure that the power cable
adheres to the channel under the frame and that the cable lies flat.
4. Install the replacement DC board, and reassemble and test the computer.
iBook (Dual USB) DC Board -
3
Page 77

iBook (Dual USB)
Logic Board
Replacement Instructions
The following instructions explain how to replace the logic board in the iBook (Dual USB)
computer.
Tools
• Soft cloth
• #0 Phillips screwdriver
• Black stick (or other nonconductive nylon or plastic tool)
Note:
To organize the screws you remove from the computer, use a tray with divided
compartments (such as a plastic ice cube tray).
Preliminary Steps
Before you begin, remove the following:
• Battery
• Bottom case
• Bottom shield
• Keyboard
• Airport Card
• Top case
• Top shield
• I/O bezel
• Display module
• Modem
Updated: 2001-07-06
Page 78
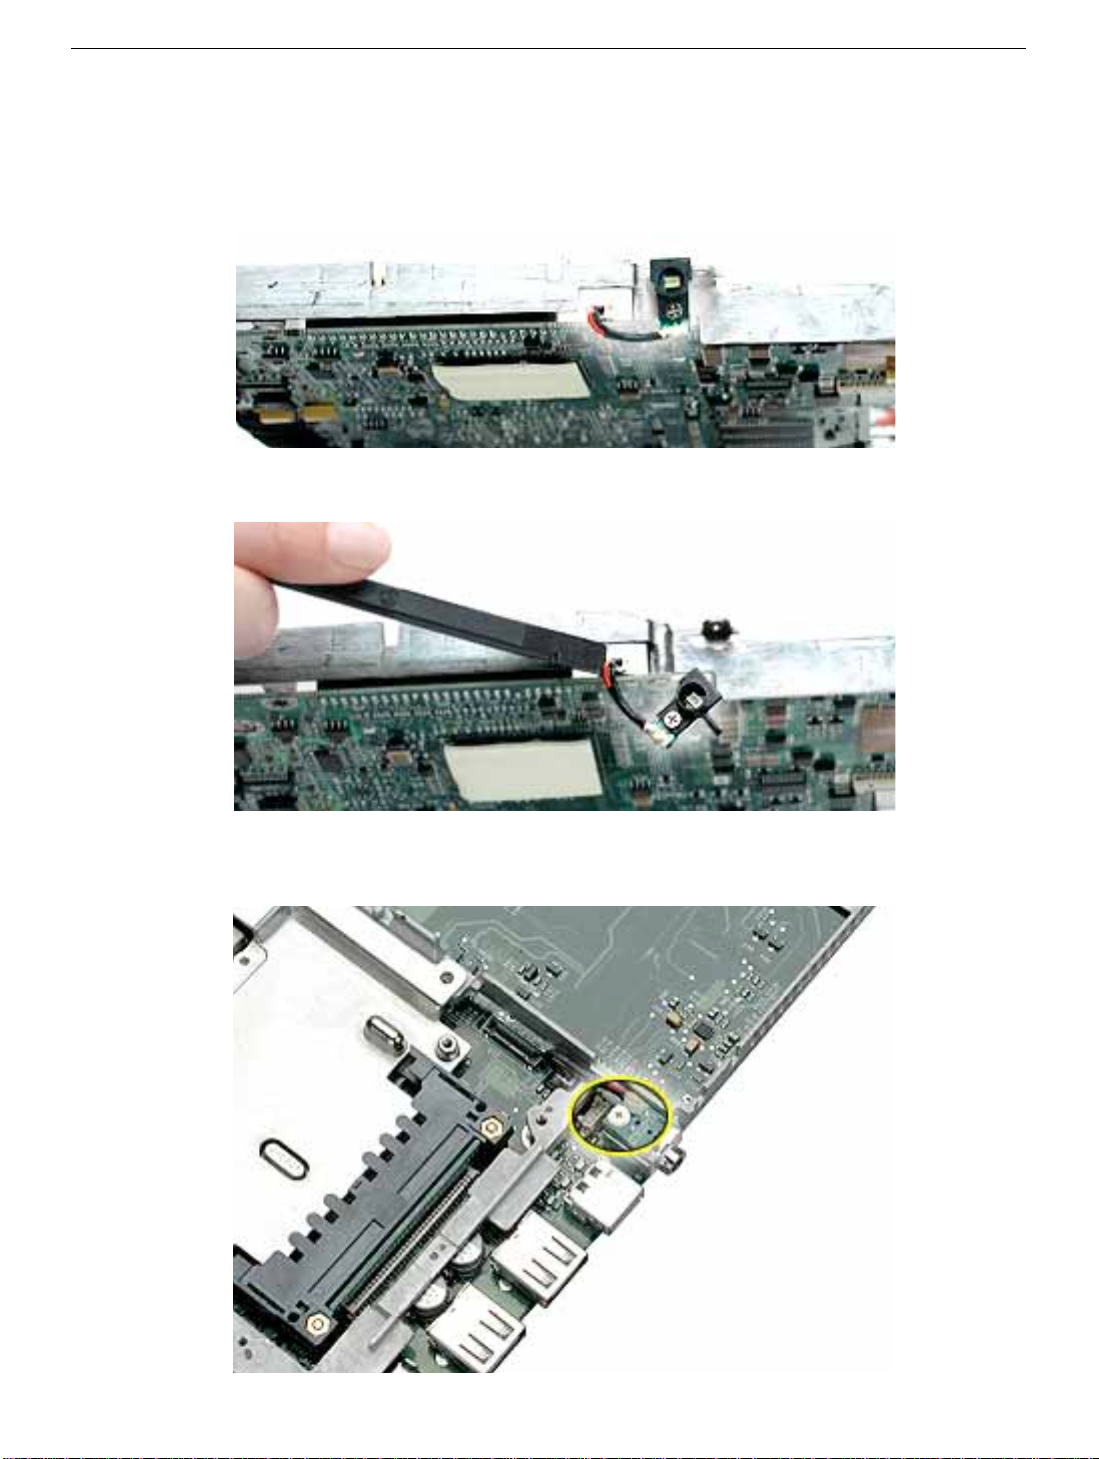
Procedure
1. With the computer on a soft cloth, note the location of the sleep light board connected
to the logic board and outer frame.
2. Using a black stick, disconnect the sleep light board connector from the logic board.
3. Remove the screw from the reset b utton board, and disconnect the connector from the
logic board.
iBook (Dual USB) Logic Board -
2
Page 79
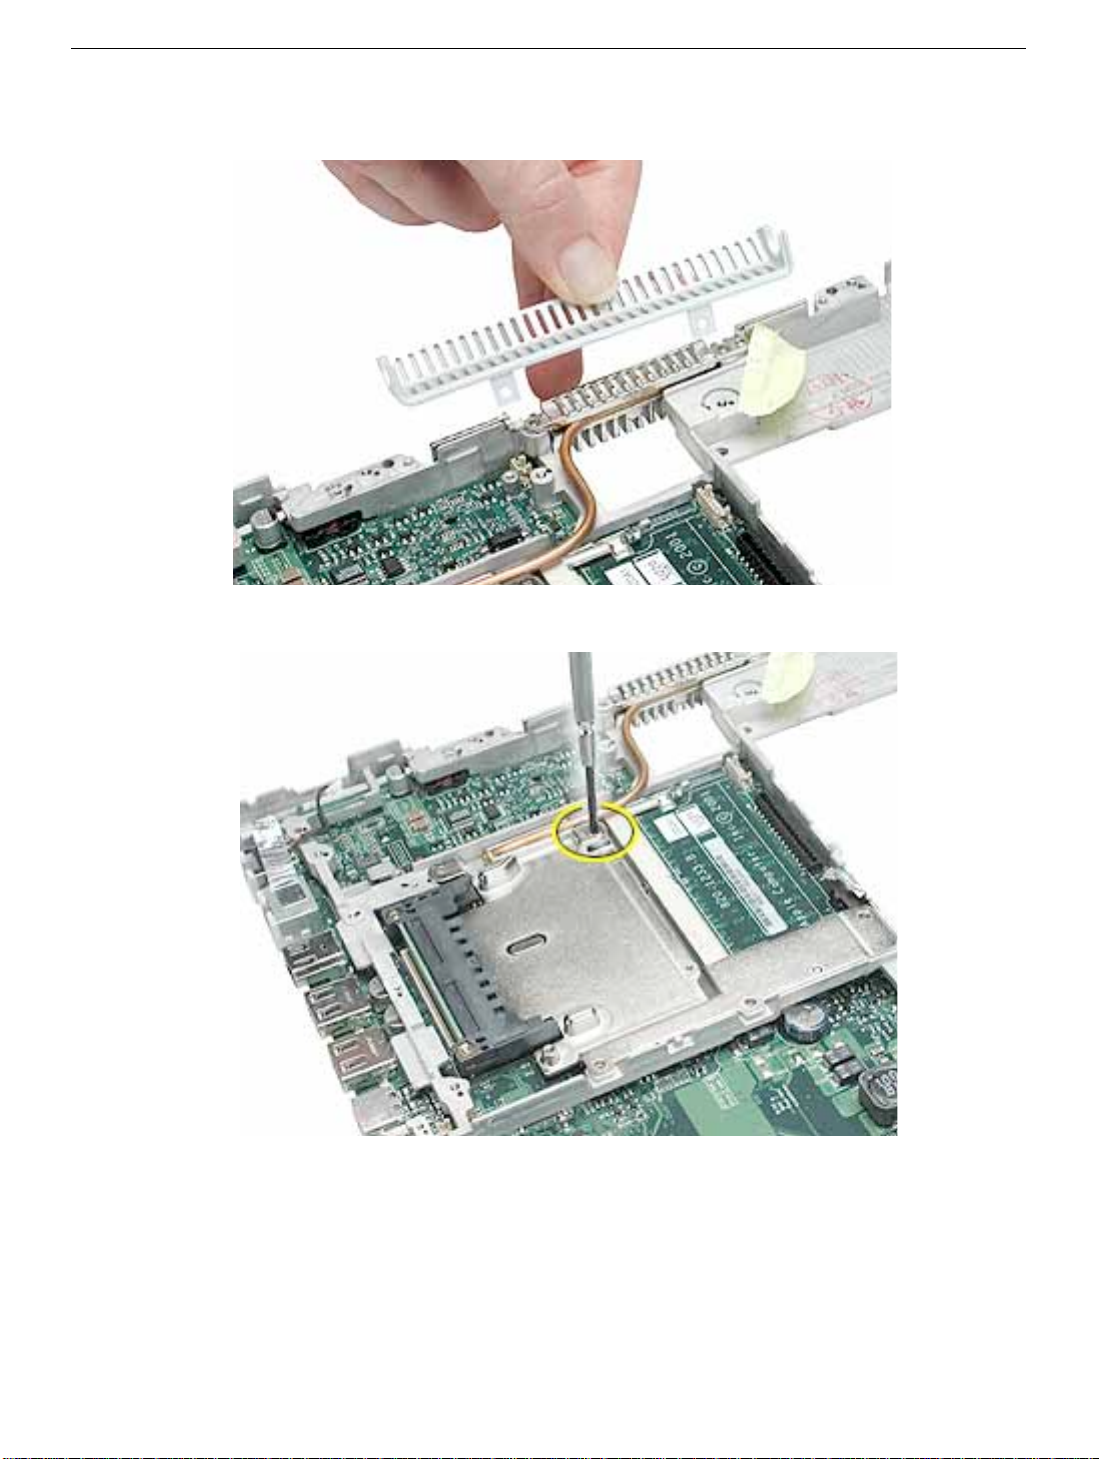
4. Remove the two screws holding the vent cover to the heat spreader.
5. Remove the remaining screw at the heat spreader plate.
iBook (Dual USB) Logic Board -
3
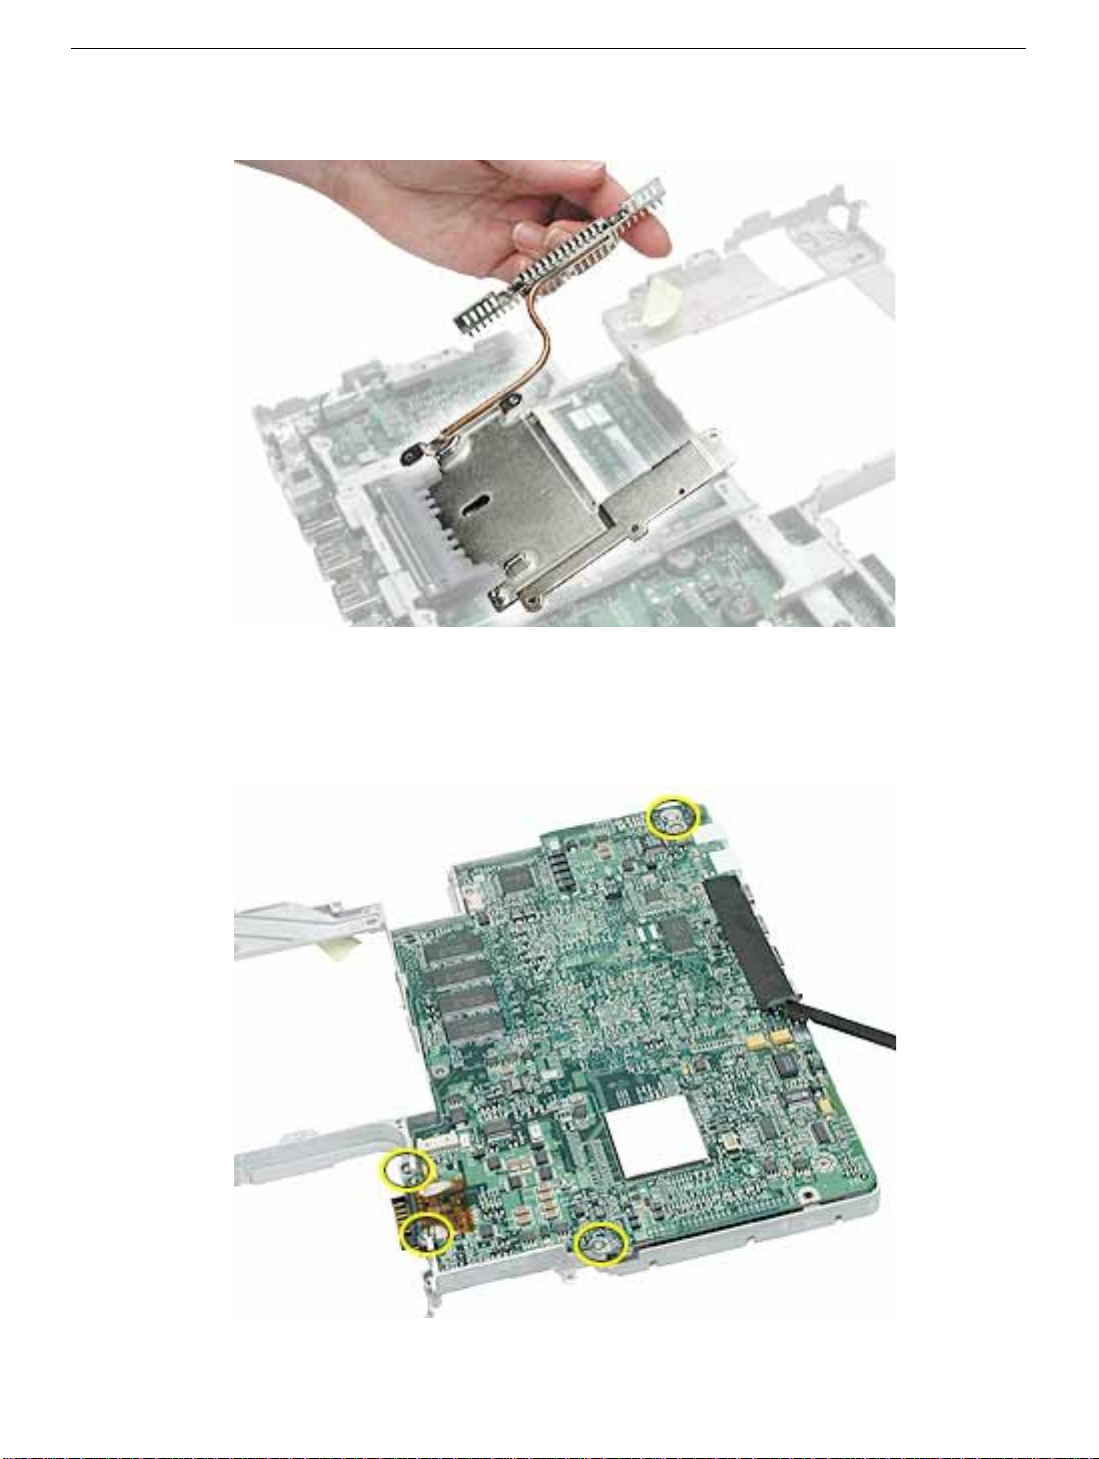
Page 80
6. Tilt up the heat spreader and lift it off the logic board and out of the frame.
7. Turn over the frame, and remove the following:
• Fabric tape at ports
• Two logic board screws
• Two battery connector screws
iBook (Dual USB) Logic Board -
4
Page 81
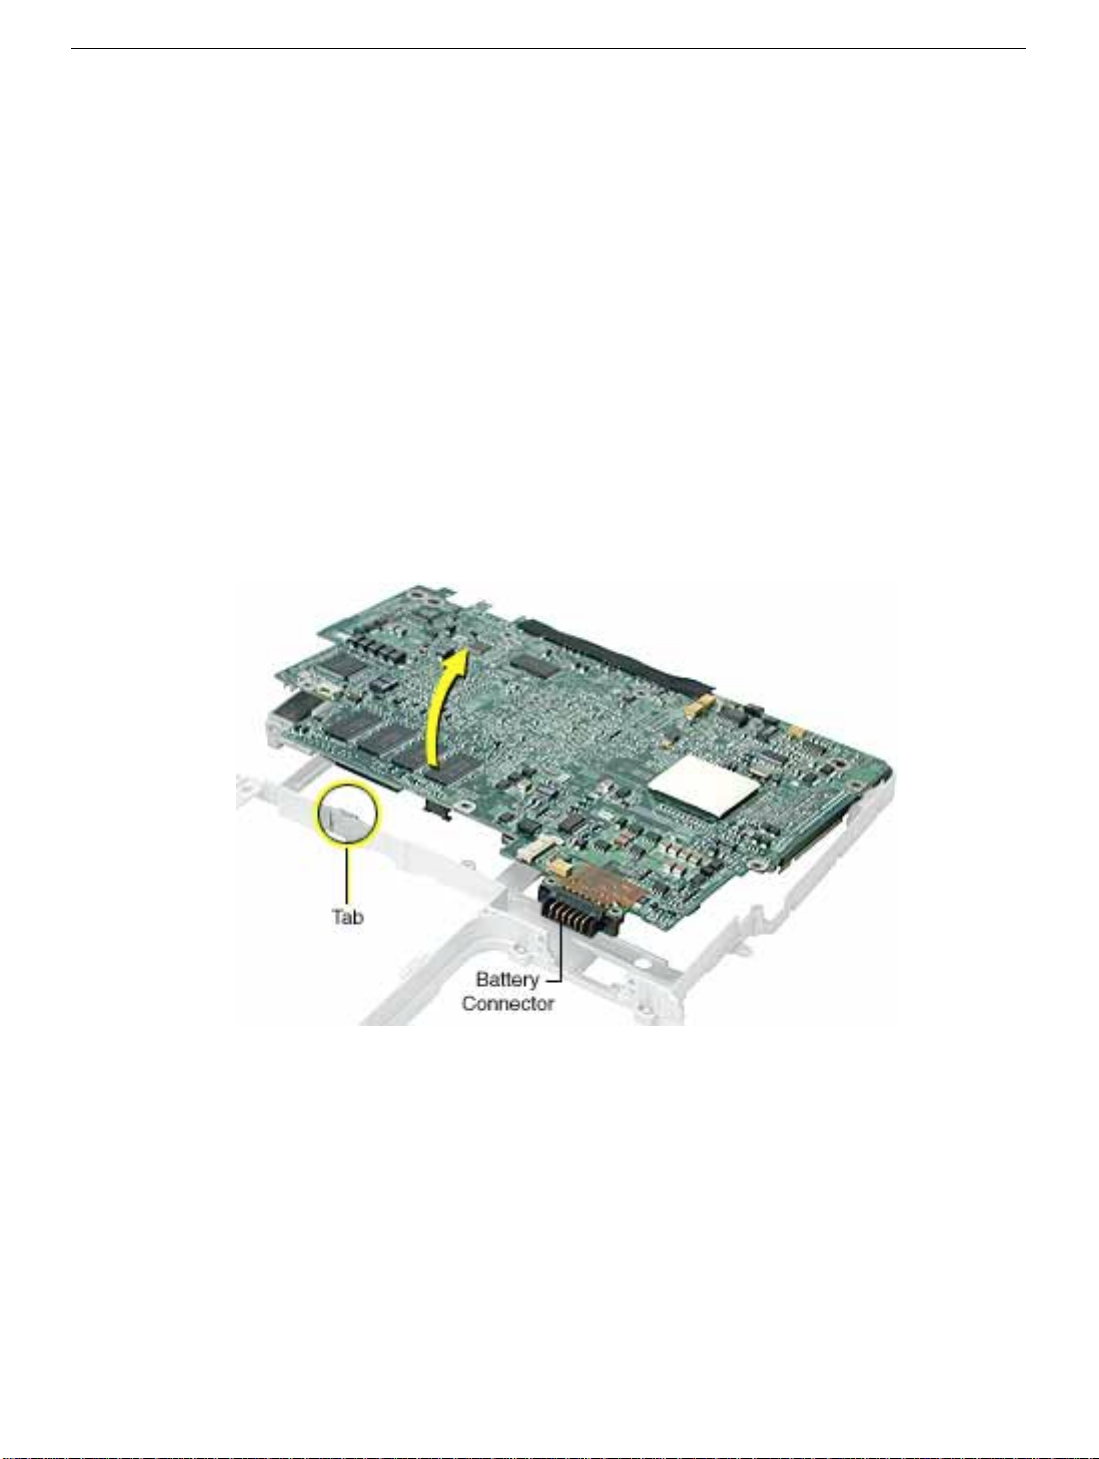
Note: When reassembling the computer, make sure that the underside of the
replacement logic board includes:
• Fabric tape at ports
• Kapton tape at battery connector
• Thermal transfer pad covering the large chip
Note: When reassembling the computer, make sure that you transfer the following
items from the original logic board to the top of the replacement logic board:
• Memory card(s)
• Strip of foil tape extending from the top of the Ethernet port, over the top of the
modem port, and folding down the side of the modem port
8. Lifting the logic board at the battery connector, tilt up the logic board to remove it from
the frame.
Note:
When installing the replacement logic board into the frame, make sure
that it snaps under the highlighted tab.
9. Install the replacement logic board, and reassemble and test the computer.
iBook (Dual USB) Logic Board -
5
Page 82
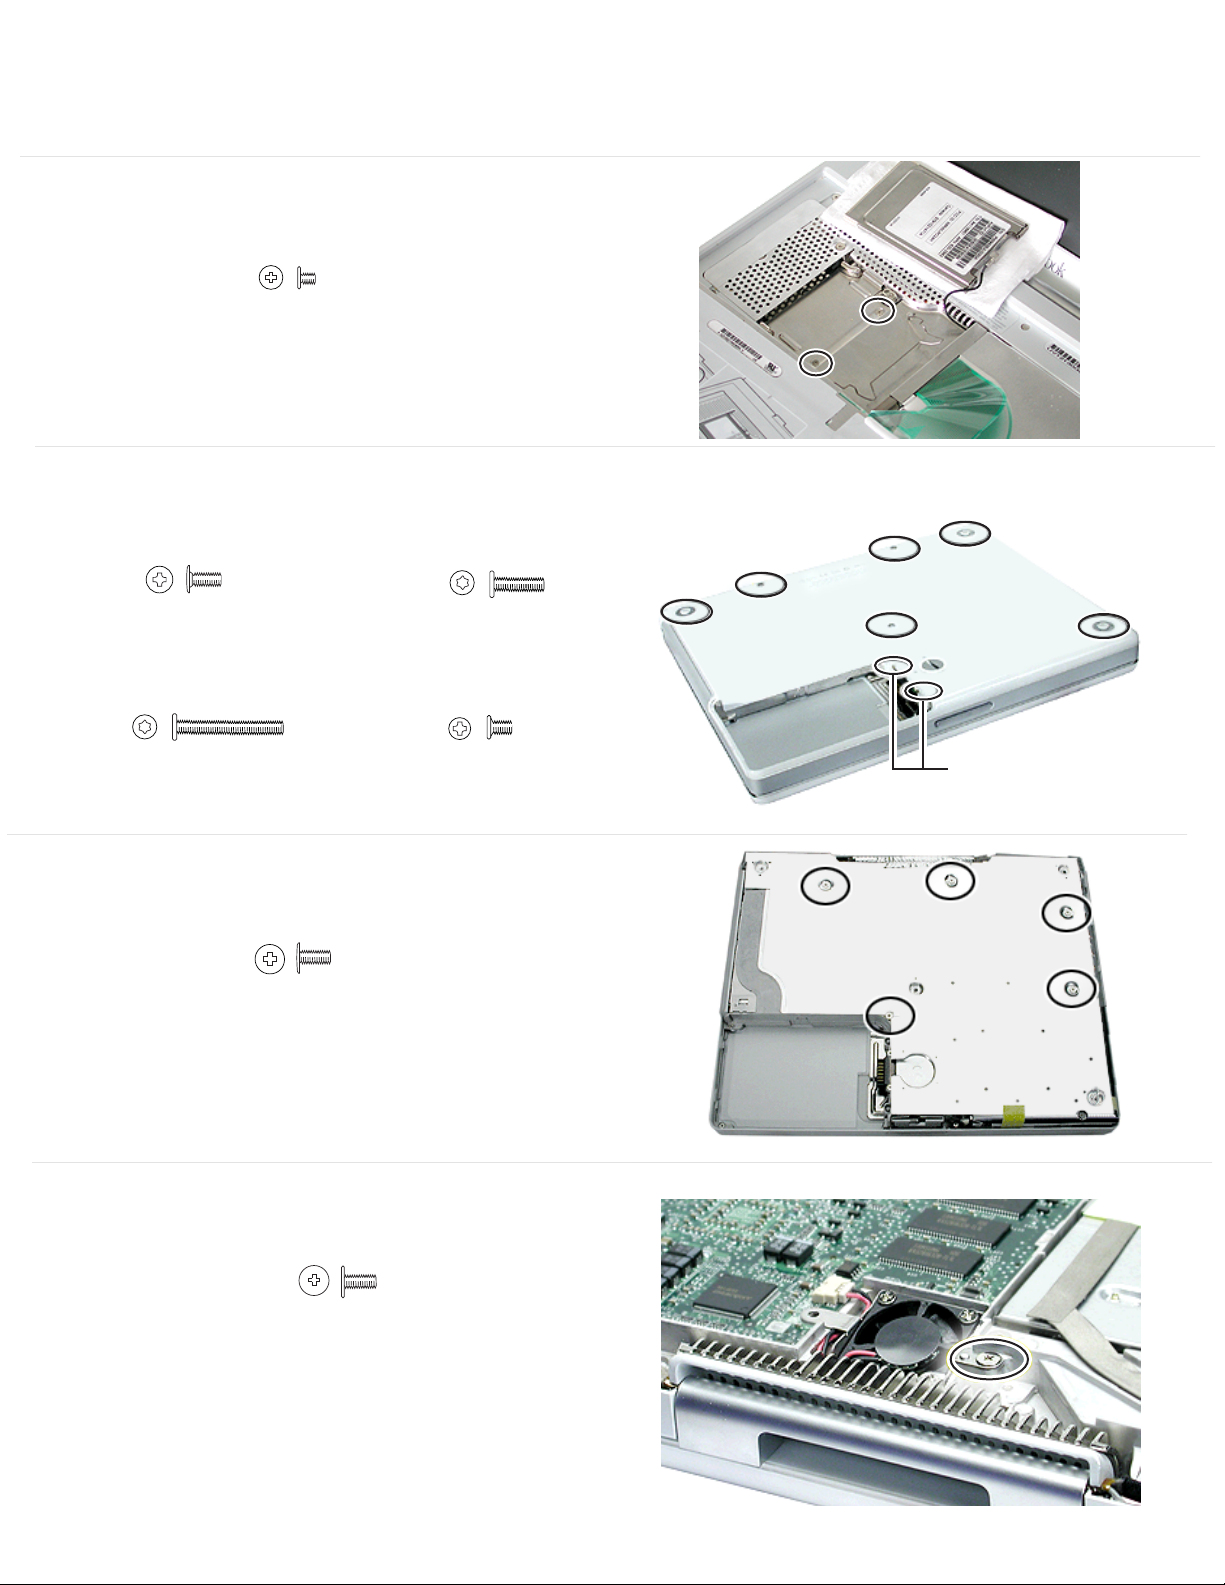
iBook (Dual USB) Screw Locator - 1 of 5
Keyboard and Memory Replacement
Two identical #0 Phillips,
3mm long
Bottom Case Replacement
(A) - Three identical # Phillips,
6 mm long
(B) - Two identical Torx T8,
20 mm long
Bottom Shield Replacement
Five identical #0 Phillips,
6 mm long
(C) - One Torx T8,
10 mm long
(D) - Two identical #0 Phillips,
4.5 mm long
A
B
B
C
A
A
D
Fan Replacement
One #0 Phillips,
6 mm long
Page 83
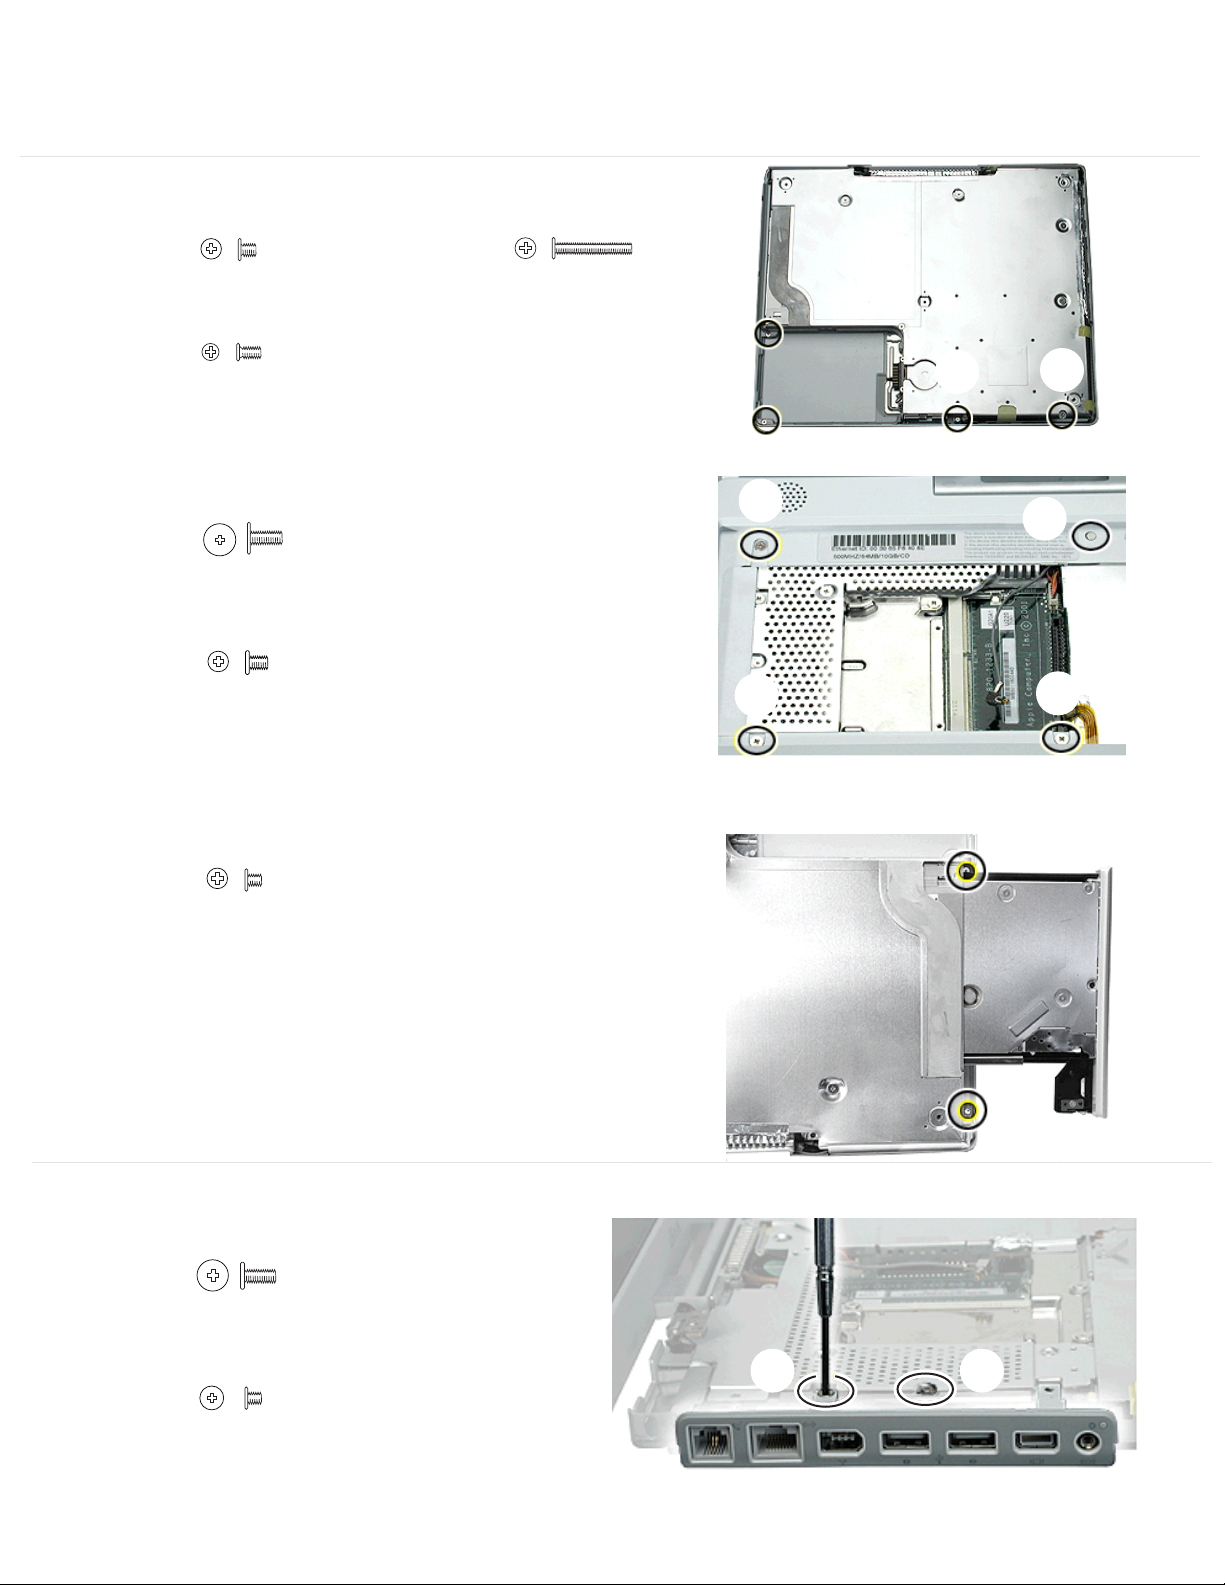
iBook (Dual USB) Screw Locator - 2 of 5
Top Case Replacement
(E) - Two identical #0 Phillips,
3 mm long
(F) - One #0 Phillips,
4.5 mm long
(H) - Three identical #0 Phillips,
6 mm long
(I ) - One under magnet #0 Phillips,
4.5 mm long
(G) - One #0 Phillips,
14.5 mm long
E
E
H
H
F
G
I
H
Two identical #0 Phillips,
3 mm long
I/O Bezel Replacement
(J) - One #0 Phillips,
6 mm long
(K) - One #0 Phillips,
3 mm long
KJ
Page 84
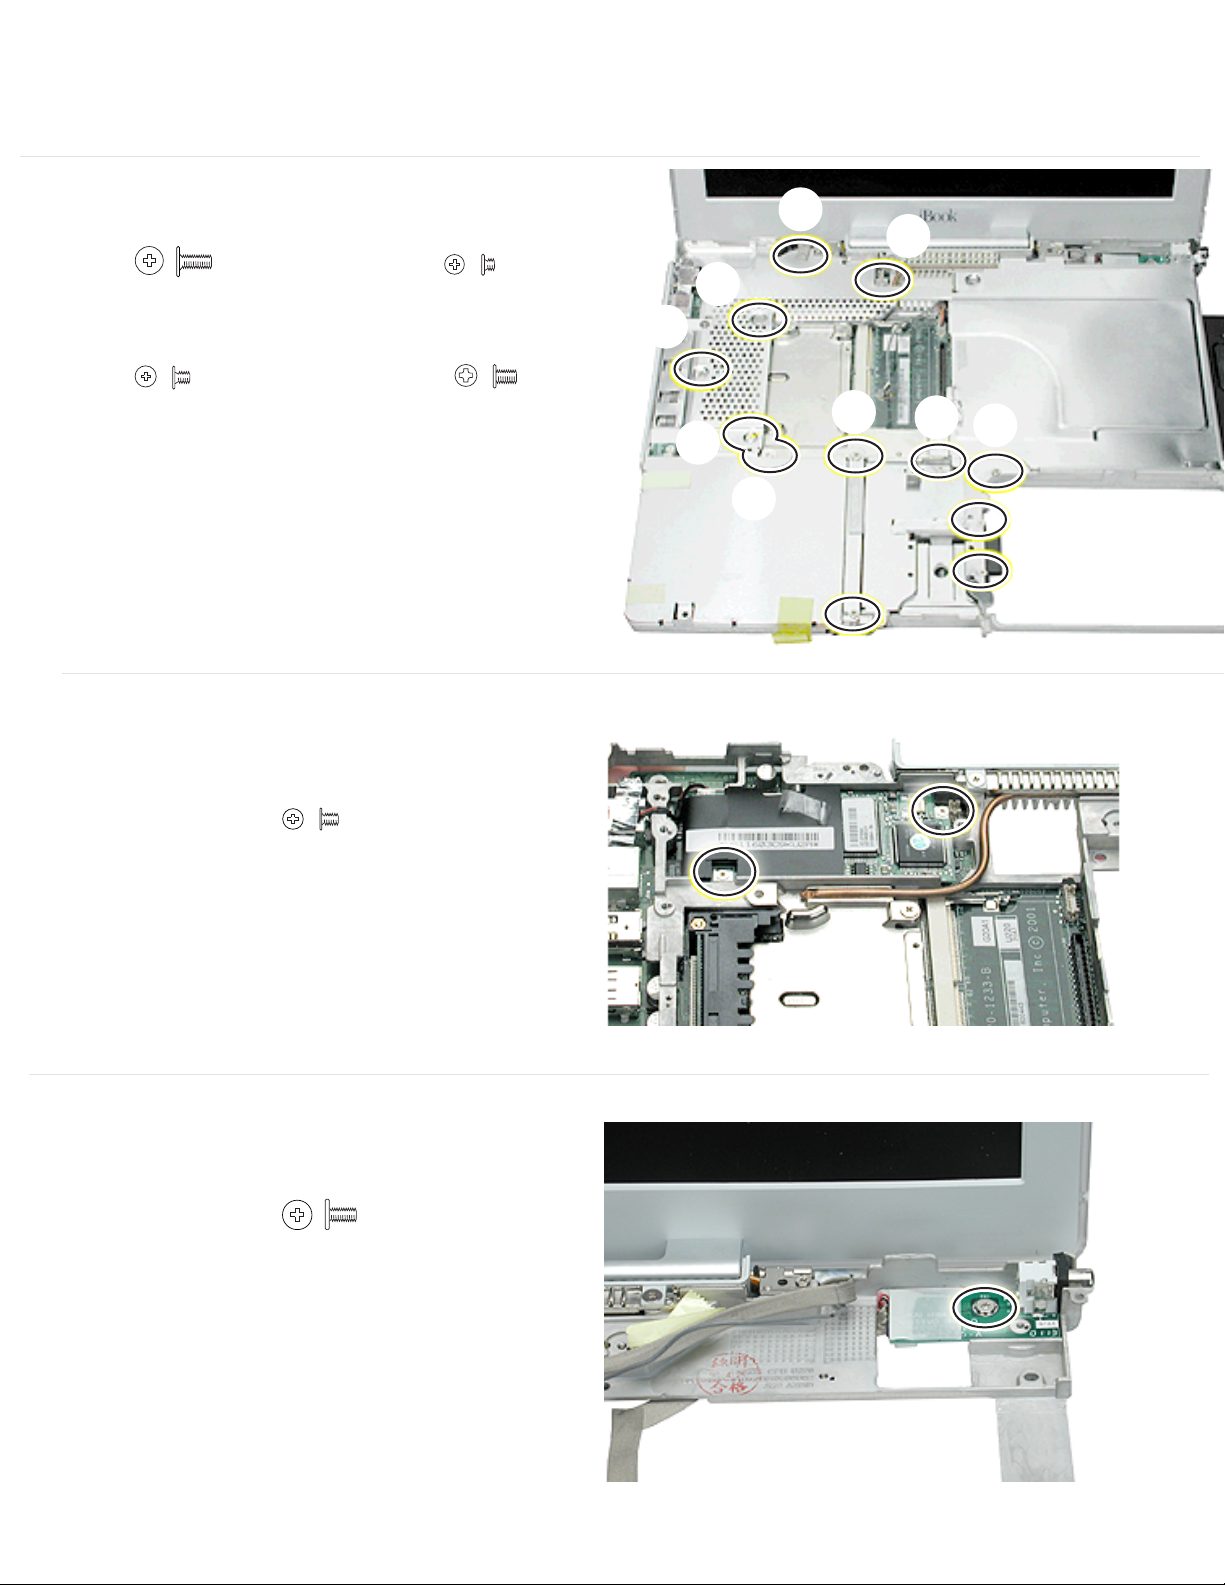
iBook (Dual USB) Screw Locator - 3 of 5
Top Shield Replacement
(L) - Five identical #0 Phillips,
6 mm long
(M) - Five identical #0 Phillips,
3.5 mm long
Modem Replacement
(N) - One #0 Phillips,
2.5 mm long
(O) - One #0 Phillips,
4.5 mm long
M
L
L
L
L
N
M
M
L
M
M
O
Two identical #0 Phillips,
3.5 mm long
DC Board Replacement
One #0 Phillips,
6 mm long
Page 85
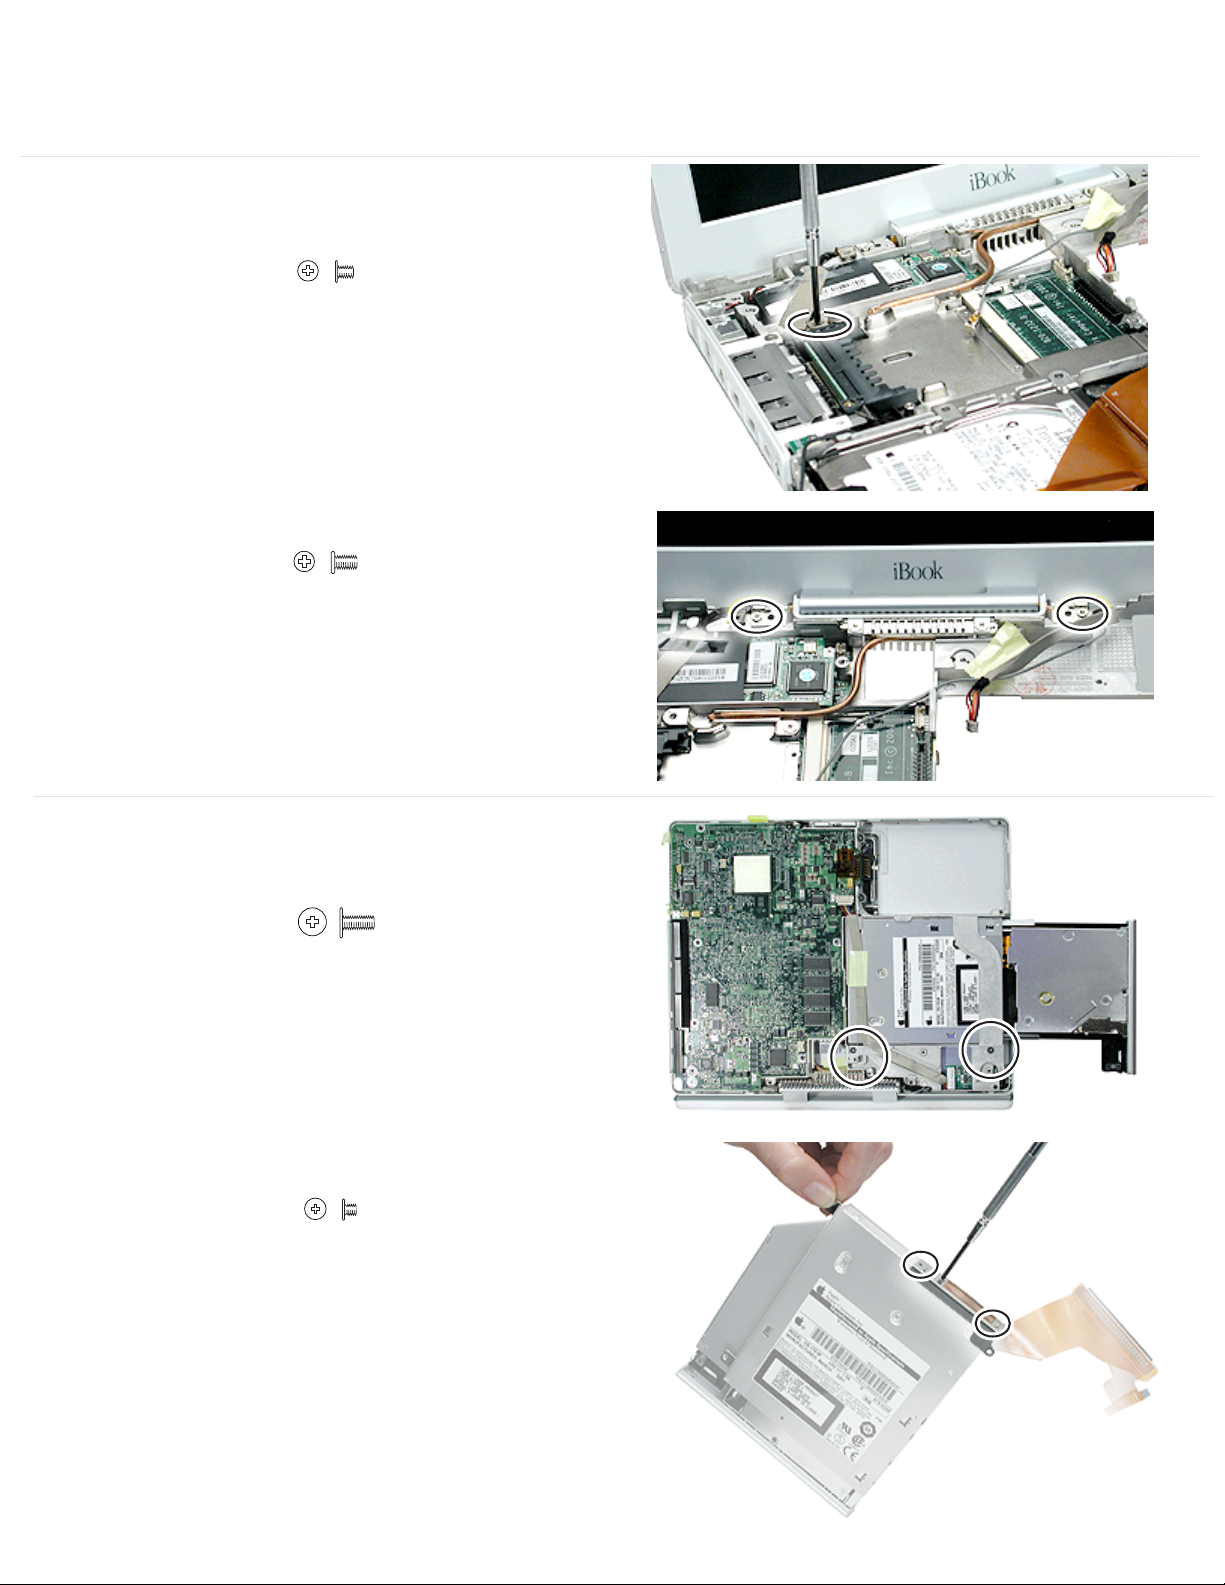
iBook (Dual USB) Screw Locator - 4 of 5
Display Module Replacement
One #0 Phillips,
3.5 mm long
Two identical #0 Phillips,
5 mm long
Optical Drive Replacement
Two identical #0 Phillips,
6 mm long
Two identical #0 Phillips,
3 mm long
Page 86
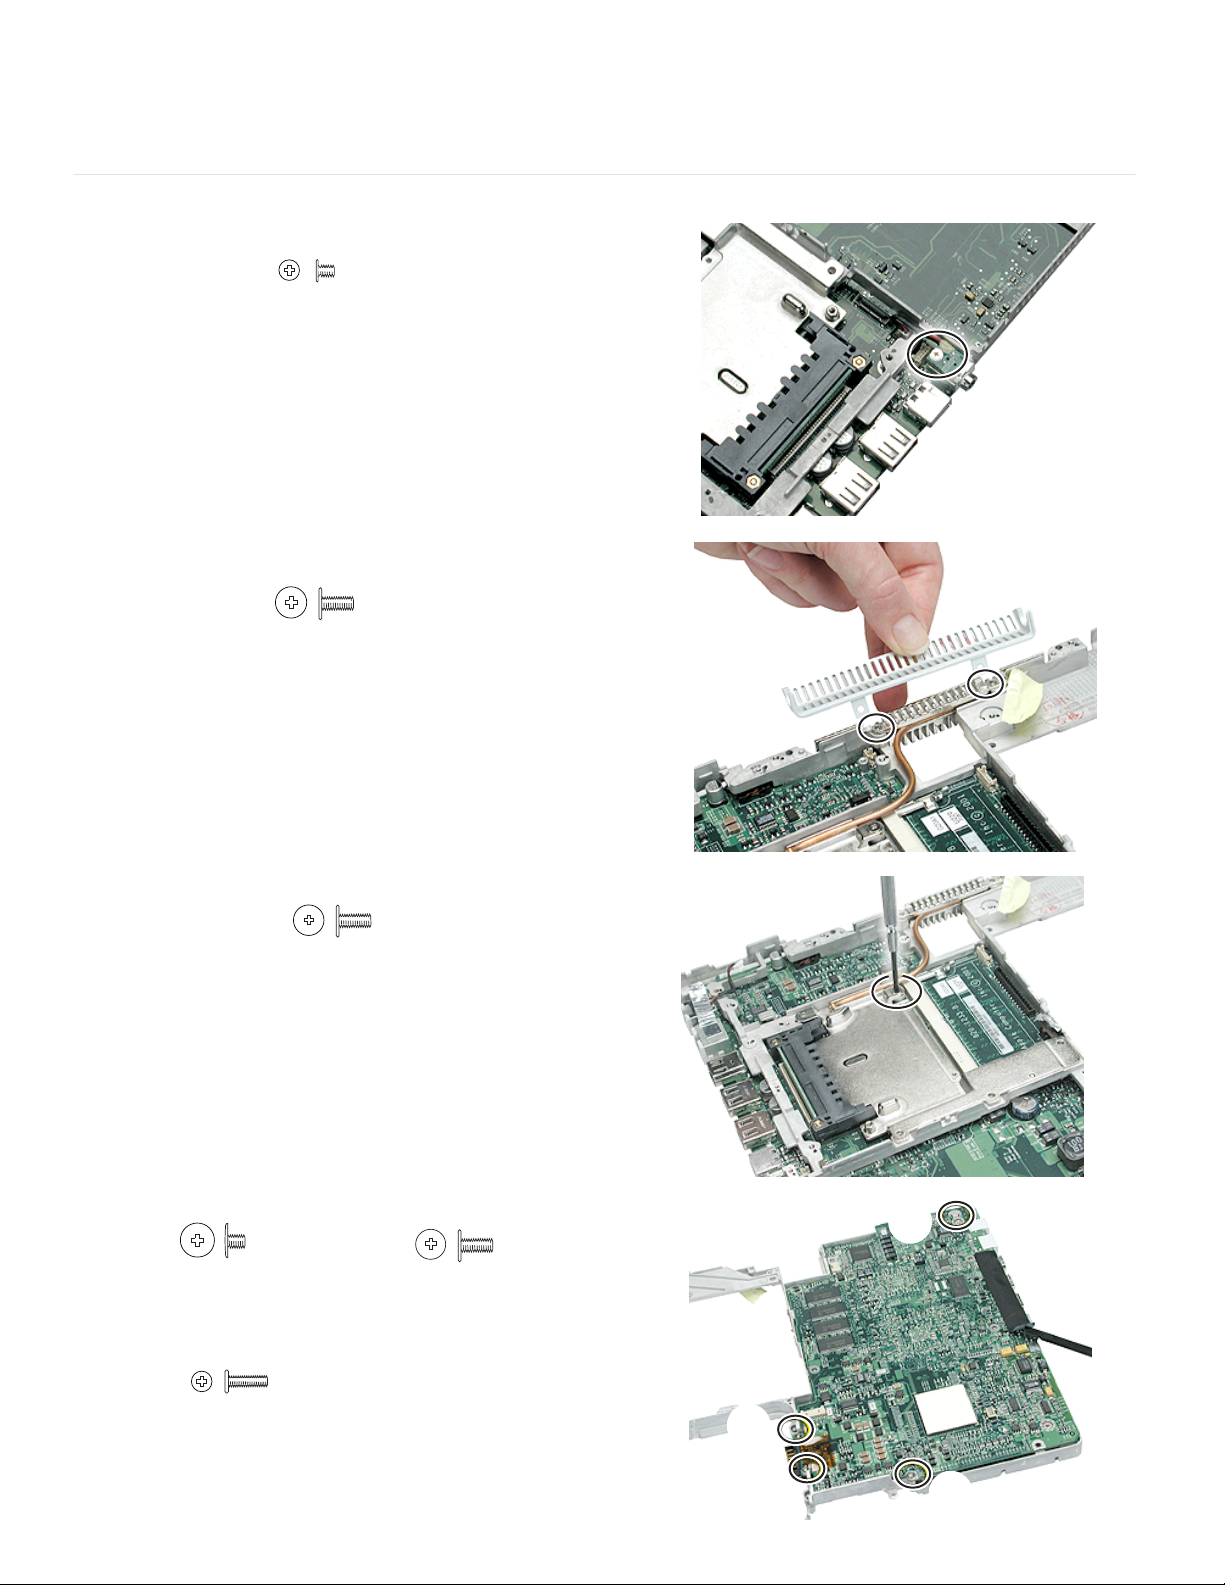
iBook (Dual USB) Screw Locator - 5 of 5
Logic Board Replacement
One #0 Phillips,
3.5 mm long
Two identical #0 Phillips,
6 mm long
One #0 Phillips,
6 mm long
(P) - One #0 Phillips,
4 mm long
(Q) - Two #0 Phillips,
7.5 mm long
P
(R) - One #0 Phillips,
6 mm long
Q
Q
R
Page 87

TITLE
iBook (Dual USB): Troubleshooting Document
Writer:
Created:
Modified:
Huckabone, Michael
2001-7-20
2001-7-20
TOPIC
This is a PDF document of recent troubleshooting articles for Apple Specialists,
Apple-Authorized Self-Servicing Providers and Internal Use.
DISCUSSION
AirPort
AirPort Card Not Recognized
Battery
Battery Won't Charge
Hard drive
Hard Drive Will Not Initialize
Internal Hard Drive Does Not Spin
Keyboard
No Response From Any Key On Keyboard
Keyboard Lock Damaged Or Won't Lock
Modem
No Modem Dial Tone
Optical drive
CD or DVD (optical) Disc Drive Does Not Accept Disc (Mechanical Failure)
CD or DVD Disc Icon Does Not Show Up On Desktop, Or A Dialog Box Appears To Initialize
Disc
Ports
FireWire Or USB Port Not Recognizing Devices
USB Device Not Recognized By Computer
Sound
Distorted Sound From Speakers
No Sound From Speaker(s)
Startup
Page 88

Computer Won't Power On.
Dialog Box "Built-in Memory Test Has Detected an Error" Comes Up On Startup
Beeps Are Heard at Startup (one to four beeps)
Video
No Video On External Device With RGB Cable Adapter
No Video On External Device With A/V Cable
Display Is Rolling (PAL Instead Of NTSC)
No Display, Or Dim Display, But Computer Appears To Operate Correctly
Misc. symptoms
Computer Runs With Battery, But Not With the Power Adapter Plugged Into Wall Outlet
Computer Runs When Plugged Into Wall Outlet but Not On Battery Power
Cursor Does Not Move When You Are Using Trackpad
Cursor Intermittently Does Not Move Or Moves Erratically
Microphone Not Working
Display Latch Not Working
-3278 Error
Document Information
Product Area:
Category:
Sub Category:
Keywords: kpbook kssts hts
Contributor:
Process Owner:
Support Site Index | Export Compliance
Contact Us | Privacy Notice
Copyright © 2001 Apple Computer, Inc. All rights reserved.
1-800-MY-APPLE
Page 89

TITLE
iBook (Dual USB): AirPort Card Not Recognized
Article ID:
Writer:
Created:
Modified:
Huckabone, Michael
2001-7-16
2001-8-17
TOPIC
The AirPort Card is not recognized.
DISCUSSION
*RESTRICTED: Apple Specialists/Apple-Authorized Self-Servicing Providers *
Internal Use Only
Troubleshooting Procedure
The steps to solve a symptom are listed sequentially. You might not need to perform every step
before the symptom is solved. Start with the first step, and then test for the symptom. If the
symptom persists, replace any modules you removed, go to the next step, and test again.
Continue down the list until the symptom is solved.
Check to make sure using the latest version of AirPort software.1.
Boot using Mac OS All extensions setting.2.
Reseat AirPort Card.3.
Remove and reinstall the AirPort software.4.
Replace with known-good AirPort Card.5.
Replace logic board.6.
Document Information
Product Area: iBook (Dual USB)
Category: iBook Hardware
Sub Category: Troubleshooting
Keywords: kibook kssts
Contributor:
Process Owner:
Page 90

Support Site Index | Export Compliance
Contact Us | Privacy Notice
Copyright © 2001 Apple Computer, Inc. All rights reserved.
1-800-MY-APPLE
Page 91

TITLE
iBook (Dual USB): Battery Won't Charge
Article ID:
Writer:
Created:
Modified:
Huckabone, Michael
2001-7-3
2001-8-17
TOPIC
The battery won't charge.
DISCUSSION
*RESTRICTED: Apple Specialists/Apple-Authorized Self-Servicing Providers *
Internal Use Only
Troubleshooting Procedure
The steps to solve a symptom are listed sequentially. You might not need to perform every step
before the symptom is solved. Start with the first step, and then test for the symptom. If the
symptom persists, replace any modules you removed, go to the next step, and test again.
Continue down the list until the symptom is solved.
Note: Some batteries could be very depleated and require at least 30 minutes of connection to the
power adapter before being recognized.
Remove any connected peripherals.1.
Try known-good power outlet.2.
Try known-good power adapter and power cord.3.
Try known-good battery.4.
Turn off the computer. Reset the power manager by pressing the reset button (located
above and right of the Audio/Video port). Wait five seconds before continuing. Press the
power button to start the computer.
Note: Make sure the reset button is not caught under the button opening.
Warning: Resetting the power manager will permanently remove a RAM disk, if
present, and all of its contents. You will also need to reset the date and time (using the
Date & Time control panel).
5.
Replace logic board.6.
Page 92

Document Information
Product Area: iBook (Dual USB)
Category: iBook Hardware
Sub Category: Troubleshooting
Keywords: kibook kssts
Contributor:
Process Owner:
Support Site Index | Export Compliance
Contact Us | Privacy Notice
Copyright © 2001 Apple Computer, Inc. All rights reserved.
1-800-MY-APPLE
Page 93

TITLE
iBook (Dual USB): Hard Drive Will Not Initialize
Article ID:
Writer:
Created:
Modified:
Huckabone, Michael
2001-7-16
2001-8-17
TOPIC
The hard drive will not initialize.
DISCUSSION
*RESTRICTED: Apple Specialists/Apple-Authorized Self-Servicing Providers *
Internal Use Only
Troubleshooting Procedure
The steps to solve a symptom are listed sequentially. You might not need to perform every step
before the symptom is solved. Start with the first step, and then test for the symptom. If the
symptom persists, replace any modules you removed, go to the next step, and test again.
Continue down the list until the symptom is solved.
Boot from the iBook Software Install CD and see if the hard drive mounts on the desktop.1.
Launch Drive Setup and update hard drive driver.2.
If no hard drive is found in Drive Setup, verify the hard drive cable connections.3.
Replace hard drive cable.4.
Replace hard drive.
Important: If the computer is under warranty and data recovery is required, refer to
Article 31077: Hard Drive Data Recovery & Warranty Implications, for important
information.
5.
Document Information
Product Area: iBook (Dual USB)
Category: iBook Hardware
Sub Category: Troubleshooting
Keywords: kibook kssts
Contributor:
Process Owner:
Page 94

Support Site Index | Export Compliance
Contact Us | Privacy Notice
Copyright © 2001 Apple Computer, Inc. All rights reserved.
1-800-MY-APPLE
Page 95

TITLE
iBook (Dual USB): Internal Hard Drive Does Not Spin
Article ID:
Writer:
Created:
Modified:
Huckabone, Michael
2001-7-5
2001-8-17
TOPIC
The internal hard drive does not spin.
DISCUSSION
*RESTRICTED: Apple Specialists/Apple-Authorized Self-Servicing Providers *
Internal Use Only
Troubleshooting Procedure
The steps to solve a symptom are listed sequentially. You might not need to perform every step
before the symptom is solved. Start with the first step, and then test for the symptom. If the
symptom persists, replace any modules you removed, go to the next step, and test again.
Continue down the list until the symptom is solved.
Disconnect any connected peripherals.1.
Try known-good power outlet.2.
Try known-good power adapter and power cord.3.
Boot from a Mac OS system CD.4.
Verify Drive Setup does not recognize the hard drive.5.
Verify cable connections.6.
Replace hard drive cable.7.
Replace hard drive.
Important: If the computer is under warranty and data recovery is required, refer to
Article 31077: Hard Drive Data Recovery & Warranty Implications, for important
information.
8.
Document Information
Product Area: iBook (Dual USB)
Category: iBook Hardware
Page 96

Sub Category: Troubleshooting
Keywords: kibook kssts
Contributor:
Process Owner:
Support Site Index | Export Compliance
Contact Us | Privacy Notice
Copyright © 2001 Apple Computer, Inc. All rights reserved.
1-800-MY-APPLE
Page 97

TITLE
iBook (Dual USB): No Response From Any Key On Keyboard
Article ID:
Writer:
Created:
Modified:
Huckabone, Michael
2001-7-11
2001-8-17
TOPIC
No response from any key on keyboard.
DISCUSSION
*RESTRICTED: Apple Specialists/Apple-Authorized Self-Servicing Providers *
Internal Use Only
Troubleshooting Procedure
The steps to solve a symptom are listed sequentially. You might not need to perform every step
before the symptom is solved. Start with the first step, and then test for the symptom. If the
symptom persists, replace any modules you removed, go to the next step, and test again.
Continue down the list until the symptom is solved.
Remove any connected peripherals.1.
Boot from a Mac OS system CD to verify that it is not a software problem.2.
Turn off the computer. Reset the power manager by pressing the reset button (located
above and right of the Audio/Video port). Wait five seconds before continuing. Press the
power button to start the computer.
Note: Make sure the reset button is not caught under the button opening.
Warning: Resetting the power manager will permanently remove a RAM disk, if
present, and all of its contents. You will also need to reset the date and time (using the
Date & Time control panel).
3.
Turn off the computer. Disconnect the keyboard connector and inspect connectors.4.
Replace keyboard.5.
Replace logic board.6.
Document Information
Page 98

Product Area: iBook (Dual USB)
Category: iBook Hardware
Sub Category: Troubleshooting
Keywords: kibook kssts
Contributor:
Process Owner:
Support Site Index | Export Compliance
Contact Us | Privacy Notice
Copyright © 2001 Apple Computer, Inc. All rights reserved.
1-800-MY-APPLE
Page 99

TITLE
iBook (Dual USB): Keyboard Lock Damaged Or Won't Lock
Article ID:
Writer:
Created:
Modified:
Huckabone, Michael
2001-7-16
2001-8-17
TOPIC
The keyboard lock is damaged or won't lock.
DISCUSSION
*RESTRICTED: Apple Specialists/Apple-Authorized Self-Servicing Providers *
Internal Use Only
Troubleshooting Procedure
The steps to solve a symptom are listed sequentially. You might not need to perform every step
before the symptom is solved. Start with the first step, and then test for the symptom. If the
symptom persists, replace any modules you removed, go to the next step, and test again.
Continue down the list until the symptom is solved.
Verify that keyboard is installed properly so the lock lines up with the notch in the top
case.
1.
Replace keyboard.2.
Document Information
Product Area: iBook (Dual USB)
Category: iBook Hardware
Sub Category: Troubleshooting
Keywords: kibook kssts
Contributor:
Process Owner:
Support Site Index | Export Compliance
Contact Us | Privacy Notice
Copyright © 2001 Apple Computer, Inc. All rights reserved.
1-800-MY-APPLE
Page 100

TITLE
iBook (Dual USB): No Modem Dial Tone
Article ID:
Writer:
Created:
Modified:
Huckabone, Michael
2001-7-5
2001-8-17
TOPIC
No modem dial tone.
DISCUSSION
*RESTRICTED: Apple Specialists/Apple-Authorized Self-Servicing Providers *
Internal Use Only
Troubleshooting Procedure
The steps to solve a symptom are listed sequentially. You might not need to perform every step
before the symptom is solved. Start with the first step, and then test for the symptom. If the
symptom persists, replace any modules you removed, go to the next step, and test again.
Continue down the list until the symptom is solved.
Verify known-good analog (not digital) telephone line.1.
Verify known-good RJ11 telephone cable.2.
Verify RJ11 cable is not plugged into Ethernet port.3.
Inspect RJ11 connector and modem port for pin damage.4.
Verify RJ11 telephone cable is firmly installed in the modem port.5.
If using Apple Remote Access, select Ignore Dial Tone in the Modem control panel. If the
modem connects with this settings selected, try another phone line. If using a terminal or
communications program, enter atx1 to disable tone detection. To reset the modem back to
the factory settings, enter atz.
6.
Verify modem 2-pin connecter is plugged into modem correctly.7.
Replace the modem 2-pin connector cable.8.
Replace modem.9.
 Loading...