

Page 1

MacBook Pro 15" Core 2 Duo Models A1226
and A1260 PRAM Battery Replacement
Written By: Walter Galan
INTRODUCTION
The time and date, as well as other settings, are kept by the PRAM battery when your
machine is off.
TOOLS:
Phillips #00 Screwdriver (1)
Spudger (1)
T6 Torx Screwdriver (1)
PARTS:
MacBook Pro 15" (Models
A1211/A1226/A1260) PRAM Battery
(1)
MacBook Pro 15" Core 2 Duo Models A1226 and A1260 PRAM Battery Replacement
© iFixit — CC BY-NC-SA www.iFixit.com Page 1 of 9
Page 2
Step 1 — Battery
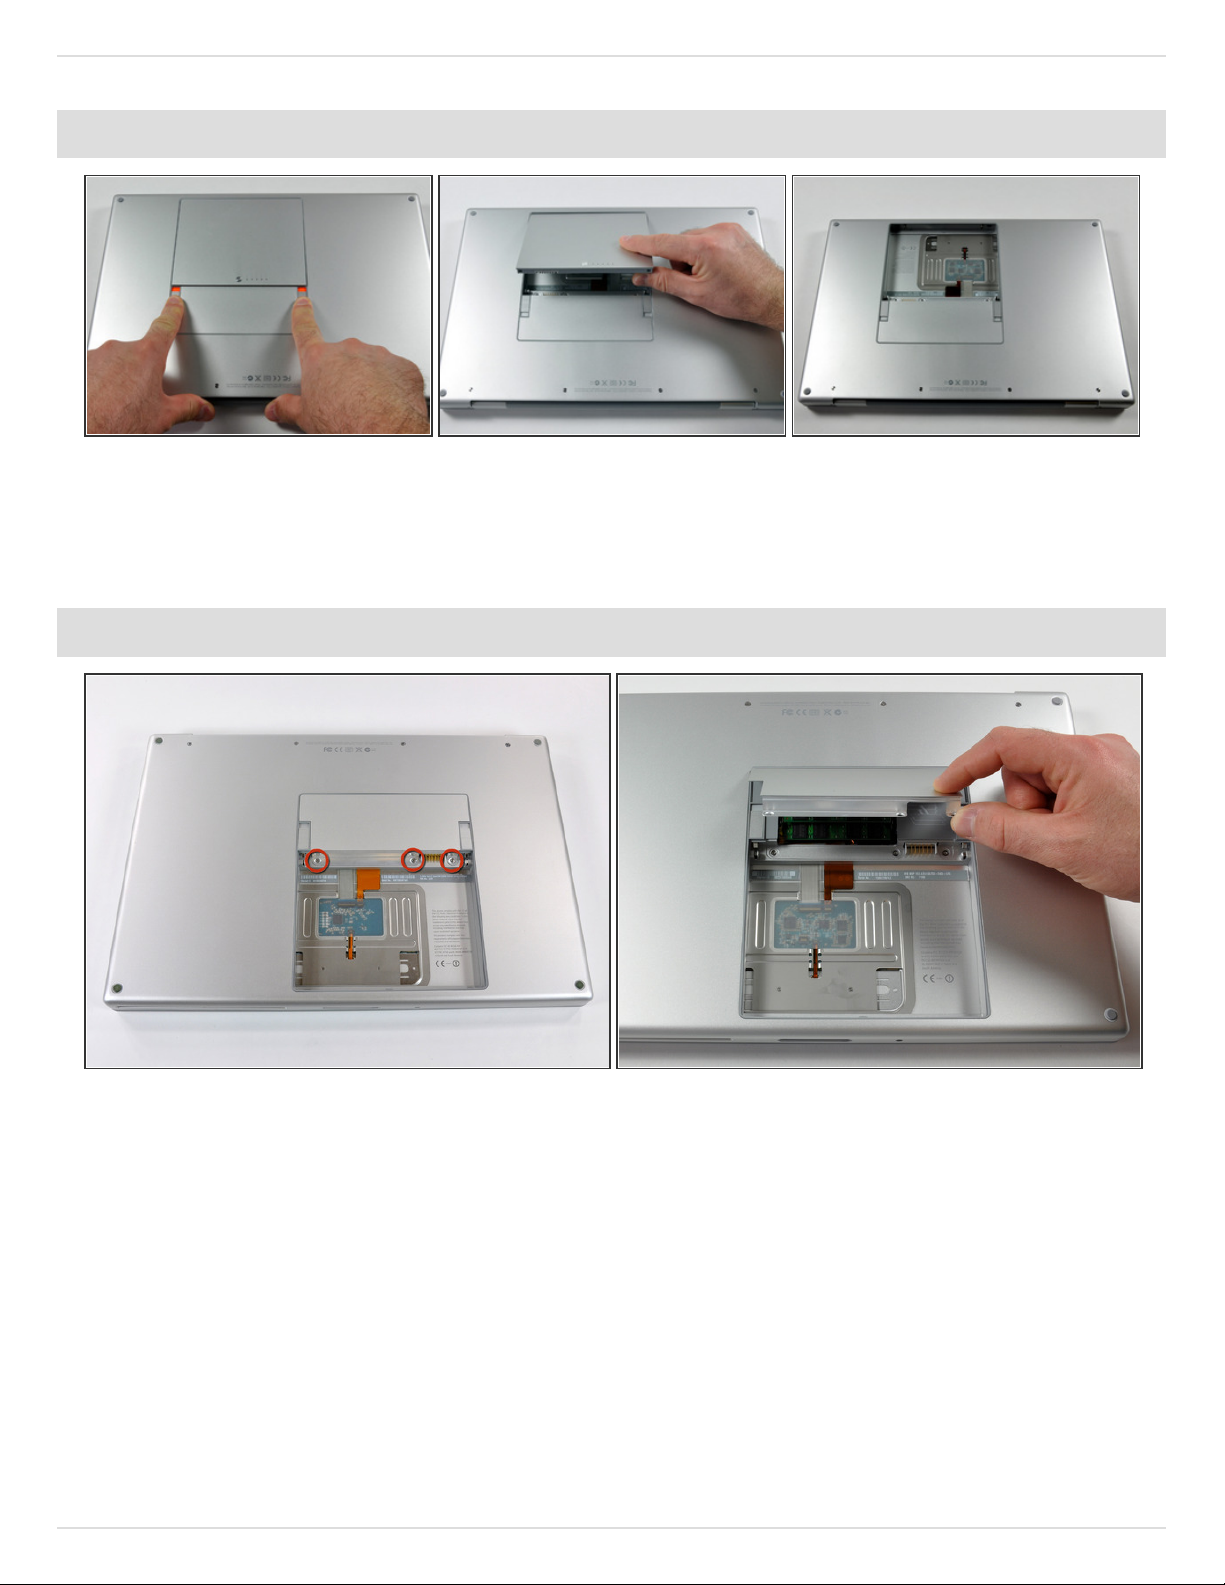
Use your fingers to push both battery release tabs away from the battery, and lift the
battery out of the computer.
Step 2 — RAM Shield
Remove the three identical 2mm PH000 Phillips screws from the memory door.
Lift the memory door up enough to grip it and slide it toward you, pulling it away from the
casing.
MacBook Pro 15" Core 2 Duo Models A1226 and A1260 PRAM Battery Replacement
© iFixit — CC BY-NC-SA www.iFixit.com Page 2 of 9
Page 3
Step 3 — Upper Case
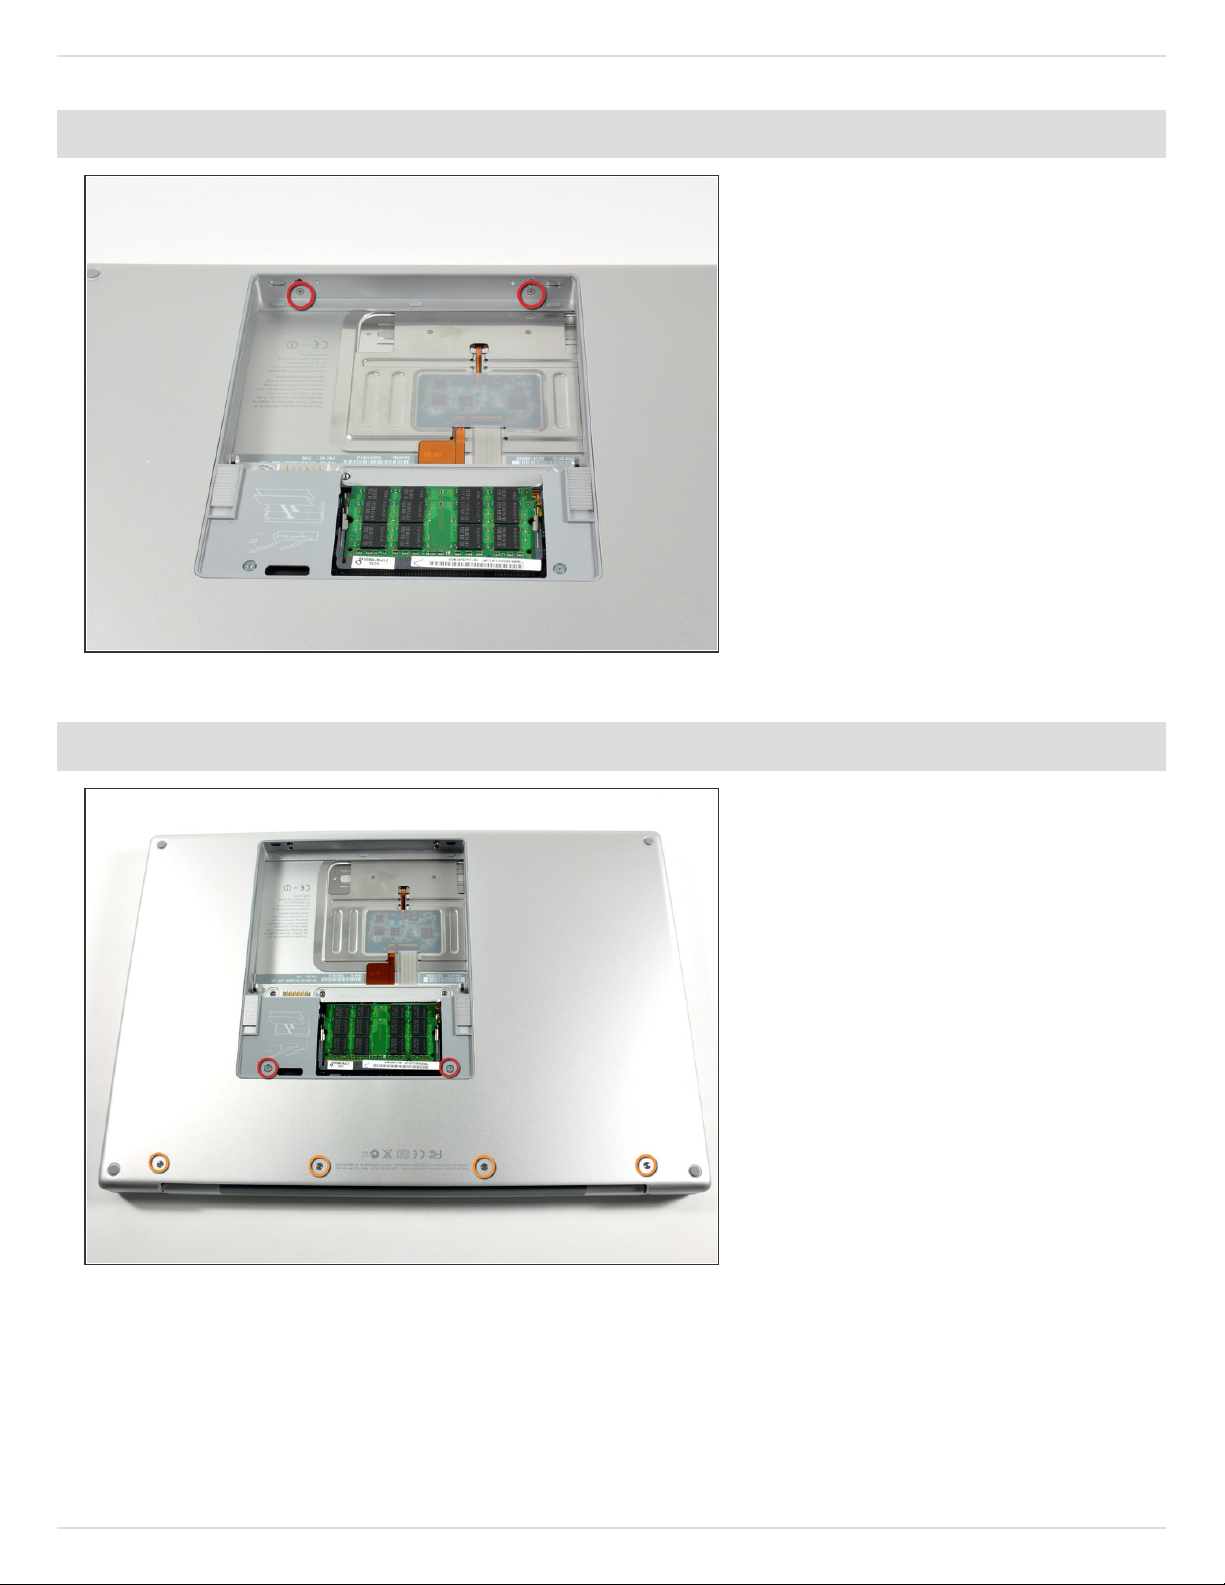
Remove the two 2.8 mm Phillips
screws in the battery compartment
near the latch.
Step 4
Remove the following 6 screws:
Two 10 mm T6 Torx screws on
either side of the RAM slot.
Four 14.5 mm Phillips screws
along the hinge.
MacBook Pro 15" Core 2 Duo Models A1226 and A1260 PRAM Battery Replacement
© iFixit — CC BY-NC-SA www.iFixit.com Page 3 of 9
Page 4
Step 5
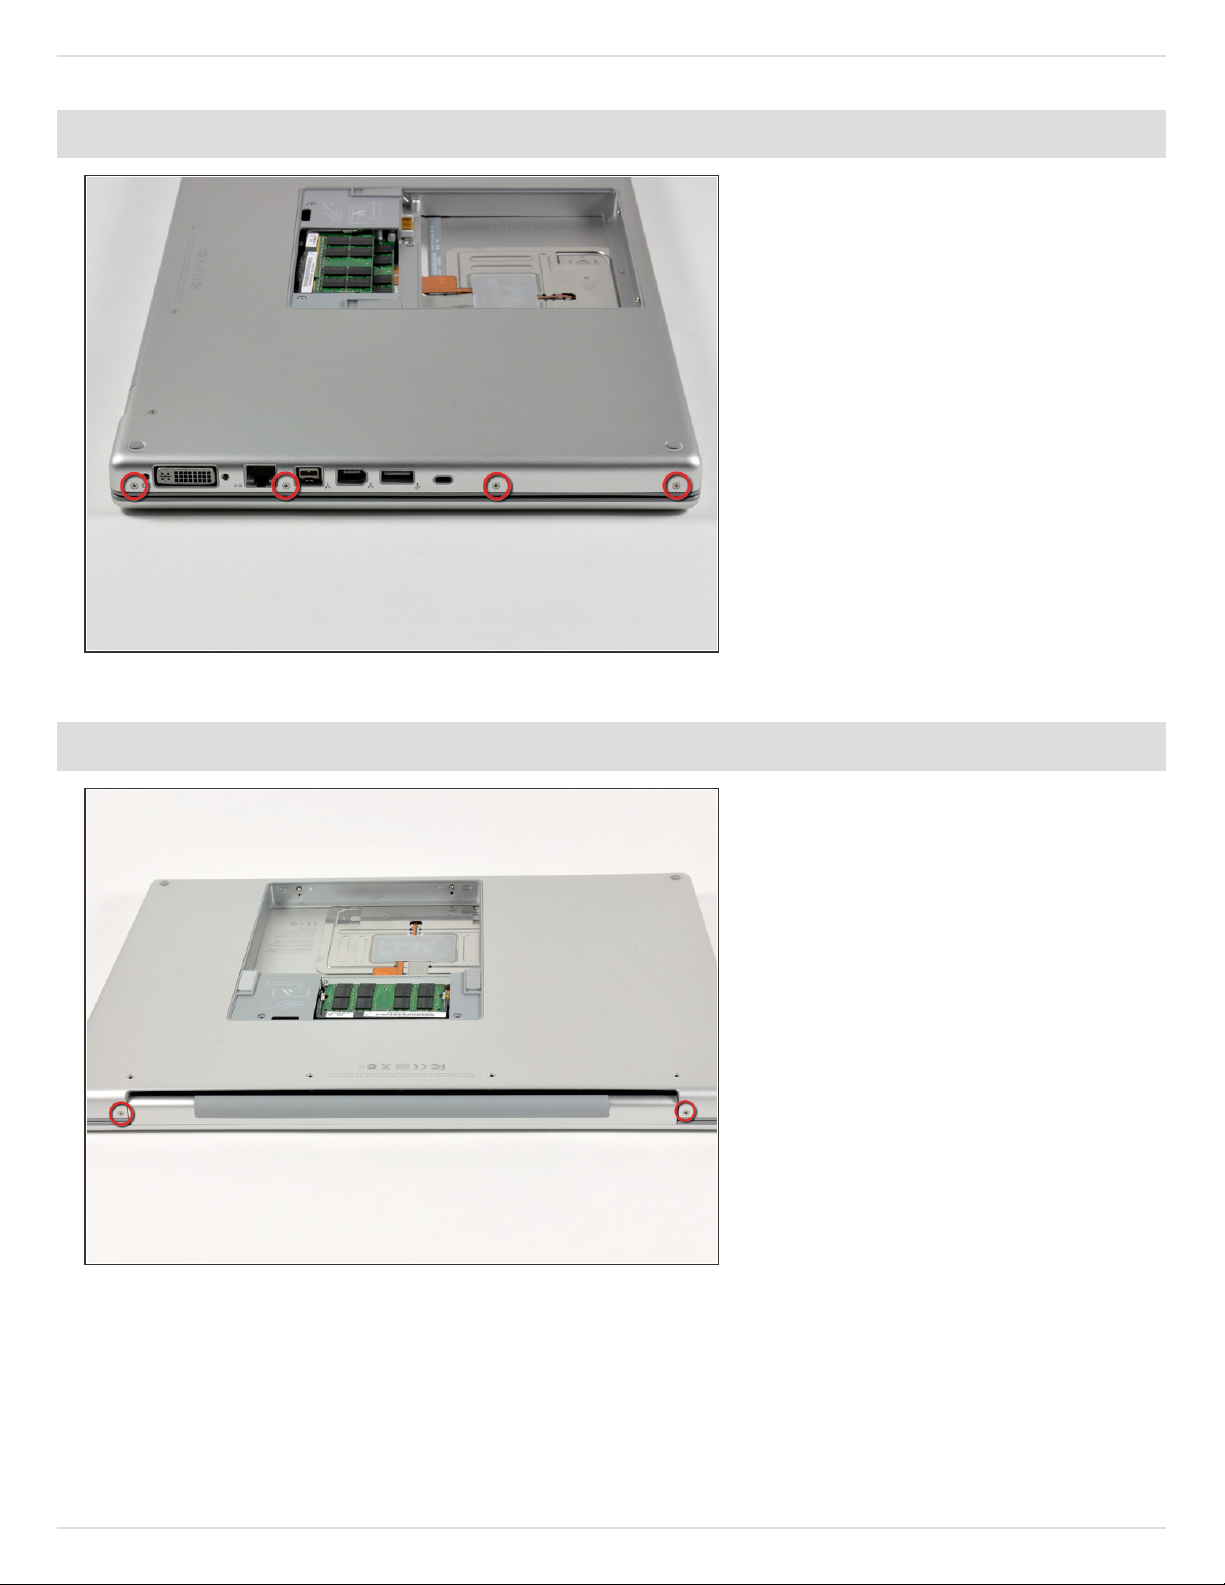
Remove the four 3.2 mm PH00
Phillips screws on the port side of
the computer.
Step 6
Rotate the computer 90 degrees
and remove the two 3.2 mm
Phillips screws from the rear of the
computer.
MacBook Pro 15" Core 2 Duo Models A1226 and A1260 PRAM Battery Replacement
© iFixit — CC BY-NC-SA www.iFixit.com Page 4 of 9
Page 5
Step 7
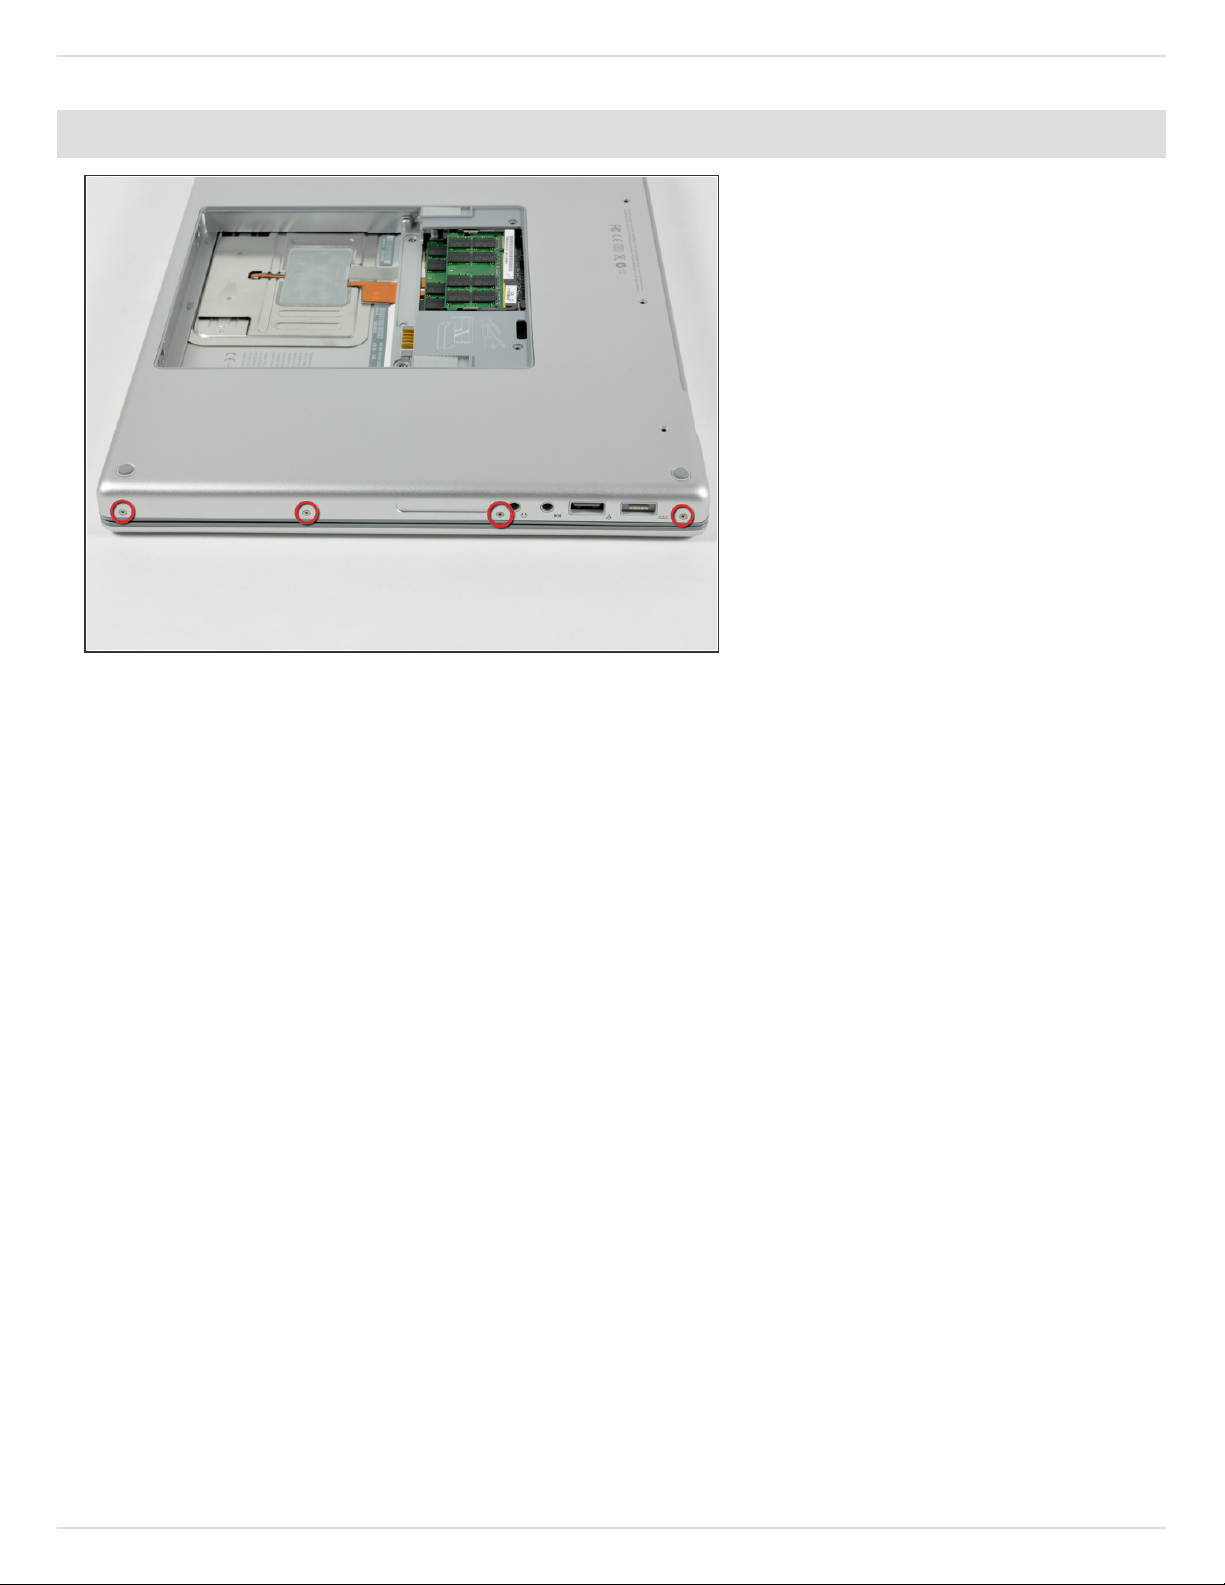
Rotate the computer 90 degrees
again and remove the four 3.2 mm
Phillips screws from the side of the
computer.
MacBook Pro 15" Core 2 Duo Models A1226 and A1260 PRAM Battery Replacement
© iFixit — CC BY-NC-SA www.iFixit.com Page 5 of 9
Page 6
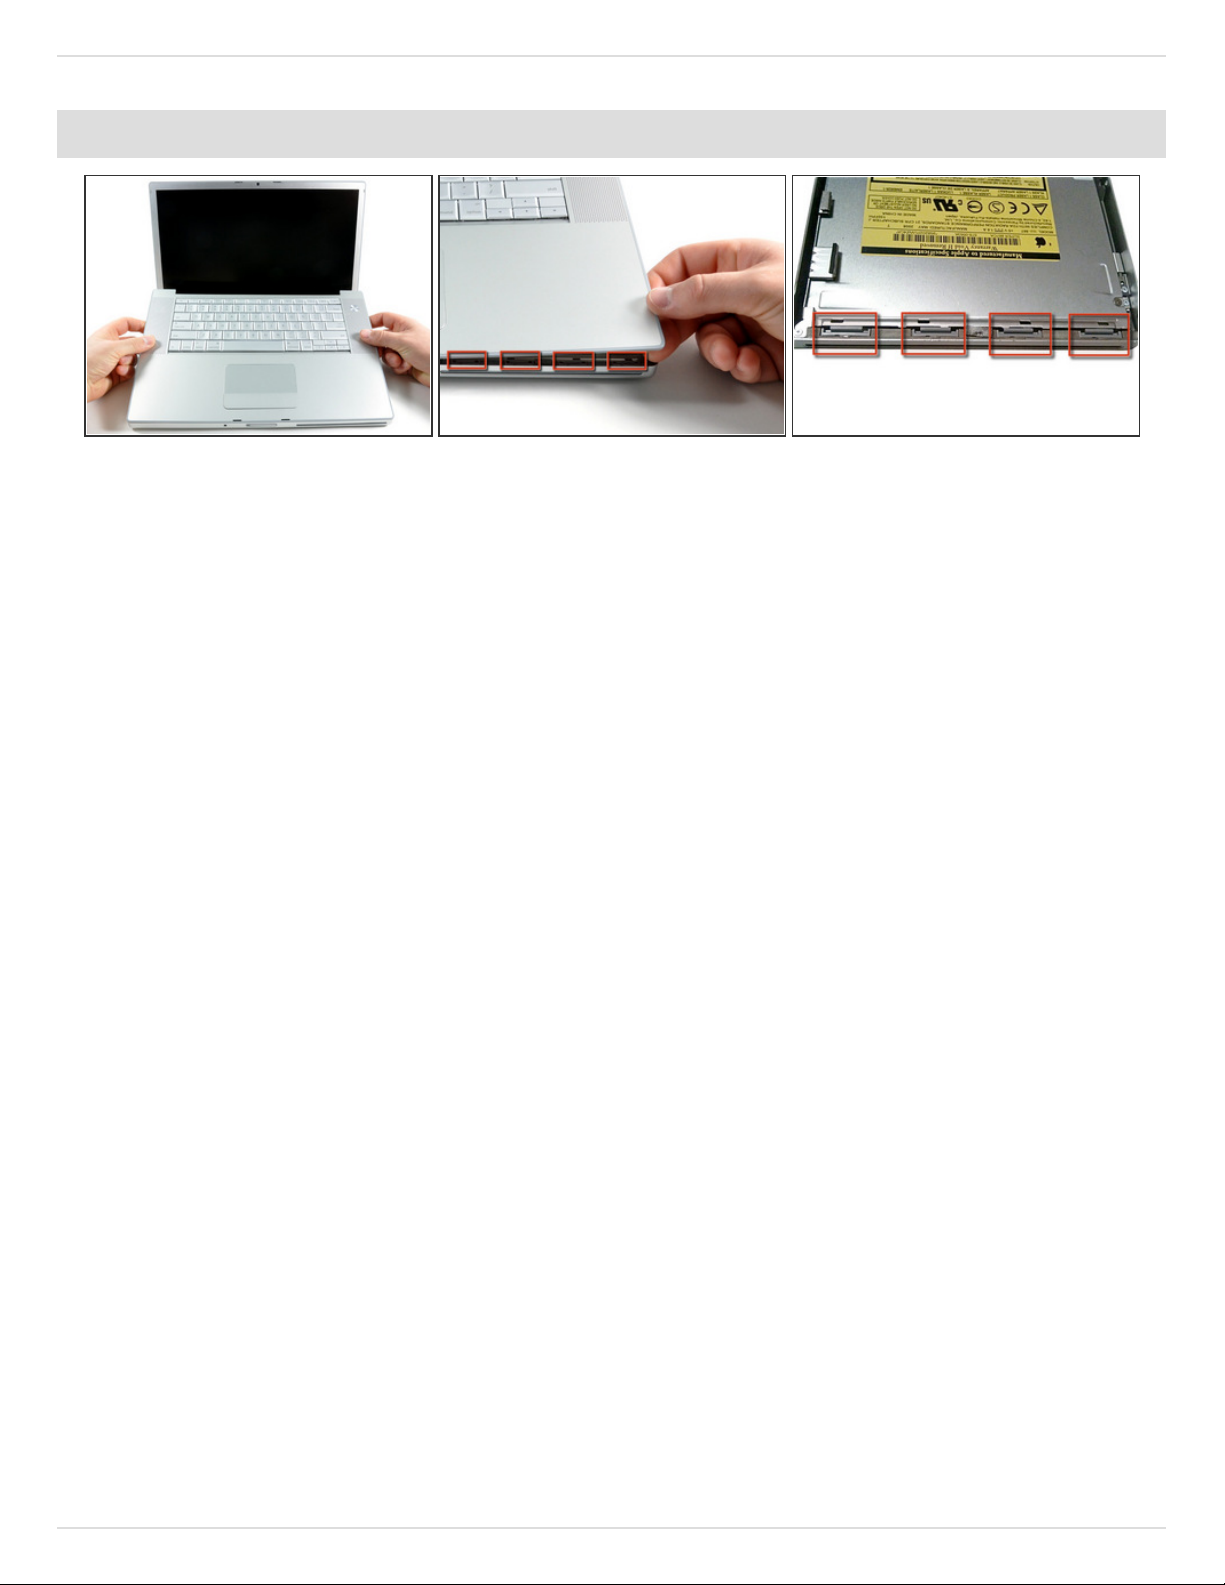
Step 8
Do not yank the upper case off quickly. The case is attached to the logic board via a
ribbon cable.
Lift up at the rear of the case and work your fingers along the sides, freeing the case as
you go. Once you have freed the sides, you may need to rock the case up and down to
free the front of the upper case.
There are four plastic clips above the DVD slot, and another above and to the left of the IR
sensor. These clips can be very difficult to disengage without prying. They can also be
difficult to re-engage during reassembly.
Reassembly Tip: Press down firmly on the tip of the top case above the location of each
clip until you hear a snap to reseat them in their slots.
Reassembly Tip: The two center DVD clips will rarely snap back into place properly
without help, and downward pressure will instead simply deform the frame around the DVD
slot. Support the frame by inserting a plastic spudger into the DVD slot directly under the
clip location until it is snug, then press down until you hear the snap.
MacBook Pro 15" Core 2 Duo Models A1226 and A1260 PRAM Battery Replacement
© iFixit — CC BY-NC-SA www.iFixit.com Page 6 of 9
Page 7
Step 9
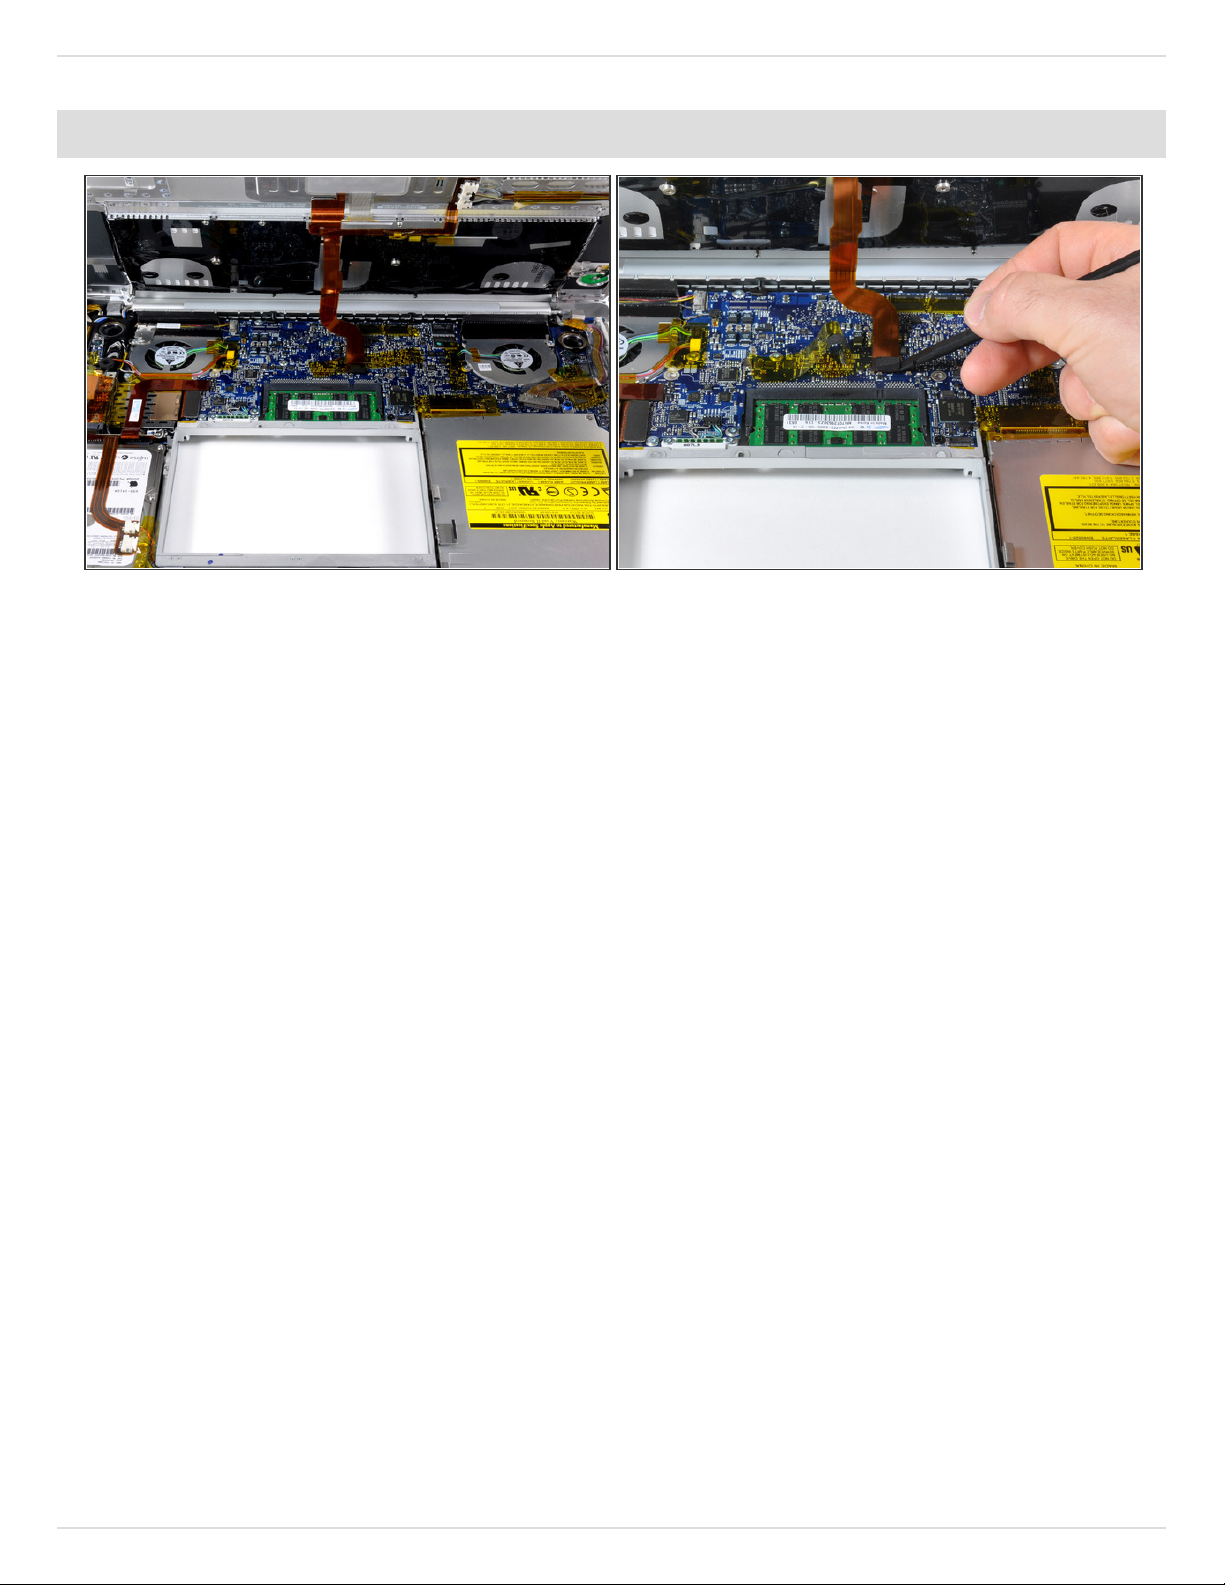
Disconnect the trackpad and keyboard ribbon cable from the logic board, removing tape as
necessary.
Note: It is possible to replace the hard drive without disconnecting the keyboard from the
chassis, but it will need to be held upright to keep it out of the way, while still allowing you
both hands to work on the drive removal. Be careful when removing the keyboard-trackpad
ribbon cable to ensure that the rear of the upper case is disengaged from the area near the
hinge. It is easy to accidentally bend the screw receivers on either side of the keyboard.
Remove the upper case.
MacBook Pro 15" Core 2 Duo Models A1226 and A1260 PRAM Battery Replacement
© iFixit — CC BY-NC-SA www.iFixit.com Page 7 of 9
Page 8
Step 10 — Optical Drive
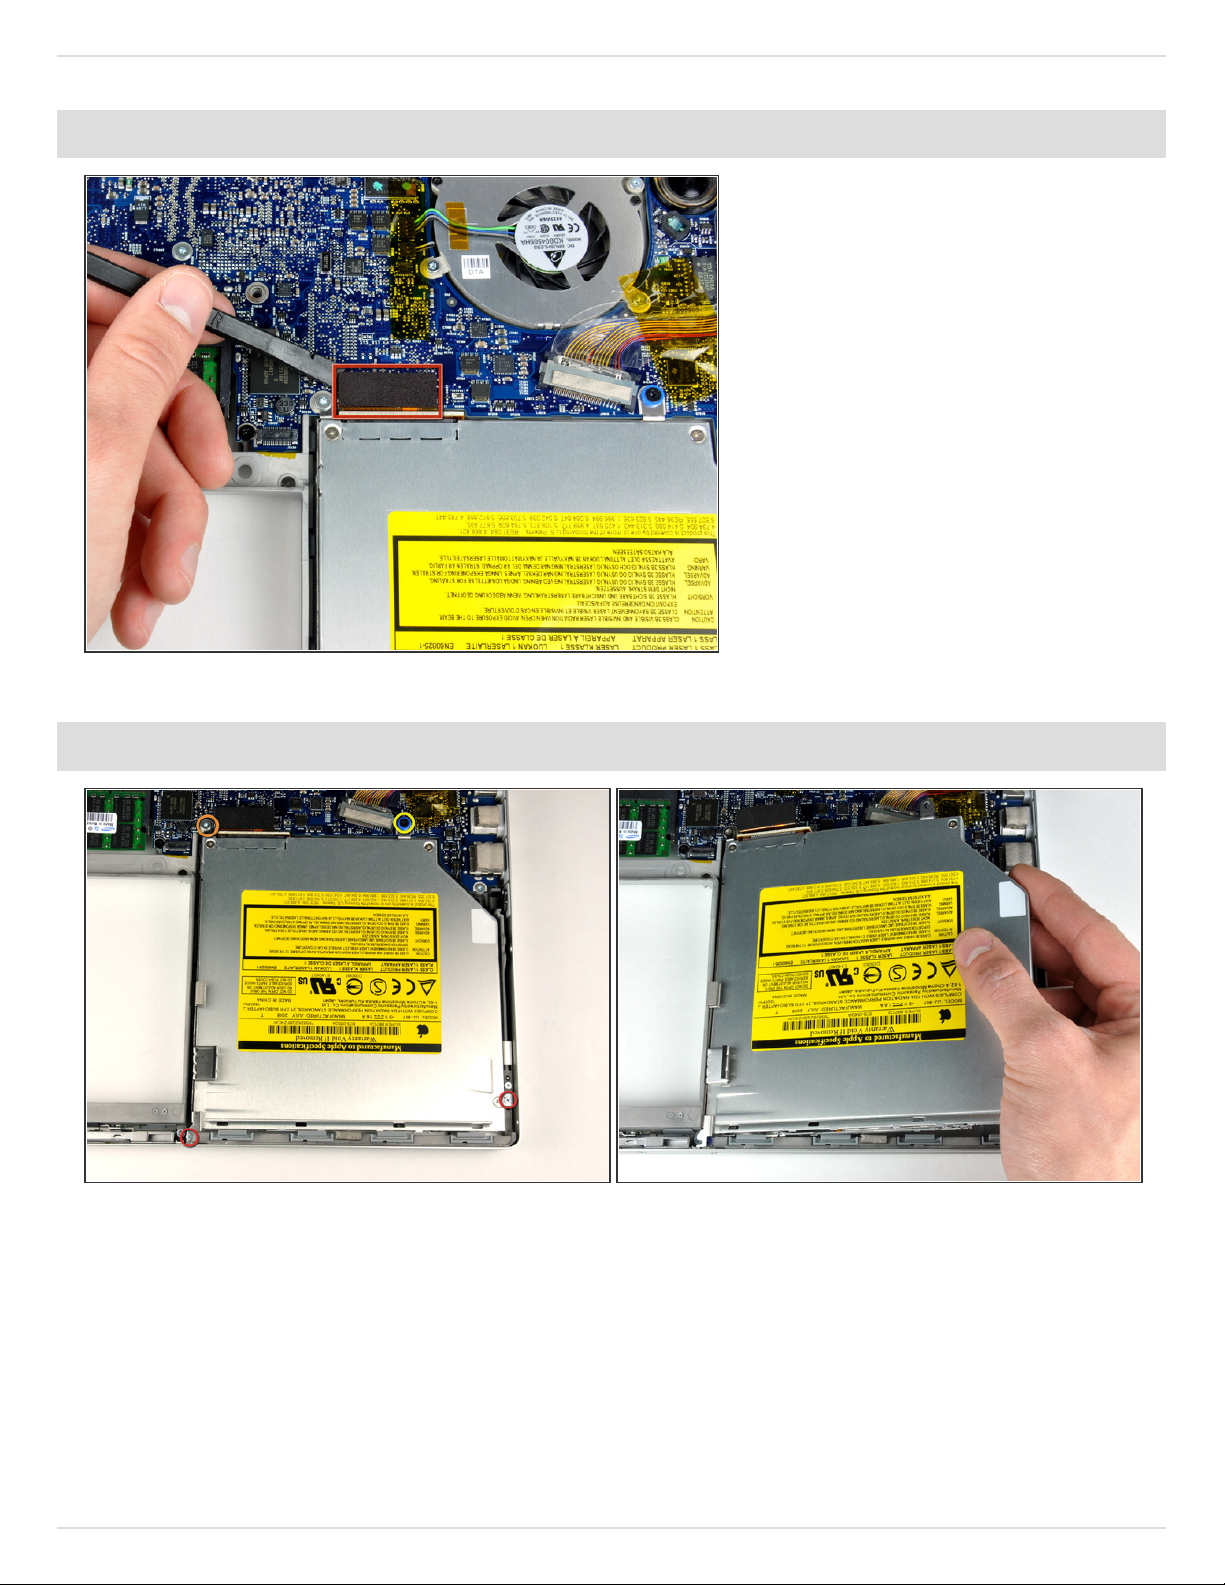
Use the flat end of a spudger to
disconnect the orange SuperDrive
ribbon cable from the logic board,
removing tape as necessary.
Step 11
Remove the following 4 screws:
Two 3.3 mm silver Phillips screws on either side of the SuperDrive.
One 4.7 mm silver T6 Torx screw from the top left corner of the drive.
One 6.2 mm black Phillips screw at the top right corner of the drive.
Lift the optical drive up and out of the computer.
MacBook Pro 15" Core 2 Duo Models A1226 and A1260 PRAM Battery Replacement
© iFixit — CC BY-NC-SA www.iFixit.com Page 8 of 9
Page 9
To reassemble your device, follow these instructions in reverse order.
This document was last g en erated on 2015-10 -01 02 :25:0 0 AM.
Step 12 — PRAM Battery
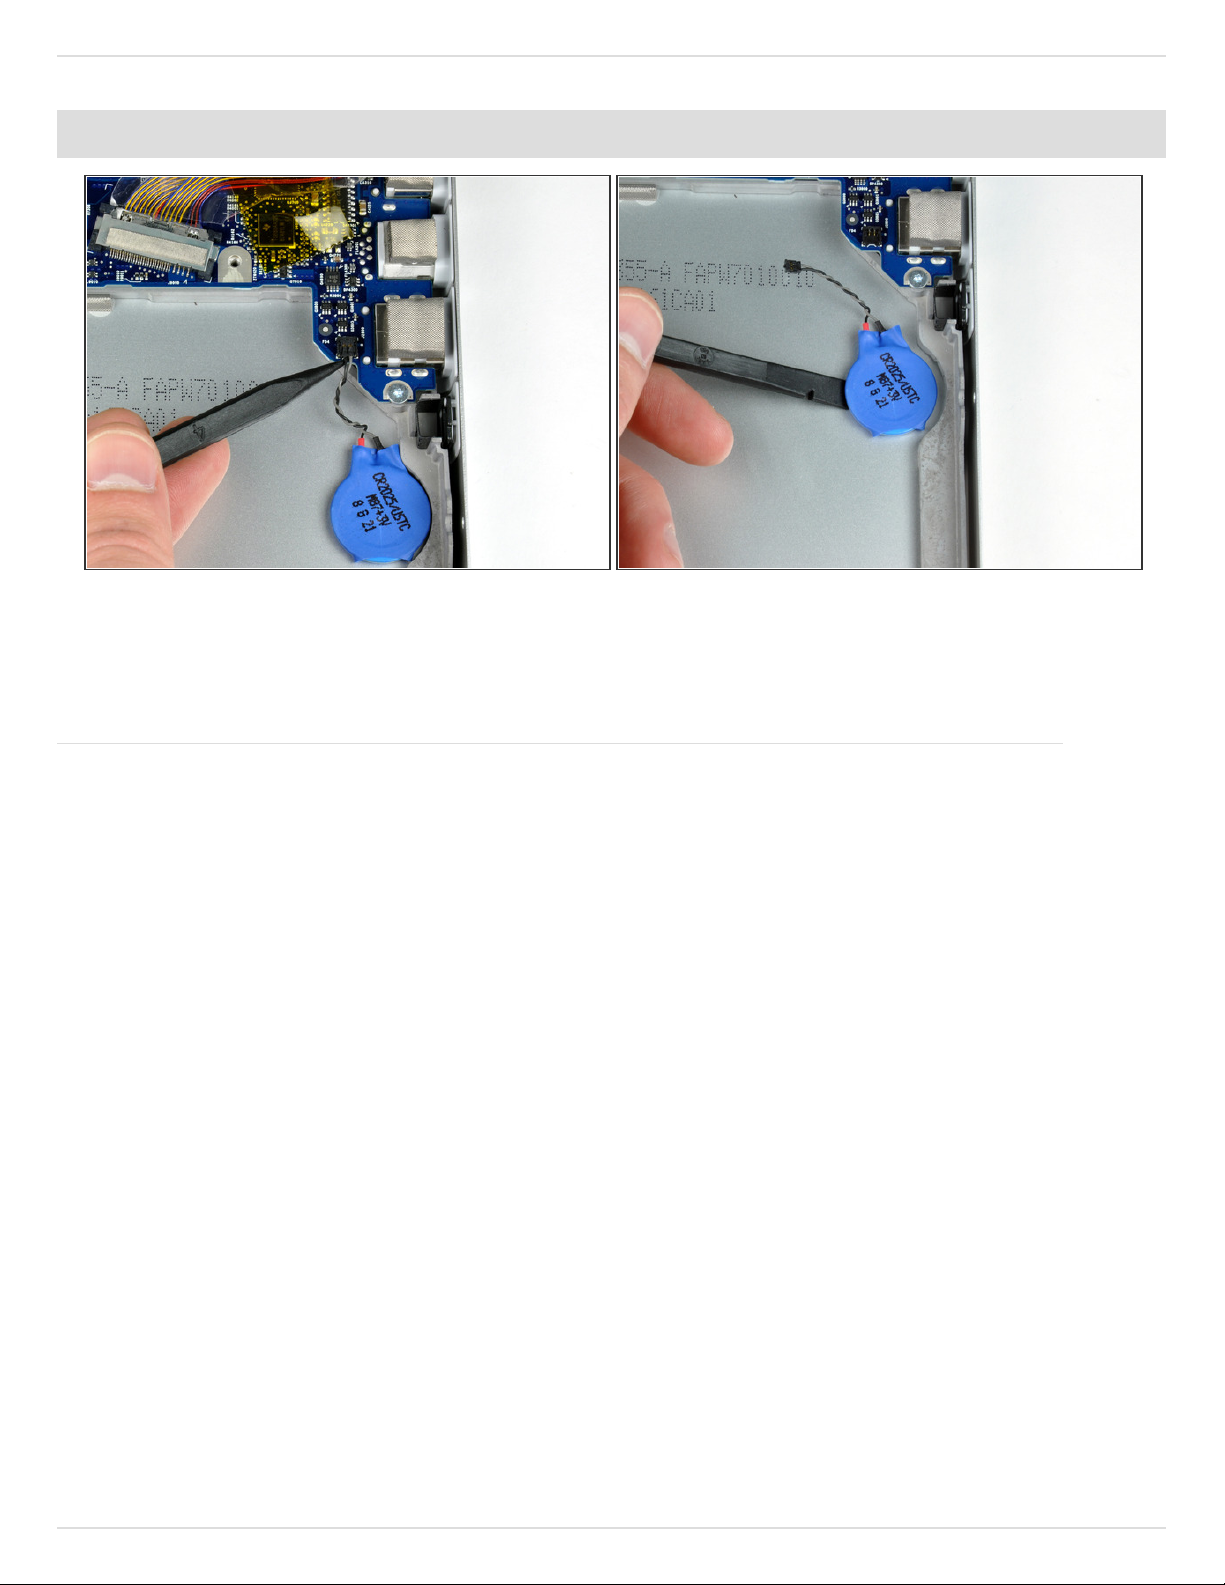
Disconnect the PRAM battery cable from the bottom right corner of the logic board.
Use a spudger to pry up the PRAM battery from the lower case.
Lift the PRAM battery out of the computer.
MacBook Pro 15" Core 2 Duo Models A1226 and A1260 PRAM Battery Replacement
© iFixit — CC BY-NC-SA www.iFixit.com Page 9 of 9
 Loading...