

Page 1
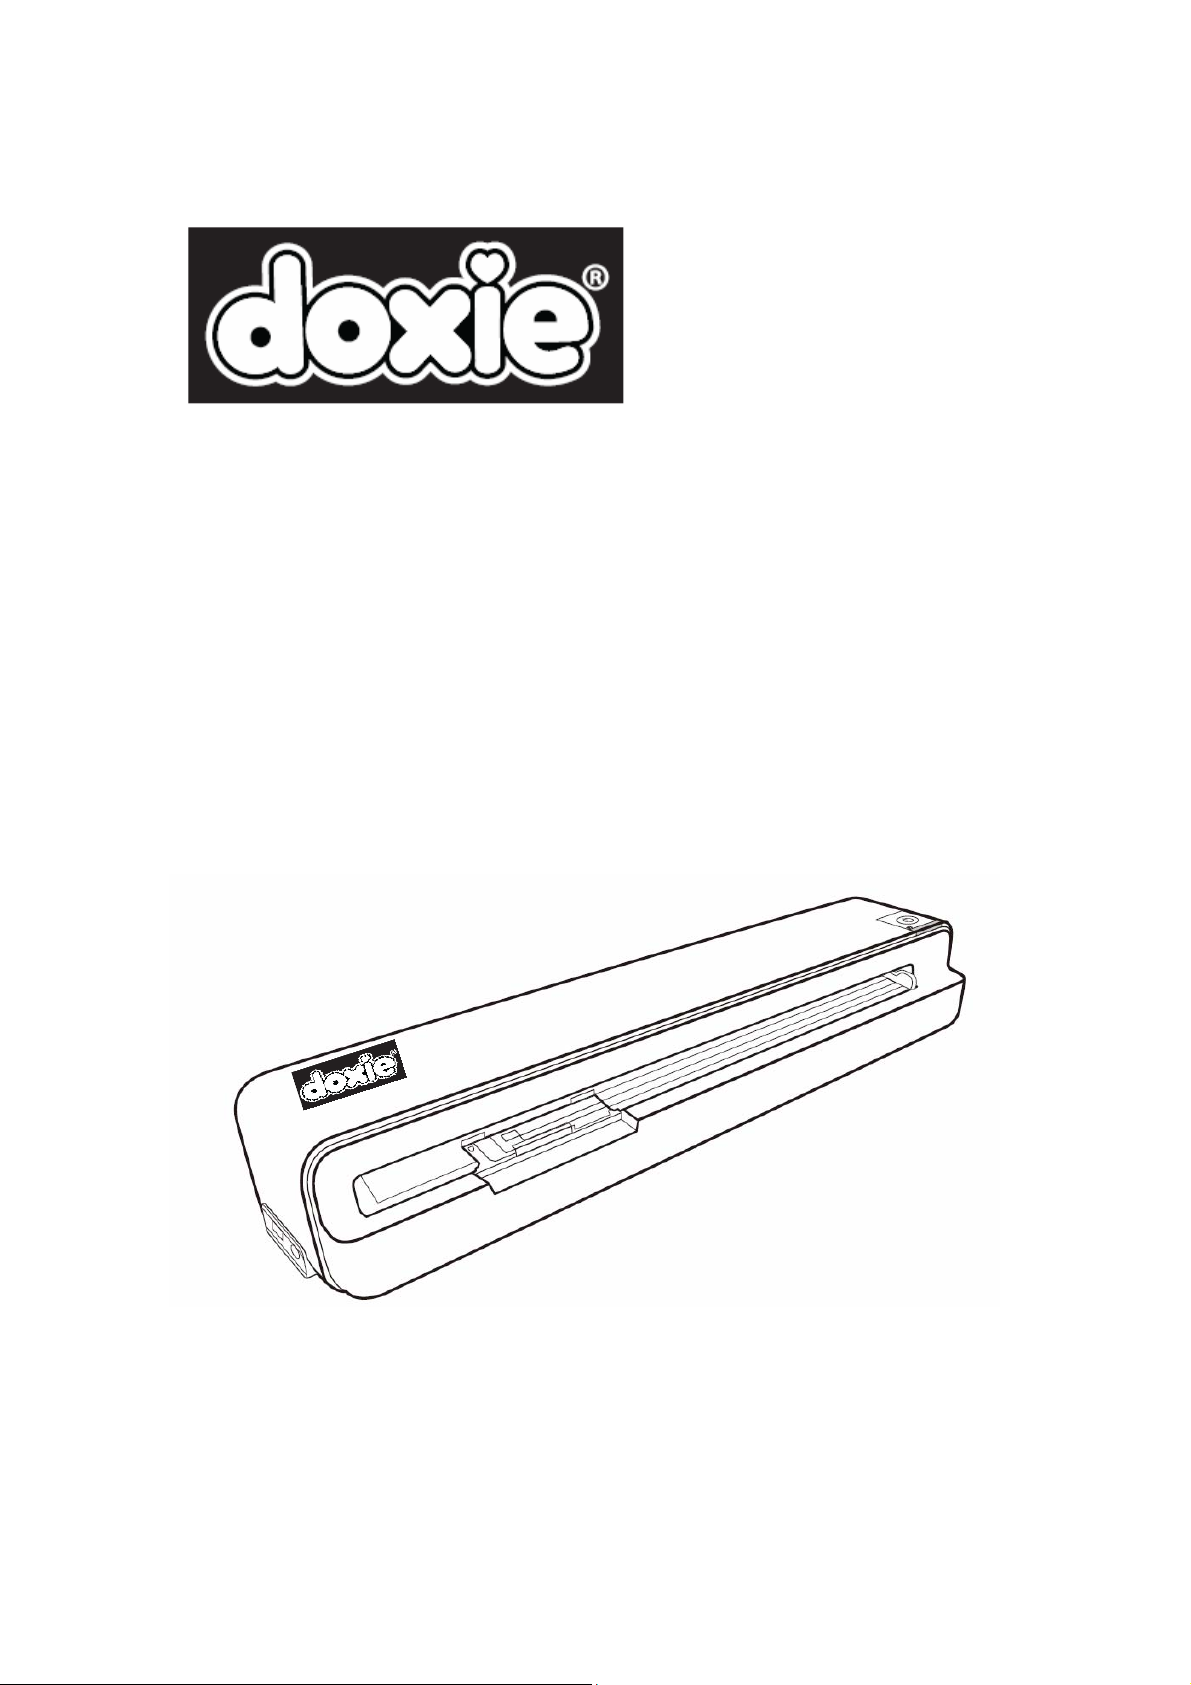
Model:DX250
UserManual
Page 2

Table of Contents i
Table of Contents
Read This First ...................................................1
Important safety instructions ......................................1
Disclaimer ...........................................................2
Copyright ............................................................2
Notes about copyrighted materials .............................3
Disposal of this product..............................................3
Package Contents ...............................................3
Introduction ........................................................5
Scanner Diagram ........................................................5
Front View..................................................................... 5
Rear View...................................................................... 6
Indicator Lights ..........................................................7
Suitable and Unsuitable Original Types.....................8
Orientation of the Original and Scanned Image.........9
Using the Scanner...............................................10
Preparation and Initial Setup ......................................10
Power on the Scanner .................................................11
Set the Scanning Resolution.......................................11
Using the Plastic Sheath .............................................12
Scan an Original .........................................................13
Automatic Image Cropping........................................15
Connecting the Scanner to a Computer......................16
System Requirements .................................................... 16
More Information .......................................................18
File naming and storage rules........................................ 18
Supported Memory Card Types .................................... 18
English
Page 3

Table of Contentsii
English
Care and Maintenance...................................... 19
Cleaning the Scanner..................................................19
Cleaning the Outer Casing ............................................ 19
Cleaning the Image Sensor ........................................... 19
Calibrating the Scanner ..............................................20
Storing the Scanner ....................................................21
Battery maintenance ...................................................21
Frequently Asked Questions/Troubleshooting 22
Specifications...................................................... 24
Page 4
Read This First 1
Read This First
Please read the following important safety instructions carefully
before using this scanner. Failure to observe these instructions may
result in personal injuries or damages to the scanner.
Important safety instructions
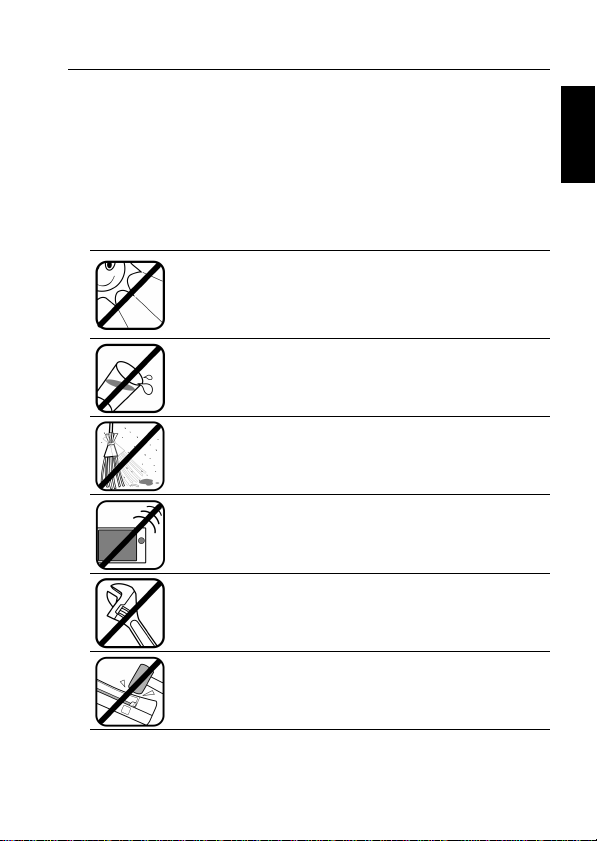
Always follow these basic safety precautions when using the
scanner. This will reduce the risk of fire, electric shock, and injury.
Do not place this scanner under direct sunlight or near heat
sources, such as in a closed car under sunlight or near a
stove. The outer casing of this device may become
deformed and the sophisticated sensors inside may become
damaged due to excessive heat.
Do not use this device near water, in the rain or allow any
liquid to get inside this device. Water and moisture may
cause short-circuit to the electronic components and lead
to malfunctions.
Do not use this device in dusty environments. Dust grains
may cover this device and scratch the original. Do not scan
originals that are contaminated by dusts or other particles.
Do not use this device near strong electromagnetic
sources, such as a microwave oven or television. The
electromagnetic interference may cause this device to
malfunction.
Do not attempt to disassemble or modify this device. There
are no user serviceable parts inside this device, and
unauthorized modifications will void your warranty.
English
Do not drop or apply shock/vibration to this device. Strong
impacts may damage the components inside.
Page 5
Disclaimer2
English
Disclaimer
Copyright
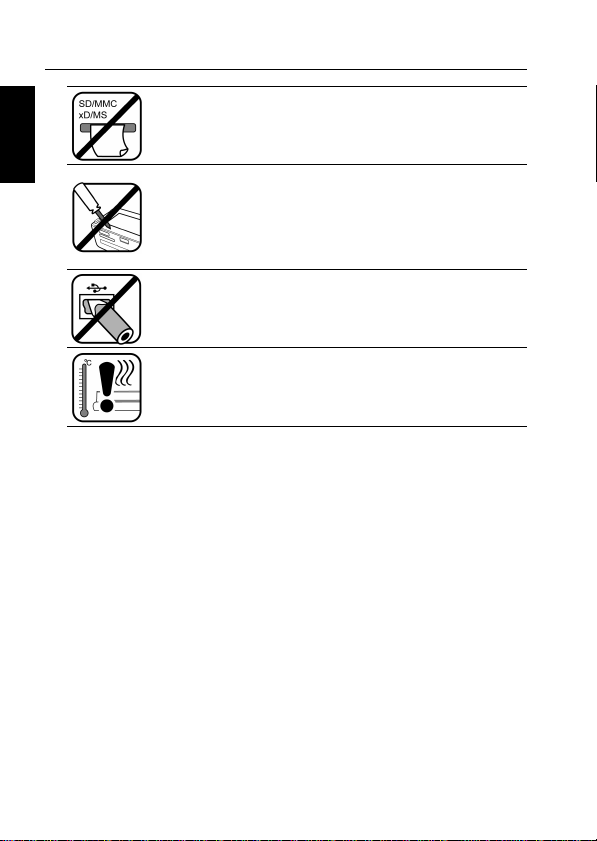
Do not insert objects other than compatible memory cards
into the memory card slot of this device. The metal
contacts inside the slot can easily become damaged by
foreign objects.
This scanner contains a rechargeable built-in Li-Polymer
battery. The battery should only be charged via the USB
connection to a PC. If the battery needs replacement, the
operation should only be performed by an authorized and
qualified serviceperson. Do not attempt to replace the
battery by yourself.
The USB port on this device is designed solely for
connecting to the USB cable. Do not insert any other
objects into this port.
If there are strange odors or heat emitting from this device
or any signs of malfunction, turn this device off
immediately and contact your dealer for inspection or
service.
This company makes no representations or warranties, either
expressed or implied, with respect to the contents of this
publication. This company reserves the right to revise this
publication and to make changes from time to time in the contents
thereof without obligation to notify any person of such revision or
changes.
Copyright this company. All rights reserved. No part of this
publication may be reproduced, transmitted, transcribed, stored in a
retrieval system or translated into any language or computer
language, in any form or by any means, electronic, mechanical,
magnetic, optical, chemical, manual or otherwise, without the prior
written permission of this company. Brand names, product names
and trademarks used in this publication are the properties of their
respective owners.
Page 6

Package Contents 3
Notes about copyrighted materials
Avoid scanning and re-distributing copyrighted originals and images
or those of unknown sources. Doing so may violate your local
copyright laws and related regulations. This company cannot be
made liable for the losses that may result from breaching the laws
described above.
Disposal of this product
To help protect the environment, dispose of this scanner properly
according to your local regulations regarding the disposal of waste
products.
Package Contents
Check the package for the following items. If there are any items
missing or damaged, please contact your place of purchase
immediately.
• Scanner x 1 • Calibration card x 1 • USB cable x 1
• Quick start guide x 1 • Sensor cleaning swab x 1
• Plastic sheath x 1
English
Page 7

Package Contents4
English
<Memo>
Page 8
Introduction 5
Introduction
Scanner Diagram
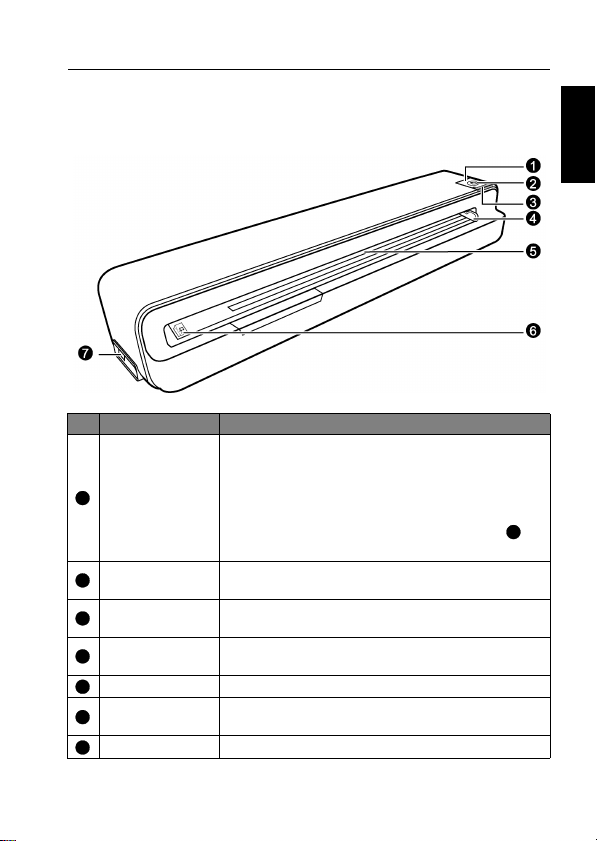
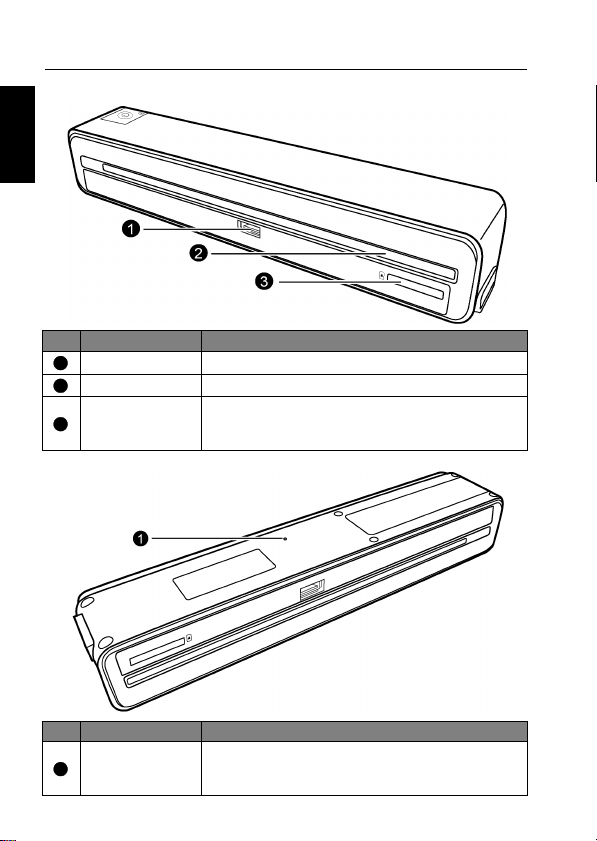
Front View
No. Name Function/description
• Press to power on the scanner.
• When scanner power is on, press and release to
change scanning resolution.
Power button
1
Power indicator
2
Status/Card
3
indicator
Paper guide slide
4
Feeding slot Insert an original into this slot to begin scanning.
5
Orientation mark
6
Mini USB socket For connecting to a computer via a USB cable.
7
• Press and hold for one second to power off the
scanner.
• When the original jams in the feeding slot ,
press to back it out from the scanner.
Indicates the power status of the scanner. Refer to
"Indicator Lights" on page 7.
Indicates the operating status of the scanner and
memory card. Refer to "Indicator Lights" on page 7.
Slide the guide to adjust for smaller originals to
ensure the proper alignment.
Indicates the correct original orientation for
scanning.
English
5
Page 9
Introduction6
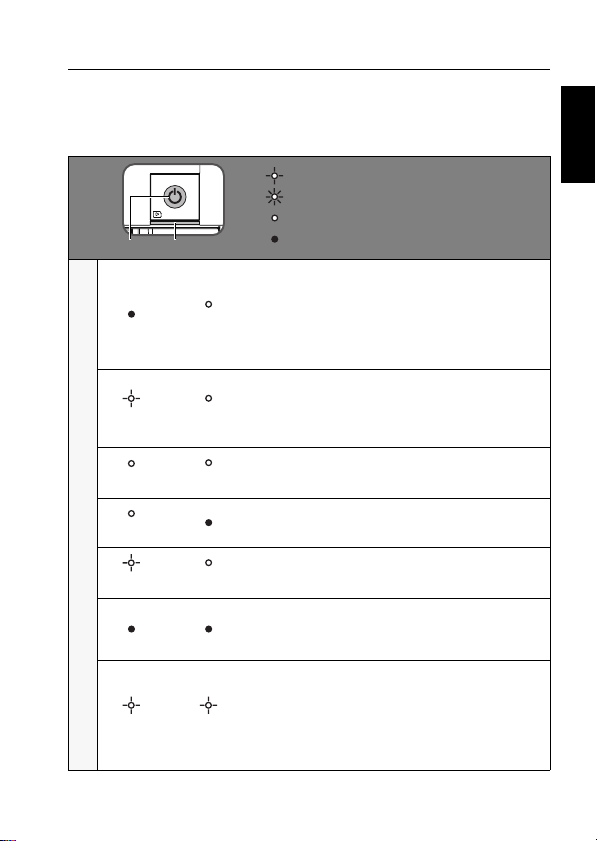
Rear View
English
No. Name Function/description
USB socket For connecting a USB flash drive.
1
Output slot The scanned original comes out from this slot.
2
SD/xD/MMC/
3
MS card slot
Accepts the following types of memory cards:
SD, xD, MMC and MS. Refer to "Supported
Memory Card Types" on page 18 for details.
Bottom View
No. Name Function/description
Reset button
1
In case there is no response from the scanner,
insert a pointed object into this hole to trigger the
reset button and reset the scanner.
Page 10
Introduction 7
Indicator Lights
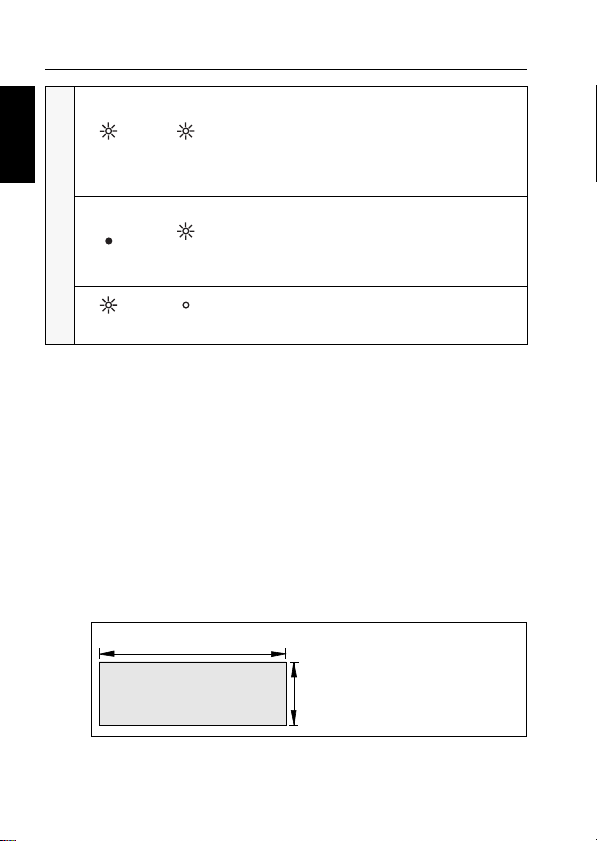
Please see below for the indicator lighting patterns and the functions
they represent.
: Blinking slowly
: Blinking rapidly
: Steadily on
Power
Status/card
(green) (color)
(orange)
(orange)
(orange) (color)
Indicator lighting patterns and the functions they represent
(green) (color)
(color)
(color)
: Off
The battery is fully charged (when scanner
power is on and connected to a computer) and
is ready for use; the scanning resolution
setting is indicated by color:
• Green - 300dpi (default setting)
• Orange - 600dpi.
Scanning current original; color indicates
current resolution setting:
• Green = 300dpi
• Orange = 600dpi
The battery is being charged when scanner
power is on.
The battery is being charged when scanner
power is off.
The battery power is low.
• The scanner is powered off.
• The battery is fully charged (when scanner
power is off and connected to a computer).
• Initializing system and memory card. Please
wait until the initialization process is
complete before using the scanner.
• Busy scanning and storing image file. Please
wait until the process is complete before
scanning another original.
English
Page 11
Introduction8
English
(green) (color)
• Paper jam. Press the Power button. The
scanner will back out the original so you can
remove the jammed original from the
Feeding slot.
• Calibration error. Please contact your
nearest service center for help.
No memory card, card full (free space below
10MB), card error, card locked or the file
(color)
(orange) (color)
system is not supported. Remove files from
the card to free up space, unlock the card if it
is locked, or try another card.
The battery power is extremely low, and the
scanner will power off automatically in 5
seconds. Charge the battery immediately.
Suitable and Unsuitable Original Types
This scanner is designed to obtain the best scanning results with the
following types of originals:
• Photos (From 3" x 5", 4" x 6", 5" x 7" up to A4/Letter size)
• Business cards (Standard 3.5" x 2" (8.9 x 5 cm) or larger)
Do not use the following types of originals for scanning. Otherwise
the scanner will malfunction or cause the original to jam in the slot.
• Originals thicker than 1.0mm
• Originals with either side shorter than 55mm
• Originals with lots of black or dark colors
• Originals with dark colors surrounding the edges
• Printed images (pictures on newspapers, magazines, etc.)
• Soft and thin materials (thin paper, cloth, etc.)
• Originals that exceed the following acceptable size:
Length: 12 inches (304.8mm)
Width: 8.5 inches (216mm)
Page 12
Introduction 9
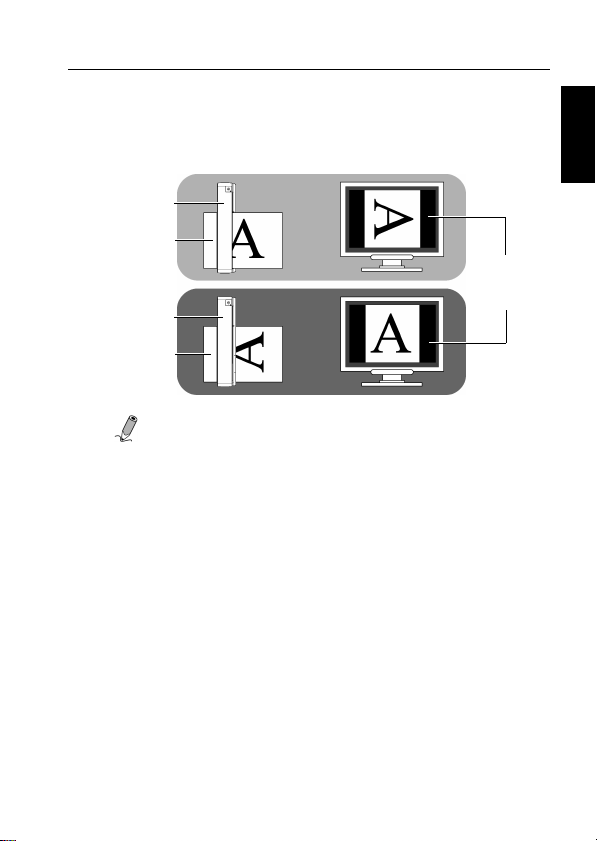
Orientation of the Original and Scanned Image
Refer to the illustrations below for the relationship between the
orientation of the original when scanning and that of the scanned
image when displayed on the computer screen.
Scanner
Original
Scanner
Original
: Scanning the same original in different orientations
NOTE
may produce scanned images that look slightly different in
color tones and brightness. This is not a malfunction.
Scanned
image when
displayed
on-screen
English
Page 13
Using the Scanner10
Using the Scanner
English
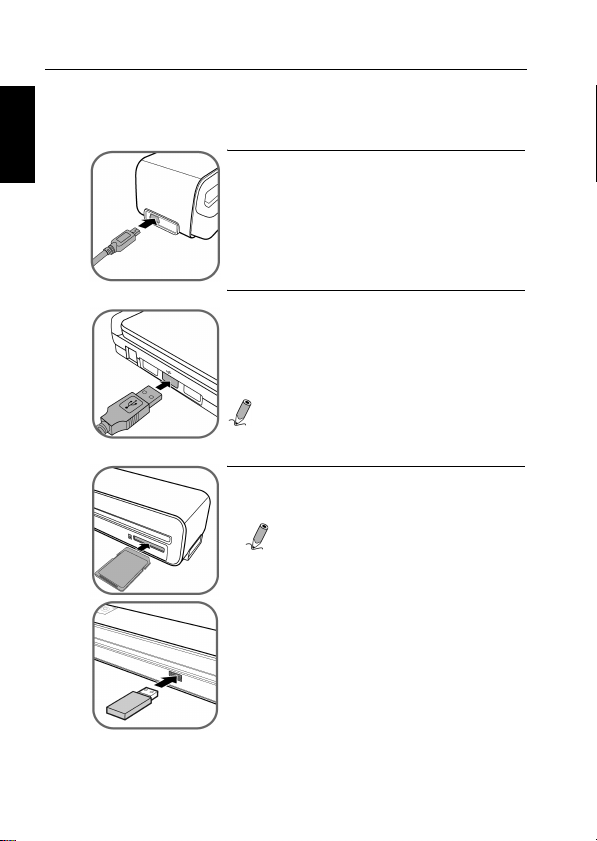
Preparation and Initial Setup
1. Connect the mini end of the USB cable
(included with scanner) to the Mini USB
socket on the scanner.
2. Power on your computer, and then connect
the large end of the USB cable to a USB
port on your computer to start charging the
built-in battery of the scanner.
After the battery is fully charged,
disconnect the scanner from the computer.
NOTE
: It takes approximately 3 to 4
hours to fully charge the scanner’s
battery. See "Indicator Lights" on page 7
to identify the charging status.
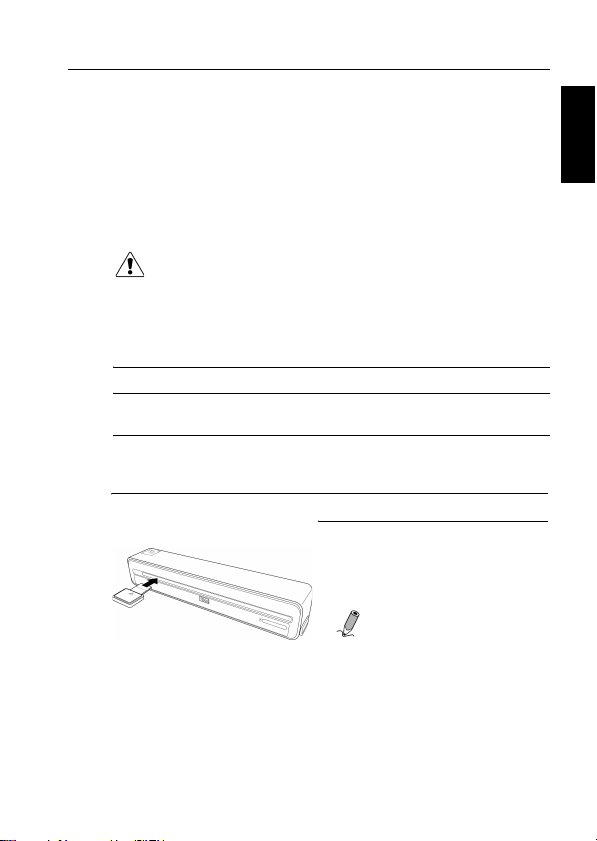
3. Insert an unlocked (writable) memory card
into the memory card slot, or a USB flash
drive into the USB port on the scanner.
NOTE
• You can also use this scanner without a
memory card or USB storage device. The
scanner has a built-in 512MB memory.
• If a USB flash drive and a memory card
are both inserted, the scanner will take the
following priority when saving the scanned
images:
USB flash drive > Memory card > Built-in
memory
• The scanner only accepts memory cards
in FAT16 or FAT32 format. NTFS and
other file systems are not supported.
• See "Supported Memory Card Types" on
page 18 for all supported memory card
types.
:
Page 14
Using the Scanner 11
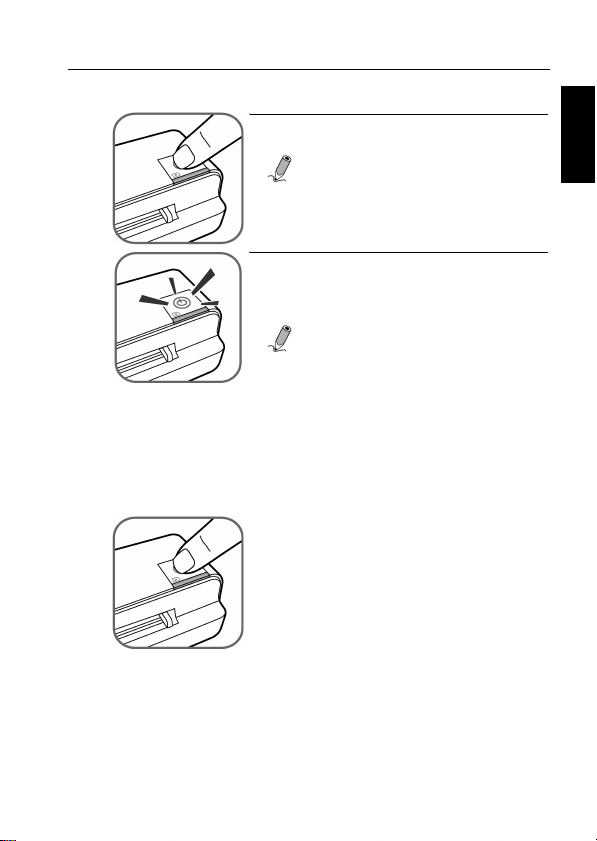
Power on the Scanner
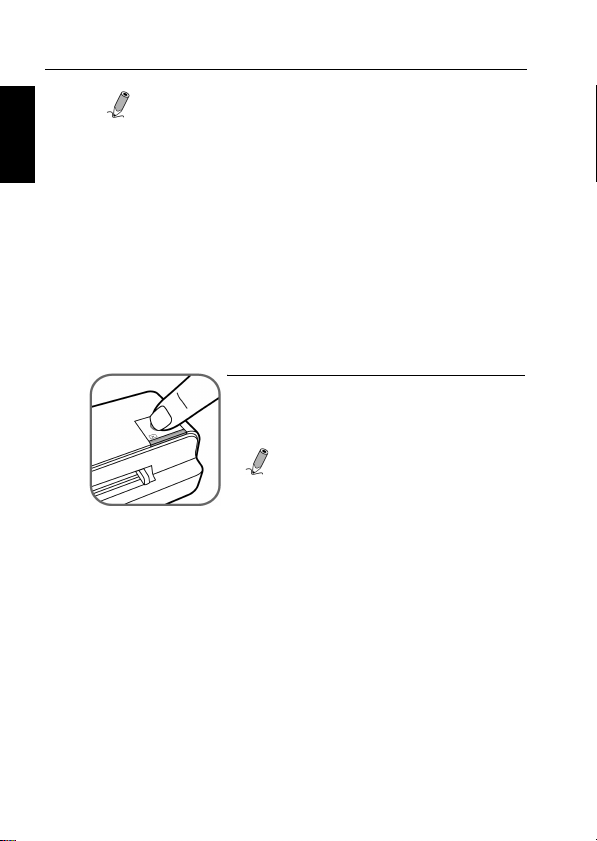
1. Press the Power button. The Power and
Status/Card indicators blink.
NOTE
: For more information on the
indicator lights, refer to "Indicator
Lights" on page 7.
2. Wait until the Power indicator stops
blinking and then goes off. The Status/Card
indicator will stay on steady, indicating that
the scanner is ready.
NOTE
: Do not insert any original into
the feeding slot when the Power
indicator is blinking; the original will
not be scanned.
Set the Scanning Resolution
The scanning resolution is measured in dpi (dots per inch). The
higher the dpi, the more details on the original will be captured by
the scanner and produce a higher quality scanned image. However, a
higher dpi will also result in a larger image size and occupy more
space on the memory card.
To change the scanning resolution, press and
release the Power button. The scanning
resolution changes by each press of the button,
and the color of the Status/Card indicator will
also change according to the resolution
selected:
• Green: 300dpi (normal mode, default setting)
• Orange: 600dpi (fine mode)
English
Page 15
Using the Scanner12
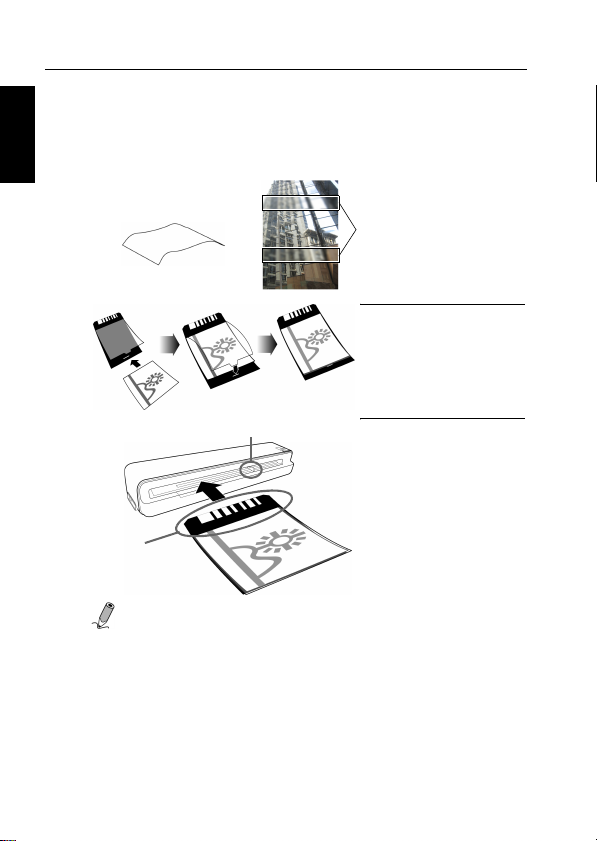
Using the Plastic Sheath
English
Always use the clear plastic sheath (included) when scanning photos
to ensure the best scanning results. The sheath helps eliminate the
possibility of de-focusing due to the uneven surface of curled
photos.
Curled photo
Fuzzy areas that result
from the uneven surface
of the curled photo
1. Insert the photo into
the plastic sheath as
shown.
Adjust the paper guide lever
Insert the
folded side
first
NOTE
:
• Keeping the original flat and level when feeding prevents
possible jamming.
• Keep originals free from finger prints, oil, dirt, and dust for
optimum scanned image quality.
• Remove photos from the plastic sheath after scanning to
prevent the sheath from sticking to the photos over time.
• If the plastic sheaths are not in use, store them in a safe place
and keep them protected from accumulating dust.
2. Adjust the paper guide
lever so that the plastic
sheath aligns against
the left side of the feed
slot, and then insert the
plastic sheath (with the
folded side first) into
the feed slot flat and
level as shown.
Page 16
Using the Scanner 13
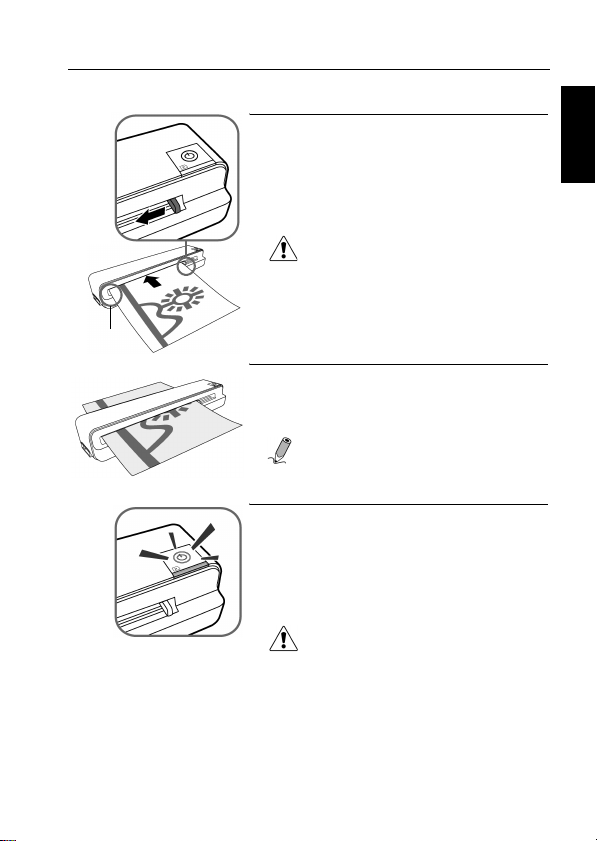
Scan an Original
Align left
1. With the side to be scanned facing upward
and in correct orientation (refer to
"Orientation of the Original and Scanned
Image" on page 9), place one edge of the
original on the scanner and adjust the paper
guide slide so that the original aligns
against the left side of the feeding slot.
CAUTION
photos in humid environments
(humidity higher than 70% RH).
Otherwise the surface of the photo
will become sticky and cause the
scanner to jam.
: Do not scan glossy
2. Insert the original into the feeding slot. The
original will be fed through the slot and
scanned automatically. The Power indicator
blinks while scanning.
NOTE
: To prevent poor image quality,
reserve adequate space behind the
scanner for the photo to complete the
scan feeds.
3. When scanning is completed, the Power and
Status/Card indicator lights will keep
blinking momentarily, indicating that the
scanner is processing the image and storing
the file onto the memory card. Wait until
the indicator lights stop blinking before
inserting and scanning the next original.
CAUTION
Insert only one original at a time.
Insert the next original only when the
previous one is done. Otherwise the
scanner may malfunction.
:
English
Page 17
Using the Scanner14
English
NOTE:
• Always place the scanner on a flat surface for scanning. Do not
hold the scanner while scanning.
• Do not remove the memory card or USB flash drive (if
connected) while the indicators are blinking.
• This scanner is not guaranteed to compatible with all USB flash
drives on the market.
• A fully charged battery can sustain up to 100 scans of A4/Letter
size plain paper at 300dpi. This is a factory test value for your
reference, and actual battery performance may vary.
• This scanner only supports output images in JPEG (.jpg) format,
and the date/ time attribute will not be added.
• For more information on how this scanner stores the scanned
image files on the memory card, refer to "File naming and
storage rules" on page 18.
• If the memory space is near full (lower than 10MB), the Status/
Card indicator blinks (refer to "Indicator Lights" on page 7). Use
another card or delete some files on it if necessary.
4. To power down the scanner after all
originals are scanned, press and hold the
Power button for one second. The power
indicator will blink and then go off.
NOTE
: The scanner will automatically
power off if it is left idle for 5 minutes (if
not connected to a computer).
Page 18
Using the Scanner 15
Automatic Image Cropping
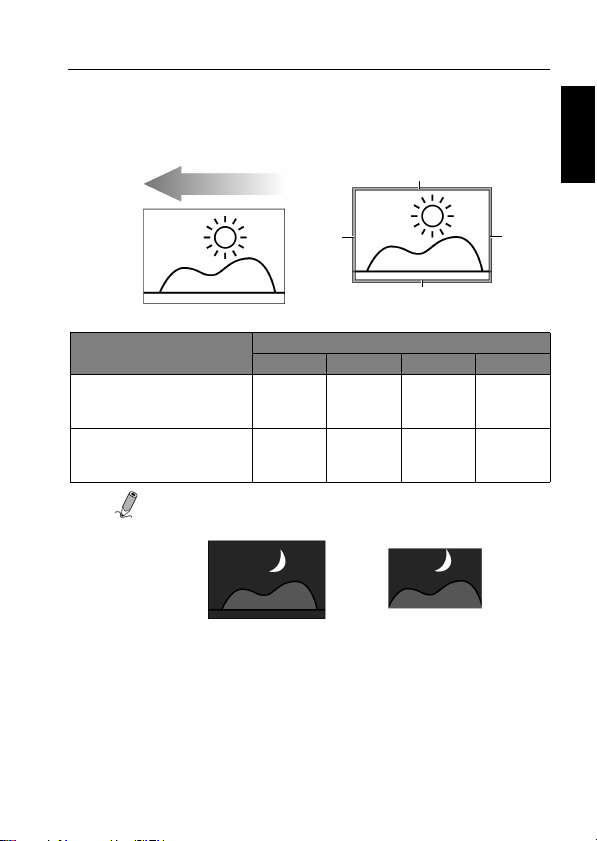
This scanner has a built-in cropping function that detects and crops
dark edges of an original during the scan process. See the illustration
below.
Scanning direction
Original
Scanning resolution
300dpi/600dpi (when the
original’s size is larger
than 5" x 7")
300dpi/600dpi (when the
original’s size is smaller
than 5" x 7")
NOTE
: When scanning darker originals (for example, a photo
of the night sky), over-cropping may occur. Please insert the
original in a different direction (orientation) and try again.
A C
Cropping size (as measured on the original)
A B C D
3 mm 3 mm 3 mm 3 mm
1.5 mm 1.5 mm 1.5 mm 1.5 mm
Original
B
D
Scanned image
Scanned image
(over-cropped)
English
Page 19
Using the Scanner16
Connecting the Scanner to a Computer
English
By connecting the scanner to a computer, you can access the
scanned images on the memory card, USB flash drive and scanner’s
internal memory directly, or use the scanner as a memory card
reader, so that you can freely copy, paste or delete files using the
computer.
System Requirements
• Operating system:
Windows: Windows XP, Vista, 7 or later versions (32-bit)
Macintosh: Mac OS 10.5, 10.6 or later versions
• USB port supported: USB 1.1 or 2.0 port
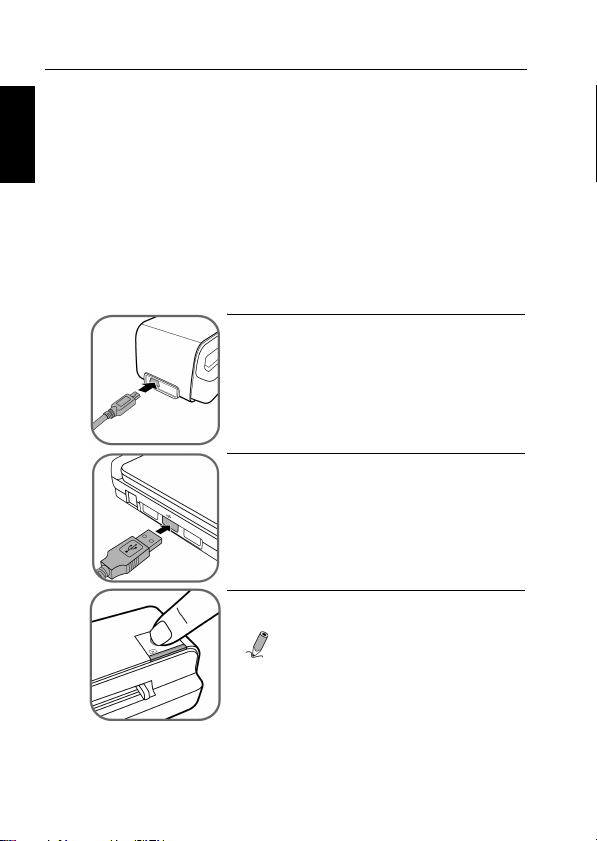
1. Connect the mini end of the USB cable
(included with scanner) to the Mini USB
socket on the scanner.
2. Power on your computer, and then connect
the large end of the USB cable to a USB
port on your computer.
3. Press the Power button. The Power and
Status/Card indicators blink.
NOTE
indicators, refer to "Indicator Lights"
on page 7.
: For more information on the
Page 20
Using the Scanner 17
4. The scanner will be recognized by the computer as removable
disks. When the Status/Card indicator stops blinking, you are
ready to view or edit the files.
NOTE:
Do not remove the memory card or USB flash drive
while the computer is accessing the files on them.
For Windows Vista Users
When the computer recognizes the scanner, with an inserted SD
card or USB flash drive, a pop-up “AutoPlay” window will
appear. To view photos on the computer while scanning, change
Windows Explorer’s setting as follows:
1. Check the Always do this for pictures checkbox.
2. Select Open folder to view files option.
For Windows XP Users
When the computer recognizes the scanner with an inserted SD
card or USB flash drive, a pop-up window will appear. To view
photos on the computer while scanning, change Windows
Explorer’s setting as follows:
1. Select Open folder to view files using Windows Explorer.
2. Select the Always do the selected action checkbox.
For Macintosh Users
When the computer recognizes the scanner with an inserted SD
card or USB flash drive, the volume icon will appear on the
desktop. To view the contents, double-click the icon to open a
Finder’s window.
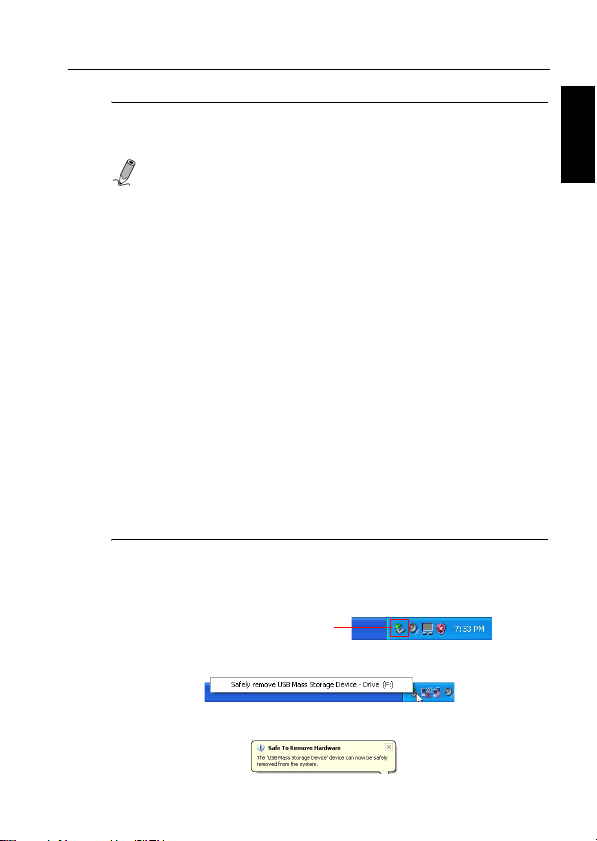
5. To safely disconnect the scanner from the computer:
For Windows Users
a. On Windows System Tray, click the hardware removal icon as
indicated below.
Hardware removal icon
b. Click to select the Safely remove USB Mass Storage Device
option that appears.
English
c. When the following message displays on-screen, you can
safely unplug the scanner from your computer.
Page 21
Using the Scanner18
English
For Macintosh Users:
a. Click and drag the volume icon to Trash.
b. Disconnect the scanner from your computer.
More Information
File naming and storage rules
Memory card
IMG_0001.jpg
IMG_0002.jpg
IMG_9999.jpg
....
Supported Memory Card Types
• MS (MemoryStick)
• MS Pro
• MS Pro Duo (adapter
required)
• MS Duo (adapter required)
• MMC (MultiMediaCard)
IMG_0001.jpg
IMG_0002.jpg
IMG_9999.jpg
IMG_0001.jpg
IMG_0002.jpg
IMG_9999.jpg
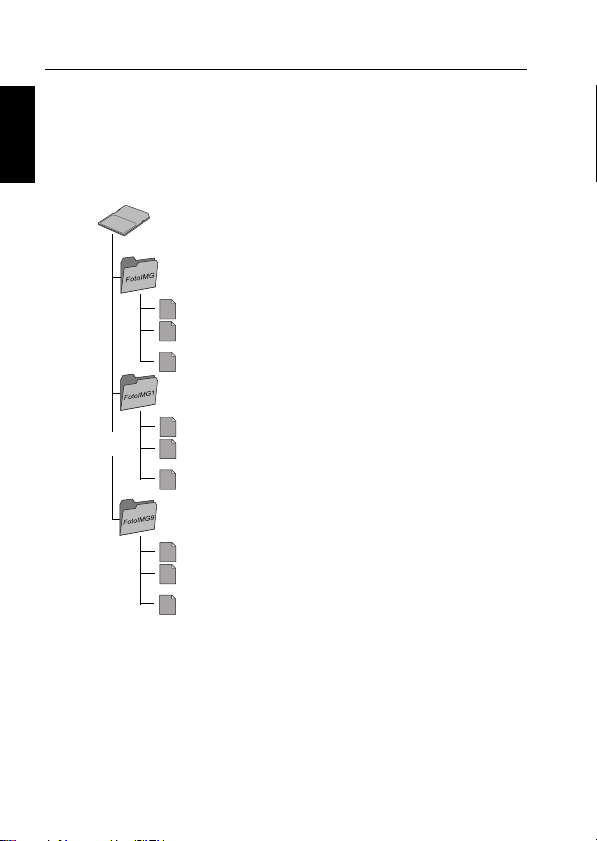
• If the memory card is used with the
scanner for the first time, the scanner
creates a folder named “FotoIMG” in
the root directory to store the
scanned image files. Each image file
has a prefix “"IMG_” followed by a
4-digit serial number in the sequence
the image is stored.
....
• If the file name reaches
IMG_9999.jpg in the “FotoIMG”
folder, another new folder named
“FotoIMG1” will automatically be
created to store subsequent new files,
and so on.
• If the memory card already contains
folders created by the scanner, the
....
scanner will store the images in the
last folder created.
• There can be up to 10 folders
(FotoIMG, FotoIMG1... FotoIMG9)
on a memory card. If exceeded, the
Status/card indicator light blinks.
Delete some files on the memory
....
card or use another one if necessary.
• RS-MMC (adapter needed)
• xD (extreme Digital, H-type and Mtype)
• SD (SecureDigital)
• Mini SD (adapter required)
• micro SD/T-Flash (adapter required)
Page 22
Care and Maintenance 19
Care and Maintenance
Cleaning the Scanner
In order to maintain the scanned image quality and prevent dust
accumulation, it is recommended that you clean the scanner (outer
casing and image sensor inside the scanner) approximately every
50-100 scans, or if vertical lines or stripes appear on the scanned
image. Use only the recommended and supplied tools to clean the
scanner.
WA R NI N G
alcohol, kerosene, etc.) to clean any part of the scanner.
Otherwise the plastic material will be permanently damaged.
Cleaning the Outer Casing
Please follow the instructions below to clean the outer casing of the
scanner when necessary.
1. Use a suitable dust blower to blow off the dust on the scanner.
2. Use a slightly dampened cloth to wipe off any smear on the
surface of the scanner.
3. Wipe the scanner with a dry and clean lint-free cloth.
Cleaning the Image Sensor
1. Clean the scanner’s outer casing first.
: Do not use any solvents or corrosive liquid (i.e.,
2. With the scanner power off and
disconnected from the power
supply, insert the sensor cleaning
swab into one end of the output
slot.
NOTE
: Make sure that
there is no visible dust on
the swab before inserting it
into the output slot.
English
Page 23
Care and Maintenance20
English
Calibrating the Scanner
If the scanned image looks fuzzy or there are strange stripes on it,
the scanner may need calibrating in order for the sensor to resume
its original precision. To calibrate the scanner:
1. Follow the instructions beginning on page 19 to clean the image
sensor, and then follow the instructions in "Preparation and
Initial Setup" on page 10 to prepare the scanner for scanning.
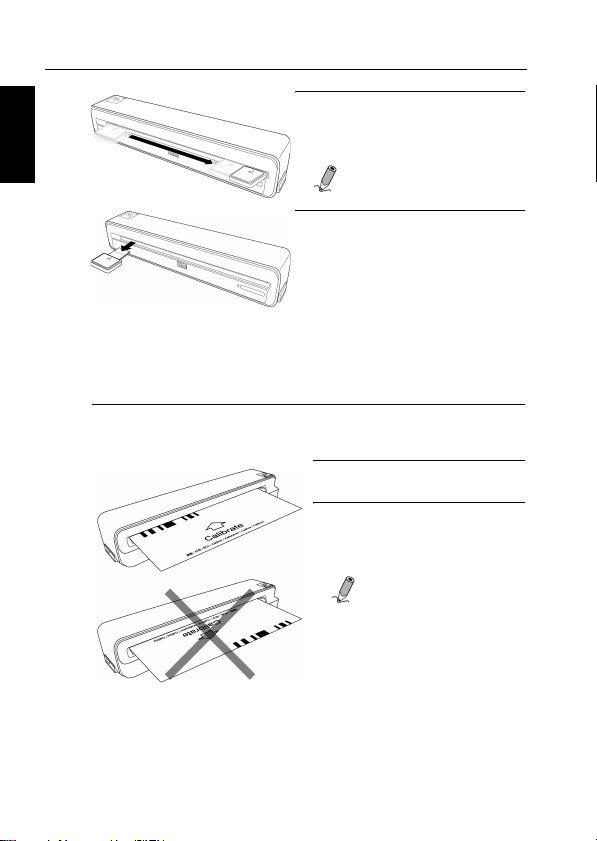
3. Gently slide the sensor cleaning
swab back and forth from one
end of the output slot to the other
five or six times consecutively.
NOTE
: Do not apply too
much force on the swab.
4. Remove the sensor cleaning
swab from the slot, and store it in
a safe place and protect it from
dust.
2. Insert the calibration card as
shown.
3. The scanner will scan the
pattern on the calibration card
and perform calibration to the
sensor inside automatically.
NOTE
: Make sure that
the calibration card is
inserted in the correct
direction and aligned
against the left side of
the feeding slot.
Otherwise the calibration
won’t work.
Page 24

Care and Maintenance 21
Storing the Scanner
If the scanner will not be used for a prolonged period of time, follow
the instructions below to store the scanner for future use.
1. Disconnect the scanner from power supply.
2. Place the scanner and power adapter in a box or bag to keep them
from accumulation of dust.
3. Place it in a cool and dry place where inaccessible to small
children. To avoid warping the top housing, do not place heavy
objects on top of the scanner.
4. After long-term storage, it is recommended that you clean and
calibrate the scanner before use.
Battery maintenance
This scanner has a built-in Li-Polymer rechargeable battery. The
capacity of the battery normally decreases each time you use it.
Nevertheless, you can still follow the suggestions below to extend
the battery’s lifetime as long as possible:
• Use the scanner at least once per week.
• Charge the battery regularly. Never leave the battery fully
discharged for a long time.
• Keep the battery fully charged when not in use. If the scanner will
not be used for several weeks, partially-discharge the battery
before storage.
• Keep the scanner and battery away from heat.
• If the scanner will only work when the power adapter is connected,
contact your dealer to replace the battery.
WARNING
yourself. Incorrect handling of the battery or using a wrong
type of battery may cause damages to the product or result in
personal injuries.
: Do not attempt to replace the battery by
English
Page 25

Frequently Asked Questions/Troubleshooting22
Frequently Asked Questions/Troubleshooting
English
Problem: There are strange lines on the scanned image, or the
Solution: Please ensure the following:
Problem: The original gets stuck halfway in the feeding slot.
Solution: Press and release the Power button. The scanner will back
Problem: The Status/Card indicator blinks rapidly and no scan
Solution: Check the following:
image is not clear.
• Are there scratches on the original, or is the original
clean? Remove any stains or dust from the original
before scanning.
• Did you insert your original into the plastic sheath before
scanning?
• Has the scanner been used for a long period of time
without cleaning and calibration? Follow the instructions
for "Cleaning the Scanner" on page 19 and "Calibrating
the Scanner" on page 20, and then try again.
out the original so you can remove the jammed original
from the Feeding slot.
is possible.
• Is the memory card inserted properly into the memory
card slot? Re-insert the card and try again.
• Is the memory card locked (set to write-protect)? Unlock
the card.
• Is the memory card full? The indicator blinks when the
free space on the memory card is below 10MB. Use
another card if necessary.
• Make sure the memory cards are in FAT or FAT32 file
formats only, not NTFS or any other file format.
• Did you insert the next original before the scanning
process of the previous one was completed? Power the
scanner off and back on and try again. Make sure that
you scan the next original only after the scanning process
of the previous one has completed.
• Does the length of the original exceed the maximum
acceptable size? Refer to "Suitable and Unsuitable
Original Types" on page 8 for more information.
Page 26

Frequently Asked Questions/Troubleshooting 23
Problem: The scanner feels warm to the touch.
Solution: It is normal for the scanner to emit a small amount of heat
(around 30-45 C) after prolonged use. However, if there
are strange odors coming from the scanner or the scanner
feels hot to the touch, disconnect the scanner immediately
from the computer.
English
Page 27
Specifications24
Specifications
English
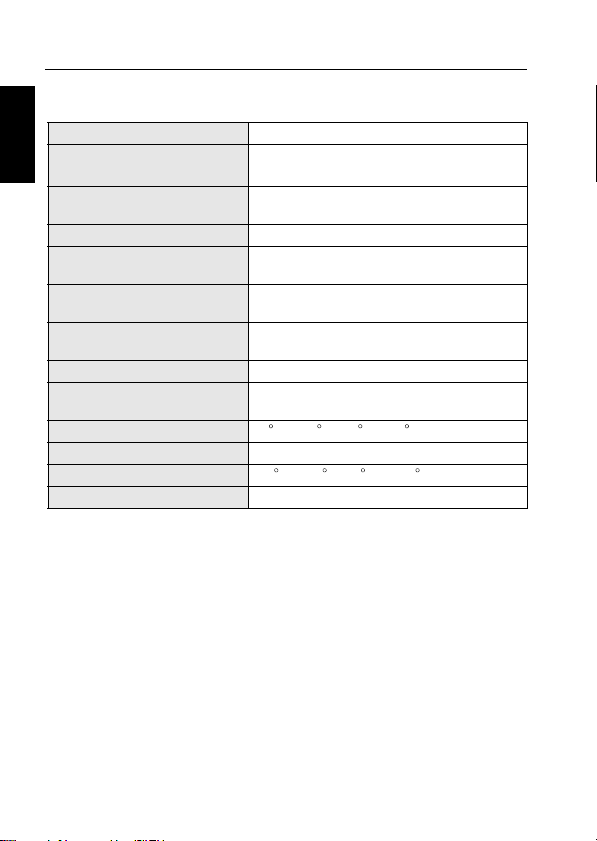
Document feeding Sheet-fed type (single-pass)
Resolution
Dimensions (approx. value)
Weight (approx. value) 396g (scanner only)
Supported original types
Supported memory card
types
Supported output image
format
Internal memory size 512 MB
USB port
Operating temperature 15 C ~ 35 C (59 F ~ 95 F)
Operating humidity 20% ~70% RH
Storage temperature -20 C ~ 60 C (-4 F ~ 140 F)
Storage humidity 10% ~ 90% RH
• 300 dpi (default setting)
• 600 dpi
59 (L) x 269 (W) x 44 (H) mm (scanner
only)
Refer to "Suitable and Unsuitable Original
Types" on page 8
Refer to "Supported Memory Card Types"
on page 18
JPEG with compression
Mini USB port compatible with the USB
2.0 specification
Page 28

Mini photo scanner is to make print photos/negative/slide easy to digitize and
share and furthermore the elderly or children with mirror instruction are easy to
operate it simply and easily and also extend to A4/Letter size to cover most of
print photos and the support of negative/slide scanning.
This device of operation is to meet the below
Easy to Use, Fast to share, and Excellent for digitizing physical media
z
(photo, film, slide)
Mobility and Scan anywhere and anytime
z
PC-Free and OS-free (standalone mode).
z
Built-in Li Battery Powered.
z
Power charged from USB Bus-powered
z
Add-on Application Program (e.g. BCR, OCR, and so on)
z
WIFI connections
z
Notice:
This device complies with Part 15 of the FCC Rules. Operation is subject to the
following two
conditions:
(1) this device may not cause harmful interference and
(2) this device must accept any interference received, including interference that
may cause undesired operation.
Any changes or modifications not expressly approved by the party responsible
for compliance could void your authority to operate the equipment.
This equipment has been tested and found to comply with the limits for a Class B
digital device, pursuant to part 15 of the FCC Rules. These limits are designed to
provide reasonable protection against harmful interference in a residential
installation. This equipment generates, uses and can radiate radio frequency
energy and, if not installed and used in accordance with the instructions, may
cause harmful interference to radio communications. However, there is no
guarantee that interference will not occur in a particular installation. If this
equipment does cause harmful interference to radio or television reception,
which can be determined by turning the equipment off and on, the user is
encouraged to try to correct the interference by one or more of the following
measures:
Page 29

—Reorient or relocate the receiv ing antenna.
—Increase the separation between the equipment and receiver.
—Connect the equipment into an outlet on a circuit different from that to which
the receiver is connected.
—Consult the dealer or an experienced radio/TV technician for help.
FCC RF Radiation Exposure Statement:
1. This Transmitter must not be colocated or operating in conjunction with any other
antenna or transmitter.
2. This equipment complies with FCC RF radiation exposure limits set forth for an
uncontrolled environment. This
equipment should be installed and operated with a minimum distance of 20
centimeters between the radiator and your
body.
 Loading...