

Page 1
ADWS6
Go To Table of Contents
Owner’s Manual
Phone: 559/292-1444 800/233-4151 • Fax: 559/292-1555
245 West Dakota Avenue • Clovis, CA 93612
Page 1
Page 2

Table of Contents
Important Safety/Record Information....................................... 3
Use and Care of the Drinking Water Container............................ 4
Electrical Requirements ...................................................... 4
The Use of Extension Cords .................................................. 4
How Distillation and Your Distiller Work ................................... 5
Getting Acquainted With Your ADWS6 ................................... 6-7
Unpacking Your ADWS6 ...................................................... 8
First Time Start-Up ......................................................... 8-9
Normal Operation.............................................................. 9
Maintenance & Cleaning ................................................ 10-11
Maintenance
Cleaning
Replacing the Carbon Filter
Troubleshooting ...........................................................12-13
Ordering Parts and Servicing ............................................... 13
Individual Parts List ..........................................................14
Exploded View of ADWS6 ................................................... 15
Warranty .......................................................................16
Page 2
AMI50000 Rev.5/99
Page 3

Congratulations
Return To Table of Contents
You’ve taken an important step to ensure that you and your dental office have contaminant
free, pure water.
The AquaSource ADWS6 distiller is built of the finest materials and constructed with
care and attention to detail. If you need assistance, please contact your local Apollo Dental
Products dealer or ADP Technical Support at (800) 233-4151. We encourage you to take time
to read and understand the Safety Information section below.
We are sure you will have many years of use from your AquaSource ADWS6 distiller.
Thank you,
Apollo Dental Products, Inc.
Record Important Information
The model and serial number are found on the back panel. You should record both the
model and serial numbers below for future references.
Date of Purchase:
Model:
Serial Number:
Purchased from:
This product has been thoroughly tested in the laboratory and field tested under a variety of
conditions. Due to the wide variation of water contamination and the conditions of use which
are beyond the control of Apollo Dental Products, Inc., it is the responsibility of the user to
ensure the distilled water produced meets the requirements for intended use. Apollo Dental
Products, Inc. recommends the distilled water be tested as frequently as the application
deems prudent.
AquaSource ADWS6
Please Read...
Important Safety Information
• Make sure lid is removed from water container before inserting into holding area, and
before unit is turned on.
• Operate indoors only in a well ventilated area.
• Always unplug the power before assembling, repairing or doing any work on the distiller.
• NEVER immerse the distiller in water or any other liquid.
• NEVER operate the distiller with a damaged cord or allow the cord to become exposed to hot
surfaces.
• Make sure your electrical outlet is properly grounded. If in doubt, contact a qualified electrician.
• NEVER remove the boiling chamber from the unit until it has cooled down.
• The physiological effect of the operation of this appliance, beneficial or otherwise, have not
been investigated by UL.
Page 3
Page 4

Use and Care of the Water Container
Return To Table of Contents
To ensure proper performance and a lifetime of trouble-free service, please read the following
information on general use and care of the water container:
• Do not use on stove-top burner, under heating elements, in microwave or conventional
ovens.
• Do not store hot liquids nor food in water container.
• Freezer-safe.
• Do not place base in dishwasher. Lid: Dishwasher safe, top rack only.
• Do not use abrasive cleaners or sharp utensils.
Electrical Requirements
The AquaSource ADWS6 must be plugged directly into a fully grounded outlet.
The AquaSource ADWS6 will use approximately 8 amps when operating, so isolate a 10
amp fuse or circuit breaker for the unit.
This unit operates on 110V, 60 cycles, or as otherwise specified on the back of the distiller.
The Use of Extension Cords
An extension cord is not recommended. However, an extension cord may be used if care is
exercised.
If an extension cord is used:
a. The marked electrical rating of the extension cord should exceed the electrical rating of
the AquaSource ADWS6 (see the specifications on back of the unit).
b. The extension cord must be a three-pin grounded type.
c. The extension cord should not be placed under carpet or left where persons may trip over it.
d. Do not overload extension cord with other power consumers.
Page 4
Page 5
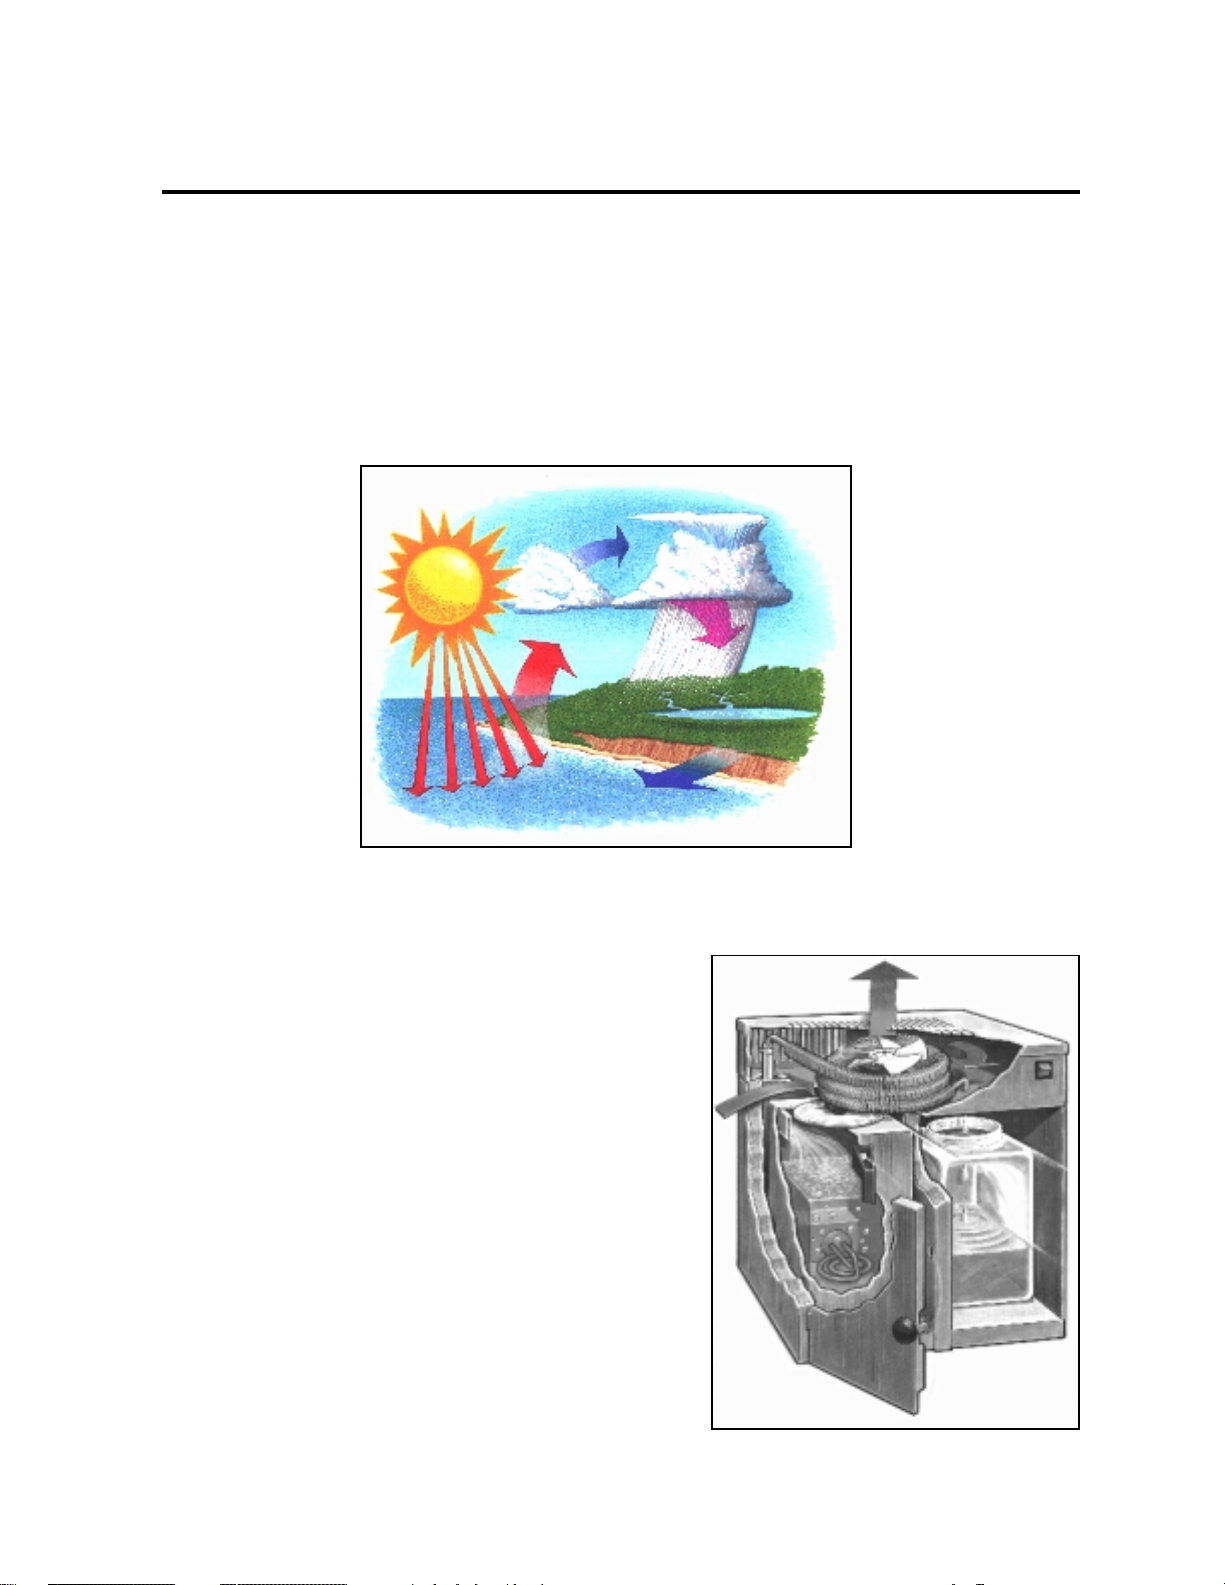
How Distillation And Your Distiller Work
Return To Table of Contents
Nature has a way to produce pure water from contaminated sea water (1). When the sun rises
in the morning, it starts to heat the surface of the ocean (2). The heat causes molecules or
pure water to escape from the surface of the ocean (3) and rise to form clouds (4). When the
conditions are right, (5) the clouds cannot hold any moisture and water falls to earth as rain
(6). The rain collects in rivers, lakes and reservoirs and is available for drinking (7).
NATURE’S DISTILLATION CYCLE...
5
2
4
3
1
THE AQUASOURCE WAY...
A distiller operates the same way. Water
is taken into a boiling chamber (1)
where heat is applied (2). The water
boils and water molecules (steam) rise
(3). The steam enters the condenser (4)
where cool air (5) causes the steam to
lose energy and it forms droplets of
pure water (6). This water is collected
and is fresh, great-tasting, distilled
drinking water (7) - the purest kind.
6
7
5
4
3
6
1
2
7
Page 5
Page 6

Getting Acquainted With Your AquaSource ADWS6
Return To Table of Contents
7
6
5
4
11
2
8
1
3
Component Identification:
Boiling Chamber (1). The manually-filled stainless steel boiling chamber
holds one gallon of water when filled to the proper level.
Water Level Indicator (2). A small rod which extends down inside the
boiling chamber. The boiling chamber should be filled to touch the bottom of
this indicator.
CAUTION: DO NOT overfill.
Heating Element (3). The 750-watt heating element provides the heat to boil
the water in the boiling chamber.
9
10
Page 6
Page 7

Lid (4). The lid is constructed of heavy-gauge stainless steel and has a
Return To Table of Contents
special gasket and handle which tightens to seal.
Door (5). The hinged stainless steel door improves the look of the unit and
serves an important safety role. DO NOT open the door until the unit has
stopped distilling for a minimum of 30 minutes.
Condenser (6). A hollow, finned stainless steel tube where the steam from
the boiling chamber is collected and cooled by the air from the fan. The steam is
converted into high-purity drinking water. At the top portion of the condensing
coil there are two small holes. These are gas vents to allow volatile compounds
to escape.
Fan (7). An electrical fan which works automatically to provide a flow of air
across the outside of the condenser.
Filter (8). Before the distilled water flows into the drinking water container, it
passes through a carbon filter pack to polish the taste of the water.
Filter Housing (9). An FDA approved food-grade housing designed to slide
into the guides in the distiller and holds the carbon filter pack.
Drinking Water Container (10). This FDA-approved food-grade PET
plastic container collects the distilled water. It is equipped with a spigot for
ease of use.
Power Switch (11). The power switch is located on the front of the unit. It is
a 3-position switch. The top position is ON, and when pushed and released, it
automatically resets to the center for operation. The bottom position is OFF.
Page 7
Page 8

Upacking Your AquaSource ADWS6
Return To Table of Contents
Your ADWS6 water purification system is shipped to you in a durable carton. Carefully remove
the contents from the box.
The ADWS6 carton contains:
• The AquaSource ADWS6 distiller.
• Food-grade plastic container and lid.
• Filter kit.
• Owners Manual and Warranty Card.
If these are not present, please look for the Quality Assurance Inspection Slip and note the
name of the inspector. Call your Dental Dealer; or, in the event you can’t reach them,
contact ADP Customer Service Department at (800) 233-4151 (outside the USA, please call
(559) 292-1444).
Note: Save the box and packing materials for future use in the unlikely event your ADWS6
should require service work.
First Time Start-Up
Starting the unit for the first time:
1. Open the door (5) and remove the boiling chamber (1) by pulling on the handle.
2. Remove the lid (4) by turning the black lid knob counterclockwise and moving the
lid (4) side to side and lift out.
3. Fill the boiling chamber (1) with tap water until the water touches the bottom of
the water level indicator (2). DO NOT overfill.
4. Replace the lid (4) on the boiling chamber (1). Turn the black lid knob clockwise
and tighten firmly, ensuring a good seal. DO NOT overtighten.
5. Push the boiling chamber (1) into the left side of the distiller until it fits snug and
the element prongs plug into the controller.
6. Close the door.
Note: DO NOT install the post filter at this time. Keep the first batch of distilled
water for soaking the post filter.
Page 8
Page 9

First Time Start-Up Continued...
Return To Table of Contents
7. Put the water container in place.
8. Plug the power cord into the electrical source.
9. Turn the power switch (11) to START .
10. Allow the unit to operate until it automatically shuts off (approximately 4 hours).
11. Keep the first batch of distilled water for soaking the post filter as described in the next
section, but do not use.
12. Replace the water container (10) to the distiller.
Normal Operation
1. Ensure that the boiling chamber is cool.
2. Open the door (5) and remove the boiling chamber (1) by pulling on the handle.
3. Loosen the black knob on the lid (4) and slide the lid from side to side and lift the lid out.
4. Swirl and empty out any water left in the boiling chamber (1) from the prior batch.
5. Fill the boiling chamber (1) with tap water until it touches the bottom of the water level
indicator (2).
6. Place the lid (4) on the boiling chamber (1). Tighten the black lid knob firmly, ensuring
a good seal. DO NOT overtighten.
7. Push the boiling chamber (1) into the left side of the distiller until it fits snug and the
element prongs plug into the controller. Close the door.
8. Submerge the filter (8) completely in a separate container with distilled water for one
minute. Remove the filter (8) and place inside the filter housing (9).
9. Slide the filter housing (9) into the guide above the water container.
10. Be sure lid is removed from container. Put the water container (10) in place.
11. Turn the power switch (11) to START. Note: To activate the unit, the switch must be fully
depressed.
12. Allow the unit to operate until it automatically shuts off. This will take approximately 4
hours.
CAUTION: Never open the door during operation and never remove the boiling
chamber while the unit is operating.
Page 9
Page 10

Maintenance & Cleaning
Return To Table of Contents
With proper care on your part, your AquaSource ADWS6 will provide you with high-quality
water for many trouble-free years.
The following recommendations are for typical water conditions. If you live in an area where
the water quality is exceptionally poor, you may need to increase the frequency of our care.
• Maintenance
Every Batch:
• Swirl and rinse out the residual water from the boiling chamber (1).
Monthly, or every 30 gallons:
• Clean the inside of the boiling chamber (1) to remove any build-up of solid
residues. (See Cleaning below).
Every 3 months:
• Replace the carbon filter, stock #45518. (See page 9).
• Clean the exterior with Stainless Steel Cleaner & Polish, stock #6606.
• Cleaning
Cleaning the Exterior:
Use Stainless Steel Cleaner & Polish (stock #6606) and follow instructions.
Cleaning the Boiling Chamber:
Sometimes scale will build up inside the boiling chamber. This needs to be removed
periodically to ensure good heating element life, and high-quality water.
Note: If you rinse the boiling chamber every time you fill it, you will rarely get
build-up of scale inside the boiling chamber, and will rarely have to clean it.
To Clean the Boiling Chamber:
1. Turn the power switch to the OFF position.
2. If the unit has been operating, allow it to cool for 30 minutes from the end of the
distillation cycle.
3. Carefully remove the boiling chamber from the unit.
CAUTION: The boiling chamber will get hot and could cause a burn if the unit has not
been allowed to cool.
4. Remove the boiling chamber lid (4).
5. Drain any residual water inside the boiling chamber (1).
6. Fill the boiling chamber to the water level indicator (2).
™
7. Add Lumen
label.
Cleaner (stock #6603) to the boiling chamber. Follow instructions on the
Note: DO NOT replace the boiling chamber back into the unit during the cleaning
process DO NOT allow the unit to operate with the Lumen Cleaner in the boiling chamber.
Page 10
Page 11

Replacing the Carbon Filter
Return To Table of Contents
A carbon filter (9) is used to finish or polish the water, and to improve the taste. The carbon
filter should be replaced approximately every 3 months, or whenever the water develops a
taste. The carbon filter is custom designed for the AquaSource ADWS6 distiller.
To Replace the Carbon Filter:
1. Remove the water container (10) from the unit.
2. Remove the old filter by sliding the filter housing (9) and filter (8) towards you or
removing it from the opening in the water container.
3. Immerse the new carbon filter (9) in a separate container filled with distilled water for
one minute.
4. Remove the soaked filter and place it into the filter housing.
5. Slide the new filter and housing back into the guide or replace it into the opening of the
water container (9).
Page 11
7
.
|
Page 12

Troubleshooting
Return To Table of Contents
The AquaSource ADWS6 distiller is designed for years of dependable service. The following
guide is presented to assist you in the event of any problems with your product.
SYMPTOM: Unit does not produce water.
1. Possible Cause: No Power.
Check:
1. That the power cord is plugged in and is pushed in completely.
2. That the power to your home/office is on.
3. That the power switch (11) is turned on. The switch must be completely depressed
4. That there is water in the boiling chamber.
5. That the boiling chamber (1) is completely pushed in.
2. Possible Cause: Heating Element Burned Out.
Check:
1. If there is power to your home/office...
2. If the power cord in plugged in...
3. If the power switch is turned on...
4. If the boiling chamber is pushed in completely, and the fan rotates when the unit is
at the top to initiate operation.
on, but the air is cool, or cold...
Then:
Replace the heating element (stock #9202).
SYMPTOM: The distilled water has a taste.
1. Possible Cause: New Carbon Filter Needed.
Action:
1. Change post filter by following directions for Replacing the Carbon Filter on page 11.
2. Thoroughly clean the boiling chamber. Note: Make sure the boiling chamber is cool.
SYMPTOM: There is steam around the unit.
1. Possible Cause: Insufficient Ventilation Of The Unit.
Check:
1. That the unit is not pushed hard against the wall. Keep about 1 inch clearance.
2. If there are any items on the unit that may block the air flow. Remove any such items.
2. Possible Cause: Fan Motor.
Check:
1. If the fan is not turning and you have checked that there is power to the unit, and the
power switch is on, then it may be a failed fan motor. Replace the fan motor (stock
#45517).
SYMPTOM: There is water around the unit.
1. Possible Cause: Improper Positioning.
Check:
1. That the carbon filter is in proper position and water is flowing through it.
2. That the water container is correctly placed to catch the water.
Page 12
Page 13

Ordering Parts & Servicing
Return To Table of Contents
Apollo Dental Products recommends that you have your AquaSource ADWS6 serviced by an
authorized service technician. Please see your Dental Dealer.
If you require parts or accessories at any time, please contact your Dental Dealer. In the
unlikely event your Dental Dealer cannot help, you may contact Apollo Dental Products
Customer Service at (800) 233-4151.
To help you identify parts for your AquaSource ADWS6 please see the parts list included in
this manual on page 14.
Page 13
Page 14

Individual Parts List
Return To Table of Contents
Key # Part # Description
100V 120V 240V
1 8009 8009 8009 Lid Knob w/ Stud
2 6022 6022 6022 Lid O-Ring
3 519 519 519 Lid Disc S.S.
4 69 69 69 Gasket, Boiling Tank Lid
5 533 533 533 Washer, Gasket Retainer
6 9085 9085 9085 Spring, Tank Lid
7 402B-01 402B-01 402B-01 Crossbar, w/ Nut
8 224-0003 224-0003 224-0003 Nut, 1/4-20 Nylock
(1-8) 31581A 31581A 31581A Lid Assembly
9 9202J 9202 9202V Heating Element, 750W
10 45501A-02 45501A-02 45501A-02 Boiling Tank, Studded
11 9108 9108 9108 Handle, Black Plastic
12 9079 9079 9079 Nut, Acorn, w/ Washer
13 9205 9205 9205 Seal, Silicon
14 9203 9203 9203 Controller, Element
15 9208 9208 9208 Washer, Flat
16 9209 9209 9209 Washer, Lock
17 9207 9207 9207 Screw, M3 x 8
18 9206 9206 9206 Protector Cover
19 9210 9210 9210 Mounting Screw
(1-19) 45511 45511 45511 Boiling Tank Assembly
20 45505 45505 45505 One Gallon Jug w/ Lid & Label
21 45516 45516 45516 Power Cord Assembly
22 7014 7014 7014 Cord Restraint
23 45512 45512 45512 Door Assembly
24 45504 45504 45504 Boiling Tank Liner, Welded
25 9204 9204 9204 Element Adapter
26 45006 45006 45006 Clip, Adapter
27 9218 9218 9218 Appliance Feet, 7/8”
28 45503 45503 45503 Base, Studded
29 45008 45008 45008 Cladding
30 45009 45009 45009 Middle Divider
31 9922 9922 9922 Hose Clamp, Wire
32 9541 9541 9541 Tubing, Silicone
33 9046 9046 9046 Washer, Lock, #10
34 9026 9026 9026 Screw, 1/4-20 x 1/4”
35 9215 9215 9215 Switch, 3-Position, Lighted
36 9213 9213 9213 Filter Cup
37 45518 45518 45518 Carbon Filter, 4-pack
38 45013 45013 45013 Filter Tray
39 45506A-02 45506A-02 45506A-02 Top Cabinet, Studded
40 9220 9220 9220 1” Bushing Closed
41 45016 45016 45016 Insulation (not shown)
42 9211 9211 9211 Timer, 210 Minute
43 9070 9070 9070 Nut, #10-24, Nylock
44 9003 9003 9003 Nut, #8-32, Nylock
45 45517J 45517 45517V Motor, Fan
46 9092 9092 9092 Push Nut
47 9216 9216 9216 Blade, Fan, 6.5”
48 9217 9217 9217 Condensing Coil
49 45014 45014 45014 Top Cover
50 9029 9029 9029 Screw, #10 Sheet Metal
Page 14
Page 15

Exploded View of Mini-Classic
Return To Table of Contents
Page 15
Page 16

Limited Warranty
Return To Table of Contents
Apollo Dental Products, Inc. warrants this distillation system, to the original user, to be free
from defects in materials and workmanship of fabricated stainless steel components for a
period of five (5) years from date of purchase, and one (1) year on all electrical components
from date of purchase. This warranty is in effect provided that the installation, operation and
maintenance are done in accordance with ADP procedures as outlined in the Owners Manual.
In the order for this warranty to be effective, the accompanying warranty registration card must
be completed and faxed or mailed to ADP within 10 days of the date the distiller is purchased.
ADP’s obligation under the warranty is to provide the replacement product (excluding labor).
All special, incidental and/or consequential damages are excluded. We will not issue credit for
complete distillation systems without first attempting to correct the problem in the field.
Written notice of breach of warranty must be given to ADP within the warranty period. The
warranty must be given to ADP within the warranty period. The warranty does not cover
damage resulting from improper installation or maintenance, accident, alteration of any kind
or misuse. The warranty does not cover damage resulting from the use of cleaning,
disinfecting or sterilizing chemicals and processes. Failure to follow instructions provided in
ADP’s Owner Manual may void the warranty.
Other than as stated herein, ADP makes no repressentations or warranty of any kind, express
or implied, including without limitation, any warranty of merchantability, or fitness of a
particular purpose. In no event will ADP be liable for incidental or consequential damages.
Page 16
AMI50000 Rev. 4/99
 Loading...