

Page 1
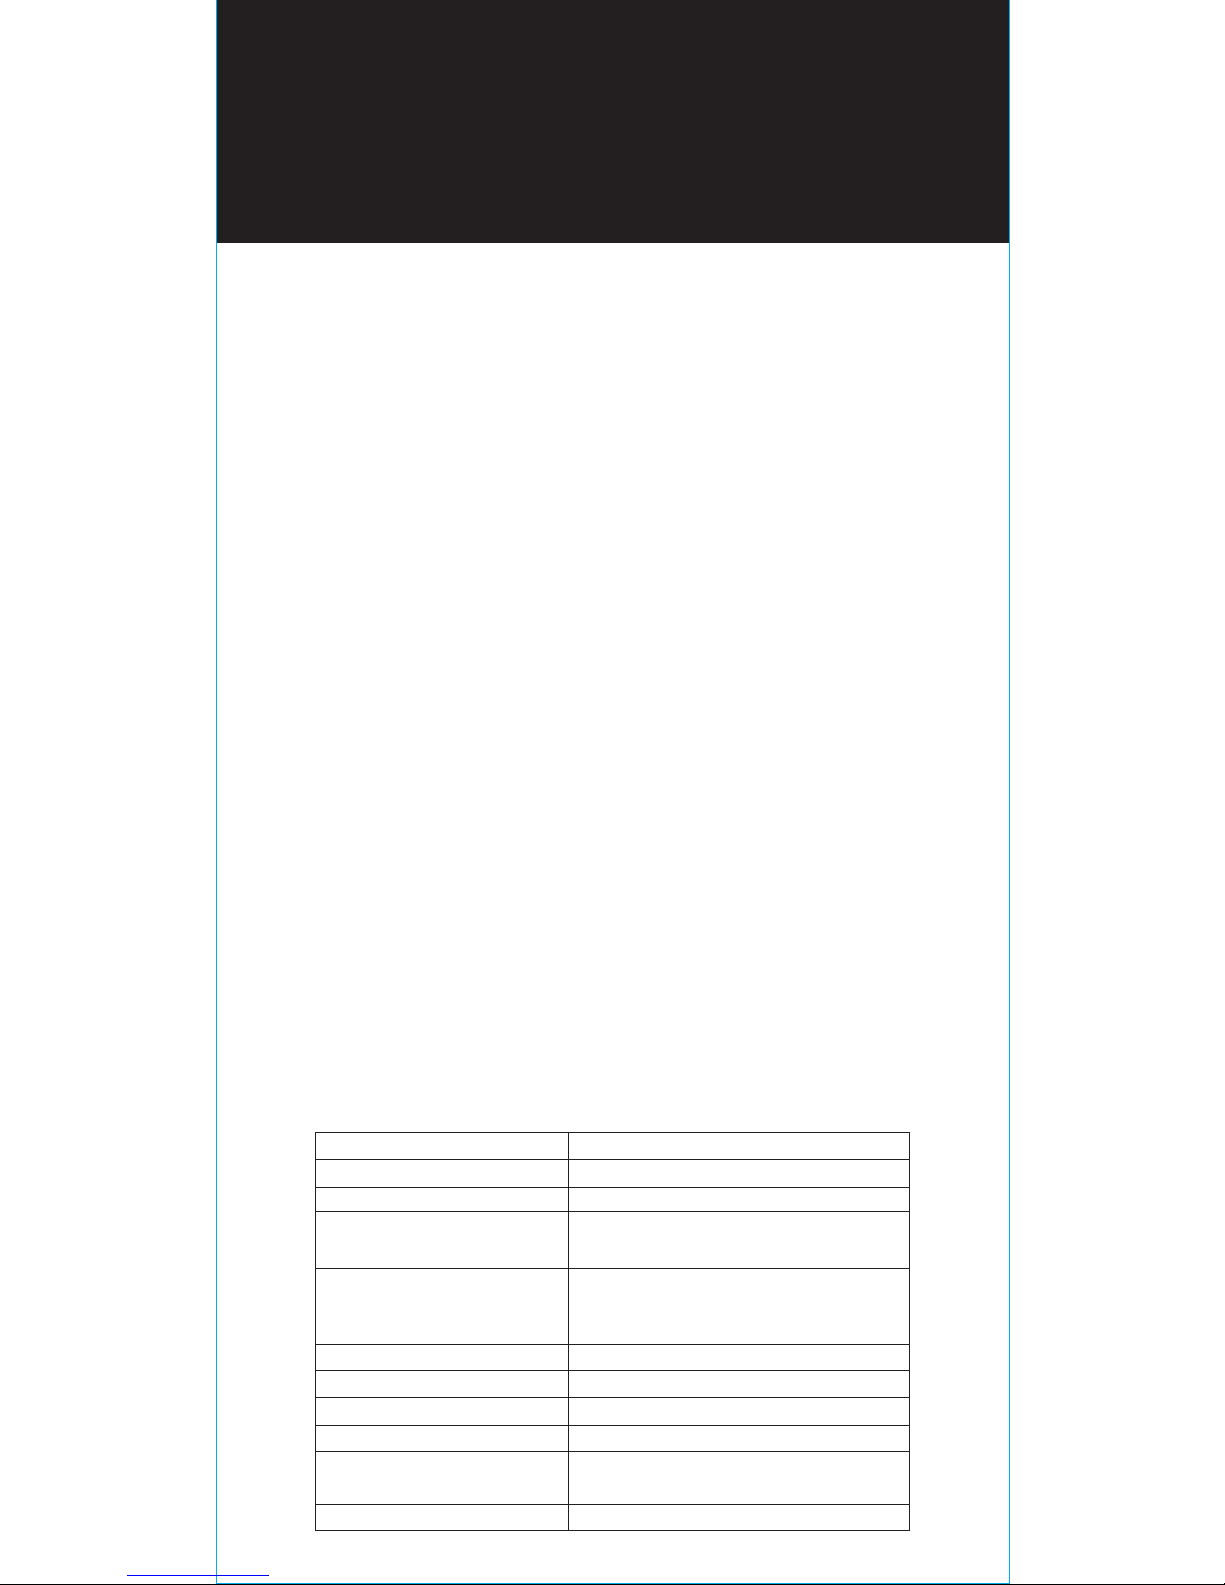
Specifications
Bluetooth version
Bluetooth profiles
Audio codecs
Wireless range
(from paired device)
Battery capacity
Driver size
Sensitivity
Frequency
Impedance @ 1kHz
MEMS omnidirectional
microphone input sensitivity
Water proof
4.1
A2DP 1.2, AVRCP 1.4, HFP 1.6, HSP 1.2
aptX/AAC/SBC
10 meters (30 feet)
Earphone (50mAh)
Charging case (Li-Ion rechargeable,
300mAh)
Ø 5.8mm Micro Driver
100dB/mW
20Hz-20KHz
16ohm
-42dB (+/- 2dB)
Nano coating technology
EN
Pairing Apollo 7 with a
Bluetooth-enabled device for the
first time
Insert either earbud in your ear, then press and hold
its button until you hear "Power On", followed
by
"Pairing", then release the button and connect to your
paired device, tap “Apollo 7-L" or “Apollo 7-R”
in the
Bluetooth device list and you will hear
"Phone Connected". Next, insert the second earbud
and
press/hold its button until you hear "Power On".
Release the button, and you will hear
“Headset Connected“. This means the two earbuds
are in sync.
*You can enjoy the music by pairing earbud
individually, but we suggest pairing both with the
same device so you can answer calls or activate
Siri/Google voice assistance.
Single-touch multifunction
Power on/off, volume up/down, pairing, play/pause,
play next/previous track, call accept/reject, and Siri
are accessible with one button. Please read and
follow these guidelines to ensure the best and safest
experience with your Apollo 7
Apollo 7 True Wireless
Headset
Page 2
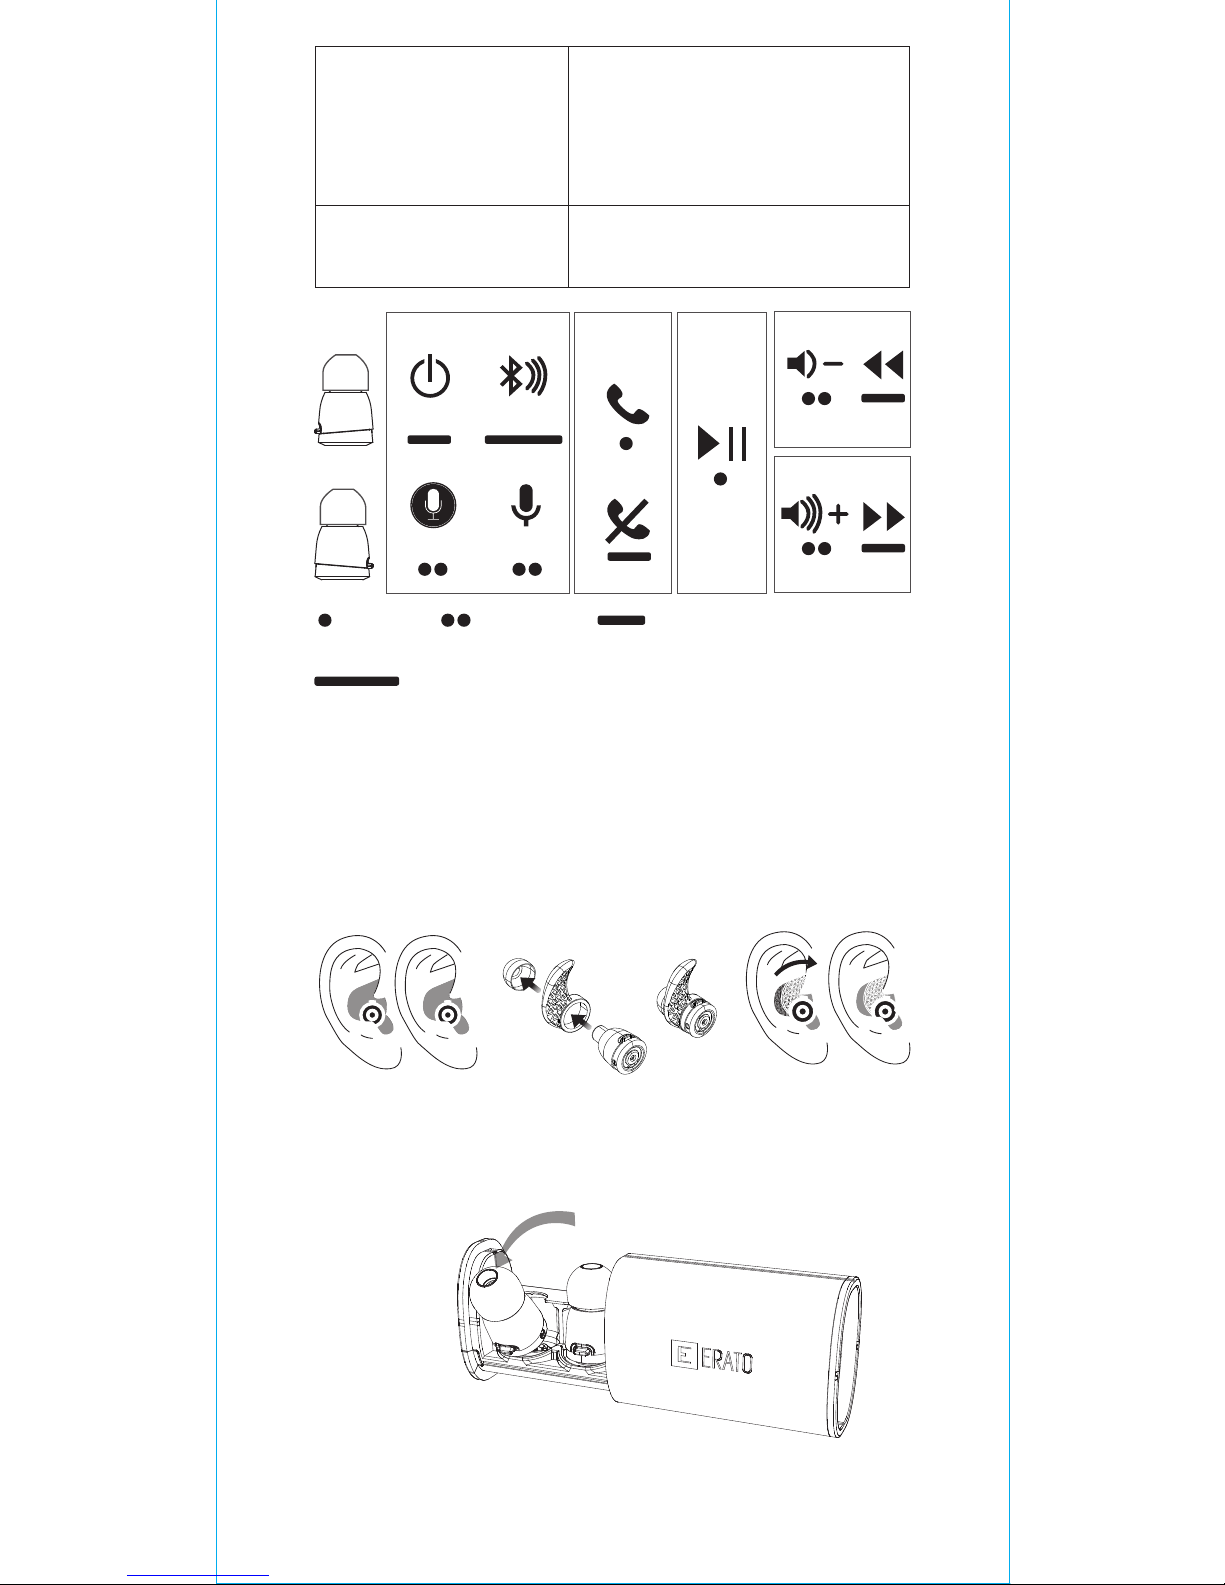
Earphone stabilizer
*Due to directional antenna, in order to get better
connectivity, please keep
the button upright.
Dimensions
Weight
Earphone:
15.4mm (D) x 22.2mm (L)
6.06in (D) x 8.74in (L)
Charging case:
62.5mm (L) x 40mm (D) x 25.5mm (H)
2.46in (L) x 1.6in (D) x 1in (H)
Earphone:
4g x 2pcs / Charging case: 52g
0.14oz x 2pcs / Charging case: 1.83oz
ON/OFF
Phone
Call
Play
Music
Basic
R
L
Google
Pairing
Siri
One click Double click
Long press 2 secs
Long press 5 secs
* Press and hold the left earbud button for
2 seconds to restart the current song. Press and
hold again within 3 seconds to skip to the previous
song.
Charging case
● Easy one-pull removal
● Earbuds auto turn off and charge after being
placed in the charging case.
Charging auto stops when batteries are full.
PULL
Page 3

1
PLACE
1
2
PUSH UNTIL CLICK-IN/CHARGING STARTS
2
Caution
1.Use the Micro USB cable to recharge the charging
case. The cable is for charging only, not for data
transfer
2.Do not leave this product inside a parked vehicle.
Direct exposure to heat and sunlight may damage
the charging case
3.Do not expose the charging case to high
temperatures or humid environments
4.Do not insert metal or other foreign objects into
the product, so as to avoid short-circuit and physical
damage
5.Do not disassemble, damage, jolt, or burn the
product. Do not place any heavy weight on it
6.Do not discard this product with household waste.
As it contains batteries, recycle it in accordance
with
local laws and regulations
1
2
With both earbuds inserted:
Charging case LED 2 turns on, then off when
headset is fully charged
With 1 earbud inserted:
Charging case LED 2 flickers and turns off after
single earbud is fully charged
If charging case battery is lower than 30% (with
earbuds inserted) the LED 1 flickers as a reminder to
connect the charging case to a power source
If earbud battery charge is 5% or less you will hear a
“Low Battery” reminder every 30 seconds
**Charging case light indicators
and notices **
Page 4

Federal Communications Commission (FCC) Statement
15.21
You are cautioned that changes or modifications not expressly
approved by the part responsible for compliance could void the user’s
authority to operate the equipment.
15.105(b)
This equipment has been tested and found to comply with the limits
for a Class B digital device, pursuant to part 15 of the FCC rules. These
limits are designed to provide reasonable protection against harmful
interference in a residential installation. This equipment generates,
uses and can radiate radio frequency energy and, if not installed and
used in accordance with the instructions, may cause harmful
interference to radio communications. However, there is no guarantee
that interference will not occur in a particular installation. If this
equipment does cause harmful interference to radio or television
reception, which can be determined by turning the equipment off and
on, the user is encouraged to try to correct the interference by one or
more of the following measures:
-Reorient or relocate the receiving antenna.
-Increase the separation between the equipment and receiver.
-Connect the equipment into an outlet on a circuit different from that
to which the receiver is connected.
-Consult the dealer or an experienced radio/TV technician for help.
This device complies with Industry Canada license-exempt
RSS standard(s). This device complies with part 15 of the FCC rules.
Operation is subject to the following two conditions:
(1) this device may not cause harmful interference, and
(2) this device must accept any interference received,
including interference that may cause undesired operation.
FCC RF Radiation Exposure Statement:
“For body worn operation, this device has been tested and meets FCC
RF exposure guidelines when used with an accessory that contains no
metal and that positions the device a minimum of 0mm from the body.
Use of other accessories may not ensure compliance with FCC RF
exposure guidelines.”
Industry Canada (IC) Statement
Canada, Industry Canada (IC)
This Class B digital apparatus complies with Canadian ICES-003 and
RSS-247.
This device complies with Industry Canada licence-exempt RSS
standard(s).
Operation is subject to the following two conditions:
(1) This device may not cause interference, and
(2) This device must accept any interference, including interference
that may cause undesired operation of the device.
IC RF Radiation Exposure Statement:
For body worn operation, this device has been tested and meets RF
exposure guidelines when used with an accessory that contains no
metal and that positions the device a minimum of 0mm from the body.
Use of other accessories may not ensure compliance with RF exposure
guidelines.
FCCID:2AHD9-ANAP070000
IC:21132-ANAP070000
7.If not used long term, recharge the headset and
charging case every three months to maintain
battery lifespan and prevent premature
performance degradation
8.Do not leave the charging case fully out of power
for prolonged periods (LED indicator remains dim)
to
prevent battery damage. Make sure the charging
case is at least 30% charged at all times
9. Output current varies based on input charge
 Loading...