

Page 1

Operation manual Ð Table of Contents
3 Introduction
6 MasterTools Features
8 System Requirements
9 Installing and authorizing MasterTools
15 Setting up MasterTools
18 Basic Operation
29 The UV22 Process
34 Impressive comments from critical listeners on UV22
Handbuch Ð Inhaltsverzeichnis
41 EinfŸhrung
44 MasterTools-Eigenschaften
47 Systemvoraussetzungen
47 MasterTools installieren und autorisieren
53 MasterTools einrichten
56 Funktionsweise
67 Der UV22-Prozess
73 Beeindruckende Kommentare kritischer UV22-Hšrer
ENGLISH DEUTSCH FRAN‚AIS
Mode dÕemploi Ð Table des mati•res
81 Introduction
85 CaractŽristiques de MasterTools
88 Configuration recommandŽe
89 Installation et autorisation de MasterTools
95 Configuration de MasterTools
98 Principes de fonctionnement
109 Le procŽdŽ UV22
115 Quelques commentaires d'auditeurs d'UV22
MasterTools
i
Page 2

The information in this document is subject to change without notice
and does not represent a commitment on the part of Steinberg Softund Hardware GmbH. The software described by this document is
subject to a License Agreement and may not be copied to other media.
No part of this publication may be copied, reproduced or otherwise
transmitted or recorded, for any purpose, without prior written permission by Steinberg Soft- und Hardware GmbH. MasterTools¨ and
UV22¨ are registered trademarks of Apogee Electronics Corp. All
product- und company names are ª or ¨ trademarks of their respective owners.
© Steinberg Soft- und Hardware GmbH, 1998. All rights reserved.
Die in diesem Dokument enthaltene Information kann ohne VorankŸndigung geŠndert werden und stellt keine Verpßichtung seitens der
Steinberg Soft- und Hardware GmbH dar. Die Software, die in diesem
Dokument beschrieben ist, wird unter einer Lizenzvereinbarung zur
VerfŸgung gestellt und darf nicht kopiert werden. Ohne ausdrŸckliche
schriftliche Erlaubnis durch die Steinberg Soft- und Hardware GmbH
darf kein Teil dieses Handbuches fŸr irgendwelche Zwecke oder in
irgendeiner Form mit irgendwelchen Mitteln reproduziert oder Ÿbertragen werden. MasterTools¨ und UV22¨ sind eingetragene Handelsmarken der Apogee Electronics Corp. Alle Produkt- und
Firmennamen sind ª- oder ¨-Warenzeichen oder Kennzeichnungen
der entsprechenden Firmen.
© Steinberg Soft- und Hardware GmbH, 1998.
Alle Rechte vorbehalten.
MasterTools
Les caractŽristiques dŽcrites dans ce document sont susceptibles
dÕ•tres modiÞŽes sans prŽavis et ne reprŽsentent pas un engagement
de la part de Steinberg Soft- und Hardware GmbH. Le logiciel dŽcrit
dans ce document est soumis ˆ un agrŽment de licence et ne peut •tre
recopiŽ sur un autre support. Aucune partie de ce document ne peut
•tre copiŽe, reproduite, transmise ou enregistrŽe dÕaucune mani•re,
sans lÕaccord Žcrit de Steinberg Soft- und Hardware GmbH. MasterTools¨ et UV22¨ sont des marques dŽposŽes de Apogee Electronics
Corp. Tous les noms de produits et de sociŽtŽs sont des marques dŽposŽes ª ou ¨ de leurs propriŽtaires respectifs.
© Steinberg Soft- und Hardware GmbH, 1998. Tous droits rŽservŽs.
Location code: 2264/2673
ii
Page 3

APOGEE MASTERTOOLS
Hi-End bit rate conversion PlugIn
Operation Manual
ENGLISH
®
MasterTools
English Ð 1
Page 4

MasterTools
English Ð 2
Page 5

Introduction
Your Digidesign TDM system consists of many digital mixing buses
capable of incredible audio detail. In the world of digital audio, the
ability to maintain detail is measured in bits Ð more bits equals more
resolution and a more accurate digital representation of the audio we
capture.
It is hard to escape the grainy and noisy sound of the older Mac's 8-bit
audio. The improvement when we step up to CD quality 16-bit audio
is a revelation.
The Digidesign TDM bus is a full 8 bits more resolution than 16-bit
systems. These extra 8 bits beyond the familiar 16-bit CD preserve the
dynamics when we mix a few or a lot of sources together as we would
when doing a vocal compilation or a mixdown to the Þnal master.
As we process even one source through digital compressors, EQs,
gates and so on, the resultant digital audio contains additional resolution. Even if the source was 16 bits, the output contains information
well beyond 16-bit resolution, (unless it is truncated to a lower resolution).
ENGLISH
The Problem:
How to capture the Þne resolution available on a TDM or ProTools 24
system with popular media such as CD and DAT which are 16 bit.
The Solution:
Apogee MasterTools¨ with UV22¨. How, you may ask, does a sunblock lotion give me better sound? UV22 is not a rating for protection
from the sunÕs UV rays, it is Apogee ElectronicsÕ revolutionary Super
CD encoding process for improved sonic accuracy. UV22 has been
overwhelmingly adopted by the elite and critical CD mastering community. ItÕs very unusual for this community as a whole to embrace a
new technology. Their choice of equipment is usually as individual as
their personalities. Despite this fact, virtually all Major Mastering Facilities have one or more Apogee UV22 Super CD Processing Systems
such as our UV1000 or AD-8000.
MasterTools
English Ð 3
Page 6

The Reason:
Apogee UV22 captures information, detail and resolution beyond 16
bits onto 16-bit media. The resulting sound is natural and Þnely detailed while maintaining an ÒanalogÓ quality without any of the
ÒharshÓ digital shortcomings.
The Tool:
MasterTools
English Ð 4
We created Apogee MasterTools to enable you to take a page from the
mastering engineersÕ secret cookbook and add the Þnal touch of UV22
encoding to your Digidesign creations. It works even if the source is
only 16 bits because UV22 enhances the quality of any digital-to-analog
Page 7

playback Ð from boom boxes to esoteric audio systems. A UV22 license
and royalty waiver are included in the purchase price of your MasterTools software.
The Vision:
To deliver an end product, you use your Digidesign system to massage
and manipulate the audio to improve what you hear. Apogee has added
an extra dimension to what we hear with a unique new way of looking
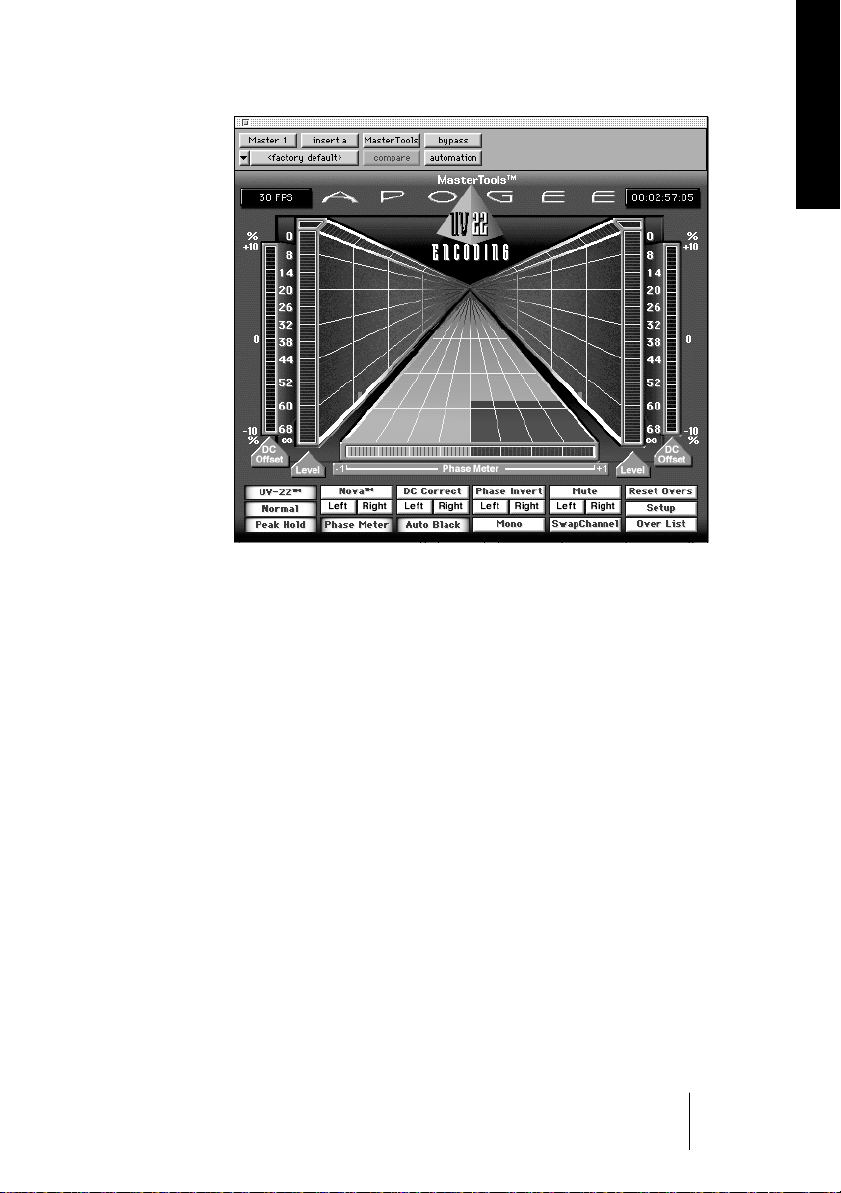
at sound. The display element of MasterTools conveys a vast array of
information in one quick glance. This multi-function stereo metering
system displays peak and average levels simultaneously along with
peak and average hold. Digital ÒOversÓ are displayed in attention grabbing red. Phase correlation between left and right signals is indicated
between the left and right channel level displays. As if this wasnÕt
enough, a Þve second history (ÒHistogramÓ) of Level, ÒOversÓ and
Phase Correlation is displayed in color, creating a window you wonÕt
want to put away. The ÒOverÓ history shows not only that you went
over but how hard you hit the stops. The Over list displays how many
ÒOversÓ occurred during the session and logs them against time code to
easily go back and Þx the mix.
ENGLISH
The Finishing Touch:
Apogee MasterTools palette provides you with the essentials to apply
the Þnishing touch to your audio creations. Thank you for choosing
Apogee MasterTools.
About This Manual
This manual explains the operation of MasterTools in detail. We recommend you take the time to read it completely to get the most out of
this unusual Plug-In. The chapter "Installing and authorizing MasterTools" on page 9 lists the steps to install MasterTools. If you have already installed MasterTools, you can go directly to the chapter
"Setting up MasterTools" on page 15 for setup and basic operation
guidance, followed by a detailed explanation of each control and function. The chapter "The UV22 Process" on page 29 explains the remarkable UV22 process.
MasterTools
English Ð 5
Page 8

MasterTools Features
UV22 Process
By utilizing UV22 encoding you preserve 20-bit (and above) resolution and detail onto 16-bit mediums without the need for special decoding equipment for playback. Apogee UV22 Encoding adds an
inaudible, high frequency ÒbiasÓ to the digital bitstream, placing an algorithmically-generated ÒclumpÓ of energy around 22 kHz. Much as
the bias on an analog tape recorder smoothes out magnetic tape recording non-linearities, UV22 silently captures resolution up to and
even beyond 20 bits on a standard, 16-bit CD.
In addition, this inaudible carrier smoothes the rough edges of even
the most inexpensive boom boxes. Apogee UV22 makes your recordings sound better on all listening systems, delivering sonic improvements that any user can realize on equipment they already own.
UV22 is a very special information carrier: it is not a new ßavour of
dither noise. The truly unique statistical properties of UV22 guarantee
a constant white noise ßoor, very similar in character to analog tape
noise, no matter what the input source.
In listening test after listening test, mastering engineers unanimously
choose UV22 over all other systems. With thousands of CD Titles already mastered using UV22, the Þnishing touch to your CD, CD-R or
DAT is just a mouse click away with Apogee MasterTools. The chapter
"The UV22 Process" on page 29 explains the UV22 Process in detail.
MasterTools
English Ð 6
DC Removal for Silent Edits
Some analog to digital converters have a small residual DC on the digital output. When DC is present on a digital signal, it means the digital
audio is not evenly centered around zero, or digital Òblack.Ó When
playing a track with DC, many digital meters will display a reading
that would appear to be an audio level, but it is inaudible. More importantly if you edit signals with different levels of DC on them, you can
get clicks and pops at your edit points. If you change the gain with DC
Offset present, the output is not faithful to the input. MasterTools can
automatically remove any DC Offset in real time. In MasterTools, digital offsets are displayed as a percentage of full scale (0 dBfs) on the
left and right channels independently.
Page 9

Smart Meter Ballistics
Some users prefer average reading meters while others like peak reading meters. MasterTools gives you not only a choice, but both simultaneously. Presented in a clear fashion, both the average and peak levels
are displayed in real time. Most screen-based meters suffer from poor
resolution and signiÞcant delays from when the event occurred to
when it shows on the screen. For those of you waiting for an accurate
meter for ProTools, both in timing and level, MasterTools has it. In addition to the metering choices, the ballistics of the meters take into account the dynamics of the input signal. A signal with a fast decay will
cause the meter to decay faster.
This added level of information helps you distinguish between buzzes,
hums and other signals that would normally be obscured by conventional metering systems.
Memory Lane Ð The Histogram
Perhaps the most visually striking feature of MasterTools is the unique
level monitoring system. This allows users to observe level, phase and
balance information presented, both in real time and through history
so you know when youÕve got it ÒJust Right.Ó
ENGLISH
Phase Meter
This feature indicates the phase correlation of stereo programs. If the
signals of both stereo channels are in phase, i.e. with identical signals
on both channels (mono), the indication of the scale will be to the right
indicating a positive correlation. If one channel is reversed in polarity
(180 degrees out phase) the scale will be toward the left (Ð). Without
any, or with only one signal at the inputs, the indication would be in
the center. Typical stereo information with correct phase correlation
will move between the center and the right (+).
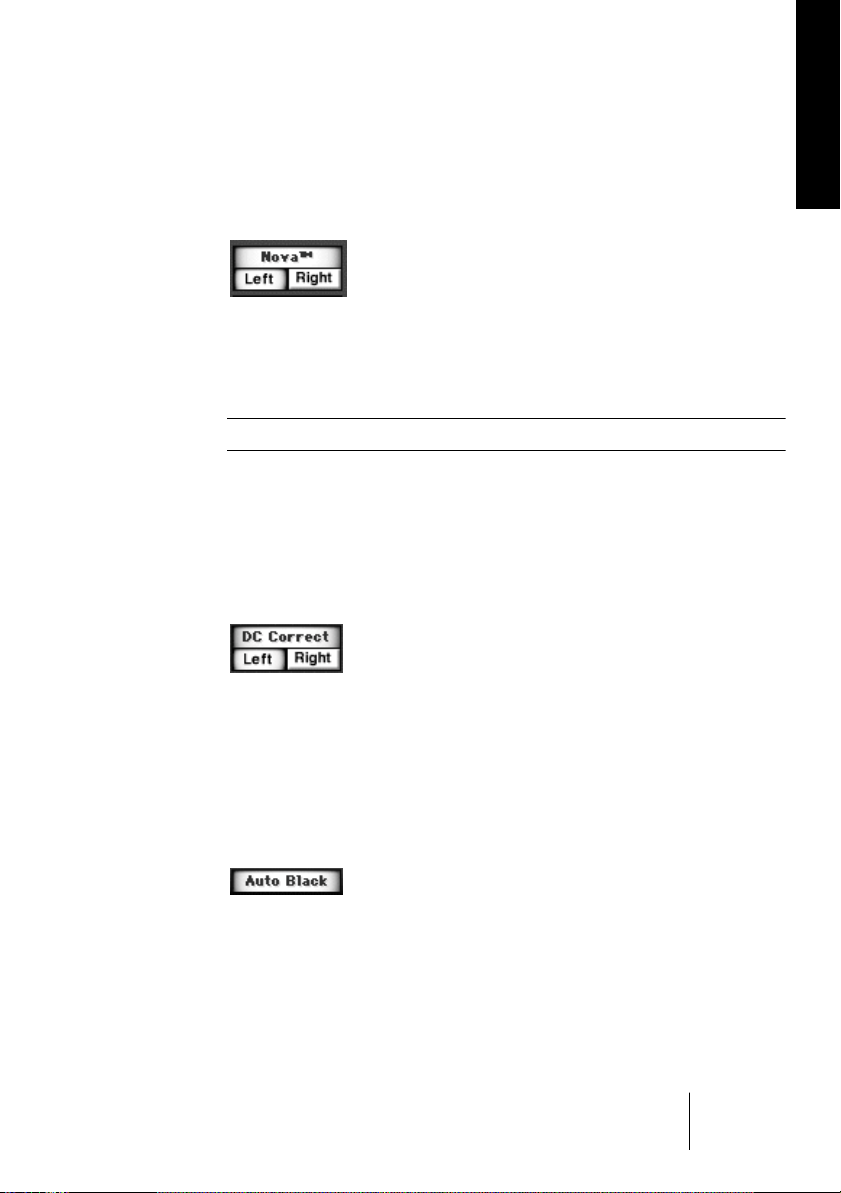
NOVAª
This function eliminates the possibility of outputting an ÒOverÓ when
operating. It does this by reducing the level of samples that are at digital full scale by one LSB (Q-unit) at the 16-bit level.
MasterTools
English Ð 7
Page 10

Over List
The Over list keeps track of any digital ÒOversÓ and logs them against
timecode. You can scroll through the list and edit the waveforms or use
ApogeeÕs Nova to automatically remove any digital ÒOversÓ. The Over
list can be printed, saved and is cumulative until cleared. The time and
number of consecutive ÒOverÓ samples are shown for the worst ÒOverÓ
during that period. Depending on the system you use and its workload,
the minimum time it takes for the system to update the Over list is approx. one sixtieth of a second. The deÞnition of an ÒOverÓ (as 3 to 6
consecutive full-scale samples) can be changed in the Setup menu.
ÒOversÓ Explained
An ÒOverÓ is the digital equivalent of clipping in the analog world.
When you clip an analog power amp, youÕve used up all the dynamic
range. The output goes up to the clipping point and squares off at the
maximum level. Rather than calling it ÒNo more digital headroom,Ó or
Òdigital clippingÓ we call it an ÒOverÓ, if we clip several samples in a
row. In other words, itÕs not an ÒOverÓ if we clip for one or two samples, but it is if we clip for 3, 4 or more. It is not universally agreed
what constitutes an ÒOverÓÐwe have set the default to the de facto
standard of 4, but you make a different setting.
System Requirements
MasterTools can operate on TDM equipped Macintosh systems that
have the following hardware and software capabilities:
¥ ProTools 4.0, DAE 3.3 (or higher)
¥ System 7.5 or higher
¥ Power Macintosh computer
¥ In addition, at least one megabyte of free disk space and one available DSP
chip are required.
MasterTools
English Ð 8
Page 11

Installing and authorizing MasterTools
MasterTools works within the TDM Plug-In architecture of Digidesign systems. Installation is aided by an automatic installer included
on the MasterTools disk.
Before installing MasterTools, please check your MasterTools disk for
a possible additional Installation Instructions document. This might
cover any changes to this manual or changes in hardware or software
requirements.
¥ Please carefully follow the steps outlined below to ensure a suc-
cessful installation.
¥ If you have previously used an earlier version of MasterTools, then
you should locate the following files, move them to the trash and
empty the trash:
Location File to trash
System folder: DAE:Plug-Ins: The old MasterTools version
System Disk: 'Outdated MasterTools Files' folder
ENGLISH
System folder: Preferences: MasterTools Prefs
System folder: Preferences: MasterTools Connections
¦ If you have previously used an earlier version of Apogee MasterTools, please
note that the program you are about to install is not just a simple upgrade. It
is a completely new written program, and as a result, authorization keys provided with previous versions of MasterTools cannot be used to authorize this
version.
¦ Please also note, that with this version you do not need the Administrator and
MIDI Administrator anymore. You can therefore remove them from your
hard disk.
¦ Check to be sure you only have the most current version of MasterTools in
the Plug-Ins folder!
MasterTools
English Ð 9
Page 12
Proceed as follows to install and authorize the current MasterTools
version:
1. Quit all other applications so that you return to the Finder and insert the MasterTools floppy disk into the corresponding drive of
your computer.
A window will open. If it doesnÕt, double click on the icon of the installation
disk.
2. Double click on the MasterTools Installer symbol to load the installation software.
MasterTools must be installed on the hard disk that holds your TDM system
files and your Digidesign Plug-Ins folder.
MasterTools
English Ð 10
Page 13
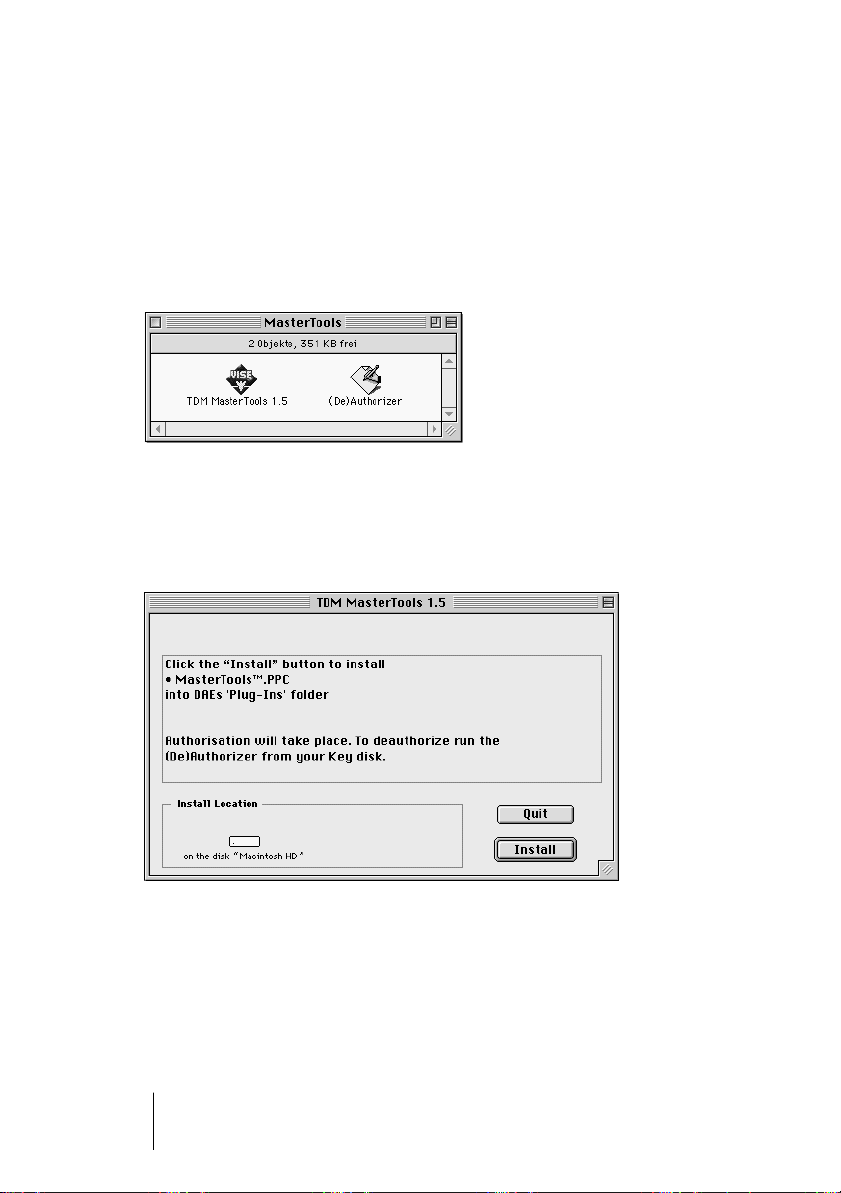
3. Click the Install button to start installation and hard disk authorization.
A dialog will inform you of what is currently installed. The installation program will place all the necessary files in the appropriate folders. MasterTools
will be placed in the Plug-Ins folder located in your System folder. If it did not
exist previously, the Plug-Ins folder will be created.
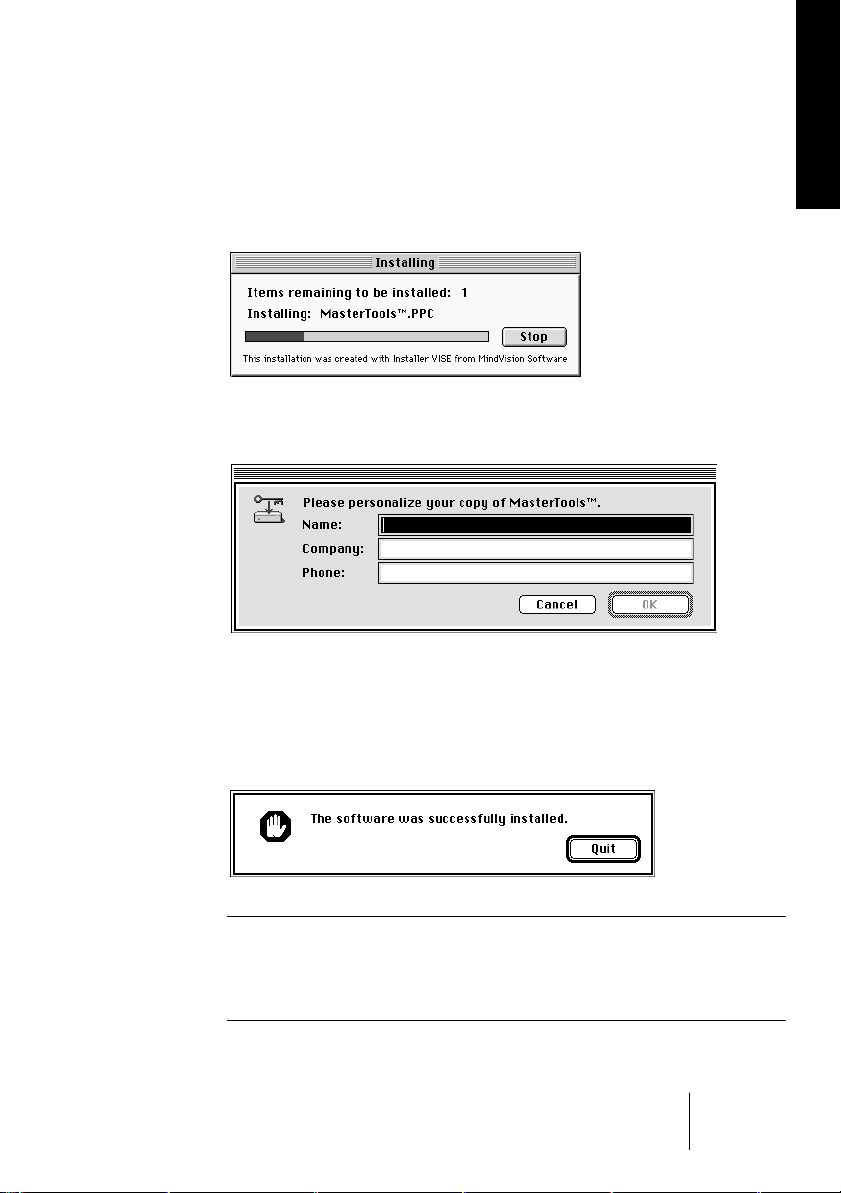
4. During installation you will be asked to personalize your
MasterTools copy. Please do so.
ENGLISH
The installation program will now install an invisible copy protection on your
hard disk and thereby authorizes it to run MasterTools.
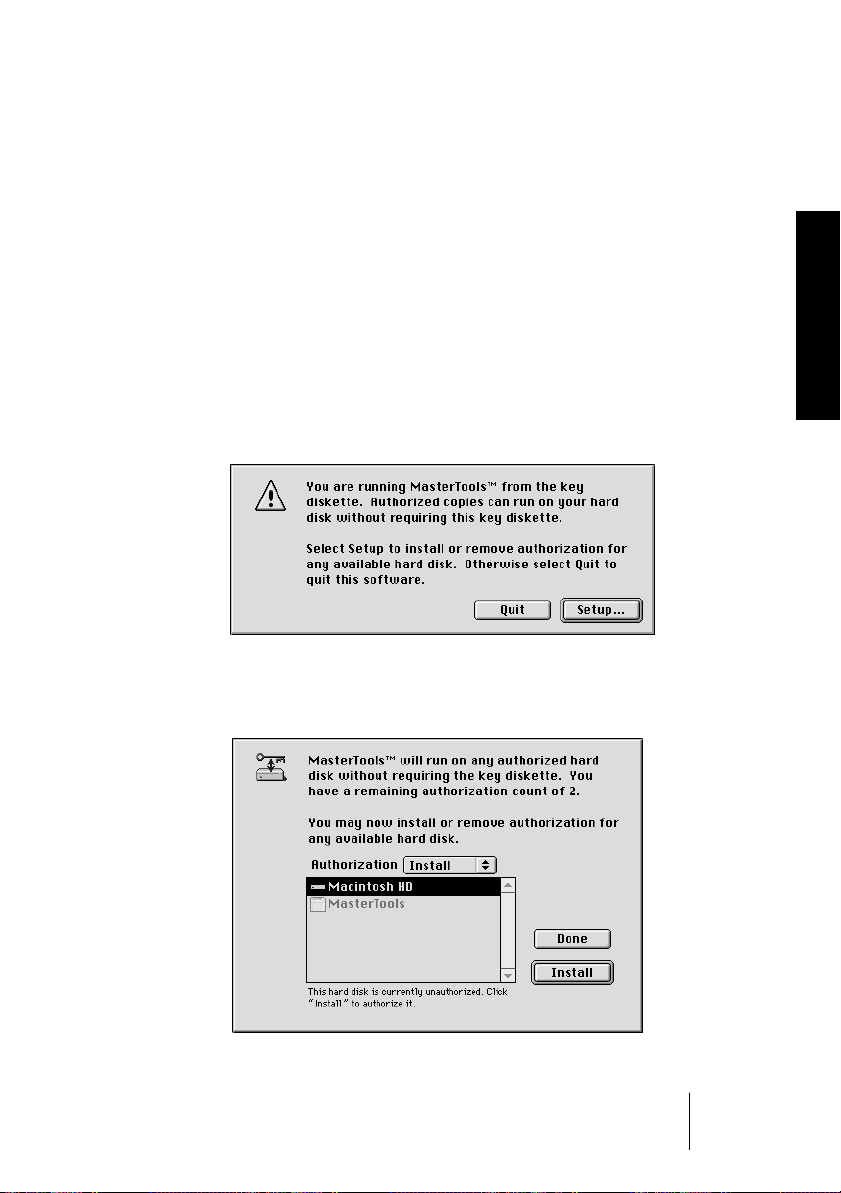
5. When installation and authorization have successfully been completed, this dialog will appear. Click ÒQuitÒ to quit the installation
program and restart your computer.
¦ If you see any error messages during installation, check your hard drive to
make sure you have enough available space to install MasterTools (Approximately 1 MB minimum.) Repeat the installation procedure and make sure to
double-check that you have met all the system requirements, see page 8.
MasterTools
English Ð 11
Page 14

Information on the copy protection
The MasterTools Plug-In uses a copy protection system in which your
authorization disk plays a vital role. It contains two authorization
counts that you can use to twice authorize a hard disk to run MasterTools.
The second authorization count is meant as a back-up, in case you accidentally lose the Þrst.
During the installation process, an invisible authorization Þle has been
installed on your hard disk. Please do not move or delete this Þle,
since it might make you lose an authorization count!
If necessary, you can remove an authorization count from the hard
disk and copy it back to the installation disk. See ÒDeauthorizing the
hard diskÓ on page 13 for more information. This way, you can reinstall MasterTools on another hard disk at any time.
Please observe the following points:
¥ If you should accidentally delete the MasterTools program files, donÕt worry.
Just install again. Even if you have deleted the files, the hard disk is still authorized to run MasterTools and you do not lose an authorization count.
¥ You can safely defragment (sometimes called ÒoptimizingÓ) your hard disk.
Copy protection is not affected by defragmentation.
¥ If you experience a hard disk crash, you may lose your installation. Please
use the second authorization count on the MasterTools installation disk if this
happens, or contact your dealer.
¥ Never re-format or partition your hard disk without deauthorizing it first (see
below), otherwise you will lose an authorization count.
¦ The MasterTools disk is your verification that you have purchased the pro-
gram. Please keep it in a safe place.
MasterTools
English Ð 12
Page 15
Deauthorizing the hard disk
Should you ever need to permanently move MasterTools to another
computer, or wish to re-format or partition your current computer, you
need to deauthorize the hard disk where you have installed the program.
During this process the authorization count will be copied back from
your hard disk to your authorization disk. Proceed as follows:
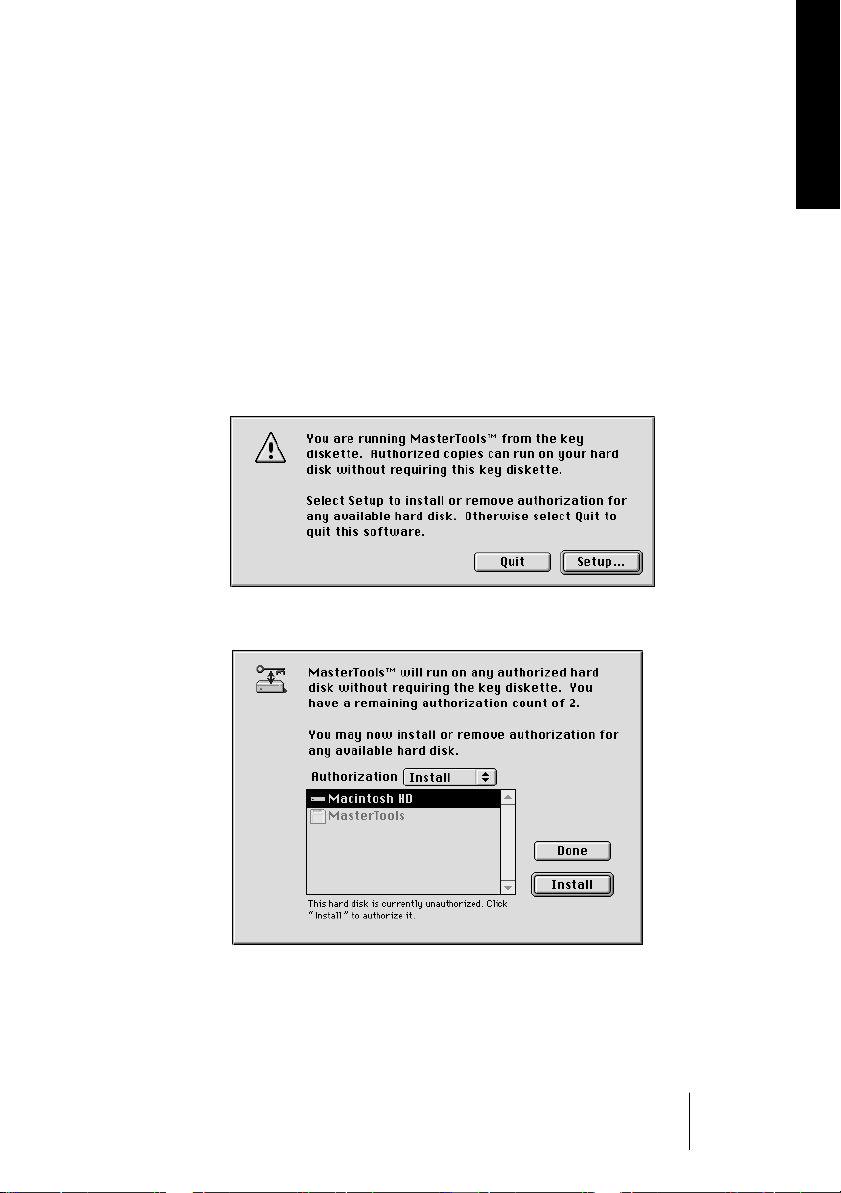
1. Write-enable your authorization disk, insert it into the disk drive
and double click on the Deauthorizer icon.
This dialog box will appear.
2. Click ÒSetup...Ó to bring up this dialog box.
ENGLISH
MasterTools
English Ð 13
Page 16
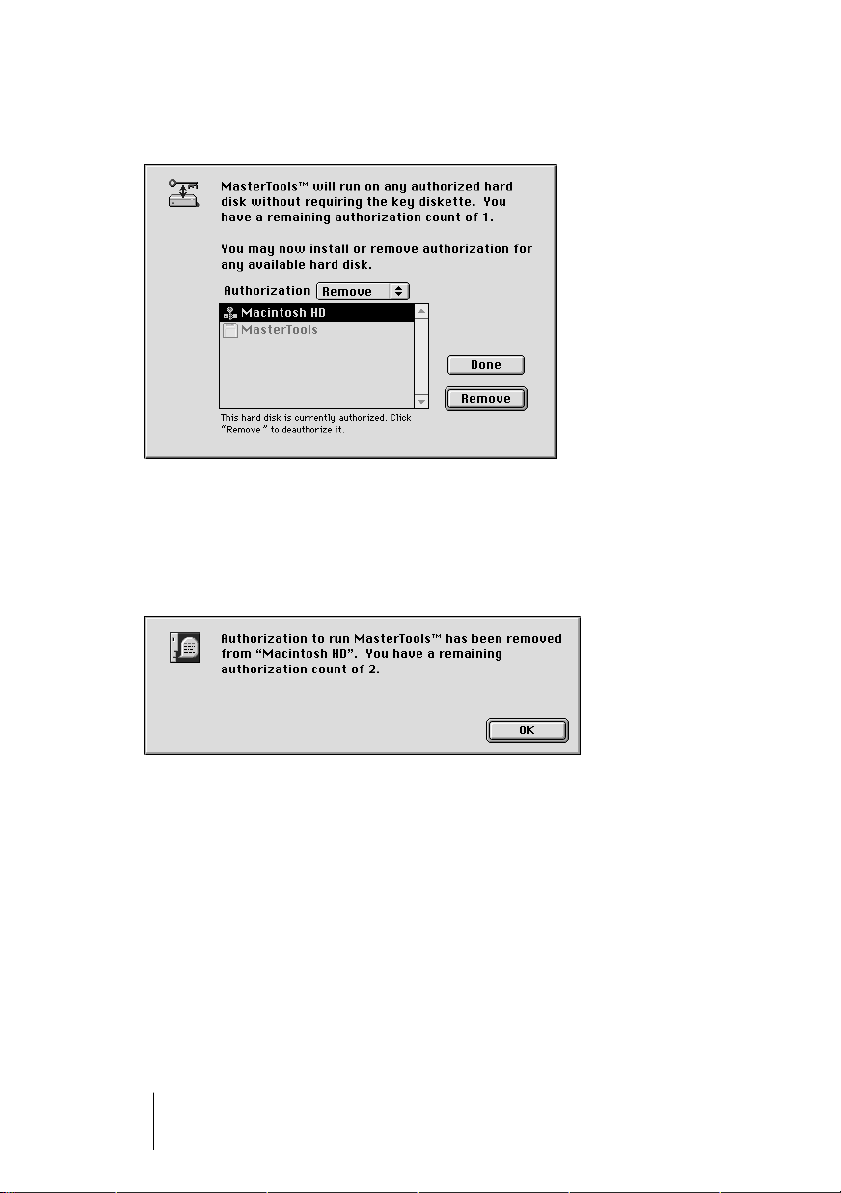
3. First select ÒRemoveÓ from the Authorization pop-up menu and
click on the desired drive. Then click on the Remove button.
This will activate the Deauthorization process.
4. The authorization count will be removed from your hard disk and
restored on your authorization disk. The following box will appear
and inform you of the number of installation counts that are now
available on your authorization disk.
5. Install MasterTools on the new or changed hard disk as previously
described.
MasterTools
English Ð 14
Page 17

Setting up MasterTools
Launch ProTools, create a new session or open an existing one Ð
MasterTools should now be available as an insert on a stereo master or
stereo aux return fader. If you are doing a ProTools III session and you
want MasterTools on your Þnal output, insert it on a stereo master. Setting up MasterTools as an insert in ProTools is also described in this
section.
¦ If MasterTools doesn't appear, move your other Plug-Ins from the System
folder: DAE folder: Plug-Ins folder to the desktop, leaving only the Mixer
Plug-In and the MasterTools Plug-In and launch ProTools again. Once MasterTools is operating properly, move your other Plug-Ins back to the Plug-Ins
folder one at a time and launch ProTools again each time to observe any possible conflicts with other Plug-Ins.
We recommend you read the entire manual before using MasterTools,
but then again we never expect anyone to take us seriously. If you are
anxious to get started, you will Þnd the operation is intuitive. We suggest, however, that you take the following steps Þrst:
ENGLISH
1. After opening your ProTools Software, establish your tracks. Select the
mix window and make sure that the Inserts are visible in the mix window.
2. Under the File Menu, select ÒNew Master Faders...Ó If you donÕt
want to process all of your tracks with MasterTools, select ÒNew
Auxiliary Inputs...Ó instead. This will bring up a dialog box. In this
box, you can define the number Master Faders/Auxiliary Inputs
that should be created. Type 1 and click the radio button next to
ÒStereo inputÓ. Then click OK.
¦ If you created an Auxiliary Input, please skip to step 4.
3. If you selected a Master Fader, it will default to output 1&2. If
youÕre using another pair of outputs that go to your stereo storage
device. i.e. DAT, CD-R, or other storage medium, click (and hold)
the ÒOutputÓ button on the Master Fader and select the pair of
outputs youÕre using. You can now skip to step number 8.
MasterTools
English Ð 15
Page 18

4. If you selected an Auxiliary Input, youÕll need to assign the input and
output parameters of the Auxiliary input as well as route the various
audio channels into the Auxiliary input for processing. This is accomplished by using the bus assigns and the Insert Points of the mix window.
5. Choose a pair of TDM buses to route all signals that you want to
process with MasterTools. LetÕs assume you have chosen buses 15
& 16 for this purpose. To route signals to these buses, click and
hold down the output button in the I/O section of each channel
you want to route to the selected bus pair by dragging to the bus
pair. Continue this for each subsequent channel that you want to
process.
6. Now that all of the channels that you want to process are routed to
the stereo TDM buses, you then need to make the connection from
the buses into the Stereo Auxiliary input that will do the MasterTools
Processing. This is done by pressing the input button on the Stereo
Auxiliary input you created and selecting (as an example) bus 15-16.
This has now made the inputs of the stereo aux input bus 15-16.
7. The next step is to route the output of the stereo auxiliary send to
the main outputs. At this time you might want to run up a rough
mix just to confirm that all of the routing is correct. After all this,
only one more step is required to activate MasterTools.
8. If you havenÕt done so already, select ÒShow Inserts ViewÓ from
the Display menu. MasterTools is a Stereo Plug-In that can be active on any Stereo Master Fader or Auxiliary Return. While you
can use any of the five inserts to assign MasterTools, to get maximum benefit from UV22 it is best to have MasterTools as the last in
the chain i.e. the bottom Insert ÒEÓ. To accomplish this, press the
last of the five insert buttons on the Master Fader/ Auxiliary Input
and select MasterTools from the list of Plug-Ins and release.
You will now be presented with the MasterTools window which should look
similar to the one on the next page.
MasterTools
English Ð 16
Page 19
9. If you start playback you should see audio levels reflected on the
main metering located on the left and right of the display at the
sides of the Òcorridor.Ó These levels march into the distance as
time goes by until they disappear over the horizon.
ENGLISH
10.Now you can continue to read about the functionality of each of
the controls and displays, or put the manual down and begin pressing buttons. You probably* wonÕt hurt anything.
* ÒProbablyÓ has been put in so that a disclaimer can be made in case something
gets fouled up.
MasterTools
English Ð 17
Page 20
Basic Operation
The MasterTools window consists of two main sections. The Þrst is
the display area located in the upper part of the window. This includes
the metering for level, phase and DC Offset. Below the metering displays are control buttons for the various parameters affecting the displays and other functions. The buttons seen at the top of the window
belong to ProTools and are described in its documentation.
Location and Functions: The Displays
The front of the Òcorridor wallsÓ to the left and right reßects the signals of the left and right inputs of the stereo auxiliary input or master
output that MasterTools is inserted into.
MasterTools
English Ð 18
Page 21
Over Indicators
Each channel has an Over indicator that lights red when an ÒOverÓ occurs. This state is held until the Reset Overs button is clicked. This
will reset both indicators. To individually reset an over indicator, simply double click on it.
Left Channel Over Indicator
If NOVA is active the Over indicator becomes blue to show that
ÒOversÓ have been corrected by this process. The ÒOversÓ in the Histogram, however, are still displayed in red.
The length of the Over segments in the Histogram (displayed in the
top lane on each of the HistogramÕs Òcorridor wallsÓ) indicates, how
many ÒOversÓ have occurred within a certain time span: The higher
each red bar, the more consecutive ÒOversÓ have occurred.
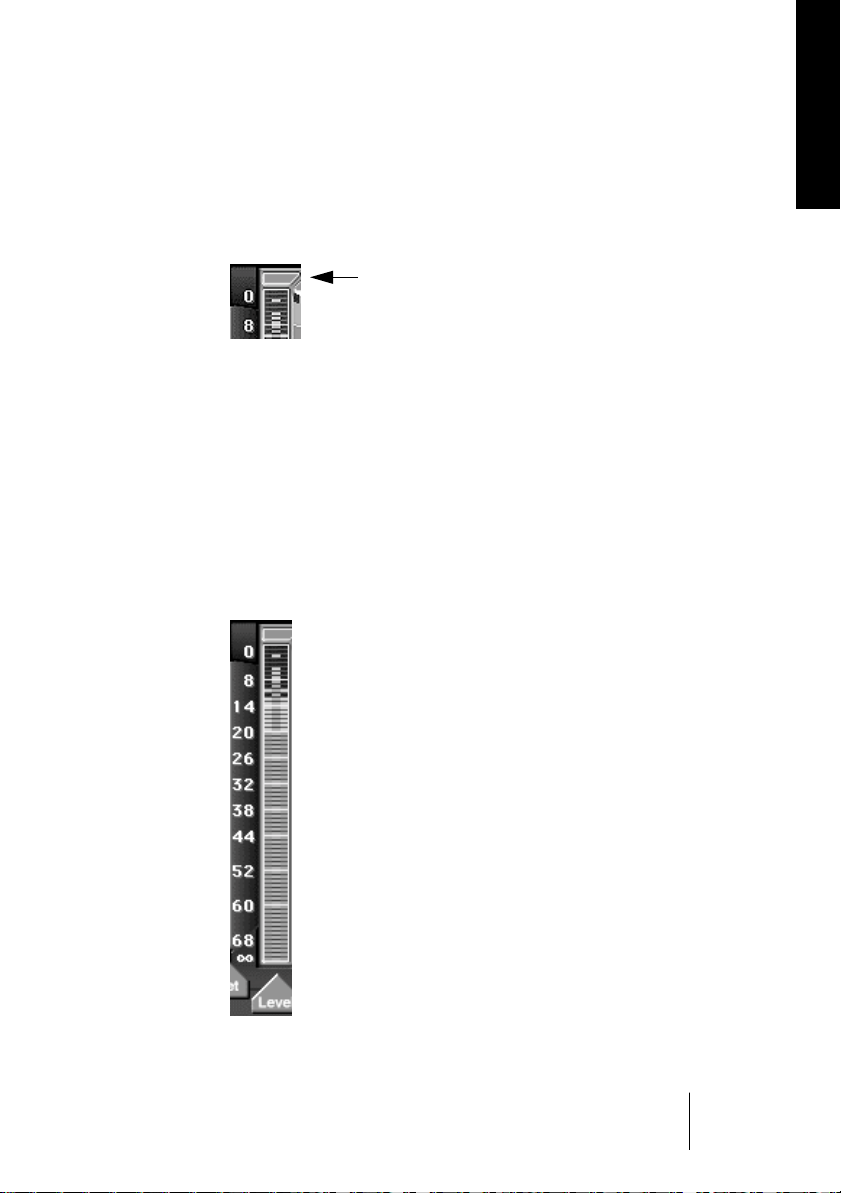
Level Indicators
The narrow bar indicates the peak level and the wide bar
shows the average (RMS) level.
ENGLISH
If peak hold is on, then the highest value that both the
Peak and Average reach will be held for two seconds (or
whatever is selected in the Setup dialog) or until a higher
level is achieved.
The Þve ÒLEDsÓ at the bottom of the scale divide the
range between Ð41 dB and ¥ (or in fact Ð138,47 dB) in
linear fashion, where ¥ represents the lowest Bit and
therefore starts to light up as soon as a signal is detected.
This meter display example shows the average level at Ð12 dB
and the Peak level at Ð5. The Peak Hold is at Ð2 and the
Average Hold is Ð10. There have been ÒOversÓ. The scale has
been set to Digital. In Analog mode, +20 dBfs is shown at the
top of the scale.
MasterTools
English Ð 19
Page 22

DC Offset Display
These displays indicate the DC level as a percentage from Ð10% to +10%.
A reading of zero indicates that no DC level is
detected.
If DC Correct is active, the reading in the DC
Offset display is shown in blue, if it is inactive
the reading is displayed in red.
This display shows that a DC Offset of 5% is being
detected on the incoming signal.
Phase Meter
Between the two level meters is a Phase Meter display. This feature indicates the phase correlation of stereo programs.
MasterTools
English Ð 20
The Phase Meter display and its Histogram
If the signals of the two stereo channels are 100% in phase, i.e. an
identical signal on both channels, the indication of the scale will be to
Page 23

the right indicating a positive correlation (+). If one channel is reversed in polarity (180 degrees out phase) the scale will be toward the
left (Ð). Without any signal, or with only one signal at the inputs, the
display will be in the center. Typical stereo information with correct
phase correlation will move between the center and the right.
Location and Functions: The Control buttons
The buttons that control MasterTools are of three types: On/Off buttons, selector buttons and buttons that start an action each time you
click on them.
The Þrst type is typical of a normal button. It switches the respective
function On or Off and affects both stereo channels.
In MasterTools, the buttons UV22, Normal/Low, Peak Hold, Phase
Meter, Auto Black, Mono, SwapChannel, Setup and Over list are of
this type.
When the button is backlit, the function is active. When it is pale, the
function is not active.
ENGLISH
Functions On Functions Off
The second type of button looks like a collection of three buttons and
act in perfect unison. These buttons give you the ability to select either
the left or right channel or both channels to be dealt with.
Pressing on the main bar will toggle the function On or Off for both
channels. Pressing either the Left or Right button will only select that
channel and will leave the other channel at its previous setting.
If either the right or left channel is On, the main button will also toggle
to On. These buttons include Nova, DC Correct, Phase Invert and
Mute.
The third type of button is the Reset Overs button that Ð when pressed
Ð resets the Overs List.
MasterTools
English Ð 21
Page 24
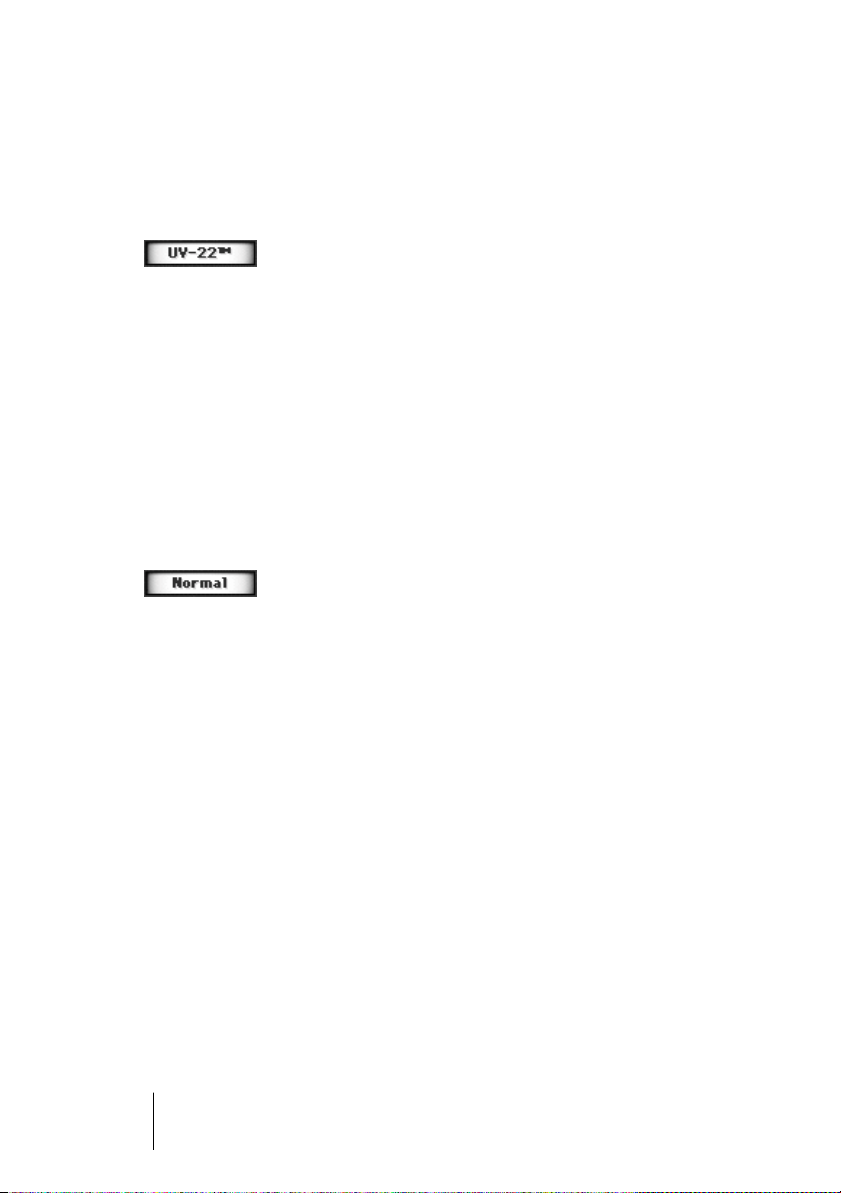
UV22 Ð (On/Off)
The Encode control is a toggle selector that enables or disables the
UV22 function. When highlighted, this signiÞes that the UV22 process is active.
UV-22 is On.
When the UV22 process is disabled, the unprocessed signal is passed
through without UV22 processing. When UV22 is active, UV22 Encoding will be embossed on the Gold Pyramid in the Main Display.
Normal Ð (Normal/Low)
The Level control toggles between two modes of UV22 operation,
Normal and Low. It is therefore highlighted if UV22 is active. You can
switch between the two modes Normal or Low by clicking on it. The
selected mode is shown on the button.
Normal is On.
Normal mode is the typical setting. The Low mode captures almost as
much resolution, but uses a lower level of the UV22 signal. A more
detailed description of the process and recommended settings is included in the section "UV22 Process Caveats" on page 33. For now
leave the selector on Normal.
MasterTools
English Ð 22
Page 25
NOVA Ð (On/Off)
Mixes can get rejected if they contain digital ÒOversÓ. When NOVA is
enabled, it automatically reduces the level of any Sample that is
ÒOverÓ to one Least SigniÞcant Bit (LSB) below digital full scale.
With this setting NOVA reduces ÒOversÓ on the left channel.
Samples that are not ÒOverÓ will not be effected. Corrected ÒOversÓ
are indicated in blue in the Over display.
¦ The ÒOversÓ in the Histogram will continue to be shown in red, see page 19.
DC Offset Removal Ð (Left On/Off, Right On/Off)
MasterTools provides a comprehensive DC Offset removal system.
Once DC Offset is detected by observing the DC Offset meters, this
feature can be engaged to efÞciently remove it.
ENGLISH
DC Correct is On and activated for the left channel.
Auto Black Ð (On/Off)
This control arms the Automatic Black function. Auto Black functions
like a gate. When the audio drops below a certain threshold for a given
time period, the signal is muted until activity at the input occurs again.
Auto Black is On.
The Auto Black function allows automatic insertion of digital silence.
It triggers when no signal at the 20-bit level occurs for 128 consecutive Sample pairs, (Left and Right) and the signal doesnÕt exceed Ð42
dBfs. Auto Black automatically Òopens the gateÓ again as soon as a
stronger signal occurs on either the left or the right channel.
MasterTools
English Ð 23
Page 26
SwapChannel Ð (Normal/Reversal of Left and Right)
This selector maintains polarity and reverses the Left and Right channels to check for correct stereo placement, i.e. left could be on the
right side.
SwapChannel is Off.
When engaged, the left and right channels will be swapped, with the
right channel coming out of the left output and vice-versa.
Phase Meter Ð (On-Off)
This selector activates the Phase Correlation Meter. When the Phase
Meter is Off, the display centers around zero.
When the Phase Meter button is activated...
MasterTools
English Ð 24
...the Phase Meter display shows the phase correlation of the audio that is
played back.
Page 27
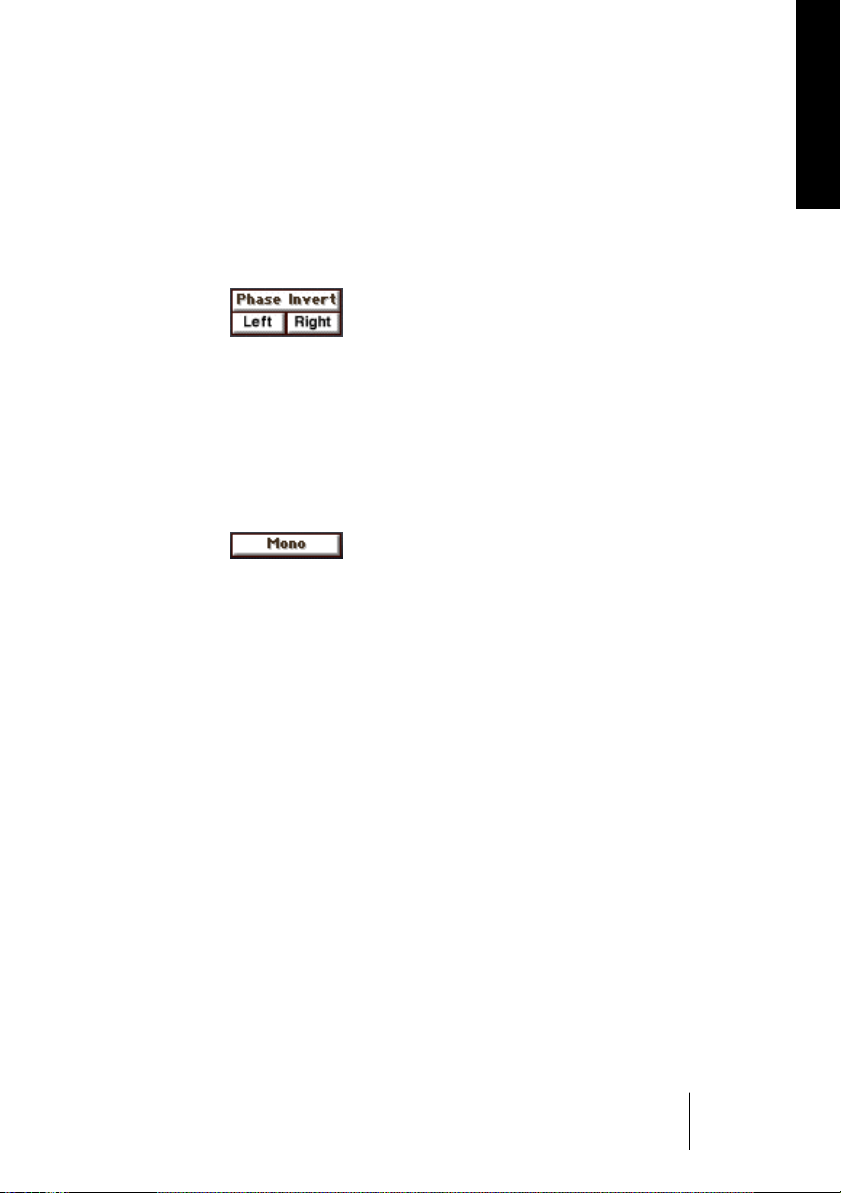
Phase Ð (Normal/Invert for Left, Right or Both)
At times it can be useful to check the absolute polarity of a signal. Listening to music with the phase reversed can be quite audible.
If the audio is inverted, a kick drum ÒthumpÓ will become a Òsuck.Ó By
selecting the Phase Invert button, the signalÕs polarity is reversed.
Phase Inversion is set to Off.
If reversing the polarity of only one channel is desired, (to conÞrm
phase relationships, etc.) clicking on either the left or right button located directly below the Phase button will accomplish this.
Mono Ð (Stereo-Mono)
If this button is inactive (not backlit), then you will hear the Stereo signal.
When engaged, the left and right channels are summed to mono to
check compatibility. The phase meter, if active, still displays the correlation between the left and right channels for reference.
ENGLISH
Because this sum-to-mono function occurs after the phase invert,
when these two functions are used in conjunction with each other it is
possible to monitor the left-minus-right signal.
This is a common mastering technique used to reveal any out-of-phase
elements of a mix.
Do this:
1. Activate the Mono and Phase Invert buttons.
2. Then use the Left and Right Channel buttons below the Phase Invert button for comparison.
MasterTools
English Ð 25
Page 28
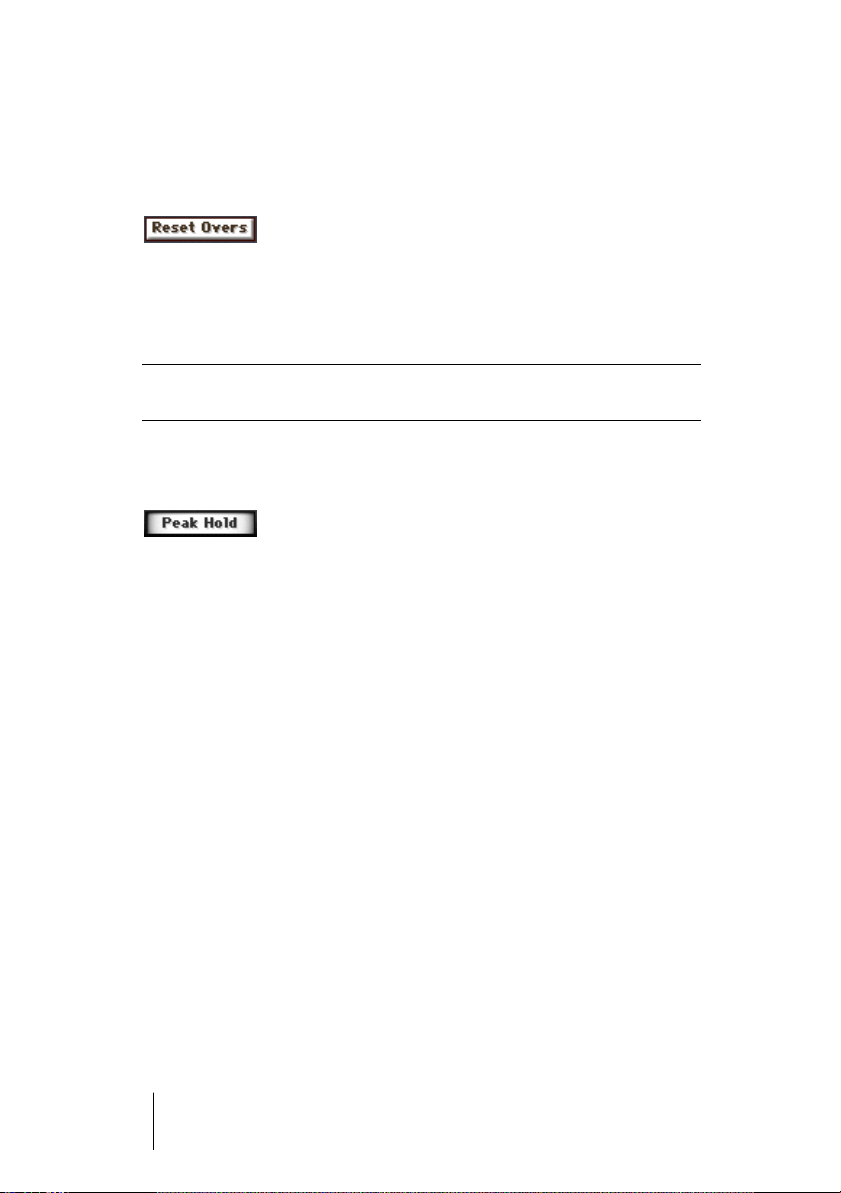
Reset Overs
Any digital ÒOversÓ will be held until either MasterTools is removed
from the active screen or the Reset Overs button is pressed.
The Reset Overs button
This button is a momentary action type and clears the digital Over Indicator located above the real time meter display.
¦ To delete the list of Overs in the Over List dialog, click the Over List button,
then click ÒClearÓ.
Peak Hold
Peak Hold is On.
The MasterTools level meters default to a Peak Hold type display.
In this mode, the highest signal attained by both the average and peak
meters is held for approximately two seconds, or whatever is selected
in the Setup Dialog Box.
MasterTools
English Ð 26
If a higher level overrides the peak hold level, the peak hold will now
represent the higher level.
Page 29
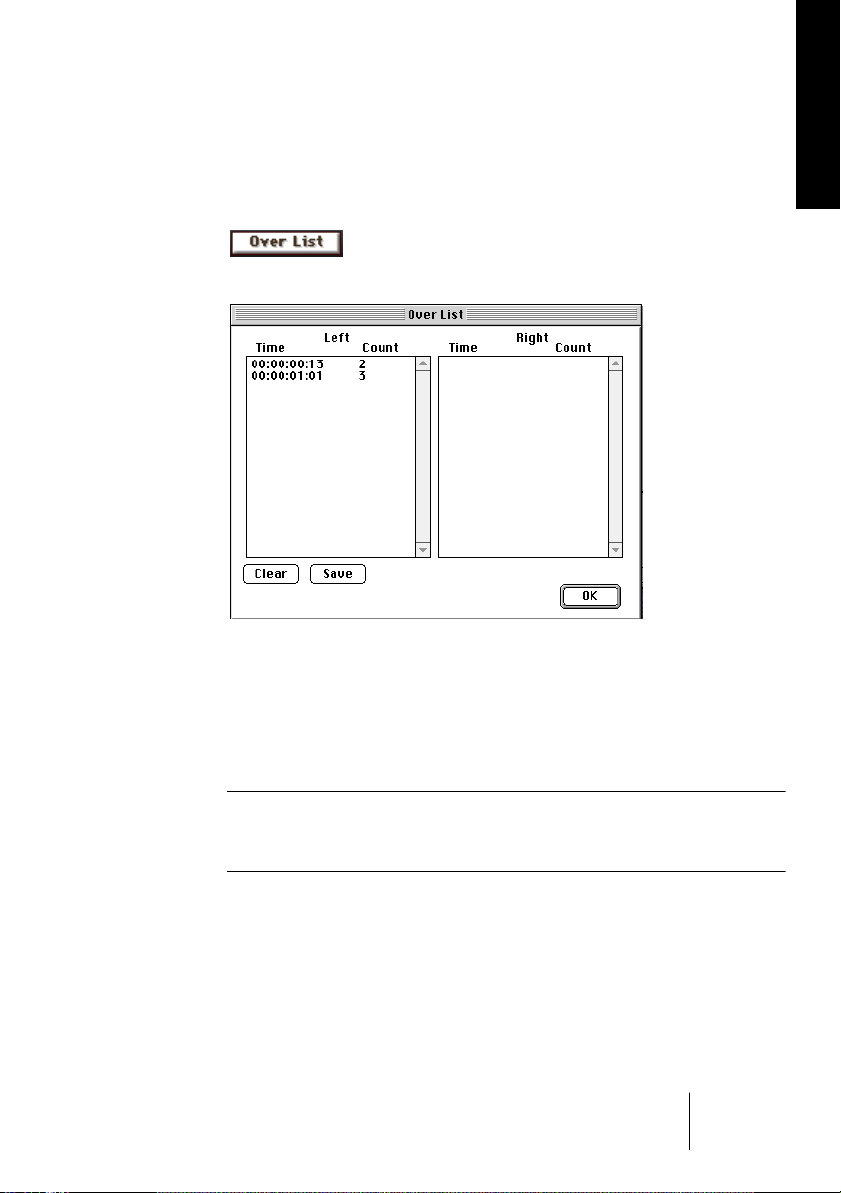
Over List
This button brings up the ÒOver ListÓ dialog. The OverList keeps track
of any ÒOversÓ that have occurred during the session. It can be cleared
or saved to a Þle for printing or reference.
Clicking on the Over List button É
ENGLISH
Éwill bring up the Over List dialog
As each ÒOverÓ is a number of clipping samples, the ÒTimeÓ value
shown in the list represents the time at which the
last
of these clipping
samples occurred.
The ÒCountÓ value shows the number of samples that were clipping.
¦ The frame format used here is the same that you have set in ProToolsÕ Dis-
play menu (ÒShow Session Setup WindowÓ). It is also displayed in the top left
of the MasterTools window.
MasterTools
English Ð 27
Page 30
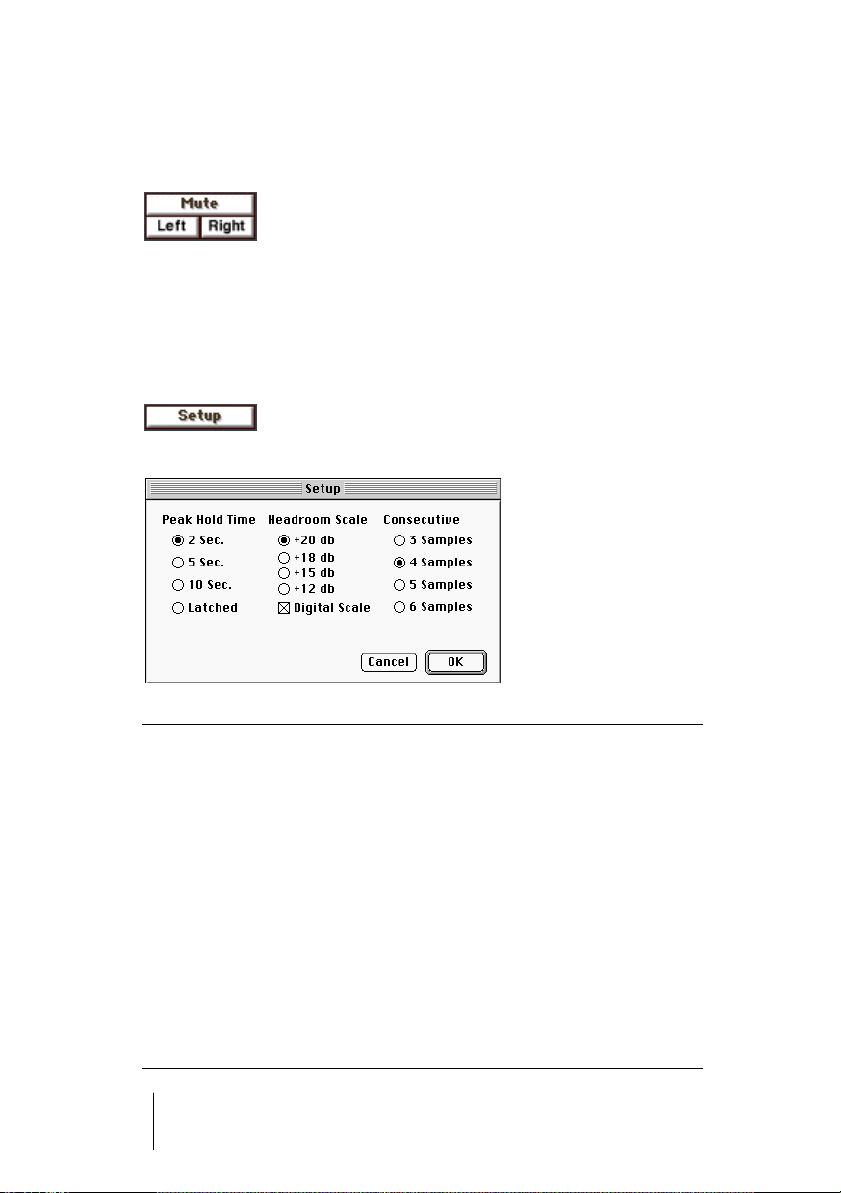
Mute Ð (Left On/Off, Right On/Off)
Press the Left, Right or Mute button to mute the associated channels.
Mute is Off.
Setup
This selector calls up a dialog box with several secondary parameter
adjustments for the visual displays as seen below.
Click on the Setup buttonÉ
Éto bring up this dialog.
MasterTools
English Ð 28
Setting this... ...has this effect
Peak Hold Time Determines how long the highest indication of peak and
average level will be held. ÒLatchedÓ will hold the indication indefinitely.
Headroom Scale Determines what type of scale the meters show. This de-
faults to + 20. Changing the scale will alter the resolution
of the meters, +12 yielding the greatest resolution at the
top of the scale. Checking the Digital Scale box puts 0 dB
at the top of the meter, more like a typical digital meter
on a DAT machine.
Consecutive Determines how many consecutive full level samples will
trigger an ÒOverÓ indication.
Page 31

The UV22 Process
Squeezing more performance from a standard CD is not a new idea. It
began with adding white noise, called dither, to the digital audio. Plain
dither was followed by different ßavours of dither noise, then a process called Ònoise shapingÓ and more recently various forms of socalled Òbit mappingÓ. Independent listening tests conÞrm these systems color the recordings we are trying to preserve or compromise the
audible noise ßoor.
Five years in the making, Apogee UV22 Super CD Encoding is an entirely different process. UV22 does its job without sonic compromise,
and without adding a sound of its own, preserving the sound stage and
tonal balance of the original 20-bit source. The effects are even audible on original 16-bit recordings.
UV22 Encoding adds an inaudible, high frequency ÒbiasÓ to the digital bitstream, placing an algorithmically-generated ÒclumpÓ of energy
around 22 kHz. Much as the bias on an analog tape recorder smoothes
out magnetic tape recording non-linearities, UV22 silently captures
resolution up to and even beyond 20 bits on a standard, 16-bit CD.
In addition, this inaudible carrier smoothes the rough edges of even
the most inexpensive CD player or external converter. Apogee UV22
makes your recordings sound better on all listening systems. Running
already-mastered 16 bit sources through a UV22 processor delivers
sonic improvements that any user can realize on equipment they already own.
ENGLISH
UV22 is a very special information carrier: it is not a new ßavour of
dither noise. The truly unique statistical properties of UV22 guarantee
a constant white noise ßoor, very similar in character to analog tape
noise, no matter what the input source. If you listen to the noise on a
UV22 encoded recording, you can hear a stable, accurate sound stage
and faithful tonal balance more than 24 dB into the noise Ð just as you
do on analog tape. Yet the UV22Õs low audible noise ßoor sits at the
theoretical limit for a 16-bit system. Nothing is lost Ð but a great deal
is gained.
In listening test after listening test, mastering engineers unanimously
choose UV22 over all other systems. Many thousands of CD titles have
already been mastered using Apogee UV1000 Super CD Encoders and
MasterTools
English Ð 29
Page 32

ApogeeÕs expanding line of D/A converters that include UV22. This
exclusive process, which has taken Þve years to perfect, is now available in the Apogee MasterTools Plug-In for Digidesign's TDM Systems.
Beware of ÒMusic Shaping.Ó
Noise-shaping and bit-mapping systems modify the noise ßoor by
changing it from a familiar white noise to one that has been radically
modiÞed. Their proponentsÕ theory says that the Ð96 dB CD noise
ßoor is not low enough to avoid interfering with our listening pleasure,
and that our ears would prefer a big dip (about 12 dB) in the noise
ßoor in the 2Ð3 kHz area, with an accompanying HF boost of as much
as 30 dB.
What they forget is that few CD releases actually approach the Ð96 dB
noise ßoor: the noise of almost all sources is signiÞcantly higher than
this and swamps any of the claimed beneÞts. In addition, in the process of shaping the ÒnoiseÓ, these systems are also shaping audio information hiding in what they call noise, which results in noticeable
shifts in image and coloured tonality of the music.
At Apogee, we believe the dynamic range of CD to be Þne for the majority of applications. As a result, we donÕt try to modify the noise
ßoor. Instead, we make it transparent, allowing clear, clean audio information to be heard up to 30 dB into the noise Ð just like analog.
This information is captured and encoded on to CD Ð and can be appreciated on any CD playback system.
MasterTools
English Ð 30
YouÕve worked hard on your project and you want the best product for
the CD consumer. There are powerful reasons to master with UV22.
What Are We Comparing?
With all the grandiose claims ßying about, it would be easy to forget
that well executed 16-bit digital audio for CD can already sound
amazingly good, and enhancements must therefore be subtle at best.
Sometimes a manufacturer will demonstrate a CD enhancement
process using 2 CDs: one recorded using the enhancement process and
the other without. What is not usually very clear is that the CD without
the process was mastered several years ago using older A to D converter technology, and the CD with the process had the added beneÞt
Page 33

of the latest A to D conversion. In these comparisons, the converters
have a much bigger bearing on the perceived sound quality than the
difference between the enhancement processes. If you do your own
listening evaluation, be sure to keep all the variables in mind and follow standard good engineering practices when making comparisons Ð
such as accurate level matching.
Something For Nothing?
If we take a well recorded 16-bit digital audio source (from a DAT, for
example) and we decide to add some digital EQ, compression, gain
change, de-click, de-crackle or even the latest process to put the sound
behind, above, or below us, we are digitally manipulating our 16-bit
numbers. We donÕt get more audio information out than we put in, but
we do get numbers with resolution greater than the 16 bit-input signal.
These extra ÒdetailÓ bits we pick up contain some of the results of
whatever process we performed to our original 16-bit audio source Ð
and ideally we should hang on to those bits. They show up in improved smoothness, detail, image and depth. The aim of the various
encoding schemes is to hold on to the extra resolution after digital
processing or A to D conversion, when transferring to a 16-bit CD
quality output.
ENGLISH
Holding on to more bits in a 16-bit CD world
An ideal ÒSuper CDÓ system would take as much as 24-bit resolution
digital audio and capture the same detail and quality on to our 16-bit
CD. We donÕt live in an ideal world, but it is possible to capture most
of the added detail in 20-bit (and greater) systems into the world of 16bit DATs and CDs.
Dancing Bits On The Noise Floor
All ÒSuper CDÓ encoding systems make the last digital bits dance so
they capture extended resolution in the 16-bit CD format. A useful
way to separate the different processes is to look at how each handles
the noise ßoor:
¥ Common dither methods compromise the 16-bit noise floor Ð they add
noise.
MasterTools
English Ð 31
Page 34

¥ Noise shaping and Òbit mappingÓ trade a reduced noise floor for a large
boost at high frequencies.
¥ UV22, ApogeeÕs unique proprietary process, keeps the audible noise floor
solid at the theoretical minimum for 16-bit systems
Although noise shaping and bit-mapping systems (questionably) focus on the noise ßoor, users often hear this ÒimprovedÓ noise ßoor as
changing with the music, making it watery and Òßuid-likeÓ. Traditional dither adds noise and raises the noise ßoor. UV22, on the other
hand, presents a constant, smooth and stable noise ßoor, unobtrusively
at the theoretical minimum level, but through which can be heard full
20-bit detail.
How Does It Compare To Analog?
We all know one of the main reasons for going digital: low noise. So
why do so many engineers still master to 1Ú2 inch analog? Technically,
analog recordings may appear to be limited by their noise ÒßoorÓ. On
closer listening, however, the noise ßoor turns out not to be as solid as
the name suggests. A better analogy would be to compare the ÒßoorÓ
to the surface of a crystal clear lake, where you can see right into the
depths. Analog noise is like that: smooth and constant Ð but you can
hear through it.
This is where digital has differed in the past. The (albeit low) noise
ßoor truly was a limit Ð more like a stirred muddy lake. Dither has
been used (intentionally and unintentionally) for years to clarify the
grunge usually lying on the bottom. The problem, however, was that
dither is quite inefÞcient at capturing full Þdelity musical detail, because it is very slow at its job Ð and it invariably increases the noise.
MasterTools
English Ð 32
UV22 is the most efÞcient method of all in capturing extended resolution into the 16-bit format. This powerful information carrier sits inaudibly out of hearing, yet presents a smooth, white, unvarying noise
ßoor through which can be heard undistorted detail up to 30 dB lower
in level Ð extending full-Þdelity information beyond 20-bit resolution
to your 16-bit CD.
Page 35

UV22 Process Caveats
UV22 Encoding is expected to be the Þnal step in the signal chain before the CD Mastering device. No more process of any kind should be
performed on the UV22 processed data or the beneÞts will be compromised. Other points in the signal chain are possible, but some care
must be taken when applying the process.
Because of the addition of the UV22 signal, it is not recommended to
use the UV22 process more than once or twice on a signal. Multiple
passes through the UV22 Process could degrade the noise ßoor of the
system in the upper frequencies. Experimentation with the Normal
and Low settings is recommended for multiple passes. In the Normal
mode, the process has been optimized to capture the greatest amount
of detail from the high resolution digital input. The Normal mode has
the added beneÞt of smoothing out the non-linearity in almost any
DAC. Even with 16-bit sources, the UV22 process gives notably better
results on inexpensive DACs. By using the Low setting, less of the detail is captured. The Low setting maintains respectable performance
with a reduction in the UV22 Energy Clump of 6 dB. The reduction in
energy could be desirable when multiple passes on a signal are performed.
ENGLISH
Recordings that would be used in a Sample or Sound Effects disc
should only be encoded if pitch shifting upward is to be used. Pitch
shifting downward on processed signals could make the UV22 Energy
Clump audible.
At this time we do not recommend UV22 processing on signals that
are destined for lossy (ÒperceptualÓ) compression systems such as
Sony MiniDisc or Internet distribution media. The UV22 Process encodes so much detail that it is possible that the compression algorithms could have adverse effects on UV22 processed material. For
this reason, the intricate information captured by the UV22 process,
would complicate the lives of these compression systems. We have not
done extensive listening tests on this yet, but do advise caution. This
caveat is not only true for the UV22 process but also for Ònoise- shapingÓ systems such as SonyÕs Super Bit Mapping.
MasterTools
English Ð 33
Page 36

Impressive comments from critical listeners on UV22
ÒThe reverb detail and stereo spread are amazing.Ó
Ñ Michael Bishop, Telarc International, Cleveland
Engineers Michael Bishop, Scott Burgess and Elaine Martone tested a
number of systems: Apogee UV22 Super CD Encoding; Sony Super
Bit Mapping; Gambit; Harmonia Mundi; and Sonic Solutions Turbo
Bit Mapping.
They used a recording of the Atlanta Symphony Orchestra and Chorus, conducted by Yoel Levi, performing RavelÕs Daphnis and Chloe
(November 1993 release, Telarc catalogue number CD-80352). The
source was 20-bit, recorded to a 20-bit Mitsubishi X-86 2-track.
¥ ÒListening tests have shown the Apogee UV22Õs 16-bit output is the closest to
what we hear on our 20-bit source. ItÕs really like getting something for nothing.
¥ ÒWe chose the Ravel recording to test dithering schemes because of its wide
dynamic range, distinct imaging and deep sound stage. The piece opens with
very low level tympani, high woodwinds and light strings and slowly builds
to a 250-voice and orchestra crescendo. Any change from the 20-bit source,
especially in those opening bars, is immediately apparent.
¥ ÒAll other systems changed the sound stage and the tonal balance. The Apo-
gee UV22 holds the detail, holds the sound stage and holds the tonal balance
across the spectrum. The UV22 was very open and very cleanÓ.
Michael further used the UV 22 on a Brazilian project, Paraiso, featuring Gerry Mulligan and Jane Dubo (October 1993 release, Telarc catalog number CD-83361).
¥ ÒThe UV 22 makes all the difference in the world in fades to digital black.Ó
¥ ÒThe reverb detail and stereo spread are amazing; it makes an overall im-
provement in the final productÓ
MasterTools
English Ð 34
Page 37

ÒUV22 kept the 24-bit signal perfectly cleanÉ all the way
down to Ð120 dB.Ó
Ñ Ted Jensen, Sterling Sound, New York
¥ ÒIn our system the UV22 kept the 24-bit signal perfectly clean with no step-
type artifacts, all the way down to Ð120 dB on our digital fader. Also, unlike
someÉnoise shaping/dithering systems weÕve listened to, the Apogee
doesnÕt color the sound.Ó
¥ ÒCompared to other systems, or truncation, there is a solidity to the sound.
Harmonics are in proper perspective with less ÒsizzleÓ, and the image is better preserved.Ó
ÒYou can hear close to 20-bit resolution from a 16-bit CD
without any special decoding hardwareÉ itÕs amazing.Ó
Ñ Roger Nichols, Engineer and Producer, Nashville
¥ ÒWarner Bros. Records called me and said that they were going to put out a 20-
bit version of Donald Fagen's album, Kamakiriad, and would I please supervise
the transfers. Our source was a 20-bit Mitsubishi X-86 tape of DonaldÕs album.
¥ ÒWe played back the X-86 tape through the Sony Super Bit Map encoder and
cut a CD and a CD master tape for Warner Bros.Ó
¥ ÒAfterwards, we compared the Super Bit Map CD with the original 16-bit
CD. The noise level actually seemed to get louder on some cuts. The quality
of the noise floor seemed to change with the signal content. The quality of
the lead vocal seemed to get grainier. With our source material, the SBM version of the CD was not any better than the straight 16-bit CD. Maybe worse.Ó
¥ ÒWe performed the same test with the Apogee UV22; we made a CD master
tape and a CD of the 20-bit X-86 tape through the UV22. We listened to all
three discs, the 16-bit, the SBM, and the UV22. The UV22 version was by far
the best. The voice was crystal clear, the noise floor was lower than that on
the 16-bit CD, and there was no noise modulation by the program material. It
was significantly better than the 16-bit CD, and the difference between the
UV22 and the SBM version was like night and day.Ó
¥ ÒWe sent the UV22 tapes to Warner Bros. for the 20-bit version of DonaldÕs
album. If there is going to be an expensive gold-plated 20-bit version, it
should sound better than the 16-bit CD, right?Ó
¥ ÒThe results are that [with UV22] you can hear close to 20-bit resolution
from a 16-bit CD without any special decoding hardware. If you get a
chance, listen to both of them and check out the difference. It is amazing.Ó
ENGLISH
MasterTools
English Ð 35
Page 38

ÒUV22 is the closest thing to the 20-bit source that I have
heard.Ó
Ñ Bob Ludwig, Gateway Mastering, Portland
Bob had a chance to put our prototype UV22 system through its paces
with various program material he was working on. He had used several types of material in the 1Ú2-inch 2-track analog format, and had
spent some time with our UV22 on the song NobodyÕs Hero from the
forthcoming Rush album Counterparts on Anthem Records. This is
what he had to say about the UV22:
¥ ÒThe Apogee UV22 is very impressiveÉ itÕs the last word in redithering.Ó
¥ ÒThe Apogee UV22 is the closest thing to the 20-bit source that I have heard.
It even makes inexpensive D to AÕs sound twice as good.Ó
ÒUV22 rounds out the rough edges of digitalÓ
Ñ Stephen Marcussen, Precision Mastering, Hollywood
¥ Ò[The Apogee UV22] rounds out the rough edges of digital. I put material
through the UV22 at below Ð60 dB and you could clearly hear the low-level
information. It was much smoother and much more intactÓ.
¥ ÒThe low-level stuff was really nice and smooth.Ó
¥ ÒThe signal with the UV22 was a lot clearer than without.Ó
Scott Hull, Masterdisk Corporation, New York
¥ ÒThe Apogee UV22 is an excellent way to utilize 20-bit A/D conversion and
20-bit signal processing. It allows you to capture the improvements of 20-bit
even on 16-bit formats. Most importantly, it is very musical sounding; it
doesnÕt change the tonal balance. With the UV22 the 16-bit output sounds
very close to the 20-bit source.Ó
¥ ÒItÕs simple to use and sounds great. Bravo!Ó
John Newton, Sound Mirror, Jamaica Plain, MA
¥ ÒWhen a 20-bit signal is processed by the UV22, the result is essentially the
same as the 20-bit original, and cleaner than Turbo Bit MappingÓ.
MasterTools
English Ð 36
Page 39

Page 40

Page 41

APOGEE MASTERTOOLS
Hi-End bit rate conversion PlugIn
Handbuch
DEUTSCH DEUTSCH
®
MasterTools
Deutsch Ð 39
Page 42

MasterTools
Deutsch Ð 40
Page 43

EinfŸhrung
Ihr Digidesign TDM-System ist dazu in der Lage, Audio mit einer unglaublichen Detailtreue wiederzugeben. Die FŠhigkeit zur Erhaltung
dieser Detailtreue wird im Digital Audio-Bereich in Bits gemessen.
Mehr Bits sind hier gleichbedeutend mit einer hšheren Außšsung und
damit einer genaueren digitalen Abbildung von Audio-Aufnahmen.
Wer erinnert sich nicht an den rauhen und verrauschten Klang der 8Bit-Aufnahmen, die man mit Šlteren Macs machen konnte? Die Verbesserung, die durch den Schritt hin zur CD-QualitŠt von 16-Bit-Aufnahmen erreicht wurde, war eine Offenbarung. Das Digidesign TDMSystem erreicht noch volle 8 Bit mehr Außšsung als ein 16-Bit-System. Diese zusŠtzlich zur VerfŸgung stehenden 8 Bits erhalten die
Dynamik beim Mischen einiger oder vieler Klangquellen, z.B. beim
Erstellen einer Zusammenstellung von Stimmen oder beim Mixdown
zum endgŸltigen Master. Selbst wenn wir nur eine Klangquelle mit einem digitalen Kompressor, Equalizer, Gate usw. des TDM-Systems
bearbeiten, dann hat das resultierende Signal eine hšhere Außšsung.
Auch wenn die Klangquelle eine Außšsung von 16 Bit hatte, enthŠlt
das resultierende Signal ein Außšsung, die Ÿber 16 Bit hinausreicht
(es sei denn, es wird auf eine niedrigere Außšsung beschnitten).
DEUTSCH DEUTSCH
Das Problem:
Wie erhalte ich die hohe Außšsung von Systemen wie TDM oder ProTools 24 auf populŠren Medien wie CD und DAT, die ÈnurÇ eine Auflšsung von 16 Bit haben?
Die Lšsung:
Apogee MasterTools¨ mit UV22¨. Wie, so mšgen Sie sich fragen,
kann eine Sonnencreme mir zu besserem Sound verhelfen? Bei UV22
handelt es sich jedoch nicht um einen Sonnenschutzfaktor, sondern
um Apogee ElectronicsÕ revolutionŠren Super CD-Kodierungsprozess
fŸr verbesserte Schallwiedergabegenauigkeit. UV22 ist von der elitŠren und kritischen CD-Mastering-Gemeinde in ŸberwŠltigender Weise
akzeptiert worden. Dies ist sehr ungewšhnlich, denn die dort verwendeten Werkzeuge unterscheiden sich gewšhnlich genauso stark wie
die unterschiedlichen Persšnlichkeiten. Dennoch verwenden praktisch
alle wichtigen Mastering-Studios eines oder mehrere Apogee UV22
Super CD-Bearbeitungssysteme wie unser UV1000 oder AD-8000.
MasterTools
Deutsch Ð 41
Page 44

Der Grund:
Apogee UV22 bringt auch die Informationen, Details und die Außš-
sung oberhalb von 16 Bit auf ein 16-Bit-Medium. Daraus resultiert ein
natŸrlicher Klang mit gro§er Detailtreue, der eine analoge QualitŠt
ohne harsche digitale MŠngel hat.
Das Werkzeug:
MasterTools
Deutsch Ð 42
MasterTools wurde entwickelt, um Ihnen bei der Bearbeitung von Audio
auf Ihrem Digidesign-System eines der Geheimrezepte guter Mastering-
Toningenieure, die UV22-Kodierung, zur VerfŸgung zu stellen. Dies
funktioniert auch dann, wenn die Klangquelle nur 16 Bits Außšsung hat.
UnabhŠngig vom verwendeten Monitorsystem verbessert UV22 die
Page 45

WiedergabequalitŠt jeder digital aufgenommen und analog wiedergegebenen Aufnahme. Im Preis Ihrer MasterTools-Software sind eine UV22Lizenz sowie ein LizenzgebŸhrenverzicht enthalten.
Die Vision:
Sie verwenden Ihr Digidesign-System fŸr die Bearbeitung und Verbesserung von Audio, also dessen, was Sie hšren. Durch HinzufŸgen
eines einzigartigen neuen Weges, Klang zu sehen hat Apogee dem
noch eine zusŠtzliche Dimension hinzugefŸgt. Das MasterToolsFenster vermittelt Ihnen auf einen Blick eine Vielzahl von Informationen. Dieses multifunktionale Me§system zeigt Spitzen- und Durchschnittspegel an und verfŸgt Ÿber Hold-Anzeigen fŸr beide. Digitale
†bersteuerungen (ÈOversÇ) werden in aufmerksamkeitsheischendem
Rot dargestellt. Die Phasenkorrelation der Signale von linkem und
rechtem Kanal wird in der Mitte zwischen beiden Pegelanzeigen angezeigt. ZusŠtzlich sind die letzten fŸnf Sekunden Audio im Fenster
als farbiges Pegel-, †bersteuerungs- und Phasenkorrelationshistogramm sichtbar. Dabei zeigt Ihnen das †bersteuerungshistogramm
nicht nur das Auftreten, sondern auch noch die StŠrke von †bersteuerungen an. Auftretende †bersteuerungen sowie ihre Timecode-Position werden zusŠtzlich in einer Over-Liste festgehalten. So kšnnen Sie
sie jederzeit zurŸckverfolgen und den Mix reparieren.
DEUTSCH DEUTSCH
Der letzte Schliff:
Mit Apogee MasterTools geben Sie Ihren Audio-Kreationen den letzten
Schliff. Danke, da§ Sie sich fŸr Apogee MasterTools entschieden haben.
†ber dieses Handbuch
Diese Handbuch soll Ihnen die FŠhigkeiten von MasterTools vermitteln. Bitte lesen Sie es daher grŸndlich durch. Das Kapitel ÈMasterTools installieren und autorisierenÇ auf Seite 47 beschreibt die
MasterTools-Installation. Informationen Ÿber das Einrichten und die
Grundfunktionen Þnden Sie im Kapitel "MasterTools einrichten" on
page 53. Darauf folgt eine ausfŸhrliche Beschreibung aller Bedienelemente und Funktionen. Das Kapitel "Der UV22-Prozess" on page 67
schlie§lich erlŠutert die UV22-Bearbeitung.
MasterTools
Deutsch Ð 43
Page 46

MasterTools-Eigenschaften
UV22-Bearbeitung
Durch Verwendung der UV22-Kodierung erhalten Sie beim Mastern
auf ein 16 Bit-Medium eine Außšsung und Wiedergabegenauigkeit
von 20 Bit und darŸber. Zur Wiedergabe ist keine Dekodierung nš-
tig.Der Apogee UV22-Prozess fŸgt dem Signal eine unhšrbare hoch-
frequente ÈVorspannungÇ hinzu. Der Algorithmus generiert und
plaziert damit eine Art von ÈEnergie-KlumpenÇ bei etwa 22 kHz.
€hnlich wie die Vorspannung (Bias) einer analogen Tonbandma-
schine, die nichtlineare Signalbestandteile ÈausbŸgeltÇ, so fŠngt
UV22 eine Außšsung von 20 Bit und darŸber hinaus auf einer 16 Bit-
CD ein. ZusŠtzlich glŠttet das unhšrbare Signal noch die Ecken und
Kanten selbst der gŸnstigsten Abhšrsysteme. Apogee UV22 lŠ§t Ihre
Aufnahmen auf allen Abhšrsystemen besser klingen. Sie kšnnen dies
auf dem System, das Sie bereits haben, einfach nachvollziehen.
UV22 ist ein sehr spezieller InformationstrŠger, keine neue Art von Dit-
hering-Rauschen. Die wirklich einzigartigen statistischen Eigenschaf-
ten von UV22 garantieren unabhŠngig von der Eingangsquelle ein
konstantes wei§es Hintergrundrauschen, das dem analogen Bandrau-
schen weitgehend entspricht. UV22 wurde von Mastering-Toningenieu-
ren in vielen Hšrtests eindeutig anderen Systemen vorgezogen.
Tausende von CD-Titeln wurden bereits mit UV22 gemastert. Mit Ma-
sterTools ist der letzte Schliff auch fŸr Ihre CD-, CD-R- oder DAT-Auf-
nahme nur noch einen Mausklick entfernt. Im Kapitel ÈDer UV22-
ProzessÇ auf Seite 67 wird der UV22-Prozess ausfŸhrlich beschrieben.
MasterTools
Deutsch Ð 44
DC-Offset entfernen
Im digitalen Ausgangssignal mancher A/D-Konverter tritt eine Rest-
Gleichstromkomponente (Englisch: DC) auf. Diese bewirkt, da§ die Si-
gnalkurve des digitalen Signals bei der Wiedergabe nicht mehr gleich-
mŠ§ig um die Nullpegel-Achse (oder digitales Schwarz = Englisch:
digital Black) zentriert ist. Bei der Wiedergabe einer Spur, die einen sol-
chen DC-Offset enthŠlt, reagieren viele digitale Pegelmeter, indem Sie
etwas anzeigen, das ein Audiopegel zu sein scheint, jedoch unhšrbar ist.
Wichtiger noch: Beim Schneiden von Signalen, die unterschiedliche
DC-Offsetpegel enthalten, kommt es an den Schnittstellen zu Klick-
und Popp-GerŠuschen. Wird die Gain-Einstellung verŠndert und es liegt
Page 47

ein DC-Offset vor, so entspricht der Ausgangspegel nicht dem Eingangspegel. MasterTools kann DC-Offsets automatisch und in Echtzeit
entfernen. Digitale Offsets werden in MasterTools fŸr beide KanŠle separat als Prozentwert bei Vollausschlag (0 dBfs) angezeigt.
Dynamische Eigenschaften der Me§instrumente
Manche Benutzer bevorzugen Me§instrumente, die Durchschnittswerte anzeigen. Andere mšgen Spitzenwertanzeigen. MasterTools
lŠ§t Ihnen nicht nur die Wahl, sondern bietet beides: Durchschnittsund Spitzenpegel werden leicht lesbar in Echtzeit dargestellt. Auf dem
Bildschirm abgebildete Me§instrumente leiden hŠuÞg unter schlechter Außšsung und erheblicher Verzšgerung zwischen Vorkommen und
Abbildung eines Ereignisses. MasterTools ist anders. Es ist die Lšsung fŸr alle, die bisher auf ein genaues Me§system fŸr ProTools gewartet haben. Die dynamischen Eigenschaften der Me§instrumente
berŸcksichtigen die Dynamik des Eingangssignals: Ein Signal mit
schnellem Abklingverhalten bewirkt z.B., da§ die Pegelanzeige ebenfalls schneller absinkt. Diese Zusatzinformation hilft Ihnen, zwischen
Brumm-, Summ- und anderen GerŠuschen zu unterscheiden, die durch
konventionelle Me§instrumente nicht deutlich abgebildet wŸrden.
DEUTSCH DEUTSCH
Das Histogramm
Das visuell wahrscheinlich herausragendste Element in MasterTools ist
sein einzigartiges Pegelmonitor-System, das Histogramm. Es bietet †bersicht Ÿber die aktuellen und vorausgegangenen Pegel-, Phasen und Balancewerte und hilft Ihnen so, Ihre Mischung Èauf den PunktÇ zu bringen.
Phasenkorrelationsmesser
Diese Anzeige gibt Ihnen Aufschlu§ Ÿber die Phasenkorrelation der
beiden StereokanŠle. Ist das Signal der beiden KanŠle phasengleich
(Mono), dann beÞndet sich die Grenze zwischen dem roten und blauen
Bereich (Indikator) ganz rechts (+1) und zeigt damit eine positive Korrelation an. Ist ein Kanal um 180û phasenverdreht, dann beÞndet sich
der Indikator ganz links (Ð1). Wenn keines oder nur ein Signal auf einem Kanal anliegt, dann ist der Indikator mittig ausgerichtet. Typische
Stereoaufnahmen mit korrekter Phasenkorrelation bewegen sich gewšhnlich zwischen der Mitte und der rechten Seite (+).
MasterTools
Deutsch Ð 45
Page 48

NOVAª
Wenn sie aktiv ist, verhindert diese Funktion die Ausgabe einer †ber-
steuerung. Sie bewirkt dies durch Reduktion des Pegels von Samples,
die digitale Vollaussteuerung erreichen, um ein LSB (Least SigniÞcant
Bit oder Q-Unit) bei 16 Bit-Pegel.
Over List
Diese Liste enthŠlt eine †bersicht Ÿber alle vorgekommenen digitalen
†bersteuerungen und deren Timecode-Position. Sie kšnnen die Liste
durchsehen und die entsprechenden Wellenformen editieren oder Apo-
geeÕs NOVA dazu verwenden, die †bersteuerungen automatisch zu
korrigieren. Die Over List lŠ§t sich ausdrucken, sichern und ist kumu-
lativ, bis sie gelšscht wird. Zeitpunkt und Anzahl aufeinander folgen-
der Ÿbersteuerter Samples werden angezeigt. Je nachdem, welches
System Sie verwenden und wie belastet es ist, kann es maximal eine
Sechzigstelsekunde dauern, bis das System die Liste aktualisiert hat.
Was ein ÈOverÇ ist (3 bis 6 aufeinander folgende Samples mit Vollaus-
steuerung), lŠ§t sich im Setup-MenŸ festlegen.
Was ist ein ÈOverÇ?
Ein ÈOverÇ ist das digitale GegenstŸck zur †bersteuerung in der ana-
logen Welt. Wenn Sie einen analogen Power-VerstŠrker Ÿbersteuern,
dann haben Sie seine gesamte dynamische Bandbreite verbraucht. Das
Ausgangssignal trifft auf die Signalbegrenzung und wird bei maxima-
lem Pegel zum rechteckigen Impuls. Anstatt Èfehlende digitale Aus-
steuerungsreserveÇ oder Èdigitales ClippingÇ nennen wir das
†bersteuern mehrerer aufeinander folgender Samples ein ÈOverÇ. Aus
wievielen Samples ein ÈOverÇ besteht, ist eine Frage der eigenen De-
Þnition und kann daher eingestellt werden. Als Grundeinstellung ha-
ben wir den de-facto-Standard von vier gewŠhlt.
MasterTools
Deutsch Ð 46
Page 49

Systemvoraussetzungen
MasterTools kann auf Apple-Computern mit TDM-System und folgender Hard- und Softwareausstattung verwendet werden:
¥ ProTools 4.0, DAE 3.3 (oder neuere Version)
¥ System 7.5 oder neuer
¥ Power Macintosh-Computer
¥ ZusŠtzlich werden mindestens ein Megabyte Speicherplatz auf Ihrer Fest-
platte sowie ein freier DSP in Ihrem TDM-System benštigt.
MasterTools installieren und autorisieren
MasterTools kann innerhalb der TDM PlugIn-Architektur des Digidesign-Systems benutzt werden. Auf der MasterTools-Diskette beÞndet
sich ein Installierungsprogramm. PrŸfen Sie vor der Installation bitte,
ob Ihre MasterTools-Diskette weitere Installationshinweise enthŠlt,
die eventuell erst nach Fertigstellung dieses Handbuchs nštig geworden sind.
¥ Folgen Sie bitte der Beschreibung mšglichst genau, um eine erfolg-
reiche Installation zu gewŠhrleisten.
¥ Falls Sie vorher eine frŸhere MasterTools-Version benutzt haben,
dann sollten Sie die folgenden Dateien auf Ihrer Festplatte finden,
in den Papierkorb bewegen und diesen leeren:
DEUTSCH DEUTSCH
Speicherort Zu lšschende Datei
Systemordner: DAE:Plug-Ins: Die alte MasterTools-Version
System-Festplatte: ÈOutdated MasterTools FilesÇ-Ordner
Systemordner: Preferences: MasterTools Prefs
Systemordner: Preferences: MasterTools Connections
¦ Das vorliegende Programm ist kein simples Update sondern eine komplette
Neuversion. Falls Sie vorher einer Šltere Apogee MasterTools-Version verwendet haben, kšnnen Sie deren Autorisation nicht mehr zum Autorisieren
dieser Version verwenden.
MasterTools
Deutsch Ð 47
Page 50

¦ Sie benštigen auch den Administrator und MIDI Administrator nicht mehr
und kšnnen Sie daher von Ihrer Festplatte entfernen.
¦ Vergewissern Sie sich bitte, da§ Ihr Plug-Ins-Ordner nur die neueste
MasterTools-Version enthŠlt!
Verfahren Sie wie folgt, um die aktuelle MasterTools-Version zu in-
stallieren und autorisieren:
1. Beenden Sie alle anderen Programme, so da§ Sie sich im Finder be-
finden, und legen Sie die MasterTools-Diskette in das entspre-
chende Laufwerk Ihres Computers ein.
Es šffnet sich ein Fenster. Ist dies nicht der Fall, dann doppelklicken Sie bitte
auf das Symbol der Installationsdiskette.
2. Doppelklicken Sie zum Laden des Installationsprogramms das Ma-
sterTools Installer-Symbol.
MasterTools mu§ auf der Festplatte Ihres Systems installiert werden, auf der sich
auch die TDM-Systemdateien und der Digidesign Plug-Ins-Ordner befinden.
MasterTools
Deutsch Ð 48
Page 51

3. Klicken Sie auf ÈInstallÇ um die Installation und das Autorisieren Ihrer
Festplatte zu starten.
Ein Dialog informiert Sie darŸber, was gerade installiert wird. Das Installationsprogramm plaziert alle Dateien in den entsprechenden Ordnern. MasterTools
wird im Plug-Ins-Ordner abgelegt, der sich in Ihrem Systemordner befindet.
War vorher kein Plug-Ins-Ordner vorhanden, so wird er neu angelegt.
4. WŠhrend der Installation werden Sie gebeten, Ihre MasterToolsKopie zu personalisieren. Tun Sie dies bitte.
DEUTSCH DEUTSCH
Das Installationsprogramm installiert nun einen unsichtbaren Kopierschutz
auf Ihrer Festplatte und autorisiert sie damit zum Betrieb von MasterTools.
5. Nach erfolgreich beendeter Installation und Autorisation erscheint
der folgende Dialog. Klicken Sie zum Beenden des Installationsprogramms auf ÈQuitÇ und starten Sie Ihren Computer neu.
¦ Falls wŠhrend der Installation Fehlermeldungen auftauchen, prŸfen Sie bitte,
ob Ihre Festplatte Ÿber genŸgend Speicherplatz zum Installieren von MasterTools verfŸgt (mindesten ca. 1 MB). Stellen Sie dies sicher, vergewissern Sie
sich, da§ die auf Seite 47 beschriebenen Systemvoraussetzungen gegeben
sind und wiederholen Sie den Installationsvorgang.
MasterTools
Deutsch Ð 49
Page 52

Informationen Ÿber den Kopierschutz
MasterTools verwendet ein Kopierschutzsystem, bei dem Ihre Installationsdiskette eine entscheidende Rolle spielt. Sie enthŠlt zwei AutorisationszŠhler, mit deren Hilfe Sie jeweils einmal eine Festplatte zum
Betrieb von MasterTools autorisieren kšnnen.
Der zweite AutorisationszŠhler dient als Ersatz, falls Sie den ersten
durch irgendwelche UmstŠnde verlieren sollten. Einer der
AutorisationszŠhler wurde wŠhrend der Installation auf Ihrer Festplatte installiert. Bitte verschieben oder lšschen Sie sie nicht, Sie
kšnnten sonst einen AutorisationszŠhler verlieren!
Ein installierter AutorisationszŠhler lŠ§t sich, falls notwendig, auch
wieder von der Festplatte entfernen und auf die Diskette zurŸckkopieren. Siehe hierzu den Abschnitt ÈDeautorisieren der FestplatteÇ auf
Seite 51. So kšnnen Sie MasterTools jederzeit auf einer anderen Festplatte neu installieren.
Beachten Sie bitte folgendes:
¥ Wenn Sie die MasterTools-Programmdateien versehentlich gelšscht haben
sollten, kšnnen Sie sie einfach neu installieren. Auch nach dem Lšschen der
Programmdateien bleibt die Festplatte weiterhin autorisiert zum Betrieb von
MasterTools, und Sie verlieren keinen AutorisationszŠhler.
¥ Sie kšnnen die Festplatte problemlos defragmentieren. Dies hat keinen Ein-
flu§ auf den MasterTools-Kopierschutz.
¥ Wenn Ihre Festplatte beschŠdigt wird, verlieren Sie eventuell einen Autorisa-
¥ Bevor Sie Ihre Festplatte neu formatieren oder partitionieren, mŸssen Sie sie
¦ Die MasterTools-Diskette ist der Nachweis dafŸr, da§ Sie das Programm re-
MasterTools
Deutsch Ð 50
tionszŠhler. Verwenden Sie in diesem Fall bitte den zweiten ZŠhler auf der
MasterTools-Diskette oder wenden Sie sich an Ihren FachhŠndler.
zunŠchst ÈdeautorisierenÇ, d.h., den AutorisationszŠhler wieder auf Ihre Installationsdiskette zurŸckkopieren. Sonst geht er verloren.
gulŠr erworben haben. Bitte bewahren Sie sie sorgfŠltig auf.
Page 53
Deautorisieren der Festplatte
Wenn Sie MasterTools permanent auf einem anderen Computer installieren wollen, mŸssen Sie die Festplatte, auf der das Programm installiert war, zunŠchst ÈdeautorisierenÇ. Dasselbe gilt, wenn Sie Ihre
Festplatte neu formatieren oder partitionieren wollen.
WŠhrend des Deautorisierens wird der AutorisationszŠhler von der
Festplatte zurŸck auf die MasterTools-Diskette kopiert. Gehen Sie folgenderma§en vor:
1. Heben Sie den Schreibschutz der MasterTools-Diskette auf, legen
Sie sie in das Diskettenlaufwerk ein, und doppelklicken Sie auf das
ÈDeauthorizerÇ-Symbol.
Es erscheint der folgende Dialog.
DEUTSCH DEUTSCH
2. Klicken Sie auf ÈSetup...Ç.
Es erscheint dieser Dialog.
MasterTools
Deutsch Ð 51
Page 54

3. WŠhlen Sie zuerst im ÈAuthorizationÇ-Pop up-MenŸ die Funktion
ÈRemoveÇ (Entfernen) an, und klicken Sie im Feld darunter auf das
entsprechende Festplattensymbol. Klicken Sie nun auf den ÈRemoveÇ-Schalter.
Dies aktiviert den Deautorisationsvorgang.
4. Der AutorisationszŠhler wird nun von Ihrer Festplatte entfernt und
zurŸck auf Ihre MasterTools-Diskette kopiert. Nach Beendigung
des Vorgangs erscheint dieser Hinweis, der Sie Ÿber die Anzahl der
nunmehr auf der Diskette vorhandenen AutorisationszŠhler informiert.
5. Installieren Sie MasterTools auf der neuen oder verŠnderten Fest-
MasterTools
Deutsch Ð 52
platte, wie zuvor beschrieben.
Page 55

MasterTools einrichten
Starten Sie nun ProTools und erzeugen Sie eine neue Session oder laden Sie eine vorhandene ein. MasterTools sollte Ihnen jetzt als InsertEffekt fŸr den Stereo-Masterregler oder einen Stereo Aux-Regler zur
VerfŸgung stehen. Falls Sie mit ProTools III arbeiten und MasterTools
auf das endgŸltige Ausgangssignal anwenden mšchten, sollten Sie das
PlugIn als Insert des Masterreglers verwenden. Hinweise auf das Einrichten von MasterTools als Insert-Effekt in ProTools Þnden Sie in
diesem Abschnitt.
¦ Wenn MasterTools nicht aufrufbar ist, verschieben Sie Ihre anderen PlugIns
(mit Ausnahme des Mixer-PlugIns und des MasterTools PlugIns) bitte vorŸbergehend vom Plug-Ins-Ordner (befindet sich im DAE-Ordner innerhalb
des Systemordners) auf den Desktop und starten Sie ProTools erneut. Falls
MasterTools nun funktioniert, bewegen Sie Ihre anderen PlugIns eines nach
dem anderen in den Plug-Ins-Ordner und starten Sie ProTools jedesmal neu.
So lassen sich eventuelle Konflikte mit anderen PlugIns herausfinden.
Wir empfehlen zwar, da§ Sie das gesamte Handbuch lesen, kšnnen
aber nicht wirklich daran glauben, da§ Sie es auch wirklich tunÉ
Falls Sie es besonders eilig haben, werden Sie feststellen, da§ sich
MasterTools intuitiv bedienen lŠ§t. Wir empfehlen Ihnen jedoch, zunŠchst noch die folgenden Schritte auszufŸhren:
DEUTSCH DEUTSCH
1. Etablieren Sie nach dem starten des ProTools-Programms Ihre Spuren.
WŠhlen Sie das Mix-Fenster an, und vergewissern Sie sich, da§ die Inserts
im Mix-Fenster sichtbar sind.
2. WŠhlen Sie den Eintrag ÈNew Master Faders...Ç im File-MenŸ aus.
Wenn Sie nicht alle Spuren mit MasterTools bearbeiten mšchten,
wŠhlen Sie stattdessen den Eintrag ÈNew Auxiliary Inputs...Ç. Es
erscheint ein Dialog. Bestimmen Sie hier die Anzahl der neu zu erzeugenden Master-Schieberegler/Aux-EingŠnge durch Eintippen
einer 1. Aktivieren Sie ÈStereo inputÇ, und klicken Sie dann auf
ÈOKÇ.
¦ Wenn Sie einen Aux-Eingang erzeugt haben, fahren Sie bitte mit Schritt 4 fort.
MasterTools
Deutsch Ð 53
Page 56

3. Wenn Sie einen Master-Schieberegler gewŠhlt haben, wird er automatisch Ausgang 1 und 2 zugeordnet. Wenn Sie ein anderes Ausgangspaar fŸr die Ausgabe auf Ihr Stereo-Speichermedium (CD-R,
DAT etc.) verwenden, klicken und halten Sie den ÈOutputÇ-Schalter
des Masterreglers und wŠhlen Sie das benutzte Ausgangspaar. Lesen
Sie nun ab Schritt 8weiter.
4. Wenn Sie einen Aux-Eingang gewŠhlt haben, mŸssen Sie ihm Eingangs- und Ausgangsparameter zuordnen und ihm durch Routen die
Signale derjenigen Audiospuren zufŸhren, die Sie damit bearbeiten
wollen. Dies bewerkstelligen Sie durch Bus-Zuordnung und die InsertPunkte des Mix-Fensters.
5. WŠhlen Sie ein TDM-Bus-Paar zum Routen aller Signale aus, die
Sie mit MasterTools bearbeiten mšchten. Nehmen wir an, Sie haben Bus 15 & 16 ausgewŠhlt. Klicken und halten Sie den OutputSchalter in der I/O-Sektion jedes Kanals, und wŠhlen Sie das gewŸnschte Bus-Paar auf das Sie routen mšchten. Wiederholen Sie
dies fŸr alle zu bearbeitenden KanŠle.
6. Wenn Sie auf diese Weise alle KanŠle, die Sie bearbeiten mšchten,
auf den richtigen TDM Stereo-Bus geroutet haben, mŸssen Sie die
Verbindung zwischen diesen Bussen und dem Stereo Aux-Eingang
herstellen, der MasterTools das Signal zufŸhrt. Klicken Sie dazu
auf den Input-Schalter des betreffenden Stereo Aux-Eingangs und
wŠhlen Sie (in unserem Beispiel) Bus 15-16.
7. Nun mŸssen Sie noch den Ausgang des Stereo Aux-Sends mit dem
8. Falls Sie es nicht schon getan haben, wŠhlen Sie nun ÈShow Inserts
MasterTools
Deutsch Ð 54
Master-Ausgang verbinden. Es ist sinnvoll, danach einen Rohmix
laufen zu lassen. So kšnnen Sie feststellen, ob das Routing richtig
funktioniert. Nun ist nur noch ein Schritt zu tun, um MasterTools
zu aktivieren.
ViewÇ im Display-MenŸ aus. MasterTools ist ein Stereo PlugIn, das
auf jedem Stereo Master-Schieberegler oder Aux-Return aktiviert
werden kann. Obwohl es mšglich ist, MasterTools einem beliebigen
der fŸnf Inserts zuzuordnen, sollten Sie dazu den untersten (ÈEÇ)
wŠhlen. So positionieren Sie MasterTools als letztes PlugIn in der
Page 57
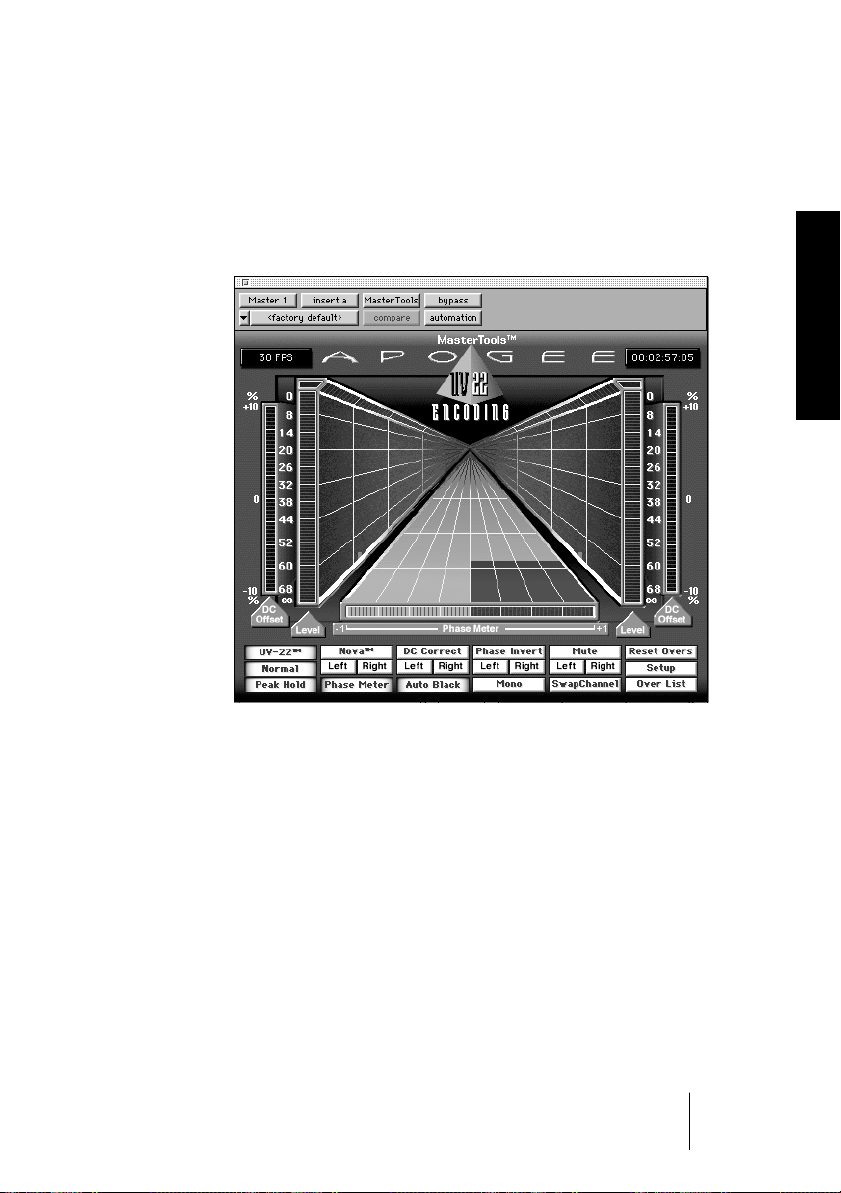
Kette und profitieren am meisten von der UV22-Bearbeitung. Klikken Sie dazu den letzten der fŸnf Insert-Schalter des Master-Schiebereglers/Aux-Eingangs, drŸcken Sie die Maustaste weiterhin und
wŠhlen Sie MasterTools aus der Liste der vorhandenen PlugIns aus.
Nun sollte sich das MasterTools-Fenster šffnen und so aussehen, wie hier
dargestellt.
DEUTSCH DEUTSCH
9. Wenn Sie die Audio-Wiedergabe starten, sollten die Pegel in den
mit ÈLevelÇ gekennzeichneten Pegelanzeigen, links und rechts des
ÈKorridorsÇ sichtbar werden. WŠhrend der Wiedergabe wandern
die angezeigten Pegel an den ÈKorridorwŠndenÇ entlang, bis sie
am ÈHorizontÇ verschwinden.
10.Sie kšnnen nun sich nun entweder in den folgenden Abschnitten
Ÿber die FunktionalitŠt der einzelnen Bedienelemente und Anzeigen informieren oder das Handbuch beiseite legen und anfangen
Èmit den Knšpfen zu spielenÇ. Aller Voraussicht nach* werden Sie
dabei nichts beschŠdigen.
* ÈAller Voraussicht nachÇ soll hei§en, da§ wir fŸr Ihre Aktionen natŸrlich
keine Verantwortung Ÿbernehmen kšnnen. Wer wei§, was Ihnen so einfŠlltÉ
MasterTools
Deutsch Ð 55
Page 58
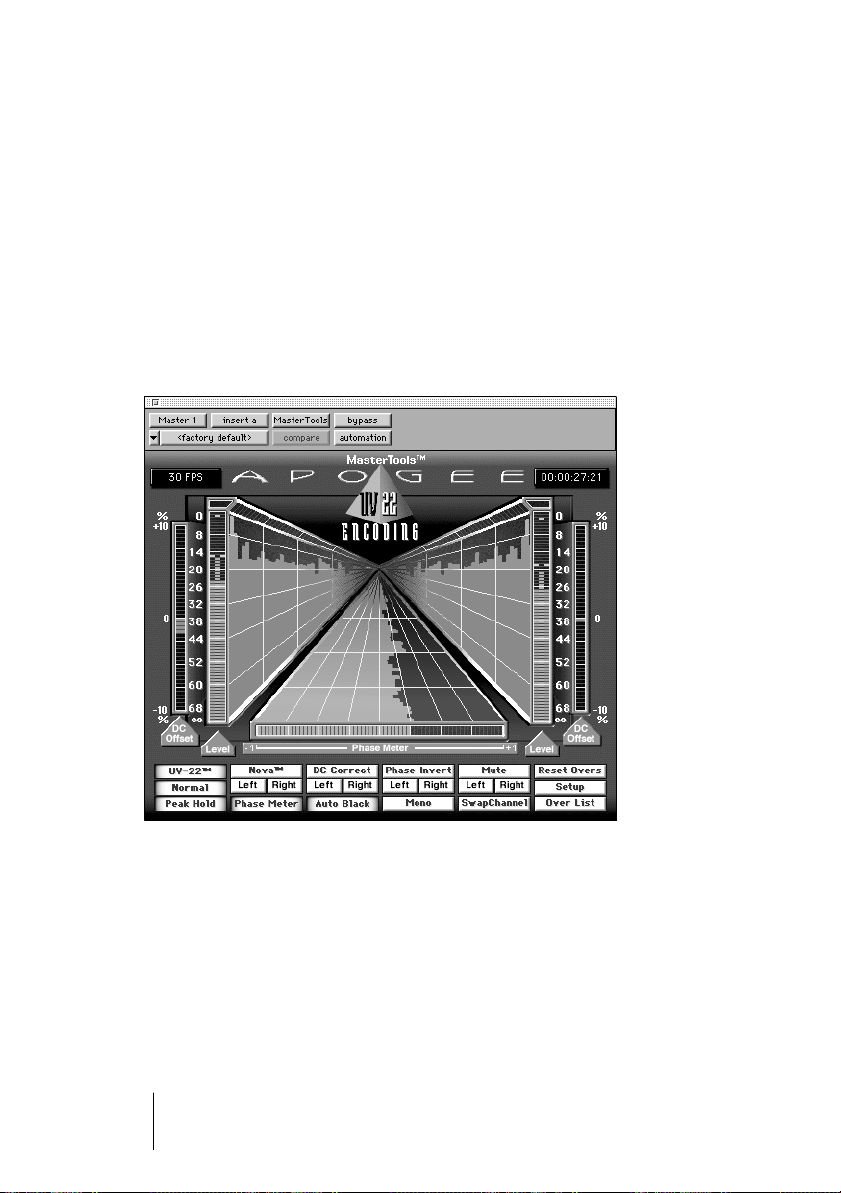
Funktionsweise
Das MasterTools-Fenster enthŠlt zwei Hauptbereiche. Der erste ist der
Anzeigebereich im oberen Teil des Fensters. Er enthŠlt die Pegelanzeigen, den Korrelationsmesser und die DC Offset-Anzeigen.
Unterhalb dieses Bereichs beÞndet sich der Schalterbereich. Er enthŠlt
Schalter, mit denen Sie die Anzeigen beeinßussen und andere Funktionen aktivieren kšnnen.
Die am oberen Fensterrand sichtbaren Schalter gehšren zu ProTools
und sind in dessen Dokumentation beschrieben.
Die Anzeigen Ð Anordnung und Funktion
Die Vorderseite der ÈKorridorwŠndeÇ links und rechts zeigt den Signalpegel, der am Stereo Aux-Eingang oder am Master-Ausgang anliegt, in dem MasterTools als Insert funktioniert.
MasterTools
Deutsch Ð 56
Page 59
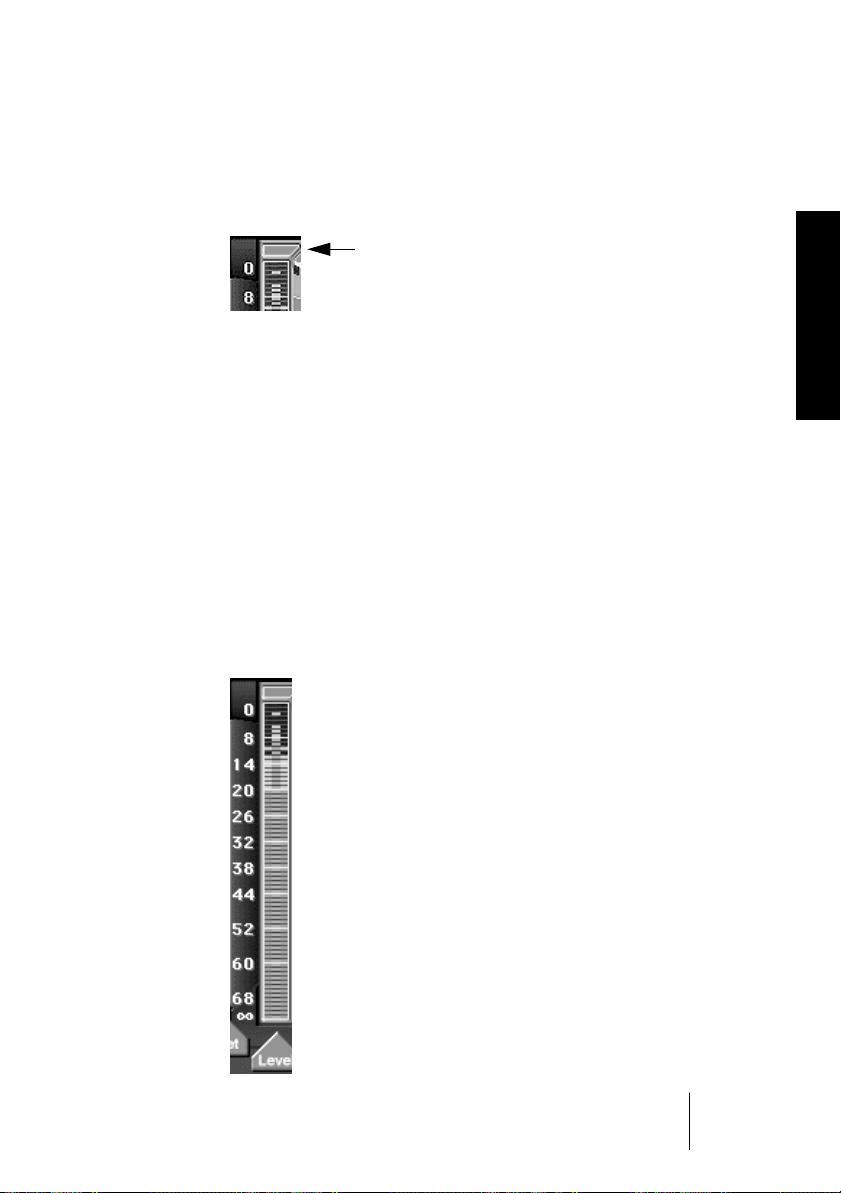
Overs-Anzeigen Ð Digitale †bersteuerungen erkennen
Jeder der beiden KanŠle hat eine Overs-Anzeige, die rot außeuchtet,
sobald eine †bersteuerung auftritt. Sie leuchtet, bis Sie den ÈReset
OversÇ-Schalter anklicken. Dies setzt beide Overs-Anzeigen zurŸck.
Over-Anzeige des linken Kanals
Sie kšnnen die Overs-Anzeigen auch separat zurŸcksetzen. Doppelklicken Sie dazu einfach die gewŸnschte Anzeige.
Wenn die NOVA-Funktion aktiv ist, werden die durch diese Funktion
korrigierten Overs in der Overs-Anzeige blau dargestellt. Die im Histogramm dargestellten Overs werden jedoch weiterhin in rot dargestellt.
Die LŠnge der einzelnen Over-Segmente im Histogramm (dargestellt
im obersten Bereich der beiden Histogramm ÈKorridorwŠndeÇ) zeigt
an, wieviele Overs innerhalb einer bestimmten Zeitspanne aufgetreten
sind: Je hšher jedes rote Segment, desto mehr aufeinanderfolgende
†bersteuerungen haben stattgefunden.
DEUTSCH DEUTSCH
Pegelanzeigen Ð Spitzen- und Durchschnittspegel sehen
Der schmale Balken zeigt den Spitzenpegel, der breite
Balken den Durchschnittspegel (RMS) an.
Wenn der Peak Hold-Schalter aktiv ist, dann werden die
in beiden Anzeigen erreichten hšchsten Pegelwerte fŸr
zwei Sekunden (oder dem im Setup-Dialog eingestellten
Wert) gehalten, falls nicht ein hšherer Pegel auftritt.
Die fŸnf ÈLEDsÇ am unteren Ende der Skala unterteilen
den Bereich von Ð41 dB bis ¥ (oder de facto Ð138,47
dB) linear auf. ¥ reprŠsentiert dabei das tiefste Bit und
leuchtet daher auf, sobald ein Signal erkannt wird.
In diesen Pegelanzeigen liegt der Durchschnittspegel bei Ð12 dB
und der Spitzenpegel bei Ð5. Der Peak Hold zeigt Ð2 und der
Durchschnittspegel Hold zeigt Ð10. Overs sind aufgetreten. Die
Skala ist auf ÈDigitalÇ eingestellt. In der ÈAnalogÇ-Einstellung
entspricht das obere Pegelende einem Wert von +20 dBfs.
MasterTools
Deutsch Ð 57
Page 60

DC Offset-Anzeigen Ð DC Offsets entfernen
Diese Anzeigen informieren Sie Ÿber den DC
Offset in Prozent (Ð10% bis +10%).
Wird hier der Wert Null angezeigt, so wurde
kein DC Offset festgestellt.
Wenn der DC Correct-Schalter aktiv ist, dann
werden in den DC Offset-Anzeigen auftretende
Werte blau angezeigt und zeigen damit an, da§
der DC Offset beseitigt wurde. Ist der Schalter
nicht aktiviert, dann werden die Werte in rot
dargestellt.
In diesem Beispiel wird ein DC Offset von 5% im
eintreffenden Signal erkannt.
Phasenkorrelationsanzeige Ð MonokompatibilitŠt prŸfen
Zwischen den beiden Pegelanzeigen beÞndet sich die Phasenkorrelationsanzeige. Diese Anzeige gibt Ihnen Aufschlu§ Ÿber die Phasenkorrelation der beiden StereokanŠle.
MasterTools
Deutsch Ð 58
Phasenkorrelationsanzeige und -Histogramm
Wenn das Signal der beiden KanŠle absolut phasengleich Ð also identisch Ð ist, dann beÞndet sich die Grenze zwischen den beiden Anzei-
Page 61

gefarben (der Indikator) ganz rechts (+1) und zeigt damit eine positive
Korrelation an. Wenn ein Kanal um 180û phasenverdreht ist, dann wird
eine negative Korrelation angezeigt und der Indikator beÞndet sich
ganz links (Ð1). Wenn keines oder nur ein Signal auf einem Kanal anliegt, dann ist der Indikator mittig ausgerichtet. Typische Stereoaufnahmen mit korrekter Phasenkorrelation bewegen sich gewšhnlich
zwischen der Mitte und der rechten Seite.
Die Schalter Ð Anordnung und Funktion
MasterTools verfŸgt Ÿber drei Schaltertypen: An-/Ausschalter, Wahlschalter und Schalter, die eine Funktion aktivieren (aber nicht deaktivieren) sobald Sie sie anklicken.
Beim ersten Typ handelt es sich um die Ÿbliche An-/Aus-Variante:
Durch Anklicken schalten Sie die betreffende Funktion fŸr beide StereokanŠle an, durch erneutes Anklicken schalten Sie sie wieder aus.
Die folgenden MasterTools-Schalter gehšren zu diesem Schaltertyp:
UV22, Normal/Low, Peak Hold, Phase Meter, Auto Black, Mono,
SwapChannel, Setup und Over List. Die Funktion ist aktiv, wenn der
betreffende Schalter ÈbeleuchtetÇ dargestellt wird.
DEUTSCH DEUTSCH
Funktionen sind eingeschaltet Funktionen sind ausgeschaltet
Der zweite Schaltertyp umfa§t jeweils eine kleine Gruppe von je drei
Schaltern. Damit legen Sie fest, ob die betreffende Funktion nur den
linken, den rechten oder beide StereokanŠle beeinßussen soll. Durch
Anklicken des breiten Schalters kšnnen Sie die Funktion insgesamt
ein- und ausschalten. Zum Einschalten mu§ zumindest einer der beiden kleineren Schalter aktiv sein. Wenn Sie den ÈLeftÇ oder ÈRightÇSchalter separat anklicken, aktivieren oder deaktivieren Sie nur diesen
Kanal und der andere behŠlt seine vorherige Einstellung. Die MasterTools-Schalter Nova, DC Correct, Phase Invert und Mute gehšren zu
diesem Schaltertyp.
Der einzige Vertreter des dritten Schaltertyps ist der Reset OversSchalter. Wenn Sie ihn anklicken, wird die Overs-Liste gelšscht.
MasterTools
Deutsch Ð 59
Page 62

UV22-Schalter Ð UV22-Kodierung aktivieren
Mit dem UV22-Schalter kšnnen Sie die UV22-Kodierung ein- oder
ausschalten. Der Schalter ist ÈbeleuchtetÇ, wenn die Funktion aktiv
ist. Au§erdem ist die Aufschrift UV22 Encoding auf der Pyramide
oben im MasterTools-Fenster zu sehen. Bei ausgeschaltetem UV22Schalter wird das Signal ohne UV22-Kodierung weitergegeben.
UV-22 ist eingeschaltet.
Normal-/Low-Schalter Ð Die zwei UV22-Modi
Mit diesem LautstŠrkeschalter wŠhlen Sie zwischen den zwei UV22Betriebseinstellungen Normal und Low. Der Schalter ÈleuchtetÇ daher
auf, sobald Sie UV22 aktivieren. Durch Mausklick auf den Schalter
kšnnen Sie zwischen den beiden Einstellungen Normal und Low wŠhlen. Die gewŠhlte Einstellung ist auf dem Schalter zu sehen.
Normal ist eingeschaltet.
Zumeist wird hier Normal eingestellt sein. Die Low-Einstellung ermšglicht eine fast genau so gro§e Außšsung, verwendet jedoch ein
UV22-Signal mit niedrigerem Pegel. Eine genauere Beschreibung des
Vorgangs und der empfohlenen Einstellungen Þnden Sie im Abschnitt
ÈWichtige Hinweise zur UV22-BearbeitungÇ auf Seite 71. Vorerst
kšnnen Sie diesen Schalter in der Normal-Stellung belassen.
MasterTools
Deutsch Ð 60
NOVA Ð †bersteuerungen automatisch vermeiden
Mischungen, die digitale †bersteuerung (ÈOversÇ) enthalten, sind
nicht akzeptabel. Wenn NOVA eingeschaltet ist, reduziert diese Funktion den Pegel jedes digitale Vollaussteuerung erreichenden Samples
automatisch um ein LSB (Least SigniÞcant Bit). Nicht betroffene
Samples werden von NOVA nicht verŠndert.
In dieser Einstellung reduziert NOVA alle ÈOversÇ auf dem linken Kanal.
Page 63
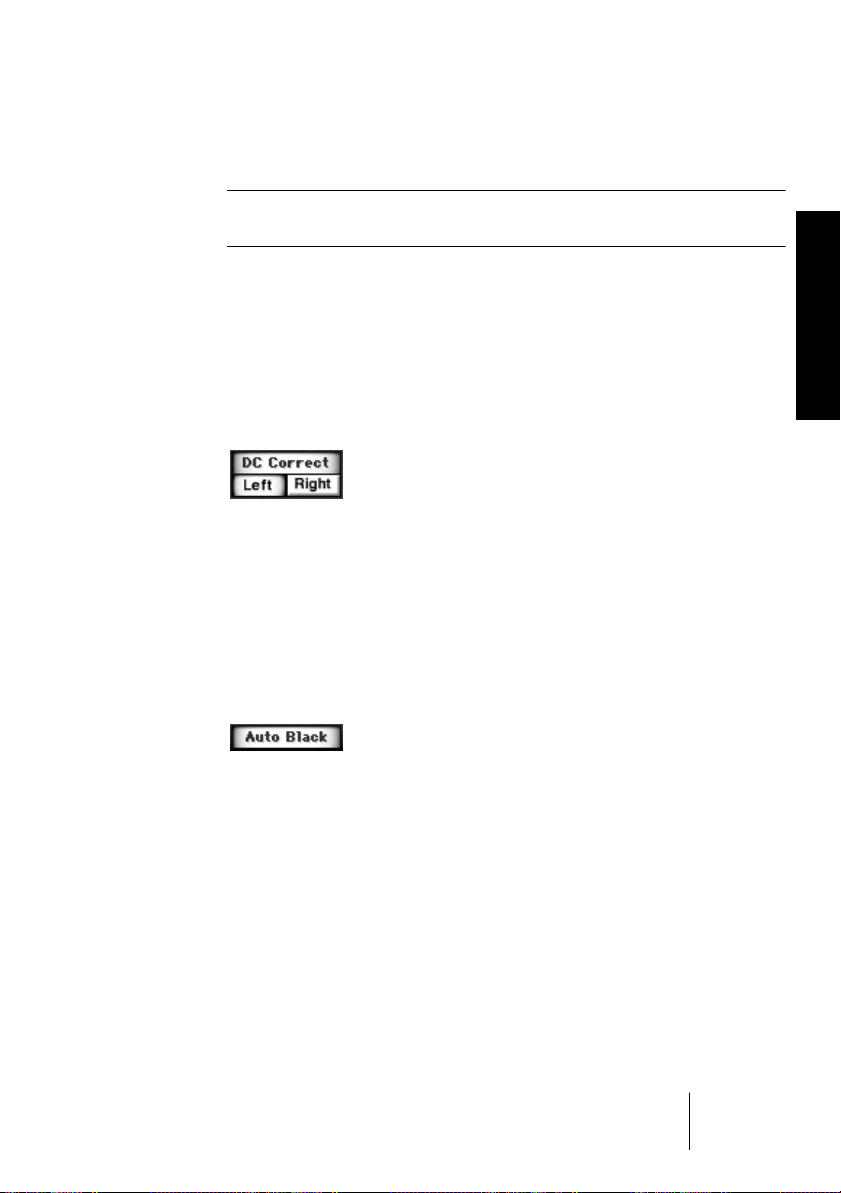
Auf diese Weise korrigierte ÈOversÇ werden in der Over-Anzeige blau
dargestellt.
¦ Im ÈOverÇ-Histogramm werden auch korrigierte ÈOversÇ weiterhin in rot
dargestellt. Weitere Einzelheiten hierzu finden Sie auf Seite 57.
DC Correct Ð DC Offsets entfernen
MasterTools enthŠlt ein umfassendes System zur Entfernung von DC
Offsets. Sobald die DC Offset-Anzeigen Ihnen das Vorhandensein eines DC Offsets anzeigen, kšnnen Sie diese Funktion aktivieren um
ihn effektiv zu beseitigen.
DC Correct ist eingeschaltet und fŸr den linken Kanal aktiviert.
Auto Black Ð Digitale Stille einsetzen
Mit diesem Schalter aktivieren Sie die Auto Black-Funktion. Sie funktioniert wie ein Gate: Wenn der Pegel fŸr eine bestimmte Zeit unter einen bestimmten Schwellwert fŠllt, wird das Signal stummgeschaltet,
bis der Pegel wieder darŸberhinaus steigt.
DEUTSCH DEUTSCH
Auto Black ist eingeschaltet.
Die Auto Black-Funktion ermšglicht so das automatische Einsetzen
digitaler Stille. Wenn Auto Black aktiv ist, setzt seine Wirkung ein, sobald wŠhrend 128 aufeinander folgender Sample-Paare (links/rechts)
kein Signal auf der 20 Bit-Ebene erfolgt und das Signal den Pegel von
Ð42 dBfs nicht Ÿbersteigt. Auto Black setzt automatisch wieder aus,
sobald auf dem linken oder rechten Kanal ein Signal auftritt.
MasterTools
Deutsch Ð 61
Page 64

SwapChannel-Schalter Ð KanŠle vertauschen
Mit Hilfe dieses Schalters kšnnen Sie durch das Vertauschen des linken und rechten Kanals eine korrekte Stereoplazierung ŸberprŸfen.
Beim Vertauschen der KanŠle wird die PolaritŠt aufrechterhalten.
SwapChannel ist ausgeschaltet.
Ist der Schalter aktiv, so wird der rechte Kanal Ÿber den linken Ausgang wiedergegeben und umgekehrt.
Phase Meter-Schalter Ð Phasenkorrelation anzeigen
Mit diesem Schalter kšnnen Sie die Phasenkorrelationsanzeige aktivieren. Ist der Schalter aus, dann zeigt die Anzeige einen Wert von 0 an.
Wenn der Phase Meter-Schalter aktiv ist...
MasterTools
Deutsch Ð 62
...wird in der Phasenkorrelationsanzeige die Phasenkorrelation des
Audiosignals der beiden AudiokanŠle zueinander angezeigt.
Page 65
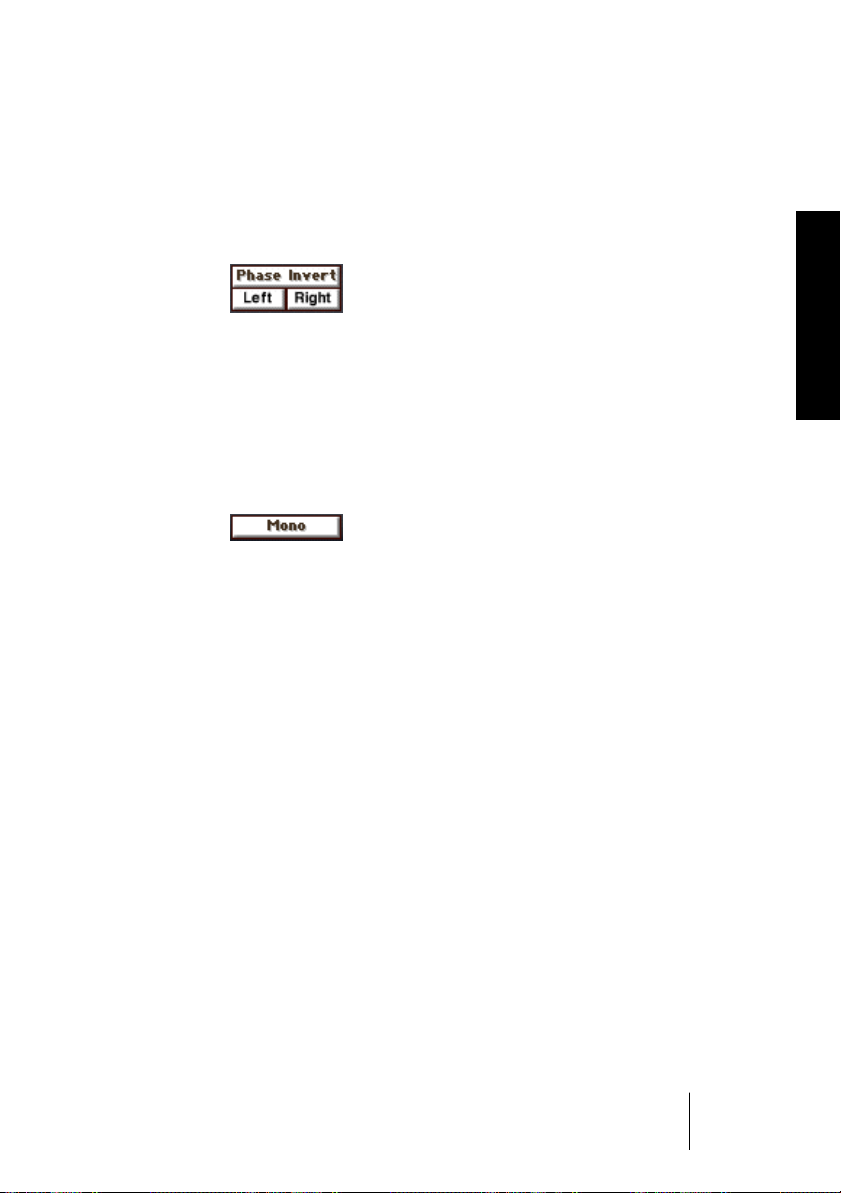
Phase Invert-Schalter Ð PolaritŠt Šndern
Es kann manchmal sinnvoll sein, die absolute PolaritŠt eines Signals
zu ŸberprŸfen. In der Phase verdrehte Musik kann interessant klingen.
Durch AnwŠhlen des Phase Invert-Schalters vertauschen Sie die PolaritŠt des Signals.
Der Phase Invert-Schalter ist aus.
Wenn Sie zum HerausÞnden von Phasenverwandschaften nur einen
Kanal in der Phase verdrehen mšchten, klicken Sie einfach auf den
Left- oder Right-Schalter unterhalb des Phase Invert-Schalters.
Mono-Schalter Ð Summe in Mono ausgeben
Ist dieser Schalter aus (nicht ÈbeleuchtetÇ), dann hšren Sie das Stereo-Signal.
Wenn der Mono-Schalter aktiviert ist, werden der linke und rechte Kanal zu einem Mono-Signal zusammengefasst. So kšnnen Sie die
Mono-KompatibilitŠt prŸfen. Falls aktiv, zeigt die Phasenkorrelationsanzeige zu Ihrer Information weiterhin die Phasenkorrelation zwischen beiden KanŠlen an.
DEUTSCH DEUTSCH
Da diese Summe=Mono-Funktion erst nach einer mšglicherweise mit
dem Phase Invert-Schalter bewirkten Phasenverdrehung stattÞndet,
lassen sich die beiden Funktionen dazu verwenden, ein Links minus
Rechts-Signal herzustellen. Dies ist eine oft verwendete MasteringTechnik, mit der man alle phasenverdrehten Elemente in einer Mischung feststellen kann.
Gehen Sie dazu wie folgt vor:
1. Aktivieren Sie die Mono und Phase Invert-Schalter.
2. Verwenden Sie nun die Left und Right-Schalter unterhalb des
Phase Invert-Schalters zum Vergleichen.
MasterTools
Deutsch Ð 63
Page 66

Reset Overs-Schalter Ð Overs-Anzeige zurŸcksetzen
Aufgetretene digitalen †bersteuerungen werden behalten, bis Sie entweder MasterTools vom aktiven Bildschirm entfernen oder den Reset
Overs-Schalter anklicken.
Der Reset Overs-Schalter
Mit diesem Schalter lšsen Sie das RŸcksetzen der Overs-Anzeigen,
oberhalb der Pegelanzeigen, zurŸck.
¦ Wenn Sie die Over-Liste lšschen mšchten, šffnen Sie sie durch Anklicken
des Over List-Schalters und klicken Sie auf ÈClearÇ.
Peak Hold-Schalter Ð Pegelspitzen optisch halten
Peak Hold ist eingeschaltet.
In der Grundeinstellung sind die MasterTools-Pegelanzeigen auf Peak
Hold aktiv eingestellt. In diesem Modus werden die hšchsten Werte in
den Spitzen- und Durchschnittspegelanzeigen fŸr ca. zwei Sekunden
gehalten, falls im Setup-Dialog kein anderer Wert eingestellt worden
ist. Falls innerhalb der zwei Sekunden ein hšherer Pegelwert auftritt,
wird dieser als Peak Hold Ÿbernommen und gehalten.
MasterTools
Deutsch Ð 64
Over List-Schalter Ð Liste der †bersteuerungen aufrufen
Der Over List-Schalter
Durch Anklicken dieses Schalters šffnen Sie den ÈOver ListÇ-Dialog.
Hier werden alle digitalen †bersteuerungen (ÈOversÇ) aufgelistet, die
wŠhrend einer Session aufgetreten sind.
Page 67

Die Liste kann durch Anklicken von ÈClearÇ gelšscht oder durch Anklicken von ÈSaveÇ (z.B. zum spŠteren Drucken oder Einsehen) gesichert werden.
Der ÈOver ListÇ-Dialog
Jedes ÈOverÇ besteht aus einer Anzahl clippender Samples. Der
ÈTimeÇ-Wert in der Liste reprŠsentiert den Zeitpunkt, zu dem das
letzte einer Reihe Ÿbersteuernder Samples aufgetreten ist. Der
ÈCountÇ-Wert zeigt an, wieviele Samples jeweils Ÿbersteuert waren.
DEUTSCH DEUTSCH
¦ Das in dieser Liste verwendete Timecode-Format entspricht demjenigen, das
Sie im ProTools Display-MenŸ unter ÈShow Session Setup WindowÇ eingestellt haben. Es wird zusŠtzlich oben links im MasterTools-Fenster dargestellt.
Mute-Schalter Ð KanŠle stummschalten
Durch Anklicken des Left-, Right- oder Mute-Schalters schalten Sie
entweder den linken, den rechten oder beide KanŠle stumm.
Die Mute-Funktion ist nicht aktiv.
MasterTools
Deutsch Ð 65
Page 68

Setup-Schalter Ð Voreinstellungen Šndern
Wenn Sie den Setup-Schalter anklicken, šffnet sich ein Dialog, in dem
Sie verschiedene Voreinstellungen Šndern kšnnen.
Wenn Sie den Setup-Schalter anklicken...
...dann erscheint dieser Dialog.
Parameter Wirkung
Peak Hold Time Hiermit legen Sie fest, wie lange Spitzen- und Durch-
schnittspegel nach ihrem Auftreten gehalten werden (also
sichtbar bleiben). In der Einstellung ÈLatchedÇ werden sie
unbeschrŠnkt gehalten.
MasterTools
Deutsch Ð 66
Headroom Scale Hiermit legen Sie die Skaleneinteilung der Pegelanzeigen
fest. In der Grundeinstellung ist hier der Wert +20 dB voreingestellt. Das VerŠndern der Skaleneinteilung verŠndert
die Auflšsung der Anzeigen. Die Einstellung +12 dB liefert die grš§te Auflšsung am oberen Ende der Skala.
Wenn Sie ÈDigital ScaleÇ aktivieren, liegt der oberste
Wert der Skala bei 0 dB und entspricht damit eher einer
typischen digitalen Pegelanzeige, wie die auf einem
DAT-Recorder.
Consecutive Hier legen Sie fest, wieviele aufeinanderfolgende Voll-
aussteuerung erreichende Samples eine ÈOverÇ-Anzeige
bewirken.
Page 69

Der UV22-Prozess
Die LeistungsfŠhigkeit einer Standard-CD zu erhšhen ist keine neue
Idee. Es begann damit, da§ man digitalen Aufnahmen wei§es Rauschen (Dithering Noise) hinzufŸgte. Danach versuchte man es mit verschiedenen Arten von Dithering, gefolgt von einem ÈNoise-ShapingÇ
genannten Prozess und den spŠter entwickelten verschiedenen Formen
des sog. ÈBit MappingsÇ. UnabhŠngige Hšrtests ergaben, da§ diese
Systeme die Aufnahmen, die wir erhalten mšchten, oder das hšrbare
Grundrauschen verŠndern.
ApogeeÕs UV22 Super CD Encoding, da§ in fŸnf Jahren entwickelt
wurde, ist ein gŠnzlich anderes Verfahren. UV22 erledigt seine Aufgabe ohne klangliche Kompromisse und ohne selbst klanglich etwas
hinzuzufŸgen. So erhŠlt es den klanglichen Zustand und die tonale Balance der ursprŸnglichen 20 Bit-Quelle. Diese Wirkung ist selbst bei
16 Bit-Aufnahmen hšrbar.
ApogeeÕs UV22 Kodierungsprozess fŸgt dem digitalen Bit-Strom eine
unhšrbare hochfrequente ÈBiasÇ-Frequenz hinzu. Der Algorithmus
generiert und plaziert damit eine Art von ÈEnergie-KlumpenÇ bei etwa
22 kHz. €hnlich wie die Vorspannung (Bias) einer analogen Tonbandmaschine, die nichtlineare Signalbestandteile ÈausbŸgeltÇ, so fŠngt
UV22 eine Außšsung von 20 Bit und darŸber hinaus auf einer 16 BitCD ein.
DEUTSCH DEUTSCH
Durch Verwendung der UV22-Kodierung erhalten Sie beim Mastern
auf ein 16 Bit-Medium eine Außšsung und Wiedergabegenauigkeit
von 20 Bit und darŸber. Zur Wiedergabe ist keine Dekodierung nštig.Der Apogee UV22-Prozess fŸgt dem Signal eine unhšrbare hochfrequente ÈVorspannungÇ hinzu. Der Algorithmus generiert und
plaziert damit eine Art von ÈEnergie-KlumpenÇ bei etwa 22 kHz.
€hnlich wie die Vorspannung (Bias) einer analogen Tonbandmaschine, die nichtlineare Signalbestandteile ÈausbŸgeltÇ, so fŠngt
UV22 eine Außšsung von 20 Bit und darŸber hinaus auf einer 16 BitCD ein. ZusŠtzlich glŠttet das unhšrbare Signal noch die Ecken und
Kanten selbst der gŸnstigsten CD-Spieler oder externer Konverter.
Apogee UV22 lŠ§t Ihre Aufnahmen auf allen Abhšrsystemen besser
klingen. Sie kšnnen dies auf dem System, das Sie bereits haben, einfach nachvollziehen.
MasterTools
Deutsch Ð 67
Page 70

UV22 ist ein sehr spezieller InformationstrŠger, keine neue Art von
Dithering-Rauschen. Die wirklich einzigartigen statistischen Eigenschaften von UV22 garantieren unabhŠngig von der Eingangsquelle
ein konstantes wei§es Hintergrundrauschen, das dem analogen Bandrauschen weitgehend entspricht. Wenn Sie sich das Rauschen einer
mit UV22 kodierten Aufnahme anhšren, so hšren Sie eine stabile, genaue Klangstufe und eine ehrliche tonale Balance mehr als 24 dB in
das Rauschen hinein Ð wie beim analogen Tonband. Dennoch liegt das
niedrige hšrbare Grundrauschen von UV22 an der theoretischen
Grenze eines 16 Bit-Systems. Nichts geht verloren Ð aber es wird eine
Menge hinzugewonnen.
UV22 wurde von Mastering-Toningenieuren in vielen Hšrtests eindeutig anderen Systemen vorgezogen. Viele Tausend CD-Titel wurden
bereits mit den Apogee-Systemen UV1000 Super CD-Encoder und
AD-1000 20-Bit Resolution AD gemastert, die UV22 enthalten. Dieser in fŸnf jahren ausgereifte exklusive Prozess steht jetzt mit dem
Apogee MasterTools Plug-In auch fŸr Digidesign's TDM-Systeme zur
VerfŸgung.
Vorsicht vor ÈMusic ShapingÇ
Noise-Shaping und Bit-Mapping-Systeme verŠndern das Grundrauschen, indem sie das familiŠre wei§e Rauschen radikal verŠndern. Die
Theorie der FŸrsprecher dieser Systeme sagt, das CD-Grundrauschen
von -96 dB sei nicht tief genug, um Konßikte mit unserem Hšrgenu§
zu vermeiden. Sie sagen, unsere Ohren wŸrden eine gro§e Senke (ca.
12 dB) im 2-3 kHz-Bereich des Grundrauschens sowie eine Anhebung
des Hochfrequenzpegels bis zu 30 dB bevorzugen. Was sie dabei vergessen, ist da§ wenige CD-Veršffentlichungen tatsŠchlich den -96 dBGrundrauschwert erreichen: das Rauschen fast aller Quellen ist erheblich lauter und Ÿberschwemmt jeden der behaupteten Vorteile. Au§erdem verformen diese Systeme wŠhrend der ÈRauschformungÇ (NoiseShaping) auch Audio-Informationen, die sich in dem verstecken, was
sie Rauschen nennen. Dies bewirkt erkennbare Verschiebungen im
Audio-Bild und eine verfŠrbte TonalitŠt der Musik.
MasterTools
Deutsch Ð 68
Page 71

Bei Apogee glauben wir, da§ der dynamische Bereich der CD fŸr die
meisten Anwendungen ausreichend ist. Wir versuchen daher nicht, das
Grundrauschen zu verŠndern. Stattdessen machen wir es durchsichtiger. Damit wird die Audio-Information wie im analogen Bereich klar
und sauber bis zu 30 dB in das Rauschen hinein hšrbar. Diese Information wird auf CD eingefangen und kodiert und lŠ§t sich auf jedem
CD-Wiedergabesystem hšren.
Sie haben hart an Ihrem Projekt gearbeitet und mšchten dem CD-Konsumenten das bestmšgliche Produkt zur VerfŸgung stellen. Es gibt
also gute GrŸnde mit UV22 zu mastern.
Worauf achten beim Vergleich?
Bei all den grandiosen Behauptungen, denen man begegnet, kšnnte
man leicht vergessen, da§ eine gut gemachte 16 Bit-Aufnahme fŸr CD
bereits erstaunlich gut klingen kann, QualitŠtssteigerungen also bestenfalls subtil sein mŸssen. Manchmal demonstrieren Hersteller ein
Verfahren zur CD-QualitŠtssteigerung mit 2 CDs, eine mit dem Verfahren hergestellte und eine ohne. Was dabei oft nicht klar wird, ist,
da§ die ohne das Verfahren erstellte CD z.B. vor mehreren Jahren mit
Šlterer A/D-Konvertertechnologie produziert wurde und die mit dem
Verfahren hergestellte CD durch neuere A/D-Konversion proÞtiert hat.
Bei solchen Vergleichen haben die Konverter einen grš§eren Einßu§
auf die wahrnehmbare KlangqualitŠt als der Unterschied zwischen
den verschiedenen QualitŠtssteigerungsprozessen. Bei Ihren eigenen
Hšrtests sollten Sie alle Variablen berŸcksichtigen und den allgemeinen Toningenieurregeln fŸr solche Tests folgen - wie z.B. der †bereinstimmung im Pegel der getesteten Varianten.
DEUTSCH DEUTSCH
Etwas fŸr nichts?
Wenn Sie eine gut aufgenommene 16 Bit-Audioquelle (z.B. von DAT)
digital Þltern, komprimieren, verstŠrken, mit einem DeClicker oder
DeCrackler bearbeiten und entscheiden, da§ der Klang mit Hilfe
neuester Technologie hinter, Ÿber oder unter Ihnen hšrbar sein soll,
dann manipulieren Sie digital Ihre 16 Bit-Zahlenreihen. Sie erhalten
zwar nicht mehr Audio-Information als Sie eingeben, dafŸr aber Zahlen mit einer grš§er Außšsung als die des 16 Bit-Eingangssignals.
MasterTools
Deutsch Ð 69
Page 72

Diese zusŠtzlichen ÈDetailÇ-Bits enthalten einen Teil des Resultats
des Prozesses, den Ihre ursprŸngliche 16 Bit-Audioquelle durchlaufen
hat. Sie sollten daher erhalten bleiben, denn sie zeigen sich in einer
Verbesserung von GlŠtte, Detail, Klangbild und Tiefe. Das Ziel der
verschiedenen Kodiersysteme ist es, die zusŠtzliche Außšsung auch
nach der digitalen Bearbeitung oder A/D-Konversion zu erhalten,
nŠmlich wenn die Audiodaten in CD-QualitŠt auf einem 16 Bit-Ausgang ausgegeben werden.
In einer 16 Bit-Welt mehr Bits erhalten
Ein ideales ÈSuper CDÇ-System wŸrde theoretisch die Außšsung und
QualitŠt einer 24 Bit-Audioaufnahme eins zu eins auf eine 16 Bit-CD
bannen. Wir leben nicht in einer idealen Welt, aber es ist mšglich, den
grš§ten Teil der zusŠtzlichen Außšsung in System mit 20 Bit (und
mehr) Außšsung einzufangen und auf 16 Bit DATs und CDs zu bringen.
Auf dem Grundrauschen tanzende Bits
Alle ÈSuper CDÇ-Kodiersysteme lassen die letzten digitalen Bits tanzen um so mehr Außšsung im 16 Bit CD-Format einzufangen. Es ist
eine sinnvolle Methode zur Unterscheidung der einzelnen Systeme,
sich dabei anzusehen, wie jedes dabei mit dem Grundrauschen umgeht:
¥ Allgemein verwendete Dithering-Methoden beeintrŠchtigen das 16 Bit-
¥ Noise -Shaping und ÈBit MappingÇ tauschen ein reduziertes Grundrauschen
¥ UV22, ApogeeÕs einzigartiger geschŸtzter Prozess, hŠlt das Grundrauschen
MasterTools
Deutsch Ð 70
Grundrauschen Ð sie fŸgen Rauschen hinzu.
gegen eine erhebliche VerstŠrkung in den hohen Frequenzen ein.
beim theoretischen Minimum fŸr 16 Bit-Systeme fest.
Obwohl Noise-Shaping und Bit Mapping-Systeme sich (fragwŸrdigerweise) auf das Grundrauschen konzentrieren, hšren Anwender
hŠuÞg, da§ ein solcherma§en ÈverbessertesÇ Grundrauschen sich mit
der Musik verŠndert und sie wŠsserig und ÈverߟssigtÇ macht. Herkšmmliches Dithering fŸgt Rauschen hinzu und hebt das Grundrauschen an. UV22 andererseits, erzeugt ein konstantes, weiches und
stabiles Grundrauschen, das unaufdringlich beim theoretischen Minimalpegel liegt, durch das jedoch die volle 20 Bit-Breite hšrbar wird.
Page 73

Und der Vergleich mit der analogen Welt?
Wir kennen alle den Hauptgrund fŸr den †bergang zur digitalen Technik: wenig Rauschen. Warum also mastern viele Toningenieure immer
noch mit Halbzoll-Analogmaschinen? Technisch mšgen viele analoge
Aufnahmen durch ihr ÈGrundÇrauschen begrenzt erscheinen. Hšrt
man jedoch genauer hin, so stellt sich heraus, da§ das Grundrauschen
nicht so solide ist, wie es sein Name (Grund = Erde: fest und undurchsichtig) nahelegt. Man kann es vielleicht eher mit der Oberߊche eines
kristallklaren Sees vergleichen, der bis tief hinunter durchsichtig ist.
Analoges Rauschen ist weich und konstant Ð aber Sie kšnnen hindurchhšren.
In diesem Punkt unterschied sich die digitale Welt in der Vergangenheit. Das (zwar niedrige) Grundrauschen wirkte als Grenze, wie ein
aufgewŸhlter trŸber See die Sicht nach unten trŸbt. Jahrelang wurde
zum Lichten der Undurchsichtigkeit am Grund (absichtlich und unabsichtlich) Dithering verwendet. Das dabei auftretende Problem ist jedoch, da§ das Dithering wegen seiner Langsamkeit und
unweigerlichen Steigerung des Rauschens beim Einfangen musikalischer Details in hoher Klangtreue ziemlich inefÞzient ist.
UV22 ist unseres Erachtens die efÞzienteste Methode, eine erweiterte
Außšsung in das 16 Bit-Format einzubringen. Der kraftvolle InformationstrŠger beÞndet sich unhšrbar au§erhalb unserer Hšrgrenzen, beinhaltet jedoch ein weiches, sich nicht verŠnderndes, wei§es
Grundrauschen durch das unverzerrt Details mit bis zu 30 dB tieferem
Pegel hšrbar werden und so die Klangtreue Ÿber die 20 Bit-Außšsung
hinaus auf Ihre 16 Bit-CD bringen.
DEUTSCH DEUTSCH
Wichtige Hinweise zur UV22-Bearbeitung
Wir gehen davon aus, da§ die UV22-Kodierung der letzte Schritt in
der Signalbearbeitung vor dem eigentlichen CD Mastering darstellt.
Mit UV22 bearbeitete Audiodaten sollten keinen weiteren Bearbeitungen zugefŸhrt werden, sonst kšnnte das Ergebnis darunter leiden. Eine
andere Positionierung in der Signalkette ist zwar mšglich, benštigt jedoch gro§e Sorgfalt beim Anwenden des Prozesses.
MasterTools
Deutsch Ð 71
Page 74

Da das UV22-Signal dem Originalsignal hinzugefŸgt wird, ist es nicht
ratsam, den UV22-Prozess mehr als ein- oder zweimal auf ein Signal
anzuwenden. MehrfachdurchgŠnge kšnnten das Grundrauschen des
Systems im Bereich der hohen Frequenzen beeintrŠchtigen. Sollten
Sie dies dennoch wŸnschen, dann experimentieren Sie mit den Einstellungen ÈNormalÇ und ÈLowÇ. In der Einstellung ÈNormalÇ ist der
Prozess darauf optimiert, dem hochaußšsenden digitalen Eingang die
grš§tmšgliche Menge an Details zu entnehmen. Die ÈNormalÇ-Einstellung hat den zusŠtzlichen Vorteil, da§ die in fast allen Digital Audio-Konversionen auftretenden NichtlinearitŠten geglŠttet werden.
Selbst mit 16 Bit-Quellen ermšglicht der UV22-Prozess deutlich bessere Resultate auf preiswerten Konvertern. In der ÈLowÇ-Einstellung
werden weniger Details eingefangen. Die ÈLowÇ-Einstellung sorgt
bei einer Reduzierung des UV22-ÈEnergie-KlumpensÇ um 6 dB noch
fŸr respektable Resultate. Diese Energiereduktion kann bei MehrfachdurchgŠngen sinnvoll sein.
Aufnahmen, die auf einer Sample- oder Sound Effekt-CD verwendet
werden sollen, sollten nur mit UV22 kodiert werden, falls ausschlie§lich AufwŠrtstransponierungen beabsichtigt sind. AbwŠrtstransponierungen mit UV22 bearbeiteter Signale kšnnen den ÈEnergieKlumpenÇ hšrbar machen.
Zum gegenwŠrtigen Zeitpunkt empfehlen wir die Anwendung des
UV22-Prozesses nicht fŸr Signale, die fŸr datenreduzierende Kompressionssysteme wie die Sony MiniDisc oder Internet-Verteilmedien
gedacht sind. Der UV22-Prozess kodiert so viele Details, da§ die
Kompressionsalgorithmen auf solches Material mšglicherweise einen
nachteiligen Effekt haben kšnnten. Die KomplexitŠt der durch den
UV22-Prozess eingefangenen Informationen wŸrde den Kompressionsalgorithmen Èdas Leben sauer machenÇ. Wir haben in diesem Bereich bisher keine ausfŸhrlichen Hšrtests veranstaltet, raten aber zur
Vorsicht. Diese Vorsichtsma§nahme gilt nicht nur fŸr den UV22-Prozess, sondern auch fŸr ÈNoise-ShapingÇ-Systeme wie SonyÕs Super
Bit Mapping.
MasterTools
Deutsch Ð 72
Page 75

Beeindruckende Kommentare kritischer
UV22-Hšrer
ÈHallauflšsung und Stereoverteilung sind verblŸffend.Ç
Ñ Michael Bishop, Telarc International, Cleveland
Die Toningenieure Michael Bishop, Scott Burgess und Elaine Martone testeten eine Anzahl von Systemen: Apogee UV22 Super CD Encoding; Sony Super Bit Mapping; Gambit; Harmonia Mundi; und
Sonic Solutions Turbo Bit Mapping.
Sie verwendeten eine Aufnahme des Atlanta Symphony Orchestra
plus Chor, dirigiert durch Yoel Levi, das RavelÕs ÈDaphnis and ChloeÇ
spielte (erschienen im November 1993 bei Telarc, Katalognummer
CD-80352). Die Klangquelle hatte eine Außšsung von 20 Bit, aufgenommen auf einer 20 Bit Mitsubishi X-86 Zweispurmaschine.
¥ ÈHšrtests zeigen, da§ die 16 Bit-Ausgabe durch Apogee UV22 dem am
nŠchsten kommt, was wir auf unserer 20 Bit-Quelle hšren. Es ist wirklich so,
als erhielte man etwas fŸr nichts.
¥ ÈWir wŠhlten die Ravel-Aufnahme zum Testen von Dithering-Systemen, weil
sie Ÿber eine gro§e dynamische Breite sowie eine klar ausgeprŠgte Abbildung und tiefe KlangbŸhne verfŸgt. Das StŸck beginnt mit einer sehr leisen
Kesselpauke, hohen HolzblŠsern und Violinen und baut sich langsam zu einem durch 250 Stimmen und Orchester vorgetragenen Crescendo auf. Jede
KlangverŠnderung im Vergleich mit der 20 Bit-Quelle wird, besonders in den
ersten Takten, sofort deutlich.
¥ ÈAlle anderen Systeme verŠnderten die KlangbŸhne und die tonale Balance.
Das Apogee UV22-System behŠlt die Auflšsung, die KlangbŸhne und die tonale
Balance Ÿber das gesamte Spektrum. UV22 war sehr offen und sehr sauber.Ç
DEUTSCH DEUTSCH
Michael verwendete das UV 22-System auch bei einem brasilianischen Projekt, Paraiso, featuring Gerry Mulligan und Jane Dubo (veršffentlicht im Oktober 1993 bei Telarc, Katalognummer CD-83361).
¥ ÈUV 22 macht den entscheidenden Unterschied aus beim Ausfaden bis hin
zu digitaler Stille.Ç
¥ ÈDie Hallauflšsung und Stereoverteilung sind verblŸffend sie bewirken eine
allumfassende Verbesserung des Endprodukts.Ç
MasterTools
Deutsch Ð 73
Page 76

ÈUV22 hielt das 24 Bit-Signal perfekt sauberÉ bis
hinunter zu Ð120 dB.Ç
Ñ Ted Jensen, Sterling Sound, New York
¥ ÈIn unserem System hielt UV22 das 24 Bit-Signal perfekt sauber, ohne stufen-
typische Artefakte, bis hinunter zu Ð120 dB auf unserem digitalen Fader.
Au§erdem, anders als einige ÉNoise Shaping- und dithering-Systeme, die
wir gehšrt haben, verfŠrbt Apogee den Klang nicht.
¥ ÈVerglichen mit anderen Systemen oder Signalbeschneidungsarten ist eine
SoliditŠt im Klang vorhanden. Die Harmonischen werden sauber und mit
weniger Zischen abgebildet und das Bild bleibt besser erhalten.Ç
ÈMan kann ohne zusŠtzliche Decoder-Hardware eine bei
knapp 20 Bit liegende Auflšsung von einer 16 Bit-CD
hšrenÉ es ist verblŸffend.Ç Ñ Roger Nichols, Engineer
und Produzent, Nashville
¥ ÈWarner Bros. Records riefen mich an und sagten, sie wŸrden eine 20 Bit-Ver-
sion von Donald Fagen's Album ÈKamakiriadÇ herausbringen, und ich solle die
†berspielung Ÿberwachen. Unsere Quelle war ein 20 Bit-Tonband von DonaldÕs Album, das auf einer Mitsubishi X-86 aufgenommen worden war.Ç
¥ ÈWir schickten das Signal auf dem X-86-Tonband durch den Sony Super Bit
Map-Encoder und schnitten eine CD sowie ein CD-Mastertape fŸr Warner
Bros.Ç
¥ ÈDanach verglichen wir die Super Bit Map-CD mit der originalen 16 Bit-CD.
Der Rauschpegel schien bei einigen Tracks zugenommen zu haben. Die
QualitŠt des Grundrauschens schien je nach Signalinhalt zu wechseln. Die
QualitŠt der Lead-Stimme schien kšrniger geworden zu sein. Mit unserem
Ausgangsmaterial war die SBM-Version der CD nicht um einen Deut besser
als die 16 Bit-CD. Vielleicht schlechter.Ç
¥ ÈWir machten denselben Test mit dem Apogee UV22; schnitten also eine CD
sowie ein CD-Mastertape auf Basis des 20 Bit-X-86-Tapes Ÿber UV22. Wir
hšrten uns alle drei CDs an, die 16 Bit-, die SBM-, und die UV22-Scheibe.
Die UV22-Version war bei weitem die beste. Die Stimme war kristallklar, das
Grundrauschen war niedriger als das der 16 Bit-CD, und es gab keine
Rauschmodulationen durch das Programm-Material. Sie war deutlich besser
als die 16 Bit-CD, und der Unterschied zwischen der UV22- und der SBMVersion war wie Tag und Nacht.
MasterTools
Deutsch Ð 74
Page 77

¥ ÈFŸr die 20 Bit-Version von DonaldÕs Album sandten wir die UV22-Tapes an
Warner Bros. Wenn man eine teure vergoldete 20 Bit-Version herstellt, dann
sollte sie schon besser klingen als die 16 Bit-CD, nicht wahr?
¥ ÈDas Ergebnis ist, man kann [mit UV22] ohne zusŠtzliche Decoder-Hard-
ware eine knapp bei 20 Bit liegende Auflšsung von einer 16 Bit-CD hšren.
Wenn Sie die Mšglichkeit haben, hšren Sie sich beide Systeme an und finden Sie den Unterschied heraus. Es ist verblŸffend.Ç
ÈUV22 ist das Ð am ehesten einer 20 Bit-Quelle
entsprechende Ð System, das ich gehšrt habe.Ç
Ñ Bob Ludwig, Gateway Mastering, Portland
Bob hatte die Gelegenheit, unser Prototyp UV22-System mit verschiedenem Programm-Material, an dem er arbeitete, auf Herz und Nieren
zu ŸberprŸfen. Er arbeitete an verschiedenem Material, das im Halbzoll-Zweispurformat vorlag und verbrachte mit UV22 einige Zeit
beim Arbeiten an ÈNobodyÕs HeroÇ, einem Song aus dem Rush-Album ÈCounterpartsÇ (Anthem Records). Das hatte er Ÿber UV22 zu
sagen:
¥ ÈDas Apogee UV22 ist sehr beeindruckendÉ es ist das letzte Wort zum
Thema Redithering.Ç
¥ ÈDas Apogee UV22 ist das Ð am ehesten einer 20 Bit-Quelle entsprechende
Ð System, das ich gehšrt habe. Es lŠ§t selbst gŸnstige D/A-Konverter doppelt
so gut klingen.Ç
DEUTSCH DEUTSCH
ÈUV22 macht die rauhen digitalen Ecken rundÇ
Ñ Stephen Marcussen, Precision Mastering, Hollywood
¥ È[Das Apogee UV22] macht die rauhen digitalen Ecken rund. Ich habe Mate-
rial mit einem Pegel von unter -60 dB durch das UV22-System geschickt, und
man konnte die Tiefpegelinformationen deutlich erkennen. Sie waren viel
weicher und sehr viel mehr intakt.Ç
¥ ÈDer Tiefpegelkram war wirklich klasse und weichÇ
¥ ÈMit UV22 war das Signal viel klarer als ohne.Ç
MasterTools
Deutsch Ð 75
Page 78

Scott Hull, Masterdisk Corporation, New York
¥ ÈDas Apogee UV22 bietet eine exzellente Mšglichkeit, 20 Bit-A/D-Konver-
sion und 20 Bit-Signalverarbeitung zu benutzen. Es ermšglicht einem, die
Vorteile von 20 Bit selbst auf 16 Bit-Formaten einzufangen. Das Wichtigste
dabei ist, da§ es sehr musikalisch klingt. Es verŠndert nicht die tonale Balance. Mit UV22 klingen 16 Bit Ausgangssignale sehr wie eine 20 Bit-Quelle.
¥ ÈEs ist einfach zu benutzen und klingt gro§artig. Bravo!Ç
John Newton, Sound Mirror, Jamaica Plain, MA
¥ ÈWenn ein 20 Bit-Signal mit UV22 bearbeitet wird, entspricht das Resultat
im wesentlichen dem 20 Bit-Original, und ist sauberer als Turbo Bit MappingÇ.
MasterTools
Deutsch Ð 76
Page 79

Page 80

Page 81

APOGEE MASTERTOOLS
Hi-End bit rate conversion PlugIn
Mode d’emploi
FRAN‚AIS FRAN‚AIS FRAN‚AIS
®
MasterTools
Fran•ais Ð 79
Page 82

MasterTools
Fran•ais Ð 80
Page 83

Introduction
Votre syst•me TDM Digidesign poss•de de nombreux bus numŽriques
de mixage capables de respecter les dŽtails audio les plus tŽnus. Dans
le monde de lÕaudionumŽrique, cette capacitŽ ˆ respecter les dŽtails se
mesure en bits Ð plus il y en a, meilleure est la rŽsolution du syst•me,
qui peut construire une reprŽsentation numŽrique plus prŽcise de la
modulation audio captŽe.
Rappelez-vous le son granuleux et le bruit de fond de lÕaudio 8 bits dŽlivrŽ par les premiers MacÉ LÕamŽlioration obtenue lorsquÕon passe ˆ
une qualitŽ CD Ð audio 16 bits, soit 8 bits de plus Ð est une rŽvŽlation.
Le bus TDM Digidesign poss•de une rŽsolution de 8 bits de plus que
les syst•mes 16 bits. Ces 8 bits supplŽmentaires par rapport ˆ la qualitŽ CD permettent de respecter la dynamique lors du mixage de plusieurs sources : quÕil sÕagisse dÕŽlaborer un ÒcompositeÓ de voix ou de
mixer pour le master Þnal. Il sufÞt de faire passer un son source ˆ travers un compresseur, un Žgaliseur, une gateÉ numŽriques pour accro”tre la rŽsolution des donnŽes audio apr•s traitement. Autrement
dit, m•me si la source Žtait en 16 bits, le son traitŽ contient des informations allant bien au-delˆ dÕune rŽsolution 16 bits (ˆ moins quÕil ne
se soit vu entre-temps tronquŽ ˆ une rŽsolution plus basse).
FRAN‚AIS FRAN‚AIS FRAN‚AIS
Le probl•me :
Comment capter sur les supports les plus rŽpandus, CD ou DAT, qui
travaillent en 16 bits, tous les dŽtails respectŽs par la rŽsolution tr•s
Þne permise par un syst•me TDM ou ProTools 24 ?
La solution :
Apogee MasterTools¨ avec lÕUV22¨. ÒMais comment diable un
Žcran solaire pour la peau peut-il me donner un meilleur son ?Ó, nous
direz-vous. Le sigle UV22 ne dŽsigne pas un quelconque indice de
protection contre les ultra-violets : cÕest le nom dÕune technologie rŽvolutionnaire signŽe Apogee Electronics, un procŽdŽ dÕencodage destinŽ au CD et permettant dÕaccro”tre sa prŽcision sonore. LÕUV22 a ŽtŽ
adoptŽ massivement dans tout le secteur du mastering et par les studios les plus exigeants : chose rare dans le monde de lÕaudio, tr•s indi-
MasterTools
Fran•ais Ð 81
Page 84

vidualiste, o• le choix des appareils reß•te les diffŽrences de
personnalitŽ des propriŽtaires de studios ou de structures de mastering. Pourtant, tous les plus grands studios de mastering de la plan•te
poss•dent un ou plusieurs appareils Apogee intŽgrant le procŽdŽ Apogee UV22 Super CD Ð par exemple lÕUV 1000 ou lÕAD-8000.
La raison :
LÕApogee UV22 permet de transposer sur un format 16 bits, pratiquement sans perte dÕinformations, toutes les informations, tous les dŽtails propres ˆ une rŽsolution supŽrieure ˆ 16 bits. Apr•s encodage via
lÕUV22, le son est plus naturel, les dŽtails restent tr•s Þns, et lÕimpression gŽnŽrale reste celle dÕun son ÒanalogiqueÓ, dŽpourvu de toute la
duretŽ quÕon attribue au numŽrique.
MasterTools
Fran•ais Ð 82
Page 85

LÕoutil :
FRAN‚AIS FRAN‚AIS FRAN‚AIS
Nous avons crŽŽ Apogee MasterTools pour vous permettre dÕarracher
une page du livre de recettes secret des grands ingŽnieurs de mastering
et dÕajouter une touche dÕUV22 ˆ vos crŽations effectuŽes sur Digidesign. LÕUV22 fonctionne m•me si les donnŽes sources sont au format
16 bits, puisquÕil amŽliore la qualitŽ de nÕimporte quelle conversion
numŽrique vers analogique Ð des radiocassettes aux syst•mes audio
les plus ŽsotŽriques. Le prix dÕachat de votre logiciel MasterTools inclut celui de la licence UV22 et la dŽrogation de royalties.
MasterTools
Fran•ais Ð 83
Page 86

La vision :
Pour livrer un produit Þni, vous utilisez votre syst•me Digidesign pour
manipuler les donnŽes audio aÞn dÕamŽliorer ce que vous entendez.
Apogee ajoute une dimension supplŽmentaire ˆ ce que vous entendez
avec une mani•re unique de visualiser le son. LÕŽcran de MasterTools
rassemble de nombreuses informations, mises en forme dÕune fa•on
exclusive, accessibles dÕun seul coup dÕÏil. Ce syst•me de reprŽsentation dÕune modulation stŽrŽophonique permet de visualiser simultanŽment les niveaux cr•tes et moyens, avec gel des valeurs les plus
ŽlevŽes si dŽsirŽ.Les dŽpassements numŽriques (ÒOversÓ) sont reprŽsentŽs en rouge, pour attirer lÕattention. La corrŽlation de phase gauche/droite est indiquŽe entre les afÞchages des niveaux gauche et droit.
Comme cela nÕŽtait pas sufÞsant, un historique (ÒHistogramÓ) des cinq
derni•res secondes de niveau, dÕOvers et de corrŽlation appara”t en
couleur, crŽant une fen•tre dont vous ne pourrez plus vous passer.
LÕhistorique des ÒOversÓ ne montre pas seulement que vous •tes allŽ
trop loin, mais de combien vous avez franchi la limite. La liste Over
indique combien de dŽpassements numŽriques se sont produits pendant la session, et les classe en fonction de leur position temporelle, ce
qui permet de les retrouver facilement pour rŽparer les dŽg‰tsÉ
La touche finale :
Apogee MasterTools vous offre une palette dÕoutils essentiels pour appliquer la touche Þnale ˆ vos crŽations audio. Merci dÕavoir choisi
Apogee MasterTools.
Ë propos de ce manuel
Ce manuel explique dans le dŽtail comment se servir de MasterTools.
Nous vous recommandons de prendre le temps de le lire compl•tement, aÞn de pouvoir tirer le meilleur parti de ce plug-in exceptionnel.
Le chapitre "Installation et autorisation de MasterTools" page 89, indique point par point comment installer MasterTools. Si c'est dŽjˆ fait,
vous pouvez aller directement au chapitre "ConÞguration de MasterTools" page 95, o• vous trouverez des conseils pour la conÞguration et
l'exploitation de base du logiciel, suivis d'une explication dŽtaillŽe de
chaque commande et fonction. Le chapitre "Le procŽdŽ UV22" page
109, explique en dŽtail le remarquable traitement UV22.
MasterTools
Fran•ais Ð 84
Page 87

CaractŽristiques de MasterTools
Traitement UV22
Utiliser l'encodage UV22 permet de prŽserver les dŽtails et les avantages d'une rŽsolution 20 bits (ou supŽrieure) sur des supports 16 bits
sans devoir utiliser un Žquipement spŽciÞque en lecture. L'encodage
Apogee UV22 ajoute une sorte de haute frŽquence inaudible au ßux
numŽrique, pla•ant un surplus d'Žnergie gŽnŽrŽ par un algorithme spŽciÞque autour de 22 kHz. Tout comme, en enregistrement analogique,
la prŽmagnŽtisation permettait de lisser les non-linŽaritŽs de la bande
magnŽtique, l'UV22 parvient ainsi ˆ transposer une rŽsolution de 20
bits ou supŽrieure sur un support 16 bits - un CD, par exemple.
De plus, cette porteuse inaudible (car trop aigu‘) permet d'adoucir les
angles m•me sur le plus basique des radio-cassettes. L'UV22 Apogee
amŽliore la restitution du son sur tous les syst•mes d'Žcoute, et cette
amŽlioration est dŽcelable sur tous les appareils d'Žcoute.
L'UV22 est un vecteur d'information spŽciÞque : il ne s'agit pas d'une
variation autour du dithering. Ce sont les propriŽtŽs statistiques vraiment uniques de l'algorithme de l'UV22 qui garantissent un niveau de
bruit blanc constant et tr•s bas, tr•s similaire ˆ l'Žcoute ˆ un bruit de
bande analogique, quelle que soit la source d'entrŽe.
FRAN‚AIS FRAN‚AIS FRAN‚AIS
Test d'Žcoute apr•s test d'Žcoute, les ingŽnieurs de mastering ont prŽfŽrŽ ˆ l'unanimitŽ l'UV22 aux autres procŽdŽs existants. Des milliers
de CD ont dŽjˆ ŽtŽ masterisŽs en utilisant l'UV22 : cette touche Þnale
pour vos CD, CD-R ou DAT est dŽsormais disponible en un clic de
souris avec Apogee MasterTools. Le chapitre "Le procŽdŽ UV22"
page 109, explique en dŽtail le remarquable traitement UV22.
ƒlimination de la composante continue, pour des
montages inaudibles
Certains convertisseurs analogique/numŽrique sont afßigŽs d'une tr•s
faible composante continue rŽsiduelle sur leur sortie numŽrique.
Lorsqu'un signal numŽrique poss•de une composante continue, cela
signiÞe que l'audio n'est pas symŽtrique par rapport ˆ l'axe de tension
nulle, ou "noir numŽrique". Ë la lecture d'un tel signal numŽrique, rien
MasterTools
Fran•ais Ð 85
Page 88

de spŽcial n'appara”tra sur les VU-m•tres. En revanche, d•s que vous
tenterez d'assembler des signaux dont l'un est affectŽ d'une composante continue et l'autre non, vous entendrez des clics et des pops aux
points de montage. Si vous modiÞez le gain avec une composante continue, la sortie ne sera pas le reßet Þd•le de l'entrŽe. MasterTools peut
Žliminer n'importe quelle composante continue en temps rŽel. Dans
MasterTools, le niveau de ces composantes appara”t, sŽparŽment pour
le canal gauche et pour le canal droit, sous la forme d'un pourcentage
se rapportant au 0 dB pleine Žchelle (0 dB FS).
Balistique des indicateurs intelligente
Certains utilisateurs prŽf•rent travailler aux VU-m•tres, d'autres les
cr•te-m•tres. MasterTools ne vous donne pas seulement le choix, mais
afÞche les deux simultanŽment, en temps rŽel, tr•s clairement. La plupart des VU-m•tres sur Žcran offrent une rŽsolution assez faible, et
sont afßigŽs d'un temps de rŽaction non nŽgligeable entre le moment
o• se produit l'ŽvŽnement et celui o• il est reprŽsentŽ ˆ l'Žcran. Pour
ceux d'entre vous qui attendent une visualisation prŽcise pour leur
ProTools, ˆ la fois temporellement et Žlectriquement, MasterTools reprŽsente LA solution. En plus des choix de visualisation, la balistique
des indicateurs tient compte de la dynamique du signal d'entrŽe. Un signal ˆ dŽcroissance rapide fera dŽcro”tre plus rapidement l'indicateur.
Ce niveau supplŽmentaire d'information aide ˆ faire la distinction entre buzz, ronßettes et autres signaux qui seraient d'habitude passŽs
sous silence par les dispositifs conventionnels de visualisation.
MasterTools
Fran•ais Ð 86
La mŽmoire du signal - les histogrammes
Les niveaux reprŽsentent peut-•tre la particularitŽ la plus frappante de
la visualisation du signal sous MasterTools. L'utilisateur peut vŽriÞer
d'un coup d'Ïil le niveau, la phase et la balance, le tout en temps rŽel,
et remonter jusqu'ˆ cinq secondes dans le temps via les histogrammes,
de fa•on ˆ •tre sžr de n'avoir rien ratŽ.
Page 89

Phase-m•tre
Cette fonction indique la corrŽlation de phase de programmes stŽrŽo.
Si les signaux des deux canaux stŽrŽo sont en phase, c'est-ˆ-dire identiques sur les deux canaux (mono), l'Žchelle indiquera +1 (tout ˆ
droite), ce qui signiÞe une corrŽlation positive. Si un des deux canaux
voit sa polaritŽ inversŽe par rapport ˆ l'autre (dŽcalage de phase de
180¡), l'Žchelle indiquera -1 (tout ˆ droite), ce qui indique une opposition de phase. En l'absence de tout signal, ou si un seul canal est prŽsent, lÕindicateur restera au centre (0). Pour des signaux stŽrŽo
typiques de corrŽlation de phase correcte, lÕindicateur bougera sans
cesse entre 0 et +1.
NOVA ª
Cette fonction Žlimine toute possibilitŽ d'obtenir un Over (dŽpassement numŽrique de niveau) en sortie. Pour cela, elle rŽduit le niveau
des samples qui sont ˆ pleine Žchelle d'un seul bit.
Liste des Overs
La liste Overs recense tous les dŽpassements de niveau numŽriques,
classŽs par positions temporelles. Vous pouvez faire dŽÞler cette liste
et modiÞer les formes d'ondes, ou alors utiliser la fonction Nova
d'Apogee pour faire dispara”tre automatiquement tout dŽpassement de
niveau. La liste des Overs peut •tre imprimŽe, sauvegardŽe, de plus
elle est cumulative jusqu'ˆ effacement. La position temporelle et le
nombre de samples dŽpassant le plein niveau numŽrique sont indiquŽs
pour le pire Over enregistrŽ depuis le dernier effacement de la liste.
Selon le syst•me que vous utilisez et sa charge de travail, la pŽriodicitŽ
de remise ˆ jour de la liste des Overs est d'environ 1/60 de seconde. La
dŽÞnition d'un "Over" (de 3 ˆ 6 samples au plein niveau numŽrique)
peut •tre modiÞŽ dans le menu Setup.
FRAN‚AIS FRAN‚AIS FRAN‚AIS
MasterTools
Fran•ais Ð 87
Page 90

Tout sur les "Overs"
Un "Over" est l'Žquivalent numŽrique de ce qu'on appelait "Žcr•tage"
dans le monde analogique. Si vous faites Žcr•ter un ampliÞcateur de
puissance analogique, c'est que vous •tes au-delˆ de sa gamme dynamique. La sortie bascule en Žcr•tage, et dŽcapite les formes d'ondes au
niveau maximal qu'elle peut produire. "Over" est un terme plus court
pour "au -delˆ de la rŽserve numŽrique" ou "Žcr•tage numŽrique", si
plusieurs samples consŽcutifs sont ainsi Žcr•tŽs. En d'autres termes, un
ou deux samples au niveau maximal numŽrique ne constituent pas un
"Over" ; mais 3, 4 ou plus en constituent un. Cette dŽÞnition de
l'"Over" n'a rien d'universel - nous avons dŽcidŽ d'adopter un standard
de facto de 4 samples plein niveau consŽcutifs, mais vous pouvez
choisir un nombre diffŽrent.
Configuration recommandŽe
MasterTools tourne sur tout Macintosh ŽquipŽ TDM possŽdant les
spŽciÞcations suivantes (hardware et OS) :
¥ ¥ ProTools 4.0, DAE 3.3 (ou supŽrieur)
¥ ¥ Syst•me 7.5 ou supŽrieur
¥ ¥ Ordinateur Power Macintosh
¥ ¥ 1 Mo d'espace disque minimum, et un chip DSP disponible
MasterTools
Fran•ais Ð 88
Page 91

Installation et autorisation de MasterTools
MasterTools est un plug-in TDM, destinŽ ˆ travailler dans un syst•me
Digidesign. Son installation s'effectue par l'intermŽdiaire d'un installeur automatique inclus sur la disquette MasterTools.
Avant de procŽder ˆ l'installation, jetez un coup d'Ïil au contenu de
votre disquette MasterTools. Il peut s'y trouver un document supplŽmentaire, "Installation Instructions", qui peut apporter des corrections
au contenu de ce manuel suite ˆ des modiÞcations de hardware ou de
logiciel.
¥ Veuillez suivre prŽcisŽment les points ci-apr•s pour rŽussir l'ins-
tallation.
¥ Si vous utilisiez dŽjˆ une version antŽrieure de MasterTools, repŽ-
rez les fichiers suivants, mettez-les ˆ la poubelle et videz cette derni•re :
Emplacement Fichier ˆ jeter
Dossier Syst•me : DAE : Plug-Ins: LÕancienne version de MasterTools
Disque de dŽmarrage : 'Dossier ÒOutdated MasterTools FilesÓ
FRAN‚AIS FRAN‚AIS FRAN‚AIS
Dossier Syst•me : PrŽfŽrences MasterTools Prefs
Dossier Syst•me : PrŽfŽrences MasterTools Connections
¦ Si vous utilisiez dŽjˆ une version antŽrieure d'Apogee MasterTools, veuillez
noter que le logiciel que vous vous prŽparez ˆ installer n'est pas une simple
mise ˆ jour. Il s'agit d'une nouvelle version, enti•rement rŽŽcrite - par consŽquent, les clŽs d'autorisation fournies avec les prŽcŽdentes versions de MasterTools ne peuvent servir ˆ autoriser cette version.
¦ Veuillez Žgalement noter que cette version ne demande plus l'Administrator
ni le MIDI Administrator. Vous pouvez donc les supprimer de votre disque
dur.
¦ VŽrifiez bien que votre dossier Plug-Ins ne contient que la version la plus rŽ-
cente de MasterTools !
MasterTools
Fran•ais Ð 89
Page 92

ProcŽdez comme ceci pour installer et autoriser la derni•re version de
MasterTools :
1. Quittez toutes les autres applications, de fa•on ˆ retourner au Finder ; insŽrez alors la disquette MasterTools dans le lecteur correspondant de votre ordinateur.
Une fen•tre s'ouvre. Si ce n'est pas le cas, double-cliquez sur l'ic™ne de la
disquette d'installation.
2. Double-cliquez sur l'ic™ne de l'Installeur MasterTools afin de
charger le logiciel d'installation.
MasterTools doit •tre installŽ sur le disque dur contenant les fichiers de votre
syst•me TDM et votre dossier Plug-Ins Digidesign
MasterTools
Fran•ais Ð 90
Page 93

3. Cliquez sur le bouton Install afin de lancer le processus d'installation et l'autorisation du disque dur.
Une fen•tre permet de suivre la progression de l'installation - c'est l'installeur
qui s'occupe de placer automatiquement tous les fichiers nŽcessaires dans
les dossiers appropriŽs. MasterTools sera placŽ dans le dossier Plug-Ins, situŽ
dans votre dossier Syst•me. S'il n'en existait pas auparavant, le dossier PlugIns sera crŽŽ.
4. Pendant l'installation, vous serez invitŽ ˆ personnaliser votre
exemplaire de MasterTools. Faites-le.
FRAN‚AIS FRAN‚AIS FRAN‚AIS
Le programme d'installation installe alors sur votre disque dur un fichier invisible de protection contre la copie, et autorise par lˆ-m•me votre disque dur
ˆ faire tourner MasterTools.
5. Une fois l'installation et l'autorisation rŽussies, ce dialogue appara”t. Cliquez sur "Quit" pour quitter le programme d'installation et
redŽmarrez votre ordinateur.
¦ Si vous voyez appara”tre des messages d'erreur en cours d'installation, vŽri-
fiez si la capacitŽ de votre disque dur est suffisante pour lui permettre d'accueillir MasterTools (environ 1 Mo). VŽrifiez aussi si votre configuration
(logicielle et matŽrielle) rŽpond aux exigences requises - voir page 88).
MasterTools
Fran•ais Ð 91
Page 94

Informations sur la protection contre les copies
Le plug-in MasterTools utilise un syst•me de protection contre les copies dans lequel l'autorisation de votre disque dur joue un r™le vital. Il
contient deux autorisations : l'une pour faire tourner MasterTools
"normalement", l'autre faisant ofÞce de secours au cas o• vous perdriez accidentellement la premi•re.
En cours d'installation, un Þchier d'autorisation invisible est copiŽ sur
le disque dur. Ne dŽplacez pas ce Þchier, ne l'effacez pas non plus,
sous peine de perdre une de vos autorisations !
Si nŽcessaire, vous pouvez enlever une des deux autorisations du disque dur et la rŽintŽgrer dans la disquette d'installation - pour plus d'informations, voir "DŽsautorisation du disque dur", page 93. Vous
pourrez de cette fa•on rŽinstaller ˆ tout moment MasterTools sur un
autre disque dur.
Veuillez tenir compte des points suivants :
¥ Si vous effacez accidentellement les fichiers du logiciel MasterTools, pas
d'inquiŽtude : refaites l'installation ! M•me si vous avez dŽtruit les fichiers, le
disque dur reste autorisŽ ˆ faire tourner MasterTools, et vous ne perdez pas
d'autorisation.
¥ Vous pouvez dŽfragmenter votre disque sans probl•me (une opŽration par-
fois appelŽe "optimisation") : la protection contre les copies n'est pas affectŽe
par la dŽfragmentation.
¥ Si votre disque dur crashe, vous pouvez perdre votre installation. Si cela se
¥ Ne reformatez jamais, ne repartitionnez jamais votre disque dur sans l'avoir
¦ La disquette MasterTools dÕorigine constitue la preuve que vous avez bien
MasterTools
Fran•ais Ð 92
produit, il ne vous reste plus qu'ˆ utiliser votre seconde autorisation, ou ˆ
contacter votre revendeur.
au prŽalable dŽsautorisŽ (voir ci-apr•s) : vous perdriez l'autorisation.
achetŽ le logiciel. Conservez-la en un endroit sžr.
Page 95
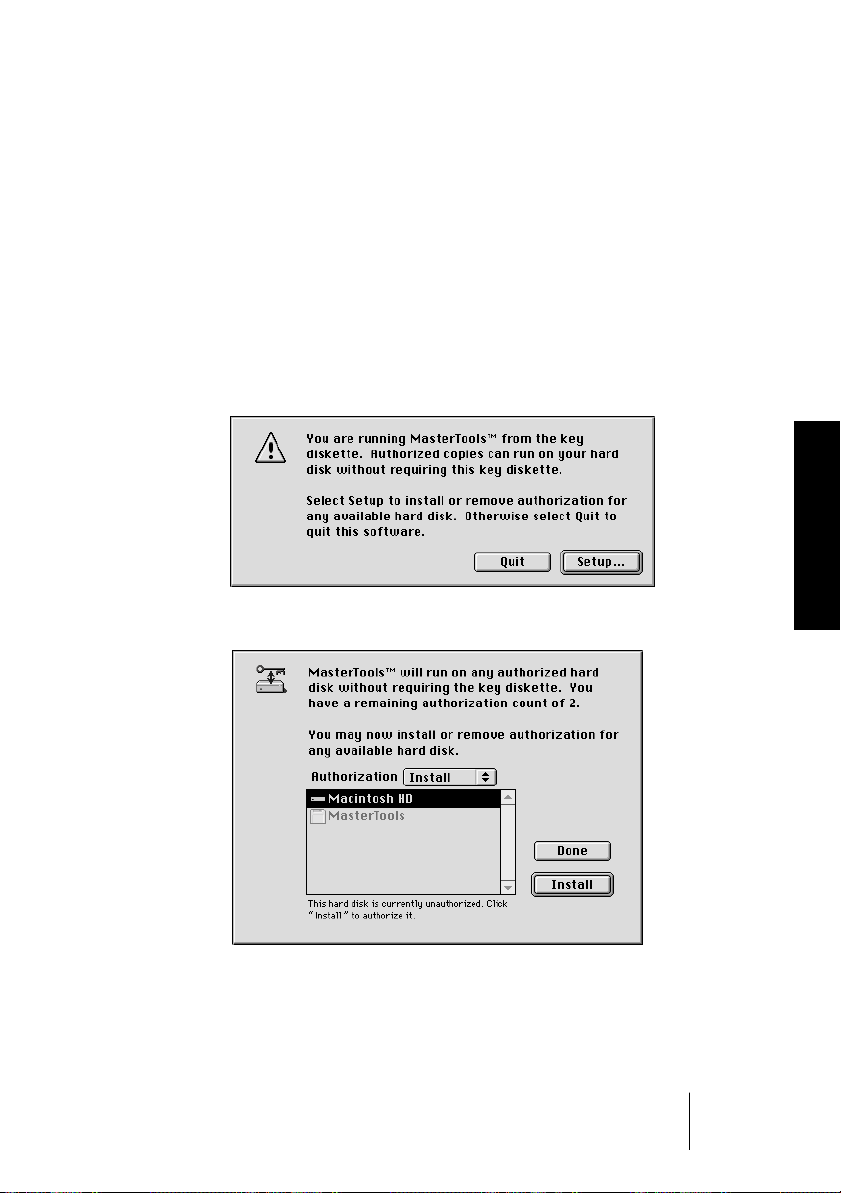
DŽsautorisation du disque dur
Si vous devez installer dŽÞnitivement MasterTools sur un autre ordinateur, o• si vous voulez reformater ou repartitionner votre disque dur,
il faut dŽsautoriser le disque dur o• le programme est installŽ.
Ce processus permet de "transfŽrer" le Þchier invisible d'autorisation
de votre disque dur sur la disquette dÕorigine. ProcŽdez comme ceci :
1. Otez la protection en Žcriture de votre disquette d'autorisation,
insŽrez-la dans le lecteur de disquette et double-cliquez sur l'ic™ne
"Deauthorizer".
Ce dialogue appara”t alors :
FRAN‚AIS FRAN‚AIS FRAN‚AIS
2. Cliquer sur "SetupÉ" fera appara”tre ce dialogue :
MasterTools
Fran•ais Ð 93
Page 96

3. SŽlectionnez d'abord "Remove" dans le menu local Authorization,
puis cliquez sur le lecteur de votre choix. Cliquez ensuite sur le
bouton Remove.
Le processus de "dŽsautorisation" commencera alors.
4. L'autorisation sera alors supprimŽe de votre disque dur et rapatriŽe sur la disquette d'autorisation. La fen•tre ci-dessous appara”t
alors : elle vous informe du nombre d'installations disponibles sur
la disquette d'autorisation.
5. Installez MasterTools sur le nouveau disque dur, ou sur le disque
MasterTools
Fran•ais Ð 94
dur repartitionnŽ, comme dŽcrit prŽcŽdemment.
Page 97

Configuration de MasterTools
Lancez ProTools, crŽez une nouvelle session ou ouvrez-en une existant dŽjˆ. MasterTools est dŽsormais disponible comme insert, sur un
fader stŽrŽo master ou de retour auxiliaire. Si vous •tes en pleine session ProTools III et que vous dŽsirez insŽrer MasterTools sur votre
sortie Þnale, insŽrez-le sur un master stŽrŽo. Cette section dŽcrit Žgalement comment conÞgurer MasterTools comme insert dans ProTools.
¦ Si MasterTools n'appara”t pas, dŽplacez vos autres Plug-Ins du Dossier
Syst•me : dossier DAE : dossier Plug-Ins vers le bureau, en ne laissant dans le
dossier que le Plug-In Mixer et le Plug-In MasterTools, puis relancez
ProTools. Une fois que MasterTools fonctionne correctement, replacez vos
autres Plug-Ins dans le dossier Plug-Ins, un ˆ la fois, et relancez ˆ chaque fois
ProTools, afin de constater tout conflit Žventuel entre Plug-Ins.
Nous recommandons de lire tout le manuel avant d'utiliser
MasterTools, mais faut-il prŽciser que nous ne nous attendons pas ˆ
•tre obŽisÉ Si vous •tes impatient de commencer, vous verrez que
l'exploitation est en fait assez intuitive. Nous vous suggŽrons toutefois
de respecter cette marche ˆ suivre :
FRAN‚AIS FRAN‚AIS FRAN‚AIS
1. Apr•s avoir lancŽ ProTools, Žtablissez vos pistes. SŽlectionnez la
fen•tre de mixage, et assurez-vous que les Inserts y sont visibles.
2. Dans le menu File, sŽlectionnez "New Master FadersÉ". Si vous ne
dŽsirez pas traiter toutes vos pistes avec MasterTools, sŽlectionnez
plut™t "New Auxiliary Inputs". Un dialogue appara”tra alors : il
vous permet de dŽfinir le nombre de Faders Master ou d'entrŽes
auxiliaires ˆ crŽer. Tapez 1, puis cliquez sur le bouton radio qui se
trouve pr•s de "Stereo Input". Cliquez alors sur "OK".
¦ Si vous avez crŽŽ une entrŽe auxiliaire (Auxiliary Input), passez directement
au point 4.
3. Si vous avez sŽlectionnŽ un fader Master, il sera affectŽ par dŽfaut
aux sorties 1 & 2. Si vous utilisez une autre paire de sorties allant
vers votre machine d'enregistrement de mixage, DAT, CD-R ou
autre, cliquez sur (et maintenez enfoncŽ) le bouton "Output" sur le
fader Master, puis sŽlectionnez la paire de sorties que vous utilisez. Vous pouvez ˆ prŽsent passer directement au point 8.
MasterTools
Fran•ais Ð 95
Page 98

4. Si vous avez sŽlectionnŽ une entrŽe Auxiliaire, il faut assigner les
param•tres dÕentrŽe et de sortie de lÕentrŽe Auxiliaire et aussi diriger les diffŽrentes voies audio dans lÕentrŽe Auxiliaire en vue du
traitement. Pour cela, il faut utiliser les fonctions d'assignation de
bus et les Points d'Inserts dans la fen•tre Mix.
5. Choisissez une paire de bus TDM pour recueillir tous les signaux
que vous dŽsirez traiter avec MasterTools. Supposons que vous
ayez choisi les bus 15 & 16 : pour diriger les signaux vers ces bus,
cliquez et maintenez enfoncŽ le bouton Output dans la section I/O
de chacune des voies que vous dŽsirez diriger vers la paire de bus
sŽlectionnŽe, et faites-la glisser vers la paire de bus. ProcŽdez de
m•me pour chacune des voies que vous dŽsirez traiter.
6. Une fois que toutes les voies que vous dŽsirez traiter sont dirigŽes
vers le bus TDM stŽrŽo, il faut Žtablir la connexion de la sortie de
cette paire de bus dans lÕentrŽe stŽrŽo Auxiliaire o• MasterTools
effectuera ses traitements. Pour cela, appuyez sur le bouton Input
de lÕentrŽe StŽrŽo Auxiliaire que vous venez de crŽer et sŽlectionnez (par exemple) les bus 15-16. Ë prŽsent, les sorties des bus 1516 sont connectŽes aux entrŽes de lÕentrŽe Auxiliaire stŽrŽo.
7. L'Žtape suivante consiste ˆ diriger la sortie du dŽpart auxiliaire stŽrŽo vers les sorties principales. Il est prudent de rŽaliser un mixage
grossier, juste pour s'assurer que tout fonctionne et que les assignations sont correctes. Il ne reste alors plus qu'une Žtape avant
de pouvoir activer MasterTools.
8. Si ce n'est dŽjˆ fait, sŽlectionnez "Show Inserts View" depuis le
MasterTools
Fran•ais Ð 96
menu Display. MasterTools est un plug-in stŽrŽo : il peut donc venir se greffer sur n'importe quel Master Fader ou Retour Auxiliaire
stŽrŽo. Vous pouvez assigner MasterTools ˆ n'importe lequel des
cinq inserts : sachez toutefois que pour tirer le meilleur parti de
l'UV22, il vaut mieux que MasterTools soit placŽ ˆ la fin de la
cha”ne de traitements, c'est-ˆ-dire au niveau du dernier insert, repŽrŽ "E". Pour cela, appuyez sur le dernier des cinq boutons d'in-
Page 99

sert au niveau de fader Master ou de l'EntrŽe Auxiliaire,
sŽlectionnez MasterTools dans la liste des Plug-Ins, et rel‰chez le
bouton de la souris.
Appara”tra alors la fen•tre MasterTools, qui devrait •tre assez similaire ˆ celle
reprŽsentŽe ci-dessous.
FRAN‚AIS FRAN‚AIS FRAN‚AIS
9. Si vous lancez la lecture, vous devriez voir les niveaux audio se reflŽter dans les Žchelles principales, situŽes ˆ gauche et ˆ droite de
l'affichage, un peu comme les "murs" d'un couloir. De plus, ˆ mesure que le temps passe, les Žchelles de niveaux progressent le long
des murs, jusqu'ˆ dispara”tre ˆ l'horizon.
10.Vous pouvez ˆ prŽsent soit continuer votre lecture, pour dŽcouvrir
les fonctions de chaque commande et affichage, soit laisser de c™tŽ
le manuel et commencer ˆ appuyer sur tous les boutons. Vous
n'ab”merez probablement* rien.
Nous avons introduit ˆ dessein le terme "probablement", de fa•on ˆ dŽgager
notre responsabilitŽ au cas o• une catastrophe se produirait !
MasterTools
Fran•ais Ð 97
Page 100

Principes de fonctionnement
La fen•tre MasterTools comporte deux sections diffŽrentes. La premi•re est la zone d'afÞchage, situŽe dans la partie supŽrieure de
lÕŽcran : elle inclut la visualisation des niveaux, de la phase et de la
composante continue (DC Offset). Sous cette rŽgion prennent place
des boutons permettant de contr™ler divers param•tres affectant la visualisation ou d'autres fonctions. Les boutons apparaissant en haut de
la fen•tre appartiennent ˆ ProTools, et sont donc dŽcrits dans la documentation de ce logiciel.
L'affichage : emplacements et fonctions
La "coupe" des murs du couloir, ˆ gauche et ˆ droite de lÕŽcran, reß•te
le niveau instantanŽ des signaux des canaux gauche et droit de lÕentrŽe
auxiliaire stŽrŽo ou de la sortie master dans laquelle MasterTools est
insŽrŽ
MasterTools
Fran•ais Ð 98
 Loading...