

Page 1
FireMix
Low latency Mixer
User’s Guide
V1.0 - April 2005
Page 2

Page 3

FireMix
User’s Guide
Table of Contents
Why FireMix?
Installing FireMix
The FireMix Application
Overview
Opening The FireMix Ap
The FireMix Front Panel
Using FireMix
FireMix Preferences
....................................................................................................................2
..........................................................................................................2
..............................................................................................2
.................................................................................................................3
.........................................................................................................5
................................................................................................5
plication
.........................................................................................4
............................................................................3
Page 4

FireMix – User’s Guide
Why FireMix?
One problematic aspect of most computer-based digital audio applications is the unavoidable delay between the application’s input and output, commonly known at latency. In
the typical recording situation where a performer listens to a mix of pre-recorded tracks
and a live input of his performance, this latency means that sounds the performer creates
are heard in his headphones some time after creating them, resulting in a poorly timed
performance.
This problem is solved by routing the performer’s live input directly to his headphones
for monitoring (avoiding a latency-inducing path through the application) and mixing this
feed with the pre-recorded tracks. This is accomplished with Apogee’s FireMix, a software
controlled mixer that allows the routing and mixing of host interface inputs and outputs,
independent of the audio application. With an X-Firewire equipped Apogee host interface,
the FireMix application and your favorite digital audio app, latency is no longer a problem.
Installing FireMix
FireMix Requirements
APOGEE ELECTRONICS
Windows XP
OS : Windows XP SP1 or SP 2 (Windows 2000 or earlier not supported)
Hardware : 1.5 gig or greater processor
At least 512 megs RAM
OS X
OS : OS X 10.3.9 (earlier versions are not supported)
Hardware : 867 mHz or greater
At least 512 megs RAM
Apogee Host Interface equipped with an X-Firewire card
X-Firewire firmware version : 3.3 or greater
X-Firewire FPGA version : 3.0 or greater
OS X
Download the FireMix Installer from our web site (www.apogeedigital.com/downloads),
unzip the file to the desktop of your computer, double click on the resultant .pkg file, and
follow the instructions given by the installer program.
Windows XP
Download the FireMix Installer from our web site (www.apogeedigital.com/downloads),
unzip the file to the desktop of your computer, double click on the setup.exe file found in
the unzipped folder, and follow the instructions given by the installer program.
2
Page 5

FireMix – User’s Guide
Host
Interface
Hardware
Inputs
X-FW Out
to App
X-FW In
from App
Host
Interface
Hardware
Outputs
APOGEE ELECTRONICS
The FireMix Application
Overview
In essence, FireMix may be conceived of as a mixer with 10 inputs and 4 pairs of outputs, where each output
pair’s mix is controlled from a separate mixer “layer”. Inputs labelled Ch 1-8 are sourced directly from the
Apogee host interface’s hardware inputs 1-8, while inputs labelled DAW In (1-2,3-4,5-6,7-8) are sourced from
corresponding outputs of the recording software used in conjunction with the X-Firewire-euipped interface.
Firemix output pairs are sent directly to the Apogee host interface’s hardware outputs 1-2, 3-4,5-6 and 7-8
respectively. Please see the signal routing path diagram to the right.
SIGNAL ROUTING PATH
Opening the FireMix Application
Before attempting to use FireMix software, verify the proper operation of the X-Firewire equipped Apogee host
interface with your software application. Also verify that the X-Firewire firmware has been updated to the latest
versions. Please check here for more information : www.apogeedigital.com/downloads. After connecting your
X-Firewire equipped Apogee host interface, double-click on the FireMix application icon. If no host interface is con
nected or some other anomaly has occurred, the message “No Apogee detected” is displayed.
3
-
Page 6

FireMix – User’s Guide
The FireMix Application (continued)
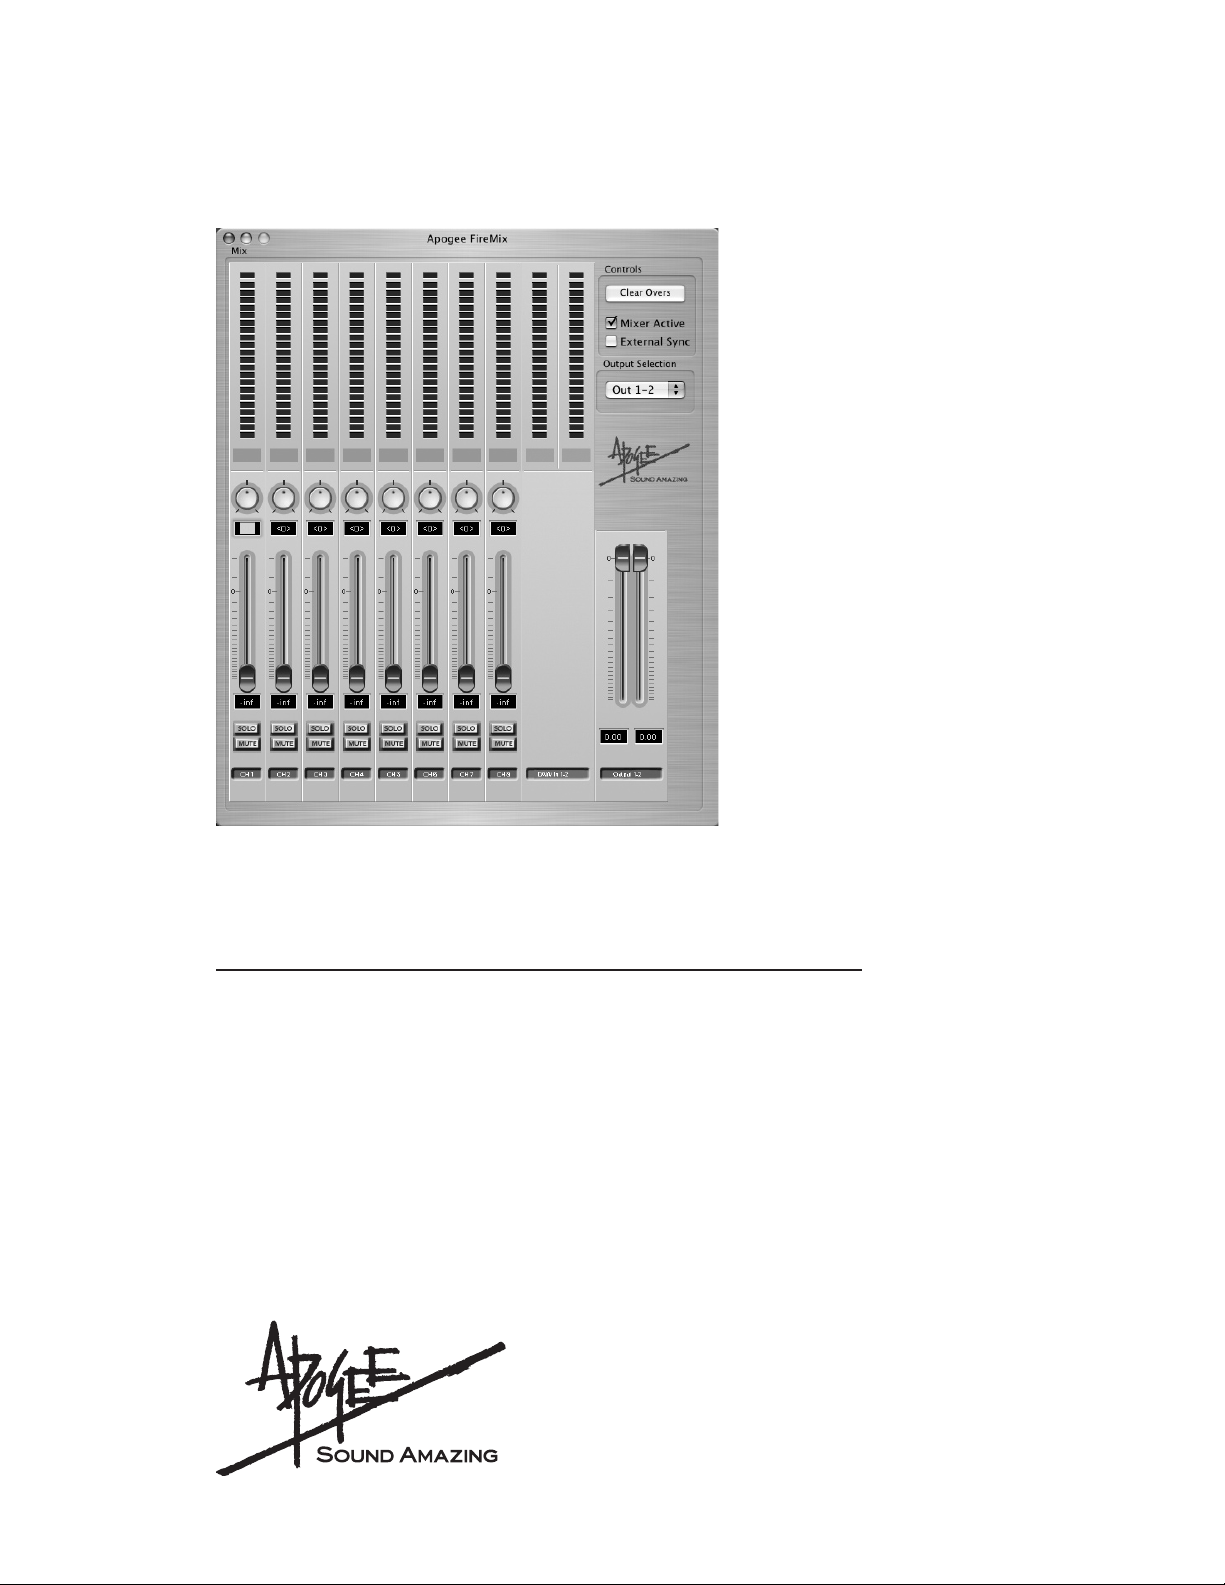
FireMix front panel
APOGEE ELECTRONICS
1) Input meters 1-8 – The first eight meters display the level of inputs sourced
from the Apogee host interface’s inputs
1-8.
2) Pan – These software knobs pan input
1
11
12
7
13
14
signals between the selected output
pair. The mouse motion used to set
the pan knob may be set in the FireMix
2
preferences.
3) Pan Value Indicator – These indicators display the value of the pan knob
3
setting, from – 64(full left) to 0 (center)
to 64 (full right).
4) Input Faders 1-8 – These software
4
9
controls set the gain level at which
inputs are mixed to the output pair.
5) Input Fader Value Indicator - These
5
indicators display the input fader’s gain
value, from –inf to (+) 6.02.
6
10
6) Solo/Mute Buttons – These buttons
offer useful monitoring functions commonly found on most mixers. When
an input channel’s Mute button is
engaged, that channel is muted and the input signal is no longer heard. When an input channel’s
Solo button is engaged, the Mute buttons of all OTHER input channels are engaged, so that only
the “Solo’ed” input channel is heard.
7) DAW In (1-2,3-4,5-6,7-8) – these meters display the level of inputs sourced from outputs of the
recording software used in conjunction with the X-Firewire-equipped Apogee interface.
8) DAW In Faders – Quite simply, there aren’t any! The inputs sourced from recording software
outputs are mixed at unity gain, i.e. if a fader was present, it would be set at 0.
9) Stereo Output Faders – These software controls set the output attenuation level.
10) Stereo Output Fader Value Indicators - These indicators display the stereo output fader’s at-
tenuation value, from –inf to 0.
11) Clear Overs – This button clears the red OVER indicators
12) Mixer Active – This box must be checked for the FireMix mixer to be active. Uncheck Mixer Active to interrupt signal flow for troubleshooting purposes.
13) External Sync (Mac OS X only) – To set the connected Apogee host interface to external sync,
check this box and select the desired external source on the host interface front panel.
14) Output Selection - This drop-down menu selects the output pair “layer” to be displayed.
4
Page 7

FireMix – User’s Guide
The FireMix Application (continued)
Using FireMix – In the following example, we will assume the following setup: a microphone (via a mic-
preamp) is connected to Input 1 of a Rosetta 800, and the Rosetta 800’s analog outputs are connected to a monitoring system with speakers and a headphone. We are recording onto track 1 of a Logic
session, and tracks 2-8 contain pre-recorded tracks.
1) After opening Logic and FireMix, set Ouput Selection to Out 1-2. Set up a mix of the prerecorded
tracks using Logic’s Track Mixer window, and route this mix to outputs 1-2. Playback level of the
mix (as displaying in Logic) should match the level displayed on the stereo input meter (9-10),
and should be present at the hardware outputs.
2) Set the mic-pre gain so the input level displayed on FireMix meter 1 is appropriate to the signal
being recorded, and raise fader 1 for the desired monitoring level.
3) Set an audio track in Logic to accept a signal from input 1 and record-enable the track; input level
should appear on the track’s meter. To avoid monitoring the record-enabled track through Logic’s
mixer (and thus with additional latency), uncheck the Software Monitoring box found in Logic
under Audio>Audio Hardware and Drivers.
4) When recording multiple instruments, connect them to the host interface inputs 1-8 and repeat
steps 2-3, creating additional Logic tracks for each instrument.
APOGEE ELECTRONICS
FireMix Preferences
Pan Control
Mouse motion – This preference sets the mouse motion required to modify the pan knob. Set-
tings are self-explanatory.
Fine adjust key – This preference specifies the computer key used to make fine adjustments to
the pan knob; press the specified key before modifying the knob position with the mouse.
Center key – This preference specifies the key used to set the pan knob to it’s center position;
press the specified key and click on the pan knob to return it to the center position (pan value of
“0”).
Fader Control
Fine adjust key – This preference specifies
the computer key used to make fine adjustments to the fader; press the specified key
before modifying the fader position with the
mouse.
0 db key – This preference specifies the key
used to set the fader to 0 db; press the specified key and click on the fader to return it to 0
db gain.
5
Page 8

FireMix User’s Guide - v1.0 - April 2005
Text conceived and delivered by: Roger Robindore
Graphics by: Sean McArthur
 Loading...