

Page 1

More Security, More Convenience www.apexis.com.cn / www.apexis.cc
Apexis IPClient Software Guider
(CMS Guider)
V1.2
Shenzhen Apexis Electronic Co., Ltd Tel: +86-755-26509025 Fax: +86-755-26509229
Page 2

More Security, More Convenience www.apexis.com.cn / www.apexis.cc
Content
1. INSTALLATION................................................................................................. 3
2. SOFTWARE OPERATION................................................................................4
2.1.Login........................................................................................................................ 4
2.2. For Multi-windows................................................................................................... 6
2.3. System Settings......................................................................................................6
2.3.1 Basic Settings.................................................................................................... 6
2.3.2 User Settings .....................................................................................................8
2.3.3 Device List .........................................................................................................9
2.3.4 Search File (Playback)..................................................................................... 10
2.4. For E-map..............................................................................................................11
2.5. Log.........................................................................................................................11
2.6. Software Interface Operation .................................................................................11
2.7. For Rightside Panel Icons.....................................................................................12
3. HOW TO SET THE DEVICE(FOR MJPEG).................................................... 13
4. PRESET SETTINGS........................................................................................ 22
5.SHORTCUT KEY ON SCREEN....................................................................... 22
5.1 Advanced Settings:................................................................................................ 23
5.2 Three Icons on screen ...........................................................................................27
6.LOGOUT........................................................................................................... 28
7.STATEMENT.................................................................................................... 28
Shenzhen Apexis Electronic Co., Ltd Tel: +86-755-26509025 Fax: +86-755-26509229
Page 3
More Security, More Convenience www.apexis.com.cn / www.apexis.cc
1. INSTALLATION
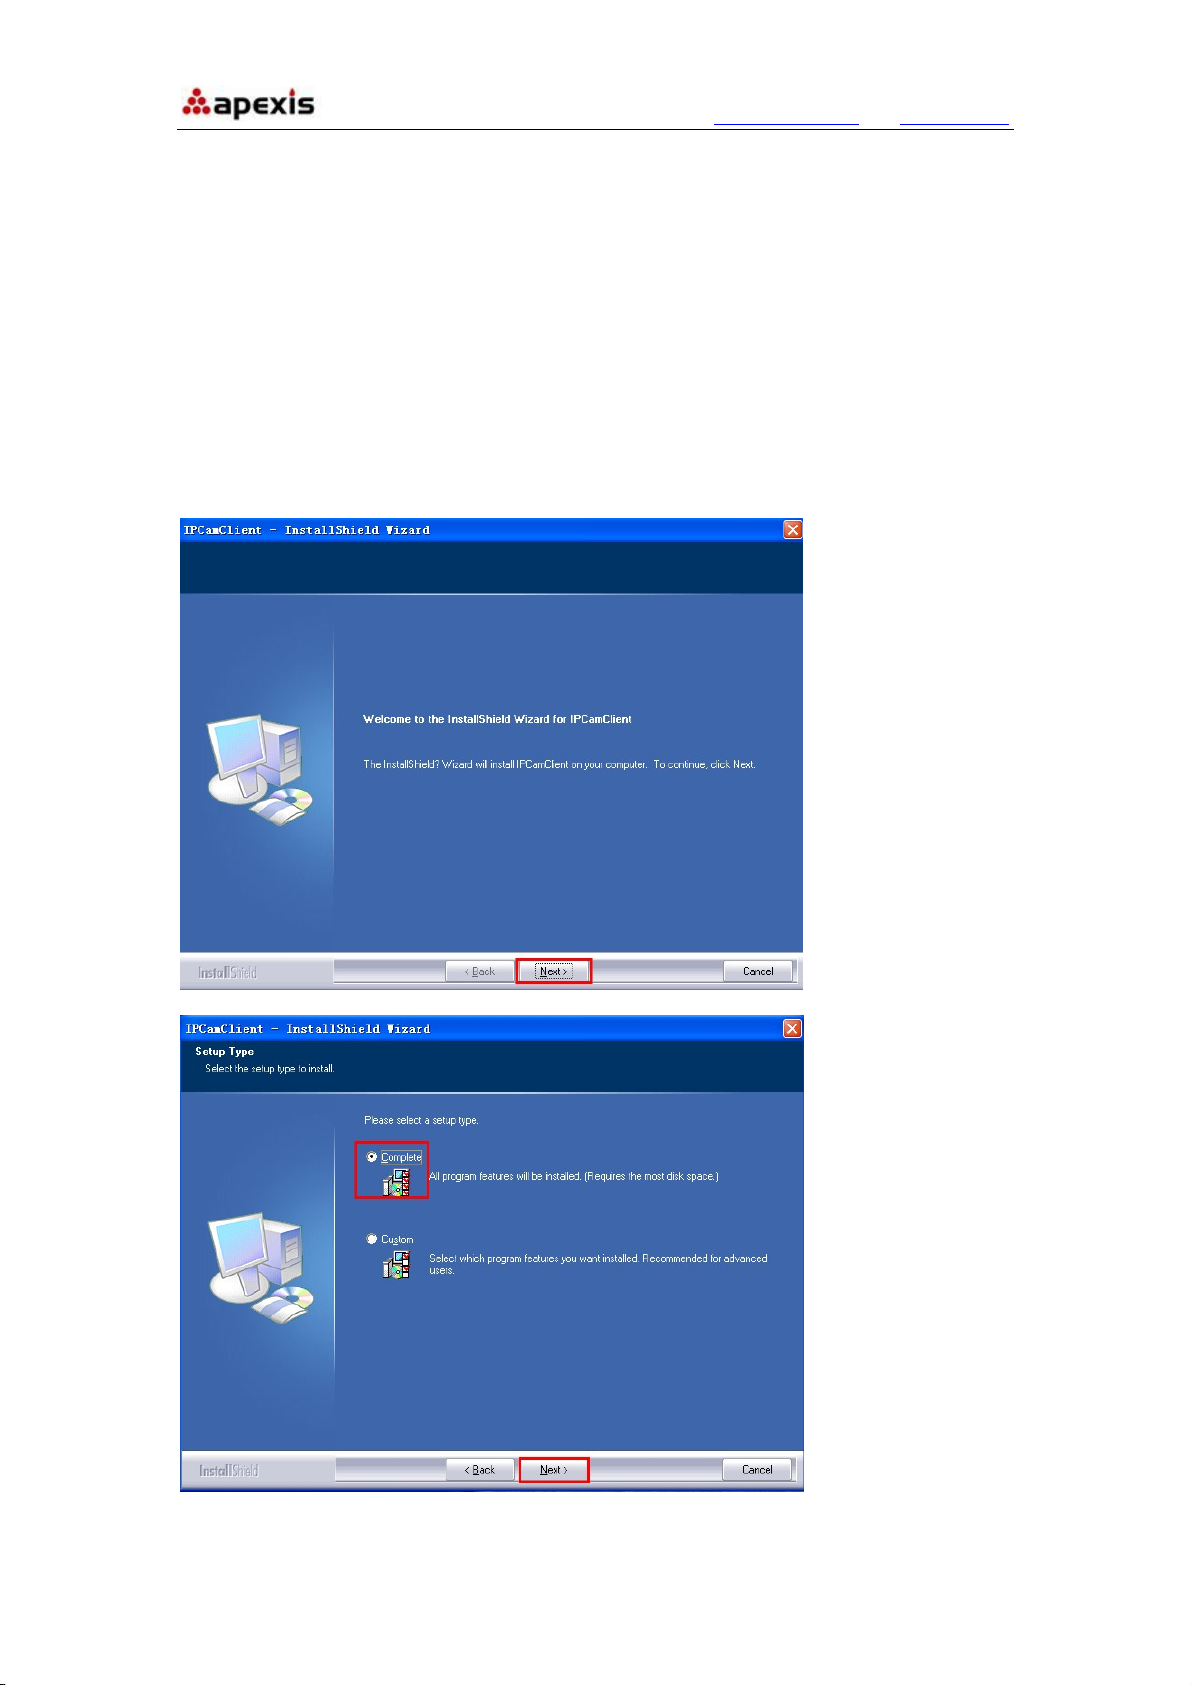
NOTE: This Ipclient software matches with all Apexis MPJEG and H.264 IP cameras.
Before installation, pls kindly turn off the firewall and Antivirus software of the computer
connected, so that this software can be installed completely and successfully. Pls don’t
worried, it’s safe and won’t bring any problem to your computer.
After installation, If there is clue for restarting the computer, please just do it, then you can
use the IPClient software.
Shenzhen Apexis Electronic Co., Ltd Tel: +86-755-26509025 Fax: +86-755-26509229
Page 4
More Security, More Convenience www.apexis.com.cn / www.apexis.cc
2. SOFTWARE OPERATION
2.1.Login
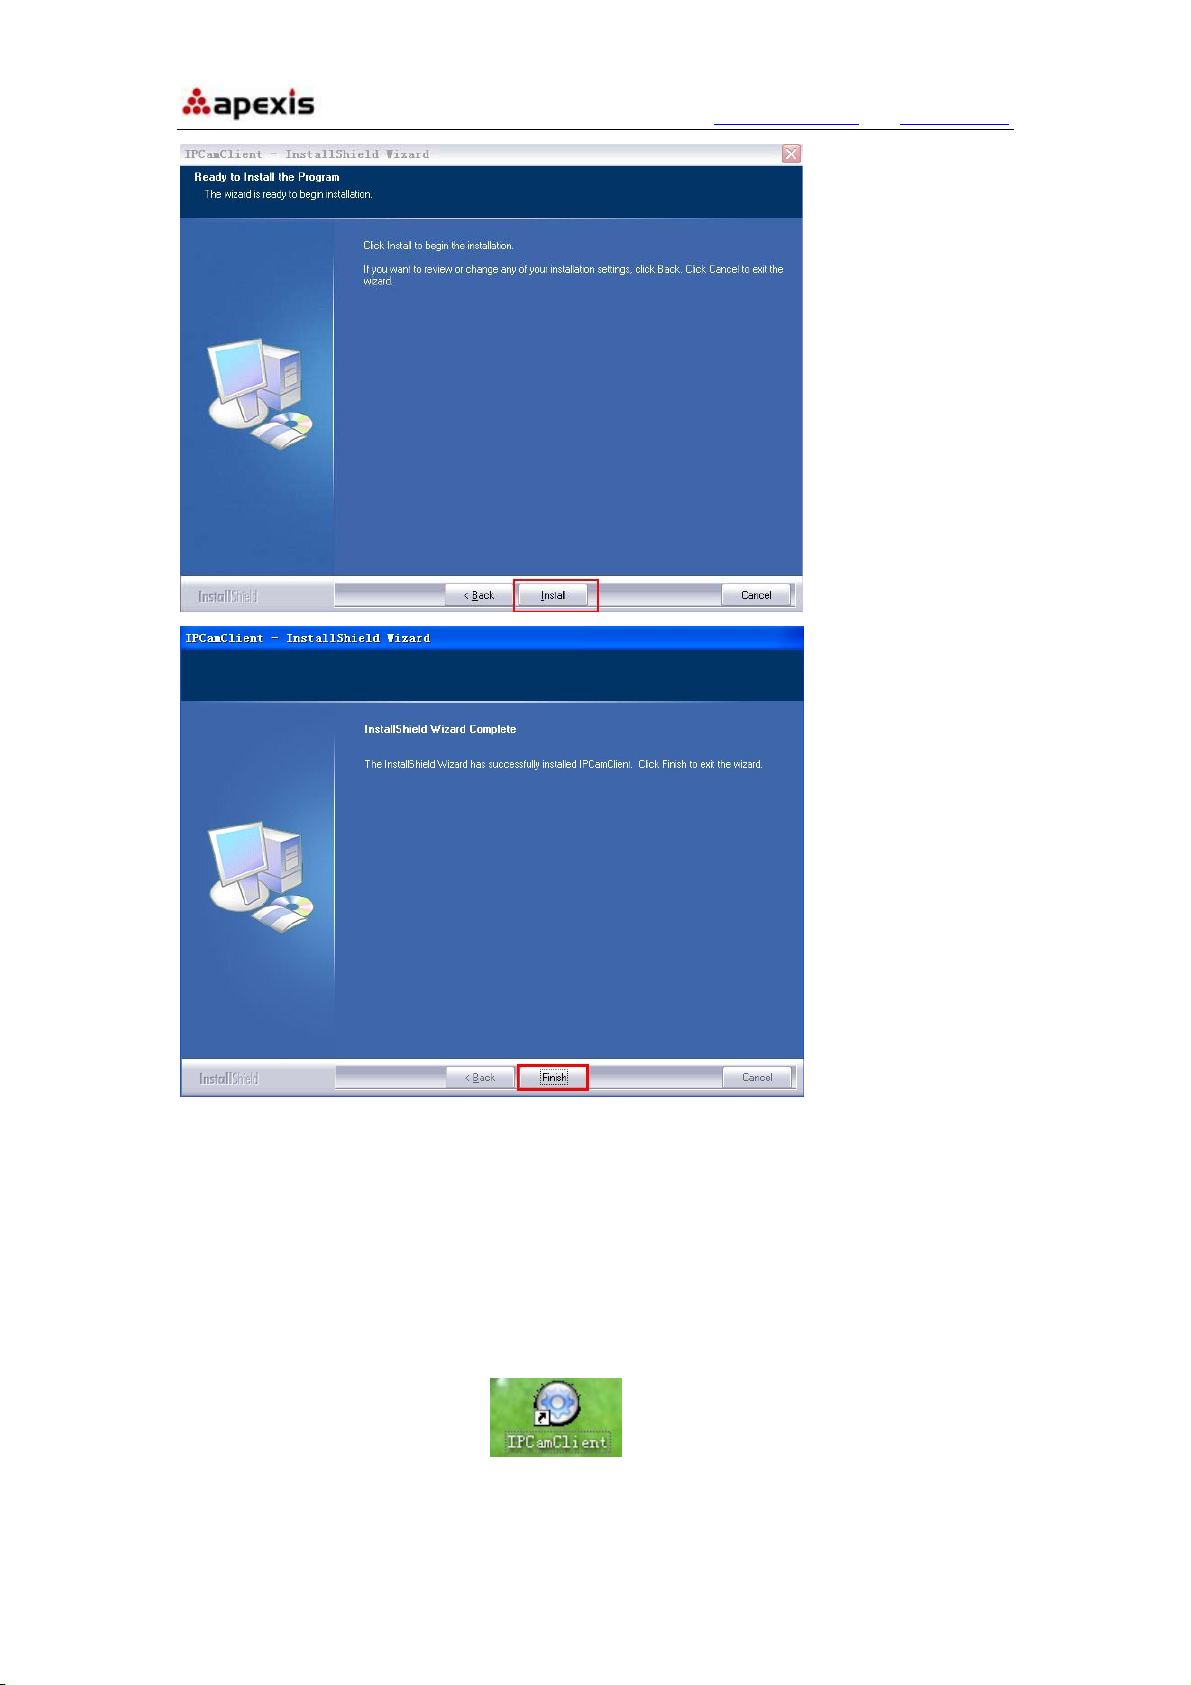
Double click the IpcamClient icon , you will see the login interface as below,
choose English language:
Shenzhen Apexis Electronic Co., Ltd Tel: +86-755-26509025 Fax: +86-755-26509229
Page 5
More Security, More Convenience www.apexis.com.cn / www.apexis.cc
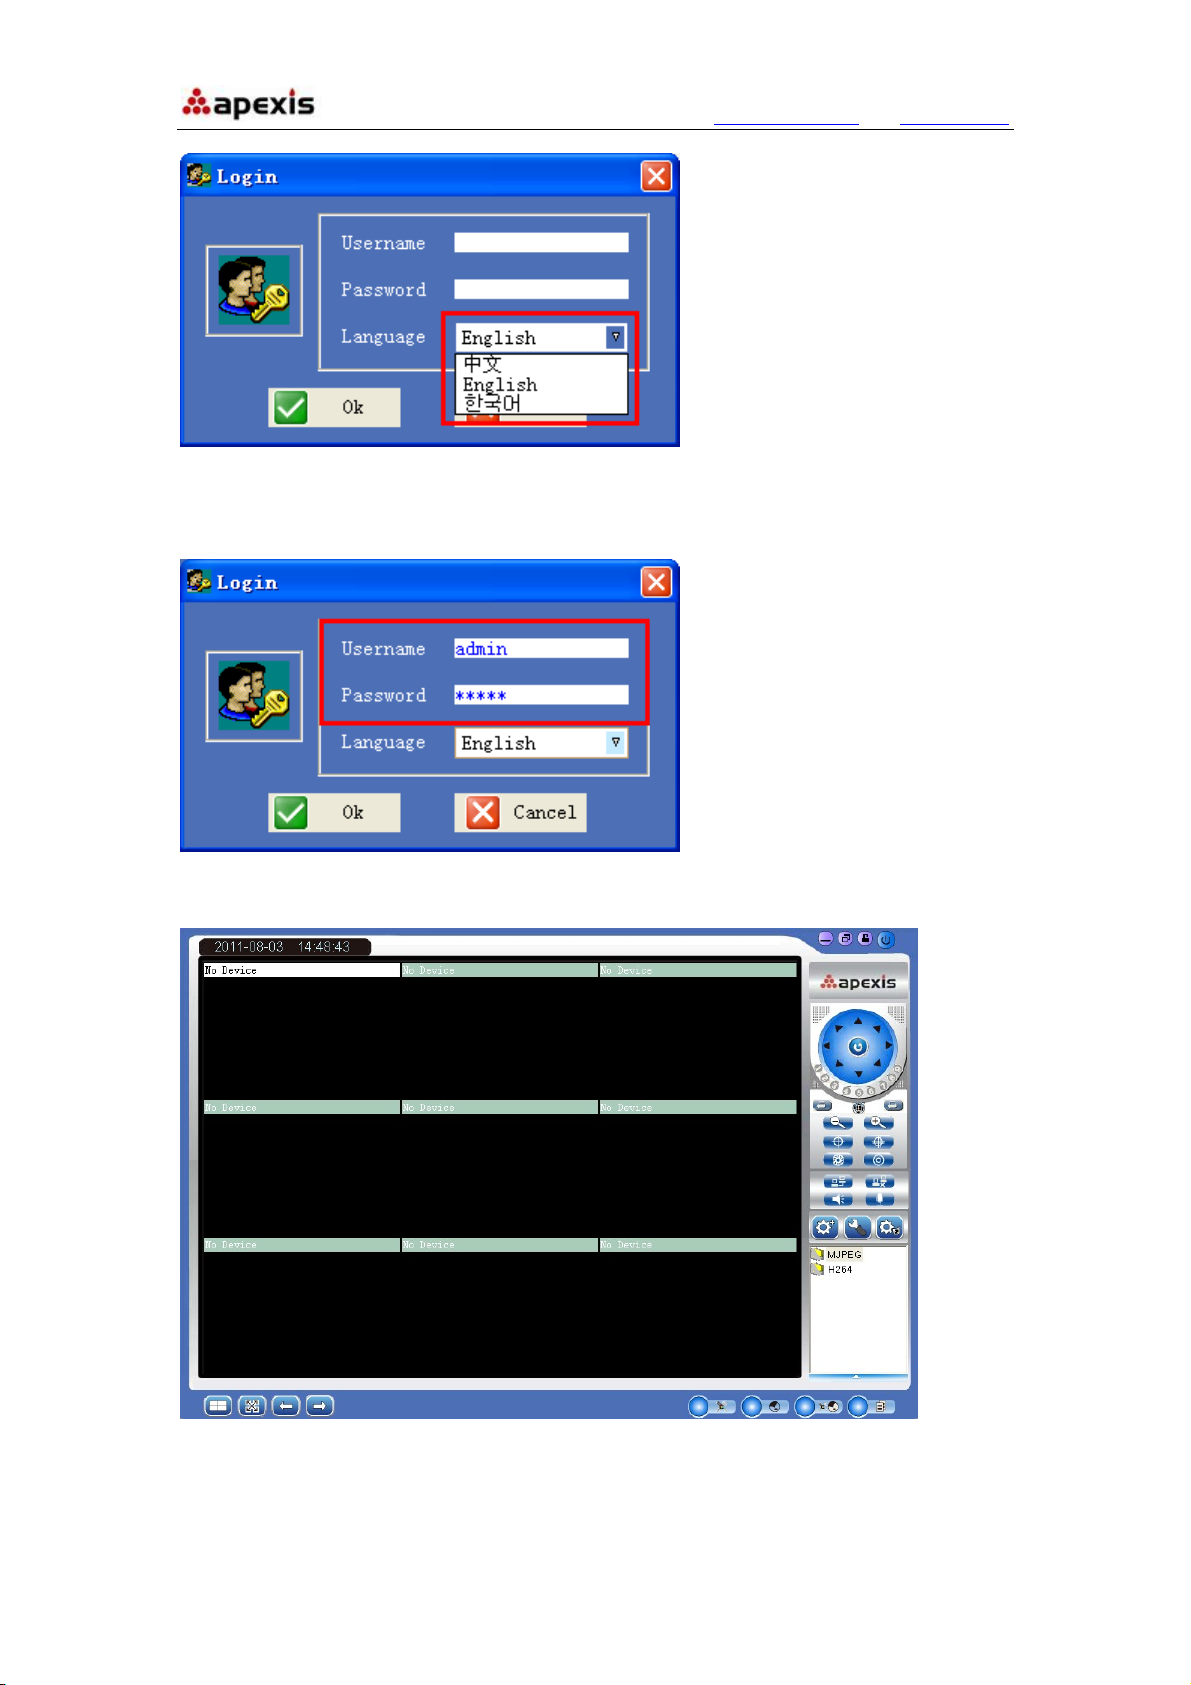
Enter the username and password. The default username is admin, default password is
admin; then click OK to login:
After login, will pop-up the software interface as below:
Shenzhen Apexis Electronic Co., Ltd Tel: +86-755-26509025 Fax: +86-755-26509229
Page 6
More Security, More Convenience www.apexis.com.cn / www.apexis.cc
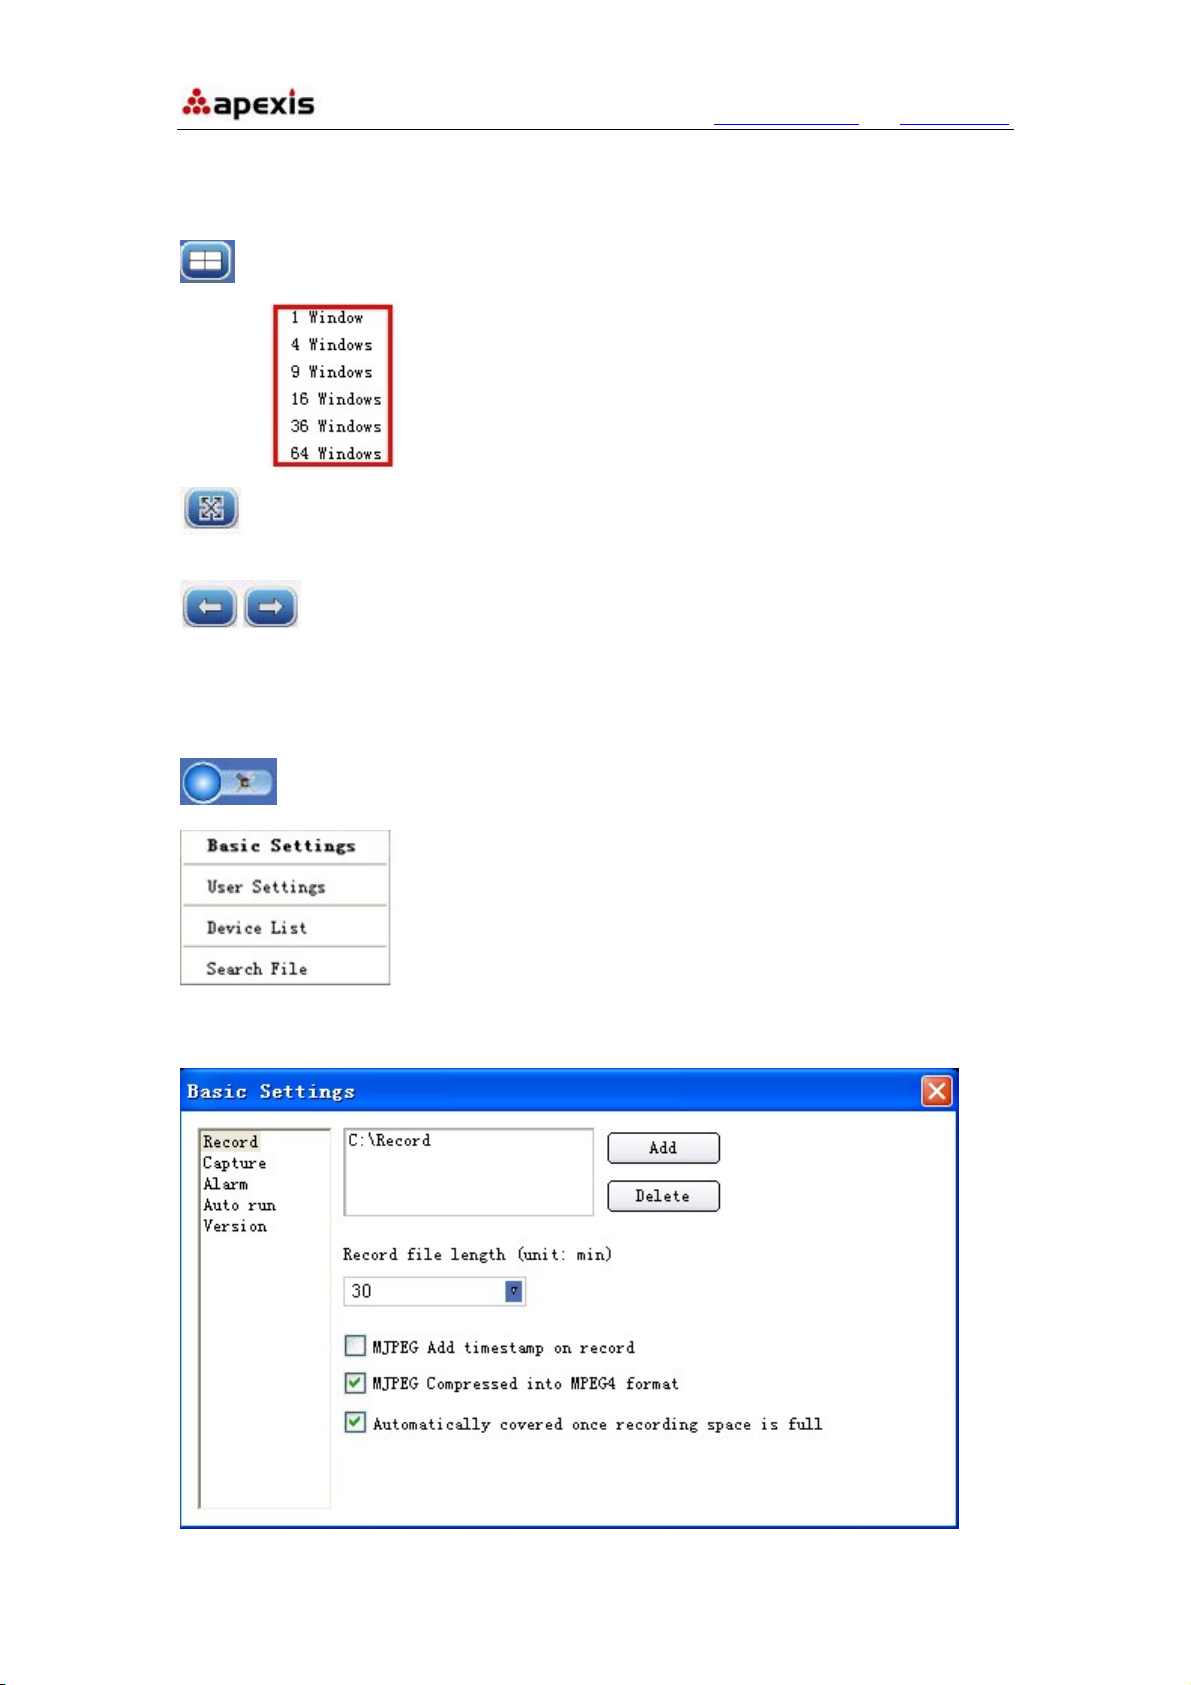
2.2. For Multi-windows
: Click it will pop-up the multi-windows options, can be from 1 to 64
windows.
|: Click it to turn to the full screen, double click the screen or press the Esc on the
keyboard to back to normal.
: Click it to page up/down.
2.3. System Settings
: System Setting: Click it will pop-up the system setting options as
2.3.1 Basic Settings:
Click it to login the basic settings interface as below:
Shenzhen Apexis Electronic Co., Ltd Tel: +86-755-26509025 Fax: +86-755-26509229
Page 7
More Security, More Convenience www.apexis.com.cn / www.apexis.cc
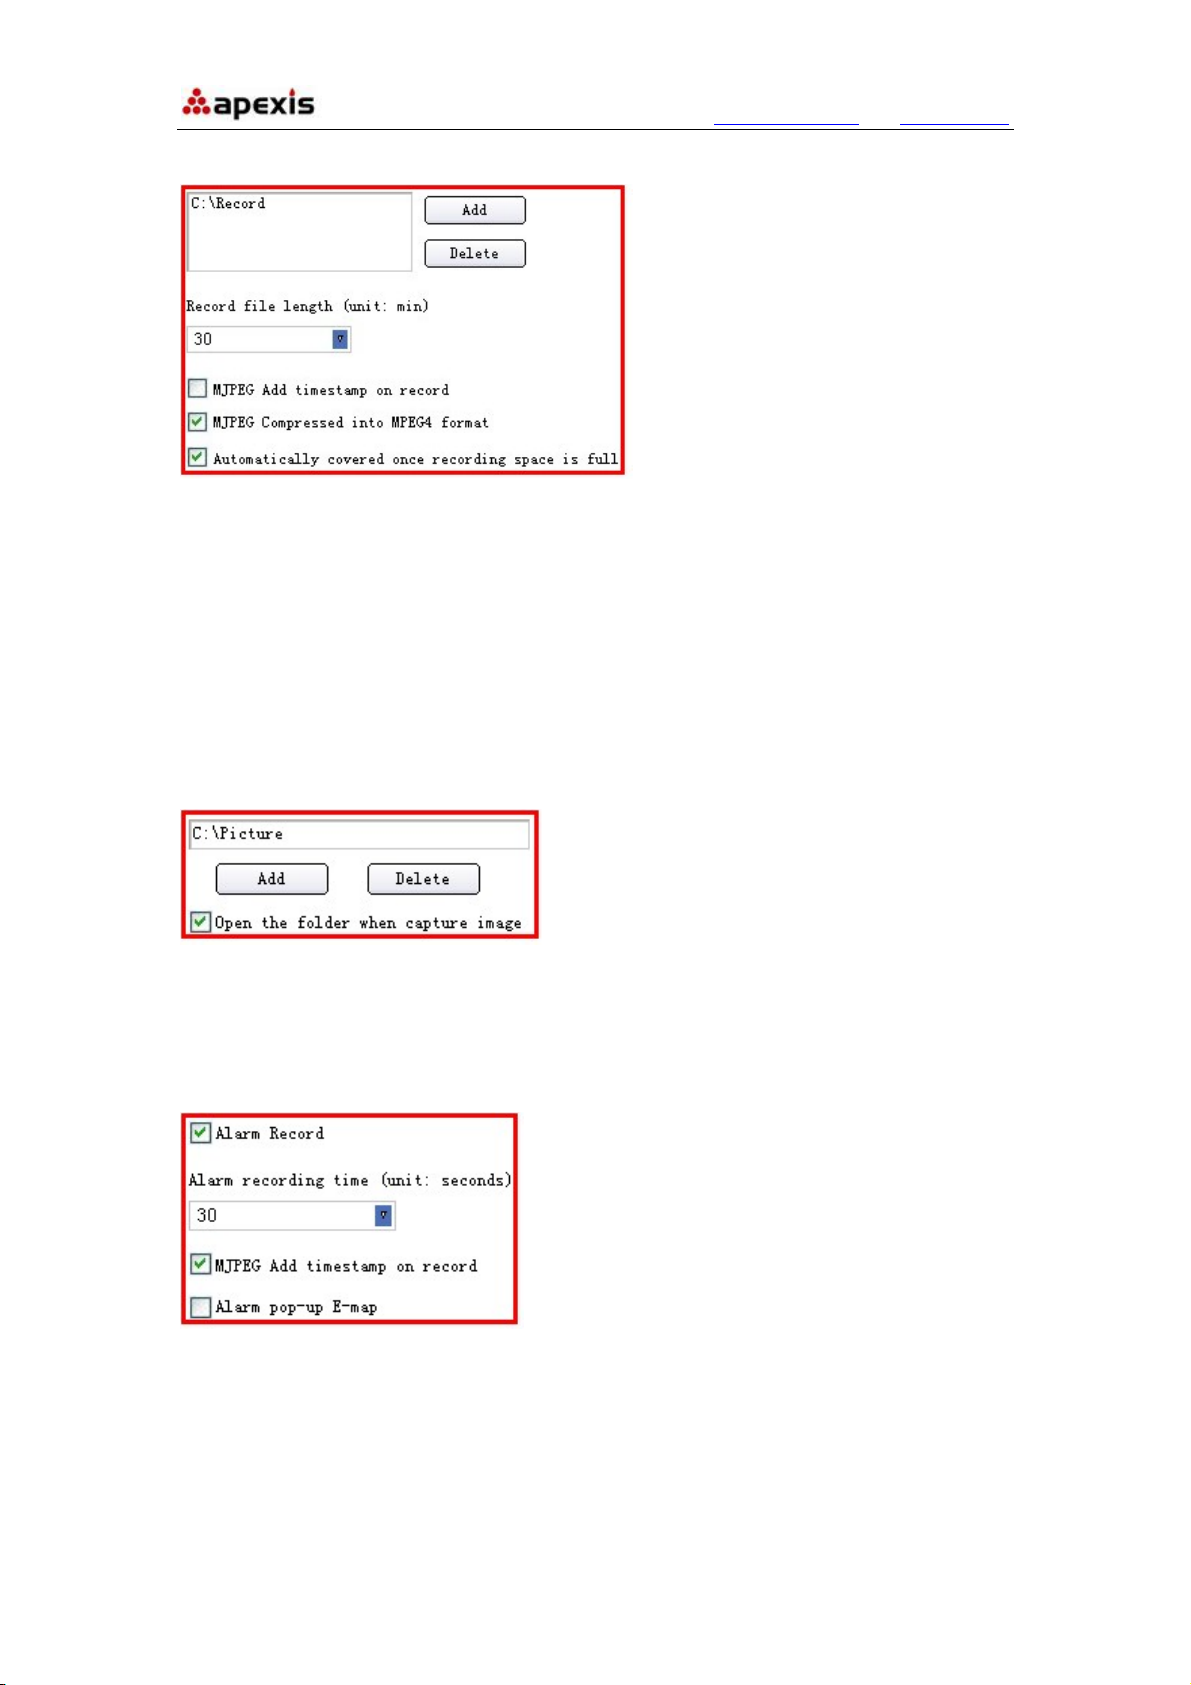
2.3.1.1 Record:
1. Add/Delete: Click it to set/delete the path for record files saved.
2. Record file length: Click it to set the length for every record file, could be
30/60/120/180/300 minutes.
3. MJPEG add timstamp on record: Select it to enable the function.
4. MJPEG compressed into MPEG-4 formart: Select it to enable the function, will save
the space for recording files.
5. Automatically covered once recording space is full: Select it, once the hardisk is
full, it will re-cover automatically.
2.3.1.2 Capture:
1. Add/Delete: Click it to set/delete the path for snapshot files saved.
2. Open the folder when capture image: Select it, will pop-up the folder when capture
image saved.
2.3.1.3 Alarm:
1. Alarm Record: Select it to active record function once alarmed.
2. Alarm recording time: Set the duration for every alarm, could be 30/60/120/180/300
seconds.
3. MJPEG add timstamp on record: Select it to enable the function.
4. Alarm pop-up E-map: Select it to enable the function, will pop-up the E-map which
set successfully already once alarmed.
Shenzhen Apexis Electronic Co., Ltd Tel: +86-755-26509025 Fax: +86-755-26509229
Page 8
More Security, More Convenience www.apexis.com.cn / www.apexis.cc
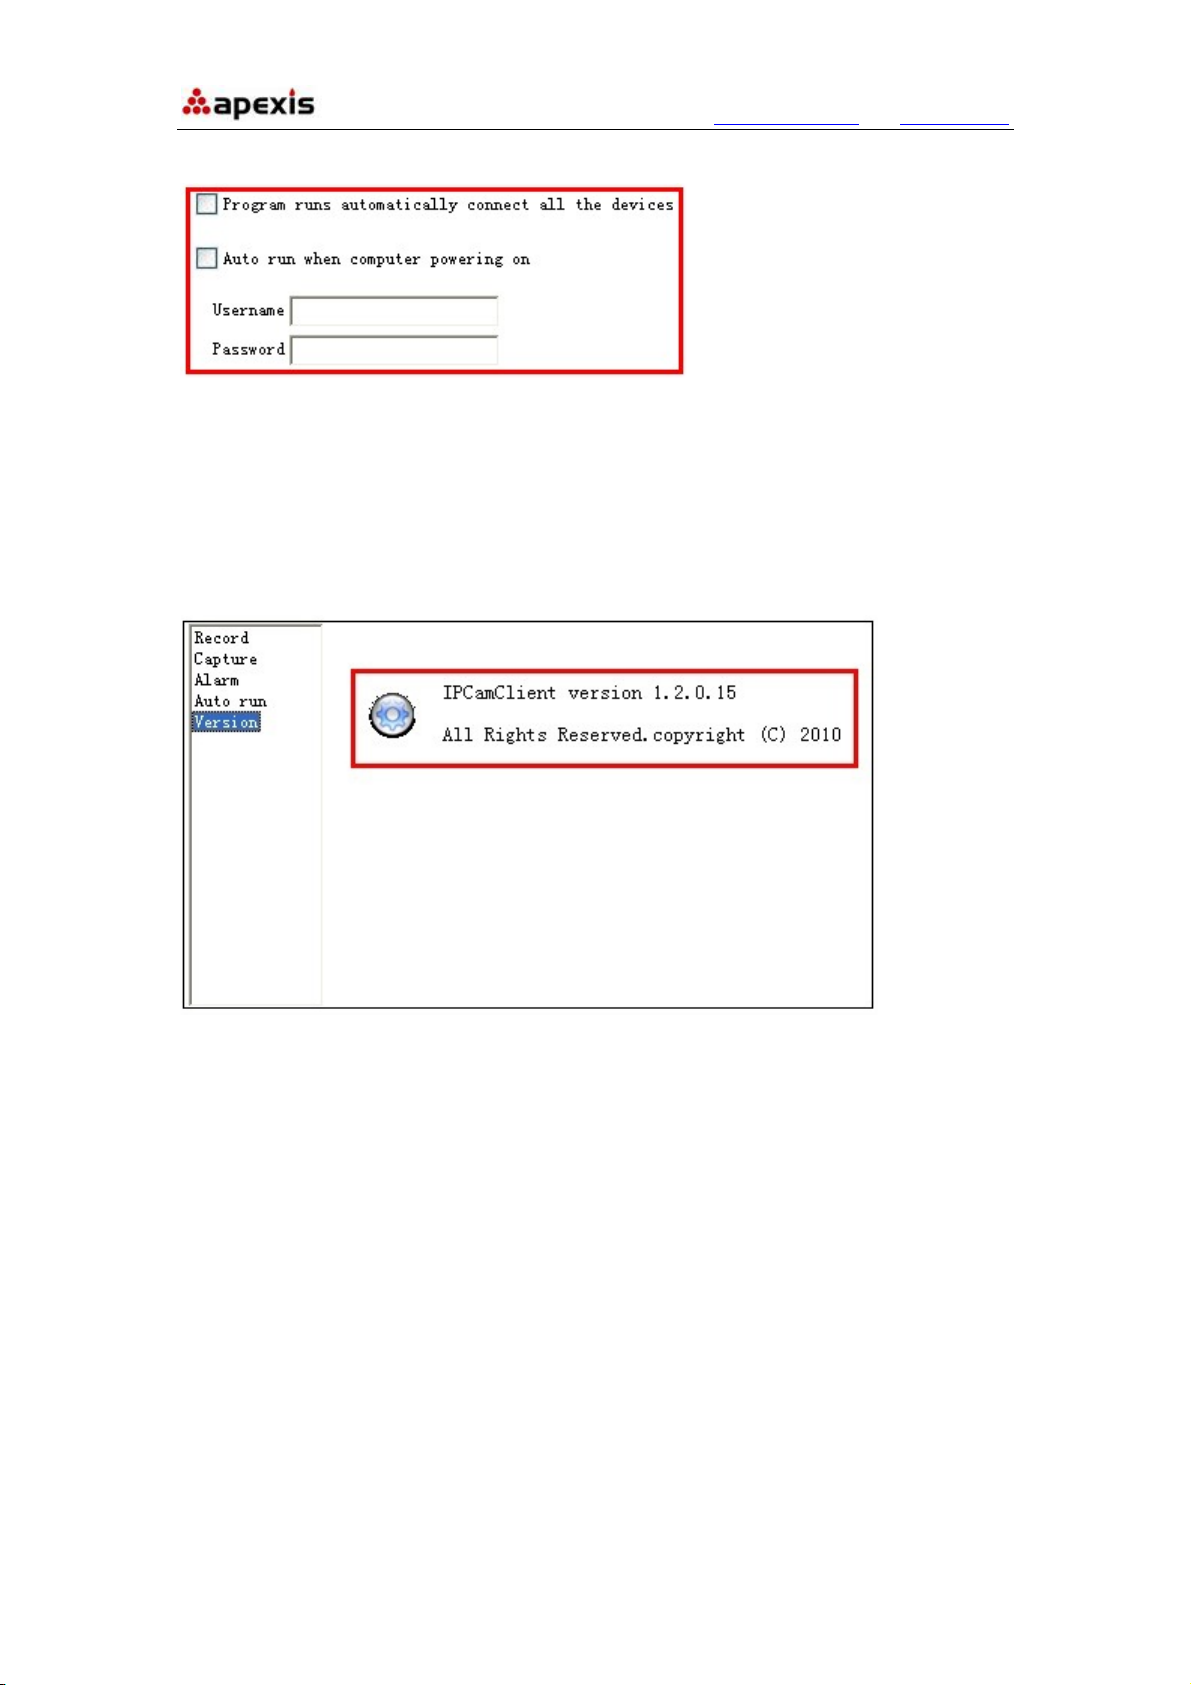
2.3.1.4 Auto run
1. Program runs automatically connect all the devices: Select it, once running the
program, will connect all the devices which set successfully already automatically.
2. Auto run when computer powering on: Select it, once start the computer, this
software will run automatically. Users can save the username and password here in
advance.
2.3.1.5 Version
Click Version to get the version details of this software.
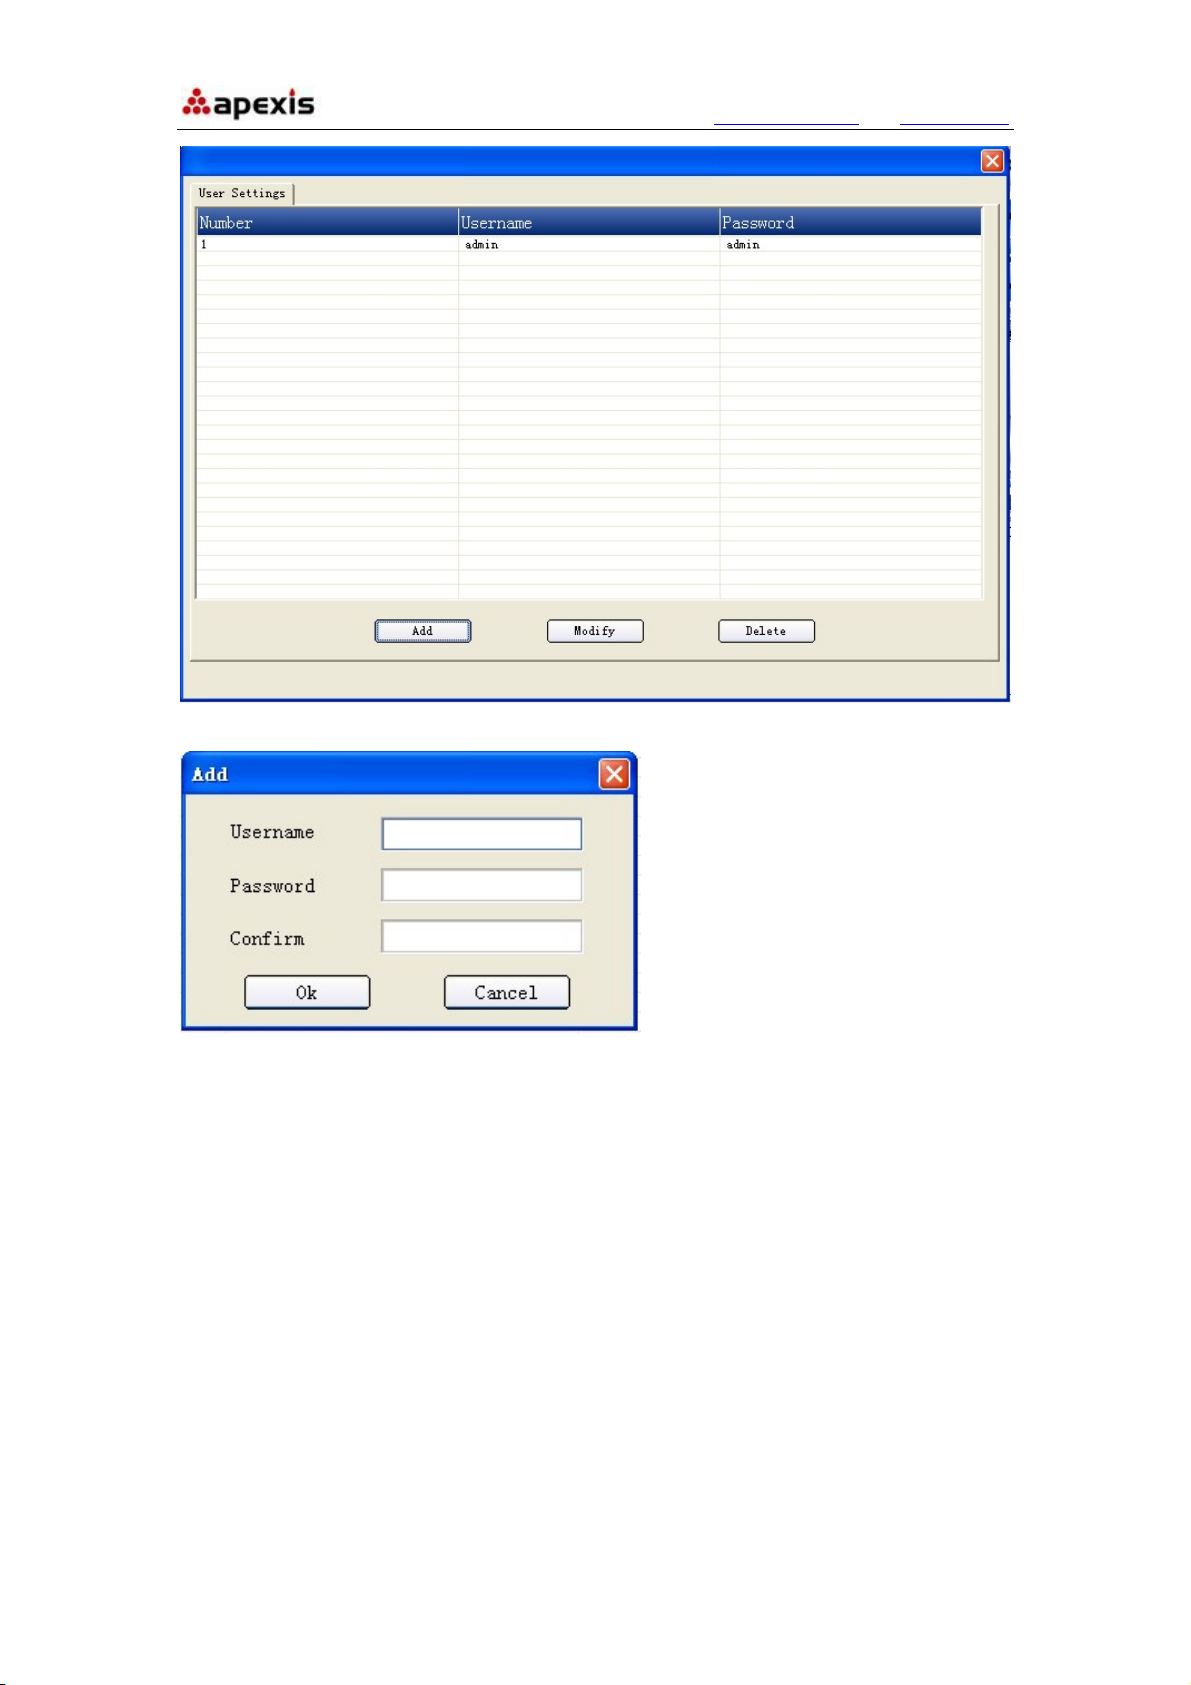
2.3.2 User Settings
Click it to login the user settings interface as below:
Shenzhen Apexis Electronic Co., Ltd Tel: +86-755-26509025 Fax: +86-755-26509229
Page 9
More Security, More Convenience www.apexis.com.cn / www.apexis.cc
Click Add to set user accounts.
Fill in the username, password, click OK to submit.
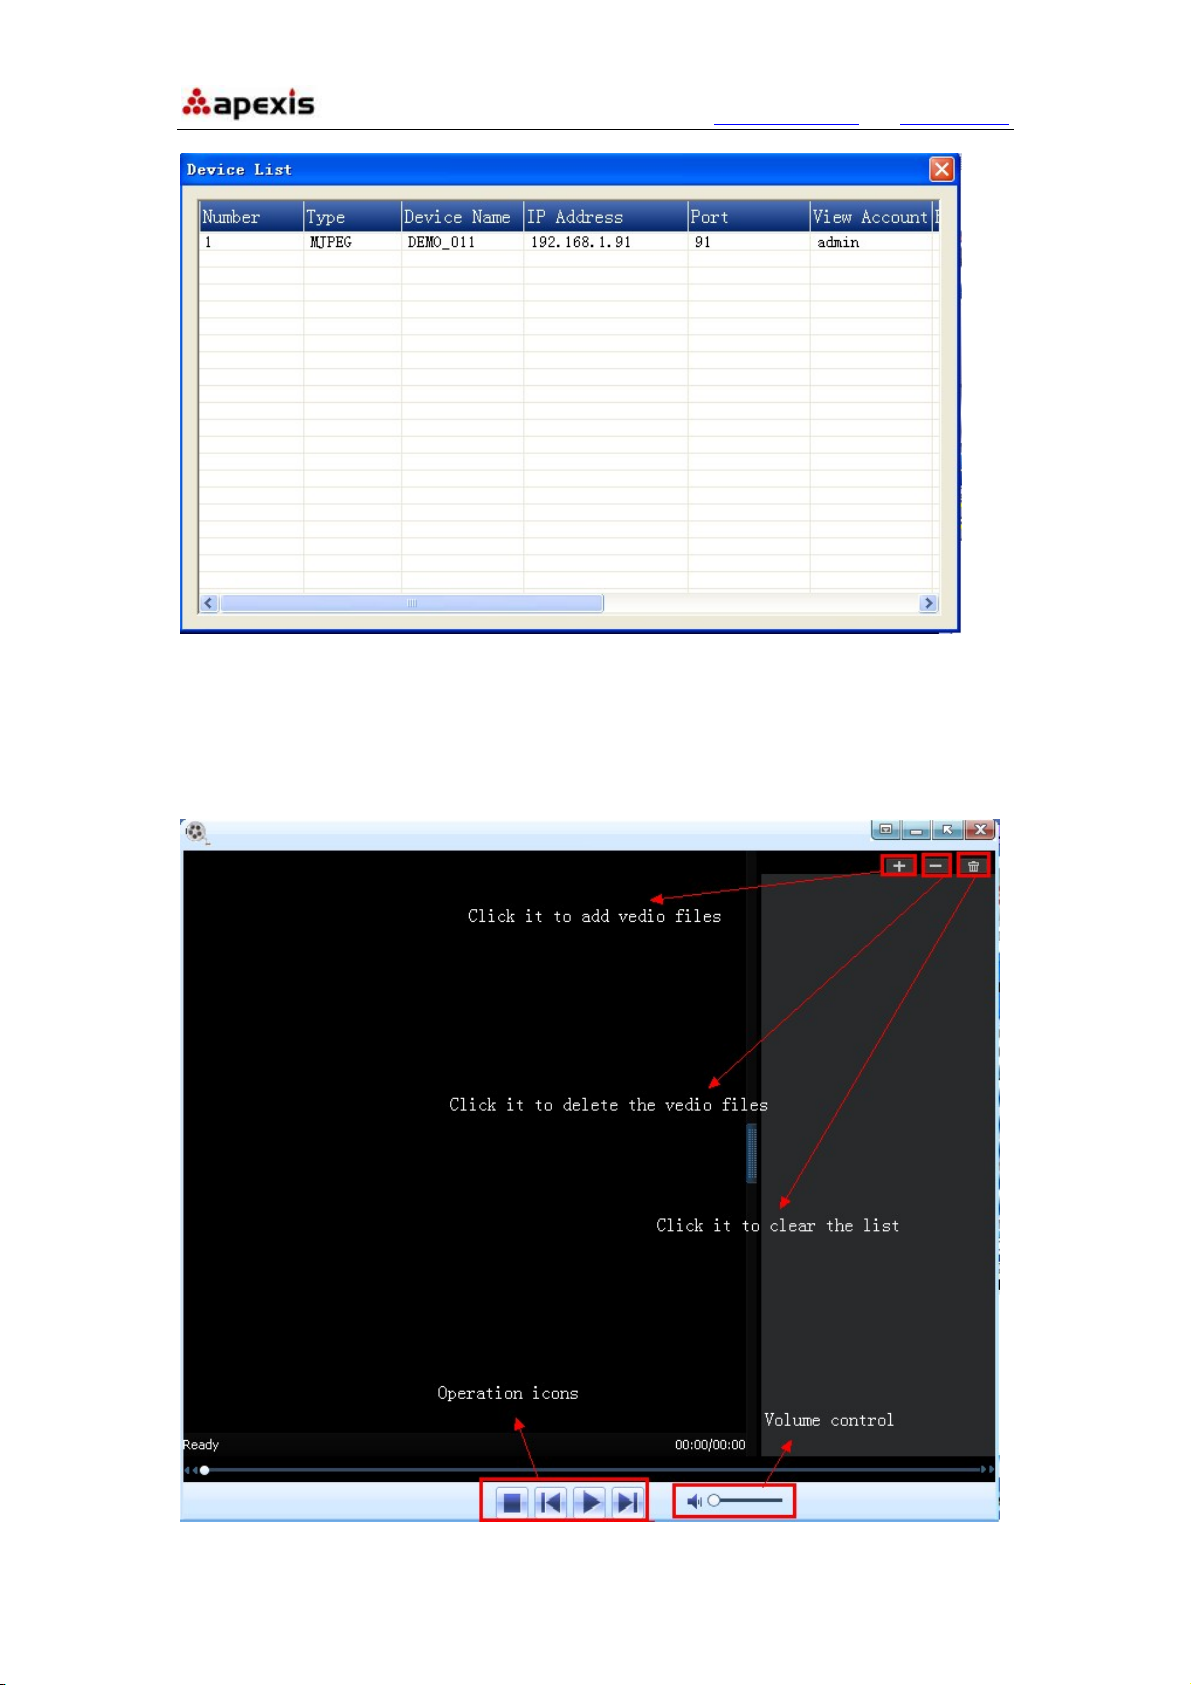
2.3.3 Device List
Click it will show all the device connected as below:
Shenzhen Apexis Electronic Co., Ltd Tel: +86-755-26509025 Fax: +86-755-26509229
Page 10
More Security, More Convenience www.apexis.com.cn / www.apexis.cc
2.3.4 Search File (Playback)
Click it will pop-up the search file interface as below:
Shenzhen Apexis Electronic Co., Ltd Tel: +86-755-26509025 Fax: +86-755-26509229
Page 11
More Security, More Convenience www.apexis.com.cn / www.apexis.cc
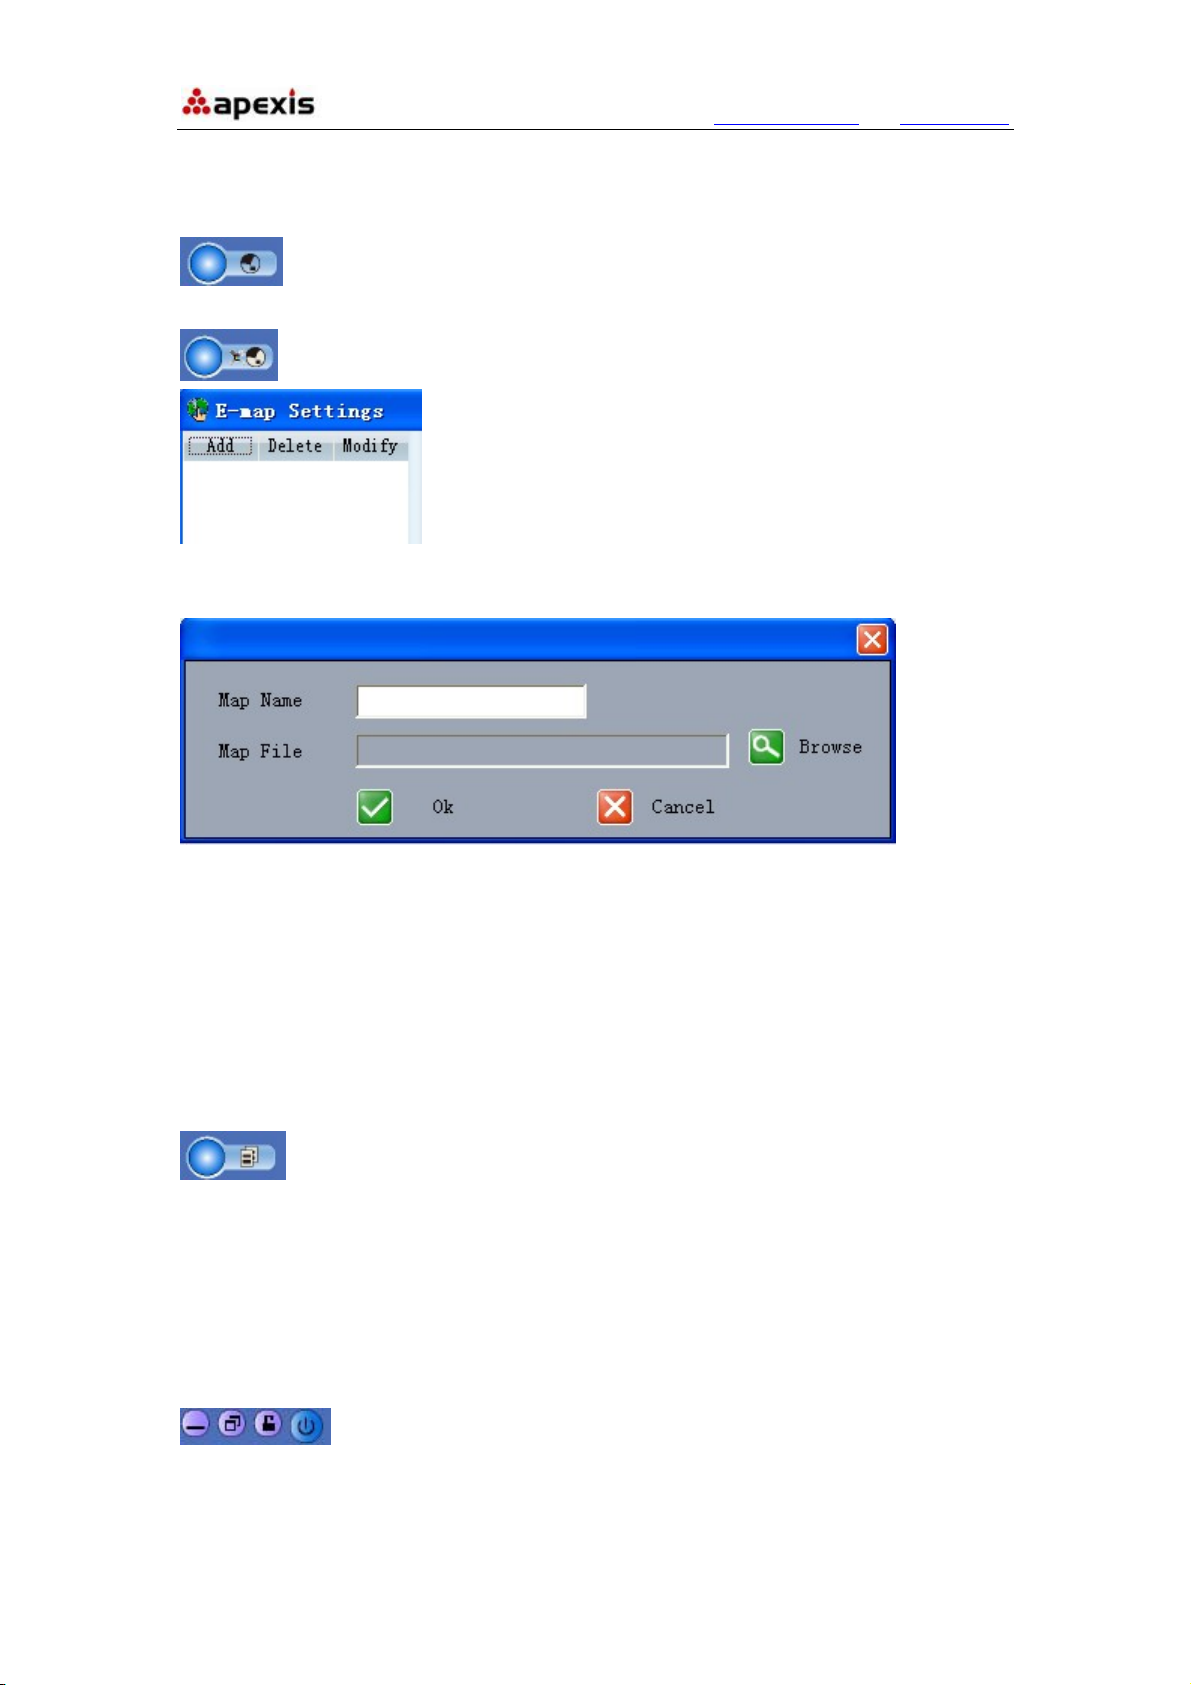
2.4. For E-map
: Show Map: Click it will pop-up the E-map which has been set sucessfully
already.
: Set Map: Click it will pop-up the E-map settings interface.
Add: Click it to add new map, will pop-up the window as below, set the map name and
browse the map to active it.
NOTE: Only support “.bmp” format images.
Delete: Choose the map firstly, click delete to remove the map.
Modify: Choose the map firstly, click modify to change/modify the map.
2.5. Log
: Search Log: Click it to search the log of the software.
ap settings: pls kindly note that you need to set the map in your LAN network before using
map function.
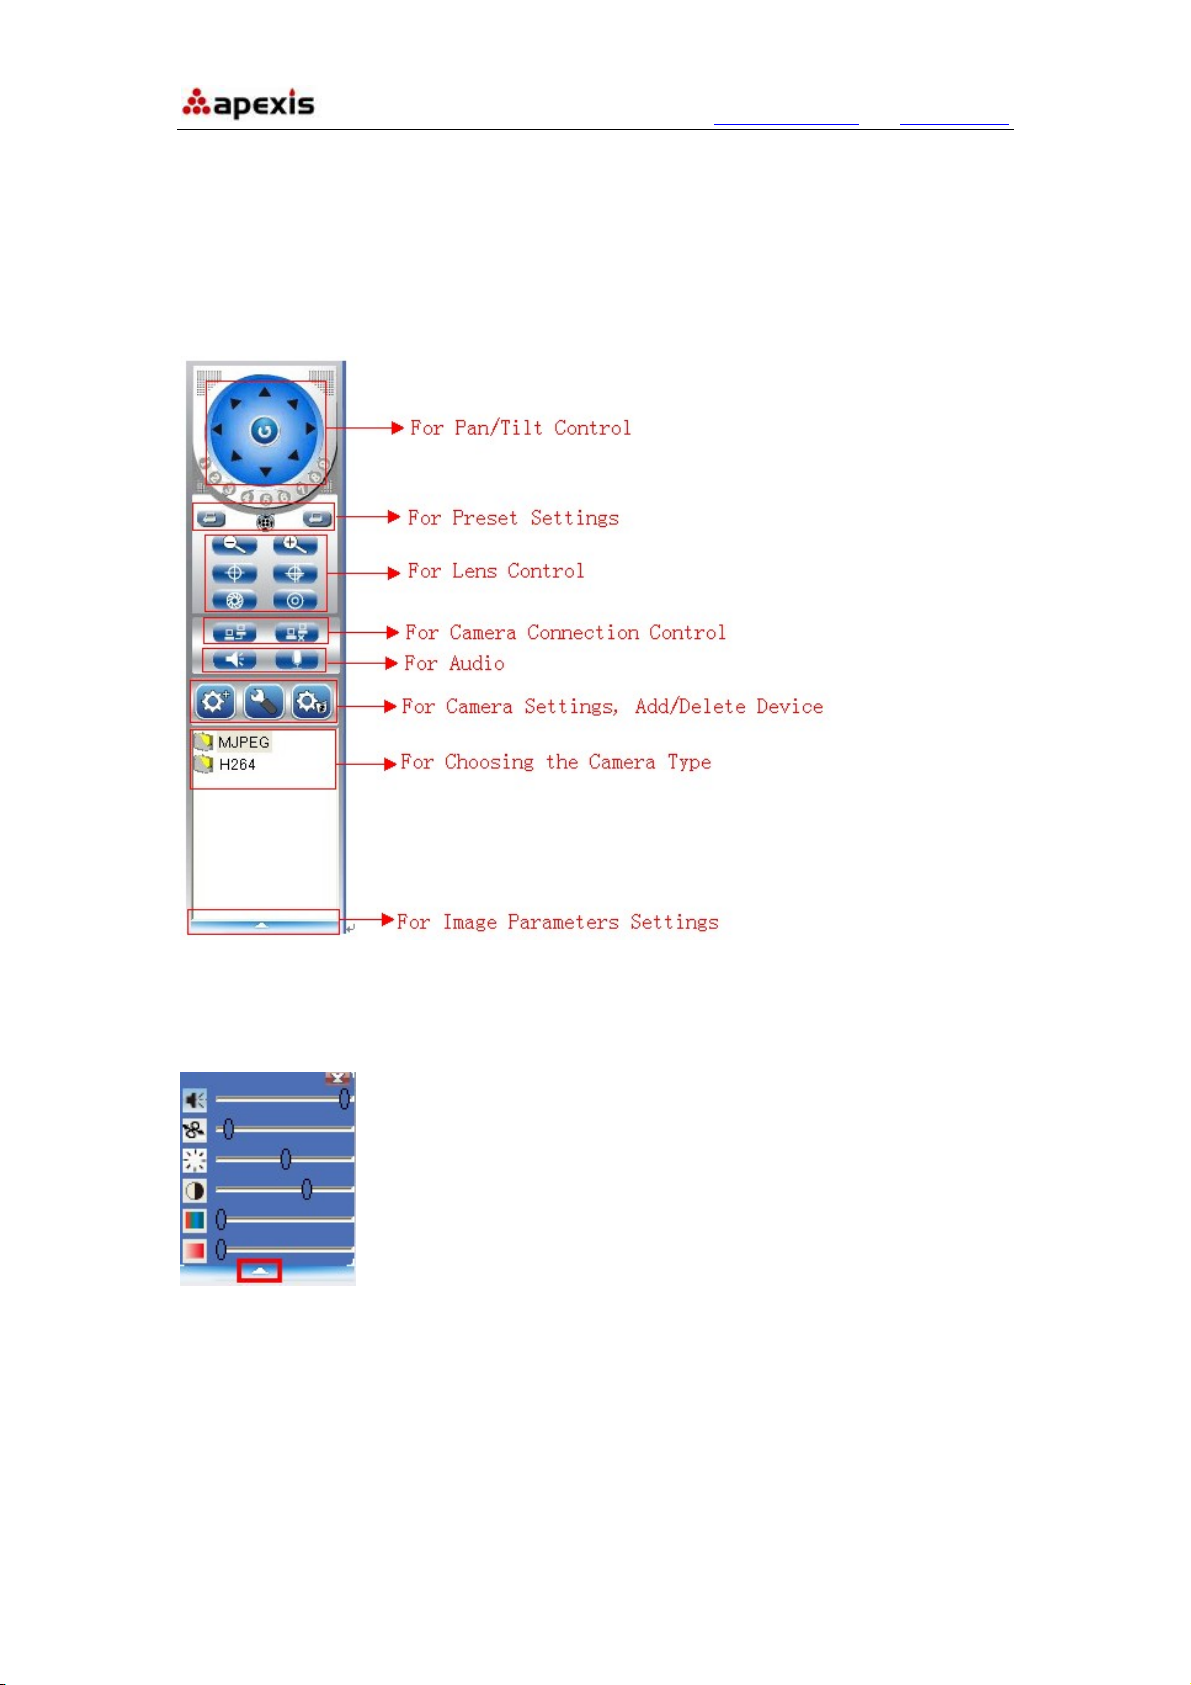
2.6. Software Interface Operation
: From left to right, means:
1. Minimize the program interface.
2. Maximization the program interface.
Shenzhen Apexis Electronic Co., Ltd Tel: +86-755-26509025 Fax: +86-755-26509229
Page 12
More Security, More Convenience www.apexis.com.cn / www.apexis.cc
3. Lock/Unlock the program.
4. Close the program.
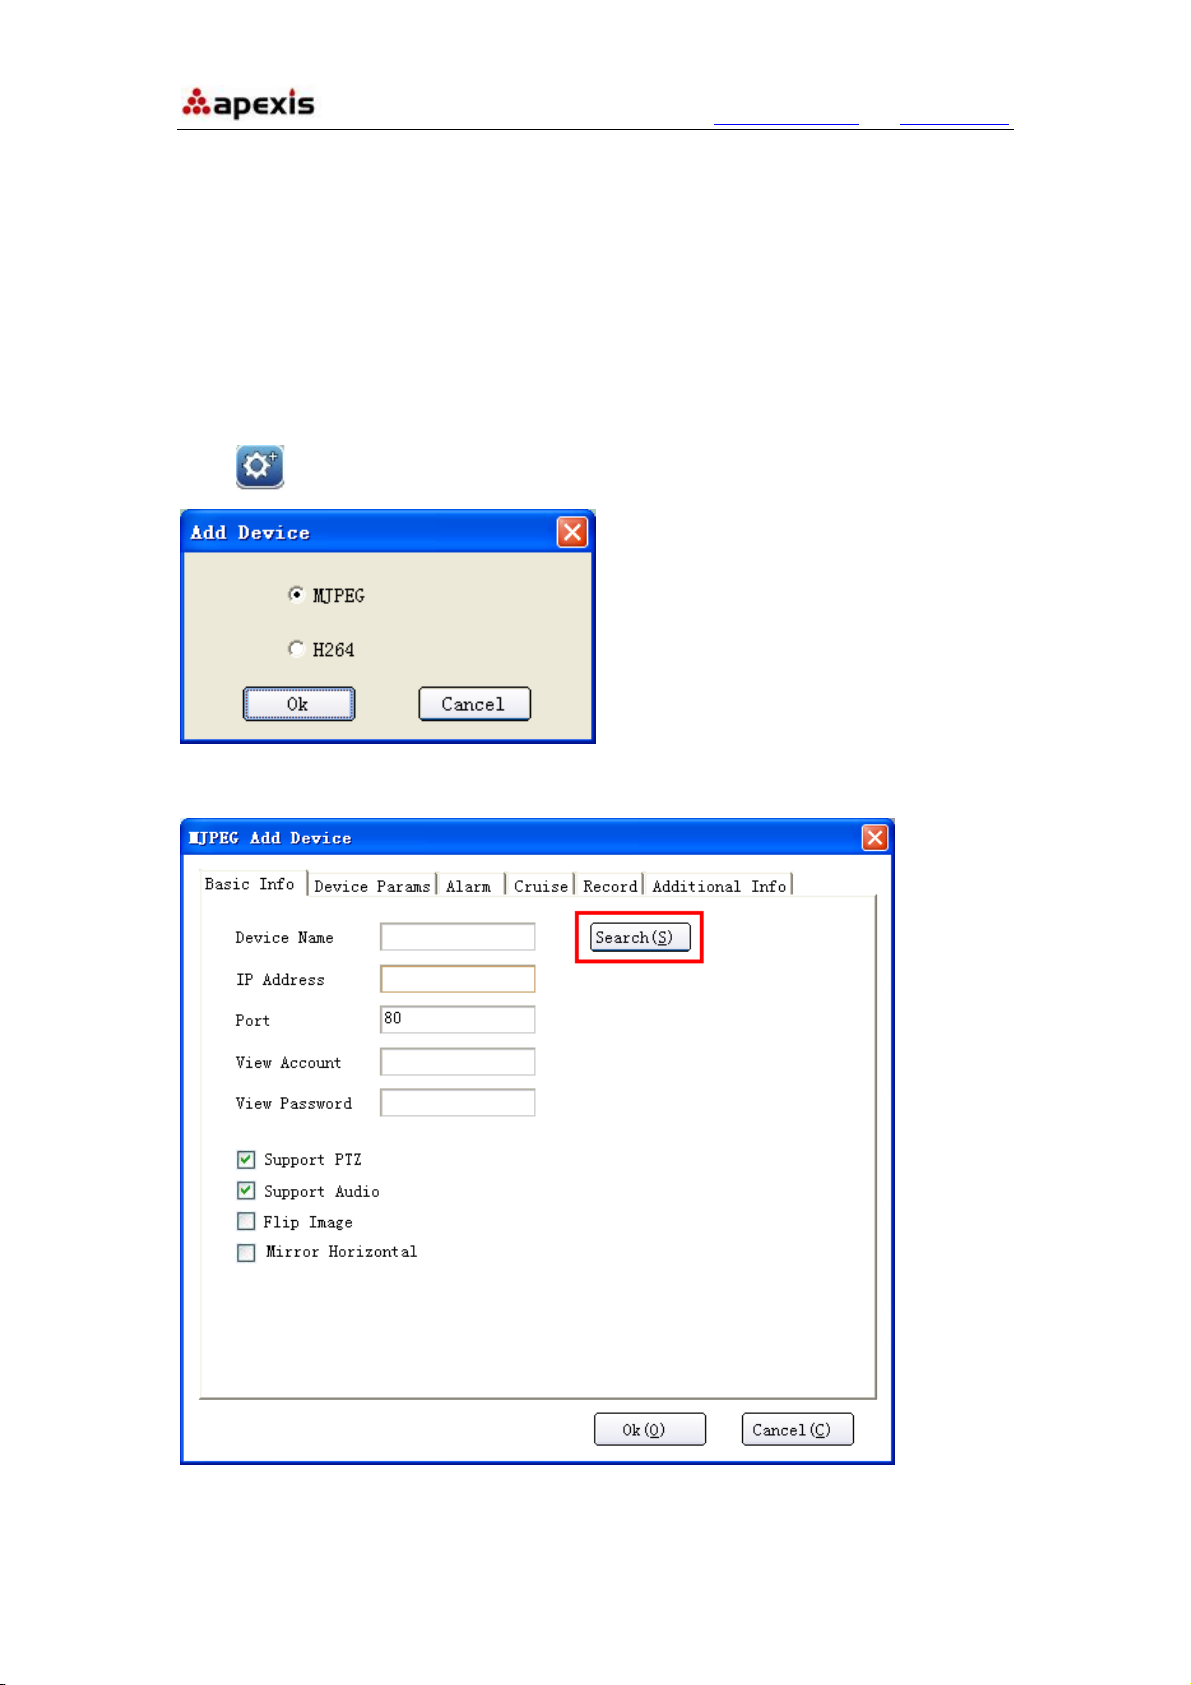
2.7. For Rightside Panel Icons
NOTE: Please choose the type which match with your IP camera.
MJPEG: For all the MJPEG series IP Cameras.
H.264: For all the H.264 series IP Cameras.
Click the arrow at the bottom, will pop-up the image parameter settings:
Shenzhen Apexis Electronic Co., Ltd Tel: +86-755-26509025 Fax: +86-755-26509229
Page 13
More Security, More Convenience www.apexis.com.cn / www.apexis.cc
3. HOW TO SET THE DEVICE(FOR MJPEG)
Before connecting the IP Camera, please make sure the firmware of your IP
camera(MJPEG) begin with: 17.22.2.**(indoor) / 17.25.2.**(outdoor)
NOTE: For H.264 series cameras, it’s the same settings.
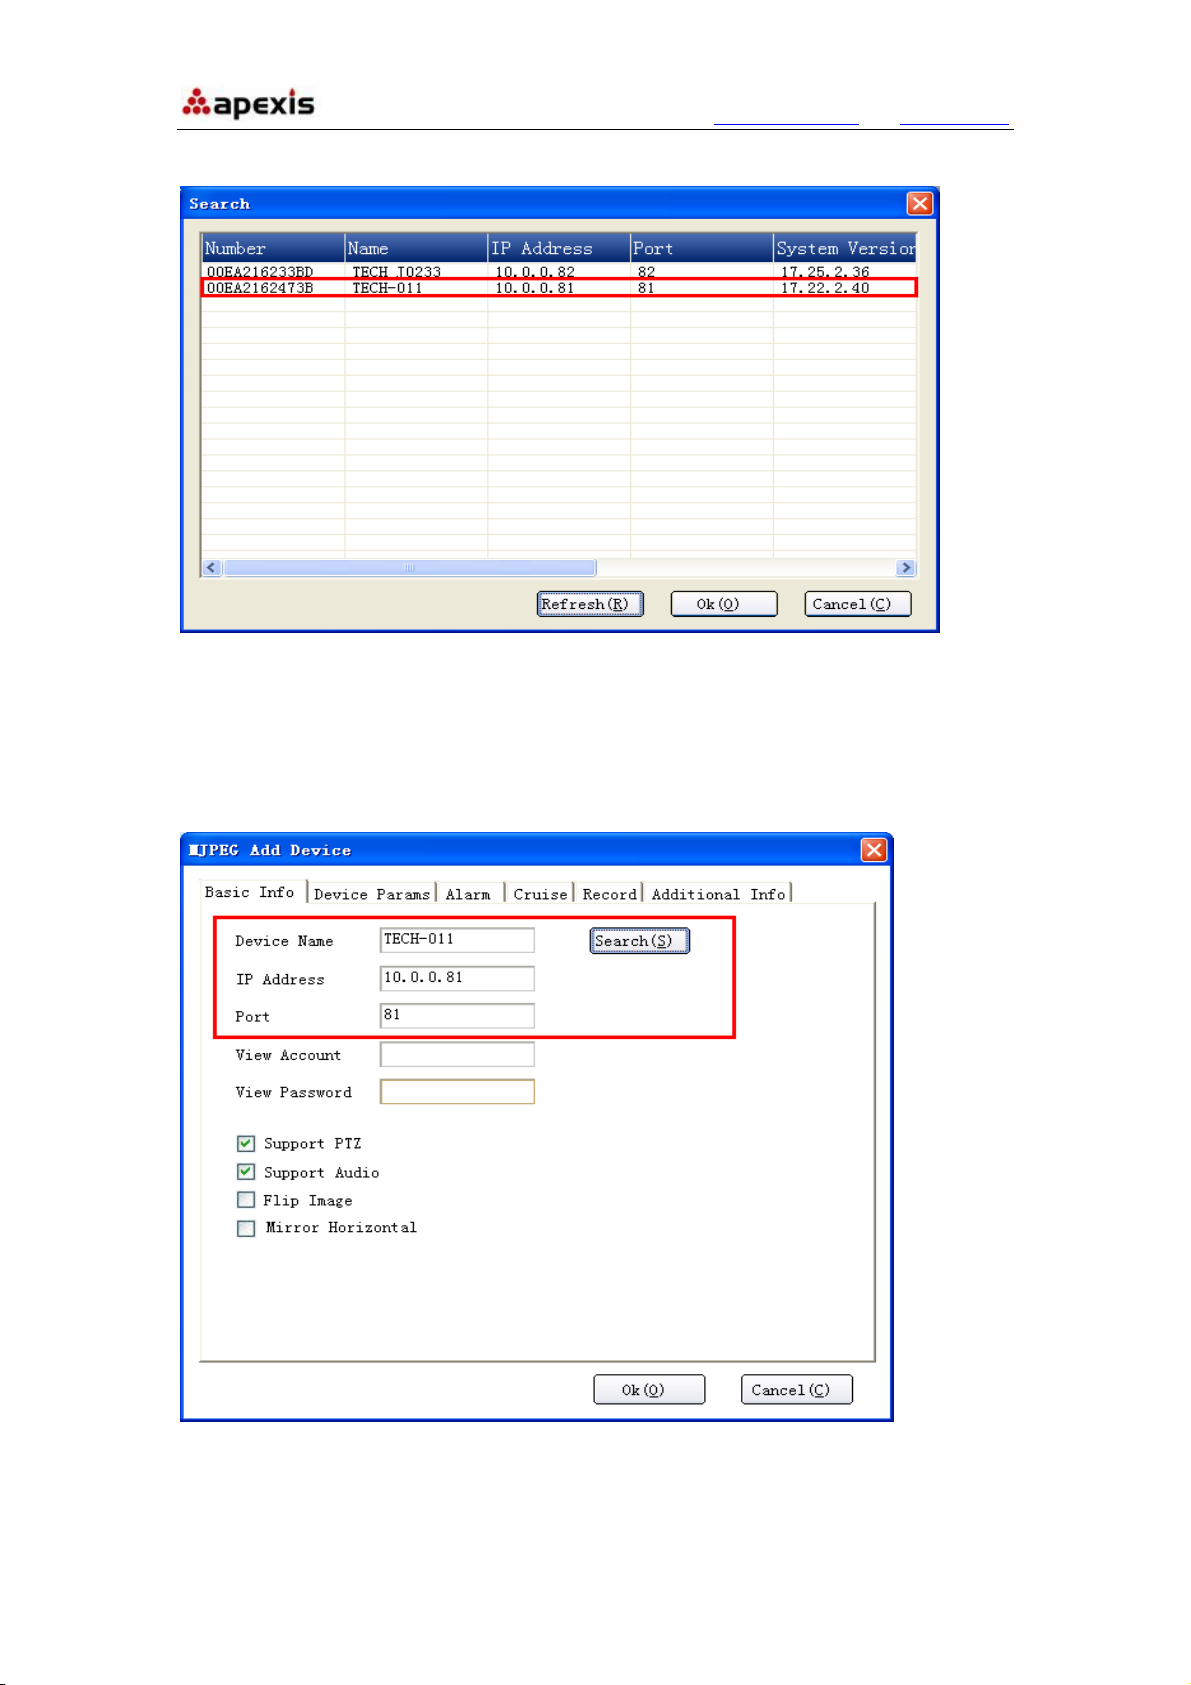
3.1 Add Device
Click , will pop-up the window as below:
Choose MJPEG, then click OK, will pop-up the window as below:
Shenzhen Apexis Electronic Co., Ltd Tel: +86-755-26509025 Fax: +86-755-26509229
Page 14
More Security, More Convenience www.apexis.com.cn / www.apexis.cc
Click Search, will pop-up the result:
If there is no cameras listed, please check the firmware version whether start as 17.*.*.*.
If the firmware version is correct, and there is still no cameras listed, maybe your
computer’s IP address doesn’t match with the camera’s IP address, they are not in the
same LAN. Please change the computer’s IP address to the same LAN as camera’s.
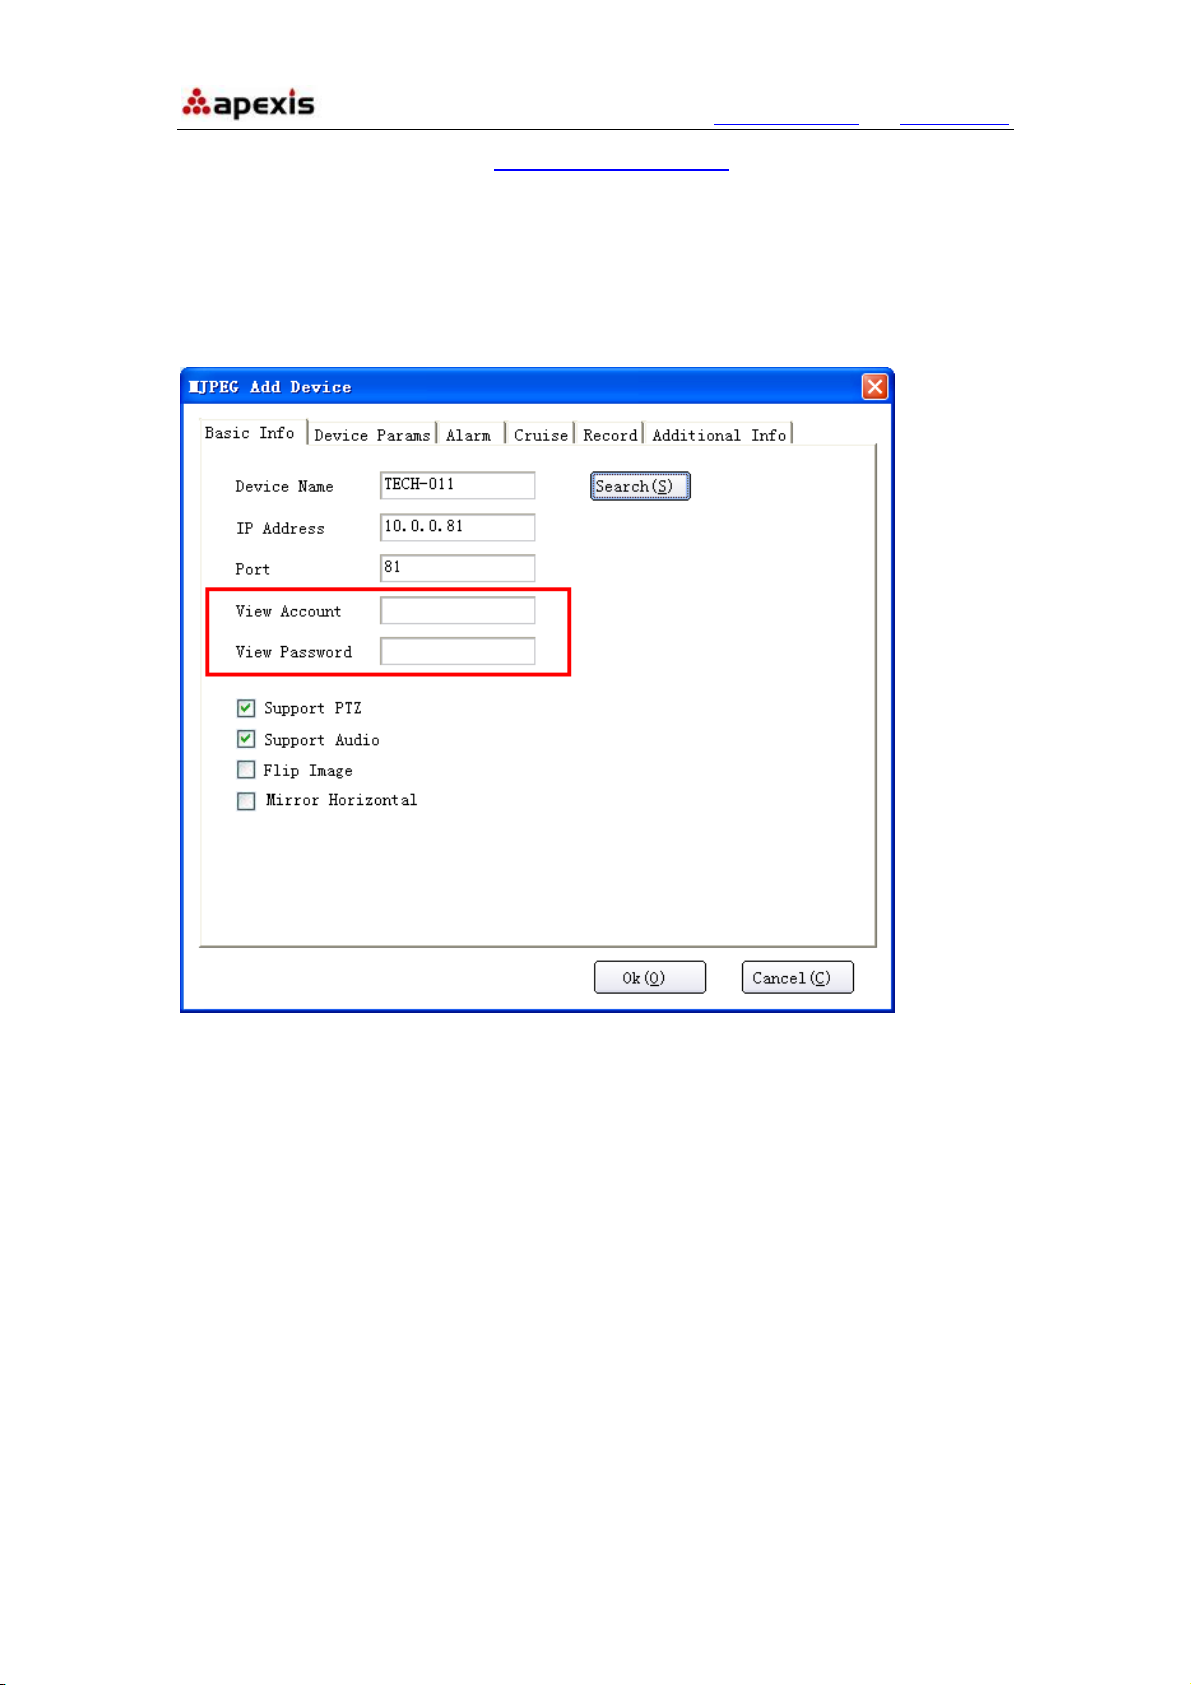
Choose the IP camera,Click OK, will show the Basic Info page automatically:
Device Name: The name of the camera.
IP Address: The IP address of the camera.
If use DDNS to view the camera, enter the DDNS domain name here, remove the “http://”,
Shenzhen Apexis Electronic Co., Ltd Tel: +86-755-26509025 Fax: +86-755-26509229
Page 15
More Security, More Convenience www.apexis.com.cn / www.apexis.cc
for example, if the DDNS http://test.aipcam.com:95 set sucessfully, then fill
“test.aipcam.com” in the IP Address.
Port: The port of the camera.
Once all these information showed, it means the firmware of the camera is correct and the
software works well, then just enter the View Account and View Password you have set:
View Account: The user name of the camera. (Default is admin)
View Password: The password of the camera. (Default is no password)
Support PTZ: Enable it to active Pan/Tilt/Zoom.
Support Audio: Enable it to active the audio function
Flip Image: Enable it to flip the image. It’s for some special installation such as ceiling etc.
Mirror Horizontal: Enable it to mirror the image
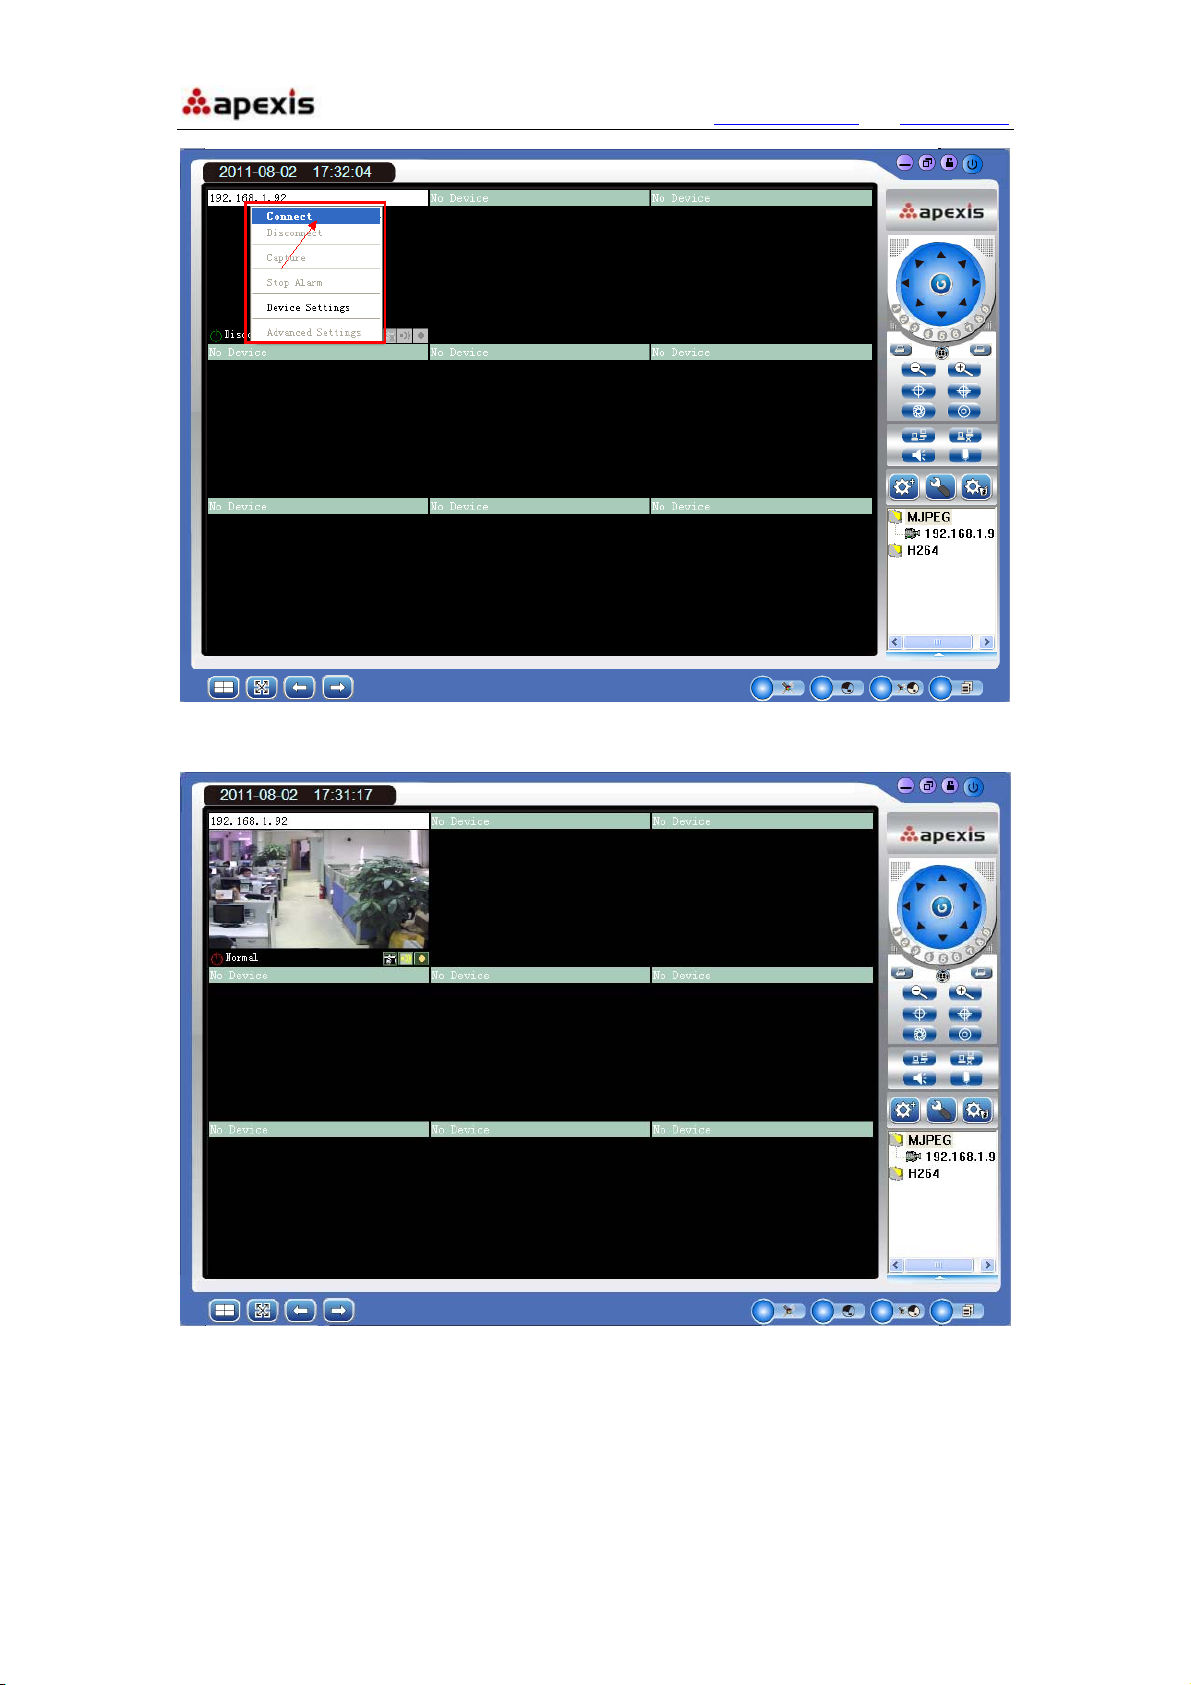
After all done, click OK, will back to the software interface:
Shenzhen Apexis Electronic Co., Ltd Tel: +86-755-26509025 Fax: +86-755-26509229
Page 16
More Security, More Convenience www.apexis.com.cn / www.apexis.cc
Move the mouse to the window where showed the camera name, then right click, choose
Connect, will show the live video:
Add more cameras, do the same steps.
3.2 Device Settings
3.2.1 Basic Info.
Shenzhen Apexis Electronic Co., Ltd Tel: +86-755-26509025 Fax: +86-755-26509229
Page 17
More Security, More Convenience www.apexis.com.cn / www.apexis.cc
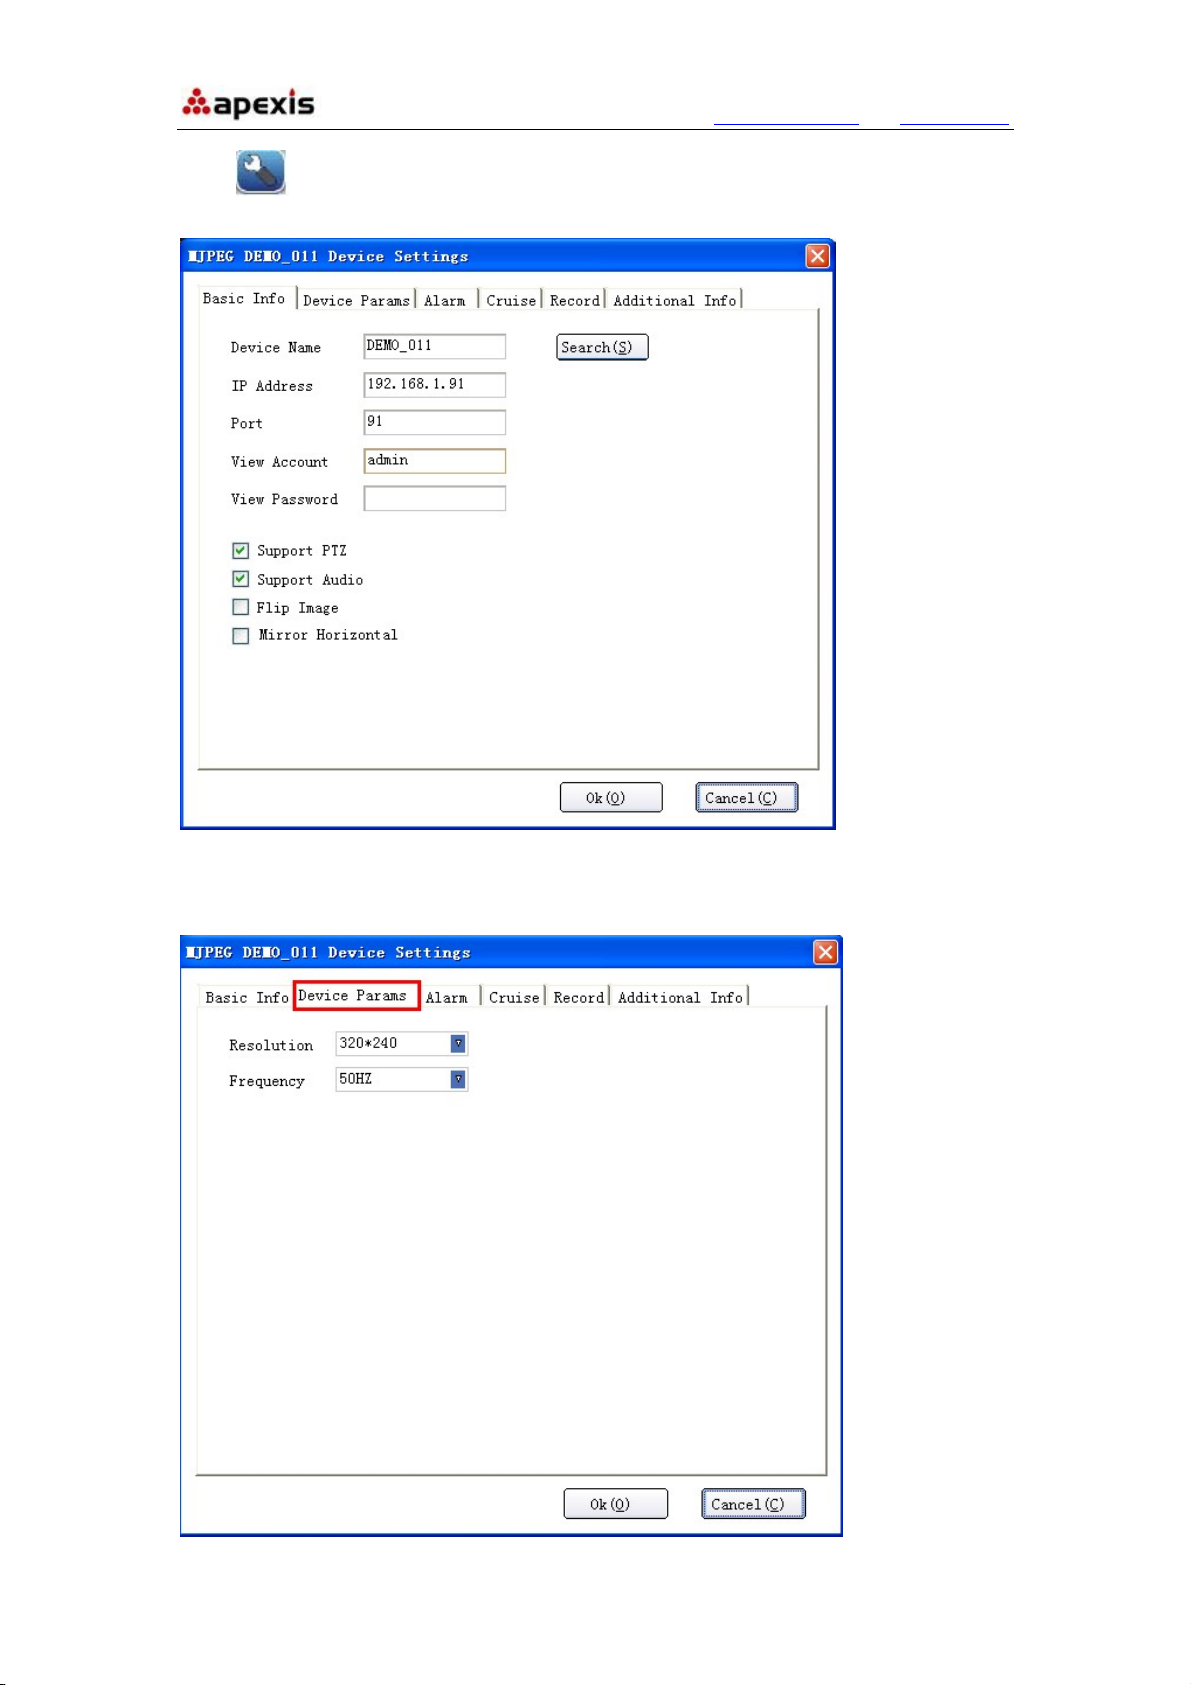
Click , or right click on the channel window, choose “Device Settings”, will pop-up
the window showing the basic info for this device connected as below:
3.2.2 Device Params.
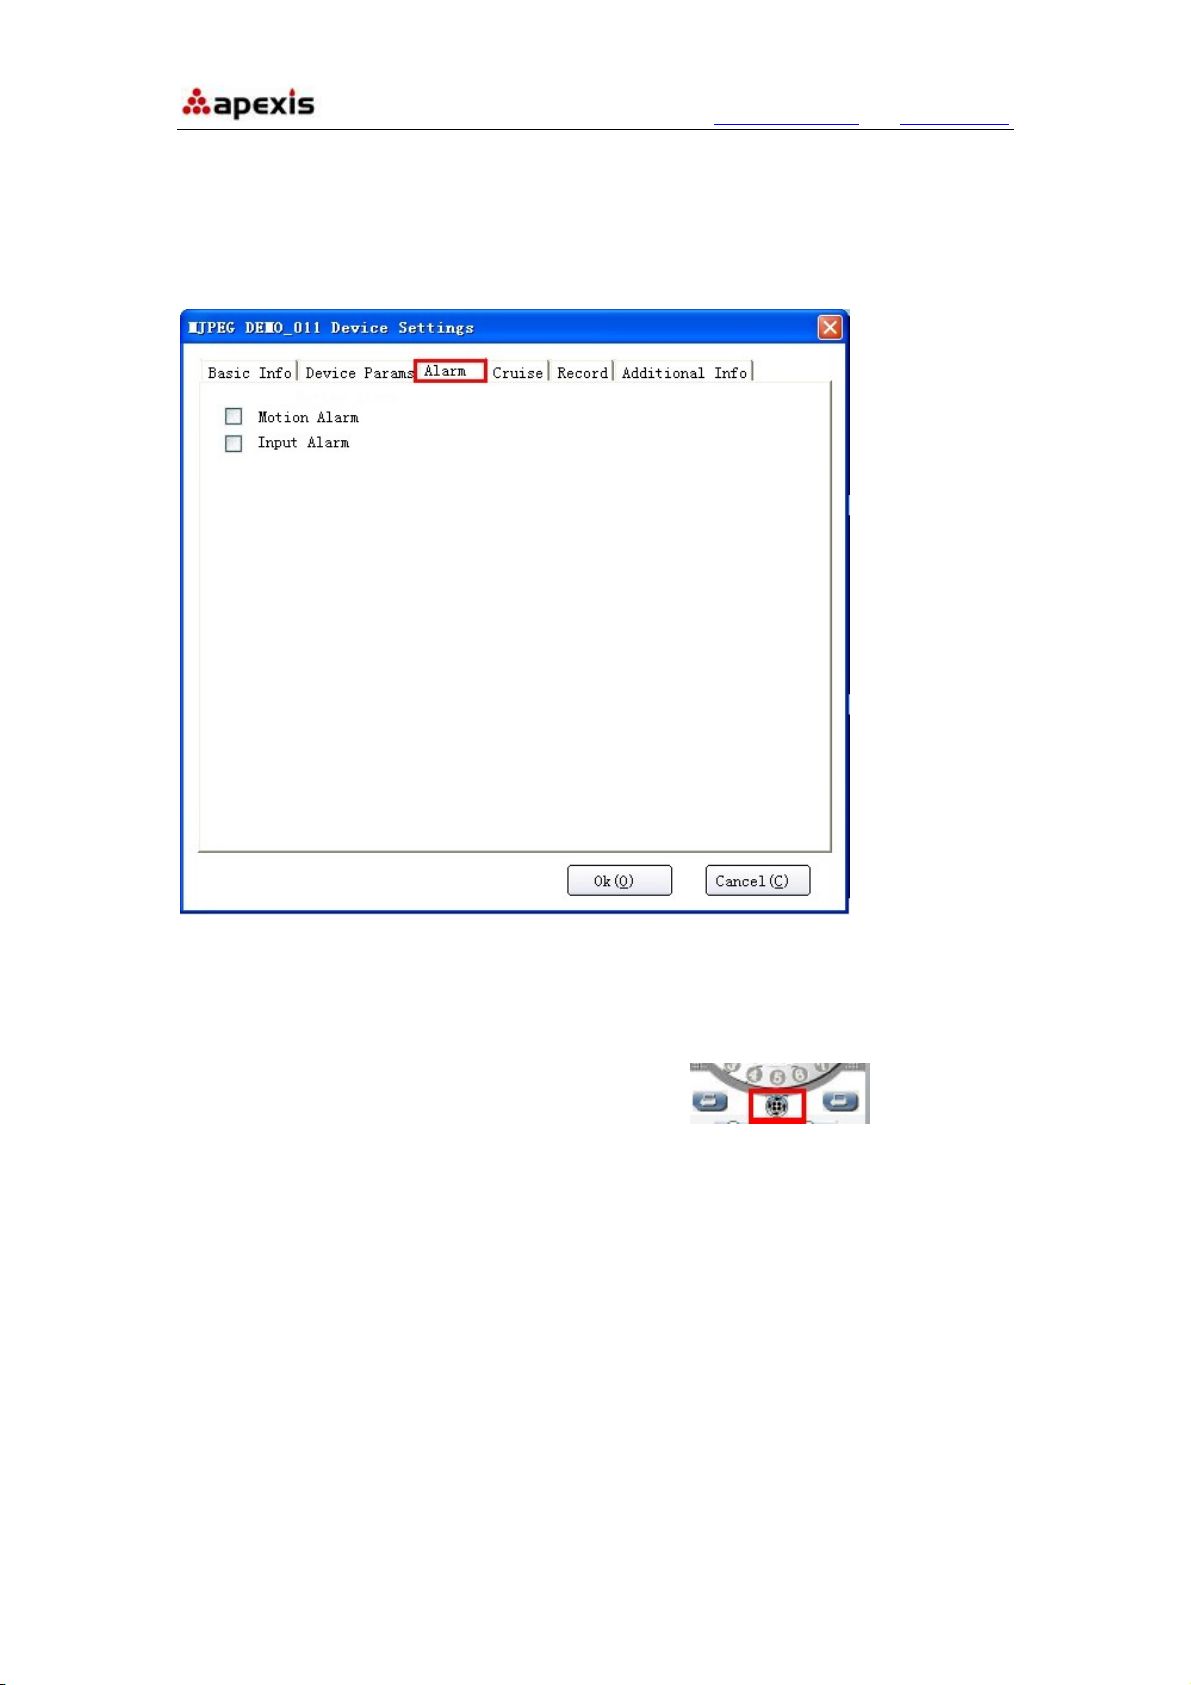
Click Device Params, will show the information as below:
Shenzhen Apexis Electronic Co., Ltd Tel: +86-755-26509025 Fax: +86-755-26509229
Page 18
More Security, More Convenience www.apexis.com.cn / www.apexis.cc
Resolution: 320*240, 640*480 optional.
Frequency: 50HZ, 60HZ, Outdoor optional.
3.2.3 Alarm
Click Alarm, will show the information as below:
Motion Alarm: Enable to active the motion detection alarm function.
Input Alarm: Enable to active the I/O input alarm function.
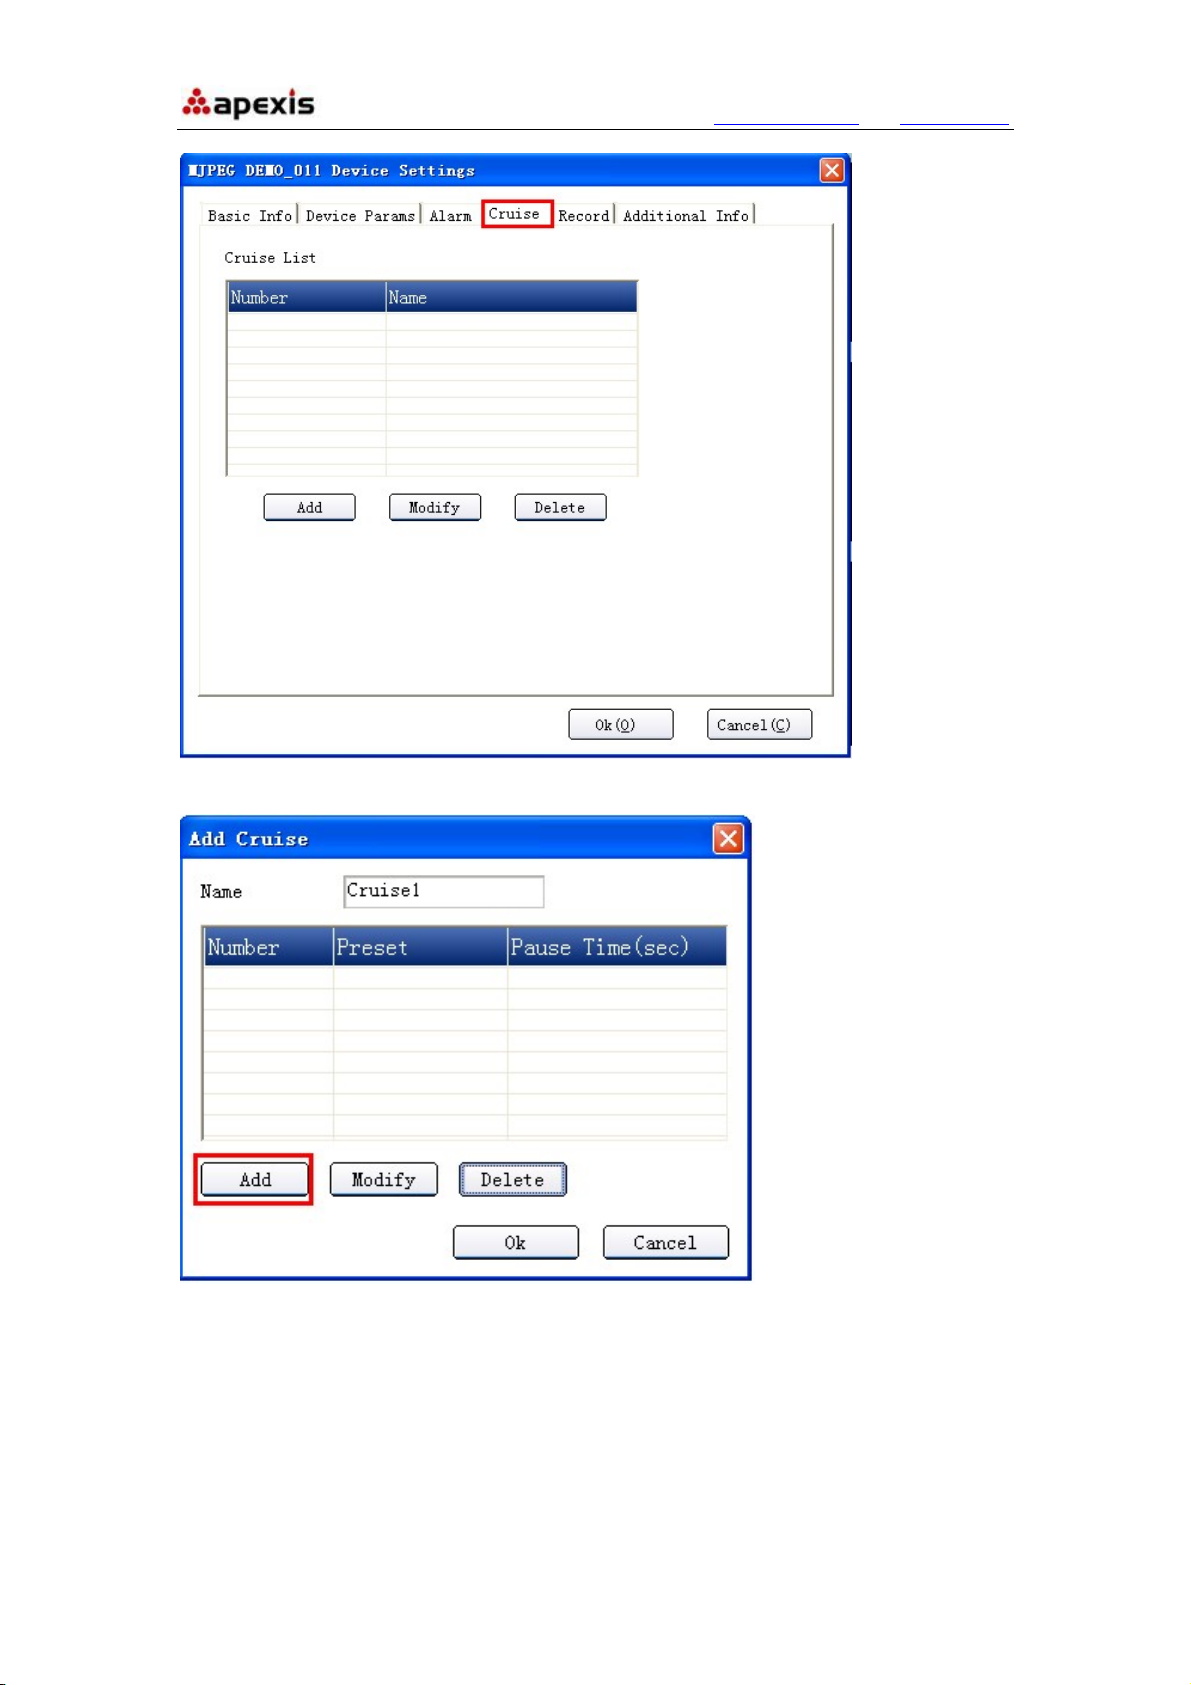
3.2.4 Cruise
Click Cruise, or click the icon on the rightside panel , will show the
information as below:
Shenzhen Apexis Electronic Co., Ltd Tel: +86-755-26509025 Fax: +86-755-26509229
Page 19
More Security, More Convenience www.apexis.com.cn / www.apexis.cc
Click Add will pop-up the add cruise window:
It support upto 10 cruise positions.
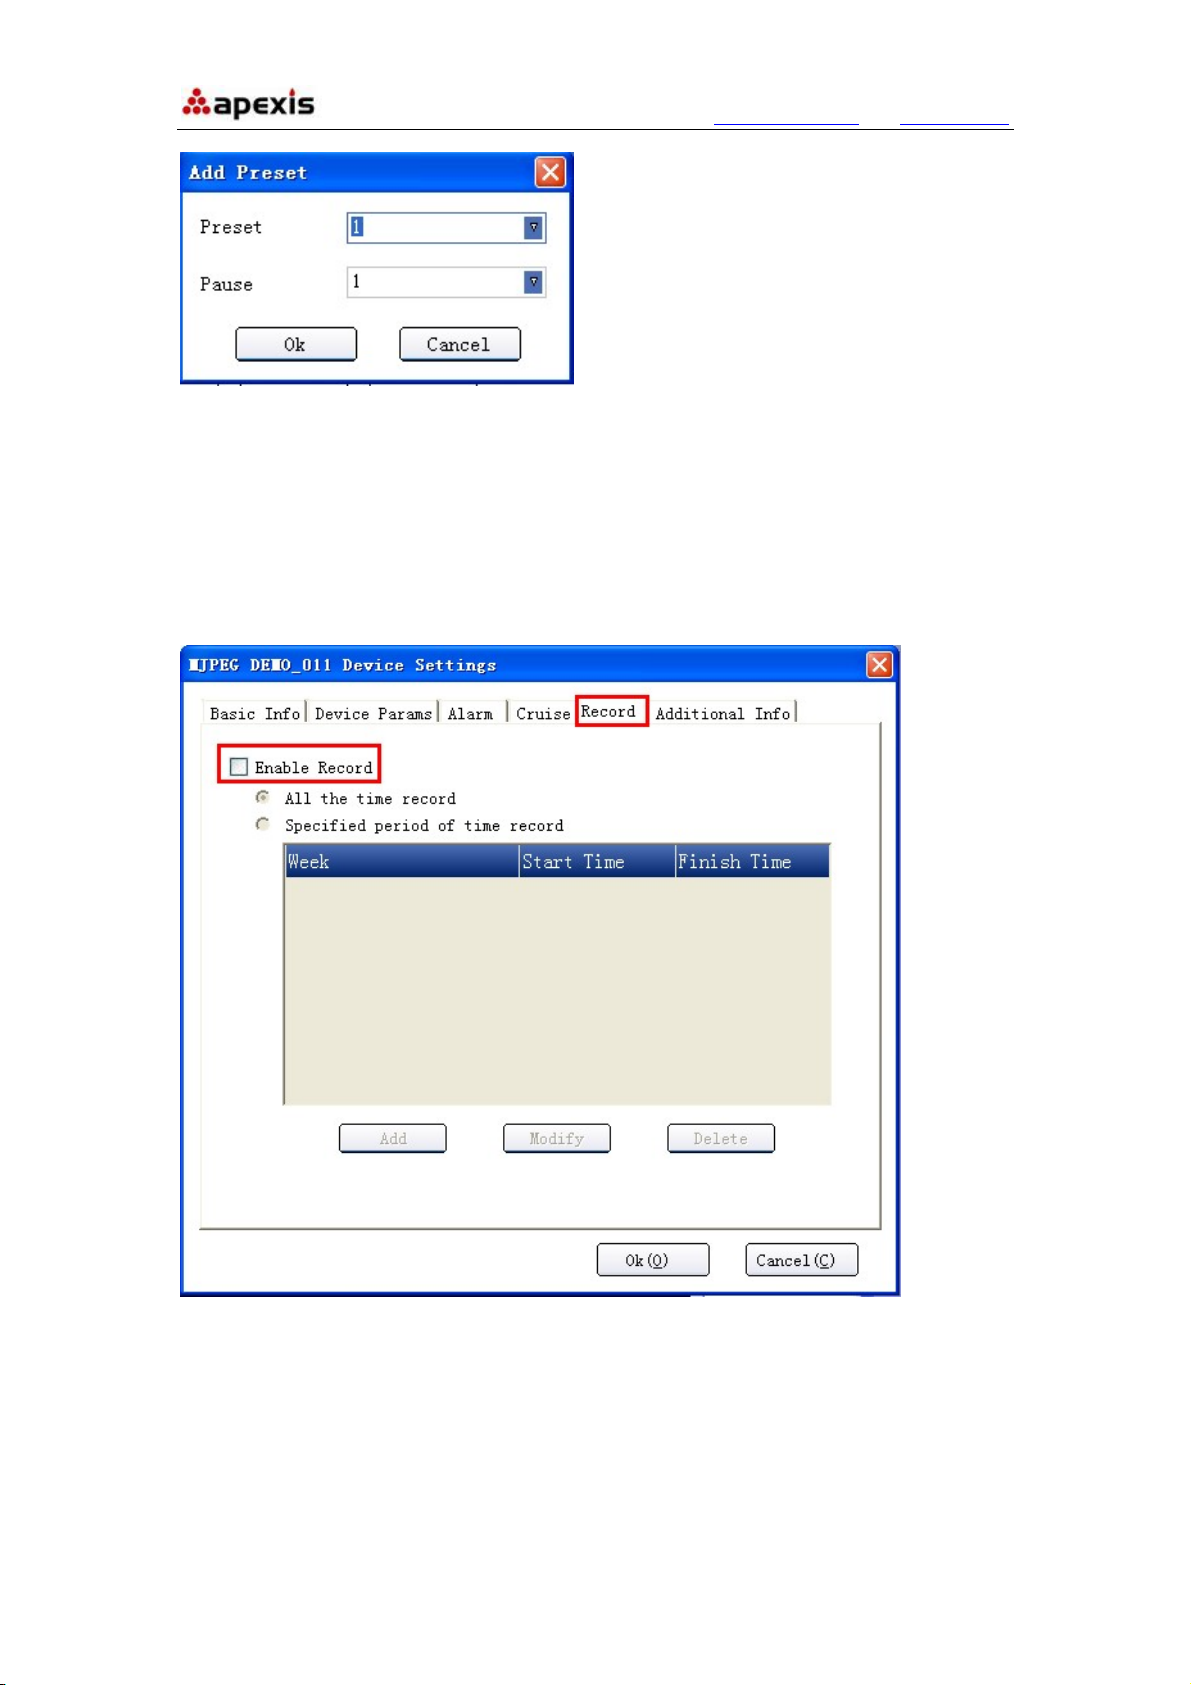
Click Add to set preset as cruise.
Shenzhen Apexis Electronic Co., Ltd Tel: +86-755-26509025 Fax: +86-755-26509229
Page 20
More Security, More Convenience www.apexis.com.cn / www.apexis.cc
Preset: Choose the preset set successfully already, can be from preset 1-9.
Pause: Set the duration for each preset, can be from 1-60 seconds.
NOTE: Before using cruise function, users have to set preset firstly, this software supports
upto 9 preset. (Details see chapter 4. Preset Settings)
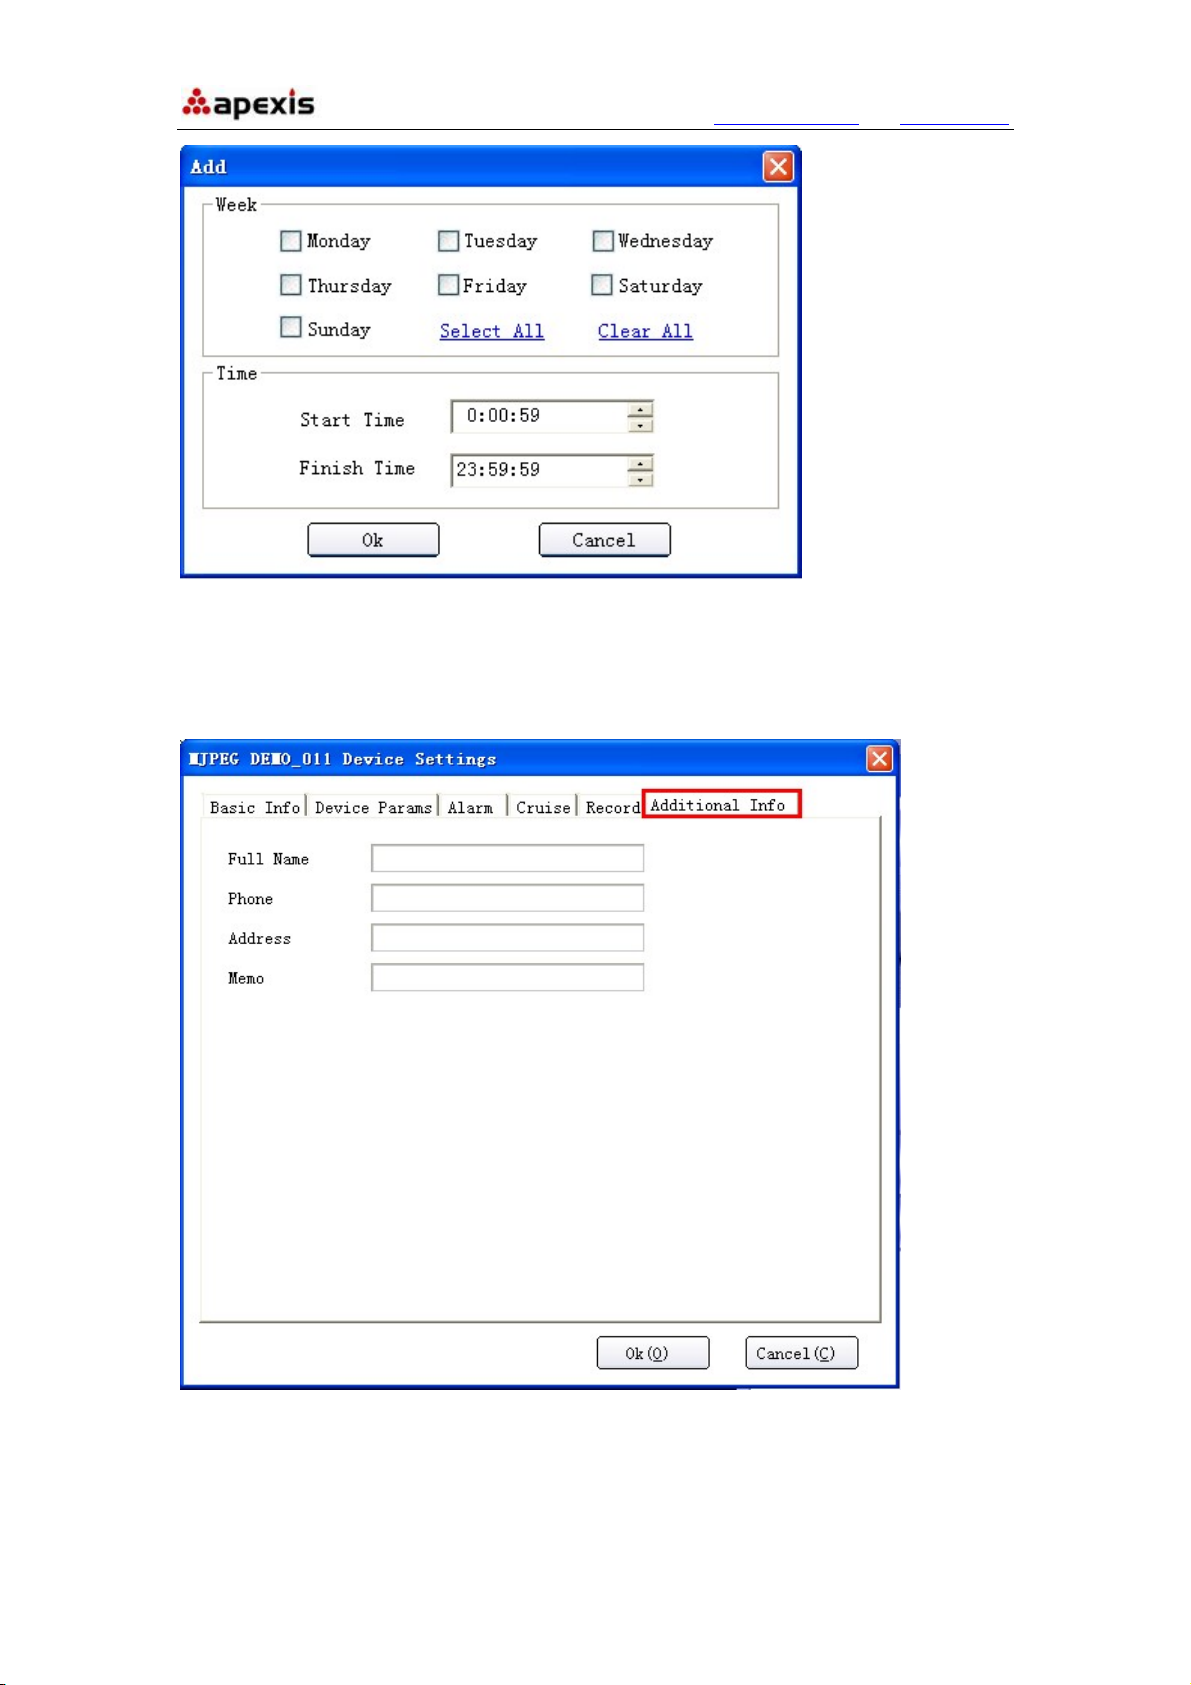
3.2.5 Record
Click Record, will show the information as below:
Enable Record: Click it to active the record function.
All the time record: Select it, will active record function all the time.
Specified period of the time record: Select it, active special time record function.
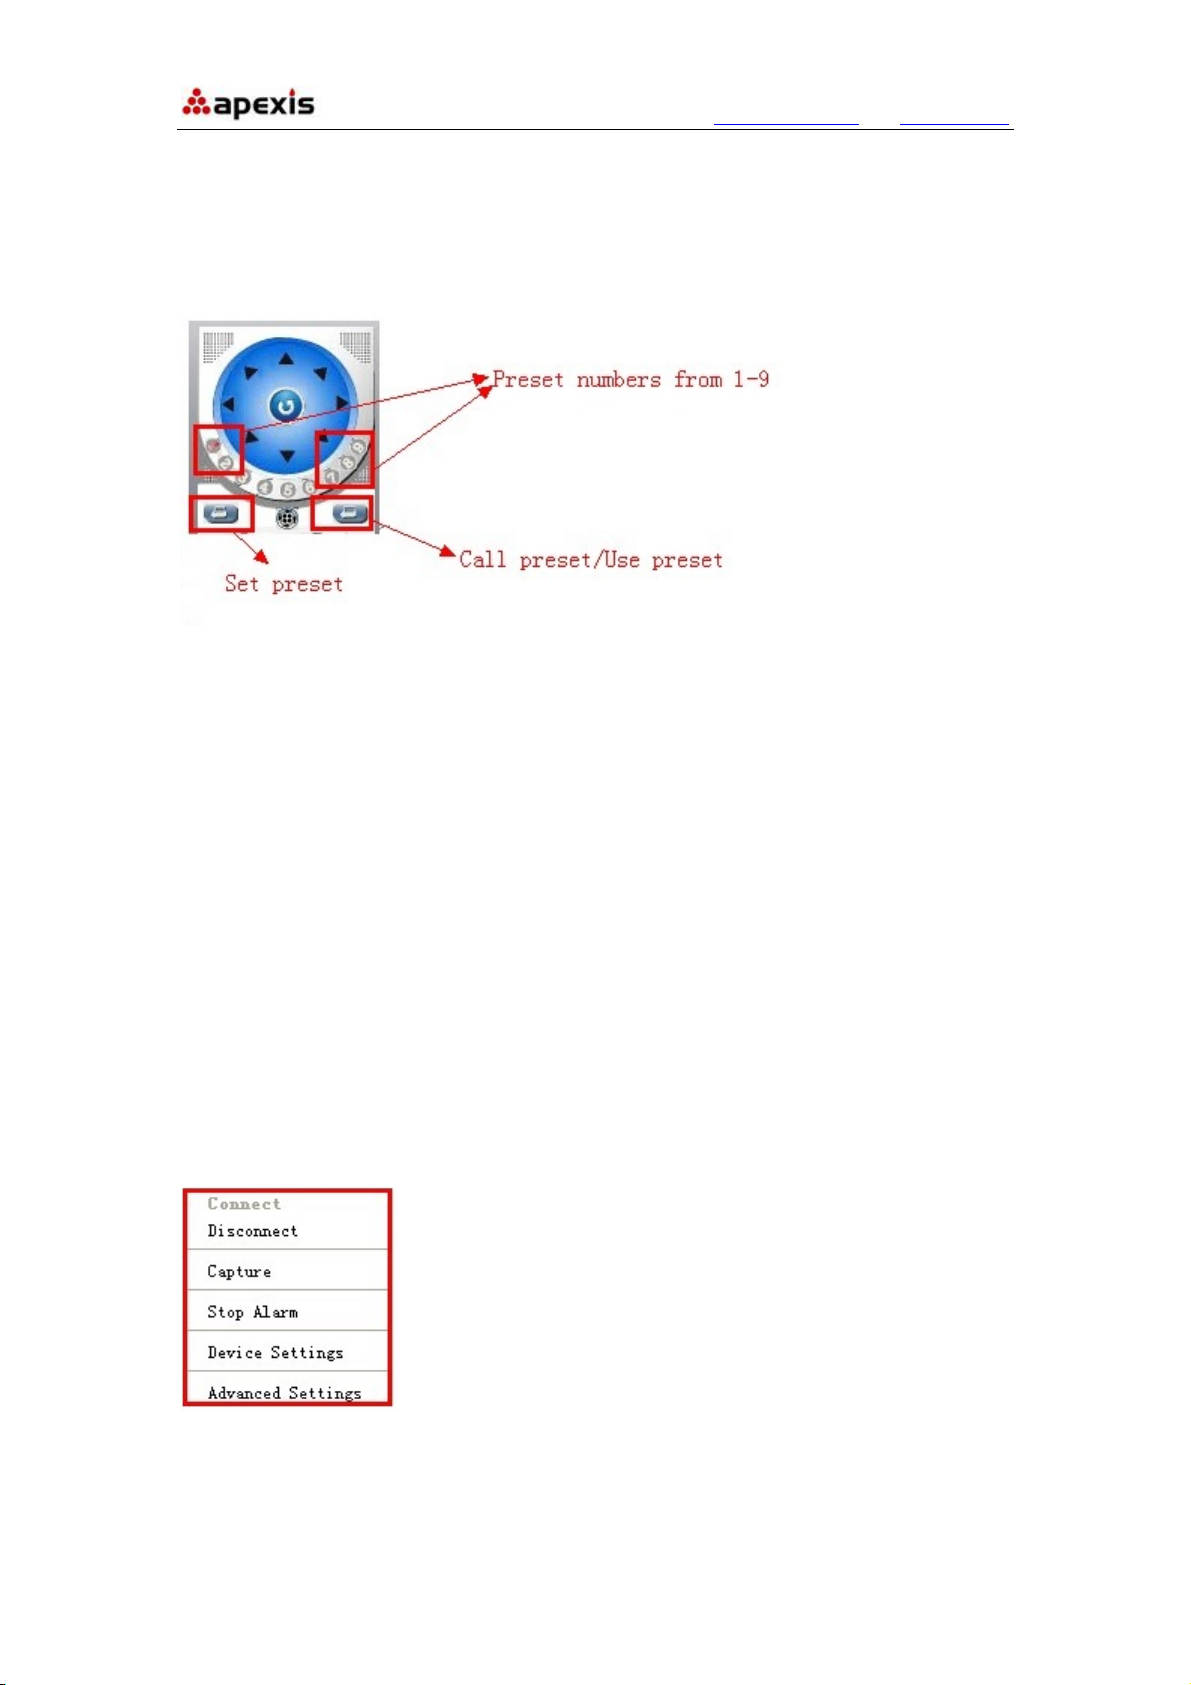
If enable specified period of the time record, click add, will pop-up the window as below:
Shenzhen Apexis Electronic Co., Ltd Tel: +86-755-26509025 Fax: +86-755-26509229
Page 21
More Security, More Convenience www.apexis.com.cn / www.apexis.cc
Week: Set the day for every week.
Time: Set the start time and finish time for activing record.
3.2.6 Additional Info
Click Additional Info., will show the information as below:
Users can set additional information for this device, such as Full name, Phone, Address,
Memo etc.
Shenzhen Apexis Electronic Co., Ltd Tel: +86-755-26509025 Fax: +86-755-26509229
Page 22
More Security, More Convenience www.apexis.com.cn / www.apexis.cc
4. PRESET SETTINGS
On the rightside panel, there are some icons for preset, details as the picture showed
below:
Number 1-9: Means the preset positions, this software supports upto 9 presets.
Set Preset: Click it to set the preset position
Use Preset: Click it to call the preset position
STEPS:
1. Select the number you want to set, such as 1,
2. Rotate the camera to a special position you want to set as preset,
3. Click Set preset icon to set this position as preset 1.
Do the same steps for other presets, such as preset2, preset3…
4. If you want to check the preset3, select the number 3 firstly, then click use preset icon,
then the camera will rotate to the appointed position which you set already.
5.SHORTCUT KEY ON SCREEN
Move the mouse to the window where showed the camera name, then right click, will
pop-up the window as below:
Connect: Click it to connect the device set successfully already.
Disconnect: Click it to disconnect the device which showing live video.
Capture: Click it to take snapshot, pictures will be saved to the appointed file.
Shenzhen Apexis Electronic Co., Ltd Tel: +86-755-26509025 Fax: +86-755-26509229
Page 23
More Security, More Convenience www.apexis.com.cn / www.apexis.cc
Stop Alarm: Click it to stop alarm. When there is alarm active, users can click it to stop it.
Device Settings: Click it, will pop-up the Device Settings interface.
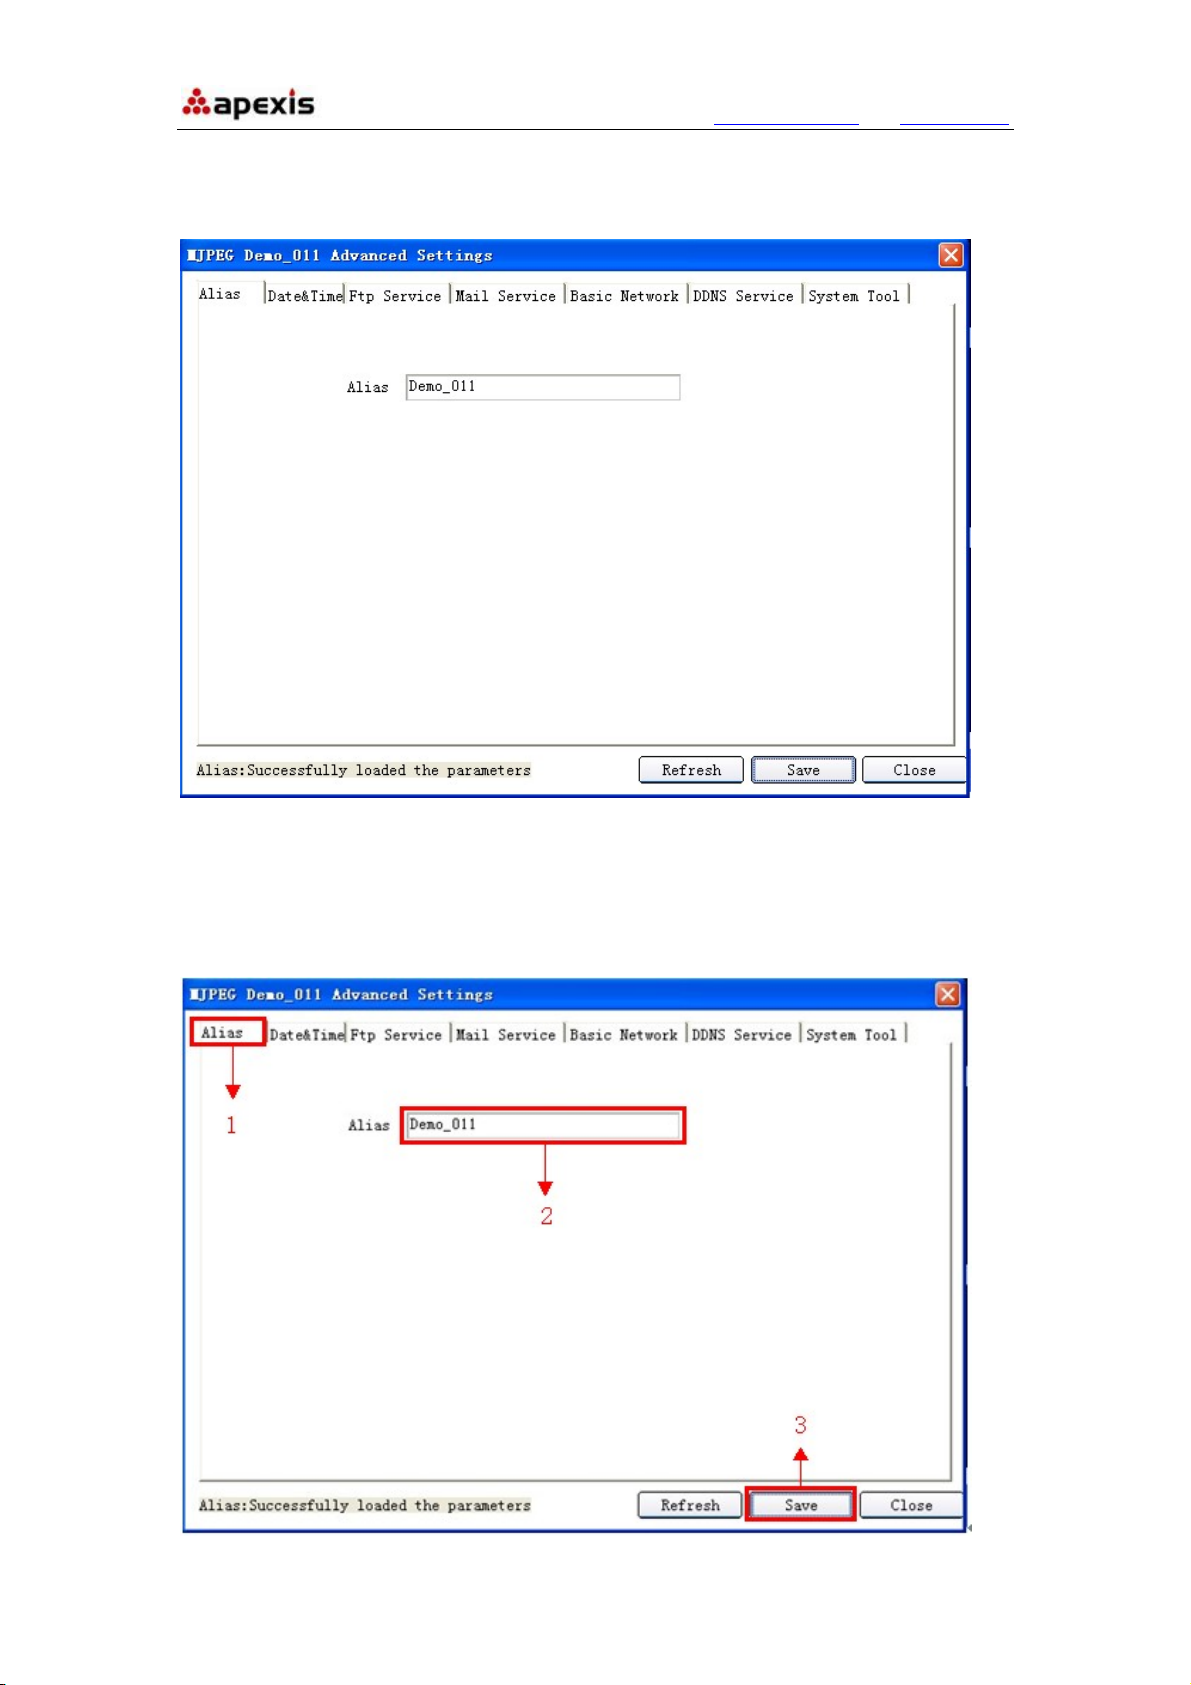
Advanced Settings: Click it, will pop-up the advance settings contects as below:
5.1 Advanced Settings:
NOTE: For all the advance settings details, please check the usermanul of the device.
Alias: Set the device name freely.
Shenzhen Apexis Electronic Co., Ltd Tel: +86-755-26509025 Fax: +86-755-26509229
Page 24
More Security, More Convenience www.apexis.com.cn / www.apexis.cc
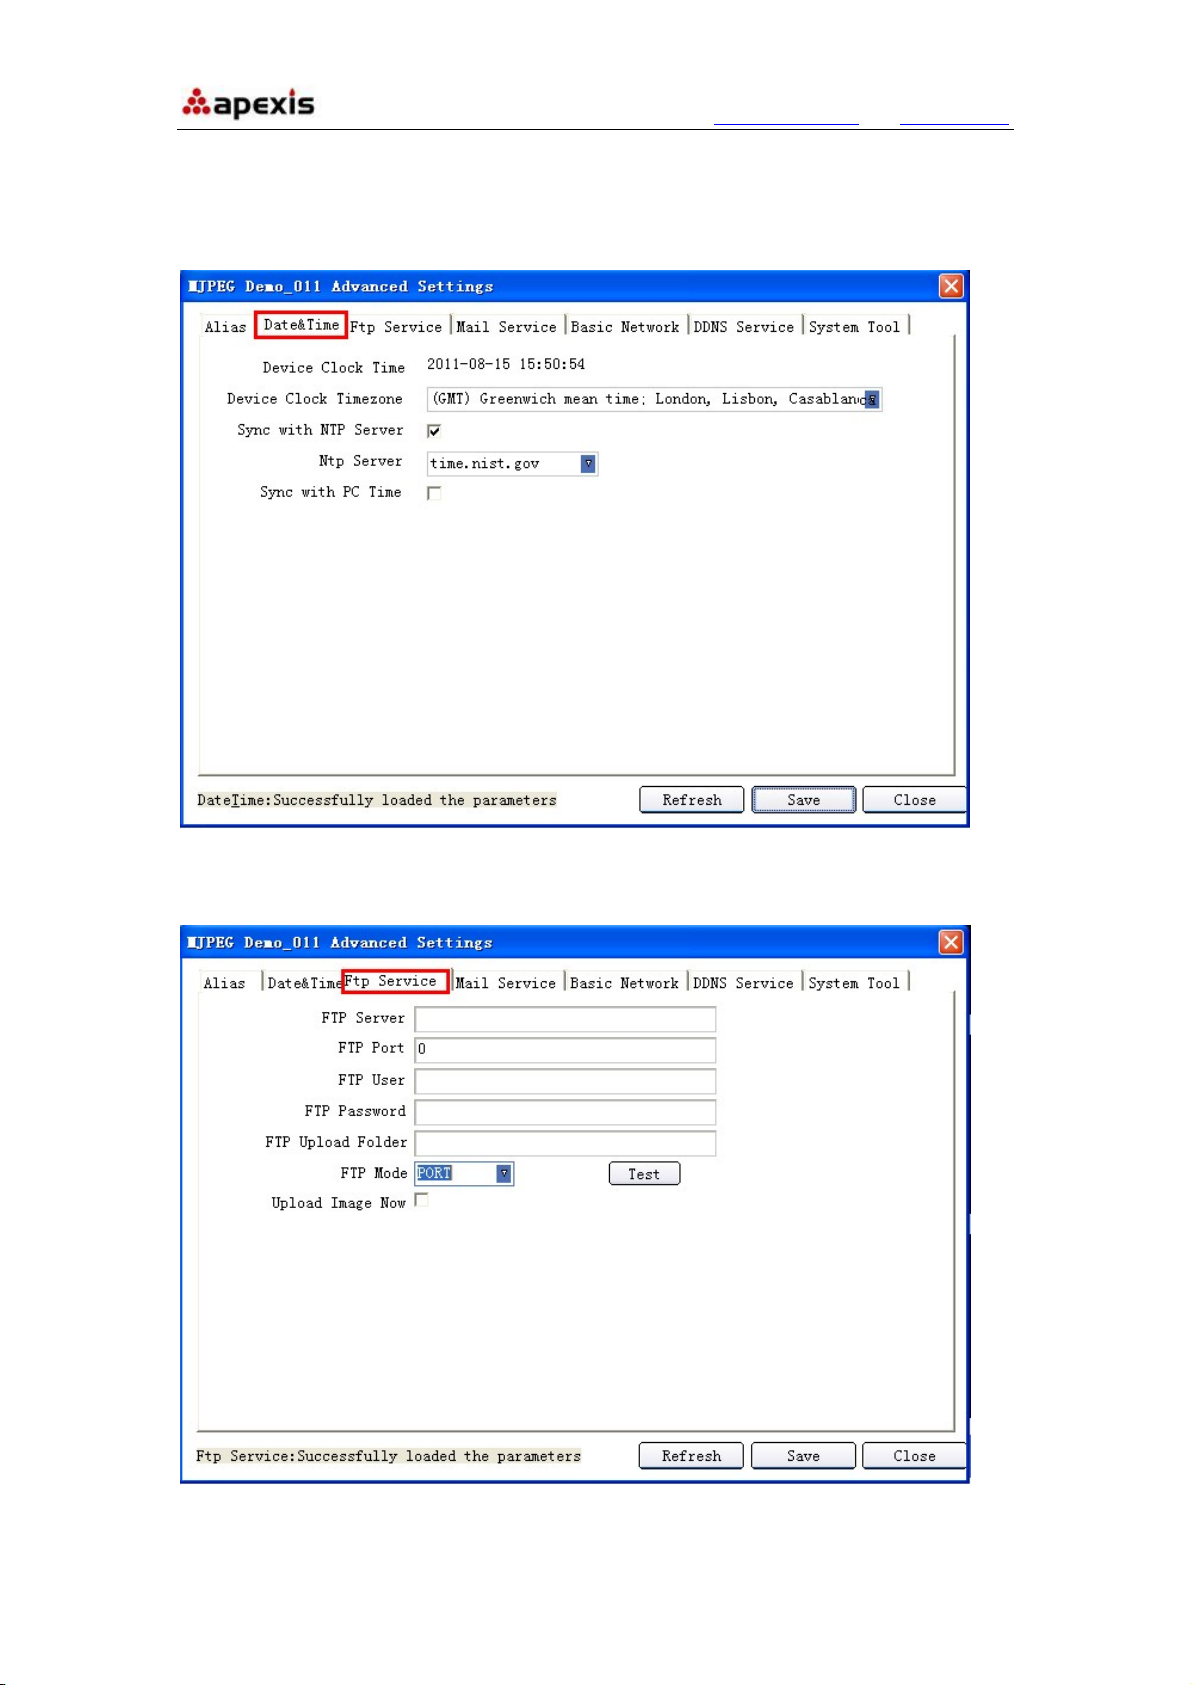
Date&Time: Set the date&time for the device.
1. Set time zone
2. Synchronism with NTP server
3. Synchronism with PC time. (The PC connected to the camera)
FTP Service: Set the FTP functions,
motion detection triggered
.
you can upload images to your FTP serv er when
Shenzhen Apexis Electronic Co., Ltd Tel: +86-755-26509025 Fax: +86-755-26509229
Page 25
More Security, More Convenience www.apexis.com.cn / www.apexis.cc
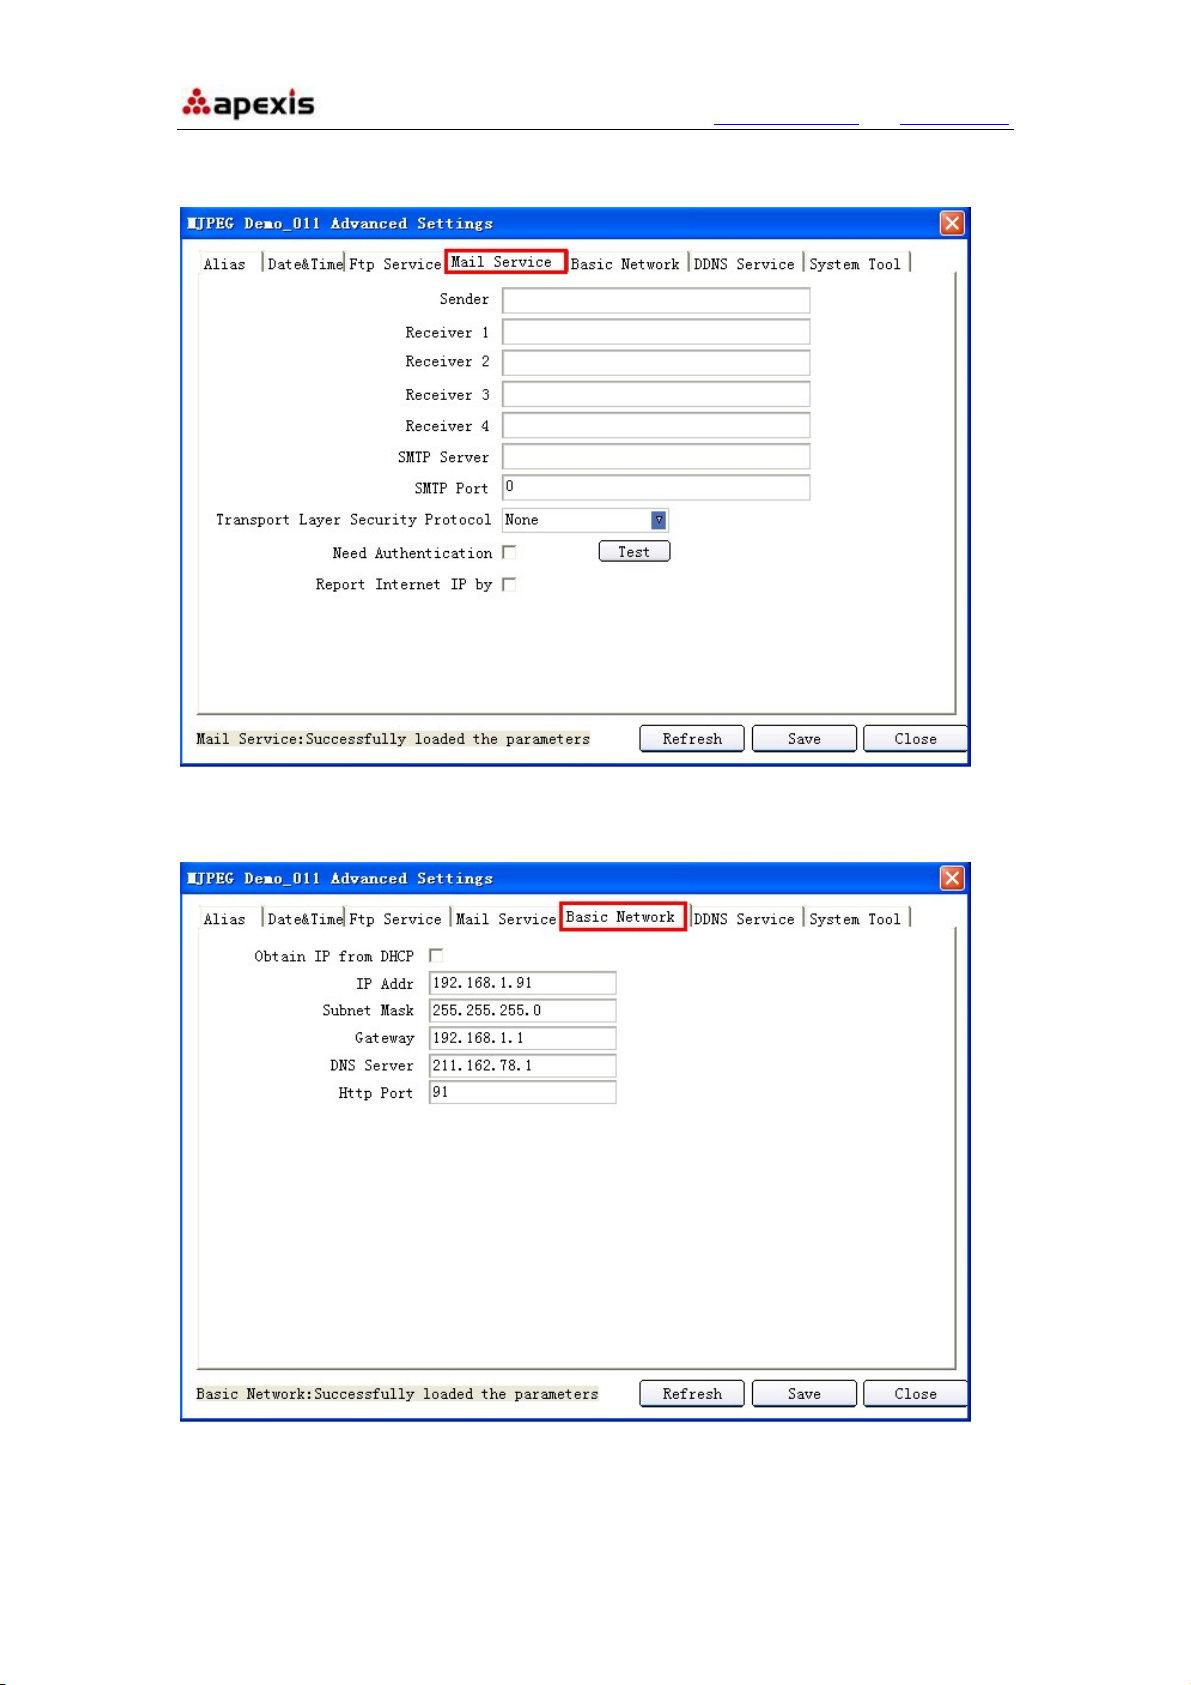
Mail Service: Enable the camera send e mail alert when motion det ection trigger ed.
Make sure the sender mailbox server provider support SMTP.
Basic Network: Set the basic network parameters for the device, such as IP address,
Subnet Mask, Gateway, DNS Server, Http Port etc.
Shenzhen Apexis Electronic Co., Ltd Tel: +86-755-26509025 Fax: +86-755-26509229
Page 26
More Security, More Convenience www.apexis.com.cn / www.apexis.cc
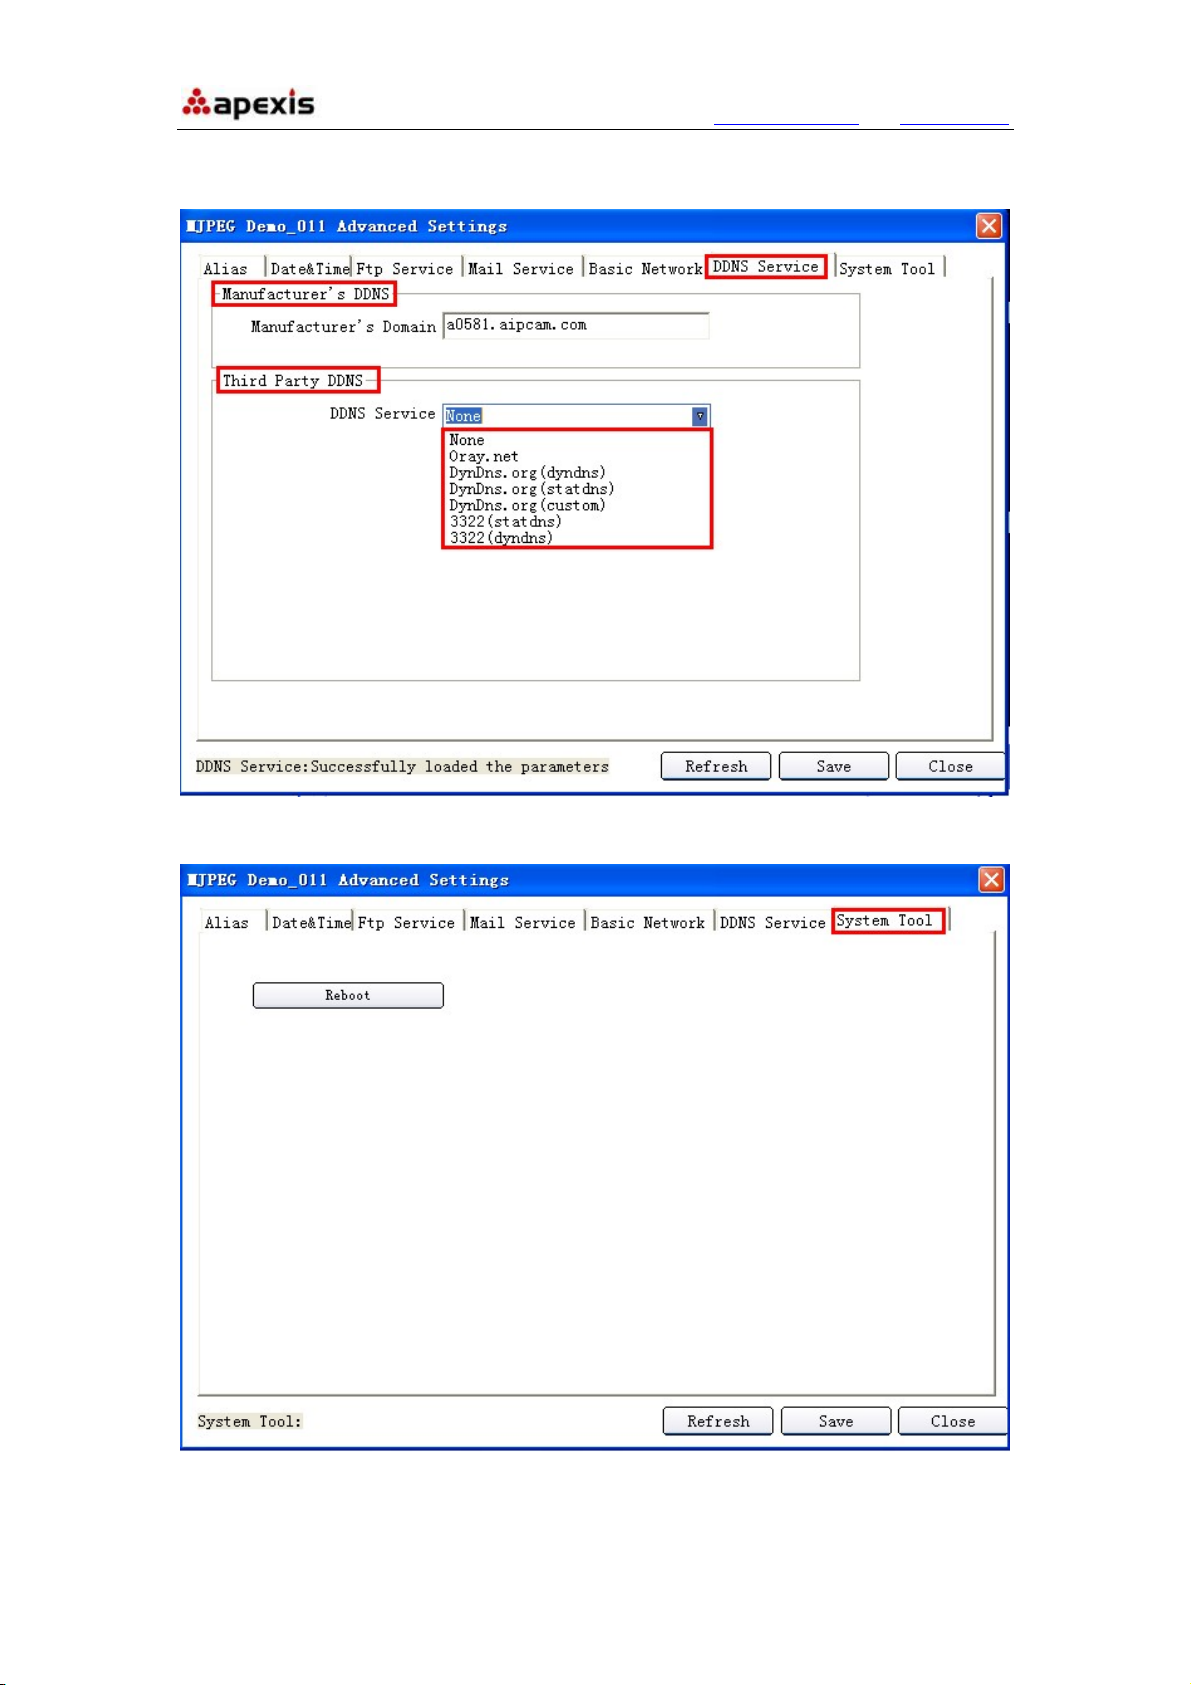
DDNS Service: Set the DDNS function, it supports Manufacturer’s DDNS and the Third
Party DDNS.
System Tool: Can reboot the device here.
Shenzhen Apexis Electronic Co., Ltd Tel: +86-755-26509025 Fax: +86-755-26509229
Page 27
More Security, More Convenience www.apexis.com.cn / www.apexis.cc
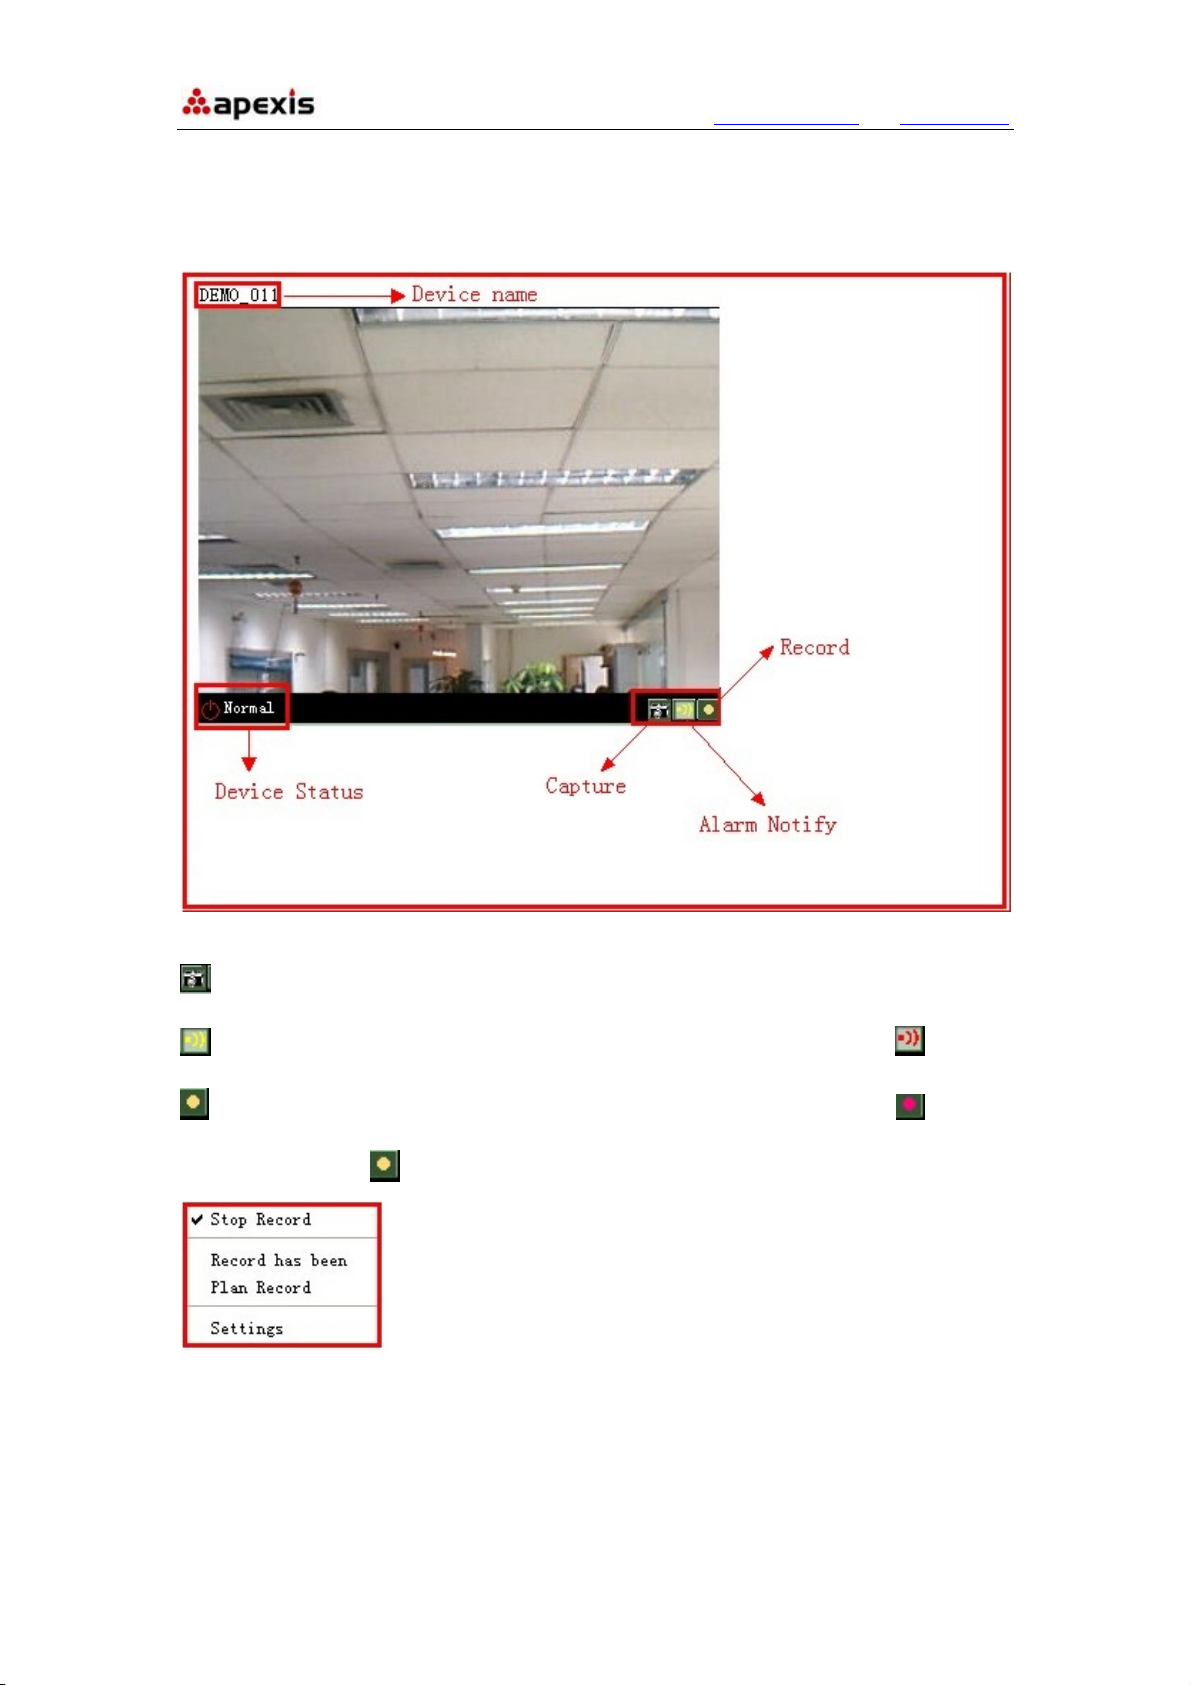
5.2 Three Icons on screen
Once device connected, there will be three icons on the right bottom, as below:
: Capture: Click it to take snapshot.
: Alarm Notify: Once there is any alarm, this icon will change to red color.
: Record: Once record function actived, this icon will change to red color.
Click the record icon
, will pop-up the window as below:
Stop Record: Click it to stop record.
Record has been: Record always.
Plan Record: Record according to the plan.
Settings: Click it to do the record settings. It’s the same as the record of device settings.
Shenzhen Apexis Electronic Co., Ltd Tel: +86-755-26509025 Fax: +86-755-26509229
Page 28
More Security, More Convenience www.apexis.com.cn / www.apexis.cc
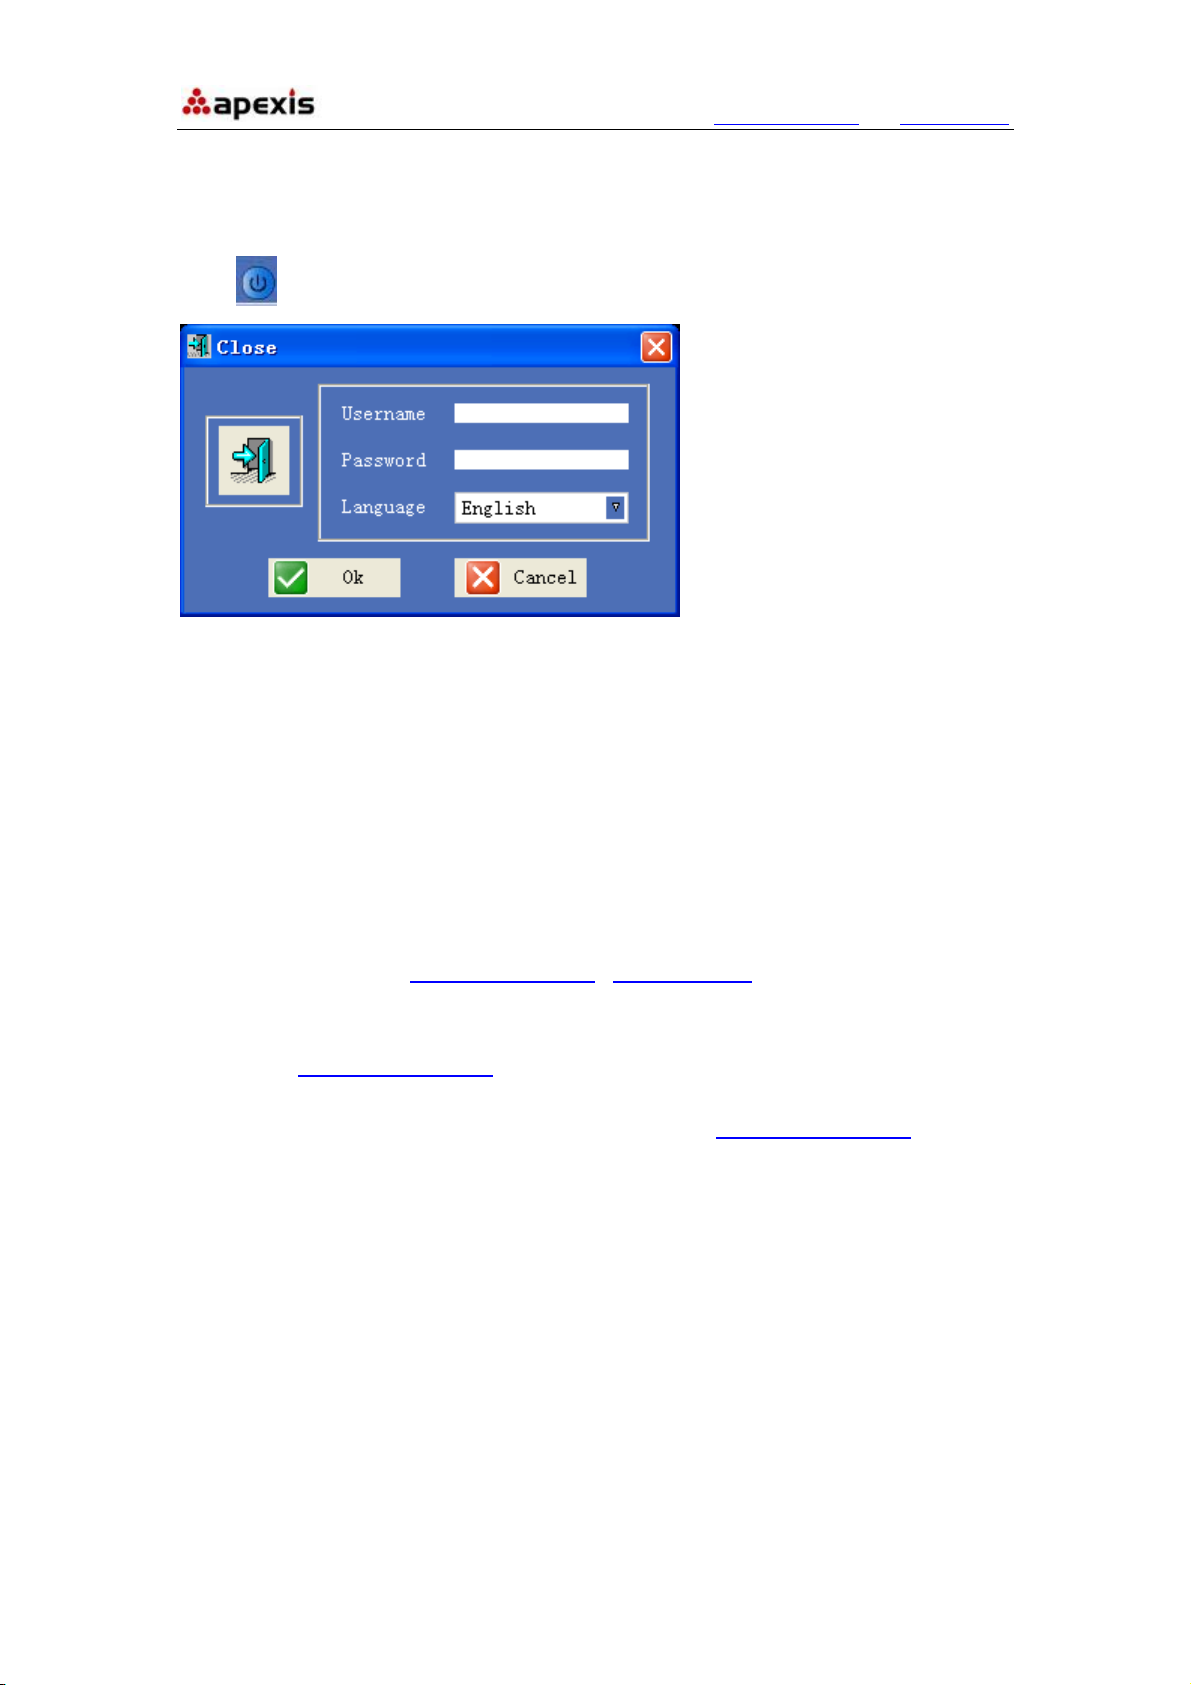
6.LOGOUT
Click on top menu, will pop-up the window as below:
Enter the username and password, click OK to logout.
The factory setting: username: admin; password: admin;
7.STATEMENT
Thank you for buying Apexis IP Camera, for camera operation, please check the official
usermanul refer to the appointed model.
This CMS usermanual based on version 1.2.0.15, please download the latest version from
APEXIS official website: www.apexis.com.cn
Any questions you can not solved by yourself, please kindly contact our technical support
department: [email protected]
Any feedback for our software, please e-mail to us freely: [email protected]
/ www.apexis.cc .
Shenzhen Apexis Electronic Co., Ltd Tel: +86-755-26509025 Fax: +86-755-26509229
 Loading...