

Page 1
Safety precautions
!
CAUTION
RISK OF ELECTRIC SHOCK
DO NOT OPEN
AVIS
CAUTION: TO REDUCE THE RISK OF ELECTRIC SHOCK, DO NOT
REMOVE COVER (OR BACK). NO USER-SERVICEABLE PARTS INSIDE.
REFER SERVICING TO QUALIFIED SERVICE PERSONNEL.
RISQUE DE CHOC ELECTRIQUE NE
PAS OUVRIR
The lightning flash with an arrowhead symbol within an equilateral
triangle is intended to alert the user to the presence of uninsulated
"dangerous volt age" within the product’s enclosure that may be of
suf ficient magnitude to constitute a risk of electric shock to persons.
The exclamation point within an equilateral triangle is intended to
alert the user to the presence of import ant operating and mainte nance (servicing) instructions in the literature accomp anying the
!
appliance.
CLASS 1
LASER PRODUCT
W ARNING: DO NOT EXPOSE THIS APPLIANCE TO RAIN OR MOISTURE,
DUE TO THE HIGH RISK OF FIRE OR ELECTRIC SHOCK, DO
NOT OPEN THE CABINET DANGEROUS HIGH VOLTAGES
ARE PRESENT INSIDE THE ENCLOSURE. ONLY QUALIFIED
SERVICE PERSONNEL SHOULD ATTEMPT THIS.
!
THIS DEVICE COMPLIES WITH PART 15 OF THE FCC
RULES. OPERATION IS SUBJECT TO THE FOLLOWING
TWO CONDITIONS: (1)THIS DEVICE MAY NOT CAUSE
HARMFUL INTERFERENCE, AND (2) THIS DEVICE MUST
ACCEPT ANY INTERFERENCE RECEIVED. INCLUDING
INTERFERENCE THAT MAYCAUSE UNDESIRED OPERATION.
CAUTION: DURING PLAYBACK, THE DISC SPINS AT HIGH SPEED, SO
DO NOT LIFT OR MOVE THE PLAYER, DOING SO MAY DAM-
AGE THE DISC.
CAUTION: This Digit al V ideo Disc Player employs a Laser System. Make
sure the device is shut down prior to opening player lid.
V isible laser radiation when open and interlocks defeated.
Use of controls or adjustment s or performance of procedures
other than those specified herein may result in hazardous radia-
1APEX DIGITALPD-650
Page 2

Safety precautions
tion exposure.
DO NOT STARE INTO BEAM.
To ensure proper use of this product, please read this owner s
manual carefully and ret ain for future reference. Should the unit
require maintenance, cont act an authorized service location, or
cont act APEX Digital Inc. O nly qualified service personnel should
remove the cover.
FCC NOTICE: This equipment has been tested and found to comply with the
W ARNING: Changes or modifications made to this equipment, not
2 APEX DIGITAL PD-650
limit s for a Class B digit al device. P ursuant with the FCC
Rules, Part 15. These limit s are designed to provide rea-
sonable protection against harmful interference in a residential inst allation.
This equipment generates,uses and can radiate radio fre-
quency energy and,if not inst alled and used in accordance
with the instructions,may cause harmful interference to
radio communication,However,this is no guarantee that
interference will not occur in a p articular inst allation.If this
equipment does cause harmful interference to radio or television reception,which can be determined by turning the
equipment of f and on,the user is encouraged to try to cor-
rect the interference by one of the following measures:
- Reorient or relocate the receiving antenna.
- Increase the sep aration between the equipment and
receiver .
- Connect the equipment into an outlet on a circuit dif-
ferent from that to which the receiver is connected.
- Consult the dealer or an experienced radio/TV techni-
cian for help.
FCC Caution:To assure continued compliance,(exampleuse only shielded interface cables when connecting to
computer or peripheral devices).Any changes or modifications not expressly approved by the p arty responsible
for compliance could void the user s authority to operate
this equipment.
expressly approved by APEX or parties authorized by APEX
will void all the manufacture warranties.
Page 3

Safety Information
CAUTION: Use of controls or adjustments or performance
of procedures other than those specified herein may result
in hazardous radiation exposure.
Please carefully study this manual and always keep it available.
There are, however, some inst allation and operation precau tions which you should be aware of.
1 .Read Instructions - All the safety and operating instructions
should be read before the product is operated.
2 .Ret ain Instructions - The safety and operating instructions
should be ret ained for future reference.
3 .Heed Warnings - All warnings on the product and in the oper ating instructions should be adhered to.
4 .Follow Instructions - All operating and use instructions should
be followed.
5 .Cleaning - Unplug this product from the wall outlet before
cleaning. Do not use liquid cleaners or aerosol cleaners. Use a
damp cloth for cleaning.
6 .Att achments - Do not use att achments not recommended by
the product manufacturer as they may cause hazards.
7.Water and Moisture - Do not use this product near water - for
example, near a bath tub, wash bowl, kitchen sink, or laundry
tub; in a wet basement; or near a swimming pool; and the like.
8 .Accessories - Do not place this product on an unst able cart,
st and, tripod, bracket, or t able. The product may fall, causing
serious injury to a child or adult, and serious damage to the
product. Use only with a cart, st and, tripod, bracket, or t able rec ommended by the manufacturer, or sold with the product. Any
mounting of the product should follow the manufacturer s
instructions, and should use a mounting accessory recom mended by the manufacturer.
9.A product and cart combination should be moved with care.
Quick stop s, excessive force, and uneven surfaces may cause
the product and cart combination to overturn.
3APEX DIGITALPD-650
Page 4

Safety Information
10.V entilation - Slot s and openings in the cabinet are provided
for ventilation and to ensure reliable operation of the product
and to protect it from overheating, and these openings must not
be blocked or covered. The openings should never be blocked
by placing the product on a bed, sofa, rug, or other similar sur face. This product should not be placed in a built-in inst allation
such as a bookcase or rack unless proper ventilation is provid ed or the manufacturer s instructions have been adhered to.
11 .Power Sources - This product should be operated only from
the type of power source indicated on the marking label. If you
are not sure of the type of power supply to your home, consult
your product dealer or local power comp any. For product s
intended to operate from battery power, or other sources, refer
to the operating instructions.
12.Grounding or Polarization - This product may be equipped
with a polarized alternating-current line plug (a plug having one
blade wider than the other). This plug will fit into the power out let only one way. This is a safety feature. If you are unable to
insert the plug fully into the outlet, try reversing the plug. If the
plug should still fail to fit, cont act your electrician to replace your
obsolete outlet. Do not defeat the safety purpose of the polar ized plug.
Alternate Warnings - This product is equipped with a three-wire
grounding-type plug, a plug having a third (grounding) pin. This
plug will only fit into a grounding-type power outlet. This is a
safety feature, If you are unable to insert the plug into the out let, cont act your electrician to replace your obsolete outlet. Do
not defeat the safety purpose of the grounding-type plug.
13.Power-Cord Protection - Power-supply cords should be rout ed so that they are not likely to be walked on or pinched by items
placed upon or against them, p aying p articular attention to cords
at plugs, convenience recept acles, and the point where they exit
from the product.
14.Protective Att achment Plug - The product is equipped with an
4 APEX DIGITAL PD-650
Page 5

Safety Information
att achment plug having overload protection. This is a safety fea ture. See Instruction Manual for replacement or resetting of pro tective device. If replacement of the plug is required, be sure the
service technician has used a replacement plug specified by the
manufacturer that has the same overload protection as the orig inal plug.
15.Out door Antenna Grounding - If an out side antenna or cable
system is connected to the product, be sure the antenna or
cable system is grounded so as to provide some protection
against volt age surges and built-up st atic charges. Article 810 of
the National Electrical Code, ANSI/NFPA 70, provides informa tion with regard to proper grounding of the mast and supporting
structure, grounding of the lead-in wire to an antenna discharge
unit, size or grounding conductors, location of antenna-dis charge unit, connection to grounding electrodes, and require ments for the grounding electrode.
16.Lightning - For added protection for this product during a
lightning storm, or when it is lef t unattended and unused for long
periods of time, unplug it from the wall outlet and disconnect the
antenna or cable system. This will prevent damage to the prod uct due to lightning and power-line surges.
17.Power Lines - An outside antenna system should not be
located in the vicinity of overhead power lines or other electric
light or power circuit s, or where it can fall into such power lines
or circuit s. When inst alling an out side antenna system, extreme
care should be t aken to keep from touching such power lines or
circuit s as cont act with them might be fat al.
18.Overloading - Do not overload wall outlet s, extension cords,
or integral convenience recept acles as this can result in a risk of
fire or electric shock.
19.Object and Liquid Entry - Never push object s of any kind into
this product through openings as they may touch dangerous
volt age point s or short-out p art s that could result in a fire or electric shock.Never spill liquid of any kind on the product.
5APEX DIGITALPD-650
Page 6

Safety Information
20.Servicing - Do not attempt to service this product yourself as
opening or removing covers may expose you to dangerous volt age or other hazards. Refer all servicing to qualified service per sonnel.
21.Damage Requiring Service - Unplug this product from the
wall outlet and refer servicing to qualified service personnel
under the following conditions:
a. When the power-supply cord or plug is damaged.
b. If liquid has been spilled, or object s have fallen into the product.
c. If the product has been exposed to rain or water .
d. If the product does not operate normally by following the oper ating instructions. Adjust only those controls that are covered by
the operating instructions as an improper adjustment of other
controls may result in damage and will of ten require extensive
work by a qualified technician to restore the product to it s nor mal operation.
e. If the product has been dropped or damaged in any way, and
f. When the product exhibit s a distinct change in performance this indicates a need for service.
22.Replacement Parts - W hen replacement part s are required,
be sure the service technician has used replacement p art s
specified by the manufacturer or have the same charateristics
as the original p art. Unauthorized substitutions may result in fire,
electric shock, or other hazards.
23.Safety Check - Upon completion of any service or repairs to
this product, ask the service technician to perform saf tey checks
to determine that the product is in proper operating condition.
24.Wall or Ceiling Mounting - The product should be mounted to
a wall or ceiling only as recommended by the manufacturer.
25. Heat - The product should be situated away from heat
sources such as radiators, heat registers, stoves or other prod uct s (including amplifiers) that produce heat.
26. Rechargeable battery - Charge volt age cannot below 12V.
6 APEX DIGITAL PD-650
Page 7
Introduction
Your new APEX Digital PD-650
Port able DVD player is designed for
you to enjoy all forms of disc media. It s
slim shape allows you to easily carry
with eveywhere to enjoy films. Y our
player incorporates the latest digit al
audio/video (AV) technologies to give
you the ultimate in listening and view ing pleasure.
Y our new player also support s CD and
MP3. Your player also has several
unique features, including an S-video
output (for greater picture clarity), large
active LCD screen, multi-angle and
multi-language, Parent al Control (to
prevent children from viewing inappro priate content), This is a truly multime dia machine designed for the multime dia world to enjoy. The digit al age has
never been easier to enjoy than with
APEX Digital.
7APEX DIGITALPD-650
Page 8

Notes on Discs
HOW TO HANDLE, CLEAN, AND STORE DISCS.
HANDLING DISCS
Do not touch the playback side of the disc.
Do not att ach p aper or t ape to discs.
NOTE: Apex Digit al Inc.shall not be
responsible for damage that may occur to a
disc from being operated in the player .
PLAYABLE DISCS
This DVD video player can play back the following
discs.
Disk M ark Cont ains Disc size Maximum playback time
DVD
video
disc
Audio
CD
MP3
CD
MP3
Audio
+
V ideo
(moving
pictures)
Audio
Audio
12 cm
12 cm
8 cm
(CD single)
12 cm
Approx. 4 hours
(single sided disc)
Approx. 8 hours
(double sided disc)
Approx. 74 minutes
Approx. 20 minutes
Approx. 600+ minutes
8 APEX DIGITAL PD-650
Page 9

Table of Content s
Safety Precautions..........................................1
Import ant Information......................................3
Intruduction.....................................................7
Note on discs..................................................8
T able of Content s............................................9
DVD Display...................................................10
Remote Control..............................................1 1-12
Identification of Controls.................................13
Quick Starting Guide......................................14-15
Connecting to a TV.........................................16-17
Connecting to Optional Equipment.................18-22
Playing Back a Disc........................................23-26
Locating a Specific T itle, Chapter or T rack.....27
Playing Repeatedly.........................................28-29
Playing in Favorite Order ................................30-31
Zooming a Picture...........................................32
Selecting Subtitles..........................................33
Using the On-Screen Display.........................34
Selecting the Camera Angle...........................35
Setting the Parent al Lock...............................36-37
Setting the Book Mark....................................38
Customizing the Function Settings.................39
9APEX DIGITALPD-650
Page 10
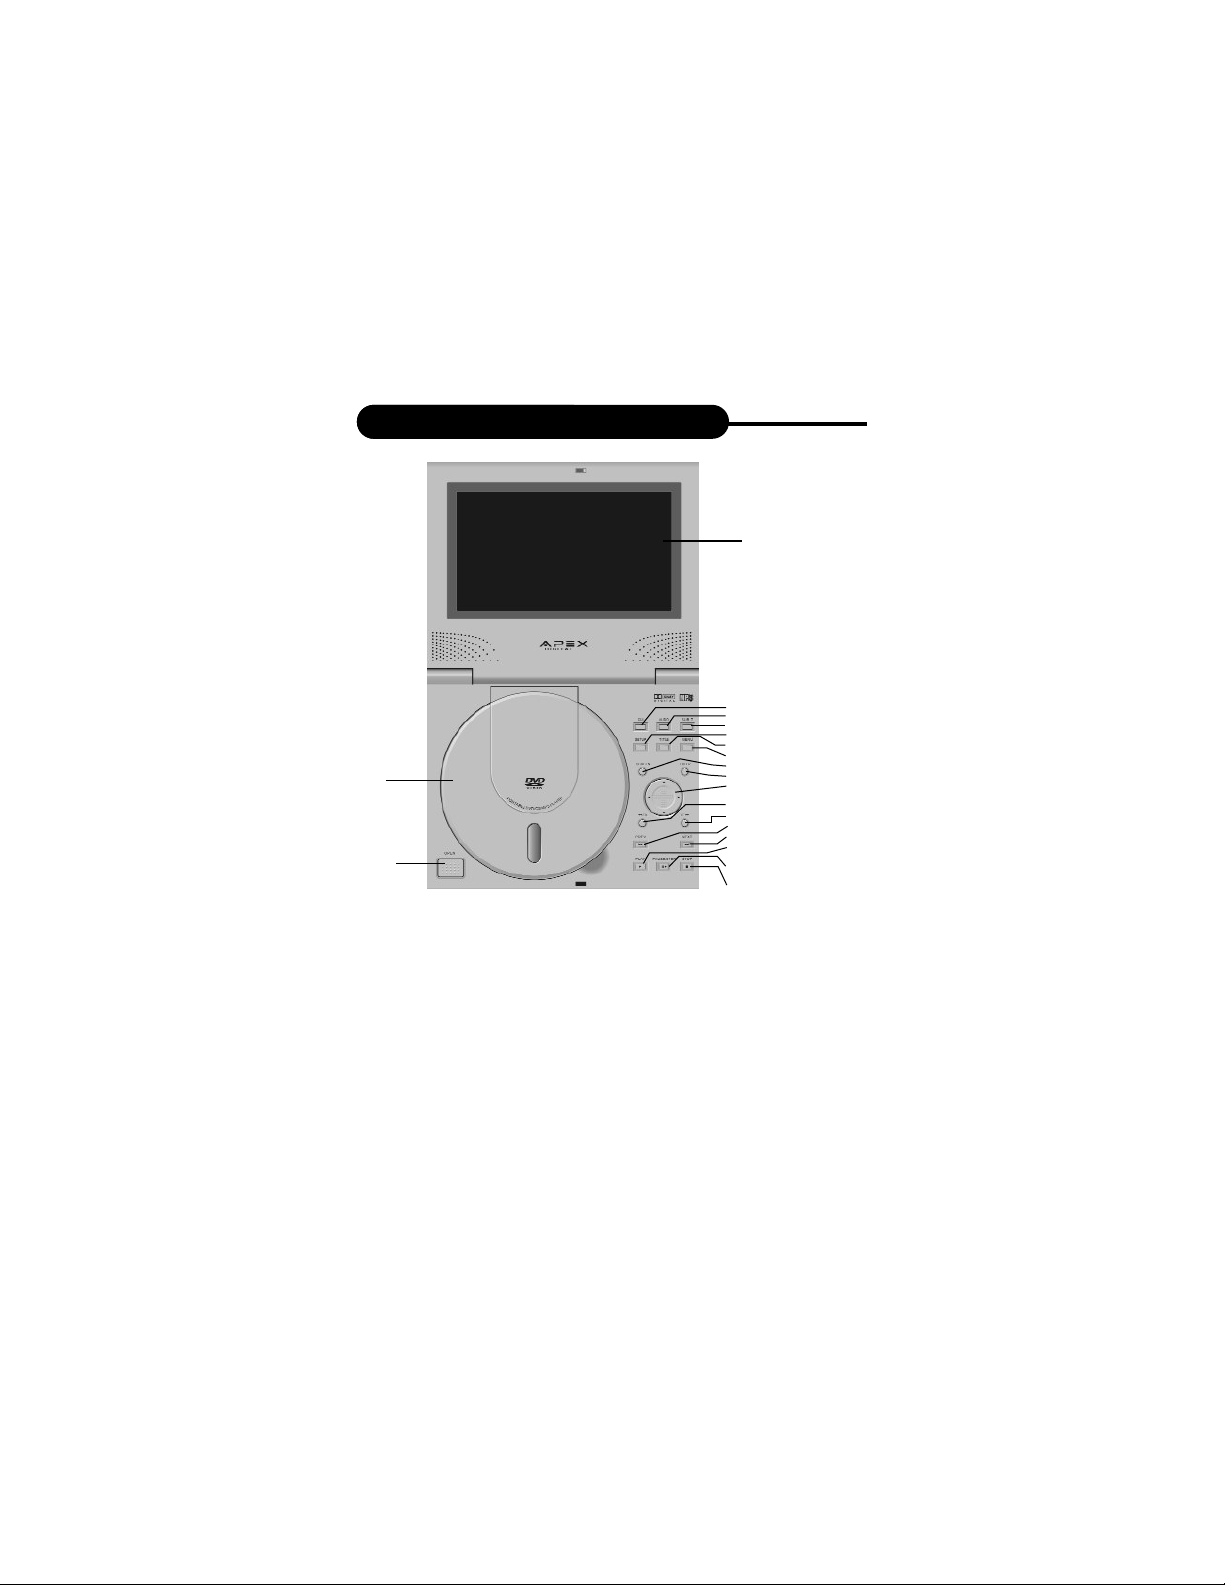
Identification of controls
19
18
1
2
3
4
5
6
7
8
9
10
11
12
13
14
15
16
17
1. LCD (Liquid cryst al display)
2. GUI
3. AUDIO
4. SUBTITLE
5. SETUP
6. T ITLE
7. MENU
8. SCREEN
9. ENTER
10. DIRECTION BUTTON
11. F AST REVERSE
12. F AST FORW ARD
13. PREVIOUS
14. NEXT
15. PLAY
16. PAUSE/STEP
17. ST OP
18. OPEN
19. DISC TRAY
10 APEX DIGITAL PD-650
Page 11

Identification of controls
AV
IN
OUT
POWER
VO L
SIDE FACE
1
1. AV JACK
2. LINE IN/OUT
3. POWER
4. VOLUME
2
3
4
11APEX DIGITALPD-650
Page 12
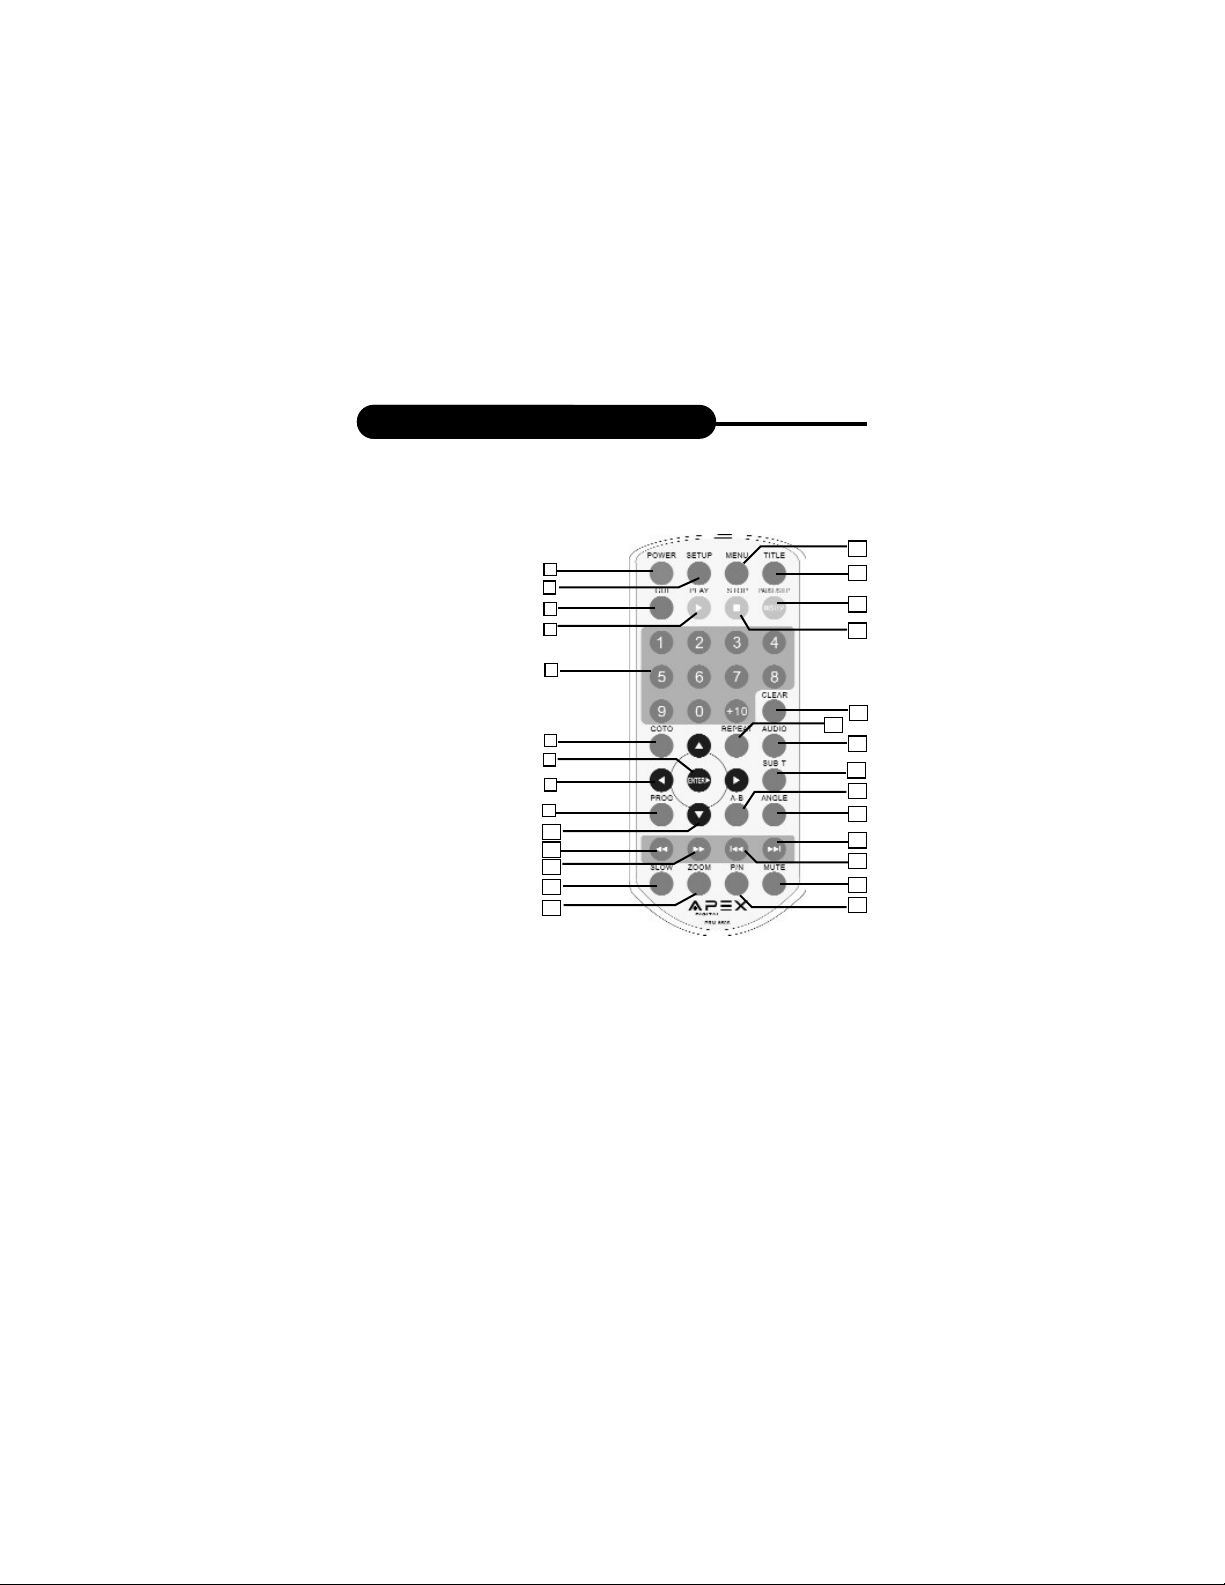
Identification of controls
THE INSTRUCTIONS IN THIS MANUAL DESCRIBE THE
FUNCTIONS ON THE REMOTE CONTROL.
1. POWER
2. SETUP
3. GUI
4. PLAY
5. NUMBERS
6. GOTO
7. ENTER/PLAY
8. DIRECTION
(LEFT/RIGHT)
9. PROGRAM
10. DIRECTION
(UP/DOWN)
11. F AST REVERSE
12. F AST FORW ARD
13. SLOW
14. ZOOM
15. MENU
16. TITLE
17. P AUSE/STEP
18. STOP
19. CLEAR
20. REPEAT
21. AUDIO
22. SUB-T
23. A-B REPEAT
24. ANGLE
25. NEXT
26. PREVIOUS
27. MUTE
28. P AL/NTSC
1
2
3
4
5
6
7
8
9
10
11
12
13
14
NOTES
When you need to use the keys
ANGLE, ZOOM, ENTER and DIRECTION, set shif t on by pressing SHIFT,
and set shif t of f to use NUMBERS.
Please turn the master power
switch on the DVD video player.
Power button on this remote control
unit is for st andby power only.
15
16
17
18
19
20
21
22
23
24
25
26
27
28
12 APEX DIGITAL PD-650
Page 13
entification of controls
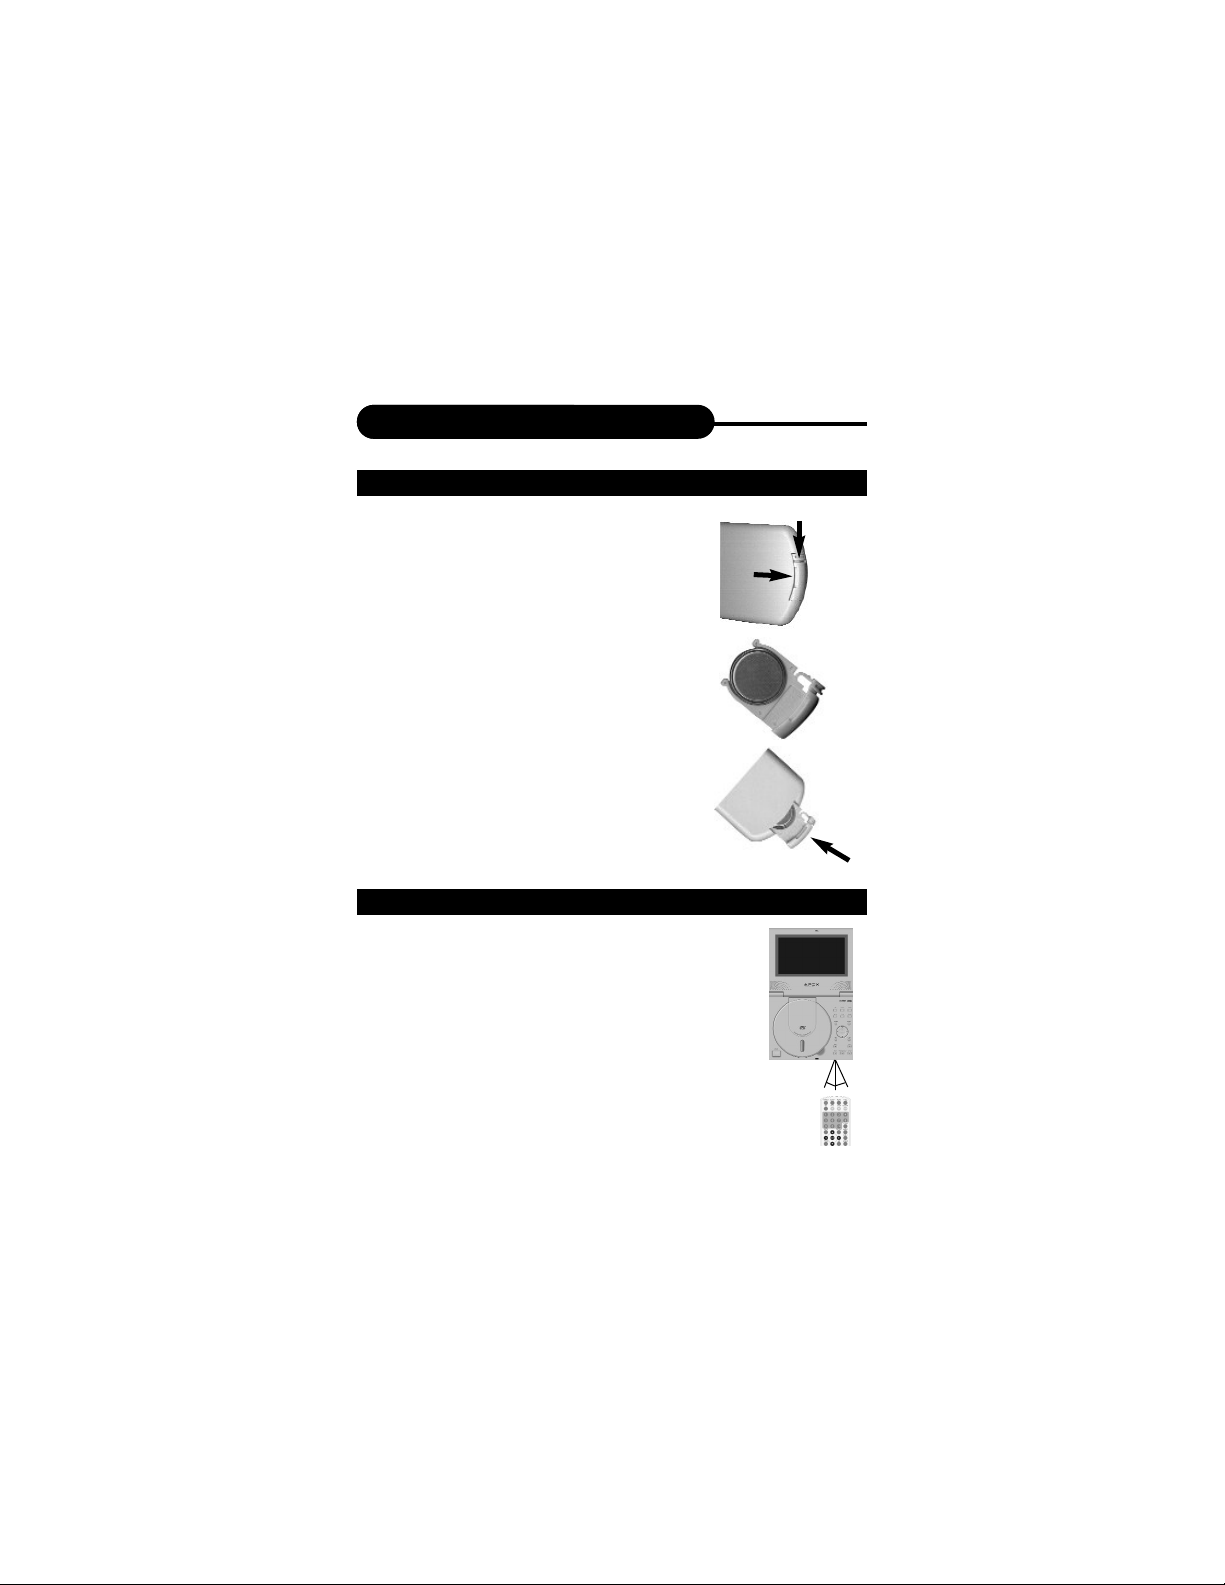
PREPARING THE REMOTE CONTROL
1. Open the cassette cover.
.
Slide the cover in the direction of
the arrow 1 while folding down as
1
the arrow 2.
2. place the battery into the
guide.
3. Insert the tray into the
remote control.
OPERATING WITH THE REMOTE CONTROL
Operating DVD video player with the
remote control.
The remote control must point at the
remote sensor, in order for the DVD
player to function correctly.
Dist ance: Maximum of 7 m from the front of
the remote sensor.
Angle: Approximately 30” from each direc tion.
2
30”
30”
13APEX DIGITALPD-650
Page 14

Quick Starting Guide
If you want to use rechargeable batteries for this DVD
player , please first read the rechargable battery instruc tions.
1. Connecting to an External Power Source
Connect the power cord (supplied
with the player) to the side input
plug and to a wall outlet. Do not
use any other device otherwise
specified by your dealer .
2. Open the protective cover
The cover opens to a maximum 135
only , so please do not try to open it any
further .
3. Press the open button on the
right to open the internal CD player
cover
Never press the OPEN button on the
right during playback.
4. Inserting a DVD disc
Align the center of the DVD disc with
the center of the disc guide. Press gen tly down on the DVD to snap the disc
into place, then close the disc lid.
5. Slide the side power switch
to on.
APEX DIGITAL PD-65014
o
5
Page 15

Quick Starting Guide
6. Press the PLAY button on the
player
In general, the DVD already insert ed into the player will st art reading
automatically when power is turned
on.
The DVD player will immediately st art rendering
the DVD program.
When you want to stop, press the ST OPbutton and
slide the ON/OFF switch to the lef t to shut of f power
and then close the cover.
15APEX DIGITALPD-650
Page 16

Connecting to a TV
SETTING UP YOUR PLAYER
Step1:connect the RCA V ideo/Audio cable to your TV.
Step2:connect the yellow cable to the VIDEO on the
back of your player .
S tep3:connect the W hite and Red cables to AUDIO
OUT of the DVD player .
(For TVs that support S-V ideo Output please follow the
diagram BETTER bellow.)
GOOD
Red
White
TV Audio Input
Yellow
TV Video Input
16 APEX DIGITAL PD-650
Page 17

Connecting to a TV
BETTER
White
TV Audio Input
Red
TV S-Video input
Connect the DVD video player with an
optional S-V ideo cable, if the TV has an S
video input. Do not connect the yellow video
cable if using the S V ideo cable.
NOTICE
T urn of f the power and unplug both unit s before setting up
any connections.
If your TV only has a cable antenna connection and no
video input s to connect your TV to the DVD player, you will
need to purchase an RF adapter from your dealer.
17APEX DIGITALPD-650
Page 18

Connecting to Optional Equipment
CONNECTING HEADHONES
1. Connect the headphones.
Headphones with a 3.5 mm stereo plug can be connect ed.
2. Adjust the volume.
NOTICE
A void listening to sound at levels which may be harmful to
your ears.
18 APEX DIGITAL PD-650
Page 19

Connecting to Optional Equipment
Enjoy Dolby Digital or DTS (BEST)
Dolby Digital/DTS
Dolby Digit al and DTS programming can deliver surround
sound with five discrete full range channels plus a sixth
channel for a subwoofer. Y ou can enjoy your APEX DVD
with a Dolby Digit al or DTS Digit al Surround Sound
System. All you need is to connect your DVD player to a
Dolby Digit al/DTS receiver or a Dolby Digit al Ready
receiver with an external decoder.
DVD SIDE
DVD BACK
To VIDEO OUT
To PCM/BITSTREAM
(Optional)
How to setup the sound output:
From the SETUP MENU display, select General Setup
by pressing ENTER.
Use down arrow key, set the "AUDIO OUTPUT" to
"SPDIF/RAW".
19APEX DIGITALPD-650
Page 20

Connecting to Optional Equipment
This product incorporates copyright protection tech nology that is protected by method claims of cert ain
U.S. p atent s and other intellectual property right s
owned by Macrovision Corporation and other right s
owners. Use of this copyright protection technology
must be authorized by Macrovision Corporation, and
is intended for home and other limited viewing uses
only unless otherwise authorized by Macrovision
Corporation. Reverse engineering or disassembly is
prohibited.
It is forbidden by law to copy , broadcast, show, play in pub lic, and rent copyrighted material without permission.
DVD video discs are copy protected, and any recordings
made from these discs will be distorted.
Manufactured under license from Dolby
Laboratories. Dolby and the double-D symbol are
trademarks of Dolby Laboratories. Confidential
Unpublished works.
1992-1997 Dolby Laboratories, Inc. All right s
reserved.
DTS and DTS Digit al Out are trademarks of Digit al
Theater Systems, Inc.
NOTICE
Adjust the volume of your receiver to a comfort able listen ing level to avoid any speaker damage.
When connecting any disconnecting the DVD video player,
turn of f the amplifier to avoid any speaker damage.
20 APEX DIGITAL PD-650
Page 21

Connecting to Optional Equipment
Enjoying 2 Channel Digital S tereo Sound (BETTER)
2 Channel Digital S tereo
Enjoy the dynamic sound of 2 Channel Digit al S tereo by
connecting an amplifier equipped with a digit al audio
input and speaker system (right and lef t front speakers).
DVD SIDE
DVD BACK
To VIDEO
Video cable
Connection
Example
Front
speaker
(lef t)
OUT
To digit al
audio input
To video
input
TV
To PCM/DOLBY DIGI TAL AUDIO OUT
Optical cable
Amplifier equipped
with digit al audio input
Front
speaker
(right)
Set "AUDIO OUT" to "SPDIF/PCM" via the setup
menu.
PD-650 APEX DIGITAL 21
Page 22

Connecting to Optional Equipment
Enjoying Dolby Pro Logic Surround Sound (GOOD)
Dolby Pro Logic Surround
Enjoy the dynamic realistic sound of Dolby Pro Logic
Surround by connecting an amplifier and speaker sys tem (right and lef t front speakers, a center speaker, and
one or two rear speakers).
Connection
Example
DVD SIDE
Center
speaker
To VIDEO
OUT
To video
input
Amplifier
equipped with
Dolby Pro
Logic Surround
Front
speaker
(right)
V ideo cable
Front
speaker
(lef t)
Connect one or
two speakers. The
output sound from
the rear speakers
will be monaural
even if you con nect two rear
speakers.
To ANALOG
AUDIO OUT
Audio cable
To audio
input
TV
Rear
speaker
Set "AUDIO OUT" to "ANALOG" via the setup
menu.
APEX DIGITAL PD-65022
Page 23

Playing Back a Disc
BASIC PLAYBACK
1. Open the protective cover
The cover opens to a maximum 135
o
only , so please do not try to open it any
further .
2. Press the open button on the right
to open the internal CD player cover
This will open the disc tray .
3. Inserting a DVD disc
Be sure the playback side is faced down.
4. Slide the side power switch to
ON.
5
5. Press PLAY on the p anel or the remote control.
As the DVD video player is reading the disc, a menu will
appear on screen.
NOTICE:
For playback on TV, connect the player to TV as
described on Page16-17.
T o enjoy the sound from the audio system, connect
both unit s as described on Page 19-21.
PD-650 APEX DIGITAL 23
Page 24

Playing Back a Disc
HOW TO START PLAYBACK FROM THE MENU SCREEN
1. Press or the
number buttons to select the
Title 1
Title 2
title.
Title 3
Title 4
2. Press the ENTER/PLAY
button.
The DVD video player will st art
playback from the title selected.
ENTER
SHIFT
HOW TO PAUSE PLAYBACK (STILL PLAYBACK)
Press the PAUSE/STEP once during playback, then
press PLAY to resume normal playback. Press
PAUSE/STEP during playback, the picture will
advance one frame each time, then press PLAY but ton to resume normal playback.
During the still playback the sound
II/STEP
is muted. MP3 CD does not have the step
feature.
PLAY
APEX DIGITAL PD-65024
Page 25

Playing Back a Disc
HOW TO STOP PLAYBACK
Press the STOPbutton.
The player is stopped.
Press the PLAY button to replay.
The player resumes to playback from the location where
it is stopped.
ADVANCED PLAYBACK
You can playback a disc at 2x, 4x, 6x, or 8x the normal
speed. Y ou may also resume playback from the location
where you stopped playback.
FF 2x FF 4x FF 8x
FR 2x
FR 4x
FR 8x
PLAY
PLAY
Press the REV or FWD button during playback.
The playback speed becomes 2x the normal speed.
The playback speed changes, each time you press the
REV or FWD button.
REV: Fast reverse
FWD: Fast forward
TO RESUME NORMAL PLAYBACK.
Press PLAY.
PLAY
25APEX DIGITALPD-650
Page 26

Playing Back a Disc
PLAYING IN SLOW-MOTION
A disc can also be played back in slow-motion.
TV SCREEN
1/2 1/4
1/4 the normal speed1/2 the normal speed
1/8
1/8 the normal speed
Press the SLOW button during playback
The playback speed becomes 1/2, 1/4, or 1/8 of the nor mal speed each time you press the SLOW button.
TO RESUME NORMAL PLAYBACK.
Press PLAY.
PLAY
NOTICE
During REV, FWD and slow-motion playback, the
sound is muted.
APEX DIGITAL PD-65026
Page 27

Chapter 3
Locating a Specific T itle, Chapter or Track
DVD DISCS ARE NORMALLY DIVIDED INTO TITLES
WHICH ARE SUB-DIVIDED INTO CHAPTERS. MOREOVER, CD and MP3 CD ARE DIVIDED INTO TRACKS.
Chapter 1 Chapter 2 Chapter 1 Chapter 2 Chapter 3
TITLE 1
DVD Video Disc
TITLE 2
LOCATING A TITLE USING THE TITLE MENU
You can locate a specific title using the title menu func tion, if a DVD video disc cont ains a title menu.
1. Press the TITLE button
On the LCD or TV screen, the title menu will appear .
2. Press the button to select the title you
want.
You can also directly locate a specific title by pressing it s
assigned number with the number buttons.
3. Press the PLAY button
This will cause the DVD video player to st art playback
from chapter 1 of the title selected.
Y ou also can use skip buttons to to select a title or
track desired:
Press or button repeatedly till the one displays.
PD-650 APEX DIGITAL 27
Page 28

Playing Repeatedly
THIS DVD VIDEO PLAYER ALLOWS YOU TO PLAYBACK A SPECIFIC TITLE, CHAPTER, TRACK, OR SEGMENT REPEATEDLY. (TITLE REPEAT,
CHAPTER/TRACK REPEAT, A-B REPEAT)
HOW TO REPEAT A TITLE, CHAPTER, OR DISC
1. During normal playback, press the REPEAT button.
The repeat mode changes, each time you press the
REPEAT button.
Resumes normal playback.
Repeats the same chapter.
Repeats the same title.
Repeats the whole disc
2. Input the number of the chapter or title you want to
repeat.
The unit will playback it repeatedly .
If you want to playback the whole disc repeatedly, select
, and select to resume normal playback.
28 APEX DIGITAL PD-650
Page 29

Playing Repeatedly
HOW TO REPEAT A SPECIFIC SEGMENT
1. Press the A-B button at the beginning of the seg ment in which you want to repeat playback (point A)
2. Press the A-B button again at the end of the seg ment (point B)
The DVD video player will automatically return to point A
and st art to repeat playback of the selected segment (AB).
3. Press the A-B RPT button to cancel the A-B
repeat function
The DVD video player will resume to normal playback.
PD-650 APEX DIGITAL 29
Page 30

Playing in Favorite Order
THIS PORTABLE DVD ALLOWS YOU TO PROGRAM
ITEMS INTO THE MEMORY AND THEN PLAY THEM
BACK IN ANY ORDER WHICH YOU WANT IT PLAYED
BACK. (PROGRAM PLAYBACK)
HOW TO SET TITLES, CHAPTERS, OR TRACKS IN A
FAVORITE ORDER
1. Press the PROGRAM button.
PROGRAM MENU displays on the screen.
PROGRAM MENU
DISC PROGRAM
1 2 3 4 5
6 7 8 9 10
_ _ _ _ _ _ _ _ _ _
_ _ _ _ _ _ _ _ _ _
_ _ _ _ _ _ _ _ _ _
_ _ _ _ _ _ _ _ _ _
_ _ _ _ _ _ _ _ _ _
_ _ _ _ _ _ _ _ _ _
CLEAR
START
CLEAR ALL
2. In the DISC volume, use direction buttons to move
the cursor and press ENTER to select one.
The number of the item selected will be input into the
PROGRAM volume.
APEX DIGITAL PD-65030
Page 31

Playing in Favorite Order
3. Program in each item in your favorite order as
above step.
For example: To program in 5, 8,10.
DISC PROGRAM
1 2 3 4 5
6 7 8 9 10
_5_ _ _ _ _ _ _ _ _
_ _ _ _ _ _ _ _ _ _
_ _ _ _ _ _ _ _ _ _
_ _ _ _ _ _ _ _ _ _
CLEAR
CLEAR ALL
1 2 3 4 5
6 7 8 9 10
_5_ _8_ _ _ _ _ _ _
_ _ _ _ _ _ _ _ _ _
_ _ _ _ _ _ _ _ _ _
_ _ _ _ _ _ _ _ _ _
CLEAR
CLEAR ALL
_5_ _8_ _10 _ _ _
1 2 3 4 5
6 7 8 9 10
_ _ _ _ _ _ _ _ _ _
_ _ _ _ _ _ _ _ _ _
_ _ _ _ _ _ _ _ _ _
CLEAR
CLEAR ALL
4. Select START to start program playback.
5. T o clear the programmed, move the cursor to
CLEAR or CLEAR ALL by pressing direction buttons
and press ENTER to confirm it.
NOTICE:
The function is not available on DVD.
PD-650 APEX DIGITAL
31
Page 32

Zooming a Picture
ZOOMING A PICTURE
This DVD video player allows you to zoom into a picture
as well as shif t the zoom point.
Press ZOOM during normal playback or slow motion. (To use the ZOOM button, it should be set
SHIFT ONby pressing SHIFT.)
The DVD video player magnifies in the center of the pic ture.
If you press during zoom playback, the zoom
point shif ts.
ZOOM
32 APEX DIGITAL PD-650
Page 33

Selecting Subtitles
HOW TO DISPLAY SUBTITLES
You have the option to select a preferred subtitle
from those included on the DVD video disc.
Press to select the subtitle language as
well as to set subtitle on or off.
01 / 05
EN ON
02 / 05
CHON
03 / 05
GEON
01 / 05
ON
EN
01 / 05
EN OFF
Press the SUBTITLE button to access to subtitle menu.
Highlight the item you want to select by
pressing or number keys (0-9).
SUBTITLE
01 / 05
EN ON
01 / 05
EN
ON
33APEX DIGITALPD-650
Page 34

Using the On-Screen Display
THIS UNIT ALLOWS YOU TO VIEW THE STATUS AND
DISC INFORMATION ON TO THE SCREEN, MOREOVER, YOU CAN SELECT ITEMS CONTAINED ON
THE DISC FROM DISPLAY MENU.
CHECKING THE OPERATIONAL STATUS
W ith this function, you can view the current title, chapter,
tot al playing time, audio, subtitle, angle, repeat mode
and bookmark.
SETTING UP YOUR FAVORITE ITEMS
Use to highlight the item you want to set up. And
select your favorite by press or , for some, you
also can select one by inputting it s number directly .
Det ailed operation is just as each short-cut such as
TITLE, AUDIO, SUB-T, ANGLE, REPEAT, A-B and
MARK.
34 APEX DIGITAL PD-650
Page 35

Selecting the Camera Angle
THIS DVD VIDEO PLAYER ALLOWS YOU TO SELECT
FROM SEVERAL DIFFERENT ANGLES.
ANGLE 1 ANGLE 2
Selecting the camera angle
HOW TO CHANGE THE CAMERA ANGLE
If the DVD video disc was recorded from multiple angles,
you have the option to change the camera angle of the
scene you are watching.
SUBTITLE
Press the ANGLE button while playing back a scene
recorded with multiple angles.
Y ou may only press the ANGLE button when the angle
icon is flashing on the DVD display .
Each time you press the ANGLE button, the angle will
change.
2/2
1/2
NOTICE
The angle function will not work on DVD video discs
that does not cont ains recorded multiple angles.
35APEX DIGITALPD-650
Page 36

Setting the Parental Lock
YOU CAN USE THE PARENTAL LOCK FUNCTION
ONLY WITH DVD VIDEO DISCS EQUIPPED WITH THE
PARENTAL LOCK FEATURE.
SETTING THE PARENTAL LOCK
DVD video discs equipped with the
parent al lock function are rated
Violent Scene
1. Press STOPduring playback
Press STOPonce.
2. Press SETUP
The SETUP MENU appears on the screen.
according to their content. The con tent s allowed by a p arent al lock
level and the way a DVD video disc
can be controlled may vary from
disc to disc. For example, if the
disc allowed, you could edit out vio lent scenes unsuit able for children
and replace them with more suit able scenes, or lock out playback of
the disc all together .
3. Press SHIFT to set shif t on, then you can use direc tion keys and the enter key.
Press it again to set shif t of f to use the number keys.
36 APEX DIGITAL PD-650
Page 37

Setting the Parental Lock
4. Use down key to select RAT ING, press right key or ENTER to
access to the sub-menu.
1. KID SAFE
2. G
3. PG
4. PG-13
5.
6. PG-R
7. NC-17
8. ADULT
BYPASS
Select ratings, press
5.
ENTER.
6. Enter your p assword then
press ENTER.
The pre-set password is 3308
7. Press SETUP to exit setup,
press ENTER to st art.
LANG
VIDEO
AUDIO
RATING
OTHER
EXIT
PD-650 APEX DIGITAL
37
Page 38

Setting the Book Mark
A BOOK MARK ALLOWS YOU TO EASILY ACCESS TO
ONE POINT FROM WHICH YOU WANT TO START.
1. Under SHIFT ON st atus, press the MARK button,
it appears:
2. As the disc is played back where you want to set a
bookmark, Press ENTER.
Each time you press it, a bookmark will be set. At maxi mum, five bookmarks (1,2,3,4,5) can be set.
1
1234 12345
1 2
12 3
3. When you desire to start playback from which mark
you set, use direction buttons to move cursor to it,
and press PLAY.
APEX DIGITAL PD-65038
Page 39

Rechargeable Battery Installation & Use
USE AND MAINTENANCE
THIS UNIT IS SUPPLIED WITH HIGHLY-EFFECTIVE
RECHARGEABLE BATTERY (NI-MH). SUCH BATTERY
PACK A HIGH STORAGE CAPACITY AND LOW LEVEL
OF DEGRADATION. THE LATTER MEANS THAT THE
BATTERY CAN ALSO BE RECHARGED WHEN ONLY
PARTLY SPENT.
Plug the A V adapter into the battery .
Please fully charge the
Charging indicator
battery prior to first use.
During the player is being
charged, the red light is
flashing. When the light
AC Adapter/charge input
turns green this indicates that the battery is fully charged.
Then you can unplug it from the wall outlet. Being
recharged, the battery will become warm, this is nothing
to be concerned about.
Y ou also can directly plug the A V adapter into the
power jack of the player which is connected with the
battery, then you can charge the battery while enjoying programmes.
Make sure you always use only the AC adapter sup-
plied with the player to recharge the battery.
If the battery would not be used for a long duration of time
(say one week or longer), it is recommended that you first
fully charge the battery and store it away properly, and
recharge it at least once every two months for mainte nance.
39APEX DIGITALPD-650
Page 40

Rechargeable Battery Installation & Use
The provided battery can be recharged for about 300
times. Each full recharge t akes about 3 hours, which can
then power the player for about 2 hours. Power con sumption depends on the operations of the player such as
brightness of the screen, volume level, etc.
Recharge the battery in time when fully spent in order to
maximize its life.
Never recharge the battery which is already charged fully.
Under no circumst ance should you short out the battery,
store it in a met al cont ainer , or leave it in a humid or damp
environment. Store the battery in an airtight cont ainer if
possible. Recharge ef fectiveness will degrade when envi ronmental temperatures drop below 10 ”C or exceed 35 ”C.
INSTALLING & REMOVING THE BATTERY PACK
2
1
3
1. Make sure the unit is powered of f and unplugged.
2. Plug the battery p ack into the outlet of the unit as the
arrowhead 1, and push it forward as arrowhead 2 to
alighn them with each other when you hear a click sound.
Removing the Battery Pack
1. Make sure the unit is powered of f and unplugged.
2. Pull the battery p ack backward as arrowhead 3 till it is
released.
40 APEX DIGITAL PD-650
Page 41

Customizing the Function Settings
THIS UNIT ALLOWS YOU TO CUSTOMIZE THE PERFORMANCE TO YOUR PERSONAL PREFERENCE.
SETUP MENU
LANG
VIDEO
AUDIO
RATING
DISPLAYING THE SETUP MENU SCREEN
LANG
VIDEO
AUDIO
RATING
OTHER
EXIT
1. Press SETUP.
2. Press
to select category
(highlight), then press
ENTER.
3. Press SETUP to nor mal playback.
/ / /
O.S.D
AUDIO
SUBTITLE
DISCMENU
SYSTEM
ASPECT
CAPTION
OFF*
ON
DIGITAL
RATING LEVEL 8*
CHANGE PASSWORD
CANCEL PASSWORD
SCR SAVER
FACTORYSETTING
PAL*
NTSC
16:9 WS*
4:3 PS
4:3 LB
LPCM*
DOLBY DTS
NOTICE:
Preset p assword is
Functions and menu may change without notice.
* Factory default s
** Y ou must press ST OPto set up PREFERENCES.
3308 .
OTHER
ON*
OFF
ENGLISH*
CHINESE
ENGLISH*
CHINESE
ORIGINAL
JAPAN
SPANISH
FRENCH
OFF*
JAPAN
SPANISH
FRENCH
ENGLISH
CHINESE
ORIGINAL
ENGLISH*
CHINESE
ORIGINAL
JAPAN
SPANISH
FRENCH
41APEX DIGITALPD-650
 Loading...