

Page 1
INSTRUCTIONMANUAL
Standard- GT2015, GT2415, GT2715, GT3215
Please read this manual carefully before operation.
Page 2
BEFORE OPERATION
Dear Customer:
Congratulations! You have purchased one of the
finest Color TMs on the market!
This manual will help you use themanyexciting
and useful features to make your TV viewing more
enjoyable than ever before.
Before operating your TV set, please read all these
safety and operating instructions completely and
then retain for future reference.
Safety Precautions
WARNING:
TO REDUCE THE RISK OF FIRE OR ELECTRIC
SHOCK, DO NOT EXPOSE THIS APPLIANCE TO
RAIN OR MOISTURE.
t_\l RISK OF ELECTRIC SHOCK
_1 DO NOT OPEN
CAUTION : TO REDUCE THE RISK OF ELEC-
TRIC SHOCK, DO NOT REMOVE COVER(OR
BACK). NO USER SERVICEABLE PARTS IN-
SIDE. REFER SERVICING TO QUALIFIED
SERVICE PERSONNEL.
The lightning symbol in the triangle tells
you that the voltage inside this product
may be strong enough to cause an
electric shock.
NOT TRY TO SERVICE THIS
PRODUCT YOURSELF.
Customer's Record
You will find the model number and chassis num-
ber on the back of your TV set.
Record these numbers in the spaces provided
below.
Refer to them whenever you call upon your Apex
dealer regarding this product.
Model Numbers: GT2015, GT2415, GT2715, GT3215
Chassis Number: CH-12C2
Avoid displaying stationary images on your TV
screen for extended periods of time. Stationary
patterns generated by computer displays, video
games, stock market reports, etc. can become
permanently engrained on the picture tube. This
damage is not protected by your warranty as it is
the result of misuse. Should you wish to use your
Apex Television to display still images, itis always
advisable to reduce brightness and contrast set-
tings. Never leave a video game or computer dis-
play unattended.
NOTE TO CABLE INSTALLER IN THE USA:
This reminder is provided to call your attention to
Article 820 - 40 of the NEC that provides guide-
lines for proper grounding and, in particular,
specifies that the cable ground shall be connect-
ed to the grounding system of the building, as
close to the point of cable entry as practical.
_. The exclamation point in the triangle tells
you that important operatingand mainte-
nance instructions follow this symbol.
CAUTIONS:
TO PREVENT ELECTRIC SHOCK, DO NOT USE
THIS POLARIZED PLUG WITH AN EXTENSION
CORD RECEPTACLE OR OTHER OUTLET UN-
LESS THE PRONGS CAN BE FULLY INSERTED
INTO THE OUTLET TO PREVENTANY EXPOSURE
OF THE PRONGS ON THE POLARIZED PLUG.
2
Page 3

BEFORE OPERATION (continued)
Important Safety Instructions
CAUTION
PLEASE READ THESE INSTRUCTIONS. KEEP THESE INSTRUCTIONS AND HEED ALL WARNINGS. FOLLOW ALL INSTRUCTIONS. J
Electhcal energy canperformmany usefulfunctions. This "rv set has been engineeredand manufactured to assure your personalsafety. However
tmproperuse can result inpotential electricalshockorfire hazards.In order not to defeat the safe guards incorporated in this TV set, observethe follow-
ing basic rules for antenna/TV installation, use and servicing.All operating and use lestnJctionsshould be followed.
0o not remove thecabinet cover.Thismay exposeyou to dangerous voltages. Refer all servicing to qualified servicepersonnel.
-i,€ m'mwJ
Power Sources- The TV set should be operated only from the type of power source indicatedon the TV set oras indicated in the Operation Manual.
If you are notsureof the type of power supply ld your home, consultyour local power company. For TV sots designed to ogereta from battery power,
or othersources, refer to the operating ius_ctldns.
Grounding or Polarization - Do notdefeat the safety purposeof the puladzed or grounding_ype plug,Apolarizedplug has twoblades withone wider
than the other. A grounding - type plug has two blades and a third goundieg prong, The wide blade or the third prong is provided for your
safety, ff the provided plug does not fit intoyour out,t, consult an elec_cian for replacement of the obsolete outleL
Altemete Warnings - This plug will only fit into a grounding-type power outlet. This is a sofety feature.
If you are unable to insert the plug into the outlet, contactyour electrician to have a suitabfa outlet installed. Do not defeat the safety purpose of the
grounding plug.
Power.Cord Protection - Protect thepower cordfrom being walked onor pinched, pertiouledyatplugs, conver_nca receptacles, and the pointwhere
they exit from the TV.
Overloading - Do not ovedead wall outlets, extension cordsor integralconvenience recaptades as this can resultinfire or electhc shock.
Lightning - For added protection for this'rV set dudng a lightning storm, orwhen it is left unattended and unused for long periods of time, unplug it
from the wall outlet and disconnect the antenna or cable system. This will prevent damage to the productdue to lightning and power-line surges.
If a snapping or popping sound from a TV set is heard co_oueasly or freguen'_y while the TV set is operated, unplug the "iV set and o_nsoit your
dealer or sorviea technician. It is normal for some TV sets to make ouc_sional snapping or popping sounds, partisoisdywhen being turned on or off.
Heat - Do not install near any heat sources such as radiators, heat registers, stoves, or other apparatus (inctudleg amplifiers) that woduce heal
Acceeaodea - Do net place the "IV set an an unstablecart, stand, tripod, bcad(et, or table. The TV sot may fall, causing serious injury to a childor
adutt, and serious damage to the TV sot. Use only wP,h a cart, stand, tnped, bracket, or table recommended bythe manufacturer, or accassury rec-
ommonded by the manufacturer, or _ with the TV set, and shoulduse a mounting accessory recommended by the manufacturer.
]
,.,J
A product and cart combination should be moved with care. Quid( stops, excessive force, and uneven surfaces may cause the TV set and cart
combination to overturn.
Water and Moisture Warnings - Do not use the "iV sot near weter-forexample, near a bathtub, wash bowl, kitchens_nk,or laundry tub; in a wet
basement; er near a swimming pool;and the like. The "IV sot shouldnot be exposed to ddpping or splasNng and no objects filledwith liquids,such
as vases, should be placed on the TV soL
Object and Liquid Entry - Never push objectsofany kind intothe TV set through opsnings as they may touchdangerous voltage pointsor short-
out parts that could result in a fire or elecbic shock. Never spillIk:luldof any kind on the TV seL
Cleaning - Unplugthe TV sot from the wall outlet before cleaningor polishing it. Do not use quid cleaners er aeroso_deaners. Use a dry clothfor
deaafng the extedor of the TV sol
Attachments - Do not use attachments not rso0m_ by theproductmanufacturer as they may cause hazards oreleckic shock.
Ventilation - Slots and openings in the cabinet are provided for ventilationandto ensure reliableoperationof the TV set and to protect itfrom over-
heating, and these openings must net de blocked or covered. The openLngsshould never be blocked by placing the "IV set on a bed, sofa, rug,or
other similarsurface. This TV set shouldnot be placed in a buiit-fainstallationsuch as a bookcase or rack unless p_operventilationis Wovldeder the
manufacturer's iusttuctionshave been adhered to.
Page 4
BEFORE OPERATION (continued)
Precautions (continued)
Damage Requiring Service - Unplug the TV set from the wall outlet and refer servicing to qualified service personnet
under the following conditions:
a. If the power cord or plug is damaged or frayed.
b. If liquid has been spilled or objects have fallen into the TV set.
c. If the TV set has been exposed to rain or water.
d. If the TV set has been subject to excessive shock by being dropped, or the cabinet has been damaged.
e. If the TV set does not operate normally by following the operating instructions. Adjust only those
controls that are covered by the operating instructions as an improper adjustment of other controls may result in dam-
age and will often require extensive work by a qualified technician to restore the TV set to its normal operation.
f. When the TV set exhibits a distinct change in performance-this indicates a need for service.
Servicing - Do not attempt to service the TV set yourself as opening or removing covers may expose you to dangerous
voltage or other hazards. Refer all servicing to qualified service personnel.
Replacement Parts - When replacement parts are required, be sure the service technician has used replacement parts
specified by the manufacturer or have the same characteristics as the original parts. Unauthorized substitutions may
result in fire, electric shock, or other hazards.
Safety Check - Upon completion of any service or repairs to the TV set, ask the service technician to perform routine safety
checks to determine that the TV set is in proper operating condition.
Disposal - When the TV set reaches the end of its useful life, improper disposal could result in a picture tube implosion.
Ask a qualified service technician to dispose of the TV set.
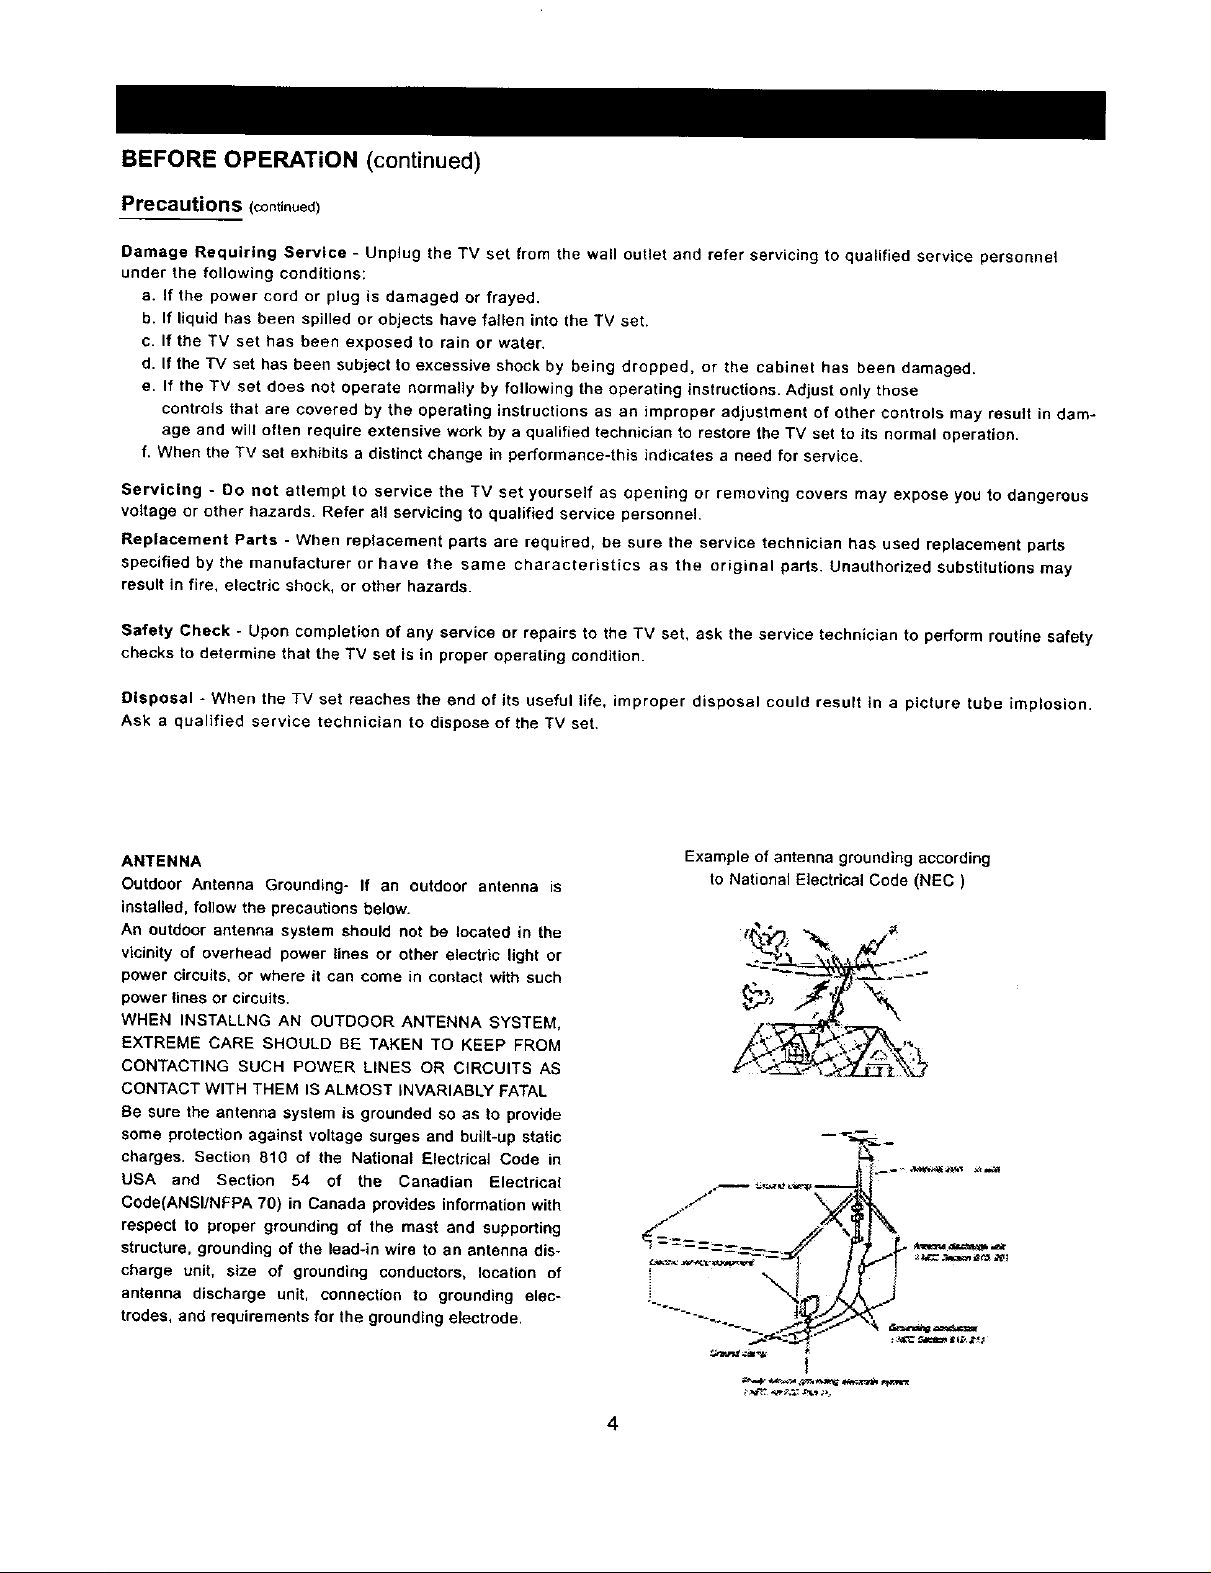
ANTENNA
Outdoor Antenna Grounding- If an outdoor antenna is
installed, follow the precautions below.
An outdoor antenna system should not be located in the
vicinity of overhead power lines or other electric light or
power circuits, or where it can come in contact with such
power lines or circuits.
WHEN INSTALLNG AN OUTDOOR ANTENNA SYSTEM,
EXTREME CARE SHOULD BE TAKEN TO KEEP FROM
CONTACTING SUCH POWER LINES OR CIRCUITS AS
CONTACT WITH THEM IS ALMOST INVARIABLY FATAL
Be Sure the antenna system is grounded so as to provide
some protection against voltage surges and built-up static
charges. Section 810 of the National Electrical Code in
USA and Section 54 of the Canadian Electrical
Code(ANSI/NFPA 70) in Canada provides information with
respect to proper grounding of the mast and supporting
structure, grounding of the lead-in wire to an antenna dis-
charge unit, size of grounding conductors, location of
antenna discharge unit, connection to grounding elec-
trodes, and requirements for the grounding electrode.
Example of antenna grounding according
to National Electrical Code (NEC)
4
Page 5
BEFORE OPERATION (continued)
FCC Warning
Class B Computing Device
Information to User
This equipment has been tested and found to comply with the limits for a class B digital device pursuant to
part 15 of FCC Rules. These limits are designed to provide reasonable protection against harmful interfer-
ence in a residential installation. This equipment generates, uses, and can radiate radio frequency energy
and, if not installed and used in accordance with the instructions, may cause harmful interference to radio
communications. However, there is no guarantee that interference will not occur in a particular installation, if
this equipment off and on, the user is encouraged to try to correct the interference by one or more of the
following measures:
1 ) Reorient or relocate the receiving antenna.
2) Increase the separation between the equipment and receiver,
3) Connect the equipment into an outlet on a circuit different from that to which the receiver is con-
nected.
4) Consult the dealer or an expedenced radio/'i'V technician for help and for additional suggestions.
The user may find the following booklet prepared by the Federal Communications Commission helpful: How
to Identify and Resolve Radio -TV Interference Problems". This booklet is available from the US Government
Printing Office. Washington, D. C 20402, Stock No. 004-000-00345-4.
FCC Warning
The user is cautioned that changes or modifications not expressly approved by the manufacturer could void
the user's authority to operate the equipment.
NOTE: In order for an installation of the product to maintain compliance with the limits for a Class B device.
shielded cables must be used.
Page 6
BEFORE OPERATION (continued)
FCC Warning
Class B Computing Device
Information to User
This equipment has been tested and found to comply with the limits for a class B digital device pursuant to
part 15 of FCC Rules. These limits are designed to provide reasonable protection against harmful interfer-
ence in a residential installation. This equipment generates, uses, and can radiate radio frequency energy
and, if not installed and used in accordance with the instructions, may cause harmful interference to radio
communications. However, there is no guarantee that interference will not occur in a particular installation, if
this equipment off and on, the user is encouraged to try to correct the interference by one or more of the
following measures:
1 ) Reorient or relocate the receiving antenna.
2) Increase the separation between the equipment and receiver.
3) Connect the equipment into an outlet on a circuit different from that to which the receiver is con-
nected.
4) Consult the dealer or an experienced radioflV technician for help and for additional suggestions.
The user may find the following booklet prepared by the Federal Communications Commission helpful: How
to identify and Resolve Radio -TV Interference Problems", This booklet is available from the US Government
Printing Office. Washington, D. C 20402, Stock No. 004-000-00345-4.
FCC Warning
The user is cautioned that changes or modifications not expressly approved by the manufacturer could void
the user's authority to operate the equipment.
NOTE: In order for an installationof the product to maintain compliance with the limits for a Class B device.
shielded cables must be used.
6
Page 7
CONTENTS
INTRODUCTION
Features .................................................................................................................................................... 9
Control Buttons........................................................................................................................................ 10
Menus ...................................................................................................................................................... 12
INSTALLATION
To Connect the Antenna ........................................................................................................................... 13
Remote Batteries...................................................................................................................................... 13
To Connect External Equipment .............................................................................................................. 14
BASIC FUNCTIONS
Power On/Off ............................................................................................................................................ 15
On - Screen Display. ................................................................................................................................ 15
Tuning in................................................................................................................................................... 16
Function Selection .................................................................................................................................... 17
General Operation ................................................................................................................................... 20
Picture Improvement ................................................................................................................................ 22
Sound Improvement ................................................................................................................................. 23
ADDITIONAL FEATURES
Time Setting ............................................................................................................................................. 24
Childlcck ................................................................................................................................................... 24
Programming the Remote Control ............................................................................................................ 25
SPECIFICATIONS ......................................................................................................................................... 27
TROUBLESHOOTING GUIDE ...................................................................................................................... 28
LIMITED UNITED STATES WARRANTY ...................................................................................................... 29
Note:
The OSD and illustration in this manual may be somewhat different from the actual situation. Please take
the TV as the standard.
7
Page 8

FeatureslNTRODUCTION
Features
True Fiat Picture Tube
• Delivers real pictures, which ensures that you can watch sharper and more natural pictures. By adopting
the invar shadow - mask, the tube increases the transparency and reduces thermal deformation, which
greatly improves the picture stability and delivers more vivid pictures.
English/French/Spanish Menus
• The unique English/French/Spanish menu control function makes the operation more easily.
181 Channel Tuner
• 2-69 channels in the Air mode and 1-125 channels in the Cable mode can be preset (of which 2-13
channels in the Air and Cable modes are the same.)
AV/S - VIDEO Terminals for External Equipment Connection
On/Off Timer
• The TV automatically turns off and on and tunes to the desired channel at the time when programmed.
Auto Off
• Under no signal condition, the TV will turn off in15 rain.
Childlock Function
• Prevents children from watching TV for a long period of time. Especially when parents are out.
Parental Control
• Prevents children from watching programs not suitable for them.
Quick Selectable Picture/Sound Modes
• Allows one - touch selection of your favorite picture and sound quality among three picture modes and four
sound modes.
COD/Text Function
• If they are included in a program, you can view closed captions or text information,
Correction Technology
• Reduces picture noise and improves color quality.
Black Level Extension
• The black level extension cimuit circuit enhances the picture gradation.
Dlgita/Geometric Correction
• The TV adopts digital geometric correction with no mechanic adjustment, which offers the TV reliablity.
Channel Scan
• Displays all channels set inthe Add mode.
MTS Stereo
AVC - Auto Volume Correction
8
Page 9
INTRODUCTION(continued)
Control Buttons
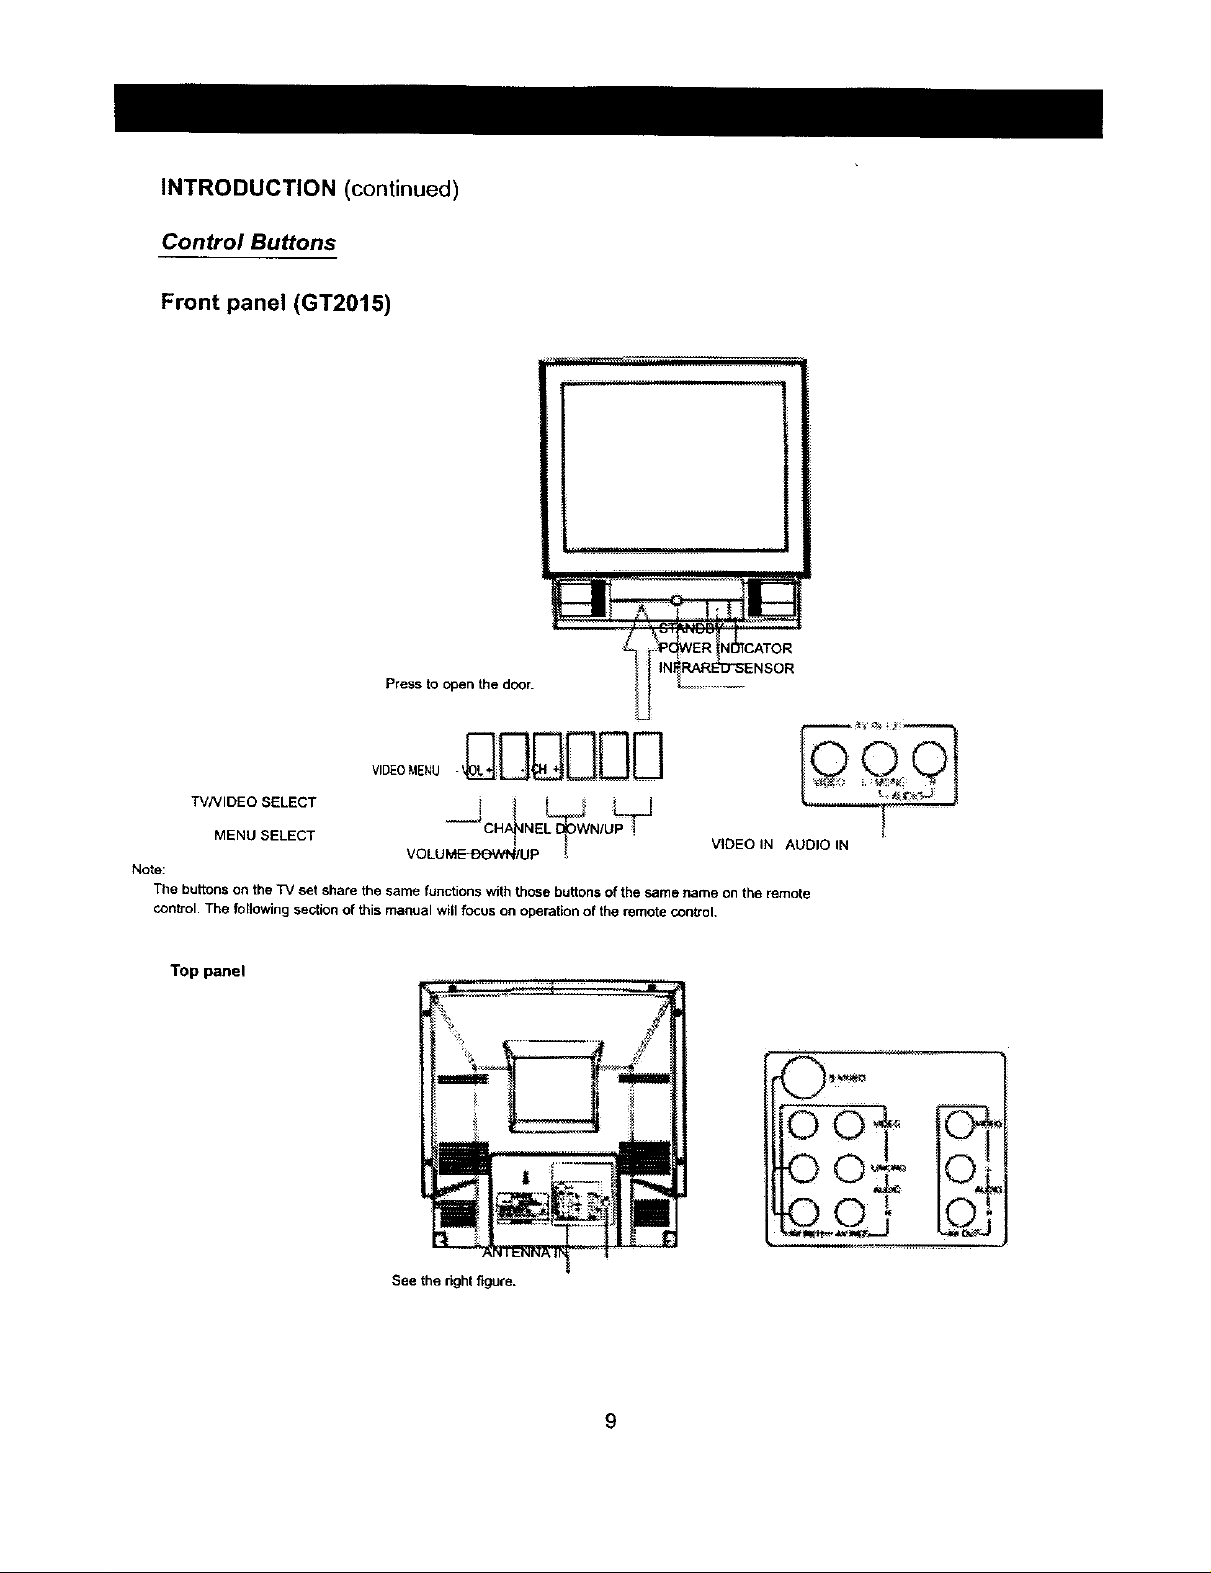
Front panel (GT2015)
Press to open the door.
TV/VIDEO SELECT
MENU SELECT
Note:
The buttons on the TV set share the same functions with those buttons of the same name on the remote
control. The following se_ion of this manual wil focus on operat_ of the remote con_oL
Top panel
VOLUMEd/UP •
See the r_ghtfigure.
VIDEO IN AUDIO IN
9
Page 10

INTRODUCTION (continued)
Control Buttons
Front panel (Gt2415, GT2715, GT3215)
_ INDICATOR
Press to open the door. _
_ ! _"_-- {NFNARED SENSOR
_ STANDBY
DDD DD
VIDEOMENU -VOL+ - CH +
TVNIDEO SELECT --
MENU SELECT "--"_ ! CHANNEL DOWN/UP
Note:
The buttons on the TV set share the same functions with those buttons of the ,same name on the remote
control. The following section of this manual ',viiifocus on operation of the remote control.
Top panel
I j i
Front-set AV IN(a)
VOLUME DOWN/UP
I
ANTENNA IN
Seethe dghtfigure,
lO
Page 11

INTRODUCTION(continued)
Control Buttons (continued)
Remote control
The buttons marked with shades don't function for the TV seL
o
I_tes:
_)When in operation, please point your remote control directly to the infrared sensor.
2 Do not expose the remote control to impacts,water or disassemble it.
3 Do not repeatedly press the buttons on the remote control. Allow interval of no less than
one secondpetween selections.
11
Page 12
INTRODUCTION(continued)
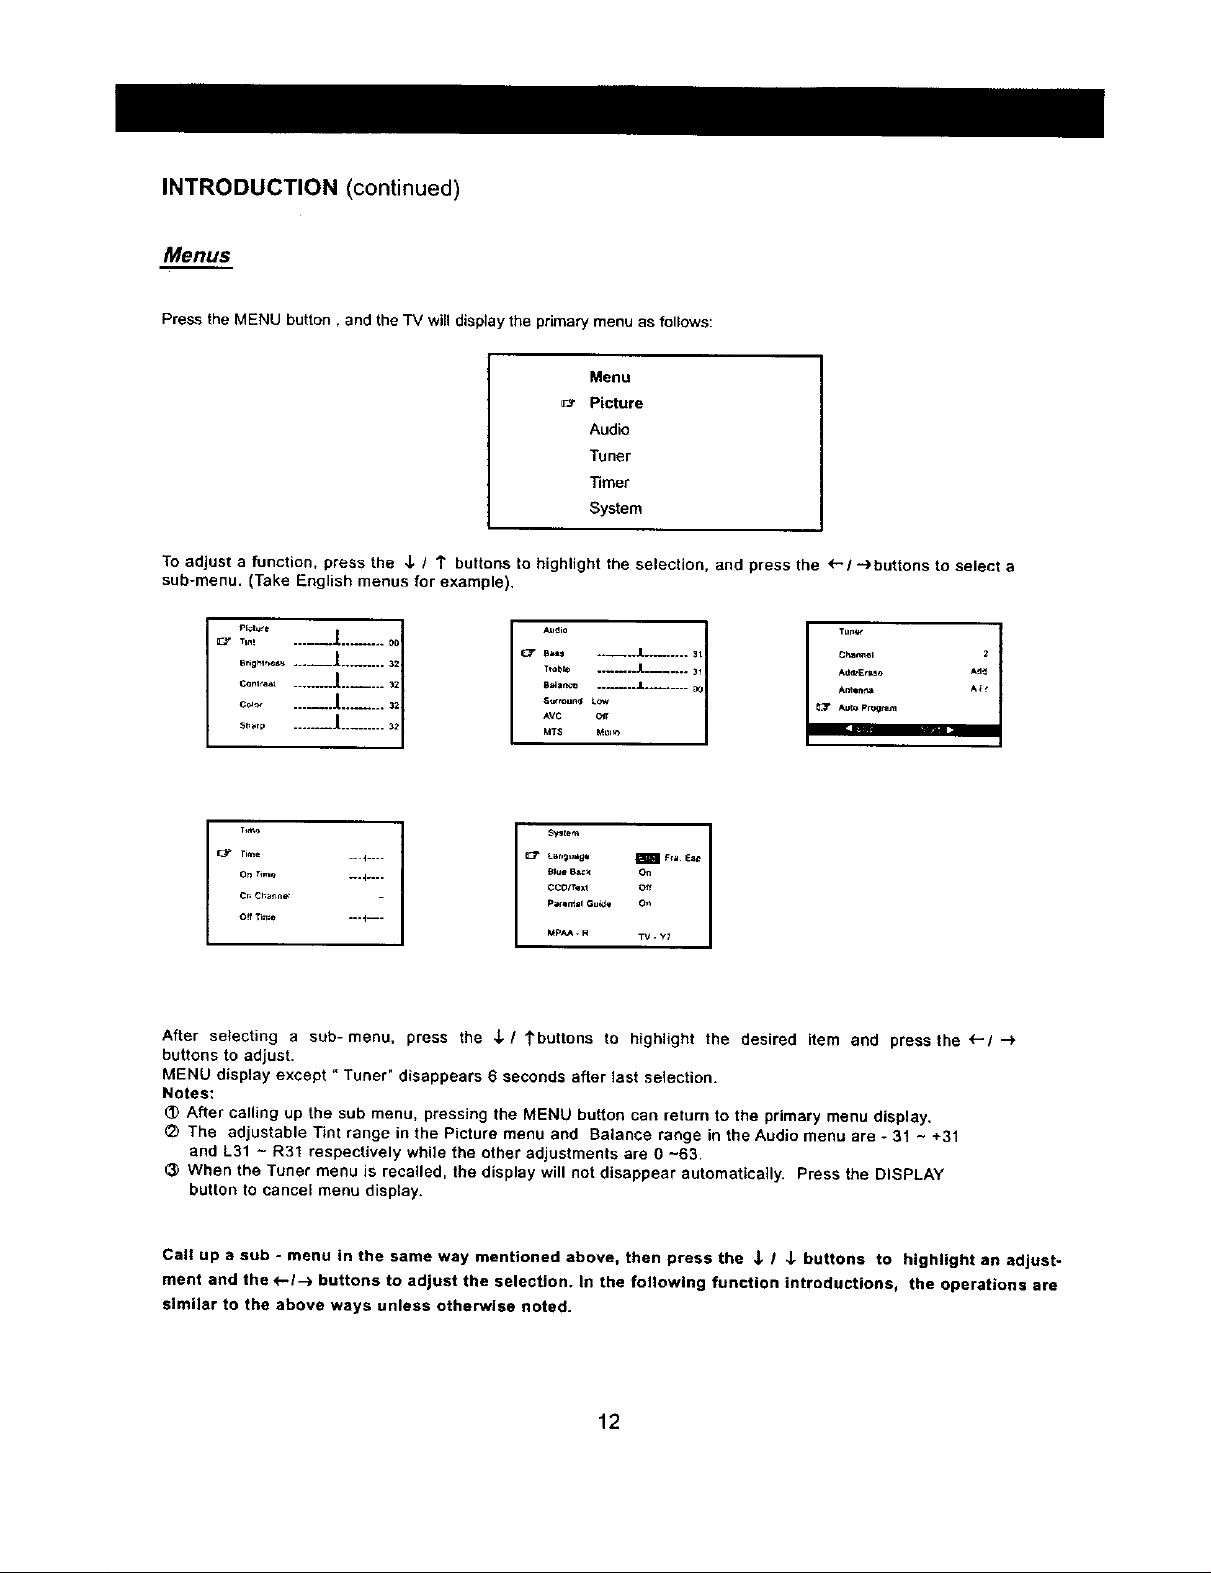
Menus
Press the MENU button, and the TV will display the primary menu as follows:
Menu
Picture
Audio
Tuner
Timer
System
To adjust a function, press the J, / 1" buttons to highlight the selection, and press the _'/"-)buttons to select a
sub-menu. (Take English menus for example).
_r B_ ..... .IL...... 3t
T_obk_ ...... J. ....... 31
Ad_Er=_o Ad_
I i ......
stl;+r p ................
o.......1......::1
e:p r+me _+1 ....
On T+rm+ _.4 ....
cn Chat+net
I T1mo I
Off Tm_e _.+---
After selecting a sub-menu, press the J,/ tbuttons to highlight the desired item and press the _'/ "->
buttons to adjust.
MENU display except " Tuner" disappears 6 seconds after last selection.
Notes:
After calling up the sub menu, pressing the MENU button can return to the primary menu display.
The adjustable Tint range in the Picture menu and Balance range in the Audio menu are - 31 ~ +31
and L31 ~ R31 respectively while the other adjustments are g -63
When the Tuner menu is recalled, the display will not disappear automatically. Press the DISPLAY
button to cancel menu display.
Call up a sub - menu in the same way mentioned above, then press the J, I J- buttons to highlight an adjust-
ment and the <--I-_ buttons to adjust the selection. In the following function introductions, the operations are
similar to the above ways unless otherwise noted.
AUdi° MO_
Ave
MT$
BlUe Bp_+< On
CCO/i'ex_ off
Parmnt =I Gu_J_ 0+,
MpAA. R TV. W
TUrbo 1
12
Page 13

INSTALLATION
• Please read the safety instructions in this manual completely before installation.
• Install your TV in a room where direct sunlight will not fall upon the screen.
• Allow enough space (at least 10cm) between the TV and the wall for proper ventilation.
• It is recommended to watch TV in soft and indirect light. The optimum watching distance is 5-7 times of the
screen's vertical length.
Auto-degaussing
Color "IV is easily affected by magnetism which leads to color distortion, If your "IV is moved or affected by near
magnetic components or appliances with power on. press the (_ button to power off your"IV for at least 1 hour.
The built-in auto-degaussing circuit will eliminate the magnetism interference.
To Connect the Antenna
An outdoor antenna or CATV is recommended for the best reception.
VHF
LIFH
cr Cab_
_:i_i'__
VHF
/
ji
UHF
Notes:
(])tt is recommended that a 75 coaxial cable be used in order to eliminate possible interference and
noise which may occur due to nearby radio transmissions.
_The antenna cable should not be tied together with other widng.
Set up a lightning arrester and check it regulady when an outdoor antenna is used.
Remote Batteries
(_Remove the battery compartment lid.
®Place in two AAA batteries. Make sure the positive ® and
negative ® polaritiee are correct.
_Reattach the battery lid.
Notes:
(]) Alkaline batteries are recommended for longer life. Always
replace both battedee with fresh ones of the same type.
Do not expose battebes to fire or disassemble them.
(3) To avoid battery leakage, remove battedee from the remote
control when it is not to be used for a long period of time
or the batteries are exhausted.
13
Page 14

INSTALLATION (continued)
To Connect External Equipment
The following are optional connections. Please refer to operation manuals of external audio/video equipment that will be con-
nected to your set.
Connect VCR' s or DVD player' s RF OUT terminal to the AN-
TENNA IN jack located on the rear panel.
= Coaxial Cable @
VCR with Modulator ANTENNA IN
AU DID/VIDEO OUT
oo%
White
Red
With S-VIDEO Terminal
VIDEO Yellow
AUDIO White
"},,--,,--_ Ked
£) o,±:
UU
AV IN on the rear panel
AUDIONIDEO IN Yellow Yellow
VIDEO
White AUDIO White
Red _ =l::3_Red
Notes:
(_ Before connection, do power off your TV and external equipment.
(_) To receive signals from external equipment, you must select a proper AV input.
_) Do not use S - VIDEO and AV IN(l} terminals at the same time.
14
AV IN on the frontr panel
AV OUT ot_._(_,,_rr panel
Page 15
BASIC FUNCTIONS
Power On/Off
1.Power on
Plug in the supply socket, and press the MAIN POWER SWITCH on the TV to enter the Power On mode.
2.Standby
When in the Power On mode. press the (i) button on the remote control to enter the Standby mode. At
this time, part of circuit on the TV set remaims active.
In the Standby mode, press the _tj button on the remote control to enter the Power On mode.
3.Power off
When in the Power On or Standby mode, Press the MAIN POWER SWITCH on the TV to turn off the power
supply of the TV set.
Note:
Avoid switching the TV on and off frequently. Doing so may shorten life span of internal components.
Auto off when no signal received
When a channel has no signal (e.g.program is over) and if no button is pressed within 15 minutes, the TV
will automatically enter the Standby mode. If the Off Time is preset and the time left is tess than I5 minutes,
the TV will carry out the Off Time program prior to the auto*off.
On - Screen Display
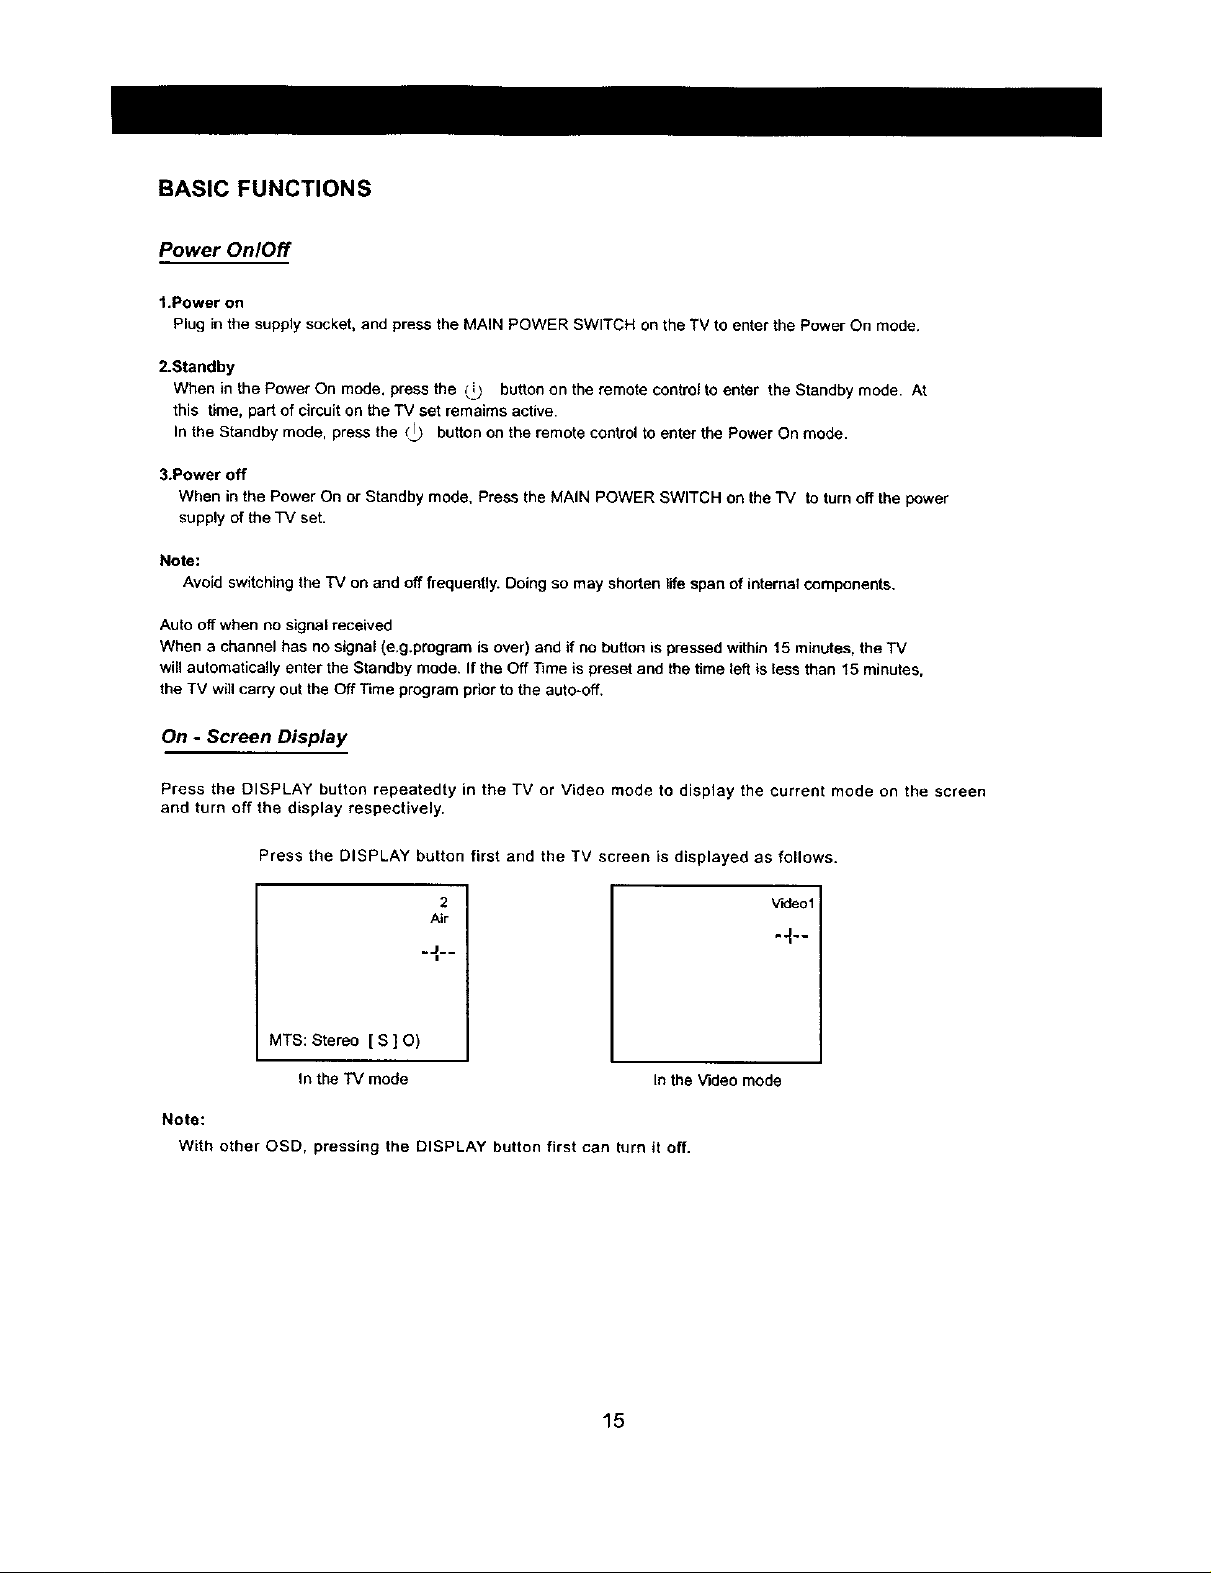
Press the DISPLAY button repeatedty in the TV or Video mode to display the current mode on the screen
and turn off the display respectively.
Press the DISPLAY button first and the TV screen is displayed as follows.
2
Air
.J--
MTS: Stereo [ S ] O)
In the "IV mode
Note:
With other OSD, pressing the DISPLAY button first can turn it off.
In the Video mode
_eol
15
Page 16

BASIC FUNCTIONS (continued)
Tuning in
This section gives descriptions about adjustment of items in the Tuner menu.
1.Auto program
1)Press the J,/ 1" buttons to highlight'Auto Program".
Tuner
Channel 2
Add,1£rase Add
Antenna Air
Auto Pn0gfam
2)Press the -.) button, and the TV will search automatically in sequence, After auto search, the TV will store
receivable channels and return to the lowest channel number.
During auto program, press the (-- button to stop searching.
Notes:
After auto program, there may be some repeated channels or infedor signal received, le thes case,
press any of the _-- / -i_, Channel Number buttons to select one of the channels. Then set Add/
Erase to Erase so that pressing the CH - / + buttons can not call up the channels. To resume the
channels, set Add/Erase to Add in the way mentioned above.
(_ When Antenna is set to the Air mode, the TV will auto search from channel number 2 to 69; when set to
the Cable mode, it will auto search from 1 to 125 (of which 2 -13 channels in the Air and Cable modes
are the same.)
2.Channel selection
Press the & / 1" buttons to highfight" Channel" inthe Tuner menu, and press any of the _- / .-),
Channel Number buttons to select channel numbers.
3,Add/Erase selection
Press the _. / 1" buttons to highlight "Add / Erase', and press the _- / --) buttons to select "Add "or
=Erase" cyclically.
16
Page 17

BASIC FUNCTIONS (continued)
Function SelectionMenus
1.Language selection
1)Press the ,L/ 1", buttonstohighlight" Language".
System
La,wju age _'ra E_p.
Blue Back On
CCD/Texl Off
Parental Guide On
MPAA - R TV - Y7
2)Press the _-/-) buttons to select a desired language display (English/French/Spanish).
2.Blue screen display
When there is no signal received with Blue Back On, the TV will display a soft blue backgrund on the
screen.
1)prese the J, / 1" buttons to highlight"Blue Back".
System
tar_uage _ Fra Esp
Blue Back On
CCD/Text Off
Parental Guide On
MpAA - R TV * Y7
2)Press the <-/--) buttons and set Blue Back to On.
Notes:
1 The Blue Back function is inactive during search,
2 If Blue Back is set to Off, noise dots will be displayed on the screen when nosigns] is present in the TV
mode. Blue Back is not available when no signal is present in the Video mode.
3,Closed caption function
When available in a program, you can view closed captions or text information.
1)Press the J- / 1" buttons to highlight "Closed Caption".
System
Language _ FFa. ESp.
Blue Back On
CCD/Text Off
Parental Guide On
MPAA - R _ " Y7
2)Press the (- / -).buttons ( - VOL + buttons on the TV) to select one of the g modes
[.-_.-Closed Captions (CC1 - CC4) <-- --,) Text Mode ( T1 - T4 )
CCD/Text Off
When you select the Closed - Caption (CCl-CC4) mode, the TV can decede CCD signal, and display it
on the screen, which is especially helpful for headng impaired individuals.
Closed caption provides an on-screen display of the dialogue, narration, and / or sound effects of a TV
program.
17
Page 18

BASIC FUNCTIONS (continued)
Function Selection (continued)
Captions will appear at either the top or bottom of the screen while a captioned broadcast is received.
When you select the Text (T1-3"4) mode, the TV can receive te]etext signal.
When you select "CCDrl"ext Off", the CCD / Text function is off.
3)Press the _CTbutton to turn on/off the CCD/Text mode.
Notes:
• A CCD signal may not be decoded in the following conditions:
-- When a video tape has been dubbed.
-- When the signal reception is weak.
-- When the signal has been changed or altered.
• With signal received without Closed Captions or Text, closed captions or text characters do not appear
on the screen.
4, Parental Control
You may prevent children from watching programs not suitable for them, such as sexual or violence prog-
rams.
Press the ",_ / t , buttons to highlight =Parental Guide"(provided it has been preset).
L_t_,0e mF,= E,,p
CCD,'_ext c_
_4pp,_ TV. y7
Use the Channel Number buttons to enter the initial pass code 6688, then press the --_button again to
proceed to the next menu display,
T#.Rat=*._
p.a_ FV DLSV
I'V._'7 Ij
TV-F'C U UUU U
TV-14 B B B B B
_rv.M._ 8 B B
Ra_,g FV D L S '*'
TV.y 13
TV_ tJ
_/_=G U UUU U
1'V-14 B ,_ B B B
t_'-MA B 8B
The TV ratings are divided into two groups: age - based and content - based.
Age Defined as
TV - Y All Children
TV - Y7 Directed to Older Children
TV - G General Audience
TV- PG Parental Guidance Suggested
TV- 14 Parents Strongly Cautioned
Contents Defined as
FV Fantasy Violence
D Sexually Su,q,qestive Dialoque
L Adult Language
S Sexual Situations
V Violence
TV - MA Mature Audience Only
Press the _ / 1" buttons to highlight one of the items TV-Y. TV-Y7. TV-G, TV-PG, TV-14, TV-MA.
Rating, FV, D, L, S, V. Press the MENU button to display "U" or" B "on the screen, A"U"indicates a
rating which is unblocked and a " S " indicates a rating which is blocked.
18
Page 19

BASIC FUNCTIONS (continued)
Function Selection (continued)
i---_- TV - Rating --)MPAA Rating
System _-Pass Code Menu
Press the <---button to move the cursor from " Pass Code Menu "," MPAA Rating ", =TV-Rating" to
"System". and select" Parental Guide Off" to stop circulation.
The followiNl is the MPAA-Rating menu.
_G U
pG. _3 U
R U
Press the -)button repeatedly to recall the Pass Code menu as follows.
I
After calling up the Pass Code Menu first, press the J_/ 1" buttons to highlight "Pass Code 6688". and then
"Enter Pass Code .... "appears on the screen. Press the Channel Number buttons to enter new
pass code which you need enter when calling up the Parental Guide Menu.
Notes:
(_ Only when the set pass code appears on the screen before the menu display is turned off. does the TV
remind you of entering the pass code when you call up the Parental Guide Menu again.
_) If you forget the new pass code when turning on the Parental Guide Menu display, you may enter the
initial pass code 6688,
(_) if you woutdn' t like to set any pass code, press the 4, / 1" buttons to highlight Pass "Code Control"
and MENU button to turn off the pass code setting display.
19
Page 20

BASIC FUNCTIONS (continued)
General Operation
1.To control volume
Press the - VOL + buttons to decrease or increase the vol-
ume.
While adjusting volume, press the F and - VOL + buttons at the
same time and the volume decreases or increases by 4 levels.
.,d_'olume 20 I
.... L____ .... I
J
During normal play, press the MUTE button to eliminate the
sound until you press the VOL + or MUTE button again.
2.To select a channel
Press the CH + button to choose higher-num-
bered channels and the -CH button to choose
lower-numbered channels, For example, if the
current channel number is 7 (Provided that
Channel 6,8 are set to Add).
Using the Channel Number buttons
• To select a one -digit channel number
Press the 0 button, then press another Channel Number but-
ton (except 100+) to select a desired number.
,,To select a two -digit channel number
Enter a first-digit, then second.digit.
,,To select channel number between 100 and 125 in the
O
3_
Cable mode
Press the 100+ button so that "1_ _ "appear on the screen,
then enter the next digit one and two.
Press the RECALL button and the TV will directly skip back to
the previous channel. For example, you are watching Channel
3 and previously you watched Channel 15.tt you press the
RECALL button, the channel number will skip directly from
Channel 3 to Channel 15. Press the RECALL button repeat-
edly to change between these two channels.
Note:
Mute I
_" the CH button - Press the CH + button-)
o_] 0
In the Video mode, pressing the RECALL button can return
to the TV mode.
2O
Page 21

BASIC FUNCTIONS (continued)
General Operation (continued)
4) SCAN
Note:
During scanning, pressing any button can interrupt scanning.
3. CCDiText switch
(_ Press theiSmS]button to display the current Closed Captions/Text mode on the screen.Press
4. TV/Video selection
VIDEO Press the VIDEO button, and the screen display changes in circular way:
Notes:
tn the Video mode, pressing the CH - ! + buttons can return to the TV mode.
5. Stereo selection
Q In the TV mode, the TV can automaticatly identify MTS stereo modes among Mono,
STEREO Stereo, SAP and SAP.
(3) Press the SCAN button so that" Scan Off" appear on the screen.
(_Press the SCAN button again so that _Scan On _appear on the I
screen and the TV begins to scan from the current channel. [ Scan On
the button again to display °CCDFrext Off" on the screen
i--) Video1 --) Video2 -_ Video3 -) S --) VHS -_ Channel Number "_1
/
To receive signals from external equipment, please be sure to select a corresponding Video mode.
Press the STEREO button firstly to display the auto - identified MTS mode on the screen.
Press the button again before the OSD disappears to shift to other MTS mode as follows.
With Stereo/SAP signal received, you may select one of the SAP, Stereo and Mono
modes cyclically.
With Stereo signal received, you may select one of the Stereo and Mono modes cycli-
cally.
With Mono signal received, only Mono mode can be available.
I
21
Page 22

BASIC FUNCTIONS (continued)
Picture Improvement
1.To select picture modes
Q
PICTURE
Mode Picture Quality
Normal Standard mode, suitable for watching ordinary program.
Memory Picture quality users set.
Theater Movie-like picture setting, suitable for viewing some movie programs.
2. TOset desired picture quality
1) Call up the Picture menu and the TV screen is displayed as follows.
Press the PICTURE button repeatedly to select one of the Normal, Memory and Theater
modes.
_- Normal "-) Memory -) Theater
Refer to the following introduction about each mode.
2) Press the J. I 1" buttons to choose an adjustment.
3) Press the _-/ --) buttons to adjust the digital level of the selected adjustment as desired.
The adjusted level is stored in the MEMORY position and remains unchanged until next adjustment.
Picture Quality
Item
Tint
Brightness
Contrast
Color
Sharp
Press
+- button --) button
Purplish Greenish
Darker Bri_lhter
Lower Hi_her
Paler Deeper
Softer Sharper
22
Page 23

BASIC FUNCTIONS (continued)
Sound Improvement
1. To select sound modes
Q
SOUND
Press the SOUND button repeatedly to select one of the Speeh, Music, Theater and
Memory modes.
.- Speech --) Music --_ Theater ---)Memory
Refer to the following introduction about each mode.
Mode Sound Quality
Speech Language clarity improvement, suitable for program focusing on dialogue
Music Suitable for enjoying music programs
Theater
Movie-like sound setting, suitable for enjoying dynamic sound, such as
programs of entedaninment
Memory Sound quality users set
2. To set desired sound quality
1) Call up the Audio menu.
EL_ Ba_s I_ 31
Tte0_ L 91
BalanCe _ 03
8urrc_t_l On
I _'_d_o IStO)
AVC Off
p_T$ Mono
2) Press the _, / 1" buttons to select an adjustment.
i
3) Press the _- / -_ buttons to adjust the digital level of the selected item as desired.
The adjusted level is stored in the Memory position and remains unchanged until next adjustment.
Sound Quality
Item Press
<-- button -) button
Bass Weaker Stronger
Treble Weaker Stronger
Balance Decrease the right volume Decrease the left volume
Surround On, Off
AVC On, Off
MTS Refer to "Stereo selection".
23
Page 24

ADDITIONAL FEATURES
Time Setting
In the Standby or Power On mode, the TV can automatically complete some functions such as power -on,
channel preset and power-oft as desired.
I . Press the TIMER button to turn on the ]]mer menu display as shown right.
2. Press the1" I J. buttons to select an adjustment.
3. Press the (.- / -) buttons to adjust the selection.
For example, now it is 6;OOPM, you have set On Time, On Channel and Off
Time to 7:00PM, 22 and 8:00PM respectively. The TV will automatically per-
form the above settings in the Standby or Power On mode.
Notes:
(_) Only after setting =Time', can you set other items.
(_) If the TV is powered off with the MAIN POWER SWITCH, all the settings will
automatically be cancelled.
Timer
Time --_'-
On Time - ...l.--
On Channel
Off Time .-i-
Timer
Time 6:O0PM
On Time 7:OOPM
On Channel 22
Off Time 8:00PM
Childlock
The CHILDLOCK function prevents children from watching TV.
Hold down the F button and then press the MUTE button until the symbol
" (_ "appears on the screen, and the TV enters the CHILDLOCK mode.
Except for the symbol" _ ", the screen becomes blue back and mutes when
you press the Lb buton to turn the TV off, then turn the TV on after setting the
CHILDLOCK function. To unlock the TV, hold down the F button and then press
the MUTE button again.
Note:
The CHILDLOCK can be set or cancelled only by the remote control
After setting CHILDLOCK, secure the remote control in a safe place.
J
24
Page 25

ADDITIONAL FEATURES (continued)
Programming the Remote Control
1. Remote - control switchover
Press the TV. VCR/DVD, SAT/CAB or AUX button to select the device you want to control.
2. To program the remote control
1. Press and hold the TV, VCPJDVD, SATICAB or AUX button for over 2 seconds until the iNDiCATOR on
the remote control turns off. Release the button (the INDICATOR will light again) and the remote control
enters the PROGRAMMING mode.
2. Use the 0 - 9 buttons to enter three - digit code number for your equipment, if the correct code number
is entered, the INDICATOR blinks three times. If you enter a code not listed below, or you press any
other buttons than SEARCH and 100 +, the INDICATOR turns off.
3. DVD codes
Code No. Model.No Code.No ModeLNo
AD1000 AD1200 AD 1500 AD1600 AD500 AD500B
00 05 MDI00
AD500W AD500WM AD600A AD703A AD5131
ADI700M
01 AD 1000W 06 AD800
02 AD7701 07 AT-100W
03 AD3201 08 AD2100
04 AD660 AD700
4. Descriptions of the buttons
1) Buttons for TV and DVD: (_) ,0-9, 100+, VIDEO/SHIFT, VOL-,VOL+,CH-/PREV, CH+/NEXT,
DISPLAY,MUTE, MENU, <--,-_ , J. and _"
2) Buttons for DVD only: PLAYIENTER,STOP, PAUSE,OPEN/CLOSE,REV, FWD,SETUP, ENTER
3) Buttons for TV only: RECALL, SCAN,PICTURE,SOUND,STEREO,TIMER,CC
Note: The REV, FWD.VOL-, VOL + buttons don't function for the device marked with *.
25
Page 26

ADDITIONAL FEATURES (continued)
Programming the Remote Controller (continued)
Operating a DVD player
Press
K;_3
• _/.
To
1. Power on the VCR
2. Select channels directly
3. Play DVD
4. Stop
5. Pause
6. Move the cursor in the men
7. Display the DVD menu
8, PREV (CH -)/NEXT (CH +)
9. REV/FWD
10. Open/Close
The buttons marked with shades don_ function for the TV set.
Notes:
1 When in operation, please point your remote control directly to the infrared sensor.
2 Do not expose the remote control to impacts,water or disassemble it.
3 Do not repeatedly press the buttons on the remote control. Allow interval of no less than
one secondbetween selections.
Note:
When operating your non - TV AV equipment with theremote controller, refer to operation instructions of youroriginal remote.
26
Page 27
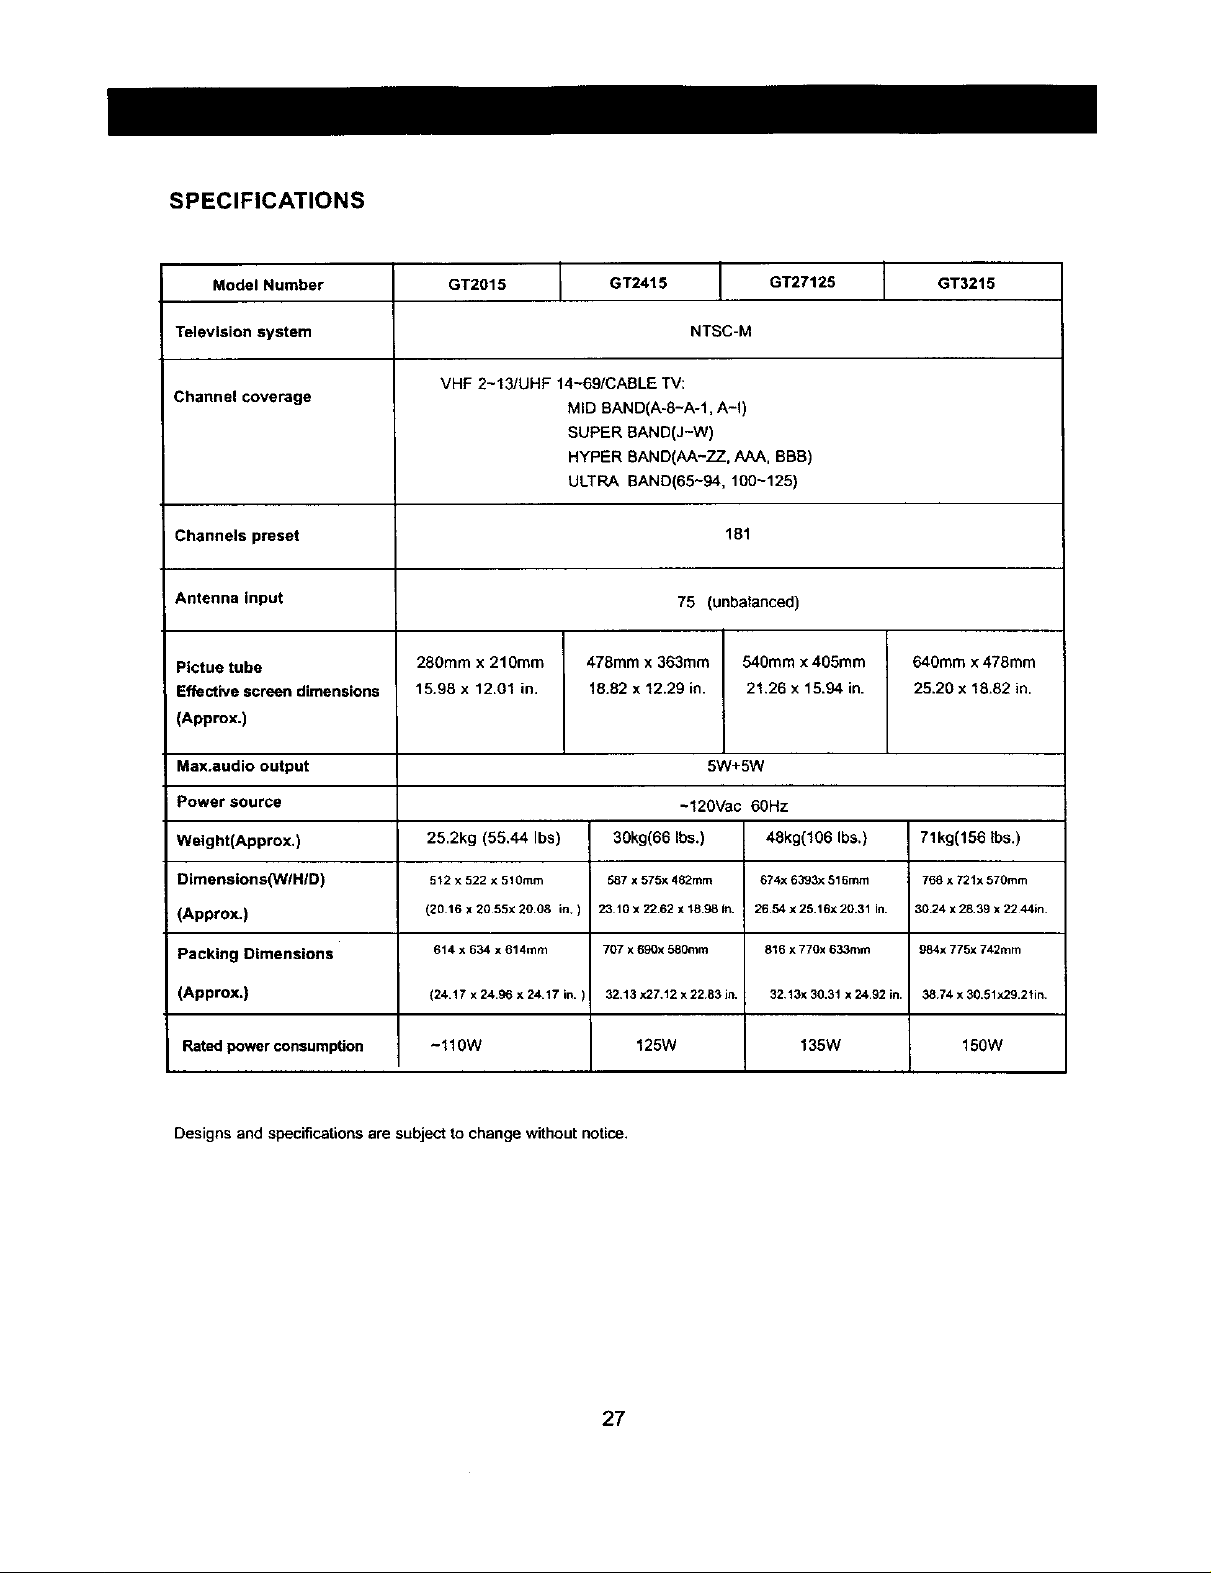
SPECIFICATIONS
Model Number GT2015 GT2415 GT27125 GT3215
Television system NTSC-M
VHF 2-13/UHF 14~69/CABLE TV:
Channel coverage MID BAND(A-8~A-1, A-I)
SUPER BAND(J-W)
HYPER BAND(AA-ZZ_, AAA, BBB)
ULTRA BAND(65-94, 100-125)
Channels preset 181
Antenna input 75 (unbalanced)
Pietue tube 280ram x 210mm 478mm x 363mm 540mm x 4O5mm 64gram x 478mm
Effective screen dimensions 15.98 x 12.01 in. 18.82 x 12.29 in. 21.26 x 15.94 in. 25.20 x 18.82 in.
(Approx.)
Max.audio output 5W+SW
Power source -120Vac 60Hz
Weight(Approx.) 25.2kg (55.44 Ibs) 30kg(66 Ibs.) 48kg(106 Ibs.) 71kg(156 Ibs.)
Dimenalons(YWHID) 512 x522x510ram 587x 575x482mm 6?4x6393x516mm 768 x721x570ram
; (Approx.) (2016 x 20 55x 20 08 in.) 2310x2262 x1B.98fn. 2654x25.16x20.31 In. 30.24x28.39x2244in.
Packing Dimensions 614x634x614mm 707x690x580ram 816 x 770x633mm 984x775x742mm
(Approx.) (24.17 x 24,96 x 24.17 in. ) 32,13x27.12x22.83in, 32,13x30.31x24,92in, 38.74x30.51x29,21in.
Rated power consumption - 110W 125W 135W 150W
Designs and specifications are subject to change without notice.
27
Page 28
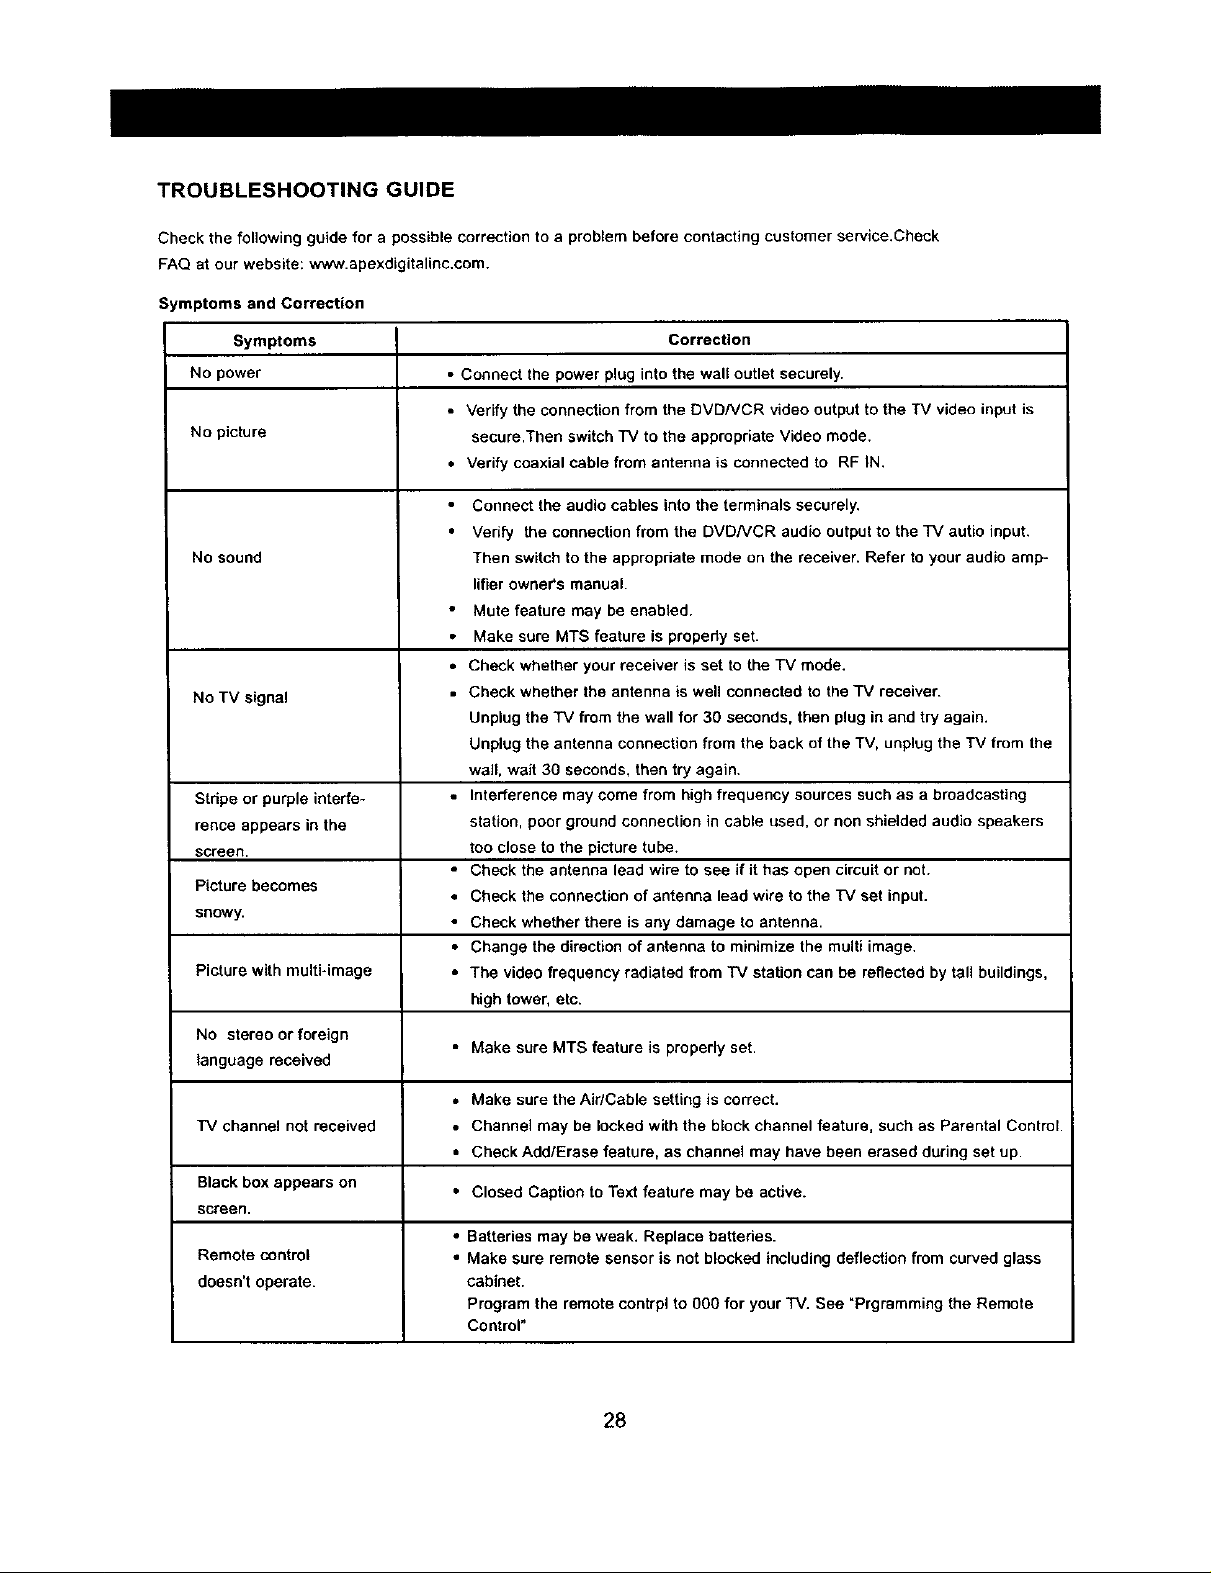
TROUBLESHOOTING GUIDE
Check the following guide for a possible correction to a problem before contacting customer service.Check
FAQ at our website: www.apexdigitalinc.com.
Symptoms and Correction
Symptoms Correction
No power • Connect the power plug into the walt outlet securely.
• Verify the connection from the DVD/VCR video output to the TV video input is
No picture secure.Tben switch "IV to the appropriate Video mode.
• Verify coaxial cable from antenna is connected to RF IN.
Connect the audio cables into the terminals securely,
Verify the connection from the DVDNCR audio output to the TV autio input.
No sound Then switch to the appropriate mode on the receiver. Refer to your audio amp-
lifter owners manual.
Mute feature may be enabled.
Make sure MTS feature is propedy set.
• Check whether your receiver is set to the TV mode.
No TV signal • Check whether the antenna is well connected to the TV receiver.
Unplug the TV from the wall for 30 seconds, then plug in and try again.
Unplug the antenna connection from the back of the "iV, unplug the TV from the
wall, wait 30 seconds, then try again.
Stripe or purple interfe- • Interference may come from high frequency sources such as a broadcasting
fence appears in the station, poor ground connection in cable used, or non shielded audio speakers
screen, too close to the picture tube.
Picture becomes
snowy. • Check whether there is any damage to antenna.
Picture with multi*image • The video frequency radiated from "IV station can be reflected by tall buildings,
No stereo or foreign
language received
• Check the antenna lead wire to see if it has open circuit or not.
• Check the connection of antenna lead wire to the TV set input.
• Change the direction of antenna to minimize the multi image.
high tower, etc.
• Make sure MTS feature is properly set.
• Make sure the Air/Cable setting is correct.
"IV channel not received • Channel may be locked with the block channel feature, such as Parental Control.
• Check Add/Erase feature, as channel may have been erased during set up.
Black box appears on • Closed Caption to Text feature may be active.
screen.
• Batteries may be weak. Replace battedes.
Remote control • Make sure remote sensor is not blocked including deflection from curved glass
doesn't operate, cabinet.
Program the remote contrpl to 00O for your TV. See "Prgramming the Remote
Control"
28
Page 29

LIMITED UNITED STATES WARRANTY
GT Series
Apex Digital, Inc, makes the following limited warranges These limited warranties extend lo the original consumer purchaser or any person
receiving this product as a gift from the odgloal consumer purchaser and Io no other purchaser o¢ _ransferee,
Limited Ninety (90) Days Warranty
Apex Dlgilol, _nc. wal/an[s this product and its parts against defects in material or workmanship for a pedod of ninety (90) days after the
dala of original retag purchase¸ During this period Apex Digital, loc will repair or replace a defective part or product ef their option, with a
new 04"refurbished part or pteduct, without charge to you _ Authodzed=:i:Apex Digital, Inc, Service Center persoflnel will come to your home
when wal'raefy secvice is required. Depending on the type Of repair required, the se _'ice will either b_ performed in your home or the set will
be taben to the Authorized Apex Digital Inc. Service Center' s repair facility for repair and then returned to you*" home at no cost to you,
Limited One (1) Year Warranty
Apex Digital Inc. further warrants the parts in th_s pteduct against defects in materials or workmanship for a pehod of one (1) year
after the date Of original retalI purchase with exception of the remote control which is gtJaranteed for ninety (90) days, During this period
Apex Digital,the, will reptace a defective pad with a new or refurbished part without charge to you, except thai if a detac9ve Dart is replaced
after ninety (90) days from the dofe of original retail purchase_ you are responsible to pay all labor charges involved in the part(s) reptace-
meat locluthng all packing, transporteflon and insurance charges for the set to and from the Sea,lee Cente_
Limited Two (2) Years Warranty
Apex Digital, inc. further warrants the picture tube in this product against defects in materials or workmanship for a pedod of two (2) years
after Ihe date of original retail purchase. During this period Apex Digital,inc. will replace the defective picture tube al theft option with a new
or _*ebuilt picture lube or at their option replace the entire preducl with a new or refurbished product al no charge to you; if however the
de?ec9ve picture tube or product is replaced after one (1) year from the date of the odgloef retail purchase, you pay all labOr, packing and
tr_sporleflon charges involved in the replacement.
Rental Product
The warranty fo_ a rental product begins with the odginal date of receipt by the renter firm
• Your Responsibigty
The above warranties are subject to the togowing conditions:
You must ratale your bill Of sale to provide proof of purChase.
AJ] warranty service Of this grodt_ct must be made by an Authorized Apex Digitaf, In(: Se_ce Dante,
These warraefles are effective only if the predict is purchased and operated in the U S. A. , Hawaii and Puerto Rico,
Labor service charges for set lostalleflon, setup, adjustment of easterner cent rels and installation or repair of any type of a_nna
or cable systems are not covered by this wartant_ Reception problems caused by inadequate anlenna Or cable system _tre your
responsibility
Warranties exlend onJy to defects in materials or wc_p_raanship as limited above and do not extend to any product or palls which have
been lost or diScarded by yotJ or damage to product or pails caused by misuse, accident, damage caused by Acts of God, such
as lightning or flucltteflons in electooal power, improper installation, improper maintenance cr use in viefeflon of instruction5 fu_'-
nished by us; or to product which has been modified or had the sedal number removed, aifered, defaced or tendered illoglole,
Warranties do not cover cosmetic damages or lost accessories,
How to Obtain Warranty Service
g after following all the operating instrucbe=_s in this manual and reading the section TROUBLESHOOTING you find that service is necessary:
1. Should g be necessary contact our Customer Sen_k:e Center directly call 866 4 APEXINC (896 427 - 3946 ), Men * Fd 8am - gpm
(Pacific Time).
2. After obtaining the req_Jested lofarmation, you must preserlt your bill of salr_ to the Authorized Service Center Io obtain warranty servloe.
Authodzed Apex Digita f, _r_, Se_'ice pe=sonneJ wdl come to your home when warranty service is required. Depending on the t'Jpe of
repe_r required, the service will either be performed in your home or the set will be taken to the Authorized Service Center's facility for
repair and then returned to your home,
Limitations
All wan'aeries implied by state law, including the implied warranties of merchantability and fitness for a particular purpose, are expressly
Umlted to the duration of the limited warranties as set forlh above. With the exceptio_ of any warranties implied by state law as hereby
_imgad, the foregoing warranty ei exclusive and in lieu Of all Ofher warranties, guarantees, agreements and similar obtigations of manutac-
turePs or seller with respect to the repair or replacemen_ of any parts, Ir_no evellt shall Apex Digital Inc. be _iable for consequentia_ or in-
eidental damages,
No pe_'son, agent, distrib_or, dealer or company is a=Jthodzed to change, modify or exte_ld the terms of these warranfes in any manner
whatgoeve_ The time within which acllon must be commenced to enforce any obligation OfApex Digital. Inc, arising under this warranty Or
under any stature, or law of the united States or any state thereof, is hereby 9mired to ninety (90) days from the date you discover or should
have discovered the defect, This limitation does not apply to implied warraoflos arising under state law,
ThLs warranty gives you specific dghts and you may also have these rights which may varY from stale to state. Some states do not edow
iimgagon o_ how long an im p_ied warranty lasls, when an action may be b_ought, or the exclusion or 9mitatior_ of incidental or conseduength
damages, so the above provisions may not appty to you
29
Page 30

Packing List
NO. Parts Quantity Remarks
1 GT Series Color TV Receiver 1
2 K12C-C1 Infrared Remote Control 1
3 Operation Manual 1
4 AAA Alkatine Batteries 2
5
3O
APEX Digital, Inc.
2919 E. Philadelphia Street
Ontario, CA 91761
www.apexdigitalinc.com
 Loading...