

Page 1

INTRODUCTION
Thank you for purchasing the BC-2100. We know you and your family will have
many years of enjoyment using it. The BC-2100 combines the performance of a
compact, easy-to-use binocular with digital camera functionality to capture
interesting moments of outdoor events you would otherwise not be able to share with
others. Download to your PC to either print or email depending the resolution you
pre-selected.
IMPORTANT: Download pictures before removing batteries. Do not look directly at the
sun through binoculars as it could cause permanent eye damage.
CONTENTS:
BC-2100 Digital Binocular Camera
USB Cable
Pouch
Neck Strap
4 x AAA Alkaline Batteries
Software CD
Page 2

Table of Contents
1. Camera Precautions 2
2. Technical Specifications 4
3. Computer System Requirement 5
4. Camera Description 6~8
5. Quick Start 9~13 . Battery Installation 9 . Power On/Off 10 . How to use SD card to expand memory capacity 11~12 . Use the Eyepieces To Aim Your Camera 13 . Taking Photos 13
6. Camera Mode Selection 14~16
. Resolution Selection 14
. Self-timer Mode 15
. Erase All Pictures 16
. Erase Last Picture 16
7. Viewfinding and Taking Better Picture Tips 17
. How To Use The Binocular 17
. Viewfinding 18
8. Connecting to Computer 19 . USB Mass Storage Mode 19
9. Install Driver 20
10. Install Application Software 20
11. Download Still Images 21
English
1
Page 3

1.Camera Precautions
Notice the following guidelines when you use the camera:
To avoid a fire or electric shock, do not put this camera in damp or dusty
location.
Do not leave the camera in places subject to extremely high temperatures,
such as in direct sunlight. This may affect the camera’s case and its internal
components.
After the camera is activated, avoid bumping it against hard surface. This may
cause malfunction.
Choose a flat surface free from vibration when the camera stands on it.
If the lens or the viewfinder is dirty, clean them with a lens brush or a piece of
soft cloth.
Under the following situations, let the camera repaired by qualified personnel:
a) Its cable or plug is damaged or worn.
b) It has been dropped and/or the casing has been damaged.
c) Liquid has entered the camera.
2
Page 4

FCC Notice
This equipment has been tested and found to comply with the limits for a Class B
digital device, pursuant to Part 15 of the FCC Rules. These limits are designed to
provide reasonable protection against harmful interference in a residential l
installation. This equipment generates, uses and can radiate radio frequency
energy. If not installed and used in accordance with the instruction, it may cause
harmful interference to radio communication. However, there is no guarantee
that interference will not occur in a particular installation. If this equipment does
cause harmful interference to radio or television reception, which can be
determined by turning the equipment on and off, the user is encouraged to try to
correct the interference by one or more the following suggestion.
• Reorient or relocate the receiving antenna.
• Increase the distance between the equipment and the receiver.
• Connect the equipment to a different power outlet other than the one where
the receiver is connect.
• Consult an experienced television or radio technician for help.
CAUTION
To comply with the limits for a Class B digital device, pursuant to Part 15 of the
FCC Rules, this device must only be installed on computer equipment certified to
comply with the Class B limits.
3
Page 5

2.Technical Specifications
Sensor Resolution: CMOS, 1600x1200 pixels
Built-in Memory: 8 MB SDRAM
External Memory Slot: SD card type I slot (MAXIMUM 128MB)
Image Storage: *** (1600x1200) – appr. 8 images
** (640x480) – appr. 40 images
(Internal 8MB Memory)
Status LCD: 3-digit B/W on back for functions
White Balance: Auto
Exposure: Auto
Viewfinder: Full featured 10 x 25 Binocular
Shutter Speed Auto
Focusing: 60 feet to infinity
Focal Length: 55mm
Aperture: F=5
Self Timer: 10 seconds
File Format: Still images--- JPEG
Interface: USB 1.1
Delete Image: All or the last one
Auto Power Off: 60 seconds
Battery: 4 x AAA alkaline battery
Dimensions: 139 x 97 x 75 mm
Weight: 315 grams (without battery)
Operating System: WIN 98/98SE/ME/2000/XP
4
Page 6

3.Computer System Requirement
Personal computer designed for Win98, 98SE, 2000 or XP
Minimum 200 MHz CPU
At least a 8x CD-ROM drive to install software
Available USB ports
Color monitor with a minimum resolution of 640 x 480 24-bit true color
(1024 x 768 is recommended)
Minimum 48 MB RAM for WIN98; 64 MB for WIN 2000 and WIN XP
At least 120 MB of available hard disk space
Graphic Card: 2 MB memory or above
5
Page 7
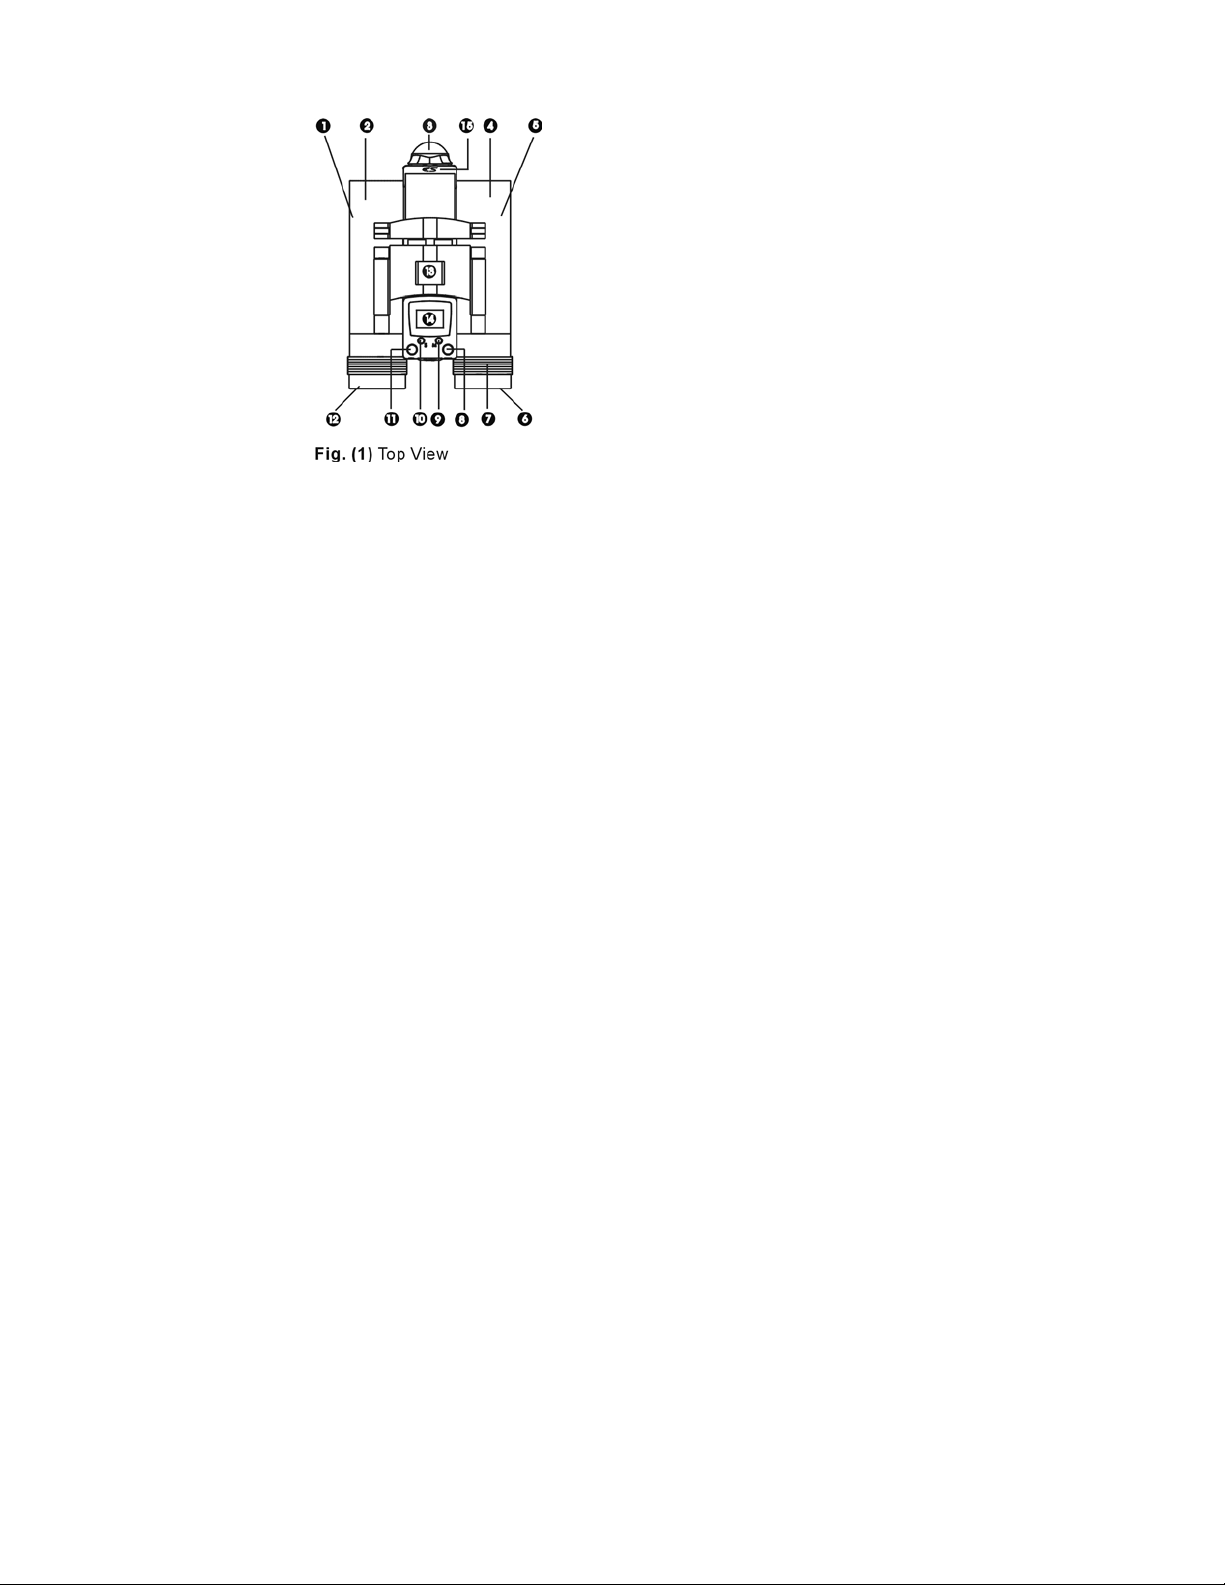
4.Camera Description
Top View ---Fig. (1)
1. Left Barrel
2. Left Objective Lens
3. Camera Lens
4. Right Objective Lens
5. Right Barrel
6. Right Eyepiece
7. Dioptric Knob
8. Shutter Button
9. Mode Button
10. Select Button
11. Power Button
12. Left Eyepiece
13. Focus Knob
14. LCD Display
15. SD Memory Slot (For Optional SD Card)
6
Page 8

4.Camera Description
Front View ---Fig. (2)
8. Shutter Button
9. Mode Button
10. Set Button
11. Power Button
16. USB Port
17. Battery Compartment
Side View ---Fig. (3)
18. Camera Lens
19. Eyepieces
20. Tripod Mount
7
Page 9

4.Camera Description
Status LCD Icons ---Fig. (4)
21. Digital Picture Frame
22. Self-timer
23. Delete All/ Last One image
24. SD Card
25. Memory Status
26. Mass Storage Mode
27. Image Resolution
28. Battery Status
8
Page 10

5. Quick Start for Digital
Camera Use
Battery Installation
Open the Battery Compartment and insert
four AAA batteries, paying attention to insert
them in the correct direction.(Polarity)
See Fig. (5)
Close the Compartment. Press Power (see
pg.10)
A battery life icon is located on the top left
corner of the status LCD. If Camera does
not power up, reinstall batteries once again.
The batteries are at full charge
The batteries are at half-full charge
The batteries are near empty that
need to be replaced
Important: When the batteries are low, you
will see the battery symbol on the Status LCD
continuously blinking. Always download
photos to the PC prior to replacing
batteries to avoid memory loss (when
using built-in 8MB SDRAM memory).
Note:
a) Do not mix old and new batteries. Replace
all of the batteries at once. Use Alkaline
Batteries only.
b) Remove the batteries if the camera will not
be used for some time. This will save the
battery life.
9
Page 11

5. Quick Start for Digital
Camera Use
Power On
Press the Power Button (Fig.6 Located below
and to the left of LCD) to turn on the camera.
The camera will beep twice to indicate it is
ready. The present mode of 2 mega pixels
resolution is indicated by a 3-star symbol on
the LCD Display. The camera can hold
approximately 8 images in high resolution or
approximately 40 images in VGA resolution
when using an optional 64MB SD card. Visit
our accessory store www.apexdigitalinc.com
The Internal 8MB built-in memory holds
approx. 8 High Res. / 40 VGA Res. Images.
Power Off
Press the Power Button again to turn off.
10
Page 12

5. Quick Start for Digital Camera Use
How to use SD card (optional) to expand memory capacity
SD card Installation
1.Prepare standard SD card. Memory size
can support up to 256MB.
2. Open SD card slot door. Located above
the camera lens.
3. Insert the card into the memory card slot
and push it all the way in. See Fig (7).
4. Turn the camera on. The Status LCD
screen shows “SD” icon as Fig (8).
This verifies the card has been properly
installed.
5. Close the SD card slot door. The camera is
now ready to use.
Note: When the SD card is installed, all
images by default will be automatically stored
to the SD card.
64MB Approx. 80 High Quality
Approx. 400 VGA Quality
128MB Approx. 160 High Quality
Approx. 800 VGA Quality
Note: You may purchase online at Apex
Accessory store www.apexdigitalinc.com
11
Page 13

5. Quick Start for Digital
Camera Use
SD card Download and Delete
5. When the SD card’s memory is full, it is
recommended that you download the
images to your computer. For details
please refer to section “ Download
Images”. (page 21)
6. If you want to delete the images in the card,
please refer to section” Delete Images in
Memory”. (page 16)
Remove SD card
7. Turn the camera off.
8. Pull the card out. See Fig (9).
Note: Without SD card, all the images by
default will be stored to the built-in memory of
the camera. (8MB)
12
Page 14

5. Quick Start for Digital Camera Use
Use The Eyepieces To Aim Your
Camera
The digital camera works best when taking
pictures of objects outdoors at a minimum of
60’ away from you or more.
NOTE: Since the camera is point and shoot and
independent from the binoculars, you do not need to
focus the binoculars to get great in-focus pictures.
Take Your Picture
To take a photo you will have 60 seconds
before the Auto Power Off feature
automatically turns off the camera function
Hold your Digital Binocular Camera steady
and aim at a scene or object at minimum of
60’ or greater away from you. Press and
release the Shutter Button to take the
pictures. Make sure you do not move the
camera until you hear a beep. This may
take up to 1 second.
When the number of available exposures has
increased by one on the LCD Display, the
camera is ready to take another picture.
See Fig. (10).
Memory Full
When the memory is full, the status LCD will
show on “Full” as Fig. (11) and beep twice.
13
Page 15

6. Camera Mode: Resolution Selection
Fig. (12)
Fig. (13)
This camera offers the following functions
that can be selected by pressing the Mode
Button (9) after it is turned on:
1. Resolution Selection
Default High (***) resolution
The resolution default setting stays on the
triple stars status to obtain the highest
resolution (1600x1200) images, as shown in
Fig (12).
VGA (**) resolution
Press Mode Button once and press Set
Button for confirmation. The resolution will
change to double stars (640x480 resolution),
as shown in Fig (13). This resolution is
appropriate for email.
14
Page 16

6. Camera Mode: Self Timer Selection
Fig. (14)
Fig. (15)
2. Self-Timer Mode
When the camera is turned on, press the
Mode Button two times (until you see the
timer icon), then press the Set Button for
confirmation. Once in this mode, press the
Shutter Button to activate the self-timer. The
camera will beep for 10 seconds before
taking the picture automatically. When the
number of available exposures has
increased by one on the LCD Display, the
camera is ready to take another picture.
See Fig. (14) and Fig. (15).
If you want to cancel Self-timer mode, press Mode Button two times and then press Set Button again to cancel Self-timer function.
15
Page 17

6. Camera Mode:
Delete Selection
Fig. (16)
Fig. (17)
3. Delete All Picture
When the camera is turned on, press the
Mode Button three times you will see “ALL”
with a trashcan icon. Then, to delete all
pictures, press and hold the Set Button (10)
for 2 seconds.
The LCD Display (14) will then show “0”.
See Fig. (16).
4. Delete Last Pictures
When the camera is on, press the Mode
Button four times, and you will see “LAST”
and the trash can icon. Then, to delete the
last picture that are in the camera, press and
hold the Select Button (10) for 2 seconds.
The number of available exposures on the
LCD Display will be decreased by 1 exposure.
See Fig. (17).
16
Page 18

7. Binocular & Camera Tips
How to use the binoculars
1. Hold the camera in a comfortable viewing position, and adjust the left and
right barrels apart or together until one single circular field is seen with both of
your eyes at the same time.
2. To adjust the focus, look into the Left Eyepiece with your left eye (with the
right eye closed) to aim at any object 60 ft. away, rotate the Focus Knob
clockwise or anti-clockwise to get the best focus. Then look into the Right
Eyepiece with your right eye (with the left eye closed), and rotate the Dioptric
Knob to the left or to the right to get the best focus.
3. Now you can look with both eyes into the left and right eyepieces and bring
nearby or far away objects into focus by adjusting the Focus Knob.
17
Page 19

Viewfinding
The function of the binocular is as an aid for viewfinding.
The area seen through the binocular is a circular area, approximately 10
times magnification of original image.
The lens produces up to a 16X enlarged image with 4x3 standard shape.
Fig. (18)
• You do not need to focus the binoculars for a focused picture.
The camera is independent from the binoculars.
• The focus of the binocular has no impact for photographs taken.
18
Page 20

8.Connecting to Computer
Connect your camera to a computer. The camera will use the USB power
instead of batteries when connected to PC. Make sure you connect the camera
directly to the USB port on your computer using the provided USB cable.
USB Mass Storage Mode
To upload still pictures from the camera, connect it to the computer.
HDD icons will appear on the Status LCD. Your computer will appear as a
removable device under My Computer. Your still pictures are located in the
DCIM\100IMDIR folder on this drive.
For Windows 2000, ME and XP, plug in the camera and start uploading images.
For Windows 98SE you need to install the driver.
Mass Storage Mode allows you to use the camera just like a standard storage
device, copying, deleting and moving files to and from the camera just as you
would with any other disk drive.
Fig. (19)
19
Page 21

9.Installing Driver
You may install the drivers as part of the application software installation (see next
section), or directly by running the appropriate installer from the CD that is
provided with your bino-cam. The driver is provided for Windows 98SE.
10.Installing Application Software
1. Turn on you computer.
2. Place the software CD to your computer’s CD-ROM drive.
3. You MUST check and install the Camera Driver first.
After then, click Presto! Mr. Photo or Presto! Image Folio images editing
programs for editing your photos.
4. Follow the instructions to complete the software installation. Normally you
can select “NEXT” icon to use default setting to go to next step installation.
5. Restart your PC after finishing the installation.
6. After PC rebooting, use USB cable to connect the camera with PC Windows
will display “ Find new hardware” after 3 seconds.
11.
20
Page 22

Download Still Images
)
)
)
Fig. (20
Fig. (21
Using Presto! Mr. Photo to download
your photos
1. Plug the USB cable to the camera and
your computer properly.
2. Open Mr. Photo
3. Click the Get Photos f
Device icon.
Refer Fig. (2
4. n for select all images
Click Select All ico
from camera.
5. ion icon, to Browse the
Click Destinat
folder is which you want to save images.
Fig. (21)
6. nload icon, your photos will
Click Dow
begin to download and save to your
desired folder. Fig. (21)
7. 1)
Click Close icon. Fig. (2
8. After the images are downlo
review your pictures using the browse bar
on the left of screen.
Fig. (22)
9. ore about the many other
To learn m
features of Presto! Mr.Photo, please visi
www.newsoftinc.com
rom Mass Storage
0).
aded, you can
t
Fig. (22
21
 Loading...