


Installation and
Quick Configuration
Manual
NetBotz
®
Rack Monitor 200
NBRK0200

This manual is available in English on the enclosed CD.
Dieses Handbuch ist in Deutsch auf der beilie genden CD-ROM verfügbar.
Este manual está dis ponible en español en el CD-ROM ad junto.
Ce manuel est disponible en français sur le CD-ROM ci-inclus .
Questo manuale è disp onibile in itali ano nel CD-ROM allegato.
本マニュアルの日本語版は同梱の CD-ROM からご覧になれます。
O manual em Português está disponível no CD-ROM em anexo.
Данное руководство на русском языке имеется на прилагаемом компакт-диске.
您可以从包含的 CD 上获得本手册的中文版本。
동봉된 CD 안에 한국어 매뉴얼이 있습니다 .

Contents
Introduction..................................................................... 1
Product Description . . . . . . . . . . . . . . . . . . . . . . . . . . . . . . . . . . . . . . .1
Document Overview . . . . . . . . . . . . . . . . . . . . . . . . . . . . . . . . . . . . . . .1
Additional Documentation . . . . . . . . . . . . . . . . . . . . . . . . . . . . . . . . . .1
Receiving Inspection . . . . . . . . . . . . . . . . . . . . . . . . . . . . . . . . . . . . . .2
Inventory . . . . . . . . . . . . . . . . . . . . . . . . . . . . . . . . . . . . . . . . . . . . . . . .2
Additional Options . . . . . . . . . . . . . . . . . . . . . . . . . . . . . . . . . . . . . . . .3
InfraStruXure-certified . . . . . . . . . . . . . . . . . . . . . . . . . . . . . . . . . . . . .3
Installation....................................................................... 4
Physical Description. . . . . . . . . . . . . . . . . . . . . . . . . . . . . . . . . . . . . . .4
Rear . . . . . . . . . . . . . . . . . . . . . . . . . . . . . . . . . . . . . . . . . . . . . . . . . . . 4
Front . . . . . . . . . . . . . . . . . . . . . . . . . . . . . . . . . . . . . . . . . . . . . . . . . . . 4
How to Install the Rack Monitor 200 . . . . . . . . . . . . . . . . . . . . . . . . . .6
Toolless peg-mount i nstallation . . . . . . . . . . . . . . . . . . . . . . . . . . . . 6
Rack-mount instal lat ion . . . . . . . . . . . . . . . . . . . . . . . . . . . . . . . . . . . 7
Power cord and network cable connec ti ons . . . . . . . . . . . . . . . . . . 8
How to Install the Temperature/Humidity Sensor . . . . . . . . . . . . . . .9
How to Connect Sensors to Universal Sensor Ports. . . . . . . . . . . .10
How to Connect an Alarm Beacon and Other Optional Devices . .11
How to Cascade Devices to A-Link Ports. . . . . . . . . . . . . . . . . . . . .12
How to Wire to the Modbus Interface . . . . . . . . . . . . . . . . . . . . . . . .13
Quick Configuration...................................................... 14
DHCP Server . . . . . . . . . . . . . . . . . . . . . . . . . . . . . . . . . . . . . . . . . . . .15
How to set up option 43 . . . . . . . . . . . . . . . . . . . . . . . . . . . . . . . . . . 15
How to disable the cookie requirement . . . . . . . . . . . . . . . . . . . . . 15
NetBotz Rack Monitor 200 Ins tal lation and Quick Configurat ion Manual
i

Important Information about the Default Gateway . . . . . . . . . . . . . 16
How to Update the BOOTPTAB File . . . . . . . . . . . . . . . . . . . . . . . . . 16
How to Use the APC Device IP Configuration Wizard. . . . . . . . . . . 17
How to Use ARP, Ping, and Telnet . . . . . . . . . . . . . . . . . . . . . . . . . . 18
Control Console . . . . . . . . . . . . . . . . . . . . . . . . . . . . . . . . . . . . . . . . . 19
How to access the control consol e . . . . . . . . . . . . . . . . . . . . . . . . . 19
How to configure TCP/IP settings through the control console . . 19
Access the Rack Monitor 200.......................................20
Web Interface . . . . . . . . . . . . . . . . . . . . . . . . . . . . . . . . . . . . . . . . . . . 20
Telnet and SSH. . . . . . . . . . . . . . . . . . . . . . . . . . . . . . . . . . . . . . . . . . 20
Simple Network Management Protocol (SNMP) . . . . . . . . . . . . . . . 21
Modbus . . . . . . . . . . . . . . . . . . . . . . . . . . . . . . . . . . . . . . . . . . . . . . . . 22
How to Recover from a Lost Password . . . . . . . . . . . . . . . . . . . . . . 22
Specifications................................................................23
NetBotz Rack Monitor 200 (NBRK0200) . . . . . . . . . . . . . . . . . . . . . . 23
Temperature/Humidity Sensor (AP9335TH). . . . . . . . . . . . . . . . . . . 2 4
System Specifications . . . . . . . . . . . . . . . . . . . . . . . . . . . . . . . . . . . . 24
Warranty and Life Support ...........................................25
Two-Year Factory Warranty. . . . . . . . . . . . . . . . . . . . . . . . . . . . . . . . 25
Terms of warranty . . . . . . . . . . . . . . . . . . . . . . . . . . . . . . . . . . . . . . . 25
Non-transferable warranty . . . . . . . . . . . . . . . . . . . . . . . . . . . . . . . . 25
Exclusions . . . . . . . . . . . . . . . . . . . . . . . . . . . . . . . . . . . . . . . . . . . . . 25
Warranty claims . . . . . . . . . . . . . . . . . . . . . . . . . . . . . . . . . . . . . . . . . 26
Obtaining service . . . . . . . . . . . . . . . . . . . . . . . . . . . . . . . . . . . . . . . 26
Life Support Policy. . . . . . . . . . . . . . . . . . . . . . . . . . . . . . . . . . . . . . . 27
General policy . . . . . . . . . . . . . . . . . . . . . . . . . . . . . . . . . . . . . . . . . . 27
Examples of life-support devices . . . . . . . . . . . . . . . . . . . . . . . . . . 27
ii
NetBotz Rack Monitor 200 Installation and Quick Configuration Manual

Introduction
Product Description
The American Power Co nversion ( APC®) NetBotz Rack Mon itor 20 0 is a centra l hardwa re appl iance f or
an APC environmental monitoring and control system. The rack-mountable Rack Monitor 200 includes
six universal sensor ports for connec ting temperature and humidity sensor s, door switch sensors, and
third-party dry contact sensors. Using other ports on the Rack Monitor 200, you can connect up to eight
temperature and humidity sensors with digital display. To expand your system, you can connect up to
twelve NetBotz Rack Sensor Pod 150 s, which includ e six unive rsal sens or port s each. The Rack Monitor
200 also includes ports that provide power to or allow control over other devices. And you can connect
the Rack Monitor 200 to your building management system. Once installed, you monitor and control
your system using a network or serial connection. (The Rack Monitor 200 cannot be connected to—or
networked with—any othe r NetBotz ap pliances . It us es unique softwar e that is not c ompatible with ot her
NetBotz products.)
Document Overview
The NetBotz Rack Monitor 200 Installation and Quick Configuration Manual describes how to install
the Rack Monitor 200, the provided temperature/humidity sensor, and additional options you connect to
the system. After performing the configuration procedures in this manual, you can access your system
through its software interface, configure the system, and monitor the environment.
Additional Documentation
Unless otherwise noted, th e followi ng documentation is available on the CD provide d with the applia nce
or on the applicable product page on the APC Web site, www.apc.com. To quickly find a product page,
enter the product name or part number in the Search field.
NetBotz Rack Monitor 200 User’s Guide – includes all details for using, managing, and configuring the
system when using a NetBotz Rack Monitor 200 (NBRK0200).
Security Handbook – describes security features for the APC Network Management Card and for
devices with embedded components of the Network Management Card.
Modbus Register Map – defines NetBotz Rack Monitor 200 (NBRK0200) Modbus datapoint registers
for communication with a building manage ment syste m using the Modbus protocol.
Modbus Over Serial Line Specification & Implementation Guide – the Modbus standard. Available at
www.modbus.org.
1NetBotz Rack Monitor 200 In stallation and Quick Configuration Manual

Receiving Inspection
Inspect the package and its contents for shipping damage and ensure that the parts include d in the
shipment match all of the parts listed in the inventory table. Immediately report any shipping damage to
the shipping agent. Report missing contents, damage, or other problems to APC or your APC reseller.
The shipping materials are recyclable. Please save them for later use, or dispose of them
appropriately.
Inventory
Quantity Item
1 NetBotz Rack Monitor 200 (NBRK0200)
1 Hardware kit for NetBotz Rack Monitor 200
Quantity Item
2 Brackets for a standard 19-in rack
1 Power cord retainer bracket
4 8-32 x 1/4-in Phillips-head screws
2 203-mm (8-in) nylon tie wrap
1 203-mm (8-in) hook and loop cable strap
1 Null modem, DB9F to DB9F, serial RS-232 configuration cable
1 1.8-m (6-ft) IEC-320-C13 to IEC-320-C14 power cord
1 1.8-m (6-ft) NEMA 5-15P to IEC-320-C13 power cord
2 A-Link terminators
1 Modbus resistor kit
Quantity Item
2 1/4-W, 150-ohm resistors
2 1/4-W, 499-ohm resistors
2 25-mm (1-in) wide nylon cable tie
1 NetBotz Rack Monitor 200 Utility CD
1 Temperature/Humidity Sensor (AP9335TH)
NetBotz Rack Monitor 200 Installation and Quick Configuration Manual2

Quantity Item
1 Hardware kit for Temperature/Hu midi ty Sensor
Quantity Item
5 203-mm (8-in) nylon tie wrap
2 19 x 19-mm (3/4 x 3/4-in) adhesive-backed cable tie mount
1 Temperature/h umidity sensor mount
(25 x 25-mm [1 x 1-in] adhesive-backed cable tie mount)
1 #6 - #10 wall anchor
1 #8 x 3/4-in sheet meta l s crew
Additional Options
The following options are availa ble for the Rack Monitor 200. For more information, contact your APC
representative or the distr ibutor from whom you purchased your APC product.
• NetBotz Rack Sensor Pod 150 (NBPD0150)
• T emperature Sensor with Digital Display (AP9520T)
• T emperature/Humidity Sensor with Digital Display (AP9520TH)
• T emperature Sensor (AP9335T)
• Temperature/Humidity Sensor (AP9335TH)
• NetBotz 3.65-m (12-ft) Door Switch Sensor for APC Racks (NBES0303)
• NetBotz 15.24-m (50-ft) Door Switch Sensor for Rooms or Third Party Racks (NBES0302)
• NetBotz Dry Contact Cable (NBES0304)
• Alarm Beacon (AP9324)
InfraStruXure-certified
This product is certified fo r use in APC InfraStruXure® systems.
3NetBotz Rack Monitor 200 In stallation and Quick Configuration Manual
Installation
Physical Description
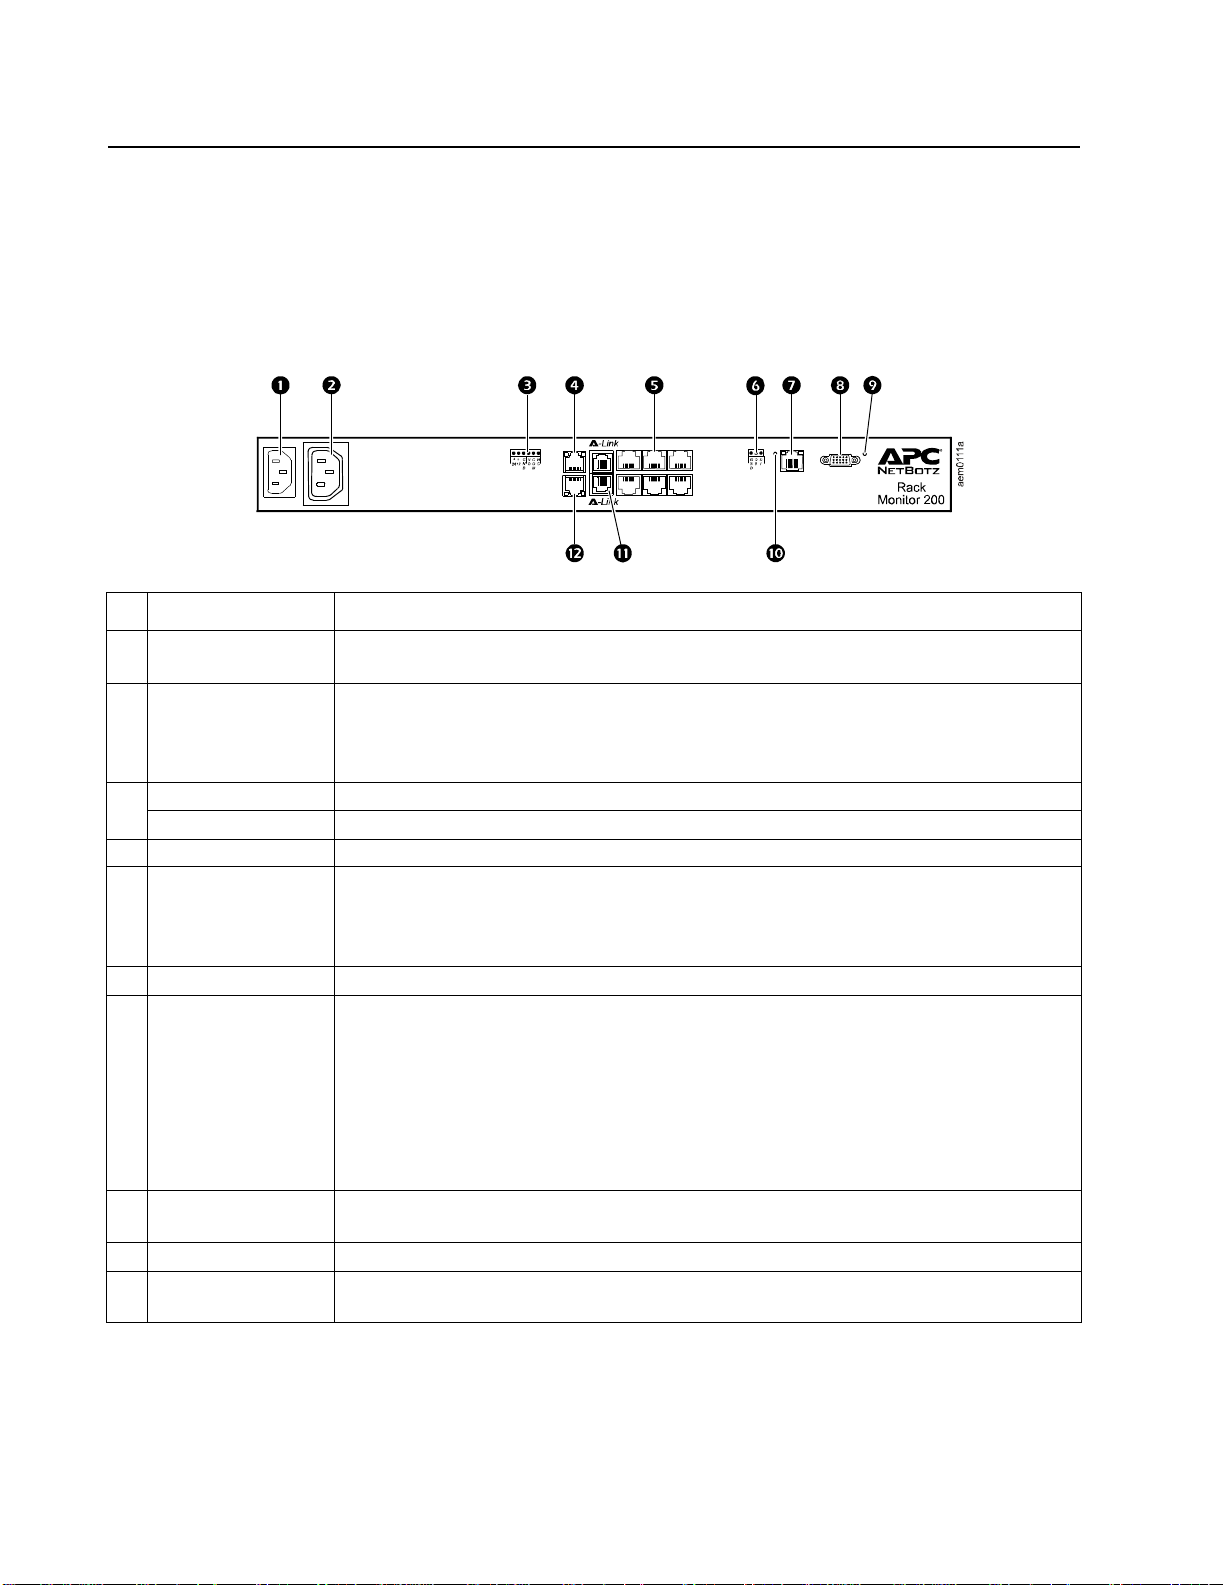
Rear
Toolless mounting pegs allow for installation in APC NetShelter® VX and SX racks and enclosures
without using any U-spaces. (For more details, see “Toolless peg-mount inst allation” on page 6.)
Front
Item Description
AC Line Inlet Provides for the input power con nection; see “Specifications” on page 23 for voltage
information.
Switched Outlet Provides power to a device at a tot al maximum amperage of 10 A. Activates a conne cted
device when configured events occur. (For example, a fan may be co nnec ted to this outlet,
and the outlet may be configured to turn on when a high threshold violation occurs for a
temp erat u r e sen s o r.)
Voltage Output Provides 12 Vdc or 24 Vdc (75 mA) to a connected device.
Relay Output Used for connecting relay-c ontrolled externa l devices.
Peripheral Port Not used.
Universal senso r
ports
Modbus RS-485 port Provides for connection to building manage ment system using the Modbus protocol.
10/100 Base-T
Network Port
Used for connecting APC sensors and third-party dry contact sensors. (See “How to
Connect Sensors to Unive r s al Sensor Ports” on page 10 for a list of applicable APC
sensors.) Third-party dry contact sensors require a NetBotz Dry Contact Cable
(NBES0304).
Provides for connection to the network; sta tus and link LEDs indicate network traffic:
Status LED—blinks orange and green at start-up; indicates the status of the network
connection (solid green—IP address established; blinking green—attemp ting to obtain an
IP address).
Link LED—blinks to indicate network traffic (green—operating at 10 Mbps; orange—
operating at 100 Mbps).
RS-232 Console Port Used for connecting the RS-232 configuration cable, when configuring initial network
Reset switch Resets the Rack Monitor 200.
Power LED Indicates whethe r the unit i s re ceiving p ower (gre en—recei ving po wer; da rk—not receiving
settings.
power).
NetBotz Rack Monitor 200 Installation and Quick Configuration Manual4

Item Description
A-Link ports Used to cascade up to twelve NetBotz Rack Sensor Pod 150s (NBPD0150) and a combined
Beacon po rt Used for connecting an alarm b eacon (AP9324).
total of eight Temperature Sensors with Digital Display (AP9520T) and Temperature/
Humidity Sensor s with Digital Display (AP9520TH). Provides communications and power
using standard CAT-5 cabling with straight-through wiring.
Note: If you cascade ten or more device s, you mu st connect a supplemental
power supply (Power Suppl y 100-120 Vac/24 Vdc—AP9505i) to a NetBotz
Rack Sensor Pod 150. For details, see “How to Cascade Devices to A-Link
Ports” on page 12.
5NetBotz Rack Monitor 200 In stallation and Quick Configuration Manual
How to Install the Rack Monitor 200
Note: Install the Rack Monitor 200 in an environment compatible with the environmental
specifications on page 23.
Note: When you install the Rack Monitor 200 in the rack, do not create a hazardous
condition due to uneven mechanical loading. For example, do not use the Rack Monitor 200
as a shelf.
You can install the Rack Monitor 200 in the front or the rear of the rack using the rack-mount option,
which requires 1 U of rack space. If using an APC NetShelter
to use the toolless peg-mounts, which do not use any U-spaces.
®
VX or SX rack, you also have the opti on
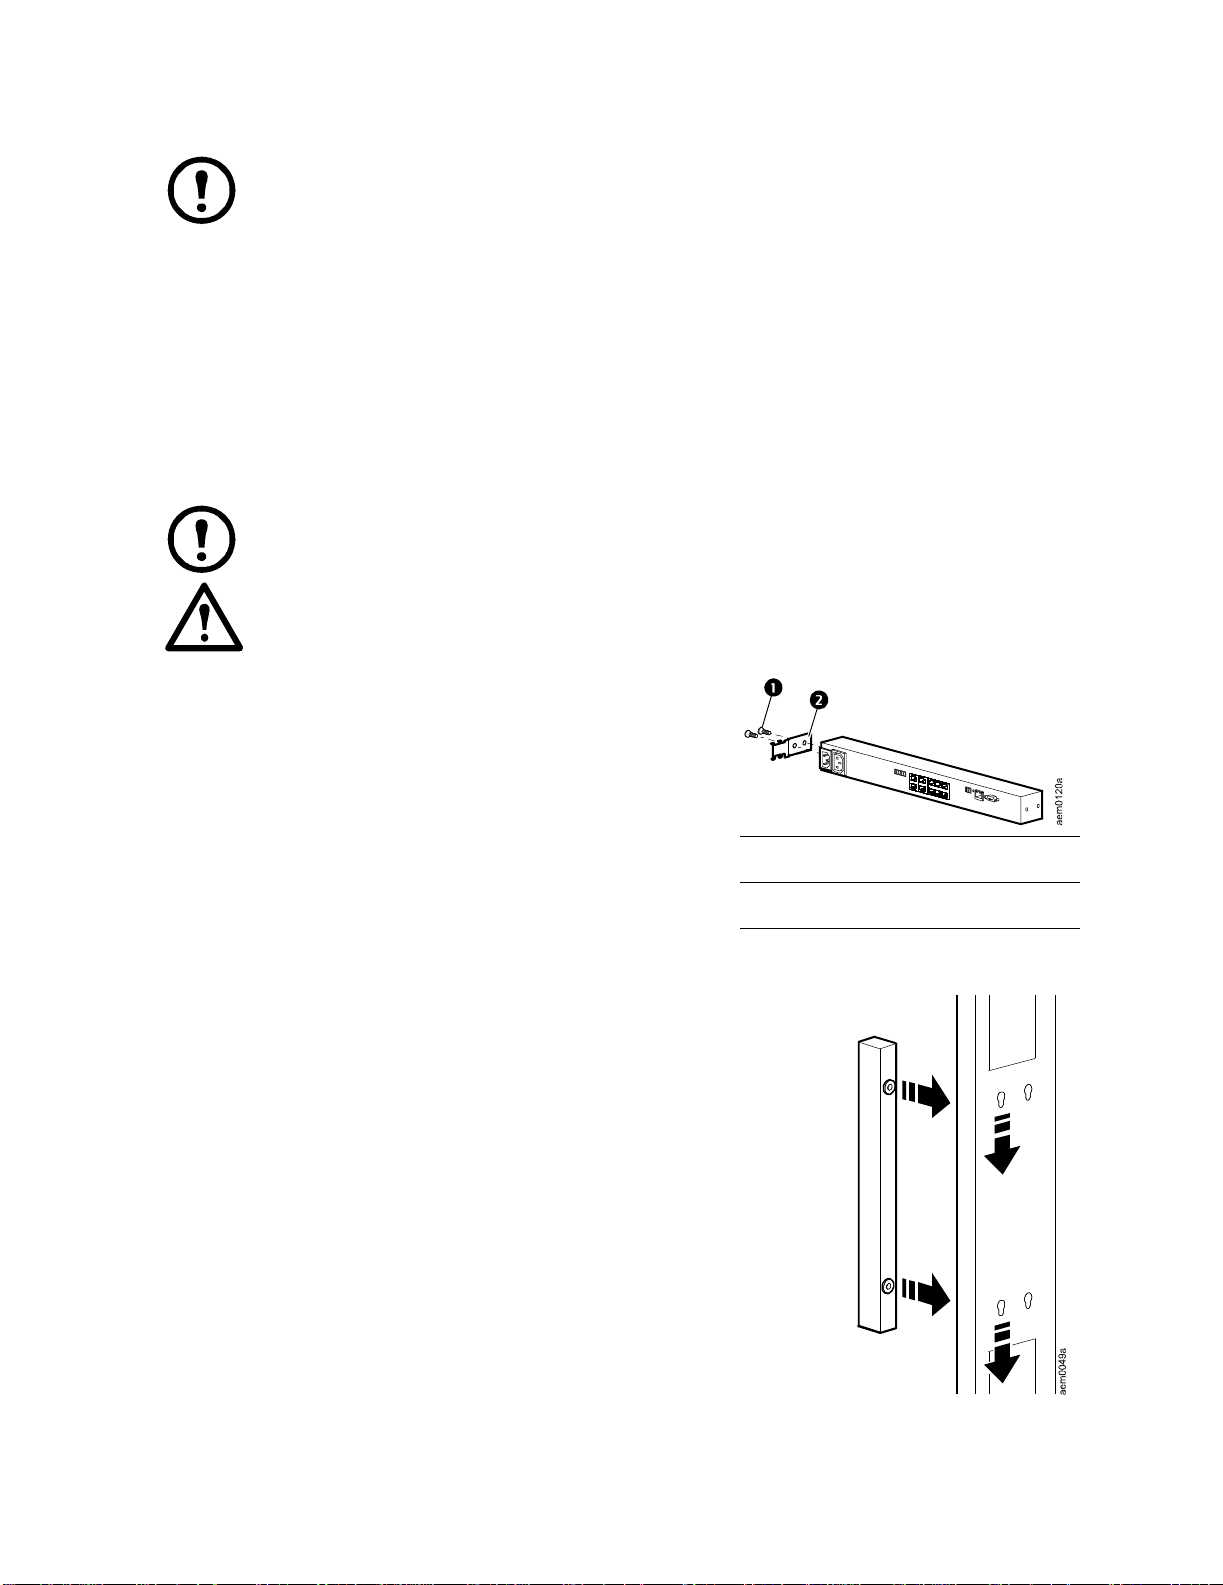
To oll ess peg-mo unt installation
Note: The toolless peg-mount i nstallation is only available with a NetShelter VX or SX rack
or enclosure.
Caution: To avoid equipment damage, use only the hardwa re provided when installing the
power cord retainer bracket.
1. Install the power cord retainer bracket as shown.
8-32 x 1/4-in Phillips-head screws
Power cord retainer bracket
2. In the left or right cable channel in the rear panel of the
enclosure, install the Rack Monitor 200 in a set of mounting
holes. Be sure to push down until it locks.
3. See “Power cord and network cable connections” on page 8.
NetBotz Rack Monitor 200 Installation and Quick Configuration Manual6
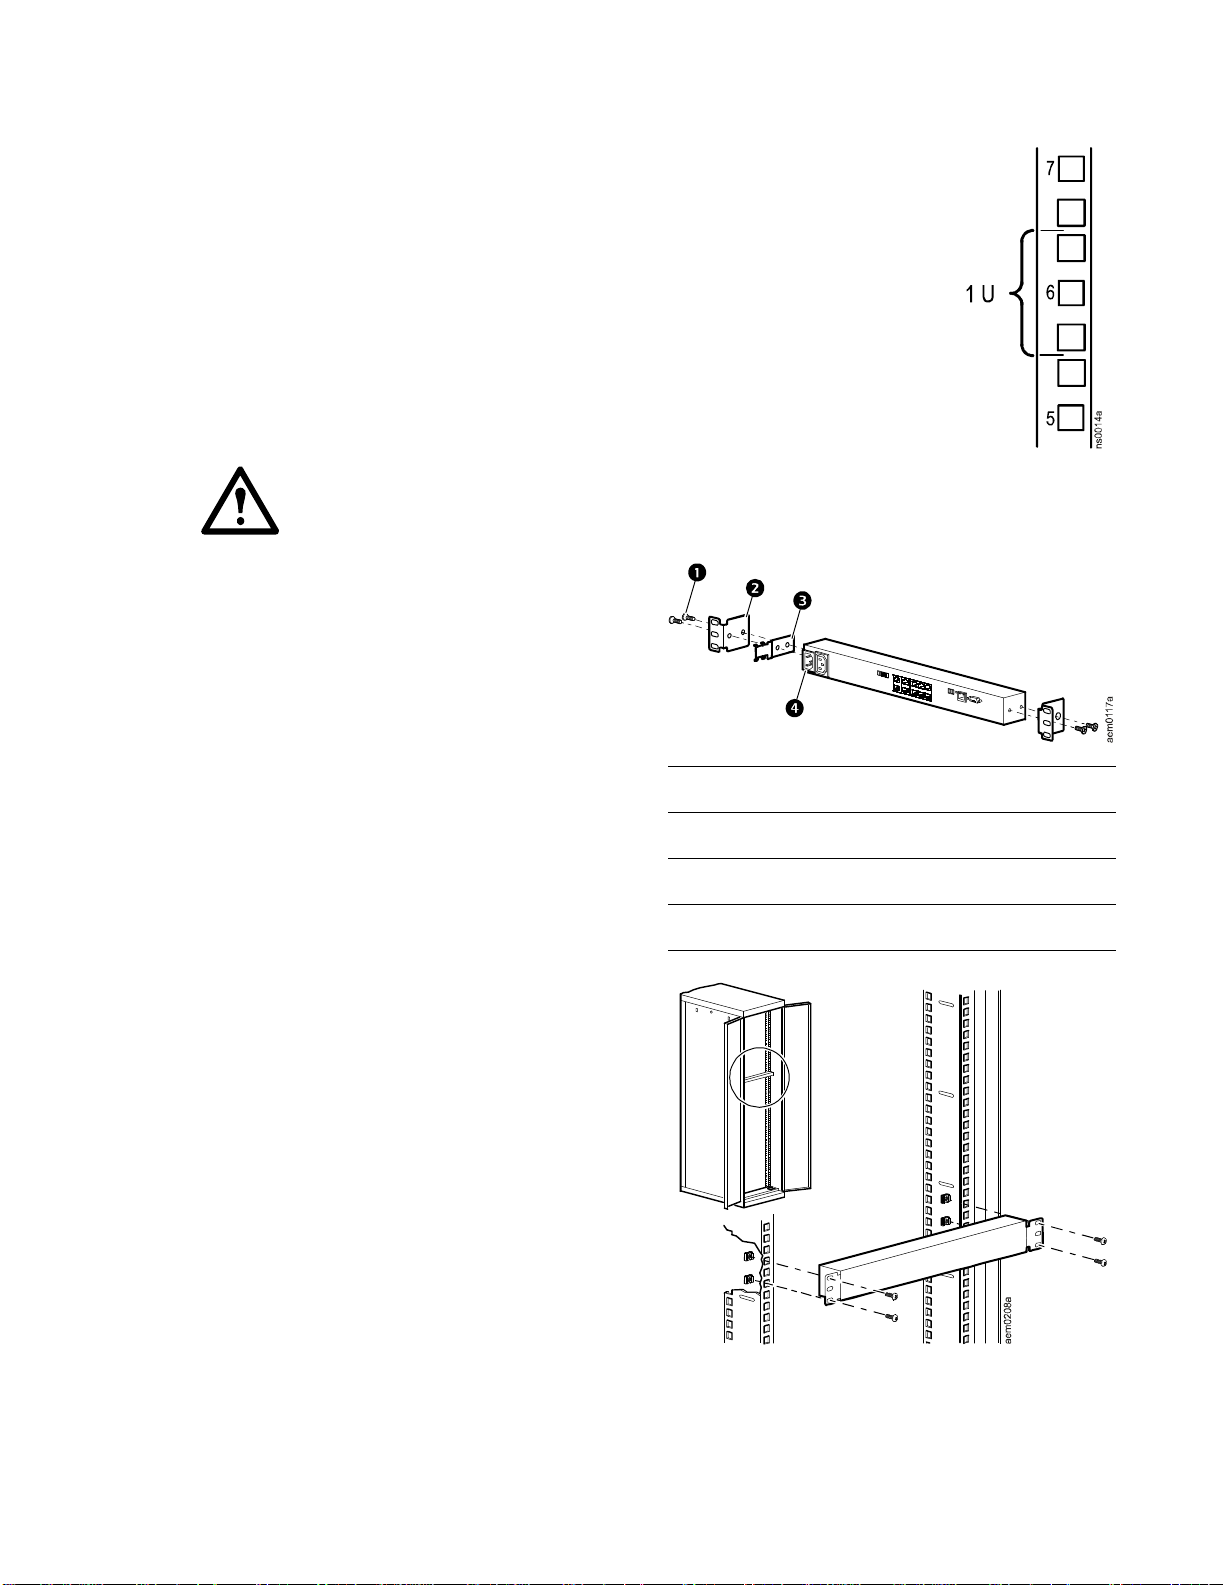
Rack-mount installation
1. Choose a location for the Rack Monitor 200 in the front or rear of the rack.
The Rack Monitor 200 occupies one U-space. A notched hole or a number
on the vertical rail of the rack denotes the middle of a U-space.
Caution: To avoid equipment damage, use only the hardwar e provided
when installing the brackets.
2. Install the brackets ( and ), including
the power cord retainer bracket, on the end
nearest the AC Line Inlet.
3. Secure the Rack Monitor 200 to the rack,
using cage nuts and screws (provided with
the rack).
4. See “Power cord and network cable
connections” on page 8.
8-32 x 1/4-in Phillips-head screws
Bracket
Power cord retainer bracket
AC Line Inlet
7NetBotz Rack Monitor 200 In stallation and Quick Configuration Manual

Power cord and network cable connections
Perform the steps below to complete the inst al lation of the Rack Monitor 200.
Caution: Before you energiz e the Rack Monitor 200, review the electrical specif ications on
page 23 to avoid overloading the circuit providing power.
Caution: Make sure you properly ground the Rack Monitor 200 by plugging it directly into
a wall outlet or by verifying the ground path if you connect the appliance to a power strip.
1. Connect the appropriate power cord to the AC Line Inlet of the Rack Monitor 200.
2. Secure the power cord to the power cord retainer bracket using the tie wraps.
3. Connect your 10/100 Base-T Network cable to the Rack Monitor 200.
4. Plug the power cord into a power source.
5. Use the hook and loop cable strap and the 25-mm (1-in) wide tie wrap to secure cable s.
NetBotz Rack Monitor 200 Installation and Quick Configuration Manual8

How to Install the Temperature/Humidity Sensor
1. Choose a location and install the temperature/humidity sensor. Avoid locat ions in dir ect sunlight
or other locations that may affect the sensor reading, such as near windows, room entrances, air
ducts, or other heat sources.
Note: When securing the sensor, tighten the tie wrap over the recessed channel of the
sensor casing.
Vertical rail installation. Firmly
install the sensor mount (25 x 25-mm
[1 x 1-in] cable tie mount) at the
location you selected. Then secure the
sensor with a tie wrap.
Door- mount installation. For racks
with a perforated door , use a tie wrap to
secure the sensor.
Wall-mount installation. For a rough
wall or porous surface, install the wall
anchor at the location you selected.
Then, secure the sensor mount to t he wall anchor using the screw provided. For a smooth wall
or other smooth surface, firmly install the sensor mount (25 x 25-mm [1 x 1-in] cable tie
mount). Secure the sensor to the sensor mount using a tie wrap.
2. Route the sensor cord to the Rack Monitor 200.
– If you mounted the s ensor on the door, be sure the door is fully ope n when yo u route the se nsor
cord.
– The 4-m (13-ft) sensor cord can be extended to a maximum of 15 m (50 ft), using RJ-45
female-to-female coup lings and standard CAT-5 cables.
3. Connect the sensor to the Rack Monitor 200 (see “How to Connect Sensors to Universal Sensor
Ports” on page 10).
9NetBotz Rack Monitor 200 In stallation and Quick Configuration Manual

How to Connect Sensors to Universal Sensor Ports
This procedure applies to the following sensors, which are supported by the Rack Monitor 200 and
connect to the universal sensor ports:
• T emperature Sensor (AP9335T)
• Temperature/Humidity Sensor (AP9335TH)
• NetBotz 3.65-m (12-ft) Door Switch Sensor for APC Racks (NBES0303)
• NetBotz 15.24-m (50-ft) Door Switch Sensor for Rooms or Third Party Racks (NBES0302)
• NetBotz Dry Contact Cable (NBES0304)
For sensors that connect to A-Link port s (Temperature Sensors with Digital Displ ay
[AP9520T] and T e mperat ure/Humidit y Sensors with Dig ital Displ ay [AP9520TH]), see “How
to Cascade Devices to A-Link Ports” on page 12.
Caution: Plugging an incompatible sensor into a port can result in undefined behavior.
Connect APC and third-party dry contact sensors to the six universal sensor ports , la bel ed Sensors, on
the Rack Monitor 200.
• Third-party dry contact sensors r equire the NetBotz Dry Contact Cable (NBES0304). To connect
a sensor to the cable, follow the instructions provided with the senso r and the ins tructions
provided with the cable.
• The length of a sensor cable can be extended using RJ-45 female- to-female couplings and
standard CAT-5 cabling. See “System Specif ications” on page 24 for maximum cable lengths.
NetBotz Rack Monitor 200 Installation and Quick Configuration Manual10

How to Connect an Alarm Beacon and Other Optional Devices
1. To install an alarm beacon :
– Mount the alarm beacon in a visible position
either on the roof of the rack or inside the rack.
– Route the alarm beacon c able to the Rac k Monitor
200. The alarm beacon cable may be extended to a
maximum of 100 m (300 ft), using RJ-45
couplings and standard CAT-5 cables.
– Connect the cable to the Beacon port.
2. Connect one device to the Voltage Output.
Caution: The Relay Output is rated for Class 2 circuits only.
3. Connect one device to the Relay Output.
4. Connect a device to the Switched Outlet.
11NetBotz Rack Monitor 200 Installation and Quick Configuration Manual

How to Cascade Devices to A-Link Ports
(NBRK0200)
(NBPD0150)
Rack Sensor
Pod 150
NetBotz
NetBotz Rack
Monitor 200
Display (AP9520TH)
Humidity
Sensor with Digital
Temperature/
(NBPD0150)
Rack Sensor
Pod 150
NetBotz
You can cascade to A-Link ports up to twelve NetBotz Rack Sensor Pod 150s (NBPD0150) and up to a
combined total of eight Temperature Sensors with Digital Display (AP9520T) and Temperature/
Humidity Sensors with Digital Display (AP9520TH). You cannot cascade Rack Monitor 200s. Use one
Rack Monitor 200 per system. A-Link is an APC proprietary CAN (Controller Area Network) bus.
Devices compatible with A-Link are not Ethernet devices and cannot coexist on an Ethernet bus with
other networking devices, such as hubs and switches.
Before performing this procedure, follow the installation instructions provided with your NetBotz Rack
Sensor Pod 150s and se nsors. Also, if you cascade ten or more devices, be sure you have a supple mental
power supply (Power Supply 100-120 Vac/24 Vdc—AP9505i) to connect to your system.
1. Connect sensors and NetBotz Rack
Sensor Pod 150s to the Rack Monitor
200, as shown.
– Use CAT-5 (or equivalent) Ethernet
patch cables (). Caution: Do not
use crossover cable s .
– Connect to in and out ports as shown.
– The maximum combined length of all
A-Link cables must not
exceed 1000 m (3,280 ft).
2. Plug an A-Link terminator into the
unused A-Link ports and .
Caution: The first time a NetBotz Rack Sensor Pod 150 receives power, it obtains a unique
identificat ion address for communication over the A-Link bus. To avoid c ommunication
problems, you must complete steps 1 and 2 before you connect a supplemental power supply.
3. If you have cascaded ten or more devices, connect one supplemental power supply (AP9505i) to
the 24 VDC Input jack of the Rack Sensor Pod 150 in or closest to the eleventh position.
NetBotz Rack Monitor 200 Installation and Quick Configuration Manual12

How to Wire to the Modbus Interface
T o connect to your building management system, use the Modbus RS-485 interface. The Modbus
interface supports 2-wi re RS-485, plus ground. In addition, Modbus requires both termination and
polarization resi stors at the bus master . Each end of the bus requires a 150-ohm resistor (provided), and
the bus also requires a 400–650-ohm resistor (provided) from D1 to +5 Vdc and from D0 to GND.
Modbus can be configured to communicate at either 9600 or 19200 bps. The default setting is 9600 bps.
For more information, see the Modbus standard available at www. modbus.org.
13NetBotz Rack Monitor 200 Installation and Quick Configuration Manual

Quick Configuration
Note: Disregard the procedures in this section if you have APC InfraStruXure Central or
InfraStr uXure Manager as part of your system. See the documenta tion for your InfraStruXure
device for more information.
Consult with your network administra tor to determine the type of network server to which the Rack
Monitor 200 is connected. Then follow the table below to complete the configuration process, which
results in the a ssignment of networ k communica tion set tings and enabl es you to acces s the R ack Monitor
200 (see “Access the Rack Monitor 200” on page 20).
Server type Procedure
RFC2131/RFC2132compliant DHCP server
RFC951-compliant BOOTP
server
1. Consult with your ne twor k admi nistra tor to d eterm ine whic h opt ion bel ow
to use. After one of the options is performed, the Rack Moni tor 200 will
automatically discover the DHCP server.
EITHER add code to the Vendor Specific Information option to include
the APC cookie information (this must be performed by the network
administrator; see “How to set up option 43” on page 15 for details).
OR disable the requirement that a DHCP offer include the APC cookie.
See “How to disable the cookie requirement” on page 15.
2. Read and note the System IP (address), which you will need to access the
system over y our network. Use the control console menu path Network >
TCP/IP. See “How to access the control console” on page 19.
1. Update the BOOTPTAB file (this must be performed by the network
administrator; see page 16). When the file is updat ed, the Rack Monitor
200 will automatically discover the BOOTP server.
2. Obtain the IP address used in the BOOTPTAB file from your network
administrator.
_________________OR
1. Obtain an IP address, su bnet mask, and default gateway from your
network administrator. See “Important Information about the Default
Gateway” on page 16.
2. Do you have access to a comput er on the network running Windows
2000, Windows Server
Yes. Run the APC Device IP Configuration Wizard (see page 17).
No. Use a local computer connected to t he serial port of the Rack Monitor
200 to configure the TCP/IP settings. See “Control Console” on page 19.
Or use ARP, Ping, and Telnet (requires network communication
experience; see “How to Use ARP, Ping, and Telnet” on page 18).
®
2003, or Windows XP?
®
Neither BOOTP nor DHCP
server
NetBotz Rack Monitor 200 Installation and Quick Configuration Manual14
1. Obtain an IP address, su bnet mask, and default gateway (see page 15)
from your network administrator.
2. Do you have access to a compute r on the net work runn ing W indows 2000,
Windo ws Server 2003, or Windows XP?
Yes. Run the APC Device IP Configuration Wizard (see page 17).
No. Use a local computer connected to t he serial port of the Rack Monitor
200 to configure the TCP/IP settings. See “Control Console” on page 19.
Or use ARP, Ping, and Telnet (requires network communication
experience; see “How to Use ARP, Ping, and Telnet” on page 18).

DHCP Server
The DHCP server must be set up with an encapsulated APC cookie in the Vendor Specific Information
option (DHCP option 43); otherwise, DHCP offers will be ignored by the Rack Monitor 200. If you do
not want to use option 43, disable the cookie requi rement (see “How to disable the cookie requirement ”
on this page).
For complete detail s on Rack Monitor 200 communication with a DHCP server, see “TCP/IP
and Communication Sett ings” in the NetBotz Rack Monitor 200 User’s Guide. For details on
how to access the user’s guide, see “Additional Documentation” on page 1.
How to set up option 43
The Main Module (NetBotz Rack Monitor 200) requires option 43 in a DHCP response to determine
whether the DHCP response is valid. This option contains up to two APC-specific options in a TAG/
LEN/DATA format: the APC Cookie and the Boot Mode Transition.
• APC Cookie. Tag 1, Len 4, Data “1APC”
Option 43 communicates to the Main Module that a DHCP server is configured to service
APC devices. By default, the DHCP response must contain the APC Cookie for the Main
Module to accept the lease.
Following, in hexadecimal format, is an example of a Vendor Specif ic Information option that
contains the APC cookie:
Option 43 = 0x01 0x04 0x31 0x41 0x50 0x43
• Boot Mode Tr ansition. Tag 2, Len 1, Data 1/2
Boot Mode Transition enables or disables the Main Module option Remain in DHCP &
BOOTP mode after accepting TCP/IP settings, which is disabled by default.
– A data value of 1 enables the option Remain in DHCP & BOOTP mode after accepting
TCP/IP settings. When the Main Module reboots, it will request its network assignment first
from a BOOTP server and then, if necessary, from a DHCP server.
– A data value of 2 disables the option Remain in DHCP & BOOTP mode after accepting
TCP/IP settings. The TCP/IP Configuration setting switches to DHCP when the Main
Module accepts this DHCP response. Thereafter, whenever the Main Module reboots, it will
request its network assi gnment from a DHCP server only.
Following, in hexadecimal format, is an example of the Vendor Specific Information option
that contains the APC cookie and the data value to disable the Remain in DHCP & BOOTP
mode after accepting TCP/IP settings:
Option 43 = 0x01 0x04 0x31 0x41 0x50 0x43 0x02 0x01 0x01
How to disable the cookie requirement
1. Access the contr ol console through the serial port on the Rack Monitor 200. (See “ How to access
the control console” on page 19.)
2. Follow the menu path Network > TCP/IP > Boot Mode > DHCP only > Advanced > DHCP
Cookie Is > Not required to accept offer.
3. Enter Accept Changes.
15NetBotz Rack Monitor 200 Installation and Quick Configuration Manual

Important Information about the Default Gateway
Observe the following when required to enter a default gateway for the Rack Monitor 200. (Refer to
page 14.)
Note: If a default gateway is unavail ab le, use the IP address of a computer that is located on
the same subnet as the Rack Monitor 200 and that is usually running. The Rack Monitor 200
uses the default gateway to test the network when traffic is very light.
Caution: Do not use the loopback address (127.0.0.1) as the default ga teway address for the
Rack Monitor 200. It disables the card and requires you to reset TCP/IP settings to their
defaults using a local seria l login.
For information about the role of the watchdog concerning the default gateway, see
“Watchdog Features” in the “Introduction” of the NetBotz Rack Monitor 200 User’s Guide.
For details on how to access the user’s guide, see “Additional Documentation” on page 1.
How to Update the BOOTPTAB File
For the Rack Monitor 200 to automatically find a BOOTP server and acquire its TCP/IP settings, the
network administrator must update the BOOTPTAB file of the BOOTP server with the Rack Monitor
200 MAC address, IP address, subnet mask, and default ga teway.
• For the MAC address, look on the bottom of the Rack Monitor 200 or on the Quality Assurance
slip included in the package.
• For the default gateway, see “Important Information about the Default Gateway” on this page.
NetBotz Rack Monitor 200 Installation and Quick Configuration Manual16

How to Use the APC Device IP Configuration Wizard
With ac cess to a comput er on the same network segment as the Rack Monitor 200 and running Windo ws
2000, Windows Server 2003, or Windows XP, you can use the APC Device IP Configuration Wizard
available on the NetBotz Rack Monitor 200 Utility CD or the software/fi rmware download page of the
APC We b site, www.apc.com/tools/download to configure the basic TCP/IP settings of the Rack
Monitor 200. See page 14 for complete details on when to use the Device IP Configur ation Wizard.
For additional infor mation on how to use the Device IP Configuration W izard, see the APC
Device IP Config uration Wizard Hel p, a vailable through the Device IP Configuration Wizard
software interface.
1. Insert the NetBotz Rack Monitor 200 Utility CD into a computer on your network.
2. If autorun is enabled, the user inte rface of the CD starts when you insert the CD. Otherwise, open
the CD and click contents.htm.
Caution: The Device IP Configuration Wizard may not find the Rack Monitor 200 while
software fir ewalls and i ntern et security software are r unning. I f you disable softwar e fire walls
and internet security software as directed below and you are connecte d to the inter net, your
computer will be vulnerab le to atta cks. Make sure you re-enable software firewa lls and
internet security software as soon as the wizard finds the Rack Monitor 200.
3. Click Device IP Configuration Wizard and follow the instructions.
– References to a Network Management Card refer to a card inside the Rack Monitor 200.
– When instructed to press the Network Manage ment Card reset button, press the Rack Monitor
200 Reset button.
– If the wizard does not di scover the Rack Monitor 200 wit hin several minutes, disable software
firewalls and interne t security software until the Rack Monitor 200 is found, then re-enable.
– If you leave the Start a Web browser when finished option enabled, you can use apc for b oth
the User Name and Password to access the Rack Monitor 200 through your browser.
17NetBotz Rack Monitor 200 Installation and Quick Configuration Manual

How to Use ARP, Ping, and Telnet
From any computer on the same network as the Rack Monitor 200, you can use ARP and Ping to assign
an IP address to a Rack Monitor 200, and then use Telnet to access the control console of the Rack
Monitor 200 and configure the remaining TCP/IP settings.
1. T o define the IP address, use the MAC address of the Rack Monitor 200 in the ARP command.
For the MAC address, look on the bottom of the Rack Monitor 200 or on the Quality Assur ance
slip included in the package.
For example, to define an IP address of 156.205.14.141 for a Rack Monitor 200 that has a MAC
address of 00 c0 b7 63 9f 67, use one of the following commands:
– Windows command format:
arp -s 156.205.14.141 00-c0-b7-63-9f-67
– LINUX command format:
arp -s 156.205.14.141 00:c0:b7
2. Use P in g with a si z e o f 113 by tes to assign the IP a d dress defined b y the ARP comma n d. For
example:
– Windows command format:
ping 156.205.14.141 -l 113
– LINUX command format:
ping 156.205.14.141 -s 113
3. Use Te lnet to access the Rack Monitor 200 at its newly assigned IP address. For example:
telnet 156.205.14.141
4. Use apc for both User Name and Password.
5. See “How to configure TCP/IP settings through the control console” on page 19 to finish the
configuration.
:63:9f:67
NetBotz Rack Monitor 200 Installation and Quick Configuration Manual18

Control Console
You can use the control console—a text-based, menu-driven Rack Monitor 200 softwar e interface—to
configure TCP/IP settings.
How to access the control console
Use a local computer that connects to the Rack Monitor 200 through the serial port on the front of the
unit to access the control console.
1. Select a serial port at the local computer, and disable any service that uses that port.
2. Use the provided RS-232 configur ation cable to connect the selected port to the RS-232 C onsole
Port on the front of the Rack Monitor 200.
3. Configure the serial port for 9600 bps, 8 data bit s, no parity, 1 stop bit, and no flow control. For
example, with Windows XP follo w the path S t art > Settings > Control Panel > Administr ative
Tools > Computer Management > Device Manager > Ports > Communications Port > Port
Settings. (The path will vary depending on your operating syst em.)
®
4. Run a terminal program (such as HyperTerminal
Windows XP follow the path Start > Program s > Acces so ri es > Comm u ni ca tio n s . (The path
will vary depending on your operating syst em.)
) on your computer. For example, with
5. Press
ENTER to display the User Name prompt.
6. Use apc for the user name and password.
How to configure TCP/IP settings through the control console
If you are not using a DHCP server or updating the BOOTPTAB file of a BOOTP server (see “Quick
Configuration” on page 14), you can use the control console to configure TCP/IP settings.
1. From the Control Console menu, choose Network.
2. From the Network menu, choose TCP/IP.
3. Choose Boot Mode. Then choose Manual.
4. Press
5. Enter the System
6. Press
ENTER to return to the TCP/IP menu.
IP, Subn et Ma s k, and Default Gateway values.
CTRL+C to exit to the Control Console menu, then choose Logout.
19NetBotz Rack Monitor 200 Installation and Quick Configuration Manual

Access the Rack Monitor 200
After the Ra ck Monitor 200 is running on your network, you can access the following Rack Monitor 200
software user interfaces to finish configuring and to begin monitoring your system:
• W eb interface (HTTP or HTTPS protocol)
• T elnet or Secure SHell (SSH)
• SNMP
• Modbus
For more information on the inter fac es, see the NetBotz Rack Monitor 200 User’s Guide. For
details on how to access the user’s guide, see “Additional Documentation” on page 1.
Web Interface
Use Microsoft® Internet Explorer® 5.5 and higher (on Windows operating systems only), Mozilla-based
browsers that support Firefox 1.x (on all operating systems), or Netscape
operating systems) to acces s the Web interface of the Rack Monitor 200. Other commonly availabl e
browsers also may work but have not been fully tested by APC.
When you use the We b browser to configure Rack Monitor 200 options or to view the event and data
logs, you can use either of the following protocols:
• The HTTP protocol (enabled by default), which provides authentication by user name and
password but no encryption.
• The HTTPS protocol, which provides extra security through Secure Sockets Layer (SS L);
encrypts user names, passwords, and data being transmitted; and auth enticates the Rack Monitor
200 by means of digital certificates.
T o access the W eb interface and configure the security of your device on the network:
1. Address the Rack Monitor 200 by its IP address (or DNS name if configured).
2. Enter the user name and password (by default, apc and apc for an Administrat or).
3. T o enable or disable the HTTP or HTTPS protocols, use the Network menu on the
Administration tab, and select the access option under the Web heading on the left navigation
menu.
For more information on select ing and configuring network securit y, see the Security
Handbook. For details on how to access the Security Handbook, see “Additional
Documentation” on page 1.
®
7.x and higher (on all
Telnet and SSH
You can access the control console through Telnet or Secure SHell (SSH), depending on which is
enabled. Select the Administration tab, the Network option on the top menu bar, and then the access
option under Console on the left navigation menu. By default , Telnet is enabled. Enabling SSH
automatically disables Telnet.
NetBotz Rack Monitor 200 Installation and Quick Configuration Manual20

Telnet for basic access. Te lnet provides the basic securi ty of authentication by user name and
password, but not the high-security benefits of encryption. To use Telnet to access the control console of
the Rack Monitor 200:
1. At a command prompt, use the following command line, and press
telnet address
ENTER:
As ad dress, use the IP address of the Rack Monitor 200 (or DNS name if configured).
2. Enter the user name and password (by default, apc and apc for an Administrator, or device and
apc for a Device User).
SSH for high-security access. If you use the high security of SSL for the Web interface, use Secure
SHell (SSH) for access to the control console. SSH encrypts user names, passwords, and transmitted
data.
The interface, user accounts, and user access rights are the same whether you access the control console
through SSH or Telnet, but to use SSH, you must first configure SSH and have an SSH client program
installed on your computer.
See the NetBotz Rack Monitor 200 User’s Guide for more information on configuring and
using SSH. For details on how to access the user’s guide, see “Addit ional Documentation” on
page 1.
Simple Network Management Protocol (SNMP)
SNMPv1 o nly. After you add the PowerNet
®
MIB to a standard SNMP MIB browser, you can use that
browser to access the Rack Monitor 200. All user names, passwords, and community names for SNMP
are transferred over the network as plain text. The default read community name is public; the default
read/write community name is private.
SNMPv3 o nly. For SNMP GETs, SETs, and trap receivers, SNMPv3 uses a system of user profiles to
identify users. An SNMPv3 user must have a user profile ass igned in the MIB software program to
perform GETs and SETs, browse the MIB, and receive traps. The default settings are no authentication
and no privacy.
Note: To use SNMPv3, you must have a MIB program that supports SNMPv3. The Rack
Monitor 200 supports only MD5 authentication and DES encryption.
SNMPv1 and SNMP v3. To use InfraStruXure Central or InfraStruXure Manager to manage the Rack
Monitor 200 on the public network of an InfraStruXure system, you must have SNMPv1 enabled in the
unit interface. Read access allows InfraStruXure devic es to receive traps from the Rack Monitor 200.
Write acce ss is requir ed while you set the InfraStruXur e device as a trap receiver.
T o enable or disable S NMP access, you must be an Administrator. Select the Administration tab, select
the Network menu on the top menu bar, and use the access option under SNMPv1 or SNMPv3 on the
left navigation menu.
21NetBotz Rack Monitor 200 Installation and Quick Configuration Manual

Modbus
Modbus lets you view the Rack Monitor 200 through the interf ace of your building management system.
It is read-only.
The Modbus interface supports 2-wi re RS-485, plus ground.
Note: Modbus can be configured to run at either 9600 or 19200 bps.
See “Additional Docu mentation” on page 1 for details on accessing the Modbus register map.
How to Recover from a Lost Password
You can use a local computer (a computer that c onnects to the Rack Monitor 200 thr ough the serial port)
to access the control console.
1. Select a serial port at the local computer, and disable any service that uses that port.
2. Connect the provided RS-232 c onfiguration cable to the selected port on the c omputer and to the
RS-232 Console Port at the Rack Monitor 200.
3. Run a terminal program (such as HyperTerminal) on your computer and configure the selected
port for 9600 bps, 8 data bits, no parity, 1 stop bit, and no flow control.
4. Press
5. Press the Reset switch. The Status LED will flash alternately orange and green. Press the Reset
6. Press
7. From the Control Console menu, select System, then User Manager.
8. Select Administrator, and change the User Name and Password settings, both of which are
9. Press
ENTER, repeatedly if necessary, to display the User Name prompt. If you are unable to
display the User Name prompt, verify the following:
– The serial port is not in use by another applic ation.
– The terminal settings are corre ct as specified in step 3.
– The correct cable is being used as specif ie d in step 2.
button a second time immediately while the LED is flashing to reset the user na me and password
to their defaults temporarily.
ENTER as many times as necessa ry to redis play the Use r Name p rompt, the n use t he default,
apc, for the user name and password. (If y ou take longer tha n 30 seconds to log on after the User
Name prompt is redisplayed, you must repeat step 5 and log on again.)
now defined as apc.
CTRL+C, log off, reconnect any serial cable you disconnected, and restart any service you
disabled.
NetBotz Rack Monitor 200 Installation and Quick Configuration Manual22

Specifications
NetBotz Rack Monitor 200 (NBRK0200)
Electrical
Input voltage, nomi nal, for AC Line Inlet 100–240 Vac; 50/60 Hz
Maximum total current draw for AC Line Inlet 10 A (defined by Switched Outlet load + 0.25 A)
Maximum output voltage for Switched Outlet Defined by input voltage
Maximum output current for Switched Outlet 10 A (defined by Switched Outlet load)
Voltage for Voltage Output contacts 12 Vdc, 24 Vdc
Current for Voltage Output contacts 75 mA total for 12 V or 24 V load
Current capacity of Relay Output contacts 1 A, 30 V AC/DC (rated for Class 2 circuits only)
Physical
Dimensions (H x W x D) 44.2 x 432.0 x 44.2 mm (1.74 x 17.00 x 1.74 in)
Shipping dimensions (H x W x D) 67 x 450 x 225 mm (2.6 x 17.8 x 8.9 in)
Weight 1.10 kg (2.50 lb)
Shipping weight 2.70 kg (6.00 lb)
Environmental
Elevation (above MSL)
Operating
Storage
Temperature
Operating
Storage
Humidity
Operating
Storage
Performance
Typical Rack Monit or 200 res ponse time for dry
contact sensor or door s w itch sensor state chan ges
Compliance
0 to 3000 m (0 to 10,000 ft)
0 to 15000 m (0 to 50,000 ft)
0 to 45ºC (32 to 113°F)
–15 to 65°C (5 to 149°F)
0 to 95%, non-condensing
0 to 95%, non-condensing
200 mS
Approvals CE, C-UL tested to CSA C22.2 No. 60950-1-3, UL
60950-1, FCC Part 15 Clas s A, ICES-003 Class A,
VCCI Class A, EN 55022 Class A, EN 55024,
EN 61000-3-2, EN 61000-3-3, AS/NZS CISP R 22,
VDE tested to EN 60950–1
23NetBotz Rack Monitor 200 Installation and Quick Configuration Manual

Temperature/Humidity Sensor (AP9335TH)
Specifications
T emperat u re accuracy ±2ºC (±3ºF), from 0 to 4 0ºC (32 to 104ºF)
Humidity accuracy ±4% RH, 20 to 90% RH, at 25ºC (77ºF)
± 8% RH, 30 to 80% RH, from 15 to 30ºC
(59 to 95ºF)
Sensor operating temperature –10 to 70ºC (14 to 159ºF)
Cable length 4 m (13 ft)
System Specifications
A-Link
Maximum combined length of all A-Link
cables
Maximum number of NetBotz Rack
Sensor Pod 150s that can be c ascaded on
the A-Link bus
Maximum number of sensors (sensors
with digital dis play [AP9520T] and
Temperature/Humidity Sensors with
Digital Displ ay [AP9520TH]) that can be
cascaded on the A-Link bus
Temperature/Humidity Sensor (AP9335TH), Temperature Sensor (AP9335T),
Maximum length of cable 15 m (50 ft)
Beacon
Maximum length of cable 100 m (330 ft )
NetBotz Dry Contact Cable (NBES0304),
NetBotz 3.65-m (12-ft) Door Switch Sensor for APC Racks (NBES0303),
NetBotz 15.24-m (50-ft) Door Switch Sensor for Rooms or Third Party Racks (NBES0302)
Maximum length of cable 30.48 m (100 ft)
†
If a combined total of ten or more devices (NetB otz Rack Sensor Pod 150s [NBP D0150],
Temperature Sensors with Digital Display [ AP9 520T], and Temperature/Humidity
Sensors with Digital Display [AP9520TH]) are cascaded on the A-Link bus, a
supplementa l power supply (Power Supply 100-12 0 Vac/24 Vdc—AP9505i) is required.
The power supply connects to the 24 VDC Input on a NetBotz Rack Sensor Pod 150.
†
†
1000 m (3,280 ft)
12
8
NetBotz Rack Monitor 200 Installation and Quick Configuration Manual24

Warranty an d Life Support
Two-Year Factory Warranty
This warranty applies only to the produ cts you purchase for your use in accordance with this manual.
Terms of warranty
APC warrants its products to be free from defects in materials and workmanship for a period of two
years from the date of purchase. APC will r epair or replace defecti ve products covered by this warran ty.
This warranty does not apply to equipment that has been damaged by accident, negligence or
misapplication or has been alter ed or modified in any way. Repair or replacement of a defective product
or part thereof do es not e xtend t he ori ginal war rant y period. Any part s fur nished un der this wa rrant y may
be new or factory-remanufactured.
Non-transferable warrant y
This warranty extends only to the origi nal purchase r who must have properly regi stered the prod uct. The
product may be registered at the APC Web site, www.apc.com.
Exclusions
APC shall not be liable under the warranty if its testing and examination disclose that the alleged defect
in the product does not exist or was caused by end user’s or any third person’s misuse, negligence,
improper installati on or testing. Further, APC shall not be liable under the warranty for unauthorized
attempts to repair or modify wrong or inadequate electrical voltage or conne ction, inappropriate on-site
operation conditions , co rrosive atmosphere, repair, installation, exposure to the elements, Acts of God,
fire, theft, or instal lation contrary to APC recommendations or spec ifications or in any event if the APC
serial number has been al tered, defa ced, or removed, or any other caus e beyond th e range of the int ended
use.
THERE ARE NO WARRANTIES, EXPRESS OR IMPLIED, BY OPERATION OF LAW OR
OTHERWISE, OF PRODUCTS SOLD, SERVICED OR FURNISHED UNDER THIS
AGREEMENT OR IN CONNECTION HEREWITH. APC DISCLAIMS ALL IMPLIED
WARRANTIES OF MERCHANTABILITY, SATISFACTION AND FITNESS FOR A
P ARTICULAR PURPOSE. APC EXPRESS WARRANTIES WILL NOT BE ENLARGED,
DIMINISHED, OR AFFECTED BY AND NO OBLIGATION OR LIABILITY WILL ARISE
OUT OF, APC RENDERING OF TECHNICAL OR OTHER ADVICE OR SERVICE IN
CONNECTION WITH THE PRODUCTS. THE FOREGOING WARRANTIES AND
REMEDIES ARE EXCLUSIVE AND IN LIEU OF ALL OTHER W ARRANTIES AND
REMEDIES. THE WARRANTIES SET FORTH ABOVE CONSTITUTE APC’S SOLE
LIABILITY AND PURCHASER’S EXCLUSIVE REMEDY FOR ANY BREACH OF SUCH
WARRANTIES. APC WARRANTIES EXTEND ONLY TO PURCHASER AND ARE NOT
EXTENDED TO ANY THIRD PARTIES.
25NetBotz Rack Monitor 200 Installation and Quick Configuration Manual

IN NO EVENT SHALL APC, ITS OFFICERS, DIRECTORS, AFFILIATES OR EMPLOYEES
BE LIABLE FOR ANY FORM OF INDIRECT, SPECIAL, CONSEQUENTIAL OR PUNITIVE
DAMAGES, ARISING OUT OF THE USE, SERVICE OR INSTALLATION, OF THE
PRODUCTS, WHETHER SUCH DAMAGES ARISE IN CONTRACT OR TORT,
IRRESPECTIVE OF FAULT, NEGLIGENCE OR STRICT LIABILITY OR WHETHER APC
HAS BEEN ADVISED IN ADVANCE OF THE POSSIBILITY OF SUCH DAMAGES.
SPECIFICALLY, APC IS NOT LIABLE FOR ANY COSTS, SUCH AS LOST PROFITS OR
REVENUE, LOSS OF EQUIPMENT, LOSS OF USE OF EQUIPMENT, LOSS OF SOFTWARE,
LOSS OF DATA, COSTS OF SUBSTITUENTS, CLAIMS BY THIRD PARTIES, OR
OTHERWISE.
NO SALESMAN, EMPLOYEE OR AGENT OF APC IS AUTHORIZED TO ADD TO OR VARY
THE TERMS OF THIS WARRANTY. WARRANTY TERMS MAY BE MODIFIED, IF AT ALL,
ONLY IN WRITING SIGNED BY AN APC OFFICER AND LEGAL DEPARTMENT.
Warrant y cl ai ms
Customers with warranty claims issue s may access the APC customer support network through the
Support page of the APC Web site, www.apc.com/support. Select your country from the country
selection pull-down menu at the top of the Web page. Select the Support tab to obtain contact
information for customer support in your region.
Obtaining service
To obtain support for problems with your NetBotz Rack Monitor 200:
1. Note the serial number. The serial number is printed on a label located on the bottom of the unit.
2. Contact Customer Support at a phone number on the back c over of thi s manual. A tec hnician will
try to help you solve the problem by phone.
3. If you must return the product, the technician will give you a return material authorization
(RMA) number. If the warranty expired, you will be charged for repair or replacement.
4. Pack the unit carefully. The warranty does not cover d amage sustained in transit. Enclose a letter
with your name, address, RMA number and daytime phone number; a copy of the sales receipt;
and a check as payment, if applicable.
5. Mark the RMA number clearly on the outside of the shipping carton.
6. Ship by insured, prepaid carrier to the address provided by the Customer Support technic ian.
NetBotz Rack Monitor 200 Installation and Quick Configuration Manual26

Life Support Polic y
General policy
American Power Conversion (APC) does not recommend the use of any of its products in the following
situations:
• In life-support applications where failure or malfunction of the APC product can be reasonably
expected to cause failure of the life-support device or to af fect significantly its safe ty or
effectiveness.
• In direct patient care.
APC will not knowingly sell its products for use in such applications unless it receives in writing
assurances satisfactory to APC that (a) the risks of injury or damage have been minimized, (b) the
customer assumes all such risks, and (c) the liability of APC is adequately protected under the
circumstances.
Examples of life-support devices
The term lif e-support device includes but is not limited to neonatal oxygen analyzers, nerve stimulators
(whether used for anesthesi a, pain relief, or other purposes), aut otransfusion devices, blood pumps,
defibrillators, arrhythmia detectors and alarms, pa cemakers, hemodialysis systems, pe ritoneal dialysis
systems, neonatal ventilator incubators, ventilators (for adults and infants) , a nesthesia ventilators,
infusion pumps, and any other devices designa ted as “critical” by the U.S. FDA.
Hospital-grade wirin g devices and leakage current protection may be ordered as options on many APC
UPS systems. APC does not claim that units with these modifications are certified or liste d as hospitalgrade by APC or any other organization. Therefore these units do not meet the requirements for use in
direct patient care.
27NetBotz Rack Monitor 200 Installation and Quick Configuration Manual


Radio Frequency Interference
Changes or modifications to this unit not expr essly approved by the party re sponsible
for compliance could void the user’s authority to operate this equipment.
USA—FCC
This equipment has been tested and found to comply with the limits for a Class A digital device,
pursuant to part 15 of the FCC Rules. These limits are designe d to provide reasonable protection
against harmful interference when the equipment is operated in a commercial environment. This
equipment generates, uses, and can rad iate radio frequency energy a nd, if not insta lled and used in
accordance with this us er manual, may caus e harmful i nterfer ence to r adio communic ations. Operati on
of this equipment in a residential area is likely to cause harmful interference. The user will bear sole
responsibility for correcting such interference.
Canada—ICES
This Class A digital apparatus complie s with Canadian ICES-003.
Cet appareil numé rique de la classe A est conforme à la norme NMB-003 du Canada.
Japan—VCCI
This is a Class A product based on the standard of the Voluntary Control Council for Interference by
Information Technology Equipment (VCCI). If this equipment is used in a domestic environment ,
radio disturbance may occur, in which case, the user may be required to take corre ctive actions.
この装置は、情報処理装置等電波障害自主規制協議会(VCCI)の基準
に基づくクラス A 情報技術装置です。この装置を家庭環境で使用すると、電波
妨害を引き起こすことがあります。この場合には、使用者が適切な対策を講ず
るように要求されることがあります。
Taiwan—BSMI
警告使用者 :
這是甲類的資訊產品 , 在居住的
環境中使用時 , 可能會造成射頻
干擾 , 在這種情況下 , 使用者會
被要求採取某些適當的對策。
Australia and New Zealand
Attention: This is a Class A product. In a domestic envir onment this product may cause radio
interference in which case the user may be required to take adequate measures.
European Union
This product is in conformity with the prot ection requirements of EU Council Directive 2004/108/EC
on the approximation of th e laws of the Member S tate s relatin g to electr omagneti c compati bility. APC
cannot accept responsibi lity for any failure to satisfy the protection requirements resulting from an
unapproved modification of the product.
This product has been tested and found to comply with the limits for Class A Information Technology
Equipment according to CISPR 22/European Standard EN 55022. The limits for Class A equipment
were derived for commercial and industrial environments to provide a reasonable protection against
interference with licensed communication equipment.
Attention: This is a Class A product. In a domestic environment this product may cause radio
interference in which case the user may be required to take adequate measures.

APC Worldwide Customer Support
Customer support for this or any othe r APC product is available at no charge in any of the following ways:
• Visit the APC Web site to access documents in the APC Knowledge Base and to submit customer
support requests.
– www.apc.com (Corporate Headquarters)
Connect to localized APC Web sites for specific countries, each of which provides customer support
information.
– www.apc.com/support/
Global support searchi ng APC Knowledge Base and using e-support.
• C ontact an APC Customer Support center by telephone or e-mail.
– Regional centers
Direct Inf raStruXure
Customer Supp ort Line
APC headquarters U.S.,
Canada
Latin America
Europe, Middle East,
Africa
Western Eu ro pe
(including Scandinavia)
Japan
Australia
New Zealand
(1)(877)537-0607
(toll free)
(1)(800)800-4272
(toll free)
(1)(401)789-5735
(USA)
(353)(91) 702000
(Ireland)
+800 0272 0272
(0) 36402- 2001
1(800) 652 725
(toll free)
0 (800) 333 373
(toll free)
– Local, country-specific centers: go to www.apc.com/support/contact for contact information.
Contact the
APC representative or other distributor from whom you purchased your APC product for
information on how to obtain local customer support.
Entire contents copyright 2008 American Power Con vers ion Corporation. All rights re served. Reproduction
in whole or in part without permission is prohibited. APC, the APC logo, Infr aStruXure, NetBo tz,
NetShel te r, and PowerNet a re tra dem ark s o f Ame ric an Pow er Con vers i on Co rp orat ion . A l l ot her t rad em arks ,
product names, and co rporate names are the property of their respective owners and are used for
informational purposes only.
4/2008990-3283-001
*990-3283*
 Loading...