

Page 1
www.apacer.com
USByer
1
Page 2

Notices
The copyright on this user manual remains with Apacer Inc. No part of this
user manual may be transmitted, reproduced, or changed.
Other companies’ product names that may be used herein remain the property
of their respective owners.
The product specifications, design and this user’s manuals content are subject
to change without notice.
If you have any questions, please contact your merchant or our service center
for clarification. We are not responsible for any losses resulting from using this
product no matter what the reason.
The guarantee and repair information is on the warranty card.
Read the contents of this manual before operating the product.
2
Page 3

Table of Contents
Before using the AU822................................................................................5
1.1 Important Notices.............................................................................5
1.2 Safety Notices..................................................................................5
2 Welcome!.................................................................................................7
3 Features highlights...................................................................................7
4 Introducing the AU822.............................................................................8
5 Charging the device.................................................................................8
5.1 Battery indicator...............................................................................9
6 Turning the player on or off......................................................................9
7 Screen display.........................................................................................9
8 Screen display.......................................................................................10
8.1 Entering menus..............................................................................10
8.2 Browsing the menus ......................................................................10
8.3 Navigating through sub-menu options ...........................................10
9 Menus....................................................................................................10
9.1 Main menu.....................................................................................10
9.2 Menu screens................................................................................11
10 Playback controls...................................................................................11
10.1 Controlling t he volume ...................................................................11
10.2 Playing and pausi ng audio files .....................................................11
10.3 Pausing and stoppi ng recording ....................................................11
11 Key operation.........................................................................................12
11.1 Keys and func tions ........................................................................12
11.2 Operating the keys.........................................................................12
12 Playing music.........................................................................................13
12.1 To play music/audio files:...............................................................13
12.2 To change the equalizer settings...................................................13
12.3 Lyrics synchronization....................................................................14
13 Playing AMV files...................................................................................14
13.1 Converting files to AMV format ......................................................14
13.1.1 Overview................................................................................14
13.1.2 Installing and launching the converter tool.............................15
13.1.3 Selecting the audio/video files to convert...............................16
13.1.4 Playing the selected the audio or video file............................17
13.1.5 Converting the audio/video file...............................................18
14 Voice recording......................................................................................28
15 Voice mode............................................................................................29
16 Converting ACT voice recordings to WAV files......................................29
17 FM radio.................................................................................................30
18 Browsing JPEG pictur es ........................................................................31
19 Setup .....................................................................................................32
19.1 Setting the time..............................................................................33
19.2 Screen setting................................................................................33
19.3 Setting the language......................................................................33
19.4 Setting the auto pow er off time ......................................................34
3
Page 4

19.5 Setting the repl ay mode.................................................................34
19.6 Setting the c ontrast........................................................................34
19.7 Using On-li ne Mode .......................................................................34
19.8 Viewing the player memory............................................................34
19.9 Firmware version ...........................................................................34
19.10 Firmware upgrade.......................................................................35
20 Using e-Book.........................................................................................35
21 Using the USB drive functionality...........................................................36
22 Upgrading the player firmware...............................................................36
23 Miscellaneous settings...........................................................................38
23.1 Changing the directory (on stop playing sub-menu) ......................38
23.2 Deleting files (on stop playing sub-menu)......................................39
23.3 Changing the playback mode (play sub-menu)..............................40
23.4 Adjusting the song tempo (play sub-menu)....................................41
23.5 Selecting the replay mode (play s ub-menu)...................................41
23.6 Using the follow and read function (not available in playback).......41
23.7 To use the contrast mode (not available in playback mode)..........42
23.8 Replay times (play sub-menu) .......................................................42
23.9 Repeat duration (play sub-menu) ..................................................42
24 Privacy Space function ..........................................................................43
25 Troubleshooting.....................................................................................46
26 Considerations.......................................................................................46
27 Technical specifications.........................................................................47
4
Page 5

Before using the AU822
1.1 Important Notices
1. Please be reminded that before you start up the system for the device
for the first time, please connect the device to the PC through the USB
cable and turn the ON/OFF switch to the “ON” position to charge the
internal battery.
2. Before connecting the device to the PC or charging the battery, please
make sure the ON/OFF switch is at the “ON” position so the PC can
detect the device.
About Battery
3. AU822 has a built-in, high-performance, rechargeable battery. The
battery should only be replaced by a qualified technician.
4. The rechargeable battery has a limited number of charge cycles.
Battery life and number of charge cycles will vary depending on
temperature, usage and settings.
5. If you have problems with battery life or if the battery needs to be
replaced, please consult your nearest Apacer dealer.
About hearing damage
6. To prevent hearing damage, please avoid using the headphones at a
high volume. Doctors and hearing experts advised against continuous,
loud and extended play.
1.2 Safety Notices
1. To prevent electrical shock or other injury, please do not disassemble
or repackage this product.
2. To prevent fire, electrical shock, or device malfunction, please do not
use this product in a wet environment such as a shower room.
3. This product is an electronic device; please avoid dropping it or
subjecting it to other severe shocks.
4. When transferring files, do not turn the power off or restart this device.
No responsibility is provided for any damage to or loss or any program,
data, or other information stored on any media or any part of this
device serviced hereunder.
5
Page 6

5. Remember to set the volume at a moderate level. Listening to music
at high volumes can impair your hearing.
6. For your safety and the safety of others, do not use headphones while
driving, cycling or any other similar activities.
6
Page 7

2 Welcome!
Thank you for choosing the Apacer AU822 MP3 player!
This versatile MP3 player supports MPEG-1, MPEG-2, MPEG-3 and WMA
music formats for superior audio file compatibility. With built-in equalizer and
high-color LCD screen, you can experience a luxurious and handy gadget with
superior acoustic quality.
The Apacer AU822 supports a stylish design that offers a digital audio
masterpiece for the new generation. With Apacer AU822, you are assured of a
satisfying digital sound experience.
3 Features highlights
• Bright and vivid color LCD makes easy and comfortable menu navigation.
• Supports a variety of audio file encoding including MPEG-1, MPEG-2,
MPEG-3 and WMA.
• Flexible firmware allows easy upgrading over the Internet so you get the
latest functions and support.
• Supports JPEG image browsing through the large LCD.
• Stylish design and incredibly thin form factor is perfect for portability and
music-on-the-go requirements.
• Stereo FM radio (optional) features auto preset, manual preset and can
save up to 40 stations (20 each band) to make your radio listening
easier and enjoyable. You can also record FM radio while you listen, for
value-added functionality.
• Doubles as a USB 2.0 flash drive with no drivers needed (Windows
2000 or higher OS).
• The Privacy Space feature allows you to divide the player's space into
two partitions, and lock one partition for complete data and file
confidentiality.
• Voice recording capability lets you store recordings in .WAV or .ACT
format through the built-in microphone.
• Features skipping and comparison repeat for track repeat functions.
• Offers up to seven preset equalizers includingNatural, Rock, Pop,
Classic, Soft, Jazz and DBB (optional).
• Plenty of playback mode options including Normal, Repeat one, Folder,
Repeat folder, Repeat all, Random and Intro.
• Configurable automatic power off, sleep and switch off time.
• Colorful and vivid screen animation makes it fun and easy to operate.
7
Page 8
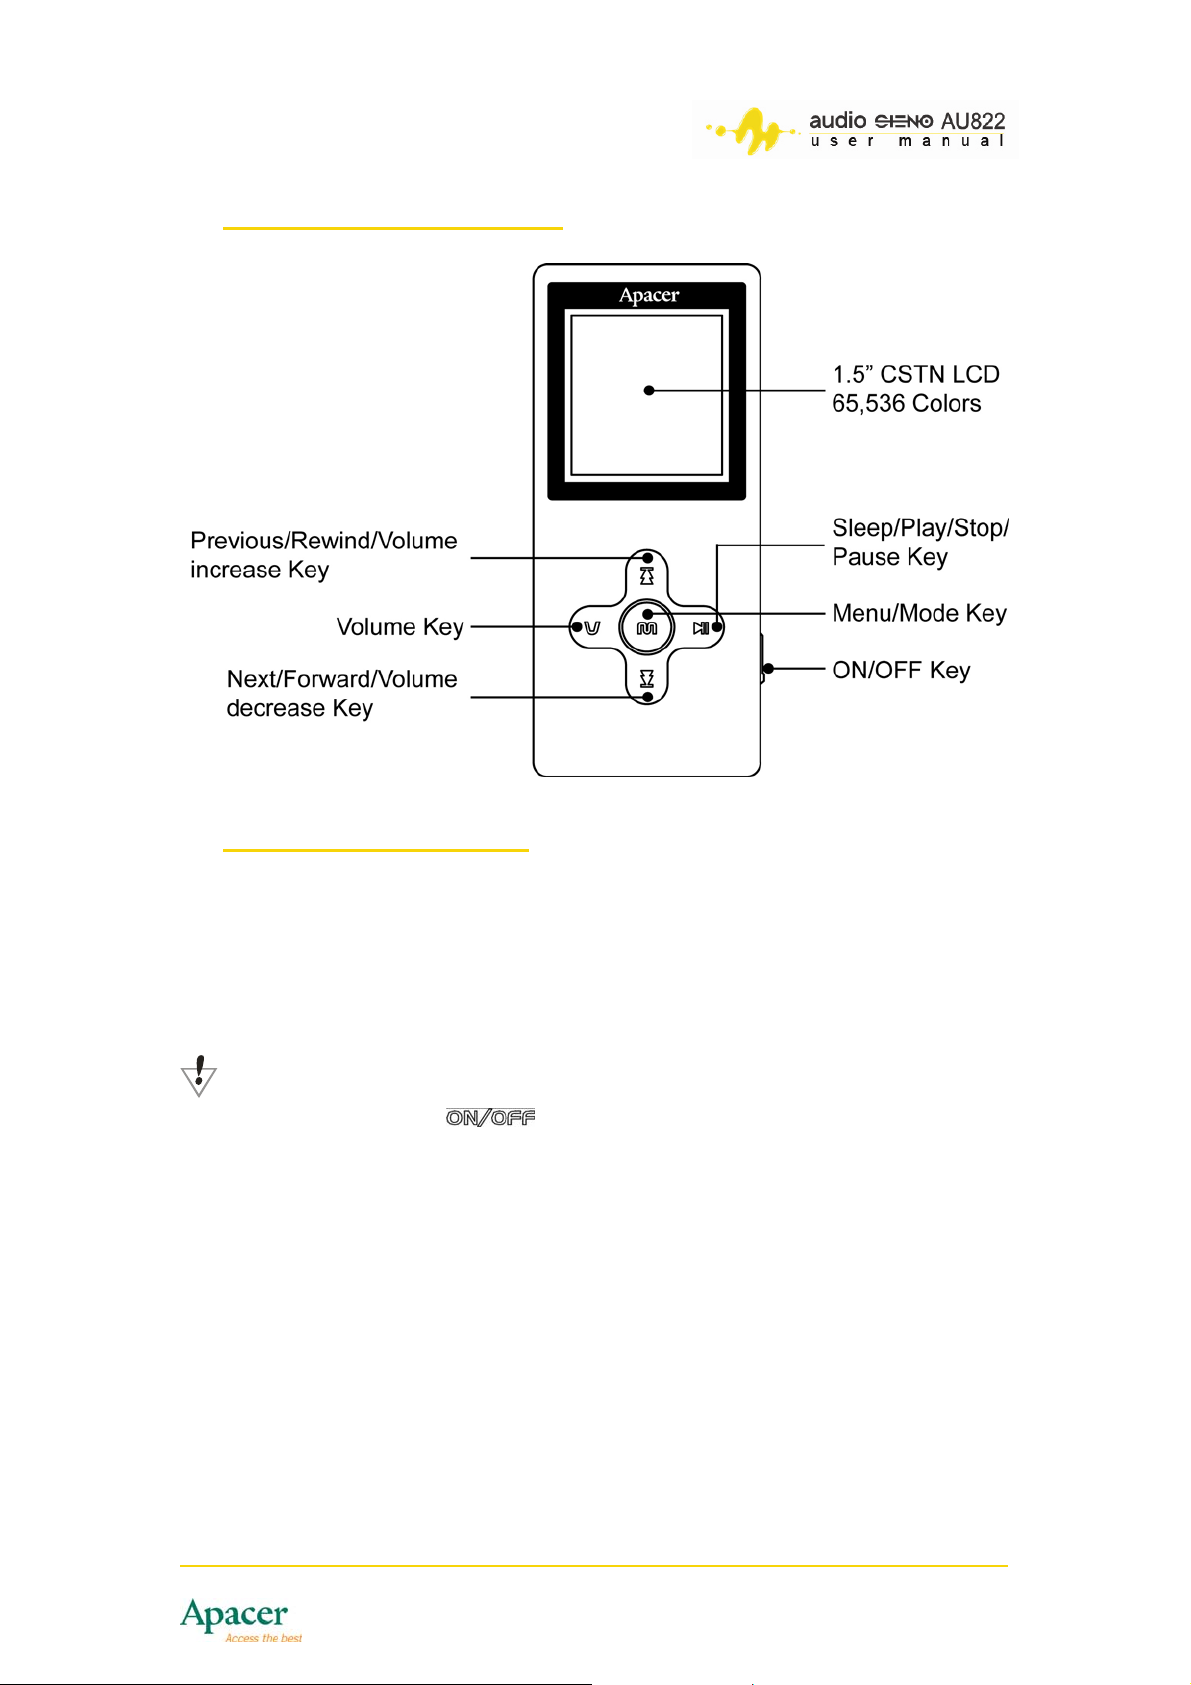
4 Introducing the AU822
5 Charging the device
The AU822 comes with a rechargeable Li-polymer battery. You must charge
the battery for at least 1 hours before initial use. You can charge the AU822 in
two ways:
• Connect the device to an available USB port on your PC
• Use the AC adapter to charge it directly from a power outlet
IMPORTANT!
You must position the key to ON to enable battery charging.
8
Page 9
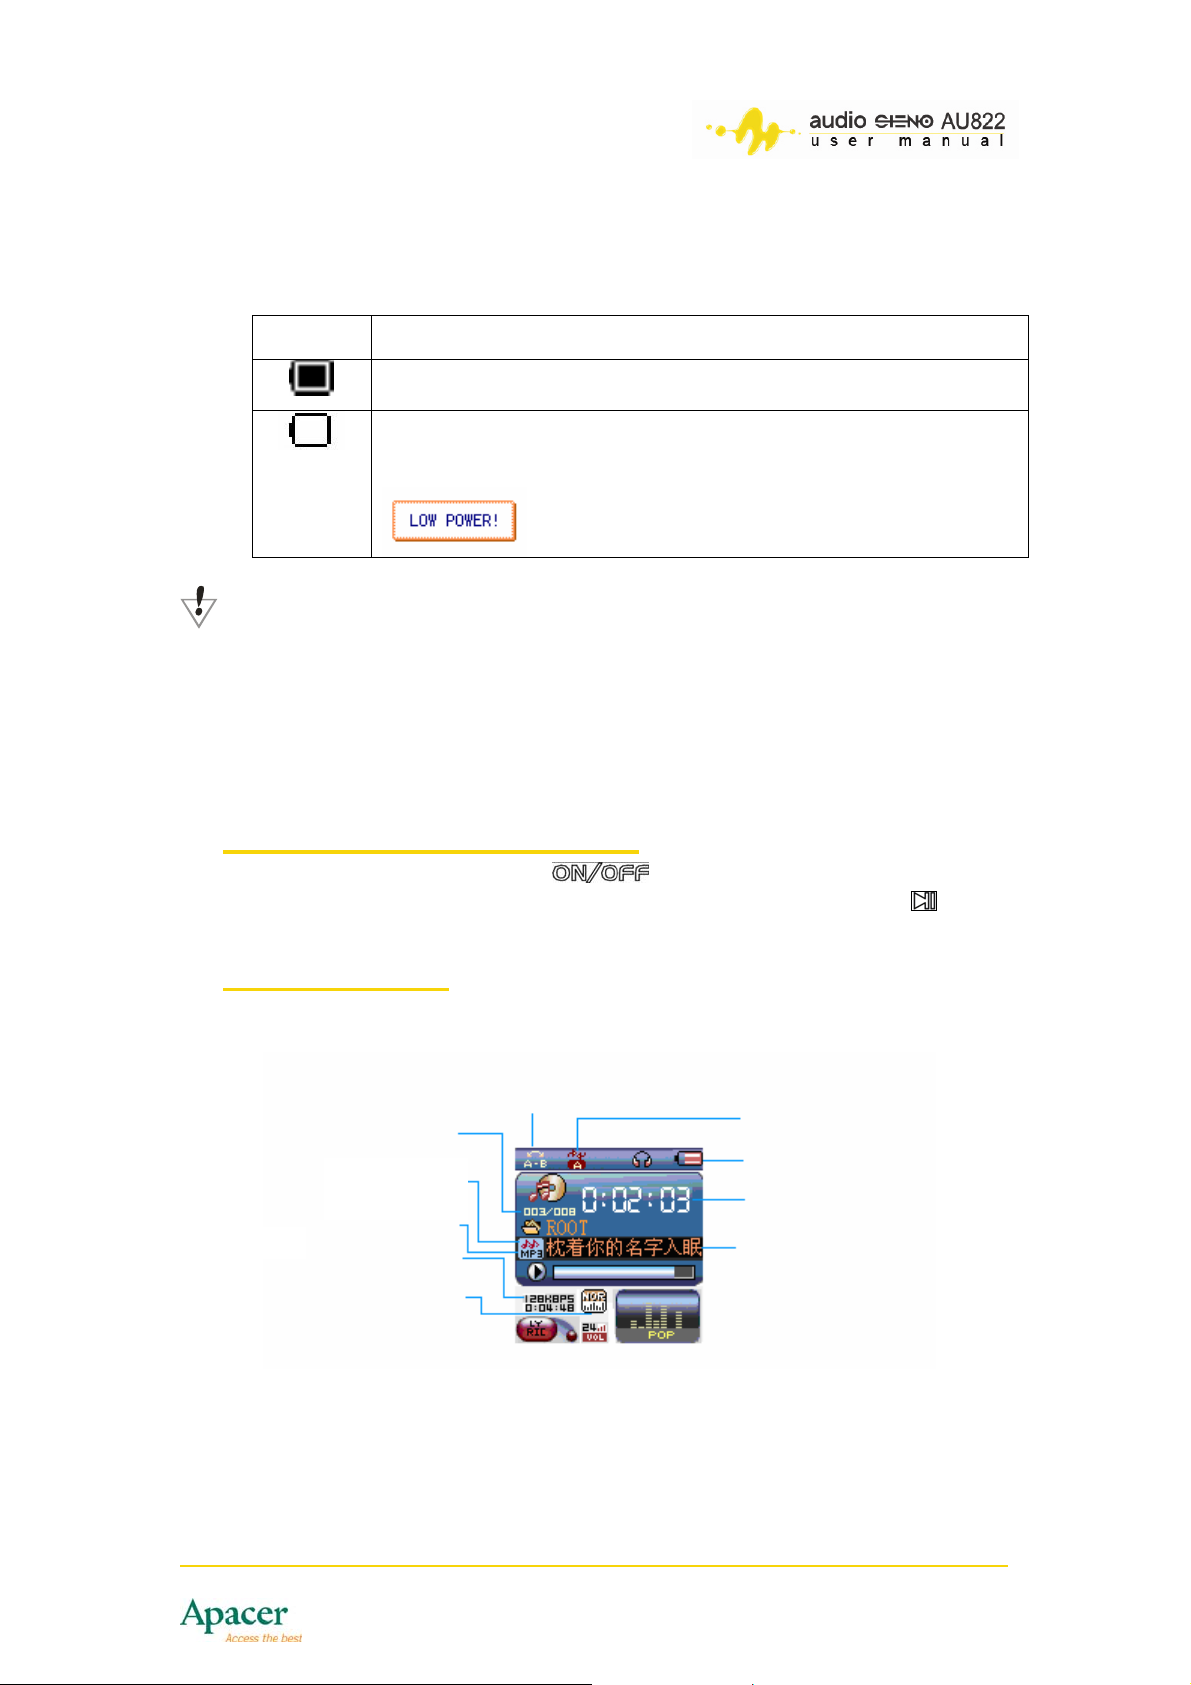
5.1 Battery indicator
The battery indicator on the right corner of the display tells you the battery
status.
Icon Description
The player battery is fully-charged. The icon gradually loses its
shade as you use the player.
The player battery has low power and needs to be recharged. A
LOW POWER! warning appears on the LCD display when the
player has very low battery power.
IMPORTANT!
• You must turn the player on while charging the battery.
• After charging the player battery via the AC adapter,
disconnect the adapter plug from the power outlet, then
disconnect the other end of the adapter from player DC-IN
socket to exit from USB mode.
• Turn the player off when not in use.
6 Turning the player on or off
To turn the AU822 on, position the switch to ON and wait for the
power-on animation to appear. To turn the player off, press and hold until
the LCD display turns off.
7 Screen display
s
A-B repeat
Order of the song
File format
Program mode icon
Bit rate
EQ mode
Repeat mode
Battery indicator
Play mode
Song/singer name
9
Page 10
8 Screen display
8.1 Entering menus
To enter main and sub-menus:
1. Press to display the current function.
2. Press to enter the main menu when the player is in stop mode.
Press button to enter the sub-menu when the player is in play or stop
mode.
8.2 Browsing the menus
To browse the menus:
1. Press , then press / to select the desired menu.
2. Press
player is playing the song.
8.3 Navigating through sub-menu options
To navigate through the sub-menu of a main menu item: press to enter.
, then press and hold / to fast rewind/forward while the
9 Menus
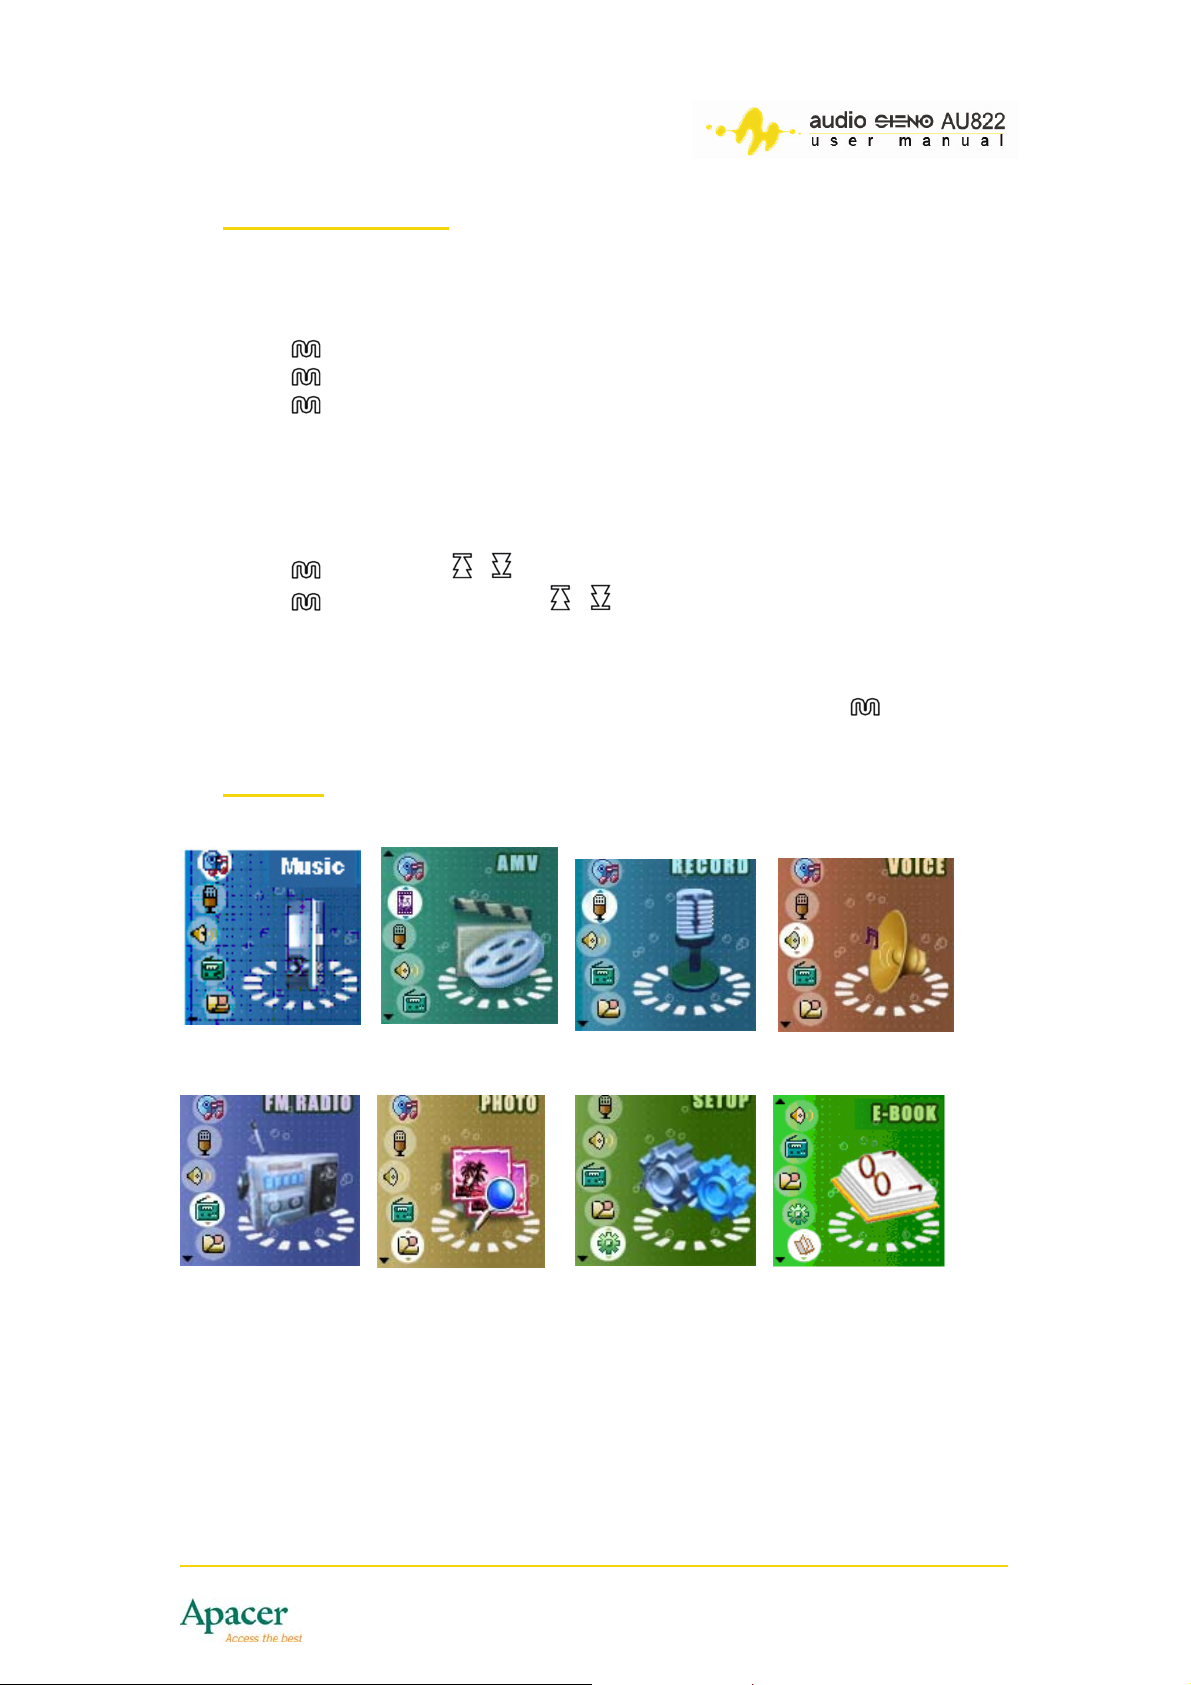
9.1 Main menu
Music playback AMV playback Voice recording Voice
FM radio Photo browser Setup E-Book
10
Page 11
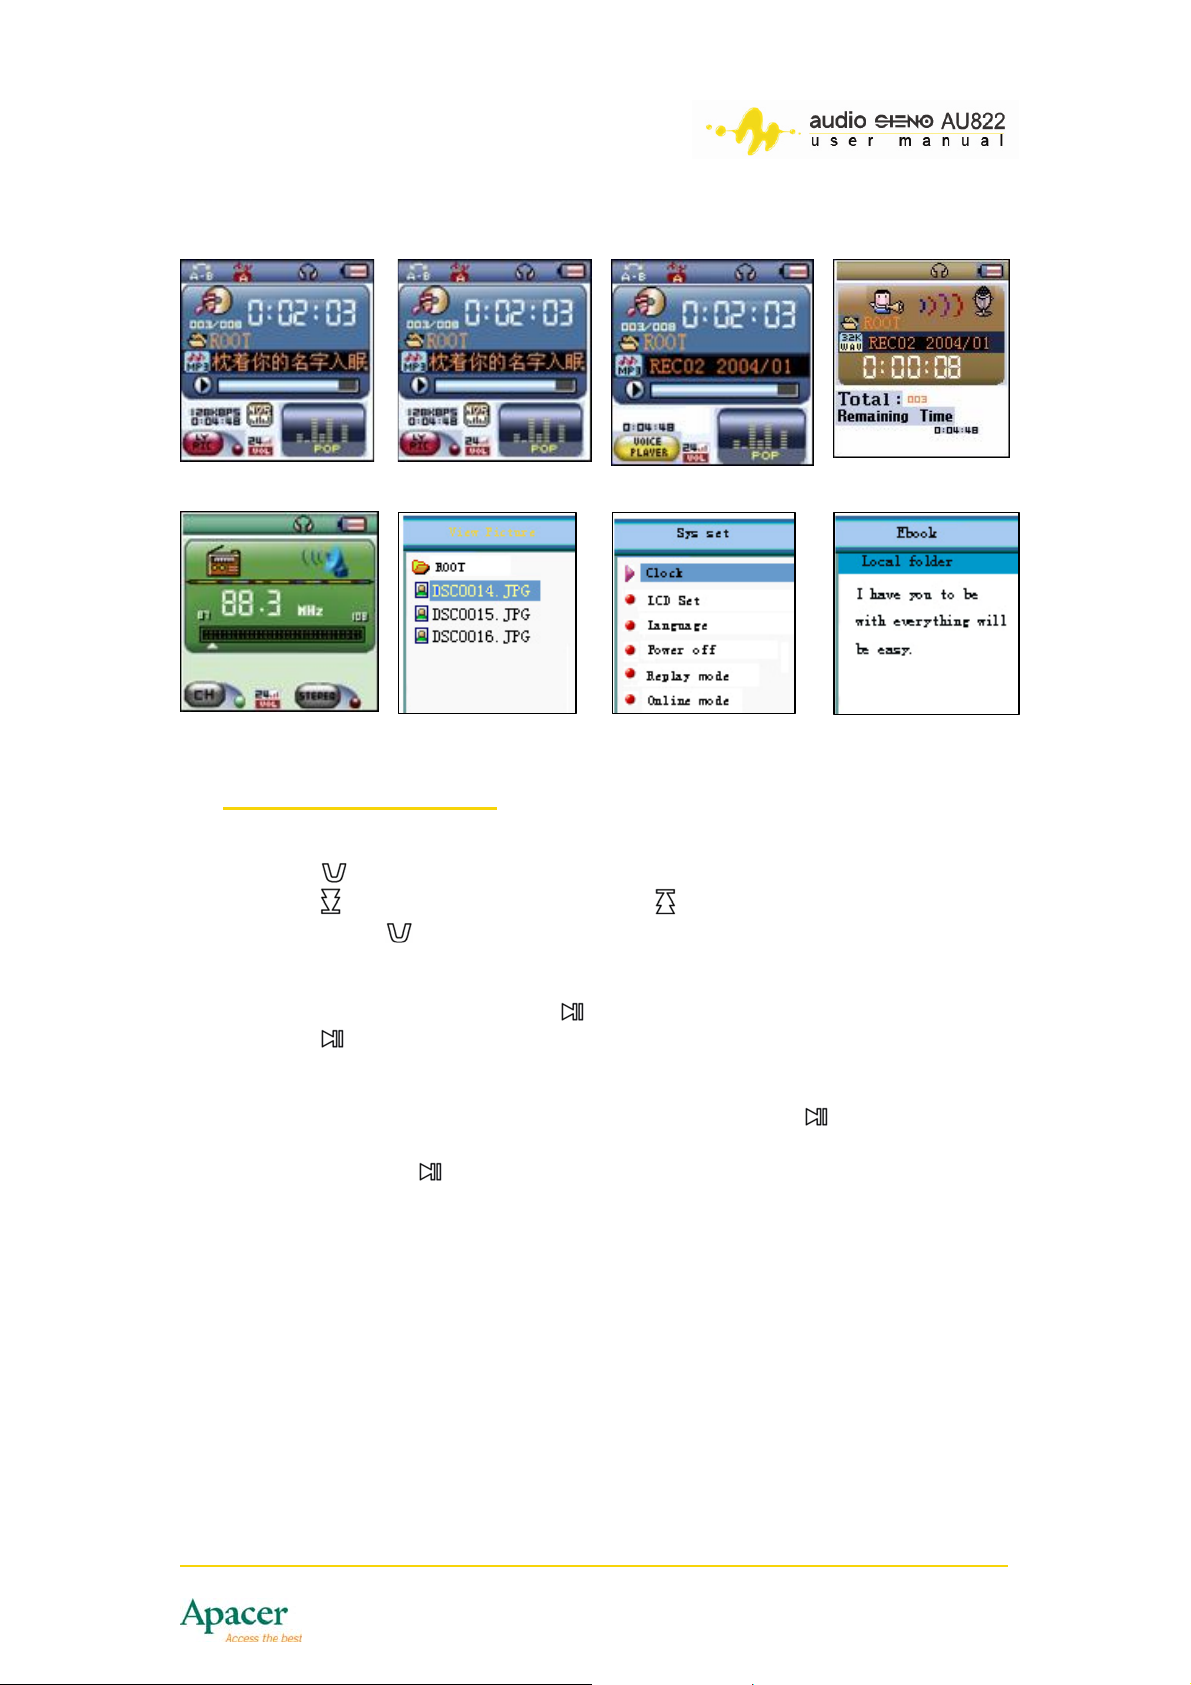
9.2 Menu screens
Music mode AMV mode Voice playback Voice recording
FM radio Photo browser Setup E-Book
10 Playback controls
10.1 Controlling the volume
1. Press to display the volume icon in the music/video mode window.
2. Press to decrease volume or press to increase the volume.
3. Then, press again to confirm the volume after adjustment.
10.2 Playing and pausing audio files
1. When in Music mode, press to begin playing the first audio file.
2. Press
to pause while playing.
10.3 Pausing and stopping recording
1. When the player is in Voice Recording mode, press to pause
recording.
2. Press and hold for 2 seconds to stop and save recording.
11
Page 12
11 Key operation
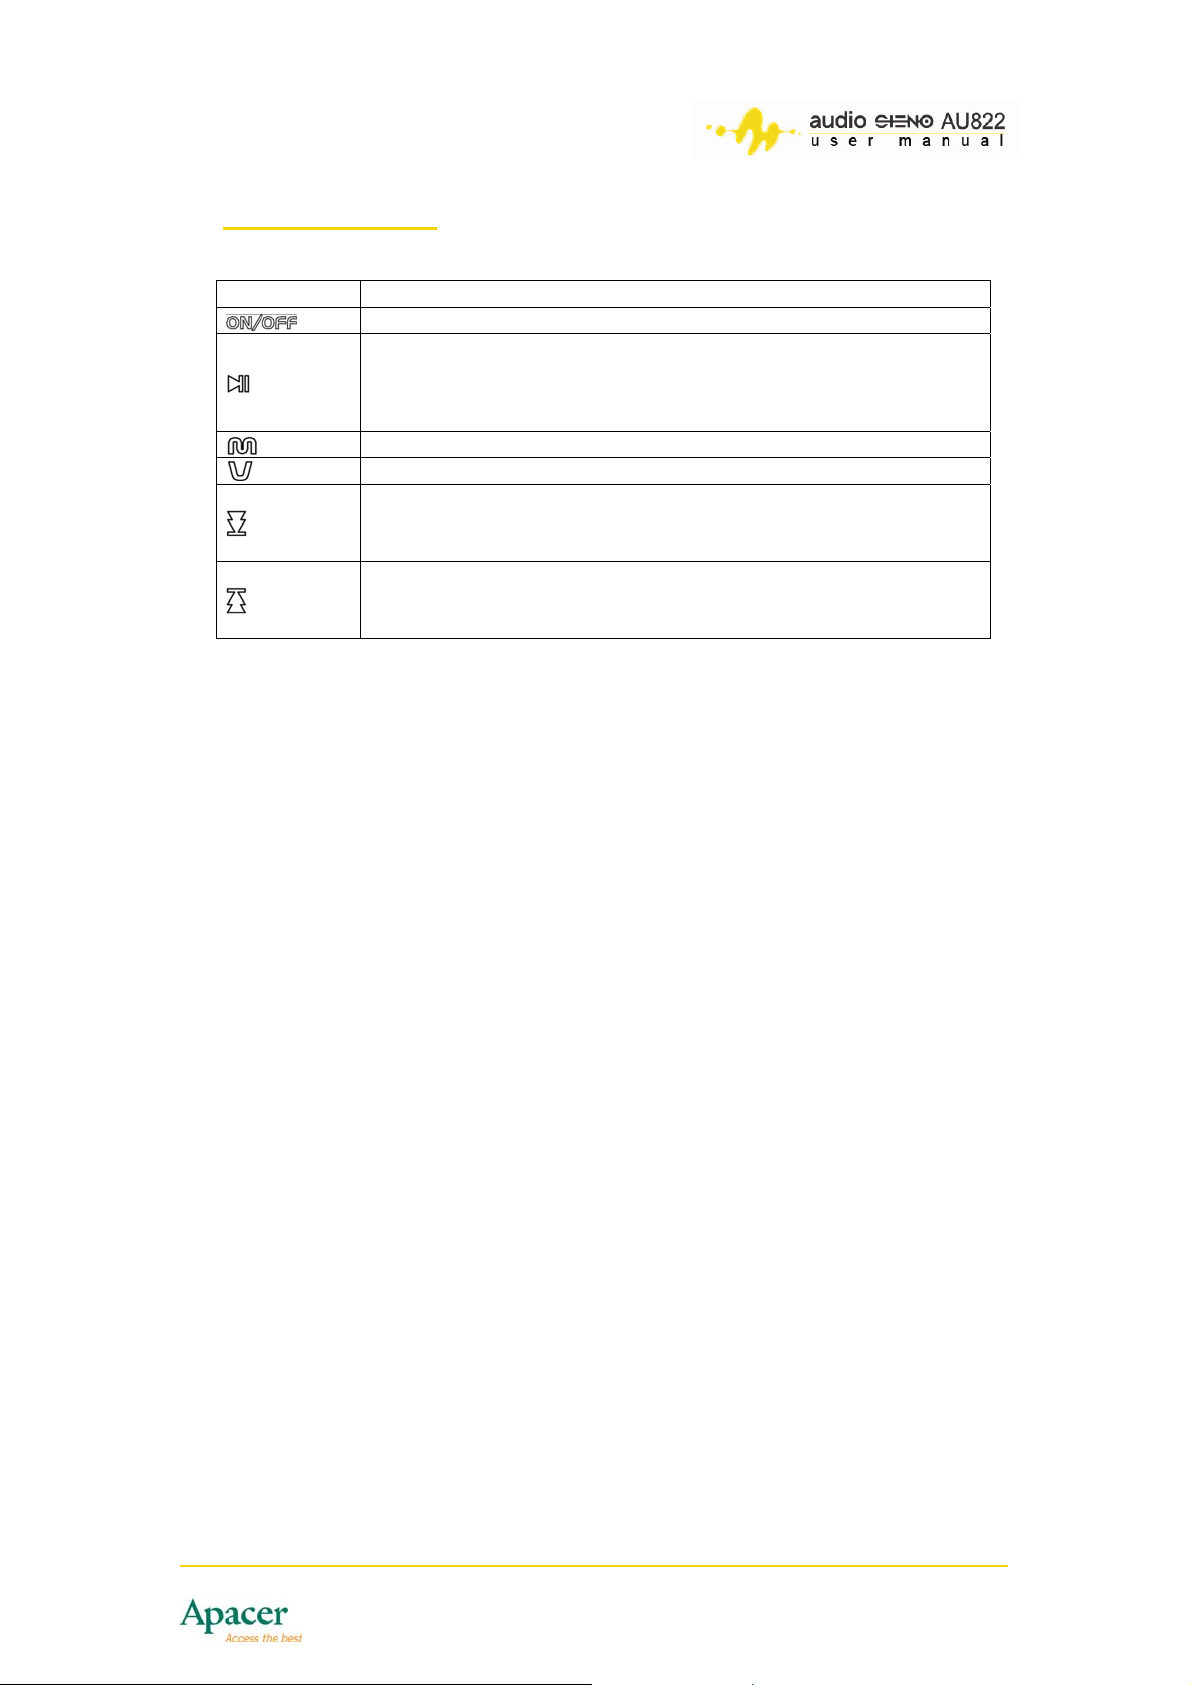
11.1 Keys and functions
Keys Functions
Turns the player on or off
Plays, pauses and stops audio, video and image play
Wakes the player up from sleep mode
Enters and selects menus
Controls the volume
Selects the next music/audio file
Fast forwards the currently playing music/audio file
Decreases the volume
Selects the previous music/audio file
Rewinds the currently playing music/audio file
Increases the volume
11.2 Operating the keys
There are two methods of pressing the keys: press once or press and hold.
Unless otherwise specified, press the button means press the key once.
• Press once - press the key once to enter a command or function.
• Press and hold - press and hold the key more than 1.2 seconds, then
release to enter a command or function.
12
Page 13
Section 2: Using the AU822 Player
12 Playing music
12.1 To play music/audio files:
1. Connect the earphone plug to the earphone jack.
2. Press to put the player in Music mode.
3. Press to play the first music/audio file.
4. Press to play the previous music/audio file.
5. Press to play the next music/audio file.
6. See section 10.1 Controlling the volume for details on how to adjust
the volume.
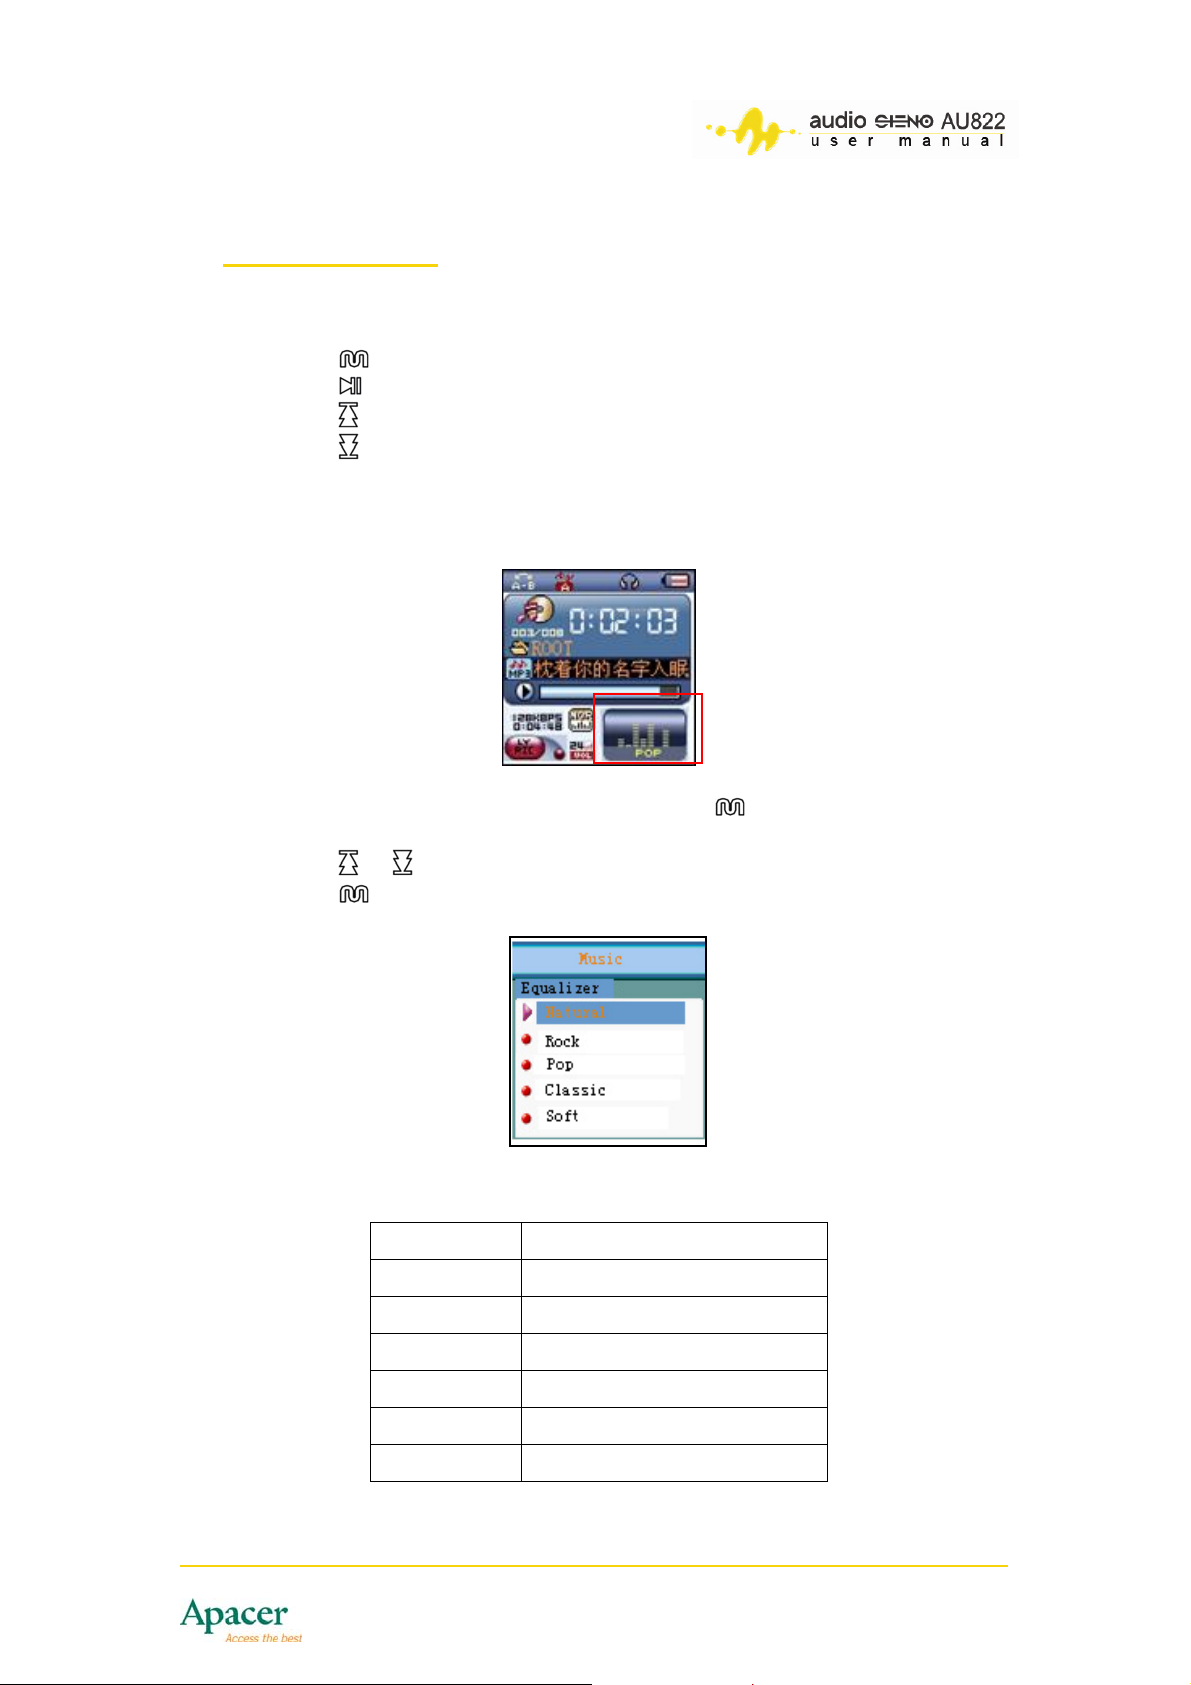
12.2 To change the equalizer settings
1. When the player is in Music mode, press to enter the Music submenu.
2. Press or until the EQ mode menu is selected.
3. Press to enter EQ mode menu.
4. Select from six equalizer presets.
EQ setting Abbreviation
Natural NRT
Rock ROC
Pop POP
Classial CLR
Soft SOF
Jazz JRZ
13
Page 14
DBB DBB
5. Press or to select an EQ setting, then press to confirm. The
selected equalizer option appears in the EQ field in the Music screen.
12.3 Lyrics synchronization
The AU822 supports dynamic sliding lyrics (.lrc files) which you can view as
the songs play. A lyrics file must have the same as the song. For example,
lyrics to the song Yesterday Once More.mp3 must be saved as Yesterday
Once More.lrc.
To determine if the current song has available lyrics:
1. Play the song following the instructions from the previous section.
2. Locate the lyrics file that matches the song.
3. Press and hold to enter the Lyrics screen. The sliding lyrics
displays on screen.
4. Press , then press or to view the lyric files manually.
5. Press to return to the Music screen.
13 Playing AMV files
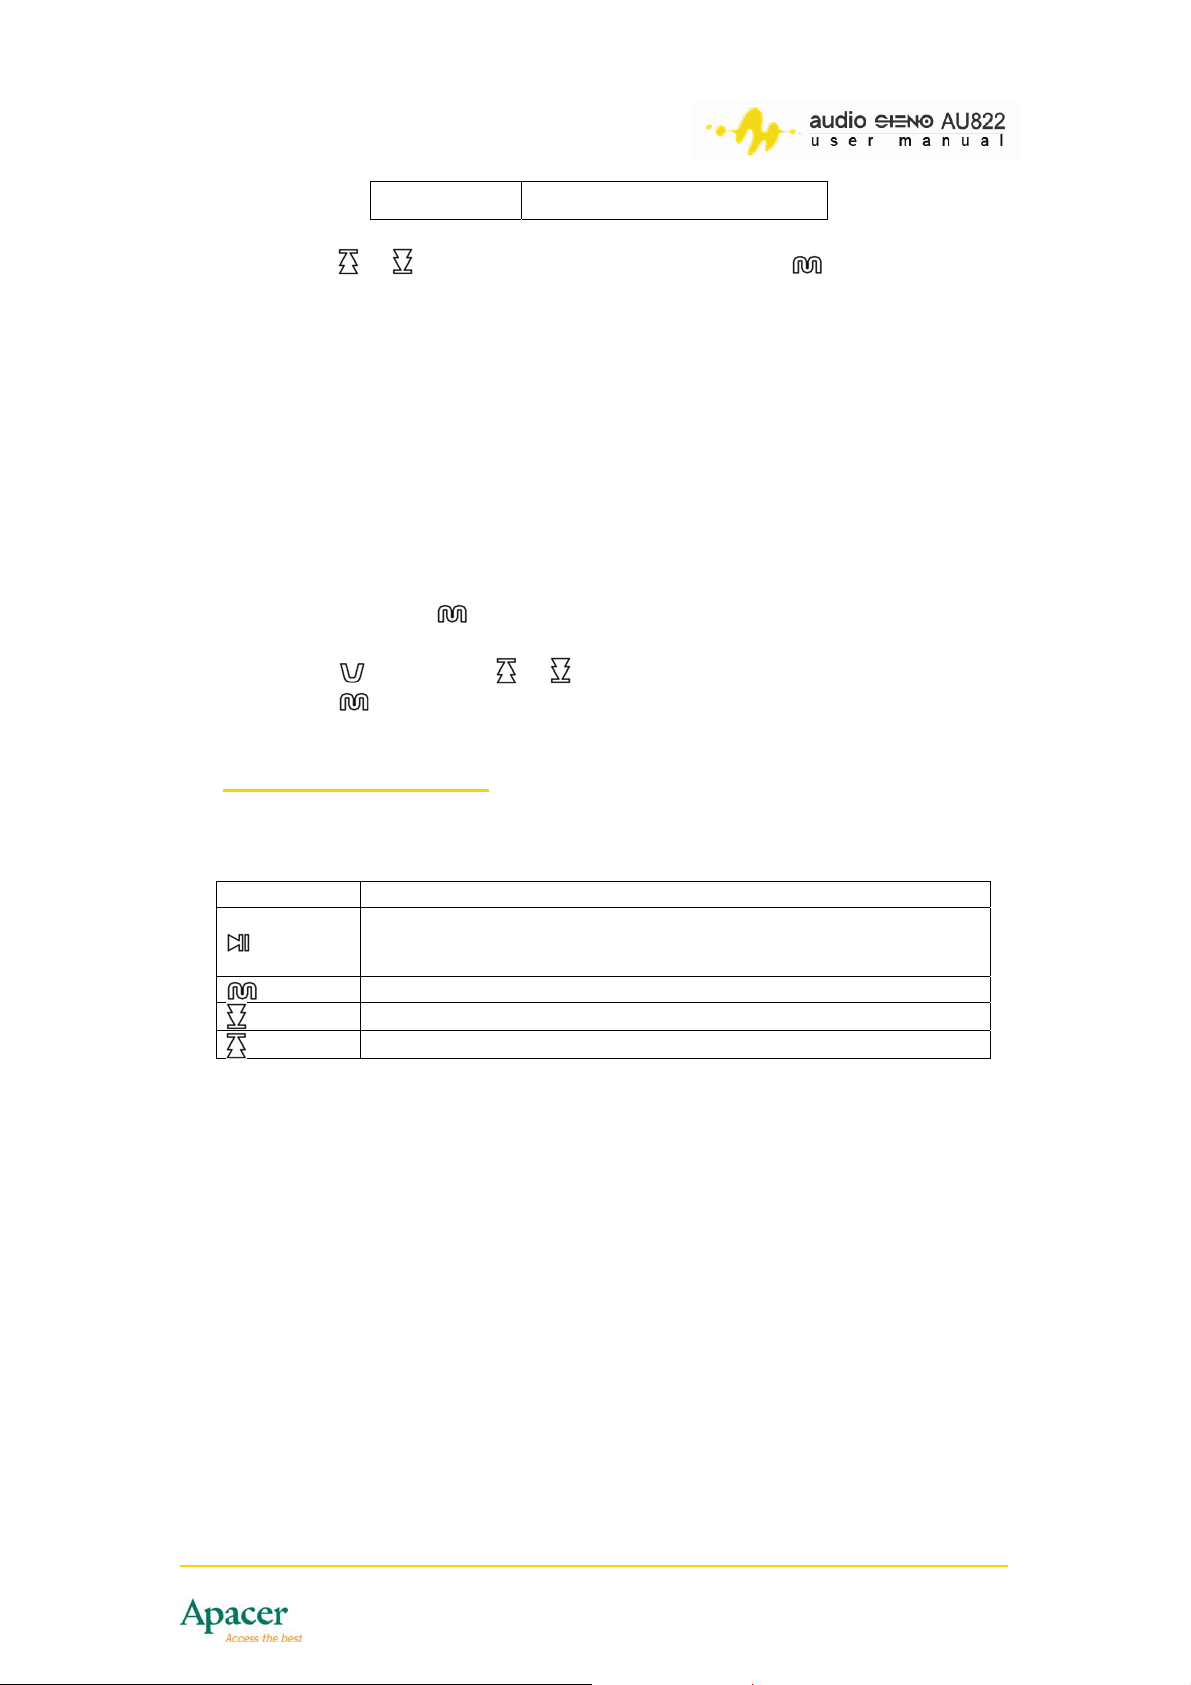
Follow the instructions in the previous section to play AMV files. When playing
AMV files, only the following keys are functional:
Key Functions
13.1 Converting files to AMV format
13.1.1 Overview
Video clips must be converted to AMV file format for playback. The provided
tool converts video clips with the following extensions to AMV:
• AVI format (*.avi)
• Windows Media format (*.asf)
• MPEG-1 format (*.mpg, *.mpeg)
• MPEG-2 format (*.vob)
• RealPlayer format (*.rm)
• Quicktime format (*.mov)
Press and hold to turn the player off
Press to play or stop the AMV playback
Press and hold to enter the main menu
Press to select the next track
Press to select the previous track
14
Page 15
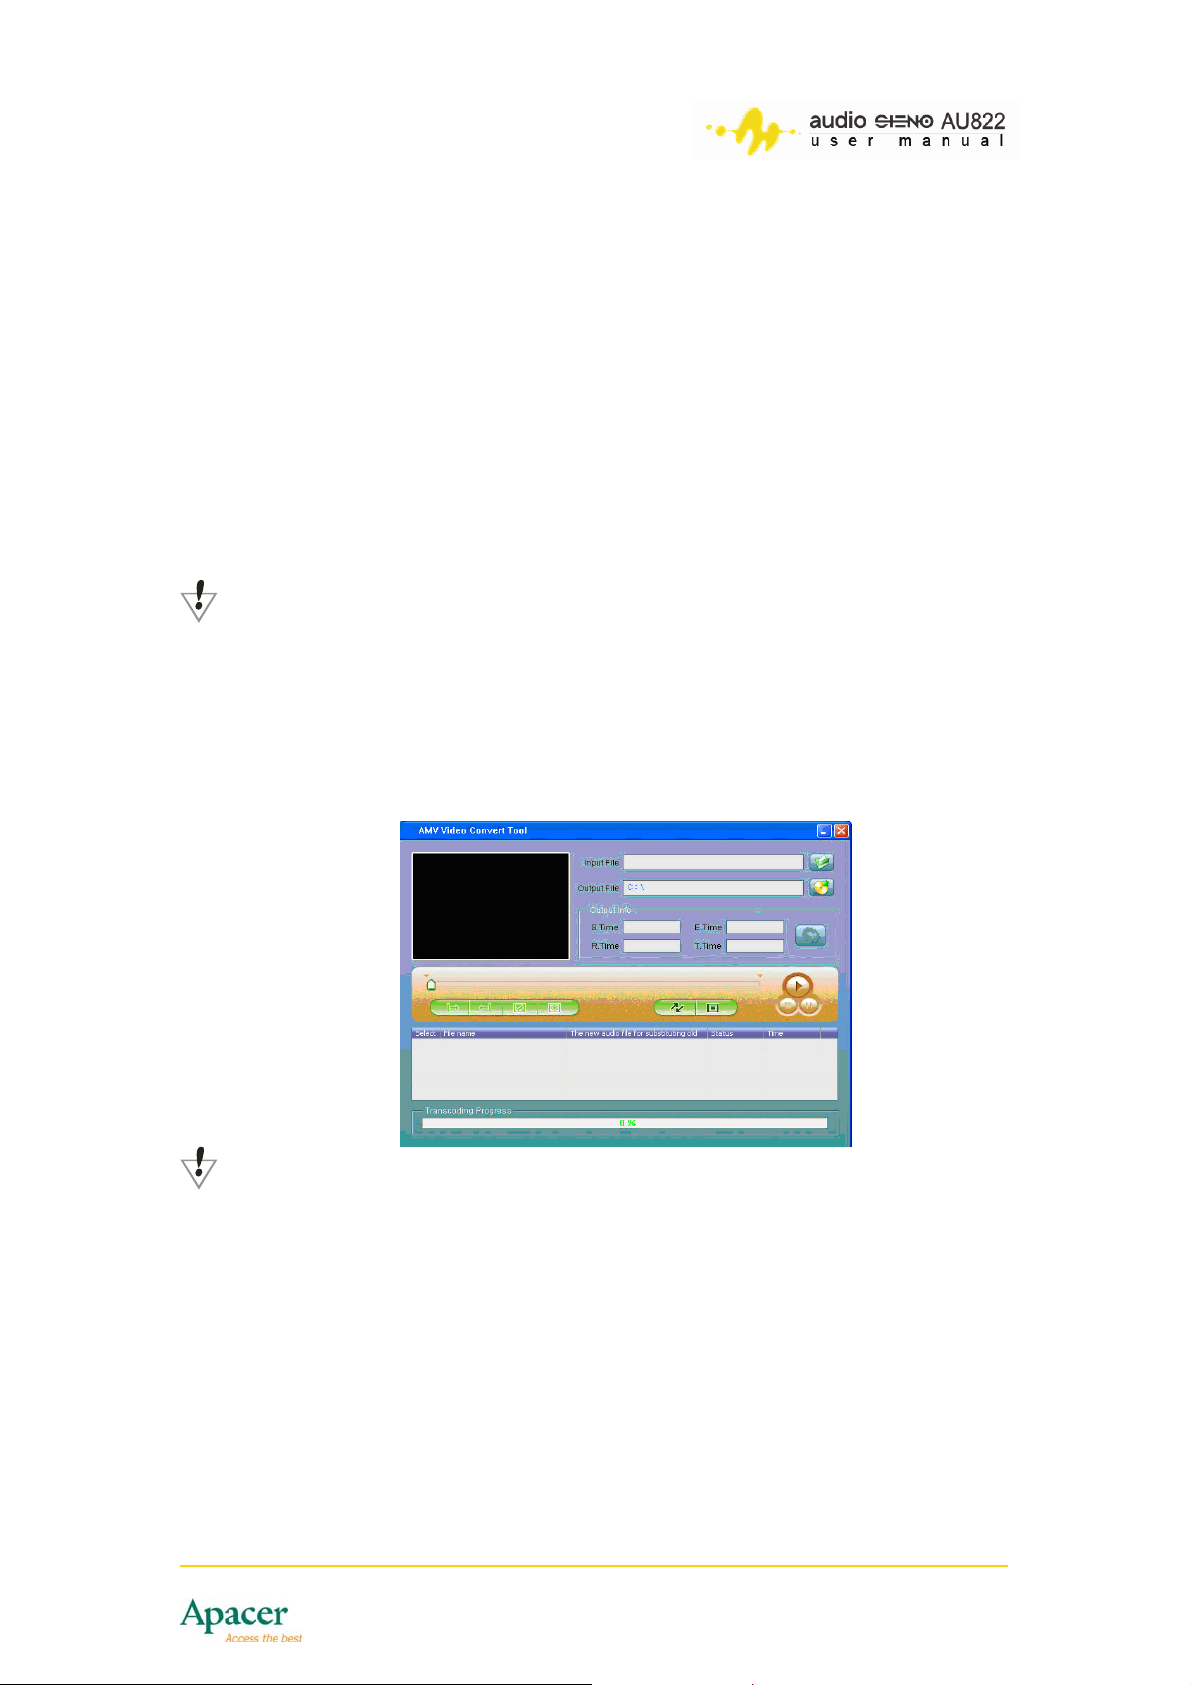
13.1.2 Installing and launching the converter tool
To install the converter tool to your PC:
1. Check if your PC meets the following requirements:
• Windows 98, Windows Me, Windows 2000, Windows XP OS
• Windows Media Player 9.0 or higher
• Microsoft DirectX 9.0 or higher
2. Turn on the PC, and then place the installation CD in the optical drive.
The system automatically begins driver installation.
3. Follow screen instructions to complete installation.
NOTE
If the installation does not start automatically, go to the root directory
of the installation CD, and then double-click on the Setup.exe file to
begin installation.
4. After installation, launch the application by clicking Start > Program >
MP3 Player Utilities > AMV Converter Tool.
NOTE
• The AMV Player is automatically installed and could be used to
playback AMV files.
• Place the mouse over the buttons to display a help balloon for
easy identification.
15
Page 16
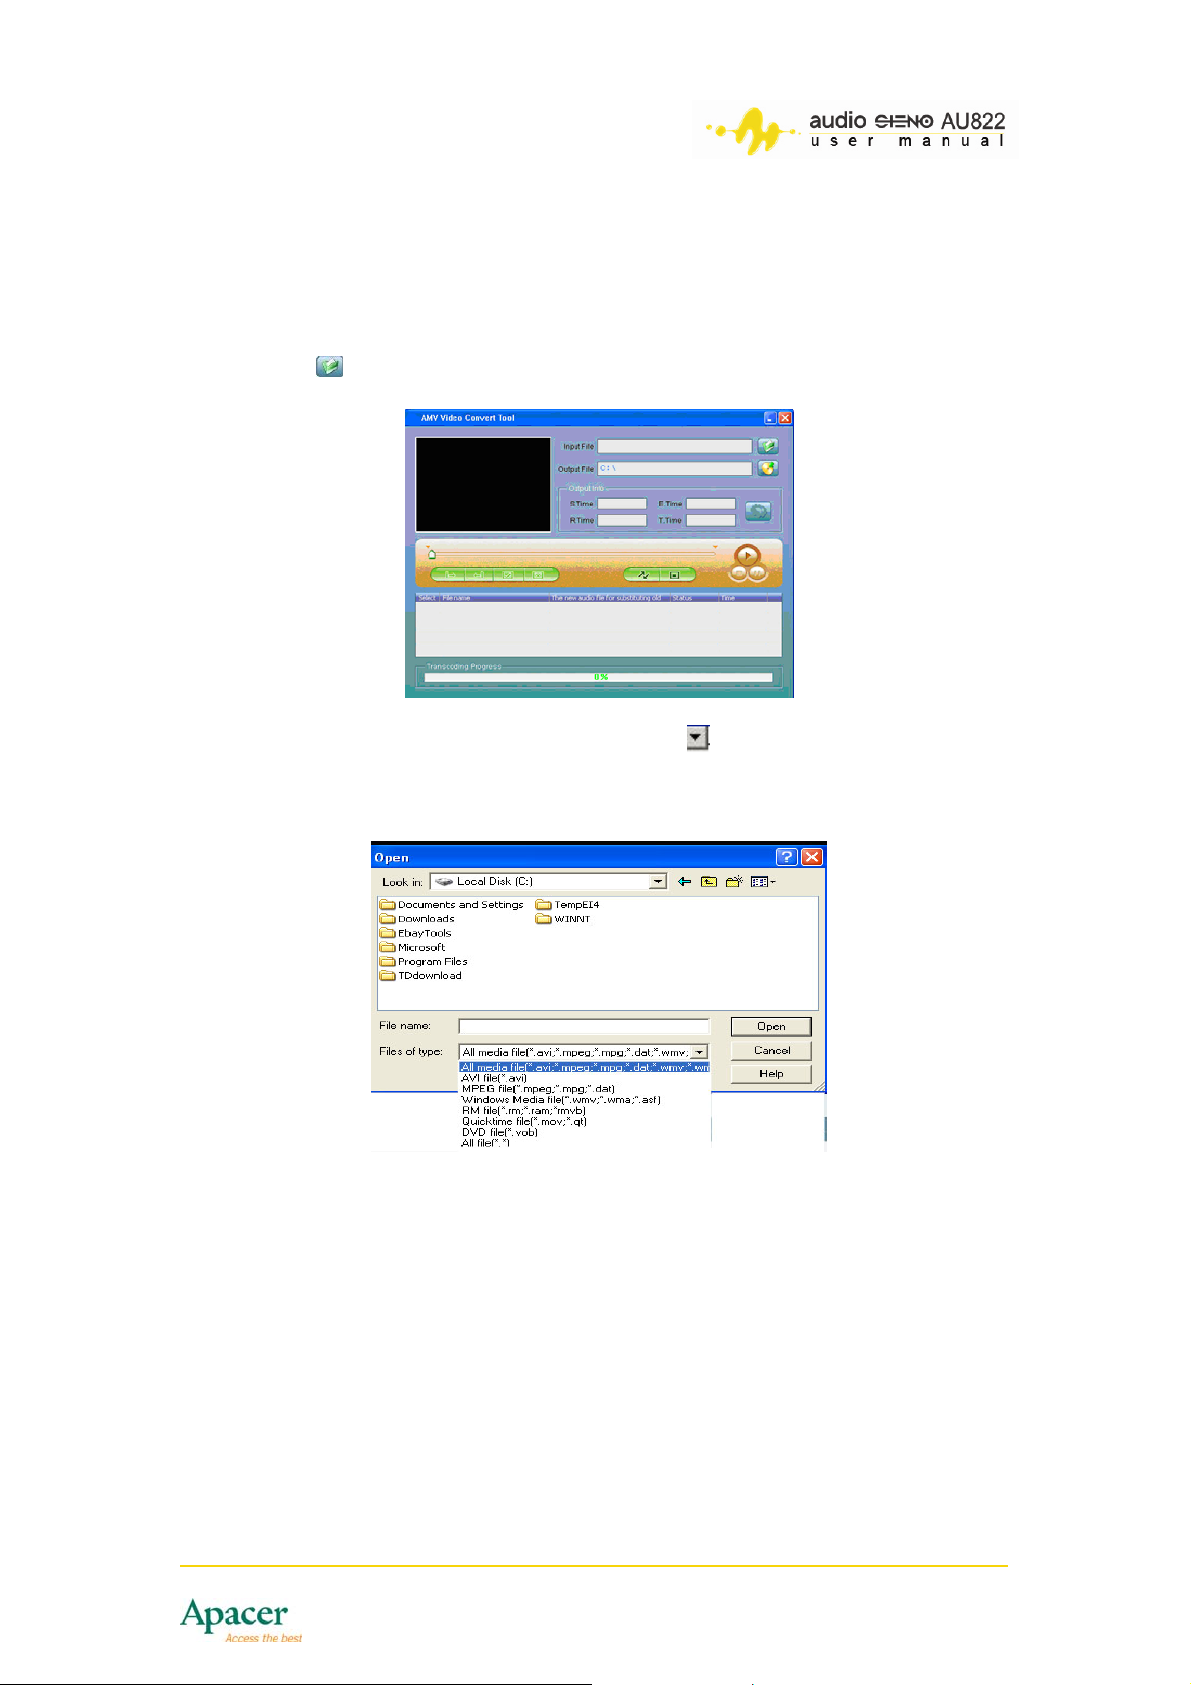
13.1.3 Selecting the audio/video files to convert
To convert audio/video files to AMV:
1. Launch the AMV Converter Tool
2. Click after the Input File field.
3. Locate the audio/video files, then click on the Files of type field to
select the correct file format.
4. Choose one or several audio/video files, then click Open.
16
Page 17
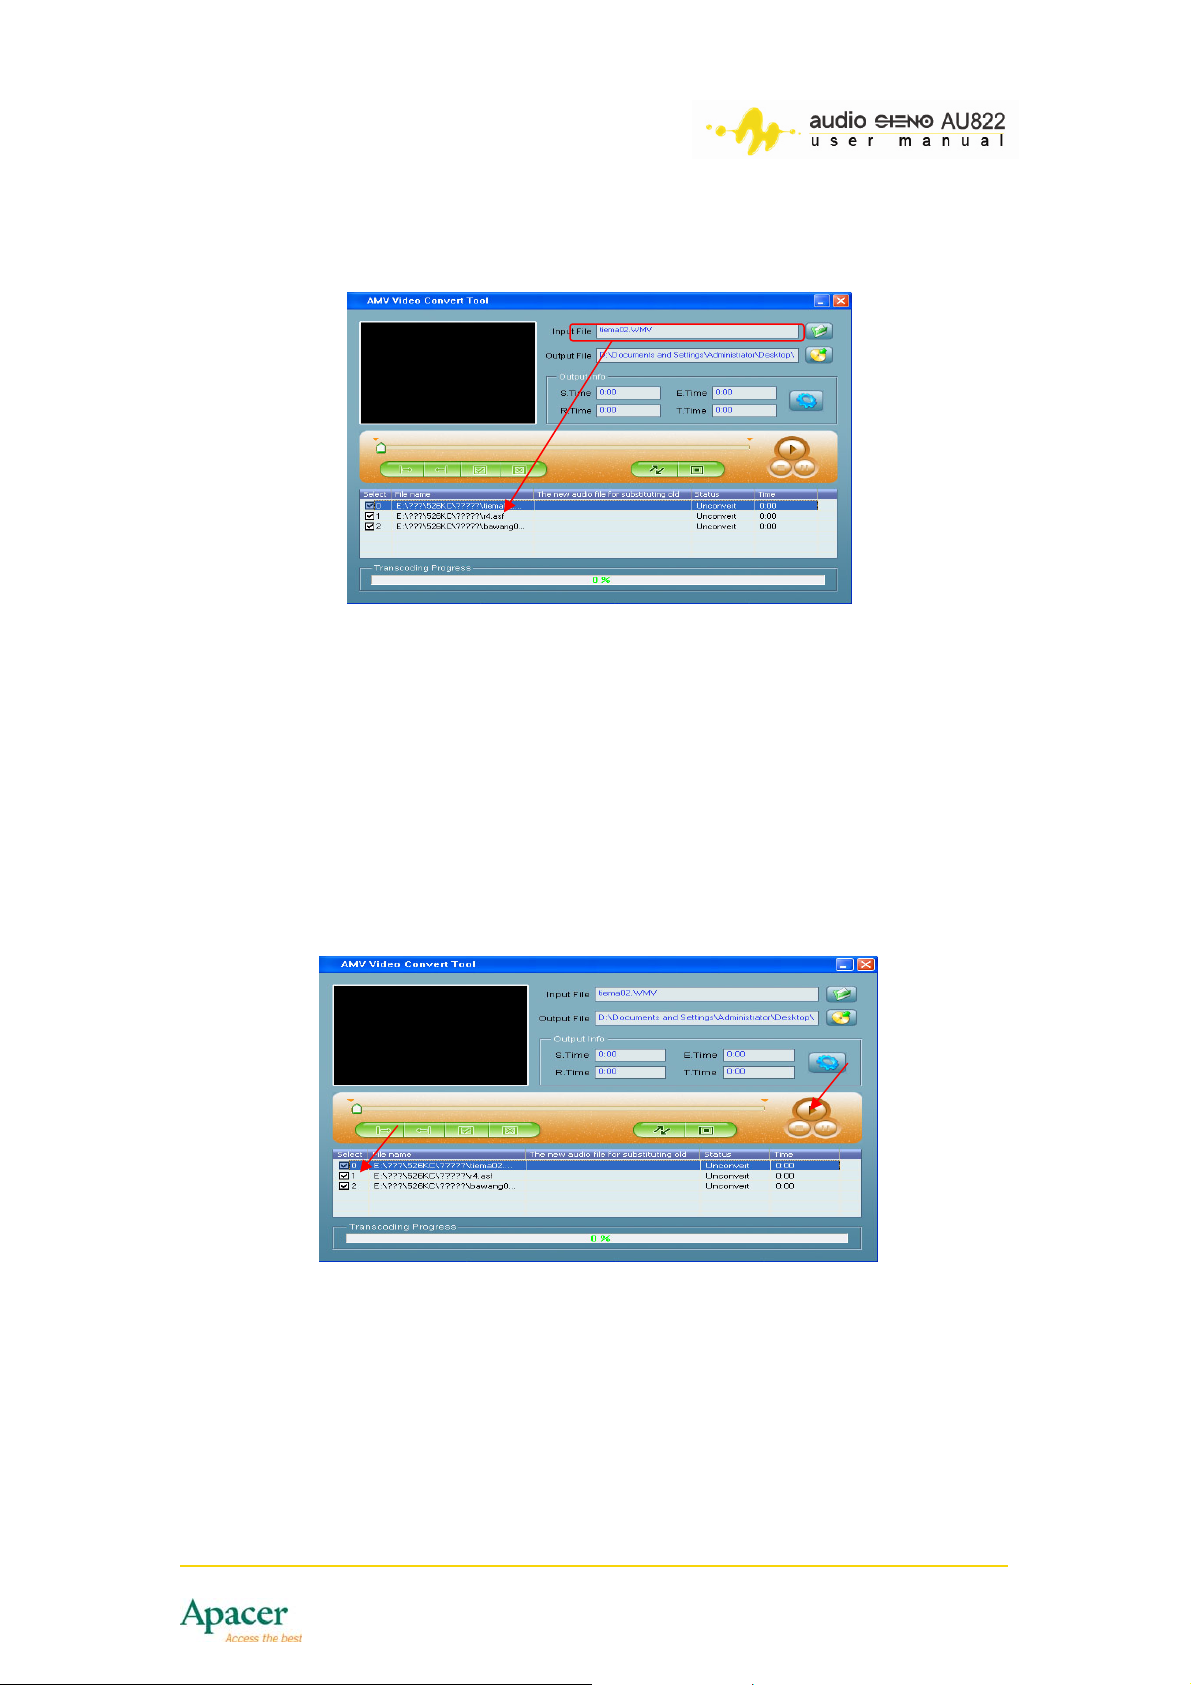
5. Information on the audio/video file including the file path, state and time
span appears in the AMV Converter Tool window. Refer to the
illustration below.
13.1.4 Playing the selected the audio or video file
The AMV Converter Tool allows you to playback the selected audio or video
file depending on the installed CODEC. Playing the audio/video file before
conversion tells you if the system has the available CODEC for that particular
file type. Refer to the Considerations section for details.
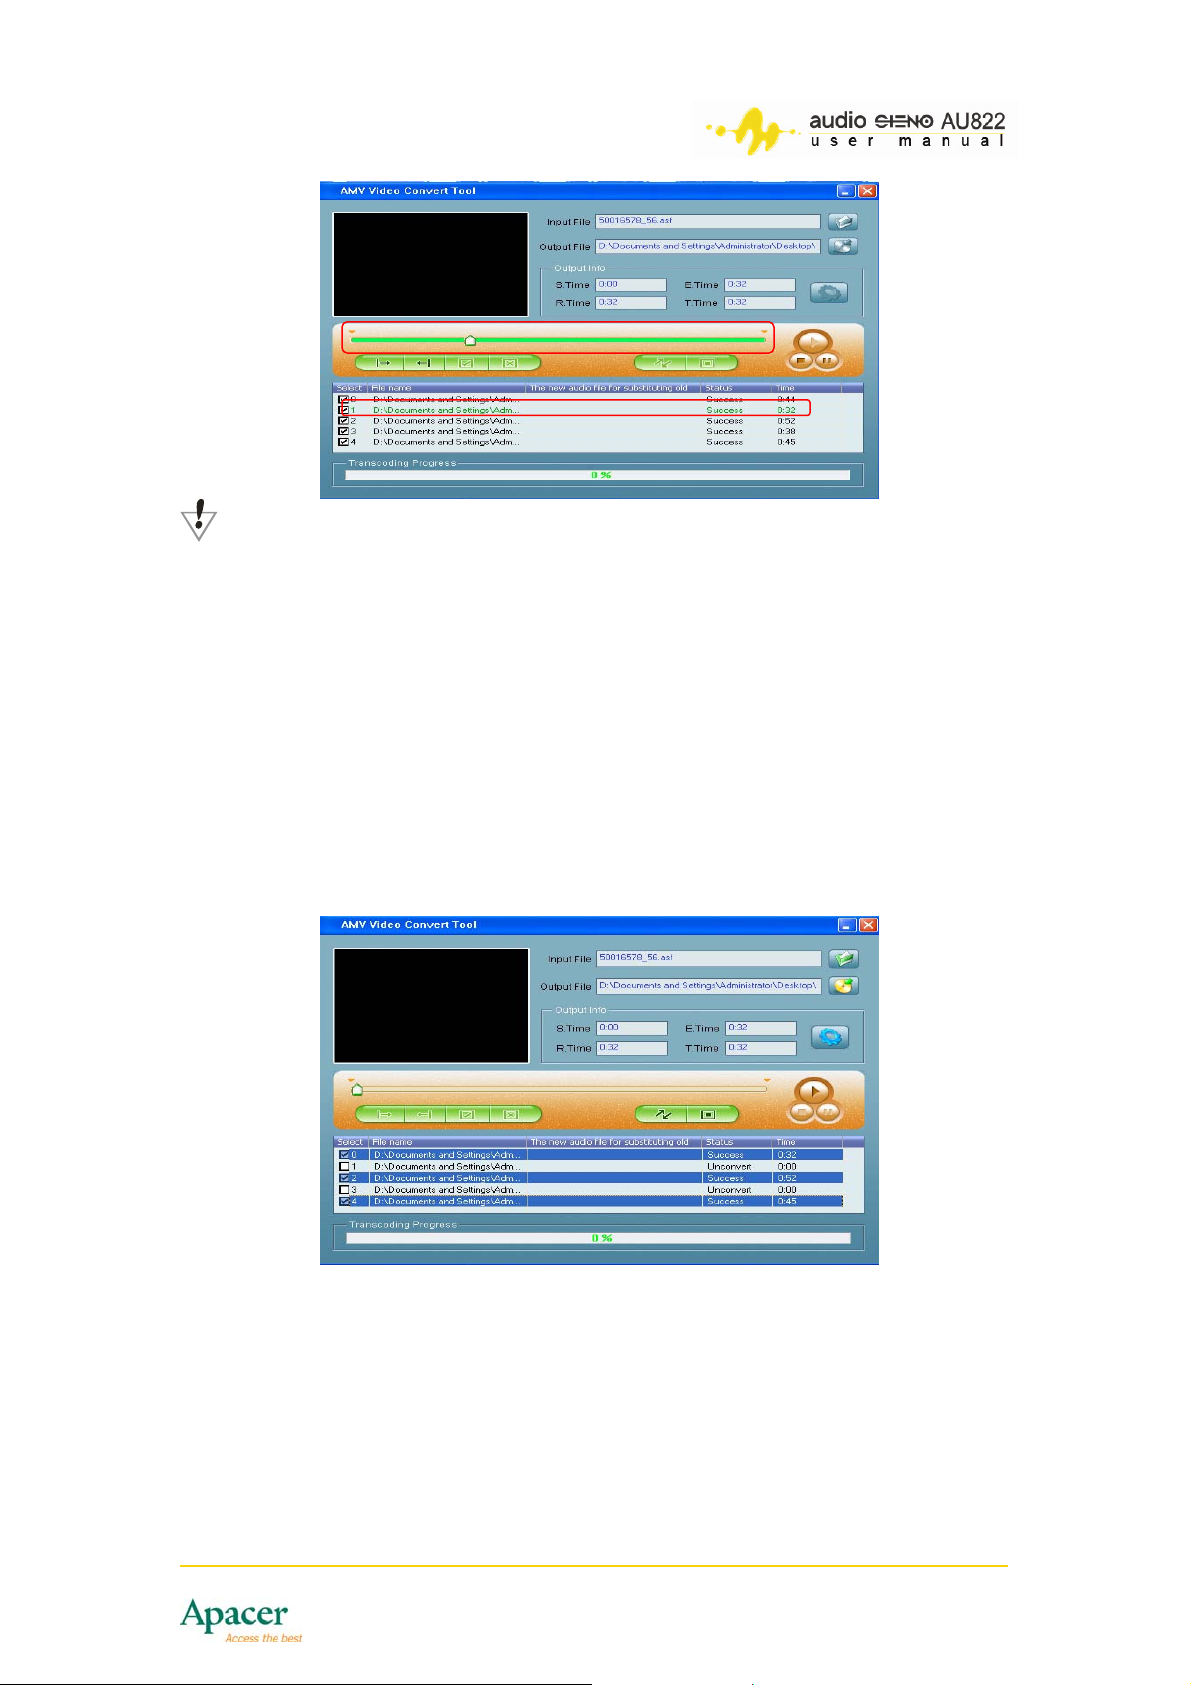
To play a selected audio/video file:
1. Click on an audio/video file from the list, then click the play button to
play the file.
During audio/video file playback, the progress bar displays the file status. The
audio/video file status now changes from Unconvert to Success and the
Time column displays the actual playing time.
2. Click the Stop or Pause buttons to stop or pause the playback.
17
Page 18
NOTE
• When the audio/video file status changes to Success, the
system has an available CODEC for that particular file type.
You can now proceed to the converting process.
• It is recommended that you play the selected audio/video file
before conversion to confirm playback capability.
13.1.5 Converting the audio/video file
To select the audio or video files for AMV conversion:
1. Select the audio/video files from the list by clicking the box before the
file. You can select as many audio/video files to convert from the list.
Unchecked audio/video files will not be converted.
18
Page 19
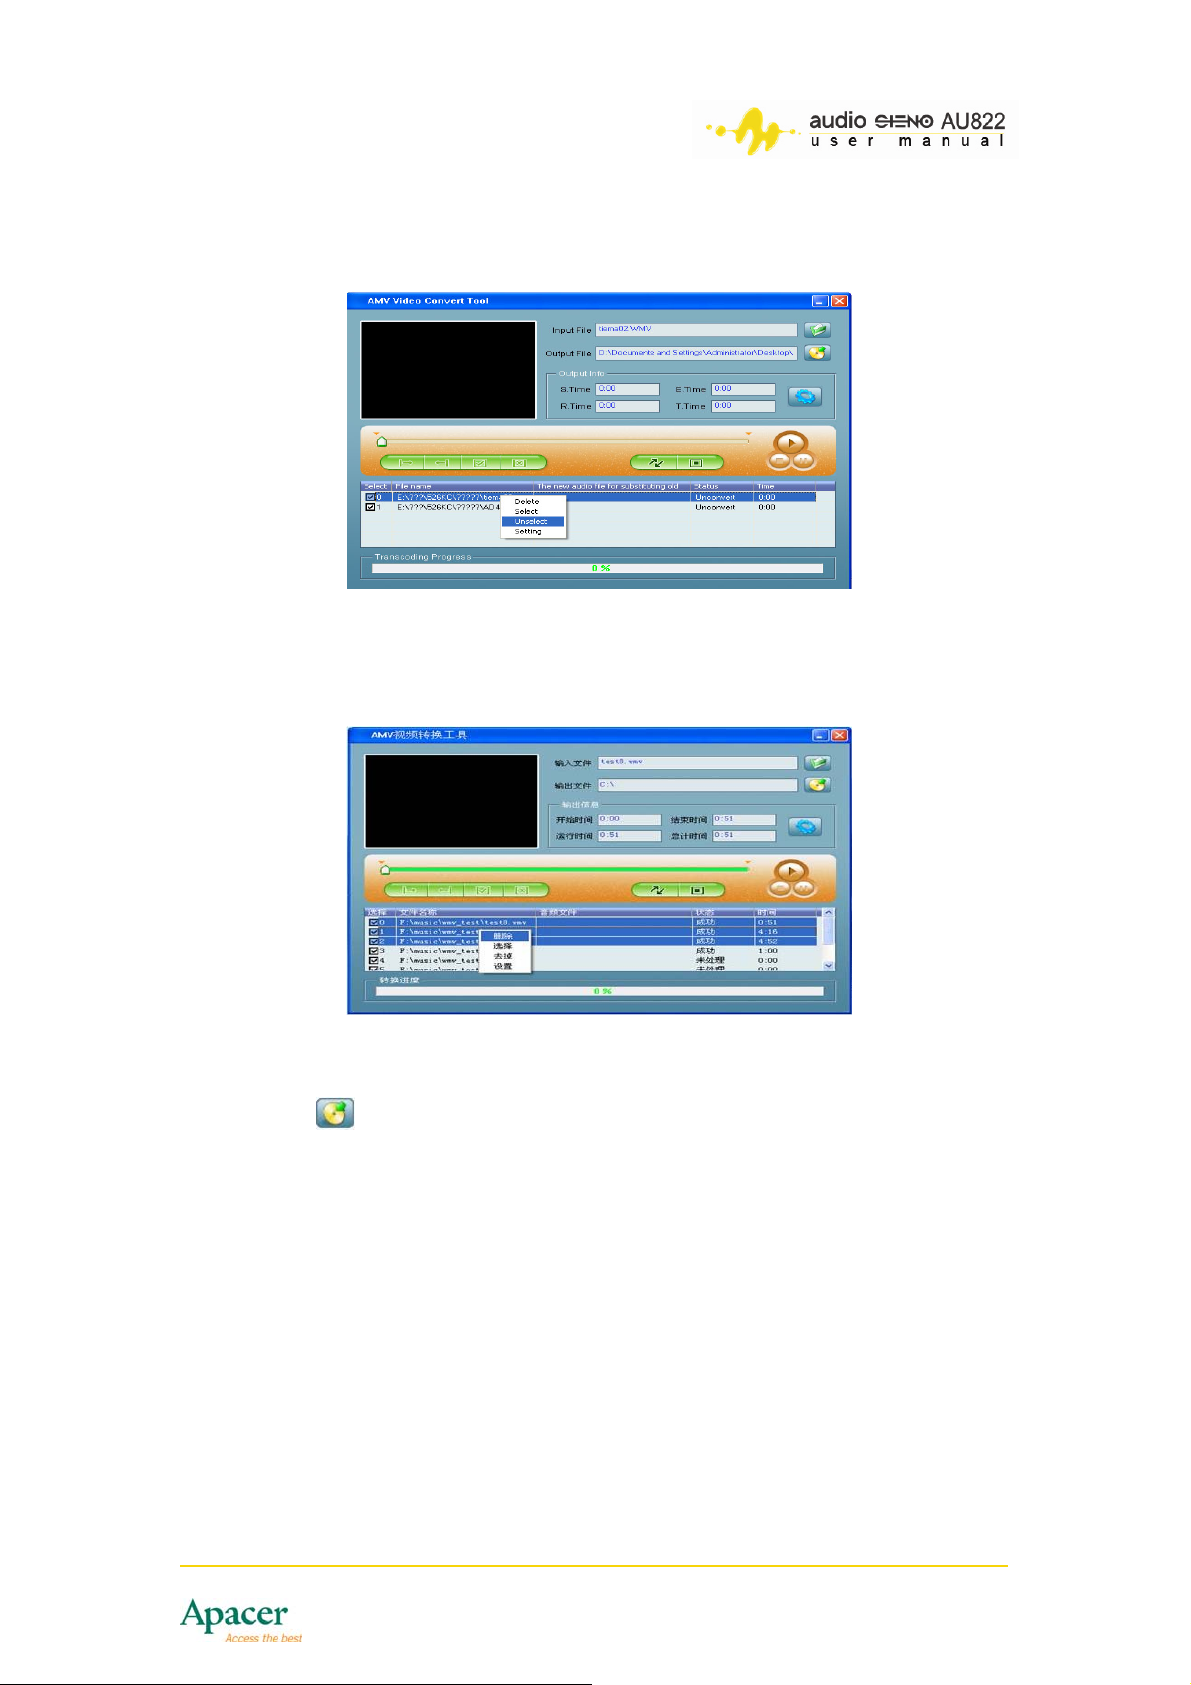
OR
Right click on an audio/video file, then click on Select from the pop-up menu.
2. To delete the audio/video file from the list, select the audio/video files
you want to remove, right-click on the file, then select Delete from the
pop-up menu. The file(s) is(are) removed from the list.
To change the destination folder for AMV converted files:
1. Click
to change the converted output file destination. The default
AMV converted file destination is: C:\.
19
Page 20
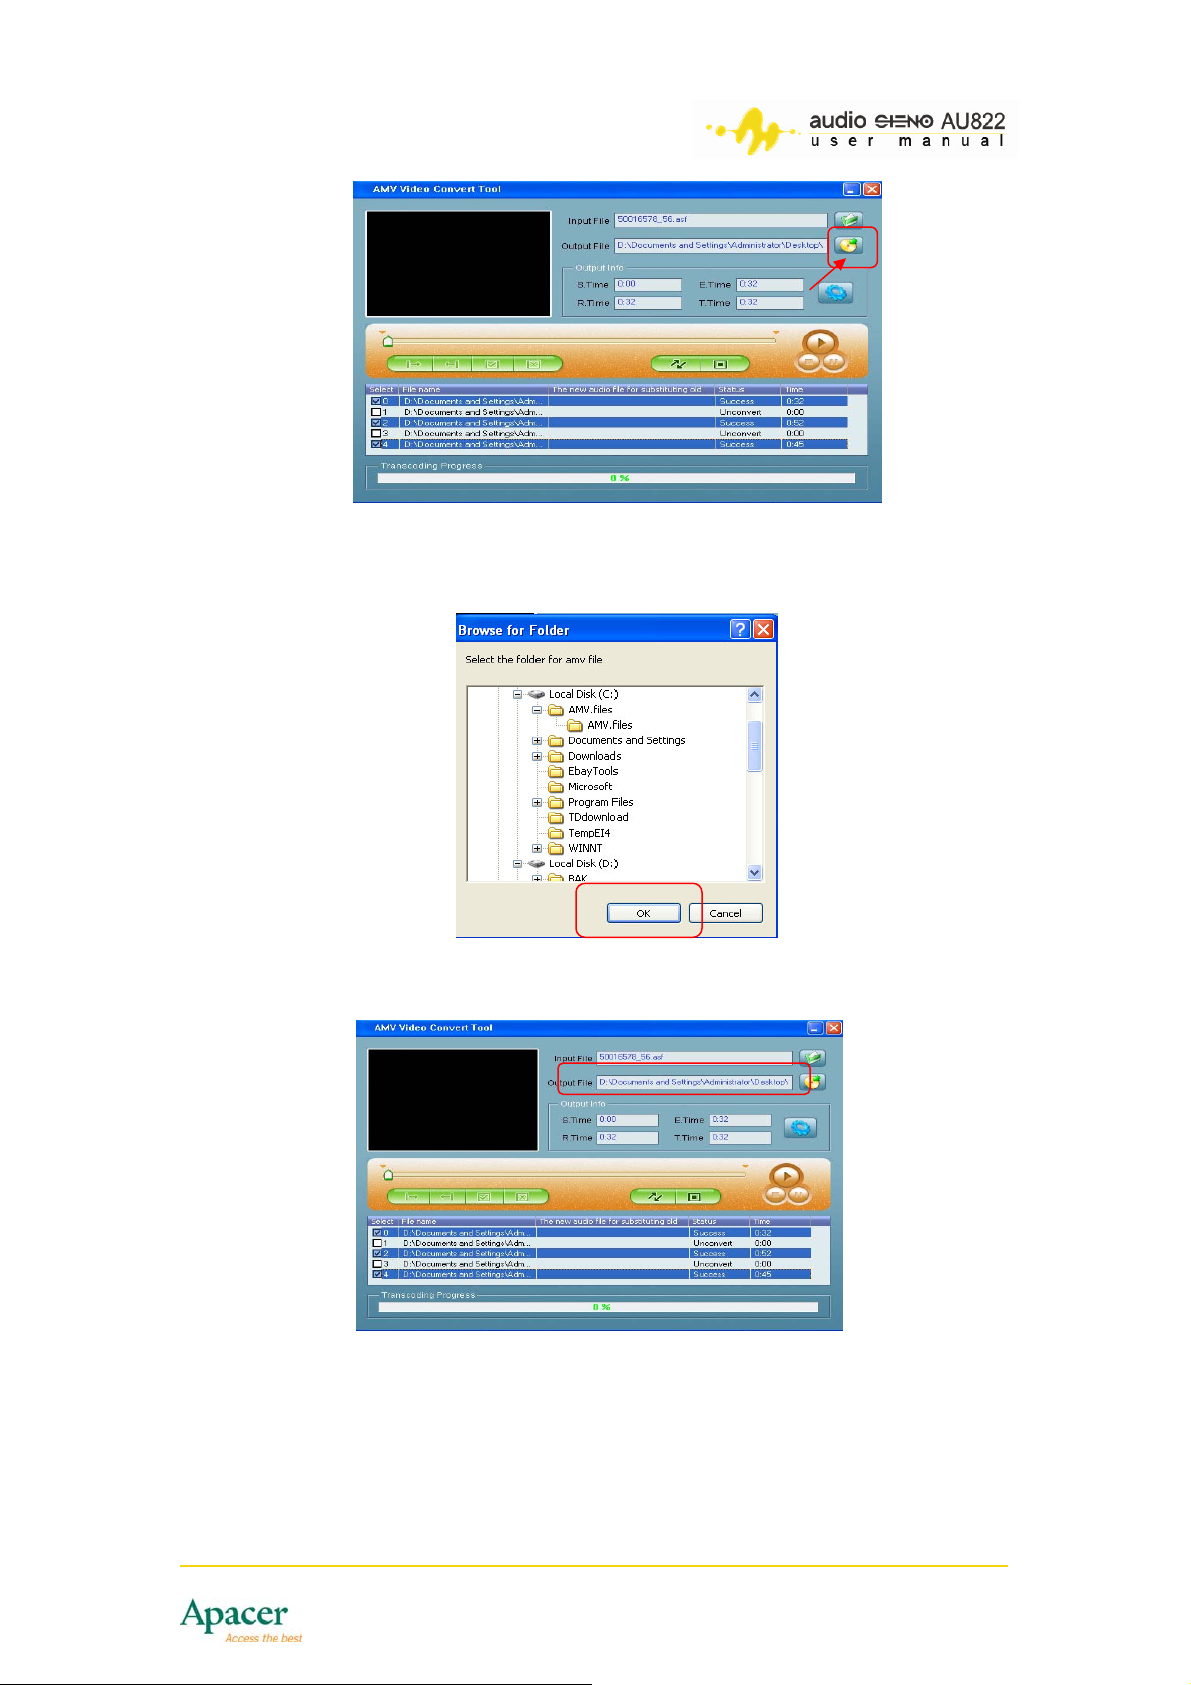
2. Select the destination for the converted AMV file from the Browse for
Folder window, then click OK.
The selected path appears in the Output File field.
20
Page 21
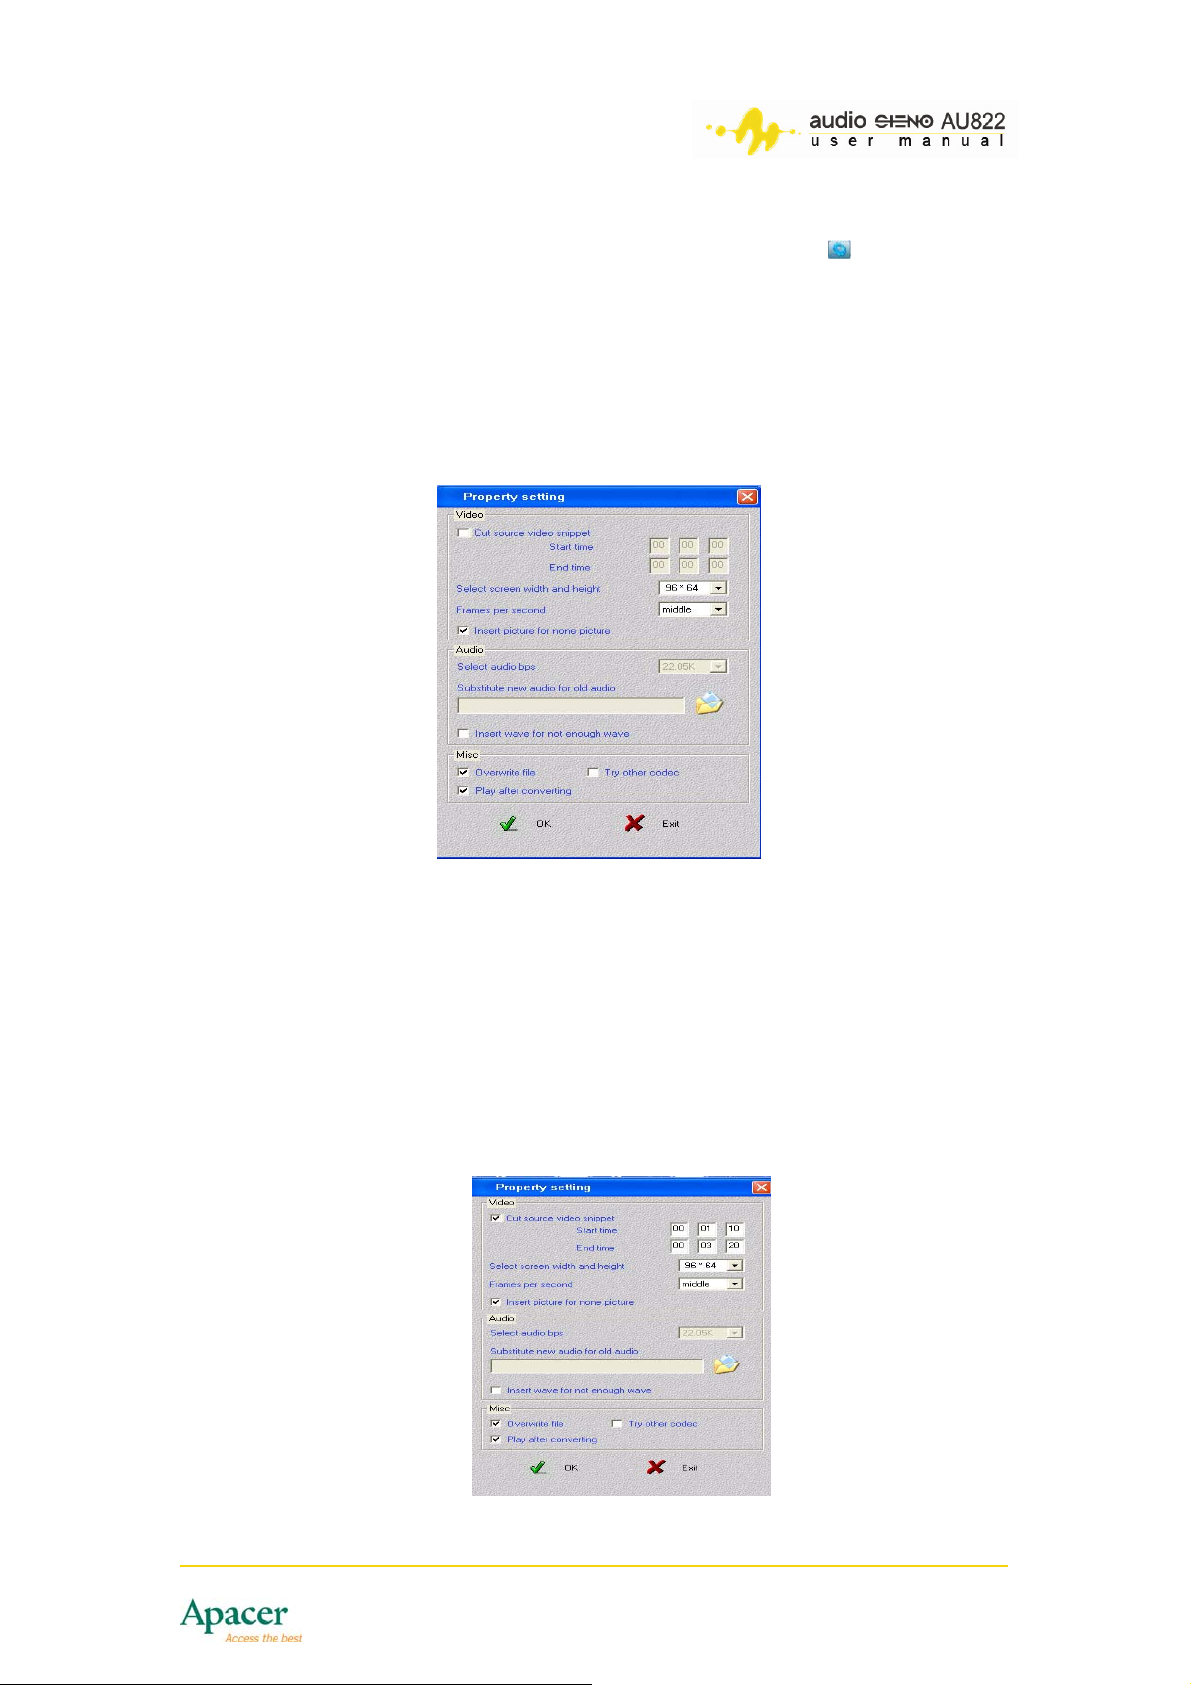
To change the audio/video file properties:
Select one or more audio/video file(s) from the list, then click .
OR
Select one or more audio/video file(s) from the list, right-click, then select
Setting from the pop-up menu.
The Property setting window appears.
To adjust the video segment intercept:
You can choose which part of the video file you want to convert to AMV using
the video segment intercept. To do this:
1. Determine the start and end time of the video file you want to intercept.
2. From the Property setting window, check the Cut source video
snippet option.
3. Set the start and end time (hh:mm:ss) for the video file.
21
Page 22
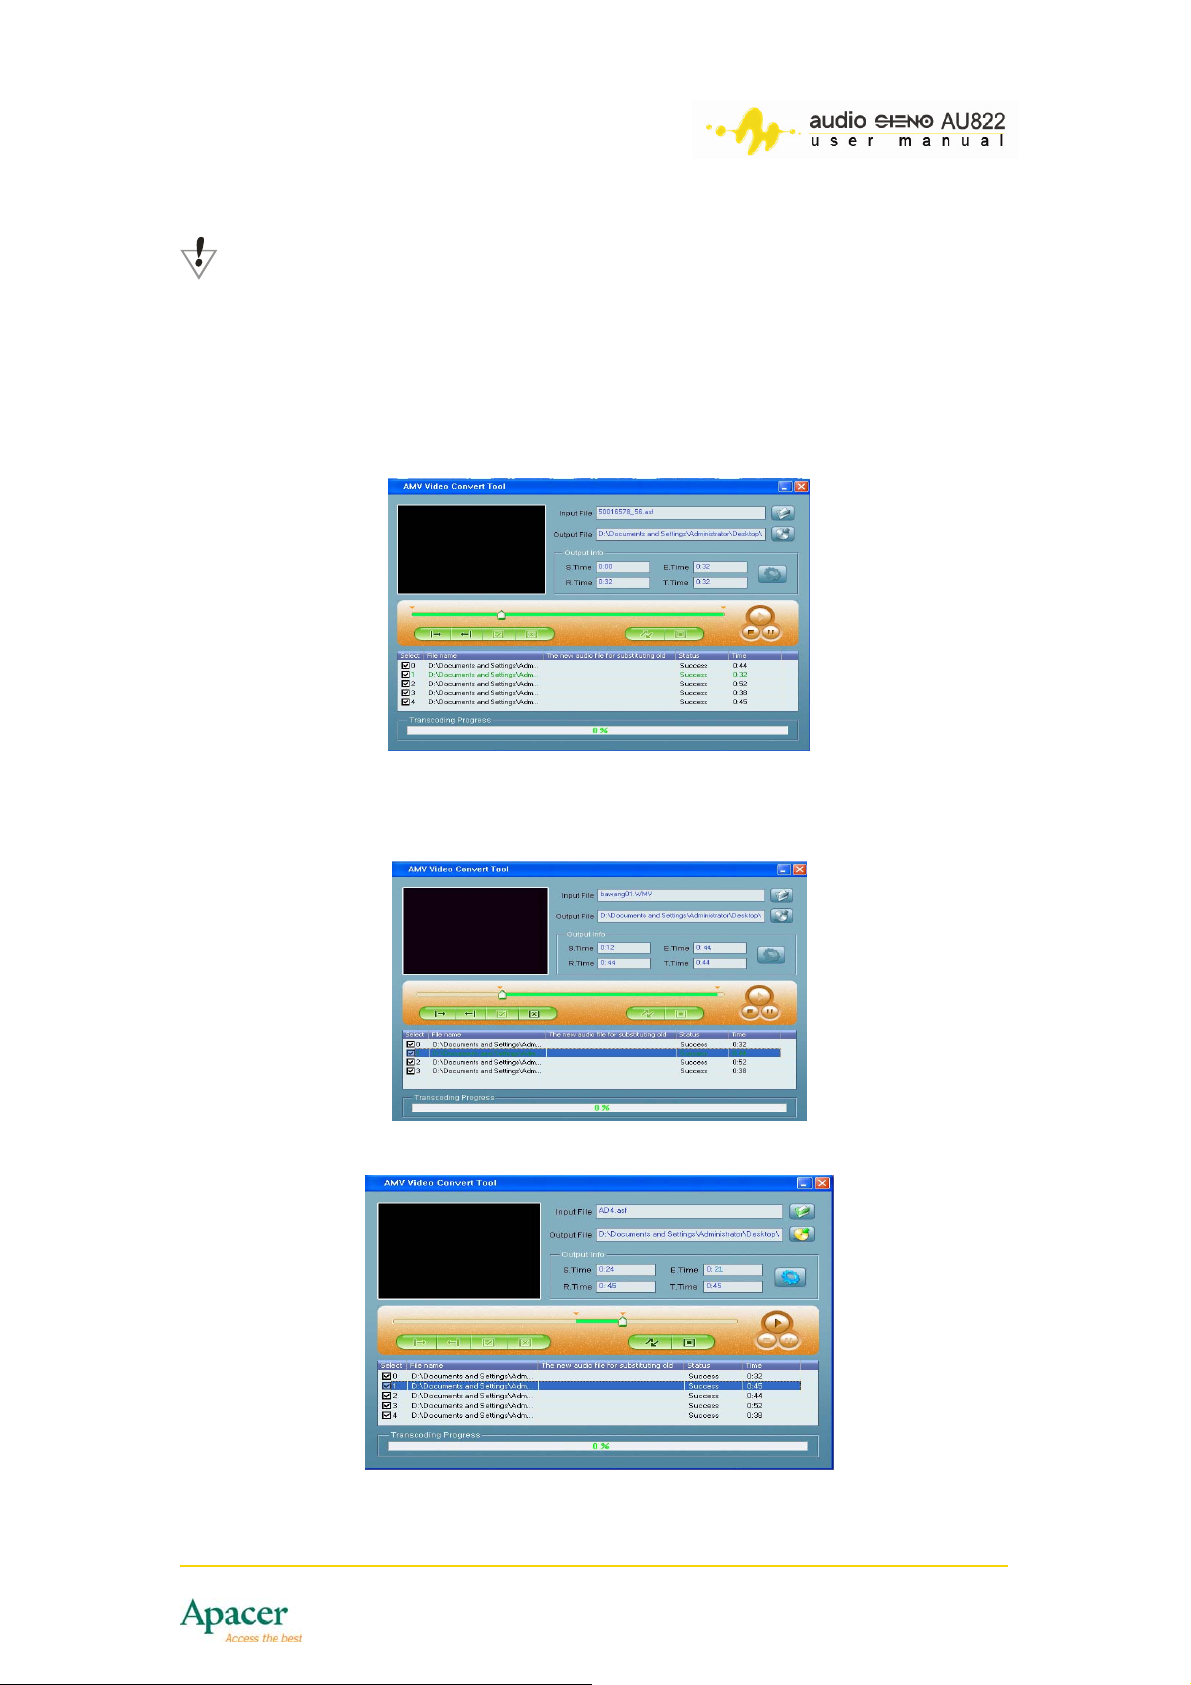
4. Click OK when finished to return to the AMV Converter Tool window.
NOTE
The whole video file is converted to AMV if you don’t want to use the
video segment intercept feature.
5. Check the start and end time of the video file from the AMV Converter
Tool window. Notice that the start and the end position buttons are
activated.
6. Click the start position button to display the starting time in the time
column.
7. Click the end position button to display the end time in the time column.
22
Page 23
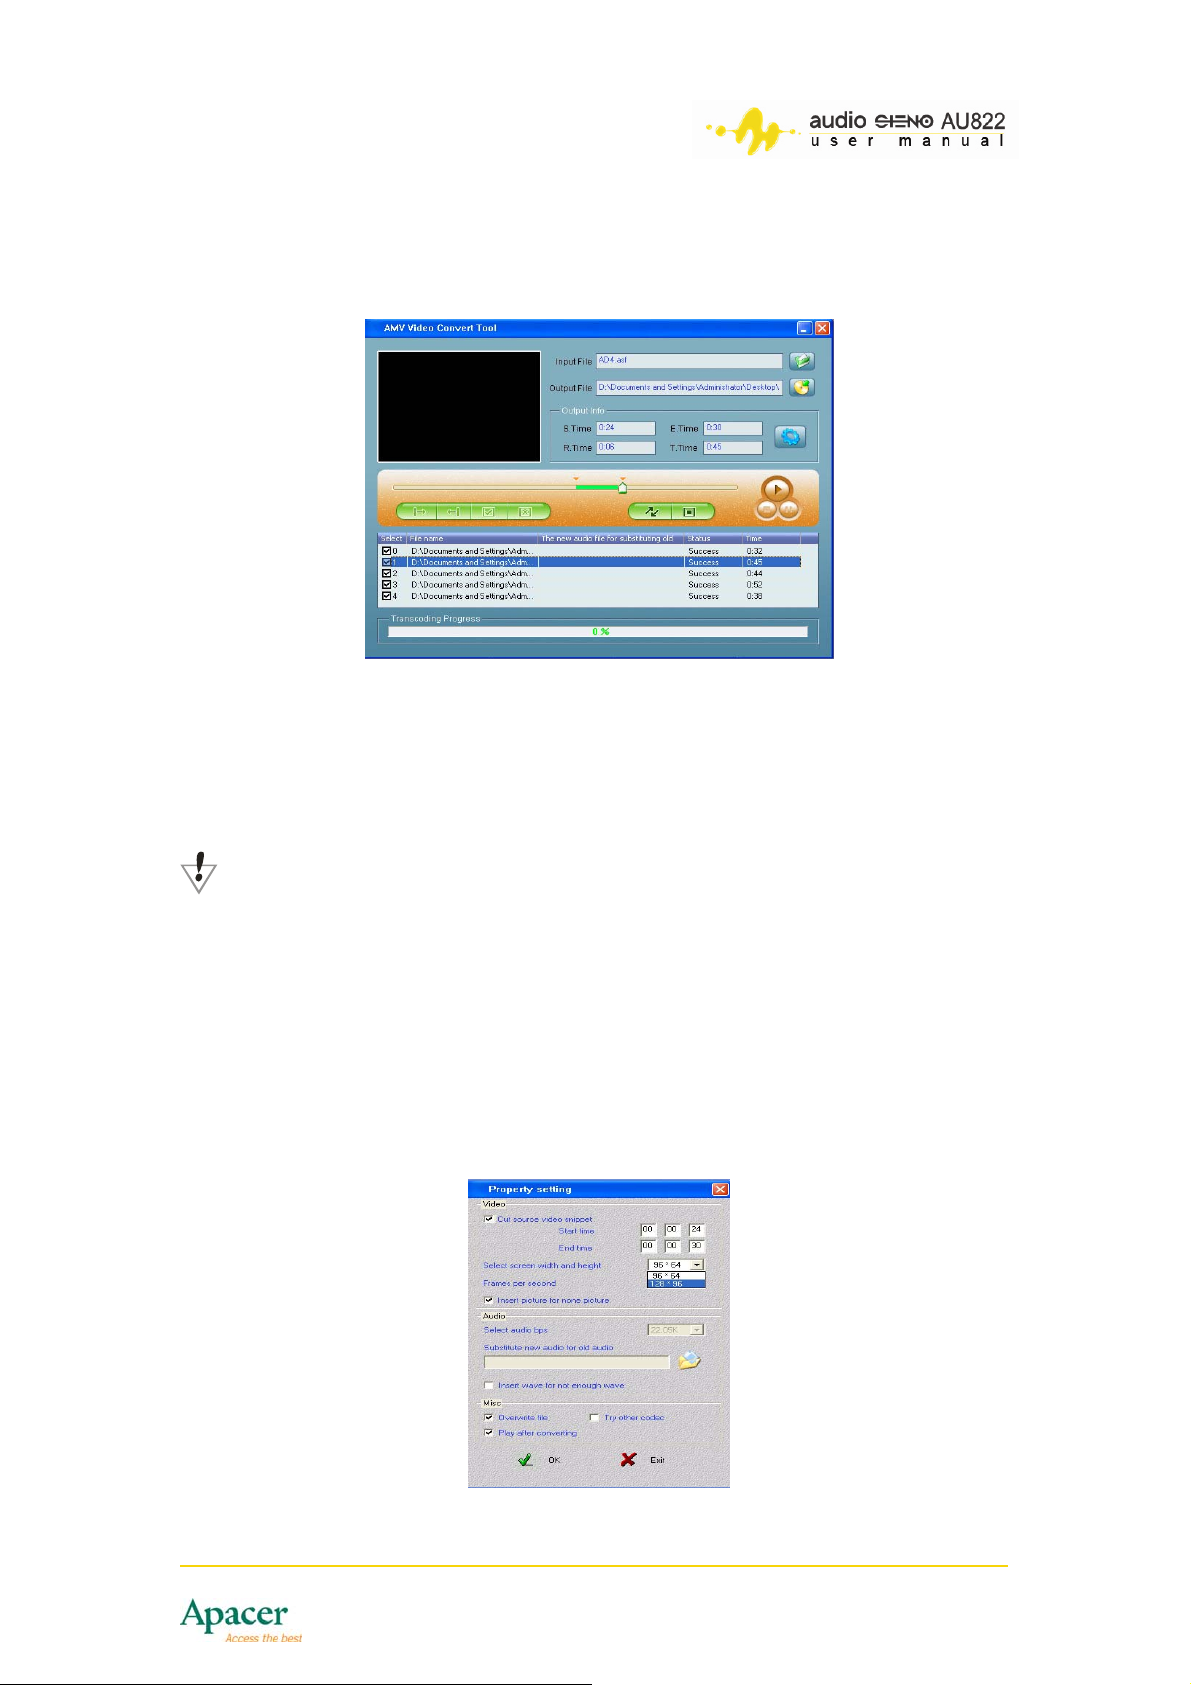
8. After you confirm the starting and ending time of the intercepted video
segment, click Selection. The time length is displayed in the
processing time bar. The tool converts only the intercepted part of the
video file. Refer to the image below.
As shown in the image, the video file has been intercepted for 8 seconds:
00:02:12 to 00:02:20.
9. If you want to cancel the intercepted segment selection, click Cancel
Selection. The display now shows the file in full time. You may now
click the Selection to convert the whole file.
NOTE
• You may change the property settings when intercepting one
or more video files.
• Other settings only apply for intercepting video segments from
the file playing.
To adjust the resolution of the converted video file:
Select the resolution from the Screen screen width and height field, then
press OK. You may choose from three resolutions: 96 x 64, 128 x 96 or 128 x
128.
23
Page 24
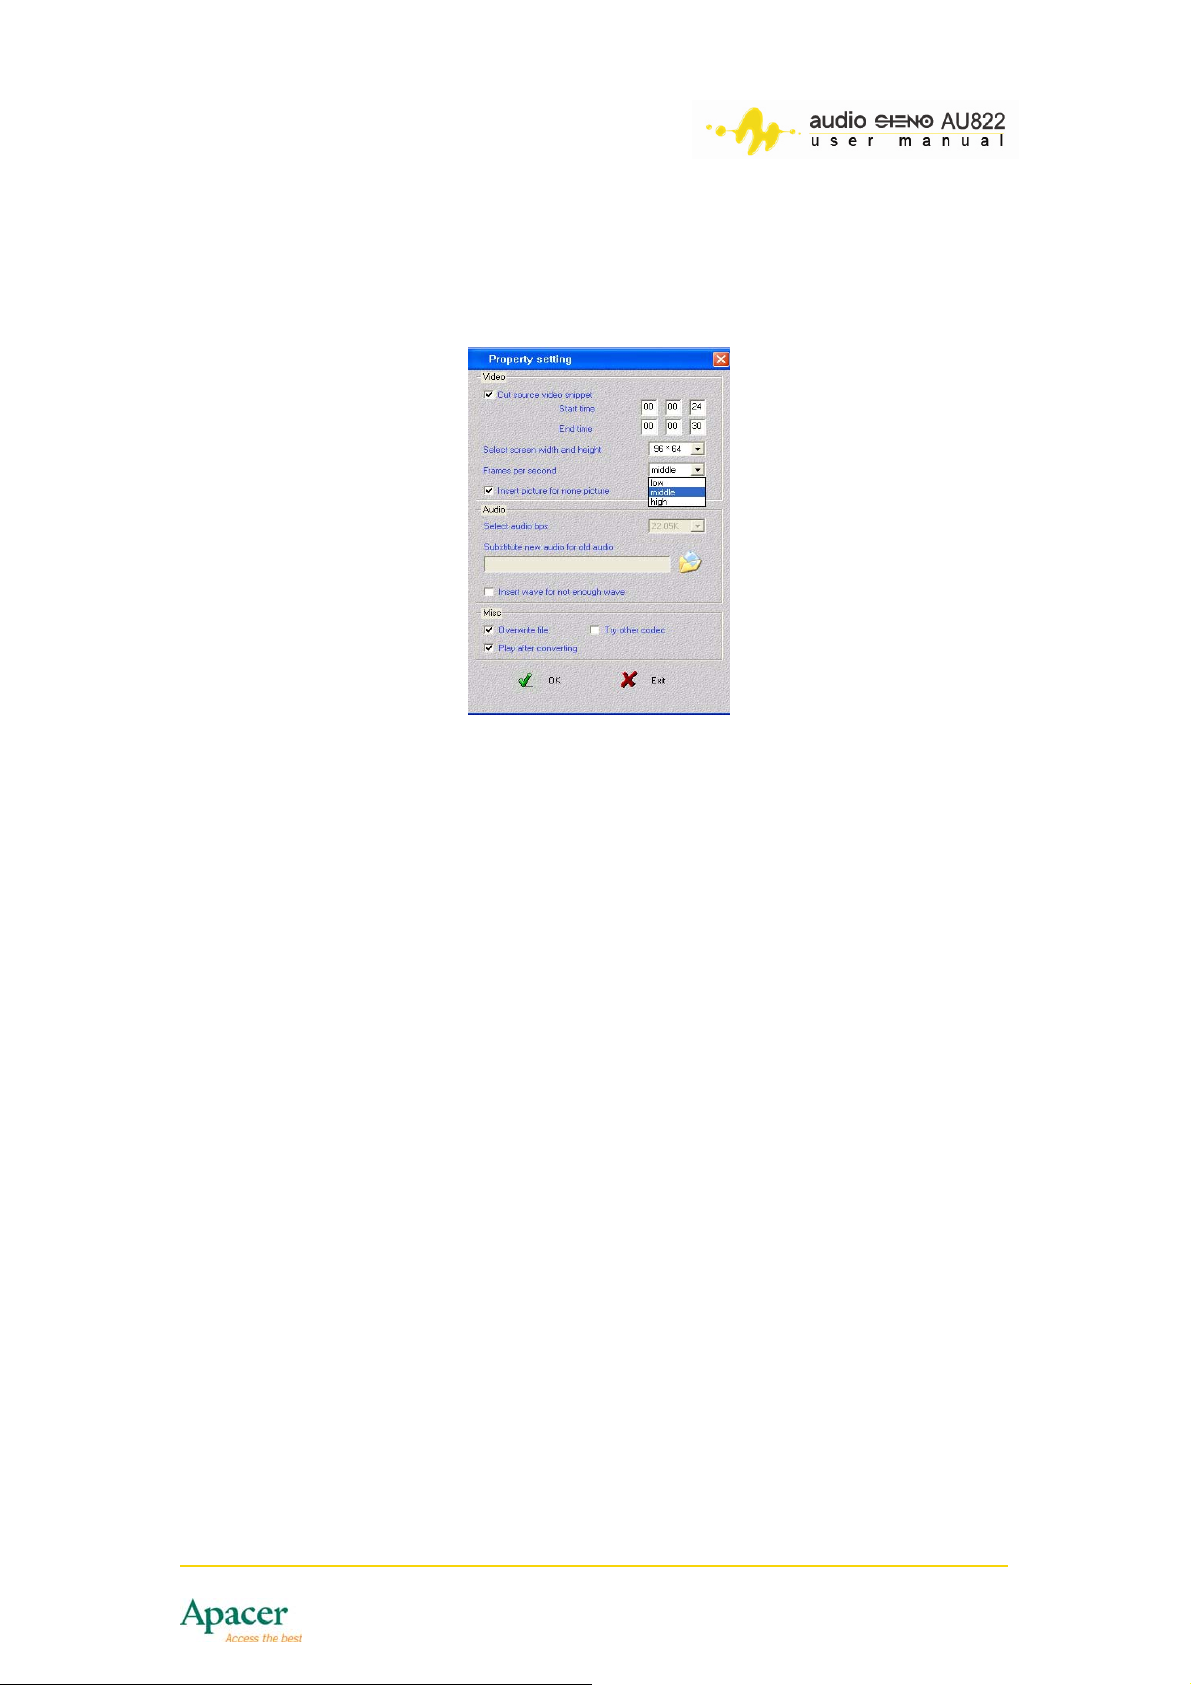
To change the frame rate of the converted video file:
Select low, medium or high frame rate from the Frames per second field,
and check nsert picture for none pictureI, then press OK.
:
We recommend that you keep the default settings for better video output.
24
Page 25
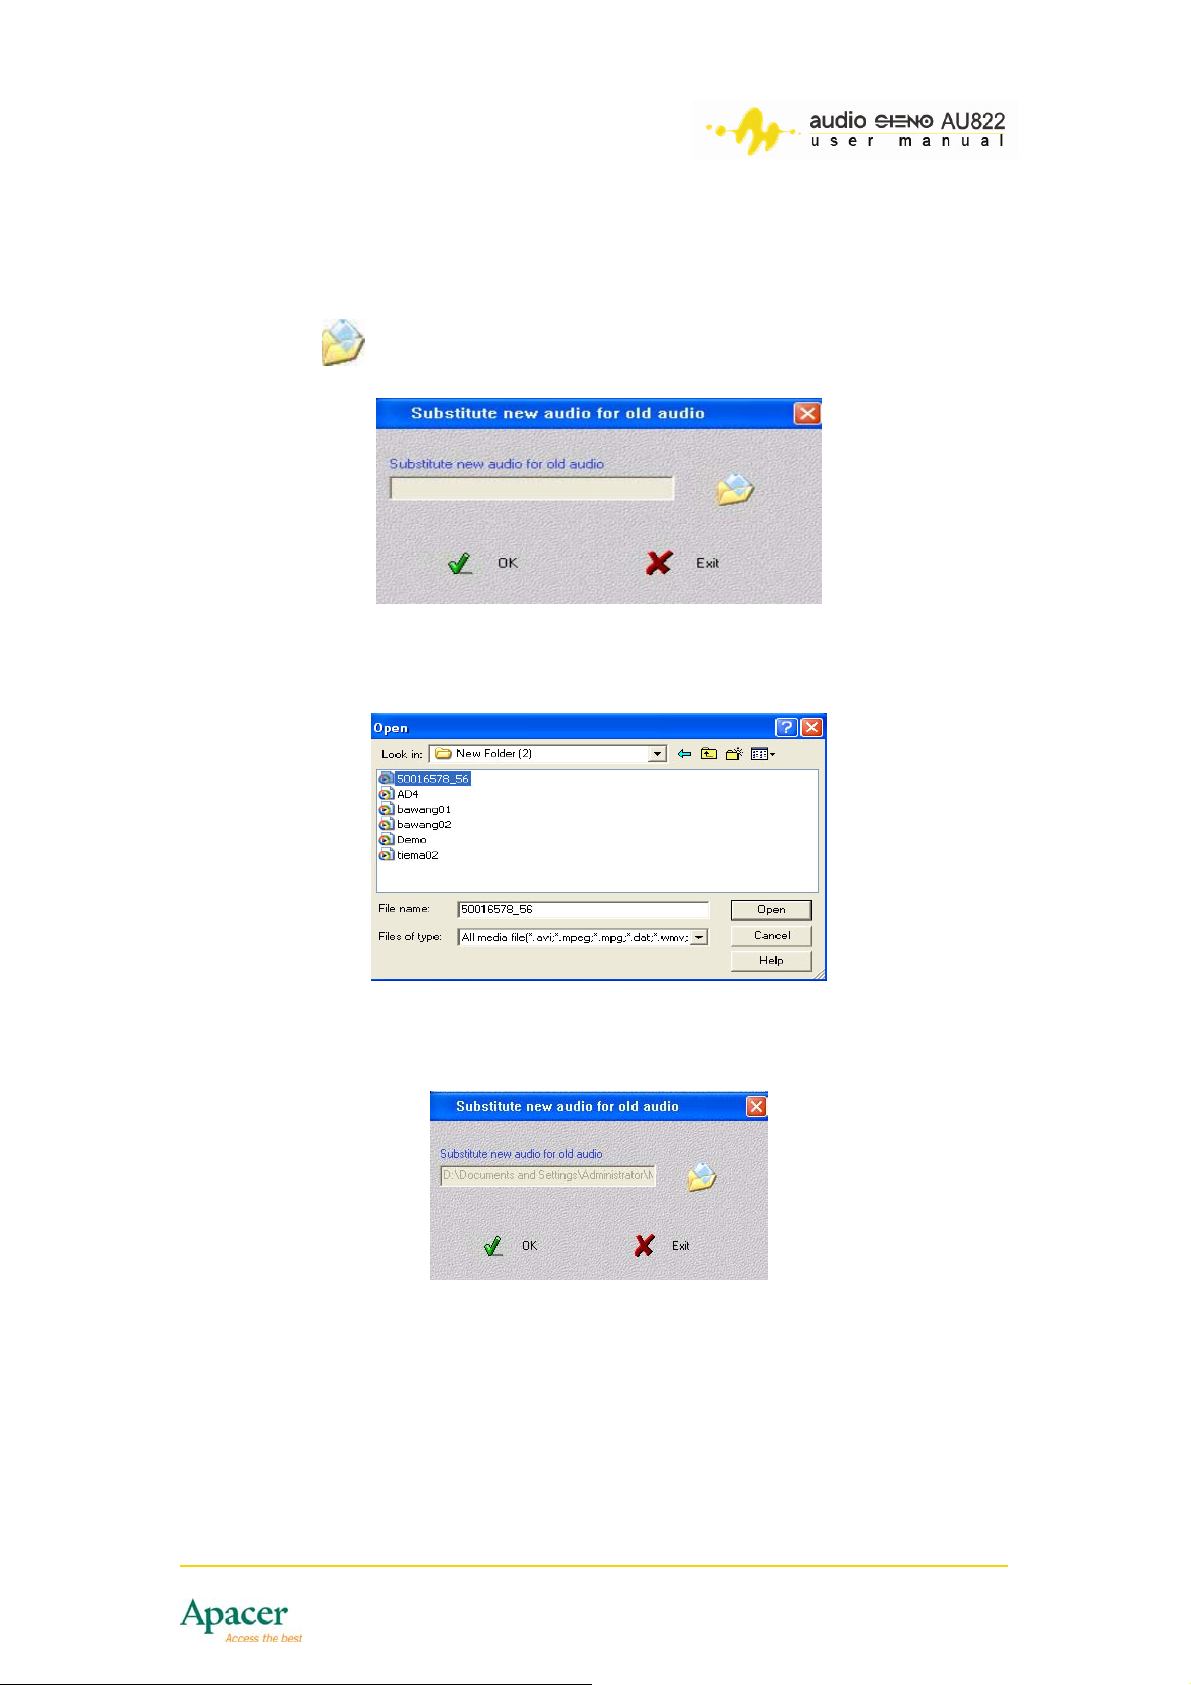
To change the Audio:
You may substitute a new audio background for the video file. Video data
remains the same. To do this:
1. Click .
2. From the Open window, locate and select the new audio file, then click
Open.
3. The new audio path now appears in the Substitute new audio file for
old audio window. Click the OK button to confirm.
25
Page 26
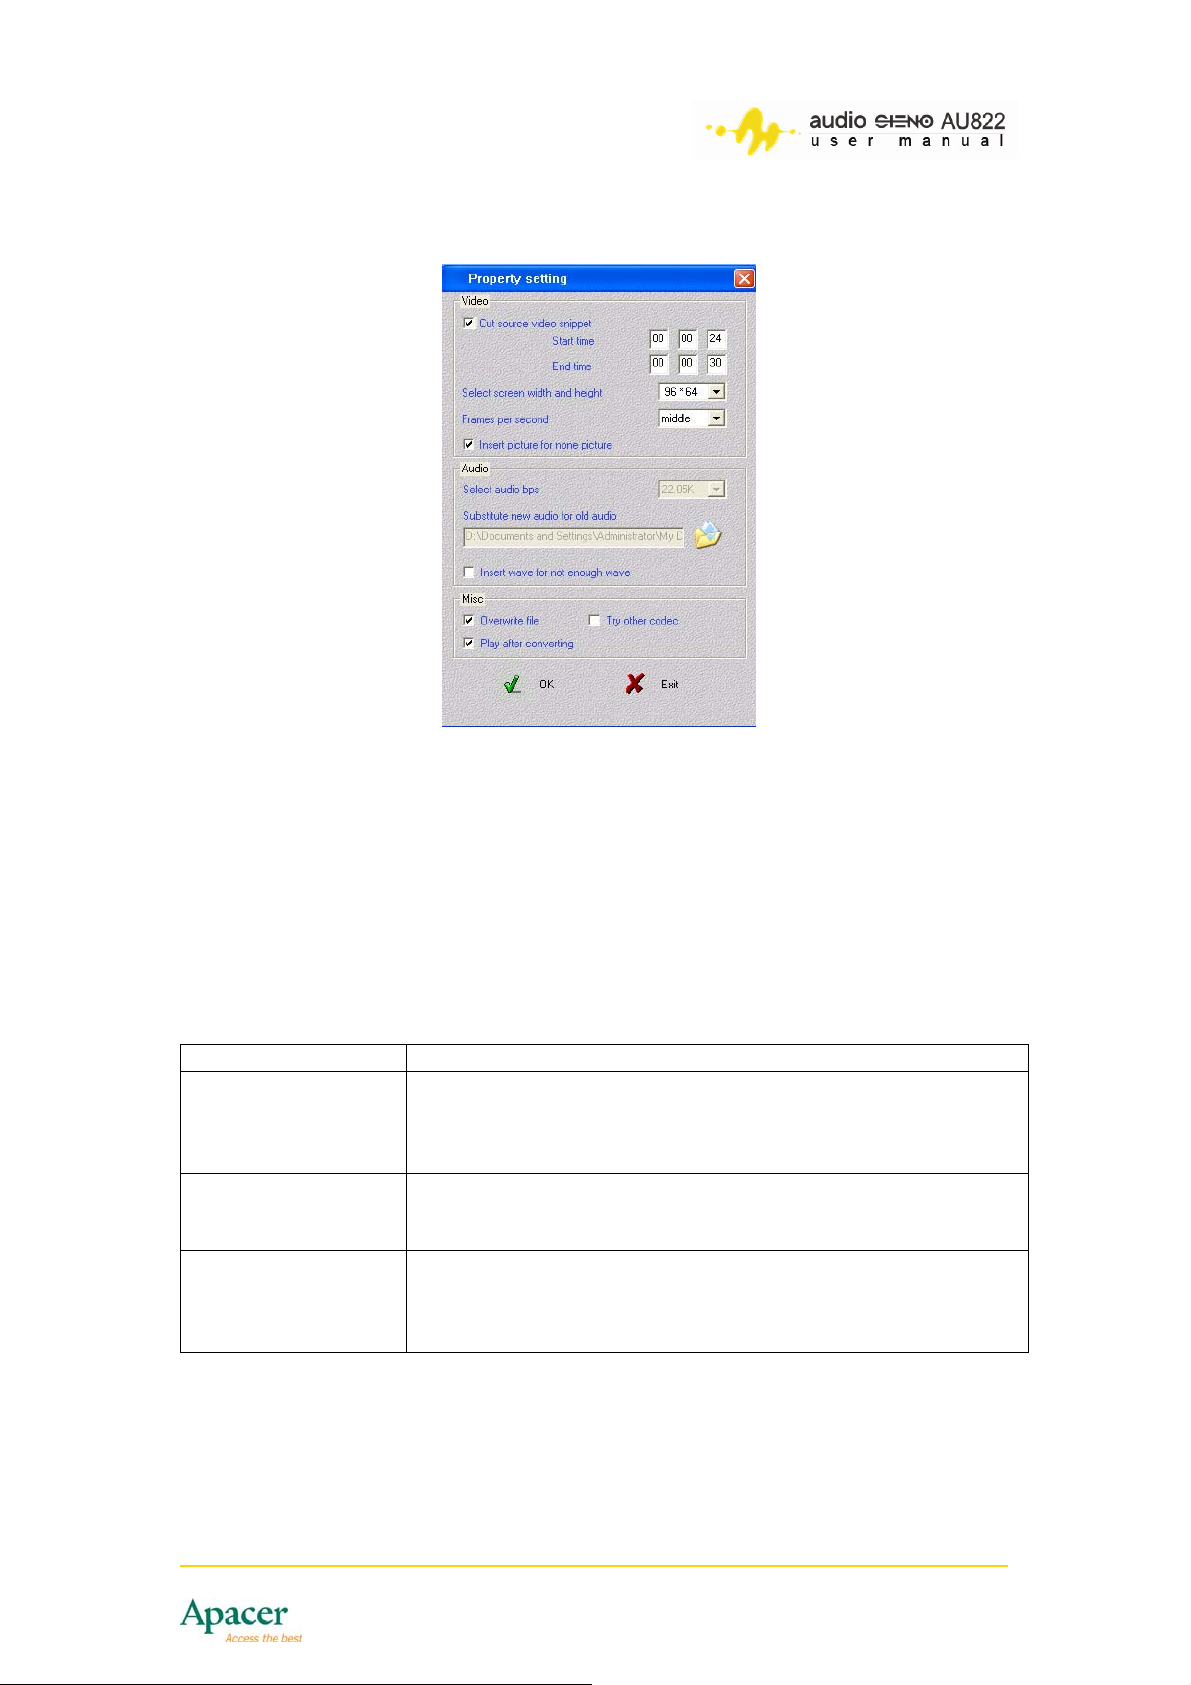
The new audio file path shows in the Substitute new audio file for old audio
field in the Property setting window.
To insert wave for videos:
This option allows you to insert wave for videos. We recommend that you keep
the default settings for better quality.
To change other settings:
Refer to the table below to change other video settings. We recommend that
you keep the default settings for better quality.
Options Function
Overwrite file The converted AMV file automatically replaces the old video
file with same file name and same folder. This option is
selected by default. The converted AMV file will have
conversion errors if this option is unchecked.
Play after converting After conversion, the AMV Player plays back the converted
file. If unchecked, you may launch the AMV Player manually
from the Start menu for playback.
Try other codec The AMV Converter Tool tries an alternative CODEC, if the
installed CODEC is not compatible with the file. This is not
selected by default. You may change the file extension as
different file formats need different CODECs.
After setting all options in the Property setting window, click OK to save and
close.
26
Page 27
NOTE
• The customized property settings apply only to the selected
audio/video file from the AMV Converter Tool list. The tool
keeps the default settings for all other audio/video files that are
not selected.
• To change the properties of a selected audio/video file, click
the file from the list until the background color changes to blue
or right click the mouse over the selected file, then choose
Setting from the pop-up menu.
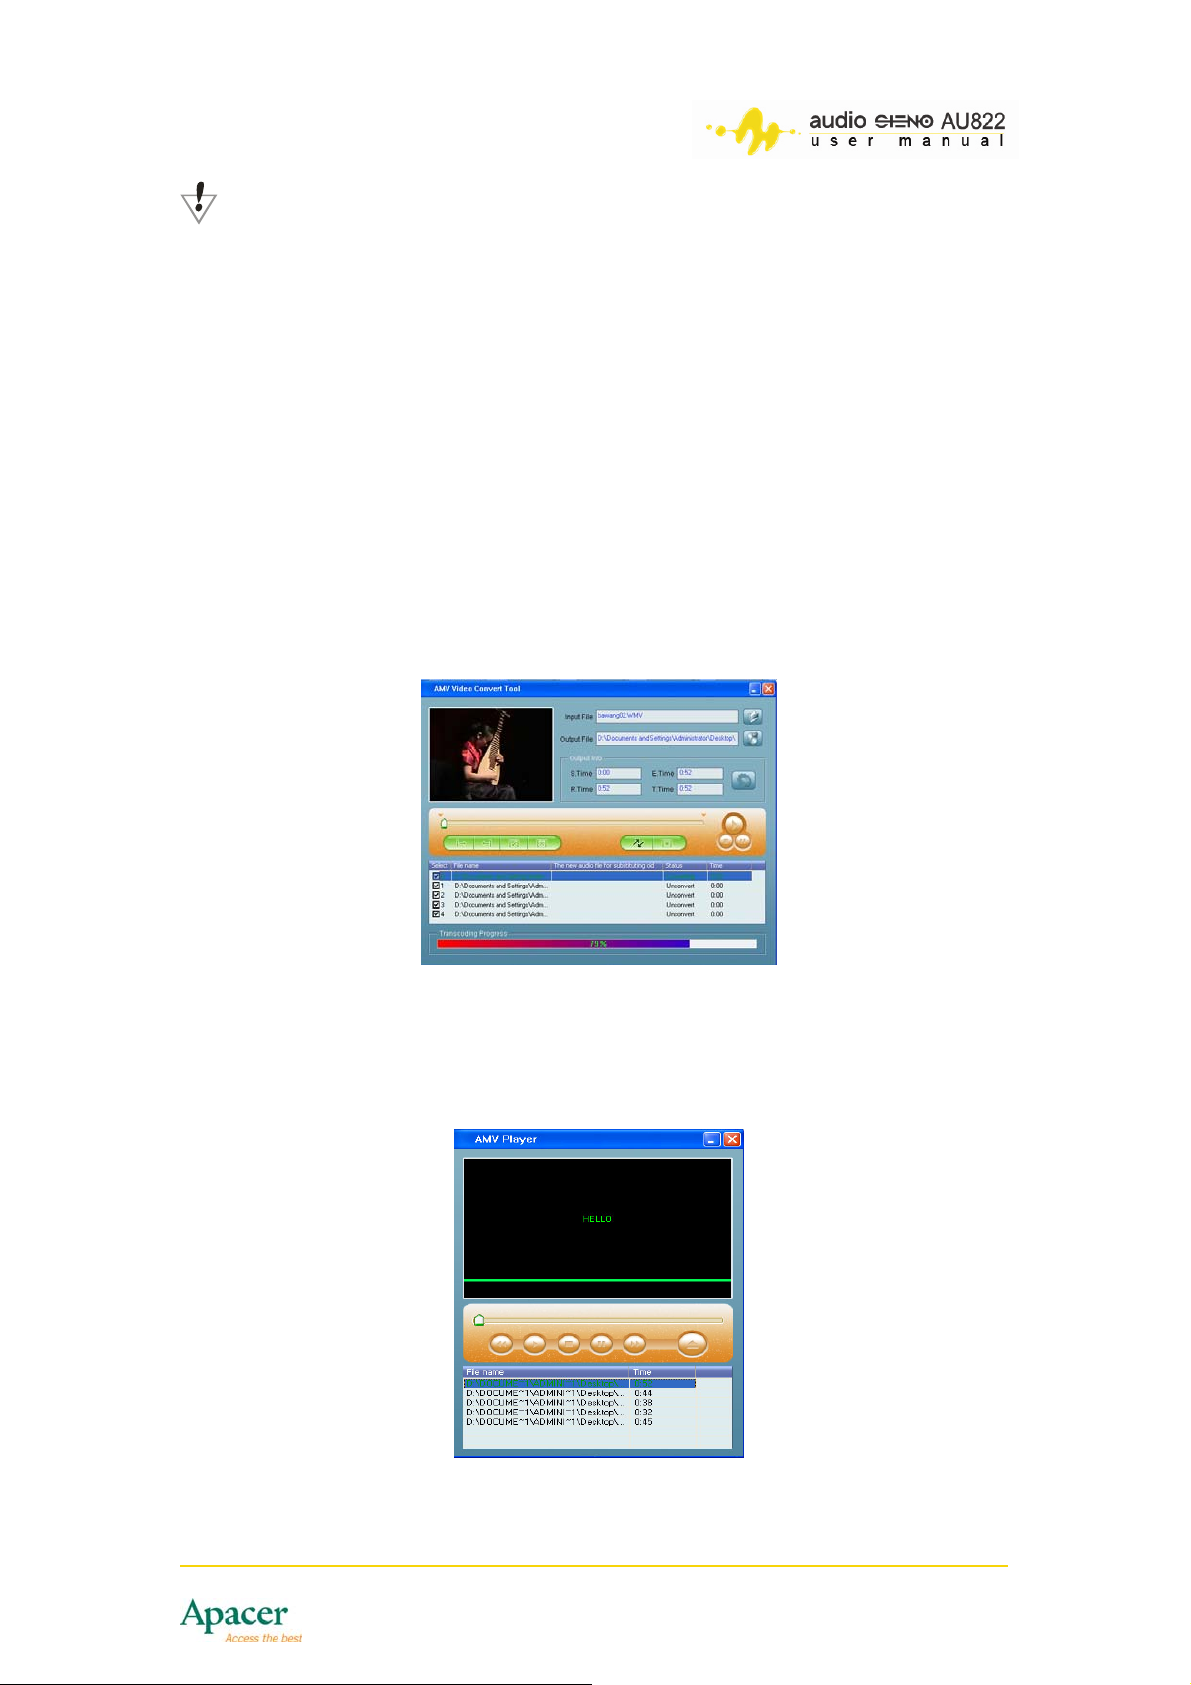
To convert the audio/video file to AMV:
1. Select the audio/video file(s) from the list following the instructions
from the previous sections.
2. Click the Start Convert button. The tool converts the file one by one.
Notice that the file status changes from Unconvert to Converting.
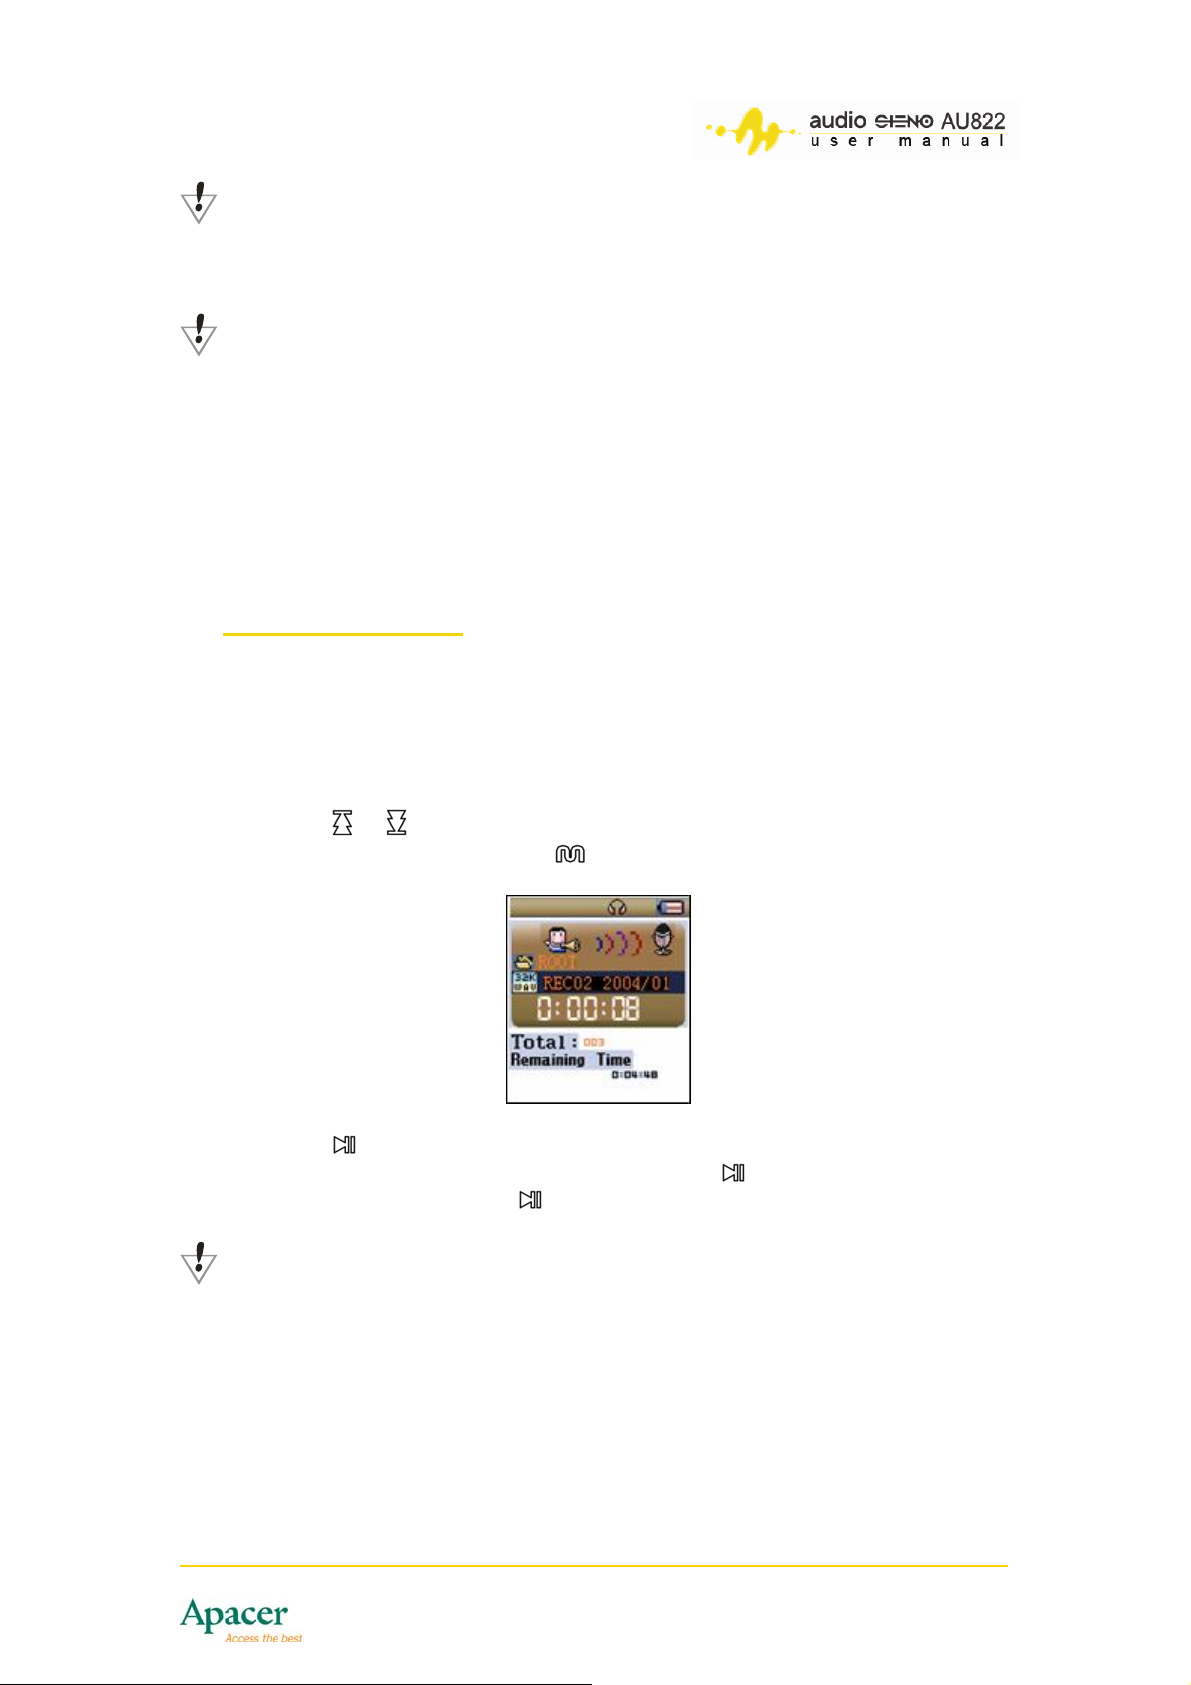
3. After file conversion, the AMV Player automatically plays back the
converted AMV file according to its order in the AMV Converter Tool
list. Conversion is successful if the file plays back successfully in the
AMV Player.
27
Page 28
NOTE
You may also start converting an audio/video file by right-clicking it
from the list, then selecting Start video convert from the pop-up
menu.
CONSIDERATIONS
• Install the relative CODEC when converting audio/video files to
Realplay, Quicktime or MPEG2 formats.
• If Windows Media Player fails to play Realplay, Quicktime or
MPEG2 DVD files, you may need to install the correct CODEC.
The converter will fail to display and/or convert the audio/video
file when Windows Media Player fail to play it.
• Screen captures and images are for reference only. Actual
screens may vary.
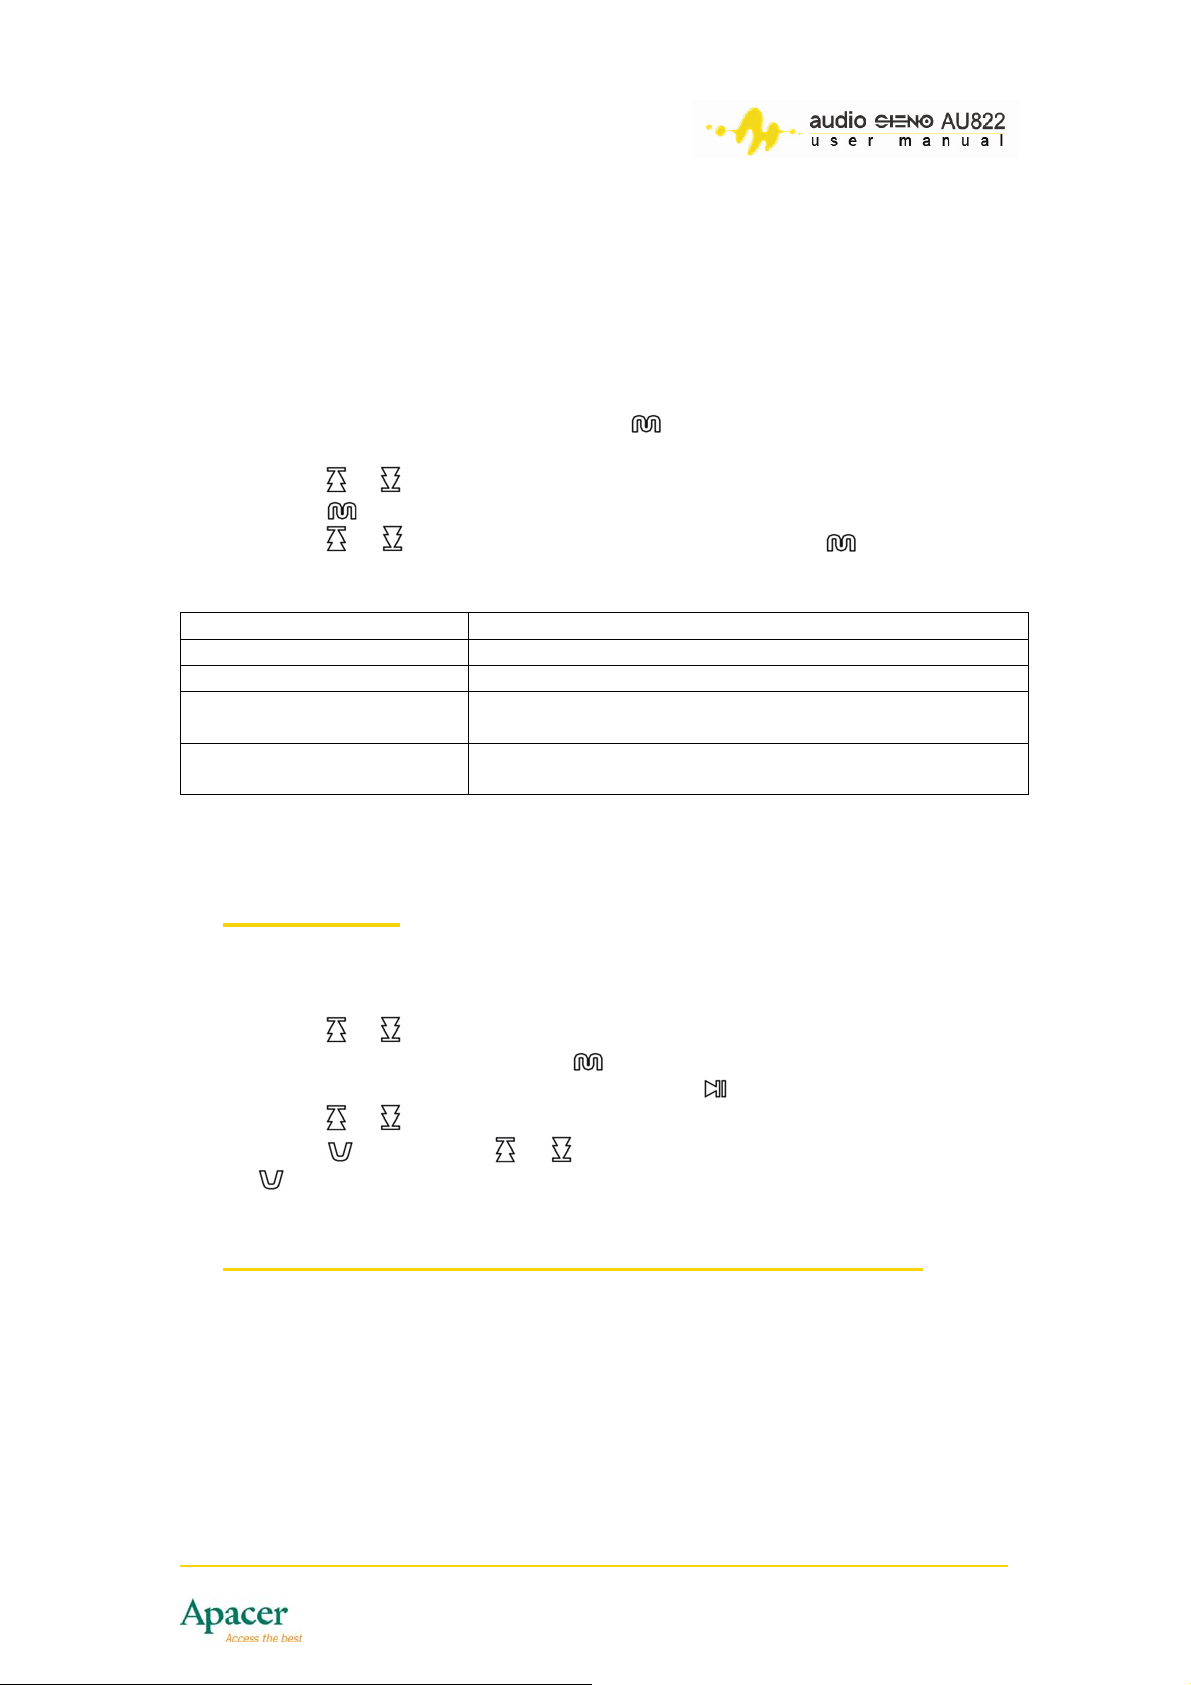
14 Voice recording
The AU822 Player supports up to 99 voice recordings. Make sure that the
player has sufficient battery power before recording.
To record voice:
1. Enter the main menu.
2. Press or then select REC mode.
3. When in REC mode, press .
4. Press
to begin voice recording.
5. If want to pause the voice recording, press again.
6. To save and exit, press and hold for about 2 seconds.
IMPORTANT
• After stopping voice record, the recording is automatically
saved in the current recording directory selected by the menu.
• The screen displays an Out of Space message if the current
directory has no space for new messages. Delete some
recordings to free some space up.
28
Page 29
• A Directory Full message appears when the directory reached
its specified capacity (99 recording). Change the directory to
continue recording.
• Only the play button functions when in recording mode.
Selecting the voice recording format:
1. From the REC mode menu, press
menu.
2. Press or then select Record Type.
3. Press to enter the Record Type sub-menu.
4. Press or to select the record type, then press
selection. Refer to the supported voice recording formats below.
Options Format
Fine sound recording Fine sound quality in *.WAV format
Long time recording General sound quality in *.ACT format
Fine sound control *.WAV format with sound-control recording and pause
recording when no sound is detected
Long time sound-control *.ACT format with sound-control recording and pause
recording when no sound is detected
to enter the voice recording sub-
to confirm the
15 Voice mode
You can use the Voice Mode menu to playback voice recordings. To do this:
1. Enter the main menu.
2. Press or , then select VOICE mode.
3. When in VOICE mode, press .
4. Select the voice recording file, then press
to start playing.
5. Press or to play the previous or the next voice recording.
6. Press , then press or to increase/decrease the volume. Press
again to confirm the volume after the adjustement.
16 Converting ACT voice recordings to WAV files
You may install and use the bundled Media Manager to ACT voice recordings
to WAV format. Make sure the audio recording files are saved to or sync with
your PC directory before converting the files to WAV.
To convert ACT files to WAV:
1. Install and run Media Manager to your PC.
2. Launch the tool, and then click Open.
29
Page 30
3. Add ACT files into the folder of Media Manager
4. Locate the ACT file, then click mouse right key
5. Click Convert to begin format conversion.
NOTE
The So
und Convert Tool can also play WAV and MP3 files.
F
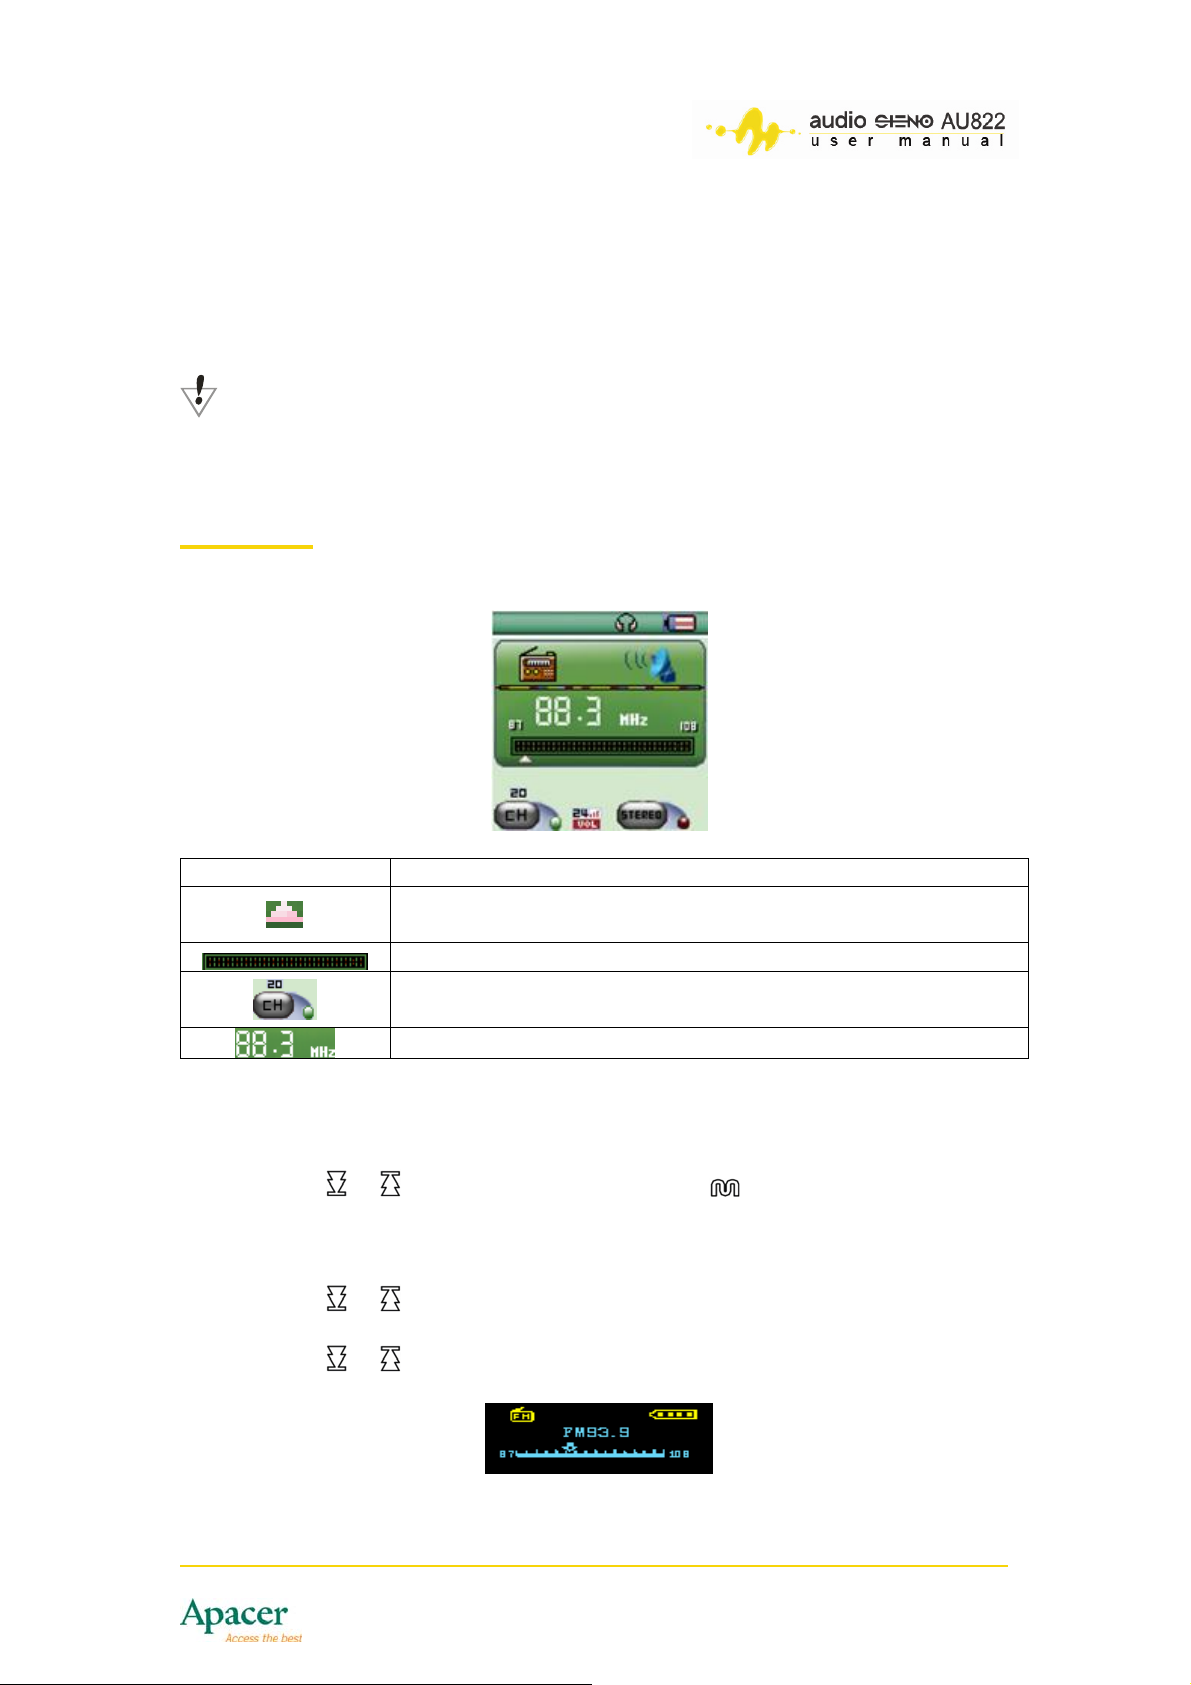
M radio
se, the screen displays the station with the lowest FM frequency. During initial u
Fields What it tells you
To tune-in to an FM radio station:
1. Enter the main menu.
2. Press or select FM .
o auto-scan available stations:
T
1. Press or for two seconds to scan backward or forward by 100 kHz.
The player stops scanning when it spots a station.
2.
Press or to stop auto-scanning.
Position of the curre s as you change nt frequency. Move
the channel.
Frequency scale
Current preset channel. You can save up to 20 preset
stations.
Station frequency
mode, then press
30
Page 31
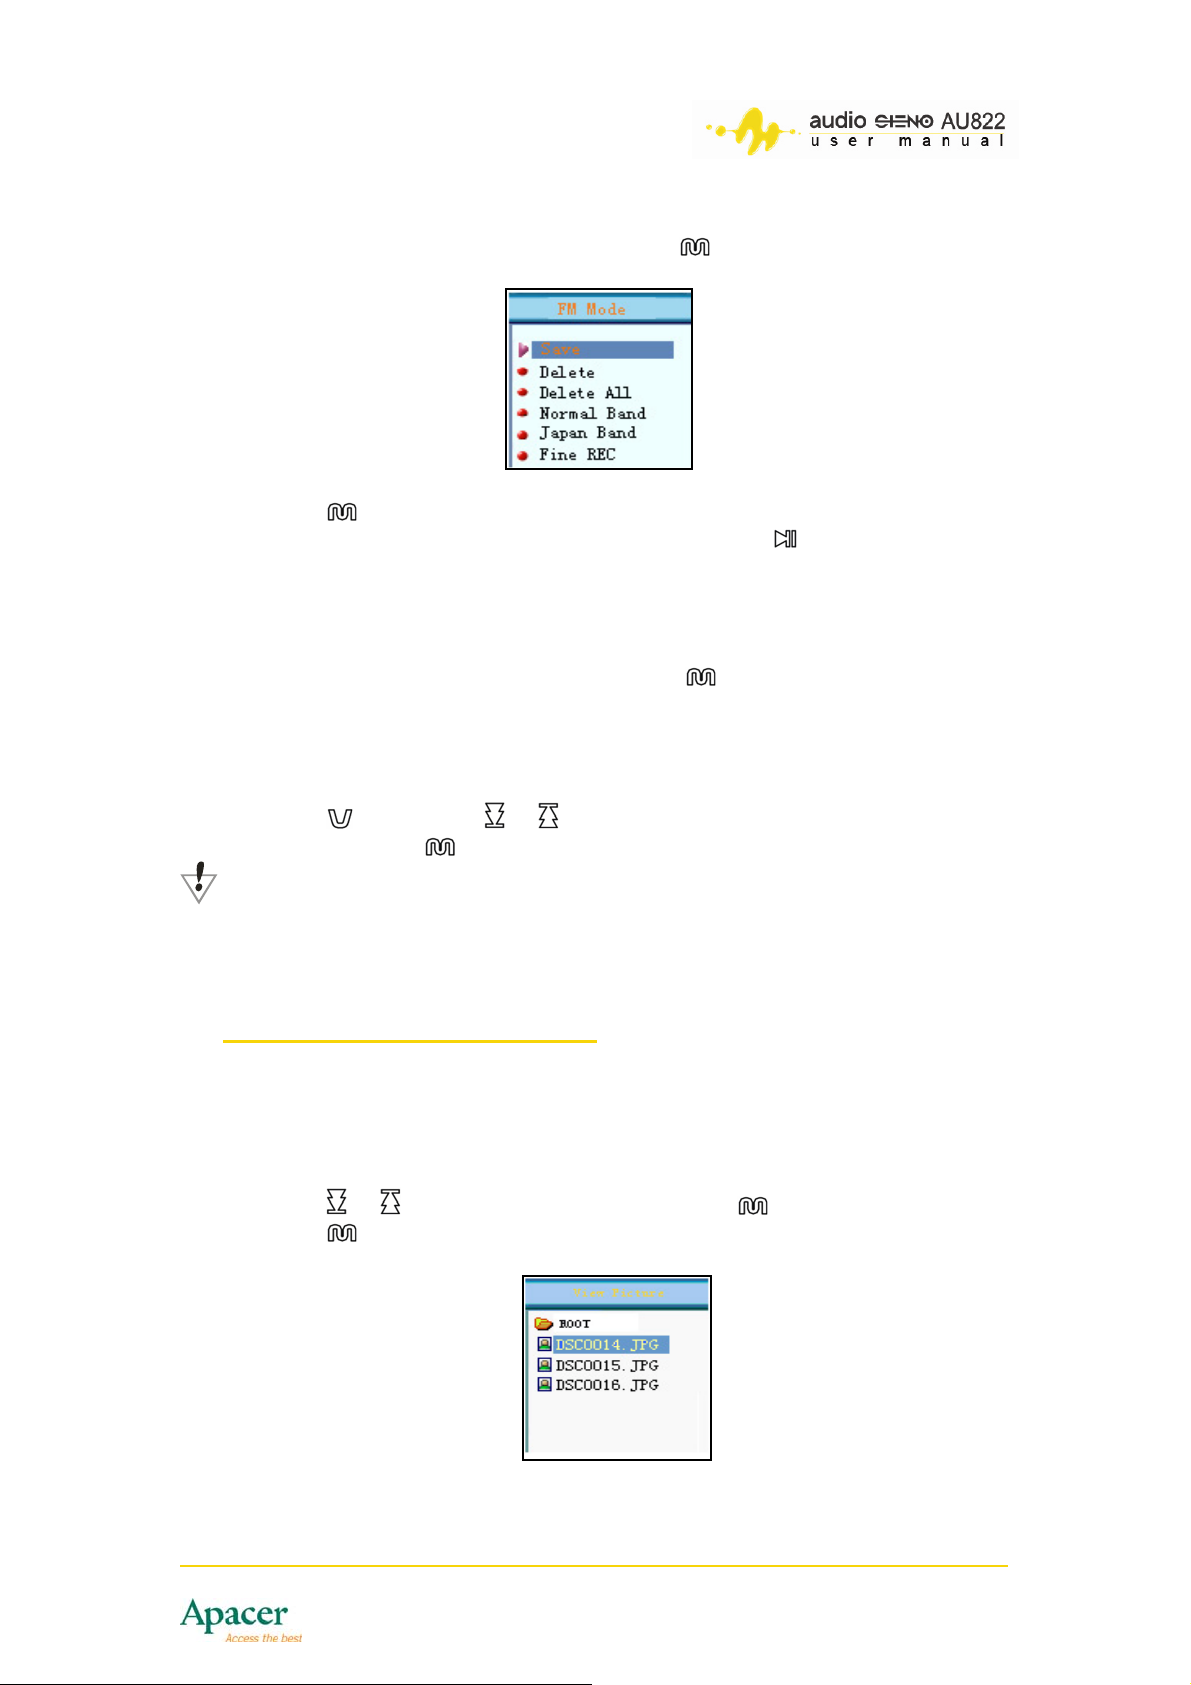
To save an FM radio station:
1. While tuned-in to a FM station, press to enter the FM mode submenu.
2. Press to save the FM station.
3. Next time, when you go to FM radio, just push , then you will go to
CH1, CH2, etc. in order, the stations which you saved earlier.
To record an FM radio program:
1. While tuned-in to an FM station, press to enter the FM mode submenu.
2. Select fine recording or long time recording to begin recording the FM
radio program. By default, the station playing will be saved in the
recording folder.
3. Press , then press or to increase/decrease the volume.
4. Press and hold about 2 seconds to save and exit recording.
NOTE
• You can save up to 20 preset stations each for normal FM
frequencies and Japanese FM frequencies.
17 Browsing JPEG pictures
The player enables you to browse saved pictures and images in JPEG format.
To browse a saved picture/image:
1. Enter the main menu.
2. Press or select Photo mode, then press .
3. Press to select the picture from the root directory.
31
Page 32
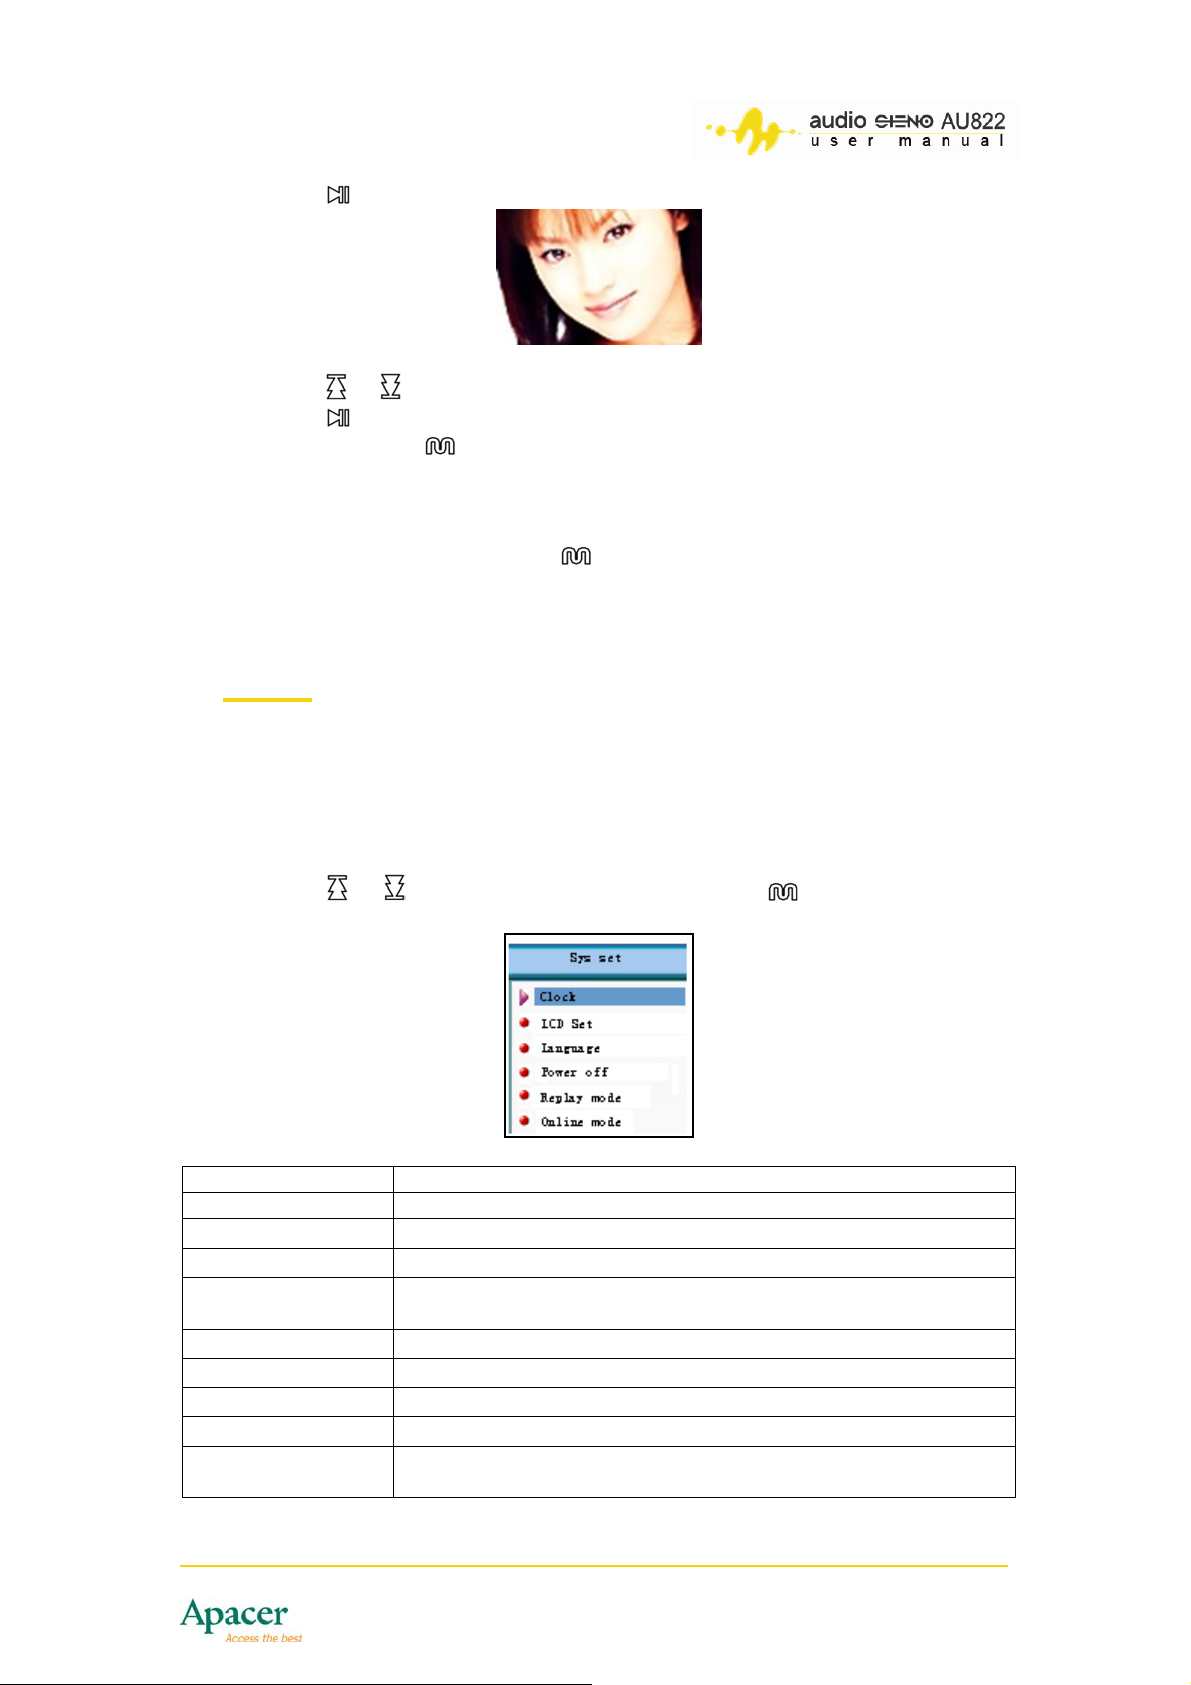
4. Press to browse the picture.
to browse the previous or next photo. 5. Press or
6. Press to return to the file selection window.
7. Press and hold about 2 seconds to return to the main menu.
o
T customize picture/image browsing:
1. When in Photo mode, press to enter the sub-menu.
Select Play set from the options, then select manual play2. list to
manually set the image disp
lets you preview a photo for
18
Setup
The
Setup menu allows you to change the player settings. When upgrading
the
firmware, the all player options and settings reset.
lay timing or auto play. Selecting auto play
1 ~ 8 seconds.
To enter the Setup menu:
1. Enter the main menu.
2. Pre . Refer to the table
ss or select Setup mode, then press
below for the settings’ functions.
Option
Clock fileSet the date and time for recording s
LC k screen settingsD Set Set the screen brightness, contrast and blan
Language Select the screen language
Power off
Replay mode Set the repeat/replay status.
On-line mode Space option. Change the settings for the Privacy
Memory info Check the used and available memory.
Firmware version View the player’s firmware version.
Firmware
upgrading
Set the power-off count
shuts down when the remaining countdown turns zero.
Upgrade the player’s firmware.
Allows you to
down timer (by minutes). The player
32
Page 33
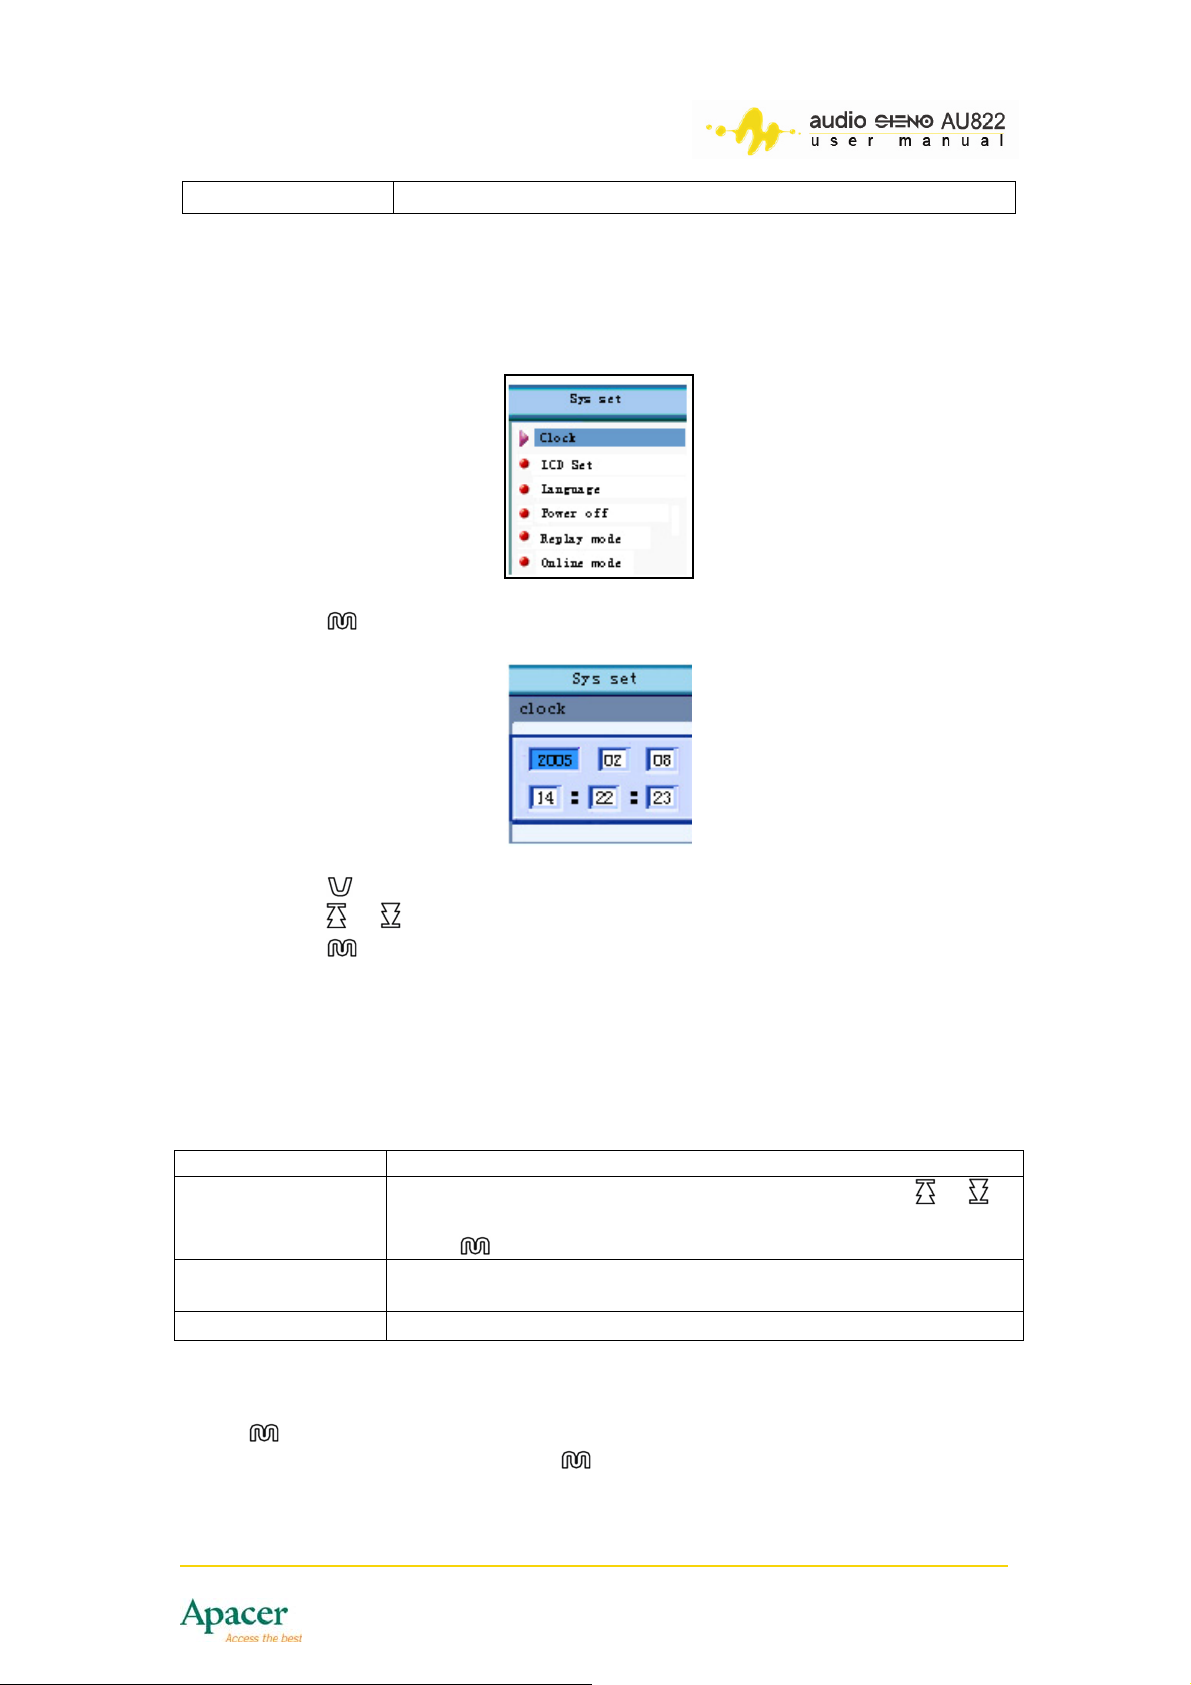
Exit Exit the menu.
18.1 Setting the time
To set the time:
1. Select Clock from the Sys set window.
2.
Press to enter the time sub-menu.
3. Press to set the recording time beginning from the Year.
Press or to increase or decre4. ase the time
5. Press to confirm and exit.
18.2 Screen setting
To change the LCD settings:
1. Select LCD Set from
2. Select from the following options:
Option Allows you to
Brightn st
Black (0-30
s
Exit Exit the sub-menu.
ess adju
econds)
djust the brightness of the display scr
A een. Press or to
djust the brightness. Brightness level 7 is
a
ress
P
S re the screen lights out when the
et the time in seconds befo
layer is in idle mode.
p
1 g the
8.3 Settin language
the Sys set window.
to return to the previous menu.
the brightest setting.
P
ress to enter th
Select the specific language, Press
e languages sub-menu
to confirm and exit.
33
Page 34

18.4 Setting the auto power off time
To set the auto-power off
1. Select Power off from the Sys set window.
2. Select from two power-off options:
• Power save me (in seconds) before the player
shuts down when it is idle. Setting this timer to 0 disables the power
save mode feature.
• Sleep timer mode – Lets you set an auto sleep timer (in minutes) before
the player goes to sleep mode when it is idle. We recommend that you
use this feature when using the player before sleep. The sleep timer
functions only once. You need to set the sleep timer again after it
expires.
mode – Lets you set the ti
feature:
18.5 Setting the replay mode
Please also refer to sec 23, mi ttings for details.
NOTE
• When set to Manual, the starting/end point in A-B repeat mode
may only be set manually.
• When set to Auto, the starting/end point in A-B repeat mode is
set automatically. Auto is applicable only for English
without audio.
scellaneous se
reading
18
.6 Setting the contrast
Please also refer to sec 23,
miscellaneous settings for details.
18.7 Using On-line Mode
lease also refer to sec 23, miscellaneous settings for details.
P
NOTE
Some operating systems (older than 0 Service Pack 4)
do not suppo USB drives with two drive icons. When using Privacy
Space, you mu
encrypt”, other
18.8 View
sub-m
memory.
enu allow e amount of used and available
rt
ing th
st choose between “Single ordinary disk” or “Single
wise, no drive icon appears on screen.
e player memory
Windows 200
thThis s you to determine
18.9 Firmware version
This sub-menu tells you the player firmware v
ersion.
34
Page 35
18.10 Firmware upgrade
ections for details.
s
layer firmware. RThis sub-menu lets you upgrade the p
efer to the succeeding
NOTE
From the Setup sub-menu press to finish the setting, then press
to exit from all sub-menus. You may also press to exit from the
current menu and return to the main menu screen.
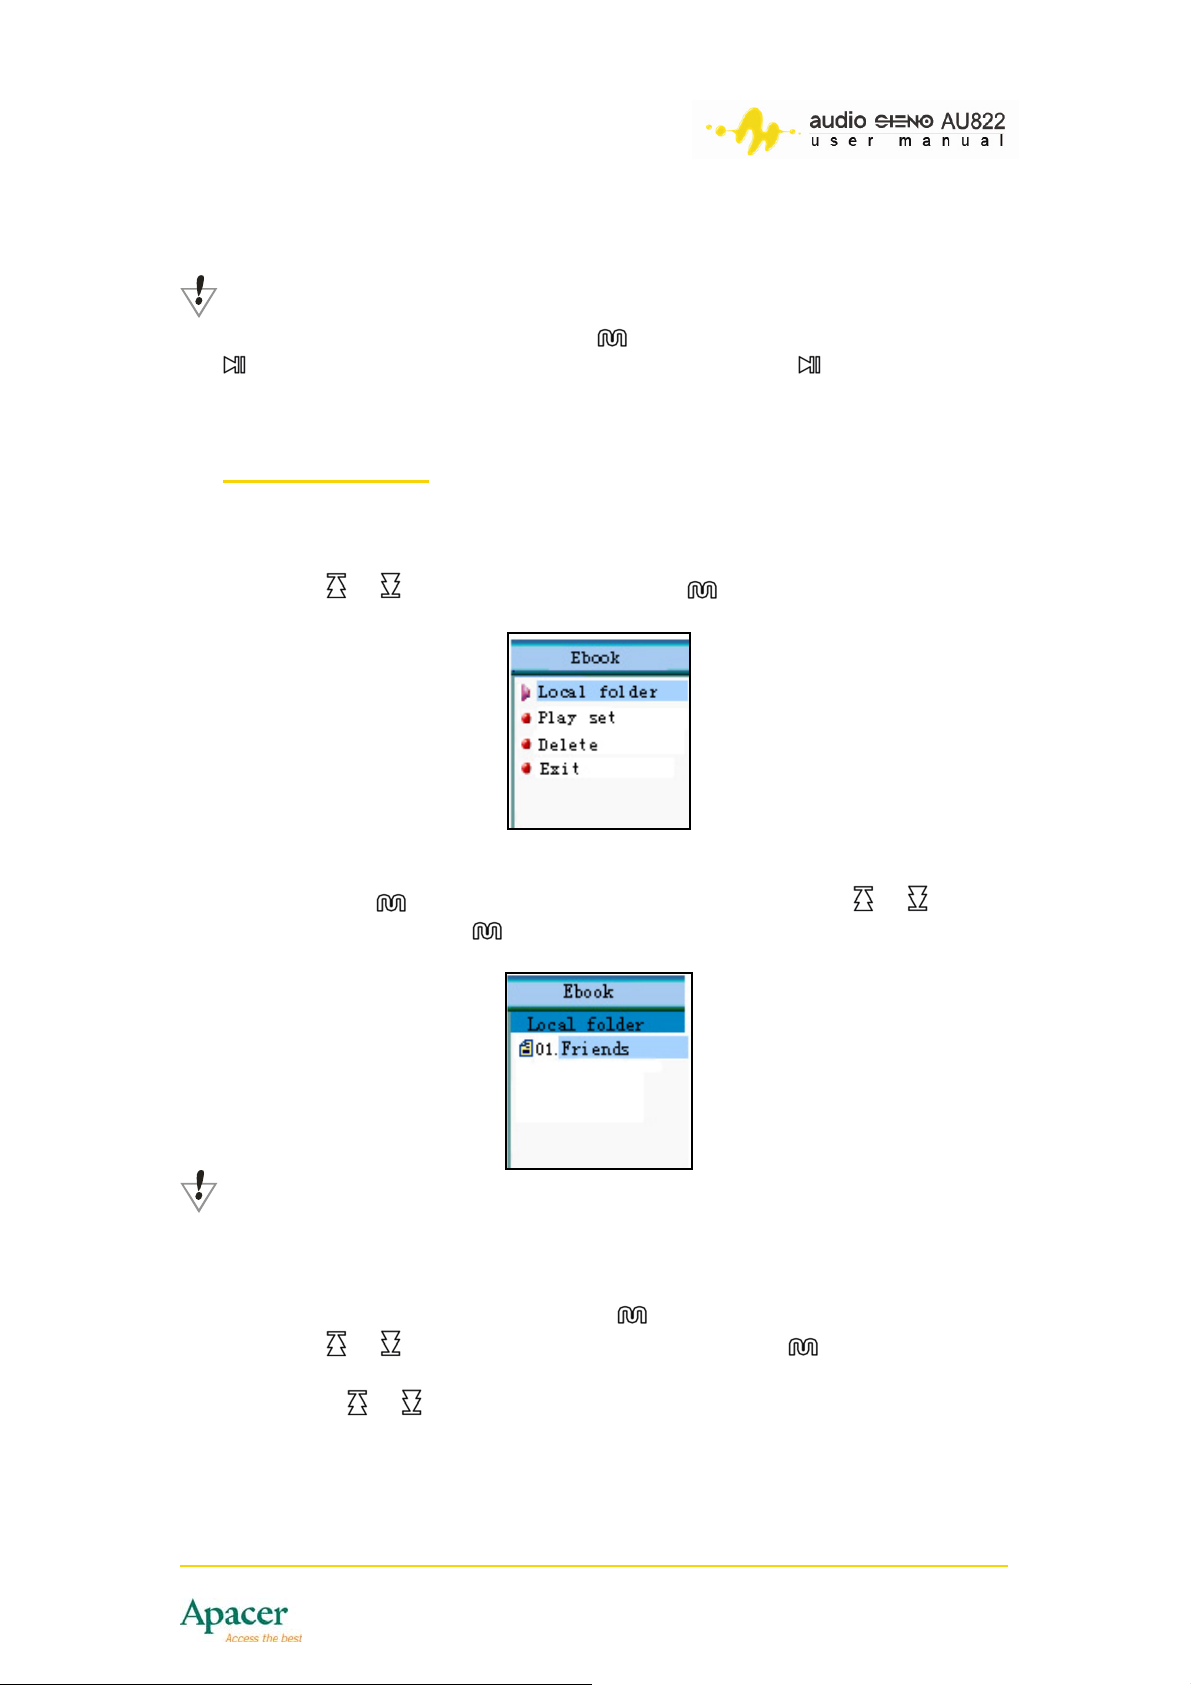
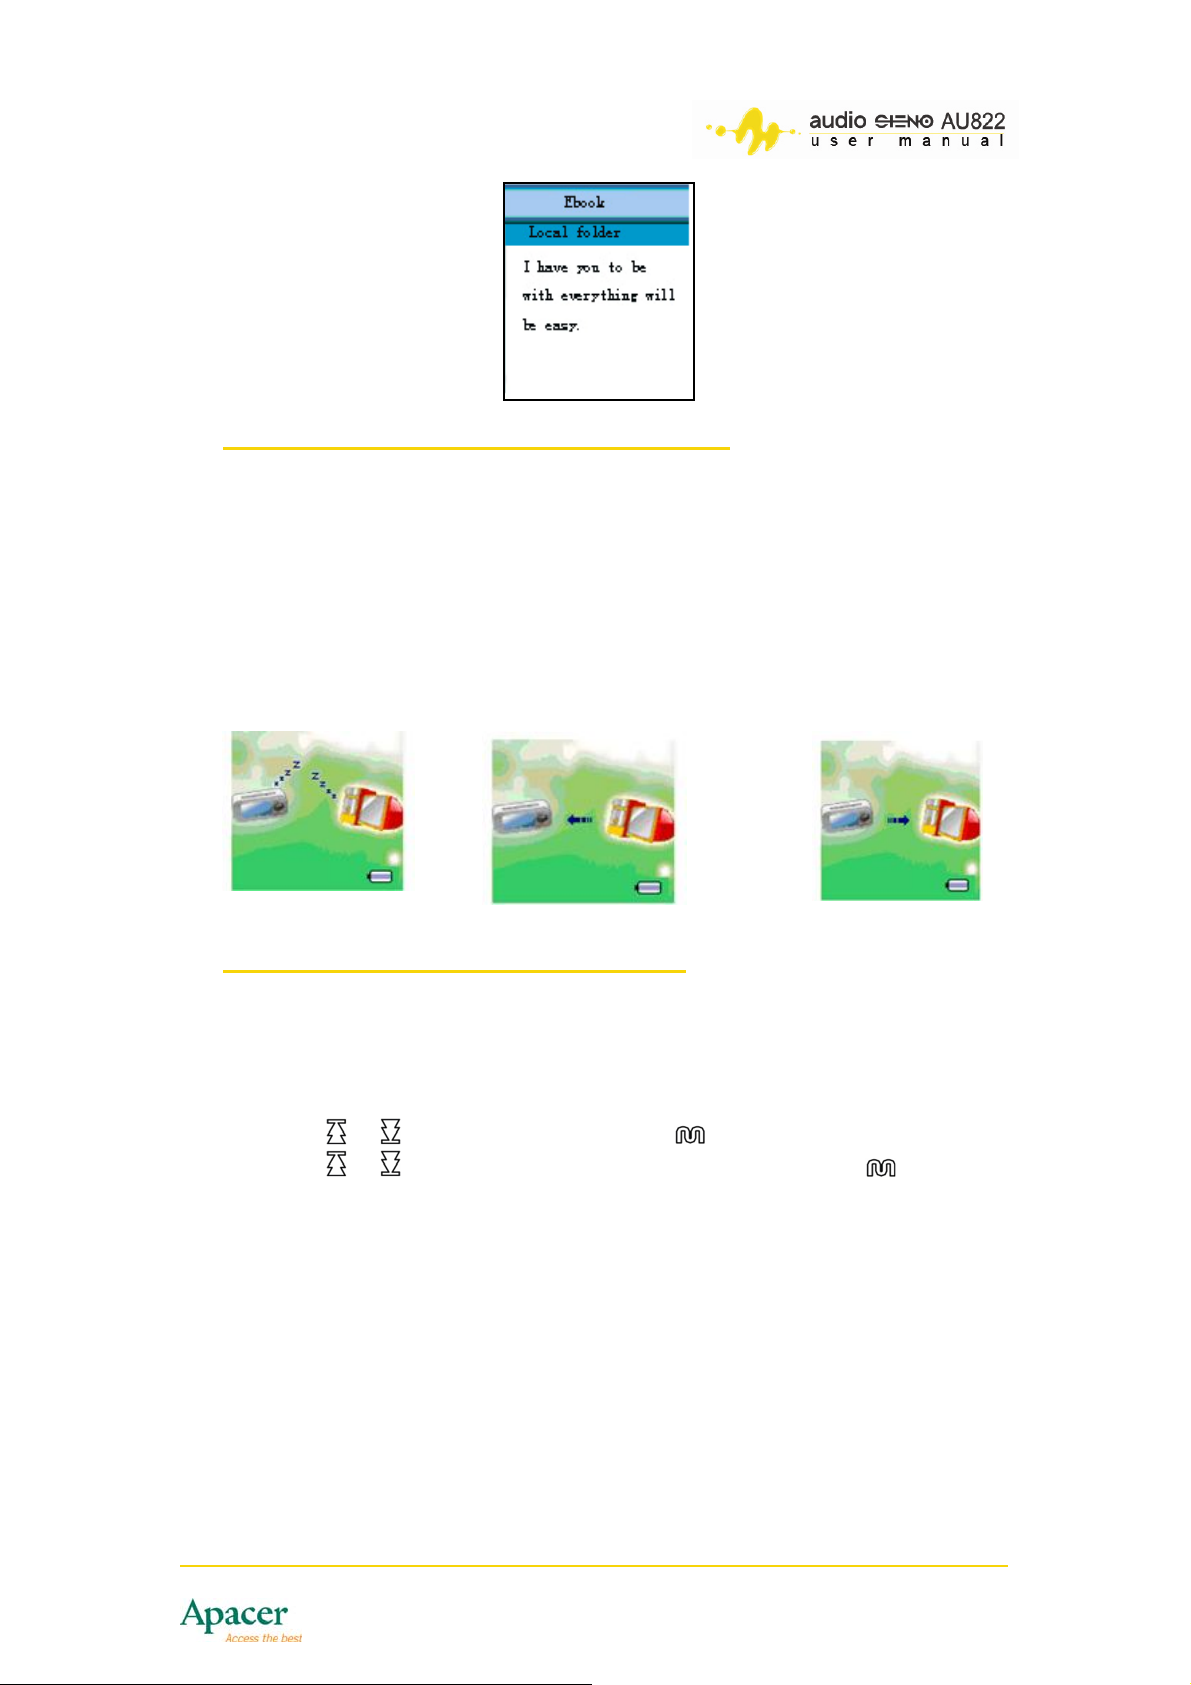
19 Using e-Book
To a
re d an e-Book:
1.
Go to the main menu.
2.
Press or select E-Book, then press .
3. Loc o
ate the e-Book from the root directory of the removable drive. To d
this
, press to enter the Dir Select menu, then press or to scroll
the directory. Press to return to the previous directory.
NOTE
You need not choose the directory if the e-Book file is saved in the
root directory of the removable drive.
4. Select the e-Book file, then press .
5. Press or to select Text reading, then press to confirm. The e-
Book contents now app
6. Use the or to scrol
ear on screen.
l through the e-Book.
35
Page 36
20 Using the USB drive functionality
The player supports stan
installation required),
stallation required), in
and ive.
write data on the player dr
he a e n an operated without the
Tb pl yer, wh n co nected to a PC USB port, c be
attery. After connecting to the P plays the following
depending on the scenario:
1.Standby mode
dard USB drive function in Windows 98 (driver
Windows 2000 or later Windows versions (no driver
Mac OSX 10.3 or later. With this function, you can read
C, the player LCD dis
2.Downloading data 3. Uploading data
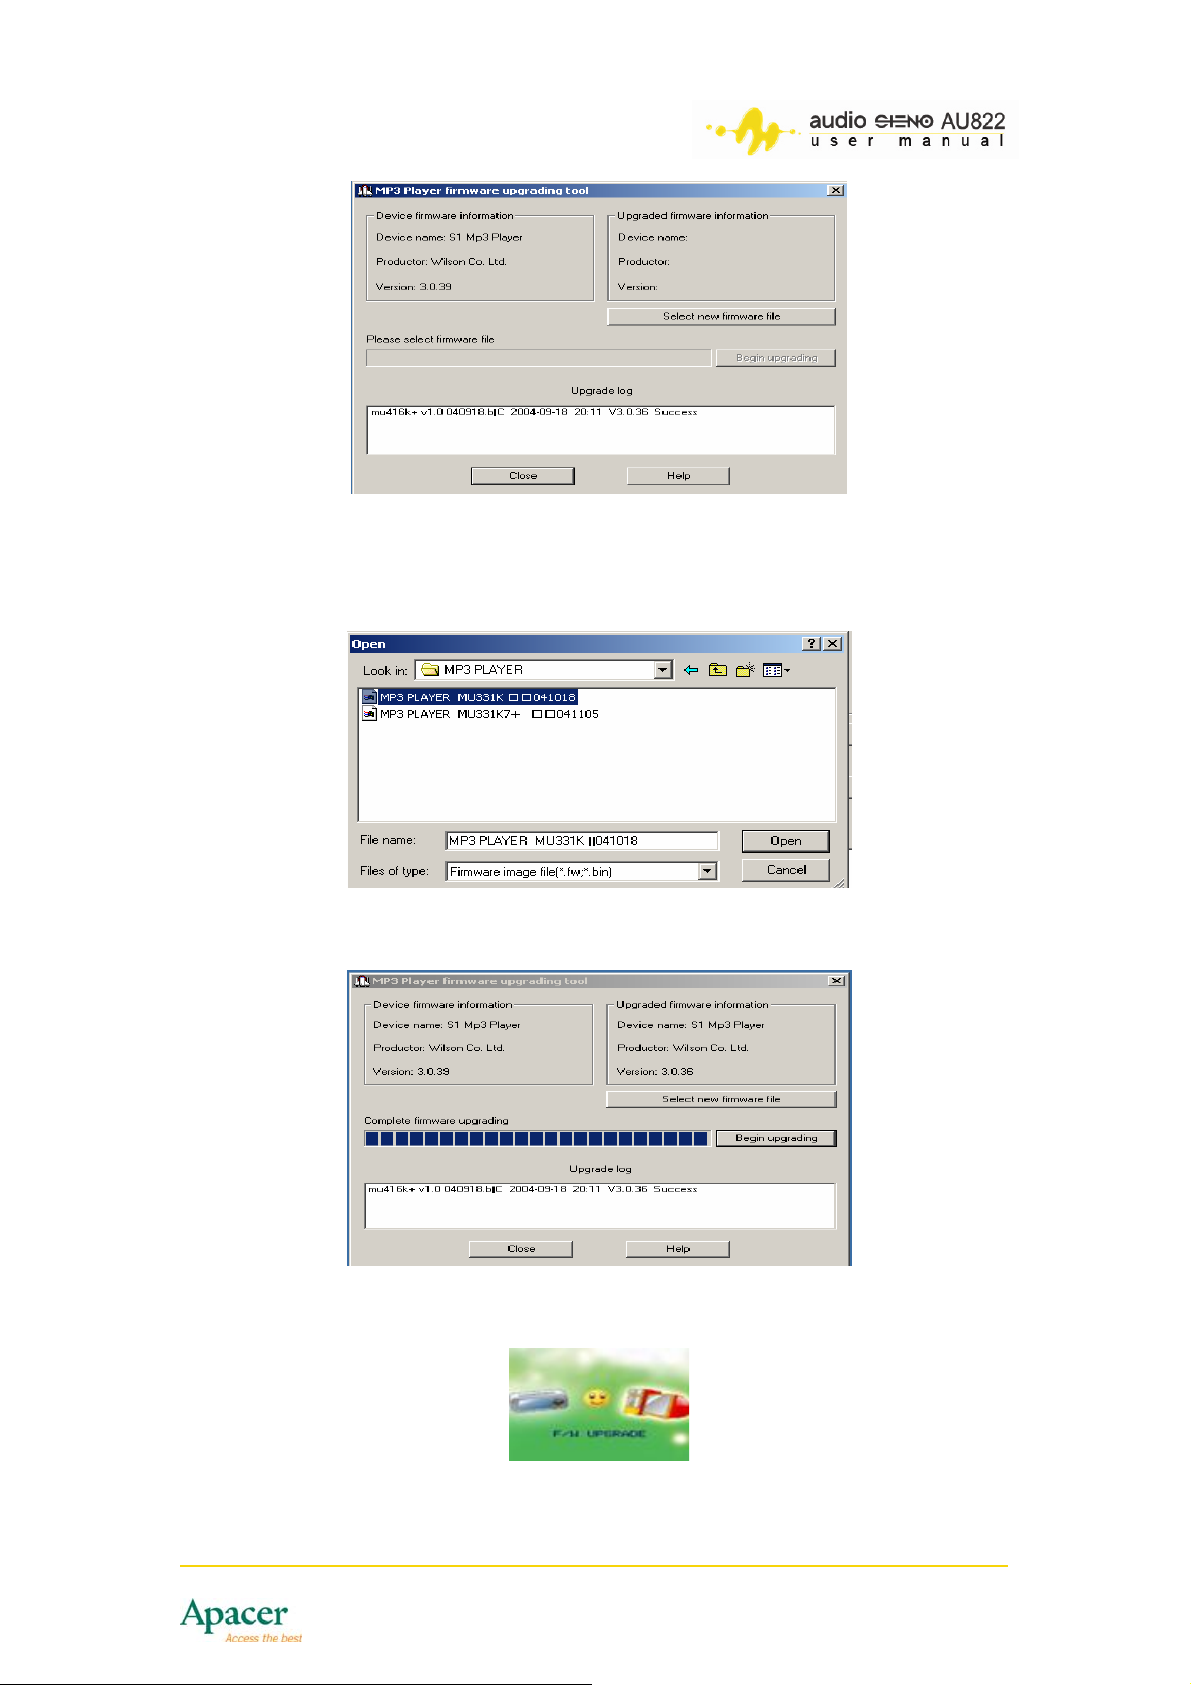
21 Upgrading the player firmware
You can upgrade the player firmware so you get most out of your AU822. The
player firmware may be maintained using the bundled tools via the PC. To
update the player firmware:
1. Go to the main menu.
2. Press or select Setup, then press
3. Press or to select Firmware upgrading, then press to confirm.
4. Con
5. Launch the MP3 Player Firmware Upgrading Tool from your PC, the
nect the player to an available USB port in your PC.
click Select new firmware file.
.
n
36
Page 37
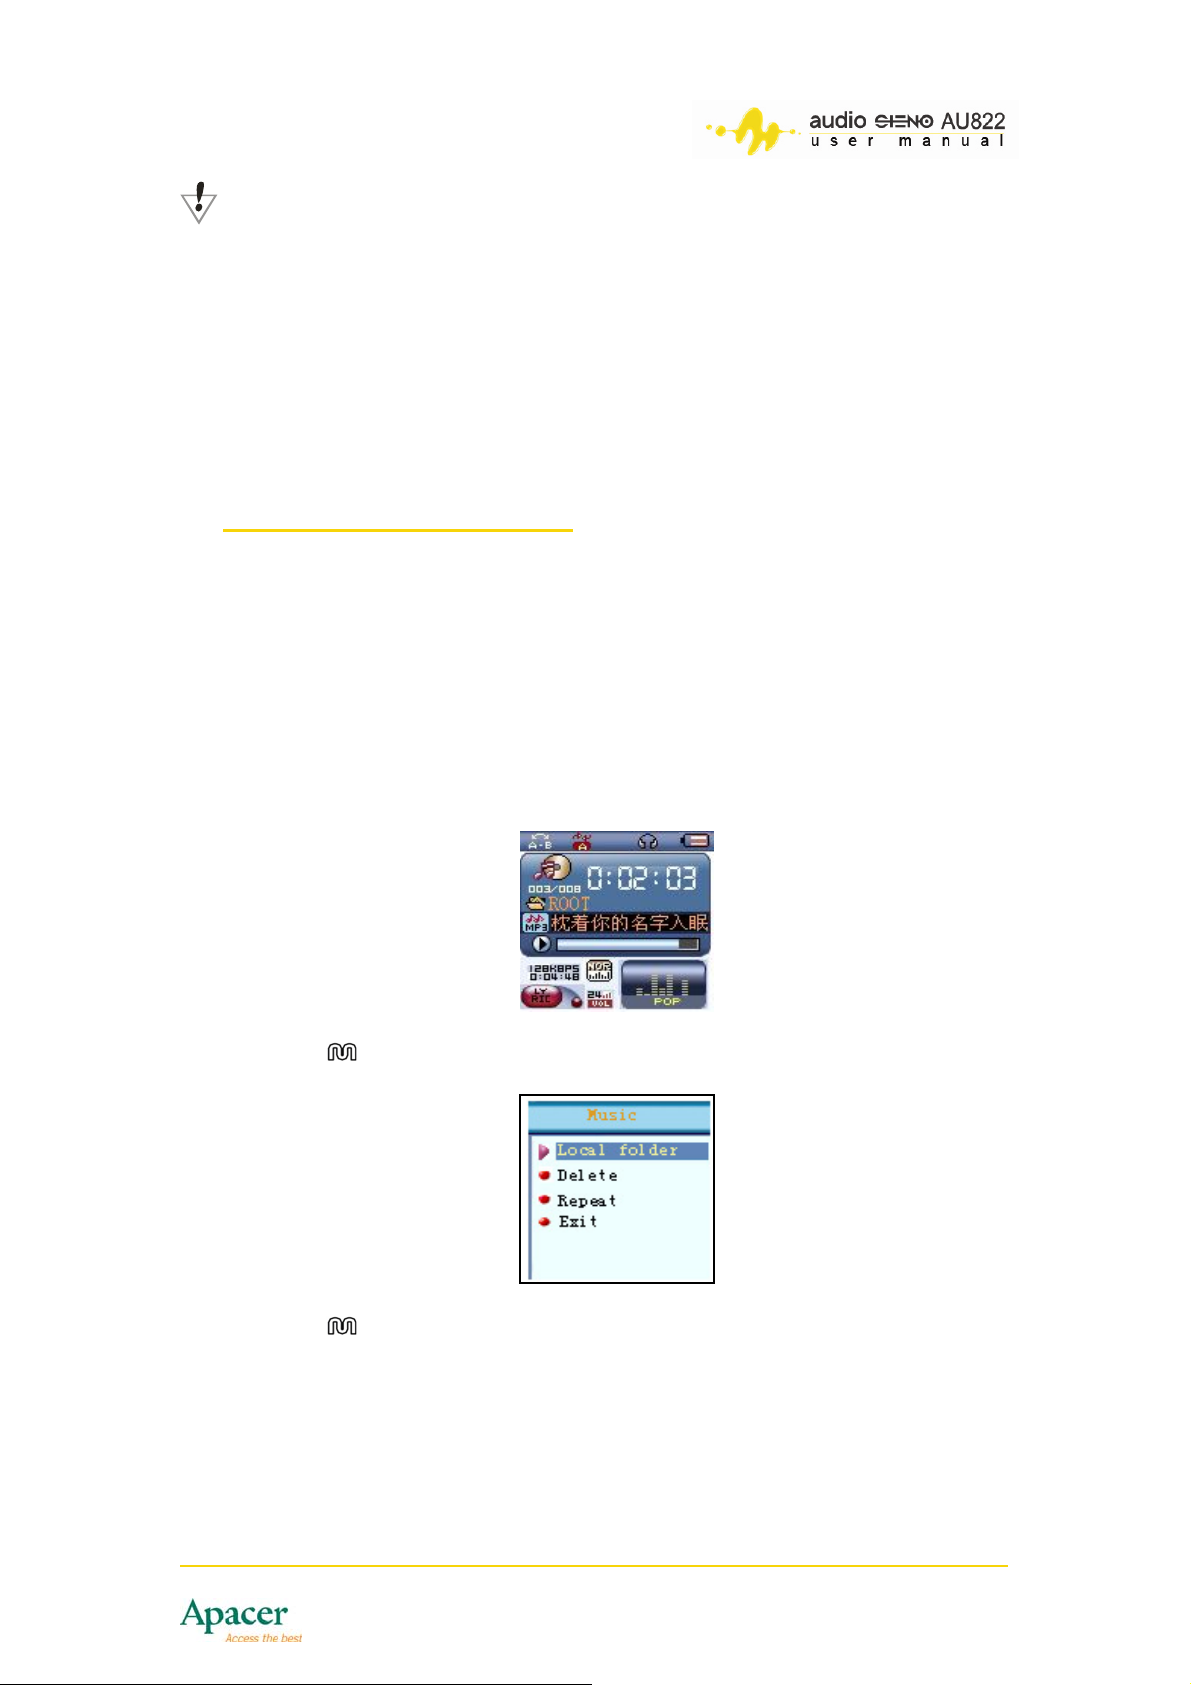
6. Locate the firmware file from the accessory CD or from th
location/folder where you doe wnloaded the updated firmware (available
from the Internet), then click Open.
7. Click Begin upgrading to update the firmw
are.
This message appears on screen to indicate that you have successfully
upgraded the player firmware.
37
Page 38
NOTE
• The play mware.
How erformance
and functionality.
• en upgrading,
Make sure that you use the correct firmware wh
otherw
• er to
Incorrect firmware updating may cause the play
malfunction. Follow the steps provided in wh
firm u ask someone with
basic PC knowledge to assist you with this task.
2 Miscellaneous settings
2
er will operate normally with the original fir
ever, firmware updating optimizes the player p
ise, this will cause the player to malfunction.
ware. It is also recommended that yo
en updating the
22.1
You ca n different directories. You must
reate the directories on your PC so you can play, manage and sort the files.
c
The player can identify
You can select the folders using the stop playing sub-menu. To do this:
Changing the directory (on stop playing sub-menu)
n save audio, video or e-Book files o
up to nine root directories.
1. mode) you may be able to
In stop playing status (for example, in Music
record and play files to and from a different directory.
2. Press to enter the stop playing sub-menu.
3. Press again to enter the Directory options menu.
38
Page 39
4. Pre
5. Pre to confirm.
ss or to select the directory.
ss
NOTE
You can set special directories for each mode such as a directory for
music, voice recordings and AMV files.
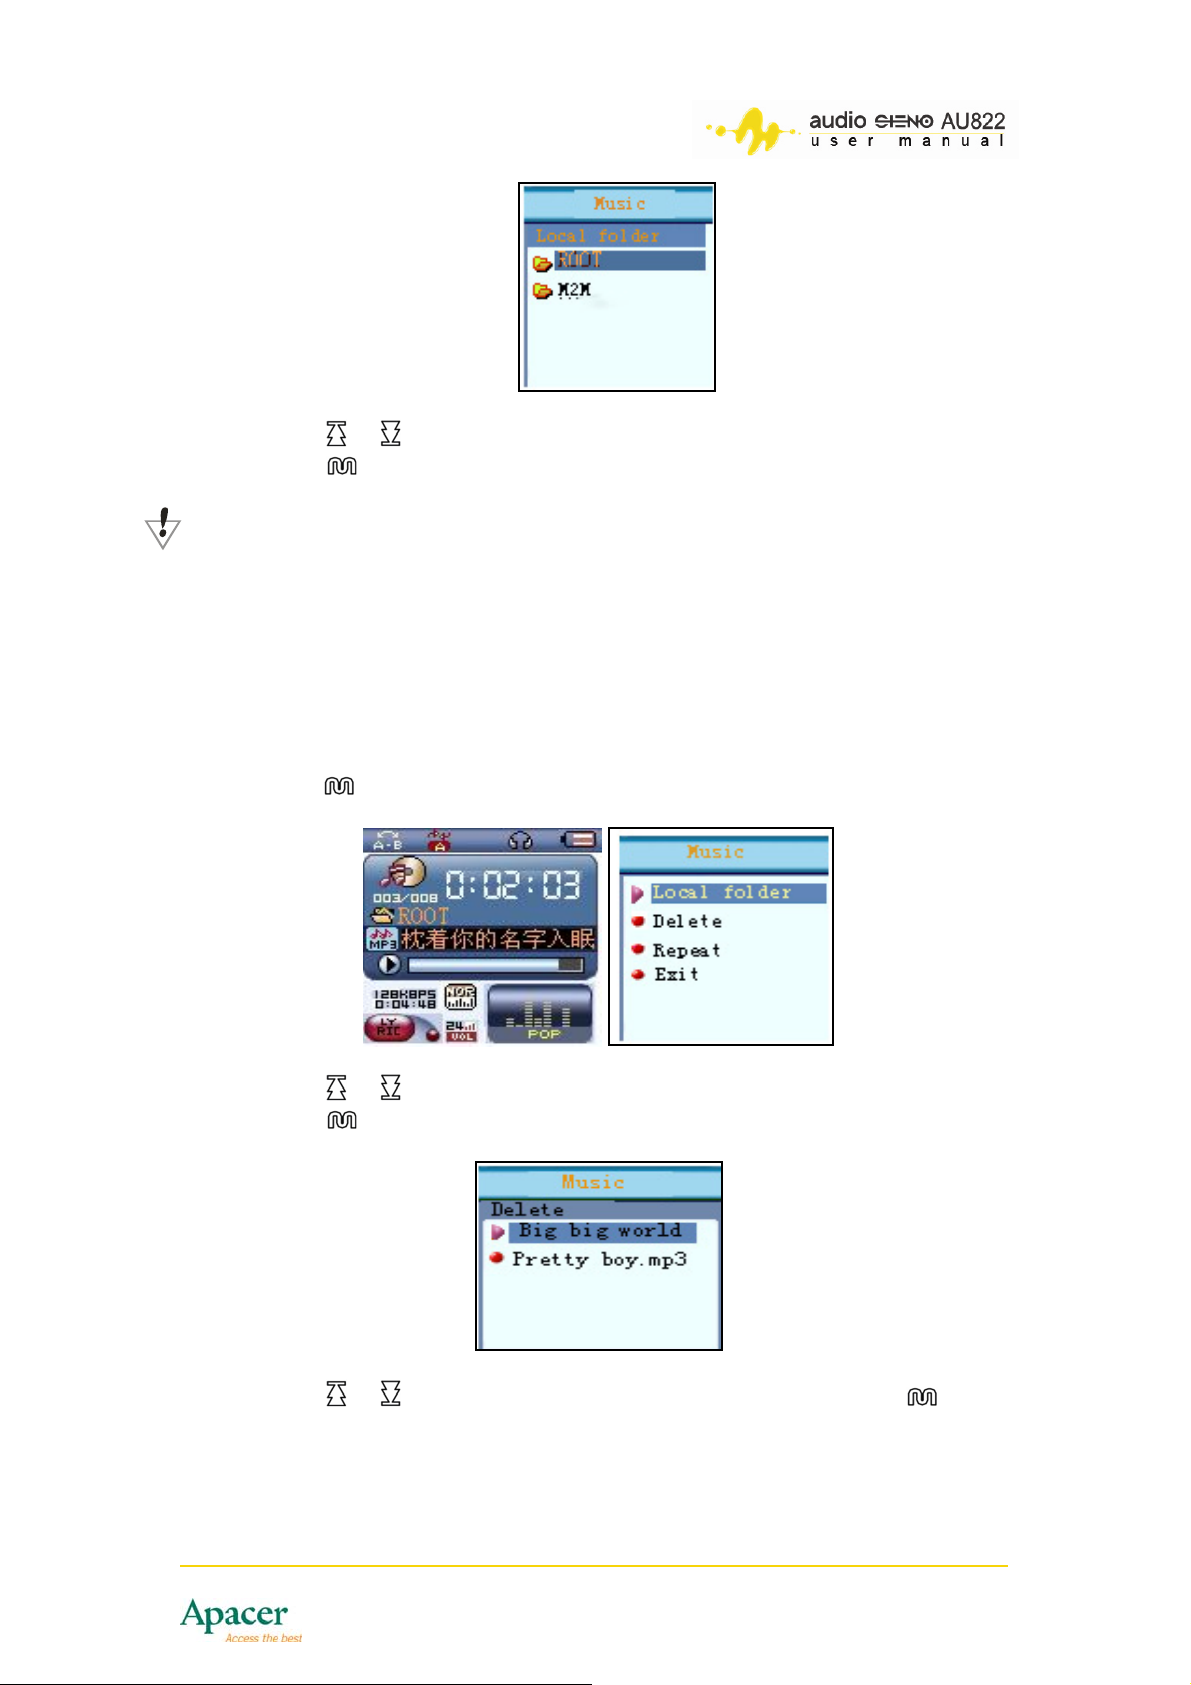
22.2 Deleting files (on stop playing sub-menu)
ou can delete audio, video or e-Book files and even saved preset FM radio
Y
stations using the stop playing sub-menu. To do this:
1. While in stop playing mode (FM mode doe not have stop playing mode),
press to enter the sub-menu.
2. Press or to select
3. Press
to enter the Delete menu.
Delete.
4. Press or to select the file you want to delete, then press
39
.
Page 40
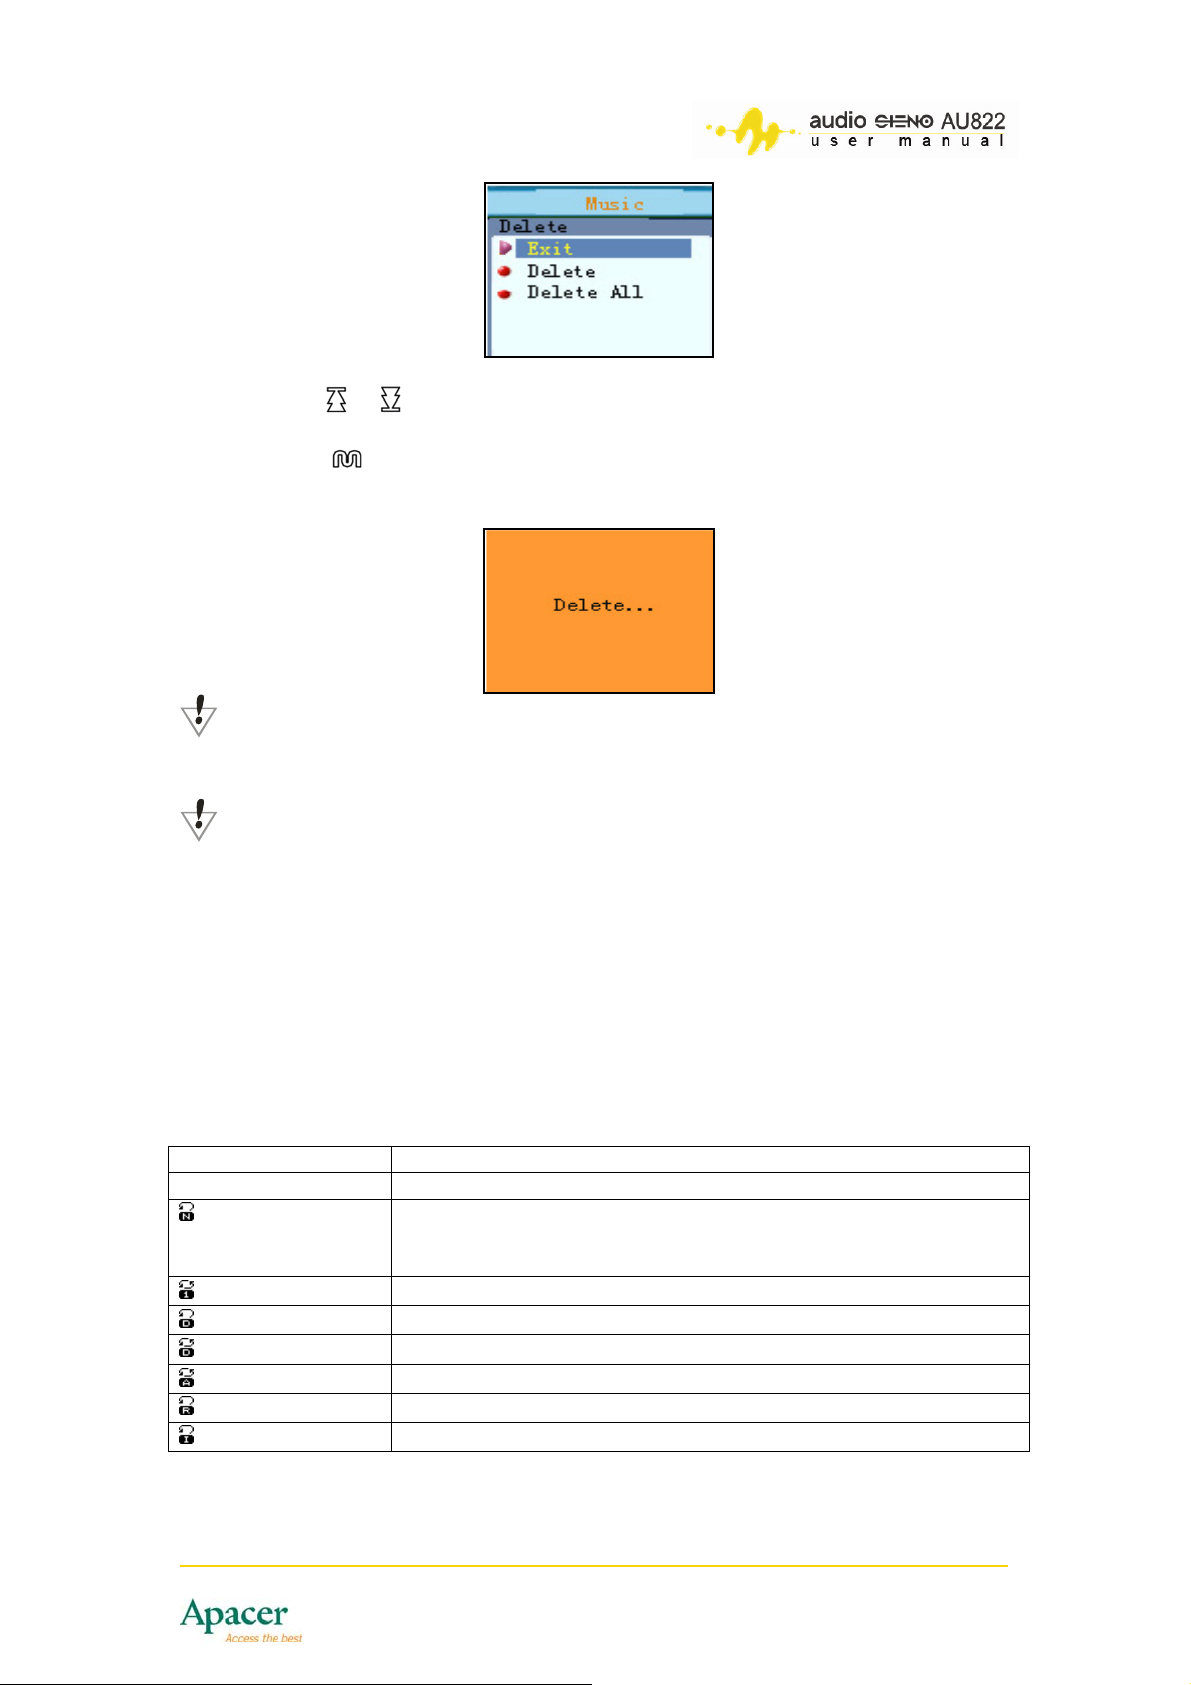
5. Press or to choose Delete to delete the selected file or Delete All
to delete all the folder contents
6. Press to confirm
indicate that you have succe
. A Delete… message appears on screen to
ssfully deleted the file(s).
NOTE
To delete preset FM radio stations, follow the first three steps of the
abo t
ve sec ion.
IMPORTANT
When you are deleting files while th er is connected to the PC,
make sure to unplug the player saf re disconnecting the USB
cable, otherwise the file will no
22.3 Changing the playb
ack mode (play sub-menu)
You can select several playback modes
and FM radio recordings. The Playback
Repeat, the player replays the currently
e play
ely befo
t be deleted.
when playing music/audio files, voice
mode is set to Repeat by default. With
played files.
Refer to the table for es.
available playback mod
Playback mode
Repeat Repeats the currently played file.
Normal After playing all files in the present directory, the player
searches and plays the files in the next directory until all
directories and files are played.
Repeat one Repeats only the selected song
Play folder Plays all the files in the selected folder once
Repeat Folder Continuously repeats playing all the files in the folder
Repeat all Continuously repeats playing all the files
Shuffle
Intro
Randomly plays the files in the current folder
Plays the first 10 seconds of each file accordingly
Function
40
Page 41
22.4 Adjusting the song tempo (pla ub-menu)
y s
You can adjust the song tem ing MP3 files. To do
this:
1. Press
2. Press or then choose Play tempo.
3. Press to display the tempo selection.
4. Press or to set the tempo to fast or press or to set the tempo
to slow. The tempo setting appli
22.5
T
Selecting the replay mode (play sub-menu)
o select the repeat mode:
1. When in Music or Vo
menu.
2. Press or to select Replay mode.
3. Press to enter the repeat mode menu.
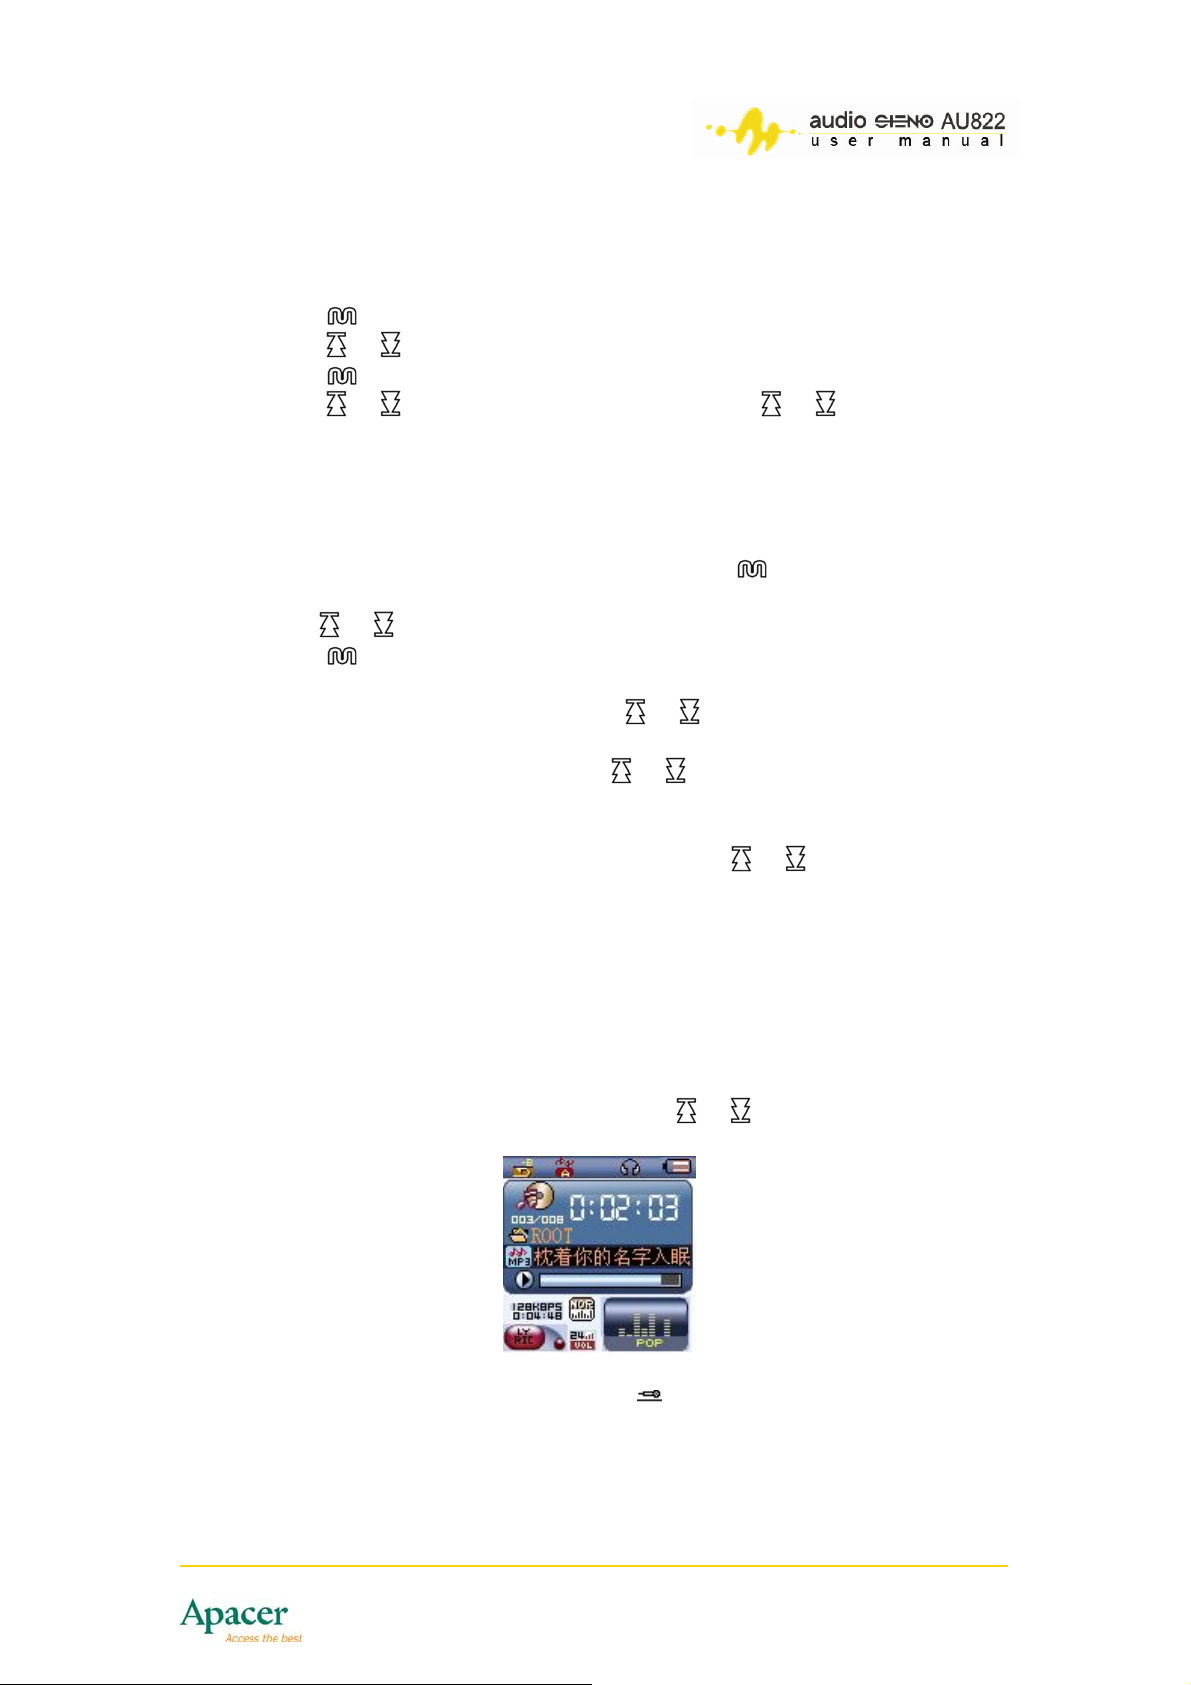
4. When the repeat A icon flashes, the player is waiting for you to set the
star
5. When the repeat B icon flashes, the player is waiting for you to set the
ending point of A-B repeat Press or to confirm the ending point B.
After setting the A-B repeat, the player repeats playing A-B segment until it
re
aches the specified repeat time. You can press or to re-edit the
st
arting point A when in A-B repeat mode. (Playing time follows the set
R
epeat time.)
while an MP3 song is playing to enter the Play sub-menu.
ting point of A-B repeat. Press or to confirm the starting point A.
po to fast or slow when play
es to all songs until it is adjusted.
ice play mode, press to enter the Play sub-
22.6 Using the follow and read function (not available in playback mode)
To use the follow and read function:
1. When playing the A-B segment, press
read function mode.
N he repeaotice that t t icon A-B changes to (microphone). The player now
records your voice. Recording time is kept the same as the A-B repeat time.
or to enter the Follow and
41
Page 42
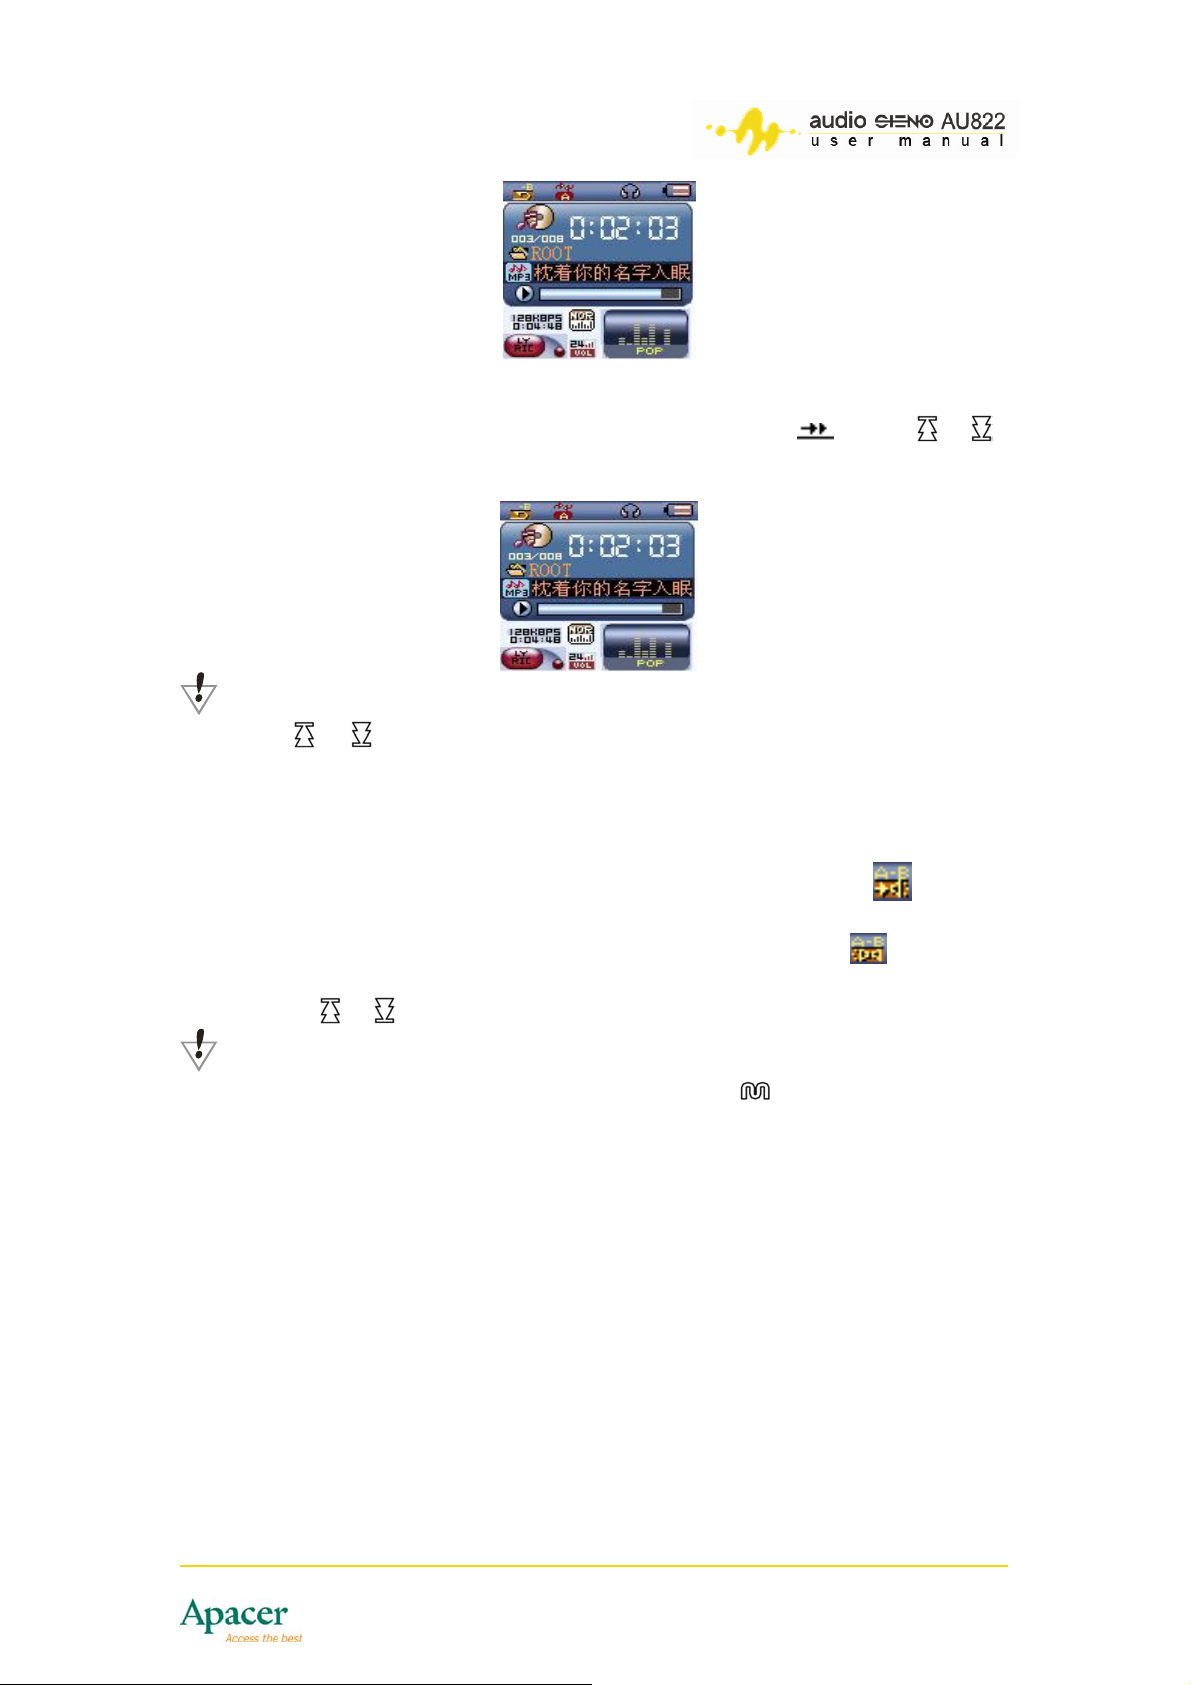
2. The player terminates the recording and returns to the track segment
when time is up. The icon on screen changes to , Press or to
enter Contrast mode.
NOTE
ss or to return to the A-B Repeat mode. Pre
22.7 o
To use the contrast mode (n t a ailable in playback v
mode)
1. After entering Contrast mode, the repeat icon displays ‘ , then th
current track is played.
2. After the current track is finished, the icon changes to e , then starts
playing the recorded voice.
3. Press or to return to the Follow and read mode function.
N
OTE
Under the three mentioned condit to exit repeat mode.
2.8 Replay times (play sub-menu)
2
Thi
s function enables you to set how many times to repeat A-B repeat.
ions, press
22.9 Repeat duration (play sub-menu)
This function allows you to determine the duration between the previous and
the next playing track in seconds.
42
Page 43
23 Privacy Space function
The Privacy Space function allows you to partition the player drive into two.
You may encrypt one of the partitions with a password to keep your private
files and data confidential.
The bundled accessory tool helps you divide the USB drive into two partitions
by random scale. When divided, two disk icons appear on the computer screen.
NO
TE
• For Windows 2000
display the drive icons. Otherwise, only one drive icon appears
on screen.
• You must set the linking mode in the Sys set menu to “Single
ordinary disk” or “Single encrypt disk” to display the other
disk partition icon.
You also have the choice of dividing the drive into two without any encryptions.
To create a Privacy Space:
OS, you must install Service Pack 4 to
IMPORTANT
Dividing the disk into two partitions or combining tw: o partitions into
one can erase all files in the player memory. Backup your data before
dividing or combining partitions.
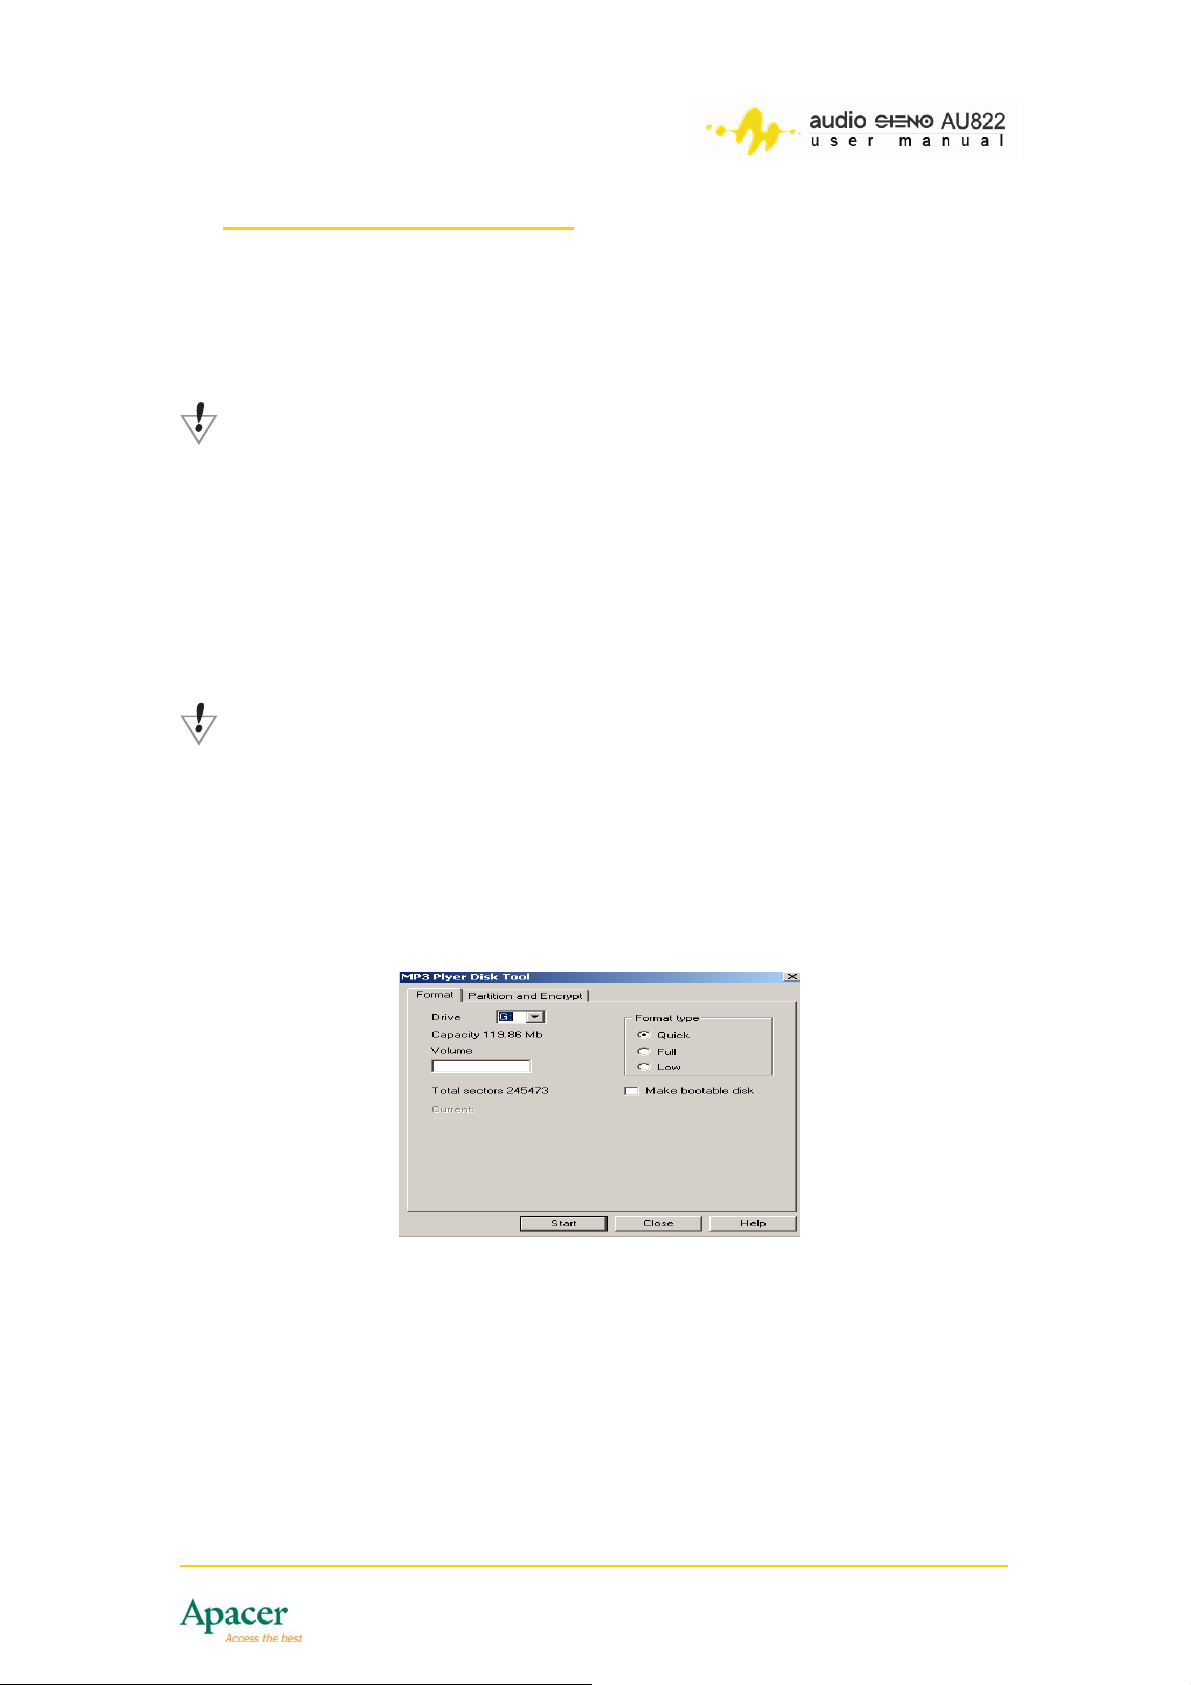
1. Connect the player to your PC.
2. Launch the MP3 Player Disk Tool. This application is available from
the accessory CD that c
ame with the package.
3. Click the Partition and Encr tab, then check the
ypt Set username and
password option.
4. Create a username and password for the encrypted partition, then click
Start.
43
Page 44
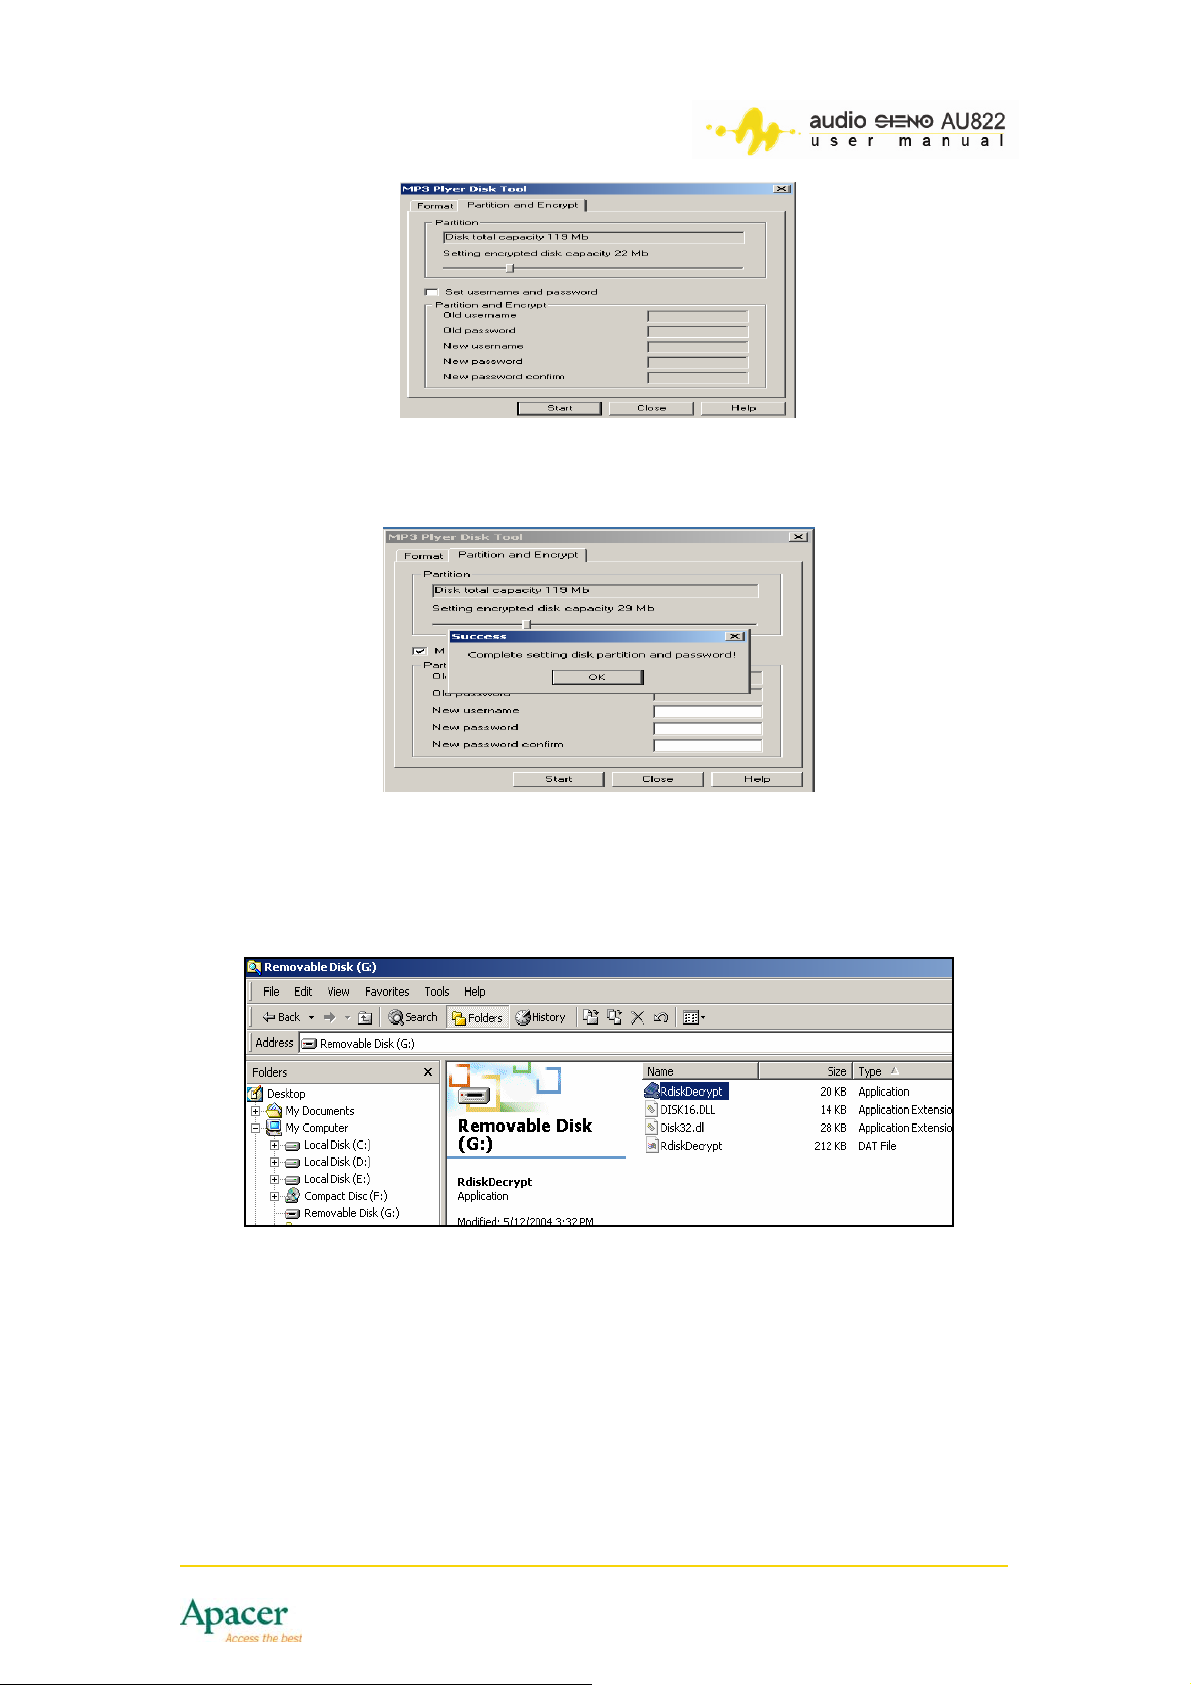
5. A S uccess message appears to indicate that you have comp
sett
ing the disk partition and password. Click OK.
leted
6. Restart the computer.
7. After restarting, you two partition
s now show on the removable drive
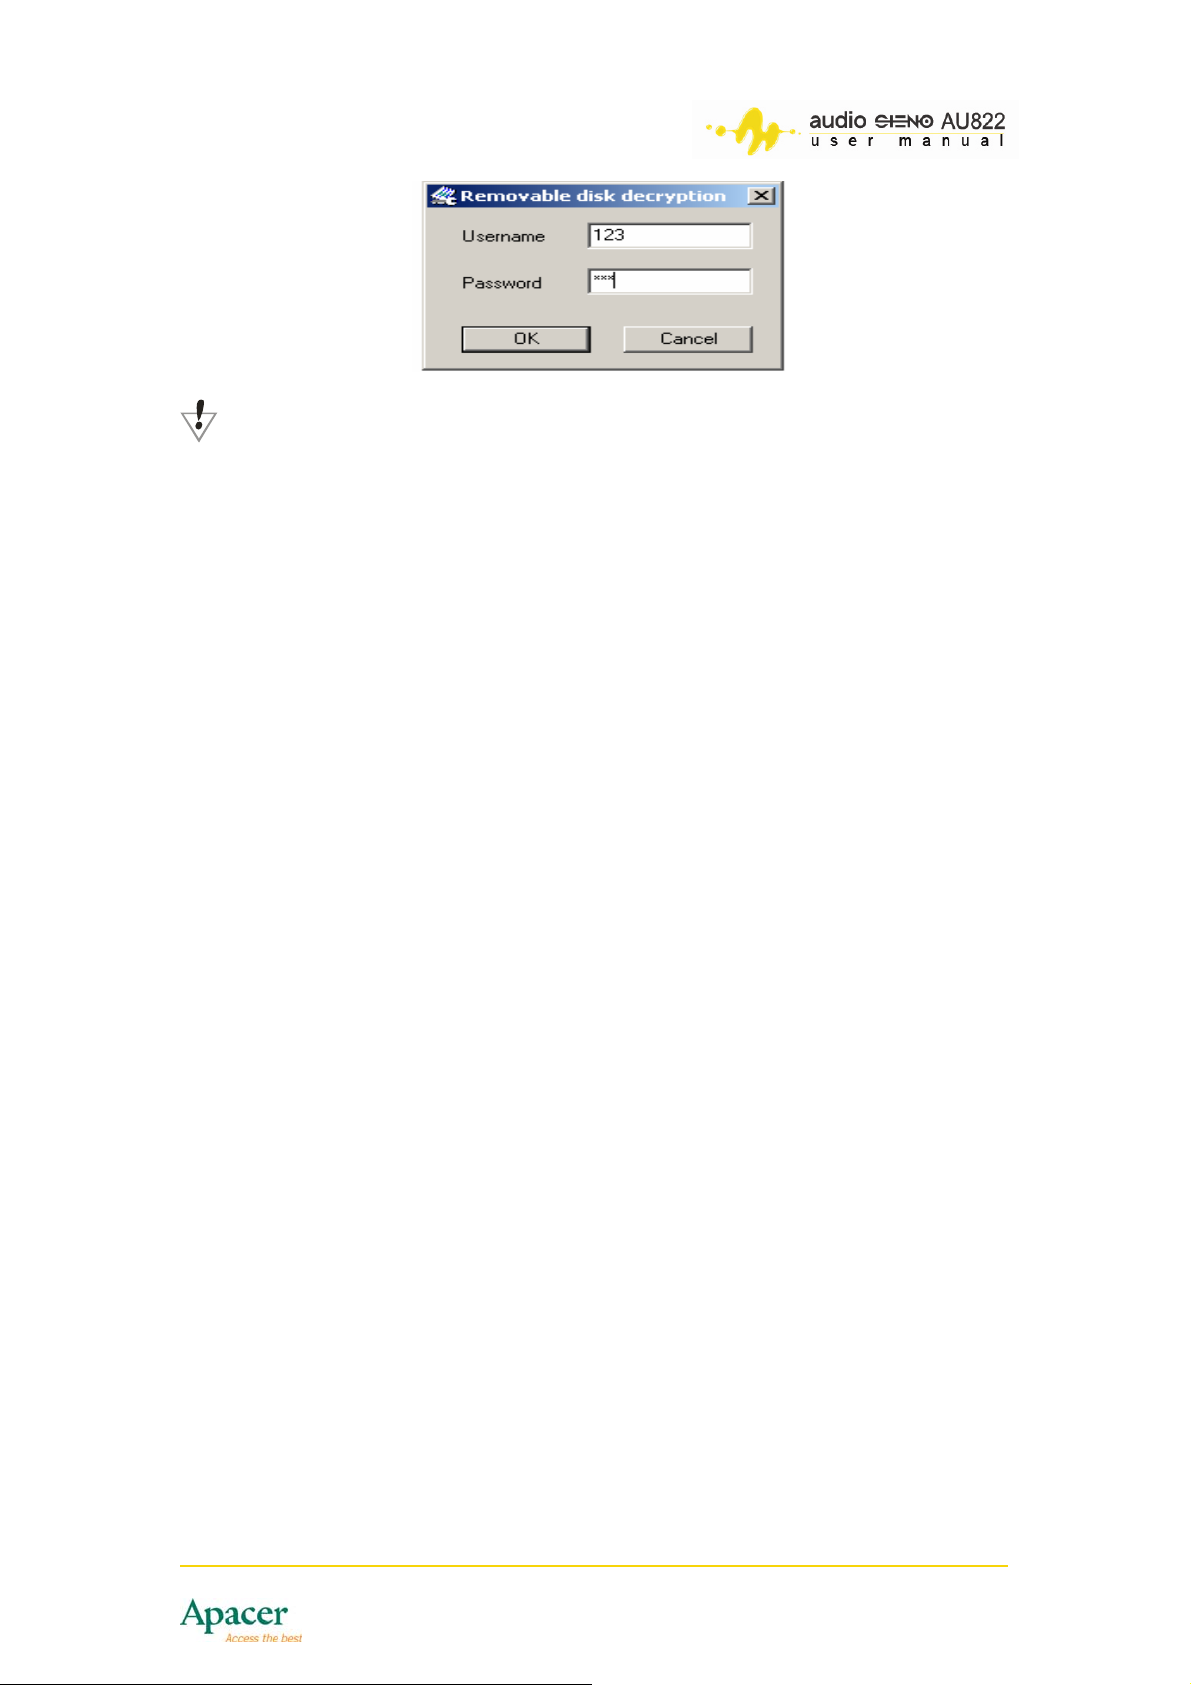
8. Double-click the encryption disk (second drive icon) to display three files
and 2 hidden files, then check the disk space.
To
read and write data on the encrypted partition:
1. Explore the encrypted partition, then double-click on the
RdiskDecrypt.exe file.
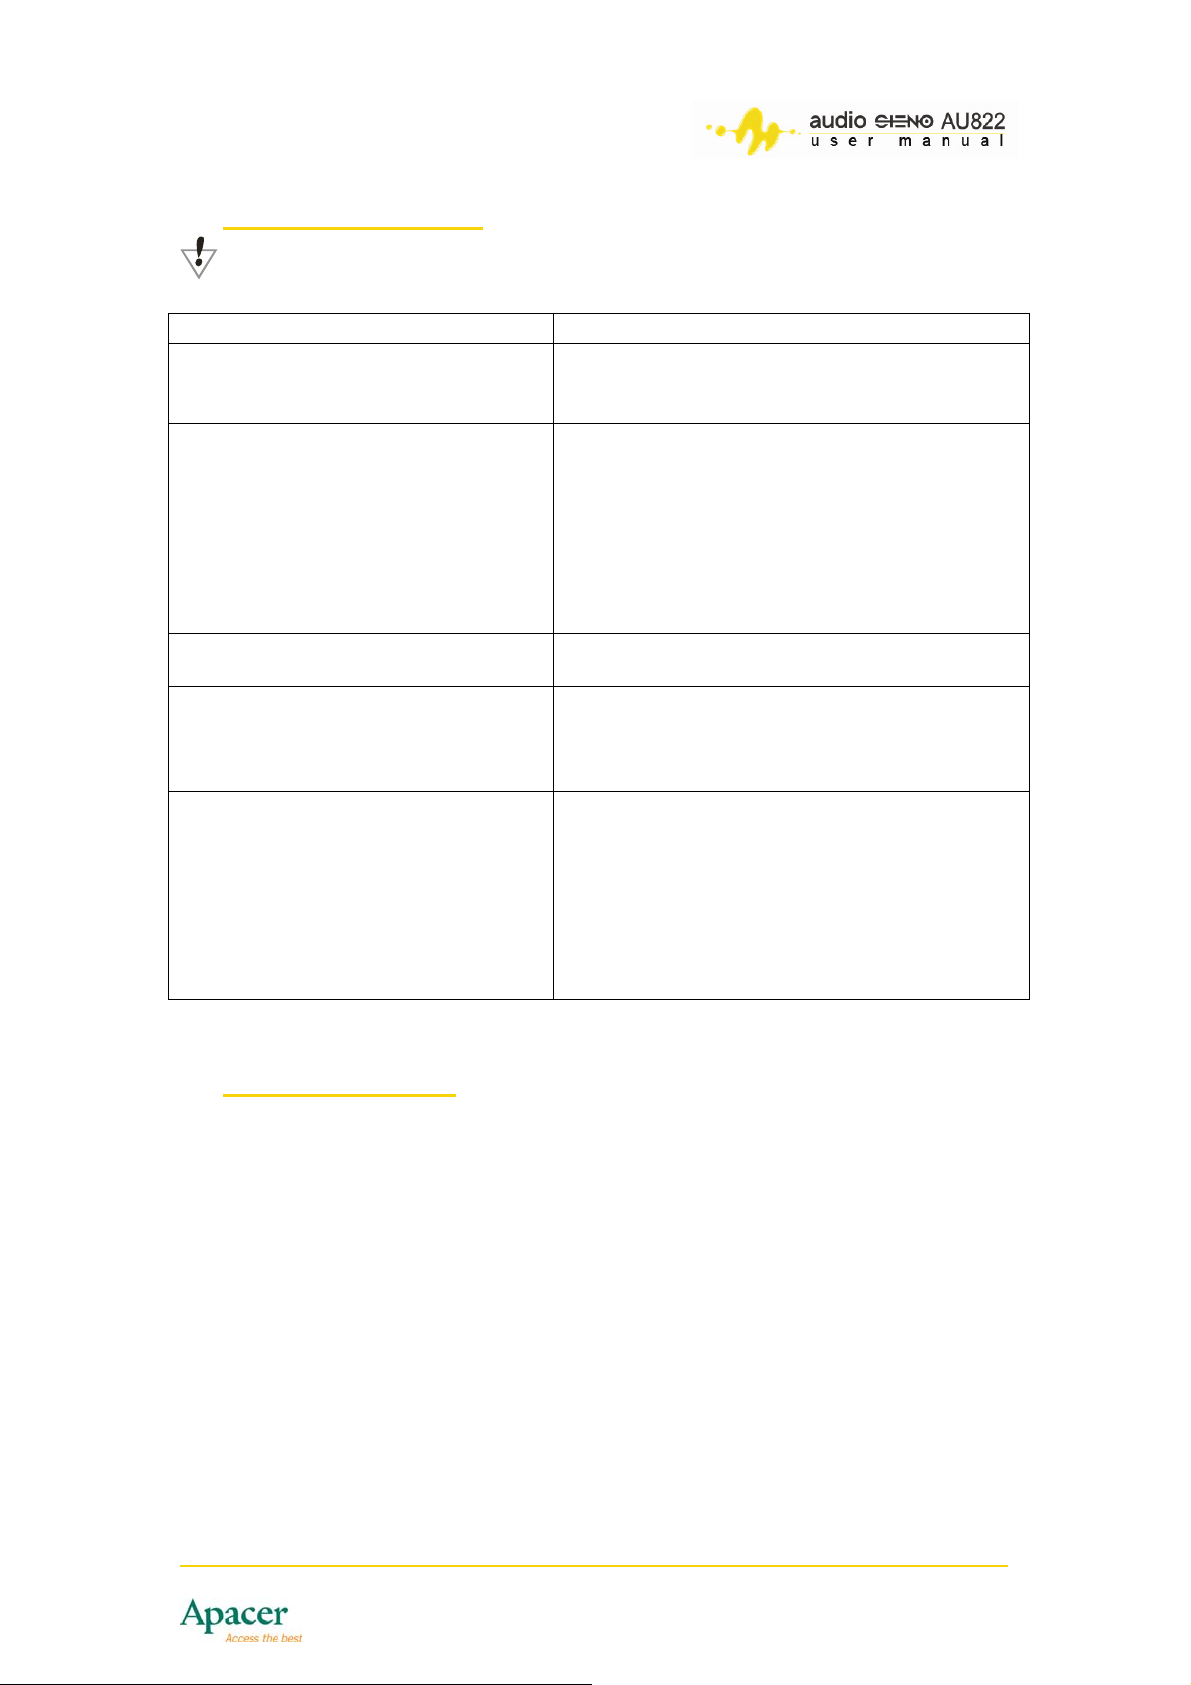
2. rompted, enter the username and password, then click OK.
When p
44
Page 45
NOTE
• You must enter the username and password to explore the
encrypted partition when the player is conn
ected to the PC.
• You cannot decrypt the partition without the correct username
and passw ord, you
may onl
encryp
ord. If you forgot your username or passw
y combine the partition and lose all data in both
ted and non-encrypted partitions.
3.
You can now read and write data on the encrypted partition.
45
Page 46
24 Troubleshooting
NOTE: Specifications are subject to change without notice.
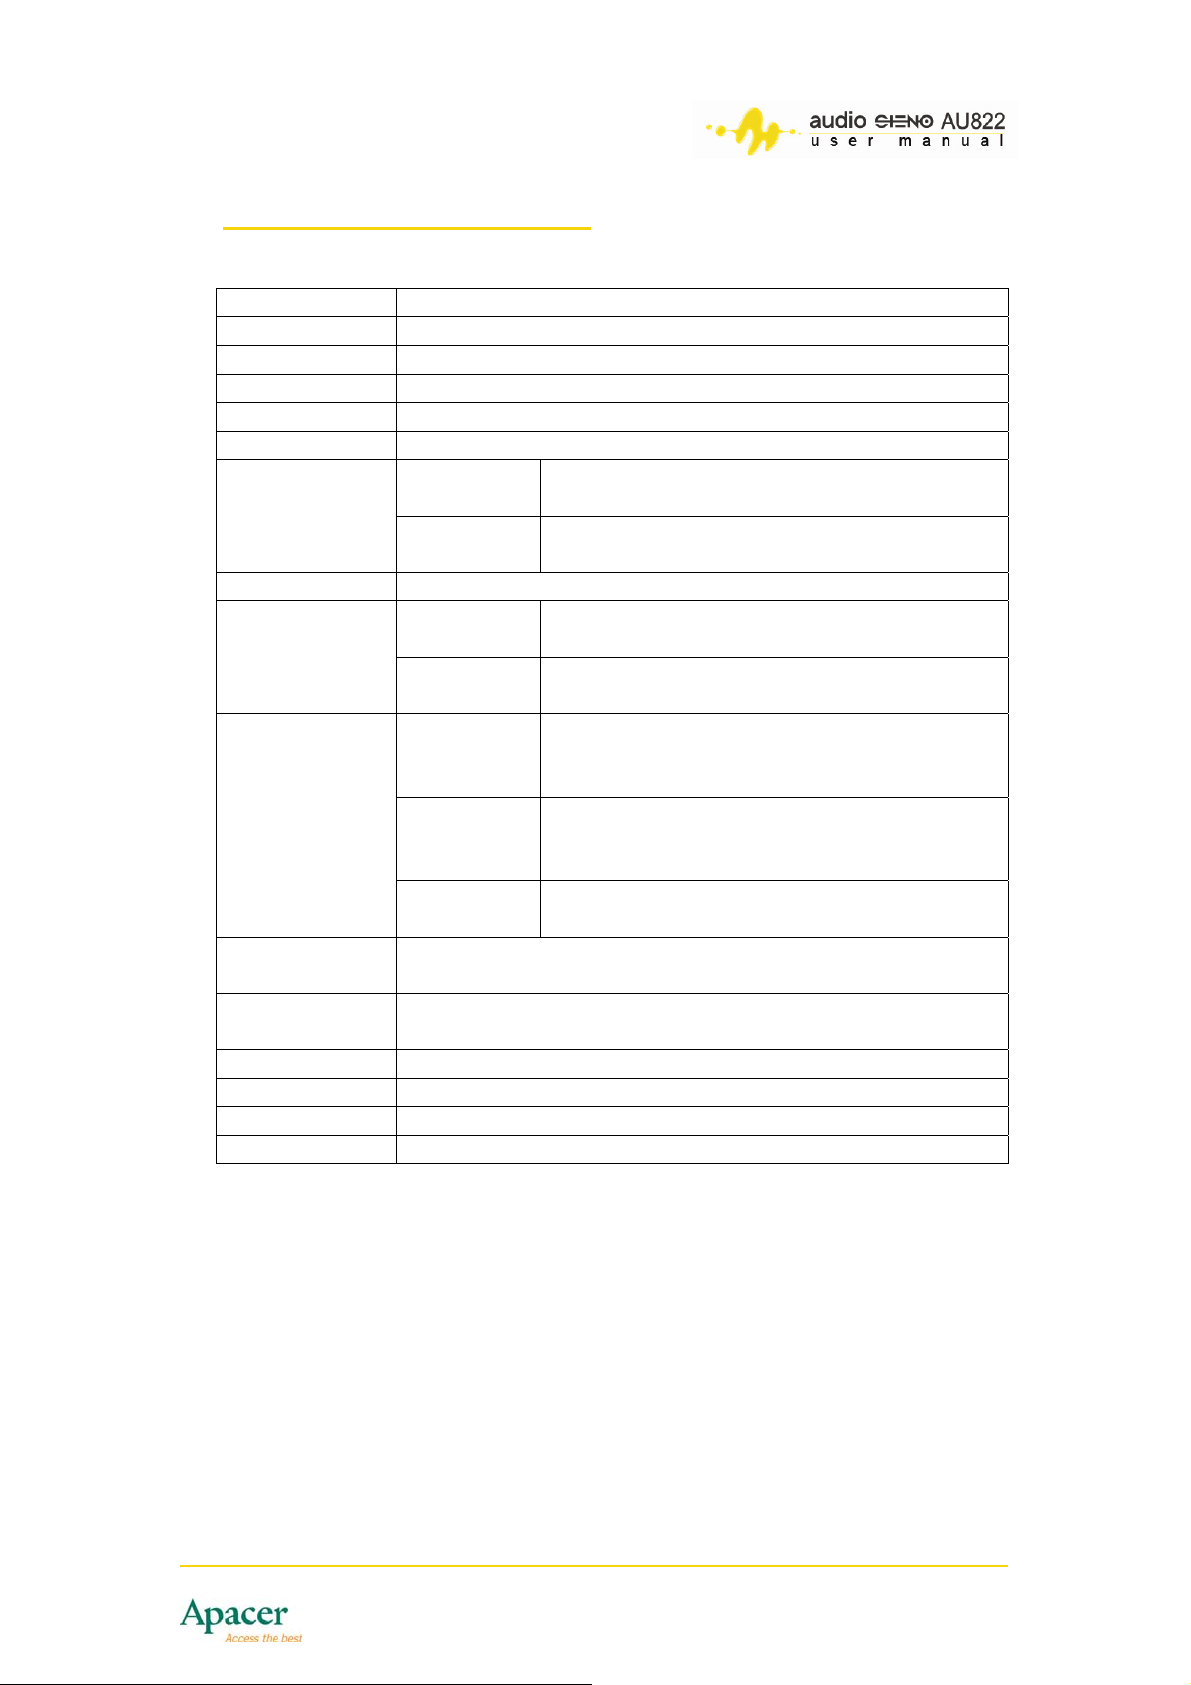
Problem Solution
The player does not turn on.
I cannot hear any sound from my
earphone.
The
screen display is garbled.
• Check if the player ON/OFF switch is
positioned t
• Check if the player battery is charged.
• Increase the volume level.
• Make sure the earphone is prop
connected to the earphone jack.
• Check if the earphone cable and plugs are
not damaged.
• Check the integrity of the file you ar
playing. A damaged MP3 file
different levels of
Choose the correct LCD languag
o ON.
noise does not play.
erly
e
creates
e.
FM radio reception is poor.
I cannot download files from the
PC.
• Operate the player in another location. The
bundled earphone serves as radio antenna.
• Operate the player away from electronic
devices that cause radio interference.
• Check if the USB cable is properly
connected to the player and your PC and is
not damaged.
• Check if the player driver is properly
installed.
• The player memory is full. Try deleting
some files to free some space, then try
again.
25 Considerations
It is normal for the player to display its nominal than its real memory capacity.
46
Page 47
26 Technical specifications
Model AU822
Siz L)90mm × (W)40mm × (H)13me ( m
Weight 43.7g
Display 1.5” 65,536 colors CSTN screen
Connectivity USB 2.0 full-speed
Capacity 256MB/512MB/1GB internal flash
MP3 bit
Music format
rate
WMA, bit
rate
EQ mode Natural / Rock / Pop / Classic / Softt / Jazz / DBB
Sampling 8KH
Record
rate
Recording W
Frequency
receiving
range
FM Radio
Programm
able
channels
Signal-tonoise
Other
functions
Headphone
max. output
Adjustable 16-le
Fade in/out featu
(L)10mW+(R)10mW / 32 Ohms
Power Built-in rechargeable 230mAH lithium polymer battery
Battery life Maximum of 5 hours music playback time
User interface Multilanguage display
Support O/S Windows98(SE)/ME/2K/XP, Mac OS 10, or later .
Note: Customers will not be informed of any changes to these product
specifications.
8K bps – 320K bps
5K bps – 384K bps
z
AV (32K bps) / ACT (8K bps)
Ctype
ontinuous / Dynamic voice
76M
Hz – 96MHz (Japan band)
87
MHz – 108MHz (European & Americas
ban
d)
20+20
45dB
vel playback/repeat speed
re
47
 Loading...