

Page 1

N27W551T/N32W551T
USER'S MANUAL
LCD TV
L27W551T/L32W551T
Page 2

1
TABLE OF CONTENTS
IMPORTANT INFORMATION ---------------------------------------------2
Safety-------------------------------------------------------------------------2
LCD panel -------------------------------------------------------------------2
Care---------------------------------------------------------------------------3
SWITCHING ON ----------------------------------------------------------------4
OPERATING INSTRUCTION------------------------------------------------6
Remote control -------------------------------------------------------------6
Teletext ----------------------------------------------------------------------7
Menus ------------------------------------------------------------------------8
Main menu ------------------------------------------------------------------8
Picture adjustments--------------------------------------------------8
Audio adjustments ---------------------------------------------------9
PIP/PAP adjustments----------------------------------------------10
Channels search ----------------------------------------------------11
Input selection ------------------------------------------------------13
Setup -----------------------------------------------------------------14
PC mode -------------------------------------------------------------------15
Controls --------------------------------------------------------------------16
Connections --------------------------------------------------------------16
AV sockets ----------------------------------------------------------17
Headphone socket -------------------------------------------------18
HDMI socket -------------------------------------------------------18
PC IN socket --------------------------------------------------------19
BEFORE CALLING SERVICE---------------------------------------------20
Thank you very much for choosing the LCD TV.
We recommend that you take a few minutes to read carefully through this manual
before installing and switching on the TV. Please keep this manual in a safe place for
your future reference.
English
This manual applies to several TV set models. Some features may not be available
on the model you purchased.
Optional functions are indicated by the following symbol: O
Page 3

2
IMPORTANT INFORMATION
Safety
Ensure that your domestic mains supply voltage matches the voltage indicated on the
identification sticker located at the back of your set.
The TV set's components are sensitive to heat.The maximum ambient temperature
should not exceed 35° Celsius. Do not cover the vents at the back or sides of the TV
set. Leave sufficient space around it to allow adequate ventilation. Install the
appliance away from any source of heat (fireplace, ...) or appliances creating strong
magnetic or electric fields.
Moisture in rooms where the set is installed should not exceed 85% humidity. If you
have to use the TV set outdoors, do not expose it to rain or splashing water.
Moving the set from a cold place to a warm one can cause condensation on the screen
(and on some components inside the TV set). Let the condensation evaporate before
switching the TV set on again.
If you intend to be away for a long period, unplug the mains plug. Even when off,
some components remain in contact with the mains electricity supply.To completely
isolate the set you mu st remove the plug from the mains supply socket.
During thunderstorms, we recommend that you disconnect the TV set from the
mains and aerial so that it is not affected by electrical or electromagnetic surges that
could damage it. For this reason, keep the mains and aerial sockets accessible so
they can be disconnected, if necessary.
Unplug the TV set immediately if you notice it giving off a smell of burning or
smoke.You must never, under any circumstances, open the TV set yourself, as you
run the risk of an electric shock in doing so.
LCD panel
The LCD panel used in this product is made of glass.Therefore, it can break when the
product is dropped or impacted upon by other objects.
The LCD panel is a very high technology product, giving you finely detailed pictures.
Occasionally, a few non-active pixels may appear on the screen as a fixed point of
blue, green or red.This does not affect the performance of your product.
In order to ensure long performance of your set and reduce the risk of screen burning,
please observe the following precautions.
- Do not display still images (still computer and video game images, logos, pictures,
text and images displayed in 4:3) for extended periods of time;
- Use a screen saver when using a computer;
Page 4
3
Care
Use a glass-cleaning product to clean the screen and a soft cloth and mild detergent to
clean the rest of the set.
Important: Using strong detergents, alcohol-based and abrasive products may
damage the screen.
Dust the vents at the back and sides regularly. Using solvents, abrasive or alcoholbased products could damage the TV set.
Never open the appliance yourself since this may put you at risk or damage the
appliance.
End of life directives
The manufacturer disclaims any liability if the TV set is not used in accordance
with this manual.
Before setting up your television set, make sure that the surface you want to put
the set on can support its weight
Don’t place the set on an unstable surface (e.g. moving shelf, very edge of a
unit) and make sure that the front of the television set does not overhang the
surface it is sitting on.
This symbol means that your inoperative electronic appliance must
be collected separately and not mixed with the household waste.
The European Union has a implemented a specific collection and
recycling system for which producers' are responsible.
This appliance has been designed and manufactured with high
quality materials and components that can be recycled and reused.
Electrical and electronic appliances are liable to contain parts that
are necessary in order for the system to work properly but which
can become a health and environmental hazard if they are not
handled or disposed of in the proper way. Consequently, please do
not throw out your inoperative appliance with the household
waste.
If you are the owner of the appliance, you must deposit it at the
appropriate local collection point or leave it with the vendor when
buying a new appliance.
- If you are a professional user, please follow your supplier's
instructions.
- If the appliance is rented to you or left in your care, please
contact your service provider.
Help us protect the environment in which we live !
Page 5
4
SWITCHING ON
Follow the instructions on this page on how to switch on your TV set and the remote
control before going on to following pages describing how to use the remote control
and the channel set-up procedure.
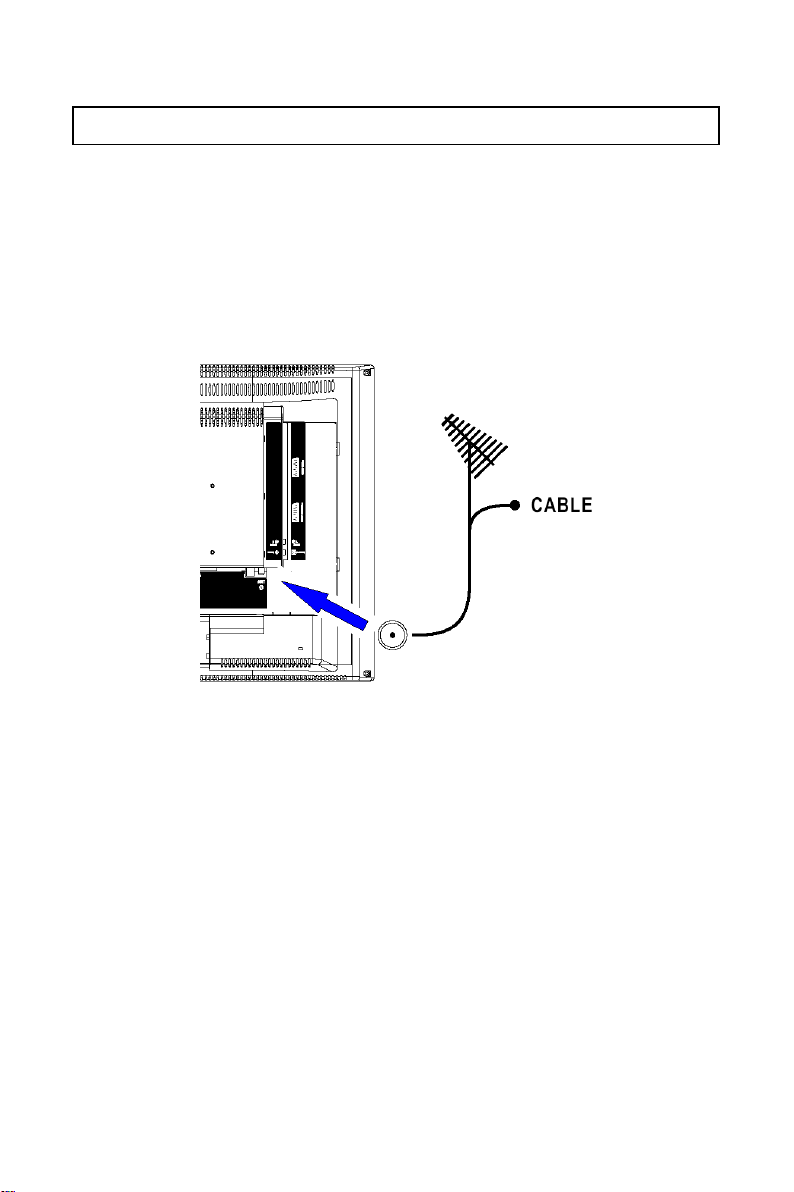
1. Place the TV on a solid surface.
2. Insert the aerial plug firmly into the aerial socket ANT at the back of the TV.
The aerial socket (75 Ohms - VHF / UHF / cable) can be used for connecting an
external aerial or other equipment fitted with a modulator (video recorder, satellite
receiver, etc.).
We recommend that you do not connect other equipment (video recorder, satellite
receiver, etc.) to your TV set to begin with, so as not to complicate the set-up
procedure with the additional steps involved. Connect them when you have finished
setting up the channels by referring to page 16 of this manual.
Page 6
5
3. Remote control:
Remove the cover of the battery compartment.
Insert the 2 batteries supplied (Type AAA 1.5V).
Precautions on using batteries:
- Only use the battery types specified.
- Make sure you use the correct polarity.
- Do not mix new and used batteries.
- Do not use rechargeable batteries.
- Do not expose batteries to excessive heat, throw them in a fire, recharge them or try to open
them, as this could cause them to leak or explode.
- Remove the batteries from the remote control if you are not using it for a long period of time
(several weeks).
4. Power :
Connect the female plug of the power cord to AC IN power input at the back of
the set.
Then connect the male plug of the power cord to the wall outlet
Your TV set should only be connected to a 220 - 240 V ~ 50/60 Hz AC supply.
It must not be connected to a DC supply. If the plug is damaged, do not, under any
circumstances, connect it to a mains socket, as there is a risk of electric shock.
5. Turn the TV on:
Press the On/standby button at the topside or on the front of the TV to turn it on,
the indicator in front turns green.
When TV set is in stand-by mode, the indicator in front of the TV illuminates amber.
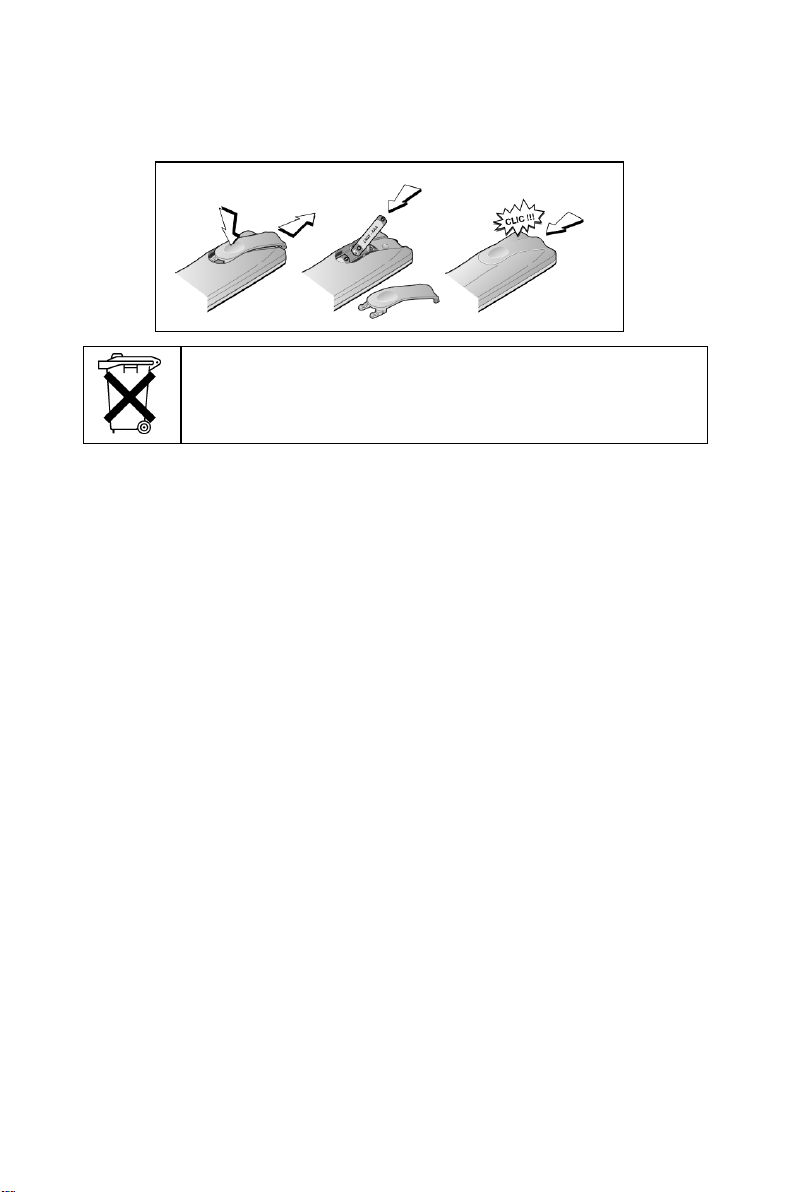
Please respect the environment and the relevant regulations. Before you
dispose of batteries (or accumulators), ask your dealer whether they
require special recycling and if he is able to take them back.
and if he is able to take them back
Page 7

play
OPERATING INSTRUCTION
Remote Control
Press this key to turn on or
on stand-by the TV set.
PR
Press PR+ or PR– to scroll
t
h
r
o
u
g
h
t
h
e
c
h
a
n
n
e
l
s
.
s
ted
t
s
ins
t
-
nu
o
o
f
f
t
i
m
e
e
s
a
e
r
c
n
i
t
oun
c
to
mbe
r o
f
af
ter
th
e
l p
ict
ure
MENU
Press this key to
display main menu.
EXIT
Press this key to exit
ma n menu
Press + or – to increase or
decrease the volume.
Press this key to adjust the
a
u
t
o
m
a
t
i
c
s
h
(from 0 to 120 minutes).
h
c
a
E
this time 15 minutes.
e
Th
do
wn
mi
nut
dis
u
e
r
p
y
e
k
beg
er
tim
fr
om
the
es
se
lec
has disappeared.
O
Press this key to swap main
pi
ctu
re
an
d s
when PIP is working.
O
Pr
e
s
s
display PIP/PAP
screen.
O
Press this key to
adjust PIP size when
PIP is working.
Teletext function and buttons will describe on
next page.
mal
t
hi
s
ke
y
:
y
a
l
p
s
i
d
o
t
y
e
k
s
i
h
t
s
s
e
r
P
- the channel number when
watching a TV program.
- the input source when
.
m
a
r
g
o
r
p
V
A
n
a
g
n
i
h
c
t
a
w
Press this key to mute
the sound.
P
r
e
s
s
t
h
i
s
k
e
y
a
g
a
i
n
t
o
o
r
res
e
e
a
ess
T
s
s
n
s t
nd
e
s
n
l
t
V
Zo
e
t
e
c
h
l
his
hi
typ
ch
i
o
t
s
o
s k
m
a
k
r
ke
e (
a
r
ey
nn
T
e
y
e
y t
Mon
+
.
l
e
n
n
a
h
c
V
t
o
r
e
t
u
r
n
t
o
o
t
n
r
u
t
o r
etu
rn
la
st
to
sel
ect
o,
St
ere
o
.
l)
e
,
-
restore it.
0~9 DIGIT BUTTONS
T
RETURN
P
previously selected TV
h
c
previously selected input
source.
AV
Pr
AV.
P
s
ou
or Dual if broadcasted by
th
O
Press these key to select
desired picture format (4:3,
14:9, CINERAMA, 16:9).
TV: To access TV mode
Press this button to control the
television
DVD: To access DVD mode.
VCR: To access VCR mode.
6
Page 8

7
TELETEXT
The Teletext service is available in many countries under a variety of names (TOP Text,
Fastext, FLOF text,Videotext). It is provided as a free service by television
broadcasters.This service provides a real wealth of information, available at any time, on
weather, sports results, news, games, etc.The information is presented in pages or
organised in topics specified in colour on the screen and you can access this information by
simply pressing the buttons of the relevant colour on the remote control.
O
Press this key to select subtitle page.
If the displayed page is not the subtitle one, search its
number in the index page and select it.
TEXT
Press this key, Teletext will display the last page selected,
or if you have changed channel, the index page (usually
100).
OK
Press this key to superimpose the teletext over the TV
picture. A 2nd key press displays the teletext in the left part
of the screen. Press again to return to Teletext mode.
RED / GREEN / YELLOW / BLUE
If Fastext is available, use coloured keys to access
directly to the relevant colour topics.
STOP
Press this key to stop the page scrolling. Press it again
to restart the page scrolling.
(?)
Press this key to reveal a hidden answer (for example, in
games). Press it again to hide the answer.
SUBPAGE ACCESS
Some information is spread across more than one page. To access sub-pages,
press ---- / AV key then enter the sub-page number using digit buttons 0~9.
PAGE SELECTION
Page can be selected in two ways.
a. Press Ÿ or ⁄ to increase or decrease the page number by one..
b. By entering the page number, using digit buttons 0~9.
Press this key, once to zoom in on the top part of the
screen, a second time to zoom in on the bottom part of
the screen and a third time to return to normal display.
Page 9

8
MENUS
MAIN MENU
Press the MENU button to display the Main menu. It offers the following options :
Picture adjustments, Audio adjustments, PIP/POP adjustments, TV channels search
menu (only in TV mode) and PC adjustments (only in PC mode). It also allows to
define your preferences in the Setup menu.
PICTURE ADJUSTMENTS
Display the Main menu by pressing MENU
button.
Select the Picture menu using the Ÿ / ⁄
buttons.
Press the OK button to confirm.
Use the Ÿ / ⁄ buttons to select each option.
Preset: choose between Personal, Vivid, Standard or Mild.
Personal gives access to following adjustments.
Contrast, Brightness, Colour and Sharpness: adjust these settings as required using
the ! / ÿ buttons.
Tint: This option is only available for NTSC audio-visual sources.
Adjust the tint of the picture using the ! / ÿ buttons.
Reset: Return to default settings. Press OK button to return to default settings.
Press the EXIT button to exit the Picture menu.
Note : this menu is removed automatically after a few seconds without using the
remote control.
When you adjust a menu option (Contrast for
example), the menu is replaced by a sub-menu as
illustrated. Press the OK button to return to the
Picture menu.
Page 10

9
AUDIO ADJUSTMENTS
Display the Main menu by pressing MENU
button.
Select the Sound menu using the ⁄button.
Press the OK button to confirm.
Use the Ÿ / ⁄ buttons to select each option.
Volume : adjust as required using the ! / ÿ buttons.
Balance : adjust the balance between left/right channels as required using the ! / ÿ
buttons.
Bass : adjust the bass level as required using the ! / ÿ buttons.
Treble: adjust the treble level as required using the ! / ÿ buttons.
SRS WOW : Using ! / ÿ, activate (On) or deactivate (Off) SRS function.
SRS is an audio technology which improve the sound quality.
Reset: Return to default settings. Press OK button to return to default settings.
Press the EXIT button to exit the Sound menu.
Note : this menu is removed automatically after a few seconds without using the
remote control.
When you adjust a menu option (Volume for
example), the menu is replaced by a sub-menu
as illustrated. Press the OK button to return to
the Sound menu
SRS WOW, SRS and are registered trademarks of SRS Labs, Inc.
This product is designed using SRS technology with permission from SRS Labs, Inc.
Page 11

10
PIP/PAP ADJUSTMENTS
Press the MENU button to display the Main
menu
Select the PIP menu using the ⁄button.
Press the OK button to confirm.
Use the Ÿ / ⁄ buttons to select each option.
Dual mode: Using ! / ÿ buttons activate (PIP/PAP) or deactivate (Off) the PIP
function.
Following options are available if you have selected PIP or PAP at the PIP line.
Position : use the ! / ÿ buttons to change the position of the PIP frame on the
screen.
Source : to select video source of the PIP/PAP, use the ! / ÿ buttons to select v ideo
source of the picture in the PIP/PAP frame (TV or AV).
You can insert a TV picture while you are viewing an AV program or insert an AV
picture while you are viewing a TV program.
Video source can also be selected without the menu, using AV button on the remote
control.
Audio select : to select audio source: MAIN (Main picture) or SUB (PIP/PAP
picture), use the ! / ÿ buttons to select audio source.
Press the EXIT button to exit the PIP menu.
Note : this menu is removed automatically after a few seconds without using the
remote control.
Page 12

11
CHANNELS SEARCH
Channels search involves selecting all the settings required to be able to search for
and store all the channels you can receive.
Make sure that the television is switched on and follow all the steps in turn specified
on this page.
Display the Main menu by pressing MENU
button.
Select the Installation menu using the ⁄button.
Press the OK button to confirm.
Use the Ÿ / ⁄ buttons to select each option.
Automatic set-up
Select Auto. installation using the ⁄ button.
Press the OK button to display the Auto.
installation menu.
Use the Ÿ / ⁄ buttons to select each option.
Country: Select the relevant country using the ! / ÿ buttons.
This is the country you are in, or the country whose channels you want to receive if
you live near its borders. If you do not find your country, select Auto.
Start: Press OK button to start channels searching
Manual set-up
Select Man. installation using the ⁄button.
Press the OK button to display the Man.
installation menu.
Use the Ÿ / ⁄ buttons to select each option.
Prog. number: Allows to select the program on which you want save a new channel
or a program you want to modify.
- Using the ! / ÿ buttons, select the program.
Frequency : Allows to enter a specific frequency for tuning.
- Using the ⁄ button, select the Frequency option and press the OK button.
Using the 0~9 digit and ! / ÿ buttons, enter desire frequency and press the OK button.
Page 13

12
Name : Allows to edit the channel name.
- Using the ⁄ button, select the Name option.
- Using the ÿ button select the first letter field.
- By pressing the 0~9 digit repeatedly and using the following table select the first
character.
Repeat the procedure for each letter field.
Press the OK button to confirm.
BUTTON
AVAILABLE CHARACTERS
1
1 Space — • !
2
2 A B C @
3
3 D E F #
4
4 G H I $
5
5 J K L %
6
6 M N O ^
7
7 P Q R &
8
8 S T U V
9
9 W X Y Z
0
0 * # ( )
Store prog.: Allows to Save a channel on a new Program N°, to Insert a channel on
an already existing Program No (the channel previously saved on this program n° will
be shifted to the upper program n°) or to Delete the Program No.
- Once a channel has been found and named, use the ⁄ button to select the Store
prog. option.
- Using the ! / ÿ buttons, select Save, Insert or Delete and press the OK button to
confirm.
Swap prog.: Allows to swap 2 programme numbers.
- Using the Ÿ / ⁄ buttons select the Prog. number option.
- Using the ! / ÿ buttons, select the program to be moved.
- Using the ⁄ button, select the Swap prog. option.
- Using the ÿ button, enter the swap function.
- Using the the 0~9 digit, enter the new programme number (3 digits).
- Press the OK button to confirm, the programme numbers are swapped.
Norm : Allows to change the audio norm.
- Using the ⁄ button, select the Norm option.
- Using the ! / ÿ buttons, select the norm.
Note: the following norms are available to choose from: I for the UK and Ireland, L/LP for
France and Luxembourg, D/K for Eastern Europe, the Middle East and Asia, B/G for Western
Europe, Australia and New Zealand.
Skip : Allows to skip a channel.
- Using the ⁄ button, select the Skip option.
- Using the ! / ÿ buttons, select On, the channel will be skip.
Repeat this procedure to skip other channels.
Page 14

13
Fine tuning : If the picture is not clear, you can adjust the setting.
- Using the ⁄ button, select the Fine Tuning option.
- Use the ! / ÿ buttons to find the good tuning point.
Man. search : Allows to launch a manual search.
- Using the ⁄ button, select the Man. search option.
- Using the ! / ÿ buttons, start the search in decreasing or increasing order.
The menu is replaced by a sub-menu showing the progression of the search.
- The search will stop at the first channel found, Man. installation menu is
displayed again (within 3 seconds).
- If you wish to memorise the channel, select Store Program option using Ÿ button
and proceed as indicated in previous page. Otherwise, continue the search using
! / ÿ buttons.
If you have modified Norm, Skip, Fine tuning options or if you have launch a
Manual Search, select Store Prog. option using Ÿ / ⁄ buttons and proceed as
indicated above to save your modification.
Press the EXIT button to exit the PIP menu.
INPUT SELECTION
To select AV source:
To select desire input source, press the AV button to
display the selection menu.
Use the Ÿ / ⁄ buttons to select each input sources.
Press the OK button to display the desire input source.
To select input source in PIP/PAP mode
To select desire input source in PIP/PAP mode, press the
AV button to display the selection menu.
Use the Ÿ / ⁄ buttons to select either MP source (to
modify Main picture source) or PIP source (to modify
PIP source).
Press the OK button to display the selection menu in PIP
mode .
Use the Ÿ / ⁄ buttons to select the input source.
Press the OK button to display the desire input source.
Page 15

14
SETUP
This menu allows to select the language for the menus as well as the colour of the
screen when there is no video input. It allows also to set an automatic shut-off time.
Display the Main menu by pressing MENU
button.
Select the Options menu using the ⁄button.
Press the OK button to confirm
Use the Ÿ / ⁄ buttons to select each option.
Menu language : To select the language for the menus.
Menu timeout : To set an automatic shut-off time for Menu. Using ! / ÿ buttons
select 5 > 10 > 20 > 30 > 40 > 50 seconds.
Menu background : Select Opaque or Transparent type.
Sleep Timer : To set an automatic shut-off time. Using ! / ÿ buttons select Off > 15
> 30 > 45 > 60 > 90 > 120 minutes.
Once the time is ended, TV set automatically switch on standby mode .
If you turn the TV on standby mode after setting the sleep timer, setting will be
erased. Set it again.
Blue Screen : To have a blue screen when there is no video input or when the RF
signal is very bad.
Using the ! / ÿ buttons select On.
Select Off if you do not want the blue screen.
Teletext language: Using ! / ÿ buttons, select the character set that wil be used for
Teletext on this channel.
The following character sets are available: West Europe, East Europe, Cyrillic
(Russia), Greek, Arabic, Persian,.
The character set determines how characters are displayed on Teletext screen.
Reset : Return to default settings. Press the OK button to return to default settings.
Press the EXIT button to exit the Options menu.
Note : this menu is removed automatically after a few seconds without using the
remote control.
Note : You can display the remaining time before the automatic shut-off. To do that,
press the sleep button .
To cancel the automatic shut-off, press several times the sleep button to
display Sleep timer Off .
Page 16

15
PC MODE
In PC mode, main menu is dfferent from the one in TV mode.
Please select PC as main input.
PC SETTINGS
Display the Main menu by pressing MENU
button.
Select the PC menu using the ⁄button.
Press the OK button to confirm.
Use the Ÿ / ⁄ buttons to select each option.
H. position : use the ! / ÿ buttons to move the picture horizontally on the screen.
V. position : use the ! / ÿ buttons to move the picture vertically on the screen.
Focus : Adjust as required to improve the picture quality.
Auto adjust: this function is used to automatically adjust the VGA input. Press the !
/ ÿ buttons to start the adjustment process.
Tone: to adjust the colour temperature at your convenience.
Reset : Return to default settings. Press OK button to return to default settings.
Page 17

16
Controls are located on the top of the TV set.
button: Press this button to switch on or on standby the TV set.
MENU button: Press this button to display the main menu.
Ÿ / ⁄ buttons: Press these buttons to select a channel or to choose an option in a
menu.
– / + buttons: Press these buttons to ajust the volume, access a sub-menu or
perform an adjustment in a menu.
Source button: To select desire input source, press the SOURCE button to
display the selection menu.
Use the Ÿ / ⁄ buttons to select each input sources.
Press the – / + button to display the desire input source.
Remove the back plate at the back of the TV as
shown on the illustration opposite.
Lay the LCD TV with the screen down on a
table, as it will be easier to connect your
peripheral equipment. Please take your
precautions not to damage the screen.
CONTROLS
CONNECTIONS
Page 18

17
AV sockets (Located at the back of the TV set, on the leftside)
To display images from the connected appliance, select the input source by pressing
the AV button on the remote control (see page 13).
For some appliances, connected to the SCART socket, this selection is made
automatically.
Video CINCH socket
(AV3)
(AV input)
To connect a VCR, a
camcorder, a DVD
player or a satellite
receiver.
AV2 SCART socket
To connect a VCR, a
camcorder, a DVD player or
a satellite receiver.
AV2 SCART socket is an
input socket.
AV1 SCART socket
To connect a VCR, a
camcorder, a DVD player, a
satellite receiver, a decoder
or a games console.
AV1 SCART socket is an
input/output socket.
Audio socket
(Audio output)
To connect to an audio
amplifier.
Adjust output level by
using + / –
buttons on the remote
control.
S-Video socket (AV3-S )
(AV input)
To connect an S-Video VCR
or an S-Video camcorder.
Audio socket
(Audio input)
(AV3,AV3-S)
Component Video CINCH
sockets (CMP) (AV input)
To connect a DVD player or
set top box.
Audio CINCH sockets
(Audio input) (CMP)
Page 19

18
HEADPHONE SOCKET (LOCATED AT THE BACK OF THE TV SET, ON THE RIGHTSIDE)
When headphones are connected, the sound
of TV set is cut.
Adjust headphones volume level by using
+ / - buttons on the remote control.
To switch off the sound of the headphone
press the button on the remote control.
HDMI SOCKET (High-Definition Multimedia Interface)
(LOCATED AT THE BACK OF THE TV SET, NEAR THE POWER INPUT SOCKET)
This socket allows the connection to all appliances fitted with an HDMI socket.
The standard HDMI allows a digital transmisson of video and audio data using only
one connector.
It gives you the possibility to obtain very high quality images.
In this case it is necessary to use an HDMI connecting cable.
Make sure the appliance output is set to be HDMI output.
To display images from the connected appliance, select the input source (HDMI) by
pressing the AV button on the remote control.
HDMI, the HDMI logo and "High-Definition Multimedia Interface" are trademarks or
registered trademarks of HDMI Licensing LLC."
Page 20

19
PC IN SOCKET (LOCATED AT THE BACK OF THE TV SET, NEAR THE HDMI SOCKET)
Allows to connect a PC to the TV set
Connect the PC IN D-sub socket located at the back of the TV set to the output of PC
equipment through a mini D-sub 15 pin cable (2).
Connect the stereo PC IN audio jack located at the back of the TV set (near the D-sub
socket) to the audio output socket on the computer through an audio cable.
To display images from the connected appliance, select the input source (PC) by
pressing the AV button on the remote control.
Page 21

20
BEFORE CALLING SERVICE
Please make these simple checks before calling service.
Symptoms
Items to Check and Actions to follow
“ Ghost ” or double
image
* Make sure the antenna is facing the right direction..
* This may be caused by obstruction to the antenna due
to high rise buildings or hills.
* Using a highly directional antenna may inprove the
picture.
No power
*Check that the TV’s AC power cord is plugged into the
mains socket.
*Unplug the TV, wait for 60 seconds. Then re-insert
plug into the mains socket and turn on the TV again.
No picture
* Check antenna connections at the rear of the TV to see
if it is properly connected to the TV.
* Possible broadcast station trouble. Try another
channel.
*Adjust the contrast and brightness settings.
* Check there is not a wrong connection or a wrong
input mode selection.
Good picture but no
sound
*Increase the VOLUME.
*Check that the TV is not muted; press the button on the
remote control.
Good sound but poor
color
*Adjust the contrast, color and brightness settings.
Poor picture
*Sometimes, poor picture quality occurs when having
activated an S-VHS camera or camcorder connected
and having connected another peripheral at the same
time. In this case switch off one of the other
peripherals
Snowy picture and
noise
*Check the antenna connection
Horizontal dotted line
*This may be caused by electrical interference (e.g.
hairdryer, nearby neon lights, etc.)
*Turn off the equipment.
Television not
responding to remote
control
*Check whether the batteries are working. Replace if
necessary
*Clean the remote control sensor lens on the TV.
*You can still use the buttons at the front of your TV.
 Loading...