

Page 1

20” LCD TV Color Monitor Norcent LT2025W
Service
Service
Service
TABLE OF CONTENTS
Description Page Description Page
Table Of Contents.......…….…..............................…........1
Revision List.…….….....................................……......2
Important Safety Notice.……..................……......3
1. Monitor Specification..…............................………........4
2. Operating Instructions……...……………….……….......6
2.1 The Use Of Remote Control..…………..................6
2.2 Front Panel Control Knobs.....................…...........6
2.3 OSD Operating…………….…............……...............8
2.4 How To Connect...………........................…............13
3. Input/Output Specification............……………............17
3.1 Input Signal Connector............………….................17
3.2 Factory Preset Display Modes........………...............17
4. Mechanical Instructions..………....……......................18
5. Repair Flow Chart…….……………………..................21
6. PCB Layout………...……….……………....….…….....27
6.1 Main Board……...……………..……………....….......27
SAFETY NOTICE
6.2 Power Board………………………….....….......29
6.3 Key Board….…..........................…….........30
6.4 Tuner Board...………...…...................................30
7. Block Diagram..……..……................….......................31
7.1 Main Board...............……..……...............................31
7.2 Power Board…...……..….…...….…..........................32
8. Schematic Diagram…….….….………………….......33
8.1 Main Board……...…..……….………......................33
8.2 Power Board...……………….……………………...46
8.3 Key Board……………..…………..………………...47
8.4 Tuner Board.....…..........……………........................48
8.5 IR Board...…….........…………...............................52
8.6 Earphone Board...…….........………................……...53
9. Exploded View…….........………..............…................54
10. BOM List…………………… …….....……….…..........55
ANY PERSON ATTEMPTING TO SERVICE THIS CHASSIS MUST FAMILIARIZE HIMSELF WITH THE
CHASSIS AND BE AWARE OF THE NECESSARY SAFETY PRECAUTIONS TO BE USED WHEN SERVICING
ELECTRONIC EQUIPMENT CONTAINING HIGH VOLTAGES.
CAUTION: USE A SEPARATE ISOLATION TRANSFOMER FOR THIS UNIT WHEN SERVICING
1
Page 2
20” LCD TV Color Monitor Norcent LT2025W
Revision List
Version Release Date Revision History TPV Model
A00 Sep-22-2006 Initial Release E206MHNKD4NCNCP
A01 Nov-07-2006 Add TPV Model in item 10
E206AHNKD4NONCP
2
Page 3

20” LCD TV Color Monitor Norcent LT2025W
Important Safety Notice
Proper service and repair is important to the safe, reliable operation of all AOC Company Equipment. The service
procedures recommended by AOC and described in this service manual are effective methods of performing service
operations. Some of these service operations require the use of tools specially designed for the purpose. The
special tools should be used when and as recommended.
It is important to note that this manual contains various CAUTIONS and NOTICES which should be carefully read in
order to minimize the risk of personal injury to service personnel. The possibility exists that improper service
methods may damage the equipment. It is also important to understand that these CAUTIONS and NOTICES ARE
NOT EXHAUSTIVE. AOC could not possibly know, evaluate and advise the service trade of all conceivable ways in
which service might be done or of the possible hazardous consequences of each way. Consequently, AOC has not
undertaken any such broad evaluation. Accordingly, a servicer who uses a service procedure or tool which is not
recommended by AOC must first satisfy himself thoroughly that neither his safety nor the safe operation of the
equipment will be jeopardized by the service method selected.
Hereafter throughout this manual, AOC Company will be referred to as AOC.
WARNING
Use of substitute replacement parts, which do not have the same, specified safety characteristics may create shock,
fire, or other hazards.
Under no circumstances should the original design be modified or altered without written permission from AOC.
AOC assumes no liability, express or implied, arising out of any unauthorized modification of design.
Servicer assumes all liability.
FOR PRODUCTS CONTAINING LASER:
DANGER-Invisible laser radiation when open AVOID DIRECT EXPOSURE TO BEAM.
CAUTION-Use of controls or adjustments or performance of procedures other than those specified herein may
result in hazardous radiation exposure.
CAUTION -The use of optical instruments with this product will increase eye hazard.
TO ENSURE THE CONTINUED RELIABILITY OF THIS PRODUCT, USE ONLY ORIGINAL MANUFACTURER'S
REPLACEMENT PARTS, WHICH ARE LISTED WITH THEIR PART NUMBERS IN THE PARTS LIST SECTION OF
THIS SERVICE MANUAL.
Take care during handling the LCD module with backlight unit
-Must mount the module using mounting holes arranged in four corners.
-Do not press on the panel, edge of the frame strongly or electric shock as this will result in damage to the screen.
-Do not scratch or press on the panel with any sharp objects, such as pencil or pen as this may result in damage to
the panel.
-Protect the module from the ESD as it may damage the electronic circuit (C-MOS).
-Make certain that treatment person’s body is grounded through wristband.
-Do not leave the module in high temperature and in areas of high humidity for a long time.
-Avoid contact with water as it may a short circuit within the module.
-If the surface of panel becomes dirty, please wipe it off with a soft material. (Cleaning with a dirty or rough cloth may
damage the panel.)
3
Page 4
20” LCD TV Color Monitor Norcent LT2025W
1. General Specifications
Item Spec
Screen Size 20” TFT-LCD Panel
Aspect Ratio 16 : 9
Resolution 1360 x768 (WXGA)
Display Area (opening) H x V 443.61(H) x 249.41(V) mm
Pixel Pitch 0.325 x 0.325 mm
LCD Panel
PC function
TV
Function
Video Input
Display Colors 16.2M
Contrast Ratio 500:1
Brightness
Viewing angle (160° H/ 140° V )
Response Time 8ms
Lamp Life 50000 hrs
Input support definition
Audio input Mini jack 3.5ø stereo
TV Standard NTSC M
Sound System BTSC
Color systems NTSC
Video AV RCA x 1
S-VIDEO S-Video x 1
YPbPr YPbPr x 1 Audio L/R x 1
450 cd/㎡
Could support to 1360*768
This product could only support to 60Hz, ‘Input out of range’ will
be displayed when the input vertical frequency out of 60Hz
Audio L/R x 1
YPbPr support modes 480i, 480p, 720p, 1080i
4
Page 5

20” LCD TV Color Monitor Norcent LT2025W
Speaker (built-in): Two 3 watt speakers
Audio output Audio output: L / R
Headphone Mini-jack for stereo (3.5ø)
OSD Language
Base Stand Yes
Wall Mount Standard VESA 100 x 100 mm
Power
Panel Tilt
English, French, German, Spanish, Portuguese and Traditional Chinese.
Power AC100V-240V, 50/60Hz
Power Consumption
Standby Power
Forwards/Backwards/
Rotation
Operating Temperature + 5 °C ~ + 35 °C
< 90W
< 1.1W
fixed
Environment
Dimension W x H x D (with stand) 546mm X445mmX185mm
Net weight 7.5 Kg (Without accessory)
Accessory
Storage Temperature - 10 °C ~ + 60 °C
Operating Humidity 10% ~ 85%
Remote control, Batteries (AAAx2), Power cord, VGA Cable, Audio Line Cable, User
Manual
5
Page 6
20” LCD TV Color Monitor Norcent LT2025W
r
V
r
2. Operations Instructions
2.1 The Use of Remote Control
Open the back battery cover of the remote control and install two AAA size
batteries and then close the battery cover on to the remote control.
POWER
Power on/Off.
0~9/100 Digit buttons
To select a TV channel.
CH
Press¿ or À to adjust channel.
VOL
Press + or - to adjust the volume.
PC
To change to PC input mode.
SLEEP
To set sleep timer.
PIP
Not Supported.
MENU
Press repeatedly to display or exit
OSD menu.
V-CHIP
Press this button to setup parental
control (active after child lock OSD
manual is set to ON).
POP
Not Supported.
MUTE
Temporarily interrupt the sound o
restore it.
DISPLAY
Press this button to display Channel.
MTS /SAP
Press this key to activate Multichannel
Television Sound, Stereo, SAP or Mono
sound.
PRE-CH
To display the previously selected T
channel.
TV/VIDEO
Select your input source: press
repeatedly to select source.
CAPTION
Press this button to select Closed
Caption mode (off, CC1~4, TXT 1~4).
SWAP
Not Supported.
SIZE
Press this button to adjust the picture
size, Auto , FullScreen, WideScreen o
4:3
6
Page 7
20” LCD TV Color Monitor Norcent LT2025W
2.2 Front Panel Control Knobs
Power Key ⑦ : Press to turn on or off the TV.
MENU Key ⑥ : Press to show the OSD menu and exit OSD menu at the TV.
CH Down / Up Key ⑤ ④: Select the intended function by pressing these two keys, or switch the channels in the
TV mode.
Vol + /- Key ② ③: Press to confirm your function selection and adjustment
volume.
Source Key ① : Press to select your input source.
7
Page 8
20” LCD TV Color Monitor Norcent LT2025W
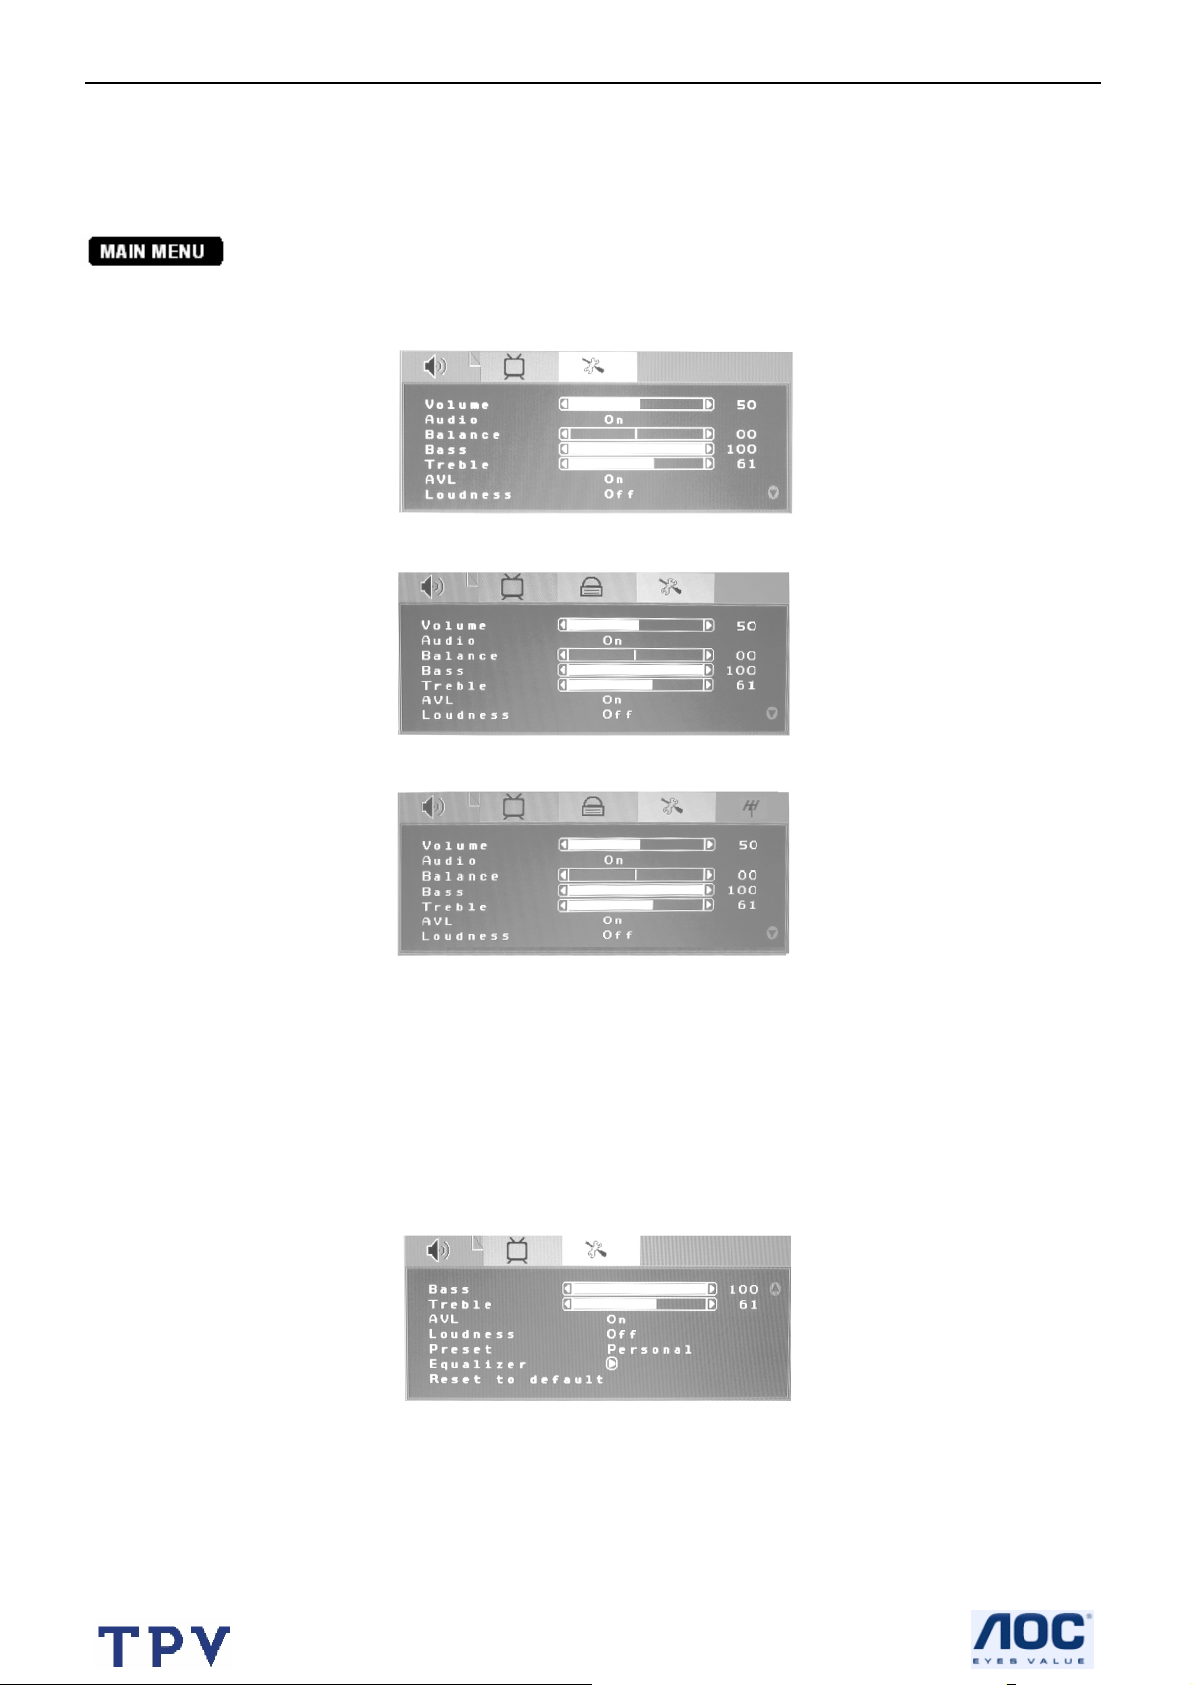
2.3 OSD Operations
1. Press the MENU button to display each menu.
2. Use the cursor up/down buttons to select a menu item.
3. Use the cursor left/right buttons to enter a submenu or enable/disable the function.
4. Press the MENU button to exit the menu.
Press the MENU button to enter the main OSD (On Screen Display). Adjust the items including Picture Setup,
Sound setup, Child Lock Setup, Function Setup and TV setup. When the input source is PC or Component mode,
only the Sound Setup, Picture Setup and Function Setup can be selected; shown in the figure below:
When the input source is AV or S-Video mode, the Sound Setup, Picture Setup, Child Lock Setup and Function
Setup can be selected; shown in the figure below:
When the input source is TV mode, the Sound Setup, Picture Setup, Child Lock Setup, Function Setup and TV
Setup can be selected; shown in the figure below:
Sound Setup (Same as in PC, TV, AV, S-Video and Component modes)
1. The range of adjusting volume, bass and treble is from 0~100.
2. Select “ON” or “OFF” in Audio selection to control the sound output.
3. The range of adjusting Balance is -50~+50; when adjusting from 0 to -50, the sound from the right track fades
until silence; when adjusting from 0 to +50, the sound from the left track fades until silence.
4. AVL: you can set it “ON” or “OFF”.
The function is to adjust the input sound automatically. You may enable this function when you notice that the
sound in the two tracks are very different, in order to prevent the bad sound effect resulting from large sound
variation.
5. Select "ON" or "OFF" for Loudness: a default setting is preset, you may adjust when necessary.
The following menu will appear when selecting continuously:
6. Preset: Designed for different types of sound output, wherein, the Voice, music and theater modes are preset;
you can set Bass, Treble and Equalizer in sound output mode according to your preference.
7. Equalizer: You can select and adjust 100, 300, 1K, 3K and 8K respectively (the figures represent the sound
frequency range).
8. Reset to default: Reset the sound setting to the factory default value.
Picture Setting
8
Page 9
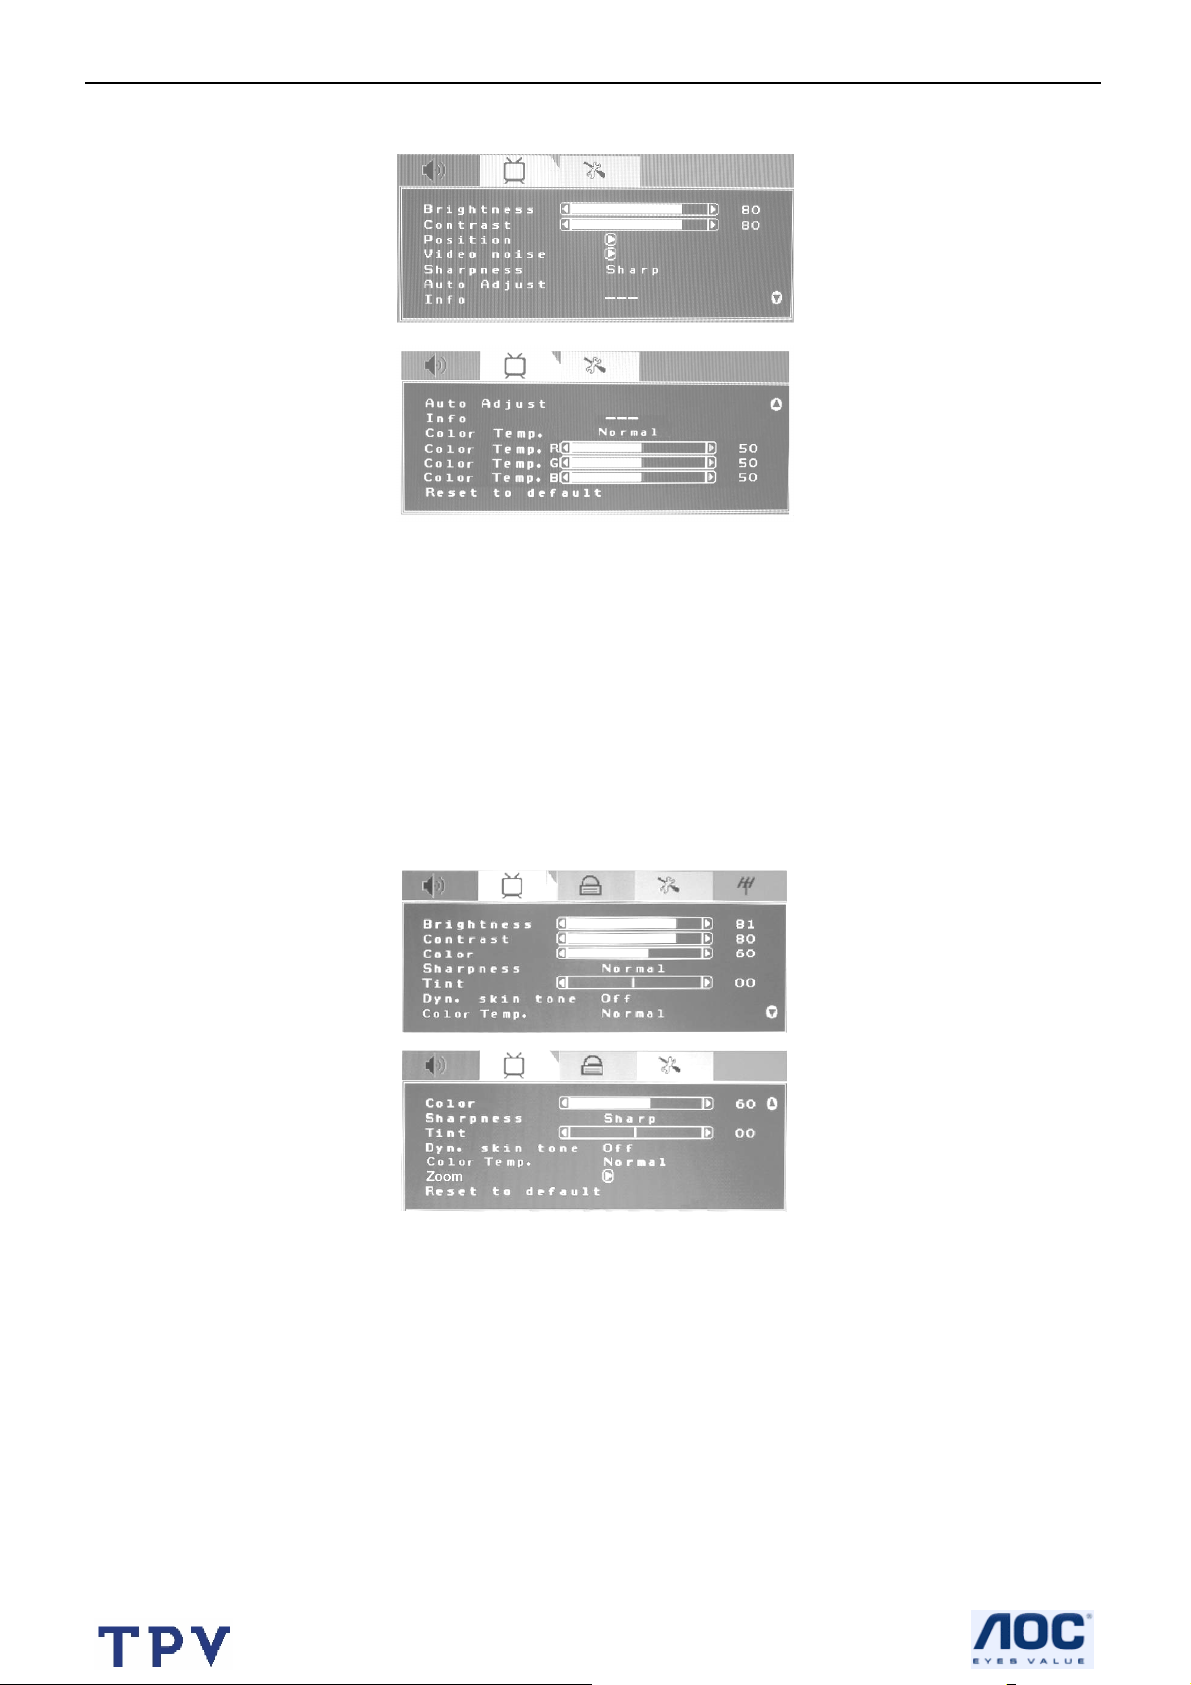
20” LCD TV Color Monitor Norcent LT2025W
When the input source is in PC mode, you can select Brightness, Contrast, Position, Video noise, Sharpness, Auto
Adjust, Info, Color Temp., Red, Green, Blue and Reset to default; shown in the figure below:
1. Brightness and Contrast: The range can be adjusted from 0~100.
2. Position: There are two options, Horizontal and Vertical, which can be adjusted from -50 to +50.
3. Video noise: There are two options, Phase and Clock, which can be adjusted from -50 to +50.
4. Sharpness: Select from options of Auto Softest, Soft, Normal, Sharp and Sharpest. You may adjust the above
options according to your preference.
5. Auto Adjust: Automatically adjust PC input to the optimal screeen size.
6. Info: Prompt the current size for PC input definition (only the definition that can be shown by this device).
7. Color Temp.: There are four options of Color temperature provided for users - Warm, Normal, Cool and User.
You can select the three Color temperatures of Warm, Normal, and Cool, or manually adjust red, green or blue
in the User setting (you can only adjust red, green and blue in the User setting).
8. Reset to default: It is used to reset the picture settings to the factory default mode.
When the input source is in TV/AV/S-Video mode, you can select Brightness, Contrast, Color, Sharpness, Tint,
Dyn. skin tone, Color Temp., Zoom and Reset to default respectively; shown in the figure below:
When the input source is in Component mode, you can select Brightness, Contrast, Video noice, Color,
Sharpness, Tint, Color Temp, Zoom and Reset to default respectively; shown in the figure below:
9
Page 10

20” LCD TV Color Monitor Norcent LT2025W
1. Brightness and Contrast: The range can be adjusted from 0~100; use Brightness and Contrast options to adjust
the brightness and contrast of picture.
2. Video noise: There are two options, Phase and Clock, which can be adjusted from -50 to +50.
3. Color: The range can be adjusted from 0~100; use this option to adjust the Color saturation of picture.
4. Sharpness: Select from options of Auto, Softest, Soft, Normal, Sharp and Sharpest. You can adjust the
sharpness of picture using any option above.
5. Tint: The range can be adjusted from -50~+50; use this option to adjust the Color tone of picture.
6. Color Temp.: There are three options of Color temperature provided for users - warm, normal and cool.
7. Zoom: There are various functions provided for zoom in/zoom out.
8. Reset: It is used to reset the picture settings to the factory default mode.
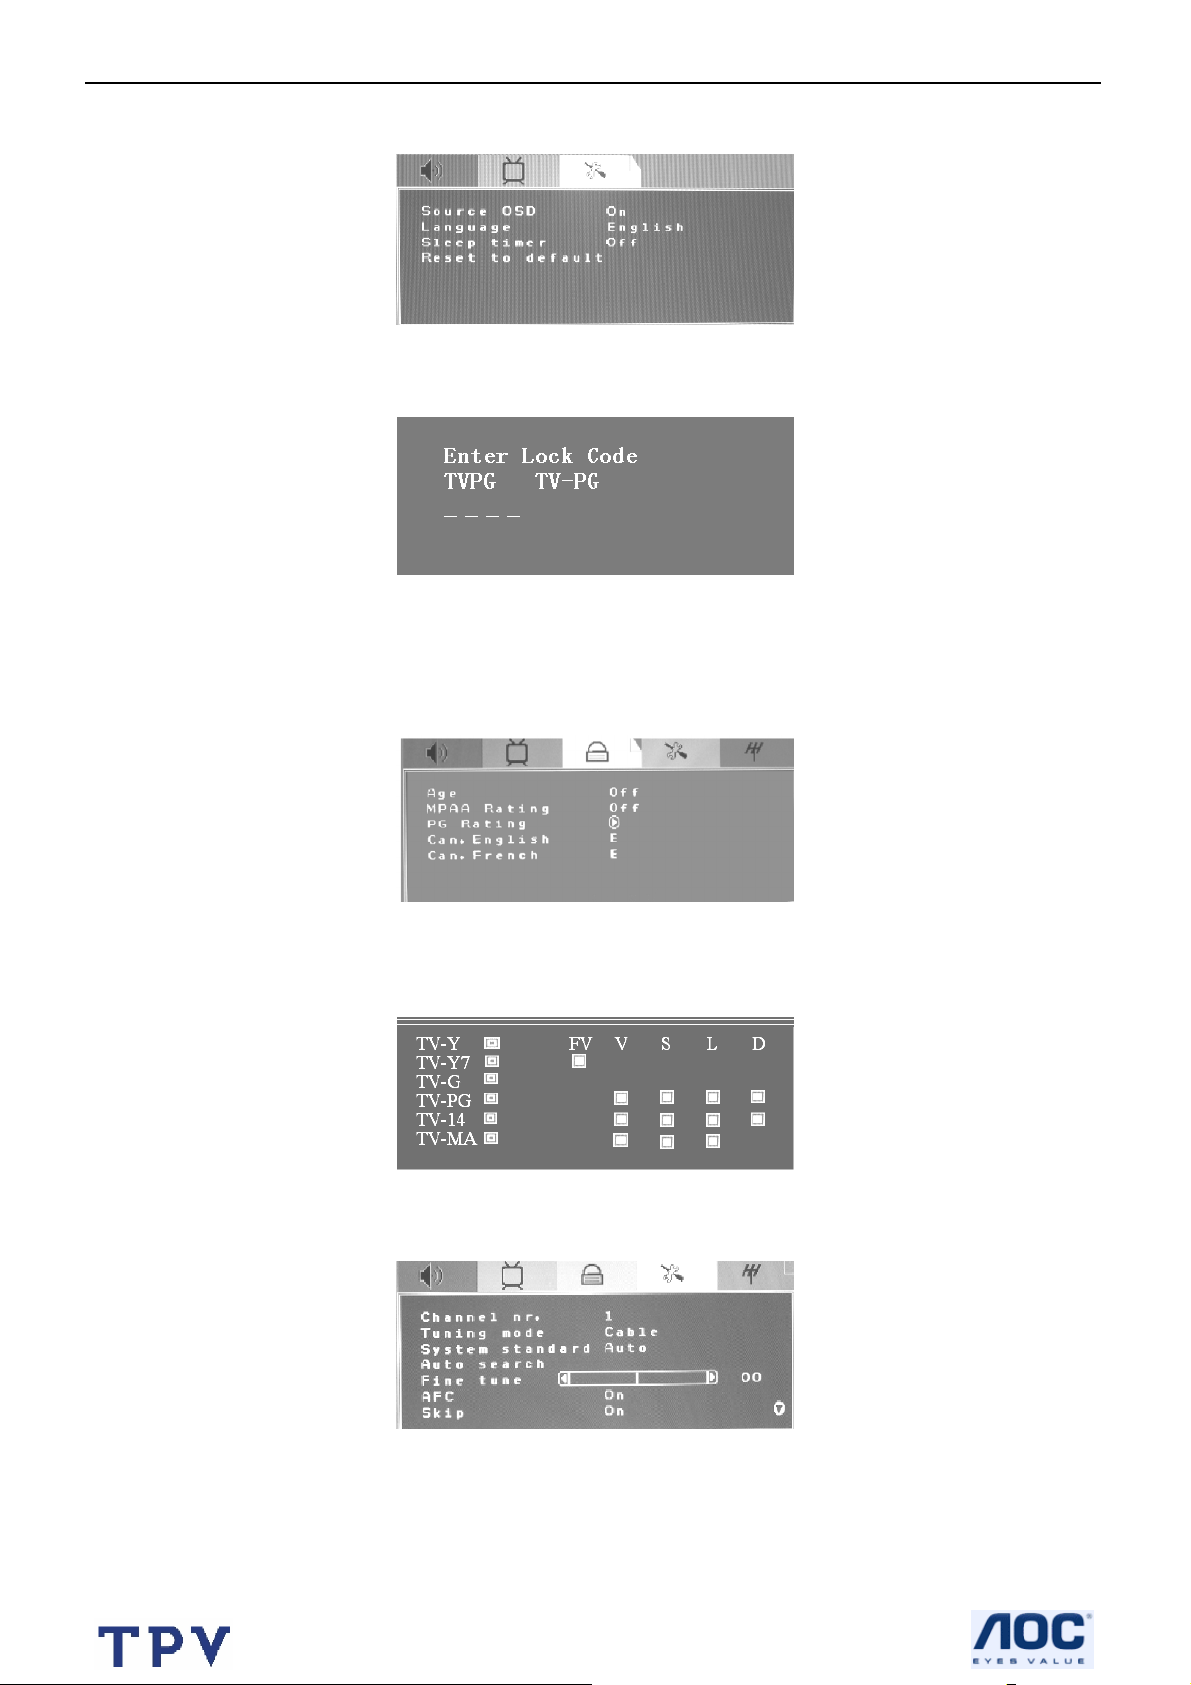
Function Setup
When the input source is in TV, AV or S-Video mode, you can select Source OSD, Language, Child lock, Timers, CC
Mode and Reset to default; shown in the figure below:
1. Current Source OSD setting: When OSD is set to ON, the left upper corner of the display will show the input
source or the TV channel number; when OSD is set to OFF, the input source or the TV channel number will
disappear.
2. OSD language setting: There are six language options provided - English, French, German, Spanish,
Portuguese and Traditional Chinese.
3. Child Lock Setup;
(1). You can enter the V-Chip level setting only when the Child Lock is ON, and the V-Chip will be enabled; you can
not enter V-Chip level setting when the Child Lock Setup is OFF, and the V-Chip is disabled.
(2). Lock code: V-Chip password can be set up when the code is locked. Enter the 4-digit password which you
choose! The factory default password is 0000.
4. Sleep Timer: Set the sleeping timer and the alert function which indicates the time left.
5. Closed Caption (CC) setting: Select CC1~CC4, TXT1~TXT4 or OFF.
6. Reset: It is used to reset the OSD settings.
10
Page 11
20” LCD TV Color Monitor Norcent LT2025W
When the input source is in PC or Component mode, you can select Source OSD, Language, Sleep Timer and
Reset to default; shown in the figure below:
Source OSD, Language, Sleep timer and Reset to default options are operated similarly as the above instructions!
Child Lock
When the input source is in TV, AV or S-Video mode, V-Chip level can be set. You can enter the Child Lock setting
only when the Child Lock is ON. When you enter the Child Lock setting, a message on the display will prompt you to
enter password:
You can enter the Child Lock setting to set up the V-Chip level when you enter the correct password:
1. Age: it may be set to Child, Youth, Young adult, Adult, Custom or OFF; when you select Custom, it can be set
according to you preference.
2. MPAA Rating: Select the movie ratings from low to high (alert) - G, PG, PG-13, R, NC-17, X and off.
3. PG Rating: Shown in the figure below:
The empty box refers to unlocked; the solid box refers to locked.
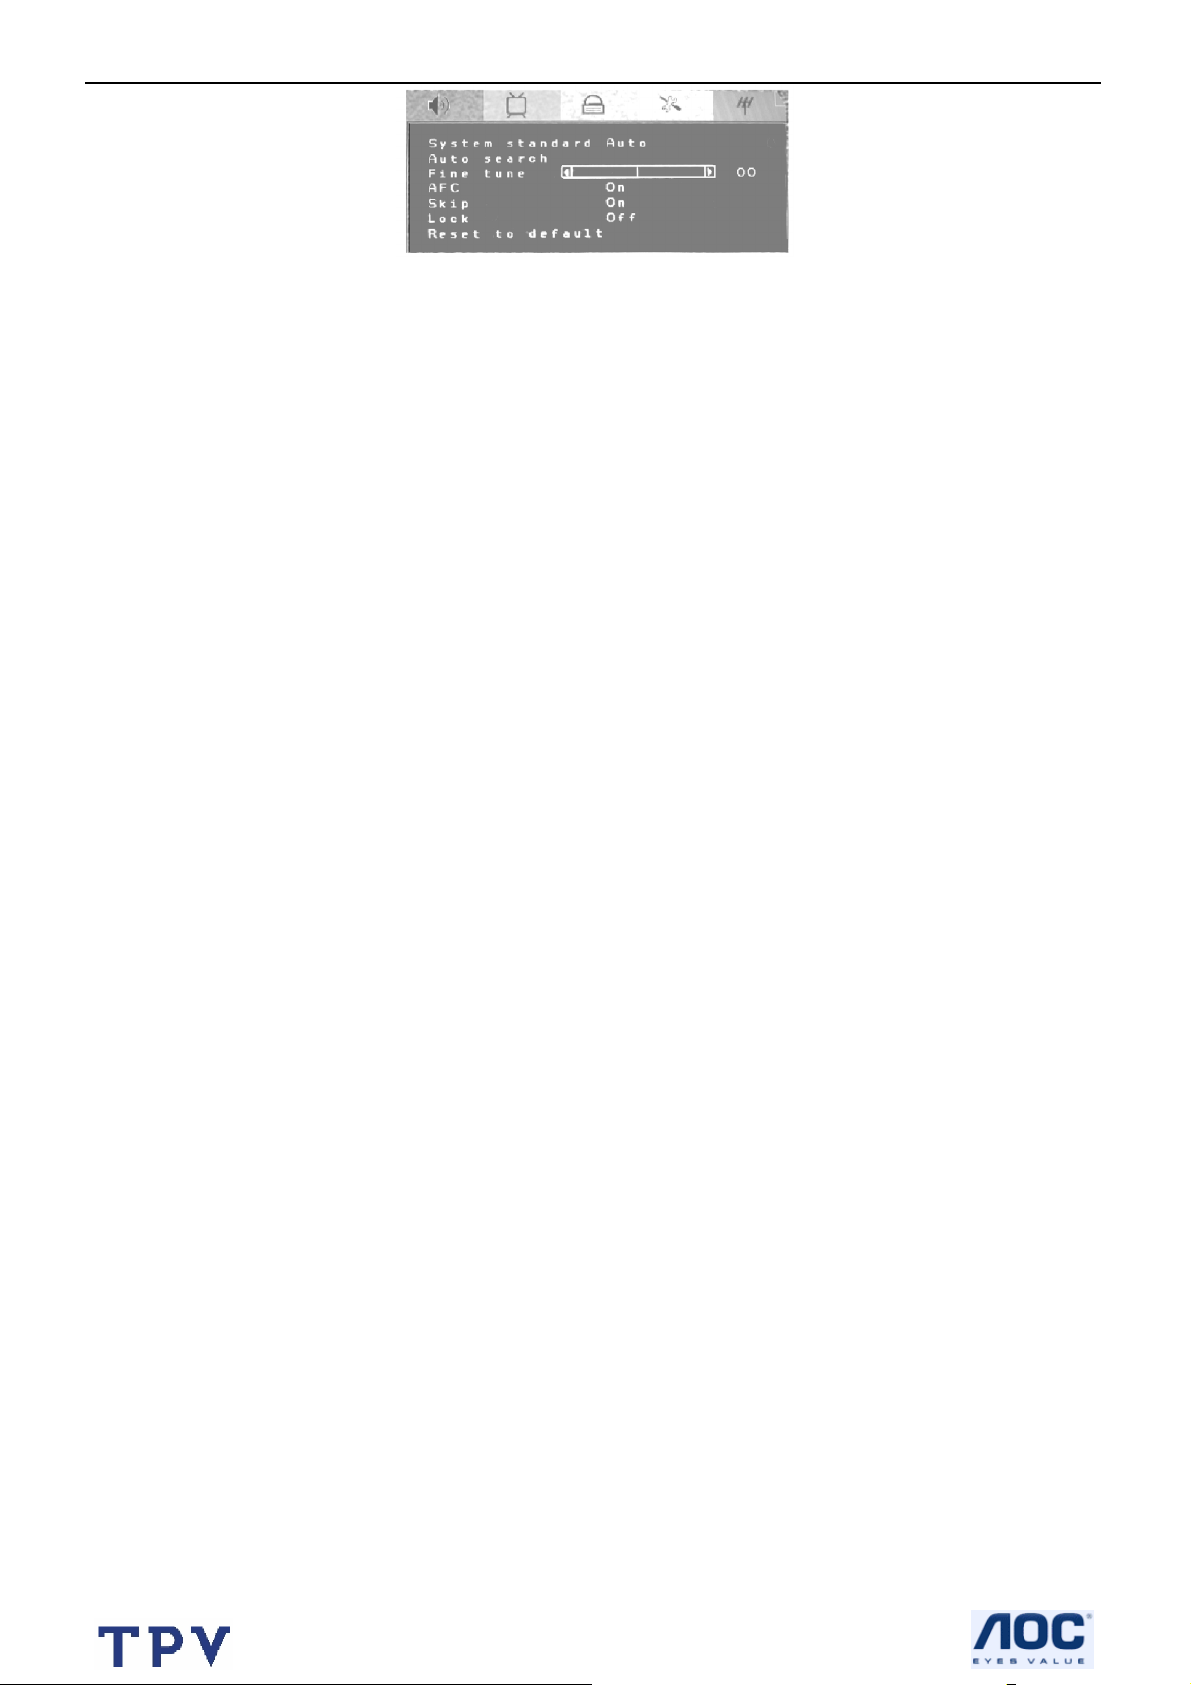
TV Setting
The following menu appears only in the TV mode.
11
Page 12
20” LCD TV Color Monitor Norcent LT2025W
1. Channel nr: Shows the current channel number.
2. Tuning mode: Select the mode of TV signal - Cable\HRC Cable\IRC Cable\ Broadcast.
3. System standard: NTSC-M , Auto
4. Auto search: Select "Auto Search" to search all signaled channel; when the searching is complete, it stays at the
first channel with signal and all channels that have been located are stored. If you would like to stop "Auto
Search" during the process, simply by pressing the MENU button.
5. Fine tune: NTSC-M is seldom used.
6. AFC can be set to ON or OFF. When it is set to ON, the TV will search the TV signal automatically; when there is
any offset in the signal, it will automatically adjust the channel to the correct positon.
7. Skip can be set to ON or OFF. When it is set to ON, a channel can be skipped when pressing the CH button on
the remote control or on the front panel.
8. Reset to default: Reset to the factory default value.
12
Page 13
20” LCD TV Color Monitor Norcent LT2025W
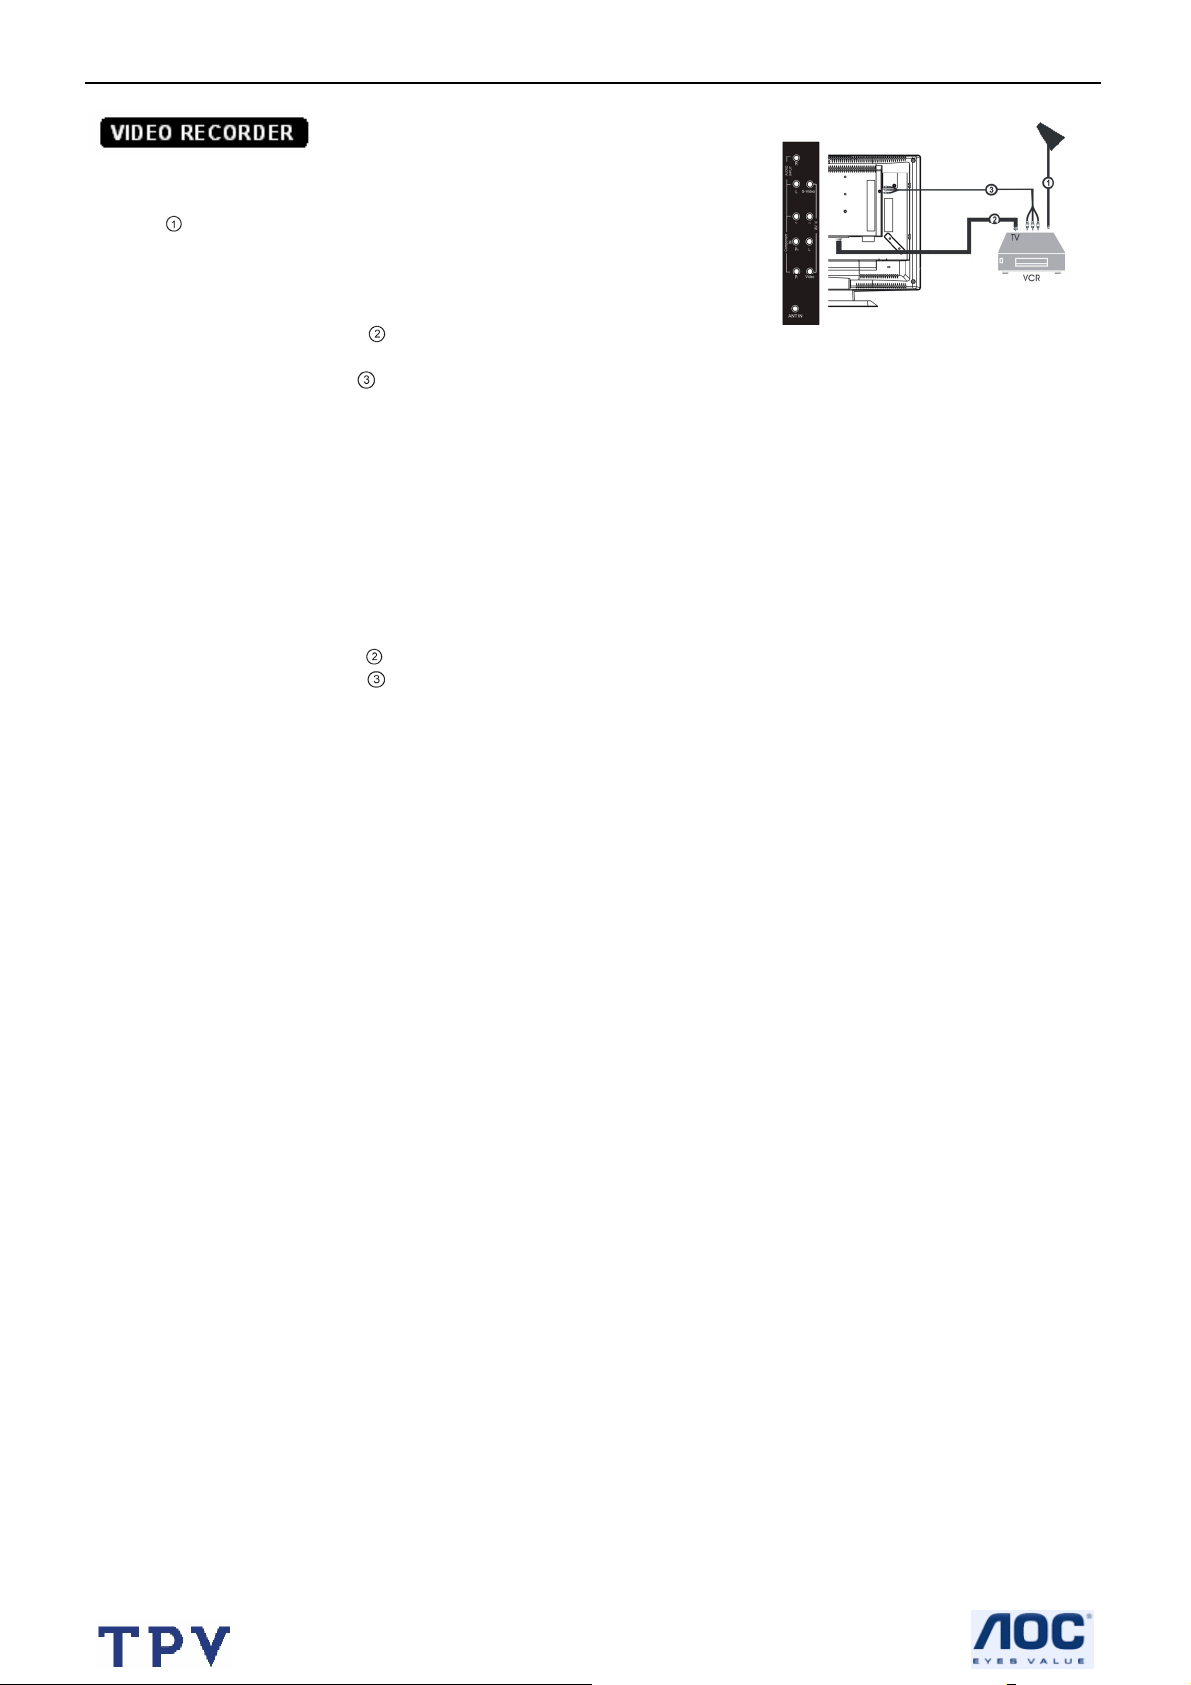
2.4 How To Connect
1. Connect the antenna
cable
port of your VCR.
2. Connect another RF cable
when playing from your VCR can be obtained if you also connect the Video, Audio LEFT AND RIGHT (only for
stereo equipment) cables
If you are using only mono equipment, connect only the VIDEO and the AUDIO L (Mono) ports.
If your VCR has an S-VHS video jack:
For improved picture quality, connect an S-Video cable to the S-VIDEO input on the TV instead of connecting the
VCR to the VIDEO port of AV.
S-Video does not provide audio, audio cables must still be connected to provide sound. (S-Video and AV share the
same audio input port)
Watching VCR
to the RF IN
from the output RF of your VCR to the Antenna input of your TV. Better quality
to the VIDEO, AUDIO L and R inputs AV.
1. If you use connection
2. If you use connection , select VIDEO or S-VIDEO, (see P7 TV/ VIDEO)
3. Insert videotape in the VCR and press the PLAY button.
, select the TV channel 3 or 4.
13
Page 14
20” LCD TV Color Monitor Norcent LT2025W
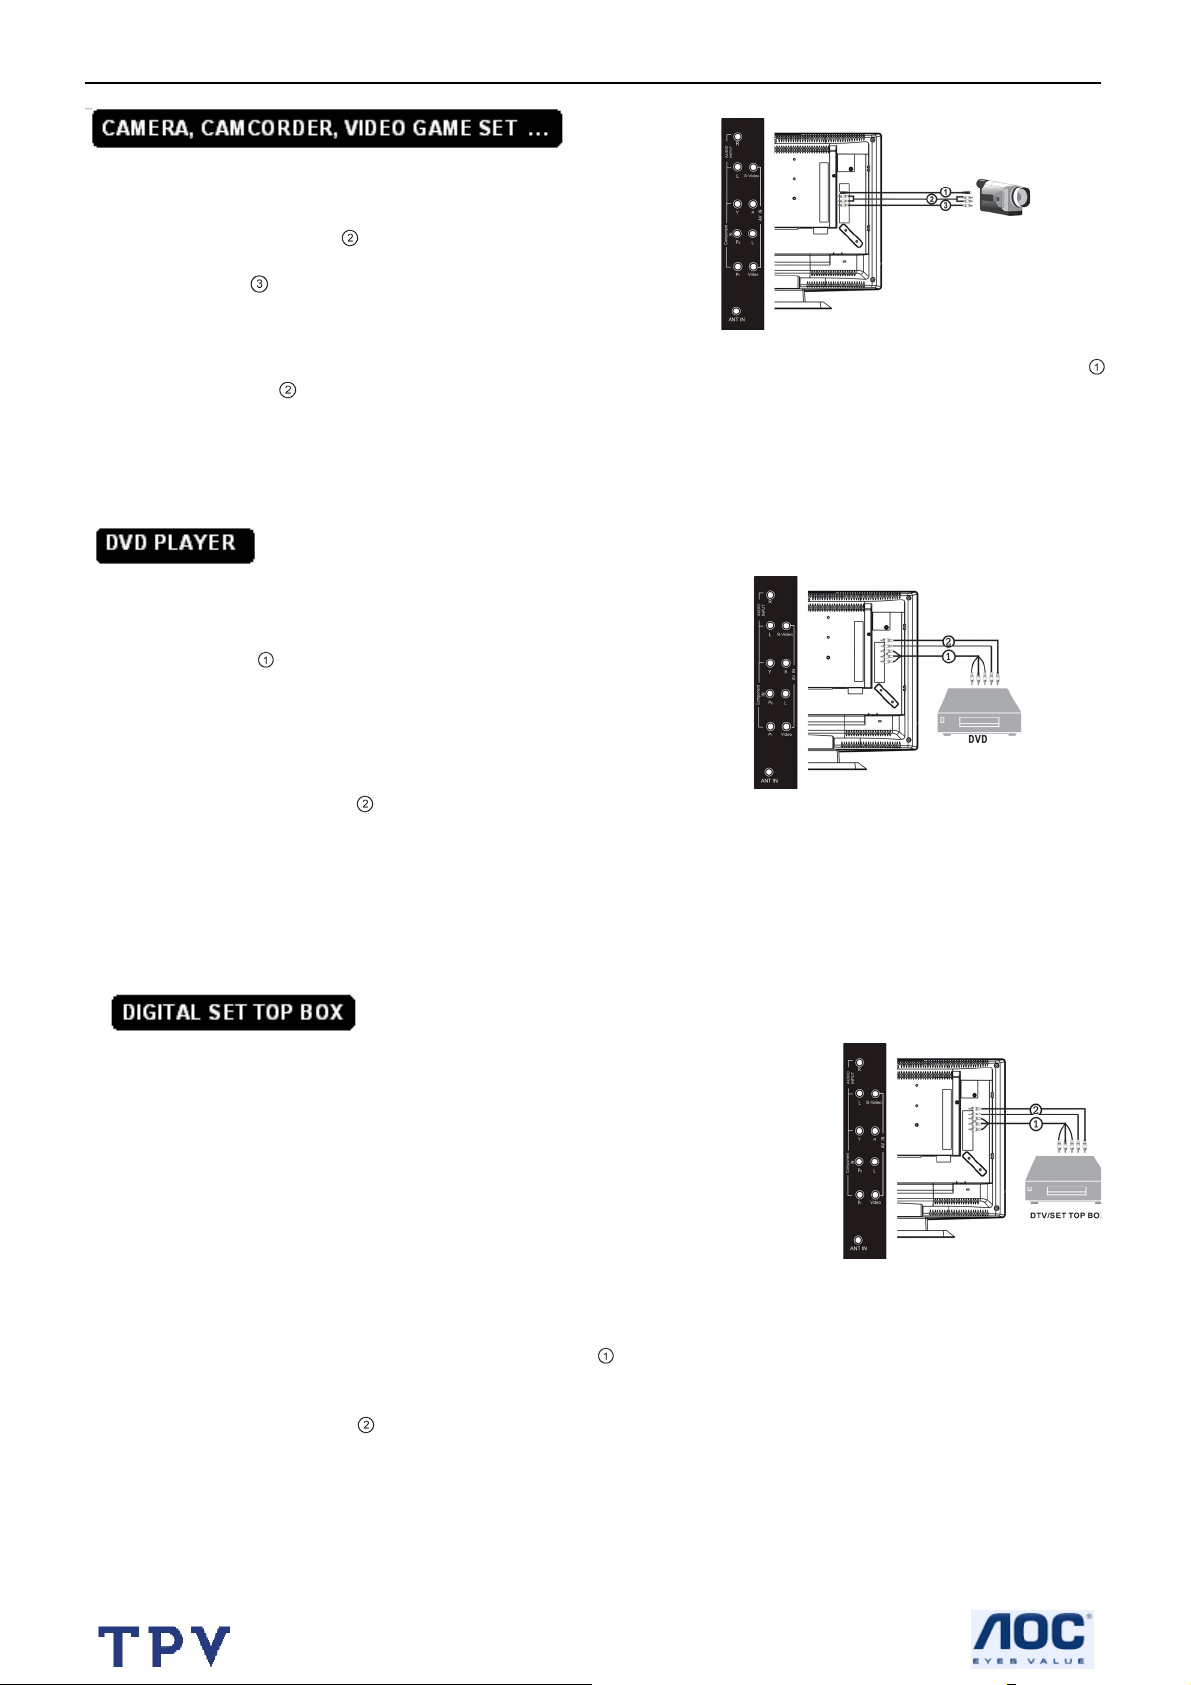
1. Composite Video:
Connect your camera,
camcorder, videogame
set… to Audio port
(Audio L for mono) and
Video port
2. S-Video Connection
S-VHS quality with an S-VHS camcorder is obtained by connecting the S-VHS cable to the S-VIDEO input
and AUDIO input
How to use
1. Select VIDEO or S-VIDEO input source (see P7 TV/ VIDEO)
2. Turn on the external AV equipment.
1. Connect the three
separate component
video cables
the DVD player’s.
Y, P b and Pr ports
and to the Y, P b and
Pr ports on the TV
2. Connect the audio cables
on the TV.
How to use
Connect DTV set top
box RF output to TV
Antenna input (TV
channel set to CH3 or
CH4). If your DTV set
top box has component
(Y, Pb, Pr) video ports,
use them for better
picture.
How to connect component video:
1. Connect the three separate component video cables
Y, P b and Pr ports on the TV.
2. Connect the audio cables
on the TV.
.
.
to
.
1. Select COMPONENT, (see P7 TV/ VIDEO)
2. Turn on the DVD set.
to the DVD player’s AUDIO L and R ports and to the L and R AUDIO INPUT ports
to the DTV set-top box Y, P b and Pr ports and to the
to the DTV set-top box AUDIO L and R ports and to the L and R AUDIO AV ports
14
Page 15
20” LCD TV Color Monitor Norcent LT2025W
How to use
1. Select COMPONENT
2. Turn on the DTV set-top box set.
Warning: In case you notice scrolling images, wrong colors or no color, no picture or even combinations of these,
on your screen, check if the connections are done in the right way. Check if the cable colors match with the Input
connector colors.
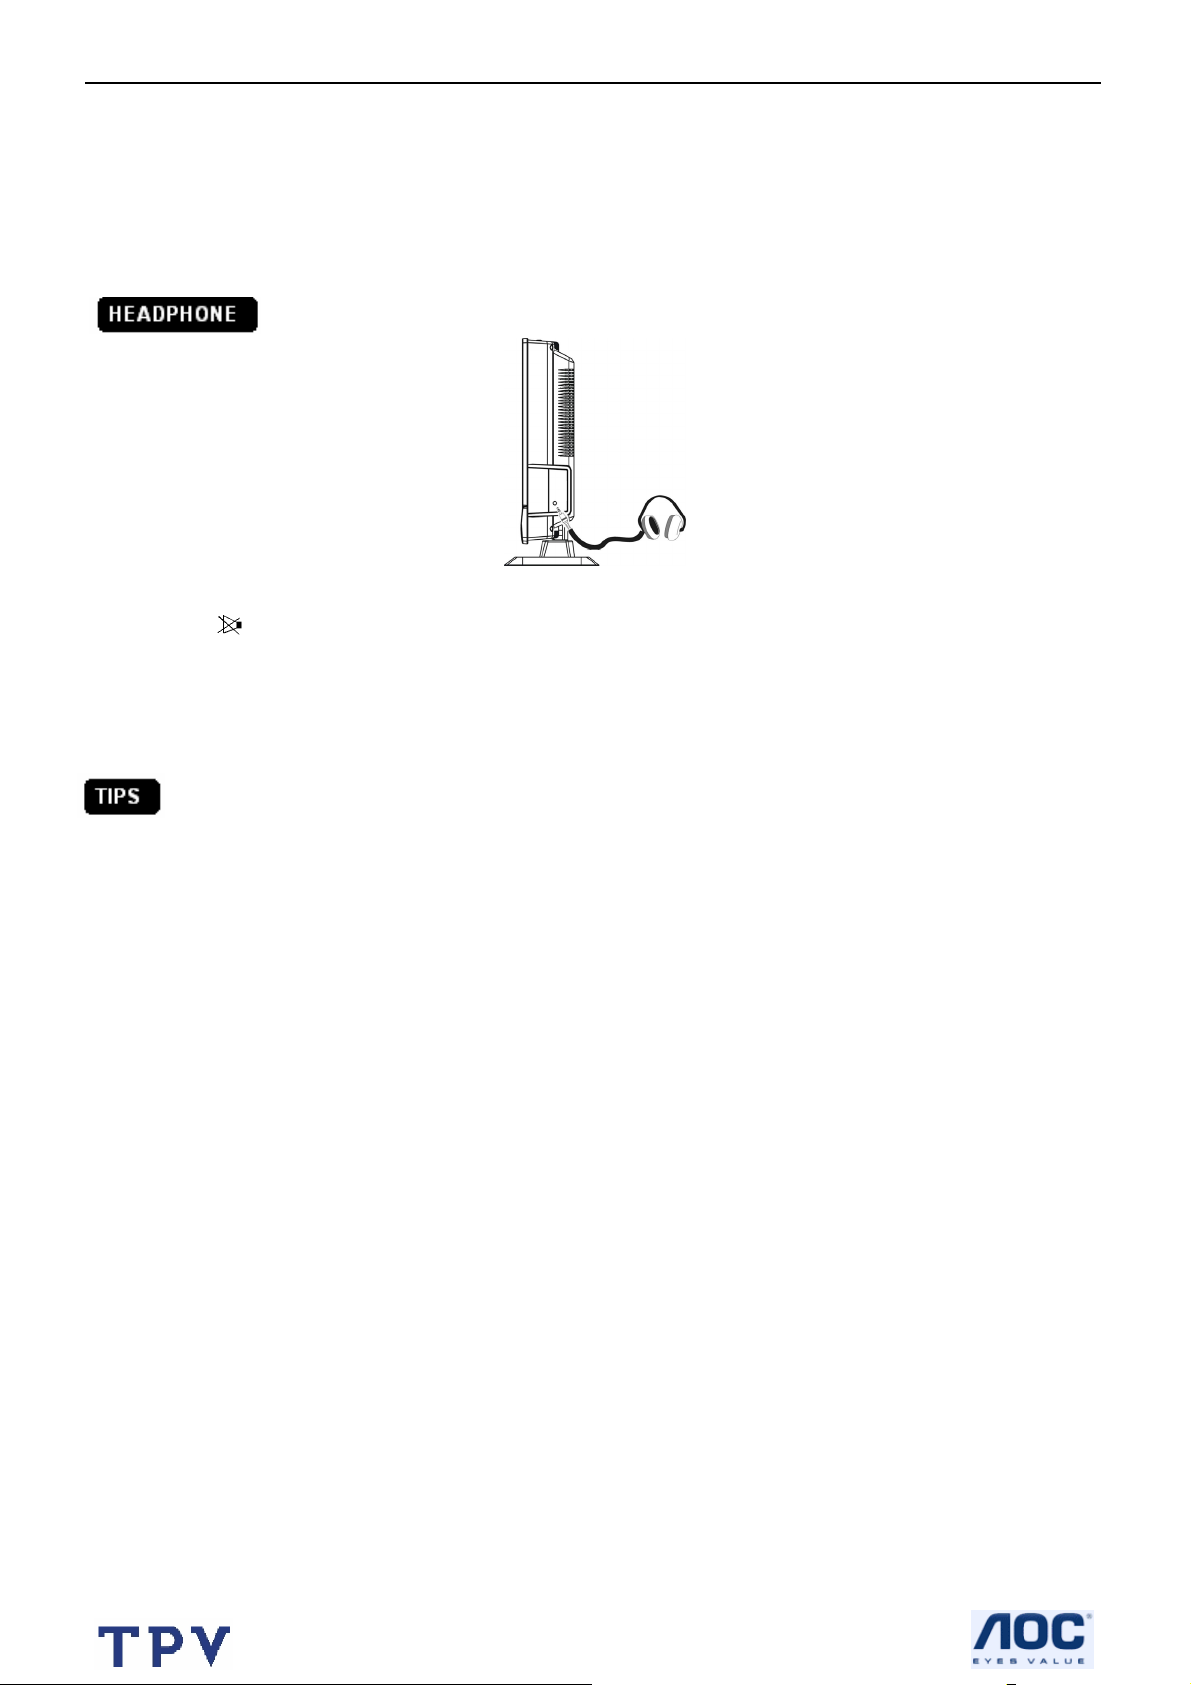
1. The earphone jack is located at the rear corner of the TV.
2. The
3. Use volume key to adjust the volume.
Note: When a TV channel or external AV source is blocked because of a rating set via the Parental control menu,
also the headphone is muted.
Care of the screen
Do not rub or strike the screen with anything hard as this may scratch, mar, or damage the screen permanently.
Unplug the power cord before cleaning the screen. Dust the TV by wiping the screen and the cabinet with a soft,
clean cloth. If the screen requires additional cleaning, use a clean, damp cloth. Do not use liquid cleaners or aerosol
cleaners.
Mobile telephone warning
To avoid disturbances in picture and sound, malfunctioning of your TV or even damage to the TV, keep away your
mobile telephone from the TV.
End of life directives
We are paying a lot of attention to produce environmentally friendly in green focal areas. Your new receiver contains
materials, which can be recycled and reused.
At the end of its life specialized companies can dismantle the discarded receiver to concentrate the reusable
materials and to minimize the amount of materials to be disposed of.
Please ensure you dispose of your old receiver according to local regulations.
MUTE key on the remote control works on both internal speaker and the earphone.
15
Page 16

20” LCD TV Color Monitor Norcent LT2025W
REGULATORY NOTICES
Federal Communications Commission Notice
This equipment has been tested and found to comply with the limits for a Class B digital device, pursuant to part 15
of the FCC Rules. These limits are designed to provide reasonable protection against harmful interference in a
residential installation. This equipment generates, uses, and can radiate radio frequency energy and, if not installed
and used in accordance with the instructions, may cause harmful interference to radio communications. However,
there is no guarantee that interference will not occur in a particular installation. If this equipment does cause harmful
interference to radio or television reception, which can be determined by turning the equipment off and on, the user
is encouraged to try to correct the interference by one or more of the following measures:
˙Reorient or relocate the receiving antenna.
˙Increase the separation between the equipment and the TV.
˙Connect the equipment into wall power outlet on a circuit different from that to which the receiver is connected.
˙Consult the dealer or an experienced radio or television technician for help.
Modifications –
The FCC requires the user to be notified that any changes or modifications made to this device that are not
expressly approved by Norcent Technology Inc. may void the user’s authority to operate the equipment.
Cables –
Connections to this device must be made with shielded cables with metallic RF/EMI connector hoods to maintain
compliance with FCC Rules and Regulations.
Canadian notice –
This Class B digital apparatus meets all requirements of the Canadian Interference-Causing Equipment
Regulations.
Avis Canadian –
Cat apparel numerous de la classed B respected toutes les exigencies du règlement sur le materiel
brouilleur du Canada.
16
Page 17
20” LCD TV Color Monitor Norcent LT2025W
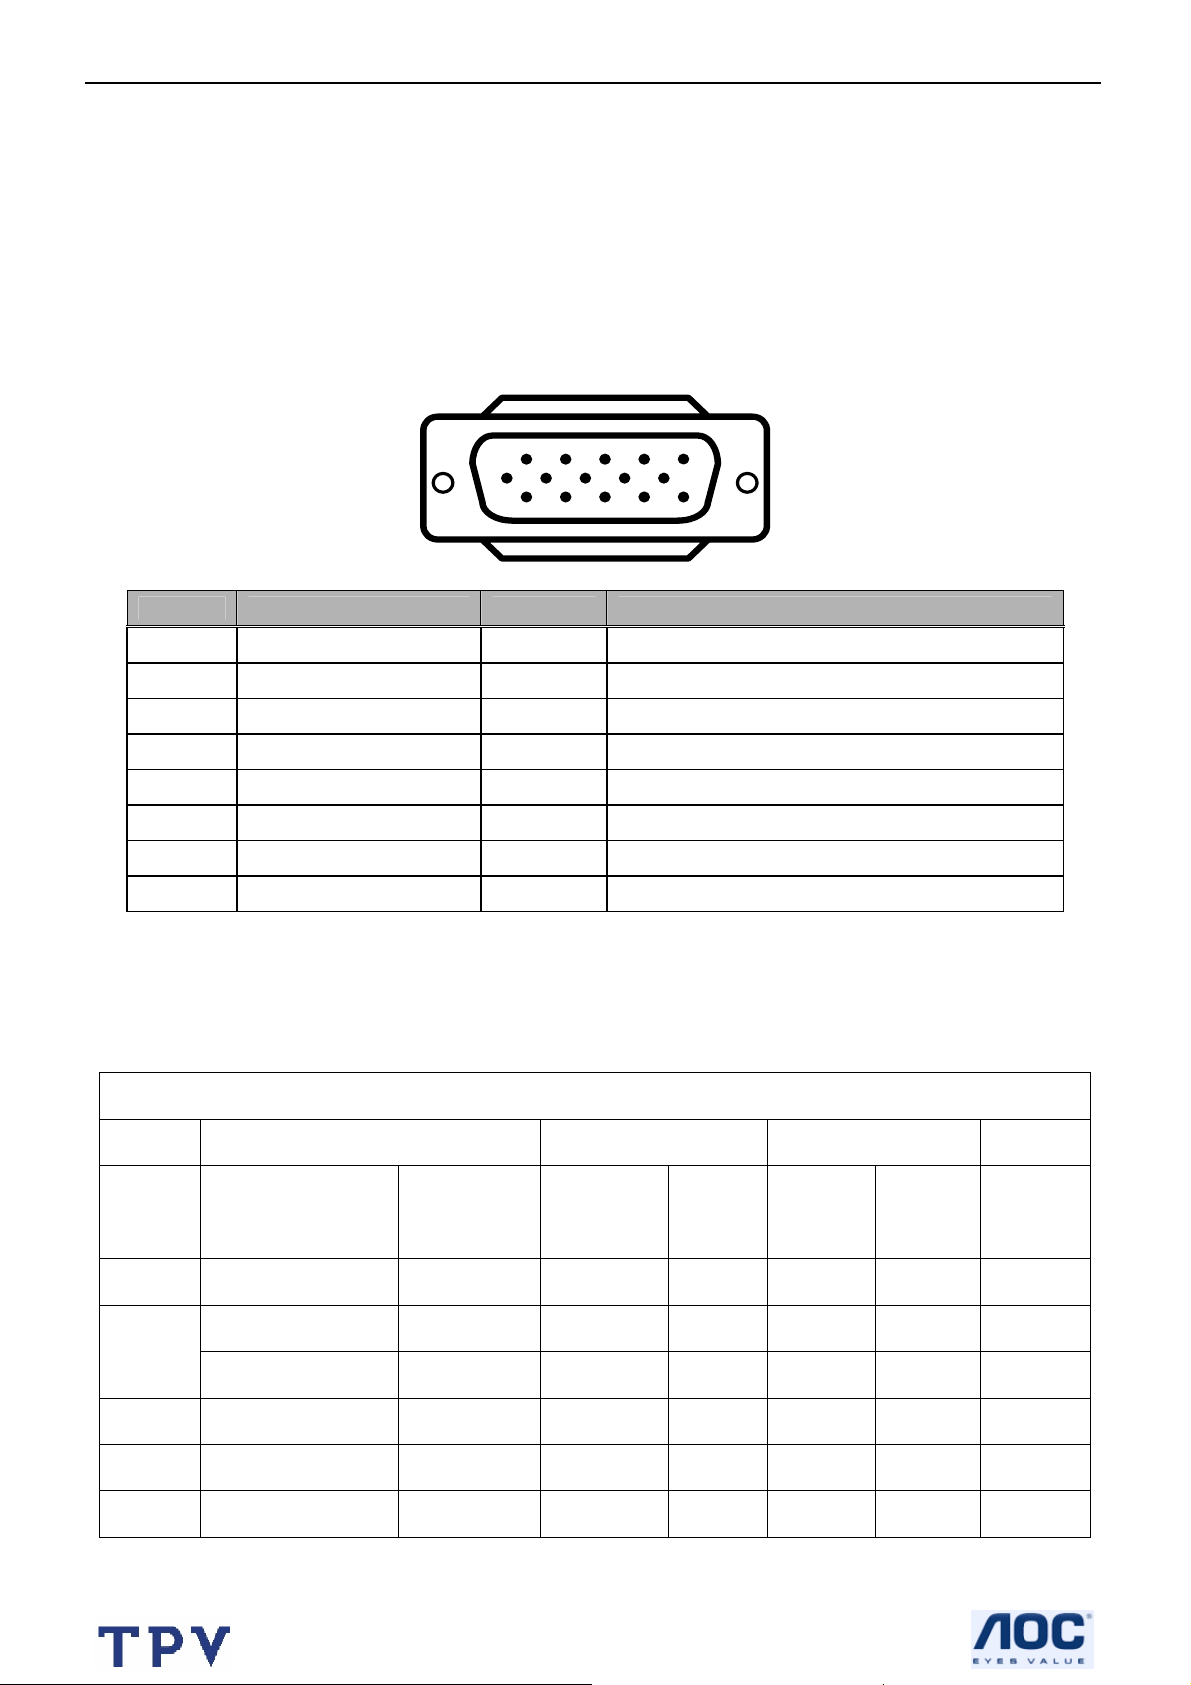
3. Input/Output Specification
3.1 Input Signal connector
This procedure gives you instructions for installing and using the LCD TV display.
Lay the display on the desired operation and plug the power cord into a convenient AC outlet. Three-wire power cord
must be shielded and is provided as a safety precaution as it connects the chassis and cabinet to the electrical
conduct ground. If the AC outlet in your location does not have provisions for the grounded type plug, the installer
should attach the proper adapter to ensure a safe ground potential.
Connect the 15-pin D-SUB color display shielded signal cable to your signal system device and lock both screws on
the connector to ensure firm grounding. The connector information is as follow:
15 - Pin Color Display Signal Cable
Pin Signal Assignment Pin Signal Assignment
1 Red Video 9 No Pin!
2 Green Video 10 Sync. Ground
3 Blue Video 11 Not Used
4 Not Used 12 Serial Data for DDC
5 GROUND 13 Horizontal Sync.
6 Red Video Ground 14 Vertical Sync.
7 Green Video Ground 15 Serial Clock for DDC
8 Blue Video Ground
3.2 Factory Preset Display Modes
Analog RGB input signal timing
1
6
11 15
5
10
VESA MODES
Mode Resolution Total
VGA 640x480@60Hz 800 x 525 31.469 N 59.940 N 25.175
800x600@56Hz 1024 x 625 35.156 N/P 56.250 N/P 36.000
SVGA
800x600@60Hz 1056 x 628 37.879 P 60.317 P 40.000
XGA 1024x768@60Hz 1344x806 48.363 N 60.004 N 65.000
1280x768@60Hz 1664x798 47.396 P 59.995 N 68.250
WXGA 1360x768@60Hz 1792x795 47.712 P 60.015 P 85.500
Horizontal Vertical
Nominal
Frequency
+/- 0.5kHz
Sync
Polarity
Nominal
Freq.
+/- 1 Hz
Sync
Polarity
Nominal
Pixel
Clock
(MHz)
17
Page 18
20” LCD TV Color Monitor Norcent LT2025W
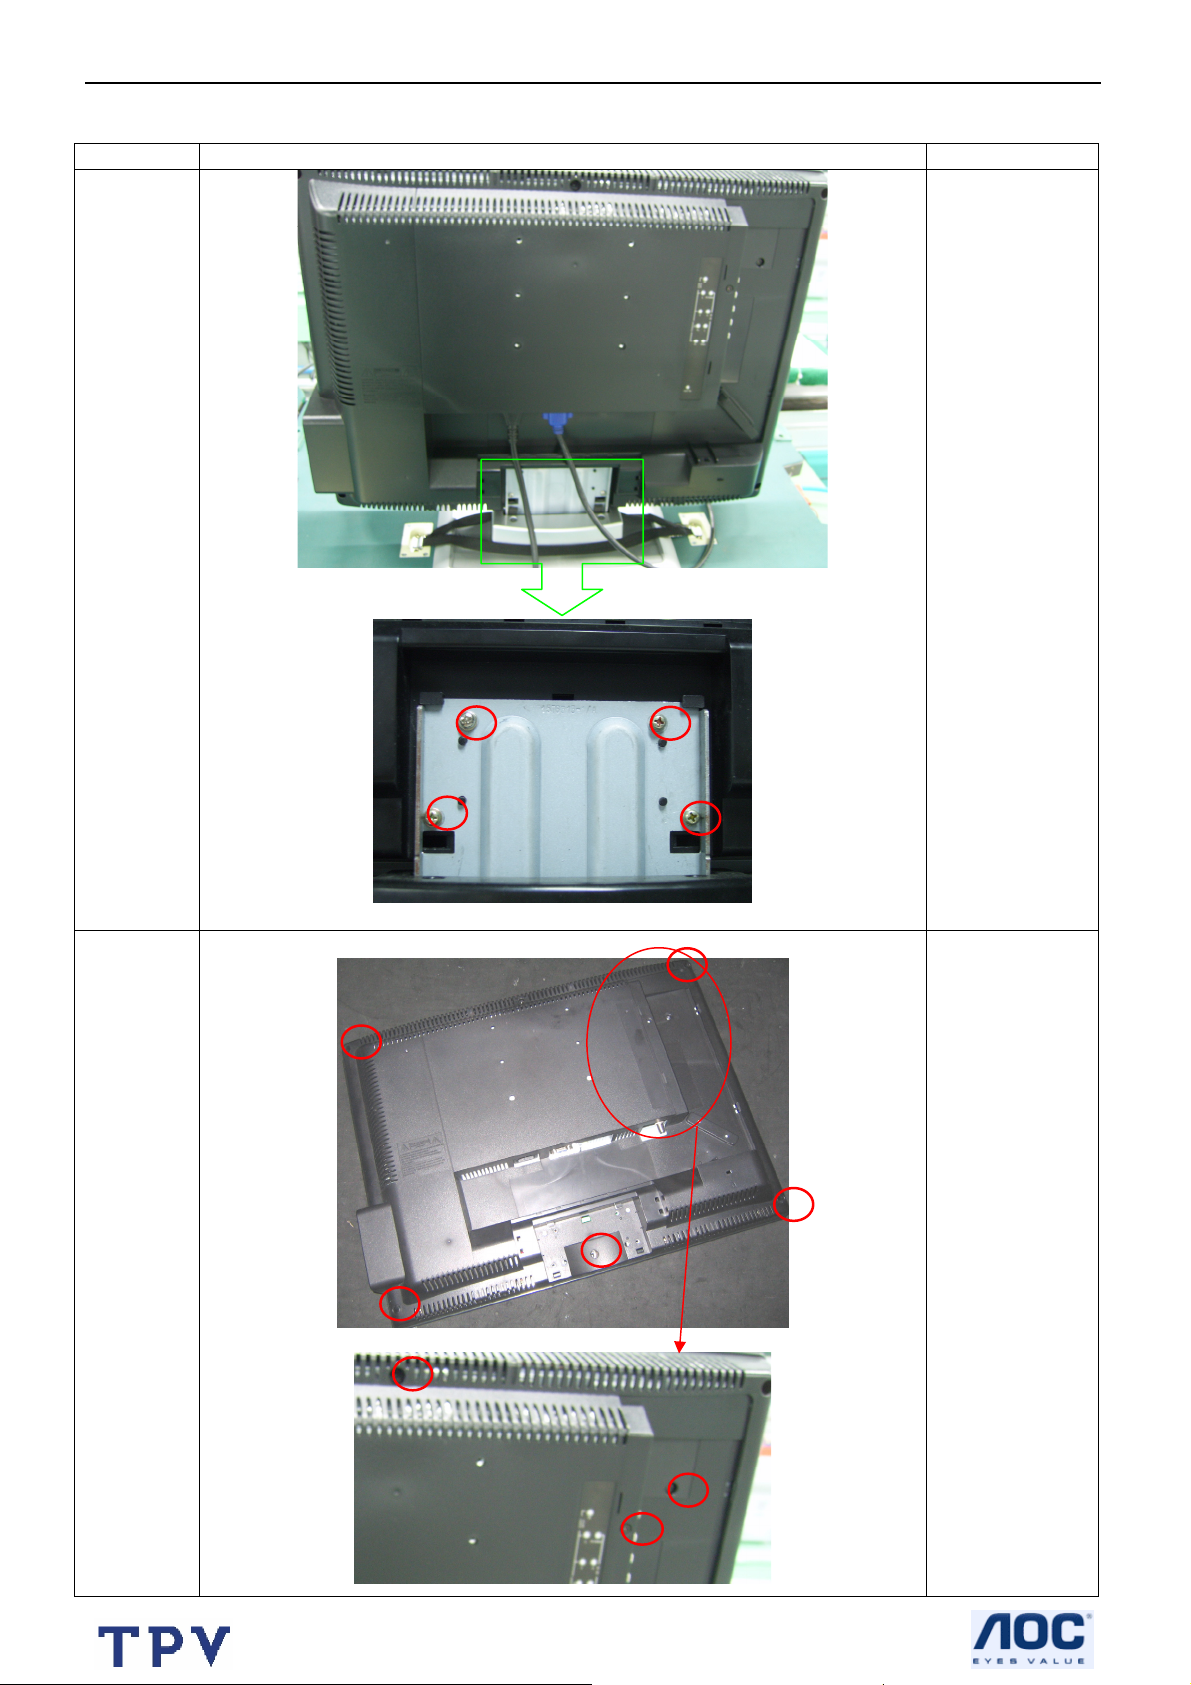
4. Mechanical Instructions
Step Figure
Description
Preparation
and
remove
the base
Remove the
screws
remarked in red
Remove
back cover
Remove the
screws
remarked in red
18
Page 19
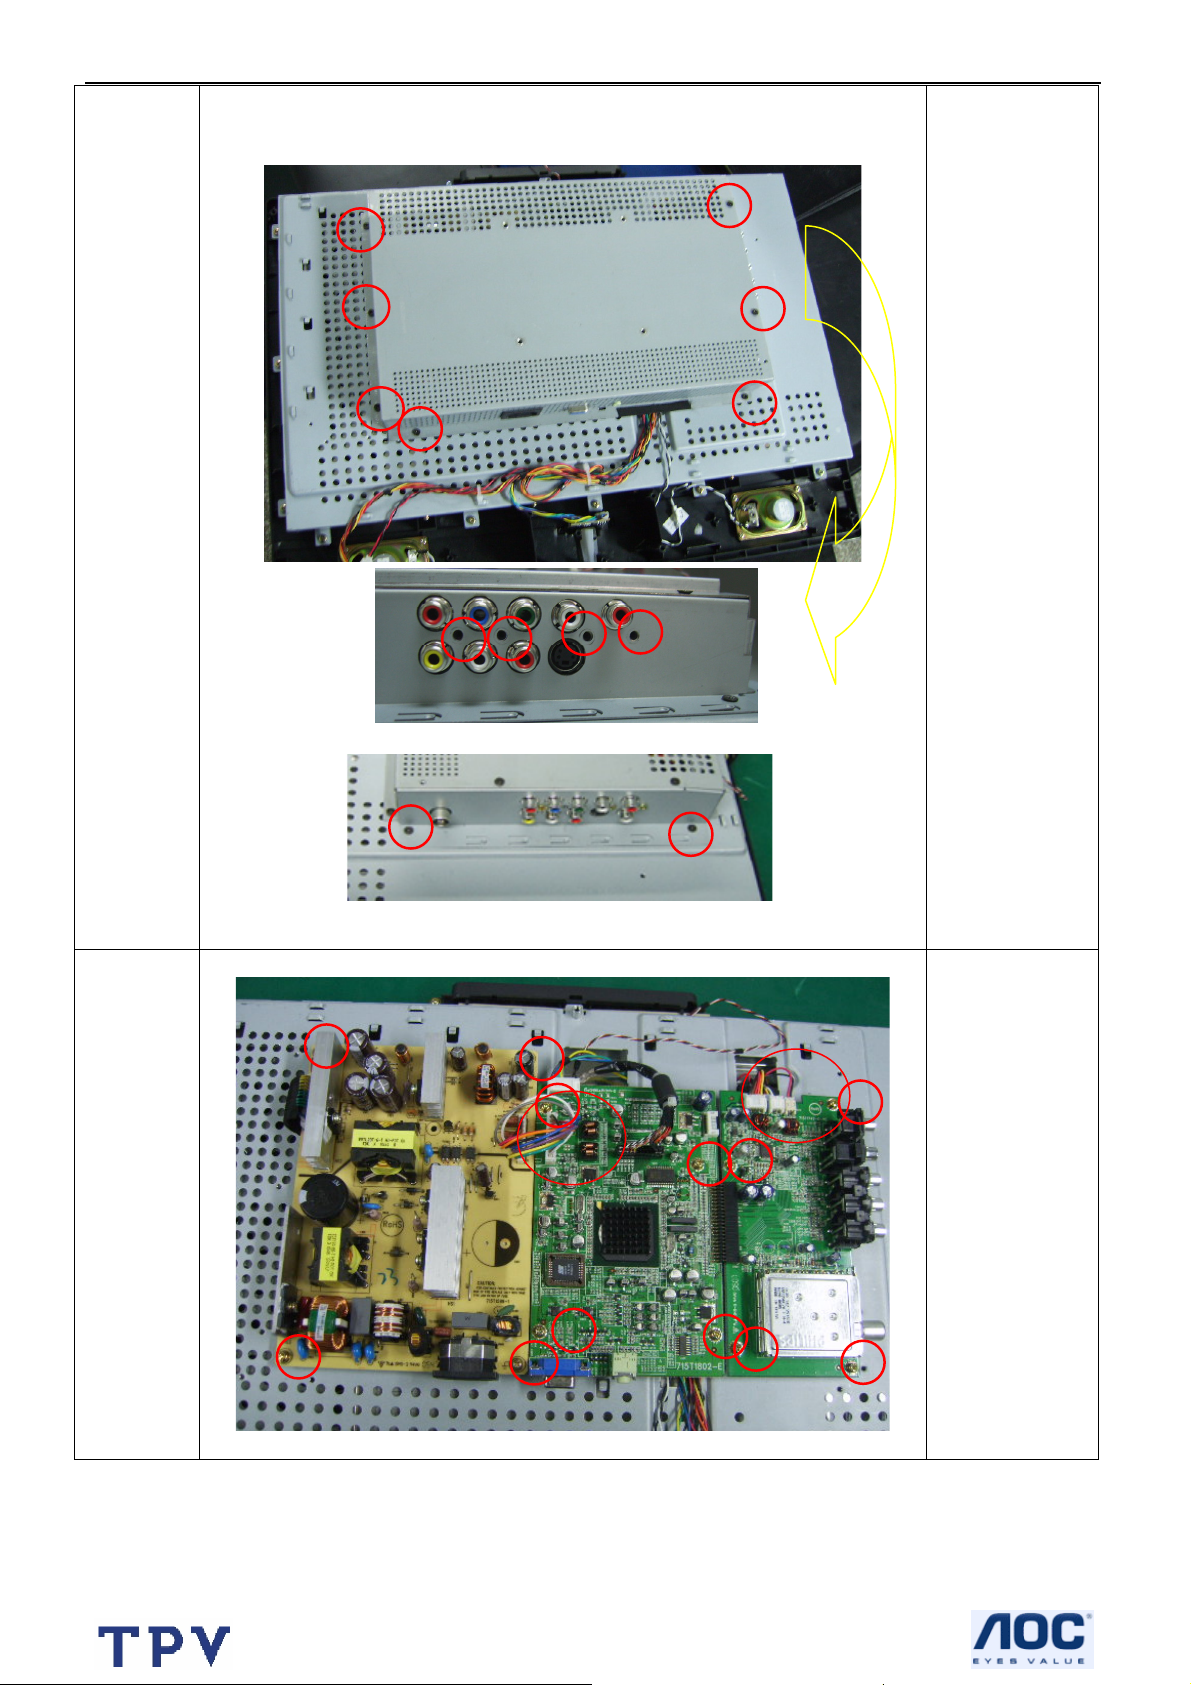
20” LCD TV Color Monitor Norcent LT2025W
Remove
shield
Remove the
screws
remarked in red
Remove
the boards
Remove
connectors and
the screws
remarked in red
19
Page 20
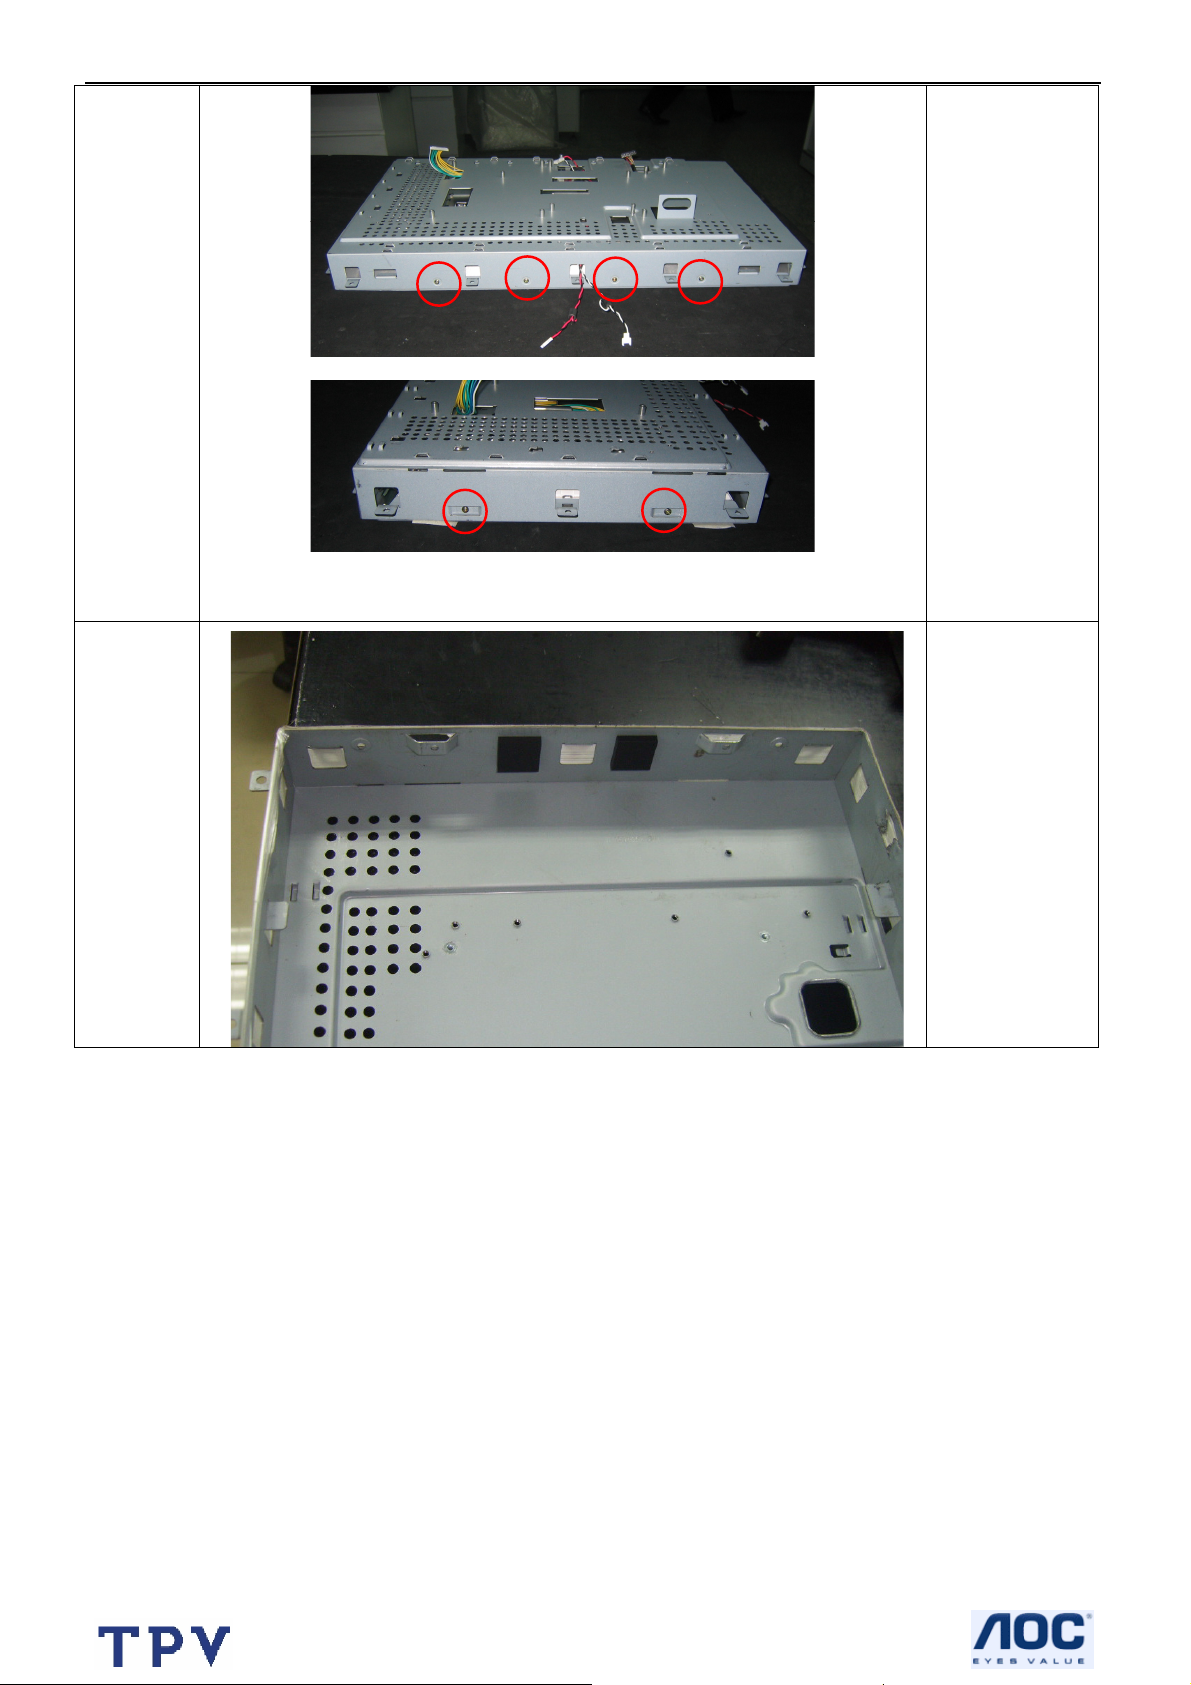
20” LCD TV Color Monitor Norcent LT2025W
Remove
main frame
The end
Remove screws
remarked in red
N/A
20
Page 21
20” LCD TV Color Monitor Norcent LT2025W
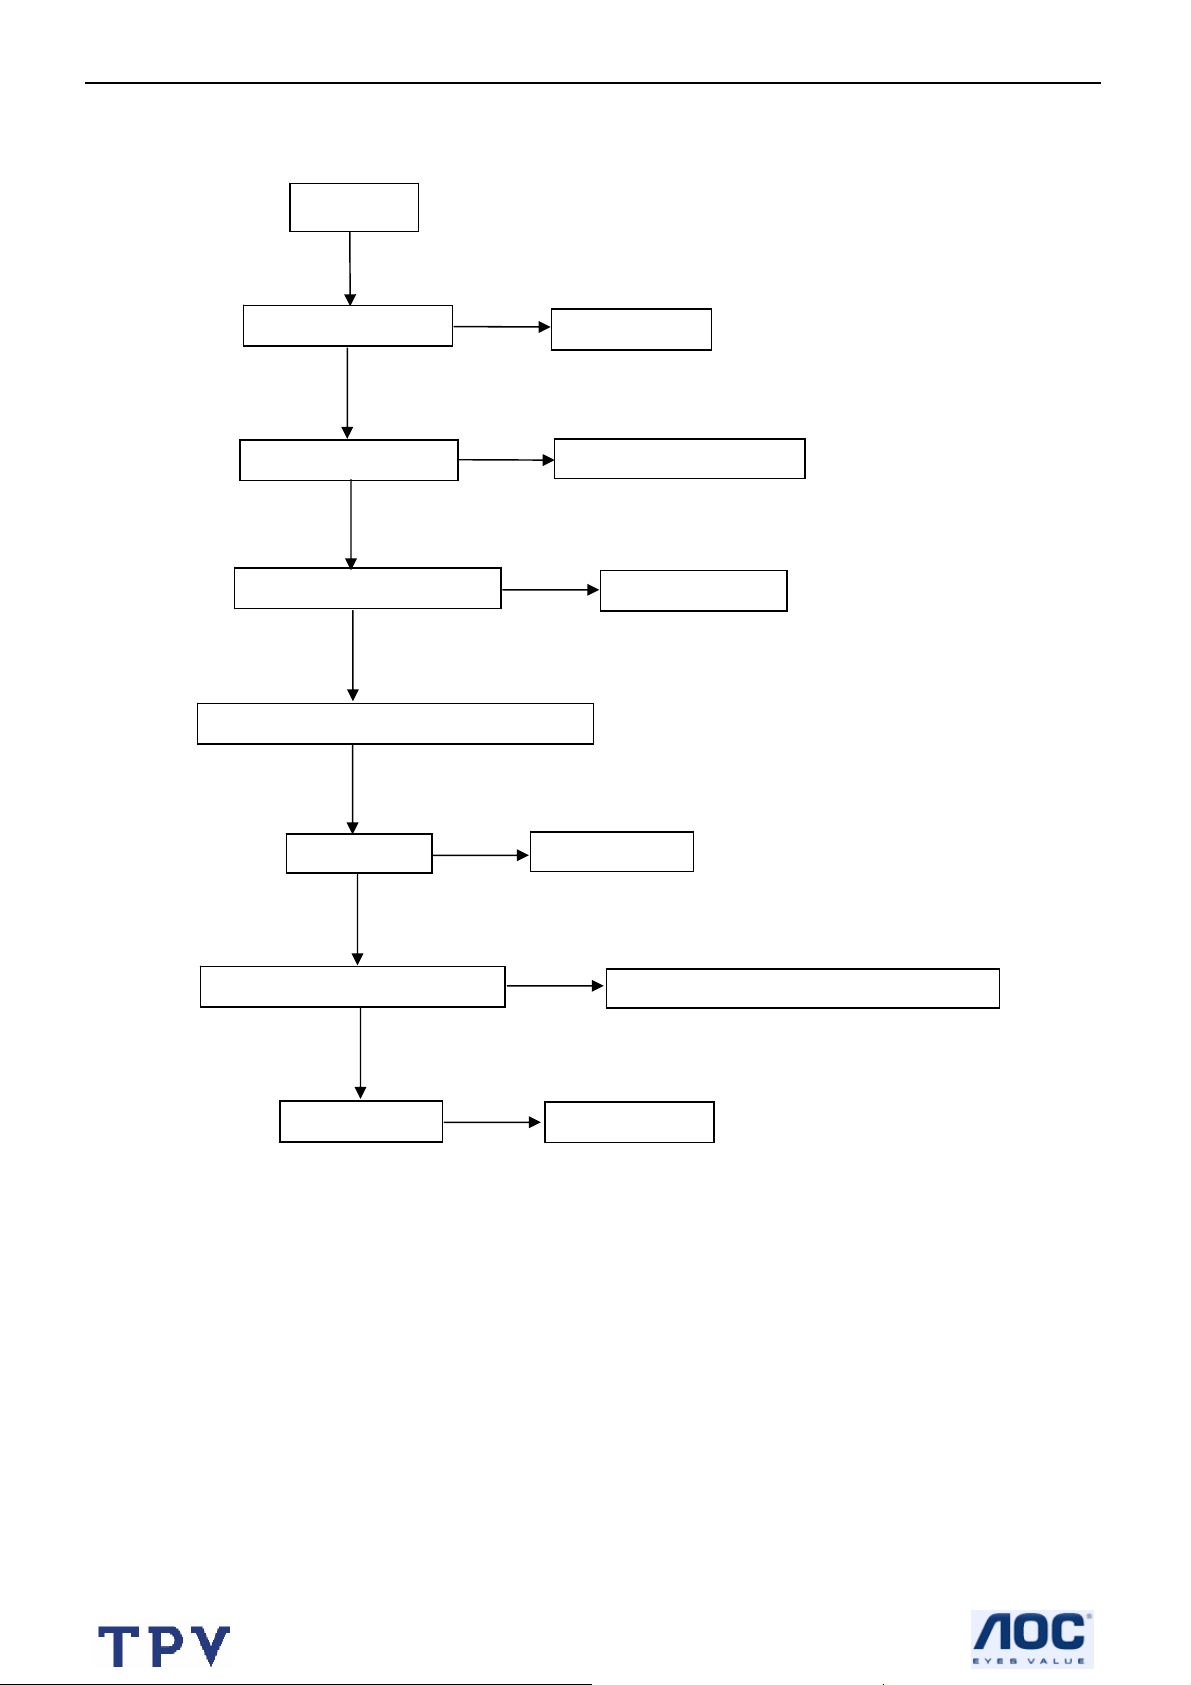
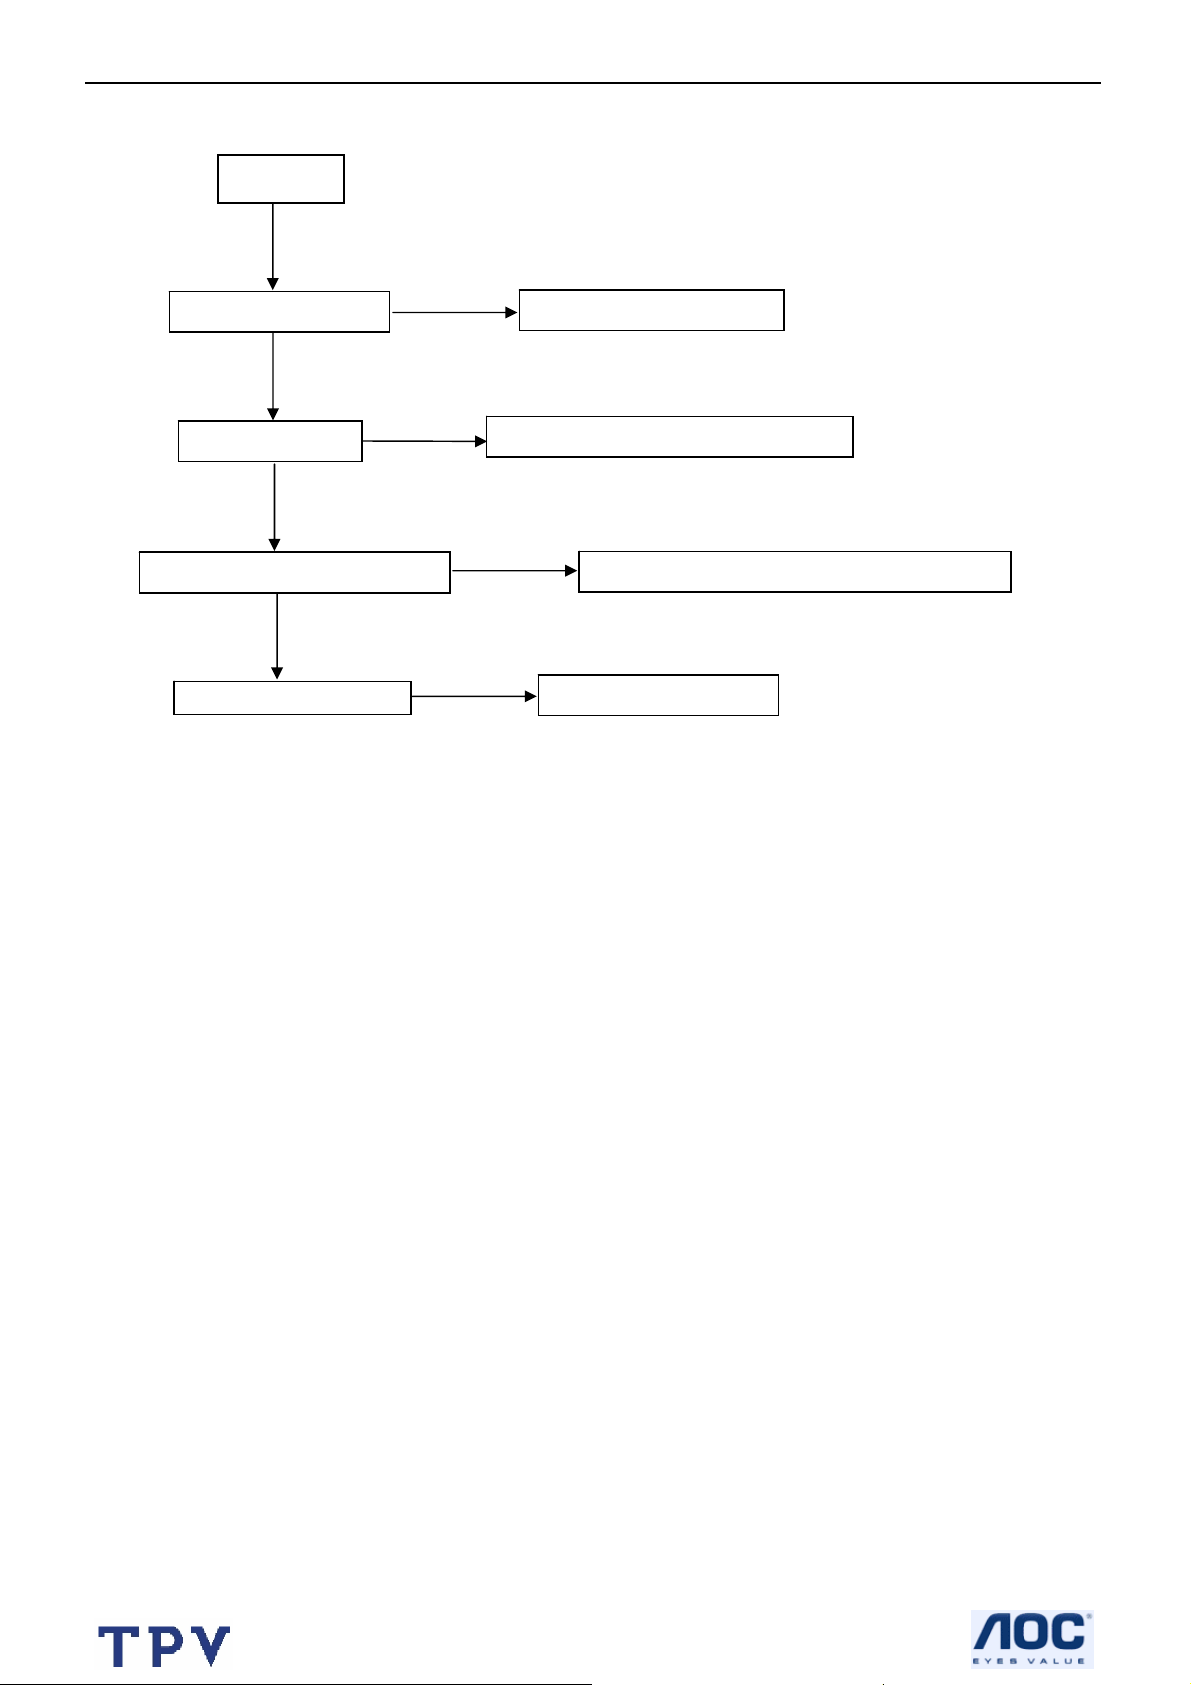
5. Repair Flow Chart
5.1. No Display (LED indicator green)
Check I2C communication
No display
Check the source
OK
Check LVDS cable
OK
Check 12V power supply
OK
Check main board power supply
OK
Check U406
OK
OK
Check panel
NG
NG
NG
NG
NG
Reset source
Replace LVDS cable
Return to “3”
Replace U406
NG
Repair I2C communication relative circuit
Replace panel
21
Page 22
20” LCD TV Color Monitor Norcent LT2025W
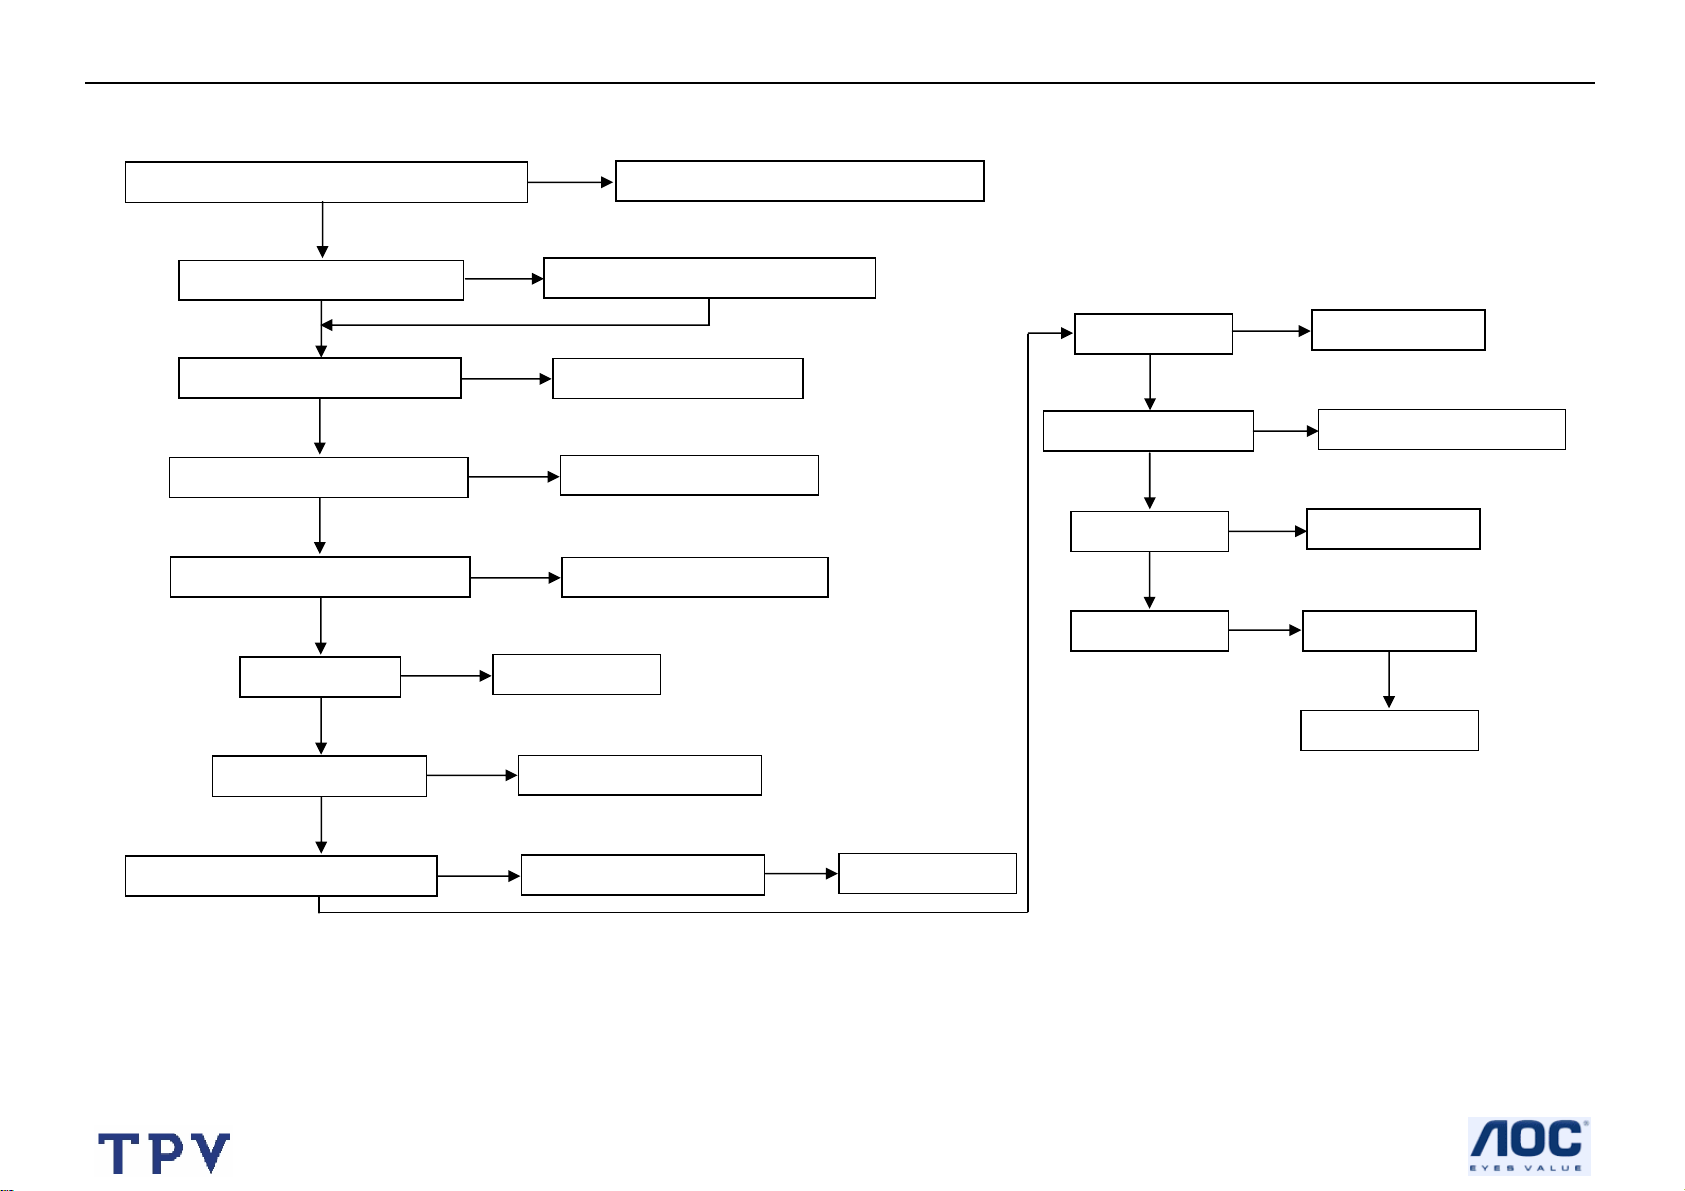
5.2. Can’t start (LED indicator yellow)
Can’t start
Check keyboard
OK
NG
Repair the keyboard
Check 5V_SB
NG
Check every chip power supply
OK
Check I2C communication
OK
NG
Replace I2C communication component
Check oscillistor
NG
Replace oscillistor
22
Page 23
20” LCD TV Color Monitor Norcent LT2025W
5.3. No Power (No LED indicator)
Check power cord and board interface
OK
Check F901, BD901, D910
OK
Check IC930, Q930
OK
Check Q931, ZD930
OK
Check PC950, TL950 (FB)
OK
Check T901
OK
Check D970, D980
Check the load
NG
NG
NG
NG
NG
NG
NG
Replace F901 or BD901 or D910
Replace IC930 or Q930
Replace T901
Replace D970 or D980
Plug in power cord and interface
Replace Q931 or ZD930
Replace PC950 or TL950
OK
Check IC 960
OK
Check Q961, Q962
OK
Check Q960
OK
Check F960
NG
NG
NG
Replace IC 960
NG
Replace Q961 or Q962
Replace Q960
Replace F960
Check the load
OK
Check F970 (12V), F980 (24V)
NG
Replace F970 or F980
Check the load
23
Page 24
20” LCD TV Color Monitor Norcent LT2025W
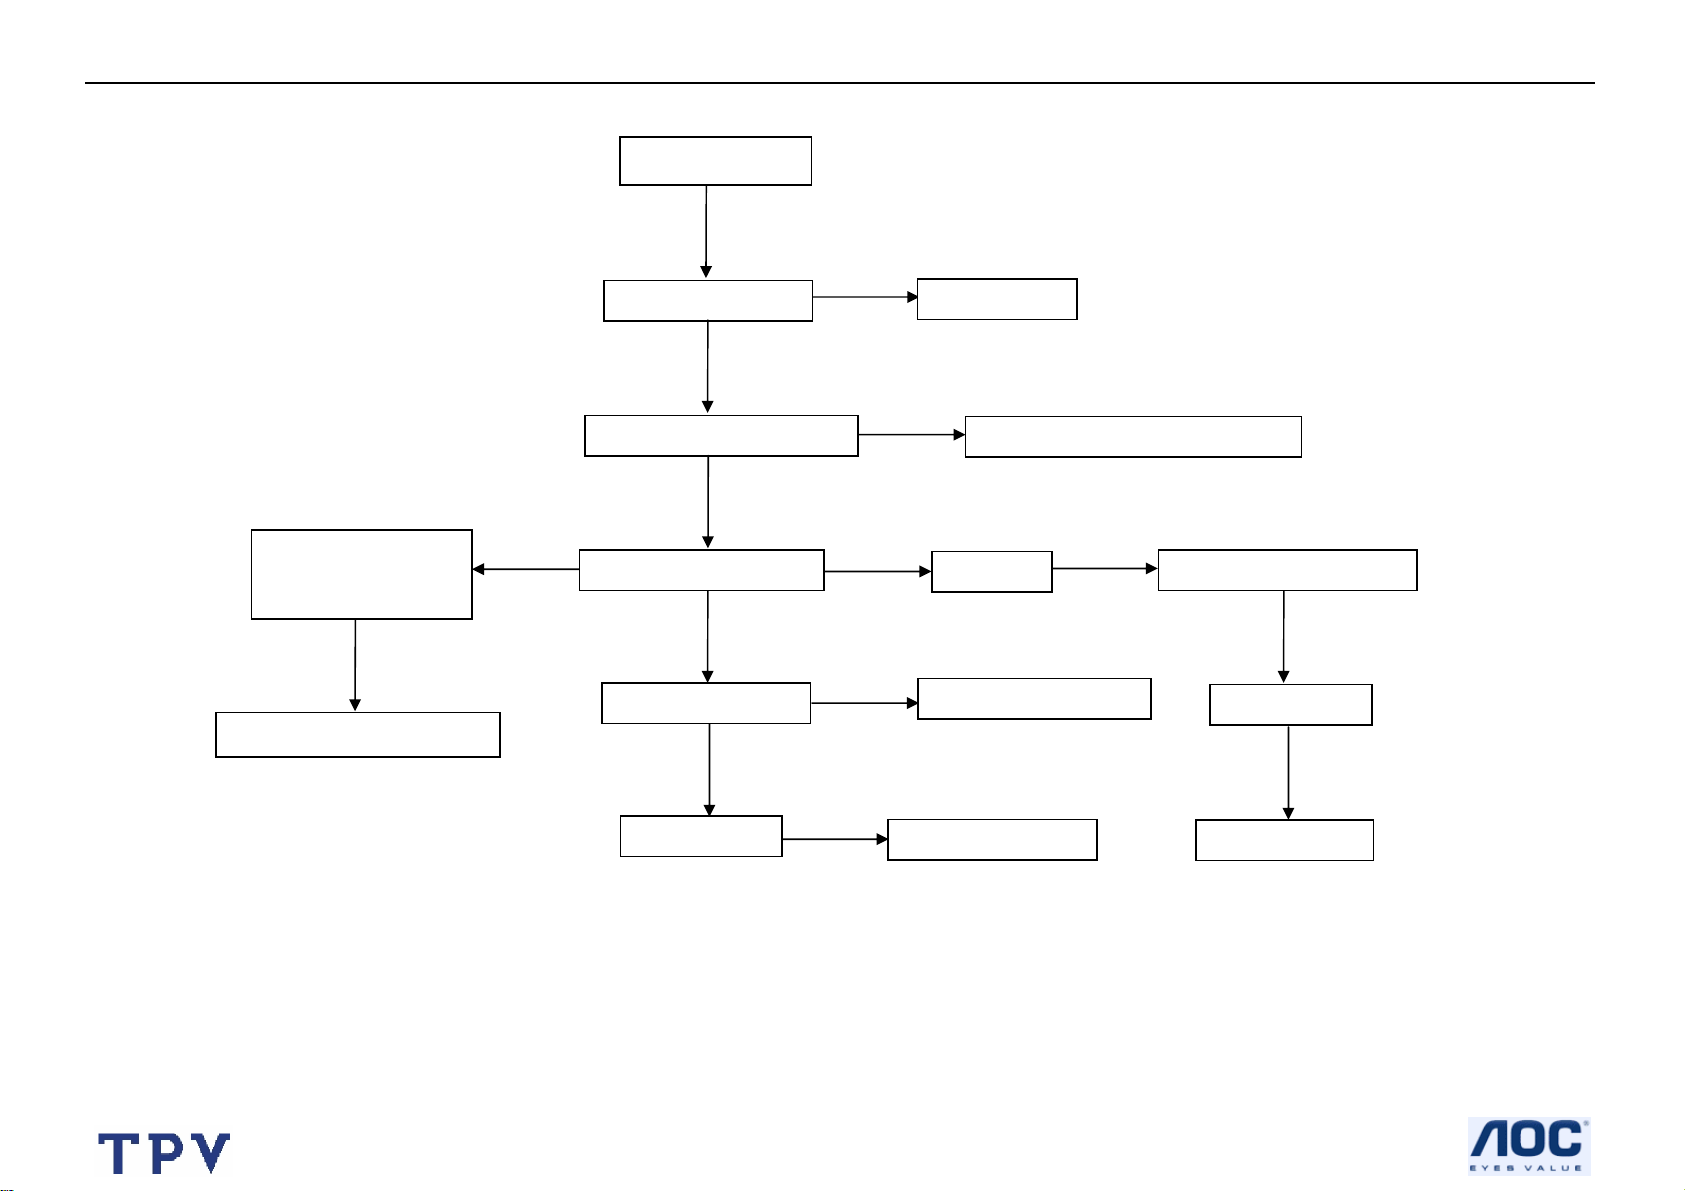
5.4. Abnormal Display
Abnormal display
Check the source
OK
NG
Reset source
Check signal filter circuit
NG
Replace the filter or inductance
OK
AV, S-video signal
component PC signal
NG
Check input signal
NG
RF signal
OK
Check TV system setup
Repair each relative circuit
OK
OK
Check LVDS cable
OK
Check panel
NG
NG
Replace LVDS cable
Replace panel
OK
Check TU100
OK
Replace TU100
24
Page 25
20” LCD TV Color Monitor Norcent LT2025W
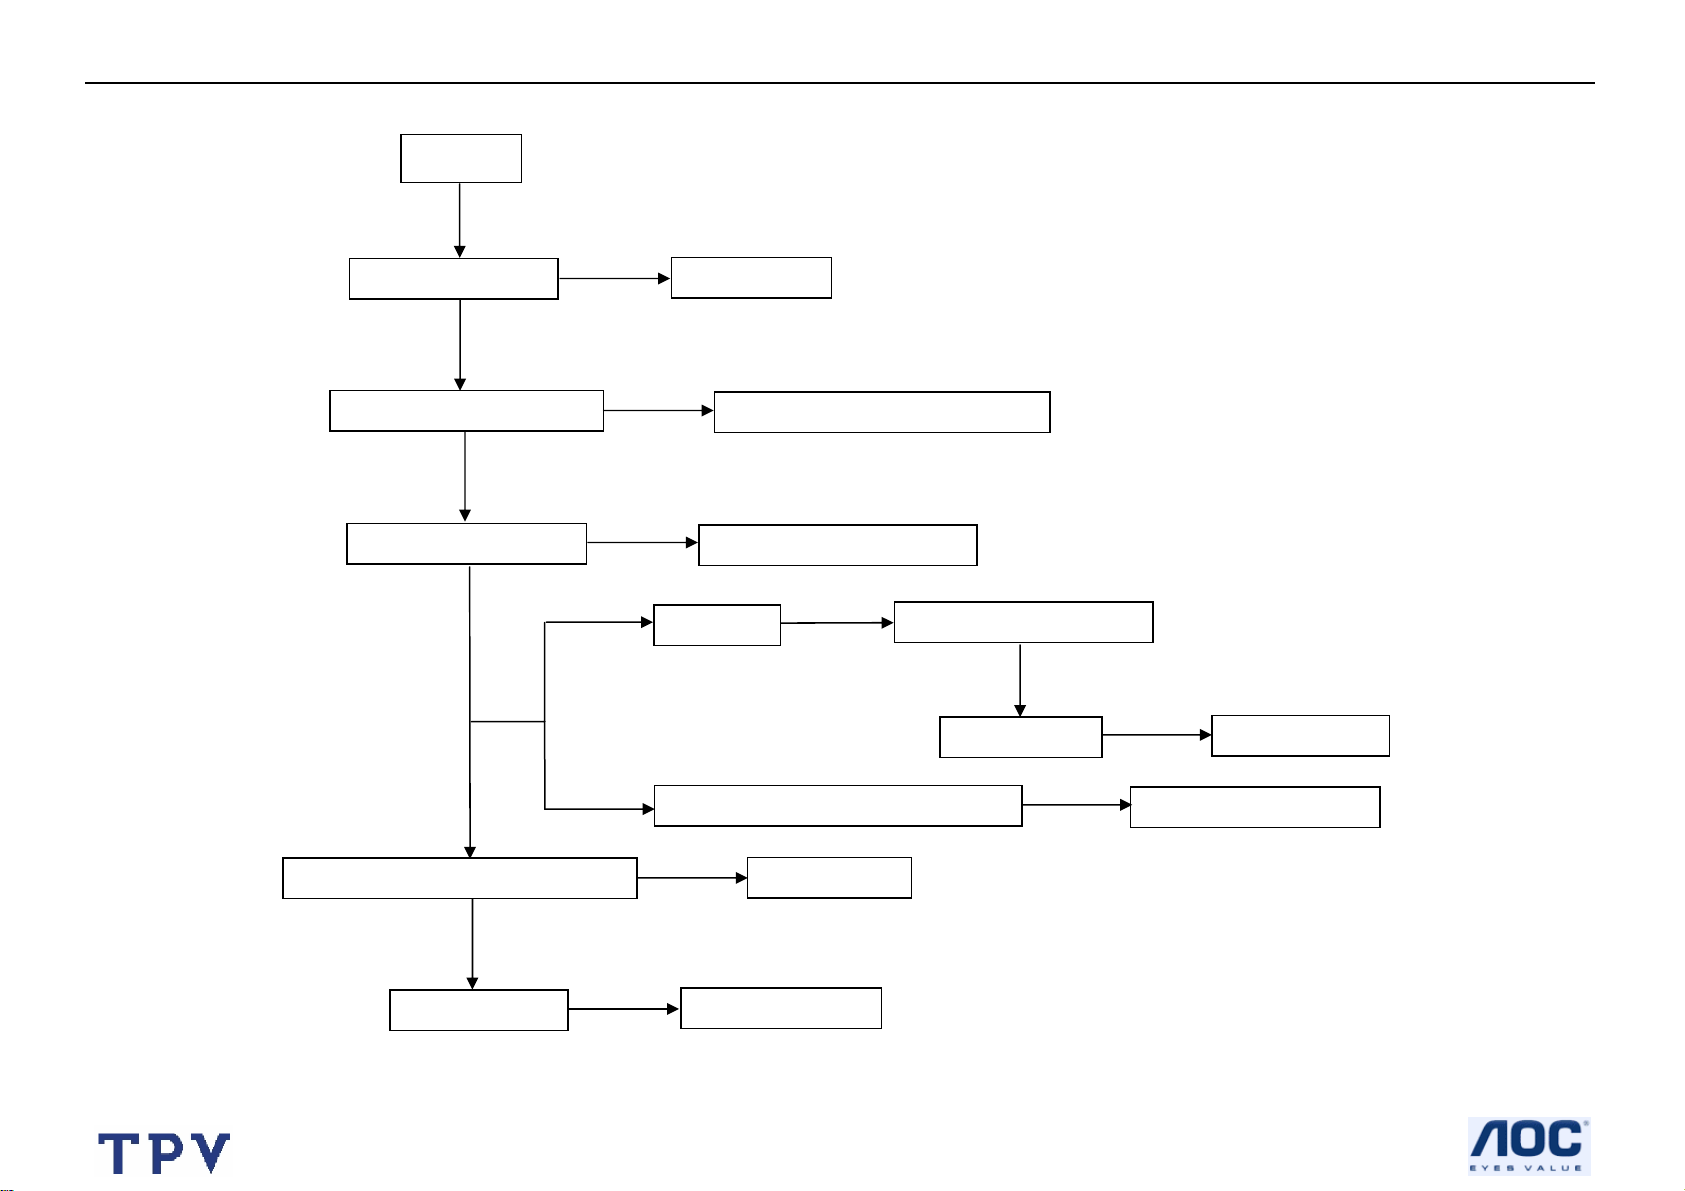
5.5. No Sound
No sound
Check the source
NG
Reset source
Check signal filter circuit
OK
NG
Replace the filter or inductance
OK
Check Earphone jack
NG
Replace the Earphone jack
NG
SIF signal
OK
Check TV system setup
OK
Check Amplifier TPA3002D2 U606
OK
Check speakers
NG
NG
AV, component, S-video, PC signal
NG
Replace speakers
Replace U606
25
OK
Check TU100
OK
NG
Check relative circuit
Replace TU100
Page 26

20’’ LCD TV Color Monitor Norcent LT2025W
5.6 Key Board
OSD is unstable or not working
Is Key Pad Board connecting normally?
Y
Is Button Switch normally?
Y
Is Key Pad Board Normally?
Y
Check Main Board
N
Connect Key Pad Board
N
N
Replace Button Switch
Replace Key Pad Board
26
Page 27
20’’ LCD TV Color Monitor Norcent LT2025W
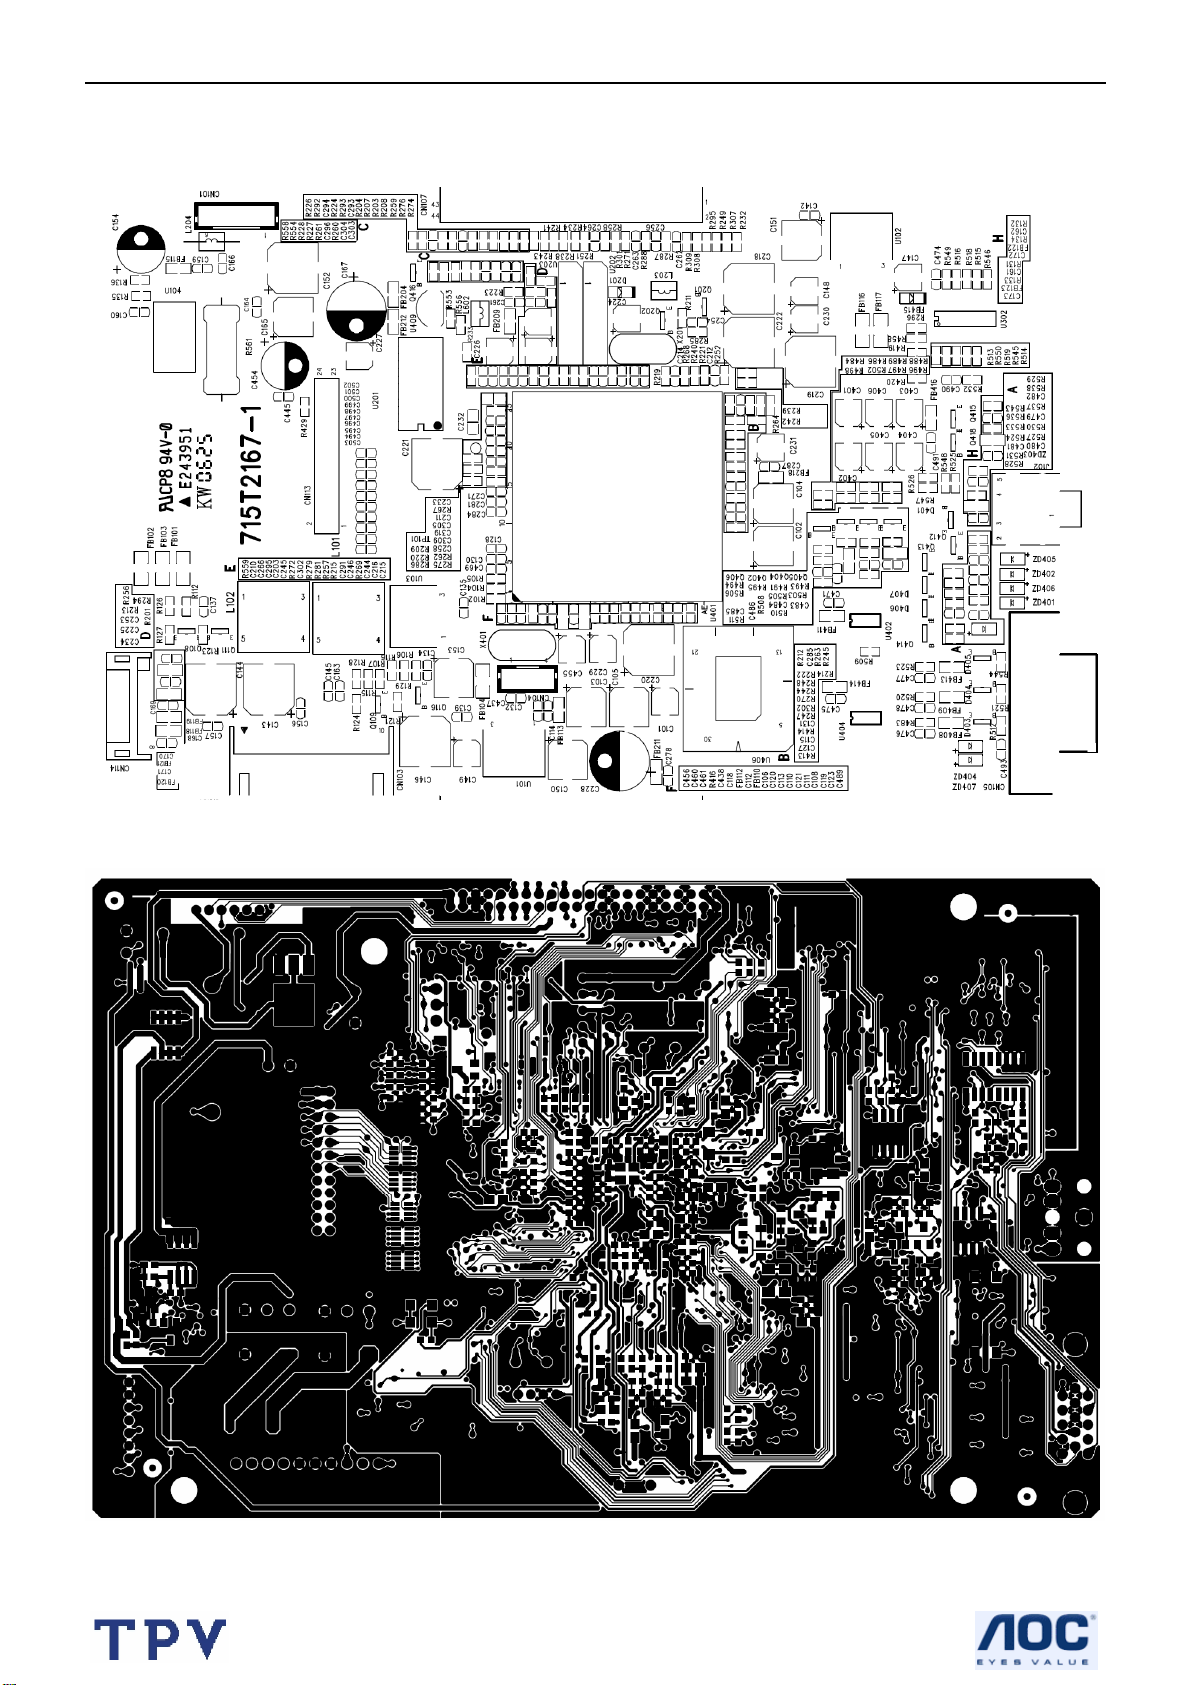
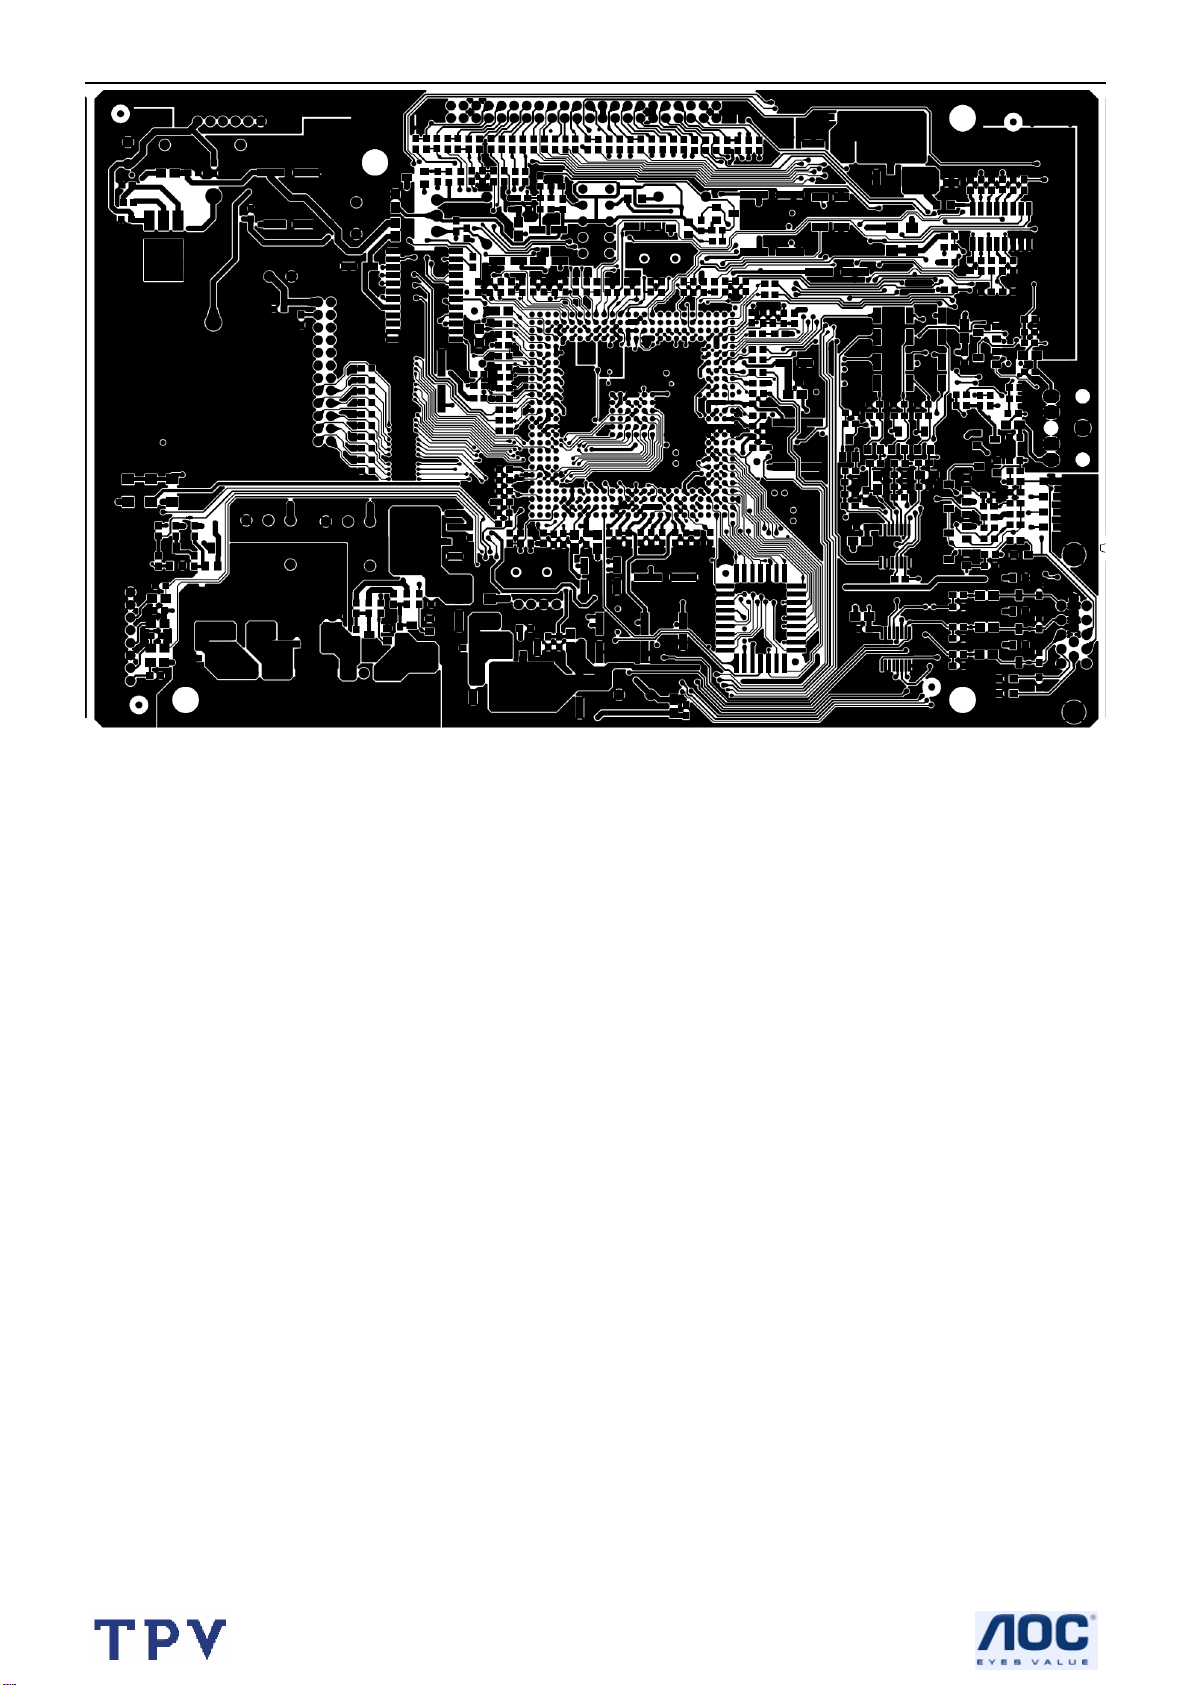
6. PCB Layout
6.1 Main Board
27
Page 28
20’’ LCD TV Color Monitor Norcent LT2025W
28
Page 29
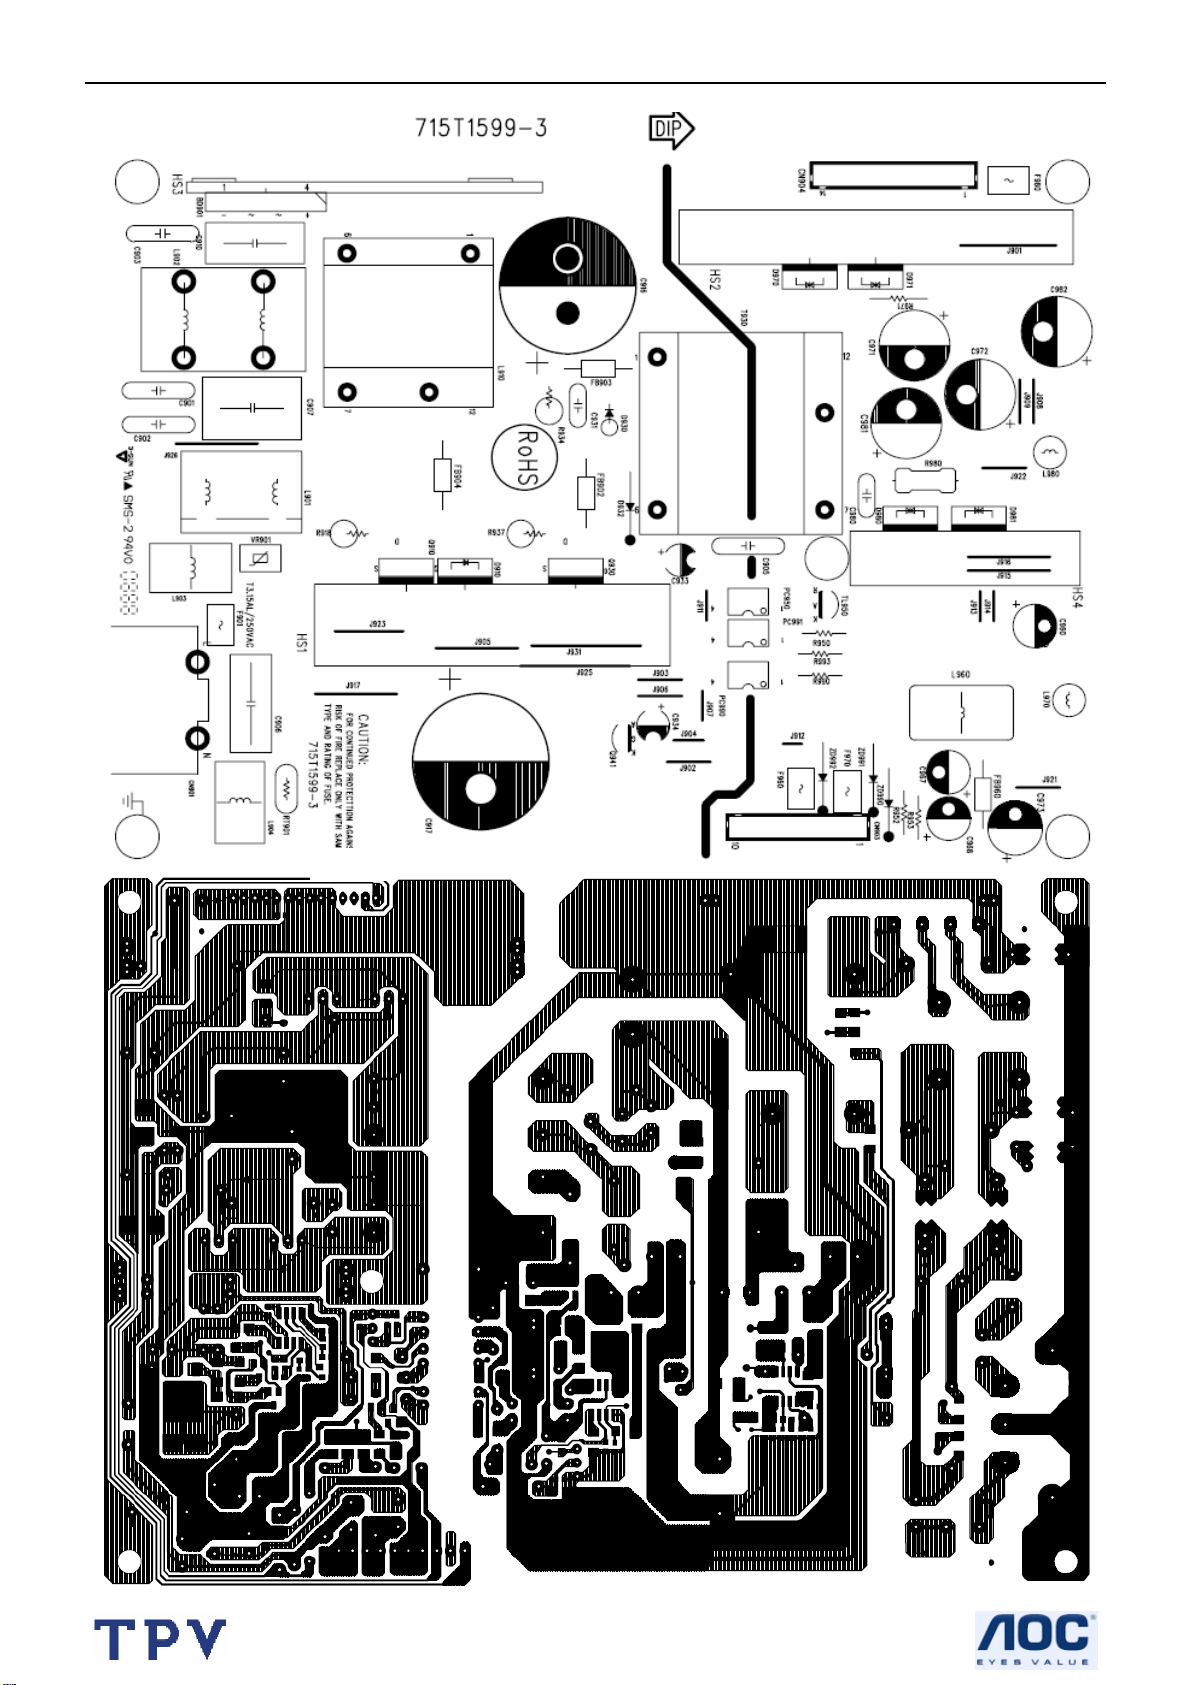
20’’ LCD TV Color Monitor Norcent LT2025W
6.2 Power Board
29
Page 30
20’’ LCD TV Color Monitor Norcent LT2025W
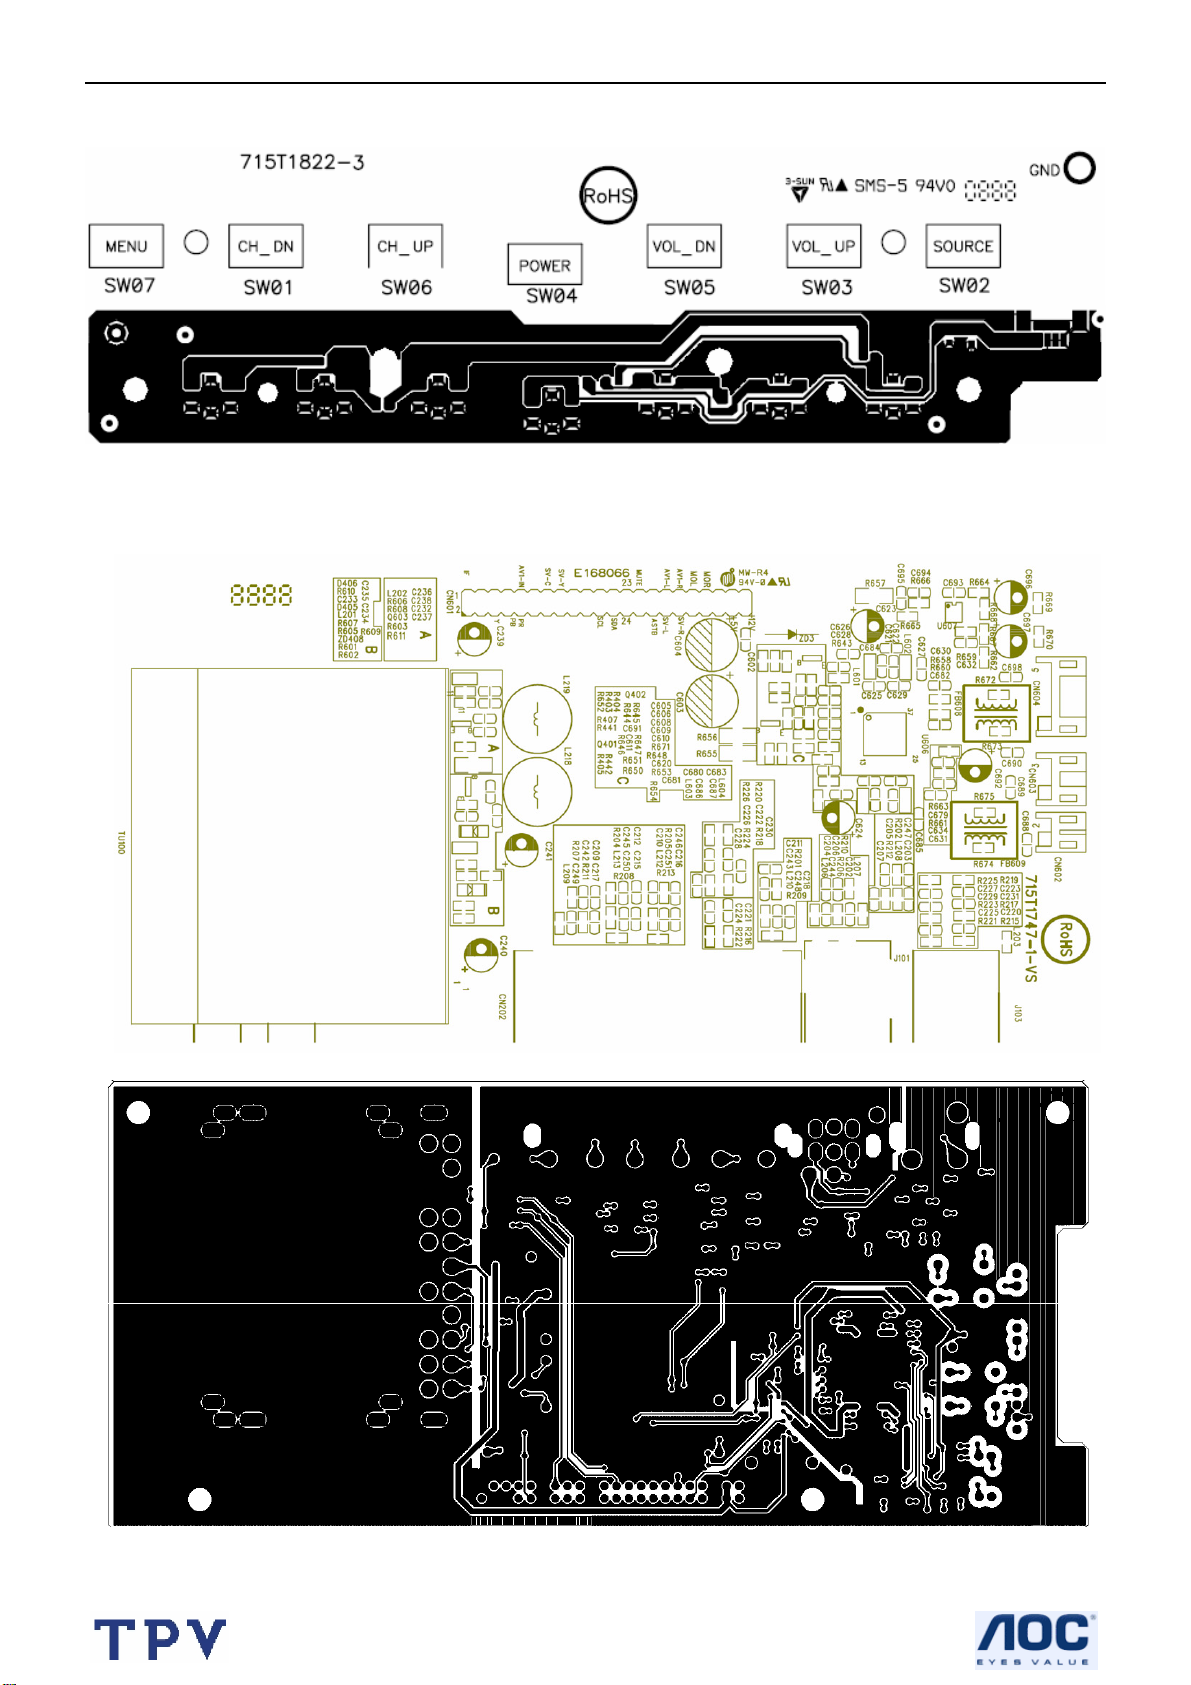
6.3 key Board
6.4 Tuner Board
30
Page 31

20’’ LCD TV Color Monitor Norcent LT2025W
7. Block Diagram
7.1 Main board
PC D-sub
HD input
PC H/V Input
VIDEO 1
S-VIDEO
ANT INT
IF Tuner
Philips
1336MK4
IR
Key PAD
IF
IF
Switch
4052
SAWFILTER
K9650M
Video H/V Output
Select H/V Input
HD
EEPROM
M24C32
32K
PHILIPS LOC1 TV Block
Y/PR/PB
Philips
LOC1
Scalar
Video IF
Audio IF
Video decoder
Audio decoder
MCU
OSD
RGB
RGB Gain Input
TTL output
PI5V
330W
U402
DC 12V
DC 5V
SST39V
330W
Flash
F020B
TTL TO LVDS
THC63LVDM84R
PI5V
U404
On/Off Dim
Power Internal
AC 100~220 Input
Inverter for TV
LVDS output
Inverter
PANEL
PC Audio
AV Audio
HD Audio
DDC SCL/SDA
DDC
EEPROM
Switch
4052
VSCL/VSDA
31
YUV
YUV output
Audio Output
TDA9178 (N/C)
Picture improve
TPA3002D2
Audio AMP
Speaker (3Wx 2)
Headphone
Page 32

20” LCD TV Color Monitor Norcent LT2025W
7.2 Power Board
DC24V
PFC circuit
Transformer
(T901)
Rectify
filter
DC12V
Rectify
(BD901)
EMI
circuit
AC in
Generatrix
PFC
(IC901)
voltage feedback
and sampling
PWM
control
(IC930)
Optical
coupling
appliance
Feedback
circuit
Dc to DC
circuit
DC5V
32
Page 33

20” LCD TV Color Monitor Norcent LT2025W
8. Schematic Diagram
8.1 Main Board
ROUT
GOUT
BOUT
PR_CR
PB_CB
C403
10uF/16V
C401
10uF/16V
C406
10uF/16V
C404
10uF/16V
C405
10uF/16V
R499
32
4.7k
+
R487
10k
REF
R498
4.7k
+
R484
10k
REF
R497
4.7k
+
R489
10k
REF
R501
4.7k
+
R485
10k
REF
R496
4.7k
+
R488
10k
REF
Q403
BC847B
1
R490
130 OHM
75
R504
32
Q406
BC847B
1
R494
130 OHM
75
R506
32
Q404
BC847B
1
R491
130 OHM
75
R505
32
Q401
BC847B
1
R492
0 OHM
100
R507
32
Q405
BC847B
1
R493
0 OHM
100
R503
C487
270P
REF
REF
C485
270P
REF
REF
C484
270P
REF
REF
C488
33P
REF
REF
C483
33P
REF
REF
C472
REF
YUV_TV_SW
100P
+5V_SW
FB412
B0805/0
nc
R509
nc
R510
nc
R511
+5V_SW
U402
REF
REF
16
2
S1A
3
S2A
VCC
5
S1B
6
S2B
11
S1C
10
S2C
14
S1D
13
S2D
1
N
15
O
4
DA
7
DB
9
DC
12
DD
GND
PI5V330W
8
REF
REF
TV_R
TV_B
TV_G
C471
100P
FB411
B0805/0
HD_Y
C402
+
10uF/16V
R502
32
4.7k
R486
10k
Q402
BC847B
1
R495
0 OHM
100
R508
C486
33P
REF
REF
C473
100P
REF
FB410
B0805/0
+5V_SWREF
AOC (Top Victory) Electronics Co., Ltd.
33
Title
Size Document Number Rev
A3
Date: Sheet of
YPrPb-SWITCH
Thursday, May 25, 2006
01
1
1
14
Page 34

20” LCD TV Color Monitor Norcent LT2025W
+12V
+5V_SW
CN107
4344
4142
39
40
37
SCOR1
SCOL1
HDIR
HDIL
ASTB
D_DECT1
STATAV1&D_DECT3
SDA
SCL
D_DECT
CVBSO2
AGC
PR_CR
PB_CB
HD_Y
FBLIN
38
35
36
34
33
32
31
30
29
28
27
26
25
24
23
22
21
20
19
18
17
16
Y
15
14
13
12
11
10
9
8
7
6
5
4
3
2
1
MOR
MOL
SCIR1
SCIL1
SCIL2
MUTE
SVIDEO_CTR_1
SVIDEO_CTR_2
Y1SCART
SCIR2
Y2IN
C2IN
AV1
S_CTL
IF
MOR
MOL
MUTE
ASTB
+12V_SW
AGND
CN101
6
5
4
3
2
1
6PIN/2.0mm
KEYBOARD
CN114
CONN
KEYB
REF
J102
PHONEJACK
1
5
4
3
2
PC AUDIO
C172
100P
AGND
FB122
FB123
C173
100P
150 OHM
150 OHM
10K
R134
10K
R133
C162
100P
AGNDFB120 150 OHM
AGND
C161
100P
AGND
R132
15k
AGND
PCIL
R131
15k
PCIR
+5V
FB118
150 OHM
FB119
8
7
6
5
4
3
2
1
150 OHM
FB121
150 OHM
REMOTE
+5V_SW
esd
REF
C168
100P
C169
100P
C170
100P
REF
C171
100P
AOC (Top Victory) Electronics Co., Ltd.
34
Title
Size Document Number Rev
A3
Date: Sheet
CONNECTOR
02
214Thursday, May 25, 2006
<RevCode>
of
Page 35

20” LCD TV Color Monitor Norcent LT2025W
U407 74HC4052D
ON_OFF
R560
2k
D410
1N4148
D409
1N4148
+5V
R541
4.7k
R552
22K
12
+5V
R540
4.7k
32
Q415
1
PMBS3904
SDA
VSDA
SCL
VSCL
R522 100
R551 100
+5V
C491
100P
FB416
B0805/0
X0
14
X1
15
X2
11
X3
1
Y0
5
Y1
2
Y2
4
Y3
10
A
9
B
6
EN
7
VEE
16
VDD
13
X
3
Y
GND
8
IIC_SEL
R534
R535
1k
1k
1
Q418
PMBS3904
32
ISP_SCL
ISP_SDA
AOC (Top Victory) Electronics Co., Ltd.
Title
IIC SWITCH
Size Document Number Rev
A4
Date: Sheet
Thursday, May 25, 2006
03
3
of
1
14
35
Page 36

20” LCD TV Color Monitor Norcent LT2025W
VGA-V
+5V_SW
1
ZD403
5.6V
ZD401
5.6V
1 2
1 2
VGA_HS
VGA_VS
REF
2
D401
BAV70
3
R526 100
R525 100
ZD402
5.6V
1 2
1617
15
14
13
12
11
VDRB
Hout
REF
REF
1 2
R546
100
ZD405
5.6V
CN105
DB15
R545
100
R547
2.7k
R548
2.7k
VGA-V
10
5
9
4
8
3
7
2
6
1
REF
ZD406
5.6V
1 2
REF
R5490
R5500
REF
ISP_SDA
ISP_SCL
C492
0.1u
1 2
REF
VGA_TV_SW
Ext_Hsync_sel
REF
R514 0
TV_VS
TV_HS
U301
8
VCC
7
WP
6
SCL
M24C02WMN6
ZD404
5.6V
REF
R5150
R5160
TV_VS
R5130
TV_HS
TXD
ZD407
5.6V
GNDSDA
C493
74HC4052D
REF
0.1u
C470
100n
1
A0
2
A1
3
A2
45
REF
AVI_DET
C469
REF
0.1u
REF
IIC_SEL
RXD
16
MDX
VEE
7
VDD
REF
REF
13
OUT
3
OUT
VSS
8
1 2
R542
0
U302
10
0
9
1
6
G4
12
0
14
1
15
2
11
3
1
0
5
1
2
2
4
3
C474
100P
R518
75 OHM
R519
75 OHM
ADC_VAA
2
ADC_VAA
2
ADC_VAA
2
FB415
BA792
REF
REF
+5V_SW
1
REF
D403
BAV99
REF
D406
BAV99
R530
47k
VGA_HS
VGA_TV_SW
C477
12P
+5V
2
REF
B
R
G
REF
VGA_VS
1
3
C480 1u
R532
10k
3
1
D404
BAV99
3
1
D405
REF
BAV99
3
C489
27P
C490
27P
REF
REF
REF
REF
AVSYNC
AHSYNC
R512
75
R521
75
R544
75
FB408
B0805/0
FB409
B0805/0
FB413
B0805/0
+5V
AVI_DET
R483 100
R520 100
R523 100
+5V
C476
12P
REF
C478
12P
REF
REF
+3.3Vstb
132
REF
D407
BAV99
11
10
14
13
15
C482 1u
R537
1K
R527 100k
C479 1u
R531 10K
D402
1N4148
1 2
2
3
5
6
1
U404
S1A
S2A
S1B
S2B
S1C
S2C
S1D
S2D
N
O
1 2
16
VCC
DA
DB
DC
DD
GND
PI5V330W
8
REF
TV_B
TV_G
TV_R
R538 1K
D408
1N4148
C481 1u
R536 1K
R528
100k
R543
47k
C475
FB414
100P
RAIN
GAIN
BAIN
1
1
Q413
PMBS3904
PMBS3904
Q414
B0805/0
32
32
32
1
R524 100
PC_DET
+3.3Vstb
R533
10k
REF
4
7
9
12
Q412
PMBS3904
R529
100k
REF
REF
AOC (Top Victory) Electronics Co., Ltd.
36
Title
Size Document Number Rev
A3
Thursday, May 25, 2006
Date: Sheet of
04
PC INPUT
4
1
14
Page 37

20” LCD TV Color Monitor Norcent LT2025W
+5V_SW
R223 100
R213 1.2K
U202
K3953M
XTAL2LI
R273 22
DECDIG
DIG1
C215
5P
C216
5P
24.576
X201
+5V_SW1
+1.8V_1
C255
0.1uF
+3.3Vstb
C251 0.1uF
C247 0.1uF
SAW_SW
C248
0.1uF
DIG1
FB205 600
C218
100u
C250
0.1uF
REF
FB207 600
FB202 600
FB203 600
C222 100u/16V
C249 0.1uF
FB201 600
C252
+
0.1uF
GND1
DIG1
C290
0.22uF
+
C292 0.22uF
R269 1K
R212
1.2K
C289
0.22uF
IF
TUNGND
R23
R24
N23
N25
N24
N26
M26
M23
M25
M24
T23
P23
P24
P25
L23
L26
R256
L203
560nH
32
Q201
1
BC847B
R211
1.2K
VSSP2
VSSC4
VDDC4
VDDA3
VREF_POS_LSL
VREF_NEG_LSR+HPR
VREF_POS_LSR+HPR
VREF_NEG_HPL+HPR
VREF_POS_HPR
XTALIN
XTALOUT
GND1
VGUARD|SWIO
DECDIG
VP1
PH2LF
LOCI
10K
U401C
R285 47K
C254
0.1uF
GND1
D201 BA792
SIFIN2|DVBIN2
SIFIN1|DVBIN1
C244 0.0068uF
C217 1.5u
1
AGCOUT
GNDIF
VIFIN2
VIFIN1
EWD|AVL
DECBG
SECPLL
PH1LF
32
Q202
BC847B
EHTD
IREF
VSC
VDRA
VDRB
GND1
R265 12K
12345
VIFIN2
SIFIN2
SIFIN1
R287 680
C245
0.01uF
VIFIN1
R215 10
AGC
Vdrb
U203
R201
0
+
12345
TUNGND
REF
GND1
K9650M
R254 100K
R279 39K
R272 1M
C302 0.33uF
R257
10K
R281
4.7K
R294
C225
10u
+
C253
0.1uF
H24
G25
H23
J23
J24
H25
G26
K23
K24
H26
J25
J26
K25
K26
L24
L25
FB204 600
R284 47K
0
SIFIN2
SIFIN1
VIFIN2
VIFIN1
C224 10u
C246 0.1uF
C291 0.22uF
AOC (Top Victory) Electronics Co., Ltd.
Title
Size Document Number Rev
A3
Thursday, May 25, 2006
Date: Sheet of
Decoder-A
05
5
1
14
37
Page 38

20” LCD TV Color Monitor Norcent LT2025W
MOR
MOL
C202
C201
GND2 C317
47pF
B18
CVBSO|PIP
C2|C3
CVBS3|Y3
AUDIOIN3L
CVBS2|Y2
AUDIOIN2L
CVBS4|Y4
AUDIOIN4L
C16
D16
D17
C17
C18
D18
C19
D19
B19
A20
B20
C20
C4
B21
C21
A23
AUDOUTHPR
AUDOUTHPL
AUDOUTLSR
AUDOUTLSL
AUDIOIN3R
AUDIOIN2R
AUDIOIN4R
32
Q417
PMBS3904
R555
100
GND2
47pF
R267
15K
C205
47pF
C263 0.1uF
TP101
C262 0.1uF
R266
15K
C308 0.47uF
C303 0.47
C207
47pF
C256 0.1uF
C211
47pF
C208
47pF
GND4
C319
47pF
47pF
C2IN
Y2IN
C209
47pF
C258
47pF
REF
R226 100
R224 100
C318
47pF
C307 0.47uF
C306 0.47uF
C305 0.47uF
C304 0.47uF
C309
100pF
R288 75
C264 0.1uF
GND2
R206 0
R205 0
R207 0
R208 0
R258 10K
R259 10K
CVBSO2
MOR
MOL
PCIR
PCIL
Y1SCART
HDIR
HDIL
AV1
SCIR2
SCIL2
SCIL1
SCIR1
SCOL1
SCOR1
R203 0
R204 0
C293 0.22uF
C294 0.22uF
R260
10K
SOL1
SOR1
R261
10K
R227 100
R228 100
GND4
C295 0.47uF
C296 0.47uF
+5V_SW1
REF
IFVO
C232
2.2uF
FB209 600
C261
0.1uF
C233
2.2uF
+5V_SW
R559 1k
GND2
C234
4.7u
GND2
+
1
C203
47pF
C257
0.1uF
C204
47pF
C260 0.1uF
C226 10u
32
Q416
PMBS3904
R554 100
R558
150
+
IFVO
IFVO1
U409
C206
47pF
C210
47pF
C240 0.0039uF
R278 390
L602
6.8uH
1
UR
G24
F25
F24
F23
E25
E24
E23
D24
C24
B24
D23
C23
D22
C22
D21
B23
2
SOR1
SOL1
U401D
REFO|REFIN
AUDIOIN5L
AUDIOINR
AUDOUTSL
AUDOUTSR
DECSDEM
QSSO|AMOUT|AUDEEM
GND1
PLLIF
SIFAGC
DVBO|IFVO|FMRO
DVBO|FMRO
VCC8V
AGC2SIF
VP2
IFVO|SVO|CVBS1
LOCI
R556 100
3
R553
1.5K
R292 NC
R293 NC
1
C259
100P
IFVO1
0.1uF
C235
TUNGND
FOR NTSC
38
TUNGND
R557
100
AOC (Top Victory) Electronics Co., Ltd.
Title
Size Document Number Rev
A3
Date: Sheet
Thursday, May 25, 2006
DECODER-B
06
6
14
of
1
Page 39

20” LCD TV Color Monitor Norcent LT2025W
+1.8V_2
+3.3Vstb
REF
C277
0.1uF
C282
0.1uF
C280
0.1uF
BOUT
GOUT
ROUT
Hout
YOUT
UOUT
VOUT
FBLIN
PR_CR
HD_Y
PB_CB
+5V_SW1
R262
C221
+
100u
C279
0.1UF
SANDC
R232 100
C270 0.1UF
C272 0.1UF
C274 0.1UF
R286
47K
FB213 600
VIN
UIN
YIN
R309 NC
R307 NC
R308 NC
GND5
R220 10
C271 0.1UF
C281 0.1UF
C284 0.1UF
C266 0.1UF
C320
nc
REF
R275
27K
GND5
C321
REF
10K
SVM
FBISO|CSY
HOUT
VSSCOMB
VDD_COMB
VIN
UIN
YIN
YSYNC
YOUT
UOUT
VOUT
INSSW3
R|Pr|N3
G|YIN3
B|Pb|N3
U401E
LOCI
VDDadc
VSSadc
VDDA2
VDDA
GNDA
VREFAD
VREFAD_POS
VREFAD_NEG
VDDA1
BLKIN
BCLIN
GND1
T16
T15
R16
R15
P16
P15
N15
N16
M16
Y25
BO
Y23
GO
Y24
RO
W23
W24
L16
VP3
L15
B17
B16
A16
C15
D15
B15
A15
B14
E26
F26
T25
T26
U24
U23
V24
V23
C322
nc
nc
GND3
C220
100u
+
C228
470u
C265
C283
0.1uF
0.1uF
+
C269
0.1UF
DIG4
C230
+
10u
C219
100u
DIG5
R219 100
R218 100
R221 100
FB211 600
C238
0.001uF
C273
0.1uF
+
REF
C278
0.1uF
DIG3
+5V_SW1
C297 0.22uF
C212
47pF
C213
47pF
FB214 600
FB216 600
C214
47pF
C268
0.1uF
C275
0.1uF
VDDA1
DIG1
FB210 600
FB215 600
FB217 600
C239
+
C229
0.001uF
10u
SANDC
YOUT
U201
+8V
FB212 600
R209 0
R237 100
R236 100
R235 100
C227
10u
C267
+
0.1uF
C276
0.1uF
GND3
20
15
1
3
4
5
6
7
18
VCC
DECDIG
SC
ADEXT1
ADEXT2
ADEXT3
YIN
ADR
VEE
TDA9178T/N1
UIN
SCL
SDA
VOUT
UOUT
YOUT
SOUT
2
2
10
10
12
12
13
13
23
23
24
24
8
9
VIN
11
14
16
17
19
21
22
CF
GND3
R233 100
R234 100
R229 100
R230 100
R231 100
C310
22pF
C311
22pF
C312
22pF
UOUT
VOUT
SCL
SDA
VIN
UIN
YIN
AOC (Top Victory) Electronics Co., Ltd.
39
Title
Size Document Number Rev
A3
Thursday, May 25, 2006
Date: Sheet of
DECODER-C
07
7
1
14
Page 40

20” LCD TV Color Monitor Norcent LT2025W
+1.8V_1
+3.3Vstb
D_DECT
ASTB
Ext_Hsync_sel
+3.3Vstb
+3.3Vstb
REMOTE
S_CTL
FB220 600
PanelVDD_EN
R271 1K
R276 100
R301
10K
C299
0.22uF
DIG2
DIG1
+3.3Vstb
R295
10k
R302
ON_OFF
10K
SCL
SDA
Reset
YUV_TV_SW
R268
15k
R240 100
R249 100
R252 100
C301 0.22uF
R247 100
WP
R270 1K
R250 100
R251 100
R244 100
R248 100
FB219
600
C286
0.1uF
AA25
AA24
AA23
AC17
AD17
AE18
AD18
AC18
AF18
AF19
AE19
AD19
AC19
AC20
AF20
AE20
REF
INT0|P0.5
P1.0|INT1
P1.1|T0
VDDC2
VSSC2
P0.4|I2SWS
P0.3|I2SCLK
P0.2|I2SD02
P0.1|I2SD01
P0.0|I2SDI1|0
P1.3|T1
P1.6|SCL
P1.7|SDA
VDDP+B183
P2.0|TPWM
P2.1|PWM0
U401F
LOCI
P2.5|PWM4
P2.4|PWM3
P2.3|PWM2
P2.2|PWM1
DIG1
P1.5|TX
VDDA1
P1.4|RX
P1.2|INT2
VSSC3
VDDC3
VSSC|P
P3.3|ADC3
P3.2|ADC2
DECV1V8
VDDC1
P3.1|ADC1
P3.0|ADC0
1
2
3
4 5
DIG1
AE25
M15
AE24
AF24
AD23
AC23
AE23
AF23
AD22
AE22
AF22
AC22
AC21
AD21
AE21
AF21
AD20
U403
AT24C32
A0
A1
A2
GND SDA
R210 0
+3.3Vstb
VCC
WP
SCLK
C298
0.22uF
R239 100 nc
R242 100 nc
R222 10
R243 100
R274 100
R241 100
R238 100
R253 100
+5V
FB116
B1206/0
8
7
6
FOR
RXD
、
FB117
NC
C237
0.22u
R289 100
R291 100
TXD
TXD
RXD
PC_DET
SAW_SW
SVIDEO_CTR_1
D_DECT1
STATAV1&D_DECT3
SVIDEO_CTR_2
VGA_TV_SW
DIG1
VDDA1
FB221 600
R290
nc
R310
nc
R296
3.3k
C231
10u
C288
0.1uF
+1.8V_1
+
R297
3.3k
C287
0.1uF
REF
+3.3Vstb
DIG2
R214
1.2K
SCL
SDA
R264
10K NC
R245 100
FB218 600
R263
C285
0.1uF
10K
WP
MUTE
KEYB
+1.8V_1
40
DIG1
AOC (Top Victory) Electronics Co., Ltd.
Title
Size Document Number Rev
B
Thursday, May 25, 2006
Date: Sheet of
DECODER-D
08
8
1
14
Page 41

20” LCD TV Color Monitor Norcent LT2025W
4k7 NC
+3.3V_IO
R415
4k7
C439
220p
PanelVDD_EN
R416
C438
220p
4k7
+
AVI_DET
R418
82k
BL_EN
BL_ADJ
6745_RST
C455
10u
X401
24.576MHZ
C456
100p
C461
22p
C460
22p
XTAL2LI
RAIN
GAIN
BAIN
R414 need NC to active
C463
R412
47R
R410
47R
R411
47R
33n
C467
33n
C465
33n
C464
22n
C468
33n
C462
33n
C466
33n
SCALER_R
FER_R
SCALER_G
IN_SOG
FER_G
SCALER_B
FER_B
VSCL
VSDA
R419
3.3k
AHSYNC
AVSYNC
IN_SOG
SCALER_R
FER_R
R420
3.3k
+3.3Vstb
SCALER_B
FER_B
SCALER_G
FER_G
R409
12K 1/16W
+1.8V_PPLL
+1.8V_ADC
+3.3V_PLL
+3.3V_AVI
+1.8V_CORE
+3.3V_IO
U401A
K4
VSS_CORE3
J2
VDD_IO0
H1
VDD_IO01
J1
KBD0
K2
KBD1
L4
PWM0
A1
NC45
A2
NC46
L3
VDD_CORE11
A10
NC47
A17
NC48
M2
VSS_CORE11
A18
NC49
A19
NC50
M3
VSS_CORE01
A21
NC51
A22
NC52
L1
TXD/GPIO(6)
A24
NC53
L2
VSS_IO31
M1
VDD3V3_RGB2
N4
VSSA_RGB2
N3
IN_B
P4
REF_B
N2
VSSA_ADC_B
N1
VDDA1V8_ADC_B
P3
AVI_TEST
P2
VDD3V3_RGB1
P1
VSSA_RGB1
R3
IN_G
R4
REF-G
R2
VSSA_ADC_G
R1
VDDA1V8_ADC_G
T1
VDD3V3_IN
T2
VSSA_CLEAN
U1
VDD_CORE0
T3
RB|AS
T4
SOGIN
V1
VDD3V3_RGB0
U2
VSSA_RGB0
U3
IN_R
U4
REF_R
V4
VSSA_ADC_R
V2
VDDA1V8_ADC_R
V3
VDD3V3_LPLL
W1
VDD1V8_LPLL
W2
VSSA_CLEAN_LPLL
W3
VSSA_LPLL
Y1
AHS
Y2
AVS
AA1
ASCL/GPIO14
AA2
ASDA/GPIO(15)
LOCI
NC43
VDDA_PPLL
VSSA_PPLL
INT_N/GPIO(7)
RST_N
GPIO()09/ACLK
NC42
SDA/GPIO(13)
SCL/GPIO(12)
GPIO(4)/PWM1/TCP_TDO
GPIO(3)/TRST
VDD_IO1
VSS_CORE7
VSSA_XTAL
XTAL1
XTAL0
VDD_XTAL
GPIO(2)/TCK
VSS_CORE6
NC55
GPIO(2)/T1/TD1
GPIO(0)/T0/TMS
T_ENABLE
NC41
NC40
NC39
NC38
NC37
NC36
VSS_CORE5
VDD_CORE5
VSS_IO3
VDD_IO3
VSS_CORE4
VDD_CORE4
NC35
NC34
NC33
NC32
NC31
NC30
NC29
NC28
NC27
NC26
NC25
NC24
NC23
NC22
NC21
NC20
NC19
+1.8V_XTL
J3
G1
F1
AF9
J4
H3
G2
F2
G3
H4
E1
AA3
E2
F3
G4
D2
E3
D3
F4
D4
E4
B3
AE14
C4
B4
A4
C5
D5
B5
A5
C6
D6
B6
A6
B7
D7
C7
D8
C8
A7
B8
A8
L14
M14
A9
B9
B10
L13
C10
A11
B11
C11
R406
10E
C458
10pf
R407
10E
C457
10pf
R408
10E
C459
10pf
VDDA_PPLL
+3.3V_IO
BL_EN&BL_ADJ
R413
4k7
6745_RST
IIC_SDA
IIC_SCL
R217 100
+1.8V_CORE
R414
+3.3V_IO
41
AOC (Top Victory) Electronics Co., Ltd.
Title
Size Document Number Rev
A3
Thursday, May 25, 2006
Date: Sheet of
SCALAR-A
09
1
14
9
Page 42

20” LCD TV Color Monitor Norcent LT2025W
+5V
C437
100n
ADD Ground
OCT-31-05
A(13)
A(8)
A(9)
A(11)
A(10)
D(7)
D(6)
D(5)
D(4)
D(3)
D[0..7]
A[0..17]
D(7)
D(6)
D(5)
D(4)
D(3)
D(2)
D(1)
D(0)
A(0)
A(1)
A(2)
A(3)
A(4)
A(5)
A(6)
A(7)
A(8)
A(9)
A(10)
A(11)
A(12)
A(13)
A(14)
A(15)
A(17)
A(16)
SWAP
A17&A16
OCT-31-05
+1.8V_CORE
WR_6745
PSEN_6745
+3.3V_IO
AB1
AB2
AC1
AC2
AD1
AC3
AE1
AB4
AE2
AD3
AC4
AF2
AE3
AD4
AF3
AC5
AE4
AD5
AF4
AE5
AC6
AF5
AD6
AE6
AC7
AF6
AD7
AE8
AE7
AC8
AD8
AF7
AF8
AC9
AD9
AE9
AC10
AD10
AE10
AF10
AC11
AD11
AE11
AF11
AC12
AD12
AE12
AF12
D1
A25
K1
H2
LOCI
U401B
RXD/GPIO(5)
NC57
VDD_CORE1
NC3
IAPMUTE
D7
D6
D5
D4
D3
D2
VSS_IO0
NC54
D1
D0
VDD_CORE0
VSS-CORE0
A0/CFG0
A1/CFG1
A2/CFG2
A3/CFG3
A4/CFG4
A5/CFG5
A6/CFG6
A7/CFG7/RSTOUT
WR_N/GPIO(8)
RDPSEN_N
A8/CFG8/CLKOUT
A9/CFG9/PWM2
A10/CFG10
A11/CFG11
VDD_XORE1
VSS_CORE1
A12/CFG12
A13/CFG13
A14/CFG14
A15/CFG15
A17/GPIO(11)
A16/GPIO(10)
VSS_CORE41
NC4
VSS_IO1
VDD_IO2
NC5
VSS_CORE21
NC6
NC7
VSS_IO01
VSS_IO11
VSS_IO21
VSS_CORE2
VSS_IO2
VSS_LVDS3
RSN7
RSN8
RSN9
NC14
VSS_LVDS21
VSS_LVDS11
VDD_LVDS3
RSPS
NC59
NC58
NC56
NC50
VDD_LVDS2
NC44
RSP7
VSS_LVDS2
RSP9
VDD_LVDS1
RSN6
RSP6
VSS_LVDS1
RSN5
RSP5
RSN4
RSP4
VDD_LVDS0
RSN3
RSP3
RSN2
RSP2
VSS-LVDS0
RSN1
RSP1
RSN0
RSP0
VDD_CORE2
NC12
NC11
NC10
VDD_CORE51
VDD_CORE41
VDD_CORE31
ADD_CORE21
VSS_CORE71
VSS-CORE51
VDD_CORE3
VSS_CORE31
VDD_IO11
VDD_IO21
VDD_CORE01
NC9
NC8
L12
L11
D10
C9
M13
D12
C12
B12
D11
A12
A13
D13
D14
C13
M12
M11
B13
D9
C14
N13
N14
A14
N12
N11
P12
P11
P13
R11
R12
R13
R14
P14
T14
T13
T11
T12
AE17
AC16
AD16
AE16
AF16
AC15
AD15
AE15
AF15
AF14
A3
AC14
AD14
AD13
AE13
AF13
Y4
+3.3V_LVDS
RP411 22x
4
5
3
6
2
7
1
8
RP410 22x
4
5
3
6
2
7
1
RP409 22x
RP408 22x
RP407 22x
8
4
5
3
6
2
7
1
8
4
5
3
6
2
7
1
8
4
5
3
6
2
7
1
8
C503
0.1u
C494
0.1u
C495
0.1u
C496
0.1u
C497
0.1u
C498
0.1u
C499
0.1u
C500
0.1u
C501
0.1u
C502
0.1u
RSN8
RSP8
RSN9
RSP9
RSN6
RSP6
RSN7
RSP7
RSN4
RSP4
RSN5
RSP5
RSN2
RSP2
RSN3
RSP3
RSN0
RSP0
RSN1
RSP1
A[0..17]
A(16)
A(15)
A(12)
A(7)
A(6)
A(5)
A(4)
A(3)
A(2)
A(1)
A(0)
CN104
D[0..7]
STOCKO 4P
+3.3Vs_SW
R452
10k
R458 47R
1
2
3
4
R457 47R
FLASH_RST
C435
100n
1
2
3
4
5
6
7
8
9
10
11
12
U406
RST
A16
A15
A12
A7
A6
A5
A4
A3
A2
A1
A0
+3.3Vs_SW
R455
323130
WE
VCC
D0D1D2
131415
D(2)
D(1)
D(0)
29
A17
16
A14
GND
10k
A13
A8
A9
A11
OE
A10
CE
D7
D6
D5
D4
D3
SCL
IIC_SCL
IIC_SDA
SDA
FLASH_WR
A(17)
A(14)
28
27
26
25
24
R450 10k
23
22
21
20
19
18
17
SST39VF020B
FLASH_OE
+3.3Vs_SW
+3.3Vs_SW
FLASH_RST
FLASH_WR
FLASH_OE
R451 10k
R449 10k
R459 100
R460 100
R461 100
WR_6745
PSEN_6745
WR_6745
PSEN_6745
6745_RST
42
AOC (Top Victory) Electronics Co., Ltd.
Title
Size Document Number Rev
A3
Thursday, May 25, 2006
Date: Sheet of
SCALAR-B
10
10
1
14
Page 43

20” LCD TV Color Monitor Norcent LT2025W
CN113
1
3
5
7
9
11
13
15
17
19
21
23
12*2PIN/2.0mm
2
4
6
8
10
12
14
16
18
20
22
24
RSP0
RSP1
RSP2
RSP3
RSP4
RSP0
RSP1
RSP2
RSP3
RSP4
RSP5
RSP6
RSP7
RSP8
RSP9
RSP5
RSP6
RSP7
RSP8
RSP9
RSN5
RSN6
RSN7
RSN8
RSN9
RSN0
RSN1
RSN2
RSN3
RSN4
RSN5
RSN6
RSN7
RSN8
RSN9
RSN0
RSN1
RSN2
RSN3
RSN4
PANEL_VDD
C454
470uF/16V
+
C445
100n
R429 0R
AOC (Top Victory) Electronics Co., Ltd.
Title
PANEL INTERFACE
Size Document Number Rev
A3
Date: Sheet
Thursday, May 25, 2006
12
1
of
1
4
43
Page 44

20” LCD TV Color Monitor Norcent LT2025W
+3.3Vstb
DIG1
Q104
BC8478
BC8478
Q114
BSH111 NC
DIG1
TUNERGND
GND5
Monday, July 17, 2006
1
+3.3Vstb
DIG1
Q105
R111
150K NC
C141
0.22uF
C140
0.22uF
1
32
REFGND4
13
R110
10k
R109
10k
32
DIG1
DIG1
POWER
1
Q113
BSH111 NC
DIG2
R120
R117
2.2
2.2
Q102
BC557B
3 2
+1.8V_2
R118
R119
2.2
2.2
Q103
1
BC557B
3 2
+1.8V_1
DIG4
DIG5
DIG3
13
AGND
1
14
CN103
10
9
8
7
6
5
4
3
2
1
10PIN 2.5MM
ON_OFF
ON_OFF
+12V_SW
C166
0.1u
C157
0.1uF
R126 3.3K
R127 3.3K
R561 20 2W
C144
100u
Q106
PMBS3904
Q108
PMBS3904
+
PGND
1
1
REF
U105
AP1117E5.0YL
3
VIN
REF
C156
0.1uF
REF
32
1
GND
32
R112
15k
CASE
VOUT
C143
100u
R113
15k
R122 22k
R123 22k
4
2
+
C165
47u/16V
C163
0.1uF
C137
0.1uF
C136
0.1uF
+5V_SW
R116
45
45
1k
L101
L102
+5V_SW1
+3.3Vs_SW
L
13
L
13
REF
D
D
D
+
PanelVDD_EN
+3.3Vs_SW
R128
R129
NC
NC
Q116
32
REF
+5V
REF
+12V
+12V_SW
8
7
6
+12V_SW
C154
470u/16V
+3.3V_IO
R105
4.7K
R104
10k
REF
PMBS3904
32
PMBS3904
+5V_SW
+
R102
100k
1
Q109
1
C135
0.1uF
3 2
C160
0.1u
REF
REF
R106 100k
R107 4.7k
U103
LM1117MP-3.3
3
VIN
REF
U104
AZ1117H-ADJ
VI VO
ADJ
1
1
C155
1u
BL_ADJ
BL_EN
4
CASE
2
VOUT
GND
1
REF
R101
47k
32
Q107
PMBS3904
REF
C158
0.068u
R130
22k
R135
1.2K
R136
6.2K
FB115
B0805/600
44
C153
47u
PANEL Power
Control
+5V_SW
R115
1k
R121 22k
R124 22k
C145
0.1uF
+
C146
100u
PGND
PGND
+12V
Q112
AO4411
1
S
2
S
3
S
4 5
GD
+5V
Q111
AO3401
L204
10uH
+
C164
0.1u
+5V_SW
C167
1000u/16V
+5V
C147
+
10u
+5V_SW
FB104 600
C138
0.1uF
+3.3Vs_SW
+
C134
0.1uF
+8V
+
C152
C159
100u/16V
0.1u
REF
Q101
AO4411
1
S
2
S
3
S
4 5
GD
确认电流规格
U102
LM1117MP-3.3
3
C139
0.1uF
+12V
FB102
NC
D
D
D
4
CASE
VIN
2
VOUT
GND
1
REF
C149
10u
8
7
6
+5V
+
RESET
FB101
B1206/0
REF
C151
47u
U101
LM1117MP-1.8
3
VIN
1
REF
+3.3Vstb
FB103
NC
R103
10k
CASE
VOUT
GND
DECDIG
PANEL_VDD
+
C142
220p
4
2
D101 BAS16 NC
R125
22k NC
DIG1
GND1
+3.3Vstb
+1.8VS_SW
C150
+
47u
R108 10k
C148
+
10u
DIG1
R114
15K NC
C133
0.1uF NC
+3.3Vs_SW: For LOC1-SCALAR&Flash&Panel&Emluator
+1.8VS_SW: For LOC1-SCALAR
+8V: For TDA9178(Picture improve)
GND2
GND3
AOC (Top Victory) Electronics Co., Ltd.
Title
Size Document Number Rev
A3
Date: Sheet of
Page 45

20” LCD TV Color Monitor Norcent LT2025W
+1.8V_PPLL
+1.8VS_SW
+1.8VS_SW
FB105
150 OHM
+1.8V_PPLL
+3.3V_PLL
+3.3Vs_SW
FB107
C123
100n
C119
100n
C101 10u/10V
C122 100n
FB111
BLM21A102S
+
FB106
BLM21A102S
+
C103
22u/6v3
+1.8V_CORE
+1.8VS_SW
C106
100n
FB113
BLM21A102S
+3.3V_AVI
C110
100n
+1.8V_XTL
C111
100n
C132
100n
C114
100n
+1.8VS_SW
VDDA_PPLL
+3.3Vs_SW
C124 100n
FB114
BLM21A102S
C118
100n
FB109
FB110
BLM21A102S
FB108
BLM21A102S
FB112
BLM21A102S
BLM21A102S
+
C102
22u/6v3
C105
+
22u/6v3
C115
100n
+1.8V_ADC
C120
100n
+3.3V_IO
C112
100n
C113
100n
C125
100n
C108
100n
+3.3V_LVDS
C126
100n
C116
100n
C127
100n
C117
100n
C130
100n
BLM21A102S
+
C104
22u/6v3
C131
100n
C109
100n
C107
100n
C121
100n
C129
100n
C128
100n
45
REF
AOC (Top Victory) Electronics Co., Ltd.
Title
SCALAR POWER
Size Document Number Rev
A4
Thursday, May 25, 2006
Date: Sheet of
14
14
1
14
Page 46

20” LCD TV Color Monitor Norcent LT2025W
8.2 Power Board
C910
1uF
C911
0.01uF
1
2
-+
4
2
3
L902
1
4
C901
470pF/250V
C907
0.47uF/275V
2
3
1
4
VR901
varistor
R902
R901
680K 1/8W
680K 1/8W
C906
0.22uF/275V
L903
150uH
F901
FUSE
1 2
CN901
SOCKET
3
R910
510K 1/8W
R911
510K 1/8W
R912
510K 1/8W
R913
10K 1/16W
BD901
GBU805
3
L
C902
470pF/250V
L901
L
680K 1/8W
R903
VCC3
R914
10K
C912
0.47uF/16V
.
7 6
R915
39K 1/8W
IC910
8 7
VCC OU T
FA5500AN
3 4
MUL IS
COMP
GND ZCD
2
6 5
C913
0.047uF
VCC3
R941
10K 1/8W
t
RT901
SCK10035
1 2
L904
150uH
FB
1
1 10
Q940
PMBS3906
43
L910
PFC CH OKE
R916
10
D911
MLL4148
C914
0.001uF
R940
10K 1/10W
R917
470
12
R993
3.3K 1/4W
PC991
PC123
Q991
PMBS3904
1
R992
10K 1/8W
510K 1/8W
FB904
BEAD
510K 1/8W
2
510K 1/8W
3
R918
0.22 2W
VCC2
12V
D910
FMX-G26S
R919
R920
Q910
20NM60
R921
C915
NC
R922
10K 1/16W
ON/OFF
+
C934
47uF/50V
+
C931
82uF
Q931
PMBS3904
1 2
ZD930
RLZ15B
+
C917
NC
R938
2K 1/8W
R930
200K 1/8W
C930
0.001uF
VCC1
4
GND
2
FB
1
ADJ
IC930
LD7575
R933
100K 1/8W
+
C933
47uF/50V
R931
200K 1/8W
HV
DRV
CS
VCC
43
FB903
BEAD
R934
C916
0.0022uF
R932
100K 1/8W
8
5
3
6
VCC2
12V
R950
470 1/4W
12
PC950
PC123
R951
2.43K 1/16W
TL950
H431BA
C950
0.1uF
C951
0.1uF
R954
2.43K 1/16W
VCC2
100K 2W
C932
0.001uF
-12V
Q941
2N5060
C940
0.47uF/16V
D930
BYV26E
D931
MLL4148
R935
10
R936
470
VCC1
R952
12K 1/4W
3.3K 1/8W
R942
PC990
PC123
R943
2K 1/8W
24V
D932
FR103
R953
130K 1/4W
43
FB92
BEAD
Q930
STP8NK80ZFP
R937
0.27 2W
+12VVCC1
R990
3.3K 1/4W
12
Q990
PMBS3904
C961
0.1uF
1
3
4
6
R960
33K 1/10W
T901
POWER X'FMR
C905
0.001uF/250V
C905
0.0022uF/250V
R961
43K 1/16W
D990
MLL4148
D991
MLL4148
D922
MLL4148
R991
2K 1/8W
C980
0.001uF
7
10
11
12
9
8
1 2
1 2
1 2
C975
0.001uF
12V
C962
NC
ZD990
MTZJ3 0D
ZD991
MTZJ1 5B
ZD992
MTZJ T 6.2B
R980
100 1/2W
3
1
D981
NC
3
1
D980
SRF20200C
D971
NC
3
1
3
1
D970
SRF20150C
+
C960
470uF/16V
2
2
R971
47 1/2W
R962
47K 1/16W
24V
-12V
5V
2
L980
2.8uH
2
+
C981
1000uF/35V
C971
+
2200uF
R968
1K
R967
0
1
2
VCC
FB
OUT
7
RT
5
SCP
6
COMP
DTC
GND
IC960
C963
FP5001
8
0.1uF
C972
+
2200uF
Q961
PMBS3904
Q962
PMBS3906
R970
1K
R969
0
C966
0.47uF/16V
R965
20K 1/16W
R966
4.7K 1/16W
L970
2.8uH
Q960
P06P03LDG
3
1
R964
3K 1/16W
12V
4
C964
R963
NC
3K 1/16W
3
C965
0.1uF
+
C982
1000uF/35V
C973
+
1000uF/16V
L960
CN903
CONN
D960
SBM84
10uH
D961
NC
1
2
3
4
5
6
7
8
9
10
2
+12V
+5V
GND
ON/OFF
PWM
C967
1000uF/10V
ZD980
SMAJ26A
1 2
+
ON/OFF
24V
F980
FUSE
+24V
22.8~25.2V
0.0~2.0A
C983
500mVpp/20MHz
0.1uF
GND
C974
0.1uF
+12V
11.4~12.6V
F970
0.0~3.0A
-12V
FUSE
120mVpp/20MHz
FB960
5V
BEAD
+24V
GND
PWM
F960
FUSE
+5V
11.4~12.6V
0.1~3.0A
+
100mVpp/20MHz
C968
C969
1000uF/10V
0.1uF
1
2
3
4
5
6
7
8
9
10
11
12
13
14
CN904
CONN
46
Page 47

20” LCD TV Color Monitor Norcent LT2025W
8.3 Key Board
CN02
2
1
KEYB
R02
150 OHM
R03
180 OHM
R04
240 OHM
R05
330 OHM
R06
470 OHM
R09
680 OHM
key Board
CONN
ZD01
5.6V
POWER
SW04
C04
100pF
1 2
CH_DOWN
SW01
CH_UP
SW06
MENU VOL_DOWN
SW07
SW05
VOL_UP
<OrgName>
<OrgAddr1>
Title
Size Document Number Rev
A4
Date: Sheet of
MODEL_SEL
SW03
SW02
KEY&IR BOARD
<Doc>
11Monday, November 28, 2005
47
Page 48

20” LCD TV Color Monitor Norcent LT2025W
8.4 Tuner Board
FOR USA
AV1
AUDIO1IN_L
AUDIO1IN_R
2 3
1
5 6
4
8 9
7
GND
CN202
JACK
C250
C217
C251
C248
C245 NC
0
100pF
C246 NC
100pF
C243 NC
100pF
R211
330pF nc
R204
0 OHM
75 1/16W
R2050
R201
C215
C216
C218
C212
Pr
0.22uF
330pF NC
0.22uF
C210
330pF NC
0.22uF
C211
330pF nc
0.22uF
C209
Pb
Y
AV1-IN
AUDIO2IN_L
L208
120 OHM
L207
120 OHM
L213
120 OHM
R208
75 1/16W
GND
L212
120 OHM
R213
75 1/16W
GND
L210
120 OHM
R209
75 1/16W
GND
C249
C242 NC
NC
R207
75 1/16W
AV1
L209
120 OHM
J101JACK
7 8
1 2
3 4
5 6
C203
330pF
C202
330pF
switch
C247 NC
R202
0 1/16W
GND
C244 NC
R206
0 1/16W
L206
9
C207
330pF
C206
330pF
150 OHM
R212
75 1/16W
Add FOR input
signal Level
NOV-11-05
R210
75 1/16W
GND
C205
SV-C
0.68u
C204
SV-Y
0.22u
AUDIO1IN_R
AUDIO1IN_L
AUDIO2IN_R
AUDIO2IN_L
R216
100 1/16W
R222
100 1/16W
R215
100 1/16W
R221
100 1/16W
C221
0.33uF/16V
C224
0.33uF/16V
C220
0.33uF/16V
C225
0.33uF/16V
R218 470 1/16W
R224 470 1/16W
C228
330pF
R217 470 1/16W
R223 470 1/16W
C229
330pF
C222
GND
GND
C231
330pF
GND
C230
330pF
C223
0.33uF/16V
C227
0.33uF/16V
0.33uF/16V
C226
0.33uF/16V
R220 100 1/16W
R226 100 1/16W
R219 100 1/16W
AUDIO2_R
R225 100 1/16W
AUDIO2_L
AUDIO1_R
AUDIO1_L
AV1-AU-IN-R
AV1-AU-IN-L
SV-Au-IN_R/YPbPr-Au-IN_R
SV-Au-IN_L/YPbPr-Au-IN_L
48
AUDIO2IN_R
GND
J103JACK
3 1
2 4
L203
150 OHM
GND
5
AOC (Top Victory) Electronics Co., Ltd.
Title
Size Document Number Rev
A3
Date: Sheet
I/O Interface
TUNERBOARD-01
13Sunday, January 22, 2006
<RevCode>
of
Page 49

20” LCD TV Color Monitor Norcent LT2025W
C236 4.7nF
L219
47u
C237
4.7nF
+5V
GND
GND
15
14
13
12
TU100
MT4
MT3
MT2
MT1
TUNER
IF2|NC2
VST
ADC
NC1
SDA
SCL
AGC
IF1
150
L202
R606 22
C239
+
10uF
GND
47u
L218
C232
220pF
C235
33nF 50V
R603
11
10
9
8
7
VS
6
5
4
3
AS
2
TU
1
C240
47uF
IF
R611 NC
GND
+
0
R601 10
R602 10
R605 10K
ZD408 5.6V
R607
3.9K
+
GND
R609
22K
C233
33nF
L201
C241
47uF
D405
1N4148
R610
150
AGC
C234
33nF
47
+5V
SDA
SCL
3
D406
BAV99
1
2
GND
GND
R608
33K
1
C238
4.7nF 50V
32
Q603
PMBS3904
GND
49
Title
Size Document Number Rev
A4
Date: Sheet
AOC (Top Victory) Electronics Co., Ltd.
TUNER
TUNERBOARD-02
of
23Sunday, January 22, 2006
<RevCode>
Page 50

20” LCD TV Color Monitor Norcent LT2025W
+12V
+5V
CN601
43 44
41 42
SV-Au-IN_R/YPbPr-Au-IN_R
SV-Au-IN_L/YPbPr-Au-IN_L
ASTB
SDA
AGC
SWAP Pr
with Y
SCL
Pb
39
37
35
33
31
17
29
27
25
23
21
19
15
Y
13
11
Pr
Y
9
7
5
3
1
40
38
36
34
32
30
28
26
24
22
20
18
16
14
12
10
8
6
4
2
MOR
MOL
AV1-AU-IN-R
AV1-AU-IN-L
MUTE
SV-Y
SV-C
AV1-IN
IF
SWAP SV-Y
WITH SV-C
GND
50
Title
Size Document Number Rev
A4
Date: Sheet
AOC (Top Victory) Electronics Co., Ltd.
CONNECTOR
03
of
33Sunday, January 22, 2006
<RevCode>
Page 51

20” LCD TV Color Monitor Norcent LT2025W
LOUT+
LOUT-
FB608
R672
NC
R673
NC
MUTE
PGND
C622
C621
0.001uF
AVDD
+5V
C612
AGND
MUTE1
1uF/16V
132
AGND
+12V
R647
NC
R654 0
D601
BAV99
1 2
R644
1k
ZD3
1N5819
PGND
C691
1n
R648 0 1/16W
R655 0 1/8W
R656 0 1/8W
R657 0 1/8W
R404
R403
47k
33k
Q401
MMBT3904
MOR
R407
100k
10k NC
R441
32
1
32
1
AGND
1uF/16V
C613
R405
100k
ASTB
R442
10k NC
Q402
MMBT3904
132
D602
BAV99
MOL
R646
1k
MUTE1
STANDBY
C611
1n
STANDBY
AGND
R650
4.7K 1/16W
R652
12K 1/16W
GND
C602
0.1uF
EMI
R643
1K 1/16W
R645
NC
GND
12VA
+
C603
470uF/16V
PGND
C628
0.1u
R671 NC
R651
4.7K 1/16W
R653
68K 1/16W
+
C604
470uF/16V
C605
1uF/16V
C606 1uF/16V
C608 1uF/16V
C609 1uF/16V
C610 1uF/16V
C620
0.1uF/16V
AGND
C625
0.01uF
U606
C680
0.01uF
10
11
12
12VA
0.001uF
C623
NC
L601
300 OHM
C624
12VA
10uF/25V
+
C626
C627
0.1uF
0.1uF
48
BSRN
PVCCR
PVCCR
1
/SD
2
RINN
3
RINP
4
V2P5
5
LINP
6
LINN
7
AVddREF
8
VREF
9
VARDIFF/AGND
VARMAX/AGND
VOLUME
REFGND
BSLN
PVCCL
1314151617181920212223
L603
300 OHM
PGNGR
PGNGR
ROUTN
ROUTN
TPA3002D2
PVCCL
LOUTN
LOUTN
PGNGL
PGNGL
C681
C682
0.1uF
0.1uF
+
C684
10uF/25V
C685
NC
C686
C687
0.001uF
0.001uF
PGND
FB609
L602
300 OHM
L101-104 USE 71L56G-301-EA
12VA
PVCCR
PVCCR
ROUTP
ROUTP
VCLAMPR
MODE_OUT/NC
MUTE
AVcc
VAROUTR/NC
VAROUTL/NC
AGND
AVdd
COSC
ROSC
AGND
VCLAMPL
LOUTP
LOUTP
PVCCL
PVCCL
L604
300 OHM
L101-104 USE 71L56G-301-EA
EMI
R662
10K 1/16W
C629
0.01uF
3738394041424344454647
24
C630
1uF/16V
BSRP
36
35
34
33
32
31
30
29
28
27
26
25
BSLP
C683
0.01uF
12VA
AVDD
PGND
C632
0.1uF
C679
220pF
R661
120K 1/16W
C634
1uF/16V
PGND
12VA
C631
0.1uF
TO POWER PAD
12VA
AGND
AGND
R658
15K 1/16W
+
C692
10uF/25V
AVDD
R659
120K 1/16W
AUDIO_MODE
Mode_out
R660
NC
R663
10K 1/16W
AGND
AGND
GND
R666
10K 1/16W
C693
1uF/16V
C695
1uF/16V
AGND
PGND
R664
10K 1/16W
R665
10K 1/16W
C688 NC
C689 NC
C690 NC
C698 NC
ROUT+
ROUT-
LOUT+
LOUT-
C694
0.47uF/16V
ROUT-
ROUT+
LOUT+
LOUT-
MODE
U607
1
BYP
IN1
2
GND
VO1
3
SD
VDD
4 5
IN2 VO2
TPA6110A2DGNR
R667
10K 1/16W
CN604
5
PHONE_R
MODE
4
3
2
PHONE_L
1
AVDD
+
C697
220uF/16V
PGND
C696
220uF/16V
+
R670
10K 1/16W
5PIN/2.0mm
PGND
PHONE_L
R669
10K 1/16W
PHONE_R
2
CN602
1
R SPEAKER
3
2
CN603
1
L SPEAKER
R668
10K 1/16W
8
7
6
R674
NC
R675
NC
ROUT+
ROUT-
51
Title
Size Document Number Rev
Date: Sheet
AUDIO AMP
14 14Sunday, January 22, 2006
of
BA2
Page 52

20” LCD TV Color Monitor Norcent LT2025W
8.5 IR board
D03
D01
CN01
CONN
5
4
3
2
1
+5V
REMOTE
REF
Green
1N4148
FB01
600 OHM
1N4148
D05
1N4148
+5V
FB02
600 OHM
D06
1N4148
R01
100
C01
2.2 uF
C03
100pF
FB04
600 OHM
FB03
600 OHM
C04
0.1uF
C05
0.1uF
C02
0.1uF
D02
3
VCC
2
GND
1
DATA
R08
1K OHM 1/8W
R07
1K OHM
R09
820 OHM
Q1
PMBS3906
1
IR Board
3 2
D04
LED
52
<OrgName>
<OrgAddr1>
Title
Size Document Number Rev
<Doc> <RevCode>
A4
Date: Sheet
KEY&IR BOARD
of
11Tuesday, March 28, 2006
Page 53

20” LCD TV Color Monitor Norcent LT2025W
8.6 Earphone Board
C3
2.2UF 16V
FB4
0
6
7
3
2
5
4
1
CN2
PHONEJACK
R+
MODE
L+
GND
CN1
FB3
0
1
2
3
4
5
4 HEADER
C4
2.2UF 16V
715T1381-1B
Title
<Title>
Size Document Number Rev
A
Date: Sheet
53
<Doc> <RevCode>
11Tuesday, September 06, 2005
of
Page 54

20” LCD TV Color Monitor Norcent LT2025W
9. Exploded View
54
Page 55

20” LCD TV Color Monitor Norcent LT2025W
9. BOM List
E206MHNKD4NCNCP
Location Part NO. Description
007T 6 L 44 COMPOUND PALLET
026T 800504 5 BARCODE
034T1655 GM L COVER CABLE
034T6385 GM L HINGE COVER
044T3121510506 SPONGE
045T 88609 22 EPE COVER
045T 88626 3 PE BAG FOR MONITOR
050T 500 1 CABLE TIE
052T 1185 MIDDLE TAPE FOR CARTON
052T 1186 SMALL TAPE
052T 1211 A ADHESIVE TYPE
052T6020 22 PR0TECT FILM
052T6025 15130 MYLAR
078T 306501 KL SPK 8OHM 5W KUAIDA
078T 306501 KR SPK 8OHM 5W KUAIDA
089T1738CAA D1 SIGNAL CABLE
089T1738GAA D1 SIGNAL CABLE
089T1738LAA D1 SIGNAL CABLE
089T402A18N IS POWER CORD
089T402A18N LS POWER CORD
089T402A18N YH POWER CABLE
092TB1JX1A31GF BATTERY
095T8014 2522 WIRE HARNESS
095T8014 3538 WIRE HARNESS
095T8014 5560 WIRE HARNESS
095T8014 8603 WIRE HARNESS
095T8014 14637 WIRE HARNESS
095T8018 30685 LVDS CABLE
098TR7SW3NENCF Remote Control
0M1T 340 6 47 CR3 SCREW
0M1T 340 14120 SCREW M4X14
0M1T1730 6128 CR3 SCREW
0M1T1730 6128 CR3 SCREW
0M1T1730 6128 CR3 SCREW
0M1T1730 6128 CR3 SCREW
0M1T2130 6 47 CR3 SCREW
0M1T2130 6 47 CR3 SCREW
0M1T2130 6 47 CR3 SCREW
0Q1T 330 8120 SCREW 3X8mm
0Q1T 340 12 47 CR3 SCREW
0Q1T 340 12128 CR3 SCREW
0Q1T 930 6128 CR3 SCREW
0Q1T3040 8 47 CR3 SCREW
705TQAK0B34029 BACK COVER ASS'Y
705TQAK0F34012 BEZEL ASS'Y
705TQAK0P34012 STAND ASS'Y
750TVMA1WB111N000E PANEL TV 20.1" B1 C2 NORCENT CMO
ADPC24100B2P POWER BOARD
CBPF6H1KY3P MAIN BAORD
Q15T0021 1 AV-BKT
Q15T6254 7 MAIN FRAME
55
Page 56

20” LCD TV Color Monitor Norcent LT2025W
Q40T 20081512A RATING LABEL
Q40T 581815 5A IO LABEL
Q44T3231 21 8 EVA WASHER
Q44TA015 1 EPS
Q44TA015 2 EPS
Q44TA015815 1A CARTON
Q85T6134 3 SHIELD
TUPFAA9P TUNER BOARD
001T6017 2 GP SCREW
040T 58162435A LABEL
045T 76 28 RN PE BAG FOR MANUAL
045T 76 28NV2 PE BAG FOR CLAMP
089T 173 56507 AUDIO CABLE
Q41T200181513A manual
Q41T780081542A qsg
Q41T780081544A warranty card
011T 176 1 RL WIRE HOLDER
012T 394 3 RUBBER FOOT
015T6184 1 Kensington lock
015T6257 1 HINGE BKT
033T6301A14 2C PC PLATE ON TOP
0Q1T 140 8120 SCREW
0Q1T 330 6120 SCREW
0Q1T 330 8120 SCREW 3X8mm
0Q1T 330 8120 SCREW 3X8mm
0Q1T 330 8120 SCREW 3X8mm
0Q1T1030 8128 CR3 SCREW
HJPFBAA1P HEAD PHONE JACK BOARD 20"TV
IRPFAA9P IR BOARD
KEPFAACP KEY BOARD
033T4823 P0 L FUN KEY
033T4907AGM 2L CARD READER (AUDIO ONLY)
033T6442 ED C IR LENS
033T6443 1 C POWER LENS
034T1652 GM 2L REAR COVER
Q34T6384 RGB2L BEZEL
015T6313 1 BKT-STAND
015T6338 1 BKT-BASE
034T6359 RG L STAND
0M1T 330 6120 SCREW
Q34T6358 RG 1L 20 BASE
Q44T3231 21 8 EVA WASHER
CN904 033T3802 14 CONN
040T 45762420A S/N LABEL
PC991 056T 139 3A PC123Y22FZOF
PC990 056T 139 3A PC123Y22FZOF
PC950 056T 139 3A PC123Y22FZOF
VR901 061T 46 6 GP TNR 10V471K
R934 061T152M10458G6267 100K OHM 5% 2W
R980 061T152M220 64 22 OHM 5% 2W
R918 061T152M22858G6267 0.22 OHM 5% 2W
R937 061T152M27858G6267 0.27 OHM 5% 2W
C906 063T 10722410S 0.22UF 275VAC X2
C910 063T213J105GFA MPF CAP
56
Page 57

20” LCD TV Color Monitor Norcent LT2025W
C931 065T 1K222 2A6213 0.0022UF/1KV
C980 065T 1K471 5A6921 470PF +-10% 1KV Y5P
C901 065T306K4712BP 470PF +-10% 250VAC
C902 065T306K4712BP 470PF +-10% 250VAC
C905 065T306M1022BM Y1.CAP.001UF 250VAC MURATA
C905 065T306M1022BP Y1.CAP.001UF 250VAC
C903 065T306M2222BM Y1.CAP.0022UF 250V AC MUR
C903 065T306M2222BP Y1.CAP.0022UF 250V AC
C901 065T306M4712BM Y1.CAP 470PF 250VAC MURATA
C902 065T306M4712BM Y1.CAP 470PF 250VAC MURATA
C916 067T 4082015K 82UF
C967 067T 215102 2K 1000UF 10V
C968 067T 215102 2K 1000UF 10V
C967 067T 215102 2R 1000UF 10V FOR ROBYCON
C968 067T 215102 2R 1000UF 10V FOR ROBYCON
C960 067T 215471 3K 470UF 16V
C971 067T215B222 3R
C972 067T215B222 3R
C973 067T215H102 3R 1000UF 16V FOR ROBYCON
C981 067T215L102 6N KY35VB1000M-L 5*25MM
C982 067T215L102 6N KY35VB1000M-L 5*25MM
C960 067T215L471 3R LOW E.E R470UF +-20% 16V
C973 067T215S102 3K LOW ESR EC 1000UF 16V
C981 067T215S102 6K 1000UF 35V
C982 067T215S102 6K 1000UF 35V
C971 067T215S222 3K 2200UF 16V
C972 067T215S222 3K 2200UF 16V
L901 073G 174 64 L LINE FIL TER
L901 073G 174 64 LS LINE FIL TER
L901 073G 174 64 YS LINE FIL TER
L902 073L 174 49 LG LINE FILTER
L902 073L 174 49LSG LINE FILTER
L910 073T 174 66 T PFC CHOKE
L910 073T 174 66 LS E133 POWER INDUCTOR
L904 073T 174 71 L LINE CHOKE
L903 073T 174 71 L LINE CHOKE
L904 073T 174 71 HA LINE CHOKE
L903 073T 174 71 HA LINE CHOKE
L904 073T 174 71YSA LINE CHOKE
L903 073T 174 71YSA LINE CHOKE
L960 073T 253169 LS 7UH (PITCH-10)
L960 073T 253169 YS 7UH (PITCH-10)
L970 073T 253171 LS 2.13 uH
L980 073T 253171 LS 2.13 uH
L970 073T 253171 YS 2.13 uH
L980 073T 253171 YS 2.13 uH
T930 080TL20T 6 T X'FMR
T930 080TL20T 6 LS POWER X'FMR
CN901 087T 501 32 S AC SOCKET
D930 093T1100 1A52T BYV26E
D930 093T1100 1C52T BYV26EGP
CN903 095T8013 10 18 WIRE HARNESS
705G F95 57 01 Q930/D910/Q910 ASS'Y
705G F95 93 01 BD901 ASS'Y
ELCAP 2200UF M 16V 105℃ RUBYCON
ELCAP 2200UF M 16V 105℃ RUBYCON
57
Page 58

20” LCD TV Color Monitor Norcent LT2025W
705G F95 93 02 D970 ASS'Y
705G F95 93 03 D980 ASS'Y
AD24100B2SMTP POWER BOARD FOR SMT
CN103 033T3278 10 10 PLUG B10E-XHA/JST E10B-XHA/
CN114 033T3802 8H WAFER 8P RIGHT ANGLE PITCH 2.0
CN107 033T801744A H WAFER
CN113 033T8027 24 CONN W TO B 12P*2 P*2.0 4504-2
040T 457624 1B CPU LABEL
040T 45762412B CBPC LABEL
U409 053T 40504 TPSRA4M50B00-B0
U202 056T 665505 HD IC VF45A3D HAODA
U203 056T 665506 HD IC AF45A3D HAODA
U406 056T1133518SST IC SST39VF020-70-4C-NHE
R561 061T152M200 64 RST MOFR 20 OHM +-5% 2WS
C228 067T215H102 3N KY16VB1000M-L 10*20
C167 067T215H102 3N KY16VB1000M-L 10*20
C167 067T215H102 3R 1000UF 16V FOR ROBYCON
C228 067T215H102 3R 1000UF 16V FOR ROBYCON
C154 067T305V331 3 330UF +-20% 16V
L204 073T 5410010T 0307 10UH +-10%
L203 073T 5556810T 0.56UH +-10%
L602 073T 5568910T 6.8UH+-10%
L101 073T 253137 ER CHOKE COIL BY EROCORE SCB-03
L102 073T 253137 ER CHOKE COIL BY EROCORE SCB-03
J102 088T 30214K PHONE JACK
CN105 088T 35315F H D-SUB 15PIN
U401 090T 372 2 HEAT SINK
X201 093T 2258B J 24.576MHZ/20PF/49US
X401 093T 2258B J 24.576MHZ/20PF/49US
SMTF6H1KY3P MAIN BOARD FOR SMT
CN602 033T3802 2H WAFER 2P RIGHT ANGLE
CN603 033T3802 3H WAFER 3P RIGHT ANGLE
CN604 033T3802 5H WAFER 5P RIGHT ANELE PI
CN601 033T802444C H WAFER
CN601 033T802444C FH WAFER
040T 45762412B CBPC LABEL
C697 067T305V101 3 1000UF +-2 16V
C696 067T305V101 3 1000UF +-2 16V
FB609 071T 55507 H CHOKE
FB608 071T 55507 H CHOKE
L219 073T 5547010T PEAKING COIL 47UH+-10% TDK
L218 073T 5547010T PEAKING COIL 47UH+-10% TDK
085T 583510 GASKET
J101 088T 78 13 3C AV-S-01-W
CN202 088T 78 13 5C RCA JACK
J103 088T 78 1R CL RCA JACK 1P RED
ZD3 093T 6021652T IN5819
TU100 094TNPALMNA NP TUNER UV1336B/AFSH-4 PHILIPS
SMTTUPFAA9P TUNER BOARD
CN1 033T3802 5H WAFER 5P RIGHT ANELE PI
J1 088T 30230T PHONE JACK
095T 900 53 HARNESS 95MM
SMTHJPFBAA1P HEAD PHONE BOARD
CN101 033T3802 5 AUDIO IN
58
Page 59

20” LCD TV Color Monitor Norcent LT2025W
D02 056T 627503 IC GP18B38BCE-HB GUANGPU
081T 12 6B GP LED GP32032CE/GP-1-ZY-50-HB
SMTIRPFAA9P IR BOARD FOR SMT
095T 900576 HARNESS
SMTKEPFAACP KEY BOARD FOR SMT
005T 42 1 CUSHION
012T 372 1 MICA
Q930 057T 600 35 STP8NK80ZFP BY ST TO-220FP
Q910 057T 667 24 STP20NM60 FP
090T6268 1 HEAT SINK
D910 093T 220 23 DIODE FMX-G26S TO-220 SANKEN
0M1T1730 10128 CR3 SCREW
090T6267 1 HEAT SINK
BD901 093T 50460 14 GBU 805
0M1T1730 8128 CR3 SCREW
090T6269 1 HEAT SINK
D970 093T 60242 SRF20150C 20A 150V TO220BY MOS
0M1T1730 10128 CR3 SCREW
090T6269 2 HEAT SINK
D980 093T 60244 SRF20200-C T0-220AB
0M1T1730 10128 CR3 SCREW
IC960 056T 379 37 FP5001DR-LR
IC930 056T 379 61 IC LD7575PS SOP-8 LEADTREND
IC910 056T 538 6 FA5500AN
Q931 057T 417 4 CHIP PMBS3904 BY PHILIPS
Q961 057T 417 4 CHIP PMBS3904 BY PHILIPS
Q990 057T 417 4 CHIP PMBS3904 BY PHILIPS
Q991 057T 417 4 CHIP PMBS3904 BY PHILIPS
Q940 057T 417 6 PMBS3906/PHILIPS-SMT
Q962 057T 417 6 PMBS3906/PHILIPS-SMT
Q960 057T 763 7 AOD405L
Q960 057T 763 9 P06P03LDG
R913 061T0603103 CHIP 10KOHM 1/16W
R914 061T0603103 CHIP 10KOHM 1/16W
R922 061T0603103 CHIP 10KOHM 1/16W
R965 061T0603200 2F RST CHIPR 20 KOHM +-1% 1/10W
R951 061T0603243 1F RST CHIPR 2.43 KOHM +-1% 1/10W
R954 061T0603243 1F RST CHIPR 2.43 KOHM +-1% 1/10W
R963 061T0603300 1F RST CHIPR 3 KOHM +-1% 1/10W
R961 061T0603430 2F RST CHIPR 43 KOHM +-1% 1/10W
R966 061T0603470 1F CHIP 4.7K OHM 1/16W 1%
R964 061T0603471 RST CHIPR 470OHM +-5% 1/10W
R962 061T0603473 CHIP 47KOHM 1/16W
JR931 061T0805000 CHIP 0OHM 5% 1/10W
R940 061T0805103 RST CHIPR 10 KOHM +-5% 1/8W
R960 061T0805330 2F RST CHIPR 33 KOHM +-1% 1/8W
R969 061T1206000 RST CHIPR 0 OHM +-5% 1/4W
R967 061T1206000 RST CHIPR 0 OHM +-5% 1/4W
JR990 061T1206000 RST CHIPR 0 OHM +-5% 1/4W
JR960 061T1206000 RST CHIPR 0 OHM +-5% 1/4W
JR940 061T1206000 RST CHIPR 0 OHM +-5% 1/4W
JR930 061T1206000 RST CHIPR 0 OHM +-5% 1/4W
JR910 061T1206000 RST CHIPR 0 OHM +-5% 1/4W
R916 061T1206100 8.2 OHM 1/4W
59
Page 60

20” LCD TV Color Monitor Norcent LT2025W
R935 061T1206100 8.2 OHM 1/4W
R968 061T1206102 RST CHIPR 1 KOHM +-5% 1/4W
R970 061T1206102 RST CHIPR 1 KOHM +-5% 1/4W
R941 061T1206103 RST CHIPR 10 KOHM +-5% 1/4W
R992 061T1206103 RST CHIPR 10 KOHM +-5% 1/4W
R932 061T1206104 RST CHIPR 100 KOHM +-5% 1/4W
R933 061T1206104 RST CHIPR 100 KOHM +-5% 1/4W
R938 061T1206202 RST CHIPR 2 KOHM +-5% 1/4W
R943 061T1206202 RST CHIPR 2 KOHM +-5% 1/4W
R991 061T1206202 RST CHIPR 2 KOHM +-5% 1/4W
R999 061T1206202 RST CHIPR 2 KOHM +-5% 1/4W
R930 061T1206204 RST CHIPR 200 KOHM +-5% 1/4W
R931 061T1206204 RST CHIPR 200 KOHM +-5% 1/4W
R942 061T1206332 RST CHIPR 3.3 KOHM +-5% 1/4W
R915 061T1206393 RST CHIPR 39 KOHM +-5% 1/4W
R917 061T1206471 RST CHIPR 470 OHM +-5% 1/4W
R936 061T1206471 RST CHIPR 470 OHM +-5% 1/4W
R910 061T1206514 RST CHIPR 510KOHM +-5% 1/4W
R911 061T1206514 RST CHIPR 510KOHM +-5% 1/4W
R912 061T1206514 RST CHIPR 510KOHM +-5% 1/4W
R919 061T1206514 RST CHIPR 510KOHM +-5% 1/4W
R920 061T1206514 RST CHIPR 510KOHM +-5% 1/4W
R921 061T1206514 RST CHIPR 510KOHM +-5% 1/4W
R901 061T1206684 RST CHIPR 680KOHM +-5% 1/4W
R902 061T1206684 RST CHIPR 680KOHM +-5% 1/4W
R903 061T1206684 RST CHIPR 680KOHM +-5% 1/4W
C914 065T0603102 32 CHIP 1000PF 50V X7R
C930 065T0603102 32 CHIP 1000PF 50V X7R
C932 065T0603102 32 CHIP 1000PF 50V X7R
C911 065T0603103 32 CHIP 0.01UF 50V X7R
C950 065T0603104 32 CHIP 0.1UF 50V X7R
C951 065T0603104 32 CHIP 0.1UF 50V X7R
C961 065T0603104 32 CHIP 0.1UF 50V X7R
C963 065T0603104 32 CHIP 0.1UF 50V X7R
C965 065T0603104 32 CHIP 0.1UF 50V X7R
C969 065T0603104 32 CHIP 0.1UF 50V X7R
C974 065T0603104 32 CHIP 0.1UF 50V X7R
C983 065T0603104 32 CHIP 0.1UF 50V X7R
C913 065T0603473 32 CHIP 0.047UF 50V X7R
C966 065T0603474 17 CHIP 0.47UF 16V Y5V
C912 065T0603474 17 CHIP 0.47UF 16V Y5V
C940 065T0603474 27 CHIP 0.47UF 25V Y5V
C975 065T1206102 726213 CHIP 1000PF 500V X7R
C975 065T1206102 726784 CHIP 1000PF 500V X7R
C975 065T1206102 726857 CHIP 1000PF 500V X7R
D911 093T 6432P LL4148 BY PANJIT
D922 093T 6432P LL4148 BY PANJIT
D931 093T 6432P LL4148 BY PANJIT
D990 093T 6432P LL4148 BY PANJIT
D991 093T 6432P LL4148 BY PANJIT
D911 093T 6432V LL4148-GSO8 SMD BY VISHA
D922 093T 6432V LL4148-GSO8 SMD BY VISHA
D931 093T 6432V LL4148-GSO8 SMD BY VISHA
D990 093T 6432V LL4148-GSO8 SMD BY VISHA
60
Page 61

20” LCD TV Color Monitor Norcent LT2025W
D991 093T 6432V LL4148-GSO8 SMD BY VISHA
ZD930 093T 39S 15 T RLZ15B
ZD963 093T 39S 33 T PTZ 13B
D962 093T 39S 63 T SMAJ22A
D962 093T 39S 64 T SMAJ22A
D962 093T 39S501 T SMAJ22A
D961 093T8004 2 SBM84PT
D960 093T8004 2 SBM84PT
AD24100B2AIP POWER BOARD FOR AI
U401 056T 562516 TDA15501E
U102 056T 563 25 AIC1084-33PE
U103 056T 563 25 AIC1084-33PE
U101 056T 563 27 AIC1117A-18PY SOT223 AIC
U105 056T 585 9 IC AP1117E50LA ANACHIP
U302 056T 614 1 IC 74HC4052D PHILIPS
U407 056T 614 1 IC 74HC4052D PHILIPS
U404 056T 634 2 PI5V330Q QSOP-16 BY PER
U402 056T 634 2 PI5V330Q QSOP-16 BY PER
U301 056T1133 34 M24C02-WMN6TP
U403 056T113353A M24C32-WMN6TP
Q104 057T 417 4 CHIP PMBS3904 BY PHILIPS
Q105 057T 417 4 CHIP PMBS3904 BY PHILIPS
Q405 057T 417 4 CHIP PMBS3904 BY PHILIPS
Q404 057T 417 4 CHIP PMBS3904 BY PHILIPS
Q403 057T 417 4 CHIP PMBS3904 BY PHILIPS
Q402 057T 417 4 CHIP PMBS3904 BY PHILIPS
Q401 057T 417 4 CHIP PMBS3904 BY PHILIPS
Q202 057T 417 4 CHIP PMBS3904 BY PHILIPS
Q201 057T 417 4 CHIP PMBS3904 BY PHILIPS
Q116 057T 417 4 CHIP PMBS3904 BY PHILIPS
Q109 057T 417 4 CHIP PMBS3904 BY PHILIPS
Q108 057T 417 4 CHIP PMBS3904 BY PHILIPS
Q107 057T 417 4 CHIP PMBS3904 BY PHILIPS
Q106 057T 417 4 CHIP PMBS3904 BY PHILIPS
Q406 057T 417 4 CHIP PMBS3904 BY PHILIPS
Q412 057T 417 4 CHIP PMBS3904 BY PHILIPS
Q413 057T 417 4 CHIP PMBS3904 BY PHILIPS
Q414 057T 417 4 CHIP PMBS3904 BY PHILIPS
Q415 057T 417 4 CHIP PMBS3904 BY PHILIPS
Q416 057T 417 4 CHIP PMBS3904 BY PHILIPS
Q417 057T 417 4 CHIP PMBS3904 BY PHILIPS
Q418 057T 417 4 CHIP PMBS3904 BY PHILIPS
Q103 057T 417 6 PMBS3906/PHILIPS-SMT
Q102 057T 417 6 PMBS3906/PHILIPS-SMT
Q111 057T 763 1 A03401L SOT23 BY AOS
Q101 057T 763 3 AO4411L SO-8 BY AOS SMT
Q112 057T 763 3 AO4411L SO-8 BY AOS SMT
RP407 061T 125220 8 CHIP ARRAY 220HM 1/16W 8P4R
RP408 061T 125220 8 CHIP ARRAY 220HM 1/16W 8P4R
RP409 061T 125220 8 CHIP ARRAY 220HM 1/16W 8P4R
RP410 061T 125220 8 CHIP ARRAY 220HM 1/16W 8P4R
RP411 061T 125220 8 CHIP ARRAY 220HM 1/16W 8P4R
R550 061T0603000 CHIP 0OHM 1/16W
R549 061T0603000 CHIP 0OHM 1/16W
61
Page 62

20” LCD TV Color Monitor Norcent LT2025W
R542 061T0603000 CHIP 0OHM 1/16W
R516 061T0603000 CHIP 0OHM 1/16W
R515 061T0603000 CHIP 0OHM 1/16W
R514 061T0603000 CHIP 0OHM 1/16W
R513 061T0603000 CHIP 0OHM 1/16W
R495 061T0603000 CHIP 0OHM 1/16W
R493 061T0603000 CHIP 0OHM 1/16W
R492 061T0603000 CHIP 0OHM 1/16W
R429 061T0603000 CHIP 0OHM 1/16W
R294 061T0603000 CHIP 0OHM 1/16W
R208 061T0603000 CHIP 0OHM 1/16W
R207 061T0603000 CHIP 0OHM 1/16W
R206 061T0603000 CHIP 0OHM 1/16W
R205 061T0603000 CHIP 0OHM 1/16W
R204 061T0603000 CHIP 0OHM 1/16W
R203 061T0603000 CHIP 0OHM 1/16W
R201 061T0603000 CHIP 0OHM 1/16W
R215 061T0603100 CHIP 10OHM 1/16W
R220 061T0603100 CHIP 10OHM 1/16W
R222 061T0603100 CHIP 10OHM 1/16W
R406 061T0603100 CHIP 10OHM 1/16W
R407 061T0603100 CHIP 10OHM 1/16W
R408 061T0603100 CHIP 10OHM 1/16W
R247 061T0603101 CHIP 100OHM 1/16W
R291 061T0603101 CHIP 100OHM 1/16W
R289 061T0603101 CHIP 100OHM 1/16W
R276 061T0603101 CHIP 100OHM 1/16W
R253 061T0603101 CHIP 100OHM 1/16W
R252 061T0603101 CHIP 100OHM 1/16W
R251 061T0603101 CHIP 100OHM 1/16W
R250 061T0603101 CHIP 100OHM 1/16W
R249 061T0603101 CHIP 100OHM 1/16W
R248 061T0603101 CHIP 100OHM 1/16W
R245 061T0603101 CHIP 100OHM 1/16W
R459 061T0603101 CHIP 100OHM 1/16W
R460 061T0603101 CHIP 100OHM 1/16W
R461 061T0603101 CHIP 100OHM 1/16W
R483 061T0603101 CHIP 100OHM 1/16W
R520 061T0603101 CHIP 100OHM 1/16W
R522 061T0603101 CHIP 100OHM 1/16W
R523 061T0603101 CHIP 100OHM 1/16W
R524 061T0603101 CHIP 100OHM 1/16W
R525 061T0603101 CHIP 100OHM 1/16W
R526 061T0603101 CHIP 100OHM 1/16W
R545 061T0603101 CHIP 100OHM 1/16W
R546 061T0603101 CHIP 100OHM 1/16W
R551 061T0603101 CHIP 100OHM 1/16W
R554 061T0603101 CHIP 100OHM 1/16W
R555 061T0603101 CHIP 100OHM 1/16W
R556 061T0603101 CHIP 100OHM 1/16W
R557 061T0603101 CHIP 100OHM 1/16W
R218 061T0603101 CHIP 100OHM 1/16W
R219 061T0603101 CHIP 100OHM 1/16W
R221 061T0603101 CHIP 100OHM 1/16W
62
Page 63

20” LCD TV Color Monitor Norcent LT2025W
R223 061T0603101 CHIP 100OHM 1/16W
R224 061T0603101 CHIP 100OHM 1/16W
R226 061T0603101 CHIP 100OHM 1/16W
R239 061T0603101 CHIP 100OHM 1/16W
R240 061T0603101 CHIP 100OHM 1/16W
R242 061T0603101 CHIP 100OHM 1/16W
R244 061T0603101 CHIP 100OHM 1/16W
R535 061T0603102 CHIP 1K OHM 1/16W
R536 061T0603102 CHIP 1K OHM 1/16W
R537 061T0603102 CHIP 1K OHM 1/16W
R538 061T0603102 CHIP 1K OHM 1/16W
R559 061T0603102 CHIP 1K OHM 1/16W
R534 061T0603102 CHIP 1K OHM 1/16W
R270 061T0603102 CHIP 1K OHM 1/16W
R269 061T0603102 CHIP 1K OHM 1/16W
R124 061T0603102 CHIP 1K OHM 1/16W
R116 061T0603102 CHIP 1K OHM 1/16W
R115 061T0603102 CHIP 1K OHM 1/16W
R261 061T0603103 CHIP 10KOHM 1/16W
R260 061T0603103 CHIP 10KOHM 1/16W
R259 061T0603103 CHIP 10KOHM 1/16W
R258 061T0603103 CHIP 10KOHM 1/16W
R257 061T0603103 CHIP 10KOHM 1/16W
R256 061T0603103 CHIP 10KOHM 1/16W
R533 061T0603103 CHIP 10KOHM 1/16W
R262 061T0603103 CHIP 10KOHM 1/16W
R263 061T0603103 CHIP 10KOHM 1/16W
R295 061T0603103 CHIP 10KOHM 1/16W
R302 061T0603103 CHIP 10KOHM 1/16W
R449 061T0603103 CHIP 10KOHM 1/16W
R450 061T0603103 CHIP 10KOHM 1/16W
R451 061T0603103 CHIP 10KOHM 1/16W
R452 061T0603103 CHIP 10KOHM 1/16W
R455 061T0603103 CHIP 10KOHM 1/16W
R484 061T0603103 CHIP 10KOHM 1/16W
R485 061T0603103 CHIP 10KOHM 1/16W
R486 061T0603103 CHIP 10KOHM 1/16W
R487 061T0603103 CHIP 10KOHM 1/16W
R488 061T0603103 CHIP 10KOHM 1/16W
R489 061T0603103 CHIP 10KOHM 1/16W
R531 061T0603103 CHIP 10KOHM 1/16W
R532 061T0603103 CHIP 10KOHM 1/16W
R134 061T0603103 CHIP 10KOHM 1/16W
R133 061T0603103 CHIP 10KOHM 1/16W
R110 061T0603103 CHIP 10KOHM 1/16W
R109 061T0603103 CHIP 10KOHM 1/16W
R108 061T0603103 CHIP 10KOHM 1/16W
R104 061T0603103 CHIP 10KOHM 1/16W
R103 061T0603103 CHIP 10KOHM 1/16W
R529 061T0603104 CHIP 100K OHM 1/16W
R528 061T0603104 CHIP 100K OHM 1/16W
R527 061T0603104 CHIP 100K OHM 1/16W
R254 061T0603104 CHIP 100K OHM 1/16W
R107 061T0603104 CHIP 100K OHM 1/16W
63
Page 64

20” LCD TV Color Monitor Norcent LT2025W
R106 061T0603104 CHIP 100K OHM 1/16W
R102 061T0603104 CHIP 100K OHM 1/16W
R272 061T0603105 CHIP 1MOHM 1/16W
R211 061T0603122 RST CHIPR 1.2 KOHM +-5% 1/10W
R212 061T0603122 RST CHIPR 1.2 KOHM +-5% 1/10W
R213 061T0603122 RST CHIPR 1.2 KOHM +-5% 1/10W
R214 061T0603122 RST CHIPR 1.2 KOHM +-5% 1/10W
R265 061T0603123 RST CHIPR 12 KOHM +-5% 1/10W
R409 061T0603123 RST CHIPR 12 KOHM +-5% 1/10W
R494 061T0603131 RST CHIPR 130 OHM +-5% 1/10W
R491 061T0603131 RST CHIPR 130 OHM +-5% 1/10W
R490 061T0603131 RST CHIPR 130 OHM +-5% 1/10W
R558 061T0603151 RST CHIPR 150 OHM +-5% 1/10W
R553 061T0603152 CHIP 1.5KOHM 1/16W
R268 061T0603153 RST CHIPR 15 KOHM +-5% 1/10W
R267 061T0603153 RST CHIPR 15 KOHM +-5% 1/10W
R266 061T0603153 RST CHIPR 15 KOHM +-5% 1/10W
R113 061T0603153 RST CHIPR 15 KOHM +-5% 1/10W
R112 061T0603153 RST CHIPR 15 KOHM +-5% 1/10W
R560 061T0603202 RST CHIPR 2 KOHM +-5% 1/10W
R273 061T0603220 CHIP 22OHM 1/16W
R552 061T0603223 CHIP 22KOHM 1/16W
R130 061T0603223 CHIP 22KOHM 1/16W
R123 061T0603223 CHIP 22KOHM 1/16W
R122 061T0603223 CHIP 22KOHM 1/16W
R121 061T0603223 CHIP 22KOHM 1/16W
R548 061T0603272 CHIP 2.7KOHM 1/16W
R547 061T0603272 CHIP 2.7KOHM 1/16W
R275 061T0603273 RST CHIPR 27 KOHM +-5% 1/10W
R131 061T0603273 RST CHIPR 27 KOHM +-5% 1/10W
R132 061T0603273 RST CHIPR 27 KOHM +-5% 1/10W
R126 061T0603332 RST CHIPR 3.3 KOHM +-5% 1/10W
R127 061T0603332 RST CHIPR 3.3 KOHM +-5% 1/10W
R296 061T0603332 RST CHIPR 3.3 KOHM +-5% 1/10W
R297 061T0603332 RST CHIPR 3.3 KOHM +-5% 1/10W
R419 061T0603332 RST CHIPR 3.3 KOHM +-5% 1/10W
R420 061T0603332 RST CHIPR 3.3 KOHM +-5% 1/10W
R278 061T0603391 RST CHIPR 390 OHM +-5% 1/10W
R279 061T0603393 RST CHIPR 39 KOHM +-5% 1/10W
R410 061T0603470 RST CHIPR 47 OHM +-5% 1/10W
R411 061T0603470 RST CHIPR 47 OHM +-5% 1/10W
R412 061T0603470 RST CHIPR 47 OHM +-5% 1/10W
R457 061T0603470 RST CHIPR 47 OHM +-5% 1/10W
R458 061T0603470 RST CHIPR 47 OHM +-5% 1/10W
R105 061T0603472 CHIP 4.7KOHM 1/16W
R281 061T0603472 CHIP 4.7KOHM 1/16W
R540 061T0603472 CHIP 4.7KOHM 1/16W
R541 061T0603472 CHIP 4.7KOHM 1/16W
R290 061T0603472 CHIP 4.7KOHM 1/16W
R415 061T0603472 CHIP 4.7KOHM 1/16W
R416 061T0603472 CHIP 4.7KOHM 1/16W
R496 061T0603472 CHIP 4.7KOHM 1/16W
R497 061T0603472 CHIP 4.7KOHM 1/16W
R498 061T0603472 CHIP 4.7KOHM 1/16W
64
Page 65

20” LCD TV Color Monitor Norcent LT2025W
R499 061T0603472 CHIP 4.7KOHM 1/16W
R413 061T0603472 CHIP 4.7KOHM 1/16W
R502 061T0603472 CHIP 4.7KOHM 1/16W
R501 061T0603472 CHIP 4.7KOHM 1/16W
R101 061T0603473 CHIP 47KOHM 1/16W
R284 061T0603473 CHIP 47KOHM 1/16W
R543 061T0603473 CHIP 47KOHM 1/16W
R530 061T0603473 CHIP 47KOHM 1/16W
R286 061T0603473 CHIP 47KOHM 1/16W
R285 061T0603473 CHIP 47KOHM 1/16W
R287 061T0603681 RST CHIPR 680 OHM +-5% 1/10W
R288 061T0603750 75OHM
R504 061T0603750 75OHM
R505 061T0603750 75OHM
R506 061T0603750 75OHM
R512 061T0603750 75OHM
R518 061T0603750 75OHM
R519 061T0603750 75OHM
R521 061T0603750 75OHM
R544 061T0603750 75OHM
R418 061T0603823 RST CHIPR 82 KOHM +-5% 1/10W
FB408 061T0805000 CHIP 0OHM 5% 1/10W
FB409 061T0805000 CHIP 0OHM 5% 1/10W
FB410 061T0805000 CHIP 0OHM 5% 1/10W
FB411 061T0805000 CHIP 0OHM 5% 1/10W
FB412 061T0805000 CHIP 0OHM 5% 1/10W
FB413 061T0805000 CHIP 0OHM 5% 1/10W
FB414 061T0805000 CHIP 0OHM 5% 1/10W
FB416 061T0805000 CHIP 0OHM 5% 1/10W
R503 061T0805101 RST CHIPR 100 OHM +-5% 1/8W
R507 061T0805101 RST CHIPR 100 OHM +-5% 1/8W
R508 061T0805101 RST CHIPR 100 OHM +-5% 1/8W
R210 061T1206000 RST CHIPR 0 OHM +-5% 1/4W
FB104 061T1206000 RST CHIPR 0 OHM +-5% 1/4W
FB101 061T1206000 4 RST CHIPR 0 OHM +-5% 1/4W
FB117 061T1206000 4 RST CHIPR 0 OHM +-5% 1/4W
R117 061T1206229 RST CHIPR 2.2 OHM +-5% 1/4W
R118 061T1206229 RST CHIPR 2.2 OHM +-5% 1/4W
R119 061T1206229 RST CHIPR 2.2 OHM +-5% 1/4W
R120 061T1206229 RST CHIPR 2.2 OHM +-5% 1/4W
C457 065T0603100 31 CHIP 10PF 50V NPO
C458 065T0603100 31 CHIP 10PF 50V NPO
C459 065T0603100 31 CHIP 10PF 50V NPO
C161 065T0603101 31 CHIP 100PF 50V NPO
C162 065T0603101 31 CHIP 100PF 50V NPO
C259 065T0603101 31 CHIP 100PF 50V NPO
C309 065T0603101 31 CHIP 100PF 50V NPO
C456 065T0603101 31 CHIP 100PF 50V NPO
C471 065T0603101 31 CHIP 100PF 50V NPO
C472 065T0603101 31 CHIP 100PF 50V NPO
C473 065T0603101 31 CHIP 100PF 50V NPO
C474 065T0603101 31 CHIP 100PF 50V NPO
C475 065T0603101 31 CHIP 100PF 50V NPO
C491 065T0603101 31 CHIP 100PF 50V NPO
65
Page 66

20” LCD TV Color Monitor Norcent LT2025W
C238 065T0603102 32 CHIP 1000PF 50V X7R
C239 065T0603102 32 CHIP 1000PF 50V X7R
C245 065T0603103 32 CHIP 0.01UF 50V X7R
C263 065T0603104 12 MLCC 0603 0.1UF K 16V X7R
C262 065T0603104 12 MLCC 0603 0.1UF K 16V X7R
C261 065T0603104 12 MLCC 0603 0.1UF K 16V X7R
C264 065T0603104 12 MLCC 0603 0.1UF K 16V X7R
C265 065T0603104 12 MLCC 0603 0.1UF K 16V X7R
C260 065T0603104 12 MLCC 0603 0.1UF K 16V X7R
C257 065T0603104 12 MLCC 0603 0.1UF K 16V X7R
C256 065T0603104 12 MLCC 0603 0.1UF K 16V X7R
C255 065T0603104 12 MLCC 0603 0.1UF K 16V X7R
C254 065T0603104 12 MLCC 0603 0.1UF K 16V X7R
C137 065T0603104 12 MLCC 0603 0.1UF K 16V X7R
C138 065T0603104 12 MLCC 0603 0.1UF K 16V X7R
C139 065T0603104 12 MLCC 0603 0.1UF K 16V X7R
C156 065T0603104 12 MLCC 0603 0.1UF K 16V X7R
C157 065T0603104 12 MLCC 0603 0.1UF K 16V X7R
C246 065T0603104 12 MLCC 0603 0.1UF K 16V X7R
C247 065T0603104 12 MLCC 0603 0.1UF K 16V X7R
C248 065T0603104 12 MLCC 0603 0.1UF K 16V X7R
C249 065T0603104 12 MLCC 0603 0.1UF K 16V X7R
C250 065T0603104 12 MLCC 0603 0.1UF K 16V X7R
C251 065T0603104 12 MLCC 0603 0.1UF K 16V X7R
C252 065T0603104 12 MLCC 0603 0.1UF K 16V X7R
C253 065T0603104 12 MLCC 0603 0.1UF K 16V X7R
C266 065T0603104 12 MLCC 0603 0.1UF K 16V X7R
C280 065T0603104 12 MLCC 0603 0.1UF K 16V X7R
C279 065T0603104 12 MLCC 0603 0.1UF K 16V X7R
C278 065T0603104 12 MLCC 0603 0.1UF K 16V X7R
C277 065T0603104 12 MLCC 0603 0.1UF K 16V X7R
C281 065T0603104 12 MLCC 0603 0.1UF K 16V X7R
C282 065T0603104 12 MLCC 0603 0.1UF K 16V X7R
C283 065T0603104 12 MLCC 0603 0.1UF K 16V X7R
C284 065T0603104 12 MLCC 0603 0.1UF K 16V X7R
C285 065T0603104 12 MLCC 0603 0.1UF K 16V X7R
C286 065T0603104 12 MLCC 0603 0.1UF K 16V X7R
C287 065T0603104 12 MLCC 0603 0.1UF K 16V X7R
C288 065T0603104 12 MLCC 0603 0.1UF K 16V X7R
C435 065T0603104 12 MLCC 0603 0.1UF K 16V X7R
C437 065T0603104 12 MLCC 0603 0.1UF K 16V X7R
C445 065T0603104 12 MLCC 0603 0.1UF K 16V X7R
C469 065T0603104 12 MLCC 0603 0.1UF K 16V X7R
C470 065T0603104 12 MLCC 0603 0.1UF K 16V X7R
C235 065T0603104 12 MLCC 0603 0.1UF K 16V X7R
C275 065T0603104 12 MLCC 0603 0.1UF K 16V X7R
C273 065T0603104 12 MLCC 0603 0.1UF K 16V X7R
C271 065T0603104 12 MLCC 0603 0.1UF K 16V X7R
C269 065T0603104 12 MLCC 0603 0.1UF K 16V X7R
C268 065T0603104 12 MLCC 0603 0.1UF K 16V X7R
C136 065T0603104 12 MLCC 0603 0.1UF K 16V X7R
C119 065T0603104 12 MLCC 0603 0.1UF K 16V X7R
C118 065T0603104 12 MLCC 0603 0.1UF K 16V X7R
C117 065T0603104 12 MLCC 0603 0.1UF K 16V X7R
66
Page 67

20” LCD TV Color Monitor Norcent LT2025W
C116 065T0603104 12 MLCC 0603 0.1UF K 16V X7R
C115 065T0603104 12 MLCC 0603 0.1UF K 16V X7R
C114 065T0603104 12 MLCC 0603 0.1UF K 16V X7R
C113 065T0603104 12 MLCC 0603 0.1UF K 16V X7R
C112 065T0603104 12 MLCC 0603 0.1UF K 16V X7R
C111 065T0603104 12 MLCC 0603 0.1UF K 16V X7R
C110 065T0603104 12 MLCC 0603 0.1UF K 16V X7R
C109 065T0603104 12 MLCC 0603 0.1UF K 16V X7R
C108 065T0603104 12 MLCC 0603 0.1UF K 16V X7R
C107 065T0603104 12 MLCC 0603 0.1UF K 16V X7R
C106 065T0603104 12 MLCC 0603 0.1UF K 16V X7R
C120 065T0603104 12 MLCC 0603 0.1UF K 16V X7R
C135 065T0603104 12 MLCC 0603 0.1UF K 16V X7R
C134 065T0603104 12 MLCC 0603 0.1UF K 16V X7R
C132 065T0603104 12 MLCC 0603 0.1UF K 16V X7R
C131 065T0603104 12 MLCC 0603 0.1UF K 16V X7R
C130 065T0603104 12 MLCC 0603 0.1UF K 16V X7R
C129 065T0603104 12 MLCC 0603 0.1UF K 16V X7R
C128 065T0603104 12 MLCC 0603 0.1UF K 16V X7R
C127 065T0603104 12 MLCC 0603 0.1UF K 16V X7R
C126 065T0603104 12 MLCC 0603 0.1UF K 16V X7R
C125 065T0603104 12 MLCC 0603 0.1UF K 16V X7R
C124 065T0603104 12 MLCC 0603 0.1UF K 16V X7R
C123 065T0603104 12 MLCC 0603 0.1UF K 16V X7R
C122 065T0603104 12 MLCC 0603 0.1UF K 16V X7R
C121 065T0603104 12 MLCC 0603 0.1UF K 16V X7R
C166 065T0603104 32 CHIP 0.1UF 50V X7R
C164 065T0603104 32 CHIP 0.1UF 50V X7R
C155 065T0603105 17 CHIP 1UF 16V Y5V
C479 065T0603105 17 CHIP 1UF 16V Y5V
C480 065T0603105 17 CHIP 1UF 16V Y5V
C481 065T0603105 17 CHIP 1UF 16V Y5V
C482 065T0603105 17 CHIP 1UF 16V Y5V
C476 065T0603120 31 CHIP 12pF 50V NPO
C477 065T0603120 31 CHIP 12pF 50V NPO
C478 065T0603120 31 CHIP 12pF 50V NPO
C460 065T0603220 31 CHIP 22PF 50V NPO
C461 065T0603220 31 CHIP 22PF 50V NPO
C142 065T0603221 31 CHIP 220PF 50V NPO
C438 065T0603221 31 CHIP 220PF 50V NPO
C439 065T0603221 31 CHIP 220PF 50V NPO
C140 065T0603224 17 CHIP 0.22UF 16V Y5V
C141 065T0603224 17 CHIP 0.22UF 16V Y5V
C298 065T0603224 17 CHIP 0.22UF 16V Y5V
C299 065T0603224 17 CHIP 0.22UF 16V Y5V
C301 065T0603224 17 CHIP 0.22UF 16V Y5V
C292 065T0603224 17 CHIP 0.22UF 16V Y5V
C291 065T0603224 17 CHIP 0.22UF 16V Y5V
C290 065T0603224 17 CHIP 0.22UF 16V Y5V
C293 065T0603224 17 CHIP 0.22UF 16V Y5V
C297 065T0603224 17 CHIP 0.22UF 16V Y5V
C237 065T0603224 17 CHIP 0.22UF 16V Y5V
C289 065T0603224 17 CHIP 0.22UF 16V Y5V
C489 065T0603270 31 CHIP 27PF 50V NPO
67
Page 68

20” LCD TV Color Monitor Norcent LT2025W
C490 065T0603270 31 CHIP 27PF 50V NPO
C487 065T0603271 31 CHIP 270PF 50V NPO
C485 065T0603271 31 CHIP 270PF 50V NPO
C484 065T0603271 31 CHIP 270PF 50V NPO
C488 065T0603330 31 CHIP 33PF 50V NPO
C486 065T0603330 31 CHIP 33PF 50V NPO
C483 065T0603330 31 CHIP 33PF 50V NPO
C468 065T0603333 32 CHIP 0.033UF 50V X7R
C467 065T0603333 32 CHIP 0.033UF 50V X7R
C466 065T0603333 32 CHIP 0.033UF 50V X7R
C465 065T0603333 32 CHIP 0.033UF 50V X7R
C464 065T0603333 32 CHIP 0.033UF 50V X7R
C463 065T0603333 32 CHIP 0.033UF 50V X7R
C462 065T0603333 32 CHIP 0.033UF 50V X7R
C503 065T0603339 31 CHIP 3.3PF 50V NPO
C502 065T0603339 31 CHIP 3.3PF 50V NPO
C501 065T0603339 31 CHIP 3.3PF 50V NPO
C500 065T0603339 31 CHIP 3.3PF 50V NPO
C499 065T0603339 31 CHIP 3.3PF 50V NPO
C498 065T0603339 31 CHIP 3.3PF 50V NPO
C497 065T0603339 31 CHIP 3.3PF 50V NPO
C496 065T0603339 31 CHIP 3.3PF 50V NPO
C495 065T0603339 31 CHIP 3.3PF 50V NPO
C494 065T0603339 31 CHIP 3.3PF 50V NPO
C240 065T0603392 32 CHIP 3900PF 50V X7R
C201 065T0603470 31 CHIP 47PF 50V NPO
C202 065T0603470 31 CHIP 47PF 50V NPO
C203 065T0603470 31 CHIP 47PF 50V NPO
C204 065T0603470 31 CHIP 47PF 50V NPO
C205 065T0603470 31 CHIP 47PF 50V NPO
C206 065T0603470 31 CHIP 47PF 50V NPO
C207 065T0603470 31 CHIP 47PF 50V NPO
C208 065T0603470 31 CHIP 47PF 50V NPO
C209 065T0603470 31 CHIP 47PF 50V NPO
C210 065T0603470 31 CHIP 47PF 50V NPO
C211 065T0603470 31 CHIP 47PF 50V NPO
C212 065T0603470 31 CHIP 47PF 50V NPO
C213 065T0603470 31 CHIP 47PF 50V NPO
C214 065T0603470 31 CHIP 47PF 50V NPO
C258 065T0603470 31 CHIP 47PF 50V NPO
C317 065T0603470 31 CHIP 47PF 50V NPO
C318 065T0603470 31 CHIP 47PF 50V NPO
C319 065T0603470 31 CHIP 47PF 50V NPO
C308 065T0603474 17 CHIP 0.47UF 16V Y5V
C307 065T0603474 17 CHIP 0.47UF 16V Y5V
C306 065T0603474 17 CHIP 0.47UF 16V Y5V
C305 065T0603474 17 CHIP 0.47UF 16V Y5V
C304 065T0603474 17 CHIP 0.47UF 16V Y5V
C303 065T0603474 17 CHIP 0.47UF 16V Y5V
C302 065T0603474 17 CHIP 0.47UF 16V Y5V
C296 065T0603474 17 CHIP 0.47UF 16V Y5V
C295 065T0603474 17 CHIP 0.47UF 16V Y5V
C215 065T0603509 31 CHIP 5PF 50V NPO
C216 065T0603509 31 CHIP 5PF 50V NPO
68
Page 69

20” LCD TV Color Monitor Norcent LT2025W
C244 065T0603682 32 CHIP 0.0068UF 50V X7R 0603
C158 065T0603683 32 CHIP 0.068UF 50V X7R
C217 065T0805155 A2 MLCC 0805 1.5UF K 10V X7R
C232 065T0805225 17 CHIP 2.2UF 16V Y5V
C233 065T0805225 17 CHIP 2.2UF 16V Y5V
C147 067T 4121003XT
C148 067T 4121003XT
C234 067T311F479 6T
C102 067T411F1003XT
C103 067T411F1003XT
C104 067T411F1003XT
C105 067T411F1003XT
C230 067T411F1003XT
C231 067T411F1003XT
C401 067T411F1003XT
C402 067T411F1003XT
C403 067T411F1003XT
C404 067T411F1003XT
C405 067T411F1003XT
C406 067T411F1003XT
C455 067T411F1003XT
C229 067T411F1003XT
C226 067T411F1003XT
C225 067T411F1003XT
C224 067T411F1003XT
C152 067T411F1003XT
C101 067T411F1003XT
C222 067T411F1013XT
C221 067T411F1013XT
C220 067T411F1013XT
C219 067T411F1013XT
C218 067T411F1013XT
C146 067T411F1013XT
C144 067T411F1013XT
C143 067T411F1013XT
C150 067T411F4703XT
C151 067T411F4703XT
C153 067T411F4703XT
C165 067T411F4703XT
FB220 071T 56G301 EA CHIP BEAD 300 OHM 0805
FB221 071T 56G301 EA CHIP BEAD 300 OHM 0805
FB105 071T 56G301 EA CHIP BEAD 300 OHM 0805
FB122 071T 56G301 EA CHIP BEAD 300 OHM 0805
FB121 071T 56G301 EA CHIP BEAD 300 OHM 0805
FB120 071T 56G301 EA CHIP BEAD 300 OHM 0805
FB119 071T 56G301 EA CHIP BEAD 300 OHM 0805
FB118 071T 56G301 EA CHIP BEAD 300 OHM 0805
FB114 071T 56G301 EA CHIP BEAD 300 OHM 0805
FB113 071T 56G301 EA CHIP BEAD 300 OHM 0805
FB219 071T 56G301 EA CHIP BEAD 300 OHM 0805
FB214 071T 56G301 EA CHIP BEAD 300 OHM 0805
FB213 071T 56G301 EA CHIP BEAD 300 OHM 0805
FB211 071T 56G301 EA CHIP BEAD 300 OHM 0805
EC 85℃ CHIP 10UF M 16V
EC 85℃ CHIP 10UF M 16V
EC 105℃ 4.7UF M 35V
EC 105℃ CHIP 10UF M 16V
EC 105℃ CHIP 10UF M 16V
EC 105℃ CHIP 10UF M 16V
EC 105℃ CHIP 10UF M 16V
EC 105℃ CHIP 10UF M 16V
EC 105℃ CHIP 10UF M 16V
EC 105℃ CHIP 10UF M 16V
EC 105℃ CHIP 10UF M 16V
EC 105℃ CHIP 10UF M 16V
EC 105℃ CHIP 10UF M 16V
EC 105℃ CHIP 10UF M 16V
EC 105℃ CHIP 10UF M 16V
EC 105℃ CHIP 10UF M 16V
EC 105℃ CHIP 10UF M 16V
EC 105℃ CHIP 10UF M 16V
EC 105℃ CHIP 10UF M 16V
EC 105℃ CHIP 10UF M 16V
EC 105℃ CHIP 10UF M 16V
EC 105℃ CHIP 10UF M 16V
EC 105℃ SMD CAP 100UF M 16V
EC 105℃ SMD CAP 100UF M 16V
EC 105℃ SMD CAP 100UF M 16V
EC 105℃ SMD CAP 100UF M 16V
EC 105℃ SMD CAP 100UF M 16V
EC 105℃ SMD CAP 100UF M 16V
EC 105℃ SMD CAP 100UF M 16V
EC 105℃ SMD CAP 100UF M 16V
EC 105℃ SMD CAP 47UF M16V
EC 105℃ SMD CAP 47UF M16V
EC 105℃ SMD CAP 47UF M16V
EC 105℃ SMD CAP 47UF M16V
69
Page 70

20” LCD TV Color Monitor Norcent LT2025W
FB210 071T 56G301 EA CHIP BEAD 300 OHM 0805
FB209 071T 56G301 EA CHIP BEAD 300 OHM 0805
FB207 071T 56G301 EA CHIP BEAD 300 OHM 0805
FB203 071T 56G301 EA CHIP BEAD 300 OHM 0805
FB202 071T 56G301 EA CHIP BEAD 300 OHM 0805
FB201 071T 56G301 EA CHIP BEAD 300 OHM 0805
FB123 071T 56G301 EA CHIP BEAD 300 OHM 0805
FB215 071T 56G301 EA CHIP BEAD 300 OHM 0805
FB216 071T 56G301 EA CHIP BEAD 300 OHM 0805
FB217 071T 56G301 EA CHIP BEAD 300 OHM 0805
FB218 071T 56G301 EA CHIP BEAD 300 OHM 0805
FB112 071T 56G301 EA CHIP BEAD 300 OHM 0805
FB111 071T 56G301 EA CHIP BEAD 300 OHM 0805
FB110 071T 56G301 EA CHIP BEAD 300 OHM 0805
FB109 071T 56G301 EA CHIP BEAD 300 OHM 0805
FB108 071T 56G301 EA CHIP BEAD 300 OHM 0805
FB107 071T 56G301 EA CHIP BEAD 300 OHM 0805
FB106 071T 56G301 EA CHIP BEAD 300 OHM 0805
FB204 071T 56Z601 CHIP BEAD 600 OHM
FB205 071T 56Z601 CHIP BEAD 600 OHM
U406 087T 202 32 NY IC SOCKET 32PIN PLCC
D401 093G 64 42 P BAV70 SOT-23
D409 093T 6432P LL4148 BY PANJIT
D410 093T 6432P LL4148 BY PANJIT
D403 093T 6433G BAV99 SOT-23
D404 093T 6433G BAV99 SOT-23
D405 093T 6433G BAV99 SOT-23
D406 093T 6433G BAV99 SOT-23
D407 093T 6433G BAV99 SOT-23
D403 093T 6433P BAV99
D404 093T 6433P BAV99
D405 093T 6433P BAV99
D406 093T 6433P BAV99
D407 093T 6433P BAV99
ZD406 093T 39S 34 T UDZS5.6B ROHM
ZD405 093T 39S 34 T UDZS5.6B ROHM
ZD403 093T 39S 34 T UDZS5.6B ROHM
ZD402 093T 39S 34 T UDZS5.6B ROHM
ZD401 093T 39S 34 T UDZS5.6B ROHM
FB415 093T 39S 34 T UDZS5.6B ROHM
D201 093T 64S51752T BA792
715T2167 1 MAIN BOARD PCB
U606 056T 616 7 TPA3002D2
U607 056T 616 8 TPA6110A2DGNR
Q603 057T 417 4 CHIP PMBS3904 BY PHILIPS
Q402 057T 417 4 CHIP PMBS3904 BY PHILIPS
Q401 057T 417 4 CHIP PMBS3904 BY PHILIPS
C210 061T0603000 CHIP 0OHM 1/16W
C211 061T0603000 CHIP 0OHM 1/16W
C212 061T0603000 CHIP 0OHM 1/16W
R202 061T0603000 CHIP 0OHM 1/16W
R206 061T0603000 CHIP 0OHM 1/16W
R207 061T0603000 CHIP 0OHM 1/16W
R603 061T0603000 CHIP 0OHM 1/16W
70
Page 71

20” LCD TV Color Monitor Norcent LT2025W
R648 061T0603000 CHIP 0OHM 1/16W
C209 061T0603000 CHIP 0OHM 1/16W
R601 061T0603100 CHIP 10OHM 1/16W
R602 061T0603100 CHIP 10OHM 1/16W
R220 061T0603101 CHIP 100OHM 1/16W
R221 061T0603101 CHIP 100OHM 1/16W
R222 061T0603101 CHIP 100OHM 1/16W
R225 061T0603101 CHIP 100OHM 1/16W
R226 061T0603101 CHIP 100OHM 1/16W
R219 061T0603101 CHIP 100OHM 1/16W
R216 061T0603101 CHIP 100OHM 1/16W
R215 061T0603101 CHIP 100OHM 1/16W
R646 061T0603102 CHIP 1K OHM 1/16W
R644 061T0603102 CHIP 1K OHM 1/16W
R643 061T0603102 CHIP 1K OHM 1/16W
R665 061T0603103 CHIP 10KOHM 1/16W
R664 061T0603103 CHIP 10KOHM 1/16W
R663 061T0603103 CHIP 10KOHM 1/16W
R662 061T0603103 CHIP 10KOHM 1/16W
R605 061T0603103 CHIP 10KOHM 1/16W
R666 061T0603103 CHIP 10KOHM 1/16W
R667 061T0603103 CHIP 10KOHM 1/16W
R668 061T0603103 CHIP 10KOHM 1/16W
R669 061T0603103 CHIP 10KOHM 1/16W
R670 061T0603103 CHIP 10KOHM 1/16W
R405 061T0603104 CHIP 100K OHM 1/16W
R407 061T0603104 CHIP 100K OHM 1/16W
R653 061T0603104 CHIP 100K OHM 1/16W
R661 061T0603124 RST CHIPR 120 KOHM +-5% 1/10W
R659 061T0603124 RST CHIPR 120 KOHM +-5% 1/10W
R658 061T0603153 RST CHIPR 15 KOHM +-5% 1/10W
R606 061T0603220 CHIP 22OHM 1/16W
R609 061T0603223 CHIP 22KOHM 1/16W
R652 061T0603243 RST CHIPR 24 KOHM +-5% 1/10W
R608 061T0603333 RST CHIPR 33 KOHM +-5% 1/10W
R607 061T0603392 CHIP 3.9KOHM 1/16W
R610 061T0603470 RST CHIPR 47 OHM +-5% 1/10W
R224 061T0603471 RST CHIPR 470OHM +-5% 1/10W
R223 061T0603471 RST CHIPR 470OHM +-5% 1/10W
R218 061T0603471 RST CHIPR 470OHM +-5% 1/10W
R217 061T0603471 RST CHIPR 470OHM +-5% 1/10W
R651 061T0603472 CHIP 4.7KOHM 1/16W
R650 061T0603472 CHIP 4.7KOHM 1/16W
R404 061T0603473 CHIP 47KOHM 1/16W
R403 061T0603473 CHIP 47KOHM 1/16W
R208 061T0603750 75OHM
R205 061T0603750 75OHM
R204 061T0603750 75OHM
R201 061T0603750 75OHM
R209 061T0603750 75OHM
R210 061T0603750 75OHM
R211 061T0603750 75OHM
R212 061T0603750 75OHM
R213 061T0603750 75OHM
71
Page 72

20” LCD TV Color Monitor Norcent LT2025W
R655 061T1206000 RST CHIPR 0 OHM +-5% 1/4W
R657 061T1206000 RST CHIPR 0 OHM +-5% 1/4W
R656 061T1206000 RST CHIPR 0 OHM +-5% 1/4W
C691 065T0603102 31 CHIP 1000PF 50V NPO
C687 065T0603102 31 CHIP 1000PF 50V NPO
C686 065T0603102 31 CHIP 1000PF 50V NPO
C622 065T0603102 31 CHIP 1000PF 50V NPO
C621 065T0603102 31 CHIP 1000PF 50V NPO
C611 065T0603102 31 CHIP 1000PF 50V NPO
C629 065T0603103 32 CHIP 0.01UF 50V X7R
C625 065T0603103 32 CHIP 0.01UF 50V X7R
C683 065T0603103 32 CHIP 0.01UF 50V X7R
C680 065T0603103 32 CHIP 0.01UF 50V X7R
C682 065T0603104 32 CHIP 0.1UF 50V X7R
C681 065T0603104 32 CHIP 0.1UF 50V X7R
C632 065T0603104 32 CHIP 0.1UF 50V X7R
C631 065T0603104 32 CHIP 0.1UF 50V X7R
C628 065T0603104 32 CHIP 0.1UF 50V X7R
C627 065T0603104 32 CHIP 0.1UF 50V X7R
C620 065T0603104 32 CHIP 0.1UF 50V X7R
C626 065T0603104 32 CHIP 0.1UF 50V X7R
C602 065T0603104 32 CHIP 0.1UF 50V X7R
C634 065T0603105 12 CHIP 1UF 16V X7R
C695 065T0603105 12 CHIP 1UF 16V X7R
C693 065T0603105 12 CHIP 1UF 16V X7R
C630 065T0603105 12 CHIP 1UF 16V X7R
C610 065T0603105 12 CHIP 1UF 16V X7R
C609 065T0603105 12 CHIP 1UF 16V X7R
C608 065T0603105 12 CHIP 1UF 16V X7R
C606 065T0603105 12 CHIP 1UF 16V X7R
C605 065T0603105 12 CHIP 1UF 16V X7R
C232 065T0603221 31 CHIP 220PF 50V NPO
C679 065T0603221 31 CHIP 220PF 50V NPO
C204 065T0603224 17 CHIP 0.22UF 16V Y5V
C231 065T0603331 31 CHIP 330PF 50V NPO
C230 065T0603331 31 CHIP 330PF 50V NPO
C229 065T0603331 31 CHIP 330PF 50V NPO
C228 065T0603331 31 CHIP 330PF 50V NPO
C217 065T0603331 31 CHIP 330PF 50V NPO
C207 065T0603331 31 CHIP 330PF 50V NPO
C206 065T0603331 31 CHIP 330PF 50V NPO
C203 065T0603331 31 CHIP 330PF 50V NPO
C202 065T0603331 31 CHIP 330PF 50V NPO
C235 065T0603333 32 CHIP 0.033UF 50V X7R
C234 065T0603333 32 CHIP 0.033UF 50V X7R
C233 065T0603333 32 CHIP 0.033UF 50V X7R
C222 065T0603334 17 CHIP 0.33UF 16V Y5V
C221 065T0603334 17 CHIP 0.33UF 16V Y5V
C220 065T0603334 17 CHIP 0.33UF 16V Y5V
C223 065T0603334 17 CHIP 0.33UF 16V Y5V
C224 065T0603334 17 CHIP 0.33UF 16V Y5V
C225 065T0603334 17 CHIP 0.33UF 16V Y5V
C226 065T0603334 17 CHIP 0.33UF 16V Y5V
C227 065T0603334 17 CHIP 0.33UF 16V Y5V
72
Page 73

20” LCD TV Color Monitor Norcent LT2025W
C236 065T0603472 32 CHIP 4700PF 50V X7R
C237 065T0603472 32 CHIP 4700PF 50V X7R
C238 065T0603472 32 CHIP 4700PF 50V X7R
C694 065T0603474 17 CHIP 0.47UF 16V Y5V
C205 065T0603683 12 CHIP 0.68UF 16V X7R
L206 071T 56G151 A CHIOP BEAD 150 OHM
L203 071T 56G151 A CHIOP BEAD 150 OHM
L604 071T 56G301 EA CHIP BEAD 300 OHM 0805
L603 071T 56G301 EA CHIP BEAD 300 OHM 0805
L602 071T 56G301 EA CHIP BEAD 300 OHM 0805
L601 071T 56G301 EA CHIP BEAD 300 OHM 0805
L202 071T 56G301 EA CHIP BEAD 300 OHM 0805
L201 071T 56G301 EA CHIP BEAD 300 OHM 0805
L213 071T 59B121 K CHIP BEAD
L212 071T 59B121 K CHIP BEAD
L210 071T 59B121 K CHIP BEAD
L209 071T 59B121 K CHIP BEAD
L208 071T 59B121 K CHIP BEAD
L207 071T 59B121 K CHIP BEAD
D406 093T 6433P BAV99
D405 093T 39S582 PH ZENER DIODE BZX284-C33 PHILIPS
ZD408 093T 39S582 PH ZENER DIODE BZX284-C33 PHILIPS
715T1747 1 VS TUNER BOARD PCB
C3 061T0603000 CHIP 0OHM 1/16W
C4 061T0603000 CHIP 0OHM 1/16W
FB4 061T0805000 CHIP 0OHM 5% 1/10W
FB3 061T0805000 CHIP 0OHM 5% 1/10W
061T0805000 EARPHONE BOARD PCB
Q1 057T 417 6 PMBS3906/PHILIPS-SMT
R01 061T0603101 CHIP 100OHM 1/16W
R07 061T0603102 CHIP 1K OHM 1/16W
R08 061T0603201 RST CHIPR 200 OHM +-5% 1/10W
R09 061T0603201 RST CHIPR 200 OHM +-5% 1/10W
C03 065T0603101 31 CHIP 100PF 50V NPO
C02 065T0603104 12 MLCC 0603 0.1UF K 16V X7R
C04 065T0603104 12 MLCC 0603 0.1UF K 16V X7R
C05 065T0603104 12 MLCC 0603 0.1UF K 16V X7R
C01 065T0603225 17 CHIP 2.2UF 16V Y5V
FB04 071T 56Z601 CHIP BEAD 600 OHM
FB03 071T 56Z601 CHIP BEAD 600 OHM
FB02 071T 56Z601 CHIP BEAD 600 OHM
D03 093T 6432S IN4148W
D01 093T 6432S IN4148W
D05 093T 39S 24 T RLZ 5.6B LLDS
D06 093T 39S 24 T RLZ 5.6B LLDS
715T2132 1 IR BOARD PCB
CN01 033T8032 4C WAFER 1.25MM SMT 4P
R03 061L0603180 0F RES 180R 1/10W 1% SMT 0603
R04 061L0603240 0F CHIPR 240 OHM 1/10W
R06 061L0603470 0F 470 OHM 1% 1/10W
R09 061L0603680 0F RST SM 0603 RC22H 680R PM1 R
R02 061T0603150 0F RST CHIPR 150 OHM +-1% 1/10W
R05 061T0603330 0F RST CHIPR 330 OHM +-1% 1/10W
C828 065T0603101 31 CHIP 100PF 50V NPO
73
Page 74

20” LCD TV Color Monitor Norcent LT2025W
SW02 077T 604 2 TO CHIP TACT SW TS-9-TMG-533
SW03 077T 604 2 TO CHIP TACT SW TS-9-TMG-533
SW05 077T 604 2 TO CHIP TACT SW TS-9-TMG-533
SW04 077T 604 2 TO CHIP TACT SW TS-9-TMG-533
SW07 077T 604 2 TO CHIP TACT SW TS-9-TMG-533
SW06 077T 604 2 TO CHIP TACT SW TS-9-TMG-533
SW01 077T 604 2 TO CHIP TACT SW TS-9-TMG-533
ZD01 093T 39S 34 T UDZS5.6B ROHM
715T1822 3 KEY BOARD PCB
CN901 006T 31500 EYELET
L902 006T 31502 1.5MM RIVET
L910 006T 31502 1.5MM RIVET
T930 006T 31502 1.5MM RIVET
C933 067T 2154707NT 47UF 50V NCC 5*11MM
C934 067T 2154707NT 47UF 50V NCC 5*11MM
C933 067T215Y4707KT 47UF 50V
FB902 071T 55 29 BEAD
FB903 071T 55 29 BEAD
FB904 071T 55 29 BEAD
715T1599 3 POWER BOARD PCB
J903 095T 90 23 TIN COATED
J904 095T 90 23 TIN COATED
J905 095T 90 23 TIN COATED
J906 095T 90 23 TIN COATED
J907 095T 90 23 TIN COATED
J931 095T 90 23 TIN COATED
J926 095T 90 23 TIN COATED
J925 095T 90 23 TIN COATED
J923 095T 90 23 TIN COATED
J922 095T 90 23 TIN COATED
J921 095T 90 23 TIN COATED
J917 095T 90 23 TIN COATED
J916 095T 90 23 TIN COATED
J915 095T 90 23 TIN COATED
J914 095T 90 23 TIN COATED
J913 095T 90 23 TIN COATED
J912 095T 90 23 TIN COATED
J911 095T 90 23 TIN COATED
J909 095T 90 23 TIN COATED
J908 095T 90 23 TIN COATED
J902 095T 90 23 TIN COATED
J901 095T 90 23 TIN COATED
R952 061T 17119352T RST CFR 19K0HM +-2% 1/4W
R953 061T 17143352T RST CFR 43KOHM +-2% 1/4W
R990 061T 17233252T 3.3K 1/4W
R993 061T 17233252T 3.3K 1/4W
R950 061T 17247152T 470OHM 5% 1/4W
R971 061T212Y47052T bST MGFR 47 OHM +-5% 1/2W
C934 067T215Y4707KT 47UF 50V
FB960 071T 55 29 BEAD
ZD991 093T 3916652T MTZJ T-72 15B
ZD990 093T 3917252T MTZJT-72 33B DO-34
ZD992 093T 3952552T MTZJ T 6.2B
D932 093T 6038T52T FR103
74
Page 75

20” LCD TV Color Monitor Norcent LT2025W
C916 006T 31500 EYELET
TL950 056T 158 4 T H431BA
TL950 056T 158 10 T IC AZ431AZ-AE1 TO-92 AAC
Q941 057T 566 1 2N5060RLRAG TO-92 BY ON
Q941 057T 566 4 MCR100-6SCR
F901 084T 56 3W FUSE
F970 084T 56 3W FUSE
F980 084T 56 3W FUSE
F960 084T 56 4W FUSE 4A
75
Page 76

20” LCD TV Color Monitor Norcent LT2025W
E206AHNKD4NONCP
Location Part No. Description
007T 5 9102 COMPOUND PALLET
026T 800504 5 BARCODE
034T1655 GM L COVER CABLE
034T6385 GM L HINGE COVER
040T 457842 2B PALLET LABEL
044T3121510506 SPONGE
044T6002716 3A Paper board
044T9003210 CORNER PAPER
045T 88609 22 EPE COVER
045T 88626 3 PE BAG FOR MONITOR
050T 500 1 CABLE TIE
052T 1185 MIDDLE TAPE FOR CARTON
052T 1186 SMALL TAPE
052T 1211 A ADHESIVE TYPE
052T6020 22 PR0TECT FILM
052T6025 15144 GP MYLAR
089T1738GAA D1 SIGNAL CABLE
089T402A18N IS POWER CORD
092TB1JX1A31GF BATTERY
095T8014 2522 WIRE HARNESS
095T8014 3538 WIRE HARNESS
095T8014 5560 WIRE HARNESS
095T8014 8D657 WIRE HARNESS
095T8018 3D604 LVDS CABLE
098TR7SW3NENCF Remote Control
0D1T1730 8128 CR3 SCREW
0M1T 340 6 47 CR3 SCREW
0M1T 340 14120 SCREW M4X14
0M1T1140 6120 SCREW 4*6MM
0M1T1730 6128 CR3 SCREW
0M1T1730 6128 CR3 SCREW
0M1T1730 6128 CR3 SCREW
0M1T2130 6 47 CR3 SCREW
0M1T2130 6 47 CR3 SCREW
0M1T2130 6 47 CR3 SCREW
0Q1T 330 8120 SCREW 3X8mm
0Q1T 340 12 47 CR3 SCREW
0Q1T 340 12128 CR3 SCREW
0Q1T 930 6128 CR3 SCREW
0Q1T3040 8 47 CR3 SCREW
705TQAK0B34052 BACK COVER ASS'Y
011T 176 1 RL WIRE HOLDER
012T 394 3 RUBBER FOOT
015T6184 1 Kensington lock
015T6257 1 HINGE BKT
033T6301A14 2C PC PLATE ON TOP
0Q1T 140 8120 SCREW
0Q1T 330 6120 SCREW
76
Page 77

20” LCD TV Color Monitor Norcent LT2025W
0Q1T 330 8120 SCREW 3X8mm
0Q1T 330 8120 SCREW 3X8mm
0Q1T1030 8128 CR3 SCREW
HJPFBAA1P HEAD PHONE JACK BOARD 20"TV
CN1 033T3802 5H WAFER 5P RIGHT ANELE PI
J1 088T 30230T PHONE JACK
095T 900 53 HARNESS 95MM
SMTHJPFBAA1P HEAD PHONE BOARD
C3 061T0603000 CHIP 0OHM 1/16W
C4 061T0603000 CHIP 0OHM 1/16W
FB4 061T0805000 CHIP 0OHM 5% 1/10W
FB3 061T0805000 CHIP 0OHM 5% 1/10W
715T1381 2 2 EARPHONE BOARD PCB
IRPFAA9P IR BOARD
CN101 033T3802 5 AUDIO IN
D02 056T 627503 IC GP18B38BCE-HB GUANGPU
081T 12 6B GP LED GP32032CE/GP-1-ZY-50-HB
SMTIRPFAA9P IR BOARD FOR SMT
Q1 057T 417 6 PMBS3906/PHILIPS-SMT
R01 061T0603101 CHIP 100OHM 1/16W
R07 061T0603102 CHIP 1K OHM 1/16W
R08 061T0603201 RST CHIPR 200 OHM +-5% 1/10W
R09 061T0603201 RST CHIPR 200 OHM +-5% 1/10W
D01 061T1206000 RST CHIPR 0 OHM +-5% 1/4W
C03 065T0603102 32 CHIP 1000PF 50V X7R
C02 065T0603104 12 MLCC 0603 0.1UF K 16V X7R
C04 065T0603104 12 MLCC 0603 0.1UF K 16V X7R
C05 065T0603104 12 MLCC 0603 0.1UF K 16V X7R
C01 065T0603225 17 CHIP 2.2UF 16V Y5V
FB02 071T 56Z601 CHIP BEAD 600 OHM
FB03 071T 56Z601 CHIP BEAD 600 OHM
FB04 071T 56Z601 CHIP BEAD 600 OHM
D03 093T 6432S IN4148W
D06 093T 39S 24 T RLZ 5.6B LLDS
D05 093T 39S 24 T RLZ 5.6B LLDS
715T2132 1 IR BOARD PCB
KEPFAACP KEY BOARD
095T 900576 HARNESS
SMTKEPFAACP KEY BOARD FOR SMT
CN01 033T8032 4C WAFER 1.25MM SMT 4P
R03 061G0603180 0F RST CHIPR 180 OHM +-1% 1/10W
R04 061G0603240 0F RST CHIPR 240 OHM +-1% 1/10W
R06 061G0603470 0F RST CHIPR 470 OHM +-1% 1/10W
R09 061G0603680 0F RST CHIPR 680 OHM +-1% 1/10W
R02 061T0603150 0F RST CHIPR 150 OHM +-1% 1/10W
R05 061T0603330 0F RST CHIPR 330 OHM +-1% 1/10W
C828 065T0603101 31 CHIP 100PF 50V NPO
SW01 077T 604 2 TO CHIP TACT SW TS-9-TMG-533
SW02 077T 604 2 TO CHIP TACT SW TS-9-TMG-533
SW07 077T 604 2 TO CHIP TACT SW TS-9-TMG-533
SW06 077T 604 2 TO CHIP TACT SW TS-9-TMG-533
77
Page 78

20” LCD TV Color Monitor Norcent LT2025W
SW05 077T 604 2 TO CHIP TACT SW TS-9-TMG-533
SW04 077T 604 2 TO CHIP TACT SW TS-9-TMG-533
SW03 077T 604 2 TO CHIP TACT SW TS-9-TMG-533
ZD01 093T 39S 34 T UDZS5.6B ROHM
715T1822 3 KEY BOARD PCB
705TQAK0F34026 BEZEL ASS'Y
033T4823 P0 L FUN KEY
033T4907AGM 2L CARD READER (AUDIO ONLY)
033T6442 ED C IR LENS
033T6443 1 C POWER LENS
034T1652 GM 2L REAR COVER
078T 306501 KL SPK 8OHM 5W KUAIDA
078T 306501 KR SPK 8OHM 5W KUAIDA
Q34T6384 RGB7L BEZEL
Q44T3231 21 16 EVA washer
Q44T3231 21 17 EVA washer
705TQAK0P34012 STAND ASS'Y
015T6313 1 BKT-STAND
015T6338 1 BKT-BASE
034T6359 RG L STAND
0M1T 330 6120 SCREW
Q34T6358 RG 1L 20 BASE
Q44T3231 21 8 EVA WASHER
750TVUA0W0222N PANEL TV T200XW02 V01 AUO
CBPF6H1KY8P MAIN BOARD
CN103 033T3278 10 10 PLUG B10E-XHA/JST E10B-XHA/
CN114 033T3802 8H WAFER 8P RIGHT ANGLE PITCH 2.0
CN107 033T801744A FH WAFER
CN113 033T8027 24 CONN W TO B 12P*2 P*2.0 4504-2
040T 457624 1B CPU LABEL
040T 45762412B CBPC LABEL
U409 053T 40504 TPSRA4M50B00-B0
U202 056T 665505 HD IC VF45A3D HAODA
U203 056T 665506 HD IC AF45A3D HAODA
U406 056T1133518SST IC SST39VF020-70-4C-NHE
R561 061T153M100 59 10 OHM 5% 3W
C167 067T215H102 3N KY16VB1000M-L 10*20
C228 067T215H102 3N KY16VB1000M-L 10*20
C154 067T305V331 3 330UF +-20% 16V
C454 067T305V471 3
L204 073T 5410010T 0307 10UH +-10%
L203 073T 5556810T 0.56UH +-10%
L602 073T 5568910T 6.8UH+-10%
L102 073T 253137 ER CHOKE COIL BY EROCORE SCB-03
L101 073T 253137 ER CHOKE COIL BY EROCORE SCB-03
J102 088T 30214K PHONE JACK
CN105 088T 35315F H D-SUB 15PIN
U401 090T 372 2 HEAT SINK
X201 093T 2258B J 24.576MHZ/20PF/49US
SMTF6H1KY8P MAIN BIARD FOR SMT
U401 056T 562516 TDA15501E
105 摄氏度 470UF +-20% 16V
78
Page 79

20” LCD TV Color Monitor Norcent LT2025W
U103 056T 563 25 AIC1084-33PE
U102 056T 563 25 AIC1084-33PE
U101 056T 563 27 AIC1117A-18PY SOT223 AIC
U105 056T 585 9 IC AP1117E50LA ANACHIP
U407 056T 614 1 IC 74HC4052D PHILIPS
U302 056T 614 1 IC 74HC4052D PHILIPS
U402 056T 634 2 PI5V330Q QSOP-16 BY PER
U404 056T 634 2 PI5V330Q QSOP-16 BY PER
U301 056T1133 34 M24C02-WMN6TP
U403 056T113353A M24C32-WMN6TP
Q104 057T 417 4 CHIP PMBS3904 BY PHILIPS
Q404 057T 417 4 CHIP PMBS3904 BY PHILIPS
Q403 057T 417 4 CHIP PMBS3904 BY PHILIPS
Q402 057T 417 4 CHIP PMBS3904 BY PHILIPS
Q401 057T 417 4 CHIP PMBS3904 BY PHILIPS
Q202 057T 417 4 CHIP PMBS3904 BY PHILIPS
Q201 057T 417 4 CHIP PMBS3904 BY PHILIPS
Q116 057T 417 4 CHIP PMBS3904 BY PHILIPS
Q109 057T 417 4 CHIP PMBS3904 BY PHILIPS
Q108 057T 417 4 CHIP PMBS3904 BY PHILIPS
Q107 057T 417 4 CHIP PMBS3904 BY PHILIPS
Q106 057T 417 4 CHIP PMBS3904 BY PHILIPS
Q105 057T 417 4 CHIP PMBS3904 BY PHILIPS
Q405 057T 417 4 CHIP PMBS3904 BY PHILIPS
Q418 057T 417 4 CHIP PMBS3904 BY PHILIPS
Q417 057T 417 4 CHIP PMBS3904 BY PHILIPS
Q416 057T 417 4 CHIP PMBS3904 BY PHILIPS
Q415 057T 417 4 CHIP PMBS3904 BY PHILIPS
Q414 057T 417 4 CHIP PMBS3904 BY PHILIPS
Q413 057T 417 4 CHIP PMBS3904 BY PHILIPS
Q412 057T 417 4 CHIP PMBS3904 BY PHILIPS
Q406 057T 417 4 CHIP PMBS3904 BY PHILIPS
Q102 057T 417 6 PMBS3906/PHILIPS-SMT
Q103 057T 417 6 PMBS3906/PHILIPS-SMT
Q111 057T 763 1 A03401L SOT23 BY AOS
Q112 057T 763 3 AO4411L SO-8 BY AOS SMT
Q101 057T 763 3 AO4411L SO-8 BY AOS SMT
RP411 061T 125220 8 CHIP ARRAY 220HM 1/16W 8P4R
RP410 061T 125220 8 CHIP ARRAY 220HM 1/16W 8P4R
RP409 061T 125220 8 CHIP ARRAY 220HM 1/16W 8P4R
RP408 061T 125220 8 CHIP ARRAY 220HM 1/16W 8P4R
RP407 061T 125220 8 CHIP ARRAY 220HM 1/16W 8P4R
R201 061T0603000 CHIP 0OHM 1/16W
R203 061T0603000 CHIP 0OHM 1/16W
R204 061T0603000 CHIP 0OHM 1/16W
R205 061T0603000 CHIP 0OHM 1/16W
R206 061T0603000 CHIP 0OHM 1/16W
R207 061T0603000 CHIP 0OHM 1/16W
R550 061T0603000 CHIP 0OHM 1/16W
R549 061T0603000 CHIP 0OHM 1/16W
R542 061T0603000 CHIP 0OHM 1/16W
79
Page 80

20” LCD TV Color Monitor Norcent LT2025W
R516 061T0603000 CHIP 0OHM 1/16W
R515 061T0603000 CHIP 0OHM 1/16W
R514 061T0603000 CHIP 0OHM 1/16W
R513 061T0603000 CHIP 0OHM 1/16W
R495 061T0603000 CHIP 0OHM 1/16W
R493 061T0603000 CHIP 0OHM 1/16W
R492 061T0603000 CHIP 0OHM 1/16W
R429 061T0603000 CHIP 0OHM 1/16W
R294 061T0603000 CHIP 0OHM 1/16W
R208 061T0603000 CHIP 0OHM 1/16W
R408 061T0603100 CHIP 10OHM 1/16W
R407 061T0603100 CHIP 10OHM 1/16W
R406 061T0603100 CHIP 10OHM 1/16W
R222 061T0603100 CHIP 10OHM 1/16W
R220 061T0603100 CHIP 10OHM 1/16W
R215 061T0603100 CHIP 10OHM 1/16W
R249 061T0603101 CHIP 100OHM 1/16W
R248 061T0603101 CHIP 100OHM 1/16W
R245 061T0603101 CHIP 100OHM 1/16W
R244 061T0603101 CHIP 100OHM 1/16W
R242 061T0603101 CHIP 100OHM 1/16W
R240 061T0603101 CHIP 100OHM 1/16W
R523 061T0603101 CHIP 100OHM 1/16W
R524 061T0603101 CHIP 100OHM 1/16W
R525 061T0603101 CHIP 100OHM 1/16W
R526 061T0603101 CHIP 100OHM 1/16W
R545 061T0603101 CHIP 100OHM 1/16W
R546 061T0603101 CHIP 100OHM 1/16W
R551 061T0603101 CHIP 100OHM 1/16W
R554 061T0603101 CHIP 100OHM 1/16W
R555 061T0603101 CHIP 100OHM 1/16W
R556 061T0603101 CHIP 100OHM 1/16W
R557 061T0603101 CHIP 100OHM 1/16W
R247 061T0603101 CHIP 100OHM 1/16W
R522 061T0603101 CHIP 100OHM 1/16W
R250 061T0603101 CHIP 100OHM 1/16W
R251 061T0603101 CHIP 100OHM 1/16W
R252 061T0603101 CHIP 100OHM 1/16W
R253 061T0603101 CHIP 100OHM 1/16W
R276 061T0603101 CHIP 100OHM 1/16W
R289 061T0603101 CHIP 100OHM 1/16W
R291 061T0603101 CHIP 100OHM 1/16W
R459 061T0603101 CHIP 100OHM 1/16W
R460 061T0603101 CHIP 100OHM 1/16W
R461 061T0603101 CHIP 100OHM 1/16W
R483 061T0603101 CHIP 100OHM 1/16W
R520 061T0603101 CHIP 100OHM 1/16W
R239 061T0603101 CHIP 100OHM 1/16W
R226 061T0603101 CHIP 100OHM 1/16W
R224 061T0603101 CHIP 100OHM 1/16W
R223 061T0603101 CHIP 100OHM 1/16W
80
Page 81

20” LCD TV Color Monitor Norcent LT2025W
R221 061T0603101 CHIP 100OHM 1/16W
R219 061T0603101 CHIP 100OHM 1/16W
R218 061T0603101 CHIP 100OHM 1/16W
R115 061T0603102 CHIP 1K OHM 1/16W
R116 061T0603102 CHIP 1K OHM 1/16W
R124 061T0603102 CHIP 1K OHM 1/16W
R269 061T0603102 CHIP 1K OHM 1/16W
R270 061T0603102 CHIP 1K OHM 1/16W
R534 061T0603102 CHIP 1K OHM 1/16W
R535 061T0603102 CHIP 1K OHM 1/16W
R536 061T0603102 CHIP 1K OHM 1/16W
R537 061T0603102 CHIP 1K OHM 1/16W
R538 061T0603102 CHIP 1K OHM 1/16W
R559 061T0603102 CHIP 1K OHM 1/16W
R263 061T0603103 CHIP 10KOHM 1/16W
R262 061T0603103 CHIP 10KOHM 1/16W
R261 061T0603103 CHIP 10KOHM 1/16W
R260 061T0603103 CHIP 10KOHM 1/16W
R259 061T0603103 CHIP 10KOHM 1/16W
R258 061T0603103 CHIP 10KOHM 1/16W
R257 061T0603103 CHIP 10KOHM 1/16W
R256 061T0603103 CHIP 10KOHM 1/16W
R134 061T0603103 CHIP 10KOHM 1/16W
R133 061T0603103 CHIP 10KOHM 1/16W
R110 061T0603103 CHIP 10KOHM 1/16W
R109 061T0603103 CHIP 10KOHM 1/16W
R108 061T0603103 CHIP 10KOHM 1/16W
R295 061T0603103 CHIP 10KOHM 1/16W
R531 061T0603103 CHIP 10KOHM 1/16W
R489 061T0603103 CHIP 10KOHM 1/16W
R488 061T0603103 CHIP 10KOHM 1/16W
R487 061T0603103 CHIP 10KOHM 1/16W
R486 061T0603103 CHIP 10KOHM 1/16W
R485 061T0603103 CHIP 10KOHM 1/16W
R484 061T0603103 CHIP 10KOHM 1/16W
R455 061T0603103 CHIP 10KOHM 1/16W
R452 061T0603103 CHIP 10KOHM 1/16W
R451 061T0603103 CHIP 10KOHM 1/16W
R450 061T0603103 CHIP 10KOHM 1/16W
R449 061T0603103 CHIP 10KOHM 1/16W
R302 061T0603103 CHIP 10KOHM 1/16W
R104 061T0603103 CHIP 10KOHM 1/16W
R103 061T0603103 CHIP 10KOHM 1/16W
R532 061T0603103 CHIP 10KOHM 1/16W
R533 061T0603103 CHIP 10KOHM 1/16W
R102 061T0603104 CHIP 100K OHM 1/16W
R106 061T0603104 CHIP 100K OHM 1/16W
R254 061T0603104 CHIP 100K OHM 1/16W
R527 061T0603104 CHIP 100K OHM 1/16W
R528 061T0603104 CHIP 100K OHM 1/16W
R529 061T0603104 CHIP 100K OHM 1/16W
81
Page 82

20” LCD TV Color Monitor Norcent LT2025W
R272 061T0603105 CHIP 1MOHM 1/16W
R211 061T0603122 RST CHIPR 1.2 KOHM +-5% 1/10W
R212 061T0603122 RST CHIPR 1.2 KOHM +-5% 1/10W
R213 061T0603122 RST CHIPR 1.2 KOHM +-5% 1/10W
R214 061T0603122 RST CHIPR 1.2 KOHM +-5% 1/10W
R265 061T0603123 RST CHIPR 12 KOHM +-5% 1/10W
R409 061T0603123 RST CHIPR 12 KOHM +-5% 1/10W
R490 061T0603131 RST CHIPR 130 OHM +-5% 1/10W
R494 061T0603131 RST CHIPR 130 OHM +-5% 1/10W
R491 061T0603131 RST CHIPR 130 OHM +-5% 1/10W
R558 061T0603151 RST CHIPR 150 OHM +-5% 1/10W
R553 061T0603152 CHIP 1.5KOHM 1/16W
R112 061T0603153 RST CHIPR 15 KOHM +-5% 1/10W
R113 061T0603153 RST CHIPR 15 KOHM +-5% 1/10W
R266 061T0603153 RST CHIPR 15 KOHM +-5% 1/10W
R267 061T0603153 RST CHIPR 15 KOHM +-5% 1/10W
R268 061T0603153 RST CHIPR 15 KOHM +-5% 1/10W
R560 061T0603202 RST CHIPR 2 KOHM +-5% 1/10W
R273 061T0603220 CHIP 22OHM 1/16W
R121 061T0603223 CHIP 22KOHM 1/16W
R122 061T0603223 CHIP 22KOHM 1/16W
R123 061T0603223 CHIP 22KOHM 1/16W
R130 061T0603223 CHIP 22KOHM 1/16W
R552 061T0603223 CHIP 22KOHM 1/16W
R547 061T0603272 CHIP 2.7KOHM 1/16W
R548 061T0603272 CHIP 2.7KOHM 1/16W
R275 061T0603273 RST CHIPR 27 KOHM +-5% 1/10W
R126 061T0603332 RST CHIPR 3.3 KOHM +-5% 1/10W
R127 061T0603332 RST CHIPR 3.3 KOHM +-5% 1/10W
R296 061T0603332 RST CHIPR 3.3 KOHM +-5% 1/10W
R297 061T0603332 RST CHIPR 3.3 KOHM +-5% 1/10W
R419 061T0603332 RST CHIPR 3.3 KOHM +-5% 1/10W
R420 061T0603332 RST CHIPR 3.3 KOHM +-5% 1/10W
R278 061T0603391 RST CHIPR 390 OHM +-5% 1/10W
R279 061T0603393 RST CHIPR 39 KOHM +-5% 1/10W
R410 061T0603470 RST CHIPR 47 OHM +-5% 1/10W
R411 061T0603470 RST CHIPR 47 OHM +-5% 1/10W
R412 061T0603470 RST CHIPR 47 OHM +-5% 1/10W
R457 061T0603470 RST CHIPR 47 OHM +-5% 1/10W
R458 061T0603470 RST CHIPR 47 OHM +-5% 1/10W
R105 061T0603472 CHIP 4.7KOHM 1/16W
R107 061T0603472 CHIP 4.7KOHM 1/16W
R281 061T0603472 CHIP 4.7KOHM 1/16W
R413 061T0603472 CHIP 4.7KOHM 1/16W
R415 061T0603472 CHIP 4.7KOHM 1/16W
R416 061T0603472 CHIP 4.7KOHM 1/16W
R496 061T0603472 CHIP 4.7KOHM 1/16W
R497 061T0603472 CHIP 4.7KOHM 1/16W
R498 061T0603472 CHIP 4.7KOHM 1/16W
R499 061T0603472 CHIP 4.7KOHM 1/16W
R501 061T0603472 CHIP 4.7KOHM 1/16W
82
Page 83

20” LCD TV Color Monitor Norcent LT2025W
R502 061T0603472 CHIP 4.7KOHM 1/16W
R540 061T0603472 CHIP 4.7KOHM 1/16W
R541 061T0603472 CHIP 4.7KOHM 1/16W
R543 061T0603473 CHIP 47KOHM 1/16W
R530 061T0603473 CHIP 47KOHM 1/16W
R290 061T0603473 CHIP 47KOHM 1/16W
R286 061T0603473 CHIP 47KOHM 1/16W
R285 061T0603473 CHIP 47KOHM 1/16W
R284 061T0603473 CHIP 47KOHM 1/16W
R101 061T0603473 CHIP 47KOHM 1/16W
R287 061T0603681 RST CHIPR 680 OHM +-5% 1/10W
R132 061T0603683 RST CHIPR 68 KOHM +-5% 1/10W
R131 061T0603683 RST CHIPR 68 KOHM +-5% 1/10W
R544 061T0603750 75OHM
R521 061T0603750 75OHM
R519 061T0603750 75OHM
R518 061T0603750 75OHM
R512 061T0603750 75OHM
R506 061T0603750 75OHM
R505 061T0603750 75OHM
R504 061T0603750 75OHM
R288 061T0603750 75OHM
R418 061T0603823 RST CHIPR 82 KOHM +-5% 1/10W
FB416 061T0805000 CHIP 0OHM 5% 1/10W
FB414 061T0805000 CHIP 0OHM 5% 1/10W
FB413 061T0805000 CHIP 0OHM 5% 1/10W
FB412 061T0805000 CHIP 0OHM 5% 1/10W
FB411 061T0805000 CHIP 0OHM 5% 1/10W
FB410 061T0805000 CHIP 0OHM 5% 1/10W
FB409 061T0805000 CHIP 0OHM 5% 1/10W
FB408 061T0805000 CHIP 0OHM 5% 1/10W
R507 061T0805101 RST CHIPR 100 OHM +-5% 1/8W
R503 061T0805101 RST CHIPR 100 OHM +-5% 1/8W
R508 061T0805101 RST CHIPR 100 OHM +-5% 1/8W
FB104 061T1206000 RST CHIPR 0 OHM +-5% 1/4W
R210 061T1206000 RST CHIPR 0 OHM +-5% 1/4W
FB117 061T1206000 4 RST CHIPR 0 OHM +-5% 1/4W
FB101 061T1206000 4 RST CHIPR 0 OHM +-5% 1/4W
R120 061T1206229 RST CHIPR 2.2 OHM +-5% 1/4W
R119 061T1206229 RST CHIPR 2.2 OHM +-5% 1/4W
R118 061T1206229 RST CHIPR 2.2 OHM +-5% 1/4W
R117 061T1206229 RST CHIPR 2.2 OHM +-5% 1/4W
C457 065T0603100 31 CHIP 10PF 50V NPO
C458 065T0603100 31 CHIP 10PF 50V NPO
C459 065T0603100 31 CHIP 10PF 50V NPO
C161 065T0603101 31 CHIP 100PF 50V NPO
C162 065T0603101 31 CHIP 100PF 50V NPO
C259 065T0603101 31 CHIP 100PF 50V NPO
C309 065T0603101 31 CHIP 100PF 50V NPO
C456 065T0603101 31 CHIP 100PF 50V NPO
C471 065T0603101 31 CHIP 100PF 50V NPO
83
Page 84

20” LCD TV Color Monitor Norcent LT2025W
C472 065T0603101 31 CHIP 100PF 50V NPO
C473 065T0603101 31 CHIP 100PF 50V NPO
C474 065T0603101 31 CHIP 100PF 50V NPO
C491 065T0603101 31 CHIP 100PF 50V NPO
C475 065T0603101 31 CHIP 100PF 50V NPO
C239 065T0603102 32 CHIP 1000PF 50V X7R
C238 065T0603102 32 CHIP 1000PF 50V X7R
C245 065T0603103 32 CHIP 0.01UF 50V X7R
C250 065T0603104 12 MLCC 0603 0.1UF K 16V X7R
C251 065T0603104 12 MLCC 0603 0.1UF K 16V X7R
C252 065T0603104 12 MLCC 0603 0.1UF K 16V X7R
C253 065T0603104 12 MLCC 0603 0.1UF K 16V X7R
C254 065T0603104 12 MLCC 0603 0.1UF K 16V X7R
C255 065T0603104 12 MLCC 0603 0.1UF K 16V X7R
C256 065T0603104 12 MLCC 0603 0.1UF K 16V X7R
C257 065T0603104 12 MLCC 0603 0.1UF K 16V X7R
C260 065T0603104 12 MLCC 0603 0.1UF K 16V X7R
C261 065T0603104 12 MLCC 0603 0.1UF K 16V X7R
C262 065T0603104 12 MLCC 0603 0.1UF K 16V X7R
C263 065T0603104 12 MLCC 0603 0.1UF K 16V X7R
C249 065T0603104 12 MLCC 0603 0.1UF K 16V X7R
C132 065T0603104 12 MLCC 0603 0.1UF K 16V X7R
C134 065T0603104 12 MLCC 0603 0.1UF K 16V X7R
C135 065T0603104 12 MLCC 0603 0.1UF K 16V X7R
C136 065T0603104 12 MLCC 0603 0.1UF K 16V X7R
C137 065T0603104 12 MLCC 0603 0.1UF K 16V X7R
C138 065T0603104 12 MLCC 0603 0.1UF K 16V X7R
C139 065T0603104 12 MLCC 0603 0.1UF K 16V X7R
C156 065T0603104 12 MLCC 0603 0.1UF K 16V X7R
C157 065T0603104 12 MLCC 0603 0.1UF K 16V X7R
C246 065T0603104 12 MLCC 0603 0.1UF K 16V X7R
C247 065T0603104 12 MLCC 0603 0.1UF K 16V X7R
C248 065T0603104 12 MLCC 0603 0.1UF K 16V X7R
C279 065T0603104 12 MLCC 0603 0.1UF K 16V X7R
C280 065T0603104 12 MLCC 0603 0.1UF K 16V X7R
C281 065T0603104 12 MLCC 0603 0.1UF K 16V X7R
C282 065T0603104 12 MLCC 0603 0.1UF K 16V X7R
C283 065T0603104 12 MLCC 0603 0.1UF K 16V X7R
C284 065T0603104 12 MLCC 0603 0.1UF K 16V X7R
C285 065T0603104 12 MLCC 0603 0.1UF K 16V X7R
C286 065T0603104 12 MLCC 0603 0.1UF K 16V X7R
C287 065T0603104 12 MLCC 0603 0.1UF K 16V X7R
C288 065T0603104 12 MLCC 0603 0.1UF K 16V X7R
C435 065T0603104 12 MLCC 0603 0.1UF K 16V X7R
C437 065T0603104 12 MLCC 0603 0.1UF K 16V X7R
C278 065T0603104 12 MLCC 0603 0.1UF K 16V X7R
C445 065T0603104 12 MLCC 0603 0.1UF K 16V X7R
C470 065T0603104 12 MLCC 0603 0.1UF K 16V X7R
C469 065T0603104 12 MLCC 0603 0.1UF K 16V X7R
C264 065T0603104 12 MLCC 0603 0.1UF K 16V X7R
C265 065T0603104 12 MLCC 0603 0.1UF K 16V X7R
84
Page 85

20” LCD TV Color Monitor Norcent LT2025W
C266 065T0603104 12 MLCC 0603 0.1UF K 16V X7R
C268 065T0603104 12 MLCC 0603 0.1UF K 16V X7R
C269 065T0603104 12 MLCC 0603 0.1UF K 16V X7R
C271 065T0603104 12 MLCC 0603 0.1UF K 16V X7R
C273 065T0603104 12 MLCC 0603 0.1UF K 16V X7R
C275 065T0603104 12 MLCC 0603 0.1UF K 16V X7R
C277 065T0603104 12 MLCC 0603 0.1UF K 16V X7R
C131 065T0603104 12 MLCC 0603 0.1UF K 16V X7R
C117 065T0603104 12 MLCC 0603 0.1UF K 16V X7R
C116 065T0603104 12 MLCC 0603 0.1UF K 16V X7R
C115 065T0603104 12 MLCC 0603 0.1UF K 16V X7R
C114 065T0603104 12 MLCC 0603 0.1UF K 16V X7R
C113 065T0603104 12 MLCC 0603 0.1UF K 16V X7R
C112 065T0603104 12 MLCC 0603 0.1UF K 16V X7R
C111 065T0603104 12 MLCC 0603 0.1UF K 16V X7R
C110 065T0603104 12 MLCC 0603 0.1UF K 16V X7R
C109 065T0603104 12 MLCC 0603 0.1UF K 16V X7R
C108 065T0603104 12 MLCC 0603 0.1UF K 16V X7R
C107 065T0603104 12 MLCC 0603 0.1UF K 16V X7R
C106 065T0603104 12 MLCC 0603 0.1UF K 16V X7R
C118 065T0603104 12 MLCC 0603 0.1UF K 16V X7R
C130 065T0603104 12 MLCC 0603 0.1UF K 16V X7R
C129 065T0603104 12 MLCC 0603 0.1UF K 16V X7R
C128 065T0603104 12 MLCC 0603 0.1UF K 16V X7R
C127 065T0603104 12 MLCC 0603 0.1UF K 16V X7R
C126 065T0603104 12 MLCC 0603 0.1UF K 16V X7R
C125 065T0603104 12 MLCC 0603 0.1UF K 16V X7R
C124 065T0603104 12 MLCC 0603 0.1UF K 16V X7R
C123 065T0603104 12 MLCC 0603 0.1UF K 16V X7R
C122 065T0603104 12 MLCC 0603 0.1UF K 16V X7R
C121 065T0603104 12 MLCC 0603 0.1UF K 16V X7R
C120 065T0603104 12 MLCC 0603 0.1UF K 16V X7R
C119 065T0603104 12 MLCC 0603 0.1UF K 16V X7R
C235 065T0603104 32 CHIP 0.1UF 50V X7R
C166 065T0603104 32 CHIP 0.1UF 50V X7R
C164 065T0603104 32 CHIP 0.1UF 50V X7R
C155 065T0603105 17 CHIP 1UF 16V Y5V
C479 065T0603105 17 CHIP 1UF 16V Y5V
C480 065T0603105 17 CHIP 1UF 16V Y5V
C482 065T0603105 17 CHIP 1UF 16V Y5V
C481 065T0603105 17 CHIP 1UF 16V Y5V
C478 065T0603120 31 CHIP 12pF 50V NPO
C477 065T0603120 31 CHIP 12pF 50V NPO
C476 065T0603120 31 CHIP 12pF 50V NPO
C142 065T0603221 31 CHIP 220PF 50V NPO
C438 065T0603221 31 CHIP 220PF 50V NPO
C439 065T0603221 31 CHIP 220PF 50V NPO
C140 065T0603224 17 CHIP 0.22UF 16V Y5V
C141 065T0603224 17 CHIP 0.22UF 16V Y5V
C237 065T0603224 17 CHIP 0.22UF 16V Y5V
C289 065T0603224 17 CHIP 0.22UF 16V Y5V
85
Page 86

20” LCD TV Color Monitor Norcent LT2025W
C290 065T0603224 17 CHIP 0.22UF 16V Y5V
C291 065T0603224 17 CHIP 0.22UF 16V Y5V
C292 065T0603224 17 CHIP 0.22UF 16V Y5V
C293 065T0603224 17 CHIP 0.22UF 16V Y5V
C297 065T0603224 17 CHIP 0.22UF 16V Y5V
C298 065T0603224 17 CHIP 0.22UF 16V Y5V
C299 065T0603224 17 CHIP 0.22UF 16V Y5V
C301 065T0603224 17 CHIP 0.22UF 16V Y5V
C489 065T0603270 31 CHIP 27PF 50V NPO
C490 065T0603270 31 CHIP 27PF 50V NPO
C484 065T0603271 31 CHIP 270PF 50V NPO
C485 065T0603271 31 CHIP 270PF 50V NPO
C487 065T0603271 31 CHIP 270PF 50V NPO
C483 065T0603330 31 CHIP 33PF 50V NPO
C486 065T0603330 31 CHIP 33PF 50V NPO
C488 065T0603330 31 CHIP 33PF 50V NPO
C468 065T0603333 32 CHIP 0.033UF 50V X7R
C467 065T0603333 32 CHIP 0.033UF 50V X7R
C466 065T0603333 32 CHIP 0.033UF 50V X7R
C465 065T0603333 32 CHIP 0.033UF 50V X7R
C464 065T0603333 32 CHIP 0.033UF 50V X7R
C463 065T0603333 32 CHIP 0.033UF 50V X7R
C462 065T0603333 32 CHIP 0.033UF 50V X7R
C240 065T0603392 32 CHIP 3900PF 50V X7R
C201 065T0603470 31 CHIP 47PF 50V NPO
C202 065T0603470 31 CHIP 47PF 50V NPO
C203 065T0603470 31 CHIP 47PF 50V NPO
C204 065T0603470 31 CHIP 47PF 50V NPO
C205 065T0603470 31 CHIP 47PF 50V NPO
C206 065T0603470 31 CHIP 47PF 50V NPO
C207 065T0603470 31 CHIP 47PF 50V NPO
C208 065T0603470 31 CHIP 47PF 50V NPO
C209 065T0603470 31 CHIP 47PF 50V NPO
C210 065T0603470 31 CHIP 47PF 50V NPO
C211 065T0603470 31 CHIP 47PF 50V NPO
C212 065T0603470 31 CHIP 47PF 50V NPO
C213 065T0603470 31 CHIP 47PF 50V NPO
C214 065T0603470 31 CHIP 47PF 50V NPO
C258 065T0603470 31 CHIP 47PF 50V NPO
C317 065T0603470 31 CHIP 47PF 50V NPO
C318 065T0603470 31 CHIP 47PF 50V NPO
C319 065T0603470 31 CHIP 47PF 50V NPO
C308 065T0603474 17 CHIP 0.47UF 16V Y5V
C307 065T0603474 17 CHIP 0.47UF 16V Y5V
C306 065T0603474 17 CHIP 0.47UF 16V Y5V
C305 065T0603474 17 CHIP 0.47UF 16V Y5V
C304 065T0603474 17 CHIP 0.47UF 16V Y5V
C303 065T0603474 17 CHIP 0.47UF 16V Y5V
C302 065T0603474 17 CHIP 0.47UF 16V Y5V
C295 065T0603474 17 CHIP 0.47UF 16V Y5V
C296 065T0603474 17 CHIP 0.47UF 16V Y5V
86
Page 87

20” LCD TV Color Monitor Norcent LT2025W
C216 065T0603509 31 CHIP 5PF 50V NPO
C215 065T0603509 31 CHIP 5PF 50V NPO
C244 065T0603682 32 CHIP 0.0068UF 50V X7R 0603
C158 065T0603683 32 CHIP 0.068UF 50V X7R
C217 065T0805155 A2 MLCC 0805 1.5UF K 10V X7R
C232 065T0805225 17 CHIP 2.2UF 16V Y5V
C233 065T0805225 17 CHIP 2.2UF 16V Y5V
C147 067T 4121003XT
C148 067T 4121003XT
C234 067T311F479 6T
C402 067T411F1003XT
C403 067T411F1003XT
C404 067T411F1003XT
C405 067T411F1003XT
C406 067T411F1003XT
C455 067T411F1003XT
C401 067T411F1003XT
C101 067T411F1003XT
C231 067T411F1003XT
C230 067T411F1003XT
C229 067T411F1003XT
C226 067T411F1003XT
C225 067T411F1003XT
C224 067T411F1003XT
C152 067T411F1003XT
C143 067T411F1013XT
C144 067T411F1013XT
C146 067T411F1013XT
C218 067T411F1013XT
C219 067T411F1013XT
C220 067T411F1013XT
C221 067T411F1013XT
C222 067T411F1013XT
C150 067T411F4703XT
C151 067T411F4703XT
C105 067T411F4703XT
C104 067T411F4703XT
C103 067T411F4703XT
C102 067T411F4703XT
C165 067T411F4703XT
C153 067T411F4703XT
FB105 071T 56G151 A CHIOP BEAD 150 OHM
FB111 071T 56G301 EA CHIP BEAD 300 OHM 0805
FB110 071T 56G301 EA CHIP BEAD 300 OHM 0805
FB109 071T 56G301 EA CHIP BEAD 300 OHM 0805
FB112 071T 56G301 EA CHIP BEAD 300 OHM 0805
FB113 071T 56G301 EA CHIP BEAD 300 OHM 0805
FB114 071T 56G301 EA CHIP BEAD 300 OHM 0805
FB123 071T 56G301 EA CHIP BEAD 300 OHM 0805
FB122 071T 56G301 EA CHIP BEAD 300 OHM 0805
FB121 071T 56G301 EA CHIP BEAD 300 OHM 0805
EC 85℃ CHIP 10UF M 16V
EC 85℃ CHIP 10UF M 16V
EC 105℃ 4.7UF M 35V
EC 105℃ CHIP 10UF M 16V
EC 105℃ CHIP 10UF M 16V
EC 105℃ CHIP 10UF M 16V
EC 105℃ CHIP 10UF M 16V
EC 105℃ CHIP 10UF M 16V
EC 105℃ CHIP 10UF M 16V
EC 105℃ CHIP 10UF M 16V
EC 105℃ CHIP 10UF M 16V
EC 105℃ CHIP 10UF M 16V
EC 105℃ CHIP 10UF M 16V
EC 105℃ CHIP 10UF M 16V
EC 105℃ CHIP 10UF M 16V
EC 105℃ CHIP 10UF M 16V
EC 105℃ CHIP 10UF M 16V
EC 105℃ CHIP 10UF M 16V
EC 105℃ SMD CAP 100UF M 16V
EC 105℃ SMD CAP 100UF M 16V
EC 105℃ SMD CAP 100UF M 16V
EC 105℃ SMD CAP 100UF M 16V
EC 105℃ SMD CAP 100UF M 16V
EC 105℃ SMD CAP 100UF M 16V
EC 105℃ SMD CAP 100UF M 16V
EC 105℃ SMD CAP 100UF M 16V
EC 105℃ SMD CAP 47UF M16V
EC 105℃ SMD CAP 47UF M16V
EC 105℃ SMD CAP 47UF M16V
EC 105℃ SMD CAP 47UF M16V
EC 105℃ SMD CAP 47UF M16V
EC 105℃ SMD CAP 47UF M16V
EC 105℃ SMD CAP 47UF M16V
EC 105℃ SMD CAP 47UF M16V
87
Page 88

20” LCD TV Color Monitor Norcent LT2025W
FB120 071T 56G301 EA CHIP BEAD 300 OHM 0805
FB119 071T 56G301 EA CHIP BEAD 300 OHM 0805
FB118 071T 56G301 EA CHIP BEAD 300 OHM 0805
FB221 071T 56G301 EA CHIP BEAD 300 OHM 0805
FB220 071T 56G301 EA CHIP BEAD 300 OHM 0805
FB219 071T 56G301 EA CHIP BEAD 300 OHM 0805
FB218 071T 56G301 EA CHIP BEAD 300 OHM 0805
FB217 071T 56G301 EA CHIP BEAD 300 OHM 0805
FB216 071T 56G301 EA CHIP BEAD 300 OHM 0805
FB215 071T 56G301 EA CHIP BEAD 300 OHM 0805
FB214 071T 56G301 EA CHIP BEAD 300 OHM 0805
FB213 071T 56G301 EA CHIP BEAD 300 OHM 0805
FB211 071T 56G301 EA CHIP BEAD 300 OHM 0805
FB210 071T 56G301 EA CHIP BEAD 300 OHM 0805
FB209 071T 56G301 EA CHIP BEAD 300 OHM 0805
FB207 071T 56G301 EA CHIP BEAD 300 OHM 0805
FB203 071T 56G301 EA CHIP BEAD 300 OHM 0805
FB202 071T 56G301 EA CHIP BEAD 300 OHM 0805
FB201 071T 56G301 EA CHIP BEAD 300 OHM 0805
FB108 071T 56G301 EA CHIP BEAD 300 OHM 0805
FB107 071T 56G301 EA CHIP BEAD 300 OHM 0805
FB106 071T 56G301 EA CHIP BEAD 300 OHM 0805
FB204 071T 56Z601 CHIP BEAD 600 OHM
FB205 071T 56Z601 CHIP BEAD 600 OHM
U406 087T 202 32 NY IC SOCKET 32PIN PLCC
D401 093G 64 42 P BAV70 SOT-23
D410 093T 6432P LL4148 BY PANJIT
D409 093T 6432P LL4148 BY PANJIT
D403 093T 6433P BAV99
D404 093T 6433P BAV99
D405 093T 6433P BAV99
D406 093T 6433P BAV99
D407 093T 6433P BAV99
ZD406 093T 39S 34 T UDZS5.6B ROHM
ZD405 093T 39S 34 T UDZS5.6B ROHM
ZD403 093T 39S 34 T UDZS5.6B ROHM
ZD402 093T 39S 34 T UDZS5.6B ROHM
ZD401 093T 39S 34 T UDZS5.6B ROHM
FB415 093T 39S 34 T UDZS5.6B ROHM
D201 093T 64S51752T BA792
715T2167 1 MAIN BOARD PCB
PWTVA66AA2P POWER T2135-D-X-X-1-060810
CN208 033T8021 2D U 3.5mm WAFER
CN202 033T8021 2D U 3.5mm WAFER
CN204 033T8021 2D U 3.5mm WAFER
CN205 033T8021 2D U 3.5mm WAFER
CN206 033T8021 2D U 3.5mm WAFER
CN207 033T8021 2D U 3.5mm WAFER
040T 45762412B CBPC LABEL
IC902 056T 139 3A PC123Y22FZOF
IC903 056T 158 10 T IC AZ431AZ-AE1 TO-92 AAC
88
Page 89

20” LCD TV Color Monitor Norcent LT2025W
VAR901 061T 46 6 VARISTOR 10A 470V NCC
NR901 061T 5810T 8 OHM 4A NTCR BY THINKING
R914 061T152M278 64 0.27 OHM 5% 2W
C906 065T 2K152 1T6921 1.5NF/2KV Y5P +-10%
C248 065T 3J1206EM 12PF/3KV
C242 065T 3J1206EM 12PF/3KV
C233 065T 3J1206EM 12PF/3KV
C221 065T 3J1206EM 12PF/3KV
C212 065T 3J1206EM 12PF/3KV
C205 065T 3J1206EM 12PF/3KV
C901 065T306K4712BM GP Y1 CAP 470PF 250VAC MURATA 10%
C902 065T306K4712BM GP Y1 CAP 470PF 250VAC MURATA 10%
C923 065T306M1022BM Y1.CAP.001UF 250VAC MURATA
C921 065T306M2222BP Y1.CAP.0022UF 250V AC
C905 067T 31510115K
C101 067T215S1024KV
FB901 071T 55 29 BEAD
L101 073G 253163LSA CHOKE
L904 073L 174 40LSG LINE FILTER
L902 073L 174 50 LR CHOKE COIL
L903 073T 253 91 LS CHOKE BY LI SHIN
T901 080GL20T 10 T X'FMR
PT206 080TL20T 3 DN X'FMR
PT205 080TL20T 3 DN X'FMR
PT204 080TL20T 3 DN X'FMR
PT203 080TL20T 3 DN X'FMR
PT202 080TL20T 3 DN X'FMR
PT201 080TL20T 3 DN X'FMR
F901 084G 56 1 FUSE 2A 250V WICKMANN
CN901 087T 501 32 S AC SOCKET
HS4 090T6212 1 HEAT SINK
G-G1A 095T 900 72 WIRE HARNESS
CN903 095T8013 10610 WIRE HARNESS
705TQAK0 57001 Q901 ASS'Y
057T 667 21 STP10NK70ZFP
0M1T1730 8128 CR3 SCREW
Q90T0043 1 HEAT SINK
705TQAK0 61001 R903 ASS'Y
R903 061G152M10458G 100K OHM 5% 2W
096T 29 6 SHRINK TUBE UL/CSA
705TQAK0 67001 ASS'Y
C110 067T215S471 3K LOW ESR EC 470UF 16V
C108 067T215S471 3K LOW ESR EC 470UF 16V
C916 067T215S4714KL
C232 067T215S4714KL
C201 067T215S4714KL
C940 067T215S6814KS
C915 067T215S6814KS
C920 067T215S6814KS
BD901 093T 50460900 BRIDGE GBU408 LITEON
705TQAK0 93001 D910/D911 ASS'Y
ELCAP 105℃ 100UF M 450V
EC 105℃ CAP 1000UF M 25V
ELCAP 105℃ 470UF M 25V
ELCAP 105℃ 470UF M 25V
ELCAP 105℃ 470UF M 25V
ELCAP 105℃ 680UF M 25V
ELCAP 105℃ 680UF M 25V
ELCAP 105℃ 680UF M 25V
89
Page 90

20” LCD TV Color Monitor Norcent LT2025W
090G6257 1 HEAT SINK
D911 093T 60247 DIODE FME-220A TO-220 SANKEN
D910 093T 60247 DIODE FME-220A TO-220 SANKEN
0M1T1730 8128 CR3 SCREW
PWA66AA2SMTP POWER BOARD FOR AI
IC101 056T 379 37 FP5001DR-LR
IC901 056T 379 52 LD7552BS
IC201 056T 608 6 02 960G SOP20
Q102 057T 417 4 CHIP PMBS3904 BY PHILIPS
Q205 057T 417 4 CHIP PMBS3904 BY PHILIPS
Q902 057T 417 4 CHIP PMBS3904 BY PHILIPS
Q208 057T 417 6 PMBS3906/PHILIPS-SMT
Q103 057T 417 6 PMBS3906/PHILIPS-SMT
Q903 057T 417 6 PMBS3906/PHILIPS-SMT
Q212 057T 600 61 AM4502C-T1-PF S0-8
Q209 057T 600 61 AM4502C-T1-PF S0-8
Q207 057T 600 61 AM4502C-T1-PF S0-8
Q201 057T 600 61 AM4502C-T1-PF S0-8
Q216 057T 759 2 RK7002
Q217 057T 759 2 RK7002
Q215 057T 759 2 RK7002
Q214 057T 759 2 RK7002
Q202 057T 759 2 RK7002
Q204 057T 759 2 RK7002
Q210 057T 759 2 RK7002
Q211 057T 759 2 RK7002
Q213 057T 759 2 RK7002
Q203 057T 760 4 DTA144WKA BY ROHM SMT
Q206 057T 760 5 DTC144WKA BY FOHM SMT
Q904 057T 760 5 DTC144WKA BY FOHM SMT
Q101 057T 763 7 AOD405L
R215 061T0603000 CHIP 0OHM 1/16W
R230 061T0603000 CHIP 0OHM 1/16W
R235 061T0603000 CHIP 0OHM 1/16W
R238 061T0603000 CHIP 0OHM 1/16W
R241 061T0603000 CHIP 0OHM 1/16W
R245 061T0603000 CHIP 0OHM 1/16W
R247 061T0603000 CHIP 0OHM 1/16W
R115 061T0603100 CHIP 10OHM 1/16W
R113 061T0603101 CHIP 100OHM 1/16W
R205 061T0603102 CHIP 1K OHM 1/16W
R116 061T0603102 CHIP 1K OHM 1/16W
R114 061T0603102 CHIP 1K OHM 1/16W
R203 061T0603103 CHIP 10KOHM 1/16W
R204 061T0603103 CHIP 10KOHM 1/16W
R207 061T0603103 CHIP 10KOHM 1/16W
R209 061T0603103 CHIP 10KOHM 1/16W
R231 061T0603104 CHIP 100K OHM 1/16W
R226 061T0603105 CHIP 1MOHM 1/16W
R232 061T0603105 CHIP 1MOHM 1/16W
R237 061T0603105 CHIP 1MOHM 1/16W
90
Page 91

20” LCD TV Color Monitor Norcent LT2025W
R240 061T0603105 CHIP 1MOHM 1/16W
R242 061T0603105 CHIP 1MOHM 1/16W
R246 061T0603105 CHIP 1MOHM 1/16W
R248 061T0603105 CHIP 1MOHM 1/16W
R251 061T0603105 CHIP 1MOHM 1/16W
R239 061T0603154 RST CHIPR 150 KOHM +-5% 1/10W
R225 061T0603200 1F RST CHIPR 2 KOHM +-1% 1/10W
R213 061T0603204 RST CHIPR 200 KOHM +-5% 1/10W
R214 061T0603220 CHIP 22OHM 1/16W
R220 061T0603220 CHIP 22OHM 1/16W
R201 061T0603242 RST CHIPR 2.4 KOHM +-5% 1/10W
R109 061T0603300 1F RST CHIPR 3 KOHM +-1% 1/10W
R106 061T0603333 RST CHIPR 33 KOHM +-5% 1/10W
R223 061T0603333 RST CHIPR 33 KOHM +-5% 1/10W
R110 061T0603360 1F CHIP 3.6K OHM 1/16W 1%
R108 061T0603473 CHIP 47KOHM 1/16W
R227 061T0603510 2F RST CHIPR 51 KOHM +-1% 1/10W
R224 061T0603513 RST CHIPR 51 KOHM +-5% 1/10W
R217 061T0603680 2F RST CHIPR 68 KOHM +-1% 1/10W
R222 061T0603823 RST CHIPR 82 KOHM +-5% 1/10W
R216 061T0603912 CHIP 9.1K OHM 1/16W
R236 061T0603913 CHIP 91KOHM 1/16W
C103 061T0805000 CHIP 0OHM 5% 1/10W
R911 061T0805100 3F RST CHIPR 100 KOHM +-1% 1/8W
R917 061T0805101 RST CHIPR 100 OHM +-5% 1/8W
R243 061T0805101 RST CHIPR 100 OHM +-5% 1/8W
R229 061T0805101 RST CHIPR 100 OHM +-5% 1/8W
R228 061T0805101 RST CHIPR 100 OHM +-5% 1/8W
R218 061T0805101 RST CHIPR 100 OHM +-5% 1/8W
R208 061T0805101 RST CHIPR 100 OHM +-5% 1/8W
R206 061T0805101 RST CHIPR 100 OHM +-5% 1/8W
R922 061T0805102 CHIP 1KOHM 1/10W
R925 061T0805102 CHIP 1KOHM 1/10W
R250 061T0805104 RST CHIPR 100 KOHM +-5% 1/8W
R111 061T0805153 RST CHIPR 15 KOHM +-5% 1/8W
R912 061T0805203 RST CHIPR 20 KOHM +-5% 1/8W
R913 061T0805203 RST CHIPR 20 KOHM +-5% 1/8W
R928 061T0805203 RST CHIPR 20 KOHM +-5% 1/8W
R923 061T0805222 RST CHIPR 2.2 KOHM +-5% 1/8W
R927 061T0805243 1F RST CHIPR 2.43 KOHM +-1% 1/8W
R112 061T0805272 RST CHIPR 2.7 KOHM +-5% 1/8W
R918 061T0805472 RST CHIPR 4.7 KOHM +-5% 1/8W
R916 061T0805472 RST CHIPR 4.7 KOHM +-5% 1/8W
R210 061T0805560 0F RST CHIPR 560 OHM +-1% 1/8W
R212 061T0805560 0F RST CHIPR 560 OHM +-1% 1/8W
R219 061T0805560 0F RST CHIPR 560 OHM +-1% 1/8W
R233 061T0805560 0F RST CHIPR 560 OHM +-1% 1/8W
R234 061T0805560 0F RST CHIPR 560 OHM +-1% 1/8W
R244 061T0805560 0F RST CHIPR 560 OHM +-1% 1/8W
R926 061T0805931 1F RST CHIPR 9.31 KOHM +-1% 1/8W
F903 061T1206000 RST CHIPR 0 OHM +-5% 1/4W
91
Page 92

20” LCD TV Color Monitor Norcent LT2025W
J242 061T1206000 RST CHIPR 0 OHM +-5% 1/4W
J241 061T1206000 RST CHIPR 0 OHM +-5% 1/4W
J239 061T1206000 RST CHIPR 0 OHM +-5% 1/4W
J238 061T1206000 RST CHIPR 0 OHM +-5% 1/4W
J237 061T1206000 RST CHIPR 0 OHM +-5% 1/4W
J236 061T1206000 RST CHIPR 0 OHM +-5% 1/4W
J235 061T1206000 RST CHIPR 0 OHM +-5% 1/4W
J229 061T1206000 RST CHIPR 0 OHM +-5% 1/4W
J228 061T1206000 RST CHIPR 0 OHM +-5% 1/4W
J227 061T1206000 RST CHIPR 0 OHM +-5% 1/4W
J224 061T1206000 RST CHIPR 0 OHM +-5% 1/4W
J223 061T1206000 RST CHIPR 0 OHM +-5% 1/4W
J222 061T1206000 RST CHIPR 0 OHM +-5% 1/4W
J203 061T1206000 RST CHIPR 0 OHM +-5% 1/4W
R909 061T1206100 8.2 OHM 1/4W
R211 061T1206100 8.2 OHM 1/4W
R933 061T1206101 RST CHIPR 100 OHM +-5% 1/4W
R932 061T1206101 RST CHIPR 100 OHM +-5% 1/4W
R931 061T1206101 RST CHIPR 100 OHM +-5% 1/4W
R930 061T1206101 RST CHIPR 100 OHM +-5% 1/4W
R920 061T1206101 RST CHIPR 100 OHM +-5% 1/4W
R919 061T1206101 RST CHIPR 100 OHM +-5% 1/4W
R904 061T1206105 RST CHIPR 1 MOHM +-5% 1/4W
R905 061T1206105 RST CHIPR 1 MOHM +-5% 1/4W
R910 061T1206221 RST CHIPR 220 OHM +-5% 1/4W
R921 061T1206301 RST CHIPR 300 OHM +-5% 1/4W
R908 061T1206339 RST CHIPR 3.3 OHM +-5% 1/4W
R202 061T1206471 RST CHIPR 470 OHM +-5% 1/4W
D212 061T1206472 RST CHIPR 4.7 KOHM +-5% 1/4W
D211 061T1206472 RST CHIPR 4.7 KOHM +-5% 1/4W
D213 061T1206472 RST CHIPR 4.7 KOHM +-5% 1/4W
D224 061T1206472 RST CHIPR 4.7 KOHM +-5% 1/4W
D225 061T1206472 RST CHIPR 4.7 KOHM +-5% 1/4W
D226 061T1206472 RST CHIPR 4.7 KOHM +-5% 1/4W
R924 061T1206684 RST CHIPR 680KOHM +-5% 1/4W
R907 061T1206684 RST CHIPR 680KOHM +-5% 1/4W
R906 061T1206684 RST CHIPR 680KOHM +-5% 1/4W
R902 061T1206684 RST CHIPR 680KOHM +-5% 1/4W
R901 061T1206684 RST CHIPR 680KOHM +-5% 1/4W
R900 061T1206684 RST CHIPR 680KOHM +-5% 1/4W
C208 065T0603103 32 CHIP 0.01UF 50V X7R
C207 065T0603103 32 CHIP 0.01UF 50V X7R
C214 065T0603103 32 CHIP 0.01UF 50V X7R
C215 065T0603103 32 CHIP 0.01UF 50V X7R
C251 065T0603103 32 CHIP 0.01UF 50V X7R
C250 065T0603103 32 CHIP 0.01UF 50V X7R
C246 065T0603103 32 CHIP 0.01UF 50V X7R
C245 065T0603103 32 CHIP 0.01UF 50V X7R
C239 065T0603103 32 CHIP 0.01UF 50V X7R
C238 065T0603103 32 CHIP 0.01UF 50V X7R
C225 065T0603103 32 CHIP 0.01UF 50V X7R
92
Page 93

20” LCD TV Color Monitor Norcent LT2025W
C224 065T0603103 32 CHIP 0.01UF 50V X7R
C249 065T0603104 32 CHIP 0.1UF 50V X7R
C247 065T0603104 32 CHIP 0.1UF 50V X7R
C244 065T0603104 32 CHIP 0.1UF 50V X7R
C241 065T0603104 32 CHIP 0.1UF 50V X7R
C234 065T0603104 32 CHIP 0.1UF 50V X7R
C228 065T0603104 32 CHIP 0.1UF 50V X7R
C211 065T0603104 32 CHIP 0.1UF 50V X7R
C252 065T0603104 32 CHIP 0.1UF 50V X7R
C253 065T0603104 32 CHIP 0.1UF 50V X7R
C210 065T0603105 12 CHIP 1UF 16V X7R
C213 065T0603105 12 CHIP 1UF 16V X7R
C218 065T0603105 12 CHIP 1UF 16V X7R
C227 065T0603105 12 CHIP 1UF 16V X7R
C231 065T0603152 32 CHIP 1500PF 50V X7R
C216 065T0603224 12 CHIP 0.22UF +-10% 16V X7R
C217 065T0603473 32 CHIP 0.047UF 50V X7R
C229 065T0603473 32 CHIP 0.047UF 50V X7R
C220 065T0603474 27 CHIP 0.47UF 25V Y5V
C230 065T0603682 32 CHIP 0.0068UF 50V X7R 0603
C910 065T0805102 31 1000PF 50V NPO
C925 065T0805103 22 CHIP 0.01UF 25V X7R 080
C102 065T0805104 32 CHIP 0.1U 50V X7R
C104 065T0805104 32 CHIP 0.1U 50V X7R
C109 065T0805104 32 CHIP 0.1U 50V X7R
C114 065T0805104 32 CHIP 0.1U 50V X7R
C115 065T0805104 32 CHIP 0.1U 50V X7R
C202 065T0805104 32 CHIP 0.1U 50V X7R
C209 065T0805104 32 CHIP 0.1U 50V X7R
C235 065T0805104 32 CHIP 0.1U 50V X7R
C243 065T0805104 32 CHIP 0.1U 50V X7R
C254 065T0805104 32 CHIP 0.1U 50V X7R
C908 065T0805104 32 CHIP 0.1U 50V X7R
C911 065T0805104 32 CHIP 0.1U 50V X7R
C912 065T0805104 32 CHIP 0.1U 50V X7R
C917 065T0805104 32 CHIP 0.1U 50V X7R
C918 065T0805104 32 CHIP 0.1U 50V X7R
C924 065T0805104 32 CHIP 0.1U 50V X7R
C932 065T0805104 32 CHIP 0.1U 50V X7R
C223 065T0805105 22 CHIP 1UF 25V X7R 0805
C909 065T0805201 32 CHIP 200PF 50V MPO 0805
C222 065T0805221 31 220PF 50V NPO
C226 065T0805472 31 CHIP 4700PF 50V NPO 0805
C913 065T1206102 72 CHIP 1000PF 500V X7R
C914 065T1206102 72 CHIP 1000PF 500V X7R
C203 065T1206475 12 CHIP 4.7UF 16V 1206
C206 065T1206475 12 CHIP 4.7UF 16V 1206
C236 065T1206475 12 CHIP 4.7UF 16V 1206
C240 065T1206475 12 CHIP 4.7UF 16V 1206
C256 065T1206475 12 CHIP 4.7UF 16V 1206
C259 065T1206475 12 CHIP 4.7UF 16V 1206
93
Page 94

20” LCD TV Color Monitor Norcent LT2025W
D227 093T 6432S IN4148W
D905 093T 6432S IN4148W
D907 093T 6432S IN4148W
D102 093T 6432V LL4148-GSO8 SMD BY VISHA
D903 093T 6432V LL4148-GSO8 SMD BY VISHA
D906 093T 6432V LL4148-GSO8 SMD BY VISHA
D204 093T 6433P BAV99
D205 093T 6433P BAV99
D208 093T 6433P BAV99
D209 093T 6433P BAV99
D210 093T 6433P BAV99
D215 093T 6433P BAV99
D216 093T 6433P BAV99
D218 093T 6433P BAV99
D220 093T 6433P BAV99
D222 093T 6433P BAV99
D223 093T 6433P BAV99
D203 093T 6433P BAV99
ZD905 093T 39S 20 T RLZ22B LLDS
ZD901 093T 39S 20 T RLZ22B LLDS
ZD201 093T 39S 24 T RLZ 5.6B LLDS
ZD202 093T 39S 24 T RLZ 5.6B LLDS
ZD204 093T 39S 24 T RLZ 5.6B LLDS
ZD203 093T 39S 35 T RLZ 9.1C LLDS
ZD902 093T 39S 40 T RLZ 13B LLDS
ZD101 093T 39S 48 T diode zener rlz6.2b rohm
D101 093T8004 2 SBM84PT
D103 093T8004 2 SBM84PT
PWA66AA1AIP POWER BOARD FOR AI
CN901 006T 31500 EYELET
T901 006T 31502 1.5MM RIVET
PT206 006T 31502 1.5MM RIVET
PT205 006T 31502 1.5MM RIVET
PT204 006T 31502 1.5MM RIVET
PT203 006T 31502 1.5MM RIVET
PT202 006T 31502 1.5MM RIVET
PT201 006T 31502 1.5MM RIVET
NR901 006T 31502 1.5MM RIVET
L904 006T 31502 1.5MM RIVET
L902 006T 31502 1.5MM RIVET
C905 006T 31502 1.5MM RIVET
Q901 006T 31502 1.5MM RIVET
R915 061T 17230352T 30K OHM5%1/4W
C922 067T215Y1007KT EC105 10U 50V KEM50V
C907 067T215Y1007KT EC105 10U 50V KEM50V
FB101 071T 55 29 BEAD
J957 071T 55 29 BEAD
D221 093T 522SE26T DIODE SR240S DO-41 SECOS
D219 093T 522SE26T DIODE SR240S DO-41 SECOS
D217 093T 522SE26T DIODE SR240S DO-41 SECOS
D214 093T 522SE26T DIODE SR240S DO-41 SECOS
94
Page 95

20” LCD TV Color Monitor Norcent LT2025W
D207 093T 522SE26T DIODE SR240S DO-41 SECOS
D206 093T 522SE26T DIODE SR240S DO-41 SECOS
D202 093T 522SE26T DIODE SR240S DO-41 SECOS
D201 093T 522SE26T DIODE SR240S DO-41 SECOS
D901 093T 6026T52T FR107
D902 093T 6038P52T PS102R
D904 093T 64 1152T 1N4148
J232 095T 90 23 TIN COATED
J231 095T 90 23 TIN COATED
J230 095T 90 23 TIN COATED
J226 095T 90 23 TIN COATED
J221 095T 90 23 TIN COATED
J220 095T 90 23 TIN COATED
J219 095T 90 23 TIN COATED
J217 095T 90 23 TIN COATED
J216 095T 90 23 TIN COATED
J215 095T 90 23 TIN COATED
J214 095T 90 23 TIN COATED
J213 095T 90 23 TIN COATED
J212 095T 90 23 TIN COATED
J211 095T 90 23 TIN COATED
J209 095T 90 23 TIN COATED
J208 095T 90 23 TIN COATED
J207 095T 90 23 TIN COATED
J206 095T 90 23 TIN COATED
F904 095T 90 23 TIN COATED
VAR902 095T 90 23 TIN COATED
JP210 095T 90 23 TIN COATED
JP1 095T 90 23 TIN COATED
J958 095T 90 23 TIN COATED
J941 095T 90 23 TIN COATED
J940 095T 90 23 TIN COATED
J918 095T 90 23 TIN COATED
J913 095T 90 23 TIN COATED
J912 095T 90 23 TIN COATED
J911 095T 90 23 TIN COATED
J910 095T 90 23 TIN COATED
J909 095T 90 23 TIN COATED
J908 095T 90 23 TIN COATED
J907 095T 90 23 TIN COATED
J244 095T 90 23 TIN COATED
J240 095T 90 23 TIN COATED
J233 095T 90 23 TIN COATED
J205 095T 90 23 TIN COATED
J204 095T 90 23 TIN COATED
J202 095T 90 23 TIN COATED
J201 095T 90 23 TIN COATED
CN902 095T 90 23 TIN COATED
715T2135 F POWER BOARD PCB
Q05T7000 3 RUBBER FOOT
Q05T7000 4 RUBBER FOOT
95
Page 96

20” LCD TV Color Monitor Norcent LT2025W
Q05T7001 2 WASHER
Q15T0021 1 AV-BKT
Q15T6254 8 MAIN FRAME
Q40T 20081512A RATING LABEL
Q40T 581815 5A IO LABEL
Q44T3231 21 8 EVA WASHER
Q44T3231 21 18 EVA washer
Q44TA015 1 EPS
Q44TA015 2 EPS
Q44TA015815 2A Carton
Q52T6025 15181 insulating sheet
Q85T6134 3 SHIELD
TUPF6YA2P TUNER BOARD
CN602 033T3802 2H WAFER 2P RIGHT ANGLE
CN603 033T3802 3H WAFER 3P RIGHT ANGLE
CN604 033T3802 5H WAFER 5P RIGHT ANELE PI
CN601 033T802444C FH WAFER
C697 067T305V101 3 1000UF +-2 16V
C696 067T305V101 3 1000UF +-2 16V
FB609 071T 55507 H CHOKE
FB608 071T 55507 H CHOKE
L219 073T 5547010T PEAKING COIL 47UH+-10% TDK
L218 073T 5547010T PEAKING COIL 47UH+-10% TDK
085T 583510 GASKET
J101 088T 78 13 3C AV-S-01-W
CN202 088T 78 13 5C RCA JACK
J103 088T 78 1R CL RCA JACK 1P RED
ZD3 093T 6021652T IN5819
TU100 094TNPALMNA NP TUNER UV1336B/AFSH-4 PHILIPS
SMTTUPF6YA2P TUNER BOARD
U606 056T 616 7 TPA3002D2
U607 056T 616 8 TPA6110A2DGNR
Q603 057T 417 4 CHIP PMBS3904 BY PHILIPS
Q402 057T 417 4 CHIP PMBS3904 BY PHILIPS
Q401 057T 417 4 CHIP PMBS3904 BY PHILIPS
C210 061T0603000 CHIP 0OHM 1/16W
C211 061T0603000 CHIP 0OHM 1/16W
C212 061T0603000 CHIP 0OHM 1/16W
R202 061T0603000 CHIP 0OHM 1/16W
R206 061T0603000 CHIP 0OHM 1/16W
R207 061T0603000 CHIP 0OHM 1/16W
R603 061T0603000 CHIP 0OHM 1/16W
R648 061T0603000 CHIP 0OHM 1/16W
L206 061T0603000 CHIP 0OHM 1/16W
C209 061T0603000 CHIP 0OHM 1/16W
R601 061T0603100 CHIP 10OHM 1/16W
R602 061T0603100 CHIP 10OHM 1/16W
R226 061T0603101 CHIP 100OHM 1/16W
R225 061T0603101 CHIP 100OHM 1/16W
R222 061T0603101 CHIP 100OHM 1/16W
R221 061T0603101 CHIP 100OHM 1/16W
96
Page 97

20” LCD TV Color Monitor Norcent LT2025W
R220 061T0603101 CHIP 100OHM 1/16W
R219 061T0603101 CHIP 100OHM 1/16W
R216 061T0603101 CHIP 100OHM 1/16W
R215 061T0603101 CHIP 100OHM 1/16W
R646 061T0603102 CHIP 1K OHM 1/16W
R644 061T0603102 CHIP 1K OHM 1/16W
R643 061T0603102 CHIP 1K OHM 1/16W
R662 061T0603103 CHIP 10KOHM 1/16W
R663 061T0603103 CHIP 10KOHM 1/16W
R664 061T0603103 CHIP 10KOHM 1/16W
R665 061T0603103 CHIP 10KOHM 1/16W
R666 061T0603103 CHIP 10KOHM 1/16W
R667 061T0603103 CHIP 10KOHM 1/16W
R668 061T0603103 CHIP 10KOHM 1/16W
R669 061T0603103 CHIP 10KOHM 1/16W
R670 061T0603103 CHIP 10KOHM 1/16W
R605 061T0603103 CHIP 10KOHM 1/16W
R407 061T0603104 CHIP 100K OHM 1/16W
R405 061T0603104 CHIP 100K OHM 1/16W
R652 061T0603123 RST CHIPR 12 KOHM +-5% 1/10W
R659 061T0603124 RST CHIPR 120 KOHM +-5% 1/10W
R661 061T0603124 RST CHIPR 120 KOHM +-5% 1/10W
R658 061T0603153 RST CHIPR 15 KOHM +-5% 1/10W
R606 061T0603220 CHIP 22OHM 1/16W
R609 061T0603223 CHIP 22KOHM 1/16W
R608 061T0603333 RST CHIPR 33 KOHM +-5% 1/10W
R403 061T0603333 RST CHIPR 33 KOHM +-5% 1/10W
R607 061T0603392 CHIP 3.9KOHM 1/16W
R610 061T0603470 RST CHIPR 47 OHM +-5% 1/10W
R224 061T0603471 RST CHIPR 470OHM +-5% 1/10W
R223 061T0603471 RST CHIPR 470OHM +-5% 1/10W
R218 061T0603471 RST CHIPR 470OHM +-5% 1/10W
R217 061T0603471 RST CHIPR 470OHM +-5% 1/10W
R651 061T0603472 CHIP 4.7KOHM 1/16W
R650 061T0603472 CHIP 4.7KOHM 1/16W
R404 061T0603473 CHIP 47KOHM 1/16W
R653 061T0603683 RST CHIPR 68 KOHM +-5% 1/10W
R213 061T0603750 75OHM
R212 061T0603750 75OHM
R211 061T0603750 75OHM
R210 061T0603750 75OHM
R209 061T0603750 75OHM
R208 061T0603750 75OHM
R205 061T0603750 75OHM
R204 061T0603750 75OHM
R201 061T0603750 75OHM
R656 061T1206000 RST CHIPR 0 OHM +-5% 1/4W
R657 061T1206000 RST CHIPR 0 OHM +-5% 1/4W
R655 061T1206000 RST CHIPR 0 OHM +-5% 1/4W
C691 065T0603102 31 CHIP 1000PF 50V NPO
C687 065T0603102 31 CHIP 1000PF 50V NPO
97
Page 98

20” LCD TV Color Monitor Norcent LT2025W
C686 065T0603102 31 CHIP 1000PF 50V NPO
C622 065T0603102 31 CHIP 1000PF 50V NPO
C621 065T0603102 31 CHIP 1000PF 50V NPO
C611 065T0603102 31 CHIP 1000PF 50V NPO
C683 065T0603103 32 CHIP 0.01UF 50V X7R
C680 065T0603103 32 CHIP 0.01UF 50V X7R
C629 065T0603103 32 CHIP 0.01UF 50V X7R
C625 065T0603103 32 CHIP 0.01UF 50V X7R
C620 065T0603104 32 CHIP 0.1UF 50V X7R
C626 065T0603104 32 CHIP 0.1UF 50V X7R
C627 065T0603104 32 CHIP 0.1UF 50V X7R
C628 065T0603104 32 CHIP 0.1UF 50V X7R
C631 065T0603104 32 CHIP 0.1UF 50V X7R
C632 065T0603104 32 CHIP 0.1UF 50V X7R
C681 065T0603104 32 CHIP 0.1UF 50V X7R
C682 065T0603104 32 CHIP 0.1UF 50V X7R
C602 065T0603104 32 CHIP 0.1UF 50V X7R
C695 065T0603105 12 CHIP 1UF 16V X7R
C693 065T0603105 12 CHIP 1UF 16V X7R
C634 065T0603105 12 CHIP 1UF 16V X7R
C630 065T0603105 12 CHIP 1UF 16V X7R
C613 065T0603105 12 CHIP 1UF 16V X7R
C612 065T0603105 12 CHIP 1UF 16V X7R
C610 065T0603105 12 CHIP 1UF 16V X7R
C609 065T0603105 12 CHIP 1UF 16V X7R
C608 065T0603105 12 CHIP 1UF 16V X7R
C606 065T0603105 12 CHIP 1UF 16V X7R
C605 065T0603105 12 CHIP 1UF 16V X7R
C679 065T0603221 31 CHIP 220PF 50V NPO
C232 065T0603221 31 CHIP 220PF 50V NPO
C204 065T0603224 17 CHIP 0.22UF 16V Y5V
C203 065T0603331 31 CHIP 330PF 50V NPO
C206 065T0603331 31 CHIP 330PF 50V NPO
C207 065T0603331 31 CHIP 330PF 50V NPO
C217 065T0603331 31 CHIP 330PF 50V NPO
C228 065T0603331 31 CHIP 330PF 50V NPO
C229 065T0603331 31 CHIP 330PF 50V NPO
C230 065T0603331 31 CHIP 330PF 50V NPO
C231 065T0603331 31 CHIP 330PF 50V NPO
C202 065T0603331 31 CHIP 330PF 50V NPO
C235 065T0603333 32 CHIP 0.033UF 50V X7R
C234 065T0603333 32 CHIP 0.033UF 50V X7R
C233 065T0603333 32 CHIP 0.033UF 50V X7R
C223 065T0603334 17 CHIP 0.33UF 16V Y5V
C222 065T0603334 17 CHIP 0.33UF 16V Y5V
C221 065T0603334 17 CHIP 0.33UF 16V Y5V
C220 065T0603334 17 CHIP 0.33UF 16V Y5V
C224 065T0603334 17 CHIP 0.33UF 16V Y5V
C225 065T0603334 17 CHIP 0.33UF 16V Y5V
C226 065T0603334 17 CHIP 0.33UF 16V Y5V
C227 065T0603334 17 CHIP 0.33UF 16V Y5V
98
Page 99

20” LCD TV Color Monitor Norcent LT2025W
C236 065T0603472 32 CHIP 4700PF 50V X7R
C237 065T0603472 32 CHIP 4700PF 50V X7R
C238 065T0603472 32 CHIP 4700PF 50V X7R
C694 065T0603474 17 CHIP 0.47UF 16V Y5V
C205 065T0603683 12 CHIP 0.68UF 16V X7R
L203 071T 56G151 A CHIOP BEAD 150 OHM
L604 071T 56G301 EA CHIP BEAD 300 OHM 0805
L603 071T 56G301 EA CHIP BEAD 300 OHM 0805
L602 071T 56G301 EA CHIP BEAD 300 OHM 0805
L601 071T 56G301 EA CHIP BEAD 300 OHM 0805
L202 071T 56G301 EA CHIP BEAD 300 OHM 0805
L201 071T 56G301 EA CHIP BEAD 300 OHM 0805
L213 071T 59B121 K CHIP BEAD
L212 071T 59B121 K CHIP BEAD
L210 071T 59B121 K CHIP BEAD
L209 071T 59B121 K CHIP BEAD
L208 071T 59B121 K CHIP BEAD
L207 071T 59B121 K CHIP BEAD
D602 093T 6433G BAV99 SOT-23
D601 093T 6433G BAV99 SOT-23
D406 093T 6433P BAV99
ZD408 093T 39S582 PH ZENER DIODE BZX284-C33 PHILIPS
D405 093T 39S582 PH ZENER DIODE BZX284-C33 PHILIPS
715T1747 1B VS TUNER BOARD PCB
001T6017 2 GP SCREW
040T 58162435A LABEL
045T 76 28 RN PE BAG FOR MANUAL
045T 76 28NV2 PE BAG FOR CLAMP
089T 173 56 31 AUDION CABLE
Q41T200181515A manual
Q41T780081563A QSG
Q41T780081565A warranty card
99
 Loading...