

Page 1
Page 2
Thank you for choosing ANYCUBIC products.
Maybe you are familiar with 3D printing technology or have purchased
ANYCUBIC printers before, but we still highly recommend that you read this
manual carefully. The installation techniques and precautions in this
manual can help you avoid any unnecessary damage or frustration.
More information please refer to :
1. ANYCUBIC Website: https://www.anycubic.com
ANYCUBIC website provides software, tutorials, models, after-sale service,
etc.
Please visit the website for technical support and we are pleased to
answer the questions or solve all the problems for you!
2. Facebook page and Youtube channel links are shown below.
ANYCUBIC Website
Facebook page Youtube channel
Team ANYCUBIC
Copyrighted by “Shenzhen Anycubic Technology Co., Ltd ”, all rights reserved.
Page 3

Contents
Safety Instructions
Technical Specification
Packing List
Product Overview
Menu Directory
Installation
Leveling
Loading Filament
Printing Models
Introduction to Slicing
Software
Resume from Outage
Maintenance
Troubleshooting
4
5
7
8
9
14
22
24
27
31
46
47
48
Page 4
www.anycubic.com
Safety Instructions
To avoid any unnecessary damage to the printer or individual injury,
please always follow the safety instructions when assembling and using
the machine.
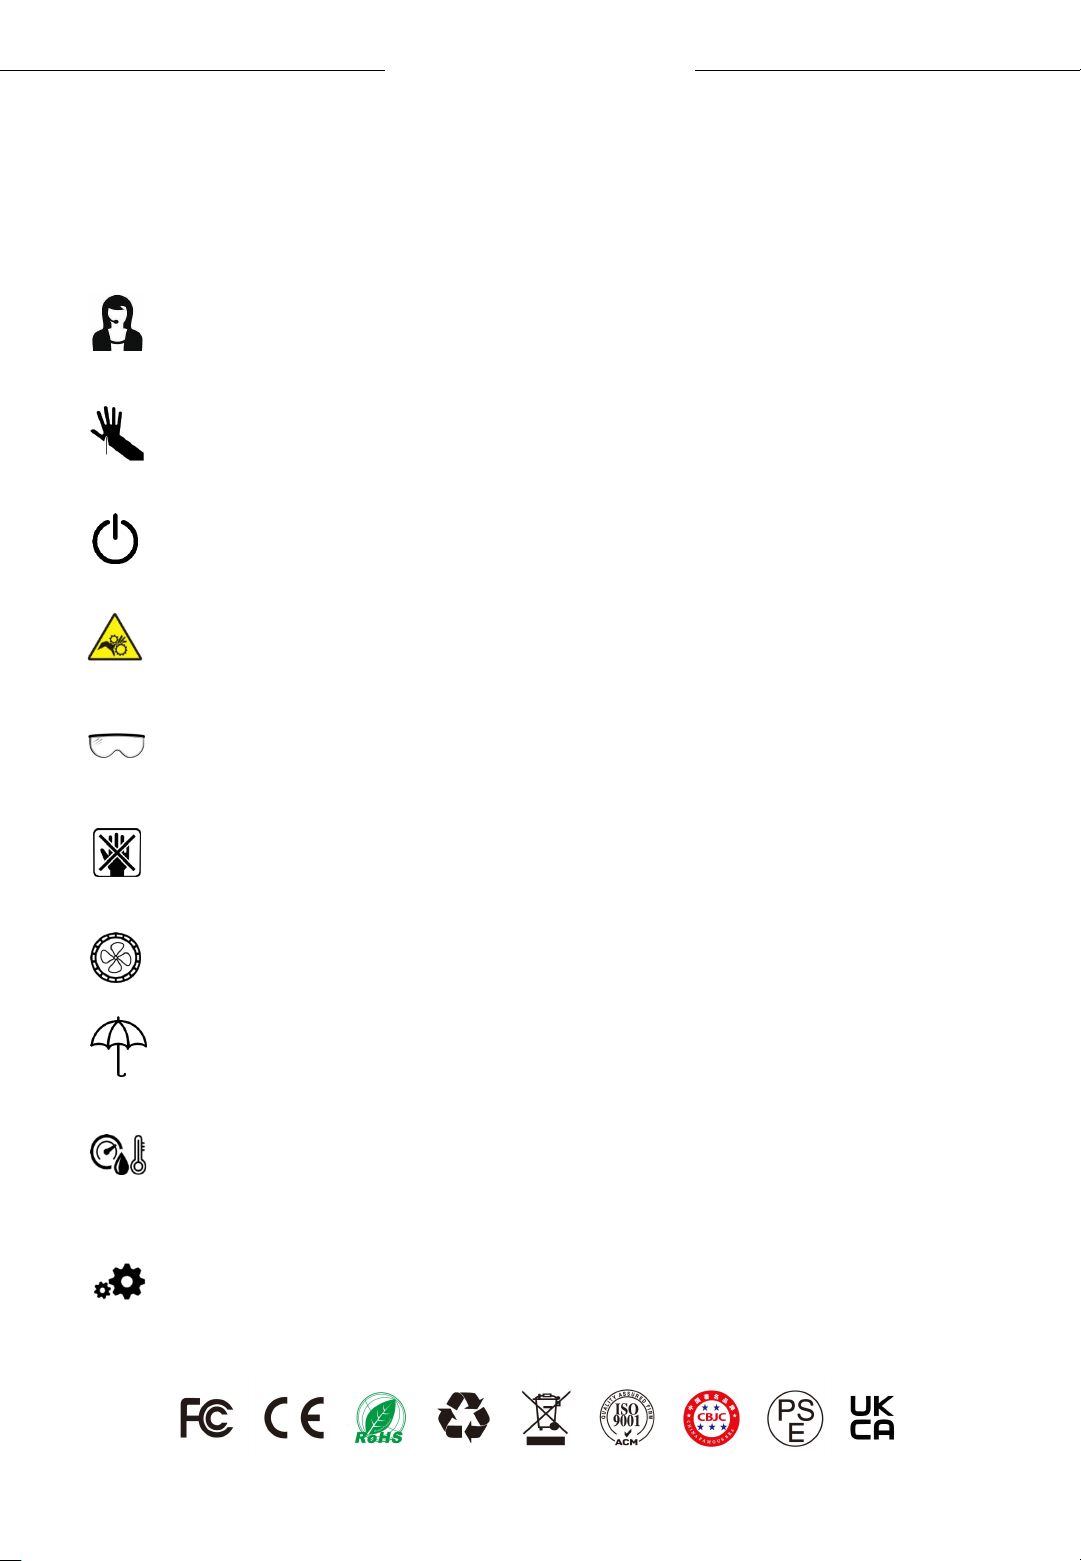
Please contact our customer service first if you have any
problem after receiving the products.
Be cautious when using the scraper. Never direct the scraper
towards your hand.
In case of emergency, please immediately cut off the power of
ANYCUBIC 3D printer and contact the technical support.
ANYCUBIC 3D printer includes high speed running parts that can
cause injury.
It is recommended to use protection glasses when
cleaning/sanding the printed models to avoid small particles in
eyes.
Keep the ANYCUBIC 3D printer and its accessories out of the reach
of children.
Vapors or fumes may be irritating at operating temperature.
Always use the ANYCUBIC 3D printer in an open and well ventilated
area.
ANYCUBIC 3D printer must not be exposed to water or rain.
ANYCUBIC 3D printer is designed to be used within ambient
temperature ranging 8ºC-40ºC, and humidity ranging 20%-50%.
Working outside those limits may result in low quality printing.
Do not disassemble ANYCUBIC 3D printer, please contact technical
support if you have any question.
4
Page 5

Technical Specification
Printing
Technology
FDM (Fused Deposition Modeling)
Build Size
245 mm(L) × 245 mm(W) × 260 mm(H)
Print Accuracy
±0.1 mm
Positioning Accuracy
X / Y / Z 0.0125 / 0.0125 / 0.002 mm
Extruder Quantity
Single
Nozzle Diameter
0.4 mm
Print Speed
20~100 mm/s (suggested 80 mm/s)
Supported Materials
ABS, PLA, TPU, PETG, Wood, etc
Temperature
Ambient Operating
Temperature
8 °C - 40 °C
Operational Extruder
Temperature
Max 260 °C
Operational Print Bed
Temperature
Max 110 °C
Software
Slicing Software
Cura
Software Input Formats
.STL, .OBJ, .AMF
Software Output Formats
GCode
Connectivity
Memory card; Data cable (expert users
only)
www.anycubic.com
5
Page 6

Technical Specification
Electrical
Power Input
110 V / 220 V AC, 50 / 60 Hz
Output rating
24V/14.6A (350W)
Physical Dimensions
Printer Dimensions
508 mm(L) × 457 mm(W) × 516 mm(H)
Net Weight
~10 kg
www.anycubic.com
6
Page 7
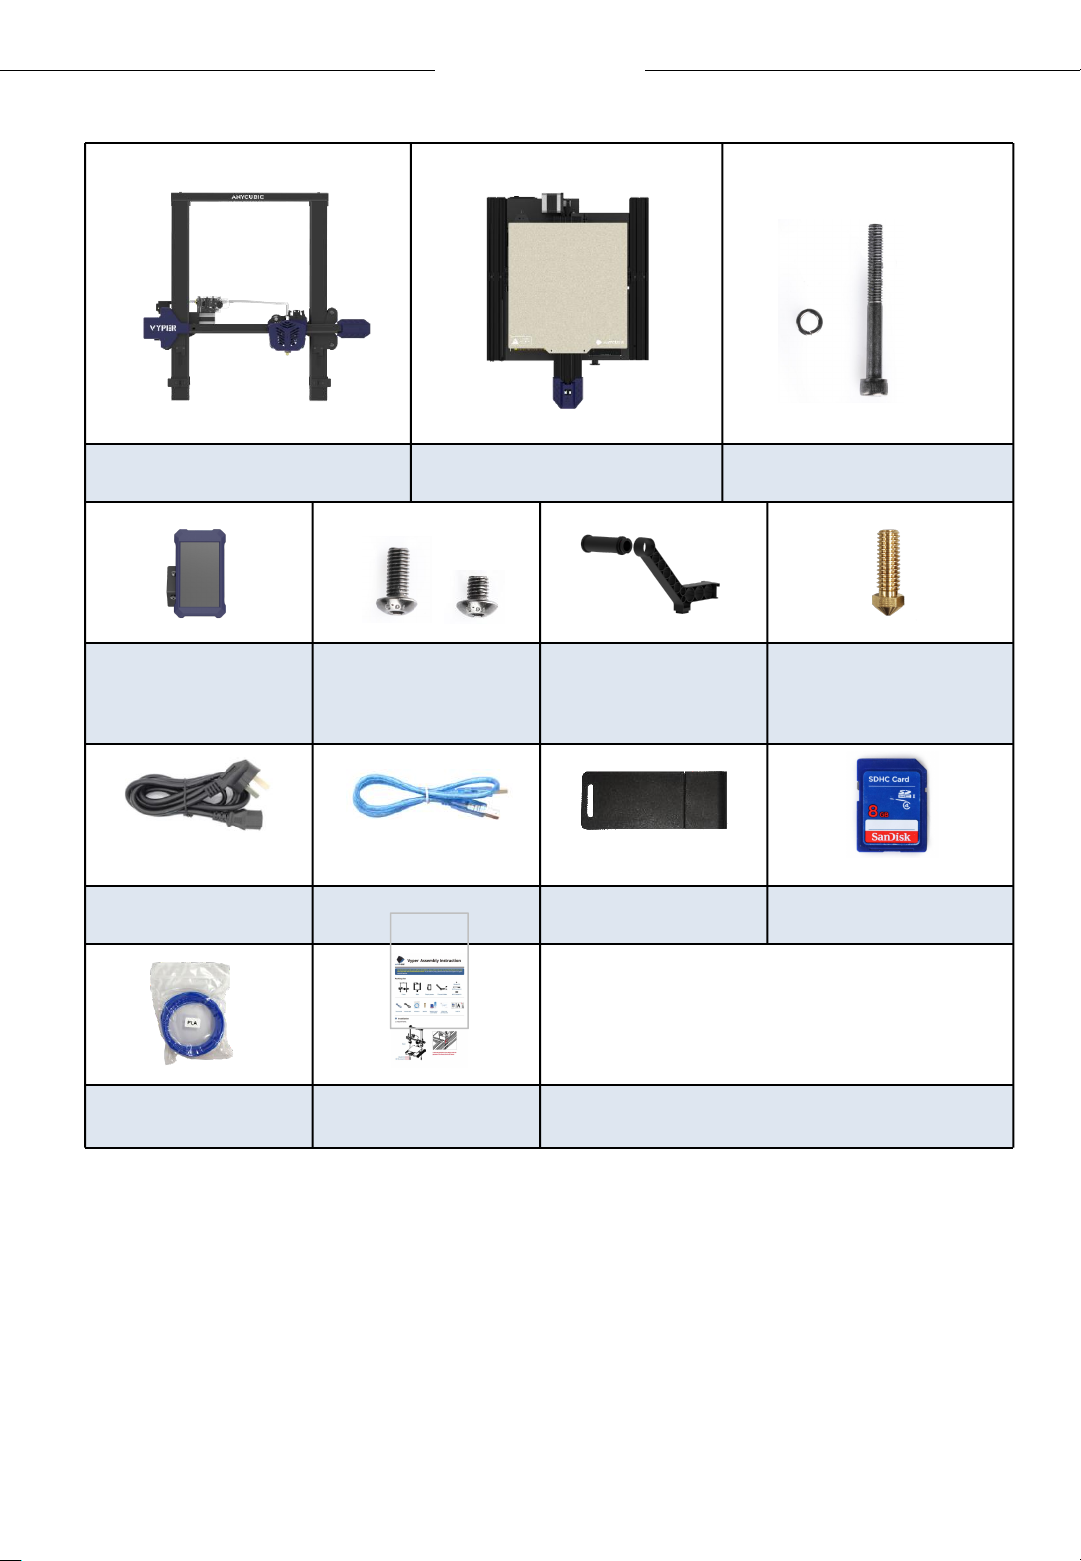
Frame
Base
Washers (4PCS)
M5 x 45 Screws (4PCS)
Touchscreen
M5 x 14 Screw
(1PCS)
M5 x 6 Screws
(2PCS)
Filament Holder
Nozzle
Power Cord
Data Cable
Card Reader
Memory Card
Filament (Random
Color)
Assembly
Instruction
www.anycubic.com
Packing List
Tips: Some accessories are placed in the toolbox on the right front of the
machine base (see the position of toolbox on the next page). Please take
out all the accessories from the toolbox when you check the accessories
list.
7
Page 8
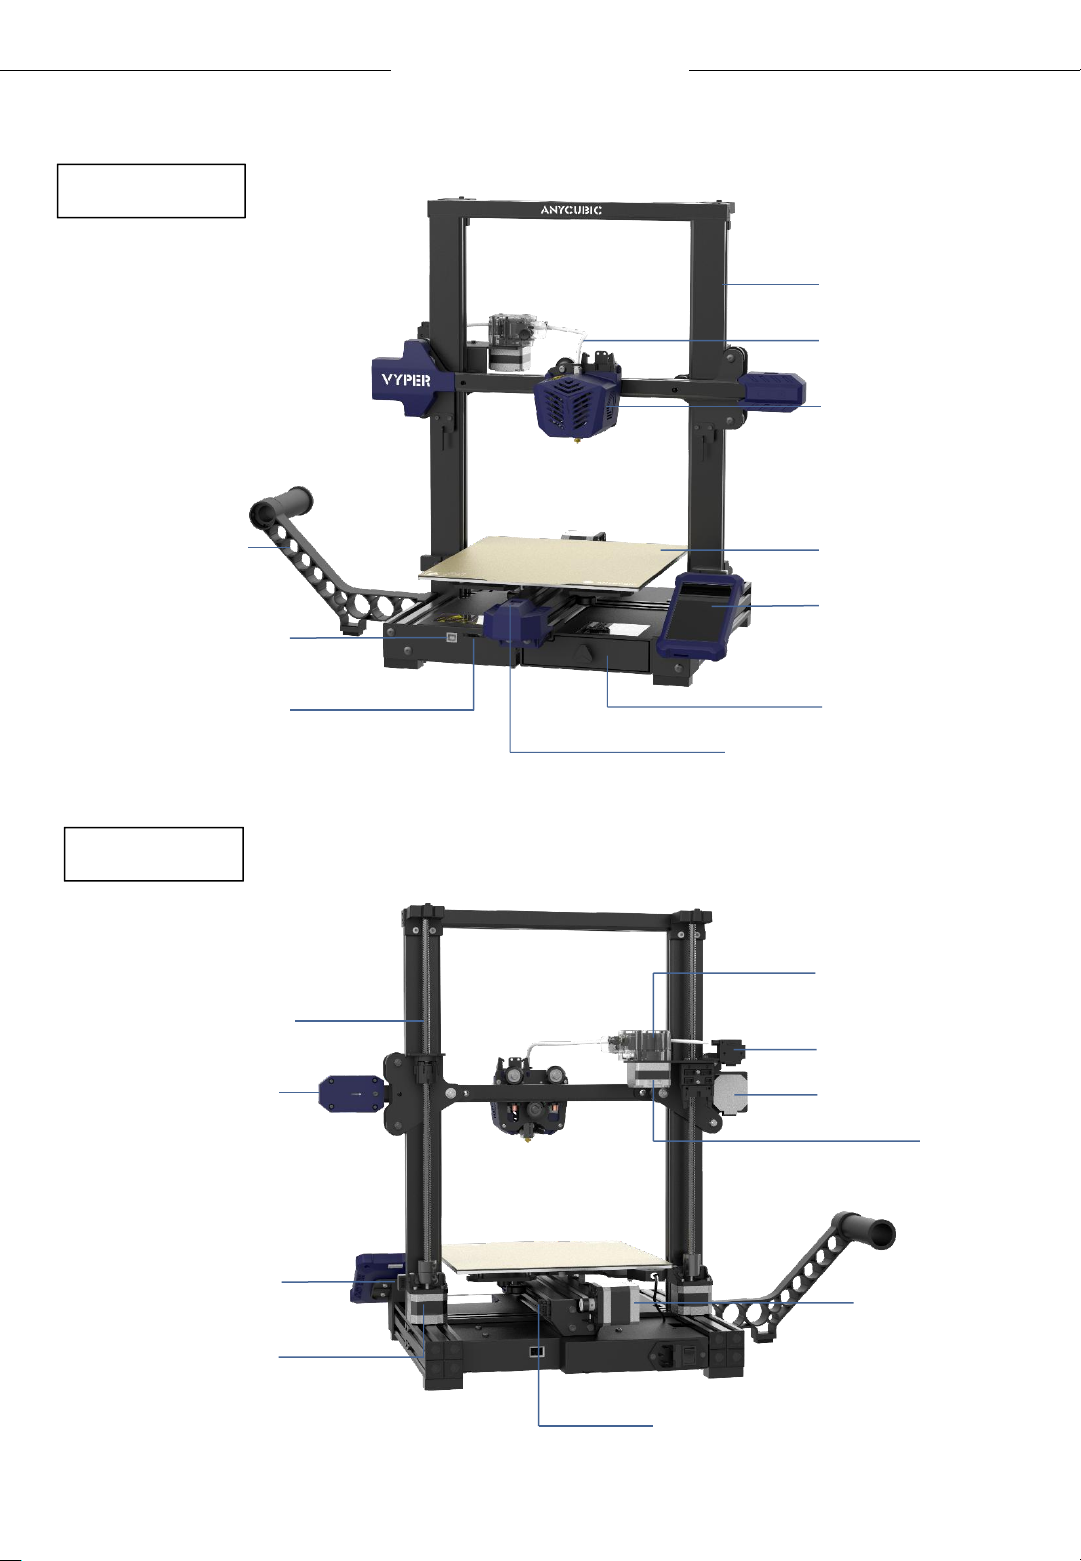
Front view
www.anycubic.com
Product Overview
Aluminum beam
Teflon feeding tube
Print head
Filament holder
Data cable port
Memory card slot
Back view
Lead screw
X belt tensioner
Printing platform
Touchscreen
Toolbox
Y belt tensioner
Extruder
Filament sensor
X motor
Z limit switch
Z motor
Extrude
r motor
Y motor
Y limit switch
8
Page 9
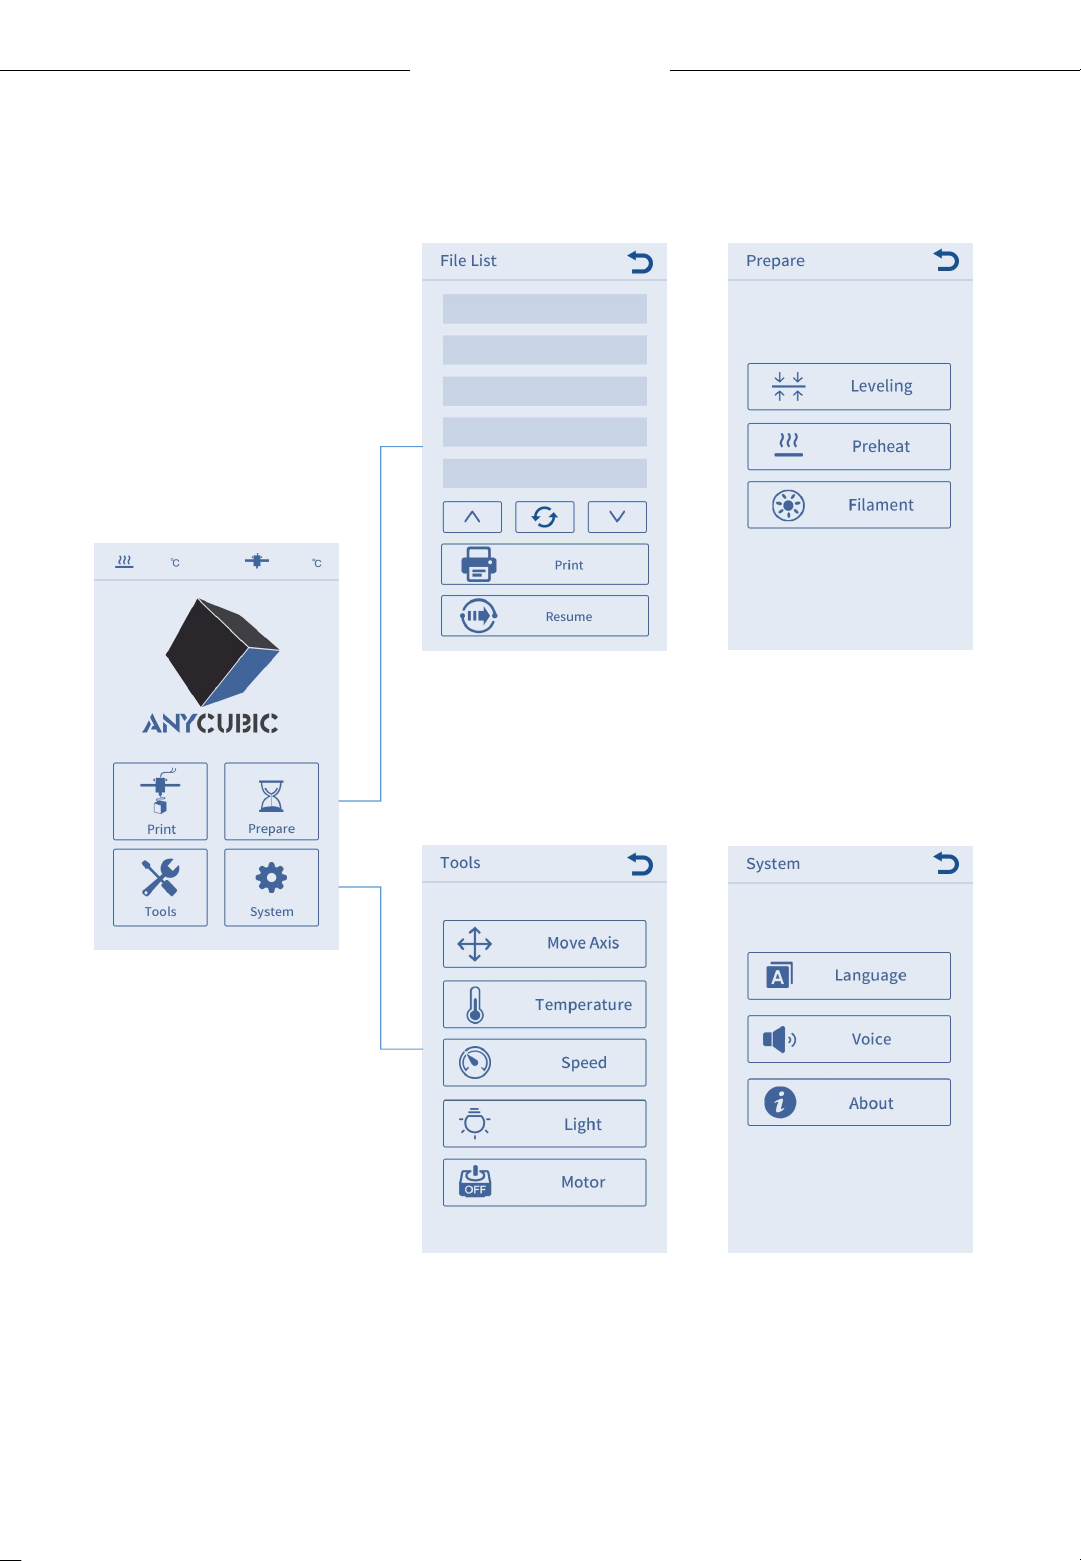
Menu Directory
www.anycubic.com
Main menu
9
Page 10
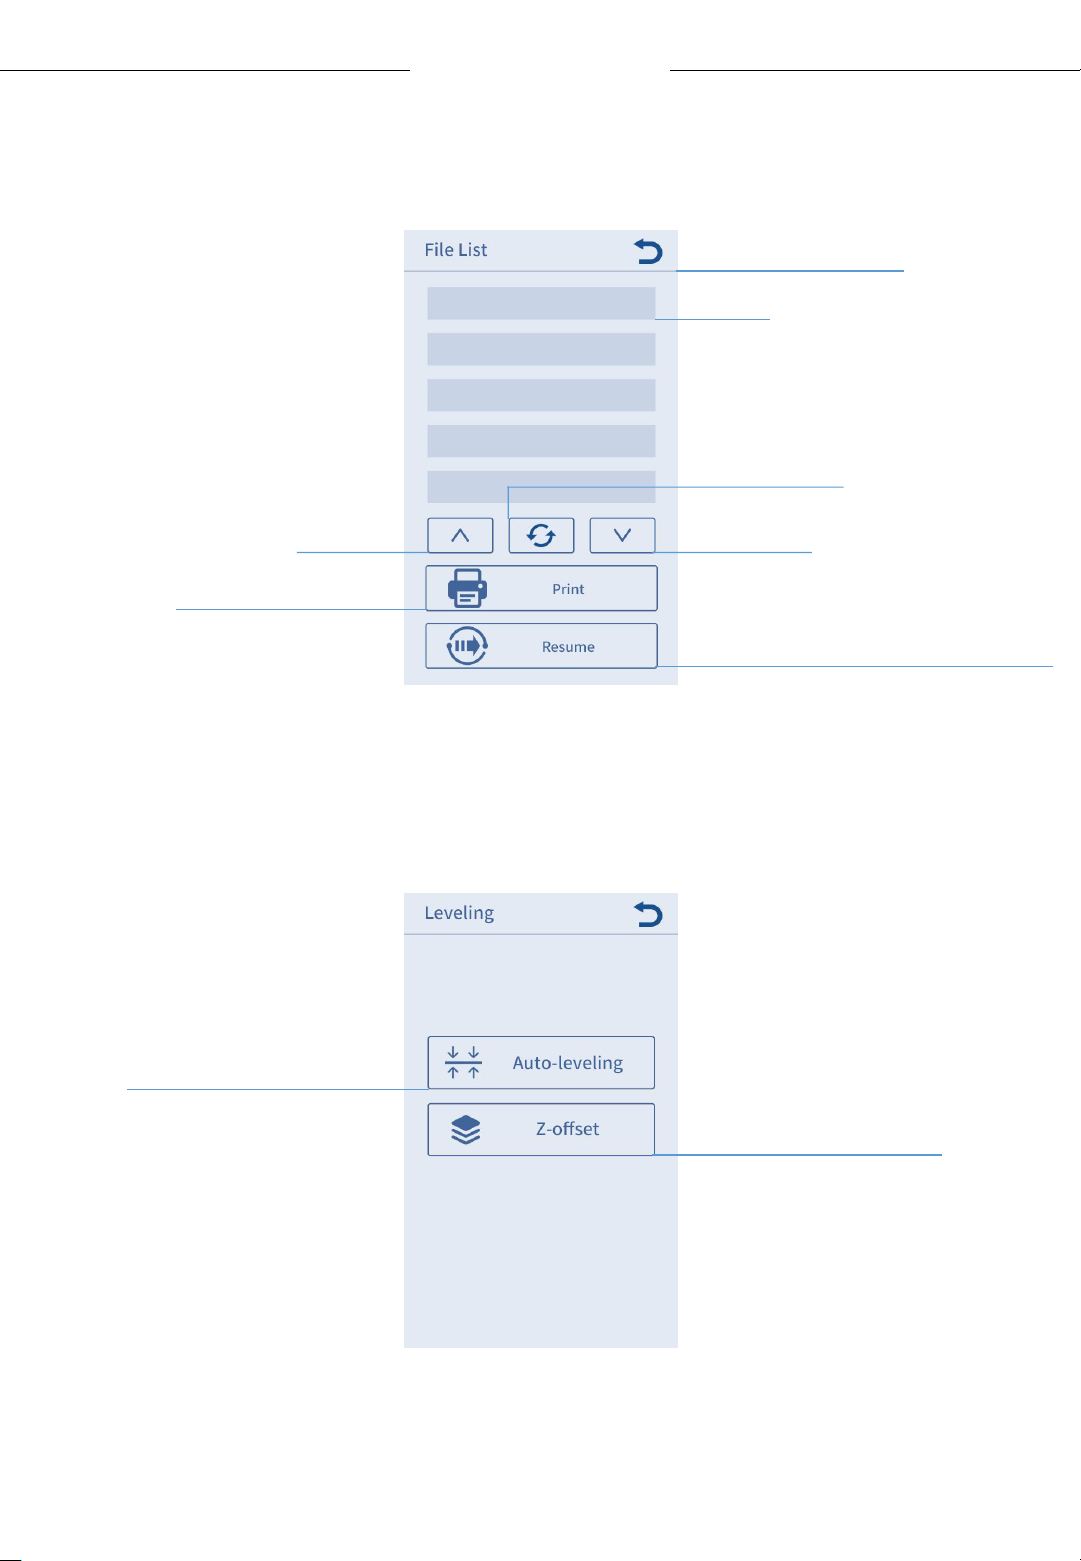
Print
File List:
www.anycubic.com
Menu Directory
Return to main menu
File list
Refresh the list
Page up Page down
Print the selected
file in memory card
Resume form outage (only valid
for offline print via memory card)
Prepare
Leveling:
Click to level the
platform automatically
Click to fine-tune the
distance between nozzle and
platform after auto-leveling
Note: In most cases, there is no need to perform “Z-offset” after auto-
leveling.
10
Page 11
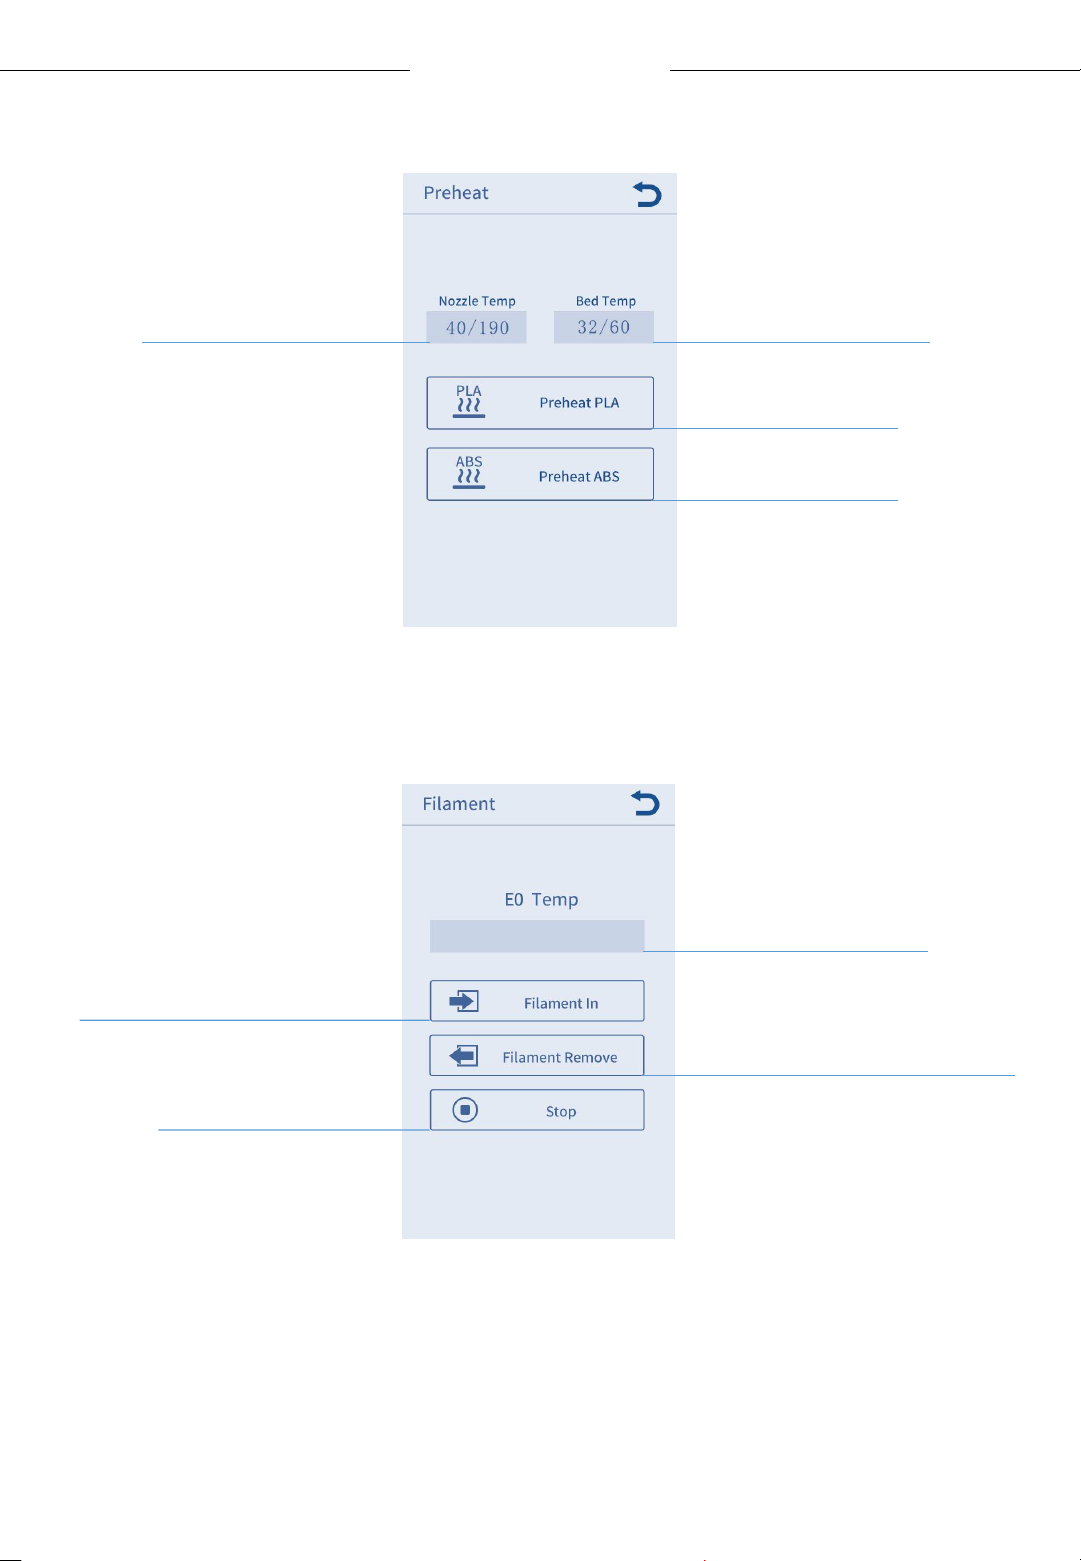
Preheat:
www.anycubic.com
Menu Directory
Display current /
target temp of nozzle
Filament:
Display current /
target temp of bed
Click to preheat PLA
Click to preheat PLA
Click to automatically heat
the print head to target temp,
and click again to feed the
filament
Stop filament
feeding or
retracting
23/230
Display current /
target temp of
extrusion
Click to automatically heat the
print head to target temp, and
click again to retract the
filament
11
Page 12
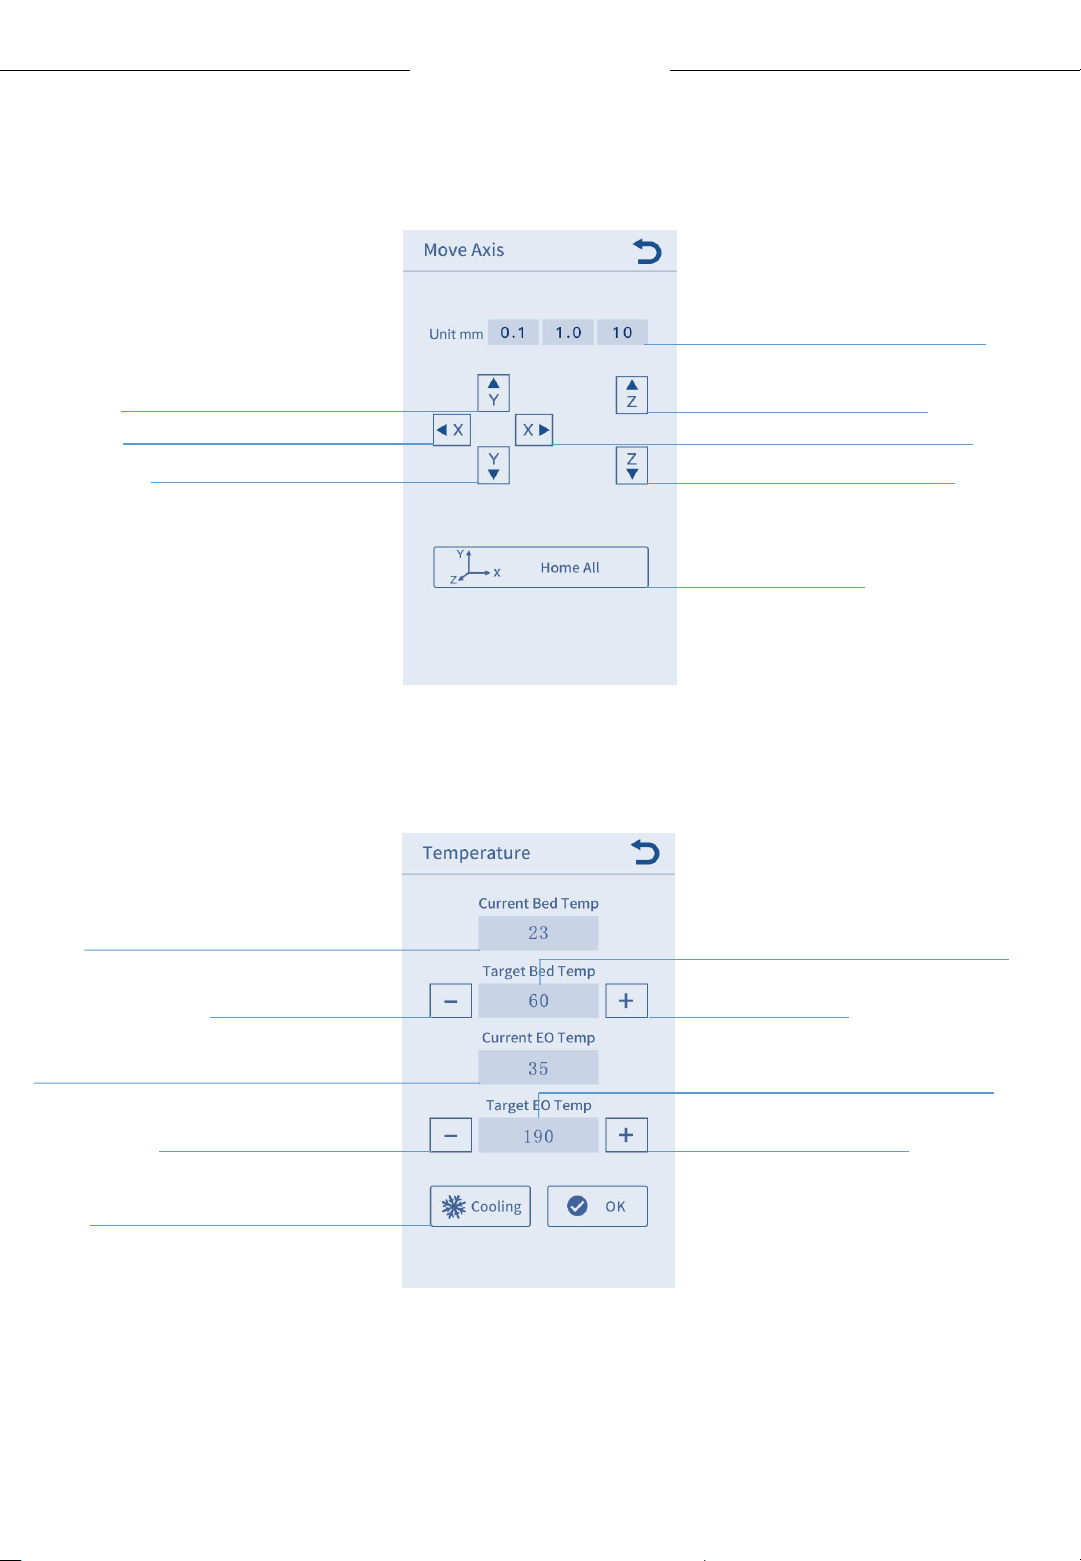
Tools
Move Axis:
www.anycubic.com
Menu Directory
Set the step distance of motor
Move the platform forward
Move print head to the
left
Move the platform
back
Temperature:
Display the current temp of bed
Move the print head up
Move print head to the
right
Move the print head down
Click to home all
Click to set bed temp (30-110℃)
Reduce bed
temp
Display the current temp of extrusion
Reduce extrusion
temp
Cut off the power to hotend and heated bed (only
valid when machine is not
printing)
Raise bed temp
Click to set extrusion temp (170-260℃)
Raise extrusion temp
12
Page 13
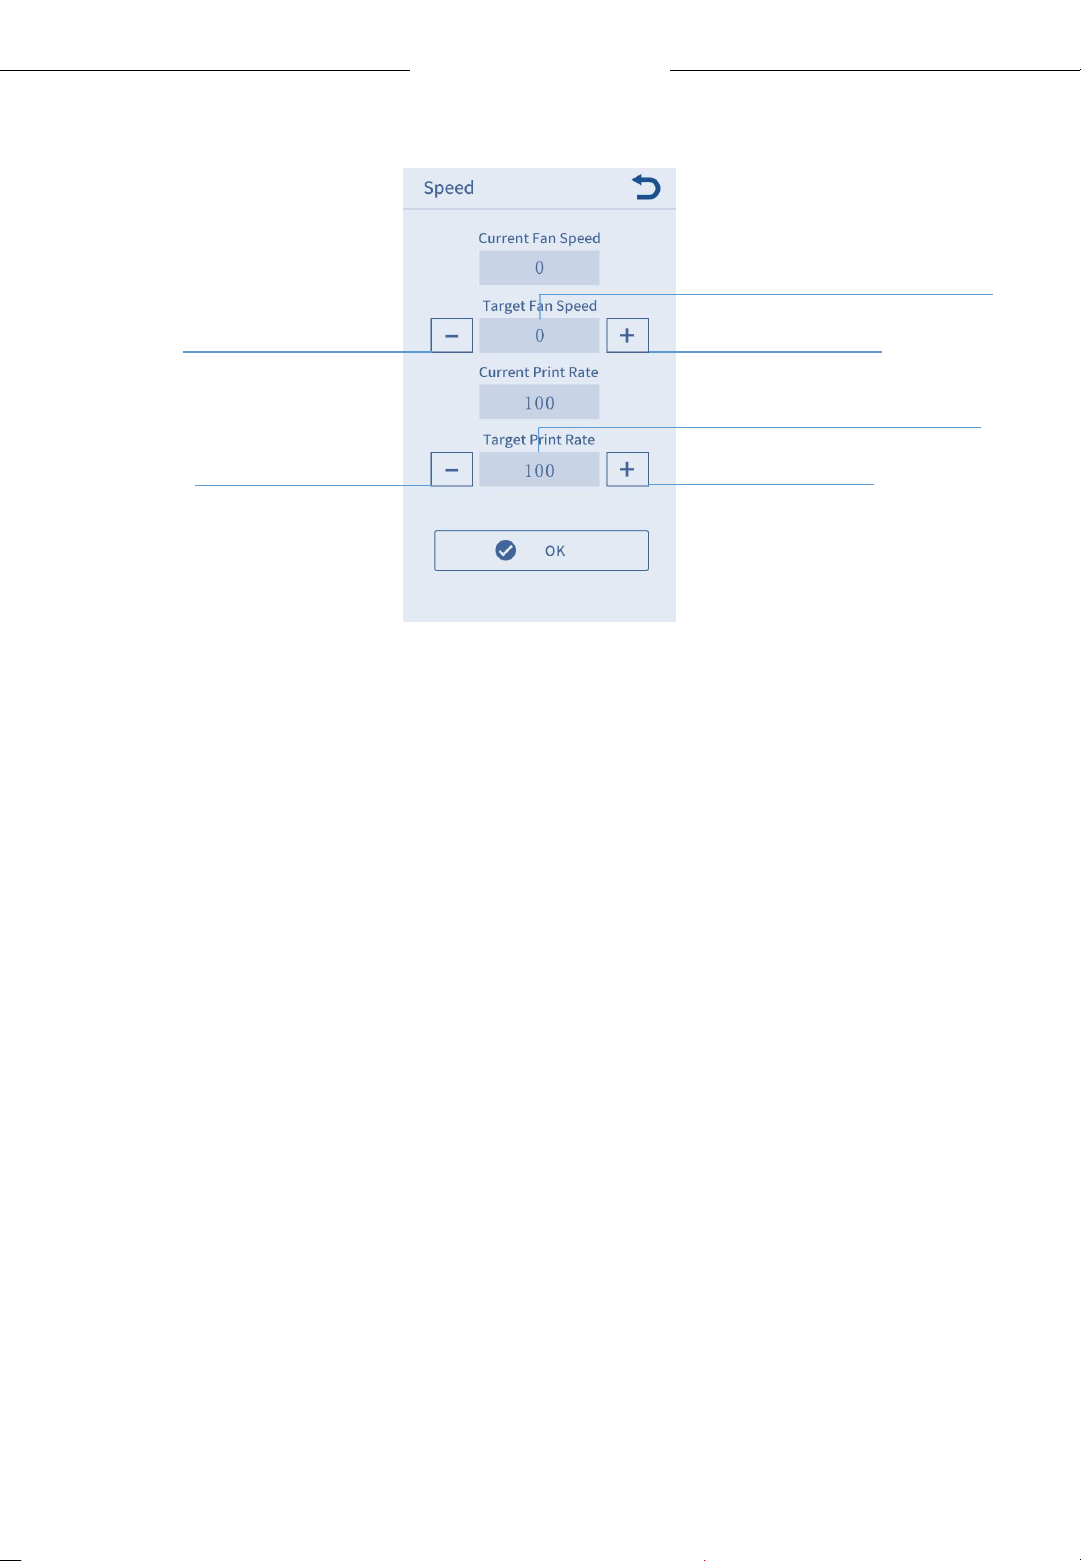
Speed:
www.anycubic.com
Menu Directory
Click to set fan speed(0-100%)
Decrease fan speed
Decrease print rate
Increase fan speed
Click to set print rate(0-100%)
Increase print rate
Light: Turn on/off the light of the print head
Motor: Disable all motors (only valid when machine is not printing).
System
Language: Change language (English / Chinese).
Voice: Turn on/off the screen sound.
About: Display the information about the product.
13
Page 14

www.anycubic.com
Installation
1. Be cautious during assembly as some parts may have sharp edges.
2. It is suggested to use a flat desktop and place the parts in an orderly
manner for quick assembly.
3. The color of some parts may be different from what in the manual,
but the assembly is the same.
4. Firmware has been pre-uploaded to the motherboard. After
completing the assembly, please level the platform and load the
filament then you could start the first test print.
Note: Every unit of the printer has been inspected and tested for printing.
Therefore, in some cases, there might be very small marks left on the
print head or on the heated bed. Those will not affect the printing quality
and those mean the printer has been tested for the quality. The aluminum
beam has slight scratches or slight unevenness on the platform, which is
normal if it does not affect normal printing. Thank you very much for your
kind understanding.
Team ANYCUBIC
14
Page 15
www.anycubic.com
Installation
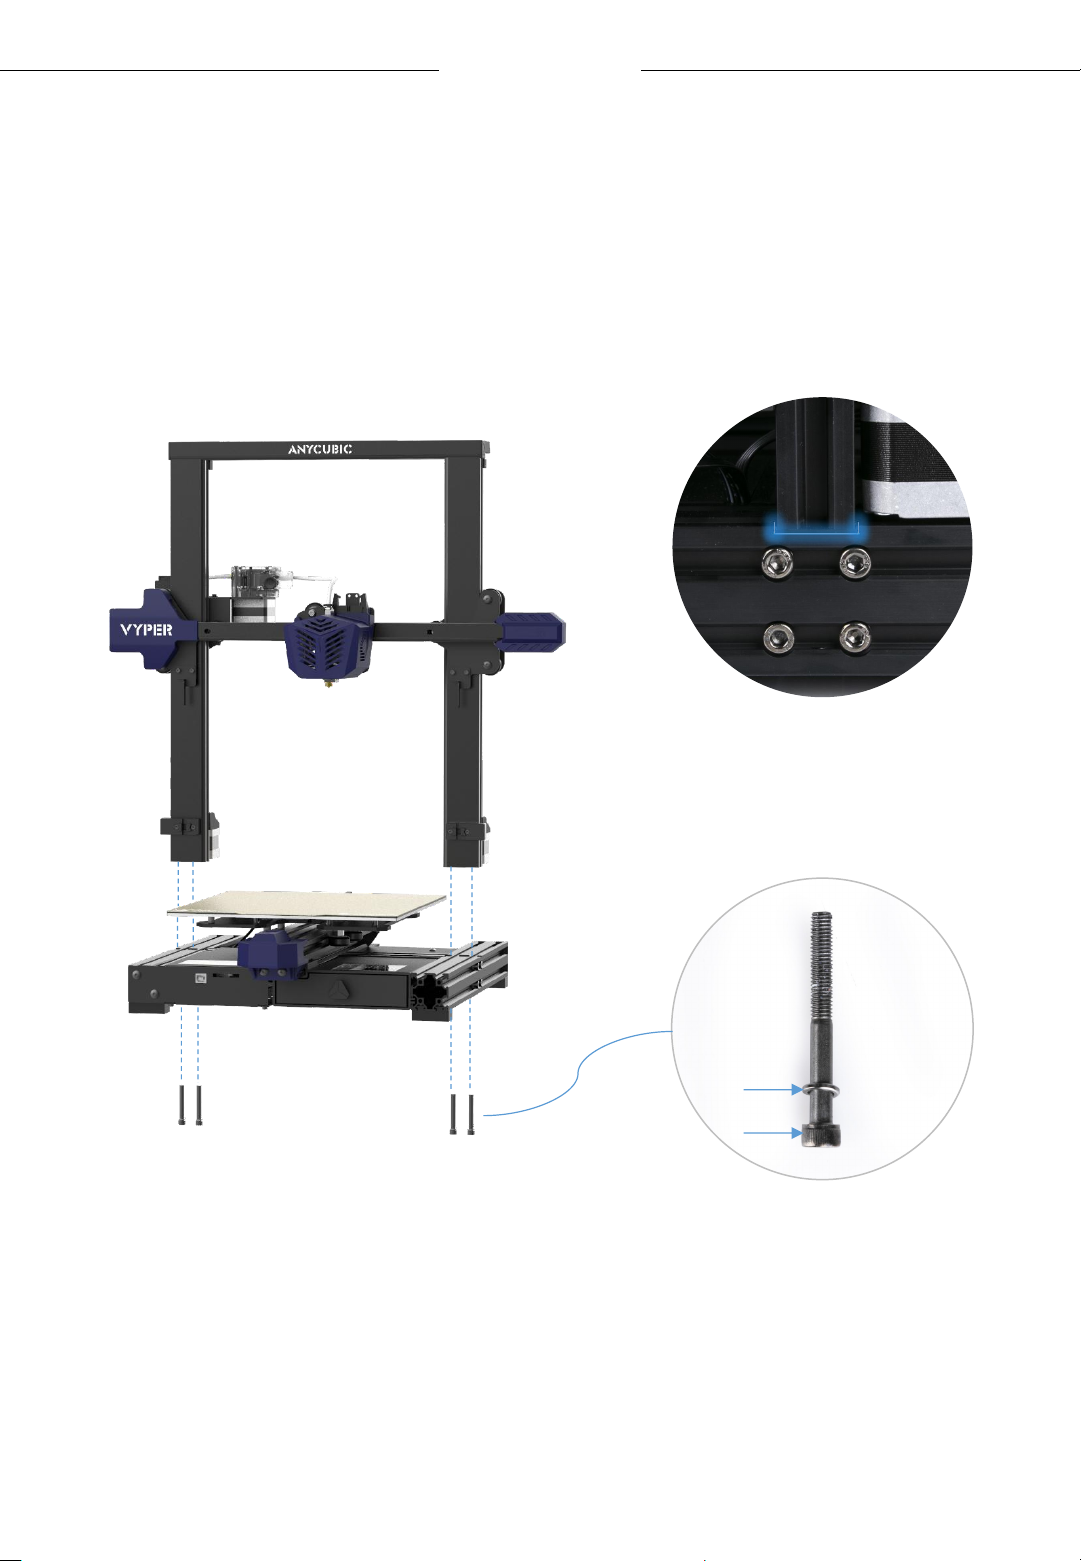
* Take tools from the toolbox on the front right side of the machine base
for assembly.
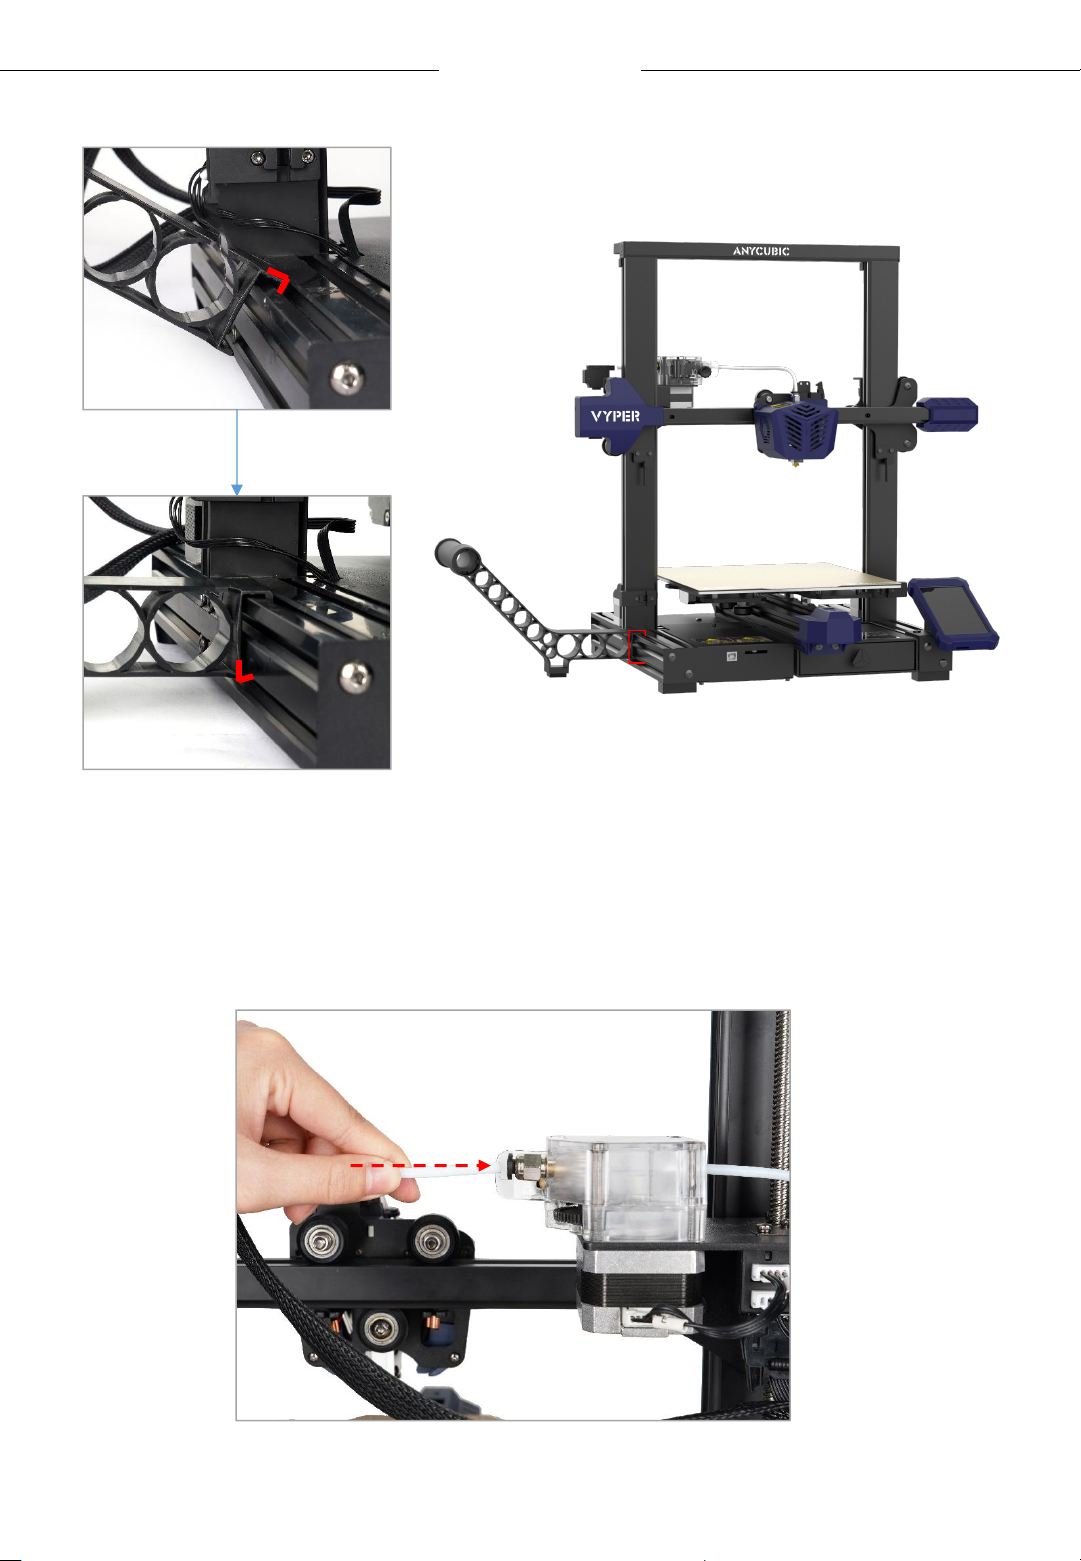
1. Install frame.
Z aluminum beams must
align with the groove of
the base aluminum beam.
Washer
M5*45 screw
15
Page 16
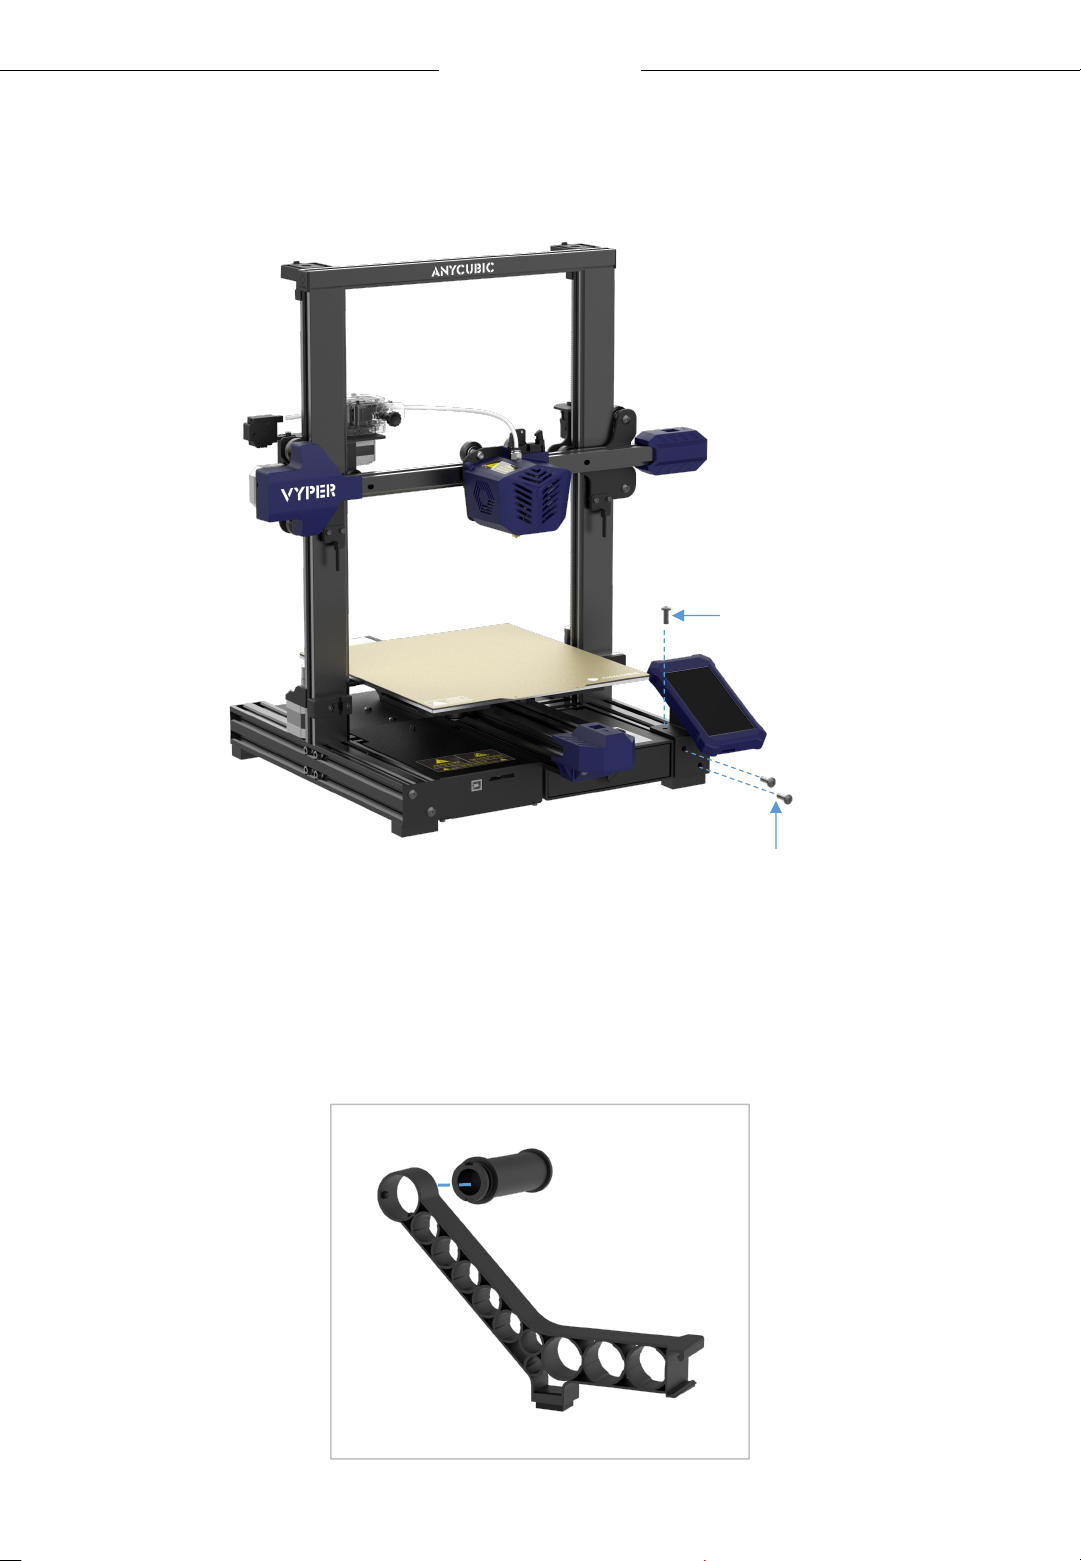
2. Install touchscreen.
www.anycubic.com
Installation
M5*14 screw X
1
3. Install the filament holder.
M5*6 screw X
2
16
Page 17
Installation
www.anycubic.com
4. Insert the teflon tubing into the extruder.
17
Page 18
www.anycubic.com
Installation
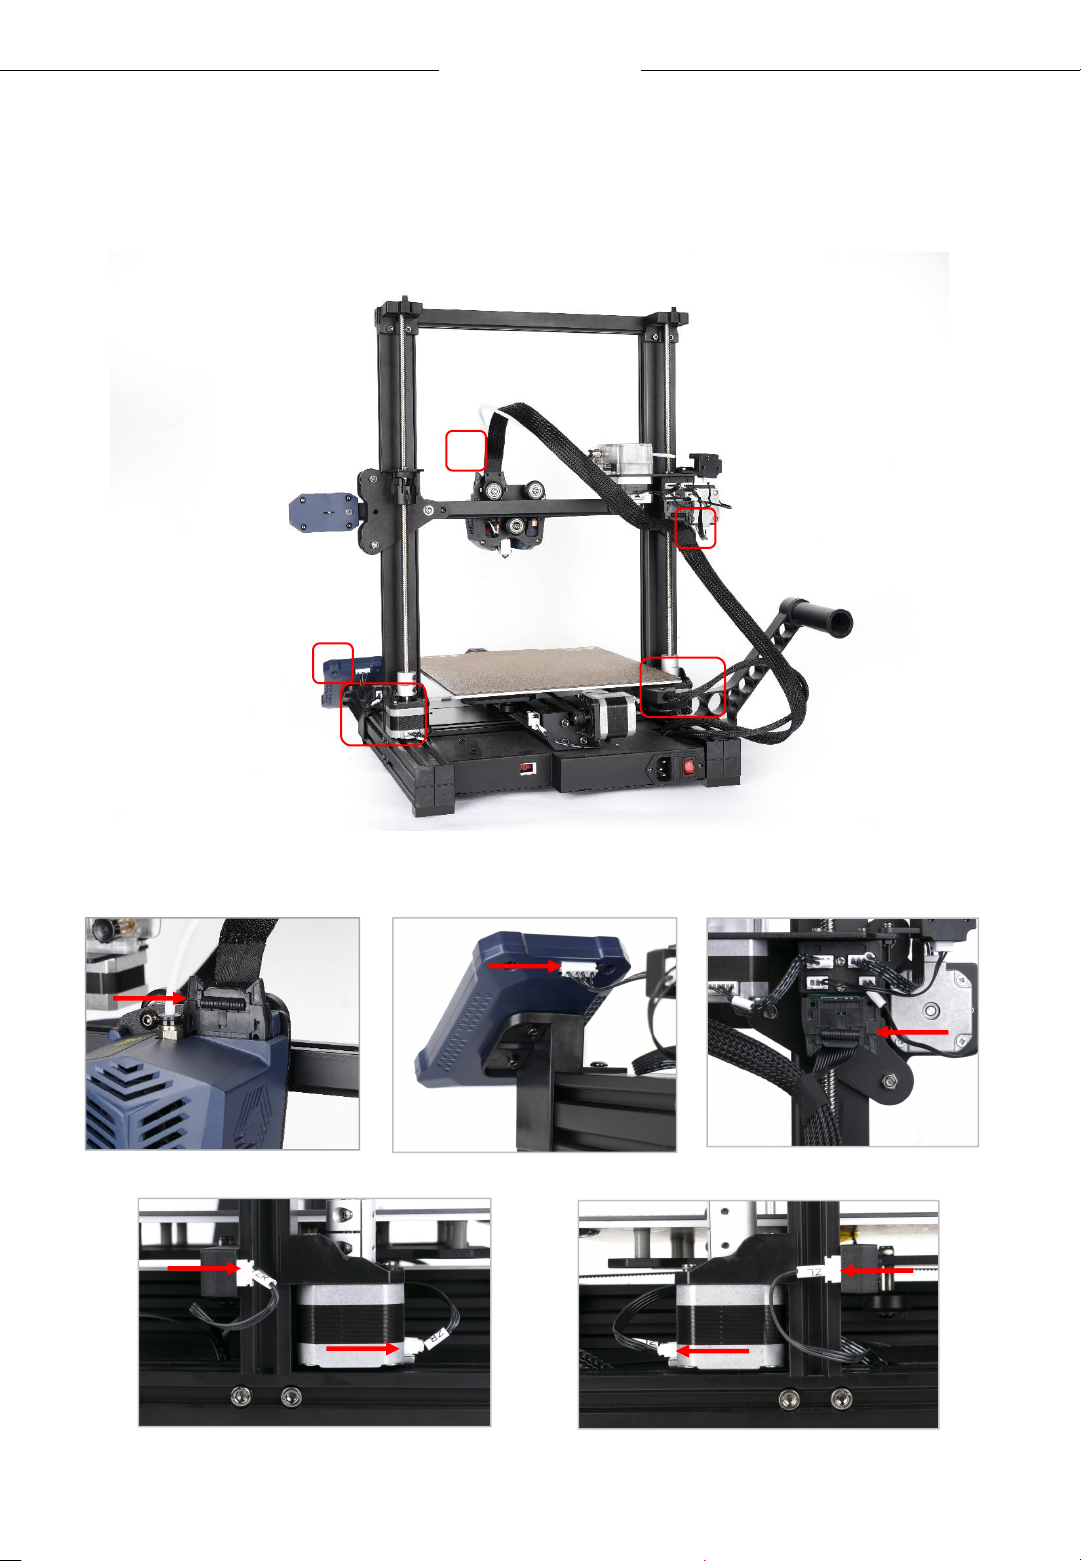
5. Wiring: connect all these wires to their corresponding ports by the
label respectively.
1
3
1. Print head wires
2
4,
5
6,
7
2. Screen wires
3. Extruder/X motor wires
4. Right Z limit switch
5. Right Z motor
6. Left Z limit switch
7. Left Z motor
18
Page 19
www.anycubic.com
Installation
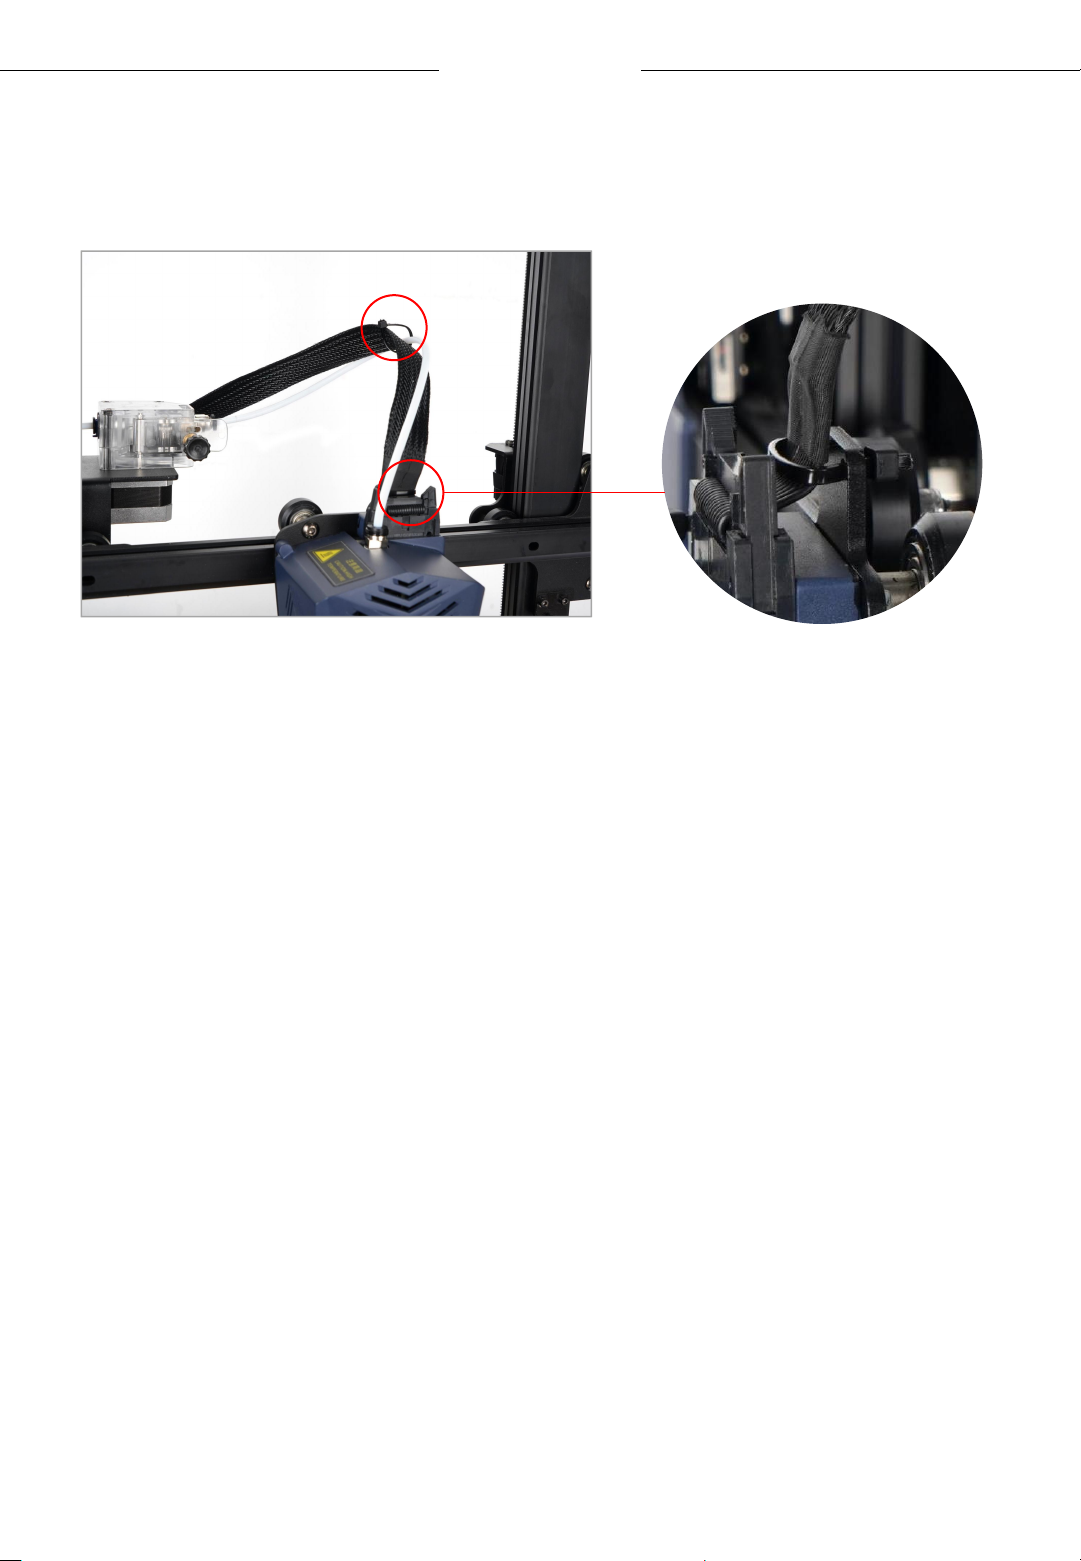
6. Use zip ties to fasten the print head wire harness and the Teflon tube.
19
Page 20
www.anycubic.com
Installation
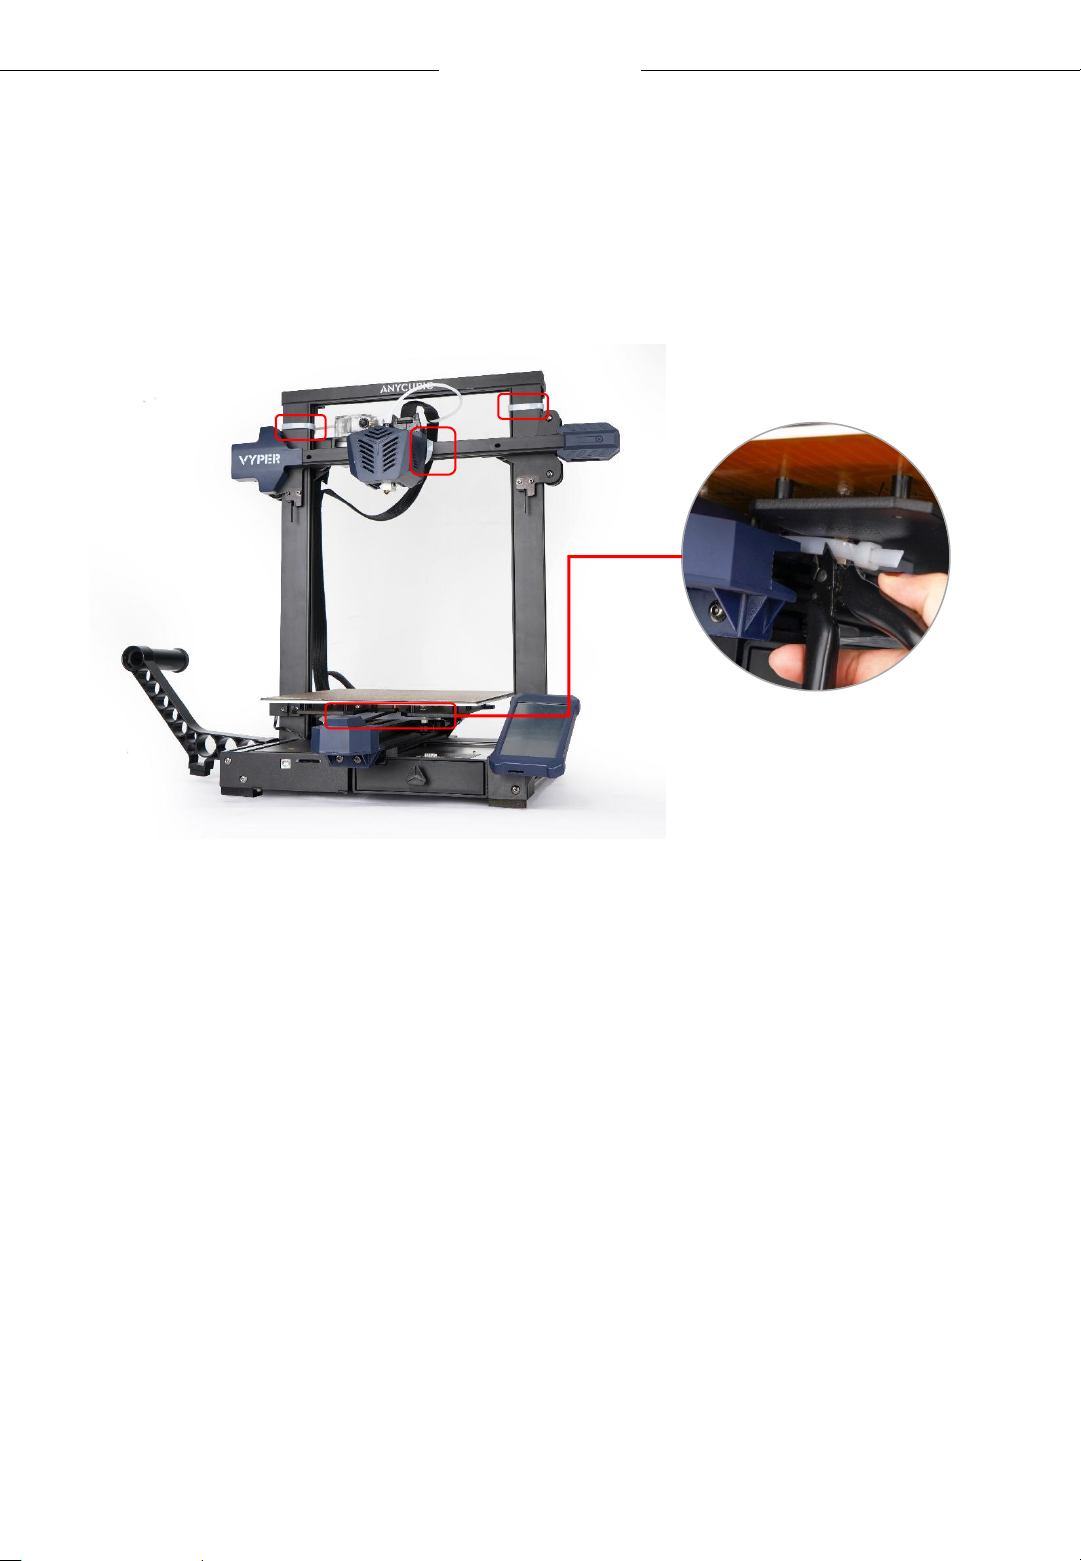
Check before using
1. Make sure that the 4 zip ties shown below have been cut off before
operating the machine.
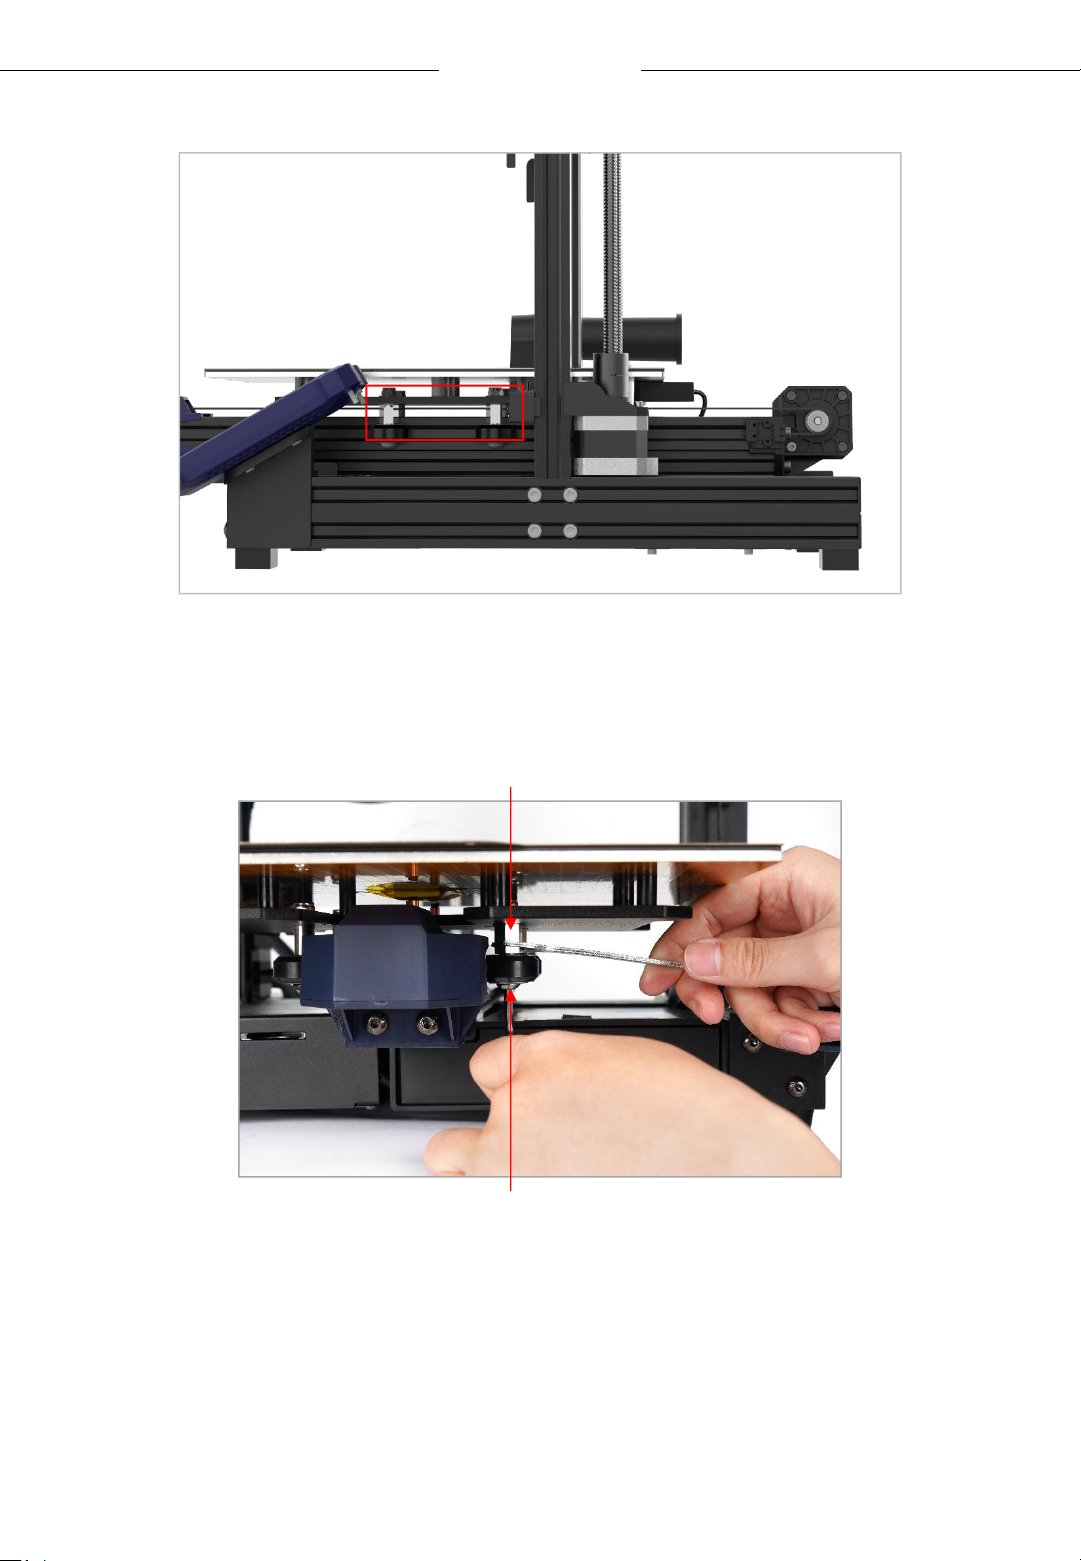
2. D-shape wheels of the base may be loosened due to transportation,
please check it after unpacking.
Place the base on a flat desktop. Shake the platform to confirm whether
the printing platform is shaking up and down. If so, please tighten the
hexagonal pillars of the D-shape wheels on the right under the platform.
• Move the platform to the front for tightening the pillar A.
• Move the platform to the rear for tightening the pillar B.
20
Page 21
Installation
A B
www.anycubic.com
② Tighten the hexagonal pillar
clockwise with a 10mm open end
wrench.
① Fix the nut with a hex key.
21
Page 22
www.anycubic.com
Leveling
Leveling the printing platform is a key ste p in 3D pr inting, w hich
determines to a large extent whether the model can be reliably adhered
to the printing platform. If the distance between the nozzle and the
printing platform is too wide, the model will not adhere to the printing
platform properly. If the nozzle is too close to the printing platform, it will
hinder material extrusion and scratch the platform. Once leveled, it is not
necessary to level every time before each printing.
Vyper supports auto-leveling, which is easy to level the platform.
* Before leveling, please ensure that the platform and nozzle are clean
and free of foreign matters to avoid affecting the leveling effect.
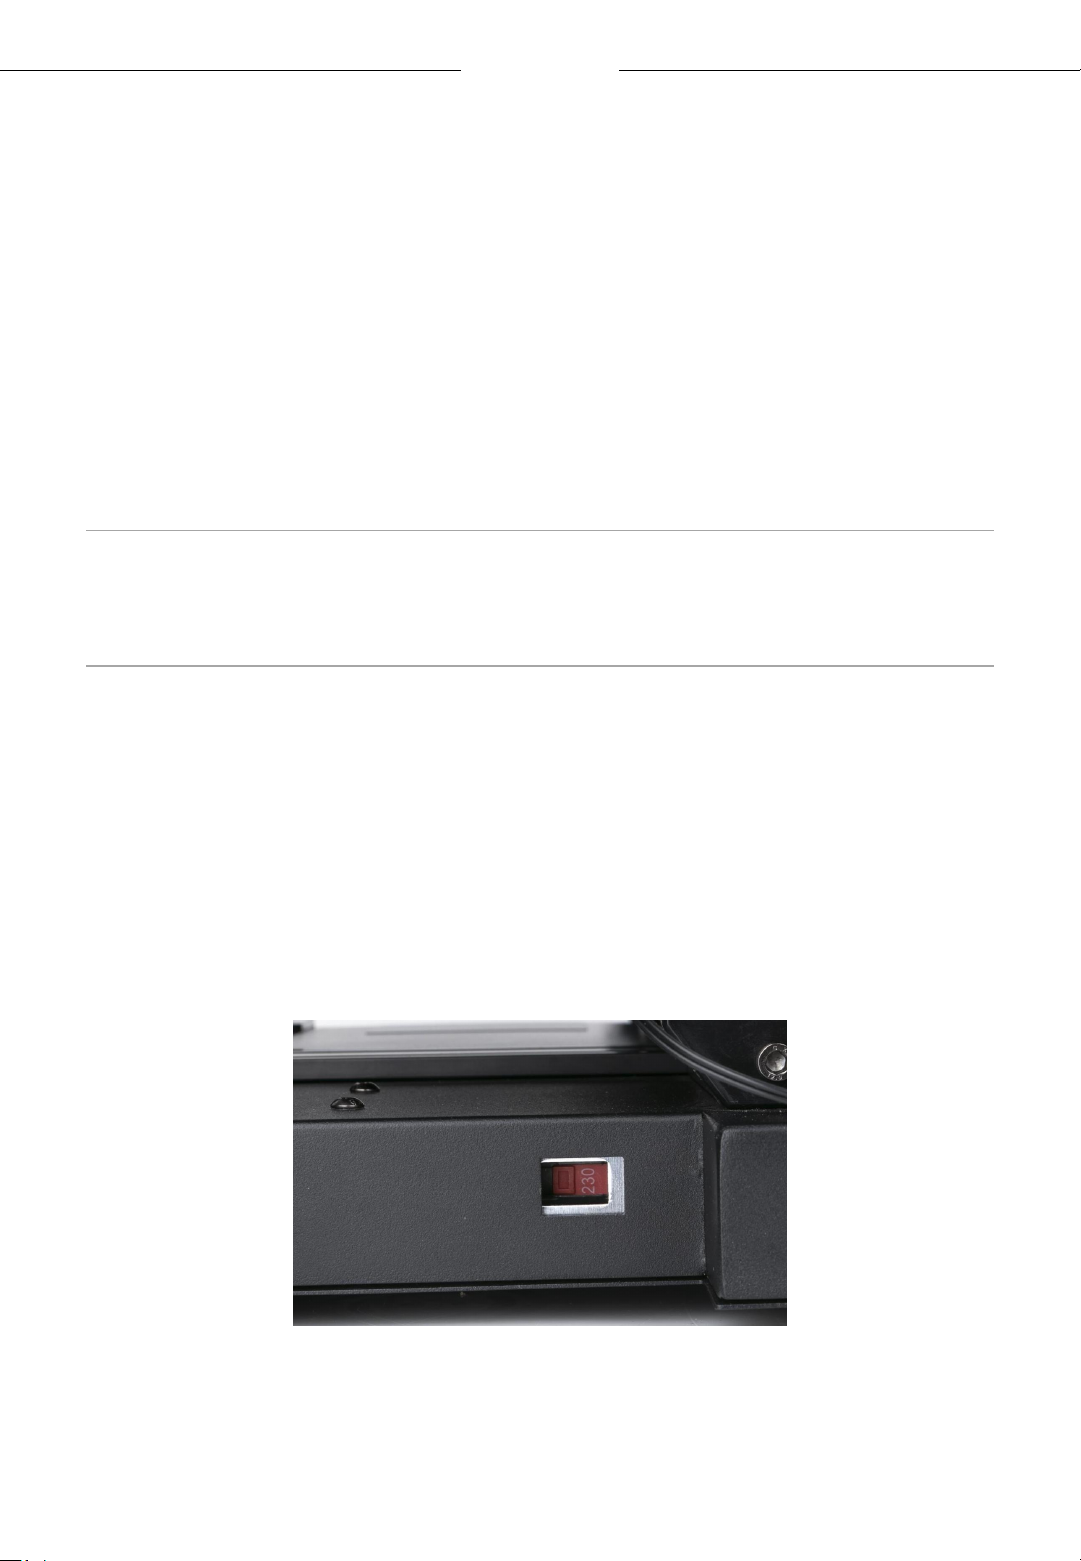
1. Select the correct voltage mode according to your local voltage ratings
(~110V or ~220V) before plugging in. The red switch is inside the
power supply casing and 220V is a default setting. A hex key can be
used to move the switch. Finally, double check the wirings, plug in the
power cord, and power on the printer.
In some cases, 220V labeled as "230" , 110V labeled as
“115"
22
Page 23
www.anycubic.com
Leveling
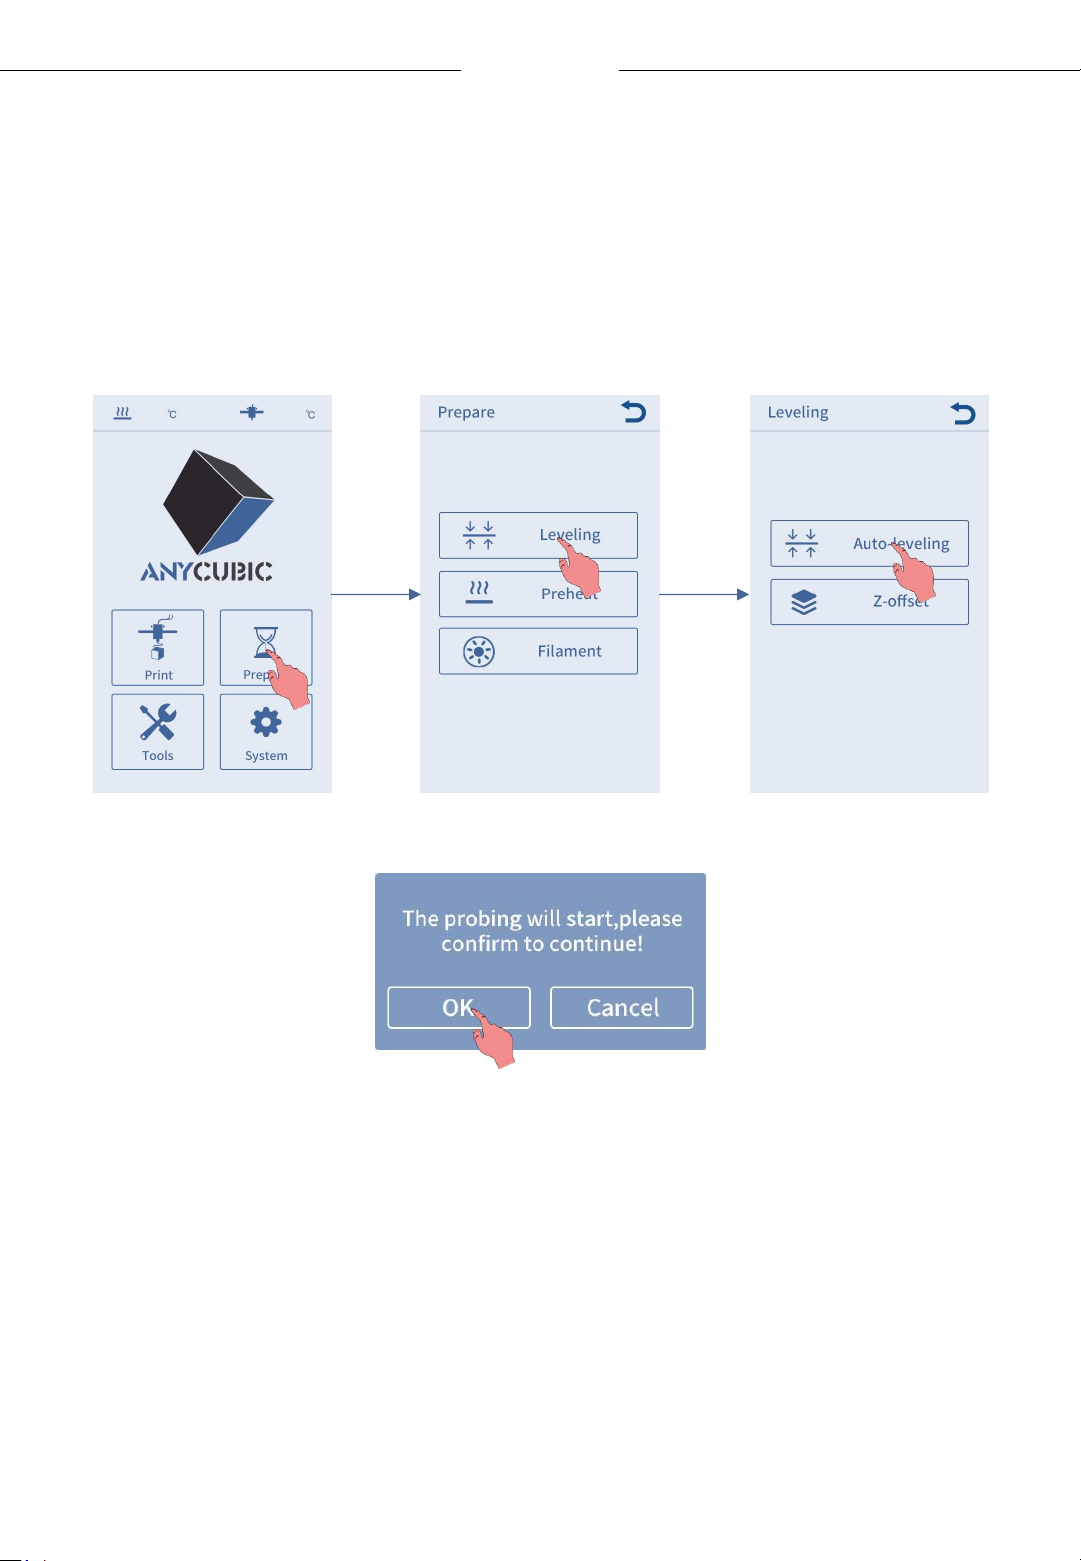
2. Return to main menu, then click Prepare → Leveling → Auto-leveling.
The confirm interface will pop up, click “OK” and the print head will
automatically probe the spots on the platform.
* The print head will heat up before probing the platform. Please do not
touch the nozzle to prevent scalding.
23
Page 24
www.anycubic.com
Loading Filament
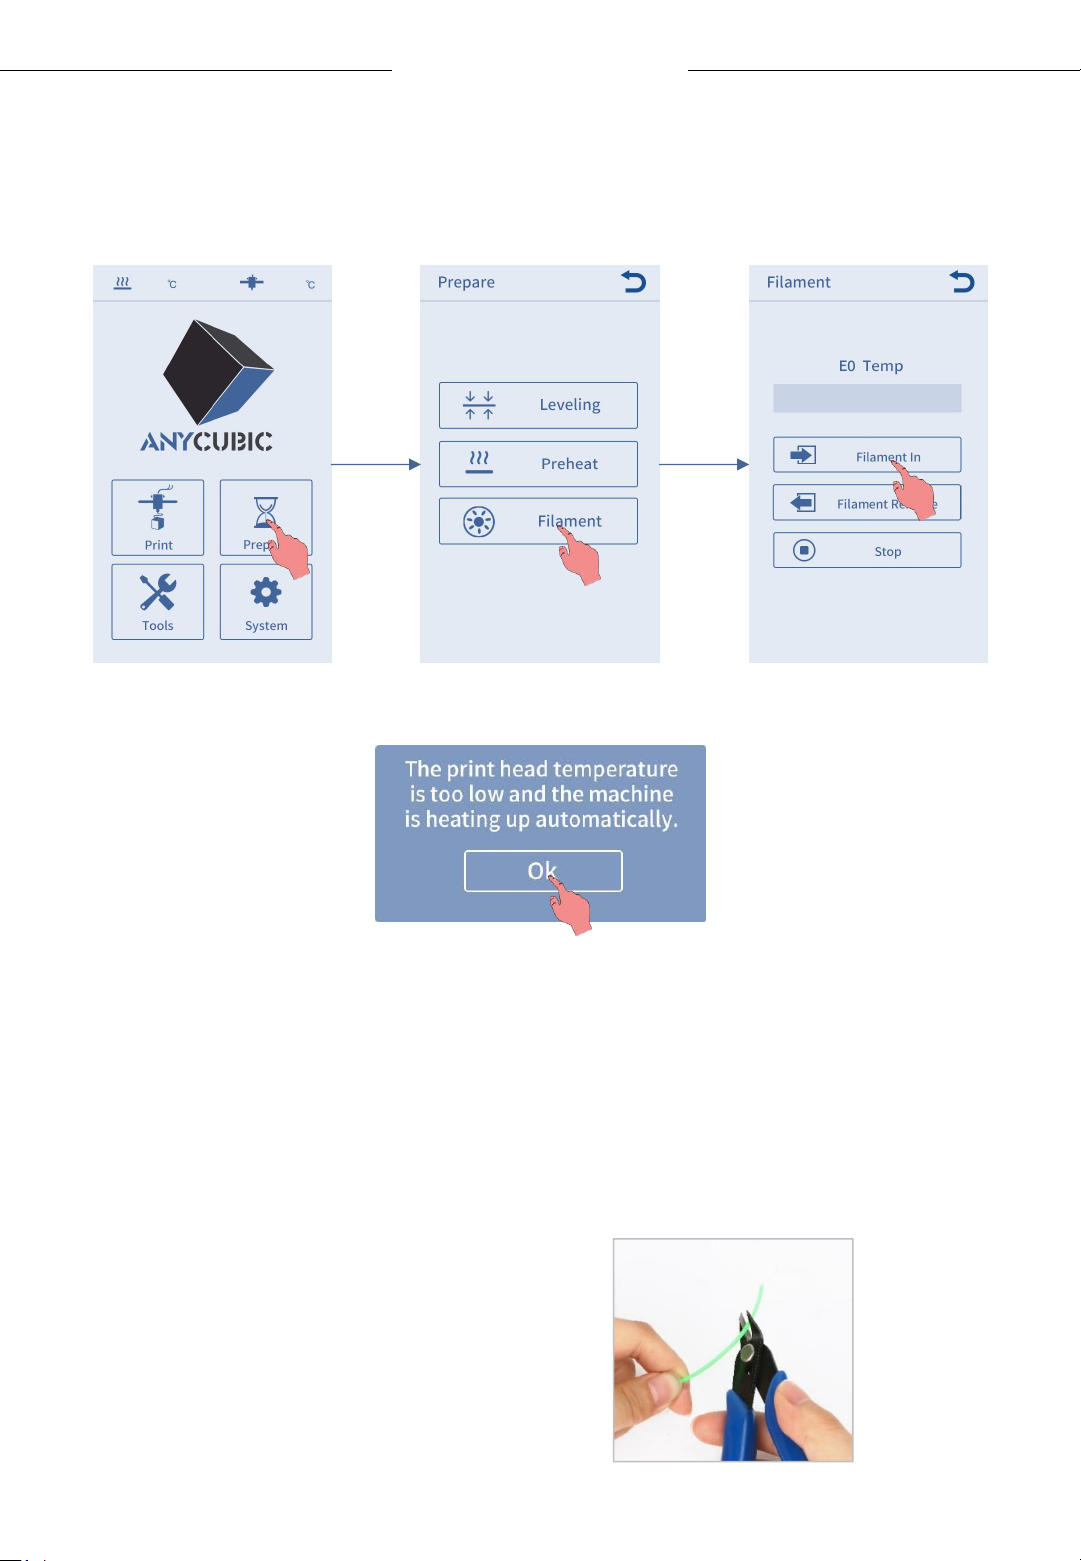
1. Return to main menu, click Prepare → Filament → Filament In, and the
heating up interface will pop up, click “OK”.
23/230
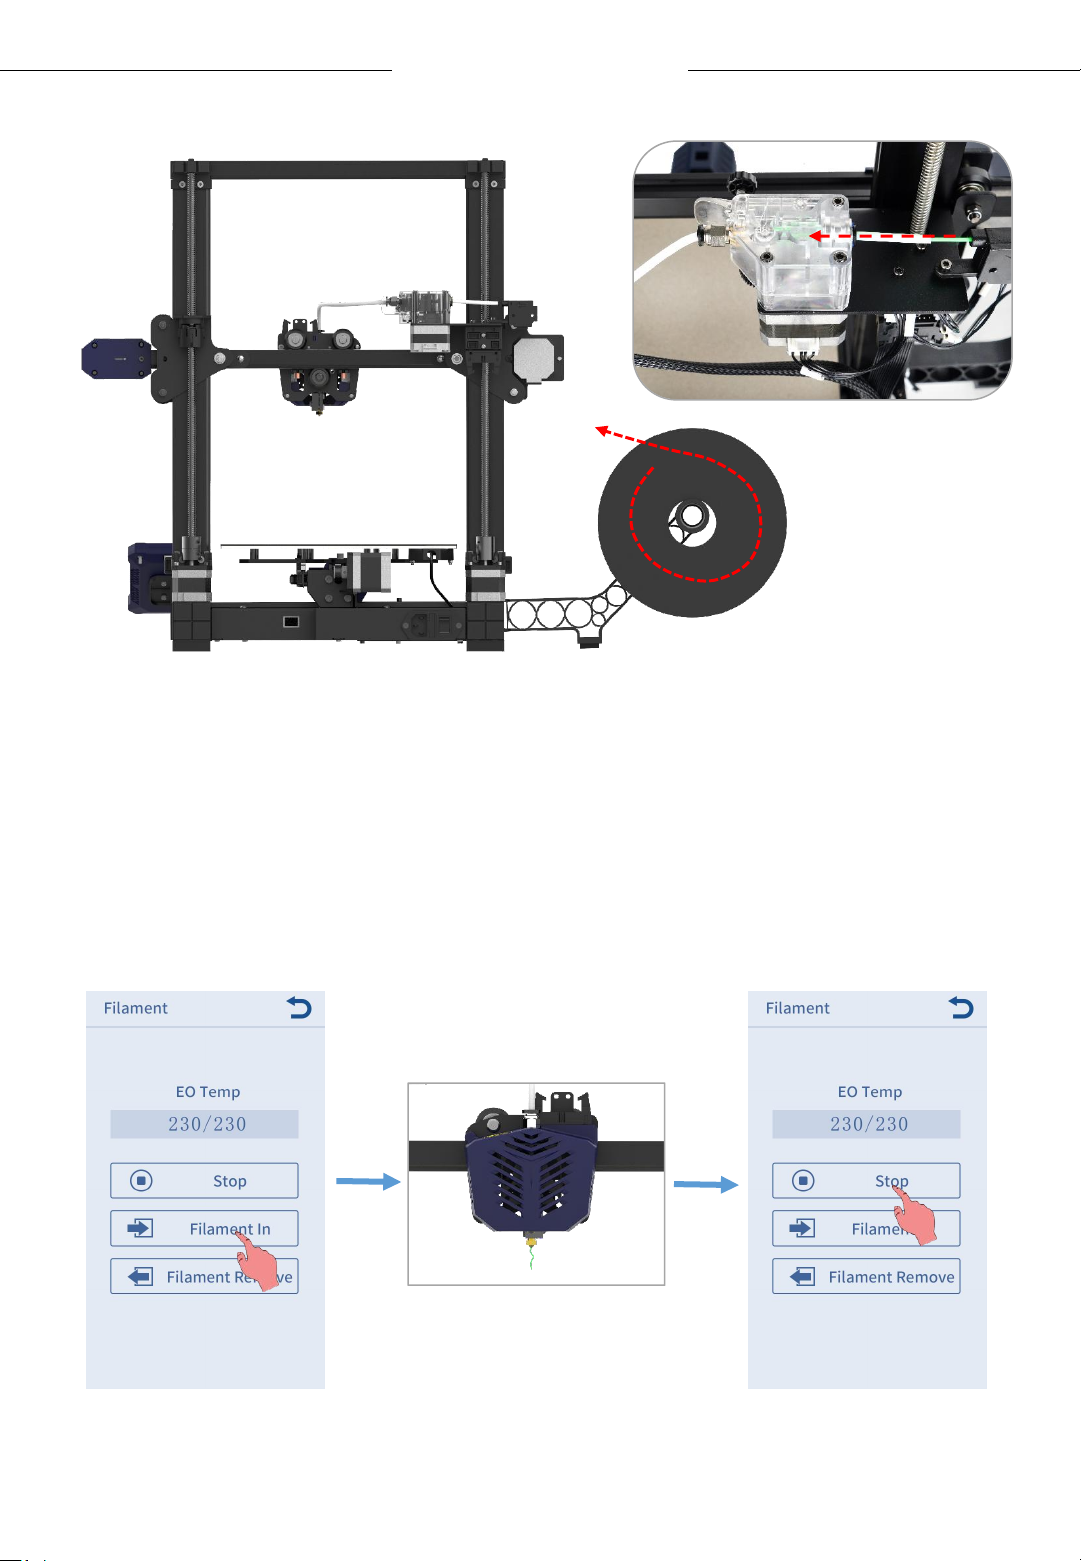
2. Straighten the end of filament, and place the filament on the filament
holder (Please note the feeding direction of filament). Then pass the
filament through filament sensor, and insert it to the extruder till the
gear. Now, wait for the nozzle reaches to the target temperature as
shown on the display screen.
Please straighten the end
of filament before insert it.
24
Page 25
Loading Filament
www.anycubic.com
Insert the filament into
the extruder till the
gear.
3. When the nozzle reaches to the target temperature, click “Filament In”
again. The filament would be automatically fed in by the extruder and it
would be melted through the nozzle. Now, click “Stop”. You may use
tweezers to clean the filament residue on the nozzle tip.
25
Page 26
www.anycubic.com
Loading Filament
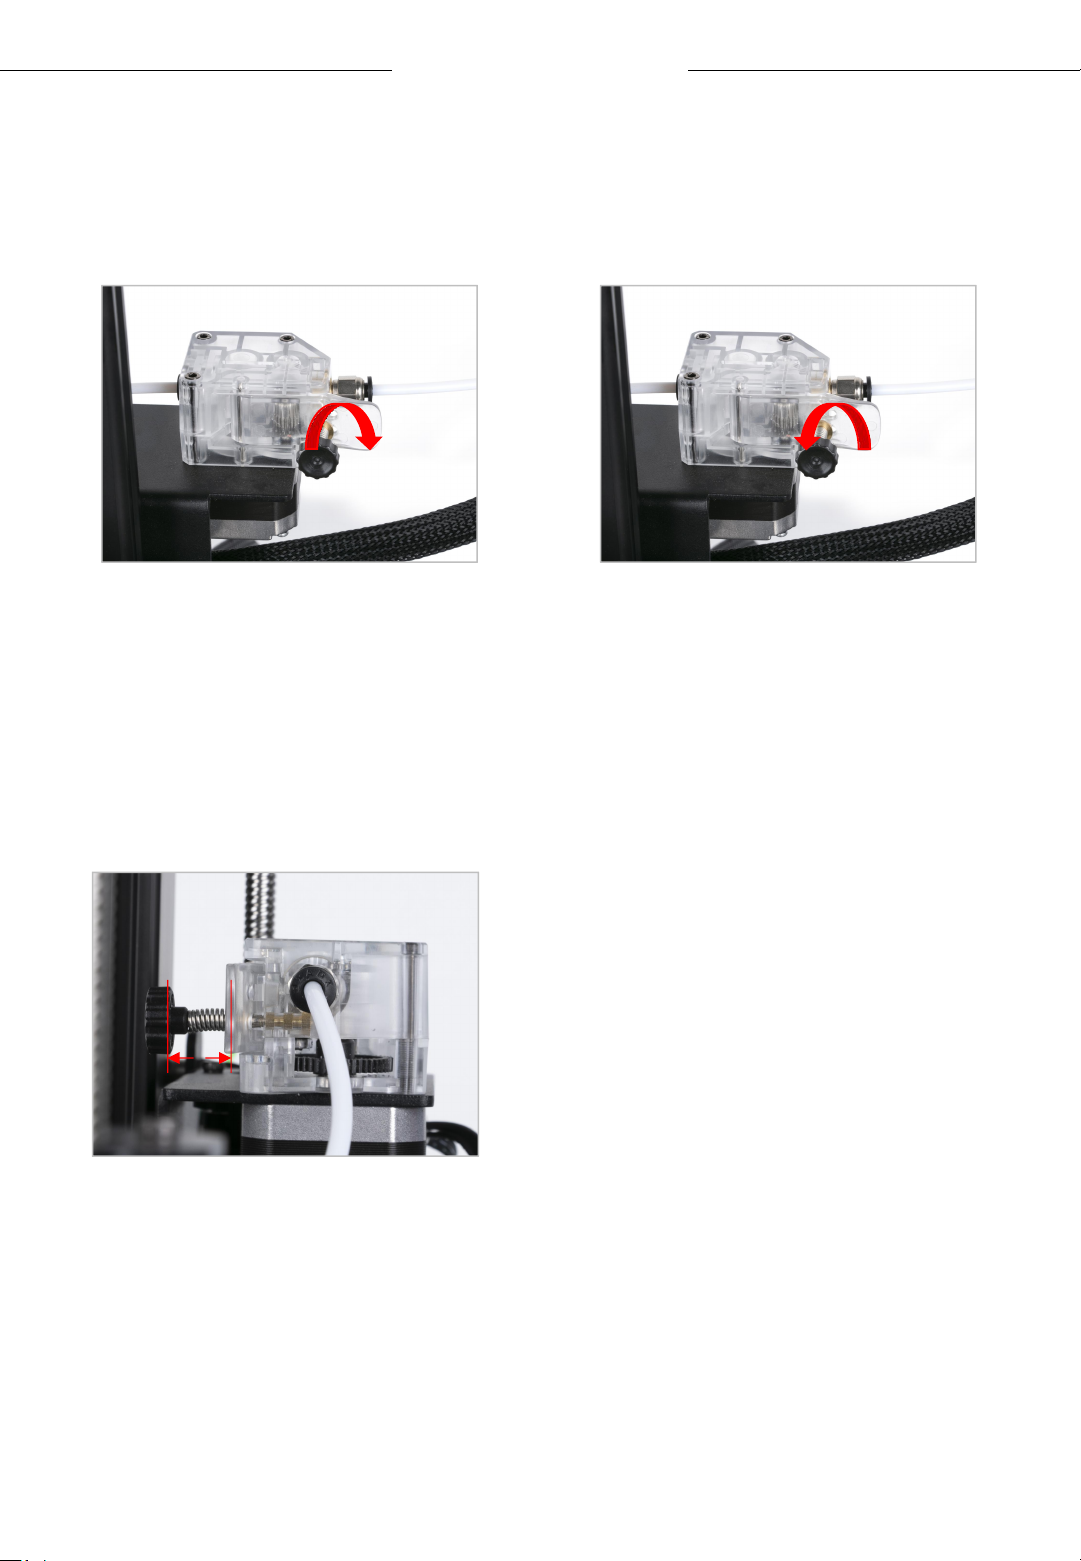
Note: During feeding, if the melted filament is not smooth or too thin,
please adjust the extrusion force by rotating the knob as shown below.
If the melted filament is
not smooth, please
increase the extrusion
force by rotating clockwise.
~18mm
If the melted filament is
too thin, please reduce
the extrusion force by
rotating counterclockwise.
Note: The better distance for
extruding filament is about 18
mm.You may adjust the distance of
the screw for the different filament.
26
Page 27
www.anycubic.com
Printing Models
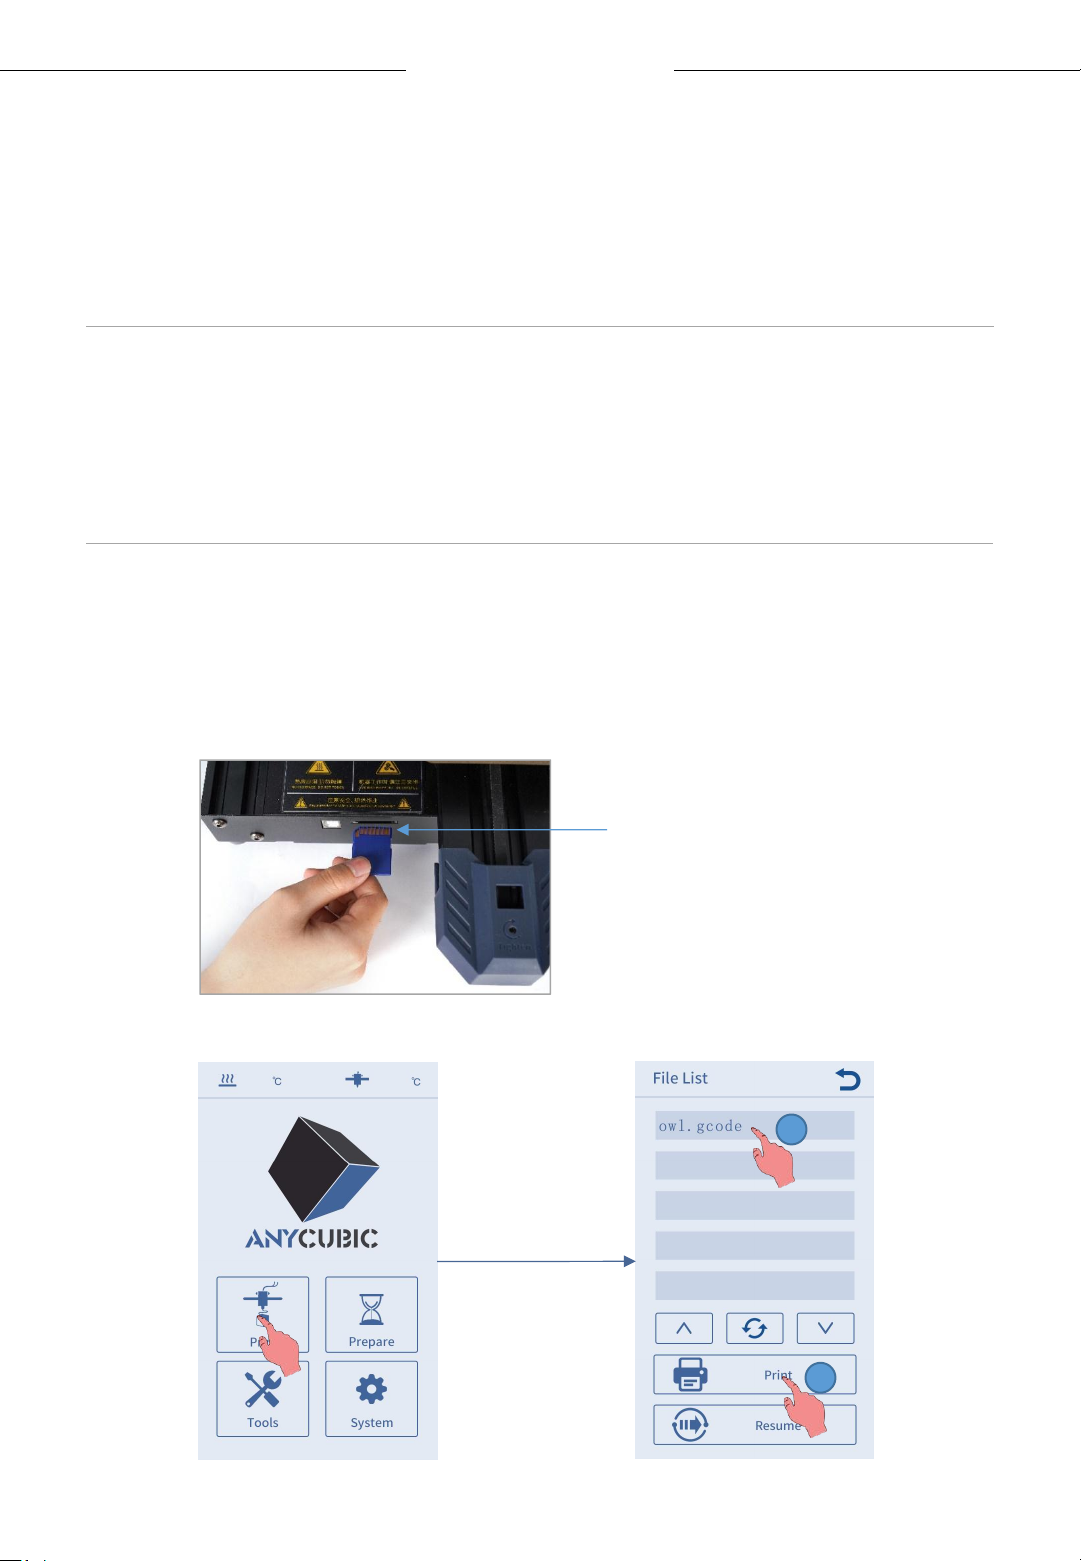
After the leveling and filament feeding are completed, the printing can be
started. A printable file "owl.gcode" has been preloaded in the memory
card and the users can print it directly.
* In order to let the printer better recognize the GCode file in the memory
card, you need to back up all the files in the memory card to the
computer, and keep the memory card only for the GCode files. Please
save all the GCode files in root directory of the memory card.
1. Insert the memory card into the memory card slot, and choose the
“owl.gcod e” file to print. (owl, author:etotheipi,www.thingiverse.com)
Metal side up
1
2
27
Page 28
www.anycubic.com
Printing Models
* Before printing, the nozzle only start to heat up after the heated bed
reaches the target temperature. After the nozzle and heated bed are
heated to the target temperature, the printer will start printing.
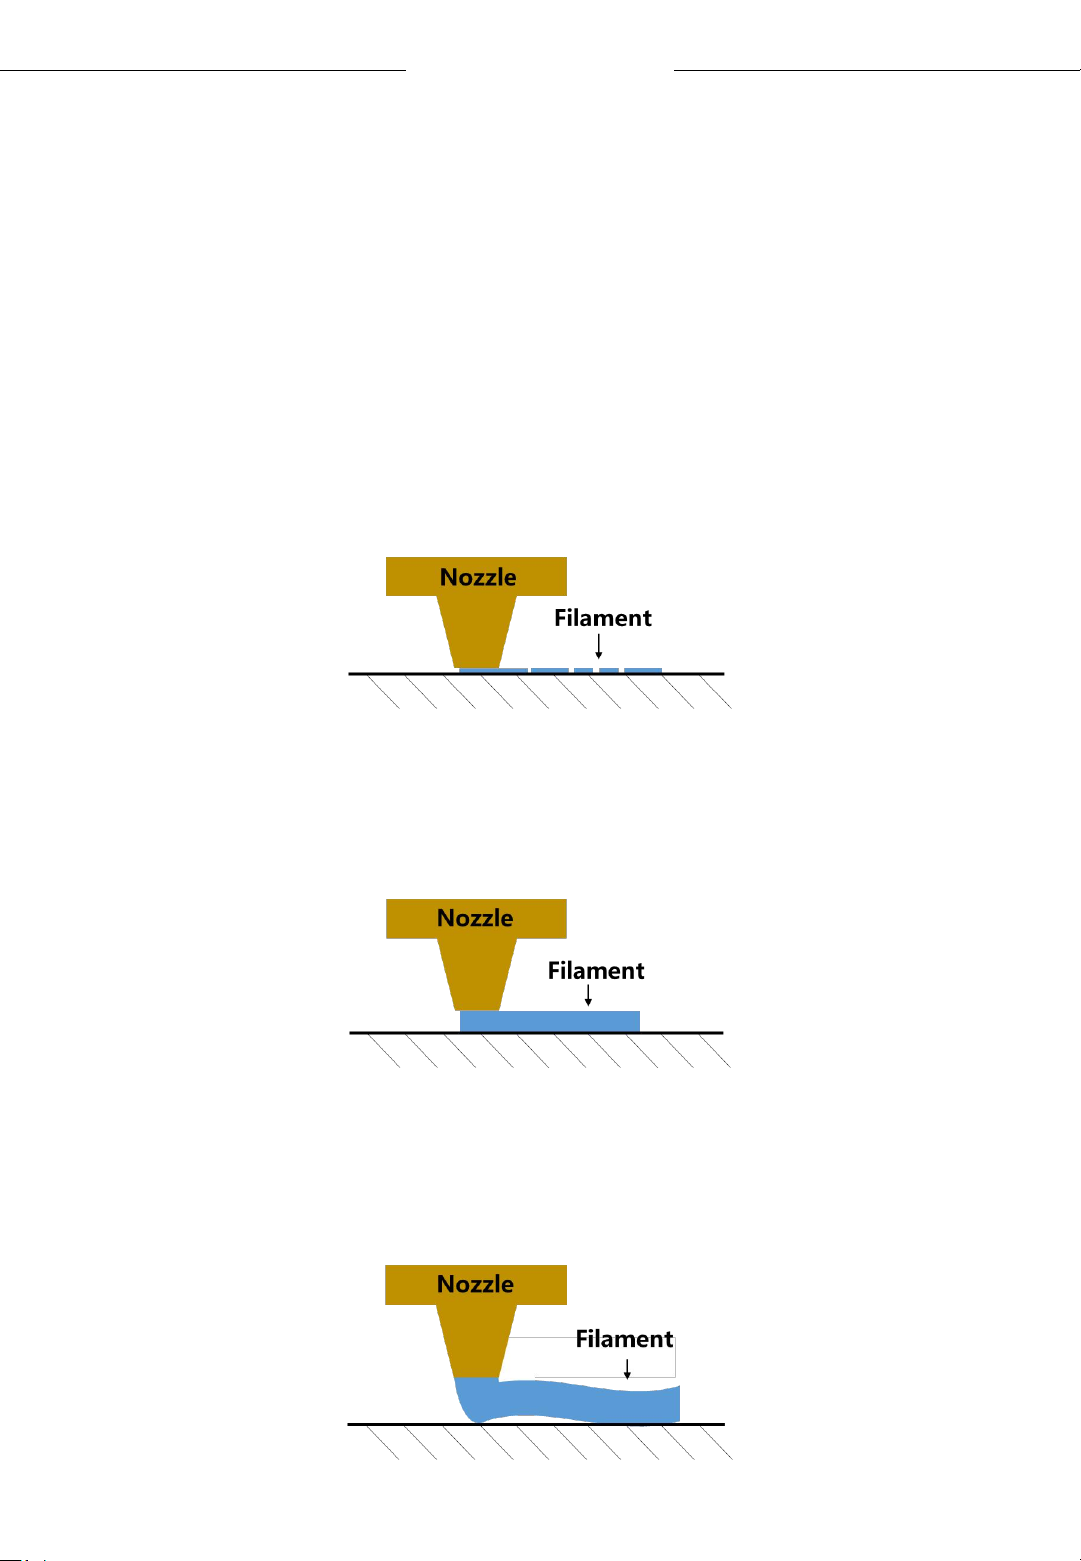
2. There might be three kinds of results for the first or second layer of the
test print:
① Nozzle is too close to the platform, resulting in insufficient extrusion of
filament.
② Proper distance between nozzle and platform can achieve the best
printing effect.
③ Nozzle is too high and the gap is large, which lead to poor adhesion of
filament to the platform.
28
Page 29
www.anycubic.com
Printing Models
The printing effect ① and ③ can be improved by adjust Z-offset during
printing.
( * In most cases, there is no need to adjust Z-offset after auto-leveling.)
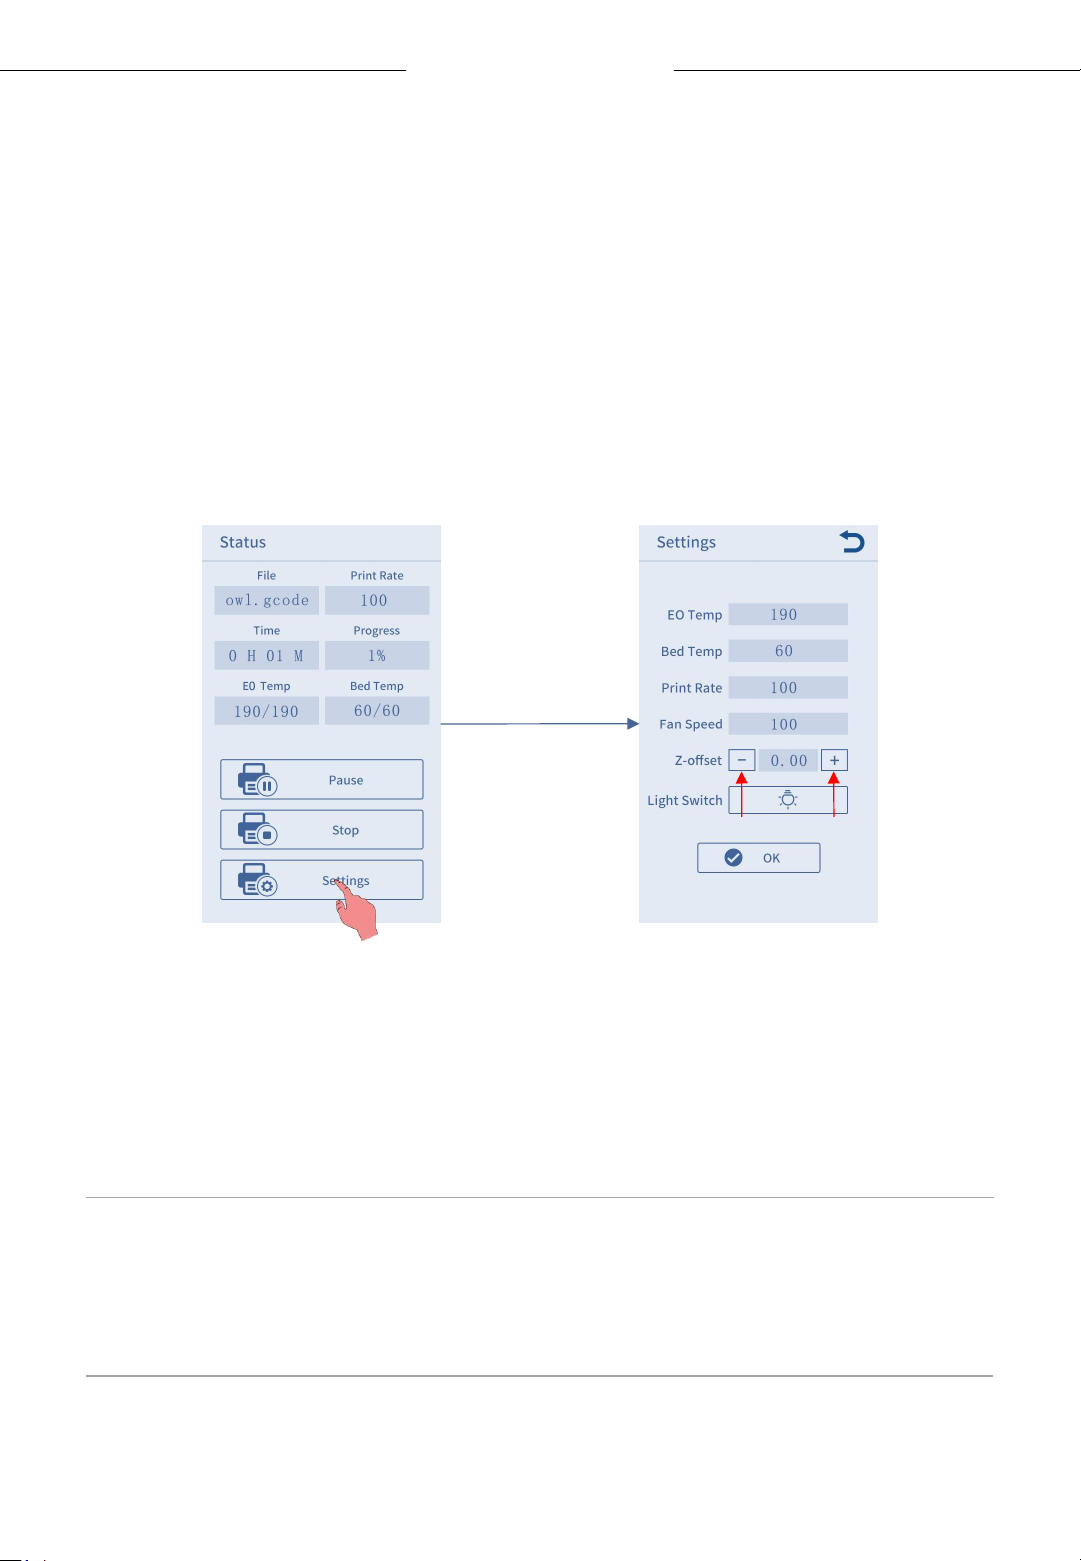
How to adjust the Z-offset:
Click Settings on printing status interface, then click “+” or “—” of the Z-
offset to adjust the distance between nozzle and printing platform and
observe the printing effect.
-: Decrease the distance
between
nozzle and printing platform.
+: Increase the distance
between
nozzle and printing platform.
* After adjusting the offset setting, click "OK" on the settings interface,
and the offset will be effective for subsequent printing; if you only click
the Return button without clicking "OK", the offset will only be effective
for this printing.
29
Page 30

www.anycubic.com
Printing Models
Please adjust the Z-offset patiently until the effect likes ②. If the printing
effect is still not good after multiple adjustments, please stop printing and
level the platform again.
3. The nozzle and heated bed are still at a high temperature when
printing is finished. Make sure to wait for nozzle and heated bed to cool
down before removing the model from the printing platform.
Note: When the ambient temperature is higher than 33°C, it is
recommended to change the slicing parameter "wall thickness" of the
model to 1.6mm.
* Tip: To eject the memory card, please press it.
30
Page 31
www.anycubic.com
Introduction to slicing software
3D printer reads GCode file and prints. It is necessary to convert 3D files
(such as stl file) into GCode files for machine to recognize. Software that
convert 3D files into GCode files is called slicing software.
Introduction of slicing software:
1. Cura Installation
2. Machine Settings
3. Import the Configuration File
4. Manipulate 3D model in Cura
5. Slice and Preview
6. Print Offline and Online
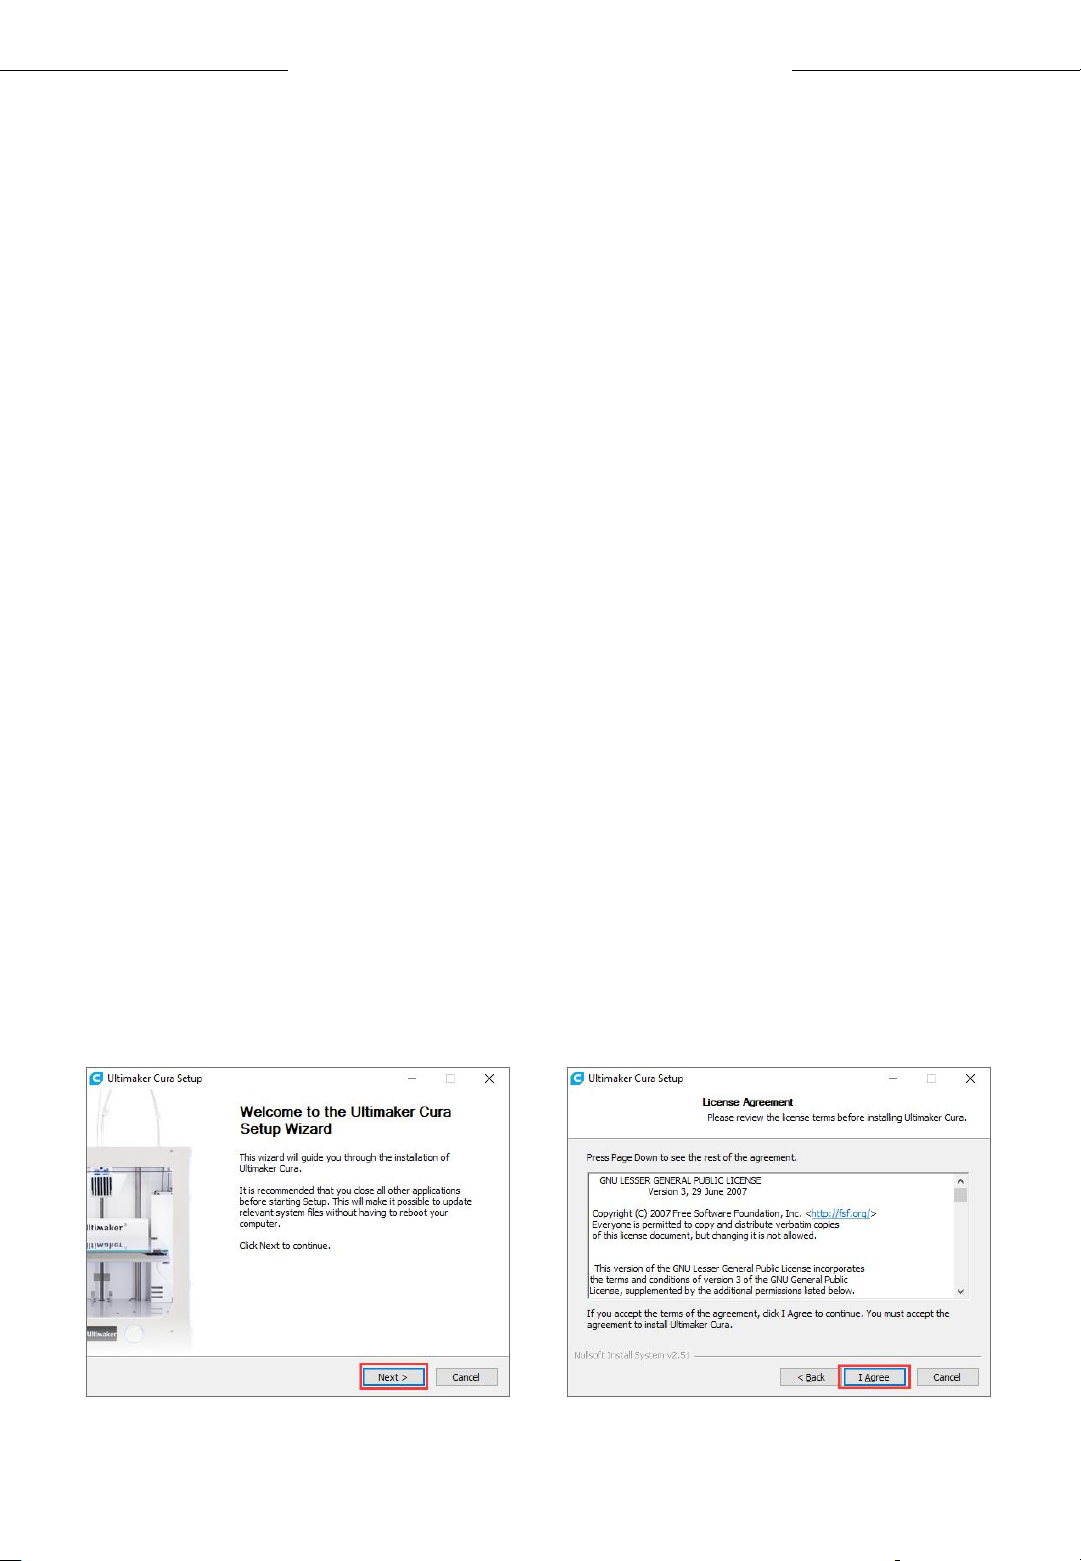
1. Cura Installation
Double click Ultimaker_Cura-4.2.1-win64, and follow the steps as shown
below.
* Ultimaker Cura 4.2.1 is used for example here, please refer to the
memory card for the actual version.
* File path: Memory card → “Files_ English_Vyper” → “Cura” →
“Windows” or “Mac”.
①
②
31
Page 32
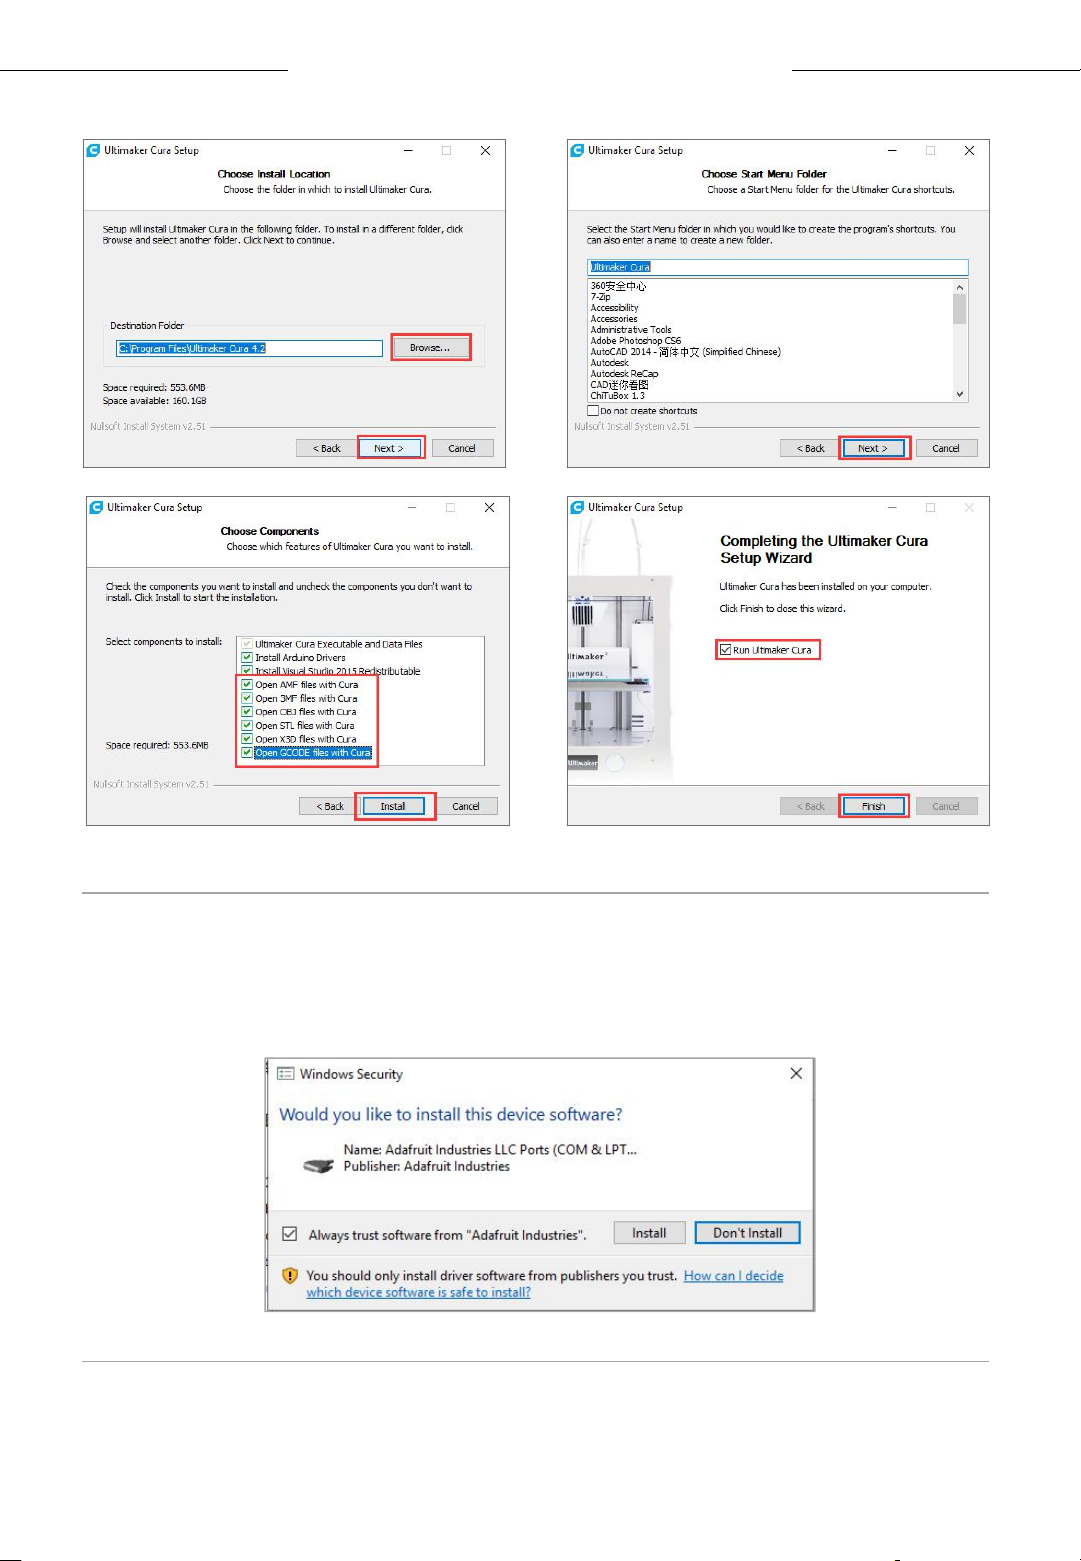
Introduction to slicing software
③ ④
www.anycubic.com
⑤
* Printing online requires the installation of a driver, as shown below. If
you don't print online, you don't need to install it.
⑥
32
Page 33
www.anycubic.com
Introduction to slicing software
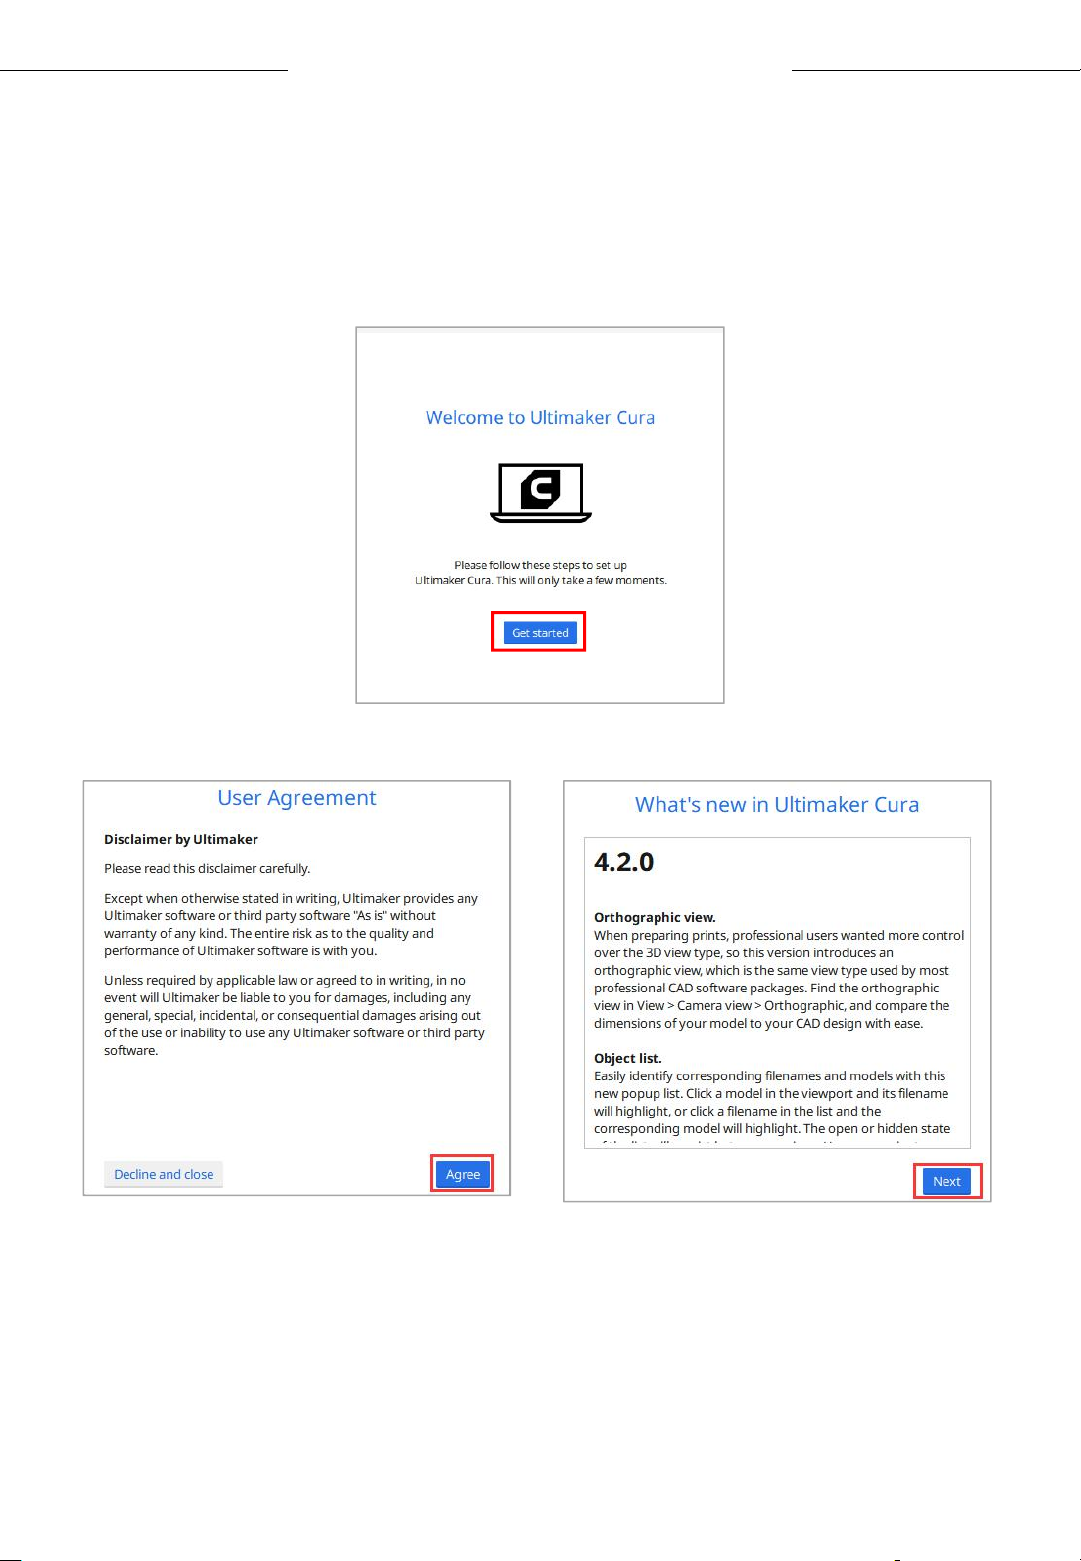
2. Machine Settings
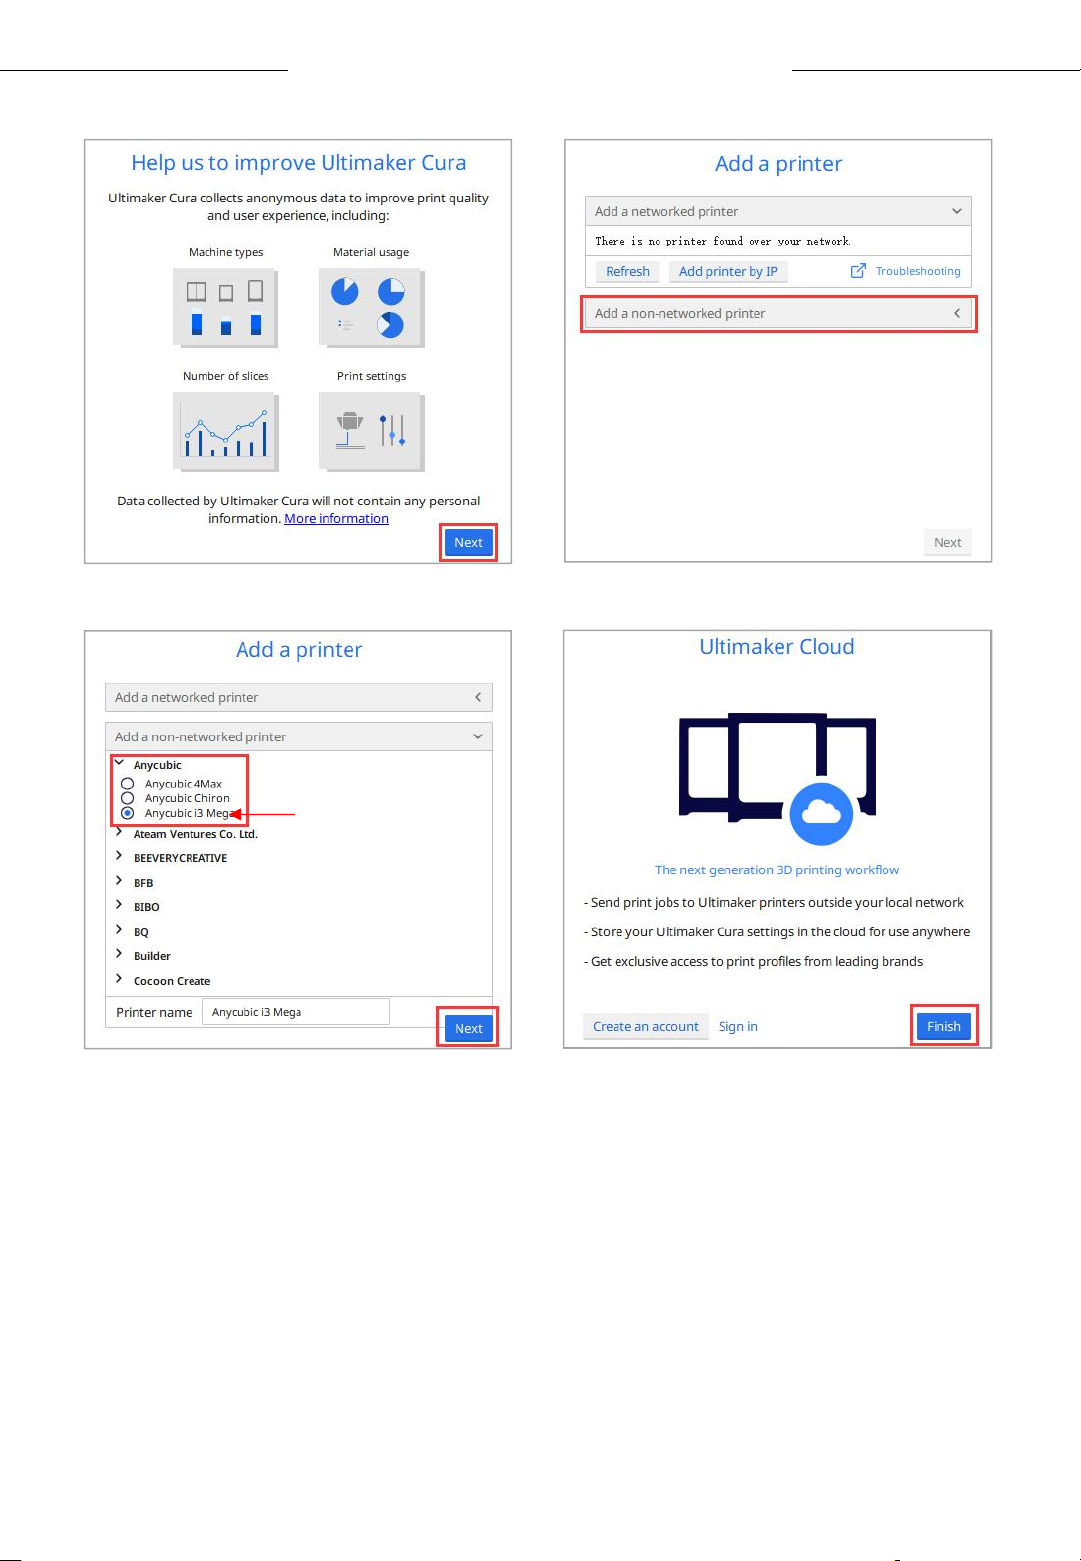
Upon completion of installation, the first launch of the software will
display the following welcome screen. Click Get started to start the
machine settings.
①
②
33
Page 34
Introduction to slicing software
www.anycubic.com
③
⑤
④
⑥
According to the wizard, we have selected the Anycubic i3 Mega printer.
Now, we will set the parameters of Vyper based on the printer.
34
Page 35
www.anycubic.com
Introduction to slicing software
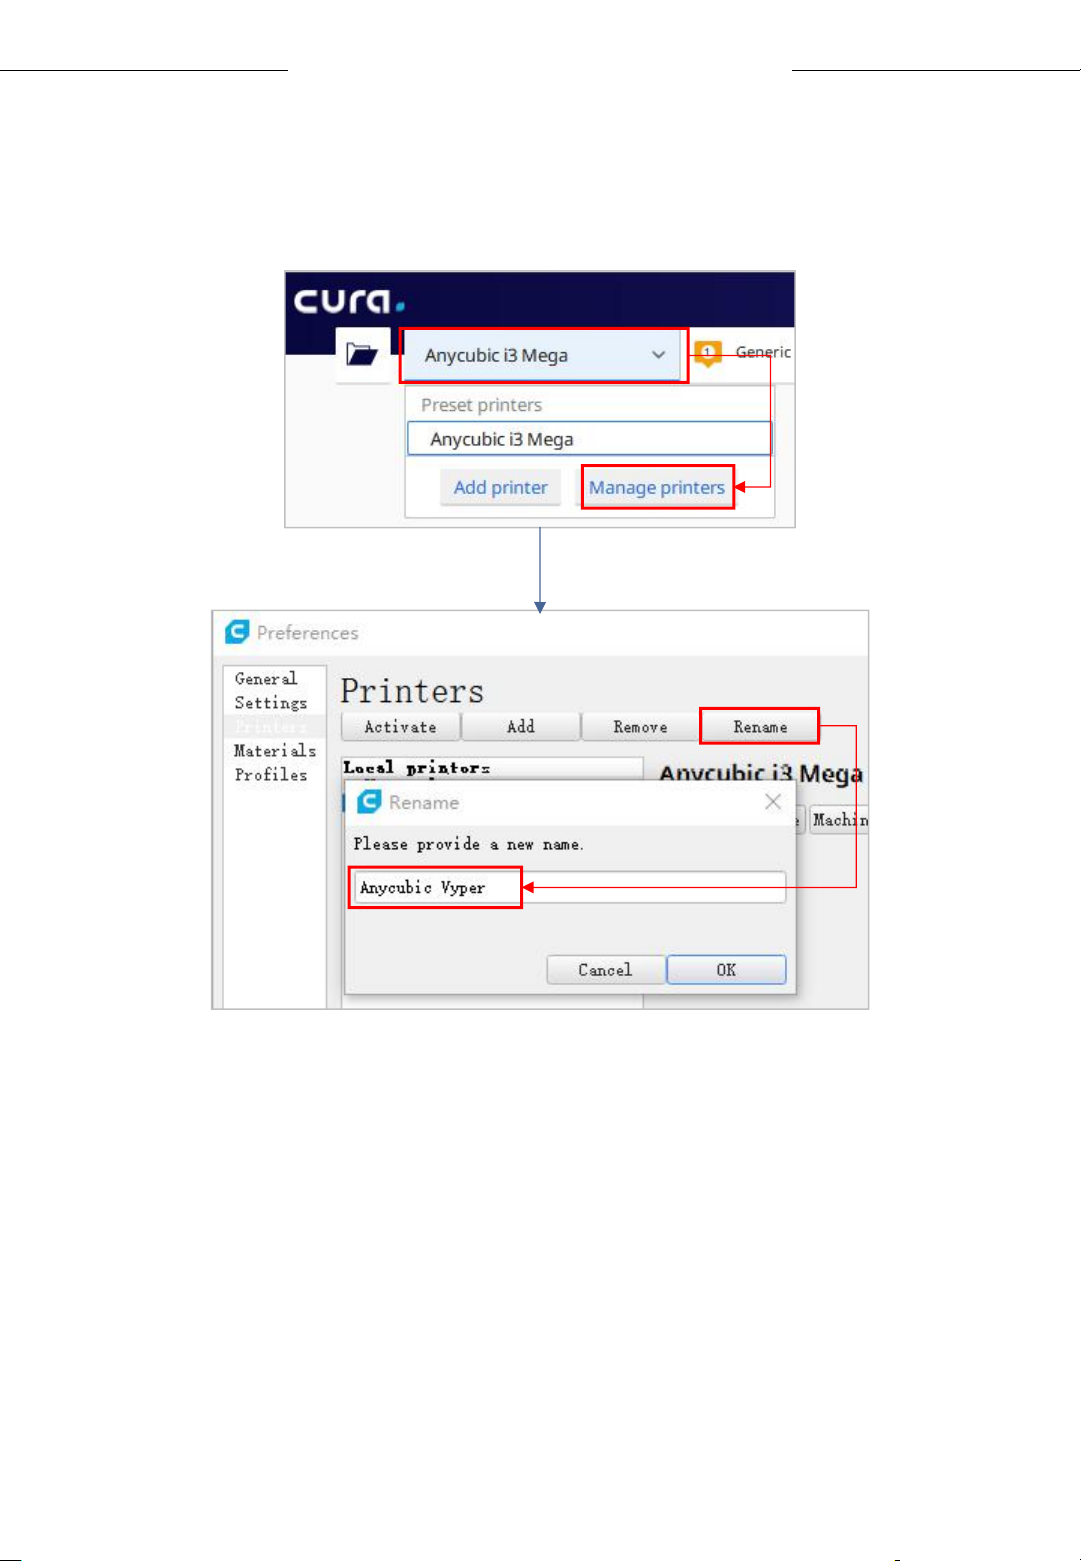
(1) Click Anycubic i3 Mega → Manage printers on the top left corner, and
rename the printer to Anycubic Vyper.
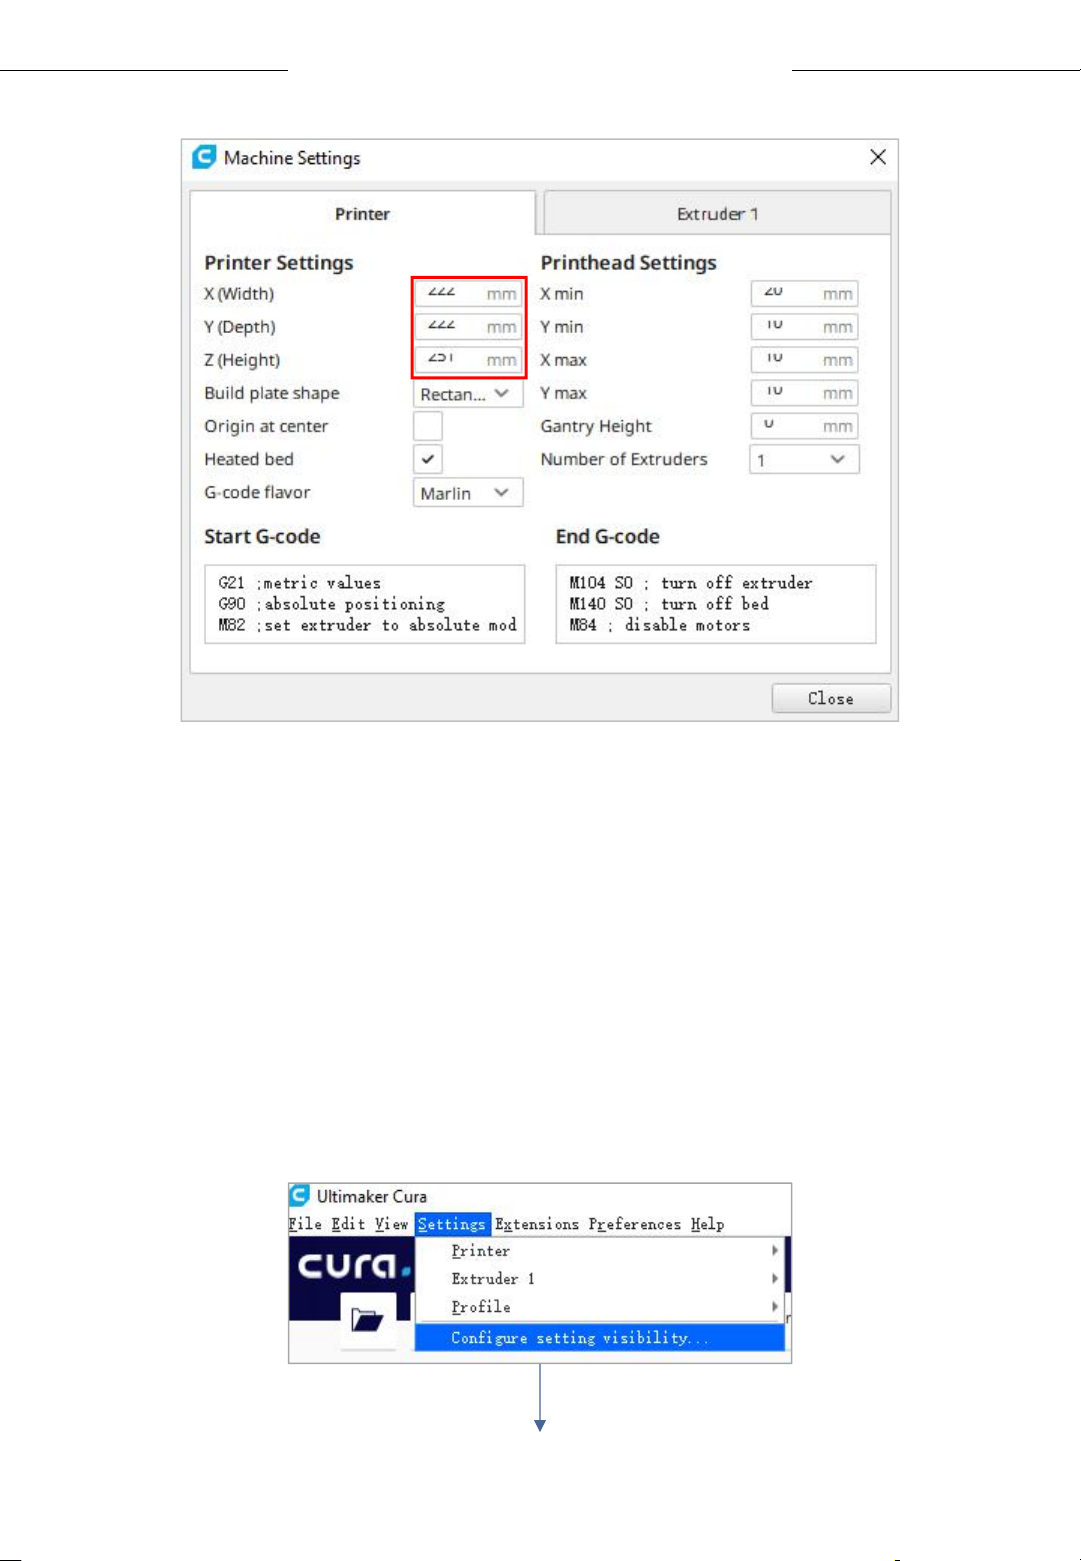
(2) In the same interface opened in Step (1), click Machine Settings and
set the X (Widch) / Y (Depth) / Z (Height) parameters of printer as 250,
255 and 265 respectively, as shown below.
35
Page 36
Introduction to slicing software
250
255
265
www.anycubic.com
3. Import the Configuration File
After continuous testing, we provided users the suggested printing
parameters of different filaments for Vyper, and the user could directly
import the parameter files to the software.
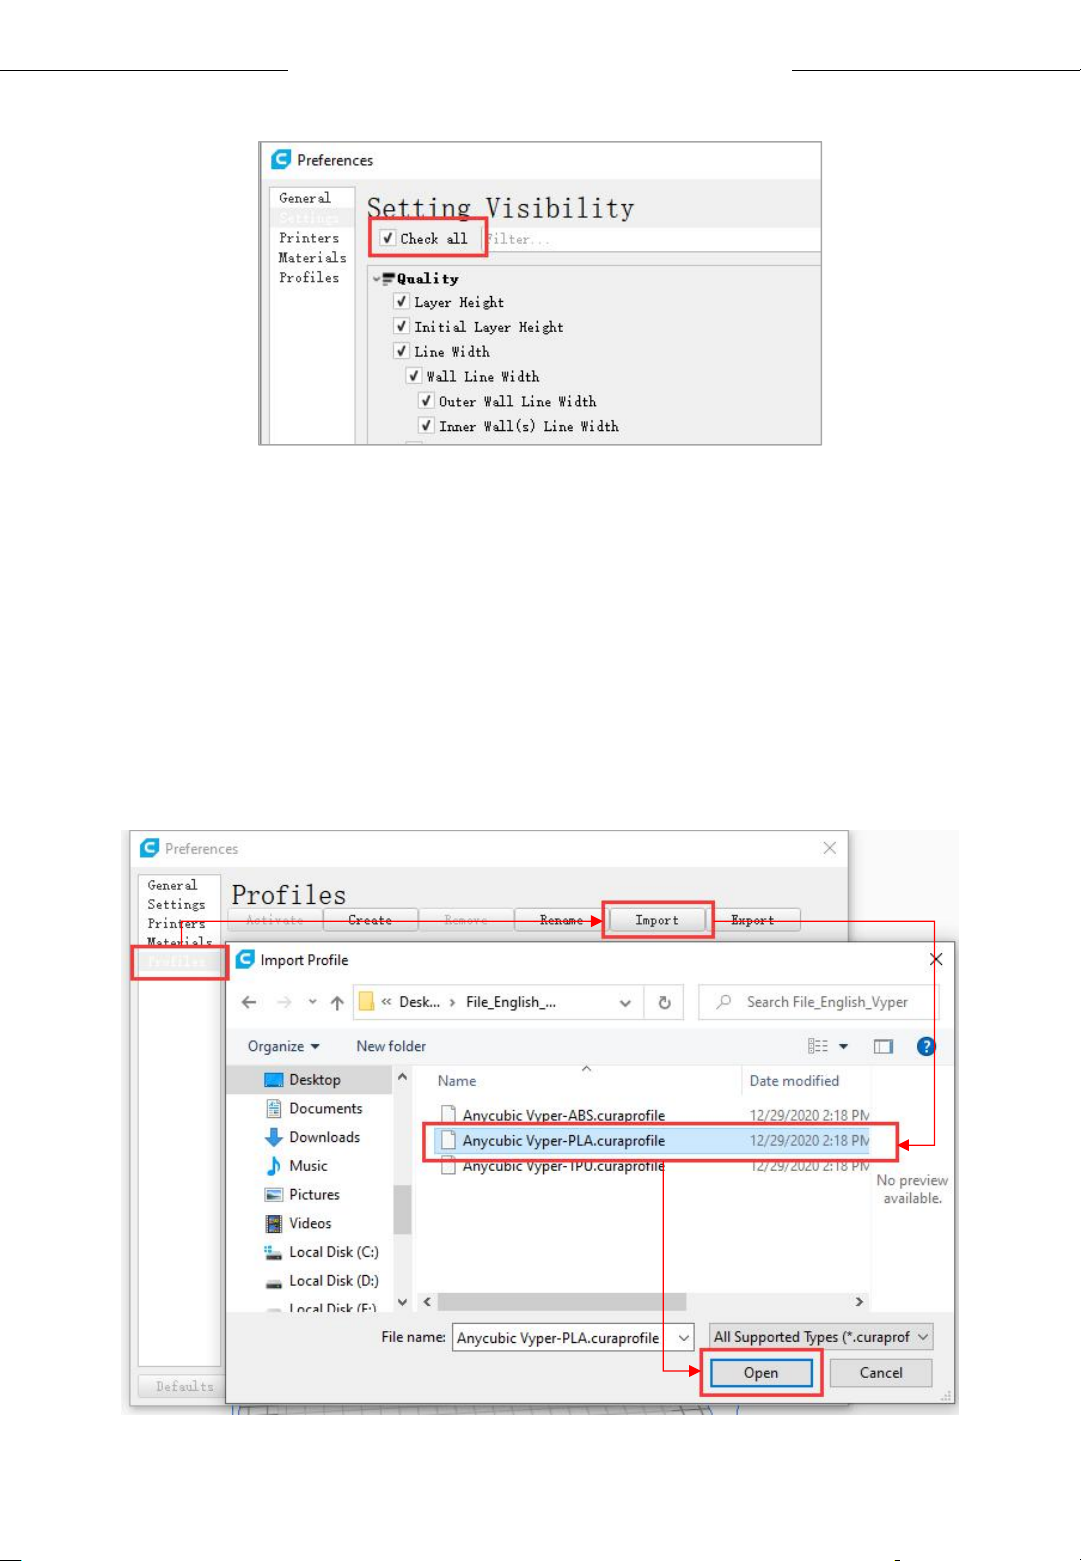
(1) Click Settings → Configure setting visibility..., and then tick Check all
box to make all settings visible.
36
Page 37
www.anycubic.com
Introduction to slicing software
(2) In the same interface opened in Step (1), click Profiles on the left side.
Then click Import button to import the desired print profile.
* Choose different parameter profiles according to different filament
types.
* Profile path: Memory card → "Files _ English _Vyper" → “Suggested
parameters for Vyper”
37
Page 38
www.anycubic.com
Introduction to slicing software
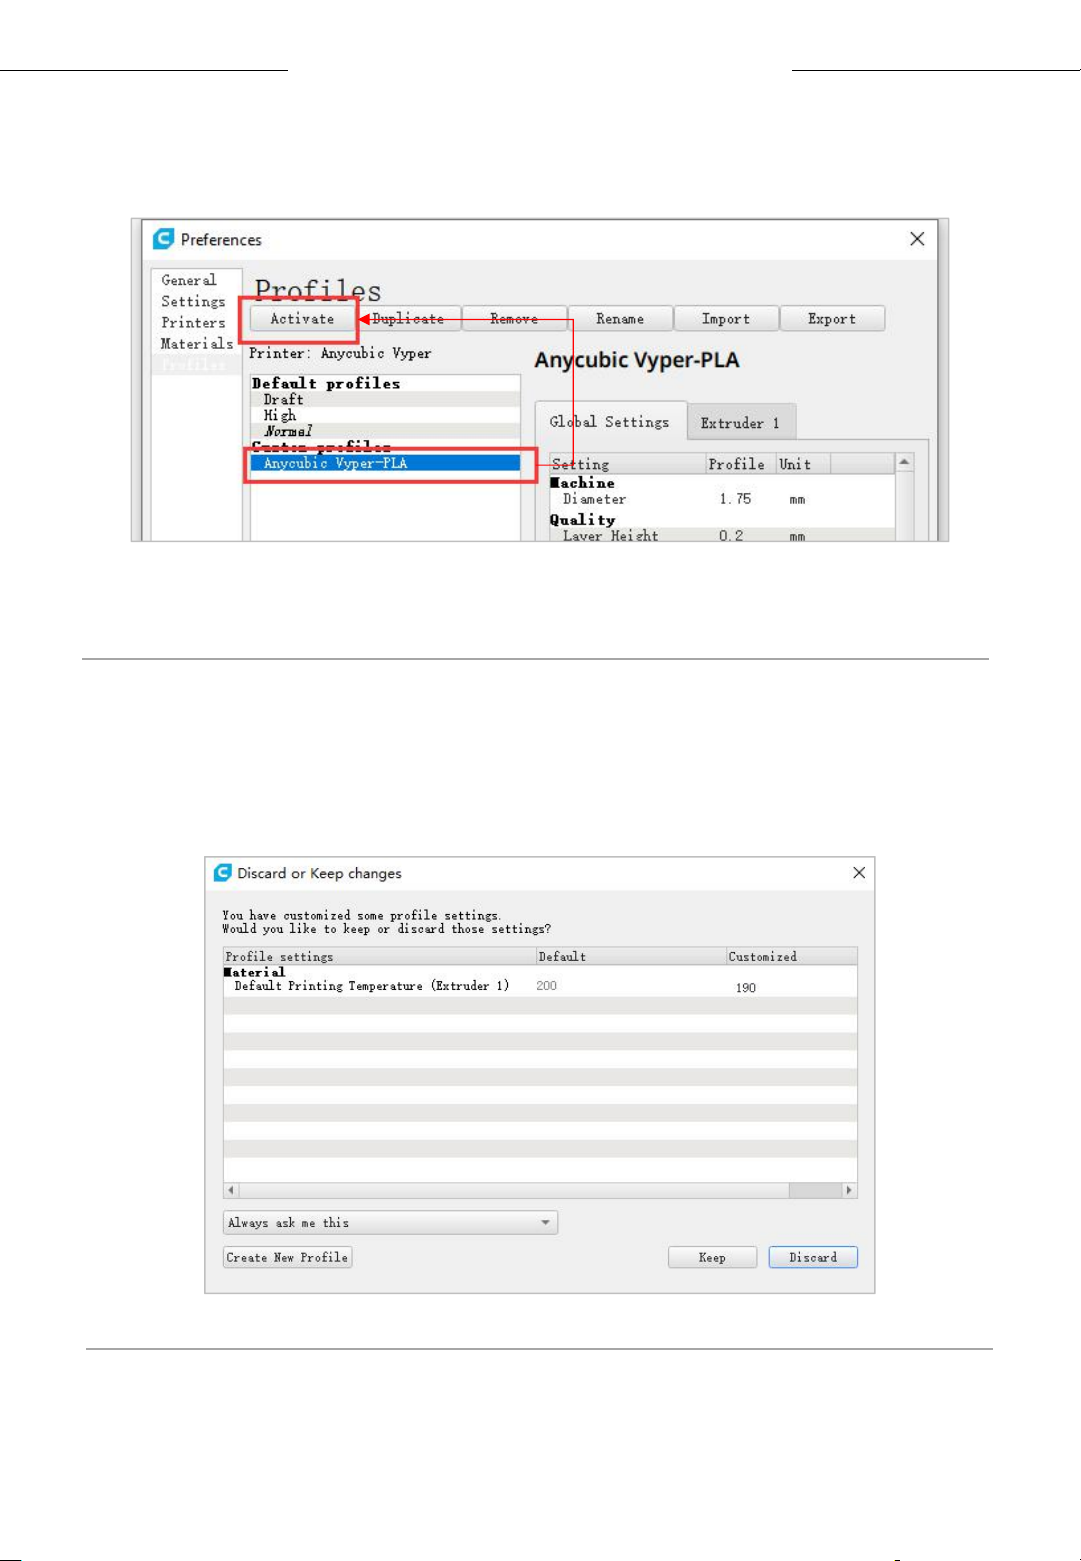
(3) Select the profile that you just imported, and then click the Activate
button。
* Note: An interface may pop up after clicking the Activate button. If so,
please check the values of listed parameters. You can click Keep to keep
the custom values or click Discard to enable the values in the profile.
38
Page 39
www.anycubic.com
Introduction to slicing software
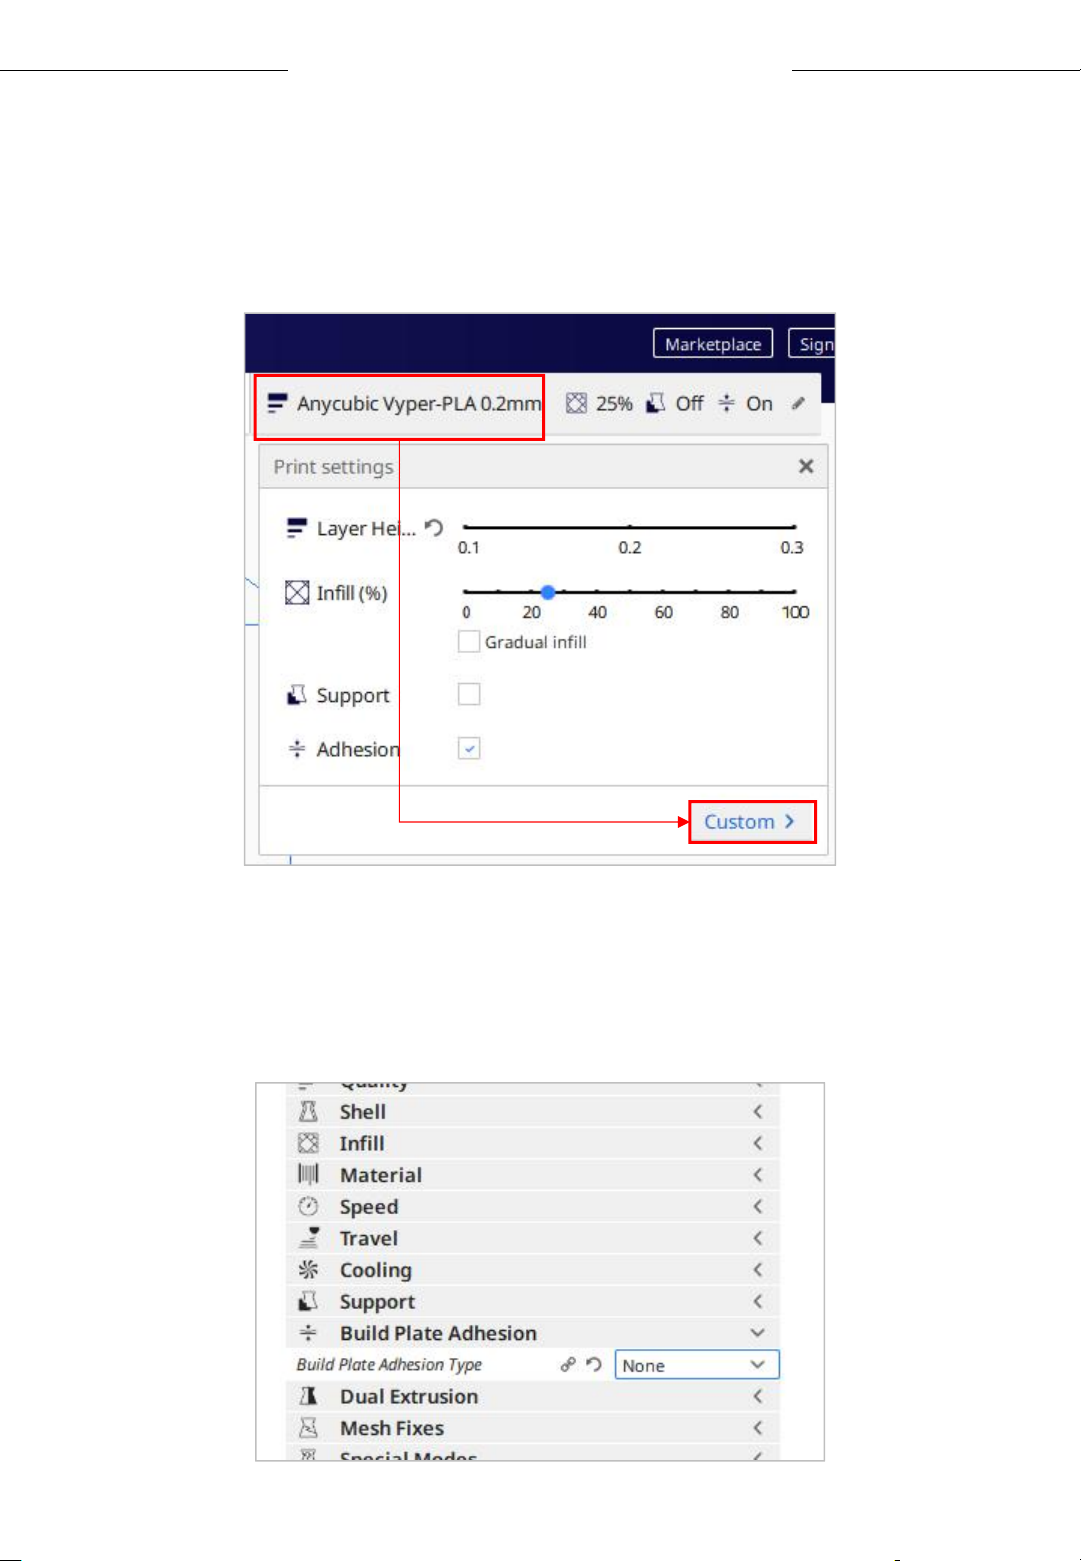
Supplementary Explanation
① You can customize some parameters after importing the profile, but
we still recommend that you use the parameters in the profile that we
provide.
② The paremeter Build Plate Adhesion → Build Plate Adhesion Type
needs to be set to “None” when you print the maximum size model.
39
Page 40
www.anycubic.com
Introduction to slicing software
4. Manipulate 3D model in Cura
* Model files can be downloaded from www.anycubic.com (ANYCUBIC
website) and www.thingiverse.com.
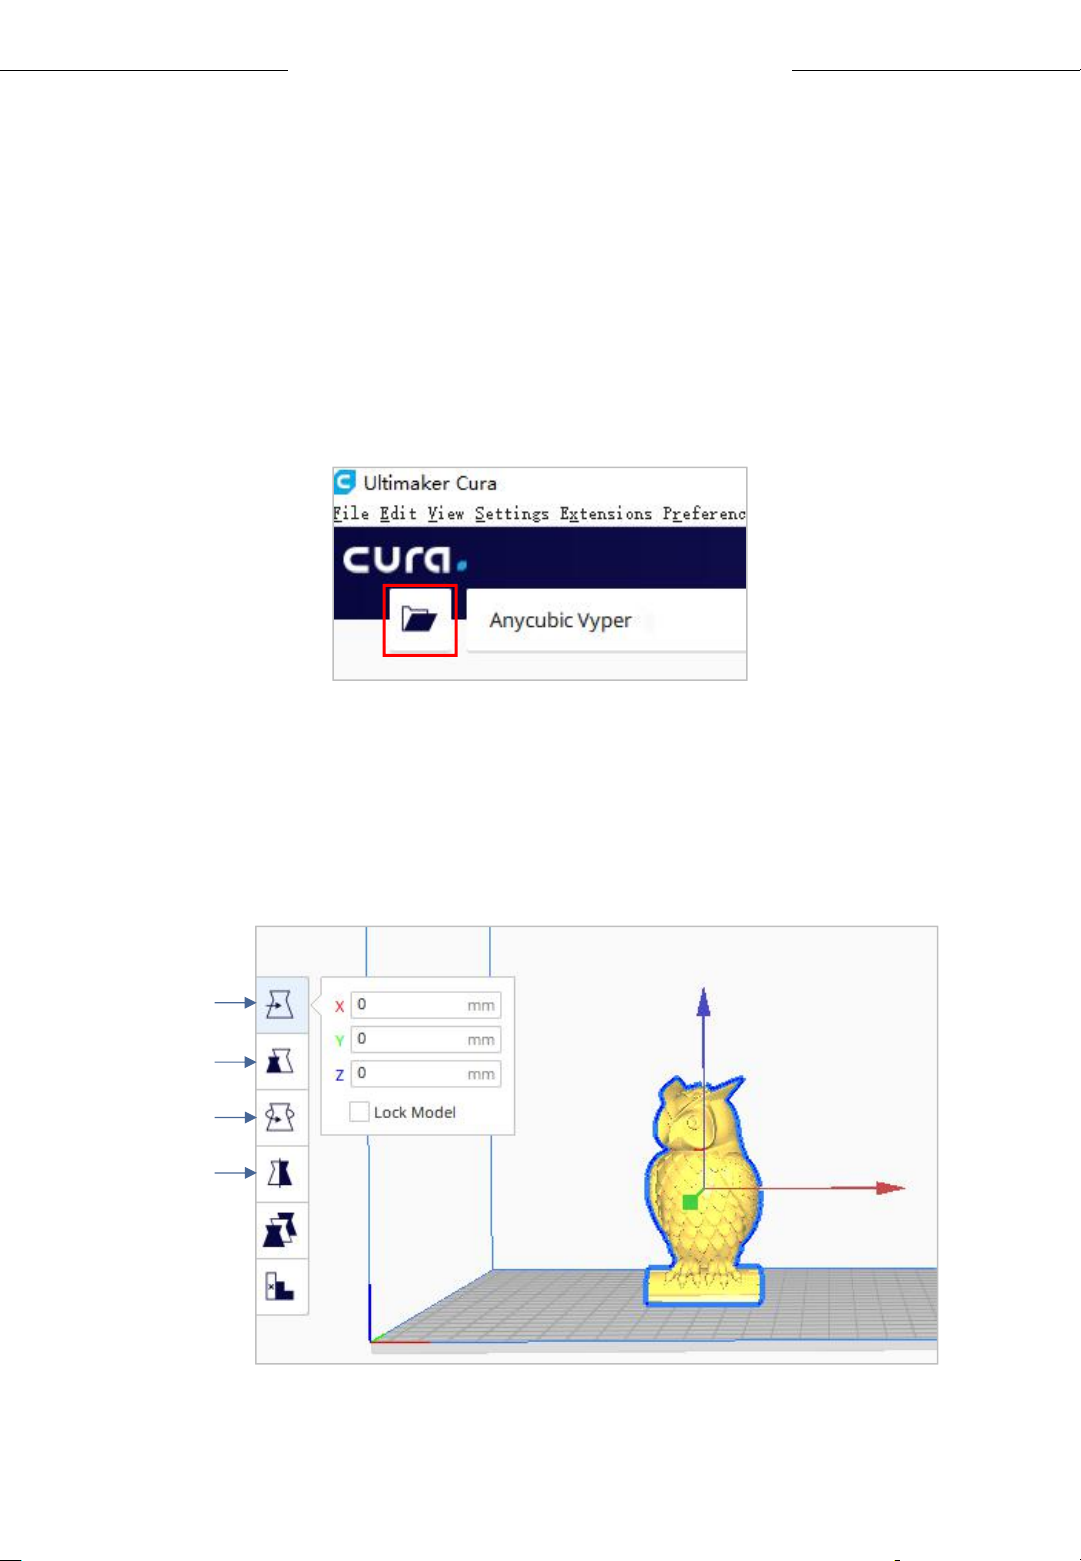
(1) Click the open file button in the top left corner to import the model
file or directly drag the file into the software.
(2) Left click the model to activate the adjustment tool on the left side of
the interface. Choose one of the adjustment tool, and then click and drag
the controls on the model to adjust it.
Move
Scale
Rotate
Mirro
r
The model name: owl
The author of the model:
etotheipi
40
Page 41
www.anycubic.com
Introduction to slicing software
Other operations:
① Press the mouse wheel and move the mouse to move the platform.
② Scroll the mouse wheel to zoom in and out the platform.
③ Right click and move the mouse to change the viewing angle.
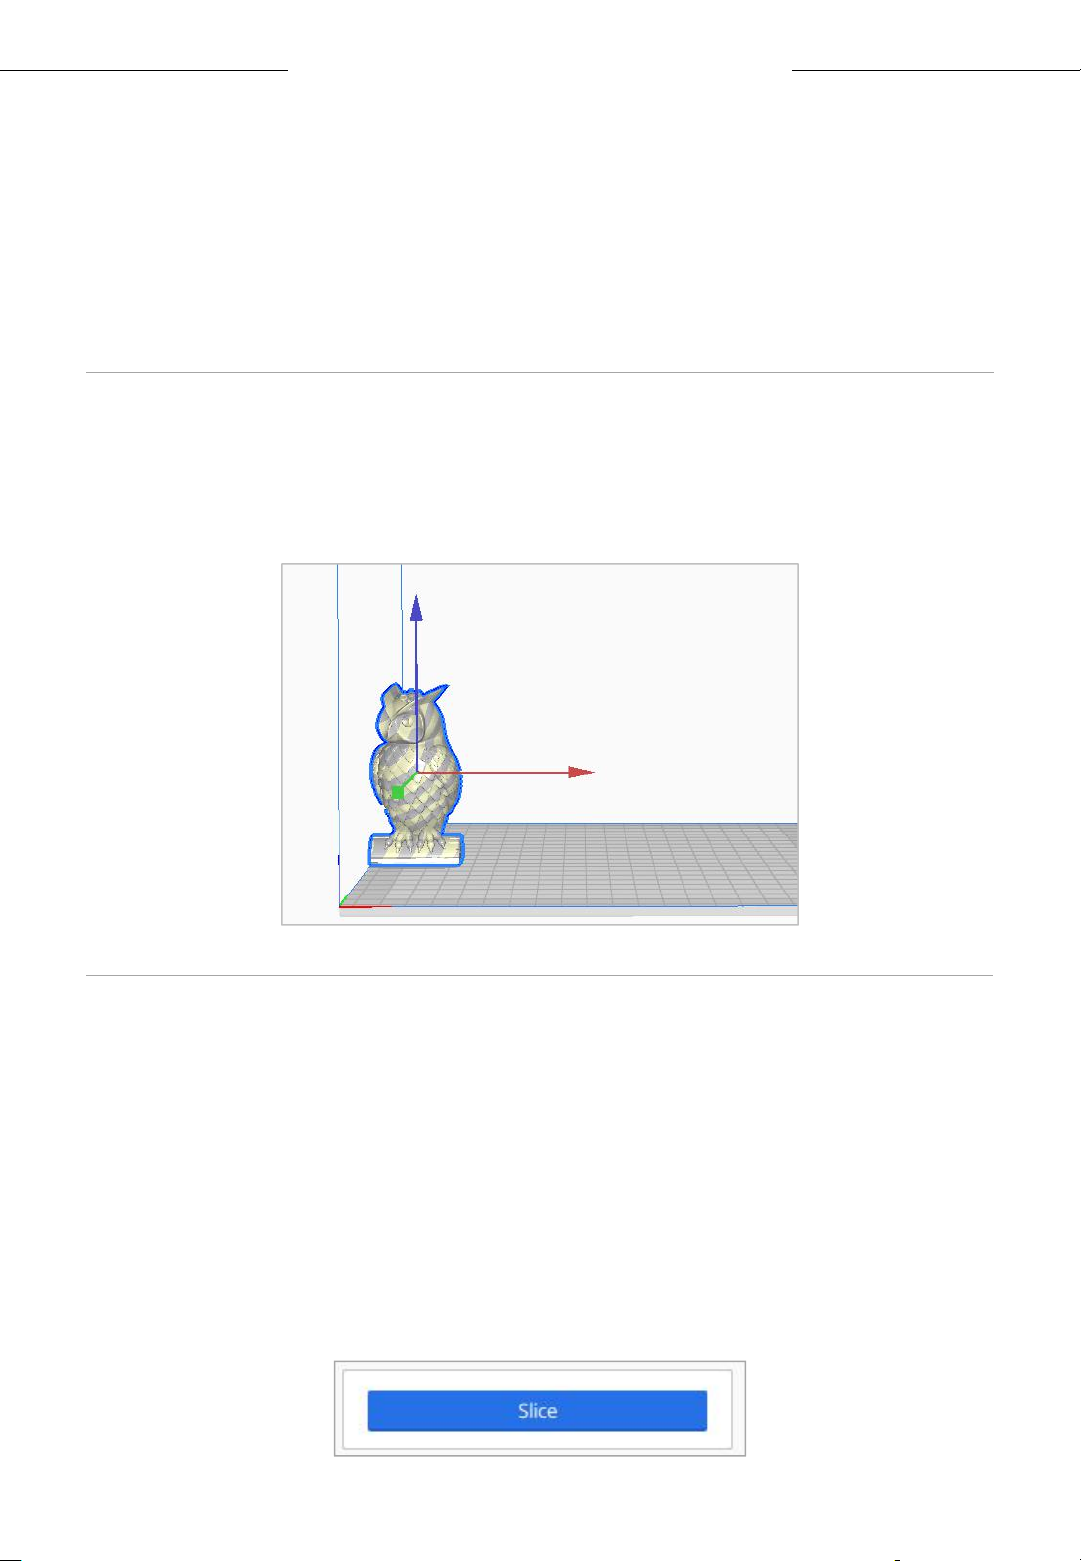
* Note: When moving the model, make sure that the model is in the
printable area. The color of the model in the following figure indicates
that the model is out of print range.
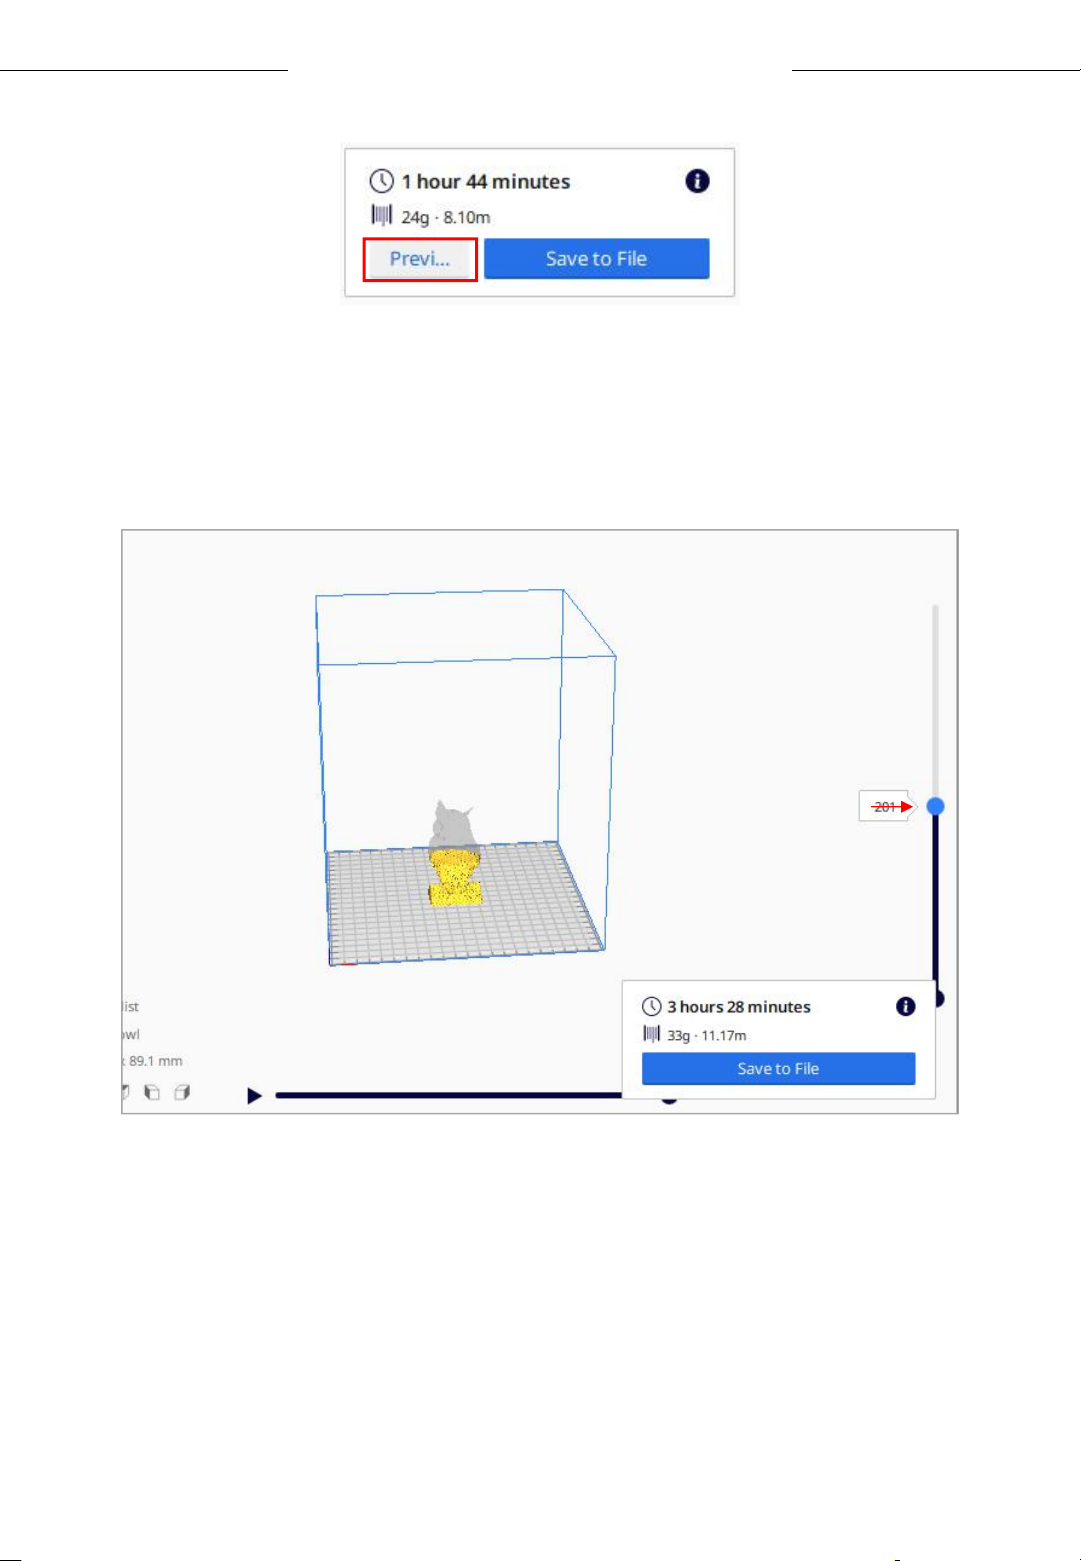
5. Slice and Preview
Now that the configuration and print settings are in place, it’s time to
slice the model. Click Slice button in the bottom right corner. When the
process completes, it will immediately show a Preview button, click it to
go to the preview stage.
41
Page 42
www.anycubic.com
Introduction to slicing software
Use the layer slider and simulation view to check important parts of your
3D slice.
Layer Slider
42
Page 43

www.anycubic.com
Introduction to slicing software
6. Print offline and online
There are two operational modes for Vyper: print offline and print online.
• Print offline: Insert memory card into the memory card slot, click on
the Home Menu “Print” to enter the file list, and print a selected file
(GCode files ONLY).
• Print online: Install CH340 driver to bridge PC and machine, and install
Cura for slicing and control the machine to print via data cable.
Print offline
Vyper
Print online
It is suggested to use Print Offline mode to minimize the noisy signal via
data cable.
l Print offline (Recommended)
After slicing, click Save to File in the bottom right corner. Save the
GCode file to the memory card, and then insert the memory card to the
printer and control via the touchscreen for offline printing.
Insert memory
card
Install Cura, PC
control via data
cable
* GCode file name should only contain English letters, underscore and
space. File name contains special characters could not be recognized by
the printer. In order to let the printer better recognize the GCode file in
the memory card, you need to back up all the files in the memory card to
the computer, and keep the memory card only for the GCode file. Please
save all the GCode files in root directory of the memory card.
43
Page 44
www.anycubic.com
Introduction to slicing software
l Print online
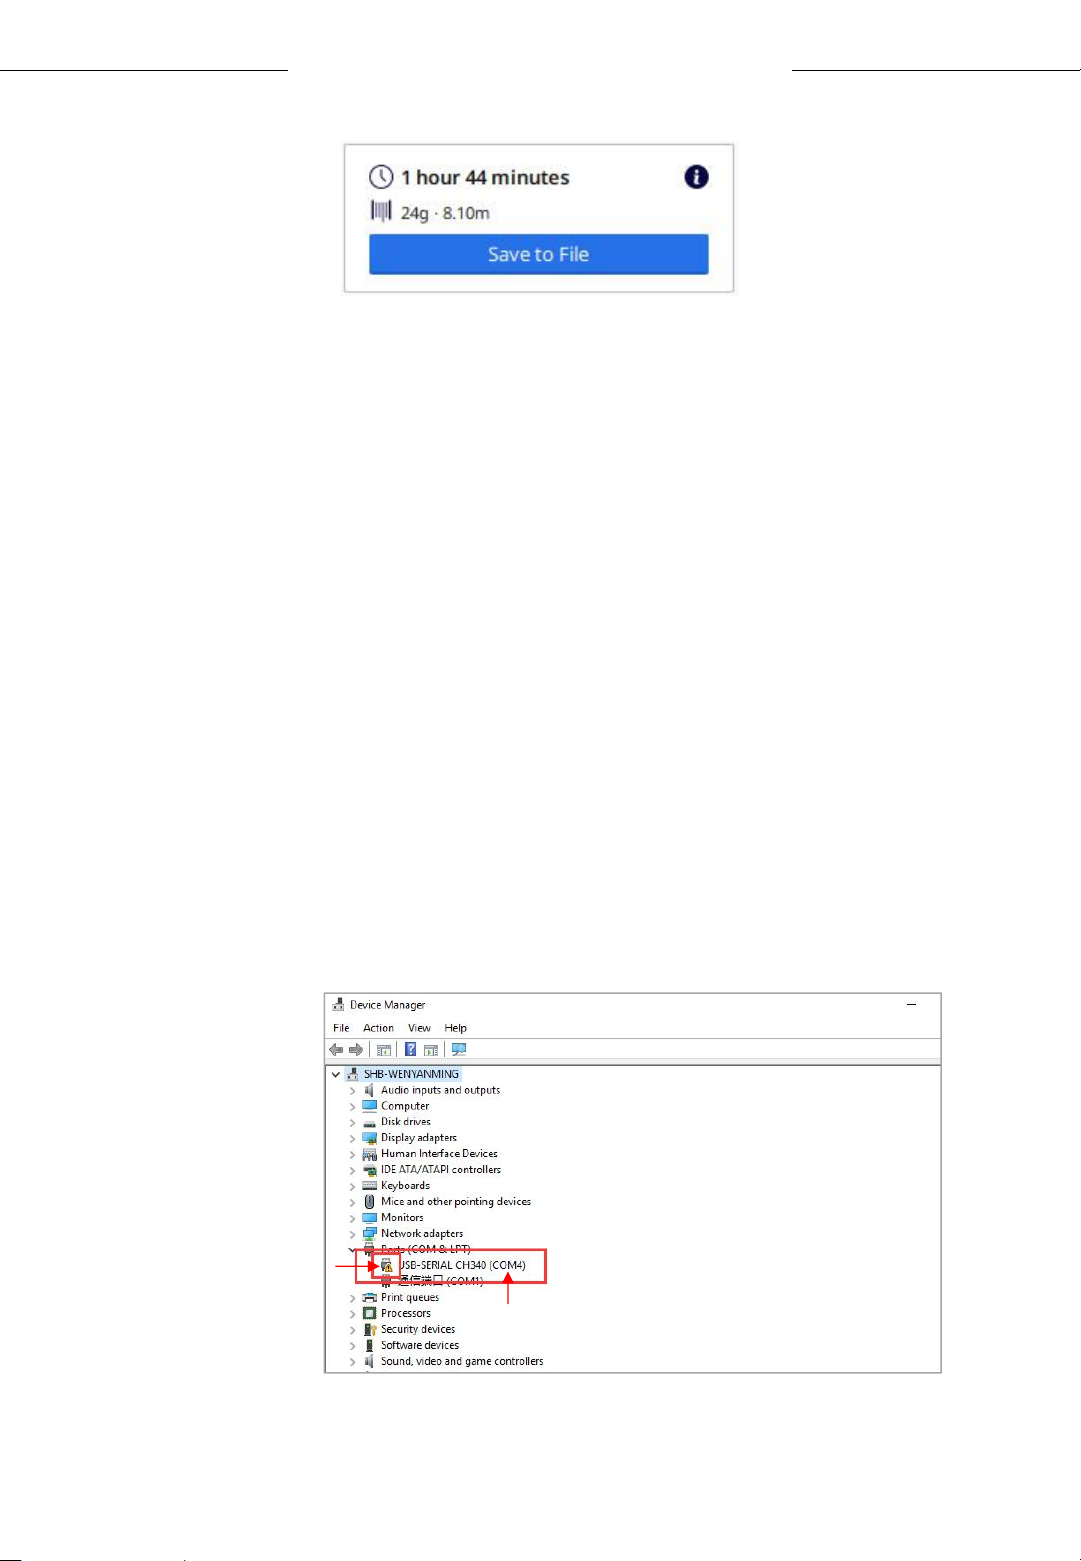
Printing online requires the installation of a driver. And you can control
the printer through Cura after connecting the data cable.
(1) Turn on the machine, connect the printer (data cable port) and your
PC via data cable. The driver may not be installed automatically, so it is
required to check that. Right-mouse click “This PC” → “Properties” →
“Device manager”, if there is an exclamation mark as shown below, then
it needs to be installed manually.
* Vyper uses CH340 chip for communication.
* CH340 driver file path: “Files_English_Vyper” → “Driver_CH341”.
There are two versions, Windows and Mac version. (* CH341 driver file is
suitable for CH340 chip).
Exclamation
Mark
Users may have a different
COM number which depends
on the PC.
44
Page 45
www.anycubic.com
Introduction to slicing software
(2) Here we take Windows PC system for example. Double click
“CH341SerSetup.exe” and follow the wizard to install it. If the driver has
installed automatically in step (1), skip this step.
* After the installation is completed, refer to the method in step (1) to see
if the driver has been identified (no exclamation mark).
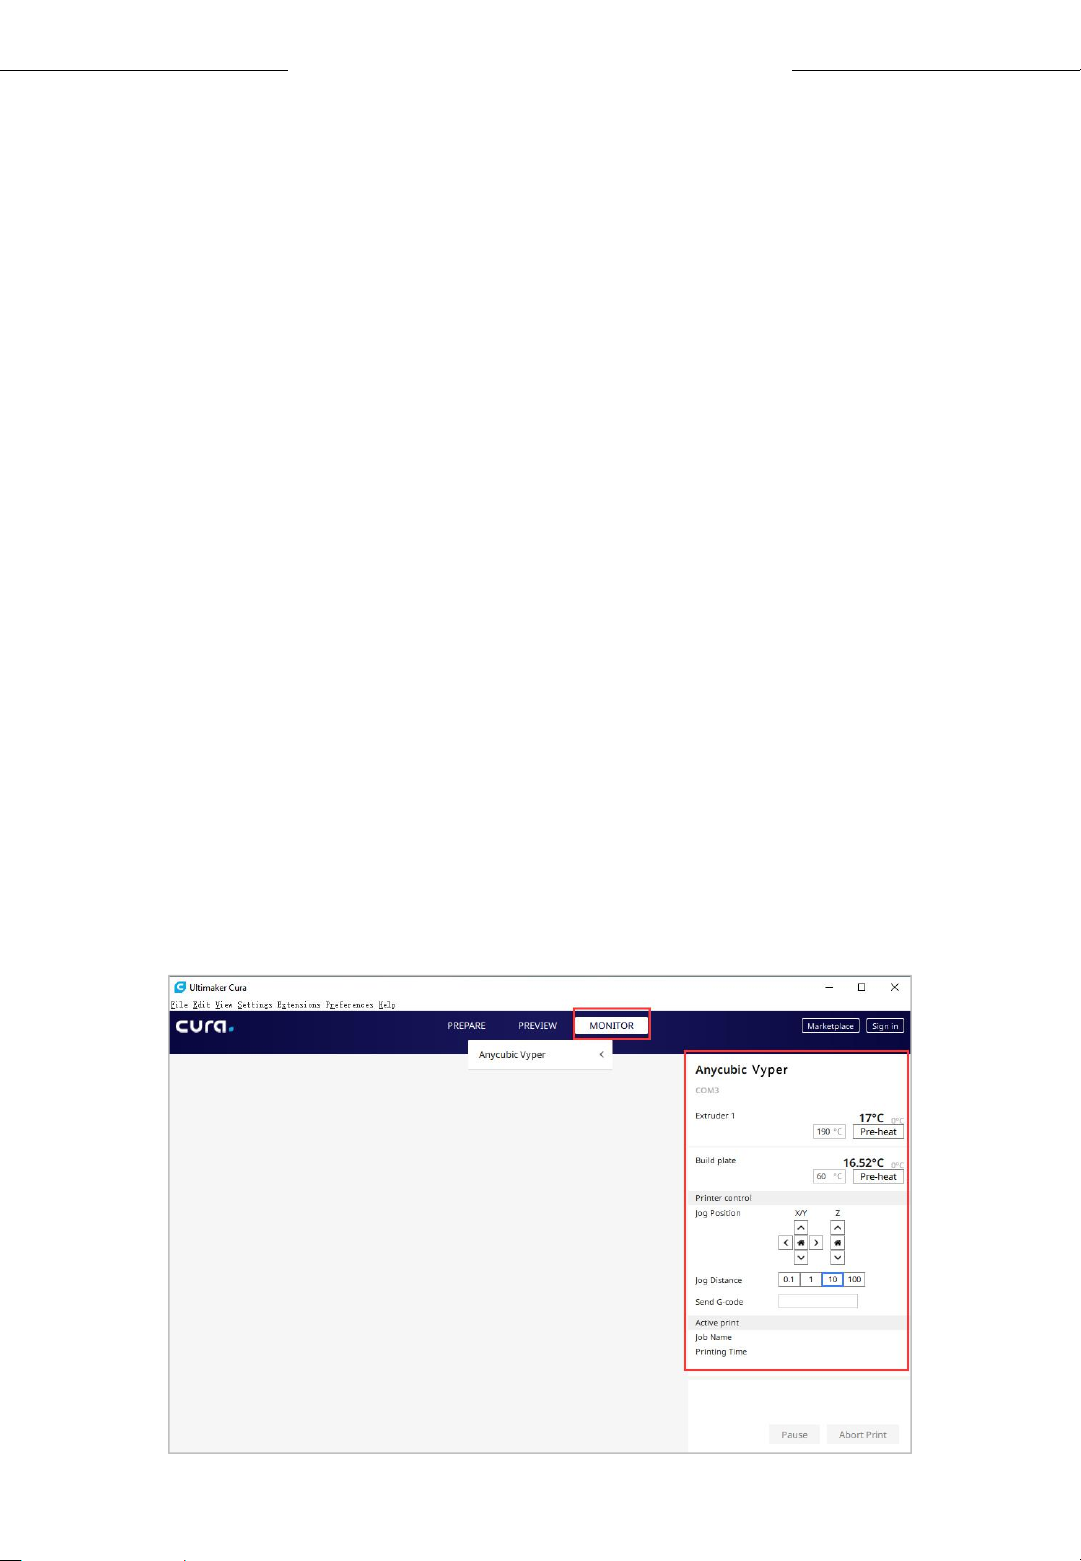
(3) After slicing, click Print via USB in the bottom right corner to go to
the monitor stage. After waiting for about ten seconds, the operation
panel will be displayed on the right side of the interface. And the printing
platform will be heated up for printing.
* If the printer is not connected properly, the Monitor interface will be
blank. Please plug the data cable to connect again.
* In the process of printing, do not plug the data line, or it will interrupt
the printing.
* In case of abnormal sound during the printing process, you can directly
turn off the power of the machine. Please check the Troubleshooting
chapter for more detail or contact Customer Service.
45
Page 46
www.anycubic.com
Resume from Outage
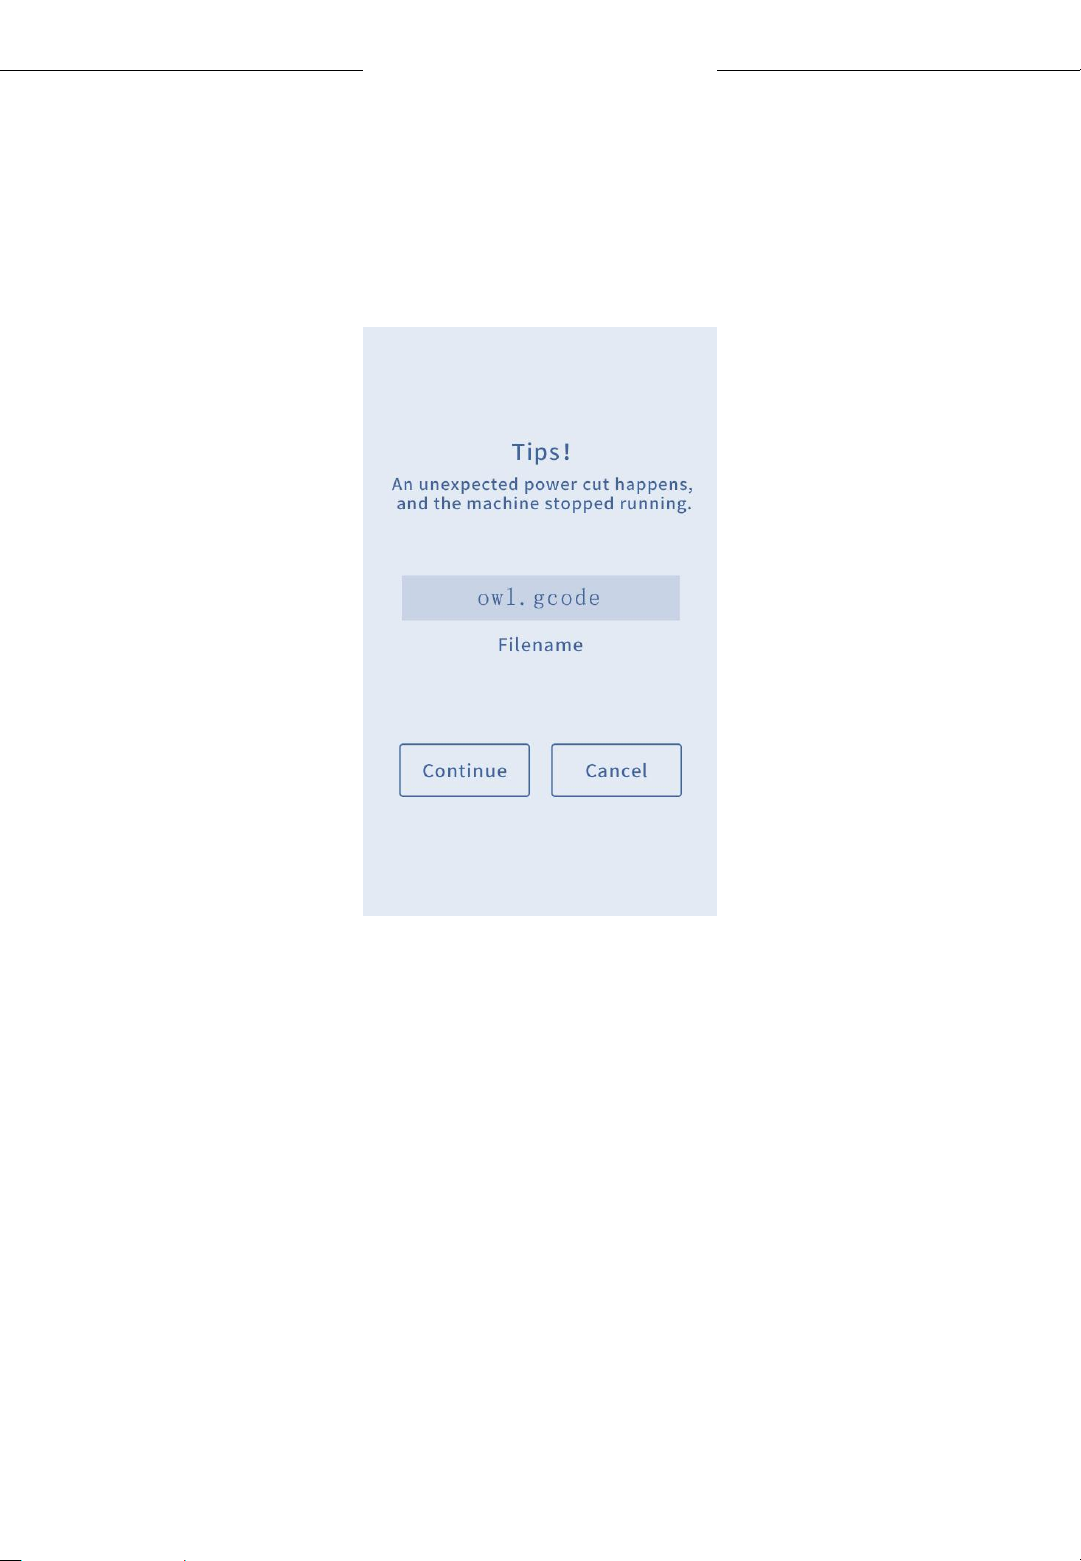
In case of a power loss during printing, the machine will automatically
save the printing status. After restarting, you will see the interface shown
below, please click "Continue" to continue your printing or “Cancel” to
cancel it.
46
Page 47

www.anycubic.com
Maintenance
It is necessary to perform routine maintenance to the 3D printer to
achieve consistent and quality results.
Some maintenance suggestions are shown as below:
1. Clean the nozzle with a needle under preheating conditions. If the
filament residue in the nozzle could not be cleared 100%, please
replace the nozzle.
2. Regularly add lubricating oil to smooth rods, linear bearings, lead
screws, brass nuts, etc. It can minimize the wear-out failure of those
moving parts.
3. Regularly clean the filament residue and dirt on the nozzle, platform,
guide rail, motor, fan, etc.
4. Pay attention to the wear conditions of the D-shape wheels. Although
they could be used for long time, please replace the D-shape wheels if
they have been wore-out.
5. After finishing a printing, clean the printing platform to ensure the
adhesion of the bottom layer of the model for next printing.
6. Check the belts regularly and tighten them if necessary.
47
Page 48

www.anycubic.com
Troubleshooting
1. Motor shaking or abnormal sound
① The corresponding limit switch could not be triggered when home.
Please check the wirings, and inspect any obstacles by manually
moving the corresponding axis.
② The motor cable are not connected properly. Please Check each
connection and then inspect the cable routing for any faults.
③ Drive current is too large / small (please contact customer service).
④ The motor is damaged.
⑤ The motor driving wheel is loose.
⑥ The belt is loose, please check the belt tension at each position of
X/Y/Z. And whether the belt is slippery during motor movement or
not.
2. File not printing or memory card failure
① Remove the memory card and insert into PC. Open the GCode files
using text editor (eg. Notepad), and inspect if GCode is readable or
not. If file contains of multiple “ÿÿÿ” symbol, then file has been
corrupted. Try reformatting the memory card to FAT32 format and
reloading the GCode file.
② Memory card is not readable, ensure file name does not contain
special characters or Change memory card.
③ Touchscreen freeze, reboot the machine and try again.
3. No extrusion or extrusion motor knocking
① Filaments tangled on spool or the Teflon tube is out of shape. Please
straighten out the filaments and Teflon tube, and pull the filaments
to observe whether the resistance is normal.
② Ensure that the nozzle temperature has been set to match the
filament. (PLA is generally set at 190-210 ° C, and ABS set at 230-
240 ° C)
48
Page 49

www.anycubic.com
Troubleshooting
③ Noz zle clogged . Pl eas e tr y to briefl y heat the pri nt h ead to a
temperature higher than 230°C and manually push the filament into
the extruder. You can also clean it with 0.4mm nozzle cleaning
needle. If it doesn’t work, you may need to replace it.
④ Not enough cooling for the hotend.
⑤ The printer has been working above the maximum speed for a long
time, please reduce the speed.
⑥ Check whether the extruder is normal and whether the friction force
of the extruder to the filament is sufficient. Try to tighten or clean
the extruder wheel.
4. Filament leaking
① Nozzle, heating block or throat tube is not tightened properly, try to
fix/replace it after cooling or contact customer service.
5. Layer shifting
① Print head moves too fast, please slow down the print speed.
② Check the belts and driving wheels and ensure they are properly
installed.
③ Drive current is too small.
6. No sticking to the bed
① The nozzle is too far from the platform, please try to re-level; at the
same time set the "initial layer thickness" to 0.2 in Cura, and set the
"initial layer line width" (for example, set to 150) to improve the first
layer adhesion.
② Print too fast at the bottom layer speed, reduce it to ~20mm/s
③ Ensure that the print platform is clean
④ Add a brim or raft to the model in slicing software
49
Page 50

www.anycubic.com
Troubleshooting
7. Freezing screen
① Please check if the soft cable above the screen is loose.
② Inspect if the touchscreen has been pressed by something.
③ Check if screen has cracks, if so, please contact our after sale service
via official website www.anycubic.com
8. T0 sensor abnormal
① Check the wiring of the hotend and ensure a good connection.
② Check if there is any pins bent inside the connector.
9. Print head move abnormal
① The setting of machine type in slicing software is wrong. Please see
page 36 to check the right setting.
10. Print stopped halfway
① Use print offline mode (memory card) instead of print online via data
cable.
② Check if the GCode file is corrupted.
② Delete plugins in the GCode file.
③ The quality of the memory card is unstable. Try changing another
brand memory card.
④ The power supply voltage is unstable. Please print again when the
voltage is stable.
11. Some of the structure of the model cannot be printed
① If your model includes overhangs or bridges, you may need to add
support on the model or adjust the angle of the model in the slicing
software. It is recommended to preview the print layer to check the
printability of the model.
50
Page 51

www.anycubic.com
Troubleshooting
12. Drawing is more serious
① The retraction distance is insufficient. It should be set larger in the
slicing software.
② The retraction speed is too slow. It should be set a bit faster in the
slicing software.
③ The printing temperature is too high, which causes the fluidity and
viscosity of the filament to be strong. The printing temperature needs
to be set a little lower.
13. Nozzle is too low or too high when printing
① Nozzle is too close to the platform, resulting in insufficient extrusion
of filament. Click “Settings” → “Z offset +” to rise the nozzle.
② Nozzle is too high and the gap is large, which lead to poor adhesion
of filament to the platform. Click “Settings” → “Z offset -” to lower
the nozzle.
Thank you for purchasing A NYC UBIC products! Under normal usage and
service, the products and its parts have a warranty period up to one year.
Please visit ANYCUBIC official website (https://www.anycubic.com) for more
details and report any issues with AN YCU BIC products. Our professional
after-sale service team would response within 24 hours and help you to
solve the issue.
51
 Loading...