


Model 1000, 1000R & 1200R
Doors
(Including Pass-Thru Door Models
2500/2700/3000)
Service & Installation
November, 2012
99-20439-I001

Model 1000/1000R/1200R Door Service & Installation
Table of Contents |
|
|
|
|
||
1. |
Model 1000 Door (Non-Reversible) (Prior to 7/83) ............................................................ |
|
5 |
|||
|
1.1. |
Drawings & Schematics .......................................................................................... |
|
6 |
||
|
|
1.1.1. Product Prior to 1987................................................................................. |
|
6 |
||
|
|
1.1.2. |
Prior to 1984.............................................................................................. |
|
6 |
|
|
|
1.1.3. Torque Assembly (Prior to 1983)............................................................... |
|
7 |
||
|
|
1.1.4. Model 100-100F (Prior to 1983) ................................................................ |
|
7 |
||
|
|
1.1.5. Joining Two Frame Sections ..................................................................... |
|
8 |
||
|
|
1.1.6. |
Brackets .................................................................................................... |
|
8 |
|
2. |
Model 1000 Door (Non-Reversible) (7/83 to 1/87)............................................................. |
|
9 |
|||
3. |
Model 1000 Non-Reversible Door Installation (Prior to 1983).......................................... |
|
10 |
|||
4. |
Model 1000 Non-Reversible Door Handle Replacement ................................................. |
|
11 |
|||
5. |
Model 1000 Non-Reversible Door Handle Replacement ................................................. |
|
11 |
|||
6. |
Model 1000R Door (Reversible) (1987 to 1991).............................................................. |
|
12 |
|||
7. |
Model 1200R Door (Reversible) (Start 10/89) ................................................................. |
|
13 |
|||
8. |
Model 1000, 1000R, 1200R Frame (Reversible) ............................................................. |
|
14 |
|||
9. |
Models 2500, 2700, 3000 – Pass-Thru Doors (Start 1987) ............................................. |
|
15 |
|||
10. |
Models 1000R, 1200R (Reversible) Frames – End & Center Sections, Full Flange |
|||||
|
Construction .................................................................................................................... |
|
|
16 |
||
|
10.1. |
Flange Placements ............................................................................................... |
|
16 |
||
|
10.2. |
Finished Frame Width Dimensions ....................................................................... |
|
17 |
||
|
10.3. |
Finished Frame Width Dimensions ....................................................................... |
|
17 |
||
11. |
Frame Installation ............................................................................................................ |
|
17 |
|||
12. |
Reversible/Cordless Door & Hold-Open Installation ........................................................ |
|
19 |
|||
13. |
Hold-Open Replacement (Prior to 1987) ......................................................................... |
|
21 |
|||
14. |
Hold-Open Replacement (1987 to 1990)......................................................................... |
|
22 |
|||
15. |
Hold-Open Replacement (1987 to 1990)......................................................................... |
|
22 |
|||
16. |
Hold-Open Replacement (1987 to 1990)......................................................................... |
|
23 |
|||
17. |
Models 2500, 2700 & 3000 Pass-Thru Door Installation ................................................. |
|
23 |
|||
18. |
Pass-Thru Identification................................................................................................... |
|
24 |
|||
19. |
Pass-Thru Wiring Schematics ......................................................................................... |
|
24 |
|||
20. |
Reversing Frame Hardware (1987 to Present)................................................................ |
|
24 |
|||
21. |
Door Reversing Instructions (1987 to 1990) .................................................................... |
|
25 |
|||
22. |
Door Reversing Instructions (1991 to Present)................................................................ |
|
28 |
|||
|
|
|
|
|
|
|
|
|
|
TITLE: |
REV. |
|
|
|
99-20439-I001 Model 1000/1000R/1200R Door Service & Installation |
A |
Page 2 of 76 |
|
||

Model 1000/1000R/1200R Door Service & Installation |
|
|
|
|
23. |
Wiring Instructions (1991 to Present) .............................................................................. |
|
|
29 |
24. |
Frame Sill Plastic Protector Installation ........................................................................... |
|
|
30 |
25. |
Ordering Replacement Doors.......................................................................................... |
|
|
30 |
26. |
Torquemaster and/or Torque Casting Replacement........................................................ |
|
|
31 |
27. |
Door Plastic (Cover) Replacement .................................................................................. |
|
|
31 |
28. |
Door Handle Replacement .............................................................................................. |
|
|
32 |
29. |
Side Access Plate Replacement...................................................................................... |
|
|
33 |
30. |
Door Heater and/or Door Plug Replacement (Prior to 1987) ........................................... |
|
|
33 |
31. |
Door Heater Replacement (1987 to 1991)....................................................................... |
|
|
34 |
32. |
Door Heater Replacement (1987 to 1991)....................................................................... |
|
|
35 |
33. |
Frame Single Station Socket Replacement ..................................................................... |
|
|
35 |
34. |
Hinge Pin Replacement (1987 to 1991)........................................................................... |
|
|
36 |
35. |
Torque Rod Replacement (1987 to 1991) ....................................................................... |
|
|
37 |
36. |
Torque Rod Replacement (1991 to Present)................................................................... |
|
|
38 |
37. |
Front Bumper Bar Field Installation ................................................................................. |
|
|
38 |
38. |
Flush Mount Lock Field Installation ................................................................................. |
|
|
39 |
39. |
Door Cylinder Lock Replacement or Repair .................................................................... |
|
|
39 |
40. |
P.O.M. Lock Installation................................................................................................... |
|
|
40 |
41. |
P.O.M. Lock Retrofit Installation ...................................................................................... |
|
|
41 |
42. |
Ordering Replacement Frames ....................................................................................... |
|
|
42 |
43. |
Glass Replacement (Reglazing) ...................................................................................... |
|
|
44 |
44. |
Frame Gasket Replacement – Models 1000, 2500, 3000 (Before 1981) |
......................... |
46 |
|
45. |
Frame Gasket Replacement – Models 1000R, 1200R, 2500, 2700 (1981 to Present).... |
47 |
||
46. |
Frame Junction Box Wiring (Standard Production).......................................................... |
|
|
47 |
47. |
Heater Wire Diagram: Models 1000, 1000R, 1200R, 2500, 2700, 3000.......................... |
|
48 |
|
48. |
“Boost & Buck” Transformer Wiring Diagram................................................................... |
|
|
48 |
49. |
Pre-Wired Ballast Replacement (8G-4039W-02) (1984 to Present) ................................ |
|
49 |
|
50. |
Raceway Clip Installation or Replacement (Start 1/1/93) ................................................ |
|
|
50 |
51. |
Ballast, Lamp & Heater Wiring Diagram Models 1000R, 1200R (120 Volt) (1984 to |
|
||
|
Present)........................................................................................................................... |
|
|
51 |
52. |
Ballast Wiring Diagram Models (Prior to 1984)................................................................ |
|
|
52 |
|
52.1. Model 1000 Coolmaster™ Normal Temp (Also Model 100 Normal ...........Temp) |
52 |
||
|
52.2. Model 1000 Coolmaster™ Normal Temp (Also Model 100 Normal ...........Temp) |
52 |
||
|
TITLE: |
REV. |
|
|
|
99-20439-I001 Model 1000/1000R/1200R Door Service & Installation |
A |
Page 3 of 76 |
|

Model 1000/1000R/1200R Door Service & Installation |
|
|
53. |
Ballast Wiring Diagram for Oneand Two-Light Ballasts (Prior to 1984)......................... |
53 |
|
53.1. Model 1000 Frame and Door Wiring Diagram ...................................................... |
53 |
|
53.2. Model 1000 Light Wiring Diagram for Oneand Two-Light Ballast ....................... |
53 |
54. |
Light Bulb Replacement................................................................................................... |
54 |
55. |
Light Channel Replacement ............................................................................................ |
54 |
56. |
Light Socket Replacement............................................................................................... |
55 |
57. |
Lamp Location: Reversible Models 1000R, 1200R (Prior to 1986).................................. |
55 |
58. |
Lamp Locations: Cooler Door Lighting (1986 to Present) Models 1000R, 1200R ........... |
56 |
59. |
Lamp Locations: Cooler Door Lighting (1986 to Present) Models 1000R, 1200R ........... |
57 |
60. |
Model 1000R, 1200R Shelf Assembly ............................................................................. |
58 |
61. |
Model 4000 Shelf Assembly ............................................................................................ |
59 |
62. |
Shelving Installation and/or Replacement (Prior to 1984)................................................ |
59 |
63. |
Four-Post Stabilizer Bar Installation ................................................................................ |
61 |
64. |
Four-Post Shelving System Installation (After 1984) ....................................................... |
62 |
65. |
Plastic Tag Molding Installation ....................................................................................... |
63 |
66. |
Humastat Installation Procedure...................................................................................... |
64 |
67. |
Electrical Information for Model 1000R Normal Temp Doors, Frames & Light Fixtures |
|
|
(Heater Amperages @ 120 Volts).................................................................................... |
66 |
68. |
Heat Load in BTU/Hr for Glass, Door Rail, Frame Heaters and Lights (Per Door, with |
|
|
Doors Closed @ 75°F Store Ambient)............................................................................. |
69 |
69. |
Electrical Information for Model 1200 Normal Temp Doors, Frames & Light |
|
|
Fixtures (Amperages @ 120 Volts).................................................................................. |
71 |
70. |
Heat Load in BTU/Hr for Glass, Door Rail, Frame Heaters and Lights (Per Door, with |
|
|
Doors Closed @ 75°F Store Ambient)............................................................................. |
72 |
71. |
Troubleshooting............................................................................................................... |
73 |
72. |
Safety Precautions .......................................................................................................... |
74 |
73. |
Tips.................................................................................................................................. |
75 |
74. |
Dew Point Chart .............................................................................................................. |
75 |
TITLE: |
REV. |
|
99-20439-I001 Model 1000/1000R/1200R Door Service & Installation |
A |
Page 4 of 76 |
|
|
|
Model 1000/1000R/1200R Door Service & Installation
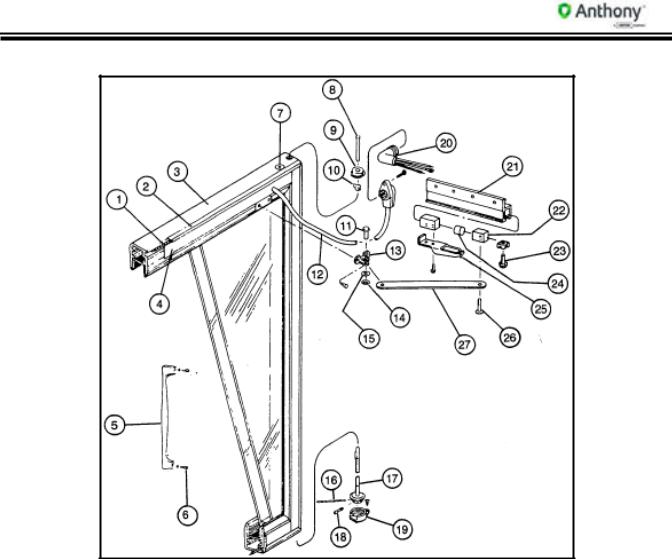
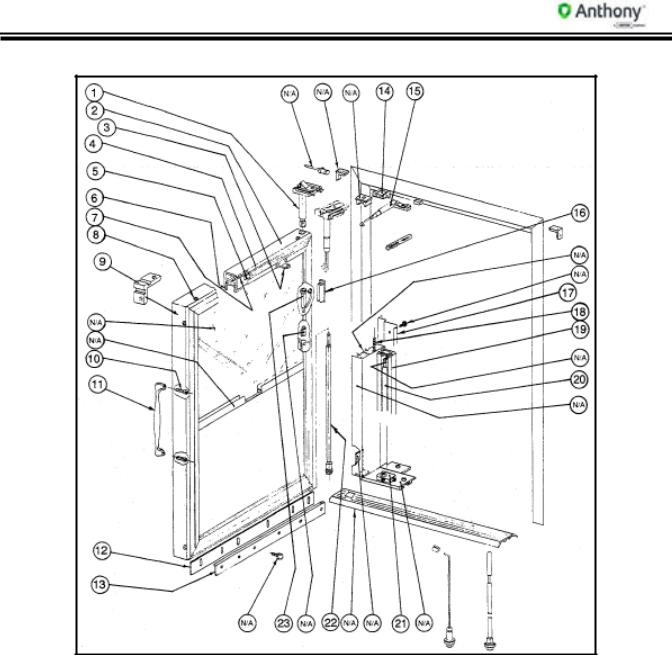
1.Model 1000 Door (Non-Reversible) (Prior to 7/83)
|
Description |
|
Description |
|
Description |
|
|
|
|
|
|
1. |
Heater Wire |
10. |
Safety Clip |
19. Torque Casting |
|
|
|
|
|
|
|
2. |
Plastic |
11. |
Camel Back Hinge Pin |
20. |
Female Plug |
|
|
|
|
|
|
3. |
Door Rail |
12. |
S.J. Cord |
21. |
Door Stop Assembly |
|
|
|
|
|
|
4. |
Contact Plate |
13. |
Camel Back Hinge |
22. |
Door Stop Sliding Block |
|
|
|
|
|
|
5. |
Handle |
14. |
Camel Back Hinge Pin Holder |
23. |
Door Stop Nut & Bolt |
|
|
|
|
||
6. |
Handle Screw |
15. Camel Back Washer |
24. Slide Stop Bumper |
||
|
|
|
|
|
|
7. |
Corner Screw |
16. |
Adjustment Pin |
25. |
Hold-Open |
|
|
|
|
|
|
8. |
Top Hinge Pin |
17. Torque Rod |
26. |
Door Stop Sliding Block Screw |
|
|
|
|
|
|
|
9. |
Top Hinge Pin Holder |
18. |
Set Pin |
27. |
10” Door Stop Arm |
|
|
|
|
|
|
TITLE: |
REV. |
|
99-20439-I001 Model 1000/1000R/1200R Door Service & Installation |
A |
Page 5 of 76 |
|
|
|
Model 1000/1000R/1200R Door Service & Installation
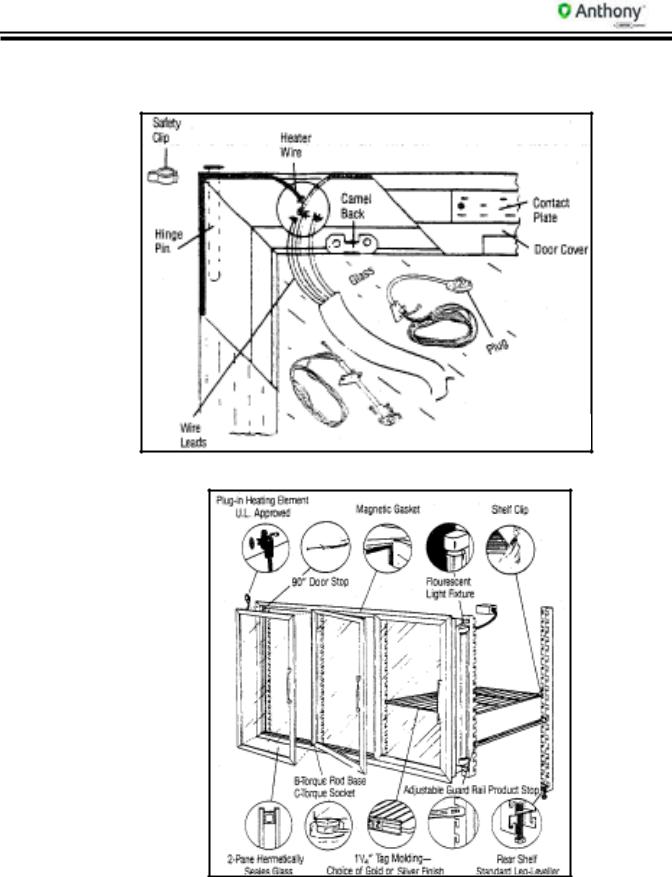
1.1.Drawings & Schematics 1.1.1. Product Prior to 1987
1.1.2. Prior to 1984
TITLE: |
REV. |
|
99-20439-I001 Model 1000/1000R/1200R Door Service & Installation |
A |
Page 6 of 76 |
|
|
|
Model 1000/1000R/1200R Door Service & Installation
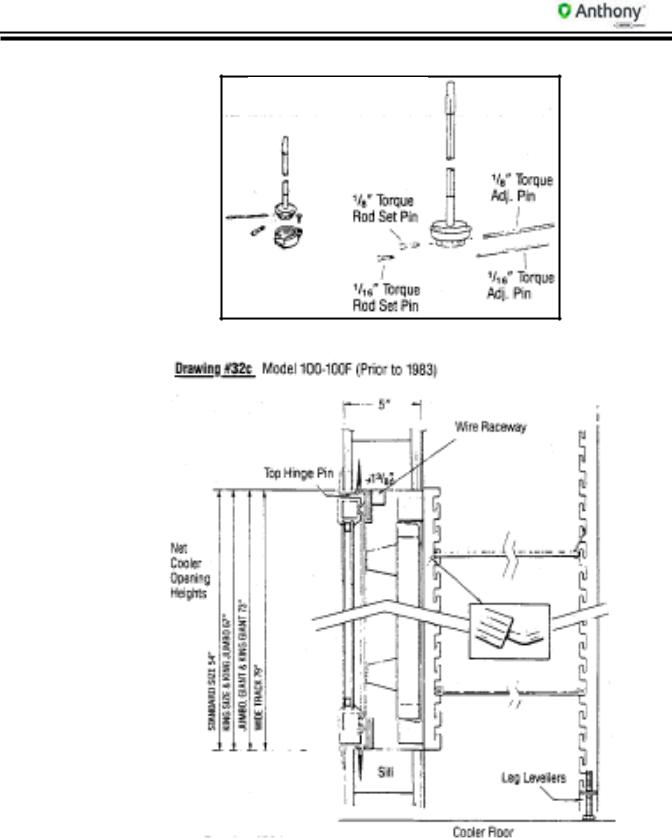
1.1.3. Torque Assembly (Prior to 1983)
1.1.4. Model 100-100F (Prior to 1983)
|
|
|
|
|
|
|
|
|
|
|
|
|
|
|
|
|
|
|
|
|
|
|
|
|
|
|
|
|
|
|
|
|
|
|
|
|
|
|
TITLE: |
REV. |
|
|
||
99-20439-I001 Model 1000/1000R/1200R Door Service & Installation |
A |
Page 7 of 76 |
||||||
|
|
|
|
|
|
|
|
|

Model 1000/1000R/1200R Door Service & Installation
1.1.5. Joining Two Frame Sections
1.1.6. Brackets
TITLE: |
REV. |
|
99-20439-I001 Model 1000/1000R/1200R Door Service & Installation |
A |
Page 8 of 76 |
|
|
|
Model 1000/1000R/1200R Door Service & Installation
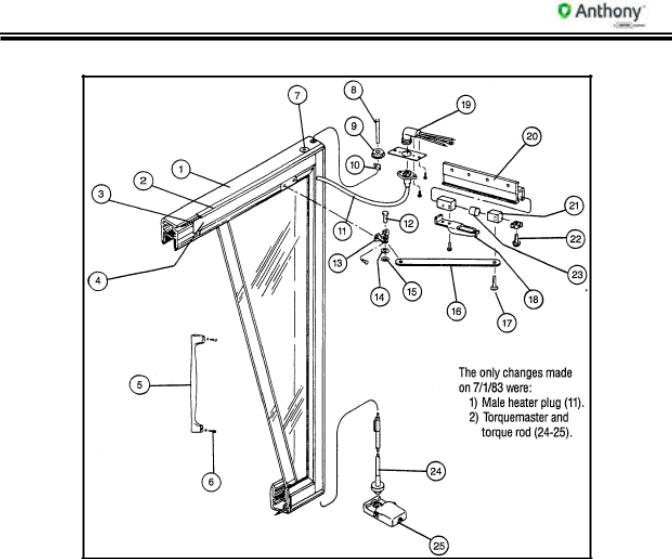
2.Model 1000 Door (Non-Reversible) (7/83 to 1/87)
|
Description |
|
Description |
|
Description |
|
|
|
|
|
|
1. |
Door Rail |
10. |
Safety Clip |
19. |
Female Plug |
|
|
|
|
|
|
2. |
Plastic |
11. |
Male Plug |
20. |
Door Stop Assembly |
|
|
|
|
|
|
3. |
Heater Wire |
12. |
Camel Back Hinge Pin |
21. |
Door Sliding Block |
|
|
|
|
|
|
4. |
Contact Plate |
13. |
Camel Back Hinge |
22. |
Door Stop Nut & Bolt |
|
|
|
|
||
5. |
Handle |
14. Nylon Washer |
23. Bumper |
||
|
|
|
|
|
|
6. |
Handle Screw |
15. |
Camel Back Hinge Pin Holder |
24. |
Torque Rod |
|
|
|
|
|
|
7. |
Corner Screw |
16. |
10” Door Arm |
25. |
Torquemaster |
|
|
|
|
|
|
8. |
Hinge Pin |
17. |
Block Screw |
|
|
|
|
|
|
|
|
9. |
Pin Holder |
18. |
Hold-Open |
|
|
|
|
|
|
|
|
TITLE: |
REV. |
|
99-20439-I001 Model 1000/1000R/1200R Door Service & Installation |
A |
Page 9 of 76 |
|
|
|
Model 1000/1000R/1200R Door Service & Installation
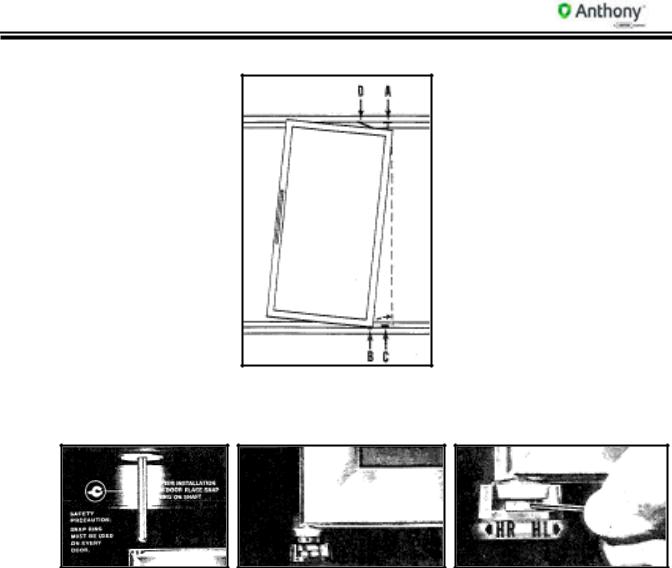
3.Model 1000 Non-Reversible Door Installation (Prior to 1983)
1.Insert top of door into top hinge pin “A”.
Safety Precaution: Snap ring must be used on every door. Place snap ring on top hinge pin after installation of every door.
2.Lift up door and insert torque shaft “B” into socket “C”. Using two (2) long pins, adjust torque to desired tension and set with one (1) short pin. Both long and short pins are provided.
Note: Do not over-adjust door as this will cause door to slam.
3.Connect 90° door stop arm “D” to slide block on frame. Secure with screw provided.
4.Reverse instructions to remove door.
Caution: Before removing door, extract torque set pin and safety snap ring with a pair of pliers.
TITLE: |
REV. |
|
99-20439-I001 Model 1000/1000R/1200R Door Service & Installation |
A |
Page 10 of 76 |
|
|
|
Model 1000/1000R/1200R Door Service & Installation
4.Model 1000 Non-Reversible Door Handle Replacement
1.To remove handle, insert 5/32” Allen wrench through back side of door frame. Handle screws are contained in door frame.
5.Model 1000 Non-Reversible Door Handle Replacement
1.Door does not have to be disassembled to replace torque rod. Drive tapered shaft of torque rod as shown below.
2.To replace new torque rod, align torque shaft with key way in door. Tapered shaft must be driven flush with bottom of door.
TITLE: |
REV. |
|
99-20439-I001 Model 1000/1000R/1200R Door Service & Installation |
A |
Page 11 of 76 |
|
|
|
Model 1000/1000R/1200R Door Service & Installation
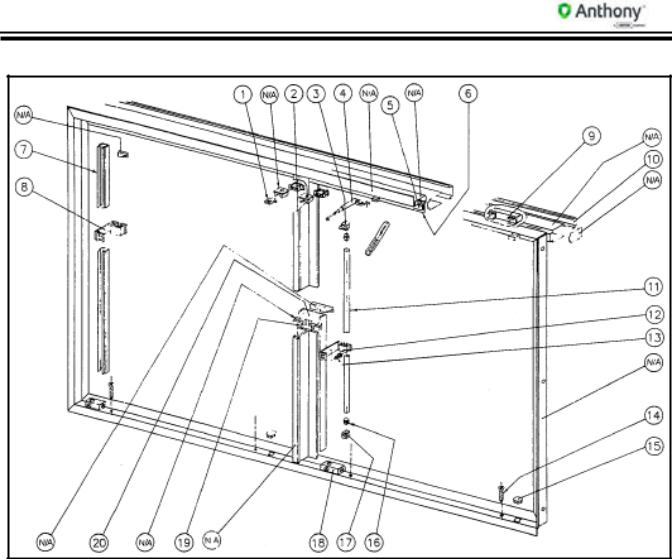
6.Model 1000R Door (Reversible) (1987 to 1991)
|
Description |
|
|
Description |
|
Description |
|
|
|
|
|
||
1. |
Corner Piece |
7. |
Door Plastic |
13. Torque Rod |
||
|
|
|
|
|
|
|
2. |
Corner Screw |
8. |
Receptacle |
14. |
Handle Screw |
|
|
|
|
|
|
|
|
3. |
Glazing Channel |
9. |
Camel Back |
15. |
Handle |
|
|
|
|
|
|
|
|
4. |
Heater Wire |
10. |
Hinge Pin |
16. |
Torque Rod (1987-1991) |
|
|
|
|
|
|
|
|
5. |
Door Rail |
11. |
Door Plastic |
17. |
Hinge Pin (1991 to Present) |
|
|
|
|
|
|
||
6. |
Contact Plate |
12. Access Cover |
18. |
Torque Rod (1991 to Present) |
||
|
|
|
|
|
|
|
TITLE: |
REV. |
|
99-20439-I001 Model 1000/1000R/1200R Door Service & Installation |
A |
Page 12 of 76 |
|
|
|
Model 1000/1000R/1200R Door Service & Installation
7.Model 1200R Door (Reversible) (Start 10/89)
|
Description |
|
Description |
|
|
Description |
|
|
|
|
|
|
|||
1. |
Hinge Pin |
8. New Hold-Open |
15. Access Hole Cover |
|
|||
|
|
|
|
|
|
||
2. |
Molded Hinge Pin |
9. Door Foam |
16. |
Contact Retainer |
|
||
|
|
|
|
|
|
|
|
3. |
Corner Screw |
10. |
Handle |
17. |
Glazing Channel |
|
|
|
|
|
|
|
|
||
4. |
Corner Piece |
11. |
Female Receptacle |
18. Torque Rod |
|
||
|
|
|
|
|
|
|
|
5. |
Door Extrusion |
12. |
Door Foam |
19. |
Corner Piece |
|
|
|
|
|
|
|
|
|
|
6. |
Camel Back |
13. |
Contact Plate |
20. |
Door Cover (Hinge Side) |
|
|
|
|
|
|
|
|
|
|
7. |
Old Hold-Open |
14. Torque Rod |
|
|
|
|
|
|
|
|
|
|
|
|
|
|
|
|
|
|
|
|
|
|
|
TITLE: |
|
REV. |
|
|
|
|
99-20439-I001 Model 1000/1000R/1200R Door Service & Installation |
A |
Page 13 of 76 |
|
|||
Model 1000/1000R/1200R Door Service & Installation
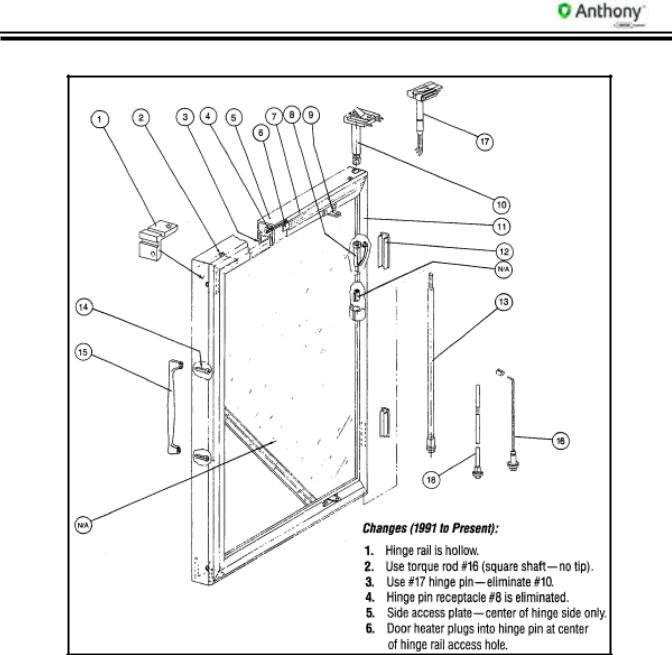
8.Model 1000, 1000R, 1200R Frame (Reversible)
|
Description |
|
|
Description |
|
Description |
|
|
|
|
|
|
|
1. |
Safety Cover |
8. |
End Bracket |
15. |
Hole Plug |
|
|
|
|
|
|
|
|
2. |
Socket |
9. |
Ballast |
16. |
End Caps |
|
|
|
|
|
|
|
|
3. |
Light Socket |
10. |
Raceway Cover |
17. |
Socket |
|
|
|
|
|
|
||
4. |
Hold-Open |
11. |
Bulb |
18. Torquemaster |
||
|
|
|
|
|
|
|
5. |
Gasket |
12. |
Center Bracket |
19. |
Heater |
|
|
|
|
|
|
|
|
6. |
Frame Cover |
13. |
Screw |
20. |
Center Fixture |
|
|
|
|
|
|
|
|
7. |
End Light |
14. |
Installation Screw |
|
|
|
|
|
|
|
|
|
|
TITLE: |
REV. |
|
99-20439-I001 Model 1000/1000R/1200R Door Service & Installation |
A |
Page 14 of 76 |
|
|
|
Model 1000/1000R/1200R Door Service & Installation
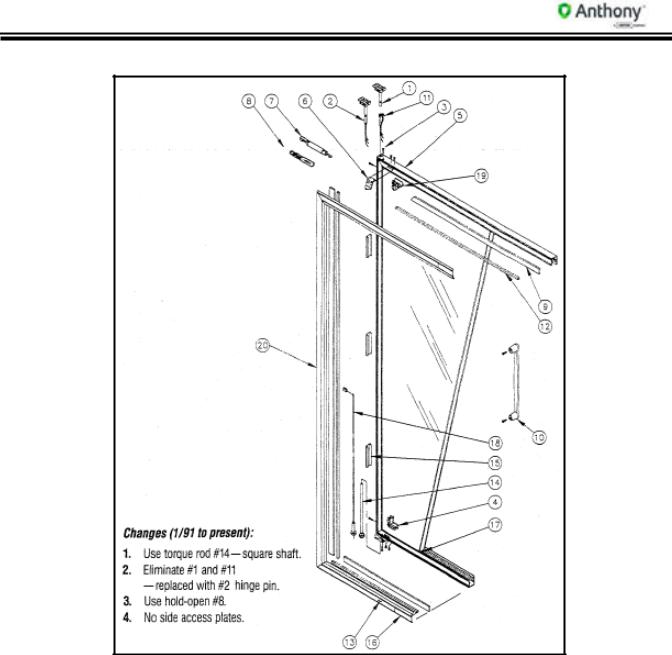
9.Models 2500, 2700, 3000 – Pass-Thru Doors (Start 1987)
|
Description |
|
Description |
|
|
Description |
|
|
|
|
|
|
|
||
1. |
Hinge Pin |
9. Corner Piece |
17. Screw |
|
|
||
|
|
|
|
|
|
|
|
2. |
Door Rail |
10. |
Handle Screw |
18. |
Heater |
|
|
|
|
|
|
|
|
|
|
3. |
Camel Back Hinge |
11. |
Handle |
19. |
Mullion |
|
|
|
|
|
|
|
|
|
|
4. |
Door Plastic |
12. |
Rubber Flap |
20. |
Frame Gasket |
|
|
|
|
|
|
|
|
|
|
5. |
Contact Plate |
13. |
Retainer |
21. |
Torquemaster |
|
|
|
|
|
|
|
|
|
|
6. |
Glazing Channel |
14. |
Single Station Socket |
22. |
Torque Rod |
|
|
|
|
|
|
|
|
|
|
7. |
Door Heater |
15. |
Hold Open |
23. |
Female Receptacle |
|
|
|
|
|
|
|
|
|
|
8. |
Corner Screw |
16. |
Access Hole Cover |
|
|
|
|
|
|
|
|
|
|
|
|
|
|
|
|
|
|
|
|
|
|
TITLE: |
|
REV. |
|
|
|
|
99-20439-I001 Model 1000/1000R/1200R Door Service & Installation |
A |
Page 15 of 76 |
|
|||

Model 1000/1000R/1200R Door Service & Installation
10.Models 1000R, 1200R (Reversible) Frames – End & Center Sections, Full Flange Construction
10.1.Flange Placements
a.Left End Section from customer side has no flange on right end of frame.
b.Center Section from customer side has flanges on neither side.
c.Right End Section from customer side has no flanges on left end of frame.
d.Full Flange Frames have flanges on all four (4) sides.
TITLE: |
REV. |
|
99-20439-I001 Model 1000/1000R/1200R Door Service & Installation |
A |
Page 16 of 76 |
|
|
|

Model 1000/1000R/1200R Door Service & Installation
10.2. Finished Frame Width Dimensions
Actual Door Width |
Catalog Size |
A |
B |
C |
D |
E |
21-5/8” |
23” C-C |
46-1/2” |
69-1/2” |
92-1/2” |
23” |
46” |
25-3/8” |
26-3/4” C-C |
54” |
80-3/4” |
107-1/2” |
26-3/4” |
53-1/2” |
27-3/8” |
28-3/4” C-C |
58” |
86-3/4” |
115-1/2” |
28-3/4” |
57-1/2” |
28-7/8” |
30-1/4” C-C |
61” |
91-1/4” |
121-1/2” |
30-1/4” |
60-1/2” |
NOTE: C-C: Center-To-Center Dimension |
|
|
|
|
|
|
F |
G |
H |
I |
J |
69” |
92” |
115” |
24” |
47” |
80-1/4”” |
107” |
133-3/4” |
27-3/4” |
54-1/2” |
86-1/4” |
115” |
143-3/4” |
29-3/4” |
58-1/2” |
90-3/4” |
121” |
151-1/4” |
31-1/4” |
61-1/2” |
K |
L |
M |
N |
O |
70” |
93” |
116” |
24” |
47” |
81-1/4”” |
108” |
N/A |
27-3/4” |
54-1/2” |
87-1/4” |
116” |
N/A |
29-3/4” |
58-1/2” |
91-3/4” |
122” |
N/A |
31-1/4” |
61-1/2” |
|
P |
Q |
|
70” |
93” |
|
81-1/4”” |
108” |
|
87-1/4” |
116” |
|
91-3/4” |
122” |
10.3. Finished Frame Height Dimensions |
|
|
Actual Door Height |
Catalog Size |
R |
51” |
54” |
53-13/16” |
64” |
67” |
66-13/16” |
70” |
73” |
72-13/16” |
72” |
75” |
74-13/16” |
76” |
79” |
78-13/16” |
|
Notes: 1. |
Features A Thru Q denote actual finished frame dimensions. |
||
|
2. |
For outside to outside frame flange width or height, add 1-1/8” total |
||
|
|
for Decorator (Flat) Rail. Add 1-7/8” total for Serrated Rail. |
||
11. Frame Installation |
|
|
||
1. |
Read instructions completely before installing frames. |
|
|
|
2. |
Openings must conform to net openings listed in Price Book or other. |
|||
3. |
Check size of finished frame to net opening. |
|
|
|
|
|
|
|
|
|
|
TITLE: |
REV. |
|
99-20439-I001 Model 1000/1000R/1200R Door Service & Installation |
A |
Page 17 of 76 |
||
Model 1000/1000R/1200R Door Service & Installation
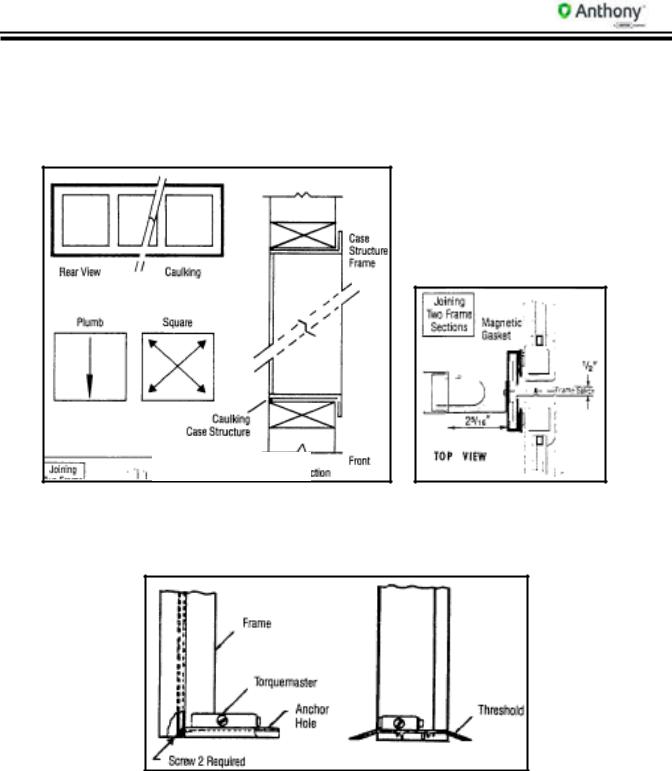
4.Do not force frame into tight opening.
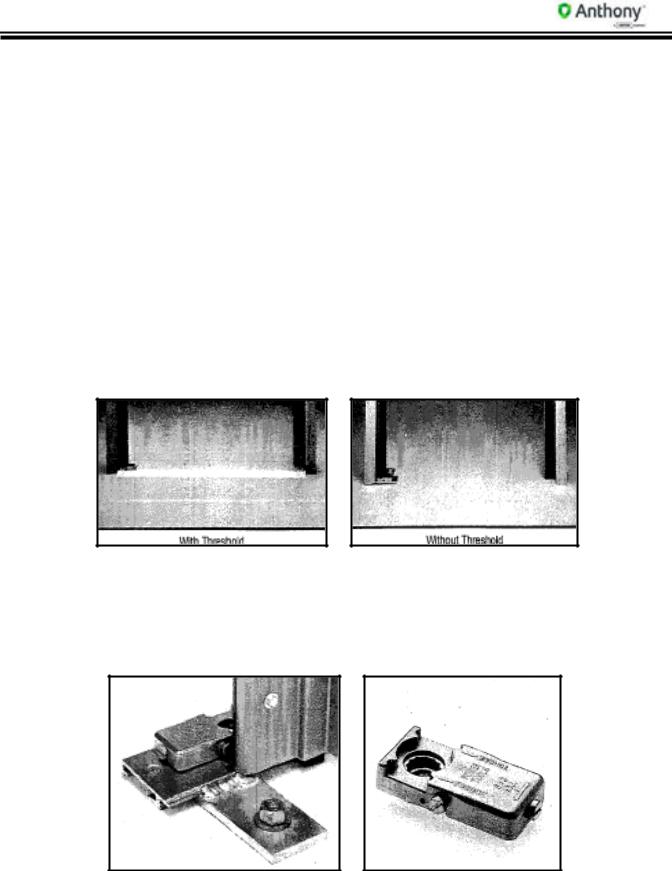
5.Check cooler opening for plumb and square as shown below. Sill must be level left to right and front to back.
a.Jambs, header and sill should be wood for a secure installation.
b.Anthony door frame needs a sill of at least 1-1/2” for proper installation.
Frame Installation
6.Set frame in opening. For safety, partially install wood screws in top of frame. Do not tighten. Torquemaster (silver rectangular box) goes at bottom of frame. Hinge pin to top of frame.
Pass-Thru Cross-Section (with/without Threshold)
7.Check frame for square as shown. Shim as necessary. Ensure that shims are placed as close to installation holes as possible. When shimming is necessary, shim top to bottom and/or left end of frame and right end of frame to maintain square of frame in net opening.
TITLE: |
REV. |
|
99-20439-I001 Model 1000/1000R/1200R Door Service & Installation |
A |
Page 18 of 76 |
|
|
|
Model 1000/1000R/1200R Door Service & Installation
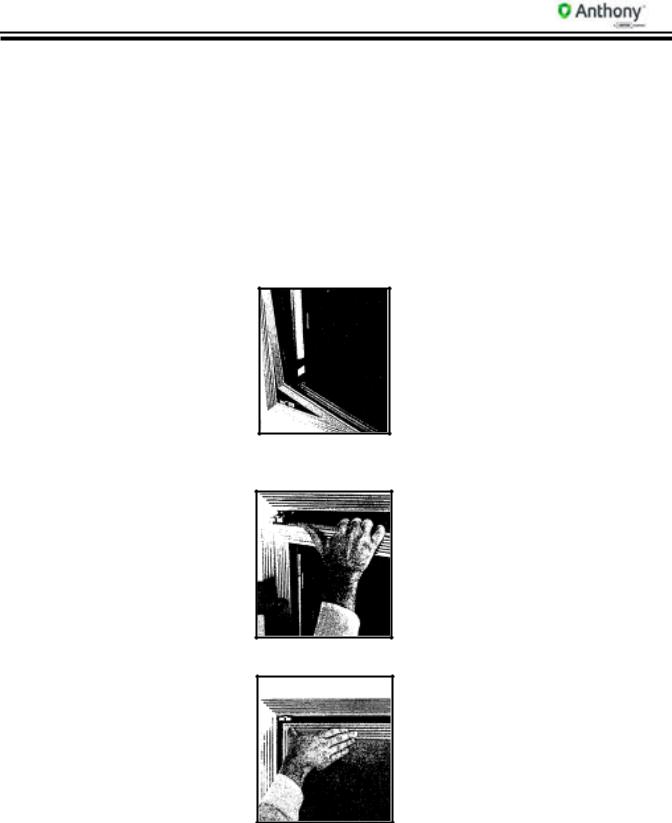
8.From the inside of case, caulk all four sides of frame between frame and case opening, as shown above.
9.Starting with frame sill, install mounting screws and tighten; first sides, then top.
(Do not over-tighten top screws as this will bow frame.)
10.From inside the case, re-check caulking.
11.For joining frame sections without flanges on center section, or one end of left end and one of right end of frame, align top and bottom with end sections and join together with sex bolts provided.
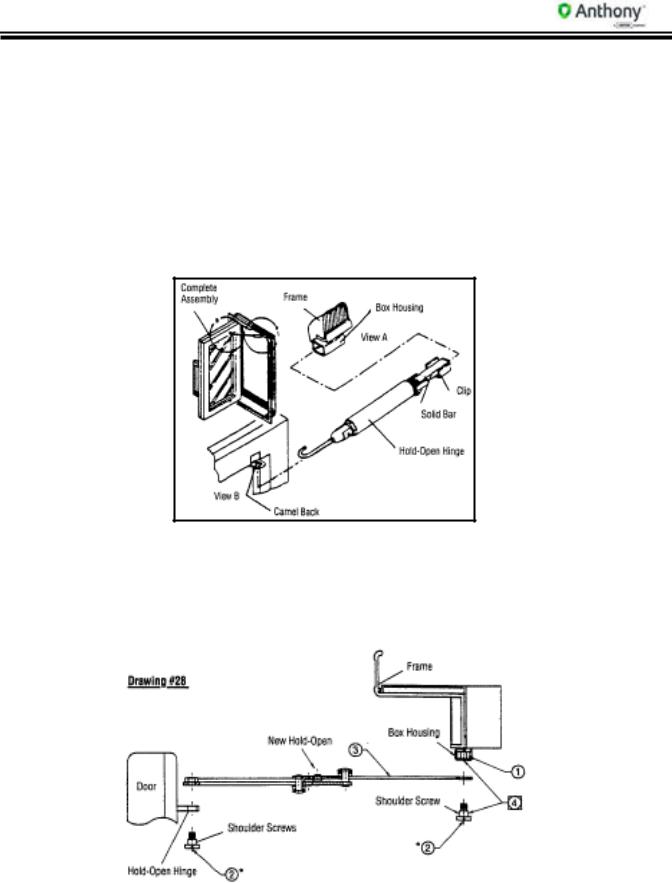
12.Reversible/Cordless Door & Hold-Open Installation
1.Align door with torque rod and insert into the Torquemaster socket at base of door.
2.Engage door with hinge pin plug inserted into hinge pin plug receptacle at top of frame.
3. Push door into top frame with thumb until hinge pin plug snaps into place.
TITLE: |
REV. |
|
99-20439-I001 Model 1000/1000R/1200R Door Service & Installation |
A |
Page 19 of 76 |
|
|
|
Model 1000/1000R/1200R Door Service & Installation
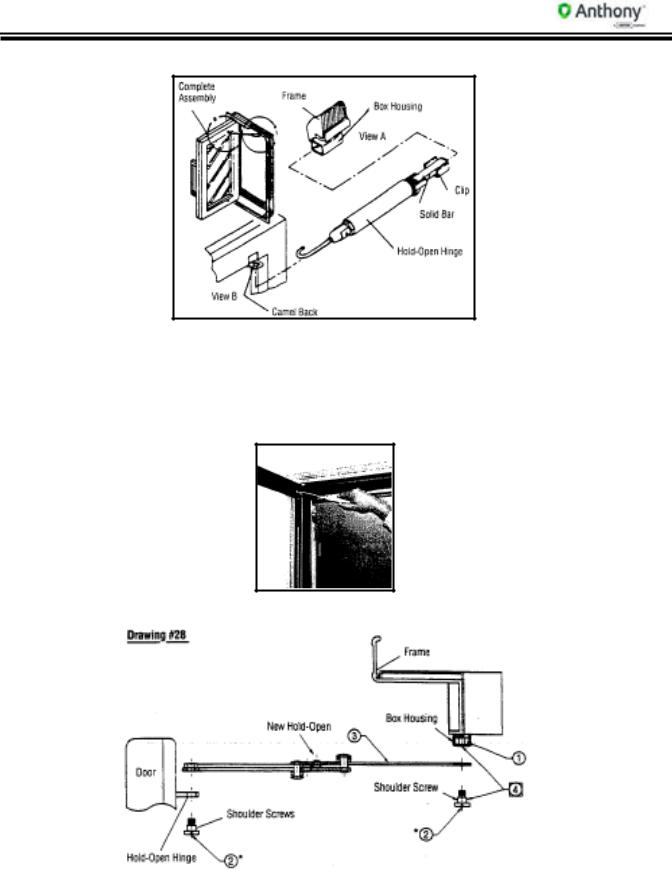
4. Hold-Open Instructions: (1987 to 1990)
a.Hold door stop and hold-open device into camel back side of door.
Note: Change is for hook to be installed coming up from the underside of the camel back hinge.
b.Slide hold-open bar with spring clip through box on frame until clip snaps into place.
5. Hold-Open Instructions: (1990 to Present)
|
|
|
|
|
|
|
|
|
|
|
|
|
|
|
|
|
|
|
|
|
TITLE: |
REV. |
|
99-20439-I001 Model 1000/1000R/1200R Door Service & Installation |
A |
Page 20 of 76 |
|||
|
|
|
|
|
|
Model 1000/1000R/1200R Door Service & Installation
a.Insert rectangular nut provided into hold-open hinge on frame as shown below.
Note: On hold-opens starting March, 1990, the nut is affixed to hold-open arm.
b.With shoulder screws provided, mount new hold-open as shown. Tighten screws.
c.Install thin metal slide toward top of frame.
d. Do not use power tools for installation or removal.
6.Adjust closing force by turning the screw on the front of the Torquemaster with a flat-head screwdriver. Turn counterclockwise to tighten, clockwise to loosen. Do not over-adjust as this will cause door to slam.
7.If necessary to square door in frame opening, turn end screw on Torquemaster (marked SAG ADJ) with flat-head screwdriver.
13.Hold-Open Replacement (Prior to 1987)
1.To remove, insert flat-head screwdriver into shoulder screw on frame white slide block and remove. Go to back of door and remove locking washer and solid rivet. This will remove 10” door stop arm.
|
|
|
|
|
TITLE: |
REV. |
|
99-20439-I001 Model 1000/1000R/1200R Door Service & Installation |
A |
Page 21 of 76 |
|
|
|
|
|
Model 1000/1000R/1200R Door Service & Installation
2.To remove white block inside slide channel, remove end Phillips-head screw and slide block outside of channel.
3.To remove fork, remove two (2) Phillips-head screws. To remove complete holdopen assembly, remove back of frame raceway for access to screws that hold hold-open channel to frame. Remove screws.
4.Reverse instructions to replace.
14.Hold-Open Replacement (1987 to 1990)
1.Open the door and lock into hold-open position. Using a flat-head screwdriver, release the door stop and hold-open frame attachment from slide channel as shown below.
2.Remove door stop and hold-open device from door as shown.
3.Reverse instructions to replace.
15.Hold-Open Replacement (1987 to 1990)
1.Remove shoulder screws from both ends of slide stop arm.
|
|
|
|
|
|
|
|
|
|
|
|
|
|
|
|
|
|
|
|
|
|
|
|
|
|
|
TITLE: |
REV. |
|
99-20439-I001 Model 1000/1000R/1200R Door Service & Installation |
A |
Page 22 of 76 |
|||
|
|
|
|
|
|
Model 1000/1000R/1200R Door Service & Installation
2.With a flat-head screwdriver, turn screws counter-clockwise.
3.Reverse instructions to replace.
16.H old-Open Replacement (1987 to 1990)
1.Remove existing hold-open (see 15. & 16.).
2.Using a 1/4” drill, enlarge hole for hold-open on hinge side of door.
3.Insert rectangular nut provided into hold-open hinge on frame.
4.Mount new hold-open with shoulder screws provided.
5.Thin metal slide goes toward top of frame.
6.Do not over-tighten screws. (Hand tighten with hand driver only.)
17.Models 2500, 2700 & 3000 Pass-Thru Door Installation
Note: If Roll-A-Way cart is included in order, it must be behind the door before installing frame.
1. When threshold is desired, drill and lag on pre-drilled mounting holes only.
2.For door and hold-open installation instructions, see previous pages.
3.When door is in closed position, adjust floor wiper seal to fit flush with door slab and screw into place.
4.For additional bottom support, Anthony Pass-Thru doors are equipped with a base plate and two special floor anchor bolts.
Base Plate |
Torquemaster |
|
|
|
|
|
|
TITLE: |
|
REV. |
|
99-20439-I001 Model 1000/1000R/1200R Door Service & Installation |
A |
Page 23 of 76 |
|
 Loading...