

Page 1

Thank You! .........................................................................3
Installing TriplePlay..............................................................3
• Parts List.......................................................................3
• Positioning the Antenna ..................................................3
• Mounting the Antenna ....................................................4
• Housing TriplePlay..........................................................5
Activating TriplePlay.............................................................5
Operating TriplePlay.............................................................6
• Default Display ..............................................................7
• Powering On TriplePlay ...................................................7
• Changing Zones.............................................................7
• Changing Categories....................................................... 7
• Changing Channels.........................................................7
• Setting and Recalling Presets........................................... 8
Configuring Options .............................................................8
• Entering SETUP Mode ..................................................... 8
• Blocking Channels ..........................................................9
• Skipping Channels........................................................ 10
• Displaying SIRIUS ID Numbers ......................................10
Using the Remote Control................................................... 11
Integration with Distributed Audio Control Systems ...............11
Technical Assistance ..........................................................11
12 Month Limited Warranty................................................. 12
Appendix A: Music and Entertainment Streams .....................13
Page 2

2 Antex Electronics
Antex Electronic s Corporation
19821 Hamilton Ave.
Torrance, California 90502
USA
www.antex.com
Copyright © 2003 Antex Electron ic s Corporation. All Rights
Reserved. No portion of this manual may be reproduced without
prior written consent from Antex Electr onics. The copyright
protection claimed h er e includes photocopy ing, translation,
and/or reformatting of the information contained in this manual.
Printed in the United States of America.
Document No.: 9000-2467- 7006 R ev. A
FCC Compliance Statement for United States Users
This equipment has been tes ted and found to comply with the
limits for a Class B device, pursuant to Part 15 of the FCC Rules.
In order to maintain c ompliance with FCC regu la tions, shielded
cables must be used with this equipment. Operation with nonapproved equipment or unsh ielded c a bles is likely to result in
interference to radio and TV reception. Changes or modifications
made to this equipment not expressly approved by Antex
Electronics could void the user’s authority to operate the
equipment.
IMPORTANT SAFETY INSTRUCTIONS
• Read Instruction s – Re a d a ll Safe ty Instructions be for e operating equ ip me n t.
• Retain Instructions – Save these instructions for future reference.
• Heed Warnings – All warnings on the product and these instructions should be
adhered to.
• Follow Instructions – All operating and use instructions should be followed.
• Cleaning –Do not use liquid cleaners or aerosol cleaners. Use a damp cloth for
cleaning.
• Attachments – Do not use attachments not recommended by the manufacturer
as they may cause hazards.
• Water and Moisture – Do not use this product near water – for example near a
bathtub, wash bowl, kitchen sink or a room where moisture is likely to occur.
• Accessories – Do not place on an unstable surface (cart table or tripod) where
tipping is a possibili t y .
• Ventilation – Install unit in well ventilated area where self generated heat may
escape. Bookcases or cabinets should have proper venting to allow heat to
escape.
• Power outlet – A properly grounded wall outlet must be used. Do not use a plug
adapter that bypasses the three-terminal ground plug.
• Power Cord Protection – Route your power cords out of traffics way so as not to
be walked on or traveled over by carts wheels. Do not pl ace it ems on top of or
against the cord so as to pinch the cord.
• Outdoor Antenna Grounding – The antenna and coaxial cable connecting to the
unit must be properly grounded to provide some protection against voltage
surges and built-up static charges. Article 810 of the National Electrical Code
(NEC), ANSI/NFPA 70, provides information with regard to proper grounding of
the mast and supporting structure, grounding of the lead-in wire to an antenna
discharge unit, size of grounding conductors, location of antenna-discharge
unit, connection to grounding electrodes, and requirements for the grounding
electrode.
• Power Lines – An outside antenna system should not be located in the vicinity of
overhead power lines or electric light or power circuits, or where they c a n fall
into such power lines or circuits. When installing an outside antenna system,
extreme care should be taken to keep from touching such power lines or
circuits, as contact with them might be fatal.
• Overloading – Do not overload wall outlets, extension cords, or integral
convenience receptacles as this can result in a risk of fire or electrical shock.
• Object and Liquid Entry – Never push objects of any kind into this product
through openings as they may short-out parts that could cause a fire. Never spill
liquid of any kind on the product.
• Servicing – Do not attempt to service this product yourself; there are no
customer serviceable parts inside. Refer all servicing to qualified service
personnel.
A product and cart combination should be moved with care. Quick stops,
excessive force, and uneven surfaces may cause the prod uc t and cart
combination to overturn.
• Damage Requiring Service – Unplug this product from the wall outlet and refer
servicing to a qualified service person under the following conditions:
a) When the power-supply cord or plug is damag ed.
b) If liquid has been spilled, or objects have fallen into t he pro d uct.
c) If product has been exposed to rain or water.
d) If the product does not operate normally by following the operating
instructions. Adjust only those controls that are covered by the operating
instructions as an improper adjustment of other controls may result in
damage and will often require extensive work by a qualified technician to
restore the product to its normal operation.
e) If the product has been dropped or damaged in any way.
f) When the product exhibits a distinct change in performance – this indicates
a need for service.
• Replacement Parts – When replacement parts are required, be sure the servi c e
technician uses replacement parts specified by the manufacturer or have the
same characteristics as the original part. Unauthorized substitutions may result
in fire, shock, or other hazards.
• Safety Check – Upon completion of any service or repairs to this product, ask
the service technician to perform safety checks to determine that the product is
in proper operating condition.
• Heat – The product shall be situated away from sources such as radiators, heat
resistors, heat registers, stoves, or amplifier that produce heat.
© 2003 Antex Electronics, Inc.
Page 3

TriplePlay Multizone Satellite Audio Receiver 3
Thank You!
Thank you for choosing the world’s first high-fidelity, 3-zone
satellite radio rec eiver. Only Antex Electronics’ TriplePlay ™ uses
the revolutionar y SIRIUS® Satellite Radio technology.
60 Channels of Music
SRX-3 TriplePlay lets you select from 60 origin a l music channels,
24 hours a day, 7 days a week. Hear today’s hits to R &B oldies
to classical masterpieces, from authentic country and real
bluegrass to cool jazz, hot Latin, reggae, rock, dan c e, gospel,
new age and even kid’s music.
40 Non-Music Channels
TriplePlay also gives you instant access to 40 plus channels of
world-class news, sports and entertainment from CNBC, CNN,
BBC World Service, E! Entertainment Radio, ABC News & Talk,
NPR Now, ESPN, The Speed Channel, an d engagin g
entertainment from the golden age of radio on Radio Classics
and Radio Disney.
Three Listening Zones
TriplePlay gives you the option to select progr a m m ing for three
independent listening zon es and independently control the
operation of the receiver with in each of those zones. With
TriplePlay, you ca n listen to the latest Top 10 in your living
room, sports in the fa m ily room, and the latest breaking news
around the world in your bedroom.
A list of SIRIUS music and entertainment streams is provided for
you in Appendix A. For the most up to date listings, go to
www.sirius.com.
Installing TriplePlay
Antex Electronics strongly recommends th at the SRX-3
TriplePlay unit and its antenna be installed by a
professional installer. Brief instructions are presented
here for reference purposes only.
Antenna installation should be in accordance with Article 810 of
NEC. Power requirements for the TripleP lay are 100-140VAC,
50-60Hz, 50 Watts.
Parts List
Before installing your SRX-3 TriplePlay, make sure you have all
the parts listed below:
• SRX-3 TriplePlay u nit
• Antenna
• Remote control
Positioning the Antenna
Prior to mounting the antenna or finding a permanent home for
your SRX-3 TriplePlay, you first want to validate the position of
the antenna.
1. Power on TriplePlay to m ake sure the unit h a s pow er .
You should see a startup screen with A ntex and SIRIUS
logos, followed by the main display (similar to tha t shown
Figure 4 on page 7).
2. Power off TriplePlay, and then c onn ec t the audio cables, IR,
and RS232 control interfaces to the other components in
your audio system.
3. Using RG58U, 50 Ohm coaxial cable, connect the antenna to
TriplePlay.
4. Position the anten na outdoors within 30 f eet of the TriplePlay
unit (or within 100 feet if you are using an inline amplifier).
• Power cord
• RCA audio cables (3)
© 2003 Antex Electronics, Inc.
Page 4
4 Antex Electronics
5. Position the flat receiving dish straight up and with an
unobstructed view to the SIRIUS satellites— that is, an
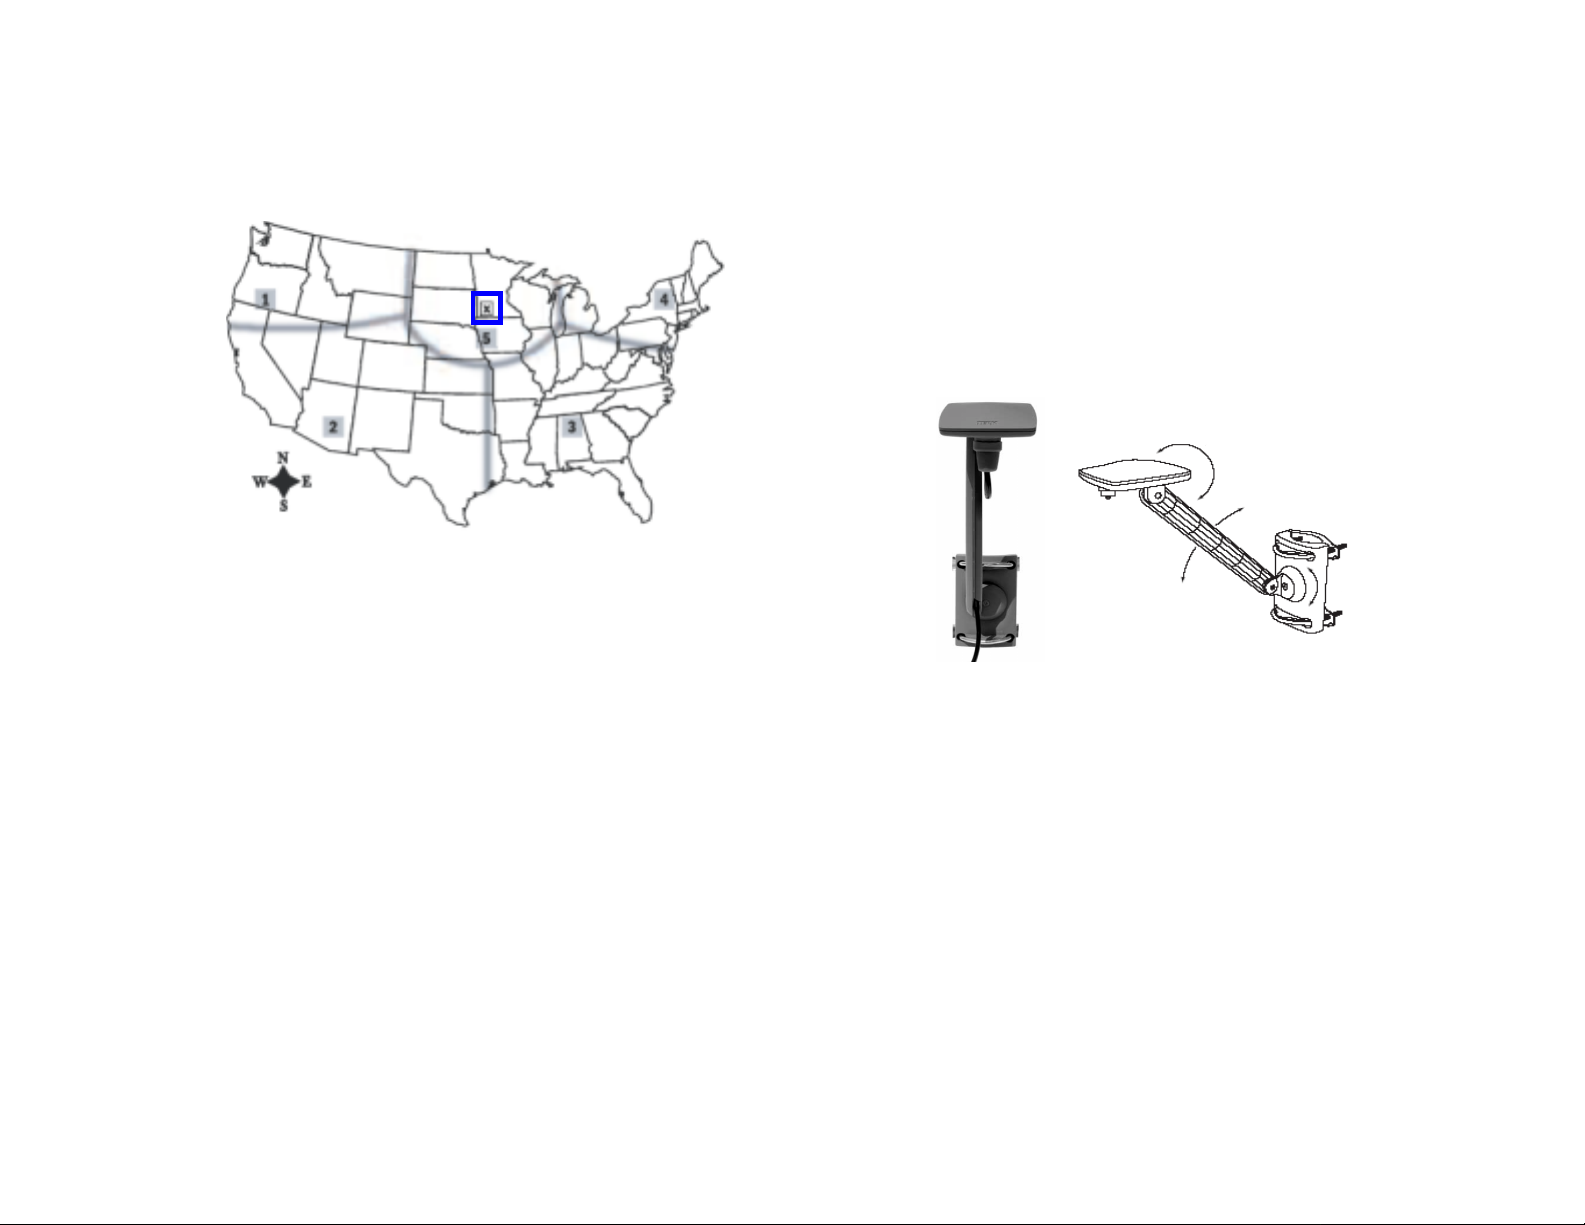
unobstructed view tow ard the “X” Figure 1.
Figure 1 Your antenna must hav e an unobstructed path to
the satellites (marked by the ”X” on the map).
6. Power on your soun d system and turn the amplifier to a low
volume.
7. Power on TriplePlay and tune to ch annel 184, a free preview
channel. Press 1-8- 4 on the front panel NUMERIC buttons.
If the system is working, you will hear SIRIUS progr a mming
on this channel and can proceed t o S tep 8.
If the antenna does not have a clear path to the sa tellites,
TriplePlay’s fron t pa nel display will read “ Acquiring Signal” or
“Antenna Not Connected.” Reposition the antenna until you
hear music playing.
8. Finish installing T r iplePlay.
a) Mount the antenna in its permanent location. Follow the
instructions in the section, “Mounting the Antenna.”
b) House TriplePlay in its permanent location. Follow the
instructions in the section, “Housing TriplePlay,” starting
on page 5.
c) Activate the unit following the instructions on pa ge 5.
Mounting the Antenna
The antenna, as shown in Figure 2, must be mounted outdoors
within 30 feet of the TriplePlay unit (or within 100 f eet when
using an inline amplif ier ) . Its versatile mount allows it to be
clamped to various objects or fastened directly to a rigid
structure. For example, the antenna can be mounted to a wall or
eave, screwed directly into the roof, or “mast mounted” to a
plumbing vent pipe or other antenna mast such as the support
post of a satellite TV dish.
Figure 2 Point the antenna’s flat surface straight up.
The flat surface of the antenna’s receiving dish should be
installed to point straight up and have an unobstructed path
(view) between it and the SIRIUS satellites—that is, the “X” in
Figure 1. The path between you r antenna and the SIRIUS
satellites depends on your location in the U.S.
The best location for th e antenna depends on where you live, the
orientation of your home, and the locations of any obstructions
that could prevent the satellite signal from reaching the antenna.
The location of the “X” on the map in Figure 1 must be visible to
the antenna. Table 1 defines the unobstructed view needed
between your anten na and the satellites.
Before mounting the antenna, hold the antenna in the desired
mounting location w ith the TriplePlay unit s et up and powered on
to make sure that th e s ystem works with the anten na in that
location.
© 2003 Antex Electronics, Inc.
Page 5
TriplePlay Multizone Satellite Audio Receiver 5
Table 1 Antenna mounting instructions.
In this
section… Mount the antenna with an unobstructed view:
1 East or Northeast
2 North or Northeast
3 North or Northwest
4 West or Northwest
5 Straight up
When the antenna is secu rely mounted with a clear view up, run
the RG58U 50 ohms coaxial cable to TriplePlay unit. Screw the
cable connector to th e a ntenna “finger tight” (do not over
tighten with a wrench) and secure the antenna c a ble inside the
arm of the antenna.
Housing TriplePlay
House the TriplePlay unit in a component rack or other suitable
location that provides adequate ven tila tion. The maximum
ambient temperature should never exceed 120 degrees
Fahrenheit.
After mounting the a ntenna, connect the audio cables (or
optional TOSLINK), IR, and RS232 c ontrol interfaces to the other
components in the sys tem. Turn the volume control of a m plifiers
to a low level, then con nect the power cable to the T r iplePlay
unit and power it on. A startup screen with Antex and SIRIUS
logos will appear briefly, followed by the defa ult display (see
Figure 4 on page 7).
Tune to channel 184, a free preview c hannel, by pressing 1-8-4
on the front panel NU MERIC buttons. If the sy s tem is working,
you will hear SIRIUS programming and can proceed to activating
the unit. If the front panel display reads “Acquiring Signal” or
“Antenna Not Connected,” reposition the antenna until you hear
music playing.
Activating TriplePlay
After the channel 184 verifica tion test, you must activate your
SRX-3 TriplePlay to ac c ess all SIRIUS channels. T o do s o you
must first obtain the SIRIUS ID numbers of your unit. The unit
contains three ID numbers that are used to activate each of the
three independent tuners (hereafter referred to as “zones”).
Follow the instruc tions below to obtain the SIRIUS ID numbers
and activate your SIRIUS radio service.
1. Press and HOLD the POWER button for four (4) seconds to
access the SETUP menu, as shown below.
SRX-3 TriplePlay
SRX-3 TriplePlay
SRX-3 TriplePlay SETUP
SRX-3 TriplePlay SETUP
ADD OR SKIP
ADD OR SKIP
PARENTAL CONTROL
PARENTAL CONTROL
SIRIUS ID NUMBERS
SIRIUS ID NUMBERS
RETURN
RETURN
2. Press the CHANNEL down button to scroll to “ SIRIUS ID
NUMBERS,” an d then press the SELECT button . The SIRIUS
ID NUMBERS screen appears. Record the ID numbers for
each zone in the space below.
ZONE 1 ID: _________________________
ZONE 2 ID: _________________________
ZONE 3 ID: _________________________
3. Press the SELECT button to return to the defau lt dis play.
4. Activate your SIRIUS radio service by: (a) going to
www.siriusradio.com, and then clicking the “JOIN” or
“Activate Now” ic on; or (b) calling SIRI US at
1-888-539-7474. A frien dly customer care representative
will assist you in activating your unit.
© 2003 Antex Electronics, Inc.
Page 6

6 Antex Electronics
Operating TriplePlay
SRX-3 TriplePlay pr ovides intuitive control of its various
functions via its front panel buttons (as shown in Figure 3), the
remote control, its hardwired I R , and the RS232 port (for local
and remote operation). TriplePlay is essentially three completely
independent SIRI US satellite tuners—th a t is “zones”—each of
which can be tuned independently so that different audio
channels play in different rooms.
CATEGORY
Tune to specific audio categories
Tune to specific audio categories
such as Pop, Rock, Rhapsody,
such as Pop, Rock, Rhapsody,
Jazz, News, and more.
Jazz, News, and more.
CATEGORY
CHANNEL
CHANNEL
Tune to specific
Tune to specific
channels.
channels.
Channel, category, art i st and song title
Channel, category, art i st and song title
information for each zone. Displays configuration
information for each zone. Displays configuration
Within each zone you can:
• Change channels and music categories
• Punch in a channel number to tune to it directly
• Set and tune to preset chann els—10 in each zone.
You can also use the SETUP menu to block specific channels, as
well as add and skip ch an nels . Instructions for a ll these features
are provided in this s ection.
Display
Display
screens when in the SETUP menu.
screens when in the SETUP menu.
1
NUMERIC BUTTONS
NUMERIC BUTTONS
Tune directly to specific channels
Tune directly to specific channels
(punch in the channel number,
(punch in the channel number,
then press SELECT) and to preset
then press SELECT) and to preset
channels (10 per zone).
channels (10 per zone).
POWER
Figure 3 TriplePlay buttons and multi-zone display.
POWER
Press to power the
Press to power the
unit on/off. Hold to
unit on/off. Hold to
enter the SETUP
enter the SETUP
menu.
menu.
SELECT
SELECT
Completes/confirms
Completes/confirms
operations. Press
operations. Press
SELECT after turning to a
SELECT after turning to a
category/channel for the
category/channel for the
selection to take effect.
selection to take effect.
ZONE
ZONE
Press to switch
Press to switch
the display to
the display to
another zone.
another zone.
© 2003 Antex Electronics, Inc.
PRESET
PRESET
Press before sel ecti ng a NUMERIC button
Press before sel ecti ng a NUMERIC button
to tune to a preset channel.
to tune to a preset channel.
Hold before select i ng a NUMERIC butt on to
Hold before select i ng a NUMERIC butt on to
set a preset channel.
set a preset channel.
1
See Appendix A for a list of SIRIUS music and entertainment streams.
For the most up to date listings, go to www.sirius.c om.
Page 7

TriplePlay Multizone Satellite Audio Receiver 7
Default Display
The default display, as shown below, provides detailed
information about the channel each zone is currently tuned to,
including category name, channel number, channel name, artist
name, and song title.
Category name
Category name
Highlighting indicates
Highlighting indicates
which zone is selected
which zone is selected
POP
POP
POP
Zone 1
Zone 1
Zone 2
Zone 2
Zone 3
Zone 3
002
002
002
002
043
043
043
043
022
022
022
022
Channel
Channel
number
number
The Pulse
The Pulse
The Pulse
The Pulse
Matchbox Twenty
Matchbox Twenty
Matchbox Twenty
Matchbox Twenty
If You Leav e
If You Leav e
If You Leav e
If You Leav e
Back Spin
Back Spin
Back Spin
Back Spin
Sugar Hill G an g
Sugar Hill G an g
Sugar Hill G an g
Sugar Hill G an g
White Lines
White Lines
White Lines
White Lines
First Wave
First Wave
First Wave
First Wave
The Clash
The Clash
The Clash
The Clash
London Calling
London Calling
London Calling
London Calling
POPPOP
HIP-HOP
HIP-HOP
HIP-HOP
HIP-HOPHIP-HOP
ROCK
ROCK
ROCK
ROCK
Channel name
Channel name
Artist name
Artist name
Song title
Song title
Changing Zones
The ZONE button is used to select the zone in which you want to
change categories or channels. Press the ZONE button to cycle
through the three zones in sequence. A highlighted zone in the
default display (for exampl e, zone 1 in Figure 4) is the one to
which any channel and category changes are applied.
The zones corresponding to audio outputs 1, 2, and 3 are
numbered from top to bottom. As shown in Figure 4, zone 1 is at
the top of the display, z one 2 in the middle, and zone 3 at the
bottom.
Changing Categories
The audio channels of the SIRIUS service are conveniently
organized into categories such as Pop, R ock, News , Sports etc.
The category of each zone is displayed in the title box of each
zone. Press the CATEGORY up/down buttons to tune to a
different category. After scrolling to the category you desire,
press the SELECT button to confirm the category s election. Note
that the category name, channel name, artist name, and song
title information in the display changes to r eflect the new
category.
Figure 4 Highlighting indicates which zone in the display
is currently selected.
Powering On TriplePlay
With the unit and antenna properly installe d, and the unit
activated, press and r elea se the POWER button to tu r n on the
unit. The SIRIUS a nd Antex logos will appear for 2 seconds,
followed by the default display . (If the SETUP menu appears, you
held the POWER bu tton too long. Press the SELECT button to
return to the default display.)
© 2003 Antex Electronics, Inc.
Changing Channels
You can change music channels using any of the following:
• Channel up/down to scroll through channels
• Numbered buttons to tu ne directly to a specific channel
• Preset button to tune to a pres et c hannel
Use the CHANNEL up/down buttons to scroll th r ough the
channel within a zone. After scrolling to the channel you desire,
press the SELECT button to confirm the channel selection. Note
that the channel name, artist name, and song title information in
the display changes to r eflect the new channel.
Page 8

8 Antex Electronics
You must press the SELECT button within four seconds of
choosing a new channel or the channel change does not take
effect.
You can also tune to a specific channel directly simply by
pressing in its chan nel number using the NUMERIC buttons.
• When you enter a three-digit channel number, such as
1-8-4, TriplePlay automatically changes to that channel.
• When you enter a two-digit ch annel number, such as 1-8,
you must then press the SELECT button for the channel
change to take effect. (If you enter the channel number as
0-1-8, TriplePlay will ma ke the change automatically.)
When preset channels have been set, you can access those
presets simply by pressing th e PRESET button, then an
appropriate numeric button. For example, if preset 0 were set to
Rock, preset 1 to Pop, and preset 2 to News , you could jump to
the News channel quickly by pressing “P R ES E T-2.”
Setting and Recalling Presets
Each zone can have 10 channel presets (numbered 0 to 9). To
assign a preset for the selected zone, first tune to a desired
audio channel. Press and hold the P R ESET button for one
second, followed by a numeric button. For example, if you want
to set channel 44 to prese t 9, press and hold the PRES ET button
for one second, then press the numeric button “9.” Note that the
title bar display changes to “PRESET” to let you know that
TriplePlay is ready to assign a preset channel.
To recall a stored preset, press (but don’t hold) the PRESET
button and then the desired nu meric button (0-9).
Configuring Options
TriplePlay's SETU P mode allows you to configu r e T r iplePlay
options (blocking, skipping, and adding channels) and obtain the
unit’s SIRIUS ID numbers for activation.
Entering SETUP Mode
To enter the SETUP m ode, pr es s a nd hold the POWER button for
four seconds. The menu shown in Figure 5 appears.
SRX
Figure 5 SETUP mode menu.
In SETUP mode:
• The CHANNEL up/down buttons are used to scroll though the
• The SELECT button is u sed to confirm selections.
- 3 TriplePlay SETUP
ADD OR SKIP
PARENTAL CONTROL
SIRIUS ID NUMBERS
SIGNAL STRENGTH
RETURN
menu options.
SRX-3 TriplePlay
© 2003 Antex Electronics, Inc.
Page 9

TriplePlay Multizone Satellite Audio Receiver 9
SRX-3 TriplePlay
Blocking Channels
Using the Parental Control feature, you can block specific
channels so that they can be accessed only with a pass code that
you define. Parents find this feature useful for preventing their
children access to specific content.
To block a channel:
1. Press and hold the POWE R bu tton to enter SETUP mode.
2. Press the CHANNEL down button to highlight “PARENTAL
CONTROL,” and then press the SELECT bu tton. A screen
similar to that shown below appears.
SRX-3 TriplePlay
SRX-3 TriplePlay
ENTER PASSWORD
ENTER PASSWORD
XXXX
XXXX
Press SELECT to Accept
Press SELECT to Accept
Preset to Exit
Preset to Exit
“XXXX” will appear f or the password. You must set a
password (if this is the first time at this menu) or enter a
previously set password to proceed. Be careful to use a
familiar number. W r ite this number down for fu ture
reference.
Pass code: _________________________
3. Enter 4 digits with the n ume r ic buttons or remote, and then
press SELECT. (To ex it this menu without settin g or entering
the password and return to the previous menu, press the
PRESET button.)
After you have entered the password successfully, the
following menu will appear.
PARENTAL CONTROL
PARENTAL CONTROL
CHANGE PASSWORD
CHANGE PASSWORD
BLOCK CHANNELS
BLOCK CHANNELS
RETURN
RETURN
Note that you can change the password by repeating steps 1
through 3.
4. Scroll to highlight “BLOCK CHANNELS”, and then press the
SELECT button. A menu similar to that shown below
appears.
PARENTAL CONTROL
PARENTAL CONTROL
ZONE 1
ZONE 1
70 Planet Jazz BLKd
70 Planet Jazz BLKd
Pres s SEL to Return
Pres s SEL to Return
UP/DN to select Channel
UP/DN to select Channel
LF/RT to cha nge Sta tu s
LF/RT to cha nge Sta tu s
Zone to change Zone
Zone to change Zone
— Use the CHANNEL up/down buttons to scroll to the
channel you want to block.
— Use the CATEGORY left/r ight buttons to toggle the st a tus
between blocked “BLKd” or u nblocked “NRML”.
5. Block (or unblock) as many channels as you choose. When
finished, press th e S ELECT button to return to the default
display.
SRX-3 TriplePlay
SRX-3 TriplePlay
SRX-3 TriplePlay
© 2003 Antex Electronics, Inc.
Page 10

10 Antex Electronics
Skipping Channels
In the course of using TriplePlay you may find that there are
specific chann els you prefer not to listen to an d would rather
skip over. Using TriplePla y’s SKIP feature, you c an program the
unit to skip over these c hannels when scr olling using the
CHANNEL up/down buttons or remote control. (Note that you
can still access the “ skipped” channels using the direct tune
method.)
To configure a channel to be skipped when scrolling:
1. Press and hold the POWE R bu tton to enter SETUP mode.
2. Press the CHANNEL down button to highlight “ADD O R SKIP,”
and then press the SELECT button. A sc r een s im ila r to that
shown below appears.
SRX-3 TriplePlay
ADD or SKIP
ZONE 1
70 Planet Jazz
Press SEL to Return
UP/DN t o se le ct Channe l
LF/RT to change Statu s
Zone to chan ge Zone
— Use the CHANNEL up/down buttons to scroll to the
channel you want to skip (or add back a currently
skipped channel).
— Use the CATEGORY left/r ight buttons to toggle the st a tus
between skipped “SKPd” and not skipped “NRML”.
3. Add and Skip as many channels as you prefer. When
finished, press th e S ELECT button to return to the default
display.
SKPd
Displaying SIRIUS ID Numbers
After initial activation it is unlikely that you will need to access
the SIRIUS ID numbers again. If you do, please follow the
instructions below.
1. Press and hold the POWE R bu tton to enter SETUP mode.
2. Press the CHANNE L down button to highlight “SIRIUS ID
NUMBERS,” and then press the SELECT button. A s c reen
similar to that shown below appears.
SRX-3 TriplePlay
SRX-3 TriplePlay
SIRIUS ID NUMBERS
SIRIUS ID NUMBERS
ZONE 1: 000 092733123
ZONE 1: 000 092733123
ZONE 2: 000 092736724
ZONE 2: 000 092736724
ZONE 3: 000 092737831
ZONE 3: 000 092737831
Press SELECT to Return
Press SELECT to Return
3. Press the SELECT button to return to the defau lt dis play.
© 2003 Antex Electronics, Inc.
Page 11

TriplePlay Multizone Satellite Audio Receiver 11
Using the Remote Control
TriplePlay’s remote control provides iden tic a l functionality to the
buttons on the front panel.
CATEGORY
CHANNEL
CHANNEL
(UP/DOWN)
(UP/DOWN)
Tune to
Tune to
specific
specific
channels.
channels.
ZONE
ZONE
Press number to
Press number to
select specific
select specific
zone.
zone.
NUMERIC
NUMERIC
Tune directly to
Tune directly to
specific channels
specific channels
(punch in the
(punch in the
channel number,
channel number,
then press SEL)
then press SEL)
and to tune to
and to tune to
preset channels
preset channels
(10 per zone).
(10 per zone).
CATEGORY
(LEFT/RIGHT)
(LEFT/RIGHT)
Tune to
Tune to
specific audio
specific audio
categories
categories
such as Pop,
such as Pop,
Rock,
Rock,
Rhapsody,
Rhapsody,
Jazz, News,
Jazz, News,
and more.
and more.
PRESET
PRESET
Press before
Press before
selecting a
selecting a
NUMERIC
NUMERIC
button to tune
button to tune
to a preset
to a preset
channel.
channel.
Hold before
Hold before
selecting a
selecting a
NUMERIC
NUMERIC
button to set a
button to set a
preset channel.
preset channel.
Integration with Distributed
Audio Control Systems
SRX-3 TriplePlay has been designed for easy integration into
distributed audio systems by professional installers. Three
methods of interface are provided: the front IR receiver, rear
hardwired IR Port on 3.5mm connector, and the rear RS232
port. Please contact your professional installer or visit our
website www.antex.com for more information, command sets,
and available macros for third party control systems.
Technical Assistance
Technical assistance is available from Antex via:
email: asupport@antex.com
Web: www.antex.com
Phone: (310) 532-3092, ext 29, 7AM to 5PM PDT
© 2003 Antex Electronics, Inc.
Page 12

12 Antex Electronics
12 Month Limited Warranty
assume for the Company any liability other than expressed
herein in connection with the sale of th is pr oduct.
Antex Electronic s Corporation, (the Company) warrants to the
original purch a s er of this product that sh ould this product or any
part thereof, under normal use an d condition s , be proven
defective in material or workmanship within 12 months of the
original date of purchase, such defect(s) will be r epaired or
replaced with new or reconditioned product (at the Company’s
option) without charge for parts and labor.
To obtain repair or repla c ement within the term s of this
Warranty, the product is to be deliv ered w ith proof of warranty
coverage (i.e. dated sales receipt), specification of the defect(s),
and transportation prepaid to the Company a t the address
shown below.
This Warranty does not extend to the elimination of externally
generated static or noise, to correction of antenna problems, to
costs incurred for installation, removal or reinstallati on of the
product, or damage to other components.
This Warranty does not apply to any produ c t or part thereof
which, in the opinion of the Company, has suffered or been
damaged through alteration , improper installation, mishandlin g,
misuse, neglect, accident, or by removal of any factory applied
markings. THE EXTENT OF THE COMPANY’S LIABILITY UNDER
THIS WARRANTY IS LIMITED TO THE REPAIR OR REPLACEMENT
PROVIDED ABOVE, AND, IN NO EVENT, SHALL THE COMPANY’S
LIABAILITY EXCEED THE PURCHASE PRICE PAID BY PURCHASER
FOR THE PRODUCT.
Some states do not allow limitations on how long an implied
warranty lasts or the exclusion or limitation of incidental or
consequential damage so the above limitations or exclusions
may not apply to you. This Warranty gives you specific legal
rights and may also have other rights that vary from state to
state.
Antex Electronic s Corporation
19821 Hamilton Ave.
Torrance, CA 90502
(310) 532-3092
This Warranty is in lieu of all other express w a rranties or
liabilities. ANY IMPLIED WARRANTIES, INCLUDING AN IMPLIED
WARRANTY OF MERCHANTABILITY, SHALL BE LIMITED TO THE
DURATION OF THIS WRITTEN WARRANTY. ANY ACTION FOR
BREACH OF ANY WARRANTY HEREUNDER INCLUDING ANY
IMPLED WARRANTY OF MERCHANTABILITY MUST BE BROUGHT
WITHIN A PERIOD OF 12 MONTHS FROM DATE OF ORIGINAL
PURCHASE. IN NO CASE SHALL THE COMPANY BE LIABLE FOR
ANY CONSEQUENTIAL OR INCIDENTAL DAMAGES FOR BREACH
OF THIS OR ANY OTHER WARRANTY, EXPRESS OR IMPLIED,
WHATSOEVER. N o per son or representative is a uthorized to
© 2003 Antex Electronics, Inc.
Page 13

TriplePlay Multizone Satellite Audio Receiver 13
20: Octane (Modern Rock)
Appendix A: Music and
Entertainment Streams
Listed here for your reference are SIRIUS music and
entertainment streams. For the most up-to-date list of music
and entertainment streams, visit www.sirius.com
Music Stream s
Pop
1: US-1 (Top 40 Hits)
The songs at the top of the pop charts and the latest pop hits breaking out
across America.
2: The Pulse (The '90s & Now)
The best variety of the '90s and now.
3: StarLite (Adult Contemporary)
The brightest stars of today and yesterday, singing the hits.
4: Movin' Easy (Easy Listening)
Easy listening vo cal and instrumenta l favorites.
5: Sirius Gold (Best of the '50s)
The roots of rock n’ roll.
6: '60s Vibrations (Best of the '60s)
Relive the musical revolu tion of the ‘60s.
7: Totally '70s (Best of the '70s)
Let the music take you back.
8: Big '80s (The Best of the '80s)
Experience the reemergence of pop music.
10: Spirit (Christian Hits)
The power and positive impact of Christian music.
Rock
15: The Rock ( Classic Rock)
The top tracks from the lege n ds of classic ro ck.
16: The Vaul t ( D e e per Classic Rock)
Deeper cuts from rock's legendary performers .
17: Jam Central (Jam Bands)
A new rock stream playing the latest jam bands.
18: The Trend (Adult Album Alternative)
40 years of “world-class rock.”
The home of high-powered pure rock.
21: Al t Nation ( Altern ative Ro c k)
The diverse sounds of current alternative music.
22: First Wave (Classic Alternative)
The music that kicked off alternative rock.
23: Big Rock (Stadium Rock)
The best of stadium rock.
24: Organic Rock (Eclectic Rock)
Musical territory with no boundaries.
25: The Bridge (Mellow Rock)
The soft sid e of classic rock .
26: Left Of Center (Underground . Independent)
Indie, underground, and unsigned bands.
27: Hard Attack (Metal)
A nonstop barrage of music with attitude for true metal heads.
28: Sirius Blues (Blues)
The many shades of blues music.
Country
31: New Country (Today's Country Hits)
The sound of today’s country music.
32: Country Road (Country Mix)
Bridging country's classic sound with today's favorite hits.
35: Road House (Classic Country)
Country gold from the legends.
36: The Border (Alternative Country)
A rough-around-the-edges sound from just this side of Nashville.
37: Bluegrass (Bluegrass)
Bluegrass is handmade, heartfelt American music.
Hip-Hop
40: Hip-Hop Nation (Today's Rap)
The raw, uncensored jointz.
41: Planet Rhyme (International Rap . Spoken Word)
The international sound of hip-hop.
42: Wax (Turntablism . Freestyle)
World-class DJs show off their cutting and scratching skills.
43: Back Spin (Old Skool Rap)
The pioneers of old skool, upfront and in the mix.
44: Street Beat (Rap Hits)
All rap, all the time.
© 2003 Antex Electronics, Inc.
Page 14

14 Antex Electronics
R&B
50: Hot Jamz (Urban Contemporary)
Sizzling hits of today's hip-hop and R&B culture.
51: Heart & Soul (R&B Hits)
The biggest R&B hits from the '80s, '90s and today.
52: Slow Jamz (Soul Ballads)
The softer side of today's R&B.
53: Soul Revue (Classic Soul)
The sounds of the golden age of R&B.
Dance
60: House Pa r ty (House Music)
Innovative, pulsating, nonstop house music.
62: The Rave (Non-Stop Club Mix)
The nonstop energy of the club and rave nightlife.
63: Planet Dance (Mainstream Dance)
From house to trance to techno and beyond.
64: The Vortex (Electronica)
The full spectrum of electronic dance music.
66: The Beat (Dance Hits)
The nonstop beat of today’s biggest dance hits and remixes.
68: The Strobe (Disco)
The disco inferno, boogie fever, and more.
Jazz/Standards
70: Planet Jazz (Contemporary Jazz)
The continuing evolution of today’s jazz!
71: Jazz Café (Sm oot h Jazz)
A sophisticated soundtrack of smooth instrumentals and vocals.
72: Pure Jazz ( Classic Jazz)
The sounds and styles of the masters, past and present.
73: Swing Street (Swing)
This joint is jumping with authentic jazz swing bands!
75: Fantasy Ballroom (Standards)
From the crooners to the cabarets, all the timeless standards.
77: Broadway's Best (Show Music)
Round-the-clock entertainment from Broadway past and present.
Classical
80: Symphony Hall (Symphonic)
Classical music at its best, heard in its entirety.
82: Vista (Chamber Works)
The intima t e , personal side of classical music.
85: Classical Voices (Classical Voices)
Music celebrating the glory of the human vo ice.
Variety
90: Univ erso La tino (Latin Pop Mix)
A vibrant and rhythmic blend of the greatest Latin music.
91: Mexicana (Mexicana)
Regional Mexican music at its best.
92: Reggae Rhythms (Reggae)
Reggae music from its '60s roots to today's exciting sounds.
94: Folk Town (Folk)
The grand tradition of minstrels, troubadours, and trios.
95: Praise (Gospel)
Let the musi c lift you up as hig h as t he music soars.
96: Kids Stuff (Kid s)
Music, stories, and more for the younger set.
98: Soundscapes (New Age)
A perfect blend of new age and ambient music.
99: Horizons (World Music)
Rock the global village with music spanning six continents.
100: Sirius Sessions (LIVE Features)
LIVE music direct from the SIRIUS Studios, along with an ever-changing
listening experience.
Entertainment Streams
News
101: CNBC
The latest in business and financial news from around the world.
102: Bloomberg Radio
Up-to-the-minute coverage of the financial markets.
103: ABC News & Talk
News and information dedicated to keeping listeners informed.
104: CNN Headline News
Up-to-the-minute news and headlines.
105: FOX News Channel
“The Network America Trusts For Fair And Balanced News.
106: NPR Now
News, entertainment, and all of your NPR favorites.
© 2003 Antex Electronics, Inc.
Page 15

TriplePlay Multizone Satellite Audio Receiver 15
107: NPR Talk
The best call-in talk shows public radio has to offer.
108: PRI's Public Radio Channel
Connecting the world to your life.
109: TWC Radio Network, National
Current weather and extended forecasts throughout the country.
110: TWC Radio Network, East
Weather fr om M aine to Mississippi.
111: TWC Radio Network, Central
Weather from Kansas to Texas.
112: TWC Radio Network, West
Weather West of the Rockies.
113: C-SPAN Radio
Gavel-to-gavel, live public affairs coverage without the spin.
114: BBC World Service News
The world's reference point.
115: World Radio Network
An international tour of the news from broadcasters worldwide.
116: BBC Mundo
International news and issues affecting Latin America.
Sports
120: ESPN Radio
The bes t in sport s progra mming from the w o rldwide leade r in sports.
121: ESPNEWS
The definitive 24 hour sports news network.
122: Sports Byline USA
Interactive sports talk, news, interviews, and highlights.
123: Sirius Sports Action
Complete sports cov erage and play-by-play action.
124: Sports 1
Love it Live.
125: Sports 2
Love it Live.
126: Sports 3
Love it Live.
128: Radio Deportivo
Sports talk and LIVE event coverage.
Entertainment
130: Radio Disney
Music and information for kids and ‘tweens.
131: STN: Sirius Trucking Network
News and information for the commercial driv er.
132: WSM Entertainment
Home of the Grand Ole Opry.
133: RadioClassics
Classic shows from the Golden Age of Radio.
134: Court TV, Plus
Reality r adio from Court T V .
135: Sirius Entertainment
Your all-access pass into the lives of your favorite stars.
136: E! Entertainment Radio
Your daily dose of entertainment industry news.
137: A&E Satellite Radio
The best of A&E Television Networks programming.
138: Discovery Channel Radio
Real-world entertainment and information.
139: La Red Hispana
International news, business, and current events.
140: Radio Amigo
Political commentary and information.
141: Radio Mujer
Programming that touches the lives of Latinas in the US.
142: The Word Network
The undisputed source for urban ministries and Gospel music.
143: WISDOM Radio
Programming dedicat e d to life impro vement.
144: Sirius Right
Your home for conservative talk.
145: Sirius Left
Your SIRIUS Talk Alternative.
146: Sirius Talk
Information, entertainment, and the unknown.
147: Sirius Comedy
Stand-up and more.
149: OutQ
News, information, and entertainment for the Gay and Lesbian community.
© 2003 Antex Electronics, Inc.
 Loading...