


ANSMANN AG MOBILE ENERGIE
1001-0080
POWERLINE 4 ULTRA
LADEGERÄT / CHARGER
BEDIENUNGSANLEITUNG / MANUAL
Deutsch | English | Français | Español | Português
Svenska | Italiano | Nederlands
1
3
2
4
9
5
678
10 11
12
13
14
15
16
17
2
Deutsch | English | Français | Español | Português
Svenska | Italiano | Nederlands

ORIGINAL-BEDIENUNGSANLEITUNG
LADEGERÄT
POWERLINE 4 ULTRA
INHALTSVERZEICHNIS
Lieferumfang ............................................................................................... 3
Bestimmungsgemäßer Gebrauch .............................................................. 3
Sicherheitshinweise ................................................................................... 4
Produktbeschreibung ................................................................................. 5
Funktionsübersicht .................................................................................... 5
Bedienung ...................................................................................................5
Ladestrom ...................................................................................................7
Modi .............................................................................................................. 7
Anzeige ........................................................................................................ 8
Fehlerbehebung .......................................................................................... 8
Pflege und Wartung ....................................................................................8
Technische Daten .......................................................................................9
Entsorgung ................................................................................................10
Haftungsausschlüsse ..............................................................................10
Garantiehinweis ........................................................................................10
LIEFERUMFANG
1x Ladegerät
1x Netzteil
Packen Sie zunächst alle Teile aus und überprüfen Sie diese auf
Vollständigkeit und Beschädigungen. Nehmen Sie ein beschädigtes
Produkt nicht in Betrieb. Sollten Sie Beschädigungen am Produkt
feststellen, kontaktieren Sie Ihren Händler.
BESTIMMUNGSGEMÄSSER GEBRAUCH
Das Produkt dient zum Laden von Li-Ion/NiMH/NiCd Akkus. Es
erkennt selbstständig den Akkutyp und stellt sich automatisch ein.
Außerdem verfügt das Produkt über einen USB-Anschluss, der als
USB-Spannungsquelle dient. So lassen sich zusätzlich entsprechende
Geräte laden.
Das Produkt ist ausschließlich für den privaten Gebrauch im Haushalt
und nicht für den kommerziellen Gebrauch bestimmt.
Deutsch | English | Français | Español | Português
Svenska | Italiano | Nederlands
3

SICHERHEITSHINWEISE
Lesen Sie vor Inbetriebnahme des Produkts die komplette
Bedienungsanleitung sorgfältig durch. Sie enthält wichtige
Hinweise zum Umgang mit dem Produkt.
händigen Sie diese Bedienungsanleitung mit aus.
• Halten Sie Kinder vom Produkt und der Verpackung fern. Das
• Dieses Produkt ist nicht zur Verwendung durch Personen
• Lesen Sie vor der Verwendung des Ladegerätes alle Anweisungen
• Lesen Sie auch die Bedienungsanleitungen aller anderen Geräte,
• Setzen Sie Akkus immer gemäß der korrekten Polarität (+ und –),
• Laden Sie keine nicht aufladbaren Batterien auf.
•
• Verwenden Sie das Produkt ausschließlich mit dem im Lieferumfang
• Platzieren Sie das Produkt stets auf einer ebenen, stabilen und
• Verwenden Sie das Produkt nicht in der Nähe von brennbaren
• Decken Sie die Lüftungsöffnungen an der Unterseite und den
• Lassen Sie das Produkt während der Verwendung nicht
• Verwenden Sie das Produkt ausschließlich in trockenen
Wenn Sie das Produkt an dritte Personen weiterreichen,
Produkt ist kein Spielzeug. Kinder sollten beaufsichtigt werden, um
sicherzustellen, dass sie nicht mit dem Produkt spielen.
(Kinder mit eingeschlossen) bestimmt, welche eingeschränkte
körperliche, sensorische oder geistige Fähigkeiten aufweisen bzw.
fehlende Erfahrung und Kenntnis im Umgang mit diesem Produkt
haben. Solche Personen müssen von einer für ihre Sicherheit
verantwortlichen Aufsichtsperson zuerst instruiert oder während
der Produktbedienung beaufsichtigt werden!
und Sicherheitshinweise auf dem Ladegerät und am Akku.
die an das Produkt angeschlossen werden.
wie im Ladefach abgebildet, ein.
Das Produkt entspricht der Schutzklasse II. Es verfügt
über eine verstärkte Isolierung und bedarf deshalb
keiner Schutzerdung.
enthaltenen Netzteil.
hitzeresistenten Oberfläche.
Flüssigkeiten oder Gasen.
Seiten des Produkts nicht ab.
unbeaufsichtigt.
Innenräumen und schützen Sie es vor Feuchtigkeit.
4
Deutsch | English | Français | Español | Português
Svenska | Italiano | Nederlands

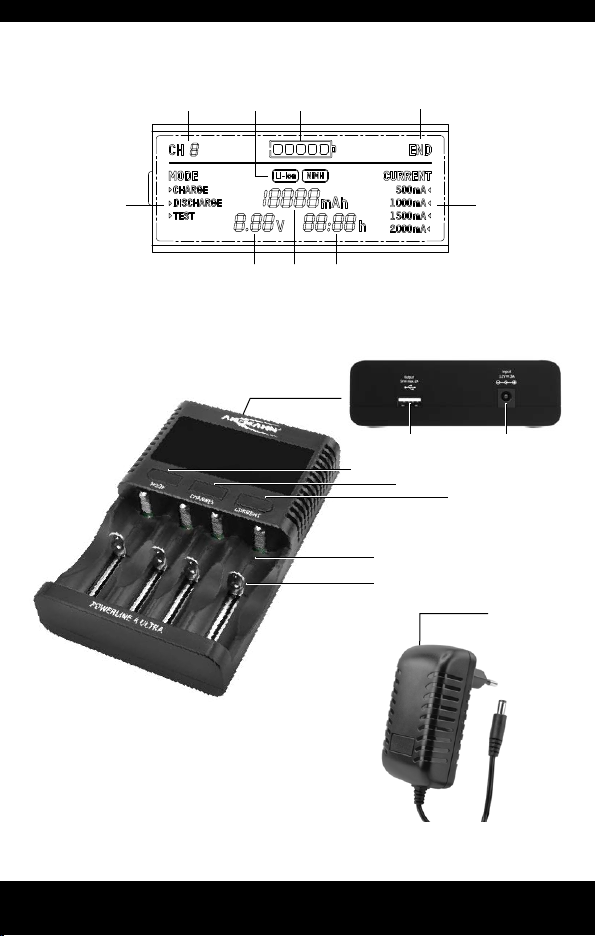
PRODUKTBESCHREIBUNG (SIEHE SEITE 2)
1 Angezeigtes Ladefach
2 Akkutyp
3 Ladestand
4 Anzeige END
5 Ladestrom
6 Zeit-Zähler
7 mAh-Zähler
8 Spannungsanzeige
9 Modus
10 USB-Anschluss
11 Netzteilanschluss
12 MODE-Taste
13 CHANNEL-Taste
14 CURRENT-Taste
15 Ladefach
16 Ladekontakt
17 Netzteil
FUNKTIONSÜBERSICHT
• Einzelschachtüberwachung
• Automatische Erkennung von Li-Ion und NiMH/NiCd Akkus
• Automatischer Ladebeginn nach polrichtigem Einlegen der Akkus
• Mikrocontrollerüberwachte Ladesteuerung
• Automatische Beendigung des Ladevorgangs bei vollständig
geladenem Akku
• Erkennung defekter Akkus
• Anzeige falsch eingelegter (verpolter) Akkus
• Detaillierte Statusanzeige
• Erhaltungsladung bei NiMH Akkus
• Entladefunktion und Kapazitätsmessung
• Einstellbarer Ladestrom
• 5 V USB-Anschluss, max. 2 A
BEDIENUNG
Einfaches Laden
1. Verbinden Sie das Kabel des Netzteils mit dem Netzteilanschluss
des Ladegeräts.
2. Verbinden Sie das Netzteil mit einer geeigneten Steckdose.
3. Schieben Sie den Ladekontakt zurück und legen Sie den Akku
polrichtig (Minus-Pol (-) am Ladekontakt) in das Ladefach ein.
4. Falls Sie keine weiteren Einstellungen vornehmen wollen, beginnt
das Produkt den Ladevorgang mit 500 mA Ladestrom nach
8 Sekunden.
5. Wenn der Akku voll geladen ist erscheint im Display die Anzeige
END.
6. Entnehmen Sie den Akku und trennen Sie das Produkt von der
Stromversorgung.
Deutsch | English | Français | Español | Português
Svenska | Italiano | Nederlands
5

Erweiterte Funktionen
Hinweis: Falls Sie für mehrere Akkus den gleichen Modus wählen
wollen, legen Sie zuerst die Akkus ein und schließen Sie danach
das Netzteil an. Nehmen Sie dann die Einstellungen vor. Diese
Einstellungen werden für alle belegten Ladefächer übernommen. Sie
können aber auch jedes Ladefach individuell belegen und einstellen.
• Nachdem Sie den Akku eingelegt haben, haben Sie 8 Sekunden
Zeit, um den Modus und den Ladestrom zu wählen.
• Der eingestellte Modus und Ladestrom wird jeweils durch einen
Pfeil am Displayrand markiert. Wenn die Pfeile blinken, können Sie
Einstellungen vornehmen.
• Der Modus wird gestartet, wenn 8 Sekunden lang keine Taste
gedrückt wird und die Pfeile am Displayrand stetig leuchten.
• Falls Sie nachträglich Änderungen vornehmen wollen:
− Wechseln Sie mit der Taste CHANNEL zum betreffenden
Ladefach.
− Halten Sie die Taste MODE 4 Sekunden lang gedrückt, bis die
Pfeile blinken.
Hinweis: Die bis dahin aufgezeichneten Werte (mAh-Zähler und
Zeit-Zähler) werden auf 0 zurückgesetzt.
Tastenfunktionen
Taste Funktion
MODE Modus ändern
CHANNEL
CURRENT Ladestrom ändern
USB-Anschluss
• Der USB-Anschluss dient als Spannungsquelle mit 5 V und max.
2000 mA.
• Der USB-Anschluss und die Ladefächer können gleichzeitig
verwendet werden.
Status für das nächste Ladefach anzeigen
Hinweis: Es können nur Ladefächer angezeigt werden,
die belegt sind.
6
Deutsch | English | Français | Español | Português
Svenska | Italiano | Nederlands

LADESTROM
Hinweis: Der maximale Ladestrom pro Ladefach hängt davon ab, wie
viele Ladefächer belegt sind.
Belegte Ladefächer Max. Ladestrom pro Ladefach
1-2 2000 mA
3 1500 mA
4 1000 mA
Hinweis: Wir empfehlen, die Akkus mit einem Ladestrom von
500/1000 mA zu laden, wenn genug Zeit vorhanden ist. So vermeiden
Sie eine übermäßige Erwärmung und schonen den Akku.
Achtung: Als Grundregel gilt: Der Wert des Ladestroms darf den Wert
der Akkukapazität nicht überschreiten.
Beispiel: Akkukapazität 1400 mAh - Ladestrom 1000 mA
MODI
CHARGE
Akku laden. Wenn der Akku voll geladen ist, erscheint im Display die
Anzeige END.
DISCHARGE
Akku entladen. Wenn der Akku entladen ist, erscheint im Display die
Anzeige END.
Hinweis: Der Entladestrom ist auf 500 mA beschränkt.
TEST
Akkukapazität messen und anschließend Akku laden (Laden Entladen - Laden). Nach dem zweiten Ladevorgang erscheint im
Display die Anzeige END. Die Messung ist abgeschlossen und der Akku
ist voll geladen.
Hinweis: Sie können für die Ladevorgänge den Ladestrom auswählen.
Messwert: Der Ladungsfluss wird nur während des Entladevorgangs
gemessen. Der mAh-Zähler gibt den Wert für die Kapazität des Akkus
an.
Deutsch | English | Français | Español | Português
Svenska | Italiano | Nederlands
7

ANZEIGE
• Der Zeit-Zähler zeigt die Zeit an,
wie lange der Modus bereits in
Betrieb ist.
• Der mAh-Zähler zeigt die bereits
geflossene Ladung an.
• Die Spannungsanzeige zeigt die
aktuelle Spannung des Akkus an.
Hinweis: Wenn 30 Sekunden lang
keine Taste gedrückt wird, schaltet
sich die Hintergrundbeleuchtung des
Displays aus.
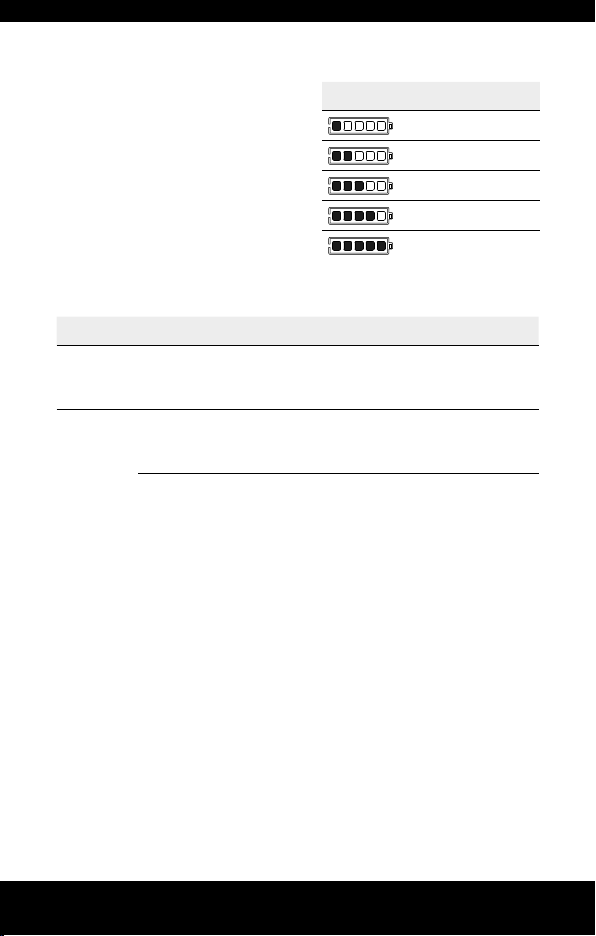
Anzeige Ladestand
ca. 0-20 %
ca. 20-40 %
ca. 40-60 %
ca. 60-80 %
ca. 80-100 %
FEHLERBEHEBUNG
Anzeige Mögliche Ursache Lösung
null
Err
Es wurde kein Akku
eingelegt/erkannt.
Der Akku ist defekt.
Li-Ion <2 V,
NiMH/NiCd <0,2 V
Der Akku wurde falsch
eingelegt (verpolt).
Legen Sie den Akku erneut
ein.
Geben Sie den Akku in einer
Sammelstelle ab.
Legen Sie den Akku
andersherum ein.
PFLEGE UND WARTUNG
Reinigung
• Unterbrechen Sie vor jeder Reinigung die Spannungsversorgung
zum Produkt und entnehmen Sie alle Akkus.
• Zur Reinigung verwenden Sie lediglich ein weiches, trockenes oder
leicht feuchtes Tuch (gegebenenfalls unter Zugabe von etwas
mildem Geschirrspülmittel). Verwenden Sie zur Reinigung auf
keinen Fall Scheuer- oder Lösungsmittel.
8
Deutsch | English | Français | Español | Português
Svenska | Italiano | Nederlands

TECHNISCHE DATEN
Ladegerät
Stromversorgung .............................................. 12 V
Schutzklasse ......................................................II
USB-Ausgang .....................................................5 V, max. 2000 mA
Ladefächer .........................................................4
Ladestrom ..........................................................500/1000/1500/2000 mA
Entladestrom ......................................................500 mA
Erhaltungsladestrom .........................................25 mA
Netzteil
Stromversorgung ...............................................100-240 V~, 50-60 Hz
Ausgang ..............................................................12 V
Schutzklasse ......................................................II
Geeignete Akkutypen
Max. Anzahl Typ (Li-Ion)
2 32650 (limitiert durch Größe)
26650, 26500, 25500, 22650, 22500, 21700, 20700
3
(limitiert durch Größe)
18700, 18650, 18500, 18490, 18350, 17670, 17650,
17500, 17350, 16650, 16500, 16340 (RCR123A), 14650,
4
14500, 14430, 14350, 13650, 13500, 13450, 12650,
12500, 12340, 10500, 10440, 10350, 10340
Max. Anzahl Typ (NiMH/NiCd) Max. Kapazität
2 Mono D
4 Mignon AA/ Micro AAA
, max. 3000 mA
, max. 3000 mA
12000 mAh3 Baby C
Deutsch | English | Français | Español | Português
Svenska | Italiano | Nederlands
9

ENTSORGUNG
Entsorgen Sie das Produkt gemäß den gesetzlichen
Bestimmungen. Die Kennzeichnung „Mülltonne“ weist
darauf hin, dass Elektrogeräte in der EU nicht mit dem
normalen Haushaltsmüll entsorgt werden dürfen. Benutzen
Sie die Rückgabe- und Sammelsysteme in Ihrer Gemeinde
oder wenden Sie sich an den Händler, bei dem das Produkt
gekauft wurde.
Batterien und Akkus sind Wertstoffe und dürfen nicht im
Hausmüll entsorgt werden. Geben Sie verbrauchte Batterien
und Akkus stets an den dafür vorgesehenen Sammelstellen
ab.
Damit erfüllen Sie Ihre gesetzlichen Pflichten und leisten Ihren Beitrag
zum Umweltschutz.
HAFTUNGSAUSSCHLÜSSE
Die in dieser Bedienungsanleitung enthaltenen Informationen können
ohne Vorankündigung geändert werden. ANSMANN übernimmt keine
Haftung für direkte, indirekte, zufällige oder sonstige Schäden
oder Folgeschäden, die durch unsachgemäße Handhabung oder
durch Missachtung der in dieser Bedienungsanleitung enthaltenen
Informationen entstehen. Bei falscher Verwendung des Produktes
übernehmen wir keine Haftung und gewähren keine Gewährleistungsoder Garantieansprüche.
GARANTIEHINWEIS
Auf das Gerät bieten wir eine dreijährige Garantie. Bei Schäden
am Gerät, die infolge Nichtbeachtung der Bedienungsanleitung
entstehen, kann keine Garantie gewährt werden.
Ihr gesetzlicher Gewährleistungsanspruch wird hierdurch nicht
beeinträchtigt.
10
Das Produkt entspricht den Anforderungen der
EU-Richtlinien.
Deutsch | English | Français | Español | Português
Svenska | Italiano | Nederlands

ORIGINAL INSTRUCTION MANUAL
CHARGER
POWERLINE 4 ULTRA
CONTENTS
Scope of delivery.......................................................................................11
Intended use .............................................................................................11
Safety information ....................................................................................12
Product description ..................................................................................13
Functions overview...................................................................................13
Operation ...................................................................................................13
Charging current .......................................................................................15
Modes.........................................................................................................15
Display .......................................................................................................16
Troubleshooting ........................................................................................16
Maintenance and care ..............................................................................16
Technical Data ...........................................................................................17
Disposal .....................................................................................................18
Disclaimer ..................................................................................................18
Warranty information ................................................................................18
SCOPE OF DELIVERY
1x Charger
1x PSU
First unpack all parts and check them for completeness and damages.
Do not operate the product if it is damaged. Contact your retailer
should you find any damage to the product.
INTENDED USE
The product is used for charging Li-ion/NiMH/NiCd rechargeable
batteries. It automatically recognizes the battery type and sets itself
accordingly. The product also features a USB connection that serves
as a USB voltage source. This allows additional appropriate devices to
be charged.
The product is designed exclusively for household use; it is not
suitable for commercial purposes.
Deutsch | English | Français | Español | Português
Svenska | Italiano | Nederlands
11
SAFETY INFORMATION
Carefully read the entire instruction manual before first
operating the product. It contains important information on
handling the product.
If you give the product to third parties, you must include
this instruction manual.
• Keep children away from the product and the packaging. The
product is not a toy. Children must always be supervised to ensure
that they do not play with the product.
• The product is not intended for use by person (including children)
with reduced physical, sensory or mental capabilities or a lack of
knowledge and experience in handling the product. Such persons
must first receive instructions from a person responsible for their
safety or be supervised while using the product!
• Before using the charger, read all the instructions and safety
instructions on the charger and the rechargeable battery.
• Also read the operating instructions of any other devices which are
connected to the product.
• Always insert the batteries heeding correct polarity (+ and –) as
indicated in the battery compartment.
• Do not charge non-rechargeable batteries.
•
• Use the product with the included power supply unit only.
• Always place the product on a flat, stable and heat-resistant
surface.
• Do not use the product near flammable liquids or gases.
• Do not cover the ventilation openings on the bottom and sides of
the product.
• Do not leave the product unattended during use.
• Use the product in dry indoor spaces only and shield it
The product complies with Protection class II. It features
reinforced insulation and thus requires no protective
grounding.
from moisture.
12
Deutsch | English | Français | Español | Português
Svenska | Italiano | Nederlands

PRODUCT DESCRIPTION (SEE PAGE 2)
1 Charging compartment
indicator
2 Rechargeable battery type
3 Charge level
4 END indicator
5 Charging current
6 Timer
7 mAh indicator
8 Voltage indicator
9 Mode
10 USB input
11 Power supply connection
12 MODE button
13 CHANNEL button
14 CURRENT button
15 Charging compartment
16 Charging contact
17 Power supply unit
FUNCTIONS OVERVIEW
• Single-slot monitoring
• Automatic recognition of Li-Ion and NiMH/NiCd rechargeable
batteries
• Automatic charging start when batteries are inserted with correct
polarity
• Micro controller-monitored charge control
• Automatic charging stop for fully charged rechargeable batteries
• Recognition of defective rechargeable batteries
• Display of incorrectly inserted (reverse polarity) rechargeable
batteries
• Detailed status display
• Trickle charge for NiMH rechargeable batteries
• Discharge function and capacity measurement
• Adjustable charging current
• 5 V USB connection, max. 2 A
OPERATION
Simple charging
1. Connect the power supply cable with the power supply connection
on the charger.
2. Connect the power supply to a suitable wall outlet.
3. Slide back the charging contact and insert the rechargeable
battery heeding correct polarity (negative terminal (-) on charging
contact) into the charging compartment.
4. If you do not wish to make any further settings, the product will
begin charging with 500 mA charging current after 8 seconds.
5. Once the rechargeable battery is fully charged, the display will
show the END indicator.
6. Remove the rechargeable battery and disconnect the product from
the power supply.
Deutsch | English | Français | Español | Português
Svenska | Italiano | Nederlands
13
Advanced functions
Note: If you wish to select the same mode for several rechargeable
batteries, first insert the rechargeable batteries and then hook up
the power supply. Then make the desired settings. These settings will
be used for all occupied charging compartments. But you can also
occupy and set each charging compartment individually.
• After inserting the rechargeable battery, you have 8 seconds to
select the desired mode and charging current.
• The set mode and charging current are marked at the edge of the
display by an arrow each. When the arrows flash, you can make
settings.
• The set mode will begin when no button is pressed for 8 seconds
and the arrows at the edge of the display are permanently lit.
• If you wish to make any subsequent changes:
− Use the CHANNEL button to toggle to the charging
compartment in question.
− Press and hold the MODE button for 4 seconds until the arrows
begin flashing.
Note: The values recorded up until this point (mAh indicator
and timer) are reset to 0.
Button functions
Button Function
MODE Change mode
CHANNEL
CURRENT Change charging current
USB connection
• The USB connection serves as a voltage source with 5 V and max.
2000 mA.
• The USB connection and charging compartments can be used at
the same time.
Show status for next charging compartment
Note: Only occupied charging compartments can be
shown.
14
Deutsch | English | Français | Español | Português
Svenska | Italiano | Nederlands

CHARGING CURRENT
Note: The maximum charging current per charging compartment
depends on the number of occupied compartments.
Occupied charging
compartments
1-2 2000 mA
3 1500 mA
4 1000 mA
Note: We recommend charging rechargeable batteries with a charging
current of 500/1000 mA if there is enough time. This will prevent
excessive heating and protect the battery.
Caution: As a general rule: The charging current value may not exceed
the battery capacity value.
Example: Battery capacity 1400 mAh - Charging current 1000 mA
Max. charging current per compartment
MODES
CHARGE
Charge rechargeable battery. Once the rechargeable battery is fully
charged, the display will show the END indicator.
DISCHARGE
Discharge rechargeable battery. Once the rechargeable battery is
discharged, the display will show the END indicator.
Note: The discharging current is limited to 500 mA.
TEST
Measure rechargeable battery capacity and then charge (charge
- discharge - charge). Once the rechargeable battery is charged
the second time, the display will show the END indicator. The
measurement is complete and the battery fully charged.
Note: You can select the charging current for the charging process.
Measured value: The charge flow is measured during discharging only.
The mAh indicator shows the rechargeable battery’s capacity value.
Deutsch | English | Français | Español | Português
Svenska | Italiano | Nederlands
15

DISPLAY
• The timer shows the duration of
time that the mode is currently
in operation.
• The mAh indicator shows the
charge flow until now.
• The voltage indicator shows the
rechargeable battery’s current
voltage.
Note: If no button is pressed for
30 seconds, the display backlight
turns off automatically.
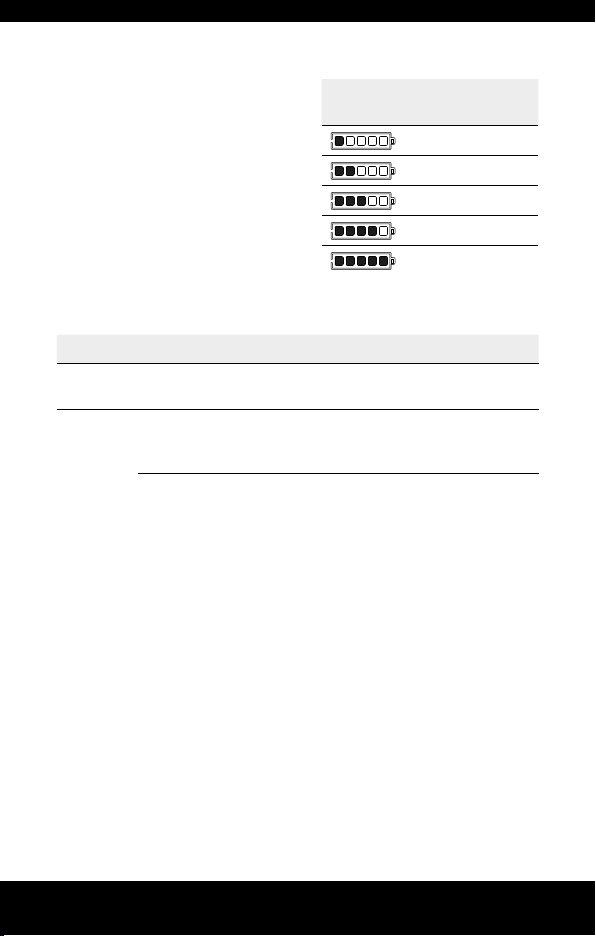
Indicator Charge level
approx. 0-20 %
approx. 20-40 %
approx. 40-60 %
approx. 60-80 %
approx. 80-100 %
TROUBLESHOOTING
Indicator Possible cause Solution
Zero
Err
No rechargeable
battery is inserted/
recognized.
The rechargeable
battery is defective.
Li-Ion <2 V,
NiMH/NiCd <0.2 V
The rechargeable
battery is inserted
incorrectly (reverse
polarity).
Reinsert the rechargeable
battery.
Return the rechargeable
battery to a collection point.
Reinsert the rechargeable
battery with correct polarity.
MAINTENANCE AND CARE
Cleaning
• Before cleaning the product, disconnect the product from the
power supply and remove all rechargeable batteries.
• Use only a soft, dry or slightly damp cloth (where necessary with a
little mild dishwashing detergent) to clean the product. Never use
any abrasive cleaners or solvents to clean the product.
16
Deutsch | English | Français | Español | Português
Svenska | Italiano | Nederlands

TECHNICAL DATA
Charger
Power supply ..................................................... 12 V
Protection class .................................................II
USB output ..........................................................5 V, max. 2000 mA
Charging compartments ....................................4
Charging current ................................................500/1000/1500/2000 mA
Discharging current ...........................................500 mA
Trickle current ....................................................25 mA
Power supply unit
Power supply ......................................................100-240 V~, 50-60 Hz
Output .................................................................12 V
Protection class .................................................II
Suitable rechargeable battery types
Max.
number
Max.
number
Type (Li-Ion)
2 32650 (limited by size)
26650, 26500, 25500, 22650, 22500, 21700, 20700
3
(limited by size)
18700, 18650, 18500, 18490, 18350, 17670, 17650,
17500, 17350, 16650, 16500, 16340 (RCR123A), 14650,
4
14500, 14430, 14350, 13650, 13500, 13450, 12650,
12500, 12340, 10500, 10440, 10350, 10340
Type (NiMH/NiCd) Max. capacity
2 Mono D
4 Mignon AA/ Micro AAA
, max. 3000 mA
, max. 3000 mA
12000 mAh3 Baby C
Deutsch | English | Français | Español | Português
Svenska | Italiano | Nederlands
17

DISPOSAL
Dispose the product in accordance with local regulations.
The dustbin symbol indicates that waste electrical and
electronic equipment may not be disposed of with normal
household waste within the EU. Please use local recycling
and collection points or contact the retailer where you
purchased the product.
Batteries and rechargeable batteries are recyclable and
may not be disposed of with household waste. Always
return used batteries and rechargeable batteries to
intended collection points.
You thus fulfill your statutory obligations and contribute to protection
of the environment.
DISCLAIMER
The information contained in this instruction manual is subject to
change without prior notice. ANSMANN assumes no liability for direct,
indirect, accidental or other types of damage or consequential
damage that result from improper handling of the product or failure to
comply with the information contained in this instruction manual. We
assume no liability and grant no warranty claims in cases of improper
use of the product.
WARRANTY INFORMATION
We offer a three-year warranty on the device. Damages to the device
due to failure to observe the instruction manual will void the warranty.
This does not affect your legal warranty right.
18
The product meets the conditions of the
European Union.
Deutsch | English | Français | Español | Português
Svenska | Italiano | Nederlands

MODE D'EMPLOI ORIGINAL
CHARGEUR
POWERLINE 4 ULTRA
TABLE DES MATIÈRES
Contenu de l’emballage ............................................................................19
Utilisation prévue ......................................................................................19
Consignes de sécurité .............................................................................. 20
Description du produit ..............................................................................21
Aperçu des fonctions ...............................................................................21
Utilisation ..................................................................................................21
Courant de charge ....................................................................................23
Modes.........................................................................................................23
Affichage ................................................................................................... 24
Dépannage ................................................................................................24
Nettoyage et entretien ............................................................................. 24
Données techniques ................................................................................25
Mise au rebut/recyclage .......................................................................... 26
Clauses de non-responsabilité ...............................................................26
Information concernant la garantie ........................................................26
CONTENU DE L’EMBALLAGE
1 chargeur
1 bloc d'alimentation
Déballez d'abord toutes les pièces et vérifiez l'exhaustivité et le parfait
état. N'utilisez pas un produit endommagé ! Si vous deviez constater
des dégâts sur le produit, prenez contact avec votre commerçant.
UTILISATION PRÉVUE
Le produit est destiné à recharger des accus Li-Ion/NiMH/
NiCd. Il détecte automatiquement le type d'accu et se règle
automatiquement. Le produit dispose également d'un port USB servant
de source d'alimentation USB. De cette façon, d'autres appareils
compatibles peuvent être rechargés.
Le produit est exclusivement réservé à une utilisation domestique et
ne convient pas pour un usage commercial.
Deutsch | English | Français | Español | Português
Svenska | Italiano | Nederlands
19

CONSIGNES DE SÉCURITÉ
Avant d'utiliser le produit, lisez attentivement et
complètement le mode d'emploi. Il contient des instructions
importantes sur l'utilisation du produit.
Si vous donnez le produit à un tiers, transmettez-le
absolument avec ce mode d'emploi.
• Tenez les matériaux d'emballage et le produit hors de la portée des
enfants ! Ce produit n’est pas un jouet. Les enfants doivent être
surveillés afin de s’assurer qu’ils ne jouent pas avec le produit.
• Ce produit n'est pas destiné à être utilisé par des personnes
(enfants compris) qui ont des capacités physiques, sensorielles
ou mentales limitées ou qui manquent d'expérience et de
connaissance dans l'utilisation de ce produit. De telles personnes
doivent recevoir des instructions d'abord par une personne les
surveillant et responsable de leur sécurité ou surveillées durant
l'utilisation du produit !
• Avant tout utilisation, lisez toutes les instructions et les consignes
de sécurité concernant le chargeur et l'accu.
• Lisez également les modes d’emploi des autres appareils qui
seront raccordés au produit.
• Installez toujours les accus en respectant bien la polarité (+ et –),
comme indiquée dans le compartiment de recharge.
• Ne rechargez jamais de piles non rechargeables.
•
• Utilisez exclusivement le produit avec le bloc d'alimentation fourni
dans le contenu de l'emballage.
• Placez le produit sur une surface plane, stable et résistante à la
chaleur.
• N'utilisez jamais le produit à proximité de liquides ou gaz
inflammables.
• Ne couvrez jamais les ouvertures de ventilation au-dessous et sur
les côtés du produit.
• Il est interdit de laisser le produit sans surveillance lors de son
fonctionnement.
• Utilisez exclusivement le produit à l'intérieur de locaux
Le produit correspond à la classe de protection II. Il
dispose d'une isolation renforcée et ne requiert par
conséquent aucune mise à la masse.
secs et protégez-le de toute humidité.
20
Deutsch | English | Français | Español | Português
Svenska | Italiano | Nederlands

DESCRIPTION DU PRODUIT (VOIR PAGE 2)
1 Affichage du compartiment de
recharge
2 Type d’accu
3 Niveau de charge
4 Affichage END
5 Courant de charge
6 Minuterie
7 Compteur mAh
8 Affichage de la tension
9 Mode
10 Port USB
11 Raccordement du bloc
d’alimentation
12 Touche MODE
13 Touche CHANNEL
14 Touche CURRENT
15 Compartiment de recharge
16 Contact de charge
17 Bloc d'alimentation
APERÇU DES FONCTIONS
• Surveillance de chaque logement
• Détection automatique d'accus Li-Ion et NiMH/NiCd
• Démarrage automatique de la recharge après insertion sur la
polarité correcte des accus
• Commande de la recharge surveillée par microcontrôleur
• Arrêt automatique de la recharge lors d'un accu complètement
rechargé
• Détection d'accus défectueux
• Affichage de mauvaise insertion des accus (polarité inversée)
• Affichage détaillé du processus
• Charge de maintien des accus NiMH
• Fonction de décharge et mesure de capacité
• Courant de charge réglable
• Port USB 5 V, 2 A maxi
UTILISATION
Recharge simple
1. Branchez le câble sur la prise du bloc d'alimentation du chargeur.
2. Raccordez le bloc d’alimentation à une prise réseau compatible.
3. Faites glisser le contact de charge vers l'arrière et insérez l'accu
dans le compartiment de recharge en respectant la polarité (pôle
négatif (-) du contact de charge).
4. Si vous ne souhaitez effectuer aucun réglage supplémentaire, le
produit commence, après 8 secondes, son processus de recharge
avec un courant de charge de 500 mA.
5. Lorsque l'accu est complètement rechargé, l'information END
apparaît à l'écran.
6. Enlevez l'accu et débranchez le produit de l‘alimentation
électrique.
Deutsch | English | Français | Español | Português
Svenska | Italiano | Nederlands
21

Autres fonctions
Remarque : Si vous souhaitez sélectionner le même mode pour
plusieurs accus, insérez-les d’abord, puis branchez le bloc
d'alimentation. Ensuite, effectuez les réglages. Ces réglages sont
appliqués à tous les compartiments de recharge occupés. Vous
pouvez également affecter et régler chaque compartiment de
recharge individuellement.
• Après avoir inséré l'accu, vous disposez de 8 secondes pour
sélectionner le mode et le courant de charge.
• Le mode de réglage déterminé et le courant de charge sont
indiqués à chaque fois par une flèche sur le bord de l'écran.
Lorsque les flèches clignotent, vous pouvez entreprendre les
réglages.
• Le mode démarre, si aucune touche n'est enfoncée pendant
8 secondes et si les flèches situées au bord de l'écran sont
allumées en permanence.
• Si vous souhaitez apporter des modifications après :
− passez au compartiment de recharge correspondant grâce à
touche CHANNEL,
− maintenez enfoncée la touche MODE pendant 4 secondes
jusqu'à ce que les flèches clignotent.
Remarque : les valeurs précédemment enregistrées
(compteur mAh et minuterie) sont remises à 0.
Fonctions des touches
Bouton Fonction
MODE Modifier le mode
CHANNEL
CURRENT Modifier le courant de charge
Port USB
• Le port USB dispose d'une source de tension de 5 V et 2000 mA
maxi.
• Le port USB et les compartiments de recharge peuvent être utilisés
simultanément.
Afficher le paramètre pour le prochain compartiment de
recharge
Remarque : seulement les compartiments de recharge
occupés peuvent être affichés.
22
Deutsch | English | Français | Español | Português
Svenska | Italiano | Nederlands

COURANT DE CHARGE
Remarque : le courant de charge maximal par compartiment de
recharge dépend du nombre de places occupées.
Compartiments de
recharge occupés
1-2 2000 mA
3 1500 mA
4 1000 mA
Remarque : si vous disposez de suffisamment de temps, nous vous
recommandons de recharger les accus avec un courant de charge de
500/1000 mA. Ainsi vous évitez un échauffement excessif et protégez
l'accu.
Attention : en règle générale, la valeur du courant de charge ne doit
pas dépasser la valeur de la capacité de l'accu.
Exemple : capacité de l'accu 1400 mAh - courant de charge 1000 mA
Courant de charge maxi par compartiment
de recharge
MODES
CHARGE
Recharger l'accu. Lorsque l'accu est complètement rechargé,
l'information END apparaît à l'écran.
DISCHARGE
Décharger l’accu. Lorsque l'accu est complètement déchargé,
l'information END apparaît à l'écran.
Remarque : le courant de décharge est limité à 500 mA.
TEST
Mesurer la capacité de l'accu, puis le recharger (recharge - décharge
- recharge). Après le second processus de recharge, l’écran affiche
END . La mesure de la valeur est terminée et l'accu est complètement
rechargé.
Remarque : vous pouvez sélectionner le courant de charge pour le
processus de recharge.
Valeur mesurée : le flux de charge est mesuré uniquement durant le
processus de décharge. Le compteur mAh donne la valeur pour la
capacité de l'accu.
Deutsch | English | Français | Español | Português
Svenska | Italiano | Nederlands
23

AFFICHAGE
• La minuterie indique depuis
combien de temps le mode est
activé.
• Le compteur mAh indique la charge
déjà reconstituée.
• L'affichage de la tension montre la
tension actuelle de l'accu.
Remarque : le rétroéclairage de l'écran
s'éteint, si aucune touche n'est
pressée durant 30 secondes.
DÉPANNAGE
Affichage
Niveau de
charge
env. 0-20 %
env. 20-40 %
env. 40-60 %
env. 60-80 %
env. 80-100 %
Affichage
null
Cause possible Solution
Aucun accu n'est
inséré/détecté.
L'accu est défectueux.
Li-Ion < 2 V,
NiMH/NiCd < 0,2 V
Err
L'accu a été mal inséré
(polarité inversée).
Replacez l'accu.
Déposez l'accu à un point de
collecte pour son recyclage.
Insérez l'accu dans le sens
inverse.
NETTOYAGE ET ENTRETIEN
Nettoyage
• Avant chaque nettoyage du produit, coupez l'alimentation en
électricité et enlevez les accus.
• Pour le nettoyage, utilisez uniquement un chiffon doux, sec ou
légèrement humide (avec éventuellement un produit à vaisselle
doux). Lors du nettoyage, n’utilisez en aucun cas de produits
récurants ou des solvants.
24
Deutsch | English | Français | Español | Português
Svenska | Italiano | Nederlands
DONNÉES TECHNIQUES
Chargeur
Alimentation en électricité .............................. 12 V
Classe de protection .........................................II
Sortie USB ..........................................................5 V, 2000 mA maxi
Compartiment de recharge ...............................4
Courant de charge ............................................500/1000/1500/2000 mA
Courant de décharge ........................................500 mA
Courant pour charge de maintien .....................25 mA
Bloc d'alimentation
Alimentation en électricité ...............................100-240 V~, 50-60 Hz
Sortie ...................................................................12 V
Classe de protection .........................................II
Types d’accu compatibles
Nombre maxi Type (Li-Ion)
2 32650 (limité par la taille)
3
4
Nombre maxi Type (NiMH/NiCd) Capacité maxi
2 Mono D
4 Mignon AA/Micro AAA
26650, 26500, 25500, 22650, 22500, 21700, 20700
(limité par la taille)
18700, 18650, 18500, 18490, 18350, 17670, 17650,
17500, 17350, 16650, 16500, 16340 (RCR123A),
14650, 14500, 14430, 14350, 13650, 13500, 13450,
12650, 12500, 12340, 10500, 10440, 10350, 10340
, 3000 mA maxi
, 3000 mA maxi
12000 mAh3 Baby C
Deutsch | English | Français | Español | Português
Svenska | Italiano | Nederlands
25

MISE AU REBUT/RECYCLAGE
Mettez au rebut le produit en respectant toutes les
dispositions légales en vigueur concernant le recyclage. Le
sigle d’identification « poubelle » indique que les appareils
électriques ne doivent pas être jetés dans les ordures
ménagères dans l'UE. Veuillez utiliser les systèmes de
retour et de collecte de votre municipalité ou contacter le
détaillant où le produit a été acheté.
Les piles et les accus sont composés de matériaux
recyclables et ne doivent pas être jetés dans les ordures
ménagères. Déposez toujours les piles et les accus usagés
aux points de collecte prévus pour le recyclage.
Vous respectez ainsi les ordonnances légales et contribuez à la
protection de l’environnement.
CLAUSES DE NON-RESPONSABILITÉ
Les informations contenues dans ce mode d'emploi peuvent être
modifiées sans préavis. ANSMANN décline toute responsabilité pour
les dommages directs, indirects, accidentels ou autres, ou les dégâts
consécutifs résultant d'une mauvaise manipulation ou du non-respect
des instructions contenues dans ce mode d'emploi. Si le produit est
utilisé de manière incorrecte, nous déclinons toute responsabilité et
n'accordons aucun recours ou aucune garantie.
INFORMATION CONCERNANT LA GARANTIE
Nous offrons une garantie de trois ans sur l'appareil. Si des dommages
sur l'appareil résultent du non-respect du mode d'emploi, alors
aucune garantie ne peut être accordée.
Votre demande de garantie légale n'est pas affectée ici.
26
Le produit est conforme aux exigences des
directives européennes.
Deutsch | English | Français | Español | Português
Svenska | Italiano | Nederlands

MANUAL DE INSTRUCCIONES ORIGINAL
CARGADOR
POWERLINE 4 ULTRA
ÍNDICE DE CONTENIDO
Volumen de suministro .............................................................................27
Uso conforme a lo previsto ......................................................................27
Indicaciones de seguridad ....................................................................... 28
Descripción del producto ......................................................................... 29
Resumen de las funciones ....................................................................... 29
Funcionamiento ........................................................................................ 29
Corriente de carga ....................................................................................31
Modos ........................................................................................................31
Indicadores ................................................................................................ 32
Subsanación de fallos .............................................................................. 32
Cuidado y mantenimiento ........................................................................32
Datos técnicos .......................................................................................... 33
Eliminación ................................................................................................ 34
Limitación de responsabilidad.................................................................34
Información sobre la garantía .................................................................. 34
VOLUMEN DE SUMINISTRO
1x Cargador
1x Adaptador de red
Desembale primero todas las piezas y compruebe que estén
completas y no presenten daños. No ponga en marcha un producto
dañado. Si detecta daños en el producto, póngase en contacto con su
distribuidor.
USO CONFORME A LO PREVISTO
El producto sirve para cargar pilas de ion-litio/NiMH/NiCd. Reconoce
por sí mismo el tipo de pila y se ajusta automáticamente. Asimismo,
el producto dispone de una conexión USB, que sirve como fuente de
tensión USB. De este modo, los aparatos se pueden cargar de forma
adicional.
El producto solo es apropiado para el uso privado y no para el uso
comercial.
Deutsch | English | Français | Español | Português
Svenska | Italiano | Nederlands
27

INDICACIONES DE SEGURIDAD
Lea atentamente el manual de instrucciones antes de
utilizar el producto. Este contiene información importante
sobre el manejo del producto.
Si transmite el producto a terceras personas, entregue
también este manual de instrucciones.
• Mantenga el producto y el embalaje alejados de los niños. El
producto no es un juguete. Es necesario vigilar a los niños para
evitar que jueguen con el producto.
• Este producto no debe ser utilizado por personas (niños incluidos)
que presenten discapacidades físicas, sensoriales o mentales
limitadas o no tengan suficiente experiencia y conocimiento en el
manejo de este producto. ¡Estas personas deberán recibir primero
una formación de un supervisor responsable de su seguridad o
estar bajo su vigilancia durante el manejo del producto!
• Antes del uso del cargador, lea todas las instrucciones e
indicaciones de seguridad del cargador y la pila.
• Lea también los manuales de instrucciones de los demás aparatos
a los que se conecta el producto.
• Coloque siempre las pilas de acuerdo con la polaridad correcta
(+ y –), como se indica en el compartimento de carga.
• No cargue ninguna pila que no sea recargable.
•
• Utilice el producto únicamente con el adaptador de red
suministrado.
• Coloque el producto siempre sobre una superficie lisa, estable y
resistente al calor.
• Nunca utilice el producto cerca de gases o líquidos inflamables.
• Nunca cubra los orificios de ventilación de la parte inferior y de los
lados del producto.
• No deje el aparato sin vigilancia durante su funcionamiento.
• Utilice el producto únicamente en interiores secos y
El producto cumple con la clase de protección II. Dispone
de un aislamiento reforzado y, por ello, no requiere
ninguna protección por puesta a tierra.
protéjalo contra la humedad.
28
Deutsch | English | Français | Español | Português
Svenska | Italiano | Nederlands

DESCRIPCIÓN DEL PRODUCTO (VÉASE LA PÁGINA 2)
1 Compartimento de carga
indicado
2 Tipo de pila
3 Estado de carga
4 Indicador END
5 Corriente de carga
6 Contador de tiempo
7 Contador mAh
8 Indicador de voltaje
9 Modo
10 Conexión USB
11 Conexión del adaptador de red
12 Botón MODE
13 Botón CHANNEL
14 Botón CURRENT
15 Compartimento de carga
16 Contacto de carga
17 Adaptador de red
RESUMEN DE LAS FUNCIONES
• Control de cajas individuales
• Detección automática de pilas ion-litio y NiMH/NiCd
• Inicio de carga automático después de insertar la pila según la
polaridad correcta
• Cargador con control por microprocesador
• Finalización automática del proceso de carga con la pila
completamente cargada
• Detección de pila defectuosa
• Indicador de pila mal insertada (inversión de polaridad)
• Indicador de estado detallado
• Carga de mantenimiento en pilas NiMH
• Función de descarga y medición de capacidad
• Corriente de carga ajustable
• Conexión USB 5 V, máx. 2 A
FUNCIONAMIENTO
Carga sencilla
1. Conecte el cable del adaptador de red a la conexión del cargador.
2. Conecte el adaptador de red a una toma de corriente apropiada.
3. Deslice hacia atrás el contacto de carga e inserte la pila conforme
a la polaridad correcta (polo negativo (-) en el contacto de carga)
en el compartimento de carga.
4. Si no desea realizar ningún otro ajuste, el producto iniciará el
proceso de carga con una corriente de carga de 500 mA después
de 8 segundos.
5. Cuando la pila esté completamente cargada, aparecerá en la
pantalla el indicador END.
6. Retire la pila y desconecte el producto del suministro de corriente.
Deutsch | English | Français | Español | Português
Svenska | Italiano | Nederlands
29

Funciones avanzadas
Nota: Si desea seleccionar el mismo modo para varías pilas,
inserte primero las pilas y conecte el adaptador de red. Realice, a
continuación, los ajustes. Estos ajustes son aceptados para todos
los compartimentos de carga ocupados. Si lo desea, puede ajustar y
ocupar cualquier compartimento de carga de forma individual.
• Una vez haya insertado la pila, tiene 8 segundos para seleccionar
el modo y la corriente de carga.
• El modo y la corriente de carga ajustados aparecerán marcados
mediante una flecha en el borde la pantalla. Podrá realizar los
ajustes cuando las flechas comiencen a parpadear.
• El modo se iniciará si no se pulsa ningún botón durante 8 segundos
y las flechas estén continuamente iluminadas en el borde de la
pantalla.
• Si desea realizar modificaciones a posteriori:
− Cambie con el botón CHANNEL al compartimento de carga
pertinente.
− Mantenga apretado el botón MODE durante 4 segundos hasta
que las flechas parpadeen.
Nota: Los valores (contador mAh y contador de tiempo)
registrados hasta entonces se restablecerán a 0.
Funciones de los botones
Botón Función
MODE Cambia el modo
CHANNEL
CURRENT Cambia la corriente de carga
Conexión USB
• La conexión USB sirve como fuente de tensión con 5 V y máx.
2000 mA.
• La conexión USB y los compartimentos de carga se pueden utilizar
al mismo tiempo.
Indica el estado del siguiente compartimento de carga
Nota: Solo se muestran los compartimentos de carga que
estén ocupados.
30
Deutsch | English | Français | Español | Português
Svenska | Italiano | Nederlands

CORRIENTE DE CARGA
Nota: La corriente de carga máxima por compartimento de carga
depende del número de compartimentos de cargas ocupados.
Compartimentos de
carga ocupados
1-2 2000 mA
3 1500 mA
4 1000 mA
Nota: Recomendamos cargar pilas con una corriente de carga de
500/1000 mA si se dispone del tiempo suficiente. De este modo, evita
un calentamiento excesivo y protege la pila.
Atención: Por norma general, se aplica: El valor de la corriente de
carga no debe sobrepasar el valor de la capacidad de la pila.
Ejemplo: Capacidad de la pila 1400 mAh - corriente de carga 1000 mA
Corriente de carga máx. por compartimento
MODOS
CHARGE
Carga la pila. Cuando la pila esté completamente cargada, aparecerá
en la pantalla el indicador END.
DISCHARGE
Descarga la pila. Cuando la pila esté completamente descargada,
aparecerá en la pantalla el indicador END.
Nota: La corriente de descarga está limitada a 500 mA.
TEST
Mide la capacidad de la pila y, a continuación, la carga (Carga Descarga - Carga). Después del segundo proceso de carga, aparecerá
en la pantalla el indicador END. La medición ha concluido y la pila está
completamente cargada.
Nota: Puede seleccionar la corriente de carga para los procesos de
carga.
Valor de medición: El flujo de carga se mide solo durante el proceso
de descarga. El contador mAh especifica el valor de la capacidad de
la pila.
Deutsch | English | Français | Español | Português
Svenska | Italiano | Nederlands
31
INDICADORES
• El contador de tiempo muestra
cuánto tiempo lleva en
funcionamiento el modo.
• El contador mAh muestra el flujo
de carga existente.
• El indicador de voltaje muestra
la tensión actual de la pila.
Nota: Si durante 30 segundos no se
pulsa ninguna tecla, la iluminación
de fondo de la pantalla se apagará.
Indicador
Estado de carga
aprox. 0-20 %
aprox. 20-40 %
aprox. 40-60 %
aprox. 60-80 %
aprox. 80-100 %
SUBSANACIÓN DE FALLOS
Indicador Causa posible Solución
null
No se ha detectado/
insertado
ninguna pila.
La pila está defectuosa.
Ion-litio <2 V,
NiMH/NiCd <0,2 V
Err
La pila ha sido
insertada
incorrectamente
(inversión de polaridad).
Vuelva a insertar la pila.
Entregue la pila en un punto
de recogida autorizado.
Inserte la pila al contrario.
CUIDADO Y MANTENIMIENTO
Limpieza
• Antes de la limpieza, interrumpa el suministro de tensión al
producto y retire la pila.
• Para la limpieza, utilice únicamente un paño suave, seco
o ligeramente humedecido (en su caso, añada un poco de
detergente de lavavajillas suave). En ningún caso utilice para la
limpieza productos abrasivos o disolventes.
32
Deutsch | English | Français | Español | Português
Svenska | Italiano | Nederlands

DATOS TÉCNICOS
Cargador
Suministro de corriente .................................... 12 V
Clase de protección ...........................................II
Salida USB ...........................................................5 V, máx. 2000 mA
Compartimentos de carga .................................4
Corriente de carga .............................................500/1000/1500/2000 mA
Corriente de descarga .......................................500 mA
Corriente de carga de mantenimiento .............25 mA
Adaptador de red
Suministro de corriente .....................................100-240 V ~, 50-60 Hz
Salida ..................................................................12 V
Clase de protección ...........................................II
Tipos de pilas apropiadas
Número
máximo
Número
máximo
Tipo (ion-litio)
2 32650 (limitado por tamaño)
26650, 26500, 25500, 22650, 22500, 21700, 20700
3
(limitado por tamaño)
18700, 18650, 18500, 18490, 18350, 17670, 17650,
17500, 17350, 16650, 16500, 16340 (RCR123A), 14650,
4
14500, 14430, 14350, 13650, 13500, 13450, 12650,
12500, 12340, 10500, 10440, 10350, 10340
Tipo (NiMH/NiCd) Capacidad máx.
2 Mono D
4 Mignon AA/ Micro AAA
, máx. 3000 mA
, máx. 3000 mA
12000 mAh3 Baby C
Deutsch | English | Français | Español | Português
Svenska | Italiano | Nederlands
33
ELIMINACIÓN
Elimine el producto conforme a las disposiciones legales.
La identificación "Contenedor de basura" indica que el
aparato eléctrico en la UE no debe ser eliminado en la
basura doméstica. Utilice los sistemas de devolución y
recogida de su comunidad o póngase directamente en
contacto con el distribuidor del producto.
Las pilas y baterías son materiales reutilizables y no deben
ser eliminados en la basura doméstica. Entregue siempre
las pilas y baterías gastadas en los puntos de recogida
previstos.
De este modo, cumple con sus obligaciones legales y ayuda a proteger
el medio ambiente.
LIMITACIÓN DE RESPONSABILIDAD
La información contenida en este manual de instrucciones puede
ser modificada sin previo aviso. ANSMANN no acepta ninguna
responsabilidad por daños directos, indirectos, accidentales
o derivados, que se originen por un uso inadecuado o por la no
contemplación de la información contenida en este manual de
instrucciones. No aceptamos ninguna responsabilidad ni ofrecemos
ningún derecho de garantía por un uso inadecuado del producto.
INFORMACIÓN SOBRE LA GARANTÍA
Ofrecemos tres años de garantía por el aparato. No se puede
ofrecer garantía alguna en caso de daños que se originen por la no
observación del manual de instrucciones.
De este modo, su derecho de garantía legal no se verá afectada.
34
El producto cumple las exigencias de las
Directivas de la UE.
Deutsch | English | Français | Español | Português
Svenska | Italiano | Nederlands

MANUAL ORIGINAL DE INSTRUÇÕES
CARREGADOR
POWERLINE 4 ULTRA
ÍNDICE
Conteúdo da embalagem .........................................................................35
Utilização adequada .................................................................................35
Instruções de segurança .........................................................................36
Descrição do produto ............................................................................... 37
Vista geral das funções ............................................................................ 37
Operação ...................................................................................................37
Potência ....................................................................................................39
Modi ............................................................................................................ 39
Indicação ................................................................................................... 40
Resolução de problemas .......................................................................... 40
Conservação e manutenção .................................................................... 40
Dados técnicos .........................................................................................41
Eliminação ................................................................................................. 42
Exoneração ................................................................................................ 42
Indicação de garantia ............................................................................... 42
CONTEÚDO DA EMBALAGEM
1x carregador
1x fonte de energia
Ao desempacotar as peças verifique a integridade do conteúdo da
embalagem e a existência de eventuais danos de todas as peças.
Nunca utilize um produto danificado. Se verificar danos no produto
contacte o seu fabricante.
UTILIZAÇÃO ADEQUADA
O produto foi concebido para carregar baterias de íon de lítio/NiMH/
NiCd. O produto reconhece independentemente o tipo de bateria e
ajusta-se automaticamente. Além disso o produto dispõe de uma
entrada USB que serve com fonte de energia USB. Desta forma pode
carregar ainda outros aparelhos que sejam apropriados.
Este produto foi concebido exclusivamente para o uso doméstico, não
sendo adequado para o uso industrial.
Deutsch | English | Français | Español | Português
Svenska | Italiano | Nederlands
35

INSTRUÇÕES DE SEGURANÇA
Antes da utilização do produto leia cuidadosamente todo o
manual de instruções. O manual de instruções contém
informações importantes referente à utilização do produto.
Se este produto for dado a terceiros, o presente manual de
instruções deve ser dado também.
• Mantenha as crianças fora do alcance do produto e da embalagem.
O produto não é um brinquedo. As crianças devem ser vigiadas para
assegurar que não brincam com o produto.
• Este produto não pode ser utilizado por pessoas (incl. crianças)
com capacidades físicas, sensoriais ou mentais reduzidas ou
que tenham falta de experiência ou conhecimento a lidar com o
presente produto. Este tipo de pessoas acima descritas precisam
ser supervisionadas por uma pessoa responsável durante a
utilização do produto ou que recebam instruções!
• Antes da utilização do carregador leia todas as instruções e
indicações de segurança que estão indicados no carregador e na
bateria.
• Leia também os manuais de instrução de todos os aparelhos que
estão ligados ao produto.
• Coloque as baterias consoante a polaridade correta (+ e –)
conforme indicado no compartimento de carregamento.
• Não carregue baterias não recarregáveis.
•
• Utilize o produto apenas com a fonte de energia fornecida.
• Coloque o produto sempre numa superfície nivelada, estável, limpa
e resistente ao calor.
• Não utilize o produto perto de líquidos inflamáveis ou gases.
• Não cubra as aberturas de ventilação que estão na parte inferior e
nas laterais do produto.
• Durante a utilização não deixe o produto sem vigilância.
• Utilize o produto apenas em espaços interiores e
O produto corresponde à classe de proteção II. O produto
não dispõe de um isolamento duplo e não necessita
de uma proteção de ligação à terra.
proteja-o contra a humidade.
36
Deutsch | English | Français | Español | Português
Svenska | Italiano | Nederlands

DESCRIÇÃO DO PRODUTO (VER PÁGINA 2)
1 Compartimento de
carregamento indicado
2 Tipo de bateria
3 Estado de carregamento
4 Indicação END
5 Potência
6 Contador do tempo
7 Contador mAh
8 Indicador de tensão
9 Modo
10 Entrada USB
11 Ligação da fonte de energia
12 Botão MODE
13 Botão CHANNEL
14 Botão CURRENT
15 Compartimento de
carregamento
16 Contacto de carregamento
17 Fonte de energia
VISTA GERAL DAS FUNÇÕES
• Controlo individual do compartimento
• Reconhecimento automático de baterias de íon de lítio e NiMH/
NiCd.
• Arranque automático após colocação correta das baterias de
acordo com a polaridade
• Controlo de carregamento controlado pelo micro controlador
• Conclusão automática do processo de carregamento quando a
bateria está carregada
• Reconhecimento de baterias defeituosas
• Indicação de baterias colocadas de forma errada (contra a
polaridade)
• Indicação detalhada do estado
• Carregamento de preservação de baterias NiMH
• Função de descarregamento e medição da capacidade
• Tensão ajustável de carregamento
• Ligação USB 5 V, máx. 2 A
OPERAÇÃO
Carregamento simples
1. Ligue o cabo da fonte de energia à ligação da fonte de energia do
carregador.
2. Ligue a fonte de energia a uma tomada adequada.
3. Deslize o contacto de carregamento para trás e coloque a bateria
corretamente conforme a polaridade (polo menos (-) do contacto
de carregamento) no compartimento de carregamento.
4. Se não quiser efetuar mais configurações, o produto iniciará
o processo de carregamento com 500 mA de tensão após
8 segundos.
Deutsch | English | Français | Español | Português
Svenska | Italiano | Nederlands
37

5. Quando a bateria estiver carregada aparece no ecrã a indicação
END.
6. Remova a bateria e separe o produto da alimentação elétrica.
Funções avançadas
Dica: Se quiser escolher para várias baterias o mesmo modo coloque
primeiro as baterias e em seguida ligue a fonte de energia. Em seguida
efetua as configurações. Essas configurações serão aplicadas a
todos os compartimentos de carregamento. Se quiser pode ocupar e
configurar cada compartimento de carregamento individualmente.
• Após ter inserido a bateria restam 8 segundos para selecionar o
modo e a tensão de carregamento.
• O modo configurado e a tensão de carregamento é indicado
através de uma seta na margem do ecrã. Quando as setas
começam a piscar pode efetuar as configurações.
• O modo é iniciado quando nenhum botão é acionado durante
8 segundos e as setas estiverem constantemente acesas na
margem do ecrã.
• Se quiser efetuar umas alterações em seguida:
− Mude para o compartimento correspondente através do botão
CHANNEL.
− Mantenha premido o botão MODE durante 4 segundos até as
setas piscarem.
Dica: Os valores que até lá já foram indicados (contador mAh e
contador do tempo) serão repostos para 0.
Funções dos botões
Botão Função
MODE Alterar modo
CHANNEL
CURRENT Alterar potência
Entrada USB
• A entrada USB: serve como fonte de tensão de 5 V e no máx. de
2000 mA.
• A entrada USB e os compartimentos de carregamento podem ser
utilizados em simultâneo.
Indicar o estado do compartimento de carregamento
seguinte
Dica: Só podem ser indicados os compartimentos de
carregamento que estejam ocupados.
38
Deutsch | English | Français | Español | Português
Svenska | Italiano | Nederlands

POTÊNCIA
Dica: A potência máxima de cada compartimento de carregamento
depende da ocupação dos compartimentos de carregamento.
Compartimentos
de carregamento
ocupados
1-2 2000 mA
3 1500 mA
4 1000 mA
Dica: Recomendamos de carregar as baterias com uma potência de
500/1000 mA no caso de haver tempo suficiente. Desta forma pode
evitar um sobreaquecimento e proteger as baterias.
Atenção: A regra básica é: O valor da potência não pode ultrapassar o
valor da capacidade da bateria.
Exemplo: Capacidade da bateria 1400 mAh - potência 1000 mA
Potência máxima por cada compartimento
de carregamento
MODI
CHARGE
Carregar bateria. Quando a bateria estiver carregada aparece no ecrã
a indicação END.
DISCHARGE
Descarregar a bateria. Quando a bateria estiver descarregada aparece
no ecrã a indicação END.
Dica: A tensão de descarga está limitada até 500 mA.
TEST
Medir a capacidade da bateria e em seguida carregar a bateria
(carregar - descarregar - carregar) Após o segundo processo de
carregamento aparece no ecrã a indicação END. A medição está
concluída e a bateria está carregada.
Dica: Pode escolher para todos os processos de carregamento a
tensão de carregamento.
Valor de medição: O fluxo de carregamento só é medido durante o
processo de descarregamento. O contador mAh indica o valor para a
capacidade da bateria.
Deutsch | English | Français | Español | Português
Svenska | Italiano | Nederlands
39
INDICAÇÃO
• O contador do tempo indica o
tempo do funcionamento do
modo.
• O contador mAh indica o
carregamento já transferido.
• O indicador da tensão indica a
tensão atual da bateria.
Dica: Quando não é acionado
nenhum botão durante um período
de 30 segundos, desliga-se a luz do
fundo do ecrã.
RESOLUÇÃO DE PROBLEMAS
Indicação
Estado de
carregamento
aprox. 0-20 %
aprox. 20-40 %
aprox. 40-60 %
aprox. 60-80 %
aprox. 80-100 %
Indicação
nulo
Causa possível Solução
Não foi detetado
nenhuma bateria.
A bateria tem uma
falha. Íon de lítio <2 V,
NiMH/NiCd <0,2 V
Err
A bateria foi colocada
de forma errada
(polaridade).
Volte a colocar a bateria.
Elimine a bateria no
ecoponto.
Coloque a bateria ao
contrário.
CONSERVAÇÃO E MANUTENÇÃO
Limpeza
• Antes de cada limpeza desliga a alimentação elétrica do produto e
remova todas as baterias.
• Para a limpeza utilize sempre um pano suave, seco ou pouco
húmido (se necessário pode adicionar um pouco de detergente
suave). Para a limpeza não utilize detergentes abrasivos ou
solventes.
40
Deutsch | English | Français | Español | Português
Svenska | Italiano | Nederlands
DADOS TÉCNICOS
Carregador
Alimentação elétrica ........................................12 V
Classe de proteção ............................................II
Saída USB ............................................................5 V, max. 2000 mA
Compartimentos de carregamento ...................4
Potência .............................................................500/1000/1500/2000 mA
Potência de saída .............................................500 mA
Potência de preservação ..................................25 mA
Fonte de energia
Alimentação elétrica .........................................100-240 V~, 50-60 Hz
Saída ...................................................................12 V
Classe de proteção ............................................II
Tipo de baterias adequadas
Quantidade
máx.
Quantidade
máx.
Tipo (íon de lítio)
2 32650 (limitado pelo tamanho)
26650, 26500, 25500, 22650, 22500, 21700, 20700
3
(limitado pelo tamanho)
18700, 18650, 18500, 18490, 18350, 17670, 17650,
17500, 17350, 16650, 16500, 16340 (RCR123A), 14650,
4
14500, 14430, 14350, 13650, 13500, 13450, 12650,
12500, 12340, 10500, 10440, 10350, 10340
Tipo (NiMH/NiCd) Capacidade máx.
2 Mono D
4 Mignon AA/ Micro AAA
, máx. 3000 mA
, max. 3000 mA
12000 mAh3 Baby C
Deutsch | English | Français | Español | Português
Svenska | Italiano | Nederlands
41

ELIMINAÇÃO
Elimine o produto usado de acordo com os regulamentos
em vigor. O símbolo “caixote de lixo” indica que os
aparelhos elétricos na EU têm de ser eliminados de forma
separada dos resíduos domésticos. Aproveite os ecopontos
da sua freguesia ou consulte o fornecedor onde comprou o
produto.
As pilhas e baterias são materiais que não devem ser
eliminadas com o lixo doméstico. Elimine as pilhas e
baterias usadas exclusivamente no ecoponto previsto.
Desta forma está a cumprir a lei obrigatória e a contribuir à proteção
do ambiente.
EXONERAÇÃO
Todas as informações do presente manual podem ser alteradas sem
aviso prévio. ANSMANN não se responsabiliza por danos diretos,
indiretos, acidentais ou danos subsequentes que resultam de uma
utilização indevida ou incumprimento das instruções de segurança
do presente manual. Em caso de utilização indevida do produto não
assumimos qualquer responsabilidade e não concedemos a garantia.
INDICAÇÃO DE GARANTIA
O aparelho tem uma garantia de três anos. Em caso de danos que
resultam do incumprimento do manual, a garantia fica anulada.
Neste caso o direito à garantia não fica afetado.
42
O produto cumpre com as Diretivas Europeias.
Deutsch | English | Français | Español | Português
Svenska | Italiano | Nederlands

ORIGINALBRUKSANVISNING
LADDARE
POWERLINE 4 ULTRA
INNEHÅLLSFÖRTECKNING
Leveransens Innehåll ...............................................................................43
Avsedd användning ..................................................................................43
Säkerhetsåtgärder .................................................................................... 44
Produktbeskrivning...................................................................................45
Översikt över funktioner ........................................................................... 45
Drift ............................................................................................................45
Laddningsström ........................................................................................ 47
Lägen ......................................................................................................... 47
Funktion ....................................................................................................48
Felsökning ................................................................................................. 48
Skötsel och underhåll ............................................................................... 48
Specifikationer .......................................................................................... 49
Avfallshantering ........................................................................................ 50
Ansvarsfriskrivning ................................................................................... 50
Garantianvisning ....................................................................................... 50
LEVERANSENS INNEHÅLL
1x laddare
1x nätaggregat
Packa först upp alla delar och kontrollera att de är fullständiga och
inte skadade. Använd inte en skadad produkt. Om skador på produkten
konstateras, vänligen kontakta din handlare.
AVSEDD ANVÄNDNING
Produkten är avsedd för laddning av Li-Ion/NiMH/NiCd laddningsbart
batteri. Den känner själv igen batterityp och ställer automatiskt in sig.
Dessutom har produkten en USB-anslutning som är USB-spänningens
källa. Därigenom kan även motsvarande enheter laddas.
Produkten tjänar uteslutande för privat bruk i hushåll och är inte
avsedd för kommersiell användning.
Deutsch | English | Français | Español | Português
Svenska | Italiano | Nederlands
43

SÄKERHETSÅTGÄRDER
Innan du tar produkten i bruk, vänligen läs noga hela
bruksanvisningen. Den innehåller viktig information
angående säker hantering av produkten.
När du överlämnar produkten till tredje man, lämna då även
över denna bruksanvisning.
• Håll barn borta från produkten och förpackningen. Produkten är
inte en leksak. Barn bör övervakas för att se till att de inte leker
med produkten.
• Denna produkt är inte avsedd att användas av personer (även barn
inberäknat) vilka uppvisar begränsade kroppsliga, sensoriska eller
andliga färdigheter eller som har bristande erfarenhet och kunskap
i hanteringen av denna produkt. Dylika personer måste först
instrueras av en person som har ansvar för deras säkerhet eller
övervakas medan de använder produkten!
• Läs för användning igenom alla anvisningar och
säkerhetsanvisningar, både på laddaren och på det laddningsbara
batteriet.
• Läs även bruksanvisningarna för alla andra enheter till vilka
produkten ansluts.
• Sätt alltid in batterierna enligt korrekt polaritet (+ och –), så som
anges på laddarens fack.
• Ladda inte upp batterier som inte är uppladdningsbara.
•
• Använd endast produkten med det nätaggregat som ingår i det
levererade paketet.
• Placera alltid produkten på en jämn, stabil och värmetålig yta.
• Använd inte produkten i närheten av brännbara vätskor eller gaser.
• Täpp inte till ventilationsöppningarna på produktens undersida och
på sidorna.
• Lämna inte produkten utan uppsikt när du använder den.
• Använd produkten uteslutande i torra inomhusutrymmen
Produkten motsvarar skyddsklass II. Den har förstärkt
isolering och kräver därför inte särskild jordanslutning.
och skydda den från fukt.
44
Deutsch | English | Français | Español | Português
Svenska | Italiano | Nederlands

PRODUKTBESKRIVNING (SE SIDA 2)
1 Anvisat laddningsfack
2 Typ av batteri
3 Effektnivå
4 Indikation END
5 Laddningsström
6 Tidsräknare
7 mAh-räknare
8 Spänningsangivare
9 Läge
10 USB-anslutning
11 Nätaggregatsanslutning
12 MODE-knapp
13 CHANNEL-knapp
14 CURRENT-knapp
15 Laddningsfack
16 Laddningskontakt
17 Nätaggregat
ÖVERSIKT ÖVER FUNKTIONER
• Övervakning över enkelt fack
• Automatisk igenkänning av Li-Ion och NiMH/NiCd batteri
• Automatisk laddningsstart efter det att batteriet placerats med
korrekt polaritet
• Laddningsstyrning som övervakas av mikrokontroller
• Automatisk avslutning av laddningen när batteriet är helt laddat
• Igenkänning av defekt batteri
• Indikation att batteri felaktigt placerat (fel polaritet)
• Detaljerad indikation av status
• Laddning hos NiMH batteri
• Urladdningsfunktion och mätning av kapacitet
• Inställningsbar laddningsström
• 5 V USB-anslutning, max. 2 A
DRIFT
Enkel laddning
1. Koppla nätaggregatets kabel med laddarens
nätaggregatsanslutning.
2. Anslut nätaggregatet till ett lämpligt eluttag.
3. Skjut tillbaka laddningskontakten och placera batteriet polriktigt
(minuspolaritet (-) vid laddningskontakten) i laddningsfacket.
4. Om du inte ska göra andra inställningar börjar laddningen med
500 mA laddningsström efter 8 sekunder.
5. När batteriet är fulladdat syns i displayen indikationen END.
6. Ta ut batteriet och lösgör produkten från strömtillförseln.
Deutsch | English | Français | Español | Português
Svenska | Italiano | Nederlands
45

Ytterligare funktioner
Observera: Om du vill välja samma läge för flera batterier, lägg då
först in batterierna och anslut sedan nätaggregatet. Ställ därefter in
de olika lägena. Dessa inställningar gäller sedan för alla batterier i
laddningsfacken. Du kan emellertid även lägga in batterierna ett och
ett i laddningsfacket och därefter göra inställningarna.
• Efter det att du lagt in batteriet har du 8 sekunder tid att välja läge
och laddningsström.
• Det läge och den laddningsström du valt markeras alltid genom
en pil på kanten av displayen. När pilarna blinkar kan du börja göra
inställningarna.
• Läget startas när du trycket på en knapp i 8 sekunder och pilarna
på kanten av displayen lyser med ett fast sken.
• Om du vill göra ändringar i efterhand:
− Växla då med knappen CHANNEL till det önskade
laddningsfacket.
− Håll knappen MODE nertryckt i 4 sekunder tills pilarna blinkar.
Observera: De dittills angivna värdena (mAh-räknaren och
tidräknaren) sätts tillbaka till 0.
Knappfunktioner
Knapp Funktion
MODE Ändra läge
CHANNEL
CURRENT Ändra laddningsström
USB-anslutning
• USB-anslutningen tjänar som spänningskälla med 5 V och max.
2000 mA.
• USB-anslutningen och laddningsfacken kan användas samtidigt.
Visar status för nästa laddningsfack
Observera: Endast de laddningsfack som har ett batteri
kan indikera.
46
Deutsch | English | Français | Español | Português
Svenska | Italiano | Nederlands

LADDNINGSSTRÖM
Observera: Hur stor den maximala laddningsströmmen per
laddningsfack är beror på hur många laddningsfack som upptas.
Upptagna
laddningsfack
1:-2 2000 mA
3 1500 mA
4 1000 mA
Observera: Vi rekommenderar att om du har tillräckligt med tid ladda
batterierna med en laddningsström om 500/1000 mA. Så undviker du
alltför stark uppvärmning och skonar batteriet.
Se upp: Grundregeln är: Laddningsströmmens styrka får inte överskrida
batteriets kapacitet.
Exempel: Batterikapacitet 1400 mAh - laddningsström 1000 mA
Maximal laddningsström per laddningsfack
LÄGEN
CHARGE
Att ladda batteriet. När batteriet är fulladdat syns i displayen
indikationen END.
DISCHARGE
Att ladda om batteriet. När batteriet har laddats om syns i displayen
indikationen END.
Observera: Omladdningsströmmen begränsas till 500 mA.
TEST
Mät batteriets kapacitet och ladda därpå batteriet (ladda - ladda
om - ladda). Efter den andra laddningsomgången visas i displayen
indikationen END. Mätningen har avslutats och batteriet är fulladdat.
Observera: Du kan välja vilken laddningsström du önskar för
laddningen.
Mätvärde: Laddningsmängden mäts endast under laddningen. mAhräknaren anger värdet för batteriets kapacitet.
Deutsch | English | Français | Español | Português
Svenska | Italiano | Nederlands
47
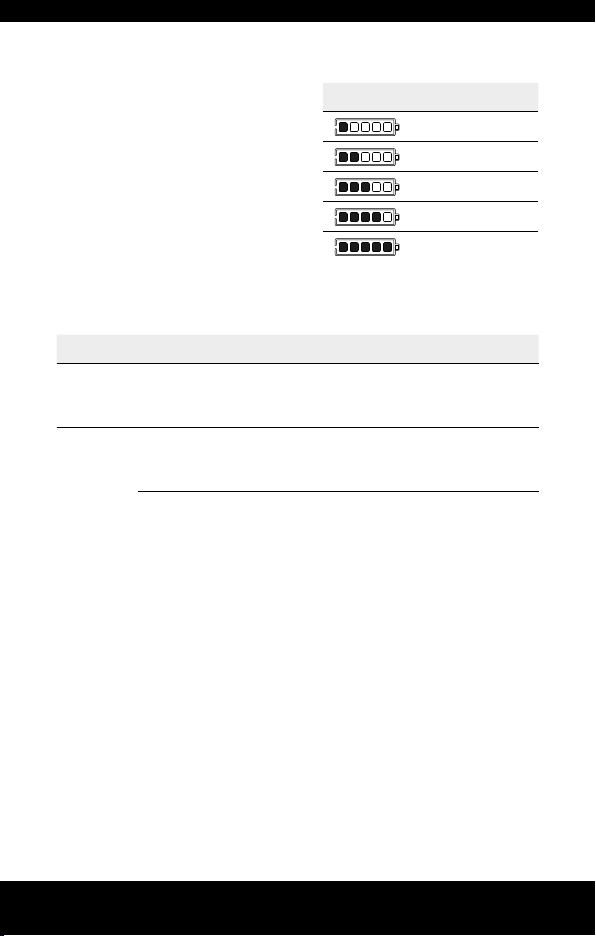
FUNKTION
• Tidräknaren visar tiden, hur länge
batteriet redan varit i drift i det
läget.
• mAh-räknaren anger den laddning
som redan ägt rum.
• Spänningsindikationen visar
batteriets aktuella spänning.
Observera: När du inte tryckt
på någon knapp under 30
sekunder, kopplas displayens
bakgrundsbelysning på.
Funktion Effektnivå
cirka 0-20 %
cirka 20-40 %
cirka 40-60 %
cirka 60-80 %
cirka 80-100 %
FELSÖKNING
Funktion Möjlig orsak Lösning
noll
Misstag
Inget batteri har
placerats/blivit
igenkänt.
Batteriet är skadat.
Li-Ion <2 V,
NiMH/NiCd <0,2 V
Batteriet har placerats
fel (felpolaritet).
Lägg in batteriet på nytt.
Lägg batteriet på ett
uppsamlingsställe.
Lägg in batteriet på nytt men
på ett annorlunda sätt.
SKÖTSEL OCH UNDERHÅLL
Rengöring
• Avbryt strömtillförseln till produkten före varje rengöring och ta ut
alla batterierna.
• Använd för rengöring framför allt en mjuk, torr eller lätt fuktad duk
(sätt eventuellt till lite diskmedel). Använd aldrig slipnings. eller
lösningsmedel till rengöringen.
48
Deutsch | English | Français | Español | Português
Svenska | Italiano | Nederlands

SPECIFIKATIONER
Laddare
Strömtillförsel....................................................12 V
Skyddsklass .......................................................II
USB-utgång ........................................................5 V, max. 2000 mA
Laddningsfack ...................................................4
Laddningsström .................................................500/1000/1500/2000 mA
Omladdningsström .............................................500 mA
Konserveringsladdningsström ..........................25 mA
Nätaggregat
Strömförsörjning ................................................100-240 V~, 50-60 Hz
Utgång ................................................................12 V
Skyddsklass .......................................................II
Lämpliga batterityper
Max. antal Typ (Li-Ion)
2 32650 (begränsat på grund av storlek)
26650, 26500, 25500, 22650, 22500, 21700, 20700
3
(begränsat på grund av storlek)
18700, 18650, 18500, 18490, 18350, 17670, 17650,
17500, 17350, 16650, 16500, 16340 (RCR123A), 14650,
4
14500, 14430, 14350, 13650, 13500, 13450, 12650,
12500, 12340, 10500, 10440, 10350, 10340
Max. antal Typ (NiMH/NiCd) Max. kapacitet
2 Mono D
4 Mignon AA/ Micro AAA
, max. 3000 mA
, max. 3000 mA
12000 mAh3 Baby C
Deutsch | English | Français | Español | Português
Svenska | Italiano | Nederlands
49

AVFALLSHANTERING
Ta hand om produkten enligt de rättsliga bestämmelserna.
Märkningen ”soptunna” anger att EU inte tillåter elektriska
anordningar att avfallshanteras tillsammans med normal
hushållsavfall. Använd dig av det retur- och
samlingssystem som finns i din kommun eller vänd dig till
den handlare hos vilken du köpt produkten.
Batterier och laddningsbara batterier är returmaterial och
får inte kastas bland hushållsavfallet. Lägg förbrukade
batterier och laddningsbara batterier alltid i de
uppsamlingsställen som är avsedda för detta.
På så sätt uppfyller du dina lagenliga plikter och ger ditt bidrag till
miljöskydd.
ANSVARSFRISKRIVNING
Den i denna bruksanvisning angivna informationen kan komma
att ändras utan föravisering. ANSMANN påtar sig inte något ansvar
för direkta, indirekta, tillfälliga eller andra skador eller följdskador
som uppstår genom felaktig hantering eller bristande hänsyn till
den information som anges i denna bruksanvisning. Vid felaktig
användning av produkten påtar vi oss inget ansvar och beviljar ingen
garantiersättning.
GARANTIANVISNING
Vi erbjuder tre års garanti på denna apparat. Vid skador på apparaten
som uppkommer på grund av att bruksanvisningens inte beaktas,
beviljas ingen garanti.
Ditt rättsliga anspråk på garantiersättning påverkas härigenom inte.
50
Produkten motsvarar kraven i EU:s riktlinjer.
Deutsch | English | Français | Español | Português
Svenska | Italiano | Nederlands

MANUALE DI ISTRUZIONI ORIGINALE
CARICABATTERIE
POWERLINE 4 ULTRA
INDICE
Contenuto della confezione .....................................................................51
Uso previsto...............................................................................................51
Avvertenze per la sicurezza .....................................................................52
Descrizione del prodotto .......................................................................... 53
Panoramica delle funzioni ........................................................................ 53
Funzionamento ......................................................................................... 53
Corrente di carica ...................................................................................... 55
Modalità ..................................................................................................... 55
Indicatore ..................................................................................................56
Risoluzione dei problemi .......................................................................... 56
Cura e manutenzione ................................................................................ 56
Dati tecnici ................................................................................................57
Smaltimento .............................................................................................. 58
Esclusioni di responsabilità ..................................................................... 58
Avviso sulla garanzia ................................................................................ 58
CONTENUTO DELLA CONFEZIONE
1x Caricabatterie
1x Alimentatore
Per prima cosa disimballare tutte le parti e verificare la completezza
e gli eventuali danni. Non utilizzare un prodotto danneggiato. Se si
notano danni al prodotto, contattare il proprio rivenditore.
USO PREVISTO
Il prodotto serve a caricare batterie Li-Ion/NiMH/NiCd. Rileva da solo
il tipo di batteria e si regola automaticamente. Il prodotto è inoltre
dotato di una porta USB che funge da fonte di alimentazione USB. In
questo modo, è possibile caricare dispositivi aggiuntivi.
Il prodotto è destinato esclusivamente ad uso domestico privato e non
ad uso commerciale.
Deutsch | English | Français | Español | Português
Svenska | Italiano | Nederlands
51

AVVERTENZE PER LA SICUREZZA
Leggere attentamente il manuale di istruzioni completo
prima di mettere in funzione il prodotto. Contiene importanti
istruzioni per la manipolazione del prodotto.
In caso di cessione del prodotto a terzi, consegnare il
presente manuale di istruzioni.
• Tenere i bambini lontani dal prodotto e dall'imballaggio. Questo
prodotto non è un giocattolo. I bambini devono essere sorvegliati
per assicurarsi che non giochino con il prodotto.
• Questo prodotto non è destinato all'uso da parte di persone
(compresi i bambini) con capacità fisiche, sensoriali o mentali
limitate o con scarsa esperienza o conoscenza di questo prodotto.
Queste persone devono prima essere istruite da un supervisore
responsabile della loro sicurezza o sorvegliate durante il
funzionamento del prodotto!
• Prima di utilizzare il caricabatterie, leggere tutte le istruzioni e le
avvertenze di sicurezza sul caricabatterie e sulla batteria.
• Leggere anche le istruzioni per l'uso di tutti gli altri dispositivi che
vengono collegati al prodotto.
• Posizionare le batterie sempre nel rispetto della corretta polarità
(+ e –) come mostrato nel vano di carica.
• Non caricare batterie non ricaricabili.
•
• Utilizzare il prodotto solo con l'alimentatore incluso nella fornitura.
• Posizionare sempre il prodotto su una superficie piana, stabile e
resistente al calore.
• Non utilizzare il prodotto in prossimità di liquidi o gas infiammabili.
• Non coprire le aperture di ventilazione sul fondo e sui lati del
prodotto.
• Non lasciare il prodotto incustodito durante l'uso.
• Utilizzare il prodotto solo in ambienti interni asciutti e
Il prodotto è conforme alla classe di protezione II. Ha un
isolamento rinforzato e quindi non necessita di messa
a terra di protezione.
proteggerlo dall'umidità.
52
Deutsch | English | Français | Español | Português
Svenska | Italiano | Nederlands

DESCRIZIONE DEL PRODOTTO (VEDI PAGINA 2)
1 Vano di carica visualizzato
2 Tipo di batteria
3 Livello di carica
4 Indicatore END
5 Corrente di carica
6 Contaore
7 Contatore mAh
8 Indicatore di tensione
9 Modalità
10 Connessione USB
11
Collegamento all'alimentazione
elettrica
12 Tasto MODE
13 Tasto CHANNEL
14 Tasto CURRENT
15 Vano di carica
16 Contatto di carica
17 Alimentatore
PANORAMICA DELLE FUNZIONI
• Monitoraggio a camera singola
• Riconoscimento automatico delle batterie Li-Ion e NiMH/NiCd
• Avvio automatico della carica dopo il corretto inserimento delle
batterie
• Controllo di carica monitorato da microcontrollore
• Terminazione automatica del processo di carica quando la batteria
è completamente carica
• Rilevamento di batterie difettose
• Indicazione di batterie inserite in modo errato (polarità invertita)
• Indicazione dettagliata dello stato
• Carica di mantenimento per batterie NiMH
• Funzione di scarica e misurazione della capacità
• Corrente di carica regolabile
• Porta USB 5 V, max. 2 A
FUNZIONAMENTO
Facile caricamento
1. Collegare il cavo dell'alimentatore al connettore di alimentazione
del caricabatterie.
2. Collegare l'alimentatore a una presa idonea.
3. Spingere indietro il contatto di carica e inserire la batteria nel vano
di carica con la polarità corretta (polo negativo (-) sul contatto di
carica).
4. Se non si desidera effettuare ulteriori impostazioni, il prodotto
inizia a caricare 500 mA di corrente di carica dopo 8 secondi.
5. Quando la batteria è completamente carica, il display mostra
l'indicatore END.
6. Rimuovere la batteria e scollegare il prodotto dall'alimentazione
elettrica.
Deutsch | English | Français | Español | Português
Svenska | Italiano | Nederlands
53
Funzioni estese
Nota: Se si desidera selezionare la stessa modalità per più batterie,
inserire prima le batterie e poi collegare l'alimentatore. Quindi eseguire
le impostazioni. Queste impostazioni vengono applicate a tutti i vani
di carica occupati. Tuttavia, è anche possibile assegnare e impostare
ciascun vano singolarmente.
• Dopo aver inserito la batteria, si hanno 8 secondi per selezionare la
modalità e la corrente di carica.
• La modalità e la corrente di carica impostate sono contrassegnate
da una freccia sul bordo del display. Quando le frecce lampeggiano,
è possibile effettuare le impostazioni.
• La modalità si avvia quando non viene premuto alcun tasto per
8 secondi e le frecce sul bordo del display sono accese in modo
fisso.
• Se si desidera apportare modifiche in seguito:
− Utilizzare il tasto CHANNEL per passare al vano di carica
corrispondente.
− Tenere premuto il tasto MODE per 4 secondi fino a quando non
lampeggiano le frecce.
Nota: I valori finora registrati (contatore mAh e contaore)
vengono riportati a 0.
Funzione tasti
Tasto Funzione
MODE Cambia modalità
CHANNEL
CURRENT Cambia la corrente di carica
Porta USB
• Il collegamento USB serve da fonte di alimentazione con 5 V e max.
2000 mA.
• La porta USB e i vani di carica possono essere utilizzati
contemporaneamente.
Indicazione dello stato del successivo vano di carica
Nota: Possono essere visualizzati solo i vani di carica
occupati.
54
Deutsch | English | Français | Español | Português
Svenska | Italiano | Nederlands

CORRENTE DI CARICA
Nota: La corrente di carica massima per vano di carica dipende dal
numero di vani occupati.
Vani di carica
occupati
1-2 2000 mA
3 1500 mA
4 1000 mA
Nota: Si consiglia di caricare le batterie con una corrente di carica di
500/1000 mA se il tempo a disposizione è sufficiente. In questo modo
si evita un riscaldamento eccessivo e si protegge la batteria.
Attenzione: La regola di base è: Il valore della corrente di carica non
deve superare il valore della capacità della batteria.
Esempio: Capacità della batteria 1400 mAh - corrente di carica
1000 mAh
Corrente di carica massima per vano
MODALITÀ
CHARGE
Ricarica della batteria. Quando la batteria è completamente carica, il
display mostra l'indicatore END.
DISCHARGE
Scaricamento della batteria. Quando la batteria è scarica, il display
mostra l'indicatore END.
Nota: La corrente di scarica è limitata a 500 mA.
TEST
Misurare la capacità della batteria e poi caricare la batteria (carica
- scarica - carica). Dopo il secondo processo di carica, il display
mostra l'indicatore END. La misurazione è completa e la batteria è
completamente carica.
Nota: È possibile selezionare la corrente di carica per i processi di
carica.
Valore misurato: Il flusso di carica viene misurato solo durante il
processo di scarica. Il contatore mAh indica il valore della capacità
della batteria.
Deutsch | English | Français | Español | Português
Svenska | Italiano | Nederlands
55

INDICATORE
• Il contaore indica il tempo di
funzionamento della modalità.
• Il contatore mAh indica la carica
che è già fluita.
• L'indicatore di tensione mostra la
tensione attuale della batteria.
Nota: Se non si preme alcun pulsante
per 30 secondi, la retroilluminazione
del display si spegne.
Indicatore
Livello di
carica
ca. 0-20 %
ca. 20-40 %
ca. 40-60 %
ca. 60-80 %
ca. 80-100 %
RISOLUZIONE DEI PROBLEMI
Indicatore Possibile causa Soluzione
zero
Err
Non è stata inserita/
riconosciuta
nessuna batteria.
La batteria è
difettosa. Li-Ion <2 V,
NiMH/NiCd <0,2 V
La batteria è stata
inserita in modo errato
(polarità).
Posizionare nuovamente la
batteria.
Consegnare la batteria ad un
punto di raccolta.
Posizionare la batteria al
contrario.
CURA E MANUTENZIONE
Pulizia
• Prima della pulizia, scollegare l'alimentazione elettrica al prodotto
e rimuovere tutte le batterie.
• Per la pulizia utilizzare solo un panno morbido, asciutto o
leggermente umido (se necessario aggiungere un po' di detersivo
delicato per piatti). Non utilizzare mai abrasivi o solventi per la
pulizia.
56
Deutsch | English | Français | Español | Português
Svenska | Italiano | Nederlands

DATI TECNICI
Caricabatterie
Alimentazione ...................................................12 V
Classe di protezione ..........................................II
Uscita USB ...........................................................5 V, max. 2000 mA
Vani di carica ......................................................4
Corrente di carica ...............................................500/1000/1500/2000 mA
Corrente di scarica .............................................500 mA
Corrente di carica di mantenimento .................25 mA
Alimentatore
Alimentazione ....................................................100-240 V~, 50-60 Hz
Uscita ..................................................................12 V
Classe di protezione ..........................................II
Tipi di batteria adatti
Numero
massimo
Numero
massimo
Tipo (Li-Ion)
2 32650 (limitato dalle dimensioni)
26650, 26500, 25500, 22650, 22500, 21700, 20700
3
(limitato dalle dimensioni)
18700, 18650, 18500, 18490, 18350, 17670, 17650,
17500, 17350, 16650, 16500, 16340 (RCR123A), 14650,
4
14500, 14430, 14350, 13650, 13500, 13450, 12650,
12500, 12340, 10500, 10440, 10350, 10340
Tipo (NiMH/NiCd) Capacità massima
2 Mono D
4 Stilo AA/ Ministilo AAA
, max. 3000 mA
, max. 3000 mA
12000 mAh3 Baby C
Deutsch | English | Français | Español | Português
Svenska | Italiano | Nederlands
57

SMALTIMENTO
Smaltire il prodotto in conformità alle disposizioni di legge.
L'etichetta "bidone della spazzatura" indica che gli
apparecchi elettrici non possono essere smaltiti con i
normali rifiuti domestici nell'UE. Utilizzare i sistemi di
restituzione e raccolta nel proprio comune o contattare il
rivenditore presso il quale il prodotto è stato acquistato.
Le batterie e gli accumulatori sono materiali riciclabili e non
devono essere smaltiti insieme ai rifiuti domestici. Smaltire
sempre le batterie e gli accumulatori usati presso gli
appositi punti di raccolta.
In questo modo si rispettano gli obblighi di legge contribuendo al
contempo alla tutela ambientale.
ESCLUSIONI DI RESPONSABILITÀ
Le informazioni contenute in questo manuale sono soggette a
modifiche senza preavviso. L'ANSMANN non è responsabile per danni
diretti, indiretti, incidentali, consequenziali o altri derivanti dall'uso
improprio o dal mancato rispetto delle informazioni contenute
in questo manuale. In caso di uso improprio del prodotto non ci
assumiamo alcuna responsabilità e non concediamo alcuna garanzia o
diritti alla garanzia.
AVVISO SULLA GARANZIA
Offriamo una garanzia di tre anni sul dispositivo. In caso di danni
all'apparecchio dovuti all'inosservanza delle istruzioni per l'uso, non
può essere fornita alcuna garanzia.
Ciò non pregiudica il proprio diritto legale alla garanzia.
58
Il prodotto è conforme ai requisiti delle Direttive
UE.
Deutsch | English | Français | Español | Português
Svenska | Italiano | Nederlands

ORIGINELE GEBRUIKSAANWIJZING
OPLADER
POWERLINE 4 ULTRA
INHOUDSOPGAVE
Leveringsomvang ...................................................................................... 59
Beoogd gebruik ......................................................................................... 59
Veiligheidsinstructies...............................................................................60
Productbeschrijving .................................................................................61
Functieoverzicht .......................................................................................61
Bediening ...................................................................................................61
Laadstroom ...............................................................................................63
Modussen .................................................................................................. 63
Indicatoren ................................................................................................ 64
Probleemoplossing ................................................................................... 64
Verzorging en onderhoud .........................................................................64
Technische Gegevens...............................................................................65
Verwijdering ...............................................................................................66
Aansprakelijkheidsuitsluiting .................................................................. 66
Garantiebewijs ..........................................................................................66
LEVERINGSOMVANG
1x Oplader
1x Netvoedingadapter
Pak eerst alle onderdelen uit en controleer of de levering volledig
en onbeschadigd is. Gebruik het product niet als het beschadigd is.
Mocht u constateren dat het product beschadigd is, neem dan contact
op met de verkoper.
BEOOGD GEBRUIK
Het product dient voor het opladen van Li-Ion/NiMH/NiCd-accu's. Het
herkent het soort accu en stelt zich op basis daarvan automatisch in.
Bovendien beschikt het product over een USB-aansluiting die als USBspanningsbron dient. Zo kunnen ook daarvoor geschikte apparaten
opgeladen worden.
Het product is uitsluitend bestemd voor privégebruik thuis en niet voor
commercieel gebruik.
Deutsch | English | Français | Español | Português
Svenska | Italiano | Nederlands
59

VEILIGHEIDSINSTRUCTIES
Lees voor ingebruikname van het product de volledige
gebruiksaanwijzing goed door. Er staan belangrijke
aanwijzingen in over hoe het product gebruikt moet worden.
Geef deze gebruiksaanwijzing mee als het product aan
derden ter hand wordt gesteld.
• Houd kinderen uit de buurt van het verpakkingsmateriaal. Het
product is geen speelgoed. Kinderen moeten onder toezicht staan
om er zeker van te zijn dat ze niet met het product gaan spelen.
• Dit product is niet bestemd voor gebruik door personen
(met inbegrip van kinderen) met lichamelijke, zintuiglijke of
verstandelijke beperkingen of personen die het ontbreekt aan
kennis of ervaring over de wijze waarop met dit product moet
worden omgegaan. Dergelijke personen moeten door een persoon
die verantwoordelijk is voor hun veiligheid, eerst geïnstrueerd
worden of tijdens gebruik van het product onder toezicht staan van
die persoon.
• Lees voor gebruik van de oplader alle aanwijzingen en
veiligheidstips op de oplader en de accu goed door.
• Lees ook de gebruiksaanwijzingen door van alle andere apparaten
die op het product worden aangesloten.
• Leg de batterij altijd met de juiste polariteit (+ en –), zoals
aangegeven in het batterijvak, in het apparaat.
• Laad nooit niet-oplaadbare batterijen op.
•
• Gebruik het product uitsluitend met de meegeleverde
netvoedingadapter.
• Plaats het product altijd op een vlak, stabiel oppervlak dat niet
hittegevoelig is.
• Gebruik het product nooit in de buurt van explosieve vloeistoffen
of gassen.
• Dek de ventilatieopeningen aan de onder- en de zijkanten van het
product nooit af.
• Laat het product nooit zonder toezicht als het gebruikt wordt.
• Gebruik het product uitsluitend in droge binnenruimten
Het product is overeenkomstig beschermingsklasse II. Het
beschikt over een versterkte isolatie en hoeft ter
bescherming dus niet geaard te worden.
en bescherm het tegen vocht.
60
Deutsch | English | Français | Español | Português
Svenska | Italiano | Nederlands

PRODUCTBESCHRIJVING (ZIE BLZ. 2)
1 Aangeduid laadvak
2 Accutype
3 Laadtoestand
4 Indicator END
5 Laadstroom
6 Klok
7 mAh-teller
8 Spanningsindicator
9 Modus
10 USB-aansluiting
11 Aansluiting netvoedingadapter
12 Toets MODE
13 Toets CHANNEL
14 Toets CURRENT
15 Laadvak
16 Laadcontact
17 Netvoedingadapter
FUNCTIEOVERZICHT
• Controle enkele sleuf
• Automatische herkenning van Li-Ion- en NiMH/NiCd-accu’s
• Automatische start opladen zodra de accu's met de juiste polariteit
zijn ingelegd
• Door microcontroller bewaakte oplaadbesturing
• Automatische beëindiging van het opladen als de accu volledig is
opgeladen
• Herkenning van defecte accu's
• Aanduiding onjuist ingelegde (omgepoolde) accu's
• Gedetailleerde statusindicatie
• Druppellading bij NiMH-accu's
• Ontladingsfunctie en capaciteitsmeting
• Instelbare laadstroom
• 5 V USB-aansluiting, max. 2 A
BEDIENING
Gemakkelijk opladen
1. Verbind de kabel van de netvoedingadapter met de daarvoor
bestemde aansluiting van de oplader.
2. Verbind de netvoedingadapter met een daarvoor geschikt
stopcontact.
3. Schuif het laadcontact naar achteren en leg de accu met de juiste
polariteit (minpool (-) tegen het oplaadcontact) in het laadvak.
4. Als u verder niets wilt instellen, begint het product na 8 seconden
met het opladen met een laadstroom van 500 mA.
5. Als de accu volledig is opgeladen, verschijnt op het beeldscherm
de indicatie END.
6. Verwijder de accu en ontkoppel het product van het
elektriciteitsnet.
Deutsch | English | Français | Español | Português
Svenska | Italiano | Nederlands
61

Verdere functies
Tip: Als u voor een aantal verschillende accu's dezelfde modus wilt
kiezen, plaats dan eerst de accu's in het product en sluit daarna de
netvoedingadapter aan. Stel daarna het product in. Deze instellingen
gelden voor alle laadvakken die een accu bevatten. U kunt echter ook
in ieder laadvak een accu leggen en die dan apart instellen.
• Na het inleggen van de accu heeft u 8 seconden de tijd om modus
en sterkte van de laadstroom te kiezen.
• De ingestelde modus en de sterkte van de laadstroom worden
telkens door een pijl aan de rand van het beeldscherm aangegeven.
Als de pijlen knipperen, kunt u de instellingen uitvoeren.
• De modus wordt gestart als er gedurende 8 seconden niet op een
toets wordt gedrukt en de pijlen aan de rand van het beeldscherm
continu branden.
• Als u daarna veranderingen wilt aanbrengen:
− Ga met behulp van de toets CHANNEL naar het betreffende
laadvak.
− Houd toets MODE 4 seconden lang ingedrukt tot de pijlen
knipperen.
Tip: De tot dat moment getoonde waarden (mAh-teller en klok)
worden op 0 teruggezet.
Toetsenfuncties
Toets Functie
MODE Modus wijzigen
CHANNEL
CURRENT Sterkte laadstroom wijzigen
USB-aansluiting
• De USB-aansluiting dient als stroombron met 5 V en max. 2000 mA.
• De USB-aansluiting en de laadvakken kunnen tegelijkertijd gebruikt
worden.
Status voor het volgende laadvak tonen
Tip: Alleen die laadvakken kunnen worden getoond, die
ook inderdaad een accu bevatten.
62
Deutsch | English | Français | Español | Português
Svenska | Italiano | Nederlands

LAADSTROOM
Tip: De maximale laadstroom per vak is afhankelijk van het aantal
vakken die een accu bevatten.
Bezette laadvakken Max. laadstroom per laadvak
1-2 2000 mA
3 1500 mA
4 1000 mA
Tip: Wij bevelen aan, als er genoeg tijd voor is, om accu’s op te laden
met een laadstroom van 500/1000 mA. Zo voorkomt u overmatige
opwarming en spaart u de accu.
Let op: Als grondregel geldt: De sterkte van de oplaadstroom mag niet
groter zijn dan de grootte van de accucapaciteit.
Voorbeeld: Accucapaciteit 1400 mAh - oplaadstroom 1000 mA
MODUSSEN
CHARGE
Accu opladen. Als de accu volledig is opgeladen, verschijnt op het
beeldscherm de indicatie END.
DISCHARGE
Accu ontladen. Als de accu volledig is ontladen, verschijnt op het
beeldscherm de indicatie END.
Tip: De ontlaadstroom kan niet groter zijn dan 500 mA.
TEST
Accucapaciteit bepalen en daarna de accu opladen (laden - ontladen
- laden). Na de tweede keer opladen verschijnt op het beeldscherm
de aanduiding END. De meting is afgerond en de accu is volledig
opgeladen.
Tip: Voor het opladen kunt u zelf de laadstroom kiezen.
Meetwaarde: De stroomsterkte wordt alleen tijdens het ontladen
gemeten. De mAh-teller geeft de grootte aan van de accucapaciteit .
Deutsch | English | Français | Español | Português
Svenska | Italiano | Nederlands
63
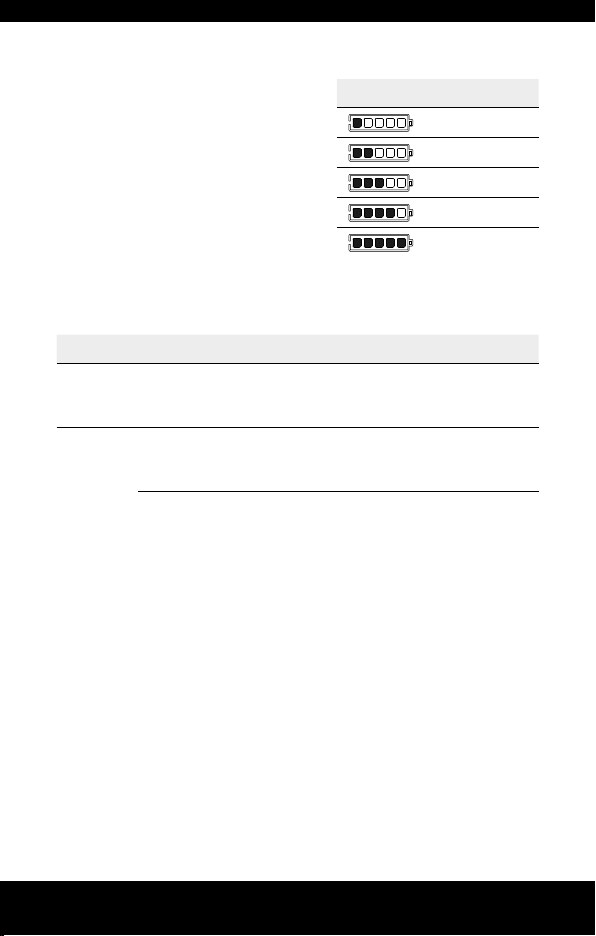
INDICATOREN
• De klok geeft de tijd aan die de
modus al actief is.
• De mAh-teller geeft aan welk deel
van de lading al gebruikt is.
• De spanningsaanduiding geeft
de spanning van de accu op dat
moment aan.
Tip: Als er 30 seconden lang niet
op een knop is gedrukt, dooft de
achtergrondverlichting van het
beeldscherm.
Indicatie Laadtoestand
ca. 0-20 %
ca. 20-40 %
ca. 40-60 %
ca. 60-80 %
ca. 80-100 %
PROBLEEMOPLOSSING
Indicatie Mogelijke oorzaak Oplossing
null
Err
De accu wordt niet
herkend/er is geen
accu geplaatst.
De accu is defect. LiIon <2 V,
NiMH/NiCd <0,2 V
De accu is onjuist
(omgepoold) ingelegd.
Plaats de accu opnieuw in het
laadvak.
Lever de accu in bij een
verzamelplaats.
Plaats de accu andersom in
het laadvak.
VERZORGING EN ONDERHOUD
Schoonmaken
• Onderbreek voor iedere schoonmaakbeurt de stroomvoorziening
van het product en verwijder alle accu’s.
• Gebruik voor het schoonmaken uitsluitend een zachte, droge of
licht vochtige doek (indien nodig met toevoeging van een beetje
mild schoonmaakmiddel). Gebruik voor het schoonmaken in ieder
geval nooit schuur- op oplosmiddelen.
64
Deutsch | English | Français | Español | Português
Svenska | Italiano | Nederlands

TECHNISCHE GEGEVENS
Oplader
Stroomvoorziening ............................................ 12 V
Beschermingsklasse .........................................II
USB-uitgang .......................................................5 V, max. 2000 mA
Laadvakken ........................................................4
Laadstroom ........................................................500/1000/1500/2000 mA
Ontlaadstroom ...................................................500 mA
Druppellaadstroom ............................................25 mA
Netvoedingadapter
Voeding ...............................................................100-240 V~, 50-60 Hz
Uitgang ...............................................................12 V
Beschermingsklasse .........................................II
Geschikte accutypes
Max. aantal Type (Li-Ion)
2 32650 (beperkt door grootte)
26650, 26500, 25500, 22650, 22500, 21700, 20700
3
(beperkt door grootte)
18700, 18650, 18500, 18490, 18350, 17670, 17650,
17500, 17350, 16650, 16500, 16340 (RCR123A), 14650,
4
14500, 14430, 14350, 13650, 13500, 13450, 12650,
12500, 12340, 10500, 10440, 10350, 10340
Max. aantal Type (NiMH/NiCd) Max. capaciteit
2 Mono D
4 Mignon AA/ Micro AAA
, max. 3000 mA
, max. 3000 mA
12000 mAh3 Baby C
Deutsch | English | Français | Español | Português
Svenska | Italiano | Nederlands
65

VERWIJDERING
Gooi het product weg conform de wettelijke regelingen. Het
symbool "Afvalbak" duidt erop dat elektrische apparaten in
de EU niet met het normale huishoudelijk afval weggegooid
mogen worden. Gebruik de inleverings- en
inzamelingssystemen van uw gemeente of wend u tot de
bedrijven waar u het product hebt gekocht.
Batterijen en accu's bevatten waardevolle stoffen en
mogen niet met het normale huisvuil worden weggegooid.
Lever verbruikte batterijen en accu's in bij de daarvoor
bestemde inzamelpunten.
Zo vervult u uw wettelijke verplichtingen en draagt u bij tot de
bescherming van het milieu.
AANSPRAKELIJKHEIDSUITSLUITING
De informatie in deze gebruiksaanwijzing kan zonder aankondiging
vooraf gewijzigd worden. ANSMANN houdt zichzelf niet
verantwoordelijk voor directe, indirecte, toevallige of andere schade
of gevolgschade die ontstaat door onvakkundig onderhoud of door het
niet de hand houden aan de informatie in deze gebruiksaanwijzingen.
Bij onjuist gebruik van het product houden wij ons niet aansprakelijk
en zijn wij onontvankelijk voor garantie- of waarborgclaims.
GARANTIEBEWIJS
Op het apparaat bieden wij een driejarige garantie. Bij schade aan
het apparaat die ontstaat door het niet de hand houden aan de
gebruiksaanwijzing, vervalt de garantie.
Aan uw wettelijke aanspraak op schadevergoeding wordt hierdoor
geen afbreuk gedaan.
66
Het product voldoet aan de eisen van de EUrichtlijnen.
Deutsch | English | Français | Español | Português
Svenska | Italiano | Nederlands

Deutsch | English | Français | Español | Português
Svenska | Italiano | Nederlands
67

ANSMANN AG | Industriestrasse 10
97959 Assamstadt | Germany
Hotline: +49 (0) 6294 / 4204 3400
E-Mail: hotline@ansmann.de | www.ansmann.de
www.ansmann.de
V01 - 12/18
 Loading...