


•This Operators and Users Manual is in English.
•It contains important safety guidelines and Instructions.
•Should you be unsure at any stage, or unable to understand the contents within this manual you must seek expert advice.
•Le mode d’emploi est en Anglais.
•Il contient des instructions et mesures de sécurité importantes.
•En cas de doute, ou s’il vous est impossible de comprendre le contenu du monde d’emploi, demandez conseil à un expert.
•Este manual de (operarios y) usarios està en Inglés.
•Contiene importantes normas de seguridad e instrucciones.
•Si no esta seguro de algún punto o no entiende los contenidos de este manual debe conultar con un experto.
•Diese Bedienungsund Benutzeranleitung ist in Englisch.
•Sie enthält wichtige Sicherheitsrichtlinien und -bestimmungen.
•Sollten Sie sich in irgendeiner Weise unsicher sein, oder den Inhalt dieses Heftes nicht verstehen, lassen Sie siche bitte von einem Experten beraten.
© 2005WDP LTD.
WARNINGS
Important Safety Instructions & Guidelines |
2 |
|
|
OPERATING INSTRUCTIONS
Charging |
3 |
|
|
Switching On Your ANGEL |
3 |
|
|
Making the ANGEL Safe |
4 |
|
|
Switching Angel Eyes On/Off |
4 |
|
|
Propellant Air/Nitrogen Supply |
4 |
|
|
Macro Line Hose/Connector attachment |
5 |
|
|
Macro Line Hose removal and re-attachment |
5 |
|
|
Loaders (Hoppers) |
5 |
|
|
Soft Nose Bolt Removal & Rotor Breech |
5 |
|
|
Velocity Adjustment |
6 |
|
|
Twist Lock Feed Collar |
6 |
|
|
LCD MENUS
Basic Menu |
7 |
|
|
Menu – Fetch – Timer – Angel Eyes Test |
|
|
|
Advanced Menu |
7 – 8 |
MROF – Hopper (Loader) T Time – Hopper (Loader) A Time
Hopper (Loader) Type – Temperature – Vibrator – Trip – Backlight
SEND IR – ROF – MODE – Dwell – Cycles – ID – Trigger Offset
Internal Electronic Menus |
8 |
|
|
Factory Default Settings |
8 |
|
|
FIGURES
1 |
Basic & Advanced Menus |
9 |
|
|
|
2 |
Internal Menu |
10 |
|
|
|
3 |
Internal Text Programming |
10 |
|
|
|
4 |
Internal PIN Programming |
10 |
|
|
|
5 |
External PIN Lock/Unlock |
11 |
|
|
|
6 |
Game Timer Activation |
11 |
|
|
|
CONTENTS |
ANGEL G7 |
1 |
|
|
|
MAINTENANCE |
|
|
General Care and Cleaning |
12 |
|
|
|
|
General Assembly - Right Hand View |
12 |
|
|
|
|
General Assembly - Left Hand View |
13 |
|
|
|
|
Sub Assemblies |
13 |
|
|
|
|
Cutaway – Right Hand View |
14 |
|
|
|
|
Cutaway – Left Hand View |
14 |
|
|
|
|
Mini-Regulator Service |
15 |
|
|
|
|
Anti-Double Ball Detent Service |
15 |
|
|
|
|
Angel Eyes Service, Removal,Test & Replacement |
16 |
|
|
|
|
LPR Adjustment |
17 |
|
|
|
|
LPR Assembly Removal |
18 |
|
|
|
|
LPR Main Seal Replacement |
18 |
|
|
|
|
Exhaust Guide Removal |
19 |
|
|
|
|
Exhaust Valve Stem Removal |
19 |
|
|
|
|
Ram Removal |
20 |
|
|
|
|
OPTO Board |
21 |
|
|
|
|
Vernier Trigger Adjustments |
21 |
|
|
|
|
Vernier Trigger Wheel Removal |
22 |
|
|
|
|
Battery Removal |
23 |
|
|
|
|
Wiring Connections |
23 |
|
|
|
|
|
|
|
APPENDIX |
|
|
Fault Finding Table |
24 |
|
|
|
|
Useful Conversions |
24 |
|
|
|
|
Terms of Warranty - EEC/R.O.W Exc USA/CAN |
25 |
|
|
|
|
WDP Ltd. Express Warranty USA/CAN Only |
26 |
|
|
|
|
Updates |
27 |
|
|
|
|
Your Personal Details |
27 |
|
|
|
|
Notes |
28 |
|
|
|
|

2 |
ANGEL G7 |
WARNINGS |
Warnings: Important Safety Instructions & Guidelines |
WARNING |
ADHERE STRICTLY TO THESE AND ALL OTHER SAFETY INSTRUCTIONS AND GUIDELINES |
||
|
|||
WARNINGS FOR SAFE ANGEL HANDLING |
|
|
|
• The ANGEL is not a toy. |
|
• Do not fire the ANGEL with the pull knob in the unlocked position. |
|
• Careless or improper use, including failure to follow instructions and warnings |
• Never look into the barrel or breech area of the ANGEL whilst the marker is |
||
within this Operator Manual and attached to the ANGEL could cause death or |
switched on and able to fire. |
||
serious injury. |
|
• Never put your finger or any foreign objects into the paintball feed tube of the |
|
• Do not remove or deface any warnings attached to the ANGEL. |
ANGEL |
||
• Paintball industry standard eye/face/ear and head protection designed |
• Never allow pressurised gas to come into contact with any part of your body. |
||
specifically to stop paintballs and meeting ASTM standard F1776 (USA) or CE |
• Always switch off the ANGEL when not in use. |
||
standard (Europe) must be worn by user and any person within range. |
• Always fit a barrel blocking device to your ANGEL when not in use on the field |
||
• Must be at least 18 years of age to purchase the ANGEL. |
|||
of play. |
|||
• Persons under 18 years of age must have adult supervision when using or |
• Always remove all paintballs from the ANGEL when not in use on the field of |
||
handling the ANGEL. |
|
play. |
|
• Observe all local and national laws, regulations and guidelines. |
• The Twisted Lock Gated Feed™ is designed to retain a number of paintballs |
||
• Use only on professional paintball fields where codes of safety are strictly |
in the feed tube and breech area of the ANGEL Always ensure that these |
||
enforced. |
|
paintballs are removed from the ANGEL when it is not in use on the field of |
|
• Use compressed air/nitrogen gas only. Do not use CO2. |
play. |
||
• Do not exceed 850 psi (58 bar) input pressure. |
• Always remove the first stage regulator and relieve all residual gas pressure |
||
• Always follow instructions, warnings and guidelines given with any first stage |
from the ANGEL before disassembly. |
||
• The ANGEL can hold a small residual charge of gas, typically 2 shots, with the |
|||
regulator you use with the ANGEL. |
|
||
• Use 0.68 calibre paintballs only. |
|
first stage regulator removed.Always discharge the marker in a safe direction |
|
|
to relieve this residual gas pressure. |
||
• Keep the ANGEL switched off until ready to shoot. |
|||
• Always remove first stage regulator and all residual gas pressure from the |
|||
• Treat every marker as if it is loaded. |
|
||
|
ANGEL for transport and storage. |
||
• Never point the ANGEL at anything you do not intend to shoot. |
|||
• Always follow warnings and guidelines given with your first stage regulator for |
|||
• Do not shoot at persons at close range. |
|
||
|
safe transport and storage. |
||
• Do not shoot at fragile objects such as windows. |
• Only charge the ANGEL using the charger supplied. |
||
• Always measure your markers velocity before playing paintball, using a suitable |
• Only use 12 Volt negative earth vehicles as a power supply for the charger. |
||
chronograph. |
|
• Do not leave the ANGEL unattended whilst charging. |
|
|
|
||
• Never shoot at velocities in excess of 300 feet (91.44 meters) per second, or |
• Always store the ANGEL in a secure place. |
|
at velocities greater than local or national laws allow. |
||
• THIS OPERATOR MANUAL MUST ALWAYS ACCOMPANY THE PRODUCT IN THE |
||
• Do not fire the ANGEL with the breech open or without the bolt in the breech, |
||
EVENT OF RESALE OR NEW OWNERSHIP. |
||
as high pressure gas will be emitted. |
||
• SHOULD YOU BE UNSURE AT ANY STAGE YOU MUST SEEK EXPERT ADVICE. |
||
|
© 2005WDP LTD.

Charging – Switching On Your ANGEL |
OPERATION |
ANGEL G7 |
3 |
CHARGING
ADHERE STRICTLY TO THESEWARNING AND ALL OTHER SAFETY
INSTRUCTIONS AND GUIDELINES
•Ensure a barrel blocking device is fitted to theANGEL.
•Ensure the hopper is removed from theANGEL.
•Ensure that there are no paintballs in the ANGEL.
•Ensure the ANGEL is switched off via the isolating switch at the rear of the marker prior to fitting your first stage regulator.
•Paintball industry standard eye/face/ear and head protection designed specifically to stop paintballs and meetingASTM standard F1776 (USA) or CE standard (Europe) must be worn by user and any person within range.
Before initial use of theANGEL,it is necessary to give the power pack a full charging cycle of 4 hours prior to use as this will ensure a long life for the power pack.
Subsequent charges will be in the region of 3 hours for a full charge, the electronics will control the charging cycle and ensure that your battery is fully charged.
The ANGEL may be left charging for prolonged periods without damage occurring to the battery pack.
•A full charge will give sufficient power for approximately 150,000 consecutive shots.
•A 1-hour charge at 12.5V DC will give sufficient power for approximately 40,000 consecutive shots.
The ANGEL will continue to use power whilst it is switched ON.
To save the charge the isolator switch must be switched OFF to isolate the battery.
We recommend the isolating switch be placed in the OFF position when the ANGEL is in storage, transit or not in use.
•Insert cigar lighter adaptor into a negative earth socket as found in most motor vehicles (red light on charger will illuminate to indicate that power is present).
•Insert remote plug from charger into the socket on the rear of the ANGEL. The socket is located on the rear of the grip frame under a rubber protection grommet.
•Ensure the isolator switch is in the ON position at the rear panel of the ANGEL. See SWITCHING ON YOUR ANGEL - right.
•The LCD on the ANGEL display will indicate the status of the charging cycle, the bar graph segments on the display will cascade to indicate charge is being taken.
•When a full charge has been taken the bar graph segments will remain illuminated.
•Removal of the charger before a full charge cycle has been completed will result in a short charge.
•Unplug the charger from the ANGEL and replace the rubber grommet cover on the rear of the grip frame to prevent the entry of dirt or debris.
IMPORTANT NOTES: For Battery Charging
•Should the ANGEL be “LIVE” the insertion of the charger will make the ANGEL “SAFE” and unable to fire and removal of the charger will cause the marker to remain in this state until the ANGEL is made “LIVE” again by pressing the red button on the back of the grip frame for 2 seconds.
•Supply voltage must be minimum 12V DC, maximum 24V DC, negative earth.
•The isolator ON/OFF switch on the back of the ANGEL must be in the ON position to charge the battery.
•The battery must be plugged into the circuit board.
•Removal of the charger before a full charge cycle has been completed will result in a short charge. Check your vehicle handbook for voltage and current capabilities prior to use.
•Use only the charger supplied for charging the ANGEL.
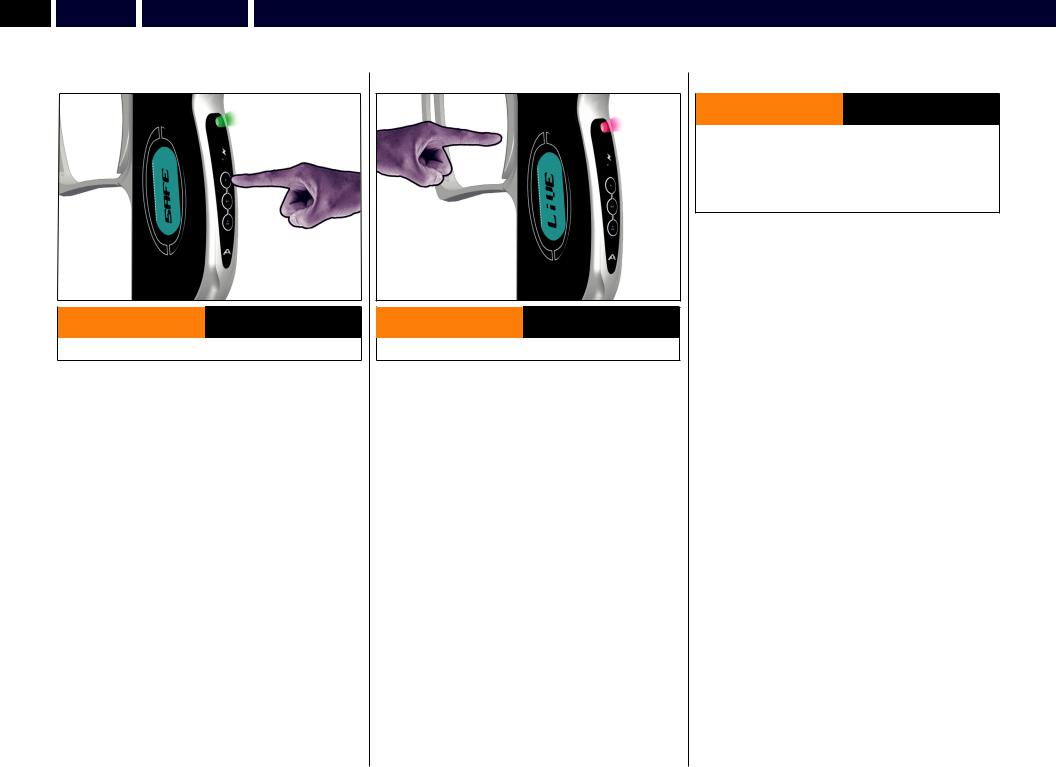
SWITCHING ON YOUR ANGEL
ON |
|
OFF |
|
|
|
ADHERE STRICTLY TO THESEWARNING AND ALL OTHER SAFETY
INSTRUCTIONS AND GUIDELINES
•Ensure a barrel blocking device is fitted to the ANGEL.
•Ensure the hopper is removed from the ANGEL.
•Ensure that there are no paintballs in theANGEL.
•Ensure theANGEL is switched off via the isolating switch at the rear of the marker prior to fitting your first stage regulator.
•Paintball industry standard eye/face/ear and head protection designed specifically to stop paintballs and meeting ASTM standard F1776 (USA) or CE standard (Europe) must be worn by user and any person within range.
•Ensure the battery is charged.
•Rotate the breech release lever clockwise to gain access to the ON/OFF switch.
•Switch the isolator switch to the ON position.
•The LED on the rear of the grip frame will be Green.
•The LCD display will show software version and will be “LIVE’.
•To make the Angel enter into “SAFE” either turn the isolator switch OFF or press and hold the top button for 1.5 seconds the display will now show “SAFE”.
© 2005WDP LTD.
4 |
ANGEL G7 |
OPERATION |
Making the ANGEL Safe – Switching ANGEL Eyes On/Off – Propellant Air/Nitrogen Supply |
MAKING THE ANGEL SAFE
Depress top button for 1 sec
ADHERE STRICTLY TO THESEWARNING AND ALL OTHER SAFETY
INSTRUCTIONS AND GUIDELINES
•THE ANGEL IS LIVEAND CAPABLE OF DISCHARGING.
•Ensure the ANGEL is switched ON. See SWITCHING ON YOUR ANGEL - Page 3.
•Press the top button on the rear of the grip frame for 1 second until the LED on the rear of the frame turns Red and the LCD displays ‘SAFE’.
MAKING THE ANGEL SAFE
Press and hold the top button on the rear of the grip frame for 2 seconds until the display indicates ‘SAFE’, alternatively switch the ANGEL OFF via the isolator switch on the rear of the ANGEL.
LED INDICATOR STATUS ON THE REAR OF THE FRAME
•NO LED = No charge present or isolator switch is OFF.
•GREEN CONSTANTLY ON = SAFE mode.
SWITCHING ANGEL EYES ON/OFF
Red light will stop blinking when eyes are ‘OFF’
When Angel is LIVE pull and hold trigger for 2 sec
ADHERE STRICTLY TO THESEWARNING AND ALL OTHER SAFETY
INSTRUCTIONS AND GUIDELINES
•THEANGEL IS LIVE AND CAPABLE OF DISCHARGING.
•Ensure the ANGEL is switched ON. See SWITCHING ON YOUR ANGEL - Page 3.
•As default the Angel Eyes will always be ON whenever the ANGEL is made LIVE.
•The Angel Eyes can only be switched off by pulling and holding the trigger in for 2 seconds.
•In modes 2 to 5 and Demo, the Angel Eyes cannot be switched off.
•To switch the Angel Eyes back on whilst the ANGEL is LIVE you may either switch the ANGEL OFF and ON via the isolator switch and then make the ANGEL LIVE by pressing the top button, or alternatively make the ANGEL SAFE then LIVE.
LED INDICATOR STATUS ON THE REAR OF THE FRAME
•RED CONSTANTLY ON = LIVE mode,ANGEL EYES OFF.
•RED SLOWLY FLASHING = LIVE mode,ANGEL EYES ON.
PROPELLANT AIR / NITROGEN SUPPLY
ADHERE STRICTLY TO THESEWARNING AND ALL OTHER SAFETY
INSTRUCTIONS AND GUIDELINES
•Always follow the instructions,warnings and guidelines given with any first stage regulator you use with the ANGEL.
•Use compressed air/nitrogen gas only DO NOT USE CO2.
•Only use a paintball regulator that has been designed for air or nitrogen gas.
•Do not exceed 850 psi (58bar) input pressure to theANGEL.
•SHOULD YOU BE UNSUREAT ANY STAGEYOU MUST SEEK EXPERT ADVICE.
The ANGEL is designed to operate on air/nitrogen gas.This needs to be supplied to the ANGEL at an ideal regulated pressure of 400 psi (27.5 BAR) using a suitable first stage paintball regulator, such as the ANGEL A.I.R.
© 2005WDP LTD.
Macro Line Hose – Loaders – Soft Nose Bolt Removal & Rotor Breech |
OPERATION |
ANGEL G7 |
5 |
MACRO LINE HOSE
11
22
ADHERE STRICTLY TO THESEWARNING AND ALL OTHER SAFETY
INSTRUCTIONS AND GUIDELINES
•All gas pressure must be relieved from theANGEL and second stage regulator prior to the Macro Line hose removal.
•The ANGEL can hold a small residual charge of gas,typically 2 shots with the first stage regulator removed.Always discharge the marker in a safe direction to relieve this residual gas pressure.
•The Macro Line hose must be cut back cleanly and square prior to re-attachment to ensure secure fitment.
MACRO LINE HOSE / CONNECTOR REPLACEMENT
•Connect the Macro Line connector to your first stage regulator outlet port using a suitable wrench or spanner.
•If necessary shorten the Macro Line hose using a sharp knife to the required length to suit your ANGEL and first stage regulator set up.
•Push the free end of the hose firmly into the Macro Line connector attached to the ANGEL second stage regulator.
REMOVAL & RE-ATTACHMENT
•The Macro Line hose may be removed from the Macro Line connectors to facilitate maintenance.
•Pull back the collet 1on the connector and keep the collet depressed.
•Pull the Macro Line hose 2out of the connector firmly.
•Cut back the Macro Line hose cleanly and square.
•Push the hose firmly into the Macro Line connector to re-attach.
LOADERS (HOPPERS)
The ANGEL has been designed to work with all existing loaders and intelligently self adjusts its program to suit the loaders feed rates for the type of loader selected from the Advanced Menu - see page 7, but there are some important things to remember about loaders:
•The Angel Eyes system will shoot paint as fast as your loader is capable of feeding in combination with trigger pulls.
•Some loaders, particularly those with a reflective eye system DO NOT correctly sense twin skin, marbleized or dark coloured paintballs, and as such, these loaders are capable of breaking or cracking paintballs before they are even loaded into the ANGEL.
•All loaders should only be used with fresh batteries.
•It is also essential that the loader and its optical system is kept clean at all times.
•Force fed loaders, due to the nature of their design are less tolerant of fragile and poor quality paint, causing breaks in the loader, and feed stack before they are loaded into the ANGEL.
•Some loaders are not capable of sustained feed rates and you will be able to outshoot the loader, causing the Angel Eyes to wait for verification of a paintball before commencing the firing cycle.
•Poorly maintained or damaged loaders will impair the performance capability of the ANGEL.
•To maximise the performance of the ANGEL,WDP recommends only using reliable enhanced feed loaders.
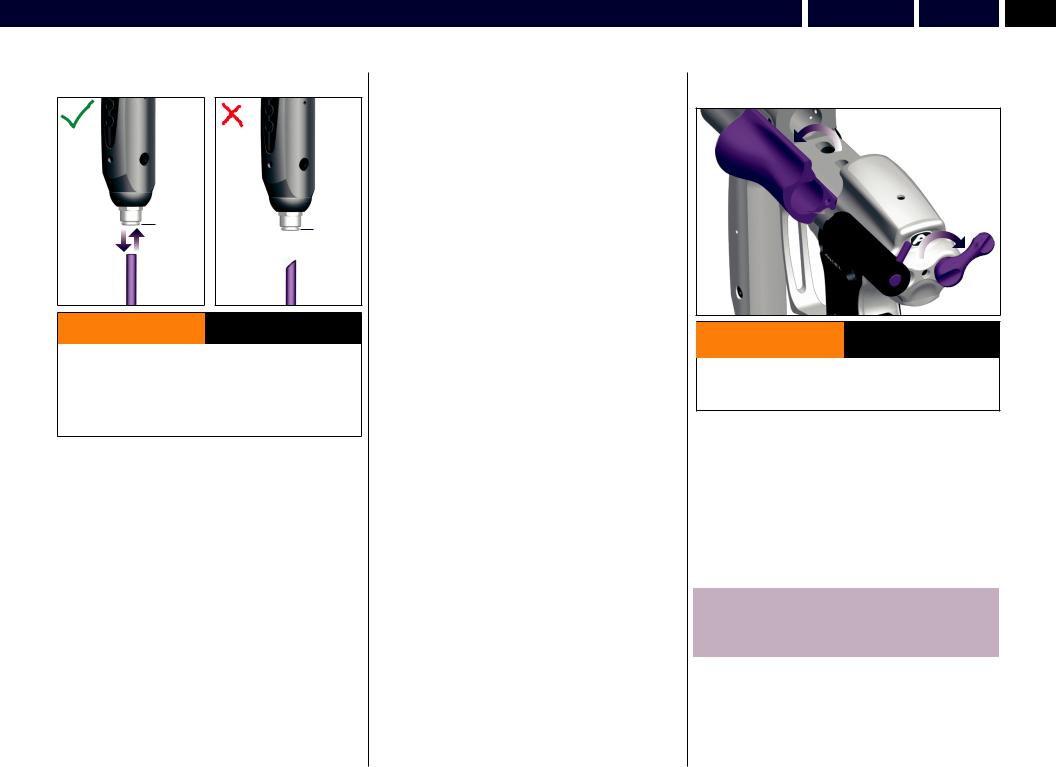
SOFT NOSE BOLT REMOVAL & ROTOR BREECH
2
1
3
ADHERE STRICTLY TO THESEWARNING AND ALL OTHER SAFETY
INSTRUCTIONS AND GUIDELINES
•Do not fire the ANGEL with the breech open or without the bolt in the breech, as high pressure gas will be emitted.
•Do not fire the ANGEL with the BREACH RELEASE LEVER in the unlocked position.
The bolt is manufactured from aluminium and plastic with the wear surfaces being plastic, this is to ensure – due to its high operating speeds – it does not seize within the body. Eventually this will show signs of wear dependent on usage and its environment of use.
It is important that the bolt is kept clean and free of dirt or grit as this will cause accelerated wear.We recommend that you clean your bolt after each day of play.
•Bolt removal is best achieved whilst the angel is gassed up as this ensures the ram is in the rearward position.
•Ensure the ANGEL isolator switch is in the OFF position or the ANGEL is in SAFE mode.
•Rotate the breech release 1lever clockwise until it stops.
•Swing out the Rotor Breech block 2so that the bolt is exposed.
NOTE:The breech will not open when the Angel is degassed and the bolt is in the forward position.
If the bolt is in the forward position even if the breech lock lever has been rotated either ensure the Angel is gassed up or push the bolt back with a squeegee.
•Extract the bolt 3by pulling rearwards.
•To replace the bolt follow the stages in reverse order.
© 2005WDP LTD.

6 |
ANGEL G7 |
OPERATION |
Velocity Adjustment – Twist Lock Feed Collar |
VELOCITY ADJUSTMENT
ADHERE STRICTLY TO THESEWARNING AND ALL OTHER SAFETY
INSTRUCTIONS AND GUIDELINES
•THEANGEL IS LIVE AND CAPABLE OF DISCHARGING.
•Paintball industry standard eye/face/ear and head protection designed specifically to stop paintballs and meetingASTM standard F1776 (USA) or CE standard (EU) must be worn by user and any person within range.
•Always measure your markers velocity before playing paintball, using a suitable chronograph.
•Never shoot at velocities in excess of 300ft (91.44 meters) per second,or at velocities greater than local or national laws allow.
DECREASING VELOCITY
The velocity adjusting screw is located on the lower portion of the front grip.
•To decrease the velocity, insert a 3.0mm A/F Allen key and rotate CLOCKWISE.
•The new input pressure to the ANGEL may be observed from the micro pressure indicator on the flash tank.
INCREASING VELOCITY
The velocity adjusting screw is located on the lower portion of the front grip.
•To increase the velocity, insert a 3.0mm A/F Allen key and rotate ANTI-CLOCKWISE.
•The new input pressure to the ANGEL may be observed from the micro pressure indicator on the flash tank.
IMPORTANT NOTE:
•When reducing velocity, allow four shots for the complete system to be at the new regulated pressure.
TWIST LOCK FEED COLLAR
3
2
1
The Twist Lock Feed Collar is a dual feature that retains your loader securely to the ANGEL. and provides shock absorbency
TWIST LOCK COLLAR
•To secure your loader, first ensure the Twist Lock collar is backed off by rotating it counter-clockwise.
•Insert the loader into the feed neck and rotate the Twist Lock collar clockwise to secure the loader.
To Remove your loader ensure that the Twist Lock collar is backed of by rotating counter clockwise.
• Should you need to dismantle the Twist Lock feed collar for cleaning ensure re-assembly is in the order shown above.
© 2005WDP LTD.

Dual External LCD Menus in Safe Mode: Basic Menu – Advanced Menu |
LCD MENUS |
ANGEL G7 |
7 |
DUAL EXTERNAL LCD MENUS IN SAFE MODE
– BASIC MENU
ADHERE STRICTLY TO THESEWARNING AND ALL OTHER SAFETY
INSTRUCTIONS AND GUIDELINES
•Ensure a barrel blocking device is fitted to theANGEL.
•Ensure the hopper is removed from theANGEL.
•Ensure that there are no paintballs in the ANGEL.
FEATURE |
MENU |
EXTERNAL |
EXTERNAL |
PARAMETER |
|
ALLOCATION |
VIEW |
ADJUST |
|||
|
|
||||
MENU |
BASIC |
YES |
YES |
Basic/Adv |
|
FETCH |
BASIC |
YES |
YES |
ON/OFF |
|
TIMER |
BASIC |
YES |
YES |
0.5-30min |
|
A1 |
BASIC |
YES |
YES |
0.5-30min |
|
A2 |
BASIC |
YES |
YES |
0.5-30min |
|
A3 |
BASIC |
YES |
YES |
0.5-30min |
|
ANGEL EYE TEST |
BASIC |
NO |
YES |
Pass/Fail |
VIEWABLE EXTERNAL MENU
The ANGEL has a number of features that may only be adjusted or viewed on the LCD screen.The menu that is displayed can be split into two main categories - Basic and Advanced.There is a division between basic and advanced menus.As default, the menu divisions are factory set.
•This is a basic viewing menu that is designed for speed of use and allows you to quickly view basic menu items; these are settings for the items you are most likely to use whilst at a tournament.
•Any menu items that may change the performance of the ANGEL CANNOT be adjusted externally e.g. Dwell,Trigger Offset and Mode.
FACTORY DEFAULT BASIC MENU SETTINGS MENU
Allows you to select either Basic or Advanced menu options.
FETCH
Allows you to put your ANGEL in receiver mode so that it will receive data/ settings transmitted from other ANGEL markers or PDA’s.
TIMER, A1, A2, A3 FEATURE
This is a fully interactive game timer with 3 independent alarms and will allow you and your team members to play in unison.The timer may be set in 30 second increments from 0 to 30 minutes.The 3 independent alarms may also be set in 30 second increments giving you a very versatile game timer and alarm system. Once the alarms are set they will be activated by the first trigger pull after making the ANGEL LIVE.
ANGEL EYE TEST FEATURE – Whilst the ANGEL is in SAFE Mode.
•From the Basic or Advanced menu select Angel Eyes Test option using the middle button externally or the blue button internally.
•Press the bottom button externally and the display will show ‘dropB’.
•Drop a paintball into the breech.
•When the paintball is detected the display will show ‘PASS’.
•Failure to obtain the ‘PASS’ message is an indication that the Angel Eyes need cleaning or servicing.
DUAL EXTERNAL LCD MENUS IN SAFE MODE
– ADVANCED MENU
ADHERE STRICTLY TO THESEWARNING AND ALL OTHER SAFETY
INSTRUCTIONS AND GUIDELINES
•Ensure a barrel blocking device is fitted to the ANGEL.
•Ensure the hopper is removed from theANGEL.
•Ensure that there are no paintballs in theANGEL.
FEATURE |
MENU |
EXTERNAL |
EXTERNAL |
PARAMETER |
|
ALLOCATION |
VIEW |
ADJUST |
|||
|
|
||||
MENU |
ADV & BASIC |
YES |
YES |
Basic/Adv |
|
FETCH |
ADV & BASIC |
YES |
YES |
ON/OFF |
|
TIMER |
ADV & BASIC |
YES |
YES |
0.5-30min |
|
A1 |
ADV & BASIC |
YES |
YES |
0.5-30min |
|
A2 |
ADV & BASIC |
YES |
YES |
0.5-30min |
|
A3 |
ADV & BASIC |
YES |
YES |
0.5-30min |
|
ANGEL EYE TEST |
ADV & BASIC |
NO |
YES |
Pass/Fail |
|
MROF |
ADVANCED |
YES |
YES |
8-25bps |
|
Hopper T Time |
ADVANCED |
YES |
YES |
0.01-1.0 Secs |
|
Hopper A Time |
ADVANCED |
YES |
YES |
1-4 Shots |
|
Hopper Type |
ADVANCED |
YES |
YES |
1-16 Levels |
|
TEMP |
ADVANCED |
YES |
YES |
°C / °F |
|
VIBRATOR |
ADVANCED |
YES |
YES |
ON/OFF |
|
TRIP |
ADVANCED |
YES |
YES |
Re-Zero |
|
BACKLIGHT |
ADVANCED |
YES |
YES |
ON/OFF |
|
SEND |
ADVANCED |
YES |
YES |
ON/OFF |
|
ROF |
ADVANCED |
YES |
YES |
Re-Zero |
|
MODE |
ADVANCED |
YES |
NO |
Where Applicable |
|
DWELL |
ADVANCED |
YES |
NO |
9-20m/s |
|
TRIGGER OFFSET |
ADVANCED |
YES |
NO |
1-20 Levels |
|
CYCLES |
ADVANCED |
YES |
NO |
Non-Resetable |
|
ID |
ADVANCED |
YES |
NO |
Non-Resetable |
VIEWABLE EXTERNAL MENU
•This is an advanced viewing menu that allows you to view the full menu for the items you are most likely to use whilst setting up your ANGEL.
•Any menu items that may change the performance of the ANGEL CANNOT be adjusted externally e.g. Dwell,Trigger Offset and Mode.
FACTORY DEFAULT ADVANCED MENU SETTINGS
In addition to the seven items in the Basic menu, the Advanced menu contains the following:
MROF
This allows you to tune your maximum rate of fire whilst the Angel Eyes modes are OFF.The MROF should not be set greater than your loader is capable of delivering.When the Angel Eyes are switched OFF the MROF is capped at 15.
HOPPER (LOADER) T TIME FEATURE
This allows the user to set the hopper (loader) activation time and is settable from 0.1 to 2.0 seconds.This is the time period that the intellifeed will supply a signal output for the hopper (loader).
HOPPER (LOADER) A ACTIVATION FEATURE
This allows the user to set the hopper (loader) activation point and can be set to activate on the following;
A1 = Activates on every shot
A2 = Activates of a ROF of 2 shots or greater A3 = Activates of a ROF of 3 shots or greater A4 = Activates of a ROF of 4 shots or greater
HOPPER (LOADER) TYPE
This allows you to select the correct Angel Eye settings for the type of loader that you are using. Once you have selected the correct setting the Angel Eyes program will intelligently adjust itself to the variable speeds of your loader.
1-4 = 9v Agitator type loaders 5-8 = 12-18v Agitator type loaders 9-12 = Force-fed type loaders
13-16 = Only Very Fast force-fed type loaders (Ensure that your loader is at maximum performance and reliability otherwise you may encounter problems
related to the loader)
TEMP FEATURE
This allows you to select Fahrenheit or Centigrade and monitors the environmental temperature that the marker is exposed to.
VIBRATOR FEATURE
Should the game timer vibrator alarm function not be required this feature allows you to disable the vibrator.The game timer will still function with the vibrator disabled but no interactive alarms will activate.
TRIP FEATURE
This is a resettable shot counter that allows you to view the total number of shots you have fired, and can be referred to at any stage, eg. per game, per day or per event.
BACKLIGHT FEATURE
This allows you to switch the display backlight on/off.
SEND IR FEATURE
This allows you to switch on the infra red transmitter and be capable of transmitting infra red data to other ANGELs. SEND IR will transmit the Game Timer and its alarms information and will also switch on the vibrator and reset the trip meter.
ROF FEATURE
This will record your highest rate of fire achieved shooting your ANGEL.The data is constantly updated with the highest reading achieved should it exceed the previous readings to ensure that you record the latest data.You can reset this when necessary.
© 2005WDP LTD.
8 |
ANGEL G7 |
LCD MENUS |
Dual External LCD Menus in Safe Mode: Advanced Menu – Internal Electronic LCD Menus – Factory Default Setting |
MODE FEATURE
ADHERE STRICTLY TO THESEWARNING AND ALL OTHER SAFETY
INSTRUCTIONS AND GUIDELINES
•In certain countries local applicable laws or industry standards may mean certain modes may not be enabled or allowed.Check with law enforcement office,or local professional paintball venue.
•MODE 1: SEMI MODE WITH ANGEL EYES
The ANGEL Semi Mode with Angel Eyes works on the following principles:
•The Angel Eyes will default to ON whenever the ANGEL is made LIVE via the top button located at the rear of the frame.
•The ANGEL will only fire when a paintball is present.
•The Angel Eyes system is a break beam system that is not affected by colour, shape or finish of paintballs.
•The ANGEL’s MROF with Angel Eyes ON is limited to whatever MROF setting has been entered by the user.When the Angel Eyes are switched OFF the MROF is capped at 15.
•To switch the Angel Eyes OFF the trigger must be held down for 2 seconds.
•MODE 1: SEMI MODE
The ANGEL Semi Mode works on the following principles:
•In this mode the Angel Eyes are de-activated.
•The ANGEL will fire whether a ball is present or not.
•To activate the Angel Eyes after it has been switched off the ANGEL may either be switched OFF, then ON again or made SAFE then LIVE.
•The MROF with the Angel Eyes ON will be at whatever MROF you have previously set it to.
•MODE 2: AUTO MODE
The ANGEL Auto Mode works on the following principles:
•The Angel Eyes will default to ON whenever the ANGEL is switched ON via the SAFE LIVE top button located on the rear of the frame.
•This is full auto and will fire for as long as the trigger is held or until a paintball is not present.
•This mode is limited to a MROF of 15 balls per second.
•This mode will only work with Angel Eyes on and it cannot be deactivated.
•MODE 3: X-BALL 2005
The ANGEL X-ball 2005 3 Shot Burst Mode works on the following principles:
•The Angel Eyes will default to ON.
•This is a 3 shot bursts mode with the first 3 shot been fired in semi automatic only, on the 4th shot a maximum of 3 shots will be added per trigger pull.
•This mode is limited to a MROF of 15 balls per second when in semi or adding shots in.
•Once the eyes are deactivated the MROF will also have a maximum limit of 15 balls per second
•MODE 4: SEMI LIMITED TO MROF 15 BALLS/SECOND
•The ANGEL Semi Limited with Angel Eyes works on the following principles:
•The Angel Eyes will default to ON whenever the ANGEL is made LIVE via the top button located at the rear of the frame.
•The ANGELs MROF with Angel Eyes ON is capped at 15 BPS.
•To switch the Angel Eyes OFF the trigger must be held down for 2 seconds.
•The ANGELs MROF with Angel Eyes OFF is capped at 15 BPS.
•The ANGEL will fire whether a ball is present or not.
•To activate the Angel Eyes after it has been switched off the ANGEL may either be switched OFF, then ON again or made SAFE then LIVE.
•MODE 5: ACCUM MODE
The ANGEL Accumulator Mode works on the following principles:
•The Angel Eyes will default to ON.
•This is a BPS enhancer that will fire more balls than trigger pulls.
•This mode is limited to a MROF of 15 balls per second.
•This mode will only work with Angel Eyes on and it cannot be deactivated.
•DEMO MODE
This is a dry firing mode for firing the ANGEL when on display and is designed to demonstrate the rate of fire achievable. It should only be used for demonstration purposes, as the Angel Eyes feature is reverse functioned so that it cannot fire paintballs. Should a paintball be detected it will prevent the ANGEL from firing.
DWELL FEATURE
This controls the valve opening time. Longer Dwell will use more gas and will generate more noise but allows the ANGEL to be more tolerant to paintball variations. Shorter Dwell will generate less noise and use less gas but will not tolerate poor paint quality.
CYCLES FEATURE
This is the ANGEL equivalent of a milometer and will register the total shot count that the ANGEL has fired.
ID FEATURE
This is a unique serial number identification that is factory set.
ADHERE STRICTLY TO THESEWARNING AND ALL OTHER SAFETY
INSTRUCTIONS AND GUIDELINES
•Never adjust your trigger offset so finely that accidental discharge may occur due to shock loads or vibrations.
TRIGGER OFFSET FEATURE
This allows the user to set the trigger snubber and can be used to ensure that trigger bounce is reduced on triggers that have been set. It should be used to eliminate trigger bounce and not used to induce trigger bounce.The level of snubbing required will be dependent on the users setting of the mechanical adjustments of the trigger.The snubber will be automatically set to the highest level of protection on all non semi modes. It is the user’s responsibility to ensure that the setting they have selected does not cause accidental discharges.
Level 1 is the maximum trigger damping and increasing the level, reduces the damping.
INTERNAL ELECTRONIC LCD MENUS
ADHERE STRICTLY TO THESEWARNING AND ALL OTHER SAFETY
INSTRUCTIONS AND GUIDELINES
•Ensure a barrel blocking device is fitted to the ANGEL.
•Ensure the hopper is removed from the ANGEL.
•Ensure that there are no paintballs in theANGEL.
The ANGEL has a number of features that can be adjusted to suit your individual needs.These features can change the performance of your marker and are only adjustable via the internal menu.This is to ensure that they pass tournament and field operator requirements.
The settings you have selected may be viewed externally but cannot be adjusted externally.
The menus can only be accessed when the marker is switched ON and in SAFE. Remove left hand grip cover screws to expose the circuit board.
Follow the internal menu list diagrams for relevant settings.
The ANGEL has the unique feature that allows you to return to the factory defaults settings by pressing and holding the internal menu button for 2 seconds.
© 2005WDP LTD.

KEY
 Press Top Button
 Press Middle Button
 Press Bottom Button
BASIC/ADV MENU
1MENU
2FETCH
3TIMER
4ALARM 1
5ALARM 2
6ALARM 3
SUB MENU
Basic / Advanced Advanced includes Basic Items.
ON / OFF – If no signal detected, will default to OFF in 30 Secs.
Game Timer – 0.5 to 30 mins. Hold to return to 0:00
Icon will flash – 0.5 to 30 mins. Hold to return to 0:00
Icon will flash – 0.5 to 30 mins. Hold to return to 0:00
Icon will flash – 0.5 to 30 mins. Hold to return to 0:00
7 ANGEL EYE TEST |
Drop 1 paintball into breech. |
|
If detected, ‘PASS’ will be shown. |
||
|
BASIC TO 1 |
ADV TO 8 |
Figure 1: Basic & Advanced Menus LCD MENUS |
ANGEL G7 |
9 |
|
ADVANCED MENU |
SUB MENU |
|
ADVANCED MENU |
SUB MENU |
8 |
MROF |
Maximum Rate Of Fire |
15 |
BACKLIGHT |
On or Off |
8 to 30 bps |
|||||
|
|
|
|
9 HOPPER ‘T’ TIME
10HOPPER ‘A’ TIME
11HOPPER TYPE
12TEMPERATURE
13VIBRATOR
Hopper Motor Running Time
0.05 to 1.0 Seconds
Activates after each shot or after 2, 3 or 4 shot per/sec or greater.
Hopper (Loader) type: STD, MED FAST, SFAST
Centigrade or Fahrenheit
Vibes Game Alert
On or Off
14 |
TRIP |
Shot Counter |
|
Hold to return to zero |
|||
|
|
16 |
SEND |
IR Send - On/Off - If no signal, |
|
defaults to Off after 30 sec inactivity. |
|||
|
|
17 |
ROF |
Achieved Rate of Fire |
|
Hold to return to zero |
|||
|
|
18 MODE
Firing Mode
No External Access - see fig.2
19 DWELL
Valve Dwell
No External Access - see fig.2
20 TRIGGER OFFSET
Trigger Offset
No External Access - see fig.2
21 CYCLES
Total Shots
Non Resetable
TO 15 BACKLIGHT |
TO 1 MENU |
© 2005WDP LTD.
 Loading...