

Page 1
Ofrecido por www.electromanuales.com
Page 2
Ofrecido por www.electromanuales.com
1 Reading Before Proceeding
1.1 Safety Precautions
Please read the safety precautions carefully to ensure the correct use of your mobile phone.
Do not crash, throw, or puncture your mobile phone. Avoid the falling, squeezing,
and bending of your mobile phone.
Do not use your mobile phone in a moist environment, such as the bathroom.
Prevent your mobile phone from being soaked or washed in liquid.
Do not switch on your mobile phone when it is prohibited to use phones or when
the phone may cause interference or danger.
Do not use your mobile phone while driving.
Follow any rules or regulations in hospitals and health care facilities. Switch off
your mobile phone near medical apparatus.
Switch off your mobile phone in aircraft. The phone may cause interference to
control equipment of the aircraft.
Switch off your mobile phone near high-precision electronic devices. The phone
may affect the performance of these devices.
Do not attempt to disassemble your mobile phone or its accessories. Only
qualified personnel are allowed to service or repair the phone.
Do not place your mobile phone or its accessories in containers with a strong
electromagnetic field.
Do not place magnetic storage media near your mobile phone. Radiation from the
phone may erase the information stored on them.
Do not put your mobile phone in a high-temperature place or use it in a place with
flammable gas such as a gas station.
1
Page 3
Ofrecido por www.electromanuales.com
Keep your mobile phone and its accessories away from children. Do not allow
children to use your mobile phone without guidance.
Use only approved batteries and chargers to avoid the risk of explosions.
Observe any laws or regulations on the use of wireless devices. Respect others’
privacy and legal rights when using your wireless device.
Strictly follow the relevant instructions of this manual while using the USB cable.
Otherwise your mobile phone or PC may be damaged.
1.2 Legal Notice
Copyright © Huawei Technologies Co., Ltd. 2010. All rights reserved.
No part of this document may be reproduced or transmitted in any form or by any means without
prior written consent of Huawei Technologies Co., Ltd.
The product described in this manual may include copyrighted software of Huawei Technologies
Co., Ltd. and possible licensors. Customers shall not in any manner reproduce, distribute, modify,
decompile, disassemble, decrypt, extract, reverse engineer, lease, assign, or sublicense the said
software, unless such restrictions are prohibited by applicable laws or such actions are approved
by respective copyright holders under licenses.
Trademarks and Permissions
, , and are trademarks or registered trademarks of Huawei Technologies Co.,
Ltd.
Other trademarks and product, service and company names mentioned are the property of their
respective owners.
Notice
Some features of the product and its accessories described herein rely on the software installed,
capacities and settings of local network, and may not be activated or may be limited by local
network operators or network service providers. Thus the descriptions herein may not exactly
match the product or its accessories you purchase.
Huawei Technologies Co., Ltd. reserves the right to change or modify any information or
specifications contained in this manual without prior notice or obligation.
Huawei Technologies Co., Ltd. is not responsible for the legitimacy and quality of any products that
you upload or download through this mobile phone, including but not limited to the text, pictures,
music, movies, and non-built-in software with copyright protection. Any consequences arising from
the installation or usage of the preceding products on this mobile phone shall be borne by yourself.
2
Page 4

Ofrecido por www.electromanuales.com
NO WARRANTY
THE CONTENTS OF THIS MANUAL ARE PROVIDED “AS IS”. EXCEPT AS REQUIRED BY
APPLICABLE LAWS, NO WARRANTIES OF ANY KIND, EITHER EXPRESS OR IMPLIED,
INCLUDING BUT NOT LIMITED TO, THE IMPLIED WARRANTIES OF MERCHANTABILITY
AND FITNESS FOR A PARTICULAR PURPOSE, ARE MADE IN RELATION TO THE
ACCURACY, RELIABILITY OR CONTENTS OF THIS MANUAL.
TO THE MAXIMUM EXTENT PERMITTED BY APPLICABLE LAW, IN N O CASE SHALL HUAWEI
TECHNOLOGIES CO., LTD. BE LIABLE FOR ANY SPECIAL, INCIDENTAL, INDIRECT, OR
CONSEQUENTIAL DAMAGES, OR LOST PROFITS, BUSINESS, REVENUE, DATA,
GOODWILL OR ANTICIPATED SAVINGS.
Import and Export Regulations
Customers shall comply with all applicable export or import laws and regulations and will obtain all
necessary governmental permits and licenses in order to export, re-export or import the product
mentioned in this manual including the software and technical data therein.
3
Page 5
Ofrecido por www.electromanuales.com
2 Getting to Know Your Mobile Phone
2.1 Mobile Phone View
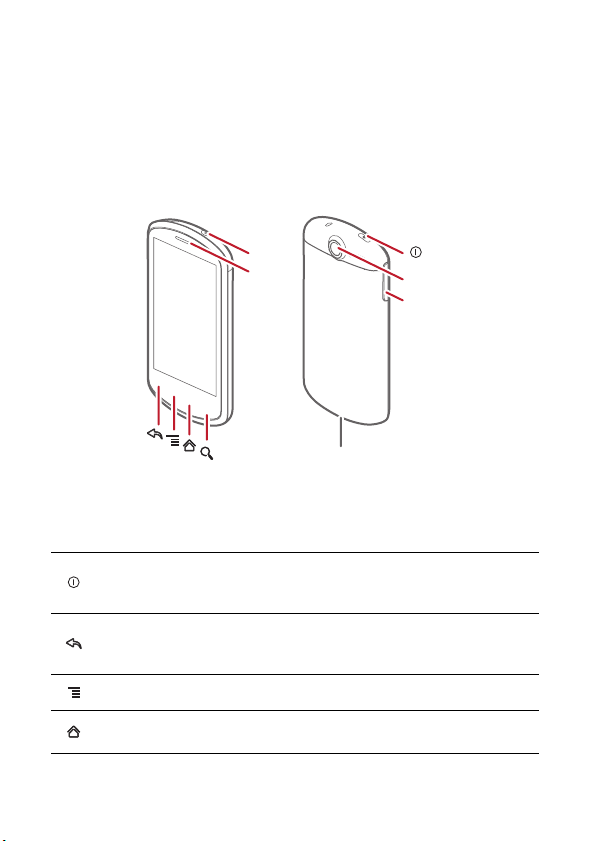
2.1.1 Phone at a Glance
■ Note:
All the pictures in this guide are for your reference only. The actual appearance and display
features depend on the mobile phone you purchase.
Headset
jack
Earpiece
Charge/Data port
■ Note:
If you apply protective film on the phone, please use the protective film with good transmittance.
2.1.2 Key Functions at Your Fingertips
• Press to power on your mobile phone.
• Press and hold to open the
• Press to lock the screen when your mobile phone is active.
• Touch to return to the previous screen.
• Touch to exit any application you are running.
• Touch to hide the keyboard.
Touch to open the menu on an active screen.
• Touch to return to the Home screen.
• Touch and hold to show the most recently used applications.
Phone options
menu.
Camera
Volume
key
4
Page 6
Ofrecido por www.electromanuales.com
• Touch to open Google search for searching your mobile phone and the web.
• Touch and hold to open Google search by voice.
2.2 Installing Your Mobile Phone
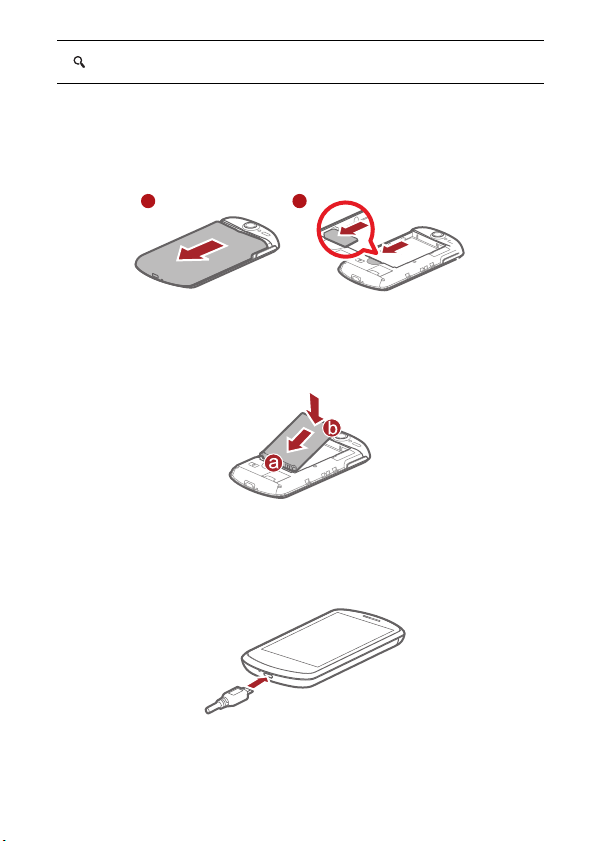
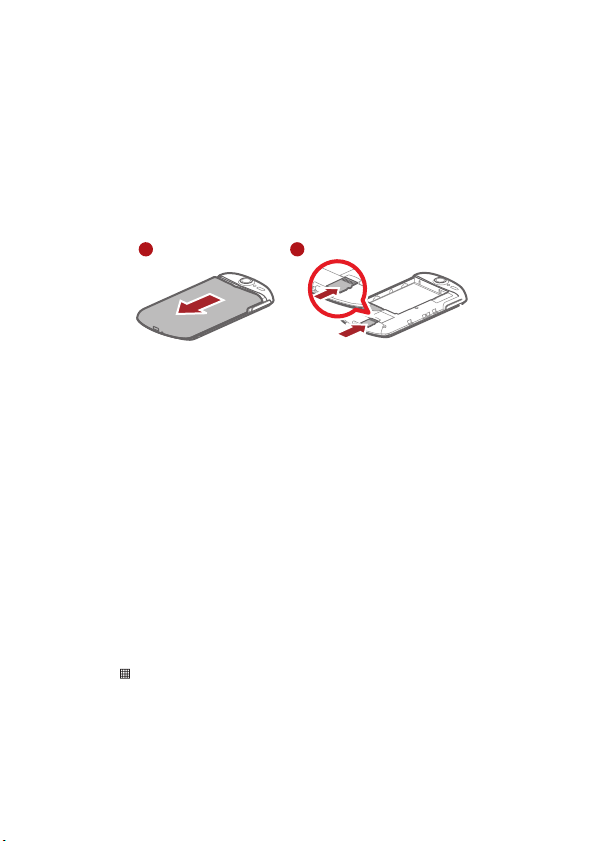
2.2.1 Installing the SIM Card
There are two steps to install the SIM card:
1 2
1. Remove the battery cover.
2. Insert the SIM card.
2.2.2 Installing the Battery
1. Angle the edge labeled a (with the contacts) into the bottom end of the battery slot.
2. Push down the edge labelled b until the battery clicks firmly into place.
2.2.3 Charging the Battery
Before charging the battery, ensure that it has been properly inserted into your phone.
1. Connect the USB cable that came with your mobile phone to the charger.
2. Connect the USB cable to your mobile phone. Then, plug in the connector of the charger to an
electrical outlet. The phone begins charging.
5
Page 7
Ofrecido por www.electromanuales.com
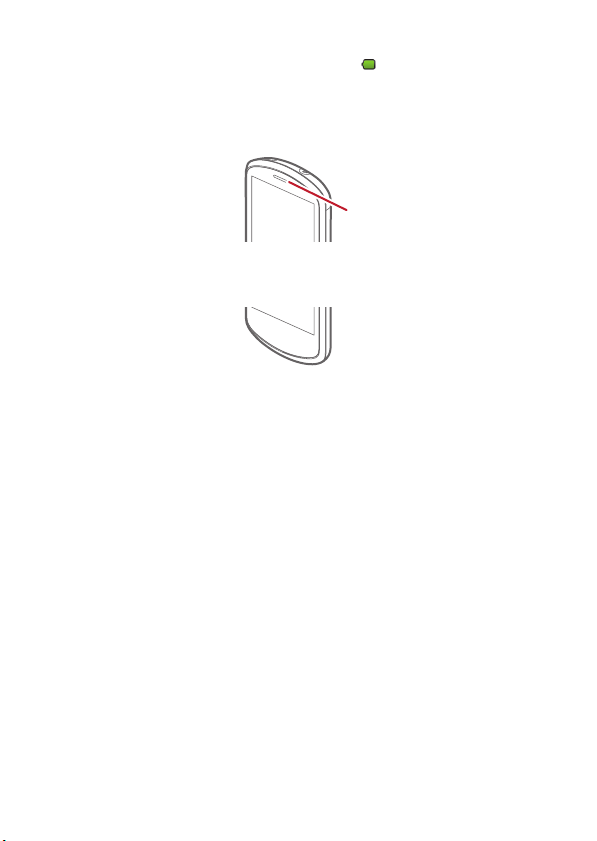
If your mobile phone is charged when it is powered on, the battery icon on the Notification bar
shows the charging status. When the battery icon changes to , it indicates that your mobile
phone is fully charged.
Status Indicator
The color of the status indicator tells the battery status of your mobile phone.
Status Indicator
Green: Fully charged (when connected to charger).
Orange: Charging in progress (when connected to charger).
Red: Battery low.
2.2.4 Important Information About the Battery
• If the battery has not been used for a long period of time, you may not be able to power on
your mobile phone immediately after you begin charging the battery. Allow the battery to
charge for a few minutes with the phone powered off before attempting to power on the phone.
• The battery will not hold a charge for the way it did when it was new. When the battery life
becomes noticeably shorter than usual after being charged properly, replace the battery with
a new one of the same type.
• Using data services increases demand on the battery and will reduce the length of time it can
hold a charge.
• The time required to charge the battery depends on the ambient temperature and the age of
the battery.
• When the battery is low on power, the phone plays an alert and displays a prompt. When
battery power is almost exhausted, your phone will power off automatically.
2.2.5 Battery Saving Tips
The longevity of battery power depends on the network that you connect to, and how you use your
mobile phone.
Try the following to conserve battery power:
• When you do not need 3G services, set your phone to connect to a 2G network.
• When your mobile phone is not in use, switch off the screen.
• Reset the time it takes for your screen light to switch off when you leave your phone idle.
• Lower the screen brightness.
6
Page 8

Ofrecido por www.electromanuales.com
• Use the AC adapter to plug your phone into an external power source whenever possible.
• Turn Bluetooth off when you are not using it. Only make your phone visible to other Bluetooth
devices when you need to establish a Bluetooth connection.
• Switch off Wi-Fi when you are not using it.
• Turn off your phone connection to GPS satellites when you are not using it.
• Lower the volume.
• Close power-draining programs, when you do not need them.
• Turn off the data service.
2.3 Power On or Off Your Mobile Phone
2.3.1 Powering On Your Mobile Phone
Press . The first time you power on your phone, you will be asked to sign in to your account
and set up your mobile phone.
■ Note:
If personal identification number (PIN) protection is enabled on your mobile phone, you must enter
your PIN before using the mobile phone.
2.3.2 Setting Up Your Mobile Phone
The first time you power on your mobile phone, the phone displays a setup wizard to help you set
up the phone.
The setup wizard helps you:
• Learn about your mobile phone
• Create or sign into your account
• Make some initial decisions about how you want to use your mobile phone
2.3.3 Powering Off Your Mobile Phone
1. Press and hold to open the
2. Touch
Power off
3. Touch OK.
.
Phone options
menu.
2.4 Using the Touchscreen
2.4.1 Touchscreen Actions
•
Touch
: Use the touch of your finger to select an item, confirm a selection, or start an
application.
•
Touch and hold
phone responds. For example, to open the options menu for the active screen, touch the screen
and hold down until the menu appears.
•
Flick
•
Drag
part of the screen. You can drag an icon to move or delete it.
: Touch an item with your finger and continue to press down until your mobile
: Move your finger either vertically or horizontally across the screen.
: Touch and hold the desired item with your finger. To move an item, Drag the item to any
7
Page 9
Ofrecido por www.electromanuales.com
2.4.2 Rotating Your Mobile Phone Screen
The orientation of most screens will rotate with the phone as you turn it from upright to sideways
and back again.
2.5 Locking and Unlocking the Screen
2.5.1 Locking the Screen
• When your mobile phone is on, press to lock the screen. When the screen is locked, you
can still receive messages and calls.
• If your mobile is idle for a while, the screen will lock automatically.
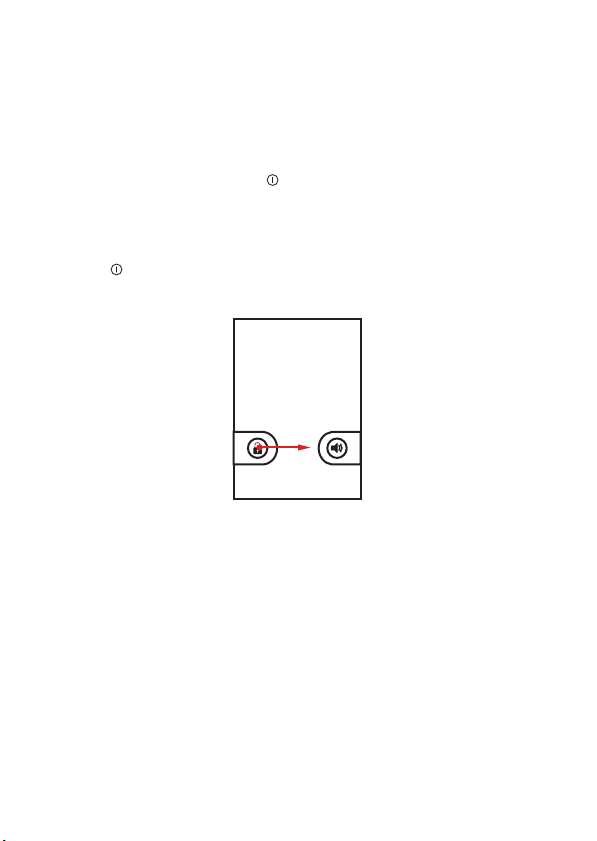
2.5.2 Unlocking the Screen
1. Press to wake up the screen.
2. Drag the lock icon from left to right to unlock the screen.
■ Note:
If you have set up a screen unlock pattern, you will be prompted to draw the pattern on the screen
to unlock it.
8
Page 10
Ofrecido por www.electromanuales.com
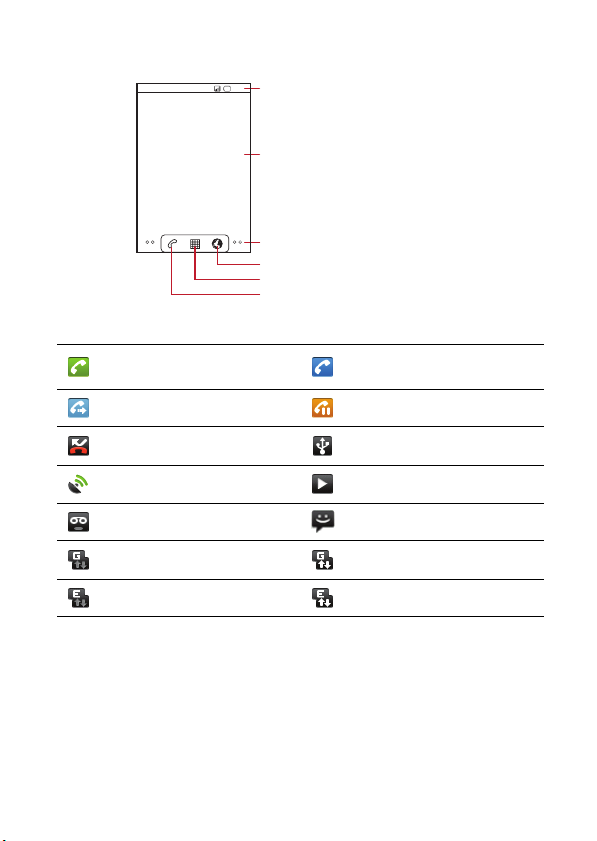
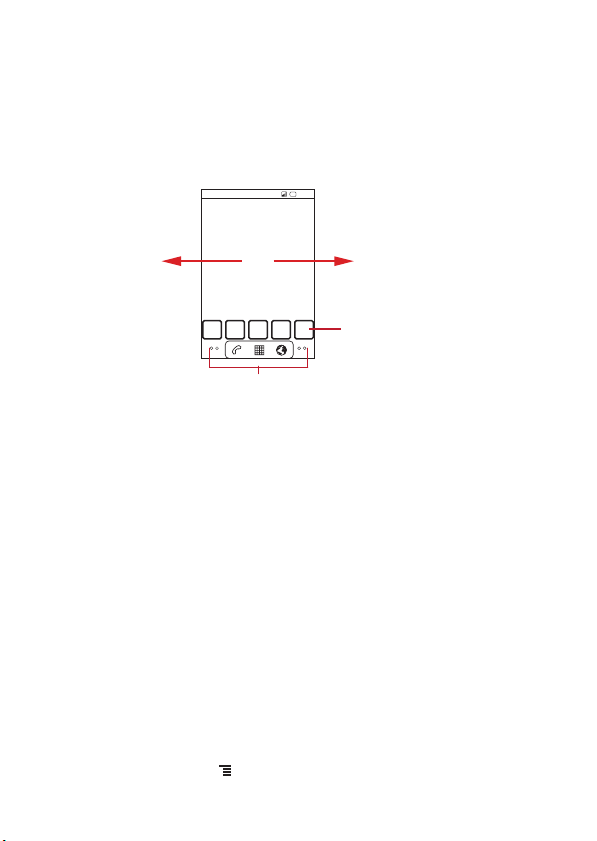
2.6 Home Screen
10:23
Notifications bar:
Displays the reminders and status icons of
your phone. Flick down to open the
notifications panel.
Display area:
Shows the operation and display areas of
your phone.
Screen switching dots:
Indicate the number of the screens on the
left or right. Touch the left or right dots to
switch between the screen.
Touch to open the Browser.
Touch to view all your applications.
Touch to open the Phone application.
2.6.1 Notification and Status Icons
Call in progress
Call forwarding on Call on hold
Missed call Connected to a PC
GPS connected Music playing
New voicemail New message
GPRS connected GPRS in use
EDGE connected EDGE in use
Call in progress using a Bluetooth
device
2.6.2 Notification Panel
Your mobile phone will notify you when you receive a new message or there is an incoming event.
The notification panel also informs you about alarms and settings, for example, when
forwarding
is activated. Open the notification panel to see who the wireless network operator is or
to view a message, reminder, or event notification.
Opening the Notification Panel
1. When a new notification icon appears on the notification bar, touch and hold the notification
bar, and then flick down to open the notification panel.
Call
9
Page 11
Ofrecido por www.electromanuales.com
2. On the notification panel, you can do the following:
• Touch a notification to open the related application.
• Touch
Clear
to clear all notifications.
Closing the Notification Panel
Touch and hold the bottom of the panel. Then flick up to close it.
2.6.3 Viewing Other Parts of the Home Screen
10:23
Flick your finger left or
right across the Home
screen.
Touch a thumbnail to
open the Home screen
or its extensions.
Touch and hold the small dots to view thumbnails
of the Home screen and its extensions.
2.6.4 Customizing the Home Screen
Adding a New Screen Item
1. Touch and hold a blank area on the Home screen until the
displayed.
2. Select an item to add it to the Home screen.
Moving a Screen Item
1. Touch and hold an item on the Home screen until the item expands in size and the mobile
phone vibrates.
2. Without lifting your finger, drag the item to the desired position on the screen, and then release
it.
Removing a Screen Item
1. Touch and hold an item on the Home screen until the item expands and the mobile phone
vibrates.
2. Without lifting your finger, drag the item to the trash can. When the item and the trash can turn
red, the item is ready to be removed.
3. Release the item to remove it from the Home screen.
2.6.5 Changing the Wallpaper
1. On the Home screen, touch >
Wallpaper
.
Add to Home screen
menu is
10
Page 12
Ofrecido por www.electromanuales.com
2. Do any of the following:
• Touch
Live wallpapers
• Touch
Gallery
• Touch
Wallpapers
2.7 Using a microSD Card
2.7.1 Installing the microSD Card (Optional)
Your mobile phone is already equipped with a large-volume built-in eMMC card. If you want to
expand your phone memory, you can also insert a microSD card.
1 2
1. Remove the battery cover.
2. Insert the microSD card into the card slot as shown in the diagram.
2.7.2 Using the microSD Card as USB Mass Storage
To transfer all your favorite music and pictures from your PC to your mobile phone’s microSD card,
set the microSD card as USB mass storage.
1. Connect your mobile phone to your PC with the USB cable. Your PC will detect the microSD
card as a removable disk.
2. Open the notification bar, and then touch
3. Touch
Turn on USB storage
files.
You can now transfer files from your PC to your mobile phone’s microSD card.
■ Note:
When your microSD card acts as USB mass storage, your mobile phone will not use this memory
space. Your PC will tell you how to safely disconnect the USB mass storage device (your mobile
phone) when you have finished transferring files.
2.7.3 Removing the microSD Card
1. Touch >
2. Scroll down the screen, and then touch
3. Carefully remove the microSD card.
Settings
to select a picture and set it as the wallpaper.
to select a picture and set it as the wallpaper.
to select a picture and set it as the wallpaper.
USB connected
in the dialog box that opens to confirm that you want to transfer
.
SD card & phone storage
.
>
Unmount SD card
.
11
Page 13

Ofrecido por www.electromanuales.com
3 Calling
To make a phone call, you can dial a number or touch a number from your contact list, on a Web
page, or in a document. When you are on a call, you can answer other incoming calls or send them
to your voicemail box. You can also set up conference calls with several participants.
3.1 Making a Call
To make a call, you can use the
When you are on a call, you can touch to return to the Home screen and use other functions.
To return to the calling screen, flick the notification bar down and touch
■ Note:
Do not block the microphone at the bottom of your phone if you want your voice heard.
3.1.1 Making a Call with the Phone Application
1. Touch >
If you are already working with
2. Touch the appropriate numeric keys to enter the phone number.
3. Touch to initiate the call.
During a call, touch
Phone
3.1.2 Making a Call from Contacts
1. Touch >
If you are already working with
2. In the list, touch the contact you want to call.
3. Touch to dial the phone number.
Contacts
3.1.3 Making a Call from Call log
1. If you are already working with
2. Touch to the right of the log entry to dial.
★ Tip:
If you touch and hold a log entry, the options menu will open.
Phone
application, or select a number from
to display the dialer.
Contacts
or
Call log
Dialpad
to enter other numbers on the dialpad.
to display the contact list.
Phone
or
Call log
Contacts
or
Phone
, touch the
, touch the
, touch the
Current call
Phone
Contacts
Call log
Contacts
tab.
tab.
tab.
.
or
Call log
.
3.2 Answering or Rejecting a Call
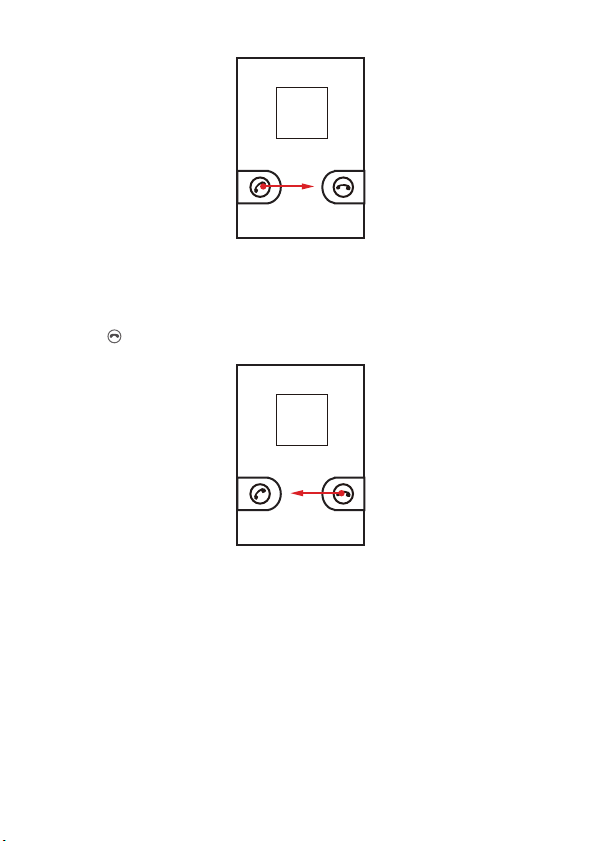
3.2.1 Answering an Incoming Call
When you receive a phone call, the incoming call screen opens with the caller's name and number
that you have entered in
Drag the to the right to answer the call.
12
Contacts
.
Page 14
Ofrecido por www.electromanuales.com
3.2.2 Ending a Call
During a call, touch
3.2.3 Rejecting an Incoming Call
Drag the to the left to reject the call.
3.3 Other Operations During a Call
3.3.1 Making a Conference Call
If you receive a new call while you are already on a call, you can connect the second call to the call
you are on. This feature is known as conference calling. You can also set up a conference call with
multiple callers.
■ Note:
Contact your network operator to learn if conference calls are supported and, if yes, how many can
participate.
1. To initiate a conference call, dial the number of the first participant. After you have connected
to the first participant, keep the connection open, touch
End
to hang up.
Add call
.
13
Page 15

Ofrecido por www.electromanuales.com
2. Enter the phone number of the next person you want to join the conversation and touch ,
or select someone from your
on hold while you do this.
3. Once you have connected to the second person, touch
call.
4. To add more people, touch
5. To end the conference call and disconnect everyone, touch
3.3.2 Switching Between Calls
If you receive a new call while you are already on a call, you can switch between the two calls.
1. While you are on the first call and the second call comes in, answer the incoming call, and then
touch
Swap
2. The current call is placed on hold and you are connected to the new call.
.
3.4 Using Call log
The
Call log
log to reference a recently called number quickly or add an incoming number to your contact list.
contains a list of calls that you have dialed, received, or missed. You can use the call
3.4.1 Adding an entry to Contacts
1. If you are already working with
2. Touch and hold the entry you want to add.
3. Touch
Add to contacts
4. Touch
Create new contact
name.
3.5 Using Airplane Mode
Some locations may require you to turn off your phone’s wireless connections. Rather than
powering off your phone, you can place it in
1. Press and hold .
2. Touch
Airplane mode
Call log
or
Contacts
. The first participant is automatically placed
Merge calls
Add call
, and then repeat steps 2 and 3.
Phone
or
Contacts
, touch the
in the options menu.
or scroll through the contact list and touch an existing contact
Airplane mode
in the options menu.
End
.
Call log
.
to begin the conference
tab.
14
Page 16

Ofrecido por www.electromanuales.com
4 Contacts
The
Contacts
and addresses of your contacts. After you save contact information on your mobile phone, you
have easy access to the people with whom you want to communicate.
4.1 Opening the Contacts Application
If you have a new mobile phone and have not yet added any contacts,
message with hints on how to start adding contacts to your mobile phone.
Touch >
All of your contacts are displayed alphabetically in a list that you can scroll through.
4.2 Importing Contacts from a SIM Card
1. In the contact list, touch >
2. Touch
3. If you have more than one account on your phone, touch the account into which you want to
4. Wait for the SIM card contents to be loaded. Select the contacts you want to import or touch
4.3 Adding a Contact
1. In the contact list, touch >
2. If you have more than one account with contacts, touch the account to which you want to add
3. Enter the contact's name, and then add detailed information such as phone number or
4. When you are finished, touch
4.3.1 Adding a Contact to Your Favorites
• Touch and hold the contact you want to add to
• Touch a contact, and then touch the star to the right of the contact’s name. The star turns gold.
application enables you to save and manage information such as phone numbers
Contacts
Contacts
Import from SIM card
import the contacts.
>
Import all
the contact.
address.
to open the
to import all contacts.
Contacts
application.
Import/Export
.
New contact
Done
.
.
to save the contact information.
Favorites
. Then touch
displays a
Add to favorites
.
4.4 Searching for a Contact
1. In the contact list, touch >
2. Enter the name of the contact you wish to search for. As you type, contacts with matching
names appear below the search box.
Search
.
4.5 Editing a Contact
You can make changes to the information you have stored for a contact at any time.
15
Page 17

Ofrecido por www.electromanuales.com
1. In the contacts list, touch and hold the contact whose details you want to edit, and then touch
Edit contact
2. Touch the category of contact information you wish to change: name, phone number, email
address, or any other information you recorded earlier.
3. Make the desired changes to the contact information, and then touch
your changes, touch
4.6 Communicating with Your Contacts
From the
message (MMS) to a contact’s default phone number. You can also open details to view a list of
all the ways you can communicate with that contact. This section describes how to communicate
with a contact when you view your contacts list.
4.6.1 Connecting Through Quick Contact for Android
1. Touch the contact's picture or picture frame (if you have not assigned a picture to the contact)
to open Quick Contact for Android.
2. Touch the icon for the way you want to communicate with the contact.
■ Note:
the applications on your phone, and the accounts you have.
4.6.2 Communicating with a Contact
1. In the contacts list, touch the contact that you want to communicate with.
2. On the contact’s details screen, touch the icon to the right of the number to call or send
messages.
4.7 Deleting a Contact
1. In the contacts list, touch and hold the contact that you want to delete, and then touch
contact
2. Touch OK to confirm that you want to delete the contact.
in the options menu.
Done
Revert
.
Contacts
or
Favorites
tab, you can quickly call or send a text (SMS) or multimedia
The icons available depend on the information you have entered for the contact,
in the options menu.
. To cancel all of
Delete
16
Page 18
Ofrecido por www.electromanuales.com
5 Using the Onscreen Keyboard
5.1 Displaying the Keyboard Panel
To enter text, use the onscreen keyboard. Some applications open the keyboard automatically. In
others, touch a text field to open the keyboard.
Touch the space where you want to write text to display the keyboard.
Touch to hide the keyboard.
★ Tip:
Touch and hold the space where you usually write your text to open the options menu.
5.1.1 Choosing an Input Method
1. Touch and hold the space where you enter your text until the
2. Touch
Input method
3. Select the input method.
The keyboard panel will be displayed automatically.
.
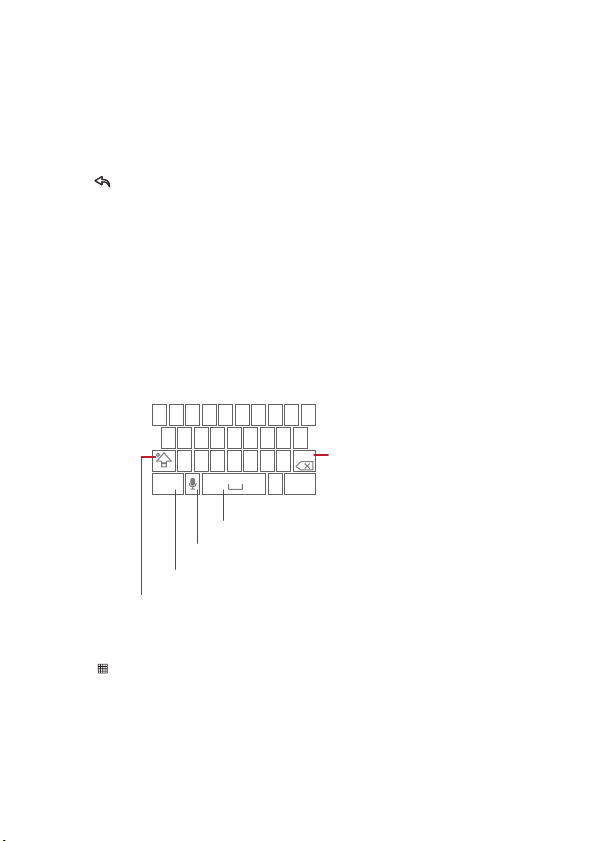
5.1.2 Using the Android Keyboard
q w e r t y u i o p
★ Tip:
Touch >
voice input.
Settings
a s d f g h j k
z x c v b n m
Touch to insert a space.
Touch to enter text by voice.
Touch to change from text mode to symbol/number mode.
Touch once to capitalize the next letter you type.
Touch and hold for all caps.
>
Language & keyboard
l
DEL
.
Next?123
>
Android keyboard
Edit text
menu is displayed.
Touch to delete a character
to the left of the cursor.
Touch and hold to delete all
characters to the left of the
cursor.
>
Voice input
to turn on
17
Page 19
Ofrecido por www.electromanuales.com
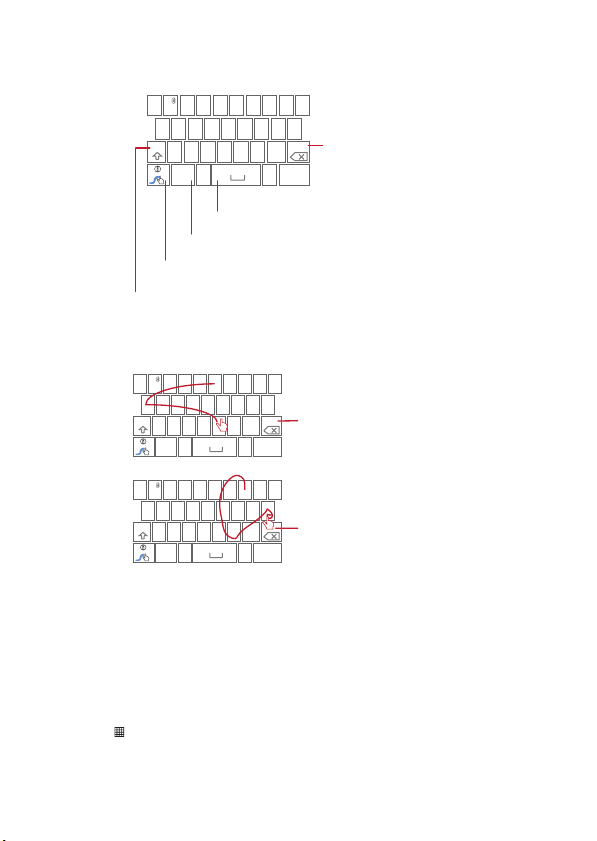
5.1.3 Using the Swype Keyboard
1
23 _%(
#
qENw e
r t y u i o p
&
$ 456 +: ;”
a s d f g h j k
!7890/?
z x c v b n m
_
SYM
’
Touch to insert a space.
Touch to change from text mode to symbol/number mode.
Touch and hold to get helpful tips.
Touch to get swype functions.
Touch once to capitalize the next letter you type.
Touch twice for all caps.
1
23 _%(
#
qENw e
r t y u i o p
&
$456+: ;”
a s d f g h j k
!7890/?
z x c v b n m
_
SYM
’
#
qENw e
r t y u i o p
&
$456+: ;”
a s d f g h j k
!7890/?
z x c v b n m
_
SYM
’
1
23 _%(
’
.
’
.
)
l
Touch to delete a character
to the left of the cursor.
’
.
l
:)
l
:)
Touch and hold to delete all
:)
characters to the left of the
cursor.
)
bay
To enter a word, just drag your
finger over the letters in the word.
)
I’ll
To capitalize, go above the
keypad.
To enter apostrophes in common
words drag through the ‘n’.
To enter double letters, circle the
letter.
5.1.4 Using the Landscape Keyboard
If you find the keyboard inconvenient or difficult to use, turn your mobile phone sideways. The
screen will display the keyboard in landscape orientation, providing you with a wider keyboard
layout.
5.2 Customizing Keyboard Settings
1. Touch >
2. Select an input method to customize the keyboard settings.
18
Settings
>
Language & keyboard
.
Page 20

Ofrecido por www.electromanuales.com
6 Messaging
The Messaging application allows you to exchange text messages (SMS) and multimedia
messages (MMS) with anyone using an SMS-or-MMS-capable phone. With the
you can read and send emails.
6.1 SMS and MMS
6.1.1 Opening Messaging
Touch >
6.1.2 Creating and Sending a Text Message
1. Touch >
2. Enter a phone number in the To field.
3. Touch the composition text box to start entering your message.
4. Once you are done, touch
The message list opens, and your name appears in the list, followed by the message you just sent.
Responses appear in the window. As you view and send additional messages, a message thread
is created.
6.1.3 Creating and Sending a Multimedia Message
You can use multimedia messages to make everyday communications very special. You can
record a message and send it as an audio file, sing 'Happy Birthday' and send it to friend, or send
a slideshow of photographs of a special event. The possibilities are endless.
1. Touch >
2. Enter a phone number in the To field.
3. Touch the composition text box to start entering your message.
4. Touch to display the options panel.
5. When the message is ready to be sent, touch
Adding a Slideshow
If you want to attach more than one file to your message, use the Slideshow option.
1. On the message editing screen, touch to display the options panel.
2. Touch
3. Touch and touch
Messaging
.
Messaging
>
New message
As you enter the phone number, matching contacts appear. You can touch a suggested
recipient or continue entering the phone number.
Send
Messaging
>
New message
★ Tip:
If you want to enter a smiley face, touch , and then touch
• Touch
Add subject
message mode.
• Touch
Attach
Attach
to add the message subject. Your mobile phone is now in multimedia
to add a picture, music, or video file.
>
Slideshow
, and then select a slide to start editing it.
More
>
Add slide
.
to add more slides.
.
.
Send
.
Email
application
Insert smiley
.
19
Page 21

Ofrecido por www.electromanuales.com
4. Touch
Done
5. To alter your multimedia message, touch
message is ready to be sent, touch
6.1.4 Opening and Viewing a Multimedia Message
1. In the message list, touch the message thread you wish to view.
2. Touch the multimedia message to view the message.
6.1.5 Replying to a Message
1. In the message list, touch a text or multimedia message thread to open it.
2. Touch the text box to compose your message, and then touch
6.1.6 Customizing the Message Settings
In the message list, touch , and then touch
6.2 Email
Your mobile phone also puts email at your fingertips. With your phone’s
use your email account with Yahoo!, AOL, or other popular email services on your phone.
6.2.1 Adding an Email Account
When using the
Email setup wizard helps you set up your account. A number of popular email systems are
supported. You can work with the same email service that you use on your PC or you can select
another email service.
1. Touch >
2. To customize your email settings, answer the onscreen prompts, and then touch
touch
■ No te:
for the account. Contact your email service provider for this information.
3. Enter the account name and the name you want other people to see when they receive an
email from you.
4. Touch
After the initial setup, your
was opened. If, however, the
the contents of your Inbox or the accounts screen (if you have more than one account).
Adding Other Email Accounts
1. After creating your initial email account, touch on the
Accounts
2. Touch on the accounts screen, and then touch
account.
to finish composing your message and return to the multimedia message screen.
Email
application for the first time, you must configure an email account. The
Email
.
Manual setup
Done
if you want to set the mail server yourself.
If you choose to set up your account manually, you will need the correct parameters
.
Email
opens to the screen you were viewing the last time the application
Email
to access the accounts screen.
Edit
on the multimedia message screen. When the
Send
.
Send
.
Settings
to customize the message settings.
Email
application, you can
Next
application has not been used for a period of time, it displays
Inbox
screen, and then touch
Add account
to create another email
. Or
20
Page 22

Ofrecido por www.electromanuales.com
★ Tip:
When adding an additional email account, you have the option to use the new account to send all
outgoing messages.
6.2.2 Viewing an Email Message
1. On the accounts screen, touch the email account you want to use.
2. Access a folder, and then touch the message that you want to view.
6.2.3 Creating and Sending an Email Message
1. On the accounts screen, touch the email account you want to use.
2. On the
Inbox
3. In the To field, enter the name or the email address.
4. Enter the subject of your message and compose the message.
To send an attachment with the message, touch , and then touch
5. When you are finished, touch
If you are not ready to send the message, touch
message as a draft.
screen, touch , and then touch
Send
.
6.2.4 Replying to an Email Message
1. On the accounts screen, touch the email account you want to use.
2. Touch the email message you want to reply to.
3. Touch
Reply
or
Reply all
to reply to the email message.
6.2.5 Deleting an Email Account
1. On the accounts screen, touch and hold the email account you want to delete.
2. Touch
Remove account
3. Touch OK.
.
6.2.6 Changing Email Account Settings
You can change a number of settings for an account, including how often you check for emails,
how you are notified of a new mail, and details about the servers the account uses to send and
receive mails.
■ Note:
Your account’s incoming and outgoing settings depend on the kind of email service you are using.
You can enter the necessary details manually, although you may need to contact your email
service provider to obtain the correct information for the account.
1. Touch >
2. On the accounts screen, touch and hold the email account you want to change.
3. Touch
4. Change
Email
.
Account settings
General settings, Notification settings
.
Compose
in the options panel.
Save as draft
, or
Server settings
Add attachment
or touch to save the
.
.
21
Page 23

Ofrecido por www.electromanuales.com
7 Getting Connected
7.1 GPRS/3G
Your mobile phone will be automatically configured to use your wireless service provider’s GPRS/
3G/EDGE service (if available) when you turn on the phone for the first time. Note that the SIM
card must be inserted.
7.1.1 Checking the Network Connection
1. Touch >
2. Touch
3. Touch
■ Note:
Your mobile phone will automatically read the access point of the SIM card. For this reason, do not
change the parameters of the access point; otherwise, you might not be able to access network
sources.
7.1.2 Turning on the Data Service
1. Touch >
2. Touch
3. Select the
7.2 Wi-Fi
Wi-Fi gives you wireless access to broadband Internet access. To use Wi-Fi on your mobile phone,
you need to have an access to wireless access points (hotspots). Obstacles that block the Wi-Fi
signal will reduce its strength.
7.2.1 Turning On Wi-Fi
1. Touch >
2. Touch
7.2.2 Connecting to a Wireless Network
1. After turning on Wi-Fi, touch >
2. Touch
the
3. Touch a Wi-Fi network to connect to it.
• If you select an open network, you will be automatically connected to the network.
• If you select a network that is secured with Wired Equivalent Privacy (WEP) and connect to
Settings
Wireless & networks
Network operators
Wireless & networks
Data enabled
Wireless & networks
Wireless & networks
Wi-Fi networks
it for the first time, enter the password, and then touch
wireless network that you have already used, you will not be prompted to enter the
password again unless you reset your mobile phone to its default settings.
.
>
Mobile networks
or
Access Point Names
Settings
.
>
Mobile networks
check box to turn on the data connection.
Settings
.
, and then select the
Settings
>
Wi-Fi settings
section.
.
to check the network connection.
.
Wi-Fi
check box to turn on Wi-Fi.
.
. You will see a list of detected Wi-Fi networks in
Connect
. If you connect to a secured
22
Page 24

Ofrecido por www.electromanuales.com
★ Tip:
On the
Wi-Fi settings
7.3 Sharing Your Phone’s Data Connection
You can share your mobile phone's data connection with a single computer via a USB cable: USB
tethering.
7.3.1 Sharing Your Phone’s Data Connection via USB
To use USB tethering in different operating systems, you may need to prepare your computer to
establish a network connection via USB.
■ Note:
You can not share your mobile phone’s data connection and SD card via USB at the same time.
1. Touch >
2. Touch
3. Select the
7.4 Browser
Your mobile phone comes with a browser. You can use
Internet.
★ Tip:
Your browser supports Flash applications.
7.4.1 Opening the Browser
Touch >
★ Tip:
When the known or open Wi-Fi networks and the mobile networks are present at the same time,
your phone will preferably select a Wi-Fi network for internet access.
Open the browser options menu and perform one of the following operations, touch :
•
New window
•
Bookmarks
•
Windows
a new web page on this screen.
•
Refresh
•
Forward
•
More
: Touch to open other menus and perform operations such as searching, selecting text,
downloading, or setting options.
7.4.2 Opening a Web Page
1. In a browser window, touch the URL field at the top of the screen.
2. Use the keyboard to enter the web page address. You can touch to enter the web page
address by voice.
screen, touch
Settings
Wireless & networks
USB tethering
Browser
to open the home page.
: Touch to open a new window.
: Touch to display bookmarks.
: Touch to go to the web preview screen. You can switch to another web page or open
: Touch to refresh the current page.
: Touch to browse the next web page.
Add Wi-Fi network
.
>
Tethering
check box to share your data connection.
to add a new Wi-Fi network.
.
Browser
to access and browse the
23
Page 25

Ofrecido por www.electromanuales.com
3. As you enter the address, matching web page addresses will appear on the screen. If you see
the address you want, touch it and go directly to that web page or complete entering the
address of the web page you want.
7.4.3 Setting a Home Page
1. In a browser window, touch .
2. Touch
More
>
Settings
>
3. Enter the address of the desired home page, and then touch OK.
Set home page
7.4.4 Managing Bookmarks
You can store as many bookmarks as you want on your mobile phone.
Adding a Bookmark
1. In a browser screen, go to the web page you want to save as a bookmark.
2. Touch , and then touch
3. Edit the bookmark name as needed and then touch OK.
Opening a Bookmark
1. In a browser window, touch , and then touch
On the
Bookmarks
touch the
2. Touch the bookmark of the website you want to open.
Most visited
Bookmarks
screen, touch the
tab to view the pages you have visited most frequently.
7.4.5 Customizing the Browser Settings
Customize the browser to suit your browsing style. Use
security preferences. In the browser screen, touch , and then touch
7.5 Bluetooth
Your mobile phone has Bluetooth, which allows you to create a wireless connection with other
Bluetooth devices so you can share files with your friends, talk hands-free with a Bluetooth
headset, or even transfer photos on your phone to your PC.
If you are using Bluetooth, remember to stay within 10 meters (33 feet) of other Bluetooth devices.
Be aware that obstacles like walls or other electronic equipment may interfere with your Bluetooth
connection.
7.5.1 Turning On Bluetooth
1. Touch >
2. Touch
When Bluetooth is turned on, the Bluetooth icon appears in the notification bar.
3. Touch
visible to other Bluetooth devices.
Settings
Wireless & networks
Bluetooth settings
.
, and then select the
, and then select the
.
>
Add
. The add bookmark screen opens.
Bookmarks
History
tab to view the pages you have visited. Or
Discoverable
.
Browser
to set page content, privacy, and
More
Bluetooth
check box to turn on Bluetooth.
to make your mobile phone
>
Settings
.
24
Page 26

Ofrecido por www.electromanuales.com
7.5.2 Pairing and Connecting a Bluetooth Device
Your mobile Bluetooth lets you do the following:
• Hands Free Profile (HFP): allows you to use a hands-free Bluetooth device.
• Headset Profile (HSP): allows you to use a mono Bluetooth headset.
• Object Push Profile (OPP): allows you to transfer files through Bluetooth.
• Advanced Audio Distribution Profile (A2DP): allows you to use a stereo Bluetooth headset.
• A/V Remote Control Profile (AVRCP): allows you to control what plays through the Bluetooth
headset remotely.
Before you use Bluetooth, you need to pair your mobile phone with another Bluetooth device as
follows:
1. Ensure that the Bluetooth function on your mobile phone is enabled.
2. Touch >
then scan for Bluetooth devices in range.
3. Touch the device you want to pair with your mobile phone.
4. Enter the pairing password to complete the connection.
7.5.3 Sending Files via Bluetooth
With Bluetooth, you can share pictures, videos, or music files with your family and friends. To send
files via Bluetooth, do as follows:
1. Touch and hold the file to be sent. The active options menu is displayed.
2. Touch
7.5.4 Disconnecting or Unpairing a Bluetooth Device
1. Touch >
2. Navigate to the
You can also just touch a connected device to disconnect it.
3. Touch
Settings
Share
, and then touch
Settings
Bluetooth devices
Disconnect
>
Wireless & networks
Bluetooth
>
Wireless & networks
or
Unpair
to disconnect the device.
>
Bluetooth settings
to select a paired device.
>
section, and then touch and hold the connected device.
Bluetooth settings
. Your mobile phone will
.
25
Page 27
Ofrecido por www.electromanuales.com
8 Entertainment
In addition to being a communication device and personal assistant, your mobile phone also
provides you with a multitude of entertainment possibilities. You can take photos, create videos
and audio clips, and download and listen to music.
8.1 Taking Photos and Recording Videos
The camera is a combination of camera and camcorder that you can use to shoot and share
pictures and videos.
8.1.1 Opening Your Camera
• Touch >
take a picture or record a video.
• Touch to close the camera.
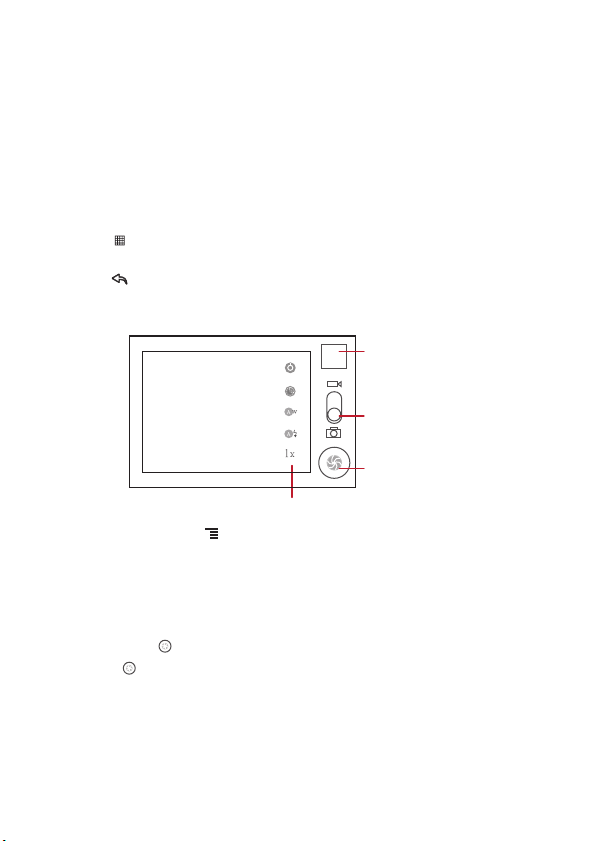
Capture Screen
Camera
to open the camera. The camera opens in landscape mode, ready to
Touch to customize the camera settings.
On the capture screen, touch to show the capture panel.
Thumbnail of last
photo. Touch to
preview the photos
or videos.
Drag up to record
videos, drag down
to take photos.
Touch to take a
photo.
3
5
8.1.2 Taking a Photo
1. Open your camera and switch to the camera mode.
2. If necessary, change the camera settings. The preview changes as you change the settings.
3. Compose your photo within the photo capture screen.
4. Touch and hold . When the frame turns green, the image is in focus.
5. Release to take your photo.
The photo you just took is displayed for a moment. You can take another photo or preview your
photos.
8.1.3 Viewing Your Photos
1. After taking a photo, a thumbnail of the photo you have just taken is shown in the upper right
corner of the capture screen. Touch the thumbnail to view it.
26
Page 28

Ofrecido por www.electromanuales.com
2. Touch the onscreen button to do any of the following:
• Touch
Share
• Touch
8.1.4 Recording a Video
1. Open the camera, and then switch to camcorder mode.
2. If necessary, change the camcorder settings.
3. Frame the scene which you want to start your video.
4. Touch to start recording a video.
5. Touch to stop recording.
8.1.5 Viewing Your Videos
1. After recording a video, a thumbnail of the video you have just recorded is shown in the upper
right corner of the Capture screen. Touch the thumbnail to view it.
2. Touch the onscreen button to do any of the following:
• Touch
• Touch
On the video playing screen, touch the controls to skip forward or back or to play or pause the
video.
3. If you want to view more videos, flick your finger left or right across the screen.
8.2 Using the Gallery
Your
Gallery
and microSD card. Use
watch videos, and set a picture as wallpaper or as a photo for a contact.
8.2.1 Opening the Gallery
Touch >
The
Gallery
files in folders. Touch a folder to view the pictures or videos inside.
8.2.2 Viewing a Picture
1. In the
2. Touch the picture to view it in full-screen mode.
3. Touch the screen. Then the zoom panel appears. You can zoom in or zoom out on the picture.
★ Tip:
mobile phone, the picture adjusts itself to the rotation.
8.2.3 Rotating a Picture
1. When viewing a picture, touch to display the operations panel.
2. Touch
to send the photo in a message or post it online.
Delete
to delete the photo.
Share
to send the video in a message or post it online.
Delete
to delete the video.
application can automatically search for pictures and videos on your mobile phone
Gallery
to sort photos and videos into folders, view and edit pictures,
Gallery
to open the viewer.
application categorizes your pictures and videos by storage location and stores these
Gallery
, touch the folder that contains the pictures you want to view.
The picture viewer supports the automatic rotation function. When you rotate your
More
.
27
Page 29

Ofrecido por www.electromanuales.com
3. Select either
8.2.4 Cropping a Picture
1. When viewing a picture, touch to display the more operations panel, and then touch
>
2. Use the cropping tool to select the portion of the picture to crop.
• Drag from the inside of the cropping tool to move it.
• Drag an edge of the cropping tool to resize the image.
• Drag a corner of the cropping tool to resize the image without changing the length to width
3. Touch
8.3 Enjoying Music
You can download music files to your PC or insert a CD and copy the files to your microSD card so
you can listen to music on your mobile phone.
8.3.1 Copying Music to the microSD Card
1. Connect the phone to your computer with a USB cable and mount the microSD card.
2. On the PC, navigate to the USB drive and open it.
3. Create a folder in the root directory of the microSD card (for example,
4. Copy the music from your computer to the folder you have created.
5. After copying music, unmount or eject the drive as required by your PC’s operating system to
safely remove the mobile phone.
6. Disconnect the mobile phone from the PC.
8.3.2 Opening the Media Library
Touch >
The
Music
Albums, Songs
8.3.3 Playing Music
1. Touch a category on the music library screen.
2. Touch the song you want to play.
★ Tip:
When you are listening to music, touch , to use another application. Your music continues to
play. To return to the music controls, open the notification panel and then touch the song.
8.3.4 Adding Music to a Playlist
1. Touch a category on the music library screen.
2. In the list that appears, select the song you want to add to the playlist.
3. Touch and hold the song, and then touch
28
Rotate Left
or
Rotate Right
Crop
.
ratio.
Save
to save the cropped picture. Touch
Music
to display the media library.
application organizes your music files by storage location. It contains four tabs:
and
Playlists
.
. The picture is saved with the new orientation.
Discard
to discard the changes.
Music
Add to playlist
in the options menu.
More
).
Artists
,
Page 30

Ofrecido por www.electromanuales.com
• Touch
Current playlist
• Touch
New
8.3.5 Playing a Playlist
1. Touch the
2. Touch and hold the playlist you want to play.
3. Touch
Playlists
Play
to play the playlist.
to add the song to an existing playlist.
to create a playlist and add the song to it.
tab on the music library screen.
29
Page 31

Ofrecido por www.electromanuales.com
9 Google Services
■ Note:
Availability of Google applications, services, and features may vary according to your country or
carrier. Please follow the local laws and regulations to use them.
When you turn on your mobile phone for the first time, touch a Google services such as
Gmail
, or
Market
■ Note:
Ensure that your mobile phone has an active data connection (3G/GPRS) before you sign in to
your Google account.
If you already have a Google account, touch
, and you will be prompted to sign in to your Google account.
Sign in
and enter your username and password.
9.1 Creating a Google Account
If you do not have a Google account, you can create one:
1. After reading the setup information, touch
2. Touch
Create
3. Enter a first name, last name, and user name for your Google account, and then touch
The mobile phone will connect to the Google server to check whether the username is
available. If the username you entered is already in use, you will be prompted to choose
another one or select one from a list.
4. Enter and confirm your Google account password.
5. Select a security question from the drop down menu, and then enter the answer.
6. Touch
7. When the
8. Enter the characters that appear on the screen, and then touch
★ Tip:
To use another Google account, go to the
account
.
Create
.
Google Terms of Service
to select which type of accounts you want to add.
Next
.
screen appears, touch
Accounts & sync settings
I agree, Next
Next
.
screen, and touch
9.2 Using Gmail
Gmail
is Google’s web-based email service. When you first set up your phone, you may have
configured it to use an existing
Gmail
application on your phone, your
on the web.
9.2.1 Opening Gmail
Touch >
phone will go to your
Gmail
9.2.2 Switching Between Accounts
1. In the mail list, touch , and then touch
30
Gmail
account or create a new account. The first time you open the
Inbox
will contain the messages from your
. The
Inbox
mail list appears. Any emails you decide to keep on your mobile
Inbox
folder.
Accounts
.
Talk
,
Next
.
.
Add
Gmail
account
Page 32

Ofrecido por www.electromanuales.com
2. Touch the account that contains the email you want to read.
9.2.3 Creating and Sending an Email
1. In the mail list, touch , and then touch
2. Enter the message recipient’s email address in the To field. If you are sending the email to
several recipients, separate the email addresses with commas. You can add as many
message recipients as you want.
If you want to send a copy (Cc) or a blind copy (Bcc) of the email to other recipients, touch
, and then touch
3. Enter the email subject and write your message.
If you want to add a picture attachment, touch , and then touch
you want to attach.
4. After composing your email, touch
Add Cc/Bcc
9.2.4 Replying To or Forwarding an Email
1. In the mail list, touch the email that you want to reply to or forward.
2. Touch
Reply, Reply to all
3. Do one of the following:
• If you selected
• If you selected
want to include with the forwarded message.
4. Touch
Send
.
, or
Forward
Reply
or
Reply to all
Forward
, specify the message recipients and add any additional text you
9.2.5 Searching for an Email
1. In the mail list, touch , and then touch
2. Enter the search keywords in the box, and then touch .
9.2.6 Customizing Your Gmail Settings
In the mail list, touch , and then touch
9.3 Using Talk
Talk
is Google’s instant messaging service. You can use it to communicate in real time with other
people using
9.3.1 Opening Talk
Touch >
■ Note:
Your
Talk
on a phone or on the web.
Talk
to open the application.
Talk
account is based on the Google account you set up with your mobile phone.
Compose
.
Send
.
.
, enter your message.
Search
More
>
Settings
.
.
to customizing your
Attach
to select the picture
Gmail
.
31
Page 33
Ofrecido por www.electromanuales.com
9.3.2 Adding a Friend
1. In the friends list, touch , and then touch
2. Enter the
3. Touch
Talk
instant messaging ID or Google email address of the friend you want to add.
Send invitation
.
9.3.3 Accepting an Invitation
1. If you have invited anyone to chat or if someone else has invited you to chat, this information
will appear in the friends list.
2. Touch a pending invitation, and then touch
9.3.4 Starting a Chat
1. In the friends list, touch a friend's name in the friends list.
2. Use the onscreen keyboard to enter text and chat with your friend.
3. After entering your message, touch
9.3.5 Setting Notifications for New Instant Messages
Whenever you receive an instant message, your mobile phone can play a sound, vibrate, or
display an icon. To set up one of these handy notifications, start in the friends list, and then touch
. Then touch
Settings
. Now choose from one of the following:
Send
Add friend
Accept
.
or
.
Cancel
.
IM
notifications
Select
ringtone
Vibrate
Select the check box to receive a notification on the notification bar when
you receive an instant message.
Touch to choose the ringtone used for a new instant message. You will
hear a short sample of the ringtone when you select it. To turn the ringtone
off, select
Silent
.
Select the check box to make your mobile phone vibrate when you receive
a new instant message.
9.3.6 Signing Out of Talk
In the friends list screen, touch , and then touch
Sign out
to quit
Talk
.
9.4 Using Maps
Maps
lets you find your current location, view real-time traffic conditions (depending on availability
in your locale), and get detailed directions to various destinations on a satellite, traffic, or other kind
of map.
9.4.1 Enabling Location Source
Before you open
"location source".
32
Maps
to find your location or search for places of interest, you must enable
Page 34

Ofrecido por www.electromanuales.com
1. Touch >
2. Touch
3. In the
satellites
9.4.2 Opening Maps
Touch >
9.4.3 Searching for Places of Interest
1. On the map, touch , and then touch
2. Enter the place you want to search for in the search box, and then touch the Search icon.
3. Your search results will then be displayed. Touch a place you are interested in and the
application will show where it is on the map.
9.4.4 Getting Directions
1. While viewing a map, touch , and then touch
2. Enter the starting point in the first text box, and then enter your destination in the second text
box.
3. Touch the icon for car, public transit, or walking directions.
4. Touch Go. Your directions will appear in a list.
5. Touch a direction item on the list to show it on the map.
6. When you finish viewing or following the directions, touch and touch
reset the map.
9.5 Using YouTube
YouTube
videos.
9.5.1 Opening YouTube
Touch >
categories, such as
9.5.2 Searching for a Video
1. On the
2. Enter a search keyword, and then touch the Search icon.
3. You will see a number of search results displayed below the notification bar. Scroll through the
results and touch a video to watch it.
9.5.3 Sharing a Video
1. On the
Settings
Location & security
My Location
check box, or both.
Maps
is Google’s free online video streaming service for viewing, searching for, and uploading
YouTube
YouTube
YouTube
.
.
section, select the
to open the application.
. You will then see the YouTube screen. The videos will be grouped into
Most viewed, Most discussed, Top rated
screen, touch , and then touch
screen, do one of the following:
Use wireless networks
Search
.
Directions
, and more.
Search
check box,
.
.
Use GPS
More
>
Clear map
to
33
Page 35

Ofrecido por www.electromanuales.com
• While viewing a list of videos, touch and hold a video entry, and then touch
options menu.
• While watching a video, touch , and then touch
2. Compose a message if you like, address the email, and send it.
Share
.
9.6 Using Market
Android Market provides direct access to applications and games which you can download and
install on your phone.
9.6.1 Opening Market
1. Touch >
2. When you open
appear. Touch
9.6.2 Searching for Applications
There are a few different ways to find applications on the
• Featured applications.
• List of applications by category: Includes subcategories, which you can sort by popularity
(most to least) or by date (newest to oldest).
• List of games.
• Search function.
• Your downloads.
9.6.3 Installing an Application
■ Note:
If you want to install a non-Market application, touch >
select the
1. In the
2. Touch a category, and then touch the item you want to download.
3. On the item details screen, read more about the application, including its cost, overall rating,
and user comments. If you scroll down to the
applications from the same developer, link to the developer's website, or send the developer
an email.
4. To install the item, touch
5. To check the progress of a download, open the notification panel. Most applications are
installed within seconds. To stop an item from downloading, touch
6. After the application has been downloaded and installed on your mobile phone, the content
download icon appears in the notification bar.
9.6.4 Uninstalling an Application
1. On the
34
Market
.
Market
Accept
to continue.
Unknown sources
Market
, touch
Apps
Market
screen, touch
for the first time, the
check box to allow installation of the non-Market application.
.
Install
(if the item is free) or
Downloads
Android Market Terms of Service
Market
home screen, including:
Settings
>
About the developer
Buy
.
section, you can see other
, whichever is displayed.
Cancel download
Applications
Share
on the
window will
, and then
.
Page 36

Ofrecido por www.electromanuales.com
2. Touch the application you want to uninstall, and then touch
3. When prompted, touch OK to remove the application from your mobile phone.
4. Choose the reason for removing the application, and then touch OK.
Uninstall
.
35
Page 37

Ofrecido por www.electromanuales.com
10 Synchronizing Information
Some applications on your mobile phone give you access to the same personal information that
you can add, view, and edit on your computer. If you add, change, or delete your information in any
of these applications on the web, the updated information also appears on your mobile phone.
This is made possible through over-the-air data synchronization. The process occurs in the
background and does not interfere with use of your mobile phone. When your phone is
synchronizing, a data synchronization icon will be shown in the notification bar.
10.1 Managing Your Accounts
You can synchronize contacts, email, and other information on your mobile phone with multiple
Google accounts or other kinds of accounts, depending on the applications installed on your
mobile phone.
For example, you can start by adding your personal Google account, so your personal email,
contacts, and calendar are always available. You could then add a work account, so your workrelated emails and work contacts are handy. If you like, you may add multiple Google accounts or
other accounts.
10.1.1 Adding an Account
When you add an account,
with contacts from your existing mobile phone accounts and attempts to merge duplicates into a
single entry in
not merged.
1. Touch >
2. Touch
3. Touch the kind of account to add.
4. Follow the onscreen steps to enter the required and optional information about the account.
5. Configure the account. Depending on the kind of account, you may be asked to configure what
Contacts
settings and a list of your current accounts.
■ Note:
example, you may need to know the account’s domain or server address.
Add account
Most accounts require a username and password, but the details depend on the kind of
account and the configuration of the service to which you are connecting.
kind of data you want to sync to the mobile phone, to name the account, and for other details.
When you are finished, the account is added to the list in the
screen.
10.1.2 Removing an Account
You can remove an account, deleting it and all information associated with it from your mobile
phone, including email, contacts, settings, and so on. You cannot, however, remove some
accounts, such as the first account you signed into on the mobile phone. If you attempt to remove
certain accounts, all personal information associated with it will be deleted.
1. On the
Accounts & sync settings
Contacts
compares contacts from the newly synchronized account
. While it is presented as a single contact entry, the contact data itself is
Settings
>
Accounts & sync
In some cases, you may need to obtain account details from an IT support. For
.
. The screen displays your current synchr onization
Accounts & sync settings
screen, touch the account to delete.
36
Page 38

Ofrecido por www.electromanuales.com
2. Touch
Remove account
3. Confirm that you want to remove the account.
10.2 Customizing Your Account Synchronization
You can configure background data use and synchronization options for all the applications on
your phone. You can also configure what kind of data you synchronize for each account.
For some accounts, synchronizing is two-directional; changes that you make to the information on
your mobile phone are made to the copy of that information on the web. Some accounts support
only one-way synchronize; the information on your mobile phone is read-only.
10.2.1 Configuring General Sync Settings
On the
Accounts & sync settings
• Select or clear the
can transmit data when you are not working with them directly (that is, when they are running
in the background).
If you clear this option,
and so on, until you touch the
• Select or clear the
on the phone or on the web are automatically synchronized with each other.
For example, when this option is selected, changes that you make in
are automatically made in Google Contacts on the web.
10.2.2 Changing an Account’s Synchronization Settings
1. On the
Accounts & sync settings
you want to change. The data and synchronization screen opens, displaying a list of the kinds
of information the account can synchronize.
2. Selected items are configured to synchronize to your mobile phone.
3. Select or clear the check box of information you want to synchronize to the mobile phone.
.
screen, do the following:
Background data
Gmail
Auto-sync
check box to control whether applications and services
stops receiving new mail,
Refresh
menu item or send an email.
check box to control whether changes you make to information
screen, touch the account whose synchronization settings
Calendar
stops synchronizing events,
Contacts
on the phone
37
Page 39

Ofrecido por www.electromanuales.com
11 Using Other Applications
11.1 Using the Calendar
Use
Calendar
synchronization settings, the calendar on your phone can be synchronized with the internet-based
calendar you use.
11.1.1 Opening the Calendar
Touch >
★ Tip:
To access Google calendar, touch , and then touch
11.1.2 Creating an Event
1. On any calendar view, touch . Then touch
2. Enter the event name.
3. Enter the location of the event and a description.
4. If you have more than one calendar, select the calendar where you want to save the event.
5. Enter email addresses to invite guests to the event.
6. Set the time of your event reminder in
7. Touch
★ Tip:
To quickly create an event in the
and then touch
date in the
11.1.3 Setting an Event Reminder
1. On any calendar view, touch an event to view its details or an event summary.
2. Touch the
3. Touch the reminder time, and then touch the length of time before the event when you want to
11.1.4 Customizing the Calendar Settings
On any calendar view, touch . Then touch
to create and manage events, meetings, and appointments. Depending on your
Calendar
to open the application.
More
>
Calendars
.
More
>
New event
screen.
• If there is a time frame for the event, touch
of the event.
• If the event is a special occasion such as a birthday or a day-long activity, set the date for
From
and To, and then select the
event recurs and, if it does, how frequently.
Done
.
New event
From
and To fields.
Add reminder
an existing reminder.
be reminded. When the time comes, you will receive a notification about the event.
Day, Week
. A new event details screen will appear with the selected time slot and
button to add a reminder. Or touch the reminder’s “-” button to delete
From
All day
check box.
Reminders
, or
Month
More
and To to set the beginning and end times
, and then specify in
view, touch and hold an empty time slot,
>
Settings
to open the
.
Repetition
Event details
whether the
38
Page 40

Ofrecido por www.electromanuales.com
•
Hide declined events
•
Set alerts & notifications
or to turn off event notifications on your mobile phone.
•
Select ringtone
•
Vibrate
•
: Select to vibrate the mobile phone when you receive an event notification.
Default reminder time
to occur.
11.2 Using the Clock
In addition to displaying the date and time, the
weather and your phone. You can also use
11.2.1 Opening the Clock
Touch >
Clock
local weather and other useful information.
11.2.2 Opening the Alarms
On the
Adding an Alarm
1. On the alarm list screen, touch
2. Set the alarm, and then touch
Setting an Alarm
1. On the alarm list screen, touch one of the alarms on the screen.
2. Touch
3. Touch
4. Touch
5. Select the
6. Touch
7. Touch
Customizing Alarm Settings
On the alarm list screen, touch , and then touch
Clock
opens with the date and time displayed on your Home screen wallpaper, along with your
Clock
screen, touch to open the
Time
Repeat
Ringtone
Label
Done
: Select to hide events for which you have declined invitations.
: Touch to set event reminders to alert you, send you a notification,
: Touch to select the ringtone to sound when you receive an event reminder.
: Touch to select the default time before an event for event reminders
Clock
application displays information about the
Clock
to turn your mobile phone into an alarm clock.
to open the application.
Alarms
.
Add alarm
Done
to set the time of the alarm.
to set the days when you want the alarm to sound.
to select a ringtone for the alarm.
Vibrate
check box to have the phone vibrate, in addition to playing the ringtone.
to enter a name for the alarm.
.
.
.
Settings
.
11.3 Using the Calculator
Use the calculator to solve simple arithmetic problems or use its advanced operators to solve more
complex equations.
11.3.1 Opening the Calculator
Touch >
Calculator
to open the application.
39
Page 41

Ofrecido por www.electromanuales.com
11.3.2 Switching to the Advanced panel
On the
Calculator
and
Basic panel
screen, flick the screen to the right or left to switch between
.
11.4 Using the Note pad
Note pad
features a simple text processor and lists all notes in a linear structure. You can add, edit,
and delete notes.
1. Touch >
2. Touch , and then touch
3. Touch to save the note.
Note pad
to open the application.
Add note
to create a note.
Advanced panel
40
Page 42

Ofrecido por www.electromanuales.com
12 Managing Your Mobile Phone
To configure your mobile phone, touch >
12.1 Setting the Date and Time
By default, your mobile phone automatically uses the date, time zone, and time provided by the
network.
■ Note:
When your mobile phone is using date and time settings provided automatically by the network,
you cannot manually set the date, time, and time zone.
1. On the
Settings
2. Clear the
3. Touch
year, and then touch
4. Touch
view more time zones.
5. Touch
Touch
6. Select or clear the
hour format.
7. Touch
screen, touch
Automatic
check box.
Set date
. On the set date screen, touch or to adjust the date, month, and
Set
Select time zone
Set time
Set
when the configuration is complete.
Select date format
when the configuration is complete.
, and then select the desired time zone from the list. Scroll the list to
. On the set time screen, touch or to adjust the hour and minute.
Use 24-hour format
to select how you want the date to display on your mobile phone.
12.2 Setting the Display
12.2.1 Adjusting the Screen Brightness
1. On the
Settings
Settings
screen, touch
screen, touch
2. Drag the slider left to make the screen darker, or right to make it brighter.
3. Touch OK to save the adjustment.
12.2.2 Adjusting the Time Before the Screen Turns Off
If your mobile phone is idle for several minutes, it will turn off the screen to save battery power. To
set a longer or shorter idle time, do the following:
1. On the
2. Select the duration you want the screen to be illuminated.
Settings
.
Date & time
Display
Display
.
check box to switch between 24-hour format and 12-
>
Brightness
.
>
Screen timeout
.
12.3 Setting Ringers
12.3.1 Turning On Silent Mode
1. On the
Settings
2. Select the
media sound.
screen, touch
Silent mode
Sound
check box to silence all sounds except alarms, and music and video
.
41
Page 43

Ofrecido por www.electromanuales.com
12.3.2 Adjusting the Volume
You can adjust the volume from the Home screen or any application screen (except during a call
or when playing music or videos). Press the Volume keys to adjust volume to the level you desire.
You can also adjust the volume from the settings screen.
1. On the
Settings
2. Drag the slider left to make the volume lower, or right to make it higher.
3. Touch OK to save the adjustment.
screen, touch
12.3.3 Changing the Phone Ringtone
1. On the
Settings
2. Touch the ringtone you want to use, and then touch OK. The ringtone plays when selected.
screen, touch
12.3.4 Changing the Message Ringtone
1. On the Home screen, touch >
2. In the message list, touch >
3. Touch the ringtone you want to use, and then touch OK. The ringtone plays when selected.
12.4 Setting Phone Services
12.4.1 Customizing Call Settings
You mobile phone service provider offers different services such as call forwarding, call waiting,
fixed dialing numbers, and voicemail. You can customize many of these services if they are part of
your calling plan.
On the
Settings
screen, touch
12.4.2 Turning on Data Roaming
1. On the
Settings
2. Select the
■ Note:
Accessing data services while roaming may incur additional charges. Ask your wireless service
provider about data roaming fees.
12.4.3 Switching off the Data Service
1. On the
2. Clear the
screen, touch
Data roaming
Settings
screen, touch
Data enabled
Sound
Sound
Messaging
Settings
Call settings
Wireless & networks
check box.
Wireless & networks
check box.
>
Volume
.
>
Phone ringtone
>
Select ringtone
to customize your call functions.
.
.
.
>
Mobile networks
>
Mobile networks
.
.
12.5 Setting Text-to-Speech
Use the Text-to-Speech settings to configure the Android text-to-speech synthesizer, for
applications that can take advantage of this feature.
42
Page 44

Ofrecido por www.electromanuales.com
12.5.1 Installing Voice Data
1. On the
Settings
screen, touch
.
voice data
2. If your mobile phone does not have speech synthesizer data installed, connect to Android
Market and let it guide you through the process of downloading and installing the data.
3. Follow the instructions to install the voice data.
12.5.2 Adjusting the Speech Rate
1. On the
Settings
rate
.
2. Select a speed at which the text is to be spoken.
screen, touch
12.6 Protecting Your Mobile Phone
12.6.1 Turning on Your SIM Card PIN
1. On the
Settings
2. Select the
3. Use the keyboard to enter the SIM card PIN, and then touch OK.
4. To change the SIM card PIN at any time, touch
■ Note:
You can dial emergency numbers any time from your mobile phone.
12.6.2 Protecting Your Mobile Phone with a Screen Lock
To keep your data more secure, lock the screen and/or require a screen unlock pattern every time
your mobile phone is turned on or wakes up from sleep mode.
1. On the
2. Flicking your finger vertically, horizontally or diagonally, connect at least four dots in any order
you choose. Lift your finger from the screen when you are finished.
You must flick your finger on the screen to create the pattern, not simply touch individual dots.
3. Your mobile phone will record the pattern. Touch
4. When prompted, draw the screen unlock pattern again, and then touch
To change your unlock screen pattern, touch
Lock SIM card
Settings
screen, touch
screen, touch
Voice input & output
Voice input & output
Location & security
check box.
Location & security
>
Text-to-speech settings
>
Text-to-speech settings
>
Set up SIM card lock
Change SIM PIN
>
Set up screen lock
Continue
.
Location & security
.
.
>
Pattern
Confirm
>
Change screen lock
>
>
.
Install
Speech
.
.
12.7 Managing Applications
12.7.1 Viewing an Installed Application
1. On the
Settings
2. In the applications list, do any of the following:
screen, touch
• Touch , and then touch
• Touch an application directly to view its details.
Applications
Sort by size
>
Manage applications
. Then touch an application to view its details.
.
43
Page 45

Ofrecido por www.electromanuales.com
12.7.2 Removing an Installed Application
1. On the
Settings
2. Touch an application, and then touch
phone.
screen, touch
12.7.3 Ways to Free Up Your Mobile Phone Memory
• Move files and email attachments to the microSD card.
• In
Browser
• Uninstall any downloaded programs that you no longer use.
• Reset your mobile phone.
, clear all temporary Internet files and Browser history information.
12.8 Resetting Your Mobile Phone
12.8.1 Backing Up My Data
You can use your Google account to back up your mobile phone’s settings to Google servers. If
you replace your mobile phone, the settings you have backed up will be transferred to the new
mobile phone the first time you sign in to your Google account.
1. On the
Settings
2. Select the
12.8.2 Restoring Factory Data
If you reset your phone to the settings that were configured at the factory, all of your personal data
stored on the phone, including information about your Google Account, any other accounts, your
system and application settings, and any applications you have downloaded will be erased.
Resetting the phone does not erase any system software updates you have downloaded or any
files on your microSD card, such as music clips or photos.
1. On the
2. When prompted, touch
resets the settings to the original factory settings, and then restarts.
screen, touch
Back up my data
Settings
screen, touch
Applications
Privacy
check box.
Privacy
Reset phone
>
Manage applications
Uninstall
to remove the application from your mobile
.
>
Factory data reset
, and then touch
.
Erase everything
.
. The mobile phone
44
Page 46

Ofrecido por www.electromanuales.com
13 Appendix
13.1 Warnings and Precautions
This section contains important information pertaining to the operating instructions of your device.
It also contains information about how to use the device safely. Read this information carefully
before using your device.
Electronic Device
Power off your device if using the device is prohibited. Do not use the device when using the device
causes danger or interference with electronic devices.
Medical Device
• Follow rules and regulations set forth by hospitals and health care facilities. Do not use your
device when using the device is prohibited.
• Pacemaker manufacturers recommend that a minimum distance of 15 cm be maintained
between a device and a pacemaker to prevent potential interference with the pacemaker. If you
are using a pacemaker, use the device on the opposite side of the pacemaker and do not carry
the device in your front pocket.
Potentially Explosive Atmosphere
Power off your device in any area with a potentially explosive atmosphere, and comply with all
signs and instructions. Areas that may have potentially explosive atmospheres include the areas
where you would normally be advised to turn off your vehicle engine. Triggering of sparks in such
areas could cause an explosion or a fire, resulting in bodily injuries or even deaths. Do not power
on your device at refueling points such as service stations. Comply with restrictions on the use of
radio equipment in fuel depots, storage, and distribution areas, and chemical plants. In addition,
adhere to restrictions in areas where blasting operations are in progress. Before using the device,
watch out for areas that have potentially explosive atmospheres that are often, but not always,
clearly marked. Such locations include areas below the deck on boats, chemical transfer or storage
facilities, and areas where the air contains chemicals or particles such as grain, dust, or metal
powders. Ask the manufacturers of vehicles using liquefied petroleum gas (such as propane or
butane) whether this device can be safely used in their vicinity.
Traffic Security
Observe local laws and regulations while using the device. In addition, if using the device while
driving a vehicle, comply with the following guidelines:
• Concentrate on driving. Your first responsibility is to drive safely.
• Do not talk on the device while driving. Use hands-free accessories.
• When you have to make or answer a call, park the vehicle at the road side before using your
device.
• RF signals may affect electronic systems of motor vehicles. For more information, consult the
vehicle manufacturer.
• In a motor vehicle, do not place the device over the air bag or in the air bag deployment area.
Otherwise, the device may hurt you owing to the strong force when the air bag inflates.
45
Page 47

Ofrecido por www.electromanuales.com
• Do not use your device while flying in an aircraft. Power off your device before boarding an
aircraft. Using wireless devices in an aircraft may cause danger to the operation of the aircraft
and disrupt the wireless telephone network. It may also be considered illegal.
Operating Environment
• Do not use or charge the device in dusty, damp, and dirty places or places with magnetic fields.
Otherwise, it may result in a malfunction of the circuit.
• The device complies with the RF specifications when the device is used near your ear or at a
distance of 1.5 cm from your body. Ensure that the device accessories such as a device case
and a device holster are not composed of metal components. Keep your device 1.5 cm away
from your body to meet the requirement earlier mentioned.
• On a stormy day with thunder, do not use your device when it is being charged, to prevent any
danger caused by lightning.
• When you are on a call, do not touch the antenna. Touching the antenna affects the call quality
and results in increase in power consumpti on. As a result, the talk time and the standby time are
reduced.
• While using the device, observe the local laws and regulations, and respect others' privacy and
legal rights.
• Keep the ambient temperature between -10°C and 45°C while the device is being charged.
Keep the ambient temperature between -10°C to 55°C for using the device powered by a
battery.
Prevention of Hearing Damage
Using a headset at high volume can damage your hearing. To reduce the risk of damage to
hearing, lower the headset volume to a safe and comfortable level.
Safety of Children
Comply with all precautions with regard to children's safety. Letting the child play with your device
or its accessories, which may include parts that can be detached from the device, may be
dangerous, as it may present a choking hazard. Ensure that small children are kept away from the
device and accessories.
Accessories
Use the accessories delivered only by the manufacturer. Using accessories of other manufacturers
or vendors with this device model may invalidate any approval or warranty applicable to the device,
result in the non-operation of the device, and cause danger.
Battery and Charger
• Unplug the charger from the electrical plug and the device when not in use.
• The battery can be charged and discharged hundreds of times before it eventually wears out.
When the standby time and the talk time are shorter than the normal time, replace the battery.
• Use the AC power supply defined in the specifications of the charger. An improper power
voltage may cause a fire or a malfunction of the charger.
• Do not connect two poles of the battery with conductors, such as metal materials, keys, or
jewelries. Otherwise, the battery may be short-circuited and may cause injuries and burns on
your body.
46
Page 48

Ofrecido por www.electromanuales.com
• If battery electrolyte leaks out, ensure that the electrolyte does not touch your skin and eyes.
When the electrolyte touches your skin or splashes into your eyes, wash your eyes with clean
water immediately and consult a doctor.
• If there is a case of battery deformation, color change, or abnormal heating while you charge or
store the battery, remove the battery immediately and stop using it. Otherwise, it may lead to
battery leakage, overheating, explosion, or fire.
• If the power cable is damaged (for example, the cord is exposed or broken), or the plug
loosens, stop using the cable at once. Otherwise, it may lead to an electric shock, a short circuit
of the charger, or a fire.
• Do not dispose of batteries in fire as they may explode. Batteries may also explode if damaged.
• Do not modify or remanufacture, attempt to insert foreign objects into the battery, immerse or
expose to water or other liquids, expose to fire, explosion or other hazard.
• Avoid dropping the device or battery. If the device or battery is dropped, especially on a hard
surface, and the user suspects damage, take it to a qualified service center for inspection.
• Improper battery use may result in a fire, explosion or other hazard.
• Promptly dispose of used batteries in accordance with local regulations.
• The device should only be connected to products that bear the USB-IF logo or have completed
the USB-IF compliance program.
Cleaning and Maintenance
• The device, battery, and charger are not water-resistant. Keep them dry. Protect the device,
battery, and charger from water or vapor. Do not touch the device or the charger with a wet
hand. Otherwise, it may lead to a short circuit, a malfunction of the device, and an electric shock
to the user.
• Do not place your device, battery, and charger in places where they can get damaged because
of collision. Otherwise, it may lead to battery leakage, device malfunction, overheating, fire, or
explosion.
• Do not place magnetic storage media such as magnetic cards and floppy disks near the device.
Radiation from the device may erase the information stored on them.
• Do not leave your device, battery, and charger in a place with an extreme high or low
temperature. Otherwise, they may not function properly and may lead to a fire or an explosion.
When the temperature is lower than 0°C, performance of the battery is affected.
• Do not place sharp metal objects such as pins near the earpiece. The earpiece may attract
these objects and hurt you when you are using the device.
• Before you clean or maintain the device, power off the device and disconnect it from the
charger.
• Do not use any chemical detergent, powder, or other chemical agents (such as alcohol and
benzene) to clean the device and the charger. Otherwise, parts of the device may be damaged
or a fire can be caused. You can clean the device and the charger with a piece of damp and soft
antistatic cloth.
• Do not dismantle the device or accessories. Otherwise, the warranty on the device and
accessories is invalid and the manufacturer is not liable to pay for the damage.
• If the device screen is broken by colliding with hard objects, do not touch or try to remove the
broken part. In this case, stop using the device immediately, and then contact an authorized
service center in ti me.
47
Page 49

Ofrecido por www.electromanuales.com
Emergency Call
You can use your device for emergency calls in the service area. The connection, however, cannot
be guaranteed in all conditions. You should not rely solely on the device for essential
communications.
Certification Information (SAR)
This device meets guidelines for exposure to radio waves.
Your device is a low-power radio transmitter and receiver. As recommended by international
guidelines, the device is designed not to exceed the limits for exposure to radio waves. These
guidelines were developed by the independent scientific organization International Commission on
Non-Ionizing Radiation Protection (ICNIRP) and include safety measures designed to ensure
safety for all users, regardless of age and health.
The Specific Absorption Rate (SAR) is the unit of measurement for the amount of radio frequency
energy absorbed by the body when using a device. The SAR value is determined at the highest
certified power level in laboratory conditions, but the actual SAR level of the device when being
operated can be well below the value. This is because the device is designed to use the minimum
power required to reach the network.
The SAR limit adopted by USA and Canada is 1.6 watts/kilogram (W/kg) averaged over one gram
of tissue. The highest SAR value reported to the FCC and IC for this device type when tested for
use at the ear is 0.34 W/kg, and when properly worn on the body is 0.79 W/kg.
The SAR limit also adopted by Europe is 2.0 W/kg averaged over 10 grams of tissue. The highest
SAR value for this device type when tested at the ear is 0.342 W/kg, and when properly worn on
the body is 0.536 W/kg.
FCC Statement
This equipment has been tested and found to comply with the limits for a Class B digital device,
pursuant to Part 15 of the FCC Rules. These limits are designed to provide reasonable protection
against harmful interference in a residential installation. This equipment generates, uses and can
radiate radio frequency energy and, if not installed and used in accordance with the instructions,
may cause harmful interference to radio communications. However,there is no guarantee that
interference will not occur in a particular installation.If this equipment does cause harmful
interference to radio or television reception,which can be determined by turning the equipment off
and on, the user is encouraged to try to correct the interference by one or more of the following
measures:
--Reorient or relocate the receiving antenna.
--Increase the separation between the equipment and receiver.
--Connect the equipment into an outlet on a circuit different from that to which the receiver is
connected.
--Consult the dealer or an experienced radio/TV technician for help.
This device complies with Part 15 of the FCC Rules. Operation is subject to the following two
conditions: (1) this device may not cause harmful interference, and (2) this device must accept any
interference received, including interference that may cause undesired operation.
Caution
Changes or modifications made to this device not expressly approved by Huawei Technologies
48
Page 50
Ofrecido por www.electromanuales.com
Co., Ltd. may void the FCC authorization to operate this device.
Disposal and Recycling Information
This symbol on the device (and any included batteries) indicates that they should not be disposed
of as normal household garbage. Do not dispose of your device or batteries as unsorted municipal
waste. The device (and any batteries) should be handed over to a certified collection point for
recycling or proper disposal at the end of their life.
For more detailed information about the recycling of the device or batteries, contact your local city
office, the household waste disposal service, or the retail store where you purchased this device.
The disposal of this device is subject to the Waste from Electrical and Electronic Equipment
(WEEE) directive of the European Union. The reason for separating WEEE and batteries from
other waste is to minimize the potential environmental impacts on human health of any hazardous
substances that may be present.
Reduction of Hazardous Substances
This device is compliant with the EU Registration, Evaluation, Authorisation and Restriction of
Chemicals (REACH) Regulation (Regulation No 1907/2006/EC of the European Parliament and of
the Council) and the EU Restriction of Hazardous Substances (RoHS) Directive (Directive 2002/
95/EC of the European Parliament and of the Council). For more information about the REACH
compliance of the device, visit the Web site
recommended to visit the Web site regularly for up-to-date information.
EU Regulatory Conformance
Hereby, Huawei Technologies Co., Ltd. declares that this device is in compliance with the essential
requirements and other relevant provisions of Directive 1999/5/EC.
For the declaration of conformity, visit the Web site
www.huaweidevice.com/certification
www.huaweidevice.com/certification
. You are
.
■ Note:
Observe the national local regulations in the location where the device is to be used. This device
may be restricted for use in some or all member states of the European Union (EU).
■ Note:
This device may be operated in all member states of the EU.
France
: Outdoor use limited to 10 mW e.i.r.p. within the band 2454-2483.5 MHz.
49
Page 51

Ofrecido por www.electromanuales.com
Italy
: For private use, a general authorisation is required if WAS/RLAN’s are used outside own
premises. For public use, a general authorisation is required.
Luxembourg
Norway
the centre of Ny-Ålesund.
13.2 FAQ
How do I prevent automatic switching of orientation when rotating phone?
Touch >
How do I set the unlock pattern?
Touch >
How can I change the keyboard mode?
Touch and hold the area where you write text and then select the input method you prefer.
How do I stop the song playing in the background?
Touch the notification bar, flick downwards to open the notifications panel, and then touch the
music playing notification to go to the music playing screen.
How do I return to the calling screen?
While on a call, if you’re on another screen, you can touch the notification bar, and drag downwards
to open the notifications panel. Then touch the current call notification to return to the calling
screen.
How do I create an application shortcut on the Home screen?
Touch and hold an application icon on the main menu screen until the Home screen is displayed.
Then drag the icon where you want it to go and release your finger.
How do I hide the keyboard?
Touch to hide the keyboard.
: General authorisation required for network and service supply.
: This subsection does not apply for the geographical area within a radius of 20 km from
Settings
>
Display
>
Settings
Auto-rotate screen
>
Location & security
to disable the function.
>
Set up screen lock
>
Pattern
.
50
Page 52

Ofrecido por www.electromanuales.com
 Loading...