


12L Digital Halogen Oven
Please read the manual fully before using the appliance and keep the manual safe for future reference.
1
Contents page
Safety instructions |
Page 2 |
|
|
Additional specific safety instructions |
Page 4 |
|
|
Components diagram illustration |
Page 6 |
|
|
Digital control pad |
Page 7 |
|
|
Assembly & Preparation |
Page 8–9 |
Starting Operation |
|
|
|
Functions Mode Table |
Page 10 |
|
|
Functions |
Page 11—14 |
|
|
Attachment Recipes |
Page 16 |
|
|
Cooking times and temperatures |
Page 22 |
|
|
Cleaning |
Page 23 |
|
|
Storing |
Page 24 |
|
|
Troubleshooting |
Page 24 |
|
|
Using Extender Ring |
Page 25 |
|
|
Replacing the halogen bulb |
Page 26—27 |
|
|
Disposal of the appliance |
Page 28 |
|
|
UK & EU Guarantee |
Page 28– 29 |
|
|
Electrical information |
Page 30 |
|
|
2
Safety Instructions
When using any electrical appliance, basic safety precautions should always be followed including:
This appliance can be used by children aged from 8 years and above and persons with reduced physical, sensory or mental capabilities or lack of experience and knowledge if they have been given supervision or instruction concerning use of the appliance in a safe way and understand the hazards involved. Children shall not play with the appliance. Cleaning and user maintenance shall not be made by children unless they are older than 8 and supervised. Keep the appliance and its cord out of reach of children less than 8 years old.
Always ensure the voltage on the rating label corresponds to the voltage in your home.
Check the power cord and plug regularly for any damage. If the cord or the plug is damaged, it must be replaced by a qualified electrician or a service repair centre. If in doubt please contact our customer service team.
The appliance is intended for domestic use only. Industrial or commercial use will void the warranty. The supplier cannot be held responsible for injury or damage if the appliance has been used for anything other than its intended use.
Incorrect operation and use can damage the appliance and cause injury to the user.
Do not use the appliance if it has been dropped or damaged in anyway. If the unit has been damaged take the unit for examination and or repair by an authorised service agent.
Do not immerse or expose the motor assembly, plug or the power cord in water or any other liquid for any reason.
If the supply cord is damaged, it must be replaced by the manufacturer or by someone who is suitably qualified to avoid a potential hazard.
Do not let the cord hang over the edge of a table or counter. Ensure that the cord is not in a position where it can be pulled or tripped over accidentally.
Do not allow the cord to touch hot surfaces and do not place the cord near hot gas, electric burners or in a heated oven.
Use of an extension cord with this appliance is not recommended.
3
However if it is necessary to use an extension cord, ensure that the extension cord is equal to or greater than the power consumption of the appliance to avoid overheating of the appliance and extension cord. Do not use any other appliance on the extension cord. Do not place the extension cord in a position where it can be pulled on by children or animals or be tripped over.
Always operate the appliance on a smooth, even and stable surface. Do not place the unit on a hot surface.
Always remove the plug of the appliance safely. Do not pull on the appliances cord to remove the appliance plug from the electrical socket.
Never handle or operate the appliance with wet hands.
Appliance specific safety advice
Only use the appliance indoors.
Place the appliance on a level, sturdy and heat resistant surface.
Do not move the appliance when it is in use.
Do not place the appliance close to other objects when it is in use.
Only use the handle to lift the lid.
Position the mains cable so that it does not come into contact with hot surfaces or objects.
Do not use the appliance in the oven, on a stove top or near a gas source.
Positioning the appliance
Do not place the appliance in the immediate vicinity of a naked flame or a heat source such as hot plates, oven etc.
Protect the appliance from spray and drops of water.
4
Damage to the appliance
If the appliance is defective, do not attempt to carry out repairs yourself. In the event of damage, contact customer services.
If water gets into the appliance or if it is damaged in any other way, it will need to be checked by a qualified electrician or service agent.
Always lift the halogen oven lid by the handle located on the front of the control panel.
Do not allow the lid to get wet. Do not immerse the appliance in water or any other liquid for any reason.
Always leave the top in the “up” position whenever the bowl is removed.
Warning!
All surfaces of the halogen oven will get very hot during the cooking process, avoid touching these surfaces before the oven cools as this may cause an injury. Do not touch any part of the oven other than the handles, until it has cooled down. After the glass bowl has cooled down, hold the bowl with a dry cloth or a suitable oven glove, to avoid the risk of burning.
5

Components Diagram illustration
1.Low rack
2.High rack
3.Tongs
4.Skewers
5.Steamer Tray
6.Baking Tray
7.Bread rack
8.Extender ring
9.Replacement Halogen Bulb
10.Glass oven bowl
11.Lid/ hinge/ base
12.Rice/Cake cooker pan
6
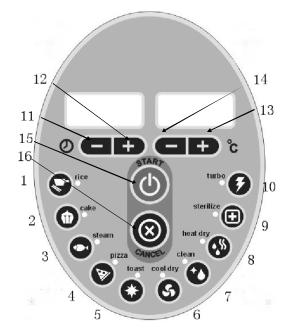
Digital control pad
1-10 |
Function keys |
|
|
11-12 |
“Up” and “Down” for time |
|
|
13-14 |
“Up” and “Down” for temperature |
|
|
15 |
“Start” |
|
|
16 |
“Cancel” |
|
|
7
Assembly and preparation of Halogen Oven
1.Place the base of the appliance (11) on a level, sturdy, heat resistant surface.
2.Remove the extender ring (8) from the base of the Halogen Oven bowl.
3.Place the glass dish (10) into the base (11) of the appliance.
4.Place one of the food racks, high or low (1/2) into the glass oven bowl (10).
5.Carefully place the lid (11) on top of the glass oven bowl (10).
6.Pre-heat the oven by setting the timer to 10 minutes approx.
7.Set the thermostat to 200˚C and turn the oven on.
8.After the timer has turned the oven off, allow it too cool for 10 minutes. You can then open the lid.
Please be aware that the oven may emit a slight odour the first time you use it, this is due to the burning off of substances left on during the manufacturing process and is completely natural. It will not affect yourself or the food being cooked.
Starting operation
1.Place the wire rack in the bowl of the oven.
2.For best results always ensure food/bakeware is placed on a low or high rack to ensure the heat can circulate, for even cooking.
3.Place the oven lid in the recessed lip of the bowl.
4.Plug the oven into the mains outlet. It will make a short beeping sound and the digital display will light up and the timer and thermostat will show “00:00”.
8
5.Choose the desired cooking function key, the display lights will show the corresponding time and temperature. If you want to increase or decrease the time and temperature press “+” or “-”.
6.Press the “start” button.
7.Once the cooking process has finished it will be signalled by a beep and flashing lights. The food can be removed at any time, but be careful as the food and the surfaces around it will be extremely hot. Always use the tongs provided.
9

Function mode table
No |
mode |
Time |
Temp. |
Function |
. |
|
(mins) |
|
|
1 |
|
30ˊ |
250 |
Roast Chicken, Steam Rice with Rice pot (supplied) |
|
|
|
|
|
2 |
|
11ˊ |
190 |
Cup Cakes |
|
|
|
|
Please note additional time may be added depending on the |
|
|
|
|
size of the cup cakes. |
|
|
|
|
|
3 |
|
13′ |
250 |
Steam Seafood/Vegetables |
|
|
|
|
Please see additional instruction on how to steam vegetables. |
|
|
|
|
|
4 |
|
15′ |
250 |
Bake Pizza |
|
|
|
|
The time is dependent on the size and filling of the pizza. |
|
|
|
|
|
5 |
|
5′ |
250 |
Heating up crispy food, such as French fries. |
|
|
|
|
E.g. For toasting bread 5 minutes and add an extra 2 minutes if |
|
|
|
|
you like your bread to be more toasted. |
|
|
|
|
|
6 |
|
30′ |
00 |
For drying the bowl or defrosting after cleaning the container. |
7 |
10′ |
250 |
Cleaning the halogen bowl, please ensure that you do not add |
|
|
|
water more than half way up the bowl when using the |
|
|
|
cleaning function. |
|
|
|
|
8 |
6′ |
90 |
Dehydrator |
|
|
|
This function can be used for drying out food. |
|
|
|
Please note additional time may be required depending on the |
|
|
|
food. |
|
|
|
|
9 |
13′ |
130 |
Cleaning |
|
|
|
|
10 |
20′ |
250 |
Grilling pork ribs and chicken wings, which can be crispy on the |
|
|
|
outside,soft on the inside |
|
|
|
|
11 |
|
|
Time up and down keys (the minimum time is 1 minute |
12 |
|
|
maximum time is 1 hour and 59 minutes). |
|
|
|
|
13 |
|
|
Temperature up and down keys (the minimum temperature is |
14 |
|
|
0̊˚C, maximum is 250˚C). |
|
|
|
|
|
|
|
|
15 |
|
|
Start key, press it after confirming the time and temperature. |
|
|
|
|
16 |
|
|
Cancel key, used for cancelling operation or settings. |
10
 Loading...