

Page 1
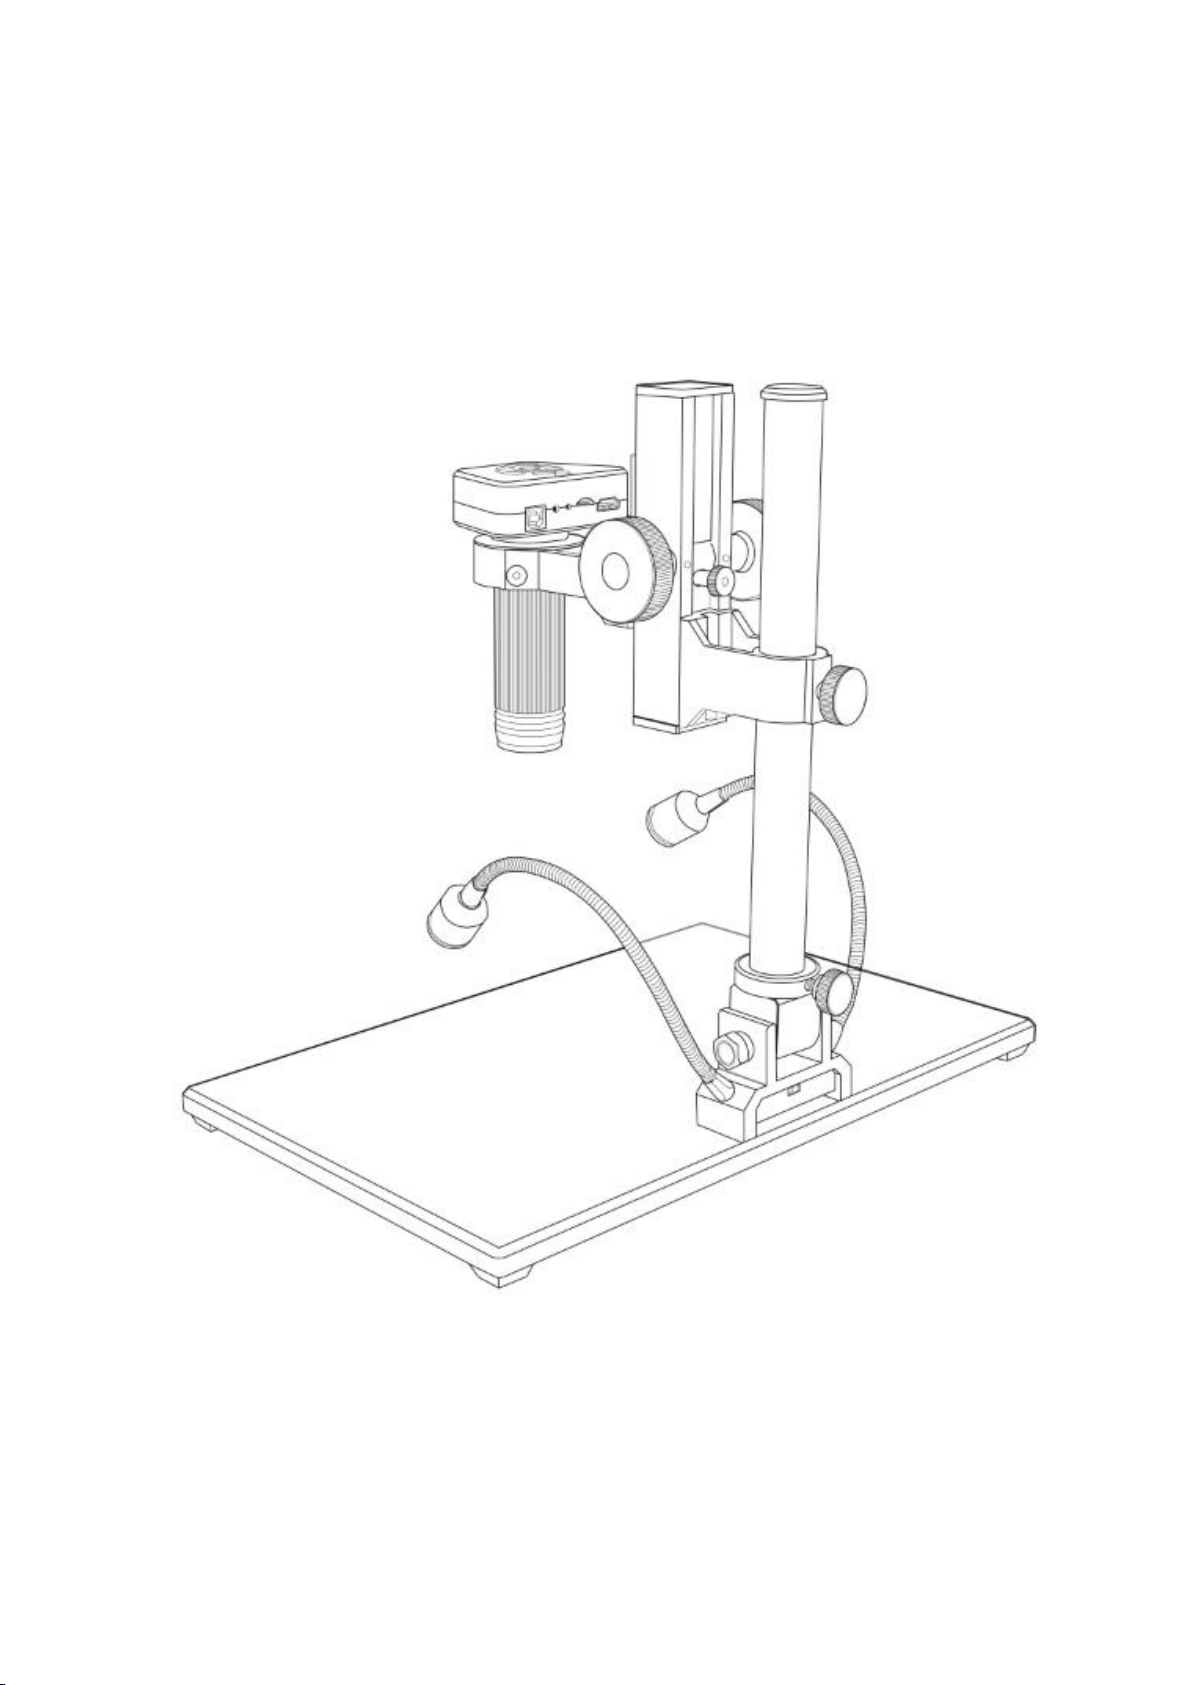
Digital Microscope AD1605 User Manual
Digital Microscope AD1605 User Manual------------------------------------------------------------1-9
数码显微镜 AD1605 使用说明书----------------------------------------------------------------10-17
Page 2

LIST OF CONTENTS
Preface...............................................................................................................1
Basic Parameters................................................................................................2
What’s in the box...............................................................................................2
Assembly............................................................................................................3
Button Instructions ............................................................................................ 4
Remote controller..............................................................................................5
Connection and output ......................................................................................6
Quick Start......................................................................................................... 7
◆Independent use .......................................................................................7
◆HDMI output .............................................................................................8
FAQ.....................................................................................................................8
Page 3

- 1 -
Preface
AD1605 is a multifunctional digital industrial microscope. It integrates 4K
high-definition output, high object distance, multi-function and convenient operation,
which fully meets the various needs of industrial maintenance, teaching
demonstration and other fields. Its exquisite appearance design took ergonomics into
consideration, and the high-quality materials provide users with a more comfortable
experience. We hope this product can truly free your eyes and bring improvements to
your work and life. Thank you for your support of this product.
◆In order to use this product better, we hope you can keep this manual forever. Any
damage caused by non-compliance with this manual will be invalidated.
◆In order to ensure a better experience for customers, we may make small changes
to the product in the process of perfecting. Where the description differs from the
product, please refer to the actual product. We hope that consumers will understand.
◆Safety and Maintenance Instructions:
1. Keep the equipment in a clean and dry environment. Keep away from oil, water,
gas and other materials that may cause corrosion. Storage and operation can refer to
general electronic equipment, such as laptop computers.
2. The product contains small parts and the overall volume is relatively large, please
keep children away from this product without a guardian to avoid accidental
ingestion of parts or accidental shaking.
3. When the image quality has declined, the protective lens under the main body lens
should be cleaned. Use a soft clean cotton cloth (such as glasses cloth) dipped in a
proper amount of alcohol and wipe it carefully.
4. If you need to wipe the microscope with a cotton cloth dampened with water,
please be sure to cut off the power first. Please be sure to check whether the machine
has returned to dryness before turning on the power again.
5. People with disabilities, mental illnesses or people with allergic symptoms are not
suitable to use this product.
6. Don't overdo it. The adjustments between the various parts of the product are
limited. To ensure the best working condition, please keep the overall balance of the
equipment.
Page 4
- 2 -
Basic Parameters
Image sensor
14 Mega Pixels HD Sensor
Video output
1920x1080 60 FPS; 1920x1080 30 FPS
2560x1440 30 FPS;3840x2160 30 FPS
Video format
MP4
Magnification Ratio
Up to 150 times (output to 29-inch high-definition display)
Photo resolution
MAX 14M (4320*3248)
Photo format
JPG
Focus distance
5CM-29CM
Frame Rate
Max 60f/s
Storage
Micro-SD card, up to 32G (not included )
Video output interface
HDMI
Power source
5V DC
Stand size
37.5cm*25cm*47cm
Package Included
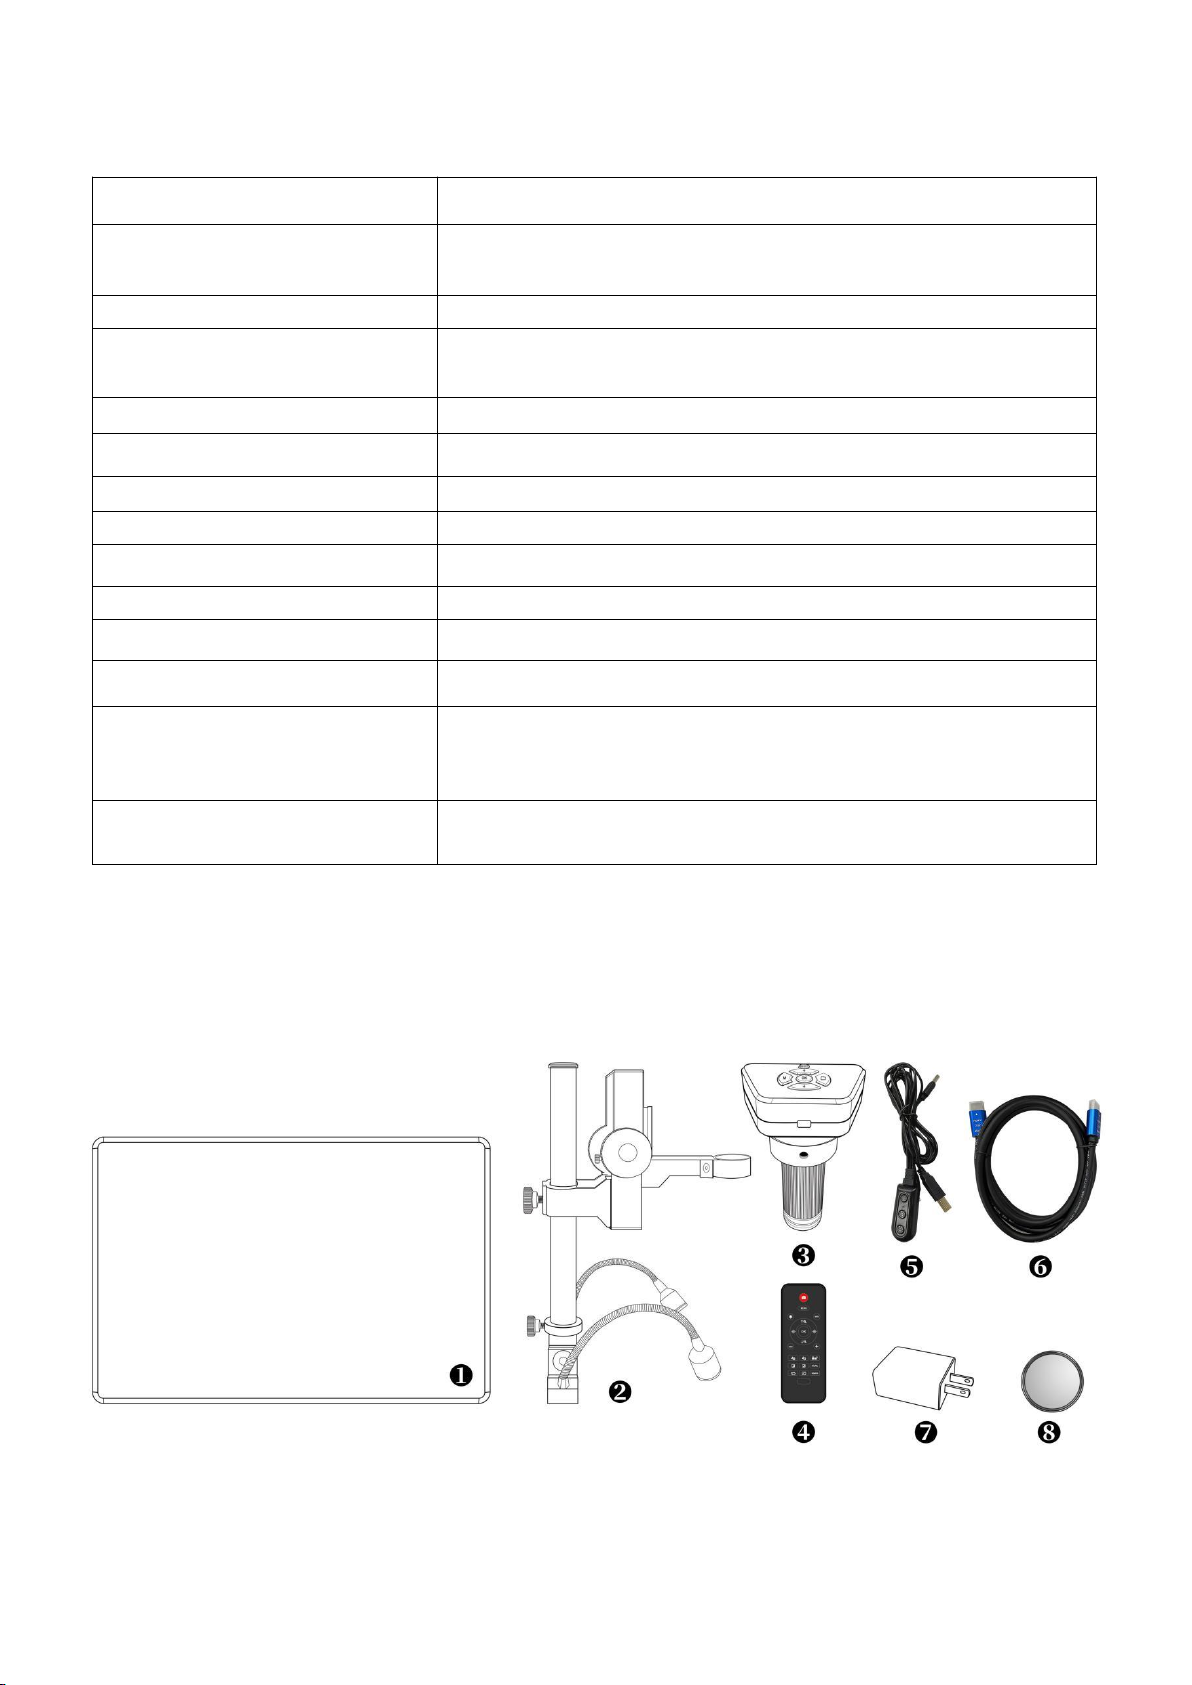
Microscope ×1 Bracket ×1 Adapter ×1
Power cable ×1 HDMI cable ×1
User manual ×1 UV filter×1 IR remote×1
Packing data
40×30×16cm/ 5.5kg
What’s in the box
Page 5
- 3 -
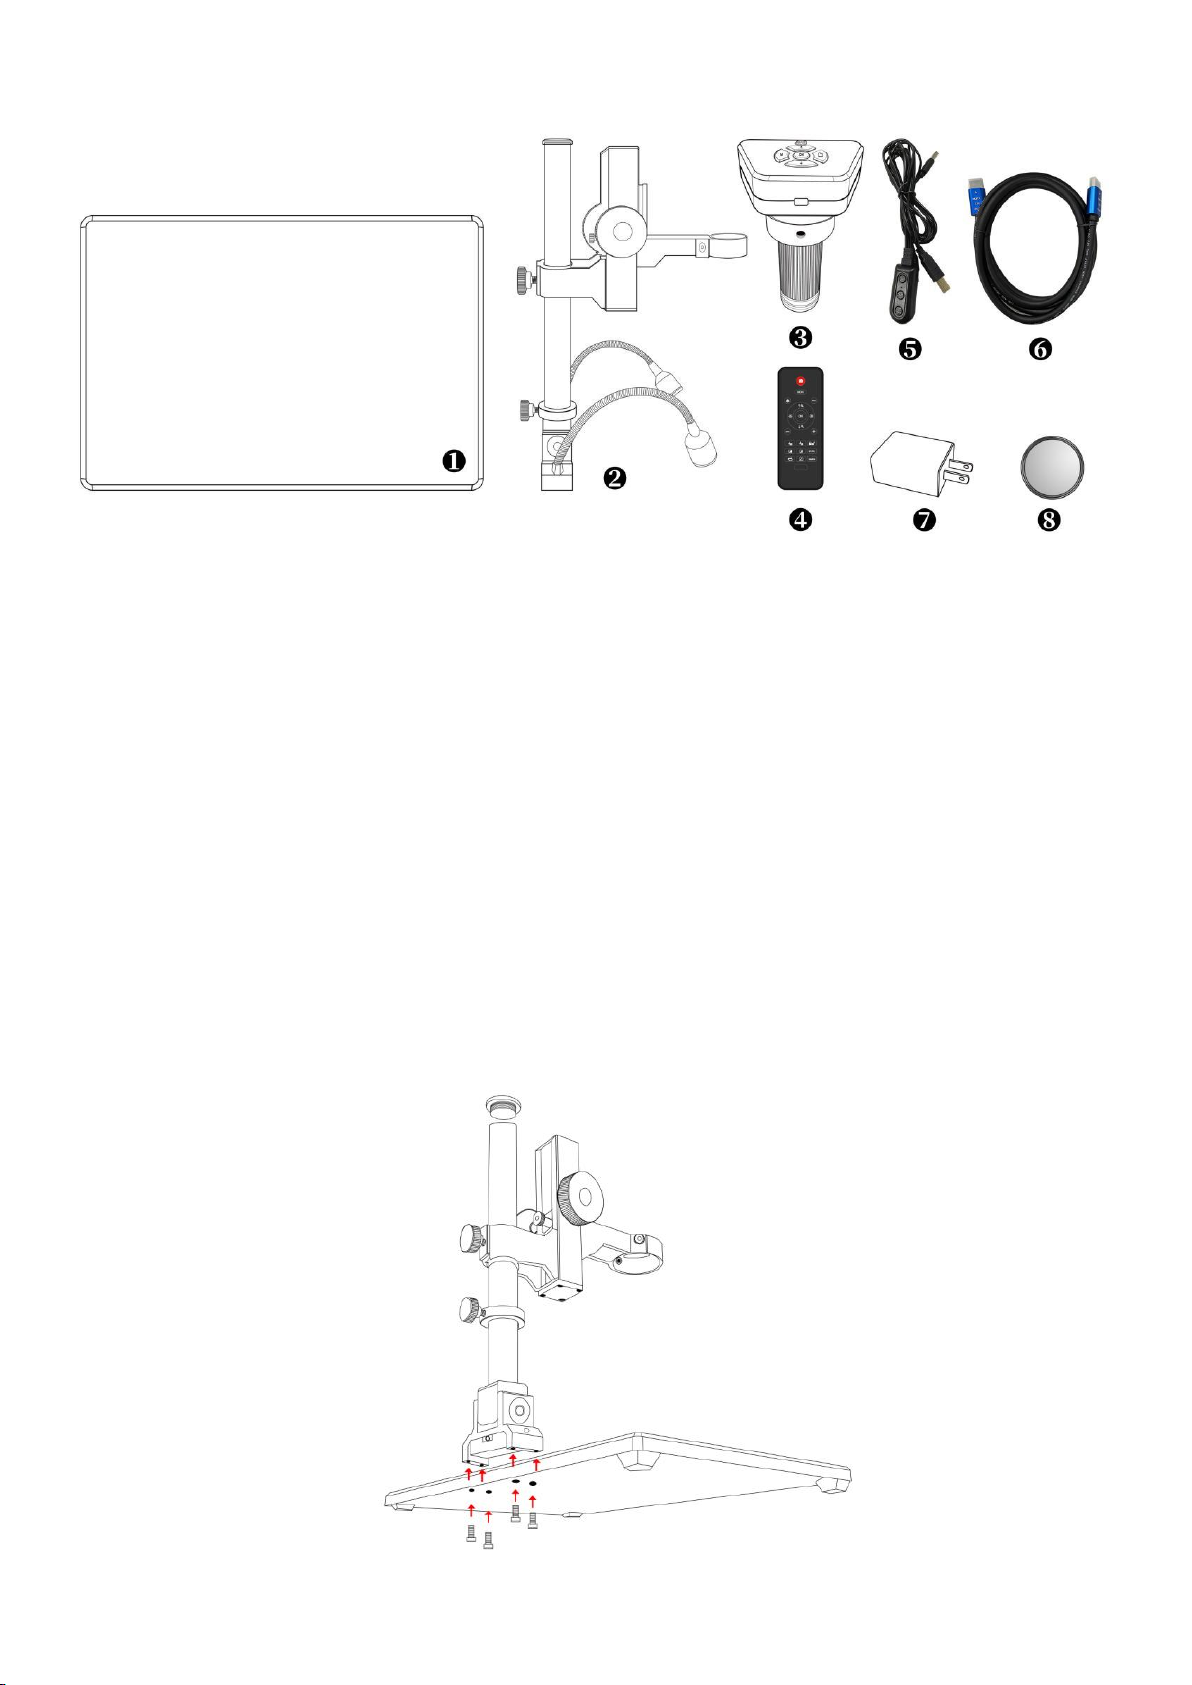
①Metal base ⑤Power cable
②Bracket
(including: universal LED light*2, beam, buffer ring) ⑥HDMI cable
③Digital microscope host ⑦Power adapter
④Remote control ⑧UV filter
Assembly
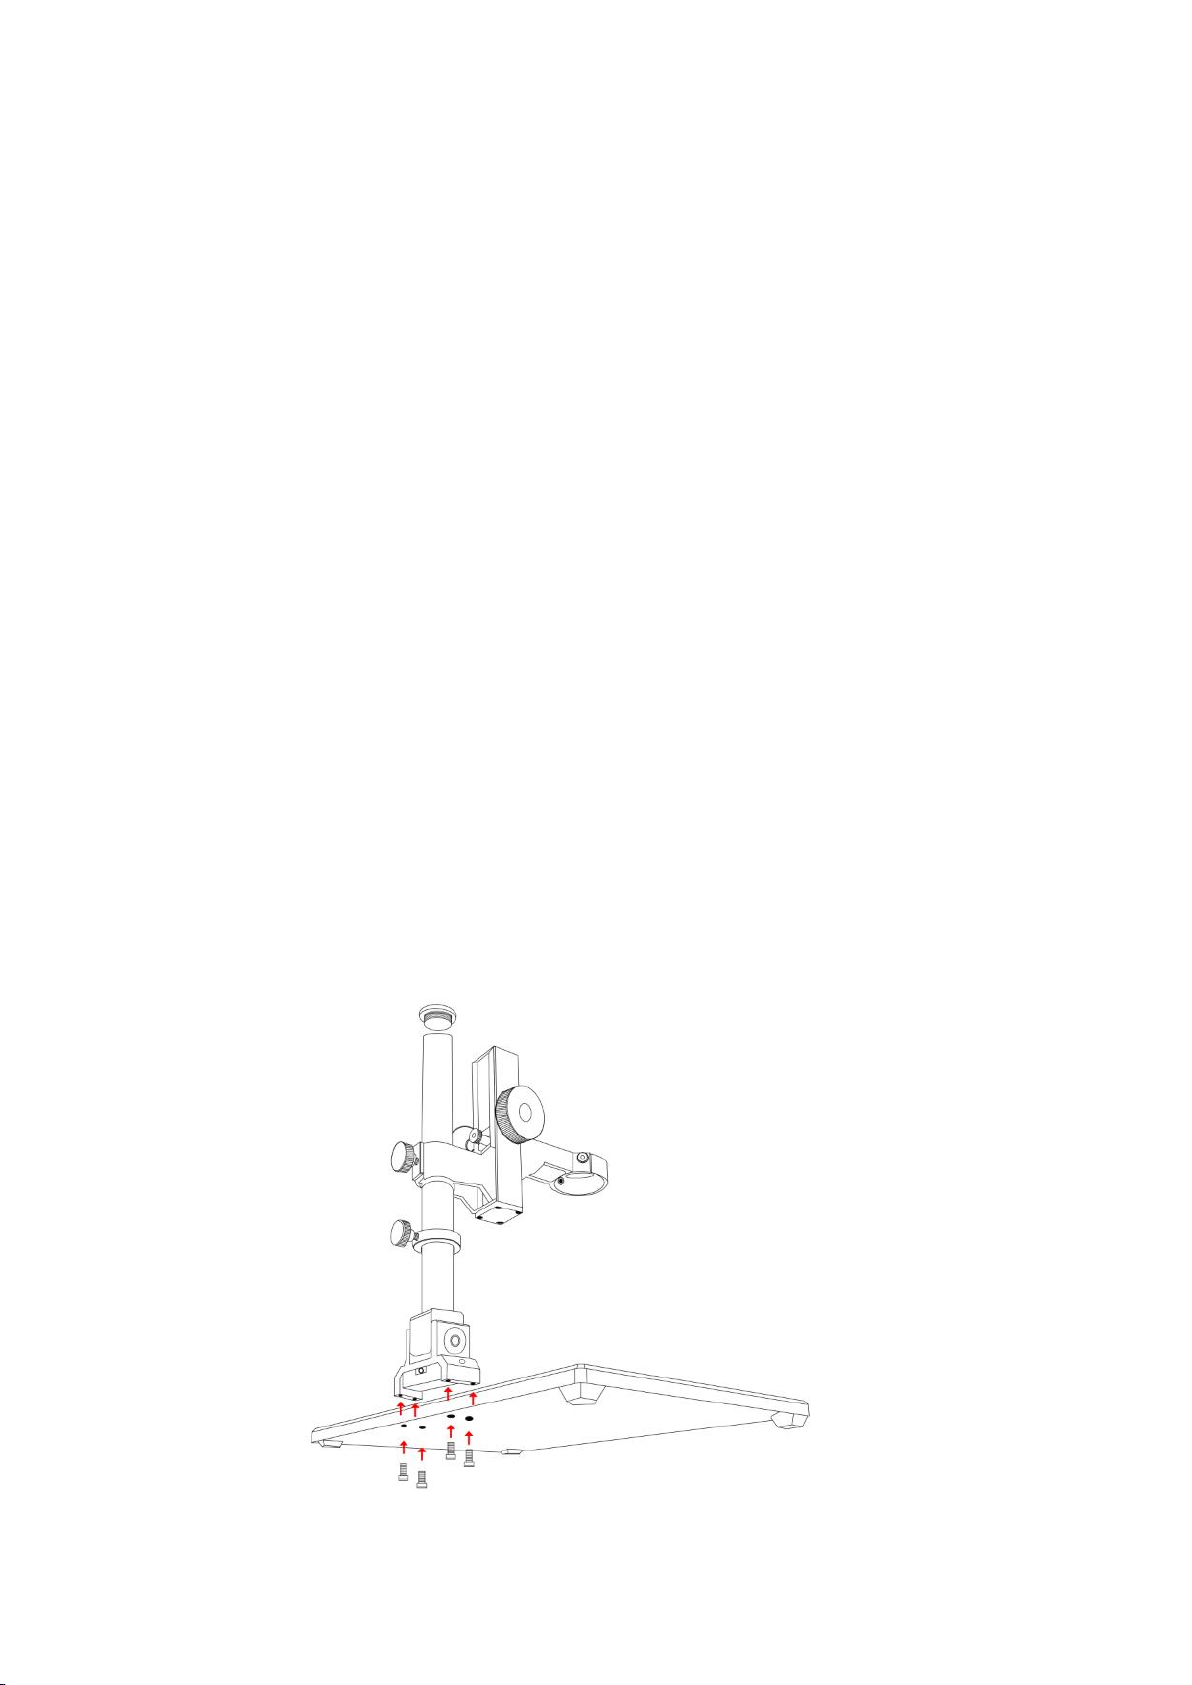
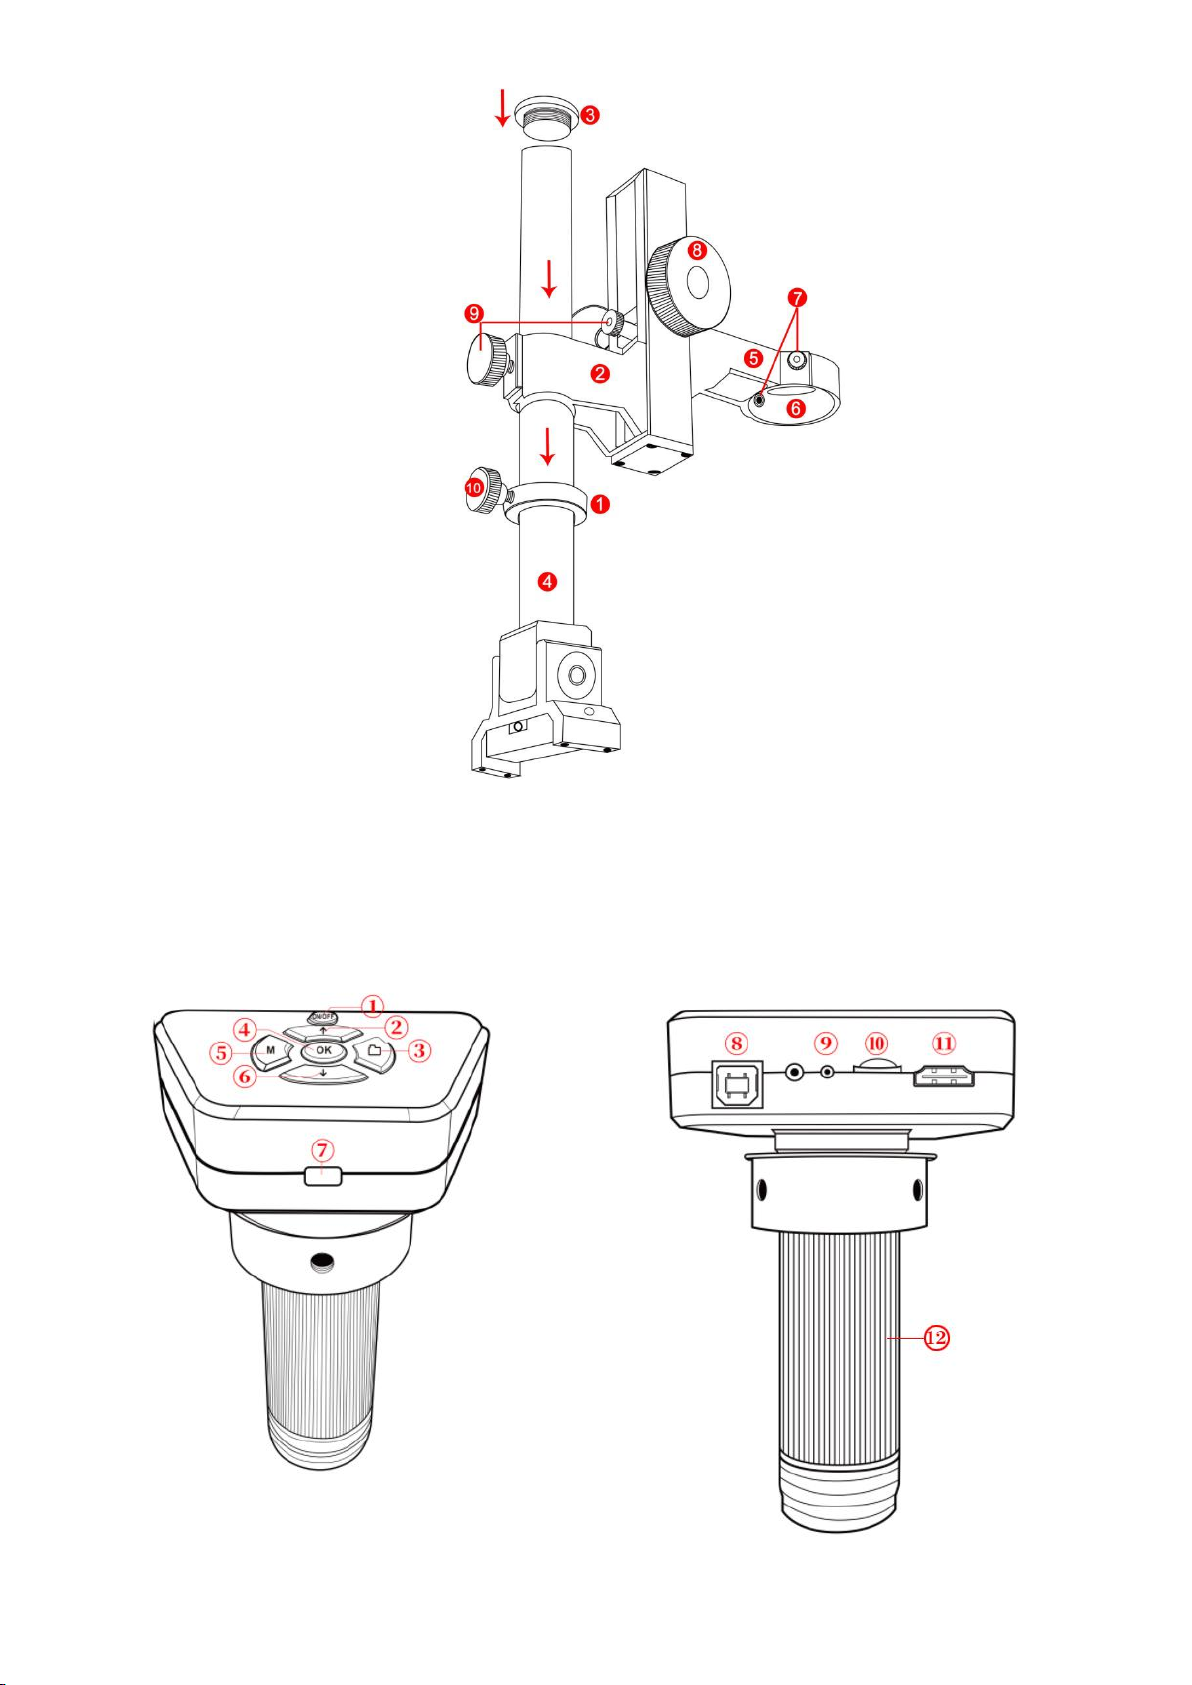
1. Install the bracket to the metal base (see Figure 2 Installation 1).
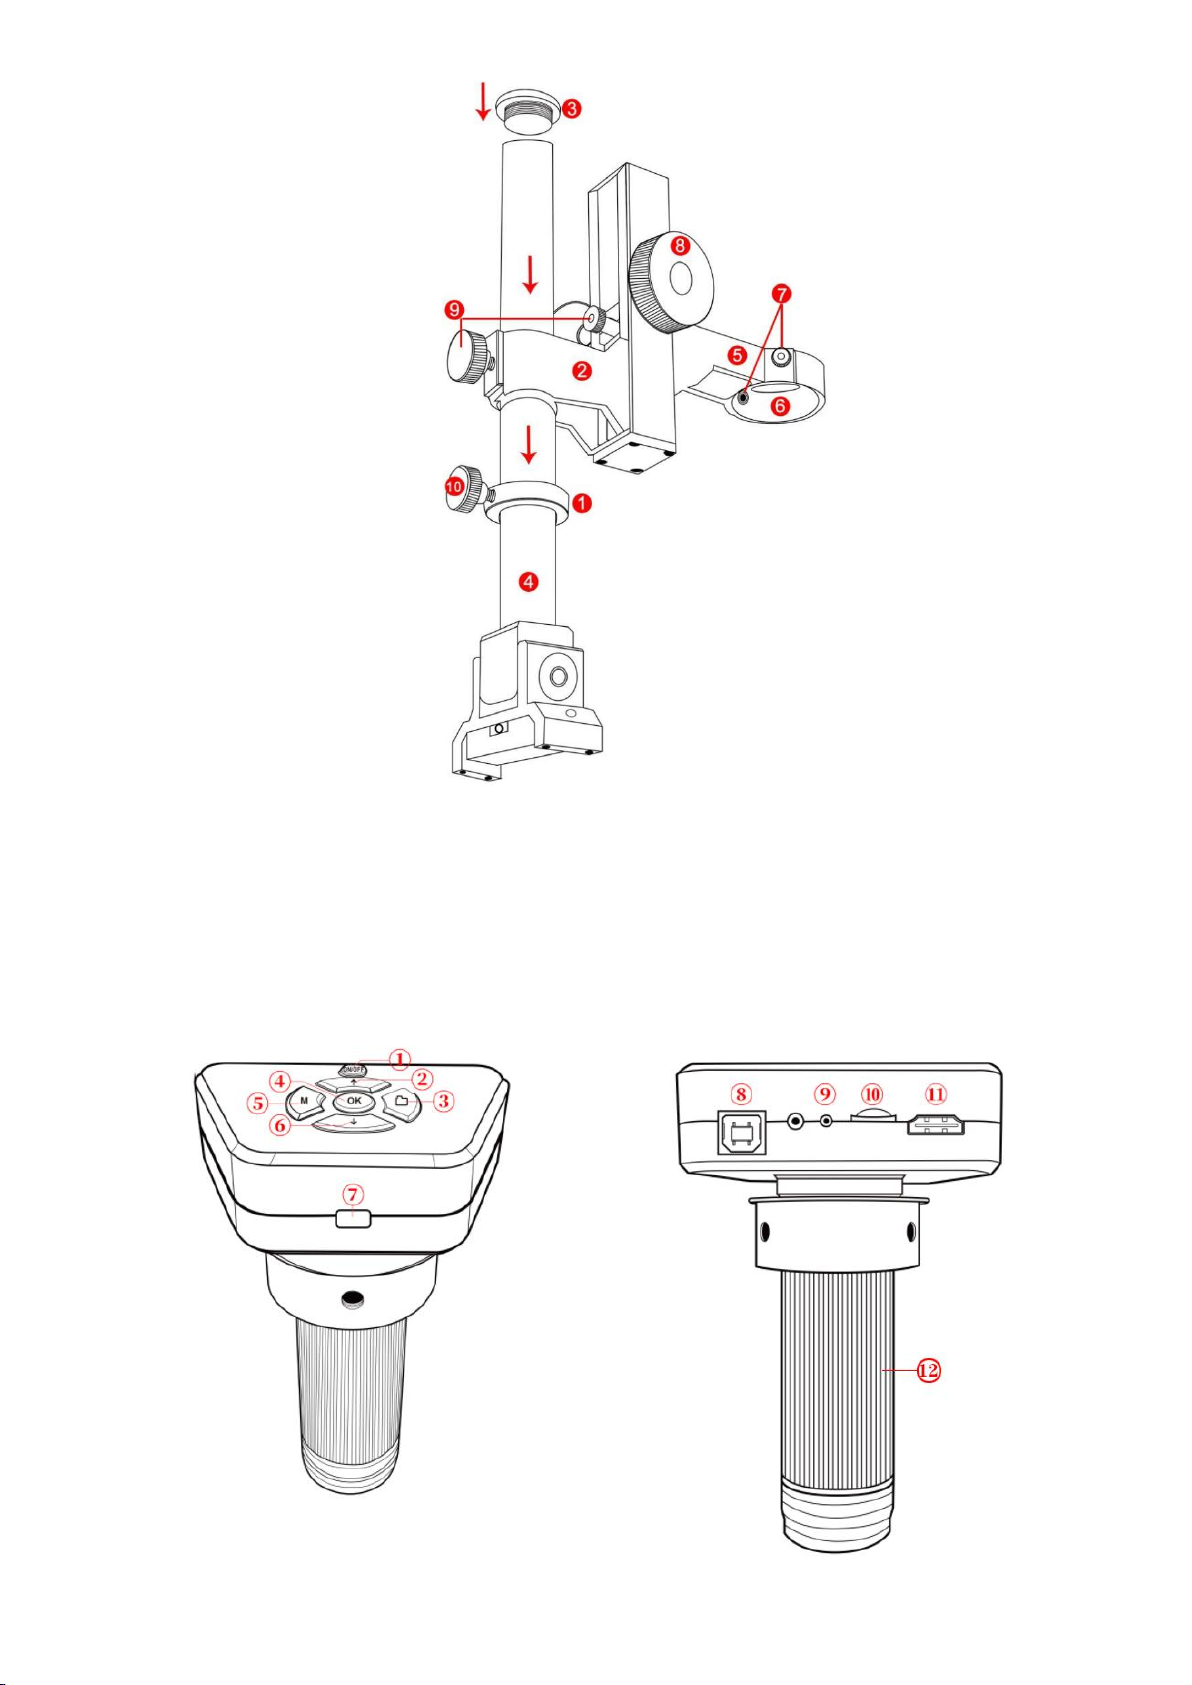
2. Raise the bottom white buffer ring(see Figure 2①)to the below of the beam(see
Figure 2②), leaving some gaps, and tighten the screws to fix it(see Figure 2⑩). This
step plays a buffering role for the beam to fall when it is not fixed properly, avoiding
direct fall to damage the host.
3. Unscrew the top cover of the bracket(see Figure 2③), insert the black beam part
(see Figure 2②) into the bracket(see Figure 2④), align the direction of the host
hole(see Figure 2⑥), and tighten the rear fixing screws. After completing this step,
turn the top cover of the bracket back and tighten it .
4. Insert the host into the host hole, adjust the position and direction of the host, and
tighten the host fixing screw(see Figure 2⑦). Be careful not to jam the screw on the
threaded focusing tube. After completion, try to rotate the focusing tube left and right
to ensure that there is no jam.
After installation, if the operation is correct, the angle between the focusing tube,
the bracket and the metal base can be adjusted freely. If there are any problems during
the installation process, please contact us in time to avoid damage to the product and
affecting normal use due to improper installation.
Figure 2 Installation 1
Page 6
- 4 -
Figure 2 Installation 2
①Buffer ring ②Large beam ③Bracket top cover ④Bracket ⑤Small beam
⑥Host hole ⑦Host fixing screw ⑧Object distance adjusting pulley
⑨Beam fixing screw ⑩Buffer ring fixing screw
Button Instructions
Page 7
- 5 -
①Power on/off
② Up
③ Picture capture
④OK
⑤Menu/Mode
⑥ Down
⑦Infrared sensor
⑧Power interface
⑨ Power Indicator
⑩Micro-SDcard slot
⑪ HDMI port
⑫Focusing tube
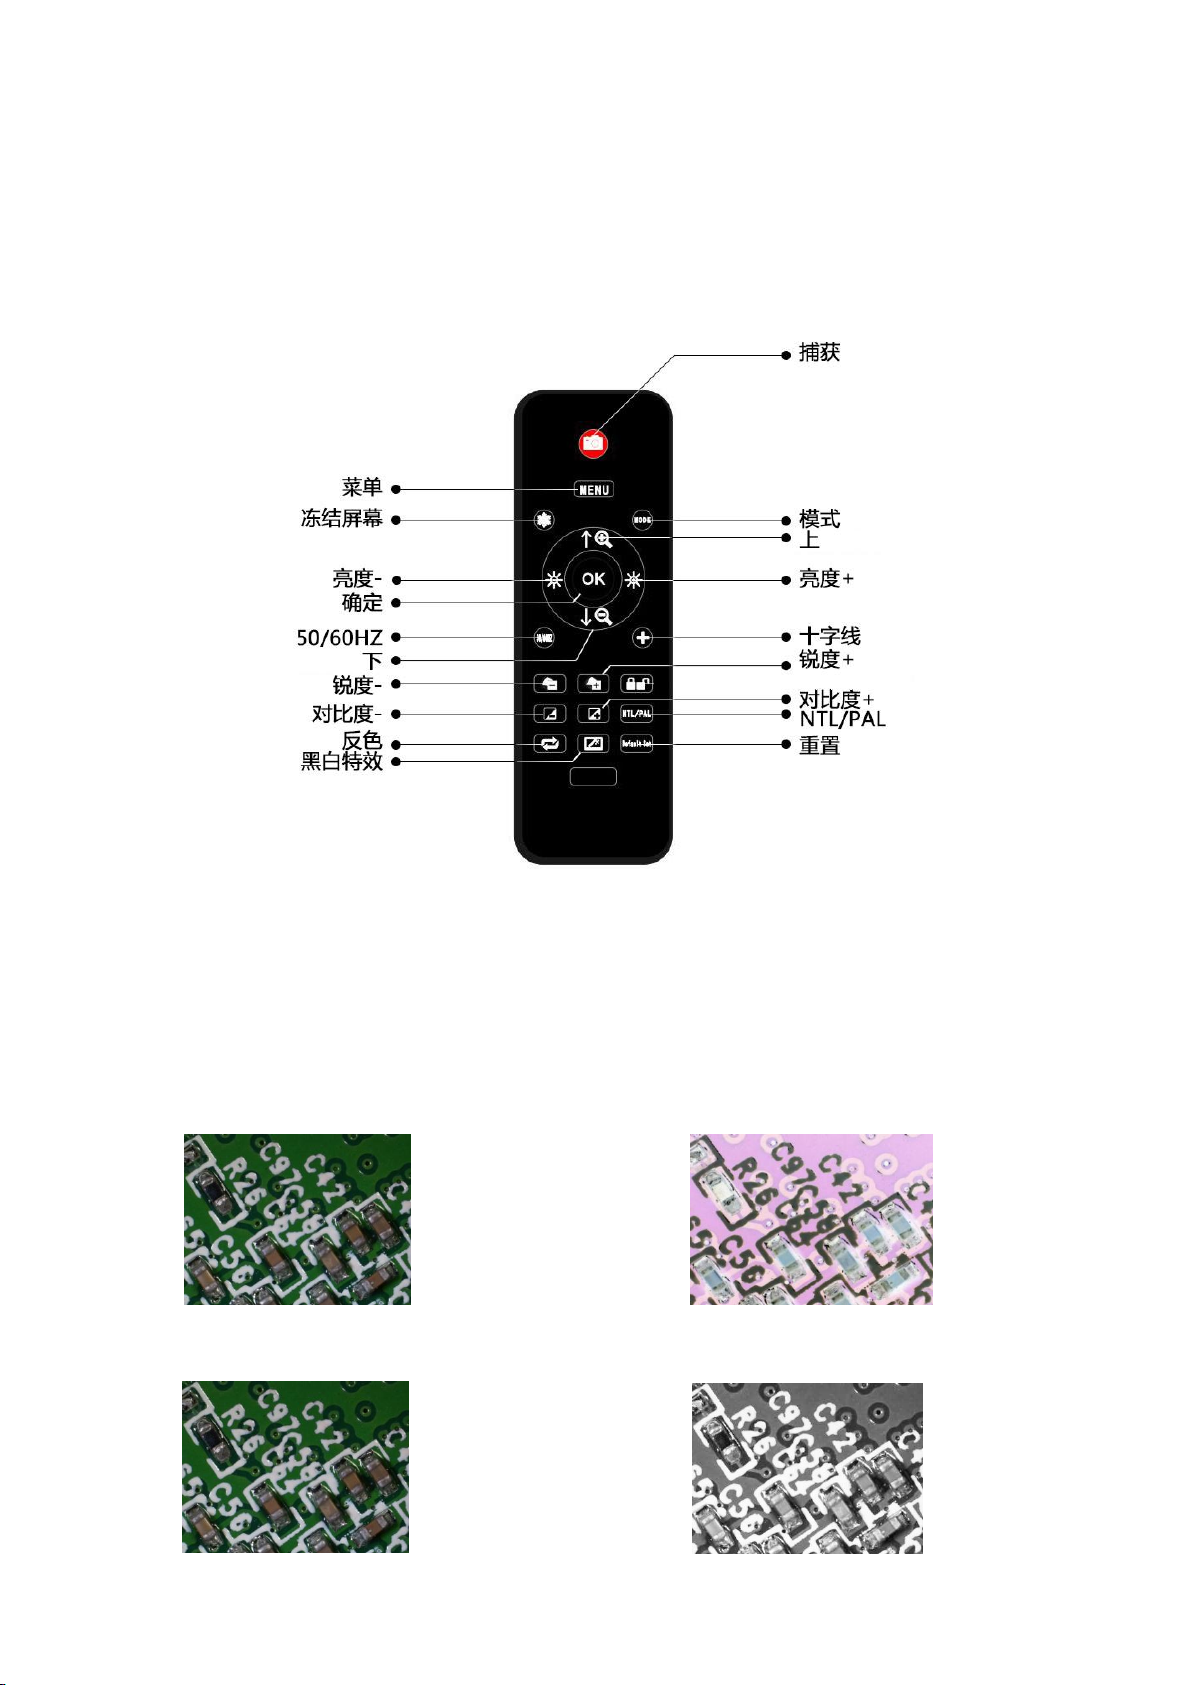
Remote controller
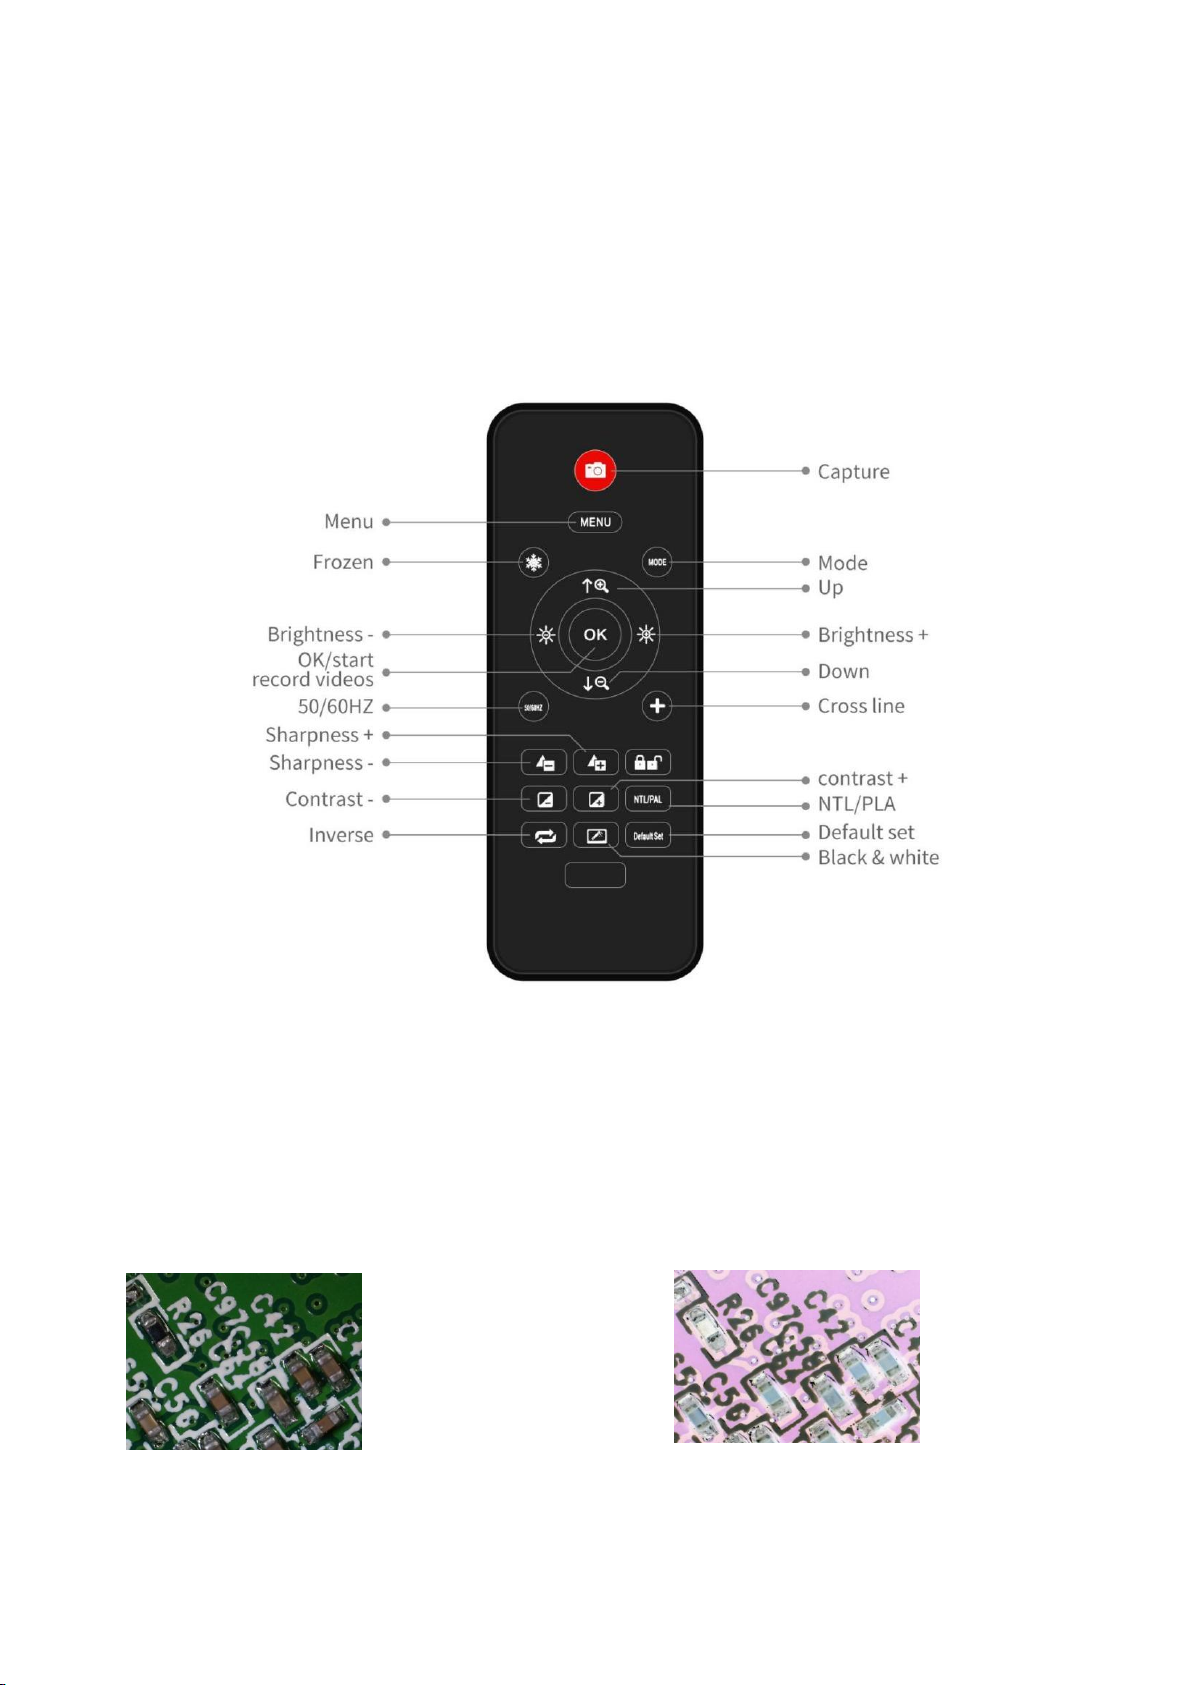
*Frozen: Keep the image on the screen. It works at standby, record and capture modes.
*Brightness up&down: exposure compensation from +2.0 to -2.0.
*Sharpness up&down: there are three levels of sharpness: Soft/Normal/Strong.
Those two buttons are both used to switch the levels, but in different orders.
*Contrast up&down: same principle as Sharpness.
*Inverse: refer to pictures in below:
Normal Inverse
*Black&white: refer to pictures in below:
Normal Black&white
Page 8
- 6 -
Connection and output
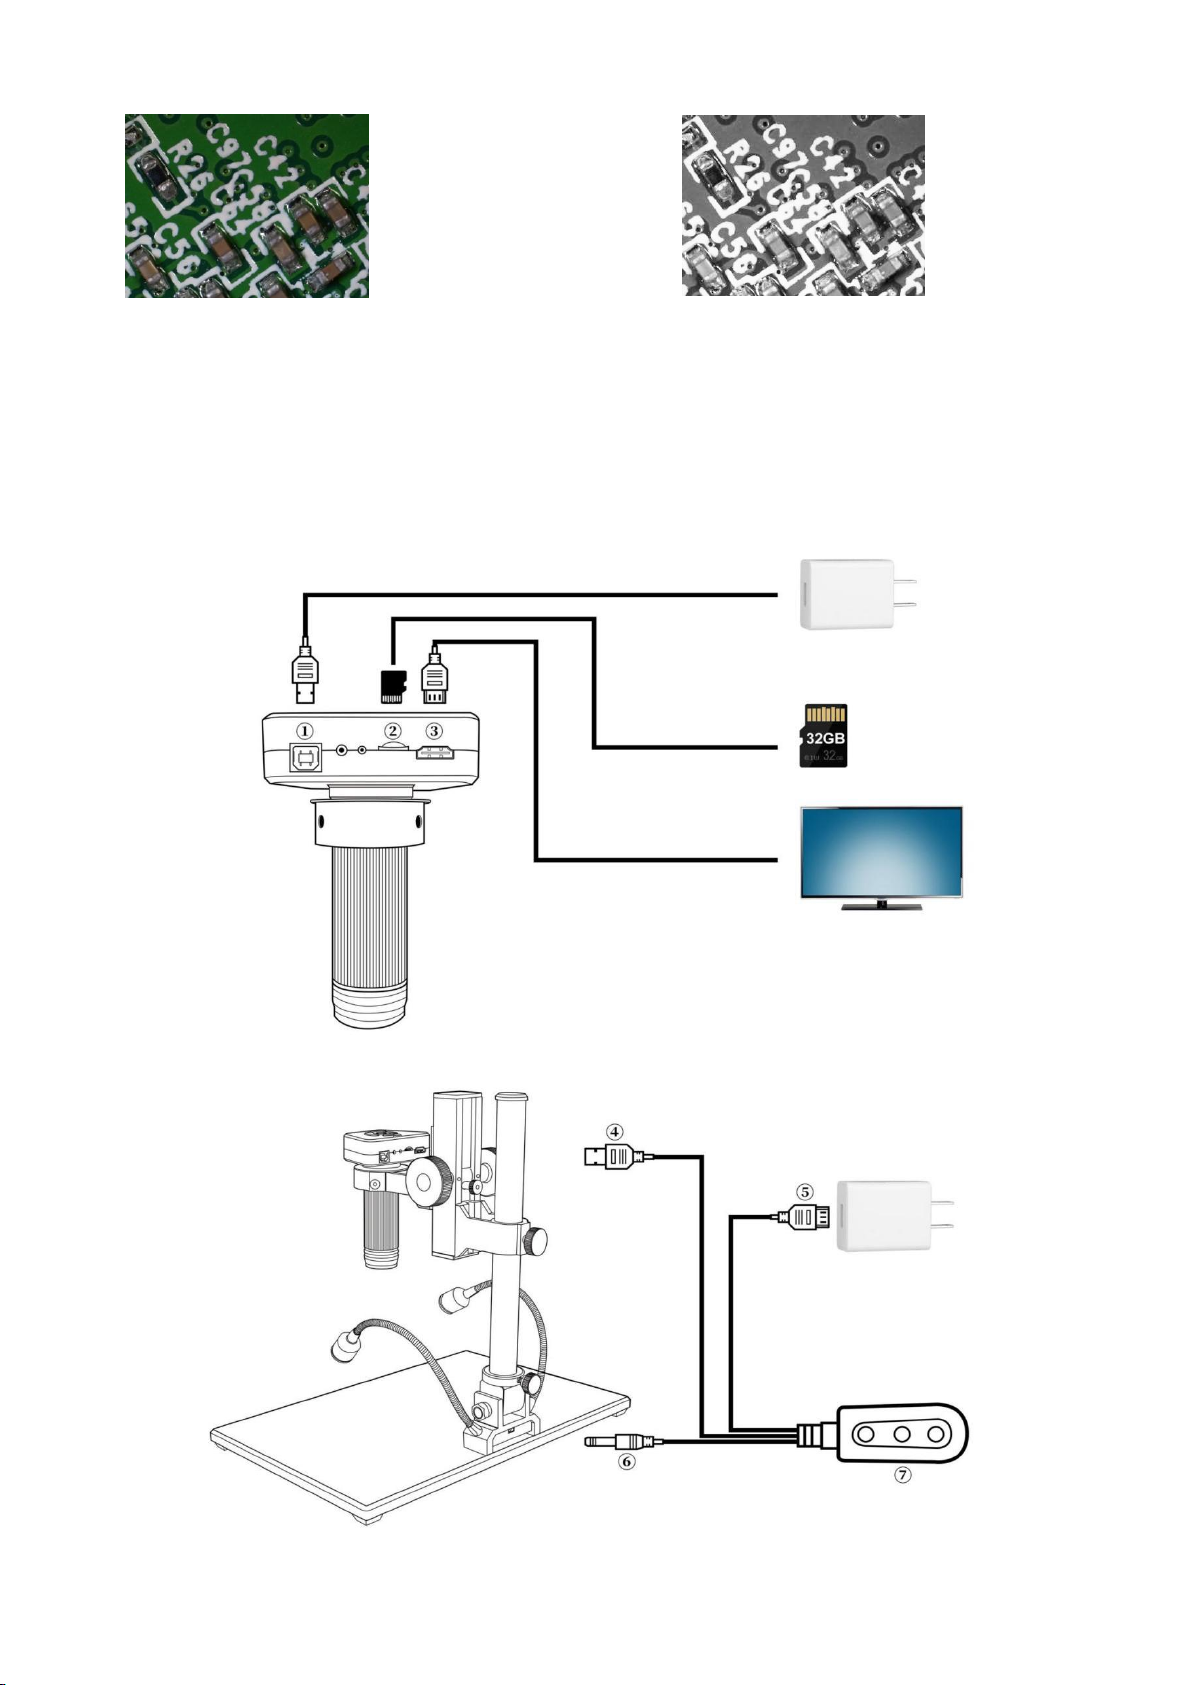
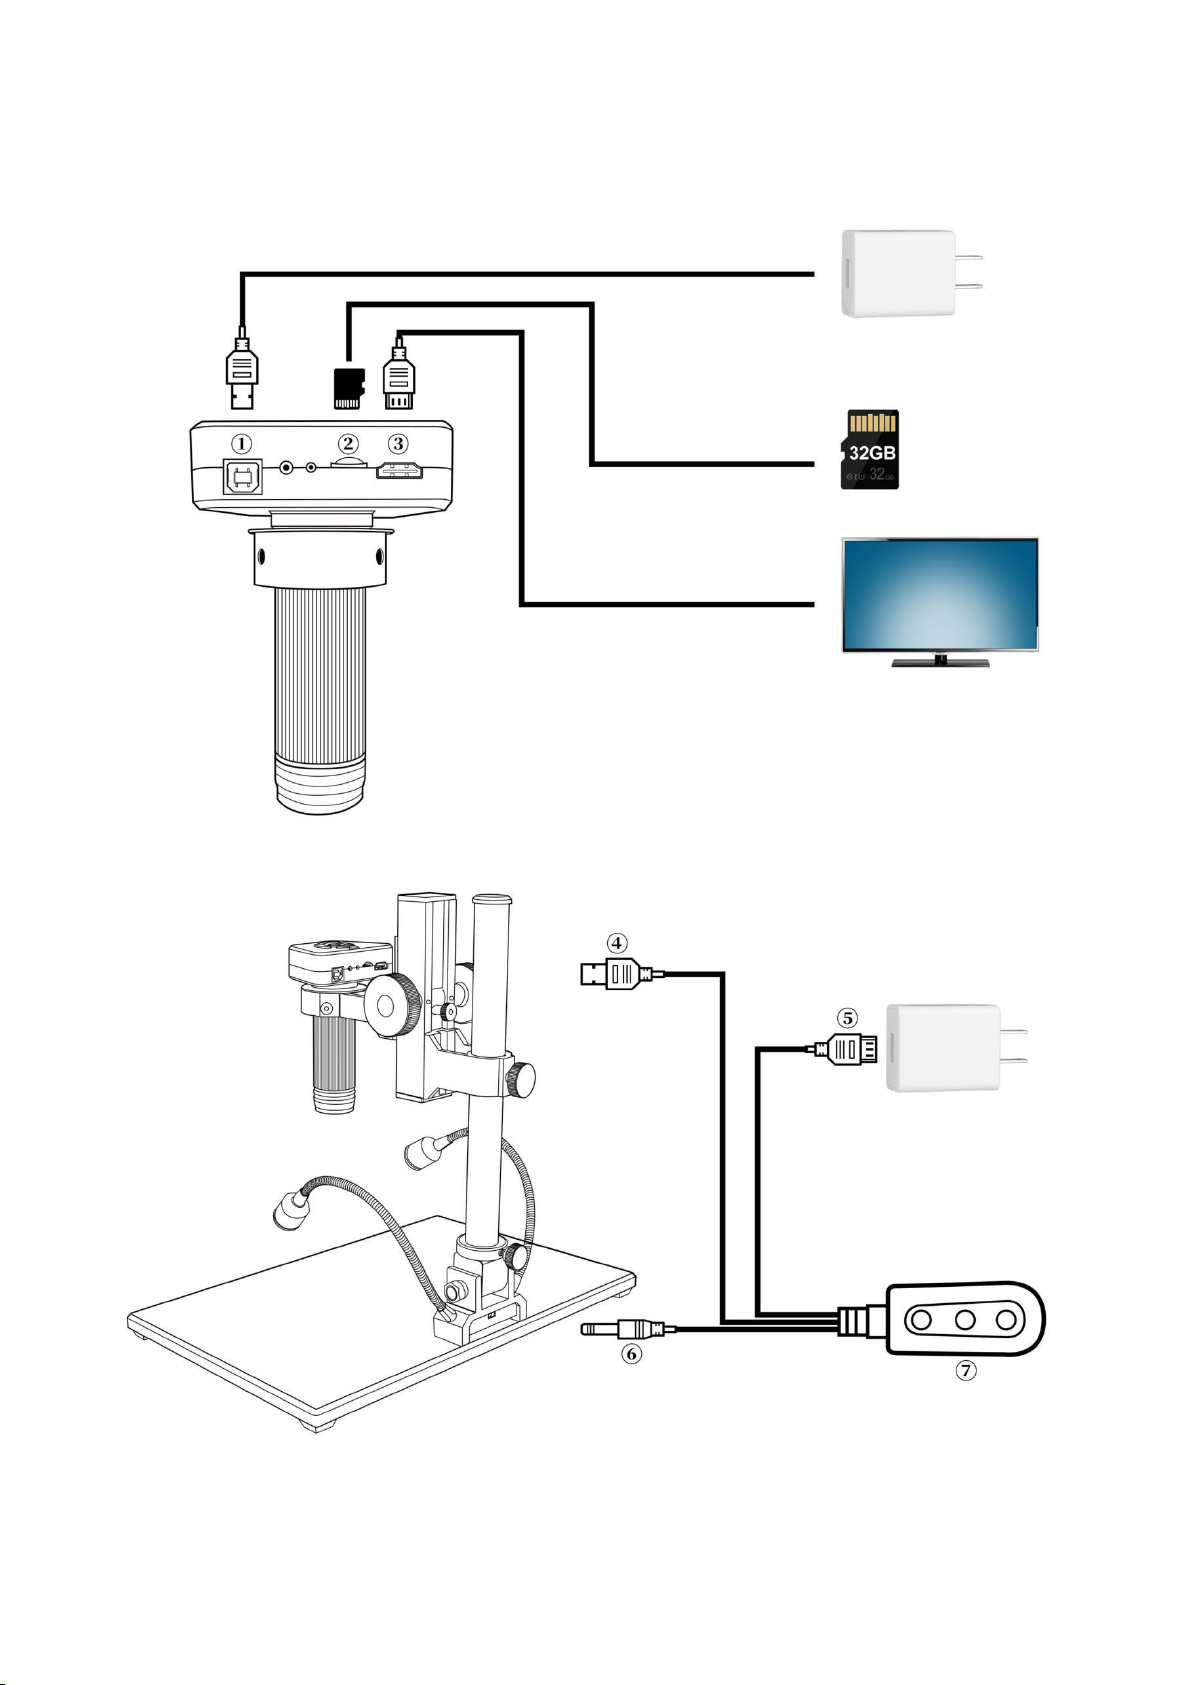
AD1605 has two output methods: HDMI and memory card.
The picture below shows the different ports on the host. The details of the HDMI output
method will be detailed in the following chapters.
①: Power interface.
Page 9

- 7 -
②: Memory card. (Used to store photos or videos)
③: HDMI output. (Output to HDMI display screen through HDMI cable)
④: Microscope power cable.
⑤: USB power plug.
⑥: Power supply cable for LED lights on the base.
⑦: Switch. There are three buttons: the left is the "on/off" button to disconnect the device or connect
the power; the other two buttons are the base lights brightness adjustment buttons, the middle is
"Brightness +", and the right is "Brightness -".
Quick Start
◆Independent use
*How to turn on
1. Connect the three cables to the positions according to the diagram in the
"Connection and Output" chapter ④⑤⑥, connect the HDMI cable to output the host
image to the HDMI high-definition display, and keep the power supply in the
power-on state.
2. Press and hold the Power button on the host (After connecting the power supply,
you need to manually press the power button to turn on the microscope. )
3. Adjust the brightness and angle of the LED lights on the base, and adjust the object
distance and the focus manually to obtain the desired image.
* Mode switch
1. Short press the "M" key to switch between different modes. (Or press the "MODE"
button on the remote control)
2. Interpretation of icons in different modes:
: Video Standby mode; : Photo mode; : Video mode;
:Playback mode (when the file is a video, press "OK" to play the video file.During
video playback, press the down button to fast forward, press the up button to enter
slow playback )
*Video settings menu
1. In the Video Standby mode, press and hold the "M" key on the main unit until the
menu is displayed on the screen. (Or press the "MENU" button on the remote control)
2. Press the "up/down" key to select the parameter to be set, and press the "OK" key
to enter the content to be set.
3. After completing the settings, press the "M" key to return to the Video Standby
mode.
*Photo setting menu
1. In the Video Standby mode, press and hold the "M" key on the main unit until the
Page 10

- 8 -
menu is displayed on the screen, and then press the "M" key again.
(Or use the remote control to operate, press the "MENU" button twice).
2. Press the "up/down" key to select the parameter to be set, and press the "OK" key
to enter the resolution setting.
3. After completing the settings, press "OK" to return to the video setting menu, then
press the "M" key to return to the Video Standby mode.
* Take pictures, 2 ways
1. In the Video Standby mode, press the "Capture" button to take a photo.
2. Using the remote control, press the "Capture" button.
*Video recording steps
1. In the Video Standby mode, press "OK" to start recording.
2. Press the "OK" button to stop recording.
◆HDMI output
•First of all, make sure that the monitor connected to the microscope is a 4k HD
monitor, otherwise the image effect will not reach 4k.
•Then, power up the microscope and connect it to the high-definition display. The
microscope does not contain a built-in battery, so please make sure that the
microscope is always energized during use.
•Third, press the "On/Off" button to turn on the microscope, place the observed
object on the stage and adjust the focus and object distance. Note that the closer the
lens is to the object, the greater the magnification.
• After inserting the SD card, you can take a video.
• If the display screen only supports 1080P, you can press and hold "OK" to
automatically switch to 1080P mode to make the microscope output signal consistent
with the display screen.
FAQ
• Why there is no image on the display?
Please check whether the cables are correctly connected and whether the power
switch is turned on. If the connected monitor only supports 1080P, you need to press
and hold the "OK" button to automatically switch to 1080P mode to make the
microscope output signal consistent with the display on the screen.
• Why the image is not clear?
Please adjust the focus or focus pulley, the angle of light irradiation, and check
whether the lens is dirty.
• Why the remote control does not work?
The remote control is not equipped with batteries at the factory, please check
Page 11

- 9 -
whether a valid battery is installed.
Warranty Card
User’s name:
Address:
Phone number:
Post code:
email:
Model name:
Purchase date:
Fault feedback:
Date:
Fault:
Notice:
Our warranty doesn’t cover:
1
If users can not provide the purchase proof or the Warranty.
2
If users use it in an improper environment, such as incompatible power supply, high
temperature environment etc.
3
If the fault caused by accident, oversight, misoperation or natural disasters etc.
4
If the fault caused by people who are not belong to authorized organizations of our company
during repacking, repair, dismantle, Or if users repack, repair or dismantle the device
not following our advice.
5
Out of warranty period.
• Why there is no image on the display screen when the playback mode is selected?
It is possible that the video is not saved completely, the shooting is not successful, or
the video file of the video is too large, and the system needs running time.(It takes
about 1 minute to display the image after switching from standby mode to playback
mode)
• Why the photo is not clear?
Please check whether the photo setting is the highest pixel to ensure high-quality
photo output.
• Prompt memory card error?
First make sure that the memory card is a genuine memory card. Then choose to
format the memory card in the system and try to use it again.
Due to the higher performance requirements of the memory card, when recording
video, if it still cannot be used normally after formatting, please replace the
high-quality TF card with class 10 or above.
Page 12

- 10 -
目录
引言.....................................................................................................................................................................11
基本参数............................................................................................................................................................ 11
AD1605 标配内容........................................................................................................................................... 12
安装.....................................................................................................................................................................12
按键说明............................................................................................................................................................ 13
遥控器.................................................................................................................................................................14
连接与输出........................................................................................................................................................15
快速入门............................................................................................................................................................ 16
◆独立使用.................................................................................................................................................. 16
◆HDMI 输出..............................................................................................................................................16
FAQ.....................................................................................................................................................................17
Page 13

- 11 -
引言
图像传感器
1400 万像素高清传感器
视频输出
1920x1080 60 帧; 1920x1080 30 帧;2560x1440 30 帧;
3840x2160 30 帧;
视频格式
MP4
放大倍率
最高可达 150 倍(输出到 29 寸高清显示器)
照片分辨率
最高 14M (4320*3248)
照片格式
JPG
对焦范围
5cm 至 29cm
帧频
最大 60f/s
视频输出接口
HDMI
存储
Micro-SD 存储卡, 最大支持 32G 卡(标配不含)
电源
5V DC
支架尺寸
37.5cm*25cm*47cm
标配内容
显微镜×1 支架×1 电源适配器×1 电源线×1
HDMI 线×1 说明书×1 UV 镜×1 遥控器×1
包装数据
40×30×16cm/ 5.5kg
AD1605 是一款多功能数码工业显微镜。它集 4K 高清输出、高物距、多功能以及便捷的操作于一身, 全方位
的满足了工业检修、 教学演示等各个领域的多种需求。 其精致的外观设计结合了人体工学的考量, 高质感的
用料为用户提供了更为舒适的使用手感。 希望该产品能真正释放您的双眼, 为您的工作生活带来改善。 感谢
您对该产品的支持。
◆为了您能更好的使用本产品, 我们希望您能一直保留这份说明书。 由于不遵守本手册而造成的任何伤害, 追
究责任无效。
◆为了保证为客户带来更好的体验, 在完善产品的过程中我们可能对产品做小的改动。 在描述与产品有出入之
处,请以实物为准, 希望广大消费者理解。
◆安全与保养须知:
1. 保持设备处在干净干燥的环境。 远离油、 水、 瓦斯以及其他可能导致腐蚀的材料。保存和操作可参照一般
电子设备进行,如笔记本电脑。
2. 产品中包含细小零件且整体质量较大, 请小孩在没有监护人的情况下远离本品以避免误食零件或者误晃砸
伤。
3. 当图像质量有所下降时,应清洁主机镜头下方的保护镜。 用柔软干净的棉布(如眼镜布)蘸取适量酒精小心
擦拭。
4. 如需用沾水的棉布擦拭显微镜, 请务必先切断电源, 再次通电前请务必检查机器已恢复干燥。
5. 残障人士、 心理疾病患者或者有过敏症状的人士不适合使用本产品。
6. 不要过分操作。 产品各个部件之间的调整都有限度, 为保证工作达到最佳状态, 请保持设备整体的平衡。
基本参数
Page 14
- 12 -
AD1605 标配内容
(图 1)
①底板 ⑤电源线
②支架(包含:万向 LED 灯*2,横梁,缓冲圈) ⑥HDMI 线
③显微镜主机 ⑦电源适配器
④遥控器 ⑧UV 镜
安装
1. 将立柱安装至底板(见图 2 安装 1)。
2. 将底部白色缓冲环(见图 2/①)升起至横梁下方(见图 2 /②), 可留下一些空隙,拧紧缓冲环固定螺丝(见
图 2 /⑩)。 这步对横梁在没有固定好时下落起到缓冲作用, 避免直接下落损坏主机。
3. 旋开立柱顶盖(见图 2/③), 将黑色横梁(见图 2 /②)套入立柱(见图 2 /④), 调准主机孔(见图 2 /⑥)位置
方向, 将大横梁固定螺丝拧紧。 完成后将立柱顶盖旋回, 拧紧。
4. 将显微镜主机插入主机孔, 调整主机位置和方向, 旋紧主机固定螺丝(见图 2 /⑦)。 注意不要将螺丝卡
在带有螺纹的调焦筒处, 完成后可尝试左右旋转调焦筒, 确保无卡顿。
如果安装操作无误, 安装好之后, 调焦筒、 以及立柱与底板之间的角度都可以自由调节。 如果安装过程中出
现任何问题, 请及时联系我们, 避免安装不当对产品造成损坏而影响正常使用。
(图 2 安装 1)
Page 15
- 13 -
(图 2 安装 2)
①缓冲环 ②大横梁 ③立柱顶盖 ④立柱 ⑤小横梁 ⑥主机孔
⑦主机固定螺丝 ⑧物距调节滑轮 ⑨横梁固定螺丝 ⑩缓冲环固定螺丝
按键说明
Page 16
- 14 -
①开/关机 ②上 ③捕获(拍照) ④OK(确认)
⑤菜单/模式 ⑥下 ⑦红外信号接收口 ⑧电源接口
⑨指示灯 ⑩Micro-SD 卡槽
遥控器
⑪
HDMI 接口
⑫
调焦筒
*冻结屏幕: 定格屏幕图像。在待机, 录像和捕获模式下可操作。
*亮度+&亮度-: 曝光补偿从+2.0 到-2.0。
*锐度+&锐度-: 有三个锐度:柔和、 正常、 强烈。 两个按键均可用于切换锐度强弱, 但是顺序不同。
*对比度+&对比度-: 原理与锐度一致。
*反色: 请参考下图:
正常 反色
*黑&白: 请参考下图:
正常 黑&白
Page 17
- 15 -
连接与输出
AD1605 有 2 种输出方式, 分别是:HDMI 和存储卡。下面的鸟瞰图显示了主机上的不同端口。HDMI 输出方
式的细节将在后面的章节中详述。
①:电源接口。
②:存储卡。(用来存储照片或视频)
③:HDMI 输出。(通过 HDMI 数据线输出到 HDMI 显示屏)
④:显微镜电源线。
Page 18

- 16 -
⑤:USB 取电插头。
⑥:底座双灯供电线。
⑦:开关。有三个按键:左边是“开/关”按键,使设备断开或连接电源;另外两个按键是底座双灯亮度调节按
键,中间为“亮度+”,右边为“亮度-”。
快速入门
◆独立使用
*开机步骤
1.根据“连接与输出”章节图示④⑤⑥三条线连接到对应位置,连接 HDMI 线将主机图像输出至 HDMI 高清显
示器,保持电源处于通电状态。
2.按下主机上的“开/关机”键。(显微镜连接电源后需要手动按开关机按键开机)
3.调节底座双灯的亮度、角度、调节物距并手动调焦获得所需要的图像。
*切换模式
1. 短按“M”键可以切换录像/回放模式。(或按遥控器上的“MODE”键)
2. 不同模式图标释义:
:录像待机模式; : 拍照; : 录像模式; : 回放模式 (当文件为视频时, 按“OK”键播放视频文件。
视频播放中按下键可以快进,按上键进入慢播放)
*视频设置菜单
1.在录像待机模式下,长按“M”键,直到屏幕上显示菜单。(或按遥控器上的“MENU”键)
2.按“上/下”键选择需要设置的参数, 按“OK”键进入要设置的内容。
3.完成设置后再按“M”键回到录像待机模式。
*拍照分辨率设置
1.在录像待机模式下, 长按“M”键, 直到屏幕上显示菜单,再按一次“M”键。
(或使用遥控器操作, 则按两次“MENU”键)。
2.按“OK”键进入分辨率设置;按“上/下”键选择需要设置的参数。
3.完成设置后按“OK”键回到视频设置菜单,再按“M”键回到录像待机模式。
*拍照,2 种方式
1.录像待机模式下,按“捕获”键进行拍照。
2.使用遥控器, 按下“捕获”键。
*视频录制步骤
1.录像待机模式下, 按“OK”开始录制。
2.按“OK”键停止录制。
◆HDMI 输出
•首先, 确保连接显微镜的显示器是 4k 高清显示器, 否则图像效果将无法达到 4k。
•然后, 将显微镜通电并连接到高清显示器。 显微镜不含内置电池, 请确保显微镜在使用时一直处于通电状态。
•第三,按“开/关机”键打开显微镜, 将观察对象放在载物台上并调整焦距和物距。 注意镜头距离物体越近,
Page 19

- 17 -
放大倍数越大。
保修卡
用户名称:
详细地址:
电话:
邮编:
邮箱:
产品型号:
购买日期:
故障反馈:
日期:
故障现象:
敬请注意:
下列情况造成的产品故障不在保修之列
1
不能出示产品的有效保修凭证和有效购物凭证。
2
使用环境或条件不当,例如电源不合、环境温度、湿度、雷击等而导致产品故障。
3
由于事故、疏忽、灾害、操作不当等造成产品故障。
4
由非本公司授权机构的维修人员改装、修理、拆卸,或未按照经被公司授权机构的售后的处理意
见进行擅自改装、修理、拆卸等而造成的故障或损坏。
5
产品超出本公司规定的保修期限。
•插卡后方可进行拍摄录像。
•如果显示器仅支持 1080P,可长按“OK”键自动切换 1080P 模式,使显微镜输出信号与显示屏显示一致。
FAQ
•为什么连接 HDMI 显示器无图像,或者提示“输入不支持”?
请检查各连接线是否正确连接, 电源开关是否开启。
如果连接的显示器仅支持 1080P,需长按“OK”键自动切换 1080P 模式,使显微镜输出信号与显示屏显示一
致。
•为什么图像不清晰?
请调整焦距或调焦滑轮、 灯光照射角度, 并检查镜头是否有脏污。
•遥控器为什么不起作用?
遥控器出厂没有配备电池, 请检查是否安装有效电池。
•为什么选择回放模式,显示器无图像?
有可能录像没有保存完整,没有拍摄成功, 或者录像视频文件太大, 系统需要运行时间。
(待机模式切换至回放模式大概需要等待 1 分钟后显示图像)
•为什么拍出来的照片不清晰?
请检查拍照设置是否为最高像素, 确保优质照片输出。
•提示内存卡错误?
首先确保内存卡为正品高速内存卡。 然后在系统中选择格式化内存卡, 再尝试使用。因录制视频时对内存卡性
能要求较高,如格式化后仍不能正常使用,请更换 class10 以上的高品质 TF 卡。
 Loading...