

Page 1
MODEL MBG-5
LITERATURE PACKET #04989
Item pictured may differ from actual product
El artículo ilustrado puede diferir del producto real
Il est possible que l’article sur la photo soit différent du produit réel
Use & Care Instructions
Page 2

ENGLISH
Please read the following instructions before using your new Andis
clipper. Give it the care that a fine, precision built instrument
deserves and it will give you years of service.
IMPORTANT SAFEGUARDS
When using an electrical appliance, basic precautions should
always be followed, including the following: Read all
instructions before using the Andis clipper.
DANGER: To reduce the risk of electric shock:
1. Do not reach for an appliance that has fallen into water.
Unplug immediately.
6. Keep the cord away from heated surfaces.
7. Never drop or insert any object into any opening.
8. Do not use outdoors or operate where aerosol (spray) products
are being used or where oxygen is being administered.
9. Do not use this appliance with a damaged or broken blade or
comb, as injury to the skin may occur.
To disconnect turn control to OFF then remove plug from outlet.
10.
11. WARNING: During use, do not place or leave appliance
where it may be (1) damaged by an animal or (2) exposed
to the weather.
12. This appliance is intended for trimming purposes only.
SAVE THESE INSTRUCTIONS
THIS PRODUCT INTENDED FOR HOUSEHOLD USE
2. Do not use while bathing or in a shower.
3. Do not place or store appliance where it can fall or be pulled
into a tub or sink. Do not place in or drop into water or other
liquid.
4. Except when charging, always unplug this appliance after use.
5. Unplug this appliance before cleaning, removing or
assembling parts.
WARNING: To reduce the risk of burns, fire, electric
shock, or injury to persons:
1.
An appliance should never be left unattended when plugged in.
2. This appliance is not intended for use by persons (including
children) with reduced physical, sensory or mental capabilities,
or lack of experience and knowledge, unless they have been
OPERATING INSTRUCTIONS
To reduce the risk of electric shock, this appliance has a polarized plug (one blade is
wider than the other). This plug will fit in a polarized outlet only one way. If the plug
does not fit fully in the outlet, reverse the plug. If it still does not fit, contact a
qualified electrician to install the proper outlet. Do not change the plug in any way.
Before starting clipper, remove blade guard (some models may not have a blade
guard). Plug cord into electrical outlet, operate at 120 volt, 60 cycle AC electrical
current or as noted on the unit. After using your clipper, rewrap cord and store in a
safe place.
2-SPEED OPERATION
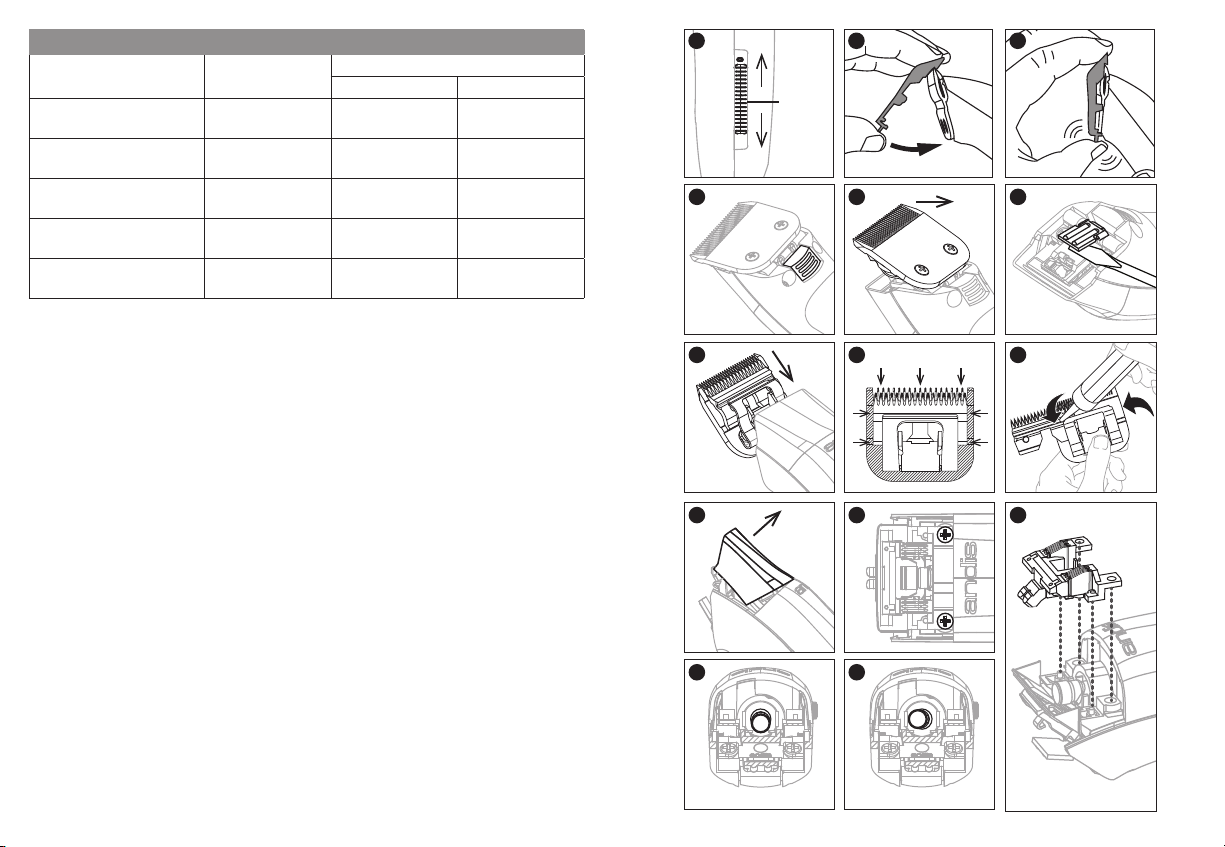
To start clipper, move switch to either normal or high speed setting (Figure A).
Use the normal setting (switch in lowest position) for most cutting needs. Use the high
speed setting (switch in highest position) for cutting through heavy hair. To stop
clipper, move switch back to original (center) position.
given supervision or instruction concerning use of the
appliance by a person responsible for their safety.
3. Children should be supervised to ensure that they do not play
with the appliance.
4. Use this appliance only for its intended use as described in this
manual. Do not use attachments not recommended by Andis.
5. Never operate this appliance if it has a damaged cord or
plug, if it is not working properly, if it has been dropped or
USING THE ATTACHMENT COMBS
(Some models do not have combs and sizes will vary by kit)
You can set the blades for a longer cut by using any of the attachment combs made
for your Andis clipper. The combs mount easily; simply slip the cutter blade teeth into
comb and snap the comb down (Figures B & C). To remove, simply snap off. These
attachment combs guide hair into the blades and give you precise control of hair
lengths. The length of trim is indicated on the attachment comb. Use the chart to find
the approximate lengths of cut. Different blade angles in relation to the skin, thickness
and texture of the hair will vary the cutting length.
damaged, or dropped into water. Return the appliance to an
Andis authorized service station for examination and repair.
2 3
Page 3
CLIPPING GUIDE
Description Clipping Direction
Standard Andis Blade
1/8” Attachment Comb
1/4” Attachment Comb
3/8” Attachment Comb
1/2” Attachment Comb
With hair grain
Against hair grain
With hair grain
Against hair grain
With hair grain
Against hair grain
With hair grain
Against hair grain
With hair grain
Against hair grain
Approximate Length of Cut
Fine Coarse
1/16” (1.6 mm)
1/32” (0.8 mm)
1/4” (6.4 mm)
1/8” (3.2 mm)
3/8” (9.5 mm)
1/4” (6.4 mm)
1/2” (12.7 mm)
3/8” (9.5 mm)
5/8” (15.9 mm)
1/2” (12.7 mm)
3/16” (4.8 mm)
1/8” (3.2 mm)
3/8” (9.5 mm)
1/4” (6.4 mm)
1/2” (12.7 mm)
3/8” (9.5 mm)
5/8” (15.9 mm)
1/2” (12.7 mm)
7/8” (22.2 mm)
5/8” (15.9 mm)
REMOVING BLADE SET
To remove blade set, first make sure your clipper motor is switched “Off”. Push blade
release mechanism under blade hinge (Figure D). While holding down the blade
release mechanism, push down on blade, then gently pull the blade forward (Figure E)
and slide it off the blade hinge. If your blade hinge should snap closed and is flush
with the clipper, use a small standard screwdriver to pry the tongue of the hinge out
(Figure F). NOTE: Hair may accumulate in the front cavity of the housing under the
blade. If this happens, you can clean out the hair by brushing out the cavity with a
small brush or an old toothbrush while the blade is off the clipper.
A C
HIGH
OFF
NORMAL
D
B
E
OIL
H IG
SNAP!
F
REPLACING OR CHANGING BLADE SET
To replace or change your blade set, slide the blade bracket onto the hinge of the
J
K
L
clipper (Figure G) and with the clipper turned “ON”, push the blade towards the
clipper to lock into position.
USER MAINTENANCE
The internal mechanism of your clipper has been permanently lubricated at the
factory. Other than the recommended maintenance described in this manual, no other
maintenance should be performed, except by Andis Company or an Andis authorized
service station.
BLADE TEMPERATURE
Due to the high speed nature of Andis clippers, please check for blade heat often,
especially on close cutting blades. If blades are too hot, dip the blades only into Andis
Blade Care Plus or apply Andis Cool Care Plus and then Andis Clipper Oil. If you have
a detachable blade unit, you can change your blade in order to maintain a comfortable
temperature; using multiple blades of the same size is popular among groomers.
4 5
M
CORRECT
N
INCORRECT
Page 4

CARE AND SERVICING OF YOUR ANDIS CLIPPER BLADES
Blades should be oiled before, during, and after each use. If your clipper blades leave
streaks or slow down, it’s a sure sign that the blades need oil. Place a few drops of oil
on the front and side of the cutter blades (Figure H). Wipe excess oil off blades with a
soft, dry cloth. Spray lubricants contain insufficient oil for good lubrication, but are an
excellent clipper blade coolant. Always replace broken or nicked blades to prevent
injury. You can clean the excess hair from your blades by using a small brush or worn
out toothbrush. To clean the blades, we suggest to immerse the blades only into a
shallow pan of Andis Blade Care Plus, while the clipper is running. Any excess hair and
dirt that has accumulated between the blades should come out. After cleaning, turn
your clipper off and dry blades with a clean dry cloth and start clipping again.
If upon cleaning your blades you find that the blades will still not cut, there may
be a few fine pieces of hair trapped between the upper and lower blade. If this
happens, you will need to snap the blade off the clipper. Proceed to slide the upper
blade to one side, without loosening the tension spring or moving the upper blade
completely out from under the tension spring (See Figure I for position of blade).
Wipe the surface between the blades clean with a dry cloth, then place a drop of
clipper oil where the upper and lower blades meet and also in the guide slot of the
tension spring (Figure I). Now, slide the upper blade to the opposite side of the lower
blade and repeat this process. After completing this procedure, slide the upper blade,
centering it over the lower blade. Handle or store your Andis Clipper with the blades
down so excess oil will not run into the clipper case.
CHANGING THE BLADE DRIVE ASSEMBLY
If your clipper blades no longer cut properly (be sure to try more than one blade,
since the blade currently being used may be dull), it could be that your blade drive
assembly needs replacement.
TO CHANGE THE BLADE DRIVE ASSEMBLY:
1. Remove blade set (Figure E).
2. Remove drive cap (Figure J).
3. Remove blade drive mounting screws (Figure K).
4. NOTE: Before removing blade drive assembly, note the way it is positioned (this
will help you in reassembly). Remove blade drive assembly (Figure L).
5. Drive bearing should be at its lowest position, if not, move it with your finger to
lowest position (Figures M & N).
6. Put on new drive assembly, align screw holes and press down (Figure L).
7. Reassemble blade drive by mounting screws (Figure K).
8. Replace drive cap (Figure J).
9. Replace blade (Figure G).
Sírvase leer las instrucciones siguientes antes de usar su nueva
recortadora Andis. Bríndele el cuidado que un instrumento fino
construido con precisión se merece y obtendrá muchos años de servicio.
PRECAUCIONES IMPORTANTES
Al usar un artefacto eléctrico, siempre deben seguirse
ciertas precauciones básicas, que incluyen la siguiente:
Lea todas las instrucciones antes de usar la recortadora
Andis.
PELIGRO: Para reducir el riesgo de descarga eléctrica:
1. Si un artefacto se ha caído al agua, no trate de sacarlo.
Desenchúfelo inmediatamente.
2. No lo utilice al bañarse una bañera o bajo la regadera.
3. No coloque ni almacene el artefacto donde pueda
caerse en una bañera o un lavabo, o ser halado dentro
de éstos. No la coloque ni la deje caer en agua u otro
líquido.
4. Excepto mientras se carga, siempre desenchufe este
artefacto después de usarlo.
5. Desenchufe este artefacto antes de limpiar, desmontar
o montar las piezas.
ADVERTENCIA: Para reducir el riesgo de
quemaduras, incendio, descarga eléctrica o lesiones a las
personas:
1. Un artefacto nunca debe dejarse desatendido mientras
ESPAÑOL
está enchufado.
BLADE & CLIPPER/TRIMMER REPAIR SERVICE
When the blades of your Andis clipper become dull after repeated use, it is advised to
purchase a new set of blades available through your Andis supplier or through an
Andis authorized service station. If you wish your clipper to be serviced as well, it
should be carefully packed and mailed either Parcel Post Insured, or U.P.S. to any
Andis Authorized Service Station. To find an Andis authorized service station near
you log on to www.andis.com or contact our customer service department:
1-800-558-9441 (U.S.) or 1-800-335-4093 (Canada).
6 7
2. Este artefacto eléctrico no debe ser usado por personas
(incluyendo niños) con limitada capacidad física, sensorial o
mental, o que no tengan experiencia o conocimientos, a
menos que alguna persona responsable de su seguridad
los supervise o les haya dado instrucciones con respecto al
uso del aparato.
Page 5

3. Es necesario supervisar a los niños para asegurarse de
que no jueguen con el aparato eléctrico.
4. Utilice este artefacto exclusivamente para su uso propuesto, tal
como se describe en este manual. No utilice accesorios no
recomendados por Andis.
5. Nunca opere este artefacto si su cable eléctrico o enchufe está
dañado, si no está funcionando correctamente o si se ha
dejado caer, si se ha dañado o si se ha caído en el agua.
Devuelva el artefacto a un centro de servicio autorizado de
Andis para su revisión y reparación.
6. Mantenga el cable lejos de superficies calientes.
7. Nunca deje caer el artefacto ni inserte ningún objeto en
ninguna de sus aberturas.
8. No lo utilice al aire libre, ni lo opere donde se estén usando
productos en aerosol (nebulizados) o donde se esté
administrando oxígeno.
9. No utilice este artefacto con una hoja o peine dañado o roto,
ya que se podrían ocasionar lesiones en la piel.
Antes de arrancar la recortadora, desmonte el protector de la hoja (es posible
que algunos modelos no tengan un protector de la hoja). Enchufe el cable en el
tomacorriente eléctrico, opere a una corriente eléctrica de CA de 120 voltios y
60 ciclos, o según se indique en la unidad. Después de usar su recortadora Andis,
vuelva a enrollar el cable y almacénela en un lugar seguro.
OPERACIÓN CON 2 VELOCIDADES
Para comenzar a mover la recortadora, mueva el interruptor al ajuste de velocidad
normal o alta (Diagrama A). Use el ajuste normal (interruptor en la posición más baja)
para la mayoría de cortes. Use el ajuste de alta velocidad (interruptor en la posición
más alta) para cortar pelo grueso. Para detener la recortadora, mueva el interruptor a
la posición (central) inicial.
USO DE LOS PEINES ACCESORIOS
(Algunos modelos no tienen peines y los tamaños varían según el modelo)
Puede ajustar las hojas para un corte más largo utilizando cualquiera de los peines
accesorios fabricados para su recortadora Andis. Los peines se montan con facilidad;
simplemente deslice los dientes de la hoja de la recortadora en el peine y enganche
el peine, presionándolo hacia abajo (Diagramas B y C). Para desmontarlos,
simplemente desengánchelos. Estos peines accesorios guían el pelo al interior de las
hojas y le proporcionan un control preciso de las longitudes del pelo. La longitud del
corte se indica en el peine accesorio. Utilice la tabla para encontrar las longitudes
aproximadas de corte. Al variar el ángulo de la hoja en relación con la piel, el grosor y
la textura del pelo, variará la longitud del corte.
10. Para desconectar, coloque el control en la posición “OFF” y
luego desconecte el enchufe del tomacorriente.
11. ADVERTENCIA: Durante el uso, no coloque ni deje el
artefacto donde (1) pueda ser dañado por un animal o
(2) pueda quedar expuesto a la intemperie.
12. Este artefacto está concebido exclusivamente para propósito
de realizar recortes de acabado.
GUARDE ESTAS INSTRUCCIONES
ESTE APARATO ESTÁ DESTINADO PARA USO EN EL HOGAR
INSTRUCCIONES DE OPERACIÓN
Para reducir el riesgo de descargas eléctricas, este artefacto tiene un enchufe
polarizado (una patilla es más ancha que la otra). Este enchufe encajará en un
tomacorriente polarizado de una sola manera. Si el enchufe no puede insertarse
completamente en el tomacorriente, invierta el enchufe. Si aún no puede insertarse,
póngase en contacto con un electricista calificado para instalar el tomacorriente
apropiado. No cambie el enchufe de manera alguna.
8 9
Descripción Dirección del corte
Hoja Andis estándar
Peine accesorio de 1/8 de pulgada
Peine accesorio de 1/4 de pulgada
Peine accesorio de 3/8 de pulgada
Peine accesorio de 1/2 de pulgada
GUÍA PARA EL CORTE
En la dirección del pelo
A contrapelo
En la dirección del pelo
A contrapelo
En la dirección del pelo
A contrapelo
En la dirección del pelo
A contrapelo
En la dirección del pelo
A contrapelo
Longitud aproximada del corte
Más corto Menos corto
1.6 mm
0.8 mm
6.4 mm
3.2 mm
9.5 mm
6.4 mm
12.7 mm
9.5 mm
15.9 mm
12.7 mm
4.8 mm
3.2 mm
9.5 mm
6.4 mm
12.7 mm
9.5 mm
15.9 mm
12.7 mm
22.2 mm
15.9 mm
Page 6

ALTO
APAGADO
NORMAL
CBA
ENGANCHAR!
DESMONTAJE DEL JUEGO DE HOJAS
Para desmontar el juego de hojas, asegúrese primero de que el motor de la
recortadora esté colocado en la posición “Off”. Presione el mecanismo de liberación
de la hoja que se encuentra debajo de la bisagra de la hoja (Diagrama D). Mientras
mantiene presionado el mecanismo de liberación de la hoja, presione la hoja y luego
suavemente mueva la hoja hacia adelante (Diagrama E), y deslícela para separarla de
la bisagra de la hoja. Si la bisagra de la hoja se cierra automáticamente para quedar a
ras con la recortadora, use un pequeño destornillador estándar para levantar la
lengüeta de la bisagra (Diagrama F). NOTA: Es posible que se acumule pelo en la
ED
F
cavidad frontal de la caja, debajo de la hoja. En caso de ocurrir esto, puede eliminar
el pelo limpiando la cavidad con un cepillo pequeño o un cepillo de dientes usado,
teniendo desmontada la hoja de la recortadora.
REEMPLAZO O CAMBIO DEL JUEGO DE HOJAS
Para reemplazar o cambiar el juego de hojas, deslice el soporte de la hoja sobre la
bisagra de la recortadora (Diagrama E) y con la recortadora encendida, empuje la hoja
hacia la recortadora para bloquearla en posición.
H IG
ACEITE
MANTENIMIENTO
El mecanismo interno de su recortadora ha sido lubricado en forma permanente
en la fábrica. Además del mantenimiento recomendado que se describe en este
manual, sólo la compañía Andis o una estación de servicio autorizada por Andis
puede llevar a cabo cualquier otro trabajo de mantenimiento en la unidad.
TEMPERATURA DE LA HOJA
Debido a la naturaleza de alta velocidad de las recortadoras de Andis, verifique el
J
K
L
calor de la hoja con frecuencia, especialmente en el caso de hojas de corte al ras. Si
las hojas están demasiado calientes, remoje las hojas únicamente en Andis Blade Care
Plus o aplique Andis Cool Care Plus y luego el aceite Andis para recortadoras. Si tiene
una unidad con hoja desmontable, puede cambiar la hoja para mantener una
temperatura confortable; utilizar varias hojas del mismo tamaño es un método popular
entre los profesionales que acicalan.
CUIDADO Y MANTENIMIENTO DE LAS HOJAS DE LA
RECORTADORA ANDIS
M
CORRECTO
10 11
N
INCORRECTO
Las hojas deben ser lubricadas antes, durante y después de cada uso. Si las hojas de
la recortadora dejan marcas o si el aparato funciona de forma más lenta, es casi
seguro que las hojas necesitan ser engrasadas. Aplique unas gotas de aceite en la
parte delantera y en los lados de las hojas de corte (Diagrama H). Limpie el exceso de
aceite de las hojas con un paño seco y suave. Los lubricantes en aerosol no contienen
la cantidad de aceite suficiente para llevar a cabo una buena lubricación, pero
constituyen un excelente sistema de enfriamiento para la recortadora. A fin de evitar
lesiones, cambie siempre las hojas que estén rotas o melladas. Se puede limpiar el
pelo que queda en las hojas con un cepillo pequeño o con un cepillo de dientes
usado. Para limpiar las hojas recomendamos que se sumerjan solamente las hojas en
Page 7

un recipiente poco profundo con Andis Blade Care Plus mientras la recortadora se
halla en funcionamiento. De esta forma se desprenderán la suciedad y los pelos que
se hayan acumulado entre las hojas. Después de limpiarla, apague la recortadora,
seque las hojas con un paño limpio y seco y ya puede volver a cortar el pelo.
Si después de limpiar las hojas resulta que éstas siguen sin cortar, puede que haya
pequeños trozos de pelo atrapados entre la hojas superior y la inferior. Si éste es el
caso, habrá que desenganchar la hojas de la recortadora, y a continuación deslizar hacia
un lado la hoja superior, sin aflojar el muelle tensor ni quitar del todo la hoja superior de
debajo del muelle tensor (consulte el Diagrama I para ver la posición de la hoja). Limpie
la superficie existente entre las hojas con un paño seco y aplique una gota de aceite
para recortadoras en el punto de contacto de las hojas superior e inferior, y otra gota en
la ranura guía del muelle tensor (Diagrama I). A continuación deslice la hoja superior
hacia el lado opuesto de la hoja inferior y repita esta operación. Una vez realizados
todos los pasos, deslice la hoja superior hasta centrarla sobre la inferior. Al manipular
o guardar la recortadora Andis, hágalo poniendo las hojas hacia abajo, de forma que
el aceite que ha salido no pueda introducirse en la carcasa del aparato.
CÓMO CAMBIAR EL CONJUNTO MOTOR DE LA HOJA
Si las hojas de su recortadora ya no cortan bien, puede que haya que cambiar el
conjunto motor de la hoja, pero antes pruebe con otras hojas, ya que es posible que
la que Vd. viene utilizando haya perdido el filo.
PARA CAMBIAR EL CONJUNTO MOTOR DE LA HOJA:
1. Quite el juego de hojas (Diagrama E).
2. Quite la tapa del conjunto motor (Diagrama J).
3. Quite los tornillos de montaje del conjunto motor de la hoja (Diagrama K).
4. NOTA: Antes de quitar el conjunto motor de la hoja fíjese en cómo está colocado,
ya que esto le ayudará luego a volver a instalarlo; a continuación extraiga dicho
conjunto (Diagrama L).
5. El rodamiento del conjunto motor debe estar en la posición más baja; si no así,
muévalo con el dedo a dicha posición (Diagramas M y N).
6. Ponga el nuevo conjunto motor, alinee los orificios para los tornillos y empuje hacia
abajo (Diagrama L).
7. Introduzca los tornillos de montaje para volver a montar el conjunto motor de la
hoja (Diagrama K).
8. Vuelva a colocar en su lugar la tapa del conjunto motor (Diagrama J).
9. Vuelva a montar la hoja (Diagrama G).
SERVICIO DE REPARACIÓN PARA LA RECORTADORA/
RECORTADORA DE ACABADO
Cuando las hojas de su recortadora Andis pierdan el filo después de un uso repetido,
se aconseja comprar un conjunto nuevo de hojas, disponible por medio de su
proveedor Andis o por medio de un centro de servicio autorizado de Andis. Si
también desea dar servicio a su recortadora, debe empacarla con cuidado y enviarla
por correo asegurado o U.P.S. a cualquier centro de servicio autorizado de Andis.
Para encontrar un centro de servicio autorizado de Andis cercano a su
visite www.andis.com o póngase en contacto con nuestro departamento
al cliente: 1-800-558-944 (EE.UU.) o 1-800-335-4093 (Canadá).
12 13
localidad,
de servicio
Lire le mode d’emploi en entier avant d’utiliser la tondeuse Andis. Si cet appareil
est traité comme un instrument de précision, il devrait donner des années de
bons services.
MISES EN GARDE IMPORTANTES
Pendant l’utilisation d’un appareil électrique, il faut
toujours suivre certaines règles de sécurité, notamment les
suivantes. Lire toutes les instructions avant d’utiliser
cette tondeuse de finition Andis.
DANGER : Pour réduire le risque d’électrocution :
1. Ne pas tenter de récupérer un appareil électrique qui
est tombé dans l’eau. Le débrancher immédiatement.
2. Ne pas utiliser cet appareil dans le bain ou sous la
douche.
3. Ne pas déposer ni ranger l’appareil à un endroit d’où
il pourrait tomber dans une baignoire ou un lavabo.
Ne pas mettre l’appareil dans l’eau ou dans un autre
liquide.
4. Toujours débrancher l’appareil de la prise murale
immédiatement après l’utilisation.
5. Débrancher l’appareil avant de le nettoyer, de le
déplacer ou d’installer une pièce.
AVERTISSEMENT : Pour réduire les risques
de brûlure, d’incendie, d’electrocution et de blessure :
1. Ne jamais laisser un appareil branché sans surveillance.
2. Cet appareil ne doit être utilisé par les personnes
(en particulier les enfants) aux capacités physiques,
sensorielles ou mentales réduites, ou dépourvues de
l’expérience et des connaissances voulues, que sous la
supervision ou la direction d’une personne responsable
de leur sécurité.
FRANÇAIS
Page 8

3. Empêcher les enfants de jouer avec l’appareil.
4. Utiliser cet appareil seulement pour l’usage prévu décrit
dans ce manuel. Utiliser uniquement les accessoires
recommandés par Andis.
5. Ne jamais utiliser l’appareil si son cordon ou sa fiche de
branchement est endommagé, s’il ne fonctionne pas
correctement, s’il est tombé par terre, s’il est endommagé
ou s’il est tombé dans l’eau. Le retourner à un centre de
réparation agréé par Andis pour examen et réparation.
6. Garder le cordon à l’écart des surfaces chaudes.
7. Ne jamais insérer un objet quelconque dans une
ouverture de l’appareil.
8. Ne pas utiliser l’appareil à l’extérieur, dans un endroit
où des aérosols sont employés ou encore dans un
endroit où l’on administre de l’oxygène.
9. Pour éviter les blessures, ne pas utiliser des lames ou
des guides de coupe cassés ou endommagés; cela
pourrait abîmer la peau.
1
0. Pour débrancher l’appareil, mettre la commande sur
arrêt, puis retirer la fiche de la prise secteur.
11. AVERTISSEMENT : Pendant l’utilisation, ne pas mettre
l’appareil à un endroit où il risque d’être (1) endommagé
par un animal ou (2) exposé aux intempéries.
12. Cet appareil est uniquement destiné à la tonte de finition.
GARDEZ PRÉCIEUSEMENT CES
DIRECTIVES
CET APPAREIL EST POUR USAGE DOMESTIQUE SEULEMENT
Avant de faire fonctionner la tondeuse, enlevez le protège-lame (certains modèles
n’en sont pas dotés). Branchez l’appareil dans une prise de 120 volts, 60 cycles C.A.
ou tel qu’il est indiqué sur l’appareil. Après avoir utilisé la tondeuse, enroulez le
cordon et rangez l’appareil dans un endroit sécuritaire.
FONCTIONNEMENT À 2 VITESSES
Pour mettre la tondeuse en marche, placer le bouton sur la position Normal ou
Grande vitesse (Figure A). Utiliser le réglage Normal (position la plus basse) pour
l'essentiel des besoins de coupe. Utiliser le réglage Grande vitesse (position la plus
haute) pour couper les poils fournis. Pour arrêter la tondeuse, remettre le bouton en
position initiale (au centre).
MODE D'EMPLOI DES GUIDES DE COUPE
(Certains modèles n'ont pas de guides de coupe et les tailles varient selon
l'ensemble)
Vous pouvez régler les lames pour une coupe plus grossière en attachant l'un des
guides de coupe encliquetables conçus pour votre tondeuse. Les guides de coupe se
montent facilement–ils s'attachent et se détachent par enclenchement (Figures B et
C). Ces guides de coupe guident les cheveux dans les lames de la tondeuse et vous
permettent de maîtriser parfaitement les longueurs de cheveux. La longueur de coupe
est indiquée sur le guide de coupe. Pour les longueurs de coupe approximatives,
consulter le guide de coupe.
TABLEAU DE COUPE
Description Directives de coupe
Lame standard Andis
Guide de 1/8 po
Guide de 1/4 po
Guide de 3/8 po
Guide de 1/2 po
Sens du poil
Sens inverse du poil
Sens du poil
Sens inverse du poil
Sens du poil
Sens inverse du poil
Sens du poil
Sens inverse du poil
Sens du poil
Sens inverse du poil
Longueur approx. de la coupe
Courte Longue
1/16 po
1/32 po
1/4 po
1/8 po
3/8 po
1/4 po
1/2 po
3/8 po
5/8 po
1/2 po
3/16 po
1/8” po
3/8 po
1/4 po
1/2 po
3/8 po
5/8 po
1/2 po
7/8 po
5/8 po
DIRECTIVES D’UTILISATION
Afin de réduire les risques d’électrocution, cet appareil est muni d’une fiche polarisée
(une broche est plus large que l’autre). La fiche s’insère dans une prise polarisée d’une
seule façon. Si elle refuse de s’insérer à fond, la tourner et essayer de nouveau. Si elle
refuse toujours de s’insérer à fond, demander à un électricien agréé d’installer une
prise de courant appropriée. Ne pas modifier la fiche.
14 15
Page 9

A
GRANDE
VITESSE
ARRÊT
NORMAL
B
C
CLAC!
RETRAIT DU JEU DE LAMES
Avant de retirer le jeu de lames, s’assurer que le moteur de la tondeuse est arrêté.
Pousser le mécanisme de libération des lames sous la charnière des lames (Figure D).
Tout en tenant le mécanisme de libération des lames enfoncé, appuyer sur la lame,
puis glisser doucement la lame vers l’avant (Figure E) et la dégager de la charnière. Si
la charnière est fermée et qu’elle affleure avec la tondeuse, utiliser un petit tournevis
pour dégager la languette de la charnière (Figure F). REMARQUE: Des poils peuvent
s’accumuler dans la cavité avant de la tondeuse, sous la lame. Dans ce cas, il est
possible de nettoyer la cavité avec une petite brosse ou une brosse à dents usagée
ED
F
alors que la lame est retirée de la tondeuse.
REMPLACEMENT OU CHANGEMENT DU JEU DE LAMES
Pour remplacer ou changer le jeu de lames, glisser le support de lame sur la charnière
de la tondeuse (Figure G) et, alors que la tondeuse est en marche, pousser la lame
vers la tondeuse pour la bloquer en position.
ENTRETIEN DE LA TONDEUSE
L’HUILE
H IG
J
M
CORRECTE
16 17
K
N
INCORRECTE
L
Le mécanisme interne de la tondeuse a été traité à l’usine pour une lubrification
permanente. Sauf pour les mesures d’entretien décrites dans ce mode d’emploi, tout
entretien doit être confié à Andis ou à un centre de réparation agréé par Andis.
TEMPÉRATURE DE LA LAME
Étant donné la grande vitesse des tondeuses Andis, contrôler souvent la chaleur,
surtout sur les lames qui coupent de près. Si les lames sont trop chaudes, tremper
uniquement les lames dans de l’Andis Blade Care Plus ou appliquez de l’Andis Cool
Care Plus, puis de l’huile pour tondeuse Andis. S'il s'agit d'une lame détachable, changer
de lame pour maintenir une température confortable; l’utilisation de lames multiples
de même taille est populaire auprès des spécialistes du toilettage.
ENTRETIEN DES LAMES DE LA TONDEUSE ANDIS
Les lames doivent être huilées avant, pendant et après chaque utilisation. Si les lames
de la tondeuse laissent des stries ou ralentissent, cela indique clairement qu’elles
manquent d’huile. Déposer quelques gouttes d’huile pour tondeuse Andis sur l’avant
et le côté des têtes de coupe (Figure H). Essuyer l’excès d’huile avec un chiffon doux
et sec. Les lubrifiants en aérosol ne permettent pas d'appliquer suffisamment d'huile
pour lubrifier correctement les lames, mais ce sont d’excellents agents de
refroidissement pour tondeuse. Toujours remplacer les lames brisées ou ébréchées
afin de prévenir les blessures. Enlever les poils qui adhèrent aux lames à l’aide d’une
petite brosse ou d’une vieille brosse à dent. Pour nettoyer les lames, nous suggérons
de les immerger dans un bac peu profond contenant de Andis Blade Care Plus,
pendant que la tondeuse fonctionne. Seules les lames doivent baigner dans l’huile.
Cela devrait suffire pour enlever les poils et les saletés logées entre les lames. Après
le nettoyage, arrêter la tondeuse, assécher les lames avec un chiffon sec, puis
reprendre la coupe.
Page 10

Si, après le nettoyage des lames, il apparaît que celles-ci ne coupent toujours pas, il
est possible que de petits poils soient demeurés logés entre les lames supérieure et
inférieure. Dans ce cas, il faut détacher la lame de la tondeuse. Glisser la lame
supérieure sur un côté, sans desserrer le ressort de tension ni dégager la lame
supérieure complètement de dessous le ressort de tension (voir la position de la lame
dans Figure I). Passer un chiffon sec sur la surface entre les lames, puis déposer une
goutte d’huile lubrifiante au point de contact des deux lames et également dans la
fente-guide du ressort de tension (Figure I). Glisser ensuite la lame supérieure du côté
opposé de la lame inférieure et reprendre la manoeuvre. Une fois la manoeuvre de
nettoyage terminée, centrer la lame supérieure sur la lame inférieure. Manipuler et
ranger la tondeuse Andis avec les lames vers le bas pour que l’excédent d’huile ne
s’infiltre pas dans la tondeuse.
CHANGEMENT DU MÉCANISME D’ENTRAÎNEMENT
DES LAMES
Si les lames ne coupent plus adéquatement (essayer plus d’une lame : celle en place
est peut-être émoussée), il faudra peut-être remplacer le mécanisme d’entraînement
des lames.
POUR REMPLACER LE MÉCANISME D’ENTRAÎNEMENT DES LAMES, PROCÉDER
COMME SUIT :
1. Retirer le jeu de lames (Figure E).
2. Retirer le capuchon d’entraînement (Figure J).
3. Retirer les vis de fixation du mécanisme d’entraînement des lames (Figure K).
4. REMARQUE : Avant de retirer le mécanisme d’entraînement des lames, noter son
positionnement (pour faciliter l’installation du nouveau mécanisme). Retirer le
mécanisme d’entraînement des lames (Figure L).
5. Le roulement du mécanisme d’entraînement doit se trouver à son point le plus bas;
dans le cas contraire, le déplacer avec le doigt à la position la plus basse (Figures M
et N).
6. Installer le nouveau mécanisme d’entraînement, aligner les trous de vis et appuyer
(Figure L).
7. Fixer le mécanisme d’entraînement avec les vis de fixation (Figure K).
8. Remettre le capuchon d’entraînement (Figure J).
9. Remette la lame (Figure G).
SERVICE APRÈS-VENTE POUR LES LAMES ET TONDEUSES/
TONDEUSES DE FINITION
Dès que les lames de votre tondeuse s’émoussent suite à une utilisation répétée, nous
vous recommandons d’acheter un nouveau jeu de lames chez un fournisseur Andis ou
dans un centre de SAV agréé par Andis. Certains jeux de lames peuvent être réaffûtés
- contactez Andis Company pour vous renseigner à ce sujet. Pour le centre de SAV
le plus proche, consulter le site www.andis.com ou contacter notre service
clientèle au : 1-800-558-9441 (É.-U.) ou 1-800-335-4093 (Canada).
18 19
Page 11

This Andis product is warranted against defective material or workmanship for one year from the date of purchase.
All implied warranties arising and by virtue of State law shall also be limited to one year. Any Andis product
determined to be defective in material or workmanship during the warranty period will be repaired or replaced
without cost to the consumer for parts and labor. The defective product must be returned via parcel post insured
or U.P.S., with proof of purchase to any Andis Authorized Service Station or to Andis, 1800 Renaissance Blvd.,
Sturtevant, WI 53177 USA. In Canada, please call 1-800-335-4093 for repair information. Attach a letter describing
the nature of the problem. Due to foreign matter sometimes found in hair, clipper blades or resharpening of
blades are not subject to this warranty. Andis will not be responsible for cost of repairs or alterations made by
any other person, agency or company, nor for incidental or consequential damages of any type, or for the use
of unauthorized attachments. Some states may not allow exclusion of limitation of incidental or consequential
damages, so the limitation or exclusion may not apply to you.
Date Purchased _______________________ Model _____________________________________________
contact our customer service department: 1-800-558-9441 (U.S.) or 1-800-335-4093 (Canada)
Este producto Andis está garantizado contra material o mano de obra defectuosos durante un año a partir de la
fecha de compra. Todas las garantías implícitas provenientes y en virtud de las leyes estatales también deberán ser
limitadas a un año. Cualquier producto Andis determinado como defectuoso en cuanto a materiales o mano de
obra durante el período de garantía será reemplazado o reparado sin costo para el consumidor en cuanto a piezas
y mano de obra. El producto defectuoso debe ser devuelto junto con el comprobante de compra a cualquiera de
las estaciones de servicio autorizado de Andis o a: Andis, 1800 Renaissance Blvd., Sturtevant, WI 53177 EEUU.
En Canadá, llame al 1-800-335-4093 para obtener información sobre reparaciones. Adjunte también una carta
explicando la naturaleza del problema. Debido al material extraño que a veces se encuentra en el pelo, la garantía
no cubre las hojas ni su reafilado. Andis no será responsable por el costo de ninguna reparación realizada por otra
persona, agencia o compañía, ni por daños incidentales o consecuentes de ningún tipo, ni por el uso de accesorios
no autorizados. Algunos estados prohíben la exclusión de daños consecuentes o incidentales, de forma que dicha
limitación o exclusión podría no aplicarse a su caso.
Fecha de compra ______________________ Modelo ____________________________________________
Para encontrar una de las estaciones de servicio autorizado de Andis cerca de su localidad,
Andis garantit cet appareil au premier acquéreur contre tout défaut de fabrication ou de matériau pour une durée
de 12 mois à partir de la date d’achat. Toute autre garantie implicite en vertu d’une loi d’État se limite aussi à une
durée de 12 mois. Tout produit Andis dont on détermine qu’il présente un défaut de fabrication ou de matériau
durant la période de garantie sera réparé ou remplacé sans frais de main-d’œuvre et de pièces pour le client.
L’appareil défectueux doit être retourné par colis postal assuré, accompagné de la preuve d’achat à n’importe quel
centre de réparation agréé par Andis ou à Andis, 1800 Renaissance Blvd., Sturtevant, WI 53177 USA. Au Canada,
veuillez appeler le 1-800-335-4093 en cas de réparation. Joignez une lettre décrivant la nature du problème.
En raison des substances étrangères que peuvent contenir les cheveux, les lames et leur aiguisage ne sont pas
couverts par la garantie. Andis ne pourra être tenu responsable des coûts des réparations ou des changements
effectués par toute autre personne, agence ou entreprise, ou dommages accidentels ou indirects de tout genre,
ou de l’utilisation d’accessoires non inclus avec l’appareil. Certaines provinces peuvent interdire les exclusions ou
limitations à la présente garantie. Dans ces cas, les exclusions ou limitations ne s’appliquent pas.
Date d’achat __________________________ Modèle ____________________________________________
ou contactez notre service clientèle au : 1-800-558-9441 (É.-U.) ou 1-800-335-4093 (Canada)
MANUFACTURER’S 12 MONTH LIMITED WARRANTY
To find an Andis Authorized Service Station near you log on to www.andis.com or
GARANTÍA LIMITADA DEL FABRICANTE DE 12 MESES
inicie una sesión en www.andis.com o póngase en contacto con nuestro departamento de
servicio al cliente: 1-800-558-9441 (EE.UU.) o 1-800-335-4093 (Canadá)
GARANTIE LIMITÉE DE 12 MOIS
Pour le centre de réparation agréé par Andis, consultez le site www.andis.com
1800 Renaissance Blvd. Sturtevant, WI 53177 1-800-558-9441
© 2017 ANDIS COMPANY
Canada: 1-800-335-4093 info@andisco.com www.andis.com
Printed in U.S.A.
Form #101413 Rev. A
 Loading...