

Page 1
Engineer-to-Engineer Note EE-240
Technical notes on using Analog Devices DSPs, Processors and development tools
a
Contact our technical support at dsp.support@analog.com and at dsptools.support@analog.com
Or vi sit our o n-li ne r esou rces htt p:/ /www.analog.com/ee-notes and http://www.analog.com/processors
ADSP-BF533 Blackfin® Booting Process
Contributed by Hiren Desai Rev 3 – January 11, 2005
Introduction
This EE-Note describes the booting process for the ADSP-BF531, ADSP-BF532, and ADSP-BF533
Blackfin® processors. Differences between silicon revision levels are noted.
This EE-Note discusses:
Boot modes
Loader file header information
Initialization code
Multi-application (multi-DXE) management
The Booting Process
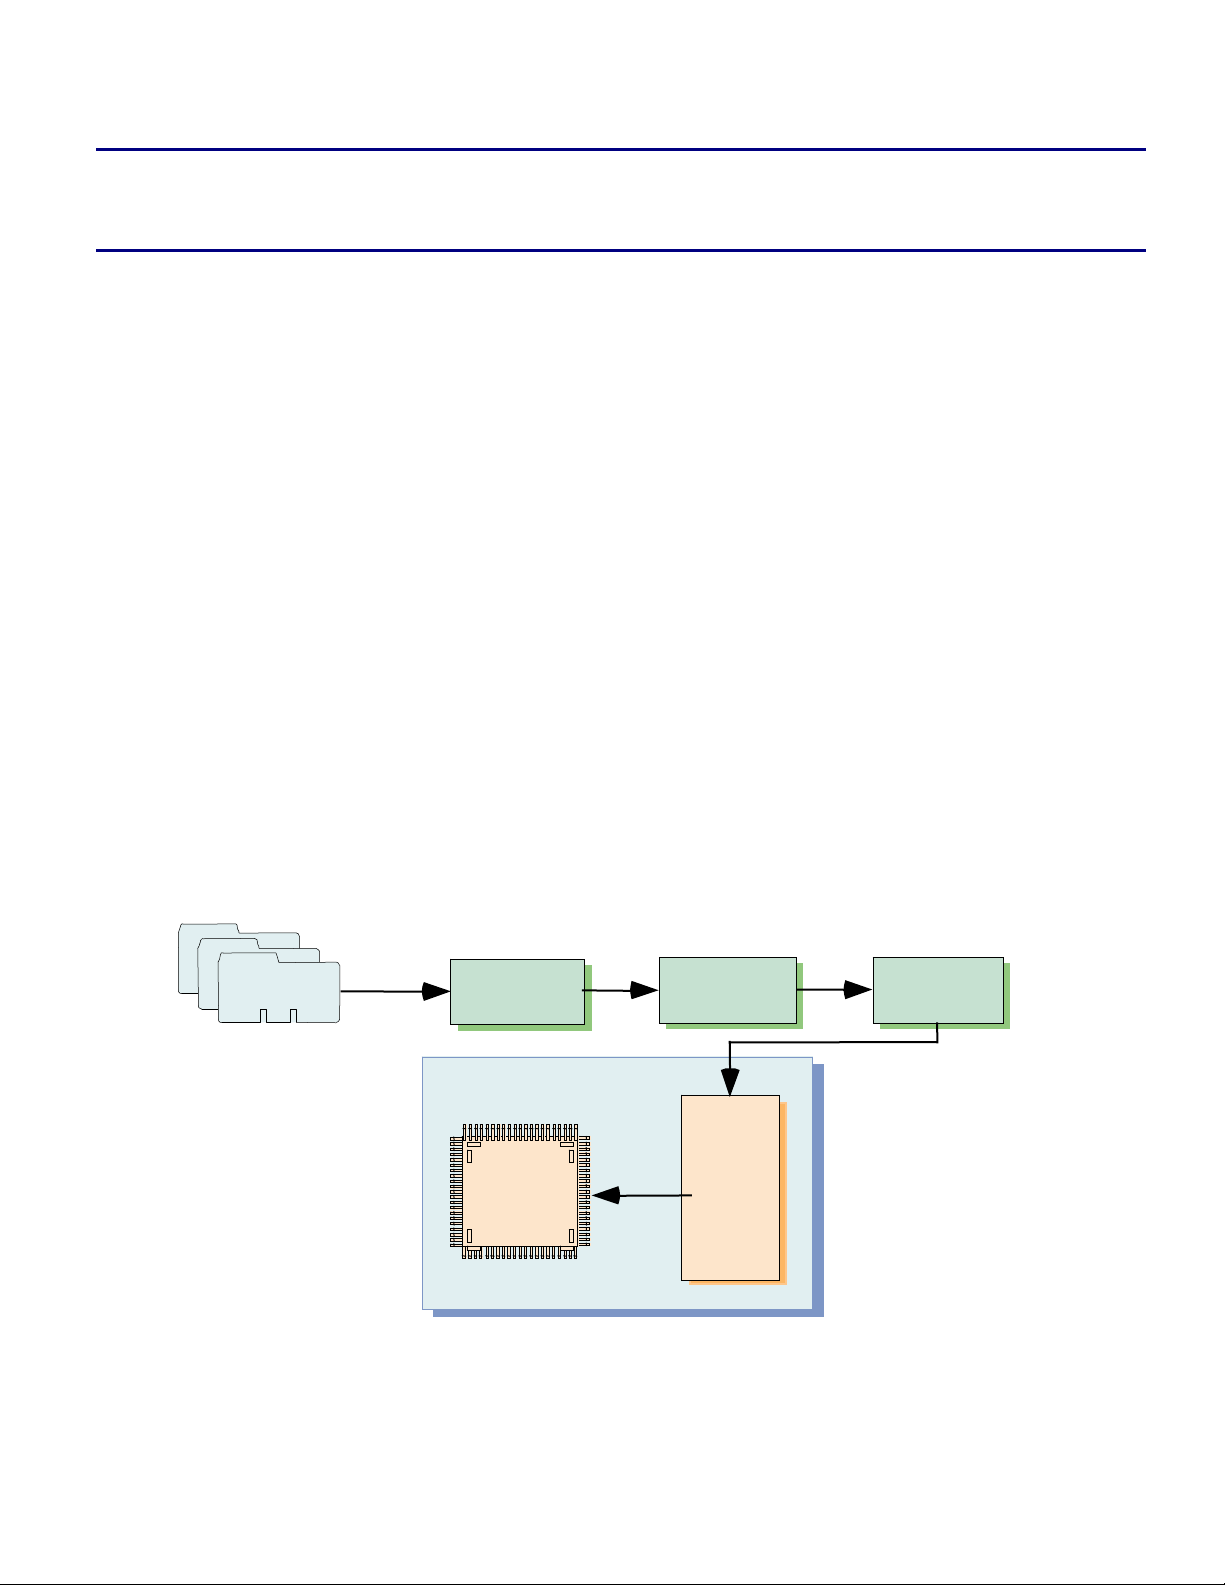
Booting is the process of loading application code/data, stored in an external memory device (or external
host), into the various internal and external memories of the Blackfin processor. This is handled by the onchip Boot ROM which is located in Blackfin memory at address 0xEF00 0000 to 0xEF00 03FF. Figure 1
shows the sequence of operations taken from source code to the final target stand-alone system.
Source Files
.ASM, .C, .CPP
Assembler and/or
Compiler
ADSP-BF53x
Processor
.DOJ(s)
Target System
Booting
Upon
RESET
Linker
External
Memory
.DXE(s)
.LDR
Loader
Figure 1. ADSP-BF531/BF532/BF533 Stand-Alone System
Copyright 2005, Analog Devices, Inc. All rights reserved. Analog Devices assumes no responsibility for customer product design or the use or application of
customers’ products or for any infringements of patents or rights of others which may result from Analog Devices assistance. All trademarks and logos are property
of their respective holders. Information furnished by Analog Devices applications and development tools engineers is believed to be accurate and reliable, however
no responsibility is assumed by Analog Devices regarding technical accuracy and topicality of the content provided in Analog Devices’ Engineer-to-Engineer Notes.
Page 2
a
Boot Modes (Silicon Revision 0.3)*
Blackfin processors can boot from a flash/PROM via asynchronous Bank 0 of the EBIU or an SPI device
(memory or host) via the SPI interface. Table 1 lists ADSP-BF531/BF532/BF533 processor booting
modes, which are selected by the state of the BMODE[1:0] pins when the RESET signal is de-asserted.
BMODE[1:0] Description (See Also Specific Blackfin Boot Modes on page 10
00 Executes from external 16-bit memory connected to ASYNC Bank0 (bypass Boot ROM)
01 Boots from 8/16-bit flash/PROM
10 Boots from a SPI host in SPI Slave mode
11 Boots from a 8/16/24-bit addressable SPI memory in SPI Master mode with support for
Atmel AT45DB041B, AT45DB081B, and AT45DB161B DataFlash® devices
Table 1. Blackfin ADSP-BF531/BF532/BF533 Booting Modes
* For boot modes supported on previous revisions of silicon, refer to the
Appendix: Boot Modes vs. Silicon Revisions.
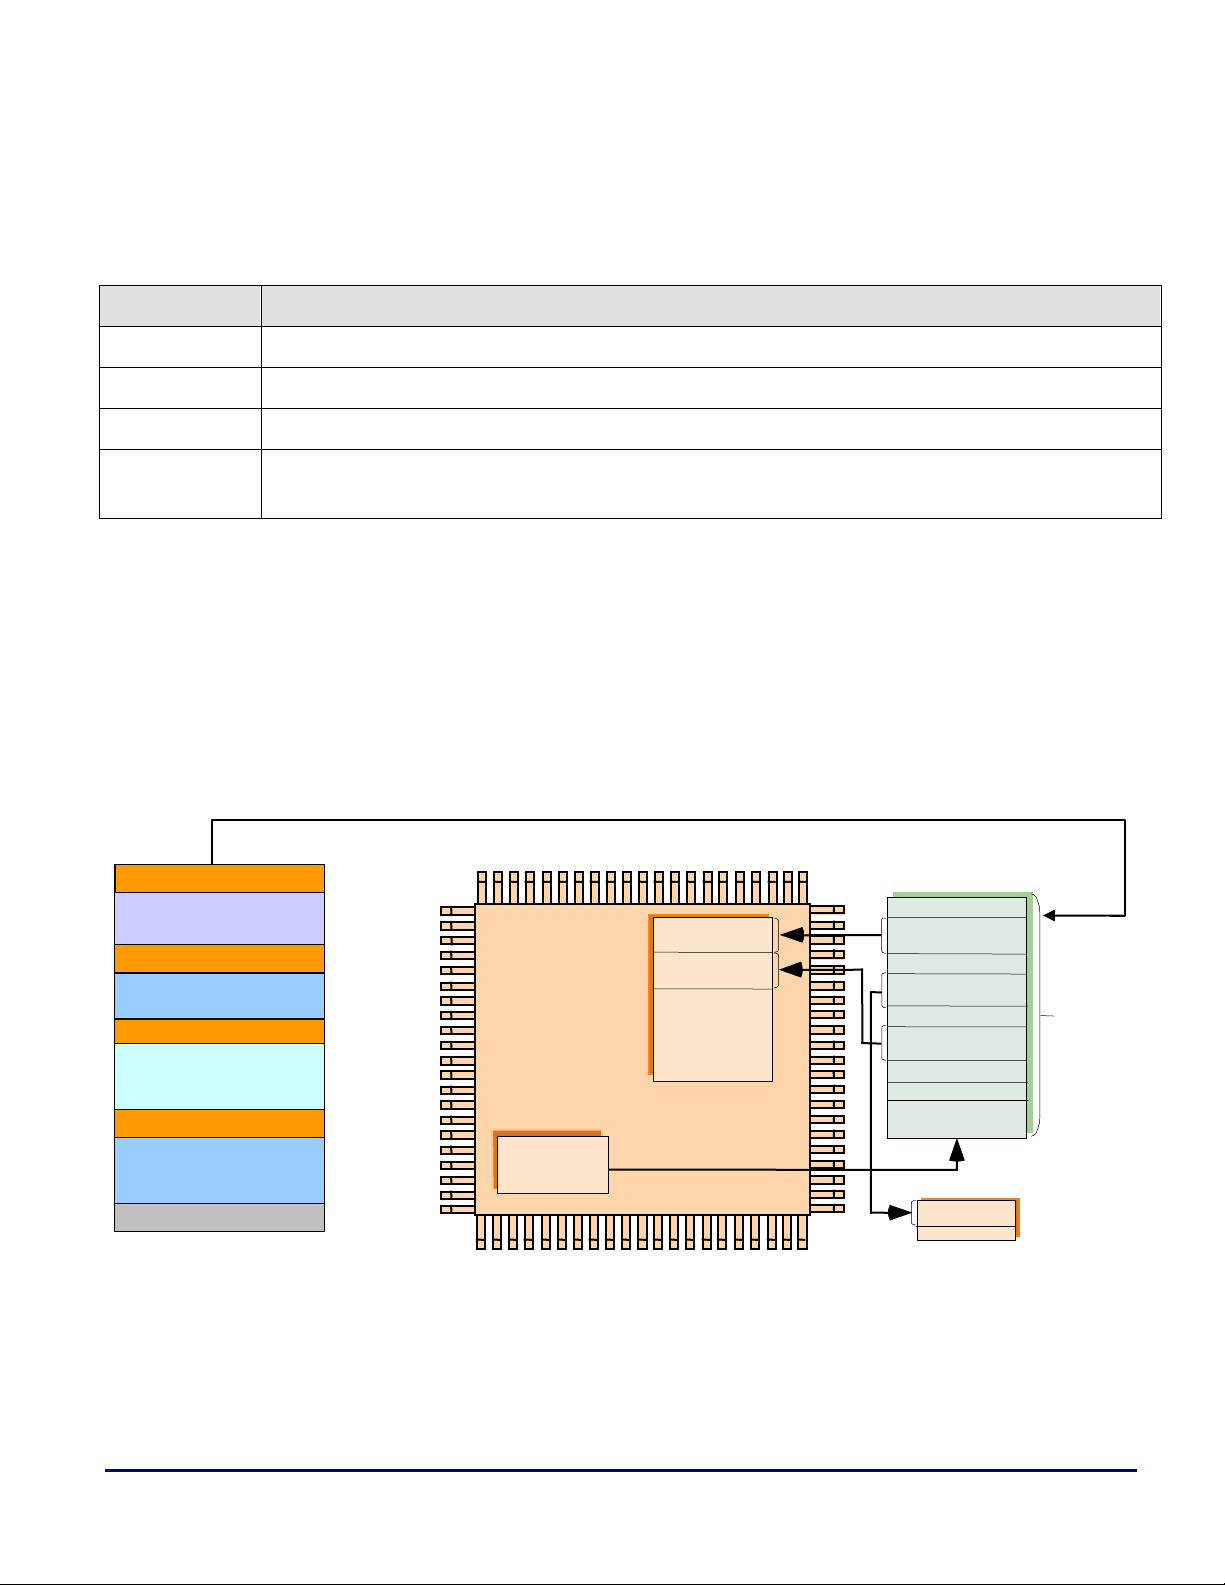
As Figure 1 illustrates, the loader utility (elfloader.exe) parses the input executable file (.DXE) and
creates a loader file (
.LDR)*, consisting of blocks preceded by headers. This loader file is then
programmed/burned into the external memory/device. The headers are read and parsed by the on-chip
Boot ROM during booting.
* Refer to the VisualDSP++ 3.5 Loader Manual for 16-Bit Processors [1] for information on switches loader files
Loader File is programmed/burned into the External Memory/Device
ADSP-BF531/BF532/BF533 Processor
10-Byte Header for Block 1
Block 1
10-Byte Header for Block 2
Block 2
10-Byte Header for Block 3
Block 3
10-Byte Header for Block n
Block n
……………..
Loader File
0xEF00 0000
On-Chip Boot
ROM
Figure 2. ADSP-BF531/BF532/BF533 Boot Process
L1 Memory
Block 1
Block 3
Flash/PROM or SPI
10-Byte Header for Block 1
Block 1
10-Byte Header for Block 2
Block 2
10-Byte Header for Block 3
Block 3
...........
10-Byte Header for Block n
Block n
SDRAM
Block 2
App.
Code/
Data
Booting into scratchpad memory (0xFFB0 0000 – 0xFFB0 0FFF) is not supported. If booting to
L
ADSP-BF533 Blackfin® Booting Process (EE-240) Page 2 of 29
scratchpad memory is attempted, the processor will hang within the on-chip Boot ROM.
Page 3
a
Header Information
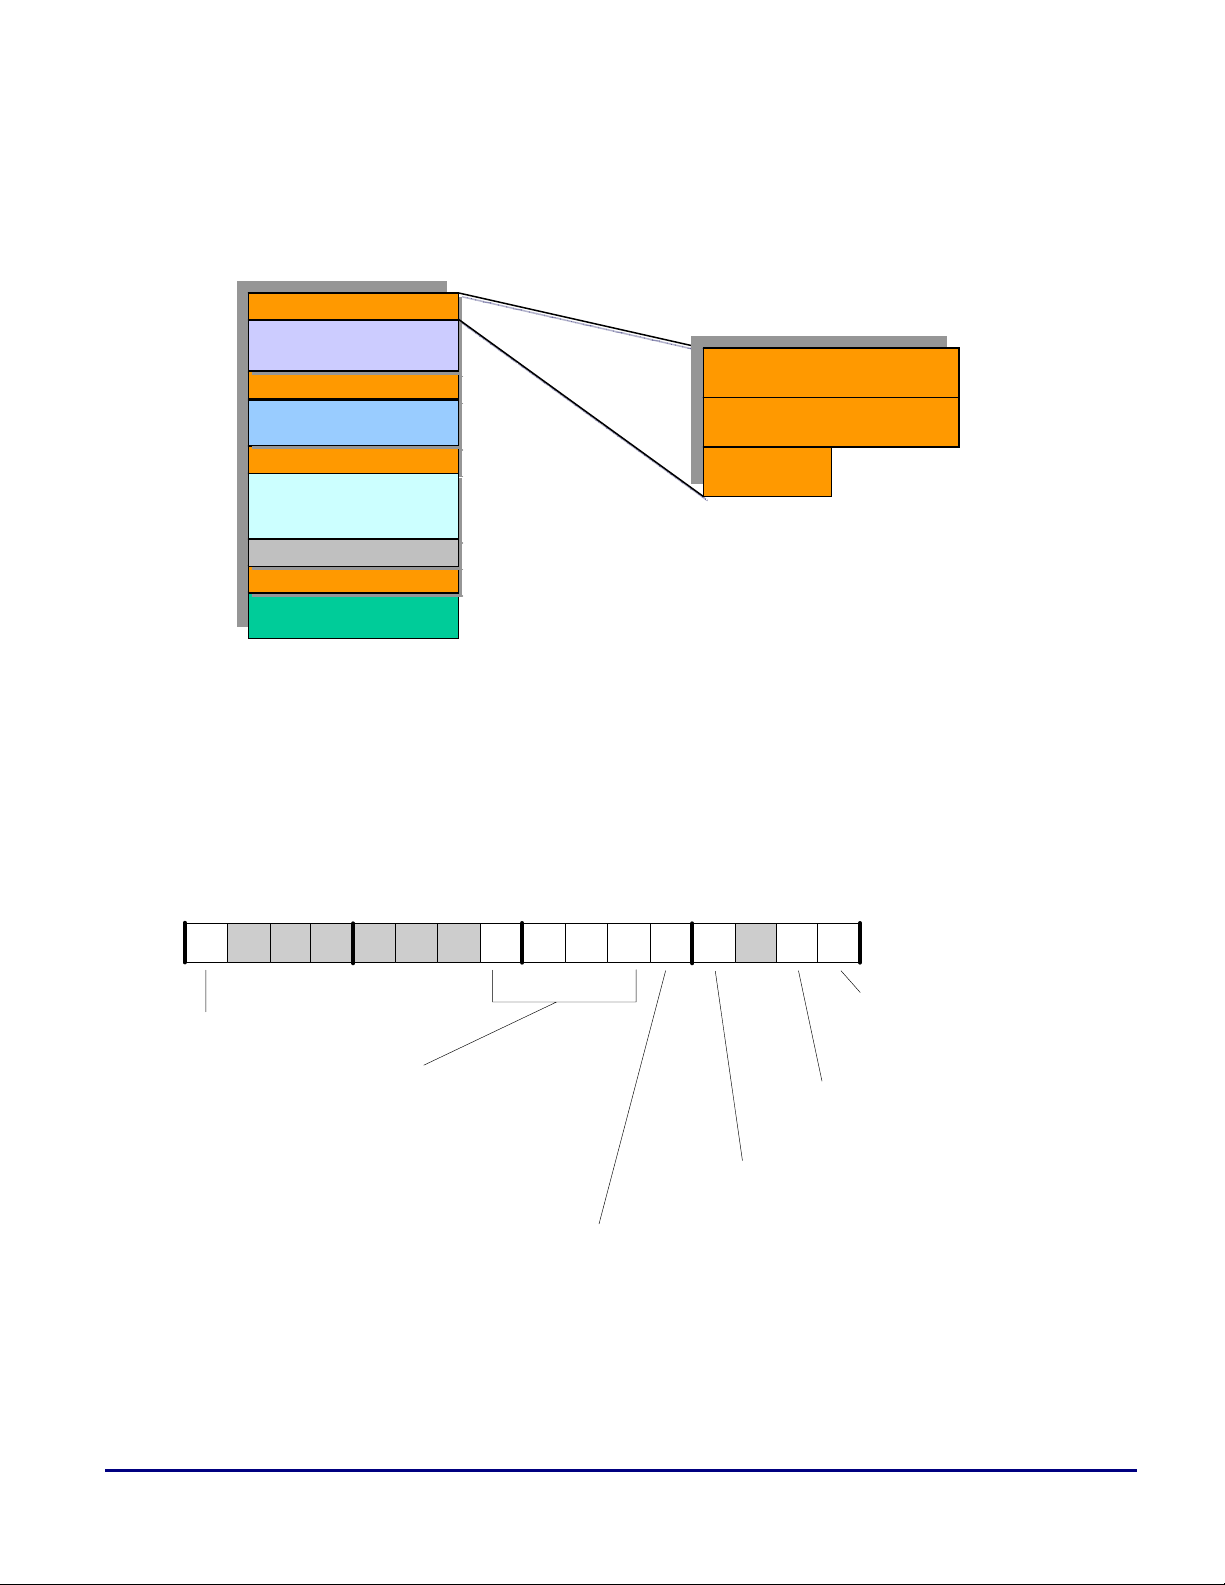
As shown in Figure 3, each 10-byte header within the loader file consists of a 4-byte ADDRESS field, a 4byte COUNT field, and a 2-byte FLAG field.
10-Byte Header for Block 1
10-Byte Header for Block 2
10-Byte Header for Block 3
10-Byte Header for Block n
Block 1
Block 2
Block 3
……………..
32-Bit ADDRESS
32-Bit COUNT
16-Bit FLAG
Figure 3. 10-Byte Header Contents
This 10-byte header, which precedes each block in the loader file, contains the following information used
by the on-chip Boot ROM during the boot process:
ADDRESS (4 bytes) – the target address, to which the block will be booted within memory
COUNT (4 bytes) – the number of bytes in the block
FLAG (2 bytes) – block type and control commands:
15 14 13 12 11 10 9 8 7 6 5 4 3 2 1 0
ZEROFILL
FINAL
0 - Non-Last Block
1 - Last Block
Figure 4. Individual Control Bits of the FLAG Word
ADSP-BF533 Blackfin® Booting Process (EE-240) Page 3 of 29
PFLAG 3:0
PF number for
SPI slave booting
INIT
0 - Non-Init Block
1 - Init Block
IGNORE
0 - Non-Ignore Block
1 - Ignore Block
0 - Non-Zero Fill Block
1 - Zero-Fill Block
RESVECT
0 - ADSP-BF531/BF532
1 - ADSP-BF533
Page 4

The FLAG bits include:
Bit 0: ZEROFILL - Indicates that the block is a buffer with zeros. ZEROFILL blocks have no
payload data. They simply instruct the on-chip Boot ROM to zero COUNT bytes starting from
ADDRESS in memory. This yields a condensed loader file for applications with large zero buffers. It
is also very helpful for ANSI-C compliant projects which often require large buffers to be zeroed
during boot time.
Bit 1: RESVECT – Indicates the reset vector after booting. All ADSP-BF531/BF532/BF533
derivatives use the same Boot ROM. This bit is set to 0 for the ADSP-BF531/BF532 and it is set to
1 for the ADSP-BF533. After booting is complete, the on-chip Boot ROM uses this bit to jump to
address
BF531/BF532.
L
0xFFA0 0000 for the ADSP-BF533 or to address 0xFFA0 8000 for the ADSP-
After a hardware reset, the reset vector (stored in the EVT1 register) is set to 0xFFA0 0000
or 0xFFA0 8000, depending on the RESVECT bit. If bit 4 (No Boot on Software Reset) of
the SYSCR register is set and a software reset is issued, the processor will vector to the
address set in the EVT1 register. This reset vector can be reconfigured to another address
during runtime and hence, an application can vector to an address other than 0xFFA0 0000
or 0xFFA0 8000 after a software reset. If the reset vector is modified during runtime,
ensure that the reset vector address within the EVT1 register is a valid instruction address.
This address can be internal instruction memory, SDRAM memory, or asynchronous
memory. The EVT1 register does not have a default value. The value within this register
will be retained after a reset is issued. When BMODE = 00, the on-chip Boot ROM is
bypassed and you must initialize the EVT1 register before issuing a software reset.
a
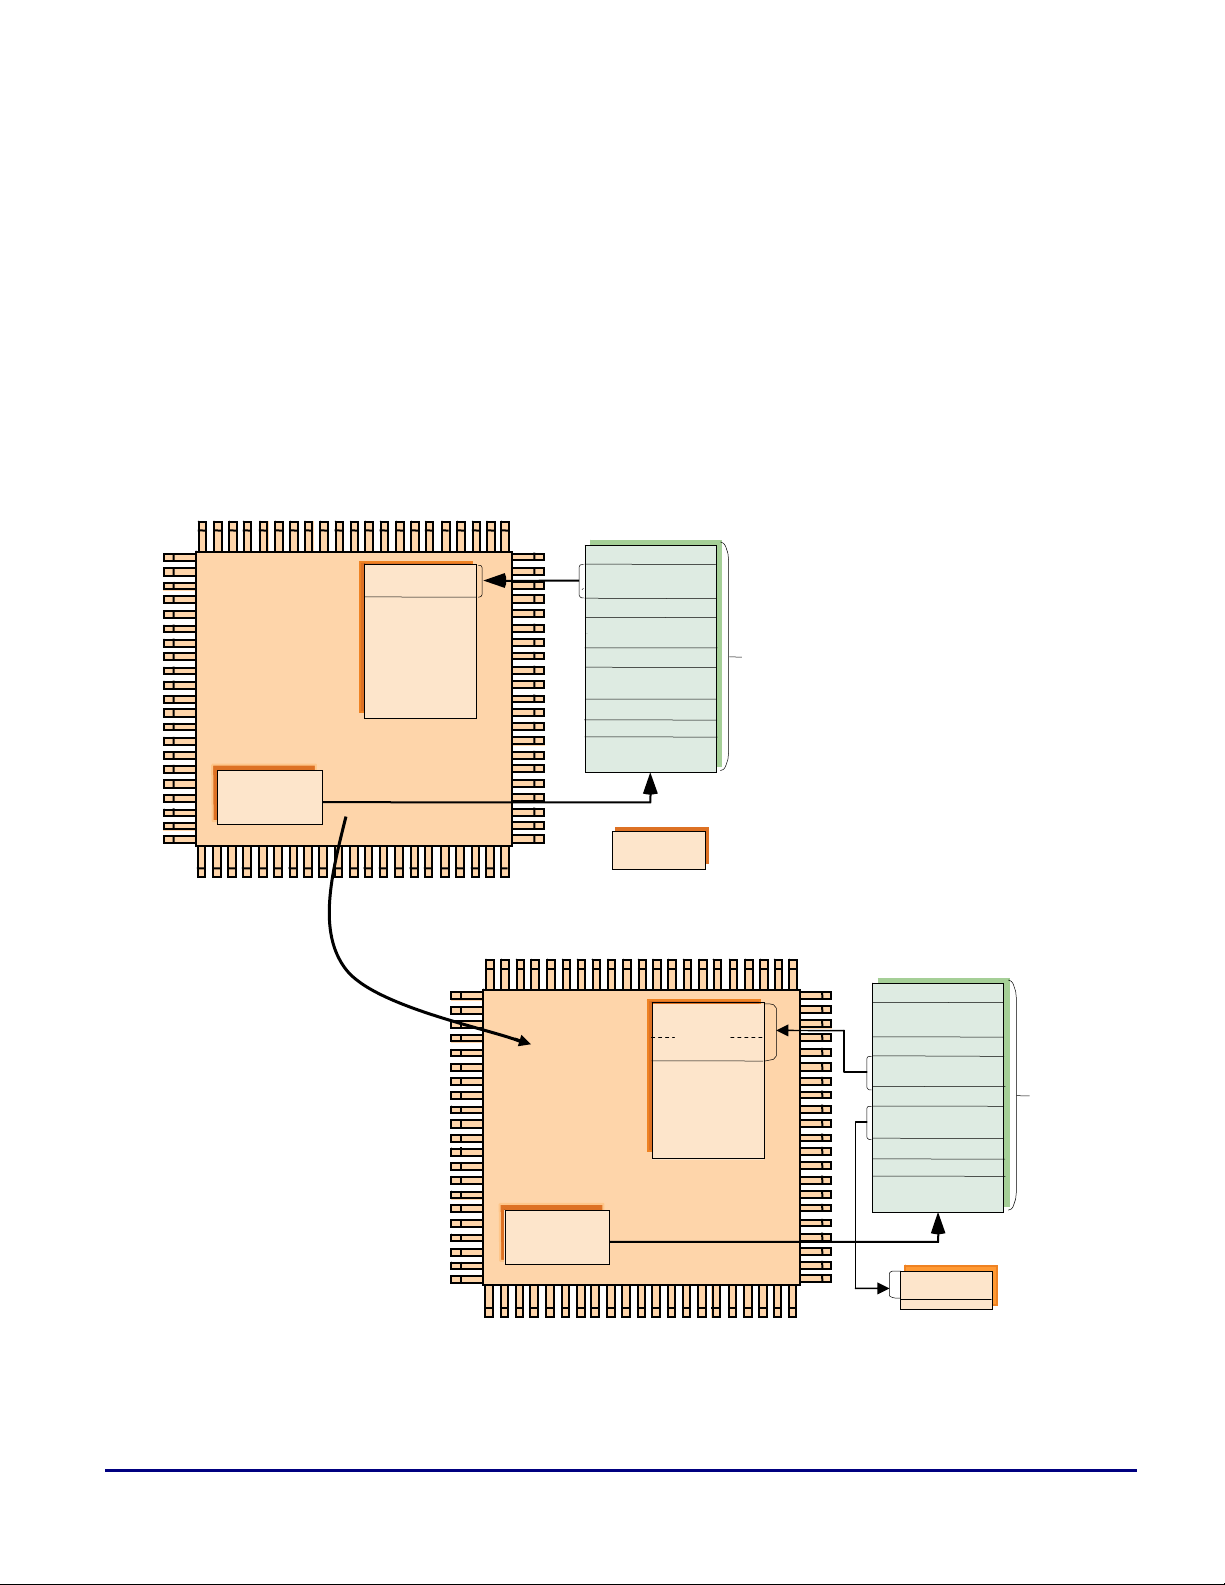
Bit 3: INIT – An initialization block (Init Block) is a block of code that executes before the actual
application code boots over it. When the on-chip Boot ROM detects an Init Block, it boots the
block into internal memory and makes a CALL to it (initialization code must have an RTS at the
end). After the initialization code is executed, it is typically overwritten with application code. See
Figure 5.
Bit 4: IGNORE – Indicates a block that is not booted into memory. It instructs the Boot ROM to
skip COUNT bytes of the boot stream. In master boot modes, the Boot ROM can just modify its
source address pointer. In slave boot modes, the Boot ROM must actively trash the payload data.
The current VisualDSP++® tools support IGNORE blocks for global headers only (currently the 4byte DXE Count, see Multi-Application (Multi-DXE) Management section below).
Bits 8:5: PFLAG - These bits are used for SPI Slave mode boot (BMODE = 10). PFLAG indicates the
PFx number used for the host wait (HWAIT) signal from the Blackfin processor to the Master SPI
host. This value can be between 1 – 15 (
Refer to the SPI Slave Mode Boot via Master Host (BMODE = 10) section below for further
information on the usage of this PF strobe.
Bit 15: FINAL – Indicates boot process is complete after this block. After processing a FINAL
block, the on-chip Boot ROM jumps to the reset vector address stored in the
processor is still in Supervisor mode and in the lowest priority interrupt (IVG15) when it jumps to
L1 memory for code execution.
0x1 – 0xF) for ADSP-BF531/BF532/BF533 processors.
EVT1 register. The
ADSP-BF533 Blackfin® Booting Process (EE-240) Page 4 of 29
Page 5
A
A
A
A
a
Unlike ADSP-BF535 processors, ADSP-BF531/BF532/BF533 processors do not require a second-
L
stage loader. The FLAG field of the 10-byte header provides ADSP-BF531/BF532/BF533
processors with all the information needed to execute a single-stage boot sequence without the
need for a second-stage loader.
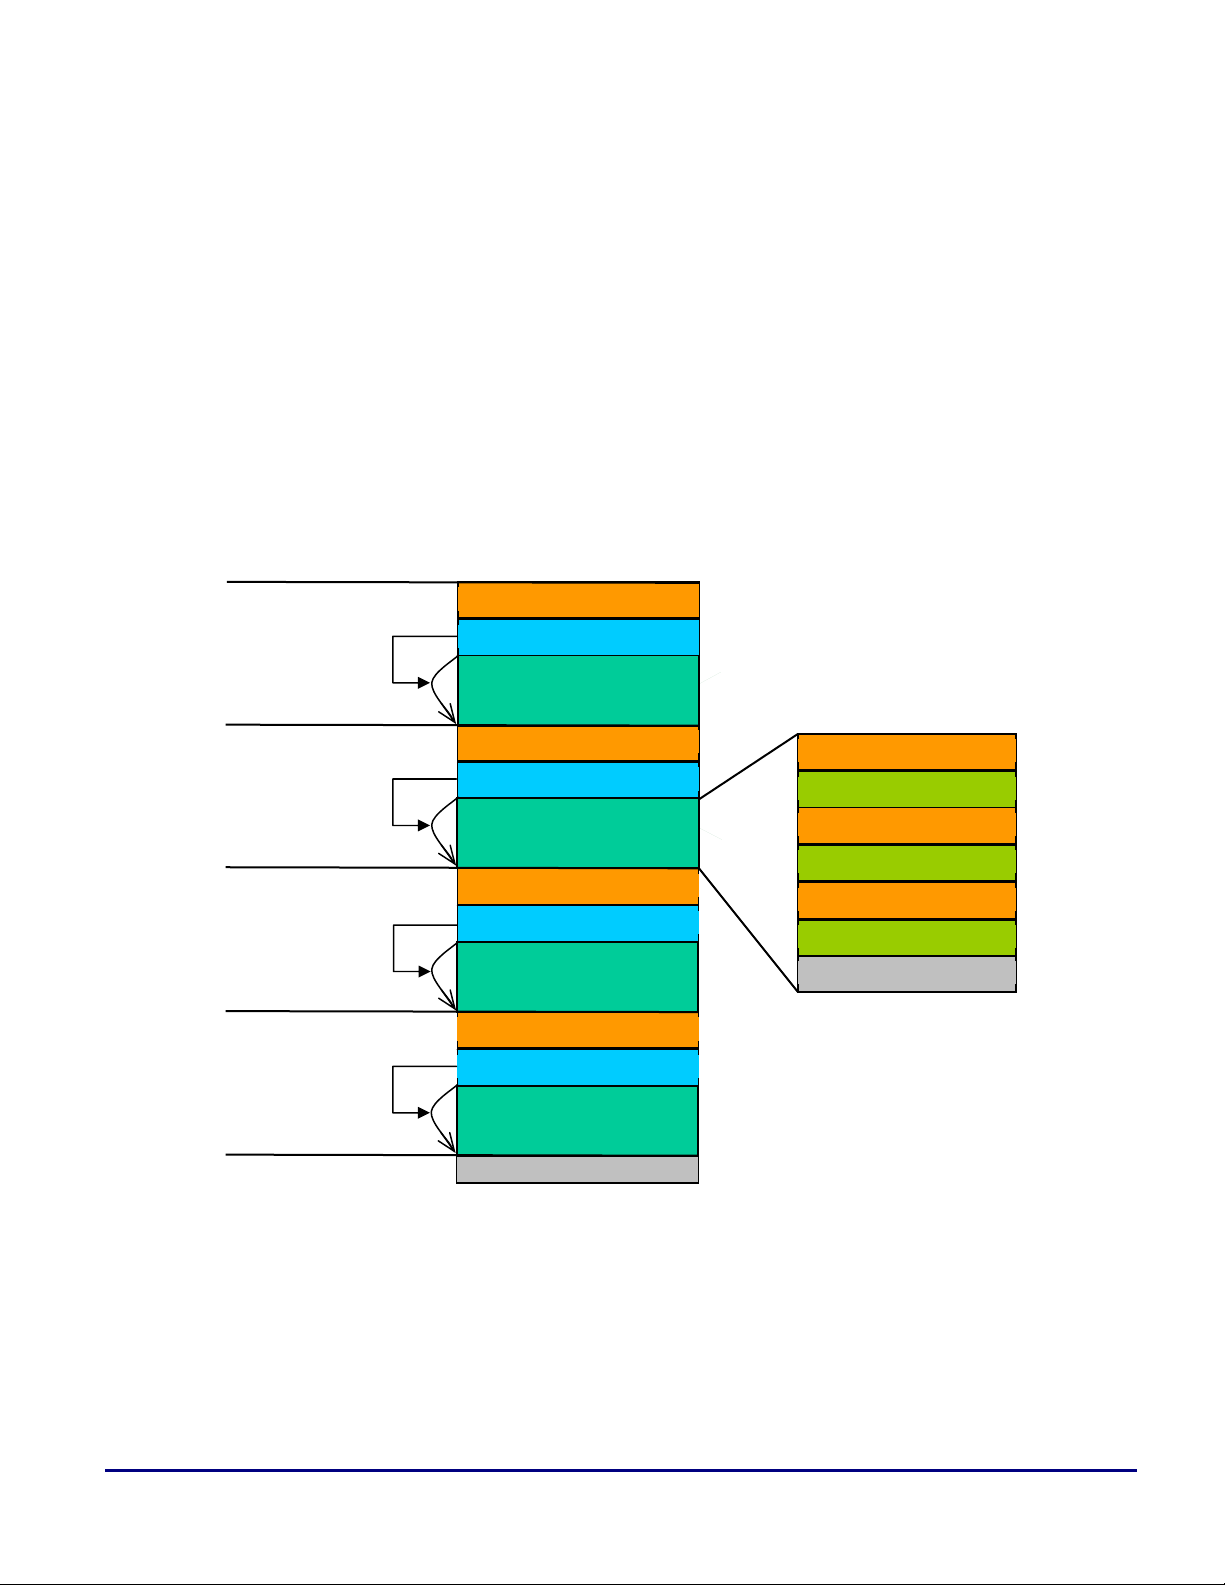
Initialization Code (Init Code)
Init Code is a feature that allows the execution of a piece code before the actual application is booted in.
This code can serve a number of purposes including initializing the SDRAM controller, or changing PLL
settings, the SPI baud rate, or EBIU wait states for faster boot time, etc. The Init Code is added to the
beginning of the loader file stream via the elfloader –Init Init_Code.DXE command-line switch, where
Init_Code.DXE refers to the user-provided custom initialization code executable.
ADSP-BF531/BF532/BF533 Processor
L1 Memory
0xEF00 0000
On-Chip Boot
ROM
After Init Code
Execution
Init Block
Flash/PROM or SPI Device
Header for Init Block
Init Block
Header for L1 Block
L1 Block
Header for SDRAM Block
SDRAM Block
........
Header for Block n
Block n
SDRAM
ADSP-BF531/BF532/BF533 Processor
L1
0xEF00 0000
On-Chip Boot
ROM
Init Block
L1 Block
pp.
Code/
Data
Flash/PROM or SPI Device
Header for Init Block
Init Block
Header for L1 Block
L1 Block
Header for SDRAM Block
SDRAM Block
........
Header for Block n
Block n
SDRAM
SDRAM Block
Code/
Data
pp.
Figure 5. Initialization Code Execution / Boot
When the on-chip Boot ROM detects a block with the INIT bit set, it will first boot it into Blackfin
memory and then execute it, by issuing a
ADSP-BF533 Blackfin® Booting Process (EE-240) Page 5 of 29
CALL to its target address. For this reason, you must terminate
Page 6

a
the Init Code with an RTS instruction to ensure that the processor vectors back to the on-chip Boot ROM
for the rest of the boot process.
It is your responsibility to save all processor registers modified by Init Code and to restore them
L
before the Init Code returns. At a minimum, it is recommended that every Init Code saves the
ASTAT, RETS, and all Rx and Px registers. The Blackfin processor provides sufficient stack space in
scratchpad memory (
0xFFB0 0000 – 0xFFB0 0FFF). The Init Code can perform push and pop
operations through the stack pointer SP. Listing 1 shows an example Init Code file that
demonstrates the setup of the SDRAM controller.
#include <defBF532.h>
.section program;
/********************************************************************/
[--SP] = ASTAT; // Save registers onto Stack
[--SP] = RETS;
[--SP] = (R7:0);
[--SP] = (P5:0);
/********************************************************************/
/*******Init Code Section********************************************/
/*******SDRAM Setup************/
Setup_SDRAM:
P0.L = lo(EBIU_SDRRC);
P0.H = hi(EBIU_SDRRC); // SDRAM Refresh Rate Control Register
R0 = 0x074A(Z);
W[P0] = R0;
SSYNC;
P0.L = lo(EBIU_SDBCTL);
P0.H = hi(EBIU_SDBCTL); // SDRAM Memory Bank Control Register
R0 = 0x0001(Z);
W[P0] = R0;
SSYNC;
P0.L = lo(EBIU_SDGCTL);
P0.H = hi(EBIU_SDGCTL); // SDRAM Memory Global Control Register
R0.H = 0x0091;
R0.L = 0x998D;
[P0] = R0;
SSYNC;
/********************************************************************/
(P5:0) = [SP++]; // Restore registers from Stack
(R7:0) = [SP++];
RETS = [SP++];
ASTAT = [SP++];
/********************************************************************/
RTS;
Listing 1. Example Init Code
Typically, an Init Code consists of a single section and is represented by a single block within the boot
stream. This block has, of course, the
INIT bit set. Nevertheless, an Init Block can also consist of multiple
sections. Then, multiple blocks represent the Init Code within the boot stream. Only the last block has the
INIT bit set. The elfloader utility ensures that the last of these blocks vectors to the Init Code’s entry
address. If this is too challenging for the elfloader, it keeps the INIT bit cleared even for the last block and
issues one extra block afterward. This extra block has the
ADSP-BF533 Blackfin® Booting Process (EE-240) Page 6 of 29
INIT bit set, but does not provide any payload
Page 7
t
a
data (COUNT = 0). It only instructs the on-chip Boot ROM to execute a CALL instruction to the given
ADDRESS.
Although Init Code
.DXE files are built through their own VisualDSP++ projects, they differ from
standard projects. Init Codes provide a callable sub-function only, and thus, they look more like a library
than an application. An Init Code is always a heading for the regular application code. Consequently,
regardless whether the Init Code consists of one or multiple blocks, it is not terminated by a FINAL bit
indicator, which would cause the Boot ROM to terminate the boot process.
Multi-Application (Multi-DXE) Management
In addition to pre-boot initialization, the Init Code feature can also be used for boot management. A loader
file (.LDR) can store multiple applications if multiple executables (.DXE files) are listed on the elfloader
command line. The elfloader creates multiple boot streams with the individual executables appended one
after the other with the Init Code DXE located at the beginning (see Figure 6).
s
1
Boot
Stream
2nd
Boot
Stream
3rd
Boot
Stream
th
4
Boot
Stream
Etc..
10-Byte Header for Count
4-Byte Count for Init Code DXE
Init Code
10-Byte Header for Count
4-Byte Count for 1st DXE
1st DXE Application
10-Byte Header for Count
4-Byte Count for 2nd DXE
2nd DXE Application
10-Byte Header for Count
4-Byte Count for 3rd DXE
3rd DXE Application
……………………….
Loader File
10-Byte Header for Block 1
Block 1
10-Byte Header for Block 2
Block 2
10-Byte Header for Block 3
Block 3
……………….
Figure 6. Multi-DXE Loader File Contents
The ADSP-BF531/BF532/BF533 loader file (.LDR) structure allows you to determine the boundary
between executables (DXE applications) stored in external memory, and hence, the ability to boot in a
specific DXE application. Each .DXE file that is parsed and placed within the .LDR file is preceded by an
IGNORE block. Currently, this IGNORE block contains a 4-byte count value, which is the number of bytes
contained within the DXE application including headers. In other words, it is the offset to the next DXE
ADSP-BF533 Blackfin® Booting Process (EE-240) Page 7 of 29
Page 8

a
application. In the future, the IGNORE block might be used to hold information in addition to the 4-byte
count value. Note that each
IGNORE block is headed by a 10-byte header.
With this DXE count information, a user can essentially “jump” through whole DXE application within
the
.LDR file until the DXE application chosen to be booted in is reached. Listing 2 shows a piece of Init
Code that demonstrates how to stream through multiple DXE applications from an 8-bit flash. Assuming
the .LDR file contains one Init Code DXE and two DXE applications, the Init Code jumps through the
.LDR file to boot in the second DXE application.
#include <defbf533.h>
.section program;
[--SP] = ASTAT; // save registers onto Stack
[--SP] = RETS;
[--SP] = (r7:0);
[--SP] = (p5:0);
[--SP] = LC0;
[--SP] = LT0;
[--SP] = LB0;
/******************************/
BOOT_DXE:
R0.H = 0x2000; // R0 = start of ASYNC Bank 0
R0.L = 0x0000;
P1 = 2; // Number of DXEs to jump over (CANNOT BE ZERO!!)
// After first iteration, R0 will point to DXE1
// After second iteration, R0 will point to DXE2
LSETUP(ADD_DXE_COUNT_BEGIN, ADD_DXE_COUNT_END) LC0 = P1;
ADD_DXE_COUNT_BEGIN:
R1 = 0xA; // Skip over 10 bytes for the 1st 10-byte header
R1 = R1 << 1; // Multiply by 2 since we are booting from a 16-bit
// flash (compensate for zero padding)
R0 = R0 + R1;
P0 = R0; // P0 points to 4-Byte DXE COUNT
R0 = W[P0++](Z); // R0 = xx | Bits[7:0] of DXE COUNT
R1 = W[P0++](Z); // R1 = xx | Bits[15:8] of DXE COUNT
R1 = R1 << 8;
R2 = W[P0++](Z); // R2 = xx | Bits[23:16] of DXE COUNT
R2 = R2 << 16;
R3 = W[P0++](Z); // R3 = xx | Bits[31:24] of DXE COUNT
R3 = R3 << 24;
R0 = R0 | R1; // R0 = Bits[15:0] of DXE COUNT
R2 = R2 | R3; // R2 = Bits[31:16] of DXE COUNT
R3 = R0 | R2; // R3 = DXE COUNT
R0 = P0;
R0 = R0 + R3; // Modify pointer by the DXE COUNT so now R0 points
P0 = R0; // to next DXE
ADD_DXE_COUNT_END:
NOP;
/******************************/
DONE:
LB0 = [SP++]; // Restore Regs
LT0 = [SP++];
LC0 = [SP++];
(p5:0) = [SP++];
(r7:1) = [SP++]; //----->DO NOT RESTORE R0<-------
RETS = [SP++]; // Modify SP by one for R0 case
RETS = [SP++]; // Pop off the real value of RETS
ASTAT = [SP++];
ADSP-BF533 Blackfin® Booting Process (EE-240) Page 8 of 29
Page 9

RTS;
Listing 2. Example Init Code for Multi-DXE Boot
Note that the date register, R0, is not restored at the end of the Init Code because R0 is the external pointer
for a flash/PROM boot (
the RTS instruction, the on-chip Boot ROM will continue booting from the location stored in R0. Similarly,
if the boot mode is set for SPI booting (BMODE = 11), the external pointer is stored in R3. Hence, for an
SPI boot, do not restore R3 within the Init Code for a multi-DXE application.
Attached to this EE-Note is a multi-DXE boot example (BF533 Ez Kit Multiple DXE Boot.zip) that
uses the ADSP-BF533 EZ-KIT Lite® board. The ZIP file contains two blink application projects and an
Init Code project. Upon RESET, the on-chip Boot ROM will boot in the Init Code. The Init Code will then
wait until
booted in and executed. If
that blinks alternate LEDs on the board, and DXE2 is an application that blinks all the LEDs on the board.
PF8 (SW4 push button) or PF9 (SW5 push button) are asserted. If PF8 is asserted, DXE1 will be
BMODE = 01). When the processor returns back to the on-chip Boot ROM after
PF9 is asserted, DXE2 will be booted in and executed. DXE1 is an application
a
ADSP-BF533 Blackfin® Booting Process (EE-240) Page 9 of 29
Page 10

]
0
a
Specific Blackfin Boot Modes
Now that we have a general understanding of the boot process for the ADSP-BF531, ADSP-BF532, and
ADSP-BF533 processors, the remainder of the this EE-Note will discuss information relevant to each boot
mode such as hardware interface, loader file structure, and expected pin behavior. Execution from external
16-bit memory (BMODE = 00) is discussed in Running Programs from Flash on ADSP-BF533 Blackfin
Processors (EE-239) [3].
For the following sections, the ASM blink example for the ADSP-BF533 EZ-KIT Lite board with Init
Code will be used. This example is included with this EE-Note.
Note that for each of the boot modes listed below, addresses 0xFF80 7FF0 – 0xFF80 7FFF (last
L
8-Bit Flash/PROM Boot (BMODE = 01)
Since the EBIU on the Blackfin processor is 16 bits wide (hence no ADDR[0]), an 8-bit flash/PROM will
occupy only the lower 8 bits of the data bus (D[7:0]). Figure 7 illustrates the pin-to-pin connections
between the Blackfin processor and an 8-bit flash/PROM:
16 bytes of L1 Data Bank A) must be reserved. This memory range is used by the on-chip Boot
ROM to store header information of each block within the loader file. After booting, this memory
range can be used by the application during runtime. See Appendix for silicon revisions 0.1 and
0.2.
ADSP-BF533
_______
AMS(0)
____
AOE
____
ADDR[N+1:1]
DATA[7:0]
V
1
DDEXT
KΩ
8-Bit Flash/PROM
____
AMS
___
OE
__ ___
R/W or WR
ADDR[N:0]
DATA[7:0
Figure 7. Connections Between a Blackfin Processor and an 8-Bit Flash/PROM
Listing 3 shows a loader file created for an 8-bit flash/PROM in Intel hex format (from example.zip
attached to this EE-Note). It is split into different sections to illustrate the loader file’s structure.
ADSP-BF533 Blackfin® Booting Process (EE-240) Page 10 of 29
Page 11

Intel Hex Overhead
ADDRESS of 10-Byte Header
COUNT of 10-Byte Header
FLAG of 10-Byte Header
DXE Count
:020000040000FA
:0A0000004080A0FF04000000120061
:04000A005C00000096
:20000E000000A0FF460000000200660167014005C00408E1180A48E1C0FF80E14A070097D7
:20002E00240008E1140A48E1C0FF80E101000097240008E1100A48E1C0FF00E18D9940E16F
:10004E009100009324008004000527012601100072
:0C005E000000A0FF020000000A00660184
:0A006A004080A0FF040000001200F7
:0400740088020000FE
:200078000000A0FF7E02000002808161113E08E1082048E1E0FF00E1D00040E1A0FF00927A
:2000980000E1D20040E1A0FF0092009200E1F60040E1A0FF009200E1F80040E1A0FF00925D
:2000B80000E1FA0040E1A0FF009200E1FC0040E1A0FF009200E1FE0040E1A0FF009200E1BA
DXE1 Count Block
:2000D800000140E1A0FF009200E1020140E1A0FF009200E1040140E1A0FF009200E106015F
:2000F80040E1A0FF009200E1080140E1A0FF009200E10A0140E1A0FF00924EE1B0FF0EE14F
:2001180000047E3208E1CC0148E1A0FF583E08E13C2048E1E0FF00E1C00040E1A0FF0092BF
:2001380080E1008040009F0011007B0108E1CC0148E1A0FF50002000FF2F002008E13007FE
:2001580048E1C0FF0095104A009708E1080748E1C0FF80E10000104A00923090709000200C
:200178001100002000200020002000200020002000200020002080E1000081E10100A2E0D0
:20019800062001900A90110801020850100008E1300748E1C0FF0095004A009708E10807FC
:2001B80048E1C0FF80E10000004A009230907090002008E1300748E1C0FF0095084A00979C
:2001D80008E1080748E1C0FF80E10000084A00923090709000200000000048E1C0FF08E131
:2001F800040A00E1B07B40E1B07B0093240048E1C0FF08E1080A00E1B07B40E1B07B0093FC
:20021800240048E1C0FF08E1000A0082796008560097240049E1272009E1040000600897F5
:20023800240049E1272009E1060080E1FFFF0897240010000000FFE3D2FF08E1300748E1F3
:20025800C0FF00E100000097240008E1340748E1C0FF00600097240008E1400748E1C0FFEC
:20027800009501E1000F08560097240049E1272009E105000C9923E1C0001C55FB61AA6027
:200298009A5494560A9B2400D243056000E3260008E1000748E1C0FF009521E10001485416
:2002B800010C0318AA60056021E100024854010C0318FA61056021E100044854010C03183D
:2002D8009A61056021E100084854010C0410050CD81BDF2F0D60DD2F0AE100004AE18003BB
:0802F800A2E00220000010004A
:00000001FF
10-Byte Header for Init Code DXE Count Block
Init Code DXE Count
10-Byte Header for Block 1 of Init Code DXE
10-Byte Header for Block 2 of Init Code DXE
Block 1 of Init Code DXE
Block 2 of Init Code DXE
10-Byte Header for DXE1 Count
10-Byte Header for Block 1 of
Block 1 of DXE1
a
Listing 3. Example Intel Hex Loader File
The loader file in Listing 3 was built for silicon revision 0.3. Loader files built for silicon revision
L
0.2 and below have a slightly different loader file structure.
When this loader file is programmed into an 8-bit flash connected to ASYNC Bank 0 of the Blackfin
processor, the contents of memory (starting at location 0x2000 0000) viewed from the Blackfin will look
like Figure 8.
ADSP-BF533 Blackfin® Booting Process (EE-240) Page 11 of 29
Page 12

(
a
Data
[15 : 8]
0x20000000 xx 0x40
0x20000002 xx 0x00
0x20000004 xx 0x80
0x20000006 xx 0xFF
0x20000008 xx 0x04
0x2000000A xx 0x00
0x2000000C xx 0x00
0x2000000E xx 0x00
ADDRESS
0x20000010 xx 0x12
0x20000012 xx 0x00
0x20000014 xx 0x5C
0x20000016 xx 0x00
0x20000018 xx 0x00
0x2000001A xx 0x00
Data
[7 : 0]
ADDRESS
COUNT
FLAG
DXE Count
Block
Data
[15 : 8]
0x2000001C xx 0x00
0x2000001E xx 0x00
0x20000020 xx 0xA0
0x20000022 xx 0xFF
0x20000024 xx 0x46
0x20000026 xx 0x00
0x20000028 xx 0x00
0x2000002A xx 0x00
ADDRESS
0x2000002C xx 0x02
0x2000002E xx 0x00
0x20000030 xx 0x66
0x20000032 xx 0x01
0x20000034 xx 0x67
0x20000036 xx 0x01
……………. …… ……
Figure 8. 8-Bit Flash/PROM Memory Contents Viewed from Blackfin Memory Window
Data
[7 : 0]
ADDRESS
COUNT
FLAG
Block 1 of
Init Code
DXE
Figure 9 shows the start of a boot sequence for an 8-bit flash/PROM boot.
COUNT ADDRESS FLAG
10-Byte Header for Init Code DXE Count Block
Initial core byte read from location
0x0 of the flash to determine 8-bit
0x40) or 16-bit flash (0x60).
flash
Figure 9. Timing Diagram for 8-Bit Flash Boot Sequence
Note that each read of an 8-bit flash
will have the data in the least
significant byte of the 16-bit bus.
ADSP-BF533 Blackfin® Booting Process (EE-240) Page 12 of 29
Page 13

533
16-Bit Flash/PROM Boot (BMODE = 01)
a
Figure 10 illustrates the pin-to-pin connections between the Blackfin processor and a 16-bit flash/PROM:
V
ADSP-BF
_______
AMS(0)
____
AOE
____
AWE
ADDR[N+1:1]
DATA[15:0]
DDEXT
10KΩ
16-Bit Flash/PROM
____
AMS
___
OE
__ ___
R/W or WR
ADDR[N:0]
DATA[15:0]
Figure 10. Connections Between a Blackfin Processor and a 16-Bit Flash/PROM
If we create a loader file for a 16-bit flash/PROM from the example attached to this EE-Note, it will be
exactly the same as the one shown in Listing 3, except that the ADDRESS of the 10-byte header for the DXE
count blocks will be 0xFF80 0060 instead of 0xFF80 0040 as in the case of an 8-bit flash/PROM. This
will cause the first byte of the loader file to be 0x60 instead of 0x40. The on-chip Boot ROM uses this
first byte to determine whether an 8- or a 16-bit flash/PROM is connected. If the first byte is 0x60, it
assumes a 16-bit flash/PROM; if the first byte is 0x40, it assumes an 8-bit flash/PROM.
When this loader file is programmed into a 16-bit flash connected to ASYNC Bank 0 of the Blackfin
processor, the contents of memory (starting at location 0x2000 0000) viewed from the Blackfin processor
will look like Figure 11.
ADSP-BF533 Blackfin® Booting Process (EE-240) Page 13 of 29
Page 14

a
0x20000000 0x00 0x60
0x20000002 0xFF 0x80
0x20000004 0x00 0x04
0x20000006 0x00 0x00
0x20000008 0x00 0x12 FLAG
0x2000000A 0x00 0x5C
0x2000000C 0x00 0x00
0x2000000E 0x00 0x00
ADDRESS
0x20000010 0xFF 0xA0
0x20000012 0x00 0x46
0x20000014 0x00 0x00
0x20000016 0x00 0x02 FLAG
0x20000018 0x01 0x66
……………. …… ……
0x2000005C 0x00 0x10
Data
[15 : 8]
Data
[7 : 0]
ADDRESS
COUNT
DXE Count
Block
ADDRESS
COUNT
Block 1 of
Init Code
DXE
0x2000005E 0x00 0x00
……………. …… ……
0x20000066 0x00 0x0A
0x20000068 0x01 0x66
0x2000002A 0x00 0x60
……………. …… ……
0x20000072 0x00 0x12
0x20000074 0x02 0x88
ADDRESS
0x20000076 0x00 0x00
0x20000078 0x00 0x00
……………. …… ……
0x20000080 0x80 0x02
0x20000082 0x61 0x81
……………. …… ……
0x200002FE 0x00 0x10
Data
[15 : 8]
Data
[7 : 0]
10-Byte
Header for
Block 2 of
Init Code
Block 2 of
Init Code
10-Byte
Header for
DXE1
Count
DXE1
Count
10-Byte
Header for
Block 1 of
DXE1
Block 1 of
DXE1
Figure 11. 16-Bit Flash/PROM Memory Contents Viewed from Blackfin Memory Window
The loader file structure (Figure 11) for a 16-bit flash/PROM is supported only by silicon
L
revision 0.3 and above. Silicon revision 0.2 and below of the ADSP-BF531/BF532/BF533
supports only 8-bit booting. Hence, if a width of 16 bits is chosen for silicon revision 0.2 and
below, the output loader file will be zero-padded to “simulate” an 8-bit boot from a 16-bit
flash/PROM. This loader file, when programmed into flash/PROM memory, will look like
Figure 8 with zeros in the upper 8 bits (
DATA[15:8]) of the data bus.
Figure 12 shows the start of a boot sequence for a 16-bit flash/PROM boot.
ADSP-BF533 Blackfin® Booting Process (EE-240) Page 14 of 29
Page 15

Note that each read
of a 16-bit flash
will populate the
full 16-bit bus.
a
COUNT ADDRESS F.
10-Byte Header for Init Code
DXE Count Block
Initial core byte read of flash
location 0x0 determines 8-bit flash
(0x40) or 16-bit flash (0x60).
Figure 12. Timing Diagram for 16-bit Flash Boot Sequence
The processor will perform an initial core byte read of location 0x0 of the flash to determine the
L
SPI Slave Mode Boot via Master Host (BMODE = 10)
For SPI slave mode booting, the ADSP-BF531/BF532/BF533 is configured as an SPI slave device and a
host is used to boot the processor.
memory width of the flash. When booting from a FIFO, the first byte (which is part of first 10-byte
header contained within the loader file) must be sent twice: once for this initial core read and once
for the actual boot sequence.
10-Byte Header for Block 1 of Init
COUNT ADDRESS F.
Code DXE
Block 1
of Init
Code
DXE…
……..
This boot mode is not supported in silicon revision 0.2 and below of the ADSP-
L
Figure 13 shows the pin-to-pin connections needed for this mode.
ADSP-BF533 Blackfin® Booting Process (EE-240) Page 15 of 29
BF531/BF532/BF533 processors.
Page 16

(
Host
(
)
(Master SPI Device)
ADSP-BF533
Slave SPI Device)
a
_____
FLAG / Interrupt
Figure 13. Connections Between Host (SPI Master) and Blackfin Processor (SPI Slave)
The host does not need any knowledge of the loader file stream to boot the Blackfin processor. It must be
configured to send one byte at a time from the loader file (ASCII format). In the above setup, PFx is the
host wait (HWAIT) signal from the Blackfin processor to the master host device. This will be the signal
used by the Blackfin processor to “hold off” the host during certain times within the boot process
(specifically during init code execution and zero-fill blocks). When PFx is asserted (high), the master host
device must discontinue sending bytes to the Blackfin processor. When PFx is de-asserted (low), the
master host device will resume sending bytes from where it left off. Since the PFx pin is not driven by the
slave until the first block has been processed, consider using a resistor to pull down the HWAIT signal.
SPICLK
S_SEL
MISO
HWAIT
10KΩ
GND
SPICLK
_____
SPISS
MOSI
MISO
PFx
The host must ensure that the Blackfin is out reset before sending any bytes. Any bytes sent to the
L
This PFx number is going to be user-defined and will be embedded within the loader file. The elfloader
utility will embed this number in PFLAG bit field (bits[8:5] of the FLAG word) within every 10-byte header.
It does this by using the
used by the Blackfin slave and has a value between 1 and 15.
L
L
On a system where the Slave’s CCLK = 333 MHz, SCLK = 66.6 MHz, the Host was tested to have a
maximum SPI Baud Rate = 1 MHz.
Attached to this EE-Note is an example host code (Host_Code.zip) for when an ADSP-BF532 processor
is used as the host.
ADSP-BF533 Blackfin® Booting Process (EE-240) Page 16 of 29
Blackfin processor prior to reset will be lost and the booting sequence will fail.
–pflag number command-line switch where number is the intended PFx flag
If the –pflag number switch is not used, the default value placed within bits 8:5 of the FLAG will
be 0, indicating that
with the
switch and specify a value other than 0.
Due to an anomaly within the Rev 0.3 Boot Rom, the SPI Control and DMA5 Configuration
Registers will not have their default values after booting.
/SPISS pin, which is mandatory for successful SPI slave boot, always use the –pflag
PF0 will be assumed as the HWAIT signal to the host. Since PF0 is multiplexed
Page 17

a
Below are timing diagrams of a SPI Slave mode boot using an ADSP-BF532 processor as the host and an
ADSP-BF533 processor as the slave SPI device. On the host side, PF4 is used as the /CS which is
connected to the /SPISS of the slave ADSP-BF533. PF13 of the SPI slave (ADSP-BF533 processor) is
connected to PF15 of the host (ADSP-BF532 processor). This connection will be the HWAIT signal to hold
off the host. All the timing diagrams are from the SPI slave point of view.
The loader file used (SPI_Slave_HostFile.ldr) is the same one as in Listing 3, except two more blocks
are added to show the functionality of this boot mode: a zero-fill block going to location 0xFFA0 0300
with a byte count of
0x11, 0x22, 0x33, 0x44, 0x55, 0x66, 0x77, 0x88, 0x99, 0xAA, 0xBB, 0xCC, 0xDD, 0xEE, 0xFF, and 0x19.
0x4000 and a data block going to location 0xFFA0 4300 with the following values:
Figure 14 shows the full SPI Slave mode boot sequence.
Execution.
Assertion of HWAIT
(PF13) during Zero Fill
Block.
Configuration of HWAIT
(PF13) after first 10-byte
header is received.
Full SPI Slave Mode Boot Sequence
Assertion of HWAIT
(PF13) during Init Code
Figure 14. Timing Diagram for SPI Slave Mode Boot Sequence
After the SPI slave receives the first 10-byte header from the host, it knows which PFx flag to configure as
HWAIT signal. In this case, we are using PF13. Note the de-assertion of PF13 in Figure 15 after bits 8:5
the
of the
FLAG field are processed.
ADSP-BF533 Blackfin® Booting Process (EE-240) Page 17 of 29
Page 18

a
0x40 0x80 0xA0 0xFF
ADDRESS
10-Byte Header for Init Code DXE Count Block
0x04 0x00 0x00 0x00
COUNT
Note the configuration of PF13 after
the first FLAG is received which has
the PF number stored in bits[8:5]
0xB2 0x01
FLAG
Figure 15. SPI Slave Mode Boot Sequence: Start of Boot Sequence
After that, the host sends out the 4-byte Init Code DXE Count Block, the 10-byte header for Block 1 of
the Init Code DXE, and then Block 1 itself.
0x5C 0x00 0x00 0x00 0x66 0x01 0x67
Init Code DXE Count Block 1 of Init Code….
0x00 0x00 0xA0 0xFF
ADDRESS
10-Byte Header for Block 1 of Init Code DXE
0x46 0x00 0x00 0x00
COUNT
0xA2 0x01
FLAG
Figure 16. SPI Slave Mode Boot Sequence: Boot Block 1 of Init Code DXE
After the full Init Code DXE is booted into Blackfin memory, the slave SPI Blackfin processor will then
assert the
HWAIT signal, PF13, to indicate to the host not to send any more bytes during Init Code
execution. Since the Blackfin processor core is running much faster than the SPI interface, the Init Code
will execute at a much faster rate compared to the rate at which bytes are sent from the host.
ADSP-BF533 Blackfin® Booting Process (EE-240) Page 18 of 29
Page 19

(
)
a
0x00 0x00 0xA0 0xFF
ADDRESS
10-Byte Header for Block 2 of Init Code DXE
0x02 0x00 0x00 0x00
COUNT
Assertion of HWAIT (PF13) during short
duration of Init Code execution.
0xAA 0x01
FLAG
0x66 0x01
Block 2
0x40 0x80 0xA0 0xFF
ADDRESS
10-Byte Header DXE1
Count Block…
Figure 17. SPI Slave Mode Boot Sequence: Boot Block 2 of Init Code DXE
Figure 18 shows the processing of a zero-fill block for this boot mode. When the on-chip Boot ROM
encounters a zero-fill block, it asserts HWAIT, PF13, to hold off the host from sending any more bytes.
During this time, it MemDMAs 0x4000 zeros to locations 0xFFA0 0300 – 0xFFA0 4300. When done, the
on-chip Boot ROM de-asserts HWAIT and the host continues to send the remaining bytes of the boot
process (10-byte header for Block 3 and Block 3 itself).
Note that the next byte of data will be sent by the host and it will sit
in the FIFO until HWAIT is de-asserted. In this case it is the first
byte (0x00) of the 10-Byte header for Block 3 of DXE1.
ADDRESS=
0xFFA00300
10-Byte Header for Block 2
of DXE1
COUNT=
0x00004000
Zero Fill Block
Assertion of HWAIT (PF13) during zero-fill block processing.
Processor is zero-filling memory via MemDMA during this time.
FLAG
0x01A3
Figure 18. SPI Slave Mode Boot Sequence: Boot Zero-Fill Block (Block 2 of DXE1)
ADSP-BF533 Blackfin® Booting Process (EE-240) Page 19 of 29
Page 20

(
)
a
10-Byte Header for
Block 3 of DXE1
Last Block
Figure 19. SPI Slave Mode Boot Sequence: Boot Block 3 of DXE1 (Last Block)
Block 3 of DXE1
ADSP-BF533 Blackfin® Booting Process (EE-240) Page 20 of 29
Page 21

(
)
K
K
SPI Master Mode Boot via an SPI Memory (BMODE = 11)
a
For SPI master mode booting, the ADSP-BF531/BF532/BF533 processor is configured as a SPI master
connected to a SPI memory. The following shows the pin-to-pin connections needed for this mode.
V
ADSP-BF533
Master SPI Device
10
Ω
DDEXT
10
SPI Memory
Ω
(Slave SPI
SPICLK
PF2
MISO
SPICLK
__
CS
MOSI
MISO
Figure 20. Blackfin – SPI Memory Pin-to-Pin Connections
A pull-up resistor on MISO is required for this boot mode to work properly. For this reason, the
L
ADSP-BF531/BF532/BF533 processor reads a 0xFF on the MISO pin if the SPI memory is not
responding (i.e., no data written on the MISO pin by the SPI memory).
Although the pull-up resistor on the MISO line is mandatory, additional pulling resistors might also be
worthwhile as well: 1) Pull up the PF2 signal to ensure the SPI memory is not activated while the Blackfin
processor is in reset. 2) Pull down on the SPICLK for cleaner scope plots.
On silicon revision 0.2 and below, the CPHA and CPOL bits within the SPI Control (SPICTL) register
L
were both set to 1 (refer to the Hardware Reference Manual [2] for information on these bits). For
this reason, the SPI memory may detect an erroneous rising edge on the clock signal when it
recovers from three-state. If the boot process fails because of this situation, a pull-up resistor on
SPICLK signal will alleviate the problem. On silicon revision 0.3, this was fixed by setting
the
CPHA = CPOL = 0 within the SPI Control register. Silicon revision 0.3 is robust against a pull-up
resistor on
SPICLK up. However, you may notice, if looking on a scope, that on silicon revision 0.3,
pull
SPICLK goes unexpectedly high while PF2 is de-asserted.
SPICLK. Therefore, boards that are populated with either silicon revisions can safely
The SPI memories supported by this interface are standard 8/16/24-bit addressable SPI memories (read
sequence explained below) and the following Atmel SPI DataFlash devices: AT45DB041B,
AT45DB081B, AT45DB161B*.
* Attached to this EE-Note is example code that programs the Atmel DataFlash devices via an ADSP-BF532 Blackfin
processor (see Program_Atmel.zip).
Standard 8/16/24-bit addressable SPI memories are memories that take in a read command byte of 0x03
followed by one address byte (for 8-bit addressable SPI memories), two address bytes (for 16-bit
addressable SPI memories), or three address bytes (for 24-bit addressable SPI memories). After the
ADSP-BF533 Blackfin® Booting Process (EE-240) Page 21 of 29
Page 22

correct read command and address are sent, the data stored in the memory at the selected address is shifted
out on the MISO pin. Data is sent out sequentially from that address with continuing clock pulses. Analog
Devices has tested the following standard SPI memory devices.
8-bit addressable SPI memory: 25LC040 from Microchip
16-bit addressable SPI memory: 25LC640 from Microchip
24-bit addressable SPI memory: M25P80 from STMicroelectronics
SPI Memory Detection Routine
Since BMODE = 11 supports booting from various SPI memories, the on-chip Boot ROM will detect what
type of memory is connected. To determine the type of memory (8-, 16-, or 24-bit addressable) connected
to the processor, the on-chip Boot ROM sends the following sequence of bytes to the SPI memory until
the memory responds back. The SPI memory does not respond back until it is properly addressed. The onchip Boot ROM does the following.
1. Sends the read command, 0x03, on the MOSI pin then does a dummy read of the MISO pin.
2. Sends an address byte, 0x00, on the MOSI pin then does a dummy read of the MISO pin.
3. Sends another byte, 0x00, on the MOSI pin and checks whether the incoming byte on the MISO pin is
anything other than 0xFF (value from the pull-up resistor; refer to the following NOTE). An incoming
byte that is not 0xFF means that the SPI memory has responded back after one address byte and an 8bit addressable SPI memory device is assumed to be connected.
a
4. If the incoming byte is 0xFF, the on-chip Boot ROM sends another byte, 0x00, on the MOSI pin and
checks whether the incoming byte on the MISO pin is anything other than 0xFF. An incoming byte
other than 0xFF means that the SPI memory has responded back after two address bytes and a 16-bit
addressable SPI memory device is assumed to be connected.
5. If the incoming byte is 0xFF, the on-chip Boot ROM sends another byte, 0x00, on the MOSI pin and
checks whether the incoming byte on the MISO pin is anything other than 0xFF. An incoming byte
other than 0xFF means that the SPI memory has responded back after three address bytes and a 24-bit
addressable SPI memory device is assumed to be connected.
6. If an incoming byte is 0xFF (meaning no devices have responded back), the on-chip Boot ROM
assumes that one of the following Atmel DataFlash devices are connected: AT45DB041B,
AT45DB081B, or AT45DB161B. These DataFlash devices have a different read sequence than the
one described above for standard SPI memories. If you require more information, refer to data sheets
[4], [5], and [6] for these devices. The on-chip Boot ROM determines which of the above Atmel
DataFlash memories are connected by reading the status register. The main difference between the
DataFlashes listed above is the number of bytes per page. The AT45DB041B and AT45DB081B have
264 bytes/page while the AT45DB161B has 528 bytes/page. To determine which one of these are
connected to the Blackfin, the on-chip Boot ROM reads the status register of the DataFlash which
contain the device density bits. If the device density bits = 1011 (binary), the on-chip Boot ROM will
assume an AT45DB161B is connected and address the part accordingly. Otherwise, it will assume an
AT45DB041B or AT45DB081B is connected and address it appropriately. Since the creation of the
silicon revision 0.3 on-chip Boot ROM code, Atmel introduced further derivatives of their
ADSP-BF533 Blackfin® Booting Process (EE-240) Page 22 of 29
Page 23

DataFlashes. If a user plans on using one of these other derivatives, they must make sure the device
has 264 bytes per page otherwise, the boot sequence will fail.
For the SPI memory detection routine explained above, the on-chip Boot ROM in silicon revision
L
The SPI Baud Rate register is set to 133, which, when based on a 54 MHz system clock, results in a
54 MHz/(2*133) = 203 kHz baud rate. On the ADSP-BF533 EZ-KIT Lite board, the default system clock
frequency is 54 MHz.
The following diagrams show the boot sequence for a SPI Master mode boot using a 16-bit addressable
SPI memory (25LC640 from Microchip). The loader file used is the same as shown in Listing 3. All
figures are captured using silicon revision 0.3.
Figure 21 shows the full SPI Master mode boot sequence.
0.2 and below checks whether the incoming data on the MISO pin is 0x00 (first byte of the loader
file). The on-chip Boot ROM in silicon revision 0.3 checks whether the incoming data on the
pin is anything other than
below must have the first byte as 0x00. For silicon revision 0.3, the first byte of the loader file is
set to 0x40.
0xFF. For this reason, SPI loader files built for silicon revision 0.2 and
Full SPI Master Mode Boot Sequence
a
MISO
Note the de-assertion of the PF2 (/CS) line for each DMA sequence. The On-Chip Boot
ROM sets up a DMA sequence for each 10-Byte Header and each Block. These DMA
sequences are preceded by a core driven read command (0x03) and address byte(s).
Figure 21. Timing Diagram for SPI Master Mode Boot Sequence
Initially, the on-chip Boot ROM determines the SPI memory type connected: an 8/16/24-bit addressable
or an Atmel DataFlash.
ADSP-BF533 Blackfin® Booting Process (EE-240) Page 23 of 29
Page 24

Start of
boot
sequence
Figure 22. SPI Master Mode Boot Sequence: SPI Memory Detection Sequence
DSP sends
out Read
Command
(0x03)
DSP sends
SPI Memory Detection Routine
st
out 1
address
byte
(0x00)
DSP sends
nd
out 2
address
byte
(0x00)
DSP sends out another
byte and the SPI memory
responds back with the
byte located at address
0x0 (value of 0x40)
After this address byte is
sent out, a 16-bit
addressable SPI memory
is properly addressed and
ready to send back data.
a
Note that Figure 22 has been captured using a silicon revision 0.3 part. On silicon revision 0.2, the SPICLK
will be high prior to and in between transfers.
The on-chip Boot ROM has detected that a 16-bit addressable SPI memory is connected at this point.
Next, it issues the read command and sends out address 0x0000 to read in the first 10-byte header for the
Init Code DXE Count Block.
DSP sends out
read command,
0x03 and then 2
address bytes:
addr[15:8] first
and then
addr[7:0].
0x40 0x80 0xA0 0xFF
ADDRESS
10-Byte Header for Init Code DXE Count Block
0x04 0x00 0x00 0x00 0x12 0x00
COUNT FLAG
Figure 23. SPI Master Mode Boot Sequence: Boot 10-Byte Header for Init Code DXE Count Block
Since the Init Code DXE Count Block is a 4-byte ignore block, the on-chip Boot ROM will then issue the
read command and send out address
0x000E for the 10-byte header for Block 1 of the Init Code DXE.
After this header is read in, the on-chip Boot ROM will know where Block 1 will reside in memory and
how many bytes to boot into that location.
ADSP-BF533 Blackfin® Booting Process (EE-240) Page 24 of 29
Page 25

DSP sends out
read command,
0x03 and then 2
address bytes:
addr[15:8] =
0x0, addr[7:0]
= 0x0E
0x00 0x00 0xA0 0xFF
ADDRESS
10-Byte Header for Block 1 of Init Code DXE
0x46 0x00 0x00 0x00 0x02 0x00
COUNT FLAG
a
Figure 24. SPI Master Mode Boot Sequence: Boot 10-Byte Header for Block 1 of Init Code DXE
Once this information is processed, the on-chip Boot ROM will again issue a read command and send out
address 0x0018 to boot in Block 1 of the Init Code DXE.
DSP sends out
read command,
0x03 and then
2 address bytes:
addr[15:8] =
0x0, addr[7:0]
= 0x18
0x66 0x01 0x67 0x01 0x40 0x05 0xC0 0x04 0x08 0xE1
Block 1 of Init Code DXE…….
Figure 25. SPI Master Mode Boot Sequence: Boot Block 1 of Init Code DXE
ADSP-BF533 Blackfin® Booting Process (EE-240) Page 25 of 29
Page 26

Appendix: Boot Modes vs. Silicon Revisions
The following boot mode options apply to all ADSP-BF531/BF532/BF533 derivatives.
Silicon Revision 0.1
BMODE[1:0] Description
00 Executes from external 16-bit memory connected to ASYNC Bank0 (bypass Boot
ROM)
a
01
10 Boots from an 8-bit addressable SPI memory in SPI Master mode
11 Boots from a 16-bit addressable SPI memory in SPI Master mode
1
Only 8-bit boot is supported. A 16-bit flash will be zero-padded to “simulate” an 8-bit boot.
Table 2. Silicon Revision 0.1 Boot Modes
On Silicon revision 0.1, IGNORE and INIT Blocks are not supported.
Note that for Silicon Revision 0.1, addresses 0xFF90 0000 – 0xFF90 000F (first 16 bytes of L1
L
Silicon Revision 0.2
Silicon revision 0.2 introduced 24-bit SPI mode. An SPI device auto-detection enables 8/16/24-bit
memory devices to be covered by one BMODE configuration. Furthermore, silicon revision 0.2 introduced
the INIT code functionality.
BMODE[1:0] Description
Data Bank B) must be reserved. This memory range is used by the on-chip boot ROM to store
header information of each block within the loader file. After booting, this memory range can be
used by the application during runtime.
00 Executes from external 16-bit memory connected to ASYNC Bank0 (bypass Boot
Boots from 8/16-bit flash/PROM. (Only 8-bit boot supported)1
ROM)
01
10 Reserved
11 Boots from a 8/16/24-bit addressable SPI memory in SPI Master mode (pull-up required
1
Only 8-bit boot is supported. A 16-bit flash will be zero-padded to “simulate” an 8-bit boot.
2
Zero-fill blocks are not supported for SPI Master mode booting in silicon revision 0.2 due to an error in the on-chip Boot
ROM. Zeros must be included within the loader file for this mode.
3
The first byte of an SPI bootable loader file must be 0x00.
Table 3. Silicon Revision 0.2 Boot Modes
ADSP-BF533 Blackfin® Booting Process (EE-240) Page 26 of 29
Boots from 8/16-bit flash/PROM. (Only 8-bit boot supported). 1
on MISO).
2, 3
Page 27

Note that for Silicon Revision 0.2, addresses 0xFF80 7FE0 – 0xFF80 7FFF (last 32 bytes of L1
L
L
Silicon Revision 0.3
Silicon revision 0.3 introduced SPI slave booting. SPI Master mode supports DataFlash devices from
Atmel in addition to standard 8/16/24-bit SPI memories. It also features true 16-bit flash/PROM mode.
The support for software reset has been cleaned up as well.
BMODE[1:0] Description
Data Bank A) must be reserved. This memory range is used by the on-chip boot ROM to store
header information of each block within the loader file. After booting, this memory range can be
used by the application during runtime.
Notes
si-revision 0.2
3.5 tools. This, however, will change in future tools releases when silicon revision 0.3 becomes
available.
00 Executes from external 16-bit memory connected to ASYNC Bank0 (bypass Boot
1, 2, 3
above are taken care of by the elfloader utility only if invoked in 0.2 mode (use the –
command-line switch), which is the default case in the current VisualDSP++
ROM)
a
01 Boots from 8/16-bit flash/PROM
10 Boots from an SPI host in SPI Slave mode
11 Boots from an 8/16/24-bit addressable SPI memory in SPI Master mode with support
for the following Atmel DataFlash devices: AT45DB041B, AT45DB081B, and
AT45DB161B
Table 4. Silicon Revision 0.3 Boot Modes
Note that for Silicon Revision 0.3, addresses 0xFF80 7FF0 – 0xFF80 7FFF (last 16 bytes of L1
L
L
L
Data Bank A) must be reserved. This memory range is used by the on-chip boot ROM to store
header information of each block within the loader file. After booting, this memory range can be
used by the application during runtime.
To enable silicon revision 0.3 features, the elfloader utility must be invoked in 0.3 mode (use the –
si-revision 0.3
VisualDSP++ 3.5 tools, as soon as silicon revision 0.3 is available. The current version of the
elfloader utility (pre-silicon revision 0.3) defaults to 0.2 mode, and should be called by the
revision 0.3
The on-chip Boot ROM of silicon revision 0.3 is completely backward compatible with silicon
revision 0.2. Customers with silicon revisions 0.2 and 0.3 must invoke the elfloader utility with
the –si-revision 0.2 command-line switch.
command-line switch). This will be the default case in future updates of the
command-line switch for silicon revision 0.3 features.
–si-
ADSP-BF533 Blackfin® Booting Process (EE-240) Page 27 of 29
Page 28

a
Appendix: Blackfin Loader File Viewer
The Blackfin Loader File Viewer (LdrViewer) available from http://www.blackfin.org/tools) is a very
useful utility that takes a loader file as an input and breaks it down and categorizes it into individual .DXE
files and displays it as individual blocks with headers (
help you view a loader file’s content. When the file in Listing 3 is loaded into the LdrViewer
contents will look like the following:
ADDRESS, COUNT, and FLAG). This handy utility can
, the GUI
Figure 26. Blackfin Loader File Viewer Utility
Note that the LdrViewer utility is not part of the standard VisualDSP++ software toolset.
ADSP-BF533 Blackfin® Booting Process (EE-240) Page 28 of 29
Page 29

a
References
[1] VisualDSP++ 3.5 Loader Manual for 16-bit Processors. Rev 1.0, October 2003. Analog Devices, Inc.
[2] ASDP-BF533 Blackfin Processor Hardware Reference. Rev 1.0, December 2003. Analog Devices, Inc.
[3] Running Programs from Flash on ADSP-BF533 Blackfin Processors (EE-239). Rev 1, May 2004. Analog Devices Inc.
[4] AT45DB041B DataFlash Datasheet. April 2004. Atmel Inc.
[5] AT45DB081B DataFlash Datasheet. November 2003. Atmel Inc.
[6] AT45DB161B DataFlash Datasheet. November 2003. Atmel Inc.
Document History
Revision Description
Rev 3 – January 11, 2005
by H. Desai
Rev 2 – December 17, 2004
by H. Desai
Rev 1 – June 03, 2004
by H. Desai
• Added informational bullets for reserved memory regions.
• Added pull-ups to the /AMS0 for all flash boot figures
• Added a pull-up to PF2 in Figure 20
• Described pull-up or pull-down on SPICLK in Figure 20
• Specified maximum SPI Baud Rate for SPI Slave Mode Boot
• Indicated that rev. 0.1 does not support IGNORE and INIT Blocks
• Changed the term “feedback strobe” to host wait (HWAIT) signal
• Added a discussion on Atmel DataFlash derivatives
Initial Release
ADSP-BF533 Blackfin® Booting Process (EE-240) Page 29 of 29
 Loading...