

Page 1
Engineer To Engineer Note EE-194
s
a
Technical Notes on using Analog Devices' DSP components and development tools
Contact our technical support by phone: (800) ANALOG-D or e-mail: dsp.support@analog.com
Or vi sit ou r on-l ine re sourc es ht tp:// www.analog.com/dsp and http://www.analog.com/dsp/EZAnswer
Connecting the AD1836A Evaluation Board to the ADSP-21161N
SHARC® EZ-KIT Lite™
Contributed by Mazlum Adas June 4, 2003
Introduction
The ADSP-21161N SHARC® DSP has four independent synchronous Serial Ports (SPORTs). Every
SPORT has two channels, channel A and B. These channels can be programmed both as receiver or both
as transmitter. Beside the Time Division Multiplex (TDM) and serial mode, the SPORTs of the ADSP21161N SHARC DSP also support the Inter IC-Sound (I
The AD1836A is a multi channel codec which supports up to 96 kHz sample rate. This codec provides
support for Right-Justified, Left-Justified, I
2
S, Serial and TDM mode.
The AD1836A provided with the ADSP-21161N EZ-KIT Lite™ supports TDM and serial mode
communication over the serial ports 0 and 2. In order to show the functionality of the serial ports in I
mode an external AD1836A codec can be connected to serial ports 1 and 3. This document shows how to
connect the AD1836A evaluation board and the ADSP-21161N EZ-KIT Lite (board revision 2.3 and
silicon revision 1.2) to realize this mode of operation.
2
S) mode developed by Philips.
2
S
I2S Mode Signal Chain
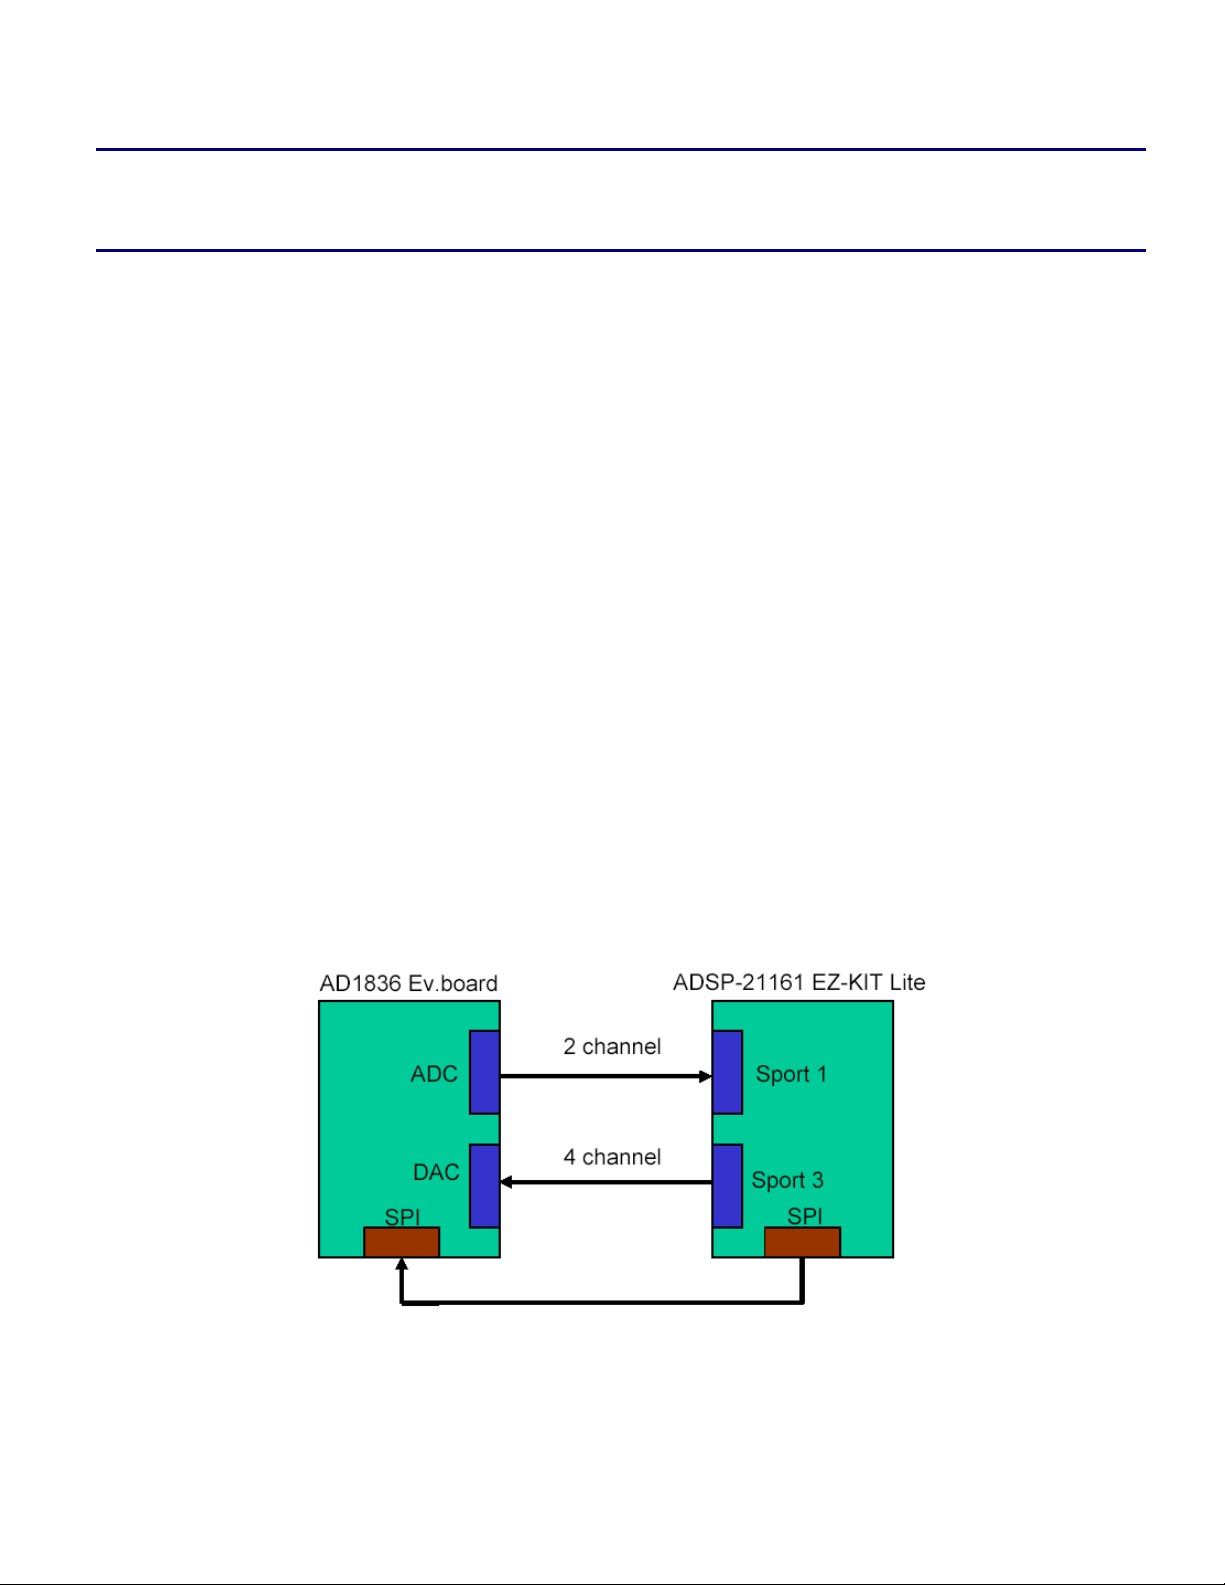
Figure 1 shows the block diagram of the signal chain for the connection between the AD1836A
Evaluation Board and ADSP-21161N EZ-KIT Lite.
Figure 1: Connection of the AD1836A Evaluation Board and the ADSP-21161N EZ-KIT Lite
Copyright 2003, Analog Devices, Inc. All rights reserved. Analog Devices assumes no responsibility for customer product design or the use or application of
customers’ products or for any infringements of patents or rights of others which may result from Analog Devices assistance. All trademarks and logos are property
of their respective holders. Information furnished by Analog Devices Applications and Development Tools Engineers is believed to be accurate and reliable, however
no responsibility is assumed by Analog Devices regarding technical accuracy and topicality of the content provided in Analog Devices’ Engineer-to-Engineer Notes.
Page 2
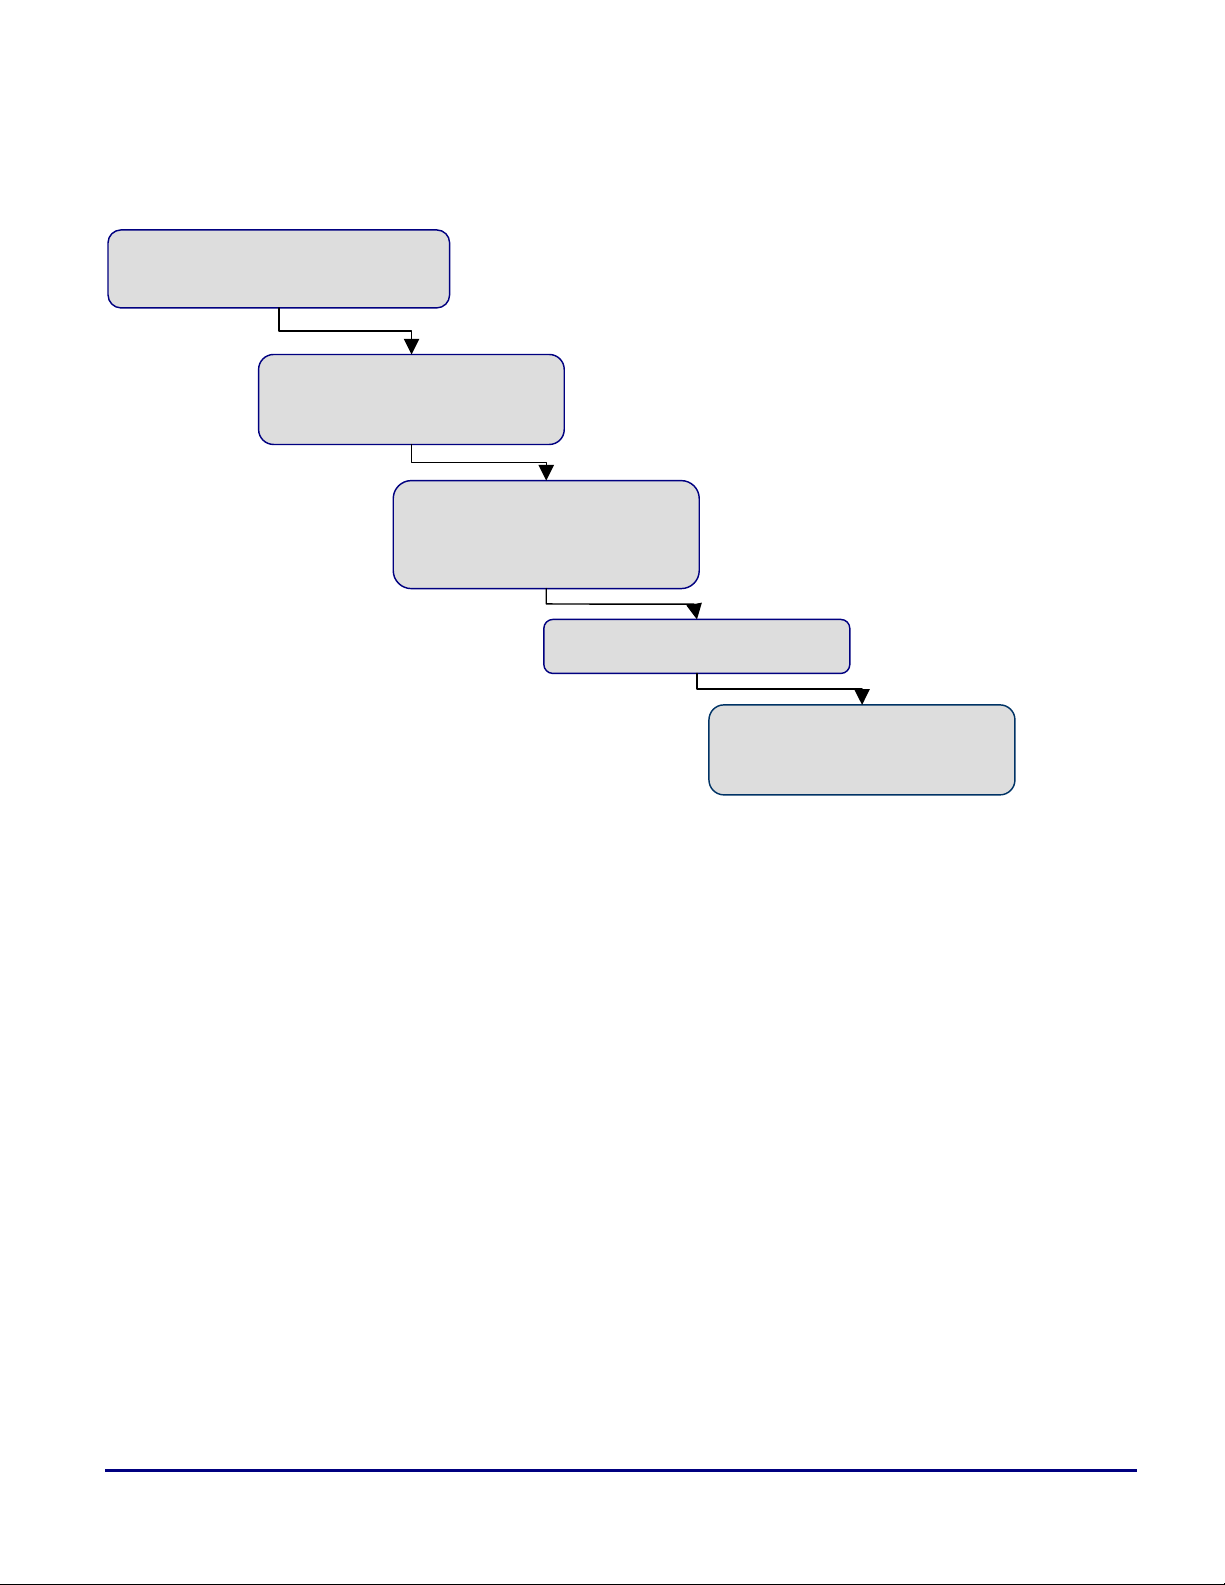
The software flow for the data transmission between the ADSP-21161N SHARC DSP and the AD1836A
is described in the following figure (Figure 2):
Initialization of the ADSP-
21161N EZ KIT Lite
Configuration of the
AD1836A via the SPI
Setting up the I/O
Processor for chained
SPORT DMA
Setting up the SPORTs
a
Interrupt service routines
of the SPORTs
Figure 2: Data transmission flow diagram
The configuration and initialization of the AD1836A codec is done over the Serial Port Interface (SPI).
2
The I
S data from the Analog to Digital Converters (ADCs) are received from SPORT1 channel A. The
SPORT3 transmits with both channels A and B the I
(DACs).
Before examining the software flow of the data transmission, let’s have a look at the system hardware
configuration.
2
S data back to the Digital to Analog Converters
Connecting the AD1836A Evaluation Board to the ADSP-21161N SHARC® EZ-KIT Lite™(EE-194) Page 2 of 12
Page 3
a
SPI connection
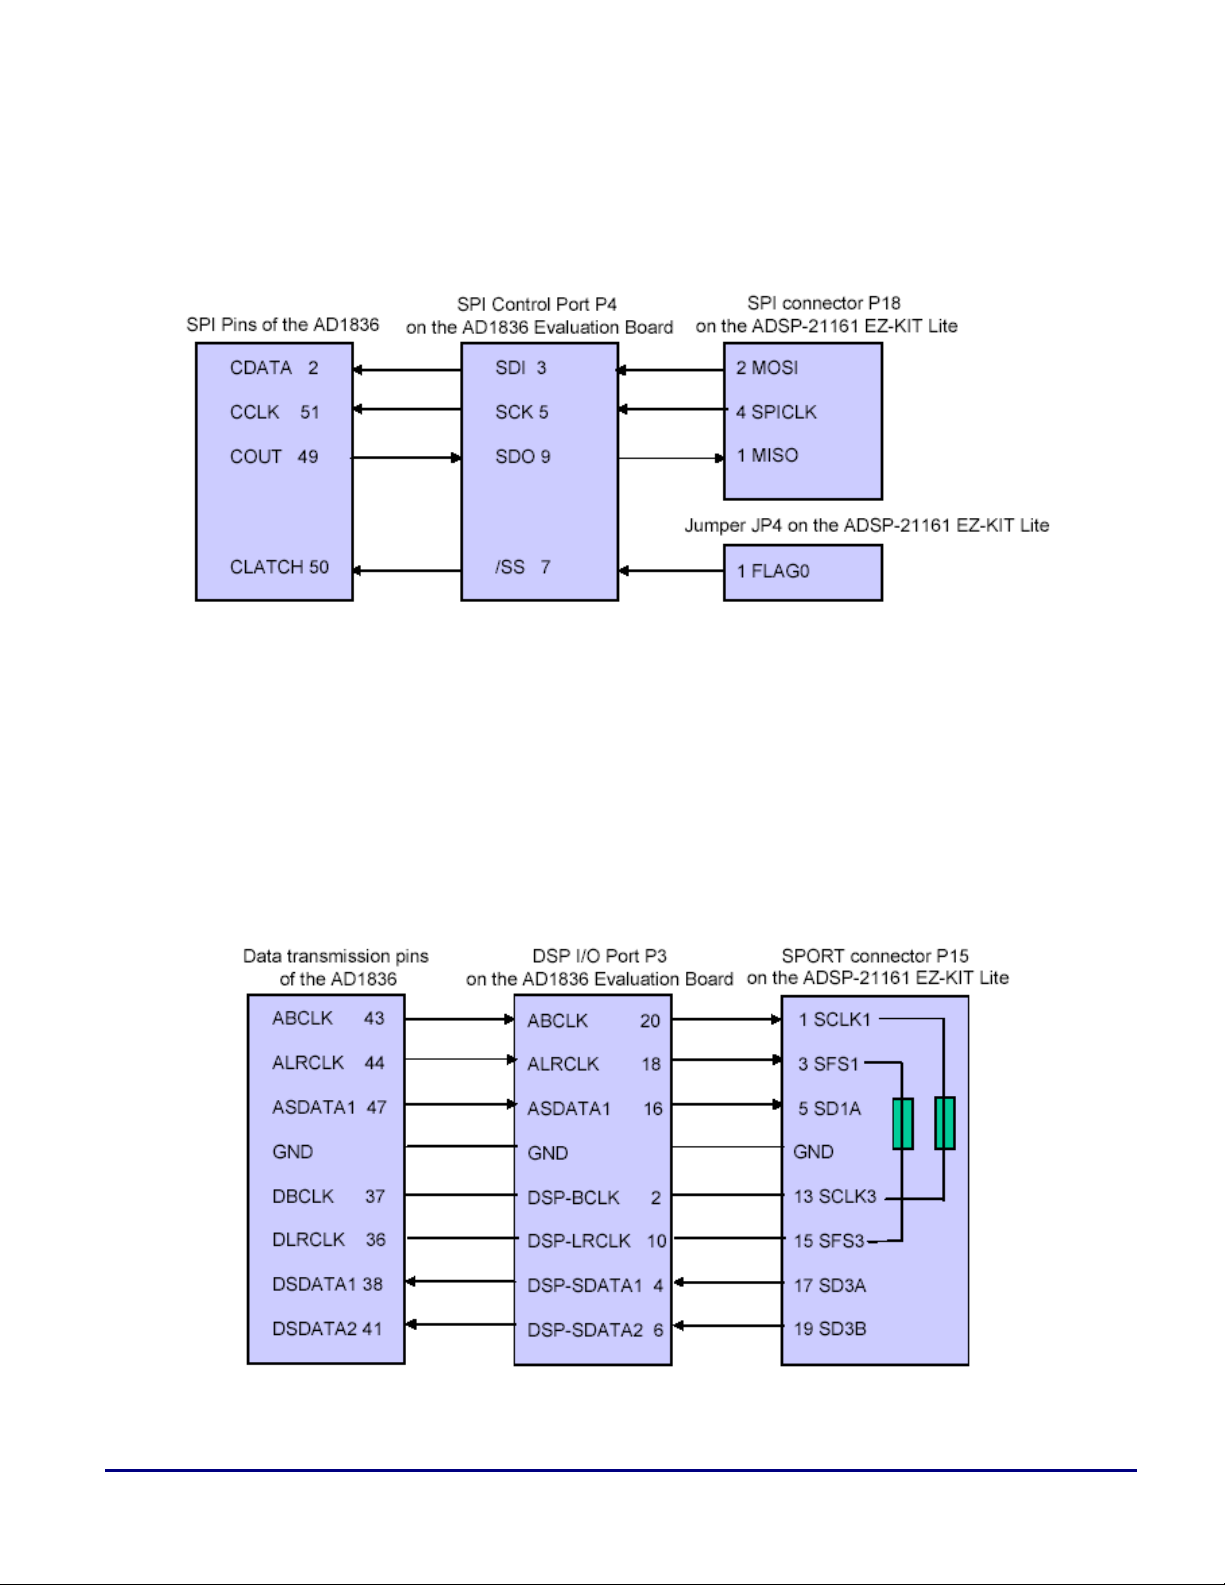
The Figure 3 shows the connection of the AD1836A Eval. Board to the ADSP-21161N EZ-KIT Lite over
the SPI port.
Figure 3: SPI connection between the AD1836A evaluation board and the ADSP-21161N EZ-KIT Lite
The SPI Control Port (P4) on the AD1836A Evaluation Board is used for the SPI connection with the
ADSP-21161N EZ-KIT Lite SPI connector (P18) to build up the SPI communication system. The ADSP21161N SHARC DSP acts as the SPI master and the AD1836A as the SPI slave. A FLAG pin of the
ADSP-21161N SHARC DSP is used as the chip select for the slave device (JP4 on the ADSP-21161N
EZ-KIT Lite).
SPORT connection
The Figure 4 shows the SPORT connection between the two boards.
Figure 4: SPORT connection between the AD1836A evaluation board and the ADSP-21161N EZ-KIT Lite
Connecting the AD1836A Evaluation Board to the ADSP-21161N SHARC® EZ-KIT Lite™(EE-194) Page 3 of 12
Page 4

The on board connectors on both evaluation boards facilitate the hardware setup for the serial port
connection. As shown in Figure 4, the SPORT connector (P15) of the ADSP-21161N EZ-KIT Lite needs to
be connected to the DSP I/O Port (P3) on the AD1836A Evaluation Board
On the ADSP-21161N EZ-KIT Lite both frame syncs (SFS1 and SFS3) and the serial clocks (SCLK1 and
SCLK3) are tied together with Zero-Ohm Resistors.
On the AD1836A Evaluation Board both bit clocks (ADC ABCLK and DAC DBCLK) and also the Left
Right clocks (ALRCLK and DLRCLK) should be connected together to get clear signals. The Figure 5
shows this connection.
Figure 5: Connecting the ADC and DACl clocks
a
Jumper Settings on the ADSP-21161N EZ-KIT Lite
For the connection of the ADSP-21161N EZ-KIT Lite to the AD1836A Evaluation Board the jumpers
should be set as follows (Table 1):
Jumper Description State
JP4 FLAG 0 enable OFF
JP5 FLAG 1 enable OFF
JP23 SPORT/SPI clock enable ON
JP26 Push-button enable FLAG 0 OFF
JP27 Push-button enable FLAG 1 OFF
Table 1: ADSP-21161N EZ-KIT Lite jumper’s settings
Connecting the AD1836A Evaluation Board to the ADSP-21161N SHARC® EZ-KIT Lite™(EE-194) Page 4 of 12
Page 5

a
Jumpers Settings on the AD1836A Evaluation Board
There are two jumpers and two switches on the AD1836A evaluation board.
The ADCs of the AD1836A on the evaluation board have different operation input modes (see AD1836A
Datasheet for more details). For these particular examples, the direct differential mode is selected for best
performance. This mode is configured as follows (Table 2):
Jumper/Switch Description State
P1(1&3, 2&4) ADC1 input mode ON
P2(1&3, 2&4) ADC2 input mode ON
SW1(1&4, 2&5) Input select ON
Table 2: AD1836A Evaluation Board jumpers/switch settings
In addition to this, switch 3 (SW3) is used to configure the PLD on the AD1836A evaluation board. For
proper data transmission, this switch must be set to one of the following values: C, D, E or F (for more
details refer to the AD1836A Evaluation Board schematics).
Initialization of the ADSP-21161N EZ KIT Lite
Listing 1 shows the code section init_DSP (contained in Init_21161_EZKit.asm); all relevant registers of
the ADSP-21161N SHARC DSP are initialized here.
Init_DSP:
bit set MODE1 CBUFEN; // Enable circular buffering for rev < 1.0
/* Setup hardware interrupts, FLAG LEDs and pushbutton */
ustat2=0x00000000;
/* flags 4-9 are outputs for LEDs, turn on all LEDs*/
bit set ustat2 FLG9O|FLG8O|FLG7O|FLG6O|FLG5O|FLG4O;
bit set ustat2 FLG9|FLG8|FLG7|FLG6|FLG5|FLG4;
dm(IOFLAG)=ustat2;
bit clr MODE2 FLG0O | FLG1O | FLG2O | FLG3O; // flag 0-3 are inputs from pushbutton switches
IMASK = 0x0;
LIRPTL = 0x0;
IRPTL = 0x00000000; /* clear pending interrupts */
L0 = 0; L1 = 0; L2 = 0;
L3 = 0; L4 = 0; L5 = 0;
L6 = 0; L7 = 0; L8 = 0;
L9 = 0; L10 = 0; L11 = 0;
L12 = 0; L13 = 0; L14 = 0;
L15 = 0;
r15 = 0;
IRPTL = 0x00000000; /* clear pending interrupts */
bit set mode1 IRPTEN; /* enable global interrupts, nesting */
bit set imask SP1I|SP3I; /* start audio processing, enable SPORT1 tx & rx int */
rts;
Listing 1: Init_DSP
Connecting the AD1836A Evaluation Board to the ADSP-21161N SHARC® EZ-KIT Lite™(EE-194) Page 5 of 12
Page 6

Note that, upon reset, circular buffers are enabled. However, this is only the case for silicon revisions 1.0
and greater. Therefore, and in case an older silicon revision is being used, circular buffers would need to
be enabled within this routine.
Additionally, this section sets the global interrupt enable bit, which needs to be done before the audio
routines start. Also, the related interrupts for the audio processing (SPORT1 and SPORT3) are enabled
here.
a
Configuration of the AD1836A via the SPI
The ADSP-21161N SHARC DSP configures the AD1836A via its SPI port by sending the appropriate
control words. The serial SPI 16-bit word format for the AD1836A codec register commands is as
follows:
D15 to D12 = Codec Register Address
D11 = Read/Write register (1=rd, 0=wr)
D10 = Reserved bit, clear to zero
D9 to D0 = Data Field for codec register
The following registers of the AD1836A are programmed as shown in Table 3:
Control Registers Modes Setting
DAC control register 1 Serial mode
Interpolator mode
ADC control register 1 sample rate 96 kHz
ADC control register 21 SOUT mode I2S
ADC control register 3 (default)
1
Bit 9 Master/Slave AUX mode in the ADC control register 2 is set to 0, and it can be only set to master in Auxiliary mode.
Table 3: Control Registers Settings
Please refer to the AD1836A Datasheet for more details on the control words and their corresponding
settings.
Before sending the control words to the AD1836A it is recommended to reset the codec. Reset will start
up the codec and set the control registers to their default settings. This is done in the software routine
powerdown_reset_AD1836A.
Note that it is not possible to read back the control words sent to the AD1836A from the ADSP-21161N
SHARC DSP. Only the Peak Level registers of the ADCs can be read
In order to be able to program the codec, the ADSP-21161N SHARC DSP SPI port must be configured
first. This is done in the SPICTL register as follows (AD1836A_reg_init_viaSpi.asm):
I2S
96 kHz
bit set ustat1 SPIEN|MS|PSSE|SPTINT|FLS0|BAUDR8|WL16|NSMLS|DF|CPHASE|CP|DCPH0;
dm(SPICTL) = ustat1;
The definitions of the relevant bits in the SPICTL registers for this particular example are shown below
(Table 4):
Connecting the AD1836A Evaluation Board to the ADSP-21161N SHARC® EZ-KIT Lite™(EE-194) Page 6 of 12
Page 7

Bit Name Bit definition Description
SPIEN SPI Port Enable This bit enables the SPI system
a
MS Master Select
PSSE Programmable Slave Select Enable
SPTINT
FLS Flag select
BAUDR Baud Rate
SPITX Interrupt Enable
This bit selects the device as master
This bit is used to program the controlled
automatic generation of slave device select
signals during SPI transfer.
This bit enables the SPI transmit interrupt. It is
necessary to set this bit in SPI data transfer, if the
ADSP-21161N SHARC DSP transmits the SPI
data words to the slave. The slave selection is
subsequently made using the FLS bits.
These 4 bits select which flag pins are used when
multiple slaves are used. The setting FLS0 mean
that the flag 0 is used to select the slave device.
With these four bits it is possible to control the
SPI clock frequency. The ADSP-21161N SHARC
DSP is set as master, so the master device
provides the AD1836A codec (slave) with the
clock signal.
The equation is
Coreclock
=
eSPIbaudrat
+
)2(2BR
The setting in the code BAUDR8 means:
MHz
100
eSPIbaudrat 656,97
2
WL Word length
NSMLS Non-Seamless Operation
DF Data Format
CPHASE
CP Clock Polarity
Connecting the AD1836A Evaluation Board to the ADSP-21161N SHARC® EZ-KIT Lite™(EE-194) Page 7 of 12
Clock Phase
These 2 pins make possible to select different
word length. In this application the word length is
16 bit.
This bit indicates that after each word transfer
there is a delay before the next word transfer
starts.
This bit selects the data format. In this case the
MSB sent/received first.
This bit selects the clock phase transfer format.
SPICLK starts toggling at the beginning of the
first data transfer bit if the bit is set.
This bit selects the clock polarity. SPICLK high is
the idle state.
==
)82(
+
kHz
Page 8

a
DCPH0
Deselect SPIDS in CPHASE = 0 This bit deselects when the slave between
successive word transfers in CPHASE = 0. The
slave is selected in master mode using PSSE
functionality. This bit is valid only when NSMLS
bit is set.
Table 4: Bit definitions of the SPICTL register
Setting up the I/O Processor for chained SPORT DMA
The transmission of the I2S data is done via the SPORTs using chained Direct Memory Access (DMA)
operation. DMA chaining is the auto-linkage of DMA transfers. The completion of one DMA sets off
another DMA without any core intervention. Transfer Control Blocks (TCB) are data buffers in the
internal memory where the DMA parameters are stored. The DMA channel parameters are automatically
loaded by the I/O Processor (IOP) from the TCBs when chaining is enabled.
The TCB format for the SPORT looks as follows:
/* TCB format for SPORT:
GPx ("general purpose"),
CPx ("Chain Point register"; points to last address (IIx) of next TCB to jump to upon
completion of this TCB.),
Cx (length of source buffer),
IMx (source buffer step size),
IIx (source buffer index (initialized to start address))
*/
For the SPORT1 one TCB for channel A is needed, for the SPORT3 two TCBs for both channels A and B
are needed.
.var sp1a_tcb[5] = 0, sp1a_tcb+4, N, 1, rx1a_buf; /* SPORT1 receive channel a tcb */
.var sp3a_tcb[5] = 0, sp3a_tcb+4, N, 1, tx3a_buf; /* SPORT3 transmit channel a tcb */
.var sp3b_tcb[5] = 0, sp3b_tcb+4, N, 1, tx3b_buf; /* SPORT3 transmit channel b tcb */
The first DMA in the chain is started by writing the address of the TCB to the Chain Pointer Register of
the DMA channel.
r8=sp1a_tcb+4; // Internal Index 1 address
r9=sp3a_tcb+4; // Internal Index 3 address
r10=sp3b_tcb+4; // Internal Index 3 address
dm(CP1A)=r8; // SPORT1 channel A DMA chain enable
dm(CP3A)=r9; // SPORT3 channel A DMA chain enable
dm(CP3B)=r10; // SPORT3 channel B DMA chain enable
For more details on the IOP and chained DMA operation refer to ADSP-21161 SHARC DSP Hardware
Reference (page 6-28).
Now the AD1836A as well as the DMA Controller have been properly configured, it’s time to configure
the SPORTs before starting with the data transmission.
Connecting the AD1836A Evaluation Board to the ADSP-21161N SHARC® EZ-KIT Lite™(EE-194) Page 8 of 12
Page 9

a
Setting up the SPORTs
The configuration of the serial ports is, that the SPORT1 operates as receiver and the SPORT3 as
transmitter.
The settings in the SPORT1 control register are as follows:
// SPORT1 control register set up as a receiver in I2S
R0 = SPEN_A|SLEN32|OPMODE|LFIRST|SDEN_A|SCHEN_A;
dm(SPCTL1) = R0; /* sport 1 control register SPCTL1 = 0x000D09F1 */
Note, that the channel B is not being used, therefore only the parameters of channel A need to be
configured (Table 5).
Bit Name Bit Definitions Description
SPEN_A SPORT Enable A This bit enables the channel A of SPORT1
SLEN Serial Word Length These five bits defines the word length of the data transmission.
The transmitted data is 32 bit, but the valuable data is 24 bits.
MSTR I2S Serial and L/R clock
master
OPMODE Operation Mode This bit must be set, because the operation mode of the SPORT
LFIRST Left or Right I2S
channel RX/TX first
SDEN_A SPORT transmit dma
enable for channel A
SCHEN_A DMA chaining enable
for channel A
DDIR Data Direction Control This bit controls the data direction. If this bit is set, the transmit
Table 5: Bit settings of the serial port 1 control register (SPCTL1)
Similarly SPORT3 control register is configured as follows:
// SPORT3 control register set up as a transmitter in I2S
R0 = SPEN_A|SLEN32|OPMODE|DITFS|LFIRST|SDEN_A|SCHEN_A|SDEN_B|SCHEN_B|FS_BOTH|SPEN_B|DDIR;
dm(SPCTL3) = R0; /* sport 3 control register, SPCTL3 = 0x273D09F1 */
This bit is not set, so the SPORT is provided with external
clock and word select and the configuration is in slave mode.
2
is I
S.
This bit selects the left channel first for receiving data.
The I2S data is received with channel A, so this bit must be
enabled.
This bit enables the DMA chaining for channel A of SPORT1.
If one DMA is finished the next one gets started.
buffers are active, but the SPORT1 should receive the data, so
this bit is not set.
Note that, SPORT3 is transmitting with both channels A and B, so the bits for the B channels must also
set. (Table 6)
Connecting the AD1836A Evaluation Board to the ADSP-21161N SHARC® EZ-KIT Lite™(EE-194) Page 9 of 12
Page 10

Bit Name Bit definition Description
SPEN_B SPORT Enable B This bit enables the channel B of SPORT3.
a
SDEN_B SPORT transmit DMA
enable for channel B
SCHEN_B DMA chaining enable
for channel B
DDIR Data Direction Control This bit must be set now, because the SPORT3 is transmitter.
DITS Data Independent TX
Frame sync, if DDIR=1
FS_BOTH Frame Sync both enable The data transmission occurs, if data is present in both TX
Table 6: Bit settings of the serial port 3 control register (SPCTL3)
This bit enables the DMA for channel B of SPORT3.
This bit enables the DMA chaining for channel B of SPORT3.
This bit sets the SPORT uses data independent frame sync
buffers
Interrupt service routines of the SPORTs
When the SPORT1 receives the I2S data from the ADC an interrupt will be generated (remember that the
serial port interrupts have been previously enabled). In the Process_AD1836A_Audio_Samples routine,
the data will be read from the receive buffer. After reading the data from the receive buffer, the data will
then be written to the transmit buffers A and B of SPORT3. Note that these data transfers are performed
by the core (using the Data Address Generators - DAGs)
Once the data is in the transmit buffers, the I
2
S data will get transmitted to the DACs.
Process_AD1836A_Audio_Samples:
LCNTR=1024, DO (PC,3) UNTIL LCE; // do the next 3 instructions many times
R0=DM(I0,M0); // read the data from the receive buffer
DM(I1,M1)=R0; // write the data to the transmit buffer a
DM(I2,M2)=R0; // write the data to the transmit buffer b
rti;
Connecting the AD1836A Evaluation Board to the ADSP-21161N SHARC® EZ-KIT Lite™(EE-194) Page 10 of 12
Page 11

Figure 6 illustrates the data flow when it’s received until it gets transmitted out to the DAC:
2
Figure 6: I
Additionally, the data transmission between the ADSP-21161N SHARC DSP SPORTs and the AD1836A
codec is shown in Figure 7, where:
S data flow
a
Channel 1: Frame sync 96 kHz
Channel 2: I
Channel 3: I
Channel 4: I
2
S data received on the SPORT1 channel A
2
S data transmitted with SPORT3 channel A
2
S data transmitted with SPORT3 channel B
2
Figure 7: Scope plot of the I
Connecting the AD1836A Evaluation Board to the ADSP-21161N SHARC® EZ-KIT Lite™(EE-194) Page 11 of 12
S data transmission
Page 12

a
References
[1] ADSP-21161 SHARC DSP Hardware Reference. Third Edition, May 2002. Analog Devices, Inc.
[2] ADSP-21161 SHARC DSP Microcomputer Datasheet. Rev. A, May 2003. Analog Devices, Inc.
[3] AD1836A Datasheet. Rev PrE April 2003. Analog Devices, Inc.
[4] AD1836A Evaluation Board documentation. April 2003. Analog Devices, Inc.
[5] ADSP-21161N EZ-KIT Lite™ Evaluation System Manual. First Edition September 2001. Analog
Devices, Inc.
[6] ADSP-21161N EZ-KIT Lite™ Schematics. Rev 2.3 July 2002. Analog Devices, Inc.
[7] Interfacing I
Tomarakos. Analog Devices, Inc.
2
S-Compatible Audio Devices to the ADSP-21065L Serial Ports. April 1999. John
Document History
Version Description
June 04, 2003 by Mazlum Adas Initial Release
Connecting the AD1836A Evaluation Board to the ADSP-21161N SHARC® EZ-KIT Lite™(EE-194) Page 12 of 12
 Loading...