

Page 1
AN-555
CLK
WORD
GENERATOR
DATA IN
DIGITAL
DATA BUS
DUAL DAC
EVALUATION
BOARD
AVDD DVDD
ANALOG
VDD
(3V TO 5V)
DIGITAL
VDD
(3V TO 5V)
ACOM DCOM
CLOCK
SOURCE
OSCILLOSCOPE
SPECTRUM
ANALYZER
DATA
OUT
a
APPLICATION NOTE
One Technology Way • P.O. Box 9106 • Norwood, MA 02062-9106 • 781/329-4700 • World Wide Web Site: http://www.analog.com
Using the AD9709, AD9763, AD9765, AD9767 Dual DAC Evaluation Board
By Steve Reine and Dawn Ostenberg
GENERAL DESCRIPTION
The AD9709, AD9763, AD9765 and AD9767 are highspeed, high-performance dual DACs (8-, 10-, 12-, 14bits) designed for I/Q transmit applications and for applications where board space is at a premium. The
evaluation board allows the user to take full advantage
of the various modes in which the AD976x can operate.
This includes operation as dual DACs with their own individual digital inputs, as well as interleaved DACs where
data is alternately written from digital input Port 1 to
either of the two DACs. Information on how to operate
the evaluation board is included in this application
note. However, for more detailed performance information, the reader should consult the individual data
sheets for the AD9709, AD9763, AD9765, and AD9767.
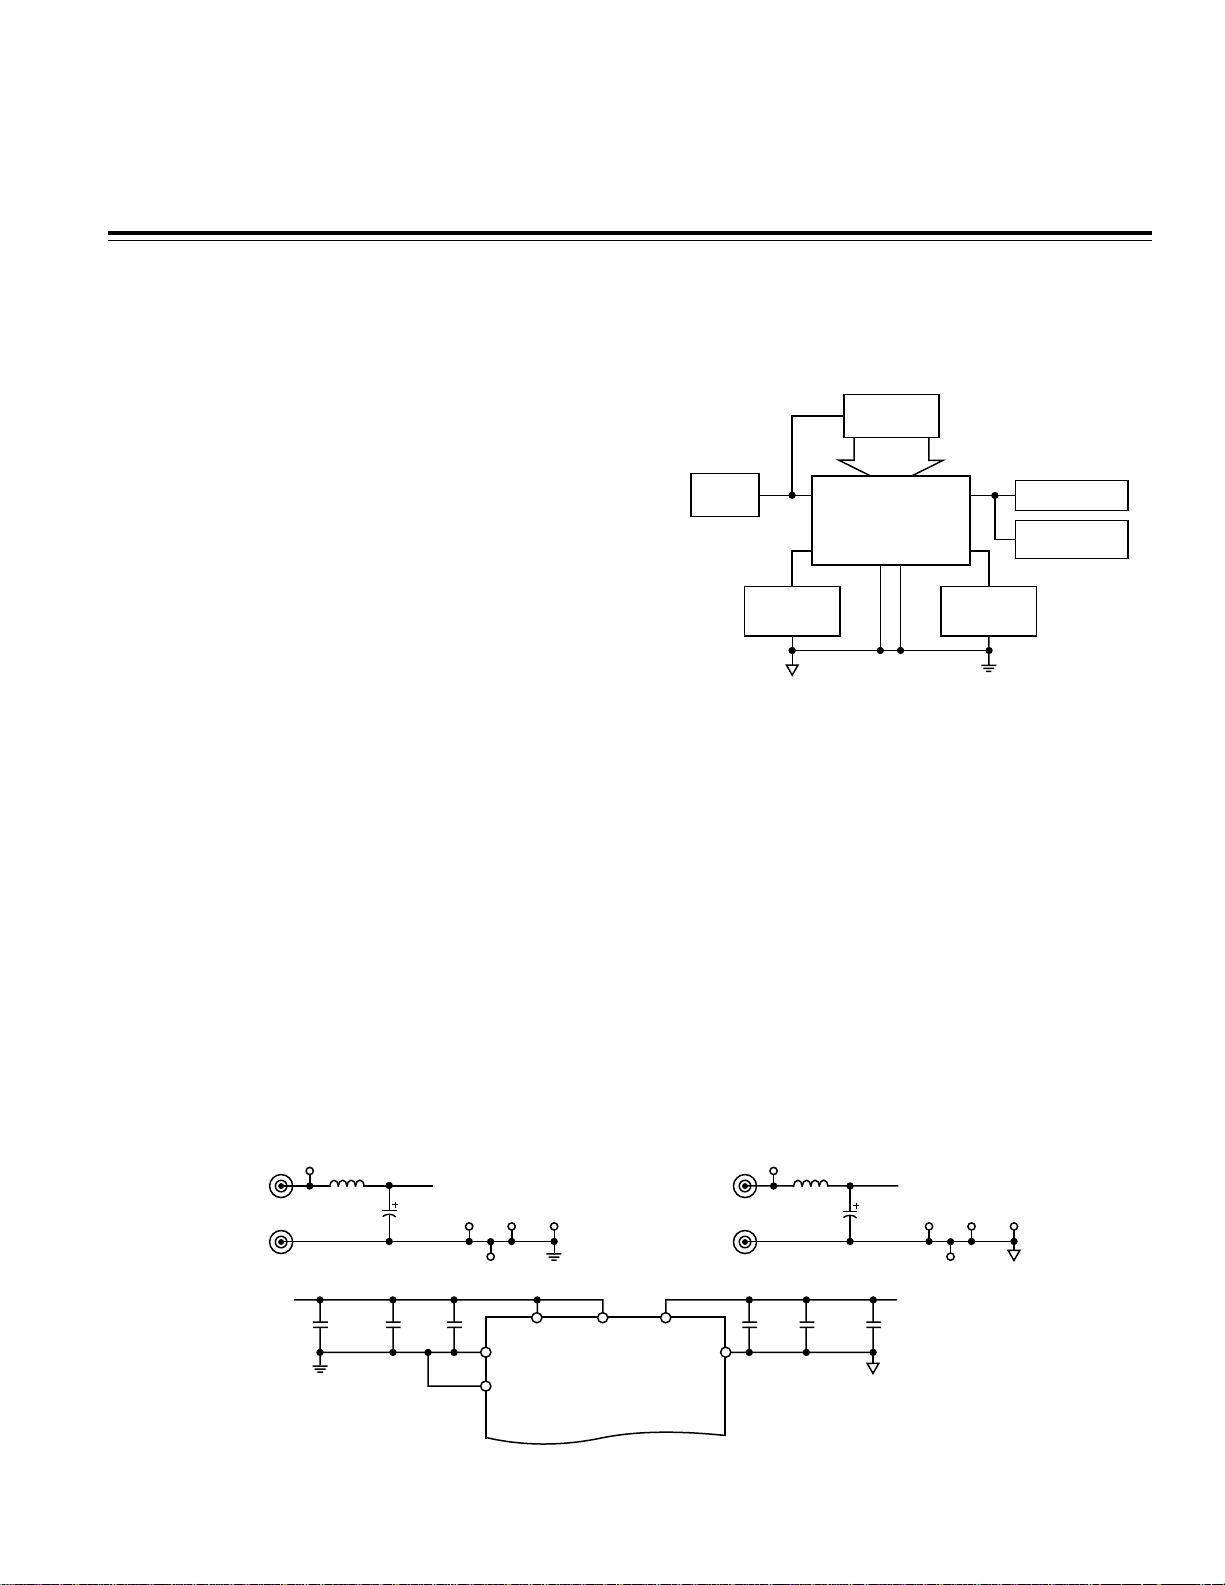
Figure 1. Typical Test Setup to Evaluate Performance
of AD976x Dual DAC Using Evaluation Board
The 8-, 10-, 12-, and 14-bit DACs in this family are all pinfor-pin-compatible and are MSB justified. Therefore, the
same evaluation board can be used to evaluate all
four parts.
EVALUATION SETUP
To evaluate the performance of the AD976x dual DAC
family, a small set of measurement and signal generation equipment is needed. Figure 1 shows a typical test
setup. Power supplies capable of driving from 3 V to 5 V
are needed for both analog and digital circuitry on the
evaluation board. A signal generator and digital word
generator are needed to provide the data and clock
inputs. On the output, an oscilloscope or spectrum
analyzer may be needed, depending on the type of performance being analyzed.
TP10
L1
DVDD
BEAD
C2
0.01mF
C9
10mF
25V
0.1mF
C3
TP37 TP38
TP43
DVDD1 DVDD2 AVDD
DCOM1
DCOM2
REV. 0
DVDDIN
BAN-JACK
BAN-JACK
DVDD
C1
0.001mF
Figure 2. Analog and Digital Power Connections on Dual DAC Evaluation Board
TP39
DGND
DUAL DAC
AD9709
AD9763
AD9765
AD9767
POWER CONNECTIONS
The AD9709, AD9763, AD9765, AD9767 dual DACs all
have separate digital and analog power and ground
pins. Analog and digital power and ground have their own
banana-style connectors on the dual DAC evaluation
board. The best performance when using the evaluation
board is achieved when analog and digital power and
ground are connected to separate power supplies.
Figure 2 shows the power supply, grounding, and decoupling connections for the evaluation board and for the
DAC itself. Note that for best noise rejection on the
power supplies, the high value bulk capacitors are
placed at the external power connectors, while the
smaller value capacitors, needed for high frequency
rejection, are located close to the DAC.
TP11
L2
AVDDIN
ACOM
BAN-JACK
BAN-JACK
C13
0.1mF
BEAD
AVDD
C12
0.01mF
C10
10mF
25V
AVDD
TP40 TP41
C11
0.001mF
TP44
TP42
AGND
Page 2
AN-555
Analog and digital supplies can be run at either 3 V or
5 V, and do not have to run from the same supply voltage. Regardless of supply voltage, the digital input data
can be safely run from 3 V or 5 V logic levels, as long as
the proper resistor packs are placed in the digital input
data path (see Digital Inputs section).
DIGITAL INPUTS
The digital inputs on the dual DAC evaluation board are
designed to accept inputs from any generic word generator. However, when running the DAC at high sample
rates, the quality of the digital data can have an impact
on the performance of the DAC. As an example, if the
edges of the digital information are slow, or the edges of
the various bits are skewed from each other in time,
specifications such as SNR and SINAD may be degraded.
The digital input path on the evaluation board includes
both pull-up and pull-down plug-in resistor packs. The
pull down resistors allow the user to apply digital logic
at 5 V levels when the DAC digital supply is operating at
3 V, and the pull-ups allow 3 V logic levels when the DAC
is run from a 5 V digital supply. The digital input signal
path is shown in Figure 3.
DVDD
NOT SUPPLIED WITH
DIGITAL DATA
INPUT
NOT SUPPLIED WITH
EVALUATION BOARD
22V
EVALUATION BOARD
DATA INPUT ON
AD9763/AD9765/AD9767
NOT SUPPLIED WITH
EVALUATION BOARD
CLOCK INPUTS
SMA connectors S1 to S4 are intended to be used as
clock and control lines for the AD976x, and are 50 Ω ter-
minated. The selection of JP9 also allows the user to
select a clock generated on the same digital data bus as
the input data.
Jumpers JP1 to JP7, JP9, and JP16 control the clock
inputs for the various clock modes in which the dual
DACs can operate. It is recommended that the clock
source be a square wave with minimal overshoot and
undershoot. Overshoot and undershoot beyond the supply rails can inject noise onto the clock, which may result
in jitter and reduced DAC performance. The dual DACs
can operate with a sine wave clock, but dynamic performance will be degraded. Figure 4 shows the clock input
section and jumper options for the dual DAC evaluation
board.
MODES OF OPERATION
The AD976x dual DAC family is designed to operate
either as two completely separate DACs in dual DAC
mode, or with a single digital input port in which the input
data is alternately sent to either of the two DACs (interleaving mode).
DGND
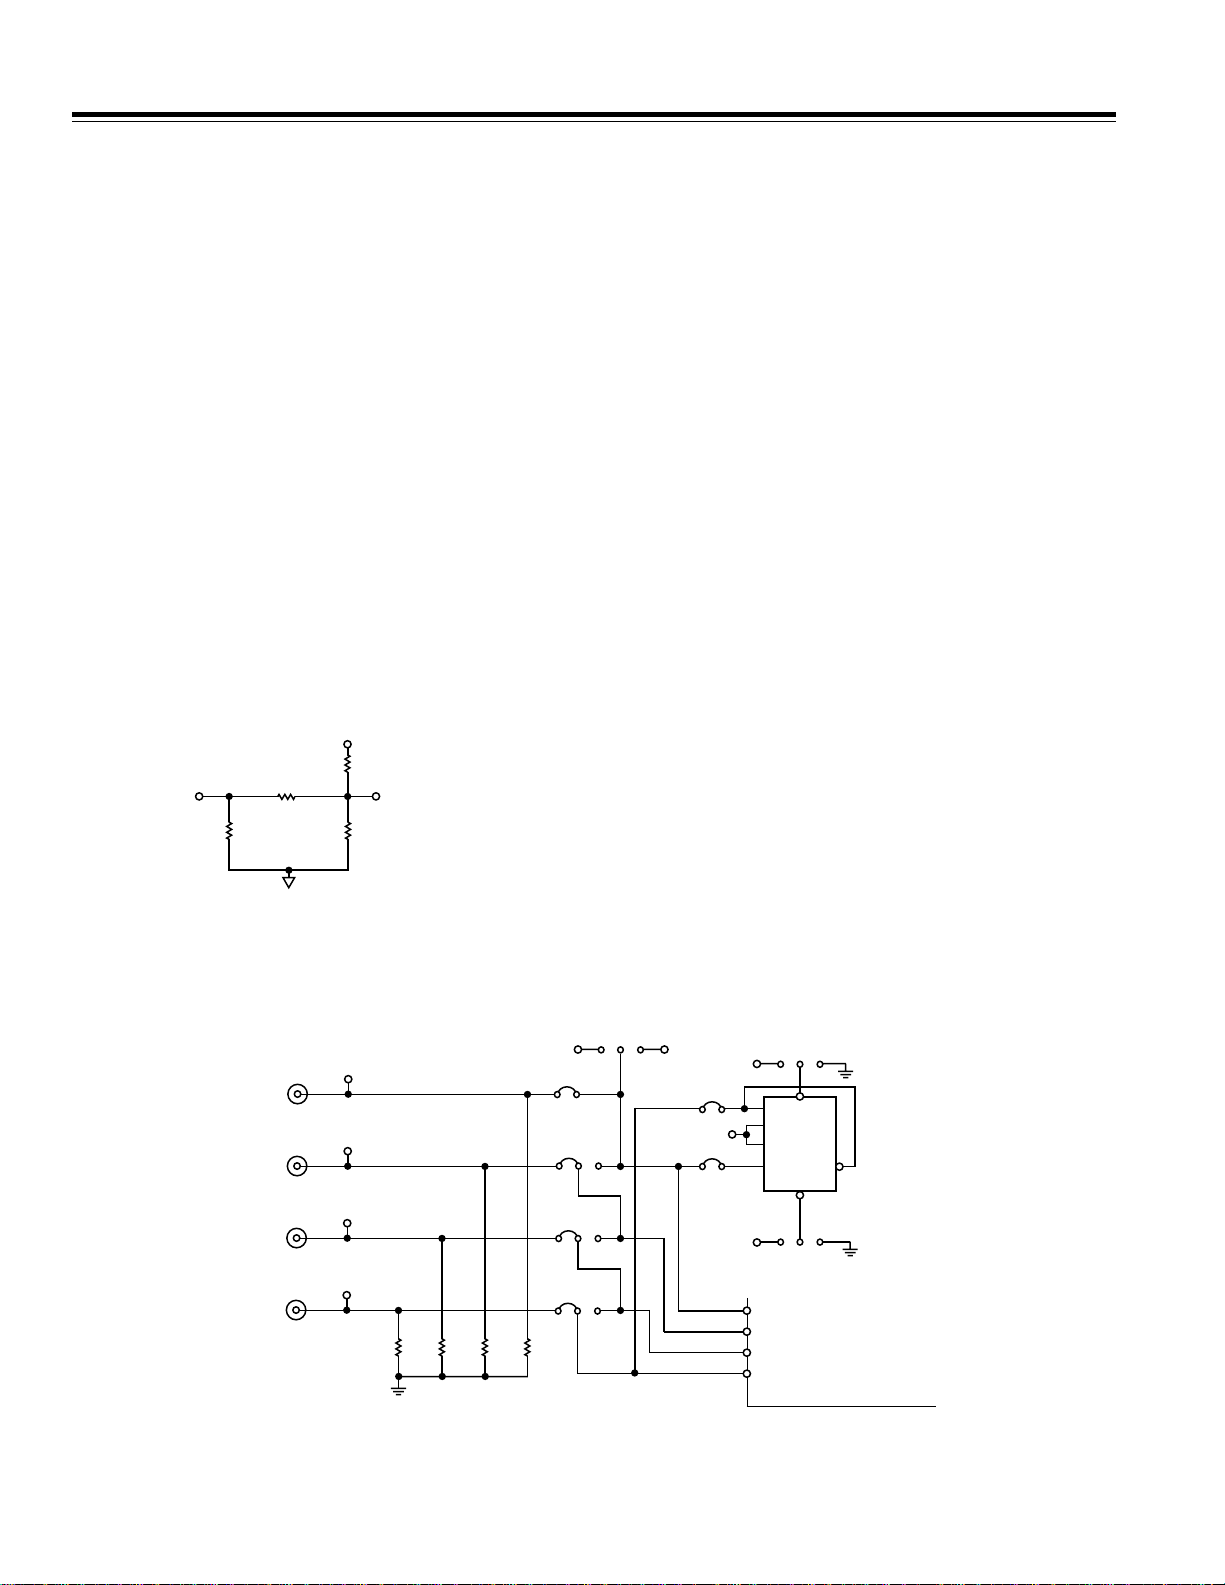
Figure 3. Input Structure of Digital Input Signal Path on
Dual DAC Evaluation Board
DCLKIN1 DCLKIN2
WRT1IN
IQWRT
CLK1IN
IQCLK
CLK2IN
RESET
WRT2IN
IQSEL
TP29
S1
TP30
S2
TP31
S3
TP32
S4
R1
50VR250VR350VR450V
Figure 4. Jumper Options for Clock Input Section on Dual DAC Evaluation Board
JP16
JP5
IC
JP4
IC
JP3
I
JP9
DVDD
JP2
DVDD
JP1
DVDD
C
JP6
LH
D
PRE
J
K
U1
CLK
Q
CLR
1
74HC112
JP7
DGND;8
HL
WRT1/IQWRT
CLK1/IQCLK
CLK2/IQRESET
WRT2/IQSEL
AD9709/AD9763/AD9765/AD9767
DVDD;16
–2–
REV. 0
Page 3

AN-555
DUAL DAC MODE
Jumper J8 controls the logic level of the MODE pin on
the AD976x dual DAC. With this jumper in the D position, the mode pin is pulled to a high logic level and the
AD976x is in dual DAC mode.
The simplest method for operating the dual DAC evaluation board in the dual DAC mode is to select a common
clock for WRT1, WRT2, CLK1, and CLK2. An external
clock generator can be selected by inserting JP16, or a
clock from the word generator can be selected by inserting JP9. By inserting JP3, JP4, and JP5 all in the C position,
the selected clock can be applied to all four clock inputs.
Different combinations of JP3, JP4, and JP5 allow
multiple options if the user desires to drive the WRT
and CLK inputs from separate clocks.
In the dual mode, jumpers JP1 and JP2 should be
removed. The state of Jumpers JP6 and JP7 does not
matter in this mode.
Table I illustrates the jumper positions required to operate in the dual DAC mode of operation.
Table I. Jumper Options for Dual DAC Mode
Jumper Position Description
JP1, JP2,
JP6, JP7 Removed These are only used in
interleaved mode.
JP3, JP4,
JP5 C With these in the B posi-
tion, the evaluation board
can be run with one common clock.
detailed information on the functions of these inputs, as
well as the DAC input and output timing, see the
AD9709, AD9763, AD9765, and AD9767 data sheets.
Operation with a single clock can be achieved by selecting JP16 or JP9 for the clock source and inserting JP5 in
the C position, and removing JP3. JP4 can be used to
control IQRESET, but for most evaluations can simply be
tied low (Position I).
In interleaving mode, digital data present at input Port 1
is written into the Port 1 or Port 2 input buffers internal
to the DAC on the rising edge of IQWRT. The port into
which data is written depends on the state of IQSEL at the
time of the IQWRT rising edge. If IQSEL is high when the
rising edge occurs, data will be written to input Port 1. If
IQSEL is low at that time, data will be written to input
Port 2.
U1 on the evaluation board provides an alternating
IQSEL signal by toggling on every falling edge of
IQWRT. To enable this function, insert JP1 and JP2 and
remove JP3. JP6 and JP7 are used to synchronize the
input data stream with the IQSEL pin. To perform this
synchronization, power up the evaluation board with the
IQWRT and input data clocks disabled and at logic low. If
the first word in the digital data stream is meant for
Channel 1, preset U1 by inserting JP7 in the H position,
temporarily insert JP6 in the L position, then permanently
in the H position. If the first word in the data stream in
intended for Channel 2, reset U1 by inserting JP6 in the
H position, insert JP7 temporarily in the L position, then
permanently in the H position.
Table II illustrates the jumper positions required to operate in the dual DAC mode of operation.
JP8 D Enables Dual DAC Mode.
JP9 Optional Selects clock from word
generator. Remove JP9 if
clock source is from S1/JP16.
JP16 Optional Selects clock from connec-
tor S1. Remove JP16 if clock
source is from JP9/JP16/
DCLK1, DCLK2.
INTERLEAVING MODE
With jumper JP8 in the I position, the MODE pin on the
AD976x is pulled to a logic low level and the DAC is in
interleaving mode. In this mode, a single stream of digital data drives Port 1 on the DAC. This stream of data
contains alternating bits from two data channels. By
using the correct clock and control signals, data in the
two channels will be separated and sent to the correct
DAC outputs. This is typical of an I/Q application.
In interleaving mode, the definitions for the four clock
inputs change. WRT1, WRT2, CLK1, and CLK2 become
IQWRT, IQCLK, IQRESET, and IQSEL, respectively. For
REV. 0
Table II. Jumper Options for Interleaved Mode
Jumper Position Description
JP1, JP2 Inserted These enable U1 to generate the
alternating logic signal for IQSEL.
JP3 Remove If the IQSEL logic is to be gener-
ated by U1, this is not needed.
JP4 I Use to allow S3 control of
IQRESET pin.
JP5 C Allows IQWRT and IQCLK to be
driven by a common clock.
JP6, JP7 These are used to preset the
IQSEL pin before the data clock
is enabled. See text for descrip-
tion of use.
JP8 I Enables Interleaved Mode.
JP9 Optional Selects clock from word genera-
tor. Remove JP9 if clock source
is from S1/JP16.
JP16 Optional Selects clock from Connector S1.
Remove JP16 if clock source is
from JP9/DCLK1, DCLK2.
–3–
Page 4

AN-555
CLOCK TIMING/PERFORMANCE
To ensure that specified setup-and-hold times are met,
the digital data inputs should change state on the falling
edge of the clock. However, due to timing skews and
delays inherent in some circuits, this does not always
happen. If the timing of the data transition and the rising
edge of the clock violates the setup-and-hold times, SNR
performance will be seriously degraded. Figure 5 shows
the valid window during the clock cycle in which the
digital input data can transition with no degradation in
SNR performance.
tS t
H
DATA
CLOCK
DATA
CLOCK
CHANNEL 2
CHANNEL 1
Figure 5. Valid Window for Data Transition During
Clock Cycle
Correct timing can be verified by generating a word pattern that repeatedly toggles the LSBs between Logic 1
and Logic 0. The user will also need a digital oscilloscope with persistence capability.
Place one probe from the scope on the clock input of the
DAC. The sensitivity of this measurement is in the tenths
of nanoseconds, so the probe should be placed as close
as possible to the DAC itself. In addition, the scope
should be set to trigger from this channel. Place a second
probe from the oscilloscope on the LSB input of the
DAC, again as close as possible to the DAC itself. The
barrels of both probes should be grounded to the
evaluation board, as close to the measurement point as
possible. A convenient way of doing this is to wrap a
piece of bus wire around the barrel and then solder the
other end of the bus wire to the PCB. Figure 6 illustrates
a typical oscilloscope display for this test, as well as the
proper way to use the scope probes.
For the most accurate results, identical high input
impedance, low input capacitance probes should be
used. If possible, they should also be calibrated.
The data setup time can be measured by placing a variable delay between the clock generator and the clock
input of the word generator. This is most often done by
using a pulse generator. By adjusting the delay of the
digital data, place the data transition point on the falling
edge of the clock. At this point, SNR should be optimized. Increase the amount of delay for the digital data,
moving the transition point closer to the rising edge. As
the data transition gets close to the rising edge, SNR will
begin to degrade. At this point, on the oscilloscope,
measure the time difference between the data transition
and the midpoint of the rising edge. This is the measured data setup time.
Figure 6. Verifying Clock/Data Timing on Evaluation
Board, Proper Use of Scope Probes
To measure the input data hold time, perform the same
operation, but start with the data transition occurring at
the midpoint of the clock transition. SNR at this point
will be completely degraded. Increase the digital input
delay until the SNR is optimized. At this point, again
measure the time difference between the data transition
and the midpoint of the rising edge. This is the measured data hold time.
REFERENCE OPERATION
The AD9709, AD9763, AD9765, AD9767 contain a single
1.2 V reference that is shared by both of the DACs on the
chip. This reference drives two control amplifiers that
independently control the full-scale output currents in
each of the two DACs. Using the 1.2 V reference and the
control amplifier, reference currents are produced for
each DAC in an external resistor attached to FSADJ1
(DAC1) and to FSADJ2 (DAC2). The relationship between
the external resistor current and the full-scale output
current is:
I
FS
OUT
= 32 ×
Reference Current
Using the internal reference, this can also be expressed
as:
I
FS
OUT
= 38.4 ÷
R
EXT
On the evaluation board, R9 and R10 are the two external resistors that define the full-scale current.
An external reference can also be used simply by driving
the REFIO pin on the dual DAC (TP36) with an external
reference. The input impedance of the REFIO pin is very
high, minimizing any loading of the external reference.
However, because some references behave poorly
when driving capacitive loads, the bypass capacitor on
–4–
REV. 0
Page 5

AN-555
REFIO (C14) may need to be removed under these conditions. Figures 7 and 8 show the internal and external reference configurations for the AD9709, AD9763, AD9765,
and AD9767.
When using an external reference in this way, the fullscale output current for each DAC can be defined by;
I
FS
OUT
= 32 ×
V
REF/REXT
Note that in the internal reference configuration, any
additional load on the reference should be buffered with
an external amplifier. This external amplifier is not
included on the evaluation board.
For more detailed information on the operation of the
reference section of the DACs, see page 9 of the data
sheet.
OPTIONAL
EXTERNAL
REFERENCE
BUFFER
ADDITIONAL
EXTERNAL
LOAD
I
REF
0.1mF
2kV
GAINCTRL
+1.2V REF
REFIO
FSADJ
DUAL DAC
REFERENCE
SECTION
AVDD
CURRENT
SOURCE
ARRAY
ACOM
Figure 7. Internal Reference Configuration
enabled. In this mode, a single R
resistor is connected
SET
to FSADJ1 and the resistor on FSADJ2 can be removed.
Note: Only parts with date code of 9930 or later have the
Master/Slave GAINCTRL function. For parts prior to this
date code, Pin 42 must be connected to AGND, and the
part will operate in the two resistor, independent gain
control mode.
OUTPUT CONFIGURATION
The AD9709, AD9763, AD9765, AD9767 have been
designed to achieve optimum performance with the
outputs used differentially. A transformer on the evaluation board (Mini-Circuits T1–1T) allows the conversion
of the differential outputs to a single-ended signal. The
bandwidth of this transformer allows low distortion
operation from 350 kHz to well past the Nyquist bandwidth
of the DAC when operating at its highest sampling rate.
Figure 9 shows a typical DAC output configuration. Both
outputs drive a 50 Ω resistor as well as a transformer.
The grounded centertap on the primary of the transformer causes the output of the DAC to swing around
ground, allowing for wider p-p swing while still remaining within the output voltage compliance range of the
DAC. On the evaluation board, these resistors are R5,
R6, R7, and R8. This provides a full-scale differential output voltage of 0.67 V p-p when operating with I
OUT
FS =
20 mA and the transformer terminated with 50 Ω.
AVDD
CURRENT
SOURCE
ARRAY
ACOM
AVDD
EXTERNAL
REFERENCE
I
REF
2kV
GAINCTRL
+1.2V REF
REFIO
FSADJ
DUAL DAC
REFERENCE
SECTION
Figure 8. External Reference Configuration
MASTER/SLAVE RESISTOR MODE, GAINCTRL
The AD9709, AD9763, AD9765, AD9767 all allow the gain
of each channel to be independently set by connecting
one R
resistor to FSADJ1 and another R
SET
resistor to
SET
FSADJ2. To add flexibility and reduce system cost, a
single R
resistor can be used to set the gain of both
SET
channels simultaneously.
When GAINCTRL is low (i.e., connected to AGND), the
independent channel gain control mode using two resistors is enabled. In this mode, individual R
resistors
SET
should be connected to FSADJ1 and FSADJ2. When
GAINCTRL is high (i.e., connected to AVDD), the master/
slave channel gain control mode using one resistor is
If the secondary of the transformer is terminated with
50 Ω, the DAC will then be capable of driving 0.5 dBm
into this load at full-scale out.
C4, C5, C6, and C15 (10 pF) on the evaluation board,
working together with the 50 Ω output resistors, form a
low-pass filter which gives some amount of image rejection at higher output frequencies. In applications where
an amplifier is used in place of the transformer, it is
important that the capacitor values be chosen to limit
the output slew rate of the DAC. If the output of the
amplifier becomes slew rate limited, severe distortion
can result.
AD9709
AD9763
AD9765
AD9767
IOUT
IOUT
10pF
50V 50V
50V
10pF
Figure 9. Typical DAC Output Configuration
REV. 0
–5–
Page 6

AN-555
TROUBLESHOOTING
The dual DAC evaluation board has been designed to
allow optimum performance from the AD9709, AD9763,
AD9765, AD9767. However, many factors can contribute
to suboptimal performance. The following is a list of
potential problems and their likely sources.
Problem—No signal or reduced signal on the output.
Is power applied correctly? Use an oscilloscope to verify
that the input data pins are switching and that the clock
is present on the input. Make sure that the output transformer is in place. Do the data input logic levels match
the DVDD being applied (3 V or 5 V)? Does the clock pass
through the input threshold, roughly one-half of DVDD?
If the internal reference is being used, make sure that
1.2 V is present at FSADJ1, FSADJ2 and REFIO. Make
sure that R9 and R10 are in place next to these test
points.
Problem—Signal and images appear at the DAC output
at twice or half the expected frequency.
The DAC is in the incorrect mode (Dual DAC or Interleaving). Make sure that the mode select jumper in the top
right corner of the eval board is set to the correct position. This jumper must be in one position or the other
and cannot be allowed to float.
Problem—Unusually high amount of noise on the output.
With an oscilloscope, verify the relative timing between
the data transition and the clock input as described in
the Clock Timing Performance section. Check to make
sure that the clock for the data source is synchronized
with the clock input to the DAC.
Problem—Can not match noise specifications from data sheet.
Is a low jitter clock being used? When generating a
single tone, does the spectrum analyzer show skirting
around the tone at the noise floor? This is a symptom of
clock jitter.
Problem—Can not match distortion spec.
Is the output signal from the DAC seeing 50 Ω? Is the
voltage on the output of the DAC within the compliance
range of ±1 V? Is the DAC output overdriving the spec-
trum analyzer input? Try increasing the spectrum analyzer input attenuation to see if the distortion products
drop. If they do, the analyzer is being overdriven.
–6–
REV. 0
Page 7

DVDDIN
TP10
B1
BAN-JACK
B2
RED
L1
BEAD
POWER DECOUPLING AND INPUT CLOCKS
RED
TP11
B3
AVDDIN
BAN-JACK
B4
1
2
C9
10mF
25V
DVDD
TP37 TP38
BLKBLKBLK
TP39
L2
BEAD
1
2
C10
10mF
25V
AVDD
BLK BLK
TP40 TP41
BLK
TP42
AN-555
WRT1IN
IQWRT
CLK1IN
IQCLK
CLK2IN
RESET
WRT2IN
IQSEL
BAN-JACK
S1
S2
S3
S4
SLEEP
WHT
TP29
DGND;3,4,5
WHT
TP30
DGND;3,4,5
WHT
TP31
DGND;3,4,5
WHT
TP32
DGND;3,4,5
WHT
TP33
1
BAN-JACK
JP9
2
B
A
TP44
AGND
BLK
3
TP43
DGND
BLK
DCLKIN1 DCLKIN2
/2 CLOCK DIVIDER
JP6
2
3
1
JP16
DVDD
JP2
JP5
2
1
3
B
A
C
I
JP4
2
1
3
B
A
IC
JP3
2
1
3
B
A
I
1
1
1
R1
R2
50V
50V
2
2
1
R13
50V
2
TSSOP112
1
R3
50V
2
2
10
PRE
11
J
U1
13
CLK
12
K
CLR
14
DGND;8
DVDD;16
R4
50V
Q
Q
C
DVDD
9
7
1
C7
0.1mF
2
JP1
DVDD
TSSOP112
DVDD
1
C8
0.01mF
2
B
A
4
PRE
U1
CLR
A
JP7
15
DGND;8
DVDD;16
B
2
5
Q
6
Q
3
3
J
1
CLK
2
K
1
WRT1
CLK1
CLK2
WRT2
SLEEP
REV. 0
RP16
RCOM
22
1
R1 R9
3 4 5 6 7 8 92
INP1
INP2
INP3
INP4
INP5
INP6
INP7
10
INP8
RP9
RCOM
22
1
R1 R9
3 4 5 6 7 8 92
INP9
INP10
INP11
INP12
INP13
INP14
10
INCK1
RP10
RCOM
22
1
R1 R9
3 4 5 6 7 8 92
INP23
INP24
INP25
INP26
INP27
INP28
INP29
INP30
RP15
RCOM
22
10
Figure 10. Power Decoupling and Clocks on Dual DAC Evaluation Board
–7–
R1 R9
3 4 5 6 7 8 92
1
INP31
INP32
INP33
INP34
INP35
INP36
10
INCK2
Page 8

AN-555
2 P1
4 P1
6 P1
8 P1
10 P1
12 P1
14 P1
16 P1
18 P1
20 P1
22 P1
24 P1
26 P1
28 P1
30 P1
32 P1
34 P1
36 P1
38 P1
40 P1
2 P2
4 P2
6 P2
8 P2
10 P2
12 P2
14 P2
16 P2
18 P2
20 P2
22 P2
24 P2
26 P2
28 P2
30 P2
32 P2
34 P2
36 P2
38 P2
40 P2
P1 1
P1 3
P1 5
P1 7
P1 9
P1 11
P1 13
P1 15
P1 17
P1 19
P1 21
P1 23
P1 25
P1 27
P1 29
P1 31
P1 33
P1 35
P1 37
P1 39
P2 1
P2 3
P2 5
P2 7
P2 9
P2 11
P2 13
P2 15
P2 17
P2 19
P2 21
P2 23
P2 25
P2 27
P2 29
P2 31
P2 33
P2 35
P2 37
P2 39
INP1
INP2
INP3
INP4
INP5
INP6
INP7
INP8
INP9
INP10
INP11
INP12
INP13
INP14
INCK1
INP23
INP24
INP25
INP26
INP27
INP28
INP29
INP30
INP31
INP32
INP33
INP34
INP35
INP36
INCK2
RP5, 10V
116
RP5, 10V
314
RP5, 10V
512
RP5, 10V
710
RP6, 10V
116
RP6, 10V
314
RP6, 10V
512
RP7, 10V
116
RP7, 10V
314
RP7, 10V
512
RP7, 10V
710
RP8, 10V
116
RP8, 10V
314
RP8, 10V
512
RP3
RCOM
22
DVDD
RP5, 10V
215
RP5, 10V
4
RP5, 10V
6
RP5, 10V
8
RP6, 10V
2
RP6, 10V
4
RP6, 10V
6
11
RP6, 10V
89
RP4
RCOM
22
DVDD
RP7, 10V
215
RP7, 10V
4
RP7, 10V
6
RP7, 10V
8
RP8, 10V
2
RP8, 10V
4
RP8, 10V
6
RP8, 10V
89
R1
1
R9
1098765432
RP1
RCOM
R1
22
1
DVDD
13
11
9
15
13
R1
1
R9
1098765432
RP2
RCOM
R1
22
1
DVDD
13
11
9
15
13
11
DIGITAL INPUT SIGNAL CONDITIONING
R9
1098765432
RP13
RCOM
33
1
R1 R9
R1 R9
RP11
RCOM
33
1098765432
1
1098765432
DUTP1
DUTP2
DUTP3
DUTP4
DUTP5
DUTP6
DUTP7
DUTP8
DUTP9
DUTP10
DUTP11
DUTP12
DUTP13
DUTP14
DCLKIN1
R9
98765432
10
RP14
RCOM
33
1
R1 R9
R1 R9
RP12
RCOM
33
1098765432
1
1098765432
DUTP23
DUTP24
DUTP25
DUTP26
DUTP27
DUTP28
DUTP29
DUTP30
DUTP31
DUTP32
DUTP33
DUTP34
DUTP35
DUTP36
DCLKIN2
SPARES
RP5, 10V
710
RP8, 10V
710
Figure 11. Digital Input Signal Conditioning
–8–
REV. 0
Page 9

DUTP1
DUTP2
DUTP3
DUTP4
DUTP5
DUTP6
DUTP7
DUTP8
DUTP9
DUTP10
DUTP11
DUTP12
DUTP13
DUTP14
WRT1
CLK1
CLK2
WRT2
DUTP23
DUTP24
1
C1
VAL
2
1
DB13P1 (MSB)
2
DB12P1
3
DB11P1
4
DB10P1
5
DB9P1
6
DB8P1
7
DB7P1
8
DB6P1
9
DB5P1
10
DB4P1
11
DB3P1
12
DB2P1
13
DB1P1
14
DB0P1
15
DCOM1
16
DVDD1
17
WRT1
18
CLK1
19
CLK2
20
WRT2
21
DCOM2
22
DVDD2
23
DB13P2 (MSB)
24
DB12P2
1
C2
0.01mF
2
U2
AD9763/
AD9765/
AD9767
1
C3
0.1mF
2
AVDD
MODE
AVDD
IA1
IB1
FSADJ1
REFIO
GAINCTRL
FSADJ2
IA2
IB2
ACOM
SLEEP
DB0P2
DB1P2
DB2P2
DB3P2
DB4P2
DB5P2
DB6P2
DB7P2
DB8P2
DB9P2
DB10P2
DB11P2
DVDD
MODE1
48
47
46
45
44
43
42
41
40
39
38
37
36
35
34
33
32
31
30
29
28
27
26
25
1
AVDD
JP8
2
AB
ACOM
1
AB
3
SLEEP
DUTP36
DUTP35
DUTP34
DUTP33
DUTP32
DUTP31
DUTP30
DUTP29
DUTP28
DUTP27
DUTP26
DUTP25
1
C11
VAL
2
JP15
AN-555
BL1
TP34
4
BL2
R15
256V
12
R14
256V
12
JP10
BL3
4
BL4
WHT
TP35
WHT
AGND;3,4,5
AGND;3,4,5
REFIO
TP36
WHT
1
2
S6
OUT1
C14
0.1mF
S11
OUT2
NC = 5
3
2
R11
TP45
WHT
TP46
WHT
VAL
R12
VAL
1.92kV
2
3
1
10pF
C15
10pF
C4
1
2
2
1
2
1
C12
0.01mF
2
1
2
R5
50V
10pF
10pF
R7
50V
C5
C6
1
2
2
1
2
1
C13
0.1mF
1
R6
50V
2
1
R8
50V
2
AVDD
1:1
16
T1
R9
2
1
C16
22nF
1
2
C17
22nF
1
2
12
R10
1.92kV
NC = 5
3
2
1:1
16
T2
DUT AND ANALOG OUTPUT SIGNAL CONDITIONING
REV. 0
Figure 12. Output Signal Conditioning
–9–
Page 10
AN-555
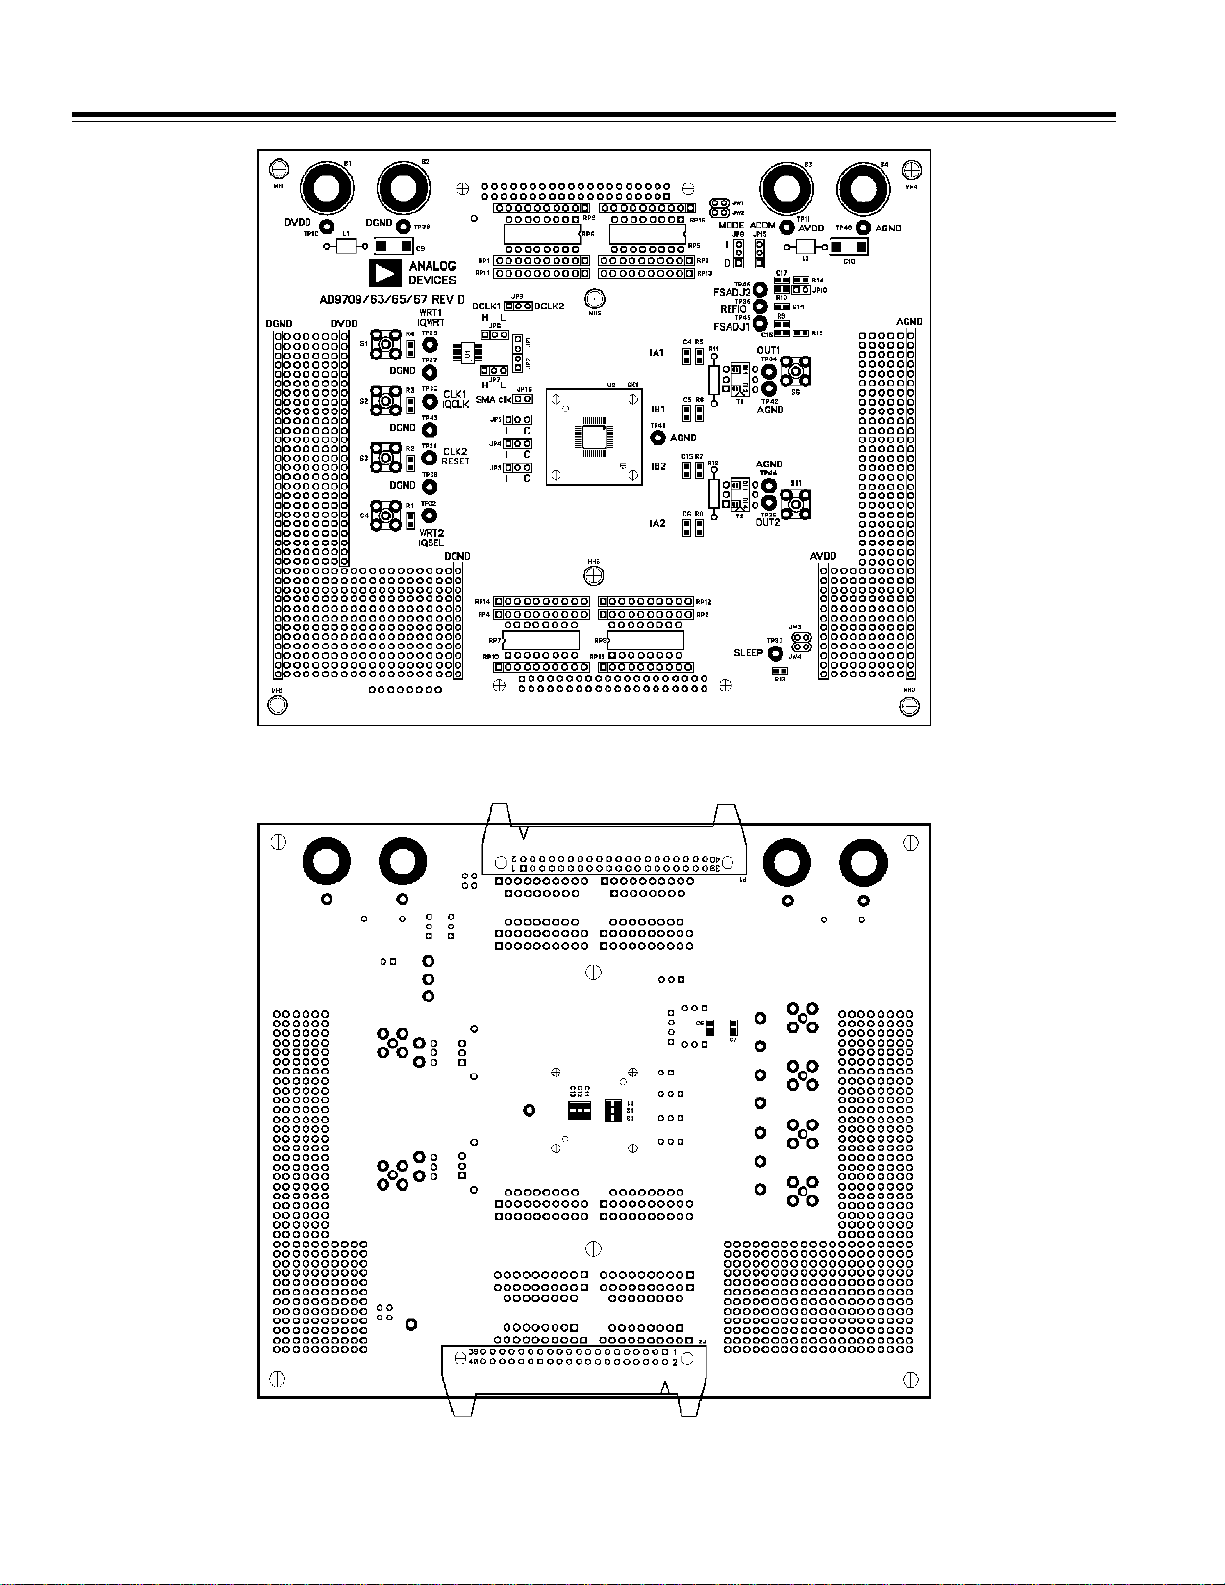
Figure 13. Assembly, Top Side
Figure 14. Assembly, Bottom Side
–10–
REV. 0
Page 11

AN-555
Figure 15. Layer 1, Top Side
REV. 0
Figure 16. Layer 2, Ground Plane
–11–
Page 12

AN-555
E3661–2–12/99 (rev. 0)
Figure 17. Layer 3, Power Plane
PRINTED IN U.S.A.
Figure 18. Layer 4, Bottom Side
–12–
REV. 0
 Loading...