

Page 1

Operation/Reference Guide
Metreau
MET-ECOM-D Metreau Entry Communicator with Display
™
Entry Communicators
MET-ECOM Metreau Entry Communicator
Voice and Video Communication Systems
Last Revised: 12/04/2008
Page 2

AMX Limited Warranty and Disclaimer
This Limited Warranty and Disclaimer extends only to products purchased directly from AMX or an AMX Authorized Partner which
include AMX Dealers, Distributors, VIP’s or other AMX authorized entity.
AMX warrants its products to be free of defects in material and workmanship under normal use for three (3) years from the date of
purchase, with the following exceptions:
• Electroluminescent and LCD Control Panels are warranted for three (3) years, except for the display and touch overlay
components are warranted for a period of one (1) year.
• Disk drive mechanisms, pan/tilt heads, power supplies, and MX Series products are warranted for a period of one (1) year.
• AMX lighting products are guaranteed to switch on and off any load that is properly connected to our lighting products, as long
as the AMX lighting products are under warranty. AMX also guarantees the control of dimmable loads that are properly
connected to our lighting products. The dimming performance or quality there of is not guaranteed, impart due to the random
combinations of dimmers, lamps and ballasts or transformers.
• AMX software is warranted for a period of ninety (90) days.
• Batteries and incandescent lamps are not covered under the warranty.
• AMX AutoPatch Epica, Modula, Modula Series4, Modula CatPro Series and 8Y-3000 product models will be free of defects in
materials and manufacture at the time of sale and will remain in good working order for a period of three (3) years following the
date of the original sales invoice from AMX. The three-year warranty period will be extended to the life of the product (Limited
Lifetime Warranty) if the warranty card is filled out by the dealer and/or end user and returned to AMX so that AMX receives it
within thirty (30) days of the installation of equipment but no later than six (6) months from original AMX sales invoice date. The
life of the product extends until five (5) years after AMX ceases manufacturing the product model. The Limited Lifetime Warranty
applies to products in their original installation only. If a product is moved to a different installation, the Limited Lifetime Warranty
will no longer apply, and the product warranty will instead be the three (3) year Limited Warranty.
All products returned to AMX require a Return Material Authorization (RMA) number. The RMA number is obtained from the AMX
RMA Department. The RMA number must be clearly marked on the outside of each box. The RMA is valid for a 30-day period. After
the 30-day period the RMA will be cancelled. Any shipments received not consistent with the RMA, or after the RMA is cancelled, will
be refused. AMX is not responsible for products returned without a valid RMA number.
AMX is not liable for any damages caused by its products or for the failure of its products to perform. This includes any lost profits, lost
savings, incidental damages, or consequential damages. AMX is not liable for any claim made by a third party or by an AMX
Authorized Partner for a third party.
This Limited Warranty does not apply to (a) any AMX product that has been modified, altered or repaired by an unauthorized agent or
improperly transported, stored, installed, used, or maintained; (b) damage caused by acts of nature, including flood, erosion, or
earthquake; (c) damage caused by a sustained low or high voltage situation or by a low or high voltage disturbance, including
brownouts, sags, spikes, or power outages; or (d) damage caused by war, vandalism, theft, depletion, or obsolescence.
This limitation of liability applies whether damages are sought, or a claim is made, under this warranty or as a tort claim (including
negligence and strict product liability), a contract claim, or any other claim. This limitation of liability cannot be waived or amended by
any person. This limitation of liability will be effective even if AMX or an authorized representative of AMX has been advised of the
possibility of any such damages. This limitation of liability, however, will not apply to claims for personal injury.
Some states do not allow a limitation of how long an implied warranty last. Some states do not allow the limitation or exclusion of
incidental or consequential damages for consumer products. In such states, the limitation or exclusion of the Limited Warranty may
not apply. This Limited Warranty gives the owner specific legal rights. The owner may also have other rights that vary from sta
state. The owner is advised to consult applicable state laws for full determination of rights.
EXCEPT AS EXPRESSLY SET FORTH IN THIS WARRANTY, AMX MAKES NO OTHER WARRANTIES, EXPRESSED OR
IMPLIED, INCLUDING ANY IMPLIED WARRANTIES OF MERCHANTABILITY OR FITNESS FOR A PARTICULAR PURPOSE. AMX
EXPRESSLY DISCLAIMS ALL WARRANTIES NOT STATED IN THIS LIMITED WARRANTY. ANY IMPLIED WARRANTIES THAT
MAY BE IMPOSED BY LAW ARE LIMITED TO THE TERMS OF THIS LIMITED WARRANTY. EXCEPT AS OTHERWISE LIMITED
BY APPLICABLE LAW, AMX RESERVES THE RIGHT TO MODIFY OR DISCONTINUE DESIGNS, SPECIFICATIONS,
WARRANTIES, PRICES, AND POLICIES WITHOUT NOTICE.
te to
Page 3

Table of Contents
Table of Contents
Metreau Entry Communicators ...........................................................................1
Overview .................................................................................................................. 1
Front Components .......................................................................................................... 2
Rear Components............................................................................................................ 3
Product Specifications - MET-ECOM ........................................................................ 3
Product Specifications - MET-ECOM-D .................................................................... 5
Positioning the Camera ...................................................................................... 7
Overview .................................................................................................................. 7
Camera Viewing Angle Adjustment ................................................................................ 7
Wiring and Connections .....................................................................................9
Overview .................................................................................................................. 9
Rear Panel Connectors.............................................................................................. 9
Ethernet 10/100 Base-T RJ-45 Wiring Configuration.............................................. 10
PoE (Power Over Ethernet) ........................................................................................... 10
Input/Output (I/O) Port: Connections and Wiring ................................................... 11
Connecting The Device via I/O ...................................................................................... 11
Relay Port: Connections and Wiring ....................................................................... 11
Ferrite Installation (Required) ................................................................................. 12
System Diagram ............................................................................................................ 13
System Diagram - Intercom ........................................................................................... 13
Mounting and Installation .................................................................................15
MET-ECOM / MET-ECOM-D Installation Overview ................................................. 15
Dimensions ............................................................................................................. 15
Mounting Specifications ......................................................................................... 16
Front View .................................................................................................................... 16
Side Views .................................................................................................................... 17
Top View ...................................................................................................................... 17
Typical Installation (Without Expansion Clips) ............................................................... 18
Installing the Wall Box Without the Use of Tabs ........................................................... 20
Wall Surface Installation (Using Expansion Clips) .......................................................... 21
Installing Into a Flat Surface Using Mounting Screws.................................................... 23
Removing the Device From the Wall ............................................................................. 24
Using the Optional Surface Mount Box .................................................................. 25
Included in the Kit ......................................................................................................... 25
Surface Mount Box Specifications ................................................................................. 26
Ferrite Installation (Required)........................................................................................ 27
Metreau Entry Communicators
i
Page 4

Table of Contents
Installing the Metreau Entry Communicator .................................................................. 27
Using Zero Configuration .................................................................................29
Overview ................................................................................................................ 29
Bonjour (Zero-Configuration) Client........................................................................ 29
Connecting In a Network With a DHCP Server ....................................................... 29
Connecting In a Network Without a DHCP Server.................................................. 30
Using the Configuration Manager ....................................................................33
Overview ................................................................................................................ 33
Command Buttons......................................................................................................... 34
Accessing the Configuration Manager .......................................................................... 34
Summary of <Device> Settings Page...................................................................... 35
Checking the Firmware Version..................................................................................... 36
Determining the IP settings of the Metreau Entry Communicator ................................ 36
Rebooting the Device.................................................................................................... 36
Configuration Page................................................................................................. 37
Configuration Page - Network IP Settings Tab.............................................................. 37
Setting the IP Address .................................................................................................. 38
Setting the DNS Address .............................................................................................. 38
Configuration Page - NetLinx Settings Tab ................................................................... 39
Setting the ICSP Connection to the NetLinx Master ..................................................... 39
Configuration Page - User Settings Tab ........................................................................ 40
Setting a New Username and Password........................................................................ 40
Device Utilities Page ............................................................................................... 41
Image File Requirements ............................................................................................... 42
Creating Display Images ......................................................................................... 42
Creating Dynamic Images ....................................................................................... 44
TPDesign4 - Resource Manager..................................................................................... 44
Creating a New Dynamic Image .................................................................................... 45
Uploading a Display Image To The Device .................................................................... 46
Deleting a Display Image From the Device ................................................................... 46
Audio/Video Page................................................................................................... 47
Audio/Video Page - Audio Settings Tab ........................................................................ 47
Setting Device Audio .................................................................................................... 47
Audio/Video Page - Video Settings Tab ........................................................................ 48
Setting Device Video..................................................................................................... 49
Audio/Video Page - Display Settings Tab...................................................................... 49
Setting the Display Settings On The Device.................................................................. 50
ii
Metreau Entry Communicators
Page 5

Table of Contents
Programming ....................................................................................................51
Overview ................................................................................................................ 51
SEND_COMMANDs ................................................................................................ 51
Touch Panel Intercom Commands ................................................................................. 51
RTP, RTCP Video and Audio Streaming Commands ...................................................... 53
Face Plate LED Commands............................................................................................ 55
Camera Commands ....................................................................................................... 56
LCD Commands............................................................................................................. 58
I/O Commands .............................................................................................................. 60
System Commands ........................................................................................................ 60
Upgrading Firmware............................................................................................... 62
Before beginning the Upgrade process ........................................................................ 62
Upgrading Firmware via an IP Address................................................................... 62
Preparing the Master for communication via an IP ....................................................... 62
Verifying and Upgrading the device firmware via an IP ................................................ 63
Using the NetLinx Module ................................................................................65
Overview ................................................................................................................ 65
Incorporating an Intercom Panel Into Your NetLinx System ................................... 65
Panel Intercom Configuration ................................................................................. 65
Intercom Setup.............................................................................................................. 65
Setting the Intercom Session Timeout .......................................................................... 66
Setting Intercom Auto Answer ...................................................................................... 66
Door Setup.................................................................................................................... 67
Disabling All Doorbells.................................................................................................. 67
Door Chime Setup......................................................................................................... 68
Assigning a Chime To a Doorbell .................................................................................. 68
Advanced Setup ............................................................................................................ 69
Allowing a Panel To Be Monitored................................................................................ 69
Allowing a Panel To Monitor ......................................................................................... 70
Naming a panel ............................................................................................................. 70
Answering an incoming Intercom call............................................................................ 70
Answering an Incoming Doorbell Call ........................................................................... 71
Someone At The Door Page ................................................................................... 71
Ending a Doorbell Call .................................................................................................. 72
Creating Intercom Pages ........................................................................................ 72
Advanced Setup page .................................................................................................. 72
Door Chime Setup page ............................................................................................... 73
Door Setup page .......................................................................................................... 73
Intercom Demo page .................................................................................................... 74
Metreau Entry Communicators
iii
Page 6

Table of Contents
Setup page.................................................................................................................... 76
Someone At The Door page ......................................................................................... 77
Creating Popup Pages ............................................................................................ 78
Door Answer Call popup page ..................................................................................... 78
Doorbell Adjustments popup page .............................................................................. 78
Intercom Answer Call popup page ............................................................................... 79
More Time popup page ................................................................................................ 80
iv
Metreau Entry Communicators
Page 7

Metreau Entry Communicators
Overview
The Metreau Entry Communicators (FIG. 1) can be placed at entry points of homes, condos and hotels to
provide audio/video communications with anyone at a door or gate - all over IP. Any AMX Modero
intercom-enabled touch panel can interface with the Entry Communicator and allow residents to open
doors, gates and more.
Metreau Entry Communicators
FIG. 1 Metreau Entry Communicators
There are two variations within the Metreau Entry Communicator device family:
MET-ECOM Metreau Entry Communicator (FG2180-01-cc). The MET-ECOM is suitable
for installation in exterior environments.
MET-ECOM-D Metreau Entry Communicator with Display (FG2180-05-cc). The
MET-ECOM-D is suitable for installation in interior or protected environments.
Both types of Metreau Entry Communicator are available in several popular colors, as indicated by the
"-cc" suffix in the product nomenclatures. Color options include:
Black
White
Polished Brass
Antique Brass
Stainless Steel
Brushed Pewter
For a listing of colors by FG# for both types of Metreau Entry Communicators refer to the Product
Specifications tables later in this section.
Metreau Entry Communicators
1
Page 8
Metreau Entry Communicators
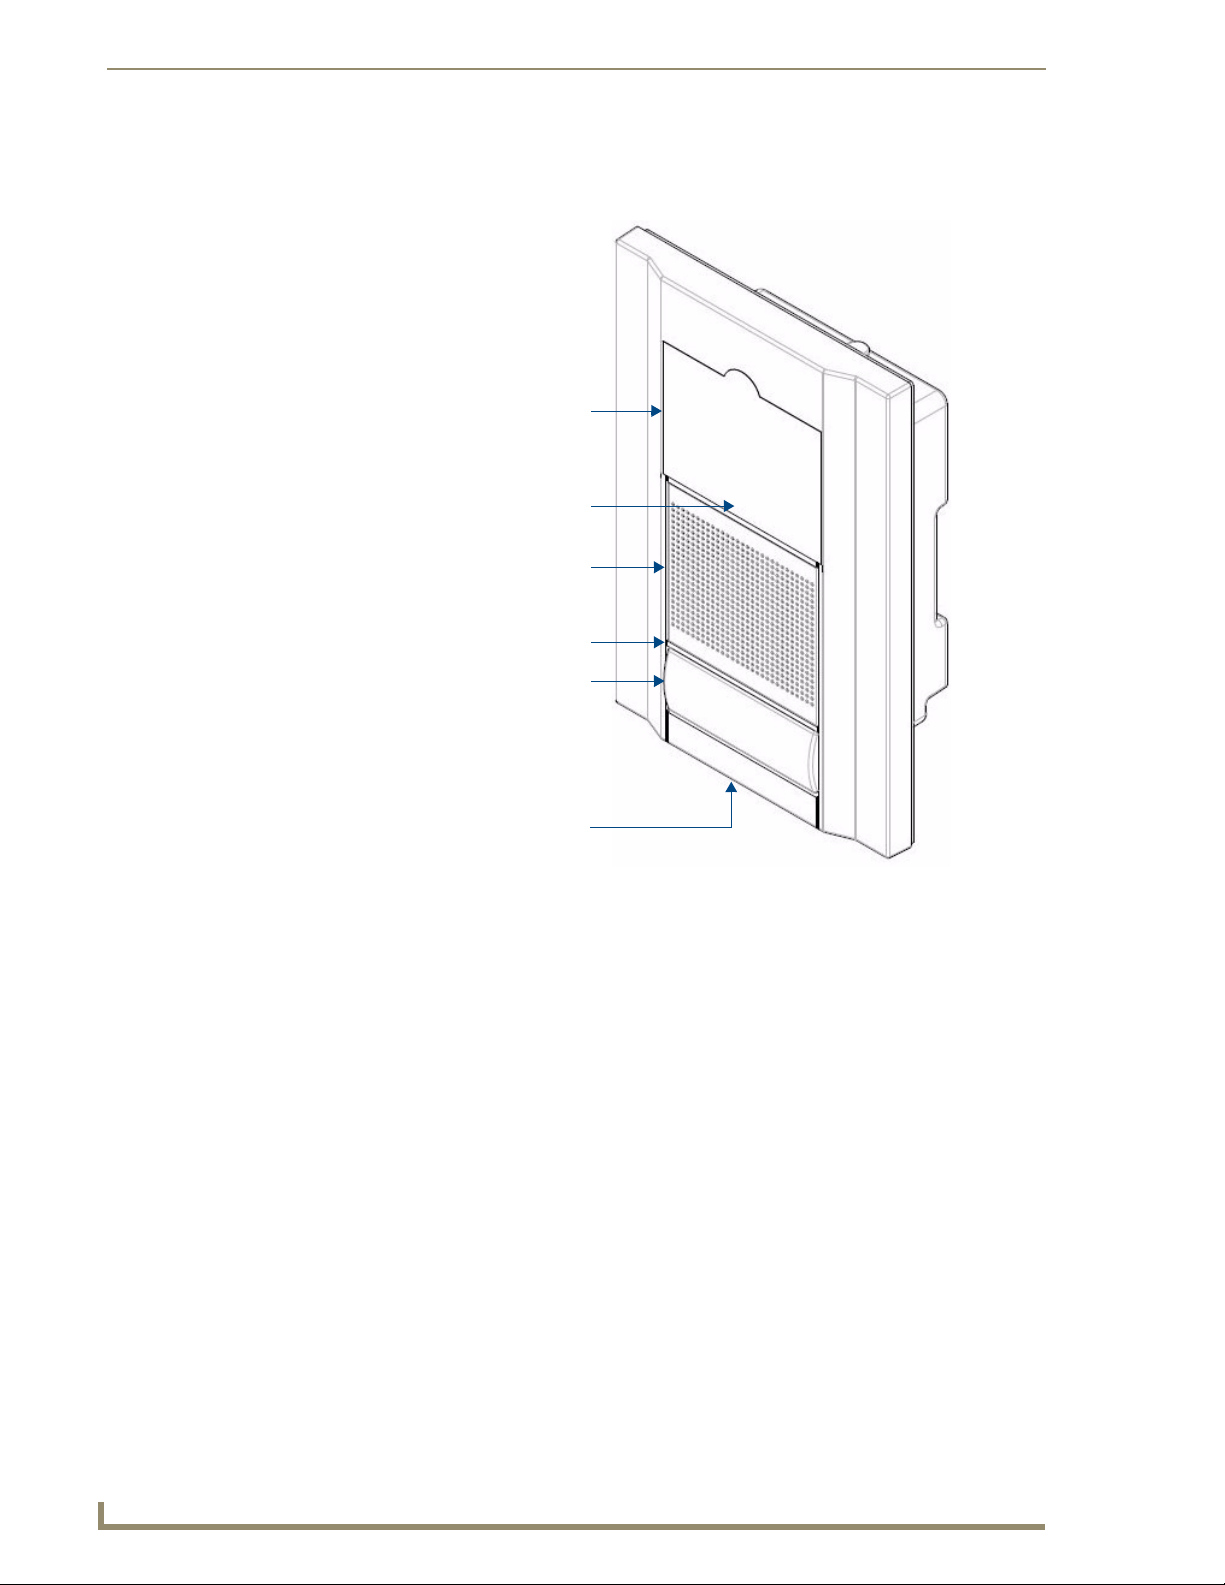
Front Components
The front components of the Metreau Entry Communicators are indicated in FIG. 2:
OLED display (MET-ECOM-D only)
Video Camera
Speaker
Dual Color LED Status Bar
Pushbutton (Doorbell)
Microphone
FIG. 2 Metreau Entry Communicators - Front Components
2
Metreau Entry Communicators
Page 9

Metreau Entry Communicators
Rear Components
The rear components of the Metreau Entry Communicators are indicated in FIG. 3:
Camera Viewing Angle Adjustment
ID/Reset pushbutton
STATUS (green LED)
Mounting Slots
(2 on each side)
Ethernet Connection
2 Multi-Purpose I/Os (5V)
2 Low Voltage Relays (1A Contact)
Mounting Clip
FIG. 3 Metreau Entry Communicators - Rear Components
Product Specifications - MET-ECOM
MET-ECOM Specifications
Power: • PoE powered – no local Power Supply needed
• IEEE 802.3af Compliant
Front Panel Components: • Integrated Color Video Camera
• Speaker
• Dual Color LED Status Bar: (Yellow/ Red) can be used to provide feedback,
to attract attention for action, or as general indicator.
• Pushbutton (Doorbell)
• Microphone
Integrated Color Video Camera: •
Speak er: • 8 Oh m, 2W
QVGA 320x240
• Supports Motion JPEG (MJPEG) and H.263 codecs.
• Viewing Angle: 42°
• 80dB SPL (sound pressure level at 1 meter)
• Meets G.711 sound standard
Metreau Entry Communicators
3
Page 10

Metreau Entry Communicators
MET-ECOM Specifications (Cont.)
Microphone: • -40 dB sensitivity, built-in echo cancellation (telephone quality)
Rear Panel Components: • Camera Viewing Angle Adjustment
Dimensions (HWD): • 5.364” x 3.594” x 1.559”
Weight:
Operating Environment: -22° to 140° F (-30° to 60° C)
Mounting: • The MET-ECOM is installed in one of two ways:
Colors Available: • Black MET-ECOM-BK (FG2180-01-BK)
Included Accessories: • Installation Kit (FG039-12) - includes front mount flange, 4 installation
Other AMX Equipment: • PS-POE-AF Power-over-Ethernet (PoE) power supply (FG423-80)
Certifications: • FCC Class B
• Full duplex communication
• VoIP Telephony
• Ethernet Port - 10/100 Ethernet with PoE. LEDs show communication
activity, connection status, speeds, and mode information:
SPD (speed) - Green LED lights On when the connection speed is 100
Mbps and turns Off when the speed is 10 Mbps.
L/A (link/activity) - Orange LED lights On when the Ethernet cables are
connected and terminated correctly, and blinks when receiving Ethernet
data packets.
• ID/Reset pushbutton: Push to set the NetLinx ID (Device only) assignment
for the device. Push and hold for at least 10 seconds to reset to factory
default settings.
• Status LED: Green LED provides an indication of both the system status
and communication status with the target Master. 1 blink every 5 seconds
indicates there is currently active communication between the Metreau unit
and a target Master.
• 2 Multi-Purpose I/Os (5V): 2-channel binary I/O ports for contact closure
with each input being capable of voltage sensing. Input format is software
selectable with interactive power sensing for IR ports.
• 2 Low Voltage Relays (1A contact): 2-channel single-pole single throw
relay ports with each relay being independently controlled and supporting
up to 2 independent external relay devices.
• 13.62 cm x 9.13 cm x 3.96 cm
Note: Refer to the Mounting Specifications section on page 16 for mounting
dimensions.
0.90 lbs (0.408 kg)
• 4 screws for hard surface mounting
• 2 expansion clips for pressure mounting
• White MET-ECOM-WH (FG2180-01-WH)
• Polished Brass MET-ECOM-PB (FG2180-01-PB)
• Antique Brass MET-ECOM-AB (FG2180-01-AB)
• Stainless Steel MET-ECOM-SS (FG2180-01-SS)
• Brushed Pewter MET-ECOM-BP (FG2180-01-BP)
screws (#4-40 x 3.12), 2 Phoenix connectors (female, 3.5mm) and a
Ferrite clip.
• NXA-ENET24 Managed Ethernet Switch (FG2178-60)
• NXA-ENET24PoE Managed Ethernet Switch, Power Over Ethernet
(FG2178-61)
• Conduit Box Assembly (FG039-12)
• CB-MET-ECOMS Surface Mount Box (FG039-14-S/B)
•CE
• IEC60950
•RoHS
4
Metreau Entry Communicators
Page 11

Metreau Entry Communicators
Product Specifications - MET-ECOM-D
MET-ECOM-D Specifications
Power: • PoE powered – no local Power Supply needed
• IEEE 802.3af Compliant
Front Panel Components: • OLED Display
• Integrated Color Video Camera
• Speaker
• Dual Color LED Status Bar: (Yellow/ Red) can be used to provide feedback,
to attract attention for action, or as general indicator.
• Pushbutton (Doorbell)
• Microphone
OLED Display: • 4-bit Gray Scale
• 1.6” Diagonal Display
• 180° Viewing Angle
• 2000:1 Contrast Ratio
• Unit stores up to 50 .bmp images
Integrated Color Video Camera: •
Speak er: • 8 Oh m, 2W
Microphone: • -40 dB sensitivity, built-in echo cancellation (telephone quality)
Rear Panel Components: • Camera Viewing Angle Adjustment
Dimensions (HWD): • 5.364” x 3.594” x 1.559”
Weight:
QVGA 320x240
• Supports Motion JPEG (MJPEG) and H.263 codecs.
• Viewing Angle: 42°
• 80dB SPL (sound pressure level at 1 meter)
• Meets G.711 sound standard
• Full duplex communication
• VoIP Telephony
• Ethernet Port - 10/100 Ethernet with PoE. LEDs show communication
activity, connection status, speeds, and mode information:
SPD (speed) - Green LED lights On when the connection speed is 100
Mbps and turns Off when the speed is 10 Mbps.
L/A (link/activity) - Orange LED lights On when the Ethernet cables are
connected and terminated correctly, and blinks when receiving Ethernet
data packets.
• ID/Reset pushbutton: Push to set the NetLinx ID (Device only) assignment
for the device. Push and hold for at least 10 seconds to reset to factory
default settings.
• Status LED: Green LED provides an indication of both the system status
and communication status with the target Master. 1 blink every 5 seconds
indicates there is currently active communication between the Metreau unit
and a target Master.
• 2 Multi-Purpose I/Os (5V): 2-channel binary I/O ports for contact closure
with each input being capable of voltage sensing. Input format is software
selectable with interactive power sensing for IR ports.
• 2 Low Voltage Relays (1A contact): 2-channel single-pole single throw relay
ports with each relay being independently controlled and supporting up to
2 independent external relay devices.
• 13.62 cm x 9.13 cm x 3.96 cm
Note: Refer to the Mounting Specifications section on page 16 for mounting
dimensions.
0.90 lbs (0.408 kg)
Metreau Entry Communicators
5
Page 12

Metreau Entry Communicators
MET-ECOM-D Specifications (Cont.)
Operating Environment: 32° to 104° F (0° to 40° C)
Mounting: The MET-ECOM-D is installed in several ways:
Colors Available: • Black MET-ECOM-BK (FG2408-01-BK)
Included Accessories: • Installation Kit (FG039-12) - includes front mount flange, 4 installation
Other AMX Equipment: • PS-POE-AF Power-over-Ethernet (PoE) power supply (FG423-80)
Certifications: • FCC Class B
• 4 screws for hard surface mounting
• 2 expansion clips for pressure mounting
• Using the optional Surface Mount Box
• White MET-ECOM-WH (FG2408-01-WH)
• Polished Brass MET-ECOM-PB (FG2408-01-PB)
• Antique Brass MET-ECOM-AB (FG2408-01-AB)
• Stainless Steel MET-ECOM-SS (FG2408-01-SS)
• Brushed Pewter MET-ECOM-BP (FG2408-01BP)
screws (#4-40 x 3.12), 2 Phoenix connectors (female, 3.5mm) and a
Ferrite clip.
• NXA-ENET24 Managed Ethernet Switch (FG2178-60)
• NXA-ENET24PoE Managed Ethernet Switch, Power Over Ethernet
(FG2178-61)
• Conduit Box Assembly (FG039-12)
• CB-MET-ECOMS Surface Mount Box (FG039-14-S/B)
•CE
• IEC60950
•RoHS
6
Metreau Entry Communicators
Page 13
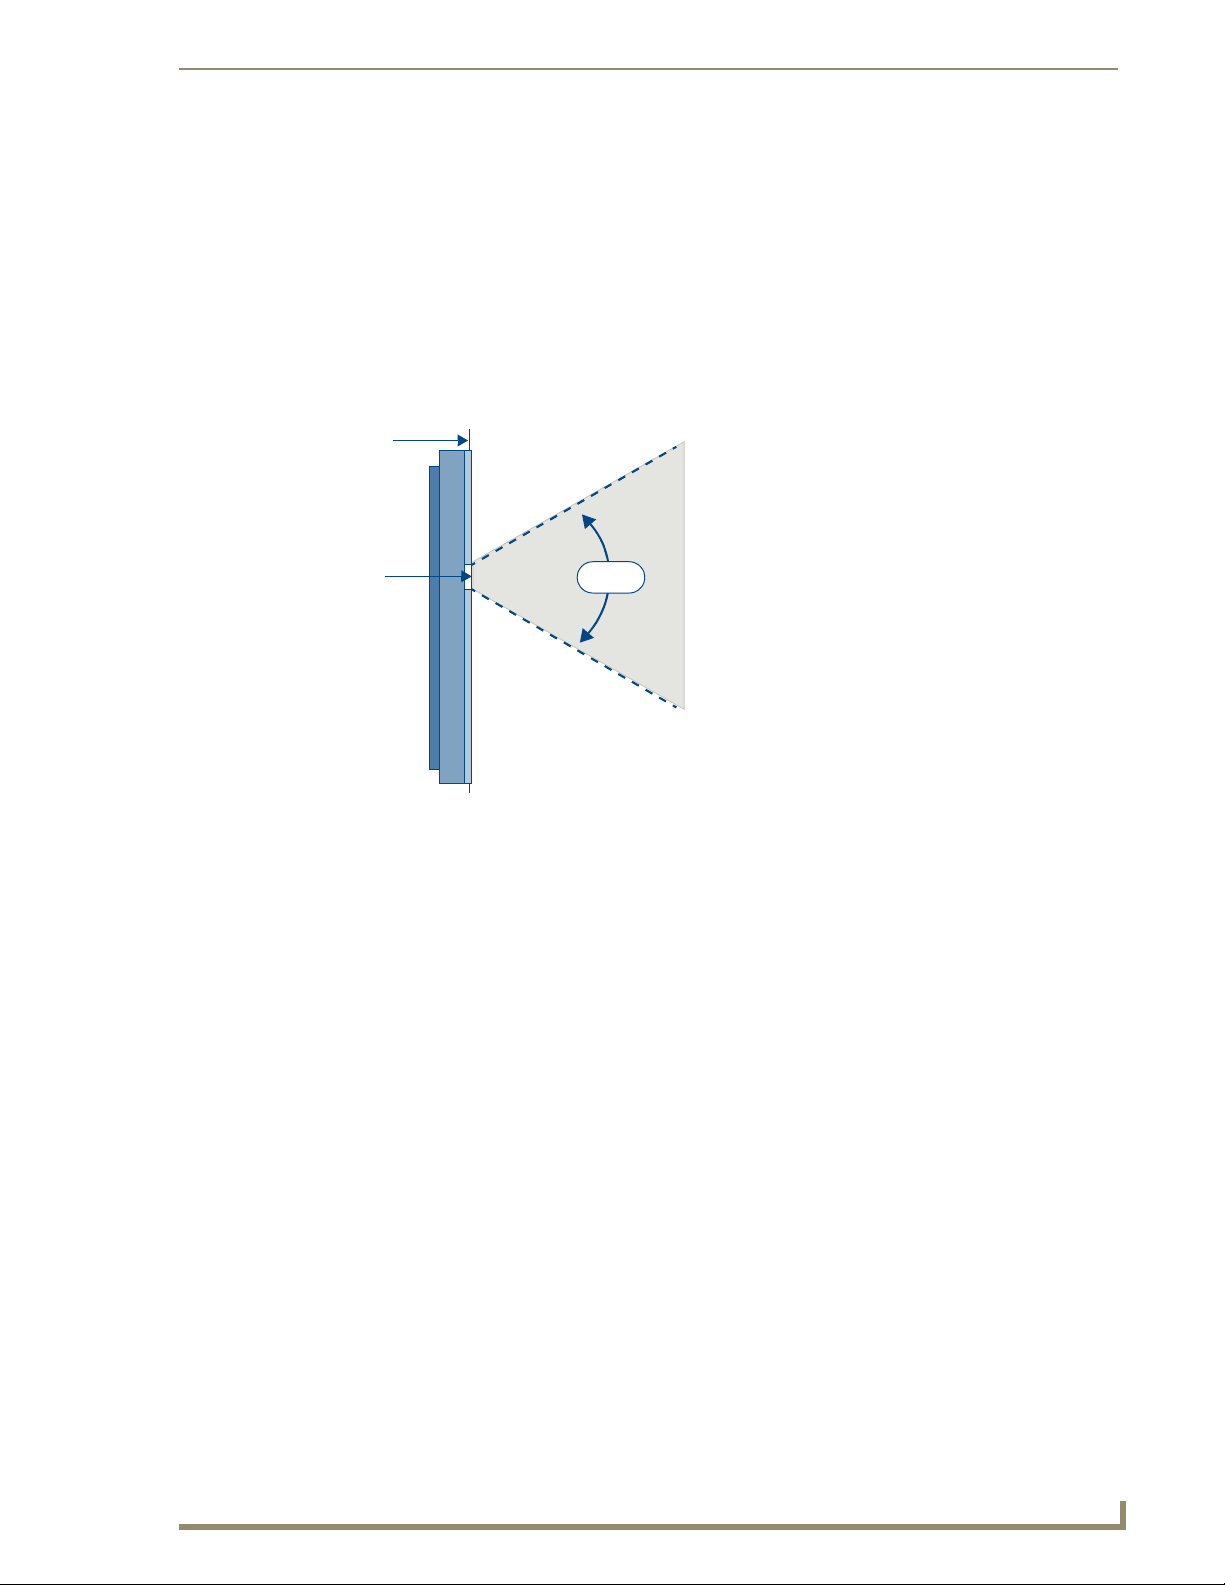
Positioning the Camera
Overview
The camera on the Metreau Entry Communicators provides a symmetrical 42° viewing angle, and by
default the camera is centered. The Metreau Entry Communicators feature a Camera Viewing Angle
Adjustment slider on the rear panel of the unit that allows you to adjust the viewing angle horizontally
from -15° to 15°.
FIG. 4 indicates the viewing range of the integrated camera in the Metreau Entry Communicators.
mounting
surface
Positioning the Camera
Camera
(front)(rear)
FIG. 4 Viewing range of the integrated camera (side view)
The camera on the Metreau Entry Communicators provides a symmetrical 42° viewing angle, and by
default, the camera is centered.
42°
Camera Viewing Angle Adjustment
The Camera Viewing Angle Adjustment slider is located on the rear panel of the unit, and is intended to
be used at the time of installation. It is not intended to be used for regular periodic adjustments. Once a
final installation location has been established, use the Camera Viewing Angle Adjustment slider to set
the desired camera angle, then finalize the installation.
The Camera Viewing Angle Adjustment slider is mechanical, and does not require
power to the unit to use.
The camera on the MET-COM-D can be adjusted horizontally from -15° to 15°, via the Camera Viewing
Angle Adjustment slider, as illustrated in FIG. 5:
Metreau Entry Communicators
7
Page 14
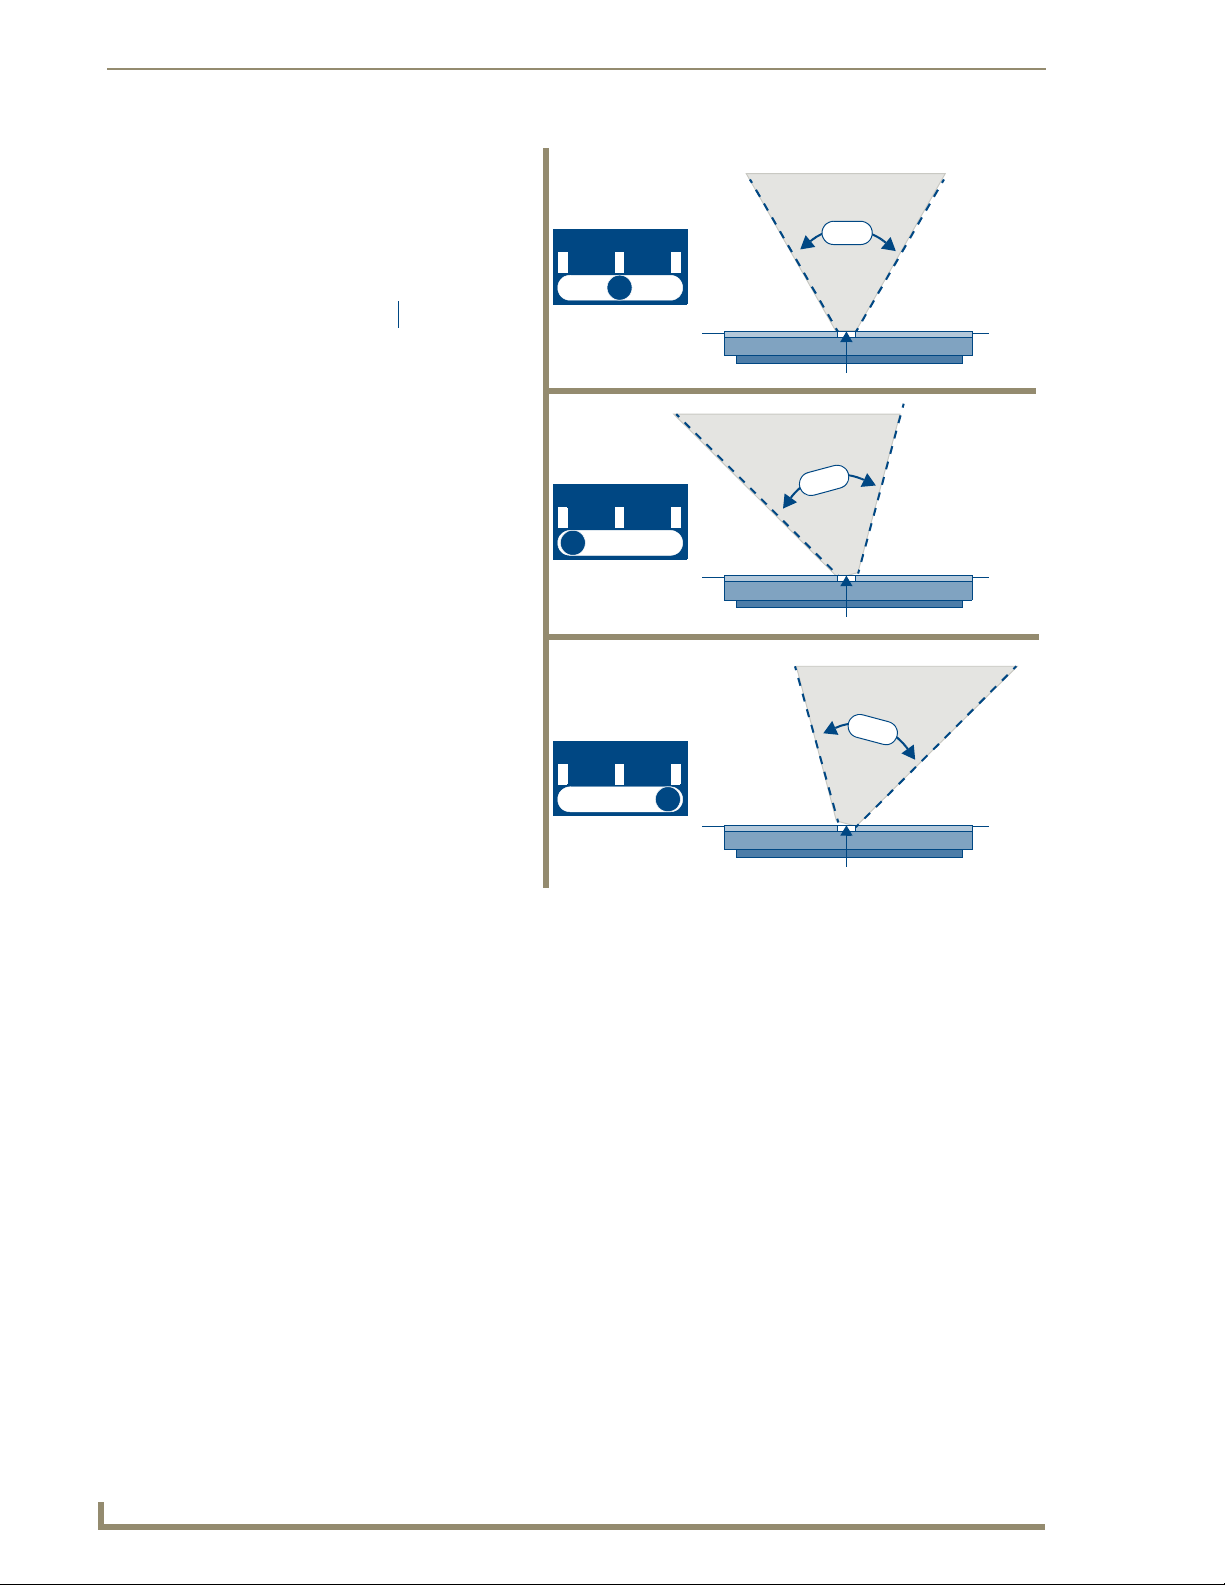
Positioning the Camera
Top view when camera is centered at 0°
Camera Viewing Angle
Adjustment slider
LR
(default)
Top view when camera is facing left at 15°
LR
Top view when camera is facing right at 15°
LR
Camera
2°
4
Camera
42°
4
2°
FIG. 5 MET-COM-D Camera: Left and Right Viewing Range
Camera
8
Metreau Entry Communicators
Page 15
Wiring and Connections
Overview
To avoid any damage to the electronic component, installation must be performed in
an ESD safe environment.
The installation section addresses the mounting and wiring of the Metreau Entry Communicators. After
you have completed the installation you must consult the Using the Configuration Manager section of
the Metreau Entry Communicators Operation/Reference Guide (available online at www.amx.com).
Additionally, consider the location of your installation. When possible, avoid facing the device in what
would be considered high traffic areas.
Do not connect power to the Metreau Entry Communicators until the wiring is
complete.
Wiring and Connections
Rear Panel Connectors
FIG. 6 shows the location of the connectors on the rear panel of the Metreau Entry Communicators, and
provides pinout information for the Relay and I/O connectors.
2
+5V GND
1234
5V I/Os
Ethernet Connection
2 Low Voltage Relays (3A Contact)
2 Multi-Purpose I/Os (5V)
FIG. 6 Metreau Entry Communicators - Rear Panel Connectors
1
21
BABA
1234
Relays
Metreau Entry Communicators
9
Page 16

Wiring and Connections
Ethernet 10/100 Base-T RJ-45 Wiring Configuration
The table below describes the pinouts, signals, and pairing for the Ethernet 10/100 Base-T connector and
cable. The Ethernet cable connection is illustrated in FIG. 7.
Ethernet Pinouts and Signals
Pin Signals Connections Pairing Color
1 TX + 1 --------- 1 1 --------- 2 White-Orange
2 TX - 2 --------- 2 Orange
3 RX + 3 --------- 3 3 --------- 6 White-Green
4 no connection 4 --------- 4 Blue
5 no connection 5 --------- 5 White-Blue
6 RX - 6 --------- 6 Green
7 no connection 7 --------- 7 White-Brown
8 no connection 8 --------- 8 Brown
FIG. 7
RJ-45 Wiring Diagram
The Metreau Entry Communicators use CAT5/CAT6 wire via the Ethernet port for PoE power.
PoE (Power Over Ethernet)
Use the PS-POE-AF Power over Ethernet Injector (FG423-80) to simplify wiring and installation by
eliminating the need for an AC outlet at each point of installation.
Entry Communicator Unit can be placed up to approximately 330’ (100 meters) from
PoE Injector.
If used with a non PoE-capable Ethernet switch (such as the NXA-ENET24), then an optional
PS-POE-AF Power-over-Ethernet (PoE) power supply is required to provide power to the
MET-ECOM.
If the MET-ECOM is used with a PoE-capable Ethernet switch (such as the NXA-
ENET24PoE), then no PoE Injectors are required.
10
Metreau Entry Communicators
Page 17

Wiring and Connections
Input/Output (I/O) Port: Connections and Wiring
The I/O port responds to either switch closures, voltage level (high/low) changes, or it can be used for
logic-level outputs.
A contact closure between the GND and an I/O port is detected as a Push.
When used for voltage inputs, the I/O port detects a low signal (0 - 1.5 VDC) as a Push, and a
high signal (3.5 - 5 VDC) as a Release (this IO port uses 5V logic but can handle up to 12V
without harm).
When used for outputs, the I/O port acts as a switch to GND and is rated for 200 mA @ 5
VDC. This device can use up to 2 I/O ports (see table below).
The PWR pin provides +5 VDC @ 200 mA.
The GND connector is a common ground and is shared by all I/O ports (see table below).
I/O Port Wiring Specifications
Pin Signal Function
15 VDC PWR
2 I/O 2 Input/Output
3 I/O 1 Input/Output
4 GND Signal GND
Connecting The Device via I/O
When connecting the I/O port, the GND on the Metreau Entry Communicator must be connected to the
ground of the I/O device, e.g., a master or any third party I/O device.
Relay Port: Connections and Wiring
You can connect up to 2 independent external relay devices to the Relay connectors on the Metreau Entry
Communicators.
Do not use the relays on this unit for "secure" applications such as door and gate
releases. For security reasons, an external relay box put in a secure location will work
better for these devices.
Connectors labeled A are for common; B are for output.
Each relay is isolated and normally open.
Metreau Entry Communicators
11
Page 18

Wiring and Connections
Ferrite Installation (Required)
Metreau Entry Communicators comes with a Cat5 Suppression Ferrite that must be clipped around the
Ethernet cable, inside the wall box (no tools required).
1. Release the latch to open
the plastic enclosure.
FIG. 8 Installing the CAT5 Suppression Ferrite
2. Insert the Cat5 cable
and close the enclosure.
3. Installation complete.
When positioning the Ferrite clip inside the wall box, place the bottom of the clip flat against the back
inside surface of the wall box, to allow sufficient room for the Metreau Entry Communicator unit
(FIG. 9).
Ethernet cable and connector
Wall Box (front view)
Ensure that the Ferrite clip is resting flat
Ferrite clip installed on
Ethernet cable
FIG. 9 Fitting the Ferrite clip and Ethernet cable inside the Conduit Box
against the inside back surface of the
wall box to allow room for the
Metreau Entry Communicator unit
12
Metreau Entry Communicators
Page 19

Wiring and Connections
System Diagram
FIG. 10 provides a basic NetLinx system diagram using Metreau Entry Communicators:
NetLinx Master
NXA-ENET24PoE
NXD-1000Vi NXD-700Vi
FIG. 10 Metreau Entry Communicators - System Diagram
System Diagram - Intercom
MVP-8400i
MVP-5200i
NXA-WAP250G
PS-POE-AF
MET-ECOM-D
MET-ECOM
The following system diagram (FIG. 11) illustrates an AMX system using Metreau Entry
Communicators with both wired and wireless touch panels:
FIG. 11 Intercom System Diagram
Metreau Entry Communicators
13
Page 20

Wiring and Connections
14
Metreau Entry Communicators
Page 21
Mounting and Installation
MET-ECOM / MET-ECOM-D Installation Overview
This section addresses the physical mounting of the MET-ECOM and MET-ECOM-D Metreau Entry
Communicators. To avoid any damage to the electronic component, installation must be performed in an
ESD safe environment. Also note that the Metreau Entry Communicator and wall box must have an
earth-ground.
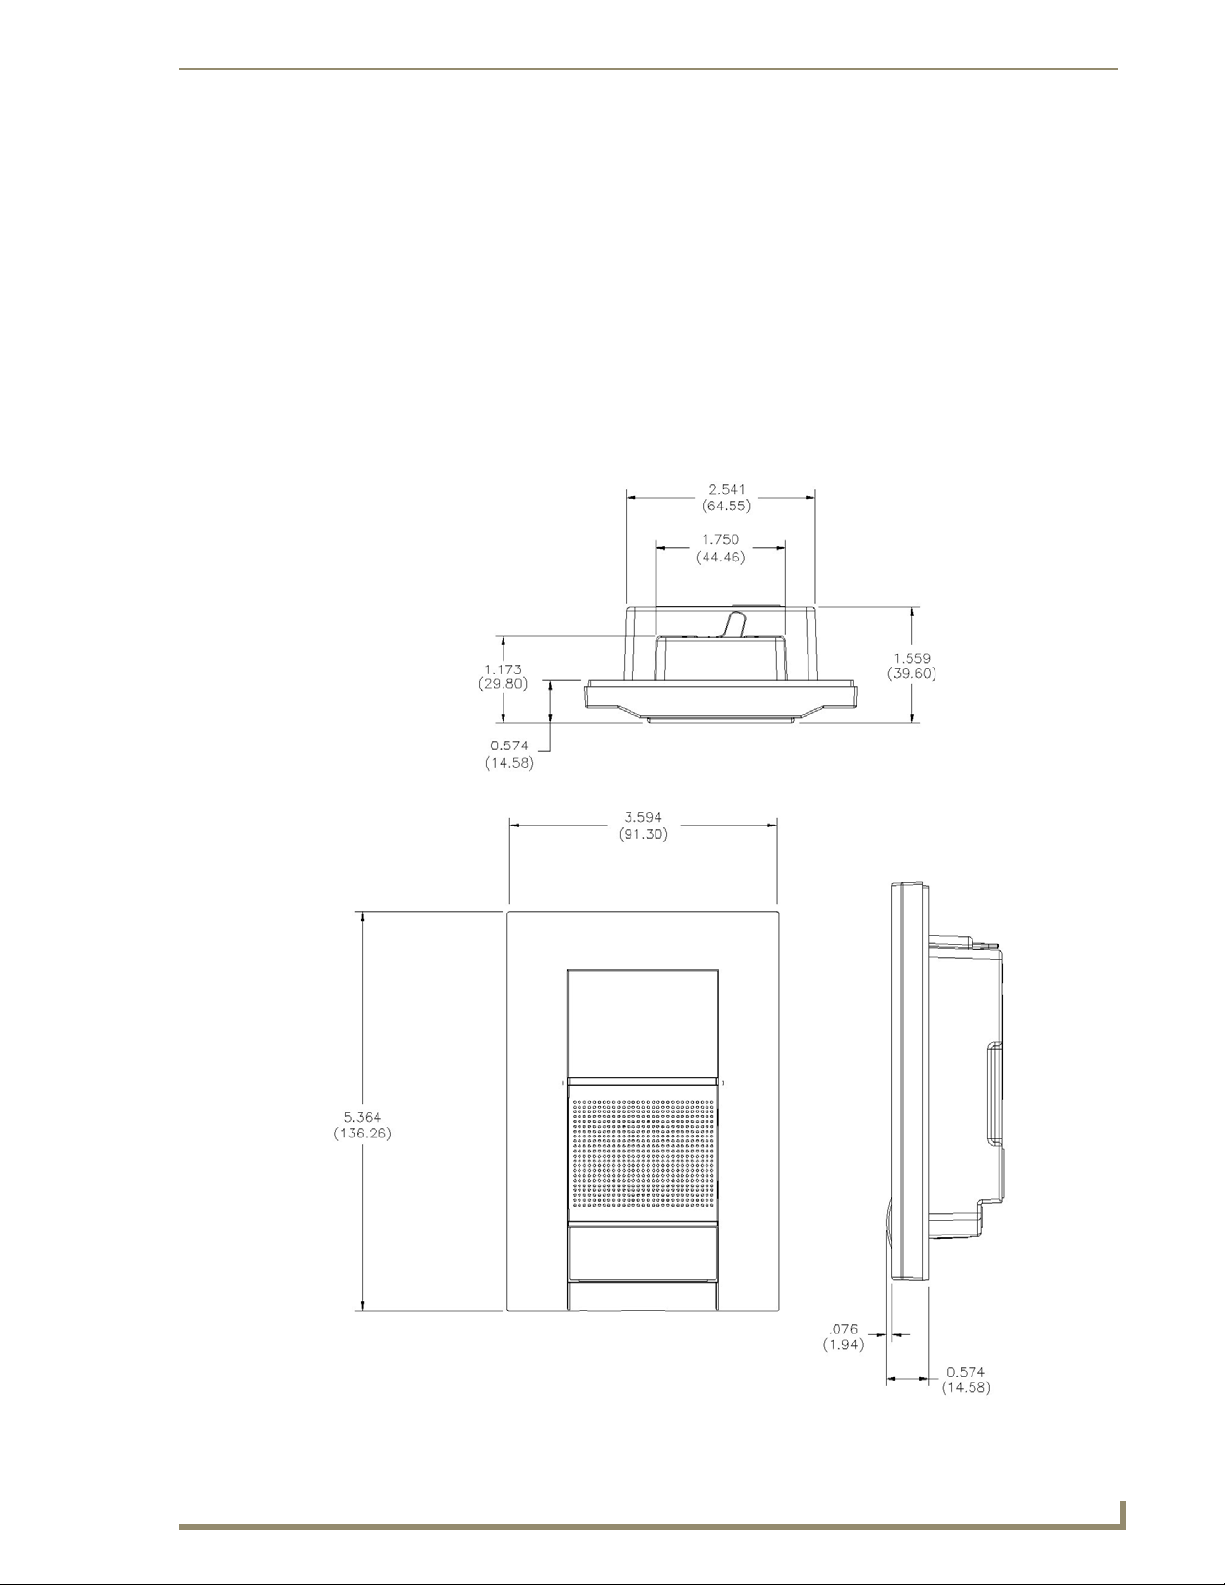
Dimensions
FIG. 12 provides detailed dimensions for the Metreau Entry Communicators:
Mounting and Installation
top view
FIG. 12 Metreau Entry Communicators - Dimensions
Metreau Entry Communicators
side view
front view
15
Page 22
Mounting and Installation
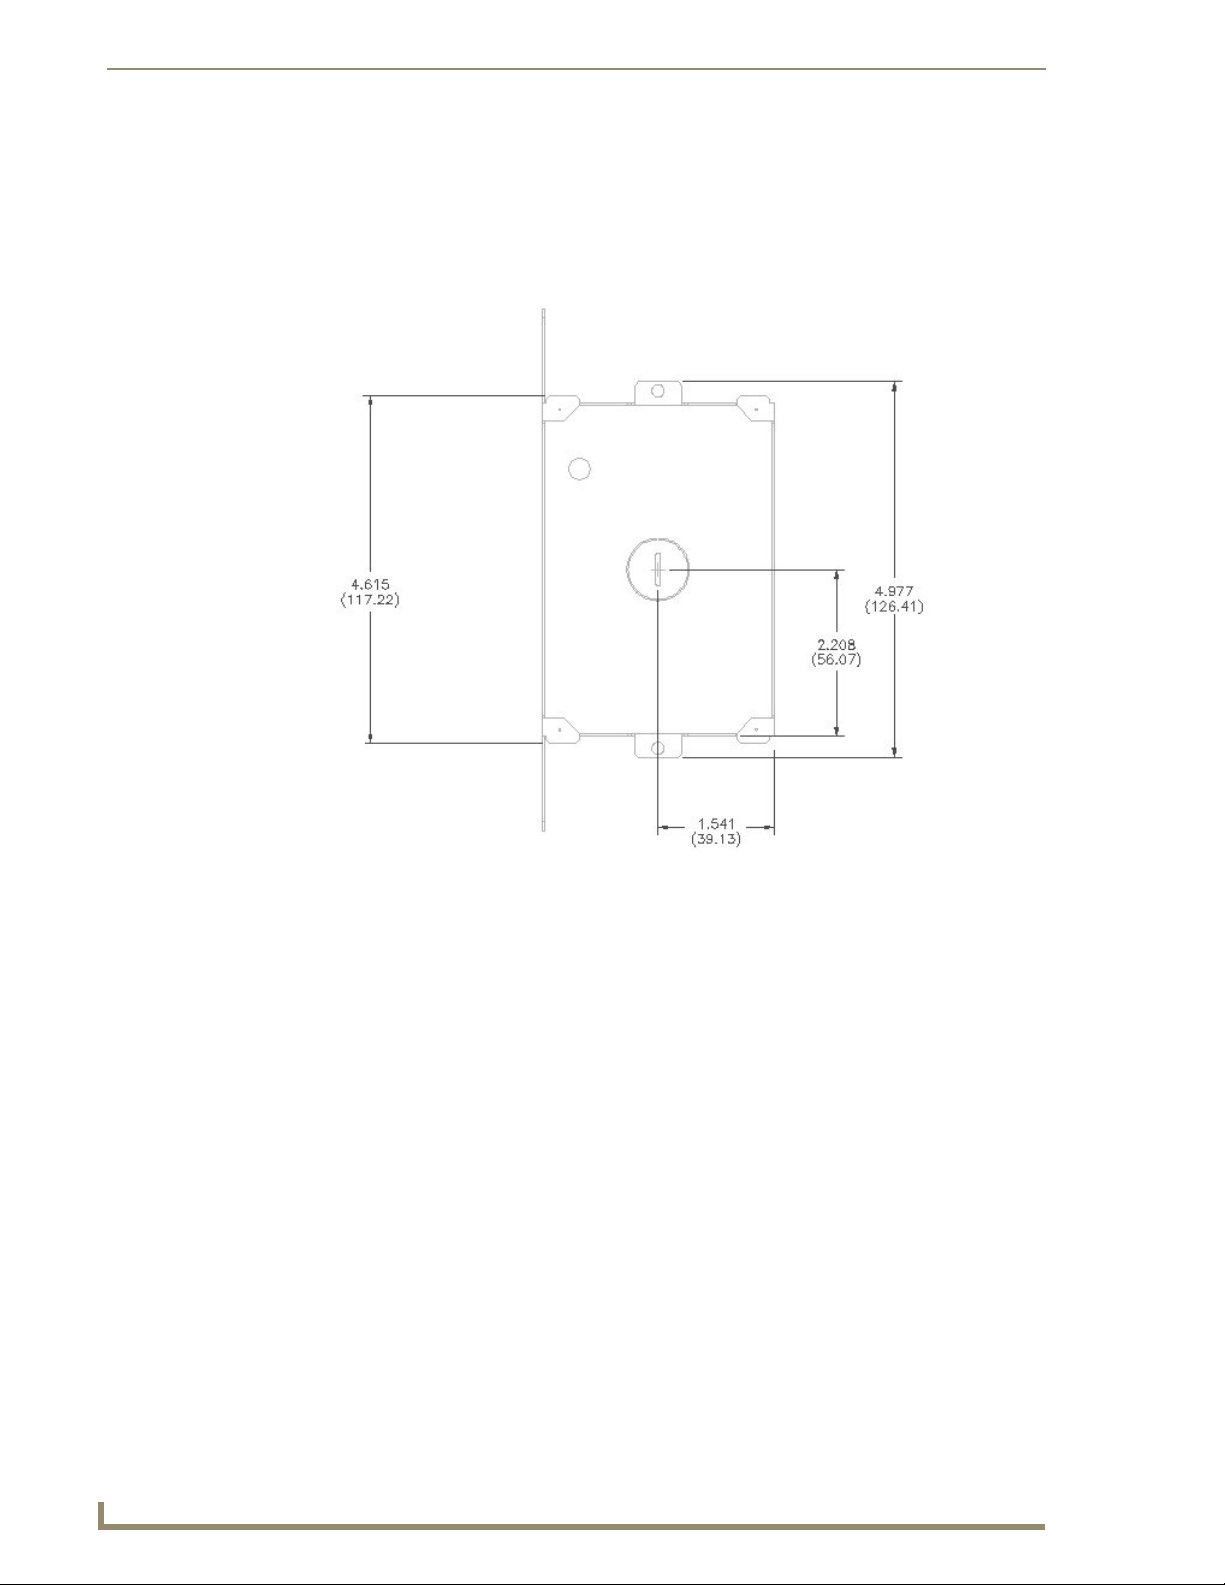
Mounting Specifications
The following illustrations (FIG. 13, FIG. 14 and FIG. 15) provide mounting specifications for the
Metreau Entry Communicators conduit box (FG. Reference these measurements when planning and
installing the device.
Front View
FIG. 13 Mounting Specifications (front view)
16
Metreau Entry Communicators
Page 23
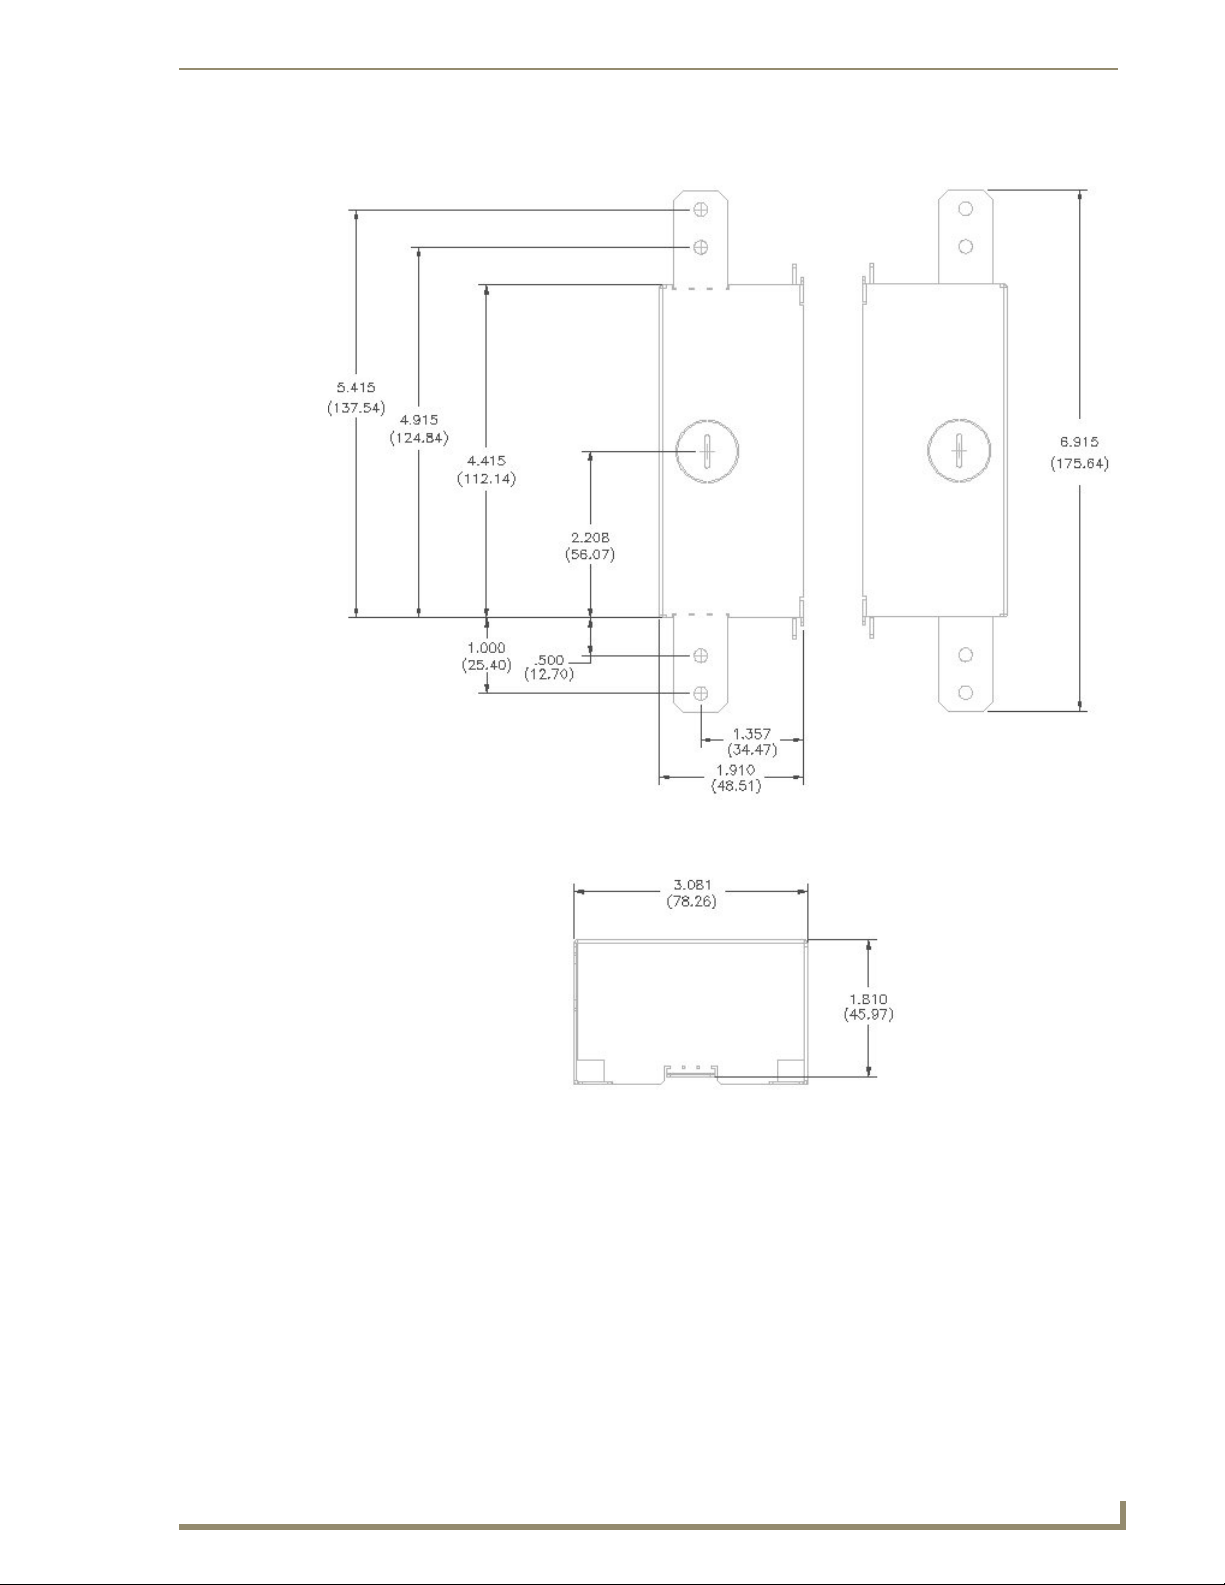
Side Views
Mounting and Installation
FIG. 14 Mounting Specifications (side views)
Top View
FIG. 15 Mounting Specifications (top view)
Metreau Entry Communicators
17
Page 24
Mounting and Installation
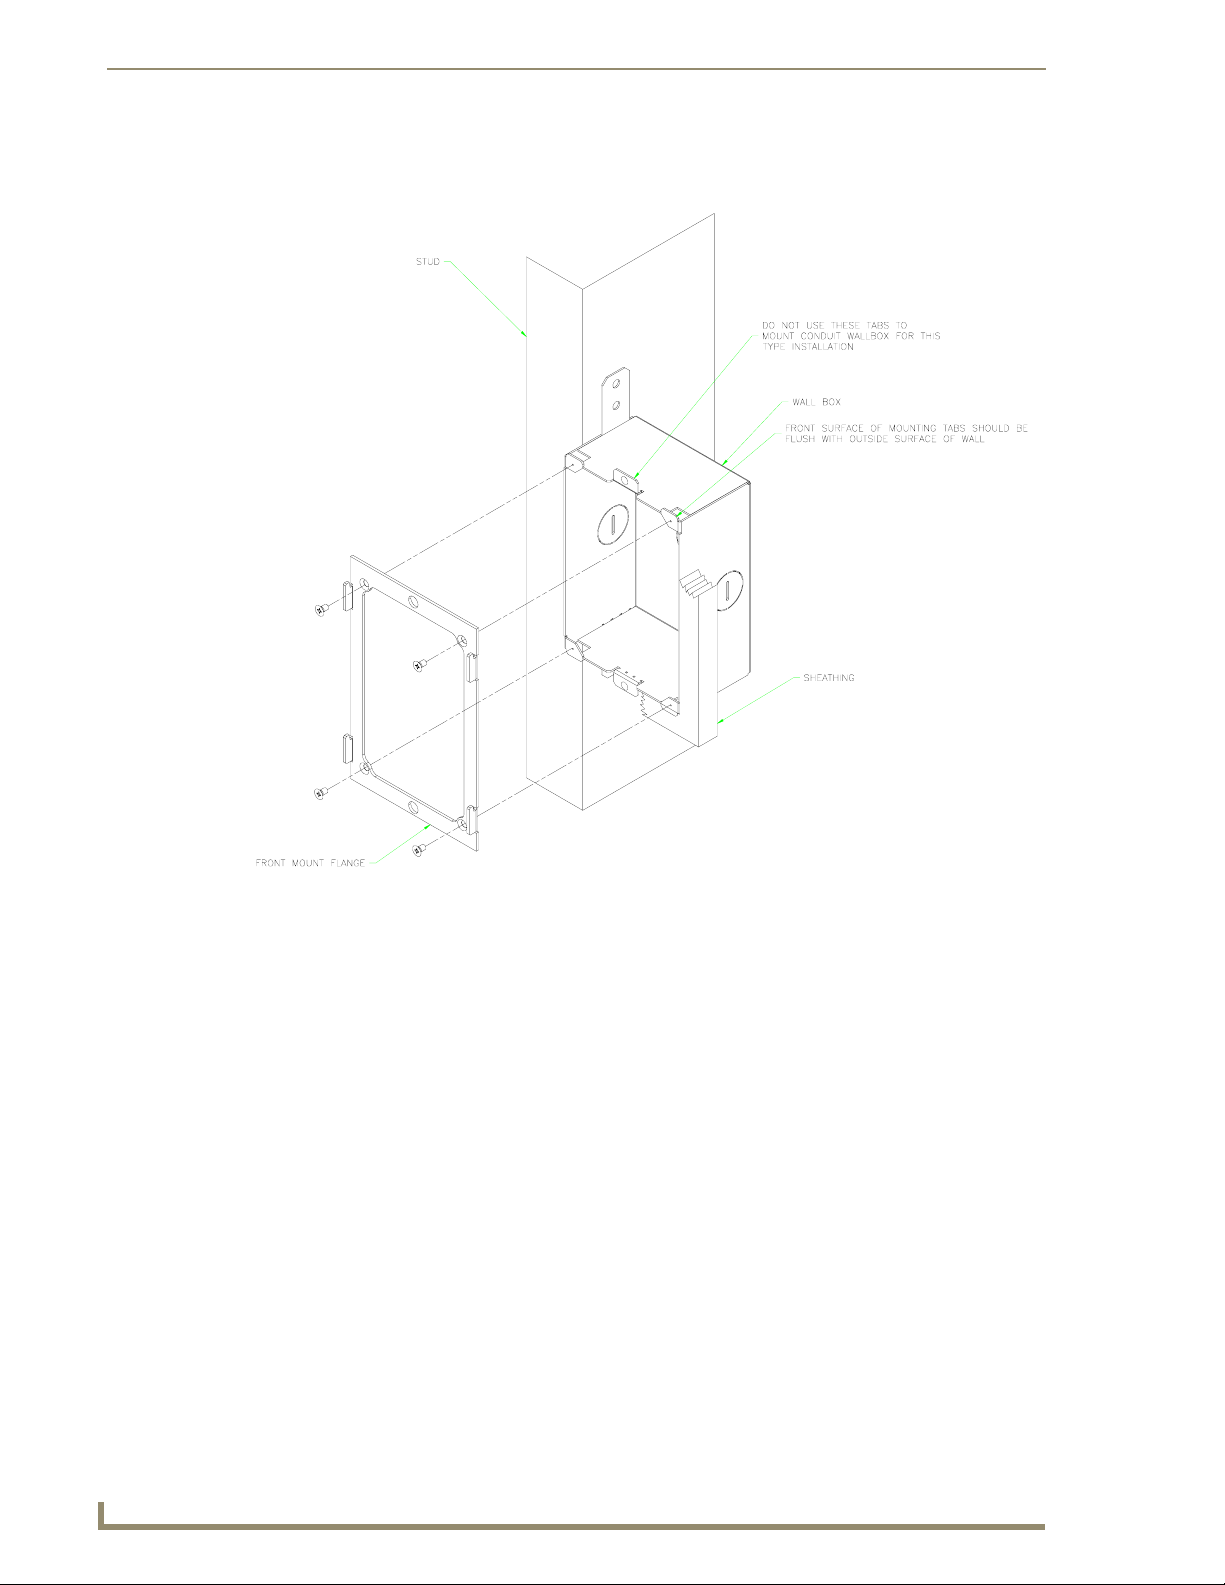
Typical Installation (Without Expansion Clips)
FIG. 16 provides specifications for mounting the wall box without the use of expansion clips.
FIG. 16 Typical Installation (Without Expansion Clips)
Be sure to install the Cat5 Suppression Ferrite (provided) before mounting the
Metreau Entry Communicator unit into the wall box. Refer to the Ferrite Installation
(Required) section on page 12 for details.
1. Remove the tabs for the expansion clip installation from the wall box by bending back and forth
with pliers.
2. Use screws through the rough-in tabs to the stud. The wall box is 1.81" (4.597 cm) deep. The front
of the wall box should be flush with the front surface of the sheetrock. While the wall box can be
recessed it should never stand proud to the surface.
3. Run the Ethernet cable and an Earth ground wire into the wall box. Only use the keyholes indicated
in FIG. 17.
4. Place the lug of the ground wire on the device and the Earth ground wire around the provided screw
and connect them both to the point shown in FIG. 17.
18
Metreau Entry Communicators
Page 25
Rough-in
installation tabs
Earth
ground
point
FIG. 17 Metreau Entry Communicators wall box
Keyhole Ethernet
cable access
Expansion clip
installation tabs
Mounting and Installation
The device and wall box must have an Earth ground.
5. Install the (provided) Ferrite clip onto the Ethernet cable (see FIG. 8 on page 12).
6. Connect the Ethernet cable in the back of the Metreau Entry Communicator.
7. Insert the Metreau Entry Communicator into the wall box, and push until the device is flush to the
wall.
Metreau Entry Communicators
19
Page 26

Mounting and Installation
Installing the Wall Box Without the Use of Tabs
Be sure to install the Cat5 Suppression Ferrite (provided) before mounting the
Metreau Entry Communicator unit into the wall box. Refer to the Ferrite Installation
(Required) section on page 12 for details.
A brick and mortar installation environment is a great example where no tabs are required.
1. Remove both the tabs for the rough-in installation and expansion clip installation from the wall box
2. Thread the Ethernet cable and the Earth ground wire through one of the provided breakaway access
3. Insert the provided cardboard paint shield into the wall box.
While conducting this installation, confirm nothing gets into the wall box, i.e., mortar.
4. Place the lug of the ground wire on the device and the Earth ground wire around the provided screw
by bending back and forth with pliers (see FIG. 16 on page 18).
points on the wall box.
Leave enough slack in the wiring to accommodate any re-positioning of the unit.
Only use the keyholes indicated in FIG. 17.
and connect them both to the point shown in FIG. 17.
The device and wall box must have an Earth ground.
5. Install the (provided) Ferrite clip onto the Ethernet cable (see FIG. 8 on page 12).
6. Connect the Ethernet cable to the back of the Metreau Entry Communicator.
7. Insert the Metreau Entry Communicator into the wall box, and push until the device is flush to the
wall.
20
Metreau Entry Communicators
Page 27

Mounting and Installation
Wall Surface Installation (Using Expansion Clips)
Expansion clips are mounted through the 2 holes located along the rim of the wall box (see FIG. 18). As
the screw is tightened, the clip bends toward the insertion hole and into the wall. This bending creates a
"grip" on the wall by either pressing onto the wall or by securing the drywall between the housing and
the drywall clip. The most important thing to remember when mounting the wall box is that the outer
trim must be installed flush against the mounting surface.
FIG. 18 provides recommended cutout dimensions for the wall box. It is recommended that you cutout
the surface slightly smaller than what is outlined in the installation drawings so that you can make any
necessary cutout adjustments.
FIG. 18 Recommended Cutout For Wall Box
Be sure to install the Cat5 Suppression Ferrite (provided) before mounting the
Metreau Entry Communicator unit into the wall box. Refer to the Ferrite Installation
(Required) section on page 12 for details.
1. If assembled, remove the Metreau Entry Communicator from the wall box.
2. Cut out the surface for the Wall Box using the dimensions shown in FIG. 18.
3. Run the Ethernet cable and an Earth ground wire into the wall box through the provided breakaway
access points on the wall box. Leave enough slack in the wiring to accommodate any re-positioning
of the unit.
Metreau Entry Communicators
21
Page 28

Mounting and Installation
4. Install the 2 drywall screws and expansion clips into the 2 locations along both sides of the wall box.
5. Insert the wall box and expansion clips into the cutout until the rim of the wall box is flush against
Replacement drywall clip sets must be ordered from AMX.
6. Tighten the 2 drywall clip sets (screws and clips) until the wall box is flush against the wall
the wall.
(FIG. 19).
22
FIG. 19 Wall Surface Installation (Using Expansion Clips)
Do not over-torque the screw; doing so can cause the unit to not function properly
7. Place the lug of the ground wire on the device and the Earth ground wire around the provided screw
and connect them both to the point shown in FIG. 17.
The device and wall box must have an Earth ground.
Metreau Entry Communicators
Page 29

Mounting and Installation
8. Install the (provided) Ferrite clip onto the Ethernet cable (see FIG. 8 on page 12).
9. Connect the Ethernet cable in the back of the Metreau Entry Communicator.
10. Insert and fasten the Metreau Entry Communicator into the wall box.
Installing Into a Flat Surface Using Mounting Screws
Mounting screws (#4 flathead, not included) are secured through two sets of circular holes located at the
left and right sides of the wall box. Ensure the wall box is flush against the mounting surface.
It is recommended that you cutout the surface slightly smaller than what is outlined in the installation
drawings so that you can make any necessary cutout adjustments.
Be sure to install the Cat5 Suppression Ferrite (provided) before mounting the
Metreau Entry Communicator unit into the wall box. Refer to the Ferrite Installation
(Required) section on page 12 for details.
1. If assembled, remove the Metreau Entry Communicator from the wall box.
2. Cut out the surface for the Metreau Entry Communicator wall box using the dimensions shown in
FIG. 13.
3. Run the Ethernet cable and an Earth ground wire into the wall box through one of the provided
breakaway access points. Leave enough slack in the wiring to accommodate any re-positioning of
the unit.
4. Insert the wall box into the cutout until the rim of the wall box is flush against the wall.
5. Insert and secure four #4 flathead mounting screws (not included) into their corresponding holes
located along the sides of the wall box until it is flush against the wall. See FIG. 20.
#4 Screws
FIG. 20 Flat Surface Installation Points
Flat Surface
Metreau Entry Communicators
23
Page 30

Mounting and Installation
6. Place the lug of the ground wire on the device and the Earth ground wire around the provided screw
The device and wall box must have an Earth ground.
7. Install the (provided) Ferrite clip onto the Ethernet cable (see FIG. 8 on page 12).
8. Connect the Ethernet cable in the back of the Metreau Entry Communicator.
9. Insert and fasten the Metreau Entry Communicator into the wall box.
Start at the top of the device and tilt in toward the bottom.
Removing the Device From the Wall
The installation housing for the Metreau Entry Communicators are made to such exacting specifications
it will always be a snug fit. Should you ever need to remove the Metreau Entry Communicator from the
wall, follow these steps:
1. Place a flathead screwdriver between the tab of the wall box and the notch of the Metreau Entry
2. Pull the bottom of the unit out (pivoting on the top clip) until it seems to bind against the shielding
3. While keeping the unit at this angle, pull the top of the unit away from the top clip.
and connect them both to the point shown in FIG. 17.
Communicator and pop the two apart.
24
Metreau Entry Communicators
Page 31

Mounting and Installation
Using the Optional Surface Mount Box
The CB-MET-ECOMS (-S/-B) Surface Mount Box Kit for Metreau Entry Communicators is available
for situations where it is undesirable or impossible to install the conduit box into the mounting surface. It
is available in two colors:
CB-MET-ECOMS-S - paintable Silver (FG039-14-S)
CB-MET-ECOMS-B - Black (FG039-14-B)
The Surface Mounting Box (FIG. 1) allows the Metreau Entry Communicators to be surface-mounted,
with the back panel of the mounting box flush against the surface and the unit protruding.
Mounting tabs
Mounting
Screw Holes
mounting clip
Front
FIG. 21 Surface Mounting Box
Included in the Kit
CB-MET-ECOMS Surface Mount Box
1 Cat5 Suppression Ferrite
2 mounting screws
Rear
Conduit
Routing Hole
Metreau Entry Communicators
25
Page 32

Mounting and Installation
Surface Mount Box Specifications
FIG. 22 provides mounting specifications for the CB-MET-ECOMS:
TOP SIDE
26
FRONTREAR
FIG. 22 Surface Mounting Box Specifications - Top and Side Views
Metreau Entry Communicators
Page 33

Mounting and Installation
Ferrite Installation (Required)
The CB-MET-ECOMS comes with a Cat5 Suppression Ferrite that must be clipped around the Ethernet
cable, inside the back box (no tools required).
12 3
(complete)
FIG. 23 Installing the CAT5 Suppression Ferrite
1. Release the latch to open the plastic enclosure.
2. Insert the Cat5 cable and close the enclosure.
When positioning the Ferrite clip inside the back box, place the bottom of the clip flat
against the back inside surface of the back box, to allow sufficient room for the
Metreau Entry Communicator unit.
Installing the Metreau Entry Communicator
The Metreau Entry Communicator clips onto the front of the Surface Mount Box via the four mounting
tabs (two on each side), and the mounting clip at the bottom center of the box (FIG. 24):
Surface Mount Box
Cables enter through the
Conduit Routing Hole
in the back panel
Metreau Entry Communicator
FIG. 24 Installing the Metreau Entry Communicator unit on the Surface Mount Box
Metreau Entry Communicators
bottom security tab
27
Page 34

Mounting and Installation
1. Run all cables through the Conduit Routing Hole on the rear panel of the Surface Mounting Box.
2. Secure the incoming conduit to the inside of the Surface Mount box.
3. Connect all cables (Ethernet, I/O & Relay) to the Metreau Entry Communicator.
4. Place the Metreau Entry Communicator on the front of the Surface Mount Box, so that the four slots
5. Gently slide the Metreau unit down until the tabs are fully seated, and the plastic security tab on the
The Conduit Routing Hole is intended to accept conduit of up to 0.500" (1.27 cm) in diameter (see
FIG. 22).
on the back panel of the Metreau unit align with the four mounting tabs on the box.
The tabs fit into the slots on the Metreau unit, and allow the Metreau unit to slide downward
slightly, to secure the tabs in the slots.
bottom of the Metreau unit clicks into place on the Surface Mount Box.
28
Metreau Entry Communicators
Page 35

Using Zero Configuration
Overview
Metreau Entry Communicators with firmware versions of v1.00.018 (MET-ECOM) and v1.00.020
(MET-ECOM-D) or higher support using "zero-configuration" client software to quickly install multiple
devices on the network.
Bonjour (Zero-Configuration) Client
You can use a zero-configuration client to determine the IP address of the Metreau Entry Communicators.
There are many zero-configuration clients available. However, for the purposes of this document, we will refer
to Bonjour for Windows. It is free and widely available for download.
If you don’t already have it installed on your PC, download and install Bonjour for Windows before you begin.
Connecting In a Network With a DHCP Server
By using the MET-ECOM zeroconf feature and the Bonjour for Windows plug-in utility, multiple devices
can be installed and configured on the network without the need to pre-configure each device before
installation.
The dealer only needs to match the serial number printed on the backside of the device or from the label
on the box to the serial number that is displayed in the Bonjour browser pane.
1. Launch Internet Explorer with the Bonjour plug-in.
2. Once power is applied to the device, the BonJour plugin displays the devices as shown in FIG. 25:
Using Zero Configuration
FIG. 25 Internet Explorer with BonJour plug-in
3. Double-click on the desired MET-ECOM (Metreau-218001XXXnnnnnnn) to access the
configuration pages of the selected device.
This requires valid login information - the browser will prompt you for User ID and Password
before displaying the configuration pages for the selected device.
Metreau Entry Communicators
29
Page 36

Using Zero Configuration
At this point, the device can be configured (changing IP settings, NetLinx settings, User settings, etc) via
the pages in the Configuration Manager (see the Using the Configuration Manager section on page 33).
Connecting In a Network Without a DHCP Server
By using the MET-ECOM zeroconf feature and the Bonjour for Windows plug-in utility, Dealers can
install and configure MET-ECOM/D devices one at a time in a network that does not have a DHCP
Server. In this case, the MET-ECOM/D devices revert to using a minimal implementation of 'link-local
addressing'.
To establish a network connection from a PC to the MET-ECOM device:
1. Direct connect a PC and MET-ECOM device with the AMX PS-POE-AF single-port PoE Injector.
Alternatively, connect the PC and MET-ECOM to an Ethernet switch equipped with
PoE. Make sure only one MET-ECOM that is still at its factory default settings is
connected.
2. Confirm PC assigned itself an IP address:
Notice that the serial number is appended to the name of the device.
In this case the serial number is 218001WHP2980023.
a. If the PC's network interface is set to DHCP wait several minutes to ensure the PC reverts to
'link-local addressing'.
b. You can confirm that the PC has assigned itself an IP by running ipconfig from a CMD shell.
The example in FIG. 26 shows the Ethernet adapter Local Area Connection: could not find a DHCP
server and assigned itself the IP address of 169.254.83.124 with Subnet Mask 255.255.0.0. This is a
valid link-local address.
30
FIG. 26 CMD shell (ipconfig)
If the PC did not assign itself a 169.254.x.x address, or if the PC assigned itself the address of
169.254.2.2 then proceed to Step 3. Otherwise skip to Step 4.
3. Manually assign an IP address, via the Internet Properties (TCP/IP) Properties dialog (FIG. 27):
You may need to manually assign the IP on the PC if the PC does not support link-local addressing
or if the PC assigned itself the IP address of 169.254.2.2.
This version of the MET-ECOM assigns itself 169.254.2.2 by default when it reverts to link-local
addressing. Therefore, in order to avoid conflict the PC cannot be assigned IP address 169.254.2.2.
Metreau Entry Communicators
Page 37

Using Zero Configuration
Manually set the PC's IP address to 169.254.1.1 and subnet mask to 255.255.0.0.
FIG. 27 Internet Properties (TCP/IP) Properties dialog
4. Launch Internet Explorer and select the Bonjour Plug-in.
5. Double-click the MET-ECOM (Metreau-218001XXXnnnnnnn) in the Bonjour Plug-in pane and
login and configure the device as needed (see Using the Configuration Manager section on
page 33).
Metreau Entry Communicators
31
Page 38

Using Zero Configuration
32
Metreau Entry Communicators
Page 39

Using the Configuration Manager
Overview
Metreau Entry Communicators have a built-in web console (FIG. 28) that allows you to easily make
various configuration settings via a web browser on any PC that has access to the device. The web
console consists of a series of web pages that separate device configuration options by category.
Collectively, the pages in the web console are referred to as the Configuration Manager. Each page of the
Configuration Manager is described in the following sub-sections.
sections of the Configuration Manager
Click to Login/Logout
(initial view = Summary)
Using the Configuration Manager
Click to refresh Click to access the four main
the Configuration
Manager
FIG. 28 Configuration Manager - Summary of Settings Page (initial view)
Metreau Entry Communicators
Click to Reboot the device
33
Page 40

Using the Configuration Manager
Command Buttons
The Configuration Manager is divided into four primary sections, indicated by four command buttons
across the top of the main page (FIG. 29):
FIG. 29 Configuration Manager Command Buttons
Summary: The Summary of Device page is the page that is displayed when the Configuration
Manager is accessed. Use the this page to view a summary of settings for this Metreau Entry
Communicator (see the Summary of <Device> Settings Page section on page 35).
Configuration: Click to access the IP Settings, NetLinx Settings and User Settings options
(see the Configuration Page section on page 37).
Utilities: Click to access the Utilities page. Use the options on this page to upload, change,
and display images on the Metreau Entry Communicator (see the Device Utilities
Pag e section on page 41).
Audio Video: Click to access the Audio/Video page. Use the options on this page to configure
Audio, Video and Display settings (see the Audio/Video Page section on page 47).
Accessing the Configuration Manager
From any PC that has access to the LAN that the Metreau Entry Communicator resides on:
1. Open a web browser and type the IP Address of the target Master in the browser’s Address Bar.
2. Press Enter to access the Configuration Manager for the specified device.
3. If prompted for a User Name and Password (FIG. 30), enter the defaults:
34
FIG. 30 Authentication Required dialog
Default User Name = Admin
Default Password = 1988
4. The initial view is the Summary page (FIG. 28).
Metreau Entry Communicators
Page 41

Using the Configuration Manager
Summary of <Device> Settings Page
The Summary of Device Settings page (FIG. 31) is the initial view when the Configuration Manager is
accessed.
FIG. 31 Summary of Device Settings Page
Naturally, this page can be accessed at any time via the Summary command button at the top of the web
console.
Summary of Device Settings Page
Device Information
Device Type The name of the connected device.
Firmware The version of the firmware running on the device.
Serial # The serial number of the device.
Location The physical location of this device (as entered on the Device Utilities Page (Utility Meta
Description A comment further describing this device (as entered on the Device Utilities Page (Utility
Metreau Entry Communicators
Information). See the Device Utilities Page section on page 41.
Meta Information). See the Device Utilities Page section on page 41.
35
Page 42

Using the Configuration Manager
Summary of Device Settings Page (Cont.)
IP Settings
IP The IP setting of the unit; either Static or Dynamic.
Host The hostname of the unit.
IP Address The IP address of the unit.
Subnet Mask The subnet mask associated with IP addressing
Gateway The IP gateway used by this unit.
MAC Address The MAC address of the unit.
NetLinx Settings
Status The connection status of the device.
System Number The NetLinx system number.
Device Number The ICSP device number of this unit.
Master IP The IP address of the NetLinx master connected to the device.
Master Port Port number for the NetLinx master connected to the device.
Friendly Name The friendly name of the device as it appears in the NetLinx master connection tree.
System Resources
File System Amount of memory available to the file system.
RAM Available RAM on the device.
Checking the Firmware Version
The firmware version is listed on the Summary of Device Settings page, in the Device Information
section at the top of the page.
Determining the IP settings of the Metreau Entry Communicator
1.
Browse to the Summary of Device Settings page.
2. The IP settings are listed in the IP Settings section.
Rebooting the Device
1.
Open the Summary of Device Settings page.
2. Click the Reboot button on the left bottom of the page.
It is necessary to reboot the device in order to apply changes to several
communication options, including Setting the IP and DNS Addresses, and setting the
ICSP connection and encryption status for the NetLinx Master (see page 39).
36
Metreau Entry Communicators
Page 43

Using the Configuration Manager
Configuration Page
Click the Configuration command button to access the Configuration page (FIG. 32). This page
contains three tabs:
IP Settings (initial view): Use the options in this tab to specify Network IP settings (see
below).
NetLinx Settings: Use the options in this tab specify the ICSP connection to the NetLinx
master (see the Configuration Page - NetLinx Settings Tab section on page 39).
User Settings: Use the options in this tab to set the Username and Password for access to the
Metreau Entry Communicators web server pages (see the Configuration Page - User Settings
Ta b section on page 40).
Configuration Page - Network IP Settings Tab
Select the IP Settings tab of the Configuration page to access the Network IP Settings tab (FIG. 32). Use
the options in this tab to set IP and DNS addresses for the Metreau Entry Communicator.
FIG. 32 Configuration Page - Network IP Settings tab
The IP address can be either a static or dynamic assignment.
Metreau Entry Communicators
37
Page 44

Using the Configuration Manager
Configuration Page - Network IP Settings Tab
IP Address
IP • Dynamic: IP address and subnet mask are requested from the DHCP server.
Host The hostname of the unit.
IP Address The IP address of the unit.
Subnet Mask The IP subnet mask of the unit.
Gateway The gateway used for IP routing.
DNS Address
Domain Suffix The domain name.
Primary DNS
Secondary DNS
Zero Configuration Networking
ZCN On/Off These radio buttons toggle Zero Configuration Networking on this device (default = On).
• Static: User provides IP address information.
Domain Name System IP numbers associated to the domain suffix.
Note: It is recommended that ZCN remain "On", to allow this device to appear online
when using zero-configuration networking tools. These tools enable automatic discovery
of computers, devices, and services on IP networks.
• In order for Zero Configuration Networking to work, the Metreau Entry Communicator
must be on the same subnet as the PC or laptop running the zero-configuration
networking tool used to identify the unit.
• In the zero-configuration networking tool, the Host Name used to identify the Metreau
Entry Communicator must be appended with ".local" suffix (i.e. "MET_ECOM.local").
Setting the IP Address
1.
In the Configuration page, select the IP Settings tab.
2. Click the radio button for either Dynamic or Static.
If you selected Dynamic, the DHCP server automatically provides the IP address.
If configured for Static, type the IP address in the field provided.
If necessary, type the Subnet Mask and Gateway in the fields provided.
3. Click Accept.
4. In the The system will need to reboot for changes to take effect window, click OK.
Setting the DNS Address
1.
In the Configuration page, select the IP Settings tab.
2. Click the Static radio button in the IP Address section.
3. Type the Domain Suffix in the field provided.
4. Type the necessary DNS IP numbers in the fields.
5. Click Accept.
6. In the The system will need to reboot for changes to take effect window, click OK.
38
Metreau Entry Communicators
Page 45

Using the Configuration Manager
Configuration Page - NetLinx Settings Tab
Select the NetLinx Settings tab of the Configuration page to access the NetLinx Settings tab (FIG. 33).
Use the options in this tab to view and edit the ICSP connection to the NetLinx master.
FIG. 33 Configuration Page - NetLinx Settings tab
Configuration Page - NetLinx Settings Tab
Connection Displays the ICSP connection status (Not Connected / Connected).
Mode Master connection mode:
• URL(TCP) - The device connects to the specific IP/URL of a master via a TCP
connection.
• Auto - The device connects to the first master that responds. This setting requires you
set the System Number.
• Listen - The device "listens" for the master to initiate contact. This setting requires you
provide the master with the device’s IP.
System Number The ICSP system number.
Device Number The ICSP device number.
Master IP/URL IP or URL of master for URL master connection mode
Master Port Number The ICSP socket port number.
Username The ICSP network username (required if the NetLinx master is encrypted).
Password The ICSP network password (required if the NetLinx master is encrypted).
Friendly Name The friendly name of the device as it appears in the NetLinx master connection tree.
Setting the ICSP Connection to the NetLinx Master
1.
In the Configuration page, select the NetLinx Settings tab.
2. Enter the system number assigned to the ICSP system.
3. Enter the device number to be assigned to the Metreau Entry Communicator in the Device Number
field.
4. Enter the IP address of the master that the Metreau Entry Communicator is to connect with in the
Master IP/URL field.
Metreau Entry Communicators
39
Page 46

Using the Configuration Manager
Setting the Host Name requires DNS implementation on the IP network.
5. If you have enabled password security on your master, you need to set the username and password
within the fields provided.
6. Click Accept.
7. In the The system will need to reboot for changes to take effect window, click OK.
Configuration Page - User Settings Tab
The options in the User Settings tab of the Configuration page are used to set the Username and
Password that allow access to the Configuration Manager pages.
FIG. 34 Configuration Page - User Settings page
Configuration Page - User Settings Tab
New Username Text field for new username.
New Password Text field for new password.
Re-type Password Text field to confirm new password.
Setting a New Username and Password
1.
In the Configuration page, select the User Settings tab.
2. In the text field next to New Username, type the new name.
3. In the text field next to New Password, type the new password.
4. Confirm the password in the Re-type Password field.
5. Click Accept.
The default username and password are “Admin” and “1988”, respectively; changing
the password as soon as possible is highly recommended.
40
Metreau Entry Communicators
Page 47

Using the Configuration Manager
Device Utilities Page
Click the Utilities command button to access the Device Utilities page (FIG. 35). The options on this
page allow you to upload, change, and display images on the MET-ECOM-D.
Create New
Folder
Image
Selection
field
FIG. 35 Device Utilities Page
Device Utilities Page
Utility Meta Information
Location Enter a descriptive text string that indicates the physical location of this device.
Description Enter a text string to provide any additional comments on this device as
desired.
Submit Click to submit the Location and Description entries.
Metreau Entry Communicators
41
Page 48

Using the Configuration Manager
Device Utilities Page (Cont.)
File Upload
Browse Opens the file browse window, where you can locate and select Display
Submit Submits the selected file image for upload.
Images
Location The file directory location of the selected image.
New Folder Creates a new folder directory.
Image Selection Field Field of available images for display on the device; click to select.
Image File Requirements
In order for images to be displayed on the MET-ECOM-D, the following image file requirements apply:
BMP image type
1-bit (monochrome)
128 x 64 pixels
Creating Display Images
Use any graphics application that is capable of saving image files under various formats and allows you
to re-size the image and reduce the number of colors available (for example, MicroSoft Paint).
Images.
MicroSoft "Paint" (formerly Paintbrush for Windows, also known as "MS Paint") is a
simple graphics painting program that has been included with almost all versions of
Microsoft Windows since its first release. Paint has the basic functions required to
transform most image files to monochrome bitmap images. However, use a more
robust graphics editing program if possible, to make it easier to achieve a better final
result
Images to be displayed on the MET-ECOM-D must be monochrome bitmap image files, with a final
image size of 128 pixels wide by 64 pixels high.
The following steps illustrate an example of using a typical image editing program to create a fullycompatible monochrome bitmap image for use with the MET-ECOM-D, using a standard JPG image file
as a starting point:
1. Open the image file that you want to use with the MET-ECOM-D (FIG. 36).
42
FIG. 36 Color image (JPG)
Metreau Entry Communicators
Page 49

Using the Configuration Manager
2. Save the file as a ".BMP" image (FIG. 37).
FIG. 37 Same image - saved as a BMP file
3. Reduce the BMP image to 128 x 64 pixels.
At this point there are options - you can either crop or reduce the original image to size. In many
cases, a combination of cropping and resizing may be best, depending on the size and nature of the
image. In this example, we will simply resize the image to 128 pixels wide by 64 pixels high
(FIG. 38).
FIG. 38 BMP file - resized to 128 x 64 pixels
4. Reduce the color count to 2 Colors, 1-bit (monochrome), as shown in FIG. 39:
FIG. 39 BMP file (128 x 64 pixels) reduced to 1-bit color
These are the basic steps involved. However, there are nuances involved in selecting images that will
translate effectively to the required size using only 1-bit color. For best results, avoid complex images
that rely on substantial color gradations as they will tend to be much less readable once they are
converted and resized.
Generally, the closer you can get the source image to the required size before reducing to
128x64, the better the resized image will look.
Metreau Entry Communicators
43
Page 50

Using the Configuration Manager
Check your graphics editing program for options relative to the reduction method applied to
the image when reducing the colors to 1-bit. In many cases you can select from several
techniques (such as error diffusion, ordered dither and/or nearest color). Depending on the
nature of the image you are working with, some reduction methods will yield much better
results than others.
Refer to your graphics editing program documentation for details, or better yet, experiment
with the options you have to find the one that works best for each image.
Creating Dynamic Images
Use the Resource Manager feature of the TPDesign4 application to create dynamic images for use with
the MET-ECOM-D. If you do not already have TPD4 installed, download and install the latest version
from www.amx.com.
TPDesign4 - Resource Manager
The Dynamic Images tab of TPD4’s Resource Manager dialog (FIG. 40) allows you to manage images
that exist on an HTTP server or FTP server, external to the panel.
FIG. 40 TPD4 - Resource Manager (Dynamic Images tab)
Click to create a new dynamic
image (opens the Create
Dynamic Images dialog)
44
Dynamic images can be refreshed at specified regular intervals or via the Panel > Refresh Dynamic
Images option.
Use this tab as a "library" of every dynamic image file that will be used in your project (for pages, popup
pages, buttons and icons). It is important to import all of your dynamic images to this tab first, before
they are applied in the project, so that you can maintain an organized profile of all images in the project,
regardless of their context (i.e. button state, page background, etc.)
Metreau Entry Communicators
Page 51

Using the Configuration Manager
Creating a New Dynamic Image
1.
In TPDesign4, select Panel > Resource Manager to access the Resource Manager dialog, and open
the Dynamic Images tab (FIG. 40).
2. Click the New button at the top of the dialog (see FIG. 40) to invoke the Create Dynamic Image
dialog (FIG. 41). The options in this dialog allow you to name and define dynamic image resources
to add to your Project.
FIG. 41 Create Dynamic Image dialog
3. Fill in the fields as described below:
Create Dynamic Image dialog
• Name: Enter a name for the dynamic image resource.
•Protocol: Select the desired protocol (HTTP / FTP).
• For Metreau Entry Communicators, Protocol must be set to HTTP.
•Host: Enter the host name, which must be a fully qualified DNS or IP address.
•Path: The Path must be a valid HTTP URL minus the protocol and host. The only
• File: Enter a file name that must be the full path to the location of the file or pro-
• User: Enter the user name for authentication.
• Password: Enter the password for authentication.
exception to this is the inclusion of special escape sequences and in the case
of the FTP protocol, regular expressions.
• For Metreau Entry Communicators, Path must be set to pages (as shown in
FIG. 41).
gram that will return the resource.
• For Metreau Entry Communicators, File must be set to:
stream_cam_wg.mjpeg?source=1 (as shown in FIG. 41).
• If the User name is changed on the Metreau Entry Communicator (via the
Configuration Manager, the User name must be updated here to match it, in
order for this dynamic image to be accessed.
• Default = Admin
• If the Password is changed on the Metreau Entry Communicator (via the
Configuration Manager), the Password must be updated here to match it, in
order for this dynamic image to be accessed.
• Default = 1988
Metreau Entry Communicators
45
Page 52

Using the Configuration Manager
4. Click OK.
When images of any (supported) file type except PNG are imported into a project, the
files are automatically converted to JPGs. For this reason, if you import (or paste) a
file that has the same name as a previously imported file (even if it has a different
extension), TPDesign4 automatically adds the "copy of" prefix to the file. PNGs are
not converted because they are already sufficiently compressed.
Uploading a Display Image To The Device
1.
Under File Upload, click the Browse button.
2. Navigate to your image file and select.
3. Click Submit.
Create Dynamic Image dialog (Cont.)
• Refresh Rate: Use the up/down arrows to adjust the number of seconds between refreshes
• Refresh only at
Panel Startup:
in which the resource is downloaded again. Refreshing resources will cause
the button displaying that resource to refresh as well.
The default value is zero (0), which means that the resource is only
downloaded once.
This option is only available if the Refresh Rate is set to 0, and causes the
dynamic image to refresh only upon restart of the panel, as opposed to upon
each visit to the page (as is the default).
Deleting a Display Image From the Device
1.
Select the image that you want to delete from the device.
2. Click on the Delete icon.
3. The system prompts you to verify this action (press OK to proceed).
46
Metreau Entry Communicators
Page 53

Using the Configuration Manager
Audio/Video Page
Audio/Video Page - Audio Settings Tab
Click on the Audio tab of the Audio/Video Page to access the Audio Settings tab (FIG. 42). Use the
options in this tab to view/edit audio-specific settings.
FIG. 42 Audio/Video Page - Audio Settings tab
Audio/Video Page - Audio Settings Tab
Audio Codec
G.711 Codec An ITU-T standard for audio companding.
• ALAW - A standard companding algorithm used in European digital communications
systems to optimize the dynamic range of an analog signal for digitizing.
• ULAW - A companding algorithm primarily used in the digital telecommunication systems
of North America and Japan.
Note: Do not change the Audio Codec setting during a call.
Audio Levels
Speaker Volume The volume level for the speaker on the device. (1 - 100)
• Mute - mutes the volume on the speaker.
Mic Volume The volume level for the mic on the device. (1 - 100)
• Mute - mutes the mic.
Setting Device Audio
1.
In the Audio/Video page, select the Audio tab.
2. Click the radio button to select the Audio Codec type.
3. Use the sliders to set the Speaker and Mic volume levels. Place a check in each box to mute these
options.
4. Click Accept.
Metreau Entry Communicators
47
Page 54

Using the Configuration Manager
Audio/Video Page - Video Settings Tab
Click the Video tab in the Audio/Video Page to access the Video Settings page (FIG. 43). Use the options
in this tab to view/edit video-specific settings.
48
FIG. 43 Audio/Video Page - Video Settings tab
Audio/Video Page - Video Settings Tab
Video Codec
Codec • MJPEG - Motion JPEG codec.
• H.263 - A low-bitrate compressed format standard codec.
Note: Do not change the Video Codec setting during a call.
Camera/Video Stream Configuration
Orientation • Normal - Sets the video stream to normal view.
• Mirror - Sets the video stream to a mirrored view.
• Flip - Flips the video stream to view.
Light Level • Normal - Setting for a normal light level environment; no changes.
• Low Light - Setting for a lower light level environment; brightens the image.
White Balance • Auto - The device sets the white balance automatically.
• Manual - Enables the RGB settings for manual use.
Metreau Entry Communicators
Page 55

Using the Configuration Manager
Audio/Video Page - Video Settings Tab (Cont.)
Red 0 - 255 scale for the Red balance.
Green 0 - 255 scale for the Green balance.
Blue 0 - 255 scale for the Blue balance.
Flicker Correction • Anti-flicker Mode - The device automatically compensates for flicker.
• 50 Hz - Sets the flicker refresh to 50 Hz.
• 60 Hz - Sets the flicker refresh to 60 Hz.
Wired Frame Rate 0 - 100 rate of frame display on the device, in hard-wired installations.
Wireless Frame Rate 0 - 100 rate of frame display on the device, in wireless installations.
Contrast 0 - 100 scale for contrast display from device.
Saturation 0 - 100 scale for saturation display from device.
Gamma 0 - 100 scale for gamma display from device.
Setting Device Video
1.
In the Audio/Video page, select the Video tab.
2. Click the radio button to select the Video Port type.
3. Click the radio button to select the video Codec type.
4. Select the video Orientation setting from the drop-down menu.
5. Select the video Light Level setting from the drop-down menu.
6. Select the video White Balance setting from the drop-down menu.
7. If necessary, use the sliders to change the Red/Green/Blue levels.
8. Select the Flicker Correction speed setting from the drop-down menu.
9. Use the sliders to change the Fra me Rate speed.
10. If necessary, use the sliders to change the Contrast/Saturation/Gamma levels.
11. Click Accept.
Audio/Video Page - Display Settings Tab
Click the Display tab in the Audio/Video Page to access the Display Settings tab (FIG. 44). Use the
options in this tab to view/edit display specific settings.
FIG. 44
Audio/Video Page - Display Settings tab
Metreau Entry Communicators
49
Page 56

Using the Configuration Manager
Audio/Video Page - Display Settings Tab
Contrast 0 - 255 scale for contrast display from device.
Intensity 0 - 255 scale for image intensity display from device.
Displaying The image currently displayed on the device.
Setting the Display Settings On The Device
1.
In the menu on the top of the Configuration Manager, select Audio/Video.
2. Select the tab Display.
3. Use the sliders to change the Contrast level.
4. Use the sliders to change the Intensity Rate level.
5. Use the sliders to change the Dimness Rate level.
6. Use the sliders to change the Motion Detector Sensitivity level; the higher the value the more
sensitive the device becomes.
7. Note the image currently displayed is correct.
8. Click Accept.
50
Metreau Entry Communicators
Page 57

Programming
Overview
There are a select number of SEND_COMMANDs recognized by the Metreau Entry Communicators.
SEND_COMMANDs
Below is a list of SEND_COMMANDs supported by the Metreau Entry Communicators from NetLinx
masters.
To use these commands, establish a Telnet session from the PC to the NetLinx master. Additionally, you
could use NetLinx Studio 2.4 or the master’s web page to send the commands.
All text is based on a Unicode index.
Touch Panel Intercom Commands
Programming
Some (not all) G4 Touch Panels feature hardware to support intercom functionality.
Only Touch Panels that support intercom may be able use intercom with the Metreau
Entry Communicators.
These commands are used to setup connections between panels that are Intercom-enabled. The "^MOD"
model name command (see page 52) is used to query a panel to determine if it has intercom capability.
Touch Panel Intercom Commands
STREAM-SET
Sets the parameters for a audio or
H.263 video stream.
The communication parameters
must include: IP address, port
used, stream type, mode and
stream ID.
See the SET VIDEO command for
details on specifying the H.23
codec.
Note: It is not necessary to set up a
video stream for motion JPEG
(MJPEG) video.
Syntax:
SEND_COMMAND <DEV>,"'STREAM-SET <dest addr>, <dest
port>, <source port> <stream type>, <mode>,
<stream id>'"
Variables:
• <stream ID> integers are from 1-20.
• <mode> Starts a call to the specified IP address and ports, where
initial mode is either TALK OR LISTEN. Please note, however, that
no data packets will actually flow until the intercom modify
command below is received.
Example (audio stream):
SEND_COMMAND MET1, "’STREAM-SET
192.168.0.3,9000,9002,audio,TALK,1’"
SEND_COMMAND TP2, "’^ICS-192.168.0.4,9002,9000,2’"
Sets up a hands-free unicast call between Metreau Entry
Communicators and a touch panel.
Metreau Entry Communicators
51
Page 58

Programming
Touch Panel Intercom Commands (Cont.)
STREAM-SET (Cont.) Example (H.263 video stream):
SEND_COMMAND MET1, "’STREAM-SET
192.168.0.3,9000,9002,video,H263,1"
SEND_COMMAND TP2, "’^ICS-192.168.0.4,9002,9000,2’"
Sets up a h.263 video stream between Metreau Entry
Communicators and a touch panel.
Note: Do not change the Audio or Video Codec settings during a call.
STREAM-GET
Retrieves a description of the
stream parameter being used by
the current stream.
STREAM-PLAY
This command notifies the Metreau
Entry Communicator to start
streaming by enabling the microphone, speaker and video source
and then, transmitting packets and
playing received packets.
STREAM-STOP
Stops transmission and receive of
stream. This command terminates
the data from moving in a stream
connection.
Syntax:
"’STREAM-GET, <stream type> <stream_ID>’"
• Stream end. This terminates an stream call/connection.
Variable:
• STREAM_TYPE: AUDIO, VIDEO
• STREAM_ID: 0 -10
Example:
SEND_COMMAND MET1, "’STREAM-GET, AUDIO, 1’"
Returns:
STREAM = 1 AUDIO 234.232.444.333 5000
Indicates that the audio stream has been configured to use and IP
address of 234.232.444.333 where it uses port 5000 for the audio
stream.
Syntax:
SEND_COMMAND <DEV>,"'STREAM-PLAY <stream id>'"
Variable:
• <stream ID> integers are from 1-20.
Example:
SEND_COMMAND MET1,"STREAM-PLAY 1"
Syntax:
SEND_COMMAND <DEV>,"'STREAM-STOP <stream id>'"
Variable:
• <stream ID> integers are from 1-20.
• If <stream ID> = "ALL" will remove all streams
Example:
SEND_COMMAND MET1,"’STREAM-STOP 1’"
Stops stream 1 from running.
52
^MOD?
Metreau Entry Communicator
model name.
The Metreau Entry Communicator will respond with its model name
as shown in the response below. Older hardware or newer hardware
that has intercom support disabled will not respond to this command.
The Metreau Entry Communicator will respond with one of the following strings:
Syntax:
SEND_COMMAND <DEV>,"’^MOD?’"
Example:
SEND_COMMAND MET1,"’^MOD?’"
Returns:
^MODEL-MET-2007-A
Metreau Entry Communicators
Page 59

Touch Panel Intercom Commands (Cont.)
Programming
^VER?
Metreau Entry Communicator
version number.
The Metreau Entry Communicator will respond with its version number as shown in the response below. The Metreau Entry Communicator will respond with one of the following strings:
Syntax:
SEND_COMMAND <DEV>,"’^VER?’"
Example:
SEND_COMMAND MET1,"’^VER?’"
Returns:
VERSION xx.xxx.xxx
RTP, RTCP Video and Audio Streaming Commands
Metreau Entry Communicators support the following RTP, RTCP Video and Audio Streaming
SEND_COMMANDs on port 1.
RTP, RTCP Video and Audio Streaming Commands
GET VIDEO
Retrieves the configuration of the
video system.
Information returned includes
codec, resolution, and bit rate.
Codec can be either H-263 or
MJPEG.
SET VIDEO
Sets the configuration of the video
system.
Configuration includes codec,
resolution, and bit rate.
Note: See the STREAM-SET
command for details on setting up
a H.263 video stream.
Syntax:
SEND_COMMAND <DEV>,"'GET VIDEO'"
Example:
SEND_COMMAND MET1,"'GET VIDEO'"
Returns:
VIDEO = MJPEG
Syntax:
SEND_COMMAND <DEV>,"'SET VIDEO <Codec>'"
Variable:
• Codec = OFF, H263 or MJPEG
Example:
SEND_COMMAND MET1,"'SET VIDEO MJPEG'"
Sets the video configuration to a very high quality stream.
Note: Do not change the Audio or Video Codec settings during a call.
GET AUDIO
Gets the current configuration of
the video system.
Configuration includes codec.
Metreau Entry Communicators
Syntax:
SEND_COMMAND <DEV>,"'GET AUDIO'"
Example:
SEND_COMMAND MET1,"'GET AUDIO'"
Returns:
AUDIO = G.711ULAW
53
Page 60

Programming
RTP, RTCP Video and Audio Streaming Commands (Cont.)
SET AUDIO
Sets the current configuration of
the audio system.
Configuration includes codec, sampling rate, and bit rate.
Sample rate is at 8khz.
GET GAIN
Retrieves the current gain setting
on the microphone input.
SET GAIN
Sets the gain on the microphone
input.
Syntax:
SEND_COMMAND <DEV>,"'SET AUDIO <Codec>'"
Variable:
• Codec = OFF, G.711ALAW, G.711ULAW
Example:
SEND_COMMAND MET1,"'SET AUDIO G.711'"
Sets the audio configuration to G.711 sampling at 8khz.
Note: Do not change the Audio or Video Codec settings during a call.
Syntax:
SEND_COMMAND <DEV>,"'GET GAIN'"
Example:
SEND_COMMAND MET1,"'GET GAIN'"
Returns:
GAIN = 127
Syntax:
SEND_COMMAND <DEV>,"'SET GAIN <Value>’"
Variable:
• Value = 0 to 255
Example:
SEND_COMMAND MET1,'"SET GAIN 0'"
Mutes the microphone.
GET VOLUME
Retrieves the current volume setting on the speaker output.
SET VOLUME
Sets the volume on the speaker
output.
Syntax:
SEND_COMMAND <DEV>,"'GET VOLUME'"
Example:
SEND_COMMAND MET1,"'GET VOLUME'"
Returns:
VOLUME = 127
Syntax:
SEND_COMMAND <DEV>,"'SET VOLUME <Value>’"
Variable:
• Value = 0 to 255
Example:
SEND_COMMAND MET1,"'SET VOLUME 0'"
Mutes the speaker.
54
Metreau Entry Communicators
Page 61

Programming
Face Plate LED Commands
Metreau Entry Communicators support the following LED face plate SEND_COMMANDs on port 1.
Face Plate LED Commands
SET LED-LEVEL
Adjusts the brightness of the LED.
To turn the LED ON or OFF.
GET LED-LEVEL
Retrieves the brightness of the
LED. To turn the LED ON or OFF.
SET LED-STATE
Sets the state of the front button
LED.
Syntax:
SEND_COMMAND <DEV>,"'SET LED-LEVEL <state>
<level>'"
Variable:
• State = ON, OFF
• Level = 0 – 100. Represents 0%(dimmest) to 100% brightest.
Example:
SEND_COMMAND MET1,'"SET LED-LEVEL ON 50'"
Sets the LED brightness level ON at 50%.
Syntax:
SEND_COMMAND <DEV>,"'GET LED-LEVEL'"
Example:
SEND_COMMAND MET1,"'GET LED-LEVEL'"
Returns:
LEDLEVEL = <state> <level>
Syntax:
SEND_COMMAND <DEV>,"'SET LED-STATE <State>’"
Variable:
• State = IDLE, ACTIVE
Example:
SEND_COMMAND MET1,"'GET LED-STATE ACTIVE’"
Sets the LEDS in an active pulsing state.
GET LED-STATE
Retrieves the brightness of the
LED. To turn the LED ON or OFF.
Syntax:
SEND_COMMAND <DEV>,"'GET LED-STATE'"
Returns:
IDLE, ACTIVE
Example:
SEND_COMMAND MET1,"'GET LED-STATE’"
Returns:
’LEDSTATE = ACTIVE’
Metreau Entry Communicators
55
Page 62

Programming
Camera Commands
Unlike AMX touch panels, Metreau Entry Communicators return String responses
instead of Command responses.
The Metreau Entry Communicators Camera (MET-ECOM-D only) supports the following camera
SEND_COMMANDs on port 1.
Camera Commands
SET CAM-WBAL
Sets the white balance control
setting for the camera.
White balance setting allows
for internal light adjustments
based upon light conditions
surrounding the unit.
GET CAM-WBAL
Retrieves the white balance
control setting for the camera.
SET CAM-RGB
Manually sets the RGB Gain
control for the camera.
Syntax:
"'SET CAM-WBAL <tag>'"
Variables:
• Tag: OFF (no white balance), AUTOMATIC, MANUAL_RGB, Presets
(DAYLIGHT, TUNGSTEN, FLUORESCENT, HORIZON).
Example:
SEND_COMMAND MET1,"'SET CAM-WBAL HORIZON’"
Sets the display white balance to horizon preset.
Syntax:
"'GET CAM-WBAL'"
Returns:
CAM-WBAL= 45
The White balance setting is 45.
Syntax:
"'SET CAM-RGB <R-tag>, <G-tag>, <B-tag>'"
Variables:
• R-tag: Red channel gain setting 00 -FF.
• G-tag: Green channel gain setting 00 -FF.
• B-tag: Blue channel gain setting 00 -FF.
Example:
SEND_COMMAND MET1,"'SET CAM-RGB #222D0B'"
Manually sets the RGB Gain parameters to Red 34, Green 45 and
Blue 11.
56
GET CAM-RGBGAIN
Retrieves the RGB gain control setting for the camera.
Syntax:
"'@CAM-RGBGAIN <R-tag>, <G-tag>, <B-tag>'"
Variables:
• R-tag: Red channel gain setting 0 -255.
• G-tag: Green channel gain setting 0 -255.
• B-tag: Blue channel gain setting 0 -255.
Returns:
CAM-RGBGAIN= 45
The White balance setting is 45.
Metreau Entry Communicators
Page 63

Camera Commands (Cont.)
Programming
SET CAM-CST
Sets the display contrast level
for the camera.
GET CAM-CST
Retrieves the contrast level
for the camera.
SET CAM-SAT
Sets the display saturation for
the camera.
Syntax:
"'SET CAM-CST <Contrast Level>'"
Variables:
• Contrast Level = a value from 0 – 100 in percentage
Example:
SEND_COMMAND MET1,"'SET CAM-CST 50’"
Sets the display contrast to approximately 50%.
Syntax:
"'GET CAM-CST'"
Variables:
• Contrast Level = a value from 0 - 100 in percentage
Example:
SEND_COMMAND MET1,"'GET CAM-CST’"
Gets the camera's contrast setting.
Returns:
CAM-CST= 45
Gets the camera contrast setting is 45.
Syntax:
"'SET CAM-SAT <color saturation Level>'"
Variables:
• color Saturation Level = a value from 0 – 100 in percentage
Example:
SEND_COMMAND MET1,"'SET CAM-SAT 50’"
Sets the display color saturation level to approximately 50%.
GET CAM-SAT
Retrieves the saturation level
for the camera.
SET CAM-FLICK
Sets the flicker mode setting
for the camera.
Syntax:
"'GET CAM-SAT'"
Variables:
• color Saturation Level = a value from 0 - 100 in percentage
Example:
SEND_COMMAND MET1,"'GET CAM-SAT’"
Gets the camera's saturation level setting.
Returns:
CAM-SAT= 45
Gets the camera saturation level setting is 45.
Syntax:
"'SET CAM-FLICK <flick>'"
Variables:
•Flick: INHIBIT, 50, 60
Example:
SEND_COMMAND STORM,"'SET CAM-FLICK 50’"
Sets the anti-flicker mode to 50hz mode.
Metreau Entry Communicators
57
Page 64

Programming
Camera Commands (Cont.)
GET CAM-FLICK
Retrieves the flicker mode
setting for the camera.
Syntax:
"'GET CAM-FLICK’"
Variables:
• none
Example:
SEND_COMMAND MET1,"'GET CAM-FLICK’"
Returns:
CAM-FLICK = 50
The Camera flicker setting is at 50hz mode.
LCD Commands
The LCD located on the face plate (MET-ECOM-D only) supports the following SEND_COMMANDs
on port 1.
LCD Commands
SET DISP-BANNER
Sets the banner on the
LCD.
Syntax:
SEND_COMMAND <DEV>,"'SET DISP-BANNER /mnt/amx/usr/upload/
<filename>'"
Variable:
• filename = Name of image file on the system to be displayed on the LCD.
Example:
SEND_COMMAND MET1,"'SET DISP-BANNER /mnt/amx/usr/upload/
do_not_disturb.bmp’"
Image file requirements:
• BMP image type
• 128 x 64 pixels
Refer to the Uploading a Display Image To The Device section on page 46 for
instructions on uploading image files to the MET-ECOM-D, to be used as
display images.
Refer to the Creating Dynamic Images section on page 41 for instructions on
using TPDesign4 to create Dynamic Images for use with Metreau Entry
Communicators.
58
GET DISP-BANNER
Retrieves the banner
displayed on the LCD.
Syntax:
SEND_COMMAND <DEV>,"'GET DISP-BANNER <type>’"
Variable:
• Type = CURR, LIST
• CURR -> will give the current bitmap displayed
• LIST -> will return the list of available bitmaps
Example:
SEND_COMMAND MET1,"'GET DISP-BANNER CURR'"
Returns:
File: = <path>/<filename>
filename = Name of file on the system to be displayed on the LCD.
Metreau Entry Communicators
Page 65

LCD Commands (Cont.)
Programming
SET DISP-BRT
Sets the brightness
level to a percentage.
The LCD display supports quad (25%), half
(50%) and full (100%)
brightness.
GET DISP-BRT
Retrieves the Brightness level for the LCD
display.
SET DISP-CST
Sets the display contrast.
GET DISP-CST
Retrieves the contrast
setting for the LCD display.
Syntax:
"'SET DISP-BRT <tag>,< brightness level>'"
Variables:
• brightness level # = a value from 25,50,100.
Example:
SEND_COMMAND MET1,"'SET DISP-BRIT 50’"
Sets the awake brightness level to 50%.
Syntax:
"'GET DISP-BRT’"
Example:
SEND_COMMAND MET1,"'GET DISP-BRT’"
Returns:
DIS-BRT=50
Syntax:
"'SET DISP-CST <Contrast Level>'"
Variables:
• Contrast Level = a value from 0 - 255.
Example:
SEND_COMMAND MET1,"'SET DISP-CST 128'"
Sets the display contrast to approximately 50%.
Syntax:
"'GET DISP-CST <Contrast Level>'"
Example:
SEND_COMMAND MET1,"'GET DISP-CST’"
Returns:
DISP-CST 50
SET DISP-STATE
Sets the display state
on/off.
GET DISP-STATE
Retrieves the display
state for the LCD display.
Metreau Entry Communicators
Syntax:
"'SET DISP-STATE <tag>’"
Variables:
• Tag = ON turns display on, OFF turns display off
Example:
SEND_COMMAND MET1,"'SET DISP-STATE ON’"
Sets the display on
Syntax:
"'GET DISP-STATE’"
Example:
SEND_COMMAND MET1,"'GET DISP-STATE’"
Returns:
ON
59
Page 66

Programming
I/O Commands
The I/O port supports the following SEND_COMMANDs on port 2. There are two channels on port 2:
Channel 1 and Channel 2;
I/O Commands
GET INPUT
Gets the input channels active state.
An active state can be high (logic high) or
low (logic low or contact closure). Channel
changes, Pushes, and Releases generate
reports based on their active state.
SET INPUT
Sets the input channel's active state.
An active state can be high (logic high) or
low (logic low or contact closure). Channel
changes, Pushes, and Releases generate
reports based on their active state. Setting
an input to ACTIVE HIGH will disable the
output for that channel.
Syntax:
SEND_COMMAND <DEV>,"'GET INPUT <CHAN>'"
Variable:
• CHAN = 1-2
Example:
SEND_COMMAND IO,"'GET INPUT 1'"
Returns:
INPUT1 ACTIVE HIGH
Syntax:
SEND_COMMAND <DEV>,"'SET INPUT <Channel>
<State>'"
Variable:
• State = LOW or HIGH
Example:
SEND_COMMAND IO,"'SET INPUT 1 HIGH'"
Sets the I/O channel to detect a high state change, and
disables output on the channel.
System Commands
The following System Commands are available:
System Commands
^MOD?
Returns the device model name.
Note: Older hardware or newer hardware
that has intercom support disabled will not
respond to this command.
Syntax:
SEND_COMMAND <DEV>,"’^MOD?’"
Example:
SEND_COMMAND STORM1,"’^MOD?’"
Returns:
^MODEL-MET-ECON-D
60
^VER?
Storm version number. The storm device
will respond with its version number as
shown in the response below. Currently
the storm device will respond with one of
the following strings:
Syntax:
SEND_COMMAND <DEV>,"’^VER?’"
Example:
SEND_COMMAND STORM1,"’^VER?’"
Returns:
VERSION xx.xxx.xxx
Metreau Entry Communicators
Page 67

System Commands (Cont.)
Programming
SET DOOR-DESC
Set the door description text.
GET DOOR-DESC
Returns the door's description text.
Syntax:
SEND_COMMAND <DEV>,"'SET DOOR-DESC
<desc_num>, <desc_txt>'"
Variables:
• Desc_num= 1 or 2
• Desc_txt = max 20 character string
Example:
SEND_COMMAND STORM,"'SET DOOR-DESC 1, front
door'"
Sets the 1st description to 'front door'
Syntax:
SEND_COMMAND <DEV>,"'GET DOOR-DESC
<desc_num>'"
Variable:
• Desc_num= 1 or 2
Example:
SEND_COMMAND STORM,"'GET DOOR-DESC 1'"
Returns:
DOOR-DESC1= front door
Metreau Entry Communicators
61
Page 68

Programming
Upgrading Firmware
Before beginning the Upgrade process
Setup and configure your NetLinx Master. Refer to your particular NetLinx Master instruction
manual for detailed setup procedures.
Prepare the communication pages on the Metreau Entry Communicator for use; refer to the
Using the Configuration Manager section on page 33.
Refer to the NetLinx Studio version 2.4 or higher Help file for information on uploading
firmware files via Ethernet.
If power or connection fails during a firmware upgrade, the file system may become
corrupted.
A Metreau Entry Communicator which is not using a valid username and password will not
communicate with a secured Master. If you are updating the firmware on a keypad which is not using a
username or password field, you must first remove the Master Security feature to establish an unsecured
connection.
Upgrading Firmware via an IP Address
Before beginning with this section, verify that your device is powered and connected to the NetLinx
Master through an Ethernet connection.
Preparing the Master for communication via an IP
1.
Obtain the IP Address of the NetLinx Master from your System Administrator, if you do not have
an IP Address for the Master, refer to your particular Master’s instruction manual for more
information on obtaining an IP Address using NetLinx Studio 2.4 or higher.
From the Online Tree tab of the Workspace window, select the NetLinx Master.
Follow steps outlined in either the Obtaining or Assigning the Master’s IP Address sections
from your particular NetLinx Master instruction manual to use an address.
Note the IP Address and Gateway information.
2. Launch NetLinx Studio 2.4 (default location is Start > Programs > AMX Control Disc > NetLinx
Studio > NetLinx Studio 2.4).
3. Select Settings > Master Communication Settings, from the Main menu to open the Master
Communication Settings dialog (FIG. 45).
4. Click the Communications Settings button to open the Communications Settings dialog.
5. Click on the NetLinx Master radio button (from the Platform Selection section) to indicate that you
are working with a NetLinx Master (such as the NXC-ME260 or NI-Series of Integrated
Controllers).
6. Click on the Authentication Required radio box (if the Master is secured) and then enter a
username and password.
7. Click on the TCP/IP radio button (from the Transport Connection Option section) to indicate you
are connecting to the Master through an IP Address.
8. Click the Edit Settings button (on the Communications Settings dialog) to open the TCP/IP Settings
dialog (FIG. 45).
9. Enter the IP Address into the TCP/IP Address field. This information is obtained from either your
System Administrator or obtained from the Master.
62
Metreau Entry Communicators
Page 69

Programming
List of previously saved IP Addresses
FIG. 45 Assigning Communication Settings and TCP/IP Settings
10. Click OK three times to close the open dialogs and save your settings.
11. Click Ye s to interrupt the current communication from the Master and apply the new settings.
12. Select Tools > Reboot the Master Controller to access the Reboot the Master dialog, then click
Reboot to reboot the Master and incorporate any changes.
13. Once the dialog replies with "Reboot of system complete", press Done.
14. Click the OnLine Tree tab in the Workspace window to view the devices on the System. The default
System value is one.
15. Right-click on the Empty Device Tree/System entry and select Refresh System to re-populate the
list.
Verifying and Upgrading the device firmware via an IP
1.
Click the OnLine Tree tab in the Workspace window to view the devices on the System. The default
System value is one.
2. Right-click the associated System number (from the Workspace window) and select Refresh
System to detect all devices on the current system, establish a new connection to the Master, and
refresh the System list with devices on that system.
3. After the Communication Verification dialog window verifies active communication between the
PC and the Master, verify the Metreau Entry Communicator appears in the OnLine Tree tab of the
Workspace window. The default device value is 10001.
4. If the device firmware version is not the latest available; locate and download the latest firmware file
from the www.amx.com > Tech Center > Downloadable Files > Firmware Files section of the
website.
5. Select Tools > Firmware Transfers > Send to NetLinx Device from the Main menu to open the
Send to NetLinx Device dialog (FIG. 46). Verify the device’s System and Device number values
match those values listed within the System folder in the OnLine Tree tab of the Workspace
window.
Metreau Entry Communicators
63
Page 70

Programming
Selected Firmware file
FIG. 46 Send to NetLinx Device dialog
Description field for selected KIT file
Firmware download
status
Device value and System number
must match the values
listed in the Workspace window
6. Select the device’s firmware file from the Files section (FIG. 46).
7. Enter the Device value associated with the device and the System number associated with the
Master (listed in the OnLine Tree tab of the Workspace window). The Port field is greyed-out.
8. Click the Reboot Device checkbox. This causes the Metreau Entry Communicator to reboot after
the firmware update process is complete.
9. Click Send to begin the transfer. The file transfer progress is indicated on the bottom-right of the
dialog (FIG. 46). Do not pull power from device during transfer, it can take approximately 5
minutes to finalize firmware transfer. The upgrade can still be in progress when the bargraph
reaches the end, it is a good idea to wait until the process is complete.
10. Click Close (after the device reboots) to return to the main program.
11. Right-click the associated System number and select Refresh System. This causes a refresh of all
project systems, establishes a new connection to the Master, and populates the System list with
devices on your particular system.
64
Metreau Entry Communicators
Page 71

Using the NetLinx Module
Overview
Metreau Entry Communicators can be controlled via the Touch Pages provided with the NetLinx
Module, as described in this section. Refer to the NetLinx module documentation for details on
incorporating the module into your source code and loading it onto the NetLinx Master.
The Door (doorbell) functionality required by Metreau Entry Communicators is contained within the
NetLinx Module, which also contains Intercom functionality required for the Door functions.
The module used by the Metreau Entry Communicators is the AMX intercom module
(the same module used by other intercom-capable AMX touch panels), updated to
support communicators.
Incorporating an Intercom Panel Into Your NetLinx System
Download the module for the intercom panel from www.amx.com, and include it in your NetLinx
project file. For searching purposes, the module manufacturer is AMX and the model is Intercom.
Using the NetLinx Module
The intercom module will only work with AMX intercom capable panels.
Panel Intercom Configuration
Intercom Setup
The Intercom Setup page (FIG. 47) allows you to set the session timeout for intercom calls, toggle
intercom auto-answer on and off, and provides access to the Door Setup and Advanced Setup pages.
FIG. 47 Intercom Setup Page
Metreau Entry Communicators
65
Page 72

Using the NetLinx Module
Setting the Intercom Session Timeout
When only 30 seconds are left in your call, the panel provides a popup to extend the call (FIG. 48).
Session time-outs are not applicable for calls with Metreau Entry Communicators.
1. Select the Setup button on your intercom page.
2. Press the up or down arrows to increment the timeout up by 1 second in each direction. If your call
FIG. 48 Extend Call Popup
exceeds your session timeout the panel provides you with a popup (FIG. 48) to extend the session.
3. Press Exit when you are finished.
The session timeout can be disabled by setting the time to 0 (zero). If both panels have a timeout of 0,
then the call must be manually terminated.
Setting Intercom Auto Answer
1.
Select the Setup button on your intercom page.
2. Press the button beneath Auto-Answer to toggle the option. The button indicates its current state.
3. Press Exit when you are finished.
66
Metreau Entry Communicators
Page 73

Using the NetLinx Module
Door Setup
The Door Setup page (FIG. 49) is accessed through the Intercom Setup page. The options on the Door
Setup page allow you to disable/enable all doorbells, and configure the Door Chime for each Metreau
Entry Communicator doorbell in the system.
FIG. 49 Intercom Door Setup Page
Disabling All Doorbells
Press the Disable All Doorbells button on the Door Setup page to disable all of the doorbells in the
system. Once disabled, no calls can be received by the doorbells until they are re-enabled. By default,
this option is off (indicated by "NO" on this page).
Metreau Entry Communicators
67
Page 74

Using the NetLinx Module
Door Chime Setup
The Door Chime Setup page (FIG. 50) is accessed through the Door Setup page. The options on the
Door Chime Setup page allow you to associate a particular Chime sound with each doorbell in the
system.
FIG. 50 Intercom Door Chime Setup Page
Assigning a Chime To a Doorbell
By default there are six different Chime sounds to choose from, and up to five doorbells to which any
Chime can be assigned.
Press the blue arrow in the Test column to preview each Chime.
1. Press a Chime # button, in the Pick Sound column.
2. Press a Doorbell button, in the Assign To column.
Chimes can be assigned to Doorbells in any combination, i.e. a single Chime can be assigned to all
doorbells, a different Chime can assigned to each doorbell, or any combination thereof.
68
Metreau Entry Communicators
Page 75

Using the NetLinx Module
Advanced Setup
The Intercom Advanced Setup page (FIG. 51) is accessed through the Intercom Setup page. The options
on the Intercom Advanced Setup page allow you to set the panel intercom to be monitored, to monitor
other intercom panels, and to name the panel. It is important to name the intercom panel; the name is
displayed in other panels’ intercom call directory pages.
FIG. 51 Intercom Advanced Setup Page
Allowing a Panel To Be Monitored
1.
Select the Setup button on your intercom page.
2. On the intercom setup page, press Advanced Setup. This launches the password numeric keypad.
3. Enter the password and press Done. The default password is Pass w o rd 4 of the panel’s firmware
Password Setup.
4. Press the button beneath Allow This Panel to be Monitored to toggle the option. The button indicates
its current state. (FIG. 52)
FIG. 52 Room Monitored
5. Press Back to return to the intercom setup pages.
6. Press Exit when you are finished.
Metreau Entry Communicators
69
Page 76

Using the NetLinx Module
Allowing a Panel To Monitor
1.
2. On the intercom setup page, press Advanced Setup. This launches the password numeric keypad.
3. Enter the password and press Done. The default password is Passwo rd 4 of the panel’s firmware
4. Press the button beneath Allow This Panel to Monitor to toggle the option. The button indicates its
If the panel you are trying to monitor does not have monitoring enabled, or the panel
you are monitoring from does not have monitoring enabled, then a double-beep is
played.
5. Press Back to return to the intercom setup pages.
6. Press Exit when you are finished.
Naming a panel
1.
2. On the intercom setup page, press Advanced Setup. This launches the password numeric keypad.
3. Enter the password and press Done. The default password is Passwo rd 4 of the panel’s firmware
4. Press in the area under Panel N a m e . This launches a on screen keyboard.
5. Type the name of the panel and press Done. This is the name that is displayed in other panels’
Select the Setup button on your intercom page.
Password Setup.
current state.
Select the Setup button on your intercom page.
Password Setup.
intercom call directory pages.
For all panels except the 5200i, this is the G4 Web Control Name. Care should be
taken when changing it.
6. Press Back to return to the intercom setup pages.
7. Press Exit when you are finished.
Answering an incoming Intercom call
The provided intercom pages include an call answering popup window. The popup page indicates the
name of the panel calling and two options:
Answer - Pressing this button opens the intercom session with the other panel.
Ignore - Pressing this button denies the intercom session with the other panel.
FIG. 53 Answer Call
To answer a call, press the Answer button in the popup window.
70
Metreau Entry Communicators
Page 77

Using the NetLinx Module
Answering an Incoming Doorbell Call
The provided intercom pages include a doorbell answering popup window (FIG. 54):
FIG. 54 Answer Doorbell
The popup page indicates the name of the doorbell calling and provides several options:
Answer - Pressing this button opens the intercom session with the doorbell.
View - Press to initiate one-way communication with the doorbell. In this case, you will see
and hear the doorbell, but the doorbell will not see or hear you.
End Call - Press to terminate the call from the doorbell.
Ignore - Pressing this button denies the intercom session with the doorbell.
Someone At The Door Page
When an incoming call from a doorbell is answered, the Someone At The Door page is displayed
(FIG. 55).
FIG. 55 Someone At The Door page
Metreau Entry Communicators
71
Page 78

Using the NetLinx Module
The options in this page allow you see and view the incoming doorbell call, as well as adjust the
microphone and speaker volume levels for both the doorbell and the panel.
The Doorbell Mute buttons only perform mute. They do not perform un-mute.
Door Microphone Level - Use the Up/Down arrow buttons to raise/lower the doorbell’s
microphone level. The current microphone level for the doorbell is indicated in the bargraph.
Press the Mute button to mute the doorbell microphone.
Door Speaker Level - Use the Up/Down arrow buttons to raise/lower the doorbell’s speaker
level. The current speaker level for the doorbell is indicated in the bargraph. Press the Mute
button to mute the doorbell speaker.
Panel Microphone Level - Use the Up/Down arrow buttons to raise/lower the panel’s
microphone level. The current microphone level for the panel is indicated in the bargraph.
Press the Mute button to mute the panel microphone.
Panel Speaker Level - Use the Up/Down arrow buttons to raise/lower the panel’s speaker
level. The current speaker level for the panel is indicated in the bargraph. Press the Mute
button to mute the panel speaker.
Ending a Doorbell Call
Press the End Call button in the Someone At The Door page to terminate the intercom session with the
doorbell.
Creating Intercom Pages
The easiest method of creating your own intercom pages is to start with the pages provided by AMX in
the module. You can change the aesthetics of the pages as long as the channel, address, level and links
remain untouched.
For the more ambitious panel designers, the necessary intercom directory buttons and their information
are contained in the Sample Intercom Page table on page 74.
Advanced Setup page
Advanced Setup
Name Description Channel
Port:Code
Allow Panel to be
Monitored
Allow Panel to
Monitor
Room Name The name of the panel as it appears in other intercom
Name Panel Set the name of the panel as it appears in other intercom
Back Navigates the intercom panel to the intercom Setup page. This
Toggle the panel’s ability to be monitored off and on. 1:11
Toggle the panel’s ability to monitor off and on. 1:10
directories. See Naming a panel section on page 70.
0:334 0:265
directories. (G4 Web Control: Server Name)
requires a standard page flip to Setup.
Address
Port:Code
0:265
72
Metreau Entry Communicators
Page 79

Using the NetLinx Module
Door Chime Setup page
Door Chime Setup
Name Description Channel
Port:Code
Chime 1 The name of the Chime 1 sound. 1:206
Chime 2 The name of the Chime 2 sound. 1:207
Chime 3 The name of the Chime 3 sound. 1:208
Chime 4 The name of the Chime 4 sound. 1:209
Chime 5 The name of the Chime 5 sound. 1:210
Chime 6 The name of the Chime 6 sound. 1:211
Front Door The name of doorbell #1 as it appears in other doorbell pages. 1:212 1:221
Kitchen The name of doorbell #2 as it appears in other doorbell pages. 1:213 1:225
Back Door The name of doorbell #3 as it appears in other doorbell pages. 1:214 1:229
Garage The name of doorbell #4 as it appears in other doorbell pages. 1:215 1:233
Lobby The name of doorbell #5 as it appears in other doorbell pages. 1:216 1:237
Back Navigates to the Door Setup page. This requires a standard
page flip to Door Setup.
Address
Port:Code
Door Setup page
Door Setup
Name Description Channel
Disable All Doorbells (YES/NO)
Door Chime
Setup
Back Navigates to the Setup page. This requires a standard page
Toggle the all doorbells on and off. 1:37
Navigates to the Door Chime Setup page. This requires a
standard page flip to Door Chime Setup.
flip to Setup.
Port:Code
Address
Port:Code
Metreau Entry Communicators
73
Page 80

Using the NetLinx Module
Intercom Demo page
The module for duplex intercom capable panels includes user pages. While you can create your own
intercom directory page (see the Creating Intercom Pages section on page 72), it is possible to use the
panel with the page shown in FIG. 56.
1
2
13 18
14 19 24
15
16 21 26
17
28
29
3
4
5
6
7
FIG. 56 Sample Intercom Page
8
9
10
11
12
Sample Intercom Page
No. Name Description Channel
1 Room Name The name of the panel as it
appears in other intercom
directories. See Naming a
panel section on page 70.
2 Page All Pages all connected intercom
panels.
3 Place Call Initiates an intercom call to a
panel.
4 End Ends an intercom call to a
panel.
5 Call Privacy Off Toggles the privacy option of
the intercom. When enabled,
other panels cannot contact the
panel.
6 Door Privacy Off Toggles the privacy option of
the doorbell. When enabled,
doorbells in the system cannot
contact the panel.
7 Monitor Enables the panel to monitor
another room’s intercom panel.
8 Panel Directory Room Name The name of a panel in the
intercom directory. You can call
the panel, enact privacy
against the panel and monitor
the panel.
Port:Code
1:6
1:7
1:8
1:9
1:36
1:19
1:1 1:1
23
20 25
27
22
Address
Port:Code
0:265
30
31
32
33
Level
Port:Code
74
Metreau Entry Communicators
Page 81

Sample Intercom Page (Cont.)
No. Name Description Channel
9 Panel Directory Room Name The name of a panel in the
intercom directory. You can call
the panel, enact privacy
against the panel and monitor
the panel.
10 Panel Directory Room Name The name of a panel in the
intercom directory. You can call
the panel, enact privacy
against the panel and monitor
the panel.
11 Panel Directory Room Name The name of a panel in the
intercom directory. You can call
the panel, enact privacy
against the panel and monitor
the panel.
12 Panel Directory Room Name The name of a panel in the
intercom directory. You can call
the panel, enact privacy
against the panel and monitor
the panel.
13 Call Panel Display only; indicates the
panel is currently in a call.
14 Call Panel Display only; indicates the
panel is currently in a call.
15 Call Panel Display only; indicates the
panel is currently in a call.
16 Call Panel Display only; indicates the
panel is currently in a call.
17 Call Panel Display only; indicates the
panel is currently in a call.
18 Panel Privacy Display only; indicates the
panel has privacy enabled.
19 Panel Privacy Display only; indicates the
panel has privacy enabled.
20 Panel Privacy Display only; indicates the
panel has privacy enabled.
21 Panel Privacy Display only; indicates the
panel has privacy enabled.
22 Panel Privacy Display only; indicates the
panel has privacy enabled.
23 Monitor Panel Display only; indicates the
panel is being monitored by
another panel.
24 Monitor Panel Display only; indicates the
panel is being monitored by
another panel.
25 Monitor Panel Display only; indicates the
panel is being monitored by
another panel.
26 Monitor Panel Display only; indicates the
panel is being monitored by
another panel.
Port:Code
1:2 1:2
1:3 1:3
1:4 1:4
1:5 1:5
1:21
1:24
1:27
1:30
1:33
1:22
1:25
1:28
1:31
1:34
1:23
1:26
1:29
1:32
Using the NetLinx Module
Address
Port:Code
Level
Port:Code
Metreau Entry Communicators
75
Page 82

Using the NetLinx Module
Sample Intercom Page (Cont.)
No. Name Description Channel
27 Monitor Panel Display only; indicates the
28 Intercom Microphone Level A Bargraph in TPDesign4 that
29 Intercom Sound Level A Bargraph in TPDesign4 that
30
31 Navigate Up Increments the intercom
32 Navigate Down Increments the intercom
33 Intercom Setup Page Navigates the intercom panel
panel is being monitored by
another panel.
sets the volume of the intercom
microphone.
sets the volume of the intercom
speaker.
Call Status Button Displays status of calls, e.g.,
incoming caller id,
connected, rejected.
directory up.
directory down.
to the intercom Setup page.
This requires a standard page
flip to Setup.
Port:Code
1:35
1:13
1:14
Address
Port:Code
1:10
Level
Port:Code
0:10
0:9
Setup page
Setup
Name Description Channel
Port:Code
Auto-Answer OFF Toggle the panel’s auto-answer feature off and on. 1:12
Session Timeout A display of the current session timeout. 1:9
Increment Up Increments the intercom session time up. 1:15
Increment Down Increments the intercom session time down. 1:16
Room Name The name of the panel as it appears in other intercom
directories. See Naming a panel section on page 70.
Door Setup Navigates to the Door Setup page. This requires a standard
page flip to Door Setup.
Advanced Setup Navigates to the intercom Advanced Setup page. This
requires a standard page flip to Advanced Setup.
Exit Setup Navigates to the intercom directory page. This requires a
standard page flip to the intercom directory.
Address
Port:Code
0:265
76
Metreau Entry Communicators
Page 83

Using the NetLinx Module
Someone At The Door page
Someone At The Door
Name Description Channel
Port:Code
StormVideo Displays video from the incoming doorbell call. 1:240
Door Microphone
Level - Mute
Door Microphone
Level - Down
Door Microphone
Level - Up
Door Microphone
Level - Bargraph
Door Speaker
Level - Mute
Door Speaker
Level - Down
Door Speaker
Level - Up
Door Speaker
Level - Bargraph
Panel
Microphone Level
- Mute
Panel
Microphone Level
- Down
Panel
Microphone Level
- Up
Panel
Microphone Level
- Bargraph
Panel Speaker
Level - Mute
Panel Speaker
Level - Down
Panel Speaker
Level - Up
Mutes the microphone on the incoming doorbell. 1:371
Lowers the microphone level on the incoming
doorbell.
Raises the microphone level on the incoming
doorbell.
Displays the current microphone level on the
incoming doorbell.
Mutes the speaker on the incoming doorbell. 1:38
Lowers the speaker level on the incoming
doorbell.
Raises the speaker level on the incoming
doorbell.
Displays the current speaker level on the
incoming doorbell.
Mutes the microphone on the panel. 0:Panel
Lowers the microphone level on the panel. 0:Panel
Raises the microphone level on the panel. 0:Panel
Displays the current microphone level on the
panel.
Mutes the speaker on the panel. 0:Panel
Lowers the speaker level on the panel. 0:Panel
Raises the speaker level on the panel. 0:Panel
1:373
1:372
1:0 1:0 1:1
1:39
1:40
1:0 1:0 1:2
Setup:
Intercom
Mic Level
Mute
Setup:
Intercom
Mic Level
Down
Setup:
Intercom
Mic Level
Up
1:0 1:0 0:Intercom
Setup:
Intercom
Sound
Level Mute
Setup:
Intercom
Sound
Level Down
Setup:
Intercom
Sound
Level Up
Address
Port:Code
Level
Port:Code
Mic Level
Metreau Entry Communicators
77
Page 84

Using the NetLinx Module
Someone At The Door (Cont.)
Name Description Channel
Panel Speaker
Level - Bargraph
Creating Popup Pages
Door Answer Call popup page
Door Answer Call Popup
Name Description Channel
Answer Opens the intercom session with the doorbell. 1:260
View Opens an incoming-only (one-way) session with the doorbell. 1:261
End Call Terminates the session with the doorbell. 1:41 1:6
Ignore/Exit Denies the intercom session with the doorbell. 1:262 1:8
Door Name The name of the doorbell as it appears in other doorbell pages. See
Port:Code
Displays the current speaker level on the panel. 1:0 1:0 0:Intercom
Naming a panel section on page 70.
Address
Port:Code
Port:Code
Level
Port:Code
Sound
Level
Address
Port:Code
1:211
Doorbell Adjustments popup page
Doorbell Adjustments Popup
Name Description Channel
Port:Code
Door
Microphone
Level Mute
Door
Microphone
Level Down
Door
Microphone
Level Up
Door
Microphone
Level
Bargraph
Door
Speak er
Level Mute
Door
Speak er
Level Down
Door
Speak er
Level Up
Door
Speak er
Level
Bargraph
Mutes the microphone on the incoming doorbell. 1:371
Lowers the microphone level on the incoming
doorbell.
Raises the microphone level on the incoming
doorbell.
Displays the current microphone level on the
incoming doorbell.
Mutes the speaker on the incoming doorbell. 1:38
Lowers the speaker level on the incoming doorbell. 1:39
Raises the speaker level on the incoming doorbell. 1:40
Displays the current speaker level on the incoming
doorbell.
1:373
1:372
1:0 1:0 1:1
1:0 1:0 1:2
Address
Port:Code
Level
Port:Code
78
Metreau Entry Communicators
Page 85

Doorbell Adjustments Popup (Cont.)
Name Description Channel
Panel
Microphone
Level Mute
Panel
Microphone
Level Down
Panel
Microphone
Level Up
Panel
Microphone
Level
Bargraph
Panel
Speak er
Level Mute
Panel
Speak er
Level Down
Panel
Speak er
Level Up
Panel
Speak er
Level
Bargraph
Mutes the microphone on the panel. 0:Panel
Lowers the microphone level on the panel. 0:Panel
Raises the microphone level on the panel. 0:Panel
Displays the current microphone level on the panel. 1:0 1:0 0-setup
Mutes the speaker on the panel. 0:Panel
Lowers the speaker level on the panel. 0:Panel
Raises the speaker level on the panel. 0:Panel
Displays the current speaker level on the panel. 1:0 1:0 0-setup
Port:Code
Setup:
Intercom
Mic Level
Mute
Setup:
Intercom
Mic Level
Down
Setup:
Intercom
Mic Level
Up
Setup:
Intercom
Sound
Level Mute
Setup:
Intercom
Sound
Level Down
Setup:
Intercom
Sound
Level Up
Using the NetLinx Module
Address
Port:Code
Level
Port:Code
1:0
1:0
1:0
port:Panel
Setup:
Intercom
Mic Level
1:0
1:0
1:0
port:Panel
Setup:
Intercom
Sound
Level
Intercom Answer Call popup page
Intercom Answer Call Popup
Name Description Channel
Answer Opens the intercom session with the other panel. 1:17
Ignore Denies the intercom session with the other panel. 1:18
Room Name The name of the panel as it appears in other intercom directories.
Metreau Entry Communicators
See Naming a panel section on page 70.
Port:Code
Address
Port:Code
1:7
79
Page 86

Using the NetLinx Module
More Time popup page
More Time Popup
Name Description Channel
Confirm More Time Select to extend intercom session beyond timeout. 1:20
Port:Code
Address
Port:Code
80
Metreau Entry Communicators
Page 87

Programming
Metreau Entry Communicators
81
Page 88

It’s Your World - Take Control™
3000 RESEARCH DRIVE, RICHARDSON, TX 75082 USA • 800.222.0193 • 469.624.8000 • 469-624-7153 fax • 800.932.6993 technical support • www.amx.com
2008 AMX. All rights reserved. AMX and the AMX logo are registered trademarks of AMX. AMX reserves the right to alter specifications without notice at any time.
©
8/08
 Loading...